IIUM Wireless Registration and Configuration
56
IIUM Wireless Registration and Troubleshooting Registration (Students) Troubleshooting (already registered)
-
Upload
encik-ahmad -
Category
Documents
-
view
1.717 -
download
5
Transcript of IIUM Wireless Registration and Configuration

IIUM Wireless Registration and Troubleshooting
Registration (Students)
Troubleshooting (already registered)
Troubleshooting
1. Automatic Configuration (choose your operating system)
a. Windows XP
b. Windows Vista
2. Manual Configuration (choose your operating system)
a. Windows XP
b. Windows Vista
c. Macintosh
d. Linux
3. Frequent Asked Question
(If you face any problem, please email your Matric Number / Staff Number, Phone Number and your MAC
Address to [email protected])
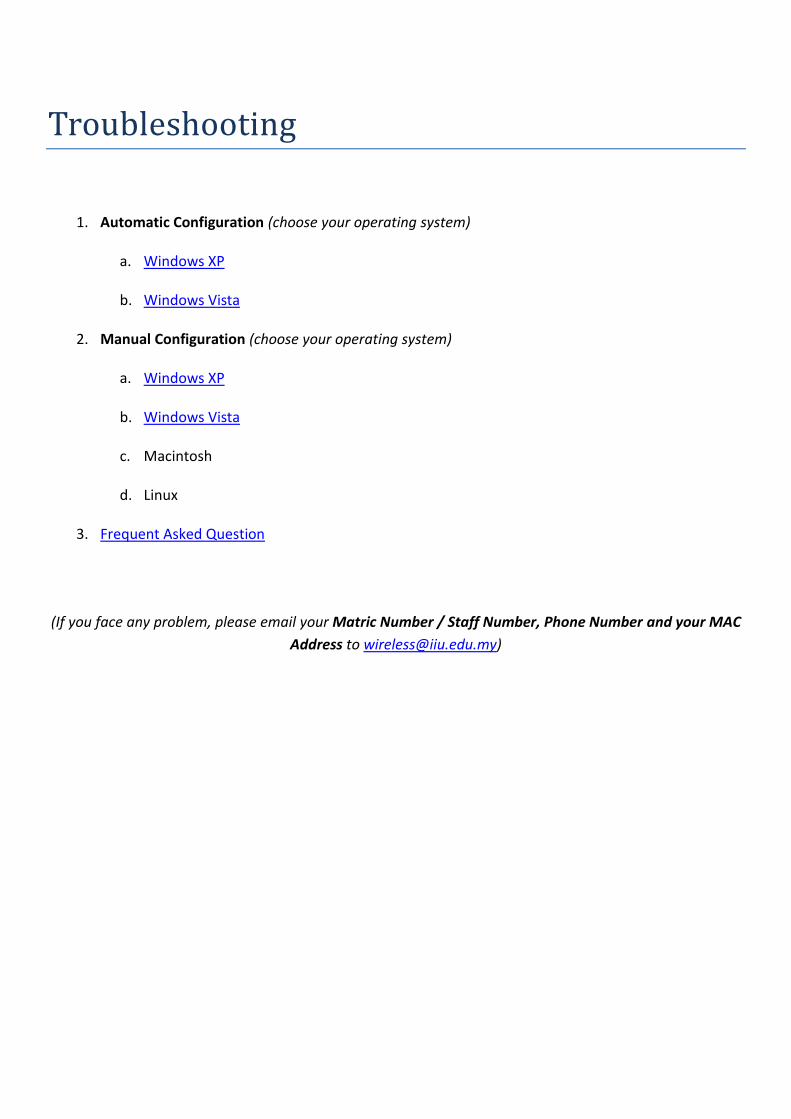
Registration Procedure (Step 1-6)
IIMMPPOORRTTAANNTT!!!!!!
1. How to Find MAC Address
1. You can also get Wireless MAC Address Tool software at this link
http://itdportal.iiu.edu.my/advise/getwifimac.exe
2. After downloaded, please save in your LAPTOP (e.g. My Document).
3. Please double-click IN YOUR LAPTOP to identify your MAC address
Before you read the manual, Make sure you have internet
connection. Please go to any Computer Lab / Cyber café /
anyone that has internet connection to get access.
Please download and run the Wireless MAC Address Tools in
your laptop to check MAC address. Please write down your
MAC Address for registration purpose. Make sure you bring
along your MAC address during registration. More details,
see the following link “How to find MAC address”
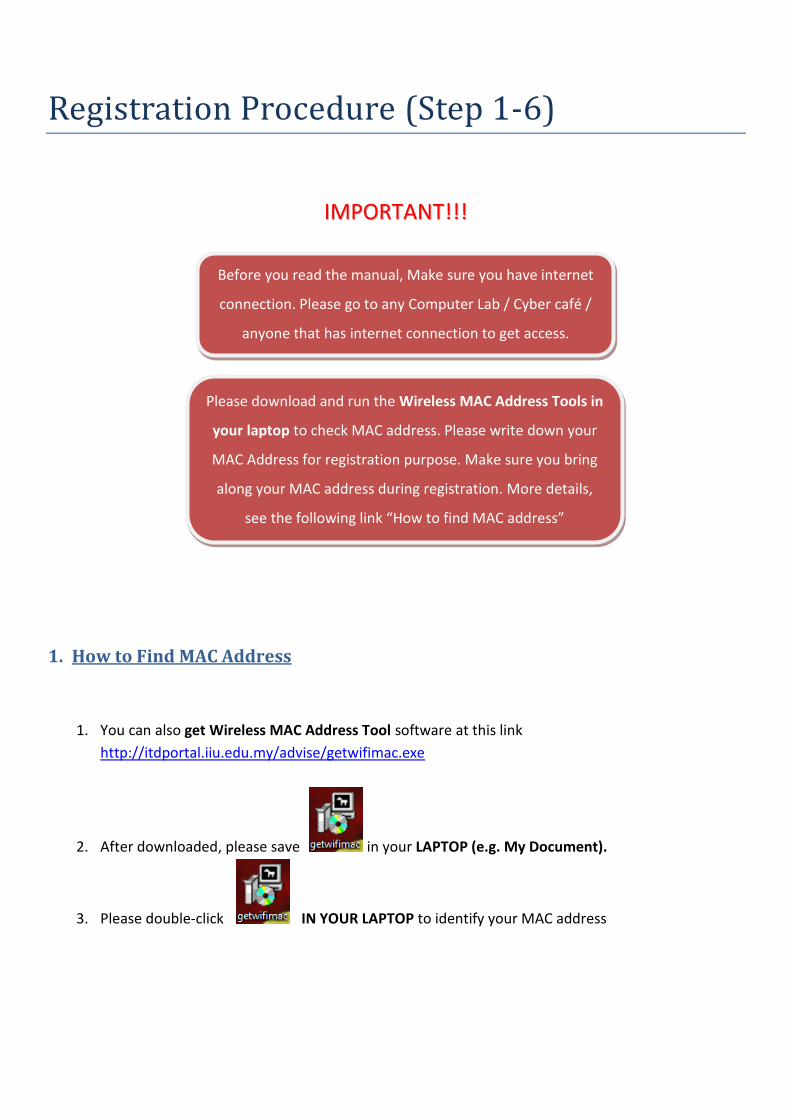
4. Command prompt will show your wireless MAC address
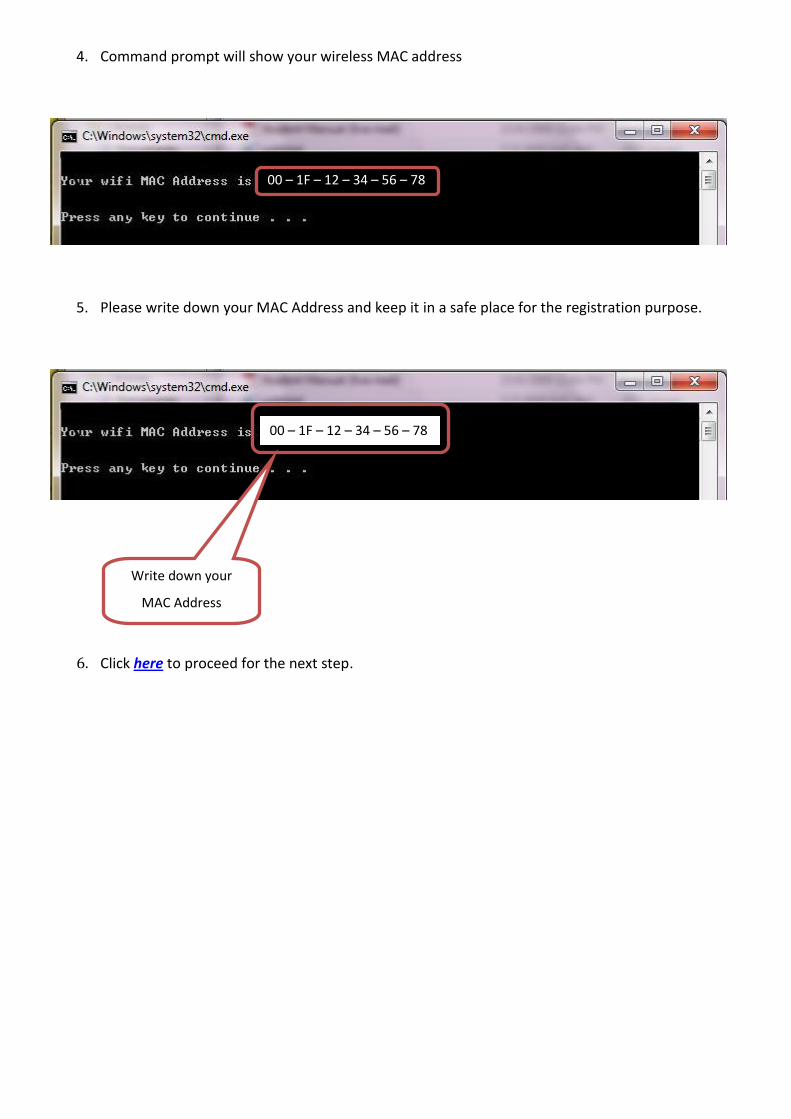
5. Please write down your MAC Address and keep it in a safe place for the registration purpose.
6. Click here to proceed for the next step.
00 – 1F – 12 – 34 – 56 – 78
00 – 1F – 12 – 34 – 56 – 78
Write down your
MAC Address
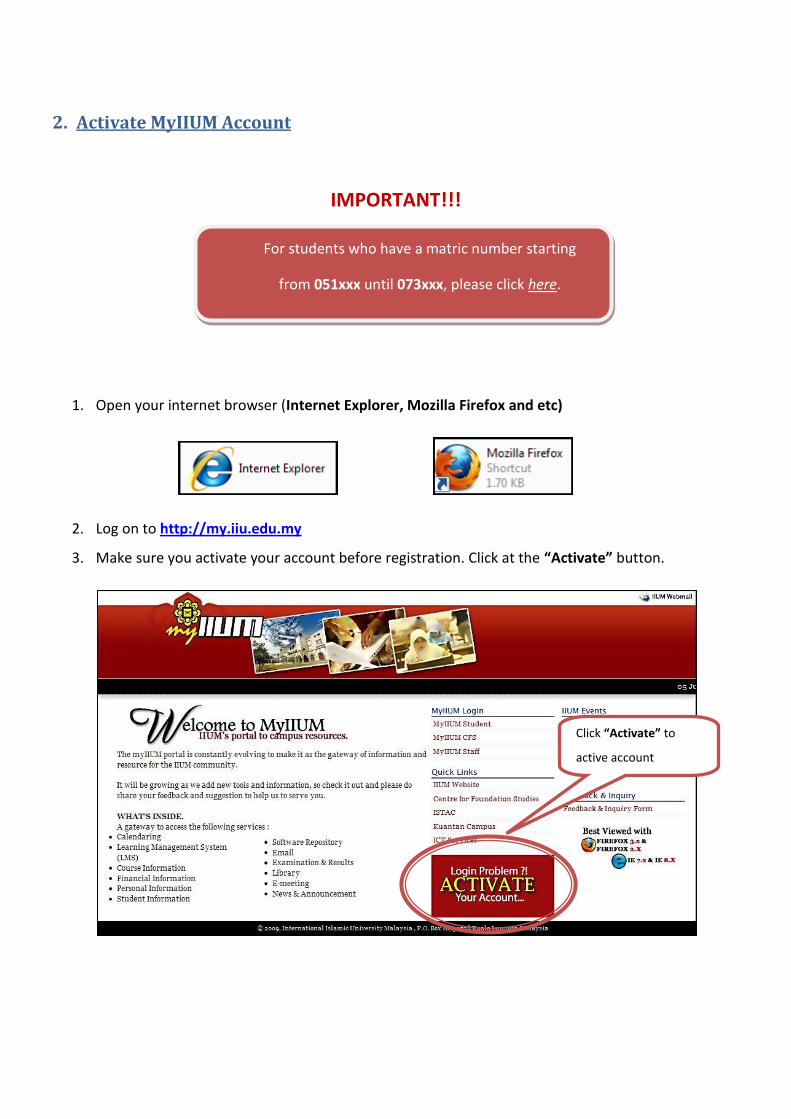
2. Activate MyIIUM Account
IMPORTANT!!!
For students who have a matric number starting
from 051xxx until 073xxx, please click here.
1. Open your internet browser (Internet Explorer, Mozilla Firefox and etc)
2. Log on to http://my.iiu.edu.my
3. Make sure you activate your account before registration. Click at the “Activate” button.
Click “Activate” to
active account

4. Then, choose your community group. Choose “UG/PG Student” for students.
5. Verify your status by clicking “Check” button.
6. FOR NEW STUDENT, please click “Activate” button.
Then, click here
Put your Matric Number
Put your Student Pin Number
Choose UG/PG Student
Activate Check
Click Activate

7. FOR SENIOR STUDENT, please click “Update” button.
8. Close the account activation by clicking “Close” button at the top side.
9. Click here to proceed for the next step
Click Update
Click Close
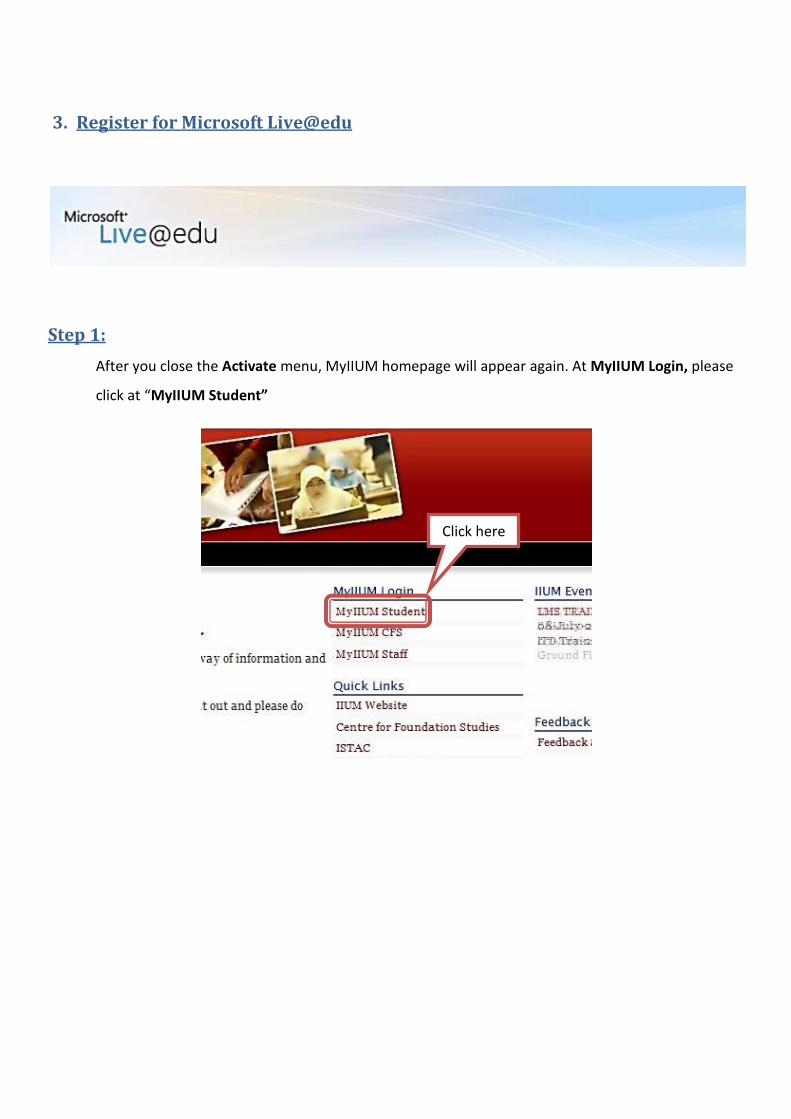
3. Register for Microsoft Live@edu
Step 1:
After you close the Activate menu, MyIIUM homepage will appear again. At MyIIUM Login, please
click at “MyIIUM Student”
Click here
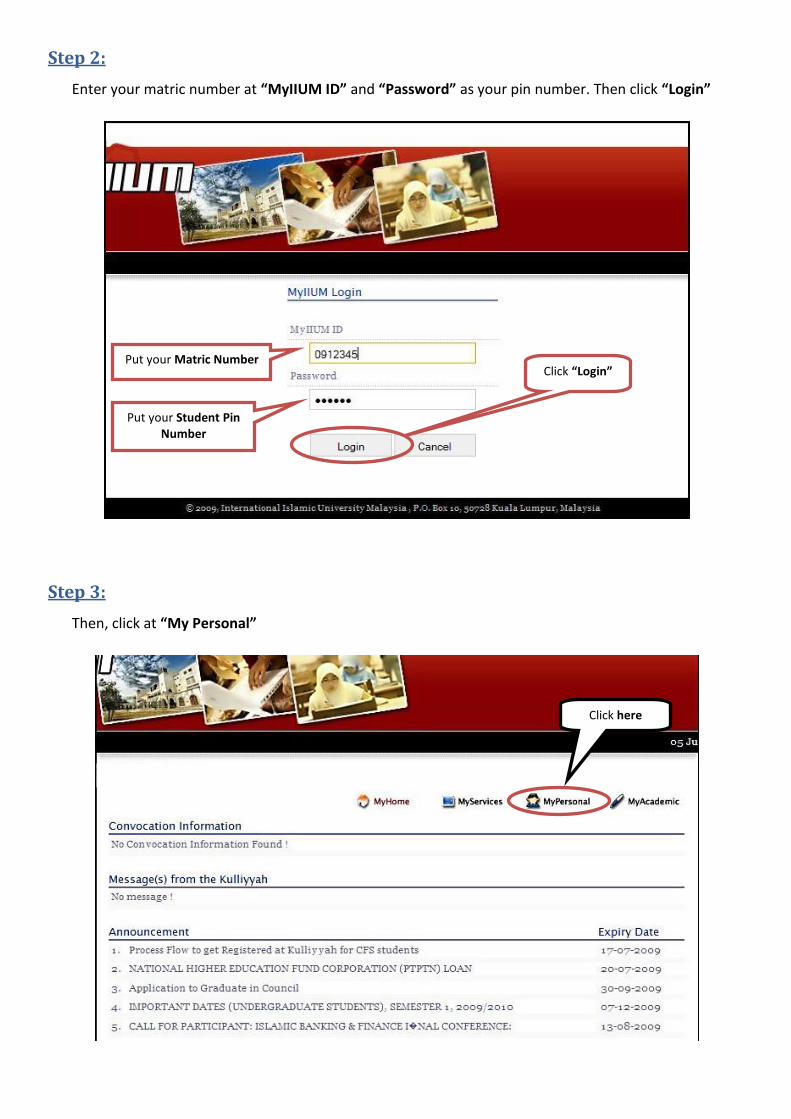
Step 2:
Enter your matric number at “MyIIUM ID” and “Password” as your pin number. Then click “Login”
Step 3:
Then, click at “My Personal”
Click “Login”
Click here
Put your Matric Number
Put your Student Pin Number
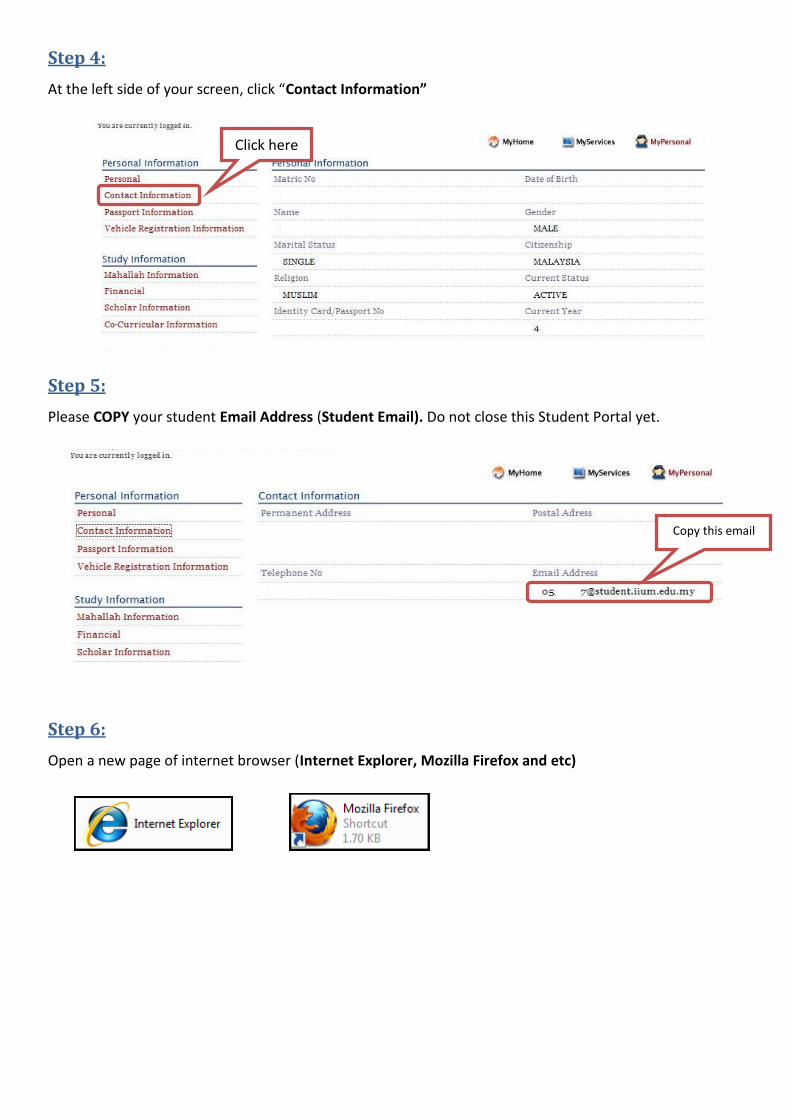
Step 4:
At the left side of your screen, click “Contact Information”
Step 5:
Please COPY your student Email Address (Student Email). Do not close this Student Portal yet.
Step 6:
Open a new page of internet browser (Internet Explorer, Mozilla Firefox and etc)
Click here
Copy this email
here
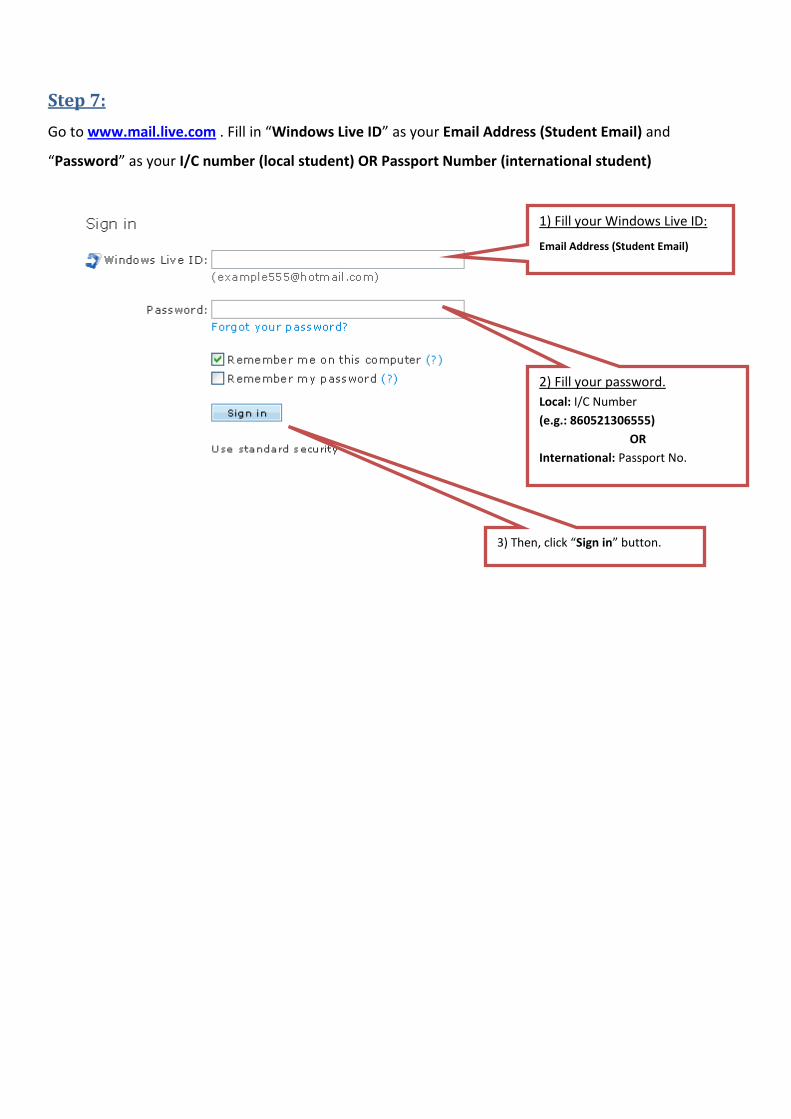
Step 7:
Go to www.mail.live.com . Fill in “Windows Live ID” as your Email Address (Student Email) and
“Password” as your I/C number (local student) OR Passport Number (international student)
2) Fill your password.
Local: I/C Number
(e.g.: 860521306555)
OR
International: Passport No.
1) Fill your Windows Live ID:
Email Address (Student Email)
3) Then, click “Sign in” button.

Step 8:
Please fill in the following information.
Step 9:
Step 10
Please remember this
email as your student
Re-enter your “I/C
number OR Passport
number”
Re-enter your new password.
Enter NEW password (must be
different from previous)
Important Section! Please choose one
question. Make sure you remember
this.
Fill in your answer. You must
remember this also.
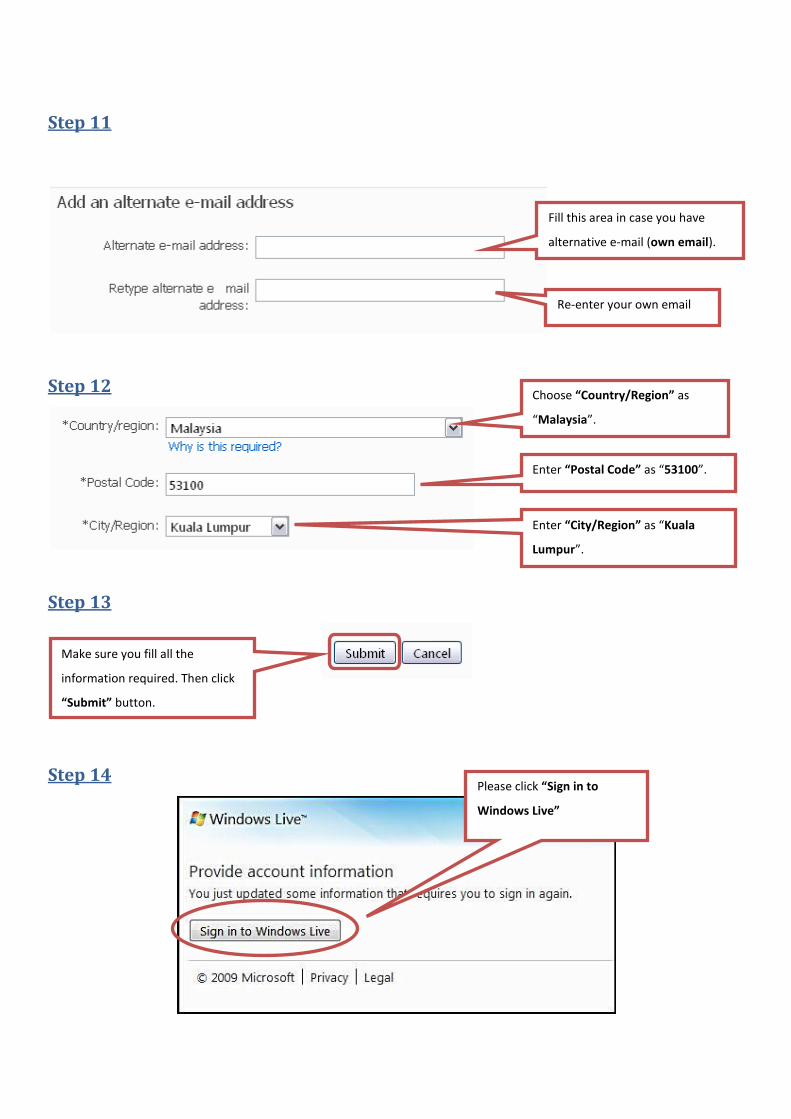
Step 11
Step 12
Step 13
Step 14
Fill this area in case you have
alternative e-mail (own email).
Re-enter your own email
Choose “Country/Region” as
“Malaysia”.
Enter “City/Region” as “Kuala
Lumpur”.
Enter “Postal Code” as “53100”.
Make sure you fill all the
information required. Then click
“Submit” button.
Please click “Sign in to
Windows Live”
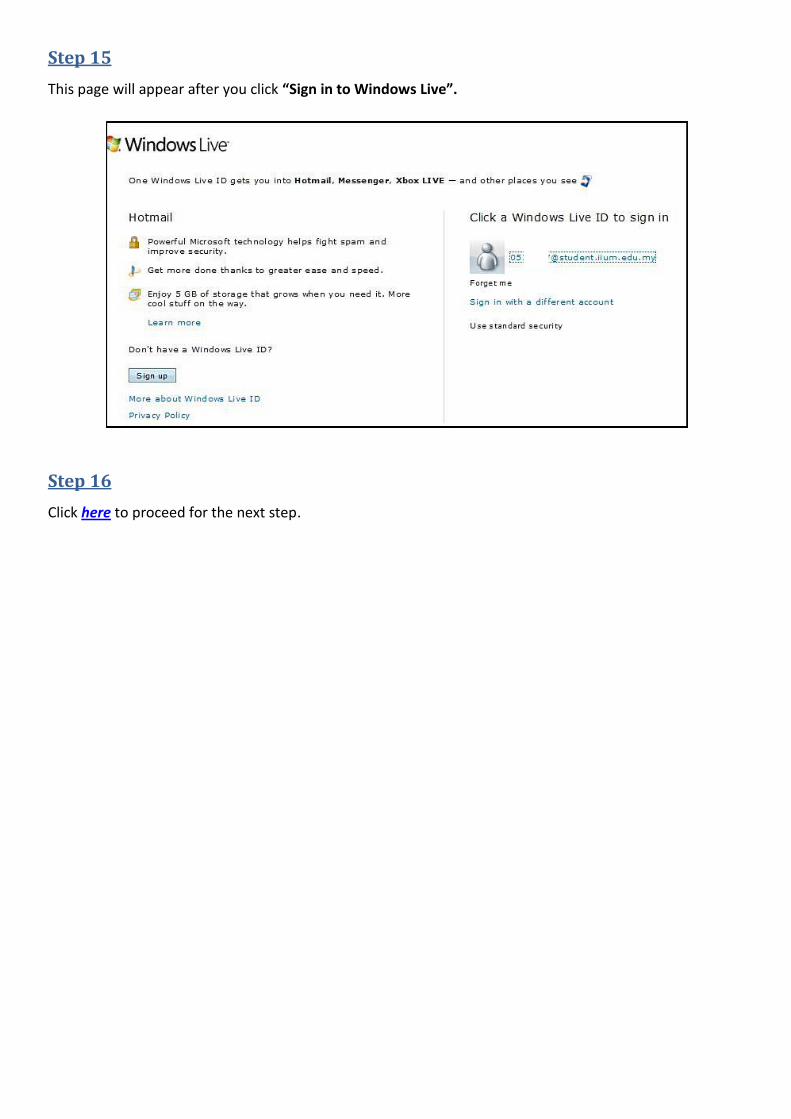
Step 15
This page will appear after you click “Sign in to Windows Live”.
Step 16
Click here to proceed for the next step.
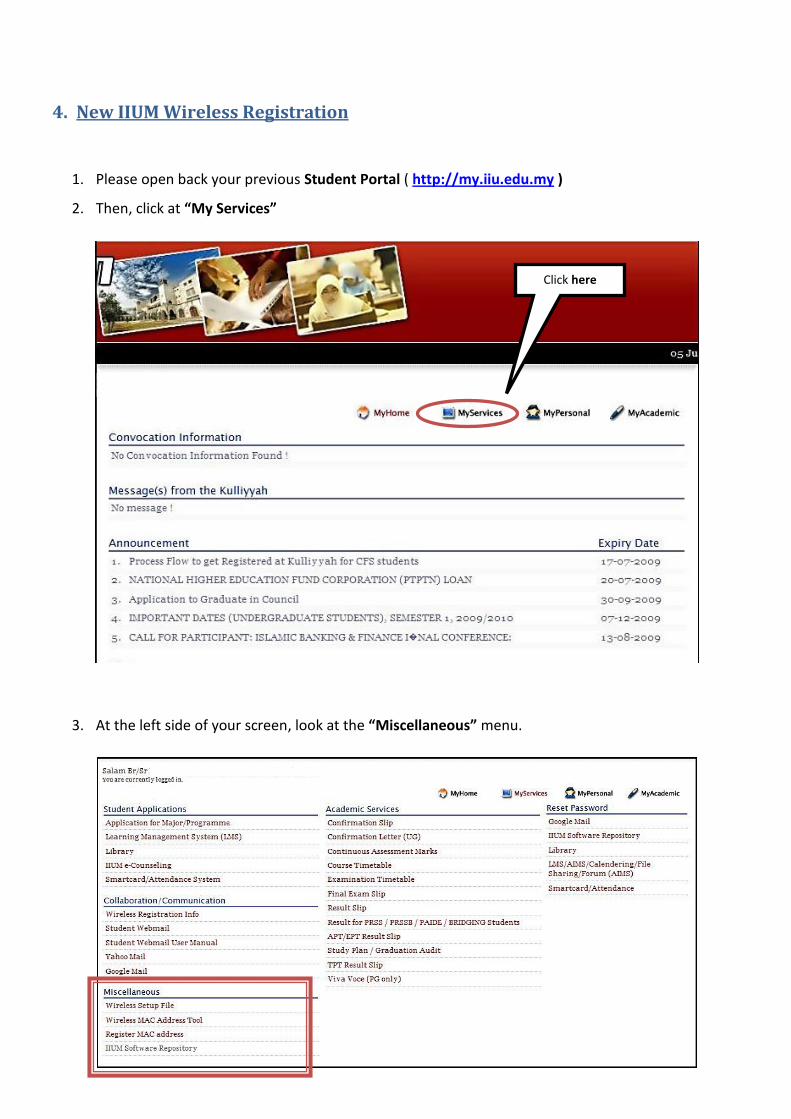
4. New IIUM Wireless Registration
1. Please open back your previous Student Portal ( http://my.iiu.edu.my )
2. Then, click at “My Services”
3. At the left side of your screen, look at the “Miscellaneous” menu.
Click here
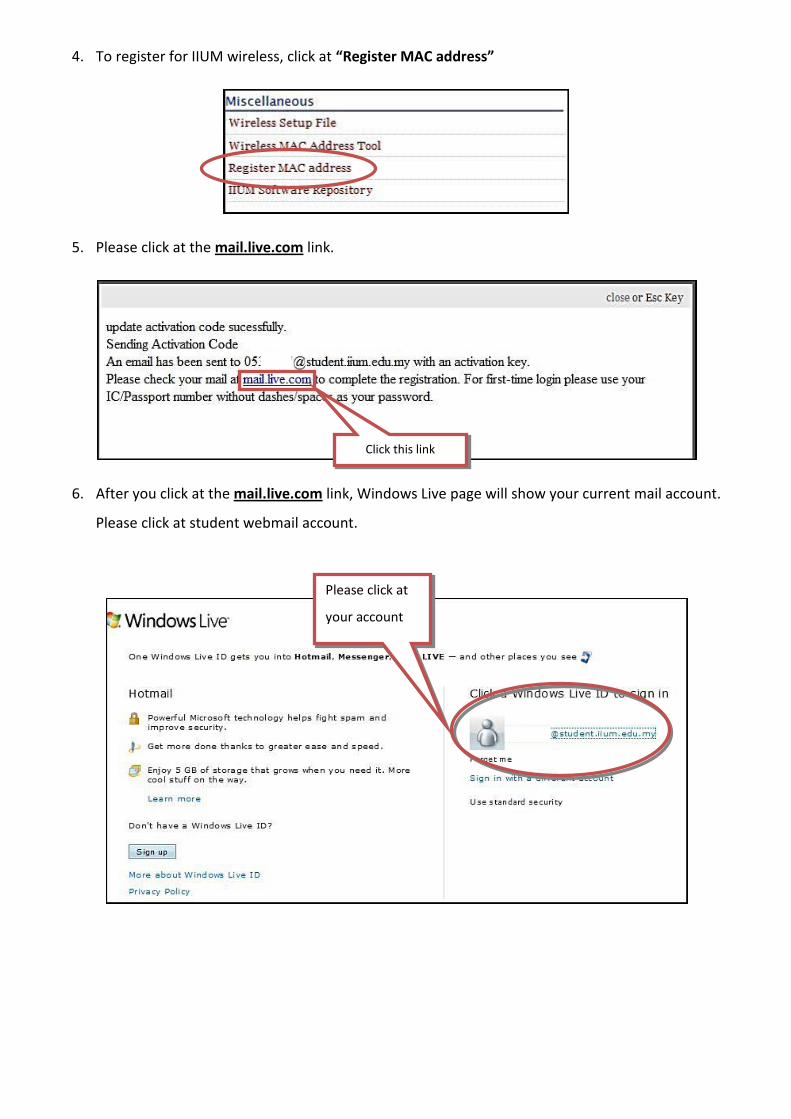
4. To register for IIUM wireless, click at “Register MAC address”
5. Please click at the mail.live.com link.
6. After you click at the mail.live.com link, Windows Live page will show your current mail account.
Please click at student webmail account.
Please click at
your account
Click this link
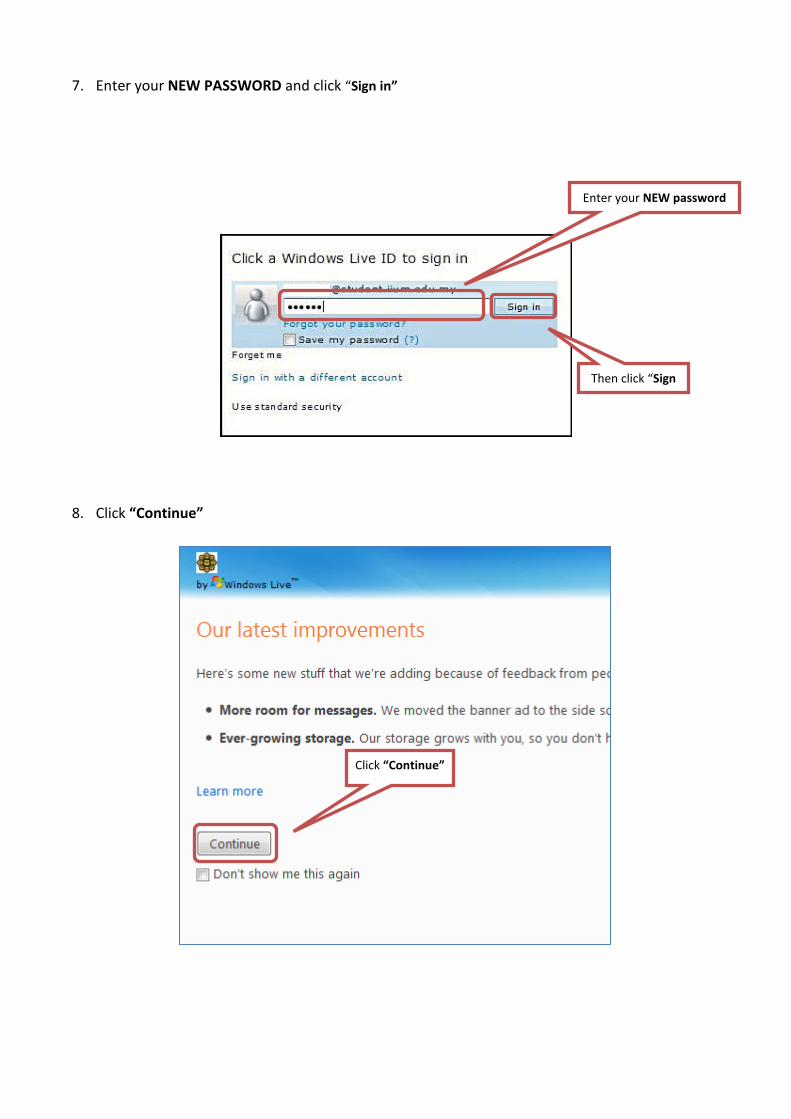
7. Enter your NEW PASSWORD and click “Sign in”
8. Click “Continue”
Enter your NEW password
Click “Continue”
Then click “Sign
in”
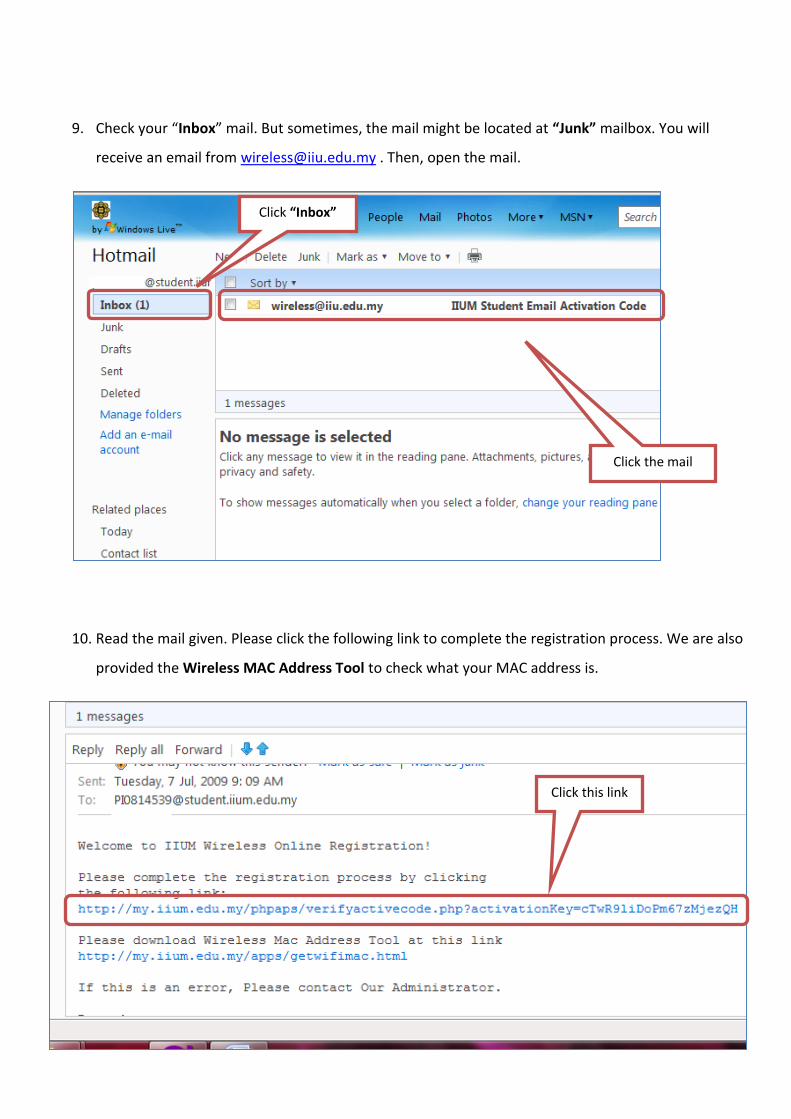
9. Check your “Inbox” mail. But sometimes, the mail might be located at “Junk” mailbox. You will
receive an email from [email protected] . Then, open the mail.
10. Read the mail given. Please click the following link to complete the registration process. We are also
provided the Wireless MAC Address Tool to check what your MAC address is.
Click “Inbox”
Click the mail
Click this link
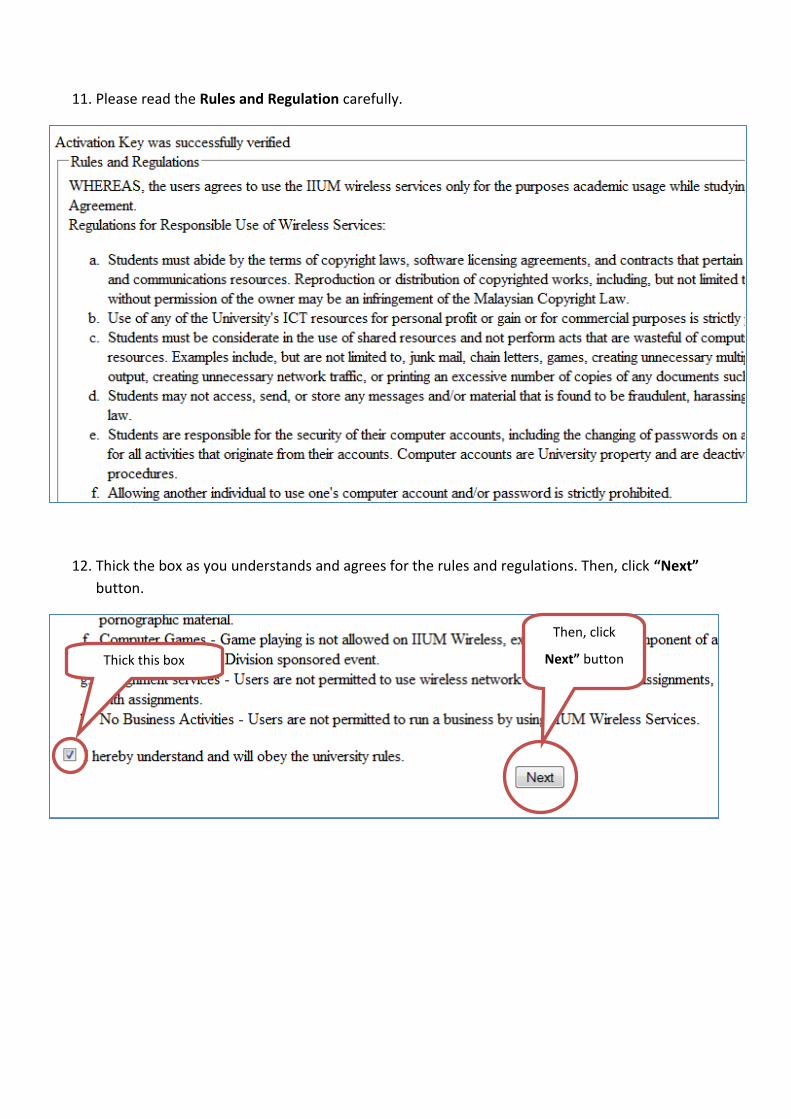
11. Please read the Rules and Regulation carefully.
12. Thick the box as you understands and agrees for the rules and regulations. Then, click “Next”
button.
Thick this box
Then, click
Next” button
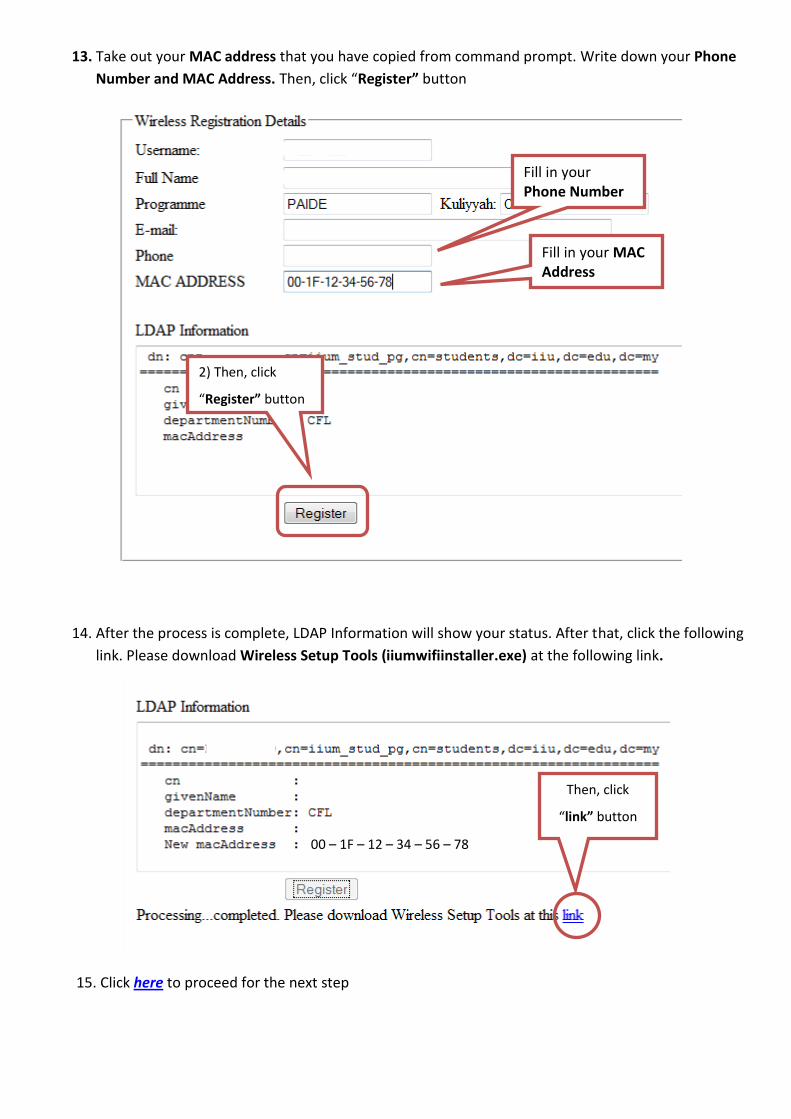
13. Take out your MAC address that you have copied from command prompt. Write down your Phone
Number and MAC Address. Then, click “Register” button
14. After the process is complete, LDAP Information will show your status. After that, click the following
link. Please download Wireless Setup Tools (iiumwifiinstaller.exe) at the following link.
15. Click here to proceed for the next step
2) Then, click
“Register” button
00 – 1F – 12 – 34 – 56 – 78
Then, click
“link” button
Fill in your Phone Number
Fill in your MAC Address

5. Choose your Operating System (Windows)
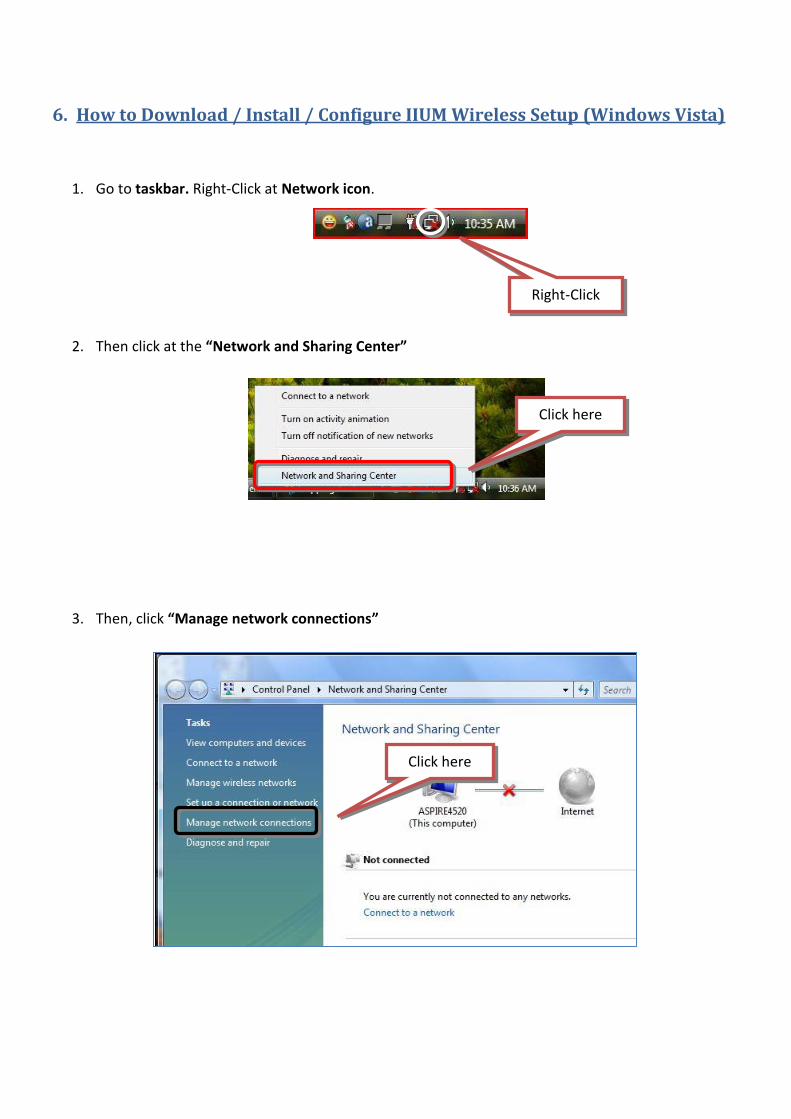
6. How to Download / Install / Configure IIUM Wireless Setup (Windows Vista)
1. Go to taskbar. Right-Click at Network icon.
2. Then click at the “Network and Sharing Center”
3. Then, click “Manage network connections”
Click here
Right-Click
Click here
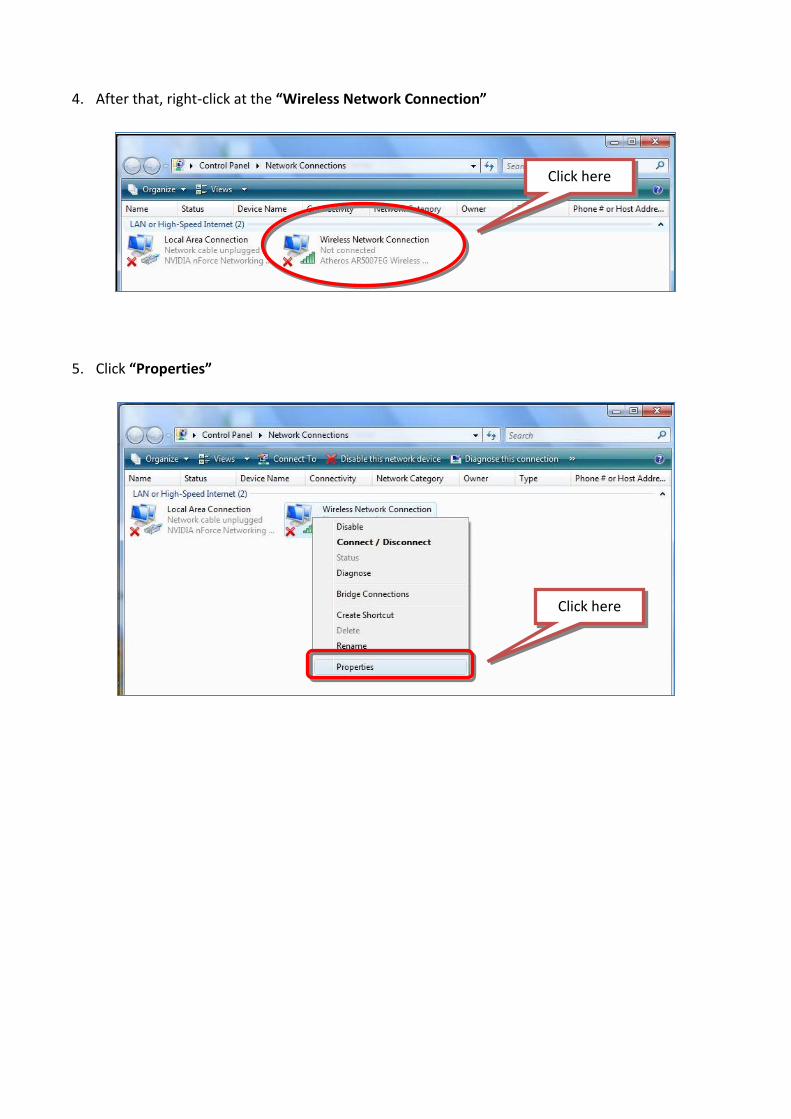
4. After that, right-click at the “Wireless Network Connection”
5. Click “Properties”
Click here
Click here

6. “Wireless Network Connection Properties” will appear. Click at “Internet Protocol Version 4
(TCP/IPv4)”. Then click “Properties”
7. Check the “Internet Protocol Version 4 (TCP/IPv4) Properties”. Make sure “Obtain an IP address
automatically” and “Obtain DNS server address automatically” are selected
1) Click here
2) Then click
Properties

8. After all settings have been correctly checked; click “OK” then “OK” again for all properties.
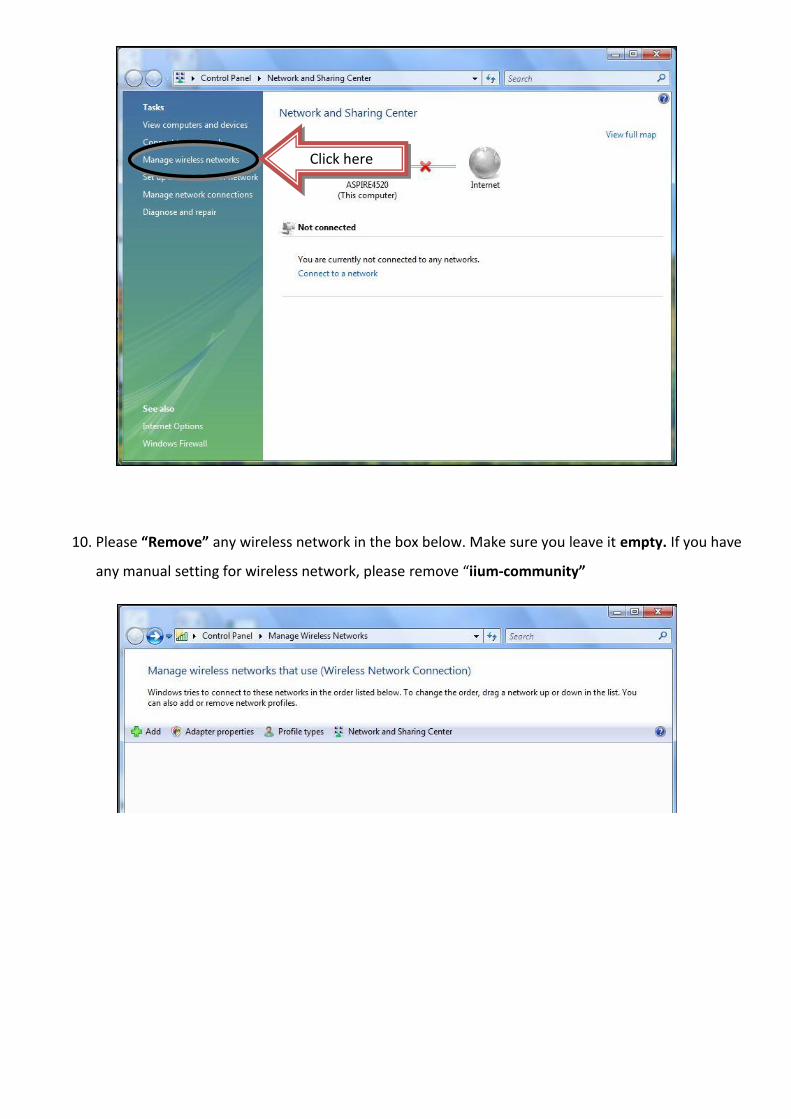
9. Go to the “Network and Sharing Centre” again. Then click “Manage wireless network”.
10. Please “Remove” any wireless network in the box below. Make sure you leave it empty. If you have
any manual setting for wireless network, please remove “iium-community”
Click here
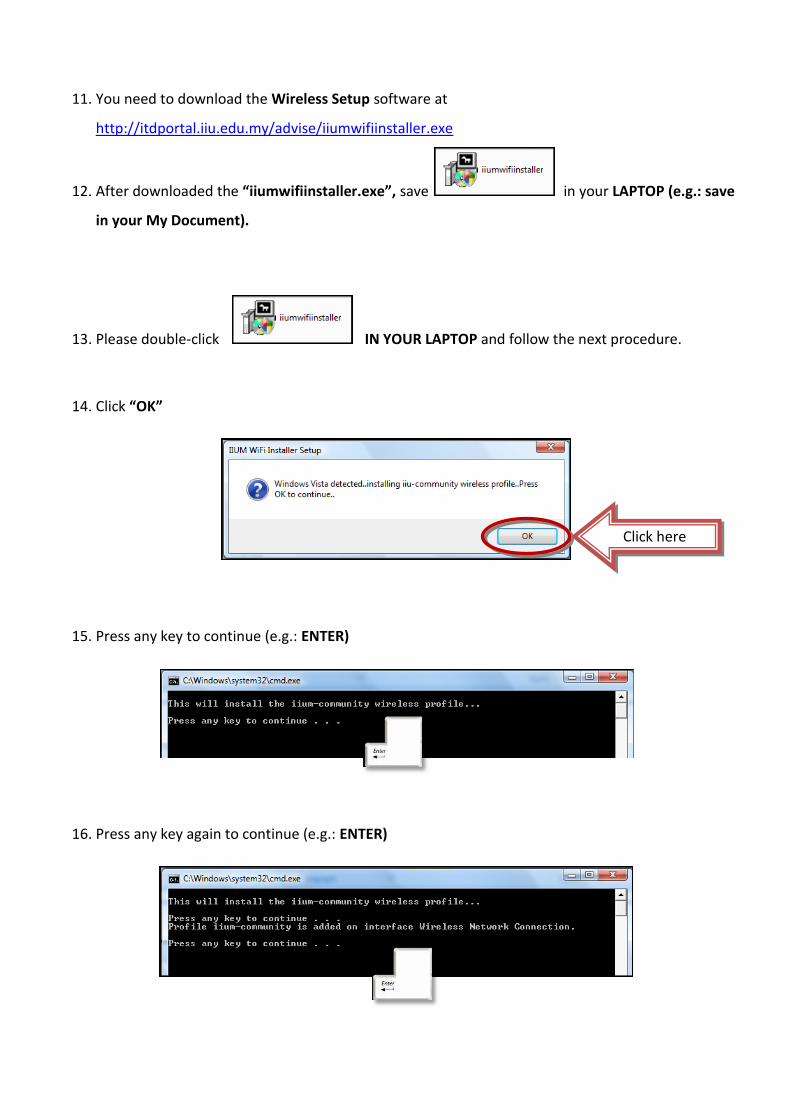
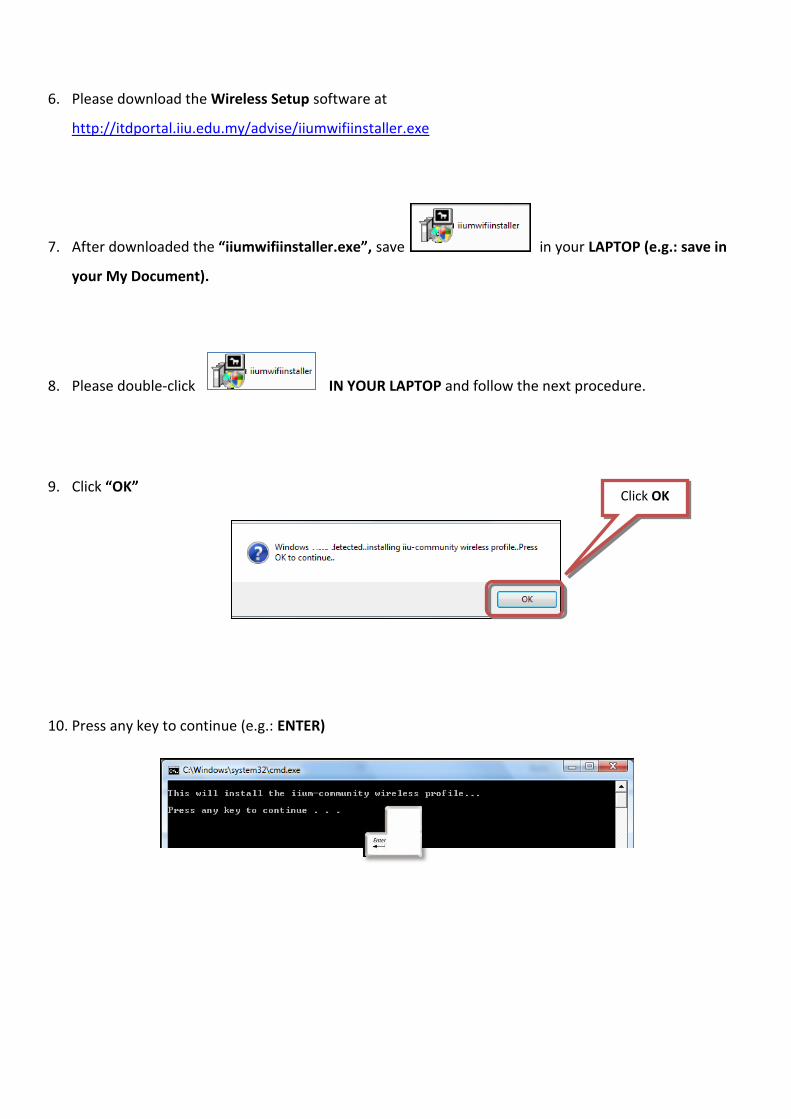
11. You need to download the Wireless Setup software at
http://itdportal.iiu.edu.my/advise/iiumwifiinstaller.exe
12. After downloaded the “iiumwifiinstaller.exe”, save in your LAPTOP (e.g.: save
in your My Document).
13. Please double-click IN YOUR LAPTOP and follow the next procedure.
14. Click “OK”
15. Press any key to continue (e.g.: ENTER)
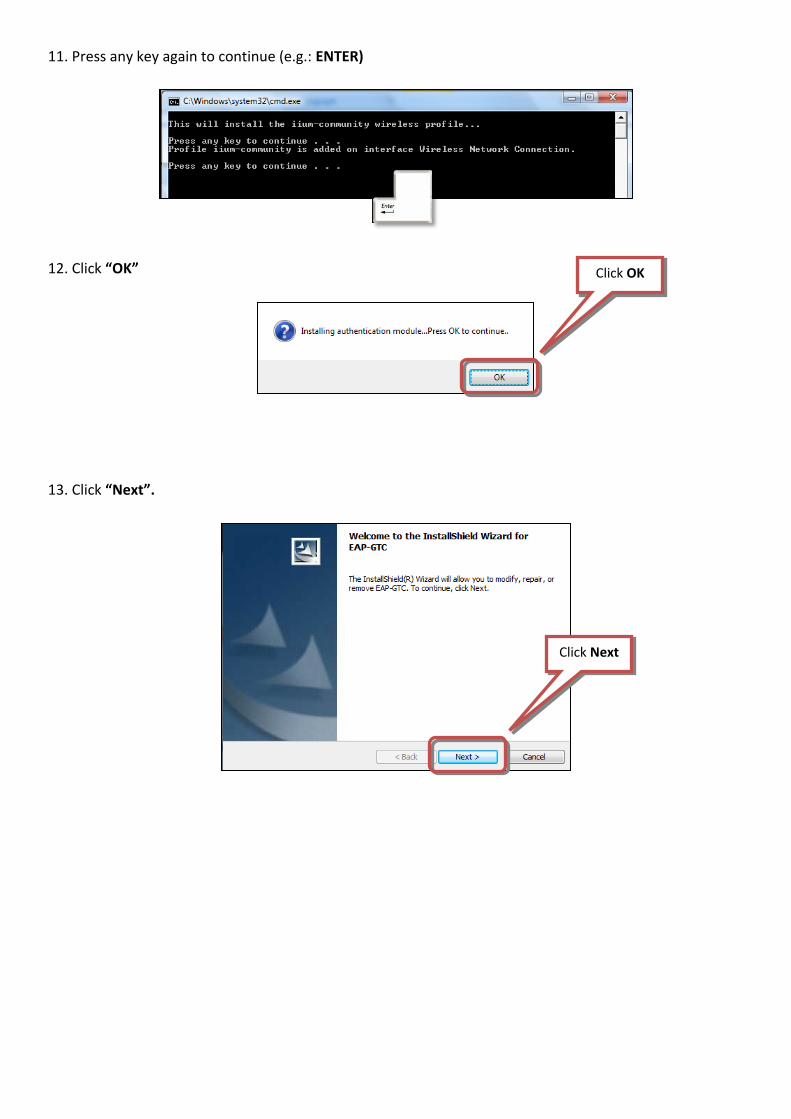
16. Press any key again to continue (e.g.: ENTER)
Click here
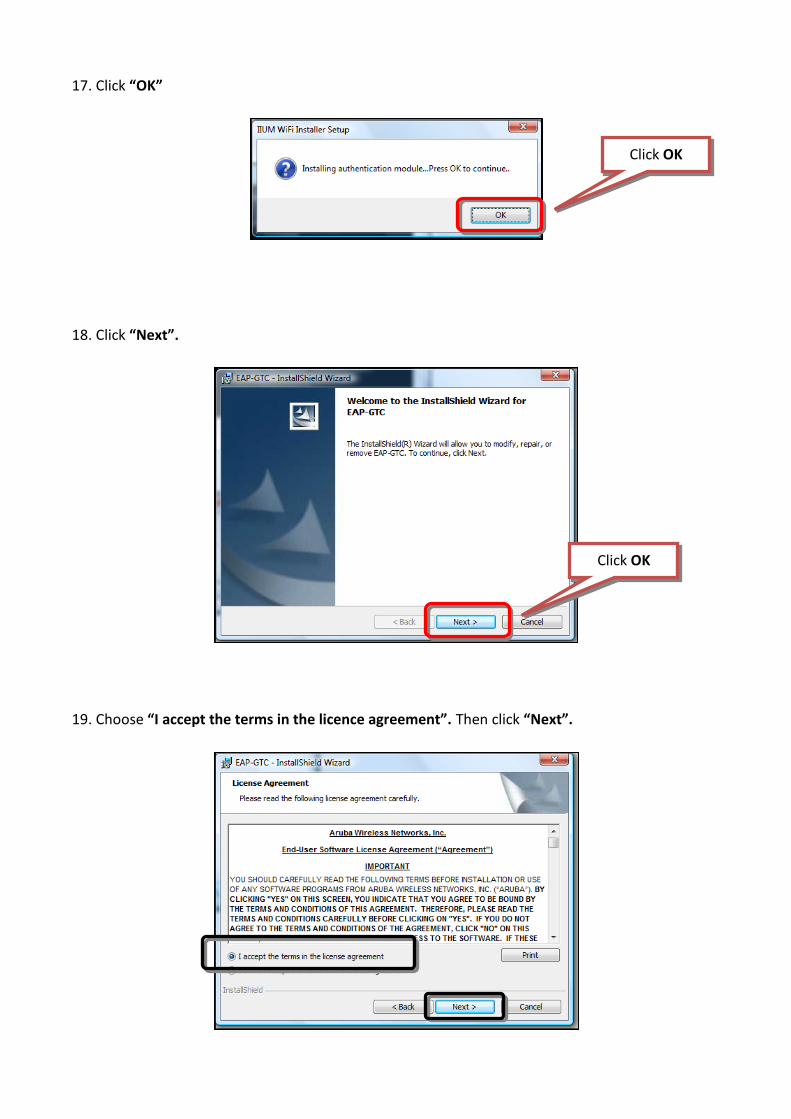
17. Click “OK”
18. Click “Next”.
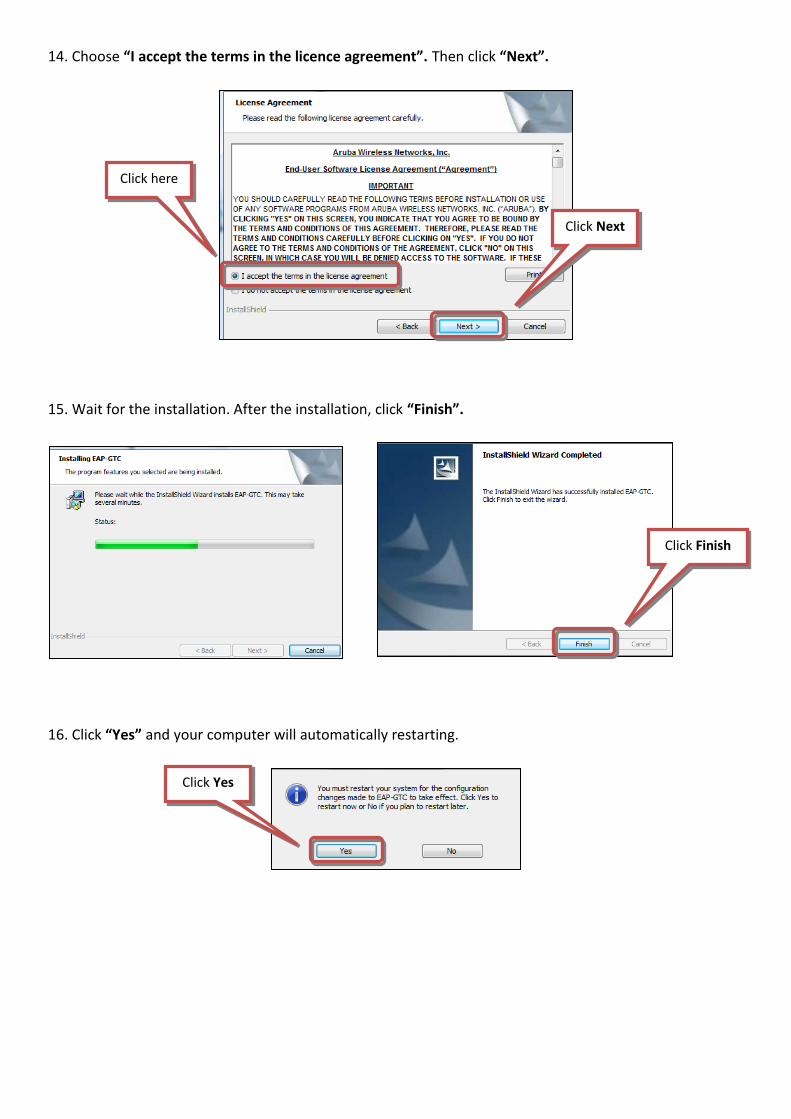
19. Choose “I accept the terms in the licence agreement”. Then click “Next”.
Click OK
Click OK
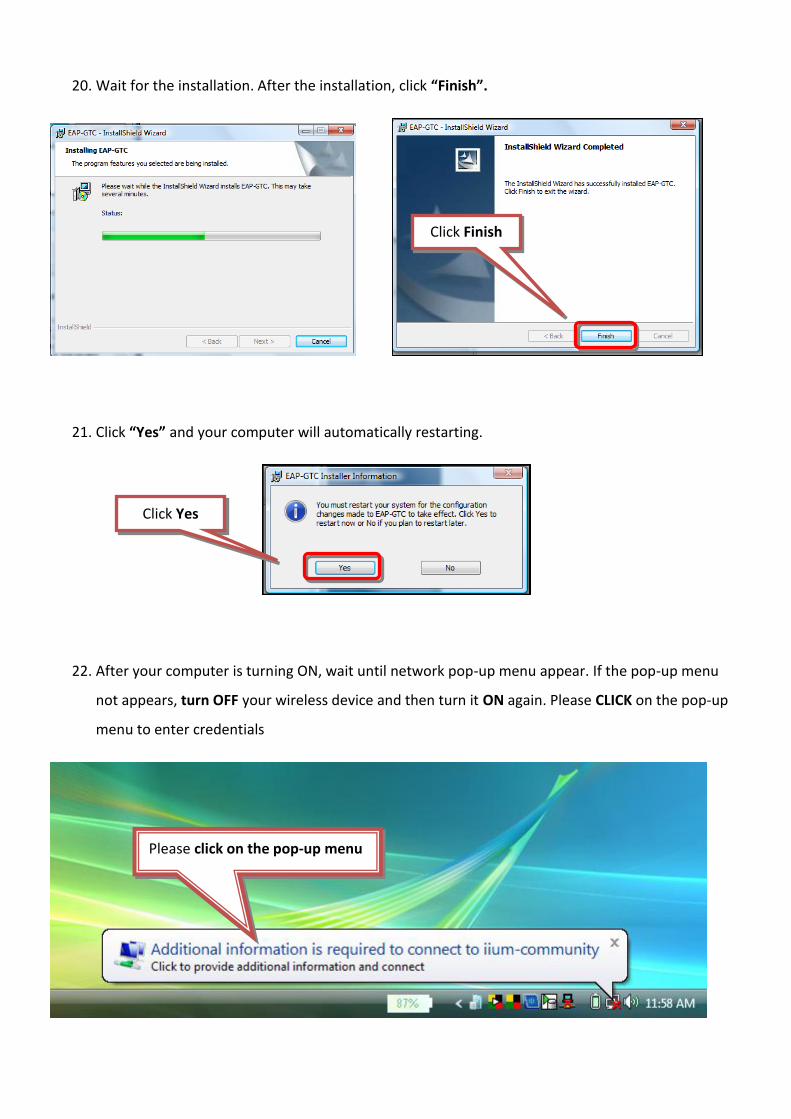
20. Wait for the installation. After the installation, click “Finish”.
21. Click “Yes” and your computer will automatically restarting.
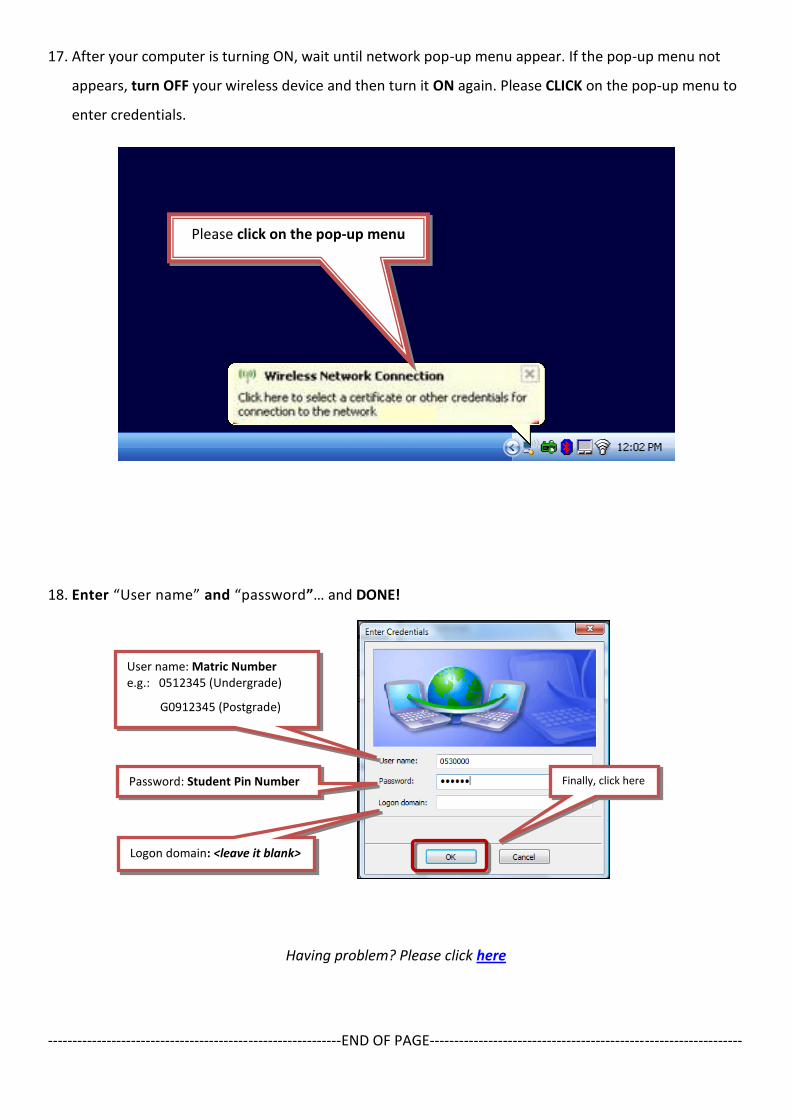
22. After your computer is turning ON, wait until network pop-up menu appear. If the pop-up menu
not appears, turn OFF your wireless device and then turn it ON again. Please CLICK on the pop-up
menu to enter credentials
Please click on the pop-up menu
Click Finish
Click Yes
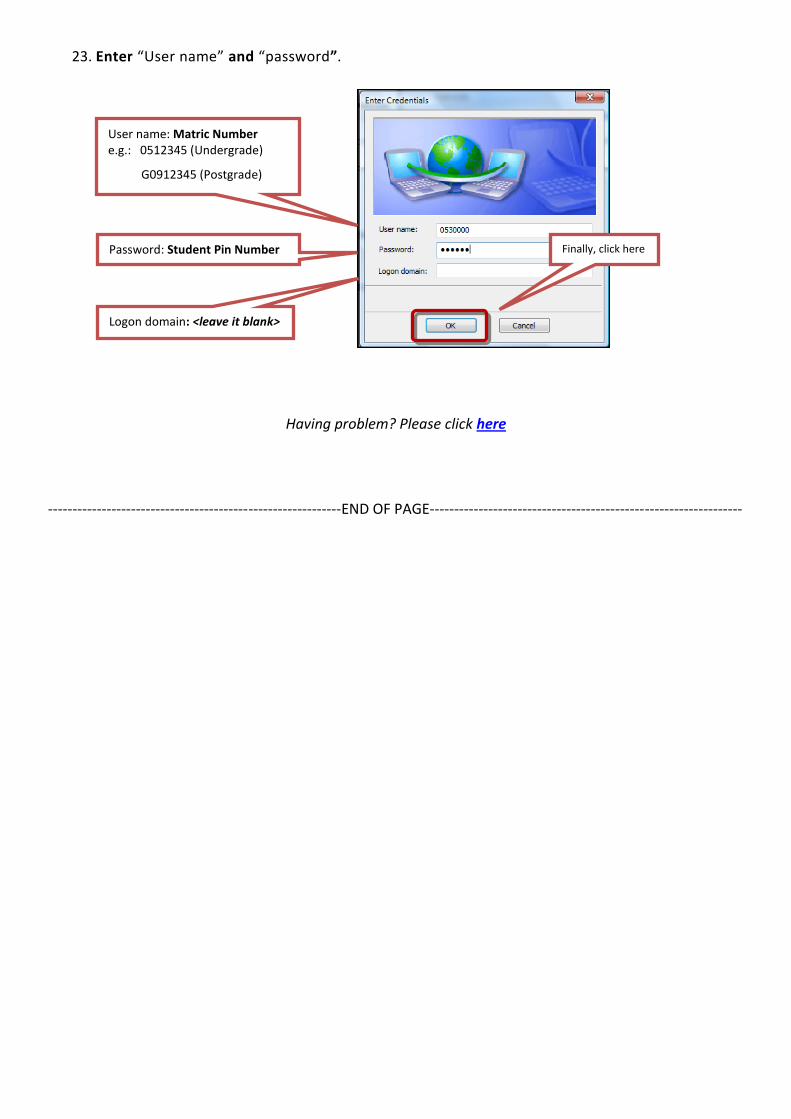
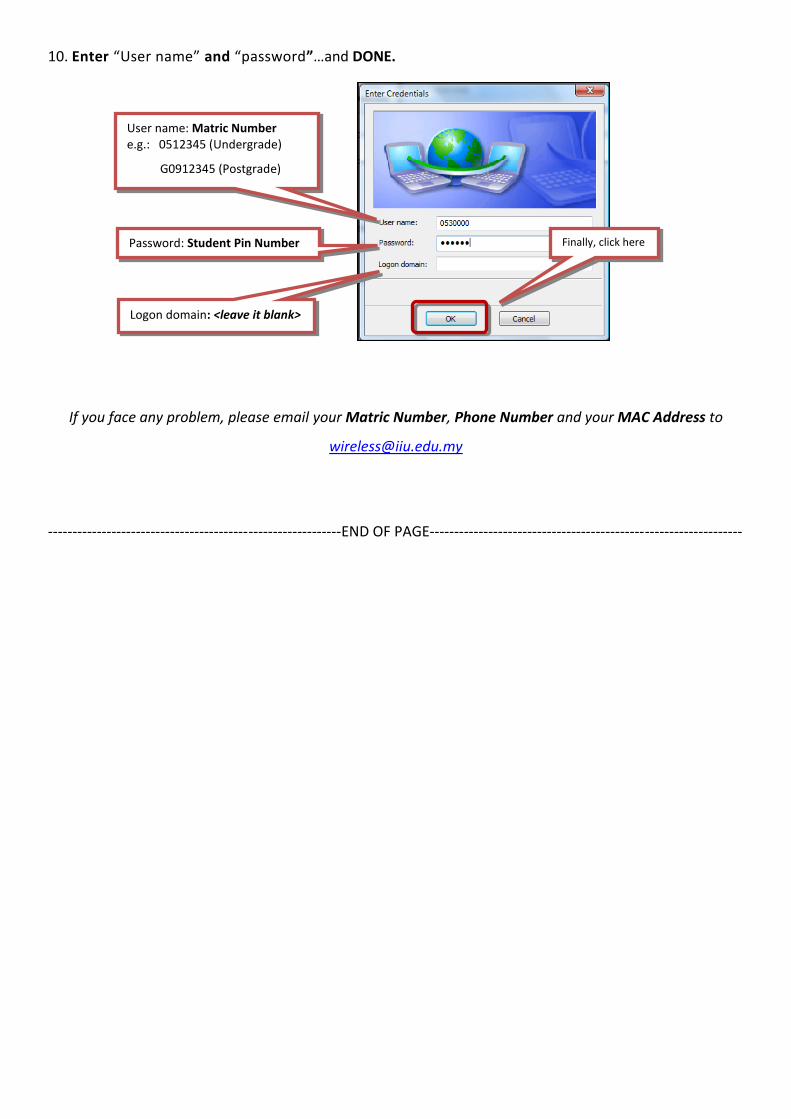
23. Enter “User name” and “password”.
Having problem? Please click here
------------------------------------------------------------END OF PAGE----------------------------------------------------------------
Logon domain: <leave it blank>
Finally, click here
User name: Matric Number e.g.: 0512345 (Undergrade)
G0912345 (Postgrade)
Password: Student Pin Number

6. How to Download / Install / Configure IIUM Wireless Setup (Windows XP)
Check this icon in your laptop. Did you see this icon on your taskbar?
OR
YES NO YES NO

Disable Intel PRO Set Wireless Management
1. Right click your Intel PROSet/Wireless icon (green color)
2. Click "Use Window to Manage Wi-Fi"
3. Tick the following box and click "Yes"
4. Then, click here
Tick this box
Right- click here
Click here
Click YES
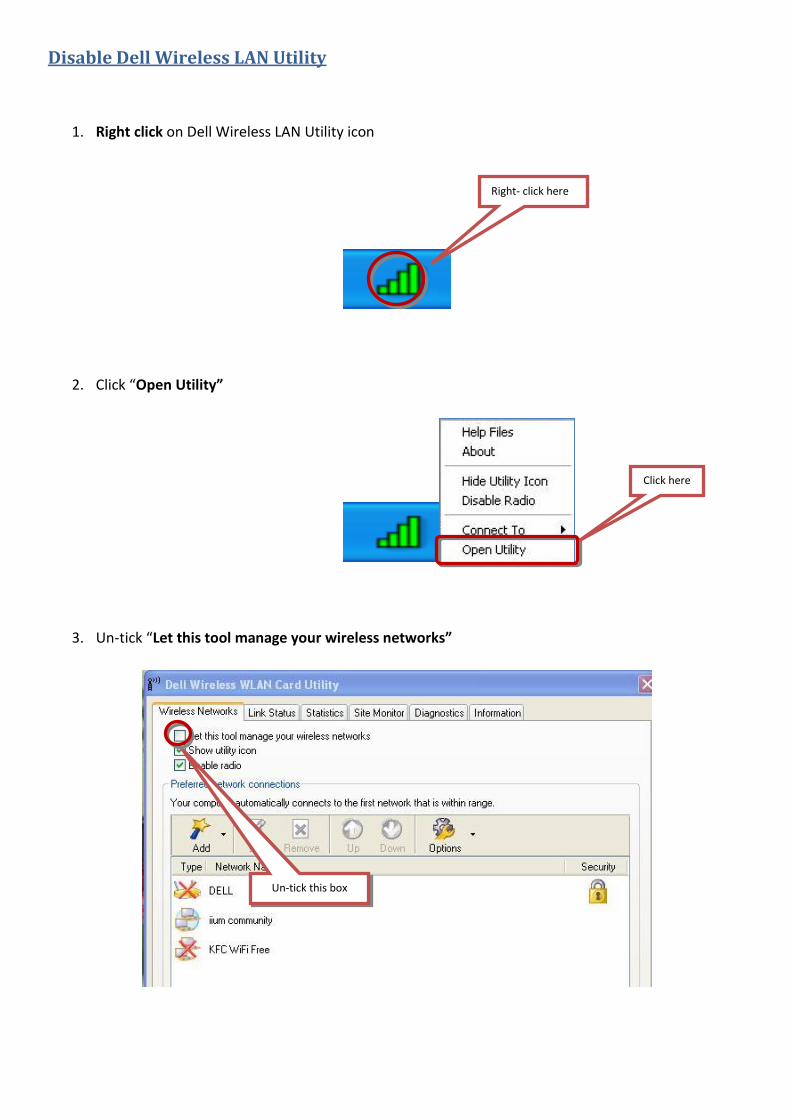
Disable Dell Wireless LAN Utility
1. Right click on Dell Wireless LAN Utility icon
2. Click “Open Utility”
3. Un-tick “Let this tool manage your wireless networks”
Right- click here
Click here
Un-tick this box

4. Click OK
5. Then, click here

6. IIUM Wireless Installation for Windows XP
1. Click “START”
2. Go to “Connect to…”
3. Then, click “Wireless Network Connection”
Click Connect to…
Click Wireless Network
Connection

4. Click “Properties”
5. Click at “Wireless Network” Tab. Make sure you remove all Preferred network by click Remove
Click “Properties”
Click at Wireless Network Tab
Remove ALL preferred
network by click Remove
Then, click OK
Tick this box
6. Please download the Wireless Setup software at
http://itdportal.iiu.edu.my/advise/iiumwifiinstaller.exe
7. After downloaded the “iiumwifiinstaller.exe”, save in your LAPTOP (e.g.: save in
your My Document).
8. Please double-click IN YOUR LAPTOP and follow the next procedure.
9. Click “OK”
10. Press any key to continue (e.g.: ENTER)
Click OK
11. Press any key again to continue (e.g.: ENTER)
12. Click “OK”
13. Click “Next”.
Click OK
Click Next
14. Choose “I accept the terms in the licence agreement”. Then click “Next”.
15. Wait for the installation. After the installation, click “Finish”.
16. Click “Yes” and your computer will automatically restarting.
Click Finish
Click Next
Click here
Click Yes
17. After your computer is turning ON, wait until network pop-up menu appear. If the pop-up menu not
appears, turn OFF your wireless device and then turn it ON again. Please CLICK on the pop-up menu to
enter credentials.
18. Enter “User name” and “password”… and DONE!
Having problem? Please click here
------------------------------------------------------------END OF PAGE----------------------------------------------------------------
Please click on the pop-up menu
Logon domain: <leave it blank>
Finally, click here
User name: Matric Number e.g.: 0512345 (Undergrade)
G0912345 (Postgrade)
Password: Student Pin Number
Register via Email
Step 1
Please submit your application through email. Users are required to perform self configuration base on
our manual guidelines.
FOR EXAMPLE:
Email to: [email protected]
Subject: Wireless Registration
Content
Name: Abdel Razzaq
Matric No: G0812020
Email: [email protected]
Phone No: 0172342020
MAC Address: 00 – 1F – 12 – 34 – 56 – 78 (please refer How to Find MAC Address)
Step 2
Please re-check your email within 24 hours (if you send during office hour) and you will get an email
from IIUM Wireless Email.
Step 3
Click here for wireless setup.
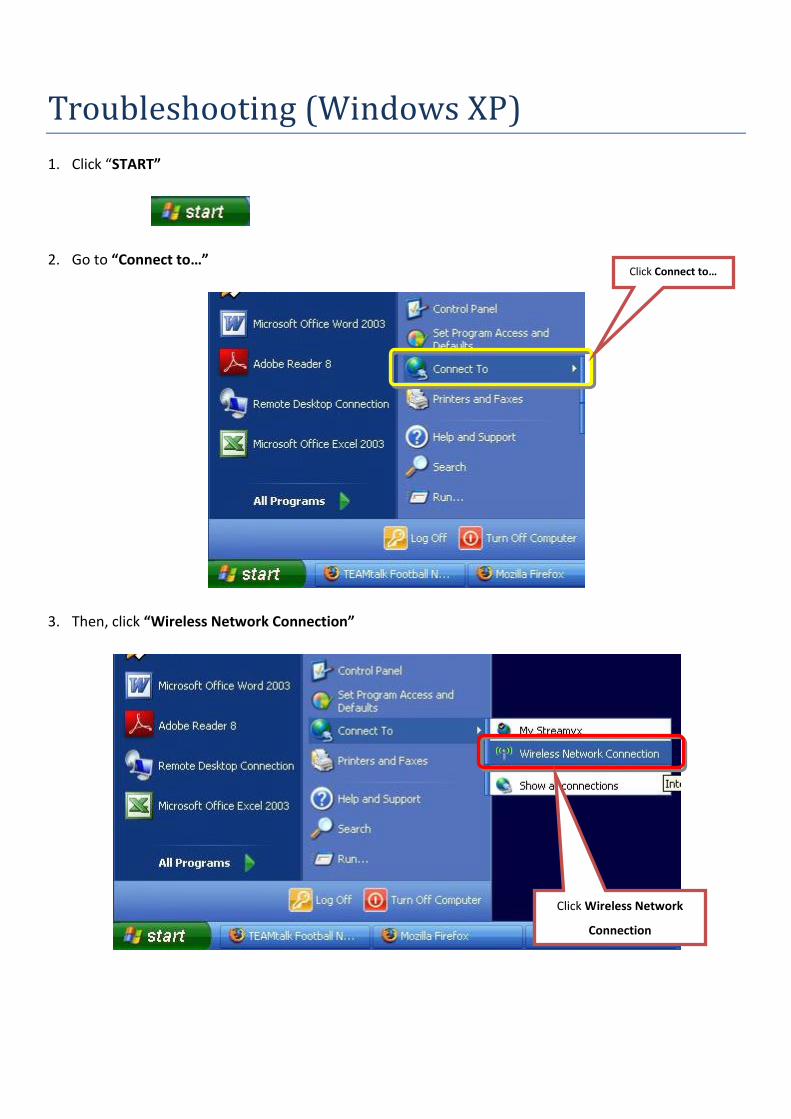
Troubleshooting (Windows XP)
1. Click “START”
2. Go to “Connect to…”
3. Then, click “Wireless Network Connection”
Click Connect to…
Click Wireless Network
Connection
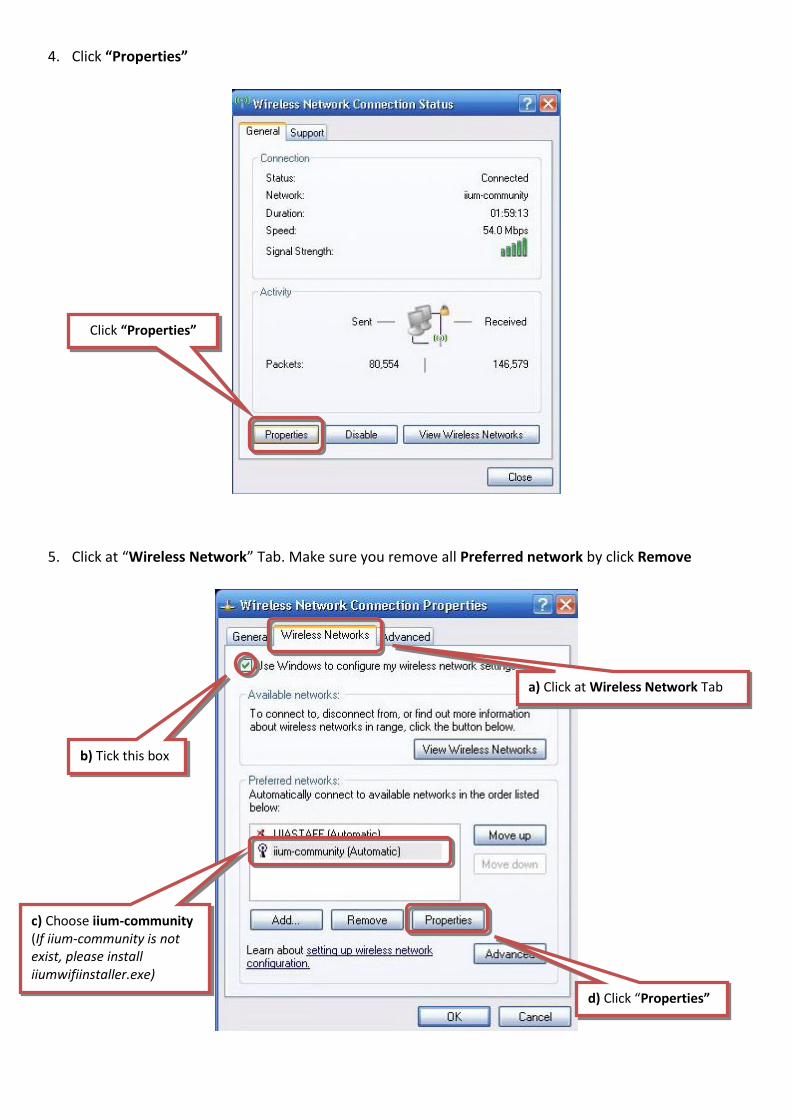
4. Click “Properties”
5. Click at “Wireless Network” Tab. Make sure you remove all Preferred network by click Remove
Click “Properties”
a) Click at Wireless Network Tab
c) Choose iium-community (If iium-community is not exist, please install iiumwifiinstaller.exe)
b) Tick this box
d) Click “Properties”
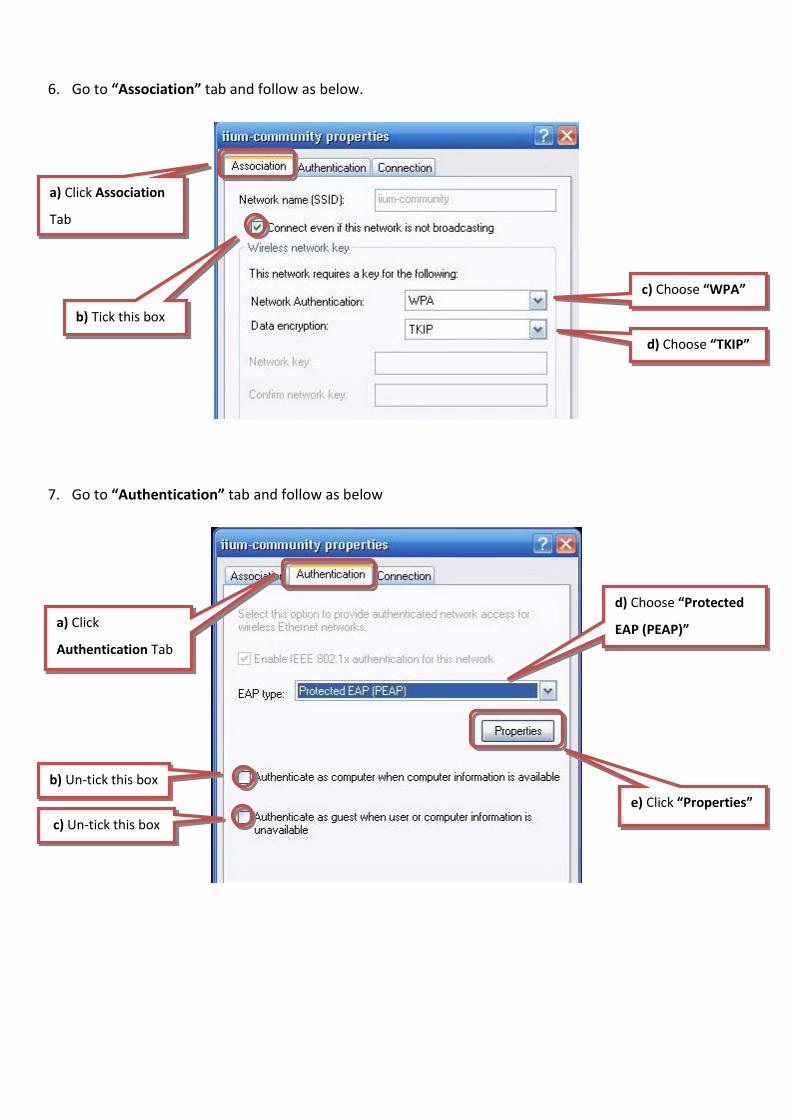
6. Go to “Association” tab and follow as below.
7. Go to “Authentication” tab and follow as below
a) Click Association
Tab
b) Tick this box
c) Choose “WPA”
Tick this box
d) Choose “TKIP”
a) Click
Authentication Tab
d) Choose “Protected
EAP (PEAP)”
b) Un-tick this box
c) Un-tick this box
e) Click “Properties”

8. At Protected EAP Properties, change the following setting.
9. Wait until network pop-up menu appear. If the pop-up menu not appears, turn OFF your wireless
device and then turn it ON again. Please CLICK on the pop-up menu to enter credentials.
a) Un-tick this box
b) Choose “EAP
Token”
c) Tick this box
d) Click “OK”
Please click on the pop-up menu
10. Enter “User name” and “password”…and DONE.
If you face any problem, please email your Matric Number, Phone Number and your MAC Address to
------------------------------------------------------------END OF PAGE----------------------------------------------------------------
Logon domain: <leave it blank>
Finally, click here
User name: Matric Number e.g.: 0512345 (Undergrade)
G0912345 (Postgrade)
Password: Student Pin Number
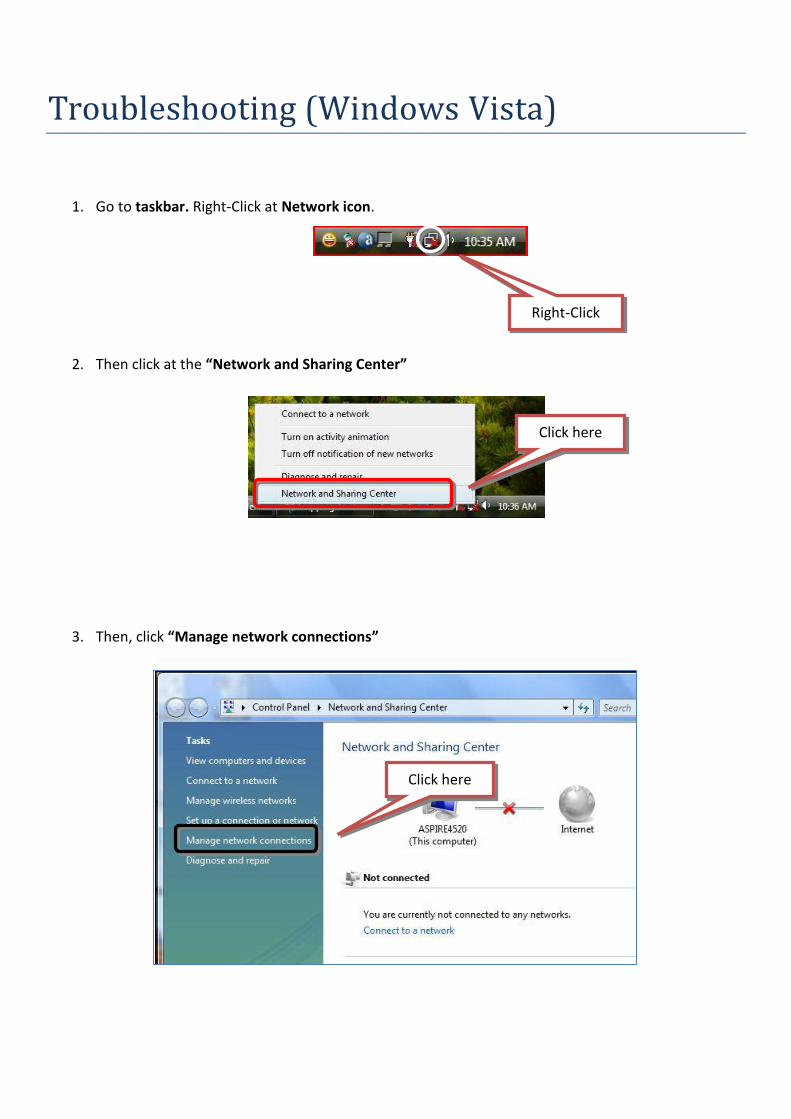
Troubleshooting (Windows Vista)
1. Go to taskbar. Right-Click at Network icon.
2. Then click at the “Network and Sharing Center”
3. Then, click “Manage network connections”
Click here
Right-Click
Click here
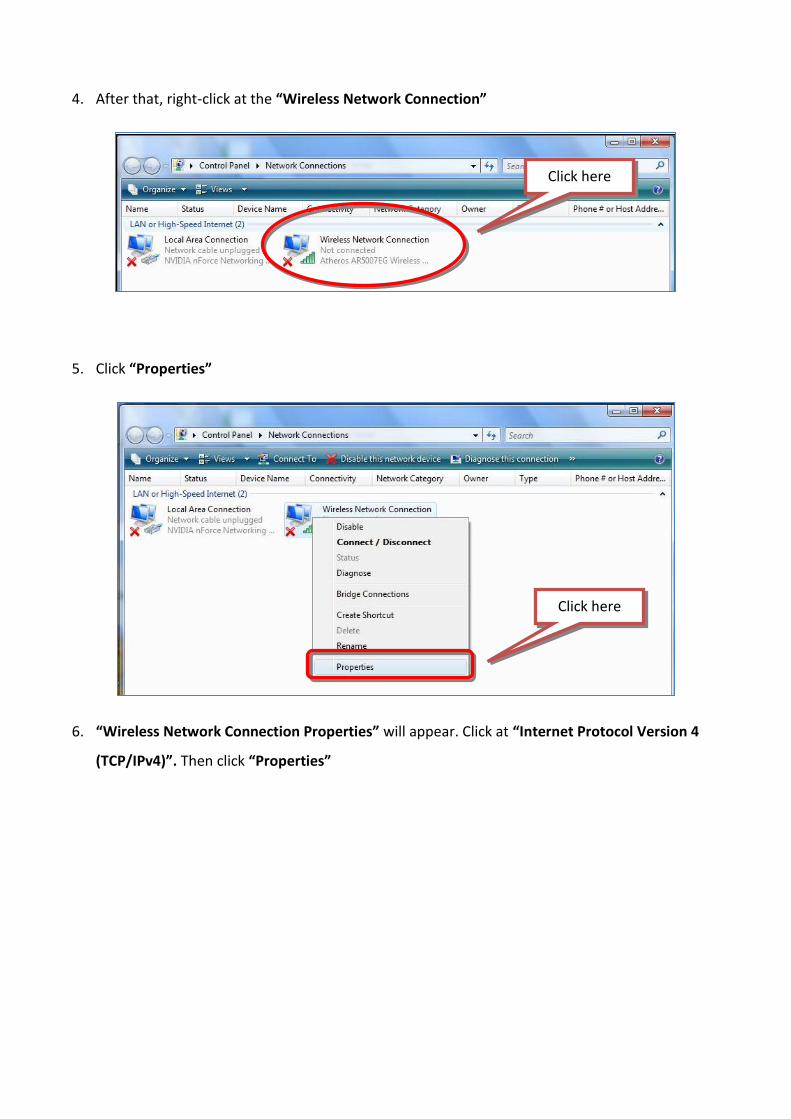
4. After that, right-click at the “Wireless Network Connection”
5. Click “Properties”
6. “Wireless Network Connection Properties” will appear. Click at “Internet Protocol Version 4
(TCP/IPv4)”. Then click “Properties”
Click here
Click here
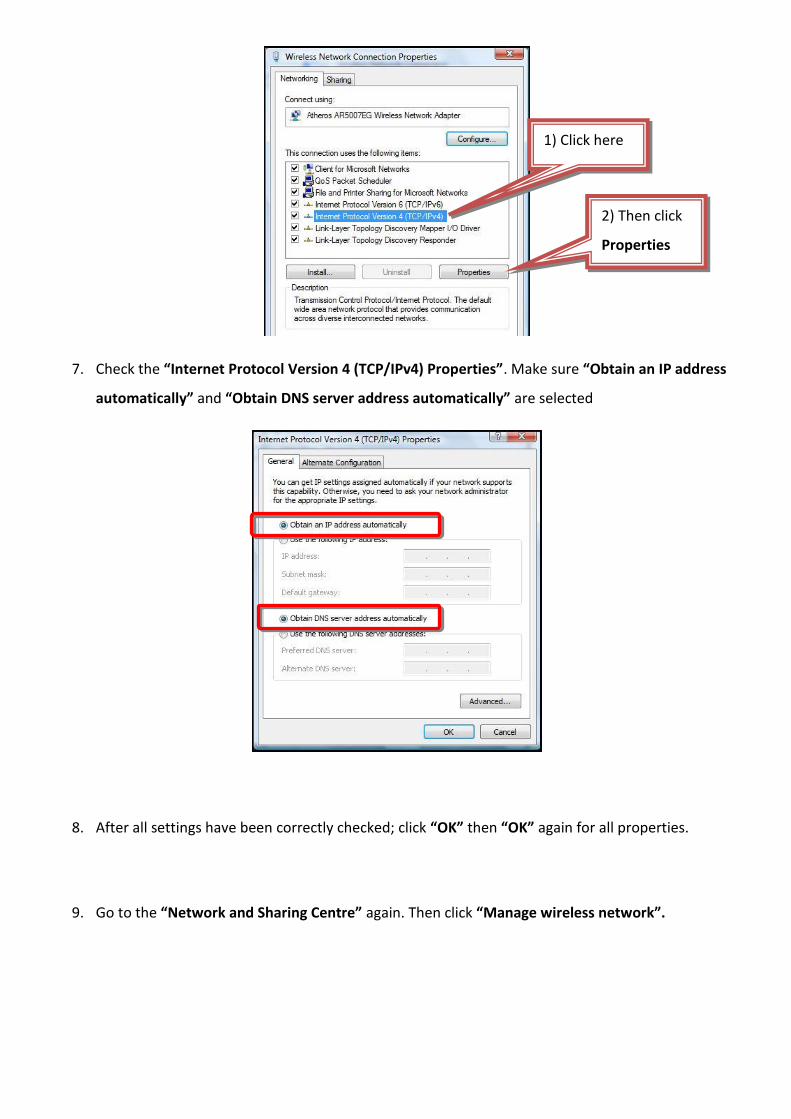
7. Check the “Internet Protocol Version 4 (TCP/IPv4) Properties”. Make sure “Obtain an IP address
automatically” and “Obtain DNS server address automatically” are selected
8. After all settings have been correctly checked; click “OK” then “OK” again for all properties.
9. Go to the “Network and Sharing Centre” again. Then click “Manage wireless network”.
1) Click here
2) Then click
Properties
10. Please “Remove” any wireless network in the box below. Make sure you leave it empty. If you have
any manual setting for wireless network, please remove “iium-community”
Click here

11. Then, click “Add”…
12. Click “Manually create a network Profile”
Click “Add”
Click “Manually create a network Profile”

13. Please follow as below
14. Click “Change connection settings”
a) Type iium-community
b) Choose “WPA-Enterprice”
c) Choose “TKIP”
d) Tick this box
e) Click “Next”
Click “Change connection settings”
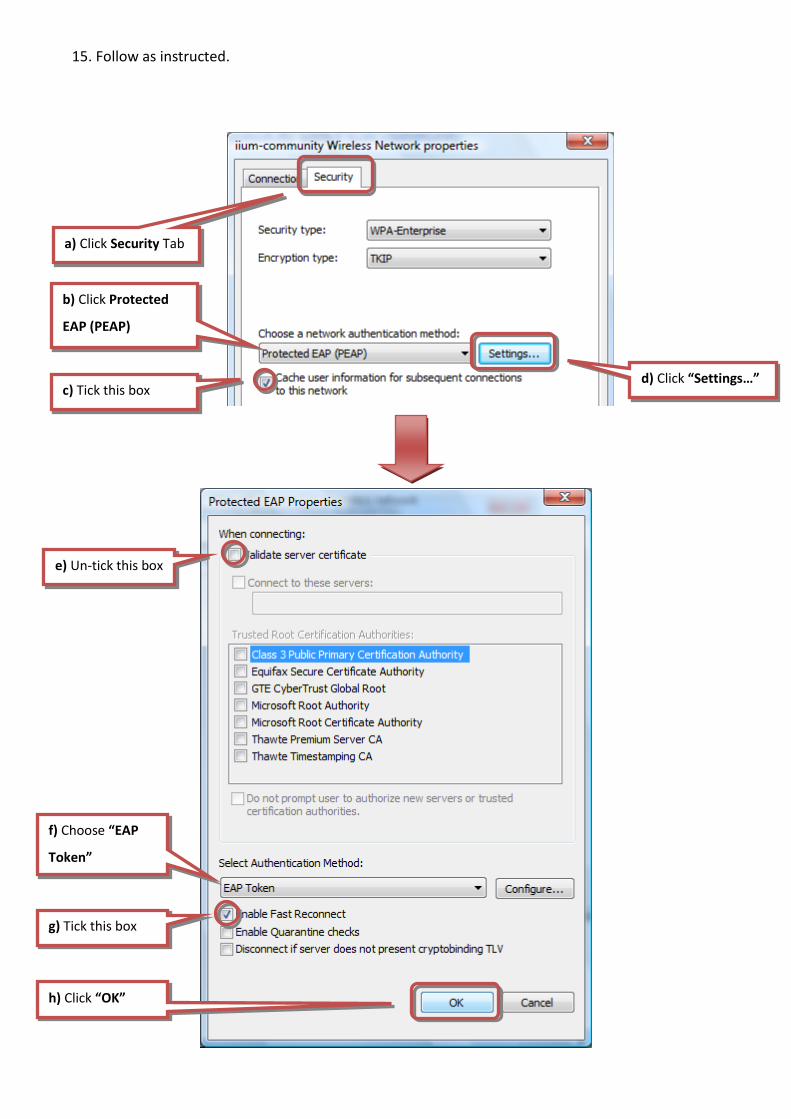
15. Follow as instructed.
a) Click Security Tab
b) Click Protected
EAP (PEAP)
c) Tick this box
x
d) Click “Settings…”
x
e) Un-tick this box
x
g) Tick this box
x
f) Choose “EAP
Token”
x
h) Click “OK”
x

16. Wait until network pop-up menu appear. If the pop-up menu not appears, turn OFF your wireless
device and then turn it ON again. Please CLICK on the pop-up menu to enter credentials
17. Enter “User name” and “password”…and DONE!
If you still face a problem, please email your Matric Number, Phone Number and your MAC Address to
------------------------------------------------------------END OF PAGE----------------------------------------------------------------
Please click on the pop-up menu
Logon domain: <leave it blank>
Finally, click here
User name: Matric Number e.g.: 0512345 (Undergrade)
G0912345 (Postgrade)
Password: Student Pin Number
Frequent Asked Question
a) What is a wireless network?
Wireless Local Area Network “WLANs”, specifically those supported by the popular 802.11 standards
family such as 802.11a, 802.11b, and 802.11g. Another term frequently used for WLANs is “Wi-Fi”. A
Wireless LAN is a type of local area network that uses high Radio Frequency (RF) waves rather than
network cable to communicate between noted.
b) How fast is the connection?
The IIUM Campus Wide Wireless Network maximum can operate at 54Mbps with IEEE 802.11a or IEEE
802.11g standard. Technologically, it is a shared access medium. This means it depends on how many
users are connected to the wireless access point. If there are many people connected to the wireless
access point, the slower the connection will become. Besides that, the encryption transmission (WPA)
will also affect the wireless speed, but this is important for wireless security purpose.
c) How to login and use wireless?
For Staff
username: email username
password: email password
For student
username: matric number
password: pin number
d) PC Minimum Requirement
The minimum system requirements for the mobile user PC are:
System hardware
PC or notebook support wireless
Wireless LAN IEEE 802.11b/g Adapter (Wi-Fi compatible)-PCMCIA, USB or built in (Centrino, etc).
Handheld, Pocket PC, Palm support wireless
System Software
One of the following:
Microsoft Windows XP Professional
Microsoft Windows 2000
Macintosh
Linux Ubuntu 8.04
Windows Vista (not recommended yet by ITD IIUM)
for easiness, please downgrade your Vista to Win XP
Additional Software
Microsoft Internet Explorer 6.0 with Service Pack 2
Netscape navigator 4.75
Any Browsers.
e) What cause wireless connection problems?
• Disabled wireless network adapters.
• Incorrectly configured wireless network settings.
• Insufficient credentials for authentication or missing permissions for authorization
• Distance, interference, or obstructions between wireless devices
f) Why the status is validating identity?
Few reasons why the status still on validating identity
Wireless client or adapter not running properly (please restart again)
Laptop infected with viruses, spyware, malware, adware, worms or Trojan-horse
The operating system is not genuine
Wireless account blacklisted by the administrator (security threat etc)
g) What to do when Windows Vista shows limited connection OR connected with limited access?
Windows Vista Wi-FI security was designed with two type of WPA which is personnel and enterprise.
While the other operating system just simply WPA only.
When you are connected but limited access, shutdown your laptop for a few minute and restart
again.
Enter again your credential info if required
Windows Vista not recommended by IIUM Wi-Fi admin - use at your own risk
The best way is to use normal Windows XP, Macintosh (MacBook) or Ubuntu 8.04
h) Why the registration setup is complicated and it is not as easy as at any public Wi-Fi such as Starbuck,
Secret Recipe, Coffee Bean or Kotiam Cafe?
The registration setup is complicated just because to ensure that all traffic travel in the air is
encrypted and secured. Public Wi-Fi does not have security features and it is open to risk. What
ever you send can be simply sniffed by unauthorized hacker. IIUM Wi-Fi offers guaranteed secure
connection and all information are encrypted. Secure environment setup is known to be a quit
complicated to non-IT savvy users.
i) Why IIUM Wi-Fi use WPA and not WEP or WPA2?
WEP key can be cracked less then 5 minutes. WPA setting is quit secure enough. WPA2 has strong
security features and more complicated to setup compared to WPA setting. In average, not many
devices own by IIUM Community supported WPA2. ITD will enhance its security using WPA2 in the
future.