
Getting Started Mac OS X Server
24
Getting Started With Mac OS X Server
Transcript of Getting Started Mac OS X Server

Getting Started With
Mac OS X ServerIncludes installation and setup informationfor Mac OS X Server version 10.2
034-2128.S4-GSCover 6/28/02 4:32 PM Page 1
K
Apple Computer, Inc.
©
2002 Apple Computer, Inc. All rights reserved.
Under the copyright laws, this publication may not be copied, in whole or in part, without the written consent of Apple.
The Apple logo is a trademark of Apple Computer, Inc., registered in the U.S. and other countries. Use of the “keyboard” Apple logo (Option-Shift-K) for commercial purposes without the prior written consent of Apple may constitute trademark infringement and unfair competition in violation of federal and state laws.
Apple, the Apple logo, AppleScript, AppleShare, AppleTalk, ColorSync, FireWire, Keychain, Mac, Macintosh, Power Macintosh, QuickTime, Sherlock, and WebObjects are trademarks of Apple Computer, Inc., registered in the U.S. and other countries. AirPort, Extensions Manager, Finder, iMac, and Power Mac are trademarks of Apple Computer, Inc.
Adobe and PostScript are trademarks of Adobe Systems Incorporated.
Java and all Java-based trademarks and logos are trademarks or registered trademarks of Sun Microsystems, Inc. in the U.S. and other countries.
Netscape Navigator is a trademark of Netscape Communications Corporation.
RealAudio is a trademark of Progressive Networks, Inc.
©
1995–2002 The Apache Group. All rights reserved.
UNIX is a registered trademark in the United States and other countries, licensed exclusively through X/Open Company, Ltd.
ContentsPreface Getting Started 5
Setup Overview 5
For More Information 5
1 Setting Up Your Server 7
Server System Requirements 7
Overview of Installation and Setup Options 7
Installing the Server Software 8
Local Installation 8
Remote Installation 8
Using the Setup Assistants 9
What You Need to Know 10
Local Setup 10
Remote Setup 10
Moving the Server After Installing the Software 11
Setting Up an Administrator Computer 11
Administrator System Requirements 11
Installing the Administrator Software 12
Setting Up Basic Services 12
Setting Up User Accounts 12
Setting Up File Sharing 13
Setting Up Printers 13
Setting Up Email 14
Hosting Web Sites 14
3
Setting Up User Work Environments 15
Setting Up Operating System Images for Client Computers 15
Managing Your Server 15
Workgroup Manager 15
Server Settings 16
Server Status 16
Server Monitor 17
Macintosh Manager 18
Other Applications 18
2 Setup Example 19
Mac OS X Server in a Classroom 19
How to Set It Up 20
Step 1: Set up the network 20
Step 2: Install and set up the server software 20
Step 3: Set up the student information and authentication directory 21
Step 4: Set up the server to host student home directories 21
Step 5: Create student accounts 22
Step 6: Add applications to each student’s dock 22
Step 7: Set up shared folders 23
Step 8: Provide shared access to the network printer 23
Step 9: Provide controlled access to the teacher’s printer 23
Step 10: Set up the student computers 24
4 Contents
P R E F A C E
Getting StartedWelcome to Mac OS X Server version 10.2. This guide will help you install the software and get your server up and running quickly.
Setup Overview
1 If you’re new to servers, you may want to review the setup example in Chapter 2 before you begin.
2 If you are currently using an older version of Mac OS X Server, AppleShare IP, or Macintosh Manager, and you want to retain your current server configuration, review Upgrading to Mac OS X Server. You’ll find a copy of this document at www.apple.com/macosx/server/migration/
3 If you are setting up a remote server or a server with no display attached (a “headless” server such as Xserve), set up an administrator computer from which you can set up the server. See “Setting Up an Administrator Computer” on page 11.
4 Install Mac OS X Server on the server computer. See “Installing the Server Software” on page 8.
5 Run the Server Assistant and Open Directory Assistant. See “Using the Setup Assistants” on page 9.
6 Set up the services you want your server to provide. See “Setting Up Basic Services” on page 12.
For More Informationm Read Me documents: Contain important updates and special information. Look for these
documents on the Mac OS X Server CDs.
m Online help: Provides onscreen instructions for all administration tasks, and includes late breaking news and Web updates. After you install the software, choose Mac Help from the Help menu.
5
2 Follow the onscreen instructions.
If you don’t complete the setup immediately after restarting the remote server, you can rerun the assistant later.
To rerun the assistant for a remote server:
1 On your administrator computer, open the Server Assistant.
2 On the assistant’s Welcome pane, choose “Create an administrator account and configure basic services.”
3 On the Remote Setup pane, select the server computer and type its password.
The password is the first 8 digits of the server’s built-in hardware serial number. You can use Apple System Profiler to find a server’s serial number, or you can look for a label on the server.
If you are installing on an older computer that has no built-in hardware serial number, use 12345678 for the password.
4 Follow the onscreen instructions to finish the setup.
Moving the Server After Installing the Software
The Server Assistant opens the Open Directory Assistant for you. However, if you plan to move the server to another IP subnet after installing the server software, you need to run the Open Directory Assistant separately after moving the server to its permanent subnet.
To move a server to a different location and finish setup:
1 When the Open Directory Assistant asks if your server is in its permanent location, click No.
2 Move the server to its permanent subnet.
3 Open the Open Directory Assistant (in /Applications/Utilities) and follow the onscreen instructions.
Setting Up an Administrator Computer
If you want to install Mac OS X Server remotely or on a computer that has no display or keyboard attached, you must first set up an administrator computer. You use the administrator computer to control the installation and setup of the server. Later, you can use the administrator computer to manage the server remotely.
Administrator System Requirements
You can install the server administration software on any of these computers:
m Power Mac G4 or Macintosh G4 Server
m Power Macintosh G3 or Macintosh G3 Server
Setting Up Your Server 11
m PowerBook
m iBook
m iMac
m eMac
An administrator computer must have
m Mac OS X 10.2 or Mac OS X Server version 10.2
m at least 128 MB of RAM
m at least 1 GB of unused disk space
Installing the Administrator Software
The Mac OS X Server Admin Tools CD contains the software you need to remotely administer a server.
To install the remote administration software:
1 Insert the Mac OS X Server Admin Tools CD in the computer you will use to manage your server (your “administrator computer”).
2 Run the installer and follow the onscreen instructions.
Now you can use the administrator computer to install, set up, and manage Mac OS X Server on other computers. See “Remote Installation” on page 8 and “Remote Setup” on page 10.
Setting Up Basic Services
Review the following sections for pointers to getting basic services running quickly.
Setting Up User Accounts
Unless you are using your server exclusively to host Web pages or other Internet content, you probably want to set up other user accounts in addition to the administrator account that the Server Assistant created for you.
To set up user accounts:
1 Open the Workgroup Manager application (its icon is in the Dock), log in, and click the Accounts button.
2 Choose the directory where user information will be stored from the At pop-up menu in the lower-left corner of the window.
3 Choose New User from the Server menu.
4 Specify user settings in the tabs that appear.
12 Chapter 1

For more information on setting up user and group accounts, see Chapter 3, “Users and Groups,” in the Mac OS X Server Administrator’s Guide.
Setting Up File Sharing
When you turn on file sharing services, users can share items in selected folders.
If you turned on Apple file service in the Server Assistant, server users can already share items by putting them in the Public folders in their home directories or by copying the items into the Drop Box folder inside another user’s Public folder.
If you did not turn on Apple file service in the Server Assistant, you can turn it on now, or you can turn on one of the other available file services.
To set up file sharing:
1 Open the Server Settings application (click its icon in the Dock) and click the File & Print tab.
2 Turn on the file services you want to use.
m To share with Macintosh computers, turn on Apple file service.
m To share with Windows computers, turn on Windows service.
m NFS, for sharing with Unix computers, is already on.
m To provide File Transfer Protocol access, turn on FTP service.
3 Open Workgroup Manager and click Sharing.
4 Select a volume or folder you want to share from the All list.
5 Click the General tab, select “Share this item and its contents,” and click Save.
For more information on setting up file sharing, see Chapter 4, “Sharing,” and Chapter 5, “File Services,” in the Mac OS X Server Administrators’ Guide.
Setting Up Printers
When you turn on print service, server users can share network PostScript printers or USB PostScript printers connected directly to the server.
If you turned on print service in the Server Assistant, the service is already running and a queue is set up for any USB printer connected to the server. No printer queues are set up automatically for network printers.
If you did not turn on print service in the assistant, you can turn it on now and add a printer.
To set up shared printers:
1 Open the Server Settings application.
2 Click Print on the File & Print tab and choose Start Print Service.
Setting Up Your Server 13
If you have a USB PostScript printer attached to the server, it is ready to use. To add a network printer, continue with the next step.
3 Click Print and choose Show Print Monitor.
4 Click New Queue.
5 Choose a connection protocol and printer, then click Add.
Users of Mac OS X computers can now add the printer using the Print Center. Mac OS 8 or Mac OS 9 users can do the same using the Chooser.
For more information setting up printing services, see Chapter 7, “Print Service,” in the Mac OS X Server Administrators’ Guide.
Setting Up Email
If you didn’t turn on email service in the Server Assistant, you can start it now.
To start email service:
1 Open Server Settings and click the Internet tab.
2 Click Mail Service and choose Start Mail Service.
Providing full mail service for your users requires additional configuration. For more information on setting up email, see Chapter 9, “Mail Service,” in the Mac OS X Server Administrators’ Guide.
Hosting Web Sites
You can use the Apache HTTP Server that comes with Mac OS X Server to host server and individual user Web sites.
If you turned on Web service in the Server Assistant, your server is ready to serve HTML pages from the general server and individual user sites folders.
m To view the main server site, open a Web browser on any computer with access to the server and type the server’s IP address (or domain name, if you have DNS set up).
m To view a user site, add a slash (/), a tilde (~), and the user’s short name after the server address. For example, http://192.268.2.1/~aldo
If you didn’t turn Web service on using the assistant, you can do so now.
To start Web service:
1 If you already have the HTML files for your main site, copy them into the Documents folder in the /Library/WebServer directory. For a user site, the files go in the Sites folder in the user’s home directory. If the files that make up your site are organized in folders, copy the entire folder structure to the Documents folder.
14 Chapter 1
If you don’t have your own HTML files yet, you can still turn on the Web service to see how it works using the default start pages included with Mac OS X Server.
2 Open Server Settings and click the Internet tab.
3 Click Web and choose Start Web Service.
For more information on setting up Web service, see Chapter 8, “Web Service,” in the Mac OS X Server Administrator’s Guide.
Setting Up User Work Environments
Your server can provide users with customized desktop environments. You can tailor specific sets of resources such as applications, printers, and directory servers for specific users, groups of users, or computers.
For details on setting up managed user work environments, see Chapter 6, “Client Management: Mac OS X,” or Chapter 10, “Client Management: Mac OS 9 and Mac OS 8,” in the Mac OS X Server Administrators’ Guide.
Setting Up Operating System Images for Client Computers
For details on using NetBoot and Network Install to simplify the management and installation of client operating systems and other software, see Chapter 12, “NetBoot,” and Chapter 13, “Network Install,” in the Mac OS X Server Administrator’s Guide.
Managing Your Server
The following paragraphs provide a brief introduction to the main software tools included with Mac OS X Server to help you manage your server.
Workgroup Manager
Use Workgroup Manager to administer user, group, and computer accounts; set up share points; and manage Mac OS X clients.
To open Workgroup Manager:
m Click the Workgroup Manager icon in the Dock or look in /Applications/Utilities.
Here are some of the tasks you can accomplish using Workgroup Manager:
m To administer user, group, or computer accounts, click the Accounts icon in the toolbar. For more information, see Chapter 3, “Users and Groups,” and Chapter 6, “Client Management: Mac OS X,” in the Mac OS X Server Administrator’s Guide.
m To work with preferences for managed users, groups, or computers, click the Preferences icon in the toolbar. See Chapter 6, “Client Management: Mac OS X,” in the Mac OS X Server Administrator’s Guide for instructions.
Setting Up Your Server 15
m To work with share points, click the Sharing icon in the toolbar. See Chapter 4, “Sharing,” in the Mac OS X Server Administrator’s Guide for instructions.
m To work with accounts in different directory domains at the same time, open multiple Workgroup Manager windows by choosing the New Workgroup Manager Window command from the Server menu.
m To open Server Status so you can monitor the status of a particular server, click the Status icon in the toolbar. For more information, see “Server Status” on page 16.
m To open Server Settings so you can work with a server’s file, print, mail, Web, NetBoot, and network settings, choose the Configure Services command from the Server menu. See “Server Settings” on page 16 for more information.
m To control the way Workgroup Manager lists users and groups, whether it should use SSL transactions, and other behaviors, choose the Preferences command on the Workgroup Manager menu.
m To customize the Workgroup Manager toolbar, choose the Customize Toolbar command from the View menu.
m To view online help, use the Help menu. It provides regularly updated Web-based help about Workgroup Manager and other Mac OS X Server topics.
Server Settings
Use the Server Settings application to change settings for file, print, mail, Web, NetBoot, and network services.
To open Server Settings:
m Click the Server Settings icon in the Dock or look in /Applications/Utilities.
Click the service icons arranged in the Server Settings tabs to choose commands for working with individual services.
Server Status
Use the Server Status application to view the state of the server and the individual services it provides. Available information varies from service to service, but includes information such as configuration summaries, current state, lists of connected clients, utilization summaries or graphs, and service logs.
To open Server Status:
m Click the Server Status icon in the Dock or look in /Applications/Utilities.
Select items in the Devices & Services list to monitor specific servers and services running on the servers:
16 Chapter 1
m To add a server to the Devices & Services list, choose the Connect command from the Server menu and log in to the server. The next time you open Server Status, servers you have added are displayed in the Devices & Services list and can be monitored again by clicking them in the list. (If a server is gray in the list, double-click it and log in again. To avoid having to reconnect, select the “Add to Keychain” option in the login dialog,)
m To review general status information for a particular server, select the server name.
m To review status information for a particular service running on a server, click the arrow next to the server name to see a list of its services. Then select the service of interest.
m To remove a server from the Devices & Services list, select the server, click Disconnect, and choose the Remove From List command from the Server menu.
m To control the way Server Status lists servers and services, how often status data is refreshed, and other behaviors, choose the Preferences command on the Server Status menu.
m To customize the Server Status toolbar, choose the Customize Toolbar command on the View menu.
m To view online help, use the Help menu. It provides regularly updated Web-based help about Server Status and other Mac OS X Server topics.
Server Monitor
Use Server Monitor to keep track of the state of Xserve hardware and trigger email notifications when circumstances warrant attention. Server Monitor shows you information about the installed operating system, drives, power supply, enclosure and processor temperature, cooling blowers, security, and network.
To open Server Monitor:
m Click the Server Monitor icon in the Dock or look in /Applications/Utilities.
Use the application to monitor local or remote servers:
m To specify a server to monitor, click Add Server, identify the server, and enter administrator and password information.
m Use the “Update every” pop-up list to specify how often you want to refresh data.
m Use the Export and Import commands in the File menu to manage different lists of servers you want to monitor. The Merge command lets you consolidate lists.
m The system identifier lights on the front and back of an Xserve server light when service is required. Use Server Monitor to determine why the lights are on. You can also turn the lights on so you can find a particular server in a rack of servers by selecting the server and clicking “system identifier light on” in the Info tab.
m You can set Server Monitor to notify you by email when a server’s status changes. For each server, you can set up the conditions that you want notification about.
Setting Up Your Server 17
m Server Monitor keeps logs of Server Monitor activity for each server. You can also use Server Monitor to get an Apple System Profiler report on a remote server.
Macintosh Manager
Use Macintosh Manager to manage user work environments on Mac OS 8 and 9 clients.
To open Macintosh Manager:
m Click its icon in the Dock or look in /Applications/Utilities.
For more information, see Chapter 10, “Client Management: Mac OS 9 and OS 8,” in the Mac OS X Server Administrator’s Guide.
Other Applications
Mac OS X Server includes a number of other specialized applications for managing various aspects of your server, such as Streaming Server Admin for setting up and managing QuickTime Streaming Server, MySQL Manager for working with the version of MySQL that comes with Mac OS X Server, and the NetBoot Administration Tools.
For a complete list of server-related software, see Chapter 1, “Administering Your Server,” in the Mac OS X Server Administrator’s Guide.
18 Chapter 1

C H A P T E R
2
2 Setup ExampleIf you’re not sure how to set up your server, you might find it useful to review the simple setup example in this chapter.
Mac OS X Server in a Classroom
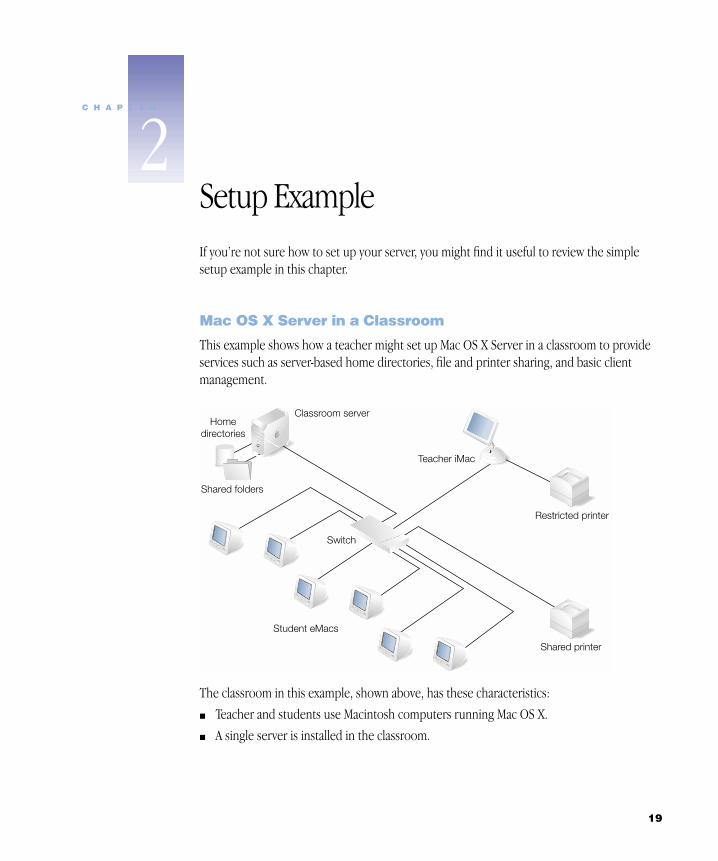
This example shows how a teacher might set up Mac OS X Server in a classroom to provide services such as server-based home directories, file and printer sharing, and basic client management.
The classroom in this example, shown above, has these characteristics:
m Teacher and students use Macintosh computers running Mac OS X.
m A single server is installed in the classroom.
Switch
Student eMacs
Teacher iMac
Restricted printer
Shared printer
Homedirectories
Classroom server
Shared folders
19
m Student computers, the teacher’s computer, the shared printer, and the server are connected to a single hub or switch.
m There are no external network or Internet connections.
m Student home directories are stored on the server.
m The teacher uses shared folders on the server to distribute assignment materials.
m Students use shared folders on the server to submit completed assignments.
m Students share an AppleTalk network printer.
m The teacher selectively makes available a color USB printer connected to his or her iMac.
m A shared set of applications appears in each student’s Dock.
How to Set It Up
The following steps show how to set up Mac OS X Server in this hypothetical classroom.
Step 1: Set up the network
1 Connect the server, the student and teacher computers, and the network printer to an Ethernet hub or switch using good-quality CAT-5 Ethernet cables. A high-speed 10/100/1000 megabit switch is recommended because some advanced server features work best over a fast connection.
In this classroom, for example, some security and flexibility is gained by storing student home directories on the server, but it places extra demands on the network connection. The teacher might also decide later to have student computers start up from a single system folder stored on the server using NetBoot, which works best on a fast network. For these reasons, a fast switch is used.
2 Each device connected to the classroom network also needs an IP address. Because this classroom is not connected to the Internet or any other network, you can assign server and client computers with arbitrary addresses from the private range 10.0.0.1 through 10.255.255.254 with a subnet mask of 255.0.0.0.
Optionally, instead of setting up each student computer with a specific address, you could set up the server to provide IP addresses automatically using the Dynamic Host Configuration Protocol (DHCP), or you can assign a single address to the server and let the student and teacher computers self-assign addresses as they are turned on.
Step 2: Install and set up the server software
1 Restart the server computer from the Mac OS X Server Installation CD (hold down the C key on the keyboard while you restart the computer). The installer application runs automatically when the computer starts up. Follow the onscreen instructions.
20 Chapter 2
2 When the installer is finished and you restart the server, the Server Assistant opens. On the assistant’s Administrator pane, enter an administrator name and password you can remember. You’ll need these to make changes to the server.
3 On the Global TCP/IP & AppleTalk pane, enter the same name for both the server’s host name and computer name. The server in this example doesn’t rely on Domain Name System (DNS) services, so you don’t need to enter a name server address or a search domain.
4 On the Port Planning pane, turn on AppleTalk for access to the networked AppleTalk printer.
5 On the TCP/IP Connection pane, enter 10.0.0.1 for both the IP address and router address, and 255.0.0.0 for the subnet mask.
6 On the Services pane, turn on Apple file service and Print service.
7 On the final pane, click Go Ahead to finish basic server setup. The Open Directory Assistant opens to help you finish server setup.
Step 3: Set up the student information and authentication directory
When the Server Assistant is finished, it automatically opens the Open Directory Assistant. This assistant helps you set up a directory containing student information needed by the server and student computers.
1 On the assistant’s Location pane, click to indicate that the server is connected at its permanent network location.
2 On the Directory Use pane, click to indicate that the server will provide directory information to other computers.
3 On the Configure pane, you don’t need to enable LDAP support for this server. It will use a NetInfo directory by default.
4 On the Security pane, set the server to provide password and authentication information to other systems. When asked for an administrator name and password, use the same one you specified in the Server Assistant.
5 When you are asked to choose an authentication protocol, accept the default, which works well for the relatively secure network in this example.
6 On the Finish Up pane, click Restart. The assistant configures the server for use.
Step 4: Set up the server to host student home directories
After the server restarts, you can set up the shared directory where student home directories will be stored.
1 On the server, open the Workgroup Manager application. When prompted, type your server administrator name and password and click Connect.
Setup Example 21
2 Click Sharing in the upper-left corner of the window, then select the Users folder in the list of share points.
3 Click the lock in the Automount tab and authenticate
4 Check the box next to “Automount this item to clients in domain” and choose Netinfo/root from the pop-up menu.
5 Click Save.
Step 5: Create student accounts
Now you can set up a user account for each student.
1 Open the Workgroup Manager application and, if necessary, click the lock icon in the lower-left corner of the window and enter your administrator name and password so you can make changes.
2 Click the Users tab, then click New Record.
3 Click the Basic tab and enter a name and password for a student.
4 Click the Home tab, select Network as the location of the user’s home directory and select the sharepoint named “Users.”
5 Repeat steps 2–4 for each student.
Step 6: Add applications to each student’s dock
You can use the client management features to present each student with a specially prepared work environment. In this example, you’ll add standard applications to each student’s Dock.
1 On the server, install the applications that you want students to be able to use.
2 Open Workgroup Manager, click Preferences, and Command-click users in the user list to select all of the students so you don’t have to adjust their settings individually.
3 Click the Applications preferences icon.
4 Click Always next to “Manage these settings” so students can’t change the settings, then choose the applications you want the students to be able to use from the list. When you’ve finished, click Apply Now, then click Done.
5 Click the Dock preferences icon.
6 Next to “Manage these settings” click Once or Always, depending on whether you want students to be able to change the Dock that you set up for them.
7 Click the Add button next to the Applications or Documents lists and add the items you want to appear in each student’s dock. When you’ve finished, click Apply Now, then click Done.
22 Chapter 2
Step 7: Set up shared folders
Because you turned on Apple file service in the Server Assistant, the teacher and students can already use their home directory Public folders and the Drop Box folders within to share files. You can create and share other folders to suit the needs of the class.
For example, to set up a shared assignments folder:
1 On the server, create a new folder named Assignments.
2 Open Workgroup Manager and click Sharing.
3 In the All tab, locate the Assignments folder, select it, and click “Share this item and its contents” in the General tab.
Step 8: Provide shared access to the network printer
To give the students access to the network printer, use Server Settings to set up print service:
1 Turn on the printer.
2 Open the Server Settings application, click Print in the File & Print tab, and choose Show Print Monitor.
3 Click the New Queue button, choose AppleTalk from the pop-up menu, select the printer, and click Add.
4 Open Workgroup Manager, click Preferences, and Command-click users in the user list to select all of the students.
5 Click the Printing preferences icon.
6 Click Always next to “Manage these settings” so students can’t change the settings.
7 Add the printer to the user’s printer list, click Apply Now, then click Done.
8 Click Accounts in the upper-left corner of the Workgroup Manager window.
9 Select the students in the user list, click the Print tab, click Per Queue, choose the printer from the Queue Name pop-up list, and enter the server’s IP address (10.0.0.1) in the Print Server field.
Step 9: Provide controlled access to the teacher’s printer
You can add a queue for the teacher’s printer, as in Step 8, and then control access to the printer on a student-by-student basis by selecting a student’s account in Workgroup Manager and temporarily switching from Per Queue to All Queues in the user’s Print tab.
Setup Example 23
Step 10: Set up the student computers
On each student computer:
1 Open System Preferences, click Network, and choose Built-in Ethernet from the Show pop-up menu.
2 In the TCP/IP tab, choose Manually from the Configure pop-up menu.
3 Type a unique IP address from the range 10.0.0.2 through 10.255.255.254 in the IP address field, 255.0.0.0 in the Subnet Mask field, and 10.0.0.1 in the Router field.
4 Click Apply Now and quit System Preferences.
5 Open Directory Access and enable NetInfo.
6 Select NetInfo and click Configure.
7 Click the checkbox next to “Attempt to connect to a specific NetInfo server.”
8 Type the server’s IP address (10.0.0.1) in the Server Address field, “network” in the Server Tag field, click OK, then click Apply.
A student can now log in to any student computer using the name and password you assigned when you created the account in Workgroup Manager. The student’s home directory is also available regardless of the computer he or she uses, and the student will have access to shared folders and the shared printer.
24 Chapter 2


![Skaffold - storage.googleapis.com · [getting-started getting-started] Hello world! [getting-started getting-started] Hello world! [getting-started getting-started] Hello world! 5.](https://static.fdocuments.net/doc/165x107/5ec939f2a76a033f091c5ac7/skaffold-getting-started-getting-started-hello-world-getting-started-getting-started.jpg)


