Getting Started in Blackboard - BUILDING & REAL …€¦ · This guide has been designed to help...
26
1 Getting Started in Blackboard
-
Upload
truongxuyen -
Category
Documents
-
view
216 -
download
0
Transcript of Getting Started in Blackboard - BUILDING & REAL …€¦ · This guide has been designed to help...

1
Getting Started in Blackboard

2
How to Use this Guide This guide has been designed to help academic staff get started in Blackboard 9.1. It assumes no previous knowledge of Learning Management Systems. Individual sandbox courses have been created in Blackboard in conjunction with this guide. You can either access specific tasks or work through the whole document. Purpose of this Document The aim of this document is to introduce Blackboard 9.1 to academic staff who are interested in creating and customising web-based learning and teaching content for their students. Different Users of Blackboard
• Teachers/Instructors • Teaching Assistants • Students • Course Designers/Builders • Graders • System Administrators
Learning Outcomes When you have completed the tasks in this guide you should be able to:
• Log into Blackboard, and edit your profile. • Navigate around various views of Blackboard and find the key features. • Customise your Blackboard course web site. • Upload, add, modify and remove some basic resources/activities to your course.
Blackboard Resources Blackboard provides a wide range of online resources for users that can be accessed within the learning management environment. The Help guide (in the Control Panel) and On Demand video tutorials are particularly useful. More resources can be found on the PolyU wikispaces site - http://blackboard-polyu.wikispaces.com/. Everyone is free to add to this wiki. The LMS Transition website also has useful information – http://newlms.polyu.edu.hk. Contacts:
• ITS: [email protected] • EDC: [email protected] (Ian); and [email protected] (Jenny)

3
Introducing the Course
You will use your Groupwise username and password. Browse to: http://learn.polyu.edu.hk Use your Groupwise username and password for entering Blackboard. You have been allocated the role of teacher in a sandbox (blank) course. You will also be enrolled as a student in another course. The format of these workshops will be hands-on giving you an overview of how you can use different types of features within Blackboard. In order to complete some of the tasks content files will have to be downloaded onto your desktop. More information will be given at the workshops.
1.1 Login details
1.2 Content files

4
Task 1. Logging into Blackboard and Orientation Learning outcomes After completing this task you should be able to:
• log into the Blackboard system. • know how and where to log out. • understand the Blackboard interface including the My Institution tab and
Notifications Dashboard. • know where the courses are. • customize the Welcome page.
Method Type in your username and password and log into Blackboard. Explore the entry page.
Blackboard provides a single entry point (LEARN@PolyU tab) to all your courses. The LEARN@PolyU tab contains modules. Modules are windows of content that organize content and links, and help users navigate to areas in their courses. The system
1.1 TASK: Logging in
1.2 TASK: Orientation
Browse to: http://learn.polyu.edu.hk Enter your Groupwise login details. Click on the Login button.

5
administrator can rename modules and determines which will appear when users log in to their courses for the first time. Modules on the LEARN@PolyU tab collect information from all the courses users are enrolled in.
The welcome page can be customized in different ways.
Courses you are enrolled on are listed
The logout facility appears in this part of the page throughout Blackboard.
Blocks with built-in tools are available and can be configured to be visible.
By default the LEARN@PolyU tab is shown when you first login. Also notice the other tabs.
1.2 TASK: Customizing Welcome Page
Click LEARN@PolyU. Click on each item to explore the interface. Make sure you know where to
find the courses you teach or study, how to access the built-in tools, and how to log out.
Find out what kind of content can be added and deleted. Try re-ordering the modules around using drag and drop, and the buttons in top right hand corner of boxes.
To move a module, point to the title bar to access the four arrows. Press and drag the module into its new location and release.
To change the colour of your page click on Personalize Page.
PolyU Hot Links

6
The Notifications Dashboard contains three basic modules that give information to users based on their enrollment and their role in the system. Users with multiple enrollments will receive information for all their classes.
Task 2. Changing your Personal Details Learning outcomes After completing this task you should be able to:
• edit your personal information • add an avatar image
Method You will access your own profile and add some information.
First click My Places at the top of the screen (near the Logout button)
Open My Places and then click on Personal Information or
Click on Personal Information in the Tools block in the Content panel.
2.1 TASK: Updating your details
1.3 TASK: Understanding the Notifications Dashboard

7
Then click Edit Personal Information
Add/change your email address. Scroll down and click on Submit at the bottom of the page to save your
changes.
Note • Some things cannot be changed for security reasons.
You can personalize your Blackboard space by adding an avatar image. This will appear throughout the course, e.g. in the page header, in various modules, and with blog entries. The image can be a photo of yourself or any other object. The recommended pixel size is 150 x 150.
Note:
• You can also add staff information for specific courses. Go to Contacts in Course Tools in
the Control Panel. Then click Create Contact. Here you can add the staff profile information
including photos and personal links.
2.2 TASK: Personalizing Blackboard
In My Places click on Personal Information. Then click Personalize My Places. Use custom avatar image. Browse for image. Choose links to display. Submit.

8
Task 3. Exploring a Course Web Site Learning outcomes After completing this task you should be able to:
• identify the courses you are working on. • use/understand the editing button, the main navigation area for content, and the
homepage.
Method You will access your sandbox course and explore some of the features of the interface.
You access a course by clicking its title on the LEARN@PolyU tab. Courses will vary in design depending on the instructor and the institution, but there are some common features.
The Welcome (Home) page is the default start page for new courses that can be changed by the instructor. It informs students of new content and due dates. It is divided into modules. The System Administrator can control which modules are made available on a course Home Page. Each instructor can then select which of those modules become visible. The modules are similar to those found on the LEARN@PolyU tab, but the information appearing pertains only to the course currently being viewed.
3.1 TASK: Accessing a course and the Home Page

9
Explore the course interface. Turn on Edit Mode to see instructor controls. This needs to
be ON to add, remove, and modify content and tools.
3.2 TASK: Exploring the course interface
Breadcrumbs Course Menu
Hide/Show Course Menu
Course banner area
Contextual Menus
Control Panel
Look at the courses you are enrolled on in the My Courses block. o SandBox_username. You have been enrolled as a teacher on
this course. (Use GroupWise details to log in). o SandBox_username_student001. You have been enrolled as a
student on this course. (Use special password to log in). o f2f Student Course. o Practice Course for f2f and Online.
Click on your Sandbox (teacher) course to see your course home page. Remember you are a teacher on this course.
You can add course modules and change the colour theme to customize the Home Page.
Content frame
Page header
Edit Mode

10
Courses in Blackboard contain content and tools for teaching & learning. The two narrower columns on the left contain information panels – the content panel or course menu (for developing content) and the Control Panel (for course management). Go to the top panel – the course menu. This is the main
access point for content. Several types of menu items can be included in a course menu.
Click on Information. This opens up a Content frame. It is currently empty but this is where you build content for course Information.
Course Content areas are used to organize all course content and materials (e.g. assignments, tests, discussion boards etc). There is no limit to the number of Content areas. They can be organized by subject, text book chapter, by time or by unit.
A course menu can include direct links to the most commonly used Course Tools, and direct links to other parts of the course for easier access. In addition External Links may also be added for important messages to students.
To add a new content area click on +, and then
type in a new name in the Create Content Area field, for example, Getting Started. Your new course content menu link appears. Create two more Content Areas: Chapter One, and Chapter Two.
Add a Tool Link to the course menu. Name it Bb Discussions. Select the
tool type – e.g. Discussion Board. Make it Available to Users. Submit. Add an External Link – Hong Kong PolyU. Enter its URL (including http://).
Make it Available to Users. Submit.
This icon means content is empty
3.3 TASK: Adding items to the Course Menu

11
Note:
• Checking Available to Users makes the course available to students.
Leaving it unchecked means the course can be developed before
being made available to students.
• Notice that each item in the panels have drop-down contextual menus with lists of options.
• Links can be hidden or shown to students.
• Content can be displayed in the content panel in lists or in folders.
Task 4. Course Settings Learning outcomes After completing this task you should be able to:
• customize some of your course settings. • know which settings can and cannot be changed.
Method You will use Customization in the Control Panel block to edit the customization properties of the course. Customization allows instructors to control how they present their courses in Blackboard. Changing the settings will affect your course and how the students interface the content. Note:
• The fields of some settings should be left to the default value.
• Not all settings can be customized by the instructor. Navigate to your course homepage (see Task 3.1 if unsure)
In the Control Panel block click on Customization
Click on Properties in Customization (Control Panel)
4.1 TASK: Accessing the course settings
4.2 TASK: Change settings of the Course – change classification, language pack, and choose the Course Files Default Directory.

12
In Classification select the subject area that best describes the course. Select a Chinese Language Pack (Make sure you know how to get back!) Look at the Course Files Default Directory. Notice how files can be saved in
different locations. Note:
• You can create a Web Folder and organize your Blackboard files on your desktop by setting
up a local network. Click on Styles in Customization Change the background colour of the menu bar Select a different Course Entry Point
4.3 TASK: Change Style settings of the Course – change menu style, content view, and Course Entry Point.

13
Task 5. An Introduction to Blackboard Tools Learning outcomes After completing these tasks you should be able to:
• find the Blackboard tools. • add an announcement to a course. • consult the course calendar.
In Blackboard 9.1 there are many different tools that you can use for your course. Many of the tools can be found in the Control Panel. It is used by instructors to manage all of the Course Tools.
We will look at many of these tools in more detail in the Communication and Assessment workshops . Method You will use Announcements in the Course Tools area of the Control Panel to place a course announcement. The Announcements tool is often used by instructors to communicate essential information, e.g. assignment due dates, exam schedules, reminders. Instructors can control the order of the announcements and the time they are displayed.
Click on CourseTools in the Control Panel to view the different tools.
You can also view them in Tools in the Content Panel.
To find out more click on Help in the Control Panel.

14
Click Announcements in the Course Tools area of the
Control Panel Click Create Announcement & enter details
Select Date Restricted and add dates (with boxes checked). Click on Submit to save changes.
Note:
• To change an existing announcement click edit from the contextual menu. • Use Email Announcement if you want the announcement to be sent by email to everyone
enrolled in the course. This will ensure that all users are aware of the announcement even if they do not login to the course. (Ask your Systems Administrator to enable this feature).
Return to the course Welcome page and go to My Announcements block.
In Subject box enter: Office Hours
In Message box add: Please note that my office hours this semester will be 10 - 6.
5.1 TASK: Adding an announcement
5.2 TASK: Viewing your announcement

15
You can see the headline of your post listed in the My Announcements block. Click on more to see the announcement in full.
Note:
• Announcements can also be seen in the What’s New block (if enabled). Students can consult the calendar to see events the instructor has added such as reminders of course meetings and due dates for assignments. It also allows the instructor to plan out activities for an entire semester before the first classroom sessions. (Some instructors may want to keep these things hidden.) Click Course Calendar in the Course Tools area of the Control Panel Select a Calendar view: Day, Week, Month, or Year. Click Create Course Event. Type Event Name: Blackboard training workshop 1 Type Event Description: Introduction to Blackboard 9.1 Type Event Date: 25 May 2011 Type Event Start and End Times: 10:00 – 12:00 Submit
The Event Name will appear as a link on the Course Calendar.
5.3 TASK: Adding events to the Course Calendar

16
Task 6. Uploading Course Materials & Creating Basic Content Learning outcomes After completing these tasks you should be able to:
• understand the Blackboard content management concept. • upload files. • move and delete folders and files. • linking to websites. • add YouTube content. • upload multiple files using Content Collection. • build a learning module. • understand the concept of Adaptive Release. • set review status.
Method You will use the Content block to upload course materials within Blackboard and make links to external websites. Note:
• In Blackboard you have to add the files to a content area associated with a course
before the learning material can be made available to students. All attached files are saved
in Course Files (AKA Manage Files in WebCT).
• It is very important to think about the structure of your information before you start to build
the course. It is a good idea to structure your information into folders. You can add different types of files (web pages, audio files, video files, Word documents, PowerPoint presentations, spreadsheets or Flash animations) into your course and they will be stored within the Blackboard server. Once your files are on the server they can then be moved, renamed, edited or deleted. A content area is a container for course material (e.g. syllabus, notes, tests, & assignments). First, you need to create a new Content area (see Task 3.3). In the Content panel click on +, and then type in a new name in the Create
Content Area field, for example, Blackboard Training. Make it available to students. Submit.
6.1 TASK: Accessing the content area and making a new content area

17
The new content area appears in the course menu. Open the content area, Blackboard Training. Look at the different options available.
One of the first things the students will look for is the course syllabus. (This file can be accessed from your desktop.) Click on Create Item. Insert Course Syllabus in the Name field. Add in the text field: This course will provide an introduction to Blackboard. Attach the file, Blackboard Syllabus. Under Options make content available and Schedule when it will be available. Submit
The new item and course description are displayed in the Blackboard Training content area.
6.2 TASK: Creating a new item for the content area

18
Click on Build Content and then Content Folder in the drop-down menu. Type in the folder name Unit 1 You have the option to add text to provide a description of the folder
contents. Leave this blank. In the Options section, allow users to view the content. Ignore the date restrictions option. Scroll down the page and press the Submit button.
The folder you have just created should now appear listed in the Content area. You can add content to this folder by repeating steps in Task 6.2 (after clicking on the name of the folder). You can move or copy content items from one of your courses to another of your courses, and from one folder to another folder in the same course. Open content area, Blackboard Training. Make sure Edit Mode is on. Select Copy from the contextual menu for
content item, Course Syllabus. Select the Destination Course from the
drop-down menu. (The default setting is the current course).
Browse to select the Destination Folder. Submit
Deleting folders or files is similar to copy and moving files. Click on the contextual menu of the content item you want to delete. Click Delete.
6.3 TASK: Creating a folder for the content area
6.4 TASK: Moving files
Click here for contextual menu.
6.5 TASK: Deleting files

19
Go into Blackboard Training and click on Build. In the drop-down menu click on URL. On the next screen type in a name: Blackboard MobileLearn
and a summary: Teaching with Blackboard. Type in the URL: http://www.niu.edu/blackboard/mobile/ Open in New Window. Keep other default settings. Submit.
In the Blackboard Training content area click on the Blackboard Learn link. It should appear in a popup window. Try again but this time don’t select New Window. See what happens. Content Collection provides central file storage for all content.
6.7 TASK: Uploading multiple files to a course (using Content Collection)
Expand Content Collection in Control Panel. Click All Courses Content. Open a course folder. Move cursor over Upload button and select
Upload Files from drop-down menu. Follow instructions on screen to drag and drop
content. (Java plug-in is required.) Click the Submit button.
6.6 TASK: Adding a website link
20
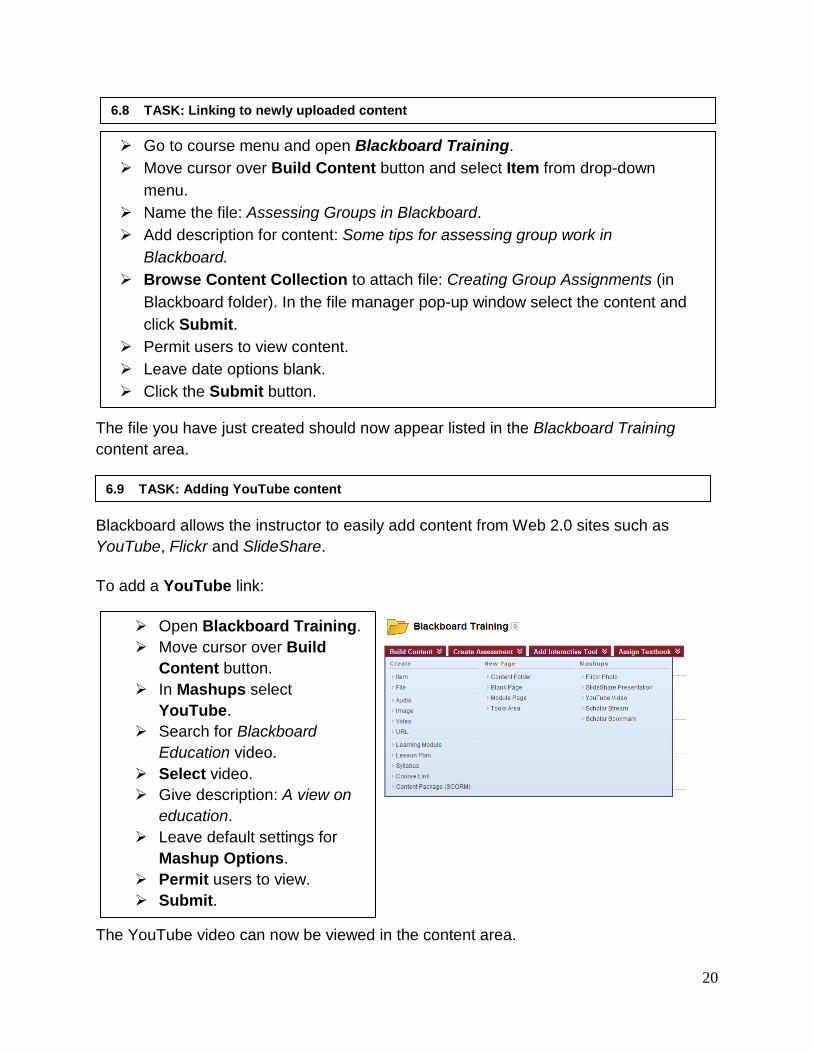
Go to course menu and open Blackboard Training. Move cursor over Build Content button and select Item from drop-down
menu. Name the file: Assessing Groups in Blackboard. Add description for content: Some tips for assessing group work in
Blackboard. Browse Content Collection to attach file: Creating Group Assignments (in
Blackboard folder). In the file manager pop-up window select the content and click Submit.
Permit users to view content. Leave date options blank. Click the Submit button.
The file you have just created should now appear listed in the Blackboard Training content area. Blackboard allows the instructor to easily add content from Web 2.0 sites such as YouTube, Flickr and SlideShare. To add a YouTube link:
The YouTube video can now be viewed in the content area.
6.8 TASK: Linking to newly uploaded content
6.9 TASK: Adding YouTube content
Open Blackboard Training. Move cursor over Build
Content button. In Mashups select
YouTube. Search for Blackboard
Education video. Select video. Give description: A view on
education. Leave default settings for
Mashup Options. Permit users to view. Submit.

21
Folders are an effective way to organize and structure content within a Content Area. However, content can also be viewed in a sequential manner using Learning Modules.
Click on the Build Content button in your Content Area and then Learning
Module in the drop-down menu. Type in the name Lecture Notes. Add text to provide a description of the folder contents: This folder will
contain copies of the daily lecture notes. In Availability allow users to view content but leave date options blank. In the View section, you can decide to allow users to progress through the
content sequentially if required. Show Table of Contents to users. Click the Submit button.
6.10 TASK: Building a Learning Module

22
Return to the Blackboard Training content area to view the learning module. Follow previous steps to add content inside the module.
Notice how the Table of Contents panel can be moved around.

23
Adaptive Release allows instructors to release content to students based on a set of rules (or criteria) related to, for example, availability, date and time, individual users and user groups, scores or attempts on any Grade Center item, or review status of another item in the course.
To create multiple rules on an item or for deleting rules, use Adaptive Release: Advanced. Review Status tracks user review of specific content items. It needs to be enabled by the System Administrator and also enabled by the Instructor for each content item to be tracked.
In the Control Panel go to Help and click on Video
Tutorials Click on Understanding & Building Your Course Watch the video Creating a Lesson Plan
6.11 TASK: Make a file viewable after a specific date (using Adaptive Release)
Open the Content Area, Blackboard Training.
Select Adaptive Release from the action menu for Course Syllabus.
Select a Date criterion. Look at the other options. Click the Submit button.
6.12 TASK: Setting Review Status
6.13 TASK: Using Help Tutorial Videos to Build Course Content

24
Open the content area, Blackboard Training.
Make sure Edit Mode is ON. Hover over Create Assignment
and select Assignment from list. Type in an Assignment name :
Blackboard Assignment 1. Write a Description for the assignment.
(These are the questions and instructions for the students to follow.)
Define Points Possible for Grade Make Available and specify attempts. Give Due dates for submission. Click Submit.
Task 7. Assignments Learning outcomes After completing these tasks you should be able to:
• Create an assignment in Blackboard (as an instructor). • Submit an assignment (as a student).
Method You will use the content area, Blackboard Training to create an assignment for your students, and use the Student course to submit the assignment. Instructors can create assignments that list the name, points value and description of the assignment. Files may be attached to Assignments. In Blackboard assignments are added to a content area. Students may access the assignment, complete it in a separate file, and send it back to the instructor. The instructor may respond to each student separately, sending comments about their individual assignment. Note:
• Once a student completes and submits an assignment, the instructor may access this file in the Grade Center.
Note:
• The instructor can add an assignment as an attachment.
7.1 TASK: Creating an Assignment (instructor)

25
You can use one of the dummy student accounts to access the student view. Log out of Blackboard as an instructor and then log back in as a student. To download, complete and submit an assignment the student needs to: Download assignment to their desktop (or mobile device). Students can
access their courses via the My Courses module. The assignment will be found in the content area.
Complete the assignment. Save and rename the file. Browse to completed assignment. Attach the file (and include a note in the
comments box). Submit to send it to the Grade Center.
Log out and log back in as an instructor.
7.2 TASK: Submitting an Assignment (student)
7.3 TASK: Grading an Assignment
Access course via the My Courses module. Click on Grade Center in the control panel and select Full Grade Center. Look for the Assignment. It will be the name of the last column (with a green
exclamation in the first row). Click on the contextualized drop-down menu in the first row. Locate the
submitted assignment by clicking on the Action Icon. Assess the assignment, and grade. This can be done in the text box in the
first row.

26
Note:
• Ungraded assignments are marked with a green exclamation mark. • The instructor can add an assignment as an attachment.
Students can check their grades by clicking on Check Your Grades in their course menu.
Action Icon
Assignment
7.4 TASK: Checking the Grades