Fundamentals of Galileo: Developmental Assessment€¦ · that regardless of where you are in...
70
Fundamentals of Galileo: Developmental Assessment
Transcript of Fundamentals of Galileo: Developmental Assessment€¦ · that regardless of where you are in...

Fundamentals of Galileo:
Developmental Assessment

©2014 Assessment Technology, Incorporated
Revised as of 05.05.14 1
Fundamentals of Galileo®: Developmental Assessment
Kerridan A. Kawecki, B.A.
Margaret A. Johnson, M.Ed.
Michelle C. Larson, M.P.H.
Assessment Technology Incorporated 6700 E. Speedway Boulevard
Tucson, AZ 85710 1.800.367.4762
www.ati-online.com
© Assessment Technology Incorporated 2014 “Galileo” and the Galileo logos are trademarks or registered trademarks of Assessment Technology Incorporated.
All rights reserved. No part of this document may be reproduced or transmitted in any form or by any means, electronic or mechanical, including photocopy, recording, or any information storage and retrieval system, without
permission from the publisher. Printed in the U.S.A

2 ©2014 Assessment Technology Incorporated
Revised as of 05.05.14
Page intentionally left blank

©2014 Assessment Technology, Incorporated
Revised as of 05.05.14 i
Fundamentals of Galileo®: Developmental Assessment
Table of Contents
Section 1: Getting Teachers Started-Basic Data Entry ................................. 1 Welcome to Galileo Technology ..................................................................... 1
How does Galileo Online benefit our staff and children? ................................. 1 What is the scientific basis underlying Galileo? ............................................. 1
Overview of Observation Process ................................................................... 2 Log In ........................................................................................................ 2 Navigating Around Galileo Online .................................................................. 4 Settings ..................................................................................................... 6
Year and Location Tab ............................................................................... 7 To set the program year ......................................................................... 7 To set the location ................................................................................. 7
Menu Tab ................................................................................................ 7 Report Format Tab ................................................................................... 8
Change Password ........................................................................................ 9 Check Your Class Roster ............................................................................. 10
Child Drop-Down List .............................................................................. 10 Class Roster Report ................................................................................ 11 Class Roster Not Up-to-Date .................................................................... 12
Section 2: Developmental Assessment and Individual Learning ................ 13 Developmental Assessment and Galileo Technology ....................................... 13
How do children benefit from developmental assessment? ........................... 13 How is assessment using Galileo different from past approaches? ................. 13 Path-Referenced Assessments .................................................................. 14
Early Intervention Educational Cycle ............................................................ 15 Enhance Observations ................................................................................ 15
Additional Galileo Resources .................................................................... 16 Head Start Framework ............................................................................... 17 Developmental Assessment Scales .............................................................. 18
Developmental Assessment Scales ........................................................... 18 Assign Scales ......................................................................................... 18 State Standards Alignment ...................................................................... 21
Galileo G3 Scales Alignment .................................................................. 21 Access Alignment Document ................................................................. 22
Scale Examples ...................................................................................... 22 View via Scale Report ........................................................................... 23 View via Observation Pages .................................................................. 24
Observations by Child ........................................................................ 25 Observations by Goal ........................................................................ 25 Observations by Class ....................................................................... 26
Copying Assessments ................................................................................ 26

Galileo® Pre-K Online
ii ©2014 Assessment Technology Incorporated
Revised as of 05.05.14
Purpose ................................................................................................. 26 Frequency ............................................................................................. 26 Steps .................................................................................................... 27 Review the Assessments ......................................................................... 30 Update Planning Levels ........................................................................... 30
Understanding Assessment in Galileo ........................................................... 31 When does assessment with Galileo begin? ................................................ 31 What is a Data Source? ........................................................................... 32 What does the “Amount Learned” tool do? ................................................. 32
What is a Developmental Level Score? ................................................... 33 What are Planning Levels? ....................................................................... 33
Setting Baseline with the “Amount Learned” Tool .......................................... 33 Points to Remember about the “Amount Learned” tool and Setting Baseline .. 36 Why use the “Amount Learned” Tool? ....................................................... 37
Observations by Child ................................................................................ 38 Steps .................................................................................................... 38 Record Anecdotal Notes (optional) ............................................................ 39
Manually Updating Planning Levels .............................................................. 41 Switching Between Automatic and Manual Update Caution ........................... 42
Option 1 ............................................................................................. 42 Option 2 ............................................................................................. 42
Observations by Goal ................................................................................. 43 Observation by Class ................................................................................. 44
Access Page ........................................................................................... 44 Record Anecdotal Notes (optional) ............................................................ 46 Record Learned Capabilities ..................................................................... 47 Edit and Print Anecdotal Notes ................................................................. 48
Edit Anecdotal Notes ............................................................................ 48 Print Anecdotal Notes ........................................................................... 49
For a Child ....................................................................................... 49 For the Entire Class ........................................................................... 49
Reports ................................................................................................. 49
Section 3: Other Tools ............................................................................... 51 AcuScreen ................................................................................................ 51 Child Notes ............................................................................................... 51
Add a New Child Note ............................................................................. 51 Edit a Child Note .................................................................................... 53 Delete a Child Note ................................................................................. 54 Print Child Notes .................................................................................... 55
Print based on publishing status ............................................................ 55 Print based on child ............................................................................. 56
Curriculum ............................................................................................... 56 Lesson Plans .......................................................................................... 56
Individualization .................................................................................. 57 Activities ............................................................................................... 57 Curriculum Maps .................................................................................... 58
Storyteller ................................................................................................ 58

Galileo® Pre-K Online
©2013 Assessment Technology Incorporated iii
Revised as of 05.05.14
Libraries ................................................................................................... 59 Monitoring Tools ........................................................................................ 59
Section 4: Classroom Scenarios ................................................................ 60 Setting Baseline Scenario ........................................................................... 60
How many? ........................................................................................... 60 Updating Observations Scenarios ................................................................ 61
Bread, Bread, Bread ............................................................................... 61 Playing Ball ............................................................................................ 61 Minky the Monkey .................................................................................. 62

Galileo® Pre-K Online
iv ©2014 Assessment Technology Incorporated
Revised as of 05.05.14
Page intentionally left blank

Galileo® Pre-K Online
©2014 Assessment Technology Incorporated 1
Revised as of 05.05.14
SECTION 1: GETTING TEACHERS STARTED- BASIC DATA ENTRY
WELCOME TO GALILEO TECHNOLOGY
HOW DOES GALILEO ONLINE BENEFIT OUR STAFF, CHILDREN AND SCHOOL READINESS
PLAN?
At ATI we want to help your staff meet the professional challenges of early childhood education and school readiness plan. Galileo technology will help you achieve this goal in several ways by enhancing your ability to:
1. Observe and understand how children develop.
2. Plan individualized learning opportunities.
3. Gather data showing you make a difference in the lives of children.
4. Implement developmentally appropriate curriculum.
5. Communicate with parents about children’s development.
6. Define school readiness goals consistent with state and local expectations.
7. Monitor children’s progress towards valued educational goals, including school readiness goals.
Galileo links and connects all aspects of the educational process. For example, in Galileo, assessment information is automatically linked to educational goals and
standards. Goals and standards are automatically linked to activities and lesson plans, which are connected to the monitoring of student progress. All of the teaching and learning that takes place has a purpose that can clearly be
documented. The circle is complete, the flow of information is continuous, and current data is always accessible for future decision-making.
WHAT IS THE SCIENTIFIC BASIS UNDERLYING GALILEO? Galileo is based on a program of research carried out over more than twenty years.
The research has focused on the assessment of children’s cognitive, social and physical development. As part of this research,
ATI has collected data on well over one
hundred thousand children. This effort has
made it possible for ATI to develop assessment and planning technology which reflects children’s growth. Additional information on
the research basis of Technical Manual: The Galileo System for the Electronic Management of Learning can be found on our website at www.ati-online.com, in the
Galileo Pre-K Online tab’s “Publications.”

Galileo® Pre-K Online
2 ©2014 Assessment Technology Incorporated
Revised as of 05.05.14
OVERVIEW OF OBSERVATION PROCESS To document an observation the following steps must be taken:
1. Verify your Galileo Class Roster to ensure that all children are listed. (Directions can be found in the Check Your Class Roster section, page 10.)
2. Print optional Worksheets/Reports directly from Galileo that may aid in documenting the observation(s).
Directions can be found in the “Fundamentals of Galileo: Reports”
manual.
3. Administer and document your observation(s) according to your agency’s
protocol. (Directions for documenting observations in Galileo found in Section 2: Developmental Assessment and Individual Learning section, page 13.)
4. Analyze the results of the observation(s).
Directions can be found in the “Fundamentals of Galileo: Reports” manual.
LOG IN Once you have received your official Galileo (or Galileo Plus with Merlin) login information, you will then be able to access the Galileo application. Galileo may be
accessed with your password from any computer that has an Internet connection and a supported browser.
1. Open your web browser.
OR
2. Type in Assessment Technology’s web address: www.ati-online.com.
Galileo® Pre-K Online
©2014 Assessment Technology Incorporated 3
Revised as of 05.05.14
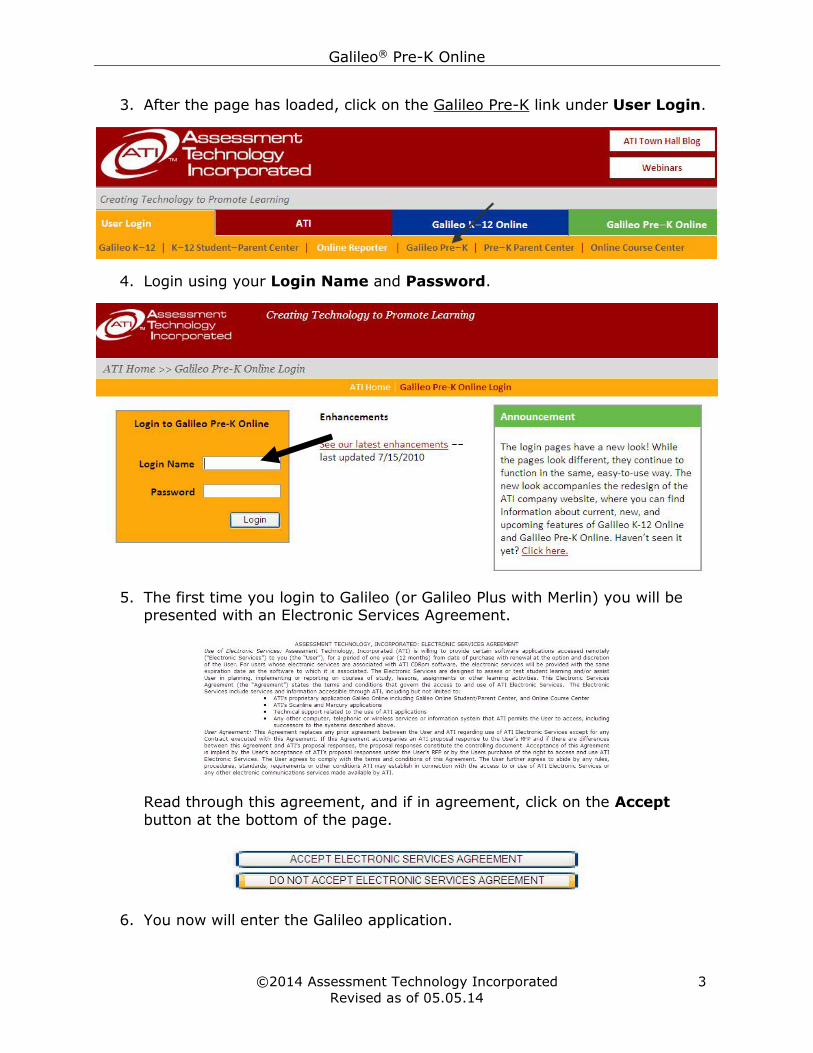
3. After the page has loaded, click on the Galileo Pre-K link under User Login.
4. Login using your Login Name and Password.
5. The first time you login to Galileo (or Galileo Plus with Merlin) you will be presented with an Electronic Services Agreement.
Read through this agreement, and if in agreement, click on the Accept
button at the bottom of the page.
6. You now will enter the Galileo application.
Galileo® Pre-K Online
4 ©2014 Assessment Technology Incorporated
Revised as of 05.05.14
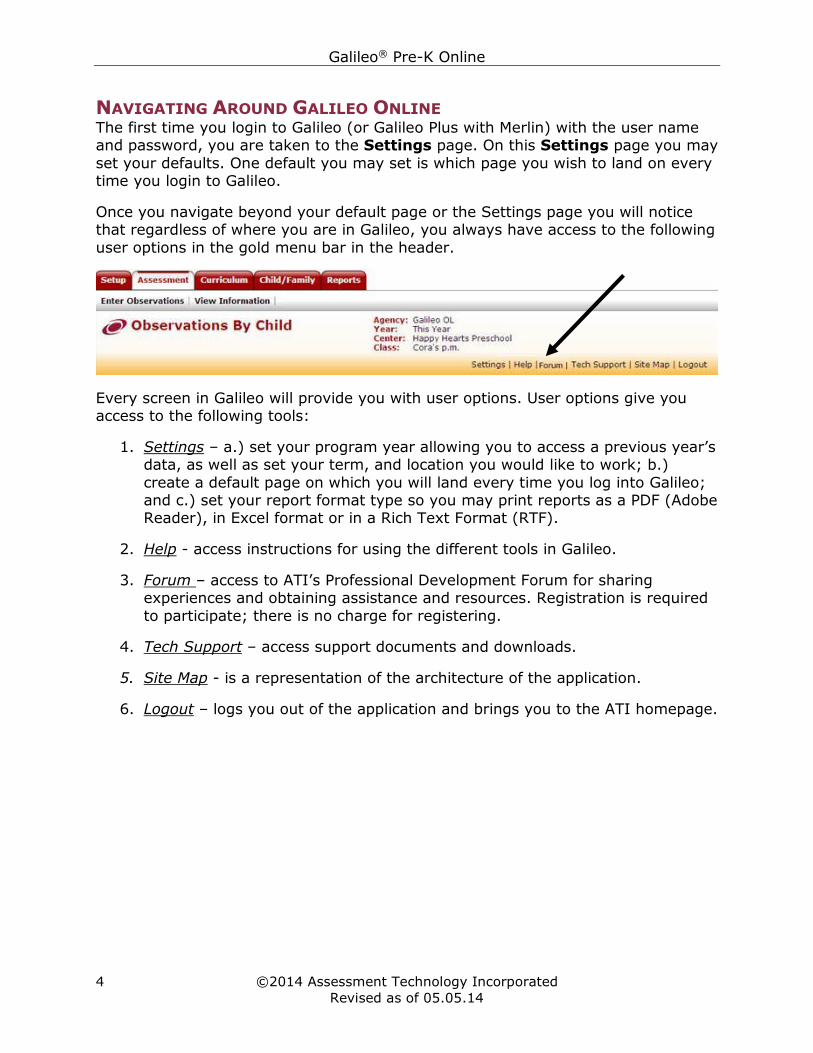
NAVIGATING AROUND GALILEO ONLINE The first time you login to Galileo (or Galileo Plus with Merlin) with the user name and password, you are taken to the Settings page. On this Settings page you may
set your defaults. One default you may set is which page you wish to land on every time you login to Galileo.
Once you navigate beyond your default page or the Settings page you will notice that regardless of where you are in Galileo, you always have access to the following
user options in the gold menu bar in the header.
Every screen in Galileo will provide you with user options. User options give you access to the following tools:
1. Settings – a.) set your program year allowing you to access a previous year’s data, as well as set your term, and location you would like to work; b.)
create a default page on which you will land every time you log into Galileo; and c.) set your report format type so you may print reports as a PDF (Adobe Reader), in Excel format or in a Rich Text Format (RTF).
2. Help - access instructions for using the different tools in Galileo.
3. Forum – access to ATI’s Professional Development Forum for sharing experiences and obtaining assistance and resources. Registration is required
to participate; there is no charge for registering.
4. Tech Support – access support documents and downloads.
5. Site Map - is a representation of the architecture of the application.
6. Logout – logs you out of the application and brings you to the ATI homepage.

Galileo® Pre-K Online
©2014 Assessment Technology Incorporated 5
Revised as of 05.05.14
To navigate around Galileo Online the red tabs at the top of the page are used. Clicking on a red tab at the top of the screen will bring you to the “default page” of
that area in Galileo. For example, the default page in the Assessment area of Galileo is the Observations by Child page.
You may navigate within a particular area of Galileo by placing your mouse over the gray menu bar that displays the Galileo tools in the area you have selected. For
example, in the Assessment area of Galileo you may access the following tools: Enter Observations and View Information.
When you place your mouse over a tool you will see:
1. That the tool is a link and by clicking on this link you will be brought to that page.
OR

Galileo® Pre-K Online
6 ©2014 Assessment Technology Incorporated
Revised as of 05.05.14
2. That when placing your mouse over the tool, a list of links associated with that tool appears. Clicking on a link will bring you to that page.
Many pages in Galileo will provide you with an Options box at the top right-hand side of the page. To see the options available, click on the (show) link.
A list of options will appear. To close the options box click on the (hide) link.
SETTINGS The first time you login to Galileo you are immediately brought to the Settings
page. You may also access your Settings by clicking on the Settings link in the gold menu bar in the header.

Galileo® Pre-K Online
©2014 Assessment Technology Incorporated 7
Revised as of 05.05.14
Your settings include a.) Year & Location b.) Menu Tab c.) Report Format
YEAR AND LOCATION TAB
The default settings allow you to choose where you wish to work in Galileo. Once you choose your settings, they become defaults. This means that every time you
open Galileo, it will automatically open to the agency, center, class and year that you have chosen for user settings.
Please note that this program year will stay until you manually come back and reset it to the desired year. This means that if you select a previous year, you will want
to set it back to the current year before entering any data.
TO SET THE PROGRAM YEAR
1. Use the down arrow on the Program Year drop-down menu to select the program year's information you would like to view.
2. Click on the Save Program Year button.
TO SET THE LOCATION 1. Use the down arrows on the Agency, Center, and Class drop-down menus
to set your preferences.
2. Your default settings will take effect after clicking on the Save Location
button. You can change them at any time simply by repeating this procedure.
MENU TAB
Notice that when you first login to Galileo, you are brought to the Settings page. By clicking on the tab that reads Menu Tab you may select which area you would
like Galileo to “default” to. Once an area is selected the application will always take you to that area upon logging in. If you leave the default setting to “None” then you
Galileo® Pre-K Online
8 ©2014 Assessment Technology Incorporated
Revised as of 05.05.14
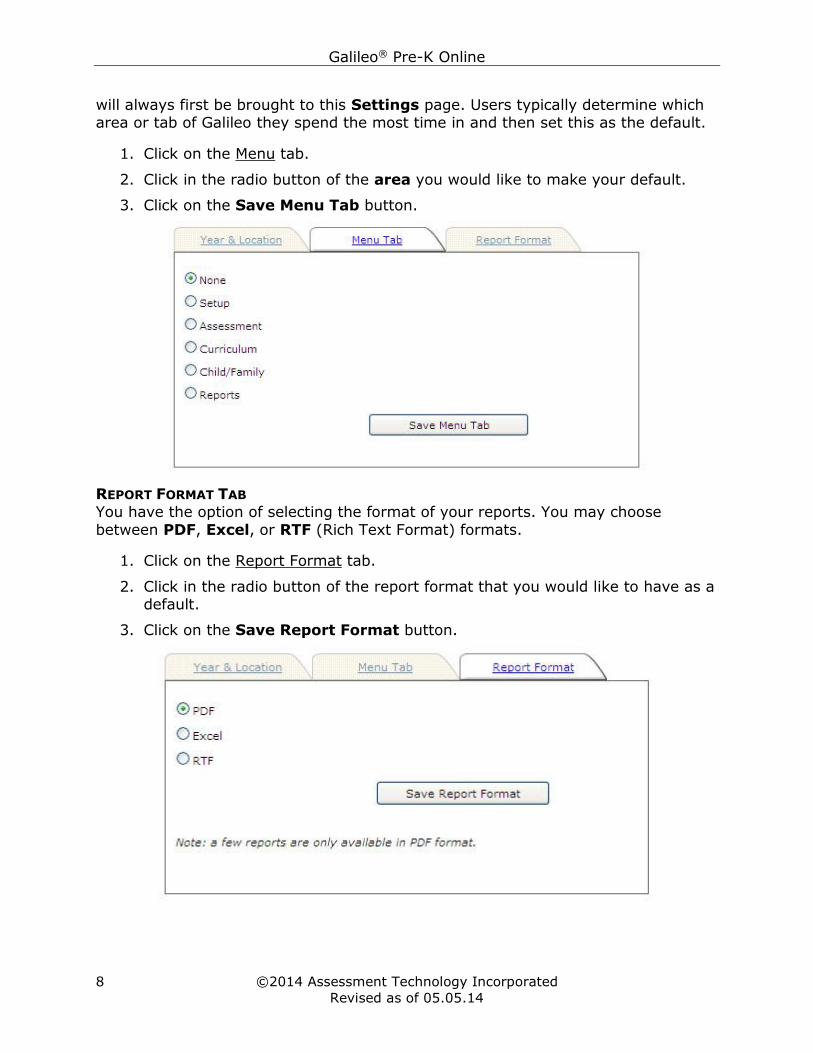
will always first be brought to this Settings page. Users typically determine which area or tab of Galileo they spend the most time in and then set this as the default.
1. Click on the Menu tab.
2. Click in the radio button of the area you would like to make your default.
3. Click on the Save Menu Tab button.
REPORT FORMAT TAB
You have the option of selecting the format of your reports. You may choose
between PDF, Excel, or RTF (Rich Text Format) formats.
1. Click on the Report Format tab.
2. Click in the radio button of the report format that you would like to have as a default.
3. Click on the Save Report Format button.

Galileo® Pre-K Online
©2014 Assessment Technology Incorporated 9
Revised as of 05.05.14
CHANGE PASSWORD While most users will be given a username and password by their program to initially log in to Galileo, you may change your password if you wish.
1. When you first log in, click on the Setup tab in the red menu bar at the top of the page.
2. Click on the Change Password link under User Accounts in the grey menu bar at the top of your screen.
3. Enter your Current Password.
4. Then enter and confirm your New Password, which must conform to the rules listed.
5. Retype the new password in the Confirm New Password field.
6. Click Save New Password. You will use this new password the next time you log in.

Galileo® Pre-K Online
10 ©2014 Assessment Technology Incorporated
Revised as of 05.05.14
CHECK YOUR CLASS ROSTER Before you begin recording observations, you will want to check your class roster to make sure it is up-to-date. There are two simple ways to check this – (a) the child
drop-down list and (b) a class roster report.
CHILD DROP-DOWN LIST
On the Child Demographics page you may check the Child drop-down list.
If using Galileo….
1. When you first log in, click on the Child/Family tab in the red menu bar at
the top of the page.
2. Click on the Child link under Records in the grey menu bar at the top of your
screen.
If using Galileo Plus….
1. When you first log in, click on the Merlin tab in the red menu bar at the top
of the page.
2. Click on the Demographics link under Child in the grey menu bar at the top of your screen.
Then...
3. If you are an Agency- or Center-level user, select the Center using the drop-
down menu.
4. Select your Class from the drop-down menu.

Galileo® Pre-K Online
©2014 Assessment Technology Incorporated 11
Revised as of 05.05.14
5. Click on the Child drop-down box to see the list of children in the class.
CLASS ROSTER REPORT On the Child Demographics page you may check the Class Roster.
If using Galileo….
1. When you first log in, click on the Child/Family tab in the red menu bar at
the top of the page.
2. Click on the Child link under Records in the grey menu bar at the top of your screen.
If using Galileo Plus….
1. When you first log in, click on the Merlin tab in the red menu bar at the top of the page.
2. Click on the Demographics link under Child in the grey menu bar at the top of your screen.
Then...

Galileo® Pre-K Online
12 ©2014 Assessment Technology Incorporated
Revised as of 05.05.14
3. If you are an Agency- or Center-level user, select the Center using the drop-down menu.
4. Select your Class from the drop-down menu.
5. Click on the Class Roster link under Options. This will open a PDF report listing each student in your class.
CLASS ROSTER NOT UP-TO-DATE If it is not your responsibility to enter, enroll and drop children then you will let
your administrator know that your Galileo Class Roster must be tended to. If it is your responsibility to handle child enrollment you will want to follow the directions in the Add, Enroll, and Drop a Child document.
Directions can be found in the “Fundamentals of Galileo: A Guide for Lead Staff” manual.

Galileo® Pre-K Online
©2014 Assessment Technology Incorporated 13
Revised as of 05.05.14
SECTION 2: DEVELOPMENTAL ASSESSMENT AND INDIVIDUAL LEARNING
DEVELOPMENTAL ASSESSMENT AND GALILEO TECHNOLOGY
HOW DO CHILDREN BENEFIT FROM DEVELOPMENTAL ASSESSMENT?
The capabilities that children acquire when they are young have a profound effect
on their future. The experiences provided to them at this time have a tremendous influence on the development of these capabilities. For these two reasons, it is vital that teachers and parents are provided with information that helps them to
understand how children learn and develop. The most effective way to gather this information is through developmental assessment.
Developmental Assessment is the process of discovering what children can do and how they do it.
It is used to:
Document growth in terms of a child’s level of development, interests, needs, strengths, and pace of learning.
Provide a portrait of the whole child with regard to her/his social, cognitive, and physical development.
Help develop curriculum and plan learning opportunities that are purposeful
and have goals.
Share a child’s accomplishments and readiness for new opportunities and
experiences with parents and families.
It is important to keep in mind that developmental assessment is quite different
from other types of assessment. Here are some examples:
Screening Assessment: Used to identify children who may have learning difficulties, handicapping conditions, or who may be at risk for developmental delays.
Diagnostic Assessment: Used to identify specific learning and adjustment disorders so that decisions such as referral and placement can be made.
HOW IS ASSESSMENT USING GALILEO DIFFERENT FROM PAST APPROACHES?
Historically, there have been two approaches for assessing young children: norm-referenced and criterion-referenced. A summary of these approaches is provided below.
Type of
Assessment
Type of Information
Provided
Typical
Scores Examples
Norm-Referenced
Tells you how well a child
is doing compared to other children of about the same
Age level,
grade level, percentile rank,
I.Q. test,
screening, age-related

Galileo® Pre-K Online
14 ©2014 Assessment Technology Incorporated
Revised as of 05.05.14
age. Uses age as the
primary way of setting learning expectations. Might encourage teaching
test content.
average, below
average, above average
checklists
Criterion-Referenced
Tells you if a child has
mastered a preset list of specific skills, behaviors,
or teaching objectives. Might encourage teaching a limited set of skills or
behaviors.
Number of
skills right or wrong, percent
of skills right or wrong
Developmental
checklists, multiple choice
or right/wrong tests, work samples
PATH-REFERENCED ASSESSMENTS
The scales in Galileo use path-referenced assessment. Path-referenced assessment helps us view the child in terms of her/his progress along a developmental path. The path can be in language, math, science, art, motor, social
or emotional development. The construction of each path in Galileo is based on research about how children construct knowledge.
Each path in Galileo is like a map, displaying capabilities from concrete to abstract, easy to difficult, and simple to complex. We can look at the map and find out where
we are, where we want to be, and how to get there. The scale, which is developmentally sequenced, will tell us where the child is currently, and what skills she/he needs to learn next to advance. Below is an example of a path from the
Literacy Knowledge and Skills scale. As you can see, there are many steps on the road to having early writing skills, starting with simple scribbles and ending with
writing complete words.
Uses scribble on paper to communicate a message.
Communicates by scribbling and with some letter-like shapes.
Draws figures and shapes to convey meanings.
Draws horizontal and vertical lines.
Holds pencil with thumb and forefinger.
Uses a variety of writing tools and materials to communicate with others.
Copies her/his name from a sample.
Writes some letters.
Writes using inventive spelling.
Write her/his name, without assistance.
Communicates by writing complete words.

Galileo® Pre-K Online
©2014 Assessment Technology Incorporated 15
Revised as of 05.05.14
EARLY INTERVENTION EDUCATIONAL CYCLE Galileo Pre-K Online is a complete and fully integrated assessment, curriculum, and reporting system linking assessment, planning, individualization and the
documentation of progress in ways that are directly articulated to the Head Start Child Development and Learning Framework. For example, the integrated set of goals established through the Framework are intended to help Head Start programs
establish school readiness goals for children, monitor children’ progress, and align curricula and conduct program planning in ways that promote all aspects of child
development and early learning. Galileo Pre-K Online is uniquely designed to facilitate these Framework goals through the implementation of a program-wide, systemic approach to educational decision-making and action leading to positive
outcomes for children.
In this regard, implementation of Galileo Pre-K Online occurs within a continuous problem solving, early intervention cycle making the effective management of early childhood education possible. The central components of the cycle include: (1) goal
setting, (2) assessment, (3) planning and implementation, (4) monitoring and management, and (5) evaluation.
ENHANCE OBSERVATIONS Here are some ways you can enhance your observations while using Galileo:
Know what to look for…
Have a good sense of the progression of capabilities for each area of development
on Galileo you wish to observe. When you know what comes before and what comes next in development, you know what to look for when observing children. You will also know what to plan next!
Goal Setting
Assessment
Planning and Implementation
Monitoring and Management
Evaluation

Galileo® Pre-K Online
16 ©2014 Assessment Technology Incorporated
Revised as of 05.05.14
Have a purpose…
Having a purpose means that you conduct your observations with a goal in mind. Your purpose may be to make a weekly activity plan, determine how to
individualize, or revise an activity. Always ask yourself, “What do I hope to learn from observing? How will I use what I’ve learned?”
Have a focus…
Having a focus means you know what you wish to observe, which children will be
observed, and where the observation will occur. Ask yourself, “What do I want to observe? Whom will I be observing? Where will I observe?”
Take advantage of moments to observe…
Observation of children can occur at any time and in any place. For example, during an outdoor activity you may observe children learning to share playground
equipment or learning a physical skill, such as catching a ball. You may observe children learning about colors, trying out new ideas, and using their fine motor skills during an art activity.
Use representative work…
You can learn about development by observing things children make. Representative work such as writing, drawings, art, projects, block constructions,
and other work samples can provide insights about development.
Use narratives…
Narratives or anecdotal notes help you to describe what children do and how they
do it. They are also very useful for recording your concerns, goals, plans, and successes. Please remember that when using narratives to be objective, accurate and brief.
Involve families…
Children often display capabilities in one setting that may not be readily observed in another. A child may be quite verbal at home and talk very little at school. Insights
provided by parents can assist you in adjusting the curriculum to more closely meet the needs of individual children.
ADDITIONAL GALILEO RESOURCES For additional information about observing and assessing children, please refer to
the Help link on any page in Galileo.

Galileo® Pre-K Online
©2014 Assessment Technology Incorporated 17
Revised as of 05.05.14
HEAD START FRAMEWORK This problem-solving early intervention cycle is supported by:
1. Quality Control
2. Communication Facilitated through a Fully Integrated Reports Suite
3. Professional Development and Technical Assistance
The Head Start Child Development and Learning Framework provides Head Start and other early childhood programs with a description of the developmental
building blocks that are most important for a child’s school and long-term success. This Framework contains eleven Domains. Assessment Technology Incorporated created the Galileo G3 Scale Library; this library houses the G3 Scales that are
associated with each of the Head Start Domains. The G3 Scales for 3-5 year olds are:
1. Approaches to Learning
2. Creative Arts
3. English Language Acquisition1
4. Language
5. Literacy
6. Logic and Reasoning
7. Early Math
8. Physical Development & Health
9. Nature and Science
10. Social and Emotional Development
11. Social Studies
12. Technology
1 The English Language Acquisition scale applies only to children who are dual
language learners (DLL). These children speak a language other than English at home.

Galileo® Pre-K Online
18 ©2014 Assessment Technology Incorporated
Revised as of 05.05.14
Additional information on alignment with the Head Start Child Development and Learning Framework, refer to the Galileo Pre-K Online: Aligned with the Head Start
Child Development and Learning Framework and the Office of Head Start Monitoring Protocol document found on our website at www.ati-online.com, in the Galileo
Pre-K Online tab under Publications.
DEVELOPMENTAL ASSESSMENT SCALES
DEVELOPMENTAL ASSESSMENT SCALES
Your agency will determine which scales you will be using. Once this is decided, the scales may be assigned for use in assessing children’s accomplishments. Scales can be set for an entire agency, an entire center, or for a single class, by each
respective level of user.
In addition to the Galileo G3 Scales aligning to each of the Head Start Domains Assessment Technology has recently included additional scales, the Galileo School Readiness scales. The Galileo School Readiness scales may serve as a useful tool
for many agencies for planning and reporting purposes. These scales are used for reporting purposes only because Galileo automatically transfers observations
entered on the G3 assessments scales to the appropriate age range Galileo School Readiness scale. There is one Galileo School Readiness Scale for each age range reflected in the Galileo G3 Assessment Scale Set.
Refer to the “Fundamentals of Galileo: Reports” manual for generating reports using this scale..
ASSIGN SCALES
1. When you first log in, click on the Setup tab in the red menu bar at the top
of the page.
2. Click on Assign Scales link under Scales in the grey menu bar at the top of
your screen.

Galileo® Pre-K Online
©2014 Assessment Technology Incorporated 19
Revised as of 05.05.14
3. Choose whether you want to assign your scales at an Agency-, Center-, or Class-level.
Any level of user can add additional scales; however, there are restrictions as
to who can remove scales, depending on the level of user. See the below chart to help you make your decision:
If I assign at this level….
The scales will be made available to…
The people who can
delete the scales set at this level are…
Agency All centers and classes in
the Agency
Only other Agency-level
users
Center All the classes within a
single center
Agency- and Center-level
users
Class The class of the teacher
setting the scales All levels of user
4. If you assign the scale to the:
a. Agency you may select the “Check here to assign to all centers in the agency” checkbox.

Galileo® Pre-K Online
20 ©2014 Assessment Technology Incorporated
Revised as of 05.05.14
b. Center you may select the “Check here to assign to all classes in the center” checkbox.
c. Class you should select the center (if necessary) and class from the
drop-down menus.
5. Click on the pull-down menu labeled Select Library. Two boxes will appear.
6. Double-click in the left-hand box on the Scales you want to use.
If you are using AcuScreen, open the “MAPS/ACUSCREEN: Infant-Preschool”
library and select the “Ages 3-5: Acuscreen” scale. This scale must be assigned to the agency, center, and/or class.

Galileo® Pre-K Online
©2014 Assessment Technology Incorporated 21
Revised as of 05.05.14
7. Click on the Save Scale Assignments.
8. Below the two boxes you will see all active scales in use in your agency, and at which level those scales have been assigned.
STATE STANDARDS ALIGNMENT
When using the Galileo G3 Assessment Scales to document children’s learning and to inform classroom planning, Head Start programs are also demonstrating alignment their state standards. The comprehensive nature of the Galileo G3
assessment tool, articulates the federal’s framework that includes 11 domains, 37 domain elements and all federal indicators, ensures that most state’s valued
learning goals will be assessed and planned when using the Galileo’s assessment tool. ATI has alignment documents that illustrate how common core and individual state standards are aligned to the Galileo G3 Assessment Scales.
GALILEO G3 SCALES ALIGNMENT
The Galileo G3 Assessment Scales Alignment with Your State Standards document is designed to aid programs with their state standards, when available, and the Galileo G3 Assessment Scale alignment. You can access the Common Core pre-
Kindergarten Math and English/Language Arts standards alignment and the state standards alignment from within Galileo. If your state alignment document is not
available, please contact your ATI Field Services Coordinator at 800.367.4762.

Galileo® Pre-K Online
22 ©2014 Assessment Technology Incorporated
Revised as of 05.05.14
ACCESS ALIGNMENT DOCUMENT
1. Access www.ati-online.com
2. Click the Galileo Pre-K Online link in the green menu option in the header.
3. Click the map titled Galileo G3
Assessment Scale Alignment on the far
right side.
4. On the map, click on the Common Core
or the name of your state.

Galileo® Pre-K Online
©2014 Assessment Technology Incorporated 23
Revised as of 05.05.14
5. The Galileo G3 Assessment Scales
Alignment with Your State Standards
document opens.
6. Familiarize yourself with the state standard alignments.
7. Locate the desired subject area,
standard, concept, and
objective. The Galileo G3
scale(s) and capabilities aligned
to the desired state objective
are shown.
SCALE EXAMPLES
You can view examples of the capabilities within a scale. This can be done via a report or on any one of the Observation pages.
VIEW VIA SCALE REPORT 1. When you first log in, click on the Assessment tab in the red menu bar at
the top of the page.
2. Click on the Scale Examples link under Enter Observations in the grey
menu bar at the top of your screen.

Galileo® Pre-K Online
24 ©2014 Assessment Technology Incorporated
Revised as of 05.05.14
3. Select the Library and Scale you wish to include in your report by using the drop-down menus.
Please note, the Observing and Assessing Children Using Galileo link on this
page provides you further information about enhancing your observations.
4. Click on the Print Goal Examples button to create a hard copy or click on the Display Goal Examples button to have examples displayed on the screen.
5. The report opens in a new window.
VIEW VIA OBSERVATION PAGES
You may also view Scale Examples when in one of Observation by Child, Observation by Goal, and Observation by Class page.

Galileo® Pre-K Online
©2014 Assessment Technology Incorporated 25
Revised as of 05.05.14
OBSERVATIONS BY CHILD To view an example of a capability, click on the capability/goal link.
OBSERVATIONS BY GOAL To view an example of a capability, click on the View Assessment Examples link.

Galileo® Pre-K Online
26 ©2014 Assessment Technology Incorporated
Revised as of 05.05.14
OBSERVATIONS BY CLASS To view an example of a capability, click on the capability/goal link.
COPYING ASSESSMENTS
PURPOSE
The Copy Assessments feature allows you to transfer learned capabilities on one scale to common capabilities on another. As you update a scale, that updated information is not automatically recorded on other scales that share the capability.
You must periodically copy the assessment data to the other scale(s). Typically administrators assign specific dates throughout the year, in which they would like
users to copy assessments.
FREQUENCY
Please note, the scale you wish to copy from and copy to must first be mapped. Contact your Galileo Administrator for guidance.

Galileo® Pre-K Online
©2014 Assessment Technology Incorporated 27
Revised as of 05.05.14
This feature may be used:
When a program is using AcuScreen and would like to copy capabilities observed during the screening to the appropriate individual assessment
scales.
When a child has been assessed on one scale and is ready to move to
another scale. For example, the child is on the 2-4 scale and is ready to move to the 3-5 scale. Assessments can be copied so teachers do not have
to re-enter repeated capabilities. Please note, enter a baseline assessment, as you would when using any new scale with a child, before copying assessments.
When a program has scales in both English and another language, and teachers enter their observations in English, they can copy the assessments
to the other language scale and print reports in that language.
If you have any user-created or modified scales that have goals mapped to another scale.
STEPS If you are copying data into a scale in which a child has not yet been baselined,
baseline the child first in the new scale, save the baseline data, then copy the assessments after that.
1. When you first log in, click on the Setup tab in the red menu bar at the top of the page.
2. Click on the Copy Assessments link under Scales in the grey menu bar at the top of your screen.
3. Click on the Center drop-down box to select the center.
4. Click on the Class drop-down box to select the class. If you have Agency-, Center-level access, or are a Class-level user with access to more than one class, you may select [All Classes].
Galileo® Pre-K Online
28 ©2014 Assessment Technology Incorporated
Revised as of 05.05.14
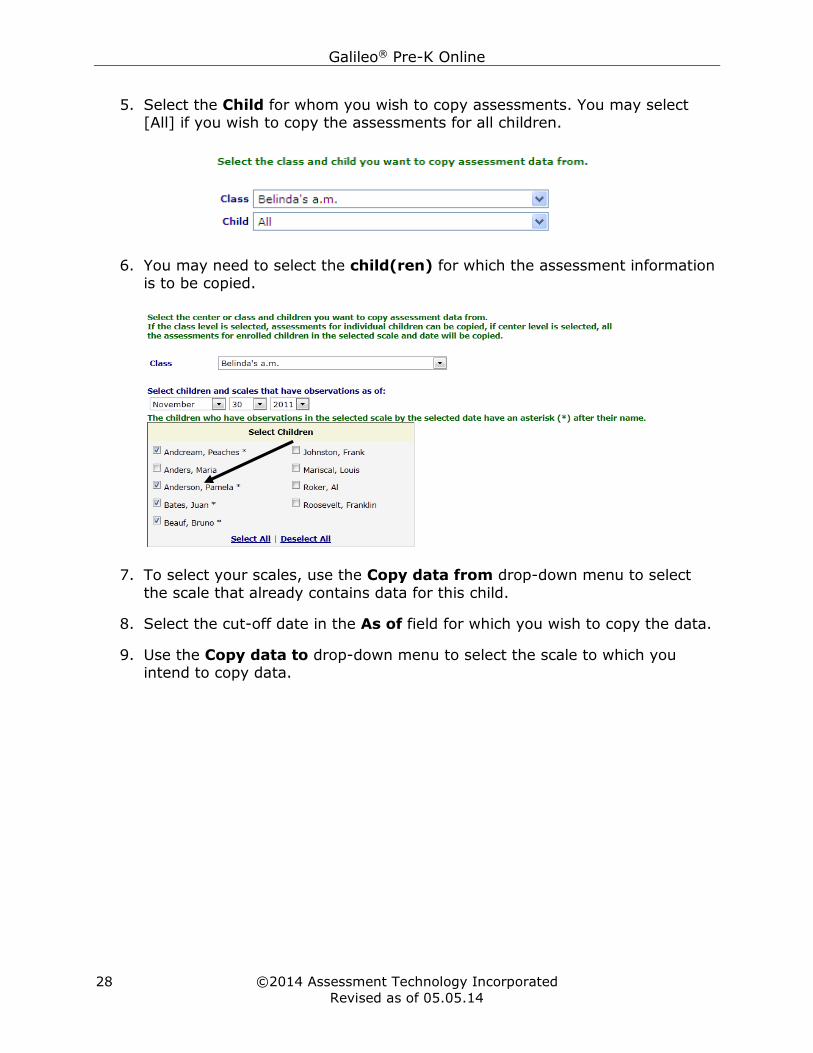
5. Select the Child for whom you wish to copy assessments. You may select [All] if you wish to copy the assessments for all children.
6. You may need to select the child(ren) for which the assessment information is to be copied.
7. To select your scales, use the Copy data from drop-down menu to select
the scale that already contains data for this child.
8. Select the cut-off date in the As of field for which you wish to copy the data.
9. Use the Copy data to drop-down menu to select the scale to which you intend to copy data.

Galileo® Pre-K Online
©2014 Assessment Technology Incorporated 29
Revised as of 05.05.14
10.The mapped scales will appear in a list so that you may view which goals in one scale correspond to the other. Please note: You may notice that a single
scale on the left maps to different scales on the right. You will need to copy assessments between each scale set to ensure maximum benefit from the
mapping, such as is the case with AcuScreen. Mapping may be unidirectional from one scale to the other, not necessarily automatically reciprocal.
11.To transfer the learned goals to the “to” scale, the Copy only goals that have been marked as learned field should contain a checkmark (that’s the default). When this field is unchecked the status of all goals to the new scale
will overwrite what is already there, even if it was learned on the “to” scale and not learned on the “from” scale.
12.Click the Copy Data button located at the bottom of the page. The screen
will refresh. The capabilities will transfer, although the anecdotal notes will
not.
13.The screen will refresh. The capabilities will transfer, although the anecdotal notes will not.

Galileo® Pre-K Online
30 ©2014 Assessment Technology Incorporated
Revised as of 05.05.14
REVIEW THE ASSESSMENTS If you wish to review the assessments that have been copied, follow these steps.
1. When you first log in, click on the Assessment tab in the red menu bar at
the top of the page.
2. Click on the By Child link under Enter Observations in the grey menu bar at
the top of your screen.
3. Select the Center, Class and Child.
4. Select the Scale to which you copied assessments.
5. The copied assessments will appear.
UPDATE PLANNING LEVELS Identify how your agency approaches setting baseline for children. Do you use the
“Amount Learned” tool? (For further information about the Amount Learned tool, please refer to the What does the “Amount Learned” tool do? section, page 32.)
Optional Step: The result is the capability is checked off as Learned and the “unchecked” capabilities will have a readiness level and the data source of Baseline. If you would like the “unchecked” capabilities on the new scale you are copying to
have updated readiness levels, you should update the planning levels.
1. When you first log in, click on the Assessment tab in the red menu bar at the top of the page.

Galileo® Pre-K Online
©2014 Assessment Technology Incorporated 31
Revised as of 05.05.14
2. Click on the By Child link under Enter Observations in the grey menu bar at the top of your screen.
3. Select the Center, Class, Child, and Scale.
4. Click on the Update planning levels button.
5. Click on the Save changes button.
UNDERSTANDING ASSESSMENT IN GALILEO When you navigate to the Enter Observations menu bar in the Assessment Area,
you are brought to one of the most important areas of Galileo. The By Child, By Goal, and By Class pages contain all of the knowledge areas in a scale and each
knowledge area is made up of a number of capabilities that you are to assess. Essential to the process of assessing children is setting baseline using The Amount Learned tool, documenting your data sources, and updating your planning levels.
WHEN DOES ASSESSMENT WITH GALILEO BEGIN?
Typically, the assessment process begins at the time the child enters your class.
The first assessment you record on a child is a baseline assessment. A baseline
assessment is an educated estimate a teacher makes as to what a child knows. Research indicates that teachers are very accurate in their baseline assessments and these assessments provide a strong initial understanding of each child. As the
program year unfolds, opportunities for observation expand, leading to an ever-deepening and refined understanding of each child’s development. As opportunities
for observation expand, more information or data sources will appear so you may continue your assessment of your children.

Galileo® Pre-K Online
32 ©2014 Assessment Technology Incorporated
Revised as of 05.05.14
WHAT IS A DATA SOURCE? Information gathered through developmental assessment must be:
Reliable: the assessment is accurate
Credible: the assessment is believable
Verifiable: the assessment is supported by facts.
Galileo’s Data Source helps you do this. You use it to record the source of information that supports your documentation that a capability has been learned. It
is your way of indicating how you know the child has learned something. Your program enters the Data Sources that appear in the drop-down boxes. Your
program can edit and change them as time passes.
To define Data Sources refer to the “Fundaments of Galileo Online: A Guide for Lead Staff” manual.
When you initially use the Amount Learned tool to set your baseline observations
or starting point, your data source is automatically set at baseline. Prior to base lining, the data source will say “Not evaluated.” As you refine your observations
over time, you replace baseline with other data sources.
WHAT DOES THE “AMOUNT LEARNED” TOOL DO?
The Amount Learned tool is used to record baseline information. It is only used
once (per child, per scale) at the beginning of the program year or at the time a child enters your program during the year. The Amount Learned tool helps teachers record their initial or baseline observations of a child after about a 2-3
week period of getting to know the child. It does this by helping the teacher answer a fundamental and highly important question: “What is the child already capable of
doing?” The Amount Learned tool helps answer this question by transforming a teacher’s general knowledge about a child into specific information about current accomplishments and readiness for new learning opportunities.

Galileo® Pre-K Online
©2014 Assessment Technology Incorporated 33
Revised as of 05.05.14
WHAT IS A DEVELOPMENTAL LEVEL SCORE? The Amount Learned tool provides a Developmental Level (DL) score, which
indicates the position of a child on a developmental path (e.g., early math).
When we know a child’s developmental level, we know the kinds of things that the
child has already learned and the things that s/he is ready to learn next. This information provides the basis for planning effective learning opportunities. The
score starts at zero when a child is born and presumably can increase as long as we are alive and learning. A child with no capabilities checked off in a given scale will still have a score, because they have learned many skills, and much about the
world, by the time they start preschool.
WHAT ARE PLANNING LEVELS? One of the most important pieces of the assessment equation is lesson planning. As teachers and educators you want to use the information you have about what
a child has already learned to tell you what a child is ready to learn. Once you know what children are ready to learn, you can plan activities that are
appropriate for their developmental level. With this goal in mind, Galileo has linked planning to the assessment scales. You will find that next to each capability in a scale there is a planning level. These planning levels will tell you if
a child has learned that capability or if you should plan for it now, soon or later. With the Galileo application you are always receiving instant, reliable information
that helps you individualize your teaching.
SETTING BASELINE WITH THE “AMOUNT LEARNED” TOOL Please note: When entering your data be certain to follow these steps in exact
order or your information will not be saved and transferred properly.
1. When you first log in, click on the Assessment tab in the red menu bar at the top of the page.

Galileo® Pre-K Online
34 ©2014 Assessment Technology Incorporated
Revised as of 05.05.14
2. Click on the By Child link under Enter Observations in the grey menu bar at the top of your screen.
3. Use the appropriate drop-down menus to select the select your Center,
Class, Child and Scale.
4. Select the Observation Date to document the date on which you made the observation. (It will default to today’s date.)
5. Scroll down the page to review the capabilities. As you are doing so, count
(DON’T check off capabilities—even though you’re tempted to) the number of capabilities that, based on available information, you would estimate the child knows.
Count the capabilities - do not check them off!
6. Set a baseline for the child. This is done only once. Use the slide bar on the Amount Learned field to select the number that you believe corresponds to
the amount of capabilities your child already knows. The less the child knows, the lower the number would be. As the scrollbar moves, the number above it changes. The highest number for any Scale is its total number of
capabilities (e.g., Nature & Science =56, Early Math = 47).
Example of How To Use the “Amount Learned” Tool
Let’s say that based on your observations, along with input from
others, it appears a child in your class knows about a third of the capabilities in Early Math. To show this, you would set the Amount

Galileo® Pre-K Online
©2014 Assessment Technology Incorporated 35
Revised as of 05.05.14
Learned Tool at about 15 (there are 47 capabilities in the scale for ages 3-5).
7. A warning window will pop up stating, "Establishing baseline capabilities will overwrite any observations that are currently on the screen, but have not yet
been saved. Do you wish to establish baseline capabilities?" Click on OK if you just started using Galileo and you have not entered any observations
yet. Setting a baseline after observations have been made will erase all your previous data.
8. Click on the Save Changes button at the top, or at the bottom of your
screen. Always save before changing scales, changing children, or moving to another area of Galileo.
Now that baseline has been set, the following things have been done for you:
1. Galileo has created a baseline Developmental Level Score.
2. The computer has checked off some capabilities for you.

Galileo® Pre-K Online
36 ©2014 Assessment Technology Incorporated
Revised as of 05.05.14
3. The computer is programmed to check off the capabilities that are developmentally linked to the developmental level score you’ve just
established for the child. You may edit these if you don’t agree.
4. Galileo has now automatically marked each capability as “Learned,” “Plan Soon,” “Plan Now,” or “Plan Later,” based on the Amount Learned you established for your children. This is to aid you in your planning.
5. Galileo states that the way you know a child has already learned this capability is through the data source of “Baseline.”
IMPORTANT: After you have established baseline for a child, do a quick update as follows:
a. To indicate that a child has learned a capability not already checked by Galileo, click in the empty square box next to the capability. Galileo
will put a check in it.
b. If you wish to indicate that a capability checked by Galileo is not yet
learned, click on the checkmark. Galileo will remove the checkmark.
POINTS TO REMEMBER ABOUT THE “AMOUNT LEARNED” TOOL AND SETTING BASELINE The Amount Learned tool is used only once, (per child, per scale) at the
beginning of the program year or when a child first enters your class. All
other capabilities should be checked off as you see the child demonstrate them. This means all capabilities checked off after baseline will have a data
source other than baseline.
The Amount Learned tool will link the baseline assessment to suggestions
about what to plan for now, soon, and later.

Galileo® Pre-K Online
©2014 Assessment Technology Incorporated 37
Revised as of 05.05.14
Have confidence in your ability to use the Amount Learned tool because the research indicates that teachers and educators are highly accurate in
determining the developmental level of children.
The Amount Learned tool should be used after the teacher has become familiar with the child over a 2-3 week period.
WHY USE THE “AMOUNT LEARNED” TOOL? Often asked is “Why use the “Amount Learned” tool at all?” and “Why not start by
checking off capabilities as you go?” The Amount Learned tool is used to set a starting point based on the sequence of development most children go through, which is, in turn, based upon twenty years of research. This research gives teachers
confidence as they baseline (or initially assess a child’s ability), because it helps them to quickly and easily identify the most likely learned capabilities for a child. By
reviewing the computer’s choices, a teacher may make the assessment even more accurate by including their own expertise and knowledge of the actual child. In this way, Galileo combines the best research on children in general, with the best
teacher knowledge of children in particular, to set the most accurate baseline, or starting point, for that child.
Scenario for setting a baseline observation can be found in Section 4: Classroom
Scenarios, page 60.

Galileo® Pre-K Online
38 ©2014 Assessment Technology Incorporated
Revised as of 05.05.14
OBSERVATIONS BY CHILD Galileo is an assessment application that is aimed at helping teachers document what their children have learned. Since children are constantly exploring and
learning, your observations should be updated on a weekly basis. It is important to also update your data sources as you discover new ways in which children demonstrate growth.
The Class Observation Record can help teachers manage the assessment of
children. There are reports that have blank spaces next to each capability in a scale so that teachers may use them as a portable means of noting children’s growth. There is also a report that displays a grid of all the capabilities for a particular scale
and the names of all the children.
STEPS 1. When you first log in, click on the Assessment tab in the red menu bar at
the top of the page.
2. Click on the By Child link under Enter Observations in the grey menu bar at
the top of your screen.

Galileo® Pre-K Online
©2014 Assessment Technology Incorporated 39
Revised as of 05.05.14
3. Select your Center, Class, Child, Scale and Observation Date.
RECORD ANECDOTAL NOTES (OPTIONAL) 4. You may open the Anecdotal Notes feature by clicking on the Show/Hide link.
5. Click on the Insert date link on top of the textbox. The observation date that
you entered in will be inserted automatically. Once this notes box is opened Galileo will automatically keep track of which capabilities you check off. You
may type your anecdotal notes in the text box next to each goal that is inserted. You may click on the Spell Check button.
You may preview and print these notes by clicking on the Preview/print notes link on the top of the screen.

Galileo® Pre-K Online
40 ©2014 Assessment Technology Incorporated
Revised as of 05.05.14
Once an observation is saved and anecdotal notes have been included for a scale you will see a yellow note icon.
6. Check off the capabilities that the child has mastered. If the Notes box is open, the goal(s) now displays in the box.
6. To the right of each capability, use the Data Source drop-down menu to select the data source you used to determine that the child had learned this
capability (e.g., observation, family input, work sample). The default data source is “Baseline.”
7. Click on the Save Changes button at top or at the bottom of your screen.
8. Repeat these steps for the other scales and other children.

Galileo® Pre-K Online
©2014 Assessment Technology Incorporated 41
Revised as of 05.05.14
Remember check on the left, change on the right!
As long as the checkbox labeled “Update Planning levels automatically when saving”
is checked you will not need to manually update and you need only to click on Save Changes.
Scenarios for updating observations can be found in Section 4: Classroom
Scenarios, page 60.
MANUALLY UPDATING PLANNING LEVELS Sometimes a teacher may want to record planning levels independently of Galileo’s suggestions. Teachers may do this by manually updating the suggested planning
levels. Teachers may manually update planning levels by doing the following:
1. When you first log in, click on the Assessment tab in the red menu bar at
the top of the page.
2. Click on the By Child link under Enter Observations in the grey menu bar at the top of your screen.
3. Select your Center, Class, Child, Scale and Observation date.

Galileo® Pre-K Online
42 ©2014 Assessment Technology Incorporated
Revised as of 05.05.14
4. Click on the checkbox next to "Update planning levels automatically when saving" to remove the check in the checkbox. This will deselect the automatic
update option for all children in your class.
5. Manually update your planning levels.
6. Click on the Save changes button.
SWITCHING BETWEEN AUTOMATIC AND MANUAL UPDATE CAUTION You may switch back to automatically updating your planning levels, but please
realize that when you do this the application will change all the planning levels to reflect the child’s current developmental progression as defined by the scale’s psychometric properties.
What does this mean? It means any planning levels you had entered manually that do not reflect the developmental progression will be overwritten, unless they are
marked as learned. Make sure you don’t mind changing your planning levels to Galileo’s suggested planning levels before you switch to automatic updating. You
may switch from manually updating planning levels to automatically updating planning levels by:
OPTION 1 1. With your mouse reactivate the automatic updating feature by clicking on the
checkbox labeled "Update planning levels automatically when saving." A checkmark will appear in the checkbox.
2. Update your observations.
3. Click on the Save changes button.
OPTION 2
1. Update your observations.
2. Click on the Update Planning Levels button.

Galileo® Pre-K Online
©2014 Assessment Technology Incorporated 43
Revised as of 05.05.14
3. Click on the Save button.
OBSERVATIONS BY GOAL In addition to being able to update the learning achievements of each child, Galileo also provides the ability to update a single goal for a group of children. Anecdotal notes entered here automatically update each child’s individual Child Notes area. A
baseline observation using the Amount Learned/Pathfinder tool should first be done on the Observation by Child page.
1. When you first log in, click on the Assessment tab in the red menu bar at the top of the page.
2. Click on the By Goal link under Enter Observations in the grey menu bar at the top of your screen.
3. Using the drop-down menus, select the Center, Class, Scale, Knowledge Area, and Goal you wish to update.
4. Use the calendar to select your observation date by clicking on the date you
wish to use, or by typing it in the small textbox above the calendar. (The Observation Date defaults to today.)
5. Using the drop-down menu, select the Planning Level you would like to enter for the children. In most cases, this will be "Learned"; however, if you
manually update planning levels you may select a different planning level.

Galileo® Pre-K Online
44 ©2014 Assessment Technology Incorporated
Revised as of 05.05.14
6. Using the drop-down menu, select your Data Source for this observation.
7. Click on the Insert Date button on the left side of the Child Notes box.
8. Enter the anecdotal note in the Child Notes text box. This note will be
automatically added to all selected children's notes. You may click on the Spell Check button.
9. Check the children you wish to update by clicking in the checkboxes next to their names. You will see their current readiness level after their name, their
current level, the data source, if any, the last observation date for that scale. (If a child has already learned a capability, their planning level will also show
a checkmark for quick reference.)
10.To group children with similar readiness levels, you may sort them by current
readiness level using the drop-down menu labeled Only show children at this planning level.
11.Click on the Save Changes button at either the top or bottom of the screen.
Scenarios for updating observations can be found in Section 4: Classroom
Scenarios, page 60.
OBSERVATION BY CLASS Galileo provides the ability to update observations by class. A baseline observation
using the Amount Learned/Pathfinder tool should first be done on the Observation by Child page. (Refer to Setting Baseline with the “Amount Learned” Tool section, page 33, for directions.)
ACCESS PAGE 1. When you first log in, clock on the Assessment tab in the red menu bar at
the top of the page.
2. Click on the By Class link under Enter Observations in the grey menu bar at the top of your screen.

Galileo® Pre-K Online
©2014 Assessment Technology Incorporated 45
Revised as of 05.05.14
3. Using the drop-down menus, select the Center, Class, Developmental
Area Scale, and the Observation Date. (The Observation Date defaults to today.)
4. A grid will appear. Across the top are the names of all the children in your class. Along the left are all of the capabilities for the selected Developmental
Area scale.
5. Use the drop-down menu to select the data Source.

Galileo® Pre-K Online
46 ©2014 Assessment Technology Incorporated
Revised as of 05.05.14
You will work either by entering information by column or by row.
Record Multiple Observations by Child (column): When recording observations on a specific child for multiple capabilities, you will work within a column.
Record Observation for Multiple Children (row): When recording a
specific capability for multiple children, you will work within a row.
6. Place the cursor at the intersection of the child’s name and the desired
capability.
7. Each colored square represents a Readiness level.
Black Checkmark = Learned
Red Checkmark = Learned, however observation not yet saved
Green = Ready Now
Blue = Ready Soon
White = Ready Later
RECORD ANECDOTAL NOTES (OPTIONAL) 8. Click on the number to the left of the capability you want to mark as
Learned.
9. A text entry box appears. Today’s date and the capability are automatically
populated. Edit the date, if necessary.

Galileo® Pre-K Online
©2014 Assessment Technology Incorporated 47
Revised as of 05.05.14
10.Enter the anecdotal notes in this text box. This note applies to all children you will check as having learned the capability. You may click on the Spell
Check button.
11.Click on the Record button.
RECORD LEARNED CAPABILITIES
12.Click in the desired colored square and a red checkmark appears.
13.This red checkmark indicates that the capability is learned, but that you have
not yet saved your work.
Save Record

Galileo® Pre-K Online
48 ©2014 Assessment Technology Incorporated
Revised as of 05.05.14
14.Click on the Save Changes button or the computer disk icon below the Knowledge Area.
15.The checkmark(s) turn black to show that the information is saved. If any
anecdotal notes were entered, they now apply to all children who had red checkmarks in that capability’s row.
EDIT AND PRINT ANECDOTAL NOTES
EDIT ANECDOTAL NOTES
1. Click on the Edit/Print Child Notes link.
2. A new text entry window appears.
3. Use the drop-down menu to select the Child.
4. Make changes to your notes. You may click on the Spell Check button.
5. Click on the Save Changes button.
Galileo® Pre-K Online
©2014 Assessment Technology Incorporated 49
Revised as of 05.05.14
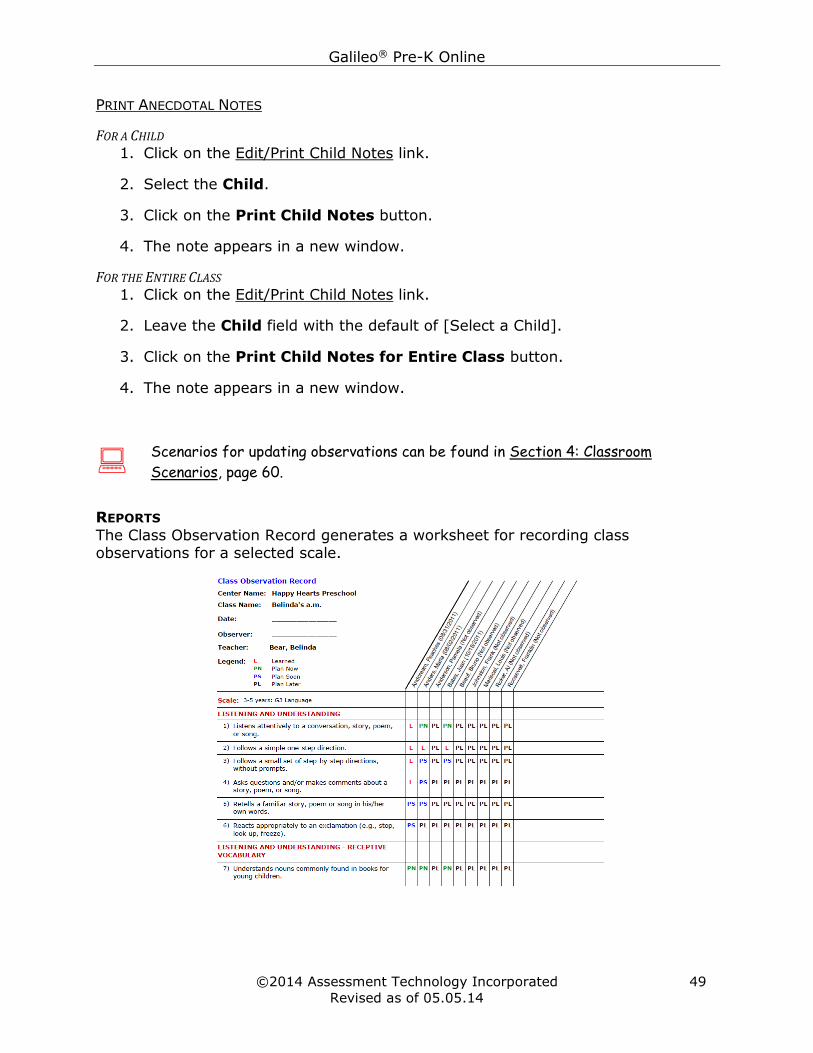
PRINT ANECDOTAL NOTES
FOR A CHILD 1. Click on the Edit/Print Child Notes link.
2. Select the Child.
3. Click on the Print Child Notes button.
4. The note appears in a new window.
FOR THE ENTIRE CLASS 1. Click on the Edit/Print Child Notes link.
2. Leave the Child field with the default of [Select a Child].
3. Click on the Print Child Notes for Entire Class button.
4. The note appears in a new window.
Scenarios for updating observations can be found in Section 4: Classroom
Scenarios, page 60.
REPORTS
The Class Observation Record generates a worksheet for recording class observations for a selected scale.

Galileo® Pre-K Online
50 ©2014 Assessment Technology Incorporated
Revised as of 05.05.14
1. Click on the Print Class Observation Record link.
2. The report opens in a new window.
The Individual Development Profile report displays the learned readiness level for
each capability in a scale for a particular child.
1. Click on the child’s name link.
2. The report opens in a new window.

Galileo® Pre-K Online
©2014 Assessment Technology Incorporated 51
Revised as of 05.05.14
SECTION 3: OTHER TOOLS
ACUSCREEN AcuScreen is a 45-day developmental screening tool in use by hundreds of Head
Start programs. AcuScreen is designed to help educators determine whether or not a child should be referred for diagnostic testing aimed at determining the child’s eligibility for special services. When used with Galileo Online, AcuScreen data can
be stored, aggregated, and used to generate analytical report information.
Many programs utilize the AcuScreen booklet instead of relying on the AcuScreen
Report printed out of Galileo. The booklet can be placed in a child’s folder to evidence assessment protocol. The booklet provides directions on administering the
assessment, has two pages of referenced images, and includes places to note anecdotal information. The booklet can be purchased directly from ATI.
For further information, please refer to the AcuScreen document. You may also contact your ATI Field Services Coordinator at 1.800.367.4762.
CHILD NOTES The profession of teaching demands that teachers document numerous things. Child behavior, parent contact, and accidents are just a few of the things on which
teachers take notes and document. You can store these notes in Galileo. Galileo will catalog notes and give you the opportunity to print them. Additionally you may “publish” any child notes you create, which will post these notes to the Pre-K Parent
Center. The Pre-K Parent Center is the parent interface of Galileo to which programs have access.
Please note, these notes are different notes available on the Observation pages. Child notes, unlike the Anecdotal Notes on the Observation pages, are used to
document events not related to learning.
ADD A NEW CHILD NOTE
1. When you first log in, click on the Assessment tab in the red menu bar at the top of the page.
2. Click on the Notes link under Enter Observations in the grey menu bar at the top of your screen.
3. If you are an Agency- or Center-level user, use the down arrow on the Center drop-down menu to select the center.

Galileo® Pre-K Online
52 ©2014 Assessment Technology Incorporated
Revised as of 05.05.14
4. Use the down arrow on the Class drop-down menu to select the class.
5. Use the down arrow on the Child drop-down menu to select the child on whom you wish to write a note. Please note, selecting the [All Children]
option will add this note for all children in the class. [All Children] will also allow you to display all the notes for all children.
6. Click on the Add a new note link.
7. Confirm that this is the child or children for whom you would like to create a note. You may choose to have this note display for any children in the
class.
8. Type the name of this category of notes in the textbox next to the Subject
label.
9. Determine if you would like to publish the note or not. Publishing the note will make it immediately available to children and parents in the Pre-K Parent
Center. Please note, only Class-level users may publish a Class Note.
10.Determine if you would like to attach an optional image.
11.(Optional) Click the insert today’s date icon.

Galileo® Pre-K Online
©2014 Assessment Technology Incorporated 53
Revised as of 05.05.14
12.Type in your note.
13.Click on the Save button.
EDIT A CHILD NOTE You may edit a note by following the instructions listed below. You may also publish
or not publish a note by following these instructions
1. When you first log in, click on the Assessment tab in the red menu bar at the top of the page.
2. Click on the Notes link under Enter Observations in the grey menu bar at the top of your screen.
3. If you are an Agency- or Center-level user, use the down arrow on the Center drop-down menu to select the center.
4. Use the down arrow on the Class drop-down menu to select the class.
5. Use the down arrow on the Child drop-down menu to select the child on whom you wish to edit a note.

Galileo® Pre-K Online
54 ©2014 Assessment Technology Incorporated
Revised as of 05.05.14
6. To edit the note, click on the pencil icon or the note’s subject link. Make any changes you see fit. You may edit which children see a note, by checking and
unchecking children.
7. Click on the Save button.
DELETE A CHILD NOTE 1. When you first log in, click on the Assessment tab in the red menu bar at
the top of the page.
2. Click on the Notes link under Enter Observations in the grey menu bar at
the top of your screen.
3. If you are an Agency- or Center-level user, use the down arrow on the
Center drop-down menu to select the center.
4. Use the down arrow on the Class drop-down menu to select the class.
5. Use the down arrow on the Child drop-down menu to select the child on whom you wish to delete a note.

Galileo® Pre-K Online
©2014 Assessment Technology Incorporated 55
Revised as of 05.05.14
6. Click on the trashcan by the note you wish to delete. You will receive a confirmation pop-up. If you made a mistake or changed your mind, click
Cancel. Otherwise, click OK.
PRINT CHILD NOTES 1. When you first log in, click on the Assessment tab in the red menu bar at
the top of the page.
2. Click on the Notes link under Enter Observations in the grey menu bar at
the top of your screen.
3. If you are an Agency- or Center-level user, use the down arrow on the
Center drop-down menu to select the center.
4. Use the down arrow on the Class drop-down menu to select the class.
5. Use the down arrow on the Child drop-down menu to select the child on
whom you wish to print a note.
PRINT BASED ON PUBLISHING STATUS
6. Determine if you would like to print ‘Published to Parent Center’ notes, ‘Not Published to Parent Center’ notes, or ‘All,’ by clicking on the appropriate radio
button.
7. Click on the Print child notes for class link.

Galileo® Pre-K Online
56 ©2014 Assessment Technology Incorporated
Revised as of 05.05.14
PRINT BASED ON CHILD 8. Determine if you would like to ‘Display Note’ or ‘Display All Notes for Child’.
a. The ‘Display Note’ option will print only the single subject. Click on the
printer icon under “Display Note” heading.
b. The ‘Display All Notes for Child’ will print notes on all subjects. Click on
the printer icon under “Display All Notes for Child” heading.
9. Click on the printer icon under “Display Note…” heading.
CURRICULUM Galileo Curriculum is unique in that it is an electronic curriculum. Galileo is a system
that emphasizes a child’s progress on their developmental path, a teacher’s role in assessing children and documenting what the child has learned. The information
attained through observations serves as the foundation of lesson planning. The two are linked and should be reflective of each other.
LESSON PLANS Galileo’s curriculum component provides programs with model content that teachers may use when providing children with learning opportunities. There are 32
lesson plans provided to teachers. (Refer to the Storyteller section, page 58, for additional information about the Storyteller language and literacy lesson plans.) The
lesson plans are intended to span the program year, while leaving four weeks available for teachers to plan special instruction. In addition, several hundred activities are available to teachers for use in the classroom and the home.
Lessons created by ATI and the lessons that you may create on your own have
three parts: the lesson plan, the activity, and the interest area. Each part is connected to the other. When “unpacking” a lesson plan, you will find goals and capabilities, specific activities that provide for learning opportunities, and a physical
environment that fosters curiosity.

Galileo® Pre-K Online
©2014 Assessment Technology Incorporated 57
Revised as of 05.05.14
For further information, please refer to the Accessing Galileo Model Content
document.
INDIVIDUALIZATION ATI allows teachers to construct a weekly plan for the class, small group, or an individual child based on the children’s readiness to learn particular skills. In this
way the teacher can select activities from the curriculum’s bank of ATI’s ready-to-use activities that address specific emerging skills, skills the child is ready to learn
now. This is an effective and informed approach that takes the guess work out of lesson planning by allowing the teacher to focus teaching and classroom activities at a level that each child will find challenging without being frustrating. Teachers
also find this especially beneficial for those children whom they are required by law to provide accommodations and modifications.
For further information, please refer to the A Guide for Galileo Pre-K Online
Lesson Plan Individualization document.
ACTIVITIES
Galileo also provides over 800 ready-to-use activities for children ages 18 months to 5 years. The 3-5 year activities are linked to the Galileo lesson plans. Activities
can also be used in a stand-alone situation. Galileo provides you with a variety of activity libraries and also allows teachers and curriculum managers (or a designated Galileo user) the opportunity to create their own activities. The Galileo activity
libraries available include:
1. Galileo G3 Activity Library. These are classroom activities. There are two age range classroom activity libraries available:
a. G3 Activity Library: 18-36 months
b. G3 Activity Library: 3-5 years
2. Times for Learning G3 Library. These are activities that can be done in a
home environment. They require little or no materials. They are great activities for parents to be involved in their child’s learning. These activities are accessible through Galileo Online and the Pre-K Parent Center.

Galileo® Pre-K Online
58 ©2014 Assessment Technology Incorporated
Revised as of 05.05.14
a. Times for Learning (English version of at-home activities)
b. Momentos para aprender (Spanish version of at-home activities)
3. Storyteller G3 Activity Library. These are special Language and Literacy
activities for 3-5 year olds housed in this library.
For further information, please refer to the Accessing Galileo Model Content document.
CURRICULUM MAPS
Curriculum Maps allow you to examine the different opportunities to learn that you provide your children in relation to the program requirements, local curriculum, and state standards. There are two Curriculum Maps in Galileo: Lesson Plans and
Activities. A report can be generated for each scale so an educator may reflect on the lesson plans and activities that are created for instruction.
For further information, please refer to the Accessing Galileo Model Content document.
STORYTELLER Storyteller is an online computer application comprised of instruction and assessment tools designed to assist teachers in promoting learning. Available to
children and teachers are 28 weeks of Language and Literacy lesson plans, 126 ready-to-use Language and Literacy classroom activities, and 23 computer-based
Storyteller instructional activities, all linked to the Language and Literacy learning goals. Storyteller integrates easily with classroom instruction as either the literacy portion of teacher-created lesson plans or in conjunction with other language and
literacy activities.
and

Galileo® Pre-K Online
©2014 Assessment Technology Incorporated 59
Revised as of 05.05.14
For further information, please refer to the Storyteller document.
LIBRARIES In Galileo Online, a library is best thought of as an electronic filing cabinet. It is an electronic filing cabinet filled with all of a teacher’s or all of a program’s interest
area ideas, activities, and lesson plans. This technology will allow you to replace the big, metal filing cabinets at the back of your room. Once these items are created and stored in the libraries, they may be accessed, edited or printed anytime, at the
click of a mouse. Libraries are ideal for collaboration.
If you decide you would like to create libraries, please refer to A Guide for Galileo Pre-K Online Library Builder document or contact an ATI’s Field Services Coordinator for assistance (1.800.367.4762).
MONITORING TOOLS Galileo ®users have access to a number of monitoring tools to help them oversee observations, chart the progress of children, conduct quality control, and view user
access.
Class Observation Report – Records the date of the last assessment for each child.
Assessment History Report – View the scale(s) in use and the frequency of saved assessments.
Data Checker-Inactive/Active Children – Checks for children with or without assessment data.
Data Checker-Form Information – Checks for entered and missing data on forms.
User Activity Report – Agency- and Center-level users can view Galileo user activity and the scales for which observations were saved.
For more information on each of the above monitoring tools, refer to the “Fundamentals of Galileo: Reports” manual.

Galileo® Pre-K Online
60 ©2014 Assessment Technology Incorporated
Revised as of 05.05.14
Section 4: Classroom Scenarios
The scenario stories in this section are designed to help you practice recording
observational information on a child’s development.
SETTING BASELINE SCENARIO Instructions: This scenario is designed to help you practice using the Amount Learned tool
to record baseline information on a child’s development. You should be able to record
baseline information for the 3-5 years: G3 Language and 3-5 years: G3 Early Math scales.
HOW MANY?
Ms. Gale called all the children to sit on the carpet. Gwen was the first to sit down and
saved a spot for Elijah. “Elijah, come sit here”, Gwen called out. Once all the children were
seated, Ms. Gale told them that she was going to read a book “We're Different, We're the
Same” by Bobbi Kates. This story is about how people have different physical
characteristics, such as Patricia has red hair and Gwen and Andrea both have black hair.
Ms. Gale then proceeded to read the story. At one point Patricia said, “That girl has red
hair just like me!” Ms. Gale said, “That’s right.” As Ms. Gale read, she paused on certain
pages to point out how people have different physical characteristics. Some children in the
story had straight hair, others had curly hair. Some had long hair while others had short
hair.
When she finished reading the book, Ms. Gale drew the children’s attention to a large
graph on the wall with pictures of different physical characteristics. She asked the
children with brown eyes to raise their hand. Elijah and Gwen raised their hand. Ms. Gale
asked Andrea, “Andrea, what color eyes do you have?” She replied “brown.” Ms. Gale then
reminded her that she should have her hand up. Ms. Gale counted the hands “1, 2, 3” as the
children counted along with her. She then wrote three lines under the brown eye heading.
Ms. Gale then took a count of the children with the various eye colors and recorded the
count.
Ms. Gale then asked “How many have long hair?” and she recorded the count with the
children helping her count. Then she asked “How many have short hair?” Looking around
she noticed that Elijah did not raise his hand so she prompted him about the length of his
hair. Elijah said he had short hair and then promptly raised his hand. Ms. Gale counted out
loud the number of hands and wrote the number on the graph.
Elijah stared at the graph pointed and exclaimed “WOW! Only one has red hair!” He then
began pointing to the short hair category saying “one, two, three, four, five, six, seven,
eight, nine, ten, eleven.” “Great job counting, Elijah,” Ms. Gale praised. When everyone had
had a chance to examine the graph, the children were ready for their snack.

Galileo® Pre-K Online
©2014 Assessment Technology Incorporated 61
Revised as of 05.05.14
UPDATING OBSERVATIONS SCENARIOS Instructions: The scenarios in this section are designed to help you practice updating
information on a child’s development on the Observations by Child, Observations by Goal,
and/or the Observations by Class pages.
BREAD, BREAD, BREAD
Instructions: You should be able to record the observational information for the 3-5
years: G3 Language and 3-5 years: G3 Early Math scales. Of course there are other scales
you may utilize, provided there was a documented baseline.
Ms. Gale called all the children to sit around the table. Elijah was the first to sit down and
saved a spot for Andrea. “Andrea, come sit here”, Elijah called out. Ms. Gale then placed
corn tortillas, English muffins, pita bread, and a loaf of French bread in the center of the
table and explained that they would be discussing how different breads come from
different places. Andrea raised her hand and stated, “I know what that is. That is a
tortilla. My tia, that’s my aunt, makes them every morning.” “That’s great Andrea! Can you
tell us anything else about tortillas,” asked Ms. Gale. All the children listened quietly as
Andrea told about tortillas and Ms. Gale filled in the blanks. When Ms. Gale had finished
discussing all of the types of bread, she was ready to pass out the bread. Elijah raised his
hand and asked if Ms. Gale needed any help. She happily set Elijah to passing out each type
of bread. The children were allowed to taste each variety. Patricia held up a piece of her
French bread and said, “This bread is hard on the outside but soft on the inside.
HHHMMM, I could eat loaves and loaves of it.”
When everyone had tasted all the different types of bread, Ms. Gale drew the children’s
attention to a large graph on the wall with pictures of each type of bread. “I would like
everyone to get a marker, go to the graph, find your name and put a check mark next to
the breads that you liked.” All the children picked up a marker, waited their turn, and
checked the breads that they liked. Andrea peered up at the graph pointed her finger at
the pita bread, and exclaimed “WOW! Everybody liked the pita bread. See, one, two,
three, four, five, six, seven, eight, nine, ten, eleven, twelve.” “Good job, Andrea,” Ms. Gale
praised. Ms. Gale then asked the other children to sit around the graph. When everyone
had had a chance to examine the graph, the children cleaned up their snack area. It was
now free time.
PLAYING BALL
Instructions: You should be able to record the observational information for the 3-5
years: G3 Language scale. Of course there are other scales you may utilize, provided there
was a documented baseline.
The children were all gathered around for a story about the playing with a ball. Ms. Gale
showed the book “Stop That Ball” by Mike McClintock to the children. Andrea raised her
hand and said, “I love to play basketball. I play every week with my dad.” “That’s great,”

Galileo® Pre-K Online
62 ©2014 Assessment Technology Incorporated
Revised as of 05.05.14
said Ms. Gale, “Let’s find out what type of ball is in our book.” Ms. Gale began to read the
story about a boy's madcap adventures as he tries to retrieve his bouncing ball. As she was
reading, she asked the children to help her with some words. Patricia took a turn, as did
Gwen and Elijah. Andrea waited for her turn. When she was called upon, Andrea was able
to read the word “ball” and “play.”
Ms. Gale and the children discussed what kind of ball was in the story, how the story
started, and how it ended. She told the children that they will write an imaginary story
about a ball they were playing with. The children were asked to decide what kind of ball
they were playing with (soccer, football, round ball, etc.). Ms. Gale wrote these words on
the board. Then she asked them to think of something imaginative that might happen,
something that might cause it to get away from them, or where their ball went. Ms. Gale
reminded the class that every story has a beginning, a middle, and an end. Ms. Gale asked,
“Did you get the ball back? Why or why not?” Elijah said, “I love to play with my dog. My
dog fetches the ball when I throw it to him. One time the ball went into the bushes and we
didn’t find it until Fall, when all the bush leaves fell off!” Patricia said, “My grandmother
took me to the zoo. I saw the monkeys playing ball. It was so funny how the monkeys
played! They were throwing the ball to the babies. The babies ran up the tree and would
drop the ball from the top of the tree.”
Ms. Gale and her parent volunteers began taking dictation of the children's story, writing
their words in their book. Each child begins drawing three pictures, one for each page.
Elijah drew a picture of himself tossing a round ball to his dog. Andrea drew a picture of
two people playing basketball. Their second drawing showed how the ball got away and
where it went. Their last page showed how the story ends, how the child gets the ball back
(or doesn't get it back).
When the children were done, they all returned the crayons to their containers, cleaned up
their area, and placed their pictures on the Writing bin, as requested.
MINKY THE MONKEY
Instructions: You should be able to record the observational information for the 3-5
years: G3 Language scale. Of course there are other scales you may utilize, provided there
was a documented baseline.
The children were all gathered around for a story about Minky the Monkey. As Ms. Gale
was about to begin, Patricia looked intently at the cover of the book, raised her hand and
said, “I know that story, it’s Minky the Monkey. My mom reads it to me all the time. It’s
about a little monkey that gets lost and the other animals help him get home.” “That’s
great,” said Ms. Gale, “so you’ll be able to help me today.” Ms. Gale began to read the story.
As she was reading, she asked the children to help her with some words. Gwen took a turn,
as did Andrea and Patricia. Elijah waited for his turn. When he was called upon, Elijah was
able to read the word “tree” and “sea.” At one point during the story, Minky was really lost

Galileo® Pre-K Online
©2014 Assessment Technology Incorporated 63
Revised as of 05.05.14
in the forest. Ms. Gale asked the children what they thought Minky might do to find his
way home. Andrea said, “Use a map.” Gwen commented, “Go back and start over.” Patricia
said, “He should ask his friends for help.”
At the end of the story, Ms. Gale invited the children to share any comments they had
about the story. As usual, Patricia was the first to speak saying, “Last week I thought I
was lost in the food store but I wasn’t. My mom was right by me but I just didn’t know. My
mom says that sometimes we can look right at a person and not know they’re there.”
When story-time was over, the children were given materials and encouraged to draw
pictures about the story. As Patricia was drawing, Andrea happened to glance over at her
picture. Andrea said, “What’s your picture about?” Patricia said that she was drawing
Minky’s family. “I like the color of your sky,” said Andrea. Patricia replied “I colored it
with this, do you want to use it?” Happily Andrea accepted the crayon and colored her sky
purple as well. When the children were done, they all returned the crayons to their
containers, cleaned up their area, and placed their pictures in their cubbies, as requested.


![Galileo - Manuale d'usogalileo-ofrm.ised.it/galileo/Galileo - Manuale utente.pdf · Manuale d’uso [OFR] - Progetto GALILEO - Manuale d’uso Documento di proprietà di ISED S.p.A.](https://static.fdocuments.net/doc/165x107/5b7292867f8b9a95348d2403/galileo-manuale-dusogalileo-ofrmiseditgalileogalileo-manuale-manuale.jpg)