FieldMaster Technician - Trimble · PDF fileCloning a task ... from the Service Center >...
75
iOS User Guide September 2017 FieldMaster Technician
-
Upload
doannguyet -
Category
Documents
-
view
219 -
download
1
Transcript of FieldMaster Technician - Trimble · PDF fileCloning a task ... from the Service Center >...

iOS User Guide
September 2017
FieldMaster Technician
ii
FMTechUG1.10-iOS Sep17_v1.0
September 2017
http://www.trimble.com/fsm
Copyright © 2017, Trimble Navigation Limited. All rights reserved. Trimble and the Globe & Triangle logo are trademarks of Trimble
Navigation Limited registered in the United States Patent and Trademark Office and other countries. TrimWeb and TrimView are
trademarks of Trimble Navigation Limited. GeoManager is a service mark of Trimble Navigation Limited. All other trademarks are the
property of their respective owners.
Trimble reserves the right to make changes at any time, in order to improve the reliability, function or design of its devices, products or
services and to supply the best devices, products and services possible. Trimble devices, products and services are protected under one or
more of the following U.S. Patents: 5,477,228; 5,694,594; 5,959,577; 5,990,827; 6,459,988; 6,529,159; 6,552,682; 6,594,576;
6,664,922; 6,578,005; 5,963,911; 6,862,524; 6,795,017; 6,882,313; 6,867,733; 6,832,140; 6,922,566 and numerous other patents and
patents pending in jurisdictions worldwide. Trimble does not represent that the devices, products or services shown or described herein are
free from patent infringement or from any other third party right. Trimble assumes no obligation to correct any errors contained herein or
to advise any user of liability for the accuracy or correctness of any engineering software support or assistance provided to a user.
The Trimble devices, products and services are dependent on the coverage and calling areas of wireless networks owned and operated by
third parties. Coverage and calling areas are approximate and may not cover significant portions of the United States. Actual coverage and
operation of the devices, products and services depend on a variety of factors, including without limitation: system availability and
capacity; system and equipment upgrades, repairs, maintenance, modifications and relocation; user equipment; terrain; signal strength;
structural conditions; weather and atmospheric conditions; availability of power; governmental regulations; suspected fraudulent
activities; acts of God and other conditions beyond the reasonable control of Trimble. Trimble will not be responsible for limits in coverage
or performance degradation due to any such conditions. The user acknowledges that coverage and calling areas may be interrupted,
halted or curtailed or the quality of the transmission may be diminished at any time.
The devices, products and services are dependent upon the availability of the Internet, which is owned and operated by and accessed
through third parties. Trimble assumes no responsibility for improper storage of data or information, or delivery of messages. The user
assumes the entire risk in downloading or otherwise accessing any data, information, files or other materials obtained from the Trimble
web site, even if the user has paid for or otherwise been provided virus protection services from Trimble.
The Trimble devices, products and services and any modifications, alterations, additions or changes to the devices, products or services are
not fault tolerant and are not designed, manufactured or intended for use in life support, emergency, mission-critical or other ultra-
hazardous activities (“High Risk Activities”). Trimble specifically disclaims any express or implied warranty of fitness for such High Risk
Activities. Use of a Trimble device, product or services in any application without the written consent of Trimble is prohibited.
All customer information is governed by the Trimble Privacy Policy located on the Trimble web site www.trimble.com/privacy.aspx.
Notice of Rights. All rights reserved. No part of this manual may be reproduced or transmitted in any form by any means—electronically,
mechanically, by photocopying, via recording or otherwise—without the prior written permission of Trimble Navigation Limited For
information on getting permission for reprints, contact Corporate Communications at Trimble Navigation Limited Headquarters.
Notice of Liability. The information in this manual is distributed on an “As Is” basis, without warranty, and was current at the time of
publication. While precautions have been taken in the preparation of the manual, Trimble will not have any liability to any person or entity
with respect to any loss or damage caused or alleged to be caused directly or indirectly by the instructions contained in this manual or by
the software or hardware products described in it.
Privacy and Use. This product is intended to monitor and make available information concerning the vehicle’s activities. It is the customer’s
sole responsibility to ensure that its use complies with any applicable laws and regulations. It is the customer’s responsibility to develop and
communicate policies concerning use of the application prior to implementing the product. Customers are urged to consult with their
own legal counsel in connection with the particular use to which the customer puts the product and the potential implications from that
use.
FIELDMASTER TECHNICIAN
User Guide
iii
Contents
Introduction ................................................................................................................................................ 1
Role-based access.......................................................................................................................................... 1
System requirements ..................................................................................................................................... 1
Logging in ..................................................................................................................................................... 2
Using the Welcome screen ............................................................................................................................ 3
Associating yourself with a vehicle .......................................................................................................... 4
Managing your tasks.................................................................................................................................. 6
Task icons...................................................................................................................................................... 7
Searching for tasks ........................................................................................................................................ 8
Refreshing the task list................................................................................................................................... 8
Progressing current tasks ............................................................................................................................... 8
Recording the parts used on a task .............................................................................................................. 11
Closing a completed task............................................................................................................................. 15
Closing an incomplete task.......................................................................................................................... 19
Entering the hours worked on tasks............................................................................................................. 20
Creating tasks ............................................................................................................................................. 22
Cloning a task ............................................................................................................................................. 24
Managing outstanding tasks........................................................................................................................ 25
Viewing task details..................................................................................................................................... 26
Viewing site history ..................................................................................................................................... 29
Attaching photos......................................................................................................................................... 31
Attaching forms .......................................................................................................................................... 32
Capturing the customer’s signature ............................................................................................................. 33
Approving the timesheet for a work order ................................................................................................... 34
Finding nearby workers or key locations ............................................................................................... 38
Viewing key location details......................................................................................................................... 41
Contacting your team mates ................................................................................................................... 43
Using the map........................................................................................................................................... 44
Working as a lone worker ....................................................................................................................... 45
Creating your timesheet .......................................................................................................................... 48
Recording your normal work shift................................................................................................................ 48
Recording overtime ..................................................................................................................................... 50
Recording a break ....................................................................................................................................... 51
Recording a visit to a warehouse ................................................................................................................. 52
Entering leave periods ................................................................................................................................. 53
Sending a location update ........................................................................................................................... 54
Recording a vehicle breakdown ................................................................................................................... 55
iv
Refueling your vehicle ................................................................................................................................. 56
Recording a custom event ........................................................................................................................... 56
Recording travel .......................................................................................................................................... 57
Viewing your Daily Activity Report ........................................................................................................ 59
Driver Safety features.............................................................................................................................. 61
Logging out .............................................................................................................................................. 63
Resetting your password......................................................................................................................... 64
Sending feedback about the app............................................................................................................ 65
Reporting issues ....................................................................................................................................... 66
Before attaching forms for the first time ............................................................................................... 67
FIELDMASTER TECHNICIAN
User Guide
1
Introduction
This document describes how to use FieldMaster Technician on your smart phone or tablet. Your smart phone or tablet is referred to as a “mobile phone” throughout this help.
FieldMaster Technician, in conjunction with Trimble’s Work Management solution, enables you to receive your work for the day on your mobile phone, to progress each task that you receive, and to close tasks. You can indicate when a task is complete, or select the reason for not being able to complete the task. You can create or clone tasks and assign the tasks to yourself, or leave the dispatcher to assign the tasks to other technicians. When closing a completed task, you can capture the signature of the customer to confirm that the work was completed satisfactorily. You can also add photos and forms to task details.
If you need help to complete your tasks, you can use the collaboration tools to contact other technicians by phone, SMS, or by email. You can search for your nearest team mates and also for nearby locations that are important to your team, such as company offices and warehouses. As well as viewing a location on the map, you can see how to navigate to that location. The driving directions are provided through the third-party mapping tool on your mobile phone.
If your company has purchased Work Management with the FieldMaster Location Service, Work Management uses location updates from your GPS-enabled mobile phone.
For more information, see Enabling the FieldMaster Location Service on iOS.This document is available from the Service Center > Documentation tab in GeoManager or from your administrator.
FieldMaster Technician empowers you to improve service delivery by completing your tasks on time and first time, improving customer satisfaction, saving your company time and money, and enabling your company to meet its service-level agreements.
Role-based access
This document describes all the functionality that is available in FieldMaster Technician.
Please note that access to the functionality is role based. Your administrator can set up specific roles for different types of users.
You are only provided with access to the functionality that has been enabled in your user role. Therefore, some of the functionality described in this document may not be available to you.
System requirementsFieldMaster Technician runs on smart phones and tablets that satisfy the following system requirements:
■ iOS 9 and above.
If you are using the FieldMaster Location Service, you must enable the “Location Services” options on your mobile phone so that FieldMaster Technician can identify your location. This is not necessary if you are using an in-vehicle device. For full information, see Enabling the
FieldMaster Location Service on iOS.
Introduction
2
FieldMaster Technician uses the phone, email and mapping apps that are configured on your mobile phone. You have to set up an email app on your mobile phone to be able to send emails from the app.
Note: Dates and times are displayed in the formats that are set up on your mobile phone.
Logging in
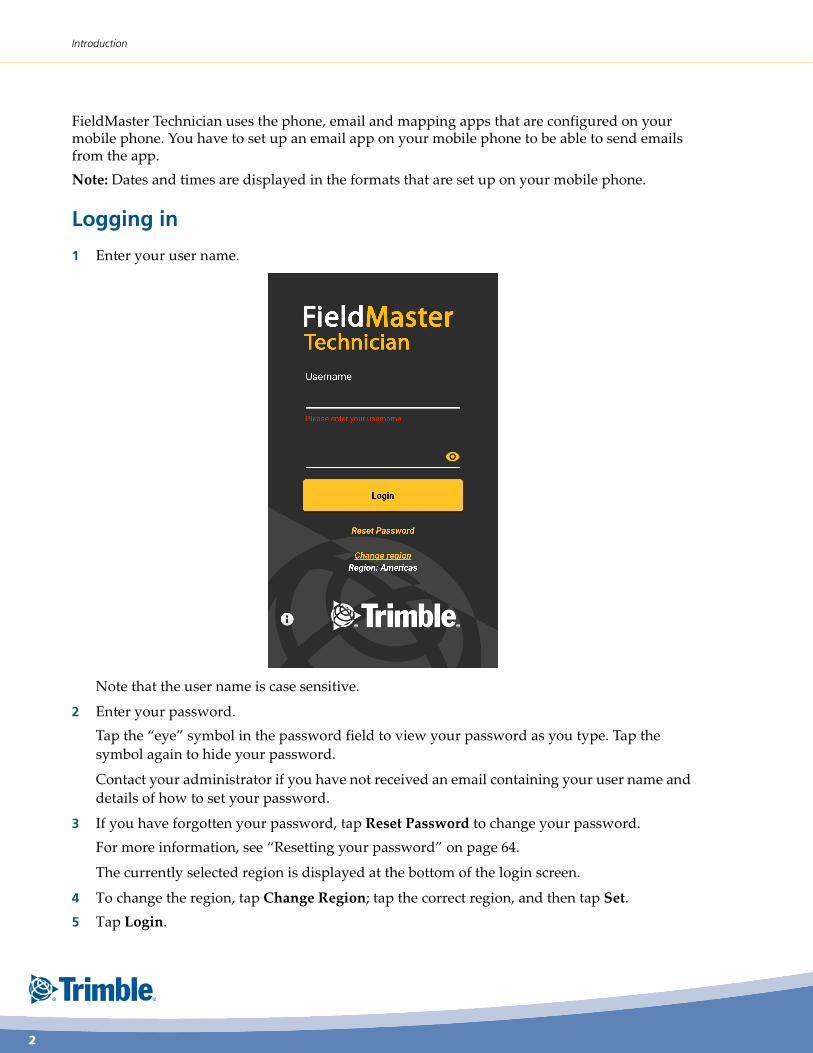
1 Enter your user name.
Note that the user name is case sensitive.
2 Enter your password.
Tap the “eye” symbol in the password field to view your password as you type. Tap the
symbol again to hide your password.
Contact your administrator if you have not received an email containing your user name and
details of how to set your password.
3 If you have forgotten your password, tap Reset Password to change your password.
For more information, see “Resetting your password” on page 64.
The currently selected region is displayed at the bottom of the login screen.
4 To change the region, tap Change Region; tap the correct region, and then tap Set.
5 Tap Login.

FIELDMASTER TECHNICIAN
User Guide
3
Using the Welcome screen
The Welcome screen appears after you log in to the app. This screen provides access to all the functionality in the app.
The following options are available on the Welcome screen. However, depending on the functionality that has been enabled for your user role, you may not see all of these options:
Field Description
Name Your employee name together with the label of your mobile device.
If you are using the FieldMaster Location Service, the “mobile device” is virtual and no device label is displayed.
Profile picture Tap to set or change your profile picture. You can use any image from your mobile phone or you can take a picture with your mobile phone.
My Timesheet & Activities
Tap to record events as they occur during your working day and complete your timesheet.
My Tasks Tap to view the tasks that have been dispatched to you. You can review the task details and then accept or reject these tasks.
Note that the My Tasks option is only available if your company has subscribed to Work Management.
Associating yourself with a vehicle
4
Associating yourself with a vehicle
Note:
This section is only relevant if you are using an in-vehicle device to provide location information, ratherthan the FieldMaster Location Service.
As a technician, when you start FieldMaster Technician, if you are associated with a vehicle, the vehicle ID is displayed under your name.
If you are not associated with a vehicle, you can associate yourself with a vehicle.
To associate yourself with a vehicle
1 If you are:
■ Already associated with a vehicle, tap the vehicle ID on the screen, or tap the vehicle icon at the top right of the screen.
You are prompted to answer if you are currently driving that vehicle.
■ If you tap Yes, the association with the current vehicle remains.
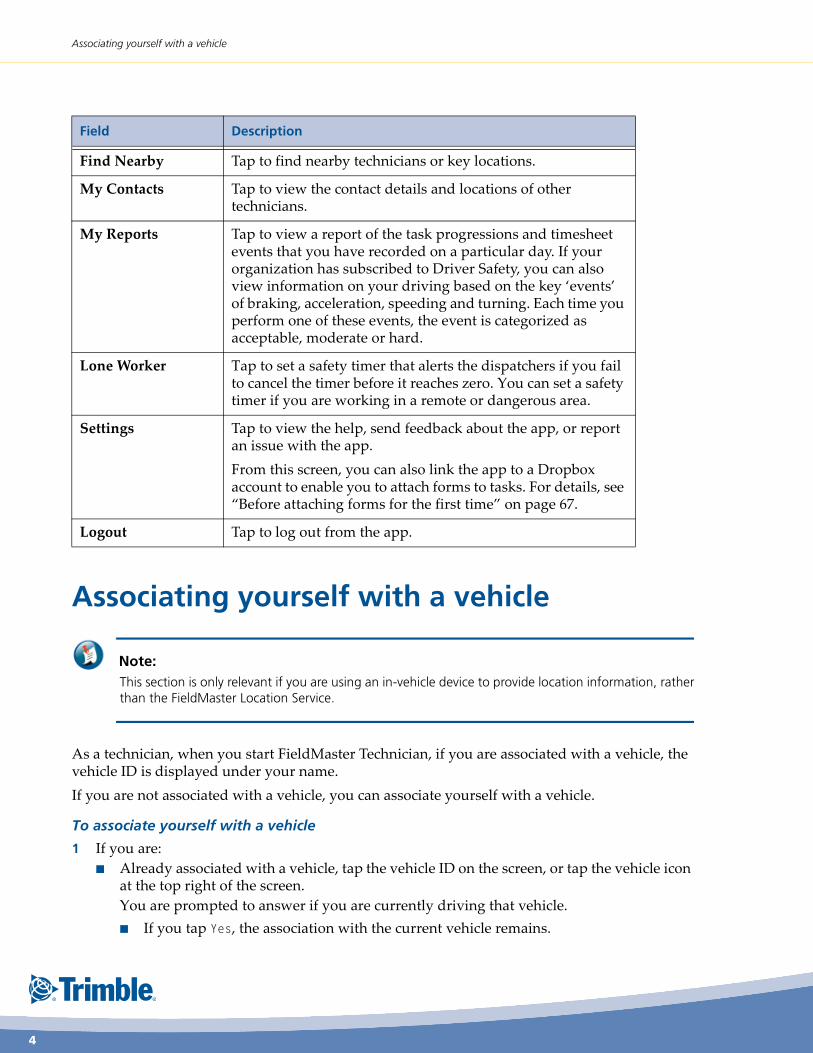
Find Nearby Tap to find nearby technicians or key locations.
My Contacts Tap to view the contact details and locations of other technicians.
My Reports Tap to view a report of the task progressions and timesheet events that you have recorded on a particular day. If your organization has subscribed to Driver Safety, you can also view information on your driving based on the key ‘events’ of braking, acceleration, speeding and turning. Each time you perform one of these events, the event is categorized as acceptable, moderate or hard.
Lone Worker Tap to set a safety timer that alerts the dispatchers if you fail to cancel the timer before it reaches zero. You can set a safety timer if you are working in a remote or dangerous area.
Settings Tap to view the help, send feedback about the app, or report an issue with the app.
From this screen, you can also link the app to a Dropbox account to enable you to attach forms to tasks. For details, see “Before attaching forms for the first time” on page 67.
Logout Tap to log out from the app.
Field Description

FIELDMASTER TECHNICIAN
User Guide
5
■ If you tap No, I’m driving another vehicle, the Vehicle Association screen is displayed.
■ If you tap No, I’m not driving, your association with the vehicle is terminated and you are returned to the Welcome screen.
■ If you tap Cancel, you are returned to the Welcome screen.
● Not currently associated with a vehicle, tap the vehicle icon.
You are prompted to answer if you are driving a vehicle, Yes or No.
◆ If you answer Yes, the Vehicle Association screen is displayed.
◆ If you answer No, you are directed to the Welcome screen.
The Vehicle Association screen shows a list of vehicles within a 3-mile radius of the technician’s current location. The vehicles are ordered based on proximity to the technician’s current location.
Technicians can only see the vehicles that have been assigned to their team.
The page shows two expandable lists. You can view both available vehicles and vehicles currently assigned to other technicians.
A maximum of 50 vehicles is displayed.
2 You can use the Search field to search for the full ID or partial ID of a vehicle.
3 Tap the vehicle with which you want to be associated.
The last known location of the vehicle and your current location are displayed on the map. The vehicle’s availability is also displayed.
4 Tap Drive to associate yourself with that vehicle instead.
Managing your tasks
6
You can associate yourself with available vehicles but also with vehicles that are currently assigned to other technicians. If you associate yourself with a vehicle that is already assigned to another technician, then the current association will be discontinued and you will be associated with that vehicle.
If you were already associated with a vehicle, then your previous vehicle will become
available.
If you have driven the vehicle within the previous 30 days, the date on which you were
associated with the vehicle is displayed.
Managing your tasks
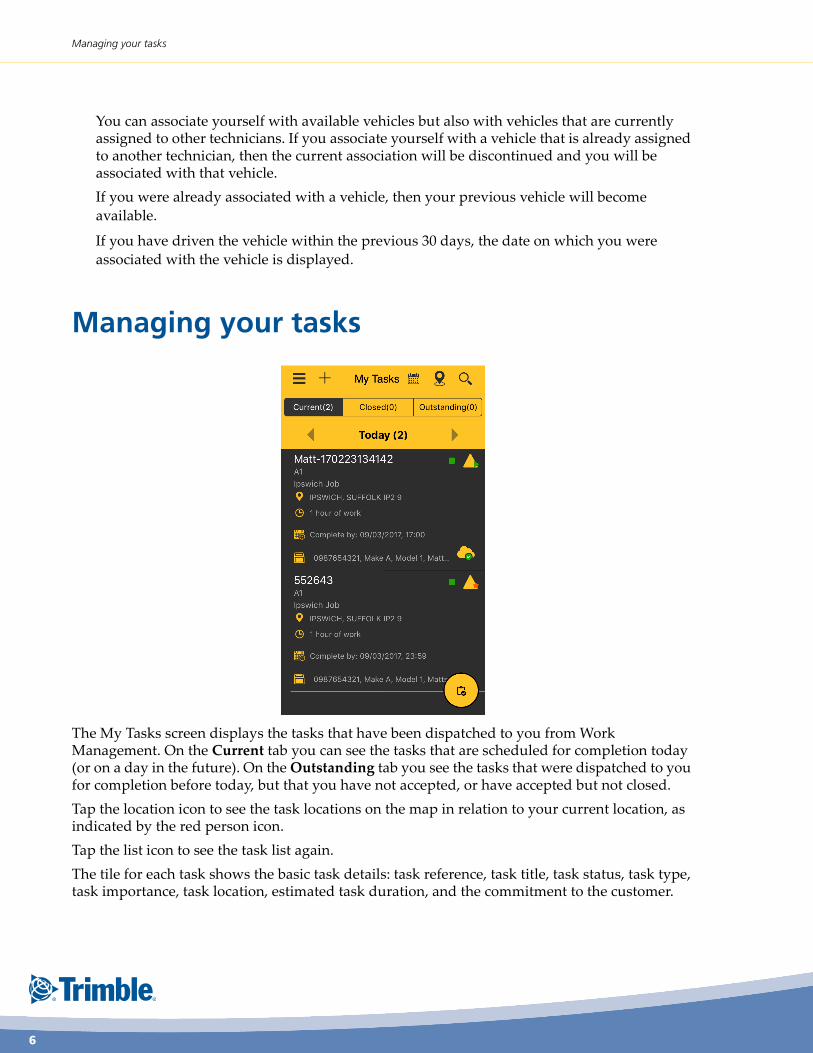
The My Tasks screen displays the tasks that have been dispatched to you from Work Management. On the Current tab you can see the tasks that are scheduled for completion today (or on a day in the future). On the Outstanding tab you see the tasks that were dispatched to you for completion before today, but that you have not accepted, or have accepted but not closed.
Tap the location icon to see the task locations on the map in relation to your current location, as indicated by the red person icon.
Tap the list icon to see the task list again.
The tile for each task shows the basic task details: task reference, task title, task status, task type, task importance, task location, estimated task duration, and the commitment to the customer.

FIELDMASTER TECHNICIAN
User Guide
7
Task icons
The task status and task importance are indicated by the following icons:
Icon Description
New: a new task that has been dispatched to you.
Accepted: you have accepted the task.
En route: you are travelling to the task location.
In progress: you are working on the task.
Complete: you have closed the task as complete.
Incomplete: you have closed the task as incomplete.
Historical: a task that was worked on in the past.
A task of high importance.
A task of normal importance.
A task of low importance.

Managing your tasks
8
Searching for tasks
Tap the search icon to search for a task.
You can search for a task by entering a full or partial search string in the search field on a list
screen or on the map. The search string can be any of the following:
■ The title, importance, type or reference of a task.
■ The address of a task (city name or postal or ZIP code).
The results are filtered as you enter the search string. The search is not case sensitive.
Refreshing the task list
The task list is automatically refreshed when you progress a task. To refresh the task list at any other time, pull the screen down to refresh the task list.
Progressing current tasks
When you first open the My Tasks screen, you can see your tasks for today, in the order in which they were dispatched. You may have been dispatched work for more than one day. If so, you can tap the right arrow next to Today to view your tasks for tomorrow and other days.
Progressing a current task
1 If you are not on the My Tasks screen, tap My Tasks on the Welcome screen to view your list of tasks today.
2 To see the tasks on the map, tap the location icon at the top of the screen.
To return to the list of tasks, tap the list icon at the top of the screen.

FIELDMASTER TECHNICIAN
User Guide
9
3 Tap the task tile to view the full task details.
For more information, see “Viewing task details” on page 26.
4 To see a list of the tasks that have been previously carried out at this site, tap the task options icon at the top right of the screen and then tap Site History.
For more information, see “Viewing site history” on page 29.
5 Tap Accept to accept the task or Reject followed by Yes to return the task to the dispatcher.
Note:
The ability to reject a task depends on your user role. You may not be able to reject a task.
Note that if you do not need to see the full task details, you can progress the task from the
task list: simply swipe the task tile to the left to see the progress buttons such as Accept/
Reject, or Travel/On Site.
6 If prompted to do so, select a reason for rejecting the task, and then tap Done.
7 If you have not yet recorded the start of your work shift, you are prompted to do so now.
For more information, see “Recording your normal work shift” on page 48.
8 When you are ready to drive to the task, tap Travel.
If required, you can update your estimated arrival time at the task. To do this, tap the task
options icon at the top right of the screen, and then tap Estimated Arrival Time. Enter the
estimated arrival time, and then tap Save.
Managing your tasks
10
■ Tap the address of the task, or rotate your mobile phone, to see the location of the task on the map.
■ Tap the task options icon on the map to open the pop-over. Tap the action buttons to navigate to the location or to the nearest fuel station.
■ If you need to quit your journey for any reason, tap Quit Journey.
When you are ready to resume, tap the task tile and then tap Travel or On Site, as required.
9 When you arrive at the task location, tap On Site.
If required, you can adjust the completion time of the task. To do this, tap the task options
icon at the top right of the screen, and then tap Adjust Completion Time. Enter the new
completion time, and then tap Save.
10 Once you have accepted the task, there are a number of options that you can carry out on the task. Most of these are available from the task options icon at the top right of the screen. For example, you can attach photos or forms to the task details, enter the service-restored time, or enter parts that you have used for the task.
■ To attach photos to the task details, tap the task options icon, and then tap Attach Photos. For more information, see “Attaching photos” on page 31.
■ To attach forms to the task, tap the task options icon, and then tap Attach Files. For more information, see “Attaching forms” on page 32.
■ To enter the time at which the service was restored to the customer, tap the task options icon, and then tap Enter Service Restored Time. You can do this at any time after accepting the task, but also when you are closing the task.
■ To enter details of the parts that you have used for this task, tap the parts icon next to the date at the top of the screen. You can do this at any time after accepting the task, but also when you are closing the task. For more information, see “Recording the parts used on a task” on page 11.
11 If you need to suspend a task, for example to help another technician, tap Suspend.
If you have suspended the task, when you are ready to resume working on the task, tap the
task tile and then tap Travel or On Site, as required.
Once you have finished the task or if you have arrived at the site but cannot complete the task, you need to close it. In addition to the standard fields that always appear when you close a task, the dispatcher can also add data entry fields to the task. The fields that appear depend on the information required by your company. If the data entry field has been set up as a mandatory field (indicated by an asterisk), you must enter the required information when closing the task.
The information that you enter in the data entry fields and anything that you attach to the task are included in the task details in Work Management.
For example, you could enter the parts that you have used, any toll and hotel costs incurred in carrying out the task, the cause of the problem and the correction that you have carried out, or a link to a web page that has helped you to solve the problem.
For more information, see “Closing a completed task” on page 15 and “Closing an incomplete task” on page 19.
FIELDMASTER TECHNICIAN
User Guide
11
Recording the parts used on a task
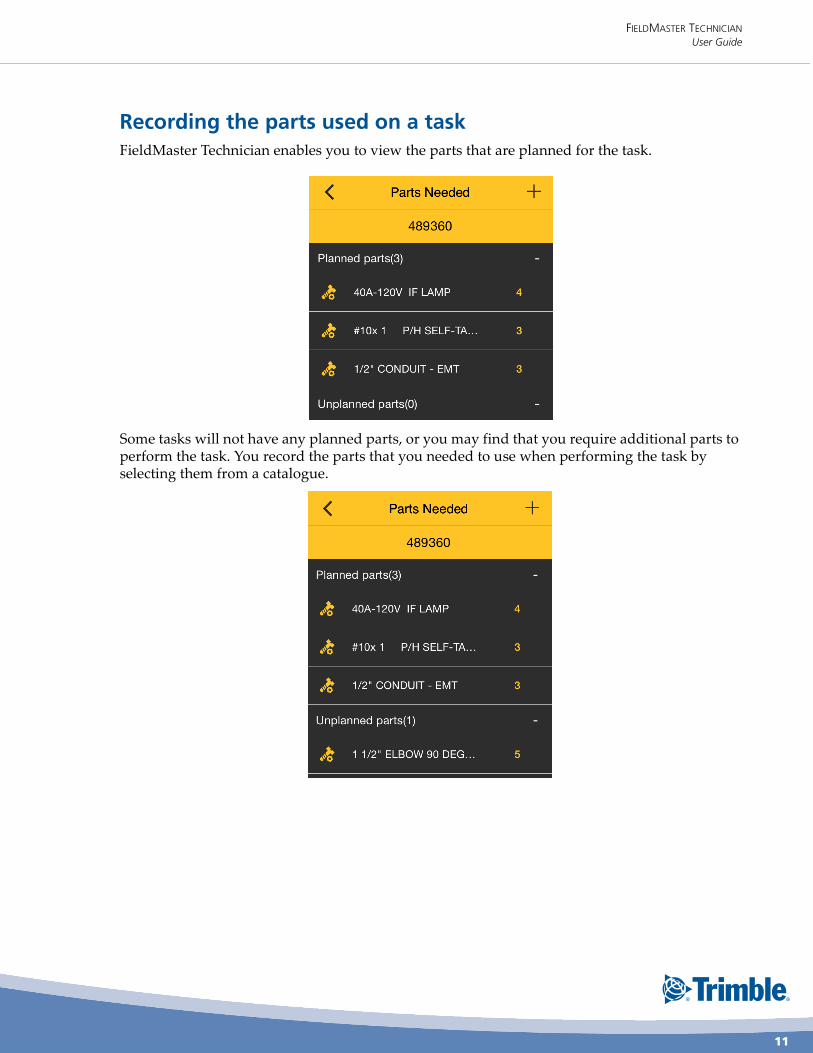
FieldMaster Technician enables you to view the parts that are planned for the task.
Some tasks will not have any planned parts, or you may find that you require additional parts to perform the task. You record the parts that you needed to use when performing the task by selecting them from a catalogue.
Managing your tasks
12
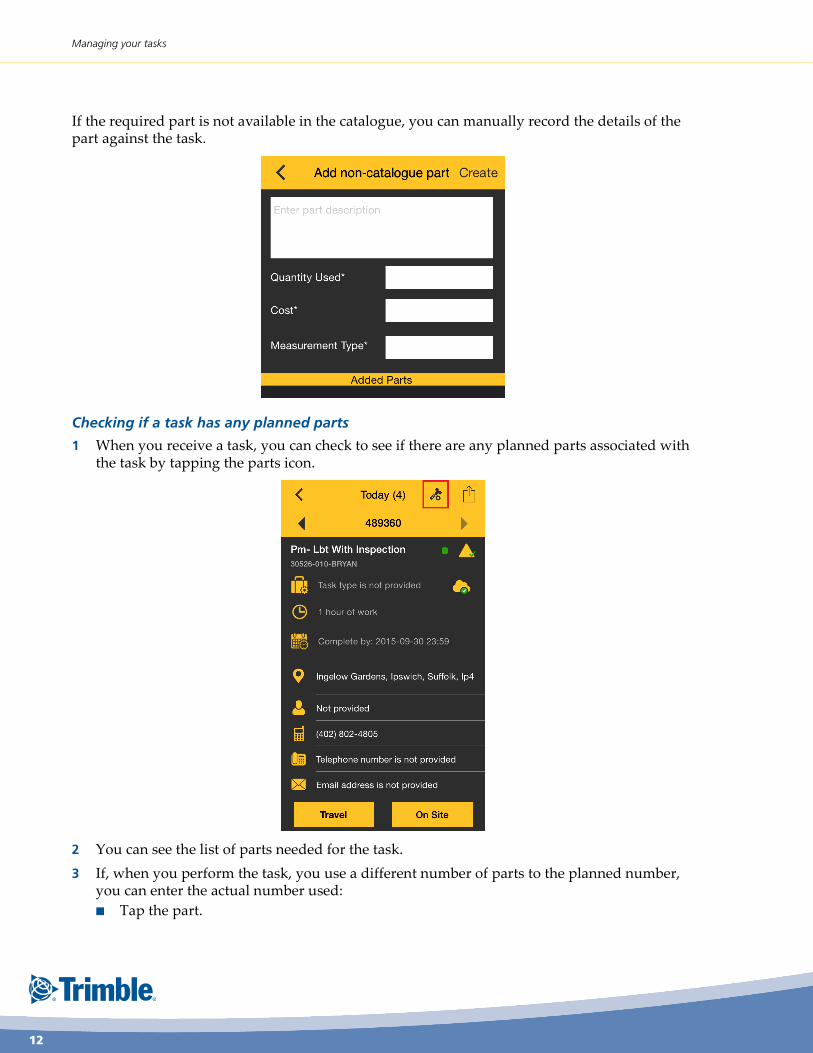
If the required part is not available in the catalogue, you can manually record the details of the part against the task.
Checking if a task has any planned parts
1 When you receive a task, you can check to see if there are any planned parts associated with the task by tapping the parts icon.
2 You can see the list of parts needed for the task.
3 If, when you perform the task, you use a different number of parts to the planned number, you can enter the actual number used:
■ Tap the part.

FIELDMASTER TECHNICIAN
User Guide
13
■ Enter the correct number in the Quantity Used field.
■ Tap Save.
Note:
You must accept a task before you can record the parts used for that task.
To record a part against the task from a catalogue
You can record the parts used for a task at any time after you have accepted the task. You can also record the parts used while you are closing the task.
1 On the Parts Needed screen, tap the plus (+) icon.
Managing your tasks
14
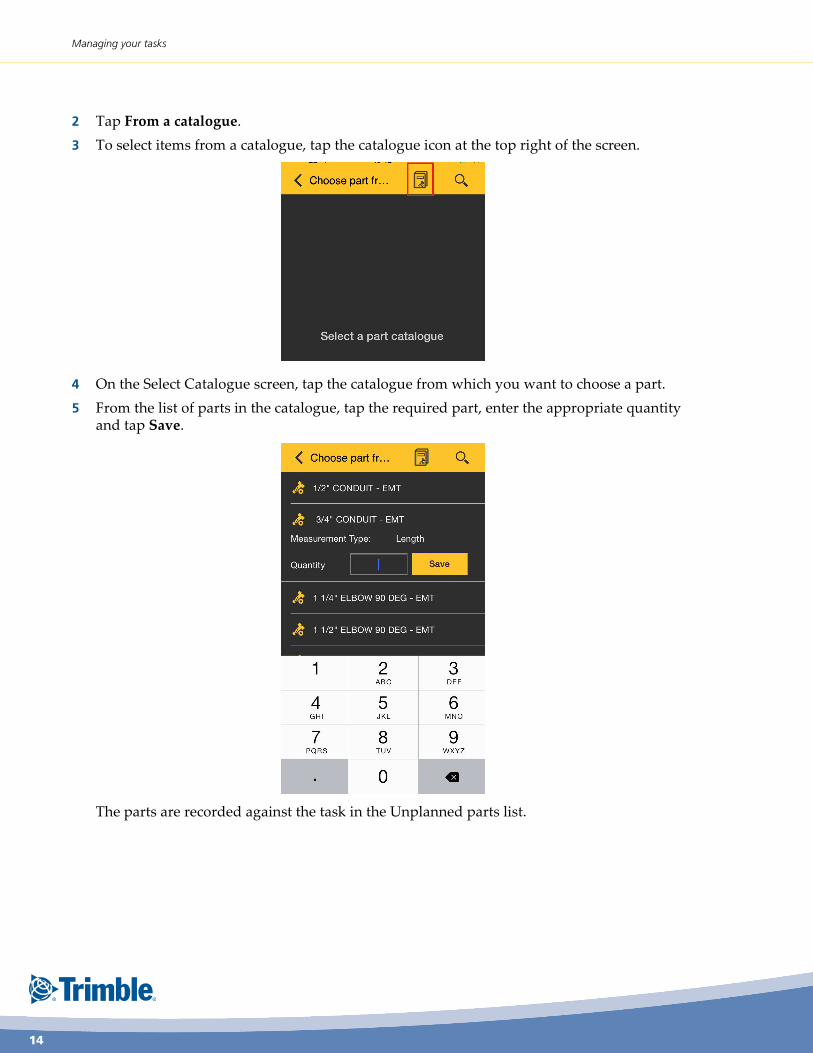
2 Tap From a catalogue.
3 To select items from a catalogue, tap the catalogue icon at the top right of the screen.
4 On the Select Catalogue screen, tap the catalogue from which you want to choose a part.
5 From the list of parts in the catalogue, tap the required part, enter the appropriate quantity and tap Save.
The parts are recorded against the task in the Unplanned parts list.
FIELDMASTER TECHNICIAN
User Guide
15
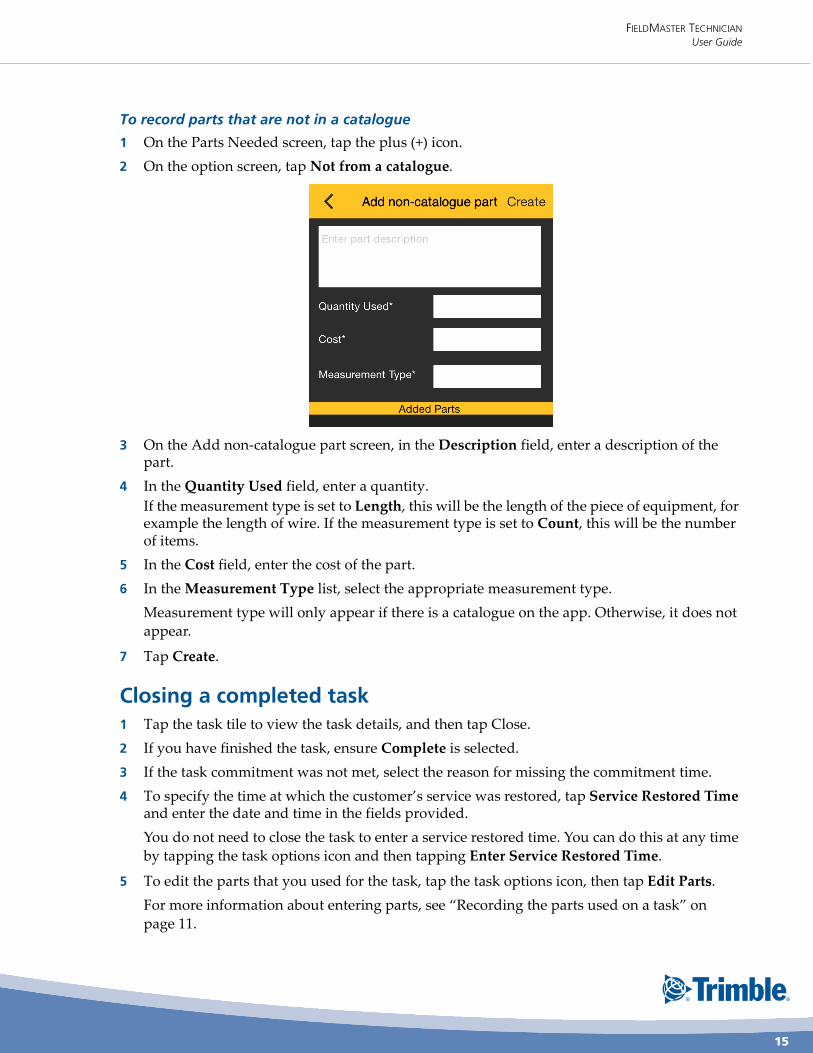
To record parts that are not in a catalogue
1 On the Parts Needed screen, tap the plus (+) icon.
2 On the option screen, tap Not from a catalogue.
3 On the Add non-catalogue part screen, in the Description field, enter a description of the part.
4 In the Quantity Used field, enter a quantity.
If the measurement type is set to Length, this will be the length of the piece of equipment, for example the length of wire. If the measurement type is set to Count, this will be the number of items.
5 In the Cost field, enter the cost of the part.
6 In the Measurement Type list, select the appropriate measurement type.
Measurement type will only appear if there is a catalogue on the app. Otherwise, it does not
appear.
7 Tap Create.
Closing a completed task
1 Tap the task tile to view the task details, and then tap Close.
2 If you have finished the task, ensure Complete is selected.
3 If the task commitment was not met, select the reason for missing the commitment time.
4 To specify the time at which the customer’s service was restored, tap Service Restored Time and enter the date and time in the fields provided.
You do not need to close the task to enter a service restored time. You can do this at any time
by tapping the task options icon and then tapping Enter Service Restored Time.
5 To edit the parts that you used for the task, tap the task options icon, then tap Edit Parts.
For more information about entering parts, see “Recording the parts used on a task” on
page 11.

Managing your tasks
16
6 You must enter the times at which you started and ended work on the task. Tap the task options icon, then tap Task Hours.
If you do not enter your task hours, you are prompted to do so before you can close the task.
7 On the Task Hours screen, in the Date field, enter the appropriate date.
By default, this will display today’s date.
8 In the Start Time field, enter the time that you started working on the task on that day.
If you started the task today, by default, this will display the time that you tapped On Site.
9 In the End Time field, enter the time you finished working on the task on that day.
By default, this is the current time.
You can edit and delete the task hours entered on the current day, as many times as required.
You can also view, but not edit, the task hours edited on a previous day. The task hours that
cannot be edited are grayed out.
Tip:
If you worked on a task over midnight, enter your hours prior to midnight, and then a second entry for your hours after midnight.
10 If the Type field appears, tap the Type field and select the type of working hours that you need to record against the task.
The type field is only displayed if it has been set up by your dispatcher. For example, you
might have to record whether you worked on a task in your standard working hours, or
during overtime.
11 Tap Save.
The information is displayed in the hours recorded for this task.
You can record the hours that you spend working on a task at any time, you do not need to
wait until you are closing the task. This is useful, for example, when you are working on
multi-day tasks.
Note:
If you do not enter task hours before closing the task, you are prompted to enter your task hours. Ifyou have already entered task hours but some time has passed, you are prompted to check the taskhours before closing the task. The alert notification takes you automatically to the Task Hours screen.
12 Tap the left arrow to return to the closure screen.
13 Enter closure notes, if required.
14 To capture the signature of your customer to confirm that you have completed the task satisfactorily, tap the task options icon at the top right of the screen and then tap Attach
FIELDMASTER TECHNICIAN
User Guide
17
Signature. You can only add one signature. For more information, see “Capturing the customer’s signature” on page 33.
15 To attach photos to the closure details, tap the task options icon at the top right of the screen, and then tap Attach Photos. For more information, see “Attaching photos” on page 31.
16 To attach forms to the closure details, tap the task options icon at the top right of the screen, and then tap Attach Forms. For more information, see “Attaching forms” on page 32.
17 Tap Close to close the task.
18 If closure attributes have been set up by your Work Management administrator, you are prompted to enter closure attributes before closing the task. Attributes marked by an asterisk are mandatory.
If more than one closure template has been defined for this task type, tap the name of a
closure template to enter the closure attributes specified in that template. Tap Save to save
the closure attributes for that template.
You can enter the closure attributes at any time after you have accepted the task by tapping
the task options icon, you do not need to wait until you are closing the task. If more than one
closure template has been specified, you do not need to enter all the closure information at
the same time. However, you must enter all the mandatory information specified in all of the
templates before you can close the task.
When you have finished entering closure attributes for a template, tap the left arrow to
return to the previous screen.
19 Tap Close again to close the task after entering the closure attributes.
20 You are prompted to confirm that you want to close the task, tap Yes.
You are taken to the Task Synchronization Status screen, where you can see whether all the
task progression, task hours and closure data have been synchronized with the server.

Managing your tasks
18
If the data has been successfully synchronized, then a green check mark is shown in the icon.
Unsuccessful synchronization is indicated by a red exclamation mark in the icon:
If there is no data connection, the data will be synchronized with the server once the data
connection becomes available.
21 When the task has been successfully closed, tap OK.

FIELDMASTER TECHNICIAN
User Guide
19
Closing an incomplete task
1 Tap the task tile to view the task details, and then tap Close.
2 If you arrived at the site but were unable to start or finish the task for some reason, tap Incomplete.
3 Select the reason why you could not complete the task, and then tap Set.
4 If the task commitment was not met, select the reason for missing the commitment time.
5 Indicate whether you have started the task.
6 On the Task Hours screen, enter the times at which you started and ended work on the task, then return to the closure screen.
7 To specify the time at which the customer’s service was restored, select Enter Service Restored Time.
A date and time field are displayed, enabling you to specify the date and time that service
was restored.
You do not need to close the task to enter a service restored time. You can do this at any time
by tapping the task options icon and then tapping Service Restored Time.
8 Select Time Remaining, and then set the number of hours and minutes remaining on the task.
9 Enter values in any data entry fields, as required.
10 Enter closure notes, if required.
11 To edit the parts that you used for the task, tap Edit Parts.
For more information about entering parts, see “Recording the parts used on a task” on
page 11.
If required, you can attach photos or completed forms to the closure details. Note that you
cannot attach a signature when closing a task as incomplete.
12 To attach photos to the closure details, tap the task options icon at the top right of the screen, and then tap Attach Photos. For more information, see “Attaching photos” on page 31.
The dispatcher will use the information you have entered to ensure that the task is reassigned
to a technician who has the necessary capabilities, parts and information for carrying out the
task.
13 To attach forms to the closure details, tap the task options icon at the top right of the screen, and then tap Attach Forms. For more information, see “Attaching forms” on page 32.
14 Tap Close to close the task as incomplete.
15 If closure attributes have been set up by your Work Management administrator, you are prompted to enter closure attributes before closing the task. Attributes marked by an asterisk are mandatory.
If more than one closure template has been defined for this task type, tap a closure template
name to enter the closure attributes specified in that template. Tap Save to save the closure
attributes for that template.

Managing your tasks
20
You can enter the closure attributes at any time after you have accepted the task by tapping
the task options icon, you do not need to wait until you are closing the task. If more than one
closure template has been specified, you do not need to enter all the closure information at
the same time. However, you must enter all the mandatory information specified in all of the
templates before you can close the task.
16 You are prompted to confirm that you want to close the task, tap Yes.
17 When the task has been successfully closed, tap OK.
Return to the My Tasks screen to view your remaining tasks for the day.
If you want to review the closure attributes for tasks that you have closed today, tap the Closed tab on the My Tasks screen and then tap the task tile. You can see the same information as that shown in the Site History for a task. For more information, see “Viewing site history” on page 29.
Entering the hours worked on tasks
You can record the number of hours worked on a task (task hours) as you go along. You do not need to have completed the task. This is especially useful when working on a task that spans multiple days. You can record the number of hours worked on that task on each day.
To record the hours worked on a task
1 Open the task.
Multi-day tasks that were started prior to the current day can be found in the Outstanding
tab.
2 Tap the task options icon at the top right of the screen to open the task options:
3 From the list of options, tap Enter Task Hours.
4 On the Task Hours screen, in the Date field, enter the appropriate date.
By default, this will display today’s date.

FIELDMASTER TECHNICIAN
User Guide
21
5 In the Start Time field, enter the time that you started working on the task on that day.
If you started the task today, by default this will display the time that you tapped On Site.
6 In the End Time field, enter the time you finished working on the task on that day.
By default, this is the current time.
Note:
If you worked on a task over midnight, enter your hours prior to midnight, and then a second entryfor your hours after midnight.
7 If the Type field appears, tap the Type field and select the type of working hours that you need to record against the task.
The type field is only displayed if it has been set up by your dispatcher. For example, you
might have to record whether you worked on a task in your standard working hours, or
during overtime.
8 Tap Save.
The information is displayed in the Hours recorded for this task area.
You can edit and delete the task hours entered on the current day, as many times as required.
You can also view, but not edit, the task hours edited on a previous day. The task hours that
cannot be edited are grayed out.
Managing your tasks
22
Creating tasks
When carrying out your tasks, you may find that another task is needed, either that you can
carry out or that needs to be carried out by someone else.
Note:
The ability to create a task depends on your user role. You may not be able to create a task.
You can create a task directly from FieldMaster Technician and then either assign the task to yourself or let the dispatcher assign the task to another technician. If particular capabilities are needed to carry out the task, you can mention this in the task notes.
If you already have a task that is similar to the one that you want to create, you can clone the existing task instead. For more information, see “Cloning a task” on page 24.
1 If you are not on the My Tasks screen, tap My Tasks on the Welcome screen to view your task list.
2 Tap the plus icon to open the Create Task screen. Enter the task details. The fields marked by an asterisk are mandatory.
Field Description
Work order If the task belongs to a work order, enter the work order reference for the task here. A work order comprises multiple tasks that belong to the same package of work for a customer.
Notes Enter any notes relating to the task. For example, you might need to explain why the task is needed, or the capabilities that are needed to carry out the task.
Title Enter the name of the task.
Type Select the task type, and then tap Set. For example, you might have Install, Repair, or Service as task types.
Customer Enter the name of the customer. The customer name is mandatory.
Address Either enter the address of the task.
The address fields marked by an asterisk show the fields that are needed to derive the latitude and longitude of the specified location.
Importance Select the importance of the task (high, normal or low), and then tap Set. By default the importance is normal.

FIELDMASTER TECHNICIAN
User Guide
23
3 Tap Create.
4 When prompted, tap Yes to assign the task to yourself or No to send the task to the dispatcher for assignment.
A message appears confirming the task reference of the created task.
5 Tap OK.
If you have assigned the task to yourself, the new task is added to your task list.
Commitment type
Date and time of the commitment
Time zone
Enter the commitment type and the date and time of commitment. By default the task is created as a complete-by task with a commitment of 23:59 (11:59 PM) today.
The commitment type can be appointment, complete by or start by.
For an appointment, enter the Start and End times. For an appointment task, the technician must arrive at the task location to meet the commitment to the customer.
For a complete-by task, enter the Complete by time. A complete-by task is a task that must be completed by a certain date and time to meet the commitment.
For a start-by task, enter the Start by time. A start-by task is a task that must be started by a certain date and time to meet the commitment.
In addition to the (primary) commitment on the task, you can optionally set a secondary commitment. For example, if the customer requires the task to be started by a specific time and completed by a specific time, you could set up the (primary) commitment as a start-by commitment and the secondary commitment as a complete-by commitment.
The time zone is automatically set to the time zone on your mobile phone.
Duration Specify the duration of the task, and then tap Set.
Contact Enter the name, telephone number, mobile phone number, and email address of the contact person at the customer site.
Field Description

Managing your tasks
24
Cloning a task
Often it is easier to clone an existing task and change the details as required rather than creating
a task from scratch.
You can clone any task that has been dispatched to you, including outstanding tasks and closed
tasks.
Note:
The ability to clone a task depends on your user role. You may not be able to clone a task.
To clone a task
1 If you are not on the My Tasks screen, tap My Tasks on the Welcome screen to view your task list.
2 Tap the tile of the task that you want to clone.
3 Tap the task options icon at the top right of the screen to open the task options:
4 Tap Clone Task.
The task details are copied from the task that you cloned. The following details are the same
as for the cloned task: work order, title, type, customer, address, duration, and contact. The
commitment type is automatically set to “complete by” with a commitment of today at 23:59
(11:59 PM).

FIELDMASTER TECHNICIAN
User Guide
25
Note that task durations can be adjusted for you to take your experience level into account.
When you clone a task, you will see the original task duration, not the adjusted duration. If
you then assign the task to yourself, the task duration will again be adjusted. So if you clone
a task that has a duration of 1 hour and then assign the task to yourself, the new task will also
have a duration of 1 hour.
5 Change any details, as required, and then tap Clone.
6 When prompted, tap Yes to assign the task to yourself or No to send the task to the dispatcher for assignment.
A message appears confirming the task reference of the created task.
7 Tap OK.
If you have assigned the task to yourself, the new task is added to your task list.
Managing outstanding tasks
The Outstanding tab lists any tasks that you did not complete on the day that they were scheduled for you to work on. Any of today’s tasks that you do not complete by 23:59 (11:59 PM) today will be moved to the Outstanding tab on the following day.
Multi-day tasks that were started before today will appear on the Outstanding tab.
You can carry out the following actions on outstanding tasks:
■ If you completed the task yesterday, close it as complete, as described in “Closing a
completed task” on page 15.
■ If you arrived at the task site but were unable to start or finish the task for some reason, close
the task as incomplete, as described in “Closing an incomplete task” on page 19.

Managing your tasks
26
■ If you did not arrive at the task site, tap Return to return the task to the dispatcher for
reassignment, rather than closing the task.
■ You can attach photos or forms to a task before you have accepted the task. However, if you
subsequently return the task, any attached photos and forms will be lost.
Viewing task details
When you tap a task displayed in the list, the full task details appear. Tap the right and left
arrows to move to the next and previous task. You can also swipe the screen to move between
tasks.
In addition to the standard task details that are described in this section, the dispatcher can add supplementary task details to help you carry out the task. For example, the supplementary task details can contain the make, model and serial number of the unit that you are installing or repairing, a list of the tools that you will need to carry out the task, a link to the installation or maintenance guide, and so on.
If tools have been booked for you or if you have been assigned to a task as part of a crew, the details are given in the task notes.
If there are any access restrictions on the task location, these are indicated along with the address of the task.

FIELDMASTER TECHNICIAN
User Guide
27
The following standard task details are displayed:
Field Description
Work order If the task belongs to a work order, this field shows the work order reference for the task. A work order comprises multiple tasks that belong to the same package of work for a customer. The work order reference links all the tasks in the work order.
Task reference The task reference given to the task by the Work Management dispatcher or automatically generated by Work Management. This could be the reference given to the customer. For example, AT-09/05/47-2431.
Title The name of the task. For example, PM-FULL SERVICE.
Customer The name of the customer for the task. For example, ABC Company.
Status The status of the task is indicated by a task status icon. For example, new tasks have a task icon with a red star. For a description of the task status icons, see “Task icons” on page 7.
Importance The importance of the task (low, normal or high) is indicated by a task importance icon. For example, a green square indicates normal task. For a description of the task importance icons, see “Task icons” on page 7.
Type The type of the task. For example, your company might have Install, Repair or Service task types.
Duration The estimated task duration in hours and minutes. This time does not include travel time. Note that the task duration may have been adjusted from the original task duration to take your experience level into account.
Time remaining If a task has been closed as incomplete with an estimate of the time remaining on the task, then both the duration and the time remaining will be displayed for the task.
Commitment The type of commitment (start by, complete by or appointment) and the time by which the commitment must be met or the appointment window.
Access restrictions Any access restrictions at the task location. An access restriction indicates when you can gain access to the site to start the task. For example, if access to a site is only allowed between 00:00 (12:00 am) and 06:00 (6:00 am) Monday, Tuesday and Wednesday, this means that you will be scheduled to arrive on site between those hours. It does not mean that the task will be scheduled to complete by the end of the access restriction.
Managing your tasks
28
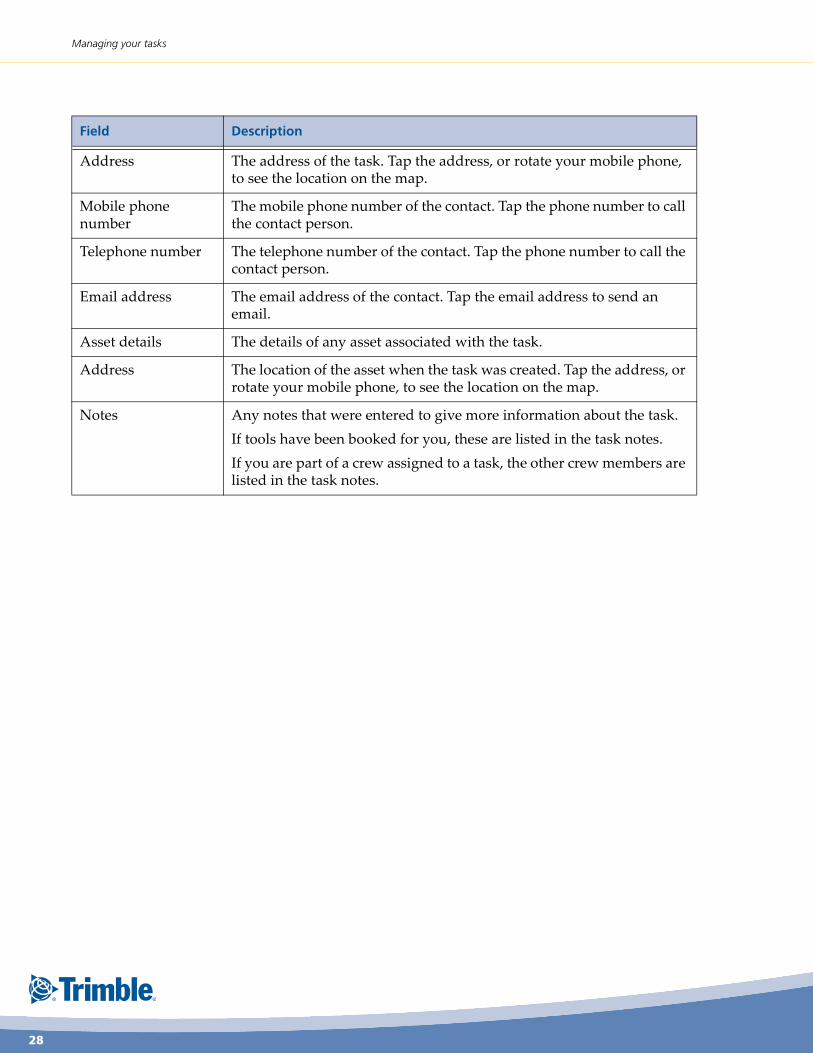
Address The address of the task. Tap the address, or rotate your mobile phone, to see the location on the map.
Mobile phone number
The mobile phone number of the contact. Tap the phone number to call the contact person.
Telephone number The telephone number of the contact. Tap the phone number to call the contact person.
Email address The email address of the contact. Tap the email address to send an email.
Asset details The details of any asset associated with the task.
Address The location of the asset when the task was created. Tap the address, or rotate your mobile phone, to see the location on the map.
Notes Any notes that were entered to give more information about the task.
If tools have been booked for you, these are listed in the task notes.
If you are part of a crew assigned to a task, the other crew members are listed in the task notes.
Field Description

FIELDMASTER TECHNICIAN
User Guide
29
Viewing site history
When you are looking at the details of a task, you can also see the details of any tasks that have
already been closed (as complete or as incomplete) at the same geographic location and for the
same customer.
To view the history of tasks carried out at a site
1 Tap the task options icon at the top right of the screen to open the task options:

Managing your tasks
30
2 Tap Site History to see the list of tasks that have been closed at this site and the closure notes for each task:
In addition to the original task details that were provided to the technician, you can also see
the information entered by the technician when progressing and closing the task.
3 Tap a task tile to view further task details.
You can see the following information for each closed task:
■ The closure attributes entered by the technician for the task.
■ Any photos or forms that were attached to the task. Tap the task options icon to download the photo or form.
■ Any closure notes provided by the technician.
■ The name of the technician who worked on the task.
■ The task status (closed complete or incomplete)
■ The date and time of the task closure, as entered by the technician.
■ The actual duration of the task, calculated as the difference between the start and end times entered by the technician.
4 Tap Task History to see the name of the employee (technician), the task status, the date and time at which the technician started working on the task and closed the task, and the actual task duration, and the closure notes.
5 Tap the clock icon to see the task hours, and then tap the left arrow to return to the previous screen.
6 Tap the document icon to see the closure attributes entered by the technician for the task, and then tap the left arrow to return to the previous screen.
FIELDMASTER TECHNICIAN
User Guide
31
Attaching photos
If required, you can attach up to a maximum of 5 photos or other images to the task details. For
example, you could attach a photo or diagram of the problem that is preventing you from
completing the task, or a photo of the completed work. The attached photos are visible on the
task details screen.
Note:
If this has been requested by your company, it may be mandatory for you to attach a certain numberof photos when closing a task as complete.
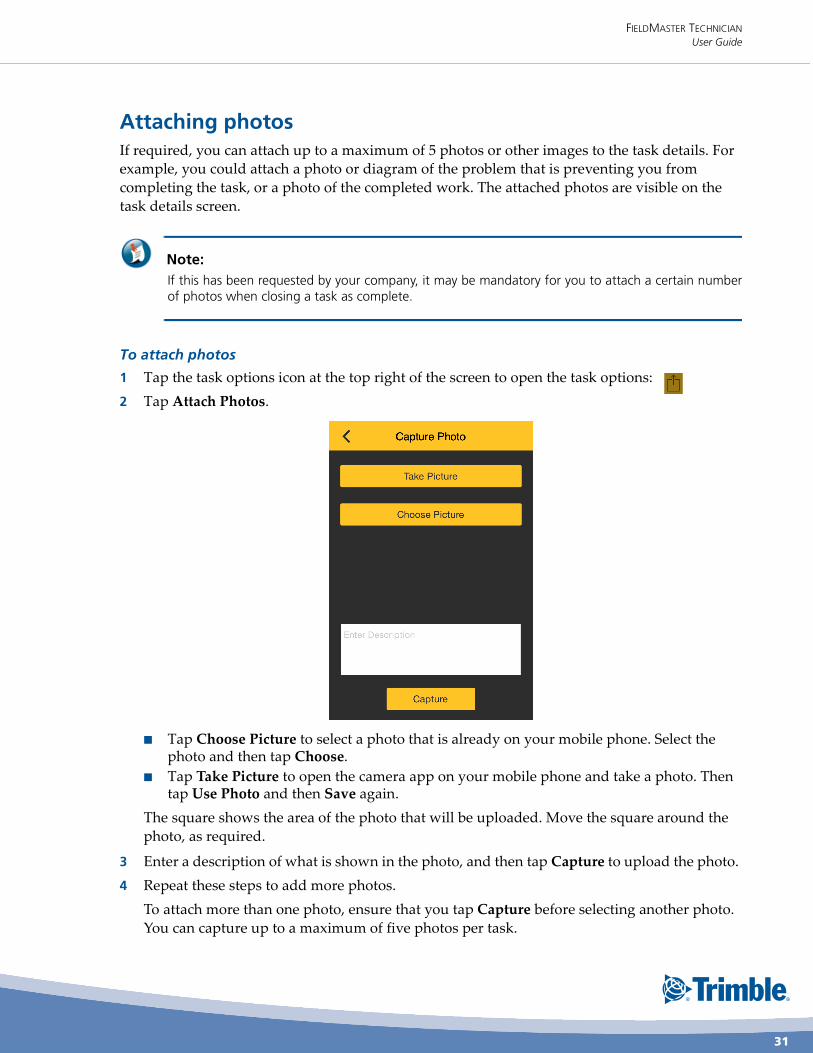
To attach photos
1 Tap the task options icon at the top right of the screen to open the task options:
2 Tap Attach Photos.
■ Tap Choose Picture to select a photo that is already on your mobile phone. Select the photo and then tap Choose.
■ Tap Take Picture to open the camera app on your mobile phone and take a photo. Then tap Use Photo and then Save again.
The square shows the area of the photo that will be uploaded. Move the square around the
photo, as required.
3 Enter a description of what is shown in the photo, and then tap Capture to upload the photo.
4 Repeat these steps to add more photos.
To attach more than one photo, ensure that you tap Capture before selecting another photo.
You can capture up to a maximum of five photos per task.

Managing your tasks
32
Attaching forms
Your administrator can create files, such as safety forms and check lists, and upload them to Work Management for you to complete. You can then get a copy of the form for the task you are working on, add the necessary information to the form, and then attach the completed form to the task.
You cannot download the forms directly onto your phone. Instead a Dropbox folder is used to manage the forms. Before you can attach forms for the first time, you must set up a Dropbox account for your use at work.
For step-by-step details of how to create the Dropbox account, and link it to FieldMaster Technician, see “Before attaching forms for the first time” on page 67.
Ensure that you are connected to the Internet when you carry out these tasks.
Once you have linked a Dropbox account to FieldMaster Technician, you can attach forms as described in this section.
This description assumes that your dispatcher has already uploaded some forms into Work Management and then dispatched a task to you.
Once you have accepted a task, you can view a list of available forms, upload a copy of a form to Dropbox for editing, and then attach the completed form when you close the task.
To attach forms to a task
1 In FieldMaster Technician, tap My Tasks on the Welcome screen to view your list of tasks.
2 Tap the relevant task to view its task details, and then tap Accept.
3 Tap the task options icon at the top right of the screen:
4 Tap Attach Forms.
5 Select the file or files that you want to upload to Dropbox, and then tap Save to Dropbox.
The selected files are saved to a folder named after the task reference in the following folder
in Dropbox:
Apps > TechnicianApp
6 Tap OK.
7 Progress the task as usual by tapping Travel when you travel to the site, and then On Site when you are on the customer’s site.
8 If necessary, you can repeat the steps to upload additional forms to Dropbox.
9 When you are ready to edit the form, open the app that you have linked to FieldMaster Technician (for example, WPS Office).
10 In the app, tap Dropbox and then navigate to the Apps > TechnicianApp folder on Dropbox, and then to the subfolder for the task that you are working on.
For example, for a task with task reference 144940, navigate to the following folder:
Apps > TechnicianApp > 144940
11 Tap the name of the form to open it in the app (for example, WPS Office).
FIELDMASTER TECHNICIAN
User Guide
33
12 Make the necessary changes and then save the changed form, or exit the app and save the form on exit.
The updated form is uploaded to the same folder on Dropbox.
Note:
As well as attaching the updated form to the task, you can also attach other files by moving them tothe same folder on Dropbox.
13 In FieldMaster Technician, tap Enter closure information to close the task.
14 On the Close Task screen, tap the task options icon at the top right of the screen to open the menu.
15 Tap Attach Forms.
A list appears, showing the documents in the Dropbox folder for this task.
16 Select the file or files that you want to attach to the task, and tap Select Forms.
17 Tap OK.
The attached files are displayed in the list of attachments.
18 Tap Close to close the task.
The dispatcher can view the updated task details, including the attached files, in Work Management.
Capturing the customer’s signature
You can capture the signature of your customer to confirm that you have completed the task
satisfactorily. You can only attach one signature. You cannot attach a signature for an incomplete
task.
Note:
If this has been requested by your company, it may be mandatory for you to capture the customer’ssignature when closing a task as complete.
The values that you have entered in the data entry fields are displayed so that you and the customer can review the values before signing.
For example, you might have entered your hotel costs related to the task.
To attach a signature
1 Tap the task options icon at the top right of the screen.
2 Tap Attach Signature.

Managing your tasks
34
3 If there are any data entry fields for this task, review the entered values, and then ask the customer to sign in the box.
4 In the Print name field, enter the customer’s name.
If necessary, tap Clear to clear the signature and ask the customer to sign again.
5 Tap Capture to upload the signature.
Approving the timesheet for a work order
A work order comprises multiple tasks that belong to the same package of work for a customer. The work order reference links all the tasks in the work order.
If your user role allows it, you can open a screen that enables a customer representative to view the hours that have been booked against each task in the work order, and then approve the timesheet for the work order. If required, you can also approve the timesheet.
Once the task hours have been approved, the technician can still add task hours to the task. These additional task hours can then be approved again.
To approve work order timesheets
1 On the My Tasks screen, tap the Work Order Timesheet Approval icon:

FIELDMASTER TECHNICIAN
User Guide
35
Alternatively, if the current task is part of the work order, tap the task options icon at the top right of the screen, and then tap Work Order Timesheet Approval.
Then enter the work order reference of the work order timesheets that you want to approve,
and tap Search.
In the following examples, the work order reference 1234 has been entered.
Managing your tasks
36
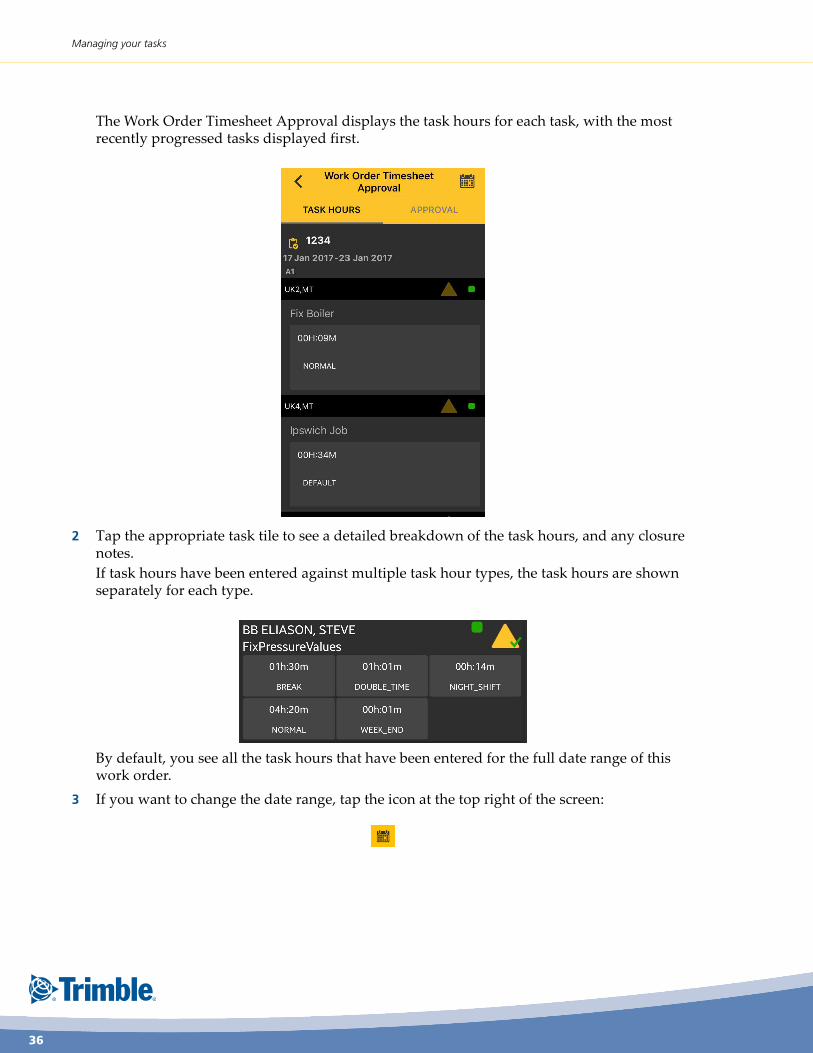
The Work Order Timesheet Approval displays the task hours for each task, with the most recently progressed tasks displayed first.
2 Tap the appropriate task tile to see a detailed breakdown of the task hours, and any closure notes.
If task hours have been entered against multiple task hour types, the task hours are shown separately for each type.
By default, you see all the task hours that have been entered for the full date range of this work order.
3 If you want to change the date range, tap the icon at the top right of the screen:

FIELDMASTER TECHNICIAN
User Guide
37
Change the start date and the end date, and then tap Show.
4 To approve the timesheet, tap the Approval tab.
5 In the Approver Name box, enter the name of the approver, and then ask the approver to sign the timesheet.
■ Tap in the Approver Signature box.
■ On the Approver Signature screen, ask the approver to sign in the box, and then tap Capture.
6 If required, you can also sign the timesheet.
Your name is automatically entered in the Employee Name field.
■ Tap in the Employee Signature box.
■ On the Employee Signature screen, sign in the box, and then tap Capture.

Finding nearby workers or key locations
38
7 If required, enter some notes relating to the approval, and then tap Approve.
You are asked to confirm that you want to approve the task hours.
8 Tap OK to approve the task hours and save the approval. Tap OK again to close the message.
Finding nearby workers or key locations
The Find Nearby screen enables you to locate other technicians and key locations within the
specified distance of your current location.
Key locations (or landmarks) are specific locations that are configured by your Work Management administrator for your team. The types of key locations depend on your business and could be warehouses, company offices, and so on.
Distances are measured using the straight-line distances.

FIELDMASTER TECHNICIAN
User Guide
39
To find nearby items
1 On the Welcome screen, tap Find Nearby.
2 Slide the ruler to select the search distance, and then select what you want to find.
3 To find nearby team mates, tap Team.
4 To find nearby key locations, tap Key Location Types, select the types of key locations that you want to find.
For example, you could find all the nearby warehouses that are used by your team. Tap
Select All to select all the key location types.
5 Tap Done.

Finding nearby workers or key locations
40
If required, you can tap the cross on the corner of the one of the selected key location types to
remove it from the search.
6 Tap Locate to see all the results.
■ Swipe a tile to the left to display options for contacting the team mate or viewing the location on the map or viewing the driving directions to the location.
■ Tap the location icon or rotate your mobile phone into landscape mode to see the results on the map.
7 Tap the Team tab to see the list of your nearby team mates.
For information about the options available for contacting your team mates, see “Contacting
your team mates” on page 43.
8 Tap the Key Locations tab to see the list of your nearby key locations.
For information about viewing key locations, see “Viewing key location details” on page 41.

FIELDMASTER TECHNICIAN
User Guide
41
Viewing key location details
In the list of key locations, you can see the name and address of each key location.
1 To search for a particular key location, tap the search icon on the list screen or on the map, and then start to enter the name or address (city name, postal or ZIP code) of the key location that you want to find.
The results are filtered as you enter the search string. The search is not case sensitive.
2 There are several ways of viewing the key locations on the map:
■ Swipe a tile to the left to display options for viewing the key location on the map or viewing the driving directions to the location.
■ Tap the location icon or rotate your mobile phone into landscape mode to see the key locations on the map. Tap an icon on the map to open the pop-over. Tap the action buttons to navigate to the location or to the nearest fuel station.
3 Tap the list icon or rotate your mobile phone into portrait mode to see the list of key locations again.

Finding nearby workers or key locations
42
4 Tap a key location tile to view the full key location details.
You can see the following information:
Field Description
Name The name of the key location.
Address Tap the address, or rotate your mobile phone, to view the location on the map.
Type The type of key location.
Start The date at which the key location came into effect in GeoManager. (You can only locate key locations that are currently in effect.)
End The date at which the key location will be removed from GeoManager.

FIELDMASTER TECHNICIAN
User Guide
43
Contacting your team mates
1 Tap My Contacts to see contact details for your team mates.
The All Team tab lists all your team mates in alphabetical order, together with their mobile
phone numbers.
2 Tap the Nearby tab to see up to 5 team mates who are within 200 miles (320 km) of your location, their mobile phone number, location and the distance to that location.
The nearest team mate is listed first. The distance shown is the road distance from your
location to their current location.
3 To search for a particular team mate, tap the search icon on the list screen or on the map, and then start to enter the name of the team mate that you want to find.
The results are filtered as you enter the search string. The search is not case sensitive.
4 There are several ways of contacting a team mate:
■ To call a team mate, tap the phone icon next to their name.
■ Swipe the tile to the left to see additional options for sending the team mate an SMS or email, viewing their location on the map, or viewing the driving directions to their location.
■ Tap the name of the team mate to see their full contact details: name and device label, current location, mobile phone number, SMS number and email address.
5 There are several ways of seeing the location of your team mates on the map.
■ When viewing a list of team mates, tap the location icon or rotate your mobile phone into landscape mode to see the location of the displayed team mates on the map.

Using the map
44
Alternatively, swipe a tile to the left to display the option to view driving directions to the team mate’s location.
■ When viewing the details of a team mate, tap the address or rotate your mobile phone to see the location on the map. Tap the task options icon on the map to open the pop-over. Tap the action buttons to navigate to the location or to the nearest fuel station.
■ If several team mates are shown on the map, tap an icon on the map to open the pop-over. Tap the action buttons to navigate to the location or to the nearest fuel station.
6 Tap the list icon or rotate your mobile phone into portrait mode to see the list of your team mates again.
Using the map
You can view the location of your team mates, key locations and tasks on the map.
To open the map
■ When viewing the list of tasks, tap the location icon.
■ When viewing a list of contacts or key locations, tap the location icon or rotate your mobile
phone into landscape mode.
■ Tap the location icon on the swipe menu.
■ Tap an address displayed in the details for a team mate, key location or task.
The following icons appear on the map:
■ A red person icon indicates your current location.
■ A blue person icon indicates the location of the selected team mate. The others are shown in
gray.
■ A blue hollow pin indicates the location of the selected key location. The others are shown in
gray.
■ A briefcase indicates the location of one of your tasks.
If several objects are shown on the map, tap an icon on the map to open the pop-over. Tap the action buttons to navigate to the location or to the nearest fuel station.

FIELDMASTER TECHNICIAN
User Guide
45
Working as a lone worker
Some tasks and locations might involve you working in remote or dangerous areas. The lone worker safety feature enables you to set a timer, which counts down to zero. If you do not cancel the timer before it reaches zero, the timer triggers a safety alert that will be seen by the dispatchers.
You can specify the duration of the timer, for example 30 minutes. Once the timer reaches 0, the dispatchers receive an alert, prompting them to take action.
You can also trigger the alert immediately if you are in danger.
For the alert to be displayed in GeoManager, your company must subscribe to the Work Management feature.
To activate the safety timer
1 On the Welcome screen, tap Lone Worker.

Working as a lone worker
46
The Lone Worker screen is displayed.
2 Tap Set to set the timer duration.
3 Set the number of minutes for the monitoring period, for example 10 and tap Set.

FIELDMASTER TECHNICIAN
User Guide
47
4 When prompted, tap Yes to confirm that you want to set the timer.
Once the alarm is set, it is shown in the notification area with the time remaining.
5 If you no longer need the timer (if, for example, you are out of the dangerous area) tap Cancel timer, and confirm you want to cancel the timer.
6 If you need additional time, tap Reset timer. You can then set a new duration for the timer. For example, if you select 15 minutes, the timer will be set for 15 minutes.
7 If you do not cancel or reset the alarm, when the timer reaches 0, the dispatchers will receive an alert.
8 To send an alert to the dispatchers immediately, tap Raise alarm now.
To adjust the lone worker alarm settings
1 On the Lone Worker screen, tap Settings.
2 Adjust the settings below, as required.
● Vibration: You can set warnings to alert you that the alarm will activate imminently. See below. In addition, you can set the phone to also vibrate when those warnings trigger. Switch vibration on or off as required.
● Warning 1 minute before alarm: A warning alarm is triggered one minute prior to the safety alarm being triggered.
● Additional warning: You can set an additional warning for a specified number of minutes before the safety alarm is triggered. Enter the number of minutes.

Creating your timesheet
48
Creating your timesheet
The My Timesheet & Activities functionality enables you to record events as they occur during
your working day. For example, use this option to record the start and end of your working day,
the start and end of your breaks, visits to warehouses, refueling stops, the start and end of any
overtime, and the details of your leave. If none of the predefined options are suitable, you can
create a custom event. You can add optional notes to each event. For example, when you record
your start time, you could add the reason for a late start.
Note: If you do not enter an end time, all events will be automatically ended at 23:59 (11:59 PM) today.
Your daily activity report contains a record of the timesheet events and task progressions that you have recorded on a particular day. In addition to the location of the activity, the daily activity report also provides the latitude and longitude of the location.
Recording your normal work shift
1 On the Welcome screen, tap My Timesheet & Activities.
Note:
If you tap Travel, to indicate that you are travelling to a task, without first entering the start of your
work shift, you are prompted to enter the start time.

FIELDMASTER TECHNICIAN
User Guide
49
2 When you start your normal work shift, tap Start Work.
3 Under Start/End Day, enter the start time and any notes, and then tap Save.
If necessary you can enter the start and end times together. You must enter a start time before
you can enter break or warehouse event details.
4 When you have finished your normal work period, tap Started at... on the My Timesheet & Activities screen.
5 Under Start/Stop Day, enter the end time and any notes, and then tap Save.
If necessary, you can correct your start and end times later in the day so that break and
warehouse events fall within your working day.

Creating your timesheet
50
Recording overtime
1 When you start your overtime period, tap Start Work on the My Timesheet & Activities.
2 Under Overtime, enter the start time and any notes, and then tap Save.
The overtime period must start after the end of your normal working day and end before
23:59 (11:59 PM) today.
3 When you have finished your overtime period, tap Started at... on the My Timesheet & Activities screen.
4 Under Overtime, enter the end time, enter any notes, and then tap Save.
FIELDMASTER TECHNICIAN
User Guide
51
Recording a break
You can enter the details of your break when you take the break. However, you can also enter a
break in advance or after you have taken it. For example, if you know you are going to take a
break at 15:00 (3 PM), you can enter that break earlier on in the day. You can enter the start and
finish times at the same time, if required.
Your breaks can be at any time during your normal work period.
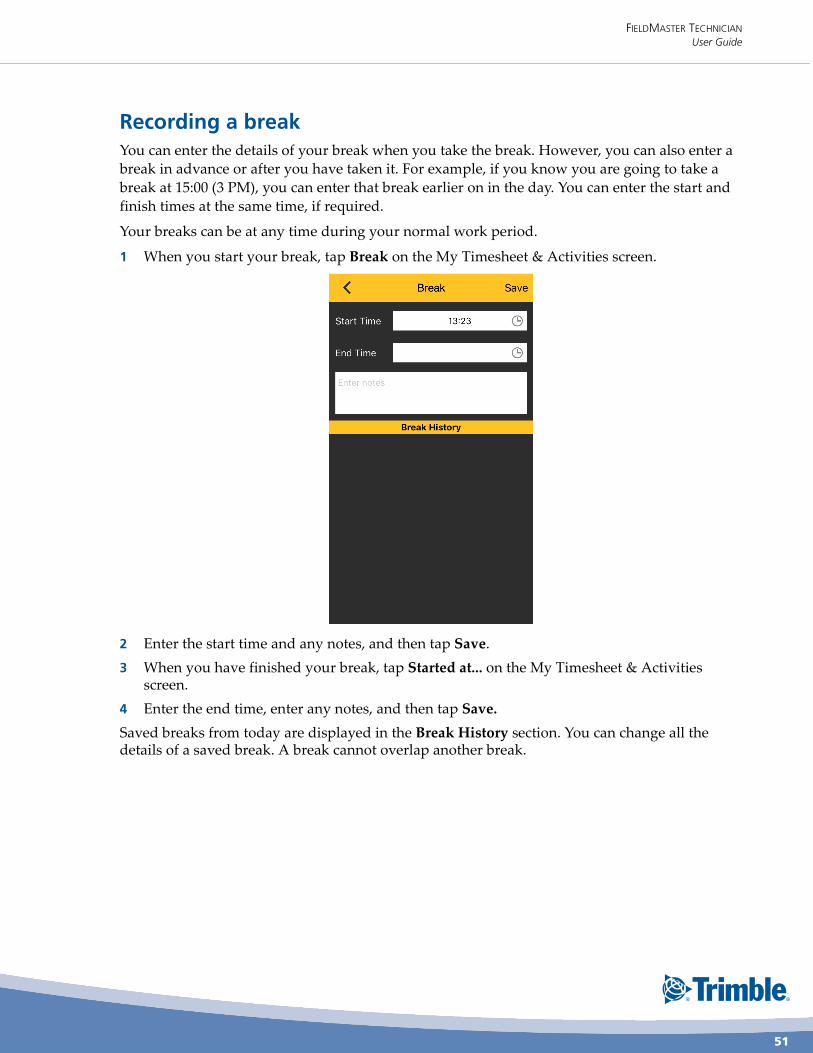
1 When you start your break, tap Break on the My Timesheet & Activities screen.
2 Enter the start time and any notes, and then tap Save.
3 When you have finished your break, tap Started at... on the My Timesheet & Activities screen.
4 Enter the end time, enter any notes, and then tap Save.
Saved breaks from today are displayed in the Break History section. You can change all the details of a saved break. A break cannot overlap another break.

Creating your timesheet
52
Recording a visit to a warehouse
1 Tap Warehouse to enter the details of a warehouse visit.
2 Select the check-in time and the check-out time.
3 If you took a part from the warehouse, tap the Enter picked up parts field, enter the name of the part, and then tap Add.
The times can be in the past but the check-out time must be after the check-in time. A
warehouse event can only occur during your normal work period.
4 Enter any notes and then tap Save.
Saved warehouse visits from today are displayed in the Warehouse Visit History section. You can change all the details of a saved warehouse event. A warehouse event cannot overlap another warehouse event.

FIELDMASTER TECHNICIAN
User Guide
53
Entering leave periods
You can enter a leave period of one or more days. Half days are not supported. A new leave
period cannot overlap an existing leave period. Dots in the calendar indicate existing leave
periods.
If you have not entered a work start time, then you can only enter leave for today.
1 Tap Leave to enter the details of your leave.
2 On the calendar, tap the start date and then tap Select.
3 Tap the End Date field to open the calendar again.
4 Tap the end date in the calendar and then tap Select on the calendar.
5 Enter any notes, and then tap Save at the top right of the screen.
Saved leave periods are displayed in the Leave Details section.
You can change the details of a saved leave period by tapping the leave period in the Leave Details section. The changed leave period cannot conflict with a day that you have already worked or overlap another leave period.
You can cancel entered leave by editing the leave period and then tapping Cancel Leave. Tap Yes to confirm.

Creating your timesheet
54
Sending a location update
The location update functionality allows you to record that you have been to a particular location and optionally enter notes that explain why you travelled to that location. For example, if you need to stop somewhere that was not on your planned route, you can send a location update and the reason for the stop.
1 Tap Location Update to send your current location.
You can send a location update at any time (without first entering a work start time).
2 Enter any notes and tap Save.
The time, address and latitude/longitude of your current location are automatically recorded
and cannot be edited.
Location updates from today are displayed in the Location Update History section. You can edit saved location updates to change the notes but you cannot change the time or the location. A location update can overlap another event.

FIELDMASTER TECHNICIAN
User Guide
55
Recording a vehicle breakdown
The breakdown functionality enables you to record the the details of an event that interrupts your journey, such as a vehicle breakdown or an accident. You can record a breakdown event at any time (without first entering a work start time).
1 Tap Breakdown.
The current time and your current location are automatically populated.
If there was a delay before you could record the event, you can change the time, but if you
change the time by more than 5 minutes, your current location is not recorded.
2 Enter some notes that explain what has happened, and then tap Save.
Saved breakdown events from today are displayed in the Breakdown History section. You can edit a saved breakdown event and change the notes. If you change the time, the location is not recorded.
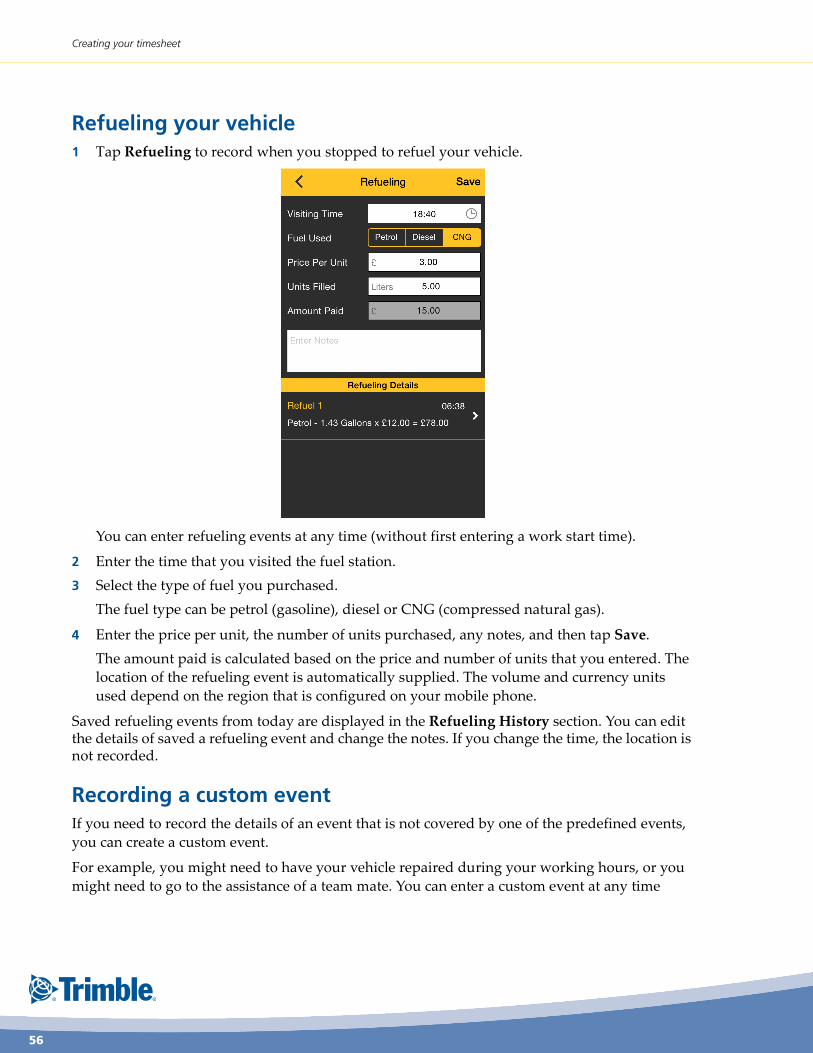
Creating your timesheet
56
Refueling your vehicle
1 Tap Refueling to record when you stopped to refuel your vehicle.
You can enter refueling events at any time (without first entering a work start time).
2 Enter the time that you visited the fuel station.
3 Select the type of fuel you purchased.
The fuel type can be petrol (gasoline), diesel or CNG (compressed natural gas).
4 Enter the price per unit, the number of units purchased, any notes, and then tap Save.
The amount paid is calculated based on the price and number of units that you entered. The
location of the refueling event is automatically supplied. The volume and currency units
used depend on the region that is configured on your mobile phone.
Saved refueling events from today are displayed in the Refueling History section. You can edit the details of saved a refueling event and change the notes. If you change the time, the location is not recorded.
Recording a custom event
If you need to record the details of an event that is not covered by one of the predefined events,
you can create a custom event.
For example, you might need to have your vehicle repaired during your working hours, or you
might need to go to the assistance of a team mate. You can enter a custom event at any time

FIELDMASTER TECHNICIAN
User Guide
57
(without first entering a work start time). You are notified if the custom event is not contained
within your work shift or your overtime period.
To record a custom event
1 When you start your custom event, tap Custom on the My Timesheet & Activities screen.
2 Enter reason for the custom event, the start time and any notes, and then tap Save.
3 When you have finished your custom event, tap Started at... on the My Timesheet & Activities screen.
4 Enter the end time and any notes, and then tap Save.
You can enter multiple custom events at the same time. The time of a custom event cannot conflict with another custom event. Custom events can overlap other events.
Saved custom events from today are displayed in the Custom History section. You can edit all the fields of a saved custom event.
Recording travel
The Travel timesheet event enables you to record the travel time and the distance traveled
between locations. This enables your company to charge travel costs to a particular customer. For
example, you can record the travel between tasks, to or from a task, to a hotel, to a warehouse,
and so on.
When you want to record the travel, you specify the type of location that you are about to leave and the type of location at your destination. You can choose between a task location, your start or finish location, and another location. You then enter the start time and odometer reading. When you arrive at the destination, you enter the end time and odometer reading.

Creating your timesheet
58
Your start and finish locations are set up for you by a dispatcher. Your start location is the location at which you start work for the day, for example your home, a company office or depot, or a hotel. Your finish location is the location at which you finish work for the day. This may be the same as your start location but does not have to be.
To record travel
1 Before leaving your current location, on the My Timesheet & Activities screen, scroll to the bottom of the screen, and then tap Travel.
Note:
You can also record travel for a task by tapping the task options icon at the top right of the screen and
then tapping Enter Travel.
2 Select the category of location that you are about to leave.
You can select from Task Reference, Start Location, Finish Location, or Other.
■ If you select Task Reference, select the task reference from the list of your open and closed tasks for today. The list does not contain any of your outstanding tasks.
■ If you select a location type of Other, enter the name of the location in the text field.
3 Enter the value for Start Time, enter any notes, and then tap Save.
4 When you reach your destination, tap Travel again.
5 Enter the values for End Time and Distance, enter any notes, and then tap Save.
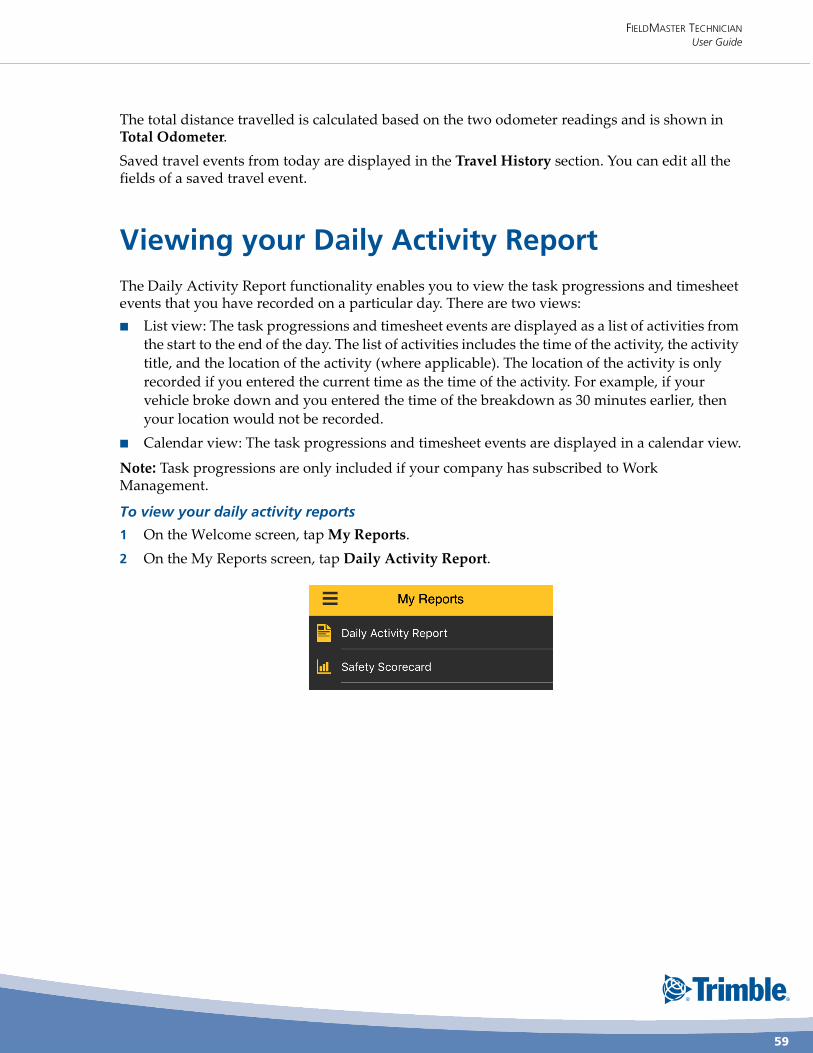
FIELDMASTER TECHNICIAN
User Guide
59
The total distance travelled is calculated based on the two odometer readings and is shown in Total Odometer.
Saved travel events from today are displayed in the Travel History section. You can edit all the fields of a saved travel event.
Viewing your Daily Activity Report
The Daily Activity Report functionality enables you to view the task progressions and timesheet events that you have recorded on a particular day. There are two views:
■ List view: The task progressions and timesheet events are displayed as a list of activities from
the start to the end of the day. The list of activities includes the time of the activity, the activity
title, and the location of the activity (where applicable). The location of the activity is only
recorded if you entered the current time as the time of the activity. For example, if your
vehicle broke down and you entered the time of the breakdown as 30 minutes earlier, then
your location would not be recorded.
■ Calendar view: The task progressions and timesheet events are displayed in a calendar view.
Note: Task progressions are only included if your company has subscribed to Work Management.
To view your daily activity reports
1 On the Welcome screen, tap My Reports.
2 On the My Reports screen, tap Daily Activity Report.

Viewing your Daily Activity Report
60
Your daily activity report appears. The task progression activities and timesheet activities are
shown as a list. The activities are ordered based on their start time.
3 Tap the activity to see the details.
You can see the date and time of the activity, the latitude and longitude of the location, the
address of the location, and any notes.
4 Tap the calendar icon to change to the calendar view.
The activities are shown in the time period in which they occurred. Overlapping activities are
shown next to one another.
5 Tap the list icon to change back to the list view.
6 To view your daily activity report for previous days, either swipe the screen to the right or tap the arrow to the left of the date.
If you do not have any activities for a particular day, no daily activity report is displayed.
7 If required, tap the mail icon to attach your daily activity report to an email.
The dispatcher can view and export your daily activity report from Work Management.

FIELDMASTER TECHNICIAN
User Guide
61
Driver Safety features
Note:
This section is only relevant if you are using an in-vehicle device to provide location information, ratherthan the FieldMaster Location Service.
The Safety Scorecard provides information on your driving based on the key ‘events’ of braking, acceleration, speeding and turning. Each time you perform one of these events, it is categorized as acceptable, moderate or hard.
The number of acceptable, moderate and hard events that you perform are used to calculate your safety score.
You can use the app to view your safety score and compare it against the average for your team.
Information is based on a rolling week and will show the score for the previous 7-day period.
You will have access to these features if your organization has subscribed to Trimble’s Driver Safety package.
To view your Safety Scorecard
1 On the Welcome screen, tap My Reports.
2 On the My Reports screen, tap Safety Scorecard.
Your Safety Scorecard is displayed.

Driver Safety features
62
The Safety Scorecard displays the following information:
● Your overall Safety Score (%) for the last week (the previous 7 days).
● Your overall Safety Score (%) for the previous week
● The total distance travelled for the last week
● Your Team Position this week, based on Safety Score
● Your Team Position last week, based on Safety Score
● The Average Safety Score for your Team
● The total number of acceptable, moderate and hard Acceleration events, together with the overall Acceleration score (%)
● The total number of acceptable, moderate and hard Deceleration events, together with the overall Deceleration score (%)
● The total number of acceptable, moderate and hard Turning events, together with the overall Turning score (%)
● The total number of acceptable, moderate and hard Speeding events, together with the overall Speeding score (%)
The overall Safety Score is based on a weighted average of the four key events: Acceleration,
Deceleration, Turning and Speeding.
3 The Scorecard also includes a daily Driver Safety tip, based on the lowest scoring event for the previous week, based on a customer-weighted average. This tip will appear each time the scorecard is accessed, but, once read, can be closed with the top-right red cross.

FIELDMASTER TECHNICIAN
User Guide
63
Logging out
1 On the Welcome screen, tap Logout.
You are prompted to confirm that you want to log out.
2 Tap Logout.
If you have not yet recorded the end of your work shift, you are prompted to do so.
3 Tap End Work, and then enter the end time, and then tap Save.
For more information about entering the start and end of your work shift, see “Recording
your normal work shift” on page 48.
If there is data on your mobile phone that has not been synchronized with the server, the
following screen appears.
4 Tap Sync Data to synchronize the data with the server.
5 Tap Logout.

Resetting your password
64
Resetting your password
If you have forgotten your password or want to change your password, you can either request
your system administrator to trigger a password reset from within GeoManager, or you can
trigger a password reset yourself from the Login screen.
A notification email is sent to your email address. The email contains a link to a web page from which you can change your password. The link expires after 5 days. If you do not use the link within 5 days, you will have to trigger a password reset again or request that an administrator triggers a password reset for you.
Your GeoManager administrator cannot set or view your password.
1 On the Login screen, tap Reset Password.
2 On the Reset Your Password screen, enter your user name and then tap Reset.
A notification email that contains a link to a web page is sent to your email address.
3 Open the email and click the link contained in the email within 5 days to change your password.
Note: Your password must contain at least eight characters.

FIELDMASTER TECHNICIAN
User Guide
65
Sending feedback about the app
The Feedback functionality enables you to send feedback about the app to the support team. The first
part of the feedback is structured. You can then provide any additional feedback in the comments.
1 Tap Settings.
2 Tap Feedback.
3 Respond to each of the structured feedback questions as requested.
4 Add any additional comments, and then tap Send.

Reporting issues
66
Reporting issues
The Report Issue functionality enables you to report any issues that you have with the app to the
Trimble support team. However, you are requested to contact your own administrator before
contacting Trimble.
1 Tap Settings.
2 Tap Report Issue.
3 Select the component for which you want to report an issue.
4 Check that your contact details are correct so that the support team can contact you.
5 Enter your comments and then tap Report.

FIELDMASTER TECHNICIAN
User Guide
67
Appendix A
Before attaching forms for the first time
Here is an overview of the steps that you need to carry out before you can attach forms for the first time:
1 Create a Dropbox account for your use at work.
2 From the App Store, download a third-party app that enables you to edit the forms, such as WPS Office, and link the app to your Dropbox account.
In this help, we use WPS Office as an example.
3 Link FieldMaster Technician to your Dropbox account.
Creating a Dropbox account
1 To create a Dropbox account, go to the following web page:www.dropbox.com
You can do this from any web browser, not just from a web browser on your phone.
2 On the Dropbox home page, tap Sign up.

Before attaching forms for the first time
68
3 Enter your first name, last name, email address and a password for your Dropbox account, review the terms and conditions, and then select I agree to Dropbox Terms.
Make a note of the email address and password that you used to sign up to Dropbox because
you will need them later.
4 Tap Sign up again.
5 Tap Continue.
You do not need to download Dropbox to your phone, unless you want to use Dropbox for another purpose.
Linking the third-party app to Dropbox
1 Go to the App Store and download an app that enables you to edit the forms provided by your dispatcher (for example, WPS Office).
2 Open the third-party app; here, we are using the free app WPS Office as an example.
3 Tap the Options icon at the top left of the screen.

FIELDMASTER TECHNICIAN
User Guide
69
4 Tap Add Cloud Drive.
5 Tap Dropbox.

Before attaching forms for the first time
70
You are taken to the Dropbox login page.
6 Enter the email address and password that you used to sign up to Dropbox, and then tap Sign in.
Linking to your Dropbox account
1 Log in to FieldMaster Technician.
2 Tap Settings.
3 Tap Log In Using Dropbox.

FIELDMASTER TECHNICIAN
User Guide
71
You are taken to the Dropbox login page.
4 Enter the email address and password that you used to sign up to Dropbox, and then tap Sign in.
This creates a TechnicianApp folder in your Dropbox.
You can see your Dropbox user name on the FieldMaster Technician Settings page.
The link to Dropbox is retained when you log out of FieldMaster Technician.