Element User Manual - Waves: Audio Plugins for Mixing ... acquainted with synthesis – especially...
30
WAVES ELEMENT USER GUIDE
Transcript of Element User Manual - Waves: Audio Plugins for Mixing ... acquainted with synthesis – especially...
WAVES
ELEMENT USER GUIDE

TABLE OF CONTENTS
CHAPTER 1 – INTRODUCTION ......................................................................................3
1.1 Welcome .................................................................................................................3
1.2 Product Overview....................................................................................................3
1.3 Concepts and Terminology .....................................................................................4
1.4 Components ............................................................................................................5
CHAPTER 2 – QUICK START GUIDE .............................................................................6
CHAPTER 3 – INTERFACE AND CONTROLS ................................................................7
3.1 Interface .................................................................................................................7
3.2 Controls..................................................................................................................8
CHAPTER 4 – STANDALONE APPLICATION...............................................................22
CHAPTER 5 – THE WAVESYSTEM ..............................................................................23
5.1 The WaveSystem Toolbar.....................................................................................23
5.2 Preset Handling.....................................................................................................24
5.3 Interface Controls..................................................................................................27
5.4 Waves Preferences (Pro Tools only) ....................................................................30
Waves Element User Guide
2
CHAPTER 1 – INTRODUCTION
1.1 Welcome
Thank you for choosing Waves! In order to get the most out of your Waves processor,
please take the time to read through this manual.
In conjunction, we also suggest that you become familiar with www.wavesupport.net.
There you will find an extensive Answer Base, the latest Tech Specs, detailed
Installation guides, new Software Updates, and current information on Authorization
and Registration.
By signing up at www.wavesupport.net, you will receive personalized information on
your registered products, reminders when updates are available, and information on
your authorization status.
1.2 Product Overview
Waves Element is a virtual analog subtractive polyphonic synthesizer, designed to
provide fat analog sound in the tradition of the classic analog synths, with the control and
flexibility of modern digital units. Element’s control panel combines tradition with intuitive
interaction, so you can easily customize existing presets, or build custom patches from
the ground up. Special care and attention has been given to Element’s sound quality, in
order to recreate the fatness and depth of its analog ancestors.
Drawing inspiration from the classics, Element lets you create seemingly complex
sounds using very simple settings, and then add “bells and whistles” using its built-in
modulators, effects and sequencer/arpeggiator. All Element parameters are accessible
via a single page interface, conveniently laid out so you can see the entire patch at all
times. Fully MIDI controllable, with easy-to-use MIDI Learn for all controls, Element is
designed for quick integration with any connected MIDI control device, and can be used
as either a plugin within your DAW host, or as a standalone application.
Waves Element User Guide
3
1.3 Concepts and Terminology
Element is powered by Virtual Voltage™, which connects its various generators and
transformation filters, envelopes and modulators. Therefore, Element uses many of the
same terms used by its hardware forefathers: VCF (Voltage Controlled Filter), VCA
(Voltage Controlled Amplifier) and so on.
Anyone acquainted with synthesis – especially classic ’80s-style polyphonic subtractive
synthesis – should feel right at home with Element. You’ll be able to dive right in and
start programming immediately. For novice synthesists, Element is an ideal place to
learn the basics of synthesis theory. The learning curve will pay off when encountering
other synthesizers, whether software or hardware, analog or digital.
All users can partake in the instant gratification of Element’s vast selection of factory
presets. Element’s team of experienced preset developers created hundreds of presets,
sorted by category, so you can quickly find just the sound you need: Leads, pads,
basses, sound effects, sequences, gated rhythmic lines and motions. Or, just browse
around until something catches your ear – or imagination.
Whether in the studio or live on stage, many musicians like to control synthesizer
parameters in real time for enhanced creativity and expression. While Element supports
the basic automation features of plugin hosting technologies like VST, it also supports
MIDI Learn. Assigning an Element control to a knob on your MIDI controller is as easy
as right click > Learn, knob turn, done!
Analog modeling and sound quality do come at a price. Element can be rather CPU-
hungry compared to other software synthesizers. During the days of analog hardware,
less expensive oscillators were often considered “dirty,” while accurate oscillators cost
more than was practical for music-making. Ironically, in today’s digital world, creating a
pristine oscillator is comparatively easy; it’s the “dirtiness” that takes more CPU
calculations to recreate.
Waves Element User Guide
4
To conserve CPU power, Element lets you select the maximum number of simultaneous
voices, and also includes a selectable High Definition mode. HD increases Element’s
process resolution, resulting in enhanced depth and greater high-end definition. Certain
types of presets, however, may actually sound better with HD mode switched off.
1.4 Components
The Element has one component:
Element Stereo
Element is a virtual instrument plugin and will appear under the related selection menus
for virtual instruments under all supported DAW host applications.
Waves Element works also as a standalone application, using ASIO (Windows) or Core
Audio (Mac) drivers to play through your audio device of choice. Element receives MIDI
data to trigger notes and control changes.
Waves Element User Guide
5
CHAPTER 2 – QUICK START GUIDE
1. Open Element on an instrument track in your DAW of choice, or launch the
Element standalone application.
2. Select a preset from Elements factory presets.
3. Play!
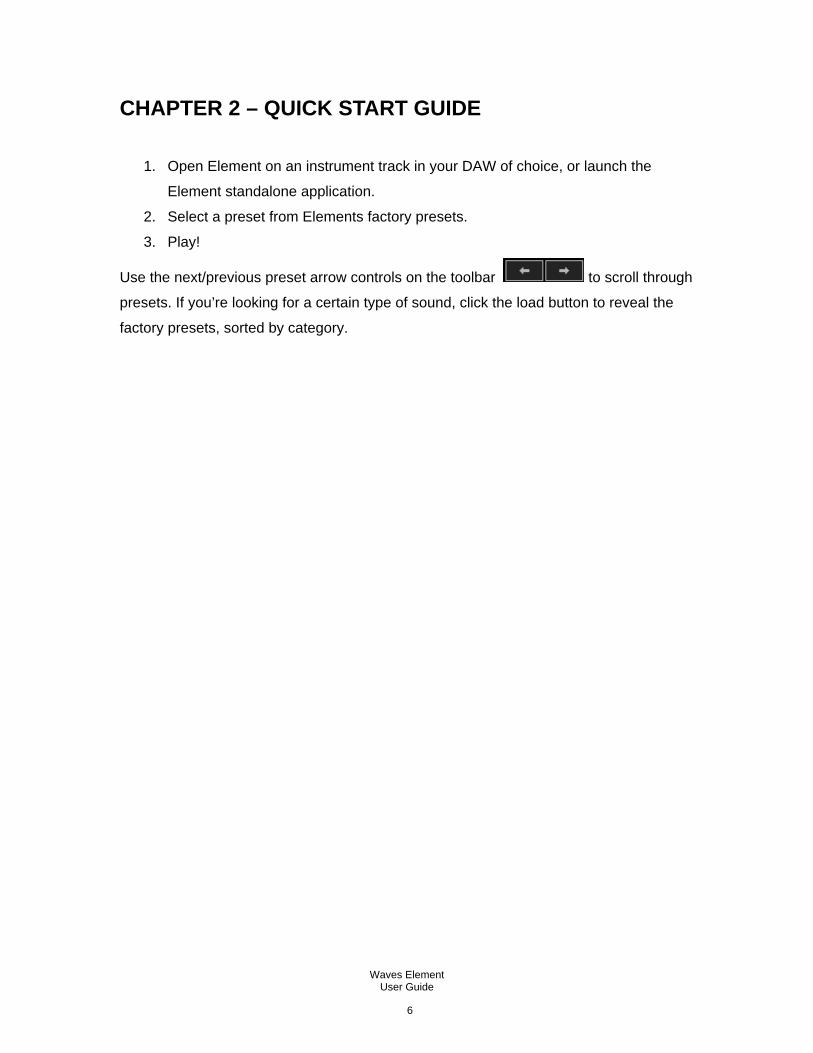
Use the next/previous preset arrow controls on the toolbar to scroll through
presets. If you’re looking for a certain type of sound, click the load button to reveal the
factory presets, sorted by category.
Waves Element User Guide
6

CHAPTER 3 – INTERFACE AND CONTROLS
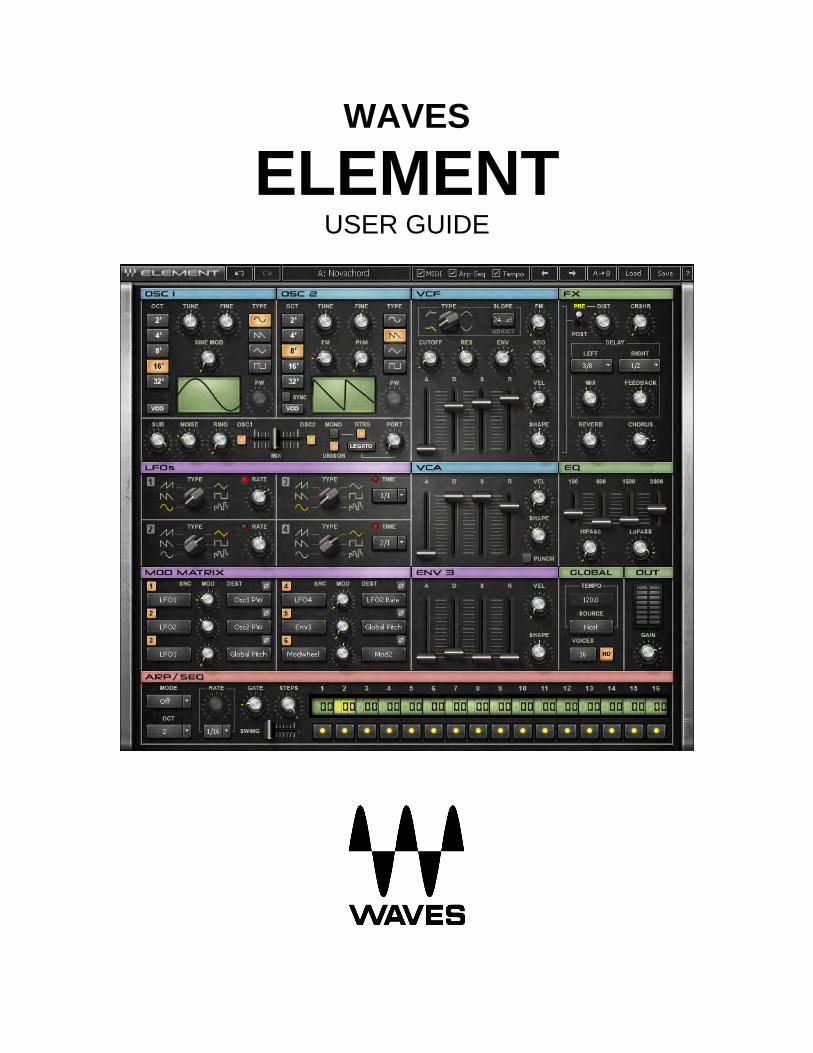
3.1 Interface
Waves Element User Guide
7
3.2 Controls
The Element interface is arranged into four sections grouped according to function, each
highlighted in a different color.
Voice generation and subtractive elements (blue)
Modulation sources and patches (purple)
Effects, EQ, global and output sections (green)
Arpeggiator / sequencer (red)
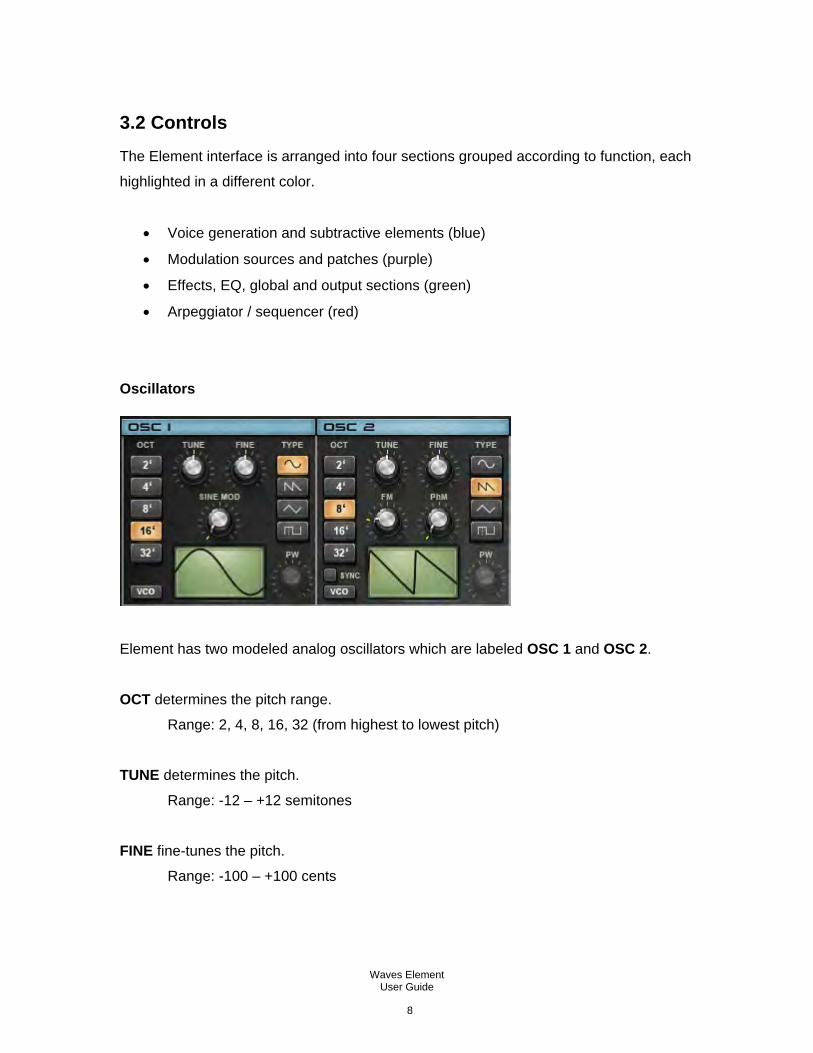
Oscillators
Element has two modeled analog oscillators which are labeled OSC 1 and OSC 2.
OCT determines the pitch range.
Range: 2, 4, 8, 16, 32 (from highest to lowest pitch)
TUNE determines the pitch.
Range: -12 – +12 semitones
FINE fine-tunes the pitch.
Range: -100 – +100 cents
Waves Element User Guide
8
TYPE determines the waveform type.
Range: Sine, Saw, Triangle, Pulse
PW determines the pulse width. (Pulse waves only)
Range: 0 – 99
VCO selects between virtual Voltage-Controlled Oscillation and virtual Digitally-
Controlled Oscillation. VCO starts the oscillation at a random phase, and jitters the pitch
within a contained range; DCO starts the oscillation when triggered by a note, and is
more consistent.
Range: VCO, DCO
SINE MOD controls the modulation of OSC 1 using a sine oscillator. (OSC 1 only)
Range: 0 – 100
FM (Frequency Modulation) controls the amount by which the frequency of OSC 2 is
modulated by OSC 1. (OSC 2 only)
Range: 0 – 100
PhM (Phase Modulation) controls the amount by which the phase of OSC 2 is
modulated by OSC 1. (OSC 2 only)
Range: 0 – 100
SYNC synchronizes the triggering the OSC 2 waveform to the rate of OSC 1. When
activated, OSC 2 pitch controls affect only OSC 2 timbre, not its pitch.
Range: On/Off
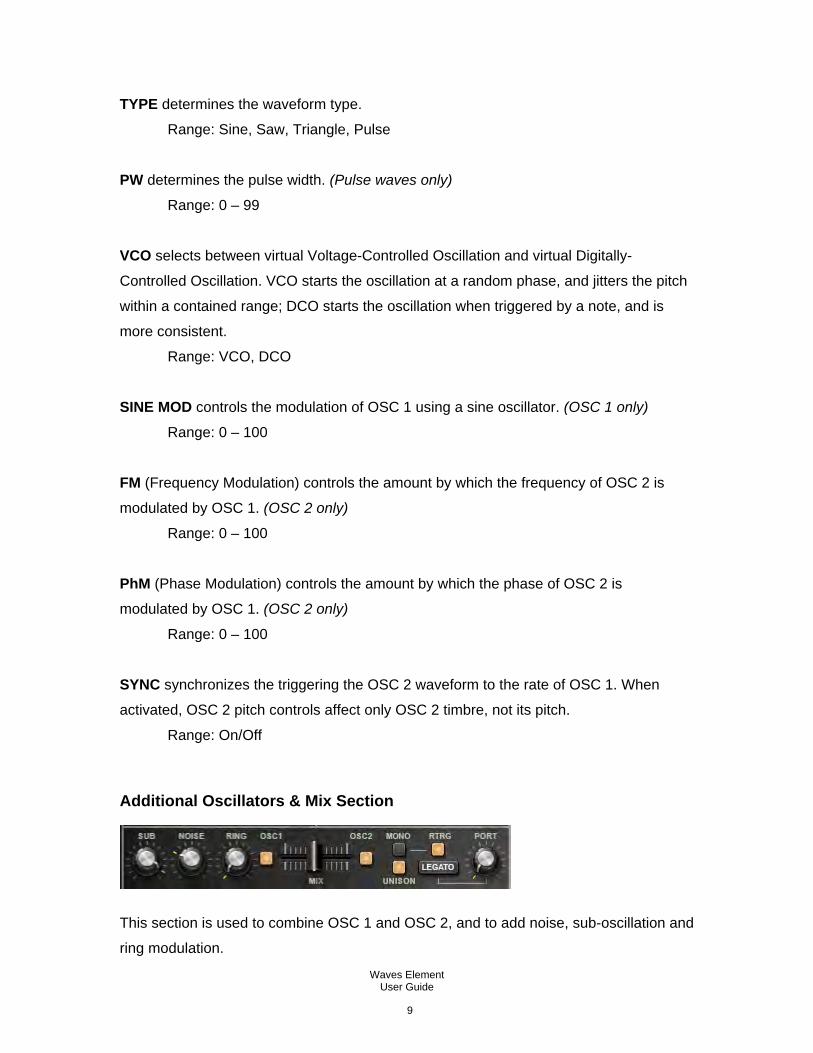
Additional Oscillators & Mix Section
This section is used to combine OSC 1 and OSC 2, and to add noise, sub-oscillation and
ring modulation.
Waves Element User Guide
9
SUB mixes in a triangle wave one octave below OSC 1.
Range: 0 – 100
NOISE mixes in white noise.
Range: 0 – 100
RING controls the ring modulation of OSC 1 and OSC 2.
Range: 0 – 100
OSC 1 / OSC 2 activate each oscillator.
Range: In, Out
MIX balances the mix between OSC 1 and OSC 2.
Range: -50 – +50
MONO toggles between monophonic and polyphonic modes.
Range: On (mono), Off (polyphonic)
RTRG controls envelope re-triggering. When activated, every note restarts the
envelopes. (Mono mode only)
Range: On, Off
UNISON activates a doubling effect which creates a richer sound.
Range: On, Off
PORT determines the glide time (portamento) between notes.
Range: 0.5 – 2500 ms (0 – 2.5 seconds)
LEGATO determines whether glide will always occur, or only when the previous note is
still held.
Range: Legato, Always
Waves Element User Guide
10
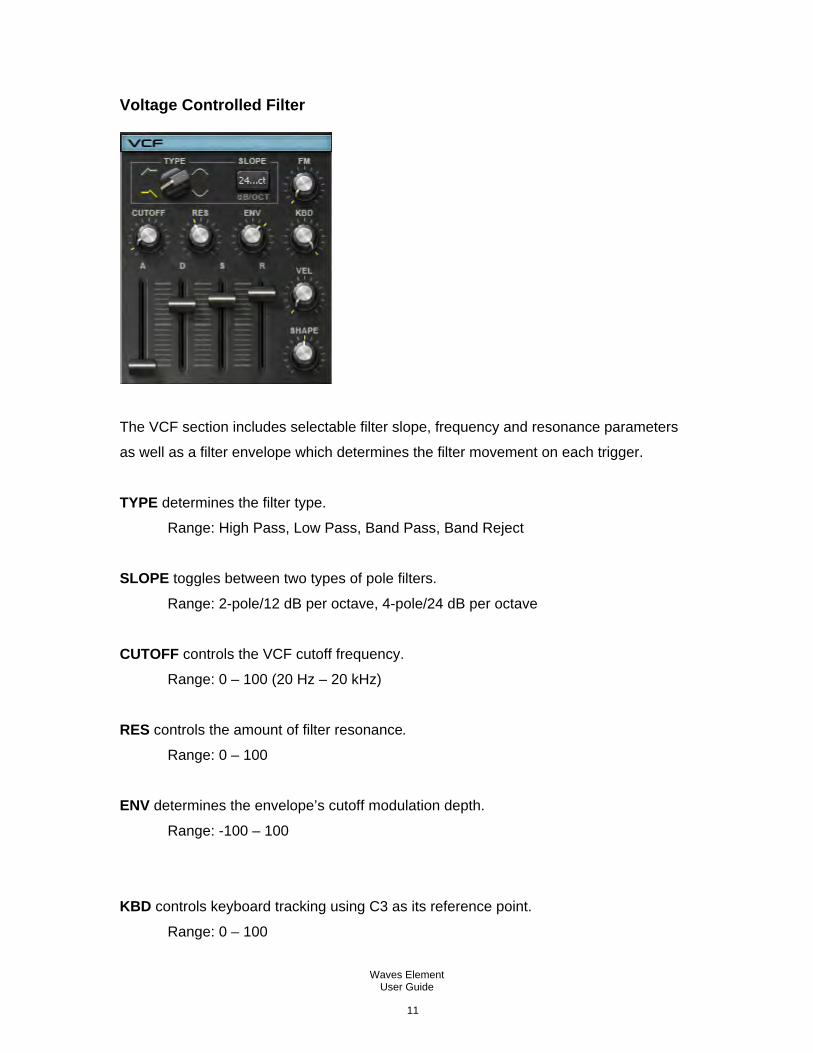
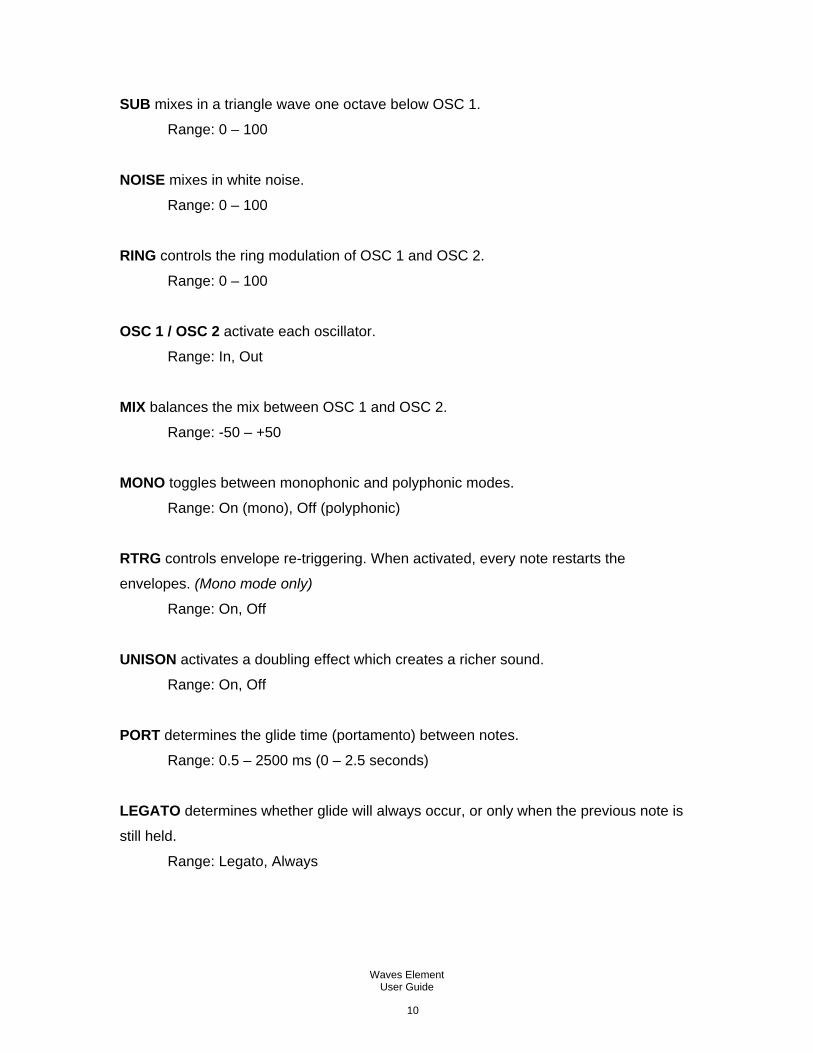
Voltage Controlled Filter
The VCF section includes selectable filter slope, frequency and resonance parameters
as well as a filter envelope which determines the filter movement on each trigger.
TYPE determines the filter type.
Range: High Pass, Low Pass, Band Pass, Band Reject
SLOPE toggles between two types of pole filters.
Range: 2-pole/12 dB per octave, 4-pole/24 dB per octave
CUTOFF controls the VCF cutoff frequency.
Range: 0 – 100 (20 Hz – 20 kHz)
RES controls the amount of filter resonance.
Range: 0 – 100
ENV determines the envelope’s cutoff modulation depth.
Range: -100 – 100
KBD controls keyboard tracking using C3 as its reference point.
Range: 0 – 100
Waves Element User Guide
11
FM controls the amount of frequency modulation on filter cutoff by OSC 1.
Range: 0 – 100
ADSR determines the filter’s envelope cutoff behavior after a note is triggered.
A (Attack): 1 – 10,000 (1 millisecond – 10 seconds)
D (Decay): 1 – 10,000 (1 millisecond – 10 seconds)
S (Sustain): 0 to 100% amplitude
R (Release): 1 – 10,000 (1 millisecond – 10 seconds)
VEL sets the VCF cutoff in relation to the Note On velocity.
Range: 0 – 100
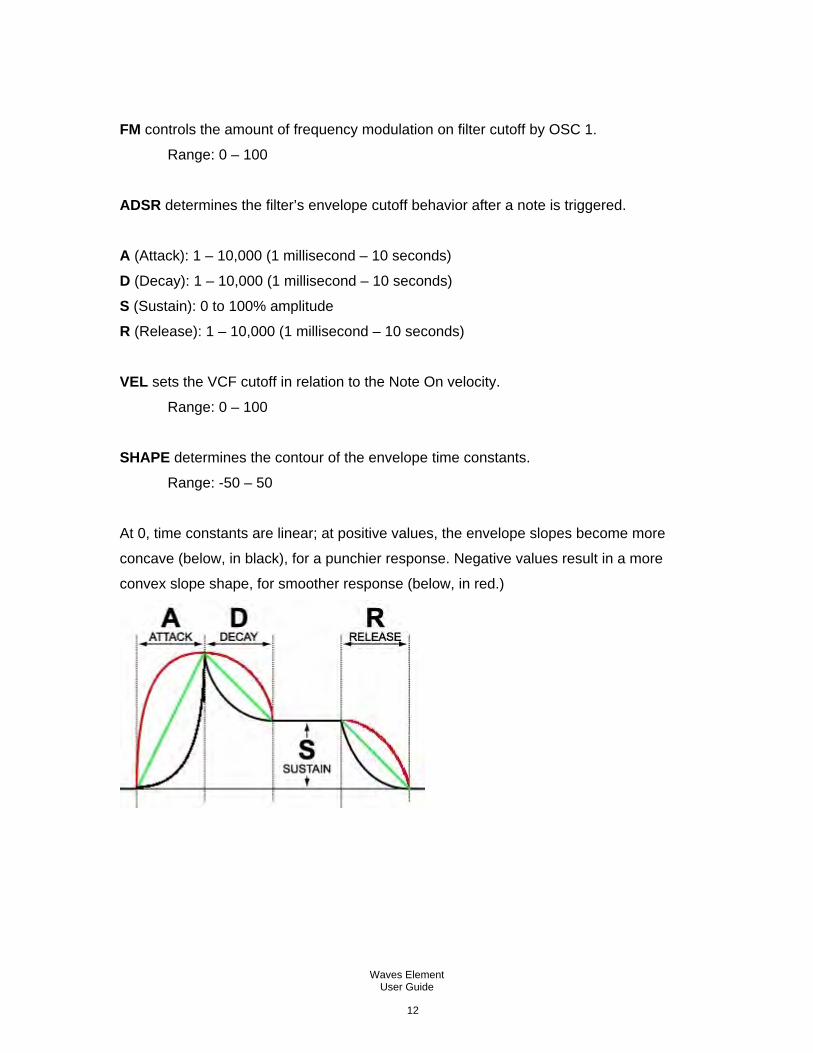
SHAPE determines the contour of the envelope time constants.
Range: -50 – 50
At 0, time constants are linear; at positive values, the envelope slopes become more
concave (below, in black), for a punchier response. Negative values result in a more
convex slope shape, for smoother response (below, in red.)
Waves Element User Guide
12
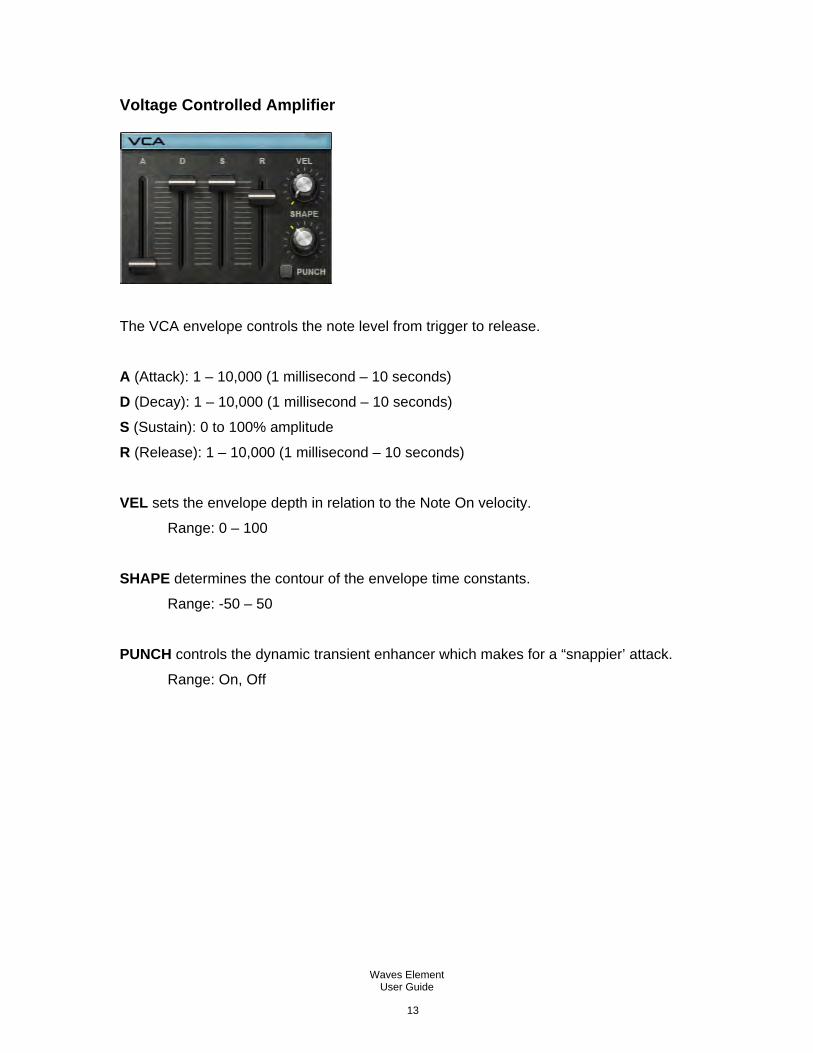
Voltage Controlled Amplifier
The VCA envelope controls the note level from trigger to release.
A (Attack): 1 – 10,000 (1 millisecond – 10 seconds)
D (Decay): 1 – 10,000 (1 millisecond – 10 seconds)
S (Sustain): 0 to 100% amplitude
R (Release): 1 – 10,000 (1 millisecond – 10 seconds)
VEL sets the envelope depth in relation to the Note On velocity.
Range: 0 – 100
SHAPE determines the contour of the envelope time constants.
Range: -50 – 50
PUNCH controls the dynamic transient enhancer which makes for a “snappier’ attack.
Range: On, Off
Waves Element User Guide
13

Low Frequency Oscillators
Element features four LFOs: two free and two synchronized. The free LFOs have a
continuous cycle time control, while the synced LFOs are voice-triggered and use
musical note values (based on the host BPM) to determine the oscillation rate.
TYPE controls the LFO waveform shape.
Range: Sine, Saw Down, Saw Up, Triangle, Pulse, S&H (random)
RATE controls the frequency of the free LFO.
Range: 0.1 to 100 Hz
TIME controls the rate of the synced LFO, locked to the project BPM.
Range: 4/1, 3/1, 2/1, 1/1, 1/2, 3/8, 1/3, 1/4, 3/16, 1/6, 1/8, 3/32, 1/12, 1/16, 3/64,
1/24, 1/32
LED displays pulsate at the same rate as the LFOs.
Waves Element User Guide
14
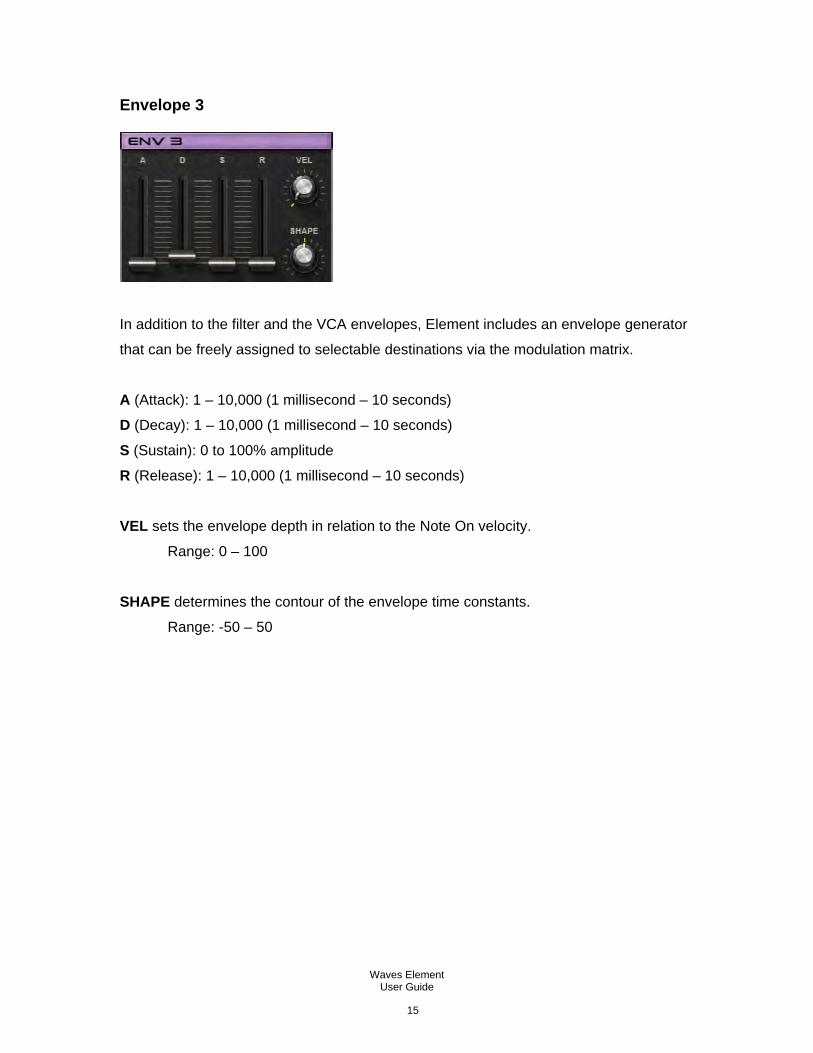
Envelope 3
In addition to the filter and the VCA envelopes, Element includes an envelope generator
that can be freely assigned to selectable destinations via the modulation matrix.
A (Attack): 1 – 10,000 (1 millisecond – 10 seconds)
D (Decay): 1 – 10,000 (1 millisecond – 10 seconds)
S (Sustain): 0 to 100% amplitude
R (Release): 1 – 10,000 (1 millisecond – 10 seconds)
VEL sets the envelope depth in relation to the Note On velocity.
Range: 0 – 100
SHAPE determines the contour of the envelope time constants.
Range: -50 – 50
Waves Element User Guide
15
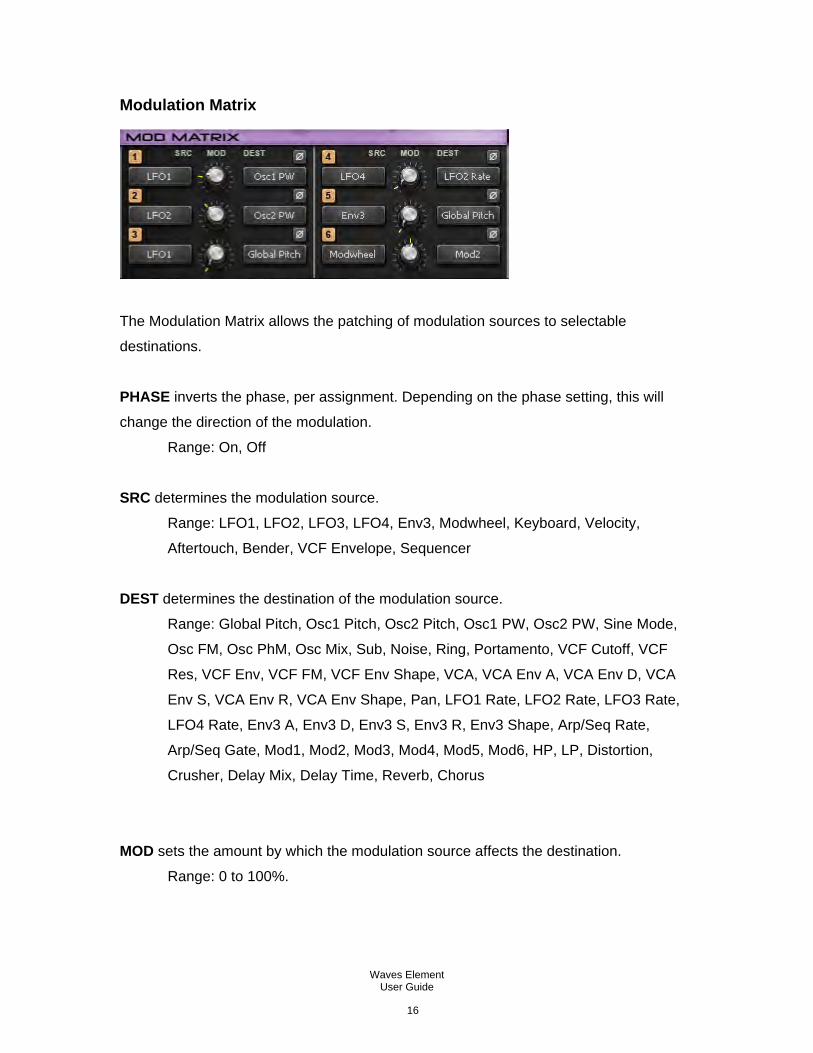
Modulation Matrix
The Modulation Matrix allows the patching of modulation sources to selectable
destinations.
PHASE inverts the phase, per assignment. Depending on the phase setting, this will
change the direction of the modulation.
Range: On, Off
SRC determines the modulation source.
Range: LFO1, LFO2, LFO3, LFO4, Env3, Modwheel, Keyboard, Velocity,
Aftertouch, Bender, VCF Envelope, Sequencer
DEST determines the destination of the modulation source.
Range: Global Pitch, Osc1 Pitch, Osc2 Pitch, Osc1 PW, Osc2 PW, Sine Mode,
Osc FM, Osc PhM, Osc Mix, Sub, Noise, Ring, Portamento, VCF Cutoff, VCF
Res, VCF Env, VCF FM, VCF Env Shape, VCA, VCA Env A, VCA Env D, VCA
Env S, VCA Env R, VCA Env Shape, Pan, LFO1 Rate, LFO2 Rate, LFO3 Rate,
LFO4 Rate, Env3 A, Env3 D, Env3 S, Env3 R, Env3 Shape, Arp/Seq Rate,
Arp/Seq Gate, Mod1, Mod2, Mod3, Mod4, Mod5, Mod6, HP, LP, Distortion,
Crusher, Delay Mix, Delay Time, Reverb, Chorus
MOD sets the amount by which the modulation source affects the destination.
Range: 0 to 100%.
Waves Element User Guide
16

Arpeggiator/Sequencer
The ARP / SEQ section functions as both a traditional arpeggiator, and a 16-step
sequencer. Each sequencer step has an In/Out toggle as well as a pitch control which
may be set +/-24 semitones from the currently held note.
MODE determines the operational mode.
Range: Off, (Arp) Up, (Arp) Down, (Arp) Up/Down, (Arp) Random, Sequence
OCT determines the range, in octaves, of the arpeggiator.
Range: 1, 2, 3, 4
TIME (drop-down) activates the host BPM sync function, and sets the rate using note
values.
Range: Free (host BPM sync off), 1/2, 3/8, 1/3, 1/4, 3/16, 1/6, 1/8, 3/32, 1/12,
1/16, 3/64, 1/24, 1/32
RATE sets the arpeggiator rate when TIME is set to Free.
Range: 1 to 50 Hz
GATE determines the length of each sequencer step as a percentage of its note length.
Range: 5 – 100%
STEPS determines the number of steps in the current sequence.
Range: 1 – 16
SWING pushes even-numbered notes/steps toward the next odd-numbered note/step, to
create a shuffle/swing feel.
Range: 0 – 100
Waves Element User Guide
17
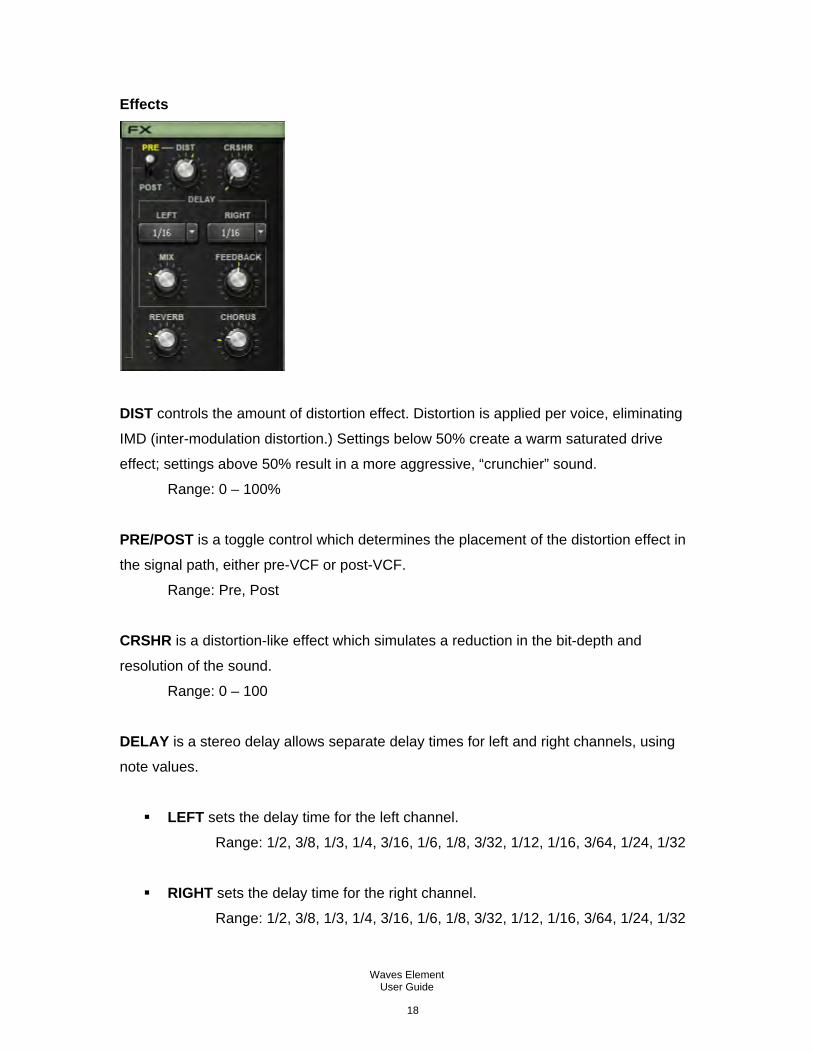
Effects
DIST controls the amount of distortion effect. Distortion is applied per voice, eliminating
IMD (inter-modulation distortion.) Settings below 50% create a warm saturated drive
effect; settings above 50% result in a more aggressive, “crunchier” sound.
Range: 0 – 100%
PRE/POST is a toggle control which determines the placement of the distortion effect in
the signal path, either pre-VCF or post-VCF.
Range: Pre, Post
CRSHR is a distortion-like effect which simulates a reduction in the bit-depth and
resolution of the sound.
Range: 0 – 100
DELAY is a stereo delay allows separate delay times for left and right channels, using
note values.
LEFT sets the delay time for the left channel.
Range: 1/2, 3/8, 1/3, 1/4, 3/16, 1/6, 1/8, 3/32, 1/12, 1/16, 3/64, 1/24, 1/32
RIGHT sets the delay time for the right channel.
Range: 1/2, 3/8, 1/3, 1/4, 3/16, 1/6, 1/8, 3/32, 1/12, 1/16, 3/64, 1/24, 1/32
Waves Element User Guide
18
MIX determines the amount of delay effect in the mix.
Range: 0 – 100
FEEDBACK determines the amount of gain fed back to the delay input.
Range: 0 – 100
REVERB controls both the amount and size of the virtual plate reverb sound. In addition
to increasing the amount of reverb, higher values also increase the reverb size and time.
Range: 0 – 100
CHORUS determines the amount of chorus modulation.
Range: 0 – 100
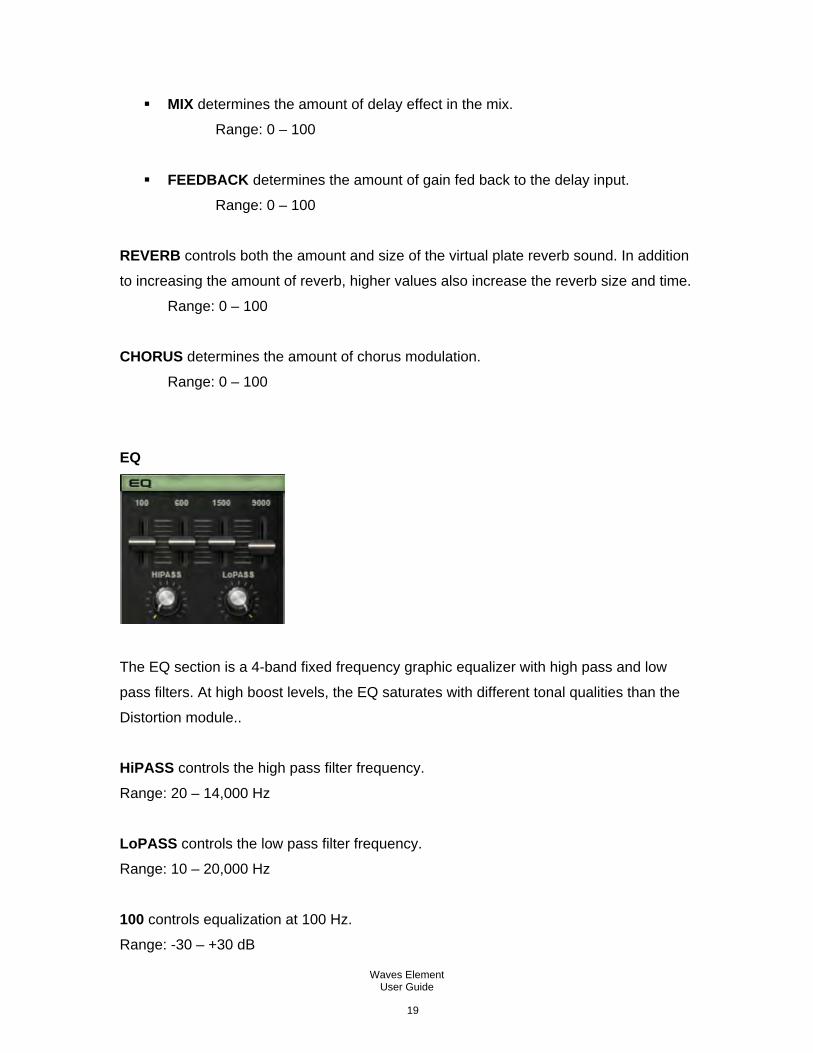
EQ
The EQ section is a 4-band fixed frequency graphic equalizer with high pass and low
pass filters. At high boost levels, the EQ saturates with different tonal qualities than the
Distortion module..
HiPASS controls the high pass filter frequency.
Range: 20 – 14,000 Hz
LoPASS controls the low pass filter frequency.
Range: 10 – 20,000 Hz
100 controls equalization at 100 Hz.
Range: -30 – +30 dB
Waves Element User Guide
19

600 controls equalization at 600 Hz.
Range: -20 – +20 dB
1500 controls equalization at 1500 Hz.
Range: -20 – +20 dB
9000 controls equalization at 9000 Hz.
Range: -25 – +25 dB
Global and Out Sections
TEMPO displays the current tempo.
Range: 1 – 300
SOURCE determines the clock source.
Range: Host, Internal
VOICES determines the number of voices which may be played simultaneously.
Range: 1 – 16
Waves Element User Guide
20

HD activates High Definition mode, which extends the digital resolution, resulting in
enhanced depth and greater high-end definition.
Range: On, Off
Please note: HD mode increases CPU consumption. Certain types of presets may sound
better with HD mode switched off.
GAIN sets Element’s overall output volume, after all generators and processors.
Range: -80 – 0 dBFS
METER displays Element’s overall output energy.
Waves Element User Guide
21
CHAPTER 4 – STANDALONE APPLICATION
The Element standalone application requires ASIO drivers for Windows or Core Audio
for Mac OS-X.
Element.exe (Win) or Element.app (MAC) loads the Element instrument and
configuration preferences dialogs.
The standalone application’s menu file contains 3 items:
• All Notes Off – Send an All Notes Off MIDI command to the Element synthesizer,
useful in cases of “stuck” sustaining notes.
• Preferences – Displays the preferences dialog for Audio, MIDI, and User Choices
configurations.
• Exit
THE PREFERENCES DIALOG
The preferences dialog allows configuration of Audio, MIDI, and User Choices.
Audio offers control over the following parameters:
Device displays the audio devices available on the system.
Output Channels allows selection of audio outputs from the selected device.
Sample Rate allows selection of sample rate.
Control Panel (Windows) launches the selected ASIO device’s control panel for
selection of buffer size and latency.
Buffer Size (Mac) allows selection of buffer size, which determines latency.
MIDI offers control over the following parameters:
MIDI Input device displays a list of available MIDI input devices on the current system.
Select the MIDI device through which to receive MIDI data.
Input Channel - Element standalone is ready to receive MIDI in OMNI mode from all
channels. The MIDI channel control allows the selection to receive MIDI input only from
certain channels as selected in the checkboxes.
Load Previous Settings
When checked, loads with last used settings; unchecked loads the Default settings.
Waves Element User Guide
22

CHAPTER 5 – THE WAVESYSTEM
5.1 The WaveSystem Toolbar
All Waves plugins feature the WaveSystem toolbar which takes care of most
administrative functions you will encounter while working with your Waves software. The
features of the WaveSystem toolbar are the same on practically all Waves plugins, so
familiarity with its features will be helpful whichever plugin you are using.
Toolbar Functions
Opens the plugin About box
Undo Undoes the last 32 actions
Redo Redoes the last 32 undone actions
Setup A/B Toggles between two presets, useful for comparison of parameter
settings.
Load Filter An Element-exclusive toolbar which lets you specify whether certain
preset characteristics should be loaded. See the next section for details.
L/R Arrows Move to the previous or next preset
Copy A→B Copies the current settings to the second preset register
Load Recalls presets from file
Save Saves presets in the Waves file formats
? Opens the PDF manual for the plugin you are using
Waves Element User Guide
23
5.2 Preset Handling
Preset Types
Factory Presets are permanent presets in the Load menu. Factory presets cannot be
overwritten or deleted. When applicable, different component plugins may have different
factory presets.
User Presets are your favorite settings of the plugin saved as a preset in the Load
menu, under ‘User Presets’. User Presets can be overwritten and deleted.
Setup Files may contain more than one preset. For example, a single file can contain all
the presets for a session. When you open a Setup File, all its setups become part of
your Load pop-up menu for fast access. This can be particularly useful with multiple
instances of a plugin in a single session. By saving all the settings you create into a
single Setup File, they can all be quickly available for every instance of that plugin.
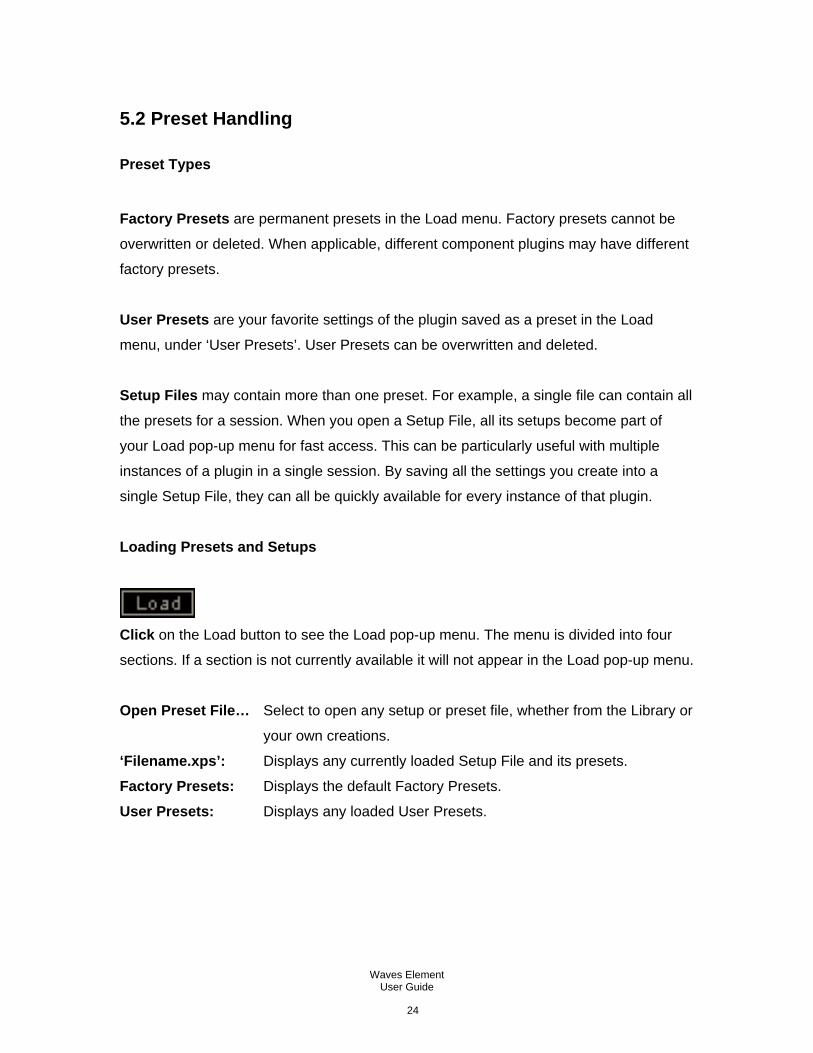
Loading Presets and Setups
Click on the Load button to see the Load pop-up menu. The menu is divided into four
sections. If a section is not currently available it will not appear in the Load pop-up menu.
Open Preset File… Select to open any setup or preset file, whether from the Library or
your own creations.
‘Filename.xps’: Displays any currently loaded Setup File and its presets.
Factory Presets: Displays the default Factory Presets.
User Presets: Displays any loaded User Presets.
Waves Element User Guide
24
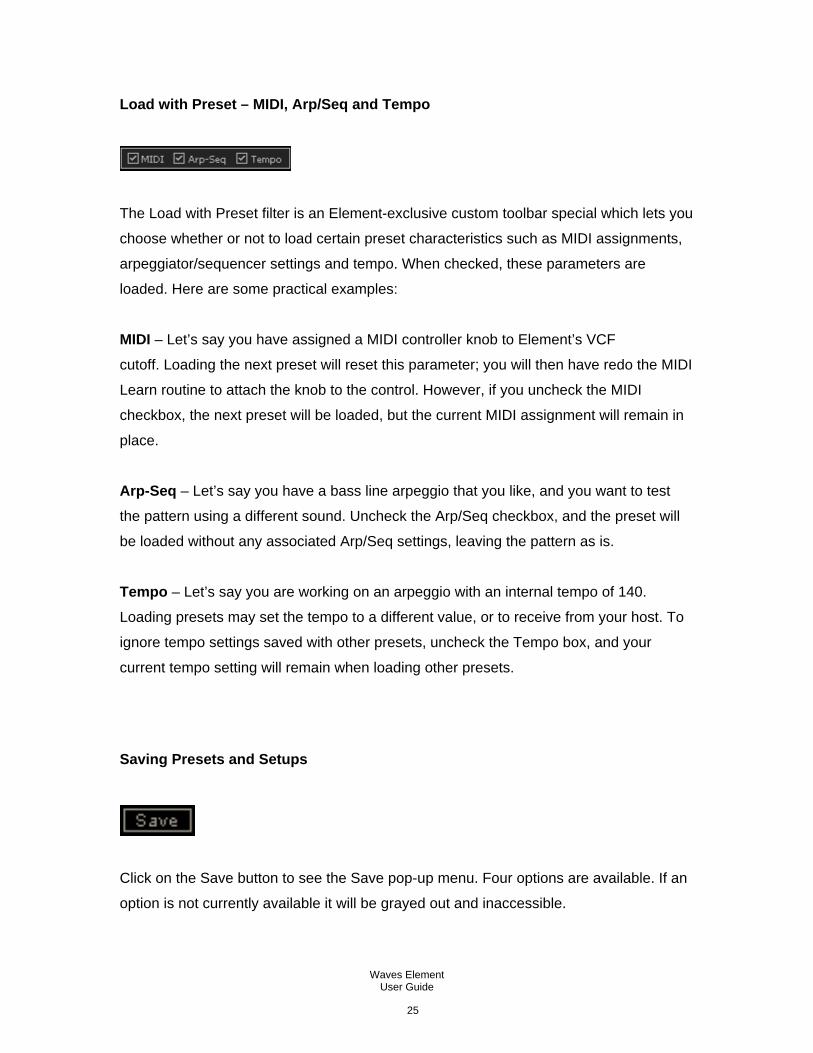
Load with Preset – MIDI, Arp/Seq and Tempo
The Load with Preset filter is an Element-exclusive custom toolbar special which lets you
choose whether or not to load certain preset characteristics such as MIDI assignments,
arpeggiator/sequencer settings and tempo. When checked, these parameters are
loaded. Here are some practical examples:
MIDI – Let’s say you have assigned a MIDI controller knob to Element’s VCF
cutoff. Loading the next preset will reset this parameter; you will then have redo the MIDI
Learn routine to attach the knob to the control. However, if you uncheck the MIDI
checkbox, the next preset will be loaded, but the current MIDI assignment will remain in
place.
Arp-Seq – Let’s say you have a bass line arpeggio that you like, and you want to test
the pattern using a different sound. Uncheck the Arp/Seq checkbox, and the preset will
be loaded without any associated Arp/Seq settings, leaving the pattern as is.
Tempo – Let’s say you are working on an arpeggio with an internal tempo of 140.
Loading presets may set the tempo to a different value, or to receive from your host. To
ignore tempo settings saved with other presets, uncheck the Tempo box, and your
current tempo setting will remain when loading other presets.
Saving Presets and Setups
Click on the Save button to see the Save pop-up menu. Four options are available. If an
option is not currently available it will be grayed out and inaccessible.
Waves Element User Guide
25

Save to New File… Select this to start a new Setup file. There are two
prompts - first for the setup filename, then for the
preset name. You must provide a name for both the
setup file and the preset. Click OK (ENTER) to
complete the save. It is a good idea to create a
folder in which to save several setup files for a
project.
Save ‘File Name’ – “Preset Name” Overwrites the settings of the loaded preset
(whether a User Preset or a preset from a Setup
File) with the current settings. If a Setup File is
currently loaded, the name of the Setup File is
displayed followed by the name of the preset itself.
If a User Preset is loaded, its name is displayed.
Save to ‘File Name’ As… Saves the current settings as a new preset into the
Setup file that is open (if one is not open, the option
is grayed out). You will be prompted to give the
preset a name.
Put into Preset Menu As… Save the current settings into a User Preset that
will always be in your Load menu (until deleted).
You will be prompted to give this preset a name.
User Presets are stored in the plugin’s preference
file.
Please note: Special characters (such as: !, @, #, %, ^, etc.) are not supported in preset
names.
Deleting Presets
You may delete User Presets and presets within a Setup File. Factory Presets and
Setup Library files cannot be deleted or overwritten.
1. Hold the Command (Mac)/Control (PC) key down.
2. Click-and-hold the Load button to see the pop-up menu.
3. While still holding the Command/Control key, select the preset or setup to delete.
4. A confirmation box will appear, allowing you to cancel or ‘OK’ the deletion.
Waves Element User Guide
26

A/B Comparison and Copying
The Setup A/Setup B button may be clicked to compare two settings. If you load a preset
in the Setup B position, this will not affect the preset loaded into the Setup A position,
and vice-versa.
If you want to slightly modify the settings in Setup A, you can copy them to Setup B by
clicking on the Copy to B button, then alter Setup A and compare with the original Setup
B.
The name of the current setup will be shown in the title bar (on platforms which support
it), and will switch as you change from Setup A to Setup B.
Note: an asterisk will be added to the preset name when a change is made to the preset.
5.3 Interface Controls
Controls can be in one of three states:
Not Selected where the control is not the target of any user entry
Selected where the control is the target of mouse control entry only
Selected and Active where the control is the target for both mouse and
keyboard entry
Toggle Buttons
Toggle buttons display the state of a control, and allow switching between two or more
states. Single-click to change the control’s state. Some toggle buttons have a text
Waves Element User Guide
27
display which updates with the current setting, and others (bypass, solo, or monitoring
toggles) illuminate when the control is active.
Some plugins have link buttons between a pair of toggle buttons, allowing click-and-
drag adjustment while retaining the offset between the controls.
Value Window Buttons
Value windows display the value of a control and allow click-and-drag adjustment, or
direct control via the keyboard.
Using the mouse, click-and-drag on the value window to adjust. Some value
windows support left/right, some up/down (as you hover over a button, arrows
will appear to let you know which direction of movement that button supports).
You may also use your mouse-wheel to adjust parameter values.
Using the arrow keys, click once with mouse to select the button, and then use
up/down – left/right (depending on the direction supported by that button) to
move in the smallest incremental steps across the button’s range (holding down
the arrow keys will move faster through the range).
Using key entry, double click on the button to open the value window, and
directly enter the value from your keyboard. If you enter an out of range number,
the button stays selected but remains at the current setting (system beeps? If
system sounds are on?)
Some plugins have link buttons between a pair of value windows, allowing click-and-
drag adjustment while retaining the offset between the controls.
Waves Element User Guide
28

Sliders
Click or scroll the mouse-wheel on the slider itself or anywhere within the sliders track.
The numerical value of the slider settings is displayed in a hover window above the
slider path.
Hover Box
Hovering boxes will appear and display the control value when hovering with the mouse
over the control.
Multiple Control Selection
One of the most powerful features of the WaveSystem is the ability to select and adjust
multiple controls simultaneously. Using the mouse, drag-select the desired group of
buttons or graphic controls by clicking and holding at a point outside the controls, and
forming a rectangle that includes the controls you wish to adjust. Alternatively, press and
hold Shift while clicking the mouse on any control you wish to link. This method is useful
when you want to select two or more controls that are not adjacent to one another.
TAB Functions
TAB moves the ‘selected’ status to the next control, with shift-TAB moving in the reverse
direction.
Additionally, the Mac has an option-TAB function for ‘down’ movement and shift-option-
TAB for ‘up’ movement where applicable.
If you have several Value Window Buttons selected, TAB functions will take you through
the selected controls only.
Hitting Esc or Return will return the 'focus' to the DAW application.
Waves Element User Guide
29
Waves Element User Guide
30
5.4 Waves Preferences (Pro Tools only)
When launching Pro Tools, hold Shift to view the Waves plugin Preferences window.
The following options are available:
Don't use AudioSuite plugins
Don’t use RTAS plugins
Rescan all plugins
HUI control surface support (low resolution)
Enable single-click text entry