
ds1000 rls - ws1.necii.comws1.necii.com/ds2000/d2kdownloads/d2k files/release_notes... · DS1000...
74
DS1000 02.11.00 Release Notes !! Important Notes When Upgrading or Transferring a Database !! If upgrading or transferring a database from a software version prior to 02.02.14: • Use the option 9803 - Initialize Distinctive Ringing to initialize Distinctive Ringing sys- tem-wide with a single command. Following initialization, you must reset the system or unplug and then replug each telephone. • Use the option 9804 - Initialize Caller ID Log Utility to initialize (clear) your Caller ID logs. • You should always use Call Forwarding Cancel to initialize Call Forwarding after upgrad- ing your system from a prior software level. When installing telephones: • Digital station ports (300-315) automatically detect the type of connected device when the keyset, 2-OPX Module or Digital Door Box is plugged in. With this software, it is no longer necessary to individually set circuit types in 1801 - Extension Circuit Type.
Transcript of ds1000 rls - ws1.necii.comws1.necii.com/ds2000/d2kdownloads/d2k files/release_notes... · DS1000...

DS1000
02.11.00Release Notes
!! Important Notes When Upgrading or Transferring a Database !!
If upgrading or transferring a database from a software version prior to 02.02.14:• Use the option 9803 - Initialize Distinctive Ringing to initialize Distinctive Ringing sys-
tem-wide with a single command. Following initialization, you must reset the system or unplug and then replug each telephone.
• Use the option 9804 - Initialize Caller ID Log Utility to initialize (clear) your Caller ID logs.•
You should always use Call Forwarding Cancel to initialize Call Forwarding after upgrad-ing your system from a prior software level.
When installing telephones:
• Digital station ports (300-315) automatically detect the type of connected device when the keyset, 2-OPX Module or Digital Door Box is plugged in. With this software, it is no longer necessary to individually set circuit types in
1801 - Extension Circuit Type
.

This manual has been developed by NEC America, Inc. It is intended for the use of its customers and service personnel, and should be read in its entirety before attempting to install or program the system. Any comments or suggestions for improving this manual would be appreciated. Forward your remarks to:
NEC America, Inc., Corporate Networks Group
4 Forest ParkwayShelton, CT 06484
cng.nec.com
Nothing contained in this manual shall be deemed to be, and this manual does not constitute, a warranty of, or representation with respect to, any of the equipment covered. This manual is subject to change without notice and NEC America, Inc. has no obligation to provide any updates or corrections to this manual. Further, NEC America, Inc. also reserves the right, without prior notice, to make changes in equipment design or components as it deems appropriate. No representation is made that this manual is complete or accurate in all respects and NEC America, Inc. shall not be liable for any errors or omissions. In no event shall NEC America, Inc. be liable for any incidental or consequential damages in connection with the use of this manual. This document contains proprietary information that is protected by copyright. All rights are reserved. No part of this document may be photocopied or reproduced without prior written consent of NEC America, Inc.
©2002 by NEC America, Inc. All Rights Reserved.Printed in U.S.A.

DS1000 Release Notes Table of Contents
DS1000
Release NotesDS1000 Release Notes Table of Contents
DS1000 02.10.09 Release NotesNew Features in 02.10.09 . . . . . . . . . . . . . . . . . . . . . . . . . . . . . . . . . . . . . . 1
Auto Redial . . . . . . . . . . . . . . . . . . . . . . . . . . . . . . . . . . . . . . . . . . . 1Feature Available . . . . . . . . . . . . . . . . . . . . . . . . . . . . . . . . 1Programming. . . . . . . . . . . . . . . . . . . . . . . . . . . . . . . . . . . . 2Operation. . . . . . . . . . . . . . . . . . . . . . . . . . . . . . . . . . . . . . . 2
Call Forwarding Off Premise . . . . . . . . . . . . . . . . . . . . . . . . . . . . . 3Feature Available . . . . . . . . . . . . . . . . . . . . . . . . . . . . . . . . 3Off Premise Call Fowarding Example . . . . . . . . . . . . . . . . 4Programming. . . . . . . . . . . . . . . . . . . . . . . . . . . . . . . . . . . . 4Operation. . . . . . . . . . . . . . . . . . . . . . . . . . . . . . . . . . . . . . . 5
22-Button and 34-Button Display Telephone Operation . . . . . . . . . . . . . . . . . . . . . . . . . . . . . . 5
22-Button Non-Display Telephone Operation . . . . 7Super Display Telephone Operation. . . . . . . . . . . . 7
Dial Tone Detection . . . . . . . . . . . . . . . . . . . . . . . . . . . . . . . . . . . 10Feature Available . . . . . . . . . . . . . . . . . . . . . . . . . . . . . . . 10
Extension Locking . . . . . . . . . . . . . . . . . . . . . . . . . . . . . . . . . . . . 10Feature Available . . . . . . . . . . . . . . . . . . . . . . . . . . . . . . . 10Programming. . . . . . . . . . . . . . . . . . . . . . . . . . . . . . . . . . . 11Operation. . . . . . . . . . . . . . . . . . . . . . . . . . . . . . . . . . . . . . 11
Locking and Unlocking Your Extension . . . . . . . 11Entering or Changing Your PIN Number . . . . . . . 13
Walking Class of Service . . . . . . . . . . . . . . . . . . . . . . . . . . . . . . . 17Feature Available . . . . . . . . . . . . . . . . . . . . . . . . . . . . . . . 17Programming. . . . . . . . . . . . . . . . . . . . . . . . . . . . . . . . . . . 17Operation. . . . . . . . . . . . . . . . . . . . . . . . . . . . . . . . . . . . . . 18
Enhanced Features in 02.10.09 . . . . . . . . . . . . . . . . . . . . . . . . . . . . . . . . . 20Call Forwarding . . . . . . . . . . . . . . . . . . . . . . . . . . . . . . . . . . . . . . 20
Call Forwarding Key. . . . . . . . . . . . . . . . . . . . . . . . . . . . . 20 Confirmation Tone Added . . . . . . . . . . . . . . . . . . . . . . . . 20Soft Key And Type Enhancements. . . . . . . . . . . . . . . . . . 20
22-Button and 34-Button Display Telephone Operation . . . . . . . . . . . . . . . . . . . . . . . . . . . . . 21
DS1000 Release Notes i

DS1000 Release Notes Table of Contents
Super Display Telephone Operation. . . . . . . . . . . 22Call Timer . . . . . . . . . . . . . . . . . . . . . . . . . . . . . . . . . . . . . . . . . . . 25
Enhanced Call Timer . . . . . . . . . . . . . . . . . . . . . . . . . . . . 25Manual Call Timer . . . . . . . . . . . . . . . . . . . . . . . . 25Automatic Call Timer . . . . . . . . . . . . . . . . . . . . . . 25Operation. . . . . . . . . . . . . . . . . . . . . . . . . . . . . . . . 25
Caller ID . . . . . . . . . . . . . . . . . . . . . . . . . . . . . . . . . . . . . . . . . . . . 26Ring Detection Timer Default Changes . . . . . . . . . . . . . . 26
Direct Station Selection (DSS) Console . . . . . . . . . . . . . . . . . . . . 26Account Code Key . . . . . . . . . . . . . . . . . . . . . . . . . . . . . . 26
Programming . . . . . . . . . . . . . . . . . . . . . . . . . . . . 26Directory Dialing . . . . . . . . . . . . . . . . . . . . . . . . . . . . . . . . . . . . . 26
Directory Dialing Can Call Ring Group and UCD Group Master Numbers. . . . . . . . . . . . . . . . . . . . . . . . . . . 26
Do Not Disturb . . . . . . . . . . . . . . . . . . . . . . . . . . . . . . . . . . . . . . . 26Do No Disturb Override Introduced . . . . . . . . . . . . . . . . . 26Programming. . . . . . . . . . . . . . . . . . . . . . . . . . . . . . . . . . . 27Operation. . . . . . . . . . . . . . . . . . . . . . . . . . . . . . . . . . . . . . 27Do Not Disturb Types Introduced. . . . . . . . . . . . . . . . . . . 28Do Not Disturb BLF for Hotline and Call Coverage Keys . . . . . . . . . . . . . . . . . . . . . . . . . . . . . . . . . 28Operation. . . . . . . . . . . . . . . . . . . . . . . . . . . . . . . . . . . . . . 29
Flash . . . . . . . . . . . . . . . . . . . . . . . . . . . . . . . . . . . . . . . . . . . . . . . 30Disable Flash In A Single Line Extension’s Class Of Service . . . . . . . . . . . . . . . . . . . . . . . . . . . . . . . . . . . . . 30
Headset Compatibility . . . . . . . . . . . . . . . . . . . . . . . . . . . . . . . . . 30Enhanced Headset Operation . . . . . . . . . . . . . . . . . . . . . . 30Headset Key . . . . . . . . . . . . . . . . . . . . . . . . . . . . . . . . . . . 31
Programming. . . . . . . . . . . . . . . . . . . . . . . . . . . . . 31Hotline. . . . . . . . . . . . . . . . . . . . . . . . . . . . . . . . . . . . . . . . . . . . . . 32
User Programmable Hotline Assignments For DSS Console . . . . . . . . . . . . . . . . . . . . . . . . . . . . . . . . . . . 32
Interactive Soft Keys. . . . . . . . . . . . . . . . . . . . . . . . . . . . . . . . . . . 32Display Enhancements . . . . . . . . . . . . . . . . . . . . . . . . . . . 32
Program Menu Rearranged . . . . . . . . . . . . . . . . . . 32Voice Announce Options Simplified . . . . . . . . . . 33
Last Number Redial . . . . . . . . . . . . . . . . . . . . . . . . . . . . . . . . . . . 33Enhanced Last Number Redial . . . . . . . . . . . . . . . . . . . . . 33Automatic Hyphenation in the Enhanced Last Number Redial Display. . . . . . . . . . . . . . . . . . . . . . . . . . . . . . . . . . 33Programming. . . . . . . . . . . . . . . . . . . . . . . . . . . . . . . . . . . 34Operation. . . . . . . . . . . . . . . . . . . . . . . . . . . . . . . . . . . . . . 34
22-Button and 34-Button Display Telephone Operation . . . . . . . . . . . . . . . . . . . . . . . . . . . . . 34
Super Display Telephone Operation. . . . . . . . . . . 35
ii DS1000 Release Notes

DS1000 Release Notes Table of Contents
Modem Cut-Through . . . . . . . . . . . . . . . . . . . . . . . . . . . . . . . . . . 36Limitations On PFT/MDM Port To Prevent Relay Misoperation . . . . . . . . . . . . . . . . . . . . . . . . . . . . . . . . . . . 36
Microphone Mute . . . . . . . . . . . . . . . . . . . . . . . . . . . . . . . . . . . . . 36Handsfree Reply Soft Key Available . . . . . . . . . . . . . . . . 36
22-Button and 34-Button Display Telephone Operation . . . . . . . . . . . . . . . . . . . . . . . . . . . . . 36
Super Display Telephone Operation. . . . . . . . . . . 36MIC Key Controls Both Handset and Handsfree Microphone . . . . . . . . . . . . . . . . . . . . . . . . . . . . . . . . . . . . 37
Night Service / Night Ring . . . . . . . . . . . . . . . . . . . . . . . . . . . . . . 37Using #KP To Set Up A System Mode System Key . . . . 37
Off-Hook Signaling . . . . . . . . . . . . . . . . . . . . . . . . . . . . . . . . . . . 38Off-Hook Signaling Enhancements . . . . . . . . . . . . . . . . . 38
Off-Premise Extensions / On-Premise SLT Extensions . . . . . . . . 38COS Option Single Ring For Single Line Sets Activated 38
Paging . . . . . . . . . . . . . . . . . . . . . . . . . . . . . . . . . . . . . . . . . . . . . . 38Page Key Clears Intercom Call. . . . . . . . . . . . . . . . . . . . . 38Trunk Ring Over Page . . . . . . . . . . . . . . . . . . . . . . . . . . . 39Programming. . . . . . . . . . . . . . . . . . . . . . . . . . . . . . . . . . . 39Operation. . . . . . . . . . . . . . . . . . . . . . . . . . . . . . . . . . . . . . 40Intercom Ring Over Page . . . . . . . . . . . . . . . . . . . . . . . . . 40Programming. . . . . . . . . . . . . . . . . . . . . . . . . . . . . . . . . . . 40Operation. . . . . . . . . . . . . . . . . . . . . . . . . . . . . . . . . . . . . . 41Door Chime Over Page. . . . . . . . . . . . . . . . . . . . . . . . . . . 41Programming. . . . . . . . . . . . . . . . . . . . . . . . . . . . . . . . . . . 41Operation. . . . . . . . . . . . . . . . . . . . . . . . . . . . . . . . . . . . . . 42Background Music Over Page . . . . . . . . . . . . . . . . . . . . . 42Programming. . . . . . . . . . . . . . . . . . . . . . . . . . . . . . . . . . . 42
Prime Line Preference. . . . . . . . . . . . . . . . . . . . . . . . . . . . . . . . . . 44Prime Line Enhancements . . . . . . . . . . . . . . . . . . . . . . . . 44Programming. . . . . . . . . . . . . . . . . . . . . . . . . . . . . . . . . . . 44
Selectable Display Messaging . . . . . . . . . . . . . . . . . . . . . . . . . . . 45Soft Key Enhancements . . . . . . . . . . . . . . . . . . . . . . . . . . 45
22-Button and 34-Button Display Telephone Operation . . . . . . . . . . . . . . . . . . . . . . . . . . . . . 45
Super Display Telephone Operation. . . . . . . . . . . 46System Programming Password Protection . . . . . . . . . . . . . . . . . 47
Duplicate Passwords Won’t Lock Out Programming. . . . 47System Timers, Trunks . . . . . . . . . . . . . . . . . . . . . . . . . . . . . . . . . 47
Ringing Signal End Detect Timer Name Change . . . . . . . 47Tandem Trunking / Unsupervised Conference . . . . . . . . . . . . . . . 47
New COS Bit Added For Unsupervised Conference . . . . 47Voice Mail . . . . . . . . . . . . . . . . . . . . . . . . . . . . . . . . . . . . . . . . . . 48
Accessing Voice Mail Simplified . . . . . . . . . . . . . . . . . . . 48
DS1000 Release Notes iii

DS1000 Release Notes Table of Contents
Answering Machine Ports and Caller ID . . . . . . . . . . . . . 48Disconnecting Conversation Record Simplified. . . . . . . . 48Personal Answering Machine Emulation Soft Key Enhancements . . . . . . . . . . . . . . . . . . . . . . . . . . . . . . . . . . 48
22-Button and 34-Button Display Telephone Operation . . . . . . . . . . . . . . . . . . . . . . . . . . . . . 48
Super Display Telephone Operation. . . . . . . . . . . 49Handling Personal Answering Machine
Emulation Calls . . . . . . . . . . . . . . . . . . . . . . . . 50Streamlined Handling Of Voice Mail Transfers To DND Extensions . . . . . . . . . . . . . . . . . . . . . . . . . . . . . . . . 50
DS1000 02.10.12 Release NotesNew Features in 02.10.12 . . . . . . . . . . . . . . . . . . . . . . . . . . . . . . . . . . . . . 51
There are no new features in this release.Enhanced Features in 02.10.12 . . . . . . . . . . . . . . . . . . . . . . . . . . . . . . . . . 52
Call Coverage Keys . . . . . . . . . . . . . . . . . . . . . . . . . . . . . . . . . . . 52Guard Timer Implemented . . . . . . . . . . . . . . . . . . . . . . . . 52
Call Forwarding . . . . . . . . . . . . . . . . . . . . . . . . . . . . . . . . . . . . . . 52Call Forwarding Cancel Available . . . . . . . . . . . . . . . . . . 52Status Restored After Reset Or Power Down. . . . . . . . . . 53
Caller ID Logging . . . . . . . . . . . . . . . . . . . . . . . . . . . . . . . . . . . . . 53New Default - All Keysets In Caller ID Logging Group 1 . . . . . . . . . . . . . . . . . . . . . . . . . . . . . . . . . . . . . . . 53
Conference . . . . . . . . . . . . . . . . . . . . . . . . . . . . . . . . . . . . . . . . . . 53Multiple Parties Cannot Place Conference On Hold . . . . 53
Directed Call Pickup . . . . . . . . . . . . . . . . . . . . . . . . . . . . . . . . . . . 53Pickup Of Additional Call Types . . . . . . . . . . . . . . . . . . . 53
Do Not Disturb . . . . . . . . . . . . . . . . . . . . . . . . . . . . . . . . . . . . . . . 53Soft Keys Reordered . . . . . . . . . . . . . . . . . . . . . . . . . . . . . 53
22-Button and 34-Button Display Telephone Operation . . . . . . . . . . . . . . . . . . . . . . . . . . . . . 53
Super Display Telephone Operation. . . . . . . . . . . 54Interactive Soft Keys. . . . . . . . . . . . . . . . . . . . . . . . . . . . . . . . . . . 54
PREVIOUS and PREV Soft Keys Renamed . . . . . . . . . . 54Off-Premise Extensions / On-Premise SLT Extensions . . . . . . . . 54
Exclusive Hold Available . . . . . . . . . . . . . . . . . . . . . . . . . 54Split Enhanced . . . . . . . . . . . . . . . . . . . . . . . . . . . . . . . . . 54
Privacy Release. . . . . . . . . . . . . . . . . . . . . . . . . . . . . . . . . . . . . . . 55Guard Timer Available . . . . . . . . . . . . . . . . . . . . . . . . . . . 55
Station Message Detail Recording . . . . . . . . . . . . . . . . . . . . . . . . 55Call Duration Independent of System Clock . . . . . . . . . . 55SMDR Header Printed When Date Changes . . . . . . . . . . 55
Tandem Trunking / Unsupervised Conference . . . . . . . . . . . . . . . 55
iv DS1000 Release Notes

DS1000 Release Notes Table of Contents
Using Trunk-To-Trunk Transfer To Set Up A Tandem Call . . . . . . . . . . . . . . . . . . . . . . . . . . . . . . . . . . . 55
Time and Date. . . . . . . . . . . . . . . . . . . . . . . . . . . . . . . . . . . . . . . . 56Automatic Daylight Savings Time Adjustment Available 56
Software Corrections in 02.10.12 . . . . . . . . . . . . . . . . . . . . . . . . . . . . . . . 57Attendant Position. . . . . . . . . . . . . . . . . . . . . . . . . . . . . . . . . . . . . 57
Out Of Range Entries While Scrolling . . . . . . . . . . . . . . . 57Call Forwarding Off Premise . . . . . . . . . . . . . . . . . . . . . . . . . . . . 57
Connection Errors When Call Forwarded to DIL. . . . . . . 57System Reset After Upgrade. . . . . . . . . . . . . . . . . . . . . . . 57
Callback . . . . . . . . . . . . . . . . . . . . . . . . . . . . . . . . . . . . . . . . . . . . 57Callback Cancel Available . . . . . . . . . . . . . . . . . . . . . . . . 57
Caller ID . . . . . . . . . . . . . . . . . . . . . . . . . . . . . . . . . . . . . . . . . . . . 57Internal Guard Timer Modified . . . . . . . . . . . . . . . . . . . . 57Super Display Does Not Display Caller ID For Call Picked Up From Hold . . . . . . . . . . . . . . . . . . . . . . . . . . . . 58
Caller ID Logging . . . . . . . . . . . . . . . . . . . . . . . . . . . . . . . . . . . . . 58Deleting Personal Record Jumps To End Of List. . . . . . . 58
Central Office Calls, Placing . . . . . . . . . . . . . . . . . . . . . . . . . . . . 58Trunk Lockup When Access Denied . . . . . . . . . . . . . . . . 58
Conference . . . . . . . . . . . . . . . . . . . . . . . . . . . . . . . . . . . . . . . . . . 58Handsfree Conference Interacts With Second Hold Depression. . . . . . . . . . . . . . . . . . . . . . . . . . . . . . . . . . . . . 58Simultaneous Loop Disconnect Commands Processed . . 58
Directory Dialing . . . . . . . . . . . . . . . . . . . . . . . . . . . . . . . . . . . . . 58Volume Control Interaction . . . . . . . . . . . . . . . . . . . . . . . 58
Extension Hunting . . . . . . . . . . . . . . . . . . . . . . . . . . . . . . . . . . . . 58UCD Group Used As Dummy Extension Doesn’t Activate Call Coverage . . . . . . . . . . . . . . . . . . . . . . . . . . . 58UCD Overflow To Voice Mail Causes System Reset . . . 59
Headset Compatibility . . . . . . . . . . . . . . . . . . . . . . . . . . . . . . . . . 59Quickly Pressing Key After Hold Disables Feature . . . . . 59
Interactive Soft Keys. . . . . . . . . . . . . . . . . . . . . . . . . . . . . . . . . . . 59Display Doesn’t Clear After Exit . . . . . . . . . . . . . . . . . . . 59
Music On Hold . . . . . . . . . . . . . . . . . . . . . . . . . . . . . . . . . . . . . . . 59Clearing Entry Resets System. . . . . . . . . . . . . . . . . . . . . . 59
Off-Hook Signaling . . . . . . . . . . . . . . . . . . . . . . . . . . . . . . . . . . . 59Off-Hook Ringing While Using Voice Mail . . . . . . . . . . 59
Off-Premise Extensions / On-Premise SLT Extensions . . . . . . . . 60Flash On Intercom Call Locks Up Keyset . . . . . . . . . . . . 60
Paging . . . . . . . . . . . . . . . . . . . . . . . . . . . . . . . . . . . . . . . . . . . . . . 60Cannot Pick Up Call Coverage and Call Queue Key Calls Ringing External Page . . . . . . . . . . . . . . . . . . . . . . . 60External Page Relay Activation Causes System Reset . . . 60Out Of Range Entries When Setting Up Page Relays . . . 60
DS1000 Release Notes v

DS1000 Release Notes Table of Contents
Update Utility Version 02.01.02. . . . . . . . . . . . . . . . . . . . . . . . . . 60Default Only Installation Path . . . . . . . . . . . . . . . . . . . . . 60
DS1000 02.10.13/02.11.00 Release NotesNew Features in 02.10.13/02.11.00 . . . . . . . . . . . . . . . . . . . . . . . . . . . . . 61
Maintenance release only. There are no new features in this release.
Enhanced Features in 02.10.13/02.11.00 . . . . . . . . . . . . . . . . . . . . . . . . . 62Maintenance release only. There are no enhanced features in this release.
Software Corrections in 02.10.13/02.11.00 . . . . . . . . . . . . . . . . . . . . . . . 63Call Forwarding Off Premise . . . . . . . . . . . . . . . . . . . . . . . . . . . . 63
Off Premise Call Forwarding Can Corrupt System Database . . . . . . . . . . . . . . . . . . . . . . . . . . . . . . . . 63
Hotline. . . . . . . . . . . . . . . . . . . . . . . . . . . . . . . . . . . . . . . . . . . . . . 63Hotline Inadvertantly Transfers Trunk . . . . . . . . . . . . . . . 63
vi DS1000 Release Notes

DS1000 02.10.09 Release Notes
DS1000 02.10.09
Release Notes
DS1000 02.10.09 Release Notes
New Features in 02.10.09
New Features in 02.10.09
Auto Redial
Feature AvailableAuto Redial periodically redials a busy outside number. If a keyset user places an outside call and the call recipient is busy, the user can press a soft key to enable Auto Redial. The keyset user doesn’t have to retry the number, hoping it will go through.
Auto Redial will periodically retry the number up to 15 times. Auto Redial cancels when the called party rings or answers, or when the extension:
� Places or answers another outside call.
� Receives an Intercom voice announcement or answers an Intercom call by lifting the handset or pressing SPK.
� Presses SPK to cancel Auto Redial.
� Presses any other fixed feature key except MIC.
� Lifts and replaces the handset.
� Presses the CANCEL soft key (Super Display only).
For your reference, the following table shows the standard call progress tones.
Call Progress Tones
Description Frequencies Rate
Dial tone 350 Hz + 440 Hz Steady
Reorder (Fast Busy) tone 480 Hz + 620 Hz 250 mS on, 250 mS off (+ 25 mS)
DS1000 Release Notes 1 � 02.10.09

DS1000 02.10.09 Release Notes
New Features in 02.10.09
Programming
0401-Auto Redial Retry Timer
Use the option to set the interval between Auto Redial callout attempts. The default setting is 30 seconds (30).
0401-Auto Redial Busy Timer
This option sets how long the system waits for busy tone when processing an Auto Redial callout attempt. The interval is measured from the last digit dialed to the receipt of busy tone. If the system doesn’t receive busy tone within this interval, it assumes that the call went through and cancels Auto Redial. The default setting is 6 seconds.
Operation
To enable Auto Redial:
1. Place an outside call and receive busy tone + Press AUTO REDIAL (ALND) soft key.OR
2. Press a line key + Press AUTO REDIAL (ALND) soft key.The system enables Auto Redial for the last outside call you dialed.
3. At a 22-Button or 34-Button Display, you see:
At a Super Display, you see:
The display shows the interval between callout attempts (e.g., 30 seconds), as well as how many times redial has occurred (e.g., 1 of 15).
Your SPK key winks on to indicate your phone is in the Auto Redial mode.
4. The system periodically redials the call, up to 15 times, or until you:
� Place or answer another outside call.
� Receive an Intercom voice announcement or answer an Intercom call by lifting the hand-set or pressing SPK.
Busy tone 480 Hz + 620 Hz 500 mS on, 500 mS off (+ 50 mS)
Audible ring tone (ring-back)
440 Hz + 880 Hz 800mS to 1.2 sec on, 2.7 sec to 3.3 sec off
Stutter dial tone 350 Hz + 440 Hz 800 mS to 1.2 sec on, 800mS to 1.2 sec off
Call Progress Tones
Description Frequencies Rate
2 � 02.10.09 DS1000 Release Notes

DS1000 02.10.09 Release Notes
New Features in 02.10.09
� Press SPK to cancel Auto Redial.
� Lift and replace the handset.
� Press the CANCEL soft key (Super Display only).If a Caller ID call rings while Auto Redial is enabled, your display will show the number
and optional name of the incoming caller. However, the ringing does not cancel Auto Redial. In addition, the Auto Redial display will be restored after the Caller ID call stops ringing.
Call Forwarding Off Premise
Feature AvailableOff Premise Call Forwarding allows a keyset user to forward their calls to an off-site location (such as a cell phone or remote office) if allowed by their Class of Service. Keyset users can stay in touch by having Off Premise Call Forwarding automatically forward their calls while they are away from the office. To set up Off Premise Call Forwarding, the user selects the trunk or trunk group over which the call should route, as well as the number the system should dial. The number dialed can be from an extension’s Personal Speed Dial bin containing an outside number, or the user can enter an outside number directly into their Personal Speed Dial bin 720. When a call rings the forwarded extension, the system selects the specified trunk or group and then outdials the stored number.
Off Premise Call Forwarding reroutes:
� Intercom calls
� Transferred calls
� Direct Inward Lines
� UTRF (unscreened transfer) calls routed from the Voice Mail Automated Attendant
� Circular and Terminal Extension Hunting calls
Off Premise Call Forwarding does not reroute:
� Key Ring calls
� Calls to a UCD Group master number.
� Group Ring calls (i.e., calls to a Ring Group master number)
� UCD Hunting Calls (i.e., calls to a UCD master number)
� Ringing Call Coverage key calls
You can set up Off Premise Call Forwarding to reroute all calls or just trunk calls. If an extension with forwarding set for trunk calls only receives a screened Transfer, the initial voice-announce-ment broadcasts at the extension. When the caller hangs up to complete the transfer, the trunk call forwards as programmed.
Notes:
� Telco must provide Loop Disconnect Supervision on the originating trunk (i.e., the trunk that Off Premise Call Forwarding will reroute).
� All other Speed Dial programming also applies to Off Premise Call Forwarding.
� An extension Speed Dial number stored in bin 719 should not be longer than 16 digits. If it is, the system automatically clears bin 719 when it stores an Off Premise Call Forwarding num-ber in bin 720.
� An extension user cannot off premise call forward to a Personal Speed Dial bin that contains an Intercom number. If the user selects a bin that contains an Intercom number, the system cancels Off Premise Call Forwarding.
� Off Premise Call Forwarding is cleared after a system reset or power down.
DS1000 Release Notes 3 � 02.10.09

DS1000 02.10.09 Release Notes
New Features in 02.10.09
� If a trunk rings an off-premise forwarded extension and the specified outbound route is busy, the system reroutes the call to the programmed overflow destination (normally Key Ring). Intercom callers will hear busy tone if the outbound route is busy, and have the option of dial-ing 2 for Trunk Queuing or Trunk Callback.
� Tandem Trunking must be enabled for the originating trunk (i.e., the trunk that Off Premise Call Forwarding will reroute).
If a screened Transfer is made to an extension with Trunk Only forwarding, and Tan-dem Trunking is not enabled for the originating trunk, the transferred trunk immediately goes to Key Ring when the transferring party hangs up.
If a screened Transfer is made to an extension with All Calls forwarding, and Tandem Trunking is not enabled for the originating trunk, the transferred trunk will stay at the transferring extension when that party hangs up.
� Off Premise Call Forwarding is not available at single line telephones.
Off Premise Call Fowarding Example
Call Routes to Emergency Service Number After Hours
A service department dispatcher has Key Ring for trunks 1-4 during the day. The dispatcher answers calls on those lines and assigns dispatchers accordingly. At night, the calls on trunks 1-4 must automatically route to the technician on call for emergency service. To do this:
1. In 1003-Direct Termination Day, make sure trunks 1-4 are assigned as Key Ring trunks (by pressing CLEAR).
2. In 1003-Direct Termination Night, terminate trunks 1-4 directly to the dispatcher’s exten-sion (e.g., extension 300).
3. At the dispatcher’s extension, program a Personal Speed Dial bin for each technician that is qualified to take emergency calls.
4. At the end of the day, the dispatcher presses their Night (System Mode System) Key (nor-mally key 11) to put the system in the night mode.
5. After enabling the night mode, the dispatcher implements Off Premise Call Forwarding to whichever Speed Dial bin represents the technician on call for that evening.
6. Calls ringing trunks 1-4 at night automatically route to the technician on call.
Programming
0101-Off Premise Call Forwarding
Use this option to enable (Y) or disable (N) an extension’s ability to use Off Premise Call Forward-ing. By default, this option is disabled (N). When disabled, the Off Premise Call Forwarding option is hidden on the telephone display.
0101-Call Forwarding
Use this option to enable (Y) or disable (N) an extension’s ability to use Call Forwarding. If an extension cannot use Call Forwarding, they cannot also use Off Premise Call Forwarding. By default, this option is enabled (Y).
1003-Tandem Trunk
Enable (Y) or disable (N) Tandem Trunking for trunks if Off Premise Call Forwarding should be able to route incoming trunk calls to an off-premise location. The originating trunk (i.e., the trunk that Off Premise Call Forwarding will reroute) must have this option enabled. If enabled, the sys-tem can forward an incoming trunk call over a second trunk to an off-premise number. If disabled, trunk-to-trunk forwarding cannot occur. This option is not required when the system is forwarding Intercom calls off-premise. The default for this option is disabled (N).
4 � 02.10.09 DS1000 Release Notes

DS1000 02.10.09 Release Notes
New Features in 02.10.09
When 1003-Tandem Trunking is disabled, the system will immediately route a trunk ringing an OPX Call Forwarded extension to Key Ring. It will not attempt to reroute the call.
1702-Personal Speed Dial
You can optionally enter Personal Speed Dial numbers from the system program. The Personal Speed Dial number you enter for Off Premise Call Forwarding must contain a trunk or trunk group route. You cannot select Intercom Speed Dials for Off Premise Call Forwarding.
1801-Extension Class of Service
Assign Class of Service to extensions.
1802-Speed Dial Block
Assign a Speed Dial block (1-62) to an extension. If the extension does not have a block assigned, it cannot use Off Premise Call Forwarding. If the extension does not have a Speed Dial block assigned, the Call Forwarding Off Premise option is not available (i.e., is hidden on the display).
OperationNote: Also see Call Forwarding in the Enhanced Features section for information on the new Call Fowarding key. This key significantly simplifies Call Fowarding feature operation.
22-Button and 34-Button Display Telephone Operation
To set up Call Forwarding Off Premise:
1. Press the ICM key and dial *3.ORPress PGM + CFWD. You see:
2. Dial 3 and skip to step 5.OR
Press MORE. You see:
3. Press OFFP.
4. You see:
- Press BIN to select a Speed Dial bin as your Off Premise Call Forwarding number.- Press NUM to store a new Off Premise Call Forwarding number (automatically in bin 720).- Press VIEW to view the currently enabled Off Premise Call Forwarding number (if any).
5. If you press BIN to store the number in a Speed Dial bin, you see:
- Select the Speed Dial bin (dial 701-720 or press the bin key) you want to use + HOLD to exit.OR
DS1000 Release Notes 5 � 02.10.09

DS1000 02.10.09 Release NotesNew Features in 02.10.09
If you press NUM to store a new number (automatically in Speed Dial bin 720), you see:
- Enter the trunk number (e.g., 1 for trunk 1), trunk group number (e.g., 90 for group 0), or ICM to store Intercom codes + HOLD.- Following Speed Dial programming methods, enter the number you want to store (up to 16 digits long, including MIC to store a pause and FLASH to store a Flash) + HOLD to exit.- You cannot enter a name using this option.- If you already have a number stored in bin 20, you see:
- Press Yes to enter a new number or No to back up to step 4.OR
If you pressed VIEW to view your currently stored number, you see:
- Press SPK to exit the VIEW mode.
6. You see:
7. Select the Call Forwarding type:- Dial 2 or press ALL to forward all calls.- Dial 8 or press TRNK to forward just trunk calls.
8. Once returning to idle, your telephone display will show:
- FWD OFP indicates that Off Premise Call Forwarding is enabled, followed by the number.- If you selected a Speed Dial bin with a stored name, the name will display instead.
To cancel Call Forwarding Off Premise:
1. Press the ICM key and dial *3.ORPress CLEAR + PGM + CFWD. You see:
2. Press NONE.ORDial 0.ORPress CLEAR.
3. Off Premise Call Forwarding is cancelled.
6 � 02.10.09 DS1000 Release Notes

DS1000 02.10.09 Release NotesNew Features in 02.10.09
22-Button Non-Display Telephone OperationIt is strongly recommended that you use a display telephone when setting up Off Premise Call For-warding. If you don’t have a display telephone, the following procedure explains how you can use a 22-button non-display set to enable Off Premise Call Forwarding.
To set up Call Forwarding Off Premise:
1. Program the number you want Call Forwarding Off Premise to dial into one of your Personal Speed Dial bins (701-720).
You must do this before proceeding to step 2 below.
For example, the following sequence programs the number 12039265400 with the name NEC to go out over trunk group 0:
#77 + 701 + HOLD + 90 + HOLD + 12039265400 + HOLD + 62 + 32 + 23 + HOLD + SPK.
2. Press the ICM key and dial *33.
3. Dial 2 and enter the Personal Speed bin number you programmed in step 1 above + HOLD.
4. Select the Call Forwarding type:- Dial 2 or press ALL to forward all calls.- Dial 8 or press TRNK to forward just trunk calls.
Your DND key flashes.
To cancel Call Forwarding Off Premise:
� Press the ICM key and dial *30.Your DND key goes out.
Super Display Telephone Operation
To set up Call Forwarding Off Premise:
1. Press the ICM key and dial *3ORPress PROGRAM + CALL FWRD. You see:
2. Dial 3 or press OFF-PREMISE. You see:
- Press SPEED DIAL BIN to select a Speed Dial bin as your Off Premise Call Forwarding number.
DS1000 Release Notes 7 � 02.10.09

DS1000 02.10.09 Release NotesNew Features in 02.10.09
- Press NUMBER to store a new Off Premise Call Forwarding number (automatically in bin 720).- Press VIEW to view the currently enabled Off Premise Call Forwarding number (if any).
3. If you press SPEED DIAL BIN to store the number in a Speed Dial bin, you see:
- Select the Speed Dial bin (701-720) you want to use + HOLD to exit.OR
If you press NUMBER to store a new number (automatically in Speed Dial bin 720), you see:
- Enter the trunk number (e.g., 1 for trunk 1), trunk group number (e.g., 90 for group 0), or ICM to store Intercom codes + HOLD.- Following Speed Dial programming methods, enter the number you want to store (up to 16 digits long, including MIC to store a pause and FLASH to store a Flash) + HOLD to exit.- You cannot enter a name using this option.- If you already have a number stored in bin 20, you see:
- Press Yes to enter a new number or No to back up to step 3.OR
8 � 02.10.09 DS1000 Release Notes

DS1000 02.10.09 Release NotesNew Features in 02.10.09
If you pressed VIEW to view your currently stored number, you see:
- Press SPK to exit the VIEW mode.
4. You see:
5. Select the Call Forwarding type:- Dial 2 or press ALL to forward all calls.- Dial 8 or press TRUNK ONLY to forward just trunk calls.
6. Once returning to idle, your telephone display will show:
- FWD OFP indicates that Off Premise Call Forwarding is enabled, followed by the number.- If you selected a Speed Dial bin with a stored name, the name will display instead.
To cancel Call Forwarding Off Premise:
1. Press the ICM key and dial *3ORPress PROGRAM + CALL FWRD. You see:
DS1000 Release Notes 9 � 02.10.09

DS1000 02.10.09 Release NotesNew Features in 02.10.09
2. Press NONE.ORDial 0.ORPress CLEAR.
3. Off Premise Call Forwarding is cancelled.
Dial Tone Detection
Feature AvailableThe system can optionally detect precise CO dial tone for automatically dialed trunk calls (such as Speed Dial and Auto Redial calls). With Dial Tone Detection enabled for a trunk, the system will monitor the trunk when initially seized for valid dial tone or stutter dial tone. If valid EIA/TIA dial tone is detected, the system outdials the call on the trunk. If dial tone is not detected within 2 sec-onds, the system will try the next available trunk in the same trunk group to which the initial trunk belongs. If another trunk in the group is not available, the user hears busy tone.
If Dial Tone Detection is disabled, the system waits 500mS after trunk seizure and then outdials the number.
If enabled, Dial Tone Detection applies to the following types of trunk calls:
� Auto Redial (initial trunk seizure)
� Caller ID (callbacks)
� Last Number Redial
� Call Forwarding Off Premise
� Save
� Speed Dial
Dial Tone Detection does not apply to manually dialed trunk calls.
1001-Dialtone Detection
Use this option to enable (Y) or disable (N) Dial Tone Detection for the trunk. The default setting for this option is disabled (N).
Extension Locking
Feature AvailableUse Extension Locking to secure your phone when you leave your office. You may want to do this if your phone has Toll Restriction and Class of Service options enabled that could be easily abused. While locked, the restrictions set up in Class of Service 15 and Toll Level 7 are in force at your extension. When you return, just unlock your extension to return it to normal operation.
You’ll need to program the restrictions in Class of Service 15 and Toll Level 7 separately. See the Class of Service and Toll Restriction features for more.
Note: Walking Class of Service overrides Extension Locking. For example:
� Extension 301 is permitted by their Class of Service and Toll Restriction to use Paging and place long distance calls.
� Extension 306 locks their extension. While locked, Class of Service 15 prevents Paging and Toll
10 � 02.10.09 DS1000 Release Notes

DS1000 02.10.09 Release NotesNew Features in 02.10.09
Level 7 prevents long distance calls. These features are no longer available at extension 306.
� The extension 301 user goes to extension 306 and implements Walking Class of Service.
� The extension 301 user can then use 306 to make long distance calls and Page (even though 306 was locked to prevent those features).
Programming
0101-Extension Locking
Enter Y to enable or N to disable Extension Locking. This option is disabled by default.
1801-Exension Class of Service Assignment
Assign Class of Service to extensions.
1801-Access Level
Be sure the operator’s extension has access level 4 or 5. If not, the operator will not be able to erase a co-worker’s PIN number and unlock their extension. The access code for extension 300 is fixed at 5. Be sure to program this option for the other operators in a multiple-operator setup.
1807-PIN Code
Use this option to assign a PIN code to an extension. PIN codes are 4 digits long, using 0-9, # and *. The PIN code is used for both Extension Locking and Walking Class of Service. By default, there are no PIN codes entered. In addition:� An extension user can dial ICM + ##6 to enter or change their PIN number.� The operator can dial ICM + ##3 to erase a co-worker’s PIN number and unlock their extension.
To enter 1807-PIN Code data:� When you see PIN CODE?, press HOLD to enter the data entry mode.� While in the data entry mode:
- Vol Up scrolls right.- Vol Down scrolls left.- LND backspaces over (erases) the last entered digit.- CLEAR + HOLD erases the current entry.- CHECK restores the previous entry.- HOLD registers the entry and advances to the next prompt.- CONF exists the program.
Operation
Locking and Unlocking Your ExtensionWhen using the procedures that follow to enter a PIN number or extension number:
� CLEAR erases your entire entry.
� LND backspaces over (erases) the last digit entered.
To lock your extension:
� Press ICM and dial ##5. Your DND key winks on while your extension is locked. In addition, you hear pulsating
Intercom dial tone when you press ICM.
To unlock your extension:
1. Press ICM.You hear pulsating Intercom dial tone.
2. Dial ##5.
DS1000 Release Notes 11 � 02.10.09

DS1000 02.10.09 Release NotesNew Features in 02.10.09
At a 22- or 34- Button Display telephone, you see:
At a Super Display Telephone, you see:
3. Enter your PIN number + HOLD.
12 � 02.10.09 DS1000 Release Notes

DS1000 02.10.09 Release NotesNew Features in 02.10.09
Entering or Changing Your PIN Number
To enter your PIN number (if you don’t have one assigned to your extension):
1. Press ICM.
2. Dial ##6. At a 22- or 34-Button Display Telephone, you see:
At a Super Display Telephone, you see:
3. Enter your new PIN number + HOLD.At a 22- or 34-Button Display Telephone, you see:
At a Super Display Telephone, you see:
4. To confirm your entry, reenter the PIN number you just entered in step 4 above + HOLD.At a 22- or 34-Button Display Telephone, you see:
DS1000 Release Notes 13 � 02.10.09

DS1000 02.10.09 Release NotesNew Features in 02.10.09
At a Super Display Telephone, you see:
5. Press PREV.
To change your PIN number (if you already have one assigned):
1. Press ICM.
2. Dial ##6. At a 22- or 34-Button Display Telephone, you see:
At a Super Display Telephone, you see:
3. Enter your current PIN number + HOLD.At a 22- or 34-Button Display Telephone, you see:
At a Super Display Telephone, you see:
14 � 02.10.09 DS1000 Release Notes

DS1000 02.10.09 Release NotesNew Features in 02.10.09
4. Enter your new PIN number + HOLD.At a 22- or 34-Button Display Telephone, you see:
At a Super Display Telephone, you see:
5. To confirm your entry, reenter the PIN number you just entered in step 4 above + HOLD.At a 22- or 34-Button Display Telephone, you see:
At a Super Display Telephone, you see:
6. Press PREV.
DS1000 Release Notes 15 � 02.10.09

DS1000 02.10.09 Release NotesNew Features in 02.10.09
To unlock an extension (and clear their PIN number) from the attendant’s phone:
1. Press ICM.You must have a PIN number entered for your phone to be able to use this feature.
2. Dial ##3.At a 22- or 34-Button Display Telephone, you see:
At a Super Display Telephone, you see:
3. Enter your current PIN number + HOLD.At a 22- or 34-Button Display Telephone, you see:
At a Super Display Telephone, you see:
4. Enter the number of the extension you want to unlock + HOLD.At a 22- or 34-Button Display Telephone, you see:
At a Super Display Telephone, you see:
16 � 02.10.09 DS1000 Release Notes

DS1000 02.10.09 Release NotesNew Features in 02.10.09
5. Press YES to unlock the extension entered in step 4 above.OR
Press NO to go back to step 3 without unlocking.
6. When you have unlocked all extensions desired, press CONF to exit.
Walking Class of Service
Feature AvailableWalking Class of Service allows an extension user to temporarily implement their Toll Restriction and Class of Service settings at a co-worker’s phone. This is normally used to override dialing restrictions at a telephone. For example, an executive with an unrestricted phone can walk to any phone in the building, implement Walking Class of Service, and dial without restriction. After the phone goes idle, Walking Class of Service remains in effect for 10 seconds. This permits the user to make multiple calls before the phone returns to its normal restrictions.
When an extension user implements Walking Class of Service and places a trunk call, the system assigns the SMDR record to the users’s extension. The system does not assign the record to the extension at which the call was placed. For example, if the extension 301 user walks to extension 306, implements Walking Class of Service and dials a trunk call, the SMDR record is assigned to extension 301. It is not assigned to extension 306.
Note: Walking Class of Service overrides Extension Locking. For example:
� Extension 301 is permitted by their Class of Service and Toll Restriction to use Paging and place long distance calls.
� Extension 306 locks their extension. While locked, Class of Service 15 prevents Paging and Toll Level 7 prevents long distance calls. These features are no longer available at extension 306.
The COS 15 options must be separately programmed.
� The extension 301 user goes to extension 306 and implements Walking Class of Service.
� The extension 301 user can then use 306 to make long distance calls and Page (even though 306 was locked to prevent those features).
Programming
0101-Day Walking Class of Service
Enter Y to enable or N to disable Walking Class of Service while the system is in the day mode. This option affects the extension implementing this feature, not the extension at which the feature is being used. For example, if the extension 301 user goes to extension 305 and tries to use Walking Class of Service during the day, this option must be enabled for extension 301. This option is dis-abled by default.
0101-Night Walking Class of Service
Enter Y to enable or N to disable Walking Class of Service while the system is in the night mode. This option affects the extension implementing this feature, not the extension at which the feature is being used. For example, if the extension 301 user goes to extension 305 and tries to use Walking Class of Service at night, this option must be enabled for extension 301. This option is disabled by default.
1801-Exension Class of Service Assignment
Assign Class of Service to extensions.
1807-PIN Code
Use this option to assign a PIN code to an extension. PIN codes are 4 digits long, using 0-9, # and
DS1000 Release Notes 17 � 02.10.09

DS1000 02.10.09 Release NotesNew Features in 02.10.09
*. The PIN code is used for both Extension Locking and Walking Class of Service. By default, there are no PIN codes entered. In addition:� An extension user can dial ICM + ##6 to enter or change their PIN number.� The operator can dial ICM + ##3 to erase a co-worker’s PIN number and unlock their extension.
To enter 1807-PIN Code data:� When you see PIN CODE?, press HOLD to enter the data entry mode.� While in the data entry mode:
- Vol Up scrolls right.- Vol Down scrolls left.- LND backspaces over (erases) the last entered digit.- CLEAR + HOLD erases the current entry.- CHECK restores the previous entry.- HOLD registers the entry and advances to the next prompt.- CONF exists the program.
Operation
To enable Walking Class of Service at an extension:
When using the procedures that follow to enter a PIN number or extension number:
� CLEAR erases your entire entry.
� LND backspaces over (erases) the last digit entered.
1. Press ICM.
2. Dial ##0. At a 22- or 34-Button Display Telephone, you see:
At a Super Display Telephone, you see:
If your extension does not have a PIN code already entered, skip to step 4.
3. Enter your own extension number + HOLD.At a 22- or 34-Button Display Telephone, you see:
18 � 02.10.09 DS1000 Release Notes

DS1000 02.10.09 Release NotesNew Features in 02.10.09
At a Super Display Telephone, you see:
4. Enter your PIN number + HOLD.If your extension does not have Walking Class of Service capability, you will hear
error tone.
5. Place any call or use any feature allowed by your Toll Restriction and Class of Service settings.You can place additional calls. Walking Class of Service will automatically deactivate
after 10 seconds.
DS1000 Release Notes 19 � 02.10.09

DS1000 02.10.09 Release NotesEnhanced Features in 02.10.09
Enhanced Features in 02.10.09
Enhanced Features in 02.10.09
Call Forwarding
Call Forwarding KeyA keyset user can have a key on their telephone or DSS Console assigned as a Call Forwarding key.
� While the extension is idle, pressing the key puts the extension in the Call Forwarding pro-graming mode - the same as pressing ICM and dialing *3.
If the extension has Call Forwarding enabled, and the user presses the key and waits (for at least 6 seconds), Call Forwarding is automatically cancelled.
If the extension has Call Forwarding disabled, and the user presses the key and waits (for at least 6 seconds), the prior Call Forwarding mode is automatically enabled (if any).
� While the extension is busy, pressing the key switches Call Forwarding on and off.
Note: The new display CFWD Not Allowed indicates that an Call Forwarding is denied because it would set up an illegal Call Forwarding loop. For example, if extension 305 if forwarded to 301, and 301 attempts to forward to 305, the user at 305 would see the display CFWD Not Allowed.
Programming
1701-Programmable Function Key Assignments
For keysets, assign a programmable key as a Call Forwarding key (code 27).
1704-DSS Console Key Assignment
For DSS Consoles, assign a key as a Call Forwarding key (code 27).
Confirmation Tone AddedKeyset users will hear a single confirmation beep after enabling or cancelling Call Forwarding. Sin-gle line telephone users will hear Intercom dial tone after enabling or cancelling Call Forwarding. In prior software versions, extension users would have no audible indication that they successfully completed the Call Forwarding steps.
Soft Key And Type EnhancementsWhen setting up Call Forwarding, display keyset users can dial codes from the dial pad or use their soft keys.
You can set up Call Forwarding to reroute all calls or just trunk calls. If an extension with forwarding set for trunk calls only receives a screened Transfer, the initial voice-announcement broadcasts at the extension. When the caller hangs up to complete the transfer, the trunk call forwards as programmed.
Call Forwarding Key BLF
This flash rate: Means:
Off Call Forwarding is disabled.
Fast flash The extension is in the Call For-warding programming mode.
Wink off Call Forwarding is enabled at the extension
20 � 02.10.09 DS1000 Release Notes

DS1000 02.10.09 Release NotesEnhanced Features in 02.10.09
22-Button and 34-Button Display Telephone Operation
To activate Call Forwarding:
1. Press ICM and dial *3.ORPress PGM + CFWD.
2. Dial 4 or press IMM for Call Forwarding Immediate. You see:
ORDial 6 or press RNA for Call Forwarding No Answer. You see:
ORDial 2 or press BNA for Call Forwarding Busy/No Answer. You see:
ORDial 3 or press MORE + OFFP for Off Premise Call Forwarding. (See Call Forwarding Off Premise in the New Features section for more.) You see:
ORDial 7 or press MORE + AME for Personal Answering Machine Emulation. (See Voice Mail in this section for more.) You see:
ORDial 8 or press MORE + MSG to select a Selectable Display Message. (See Selectable Dis-play Messaging in this section for more.)
3. Dial destination extension (or 0 for your operator).OR
Dial the Voice Mail master number.OR
DS1000 Release Notes 21 � 02.10.09

DS1000 02.10.09 Release NotesEnhanced Features in 02.10.09
Press MW.
4. Select the Call Forwarding type:- Dial 2 or press ALL to forward all calls.- Dial 8 or press TRNK to forward just trunk calls.
It is no longer necessary to press SPK to hang up.
To cancel Call Forwarding
1. Press ICM and dial *3.ORPress CLEAR + PGM + CFWD. You see:
2. Dial 0, press CLEAR, or press NONE to cancel forwarding.It is no longer necessary to press SPK to hang up.
3. Call Forwarding is cancelled.
Super Display Telephone Operation
To activate Call Forwarding:
1. Press ICM and dial *3.ORPress PROGRAM + CALL FWRD.
2. Dial 4 or press IMMEDIATE for Call Forwarding Immediate. You see:
OR
22 � 02.10.09 DS1000 Release Notes
DS1000 02.10.09 Release NotesEnhanced Features in 02.10.09
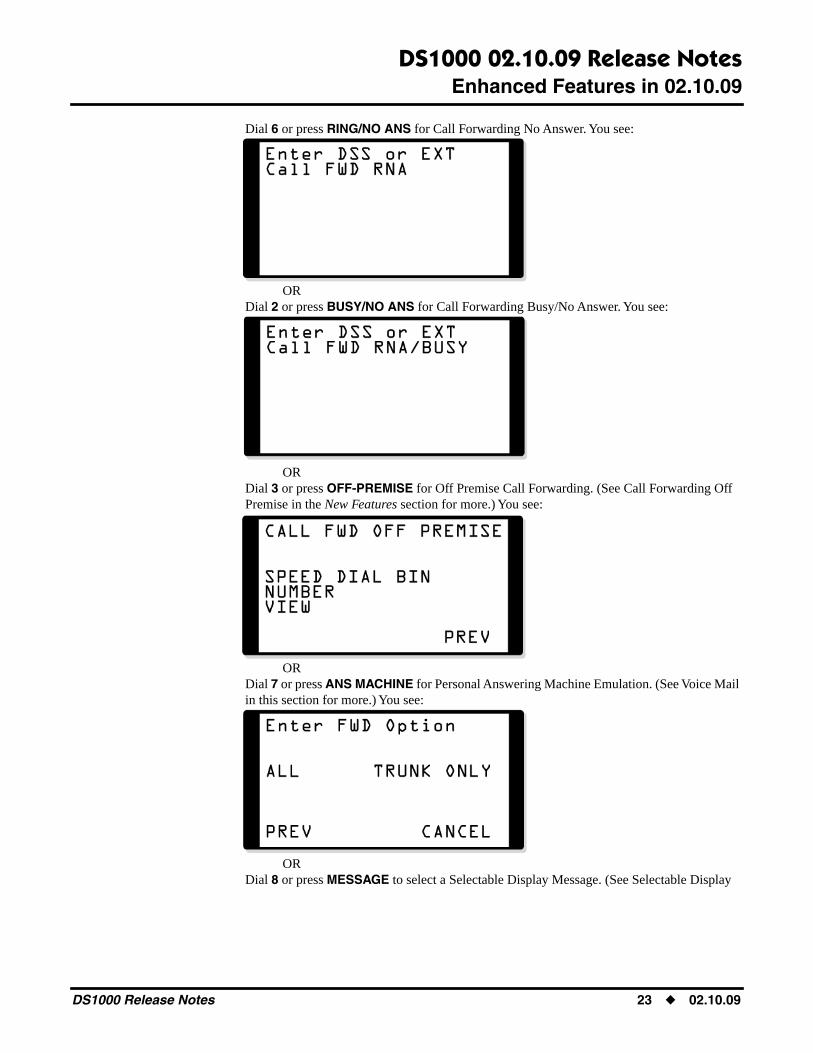
Dial 6 or press RING/NO ANS for Call Forwarding No Answer. You see:
ORDial 2 or press BUSY/NO ANS for Call Forwarding Busy/No Answer. You see:
ORDial 3 or press OFF-PREMISE for Off Premise Call Forwarding. (See Call Forwarding Off Premise in the New Features section for more.) You see:
ORDial 7 or press ANS MACHINE for Personal Answering Machine Emulation. (See Voice Mail in this section for more.) You see:
ORDial 8 or press MESSAGE to select a Selectable Display Message. (See Selectable Display
DS1000 Release Notes 23 � 02.10.09

DS1000 02.10.09 Release NotesEnhanced Features in 02.10.09
Messaging in this section for more.)
3. Dial destination extension (or 0 for your operator).OR
Dial the Voice Mail master number.OR
Press MW.
4. Select the Call Forwarding type:- Dial 2 or press ALL to forward all calls.- Dial 8 or press TRUNK ONLY to forward just trunk calls.
It is no longer necessary to press SPK to hang up.
To cancel Call Forwarding
1. Press ICM and dial *3.ORPress PROGRAM + CALL FWRD. You see:
2. Dial 0.ORPress NONE.ORPress CLEAR.
It is no longer necessary to press SPK to hang up.
3. Call Forwarding is cancelled.
24 � 02.10.09 DS1000 Release Notes

DS1000 02.10.09 Release NotesEnhanced Features in 02.10.09
Call Timer
Enhanced Call TimerIn addition to the capabilities of the Call Timer feature, Enhanced Call Timer provides:
� Review of Previously Timed CallAny time after hanging up from a timed call, a display keyset user can press their Manual or Automatic Call Timer key to review the duration of that call.
� Timer Reset for Current CallWhile the display keyset user is timing their call, they can press CLEAR at any time to reset the Call Timer to 00:00:00.
� Automatic Timer StopThe system assigns the Call Timer to the active call. When the user terminates the active call, the Call Timer automatically shuts down.
� Wrap-up Timer DisplayAfter hanging up a timed call, a display keyset will show the Call Timer data for 6 seconds before returning the display to idle. This gives the extension user adequate time to make a record of the timed call, if desired.
Manual Call TimerAny time while placing a call or while on a call, a display keyset user can press their Manual Call Timer key to start the Call Timer. The Call Timer will continue until the user hangs up or presses their Manual Call Timer key again.
Unlike previous software versions, the Manual Call Timer key no longer works like a stopwatch while the phone is idle.
Automatic Call TimerIn addition to the features of the Manual Call Timer key, the Automatic Call Timer key provides automatic timing for trunk calls. When a display keyset with an Automatic Call Timer key places or answers a trunk call, the Call Timer automatically starts when that trunk call connects.
The Automatic Call Timer does not automatically start for Intercom calls.
Operation
To time your trunk call if you have an Automatic Call Timer key:
� Place or answer trunk call.The Call Timer starts automatically. The Automatic Call Timer key lights red while the
system times the call.
To manually time your Intercom or trunk call:
� While placing or while on the call, press the Manual or Automatic Call Timer key.the Call Timer key lights red while the system times the call.
To stop the Call Timer:
� Hang up.The timer automatically stops after 6 seconds.OR
� Press the Manual or Automatic Call Timer key.To restart the timer, press CLEAR.
DS1000 Release Notes 25 � 02.10.09

DS1000 02.10.09 Release NotesEnhanced Features in 02.10.09
To reset the Call Timer to 00:00:00 while it is running (i.e., timing your call):
� Press CLEAR.
To review the duration of your last timed call:
� While idle, press the Manual or Automatic Call Timer key.Press CLEAR or wait 6 seconds to return to idle Time/Date display.
Caller ID
Ring Detection Timer Default ChangesSoftware version 02.10.09 changes several Caller ID timers as follows:
� 0402-Minimum Single Ring Detection Timer is changed from 1004 mS to 1216 mS. It was 504 mS prior to version 02.02.17.
� 0402-Maximum Double Ring Detection Off Timer is changed from 504mS to 576 mS. It was 304 mS prior to version 02.02.17.
Direct Station Selection (DSS) Console
Account Code KeyA keyset user can have an Account Code key on their DSS Console. It works the same as a keyset Account Code key with the following exceptions:
� The DSS Console key flashes quickly red while the user is entering their Account Code. (The keyset Account Code key flashes quickly green.)
� The DSS Console key lights red while the user is on a call for which they have entered an Account Code. (The keyset Account Code key lights green.)
Programming
1704-DSS Console Key Assignment
For DSS Consoles, assign a key as a Account Code key (code 26).
Directory Dialing
Directory Dialing Can Call Ring Group and UCD Group Master NumbersIntercom Directory Dialing can call Ring Group and UCD Hunting Group master numbers, pro-vided group names are entered in 0510-Name and 0511-Name. In prior software versions, the mas-ter number names would display but could not be selected.
Do Not Disturb
Do No Disturb Override IntroducedDo Not Disturb Override allows an extension user to override another extension’s Do Not Disturb. This allows a priority employee (such as a supervisor or executive) to get through to a co-worker right away while the co-worker’s phone is in Do Not Disturb. DND Override is available to all
26 � 02.10.09 DS1000 Release Notes

DS1000 02.10.09 Release NotesEnhanced Features in 02.10.09
extensions that have DND Override set in their Class of Service. It is also available to any extension that has a Hotline key for a co-worker, even without the Class of Service option enabled. In soft-ware versions prior to 02.10.09, DND Override was only available to Hotline partners.
Programming
0101-DND Override
If enabled (Y), an extension user can dial 1 or press their DND Override soft key to override an extension’s Do Not Disturb. If disabled (N), an extension cannot dial 1 to override an extension’s DND and the DND Override soft key is unavailable. This option is disabled (N) by default.
This option does not apply when an extension user presses their Hotline key, since Hotline keys always provide the DND Override option.
1801-Extension Class of Service Assignment
Assign Class of Service to extensions.
Operation
To use Do Not Disturb Override:
1. Dial your co-worker.
2. When you hear DND tone and see “DO NOT DISTURB” in your telephone’s display:- Press OVRD (DND OVERRIDE at Super Display).
OR- Dial 1.
3. The system automatically places a ringing Intercom call to your co-worker.If you hear busy or ring/busy tone after step 2, your co-worker is busy on a call.
DS1000 Release Notes 27 � 02.10.09

DS1000 02.10.09 Release NotesEnhanced Features in 02.10.09
Do Not Disturb Types IntroducedDo Not Disturb is enhanced to provide the following 4 DND options:
(1) Incoming trunk calls blocked(2) Incoming Intercom calls blocked(3) All incoming calls blocked(0) Cancel Do Not Disturb
Note that Call Forwarding has priority over Do Not Disturb. If both are enabled simultaneously at an extension, Call Forwarding is in force.
Do Not Disturb BLF for Hotline and Call Coverage KeysThe following chart shows the Do Not Disturb Busy Lamp Field flash rates for Hotline and Call Coverage keys.
Do Not Disturb Options
This DND option: Blocks these calls:
(1) Incoming Trunk Calls Blocked Ringing for outside calls, including:• Key Ring calls• Off Hook Ringing• Call Coverage Keys• Group Call Pickup keys• Transferred trunk calls• Hold, Park, and Transfer recalls• Extension Hunting calls• DILs to the extension (if the extension is the
night mode termination)• DILs to a Ring Group master number (if the
extension is in the group)
(2) Incoming Intercom Calls Blocked • Incoming Intercom calls• Transferred calls• Paging announcements• Ringing from Intercom calls to the Ring Group
master number (if the extension is in the group)• Extension hunting calls that normally ring the
extension
(3) All Incoming Calls Blocked • All calls blocked by Option 1 and Option 2.
(0) Cancel Do Not Disturb • Options 0 cancels Do Not Disturb
Hotline and Call Coverage Key Busy Lamp Indications
When the key is: The covered extension is:
Off Idle or not installed
On Busy
Flashing slowly1 Ringing
Wink off In DND for trunk calls (option 1)
Flashing fast In DND for Intercom calls (option 2) or All Calls (option 3)
1 Available on Call Coverage key only.
28 � 02.10.09 DS1000 Release Notes

DS1000 02.10.09 Release NotesEnhanced Features in 02.10.09
Note: When transferring a trunk call to an extension in DND, the Transfer will be blocked if the extension has enabled DND for all calls (type 3) or DND for trunk calls (type 1). The Transfer will be allowed if the extension has enabled DND for Intercom calls (type 2).
Operation
To enable or disable DND at 22-Button and 34-Button Telephones:
1. Do not lift the handset or press the SPK key.
2. Press your DND key. You see:
The first line of the display shows the currently selected DND type.
3. Select the soft key for the DND type you want to select.OR
Dial a digit (0-3) for the DND type you want to select.1 (or EXT) = Incoming trunk calls blocked2 (or ICM) = Incoming Intercom calls blocked3 ( or ALL) = All calls blocked0 (or OFF) = Cancels DND.
If you are on a call (or anytime your phone is not idle), pressing DND automatically enables DND for all calls (type 3). If DND is enabled, pressing DND automatically dis-ables DND.
When DND types 2 or 3 are enabled, Intercom callers hear DND tone and see “DO NOT DISTURB” in their telephone’s display.
If you don’t make an entry for 10 seconds:- If DND is disabled, the system automatically enables DND All Calls.- If DND is disabled, the system automatically cancels DND.
To enable or disable DND at Super Display Telephones:
1. Do not lift the handset or press the SPK key.
2. Press your DND key. You see:
The first line of the display shows the currently selected DND type.
3. Select the soft key for the DND type you want to select.OR
Dial a digit (0-3) for the DND type you want to select.1 (or EXTERNAL) = Incoming trunk calls blocked2 (or INTERCOM) = Incoming Intercom calls blocked3 ( or ALL) = All calls blocked0 (or OFF) = Cancels DND.
If you are on a call (or anytime your phone is not idle), pressing DND automatically
DS1000 Release Notes 29 � 02.10.09

DS1000 02.10.09 Release NotesEnhanced Features in 02.10.09
enables DND for all calls (type 3). If DND is enabled, pressing DND automatically dis-ables DND.
When DND types 2 or 3 are enabled, Intercom callers hear DND tone and see “DO NOT DISTURB” in their telephone’s display.
If you don’t make an entry for 10 seconds:- If DND is disabled, the system automatically enables DND All Calls.- If DND is disabled, the system automatically cancels DND.
To check your extension’s DND type:
� Look at the second line of your display. When you enable Do Not Disturb, the display will show one of the following:DND ALLDND EXTERNALDND INTERCOM
Flash
Disable Flash In A Single Line Extension’s Class Of ServiceThe Class of Service option 0101-Flash for Single Line Sets allows you to enable or disable hook-flash for analog single line extensions and 2-OPX Modules. If enabled (Y), a single line extension can hookflash normally and use any of the associated system features. If disabled (N), hookflash is prevented. This means the analog extension can not use any features that require a hookflash (such as Hold, Conference, or Transfer). This may be helpful for lobby phones and single line Ringdown Extensions that should not have access to system features.
When 0101-Flash for Single Line Sets is enabled (Y):
� A single line extension user cannot seize a trunk and hookflash without dialing. If they do, the system will disconnect the initial trunk call.
� If a single line extension user hookflashes to place their current trunk call on Hold and then hangs up, the trunk call will immediately recall the extension.
The option is ignored for Voice Mail ports (i.e., you cannot disable Flash in 0101-Flash for Single Line Sets for ports marked as Voice Mail ports in 1802-Voice Mail Port).
Headset Compatibility
Enhanced Headset OperationSoftware version 02.10.09 enhances headset operation as follows. (Note that while an extension is in the Headset mode, the system ignores all hookswitch depressions.)� Background Music
If programmed and connected, Background Music will broadcast over the telephone speaker while the extension is in the Headset mode.
� Central Office Calls, AnsweringAn extension user in the Headset mode can press Vol Up and Vol Down while idle to control the volume of any call ringing their phone.
30 � 02.10.09 DS1000 Release Notes

DS1000 02.10.09 Release NotesEnhanced Features in 02.10.09
� Handsfree and Handsfree AnswerbackAn extension in the Headset mode can receive normal voice-announced Intercom calls (depending on the setting of 1807-Headset Voice-Announced Intercom calls). The exten-sion user can respond to the voice-announced call by speaking toward the phone (just like non-headset extensions). To answer the voice-announced call in the headset, the user just presses SPK after hearing the voice-announcement.
� Microphone MuteWhile on a headset call, the extension user can press MIC to mute (i.e., turn off) the headset microphone. While responding to an Intercom call using Handsfree Answerback, pressing MIC mutes the Handsfree microphone.
� Off-Hook SignalingTrunk CallsDepending on the setting of 1802-Off-Hook Signaling for CO Calls, an extension in the headset mode can receive either Camp On beeps or Off-Hook Ringing for incoming trunk calls (just like non-headset extensions).
Intercom CallsDepending on the setting of 1802-Off-Hook Signaling for Intercom Calls, an extension in the headset mode can receive either Camp On beeps or Voice Over announcements from a co-worker (just like non-headset extensions).
Hotline CallsDepending on the setting of 1802-Off-Hook Signaling for Hotline Partner, an extension in the headset mode can receive either Camp On beeps or Voice Over announcements from their Hotline partner.
� PagingInternal Paging announcements broadcast over the telephone speaker while the extension is in the Headset mode.
� TransferScreened and unscreened transfers work just like non-headset extensions. For example, if a headset extension user presses SPK to answer a screened transfer, the call will connect to their headset when the transferring party hangs up.
Handsfree Transfers always connect to the headset extension’s headset, not speakerphone.
� Volume ControlWhile on a headset call, the extension user can press VOL Up or VOL Down to adjust the receive volume in the headset.
Headset KeyA keyset user can have a key on their telephone or DSS Console assigned as a Headset key. The user presses the key to enable or disable the headset mode, as an alternative to using the #HL User Programmable Feature. The key lights while the extension is in the Headset mode, and is off while the Headset mode is disabled.
If an extension user is on a call, pressing the Headset key automatically switches the active call to the headset. Pressing the Headset key again switches the call back to Handsfree.
Programming
1701-Programmable Function Key Assignments
For keysets, assign a programmable key as a Headset key (code 28).
1704-DSS Console Key Assignment
For DSS Consoles, assign a key as a Headset key (code 28).
DS1000 Release Notes 31 � 02.10.09

DS1000 02.10.09 Release NotesEnhanced Features in 02.10.09
Hotline
User Programmable Hotline Assignments For DSS ConsoleA keyset user with a DSS Console can use the #HL user-programmable procedure to change the Hotline assignments on their console. Prior to software version 02.10.09, the keyset user could only use #HL to change the assignments on their telephone.
Interactive Soft Keys
Display Enhancements
Program Menu RearrangedThe soft key program menu has been rearranged to make room for the Handfree Reply option.
Program Menu Prior to Version 02.10.09
Program Menu in Version 02.10.09
For more on the Handsfree Reply feature, see Microphone Mute under Enhanced Features.
32 � 02.10.09 DS1000 Release Notes
DS1000 02.10.09 Release NotesEnhanced Features in 02.10.09
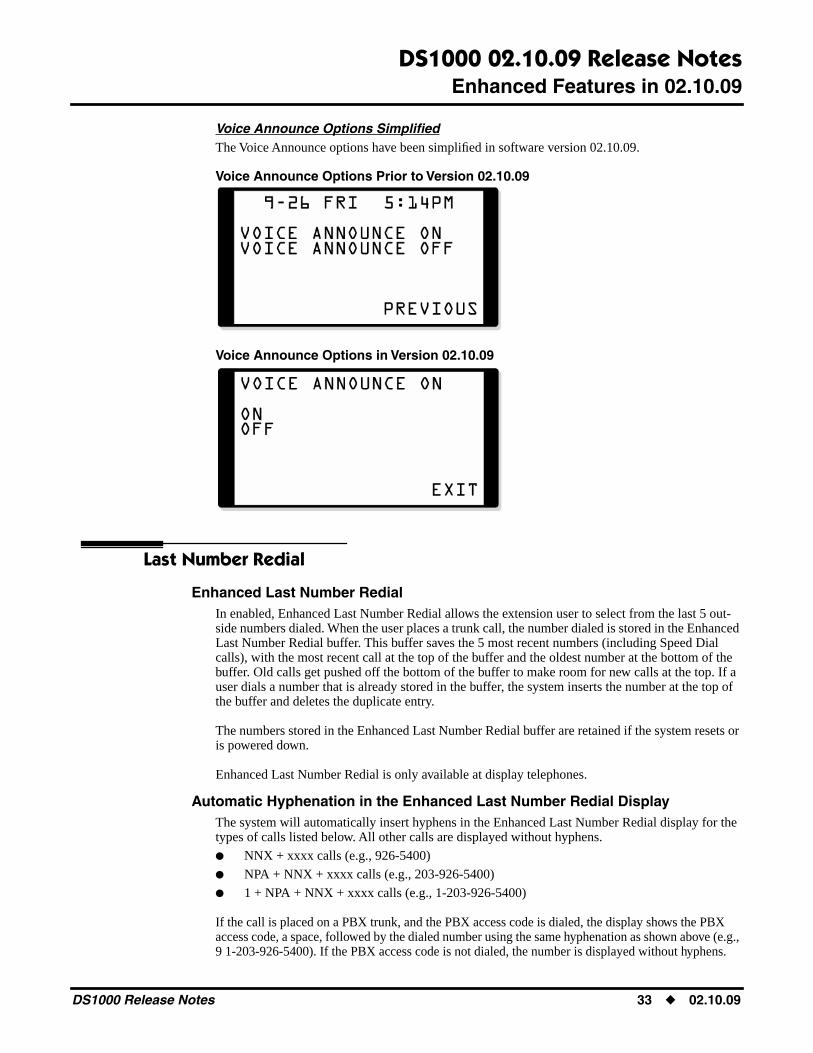
Voice Announce Options SimplifiedThe Voice Announce options have been simplified in software version 02.10.09.
Voice Announce Options Prior to Version 02.10.09
Voice Announce Options in Version 02.10.09
Last Number Redial
Enhanced Last Number RedialIn enabled, Enhanced Last Number Redial allows the extension user to select from the last 5 out-side numbers dialed. When the user places a trunk call, the number dialed is stored in the Enhanced Last Number Redial buffer. This buffer saves the 5 most recent numbers (including Speed Dial calls), with the most recent call at the top of the buffer and the oldest number at the bottom of the buffer. Old calls get pushed off the bottom of the buffer to make room for new calls at the top. If a user dials a number that is already stored in the buffer, the system inserts the number at the top of the buffer and deletes the duplicate entry.
The numbers stored in the Enhanced Last Number Redial buffer are retained if the system resets or is powered down.
Enhanced Last Number Redial is only available at display telephones.
Automatic Hyphenation in the Enhanced Last Number Redial DisplayThe system will automatically insert hyphens in the Enhanced Last Number Redial display for the types of calls listed below. All other calls are displayed without hyphens.
� NNX + xxxx calls (e.g., 926-5400)
� NPA + NNX + xxxx calls (e.g., 203-926-5400)
� 1 + NPA + NNX + xxxx calls (e.g., 1-203-926-5400)
If the call is placed on a PBX trunk, and the PBX access code is dialed, the display shows the PBX access code, a space, followed by the dialed number using the same hyphenation as shown above (e.g., 9 1-203-926-5400). If the PBX access code is not dialed, the number is displayed without hyphens.
DS1000 Release Notes 33 � 02.10.09

DS1000 02.10.09 Release NotesEnhanced Features in 02.10.09
Programming
0101-Enhanced LND
Use this option to enable (Y) or disable (N) Enhanced Last Number Redial. If enabled, the extension has Enhanced Last Number Redial with the 5 number redial buffer and the enhanced operation. If dis-abled, the extension has traditional Last Number Redial with a single number redial buffer and the standard operation. The default for this option is Y (Enhanced Last Number Redial enabled).
1801-Extension Class of Service Assignment
Use this option to assign Class Of Service to extensions.
Operation
22-Button and 34-Button Display Telephone Operation
To redial your last call (when Enhanced Last Number Redial is enabled):
If you select a line key before going to step 1, the system automatically outdials your most recent call when you press LND.
1. Press LND. You see (for example):
The number to the right of the display shows the Last Number Redial record number (1-5). To return your phone to idle, press LND again.
2. (Optional) Press Vol Up or Vol Down to display the number you want to recall.
3. Press SPK, DIAL or lift the handset to recall the displayed number.The system tries to use the same trunk as that used for your initial call.
- If that trunk is busy, the system selects a trunk from the same group as your initial call. - If all trunks are busy, you can dial 2 to leave a Trunk Queue or Trunk Camp On. The number will automatically redial when the Trunk Queue or Trunk Camp On goes through.
To erase (clear) all the numbers from your Enhanced Last Number Redial buffer:
1. Press LND. You see (for example):
2. Press CLEAR. You see:
3. Press the YES soft key to erase all the numbers in the Last Number Redial buffer and return to idle.
ORPress the NO soft key to return to step 1 without erasing the buffer.
34 � 02.10.09 DS1000 Release Notes

DS1000 02.10.09 Release NotesEnhanced Features in 02.10.09
Super Display Telephone Operation
To redial your last call (when Enhanced Last Number Redial is enabled):
If you select a line key before going to step 1, the system automatically outdials your most recent call when you press LND.
1. Press LND. You see (for example):
To return your phone to idle, press LND again.
2. Press the key that corresponds to the number you want to recall.The system tries to use the same trunk as that used for your initial call.
- If that trunk is busy, the system selects a trunk from the same group as your initial call. - If all trunks are busy, you can dial 2 to leave a Trunk Queue or Trunk Camp On. The number will automatically redial when the Trunk Queue or Trunk Camp On goes through.
3. The stored number dials out.
To erase (clear) all the numbers from your Enhanced Last Number Redial buffer:
1. Press LND. You see (for example):
2. Press CLEAR. You see:
3. Press the YES soft key to erase all the numbers in your Last Number Redial buffer and return to idle.
ORPress the NO soft key to return to step 1 without erasing the buffer.
DS1000 Release Notes 35 � 02.10.09

DS1000 02.10.09 Release NotesEnhanced Features in 02.10.09
Modem Cut-Through
Limitations On PFT/MDM Port To Prevent Relay MisoperationTo ensure proper operation of the system’s PFT/MDM port, software version 02.10.09 disables hook-flash, Barge In and Privacy Release for the telephone connected to the PFT/MDM port. Also, the extension 316 user will hear reorder tone if they lift the handset while the telephone connected to the PFT/MDM port is already on a call.
Microphone Mute
Handsfree Reply Soft Key AvailableDisplay keyset users can press their HF REPLY (HFRP) soft key to turn off their telephone’s Handsfree microphone for incoming Intercom calls. In prior software versions, this capability was only available using the system programming options 0201-Handsfree Reply on Intercom Calls and 1802-Handsfree Reply on Intercom Calls.
22-Button and 34-Button Display Telephone Operation
To turn off your telephone’s microphone for Incoming Intercom calls:
1. Press PGM + MORE. You see:
2. Press HFRP. You see:
The first line of the display indicates whether Handsfree Reply is on or off.
3. To turn Handsfree Reply on (if it is off), press ON.OR
To turn Handsfree Reply off (if it is on), press OFF.
When you answer a voice-announced Intercom call (if Handsfree Reply is off):
You hear a single beep in your speaker and the voice of the calling party. The ICM, MIC, and SPK keys are on.
� To answer the voice-announcement, lift the handset.ORPress MIC to turn Handsfree Reply back on (for this call only).
Super Display Telephone Operation
36 � 02.10.09 DS1000 Release Notes

DS1000 02.10.09 Release NotesEnhanced Features in 02.10.09
1. Press PROGRAM. You see:
2. Press HF REPLY. You see:
The first line of the display indicates whether Handsfree Reply is on or off.
3. To turn Handsfree Reply on (if it is off), press ON.OR
To turn Handsfree Reply off (if it is on), press OFF.
When you answer a voice-announced Intercom call (if Handsfree Reply is off):
You hear a single beep in your speaker and the voice of the calling party. The ICM, MIC, and SPK keys are on.
� To answer the voice-announcement, lift the handset.ORPress MIC to turn Handsfree Reply back on (for this call only).
MIC Key Controls Both Handset and Handsfree MicrophoneMicrophone Mute lets the keyset user turn off their phone’s handset or Handsfree microphone at any time. While the extension is on-hook, Microphone Mute mutes the Handsfree microphone. While off-hook, Microphone Mute mutes the handset microphone. In prior software versions, Microphone Mute could only turn off the keyset’s Handsfree microphone. (Note that lifting the handset while the feature is active automatically cancels Microphone Mute.)
Night Service / Night Ring
Using #KP To Set Up A System Mode System KeyThe following steps allow an extension user to implement the User Programmable Feature option #KP to set up a System Mode System key:
1. Dial #KP.
2. Press the key you want to program + HOLD.
3. Dial 18 + HOLD.
4. Press CLEAR + HOLD, then CONF + SPK to exit.
DS1000 Release Notes 37 � 02.10.09

DS1000 02.10.09 Release NotesEnhanced Features in 02.10.09
In prior software versions, pressing CLEAR in step 4 would exit the procedure without properly setting up the key.
Off-Hook Signaling
Off-Hook Signaling EnhancementsThe following Off-Hook Signaling programming for Intercom calls is available in software version 02.10.09. In prior software versions, you could enter additional non-functional options.
1802-Off-Hook Signaling For Intercom Calls
Set the extension’s Off-Hook Signaling options for incoming Intercom calls. The only options available are:
0 = No Off-Hook Signaling1 = Call Wait beeps (Default setting)3 = Voice Over
1802-Off-Hook Signaling for Hotline Calls
Set an extension’s Off-Hook Signaling options for incoming Intercom calls from their Hotline part-ner that were placed using the Hotline key. The only options available are:
0 = No Off-Hook Signaling1 = Call Wait beeps (Default setting)3 = Voice Over
The same enhancements were made to the #OHS User Programmable Feature as well. After an option is selected, the second line of the display shows the selection chosen. This display is cleared by pressing SPK to exit the user programming mode.
In addition, in software version 02.10.09 the default value for 1802-Off Hook Signaling For Hotline Partners is 0 (no signaling). In prior software versions, the default value was 2 (Off-Hook Ringing). Entry 2 is not valid for this option (i.e., Off-Hook Ringing for Hotline partners does not exist).
Off-Premise Extensions / On-Premise SLT Extensions
COS Option Single Ring For Single Line Sets ActivatedThe option 0101 - Single Ring for Single Line Sets determines the type of ringing at analog single line extensions. If enabled (Y), analog single line extensions always receive single ringing for trunk calls. (Certain analog single line devices connected to the system may require this type of ringing.) If disabled (N), trunk ringing at analog single line extensions follows the ringing pattern of the trunk. For example, if a trunk is ringing the system with two ring bursts, the single line extensions will fol-low the same ringing pattern.
In software versions prior to 02.10.09, this option could be set but was not functional.
Paging
Page Key Clears Intercom CallIf a keyset user on an Intercom call presses their Page key, the system disconnects the Intercom call and activates the Page. In prior software versions, this sequence would place the Intercom call on Hold. This could inadvertantly make the make the party on Intercom Hold unavailable.
38 � 02.10.09 DS1000 Release Notes

DS1000 02.10.09 Release NotesEnhanced Features in 02.10.09
Trunk Ring Over PageTrunk ringing can optionally broadcast over External Paging speakers. For each trunk, the Paging speakers can broadcast ringing for all calls ringing the trunk, for calls ringing only at night, or for delay ring calls. While a trunk rings External Paging, any extension user can dial a code (ICM + *0) to pick up the call. If Door Box chimes, ringing, and Background Music are all programmed to out-put over External Paging, the system uses the following broadcast priority:
� Paging
� Door Box chimes
� Ringing
� Background Music
Note that External Paging can broadcast either extension ringing or trunk ringing, not both. In addition, External Paging requires additional customer-provided equipment. Refer to the Hardware Manual that came with your system for more.
Programming
0202-Page Ring Source
Use this option to assign trunk ringing as the ring source for the External Page zone. By default, this option is unassigned (none).
To enter data:1. Enter the programming mode.
2. Dial 0202 + HOLD.
3. Press Vol Up until you see: PG RING SRC [NONE].To see the available entries for this option, press HOLD before going to the next step.
The entries are E (extension), T (trunk), and N (none).To clear this entry (i.e., reset to NONE), press CLEAR.
4. Dial T (8) + HOLD.
5. Press CONF to exit program 0202.
When entering data, pressing:
� Vol Up advances to next prompt.
� Vol Down backs up to the previous prompt.
� CHECK restores the previous entry.
� HOLD registers the entry and advances to the next prompt.
� CONF exists the program.
0203-UNA Ringing Over External Page
If 0202-Page Ring Source is set to trunk, use 0203-UNA Ringing Over External Page to select the type of trunk ringing that will broadcast over the External Paging speakers. By default, ringing is disabled for all trunks. For each trunk, the ring options are:0 = Never1 = Always2 = Night only3 = Delay ring only (i.e., rings after the 0401-Trunk Delay Ring interval)
To enter data:1. Enter the programming mode.
2. Dial 0203 + HOLD.
DS1000 Release Notes 39 � 02.10.09

DS1000 02.10.09 Release NotesEnhanced Features in 02.10.09
3. Dial the trunk you want to program + HOLD.OR
Press Vol Up or Vol Dn to select the trunk you want to program + HOLD.OR
Press HOLD to select trunk 1.The previously programmed option for the selected trunk displays.
4. Select the type of ringing that will broadcast over the External Page (0=None, 1=Always, 2=Night only, 3=Delay only) + HOLD.
5. Go back to step 3 and select another trunk to program.OR
Press CONF to exit program 0203.
When entering data, pressing:
� Vol Up advances to next trunk.
� Vol Down backs up to the previous trunk.
� CHECK restores the previous entry.
� HOLD registers the entry and advances to the next prompt.
� CONF exists the program.
0401-Trunk Delay Ring
Use this option to set how long the system waits before ringing an extension that has the Delayed Ringing option enabled. This option also sets the delay interval for delay ring trunks ringing the external paging system. The default for this option is 10 (10 seconds).
Operation
To answer the call that is ringing over the Paging speakers:
1. Lift handset or press SPK.
2. Dial *0.
3. Converse with the caller.
Intercom Ring Over PageAn extension’s ringing can optionally broadcast over External Paging. If enabled, any type of call that rings the extension will broadcast over the Paging speakers. While an Intercom call rings External Paging, any extension user can dial a code (ICM + *0) to pick up the call. If Door Box chimes, ringing, and Background Music are all programmed to output over External Paging, the system uses the following broadcast priority:
� Paging
� Door Box chimes
� Ringing
� Background Music
Note that External Paging can broadcast either extension ringing or trunk ringing, not both. In addition, External Paging requires additional customer-provided equipment. Refer to the Hardware Manual that came with your system for more.
Programming
0202-Page Ring Source
Use this option to assign an extension as the ring source for the External Page zone. By default, this option is unassigned (none).
40 � 02.10.09 DS1000 Release Notes

DS1000 02.10.09 Release NotesEnhanced Features in 02.10.09
To enter data:1. Enter the programming mode.
2. Dial 0202 + HOLD.
3. Press Vol Up until you see: PG RING SRC [NONE].To see the available entries for this option, press HOLD before going to the next step.
The entries are E (extension), T (trunk), and N (none).To clear this entry (i.e., reset to NONE), press N or CLEAR.
4. Dial E (3) + Dial the number of the extension that should activate ringing over the External Page zone + HOLD.
5. Press CONF to exit program 0202.
When entering data, pressing:
� Vol Up advances to next prompt.
� Vol Down backs up to the previous prompt.
� CHECK restores the previous entry.
� HOLD registers the entry and advances to the next prompt.
� CONF exists the program.
Operation
To answer the call that is ringing over the Paging speakers:
1. Lift handset or press SPK.
2. Dial *0.
3. Converse with the caller.
Door Chime Over PageDoor Box chimes can optionally broadcast over External Paging. While Door Box chimes broad-cast over External Paging, any extension user can dial a code (ICM + *0) to answer the Door Box. After answering, a keyset user can press a soft key or FLASH to control the Door Box relay. If Door Box chimes, ringing, and Background Music are all programmed to output over External Pag-ing, the system uses the following broadcast priority:
� Paging
� Door Box chimes
� Ringing
� Background Music
Programming
0202-Door Chime Over Page
Use this option to enable Door Box chimes over External paging. By default, this option is dis-abled (N).
To enter data:1. Enter the programming mode.
2. Dial 0202 + HOLD.
3. Press Vol Up until you see: DOORCHIME OVR PG?.
4. Press Y (9) to enable Door Chimes over External Paging + HOLD.OR
DS1000 Release Notes 41 � 02.10.09

DS1000 02.10.09 Release NotesEnhanced Features in 02.10.09
Press N (6) to disable Door Chimes over External Paging + HOLD.
5. Press CONF to exit program 0202.
When entering data, pressing:
� Vol Up advances to next prompt.
� Vol Down backs up to the previous prompt.
� CHECK restores the previous entry.
� HOLD registers the entry and advances to the next prompt.
� CONF exists the program.
1801-Door Chime
If enabled in 0202-Door Chime Over Page, External Paging can broadcast Door Box chime types 1, 2, and 3. External Paging will not broadcast chime type 0.
Operation
To answer Door Box chimes you hear over External Paging speakers:
1. Lift handset or press SPK.
2. Dial *0.
3. Converse with the Door Box caller.Keyset users can press the FLASH key or the OPEN and RLS soft keys to control the
Door Box relay.
Background Music Over PageBackground Music (BGM) can optionally play over the External Paging speakers while Paging is idle. BGM will automatically turn off while Paging, ringing or Door Box chimes broadcast from the external zone, and restart when the external zone again becomes idle. If Door Box chimes, ring-ing, and Background Music are all programmed to output over External Paging, the system uses the following broadcast priority:
� Paging
� Door Box chimes
� Ringing
� Background Music
Note: Background Music and External Paging require additional customer-provided equipment. Refer to your the Hardware Manual that came with your system for more.
Programming
0201-Background Music
Enable this option (Y) to enable Background Music system-wide. If disabled (N), BGM will never play over the External Paging zone (regardless of the setting of 0202-Background Music Over Page below). By default, this option is enabled (Y).
0202-Background Music Over Page
Enable this option (Y) to have Background Music (if installed) play over the system’s External Pag-ing zone. Disable this option (N) if you don’t want Background Music to play over the system’s External Paging zone. By default, this option is disabled (N).
When entering data, pressing:
� Vol Up advances to next prompt.
42 � 02.10.09 DS1000 Release Notes

DS1000 02.10.09 Release NotesEnhanced Features in 02.10.09
� Vol Down backs up to the previous prompt.
� CHECK restores the previous entry.
� HOLD registers the entry and advances to the next prompt.
� CONF exists the program.
DS1000 Release Notes 43 � 02.10.09

DS1000 02.10.09 Release NotesEnhanced Features in 02.10.09
Prime Line Preference
Prime Line EnhancementsWith this software release, Idle Prime Line Preference is enhanced as follows:
� An extension’s Idle Prime Line can be any trunk or trunk group, regardless of whether the extension has a line or loop key for the trunk or group. If the Prime Line is for a trunk or group, the extension user cannot use the #PLA User Programmable Feature to customize the setting.
� Idle Prime Line to any trunk or trunk group is available at single line telephones.
Intercom Prime Line works the same as in previous releases, although with this software release it is programmed differently. Intercom Prime Line is the default setting.
Programming
1807-Prime Line Type
Use this option to set the Prime Line type at an extension. The options are:
� Key (1)The Prime Line is associated with a key on the phone, assigned in 1807-Prime Line Key. This is the default setting.
� Line (2)The Prime Line is a trunk or trunk group, assigned in 1807-Prime Line/Line Group.
� None (0)There is no Prime Line assignment. Nothing happens when the user lifts the handset.
At single line extensions, any entry other than Line (2) provides Intercom Prime Line.
When entering data, pressing:
� CLEAR enables Intercom Prime Line.
� CHECK restores previous entry.
� Vol Up or Vol Down scrolls through the available entries.
1807-Prime Line Key
If 1807-Prime Line Type is set to Key (1), use the option to select the key assigned as the exten-sion’s Prime Line key. The options are:
� 0 (None)There is no Prime Line Key assignment.
� 1-24 (Programmable Function Key 1-24)The extension seizes the trunk or group assigned to the designated key when the user lifts the handset.
� ICMThis enables Intercom Prime Line. The extension user hears Intercom dial tone when they lift the handset. This is the default setting.
This option does not apply to single line telephones.
When entering data, pressing:
� CLEAR enables Intercom Prime Line.
� CHECK restores previous entry.
44 � 02.10.09 DS1000 Release Notes

DS1000 02.10.09 Release NotesEnhanced Features in 02.10.09
� Vol Up or Vol Down scrolls through the available entries.
1807-Prime Line Line/Group
If 1807-Prime Line Type is set to Line (2), use this option to assign the trunk or trunk group the extension seizes when the user lifts the handset. The trunk or group does not have to be on a key appearing on the phone. Also use this option to set up Prime Line for single line telephones. The options are:
� 1-48Line 1-48 (1-6 in DS1000).
� 90-98Trunk group 0-8 (corresponding to entries 90-98).
The default setting for this option is 90 (trunk group 0).
When entering data, pressing:
� CLEAR enables Intercom Prime Line.
� CHECK restores previous entry.
� Vol Up or Vol Down scrolls through the available entries.
Selectable Display Messaging
Soft Key EnhancementsWhen selecting a Selectable Display Message, display keyset users can dial codes from the dial pad or use their soft keys.
22-Button and 34-Button Display Telephone Operation
To select a Selectable Display Message:
1. Press ICM and dial *3.ORPress PGM + CFWD. You see:
2. Dial 8 or press MORE + MSG. You see:
3. Dial the message number (01-16).OR
Press Vol Up or Vol Down to scroll through the messages.
4. Press HOLD. The selected message displays.
5. Enter any additional digits.The total number of digits/characters in the message cannot exceed 20. Use any valid
characters, digits, or symbols (just as if you were entering names).
6. Press HOLD.It is no longer necessary to press SPK to hang up.
DS1000 Release Notes 45 � 02.10.09

DS1000 02.10.09 Release NotesEnhanced Features in 02.10.09
To cancel Selectable Display Messaging:
1. Press ICM and dial *3.ORPress CLEAR + PGM + CFWD. You see:
2. Dial 0, press CLEAR, or press NONE to cancel forwarding.
3. Selectable Display Messaging in cancelled.It is no longer necessary to press SPK to hang up.
Super Display Telephone Operation
To select a Selectable Display Message:
1. Press ICM and dial *3.ORPress PROGRAM + CALL FWRD.
2. Dial 8 or press MESSAGE. You see:
3. Dial the message number (01-16).OR
Press Vol Up or Vol Down to scroll through the messages.
4. Press HOLD. The selected message displays.
5. Enter any additional digits.The total number of digits/characters in the message cannot exceed 20. Use any valid
characters, digits, or symbols (just as if you were entering names).
6. Press HOLD.It is no longer necessary to press SPK to hang up.
46 � 02.10.09 DS1000 Release Notes

DS1000 02.10.09 Release NotesEnhanced Features in 02.10.09
To cancel Selectable Display Messaging:
1. Press ICM and dial *3.ORPress PROGRAM + CALL FWRD. You see:
2. Dial 0.ORPress NONE.ORPress CLEAR.
It is no longer necessary to press SPK to hang up.
3. Selectable Display Messaging is cancelled.
System Programming Password Protection
Duplicate Passwords Won’t Lock Out ProgrammingWhen programming passwords in 9905-Password, the system will enforce the higher level pass-word if there are duplicate entries. For example, if you inadvertantly set the level 3 (Installer) pass-word the same as either level 1 (System Administrator 1) or level 2 (System Administrator 2), the system will enforce the level 3 password. In prior software versions, the system would enforce the lower level password if there were duplicate entries. This would lock you out of system program-ming, since only level 3 can program passwords.
System Timers, Trunks
Ringing Signal End Detect Timer Name ChangeThe prompt for 0402-Ringing Signal End Detect Timer is changed from SIGNAL STOP DET? to RING STOP DET?.
Tandem Trunking / Unsupervised Conference
New COS Bit Added For Unsupervised ConferenceAn extension can set up an Unsupervised Conference only if:
� The new Extension Class of Service option 0101-Unsupervised Conference is enabled.
� One of the trunks involved in the Unsupervised Conference has 1003-Tandem Trunk enabled.
This new Extension Class of Service option ensures that enabling 1003-Tandem Trunk for Off Premise Call Forwarding does also not inadvertantly enable Unsupervised Conference.
DS1000 Release Notes 47 � 02.10.09

DS1000 02.10.09 Release NotesEnhanced Features in 02.10.09
Voice Mail
Accessing Voice Mail SimplifiedSoftware version 02.10.09 provides the following Voice Mail enhancements:
To call your mailbox:
� Press MW.There is no need to press SPK, ICM, or lift the handset first. The Number of Messages
display previously accessed by press MW while idle is removed. This information is already provided by the V-Mail nn (VMnn) soft key.
While connected to your mailbox, your MW key will be on (red).
To hang up while using your mailbox:
� Press MW.Your MW key will go out.
Answering Machine Ports and Caller IDWhen connecting a customer-provided answering machine to a system analog port, you should designate it as a Voice Mail port (1802-Voice Mail Port = Y). This will cause any trunk call picked up by the answering machine not to be marked as answered in the Caller ID log. For this applica-tion, do not enable Voice Mail in 0201-Voice Mail Installed. If you do, the analog port marked as a Voice Mail port will no longer Key Ring for incoming trunk calls.
Disconnecting Conversation Record Simplified
When you want to stop Conversation Record
� Press your lit MW key.Recording stops and the call is sent to your voice mailbox.
Personal Answering Machine Emulation Soft Key EnhancementsWhen setting up Personal Answering Machine Emulation, display keyset users can dial codes from the dial pad or use their soft keys.
22-Button and 34-Button Display Telephone Operation
To activate Personal Answering Machine Emulation:
1. Press ICM and dial *3.ORPress PGM + CFWD.
2. Dial 7 or press MORE + AME. You see:
3. Dial 2 or press ALL to forward all calls.OR
Dial 8 or press TRNK to forward just trunk calls.It is no longer necessary to press SPK to hang up.
48 � 02.10.09 DS1000 Release Notes
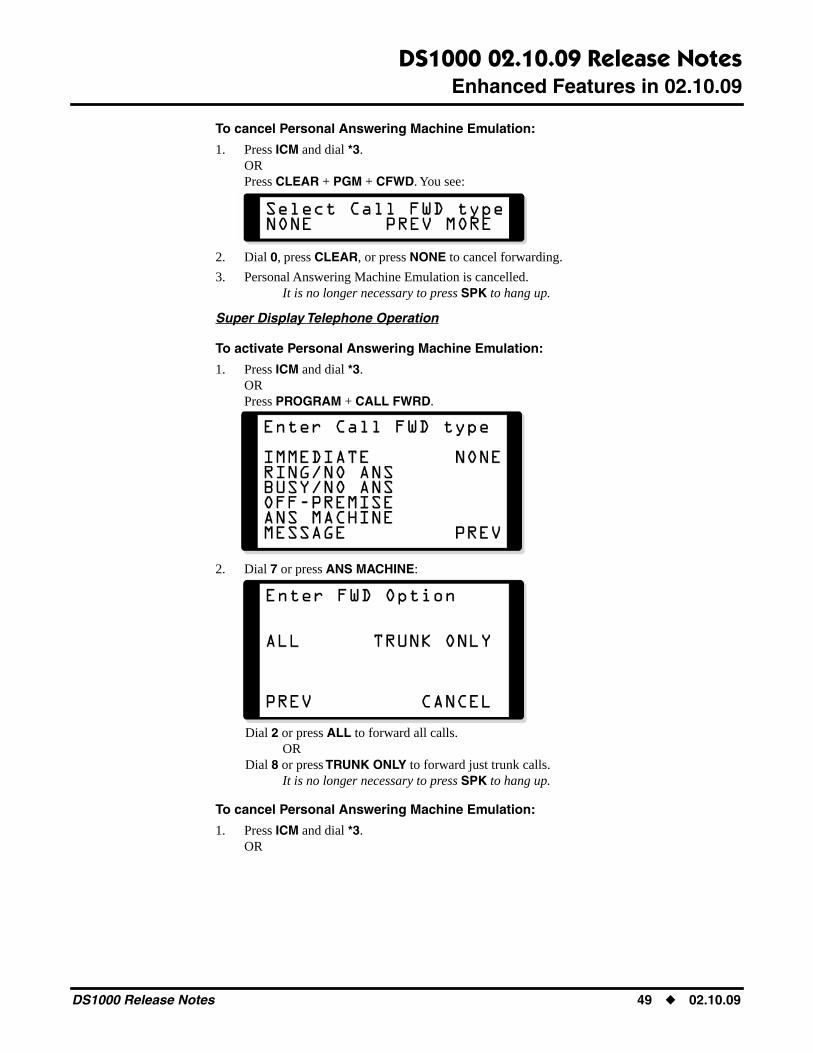
DS1000 02.10.09 Release NotesEnhanced Features in 02.10.09
To cancel Personal Answering Machine Emulation:
1. Press ICM and dial *3.ORPress CLEAR + PGM + CFWD. You see:
2. Dial 0, press CLEAR, or press NONE to cancel forwarding.
3. Personal Answering Machine Emulation is cancelled.It is no longer necessary to press SPK to hang up.
Super Display Telephone Operation
To activate Personal Answering Machine Emulation:
1. Press ICM and dial *3.ORPress PROGRAM + CALL FWRD.
2. Dial 7 or press ANS MACHINE:
Dial 2 or press ALL to forward all calls.OR
Dial 8 or press TRUNK ONLY to forward just trunk calls.It is no longer necessary to press SPK to hang up.
To cancel Personal Answering Machine Emulation:
1. Press ICM and dial *3.OR
DS1000 Release Notes 49 � 02.10.09

DS1000 02.10.09 Release NotesEnhanced Features in 02.10.09
Press PROGRAM + CALL FWRD. You see:
2. Dial 0.ORPress NONE.ORPress CLEAR.
It is no longer necessary to press SPK to hang up.
3. Personal Answering Machine Emulation is cancelled.
Handling Personal Answering Machine Emulation Calls
When Personal Answering Machine Emulation broadcasts your caller’s voice, you can:
While you are listening to the broadcast, SPK flashes and MW lights steadily on.
� Do nothing to have the caller’s message automatically recorded in your mailbox.
� Press SPK or lift the handset to intercept the call.If your extension is in the headset mode, you can only press SPK.
� Press MW to stop the broadcast and send the call directly to your mailbox.
Streamlined Handling Of Voice Mail Transfers To DND ExtensionsTo streamline handling of Automated Attendant UTRFs, the following will occur:
� A UTRF to an extension in DND or to an uninstalled extension will immediately recall the Voice Mail.
� The phone system will send the “unavailable” protocol (***3[trk][ext]) to the voice mail, which will cause the unavailable prompt to be played to the incoming caller.
In addition, when an Automated Attendant transfer detects reorder tone at an extension under any other condition, the phone system sends the remote login protocol (**6) to the voice mail and the incoming caller hears the remote login prompt.
In prior software versions, a UTRF to an uninstalled extension or an extension in DND would even-tually time out and recall to key ring, causing call processing delays.
Software Corrections in 02.10.09
50 � 02.10.09 DS1000 Release Notes

DS1000 02.10.12 Release Notes
DS1000 02.10.12
Release Notes
DS1000 02.10.12 Release Notes
New Features in 02.10.12
New Features in 02.10.12
There are no new features in this release.
DS1000 Release Notes 51 � 02.10.12
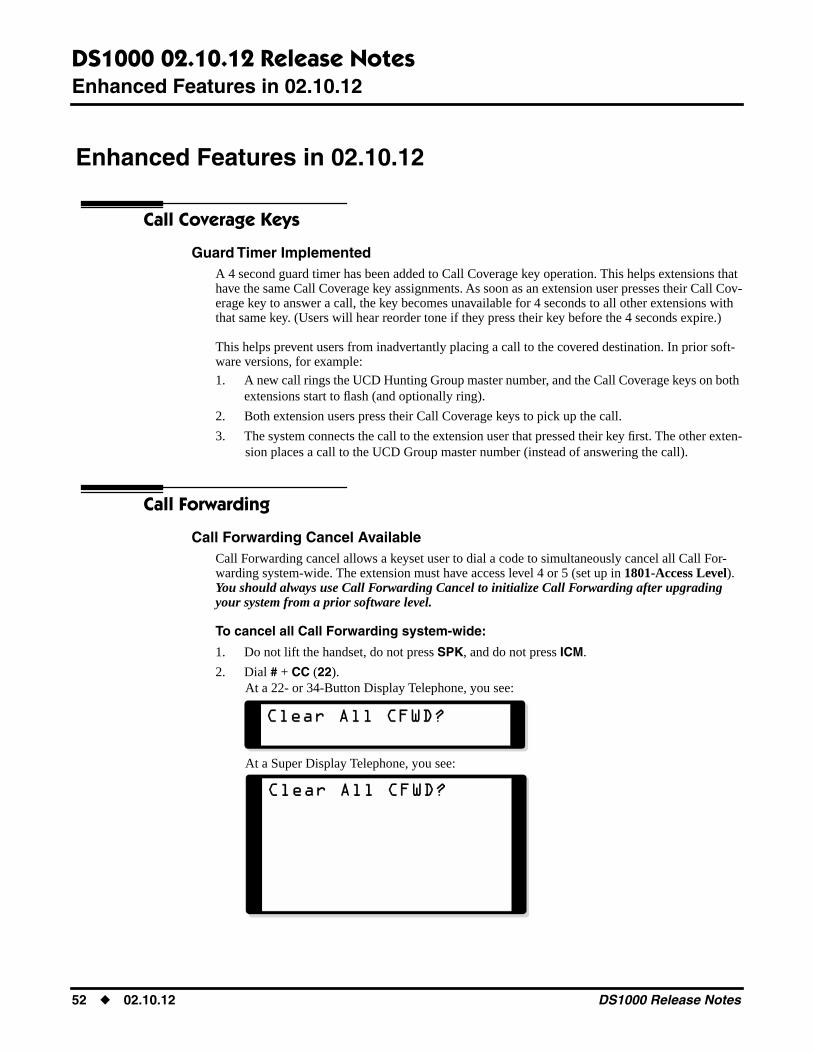
DS1000 02.10.12 Release NotesEnhanced Features in 02.10.12
Enhanced Features in 02.10.12
Enhanced Features in 02.10.12
Call Coverage Keys
Guard Timer ImplementedA 4 second guard timer has been added to Call Coverage key operation. This helps extensions that have the same Call Coverage key assignments. As soon as an extension user presses their Call Cov-erage key to answer a call, the key becomes unavailable for 4 seconds to all other extensions with that same key. (Users will hear reorder tone if they press their key before the 4 seconds expire.)
This helps prevent users from inadvertantly placing a call to the covered destination. In prior soft-ware versions, for example:
1. A new call rings the UCD Hunting Group master number, and the Call Coverage keys on both extensions start to flash (and optionally ring).
2. Both extension users press their Call Coverage keys to pick up the call.
3. The system connects the call to the extension user that pressed their key first. The other exten-sion places a call to the UCD Group master number (instead of answering the call).
Call Forwarding
Call Forwarding Cancel AvailableCall Forwarding cancel allows a keyset user to dial a code to simultaneously cancel all Call For-warding system-wide. The extension must have access level 4 or 5 (set up in 1801-Access Level). You should always use Call Forwarding Cancel to initialize Call Forwarding after upgrading your system from a prior software level.
To cancel all Call Forwarding system-wide:
1. Do not lift the handset, do not press SPK, and do not press ICM.
2. Dial # + CC (22). At a 22- or 34-Button Display Telephone, you see:
At a Super Display Telephone, you see:
52 � 02.10.12 DS1000 Release Notes

DS1000 02.10.12 Release NotesEnhanced Features in 02.10.12
3. Dial Y (9) to cancel forwarding.ORDial N (6) to exit this procedure without canceling.
Status Restored After Reset Or Power DownAn extension’s Call Forwarding will be reinstated after a power down or system reset. For example, an extension with calls forwarded immediately to Voice Mail will still be forwarded to Voice Mail after the system resets or is powered down and then powered back up.
Caller ID Logging
New Default - All Keysets In Caller ID Logging Group 1To simplify Caller ID operation in DS1000, all keyset extensions by default are now in Caller ID Logging Group 1. Since all keysets share a common group log, deleting a record at one keyset will automatically update the log for all others. Following is the updated default programming for exten-sions 300-315:
� 1807-Caller ID Log Type = 2 (group logging)
� 1807-Caller ID Logging Group = 1 (group 1)
Conference
Multiple Parties Cannot Place Conference On HoldIf an extension user places a Conference on Hold, no other participants can place the Conference on Hold, split it, or terminate it.
Directed Call Pickup
Pickup Of Additional Call TypesDirected Call Pickup will now pick up any type of call ringing the destination extension. In prior software versions, Directed Call Pickup would not intercept:
� Ringing Call Coverage key calls.
� Ringing Group Call Pickup key calls.
� Calls ringing the operator’s Call Queue key.
Do Not Disturb
Soft Keys ReorderedThe soft keys for Do Not Disturb are reordered so that they match the order of their numeric equiv-alents (0=Off, 1=External, 2=Intercom, 3=All).
22-Button and 34-Button Display Telephone Operation
DS1000 Release Notes 53 � 02.10.12

DS1000 02.10.12 Release NotesEnhanced Features in 02.10.12
Super Display Telephone Operation
Interactive Soft Keys
PREVIOUS and PREV Soft Keys RenamedTo more closely match the key’s function, all occurrences of the PREVIOUS (Super Display) and PREV (2-line display) soft keys have been renamed EXIT.
Off-Premise Extensions / On-Premise SLT Extensions
Exclusive Hold AvailableA single line telephone connected to an analog station port or 2-OPX Module can place their Inter-com or outside call on Exclusive Hold. (Note that this option does not apply to Voice Mail ports.)
To place your Intercom or outside call on Exclusive Hold
� Hookflash + Dial *7.
� Hang up.- If the call is left on Exclusive Hold too long, it will recall to you.- If you hang up without first dialing *7, the call will recall immediately.- If you previously placed a call on Exclusive Hold or have a Camped-On call waiting, dialing *7 will answer the waiting call. See Split Available below for more.
To retrieve a call you have placed on Exclusive Hold:
� Lift the handset and dial *7 (or hookflash).
Split EnhancedA single line telephone connected to an analog station port or 2-OPX module can Split (alternate) between their current call and waiting calls. The waiting calls can include a call you previously placed on Exclusive Hold or camped-on calls. (Note that this option does not apply to Voice Mail ports.)
To Split (Alternate) between your current call and a waiting call:
� Hookflash + Dial *7.- You are connected to your camped-on call (if any) or the call that has been on Hold the longest.- Repeat this procedure to cycle through all your waiting calls (from oldest to newest) and return to your first call.
54 � 02.10.12 DS1000 Release Notes
DS1000 02.10.12 Release NotesEnhanced Features in 02.10.12
Privacy Release
Guard Timer AvailableSoftware version 02.10.12 provides a guard timer that prevents an extension user from inadvert-antly placing a Privacy Release Conference on Hold. When an extension user with privacy released presses a line key to join a Conference, the system starts a 3 second guard timer. During this inter-val, if the initial extension on the call presses their Hold key, they will drop out of the 3-party call. This prevents an extension user, who is trying to extend a call to a co-worker, from inadvertantly putting a Privacy Release Conference on Hold by pressing their Hold key.
Station Message Detail Recording
Call Duration Independent of System ClockThe duration of a call on the SMDR report is calculated independently of the system clock. This prevents changes made to the system Time and Date from inaccurately reporting the call duration after the Time and Date change. The automatic Daylight Savings Time adjustment also will no longer affect the call duration.
SMDR Header Printed When Date ChangesWhen 0301-Print SMDR Header is enabled (Y), the SMDR header will print before the first call record on each new day. In prior software versions, the SMDR header would only print at the top of each page. It would not reprint for the first call record of each new day.
Tandem Trunking / Unsupervised Conference
Using Trunk-To-Trunk Transfer To Set Up A Tandem CallAn extension user can use the following steps to set up a tandem call via trunk-to-trunk Transfer:
1. Place or answer a trunk call.
2. Press ICM.
3. Place a new trunk call.
4. Hang up to set up a tandem call between the initial call and the new call.
This procedure is available if:
� The new call in step 3 is an outgoing trunk call (not an incoming call or a call on Hold).
� Either the initial call (in step 1) or the new call (in step 3) must have 1003-Tandem Trunk enabled (Y).
� The extension must have 0101-Unsupervised Conference enabled (Y). (This is not required when the system is automatically routing an Off-Premise Call Forward.) Only enable this option if you need Unsupervised Conference.
DS1000 Release Notes 55 � 02.10.12

DS1000 02.10.12 Release NotesEnhanced Features in 02.10.12
Time and Date
Automatic Daylight Savings Time Adjustment AvailableUse 0302-Automatic Daylight Savings Time Adjustment to automatically have the system adjust the time for Daylight Savings Time. If enabled (Y), the system will automatically set the time back 1 hour at 2:00 AM on the last Sunday in October and set the time forward 1 hour at 2:00 AM on the first Sun-day in April. If disabled (N), this adjustment will not occur. The default for this option is Y (enabled).
56 � 02.10.12 DS1000 Release Notes

DS1000 02.10.12 Release NotesSoftware Corrections in 02.10.12
Software Corrections in 02.10.12
Software Corrections in 02.10.12
Attendant Position
Out Of Range Entries While ScrollingSoftware version 02.10.12 corrects an out of range programming error when assigning multiple operators.
Call Forwarding Off Premise
Connection Errors When Call Forwarded to DILIf an extension is Off Premise Call Forwarded to their DIL, and a call rings in on the DIL, the sys-tem will route the incoming call to the DIL overflow destination. Overflow is set up in 1003-Day Overflow Destination. If no overflow is programmed, the incoming call diverts to Key Ring. In software version 2.10.09, the system would attempt to route the outgoing call over the incoming DIL, resulting in connection errors.
System Reset After UpgradeSoftware version 02.10.12 corrects a problem with Call Forwarding Off Premise that could cause resets in a system that was upgraded from a prior software version and not initialized. If Call For-warding Off Premise attempts caused the system to reset, the only workaround was to:
1. Power down the system.
2. Remove the CPU battery for several minutes.
3. Power the system back up.
Note: A Direct Inward Line (DIL) to an extension that is Call Forwarded Off Premise uses its own Toll Level (1001-Trunk Toll Restriction Level) and Class of Service (1001-Trunk Class of Ser-vice Assignment) when enforcing Toll Restriction. It does not use the extension’s Toll Level and Class of Service.
Callback
Callback Cancel AvailableAfter a keyset user leaves a Callback at a busy extension, they can hang up and dial # + DC (32) to delete (cancel) the Callback. If the user has left callbacks for several extensions, this code will simultaneously cancel all their Callbacks.
Caller ID
Internal Guard Timer ModifiedA system internal timer has been modified to increase the accuracy of Caller ID.
DS1000 Release Notes 57 � 02.10.12

DS1000 02.10.12 Release NotesSoftware Corrections in 02.10.12
Super Display Does Not Display Caller ID For Call Picked Up From HoldSoftware version 02.10.12 corrects a Caller ID problem in prior software versions in which a Super Display Telephone would not properly display the Caller ID data for a call picked up from Hold. In prior versions when a Super Display Telephone user retrieved the call from Hold, the Caller ID information would display quickly and then go away. The first line of the display would then show the Time and Date, and the second line of the display would be blank.
Caller ID Logging
Deleting Personal Record Jumps To End Of ListA Caller ID Logging user editing error that occurred in software version 02.10.09 which caused the display to jump to the end of the log list after deleting a record has been corrected.
Central Office Calls, Placing
Trunk Lockup When Access DeniedA potential trunk lockup problem is corrected. The lockup could occur if a user accessed a line group for an outgoing call and then pressed a busy line key for a trunk to which they didn’t have access (in 1803-Extension Line Access Assignments).
Conference
Handsfree Conference Interacts With Second Hold DepressionIf an extension user sets up a Handsfree Conference with 2 trunks and presses HOLD to place the Conference on Hold, any subsequent HOLD depressions will return the extension to idle.
Simultaneous Loop Disconnect Commands ProcessedThe system will process simultaneous loop disconnect messages from the telco. This can occur if multiple outside parties in Conference hang up at the same time. In software versions prior to 02.10.12, simultaneous commands might not be processed.
Directory Dialing
Volume Control InteractionIn software version 02.10.12, using Vol Up and Vol Down to scroll through Directory Dialing entries and while using Dial Number Preview will not change Volume Control Settings.
Extension Hunting
UCD Group Used As Dummy Extension Doesn’t Activate Call CoverageIn software version 02.10.12, you can set up an empty UCD Group (i.e., a group with no members) as a dummy extension. If an extension has a Call Coverage key for the empty group’s master num-ber, the key will ring whenever the master number is called. In software version 02.10.09, the Call Coverage key would not activate for a UCD Group with no members, and the dummy extension would not work.
58 � 02.10.12 DS1000 Release Notes

DS1000 02.10.12 Release NotesSoftware Corrections in 02.10.12
UCD Overflow To Voice Mail Causes System ResetSoftware version 02.10.12 corrects a potential reset problem that could occur if a UCD Extension Hunting group used Voice Mail as the overflow destination. The reset could occur if a call overflowed to the Automated Attendant, the caller dialed an extension, and the extension was unanswered.
Headset Compatibility
Quickly Pressing Key After Hold Disables FeatureSoftware version 02.10.12 corrects a problem in which a headset user could cause feature misopera-tion by pressing Hold and then quickly pressing a Programmable Function Key. For example, if a headset user busy on an outside call pressed Hold and then quickly pressed a Page key, the user could not broadcast into the Page zone accessed.
Interactive Soft Keys
Display Doesn’t Clear After ExitThe first line of the telephone display will now clear (restore to Time and Date) after the following soft key sequences.
Super Display TelephonePROGRAM + VOICE ANNOUNCE + EXITPROGRAM + HF REPLY + EXIT
22- and 34-Button Display TelephonePGM + VANN + EXITPGM + MORE + HFRP + PREV
Music On Hold
Clearing Entry Resets SystemWhen assigning a Music On Hold music source to a trunk in 1003-MOH Source, pressing CLEAR sets the option to None (No MOH). In software version 02.10.09, pressing CLEAR would cause the second line of the display to show TANDEM TRUNK?NO SOU and the system would eventually reset. This has been corrected.
Off-Hook Signaling
Off-Hook Ringing While Using Voice MailIn software version 02.10.12, off-hook ringing for outside calls will function normally at an exten-sion using Voice Mail.
DS1000 Release Notes 59 � 02.10.12

DS1000 02.10.12 Release NotesSoftware Corrections in 02.10.12
Off-Premise Extensions / On-Premise SLT Extensions
Flash On Intercom Call Locks Up KeysetSoftware version 02.10.12 corrects a problem in prior versions in which a single line set on an Intercom call with a keyset was permitted to hookflash and dial #3 (which is the trunk flash code). This put the keyset in an improper Hold state. To clear the problem, the keyset user had to hang up and attempt a new call.
Paging
Cannot Pick Up Call Coverage and Call Queue Key Calls Ringing External PageAn extension user can dial the Universal Night Answer code (ICM + *0) to pick up any type of call ringing the External Paging system. In prior software versions, this code would not pick up:
� Ringing Call Coverage key calls.
� Ringing Group Call Pickup key calls.
� Calls ringing the operator’s Call Queue key.
External Page Relay Activation Causes System ResetExternal Paging (with relay control) will no longer cause the system to intermittently reset when zones 1 or 2 are paged.
Out Of Range Entries When Setting Up Page RelaysSoftware version 02.10.12 corrects out of range data entry problems that could occur with 0201-DOOR1 Relay Page Zone Assignment and 0201-DOOR 2 Relay Page Zone Assignment.The programming was still functional, however, and would respond to the correct entries.
Update Utility Version 02.01.02
Default Only Installation PathThe Update Utility will automatically install in the directory C:\NEC\DS-Series\Update Utility. This assignment cannot be changed.
60 � 02.10.12 DS1000 Release Notes

DS1000 02.10.13/02.11.00 Release Notes
DS1000 02.10.13/02.11.00
Release Notes
DS1000 02.10.13/02.11.00 Release Notes
New Features in 02.10.13/02.11.00
New Features in 02.10.13/02.11.00
Maintenance release only. There are no new features in this release.
DS1000 Release Notes 61 � 02.10.13/02.11.00
DS1000 02.10.13/02.11.00 Release NotesEnhanced Features in 02.10.13/02.11.00
Enhanced Features in 02.10.13/02.11.00
Enhanced Features in 02.10.13/02.11.00
Maintenance release only. There are no enhanced features in this release.
62 � 02.10.13/02.11.00 DS1000 Release Notes

DS1000 02.10.13/02.11.00 Release NotesSoftware Corrections in 02.10.13/02.11.00
Software Corrections in 02.10.13/02.11.00
Software Corrections in 02.10.13/02.11.00
Call Forwarding Off Premise
Off Premise Call Forwarding Can Corrupt System DatabaseSoftware version 02.10.13/02.11.00 corrects a problem in versions 02.10.09 and 02.10.12 in which forwarding a trunk off premise could corrupt the system database. The problem was most promi-nent on trunk 4 with DS2000 but could occur on other trunks in both systems as well. In DS2000, once the system database became corrupt all extensions assigned to the DSTU PCB in slot CN1 would stop functioning. To solve the problem:
� From any keyset not assigned to the DSTU PCB in slot CN1, you had to use 9999-System Initialization to initialize the system.
� If all keysets were assigned to the DSTU PCB in slot CN1, you had to shut the system down, remove the CPU battery, and then restart the system with the battery removed to restore the default database.
Hotline
Hotline Inadvertantly Transfers TrunkIf an extension user seizes a trunk (without dialing) and then presses a Hotline key, the system will disconnect the trunk call and place a Hotline call to the assigned partner extension. If the user dials at least one digit on the trunk (or waits the interdigit interval), the system transfers the call to the Hotline partner. In software versions prior to 02.10.13/02.11.00, the system could Transfer the call to the Hotline partner even when no digits had been dialed.
DS1000 Release Notes 63 � 02.10.13/02.11.00

DS1000 02.10.13/02.11.00 Release NotesSoftware Corrections in 02.10.13/02.11.00
64 � 02.10.13/02.11.00 DS1000 Release Notes

NEC America, Inc., Corporate Networks Group4 Forest Parkway, Shelton, CT 06484
Tel: 800-365-1928 Fax: 203-926-5458cng.nec.com
Other Important Telephone Numbers
Sales: . . . . . . . . . . . . . . . . . . . . . . . . . . . . . . . . . . . .203-926-5450Customer Service: . . . . . . . . . . . . . . . . . . . . . . . . . . .203-926-5444Customer Service FAX: . . . . . . . . . . . . . . . . . . . . . . .203-926-5454Technical Service: . . . . . . . . . . . . . . . . . . . . . . . . . . .203-925-8801Discontinued Product Service: . . . . . . . . . . . . . . . . . .900-990-2541Technical Training: . . . . . . . . . . . . . . . . . . . . . . . . . . .203-926-5430Emergency Technical Service (After Hours) . . . . . . . .203-929-7920
(Excludes discontinued products)

NEC America, Inc., Corporate Networks Group4 Forest Parkway, Shelton, CT 06484
*80200RNT22*80200RNT22
October 2002Printed in U.S.A.
TEL: 203-926-5400 FAX: 203-929-0535cng.nec.com