Download a Manual - DFV · Sabre2 Flight Characteristics 1. Introduction The Sabre2 from...
30
Download a Manual All articles are in a Adobe Acrobat format or a Word 6.0 format. You will need to have the Adobe Acrobat Reader installed to view and print the forms. You can download the Adobe Acrobat Reader by clicking the link at the bottom of the page. "New!"Sabre2 Flight Characteristics"New!" Adobe Acrobat Format Velocity Flight Characteristics Adobe Acrobat Format Vengeance Flight Characteristics Adobe Acrobat Format Stiletto Flight Characteristics Adobe Acrobat Format PD Series Ram-Air Reserve Parachute Owner's Manual Word 6.0 Format PD Series Ram-Air Reserve Parachute Manual Addendum - PRO Packing Instructions Adobe Acrobat Format Ram-Air Parachute Owner's Manual Word 6.0 Format How To Prevent Hard Openings Adobe Acrobat Format Top Of Page | Home Performance Designs, Inc. - Manuals http://www.performancedesigns.com/manuals.html [17.09.2001 13:38:34]
Transcript of Download a Manual - DFV · Sabre2 Flight Characteristics 1. Introduction The Sabre2 from...
Download a ManualAll articles are in a Adobe Acrobat format or a Word 6.0 format. You will need to have the Adobe
Acrobat Reader installed to view and print the forms. You can download the Adobe AcrobatReader by clicking the link at the bottom of the page.
"New!"Sabre2 Flight Characteristics"New!"Adobe Acrobat Format
Velocity Flight CharacteristicsAdobe Acrobat Format
Vengeance Flight CharacteristicsAdobe Acrobat Format
Stiletto Flight CharacteristicsAdobe Acrobat Format
PD Series Ram-Air Reserve Parachute Owner's ManualWord 6.0 Format
PD Series Ram-Air Reserve Parachute Manual Addendum - PROPacking Instructions
Adobe Acrobat Format
Ram-Air Parachute Owner's ManualWord 6.0 Format
How To Prevent Hard OpeningsAdobe Acrobat Format
Top Of Page | Home
Performance Designs, Inc. - Manuals
http://www.performancedesigns.com/manuals.html [17.09.2001 13:38:34]
Sabre2 Flight Characteristics 1. Introduction The Sabre2 from Performance Designs is a slightly tapered, zero-porosity nine cell canopy. Like the original PD Sabre, the Sabre2 is designed to be fun to fly, easy to land, and to be a great general–purpose skydiving canopy. This is not just a modified Sabre, though. The Sabre2 is a totally new design, and takes full advantage of the research and technological advancements we have achieved in the decade that has passed since we released the original Sabre. In this document, we will compare the performance characteristics of the Sabre2 to the original Sabre, since it remains a popular canopy. We will also compare some characteristics to the PD Spectre, another popular general-purpose canopy. A Note on Comparing Canopies: When comparing two different canopy designs, such as the original Sabre and the Sabre2, an accurate comparison can only be made if the canopies are the same size, they are flown under similar conditions, and they are flown by the same jumper, or by two jumpers of very similar size and weight. Comparing a 150 Sabre2 to a 170 square foot canopy, for example, would not yield an accurate comparison. The way canopies are “set up” can also affect a comparison. Two identical canopies will perform differently if one has the toggles attached at the location specified by the factory, but the other has had the steering lines shortened a few inches. If one canopy has a collapsible pilot chute and the other does not, this will also make a significant difference. There may also be a difference between a canopy with new lines, and one that has several hundred jumps on the line set. 2. Openings To describe the openings, we need to agree on some common terms. The first part of the opening you feel, when the canopy first reaches the end of the lines, is the snatch force. The second phase of the opening, when the canopy is overhead but the slider is still all the way up, is called the snivel. The third stage, when the slider travels down the lines and the cells finally pressurize, is called the inflation. Overall, the openings on the Sabre2 are quite comfortable. The Sabre2 has about the same snatch force as a Spectre or the original Sabre. It will generally snivel longer than a Sabre, but not quite as long as a Spectre. The inflation speed is similar to the Spectre. The Sabre2 is also similar to the Spectre in that it is fairly forgiving of packing technique, body position, and the airspeed at which it is deployed. We had consistently good openings while testing the Sabre2 using a variety of packing methods, including our normal factory PRO pack, a neat side pack, and some other pack jobs that probably were not wise to try. You will get the best results, however, by using the packing method we recommend, and by deploying at a reasonable airspeed while in a good body position. As with any canopy, a correctly positioned slider, proper line stows, and a correctly sized pilot chute are required to ensure consistently soft openings. See our information sheet entitled “Solving Deployment Problems” for more information.

3. Flight Characteristics Although the overall flight characteristics of the Sabre2 are similar to the original Sabre, there are a few noticeable differences: Straight Flight at full Glide: The Sabre2 and the original Sabre both fly at about the same airspeed, but the glide angle of the Sabre2 is a bit flatter. You may notice the Sabre2 gives you better penetration when flying into the wind, and carries you farther when flying with the wind at your back. Straight Flight in Brakes: The Sabre2 has a lower rate of descent in brakes than the original Sabre. This will be useful if you are returning from a long spot with the wind at your back, and use your brakes to “float” farther. It will also be useful if you like to fly in brakes for a while after opening, to let other canopies land first. Toggle Turns from Full Glide: The Sabre2 is more responsive than the original Sabre, but not radically different. Less toggle input is required to start a turn on the Sabre2, and toggle pressure is generally lighter than the original Sabre. Like the Spectre, the Sabre2 will lose slightly more altitude in a turn than the original Sabre. Toggle Turns in Brakes (Flat Turns): Flat turns are an important technique to learn on any canopy. By pulling the toggles half way down, then slowly raising or lowering one toggle to start a turn, you will lose much less altitude than by making a turn from full glide. The Sabre2 is quite responsive in braked flight, making flat turns very effective on this canopy. Front Riser Turns: Like the Spectre, the Sabre2 has light front riser pressure. Even larger sizes of the Sabre2 respond fairly well to front riser input. As with most canopies, if the control lines are too short the Sabre2 may “hobble” when the front risers are pulled. A canopy’s control lines normally become shorter after several hundred jumps, or can be made too short by attaching the steering toggles too close to the brake loop. Stall Characteristics: As with the Spectre and the original Sabre, you may find that you can pull the toggles all the way down to full arm extension without stalling the Sabre2, especially if you are jumping a larger one. It’s important to remember that you do not have to be able to stall your canopy in order to land it correctly. Technically, a stall means the canopy has dramatically reduced its lift and increased its rate of descent. A stalled canopy is not really “flying” any longer. If you want a soft landing, you really want your canopy to keep creating lift and maintain a low rate of descent until your feet are on the ground. If you adjust your steering toggles so that your canopy is easier to stall, it may actually become more difficult to land softly. The Sabre2 will reach a fairly low airspeed before stalling. As with many canopies, it’s not unusual to experience some end cell closure when recovering from a full stall. After recovering from a stall, bringing the toggles back down to between ½ and ¾ brakes and holding them there for a moment will help the end cells re-inflate more quickly. Landings: Like the original Sabre, the Sabre2 is an easy canopy to land. When a proper flare technique is used, the Sabre2 generates more lift at low airspeed, which allows for even slower touchdown speeds and softer landings. And like the original Sabre, the Sabre2 may still give you a decent landing even if your flare is less than perfect, as long as you are jumping one that is a reasonable size. Aggressive Approaches (High-Speed Approaches): As we mentioned above, the Sabre2 loses slightly more altitude in a turn than the original Sabre and the Spectre. By comparison, the PD Stiletto pulls out of a dive relatively quickly. As with most canopies, smaller sizes dive more in turns than larger ones. It is important to consider differences like these when making an aggressive, turning approach on a canopy that is new to you. Even if you have made hundreds or thousands of these approaches, it is best to be cautious when trying a new type of canopy or a smaller size than you are accustomed to. 4. Canopy Sizing The chart below shows our suggested weight limits for the Sabre2. We provide this information with each of our canopies to help you choose the correct canopy size for your weight and experience level. It is important to understand what the information really means so you can use these charts correctly.

Exit weight is your body weight plus the weight of your clothing, rig, main and reserve canopies, and anything else you will be wearing when you exit the aircraft. The average jumper’s exit weight is about 20 to 25 lbs. more than his or her body weight. There are various exit weights listed on the chart below, divided into several experience categories. It’s important to note that these are maximum weight limits. For example, the maximum exit weight listed under “Novice” for a 170 Sabre2 is 153 lbs. This means we feel the 170 is appropriate for a novice jumper with an exit weight of 153 lbs. or less. It does not mean you must weigh 153 lbs. to make this canopy perform correctly. In fact, a much lighter jumper might be perfectly happy flying this canopy. The canopy will have a slower forward speed and lower rate of descent when flown by a lighter jumper, and is likely to be more forgiving and easier to land. These may be exactly the characteristics this jumper wants from a canopy!
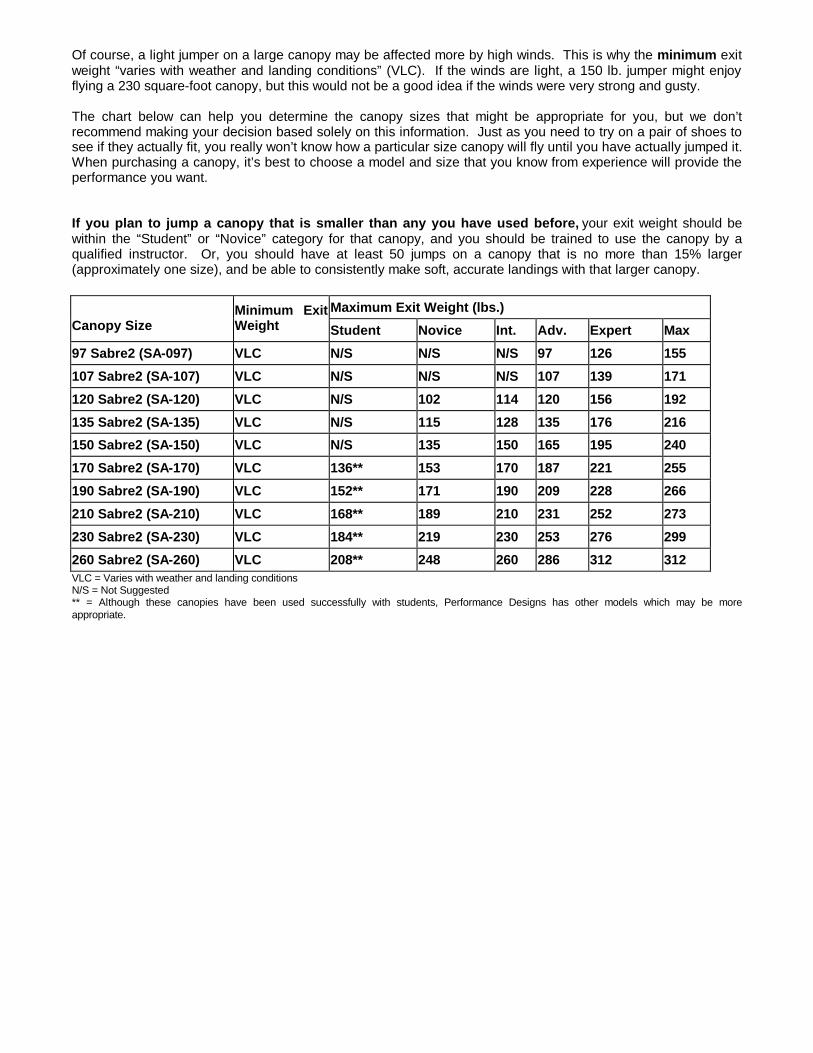
Of course, a light jumper on a large canopy may be affected more by high winds. This is why the minimum exit weight “varies with weather and landing conditions” (VLC). If the winds are light, a 150 lb. jumper might enjoy flying a 230 square-foot canopy, but this would not be a good idea if the winds were very strong and gusty. The chart below can help you determine the canopy sizes that might be appropriate for you, but we don’t recommend making your decision based solely on this information. Just as you need to try on a pair of shoes to see if they actually fit, you really won’t know how a particular size canopy will fly until you have actually jumped it. When purchasing a canopy, it’s best to choose a model and size that you know from experience will provide the performance you want. If you plan to jump a canopy that is smaller than any you have used before, your exit weight should be within the “Student” or “Novice” category for that canopy, and you should be trained to use the canopy by a qualified instructor. Or, you should have at least 50 jumps on a canopy that is no more than 15% larger (approximately one size), and be able to consistently make soft, accurate landings with that larger canopy.
Maximum Exit Weight (lbs.) Canopy Size
Minimum Exit Weight Student Novice Int. Adv. Expert Max
97 Sabre2 (SA-097) VLC N/S N/S N/S 97 126 155 107 Sabre2 (SA-107) VLC N/S N/S N/S 107 139 171 120 Sabre2 (SA-120) VLC N/S 102 114 120 156 192 135 Sabre2 (SA-135) VLC N/S 115 128 135 176 216 150 Sabre2 (SA-150) VLC N/S 135 150 165 195 240 170 Sabre2 (SA-170) VLC 136** 153 170 187 221 255 190 Sabre2 (SA-190) VLC 152** 171 190 209 228 266 210 Sabre2 (SA-210) VLC 168** 189 210 231 252 273 230 Sabre2 (SA-230) VLC 184** 219 230 253 276 299 260 Sabre2 (SA-260) VLC 208** 248 260 286 312 312 VLC = Varies with weather and landing conditions N/S = Not Suggested ** = Although these canopies have been used successfully with students, Performance Designs has other models which may be more appropriate.
Performance Characteristics of the PD Velocity
This document describes in detail the opening, flying, and landing characteristics of the Velocityin comparison to a similarly sized Stiletto. There are also a few flying tips. This will help potentialusers of the Velocity learn as much as possible about the canopy before deciding to jump it.
The Velocity is intended only for very experienced pilots who have already flown a small ellipticalcanopy for several skydiving seasons, and consider themselves very current and very proficient.If this doesn’t describe you, keep jumping and keep learning, but stay away from the Velocity,especially if it’s a smaller canopy than you’re used to. If you decide to go for it, we suggest youmake several solo jumps on the Velocity opening above 6000 feet, or higher if it’s a small one.This should give you the freedom to really explore the canopy unencumbered by other traffic.
I. Flight characteristics:General Impressions:The Velocity has the largest flight speed range of any canopy we’ve ever jumped. It is anabsolute blast to fly. It responds very quickly to toggle, riser, or harness movements, and feelsvery “connected” to your body. Its cross-braced structure makes it feel very rigid. The swoops ona Velocity are the longest we’ve seen from any canopy, especially when using a smoothaggressive approach. The Velocity lands great, even at the maximum placarded wing loading,after a normal straight-in approach without front risers. There should be no problem using veryconservative straight-in approaches in the beginning, especially if you’ve done a few recently onyour present canopy of similar size. The flight performance information below assumes thecanopy size is the same as what you’re used to. Obviously, things happen much faster thandescribed when down sizing.
Straight flight at full glide:The canopy is slightly faster at full glide than the same sized Stiletto, but has a much higher rateof descent. The Stiletto has a much flatter glide at full glide, with the Velocity pulling out in front.
Straight Flight in brakes:The control range on the Velocity is slightly longer than a Stiletto, but gets progressively shorteras you downsize. Like the Stiletto, the Velocity will really flatten out when flying in the brakes.Getting back from long spots using this technique is easy, as long as you get deep enough in thebrakes. The speed slows down noticeably, but the descent rate slows dramatically, which is thekey to performance on long spots upwind. Flying the Velocity in deep brakes is also an excellentmethod of creating more vertical separation from other traffic prior to landing.
Stall Characteristics:When using with careful control inputs, and recovering as smoothly as possible upon the firstindications of a stall, the Velocity has a slightly less radical stall compared to a same sizedStiletto. This is due to the fact the canopy initially bends in the middle less than the Stiletto at thestart of the stall, which makes heading control less difficult. This situation changes quickly,however, if the pilot does not take immediate action to recover upon the first indications of a stall.
As with any high aspect ratio elliptical canopy, the Velocity will become very difficult to keep onheading if the stall is allowed to develop fully, with line twists being a distinct possibility. Also,when recovering using too aggressive a technique, the Velocity is more likely to recover withclosed end cells, turns, slack lines, and rapid altitude loss, even if the initial stall was quite gentle.As with the Stiletto, radical stalling maneuvers are likely to result in an unrecoverable situation ona Velocity, so such maneuvers should not be attempted, especially during turns.
Turns from full glide:The Velocity tends to dive much more than a Stiletto during turns from full glide, even when theturns aren’t very radical. Gentle toggle turns from full glide create a similar flight path to gentlefront riser turns on a Stiletto. Though the Velocity doesn’t take much toggle movement to producea turn, it does require slightly more toggle input and pressure than a Stiletto, to achieve a giventurn rate. The ultimate turn rate of the Velocity is faster than a Stiletto. The Velocity builds up andretains a lot more speed in a turn from full glide than a Stiletto, in even a gentle turn. This is partlybecause of the steeper glide, but mostly because the Velocity airfoil is very cleanaerodynamically. If jumping a Velocity in a smaller size than you’re used to, be smooth and gentleon the toggles. Yanking a toggle down might cause such an abrupt turn that you get a three-ringslammed into the side of your head!
Braked turns in low speed flight:The turns flatten out a lot while in the slow flight mode, when compared to turns at full glide.However, you still need a healthy respect for your speed and rate of descent while in brakes,especially if you’ve down sized from your previous canopy. The ability to make turns in brakeswhile losing little altitude diminishes rapidly as you downsize any canopy, which is a good reasonto be cautious about making a big change in size.
Braked turns in high speed flight:If you’ve converted excess speed (generated from high-speed maneuvering) back into lift byusing brakes, very flat or even climbing turns are possible, and come in handy when you need alittle extra altitude. Using braked turns while entering and flying in the landing pattern is especiallyhelpful for conserving altitude to be used for additional safety margin on the last turn onto final.Lots of low turn accidents could have been avoided using this strategy. It is important tounderstand that rapid turns in braked flight will still develop tremendous airspeed and high G-forces, and a lethal rate of descent as well. If you’re spiraling toward the ground, going intobrakes won’t stop the rate of descent unless you stop the turn!
Harness turns:The Velocity turns very well using only harness movements, especially when the brakes are set.At higher wing loadings, prolonged harness turns become a fast spiral at the ground at extremelyhigh speed, whether the brakes are set or not. One should feel free to make heading changesusing harness movements, but blindly spiraling at high speed should be avoided, regardless ofthe control method, as it can be a danger to other traffic. The harness also works really well tofine tune your heading during the dive after letting up on the front riser.
Oversteer after turns:The Velocity will oversteer about as much as a Stiletto. Oversteer is the tendency for somecanopies to continue to turn after neutralizing the toggles, rather than immediately stopping onheading. The degree of oversteer a jumper feels is heavily influenced by any intentional (orunintentional) weight shifting during the turns. Some people allow themselves to get slung to theoutside of a turn, and they feel very little oversteer. Others lean into the turn, but don’t lean outduring roll out, and they will feel a lot of oversteer. Most people who have been flying highlyelliptical canopies for a while use harness movements to roll both into and out of a turn, inconjunction with toggles. Stopping turns using a little opposite harness movement alone worksreally well on the Velocity, for all but the fastest of turns.

Front riser turns:The Velocity will dive a great deal more than a Stiletto during a front riser turn. Be reallycareful of this on your first jumps! Riser pressure starts fairly low at the beginning, compared to aStiletto, but will increase steadily as the speed builds up. On long, carving front riser turns whereyou build up tremendous speed, a great technique is to start a turn using the riser, and thensmoothly transition to a harness turn as the riser pressure builds up.
Coming out of the dive:The radius of the Velocity’s natural pull out arc is much larger than that of the Stiletto,whether a riser or a toggle initiated the turn that started the dive. The difference will be even morenoticeable if you’re downsizing. Like most canopies, the Velocity will not pull out into level flightcompletely unless some brakes are applied. (It will pull out to a flight path that is slightly flatterthan the normal full glide angle, but will not as flatten out as much as the Stiletto.) For thesereasons, your first few approaches to landing should be very conservative, with very little turn, ifany. Start your last turn to final really high! Don’t be afraid to use the toggles if you find yourselflower than expected and need to start pulling out of the dive! There is a big difference betweenthe Velocity and the Stiletto in these regards. Compounding this difference is the fact that manyStilettos are set up incorrectly, with the control lines deflecting the tail even with the toggles up.This slows the canopy noticeably at full glide, tightens up the pull out arc a great deal, and maymake the Stiletto pull out completely into level flight with little or no need to use the brakes,something it really wasn’t designed to do. If you have a Stiletto set up like this, you can expect ahuge change when going to a Velocity, especially if you downsize. Also, get rid of the belief (ifyou have it) that you absolutely have to point the canopy straight at the ground to gain speed fora good landing. You can make some amazing swoops from a normal straight in approach on aVelocity—even without using front risers.
Setting up the Velocity for great front riser performance:For best front riser performance, it is important to install risers and toggles in the correctconfiguration to prevent canopy buffeting during riser maneuvers. The Velocity is very stable onfront risers, but its front riser performance is effected more by incorrect set up on risers andtoggles than a Stiletto. Two factors contribute to good riser performance:
First, the loops (or blocks) on the front riser should be as high up as possible, so that your handmust grab the riser at least four inches (10cm) above the height of the toggle position. This willhelp prevent too much tail being pulled down when front risering while the toggles are in yourhands (where they should be.) If you can’t reach up that high on the risers, get shorter ones.
Second, make sure there is sufficient slack in the control system. The control system shouldappear quite bowed at full glide, due to the drag of the lines. Having the control lines tied tooshort deflects the tail, which makes the initial toggle turn rate feel snappier, but reduces canopyspeed at full glide, reduces the speed and angle of the dive, and causes buffeting.
A kill line collapsible pilot chute is mandatory!This is a third factor that contributes to good front riser performance, but it goes much farther thanthis! It is very important to have a very dependable collapsible pilot chute on a Velocity. Due tothe very high speed that can be attained with a Velocity, the pilot chute must be collapsed afterit’s not needed, and it must stay collapsed. A bungee style collapsible is not recommended as itmay inflate when it’s not needed, and really change your flight path. This can be a problem onany small high aspect ratio canopy, and it’s not often mentioned. At best, it will cause a rapid lossof speed and change in flight direction. The worst scenario would be if the pilot chute suddenlyinflates during initiation of a radical front riser turn, or during an aggressive stall recovery. In thissituation, it is possible that the pilot chute could “stop” the center cell while the end cells continueto fly forward toward each other until they touch, causing obvious problems! Again, this canhappen on any high aspect ratio canopy, but it has a bigger effect of a high speed one. A kill linepilot chute avoids this possibility.
II. Landing the Velocity:General Impressions:(It is assumed that the prospective Velocity pilot is already very proficient at landing their presentcanopy, so this is not a “how-to” description!) Landing a Velocity is a real pleasure, once youbecome accustomed to the high approach speed! A Velocity can be slowed down much more atthe end of a landing than similarly sized canopies, even more than many canopies much larger.Most people don’t expect this, and put their feet down prematurely on their first Velocity landings,touching down faster than is necessary. Consistent landings, with minimum possible speed attouchdown time, are necessary before downsizing to a smaller Velocity. It is important to besmooth on the toggles while planing out, or the distance will be reduced, and the touchdownspeed will be higher than necessary.
Straight in landings, no front riser:Since the Velocity has a steeper approach angle than a Stiletto, a straight in approach feelssimilar to an approach made with a small amount of front risers on a Stiletto. Many aggressivepilots are afraid of straight in landings, but they can be accomplished quite well on the Velocity,even at very high wing loadings, if the technique is right. You have lots of excess energy, whichmakes it easy to level off and plane out for a long distance, if you get the technique and timingright. A big part of the technique is to avoid the common mistake of being “twitchy” on the togglesall the way down the final approach. This nervous habit scrubs off a surprising amount of speed,which certainly won’t help the flare! Harness movements are great for making minor coursecorrections smoothly.
Aggressive turning approaches:If you’ve already been doing them for hundreds or thousands of jumps, then your skills willprobably transfer to the Velocity. This assumes that you keep the down sizing within reason, andstart your approach much higher than you are used to. Really watch the altitude loss! This is avery dangerous game, one that is very unforgiving of error. Two ideas to consider: First, forthe front riser crowd, don’t think of a toggle turn as dangerous in and of itself. With the Velocity’sspeed and rate of descent, you may find yourself too low for a front riser turn, and a carvingtoggle turn may save your day. Second, a long carving turn initiated really high will build up muchmore speed than a radical snapping turn, so you’ll get longer swoops. Do remember, however,they take a lot of space and a great deal of altitude, and may not be appropriate in traffic. Theability to switch to a more mellow approach at any time is the mark of a great canopy pilot. Becourteous to the slower traffic.
III. Opening characteristics:Definitions:The first part of the opening force you feel is called the snatch force. It is the force you feel whenthe canopy first gets to line stretch. The second phase of the opening is called the snivel, duringwhich the canopy is overhead but the slider has not yet begun to travel down the lines. The thirdstage is the inflation, during which the slider travels down the lines and the cells finallypressurize.
Snatch force:The snatch force on the Velocity is equal to, or slightly higher than on a Stiletto, mainly due to theextra bulk and rigidity of the canopy. The brake setting is deeper as well. This is important forreducing the flying speed on opening, but it also contributes to a slightly higher snatch force. Wefeel the trade off for safety is worth it. Neat flaking of the canopy during packing will reduce thesnatch force.

Snivel:The snivel is comparable to that of a Stiletto, and much longer than that of a Sabre or aSilhouette. The snivel is considerably shorter when the jumper’s airspeed is higher, and snivelsconsiderably longer when going slower. The snivel is also affected by the degree of neatness inthe pack job.
Inflation:In general, the inflation is similar to that of a Stiletto, perhaps a little slower, with a similar peakforce. However, the opening may be slightly quicker if you have the habit of deploying at a higherairspeed, (primarily because the snivel will be shorter, so you will not have slowed down as muchbefore inflation.)
Heading control during opening:The Velocity is easier to keep on heading than a Stiletto. However, like on the Stiletto, even slightbody movements in the harness will cause a heading change, for better or worse. See theadditional note about heading control at the end of this document.
Factors that affect openings:The Velocity openings are more affected by differences in airspeed, pilot chute size, andneatness of packing than a Stiletto, with the Stiletto being more forgiving than the Velocity inthese respects.Neatness in packing helps make the openings more consistent. Give the canopy a good shake, toget the fabric to lay flatter before you flake between the line groups. Pushing the nose into thecenter of the pack job is definitely not recommended, as it promotes off heading openings.Either leave the nose straight, or fold each half toward the center without pushing it into thepack job. Take care to keep the C and D lines together in the center. The slider should bequartered evenly to the sides, front and back, with just a little sticking out in front of the nose. Youshould take care to keep the slider grommets firmly against the stops on the stabilizers, with theslider fabric well down inside the center of the pack job. When wrapping the tail around thecanopy, roll just enough tail to keep things under control, and don’t stuff that roll into the pack job!When bagging the smaller sizes, you may want to delete the first small fold in the slider area,(see the manual,) as the canopy will be too short to complete the rest of the folds!
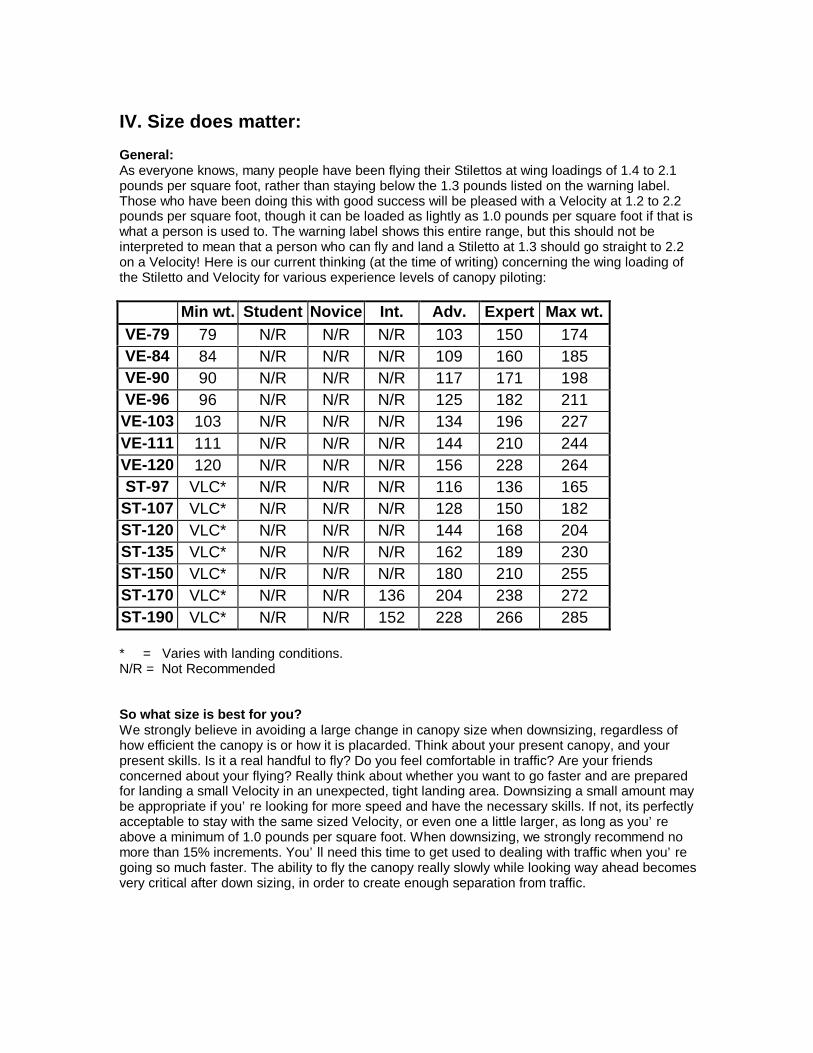
IV. Size does matter:General:As everyone knows, many people have been flying their Stilettos at wing loadings of 1.4 to 2.1pounds per square foot, rather than staying below the 1.3 pounds listed on the warning label.Those who have been doing this with good success will be pleased with a Velocity at 1.2 to 2.2pounds per square foot, though it can be loaded as lightly as 1.0 pounds per square foot if that iswhat a person is used to. The warning label shows this entire range, but this should not beinterpreted to mean that a person who can fly and land a Stiletto at 1.3 should go straight to 2.2on a Velocity! Here is our current thinking (at the time of writing) concerning the wing loading ofthe Stiletto and Velocity for various experience levels of canopy piloting:
Min wt. Student Novice Int. Adv. Expert Max wt.VE-79 79 N/R N/R N/R 103 150 174VE-84 84 N/R N/R N/R 109 160 185VE-90 90 N/R N/R N/R 117 171 198VE-96 96 N/R N/R N/R 125 182 211
VE-103 103 N/R N/R N/R 134 196 227VE-111 111 N/R N/R N/R 144 210 244VE-120 120 N/R N/R N/R 156 228 264ST-97 VLC* N/R N/R N/R 116 136 165
ST-107 VLC* N/R N/R N/R 128 150 182ST-120 VLC* N/R N/R N/R 144 168 204ST-135 VLC* N/R N/R N/R 162 189 230ST-150 VLC* N/R N/R N/R 180 210 255ST-170 VLC* N/R N/R 136 204 238 272ST-190 VLC* N/R N/R 152 228 266 285
* = Varies with landing conditions.N/R = Not Recommended
So what size is best for you?We strongly believe in avoiding a large change in canopy size when downsizing, regardless ofhow efficient the canopy is or how it is placarded. Think about your present canopy, and yourpresent skills. Is it a real handful to fly? Do you feel comfortable in traffic? Are your friendsconcerned about your flying? Really think about whether you want to go faster and are preparedfor landing a small Velocity in an unexpected, tight landing area. Downsizing a small amount maybe appropriate if you’re looking for more speed and have the necessary skills. If not, its perfectlyacceptable to stay with the same sized Velocity, or even one a little larger, as long as you’reabove a minimum of 1.0 pounds per square foot. When downsizing, we strongly recommend nomore than 15% increments. You’ll need this time to get used to dealing with traffic when you’regoing so much faster. The ability to fly the canopy really slowly while looking way ahead becomesvery critical after down sizing, in order to create enough separation from traffic.

Sizes and pack volume:The Velocity is available in seven sizes: 120, 111, 103, 96, 90, 84, and 79. The pack volume issimilar to a Stiletto that is one size larger. This varies from canopy to canopy according to,neatness of packing, material and humidity variations.
V. Summary:Remember, the comparisons described above assumed the canopies were sized the same.Downsizing even a little bit will really spice things up a lot. In other words, expect a Velocity 103to be faster and much more responsive in every way than a Stiletto 107, because it’s smaller. (Itwill slow down more, if you have the right technique, though.) The Velocity is really fun to fly, butwill not replace everybody’s Stiletto. Canopy model and size are a personal choice, and muchmore should go into the decision than the question, “Is it fast, and can I land it?” Choose yourcanopy while considering the information presented here, and reflecting on your presentexperience and desires. If you decide the Velocity is for you, we certainly hope you thoroughlyenjoy it as much as we have.
Additional notes on heading control during openings:Many people are very good at heading control on Stilettos or other highly elliptical canopies, butsome jumpers have considerable difficulty with this! Some of the solution lies in correct packing,but the largest part of the solution is in the body position throughout the entire opening, from pilotchute launch to collapsing the slider. Some people have a relatively simplistic concept of goodbody position, being nothing more than shoulders level during the pilot chute launch. In reality, it’smuch more.
The most crucial concept to learn is that the two halves of the canopy are being controlled (or notcontrolled) by you, through the two halves of your harness during the whole opening, especiallyduring the inflation. The center cell and slider are a big deflector of relative wind, spilling air intoeach half of the canopy. How you sit in the harness dictates how much air is deflected into eachhalf of the canopy, which will change how each side inflates. Since asymmetrical inflation of thecanopy can load the harness unevenly, it can change your body position. Therefore, maintaininggood body position is both a dynamic and an interactive process. Your body position is constantlyinfluencing the opening canopy, while the opening canopy is constantly influencing your bodyposition.
If the pack job and body position are good, you should feel a slight pulsing tension equally onboth sides of the harness during the time the lines are unstowing. The snatch force should feelfairly even on both sides. Both knees should drop simultaneously as you transition to a sittingposition at this time.
During the snivel, if things are square and evenly loaded, just sit there and pay attention to whatis happening through the harness as you scan for traffic. If, during the start of the inflation, oneside of the harness is lifting up harder, sit down a little harder on that side. (Don’t over do it.) Thecanopy is telling you it will likely turn away from the side that is loading harder. You areattempting to prevent that from happening by pushing down with just as much extra force it ispulling up. Doing this should prevent the canopy from tipping you to one side, which will eliminatethe turn, or at least reduce it. You will turn, however, if you let the canopy lift one side of theharness more than the other.
While some people have heading control problems because they simply “let it happen to them,” inthe way described above, other jumpers have just as much problem because they are stiff andrigid, wanting to dominate the opening, like a cowboy trying to break a wild horse. It’s aninteractive process, not a dominating one. The best solution is to go with the flow, being relaxed

and square in the harness, making harness inputs if or when the opening shows a subtle butnoticeable trend to load one side of the harness more than the other.
Remember that the proper harness movement is to press down a little on the side that is lifting.Do not try to twist or rotate in the harness against the direction of the turn! Some may call thatmovement “Body English,” but in reality it is one of the leading causes of line twists. If the canopyturns despite you’re efforts, go with the flow, turning with the canopy to prevent line twists.(Another cause of line twists is a tumbling bag, which you will likely feel right at line stretch. It isusually caused by a riser being caught under the low side of the reserve container during ashoulder low deployment. This can also be caused by a tight line stow very close to the connectorlinks. Leave the last line stow about 18” from the links.)
Performance Characteristics of the PD Vengeance
This document describes in detail the opening, flight and landing characteristics of the Vengeance (Airlocked nine-cell) in comparison to a similarly sized Stiletto, with an occasional reference to the Velocity. There are also some piloting tips, and a few hints on selecting the right options should you decide to order one. I. Flying the Vengeance: General Impressions: The Vengeance is an easy canopy to like, if you are already familiar with the current elliptical nine-cells. It is a noticeable step up in performance from a Stiletto, yet in some ways, it is easier to fly and land. Straight flight at full glide: The Vengeance flies at very close to the same speed and glide angle as a Stiletto of the same size. It is very common to see Stilettos in the field with brake lines set too short, however, making it fly in slight brakes even when the toggles are all the way up. In this case, the Stiletto would seem to have a slightly slower and more floaty glide. The Velocity glides much steeper than both canopies. Straight flight in brakes: The Vengeance feels very similar in brakes to a Stiletto, with the Vengeance having a slightly lower rate of descent and better glide angle. This glide makes getting back from long spots upwind easy, perhaps even easier than with the Stiletto. (Downsizing eliminates some or all of this advantage, however.) Straight flight on rear risers: The Vengeance has a flatter glide than a Stiletto on rear risers, and feels more rigid and efficient near the edge of the stall. However, you will actually find more useable performance in deep brakes (on either canopy) when the spot is far upwind. Stall characteristics: The Vengeance has a slightly less radical stall, and is slightly easier to keep on heading than a Stiletto of the same size, assuming you recover upon the first indication that a stall is occurring. While it is easier to keep on heading during stall recovery, it is more prone to surging forward than a Stiletto. Because the airlocks keep the canopy fully pressurized, it is ready to fly instantly upon raising the toggles. Therefore, only raise the toggles a small amount when recovering, or you will find yourself looking over the tail at the horizon! As with any high aspect ratio elliptical canopy, the Vengeance will become very difficult to keep on heading if a deep stall is allowed to develop. Line twists, closed end cells, turns, slack lines, line twists, and rapid altitude loss are all likely to develop, especially if the recovery is not carefully controlled. Radical stalling maneuvers are likely to result in an unrecoverable situation on a Vengeance, as with any high aspect ratio elliptical, especially when stalling during turns.
Turns from full glide: The ultimate turn rate on the Vengeance is faster than a Stiletto. Toggle pressure is similar on both canopies, and slightly lighter than a Velocity. The Vengeance dives a little more than a Stiletto during a turn, but less than a Velocity. It also builds up slightly more speed during aggressive turns than a Stiletto, and less than a Velocity. Braked turns in low speed flight: You can make a much flatter turn in the brakes compared to at full glide. As with any canopy, you lose much of this characteristic when downsizing. Braked turns in high speed flight: If you convert excess speed (generated from high speed maneuvering) back into lift by using brakes, very flat or climbing turns are possible. This Vengeance is even more capable than the Stiletto in this regard, because it has a higher maximum speed capability, and more float in brakes as well. Harness turns: The Vengeance turns nicely with harness movements alone. This is especially true when the brakes are set. Some jumpers may have a tendency to over control with brakes set, particularly on the smaller sizes. Make sure your harness is adjusted evenly on both sides, or you will create an unwanted turn. Oversteer after turns: The Vengeance will oversteer about the same amount as a Stiletto. Oversteer is the tendency for some canopies to continue turning after neutralizing the toggles. The degree of oversteer a jumper feels is heavily influenced by any intentional (or unintentional) weight shifting during the turns. Oversteer is minimized by rolling out of the turn with the harness upon raising the toggle. A slight opposite toggle input will also stop a fast turn quickly. If you’ve never flown a highly elliptical canopy before, this will take some time to get used to. Front riser turns: The Vengeance dives slightly more than a Stiletto of the same size, building up more speed in the process. This is more noticeable if you’ve downsized to a smaller size from your current canopy. Be ready to use toggles to pull out quicker in case you find yourself getting into the corner. The front riser pressure is much lighter than a Stiletto. Setting up the Vengeance for great front riser performance: It is important to install risers and toggle in the correct configuration to prevent canopy buffeting during front riser maneuvers. First, the dive loops (or riser blocks) should be as high as possible on the risers, so that your hand must grab the riser at least four inches (10cm) above the place where you would grab the toggles. (If you can’t reach up that high, get shorter risers.) Second, make sure there is enough slack in the control system. The control lines should appear quite bowed when at full glide. Having the control lines too tight kills a great deal of front riser performance, reducing the speed and angle of the dive, and causing buffeting. It also reduces full glide speed, and makes the canopy flight bumpier in turbulence, while reducing flare efficiency.
A collapsible pilot chute is mandatory: The kill line type is best, as it gives more consistent openings and stays collapsed during flight at any airspeed. An inflated pilot chute really kills flight performance and reduces flare effectiveness. II. Landing the Vengeance: General Impressions: The Vengeance is an absolute pleasure to land. It will swoop farther than the same sized Stiletto, and will slow down more at the end of the landing. Be smooth! Getting twitchy on the toggles during the approach will scrub off a lot of speed and potential flaring energy. Try to avoid uneven toggle movement, which causes a pronounced rolling from side to side during the flare and plane out. The following text assumes that you have figured out your landings on your present canopy. Straight in landings without front risers: The Vengeance feels very similar to a Stiletto of the same size during a straight in approach, but the flare is slightly more efficient, so it is easier to get a great landing. Pilots adapt quickly to the Vengeance’s ability to slow down more. Keep in mind the fact that you don’t need to point the canopy straight at the ground to build up enough speed to get a good landing. If your technique is good, you can perform great swoops and landings from a normal straight in approach without using front risers, even at a very high wing loading. Aggressive approaches: Aggressive turning approaches are similar to a Stiletto of the same size, with a little steeper dive and slightly higher top speed. If you’ve been doing such approaches for hundreds or thousands of jumps, you’ll find it easy to figure out the Vengeance, assuming you don’t get crazy on the downsizing. The Vengeance also has plenty of efficiency for carving level flight turns during the swoop. As with most canopies, a long carving turn initiated very high will build up more speed and give you a longer swoop than a radical snapping turn. III. Opening characteristics of the Vengeance: General: They open really nicely! To describe the openings, we need to agree on common language, so here are some definitions: The first part of the opening you feel, when the canopy first gets to the end of the lines, is called the snatch force. The second phase of the opening, when the canopy is overhead but the slider is still all the way up, is called the snivel. The third stage is the inflation, when the slider travels down the lines and the cells finally pressurize. Snatch Force: Snatch force is similar to a Stiletto, and less than that of a Velocity. It is adversely affected by using a pilot chute that is too large, by sloppy packing, or if you have excess airspeed at opening time. Snivel: The snivel is similar to a Stiletto, and is comparatively shorter when the jumper’s airspeed is higher.
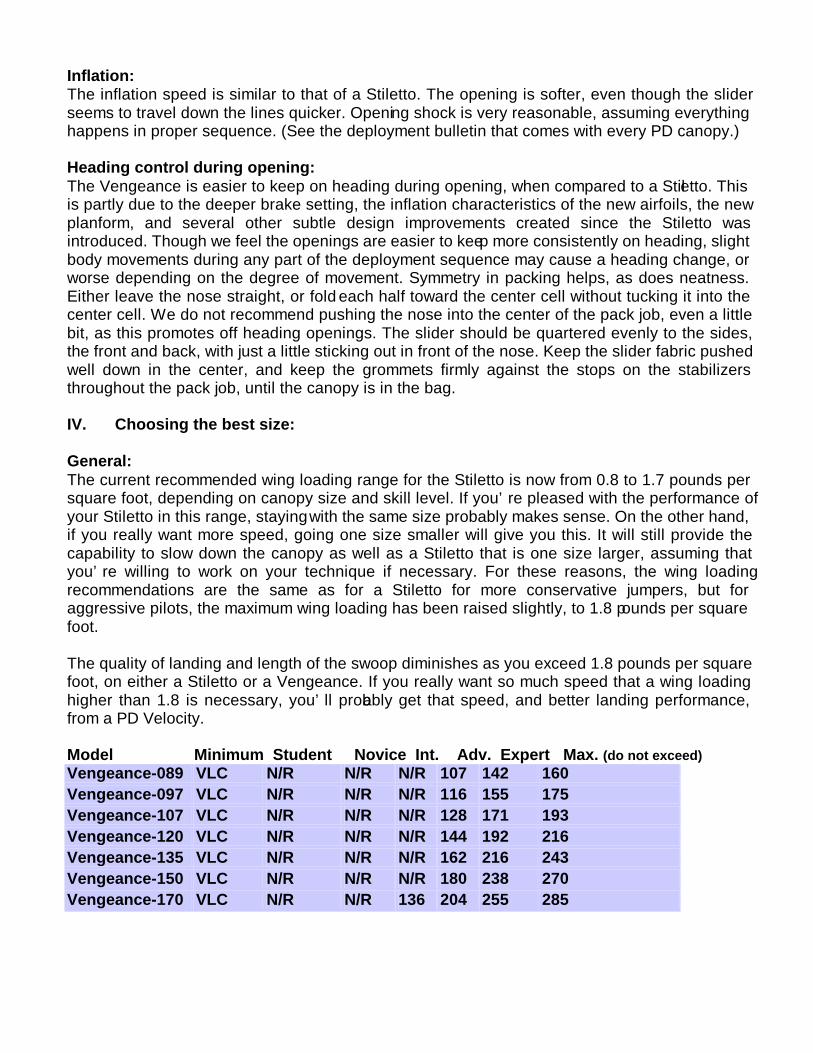
Inflation: The inflation speed is similar to that of a Stiletto. The opening is softer, even though the slider seems to travel down the lines quicker. Opening shock is very reasonable, assuming everything happens in proper sequence. (See the deployment bulletin that comes with every PD canopy.) Heading control during opening: The Vengeance is easier to keep on heading during opening, when compared to a Stiletto. This is partly due to the deeper brake setting, the inflation characteristics of the new airfoils, the new planform, and several other subtle design improvements created since the Stiletto was introduced. Though we feel the openings are easier to keep more consistently on heading, slight body movements during any part of the deployment sequence may cause a heading change, or worse depending on the degree of movement. Symmetry in packing helps, as does neatness. Either leave the nose straight, or fold each half toward the center cell without tucking it into the center cell. We do not recommend pushing the nose into the center of the pack job, even a little bit, as this promotes off heading openings. The slider should be quartered evenly to the sides, the front and back, with just a little sticking out in front of the nose. Keep the slider fabric pushed well down in the center, and keep the grommets firmly against the stops on the stabilizers throughout the pack job, until the canopy is in the bag. IV. Choosing the best size: General: The current recommended wing loading range for the Stiletto is now from 0.8 to 1.7 pounds per square foot, depending on canopy size and skill level. If you’re pleased with the performance of your Stiletto in this range, staying with the same size probably makes sense. On the other hand, if you really want more speed, going one size smaller will give you this. It will still provide the capability to slow down the canopy as well as a Stiletto that is one size larger, assuming that you’re willing to work on your technique if necessary. For these reasons, the wing loading recommendations are the same as for a Stiletto for more conservative jumpers, but for aggressive pilots, the maximum wing loading has been raised slightly, to 1.8 pounds per square foot. The quality of landing and length of the swoop diminishes as you exceed 1.8 pounds per square foot, on either a Stiletto or a Vengeance. If you really want so much speed that a wing loading higher than 1.8 is necessary, you’ll probably get that speed, and better landing performance, from a PD Velocity. Model Minimum Student Novice Int. Adv. Expert Max. (do not exceed) Vengeance-089 VLC N/R N/R N/R 107 142 160 Vengeance-097 VLC N/R N/R N/R 116 155 175 Vengeance-107 VLC N/R N/R N/R 128 171 193 Vengeance-120 VLC N/R N/R N/R 144 192 216 Vengeance-135 VLC N/R N/R N/R 162 216 243 Vengeance-150 VLC N/R N/R N/R 180 238 270 Vengeance-170 VLC N/R N/R 136 204 255 285
Should you downsize? If so, how much? If you don’t want more speed, don’t downsize. If you do want more speed, think carefully about the decision. Think about your current canopy. Is it a real handful to fly? Do you feel comfortable in traffic? Does the thought of a no wind day (or a downwind landing) intimidate you? Are your friends concerned about your flying skills and habits? Think about how you’ll handle an unexpected landing in a really tight area. Downsizing may be appropriate if you’re looking for more speed and have the necessary skills. If so, we recommend you don’t make more than a 15% size reduction. V. Sizes, pack volume, and other details: Sizes available: The Vengeance is available in the same sizes as the Stiletto except we’ve added a smaller size and eliminated the 190 size. (i.e. 89, 97, 107, 120, 135, 150, and 170) We may introduce a 190 later, if we receive lots of requests for one. Pack volume: The pack volume is very slightly larger than the same sized Stiletto. If your Stiletto is an easy fit into your container, a Vengeance of the same size will probably fit well. If it is a tight fit, you may need to either downsize or get a larger container. We’re in the process of sending demos to container manufacturers for sizing. Colors patterns: You can get any skin or rib in any color normally available, and each pair of airlocks in each cell can be a different color. We recommend choosing a slightly darker color for the airlocks, because it looks cool. (Its easier for us to build it that way too!)

STILETTO FLIGHT CHARACTERISTICS
The Stiletto will be described in comparison to the Sabre of similar size since it is a very popular high performance canopy that most experienced people have jumped. Both canopies are first class high performance canopies but with different handling characteristics. Some jumpers will prefer the handling of the PD-Stiletto, while other highly experienced jumpers will still prefer the more traditional high performance characteristics of the PD-Sabre. We suggest you make several jumps pulling above 10,000 feet to learn about the Stiletto. This is true even if you have thousands of jumps on high performance canopies. These notes certainly do not attempt to teach you how to fly this or any other parachute. They simply describe how we feel the canopy behaves. Full Glide Speed: The Stiletto is slightly faster than a Sabre, but not enough to make speed alone the deciding factor between the two. Performance is much more than speed alone! Glide Ratio at Full Glide: The Stiletto has a slightly flatter glide angle at full glide than the Sabre. This makes estimating the exact touchdown point a little more difficult than on a Sabre. Straight Flight in Brakes: The Stiletto can achieve a lower minimum rate of descent than a Sabre; however, both canopies have a minimum descent that is much lower than the descent rate at full glide speed. This is very important on bad spots when running with the wind in brakes to get back to the DZ. The flight in brakes is a fairly slow, very floaty, flat glide, rather than a steep, sinking glide. Straight Flight on Front Risers: The Stiletto tends to front riser to a higher airspeed, but not at quite as steep an angle as a Sabre (straight flight only). Riser pressure is similar to a Sabre at similar airspeeds. (Pressure builds up as airspeed increases.) Control Range on Toggles: The Stiletto has a slightly shorter control range than a Sabre. Stall Characteristics: The Stiletto has a slightly sharper stall than the Sabre. It has more tendency for one side to stall before the other when one toggle is even one inch past the other. When stalling and recovering using careful control inputs, the Stiletto recovers more quickly with less altitude loss, and heading is very controllable. However, when stalling and recovering radically, the Stiletto is more likely to recover with closed end cells, turns, slack lines, and rapid altitude loss. Radical stalling
maneuvers are more likely to result in an unrecoverable situation on a Stiletto, so such maneuvers are strongly discouraged, especially during turning flight. Toggle Turning Characteristics: The Stiletto definitely rolls into a toggle turn much faster than a Sabre, and one needs much less control input to start a fast turn. The Sabre immediately rolls out of a fast turn quickly when the toggle is released; however, the Stiletto will continue to turn as it slowly rolls out of a fast turn. This causes the new Stiletto jumper to have difficulty in stopping turns on a desired heading. This can be corrected by using a little opposite toggle to roll out of a turn. (The amount required depends on the rate of turn and how you are sitting in the harness.) When using this technique, turns can be stopped quickly and precisely on heading with little or no loss in airspeed, after some practice! The opposite toggle technique isn=t required on the Sabre and if used results in a loss of speed and floaty glide afterwards. Toggle Turns at Low Airspeeds: The turn rate at slow airspeeds is still quite fast on a Stiletto. There is much more control range available than is necessary to produce quick turns. Aggressive sashays can get out of control if extreme toggle movements are used. Line twists are possible at any airspeed if radical turns are pushed too far. Front Riser Turns: In general, the Stiletto has a slightly slower turn rate on front risers than a Sabre, but the airspeed and rate of descent build up faster. On both canopies, the initial turn rate is faster if the front riser turn is initiated from a slow braked flight. High Speed Maneuvering: From the above description, you can see that the Sabre is a little more Αground hungry≅ than a Stiletto when flown conservatively. However, the Stiletto tends to stay in a steep dive for a long time after several high speed turns. You can achieve a higher airspeed and rate of descent on the Stiletto than on a Sabre, so you may run out of altitude quicker than you expect. If you discover this, you may need to quickly use brakes, converting some airspeed back into lift, to gain back some lost altitude. This may open up more options for a safer approach and landing. Flying in Turbulence: As with the Sabre, the Stiletto flies best in turbulence when it is flown using smooth control inputs at a speed close to full glide. It is quite stable even in conditions that you probably shouldn=t be jumping in. Allow the canopy to bounce around in turbulence WITHOUT trying to make constant jerky toggle movements to compensate. Many people worsen the situation in turbulence by making aggressive toggle movements or by flying too slow. Flying too close to stalling speed can result in a gust induced stall or collapse. Use good judgement. Conservative Landing: An aggressive approach should not be required on either canopy, with proper technique. The Stiletto lands nicely when making a straight, full glide approach and carefully executing the flare. The result is similar to what can be achieved with a Sabre, but is a little less forgiving of poor technique than the Sabre, especially in the case of over controlling. It is particularly

less forgiving of errors in maintaining heading at the time of touchdown. It is also less forgiving of overflaring, since its stall is sharper. These errors commonly occur when toggles are unintentionally moved around when placing feet on the ground. The Αside gusts≅ that many people experience at touchdown are usually pilot induced, by unknowingly lifting the left toggle while placing the right foot on the ground. Sometimes the right toggle is pushed further as well. Even highly experienced jumpers occasionally have this bad habit! (Did you ever wonder why most Αgusts≅ push the jumper to the right?) Obviously, this will get you into trouble more quickly on a Stiletto, because the turn rate is much higher. A few people pump toggles on landing. This has never improved any landing on any parachute. If you are a pumper, get rid of that habit before trying a Stiletto. Swoop Landings: In general, the Stiletto will skim the ground farther than a Sabre on a similarly aggressive swoop. Since the Stiletto is less forgiving, it is not the canopy to use when learning the basics of swooping. We hope that Stiletto jumpers are rational enough to realize that swoops cannot be made safely in all conditions and on all jumps. Try to create safer situations for others when you reach the landing area. If you feel a swoop is required for a soft landing on a Sabre or a Stiletto, then perhaps you need some more practice... Pilot Chute: The above characteristics assume that a collapsing pilot chute is used. An inflated pilot chute greatly hinders performance, stability and landings, especially in turbulence. Packing: Keep it symmetrical! Roll packs will create some wild openings. Flat packing will be somewhat difficult due to varying chord length and the lack of packing tabs. When propacking, the nose is not rolled or stuffed in the center cell. To do either results in more off heading openings, long snivels and does not create a softer opening! Also, do not push the nose back inside the pack job, as this tends to create erratic openings. Openings: When propacked, the canopy opens very soft, and somewhat snively. We have designed it this way since most very experienced jumpers prefer it this way. It is somewhat sensitive to body position during inflation, but opens generally on heading. Body Position on Opening: Body position is important during the entire opening sequence. If you allow the inflating parachute to tilt your body in the harness, the canopy will respond by starting a turn while the slider comes down. If you want an on heading opening, do not allow this to happen! Some people learn to control this well enough to make the canopy open on any heading they choose. Others allow the inflating parachute to control their body position, making the heading a surprise. Pay attention to what the harness is telling you! Since the Stiletto is very responsive to harness movements during deployment, this canopy is not for everybody. Riser Configuration: For better front riser performance, the risers should have the dive loops quite high up the riser. This allows holding toggles while pulling risers without deflecting the tail. Slight
buffeting will occur if the toggles are deflected too much while front risering. The higher dive loops and/or more slack in the steering lines should eliminate the buffeting. Shorter risers (20" to 22") may work better, because the create the effect of lengthening the control range. (Actually the control range is lowered.) Shorter risers also make the slider easier to reach. Wing Loading: The Sabre is placarded at 1.1 lbs per square foot maximum weight. This means that 148 lbs is our maximum recommended weight for a Sabre 135, including gear weight. Obviously, the Sabre is capable of much higher wing loading in the right hands. The placard is intentionally quite conservative to help prevent problems with inexperienced jumpers getting in over their heads because their D-license says they are a Αmaster parachutist≅. Because the Stiletto is built for extremely experienced skydivers, the maximum weight placarded is 1.3 lbs per square foot. We don=t feel the Stiletto is more capable of high wing loadings, but rather we feel that the extremely experienced jumpers are more capable of flying at higher wing loadings. Both canopies have been frequently flown at wing loadings over 2.0 lbs per square foot for thousands of jumps at sea level, including straight in landings in no wind. We do not recommend such extreme loading and actually feel such extremes may compromise both safety and performance. Conclusions: As stated earlier, the Stiletto is not going to be everyone=s favorite canopy, as many highly experienced jumpers will still prefer the more traditional handling of the Sabre. Our impressions of the Stiletto are based on much testing and evaluation in house, along with feedback from others who have jumped pre-production canopies.The canopy has been very thoroughly and completely tested. We do not ask our customers to be unpaid test jumpers. We are very confident in the stability and performance of the canopy, and believe it is the highest performance elliptical canopy available today. Though the Stiletto is ready for the market, we feel the majority of the market is not ready for such a canopy. This is why we are restricting the release of the canopy in the skydiving community. We are interested in hearing your opinion about the canopy, and welcome any written feedback you are willing to send us. Should you write to us, please tell us how many jumps you have made on the Stiletto, as well as the other types of canopies recently jumped. Thank you for your interest; fly intelligently and safely. Sincerely yours, John LeBlanc Vice President Performance Designs, Inc.

PD Series Ram-Air Reserve Parachute Owner’s Manual Addendum
PRO Packing Instructions
This document is a supplement to the PD Series Ram-Air Reserve Parachute Owner’s Manual, Third Edition. It contains instructions for packing PD Series Ram-Air Reserve Parachutes using the PRO packing method. You will need to refer to the PD Reserve Owner’s Manual in order to follow the instructions in this addendum correctly. If the rig manufacturer specifies a packing method other than the ones shown, and the rig manufacturer authorizes its use for this specific parachute, you may decide which instructions to follow. Otherwise you must follow PD’s instructions. These reserves have been tested and found to work well using both the PRO Pack method shown here, and the Flat Pack method shown in section XVII of the PD Reserve Owner’s Manual. It is recommended that you follow the instructions for the packing method with which you are most familiar.
Performance Designs, Inc. 1 PD Series Ram-Air Reserve Owner's Manual Addendum
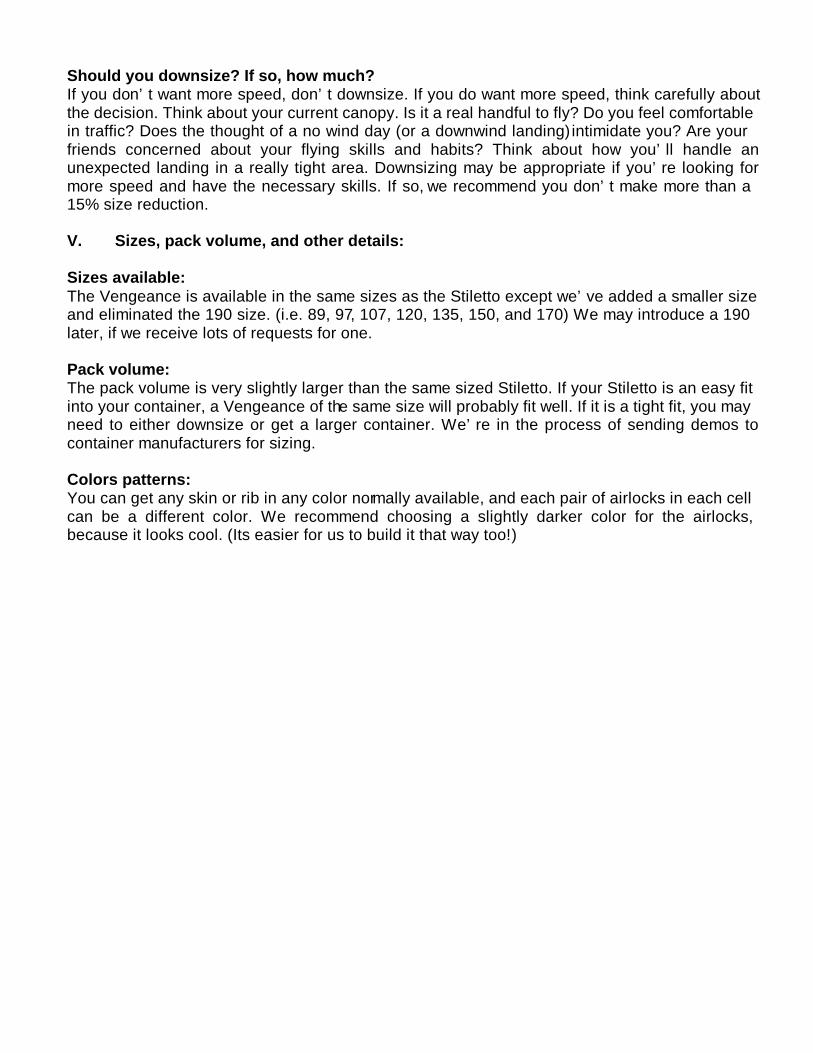
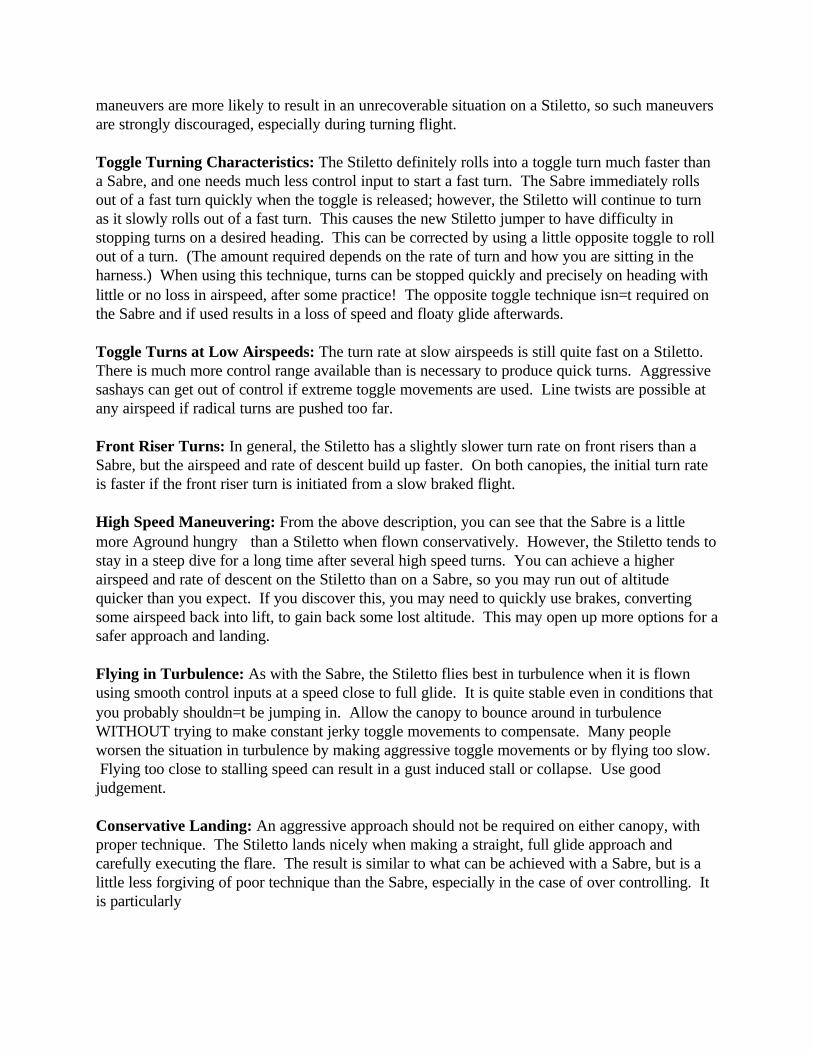
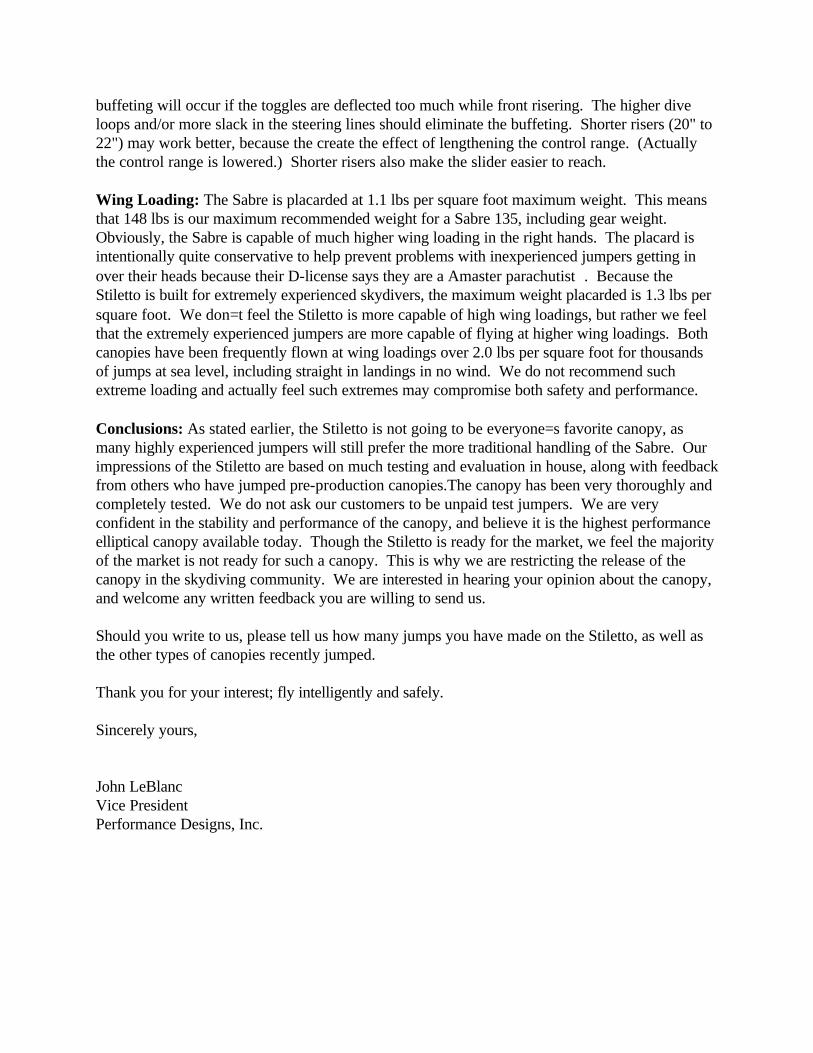
PRO PACK Inspect the canopy thoroughly before starting to pack it, following the inspection instructions described in section XIV of the PD Reserve Owner’s Manual. Check the line continuity, and ensure the canopy has been assembled on the rig correctly. 1) Flake the canopy out on its side until all seven T seams (where the non-loaded ribs meet the top skins) are straight from leading edge to trailing edge as shown. Set the deployment brakes according to the rig manufacturer’s instructions. 2) Crouch next to the risers and face the canopy. Be sure there are no twists in the risers. Slip the fingers of your left hand between each left hand riser and between the left hand steering line and the risers. Do the same with your right hand. Slide your fingers up onto the lines as shown, grasping the lines below the slider. 3) Start moving up the lines, allowing them to slide between your fingers. Push the slider ahead of you until you reach the bottom of the canopy. Carefully lift the canopy off of the ground. Make sure the lines are not twisted and the canopy is facing the correct direction. The nose openings should be facing the rig, and the tail should be farthest from the rig. Step outside of the lines and transfer the lines to one hand so that the left and right sides of the canopy hang at the same height.

Performance Designs, Inc. 2 PD Series Ram-Air Reserve Owner's Manual Addendum
4) Starting with the end cell nearest your legs, begin flaking the nose of the canopy. Pull each cell completely out, and keep it in your hand. Then, pick up the next, taking care not to miss any until all seven cells are in your hand. When you have the entire nose flaked, tuck it between your knees and hold it there 5) Clear the stabilizers. Flake the material between each line group out toward the stabilizers, keeping the line groups stacked together in the middle of the pack job. Clear the tail, flaking the material between each steering line toward the outside of the pack job. The diagram at right shows the correct organization of the canopy after step 5 is completed. The leading edge will be closest to your body, and the trailing edge will be farthest away from you. When looking straight down into the canopy from above, it should resemble this diagram. Note: to improve clarity, the slider is not shown.
Trailing Edge (Tail)
Leading Edge (Nose)
A Lines
B Lines
C Lines
Control Lines
D Lines
Material between lineattachments (onlyloaded ribs are shown)

Performance Designs, Inc. 3 PD Series Ram-Air Reserve Owner's Manual Addendum
6) Hold the canopy parallel to the floor with the nose facing down as shown. Continue to hold the lines in one hand while using your free arm to support the canopy fabric. While maintaining even tension on the lines, gently place the canopy back down on the floor or packing table with the nose facing down. 7) Starting on the right side of the canopy, carefully lift the folds of material back towards the center of the pack job until the nose is exposed. Clear the three cells to the right of the center cell and flake this section of the nose toward the outside of the pack job. Note: references to the right and left sides are from the canopy pilot’s point of view.

Performance Designs, Inc. 4 PD Series Ram-Air Reserve Owner's Manual Addendum
8) Flake the material between the A and B lines away from the line channel in the center of the pack job. Be sure that all three T seams to the right of the center cell are neatly flaked.
9) Find the four bottom seams to the right of the center cell and flake them out toward the stabilizer. The bottom seams are where the loaded ribs meet the bottom skins. Make sure the right side B lines are grouped together and stacked neatly on top of the A lines. 10) Smooth out the fold between the A and B lines. Repeat steps 8 through 10 to flake the material between the B and C lines.

Performance Designs, Inc. 5 PD Series Ram-Air Reserve Owner's Manual Addendum
11) Flake the material between the C and D lines away from the line channel in the center of the pack job. Make sure the D lines are grouped together and stacked neatly on top of the A, B, and C lines. It is important to keep even tension on all the line groups throughout the remainder of the pack job. Pulling on the T seams directly above the line attachment points will help keep the lines straight and maintain the folds in the material. 12) Flake the material between the upper control lines toward the outside of the pack job, leaving the control lines stacked neatly on top of the A, B, C, and D lines. 13) Repeat steps 7 through 12 to flake and the left side of the canopy. Make sure the line channel in the center of the pack job is clear, as indicated by the arrow in the picture at right.
Performance Designs, Inc. 6 PD Series Ram-Air Reserve Owner's Manual Addendum
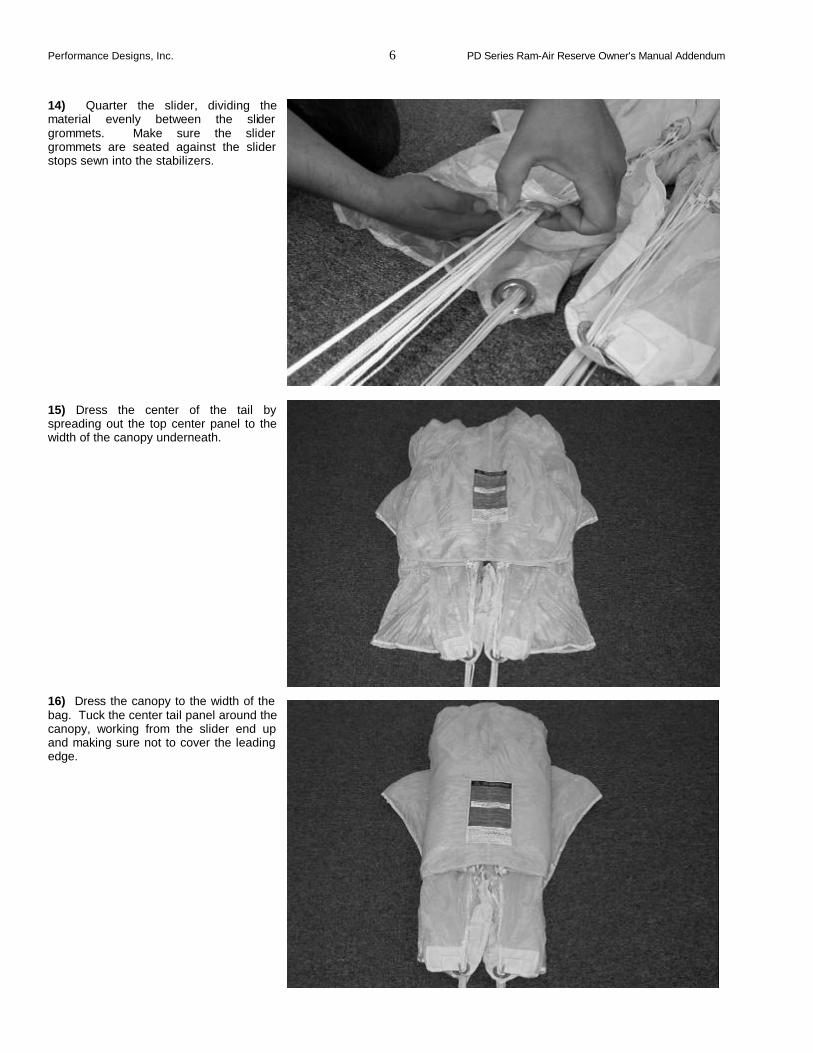
14) Quarter the slider, dividing the material evenly between the slider grommets. Make sure the slider grommets are seated against the slider stops sewn into the stabilizers.
15) Dress the center of the tail by spreading out the top center panel to the width of the canopy underneath.
16) Dress the canopy to the width of the bag. Tuck the center tail panel around the canopy, working from the slider end up and making sure not to cover the leading edge.

Performance Designs, Inc. 7 PD Series Ram-Air Reserve Owner's Manual Addendum
17) Carefully S-fold the nose under the canopy, making sure the leading edge remains exposed, but does not extend past the edges of the folded canopy. Proceed to step 15 of the Flat Packing instructions on page 20 of the PD Reserve Owner’s Manual.