Discover what AmplifyRP can do for you. · Discover what AmplifyRP can do for you. Assay Design...
17
Page 1 RP Amplify ® Discovery Kits Discover what AmplifyRP can do for you. Assay Design Help Book
Transcript of Discover what AmplifyRP can do for you. · Discover what AmplifyRP can do for you. Assay Design...

Page 1
RPAmplify®
Discovery Kits
Discover what AmplifyRP can do for you.
Assay Design Help Book

Page 3Page 2
Permitted Use of Product
The end-user of this product acknowledges and agrees that the materials and information provided in AmplifyRP test kits are for RESEARCH purposes only in the following Field of Use:
• Detection of plant pathogens that cause disease in crops
End-users are restricted from use of AmplifyRP Discovery kits outside the aforementioned Field of Use.
AmplifyRP Discovery kits are not to be used for commercial purposes or to provide services to any third party.
Storage of Product
AmplifyRP Discovery kit components should be stored at 4 °C to 6 °C upon receipt.
Discovery kit reaction pellets are provided in strips of 8 pellets contained inside a desiccated container. Before removing pellets from their desiccated containers, allow them to warm to room temperature. Unused pellets may be returned to the desiccated container and stored as recommended above.
Agdia warranties the activity of kit components for up to 12 months provided the above storage conditions are followed.
Warranty Information
Agdia warrants the activity of reagents provided in Discovery kits for up to 12 months provided storage recommendations are followed.
The end-user of these products understands and agrees that Discovery kits are experimental in nature and that Agdia does not make any warranty or guarantee that results will be as expected.
Table Contents
Permitted Use of Product 3Storage of Product 3Warranty Information 3AmplifyRP Overview 4AmplifyRP Formats 5AmplifyRP Primer Design 8
AmplifyRP Acceler8AmplifyRP Acceler8 Probe Design 10Special Design Guidelines 10Optimization of Primers and Probes 11Concentration Optimization 11Running AmplifyRP Acceler8 12Using the Amplicon Detection Chamber 13
AmplifyRP XRTAmplifyRP XRT Probe Design 16Special Design Guidelines 16Optimization of Primers and Probes 17Concentration Optimization 17Running AmplifyRP XRT 18
Other Assay ConsiderationsSample Extraction 20Multiplexing 20Frequently Asked Questions 21
Ordering InformationOrdering AmplifyRP Products 23
Page 5Page 4
AmplifyRP Overview
AmplifyRP is a rapid isothermal nucleic acid amplification and detection platform that is based on patented Recombinase Polymerase Amplification (RPA) technology.
AmplifyRP can achieve similar sensitivity and specificity to that of PCR based testing methods, but has some clear advantages. Unlike PCR, AmplifyRP testing formats do not require thermal cycling. The entire amplification process is completed at a single operating temperature (39°C) using a portable hot block or fluorometer.
Additionally, AmplifyRP does not require any nucleic acid purification steps. Crude sample extracts can be prepared using a simple extraction buffer and can be tested directly. This makes the testing process very simple and saves the end-user valuable time.
Amplification products may be detected at end-point or in real-time depending on the desired format.
AmplifyRP Formats
AmplifyRP is available from Agdia in two different formats, Acceler8 and XRT. The format you choose will depend on how you ultimately want to visualize your results and will also dictate how you design your probe(s). Each AmplifyRP Discovery kit will include lyophilized reaction pellets that contain all the reagents necessary to amplify DNA. The end-user needs only to supply suitable primers and probes for their target of interest. If planning to amplify RNA the addition of reverse transcriptase to each reaction will also be necessary.
Both formats of AmplifyRP share these common features:
• Crude sample extraction. Mesh extraction bags with buffer are very convenient for this purpose, depending on your sample type.
• Rapid (10 to 20 minutes) amplification at a constant temperature (39°C).
AmplifyRP Acceler8 is formulated to allow an end-point detection of amplified products using a lateral flow strip. This lateral flow strip is housed inside an Amplicon Detection Chamber that is specifically designed to prevent the escape of amplified products and thereby also prevent laboratory contamination.
A small portable heat block is also available from Agdia for end-users that desire an on-site option for amplification steps.
AmplifyRP XRT is formulated to allow real-time detection of amplified products. XRT reaction pellets contain Exonuclease III which will process suitably designed probes during the amplification step and produce a real-time read out much like a real-time PCR.
Portable, battery operated, fluorometers are available which enable on-site, real-time detection.


RPAmplify®
Discovery Kits
PRIMER DESIGN CONSIDERATIONS

Page 8
AmplifyRP Primer Design
At the outset, it should be noted that the technology used in the AmplifyRP® platform requires selection of opposing primers that are distinctly different from the type used in conventional and real-time PCR. Typical primers designed for PCR generally do not function in an AmplifyRP® reaction.
There are no hard and fast rules when designing optimal primers for AmplifyRP® reactions. Therefore, it is suggested that between 5 and 10 primers for each of the forward and reverse orientations be chosen. Consideration should be given to the following characteristics. However, other than the minimum length, no single item should disqualify a potential primer.
• It is preferable that the size of the amplicons produced be 200bp or less.• AmplifyRP® primers typically are 30 to 35 nucleotides long. They can be longer.
Shorter oligonucleotides are bound less efficiently by the recombinase.• Long strings of guanines at the 5’ end can be detrimental while cytosines, or
possibly just pyrimidines may be beneficial. A “G/C clamp” at the 3’ end may also have a positive effect.
• The GC content should be between 30% and 70%. But, Tm is not a factor in AmplifyRP® chemistry.
• Long strings of repeated bases as well as excessive numbers of short repeats should be avoided if possible.
• As with PCR, sequences that could contribute to primer-primer interactions, hairpins, and secondary structure are undesirable. This can affect the sensitivity of the assay by competing for resources in the reaction.
Primer design considerations are the same for XRT and Acceler8. However, the Acceler8 format requires that one of the primers be labeled at the 5’ end with a biotin. The choice of which primer is determined by the orientation of the Acceler8 probe, as described in the following section.

Probe Design Considerations&
Assay Protocol
RPAmplify®
®

Page 11Page 10
Optimization of Primers and Probes
1. Screen all combinations of forward primers, reverse primers, and probes. This can be done using either a full matrix or by sequential rounds of pairings. For example, all forward primers could be screened against a single reverse primer. The best forward candidate could then be screened against all reverse primers. The best reverse candidate could then be rescreened against the best Forward primers as a check.
2. When performing these initial screens, use standard AmplifyRP primer and probe concentrations (Acceler8 primers at 420nM, Acceler8 probe at 120nM) to test each combination of oligos using a positive control at concentrations both above and near the desired limit of detection.
• Determine which primer/probe combination(s) demonstrate the greatest sensitivity/specificity.
• Check for improved signal intensity at the test line.• Select the primer/probe combination(s) that gave the best results with
respect to the above criteria.• Confirm there is no hook effect at high concentrations of target that could
cause false negatives.
Concentration Optimization
1. Optimize primers and probe concentrations in the AmplifyRP reaction. The suggested ranges for optimization are between 150nM and 600nM for primers and between 50nM and 150nM for probes.
• Check for improved sensitivity and no change in specificity.• Test for improved signal intensity.
2. If the optimized primers and probe set does not meet the acceptable limit for sensitivity/specificity, redevelopment of gene target and/or primer sequences may need to be done.
3. If the optimization meets or exceeds the acceptable sensitivity/specificity then move forward.
AmplifyRP Acceler8 Probe Design
Probes intended for use with AmplifyRP® Acceler8, while similar to those used with the XRT kits, have different compositions due to the fact that they are intended to be detected via a “sandwich assay.” These probes are simpler and have fewer design constraints. They consist of an oligonucleotide homologous to the target sequence into which is incorporated a 5’-antigenic label (typically FAM), an internal abasic nucleotide analogue (THF), and a polymerase extension blocking group (such as a C3-spacer) at the 3’ end.
An AmplifyRP® Acceler8 reaction is comprised of the probe, as described above, flanked by two opposing primers. The primer in the opposite orientation to the probe is labeled at the 5’ end with a biotin. The reaction also contains the DNA repair enzyme, Endonuclease IV (nfo). Once the primers bind and amplification begins, the probe can bind to the initial product. The nfo recognizes the mismatch created by the THF residue and clips the probe at that site. This has the effect of unblocking the part of the probe 5’ to the THF residue, creating a 5’ FAM labeled primer that can amplify a smaller target in conjunction with the biotinylated primer. Just like in PCR, the smaller amplicon is preferentially copied and the majority of the final product is a piece of DNA dual labeled with FAM and biotin. Dual labeled amplicons can be detected using the AmplifyRP Acceler8 detection chamber.
Special Design Guidelines
• The probe should be 46-52 nucleotides long. At least 30 of the nucleotides are placed 5’ to the THF site. At least 15 are located 3’ to it.
• The THF residue replaces a nucleotide in the target region. It is not an addition to the target sequence.
• Sequences that may cause hairpins and secondary structure are undesirable. Possible interactions between probes and primers, such as probes and opposing primers that overlap, should also be avoided. This can affect the sensitivity of the assay by competing for resources in the reaction.
It may be necessary to design and screen against more than one probe for optimal results.
Example Probe:
5’Fam-CTATGACATACTAAGAACGACGTCGTTAGTCTHTTGCTAGAGGTGGTA-C3-Spacer
THF Residue
Fluorophore

Page 13Page 12
Running AmplifyRP Acceler8
Materials Required but Not Provided
• Amplification primers (one labeled with a 5’ biotin label)• Amplicon detection chamber (ADC 98800/0001)• AmplifyRP Acceler8 probe for detection• Portable heat block (ACC 00592)
PROTOCOL
1. For each sample, prepare a rehydration solution as follows:
• Rehydration buffer 5.9 µL• Primer A (10 µM) 0.42 µL• Primer B (10 µM) 0.42 µL• Acceler8 probe (10 µM) 0.12 µL• MgOAc (280 mM) 0.50 µL• Template 1.00 µL• Reverse transcriptase (optional - see below)• dH2O fill to 10 µL
NOTE: Reverse transcriptase (RT) should be added to the rehydration solution if testing RNA. The recommended concentration for RT should be 20 units per reaction for the Acceler8 format.
* The above volumes for primers, probe, and water are suggested starting points for test development. They may change once the test is fully optimized.
2. Vortex and spin the solution briefly. Transfer the entire 10 µL volume to a reaction pellet. Mix by pipetting up and down until the entire pellet has been resuspended.
3. Cap the reaction tube(s). Vortex and spin briefly 2 times. 4. Transfer the reaction tube(s) to a portable heat block and incubate for 20
minutes at 39°C.5. After incubation place the reaction into an amplicon detection chamber as
illustrated on the opposite page and clamp it shut. Allow to run for 20 minutes.6. At 20 minutes, interpret results.
WARNING
Reaction pellets are activated once MgOAc solution has been added, even at room temperature. It is recommended to proceed to the
incubation step quickly once the pellet has been rehydrated.
Using the Amplicon Detection Chamber
1. Open the foil pouch containing the Amplicon detection chamber. There are two pieces to the chamber as indicated in the figure to the right.
2. Add the unopened reaction tube to reaction apparatus as illustrated to the right.
Once the tube has been added, snap the apparatus shut which will immobilize the reaction tube.
3. Add the reaction apparatus to the detection chamber housing as indicated. IMPORTANT: The reaction tube should be facing toward the lateral flow strip, contained in the housing, during this step.
4. Push down on the handle of the detection chamber housing until it snaps shut. Wait 20 minutes and interpret results.
NOTE: The 20 minute incubation period in this step is a recommended starting point. This may be optimized to incubate for more or less time depending on the stringency of your assay.
5. Interpret Results
NEGATIVE = ONLY CONTROL LINE VISIBLE
POSITIVE = CONTROL AND TEST LINE VISIBLE
INVALID = CONTROL LINE NOT VISIBLE
+ -


Probe Design Considerations&
Assay Protocol
RPAmplify®
Page 17Page 16
Optimization of Primers and Probes
1. Screen all combinations of forward primers, reverse primers, and probes. This can be done using either a full matrix or by sequential rounds of pairings. For example, all forward primers could be screened against a single reverse primer. The best forward candidate could then be screened against all reverse primers. The best reverse candidate could then be re-screened against the best forward primers as a check.
2. When performing these initial screens, use standard AmplifyRP primer and Probe concentrations (primers at 420nM, probe at 120nM) to test each combination of oligos using a positive control at concentrations both above and near the desired limit of detection.
• Determine which primer/probe combination(s) demonstrate the greatest sensitivity/specificity.
• Check for improved onset of amplification and fluorescent signal.• Select the primer/probe combination(s) that gave the best results with
respect to the above criteria.• Confirm there is no hook effect at high concentrations of target that could
cause false negatives.
Concentration Optimization
1. Optimize primers and probe concentrations in the AmplifyRP reaction. The suggested ranges for optimization are between 150nM and 600nM for primers and between 50nM and 150nM for probes.
• Check for improved sensitivity and no change in specificity.• Test for improved onset of amplification and final fluorescent signal.
2. If the optimized primers and probe set does not meet the acceptable limit for sensitivity/specificity, redevelopment of gene target and/or primer sequences may need to be done.
3. If the optimization meets or exceeds the acceptable sensitivity/specificity then move forward.
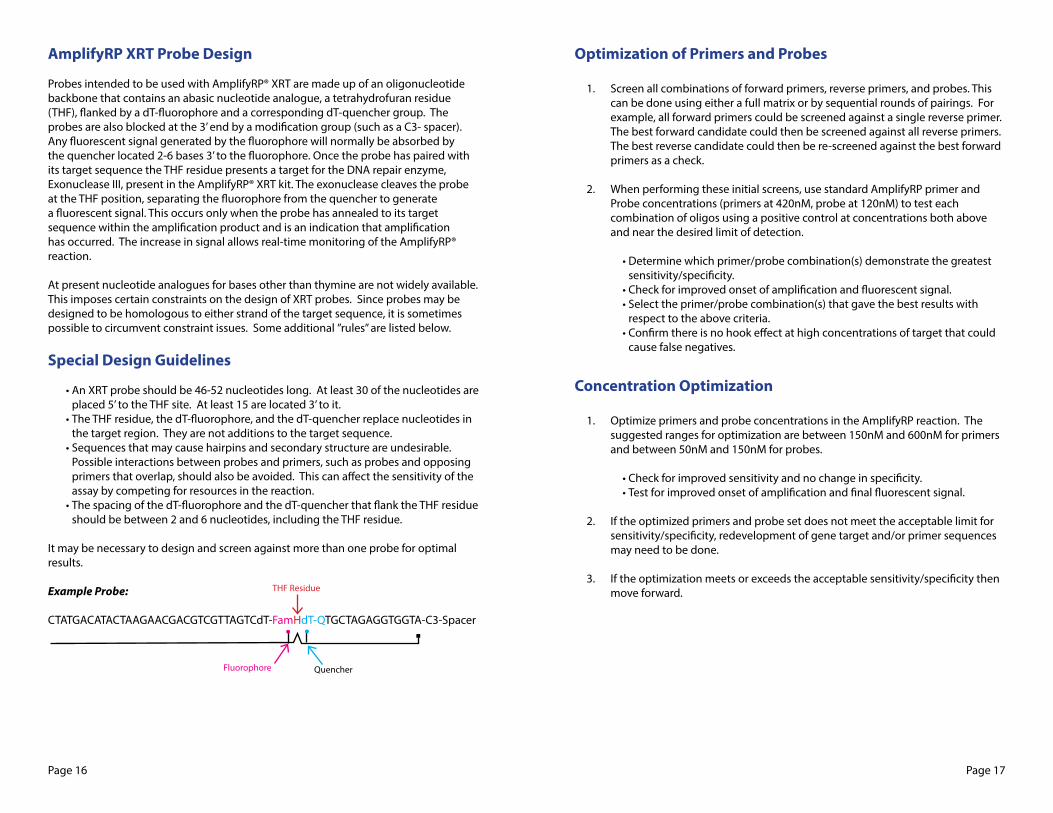
AmplifyRP XRT Probe Design
Probes intended to be used with AmplifyRP® XRT are made up of an oligonucleotide backbone that contains an abasic nucleotide analogue, a tetrahydrofuran residue (THF), flanked by a dT-fluorophore and a corresponding dT-quencher group. The probes are also blocked at the 3’ end by a modification group (such as a C3- spacer). Any fluorescent signal generated by the fluorophore will normally be absorbed by the quencher located 2-6 bases 3’ to the fluorophore. Once the probe has paired with its target sequence the THF residue presents a target for the DNA repair enzyme, Exonuclease III, present in the AmplifyRP® XRT kit. The exonuclease cleaves the probe at the THF position, separating the fluorophore from the quencher to generate a fluorescent signal. This occurs only when the probe has annealed to its target sequence within the amplification product and is an indication that amplification has occurred. The increase in signal allows real-time monitoring of the AmplifyRP® reaction.
At present nucleotide analogues for bases other than thymine are not widely available. This imposes certain constraints on the design of XRT probes. Since probes may be designed to be homologous to either strand of the target sequence, it is sometimes possible to circumvent constraint issues. Some additional ”rules” are listed below.
Special Design Guidelines
• An XRT probe should be 46-52 nucleotides long. At least 30 of the nucleotides are placed 5’ to the THF site. At least 15 are located 3’ to it.
• The THF residue, the dT-fluorophore, and the dT-quencher replace nucleotides in the target region. They are not additions to the target sequence.
• Sequences that may cause hairpins and secondary structure are undesirable. Possible interactions between probes and primers, such as probes and opposing primers that overlap, should also be avoided. This can affect the sensitivity of the assay by competing for resources in the reaction.
• The spacing of the dT-fluorophore and the dT-quencher that flank the THF residue should be between 2 and 6 nucleotides, including the THF residue.
It may be necessary to design and screen against more than one probe for optimal results.
Example Probe:
CTATGACATACTAAGAACGACGTCGTTAGTCdT-FamHdT-QTGCTAGAGGTGGTA-C3-Spacer
THF Residue
Fluorophore Quencher

Page 18
Running AmplifyRP XRT
Materials Required but Not Provided
• Amplification primers• AmplifyRP XRT probe for detection• Real-time fluorescent detection instrument (contact Agdia for a list of
recommended vendors)
PROTOCOL
1. Prior to setting up reactions, set up your fluorometer so that it is ready to accept reactions.
2. For each sample, prepare a rehydration solution as follows:
• Rehydration buffer 14.75 µL• Primer A (10 µM) 1.05 µL• Primer B (10 µM) 1.05 µL• XRT probe (10 µM) 0.3 µL• Template 1.00 µL• Reverse transcriptase (optional - see below)• dH2O fill to 22.75 µL
NOTE: Reverse transcriptase (RT) should be added to the rehydration solution if testing RNA. The recommended concentration for RT should be 50 units per reaction for the XRT format.
*The primer and probe volumes listed are recommended volumes when first testing new primers and probe. If the concentrations of primer and probe are changed be sure to adjust the volume of water for a final rehydration solution volume of 22.75µl.
3. To the cap of each reaction pellet, add 1.25µl 280mM Magnesium Acetate. 4. Transfer 22.75µl rehydration solution to the reaction pellet, for each sample.
Mix briefly by pipetting up and down.5. Cap the reaction tubes and spin briefly to add the magnesium acetate and “hot
start” the reactions. Vortex and spin briefly again.6. Place immediately into fluorometer and begin monitoring reaction(s).7. After 4 minutes of incubation remove the reaction(s) from the fluorometer.
Quickly mix, spin, and then reinsert the reaction into the fluorometer to continue monitoring results. Take to ensure the tubes are in their original positions and orientations.
8. Onset of amplification (if positive) will typically occur between 6 and 10 minutes for higher titer samples and 10 and 20 minutes for lower titer samples. This greatly depends on your primer and probe design and how well they have been optimized. Reactions should not be allowed to incubate for more than 30 minutes.
WARNING
Reaction pellets are activated once MgOAc
solution has been added, even at room
temperature. It is recommended to proceed
to the incubation step quickly once the pellet has
been rehydrated.

RPAmplify®
Discovery Kits
OTHER DESIGN CONSIDERATIONS

Page 21Page 20
Sample Extraction
AmplifyRP does not require nucleic acid purification steps to successfully amplify target DNA or RNA. Many common sample extraction buffers, such as those used in Agdia’s ImmunoStrip and ELISA test kits, are suitable for use with either AmplifyRP format. Physical extraction of plant tissue or insect vectors can be performed using any common laboratory technique such as macerating with a mortar and pestle and/or mesh extraction bags.
Below is a list of extraction buffers or solutions that Agdia has used successfully for AmplifyRP products. However, this list is not exhaustive and it is not guaranteed that these buffers will work for your specific application. It is recommended that several extraction buffers are evaluated during the development process in order to achieve optimal results.
Buffer or Solution Catalog Number Recommended Use
0.2N NaOH DNA pathogens
GEB3 ACC 00360 DNA or RNA pathogens
GEB4 ACC 00380 DNA or RNA pathogens
PBST ACC 00501 (20x Concentrate)ACC 00115 (Powder)
DNA or RNA pathogens
Multiplexing
Multiplexing is possible using AmplifyRP technology. It should be noted that, at present, only the XRT platform allows for discrimination of multiple targets. In the future, the same ability to discriminate will be available with Agdia’s Acceler8 Platform.
The same considerations applicable to designing primers and probes for a single test are relevant to multiplexing. Particularly, none of the primers and probes should interact directly with one another. It is quite possible that primers and probes from two successful individual tests will not “play well together”. Agdia does also strongly suggest that the final, total concentration of primers and probes not exceed the maximum recommended concentrations for a singleplex reaction, although that is ultimately up to the individual researcher.
Frequently Asked Questions
Will PCR primers and probes work for AmplifyRP assays?
No... primers and probes must be designed specifically for use in AmplifyRP assays. Please see the appropriate sections in this handbook for more information on primer and probe design. If additional guidance is needed, please contact Agdia.
How long do my primers need to be?
It is recommended that AmplifyRP primers be between 30 and 35 nucleotides long.
How far should my primers be apart?
Optimal results are typically achieved with amplicons being between 100 and 200 base pairs long. However, depending on your application, slightly longer or shorter amplicon lengths may be appropriate.
Can magnesium acetate be added directly to my XRT rehydration solution?
Yes... but one must keep in mind that reactions are activated immediately upon the addition of magnesium acetate. Agdia recommends dispensing the magnesium acetate into the reaction tube cap and spinning it down just before starting the reaction. This reduces the chance of initial, spurious, elevated background readings which could mask a positive response.
Can I make a master-mix?
Yes... if you wish to run multiple reactions at one time a master mix is recommended.

Page 23
RPAmplify®
Discovery Kits
Ordering Information
Ordering Information
AmplifyRP Acceler8 - Discovery Kits
Item No. Description Includes
ACS 98800/0048 AmplifyRP Acceler8Discovery Kit
Amplification reagents for 48 reactions
ADC 98800/0001 Amplicon Detection Chamber One (1) amplicon detection chamber
ACC 00592 AmplifyRP Portable Heat Block
One (1) heat block
AmplifyRP XRT - Discovery Kits
Item No. Description Includes
XCS 99200/0048 AmplifyRP XRTDiscovery Kit
Amplification reagents for 48 reactions
NOTE: AmplifyRP XRT requires a fluorescent measurement device that operates at a constant 39°C to work properly. Please contact Agdia for information regarding available devices and pricing.
CONTACT INFORMATION
Agdia, Inc.52642 County Road 1Elkhart, Indiana 46514 USA
Phone: 800-622-4342 (toll-free) or 574-264-2615Fax: 574-264-2153Email: [email protected]: www.agdia.com

m368