DIGITAL MUSIC MEDIA PLAYER USER MANUAL€¦ · DIGITAL MUSIC MEDIA PLAYER USER MANUAL. PRODUCT...
16
Scan the code to visit our official Website iletushi.com DIGITAL MUSIC MEDIA PLAYER USER MANUAL
Transcript of DIGITAL MUSIC MEDIA PLAYER USER MANUAL€¦ · DIGITAL MUSIC MEDIA PLAYER USER MANUAL. PRODUCT...
Scan the code to visit our official Website iletushi.com
DIGITAL MUSIC MEDIA PLAYERUSER MANUAL

PRODUCT FEATURES
BUTTON DESCRIPTION
1.2.4 Inch TFT LCD high-definition display;2.One-piece tempered glass panel, smooth and natural;3.Ultra-thin full metal body;4.Bluetooth 4.1 transmission, easy to connect to Bluetooth headset, Bluetooth speaker, or even your own vehicle;5.High-sensitivity capacitive touch button, perfect control experience;6.Professional recording function, one-click recording, comparable to any recording pens;7.Built-in speaker ;8.USB Type-C port, faster and more stable ;9.TF Card storage expansion, supports up to 64GB;10.Multi-funtions (support date, clock display, set alarm clock, FM Radio, Video, E-Book and Image)11.Support repeat, variable speed playback, learning easier;12.Support Mp3, wma, wav, ape, flac and a variety of music formats; 13.Support Lrc Lyrics and album cover display;Long play time, continuous playback reachable about 30 hours.

INSTRUCTIONS
Power on/offPress and hold the Power button 2s to turn on the player, and press and hold the Power button 2s to turn off the player.Press to turn off the screen, and press again to turn on the screen.
BatteryBattery will be fully charged in approximately 4 hours on a wall charger. If charging on a computer or other devices, the charging time varies as the input differs on each device.
Lock Mode Press the Power button to lock the device. The screen will be turned off and all buttons will be locked except the Power button and the volume buttons.
MemoryBulid-in 8GB internal memory and support up to 64GB memory card.
1.LCD monitor2.Speaker3.Back4.Up5.Previous/Rewind6.Play/Pause7.Down8.Menu button
9.Next/Fast-forward10.Recording button11.Volume Up12.Volume Down13.Microphone14.Power button15.Micro SD card slot16.USB Type-C port17.Line out port

PLAY MUSICPress the play button on the music interface to enter the song list, then press the up and down buttons to select the song you want to play. Press the play button to play and pause the music. Press the menu button to enter the music settings, press the up and down buttons to select the menu and press the play button to confirm.
1.Play mode•Sequential playback: All songs are played once in sequence.•Single repeat: The same song is played in a loop.•Repeat all: All songs are played in a loop.•Random play: The system randomly switches the track play.•Repeat settingRepeat mode: Select the repeat mode during playback and press the play button to confirm the entry start and end point settings.Short press to set the repeat start point A, short press the button again to set the repeat end point B, at this point the device begins to repeat.Press again to cancel the repeat, press the to reset the repeat.Number of repetitions: The number of A-B repetitions can be set (the system defaults 5 times)Repeat interval: You can set the interval for A-B repeat (system default 1 second)2. Sound settingsEqualizer: six different styles EQ Choice (Rock, funk, Hip hop, jazz, classical, electronic music)Variable speed playback: The speed of playback can be adjusted.

3. DeleteSelect Delete and press the play button to delete the currently playing song.
PLAY VIDEOPress the play button on the video interface to enter the video list, then press up and down Select the video you want to play by pressing the play button to play and pause.
Video format and specifications: Supports 340*320 AVI and AMV formats only.
FM RADIO•Press the play button to enter the radio (The MP3 player must be plugged in by an earphone. The earphone works as an antenna to listen to the FM radio.)•Press the menu button and then press the up and down buttons to select the menu and press the play button to confirm.•Select auto-tuning to perform automatic search and store of stations (frequency range: 87.5-108.0MHz)After the auto-tuning is completed, you can press the play button to switch the saved station.•FM radio recording: When you listen to the radio, press the Menu button and select “Start FM Radio Recording” to record the stations you like to listen to, and press and

hold the Record button to save. (Radio recording files can be viewed and played in the FM Recording menu)•You can select the normal band or the Japanese band by selecting “Radio band ” (campus Frequency band)•Press the back button to select "Yes" to exit the radio. Select "No" to convert to background playback.
PICTURE•Press the play button to enter the picture, then press the up and down buttons to select the picture and press the play button to start browsing the picture. •Image format: only supports JPG and BMP formats
EBOOK•Press the play button to enter the e-book, then press the up/down button to select the e-book file (TXT format). Press the play button to start reading the e-book.•Press the play button to turn pages automatically.•Press the Menu button and then press the Up/Down button to select the menu you want to set. Press the Play button to confirm.
FOLDERS•Press the play button to enter the folder view to view all the stored files.

•Press the up/down button to select the file you want to find and press the play button to confirm playback. •Press the back button to exit.
BLUETOOTH•Press the play button to enter the Bluetooth mode.•Turning on the Bluetooth: Press the up/down button to select the Bluetooth switch control and select “Bluetooth On” and press the play button to confirm.•Search for devices: Press Play/Pause to turn on the Bluetooth. Select the [Search for device] and press the play button to confirm, the player will now scan for Bluetooth devices. It is normal to take few seconds before successfully connected to your devices. When scanning, your other Bluetooth devices (e.g. Bluetooth headphones or speakers) should also be in scanning/pairing mode.
SYSTEM SETUP1.Power saving mode•Timed shutdown: After setting the timed shutdown,the audio player will automatically shut down when it reaches the specified time.•Idle shutdown: When the unit is not playing, and there is no operation status,

it will automatically shut down to save power when it reaches the set idle shutdown time. The unit offers six options: Off, 5 minutes, 10 minutes, 15 minutes, 30 minutes, 60 minutes.
2.Recording settings•Start voice recording: press the play button to enter “Start Voice Recording” and enter the recording mode. Press and hold the record button shortcut key to save the recording file ( you can also press and hold the record button shortcut key to record and save in any state of booting )•Recording library: Press the play button to enter the “recording library” to view the saved audio recordings. Press the up and down buttons to select the recording file and then press the play button to play the recording file directly .•Recording format: MP3, WAV•Recording settings: you can choose different quality recording bit rate effects and Avr Mode (After choose Avr mode, the microphone will pause recording when no external sound is detected, and continue recording after detecting the sound.)
3.Display setting•Backlight timer: After the specified time is set, the backlight will be automatically extinguished, which will save the screen saver or directly press the power button to enter the black screen mode.•Brightness: Select the backlight brightness level according to your own environment.
4.Date and timeThe time and date can be set in this function. Press the up and down buttons to adjust the digital scrolling, press the up and

down button to switch the options and press the play button to confirm the save settings.
5.Language Press the play button to enter the language setting and press the up and down buttons to select the language and press the play button to confirm. (English, German, French, Spanish, Italian, Japanese, Simplified Chinese, Traditional Chinese)
6.InformationAfter entering the information, you can check the software information and disk space status.
7.Screen protecting modeClose screen: black screen after screen saverDigital clock: The digital time and date will be displayed first after the screen saver.
8.Formatting deviceConfirm delete all the files inside the memory card after formatting.
9.Factory settingThe player can be restored to its original factory settings. At this time, any customer setting information is deleted and reset to the default state. (The card file will not be lost)
Video conversion tool usage1.Convert Video files into AVIThe tool supports converting audio/video files into advanced AVIformat file, which can be played by our MP4 Player. Video files

that able to be played by Windows Media Player, normally can be converted into AVI files by this tool.Tools application platformPlease use version 9.0 or above for operating system: Windows2000, Windows XP, Vista, or DirectX. You’d better not to use this tool under operating system of Windows98, and Windows Me.
Operation steps•Download the RAR of the conversion tool to your computer and extract it to the current folder. And then Run the installation tools, and finish installation as guided by Navigation. •After installation, open the installation folder, and find the tool file: double click it to open, then choose the tool file: and double click it to run; •Display interface:
① Choose source video file, click the button , which is on the right of “Source File”, and choose the right file you are to convert;
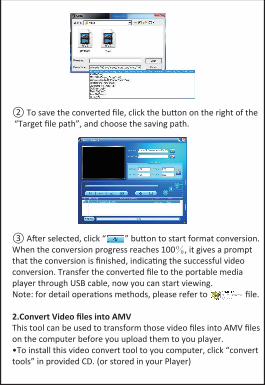
② To save the converted file, click the button on the right of the “Target file path”, and choose the saving path.
③ After selected, click “ ” button to start format conversion. When the conversion progress reaches 100%, it gives a prompt that the conversion is finished, indicating the successful video conversion. Transfer the converted file to the portable media player through USB cable, now you can start viewing.Note: for detail operations methods, please refer to file.
2.Convert Video files into AMVThis tool can be used to transform those video files into AMV files on the computer before you upload them to you player.•To install this video convert tool to you computer, click “convert tools” in provided CD. (or stored in your Player)

•Select “Setup” to start the install program, the software will automatically install to you computer.•After installation is done, open AMV converter tool on the PC
Noted: This program is used to convert video files into AMV format, currently only AMV format is supported.
•Run “AMV Convert Tools”, click to choose the folder where to save the AMV files, and then click to select the folder where the original files are. The original file will show in the file window once selected.•Select with highlight the unprocessed AMV files in the file window, the icon will be highlighted into . And then click icon and a dialog box will be shown.

•Choosing pixels of AMV to “160x128” and Frames per second to “middle”, then click OK to confirm.•Click to start converting.
•After conversion, the AMV files will play automatically for preview.•And now the converted AMV file is ready to transfer, you can simply copy and place those converted AMV files to the media player.Note: Only pixels in 160x128 can be supported.You can scan the qr code on the box to get the video conversion tool or visit our website iletushi.com to download.
SpecificationDimensions: 107*50*8mmProduct Weight:70gDisplay:2.4 inch (lattice 240*320 TFT HD LCD screen)Battery:500mAH/3.7V Lithium polymer batteryCharging specification:5V/1A inputCharging time:<4 hoursPlay time:30 hoursTF card expansion:≤128GBAudio format: APE、FLAC、MP3、WMA

Recording format:MP3、WAVVideo format:AVI、AMVTHD:0.047% Frequency Response Range:20Hz-20KHz
MATTERS NEED ATTENTIONThis product is a precision electronic product that requires special attention during use:1. Keep the product away from the electromagnetic environment; keep away from harsh environments such as excessive humidity and smoke;2. Please do not separate or modify the product;3. Do not use any corrosive or abrasive cleaner to clean the headphones;4. the device should not be immersed in water;5. Please do not use excessive force to squeeze the product;6. Please do not put the product in direct sunlight or in a fire-baked environment, please keep away from high temperature and low temperature environment;7. Please do not violently shake or strike the product;8. It is recommended to turn down the volume of the unit before using the headphones. After starting to listen, gradually increase the volume until it is suitable. In order to protect your hearing, please don't adjust the volume too high (the doctor pointed out that listening to a large volume for a long time will damage thelistener's hearing). When tinnitus occurs, turn down the volume or stop using it;9. Make sure that the product is safely placed to prevent accidental and falling children's touches;10. This unit USB and the computer are connected for too long, the body will heat up, under normal circumstances, the machine

Charging can be completed in 4 hours. After charging is recommended, please remove it from the USB interface. Do not charge it for too long.11. Do not disassemble the machine without authorization, otherwise the warranty will be lost. If you have any questions, please contact the dealer.12. Changes due to the performance and function of the product will be subject to change without notice. If the instructions are not in accordance with the actual product, please refer to the actual product;13. Do not use headphones when driving, riding, operating the machine, or working on a computer that requires attention to outside sounds;14. Battery charging precautions:A. The battery of this unit is a lithium polymer battery that can be recharged. In the first few charges, it must be charged for more than 4 hours, and each time you need to use up the battery's power and then charge it, you can extend the life;B. It is recommended to continue charging for half an hour after fully charged to ensure a longer playing time;C. Lithium battery must be replaced by customer service personnel, users can not replace it by themselves (Note: If the battery is improperly replaced, there is a danger of explosion, only replace it with the same type or equivalent type of battery); to protect the environment, please give the battery to theprofessional Institutional recycling;D. Battery life may vary depending on usage conditions and production time.15. Charging: This unit can only be charged through the USBinterface of the computer or by using the 5V1000mA adapter that conforms to the national standard. Whether the machine is

turned on or off, as long as you connect the product to the adapter, you can charge the product. During the charging process, The product has a certain temperature rise, which is a normal phenomenon;16. This product may be different from the actual content of the manual due to the software update. Please refer to the product purchased. The operation guide is for reference only.