DIGITAL GRAPHICS M/601/6630 LO1 - Know the hardware and software required to work with graphic...
26
Unit 27 DIGITAL GRAPHICS M/601/6630 LO1 - Know the hardware and softwar required to work with graphic images
-
Upload
lawrence-richardson -
Category
Documents
-
view
214 -
download
0
Transcript of DIGITAL GRAPHICS M/601/6630 LO1 - Know the hardware and software required to work with graphic...
Unit 27
DIGITAL GRAPHICS M/601/6630
LO1 - Know the hardware and softwarerequired to work with graphic images
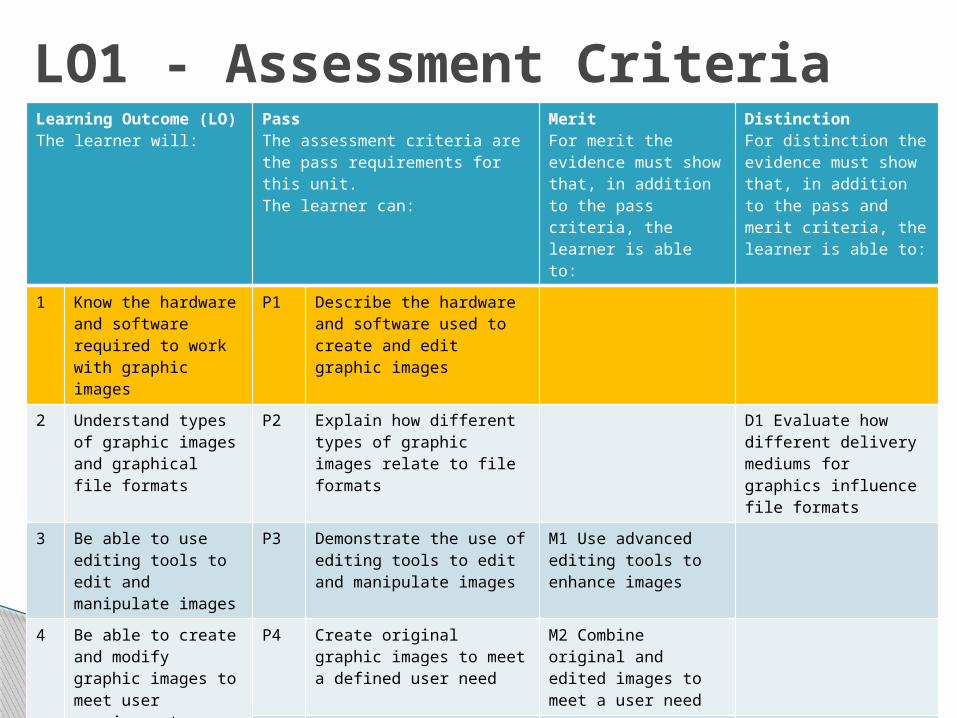
Learning Outcome (LO) The learner will:
Pass The assessment criteria are the pass requirements for this unit. The learner can:
Merit For merit the evidence must show that, in addition to the pass criteria, the learner is able to:
Distinction For distinction the evidence must show that, in addition to the pass and merit criteria, the learner is able to:
1 Know the hardware and software required to work with graphic images
P1 Describe the hardware and software used to create and edit graphic images
2 Understand types of graphic images and graphical file formats
P2 Explain how different types of graphic images relate to file formats
D1 Evaluate how different delivery mediums for graphics influence file formats
3 Be able to use editing tools to edit and manipulate images
P3 Demonstrate the use of editing tools to edit and manipulate images
M1 Use advanced editing tools to enhance images
4 Be able to create and modify graphic images to meet user requirements.
P4 Create original graphic images to meet a defined user need
M2 Combine original and edited images to meet a user need
P5 Modify images as a result of user feedback
D2 Evaluate how final images meet user requirements
P6 Explain the potential legal implications of using and editing graphical images
LO1 - Assessment Criteria
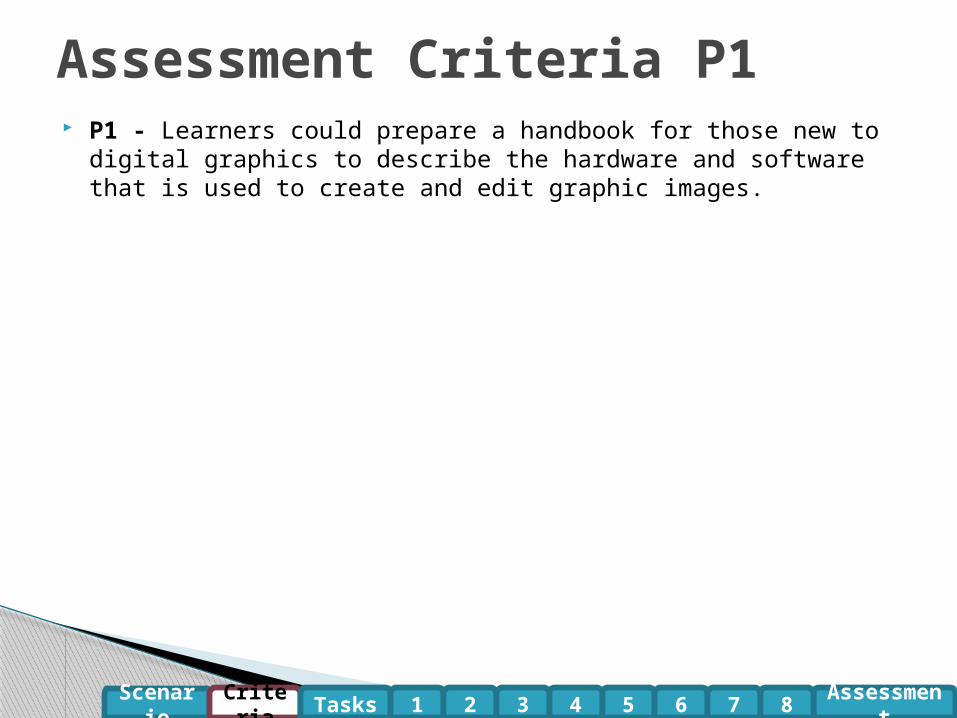
P1 - Learners could prepare a handbook for those new to digital graphics to describe the hardware and software that is used to create and edit graphic images.
Assessment Criteria P1
Scenario Criteria Tasks Assessment1 2 3 4 5 6 7 8
Both the hardware and software that is used in the creation and editing of computer graphics needs to be investigated. Learners should investigate the different input devices that allow images to be digitally created. They may work in groups and each be given different image capture methods to work with so they can feed back to the group as to ease of use and availability of images. Input may range from a digital camera, which they should be able to experiment with in terms of zoom, ISO, aperture f/stop, to scanners and stock images. (For example, from CDs given away with photography magazines to online stock images e.g. http://openphoto.net/ http://www.stockvault.net/.) They should look at different ways of outputting these images in terms of monitors with differing resolutions, and different printing methods, including size of images from A5 through to image output on plotters. It may be possible to see plotters in the centre’s design and technology department or by arranging a visit to, for example, an architect’s office that produces images in different sizes. Learners could look at the different hardware that can be used to manipulate images, they could compare PC to Mac and then differing processor speeds, graphic cards and memory within the computer.
Learners will be taught how to use different image manipulation packages and the tools that are available in them and be able to compare the packages and tools in each. The software will range from basic ones like Paint, freeware like Gimp, and then onto professional software like Photoshop and Fireworks (depending on the software the centre has available). This will allow the learner to compare and contrast the different software packages once they have been taught how to use them. Learners should be allowed to try out the software tools so they can understand the limitations of each package. They should be taught about different hardware and peripherals and which are best suited to different tasks. Please note – it is not necessary for centres to purchase bespoke software solutions; web demonstrations may be available, trial/demonstration copies of software may be available and the centre could generate some sample output from such packages.
LO1 Know the hardware and software required to work with graphic images
Scenario Criteria Tasks Assessment1 2 3 4 5 6 7 8
In the world of graphics there are just two ways of getting a suitable image, taking one and downloading one. In terms of taking an image there are multiple methods of inputting from the real world to the digital world, all with their merits and all have gone through their own levels of revolution in the last twenty years. Scanners have more depth and better resolution, cameras have become more publically available and device limited and graphic tablets have become more available with more depth and precision.
The biggest revolution has come in the form of price, all phones now have a camera, all scanners, even those with 4800dpi, cost around £30 or come free with the printer attached and Graphic Tablets like Wacom Bamboo are faster and more precise for less money.
This still does not take away from the old method of 35mm cameras and still images but this requires so much more work. Art packages like Serif can do as much now as a standard dark room, and there is little limit to the power of packages like Photoshop.
The only thing that has not been revolutionised in the digital age is digital zoom, cameras come with them but they pixilate whereas lens do not. What happens to the images after taking is then up to the user, manipulation is common, blurring, sharpening, colour changing, masking etc.
LO1 Know the hardware and software required to work with graphic images
Scenario Criteria Tasks Assessment1 2 3 4 5 6 7 8
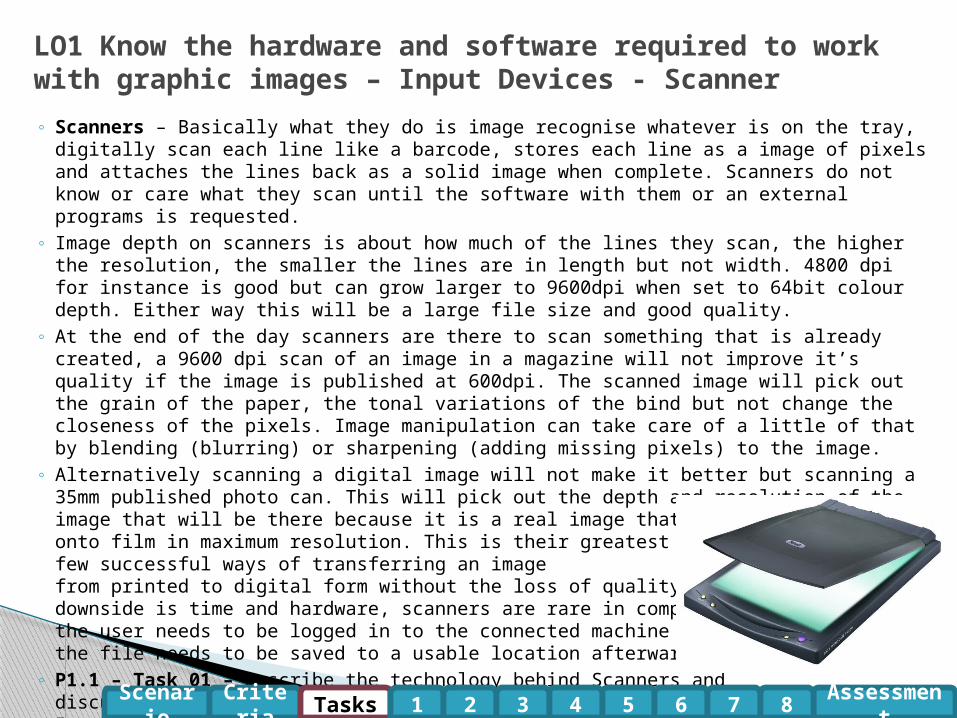
◦ Scanners – Basically what they do is image recognise whatever is on the tray, digitally scan each line like a barcode, stores each line as a image of pixels and attaches the lines back as a solid image when complete. Scanners do not know or care what they scan until the software with them or an external programs is requested.
◦ Image depth on scanners is about how much of the lines they scan, the higher the resolution, the smaller the lines are in length but not width. 4800 dpi for instance is good but can grow larger to 9600dpi when set to 64bit colour depth. Either way this will be a large file size and good quality.
◦ At the end of the day scanners are there to scan something that is already created, a 9600 dpi scan of an image in a magazine will not improve it’s quality if the image is published at 600dpi. The scanned image will pick out the grain of the paper, the tonal variations of the bind but not change the closeness of the pixels. Image manipulation can take care of a little of that by blending (blurring) or sharpening (adding missing pixels) to the image.
◦ Alternatively scanning a digital image will not make it better but scanning a 35mm published photo can. This will pick out the depth and resolution of the image that will be there because it is a real image that burns the picture onto film in maximum resolution. This is their greatest benefit and one of the few successful ways of transferring an image from printed to digital form without the loss of quality. The downside is time and hardware, scanners are rare in companies,the user needs to be logged in to the connected machine and the file needs to be saved to a usable location afterwards.
◦ P1.1 – Task 01 – Describe the technology behind Scanners and discuss the advantages and disadvantages of this technology in Image gathering.
LO1 Know the hardware and software required to work with graphic images – Input Devices - Scanner
Scenario Criteria Tasks Assessment1 2 3 4 5 6 7 8
◦ Digital cameras (e.g. zoom, ISO, aperture f/stop) – This is the most common method companies now use to get images from one format to another and with the development of removable medium like memory cards, the process has become easier and more usable.
◦ Digital cameras bacically are like the older SLR cameras, they open their apertures, control the amount of light and digitally imprint the image whereas SLR’s burn the image onto negative film.
◦ Digital cameras are rarely better than SLR’s in terms of quality of captured image resolution but there are cameras that are better. The digital images stored of Vancouver, Paris, Tokyo and London are 26gigapixels, the equivilent of 26,000 digital images in a single stored image.
◦ The biggest difference between SLR and Digital is the Zoom, SLR’s use lenses that allow the cameras to get distant information closer. Digital cameras do not. Lenses work like a telescope, they take the massive amount of information the eye can see and brings it closer using convex light focuses. Digital does not, it merely takes the image it seems through the lens and when zoomed, makes up the missing pixels by adjusting the sharpen width. This is flawed and only Digital Cameras with SLR lenses can manage these without the loss of definition.
◦ Despite the technology for storing the images being different, the technology of filtering and grabbing the images are the same for SLR and Digital. They both use ISO, aperture and f/stop settings to open the iris and allow light in.
LO1 Know the hardware and software required to work with graphic images – Input Devices - Camera
Scenario Criteria Tasks Assessment1 2 3 4 5 6 7 8
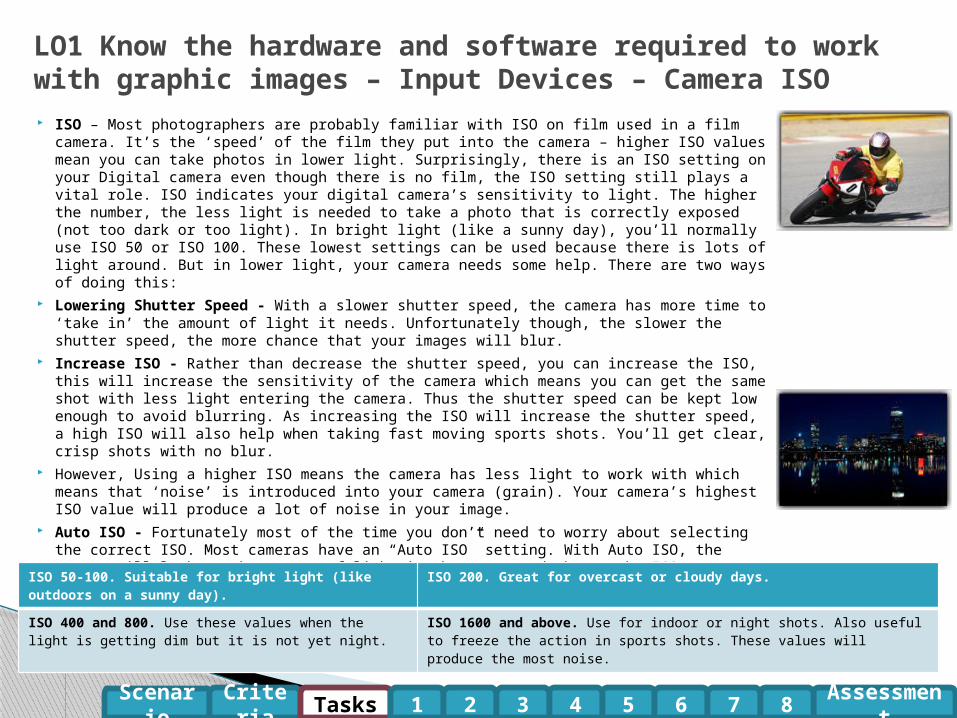
ISO – Most photographers are probably familiar with ISO on film used in a film camera. It’s the ‘speed’ of the film they put into the camera – higher ISO values mean you can take photos in lower light. Surprisingly, there is an ISO setting on your Digital camera even though there is no film, the ISO setting still plays a vital role. ISO indicates your digital camera’s sensitivity to light. The higher the number, the less light is needed to take a photo that is correctly exposed (not too dark or too light). In bright light (like a sunny day), you’ll normally use ISO 50 or ISO 100. These lowest settings can be used because there is lots of light around. But in lower light, your camera needs some help. There are two ways of doing this:
Lowering Shutter Speed - With a slower shutter speed, the camera has more time to ‘take in’ the amount of light it needs. Unfortunately though, the slower the shutter speed, the more chance that your images will blur.
Increase ISO - Rather than decrease the shutter speed, you can increase the ISO, this will increase the sensitivity of the camera which means you can get the same shot with less light entering the camera. Thus the shutter speed can be kept low enough to avoid blurring. As increasing the ISO will increase the shutter speed, a high ISO will also help when taking fast moving sports shots. You’ll get clear, crisp shots with no blur.
However, Using a higher ISO means the camera has less light to work with which means that ‘noise’ is introduced into your camera (grain). Your camera’s highest ISO value will produce a lot of noise in your image.
Auto ISO - Fortunately most of the time you don’t need to worry about selecting the correct ISO. Most cameras have an “Auto ISO” setting. With Auto ISO, the camera will look at the amount of light in the scene and change the ISO appropriately so that the shutter speed doesn’t get too slow.
ISO Values
LO1 Know the hardware and software required to work with graphic images – Input Devices – Camera ISO
Scenario Criteria Tasks Assessment1 2 3 4 5 6 7 8
ISO 50-100. Suitable for bright light (like outdoors on a sunny day).
ISO 200. Great for overcast or cloudy days.
ISO 400 and 800. Use these values when the light is getting dim but it is not yet night.
ISO 1600 and above. Use for indoor or night shots. Also useful to freeze the action in sports shots. These values will produce the most noise.
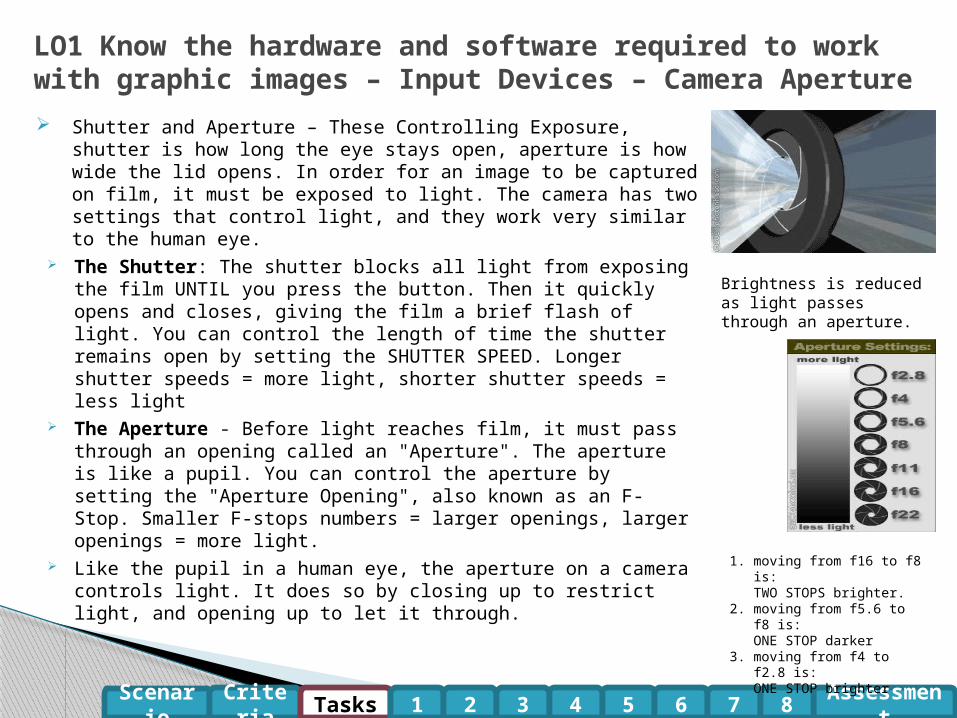
Shutter and Aperture – These Controlling Exposure, shutter is how long the eye stays open, aperture is how wide the lid opens. In order for an image to be captured on film, it must be exposed to light. The camera has two settings that control light, and they work very similar to the human eye.
The Shutter: The shutter blocks all light from exposing the film UNTIL you press the button. Then it quickly opens and closes, giving the film a brief flash of light. You can control the length of time the shutter remains open by setting the SHUTTER SPEED. Longer shutter speeds = more light, shorter shutter speeds = less light
The Aperture - Before light reaches film, it must pass through an opening called an "Aperture". The aperture is like a pupil. You can control the aperture by setting the "Aperture Opening", also known as an F-Stop. Smaller F-stops numbers = larger openings, larger openings = more light.
Like the pupil in a human eye, the aperture on a camera controls light. It does so by closing up to restrict light, and opening up to let it through.
LO1 Know the hardware and software required to work with graphic images – Input Devices – Camera Aperture
Scenario Criteria Tasks Assessment1 2 3 4 5 6 7 8
Brightness is reduced as light passes through an aperture.
1. moving from f16 to f8 is: TWO STOPS brighter.
2. moving from f5.6 to f8 is:ONE STOP darker
3. moving from f4 to f2.8 is:ONE STOP brighter
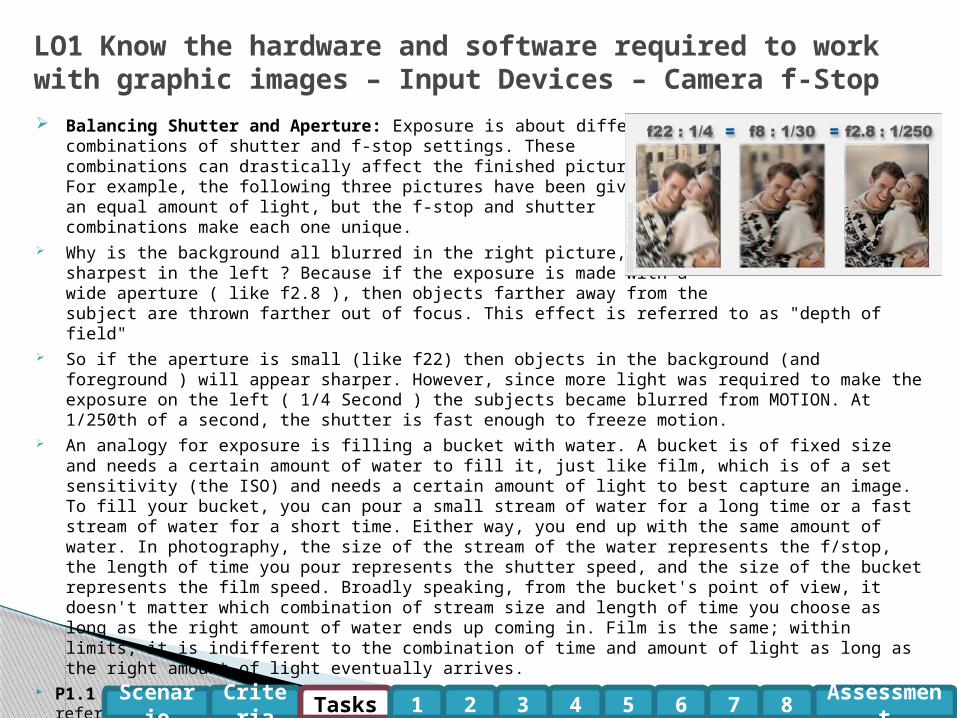
Balancing Shutter and Aperture: Exposure is about different combinations of shutter and f-stop settings. These combinations can drastically affect the finished picture. For example, the following three pictures have been given an equal amount of light, but the f-stop and shutter combinations make each one unique.
Why is the background all blurred in the right picture, and sharpest in the left ? Because if the exposure is made with a wide aperture ( like f2.8 ), then objects farther away from the subject are thrown farther out of focus. This effect is referred to as "depth of field"
So if the aperture is small (like f22) then objects in the background (and foreground ) will appear sharper. However, since more light was required to make the exposure on the left ( 1/4 Second ) the subjects became blurred from MOTION. At 1/250th of a second, the shutter is fast enough to freeze motion.
An analogy for exposure is filling a bucket with water. A bucket is of fixed size and needs a certain amount of water to fill it, just like film, which is of a set sensitivity (the ISO) and needs a certain amount of light to best capture an image. To fill your bucket, you can pour a small stream of water for a long time or a fast stream of water for a short time. Either way, you end up with the same amount of water. In photography, the size of the stream of the water represents the f/stop, the length of time you pour represents the shutter speed, and the size of the bucket represents the film speed. Broadly speaking, from the bucket's point of view, it doesn't matter which combination of stream size and length of time you choose as long as the right amount of water ends up coming in. Film is the same; within limits, it is indifferent to the combination of time and amount of light as long as the right amount of light eventually arrives.
P1.1 – Task 02 - Describe and Compare the technology behind Digital and SLR cameras with reference to ISO, Aperture and f-Stop and discuss the advantages and disadvantages of this technology in Image gathering.
LO1 Know the hardware and software required to work with graphic images – Input Devices – Camera f-Stop
Scenario Criteria Tasks Assessment1 2 3 4 5 6 7 8
Graphic tablets – To be clear these are different from handheld tablets and are used in the graphic industry as a more precise replacement for a mouse. Smaller ones like Wacom Bamboo are used for brush control and are sensitive to the pressure the user places on the tip against the tablet. More complex and larger tablets allow the user to define keys for shortcuts. The newer ones have built in sensitive screens with a replacement for the VDU for more precision control.
“But I can do everything I need with a mouse.” Everything on a graphics tablet in an art package can be done with a mouse but Tablets are for those who can draw better with a pen or pencil. They are pressure sensitive for heavier control and can be held like a pencil. Buttons on them act like left and right mouse clicks but can be programmed.
Think how difficult it is to draw a sketch with a mouse, all the lines will be of similar thickness and for those who are right handed, line shades will be done from left to right or vice versa. Try drawing a curved line from right to left with a mouse.
Graphic tablets get even more useful when it comes to Architectural visualisation and 3D modelling, point to point line drawing and zoomed in detail for pressure point accuracy is what makes them a valuable tool for artists and designers.
P1.1 – Task 03 - Describe and Compare the technology behind Graphics Tablets and discuss the application, advantages and disadvantages of this technology in Image creation and manipulation.
LO1 Know the hardware and software required to work with graphic images – Input Devices – Graphic Tablets
Scenario Criteria Tasks Assessment1 2 3 4 5 6 7 8

There are 2 ways of outputting work on computers for the user to see in preview, work-in-progress or in finished form. These are called Soft Copy and Hard Copy. Both forms have their uses and both have their different quality standards to consider.
Monitors have developed over thirty years from Monochrome 12” to high definition Flat Screens. But the biggest revolution is not their size, which can be quite impressive, or the technology to have multiple monitors, which is quite useful, but the resolution, the DPI and the controllers to push the display faster to manage the colour depth and resolution.
They say that a monitor is only as good and the graphics card that drives it, the better the card the more depth the monitor can manage. Up to a point, then it just handles the information faster.
The standard resolution for a monitor is 800x600, 800 pixels across by 600 high. Most monitors now have settings to push that higher, but the display will slow down because the quality of the image displayed will be more dense. This is where the graphics card comes in.
Larger monitors like a 24” can manage that better because it will still be the standard resolution just on a wider area. The benefit of these is that it allows for more room, more icons, more open toolbars and more of the image to be seen. Who does not want to have a larger monitor than the one in front of them.
The alternative is multiple screens, this is where graphic cards come into their element, to display on two screens at one time, or three, tools on one, image on another, second image on the third. This takes processing power and should be managed by a separate card rather than putting pressure on a CPU.
P1.2 – Task 04 - Describe and Compare the technology behind Monitors and discuss the application, advantages and disadvantages of this technology in Image output and management.
LO1 Know the hardware and software required to work with graphic images – Output Options - Monitors
Scenario Criteria Tasks Assessment1 2 3 4 5 6 7 8
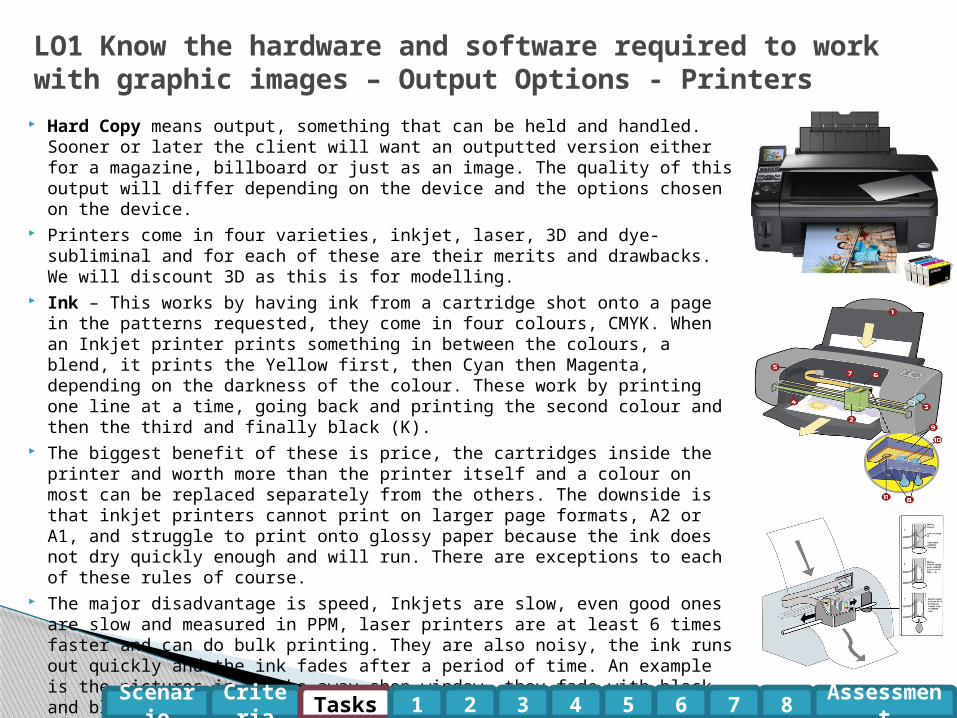
Hard Copy means output, something that can be held and handled. Sooner or later the client will want an outputted version either for a magazine, billboard or just as an image. The quality of this output will differ depending on the device and the options chosen on the device.
Printers come in four varieties, inkjet, laser, 3D and dye-subliminal and for each of these are their merits and drawbacks. We will discount 3D as this is for modelling.
Ink – This works by having ink from a cartridge shot onto a page in the patterns requested, they come in four colours, CMYK. When an Inkjet printer prints something in between the colours, a blend, it prints the Yellow first, then Cyan then Magenta, depending on the darkness of the colour. These work by printing one line at a time, going back and printing the second colour and then the third and finally black (K).
The biggest benefit of these is price, the cartridges inside the printer and worth more than the printer itself and a colour on most can be replaced separately from the others. The downside is that inkjet printers cannot print on larger page formats, A2 or A1, and struggle to print onto glossy paper because the ink does not dry quickly enough and will run. There are exceptions to each of these rules of course.
The major disadvantage is speed, Inkjets are slow, even good ones are slow and measured in PPM, laser printers are at least 6 times faster and can do bulk printing. They are also noisy, the ink runs out quickly and the ink fades after a period of time. An example is the pictures in a take away shop window, they fade with black and blue breaking down first to form yellows and greens.
LO1 Know the hardware and software required to work with graphic images – Output Options - Printers
Scenario Criteria Tasks Assessment1 2 3 4 5 6 7 8
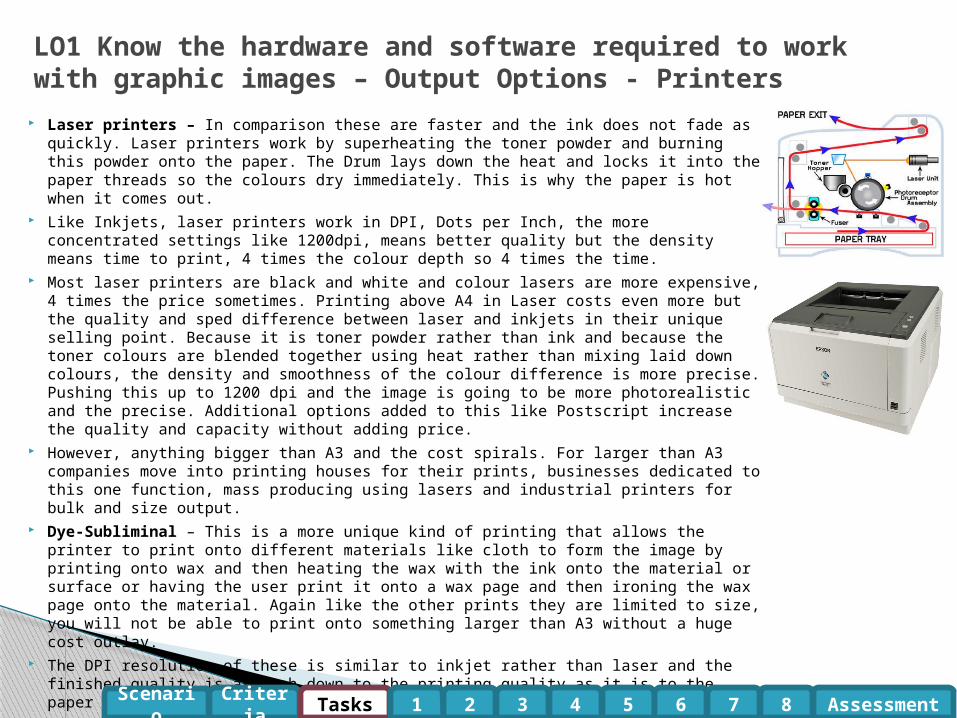
Laser printers – In comparison these are faster and the ink does not fade as quickly. Laser printers work by superheating the toner powder and burning this powder onto the paper. The Drum lays down the heat and locks it into the paper threads so the colours dry immediately. This is why the paper is hot when it comes out.
Like Inkjets, laser printers work in DPI, Dots per Inch, the more concentrated settings like 1200dpi, means better quality but the density means time to print, 4 times the colour depth so 4 times the time.
Most laser printers are black and white and colour lasers are more expensive, 4 times the price sometimes. Printing above A4 in Laser costs even more but the quality and sped difference between laser and inkjets in their unique selling point. Because it is toner powder rather than ink and because the toner colours are blended together using heat rather than mixing laid down colours, the density and smoothness of the colour difference is more precise. Pushing this up to 1200 dpi and the image is going to be more photorealistic and the precise. Additional options added to this like Postscript increase the quality and capacity without adding price.
However, anything bigger than A3 and the cost spirals. For larger than A3 companies move into printing houses for their prints, businesses dedicated to this one function, mass producing using lasers and industrial printers for bulk and size output.
Dye-Subliminal – This is a more unique kind of printing that allows the printer to print onto different materials like cloth to form the image by printing onto wax and then heating the wax with the ink onto the material or surface or having the user print it onto a wax page and then ironing the wax page onto the material. Again like the other prints they are limited to size, you will not be able to print onto something larger than A3 without a huge cost outlay.
The DPI resolution of these is similar to inkjet rather than laser and the finished quality is as much down to the printing quality as it is to the paper quality chosen by the user.
P1.2 – Task 05 - Describe and Compare the technology behind Printers and discuss the application, advantages and disadvantages of this technology in Image output and presentation.
LO1 Know the hardware and software required to work with graphic images – Output Options - Printers
Scenario Criteria Tasks Assessment1 2 3 4 5 6 7 8
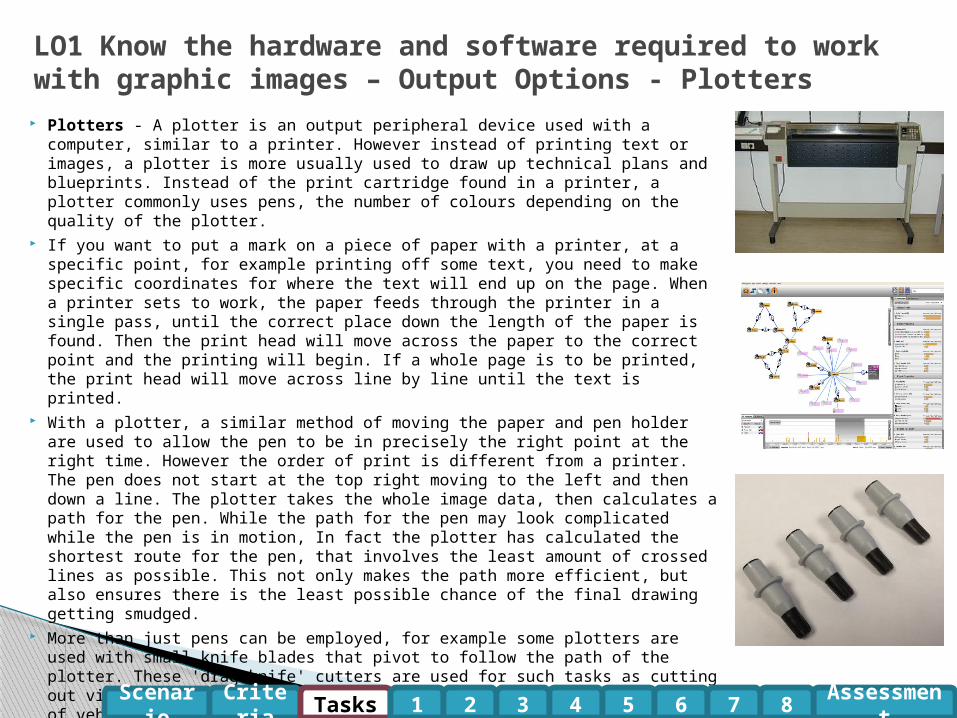
Plotters - A plotter is an output peripheral device used with a computer, similar to a printer. However instead of printing text or images, a plotter is more usually used to draw up technical plans and blueprints. Instead of the print cartridge found in a printer, a plotter commonly uses pens, the number of colours depending on the quality of the plotter.
If you want to put a mark on a piece of paper with a printer, at a specific point, for example printing off some text, you need to make specific coordinates for where the text will end up on the page. When a printer sets to work, the paper feeds through the printer in a single pass, until the correct place down the length of the paper is found. Then the print head will move across the paper to the correct point and the printing will begin. If a whole page is to be printed, the print head will move across line by line until the text is printed.
With a plotter, a similar method of moving the paper and pen holder are used to allow the pen to be in precisely the right point at the right time. However the order of print is different from a printer. The pen does not start at the top right moving to the left and then down a line. The plotter takes the whole image data, then calculates a path for the pen. While the path for the pen may look complicated while the pen is in motion, In fact the plotter has calculated the shortest route for the pen, that involves the least amount of crossed lines as possible. This not only makes the path more efficient, but also ensures there is the least possible chance of the final drawing getting smudged.
More than just pens can be employed, for example some plotters are used with small knife blades that pivot to follow the path of the plotter. These 'drag knife' cutters are used for such tasks as cutting out vinyl sheet to make custom signs, like the type seen on the sides of vehicles to advertise the details of a company, or tradesman.
P1.2 – Task 06 - Describe and Compare the technology behind Plotters and discuss the application, advantages and disadvantages of this technology in Image output and presentation.
LO1 Know the hardware and software required to work with graphic images – Output Options - Plotters
Scenario Criteria Tasks Assessment1 2 3 4 5 6 7 8
In the graphics world there has been the same argument for the last 30years, Mac or PC, they both have the same setup, graphics cards, memory etc. they both have good quality monitor output and even use the same graphic programs to a degree, Photoshop, Office macromedia Suite. So why the difference.
Mac – for 30 years the machine has gone through multiple changes and names, 13 current operating systems on the current range, compatibility issues, its own standards in presentation like QTM instead of AVI as a standard but it has always dominated the graphics market.
This is because of its superior graphics output on screen, the way it manages memory to operate programs like Photoshop and the interface which is just plain friendlier.
Macs are built for two things, graphics and sound, both of which make up video. Programs on the mac like Premiere, iMovie, Avid, all show the power of both of these. They just work better.
Output wise they use DVi as standard rather than VGA, something PC’s are starting to catch up with which makes transferring information faster. And they use USB’s which makes them more compatible with PC and universal hardware.
PC’s – They have developed like Apples but not as a single union. Apple is one company, one compatible hardware across the platforms, PC’s is hundreds. For the last 40years rival companies made hardware to push PC’s on but there were compatible issues. Cards like PCI cards had a range, memory could only fit in certain sockets, boxes were different sizes. But still PC’s outsold Apples 10-1. This made them more usable. Companies bought them because they were cheap, people learned to use them and relied on Windows despite faults.
Programs are the same, more available than Apples, more broad in their availability. Cross compatibility with modern Apples and PC’s is less of an issue than it used to be with programs like Office, Adobe Suite and Maxon Software like 3DS Max. Pc’s were built for multiple purposes which makes them different from Apples, Games, Office, Internet, Programming etc. This multipurpose is another of the reasons they have been considered inferior.
P1.2 – Task 07 - Compare the technologies behind PC’s and Apple Computers as a platform for Graphics Editing and discuss advantages and disadvantages of these platforms in Image output and presentation.
LO1 Know the hardware and software required to work with graphic images – Computer Platform
Scenario Criteria Tasks Assessment1 2 3 4 5 6 7 8
Whatever Platform is used for image manipulation, there are internal hardware considerations which will have an affect on the speed and production security of image manipulation. Some of these are limited by the version of Art packages available and the other internal hardware of the computers, for instance a 32bit version of Windows will only use 4gb of memory for image processing, everything after that is redundant. Only 64bit computers manage memory better beyond 4gb.◦ Processor – this is the brain of the computer, the more powerful
the CPU the faster an image will be manipulated and the result processed to the screen or the printer. This means it will apply filters faster, rendering images more effectively (especially 3D images), batch processing and scrolling around an image when the resolution is very high or zoomed in quite close. Apples and PC’s have different CPU’s but the function and result is still the same.
◦ The Processor is not something that can be changed easily on either machine. On a PC this could mean removing the motherboard and paying a lot of money. On an Apple do not bother.
LO1 Know the hardware and software required to work with graphic images – Computer Hardware - Processor
Scenario Criteria Tasks Assessment1 2 3 4 5 6 7 8
Graphics card - Graphics cards handle all of the visual data within a computer, interpret it and display it via a VDU. Components on a Graphics card include:◦ GPU – Graphical Processing Unit is a dedicated microprocessor making
calculations in order to display both 2D and 3D graphics. ◦ Motherboard interface – This is the method of connection and transfer of
information between the motherboard. These include PCI, AGP and PCI express.◦ Video BIOS - basic program that governs the video card's operations and provides
the instructions that allow the computer and software to interface with the card.◦ Video memory – if the card is integrated onto the mother board it may use the
computers RAM, otherwise it will have a dedicated amount of memory for use for storing other data as well as the screen image such as object co-ordinates.
◦ Random Access Memory Digital-to-Analogue Converter – This coverts the digital signals produced by the computer processor into an analog signal which can be understood by the computer display
◦ Output connectors – this is how the graphics card connectors to the VDU. This can include DVI, HDMI and component.
◦ Cooling device – Video cards may use a lot of electricity, which is converted into heat. If the heat isn't dissipated, the video card could overheat and be damaged. Cooling devices are incorporated to transfer the heat elsewhere. Three common methods are heat sink, fan or water block.
LO1 Know the hardware and software required to work with graphic images – Computer Hardware – Graphics Card
Scenario Criteria Tasks Assessment1 2 3 4 5 6 7 8
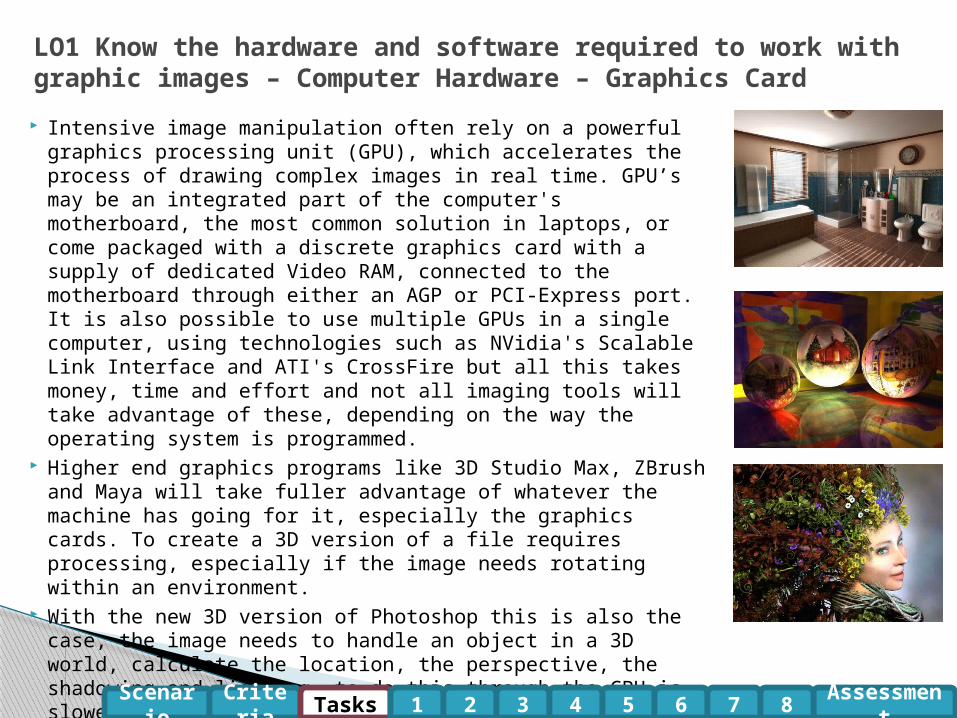
Intensive image manipulation often rely on a powerful graphics processing unit (GPU), which accelerates the process of drawing complex images in real time. GPU’s may be an integrated part of the computer's motherboard, the most common solution in laptops, or come packaged with a discrete graphics card with a supply of dedicated Video RAM, connected to the motherboard through either an AGP or PCI-Express port. It is also possible to use multiple GPUs in a single computer, using technologies such as NVidia's Scalable Link Interface and ATI's CrossFire but all this takes money, time and effort and not all imaging tools will take advantage of these, depending on the way the operating system is programmed.
Higher end graphics programs like 3D Studio Max, ZBrush and Maya will take fuller advantage of whatever the machine has going for it, especially the graphics cards. To create a 3D version of a file requires processing, especially if the image needs rotating within an environment.
With the new 3D version of Photoshop this is also the case, the image needs to handle an object in a 3D world, calculate the location, the perspective, the shadowing and lighting, to do this through the CPU is slower than to process this through a dedicated image handling system like a graphics card.
LO1 Know the hardware and software required to work with graphic images – Computer Hardware – Graphics Card
Scenario Criteria Tasks Assessment1 2 3 4 5 6 7 8
RAM - Memory demands on a PC have grown exponentially over the years and doubles every time a new version of windows is released. Currently 2gb of memory is enough to run Windows Vista smoothly but not enough to manage intensive graphics manipulation as well. 3gb is good, 4gb is better.
Fifteen years ago with Windows 98, 256mb was the standard for a good computer on a PC, 512mb for 3D package handling. But memory is necessary, the more there is, the faster the processor can receive, manage and pass on information.
There are three standards for memory and all of them are speed based. DDR, DDR2 and DDR3. They have a clock speed, the faster the clock speed, the faster the processing time. And this improves image handling, the more processing power that is taken from the CPU, the faster the CPU can deal with the instruction code of the art packages.
To have 4gb of memory now is standard, enough for Photoshop, Gimp and other packages to run smoothly without slow down. For higher level graphics packages like 3DS Max and Maya, 4GB is enough to run and do small things but not to render at speed, for these packages, the more memory, the faster the computer processing.
LO1 Know the hardware and software required to work with graphic images – Computer Hardware – RAM
Scenario Criteria Tasks Assessment1 2 3 4 5 6 7 8
Storage mediums (e.g. HDD, Removable mediums (USB, Flash Cards, Roms). These are important if there are a lot of images or if there is a need to transport the images from the computer to another source. A good quality saved .Psd (Photoshop) file that is still intact in good resolution will take up 4mb of space, not much when you consider the size of removable storage mediums. The average memory stick is 16gb, enough for 4000 .Psd images. Removable hard drives are on average 320gb, this is 32,000 .Psd files.
The size of the Internal HDD is important because this is where the operating system is held, there will then be room set aside for the storage of files. Most packages also store a backup of the working file and it is necessary to have enough room for this and the original file otherwise the machine will slow down and if it crashes, there will be no backup to rescue. Computers also need room for windows backups, room for their own running modules which is why it is always necessary to have at least 2gb hard disk space free. Most modern computers have large HDD’s 320gb, 500gb, the price has come down considerably so having a large hard drive works out at about 10gb per £1.
But to email a 4mb file takes time, most email accounts are limited to processing 12mb, three images, this is where storage mediums come into play. Cloud can be an option but takes time, there is little transfer method faster than the one in your pocket.
For the professional levels these are more important. Storage mediums are useful for three things, carrying large files to clients, taking it away to work elsewhere and as a backup. Burning the files onto DVD is a one way process, great for backups of finished work but not of work-in-progress.
P1.3 – Task 08 - Describe the internal hardware of computers and their function for Graphics Editing and discuss advantages and disadvantages of these platforms in Image output and presentation.
LO1 Know the hardware and software required to work with graphic images – Computer Hardware – Storage
Scenario Criteria Tasks Assessment1 2 3 4 5 6 7 8
Once the hardware is sorted out, the user then needs to decide what kind of software package to use to create and edit their graphics. This will come down to four things, competence, purpose, package ability and image type.
Competence – Most people can figure out the tools within Paint within 10minutes, we have the standard features, brush, shape, text, colour, line and fill. All the art packages have these. The ability to use these is straight forward, if you feel confident about using them. For sketches there is no need to go beyond Paint, it is free, it is small, takes no memory and can save the files. Whereas Photoshop, there is so much in there, so many tools, pull outs, drop down menus. There are tutorial guide that take weeks to get through for features within the package. Professionals use it and only use a fraction of the tools each. When faced with the interface of Photoshop for the first time new users are put off.
Purpose – All Art packages have features that are there for a reason, either to create from scratch or edit something that exists. If you want to create a 2D logo with text Photoshop, Gimp and Fireworks are best, if you want to create a picture with layers then Photoshop and Gimp, if you want to create an image from scratch, then Paint can do that. But if the user wants to create a UV Map for a flattened output 3D image and add textures, then all the professionals use Photoshop. At the end of the day, the levels of detail dictate which package will be used.
LO1 Know the hardware and software required to work with graphic images - Packages
Scenario Criteria Tasks Assessment1 2 3 4 5 6 7 8
Package ability – It all comes down to layers and filters. Paint cannot do these, GIMP and Fireworks can but they are limited in their ranges, Photoshop can do all these and more. For 90% of users anything that can be done in Photoshop can be transferred skill wise to the other two packages, and they will do it quicker and smoother.
Fireworks is the middle ground for non-professional die-hard Photoshop users, it is better at some things because of this, managing image locations, manipulating text, altering specifics on the toolbar rather than the pull out tools Photoshop uses.
GIMP is similar but is more of a replacement for Fireworks and Photoshop for those who cannot afford Adobe things.
Output is important, all the packages need to be able to export as a Jpeg and Tiff. More professional packages need to be able to open file formats from other packages so they need .Psd importing at a higher level and .Png at a lower level to maintain the levels of layers and formatting.
Image Type – there are two types of images, vector and bitmap, bitmap is images, pictures, created in packages like Photoshop that use pixels to create the image. Vector graphics on the other hand are mathematically calculated forms, work out by the computer as coordinates on the screen. A Vector image like a circle is and oval is the same with the x and y dimension decreased or increased. When the computer needs to make it larger, instead of increasing the pixels, it merely changes the dimensions of the formula. Therefor the image can be printed as large as necessary, shrunken, stretched or skewed without the loss of quality.
More importantly the image is a series of calculations, not pixels, therefor the amount of information and the length of time to calculate that position is far less, takes up less room and therefor the file size is far smaller no matter how complicated it is.
An example of a vector graphic program is Illustrator or Freehand and can be compared to Photoshop for a lot of features.
P1.3 – Task 09 - Describe the different graphic editing options and their advantages and disadvantages in Image output and presentation.
LO1 Know the hardware and software required to work with graphic images - Packages
Scenario Criteria Tasks Assessment1 2 3 4 5 6 7 8
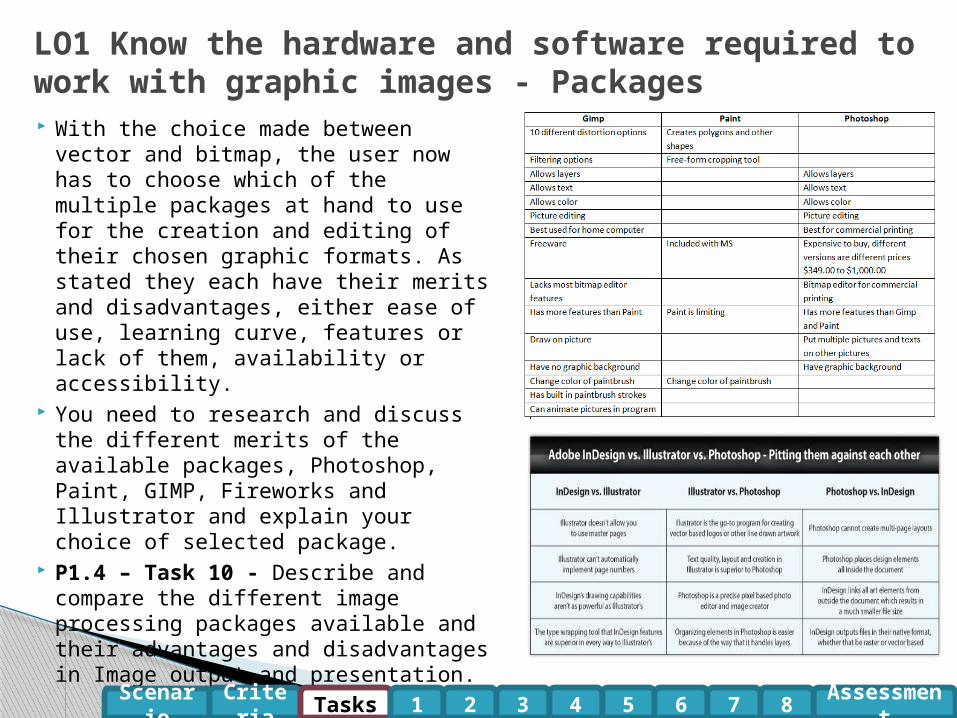
With the choice made between vector and bitmap, the user now has to choose which of the multiple packages at hand to use for the creation and editing of their chosen graphic formats. As stated they each have their merits and disadvantages, either ease of use, learning curve, features or lack of them, availability or accessibility.
You need to research and discuss the different merits of the available packages, Photoshop, Paint, GIMP, Fireworks and Illustrator and explain your choice of selected package.
P1.4 – Task 10 - Describe and compare the different image processing packages available and their advantages and disadvantages in Image output and presentation.
LO1 Know the hardware and software required to work with graphic images - Packages
Scenario Criteria Tasks Assessment1 2 3 4 5 6 7 8

The alternative to taking your own images or creating them from scratch is to source them from websites that have copyright free materials. The internet is a huge source for images, with restrictions. Stock images is from companies who have sourced their own materials and provide a service for the customer. With permission, use for those images are then given to the customer for that one purpose.
The benefit of this is that these images are very high quality and suitable for purpose. They usually have the detritus of standard photographs removed, people, objects and distractions and can be sourced like searching through a catalogue, stored in folders and categories, cross referenced and amenable.
These can be gained from photography and specialist magazines on the cover disks of from the website vaults. Magazines like 3D World and 3D Artist give away 3D images, Photoshop Now and Photoshop Elements give away edited layered Photoshop images and installed programs sometimes have a stock library of their own for the customer to use and experiment with.
Websites such as http://openphoto.net/ and http://www.stockvault.net/ have examples to use as does less specific websites such as Nasa.
P1.5 – Task 11 - Describe the purpose of availability of sourced and pre-selective materials and their advantages and disadvantages in Image output and presentation.
LO1 Know the hardware and software required to work with graphic images – Sourced images
Scenario Criteria Tasks Assessment1 2 3 4 5 6 7 8
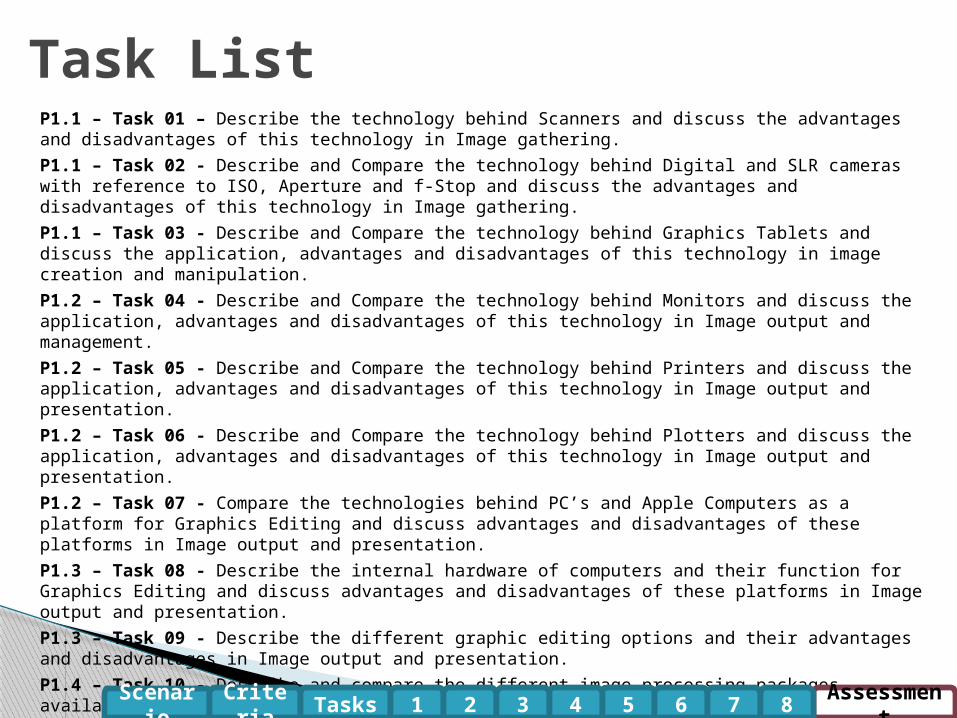
P1.1 – Task 01 – Describe the technology behind Scanners and discuss the advantages and disadvantages of this technology in Image gathering.
P1.1 – Task 02 - Describe and Compare the technology behind Digital and SLR cameras with reference to ISO, Aperture and f-Stop and discuss the advantages and disadvantages of this technology in Image gathering.
P1.1 – Task 03 - Describe and Compare the technology behind Graphics Tablets and discuss the application, advantages and disadvantages of this technology in image creation and manipulation.
P1.2 – Task 04 - Describe and Compare the technology behind Monitors and discuss the application, advantages and disadvantages of this technology in Image output and management.
P1.2 – Task 05 - Describe and Compare the technology behind Printers and discuss the application, advantages and disadvantages of this technology in Image output and presentation.
P1.2 – Task 06 - Describe and Compare the technology behind Plotters and discuss the application, advantages and disadvantages of this technology in Image output and presentation.
P1.2 – Task 07 - Compare the technologies behind PC’s and Apple Computers as a platform for Graphics Editing and discuss advantages and disadvantages of these platforms in Image output and presentation.
P1.3 – Task 08 - Describe the internal hardware of computers and their function for Graphics Editing and discuss advantages and disadvantages of these platforms in Image output and presentation.
P1.3 – Task 09 - Describe the different graphic editing options and their advantages and disadvantages in Image output and presentation.
P1.4 – Task 10 - Describe and compare the different image processing packages available and their advantages and disadvantages in Image output and presentation.
P1.5 – Task 11 - Describe the purpose of availability of sourced and pre-selective materials and their advantages and disadvantages in Image output and presentation.
Task List
Scenario Criteria Tasks Assessment1 2 3 4 5 6 7 8


![U1.6 lesson1[lo1]](https://static.fdocuments.net/doc/165x107/58f099a31a28ab47428b4601/u16-lesson1lo1.jpg)