Data Forms in Hyperion Planning. Data Forms are used by the business users and planners to enter,...
19
Data Forms in Hyperion Planning
-
Upload
donna-glenn -
Category
Documents
-
view
224 -
download
2
Transcript of Data Forms in Hyperion Planning. Data Forms are used by the business users and planners to enter,...

Data Formsin
Hyperion Planning
Data Forms are used by the business users and planners to enter, update and analyze the data. Actually, data forms are spreadsheet like web based grids and connected to the Essbase database which acts as an central repository for all data.
This tutorial will take you through data form structure, its properties and on how to create simple data form and composite form.
Data Forms and Folders:
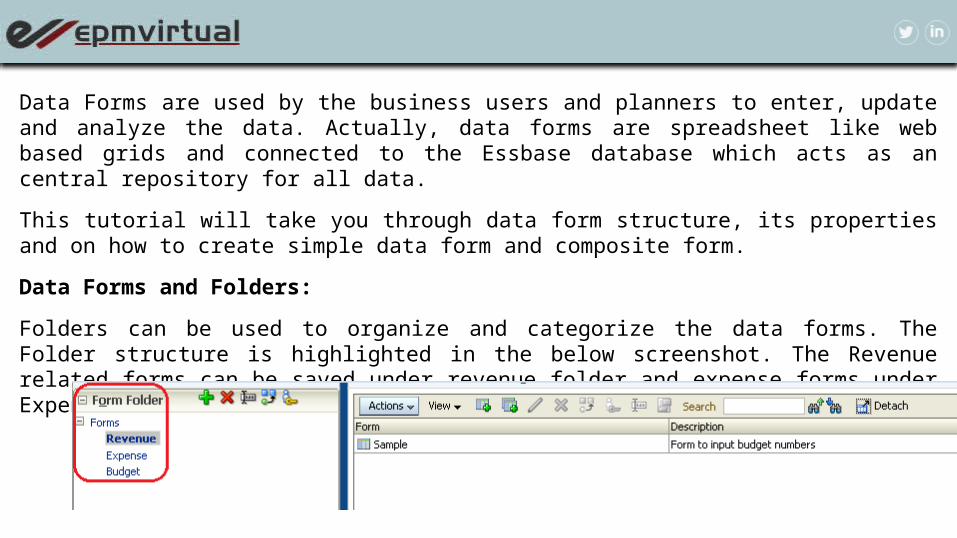
Folders can be used to organize and categorize the data forms. The Folder structure is highlighted in the below screenshot. The Revenue related forms can be saved under revenue folder and expense forms under Expense folder etc..
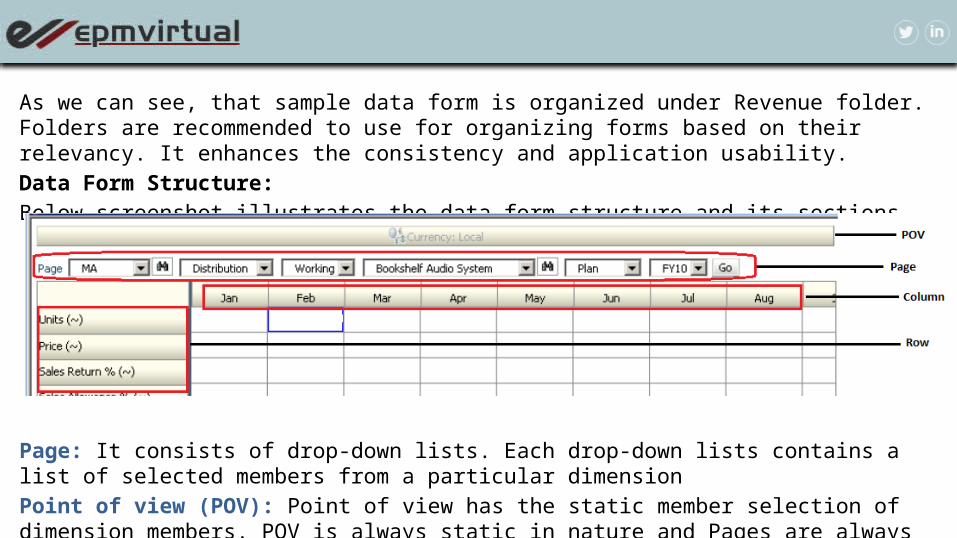
As we can see, that sample data form is organized under Revenue folder. Folders are recommended to use for organizing forms based on their relevancy. It enhances the consistency and application usability.Data Form Structure:Below screenshot illustrates the data form structure and its sections,
Page: It consists of drop-down lists. Each drop-down lists contains a list of selected members from a particular dimensionPoint of view (POV): Point of view has the static member selection of dimension members. POV is always static in nature and Pages are always dynamic
Rows and Columns: Rows include Account dimension whereas the column include Period dimension as shown.Ensure that all dimensions of Hyperion planning are included in the form and it is must. Each dimension can appear only in one of the sections page, column, row, or POV. Data Form Properties:The data form has the following sections,
•Properties•Layout•Other options•Business Rules
Properties: It has basic details such Name, description and instructions for the formLayout: In this section, actual layout of the form is designed with POV, Page, rows and ColumnsOther options: Properties like display options, precision are set in this sectionBusiness rules: In this section, the business rule are associated with the form and its properties are defined for business rule execution
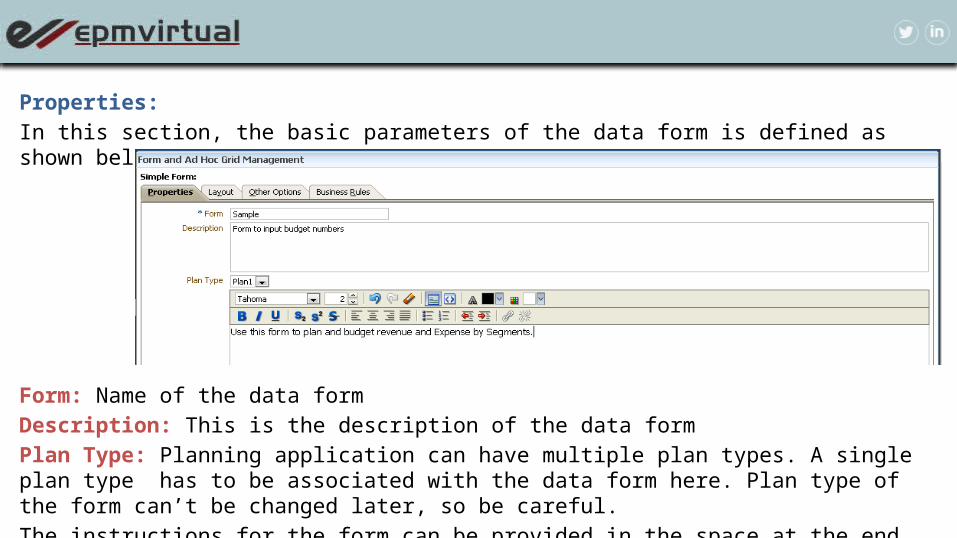
Properties:In this section, the basic parameters of the data form is defined as shown below,
Form: Name of the data formDescription: This is the description of the data formPlan Type: Planning application can have multiple plan types. A single plan type has to be associated with the data form here. Plan type of the form can’t be changed later, so be careful.The instructions for the form can be provided in the space at the end of the tab as shown.
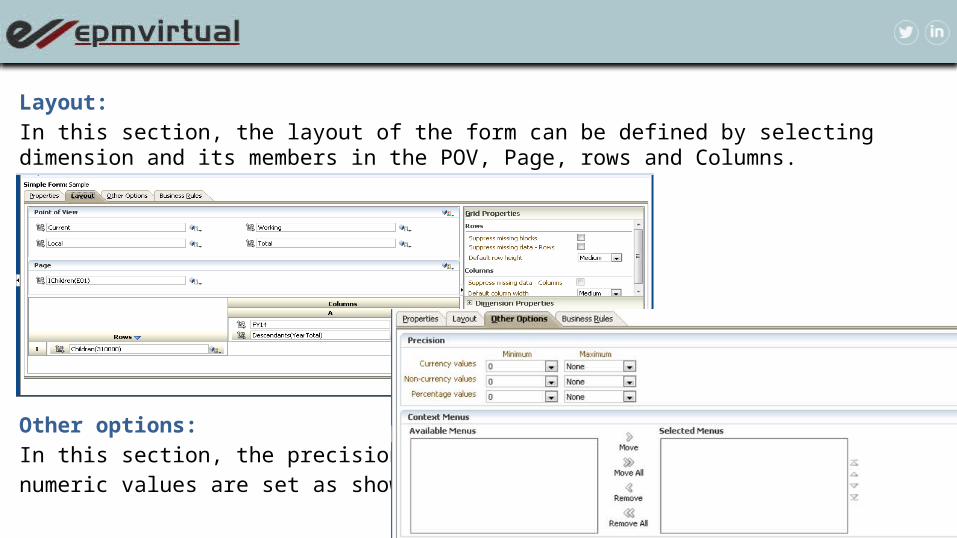
Layout: In this section, the layout of the form can be defined by selecting dimension and its members in the POV, Page, rows and Columns.
Other options:In this section, the precision for the numeric values are set as shown.
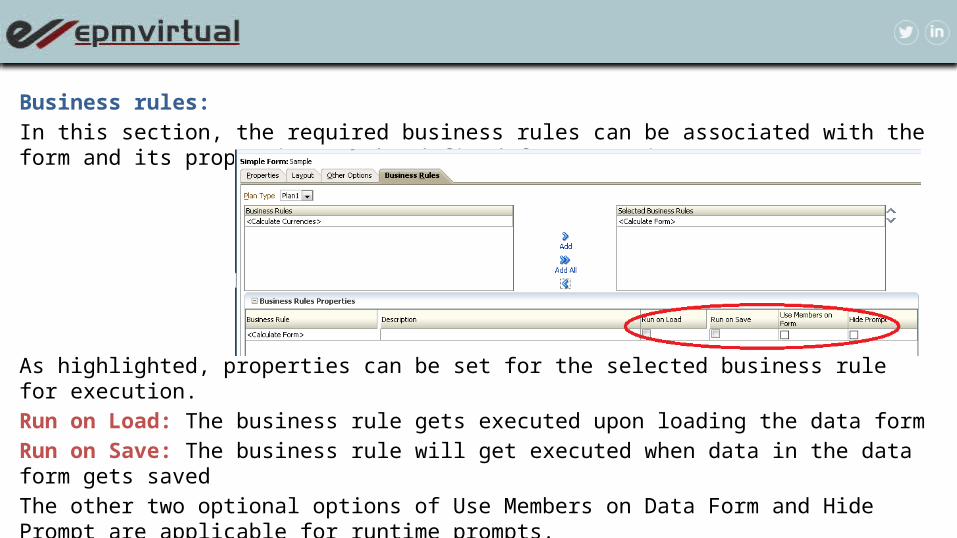
Business rules:In this section, the required business rules can be associated with the form and its properties can be defined for execution.
As highlighted, properties can be set for the selected business rule for execution.Run on Load: The business rule gets executed upon loading the data formRun on Save: The business rule will get executed when data in the data form gets savedThe other two optional options of Use Members on Data Form and Hide Prompt are applicable for runtime prompts.
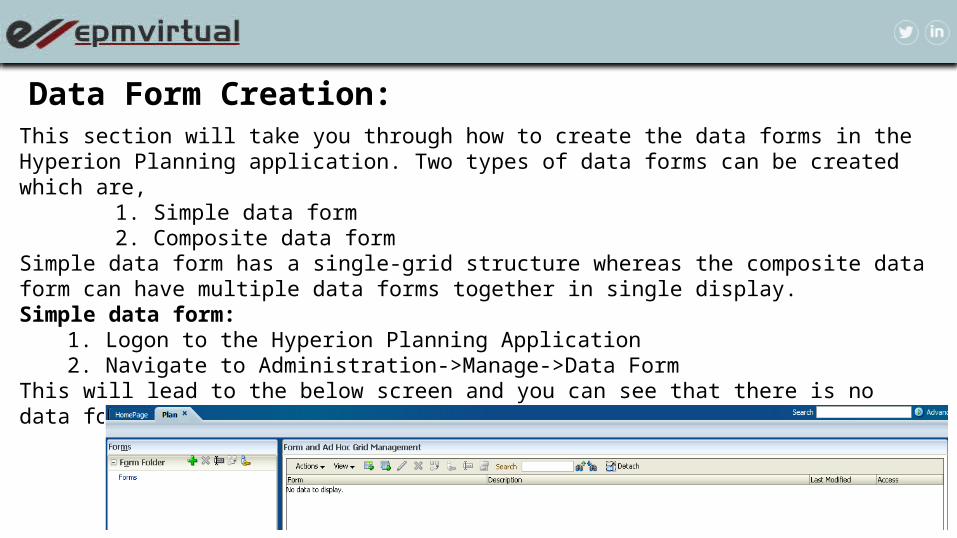
Data Form Creation:This section will take you through how to create the data forms in the Hyperion Planning application. Two types of data forms can be created which are,
1. Simple data form2. Composite data form
Simple data form has a single-grid structure whereas the composite data form can have multiple data forms together in single display.Simple data form:
1. Logon to the Hyperion Planning Application2. Navigate to Administration->Manage->Data Form
This will lead to the below screen and you can see that there is no data form or folder created in the app.
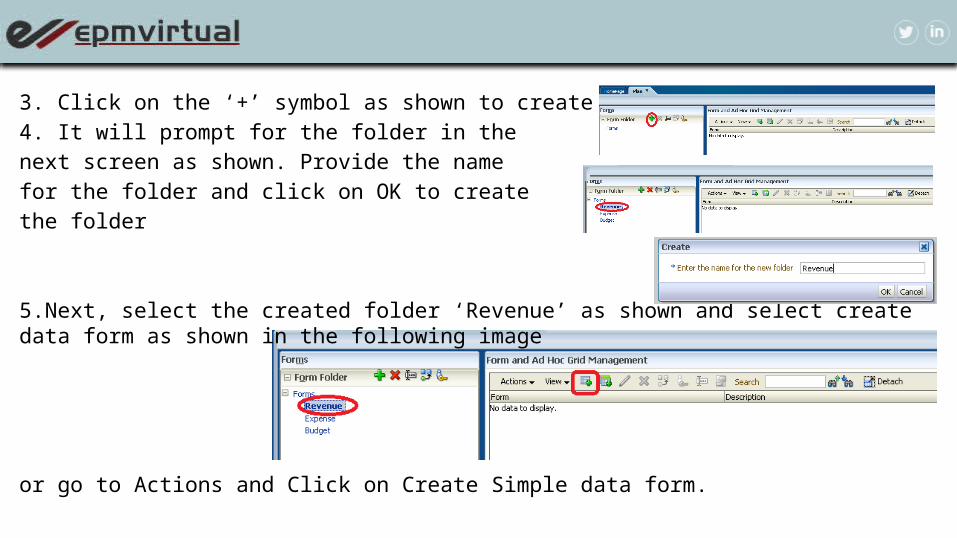
3. Click on the ‘+’ symbol as shown to create the folder.4. It will prompt for the folder in the next screen as shown. Provide the namefor the folder and click on OK to create the folder
5.Next, select the created folder ‘Revenue’ as shown and select create data form as shown in the following image
or go to Actions and Click on Create Simple data form.
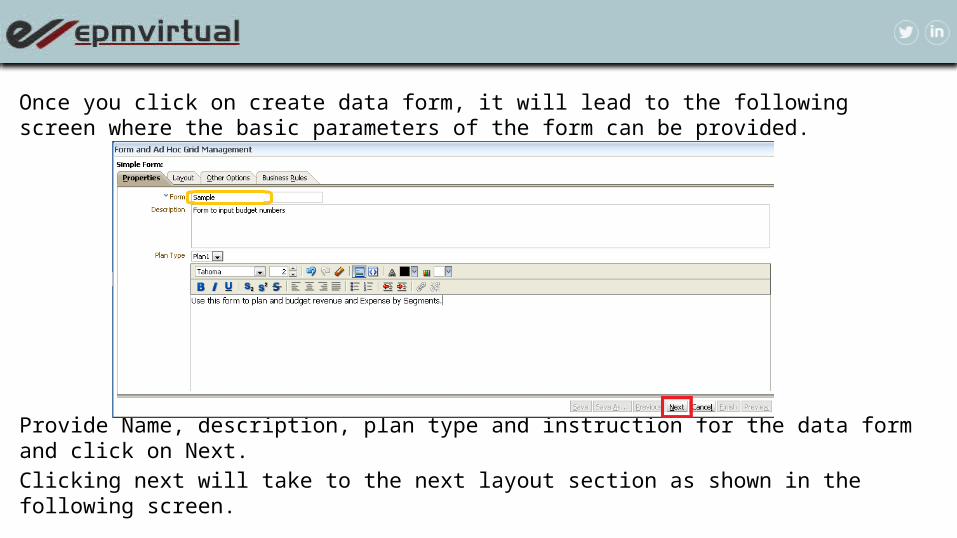
Once you click on create data form, it will lead to the following screen where the basic parameters of the form can be provided.
Provide Name, description, plan type and instruction for the data form and click on Next.Clicking next will take to the next layout section as shown in the following screen.
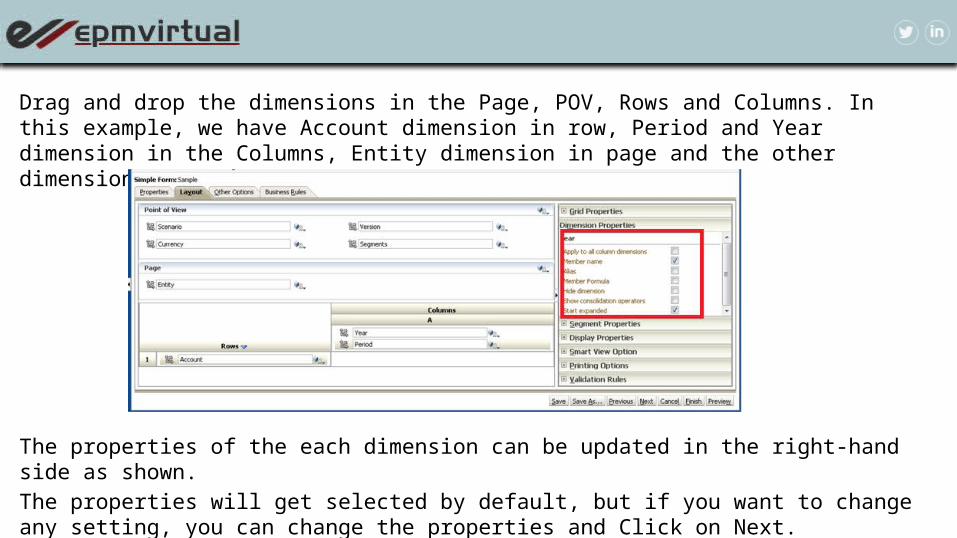
Drag and drop the dimensions in the Page, POV, Rows and Columns. In this example, we have Account dimension in row, Period and Year dimension in the Columns, Entity dimension in page and the other dimensions in the POV.
The properties of the each dimension can be updated in the right-hand side as shown.The properties will get selected by default, but if you want to change any setting, you can change the properties and Click on Next.
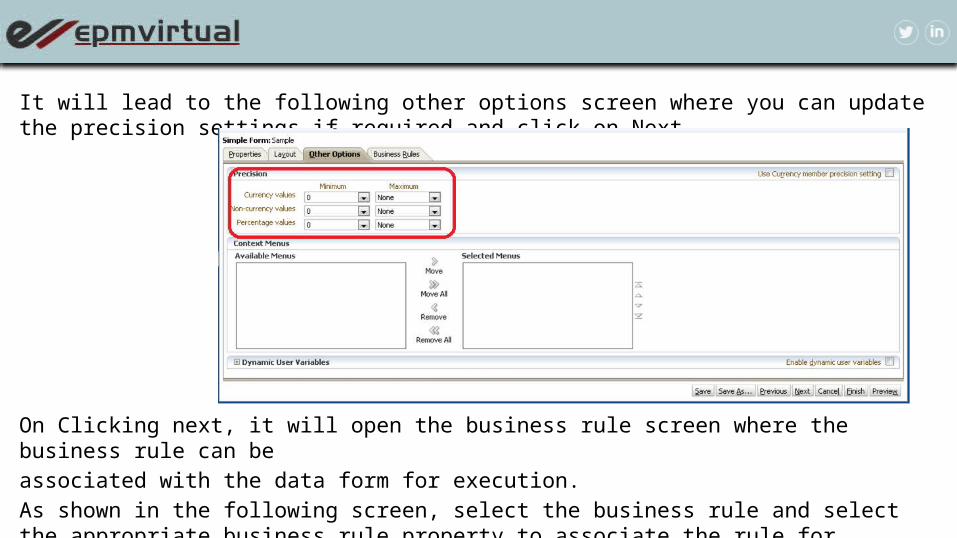
It will lead to the following other options screen where you can update the precision settings if required and click on Next.
On Clicking next, it will open the business rule screen where the business rule can be associated with the data form for execution. As shown in the following screen, select the business rule and select the appropriate business rule property to associate the rule for execution and Click on Finish.
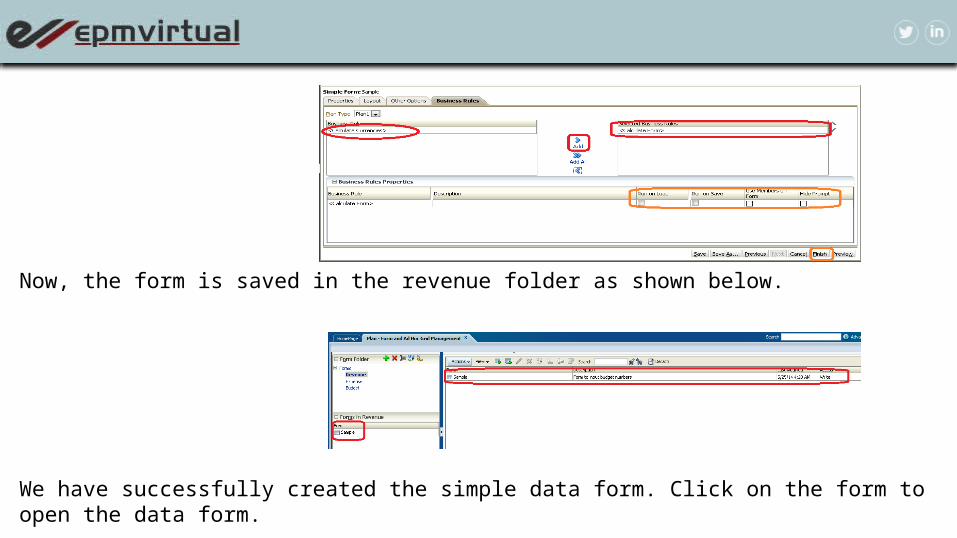
Now, the form is saved in the revenue folder as shown below.
We have successfully created the simple data form. Click on the form to open the data form.
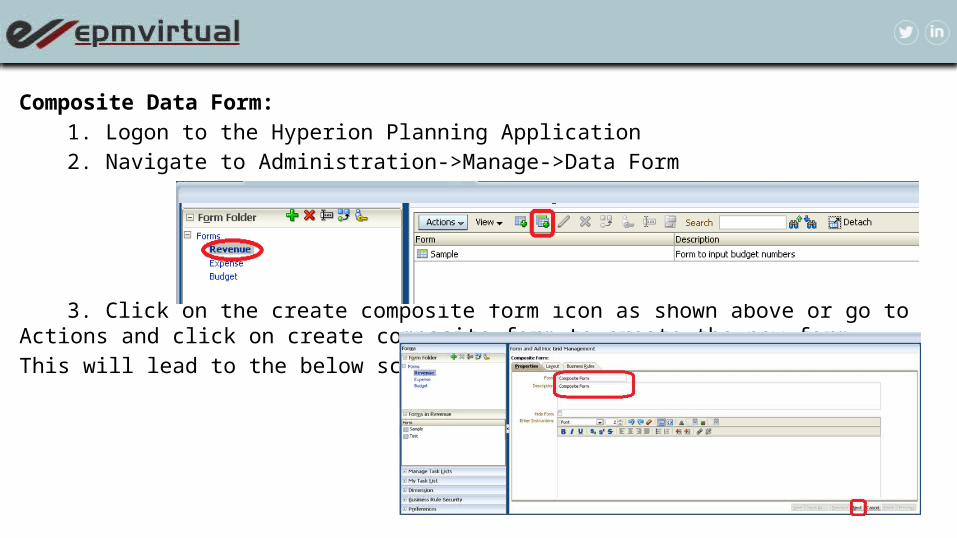
Composite Data Form:1. Logon to the Hyperion Planning Application2. Navigate to Administration->Manage->Data Form
3. Click on the create composite form icon as shown above or go to Actions and click on create composite form to create the new form.This will lead to the below screen,
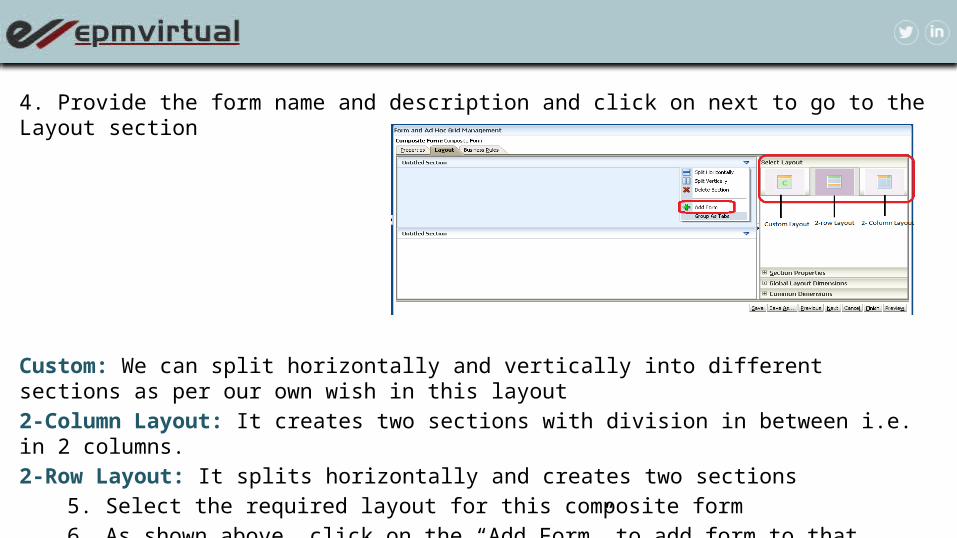
4. Provide the form name and description and click on next to go to the Layout section
Custom: We can split horizontally and vertically into different sections as per our own wish in this layout2-Column Layout: It creates two sections with division in between i.e. in 2 columns. 2-Row Layout: It splits horizontally and creates two sections
5. Select the required layout for this composite form6. As shown above, click on the “Add Form” to add form to that section. This will lead an
another pop-up to select the data form
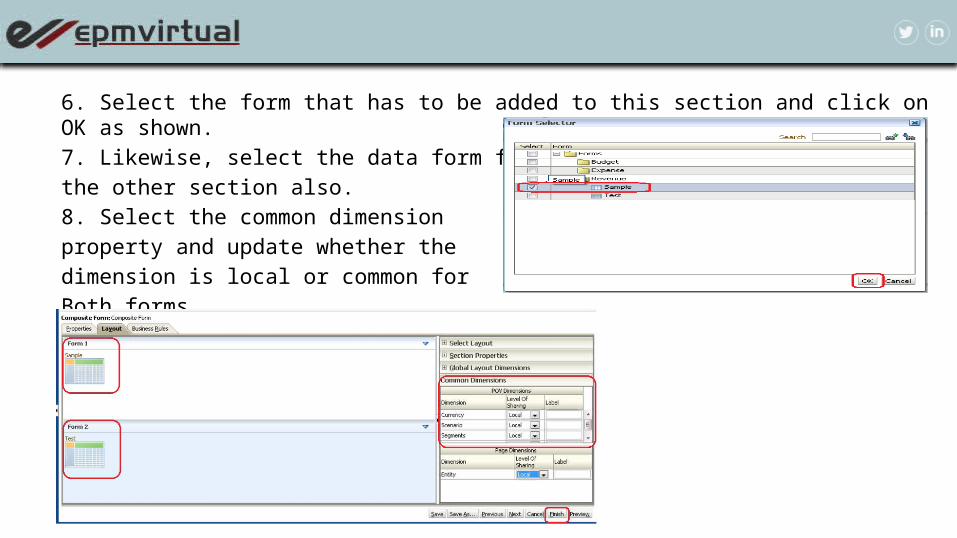
6. Select the form that has to be added to this section and click on OK as shown.7. Likewise, select the data form for the other section also.8. Select the common dimension property and update whether the dimension is local or common for Both forms

Click on Finish to create the form and you can see the form created in the revenue folder.
Finally, we have created the composite form and we can open the form to view.
thank youwww.epmvirtual.com