Dart OCM 2
14
Dart OCM 2.19 User Guide Document number: Author:Damien Nash Approved by: WARNING: this is a controlled document Page: - 1 - Date of Issue: 06/10/14 Revision: 1 Dart OCM 2.19 User Guide (EMIS)
Transcript of Dart OCM 2

Dart OCM 2.19 User Guide
Document number: Author:Damien Nash Approved by:
WARNING: this is a controlled document Page: - 1 - Date of Issue: 06/10/14 Revision: 1
Dart OCM 2.19 User Guide
(EMIS)

Dart OCM 2.19 User Guide
Document number: Author:Damien Nash Approved by:
WARNING: this is a controlled document Page: - 2 - Date of Issue: 06/10/14 Revision: 1
Contents
Page 4 ……… Specimen Requesting Page 5 ……… Blood Sciences Ordering Page 8 ……… Microbiology Ordering Page 11 ……… Specimen Collection Page 14 ……… Correct Labelling of Samples

Dart OCM 2.19 User Guide
Document number: Author:Damien Nash Approved by:
WARNING: this is a controlled document Page: - 3 - Date of Issue: 06/10/14 Revision: 1
PLEASE REMEMBER
Dart OCM contains confidential information. By entering you acknowledge your understanding of your responsibilities
under the Data Protection Act 1998
http://www.legislation.gov.uk/

Dart OCM 2.19 User Guide
Document number: Author:Damien Nash Approved by:
WARNING: this is a controlled document Page: - 4 - Date of Issue: 06/10/14 Revision: 1
Specimen Requesting
After you have selected your patient in EMIS, ensure you have an active new consultation open. In the list on the left of the screen (see below) select “Test Request” and then “Online Test Request” from the sub-menu.
This will take you directly into Dart OCM. Your user credentials for Dart are already linked to your EMIS account so you will not be asked to enter them when the Dart OCM window opens.

Dart OCM 2.19 User Guide
Document number: Author:Damien Nash Approved by:
WARNING: this is a controlled document Page: - 5 - Date of Issue: 06/10/14 Revision: 1
Blood Sciences Ordering
With Dart OCM now open, you will notice the patient’s details have been filled in for you automatically. You will also notice that by default the discipline is set to “Blood Science”.
Select the tests you would like to order for the patient. The most commonly ordered tests are on display, everything else can be found by clicking on the “Add Tests” button which will bring up an alphabetical list of available tests. Predefined groups of tests can be found using the “Add Test Group” button. You now have two options available to you: “Save” or “Save & Print”. If you do not need labels or an appointment card (for example, if you are ordering the tests for a nurse to collect in the future) then choose “Save” and you will immediately be taken back to EMIS. This is usually for when you do not have the patient with you when placing the order. If you do need to print either labels or an appointment card, click on the “Save & Print” button. A pop-up box will appear asking if you are taking the sample(s) now.

Dart OCM 2.19 User Guide
Document number: Author:Damien Nash Approved by:
WARNING: this is a controlled document Page: - 6 - Date of Issue: 06/10/14 Revision: 1
If you select “No”, the system will generate an appointment card for the patient to take with them and you will be returned to the consultation screen in EMIS.
If you select “Yes”, you will be taken to the “Specimen Collection” screen as described in the next section starting on Page 11.

Dart OCM 2.19 User Guide
Document number: Author:Damien Nash Approved by:
WARNING: this is a controlled document Page: - 7 - Date of Issue: 06/10/14 Revision: 1
At any point when you return to EMIS you may be presented with the following screen. Simply press “OK” to continue.
On returning to EMIS, you will notice your request has appeared in the centre of the screen in the patient consultation window (see screenshot below).
Dart OCM 2.19 User Guide
Document number: Author:Damien Nash Approved by:
WARNING: this is a controlled document Page: - 8 - Date of Issue: 06/10/14 Revision: 1
Microbiology Ordering
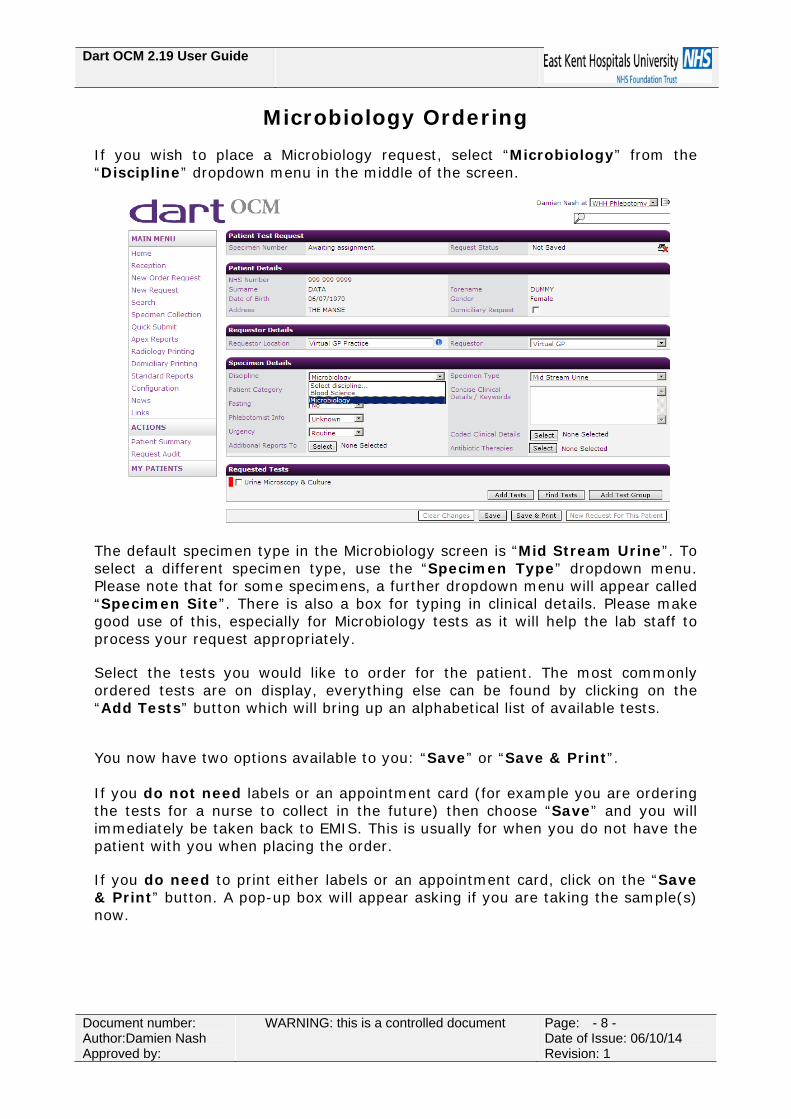
If you wish to place a Microbiology request, select “Microbiology” from the “Discipline” dropdown menu in the middle of the screen.
The default specimen type in the Microbiology screen is “Mid Stream Urine”. To select a different specimen type, use the “Specimen Type” dropdown menu. Please note that for some specimens, a further dropdown menu will appear called “Specimen Site”. There is also a box for typing in clinical details. Please make good use of this, especially for Microbiology tests as it will help the lab staff to process your request appropriately.
Select the tests you would like to order for the patient. The most commonly ordered tests are on display, everything else can be found by clicking on the “Add Tests” button which will bring up an alphabetical list of available tests. You now have two options available to you: “Save” or “Save & Print”. If you do not need labels or an appointment card (for example you are ordering the tests for a nurse to collect in the future) then choose “Save” and you will immediately be taken back to EMIS. This is usually for when you do not have the patient with you when placing the order. If you do need to print either labels or an appointment card, click on the “Save & Print” button. A pop-up box will appear asking if you are taking the sample(s) now.

Dart OCM 2.19 User Guide
Document number: Author:Damien Nash Approved by:
WARNING: this is a controlled document Page: - 9 - Date of Issue: 06/10/14 Revision: 1
If you select “no”, the system will generate an appointment card for the patient to take with them and you will be returned to the consultation screen in EMIS.

Dart OCM 2.19 User Guide
Document number: Author:Damien Nash Approved by:
WARNING: this is a controlled document Page: - 10 - Date of Issue: 06/10/14 Revision: 1
At any point when you return to EMIS you may be presented with the following screen. Simply press “OK” to continue.
On returning to EMIS, you will notice your request, has appeared in the centre of the screen in the patient consultation window (see screenshot below).

Dart OCM 2.19 User Guide
Document number: Author:Damien Nash Approved by:
WARNING: this is a controlled document Page: - 11 - Date of Issue: 06/10/14 Revision: 1
Specimen Collection To collect a specimen via EMIS, the process is very similar to ordering a specimen. From the live patient consultation screen in EMIS, select “Test Request” from the menu on the left and then select “Online Test Request” from the sub-menu (see screenshot below).
When the Dart OCM screen appears, it will look the same as it would for a new test request. In the menu on the left of the screen you will see a section called “Actions”. Click on the “Patient Summary” link in that section.

Dart OCM 2.19 User Guide
Document number: Author:Damien Nash Approved by:
WARNING: this is a controlled document Page: - 12 - Date of Issue: 06/10/14 Revision: 1
On this screen you will see a list of requests for your patient. All requests are in date order with the most recent at the top of the list. Open orders that are able to be collected are labelled “Awaiting Specimen Collection” (as highlighted in the screenshot below).
On the next screen, you are able to add/remove tests if necessary. When you are ready, click on the “Save & Collect” button located on the bottom left of the screen.

Dart OCM 2.19 User Guide
Document number: Author:Damien Nash Approved by:
WARNING: this is a controlled document Page: - 13 - Date of Issue: 06/10/14 Revision: 1
You will then be presented with this screen.
You will notice there are three check boxes, as highlighted by the red circle in the
screenshot above. For each sample, choose the icon if you are collecting now,
or choose the icon if you are giving the patient an empty pot to take home with them (e.g. urine). Then click “Action Request”. If you click on the icon directly, it will automatically tick all boxes in that column.
A new window will appear showing the labels that will be printed (as below). These labels should then be attached to the samples you have collected from the patient. Click “Finish” to return to EMIS.

Dart OCM 2.19 User Guide
Document number: Author:Damien Nash Approved by:
WARNING: this is a controlled document Page: - 14 - Date of Issue: 06/10/14 Revision: 1
Correct Labelling of Samples
When placing the printed barcode labels on the sample tubes, it is essential they are placed in the correct position and orientation. If the labels are not applied correctly, it will be necessary for the lab to reprint the labels, wasting time and resources. Below are some examples of incorrectly labelled samples:
This label is upside down. Always affix the Dart label in the same orientation as the label already on the tube. The analysers are unable to read these as the barcode is too low down.
This label has been wrapped around the tube sideways. The analysers are unable to see the whole barcode.
Try to ensure the label is placed on the tube as straight as possible. Crooked, crumpled or torn labels will need reprinting. This is an example of a correctly labelled sample…
Note how the label is perfectly centred and straight, clearly printed and aligned on the tube with the coloured lid on the left.