Configuration Note - AudioCodes · Configuration Note . Connecting Microsoft® Lync™ and Bell...
74
Configuration Note Connecting Microsoft® Lync™ and Bell Canada SIP Trunk using Mediant™ 3000, Mediant 800 MSBG and Mediant 1000 MSBG August 2011 Document # LTRT-39230
Transcript of Configuration Note - AudioCodes · Configuration Note . Connecting Microsoft® Lync™ and Bell...

Configuration Note Connecting Microsoft® Lync™ and Bell Canada
SIP Trunk using Mediant™ 3000, Mediant 800 MSBG and Mediant 1000 MSBG
August 2011 Document # LTRT-39230


Configuration Note Contents
Version 6.2 3 August 2011
Table of Contents 1 Introduction ......................................................................................................... 9
2 Components Information .................................................................................. 11
2.1 AudioCodes Gateway Version .............................................................................. 11 2.2 Bell Canada SIP Trunking Version ....................................................................... 11 2.3 Microsoft Lync Version ......................................................................................... 11 2.4 Topology .............................................................................................................. 12
3 Configuring Lync Server 2010 ......................................................................... 13
3.1 Configuring the Device as an IP/PSTN Gateway .................................................. 13 3.2 Associating the IP/PSTN Gateway with the Mediation Server ............................... 17 3.3 Configuring the Route on the Lync Server 2010 ................................................... 22
4 Configuring the Device ..................................................................................... 29
4.1 Step 1: Configuring IP Addresses ......................................................................... 31 4.1.1 Configuring LAN IP Addresses ................................................................................31 4.1.2 Configuring WAN IP Addresses ..............................................................................33
4.2 Step 2: Configuring Data Firewall Rules ............................................................... 34 4.3 Step 3: Configuring IP Addresses for Mediant 3000 ............................................. 35 4.4 Step 4: Configuring SIP TLS Connection .............................................................. 36
4.4.1 Step 4-1: Configuring VoIP DNS Settings ...............................................................36 4.4.2 Step 4-2: Configuring the NTP Server .....................................................................36 4.4.3 Step 4-3: Configuring a Certificate ..........................................................................37
4.5 Step 5: Configuring Secure Real-Time Transport Protocol (SRTP) ....................... 41 4.6 Step 6: Enabling the SIP SBC and IP-to-IP Applications ...................................... 42 4.7 Step 7: Configuring SIP General Parameters ....................................................... 43 4.8 Step 8: Configuring IP Media ................................................................................ 45 4.9 Step 9: Configuring SIP Media Realm .................................................................. 46 4.10 Step 10: Configuring SRDs ................................................................................... 47 4.11 Step 11: Configuring IP Interfaces ........................................................................ 48 4.12 Step 12: Configuring IP Groups ............................................................................ 49 4.13 Step 13: Configuring Proxy Sets ........................................................................... 51 4.14 Step 14: Configuring Registration and Authentication Accounts ........................... 53 4.15 Step 15: Configuring Routing Rules ...................................................................... 54 4.16 Step 16: Configuring Manipulation Rules .............................................................. 56 4.17 Step 17: Configuring Coder Groups ...................................................................... 59 4.18 Step 18: Configuring IP Profiles ............................................................................ 60 4.19 Step 19: Configuring Message Manipulations ....................................................... 62 4.20 Step 20: Resetting the Gateway ........................................................................... 65
A AudioCodes INI File .......................................................................................... 67

Configuration Note 4 Document #: LTRT-39230
Microsoft Lync and Bell Canada SIP Trunk
List of Figures Figure 2-1: Topology .............................................................................................................................. 12 Figure 3-1: Starting the Lync Server Topology Builder .......................................................................... 13 Figure 3-2: Topology Builder Options .................................................................................................... 14 Figure 3-3: Save Topology .................................................................................................................... 14 Figure 3-4: Downloaded Topology ......................................................................................................... 15 Figure 3-5: New IP/PSTN Gateway ....................................................................................................... 15 Figure 3-6: Define New IP/PSTN Gateway............................................................................................ 16 Figure 3-7: IP/PSTN Gateway ............................................................................................................... 16 Figure 3-8: Associating Mediation Server with IP/PSTN Gateway ........................................................ 17 Figure 3-9: Before Associating IP/PSTN Gateway to a Mediation Server Association ......................... 18 Figure 3-10: After Associating IP/PSTN Gateway to Mediation Server ................................................. 19 Figure 3-11: Media Server PSTN Gateway Association Properties ...................................................... 19 Figure 3-12: Publishing Topology .......................................................................................................... 20 Figure 3-13: Publish Topology Confirmation ......................................................................................... 20 Figure 3-14: Publish Topology Confirmation Page ................................................................................ 21 Figure 3-15: Publish Topology Successfully Completed ....................................................................... 21 Figure 3-16: Lync Server Control Panel ................................................................................................ 22 Figure 3-17: Lync Server Credentials .................................................................................................... 22 Figure 3-18: Microsoft Lync Server 2010 Control Panel Page .............................................................. 23 Figure 3-19: Voice Routing Option ........................................................................................................ 23 Figure 3-20: Route Option ..................................................................................................................... 23 Figure 3-21: Adding New Voice Route .................................................................................................. 24 Figure 3-22: List of Deployed Gateways ................................................................................................ 25 Figure 3-23: Selecting the Device Gateway .......................................................................................... 25 Figure 3-24: Associating PSTN Usage to Device Gateway ................................................................... 26 Figure 3-25: Confirmation of New Voice Route ..................................................................................... 26 Figure 3-26: Committing Voice Routes .................................................................................................. 26 Figure 3-27: Uncommitted Voice Configuration Settings....................................................................... 27 Figure 3-28: Voice Routing Configuration Confirmation ........................................................................ 27 Figure 3-29: Voice Routing Screen Displaying Committed Routes ....................................................... 27 Figure 4-1: Web Interface Showing Basic/Full Navigation Tree Display ............................................... 30 Figure 4-2: IP Settings ........................................................................................................................... 31 Figure 4-3: Connections Page ............................................................................................................... 31 Figure 4-4: Defining LAN Data-Routing IP Address .............................................................................. 32 Figure 4-5: WAN Settings ...................................................................................................................... 33 Figure 4-6: General Security .................................................................................................................. 34 Figure 4-7: Multiple Interface Table Page.............................................................................................. 35 Figure 4-8: VoIP DNS Settings .............................................................................................................. 36 Figure 4-9: NTP Settings ....................................................................................................................... 36 Figure 4-10: Certificates Page ............................................................................................................... 37 Figure 4-11: Microsoft Certificate Services Web Page .......................................................................... 38 Figure 4-12: Request a Certificate Page ............................................................................................... 38 Figure 4-13: Advanced Certificate Request Page ................................................................................. 38 Figure 4-14: Submit a Certificate Request or Renewal Request Page ................................................. 39 Figure 4-15: Download a CA Certificate, Certificate Chain, or CRL Page ............................................ 39 Figure 4-16: Certificates Page ............................................................................................................... 40 Figure 4-17: Media Security Page ......................................................................................................... 41 Figure 4-18: Applications Enabling ........................................................................................................ 42 Figure 4-19: General Parameters .......................................................................................................... 43 Figure 4-20: General Parameters (Cont.) .............................................................................................. 43 Figure 4-21: General Parameters (Cont.) .............................................................................................. 44 Figure 4-22: INI file Output Window ....................................................................................................... 44 Figure 4-23: IP Media Settings .............................................................................................................. 45 Figure 4-24: SIP Media Realm Table .................................................................................................... 46 Figure 4-25: LAN SRD Table ................................................................................................................. 47 Figure 4-26: WAN SRD Table ............................................................................................................... 47 Figure 4-27: SIP Interface Table ............................................................................................................ 48

Microsoft Lync and Bell Canada SIP Trunk Contents
Version 6.2 5 August 2011
Figure 4-28: IP Group 1 ......................................................................................................................... 49 Figure 4-29: IP Group 2 ......................................................................................................................... 50 Figure 4-30: Proxy Set 1 ........................................................................................................................ 51 Figure 4-31: Proxy Sets Table 2 ............................................................................................................ 52 Figure 4-32: Account Table ................................................................................................................... 53 Figure 4-33: Inbound IP Routing Table .................................................................................................. 54 Figure 4-34: Outbound IP Routing Table ............................................................................................... 55 Figure 4-35: Manipulation Tables .......................................................................................................... 56 Figure 4-36: Destination Phone Number Manipulation Table for Tel-to-IP Calls Page ......................... 57 Figure 4-37: Source Phone Number Manipulation Table for Tel-to-IP Calls Page ............................... 57 Figure 4-38: Redirect Number Manipulation Table for Tel-to-IP Calls Page ......................................... 58 Figure 4-39: Coders Group Settings - Microsoft Lync ........................................................................... 59 Figure 4-40: Coders Group Settings-Bell Canada ................................................................................. 59 Figure 4-41: IP Profile Settings .............................................................................................................. 60 Figure 4-42: IP Profile Settings .............................................................................................................. 61 Figure 4-43: SIP Message Manipulation................................................................................................ 62 Figure 4-44: IP Group Table .................................................................................................................. 63 Figure 4-45: Output Window .................................................................................................................. 64 Figure 4-46: Reset the Gateway ............................................................................................................ 65
Configuration Note 6 Document #: LTRT-39230
Microsoft Lync and Bell Canada SIP Trunk
List of Tables Table 2-1: AudioCodes Gateway Version.............................................................................................. 11 Table 2-2: Bell Canada Version ............................................................................................................. 11 Table 2-3: Microsoft Lync Version ......................................................................................................... 11

Microsoft Lync and Bell Canada SIP Trunk Notices
Version 6.2 7 August 2011
Notice This document describes how to connect the Microsoft Lync server and Bell Canada SIP Trunking using the Mediant 3000, Mediant 800 MSBG and Mediant 1000 MSBG devices. Information contained in this document is believed to be accurate and reliable at the time of printing. However, due to ongoing product improvements and revisions, AudioCodes cannot guarantee accuracy of printed material after the Date Published, nor can it accept responsibility for errors or omissions. Updates to this document and other documents as well as software files can be viewed by registered customers at http://www.audiocodes.com/downloads.
© Copyright 2011 AudioCodes Ltd. All rights reserved. This document is subject to change without notice.
Date Published: August-11-2011
Trademarks AudioCodes, AC, AudioCoded, Ardito, CTI2, CTI², CTI Squared, HD VoIP, HD VoIP Sounds Better, InTouch, IPmedia, Mediant, MediaPack, NetCoder, Netrake, Nuera, Open Solutions Network, OSN, Stretto, TrunkPack, VMAS, VoicePacketizer, VoIPerfect, VoIPerfectHD, What’s Inside Matters, Your Gateway To VoIP and 3GX are trademarks or registered trademarks of AudioCodes Limited. All other products or trademarks are property of their respective owners.
WEEE EU Directive Pursuant to the WEEE EU Directive, electronic and electrical waste must not be disposed of with unsorted waste. Please contact your local recycling authority for disposal of this product.
Customer Support Customer technical support and service are generally provided by AudioCodes’ Distributors, Partners, and Resellers from whom the product was purchased. For technical support for products purchased directly from AudioCodes, or for customers subscribed to AudioCodes Customer Technical Support (ACTS), contact [email protected].
Abbreviations and Terminology Each abbreviation, unless widely used, is spelled out in full when first used.
Note: Throughout this manual, unless otherwise specified, the term device refers to the Mediant 3000, Mediant 800 MSBG and Mediant 1000 MSBG devices.

Configuration Note 8 Document #: LTRT-39230
Microsoft Lync and Bell Canada SIP Trunk
Reader’s Notes
Microsoft Lync and Bell Canada SIP Trunk 1. Introduction
Version 6.2 9 August 2011
1 Introduction This document describes how to setup the Mediant 3000, Mediant 800 MSBG and Mediant 1000 MSBG devices with Enterprise Session Border Controller (E-SBC) functionality enabled, (hereafter referred to as device) to work with the Bell Canada SIP Trunking and Microsoft Lync Communication platform. This document is intended for Installation Engineers or AudioCodes and Bell Canada Partners who are installing and configuring the Bell Canada SIP Trunking and Microsoft Lync Communication platform to place VoIP calls using the AudioCodes device. This networking device combines multiple service functions, such as a Media Gateway, Session Border Controller (SBC), and in case of the MSBG devices also Data Router and Firewall, LAN switch, WAN access, Stand Alone Survivability (SAS). The device offers enhanced dialing plans and voice routing capabilities along with SIP-to-SIP mediation, allowing enterprises to implement SIP Trunking services (IP-to-IP call routing) and IP-based Unified Communications, as well as flexible PSTN and legacy PBX connectivity.
Note: The scope of this document does not cover security aspects for connecting the SIP Trunk to the Microsoft Lync environment. Security measures should be implemented in accordance with your organization’s security policies. For basic security guidelines, refer to the AudioCodes Recommended Security Guidelines document.

Configuration Note 10 Document #: LTRT-39230
Microsoft Lync and Bell Canada SIP Trunk
Reader’s Notes

Microsoft Lync and Bell Canada SIP Trunk 2. Components Information
Version 6.2 11 August 2011
2 Components Information 2.1 AudioCodes Gateway Version
Table 2-1: AudioCodes Gateway Version
SBC Vendor AudioCodes
Tested Model Mediant 1000 MSBG
Software Version SIP_6.20A.028.004
Interface Type SIP/IP
VoIP Protocol SIP
Supported Models Mediant 800 MSBG, Mediant 1000 MSBG, and Mediant 3000
2.2 Bell Canada SIP Trunking Version Table 2-2: Bell Canada Version
Gateway Vendor Bell Canada
VoIP Protocol SIP
Additional Notes None
2.3 Microsoft Lync Version Table 2-3: Microsoft Lync Version
Gateway Vendor Microsoft
Models Microsoft Lync
Software Version RTM: Release 2010 4.0.7577.0
VoIP Protocol SIP
Additional Notes None

Configuration Note 12 Document #: LTRT-39230
Microsoft Lync and Bell Canada SIP Trunk
2.4 Topology The procedures described in this document describe the following example scenario: An enterprise has a deployed Microsoft® Lync server 2010 in its private network for
enhanced communication within the company. The enterprise decides to offer its employees Enterprise voice and to connect the
company to the PSTN network using the Bell Canada SIP Trunking service. AudioCodes Session Border Controller (SBC) is used to manage the connection
between the Enterprise LAN and the Bell Canada SIP trunk. The “session" refers to the real-time voice session using IP SIP signaling protocol. The "border" refers to the IP to IP network border between the Microsoft Lync network in the Enterprise LAN and the Bell Canada SIP trunk in the public network.
Figure 2-1 illustrates the interoperability topology between the Microsoft® Lync Server 2010 LAN and the Bell Canada SIP Trunking site. The setup requirements are characterized as follows: While the Microsoft® Lync Server 2010 environment is located on the Enterprise's
Local Area Network (LAN), the Bell Canada SIP Trunks are located on the WAN. Microsoft® Lync Server 2010 works with the TLS/SRTP transport type, while the Bell
Canada SIP trunk works on the SIP over UDP/RTP transport type. The internal data routing capabilities of the device are used. Consequently, a separate
WAN interface is configured in the LAN. Support for early media, Silence Suppression and Message Manipulation handling
Figure 2-1: Topology

Microsoft Lync and Bell Canada SIP Trunk 3. Configuring Lync Server 2010
Version 6.2 13 August 2011
3 Configuring Lync Server 2010 This section explains how to configure the Lync Server 2010 to operate with the device and describes the following procedures: 1. Configuring the device as an ‘IP/PSTN Gateway’. See Section 3.1 on page 13. 2. Associating the ‘IP/PSTN Gateway’ with the Mediation Server. See Section 3.2 on
page 17. 3. Configuring a ‘Route’ to utilize the SIP trunk connected to the device See Section 3.3
on page 22.
Note: Dial Plans, Voice Policies, and PSTN usages are also necessary for enterprise voice deployment; however, they are beyond the scope of this document.
3.1 Configuring the Device as an IP/PSTN Gateway This section describes how to configure the device as an IP/PSTN Gateway.
To configure the device as a IP/PSTN Gateway and associating it with the Mediation Server:
1. On the server where the Topology Builder is located, start the Lync Server 2010 Topology Builder (Start > All Programs > Lync Server Topology Builder).
Figure 3-1: Starting the Lync Server Topology Builder

Configuration Note 14 Document #: LTRT-39230
Microsoft Lync and Bell Canada SIP Trunk
2. The following screen is displayed;
Figure 3-2: Topology Builder Options
3. Click the Download Topology from the existing deployment and click OK. 4. Click Save.
Figure 3-3: Save Topology
5. Enter the File name and click Save. This action enables you to rollback from any
changes you make during the installation.

Microsoft Lync and Bell Canada SIP Trunk 3. Configuring Lync Server 2010
Version 6.2 15 August 2011
6. The Topology Builder screen with the topology downloaded is displayed.
Figure 3-4: Downloaded Topology
7. Right-click on the IP/PSTN Gateway folder and select New IP/PSTN Gateway.
Figure 3-5: New IP/PSTN Gateway

Configuration Note 16 Document #: LTRT-39230
Microsoft Lync and Bell Canada SIP Trunk
8. In the ‘Gateway FQDN or IP Address’ field, enter the FQDN of the device (i.e. ‘ACGW.lync.local’) and click OK.
Figure 3-6: Define New IP/PSTN Gateway
9. In the ‘Listening port for IP/PSTN gateway’ field, enter “5067”. 10. In the ‘Sip Transport Protocol’ field, click the TLS option. The device is now added as
an ‘IP/PSTN Gateway’.
Figure 3-7: IP/PSTN Gateway

Microsoft Lync and Bell Canada SIP Trunk 3. Configuring Lync Server 2010
Version 6.2 17 August 2011
3.2 Associating the IP/PSTN Gateway with the Mediation Server This section describes how to associate the IP/PSTN Gateway with the Mediation Server.
To associate the IP/PSTN Gateway with the Mediation Server:
1. Right-click on the Mediation Server to use with the device (i.e. FE-Lync.Lync.local). 2. From the shortcut menu, choose Edit Properties.
Figure 3-8: Associating Mediation Server with IP/PSTN Gateway

Configuration Note 18 Document #: LTRT-39230
Microsoft Lync and Bell Canada SIP Trunk
3. The following screen is displayed:
Figure 3-9: Before Associating IP/PSTN Gateway to a Mediation Server Association
4. In the left pane, click PSTN gateway; the Mediation Server PSTN gateway group
appears in the right pane.
Microsoft Lync and Bell Canada SIP Trunk 3. Configuring Lync Server 2010
Version 6.2 19 August 2011
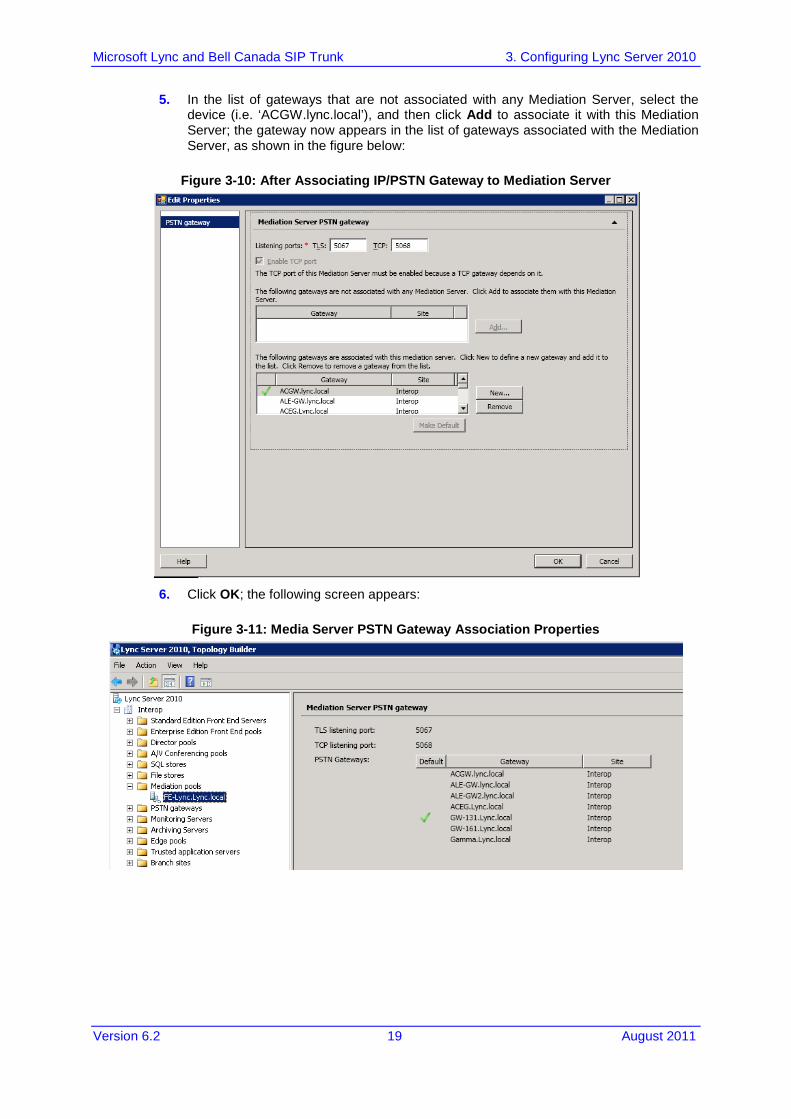
5. In the list of gateways that are not associated with any Mediation Server, select the device (i.e. ‘ACGW.lync.local’), and then click Add to associate it with this Mediation Server; the gateway now appears in the list of gateways associated with the Mediation Server, as shown in the figure below:
Figure 3-10: After Associating IP/PSTN Gateway to Mediation Server
6. Click OK; the following screen appears:
Figure 3-11: Media Server PSTN Gateway Association Properties

Configuration Note 20 Document #: LTRT-39230
Microsoft Lync and Bell Canada SIP Trunk
7. Right-click the Lync Server 2010 root folder, and then from the shortcut menu choose Publish Topology.
Figure 3-12: Publishing Topology
8. The Publish Topology page is displayed.
Figure 3-13: Publish Topology Confirmation

Microsoft Lync and Bell Canada SIP Trunk 3. Configuring Lync Server 2010
Version 6.2 21 August 2011
9. Click Next; the Topology Builder attempts to publish your topology.
Figure 3-14: Publish Topology Confirmation Page
10. Wait until the publish topology process has ended successfully.
Figure 3-15: Publish Topology Successfully Completed
11. Click Finish.

Configuration Note 22 Document #: LTRT-39230
Microsoft Lync and Bell Canada SIP Trunk
3.3 Configuring the Route on the Lync Server 2010 This section describes how to configure a Route on the Lync server and associate it with the PSTN gateway.
To configure the ‘route’ on the Lync server:
1. From the Communication Server Control Panel (CSCP), click Start > All Programs, and then select Lync Server Control Panel.
Figure 3-16: Lync Server Control Panel
2. You are prompted for credentials; enter your domain username and password.
Figure 3-17: Lync Server Credentials

Microsoft Lync and Bell Canada SIP Trunk 3. Configuring Lync Server 2010
Version 6.2 23 August 2011
3. The Microsoft Lync Server 2010 Control Panel page is displayed.
Figure 3-18: Microsoft Lync Server 2010 Control Panel Page
4. From the Navigation pane, select the Voice Routing option as shown in the figure
below:
Figure 3-19: Voice Routing Option
5. In the Voice Routing menu at the top of the page, select the Route option.
Figure 3-20: Route Option

Configuration Note 24 Document #: LTRT-39230
Microsoft Lync and Bell Canada SIP Trunk
6. In the content area toolbar, click . 7. In the Build a Pattern to Match pane, enter a Name for this route (i.e. SIP Trunk
Route) and an entry for Match this pattern, for the phone numbers you wish this route to handle. In this example, the pattern to match is ‘*’, which means “to match all numbers”.
8. Click Add.
Figure 3-21: Adding New Voice Route
9. Associate the route with the device IP/PSTN gateway you created above; scroll down
to the Associated Gateways pane, and then click Add.

Microsoft Lync and Bell Canada SIP Trunk 3. Configuring Lync Server 2010
Version 6.2 25 August 2011
10. A list of all the deployed Gateways is displayed.
Figure 3-22: List of Deployed Gateways
11. Select the device you created above and click OK.
Figure 3-23: Selecting the Device Gateway

Configuration Note 26 Document #: LTRT-39230
Microsoft Lync and Bell Canada SIP Trunk
12. Associate a PSTN Usage to this route. In the Associated PSTN Usages toolbar, click Select and add the associated PSTN Usage.
Figure 3-24: Associating PSTN Usage to Device Gateway
13. Click OK in the toolbar at the top of the New Voice Route pane.
Figure 3-25: Confirmation of New Voice Route
14. In the Content area Toolbar, click the arrow adjacent to the Commit button. 15. From the ‘Commit’ drop-down menu, select Commit All.
Figure 3-26: Committing Voice Routes

Microsoft Lync and Bell Canada SIP Trunk 3. Configuring Lync Server 2010
Version 6.2 27 August 2011
16. In the Uncommitted Voice Configuration Settings page, click Commit.
Figure 3-27: Uncommitted Voice Configuration Settings
17. A message is displayed, confirming a successful voice routing configuration; in the
Microsoft Lync Server 2010 Control Panel page, click Close.
Figure 3-28: Voice Routing Configuration Confirmation
18. The new committed Route is now displayed in the Voice Routing page.
Figure 3-29: Voice Routing Screen Displaying Committed Routes

Configuration Note 28 Document #: LTRT-39230
Microsoft Lync and Bell Canada SIP Trunk
Reader’s Notes

Microsoft Lync and Bell Canada SIP Trunk 4. Configuring the Device
Version 6.2 29 August 2011
4 Configuring the Device This section describes the following steps for configuring the device in the Bell Canada SIP Trunking environment:
Note: The configuration below refers to the Mediant 1000 MSBG. However, the same configuration is also applicable for the Mediant 800 and Mediant 3000, unless explicitly stated otherwise.
Step 1: Configuring IP Addresses. See Section 4.1 on page 31. Step 2: Configuring Data Firewall Rules. See Section 4.2 on page 34. Step 3: Configuring IP Addresses for Mediant 3000. See Section 4.3 on page 35. Step 4: Configuring the TLS Connection. See Section 4.3 on page 35.
• Step 4-1: Configuring VoIP DNS Settings. See Section 4.4.1 on page 36. • Step 4-2: Configuring NTP Server. See Section 4.4.2 on page 36. • Step 4-3: Configuring Certificates. See Section 4.4.3 on page 37.
Step 5: Configuring Data Firewall Settings. See Section 4.5 on page 41. Step 6: Enabling SIP SBC Applications. See Section 4.6 on page 42. Step 7: Configuring SIP General Parameters. See Section 4.7 on page 43. Step 8: Configuring IP Media. See Section 4.8 on page 45. Step 9: Configuring SIP Media Realm. See Section 4.9 on page 46. Step 10: Configuring SRD Table. See Section 4.10 on page 47. Step 11: Configuring the IP Interface Table. See Section 4.11 on page 48. Step 12: Configuring IP Groups. See Section 4.12 on page 49. Step 13: Configuring Proxy Sets. See Section 4.13 on page 51. Step 14: Configuring Account Table. See Section 4.14 on page 53. Step 15: Configuring Routing Rules. See Section 4.15 on page 54. Step 16: Configuring Manipulation Rules. See Section 4.16 on page 56. Step 17: Configure Coder Group. See Section 4.17 on page 59. Step 18: Configure IP Profiles. See Section 4.18 on page 60. Step 19: Configuring Message Manipulations. See Section 4.19 on page 62 Step 20: Resetting the Gateway. See Section 4.20 on page 65.

Configuration Note 30 Document #: LTRT-39230
Microsoft Lync and Bell Canada SIP Trunk
The procedures described in this section are performed using the device’s Web-based management tool (i.e., embedded Web server). Before you begin configuring the device, ensure that the Web interface's Navigation tree is in full menu display mode (i.e., the Full option on the Navigation bar is selected), as displayed below:
Figure 4-1: Web Interface Showing Basic/Full Navigation Tree Display

Microsoft Lync and Bell Canada SIP Trunk 4. Configuring the Device
Version 6.2 31 August 2011
4.1 Step 1: Configuring IP Addresses This step describes how to configure LAN IP addresses when the internal data-routing capabilities of the device are used in order to connect to the Bell Canada SIP Trunk. In this case, you must configure a separate WAN interface as described in this section. Since the Mediant 3000 does not have data-routing capabilities, see Section 4.3 on page 35 to configure the IP address.
Notes:
• The VoIP and Management interface must be in the same subnet as the data-routing interface as shown in the figure below.
• When operating with both VoIP and data-routing functionalities, it is recommended to define the Default Gateway IP address for the VoIP network interface in the same subnet and with the same VLAN ID as the IP address for the data-routing LAN interface as shown below.
4.1.1 Configuring LAN IP Addresses This step describes how to configure the LAN addresses.
To configure the VoIP IP settings:
1. Open the 'IP Settings' page (Configuration tab > VoIP menu > Network > IP Settings).
2. Set the following parameters: • In the ‘IP Address’ field, enter the Gateway IP-Address (e.g., 10.15.4.70). • In the 'Prefix Length’ field, enter the Subnet Mask in bits (e.g., 16). • In the ‘Gateway’ field, enter the default Gateway (e.g., 10.15.4.71).
3. From the ‘WAN Interface Name’ drop-down list, enter “WAN Ethernet”. This is the WAN interface on which your VoIP traffic interfaces with the public network.
Figure 4-2: IP Settings
To define the device's LAN data-routing IP address:
1. Access the device's Web interface with the IP address that you assigned to the VoIP and Management interface.
2. Open the 'Connections' page (Configuration tab > Data menu > Data System > Connections).
Figure 4-3: Connections Page
2
3

Configuration Note 32 Document #: LTRT-39230
Microsoft Lync and Bell Canada SIP Trunk
3. Click the Edit icon corresponding to the "LAN Switch VLAN 1" connection, and then click the Settings tab.
4. In the 'IP Address' and 'Subnet Mask' fields, enter the required IP address (e.g., 10.15.4.71) and subnet respectively, and then click OK.
Figure 4-4: Defining LAN Data-Routing IP Address

Microsoft Lync and Bell Canada SIP Trunk 4. Configuring the Device
Version 6.2 33 August 2011
4.1.2 Configuring WAN IP Addresses This step describes how to configure the device’s firewall IP address used to connect to the WAN.
To configure the WAN IP address:
1. Cable the device to the WAN network (i.e., ADSL or Cable modem), using the WAN port.
2. Open the 'Settings' page (Configuration tab > Data menu > WAN Access > Settings).
Figure 4-5: WAN Settings
3. Set the following parameters:
• IP Address: <WAN IP-Address> (e.g., 195.189.192.153). • Subnet Mask: <Subnet Mask> (e.g., 255.255.255.128). • Default Gateway: <WAN Default GW IP-Address> (e.g., 195.189.192.129). • Primary DNS Server: <First DATA DNS IP-Address> (e.g., 80.179.55.100). • Secondary DNS Server: <Second Data DNS IP-Address> (e.g., 80.179.52.100).
Configuration Note 34 Document #: LTRT-39230
Microsoft Lync and Bell Canada SIP Trunk
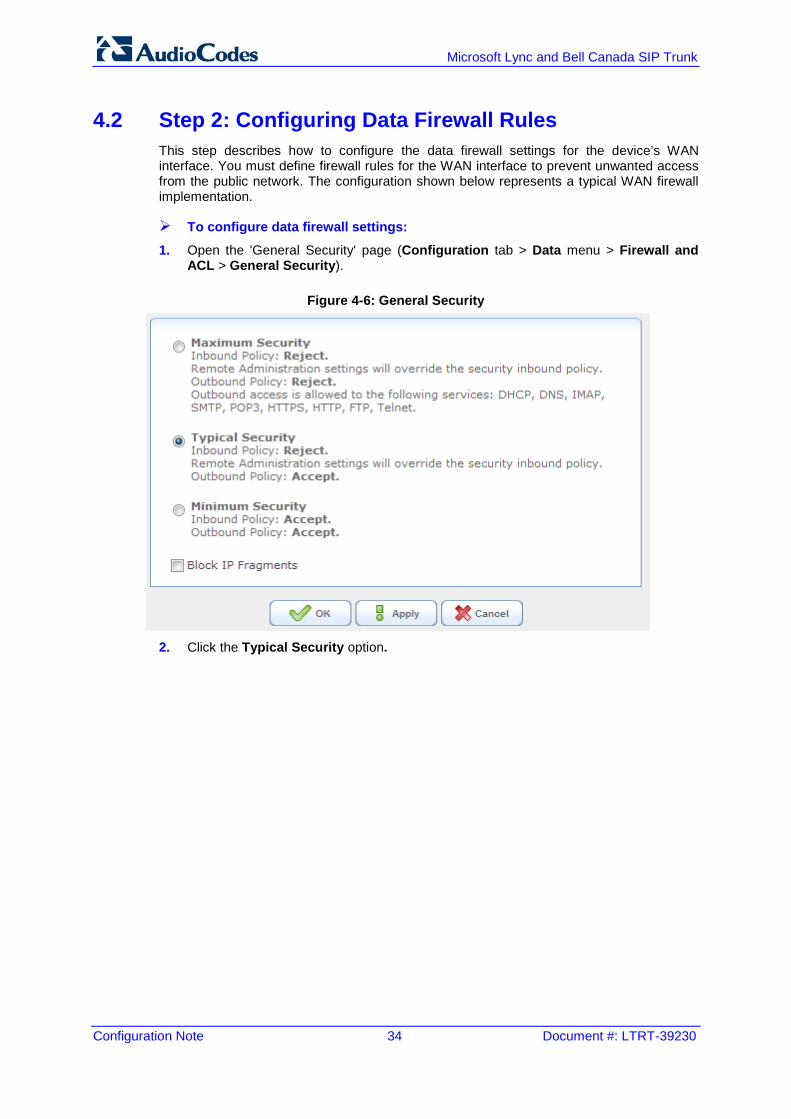
4.2 Step 2: Configuring Data Firewall Rules This step describes how to configure the data firewall settings for the device’s WAN interface. You must define firewall rules for the WAN interface to prevent unwanted access from the public network. The configuration shown below represents a typical WAN firewall implementation.
To configure data firewall settings:
1. Open the 'General Security' page (Configuration tab > Data menu > Firewall and ACL > General Security).
Figure 4-6: General Security
2. Click the Typical Security option.

Microsoft Lync and Bell Canada SIP Trunk 4. Configuring the Device
Version 6.2 35 August 2011
4.3 Step 3: Configuring IP Addresses for Mediant 3000 To configure IP network interfaces:
1. Open the 'Multiple Interface Table' page (Configuration tab > VoIP menu > Network submenu > IP Settings).
Figure 4-7: Multiple Interface Table Page
2. In the 'Add Index' field, enter the desired index number for the new interface, and then click Add Index; the index row is added to the table.
3. Set the following parameters: • In the ‘IP Address’ field, enter the Gateway IP-Address (e.g., 10.15.4.70). • In the 'Prefix Length’ field, enter the Subnet Mask in bits (e.g., 16). • In the ‘Gateway’ field, enter the company default Gateway (e.g., 10.15.0.1).
4. Click Apply; the interface is added to the table and the Done button appears. 5. Click Done to validate the interface. 6. Save the changes to flash memory and reset the device.

Configuration Note 36 Document #: LTRT-39230
Microsoft Lync and Bell Canada SIP Trunk
4.4 Step 4: Configuring SIP TLS Connection This step describes how to configure AudioCodes gateways for implementing a TLS connection with the Microsoft Lync Mediation Server. The procedures described in this section are essential elements in the configuration of a secure SIP TLS connection.
4.4.1 Step 4-1: Configuring VoIP DNS Settings This step describes how to define the VoIP LAN DNS server, which is a necessary action whenever an FQDN is configured (such is the case for the configuration in this scenario, see Section 4.13 on page 51).
To configure the VoIP DNS settings:
1. Open the 'DNS Settings' page (Configuration tab > VoIP menu > DNS > DNS Settings).
Figure 4-8: VoIP DNS Settings
2. Set the following parameters:
• DNS Primary Server IP: <Primary DNS IP-Address> (e.g., 10.15.9.10). • DNS Secondary Server IP: <Secondary DNS IP-Address>.
4.4.2 Step 4-2: Configuring the NTP Server This step describes how to configure the NTP Server IP address. It is recommended to implement an NTP server (third-party) so that the device receives the accurate current date and time. This is necessary for validating remote parties' certificates.
To configure NTP Settings:
1. Open the 'Application Settings' page (Configuration tab > System menu > Application Settings).
Figure 4-9: NTP Settings
2. In the ‘NTP Server IP Address’ field, enter the NTP server IP address (e.g.,
10.15.9.10).
2
Microsoft Lync and Bell Canada SIP Trunk 4. Configuring the Device
Version 6.2 37 August 2011
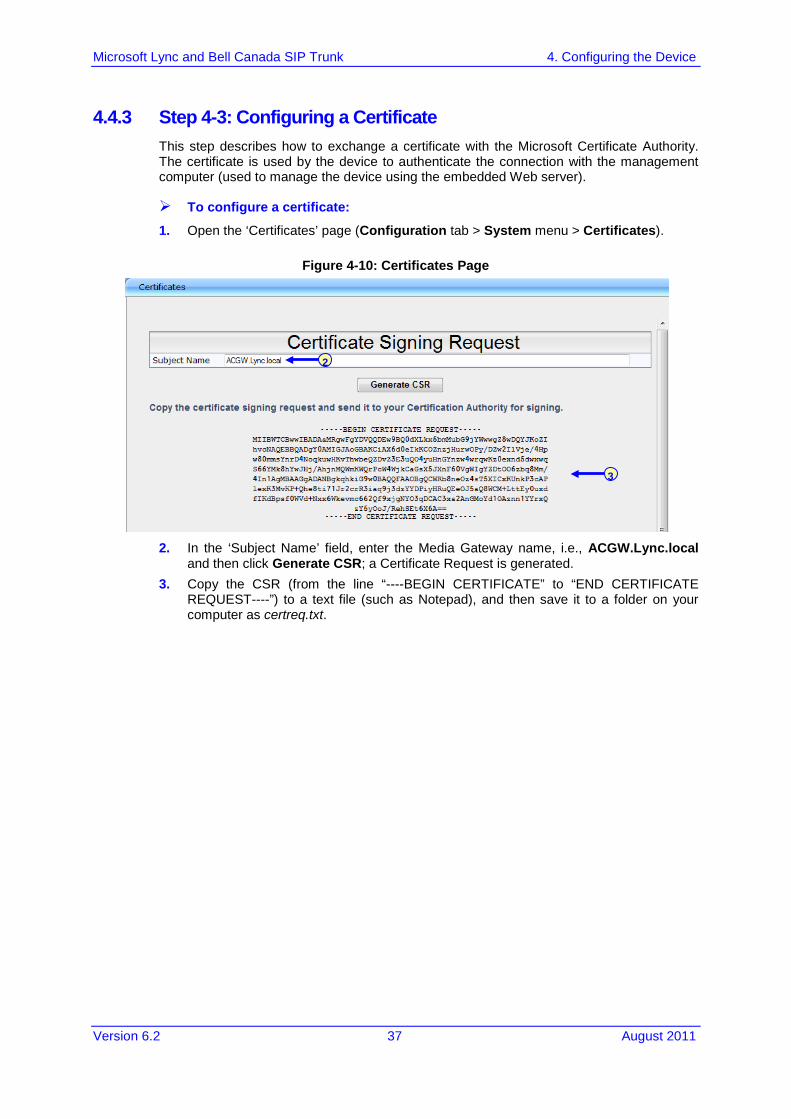
4.4.3 Step 4-3: Configuring a Certificate This step describes how to exchange a certificate with the Microsoft Certificate Authority. The certificate is used by the device to authenticate the connection with the management computer (used to manage the device using the embedded Web server).
To configure a certificate:
1. Open the ‘Certificates’ page (Configuration tab > System menu > Certificates).
Figure 4-10: Certificates Page
2. In the ‘Subject Name’ field, enter the Media Gateway name, i.e., ACGW.Lync.local
and then click Generate CSR; a Certificate Request is generated. 3. Copy the CSR (from the line “----BEGIN CERTIFICATE” to “END CERTIFICATE
REQUEST----”) to a text file (such as Notepad), and then save it to a folder on your computer as certreq.txt.
2
3

Configuration Note 38 Document #: LTRT-39230
Microsoft Lync and Bell Canada SIP Trunk
4. Navigate to the ‘Server http://<Certificate Server>/CertSrv’ certificate.
Figure 4-11: Microsoft Certificate Services Web Page
5. Click the Request a Certificate link.
Figure 4-12: Request a Certificate Page
6. Click the advanced certificate request link, and then click Next.
Figure 4-13: Advanced Certificate Request Page
Microsoft Lync and Bell Canada SIP Trunk 4. Configuring the Device
Version 6.2 39 August 2011
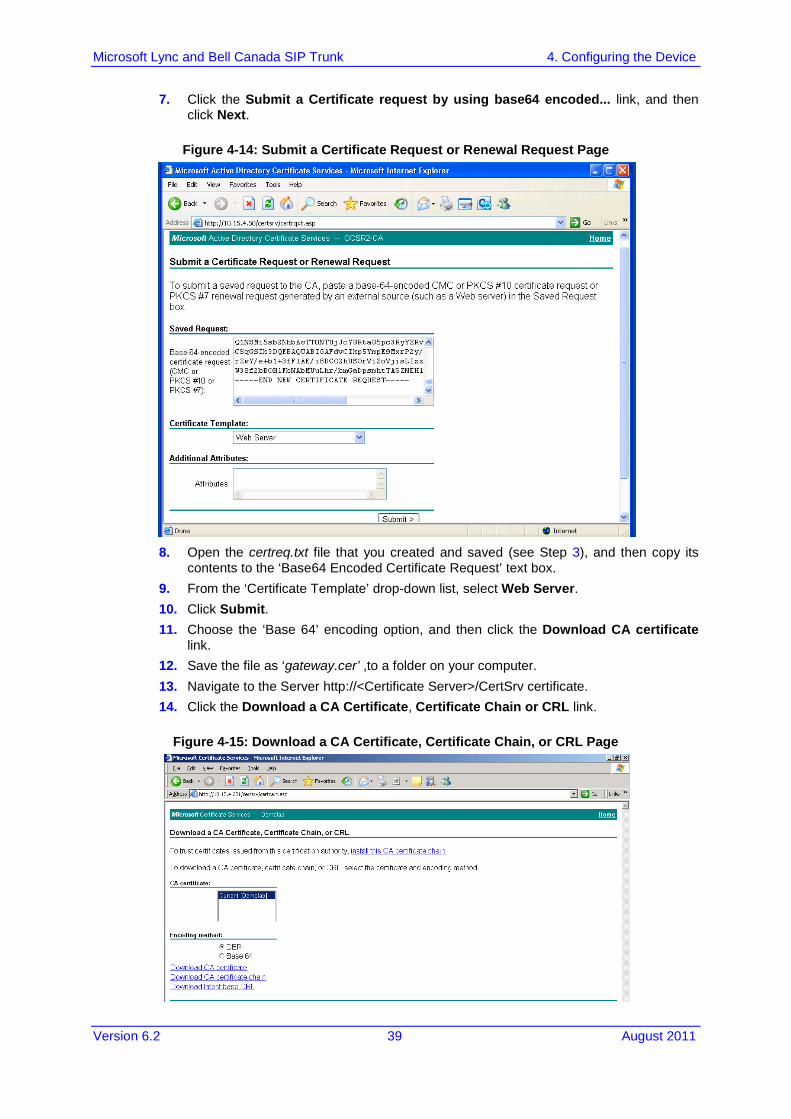
7. Click the Submit a Certificate request by using base64 encoded... link, and then click Next.
Figure 4-14: Submit a Certificate Request or Renewal Request Page
8. Open the certreq.txt file that you created and saved (see Step 3), and then copy its
contents to the ‘Base64 Encoded Certificate Request’ text box. 9. From the ‘Certificate Template’ drop-down list, select Web Server. 10. Click Submit. 11. Choose the ‘Base 64’ encoding option, and then click the Download CA certificate
link. 12. Save the file as ‘gateway.cer’ ,to a folder on your computer. 13. Navigate to the Server http://<Certificate Server>/CertSrv certificate. 14. Click the Download a CA Certificate, Certificate Chain or CRL link.
Figure 4-15: Download a CA Certificate, Certificate Chain, or CRL Page

Configuration Note 40 Document #: LTRT-39230
Microsoft Lync and Bell Canada SIP Trunk
15. Under the Encoding method group, do the following: a. Click the Base 64 encoding method option. b. Click the Download CA certificate link
16. Save the file as ‘certroot.cer’ in a folder on your computer. 17. Navigate back to the ‘Certificates’ page. 18. In the ‘Certificates’ page, in the ‘Server Certificate’ field, click Browse and select the
‘Gateway.cer’ certificate file that you saved on your local disk (see Step 12), and then click Send File to upload the certificate.
19. In the ‘Certificates’ page, in the ‘Trusted Root Certificate Store’ field, click Browse and select the ‘Certroot.cer‘ certificate file that you saved on your local disk (see Step 16), and then click Send File to upload the certificate.
Figure 4-16: Certificates Page
20. Save (burn) the Media Gateway configuration and reset the Media Gateway, using the
Web interface’s ‘Maintenance Actions’ page (On the Navigation bar, click the Management tab, and then in the Navigation tree, select the Management Configuration menu, and then choose the Maintenance Actions).
18
19

Microsoft Lync and Bell Canada SIP Trunk 4. Configuring the Device
Version 6.2 41 August 2011
4.5 Step 5: Configuring Secure Real-Time Transport Protocol (SRTP) This step describes how to enable SRTP media security on the gateway.
To configure the media security: 1. Open the 'Media Security' page (Configuration tab > Media Settings menu > Media
Security).
Figure 4-17: Media Security Page
2. From the ‘Media Security’ drop-down list, select Enable, to enable SRTP. 3. From the ‘Media Security Behavior’ drop-down list, select the following:
• Mandatory - if Mediation Server is configured to ‘SRTP Required’ • Preferable-Single media - if Mediation Server is configured to ‘SRTP Optional’.
4. In the ‘Master Key Identifier (MKI) Size’ field, enter “1”. 5. Click Submit. 6. Save (burn) the Media Gateway configuration and reset the gateway.
2 3
4

Configuration Note 42 Document #: LTRT-39230
Microsoft Lync and Bell Canada SIP Trunk
4.6 Step 6: Enabling the SIP SBC and IP-to-IP Applications This step describes how to enable the SIP SBC and IP-to-IP applications.
To enable the SBC and IP-to-IP applications:
1. Open the 'Applications Enabling' page (Configuration tab > VoIP menu > Applications Enabling > Applications Enabling).
Figure 4-18: Applications Enabling
2. From the ‘Enable SBC Application’ drop-down list, select Enable. 3. From the ‘Enable IP2IP Application’ drop-down list, select Enable.
Notes:
• To enable the SBC and IP-to-IP capabilities on the AudioCodes gateway, your gateway must be loaded with the feature key that includes the IP-to-IP feature.
• The device must be running SIP version 6.2 or later. • Reset with BURN to FLASH is required.
2 3

Microsoft Lync and Bell Canada SIP Trunk 4. Configuring the Device
Version 6.2 43 August 2011
4.7 Step 7: Configuring SIP General Parameters This step describes how to enable SIP General parameters.
To configure SIP General Parameters:
1. Open the 'Applications Enabling' page (Configuration tab > VoIP menu > SIP Definitions > General Parameters).
Figure 4-19: General Parameters
2. From the ‘Enable Early Media’ drop-down list, select Enable. 3. From the ‘Session Expires Method’ drop-down list, select UPDATE. 4. From the ‘Asserted Identity Mode’ drop-down list, select Adding PAsserted Identity. 5. From the ’SIP Transport Type’ drop-down list, select TLS.
Figure 4-20: General Parameters (Cont.)
6. From the ‘Play Ringback Tone to Tel’ drop-down list, select Play Local Until Remote
Media Arriving.
2
3
5
4
6
5

Configuration Note 44 Document #: LTRT-39230
Microsoft Lync and Bell Canada SIP Trunk
7. From the ‘Use Tgrp information’ drop-down list, select Send & Receive.
Figure 4-21: General Parameters (Cont.)
8. From the ‘Forking Handling Mode’ drop-down list, select Sequential handling. 9. Open the 'Admin" page, by appending the case-sensitive suffix ‘AdminPage’ to the
Media Gateway's IP address in your Web browser's URL field (e.g., http://10.15.4.70/AdminPage).
10. On the left pane, click ini Parameters. In the 'Parameter Name' field, enter the following parameters • IGNOREALERTAFTEREARLYMEDIA; In the 'Enter Value' field, enter ‘1’. • ENABLEEARLY183; In the Enter Value field, enter ‘1’ • FAKERETRYAFTER; In the Enter Value field, enter ’60’ • USESIPURIFORDIVERSIONHEADER; In the Enter Value field, enter ‘1’
11. Click Apply New Value.
Figure 4-22: INI file Output Window
7

Microsoft Lync and Bell Canada SIP Trunk 4. Configuring the Device
Version 6.2 45 August 2011
4.8 Step 8: Configuring IP Media This step describes how to configure the number of media channels for the IP media. In this configuration, 120 channels are configured.
To configure IP Media Settings:
1. Open the 'IP Media Settings' page (Configuration tab > VoIP menu > IP Media > IP Media Settings).
Figure 4-23: IP Media Settings
2. In the ‘Number of Media Channels’ field, enter “120”.
2

Configuration Note 46 Document #: LTRT-39230
Microsoft Lync and Bell Canada SIP Trunk
4.9 Step 9: Configuring SIP Media Realm A Media Realm is a range of UDP ports that is associated with a media IP interface/IP address (defined in the Multiple Interface table). Media Realms allow you to divide a media (RTP traffic) IP interface into several realms, where each realm is specified by a UDP port range. The pool of media interfaces (i.e., Media Realms) are defined in the SIP Media Realm table (CpMediaRealm parameter). Once created, the Media Realm can be assigned to other entities for routing (e.g., to an IP Group in the 'IP Group' table and to an SRD in the 'SRD' table).
To configure SIP Media Realm:
Open the 'Media Realm Configuration' page (Configuration tab > VoIP menu > Media > Media Realm Configuration) and configure the Media Realm table as illustrated below:
Figure 4-24: SIP Media Realm Table
Notes:
• Row Index 0: Defines the range of 90 UDP ports for the LAN side (for 10 RTP sessions),
• Row Index 1: Defines the range of 90 UDP ports for the WAN side (for 10 RTP sessions).

Microsoft Lync and Bell Canada SIP Trunk 4. Configuring the Device
Version 6.2 47 August 2011
4.10 Step 10: Configuring SRDs An SRD is a set of definitions of IP interfaces, device resources, SIP behaviors and other definitions that together create (from the IP user’s perspective) from one physical device, multiple virtual multi-service gateways. You must configure two SRD’s, one for the LAN and one for the WAN
To configure SRDs:
Open the 'SRD Table' page (Configuration tab > VoIP menu > Control Network > SRD Table) and configure the SRD table as illustrated below:
Figure 4-25: LAN SRD Table
Figure 4-26: WAN SRD Table
Note: The Media realm field should correspond to the configured entry in the previous step (case sensitive).

Configuration Note 48 Document #: LTRT-39230
Microsoft Lync and Bell Canada SIP Trunk
4.11 Step 11: Configuring IP Interfaces A SIP Interface represents a SIP signaling interface (IPv4), which is a combination of ports (UDP, TCP, and TLS) associated with a specific IP address and an SRD ID. SIP Interfaces allow you to use different SIP signaling interfaces for each of the two SBC legs (i.e., each SIP user agent communicates with a specific SRD row index 1 with Lync and row index 2 with the ITSP).
To configure IP Interfaces:
Open the 'SIP Interface Table' page (Configuration tab > VoIP menu > Control Network submenu > SIP Interface Table) and configure the SIP Interface table as illustrated below:
Figure 4-27: SIP Interface Table
Note: Note that in SRD 1, the TLS port is set to ‘5067’. This is the E-SBC listening port as configured on the Lync Server 2010 on page 16.
Microsoft Lync and Bell Canada SIP Trunk 4. Configuring the Device
Version 6.2 49 August 2011
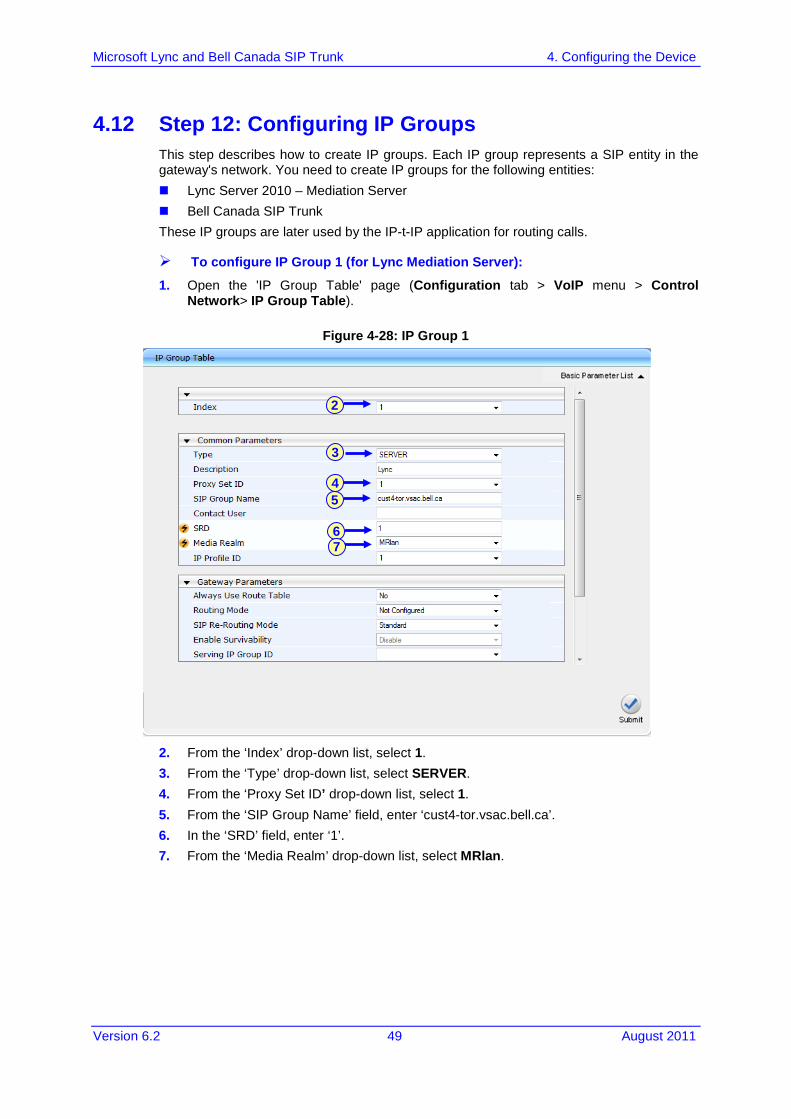
4.12 Step 12: Configuring IP Groups This step describes how to create IP groups. Each IP group represents a SIP entity in the gateway's network. You need to create IP groups for the following entities: Lync Server 2010 – Mediation Server Bell Canada SIP Trunk These IP groups are later used by the IP-t-IP application for routing calls.
To configure IP Group 1 (for Lync Mediation Server):
1. Open the 'IP Group Table' page (Configuration tab > VoIP menu > Control Network> IP Group Table).
Figure 4-28: IP Group 1
2. From the ‘Index’ drop-down list, select 1. 3. From the ‘Type’ drop-down list, select SERVER. 4. From the ‘Proxy Set ID’ drop-down list, select 1. 5. From the ‘SIP Group Name’ field, enter ‘cust4-tor.vsac.bell.ca’. 6. In the ‘SRD’ field, enter ‘1’. 7. From the ‘Media Realm’ drop-down list, select MRlan.
2
3
5
6 7
4

Configuration Note 50 Document #: LTRT-39230
Microsoft Lync and Bell Canada SIP Trunk
To configure IP Group 2 (For Bell Canada Sip Trunk):
1. Open the 'IP Group Table' page (Configuration tab > VoIP menu > Control Network> IP Group Table).
Figure 4-29: IP Group 2
2. From the ‘Index’ drop-down list, select 2. 3. From the ‘Type’ drop-down list, select SERVER. 4. From the ‘Proxy Set ID’ drop-down list, select 2. 5. From the ‘SIP Group Name’ field, enter ‘acgw.lync.local’. 6. In the ‘SRD’ field, enter ‘2’. 7. From the ‘Media Realm’ drop-down list, select MRwan.
3
4
2
5
6 7

Microsoft Lync and Bell Canada SIP Trunk 4. Configuring the Device
Version 6.2 51 August 2011
4.13 Step 13: Configuring Proxy Sets This step describes how to configure the proxy set tables. In this configuration, you configure a proxy set for the Bell Canada SIP trunk and another for the Microsoft Lync server.
To configure Proxy Set 1 for Lync Server:
1. Open the 'Proxy Sets Table' page (Configuration tab > VoIP menu > Control Network> Proxy Sets Table).
Figure 4-30: Proxy Set 1
2. From the ‘Proxy Set ID’ drop-down list, select 1. 3. In the ‘Proxy Address’ Table field, enter the Microsoft Lync Server SIP Trunking IP-
Address or FQDN and Destination Port (e.g., FE-Lync.Lync.local:5067). 4. From the ‘Transport Type’ drop-down list, select TLS. 5. From the ‘Enable Proxy Keep Alive’ drop-down list, select Using Options. 6. In the ‘SRD Index’ field, enter ‘1’.
5
6
2
4 3
Configuration Note 52 Document #: LTRT-39230
Microsoft Lync and Bell Canada SIP Trunk
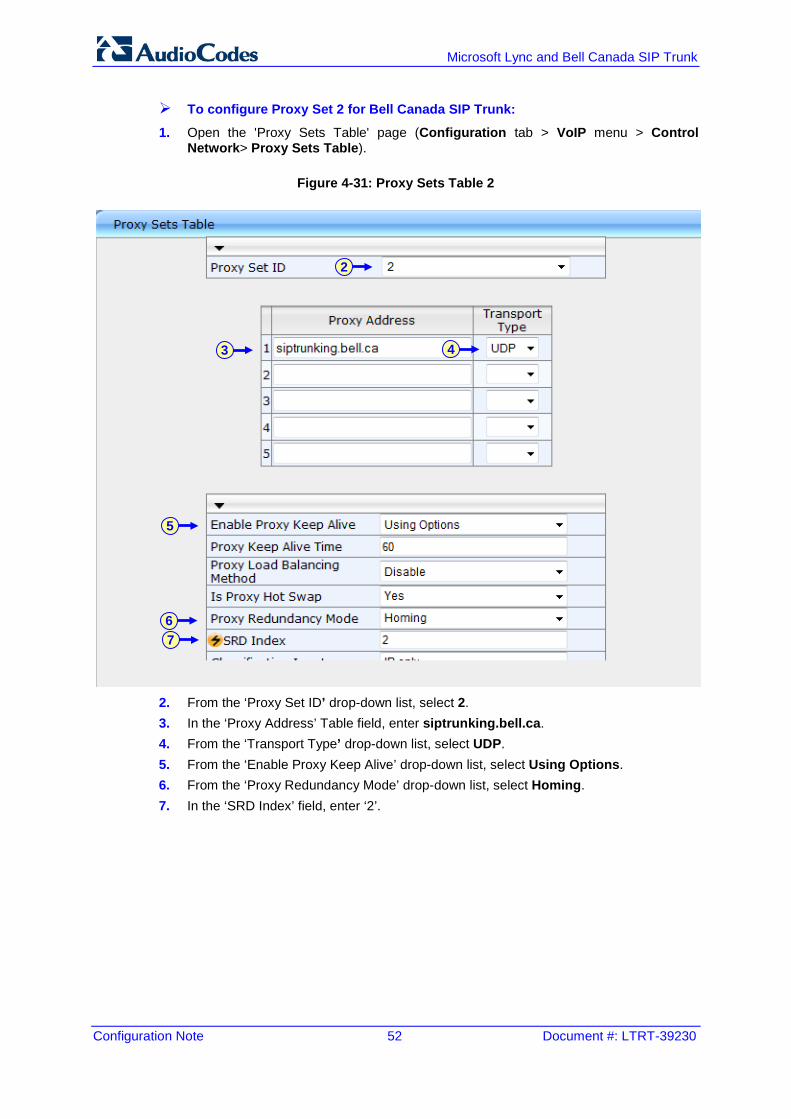
To configure Proxy Set 2 for Bell Canada SIP Trunk:
1. Open the 'Proxy Sets Table' page (Configuration tab > VoIP menu > Control Network> Proxy Sets Table).
Figure 4-31: Proxy Sets Table 2
2. From the ‘Proxy Set ID’ drop-down list, select 2. 3. In the ‘Proxy Address’ Table field, enter siptrunking.bell.ca. 4. From the ‘Transport Type’ drop-down list, select UDP. 5. From the ‘Enable Proxy Keep Alive’ drop-down list, select Using Options. 6. From the ‘Proxy Redundancy Mode’ drop-down list, select Homing. 7. In the ‘SRD Index’ field, enter ‘2’.
2
3 4
5
6 7
Microsoft Lync and Bell Canada SIP Trunk 4. Configuring the Device
Version 6.2 53 August 2011
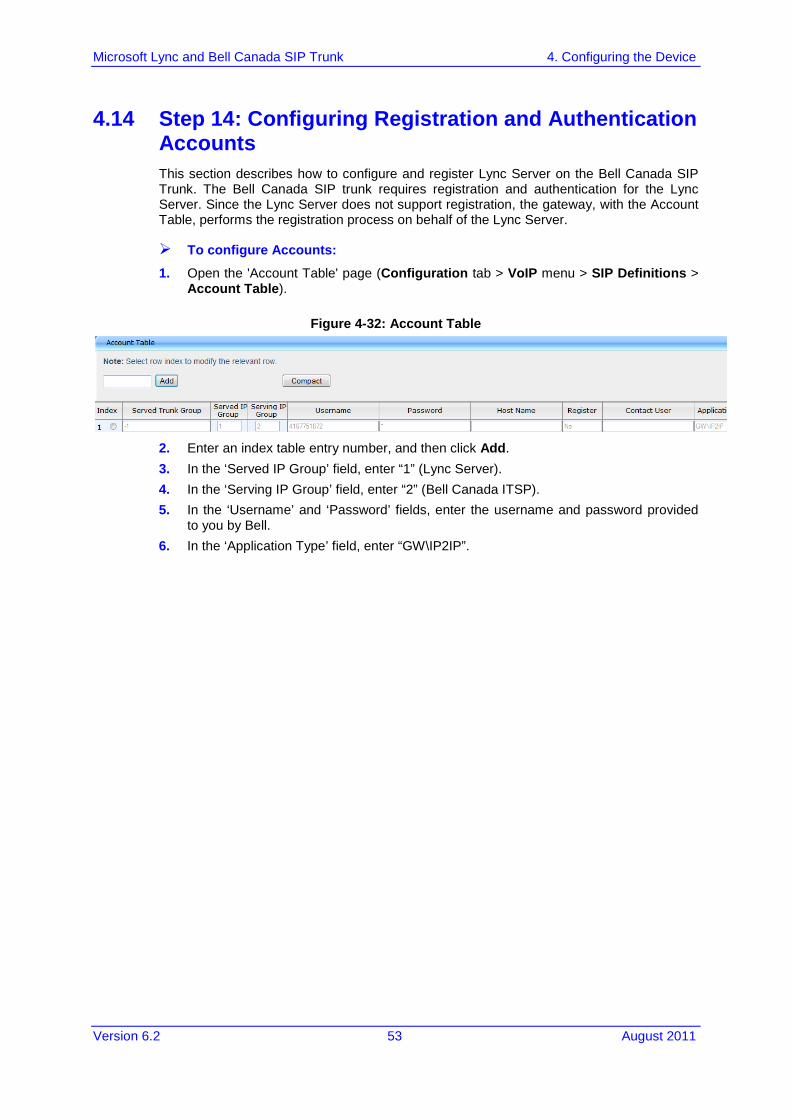
4.14 Step 14: Configuring Registration and Authentication Accounts This section describes how to configure and register Lync Server on the Bell Canada SIP Trunk. The Bell Canada SIP trunk requires registration and authentication for the Lync Server. Since the Lync Server does not support registration, the gateway, with the Account Table, performs the registration process on behalf of the Lync Server.
To configure Accounts:
1. Open the 'Account Table' page (Configuration tab > VoIP menu > SIP Definitions > Account Table).
Figure 4-32: Account Table
2. Enter an index table entry number, and then click Add. 3. In the ‘Served IP Group’ field, enter “1” (Lync Server). 4. In the ‘Serving IP Group’ field, enter “2” (Bell Canada ITSP). 5. In the ‘Username’ and ‘Password’ fields, enter the username and password provided
to you by Bell. 6. In the ‘Application Type’ field, enter “GW\IP2IP”.
Configuration Note 54 Document #: LTRT-39230
Microsoft Lync and Bell Canada SIP Trunk
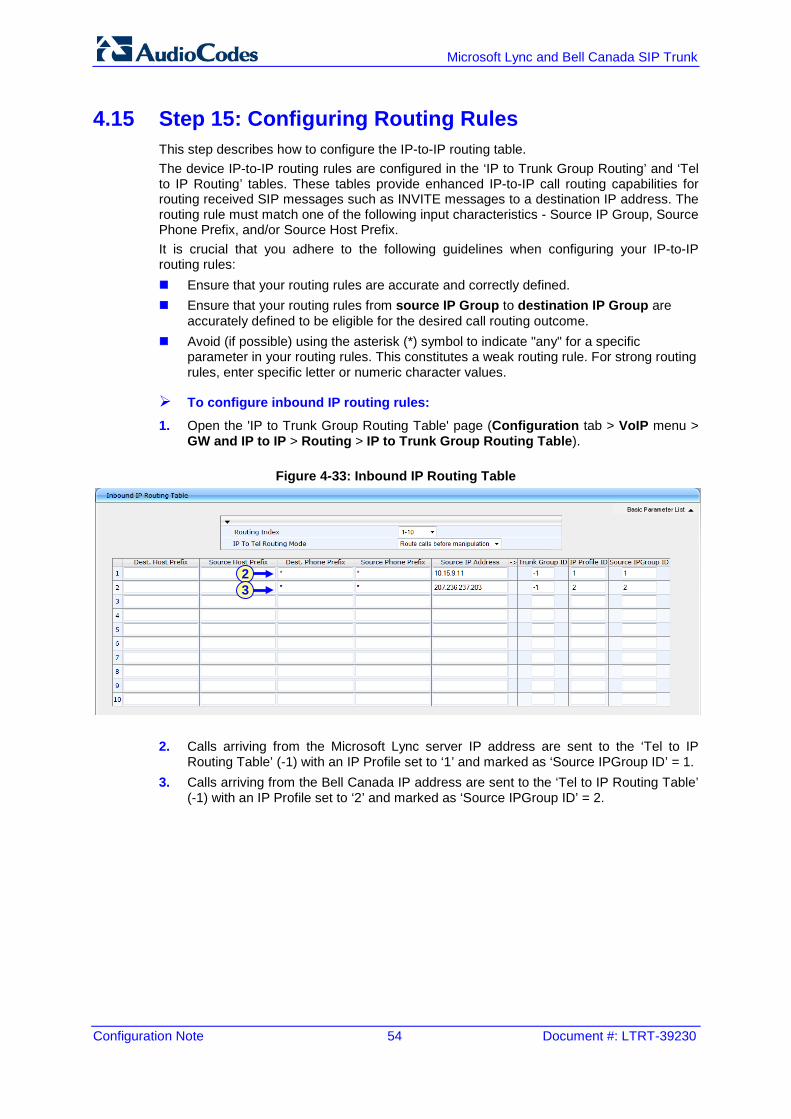
4.15 Step 15: Configuring Routing Rules This step describes how to configure the IP-to-IP routing table. The device IP-to-IP routing rules are configured in the ‘IP to Trunk Group Routing’ and ‘Tel to IP Routing’ tables. These tables provide enhanced IP-to-IP call routing capabilities for routing received SIP messages such as INVITE messages to a destination IP address. The routing rule must match one of the following input characteristics - Source IP Group, Source Phone Prefix, and/or Source Host Prefix. It is crucial that you adhere to the following guidelines when configuring your IP-to-IP routing rules: Ensure that your routing rules are accurate and correctly defined. Ensure that your routing rules from source IP Group to destination IP Group are
accurately defined to be eligible for the desired call routing outcome. Avoid (if possible) using the asterisk (*) symbol to indicate "any" for a specific
parameter in your routing rules. This constitutes a weak routing rule. For strong routing rules, enter specific letter or numeric character values.
To configure inbound IP routing rules:
1. Open the 'IP to Trunk Group Routing Table' page (Configuration tab > VoIP menu > GW and IP to IP > Routing > IP to Trunk Group Routing Table).
Figure 4-33: Inbound IP Routing Table
2. Calls arriving from the Microsoft Lync server IP address are sent to the ‘Tel to IP Routing Table’ (-1) with an IP Profile set to ‘1’ and marked as ‘Source IPGroup ID’ = 1.
3. Calls arriving from the Bell Canada IP address are sent to the ‘Tel to IP Routing Table’ (-1) with an IP Profile set to ‘2’ and marked as ‘Source IPGroup ID’ = 2.
2 3
Microsoft Lync and Bell Canada SIP Trunk 4. Configuring the Device
Version 6.2 55 August 2011
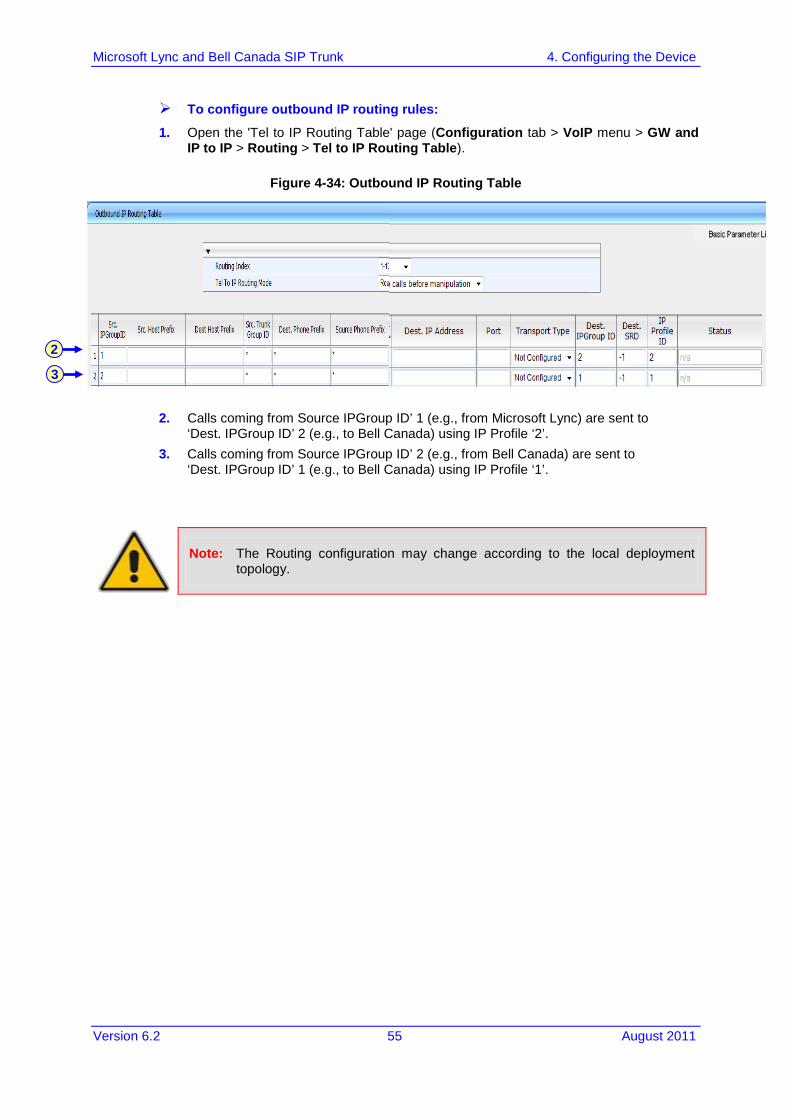
To configure outbound IP routing rules:
1. Open the 'Tel to IP Routing Table' page (Configuration tab > VoIP menu > GW and IP to IP > Routing > Tel to IP Routing Table).
Figure 4-34: Outbound IP Routing Table
2. Calls coming from Source IPGroup ID’ 1 (e.g., from Microsoft Lync) are sent to ‘Dest. IPGroup ID’ 2 (e.g., to Bell Canada) using IP Profile ‘2’.
3. Calls coming from Source IPGroup ID’ 2 (e.g., from Bell Canada) are sent to ‘Dest. IPGroup ID’ 1 (e.g., to Bell Canada) using IP Profile ‘1’.
Note: The Routing configuration may change according to the local deployment topology.
3
2

Configuration Note 56 Document #: LTRT-39230
Microsoft Lync and Bell Canada SIP Trunk
4.16 Step 16: Configuring Manipulation Rules This step describes how to configure the manipulation tables. You need to adapt the manipulation table according to you environment dial plan.
To open the manipulation table:
Open the 'Manipulation Table' page (Configuration tab > VoIP menu > GW and IP to IP > Manipulations).
Figure 4-35: Manipulation Tables

Microsoft Lync and Bell Canada SIP Trunk 4. Configuring the Device
Version 6.2 57 August 2011
The following procedures provide examples for number manipulation on destination and source numbers in the Tel-to-IP tables:
To configure destination phone number manipulation rules for Tel-to-IP calls:
1. Open the ‘Destination Phone Number Manipulation Table for Tel-to-IP calls page (Configuration tab > VoIP menu > GW and IP to IP > Manipulations sub-menu > Dest Number Tel > IP).
Figure 4-36: Destination Phone Number Manipulation Table for Tel-to-IP Calls Page
2. Configure the following manipulation rules:
• Index #1 defines destination number manipulation of IP calls from the Bell Canada SIP Trunk. All calls received from Source IP Group 1 (i.e., from the Lync Server) and the destination number prefix begins with '+1', then remove the ‘+1’ from the destination number.
• Index #2 defines destination number manipulation of IP calls from the Bell Canada SIP Trunk. All calls received from Source IP Group 2 (i.e., from Bell Canada SIP Trunk) and the destination number prefix begins with '416' (which is the prefix of the numbers assigned to the account), then add the ‘+1’ prefix to the number.
To configure source phone number manipulation rules for Tel-to-IP calls:
1. Open the ‘Source Phone Number Manipulation table for Tel-to-IP calls page (Configuration tab > VoIP menu > GW and IP to IP > Manipulations sub-menu > Source Number Tel > IP).
Figure 4-37: Source Phone Number Manipulation Table for Tel-to-IP Calls Page
2. Configure the following manipulation rule:
• Index #1 defines the source number manipulation of IP calls To the Bell Canada SIP Trunk. All calls received from the Source IP Group 1 (i.e., from Lync Server) and the Source number prefix begins with '+1', then remove the ‘+1’ from the source number.
Configuration Note 58 Document #: LTRT-39230
Microsoft Lync and Bell Canada SIP Trunk
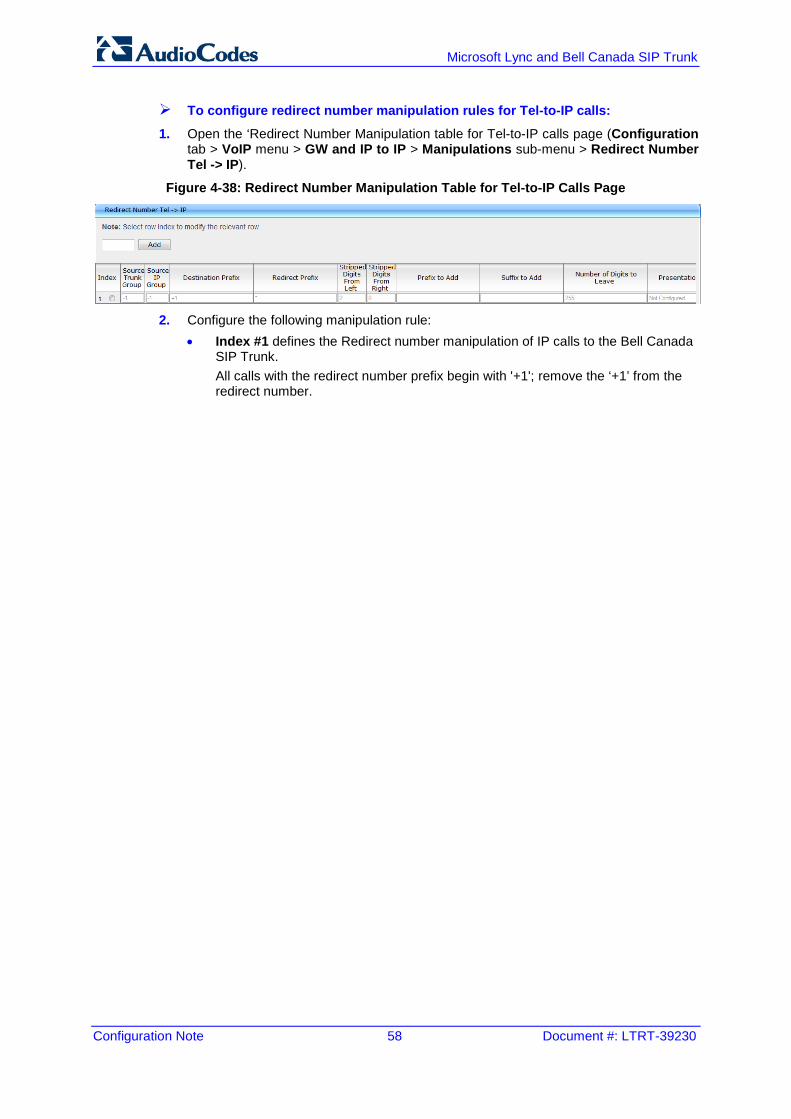
To configure redirect number manipulation rules for Tel-to-IP calls:
1. Open the ‘Redirect Number Manipulation table for Tel-to-IP calls page (Configuration tab > VoIP menu > GW and IP to IP > Manipulations sub-menu > Redirect Number Tel -> IP).
Figure 4-38: Redirect Number Manipulation Table for Tel-to-IP Calls Page
2. Configure the following manipulation rule:
• Index #1 defines the Redirect number manipulation of IP calls to the Bell Canada SIP Trunk. All calls with the redirect number prefix begin with '+1'; remove the ‘+1’ from the redirect number.

Microsoft Lync and Bell Canada SIP Trunk 4. Configuring the Device
Version 6.2 59 August 2011
4.17 Step 17: Configuring Coder Groups This step describes how to configure the coder groups. Microsoft Lync supports the G.711 coder with Silence Suppression, while the Bell Canada SIP trunk does not support Silence Suppuration. These Coder Groups are then assigned to IP Profiles, where each IP profile is based on the respective supported coder.
To configure Coders Group for Microsoft Lync:
1. Open the 'Coders Group Settings' page (Configuration tab > VoIP menu > Coders and Profiles> Coders Group Settings).
Figure 4-39: Coders Group Settings - Microsoft Lync
2. From the ‘Coder Group ID’ drop-down list, select 1. 3. From the ‘Coder Name’ drop-down list, select G.711A-law and G.711U-law. 4. From the ‘Silence Suppression’ drop-down list, select Enable for both Coders. 5. Click Submit.
To configure Coders Group for the Bell Canada SIP Trunk:
1. Open the 'Coders Group Settings' page (Configuration tab > VoIP menu > Coders And Profiles > Coders Group Settings).
Figure 4-40: Coders Group Settings-Bell Canada
2. From the ‘Coder Group ID’ drop-down list, select 2. 3. From the ‘Coder Name’ drop-down list, select G.711A-law and G.711U-law. 4. From the ‘Silence Suppression’ drop-down list, select Disabled for both Coders. 5. Click Submit.
2
2
3
3

Configuration Note 60 Document #: LTRT-39230
Microsoft Lync and Bell Canada SIP Trunk
4.18 Step 18: Configuring IP Profiles This step describes how to configure the IP Profile. In this configuration, the IP Profile is used to configure the SRTP/TLS mode and the Coder Group (see Section 4.17 on page 59). You must configure Microsoft Lync to work in secure mode (SRTP/TLS); while, the Bell Canada SIP trunk is configured in non-secure RTP/TLS mode.
To configure IP Profile for Microsoft Lync:
1. Open the 'IP Profile Settings' page (Configuration tab > VoIP menu > Coders And Profiles > IP Profile Settings).
Figure 4-41: IP Profile Settings
2. From the ‘Profile ID’ drop-down list, select 1. 3. From the ‘Media Security Behavior’ drop-down list, select Preferable – Single Media. 4. From the ‘Coder Group’ drop-down list, select Coder Group 1. 5. Click Submit.
2
3
4

Microsoft Lync and Bell Canada SIP Trunk 4. Configuring the Device
Version 6.2 61 August 2011
To configure IP Profile for the Bell Canada SIP Trunk:
1. Open the 'IP Profile Settings' page (Configuration tab > VoIP menu > Coders And Profiles > IP Profile Settings).
Figure 4-42: IP Profile Settings
2. From the ‘Profile ID’ drop-down list, select 2. 3. From the ‘Media Security Behavior’ drop-down list, select Disable. 4. From the ‘Coder Group’ drop-down list, select Coder Group 2. 5. Click Submit.
2
3
4
Bell

Configuration Note 62 Document #: LTRT-39230
Microsoft Lync and Bell Canada SIP Trunk
4.19 Step 19: Configuring Message Manipulations The 'Message Manipulations' page allows you to define up to 200 SIP message manipulation rules. This manipulation includes insertion, removal, and/or modification of SIP headers. Multiple manipulation rules can be configured for the same SIP message. SIP message manipulation rules configured on this page will be assigned to an IP Group and determined whether they must be applied to inbound or outbound messages. This step describes the Message Manipulation you must define for working with Bell Canada SIP Trunk. Two sets of manipulation are defined: Set ID 0 is assigned to Bell Canada IP Group (IP Group 2) as an Outbound Message
Manipulation Set, Set ID 1 is assigned to the gateway Inbound manipulation set.
To configure SIP message manipulations:
1. Open the 'Message Manipulations' page (Configuration tab > VoIP menu > SBC submenu > Manipulations SBC submenu > Message).
Figure 4-43: SIP Message Manipulation
2. Configure the following manipulation rules:
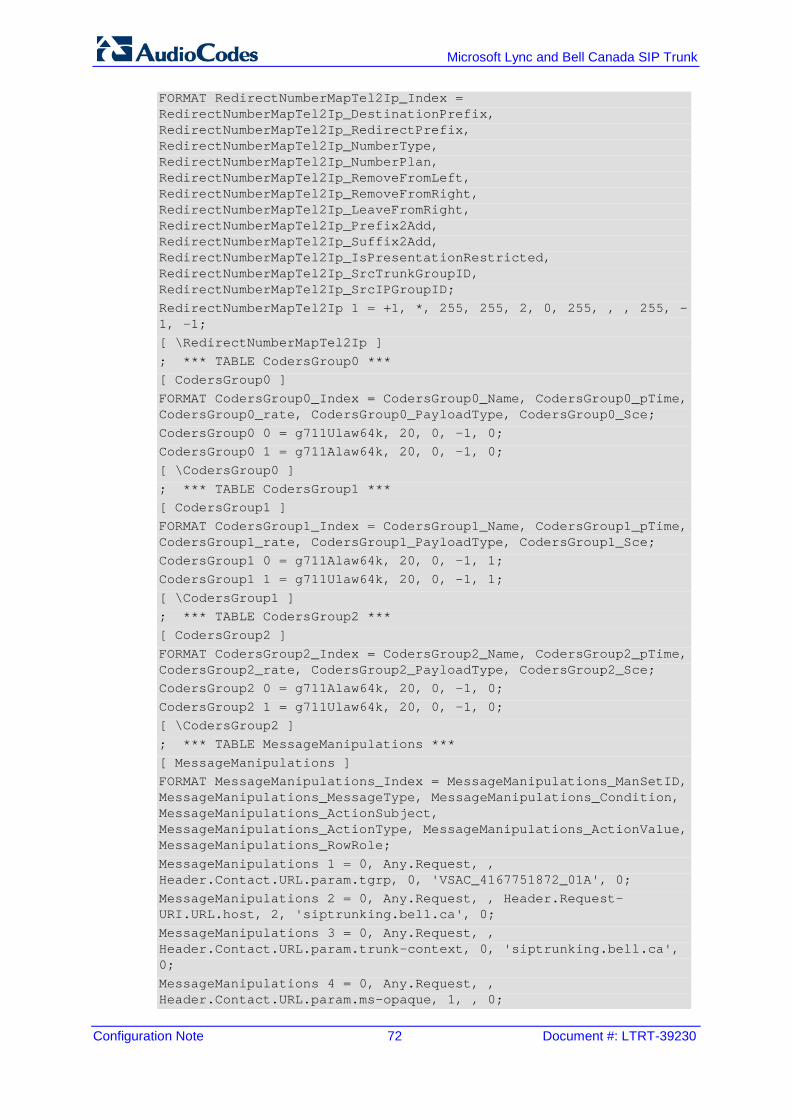
• Row Index #1: For any requests sent to Bell Canada SIP Trunk, this manipulation row adds the ‘tgrp’ parameter with the value of ‘VSAC_4167751872_01A’, in the Contact Header.
• Row Index #2: For any requests sent to Bell Canada SIP Trunk, this manipulation row modifies the Host part in the Request-URI to ‘siptrunking.bell.ca’.
• Row Index #3: For any requests sent to Bell Canada SIP Trunk, this manipulation row adds ‘trunk-context’ parameter with the value of ‘siptrunking.bell.ca’ in the Contact header.
• Row Index #4: For any requests sent to Bell Canada SIP Trunk, this manipulation row removes the ‘ms-opaque’ parameter from the Contact header.
• Row Index #5: For any requests sent to Bell Canada SIP Trunk, this manipulation row modifies the host part in the To Header with the value of ‘siptrunking.bell.ca’.
• Row Index #6: For any requests sent to Bell Canada SIP Trunk, this manipulation row modifies the user part of the Contact header with the value of the user part that appears in the From Header.

Microsoft Lync and Bell Canada SIP Trunk 4. Configuring the Device
Version 6.2 63 August 2011
• Row Index #7: If a Diversion header is included in the requests sent to Bell Canada SIP Trunk, this manipulation row modifies the user part of the Contact header with the value of the user part that appears in Diversion Header.
• Row Index #8: If a Diversion header is included in the requests sent to Bell Canada SIP Trunk, this manipulation row modifies the user part of the P-Asserted-ID header with the value of the user part that appears in Diversion Header.
• Row Index #9: If a Referred-By header exists in the request coming from the Lync Server, this manipulation row modifies the user part in the Contact header to the user part that appears in the Referred-by header.
• Row Index #10: This manipulation row executes only if the pervious row (index #9) is executed. After modifying the user part of the Contact header in row index 9, this manipulation row removes the prefix ‘+1’ from the number.
• Row Index #11: If a Referred-By header exists in the request coming from the Lync Server, this manipulation row adds a Diversion header with the value '<sip:[email protected];user=phone>'.
• Row Index #12: In addition to the previous row (Index #11), this row modifies the user part of the Diversion header with the user part that appears in the Referred-By header.
Row indexes 1-8 are all configured as manipulation set ID 0 and should be assigned Bell Canada IP Group (IP Group 2) as an Outbound Message Manipulation Set.
To assign manipulation set ID 0 to IP Group 2:
1. Open the 'IP Group Table' page (Configuration tab > VoIP menu > Control Network> IP Group Table).
Figure 4-44: IP Group Table
2. From the ‘Index drop-down list, select 2. 3. In the ‘Outbound Message Manipulation Set’ field, enter “0”. Row indexes 9-12 are all configured as Manipulation Set ID 1 and should be assigned to the gateway Inbound manipulation set.
3
2

Configuration Note 64 Document #: LTRT-39230
Microsoft Lync and Bell Canada SIP Trunk
To assign manipulation set ID 1 to gateway inbound manipulation set:
1. Open the 'Admin’ page, by appending the case-sensitive suffix ‘AdminPage’ to the Media Gateway's IP address in your Web browser's URL field (e.g., http://10.15.4.70/AdminPage).
2. On the left pane, click ini Parameters. 3. In the 'Parameter Name' field, enter “GWINBOUNDMANIPULATIONSET”. 4. In the 'Enter Value' field, enter ‘1’.
Figure 4-45: Output Window
5. Click Apply New Value.
Microsoft Lync and Bell Canada SIP Trunk 4. Configuring the Device
Version 6.2 65 August 2011
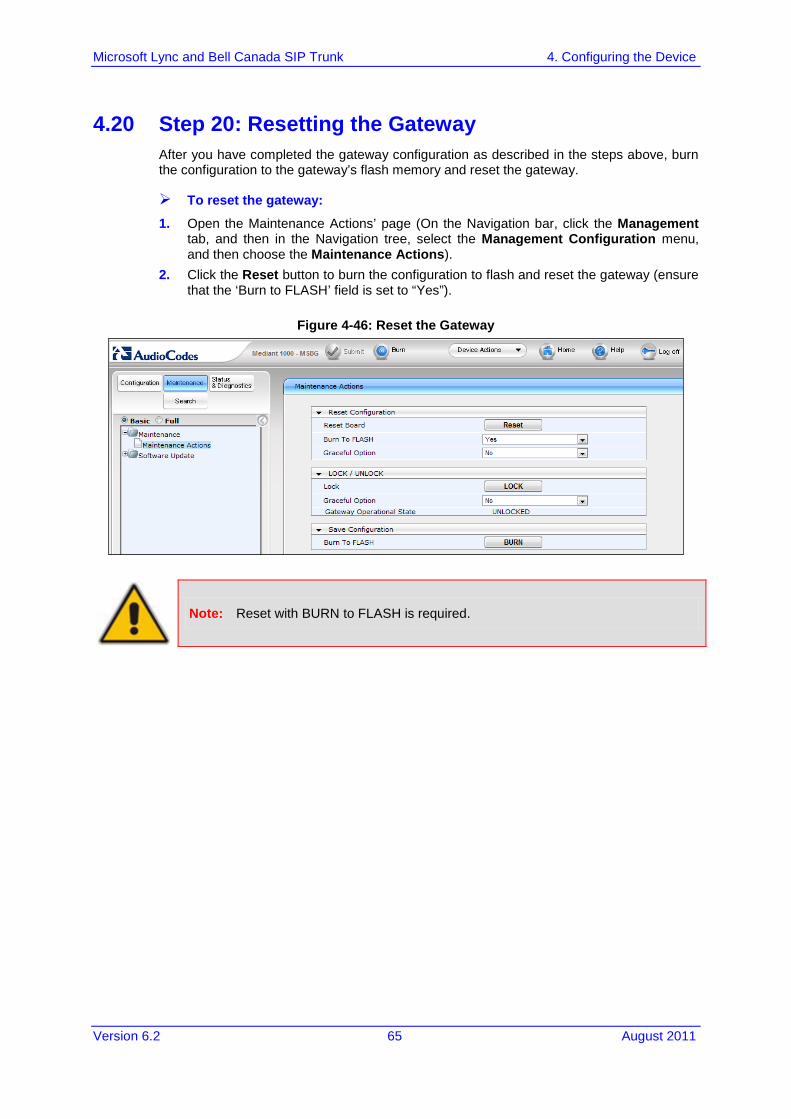
4.20 Step 20: Resetting the Gateway After you have completed the gateway configuration as described in the steps above, burn the configuration to the gateway’s flash memory and reset the gateway.
To reset the gateway:
1. Open the Maintenance Actions’ page (On the Navigation bar, click the Management tab, and then in the Navigation tree, select the Management Configuration menu, and then choose the Maintenance Actions).
2. Click the Reset button to burn the configuration to flash and reset the gateway (ensure that the ‘Burn to FLASH’ field is set to “Yes”).
Figure 4-46: Reset the Gateway
Note: Reset with BURN to FLASH is required.

Configuration Note 66 Document #: LTRT-39230
Microsoft Lync and Bell Canada SIP Trunk
Reader’s Notes

Microsoft Lync and Bell Canada SIP Trunk A. AudioCodes INI File
Version 6.2 67 August 2011
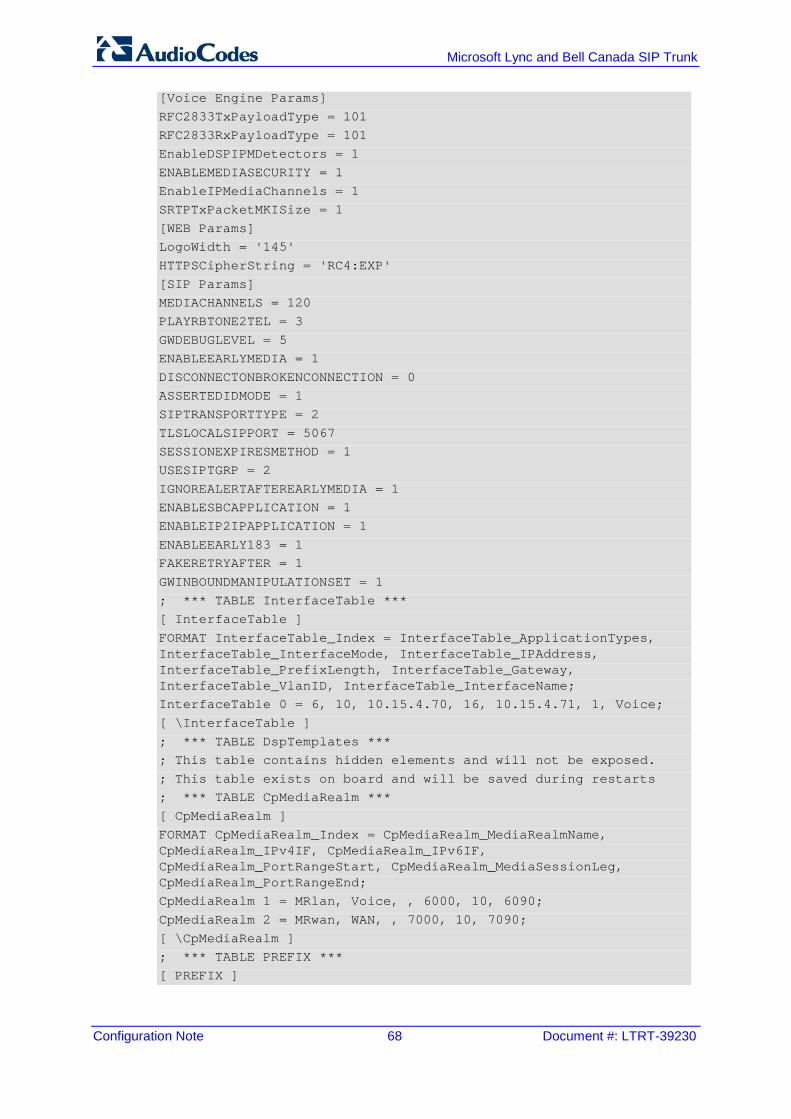
A AudioCodes INI File This section displays the device’s INI file. This file reflects the configuration described in Section 4 on page 29. ;************** ;** Ini File ** ;************** ;Board: Mediant 1000 - MSBG ;Serial Number: 2350801 ;Slot Number: 1 ;Software Version: 6.20A.028.004 ;DSP Software Version: 620AE3 => 620.08 ;Board IP Address: 10.15.4.70 ;Board Subnet Mask: 255.255.0.0 ;Board Default Gateway: 10.15.4.71 ;Ram size: 256M Flash size: 64M ;Num of DSP Cores: 8 Num DSP Channels: 32 ;Profile: NONE ;Key features:;Board Type: Mediant 1000 - MSBG ;Security: IPSEC MediaEncryption StrongEncryption EncryptControlProtocol ;IP Media: Conf VXML VoicePromptAnnounc(H248.9) ;PSTN Protocols: ISDN IUA=4 CAS ;DATA features: Routing FireWall&VPN ;DSP Voice features: EC128mSec AdditionTimeslotSummation FastSlowPlayback BargeIn PatternDetector IpmDetector ;Coders: G723 G729 GSM-FR G727 ;Channel Type: RTP PCI DspCh=240 IPMediaDspCh=240 ;E1Trunks=4 ;T1Trunks=4 ;Control Protocols: MGCP MEGACO SIP SASurvivability SBC=120 MSFT ;Default features:;Coders: G711 G726; ;--------- Mediant-1000 HW components --------- ; ; Slot # : Module type : # of ports : # of DSPs ;---------------------------------------------- ; 1 : FALC56 : 1 : 2 ; 2 : Empty ; 3 : Empty ; 4 : Empty ; 5 : Empty ; 6 : Empty ;---------------------------------------------- [SYSTEM Params] DNSPriServerIP = 10.15.9.10 SyslogServerIP = 10.15.2.8 EnableSyslog = 1 PM_VEDSPUtil = '1,43,48,15' [BSP Params] PCMLawSelect = 3 WanInterfaceName = 'GigabitEthernet 0/0' [ControlProtocols Params] AdminStateLockControl = 0
Configuration Note 68 Document #: LTRT-39230
Microsoft Lync and Bell Canada SIP Trunk
[Voice Engine Params] RFC2833TxPayloadType = 101 RFC2833RxPayloadType = 101 EnableDSPIPMDetectors = 1 ENABLEMEDIASECURITY = 1 EnableIPMediaChannels = 1 SRTPTxPacketMKISize = 1 [WEB Params] LogoWidth = '145' HTTPSCipherString = 'RC4:EXP' [SIP Params] MEDIACHANNELS = 120 PLAYRBTONE2TEL = 3 GWDEBUGLEVEL = 5 ENABLEEARLYMEDIA = 1 DISCONNECTONBROKENCONNECTION = 0 ASSERTEDIDMODE = 1 SIPTRANSPORTTYPE = 2 TLSLOCALSIPPORT = 5067 SESSIONEXPIRESMETHOD = 1 USESIPTGRP = 2 IGNOREALERTAFTEREARLYMEDIA = 1 ENABLESBCAPPLICATION = 1 ENABLEIP2IPAPPLICATION = 1 ENABLEEARLY183 = 1 FAKERETRYAFTER = 1 GWINBOUNDMANIPULATIONSET = 1 ; *** TABLE InterfaceTable *** [ InterfaceTable ] FORMAT InterfaceTable_Index = InterfaceTable_ApplicationTypes, InterfaceTable_InterfaceMode, InterfaceTable_IPAddress, InterfaceTable_PrefixLength, InterfaceTable_Gateway, InterfaceTable_VlanID, InterfaceTable_InterfaceName; InterfaceTable 0 = 6, 10, 10.15.4.70, 16, 10.15.4.71, 1, Voice; [ \InterfaceTable ] ; *** TABLE DspTemplates *** ; This table contains hidden elements and will not be exposed. ; This table exists on board and will be saved during restarts ; *** TABLE CpMediaRealm *** [ CpMediaRealm ] FORMAT CpMediaRealm_Index = CpMediaRealm_MediaRealmName, CpMediaRealm_IPv4IF, CpMediaRealm_IPv6IF, CpMediaRealm_PortRangeStart, CpMediaRealm_MediaSessionLeg, CpMediaRealm_PortRangeEnd; CpMediaRealm 1 = MRlan, Voice, , 6000, 10, 6090; CpMediaRealm 2 = MRwan, WAN, , 7000, 10, 7090; [ \CpMediaRealm ] ; *** TABLE PREFIX *** [ PREFIX ]
Microsoft Lync and Bell Canada SIP Trunk A. AudioCodes INI File
Version 6.2 69 August 2011
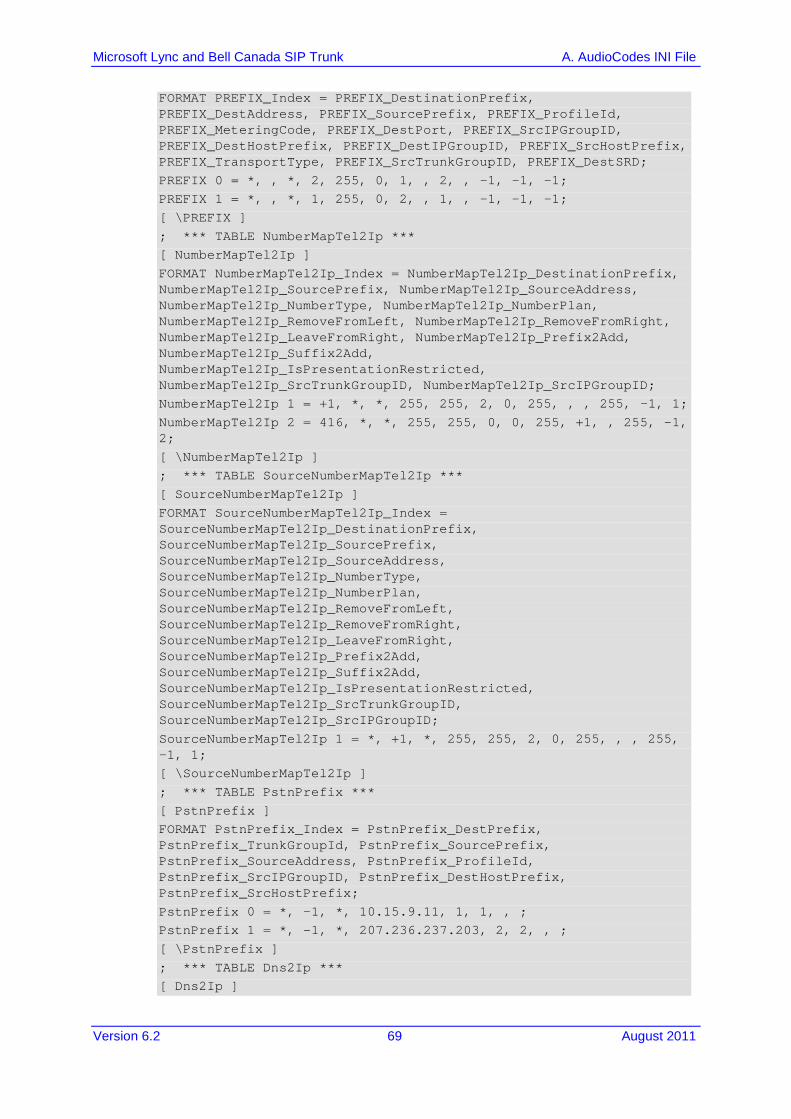
FORMAT PREFIX_Index = PREFIX_DestinationPrefix, PREFIX_DestAddress, PREFIX_SourcePrefix, PREFIX_ProfileId, PREFIX_MeteringCode, PREFIX_DestPort, PREFIX_SrcIPGroupID, PREFIX_DestHostPrefix, PREFIX_DestIPGroupID, PREFIX_SrcHostPrefix, PREFIX_TransportType, PREFIX_SrcTrunkGroupID, PREFIX_DestSRD; PREFIX 0 = *, , *, 2, 255, 0, 1, , 2, , -1, -1, -1; PREFIX 1 = *, , *, 1, 255, 0, 2, , 1, , -1, -1, -1; [ \PREFIX ] ; *** TABLE NumberMapTel2Ip *** [ NumberMapTel2Ip ] FORMAT NumberMapTel2Ip_Index = NumberMapTel2Ip_DestinationPrefix, NumberMapTel2Ip_SourcePrefix, NumberMapTel2Ip_SourceAddress, NumberMapTel2Ip_NumberType, NumberMapTel2Ip_NumberPlan, NumberMapTel2Ip_RemoveFromLeft, NumberMapTel2Ip_RemoveFromRight, NumberMapTel2Ip_LeaveFromRight, NumberMapTel2Ip_Prefix2Add, NumberMapTel2Ip_Suffix2Add, NumberMapTel2Ip_IsPresentationRestricted, NumberMapTel2Ip_SrcTrunkGroupID, NumberMapTel2Ip_SrcIPGroupID; NumberMapTel2Ip 1 = +1, *, *, 255, 255, 2, 0, 255, , , 255, -1, 1; NumberMapTel2Ip 2 = 416, *, *, 255, 255, 0, 0, 255, +1, , 255, -1, 2; [ \NumberMapTel2Ip ] ; *** TABLE SourceNumberMapTel2Ip *** [ SourceNumberMapTel2Ip ] FORMAT SourceNumberMapTel2Ip_Index = SourceNumberMapTel2Ip_DestinationPrefix, SourceNumberMapTel2Ip_SourcePrefix, SourceNumberMapTel2Ip_SourceAddress, SourceNumberMapTel2Ip_NumberType, SourceNumberMapTel2Ip_NumberPlan, SourceNumberMapTel2Ip_RemoveFromLeft, SourceNumberMapTel2Ip_RemoveFromRight, SourceNumberMapTel2Ip_LeaveFromRight, SourceNumberMapTel2Ip_Prefix2Add, SourceNumberMapTel2Ip_Suffix2Add, SourceNumberMapTel2Ip_IsPresentationRestricted, SourceNumberMapTel2Ip_SrcTrunkGroupID, SourceNumberMapTel2Ip_SrcIPGroupID; SourceNumberMapTel2Ip 1 = *, +1, *, 255, 255, 2, 0, 255, , , 255, -1, 1; [ \SourceNumberMapTel2Ip ] ; *** TABLE PstnPrefix *** [ PstnPrefix ] FORMAT PstnPrefix_Index = PstnPrefix_DestPrefix, PstnPrefix_TrunkGroupId, PstnPrefix_SourcePrefix, PstnPrefix_SourceAddress, PstnPrefix_ProfileId, PstnPrefix_SrcIPGroupID, PstnPrefix_DestHostPrefix, PstnPrefix_SrcHostPrefix; PstnPrefix 0 = *, -1, *, 10.15.9.11, 1, 1, , ; PstnPrefix 1 = *, -1, *, 207.236.237.203, 2, 2, , ; [ \PstnPrefix ] ; *** TABLE Dns2Ip *** [ Dns2Ip ]

Configuration Note 70 Document #: LTRT-39230
Microsoft Lync and Bell Canada SIP Trunk
FORMAT Dns2Ip_Index = Dns2Ip_DomainName, Dns2Ip_FirstIpAddress, Dns2Ip_SecondIpAddress, Dns2Ip_ThirdIpAddress, Dns2Ip_FourthIpAddress; Dns2Ip 0 = siptrunking.bell.ca, 207.236.237.203, 0.0.0.0, 0.0.0.0, 0.0.0.0; [ \Dns2Ip ] ; *** TABLE ProxyIp *** [ ProxyIp ] FORMAT ProxyIp_Index = ProxyIp_IpAddress, ProxyIp_TransportType, ProxyIp_ProxySetId; ProxyIp 0 = FE-Lync.lync.local:5067, 2, 1; ProxyIp 1 = siptrunking.bell.ca, 0, 2; [ \ProxyIp ] ; *** TABLE TxDtmfOption *** [ TxDtmfOption ] FORMAT TxDtmfOption_Index = TxDtmfOption_Type; TxDtmfOption 0 = 4; [ \TxDtmfOption ] ; *** TABLE IpProfile *** [ IpProfile ] FORMAT IpProfile_Index = IpProfile_ProfileName, IpProfile_IpPreference, IpProfile_CodersGroupID, IpProfile_IsFaxUsed, IpProfile_JitterBufMinDelay, IpProfile_JitterBufOptFactor, IpProfile_IPDiffServ, IpProfile_SigIPDiffServ, IpProfile_SCE, IpProfile_RTPRedundancyDepth, IpProfile_RemoteBaseUDPPort, IpProfile_CNGmode, IpProfile_VxxTransportType, IpProfile_NSEMode, IpProfile_IsDTMFUsed, IpProfile_PlayRBTone2IP, IpProfile_EnableEarlyMedia, IpProfile_ProgressIndicator2IP, IpProfile_EnableEchoCanceller, IpProfile_CopyDest2RedirectNumber, IpProfile_MediaSecurityBehaviour, IpProfile_CallLimit, IpProfile_DisconnectOnBrokenConnection, IpProfile_FirstTxDtmfOption, IpProfile_SecondTxDtmfOption, IpProfile_RxDTMFOption, IpProfile_EnableHold, IpProfile_InputGain, IpProfile_VoiceVolume, IpProfile_AddIEInSetup, IpProfile_SBCExtensionCodersGroupID, IpProfile_MediaIPVersionPreference, IpProfile_TranscodingMode, IpProfile_SBCAllowedCodersGroupID, IpProfile_SBCAllowedCodersMode, IpProfile_SBCMediaSecurityBehaviour, IpProfile_SBCRFC2833Behavior, IpProfile_SBCAlternativeDTMFMethod, IpProfile_SBCAssertIdentity, IpProfile_AMDSensitivityParameterSuit, IpProfile_AMDSensitivityLevel, IpProfile_AMDMaxGreetingTime, IpProfile_AMDMaxPostSilenceGreetingTime, IpProfile_SBCDiversionMode, IpProfile_SBCHistoryInfoMode; IpProfile 1 = , 1, 1, 0, 10, 10, 46, 40, 0, 0, 0, 0, 2, 0, 0, 0, 1, -1, 1, 0, 3, -1, 0, 4, -1, 1, 1, 0, 0, , -1, 0, 0, -1, 0, 0, 1, 0, 1, 0, 8, 300, 400, -1, -1; IpProfile 2 = , 1, 2, 0, 10, 10, 46, 40, 0, 0, 0, 0, 2, 0, 0, 0, 1, -1, 1, 0, 2, -1, 0, 4, -1, 1, 1, 0, 0, , -1, 0, 0, -1, 0, 0, 2, 1, -1, 0, 8, 300, 400, -1, -1; [ \IpProfile ] ; *** TABLE ProxySet *** [ ProxySet ]

Microsoft Lync and Bell Canada SIP Trunk A. AudioCodes INI File
Version 6.2 71 August 2011
FORMAT ProxySet_Index = ProxySet_EnableProxyKeepAlive, ProxySet_ProxyKeepAliveTime, ProxySet_ProxyLoadBalancingMethod, ProxySet_IsProxyHotSwap, ProxySet_SRD, ProxySet_ClassificationInput, ProxySet_ProxyRedundancyMode; ProxySet 0 = 0, 60, 0, 0, 0, 0, -1; ProxySet 1 = 1, 60, 0, 0, 1, 0, -1; ProxySet 2 = 1, 60, 0, 1, 2, 0, 1; [ \ProxySet ] ; *** TABLE IPGroup *** [ IPGroup ] FORMAT IPGroup_Index = IPGroup_Type, IPGroup_Description, IPGroup_ProxySetId, IPGroup_SIPGroupName, IPGroup_ContactUser, IPGroup_EnableSurvivability, IPGroup_ServingIPGroup, IPGroup_SipReRoutingMode, IPGroup_AlwaysUseRouteTable, IPGroup_RoutingMode, IPGroup_SRD, IPGroup_MediaRealm, IPGroup_ClassifyByProxySet, IPGroup_ProfileId, IPGroup_MaxNumOfRegUsers, IPGroup_InboundManSet, IPGroup_OutboundManSet, IPGroup_ContactName; IPGroup 1 = 0, Lync, 1, cust4-tor.vsac.bell.ca, , 0, -1, 0, 0, -1, 1, MRlan, 1, 1, -1, 1, -1, ; IPGroup 2 = 0, "Bell Canada", 2, acgw.lync.local, , 0, -1, 0, 0, -1, 2, MRwan, 1, 2, -1, -1, 0, ; [ \IPGroup ] ; *** TABLE Account *** [ Account ] FORMAT Account_Index = Account_ServedTrunkGroup, Account_ServedIPGroup, Account_ServingIPGroup, Account_Username, Account_Password, Account_HostName, Account_Register, Account_ContactUser, Account_ApplicationType; Account 1 = -1, 1, 2, 4167751872, *, , 0, , 0; [ \Account ] ; *** TABLE SIPInterface *** [ SIPInterface ] FORMAT SIPInterface_Index = SIPInterface_NetworkInterface, SIPInterface_ApplicationType, SIPInterface_UDPPort, SIPInterface_TCPPort, SIPInterface_TLSPort, SIPInterface_SRD; SIPInterface 1 = Voice, 0, 5068, 5068, 5067, 1; SIPInterface 2 = WAN, 0, 5060, 5060, 5061, 2; [ \SIPInterface ] ; *** TABLE SRD *** [ SRD ] FORMAT SRD_Index = SRD_Name, SRD_MediaRealm, SRD_IntraSRDMediaAnchoring, SRD_BlockUnRegUsers, SRD_MaxNumOfRegUsers, SRD_EnableUnAuthenticatedRegistrations; SRD 1 = LANsrd, MRlan, 0, 0, -1, 1; SRD 2 = WANsrd, MRwan, 0, 0, -1, 1; [ \SRD ] ; *** TABLE RedirectNumberMapTel2Ip *** [ RedirectNumberMapTel2Ip ]
Configuration Note 72 Document #: LTRT-39230
Microsoft Lync and Bell Canada SIP Trunk
FORMAT RedirectNumberMapTel2Ip_Index = RedirectNumberMapTel2Ip_DestinationPrefix, RedirectNumberMapTel2Ip_RedirectPrefix, RedirectNumberMapTel2Ip_NumberType, RedirectNumberMapTel2Ip_NumberPlan, RedirectNumberMapTel2Ip_RemoveFromLeft, RedirectNumberMapTel2Ip_RemoveFromRight, RedirectNumberMapTel2Ip_LeaveFromRight, RedirectNumberMapTel2Ip_Prefix2Add, RedirectNumberMapTel2Ip_Suffix2Add, RedirectNumberMapTel2Ip_IsPresentationRestricted, RedirectNumberMapTel2Ip_SrcTrunkGroupID, RedirectNumberMapTel2Ip_SrcIPGroupID; RedirectNumberMapTel2Ip 1 = +1, *, 255, 255, 2, 0, 255, , , 255, -1, -1; [ \RedirectNumberMapTel2Ip ] ; *** TABLE CodersGroup0 *** [ CodersGroup0 ] FORMAT CodersGroup0_Index = CodersGroup0_Name, CodersGroup0_pTime, CodersGroup0_rate, CodersGroup0_PayloadType, CodersGroup0_Sce; CodersGroup0 0 = g711Ulaw64k, 20, 0, -1, 0; CodersGroup0 1 = g711Alaw64k, 20, 0, -1, 0; [ \CodersGroup0 ] ; *** TABLE CodersGroup1 *** [ CodersGroup1 ] FORMAT CodersGroup1_Index = CodersGroup1_Name, CodersGroup1_pTime, CodersGroup1_rate, CodersGroup1_PayloadType, CodersGroup1_Sce; CodersGroup1 0 = g711Alaw64k, 20, 0, -1, 1; CodersGroup1 1 = g711Ulaw64k, 20, 0, -1, 1; [ \CodersGroup1 ] ; *** TABLE CodersGroup2 *** [ CodersGroup2 ] FORMAT CodersGroup2_Index = CodersGroup2_Name, CodersGroup2_pTime, CodersGroup2_rate, CodersGroup2_PayloadType, CodersGroup2_Sce; CodersGroup2 0 = g711Alaw64k, 20, 0, -1, 0; CodersGroup2 1 = g711Ulaw64k, 20, 0, -1, 0; [ \CodersGroup2 ] ; *** TABLE MessageManipulations *** [ MessageManipulations ] FORMAT MessageManipulations_Index = MessageManipulations_ManSetID, MessageManipulations_MessageType, MessageManipulations_Condition, MessageManipulations_ActionSubject, MessageManipulations_ActionType, MessageManipulations_ActionValue, MessageManipulations_RowRole; MessageManipulations 1 = 0, Any.Request, , Header.Contact.URL.param.tgrp, 0, 'VSAC_4167751872_01A', 0; MessageManipulations 2 = 0, Any.Request, , Header.Request-URI.URL.host, 2, 'siptrunking.bell.ca', 0; MessageManipulations 3 = 0, Any.Request, , Header.Contact.URL.param.trunk-context, 0, 'siptrunking.bell.ca', 0; MessageManipulations 4 = 0, Any.Request, , Header.Contact.URL.param.ms-opaque, 1, , 0;

Microsoft Lync and Bell Canada SIP Trunk A. AudioCodes INI File
Version 6.2 73 August 2011
MessageManipulations 5 = 0, Any.Request, , Header.To.URL.host, 2, 'siptrunking.bell.ca', 0; MessageManipulations 6 = 0, Any.Request, , Header.Contact.URL.user, 2, header.From.URL.user, 0; MessageManipulations 7 = 0, Any.Request, , Header.Contact.URL.user, 2, Header.Diversion.URL.user, 0; MessageManipulations 8 = 0, Any.Request, , Header.P-Asserted-Identity.URL.user, 2, Header.Diversion.URL.user, 0; MessageManipulations 9 = 1, Any.Request, "header.referred-by exists", Header.Contact.URL.user, 2, header.referred-by.URL.user, 0; MessageManipulations 10 = 1, Any.Request, , Header.Contact.URL.user, 6, '+1', 1; MessageManipulations 11 = 1, Invite.Request, "header.referred-by exists", Header.Diversion, 0, '<sip:[email protected];user=phone>', 0; MessageManipulations 12 = 1, Any.Request, , Header.Diversion.URL.user, 2, header.referred-by.URL.user, 0; [ \MessageManipulations ] ; *** TABLE DiffServToVlanPriority *** [ DiffServToVlanPriority ] FORMAT DiffServToVlanPriority_Index = DiffServToVlanPriority_DiffServ, DiffServToVlanPriority_VlanPriority; DiffServToVlanPriority 1 = 46, 5; DiffServToVlanPriority 2 = 40, 5; [ \DiffServToVlanPriority ]

www.audiocodes.com
Configuration Note