
Carpo FAQ/troubleshooting guide – General 10/FAQ/Carpo_FAQ... · Carpo FAQ/troubleshooting guide...
10
Carpo FAQ/troubleshooting guide – General Q: How to calibrate touch screen for Windows platform A: Please follow procedures below to calibrate touch screen. i. Double click the eGalaxTouch icon located on desktop (or from programs menu) and go to "Setting" tab menu. Linearization Style → 9 points, Double Click Area → Bigger, then click “apply”. ii. Go to "Tools" tab and click on Linearization for 9 points calibration. 2 iii. Use stylus pen to calibrate the 9 points as shown on screen. When done, click OK to finish. iv. If still unable to calibrate, then please go to "Hardware" tab, “Hardware setting”, “Reset all of control parameters to factory default setting” first and repeat calibration steps above. v. If touch screen still cannot work properly, please uninstall touch screen driver first from control panel, follow by system reboot, and then reinstall touch screen driver. Repeat calibration steps above. Q: Front panel Fn button customization A: The configuration file is located at C:\FKeySet.txt, user can use notepad to modify and customize desired executable programs accordingly. Field item description: F1_EXE= the full path of software executable program. F1_PARA= the parameter of software if necessary, if no parameter, please leave it as "" F1_PATH= the program working full path if necessary, if needn't specify, please leave it as "" Below is the example content, F1 will launch file manager, F2 will launch Media Player, F3 will launch soft-keyboard, F4 will launch task manager, F5 will launch calculator, F6 will launch MS paint tool. [Setup] F1_EXE="c:\windows\explorer.exe" F1_PARA="" F1_PATH="" F2_EXE="C:\Program Files\Windows Media Player\wmplayer.exe" F2_PARA="/prefetch:1" F2_PATH="" F3_EXE="C:\WINDOWS\system32\osk.exe" F3_PARA="" F3_PATH="" F4_EXE="C:\WINDOWS\system32\taskmgr.exe" F4_PARA="" F4_PATH="" F5_EXE="C:\WINDOWS\system32\calc.exe” F5_PARA="" F5_PATH="" F6_EXE="C:\WINDOWS\system32\mspaint.exe" F6_PARA="" F6_PATH=""
Transcript of Carpo FAQ/troubleshooting guide – General 10/FAQ/Carpo_FAQ... · Carpo FAQ/troubleshooting guide...
Carpo FAQ/troubleshooting guide – General
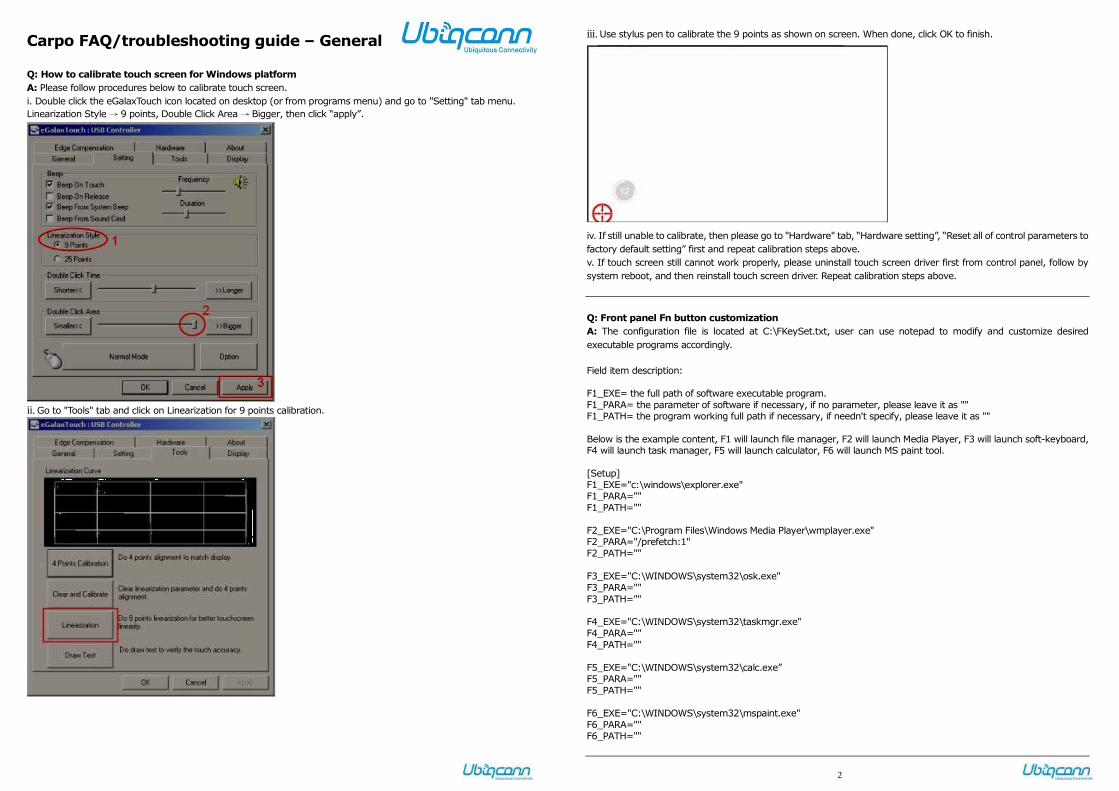
Q: How to calibrate touch screen for Windows platform
A: Please follow procedures below to calibrate touch screen.
i. Double click the eGalaxTouch icon located on desktop (or from programs menu) and go to "Setting" tab menu.
Linearization Style → 9 points, Double Click Area → Bigger, then click “apply”.
ii. Go to "Tools" tab and click on Linearization for 9 points calibration.
2
iii. Use stylus pen to calibrate the 9 points as shown on screen. When done, click OK to finish.
iv. If still unable to calibrate, then please go to "Hardware" tab, “Hardware setting”, “Reset all of control parameters to
factory default setting” first and repeat calibration steps above.
v. If touch screen still cannot work properly, please uninstall touch screen driver first from control panel, follow by
system reboot, and then reinstall touch screen driver. Repeat calibration steps above.
Q: Front panel Fn button customization
A: The configuration file is located at C:\FKeySet.txt, user can use notepad to modify and customize desired
executable programs accordingly.
Field item description:
F1_EXE= the full path of software executable program.
F1_PARA= the parameter of software if necessary, if no parameter, please leave it as "" F1_PATH= the program working full path if necessary, if needn't specify, please leave it as ""
Below is the example content, F1 will launch file manager, F2 will launch Media Player, F3 will launch soft-keyboard, F4 will launch task manager, F5 will launch calculator, F6 will launch MS paint tool.
[Setup]
F1_EXE="c:\windows\explorer.exe" F1_PARA=""
F1_PATH=""
F2_EXE="C:\Program Files\Windows Media Player\wmplayer.exe" F2_PARA="/prefetch:1"
F2_PATH=""
F3_EXE="C:\WINDOWS\system32\osk.exe"
F3_PARA=""
F3_PATH="" F4_EXE="C:\WINDOWS\system32\taskmgr.exe"
F4_PARA=""
F4_PATH=""
F5_EXE="C:\WINDOWS\system32\calc.exe” F5_PARA=""
F5_PATH=""
F6_EXE="C:\WINDOWS\system32\mspaint.exe"
F6_PARA="" F6_PATH=""
3
Q: Is it possible to open both front and rear webcam at the same time
A: No. Due to system design, only one webcam (either front or rear) can be used at any one time.
Access front webcam by running Bison webcam icon from desktop.
Access rear webcam by running AmCap webcam icon from desktop (or from hotkey utility).
Q: External battery not detected
A: Please check if the lock/unlock latch on the external battery is switched to “Lock” position for battery detect.
Q: Touch screen and front panel Fn buttons are not working
A: Please check if the lock button on the left hand side of the tablet is set to “lock mode” or not first. Press the lock
button for few seconds until Lock or Unlock message is shown on screen.
Q: How to unlock touch screen and front panel Fn buttons after resumed from sleep mode?
A: At the login screen, press lock button for 2 seconds to unlock front panel Fn buttons first. Use the navigation
buttons to switch between users and press navigation enter button to login without password or connect USB
keyboard to enter user password. After entering Windows desktop, press the lock button to lock and push for 2
seconds again to completely unlock both LCD display and front Fn buttons.
Process:
Lock + enter sleep mode → Power Button to wake up from sleep mode → Navigation enter Button / USB keyboard
enter password → Windows desktop → lock → unlock
Q: Cannot power on system
A: Please remove any external plug-in devices first. Plug-in power adapter and turn on system to check for power LED
status. If power LED does not light up, please return the system to local service center.
System will not be able to power on normally if the internal battery is at critical low level. Please plug-in the power
adapter to charge the internal battery inside the tablet first. During battery charging, power LED will blink constantly.
Q: Audio input/output has no sound
A:
1. Please open hotkey utility UI, look under audio Settings and adjust audio volume (or uncheck the "mute" option).
2. Single click on the speaker icon in task bar if set to mute or not.
3. Right click on speaker icon in task bar, and select "recording". Under microphone, click on properties and adjust MIC
recording level and MIC boost gain accordingly.
Q: WLAN / Bluetooth connection issue
A:
1. Under Windows device manager, check if WLAN / bluetooth device exist or not.
2. Check if your system already installed WLAN/BT drivers from add/remove programs under control panel.
3. Check if WLAN/Bluetooth device is enabled or not by pressing the WLAN/BT switch on the left hand side of tablet
and popup box will show current WLAN/BT status on screen.
Please note WLAN/BT is off by bios default, please enable it manually by pressing the WLAN/BT switch and
enable/disable it manually from the on screen popup menu.
If WLAN is turn on, WLAN LED will light up.
5. For Bluetooth connection between tablet and other external peripheral device(eg. phone, mouse etc.) please make
sure bluetooth function is turned on first before pairing.
4
Q: How to setup wireless LAN (WLAN) under Windows
A:
1. Check if WLAN device is enabled or not by pressing the WLAN/BT switch on the left hand side of tablet and popup
box will show current WLAN status on screen.
2. Click on WLAN icon in task bar and select the wireless network AP you wish to connect. Click on "refresh" icon to
rescan for existing active wireless access points if needed.
Once wireless connection is made successfully between tablet and wireless AP, it will show "connected".
Q: Ambient light sensor dims the screen brightness automatically, how to disable it?
A: This tablet has built in light sensor that actively detect the levels of light source on the right hand side of screen.
Based on these levels, screen brightness will increase or decrease automatically.
If you don't want the ambient light sensor automatically adjust the screen brightness and wish to adjust screen
brightness manually by yourself, then please open hotkey utility UI, look under brightness Settings and uncheck the
"Auto" option. Adjust screen brightness accordingly by your own preferences.
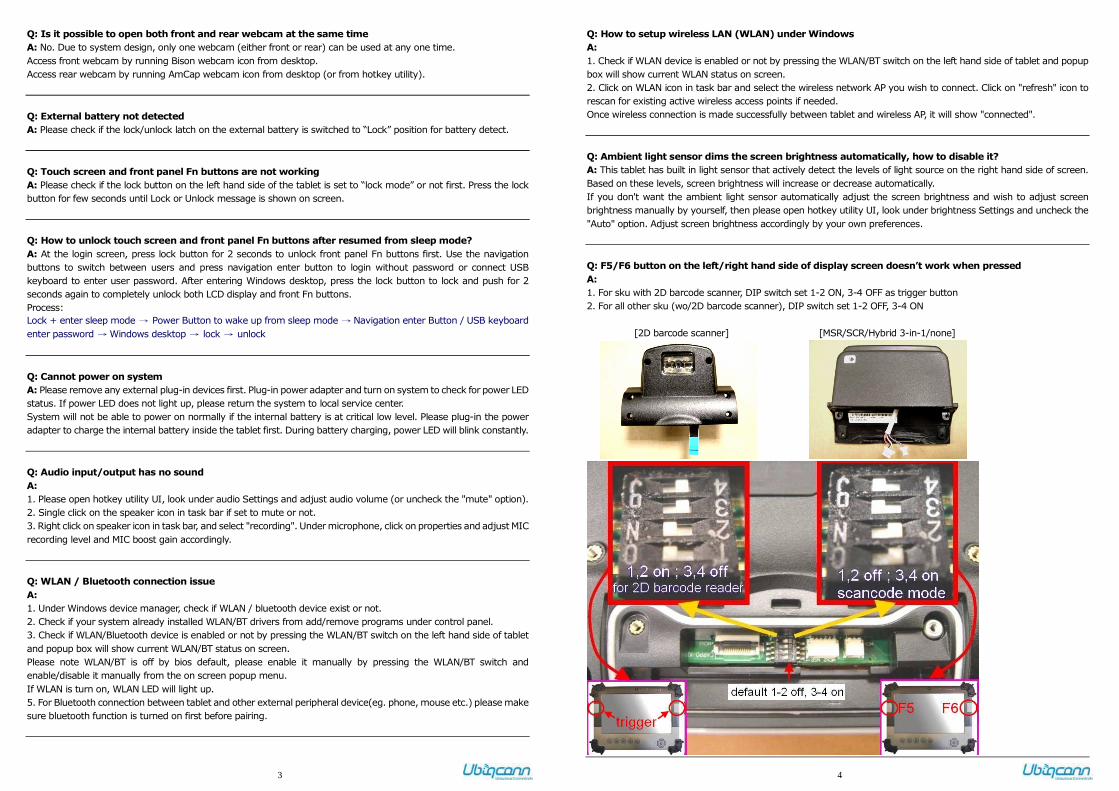
Q: F5/F6 button on the left/right hand side of display screen doesn’t work when pressed
A:
1. For sku with 2D barcode scanner, DIP switch set 1-2 ON, 3-4 OFF as trigger button
2. For all other sku (wo/2D barcode scanner), DIP switch set 1-2 OFF, 3-4 ON
[2D barcode scanner] [MSR/SCR/Hybrid 3-in-1/none]
5
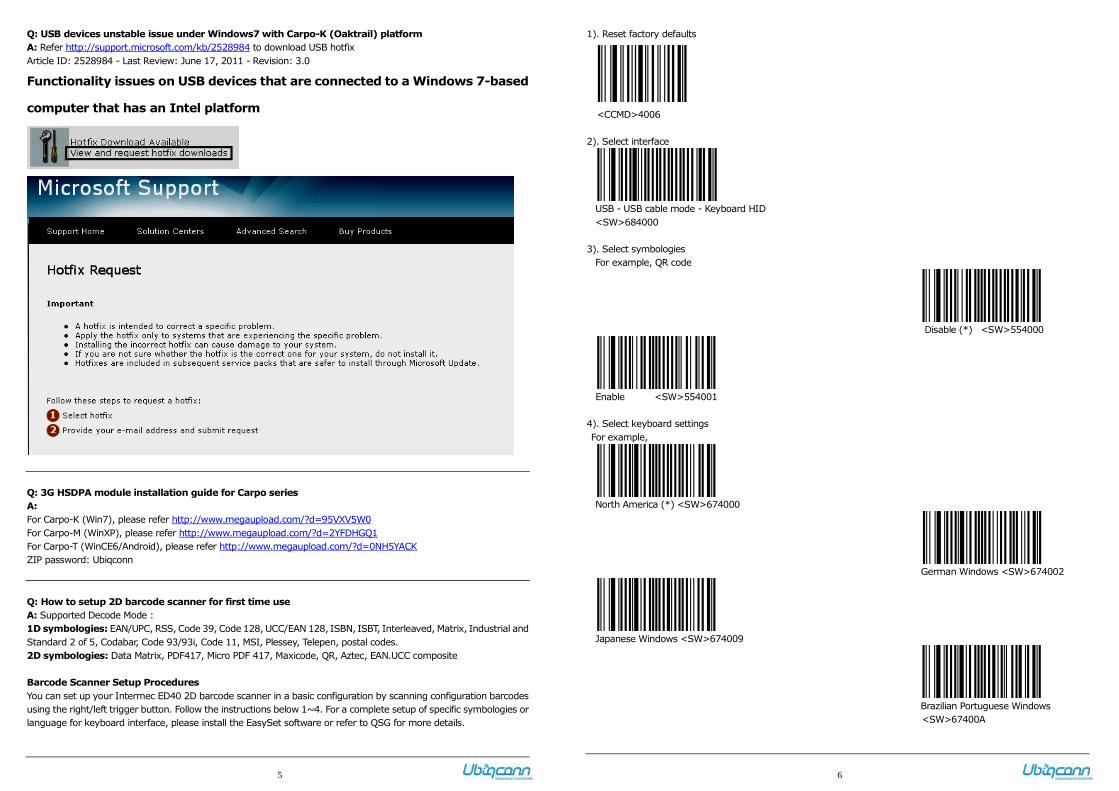
Q: USB devices unstable issue under Windows7 with Carpo-K (Oaktrail) platform
A: Refer http://support.microsoft.com/kb/2528984 to download USB hotfix Article ID: 2528984 - Last Review: June 17, 2011 - Revision: 3.0
Functionality issues on USB devices that are connected to a Windows 7-based
computer that has an Intel platform
Q: 3G HSDPA module installation guide for Carpo series
A:
For Carpo-K (Win7), please refer http://www.megaupload.com/?d=95VXV5W0
For Carpo-M (WinXP), please refer http://www.megaupload.com/?d=2YFDHGQ1
For Carpo-T (WinCE6/Android), please refer http://www.megaupload.com/?d=0NH5YACK
ZIP password: Ubiqconn
Q: How to setup 2D barcode scanner for first time use
A: Supported Decode Mode :
1D symbologies: EAN/UPC, RSS, Code 39, Code 128, UCC/EAN 128, ISBN, ISBT, Interleaved, Matrix, Industrial and
Standard 2 of 5, Codabar, Code 93/93i, Code 11, MSI, Plessey, Telepen, postal codes.
2D symbologies: Data Matrix, PDF417, Micro PDF 417, Maxicode, QR, Aztec, EAN.UCC composite
Barcode Scanner Setup Procedures
You can set up your Intermec ED40 2D barcode scanner in a basic configuration by scanning configuration barcodes
using the right/left trigger button. Follow the instructions below 1~4. For a complete setup of specific symbologies or
language for keyboard interface, please install the EasySet software or refer to QSG for more details.
6
1). Reset factory defaults
<CCMD>4006
2). Select interface
USB - USB cable mode - Keyboard HID
<SW>684000
3). Select symbologies
For example, QR code
Disable (*) <SW>554000
Enable <SW>554001
4). Select keyboard settings
For example,
North America (*) <SW>674000
German Windows <SW>674002
Japanese Windows <SW>674009
Brazilian Portuguese Windows
<SW>67400A
7
5). Additionally, for Carpo-T TI platform set USB speed to full speed mode
USB - USB speed selection - force full speed <SW>684101
(Optional)
Start a new line of text for every barcode scanned
Postamble - Carriage Return + Line Feed (*) <SW>60C100020D0A
Note: (*)= factory default
Q: RFID(NFC) Reader supported tag types, read range of RFID module and test method
A:
RFID Reader supports the following RFID tag
- ISO/IEC 1443A, 1443B, 15693
- Mifare 1K/4K, Ultralight
- NFC-IP1 Protocol
The RFID read range of this module will vary from approximately 40 ~50mm depending on the following factors;
1. The shape and size of the RFID tag. Large Size RFID tags have longer read range (Smaller tags have a smaller RF
radiating field)
2. Any metallic objects near the RFID tag will effectively reduce the read range
3. Any electrical interference from surrounding electrical equipment may reduce read range.
For Carpo-K(Oaktrail), please download demo test kit from http://www.megaupload.com/?d=9CWV6KHT
For Carpo-M(Menlow), please download demo test kit from http://www.megaupload.com/?d=5JYFCML1
ZIP password: Ubiqconn
Note: this tool is provided for test evaluation demo purpose only, not for distribution of any other purposes. Pls contact sales for SDK packages.
Q: "The file 'Asms' on Windows XP Professional CD-ROM is needed" error message when you install
Windows XP on Carpo-M (Menlow) platform
A:
This issue may occur if the setup program cannot communicate properly with the external USB CD-ROM drive (path:
GLOBALROOT\DEVICE\CDROM0\I386).
1. Press F2 to enter bios setup, go to Advanced menu and change "WinXP install mode" to [enabled] to clean install
WinXP. After the 2nd reboot of the WinXP GUI setup installation, please go into bios setup and change "WinXP install
mode" back to [disabled] for XP runtime mode.
2. Alternatively, create a WinXP USB flash drive and boot install from this USB drive to workaround Microsoft USB
CD-ROM installation issue.
http://www.intowindows.com/how-to-create-multiboot-usb-flash-drive-windows-7-and-xp/
8
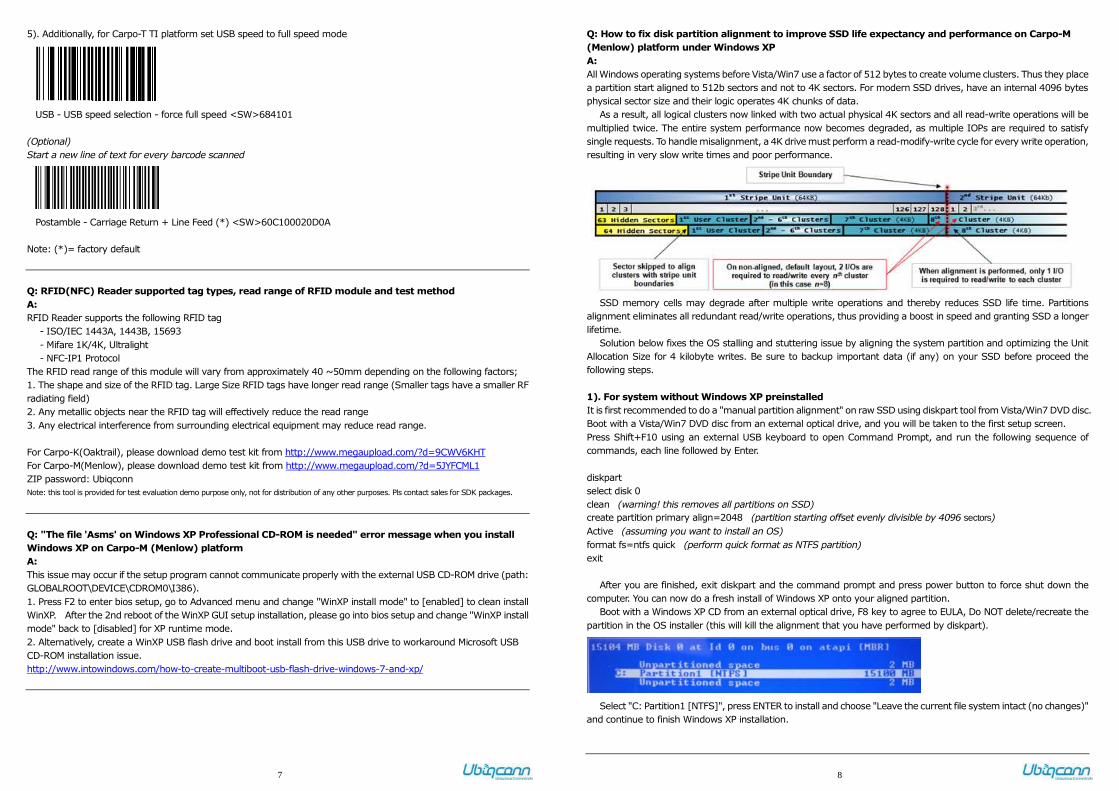
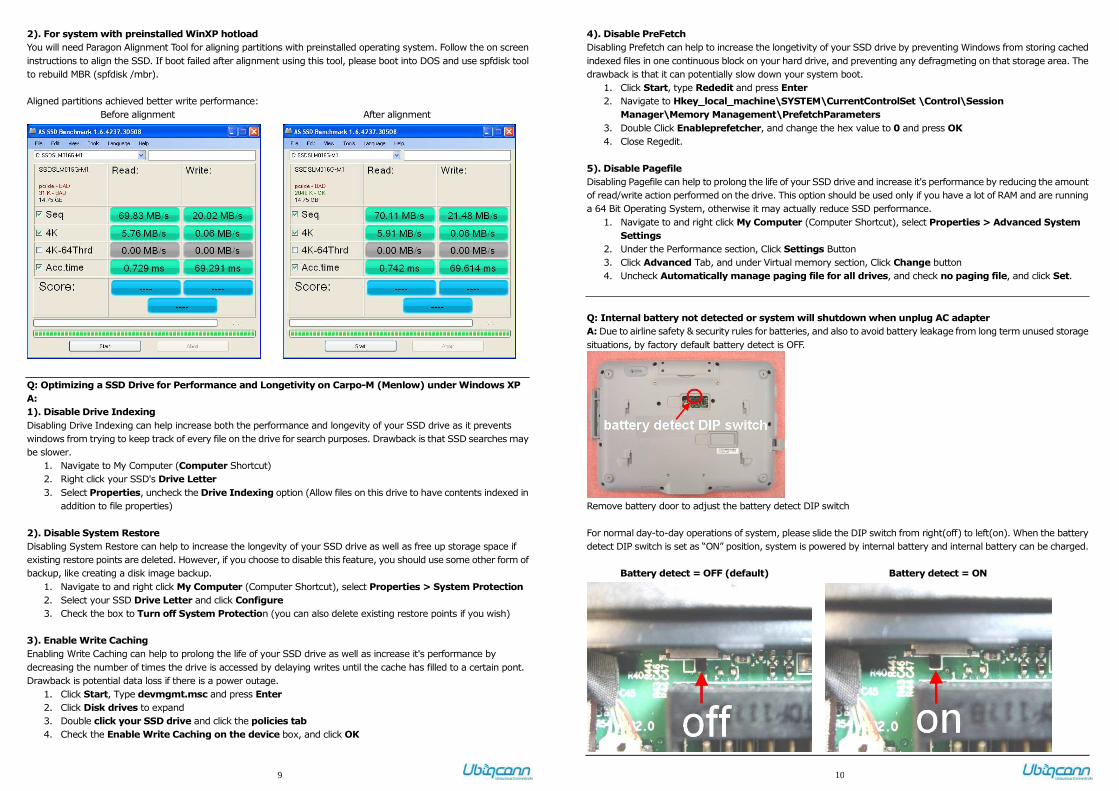
Q: How to fix disk partition alignment to improve SSD life expectancy and performance on Carpo-M
(Menlow) platform under Windows XP
A:
All Windows operating systems before Vista/Win7 use a factor of 512 bytes to create volume clusters. Thus they place
a partition start aligned to 512b sectors and not to 4K sectors. For modern SSD drives, have an internal 4096 bytes
physical sector size and their logic operates 4K chunks of data.
As a result, all logical clusters now linked with two actual physical 4K sectors and all read-write operations will be
multiplied twice. The entire system performance now becomes degraded, as multiple IOPs are required to satisfy
single requests. To handle misalignment, a 4K drive must perform a read-modify-write cycle for every write operation,
resulting in very slow write times and poor performance.
SSD memory cells may degrade after multiple write operations and thereby reduces SSD life time. Partitions
alignment eliminates all redundant read/write operations, thus providing a boost in speed and granting SSD a longer
lifetime.
Solution below fixes the OS stalling and stuttering issue by aligning the system partition and optimizing the Unit
Allocation Size for 4 kilobyte writes. Be sure to backup important data (if any) on your SSD before proceed the
following steps.
1). For system without Windows XP preinstalled
It is first recommended to do a "manual partition alignment" on raw SSD using diskpart tool from Vista/Win7 DVD disc.
Boot with a Vista/Win7 DVD disc from an external optical drive, and you will be taken to the first setup screen.
Press Shift+F10 using an external USB keyboard to open Command Prompt, and run the following sequence of
commands, each line followed by Enter.
diskpart
select disk 0
clean (warning! this removes all partitions on SSD)
create partition primary align=2048 (partition starting offset evenly divisible by 4096 sectors)
Active (assuming you want to install an OS)
format fs=ntfs quick (perform quick format as NTFS partition)
exit
After you are finished, exit diskpart and the command prompt and press power button to force shut down the
computer. You can now do a fresh install of Windows XP onto your aligned partition.
Boot with a Windows XP CD from an external optical drive, F8 key to agree to EULA, Do NOT delete/recreate the
partition in the OS installer (this will kill the alignment that you have performed by diskpart).
Select "C: Partition1 [NTFS]", press ENTER to install and choose "Leave the current file system intact (no changes)"
and continue to finish Windows XP installation.
9
2). For system with preinstalled WinXP hotload
You will need Paragon Alignment Tool for aligning partitions with preinstalled operating system. Follow the on screen
instructions to align the SSD. If boot failed after alignment using this tool, please boot into DOS and use spfdisk tool
to rebuild MBR (spfdisk /mbr).
Aligned partitions achieved better write performance:
Before alignment After alignment
Q: Optimizing a SSD Drive for Performance and Longetivity on Carpo-M (Menlow) under Windows XP
A:
1). Disable Drive Indexing
Disabling Drive Indexing can help increase both the performance and longevity of your SSD drive as it prevents
windows from trying to keep track of every file on the drive for search purposes. Drawback is that SSD searches may
be slower.
1. Navigate to My Computer (Computer Shortcut)
2. Right click your SSD's Drive Letter
3. Select Properties, uncheck the Drive Indexing option (Allow files on this drive to have contents indexed in
addition to file properties)
2). Disable System Restore
Disabling System Restore can help to increase the longevity of your SSD drive as well as free up storage space if
existing restore points are deleted. However, if you choose to disable this feature, you should use some other form of
backup, like creating a disk image backup.
1. Navigate to and right click My Computer (Computer Shortcut), select Properties > System Protection
2. Select your SSD Drive Letter and click Configure
3. Check the box to Turn off System Protection (you can also delete existing restore points if you wish)
3). Enable Write Caching
Enabling Write Caching can help to prolong the life of your SSD drive as well as increase it's performance by
decreasing the number of times the drive is accessed by delaying writes until the cache has filled to a certain pont.
Drawback is potential data loss if there is a power outage.
1. Click Start, Type devmgmt.msc and press Enter
2. Click Disk drives to expand
3. Double click your SSD drive and click the policies tab
4. Check the Enable Write Caching on the device box, and click OK
10
4). Disable PreFetch
Disabling Prefetch can help to increase the longetivity of your SSD drive by preventing Windows from storing cached
indexed files in one continuous block on your hard drive, and preventing any defragmeting on that storage area. The
drawback is that it can potentially slow down your system boot.
1. Click Start, type Rededit and press Enter
2. Navigate to Hkey_local_machine\SYSTEM\CurrentControlSet \Control\Session
Manager\Memory Management\PrefetchParameters
3. Double Click Enableprefetcher, and change the hex value to 0 and press OK
4. Close Regedit.
5). Disable Pagefile
Disabling Pagefile can help to prolong the life of your SSD drive and increase it's performance by reducing the amount
of read/write action performed on the drive. This option should be used only if you have a lot of RAM and are running
a 64 Bit Operating System, otherwise it may actually reduce SSD performance.
1. Navigate to and right click My Computer (Computer Shortcut), select Properties > Advanced System
Settings
2. Under the Performance section, Click Settings Button
3. Click Advanced Tab, and under Virtual memory section, Click Change button
4. Uncheck Automatically manage paging file for all drives, and check no paging file, and click Set.
Q: Internal battery not detected or system will shutdown when unplug AC adapter
A: Due to airline safety & security rules for batteries, and also to avoid battery leakage from long term unused storage
situations, by factory default battery detect is OFF.
Remove battery door to adjust the battery detect DIP switch
For normal day-to-day operations of system, please slide the DIP switch from right(off) to left(on). When the battery
detect DIP switch is set as “ON” position, system is powered by internal battery and internal battery can be charged.
Battery detect = OFF (default) Battery detect = ON

11
Q: For Carpo-K Win7 platform, display sometimes may dim and light up suddenly by itself
A: Please turn off Intel graphics driver power management as shown below.
Q: How to test GP01 GPS module on Carpo series
A:
Please download the test program to test GP01 GPS module on Carpo-K/M (Win7/WinXP) platform
ftp://common:[email protected]/GP01/utility/u-center_6.10.zip
1. set baud rate to 9600bps
2. connect to GPS via appropriate serial port
(check under device manager under COM&LPT ports, try either COM ports from Silicon Labs Dual CP210x USB to
UART Bridge)
Please download the test program to test GP01 GPS module on Carpo-T (WinCE6.0) platform
ftp://common:[email protected]/GP01/utility/u-CenterMobile_4.01.rar
1. Under Rx menu, set to COM4
2. Under Rx menu, set baud rate to 9600bps
TTFF (Open Sky) : Cold start < 45s ; Hot start < 2s
12
Q: After bios update or load bios default on Carpo-K Oaktrail platform, blue screen system halt (BSOD;
STOP: 0X000000CE RTL8192cu.sys) appears during booting into Win7
A:
If previously WLAN is enabled by hotkey and WLAN device is active, after bios update or load bios setup default, the
WLAN enable register in CMOS will reset to disable by default. This then will cause a conflict with current hotkey WLAN
enable status and give rise to blue screen halt error :
RTL8192cu.sys
DRIVER_UNLOADED_WITHOUT_CANCELLING_PENDING_OPERATIONS
STOP: 0X000000CE
To resolve this issue, please press power button for more than 5 seconds to power off system, and system will auto
power on by itself. Use an external USB keyboard to press F8 key to enter Windows safe mode first. Go to My
computer > Manage > Device Manager > Network adapters and manually disable Realtek RTL8188CE WLAN device.
Now restart system.
Press Wifi side button to invoke Wifi enable/disable pop-up box and select (tick) Wi-Fi option as shown.
Go to My computer > Manage > Device Manager > Network adapters and now manually enable Realtek RTL8188CE
WLAN device like below.

13
Q: Tracker board switch setting for later released Carpo series
A:
PCB v0.2 tracker board must be installed in Carpo-K v1.0a, Carpo-M v0.2a, Carpo-T v0.3 for use with GT01(tracker)
/GP01(GPS) SKU. Tracker board switch (D_CN3) will determine GPS or Tracker mode.
D_CN3 DIP switch setting
Tracker : 1-2
GPS : 2-3
Q: How to safely remove an USB stick from your Carpo-T Android system
A: If your Android system has an USB stick plugged in, you can safely remove the USB stick from your Carpo-T
system any time the system is turned off. If you need to remove the USB stick while the system is powered on under
Android, to prevent corrupting or damaging the USB stick you must unmount it from the system first.
1. Go to Settings > Storage
2. Select Unmount USB stick
You can now safely unplug the external USB stick out from the system.
14
Q: Wireless WG7310 buildup from Android source code
A:
Refer “How to Integrated WG73XX and WG75XX with NVS & MAC.pdf” from :
ftp://common:[email protected]/Carpo_T/Android/WLAN/
Note: tiwlan_cu is replaced by wlan_cu tool in source code provided, hence please use “wlan_cu –b” command
instead.
By original Android source code, the nvs_map.bin containing unique MAC address ID for each system will be
generated under folder “/data/misc/wifi/”. However, please take note that in Ubiqconn’s uImage, WLAN MAC address
is stored differently as /system/etc/firmware/ti-connectivity/wl1271-nvs.bin in android file system.
Hence, in init.rc file, the following modification is done in Ubiqconn’s uImage code:
# WLAN Related services
service wlan_loader /system/bin/wlan_loader \
-f /system/etc/wifi/firmware.bin -i /system/etc/wifi/tiwlan.ini -e /system/etc/firmware/ti-connectivity/wl1271-nvs.bin
#-f /system/etc/wifi/firmware.bin -i /system/etc/wifi/tiwlan.ini -e /data/misc/wifi/nvs_map.bin
Please refer update.sh file in Ubiqconn’s uImage first.
Since wl1271-nvs.bin (or nvs_map.bin) containing corresponding MAC address is unique for each system, so please
make sure to backup this file before updating to new image. wl1271-nvs.bin is backup first and then restored after
uImage update in update.sh (refer Ubiqconn’s uImage update file).
#!/bin/ash
cp /media/mmcblk1p2/system/etc/firmware/ti-connectivity/wl1271-nvs.bin /media/mmcblk1p1/.
cp uImage /media/mmcblk1p1/.
rm -rf /media/mmcblk1p2/*
tar jxvf rootfs.tar.bz2 -C /media/mmcblk1p2/
cp /media/mmcblk1p1/wl1271-nvs.bin /media/mmcblk1p2/system/etc/firmware/ti-connectivity/.
umount /dev/mmcblk1p4
./mkdosfs -F 32 -n data /dev/mmcblk1p4
mount /dev/mmcblk1p4 /media/mmcblk1p4
cp -r Media_Clips/* /media/mmcblk1p4/.
If wl1271-nvs.bin is accidently deleted or lost, you will need to refer section#3 “How to modify MAC address” of “How
to Integrated WG73XX and WG75XX with NVS & MAC.pdf” to generate nvs_map.bin first and manually insert the
MAC address. You will need to disassemble Carpo-T system and the MAC address is shown on the LAN_ID label.
15
Q: On Carpo-T + WinCE6.0 platform, cannot resume from sleep after connection made to GP01/GT01
with GPS/tracker application
A: Because the COM ports used by GPS/tracker module is derived from an USB-to-UART CP2105 chip, so any
GPS/tracker application for WinCE (eg. u-center GPS demo) will need to disconnect from COM port first before enter
suspend sleep mode. Otherwise, CP2105 chip will unable to enter D3 suspend state while COM port is still active
(connected) and subsequently cause hang-up after system resume from sleep.
Since u-center GPS demo application is unable to disconnect automatically from COM port before going into
suspend state, so user will need to manually disconnect COM port first. During similar GPS/Tracker application
development, software developer will need include script for application to able to listen to suspend notify from
system and disconnect corresponding active COM ports before go into suspend mode to avoid such issue.
Q: Dual boot between WinCE 6.0 and Android 2.3 on Carpo-T platform
A: The following is only for Carpo-T system with dual OS (WinCE 6.0 and Android 2.3.4) loaded.
WinCE 6.0 change to Android :
1. Open Command Prompt from Start menu
2. Type in “cd Storage Card2” (go to boot loader partition when a SD card is installed)
Type in “copy MLO_Android MLO” (overwrite existing boot loader and change to Android)
3. Power off and power on system again.
Android change to WinCE 6.0 :
1. Open Terminal from Dev Tools > Terminal Emulator
2. Type in “cd boot” (go to boot loader partition)
Type in “busybox cp MLO_CE MLO” (overwrite existing boot loader and change to WinCE)
3. Power off and power on system again.
16
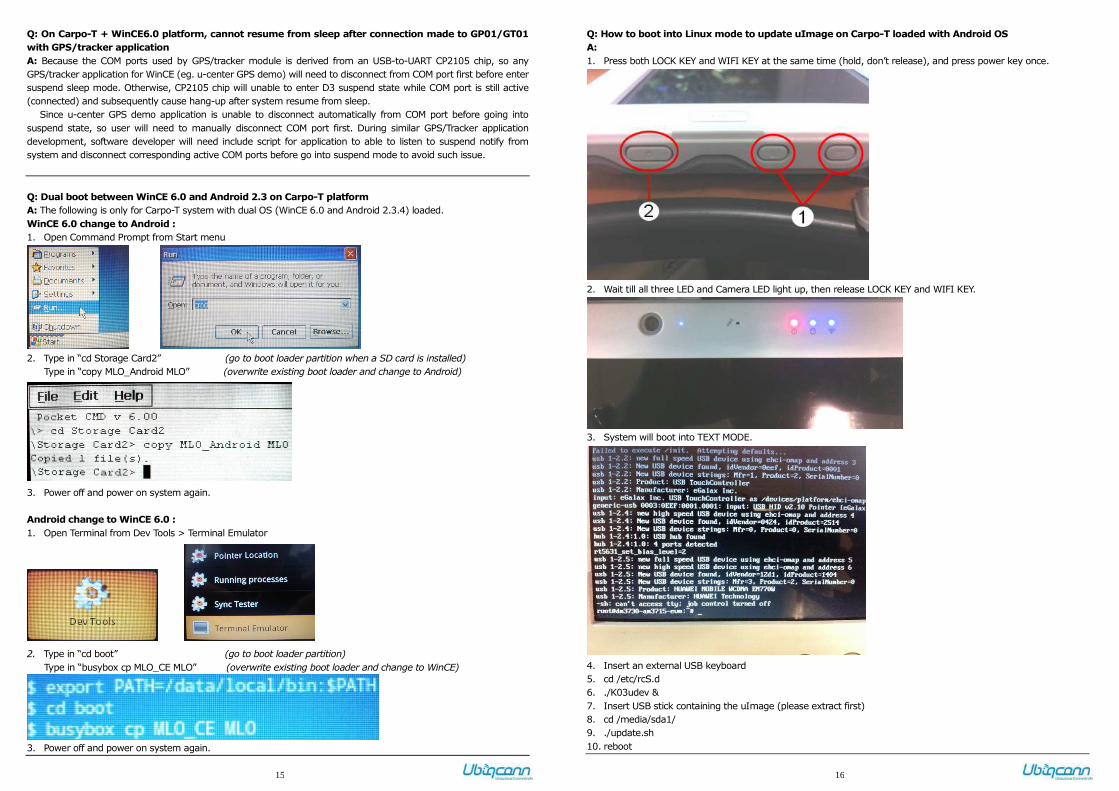
Q: How to boot into Linux mode to update uImage on Carpo-T loaded with Android OS
A:
1. Press both LOCK KEY and WIFI KEY at the same time (hold, don’t release), and press power key once.
2. Wait till all three LED and Camera LED light up, then release LOCK KEY and WIFI KEY.
3. System will boot into TEXT MODE.
4. Insert an external USB keyboard
5. cd /etc/rcS.d
6. ./K03udev &
7. Insert USB stick containing the uImage (please extract first)
8. cd /media/sda1/
9. ./update.sh
10. reboot
17
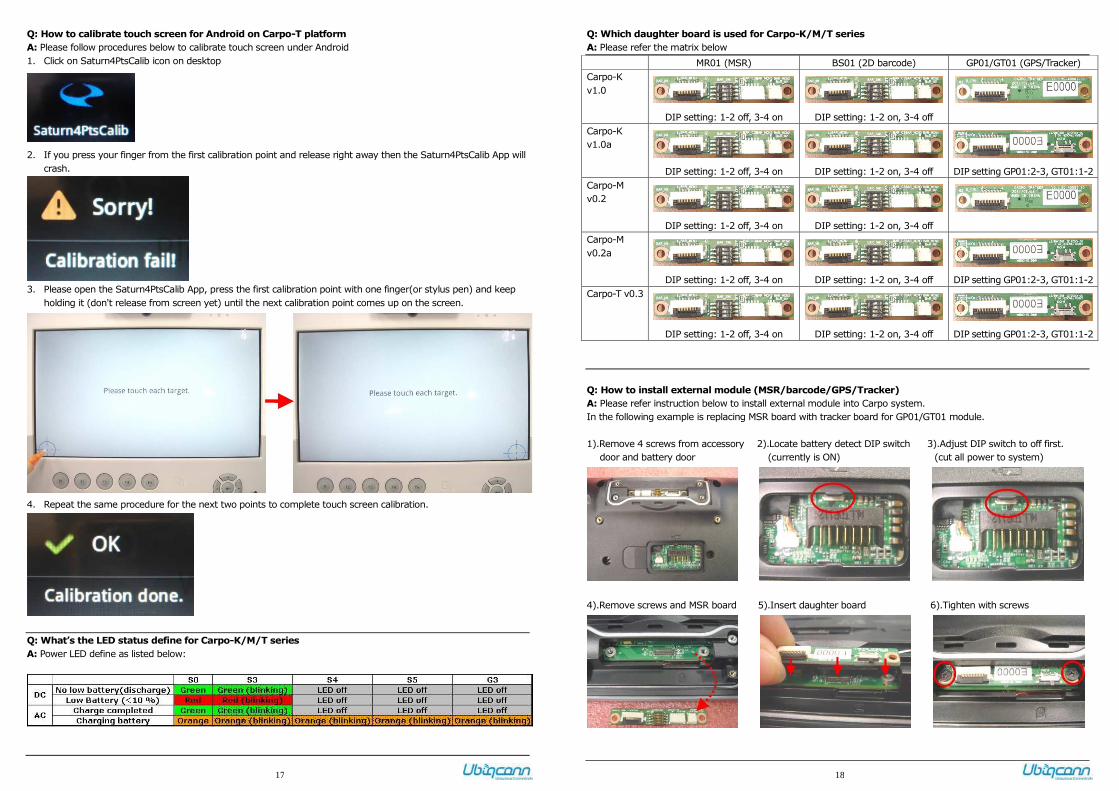
Q: How to calibrate touch screen for Android on Carpo-T platform
A: Please follow procedures below to calibrate touch screen under Android
1. Click on Saturn4PtsCalib icon on desktop
2. If you press your finger from the first calibration point and release right away then the Saturn4PtsCalib App will
crash.
3. Please open the Saturn4PtsCalib App, press the first calibration point with one finger(or stylus pen) and keep
holding it (don't release from screen yet) until the next calibration point comes up on the screen.
4. Repeat the same procedure for the next two points to complete touch screen calibration.
Q: What’s the LED status define for Carpo-K/M/T series
A: Power LED define as listed below:
18
Q: Which daughter board is used for Carpo-K/M/T series
A: Please refer the matrix below
MR01 (MSR) BS01 (2D barcode) GP01/GT01 (GPS/Tracker)
Carpo-K
v1.0
DIP setting: 1-2 off, 3-4 on
DIP setting: 1-2 on, 3-4 off
Carpo-K
v1.0a
DIP setting: 1-2 off, 3-4 on
DIP setting: 1-2 on, 3-4 off
DIP setting GP01:2-3, GT01:1-2
Carpo-M
v0.2
DIP setting: 1-2 off, 3-4 on
DIP setting: 1-2 on, 3-4 off
Carpo-M
v0.2a
DIP setting: 1-2 off, 3-4 on
DIP setting: 1-2 on, 3-4 off
DIP setting GP01:2-3, GT01:1-2
Carpo-T v0.3
DIP setting: 1-2 off, 3-4 on
DIP setting: 1-2 on, 3-4 off
DIP setting GP01:2-3, GT01:1-2
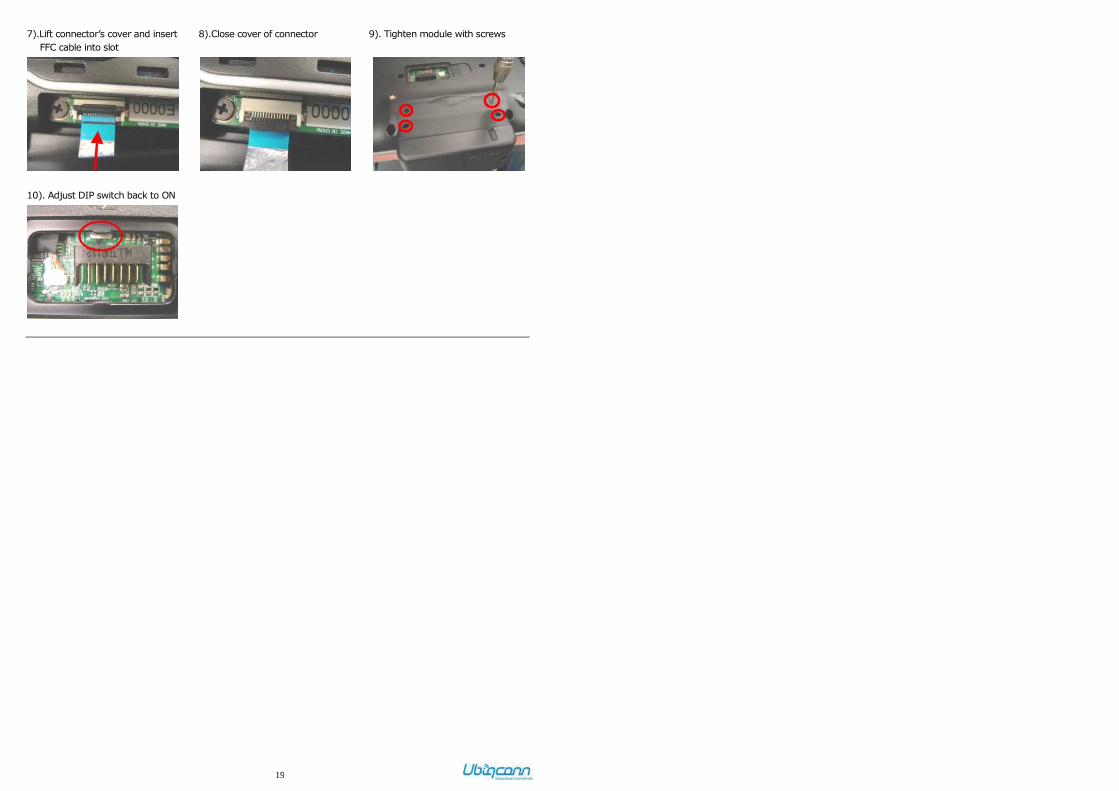
Q: How to install external module (MSR/barcode/GPS/Tracker)
A: Please refer instruction below to install external module into Carpo system.
In the following example is replacing MSR board with tracker board for GP01/GT01 module.
1).Remove 4 screws from accessory 2).Locate battery detect DIP switch 3).Adjust DIP switch to off first.
door and battery door (currently is ON) (cut all power to system)
4).Remove screws and MSR board 5).Insert daughter board 6).Tighten with screws
19
7).Lift connector’s cover and insert 8).Close cover of connector 9). Tighten module with screws
FFC cable into slot
10). Adjust DIP switch back to ON