Capture One PRO Online Help - People · 2.4.1. How to Compare ... Nikon ... Capture One PRO Online...
106
Capture One PRO Online Help
Transcript of Capture One PRO Online Help - People · 2.4.1. How to Compare ... Nikon ... Capture One PRO Online...

Capture One PRO Online Help

Capture One PRO Online Help

Table of Contents1. Installation ............................................................................................................................... 1
1. How to Install Capture One Software ................................................................................. 12. How to Activate a License ................................................................................................ 1
2.1. How to Activate a License Automatically ................................................................. 12.2. How to Activate a License Manually ....................................................................... 2
2. Getting Started ........................................................................................................................ 51. Software Basics ............................................................................................................... 5
1.1. Creating a New Session ........................................................................................ 61.2. Importing Images .................................................................................................. 71.3. White Balancing Images ........................................................................................ 81.4. Fine Tuning Exposure, Contrast and Saturation ....................................................... 91.5. Focusing and Sharpening .................................................................................... 101.6. Image Output and Batch Processing ..................................................................... 111.7. The Batch Queue ................................................................................................ 13
2. How to Set Up the Hardware ........................................................................................... 132.1. Installing the PCI IEEE-1394 Card ........................................................................ 142.2. Setting Up the Phase One Equipment .................................................................. 142.3. Understanding the LED Indicator Lights ................................................................ 152.4. Working With Other Photographic Equipment ........................................................ 15
3. Main Window Overview .......................................................................................................... 171. Tools Reference ............................................................................................................. 17
1.1. Tool Tips ............................................................................................................. 171.2. Tool Selector ....................................................................................................... 171.3. View Mode .......................................................................................................... 181.4. Image Rotation ................................................................................................... 181.5. Capture Navigator ............................................................................................... 181.6. Trash .................................................................................................................. 181.7. Capture .............................................................................................................. 181.8. Process Images .................................................................................................. 181.9. Cursor Tools ........................................................................................................ 181.10. Exposure Warning ............................................................................................. 191.11. Zoom Slider ...................................................................................................... 191.12. Zoom to Fit ....................................................................................................... 191.13. Show Information .............................................................................................. 201.14. Preferences ...................................................................................................... 201.15. Customizing the Toolbar ..................................................................................... 201.16. Guides and Grid ................................................................................................ 211.17. Tools Placement Switch ..................................................................................... 211.18. Preview Switch .................................................................................................. 211.19. Proof ICC Profile ............................................................................................... 221.20. Batch Rename .................................................................................................. 22
2. Cropping and Rotation .................................................................................................... 222.1. How to Crop Images ............................................................................................ 222.2. How to Create Custom Aspect Ratios ................................................................... 232.3. How to Rotate Images by Preset Amounts ............................................................ 232.4. How to Rotate Images Arbitrarily .......................................................................... 242.5. How to Rotate Images by Fixed Amounts .............................................................. 24
4. Organizing Images ................................................................................................................. 261. Sessions: Organizing Files .............................................................................................. 26
1.1. How to Create a New Session .............................................................................. 261.2. New Session Dialog Box Fields ............................................................................ 27
2. Selecting and Editing Images .......................................................................................... 282.1. Exploring Folders ................................................................................................ 292.2. Working with Thumbnails ..................................................................................... 292.3. Working with Previews ......................................................................................... 30
iii

2.4. Comparing Multiple Images ................................................................................. 302.4.1. How to Compare Multiple Images .............................................................. 302.4.2. How to Compare Before and After Views of Images .................................... 31
2.5. Working with Dual Screens .................................................................................. 332.6. Status Bar ........................................................................................................... 33
3. Working with Sessions .................................................................................................... 343.1. Session Structure ................................................................................................ 343.2. What is a Session? .............................................................................................. 343.3. File Browser ........................................................................................................ 35
3.3.1. Adding Folders to a Session Using the Finder ............................................ 363.3.2. Adding Folders to a Session Using the File Browser ................................... 37
5. Capture ................................................................................................................................. 381. Capturing Tethered ......................................................................................................... 38
1.1. How to Capture Images ....................................................................................... 381.2. Capture Tool Fields .............................................................................................. 381.3. Working in Composition Mode .............................................................................. 40
6. White Balancing Images ......................................................................................................... 421. How to White Balance Images ........................................................................................ 422. White Balance Tool Fields ............................................................................................... 43
7. Exposure Evaluation .............................................................................................................. 461. Exposure Tool Fields ...................................................................................................... 46
8. Focus and Sharpness ............................................................................................................ 491. How to Focus and Sharpen Images ................................................................................. 492. Focus Tool Fields ........................................................................................................... 49
9. Processing Images ................................................................................................................. 511. Processing Images ......................................................................................................... 51
1.1. How to Process Images ....................................................................................... 511.2. Working with Multiple Outputs .............................................................................. 511.3. Advanced Panel .................................................................................................. 521.4. Process Tool Fields ............................................................................................. 53
2. Batch Processing ........................................................................................................... 5510. Color Management ............................................................................................................... 58
1. Working with Color Management ..................................................................................... 581.1. A Guide to Color Management Settings ................................................................ 581.2. Selecting the Color Management Workflow ........................................................... 611.3. Using Other ICC Profiles ...................................................................................... 611.4. Proof Profile ........................................................................................................ 61
2. The Color Editor ............................................................................................................. 622.1. Local Color Adjustment ........................................................................................ 632.2. Global Color Adjustments .................................................................................... 642.3. Color Editor Inspector .......................................................................................... 64
11. Supported Meta Data and IPTC Fields .................................................................................. 661. Phase One .................................................................................................................... 662. Canon ........................................................................................................................... 673. Nikon ............................................................................................................................ 694. Olympus ........................................................................................................................ 705. Pentax ........................................................................................................................... 716. Fuji ............................................................................................................................... 727. Konica Minolta ............................................................................................................... 738. IPTC Information Editor .................................................................................................. 74
12. Special Features .................................................................................................................. 751. Demoirize Plug-in ........................................................................................................... 752. Stitching Images ............................................................................................................ 76
2.1. How to Stitch Images Together ............................................................................. 763. Automatically Importing Images from an External Media ................................................... 77
3.1. How to Import Images from External Media ........................................................... 773.2. New Media Detected Fields ................................................................................. 78
4. AppleScripts .................................................................................................................. 78
iv
Capture One PRO Online Help

5. Overlay Utility ................................................................................................................ 786. Lens Cast Calibration ..................................................................................................... 79
13. Preferences ......................................................................................................................... 801. Imaging Preferences ...................................................................................................... 80
1.1. Camera Setup ..................................................................................................... 801.2. Capture Naming .................................................................................................. 821.3. Exposure ............................................................................................................ 821.4. Processing .......................................................................................................... 83
2. System Preferences ....................................................................................................... 852.1. Alignment ........................................................................................................... 852.2. AppleScript ......................................................................................................... 852.3. Color Management .............................................................................................. 862.4. General Settings ................................................................................................. 872.5. Software Update ................................................................................................. 872.6. Thumbnails ......................................................................................................... 87
14. Tips and Tricks ..................................................................................................................... 891. Tips on Daily Usage of Capture One ............................................................................... 89
1.1. Optimizing white balance ..................................................................................... 891.2. .work file naming convention ................................................................................ 891.3. Reusing your white balance settings ..................................................................... 891.4. Calibrating fixed lenses ........................................................................................ 901.5. Lens cast calibration with image stitching .............................................................. 921.6. Good sharpening ................................................................................................ 931.7. Creating your own cropping dimensions ................................................................ 931.8. Opening images into another application .............................................................. 941.9. Undoing rotations ................................................................................................ 951.10. Activating Capture One software ........................................................................ 951.11. Creating a contact sheet .................................................................................... 951.12. Dynamic range from RAW .................................................................................. 961.13. Capturing tethered with Canon 1Ds KII, 1D MKII, 1Ds, 1D, 20D, 10D, 300D, D30,D60 .......................................................................................................................... 971.14. Previewing more than one image at a time .......................................................... 981.15. Get inline RGB color Read-out ........................................................................... 981.16. Monitoring the batch with Capture One minimized ............................................... 98
2. Troubleshooting .............................................................................................................. 992.1. Windows are missing, menus are greyed out ......................................................... 992.2. I can't transfer images from my camera to the Mac ................................................ 992.3. Nothing happens when I try to process my images ................................................ 992.4. How do I recover items from the trash? ............................................................... 100
15. Troubleshooting and Feedback ............................................................................................ 101
v
Capture One PRO Online Help
Chapter 1. InstallationThis section describes how to install the Capture One software.
1. How to Install Capture One SoftwareCapture One software includes an easy-to-use installer that will install all the software you need to runthe application on a Mac OS X computer.
To install the software follow the procedure below:
1. Either load the Capture One CD into the CD drive, or download the application from the Phase OneWebsite
2. Double click the CD-ROM, or the disk image (.dmg)
3. Double click Capture One Installer
4. After reading the on-screen instructions, click Next to continue the installation
5. Follow the on-screen instructions to complete the installation
Note
If you need to stop the installation, click the Cancel button
2. How to Activate a LicenseUse of the Capture One application is controlled by a license key. Without a valid license key, whichyou have activated, you will not be able to operate the application beyond its 30 day trial period. For in-structions on how to activate your license key, see the sections, below.
2.1. How to Activate a License Automatically
If your computer is connected to the Internet and you want to activate your license automatically, followthe procedure, below:
1. Open the application and select License activation from the Capture One menu.
2. The License Activation dialog box (see illustration, below) will be displayed
1

3. Select Online Activation
4. Enter the Product Key enclosed in the software box
5. Click the Get Registration Key button
6. Click Activate License to complete the license activation.
2.2. How to Activate a License Manually
If your computer is not connected to the Internet, and you want to activate your license manually, followthe procedure, below:
1. Open the application and select License activation from the Capture One menu.
2. The License Activation dialog box (see illustration, below) will be displayed
2
Installation

3. Select Manual Activation.
4. Enter the Product Key enclosed in the software box.
5. Click the Get Registration Key button.
6. Select Manual Activation and write down the Registration key that is displayed.
7. From a computer that is connected to the Internet, go to http://www.phaseone.com/.
8. Have your Registration Key ready, click Activate Software in the menu and follow the instructionson the site. Once the process is complete you'll have the activation key to activate your copy ofCapture One.
3
Installation

Note
Make a note of your activation key. Either by writing it down, or by taking a screencapture.
Important
Save a copy of your activation key, your product key and your log in information in asafe place.You may need them again in the future.
9. Enter your Activation Key in the Manual Activation dialog box, then click the Activate License buttonto complete the license activation.
4
Installation

Chapter 2. Getting StartedThis section provides you with some basic general concepts and instructions that will help you to startworking with the application as quickly as possible. However, to get a more detailed understanding ofthe application: what it is capable of and how you can use it to achieve what you want to when workingwith images, you will need to refer to the other more detailed sections that this online help is comprisedof.
1. Software BasicsThis section will give you a brief introduction to the application's interface and its main functional areas.The following sections will provide a more detailed description of what these functional areas are andhow to use them.
The application's main window is made up of four functional areas. In the illustration, below, these areashave been higlighted using colored frames. These areas are:
The toolbar which includes the tool selector . Clicking on the different buttonsswitches between the application's tool panels.
The thumbnail window. The thumbnail window displays information about your capture files and isused to select images. When an image in the thumbnail window has been selected it becomes the ap-plication's focus.
The preview window. The preview window displays image(s) selected from the thumbnail window.The preview image(s) is updated in real time to show you the effect of changes that you have made tothe image.
The tool panel. Using the tool selector, tool panels are made active. Tool panels are arranged in thesame order as a typical workflow. In this example the White Balance panel is active.
5

1.1. Creating a New Session
To create a new session, follow this procedure:
1.Select the Organize tool panel .
2. Click the plus button at the top of the session window, see illustration, below.
3. The New Session dialog box will open, see illustration, below:
6
Getting Started

4. Fill out the fields with the information that you want to be associated with your new session.
Note
Add a Capture Name: to have this name applied to all imported files.
5. Click OK to create the new session.
For more information on sessions, see Section 3, “Working with Sessions” .
1.2. Importing Images
After creating a session, the next step in a typical workflow is to add the image files to it that you wantto work with. There are two ways of doing this:
1. Connect a card reader to your computer and insert your FlashTM or MicrodriveTM card. When youdo this, a New Media DetectedPhase One Media Reader window (see illustration, below) willautomatically open.You can choose to have your files renamed as they are imported by checkingthe Rename captures check box and typing the name you want to use in the field next to it.
Note
If you choose not to rename captures, then the images will retain their names as gen-erated by the camera that they were shot with.
7
Getting Started

2. Click on the Finder icon (see illustration, below) then select the folder with the image that needsto be viewed.
Images dragged / copied into the captures folder manually will not be renamed. As images are addedto the session they will be displayed as thumbnails.
For more information on importing images, see Section 3, “Automatically Importing Images from an Ex-ternal Media” .
1.3. White Balancing Images
To white balance images follow the procedure, below:
1. From the thumbnail window, select an image that contains either a gray card a neutral white or greyarea.
2. If it is not already selected, click on the tool selector to choose the White Balance tool
. Select the picker cursor tool .
3. Using the cursor, click the color picker on the gray card's neutral gray area in the image being dis-played in the preview window.
Tip
If your image does not contain a satisfactory gray area, you should shoot the imageagain and include a QP or MacBeth card in the scene.
Alternatively, use the If selected display on the white balance tool. While moving theeye dropper around the image, the left window will show you the current position in theimage. The window on the right will show what the area will look like if the current pos-ition is used for white balancing the image:
8
Getting Started

4. The selected image will now be white balanced. This white balance can be used to balance otherimages and/or applied as a capture balance to new images if you are capturing tethered to thecomputer.
If you are not happy with the result, click on the reset to default icon , then select a preset from theBalance selection field. After selecting an appropriate preset you can make fine adjustments to the imagemanually using the color temperature sliders or the color wheel.
1.4. Fine Tuning Exposure, Contrast and Saturation
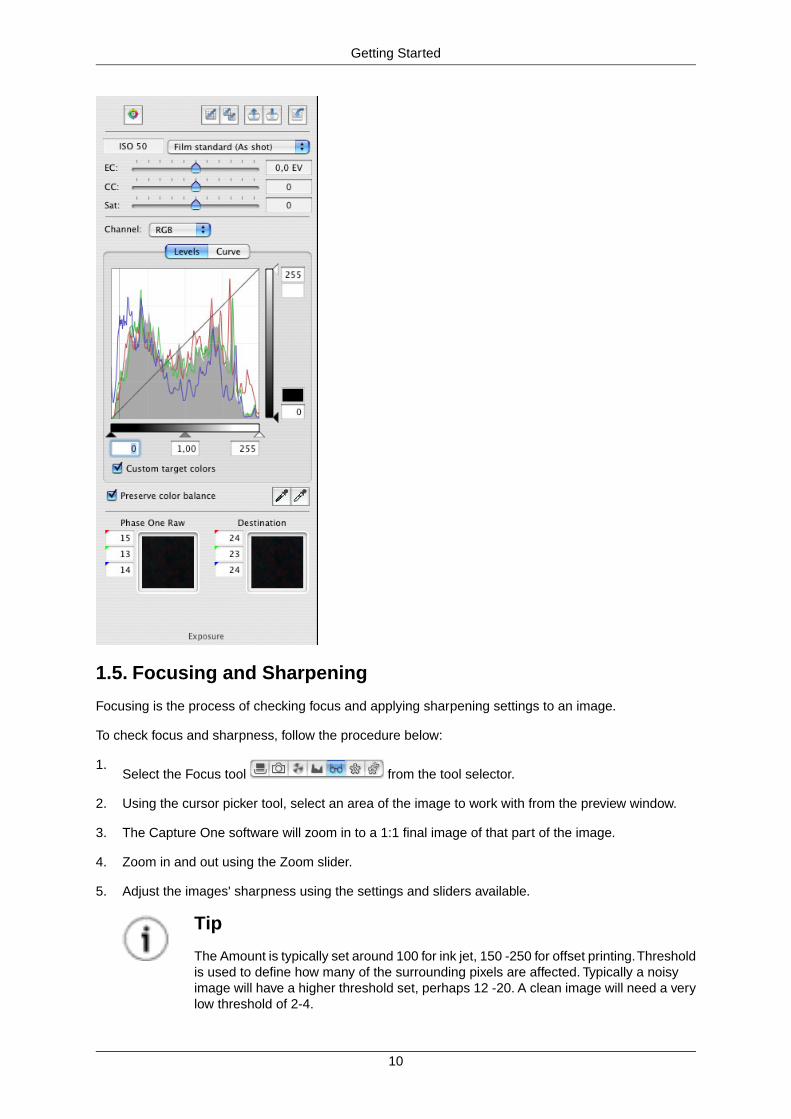
Select the Exposure tool from the tool selector .
The Exposure tool panel will be displayed, see illustration, below.
Use the EC and CC sliders to adjust the image. Use the Sat: slider to increase or decrease the images'saturation.
If you prefer to work with levels or curves, you can alternate between the two using the Levels and Curvebuttons. The two preview windows Phase One Raw and Destination display the current RGB values ofthe RAW files and as they will be when output into the selected output color space, respectively.
9
Getting Started
1.5. Focusing and Sharpening
Focusing is the process of checking focus and applying sharpening settings to an image.
To check focus and sharpness, follow the procedure below:
1.Select the Focus tool from the tool selector.
2. Using the cursor picker tool, select an area of the image to work with from the preview window.
3. The Capture One software will zoom in to a 1:1 final image of that part of the image.
4. Zoom in and out using the Zoom slider.
5. Adjust the images' sharpness using the settings and sliders available.
Tip
The Amount is typically set around 100 for ink jet, 150 -250 for offset printing.Thresholdis used to define how many of the surrounding pixels are affected. Typically a noisyimage will have a higher threshold set, perhaps 12 -20. A clean image will need a verylow threshold of 2-4.
10
Getting Started

Select a method from the Method: selection field. This is a subjective setting. Themethods available are Standard, Soft Look and Disable, the latter means that nomethod will be used.
Keep checking the image in the focus window. For a web image, the image should lookcorrect on screen. For an image to be printed in a magazine or book, the preview shouldideally look slightly over-sharp on screen.
6.
When you are satisfied with the adjustments made, click the button to apply them to theselected images.
Note
use this button to open a floating focus utility window. This window can be resized tooptimize your view of the image that you are working with.
1.6. Image Output and Batch Processing
To process images, follow the procedure below:
1. Using the mouse, select the image you wish to work with, and then select the process tool
2. The Process tool panel will be displayed. See illustration, below:
11
Getting Started

3. Uncheck Enabled only.
4. Select one of the output types from the Name field, or click to add a new output type.
5. Configure all of the appropriate settings. For detailed information on the options available and howto use them, see Section 1.4, “Process Tool Fields”.
The software can create any number of simultaneous outputs from one file, each in a separatefolder within the Processed folder. By selecting the Advanced button it is possible to create a namedsub folder for each type of output, for example, JPEG High and TIFF.
6.Click either the Process button at the bottom of the process tool or the process icon at itstop.
7. Processing of your images will start. All selected captures will be processed according to the settingsin the process panel and in the processing preferences. Images are being stored in your selectedProcessed folder with the individual file names.
12
Getting Started

1.7.The Batch Queue
To process batches of files, select the Batch processing tool from the tool selector .
The Batch queue controls whether images are processed immediately in the background or when youactivate the batch. Processed images are indicated by a green icon. To clear the queue, select a fileand click the square (stop) button. All images can be selected and stopped, paused or deleted by usingApple (Cmd), then making the appropriate choice.
2. How to Set Up the HardwareThis section describes what has to be done to set up the hardware if you are going to be shootingtethered .
13
Getting Started

Note
This section only applies to photographers shooting tethered with a Phase One cameraback.
Note
Your computer must have a minimum of 1GB RAM.
2.1. Installing the PCI IEEE-1394 Card
The Phase One camera back is connected to the computer via an IEEE 1394 connection.This extremelyfast connection does not have many of the limitations of the SCSI technology previously used in olderdigital cameras. If necessary, the cable length can be extended using Phase One Power Conditionersto move the camera further from the computer.
To install a PCI IEEE-1394, follow the procedure, below:
Note
Whilst this procedure will work in most cases, it is important that you have read and under-stood the user information (manual, online help, etc.) for your own computer, before carryingout this installation.
1. Shut down and un-plug the computer.
2. Remove the computer's cover to get access to its motherboard.
3. Choose an empty PCI slot and remove the screw and cover.
4. Gently place the card into the slot with the 1394 connectors facing through the opening.
5. Exert a firm downward pressure straight down on the card whilst rocking it slightly until it is firmlyseated in the slot.
6. Replace the screw to hold the card in place.
7. Replace the computer's cover, then restart it.
2.2. Setting Up the Phase One Equipment
In addition to setting up the computer, the camera also has to be set up for working with the Phase Onecamera back.
To set up the Phase One Equipment, follow the procedure, below:
1. A Ground Glass Mask is included.This must be installed in the viewfinder to ensure correct framing.Remove the camera viewfinder and focusing screen (refer to the camera user's manual for detailedinstructions). Insert the Ground Glass Mask and replace the viewing screen and the viewfinder.
2. Connect the Phase One camera back to the camera or mounting plate.
Important
Ensure that the back is firmly connected to the camera before releasing it.
The small screw on the top of the Phase One camera back H series can be tightened with thescrewdriver supplied to prevent it from being accidentally removed. Phase One's P series camerabacks are equipped with a locking mechanism.
14
Getting Started

3. Connect the supplied Sync Cable from the lens' flash sync to either the connector on the PhaseOne camera back marked "C" or the Mamiya Mounting plate. This is the same for Phase One's Hand P series camera backs.
4. If a motorized camera is used, connect the included Motor Cable to the connector on the right handside of the back, marked "M". This is the same for Phase One's H and P series camera backs.
5. If a Mamiya RZ67 Pro II is used, connect the mounting plate to the camera and then connect thecable from the mounting plate to the connector on the front of the Mamiya. Ensure that the cableis connected and locked properly; the latching mechanism will be on the bottom.
6. If flash is used, connect the Flash Sync Cable (not included) from the strobes to the connector onthe right side of the camera back, marked "F". This is the same for Phase One's H and P seriescamera backs.
7. Connect one end of the IEEE 1394 cables (included) to any one of the empty ports on the newlyinstalled card, or the built-in port. Connect the other end to the back of the Phase One camera back.These cables can only be inserted one way and may require a little pressure to insert.
Note
For the Mamiya RZ the camera must be set to take multiple exposures in order to use thePhase One camera back.The multiple exposure selector (M) is combined with the film backrevolve switch (R).
2.3. Understanding the LED Indicator Lights
LED Indicators lights: On the back of the Phase One camera back are two sets of LED indicator lights.A red and green light on the left and a red and green light on the right. The left and right pairs areidentical and should always display the same thing. These lights indicate the camera back status. Thelist below describes what the status lights indicate:
• Green Lights Steadily On: this means that the Phase One camera back is receiving power and isready to capture images.
• Green Lights Flickering: after capturing an image the green lights will flicker on and off whiletransferring the image to the computer.
• Both Red and Green Lights Steadily On: if the camera is not shut down properly, or an error occursboth sets of lights may stay lit. If this happens, shut down the Capture One software, unplug thecamera back, wait ten seconds, then reconnect the camera.
• No Lights On: if the camera is properly plugged in and receiving power and there are no lights on,the camera back has shut down or may be damaged. Unplug all connectors, inspect all cables fordamage, examine the IEEE 1394 card (if in use) for proper installation and reconnect everything. Ifthe problem persists, contact your Phase One dealer for assistance.
2.4. Working With Other Photographic Equipment
While the Phase One camera back has been made as compatible as possible with photographicequipment, there are a few issues to be aware of:
• When using the Phase One P20/P25 camera back with a Hasselblad 555ELD, the release buttonon the front of the Hasselblad needs to be in the "DIGI" position. If the camera back is turned aroundto support landscape or portrait mode (depending on the CCD placement in the back) the releasebutton needs to be in "FILM" position.
• When using the Phase One camera back on a view camera, use "Two Shot Mode". This means thatthe shutter release is activated twice. To shoot an image, release the shutter, reset it, and shoot
15
Getting Started

another frame. The first shot 'wakes' the camera up, and the second is the actual exposure. Altern-atively pressing the Capture button in the preview window will wake the camera up and then theshutter can be fired once to take a photo. The camera will remain 'awake' for 5 seconds or until thenext capture.
• When used on a Mamiya RZ67 Pro II the selector on the right side of the camera body must be inthe "M" position.
• The Phase One camera back fully conforms to ISO 10330 Standard for Photographic Strobe Systems;unfortunately, not all strobe manufacturers comply with this standard. Check with the manufacturerof your strobe system to prevent damage to the Phase One camera back.
16
Getting Started

Chapter 3. Main Window Overview1.Tools ReferenceThis section contains a detailed description of the application's tools - for more details, please refer tothe individual sections.
1.1.Tool Tips
Tool tips are designed to give you on-screen information about what the components of the interfaceare and do. To use tool tips, roll the cursor over a tool, button or view. This brings up a dialog with ashort explanation of the object that the cursor is on top of.
1.2.Tool Selector
The tool buttons are laid out from left to right in typical workflow order:
You use the tool selector to choose which of the tool panels you want to workwith.
Selects the organize tool panel.
See Chapter 4, Organizing Images for more detailson organizing images.
Selects the capture tool panel.
See Chapter 5, Capture for more details on captur-ing.
Selects the white balance tool panel.
See Chapter 6, White Balancing Images for moredetails on white balancing images.
Selects the exposure tool panel.
See Chapter 7, Exposure Evaluation for more de-tails on the exposure tool.
Selects the focus tool panel.
See Chapter 8, Focus and Sharpness for more de-tails on the focus tool.
Selects the process tool panel.
See Chapter 9, Processing Images for more detailson the process tool.
Selects the batch process tool panel.
See Section 2, “Batch Processing” for more detailson batch processing.
17

1.3. View Mode
When using the application you have the option of working in a portrait or landscape window layout. Byclicking these two icons you can toggle between these view modes. In landscape mode the previewwindow is above the thumbnail window. In portrait mode the thumbnail window is beside the previewwindow.
1.4. Image Rotation
All selected images in a capture folder can be rotated either 90º clockwise or 90º counter clockwise using
the rotate left or rotate right buttons in the toolbar.
1.5. Capture Navigator
The capture navigator buttons are used to browse through images by clicking either the Next Image orthe Previous Image buttons.
1.6.Trash
Clicking the Trash button deletes whatever is selected, that is, the current capture or selected cap-tures.
1.7. Capture
Click the Capture button to capture an image.
Note
The button is only active if a camera back is connected and you are shooting tethered.
1.8. Process Images
Clicking the Process button on the toolbar will process either the image in the preview window,or all the selected images in the Capture collection window. When all selected images are processedthey will be added to a batch and the current settings will be applied to all the images in the batch.
See also Chapter 9, Processing Images.
1.9. Cursor Tools
By clicking the buttons within the cursor selection tool you can select which one you want to use. Thefollowing options are available:
The Picker tool (highlighted) is used to read andset the RGB values of a particular area of an image.The active area of this tool measures 3x3 pixels.
The Zoom tool (highlighted) is used in the mainpreview window to zoom in and out.
18
Main Window Overview
Note
Preview images are only cached, low-resolution images of a selected cap-ture, and previews will quickly pixelatewhen enlarged.
The Crop tool (highlighted) is used to remove partsof an image. Click on the crop icon then move thecrop pointer to the selected image in the Previewwindow. Click and drag the mouse until the desiredframe is surrounding the area of the image to becropped out. Then release the mouse button. Thecrop can be adjusted in size and position before thefinal cropping. Click the edges or corners of theframe to drag it, or to change the selected framesize. Holding down the cursor on the Cropping tooldisplays a drop down menu, where you can selecta constrained aspect ratio, make a new one, re-name, delete, or make a unconstrained crop.
The Rotation tool (highlighted) is used to rotate im-ages. Select the tool and draw a line either horizont-ally or vertically along a line in the image, and therotation will adjust in parallel to the line.You canalso hold down the Option key to drag the cornerof the images freely. Double clicking the tool willdisplay the rotation palette, where you can rotatethe image by entering the number of degrees re-quired. .
The Hand button (highlighted) is used select andmove. The move tool is used to move the image inthe preview area if the image is too large for all ofit to be viewed at once in the preview window. If thekeyboard space bar is held down, this tool will beautomatically selected.
1.10. Exposure Warning
The Exposure warning tool can be toggled on and off using F5. Double clicking the icon will bringup the exposure tool preferences. Here you can set the lightness and shadow warning level and color.
1.11. Zoom Slider
The zoom slider acts on whatever is in focus: the Preview window or thethumbnails in the Thumbnails view. The slider is used to zoom in an out in the preview window, or tochange the size of the thumbnail views in the capture collection.
1.12. Zoom to Fit
The Eyeglass tool is used to zoom the image to fit in the Preview window. Whenever the displayarea is changed, click once on this icon to optimize your view of the preview area.
19
Main Window Overview

1.13. Show Information
The Show information tool is used to display information stored in a captured file. For example:
• File information
• Image information
• Exposure settings
• Initial Camera settings
• Current camera software version
To display this information for an image, highlight its thumbnail then click the Show information button.
Please see Chapter 11, Supported Meta Data and IPTC Fields for more detail on what is support by thedifferent cameras.
1.14. Preferences
The Preferences tool is used to access the application's preferences window.
Please see Chapter 13, Preferences for more details.
1.15. Customizing the Toolbar
The Capture One toolbar can be customized to hold exactly the tools you use the most. Here's how youdo it:
1. Place the mouse somewhere on the toolbar, hold down the Ctrl button and click once with themouse.
2. Select Customize Toolbar from the menu that pops up. This will bring up a palette of all the toolsavailable in Capture One:
20
Main Window Overview

3. Now simply drag and drop the tools you want to your toolbar and Capture One will adapt.
1.16. Guides and Grid
The Guide and Grids button can be toggled on and off. Its effect depends on what is set up inAlignment preferences. A predefined grid or a drag enabled guide can be displayed in the Previewwindow. Double click this button to display the Alignment preferences window.
Note
This button is not part of the default tool set. See Section 1.15, “Customizing the Toolbar”for instructions on how to place it in your tool bar.
1.17.Tools Placement Switch
The Tool placement buttons are used to switch the placement of the Tool panels and theThumbnail view.
Note
This button is not part of the default tool set. See Section 1.15, “Customizing the Toolbar”for instructions on how to place it in your tool bar.
1.18. Preview Switch
The Preview switch tool is used to select different image layouts in the Previewwindow. The layouts you can choose between are:
• 1 UP: 1 image.
• 2 UP Landscape: 2 images in landscape orientation
• 2 UP Portrait: 2 images in portrait orientation
• 4 UP: 4 images displayed at once.
• Before/after Landscape: a before and after adjustments comparison of the same image in landscapeorientation.
• Before/after Portrait: a before and after adjustments comparison of the same image in portrait orient-ation.
This function can also be accessed from the View>Preview menu.
Note
This button is not part of the default tool set. See Section 1.15, “Customizing the Toolbar”for instructions on how to place it in your tool bar.
Tip
A quick way to do a preview of two images at the same time is to select the two thumbnailsand the select the 2 Up preview. 4 up works the same way.You can also use the left arrowand the up arrow to scroll to the next image if you want the preview to be as large as possibleand not share the screen real estate with other previews.
21
Main Window Overview

1.19. Proof ICC Profile
The Proof ICC Profile selection box can be added to the toolbar as an altern-ative to accessing it from the Image>Proof Profile menu.
Note
This button is not part of the default tool set. See Section 1.15, “Customizing the Toolbar”for instructions on how to place it in your tool bar.
1.20. Batch Rename
The Batch rename tool (see illustration, below) is used to rename a selection of images.
To rename using this tool, Control - click on the image files that you want to rename.You can renamea series of images including an incremental number, which will automatically be applied, by selectingthem in the Capture Collection window or the File Browser window. After selecting the images, chooseRename from the pop-up menu. Fill out the Batch Name and the Start Count fields then click Rename.An example of the file name will be displayed in the dialog box.
2. Cropping and RotationUsing the application's cropping and rotation functions allows you to crop your images to the appropriatesize and rotate them to apply the orientation that you want in your final picture. Images can be croppedat any stage in the workflow.
2.1. How to Crop Images
To crop images follow the procedure below:
1.Click and hold down the mouse button on the crop cursor on the toolbar.
2. The aspect ratio dialog box (see illustration, below) will be displayed.
22
Main Window Overview

3. Choose the aspect ratio that you want to work with.
4. Click and drag to dimension the crop box on the image that you want to crop in the preview pane.
Note
If you select Destination Size you can type in the exact dimensions of your image in theoutput field of the process panel.
Note
A crop from one image can be applied to a series of images, by selecting the images in the
thumbnail view and then clicking the Apply current crop to selected captures button .
2.2. How to Create Custom Aspect Ratios
Holding down the mouse button while clicking the crop tool displays a menu with predefined crop aspectratios. Selecting one of the predefined aspect ratios makes all subsequent crops fit that aspect ratio. If,however, the predefined aspect ratios do not meet your needs you can define a custom aspect ratio.To do this, click New. A dialog box (see illustration, below) will be displayed
Complete the fields and click OK to save the new aspect ratio.
You can use the menus Rename.. and Remove menu options to edit the name of a custom made aspectratio or to delete it.
2.3. How to Rotate Images by Preset Amounts
To rotate images by preset amounts follow the procedure, below:
1. Select the image which you want to rotate by clicking on its thumbnail image.
23
Main Window Overview

2.To rotate the image left or right by 90 degrees by clicking or respectively.
2.4. How to Rotate Images Arbitrarily
To rotate images based on an arbitrary line follow the procedure, below:
1. Select the image which you want to rotate by clicking on its thumbnail image.
2.Click on the Arbitrary Rotation tool .
3. Click and drag on the image to draw a line (as shown in illustration, below).
4. The image will rotate to be parallel with the drawn line.
2.5. How to Rotate Images by Fixed Amounts
To rotate images based by fixed amounts follow the procedure, below:
1. Select the image which you want to rotate by clicking on its thumbnail image.
2.Double click on the Arbitrary Rotation tool .
3. The Rotation tool (see illustration, below) will be displayed.
24
Main Window Overview

4. Rotate the image by either:
• Entering a value in the field, using the up and down arrows, or the slider to set the amount ofrotation to be applied.
• Clicking the Left and Right buttons to rotate the image 90 degrees to the left or right respectively.
Tip
If you are unhappy with the rotations you have performed on an image, Inserting avalue of 0 in the Rotation Tool's free text area returns the image to its original rotation.
25
Main Window Overview

Chapter 4. Organizing Images1. Sessions: Organizing FilesSessions are used to organize your image files. Different sessions can be created and configured differ-ently to closely match the specific requirements of the task that you are working on.
The Session window displays a list of the current session. To organize your sessions you can:
• Select an existing session by clicking the Session selection box arrows to open the session selectionmenu (see illustration, below).
• Create a new session by clicking the button. See the following section for more details.
• Remove a session by clicking the button.
Note
Removing a session only removes the session from the display list. It does not deletethe session from the computer.
1.1. How to Create a New Session
To begin organizing your files you should create a new session. The following procedure explains howto do this:
1. Click the New Session button.
2. The New Session dialog box will be displayed.
26

3. Fill out the fields in the dialog box to create your session. For a detailed explanation of these fields,see the following section.
4. When all the fields have been filled out as you want them, click OK to create the new session.
5. A new session folder will have been created. This will contain Capture, Process and Trash folders.
1.2. New Session Dialog Box Fields
The New Session dialog box (see illustration, below) contains the following fields:
Name: enter the name for your new session. This will be used to name the folder created.Location: select where you want the new session to be located on your computer. Either accept thesuggested default or select another location using the Choose... button.Template: select a template to base the session on.The default template is Session Folder.The templatecan be used to make an exact copy of the selected session (including all favorites defined), or to makea blank copy without its files but with exactly the same folder structure.Capture Subfolder: accept the default or enter your own choice of name.Process Subfolder: accept the default or enter your own choice of name.Trash Subfolder: accept the default or enter your own choice of name.Capture Name: accept the default or enter your own choice of name.
27
Organizing Images

2. Selecting and Editing ImagesFor ease of use the Capture One application's main window is split into three functionally different areas.These are, from left to right based on the illustration, below:
• Tool panels with tools for capturing, validation and image adjustments.
• Preview window, which displays a preview of the selected capture file.
• Capture Collection, which displays thumbnail images of the capture files.
The following sections explain how, working in these areas and using the functionality that they provide,you will be able to select and edit your images to achieve the results you want.
28
Organizing Images

2.1. Exploring Folders
In the Organize panel the folders on your computer can be accessed through the finder. Folders andfiles can be dragged and dropped in and out of the application. Ctrl-clicking files or favorites will bringup a selection box from which you can select the option Show in Finder, or in the Organize panel youcan select the Finder icon at the bottom You can also select a Processed and Captures folder by rightclicking or by pressing Ctrl + mouse click on a folder that you want to select. In addition, by using theFile menu bar from this window, you can access all the traditional Macintosh file commands to managefiles and folders.
2.2. Working with Thumbnails
The thumbnail area displays thumbnail views of the images in the current capture folder. Thumbnailsizes can be changed by using slider bar at the top of the window.Thumbnails can be sorted by capturename, size, date, processed state, or tagged state. Ctrl-clicking in the thumbnail window lets you selectthe sort order from a selection box.
File Tagging: the thumbnails in the capture collection are tagged in their corners with different tags de-pending on the status of the image.The upper left corner will be tagged with the file format, for example,RAW, TIFF or JPG.The Processed status will be indicated by the tag in the lower left corner. If the imageis processed this will be indicated by a green process icon. A yellow icon indicates that the image isplaced in batch, but not yet fully processed. Files can be tagged individually for priority in the lower lefthand corner by pressing + - ?. Images are then tagged with a green check mark, a yellow one and ared minus. In addition, by pressing 1 to 9 on the keyboard they can be tagged with a numbered bullet.Images can then be sorted by tagged state, as explained above.
Deleting Images: images can be deleted by selecting them and pressing Delete or Backspace on thekeyboard. Alternatively, drag and drop the selected thumbnails into the trash can in the Organize Tool,or use the Delete from the Edit menu.You can also select multiple captures using Ctrl + click and selectMove to Trash or Delete Immediately. Unless you select Delete Immediately the trashed images will bestored in the trash can until they are permanently deleted from there. If you need to recover images thatare trashed by mistake, drag the capture out of the trash can and back into a capture collection folder.
29
Organizing Images

Note
Once the trash can has been emptied the captures will be permanently deleted. The sameis true if you use the Delete Immediately function.
2.3. Working with Previews
The preview window provides you with a detailed and scalable preview of either a single selected image,or a maximum of fours images, which can be displayed next to each other to allow comparisons to bemade between them.
To select an image to be previewed, click on its thumbnail in the Capture Collection window.
Sizing Thumbnails or Preview: depending on the application's focus the sizing slider can be used to sizeeither the thumbnails or the preview window. The application's focus is the image last clicked on. So, toadjust an image, whether it is in the thumbnail or the preview window, click on it first, then make theadjustment.
Expanding the preview area: by clicking the currently selected tool switch button the tool panel is col-lapsed, click once more to expand it again. To expand the preview area further, the capture collectioncan be collapsed by dragging the small handle in the middle of the dividing bar. When sliding the cursor
over the handle the cursor will change to a moving handle use this handle to expand or collapse thethumbnail area.
2.4. Comparing Multiple Images
To help evaluate changes that you have made to images, or are in the process of making, the previewarea can display multiple images simultaneously and in different configurations. This allows you tocompare the effect of your changes when applied to multiple images. In addition, it also allows you tomake "before and after" comparisons of two views of the same image so that you can evaluate two dif-ferent views of the same image:
• Before: displays the image as it is, that is before any changes have been applied to it
• After: displays the image as it would be after any changes that you have made have been appliedto it.
For additional information on how to select different previews, see Section 1.18, “Preview Switch”.
2.4.1. How to Compare Multiple Images
To compare multiple images in the preview window follow the procedure, below:
1. Select one of the views supporting multiple images:
• 2 Up Landscape
• 2 Up Portrait
• 4 Up
2. Select the images that you want to be displayed by either:
• Clicking on a preview pane to change the application's focus and then clicking on the thumbnailimage to be displayed.
• Holding down the Apple key and then clicking in turn on the series of images that you want toview.
30
Organizing Images

3. Change the images displayed by either:
• Clicking on a different image. This will swap the image in focus with the one that you clicked on.
• Apple key-clicking on a different image.
• Holding down the Apple button and using the left and right arrow keys. This will scroll throughthe images available.
• Holding down the Apple button and using the up and down arrow keys. This will scroll throughthe images available displaying the images from before or after the range of images that arealready selected.
Note
When working with preview panes it is important to understand what the "focus" of the ap-plication is and how to use it. When you have clicked on a preview pane, it is then in "focus"until you click on a different one. Changes that you make are applied to the image that isin "focus".
2.4.2. How to Compare Before and After Views of Images
1. Open the View menu, go to Preview and select one of the views supporting before and after com-parisons:
• Before/after Landscape
• Before/after Portrait
2. Select the image you want to be displayed by clicking on its thumbnail image.
Now the image will be shown in a Before and After view:
31
Organizing Images

3. As you make changes their effect on the image will be displayed in the After pane.
Note
The application's default is to apply changes made without you having to do anything toaccept them. If you either change the image being displayed, or change to another view(expect when you alternate between Landscape and Portrait views) changes that you madewill be applied to the image.
32
Organizing Images

2.5. Working with Dual Screens
Using Dual Screen support you can display the Organize panel and Capture Collection in a separatewindow. This then allows you to view this window on one monitor and the Preview pane on another sothat you have can work with a larger version of the preview image.
To separate the windows, go to the Window menu and select Thumbnails Window. This will bring up anew window (see illustration, below), and remove the thumbnail view from the Preview Window.Youcan toggle between the two windows by selecting Preview Window or Thumbnails Window from the
Window menu. Clicking the Organize button will collapse the organize panel and expand theThumbnail view within the Thumbnail window, and clicking it again will bring the organize panel back.
To combine the windows again, shut the Thumbnails window. The display will return to a single windowdisplaying both the thumbnail and preview panes.
2.6. Status Bar
The Status bar at the bottom of the screen displays useful information about the current status of theapplication. From left to right (in the illustration, below) the information displayed is:
• RGB values for the current cursor location. Displayed on a scale from 0 to 255.
• Camera information, this indicates what camera was used to capture the currently selected image.
• The ICC profile applied to the image and the destination profile in the currently selected output (if acamera profile is not embedded).
• Selected images and number of images in the active capture collection, in the illustration, below thisshows 1out of 52 captures is currently selected.
33
Organizing Images

3. Working with SessionsSessions are used to organize your image files. Different sessions can be created and configured toclosely match the specific requirements of the task that you are working on.
The Session window displays a list of the current sessions.
3.1. Session Structure
Sessions contain three folders:
Captures Folder: the active capture folder favorite is displayed at the top of the file organizer and ismarked with a camera icon.The Capture folder will always point to the currently active capture folder(the folder where the next capture is to be stored) By default this is ~/Pictures/Session name/Captures
Processed Folder: the processed folder favorite is marked with a process icon. It will always pointto the currently active processed folder (the folder where the next processed file is to be stored) By defaultthis is ~/Pictures/Session name/Processed
Trash Folder: the trash folder favorite is marked with a trash can icon. It will always point to thesession trash can folder (when deleting files, these are temporarily stored within the session trash canfolder) The folder can be emptied by selecting File>Empty Trash, or from the menu displayed when thetrash icon is right-clicked or Ctrl-clicked. By default the trash can folder points to ~/Pictures/Sessionname/Trash
Favorites :a favorite is an alias or shortcut to a folder on the hard disk. The organize panel contains twodefault favorites, which are always defined and placed just below the thin line in the window. These arethe Capture folder (the default name is Captures) and the Process folder (the default name is Processed).These favorites are added when creating a new session. Other favorites can be added either by dragging
them from the finder and into the window, or by clicking the New Favorite button at the bottom of thepanel. A favorite can be set as the active capture or process folder by either selecting Set Capture Folderor Set Process folder from the File menu, or by holding down the Control key while clicking on the favoritefolder in the organize window. Favorites belong to sessions, and will change if you change the session.For a more detailed explanation of sessions, see Section 3.2, “What is a Session?”. Favorites can be
tagged at the right hand side with either a camera icon, or a processed icon, which indicatesthat they have been designated as the current capture or process folder, respectively. If you select afavorite in the organize window, and want to go to the associated folder in the Finder, click the Finder
icon in the lower left corner of the organize panel. Use the New Folder icon to add a new folderto the session.
3.2. What is a Session?
A session is basically a folder structure comprised of your defined favorites and a complete set of capturesettings stored within this structure.The session folder structure is comprised of three folders: Captures,Processed and Trash
The ".session" file (Vegetables.session in the illustration, below) located in the session folder is the filethat stores your session settings and the favorites you have defined.
34
Organizing Images

All Previews, Thumbnails and Image settings are stored inside the Capture One Settings folder insidethe Captures folder and any other folders within your session that contain images (see illustration, below).
The settings for gray calibration, exposure compensation, contrast compensation, cropping, rotationand sharpening are all stored in the Capture One Settings files.
Note
If capture files are moved, for example, to another computer or stored as a backup, it is veryimportant to copy the full capture folder including the Capture One Settings. Doing so ensuresthat all settings are preserved and can be accessed again.
Note
If sessions are moved, for example, to another computer, then the .session file also has tobe moved and placed in the same relative position in order to maintain the session's structure.
3.3. File Browser
The Organize tool has a file browser, which you can use to find and organize your capture images.
To open or close the file browser, with the Organize tool selected, click on the
button. The file browser is displayed as a panel at the bottom of the capture tool, see illustration,below. When the file browser is displayed the folders displayed will be synchronized with the selectedsession's folders, that is, when you change to a different session, the file browser will update automaticallyto display the current session's folders. In the illustration below, the selected session is ZooShots sothe folders displayed by the file browser will be those which are part of this session.
35
Organizing Images

3.3.1. Adding Folders to a Session Using the Finder
To add a folder to a session use the following procedure:
1.With the Organize tool selected, click on the button.
2. The New Folder dialog box (see illustration, below) will be displayed.
3. Fill out the Name: field with the name that you want the new folder to have.
4. When you are happy with what you have entered, click OK to create the new folder.
5. The folder will be added to the current session.
36
Organizing Images

3.3.2. Adding Folders to a Session Using the File Browser
To add a folder to a session use the following procedure:
1.With the Organize tool selected, click on the button.
2. The file browser panel will be displayed.The folders displayed will be synchronized with the selectedsession.
3. If the folder that you want to add is not found as a part of the currently selected session, use the
selection field to find the folder that you want to add to the session.
4. When you have found the folder that you are looking for, click on it. If the folder contains any captures,these will be displayed in the thumbnail window to help you make sure that this folder contains theimages that you want to add to the session.
5. The folder that you clicked on will also be displayed in the session window. Its name will be displayedin italics and its associated icon will be have an irregular shape, for example,
. This indicates that the folder is only being temporarily included inthe session.
6. To make the folder a permanent part of the session, drag the folder from the file browser and dropit into the session.
7. The folder will be added to the session and will be marked as a favorite in the file browser
.
37
Organizing Images

Chapter 5. Capture1. Capturing TetheredWhen you are capturing images while tethered to a computer and with the capture selected, the CaptureOne PRO application will display:
• Information about the images being captured.
• Current settings.
• Status of the system.
When capturing tethered, exposure can be evaluated in the Exposure evaluation histogram at the topof the panel.
Note
Remember to include a grey card in one of the captures for white balance calibration.
1.1. How to Capture Images
When you have finished setting up the capture settings you are ready to start capturing images tethered(To find out if a select camera is supported tethered please see the release note for that version ofCapture One). To capture images tethered either click the Capture button, or push the capture buttonon the camera that you have connected to the application.
1.2. Capture Tool Fields
The Capture Tool (see illustration, below) contains the following fields:
Exposure evaluation: this histogram, is used to make an evaluation of the image's exposure. Ideally,the data peaks will show an even distribution between -4 and 0. Peaks in the lower end of the histogram'srange (4) or in its top end of the scale (0) indicate that either a part of your image is too dark or overexposed, respectively.
Name: select the session name that you want the tethered captured images to be added to. The Namefield can actually be left empty. If that is the case the image will be named using the same name as thesession folder plus an automatically generated capture count. If a name is given this will override thesession name.
Settings: select which settings you want to be applied to the captured images:
• Use Defaults: applies the Phase One defaults.
• Inherit from the last capture: applies the setting used for the last captured image.
• Inherit from the current image: applies the settings of the currently selected image.
ISO: select the appropriate ISO number.The appropriate setting is dependent on the camera equipmentthat you are going to use. As when shooting on film, selecting a higher ISO value makes it possible tocapture images in low light conditions, for example, for indoor photography, but it also introduces morenoise or graininess into the image. For this reason the ISO default is 50. If you are shooting in low lightconditions you can increase the ISO value to try to compensate for this.
38

Film Curve: select the appropriate film curve. A film curve indicates how light values recorded by theCCD will be converted to light values in the image data file. Three different film curve presets can beselected for the Capture One application:
• Film standard: the default film curve, suitable for most general purposes.
• Film extra shadow: a curve similar to the Film standard curve, but increasing shadow areas, whichresults in slightly less contrast in the image.
• Film outdoor: especially useful in outdoor daylight. The curve is designed to gain data in the highlight areas, whilst still maintaining contrast.
• Linear response: exact linear response will simply transfer the image as it was taken with the camerawithout applying any post-filtering or adjustments through the Capture One application.This is espe-cially useful for precise scientific photography and very high contrast scenery.
ICC Profile: select the appropriate ICC profile, that is the profile that best corresponds to the light used.
Available Storage: Local: displays the amount of storage available for storing the images that you arecapturing and, if a camera back is attached, the corresponding number of captures that this equates to.
Mirror Up-mode: this check box should be selected to enable the use of mirror up on Hasselblad cameraswith the Phase One H 20.
Note
Mirror Up-mode is grayed out when it does not apply to the camera back you are using.
Camera Status: Burst : displays the maximum number of captures in memory status. If captures arecaptured in rapid succession the lights will turn yellow one at a time to indicate how much of the cachein the camera back is used to hold the images. If all the lights are yellow the cache is full. For more detailedinformation on this, see Maximum number of captures.
Note
If this item appears grayed out then the camera is not connected properly.
Capture: the capture button can be used to capture images from the computer. This is especially usefulif the Phase One camera back is used on a motorized camera body, for example, Hasselblad H1, Has-selblad 555 ELD or 553 ELX. To use the Capture button while the Phase One camera back is placedon a manual camera you will have to manually withdraw the lens shutter on the camera.
Note
When the camera is connected to the computer by a motor cable, the enter key on thekeyboard can also be used as a short cut to trigger the camera back remotely.
39
Capture

1.3. Working in Composition Mode
When working in the studio, setting up lights and composing the scene, it can be convenient to use thecomposition mode function. To enable composition mode, select Camera>Composition Mode from theapplication's menus. In this mode only the last tethered captured image is stored on disk. The nextcapture taken will overwrite the current one.
Warning
While composition mode is enabled only the last capture is stored on disk. For normal imagecapture, when you will want to capture more than one image, composition mode should bedisabled.
To indicate that you are in composition mode, warning triangles are displayed over the preview as inthe illustration, below:
40
Capture

41
Capture

Chapter 6. White Balancing ImagesThe White Balance tool is used to make white balance adjustments to your captured images. Workingwith Capture One this is a simple and easy process using a gray card or selecting a neutral gray areato adjust the balance of your images. In addition, you can make manual adjustments to images if needed.
1. How to White Balance ImagesTo white balance images follow the procedure below:
1. From the thumbnail window, select an image that contains a gray card or a neutral gray area.
2. If it is not already selected, click on the tool selector to choose the White Balance Tool
. Select the picker cursor tool .
3. Using the cursor, click the color picker on the neutral gray area in the image being displayed in thepreview window.
Tip
If your image does not contain a satisfactory gray area, you should shoot the imageagain and include a QP or MacBeth card in the scene.
Alternatively, use the If selected display on the white balance tool. While moving theeye dropper around the image, the left window will show you the current position in theimage. The window on the right will show what the area will look like if the current pos-ition is used for white balancing the image:
4. The selected image will now be white balanced. This white balance can be used to balance otherimages and/or applied as a capture balance to new images if you are capturing tethered to a com-puter.
Tip
To avoid re-doing the same white balance settings for every new image, Capture One allowsyou to store your own white balance settings and reuse them on other images. Here's howyou do it:
1. Adjust the white balance settings to your liking.
2.Click the Save White Balance button . This brings up the Save As dialog:
42

3. Enter a name for your white balance settings and click the Save button.
4. Now your white balance can be applied to other images by clicking the Load White
Balance button and selecting it from the saved settings:
2. White Balance Tool FieldsThe White Balance Tool contains the following fields:
DescriptionIcon
Set as Default for New Captures: Use this button toapply the selected white balance setting to all futurecaptures.
Automatic Adjust: Use this button to have the applicationcalculate and apply a suitable white balance.
Reset To Default: Use the button to reset the color bal-ance. Any color balance adjustments that you havemade to the image will be lost.
43
White Balancing Images

DescriptionIcon
Load or Save White Balance: Use these buttons to saveor load your white balance adjustments so that they canbe used again.
Apply White Balance to Selected Captures: Use thisbutton to apply the selected white balance, ICC Profilesor Lens Cast calibrations to the current selection ofcaptures. When this button is clicked a dialog box (seeillustration, below) will be displayed.
Note
The third check box (Lens Cast Correction) will only be available if you are workingwith Phase One H 20, H 25, P 20 or P 25captures. This is a calibration tool, which isespecially useful when working with wideangle photography or on cameras with tiltand swing options.
Check out Section 1.4, “Calibrating fixedlenses” and Section 1.5, “Lens cast calibra-tion with image stitching” for more detailson lens cast calibration.
Note
If you hold down the option key while click-
ing the button this dialog will not bedisplayed.
Balance: Use this selection box to apply one of CaptureOne's preset white balance settings.
ICC Profile: Use this selection box to choose an ICCprofile to apply to selected images.
Lens CC: Use this selection box to decide which LensCast Calibration file to apply to the image. Check outSection 1.4, “Calibrating fixed lenses” for an explanationof how to create calibration files.
44
White Balancing Images

DescriptionIcon
Color Temperature and Tint: Several presets can beselected from the Balance selection box.These presetscan be used for a quick adjustment of temperature andtint balance. How appropriate these are will depend onthe images they are applied to. If you adjust the coloror temperature sliders when you have chosen one ofthese presets, then the selection made in the Balanceselection box will be reset to Custom.
Color Balance Correction : Use this tool to make thesame adjustments to selected images based on theHue, Saturation and Balance (HSB) color model. Tomake adjustment to color balance, click on the ColorBalance Correction wheel to move the selection circle,or use the Hue and Sat sliders to adjust hue and satur-ation respectively.
Note
The adjustments are the same as colortemperature and tint. So, as you changesettings in one area of the tool these will beupdated in the other related areas of thetool.
Current and If selected:This displays the results of partsof the selected image, which are selected from the pre-view window using the color picker. The RGB valuesfor the selection are displayed:
• Current shows what the image when the currentwhite balance settings are applied to it.
• If selected shows the image when the settingschosen using the color picker are applied.
45
White Balancing Images

Chapter 7. Exposure EvaluationThe exposure tool is used to evaluate and, if necessary adjust an image based on its exposure. Itprovides a visual, histogram based, illustration of the exposure of a selected image. Based on this, orworking to predetermined settings, the exposure characteristics of an image can be adjusted.
The exposure tool uses an RGB color readout in both the Raw files (the raw images) and in the Destin-ation (which reflects how it will be in the processed image).
You can obtain precise values for any point on the image by resting the cursor on it - mouse around andyou'll see the RGB value changing in the lower left hand corner of the window:
Tip
If you want an inline RGB color read-out, select the Picker Cursor Tool then click on the preview image while holding down the CTRL button on the keyboard. Adialog box Show Color Readout will be displayed, click on this to select the color read out.The color readout for the cursor's position will now be displayed as in the illustration, below.
When you want to hide the read-out again, CTRL click the image again and de-select thefeature.
Knowing the precise values of any part of the image gives you full control over the printing process.Printers and printing processes all have individual characteristics. Adjusting exposure levels helps toensure a predictable, high quality result matching your specific output needs.
1. Exposure Tool FieldsThe Exposure tab (see illustration, below) contains the following fields:
Film standard selection box: use this selection box to choose which film curve is applied
• Film Standard: this is the default film curve
• Film extra shadow: this curve applies slightly more detail to the shadow areas of an image
• Film outdoor: this curve is especially suitable for use in outdoor daylight. The curve is designed togain data in the high light areas whilst still maintaining contrast.
• Linear response: exact linear response will transfer the Image as it was taken with the camera,without the application applying any filtering or adjustments. This is especially useful for scientificphotography and very high contrast scenery.
46

EC: Exposure compensation. Allows you to correct the images' exposure if you have taken an imagethat is to dark or to light (under or over exposed respectively).
CC: Contrast compensation. Allows you to increase or decrease the contrast of a image.
Sat: Saturation. The saturation slider can be used to set the saturation level of the image: how muchcolor is applied.
Use this button to autocorrect the exposure in yourimage. Capture One will use proprietary algorithmsto try to estimate the best exposure correction foryou.
Use this button to reset levels.
Use this button to reset all exposure settings.
Use this button to load and/or save exposure set-tings.
Use this button to apply any adjustments made toall the images selected in the capture collection.
Channel: use this selection box to choose whether to adjust the image based on individual RGB channels,or based on all three combined.
Levels: displays a histogram of the image's levels. Points in the histogram are plotted on a scale from0 to 255. A completely black pixel has a value of 0 whilst at the opposite end of the scale a completelywhite pixel has a value of 255. It is important not to overexpose an image (clipping); if you see any ofthe Red, Green or Blue (RGB) values approaching overexposure (a value of 255) you need to adjustthe exposure level. Keep image highlights (areas that should record as white with detail, and not as aspecular reflection) between 225 and 255.
Curve: use this display to adjust the image's exposure levels. An image curve is a graph that reflectsthe original image data (X-axis) and the output or developed data (Y-axis). Dark tones are placed to theleft, while the light colors are placed on the right. The default curve is a straight line. By clicking on thedisplayed curve, you can add an adjustment handle (displayed as a circle). Click and drag these to adjustthe curve. In this way you can adjust and control every tone in the image.
Note
The Curve control may have a huge impact on the result and it should be used with caution.
Note
Click on the Apply to Selection button to apply any adjustments made to all the imagesselected in the capture collection.
47
Exposure Evaluation

Preserve Balance: when selected ensures that all three color channels are adjusted simultaneously. Ifthis box is not checked, you can control each color channel separately using the Red, Green and Bluechannels.
Raw RGB: displays a preview of the image, before any adjustments have been applied to it.The previewis based on a selection of the preview images made using the cursor picker.
Destination: displays a preview of the image, after any adjustments have been applied to it.The previewis based on a selection of the preview images made using the cursor picker.
48
Exposure Evaluation

Chapter 8. Focus and SharpnessThe Focus Tool is used to assess and make adjustments to an image based on its focus and USM(unsharp mask) sharpness settings. The tool's focus window displays a fully processed version of theimage, which you can then use to assess any adjustments that you have made to the image.
Using the sharpening will actually increase sharpness by enhancing the edge differences between pixelsof different colors. When applied, the software evaluates the contrast differences between pixels andthese are either enhanced or omitted based on the settings applied.
1. How to Focus and Sharpen ImagesTo check focus and adjust sharpness, follow the procedure below:
1. Using cursor picker tool, select an area of the image to work with from the preview window.
2. The Capture One software will zoom in to a 1:1 final image of that part of the image.
3. Zoom in and out using the Zoom slider.
4. Adjust the image's sharpness using the settings and sliders available.
5.When you are satisfied with the adjustments made, click the button to apply them.
Note
use this button to open a floating focus utility window. This window can be resized tooptimize your view of the image that you are working with.
2. Focus Tool FieldsThe Focus tool (see illustration, below) contains the following fields:
use this button to open a floating focus utility window. This window can be resized to optimize yourview of the image that you are working with.
use this button to reset the focus, resetting any adjustments that you have made to the image.
use this button to apply the adjustments made to selected images.
Focus Window: (the representation of the image between the buttons and the Zoom slider).
Zoom: use this slider to zoom into or out from the selected image.
Method: use this selection box to choose from the preset methods, or deselect all of them.
Amount: use this slider to adjust the amount of sharpening applied to the image. The default value is25.
Threshold: use this slider to adjust the threshold value above which adjustments will be made.The defaultvalue is 3.
Advanced Settings:
49

Noise Suppression: use this slider to vary the amount of noise suppression applied to the image. Noisesuppression us used to reduce noise in images suffering from noise artifacts or graininess.
Banding Suppression: use this slider to compensate for banding artifacts in an image. Banding is mostlyseen in images captured with the H 20 or H 25. It is caused by the clean and noiseless nature of thesecameras' images. Banding occurs, if, for example, a monitor is not able to display the full transition fromone color to another or the gradient in a color. This is not always noticeable on a monitor, or when out-putting the image on an image setter or in print and vice versa. By increasing the banding suppressionslider noise is actually added to the image. This prevents banding from occurring on the monitor orprinter.
50
Focus and Sharpness

Chapter 9. Processing Images1. Processing ImagesHaving completed your adjustments and generated images within the application that you are happywith, the final stage of the workflow is to process these images.
The process panel is used to organize the output at the end of your workflow. Using the process tool,you can choose a destination folder and select multiple variations of selected images. For example, youmay need a large image, a web image, and a CMYK version of each image. Using the process tool,these can all be generated simultaneously.
Destinations when you start using the application your default Captures and Processed folders are createdand assigned. Images captured by a Phase One camera back are stored as Phase One Raw capturefiles. Images from supported DSLR cameras also have to be in their native raw format. Only raw filescan be processed by the Phase One Capture One application. To process the images, click theProcess button at the bottom of the panel. All settings in the process panel are stored as default settingsand can be reused or changed at any time.
1.1. How to Process Images
To process images, follow the procedure below:
1.If it is not already selected, select the process tool
2. Configure all of the appropriate settings. For detailed information on the options available and howto use them, see Section 1.4, “Process Tool Fields”.
3.Click either the Process button at the bottom of the process tool or the process icon at itstop.
4. Processing of your images will start. All selected captures will be processed according to the settingsin the process panel and in the processing preferences. Images are being stored in your selectedProcessed folder with the individual file names.
Process History: when an image is selected in the capture collection its process history will be displayedin the Image menu under Process History. Images can be opened directly from the Process History.
While images are being processed a progress bar will be displayed in the lowerleft corner of the application's window.
Note
For information on how to cancel processing of an image or stop processing a series ofimages, see Section 1.4, “Process Tool Fields”.
1.2. Working with Multiple Outputs
Using the application's multiple outputs feature allows you to output the same images to multiple destin-ation files simultaneously. To choose multiple outputs, add new entries to the Destination window (see
illustration, below) with the button. Then set the required parameters by selecting each of the imagedestination entries and entering the various output parameters for that specific output file in the Basicand Advanced panels. Each entry can be individually enabled or disabled by checking the button.
51

You can select to only show the enabled destinations, by checking Enabled only. If you want to showor change the size in each column, check Size Columns.
The same capture image can now be processed using unlimited different names, sizes, resolutions, fileformats, output profiles and compression ratios.
Tip
By ticking the Open image after process checkbox, the image(s) will be opened in the ap-plication you have associated with the file type you are producing, once the processing isdone:
Most likely the associated application is Adobe Photoshop.
Warning
Do not enable this feature if you're processing a large amount of images, asyour computer might freeze up.
1.3. Advanced Panel
Use the Advanced panel to set up a subname: a name that will always be added to the end of the filename as it is setup in the basic panel and preferences.You also have the option of putting the imagesof the selected output into a subfiolder inside the Process folder by filling out the Sub folder field. EnableWatermark to include a watermark in the developed image as either a text string or an image. Click theChange... button to bring up a new window where you can set the content, position, size and opacity ofthe watermark to be included.
52
Processing Images

1.4. Process Tool Fields
The Process tools (see complete illustration below) contain the following fields:
Basic Panel
Select the format for the current output destination.You can choose between:
• TIFF 8 bit
• TIFF 16 bit
• JPEG-High
• JPEG-Medium
• JPEG-Low resolution
Use the profile field to select the profile to be appliedto each image version Preferred RGB profile, CMYKprofile or an embedded capture profile.
Use this field to choose between the High orQuickProof options. High is based on full qualitywhereas QuickProof is based on an export of thepreview. QuickProof is significantly faster than High,but might lack quality in the sizing or interpolationused.
Using the Resolution field you can set the final im-age resolution. Resolution can be set in pixels perinch, pixels per millimeter or pixels per centimeter.
Using Scale you can set the desired output sizeand resolution for the image or crop. The scale canbe either Fixed which is measured in percent of theactual image or crop, or it can be To Size whichscales the image(s) to an absolute size in eitherpixels (px), mm, cm or inches.
53
Processing Images

See also Section 2, “Cropping and Rotation”.
Checking this box will cause the processed image(s)to be opened in the application that is associatedwith the extension of the processed file (i.e. AdobePhotoshop).
Output Size
This is the actual measurement of the processedfile, taking into account the scaling made with theScale controls. The size can be measured in eitherpixels (px), inches, centimeters or millimeters.Which units are used are selected using the up anddown arrows. Typing in the size fields will adjustthe crop to the new size and therefore change theactual file crop. If you want to scale the size to aspecific size use the Scale control.
File Naming
Use this field to enter any name that you want ap-plied to the processed images, or click the buttonto use the capture's name.
Use this field to select what the make up of thename will be. Choose from the list displayed to se-lect which components to include or exclude fromthe file names.
Displays the final file name as it will look in thefinder, including Job name and/or sub name.
File Size
This field calculates the estimated output file sizein megabytes.
Clicking the Process button will start the processing.
54
Processing Images

See also Section 2, “Cropping and Rotation”.
2. Batch ProcessingTo view your batch processing status and progress, click the batch tool in the Tool Switch
.
In the Batch tool (see illustration, below) you can see a list of all the selected captures scheduled forprocessing. Captures are queued until they have been processed and stored on your hard disk in theProcessed folder that you have selected.
Batch Status: under Current Job is a status bar displaying the capture processing progress.
55
Processing Images

Modifying a batch:
use cancel button to delete an entry from the batch list during processing. Select the item from thelist and click the icon.
use pause button to pause the processing of an image in the batch.
use the continue button to place an image back in the queue.
Tip
If Capture One is collapsed, you can still monitor the progress in the batch, as the applicationwill show you the process in the Capture One icon in the Mac OS X dock:
56
Processing Images

This way you can start a big batch and let it run in the background while you take care ofother things on your computer.
57
Processing Images

Chapter 10. Color ManagementThis section describes how to use ColorSync and ICC profiles in the Capture One application's workflow.The use of standard settings is discussed and explained.
1. Working with Color ManagementThe Capture One application uses color management with ICC profiles to insure correct colors all theway from image capture to final image. This means that when working on a properly setup system theimage you see on the monitor will look exactly like the final image. An ICC profile is a description of howa device sees, displays or print colors. The Capture One application uses ICC profiles to calculate howto generate the correct colors when displaying the image on the monitor or when processing the finalimage. When working with ICC color management in Capture One an ICC profile for the camera andthe monitor has to be specified. Optional ICC profiles for possible destinations can be specified. TheCapture One Software installs ICC profiles for all the supported cameras as well as a generic Macintoshmonitor profile and a wide selection of destination profiles for printing, web publishing, and proofingpurposes.
To set up your ICC profiles, select Preferences from the Capture One menu and click on the ColorManagement Icon.
1.1. A Guide to Color Management Settings
The Color Management Preferences window (see illustration, below) has 4 tabs:
• Camera Profile
• Monitor Profile
• Destination
• Profile Management
58

Camera Profile: use the selection boxes to view and select the appropriate camera profile. Then selectthe desired default camera profile, for example, Phase One H 25 Product Flash, Phase One H 25 ProductTungsten, Phase One H 25 Portrait Natural or Phase One H 25 Outdoor Daylight. The ICC profiles forPortrait are optimized for portraits shot in flash or daylight. Unchecking the check mark lets you specifyalternative or customized profiles.
Monitor Profile: a monitor profile is selected in your Mac OS X System Preferences. To select anothermonitor profile or calibrate the monitor using Apple's Display Preferences click Open Display prefer-ences.... If the monitor is calibrated correctly you should see an even distribution across the gray scalebar shown in the dialog (see illustration, below).
Destination Profiles: an output device like a printer may not be able to print all the colors in an image.This is described as the printer having a smaller color gamut than the color gamut of the image. Howthe colors in an image are transformed to fit into a smaller color gamut is controlled by the Renderingintent: settings.
59
Color Management

Perceptual rendering intent gives a good overall transformation of colors in an image such that all thecolors in the image fit inside the new and smaller color gamut.This is the recommended rendering intentfor photographic images. Other rendering intents are Saturation, Relative Colorimetric and AbsoluteColorimetric. When rendering intent and rendering quality are set to default, it is set to the default forthe selected profile. All profiles supplied from Phase One are set to Perceptual rendering intent and Bestrendering quality. By clicking Open ColorSync Preferences... you can set up default ICC profiles for 3commonly used destinations. These 3 destinations will be available for selection in the Process tab,along with all other output profiles installed.
RGB default: should be set to the ICC profile for the working space used when delivering images inRGB. A very common working space is Adobe 1998. CMYK Default: should be set to an ICC profile forthe printing technology used by the clients. Gray Default: should be set to the preferred Black and WhiteICC profile
Profile Management: in the profile management panel (see illustration, below) you can enable or disablethe profiles installed on the system. This can be done for either camera profiles or destination profilesby making a selection from the Show enabled profiles for: field.
60
Color Management

Unchecking the check mark to the left of a profile will remove it from the selection lists throughout theapplication.
1.2. Selecting the Color Management Workflow
Select the Profile selection box on the process panel to display the profile selectionmenu. From this menu (see illustration, below) choose the color management workflow to apply to yourimages.
The profile setting controls the color transformations for the final image. All effects of the applied profilesare reflected immediately in the preview and thumbnail views
Embed Camera Profile: when selected the image is not transformed by any ICC profiles. Instead thecamera profile is embedded into the final image. Even when only embedding the camera profile an ap-plication like Photoshop will still be able to show and handle the image with correct colors. The benefitof using Embed Camera Profile is that the original image date is untouched and the number of colortransformations that the image needs to undergo can be minimized.
Convert to RGB Default: the image will be converted to the default RGB destination profile in the pro-cessed TIFF or JPEG file.
Convert to CMYK Default: the image will be converted to the default CMYK destination profile in a TIFFor JPEG file. The application converts the image to the default CMYK on-the-fly.
Convert to Gray default: the Image will be converted to the default gray scale profile in the processedTIFF or JPEG file.
Profiles are always embedded: Capture One will always embed a profile in the processed image file.Even if you choose to convert the data, the profile used will also be embedded; this ensures that theprofile is there if the file is to be converted to another color space in the future.
1.3. Using Other ICC Profiles
It is possible to create your own ICC profiles and use them in the Capture One software. For Mac OSX place the desired profile in the ColorSync folder under Library/ColorSync/Profiles. Restart the applic-ation and the new profile will appear in the Preferences>Color management panel. Customized printeror monitor profiles can be made and installed in order to optimize your workflow for high precision,specific output needs.
1.4. Proof Profile
The Proof Profile menu entry in the Image menu (see illustration, below) is used to select a destinationprofile to proof through on the monitor. What you see on the monitor will then be a simulation of theoutput from the Image setter, printer or other output device. The output profile is actually applied beforethe monitor profile. This validates that nothing will go wrong in the CMM process.
61
Color Management

An output device may not be able to output all the colors in an image. This situation is described as thedevice having a smaller color gamut than the color gamut of the image or the monitor. This will occur ifthe application is set up to use the profile of the output device as proof profile.
Important
Selecting the right Proof Profile very important. If you are uncertain of which to select, it isbetter not to select any, and just rely on the default setting: Selected Destination. In a normalCMM workflow the most common problems with gamut are handled correctly.
To help you, if a proof profile is selected and it differs from the selected output profile, it will be shownin red on the information bar at the bottom of the screen (see illustration, below), and an arrow will pointfrom the name of the input profile to the proof profile. If the proof profile is set to Selected Destinationyou will always be certain that "what you see is what you get", that is, that the preview will always reflectwhat is selected in the output.
2.The Color EditorThe Color Editor is accessed from the Image menu. The purpose of the tool is to provide you with theoption of adjusting predefined camera profiles to fit your individual color requirements. The Color Editorworks with Phase One's predefined camera profiles.To start the Color Editor, select the image you wantto adjust the profile on and select Open in Color Editor from the Image menu (see illustration, below).
62
Color Management

Making Color Adjustments: all adjustments are made to a copy of the original profile. The Capture Onesoftware automatically copies the master profile to avoid unintended overwriting of an original profile.Use Export Profile to store the new adjusted profile under a new name once all corrections have beencarried out.
New profiles are added to and can be selected from the ICC Profile field in the Capture Panel, or in theColor Management preferences.
2.1. Local Color Adjustment
Using the color balance correction circle in the Color Editor window (see illustration, below), highlyspecific colors can be pinpointed and selected directly from the image in the image window. TheSmoothness slider makes color adjustments smoother, that is, by enhancing the smoothness a redcolor correction will slightly affect neighboring colors like magenta and yellow as well. The dot controlsin the Color Balance Correction Circle are used to adjust precisely what colors are affected by the cor-rections made. Moving the black dot in the center will move the selected area. Moving the white dots inthe outer boundary of the area will increase or decrease the color coverage of the selection.
63
Color Management

Hue rotation, Saturation and Lightness adjustments can be verified immediately on the screen. Whenone of the controls has been moved, clicking in the preview again will add another edit line to the editlist below. These types of adjustments are know as "local color adjustments".
2.2. Global Color Adjustments
If you prefer to adjust all colors simultaneously you can do so by adding a global color adjustment to the
list. Click the Color Wheel Plus icon at the top of the window to create a new edit line in the editlist. Hue rotation and saturation can be adjusted in a global edit and the result is displayed instantly onthe screen. Preview of the adjustments can toggled on and of by using the Smiley Icon in the upper leftcorner.
2.3. Color Editor Inspector
Profile adjustments should be carried out with care as there is always a risk of creating a profile that willdo more harm than good. In order to avoid this occurring, the Color Editor includes an inspection toolthat can help you verify the characteristics of the profile, before you save it and begin to use it. The Info
Icon in the upper right corner will open a window with an image where the colors affected by theadjustments are displayed (see illustration, below).
64
Color Management

Colorize difference: shows a monochrome image that displays color corrected areas with colored high-lights.
Absolute difference: shows a completely black image where only the color corrected areas are visible.
Highlight difference: displays an image where all changes are shown with a green highlight color.
3D Color Space Tab: provides a graphic illustration of the profileâ s color space. The color space illus-tration gives a clear indication of whether or not the profile is suitable for use in a professional colormanagement workflow. A smooth and even color space indicates that the profile is acceptable.
65
Color Management

Chapter 11. Supported Meta Data andIPTC FieldsThe charts in the following sections list Capture One's support for meta data based on camera model.An "X" means that the meta data field is supported, while "--" means that the field is not supported forthe model in question.
1. Phase One
MetaData
P 20 Hass Vtethered
P 25 HassV tethered
P 20 Un-tethered
P 25tetheredH101
P 20TetheredM645, C645
P 25 Un-tetheredM645,
P 25TetheredM645,C645, H645
Phase Onecameras:
and un-tethered
and un-tethered
M645,C645, H645C645,
H645
Camera:
XXXXXXXCameraModel
XXXXXXXCameraSerial Num-ber
XXXXXXXCameraFirmwareVersion
--------------CameraOwner
--------------Lens
Exposure:
----XXXXXShutterSpeed
----XXXXXAperture
--------------Max Aper-ture
--------------ExposureProgram
--------------ExposureMode
--------------Flash Mode
--------------MeteringMode
--------------DriveMode/ SelfTimer
--------------ExposureCompensa-tion
66

----Flash Com-pensation
XXXXXXXISO SpeedRating
----XXXXXFocalLength
----xxxxxAuto FocusMode
White Bal-ance Set-ting
--------------SubjectDistanceRange
--------------SubjectDistance
File:
XXXXXXXFile Size
XXxxxXXImage Seri-al Number
XXXXXXXCreationDate
XXXXXXXImage Di-mension
XXXXXXXimageQuality
--------------Copyright
2. Canon
MetaData
G2G3G5Pro 1D30D60300D10D20D1DMKII
1DsMKII
1Ds1DCan-oncam-eras:
Cam-era:
XXXXXXXXXXXXXCam-eraModel
X------XXXXXXXXXCam-eraSerialNum-ber
XXXXXXXXXXXXXCam-eraFirm-
67
Supported Meta Data and IPTCFields

wareVer-sion
XXXXXXXXXXXXXCam-eraOwn-er
XXXXXXXXXXXXXLens
Ex-pos-ure:
XXXXXXXXXXXXXShut-terSpeed
XXXXXXXXXXXXXAper-ture
XXXXXXXXXXXXXMaxAper-ture
XXXXXXXXXXXXXExpos-urePro-gram
XXXXXXXXXXXXXExpos-ureMode
XXXXXXXXXXXXXFlashMode
XXXXXXXXXXXXXMeter-ingMode
XXXXXXXXXXXXXDriveMode/SelfTimer
XXXXXXXXXXXXXExpos-ureCom-pensa-tion
XXXXXXXXXXXXXFlashCom-pensa-tion
XXXXXXXXXXXXXISOSpeedRat-ing
XXXXXXXXXXXXXFocalLength
68
Supported Meta Data and IPTCFields

XXXXXXXXXXXXXAutoFocusMode
XXXXXXXXXXXXXColorSpace
--------------------------Sub-jectDis-tanceRange
--------------------------Sub-jectDis-tance
File:
XXXXXXXXXXXXXFileSize
XXXXXXXXXXXXXImageSerialNum-ber
XXXXXXXXXXXXXCre-ationDate
XXXXXXXXXXXXXImageDi-men-sion
XXXXXXXXXXXXXimageQual-ity
XXXXXXXXXXXXXCopy-right
3. Nikon
MetaData
D70D100D2HD1HD1XNikon camer-as:
Camera:
XXXXXCamera Model
----------Camera SerialNumber
XXXXXCamera Firm-ware Version
XXXXXCamera Owner
XXXXXLens
Exposure:
69
Supported Meta Data and IPTCFields

Shutter Speed
XXXXXAperture
XXXXXMax Aperture
XXXXXExposure Pro-gram
XXXXXExposure Mode
XXXXXFlash Mode
XXXXXMetering Mode
----------Drive Mode/Self Timer
XXXXXExposure Com-pensation
----------Flash Compens-ation
XXXXXISO Speed Rat-ing
XXXXXFocal Length
----------Auto FocusMode
XXXXXColor Space
XXXXXSubject Dis-tance Range
----------Subject Dis-tance
File:
XXXXXFile Size
----------Image SerialNumber
XXXXXCreation Date
XXXXXImage Dimen-sion
XXXXXimage Quality
------XXCopyright
4. Olympus
MetaData
C 8080E-20E-10E-1Olympus cameras:
Camera:
XXXXCamera Model
--XX--Camera SerialNumber
XXXXCamera FirmwareVersion
70
Supported Meta Data and IPTCFields

XXXXCamera Owner
XXXXLens
Exposure:
XXXXShutter Speed
XXXXAperture
XXXXMax Aperture
XXXXExposure Program
XXXXExposure Mode
XXXXFlash Mode
XXXXMetering Mode
--------Drive Mode/ SelfTimer
XXXXExposure Compens-ation
XXXXFlash Compensa-tion
XXXXISO Speed Rating
XXXXFocal Length
--------Auto Focus Mode
XXXXColor Space
--------Subject DistanceRange
--------Subject Distance
File:
XXXXFile Size
--------Image Serial Num-ber
XXXXCreation Date
XXXXImage Dimension
XXXXimage Quality
--------Copyright
5. Pentax
MetaData
*istDPentax Camera:
Camera:
XCamera Model
--Camera Serial Number
XCamera Firmware Version
XCamera Owner
XLens
71
Supported Meta Data and IPTCFields

Exposure:
XShutter Speed
XAperture
XMax Aperture
XExposure Program
XExposure Mode
XFlash Mode
XMetering Mode
--Drive Mode/ Self Timer
XExposure Compensation
XFlash Compensation
XISO Speed Rating
XFocal Length
--Auto Focus Mode
XColor Space
XSubject Distance Range
--Subject Distance
File:
XFile Size
XImage Serial Number
XCreation Date
XImage Dimension
Ximage Quality
XCopyright
6. Fuji
MetaData
S2S3Fuji cameras:
Camera:
XXCamera Model
X--Camera Serial Number
XXCamera Firmware Version
XXCamera Owner
XXLens
Exposure:
Shutter Speed
XXAperture
XXMax Aperture
XXExposure Program
XXExposure Mode
72
Supported Meta Data and IPTCFields
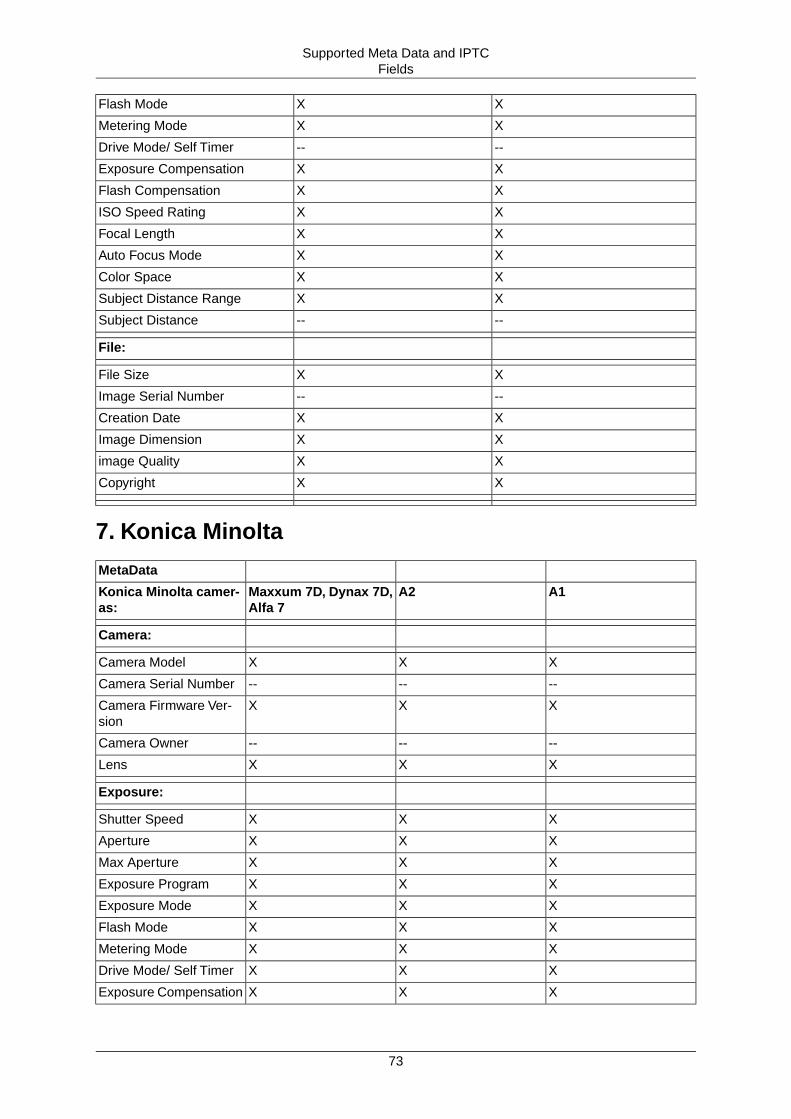
XXFlash Mode
XXMetering Mode
----Drive Mode/ Self Timer
XXExposure Compensation
XXFlash Compensation
XXISO Speed Rating
XXFocal Length
XXAuto Focus Mode
XXColor Space
XXSubject Distance Range
----Subject Distance
File:
XXFile Size
----Image Serial Number
XXCreation Date
XXImage Dimension
XXimage Quality
XXCopyright
7. Konica Minolta
MetaData
A1A2Maxxum 7D, Dynax 7D,Alfa 7
Konica Minolta camer-as:
Camera:
XXXCamera Model
------Camera Serial Number
XXXCamera Firmware Ver-sion
------Camera Owner
XXXLens
Exposure:
XXXShutter Speed
XXXAperture
XXXMax Aperture
XXXExposure Program
XXXExposure Mode
XXXFlash Mode
XXXMetering Mode
XXXDrive Mode/ Self Timer
XXXExposure Compensation
73
Supported Meta Data and IPTCFields
XXXFlash Compensation
XXXISO Speed Rating
XXXFocal Length
XXXAuto Focus Mode
XXXColor Space
XXXSubject Distance Range
------Subject Distance
File:
XXXFile Size
------Image Serial Number
XXXCreation Date
XXXImage Dimension
XXXimage Quality
------Copyright
8. IPTC Information EditorThe IPTC Editor is accessed from the Image menu. IPTC information is a kind of meta data that can beadded to hidden fields in your files.
The fields are available both in capture files and in processed files, where it is transferred to when theimage is processed.
Use the button to create new templates with the fields you require.
resets all fields to the default values.
undoes changes made.
applies the settings to all selected captures.
74
Supported Meta Data and IPTCFields

Chapter 12. Special FeaturesThis section describes the special utility functions that the Capture One application provides.
1. Demoirize Plug-inThe Phase One Demoirize plug-in for Adobe Photoshop allows the removal of moiré patterns from imagesby means of three different filtering modes: Advanced, Unicolor Textiles and Skin and Hair. The plug-inis enclosed on the CD-ROM and will be placed in Adobe Photoshop's plug-ins folder when installingCapture One the application.
The Demoirize plug-in window is divided into two separate previews: Original Image, which displays theimage before correction and Corrected Image, which displays the image after correction:
Using Advanced Mode on Skin and Hair: for skin and hair surfaces the optimal settings for the advancedfilter would be to position the Quality/Speed slider at Speed and the Pattern Size slider lose to Small.
Note
Large color moiré areas in hair may require a larger pattern size setting.
Using Advanced Mode on Textiles: on textile the optimal settings for the advanced filter would be toposition the Quality/Speed slider towards Speed, or in an intermediate position. Then move the PatternSize slider to the smallest possible setting. In many cases the masking of unicolored, or nearly unicoloredareas, may be carried out less accurately with the advanced filter compared to the Unicolor textiles filter.Since masking depends very much on the type of image, it is recommended that you test differentmasking and filter settings.
75

Advanced Mode: is a new filter tool. It is also the default mode of the Demoirize plug-in. In advancedmode the filter estimates colors by means of the Quality/Speed slider and the Pattern Size slider. Oftenthe color moiré is visible by multiple red/green or blue/yellow areas of discoloration. These areas ofdiscoloration are seen as bands or stripes. The larger the band or stripe, the larger the pattern sizesetting should be.
Pattern Size: the best way of finding the optimal pattern size is by setting the Quality/Speed slider toSpeed while moving the Pattern Size slider towards Large. While moving the slider the effects of correc-tions are seen on the screen. Selecting a larger than necessary pattern size will not generally enhancethe result. A circular arrow icon, that turns, indicates that the Demoirize filter is currently calculating imagedata.
Quality/Speed: when large areas of moiré stripes and bands are present the Quality/Speed slider shouldbe set towards Quality, at the cost of Speed. Use the Quality setting when details smaller that the selectedpattern size should be less affected by the filtering.
2. Stitching ImagesCapture One has the ability to stitch two or three images together to assemble one big TIFF or JPEGfile (You must use Phase One cameras backs files inorder to do this). Using the Phase One FlexAdaptoron a large format camera, it is possible to precisely take two or three images (depending on the cameraback) and stitch them together with the Stitch Images function found in the Image menu.
2.1. How to Stitch Images Together
To stitch images together, follow the procedure below:
1. Select the images that you want to stitch together in the thumbnail window.
2. Select Image>Stitch Images
3. The Stitching window will be displayed. See illustration, below:
4. If the images are not correctly positioned (from left to right) use the switch position arrows at thetop of the image to swap them around.
5. If the overlap is not correct, select a more appropriate type from the Overlap: selection field.
6. Fill out the Job name: field
7. When you are satisfied with the settings that you have applied, click the Stitch button.
8. The images will be processed and a larger, single "stitched" image will be produced.
76
Special Features

3. Automatically Importing Images from an External Me-diaIf it is configured to do so, when you connect a compact flash card, a micro drive, or a camera with aremovable storage media, the Capture One application automatically detects the raw files and displaysthe New Media Detected dialog box, see illustration, below. See Section 3.2, “New Media DetectedFields” for details of the available fields.
Note
Automatic import can be turned on and off in the Capture naming preferences dialog. If itis turned off, then you can import manually after connection from the Capture tool wherean Import Captures field will be displayed. Click the Import button in this field to open theNew Media Detected dialog box.
3.1. How to Import Images from External Media
To import images, follow the procedure below:
1. In the New Media Detected dialog box, select the settings that you want to apply to the images asthey are imported.
2. Click Import to start importing the images.
3. A Progress dialog box will open.This displays a summary of how many images are being imported,a progress bar and an estimate of the time remaining until the import process will be completed.
4. When the import process has been completed, the dialog box will close.
Note
If the New Media Detected dialog box is not displayed, then you can import manually afterconnecting the media. From the Capture tool where an Import Captures field will be displayed,click the Import button in this field to open the New Media Detected dialog box.
Note
Remember to eject media, before disconnecting them from the computer.You can do thisfrom the Capture tools window, where an Eject button will be displayed.
77
Special Features

3.2. New Media Detected Fields
The New Media Dialog box contains the following fields:
Import to: use this selection box to choose which folder you want the images to be imported into.
Rename captures: use this check box to select or deselect the option to rename captures as they areimported.This is used in combination with the selection box to its right. If selected, images will be renamedas they are imported based on the name selected.
Generate preview files during import: use this check box to select or deselect the option to have theapplication display previews of the images as they are being imported.
Remove captures from media after import: use this check box to select or deselect the option to deletethe imported files from the source media as they are imported.
4. AppleScriptsThe AppleScipts menu can be enabled from the AppleScript preferences menu. See Section 2.2,“AppleScript” for more details.
In the Applescript preferences you can attach scripts written and compiled with the AppleScript ScriptEditor. These scripts will execute automatically as specified in the script itself. The Applescript menucan be used to hold scripts that are to be executed manually from the menu. Use the Open ScriptsFolder option to display the folder where the scripts are to be added (see illustration, below) .
After adding the scripts, use the Update Scripts Menu to refresh the menu and display the newly addedscripts. To get an overview of the scriptable parts of the application drag the Capture One Applicationand drop it on the Applescript script editor located in the Applications > Utilities folder on your computer.This will open the Capture One Application dictionary for Applescript.
Note
In the Extras folder on the CD there is a folder containing sample scripts
5. Overlay UtilityThe overlay utility can be used to bring in another image to be used for composing a scene.This enablesthe photographer to make compositions from art directors' drawings or other images that are eithersupplied electronically or captured with the camera.The image will only be visible in the preview window,and not in the processed file. All TIFF or JPEG files can be used as overlay image.
To use the Overlay Utility select it from the Window menu, see illustration, below:
78
Special Features

In the overlay utility window you (see illustration, below) can select the image to be used by clicking theSelect Image... button. Transparency and Scale can be set, and the image can be toggled on and offin the preview window by checking and unchecking the Show overlay image check box. To move theoverlay image around in the preview window, use the hand cursor tool while holding down the Option(ALT) key on the keyboard.
6. Lens Cast CalibrationTo learn how Capture One can help you calibrate fixed lenses, please read Section 1.4, “Calibratingfixed lenses”.
79
Special Features

Chapter 13. PreferencesThe application's preferences are accessed through the Capture One menu, or by clicking the preferences
button on the right hand side of the toolbar.You can use the application's preferences settings toalign the workflow to your specific needs.
• The top pane containing the Show All icon is customizable.You can drag and drop icons from theother two panes to create your own selection of icons. Dragging icons away from the pane removesthem from the selection.
• The Imaging pane contains icons that you use to access and modify imaging preferences.
• The System pane contains icons that you use to access and modify imaging preferences.
1. Imaging PreferencesThe Imaging pane contains a range of icons that you use to access and modify preferences related toimage capturing, viewing, modification and processing. The details of each of these is covered in thefollowing sections.
1.1. Camera Setup
In Camera Setup Preferences, you can setup your capture orientation, capture file format and whetheror not you want audible feedback from the camera.
Capture orientation:
The Capture orientation selector is used to choose a preset degree of rotation for files captured tethered.This is particularly useful if you are working with a large format camera.
80

Capture File Format:
Capture file format is only relevant for Phase One camera backs which support 4 different formats:
• IIQ Raw - Large
• IIQ Raw - Small
• Raw - Compatible with 3.0
• Raw - Compatible with 2.9
Note
The new Phase One IIQ RAW file format is not backward compatible with versions prior to3.5. If you are still working in an environment with mixed versions of the software you maywant to continue to work with the older Capture 3.0 or 2.9 formats. If that is not the case werecommend that you use the new IIQ formats as they offer a number of advantages, forexample: reduced file size, embedded images settings, more advanced file tagging andMac OS X Finder thumbnail support.
The IIQ Raw (Intelligent Image Quality RAW) is an intelligent way of transforming the full 16 bit imagedata captured by the camera into a compact RAW format file without any loss of data.
• IIQ RAW - transforms files without any loss of data, but reduces their size by 50% compared to theold 3.0 Raw format.
• IIQ RAW - transforms files to 30% of there original size with virtually no perceptible difference betweenthe two formats. This offers all the advantages of smaller file size: space savings and faster transferbetween media with virtually no loss of image quality.
Maximum number of captures in memory:
The Maximum number of captures in memory defaults to a value of 3. That is usually enough. As longas a minimum of one circle remains green this value need not be altered. However, if you sometimesnotice that all 3 circles in the burst indicator (see illustration, below) are displayed as yellow, you maywant to increase this value.
Note
If you do increase this value you must have sufficient memory to hold all the captures intheir full size, otherwise, the computer will start spooling to disk, which will slow down thecapture rate drastically.
Audible feedback from camera:
Use the two selection boxes: Camera ready sound and Camera done sound to select type of sound youwould like to be used for the audible feedback. Select None for no feedback.
Camera power mode:
If your camera back supports Camera power mode a selection box will be displayed. Use this to selectthe appropriate settings for your camera.
81
Preferences

For information on which setting to select, please refer to your Phase One camera back Getting Startedmanual.
1.2. Capture Naming
In Capture Naming Preferences, you can configure how new captured raw images are named.
Raw image files can be named automatically based on the selected Suffix , Counter and Postfix settingswhich you choose.s
File names can be changed later, after capture, either by clicking on the name fields at the bottom ofeach thumbnail, or by using the Batch Rename feature.
1.3. Exposure
Exposure Warnings allows you to select at what point you want the warning for highlight and shadow(over and under exposure).You can also select the color where you would like the over and under ex-posure to appear.
Automatic adjustment of exposure levels, clipping amount allows you to set the clipping amount for yourhighlights and shadows A 2% highlight clipping amount corresponds to clipping 2% of the histogramvolume at the highlight end of the histogram when doing automatic adjustment of the exposure level.The same thing happens with the shadow clipping amount.
82
Preferences

1.4. Processing
In Processing Preferences, you can configure how images will be processed after completing yourworkflow.
83
Preferences

The Processing Preferences window has four tabs:
Name
The Name tab is used to set up the default name given to processed images. If the Use capture nameas default name is selected the processed image will inherit the capture name. Name delimiter is thecharacter that divides the name and the number or suffix if these are used in the file name. Samplesdisplays examples of what file names will be generated based on the check boxes selected.
Attributes
The Attributes tab is used to choose which application will be used to open the processed Tiff files, andwhether or not to bring this application to the front.
Defaults
The Defaults tab is used to select the Sharpening applied to the processed images. By default this isset to Standard Look, Amount: 25 , and Threshold: 3.
Noise suppression is only relevant for DSLR Images.
Banding suppression is only applicable to H 20/H 25 and P 20/P 25 images. Banding suppression addsnoise to the image. In images containing evenly distributed, uniform colours, for example, blue sky, thereis a tendency for shifts in color to look like banding on a monitor or in print. When this occurs, bandingsuppression can help by reducing the purity of the colors.The result is a more evenly distributed transition,which reduces the banded appearance-
84
Preferences

Batch Processing is used to set the number of batch jobs that are retained in the batch processingwindow. Retaining the last 10 jobs makes it easy for you to redo these one by one by clicking the con-
tinue button in the Batch panel.
2. System PreferencesThe System pane contains a range of icons that you use to access and modify preferences related tosystem preferences. The details of each of these is covered in the following sections.
2.1. Alignment
In Alignment preferences you can set up the application's preview window to use either a cross hairguide or a grid as aid to be used when aligning horizontal or vertical objects.
The Alignment Preferences window has two tabs:
Guides
When Enabled is checked cross hair guides will be activated in the preview window. Use the Color se-lection box to select the color of the cross hairs. Use Vertical Position and Horizontal Position to set thepositions of the cross hairs. This can also be done by selecting and dragging the cross hairs into thepreview window.
Grid
When Enabled is checked grid guides will be activated in the preview window. Use the Color selectionbox to select the color of the cross hairs. Use Vertical Lines and Horizontal Lines to configure the numberof grid lines displayed in the preview window.
2.2. AppleScript
In AppleScripts Preferences you can enable or disable the AppleScript menu on the application's toolbar.
85
Preferences

Use the Add button to add scripts that have been written and compiled using AppleScript Editor.
Use the Show AppleScript menu to display the AppleScript menu as part of the application's user menus.
For an overview of the parts of the application that can be scripted, drag the Capture One Applicationand drop it on the Applescript script editor in your computer's Applications > Utilities folder. This willopen the Capture One Application dictionary for Applescript. In addition, the Extras folder on the CDincludes a folder that contains sample Applescripts.
2.3. Color Management
In Color Management Preferences you can set up your color management workflow, select the defaultprofile for your camera, calibrate your monitor and manage your color profiles.
86
Preferences

2.4. General Settings
In General Preferences you can set up the crop marks appearance. This includes whether the cropshould have a mask graying out the unwanted part of the image, and the opacity and brightness of thatmask.
Use Crop Labels to define whether or not the crop frame should have labels displaying the current sizeof the crop area. The options available are: Always, During Drag Only (default) and Never.
2.5. Software Update
The Capture One application is set up to automatically check for software updates on the Internet.Youwill be notified if a newer version becomes available for download. Use the selection box to choose howoften you want the application to check the availability of updates.You can also check manually at anytime by clicking the Check Now button.
2.6.Thumbnails
In Thumbnails Preferences you can set up how thumbnails will are displayed in the capture collectionwindow.
87
Preferences
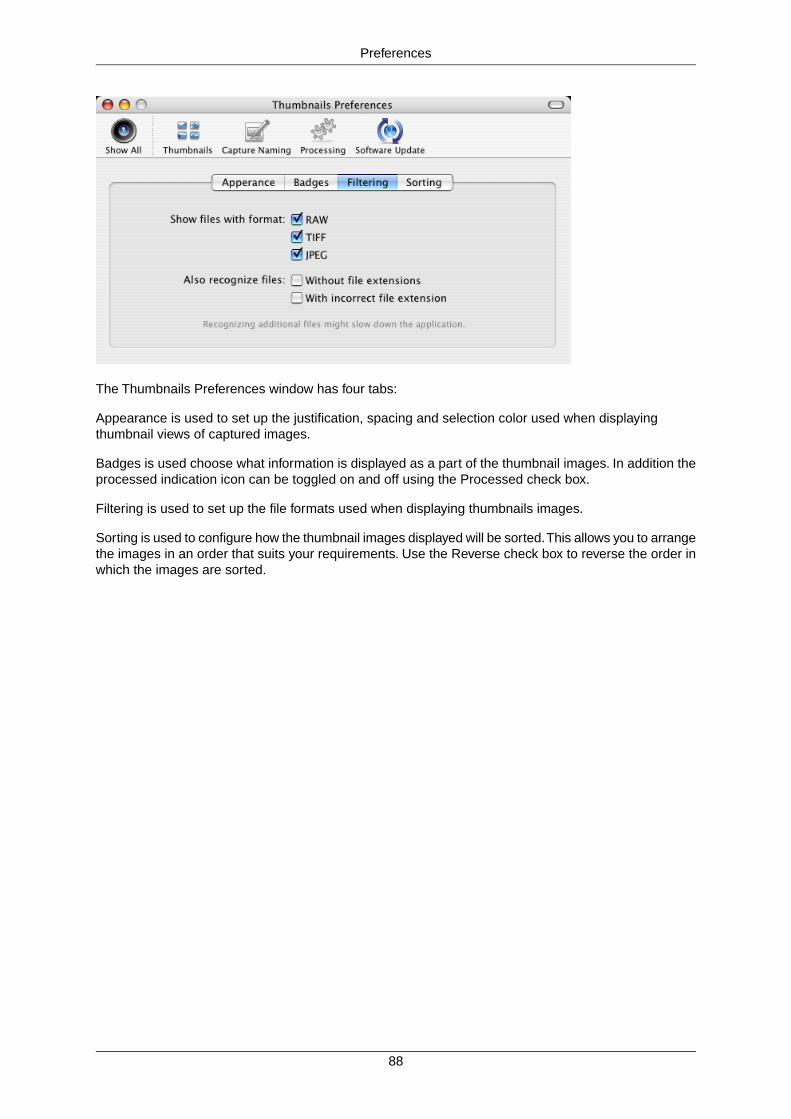
The Thumbnails Preferences window has four tabs:
Appearance is used to set up the justification, spacing and selection color used when displayingthumbnail views of captured images.
Badges is used choose what information is displayed as a part of the thumbnail images. In addition theprocessed indication icon can be toggled on and off using the Processed check box.
Filtering is used to set up the file formats used when displaying thumbnails images.
Sorting is used to configure how the thumbnail images displayed will be sorted.This allows you to arrangethe images in an order that suits your requirements. Use the Reverse check box to reverse the order inwhich the images are sorted.
88
Preferences

Chapter 14.Tips and Tricks1.Tips on Daily Usage of Capture One
1.1. Optimizing white balance
Tip
If your image does not contain a satisfactory gray area, you should shoot the image againand include a QP or MacBeth card in the scene.
Alternatively, use the If selected display on the white balance tool. While moving the eyedropper around the image, the left window will show you the current position in the image.The window on the right will show what the area will look like if the current position is usedfor white balancing the image:
1.2. .work file naming convention
Tip
The .work files are named according to the following scheme: UID_[M]_[S]_[C]_[T]
An example could be:UID_Canon EOS-1D_00003E74_002000_20020805174645.work,broken down like this:
ExampleDescription
Canon EOS-1DCamera model[M]
00003E74Serial number of the sensor[S]
002000Capture number assigned bycamera
[C]
20020805174645 (Whichwould mean that the image
Timestamp in the formatyyyymmddhhmmss
[T]
was captured at August 5th2002 at 5:46:45 PM)
1.3. Reusing your white balance settings
Tip
To avoid re-doing the same white balance settings for every new image, Capture One allowsyou to store your own white balance settings and reuse them on other images. Here's howyou do it:
1. Adjust the white balance settings to your liking.
89

2.Click the Save White Balance button . This brings up the Save As dialog:
3. Enter a name for your white balance settings and click the Save button.
4. Now your white balance can be applied to other images by clicking the Load White
Balance button and selecting it from the saved settings:
For more details about white balancing, check out Chapter 6, White Balancing Images.
1.4. Calibrating fixed lenses
Tip
Lens cast is a result of the CCD being exposed to light from a very sharp angle and willtypically occur as a green cast in or corner of the image, stretching into a magenta cast inthe opposite corner.
Lens cast may occur when using Phase One H 25 with wide angle lenses like HorsemanDigiflex II, Hasselblad Flexbody or Hasselblad 905SWC or on other large format cameraswith different tilt or swing settings. On a medium format camera lens cast is very rare if usingfixed lenses from 60 mm to 120 mm.
90
Tips and Tricks
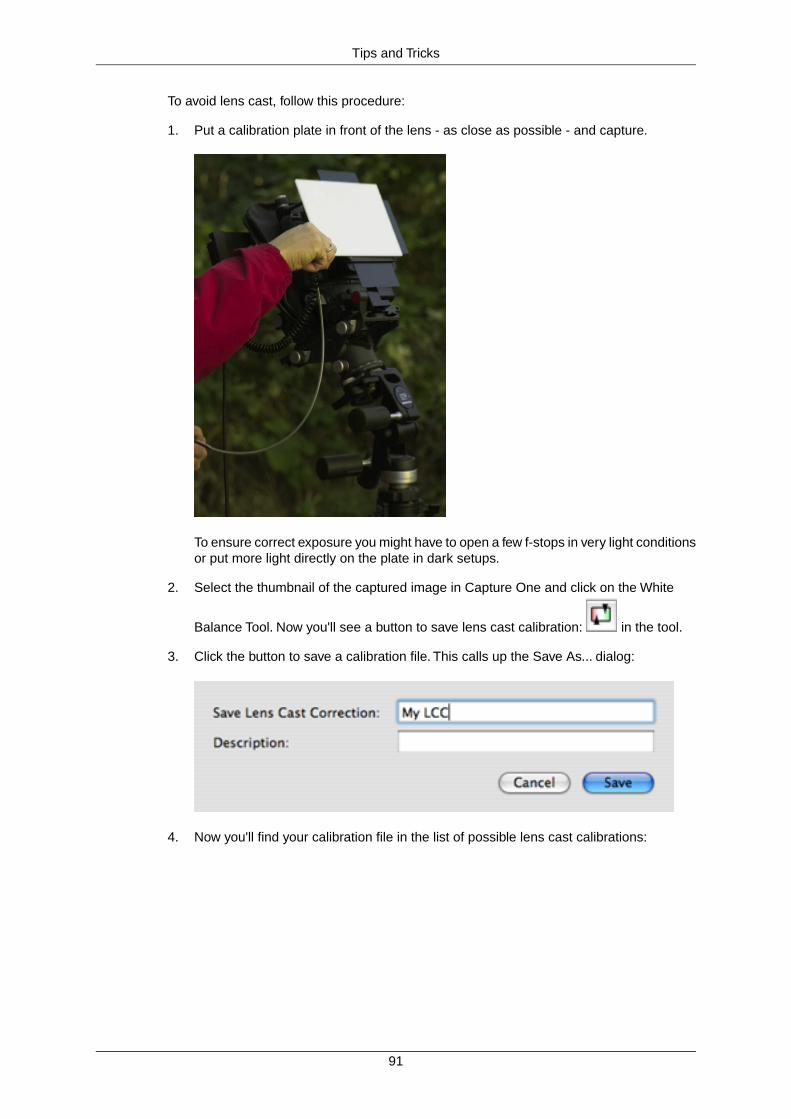
To avoid lens cast, follow this procedure:
1. Put a calibration plate in front of the lens - as close as possible - and capture.
To ensure correct exposure you might have to open a few f-stops in very light conditionsor put more light directly on the plate in dark setups.
2. Select the thumbnail of the captured image in Capture One and click on the White
Balance Tool. Now you'll see a button to save lens cast calibration: in the tool.
3. Click the button to save a calibration file. This calls up the Save As... dialog:
4. Now you'll find your calibration file in the list of possible lens cast calibrations:
91
Tips and Tricks

5. Click the Set as Capture White Balance button to apply this for your next captures:
6. After saving your calibration file, you can delete the image used to create the LCC file.
Note
If you tilt the camera, zoom or in any other way change the way the light willenter the lens, you need to create a new calibration file. If you're working withlarge format or stitched images, you should check out Section 1.5, “Lens castcalibration with image stitching”.
1.5. Lens cast calibration with image stitching
Tip
When working with large format and stitched images, you must use a different lens castcalibration file for each image in the aggregated image:
1. Create a calibration file along with each image you shoot and apply the calibration filesto the images. (See Section 1.4, “Calibrating fixed lenses” for details on how to createcalibration files and apply them to images).
2. To ease the white balancing you can apply the same settings to all images by selecting
them all and clicking the Apply to Selected Captures button: .
This brings up the following dialog:
92
Tips and Tricks

3. Check the White balance checkbox only and click Apply.
1.6. Good sharpening
When working with the Focus Tool you need to adjust the Amount and Threshold sliders. Here are acouple of hints to good practice:
Tip
The Amount is typically set around 100 for ink jet, 150 -250 for offset printing. Threshold isused to define how many of the surrounding pixels are affected. Typically a noisy image willhave a higher threshold set, perhaps 12 -20. A clean image will need a very low thresholdof 2-4.
Select a method from the Method: selection field. This is a subjective setting. The methodsavailable are Standard, Soft Look and Disable, the latter means that no method will be used.
Keep checking the image in the focus window. For a web image, the image should lookcorrect on screen. For an image to be printed in a magazine or book, the preview shouldideally look slightly over-sharp on screen.
Read more about focus and sharpening in Chapter 8, Focus and Sharpness.
1.7. Creating your own cropping dimensions
Tip
Capture One lets you create your own custom cropping dimensions that you can reuse inthe future. Here's how you create a new cropping menu item with your own dimensions:
1.Click and hold down the crop icon and select New... when the contex-tual menu pops up.
2. Enter your constraints and a name in the menu that pops up:
93
Tips and Tricks

When done, click the OK button to save your cropping.
3. Now you can see your new cropping in the menu:
1.8. Opening images into another application
When processing images you can enable Capture One to open the processed images immediately inyour preferred application, other than Capture One.
Tip
By ticking the Open image after process checkbox, the image(s) will be opened in the ap-plication you have associated with the file type you are producing, once the processing isdone:
94
Tips and Tricks

Most likely the associated application is Adobe Photoshop.
Warning
Do not enable this feature if you're processing a large amount of images, asyour computer might freeze up.
You can read more about processing your images in Chapter 9, Processing Images.
1.9. Undoing rotations
Tip
If you are unhappy with the rotations you have performed on an image, Inserting a value of0 in the Rotation Tool's free text area returns the image to its original rotation.
Read all about cropping and rotating in Section 2, “Cropping and Rotation”.
1.10. Activating Capture One software
Tip
To activate a license for your copy of Capture One, follow the instructions on how to activatea license.
1.11. Creating a contact sheet
Tip
Capture One lets you quickly create a contact sheet for clients to preview:
1. From the capture collection, select one of the images you wish to add to the contactsheet.
2. Apply any adjustments to the image - little is usually needed for a preview version, likeauto adjusting the image in the exposure tool.
3. Now select the rest of the images for the contact sheet by holding down the Applebutton as you click once on each image you wish to select.
4. From the File menu, select Export Image Index....
This will bring up the following dialog:
95
Tips and Tricks

5. Fill in the fields and click Export.
Now you'll be prompted for a location for your contact sheet - after this your contactswill be created as a Web page, ready for publishing on the Web or just previewing locallyin a browser on your machine.
1.12. Dynamic range from RAW
Tip
One of the major limitations of most DSLR cameras is the blowing out of highlight detailsin high contrast situations. The solution to the problem in a film workflow was to shoot twoframes, one exposed for highlights and one for shadows. By combining them after scanning,the best possible result could be achieved although with the associated risks of image mis-registration.
RAW offers the ability to achieve the same result by simply outputting two versions of thesame file with exposure compensation or curves applied to the second output to give adarker image.
Achieving this effective increase in dynamic range is very straightforward:
1. Capture the image, taking care to expose for the highlights and ensure that they arenot overexposed. On output, create two files, one with normal exposure and namedwith the suffix top and the second, where the exposure compensation control andcontrast slider have been used to enhance the shadow detail with the original file name.
2. After processing as TIFF files, open both in Adobe Photoshop®. Select the Move Tool.Drag the top file onto the other image while holding down the SHIFT key. The imagesshould be perfectly aligned.
3. Go to Layer > Add Layer Mask > Reveal all. Reset default colors to black and whiteand then click on the rectangular Mask icon on the top layer in the layers palette. Usea paintbrush set on 10% opacity to paint away the shadows on the top layer to revealmore detail from the lower layer. Black paints away the top layer, white paints it backin.
4. Once satisfied with the result, Ctrl click and select Apply Layer Mask. Flatten the imageand you are done.
96
Tips and Tricks

1.13. Capturing tethered with Canon 1Ds KII, 1D MKII, 1Ds, 1D, 20D,10D, 300D, D30, D60
Tip
Here's how you configure Capture One to allow you to capture tethered with Canon 1DsKII, 1D MKII, 1Ds, 1D, 20D, 10D, 300D, D30, D60:
1. Locate the Capture One application in the Finder - typically it is here: Capture OnePRO/Applications/<Version Number>/Capture One PRO
2. Ctrl+Click on the application icon and select Get Info (or click it once and push Apple+I).This will call up the Info dialog:
3. Make sure that Canon.camera and Camera Setup.prefPane are checked and close thedialog.
4. Set the camera to shoot "Raw Only". Selecting "RAW+JPEG recording" will cause thecapture to fail with error code 0C000007.
5. Connect the camera to your computer.
6. Open Capture One and start shooting tethered.
Note
When capturing tethered with your Canon 1Ds KII, 1D MKII, 1Ds, 1D, 20D,10D, 300D, D30, D60 you can not have any FireWire disks connected to yourcomputer, for data on these disks may corrupt.You can not disconnect thecamera from the computer and you should not let the computer go into sleepmode while Capture One is running and the camera is connected.
97
Tips and Tricks

1.14. Previewing more than one image at a time
Tip
A quick way to do a preview of two images at the same time is to select the two thumbnailsand the select the 2 Up preview. 4 up works the same way.You can also use the left arrowand the up arrow to scroll to the next image if you want the preview to be as large as possibleand not share the screen real estate with other previews.
Read more about previewing images in Section 1.18, “Preview Switch”.
1.15. Get inline RGB color Read-out
Tip
If you want an inline RGB color read-out, select the Picker Cursor Tool then click on the preview image while holding down the CTRL button on the keyboard. Adialog box Show Color Readout will be displayed, click on this to select the color read out.The color readout for the cursor's position will now be displayed as in the illustration, below.
When you want to hide the read-out again, CTRL click the image again and de-select thefeature.
1.16. Monitoring the batch with Capture One minimized
Tip
If Capture One is collapsed, you can still monitor the progress in the batch, as the applicationwill show you the process in the Capture One icon in the Mac OS X dock:
This way you can start a big batch and let it run in the background while you take care ofother things on your computer.
98
Tips and Tricks

2.Troubleshooting
2.1. Windows are missing, menus are greyed out
Tip
If you experience strange behavior in Capture One like greyed out menus, missing windowsand curves, or if you are using multiple camera backs and they seem to pick up each other'scalibration files, it might be a good idea to delete your cache and preference files.
1. Navigate to your home directory and enter the Library folder.
2. Your preferences might be located in one or more of several locations. Which ever ofthe following files exist, you should delete:
• Preferences/Phase One/Capture One preferences
• Preferences/com.phaseone.application.captureone.plist
• Preferences/com.phaseone.application.captureonedslr.plist
3. Delete your cached calibration files that are located in <Your Home Directory>/Lib-rary/Caches/Phase One folder/camera calibration cache. New calibration files will becreated automatically when the camera back is connected the next time.
4. Now restart the application and there's a good chance that your problems are gone.
2.2. I can't transfer images from my camera to the Mac
Tip
Capture One supports tethered operation with the following cameras only: Canon 1Ds KII,1D MKII, 1Ds, 1D, 20D, 10D, 300D, D30, D60. Check out Section 1.13, “Capturing tetheredwith Canon 1Ds KII, 1D MKII, 1Ds, 1D, 20D, 10D, 300D, D30, D60” for instructions on howto use one of these DSLR cameras to capture tethered to Capture One.
If you do not own one of these cameras, you need to import images via a memory card -see Section 3, “Automatically Importing Images from an External Media” for instructions.
Of course tethered operation is available for all supported camera backs.
2.3. Nothing happens when I try to process my images
Tip
If Capture One doesn't seem to respond to clicks on the Process button at all, check thefollowing:
• Check that the Enable Queue checkbox is checked in the Batch Tool:
99
Tips and Tricks
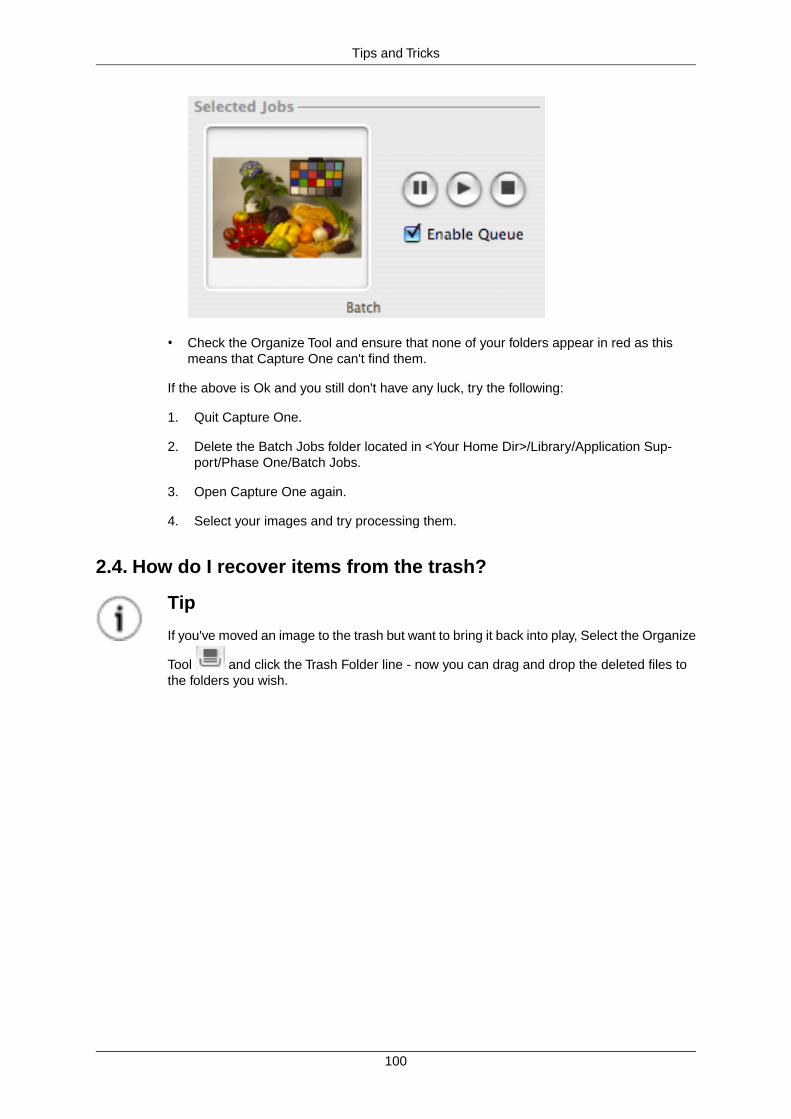
• Check the Organize Tool and ensure that none of your folders appear in red as thismeans that Capture One can't find them.
If the above is Ok and you still don't have any luck, try the following:
1. Quit Capture One.
2. Delete the Batch Jobs folder located in <Your Home Dir>/Library/Application Sup-port/Phase One/Batch Jobs.
3. Open Capture One again.
4. Select your images and try processing them.
2.4. How do I recover items from the trash?
Tip
If you've moved an image to the trash but want to bring it back into play, Select the Organize
Tool and click the Trash Folder line - now you can drag and drop the deleted files tothe folders you wish.
100
Tips and Tricks

Chapter 15.Troubleshooting andFeedbackPhase One Support: if you experience technical problems while working with the Phase One CaptureOne application, try visiting our Phase One Support area on our corporate web at: http://sup-port.phaseone.com. Here you will find links to our official support forum and the Phase One KnowledgeBase with searchable articles on troubleshooting and known issues.
Providing Feedback: Phase One values your feedback on our software. The easiest way for you to sendus your thoughts is by selecting the Capture One > Provide feedback... menu item from the CaptureOne menu.You can also manually send an email to: <[email protected]> We readall feedback carefully, but please note that we cannot respond to the comments you send to this account.
101