Bridging the Gap: Bridging the Gap: Reaching Consensus on ACO Metrics

Day 9 & 10: Paper
Bridges
Quilling, also known as paper filigree, is an art form that involves
rolling and gluing thin strips of paper into various shapes and arrang-
ing them to form designs. Quilled paper designs can be very simple or
as complex as you have the dexterity and patience for!
The art of quilling dates back to the Renaissance when French and
Italian monks and nuns would use quills (the shaft of a feather) to roll
thin strips of paper into ornate designs. They would then use these to
decorate book covers and other items, often imitating designs they
saw in ironwork. Quilling later became popular in America during
Colonial times.
Quilling has become popular worldwide, thanks to the common, inex-
pensive materials used to do it. All
you need is paper, glue, and some-
thing to roll the paper around.
Even though quilled designs are
made from humble materials,
there’s no limit when it comes to
the elaborate designs you can
create!
Quilling is traditionally done
with 1/8″ paper strips which can be
purchased precut and ready to use.
You can also make your own 1/4″
strips using a paper shredder.
Beginning artists will have an easier
time with wider strips, so I it’s best
to start younger students out with
1/2″ strips (which you can cut on a
paper trimmer) until they get the
hang of it. Note: Wide strips from a
heavy paper can be easily rolled
with fingers, without the need to
use a tool.
You will need:
Bridging the Gap
Artwork & photography created by Christine Nguyen. All Rights
Reserved. Via Allthingspaper. Christine blogs and is on Flickr.

Bridging the Gap: Week 3
2
Paper strips (ex. Black & Red—for the bridge,
Yellow—lights or stars?, Blue, Green, Purple,--
water; Grey, White—Clouds/Fog)
Q-tip, with the ends cut off (You can pur-
chase a special tool with a slit at the end
for rolling your paper strips, but it
really isn’t necessary.)
scissors (or simply tear the
strips to the lengths you want)
Glue (YES! Paste works well, but any white craft glue will work)
toothpick for applying small amounts of glue
for inspiration, have students check out the included images of the Golden Gate Bridge
Quilling Basics from TeachKidsArt:
Have students follow these simple steps to learn the basic shapes for quilling… then combine them to
create a gorgeous bridge design! Children's quilling doesn't have to be perfect :) Encourage your
students to do quilling no matter how messy it turns out.
1. Cut the ends off your Q-tip and use it to roll one of your paper strips into a tight coil. (Some artists
find that rolling towards themselves is easiest, but that’s just personal preference, see what works for
you..)
2. Apply a small amount of glue to the end and press it down for a few seconds (Using YES! Paste or
Craft Glue here).
3. Now pull out your Q-tip “quill” — you have just completed your first tight coil.
4. Roll another coil the same
way, but when you get to the
end, pull out your quill and
release your grip just a little
so your coil begins to expand.
You can let it expand a lot or
just a little…it’s up to you. A
small amount of glue will hold
it in place at the size you
want. We’ll call this a loose
coil.
5. Now make two more loose
coils. Pinch one of them on
one side to form
a teardrop shape. Pinch the
other one on two opposing sides to form an eye shape.
Image V
ia: Ch
eryl Trow
brid
ge @ Teach
Kid
sArt. A
ll Righ
ts
reserved.

Bridging the Gap: Week 3
3
6. To make a graceful “S” curve, roll a strip halfway and release it. Then roll the other end of the strip
halfway in the opposite direction and release again.
7. A heart shape is made by first folding your paper strip in half. Then roll each end in toward the mid-
dle, releasing when you get to the size you want your heart shape to be.
8. After making each of these basic shapes, it’s easy to make triangles, squares, and more.
9. Finally, use small amounts of glue to assemble your
shapes into a suspension bridge/Golden Gate
Bridge/Brooklyn Bridge scene! Don't be afraid of
spilling the glue: spread it over the base, not the
quilling shapes as usual. Another method is to pour
some glue onto a sheet of paper or cardboard, or into
a small plate and let children dip their quilling shapes
in it. Older children can apply the glue directly onto
the shapes.
Remember: Building a complicated design with
quilling can take
some patience!
Younger students
can/should keep it simple!
Option: Don't limit your
kids to quilling in their
projects. Let them combine
different media and
techniques, you'll be
surprised what wonderful
little pieces of art they
come up with.
Bridging the Gap: Week 3
4
Days Nine & Ten K-8 Standard Alignment
K
3.1.3 Select and apply subject matter, symbols, and ideas in the student’s own art.
1.1.3 Demonstrate precision in the use of teacher selected tools and media in a safe manner.
These standards will be met and reinforced as students learn about quilling and practice techniques and
then implement them in order to make their own suspension bridge art incorporating the symbolism of
the Golden Gate Bridge (or Brooklyn Bridge) as modeled by the teacher.
1
1.1.3 Demonstrate a precision in and explore the use of teacher selected tools and media in a
safe manner.
3.1.3 Select and apply subject matter, symbols, and ideas in the student’s own art.
These standards will be met and reinforced as students learn about quilling and practice techniques and
then implement them in order to make their own suspension bridge art incorporating the symbolism of
the Golden Gate Bridge (or Brooklyn Bridge) as modeled by the teacher.
2
3.1.3 Implement chosen subject matter, symbols, and ideas in the student’s own art.
1.1.2 Demonstrate a precision in and explore the use of teacher selected tools and media in a
safe manner.
These standards will be met and reinforced as students learn about quilling and practice techniques and
then implement them in order to make their own suspension bridge art incorporating the symbolism of
the Golden Gate Bridge (or Brooklyn Bridge) as modeled by the teacher.
3
3.1.3 Produce subject matter, symbols, and ideas in one’s own artwork as guided by the teacher.
1.2.1 Demonstrate media in the intended manner as modeled by the teacher.
These standards will be met and reinforced as students learn about quilling and practice techniques and
then implement them in order to make their own suspension bridge art incorporating the symbolism of
the Golden Gate Bridge (or Brooklyn Bridge) as modeled by the teacher.
4
3.1.3 Produce subject matter, symbols, and ideas in one’s own artwork as modeled by the
teacher.
1.2.1 Execute a variety of media in the intended manner as modeled by the teacher.

Bridging the Gap: Week 3
5
These standards will be met and reinforced as students learn about quilling and practice techniques and
then implement them in order to make their own suspension bridge art incorporating the symbolism of
the Golden Gate Bridge (or Brooklyn Bridge) as modeled by the teacher.
5
3.1.3 Produce subject matter, symbols, and ideas in one’s own artwork as coached by the
teacher.
1.2.1 Execute a variety of media in the intended manner as coached by the teacher.
These standards will be met and reinforced as students learn about quilling and practice techniques and
then implement them in order to make their own suspension bridge art incorporating the symbolism of
the Golden Gate Bridge (or Brooklyn Bridge) as modeled by the teacher.
6
3.1.3 Apply subjects, themes, and symbols in works of art in an effective manner.
1.1.2 Develop and demonstrate control of different types of media, techniques, and processes.
These standards will be met and reinforced as students learn about quilling and practice techniques and
then implement them in order to make their own suspension bridge art incorporating the symbolism of
the Golden Gate Bridge (or Brooklyn Bridge) as modeled by the teacher.
7
3.1.3 Apply subjects, themes, and symbols in works of art in an effective manner.
1.1.2 Develop and demonstrate control of different types of media, techniques, and processes.
These standards will be met and reinforced as students learn about quilling and practice techniques and
then implement them in order to make their own suspension bridge art incorporating the symbolism of
the Golden Gate Bridge (or Brooklyn Bridge) as modeled by the teacher.
8
3.1.3 Apply subjects, themes, and symbols in works of art in an effective manner.
1.1.2 Develop and demonstrate control of different types of media, techniques, and processes.
These standards will be met and reinforced as students learn about quilling and practice techniques and
then implement them in order to make their own suspension bridge art incorporating the symbolism of
the Golden Gate Bridge (or Brooklyn Bridge) as modeled by the teacher.

Bridging the Gap: Week 3
6
Day 11: The Force(s) are with you!
To introduce the lesson
activities and access
students’ prior knowledge
have them watch and analyze
this short animated film from
Vimeo user Ting entitled
"Bridge".
Have you ever wondered how bridges stand tall
in the face of gravity, weather and the heavy
traffic crossing over them? Building them might
seem complicated, but they are based on some
surprisingly simple forces that you have probably experienced yourself. Have you ever stomped on an
empty can? Or played tug-of-war? Then you might know more about engineering suspension bridges
than you think!
"Compression" and "tension" are two forces that we can feel and see in the world around us. Where can
you find examples of compression (hint: think of the empty can) and tension (hint: try a game of tug of
war). Using lots of math, civil engineers position the parts of a suspension bridge so compression and
tension work together to hold up some of the world's longest spans.
In the U.S. the two most famous suspension spans are probably San Francisco's Golden Gate and New
York City's Brooklyn bridges, which we’ve learned about!
The main parts of a suspension bridge are its towers, cables, decking and anchorages. As you might
guess, the long cables are the unique part of a suspension bridge. Anchored on land at each end, the
cables are strung over the top of tall towers and
gently slope back down to support the bridge
deck (the road and/or walkway) from above.
Feel the Force
An easy engineering activity from CityScience By
Thor Snilsberg, CityScience. © 2016 Scientific
American, A Division Of Nature America, Inc.All
Rights Reserved.
Materials
• A partner (someone of similar size
works best)
• Three straws: one to use as towers and
two to use as bridge decks—one for each of
the two bridges to be built
• Scissors
• Piece of string, four feet long, to use as a suspension cable

Bridging the Gap: Week 3
7
• Masking tape
• Large paper clip
• Load bucket (paper box takeout containers work well)
• Heavy nuts, bolts or anything else small but heavy to serve as weights
• Ruler
Preparation
• Move two chairs of equal height seven inches apart.
• Carefully cut one straw in half to make two towers.
• Cut a small slit on the top end of each tower for the string to rest in.
• Cut one four-inch piece of string.
• Have the masking tape handy.
Procedure
1. To learn about the forces that keep suspension bridges standing, you can experience them
yourself. To start, face your partner.
Join hands, and slowly, carefully lean backward. Don't let go! Do you feel a tug? What is the
force associated with pulling? This is tension, which suspension bridge cables use.
Facing your partner again, place your palms against your partner's. Now slowly, carefully lean
toward each other. What kind of pressure do you feel now? This is compression, which is found
in bridge towers.
2. Now that we know what the forces of compression and tension feel like, we can build two types
of bridges and compare their strength. We'll start by building a model suspension bridge.
3. Tape one half of the cut (tower) straw to the top of one of the chairs so that the slit is on the
top, pointing to the other chair.
4. Now tape the other half of the straw to the other chair in the same manner. The two slits should
be in a line, and the straws should be seven inches apart.
5. Wrap the middle of the four-foot string twice around a whole straw. This will serve as the
deck—where a road or walkway would go.
6. Tape each end of this straw to a base of a tower straw so that it spans the distance between
them.
7. Thread each end of the string through the slit in each straw down the other side. To anchor the
bridge, tape each side of the string to the chair. You've just built a suspension bridge!
8. Loop a large paper clip around the deck straw and hang your empty load bucket from it. Begin to
put your weights into the bucket, recording the number until the bridge breaks (by the straw
bending or giving way).
You’re Beaming! An easy engineering activity from CityScience By Thor Snilsberg, CityScience. © 2016 Scientific American, A Division Of Nature
America, Inc.All Rights Reserved.
Now we'll build a beam bridge. Remove the string and carefully cut the two side-tower straws in half.

Bridging the Gap: Week 3
8
1. Tape one straw "tower" to the edge of a chair.
2. Tape the second tower to a second chair of the same height.
3. Position these towers seven inches
apart.
4. Now tape each end of another
straw to the bottoms of the two shorter side
straws. This is your beam—where a road, path
or railroad tracks would go.
5. You've just built a beam bridge! Do you think
this bridge will be able to hold more weight than
the suspension bridge or less? Why?
Hang the load bucket from the deck and run
the test again by adding weights one at a
time.
Which bridge is stronger? Where did the bridges
collapse? Where was each bridge weakest?
Observations and result:
Which bridge was able to hold more weight? Why do you think that is?
When all the materials and circumstances are the same, suspension bridges can span longer distances
than simple beam bridges. This is because the bridge deck, or roadway, is supported from above using
tension in the cables and compression in the towers rather than just from bases. Suspension bridges are
also less rigid, so they can better withstand outside forces, such as earthquakes. Have you crossed beam
bridges or suspension bridges?
Extra: Design and build a longer span. See if you can make a bridge twice as long (14 inches) that
supports the same amount of weight. What parts of the bridge will you need to change? (Tip: You might
need to reinforce the tape situating the towers, wrap the string around the deck more times or tape the
anchorages farther back.)
Day Eleven K-8 Standard Alignment
K
7.9.1 Observe, identify, and compare the properties and characteristics of various objects.
7.T/E.1 Explain how simple tools are used to extend the senses, make life easier, and solve
everyday problems.
7.T/E.3 Use tools to measure materials and construct simple products.
These standards will be met and reinforced as students learn about, build models of, and compare and
contrast the characteristics of suspension and beam bridges. Ex. Which bridge is stronger? Where did the
bridges collapse? Where was each bridge weakest?
1

Bridging the Gap: Week 3
9
7.9.1 Classify objects according to their physical properties.
7.T/E.1 Explain how simple tools are used to extend the senses, make life easier, and solve
everyday problems.
7.T/E.3 Use tools to measure materials and construct simple products.
These standards will be met and reinforced as students learn about, build models of, and compare and
contrast the characteristics of suspension and beam bridges. Ex. Which bridge is stronger? Where did the
bridges collapse? Where was each bridge weakest?
2
7.12.2 Realize that things fall toward the ground unless something holds them up.
7.T/E.1 Explain how simple tools are used to extend the senses, make life easier, and solve
everyday problems.
7.T/E.3 Use tools to measure materials and construct simple products.
These standards will be met and reinforced as students learn about, build models of, and compare and
contrast the characteristics of and uses for suspension and beam bridges. Ex. Which bridge is stronger?
Where did the bridges collapse? Where was each bridge weakest?
3
7.9.1 Use physical properties to compare and contrast objects.
7.T/E.1 Explain how different inventions and technologies impact people and other living
organisms.
7.T/E.3 Determine criteria to evaluate the effectiveness of a solution to a specified problem.
These standards will be met and reinforced as students learn about, build models of, and compare and
contrast the characteristics of and uses for suspension and beam bridges. Ex. Which bridge is stronger?
Where did the bridges collapse? Where was each bridge weakest? Students will apply what they’ve
learned from the original models and try to expand on them, ex. Building a longer bridge that will hold
the same amount of weight. They will determine what will show whether they were successful or not, ex.
Did the bridge hold the weight? Did it collapse? Etc.
4
7.9.1 Choose an appropriate tool for measuring a specific physical property of an object.
7.T/E.1 Explain how different inventions and technologies impact people and other living
organisms.
7.T/E.3 Determine criteria to evaluate the effectiveness of a solution to a specified problem.
These standards will be met and reinforced as students learn about, build models of, and compare and
contrast the characteristics of and uses for suspension and beam bridges. Ex. Which bridge is stronger?
Where did the bridges collapse? Where was each bridge weakest? Students will apply what they’ve
learned from the original models and try to expand on them, ex. Building a longer bridge that will hold
the same amount of weight. They will determine what will show whether they were successful or not, ex.
Did the bridge hold the weight? Did it collapse? Etc.

Bridging the Gap: Week 3
10
5
7.12.2 Identify the force that causes objects to fall to the earth.
7.T/E.1 Explain how different inventions and technologies impact people and other living
organisms.
7.T/E.3 Determine criteria to evaluate the effectiveness of a solution to a specified problem.
These standards will be met and reinforced as students learn about, build models of, and compare and
contrast the characteristics of and uses for suspension and beam bridges. Ex. Which bridge is stronger?
Where did the bridges collapse? Where was each bridge weakest? Students will apply what they’ve
learned from the original models and try to expand on them, ex. Building a longer bridge that will hold
the same amount of weight. They will determine what will show whether they were successful or not, ex.
Did the bridge hold the weight? Did it collapse? Etc.
6
7.T/E.1 Use appropriate tools to test for strength, hardness, and flexibility of materials.
7.T/E.2 Apply the engineering design process to construct a prototype that meets certain
specifications.
These standards will be met and reinforced as students learn about, build models of, and compare and
contrast the characteristics of and uses for suspension and beam bridges. Ex. Which bridge is stronger?
Where did the bridges collapse? Where was each bridge weakest? Students will apply what they’ve
learned from the original models and try to expand on them, ex. Building a longer bridge that will hold
the same amount of weight. They will determine what will show whether they were successful or not, ex.
Did the bridge hold the weight? Did it collapse? Etc.
7
7.T/E.1 Use appropriate tools to test for strength, hardness, and flexibility of materials.
7.T/E.2 Apply the engineering design process to construct a prototype that meets certain
specifications.
These standards will be met and reinforced as students learn about, build models of, and compare and
contrast the characteristics of and uses for suspension and beam bridges. Ex. Which bridge is stronger?
Where did the bridges collapse? Where was each bridge weakest? Students will apply what they’ve
learned from the original models and try to expand on them, ex. Building a longer bridge that will hold
the same amount of weight. They will determine what will show whether they were successful or not, ex.
Did the bridge hold the weight? Did it collapse? Etc.
8
7.T/E.1 Use appropriate tools to test for strength, hardness, and flexibility of materials.
7.T/E.2 Apply the engineering design process to construct a prototype that meets certain
specifications.
These standards will be met and reinforced as students learn about, build models of, and compare and
contrast the characteristics of and uses for suspension and beam bridges. Ex. Which bridge is stronger?

Bridging the Gap: Week 3
11
Where did the bridges collapse? Where was each bridge weakest? Students will apply what they’ve
learned from the original models and try to expand on them, ex. Building a longer bridge that will hold
the same amount of weight. They will determine what will show whether they were successful or not, ex.
Did the bridge hold the weight? Did it collapse? Etc.
Bridging the Gap: Week 3
12
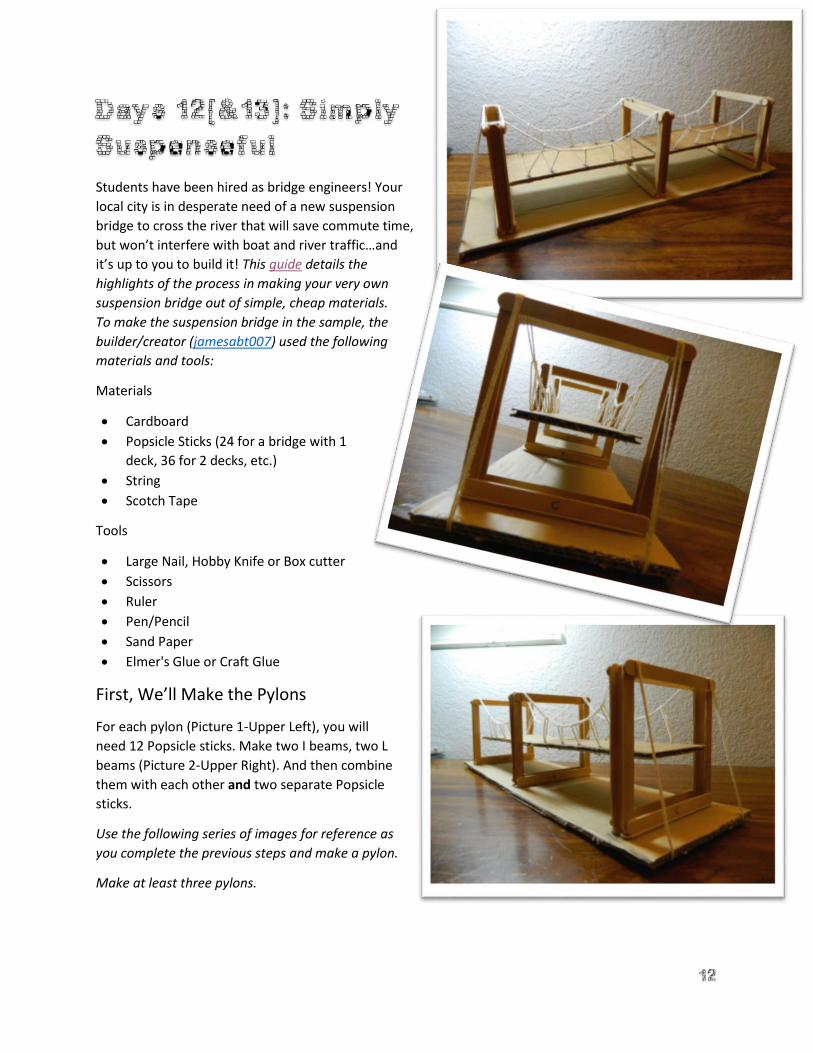
Days 12[&13]: Simply
Suspenseful
Students have been hired as bridge engineers! Your
local city is in desperate need of a new suspension
bridge to cross the river that will save commute time,
but won’t interfere with boat and river traffic…and
it’s up to you to build it! This guide details the
highlights of the process in making your very own
suspension bridge out of simple, cheap materials.
To make the suspension bridge in the sample, the
builder/creator (jamesabt007) used the following
materials and tools:
Materials
Cardboard
Popsicle Sticks (24 for a bridge with 1
deck, 36 for 2 decks, etc.)
String
Scotch Tape
Tools
Large Nail, Hobby Knife or Box cutter
Scissors
Ruler
Pen/Pencil
Sand Paper
Elmer's Glue or Craft Glue
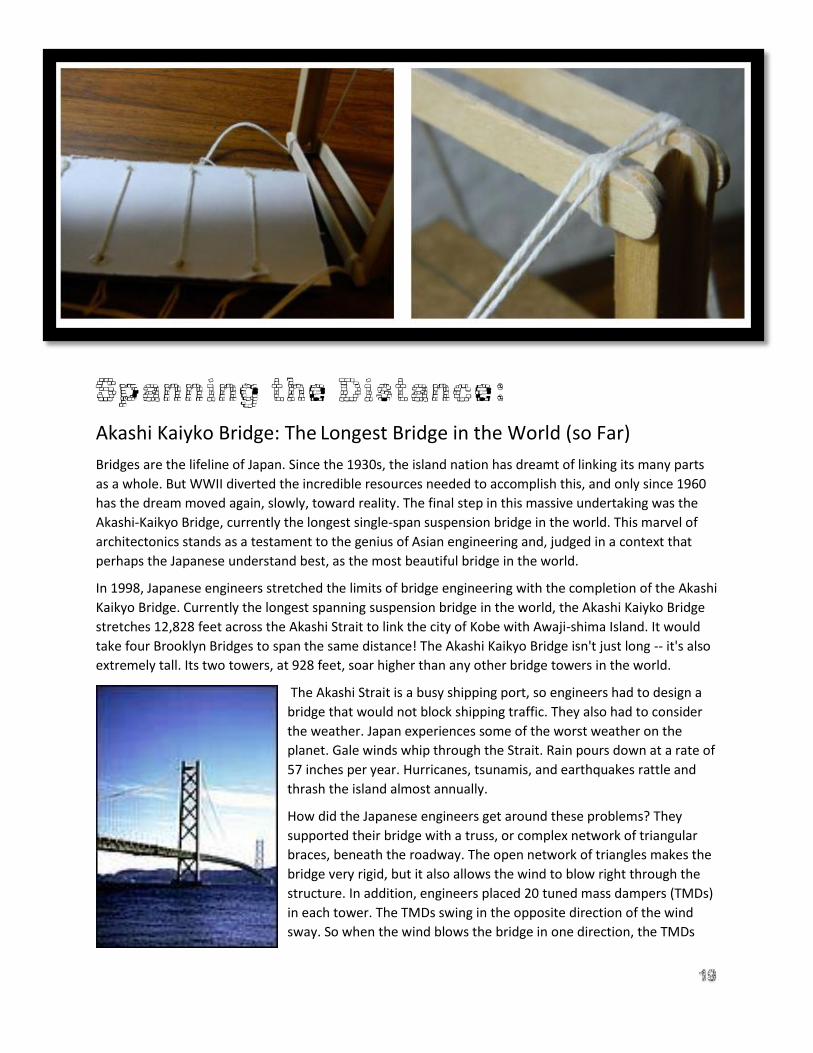
First, We’ll Make the Pylons
For each pylon (Picture 1-Upper Left), you will
need 12 Popsicle sticks. Make two I beams, two L
beams (Picture 2-Upper Right). And then combine
them with each other and two separate Popsicle
sticks.
Use the following series of images for reference as
you complete the previous steps and make a pylon.
Make at least three pylons.

Bridging the Gap: Week 3
13

Bridging the Gap: Week 3
14
Bridging the Gap: Week 3
15
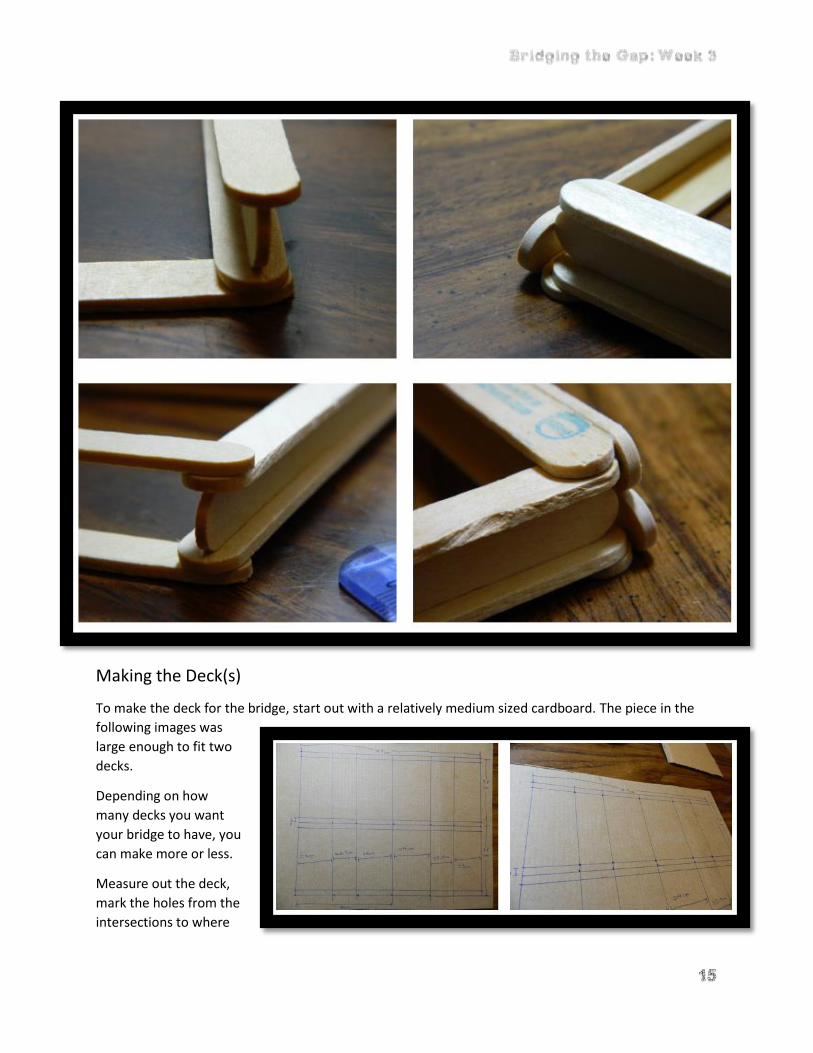
Making the Deck(s)
To make the deck for the bridge, start out with a relatively medium sized cardboard. The piece in the
following images was
large enough to fit two
decks.
Depending on how
many decks you want
your bridge to have, you
can make more or less.
Measure out the deck,
mark the holes from the
intersections to where

Bridging the Gap: Week 3
16
you will punch holes for the suspension cables to go through, cut the piece.
Tip: if you are using a knife to punch the holes for students, be sure to have students clean them by
either making them larger than needed or by forcing the material aside such that there is a distinct hole
with a pen or pencil or large nail. This is to ensure that the string can easily be threaded through the
holes and will make the process a lot easier to make the decks.

Bridging the Gap: Week 3
17
String
Your lengths of string can vary depending on the distance from
pylon to pylon, your total span of the bridge, and your height
you want the decks to be above the ground. Use a ruler and
explore with different lengths to see which bridge looks nicer
or more realistic.
Stringing the deck(s)
This part of the process is placing the string you determined
from the previous step into the holes of the deck. There are
many ways to do this step.
Just remember that if you have 5 total suspenders on each side
of the deck, you'll need to make the 4 holes on each corner of
the deck have longer loops than the one in the middle since the
cable droops slightly, like the curve of a parabola with a positive a
coefficient (y=ax2 +bx+c).
Tip!
If you hold a piece of string from
both ends and let it hang downwards
with nothing attached to it, it will
create the shape that your finished
suspension bridge's cable should
have- you can then copy this shape
to a piece of paper or cardboard and
use it to figure out how long the
suspender cables should be. This
shape is also the shape of an ideal
arch bridge upside down.
Top of Bridge Deck- a look into how to start
the stringing process.

Bridging the Gap: Week 3
18
Bringing it together
These are a
few images
and close
ups of a
completed
model.
Remember
that this is a
very open
ended
project with
no real set
guidelines
on the
lengths and
distances
just like
suspension
bridges in
real life.
There are
many ways
this bridge
can be built!
Bottom of Bridge Deck- a look into how to
start the stringing process.
Bridging the Gap: Week 3
19
Spanning the Distance:
Akashi Kaiyko Bridge: The Longest Bridge in the World (so Far)
Bridges are the lifeline of Japan. Since the 1930s, the island nation has dreamt of linking its many parts
as a whole. But WWII diverted the incredible resources needed to accomplish this, and only since 1960
has the dream moved again, slowly, toward reality. The final step in this massive undertaking was the
Akashi-Kaikyo Bridge, currently the longest single-span suspension bridge in the world. This marvel of
architectonics stands as a testament to the genius of Asian engineering and, judged in a context that
perhaps the Japanese understand best, as the most beautiful bridge in the world.
In 1998, Japanese engineers stretched the limits of bridge engineering with the completion of the Akashi
Kaikyo Bridge. Currently the longest spanning suspension bridge in the world, the Akashi Kaiyko Bridge
stretches 12,828 feet across the Akashi Strait to link the city of Kobe with Awaji-shima Island. It would
take four Brooklyn Bridges to span the same distance! The Akashi Kaikyo Bridge isn't just long -- it's also
extremely tall. Its two towers, at 928 feet, soar higher than any other bridge towers in the world.
The Akashi Strait is a busy shipping port, so engineers had to design a
bridge that would not block shipping traffic. They also had to consider
the weather. Japan experiences some of the worst weather on the
planet. Gale winds whip through the Strait. Rain pours down at a rate of
57 inches per year. Hurricanes, tsunamis, and earthquakes rattle and
thrash the island almost annually.
How did the Japanese engineers get around these problems? They
supported their bridge with a truss, or complex network of triangular
braces, beneath the roadway. The open network of triangles makes the
bridge very rigid, but it also allows the wind to blow right through the
structure. In addition, engineers placed 20 tuned mass dampers (TMDs)
in each tower. The TMDs swing in the opposite direction of the wind
sway. So when the wind blows the bridge in one direction, the TMDs
Bridging the Gap: Week 3
20
sway in the opposite direction, effectively "balancing" the bridge and canceling out the sway. With this
design, the Akashi Kaikyo can handle 180-mile-per-hour winds, and it can withstand an earthquake with
a magnitude of up to 8.5 on the Richter scale!
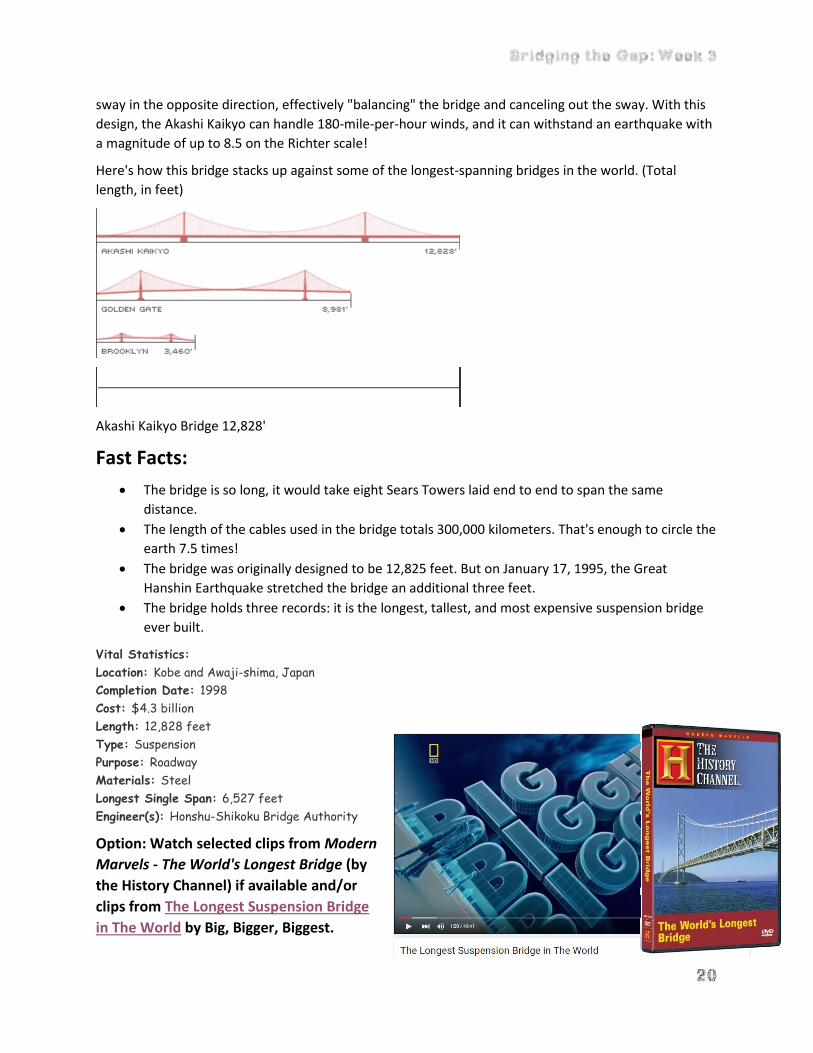
Here's how this bridge stacks up against some of the longest-spanning bridges in the world. (Total
length, in feet)
Akashi Kaikyo Bridge 12,828'
Fast Facts:
The bridge is so long, it would take eight Sears Towers laid end to end to span the same
distance.
The length of the cables used in the bridge totals 300,000 kilometers. That's enough to circle the
earth 7.5 times!
The bridge was originally designed to be 12,825 feet. But on January 17, 1995, the Great
Hanshin Earthquake stretched the bridge an additional three feet.
The bridge holds three records: it is the longest, tallest, and most expensive suspension bridge
ever built.
Vital Statistics:
Location: Kobe and Awaji-shima, Japan
Completion Date: 1998
Cost: $4.3 billion
Length: 12,828 feet
Type: Suspension
Purpose: Roadway
Materials: Steel
Longest Single Span: 6,527 feet
Engineer(s): Honshu-Shikoku Bridge Authority
Option: Watch selected clips from Modern
Marvels - The World's Longest Bridge (by
the History Channel) if available and/or
clips from The Longest Suspension Bridge
in The World by Big, Bigger, Biggest.

Bridging the Gap: Week 3
21
Day Twelve K-8 Standard Alignment
K
7.T/E.2 Apply engineering design and creative thinking to solve practical problems.
7.T/E.3 Use tools to measure materials and construct simple products.
These standards will be met and reinforced (and used as a guideline for student outputs and
expectations) while students work as bridge engineers and build models of suspension bridges.
1
7.T/E.2 Apply engineering design and creative thinking to solve practical problems.
7.T/E.3 Use tools to measure materials and construct simple products.
These standards will be met and reinforced (and used as a guideline for student outputs and
expectations) while students work as bridge engineers and build models of suspension bridges.
2
7.T/E.2 Apply engineering design and creative thinking to solve practical problems.
7.T/E.3 Use tools to measure materials and construct simple products.
These standards will be met and reinforced (and used as a guideline for student outputs and
expectations) while students work as bridge engineers and build models of suspension bridges.
3
7.T/E.1 Describe how tools, technology, and inventions help to answer questions and solve
problems.
7.T/E.3 Identify appropriate materials, tools, and machines that can extend or enhance the
ability to solve a specified problem.
7.T/E.5 Apply a creative design strategy to solve a particular problem.
These standards will be met and reinforced (and used as a guideline for student outputs and
expectations) while students work as bridge engineers and build models of suspension bridges (working
to overcome challenges and problems they encounter as they build). They will also be met as students
learn about the Akashi Kaikyo bridge and how engineers met the challenges of construction and what
approaches they took and tools and technology they used to solve their problems.
4
7.T/E.1 Describe how tools, technology, and inventions help to answer questions and solve
problems.
7.T/E.3 Identify appropriate materials, tools, and machines that can extend or enhance the
ability to solve a specified problem.
7.T/E.5 Apply a creative design strategy to solve a particular problem.
These standards will be met and reinforced (and used as a guideline for student outputs and
expectations) while students work as bridge engineers and build models of suspension bridges (working

Bridging the Gap: Week 3
22
to overcome challenges and problems they encounter as they build). They will also be met as students
learn about the Akashi Kaikyo Bridge and how engineers met the challenges of construction and what
approaches they took and tools and technology they used to solve their problems.
5
7.T/E.1 Describe how tools, technology, and inventions help to answer questions and solve
problems.
7.T/E.3 Identify appropriate materials, tools, and machines that can extend or enhance the
ability to solve a specified problem.
7.T/E.5 Apply a creative design strategy to solve a particular problem.
These standards will be met and reinforced (and used as a guideline for student outputs and
expectations) while students work as bridge engineers and build models of suspension bridges (working
to overcome challenges and problems they encounter as they build). They will also be met as students
learn about the Akashi Kaikyo Bridge and how engineers met the challenges of construction and what
approaches they took and tools and technology they used to solve their problems.
6
7.T/E.1 Use appropriate tools to test for strength, hardness, and flexibility of materials.
7.T/E.2 Apply the engineering design process to construct a prototype that meets certain
specifications.
These standards will be met and reinforced (and used as a guideline for student outputs and
expectations) while students work as bridge engineers and build models of suspension bridges (working
to overcome challenges and problems they encounter as they build). They will also be reinforced as
students view real life examples and learn about the Akashi Kaikyo Bridge and how engineers met the
challenges of construction and what approaches they took and tools and technology they used to solve
their problems.
7
7.T/E.1 Use appropriate tools to test for strength, hardness, and flexibility of materials.
7.T/E.2 Apply the engineering design process to construct a prototype that meets certain
specifications.
These standards will be met and reinforced (and used as a guideline for student outputs and
expectations) while students work as bridge engineers and build models of suspension bridges (working
to overcome challenges and problems they encounter as they build). They will also be reinforced as
students view real life examples and learn about the Akashi Kaikyo Bridge and how engineers met the
challenges of construction and what approaches they took and tools and technology they used to solve
their problems.
8
7.T/E.1 Use appropriate tools to test for strength, hardness, and flexibility of materials.
7.T/E.2 Apply the engineering design process to construct a prototype that meets certain
specifications.
Bridging the Gap: Week 3
23
These standards will be met and reinforced (and used as a guideline for student outputs and
expectations) while students work as bridge engineers and build models of suspension bridges (working
to overcome challenges and problems they encounter as they build). They will also be reinforced as
students view real life examples and learn about the Akashi Kaikyo Bridge and how engineers met the
challenges of construction and what approaches they took and tools and technology they used to solve
their problems.
Sample Academic Vocabulary to Reinforce Week 3
K
Job
Needs
Tools
Parts
Location
1
Property
Push
Pull
Invent
History
Length
Weight
Property
2
Type
Distance
History
Natural Resources
Compare
Contrast
Landmark
River
3
Landforms
Natural resources
Tools
Conclusion
Factor
Capacity
Force
4
Expansion
Weathering
Exploration
Accuracy
Relationship
Remainder
5
Region
View
Model
Core
Gravity
Solution
Reconstruct
Historian
6
Technological
Cause
Effect
Prototype
Design Constraint
7
Impact
Topography
Speed
Function
Property
Juncture
8
Human impact
Variation
Angles
Tension
Infrastructure
Element
Sample Supply List Bridging the Gap Week 3
Day 9&10
Paper strips (ex. Black & Red—for the bridge, Yellow—lights or stars?, Blue, Green, Purple,--water;
Grey, White—Clouds/Fog)
Q-tip, with the ends cut off (You can purchase a special tool with a slit at the end for rolling your
paper strips, but it really isn’t necessary.)
scissors (or simply tear the strips to the lengths you want)
Glue (YES! Paste works well, but any white craft glue will work)
toothpick for applying small amounts of glue
for inspiration, have students check out the included images of the Golden Gate Bridge
Day 11 • A partner (someone of similar size works best)
• Straws
• Scissors
• Piece of string, four feet long, to use as a suspension cable
• Masking tape
• Large paper clip
• Load bucket (paper box takeout containers work well)
• Heavy nuts, bolts or anything else small but heavy to serve as weights
• Ruler
• Teacher made sample
Days 12 (& 13)
Access to videos & links
Cardboard
Popsicle Sticks (24 for a bridge with 1 deck, 36 for 2 decks, etc.)
String
Scotch Tape
Large Nail, Hobby Knife or Box cutter
Scissors
Ruler
Pen/Pencil
Sand Paper
Elmer's Glue or Craft Glue

Bridging the Gap: Week Three
25
SOURCES& REFERENCES
https:/ /en.wikipedia.org/wiki /s imple_suspension_bridge#living_bridges
http:/ /www.pbs.org/wgbh/bui ldingbig/bridge/ index.html http:/ /www.scient i f icamerican.com/artic le/br ing -science-home-suspension-bridge/
https:/ /www.youtube.com/watch?v=N9fbRcRJY34
http:/ /www.pbs.org/wgbh/bui ldingbig/wonder/structure/akashi_kaikyo.html
http:/ /www.instructables.com/id/Simple -Suspension-Bridge-Model/
http:/ /www.al l thingspaper.net/2013/06/qui l led -golden-gate-bridge.html
https:/ /vimeo.com/27299211
http:/ /www.teachkidsart.net/qui l led -paper-designs/
ALL MATERIALS USED FOR PERSONAL, EDUCAT IONAL, AND OTHER NON -COMMERCIAL USE ONLY