Auditing Administrator s Guide
241
Centrify Server Suite Auditing Administrator’s Guide July 2021 (release 2021) Centrify Corporation
Transcript of Auditing Administrator s Guide

Centrify Server Suite
Auditing Administrator’s GuideJuly 2021 (release 2021)
Centrify Corporation

Legal Notice
This document and the software described in this document are furnished under and are subject to theterms of a license agreement or a non-disclosure agreement. Except as expressly set forth in such licenseagreement or non-disclosure agreement, Centrify Corporation provides this document and the softwaredescribed in this document “as is” without warranty of any kind, either express or implied, including, but notlimited to, the implied warranties of merchantability or fitness for a particular purpose. Some states do notallow disclaimers of express or implied warranties in certain transactions; therefore, this statement may notapply to you.
This document and the software described in this document may not be lent, sold, or given away withoutthe prior written permission of Centrify Corporation, except as otherwise permitted by law. Except asexpressly set forth in such license agreement or non-disclosure agreement, no part of this document or thesoftware described in this document may be reproduced, stored in a retrieval system, or transmitted in anyform or by any means, electronic, mechanical, or otherwise, without the prior written consent of CentrifyCorporation. Some companies, names, and data in this document are used for illustration purposes andmay not represent real companies, individuals, or data.
This document could include technical inaccuracies or typographical errors. Changes are periodically madeto the information herein. These changes may be incorporated in new editions of this document. CentrifyCorporation may make improvements in or changes to the software described in this document at any time.
© 2004-2021 Centrify Corporation. All rights reserved. Portions of Centrify software are derived fromthird party or open source software. Copyright and legal notices for these sources are listed separately inthe Acknowledgements.txt file included with the software.
U.S. Government Restricted Rights: If the software and documentation are being acquired by or on behalf ofthe U.S. Government or by a U.S. Government prime contractor or subcontractor (at any tier), in accordancewith 48 C.F.R. 227.7202-4 (for Department of Defense (DOD) acquisitions) and 48 C.F.R. 2.101 and 12.212(for non-DOD acquisitions), the government’s rights in the software and documentation, including its rightsto use, modify, reproduce, release, perform, display or disclose the software or documentation, will besubject in all respects to the commercial license rights and restrictions provided in the license agreement.
Centrify, DirectControl, DirectAuthorize, DirectAudit, DirectSecure, DirectControl Express, Centrify forMobile, Centrify for SaaS, DirectManage, Centrify Express, DirectManage Express, Centrify Suite, CentrifyUser Suite, Centrify Identity Service, Centrify Privilege Service and Centrify Server Suite are registeredtrademarks of Centrify Corporation in the United States and other countries. Microsoft, Active Directory,Windows, andWindows Server are either registered trademarks or trademarks of Microsoft Corporation inthe United States and other countries.
Centrify software is protected by U.S. Patents 7,591,005; 8,024,360; 8,321,523; 9,015,103; 9,112,846;9,197,670; 9,442,962 and 9,378,391.
The names of any other companies and products mentioned in this document may be the trademarks orregistered trademarks of their respective owners. Unless otherwise noted, all of the names used asexamples of companies, organizations, domain names, people and events herein are fictitious. Noassociation with any real company, organization, domain name, person, or event is intended or should beinferred.
• • • • • •
Auditing Administrator’s Guide 2

ContentsAbout this guide 8Intended audience 8
Using this guide 8
Documentation conventions 9
Finding more information about Centrify products 10
Product names 10
Contacting Centrify 12
Getting additional support 13
Overview of the auditing infrastructure 14Deciding whether to audit user activity 14
Capturing detailed and summary information for user sessions 15
Reviewing recorded activity 16
Auditing requires a scalable architecture 17
How audited sessions are collected and stored 18
Auditing architecture and data flow 19
Deploying auditing components in an audit installation 21
Agent components on audited UNIX computers 23
Agent components on auditedWindows computers 24
Planning an audit installation 26Deciding on the scope of the installation 26
Deciding where to install the management database 27
Deciding where to install collectors and audit stores 28
Deciding where to install agents 33
Deciding where to install consoles 34
Audit & Monitoring Service deployment checklist 34
Supported SQL Server editions 36
• • • • • •
Auditing Administrator’s Guide 3

Checking SQL Server logins for auditing 37
Determining storage requirements for auditing 39
What’s involved in the deployment process 41
Installing Centrify Audit & Monitoring Service 45Installation preview 46
Installing and configuring Microsoft SQL Server for auditing 48
Installing the Audit Manager and Audit Analyzer consoles 53
Creating a setup user account for installation 55
Creating a new installation 55
Installing the audit collectors 66
Installing the Centrify Agent for Windows 69
Installing the Audit Management Server 88
Enabling or disabling auditing onWindows computers 89
Installing an Centrify Agent for *NIX 90
Enabling or disabling auditing on Linux and UNIX computers 92
Enabling or disabling video capture auditing 95
Installing additional Audit Manager or Audit Analyzer consoles 96
Checklist for auditing systems outside of Active Directory 96
Auditing systems that are inside a DMZ 99
Managing an installation 103Securing an installation 104
Configuring selective auditing 109
Configuring agents to prefer collectors 111
Audit license enforcement 112
Enabling audit notification onWindows 113
Preventing users from reviewing or deleting sessions 114
Adding an installation 115
• • • • • •
Contents 4

Publishing installation information 116
Removing or deleting an installation 118
Managing audit store databases 119
Managing audit stores 129
Managing the audit management database 132
Maintaining database indexes 134
Managing collectors 135
Managing audited computers and agents 138
Delegating administrative permissions 139
Managing audit roles 140
Querying and reviewing audited activity 144Accessing audited sessions 145
Predefined queries for audit sessions 145
Predefined queries for audit events 147
Predefined queries for reports 147
Creating new session queries 151
Creating queries for audit events 158
Organizing queries in custom folders 161
Exporting and importing query definitions 161
Displaying session information 162
Adding session reviewers without designating auditing roles 162
Changing the review status for audited sessions 163
Playing back a session 165
Exporting sessions 169
Deleting sessions 171
Viewing sessions outside of Audit Analyzer 172
Advanced monitoring 175
• • • • • •
Auditing Administrator’s Guide 5
Set up advanced monitoring 176
Using the advanced monitoring reports 179
Troubleshooting and common questions 180Checking the status of the UNIX agent 180
Viewing and changing log file settings 183
Tracing database operations 188
Stopping auditing on a computer 191
Determining collector status and connectivity 192
Managing Microsoft SQL Server databases 195
Publishing installation information in Active Directory 197
Monitoring file system disk space usage 198
Command line programs for managing auditedsessions 199How to use command line programs 199
Displaying usage information and man pages 200
Using commands for administrative tasks 200
Installing the UNIX agent on remote computers 205Installing the agent silently using a configuration file 205
Using other programs to install the UNIX agent 206
Permissions required to perform administrative andauditing tasks 208Setting and synchronizing audit-related permissions 208
Installation permissions 210
Management database permissions 213
Audit store and audit store database permissions 215
• • • • • •
Contents 6

Audit role permissions 216
Auditor permissions 216
Sizing recommendations for audit installations 218Planning an audit and monitoring service deployment 219
Best practices for an audit installation 223
Creating an initial estimate of your database storage needs 227
Guidelines for determining hardware configuration 227
Identifying typical deployment issues 232
Settings to adjust for performance improvement 233
Conclusion 237
Glossary 239
• • • • • •
Auditing Administrator’s Guide 7

About this guide
The Auditing Administrator’s Guide provides complete information for installingand configuring the auditing infrastructure, including guidelines for planningyour deployment, managing audited activity, and how to use Audit Analyzer tofind and replay captured user sessions. Centrify software helps you comply withregulatory requirements and improve accountability by collecting detailedinformation about user activity on Linux, UNIX, andWindows computers. TheCentrify auditing features enable you to monitor user activity for immediateanalysis or specific incidents, such as application failures or security breaches.
Intended audience
This guide is intended for administrators responsible for installing andmaintaining auditing-related software and the databases that store audit-related data, including the roles and permissions assigned to the users andgroups who are responsible for monitoring and reviewing user activity onaudited computers. In addition, some of the information in this guide is intendedfor security personnel and auditors who are responsible for identifying auditrequirements, querying the audit store databases, examining user activity, andmanaging the status of sessions they have reviewed.
Using this guide
Depending on your environment and role as an administrator or auditor, youmay want to read portions of this guide selectively. The guide provides thefollowing information:
n Overview of the auditing infrastructure provides an overview of what youcan audit and how auditing works.
n Planning an audit installation explains how to prepare for the deploymentof auditing components.
• • • • • •
Auditing Administrator’s Guide 8

n Installing Centrify Audit & Monitoring Service explains how to install andconfigure auditing components in a production environment.
n Managing an installation explains how to secure, change, reconfigure, add,and remove audit and monitoring service components.
n Querying and reviewing audited activity explains how to use AuditAnalyzer to find and review the audited sessions and audit trail events inwhich you are interested.
n Advanced monitoring explains how to use the advanced monitoringfeatures to gather additional information about which users and whatprograms are accessing or modifying production systems.
n Troubleshooting and common questions describes how to view log filesand diagnostics for components of the auditing infrastructure and how toidentify and resolve common issues.
n Command line programs for managing audited sessions provides asummary of the command line programs andWindows utilities.
n Installing the UNIX agent on remote computers describes how to install theagent package using non-interactive scripts and native installers.
n Permissions required to perform administrative and auditing tasksdiscusses the permissions required to perform actions in the AuditManager and Audit Analyzer consoles.
In addition, an index is provided for your reference.
Documentation conventions
The following conventions are used in Centrify documentation:
n Fixed-width font is used for sample code, program names, programoutput, file names, and commands that you type at the command line.When italicized, this font indicates variables. Square brackets ([ ])indicate optional command-line arguments.
n Bold text is used to emphasize commands or key command results;buttons or user interface text; and new terms.
n Italics are used for book titles and to emphasize specific words or terms. Infixed-width font, italics indicate variable values.
n Standalone software packages include version and architectureinformation in the file name. Full file names are not documented in this
• • • • • •
About this guide 9

guide. For complete file names for the software packages you want toinstall, see the distribution media.
n For simplicity, UNIX is used to refer to all supported versions of the UNIXand Linux operating systems. Some parameters can also be used on MacOS X computers.
Finding more information about Centrify products
Centrify provides extensive documentation targeted for specific audiences,functional roles, or topics of interest. If you want to learn more about Centrifyand Centrify products and features, start by visiting the Centrify website. Fromthe Centrify website, you can download data sheets and evaluation software,view video demonstrations and technical presentations about Centrify products,and get the latest news about upcoming events and webinars.
For access to documentation for all Centrify products and services, visit theCentrify documentation portal at docs.centrify.com. From the Centrifydocumentation portal, you can always view or download the most up-to-dateversion of this guide and all other product documentation.
For details about supported platforms, please consult the release notes.
For the most up to date list of known issues, please login to the CustomerSupport Portal at http://www.centrify.com/support and refer to Knowledge Basearticles for any known issues with the release.
Product names
Over the years we've made some changes to some of our product offerings andfeatures and some of these previous product names still exist in some areas. Ourcurrent product offerings include the following services:
Current Overall Product Name Current Services Available
Centrify Identity-Centric PAM
Privileged Access Service
Gateway Session Audit and Monitoring
Authentication Service
Privilege Elevation Service
Audit and Monitoring Service
Privilege Threat Analytics Service
• • • • • •
Auditing Administrator’s Guide 10

Whether you're a long-time or new customer, here are some quick summaries ofwhich features belong to which current product offerings:
PreviousProduct Offering
PreviousProductOffering
Description Current ProductOffering
CentrifyPrivilegedService (CPS)
Privileged AccessService
DirectControl(DC) Authentication Service
DirectAuthorize(DZ or DZwin)
Privilege ElevationService
DirectAudit (DA) Audit and MonitoringService
InfrastructureServices
Privileged AccessService, AuthenticationService, PrivilegeElevation Service, Auditand Monitoring Service,and Privilege ThreatAnalytics Service
DirectManage(DM)
ManagementServices
Consoles that are used by all 3services:Authentication Service,Privilege Elevation Service, andAudit and Monitoring Service
DirectSecure (DS)Isolation andEncryptionService
Still supported but nolonger being developedor updated
User AnalyticsService
Privilege ThreatAnalytics Service
DeploymentManager
Deployment Manager provideda centralized console fordiscovering, analyzing, andmanaging remote computers.This feature is no longerincluded starting withInfrastructure Services release19.6.
Depending on when you purchased a Centrify product offering, you may havepurchased one of the following product bundles:
• • • • • •
About this guide 11

PreviousProductBundle
PreviousProductBundle
CurrentProductBundle
Services Included Description
CentrifyIdentity-CentricPAM CoreEdition
Privileged Access Serviceand Gateway SessionAudit and Monitoring
CentrifyServer SuiteStandardEdition
Authentication Serviceand Privilege ElevationService
CentrifyInfrastructureServicesStandardEdition
CentrifyIdentity-CentricPAMStandardEdition
Privileged Access Service,Authentication Service,and Privilege ElevationService
CentrifyServer SuiteEnterpriseEdition
Authentication Service,Privilege Elevation Service,and Audit and MonitoringService
CentrifyInfrastructureServicesEnterpriseEdition
CentrifyIdentity-CentricPAMEnterpriseEdition
Privileged Access Service,Authentication Service,Privilege Elevation Service,Audit and MonitoringService (includes GatewaySession Audit andMonitoring)
CentrifyServer SuitePlatinumEdition
Discontinuedbundle thatincludedDirectControl,DirectAuthorize,DirectManage,DirectAudit, andDirectSecure
Contacting Centrify
You can contact Centrify by visiting our website, www.centrify.com. On thewebsite, you can find information about Centrify office locations worldwide,email and phone numbers for contacting Centrify sales, and links for following
• • • • • •
Auditing Administrator’s Guide 12

Centrify on social media. If you have questions or comments, we look forward tohearing from you.
Getting additional support
If you have a Centrify account, click Support on the Centrify website to log onand access the Centrify Technical Support Portal. From the support portal, youcan search knowledge base articles, open and view support cases, downloadsoftware, and access other resources.
To connect with other Centrify users, ask questions, or share information, visitthe Centrify Community website to check in on customer forums, read the latestblog posts, view how-to videos, or exchange ideas with members of thecommunity.
• • • • • •
About this guide 13

Overview of the auditinginfrastructure
Auditing is a key feature of Centrify Server Suite. If you choose to enable auditingin your organization, you can capture detailed information about user activity onLinux, UNIX, andWindows computers and store that activity to improveregulatory compliance and accountability and mitigate security risks. Thissection provides an overview of the auditing infrastructure, including keycomponents and terminology.
The following topics are covered:
Deciding whether to audit user activity 14
Capturing detailed and summary information for user sessions 15
Reviewing recorded activity 16
Auditing requires a scalable architecture 17
How audited sessions are collected and stored 18
Auditing architecture and data flow 19
Deploying auditing components in an audit installation 21
Agent components on audited UNIX computers 23
Agent components on auditedWindows computers 24
Deciding whether to audit user activity
Just as it is important to protect assets and resources from unauthorized access,it is equally important to track what users who have permission to access thoseresources are doing or have done in the past. For users who have privileged
• • • • • •
Auditing Administrator’s Guide 14

access to computers and applications with sensitive information, auditing theiractions helps ensure accountability and improve regulatory compliance.
There are many reasons for organizations to establish auditing policies andenable auditing of user activity. For example, you might want to audit activity forany of the following reasons:
n To prove certain computers or applications are secure in order to complywith government or industry regulatory requirements.
n To report on actions taken by users with elevated privileges.
n To prevent the use of shared passwords when more than one personneeds administrative access to a computer or an application.
n To improve accountability when users with elevated permissions haveaccess to privileged resources.
n To detect suspicious activity and mitigate the threat posed by maliciousinsiders or third parties who have access to sensitive systems.
n To pinpoint actions that may have caused failures and simplifytroubleshooting procedures.
n To capture information, such as the steps that resolved an open case, thatcan be used to help your organization improve its helpdesk operations orsecurity procedures.
Capturing detailed and summary information foruser sessions
After you deploy the auditing infrastructure, you can capture detailedinformation about user activity and the events that occurred on the computersyou choose to audit. On those computers, an agent starts recording user activitywhen a user selects an audited role or starts a login shell locally, using a remoteshell, or through a virtual network connection such as Citrix or VNC.
Each record of continuous user activity is called a session. A session ends whenthe user logs out, disconnects, or is inactive long enough to lock the desktop. Ifthe user reconnects or unlocks the desktop, the agent resumes recording theuser’s activity as a new session. When users start a new session on an auditedcomputer, they can be notified that their session is being audited but they cannotturn off auditing except by logging off, so you have a complete record of whathappened, includes an audit trail of the actions a user has taken.
• • • • • •
Overview of the auditing infrastructure 15

You can choose whether to record only summaries of user activity or a full visualrecord of user activity.
Sessions include different kinds of information depending on the auditedsystem's operating system:
n Windows: When auditingWindows computers, each session is a videocapture of everything that takes place on the desktop, including theapplications opened, text that was entered, and the results that weredisplayed.
n Linux:When auditing Linux computers, the agent records shell activity,such as the commands a user runs or the changes made to key files anddata. On some versions of Linux computers, actions performed using adisplay manager, such as GNOME or KDE, are also recorded. Consult theCentrify release notes for supported platform details.
In addition to capturing detailed information about user activity, sessionsprovide a summary of actions taken so that you can scan the applicationsopened or commands executed for potentially interesting or damaging actionswithout playing back a complete session. After you select a session of interest inthe Audit Analyzer, the console displays an indexed list of actions taken in theorder in which they occurred. You can then select any entry in the list to startviewing the session beginning with that action. For example, if a user opened anapplication that stores credit card information, you can scan the list of actions forthat event and begin reviewing what happened in the session from the time theuser opened that particular application.
If users change their account permissions to take any action with elevatedprivileges, the change is recorded as an audit trail event. You can also search forthese events to find sessions of interest.
Reviewing recorded activity
The information recorded in each session is transferred to a Microsoft SQLServer database so that it is available for querying and playback. Because theinformation is collected as it happens, you can monitor computers for suspiciousactivity or troubleshoot problems immediately after they occur.
You can also search for and play back sessions to locate past events thatoccurred on specific computers or that affected particular users. For example,you might be interested in activity that occurred immediately before a securitybreach or want to investigate the cause of an application failure. Similarly, a
• • • • • •
Auditing Administrator’s Guide 16

security expert might want to see who had access to computers with sensitivedata, such as payroll information or medical records, during a particular period oftime, such as the last 72 hours.
Auditing requires a scalable architecture
To ensure scalability for large organizations and provide fault tolerance, theauditing infrastructure has a multi-tier architecture that consists of the followinglayers:
n Audited computers are the computers on which you want to monitoractivity. To be audited, the computer must have an agent installed, auditfeatures enabled, and be joined to an Active Directory domain.
n Collectors are intermediate services that receive and compress thecaptured activity from the agents on audited computers as the activityoccurs. You should establish at least two collectors to ensure that auditingis not interrupted. You can add collectors to your installation at any timeand it is common to have multiple collectors to provide load balancing andredundancy.
n Audit stores define a scope for auditing and include the audit storedatabases that receive captured activity and audit trail records from thecollectors and store it for querying and playback. Audit store databasesalso keep track of all the agents and collectors you deploy. For scalabilityand network efficiency, you can have multiple audit stores each withmultiple databases.
n Amanagement database server is a computer that hosts the MicrosoftSQL Server instance with the audit management database. Themanagement database stores information about the overall installation,such as the scope of each audit store, which audit store database is activeand where there are attached databases, the audit roles you create, andthe permissions you define. The management database enablescentralized monitoring and reporting across all audit stores, collectors, andaudited computers.
n The Audit Manager and Audit Analyzer consoles are the graphical userinterfaces which administrators can use to configure and manage thedeployment of audit components, such as agents and collectors, or toquery and review captured user sessions.
• • • • • •
Overview of the auditing infrastructure 17

To ensure that audit data transferred over the network is secure, communicationbetween components is authenticated and encrypted.
In addition to these core components of the auditing infrastructure, there is aseparateWindows service that collects audit trail events when there are auditstore databases that are not accessible, for example, because of network issuesor the database server is shut down. This audit management server runs as aWindows service and spools the events on the management database, thensends them to the audit store database when the inaccessible database comesback online.
In addition to spooling audit trail events, the audit management serverautomatically calculates the approximate disk space used by audited sessionson the database server. The audit management server will calculate the sessionsize for all completed audited sessions. The session size is not calculated for in-progress or disconnected sessions. You can view the session size for allcompleted sessions in the Audit Analyzer console’s query results.
How audited sessions are collected and stored
The agent on each audited computer captures user activity and forwards it to acollector on aWindows computer. If the agent cannot connect to a collector—forexample, because all of the computers hosting the collector service for the agentare shut down for maintenance—the agent spools the session data locally andtransfers it to a collector later.
The collector sends the data to an audit store server, where the audit data isstored in the Microsoft SQL Server database that you have designated as theactive audit store database. As you accumulate data, you can add more SQLServer databases to the audit store to hold historical information or to changethe database designated as the active audit store database.
After the audit data is transferred to the audit store database, you can use theAudit Analyzer console to request session data. The audit managementdatabase, which stores information about all of the components that make upthe auditing infrastructure, retrieves the session data from the appropriate auditstore database.
• • • • • •
Auditing Administrator’s Guide 18

Auditing architecture and data flow
The following figure illustrates the basic architecture and flow of data with aminimum number of auditing components installed.
In the illustration, each agent connects to one collector. In a productionenvironment, you can configure agents to allow connections to additionalcollectors for redundancy and load balancing or to prevent connections betweenspecific agents and collectors. You can also add audit stores and configurewhich connections are allowed or restricted. The size and complexity of theauditing infrastructure depends on how you want to optimize your networktopology, how many computers you are auditing, how much audit data youwant to collect and store, and how long you plan to retain audit records.
The following figure illustrates the data flow details. You can see whichcomponents communicate to other components and in what order. The diagramalso includes some port details.
• • • • • •
Overview of the auditing infrastructure 19

The following diagram shows how the Linux Desktop auditing session data iscollected.
• • • • • •
Auditing Administrator’s Guide 20

Within the Linux Desktop, there's a component called DAX that generates therecorded session data and passes it to the audit daemon. The audit daemonencrypts and passes the recorded session data to the collector. The collectorchannels session data of different types together and passes that encryptedsession data along to the active audit store database.
Deploying auditing components in an auditinstallation
The multi-tiered architecture of the auditing infrastructure is referred tocollectively as a DirectAudit installation. The DirectAudit installation representsa logical object similar to an Active Directory forest or site. It encompasses all ofthe auditing components you deploy—agents, collectors, audit stores,management database, and consoles—regardless of how they are distributedon your network. The installation also defines the scope of audit data available.All queries and reports are against the audit data contained within theinstallation boundary.
The most common deployment scenario is to have a single audit installation foran entire organization so that all audit data and management of the audit datais centralized. Within a single installation, you can have components whereverthey are needed, as long as you have the appropriate network connections thatallow them to communicate with each other. The audit data for the entireinstallation is available to users who have permission to query and view it usinga console. For most organizations, having a single installation is a scalablesolution that allows a “separation of duties” security model through the use ofaudit roles. If you establish a single installation, there will be one Master Auditorrole for the entire organization, and that Master Auditor can control the auditdata that other users and groups can see or respond to by defining roles thatlimit access rights and privileges.
However, if you have different lines of business with different audit policies—indifferent geographic locations, or with different administrative groups—you canconfigure them as separate audit installations. For example, if you have offices inNorth America and Hong Kong managed by two different IT teams—IT-US andIT-HK—you might want to create two DirectAudit installations to maintain yourexisting separation of duties for the IT-US and IT-HK teams.
• • • • • •
Overview of the auditing infrastructure 21

Planning where to install auditing components
Before you install Centrify Audit & Monitoring Service, you should develop abasic deployment plan for how you will distribute and manage the componentsthat make up an installation. For example, you should decide howmanycollectors and audit stores to create and where to put them. You should alsoconsider the network connections required and howmany computers you planto audit. For example, you can have multiple agents using the same set ofcollectors, but you should keep the collectors within one hop of the agents theyserve and within one hop of the audit stores to which they transfer data.
By planning where to install components initially, you can determine the numberof collectors you should have for load balancing or redundancy. After the initialdeployment, you can add collectors and audit stores whenever and whereverthey are needed.
Using multiple databases in an audit store
Each audit store uses Microsoft SQL Server to provide database services to theaudit installation. When you install the first audit store, you configure thedatabase instance you want to use and that database becomes the activedatabase for storing incoming audit data. A single audit store, however, canhave several databases attached to it. Attached databases store historicalinformation and respond to queries from the management database. You canuse the Audit Manager console to control the databases that are attached to theaudit store and to designate which database is active. Only one database canbe active in an audit store at any given time.
Although the audit store can use multiple databases, the presentation of sessiondata is not affected. If a session spans two or more databases that are attachedto the audit store, the Audit Analyzer console presents the data as a single,unbroken session. For example, if you change the active database during asession, some of the session data is stored in the attached database that is nolonger active and some of it stored in the newly activated database, but thesession data plays back as a single session to the auditor.
Using multiple consoles in an installation
A single installation always has a single audit management database. In mostcases, however, you use more than one console to request data from the audit
• • • • • •
Auditing Administrator’s Guide 22

management database. The two most important consoles in an installation arethe Audit Manager console and the Audit Analyzer console.
n As the audit installation owner, you use the Audit Manager console toconfigure and manage the auditing components in your installation. Inmost organizations, there is only one Audit Manager console installed.
n Auditors use the Audit Analyzer console to search, retrieve, and play backsessions. The auditor can use predefined queries to find sessions or definenew queries. Auditors can also choose whether to share their queries withother auditors or keep them private. In most organizations, there aremultiple Audit Analyzer consoles installed.
In addition to the Audit Manager and Audit Analyzer consoles, you can use theAgent Control Panel and the Collector Control Panel to configure and manageagents and collectors.
The following figure shows the architecture of a medium-size installation.
Agent components on audited UNIX computers
To enable auditing for Linux and UNIX computers, you must install the CentrifyUNIX agent on the computers you want to audit and make sure the computers
• • • • • •
Overview of the auditing infrastructure 23
are joined to an Active Directory domain. Joining a domain is required to ensurethat authentication and authorization services are provided by Active Directory.To enable auditing on a computer, the Centrify UNIX agent includes thefollowing components:
n dad—the core auditing service that collects the audit data and either sendsit to a collector or spools it locally until a collector is available.
n cdash—the UNIX shell wrapper that intercepts all user traffic and sends itto the dad process.
n dacontrol, dainfo, dareload, and other command-line programs thatenable you to manage agent operations from a login shell.
n dax—the audit service that records graphical user interface sessions onxWindows computers. Consult the release notes for which xWindowsversions are supported.
If you're auditing only shell sessions on a UNIX computer: after you enableauditing on a computer, the agent captures all output (stdout), error messages(stderr), and user input (stdin) except for passwords. By default, the agentcaptures user input even if a user runs commands with echo turned off. Forexample, if a user logs on, then runs echo off before typing the sudo command,the auditing service captures the sudo entry as part of the user’s session.
If you're auditing xWindows sessions: the agent captures all windows that auser opens and which user interface items the user interacts with. For webbrowser applications, the agent captures the title of the web page but not anyactivity within the web page.
Agent components on auditedWindowscomputers
To enable auditing for Windows computers, you must install the Centrify Agentfor Windows on the computers you want to audit and make sure the computersare joined to an Active Directory domain. Joining a domain is required to ensurethat authentication and authorization services are provided by Active Directory.If you enable auditing for the Centrify Agent for Windows, the agent includes thefollowing components:
• • • • • •
Auditing Administrator’s Guide 24

n wdad—theWindows audit data collection service.
n wash—theWindows service that intercepts all user traffic and sends it totheWindows audit data collection service.
n The Agent Control Panel—an applet that enables you to configure andmanage the agent.
For example, you can use the Agent Control Panel to configure the colordepth of audit data to achieve the desired balance between playbackscreen resolution and audit store database size.
• • • • • •
Overview of the auditing infrastructure 25

Planning an auditinstallation
This chapter describes the decisions you need to make during the planningphase of a deployment and summarizes what’s involved in deploying audit andmonitoring service components and auditing-related services on the computersto be audited. It includes simplified diagrams that highlight the steps involved.
The following topics are covered:
Deciding on the scope of the installation 26
Deciding where to install the management database 27
Deciding where to install collectors and audit stores 28
Deciding where to install agents 33
Deciding where to install consoles 34
Audit & Monitoring Service deployment checklist 34
Supported SQL Server editions 36
Checking SQL Server logins for auditing 37
Determining storage requirements for auditing 39
What’s involved in the deployment process 41
Deciding on the scope of the installation
Before you deploy any part of the auditing infrastructure, you should decide onthe scope of the audit installation and whether you want to use a singleinstallation for your entire Active Directory site, or separate audit installations fordifferent geographical areas or functional groups.
• • • • • •
Auditing Administrator’s Guide 26

The most common deployment scenario is a single installation for each ActiveDirectory forest, so that auditors can query and review information for the entireorganization. However, if your Active Directory site has more than one forest,you might want to use more than one installation. If you want to use more thanone installation, you should determine the subnetwork segments that will definethe scope of each installation.
In Active Directory, a site represents the collection of Internet Protocol (IP)addresses that describe the physical structure of your network. If you are notfamiliar with how Active Directory sites are defined, you should consult Microsoftdocumentation for more information.
Deciding where to install the managementdatabase
Each audit installation has a single audit management server and auditmanagement database. The management database is a Microsoft SQL Serverdatabase that stores information about the installation such as the ActiveDirectory sites or subnets associated with each audit store.
The computer you use for the audit management database should have reliable,high-speed network connectivity. The management database does not store thecaptured sessions, and is, therefore, much smaller than the audit storedatabases. There are no specific sizing requirements or recommendations forthe management database.
You can use the following guideline as the recommended minimum hardwareconfiguration for the computer you use as the management database:
Computer used for Number of concurrentsessions
CPUcores
CPUspeed
Memory
Managementdatabase Any 1 to 2 2.33 GHz 8 GB
The audit management server is aWindows service that performs two maintasks:
n The service collects audit trail events on the management database, thensends them to the audit store database.
n The service automatically calculates the approximate disk space used byaudited sessions.
• • • • • •
Planning an audit installation 27

Deciding where to install collectors and audit stores
Although a collector and an audit store database can be installed on the samecomputer for evaluation, you should avoid doing so in a production environment.As part of the planning process, therefore, you need to decide where to installcollectors and audit store databases. In designing the network topology for theinstallation, there are several factors to consider. For example, you shouldconsider the following:
n Database load and capacity
n Network connectivity
n Port requirements
n Active Directory requirements
The next sections provide guidelines and recommendations to help you decidewhere to install the collectors and audit store databases required to support thenumber of computers you plan to audit.
Use separate computers for collectors and audit storedatabases
To avoid overloading the computers that host collectors and audit storedatabases, you should install collectors and audit store SQL Server databaseson separate computers. Because SQL Server uses physical memory to storedatabase information for fast query results, you should use a dedicatedcomputer for the audit store database, and allocate up to 80% of the computer’smemory to SQL Server. In most installations, you also need to plan for more thanone audit store database and to periodically rotate from one database toanother to prevent any one database from getting too large. For moreinformation about managing audit store databases, see Managing audit storedatabases.
Plan for network traffic and default ports
You should minimize the distance network packets have to travel between anagent and its collector. You should also minimize the distance between collectorsand their audit stores. If possible, you should not have more than one gateway orrouter hop between an agent and its collector.
• • • • • •
Auditing Administrator’s Guide 28

To help you plan for network traffic, the following ports are used in the initial setof network transactions:
n Directory Service - Global Catalog lookup request on port 3268.
n Authentication Services - LDAP sealed request on port 389.
n Kerberos – Ticket Granting Ticket (TGT) request on port 88.
n Network Time Protocol (NTP) Server – Time synchronized for Kerberos onport 123.
n Domain Name Service (DNS) – Host (A), Pointer (PTR), Service Location(SRV) records on port 53.
Depending on the specific components you deploy and operations performed,you might need to open additional ports. The following table summarizes theports used for Centrify software.
Thisport
Is used for Centrify software component
23 TCP communication for Telnetconnections
Centrify authentication service, privilegeelevation service, and audit andmonitoring service.
By default, telnet connections are notallowed because passwords aretransferred over the network as plain text.
53 TCP/UDP communication Clients use the Active Directory DNSserver for DNS lookup requests.
88 Encrypted UDP communication Kerberos ticket validation andauthentication, agents, Centrify PuTTY
123 UDP communication for simple networktime protocol (NTP)
Keeps time synchronized between clientsand Active Directory for Kerberosticketing.
389 Encrypted TCP/UDP communication Active Directory authentication and clientLDAP service.
443 Centrify Connector communication withPrivileged Access Service Centrify Connector
445 Encrypted TCP/UDP communication fordelivery of group policies
The adclient and adgpupdate use Samba(SMB) andWindows file sharing todownload and update group policies, ifapplicable.
464 Encrypted TCP/UDP communication forKerberos password changes
Kerberos ticket validation andauthentication for agents, Centrify PuTTY,adpasswd, and passwd.
• • • • • •
Planning an audit installation 29

Thisport
Is used for Centrify software component
1433Encrypted TCP communication for thecollector connection to Microsoft SQLServer
The collector service sends audited activityto the database
3268 Encrypted TCP communication Active Directory authentication and LDAPglobal catalog updates.
5063 Encrypted TCP/RPC communication forthe agent connection to collectors
The auditing service records user activityon an audited computer.
5064
Encrypted SSL/TLS communication forthe agent connection to collectors forsystems that are not joined to ActiveDirectory.
The auditing service records user activityon an audited computer outside of ActiveDirectory.
none ICMP (ping) connections To determine whether if a remotecomputer is reachable.
Identify an Active Directory site or subnets
Depending on the size and distribution of your Active Directory site, an auditstore might cover an entire site or specific subnet segments. If you have a large,widely distributed site, you should consider network connectivity and latencyissues in determining which subnets each audit store should serve. In addition,you should always place collectors in the same site as the agents from whichthey receive data. Collectors and agents must always be in the same ActiveDirectory forest. If possible, you should put collectors and agents in the samedomain.
Note: If you deploy agents in a perimeter network, such as ademilitarized zone (DMZ), that is separated from your mainnetwork by a firewall, put the collectors in the same ActiveDirectory domain as the audited computers. The collectors cancommunicate with the audit store database through a firewall.
Determining how many collectors and audit stores to install
Although you can add collectors and audit stores to your audit installation afterthe initial deployment, you might want to calculate howmany you will needbefore you begin deploying components. You should always have at least twocollectors to provide redundancy. As you increase the number of agentsdeployed, you should consider adding collectors.
• • • • • •
Auditing Administrator’s Guide 30

Estimate the number of agents and sessions audited
If you plan to use more than the minimum number of collectors, the mostimportant factor to consider is the number of concurrent sessions you expect tomonitor on audited computers. The number of concurrent sessions representsthe number of agents that are actively capturing user sessions in a site at thesame time.
Guidelines for Linux and UNIX computers
You can use the following guidelines as a starting point and adjust after youhave observed howmuch audit data you are collecting and storing for Linux andUNIX computers:
Number of concurrentsessions
Recommended number ofcollectors
Recommended number of auditstores
500 (or less) agents 2 1
up to 1000 agents 2 1
more than 1000 agents 2 for every 500 agents 1 for every 1000 agents
Guidelines for Windows computers or mixed environments
You can use the following guidelines as a starting point and adjust after youhave observed howmuch audit data you are collecting and storing for Windowscomputers:
Number of concurrentsessions
Recommended number ofcollectors
Recommended number of auditstores
100 (or less) agents 2 1
more than 100 agents 2 for every 100 agents 1 for every 100 agents
If you auditing Linux, UNIX, andWindows computers, use the numbers ofcollectors and audit stores recommended for Windows agents unless you havesignificantly fewerWindows agents.
Determine the recommended hardware configuration
The hardware requirements for collectors and audit store servers depend on thesize of the installation and where the components are installed on the network.For example, the requirements for a computer that hosts the collector service aredetermined by the number of audited computers the collector supports, the level
• • • • • •
Planning an audit installation 31

of user activity being captured and transferred, and the speed of the networkconnection between the agents and the collector and between the collector andits audit store.
Guidelines for Linux and UNIX computers
You can use the following guidelines as the recommended hardwareconfiguration for the computers you use for collectors and audit store serverswhen auditing Linux and UNIX computers:
Computer used for Number of concurrent sessions CPU cores CPU speed Memory
CollectorsUp to 250 active UNIX agents 2 2.33 GHz 8 GB
250 to 500 active UNIX agents 4 2.33 GHz 16 GB
Audit store
Up to 250 active UNIX agents 2 2.33 GHz 8 GB
250 to 500 active UNIX agents 4 2.33 GHz 16 GB
500 to 1000 active UNIX agents 4 2.33 GHz 32 GB
Guidelines for Windows computers
You can use the following guidelines as the recommended hardwareconfiguration for the computers you use as collectors and audit store serverswhen auditingWindows computers:
Computer used for Number of concurrent sessions CPU cores CPU speed Memory
Collectors Up to 100 activeWindows agents 2 2.33 GHz 8 GB
Audit storeUp to 200 activeWindows agents 2 2.33 GHz 8 GB
200 to 500 activeWindows agents 4 2.33 GHz 32 GB
Guidelines for storage
Because audit and monitoring service collectors send captured user sessions tothe active SQL Server database, you should optimize SQL Server storage for fastdata logging, if possible. For the active database, you get the most benefit fromimprovements to disk write performance. Read performance is secondary. FibreAttached Storage (FAS) and Storage Area Network (SAN) solutions can provide2 to 10 times better performance than Direct Attached Storage (DAS), but at ahigher cost. For attached databases that are only used to store information forqueries, you can use lower-cost storage options.
Guidelines for disk layout
The following table outlines the recommended disk arrays:
• • • • • •
Auditing Administrator’s Guide 32

Application Diskconfiguration
Use the disk for
Operatingsystem C: RAID 1 Operating system files, page file, and SQL Server
binaries.
Microsoft SQLServer
D: RAID 10 (1+0) Audit store database.
E: RAID 10 (1+0) Audit store database log files.
F: RAID 1 or 10(1+0)
Temporary database space (tempdb) for large queriesfor reports.
G: RAID 1 Database dump files.
The size of disk needed depends on the number, length, and types of sessionsrecorded each day, the selected recovery model, and your data retention policies.For more information about managing audit store databases, see Managingaudit store databases.
Deciding where to install agents
The Centrify agent must be installed on all of the computers you want to audit.Therefore, as part of your planning process, you should decide whether youwant to audit every computer on the network or specific computers, such as thecomputers used as servers or used to run administrative software.
Before installing the Centrify Agent for Windows, verify the following:
n The computer is joined to Active Directory.
n The computer has .NET 4.6.2 or later installed.
n The computer has Microsoft Windows Installer version 3.1 or newer.
Agents can communicate with a collector only if the agents and collector are inthe same Active Directory forest.
For UNIX and Linux systems, be aware that desktop auditing is available only forsome Linux distributions. Please see the release notes for the supported platformdetails.
Linux desktop auditing workings independently from shell session auditing. Forplatforms that support both, you can enable either one or both.
• • • • • •
Planning an audit installation 33

Deciding where to install consoles
You can install and run the Audit Manager console and the Audit Analyzerconsole on the same computer or on different computers. The computers whereyou install the consoles must be joined to the Active Directory domain and beable to access the management database that serves the installation.
You can also use the Audit Analyzer console to run queries from any additionalcomputers with network access to the management database. Therefore, youshould decide where it would be convenient to have this capability.
Audit & Monitoring Service deployment checklist
The following checklist provides an overview of each of the main steps that areinvolved when you deploy Centrify Audit & Monitoring Service. For any tasksrelated to Centrify software, there are links to more information and procedures.
For authentication and privilege elevation deployment steps, please seeAuthentication and Privilege Elevation services deployment checklist.
Step Auditing and Monitoring installationstep
Notes Link to Details
Preparation and Planning1 Analyze your network topology to
determine where to install componentsand services and any hardware orsoftware updates required.
Overview of theauditing infrastructure
2 Create a list of the computers whereyou plan to install differentcomponents.
Planning an auditinstallation
3 Determine the scope of the auditinstallation.
Deciding on the scopeof the installation
4 Determine the size of your databasestorage.
Sizingrecommendations foraudit installations
Pre-requisite tasks5 Create Active Directory security
groups for managing the permissionsrequired for the auditing andmonitoring service infrastructure.
Creating securitygroups for auditing
• • • • • •
Auditing Administrator’s Guide 34

Step Auditing and Monitoring installationstep
Notes Link to Details
6 Install Microsoft SQL Server and createa database instance for use with theaudit and monitoring service.
Installing andconfiguring MicrosoftSQL Server forauditing
7 Prepare SQL Server for auditing. This includes creatinga backend serviceaccount that will runstored procedures.
Configuring SQLServer to prepare forauditing
8 Create a setup user account and give itdatabase administrator (DBA)privileges.
You'll use thisaccount andpassword to run theinstallers.
Creating a setup useraccount forinstallation
Install tasks9 Install the Audit Manager and Audit
Analyzer consoles.Installing the AuditManager and AuditAnalyzer consoles
10 In Audit Manager, create a newinstallation for auditing.
Creating a newinstallation
11 In Audit Manager, set up the AuditStores and Audit Store databases.
Creating the first auditstore, Creating thefirst audit storedatabase
12 Install and configure the audit collectorservice on at least twoWindowscomputers.
Installing the auditcollectors
13 Install a Centrify agent for Windowson eachWindows computer that youwant to audit.
Installing the CentrifyAgent for Windows
14 Install a Centrify agent for UNIX oneach UNIX or Linux computer that youwant to audit.
Installing an CentrifyAgent for *NIX
15 Install and configure the AuditManagement Server component on aWindows server computer.
For this task, run theinstaller using thesetup user accountthat you created instep 8.
Installing the AuditManagement Serverand Configuring theAudit ManagementServer
16 Configure and enable auditing on theWindows computers, if they're notalready enabled.
Enabling or disablingauditing onWindowscomputers
• • • • • •
Planning an audit installation 35

Step Auditing and Monitoring installationstep
Notes Link to Details
17 Configure and enable auditing on theUNIX or Linux computers.
Enabling or disablingauditing on Linux andUNIX computers
18 Install additional Audit Manager orAudit Analyzer consoles on anyWindows computer that you want touse for the auditing and monitoringservice.
Installing additionalAudit Manager orAudit Analyzerconsoles
Verification tasks19 Verify that data is being collected and
agents are working correctly:
l Run dainfo on audited UNIXcomputers.
l Use Audit Analyzer to verify that datais being collected.
Checking the status ofthe UNIX agent
Supported SQL Server editions
The current release of the Centrify Audit & Monitoring Service supports 64-bitversions of the following SQL Server editions:
n SQL Server 2008 Express with Advanced Services
n SQL Server 2008
n SQL Server 2008 R2 Express with Advanced Services (Service Pack 2 orhigher recommended)
n SQL Server 2008 R2 (Service Pack 2 or higher recommended)
n SQL Server 2012 Express with Advanced Services
n SQL Server 2012 (All SP levels)
n SQL Server 2014 Express with Advanced Services
n SQL Server 2014 (All SP levels)
n SQL Server 2016 -- all SP levels for SQL Server 2016 Standard andEnterprise including the latest 2016 SP2 CU7 version.
n SQL Server 2017
• • • • • •
Auditing Administrator’s Guide 36

n SQL Server 2017 Express Advanced
n SQL Server 2019
n SQL Server 2019 Express Advanced
Note: SQL Server 2008 and 2008 R2 are not compatible withWindows10
Checking SQL Server logins for auditing
An audit installation requires at least two Microsoft SQL Server databases: onefor the management database and at least one for the first audit store database.To successfully connect to these databases, you must ensure that theappropriate users and computers have permission to read or to read and writefor the databases that store audit-related information.
The simplest way to manage SQL Server logins for auditors and administratorsis to do the following:
n Ensure you have a SQL Server login account for the NT Authority\Systembuilt-in account.
n Add the NT Authority\System account to the sysadmin fixed server role.
n Use the Audit Manager console to add Active Directory users and groups tothe Auditor roles and/or assign them administrative rights over the auditinstallation.
If you use Audit Manager to manage SQL Server logins, you can use ActiveDirectory membership to automatically add and remove the permissionsrequired for auditing activity. There is no requirement to use the SQL ServerManagement Studio to manage logins or permissions. Since it is recommendedthat you have a dedicated SQL Server instance for auditing, giving the NTAuthority\System account a SQL Server login and system administrator role isan acceptable solution for most organizations.
SQL Server account Type of account Required permissions Notes
NT Authority\System machine account SQL Server Roles: sysadmin role
Auditing permissions for SQL Server
• • • • • •
Planning an audit installation 37

Creating security groups for auditing
Depending on whether you configure Microsoft SQL Server to useWindows onlyauthentication or Windows or SQL Server authentication, your SQL Server logincredentials might be aWindows account or a SQL Server login account that isnot associated with aWindows account.
To facilitate communication and the management of SQL Server logins, you cancreate Active Directory security groups for the following users and computers:
n Centrify-Admins for the user accounts that perform administrative tasksusing Audit Manager.
n Centrify-Auditors for the user accounts that use Audit Analyzer.
n Centrify-TrustedCollectors for the computers accounts that host thecollector service.
If you create these Active Directory security groups, you can then use AuditManager to grant Manage SQL Login permissions for each group to allow itsmembers to connect to the appropriate SQL Server database. Creating ActiveDirectory security groups with SQL Server logins enables you to manage accessto the databases required for auditing through Active Directory groupmembership without the help of the database administrator.
Any time you want to add an administrator, auditor, or collector computer to theinstallation, you simply add that user account or computer object to theappropriate Active Directory group. If an administrator or auditor leaves or if youwant to stop using the collector on a particular computer, you can remove thatuser or computer from its Active Directory security group to prevent it fromaccessing the database.
• • • • • •
Auditing Administrator’s Guide 38

Active Directorysecurity groups
Type ofaccount
RequiredSQL Serverpermissions
Notes
Centrify-Admins for theuser accountsthat performadministrativetasks usingAudit Manager.
ActiveDirectory
no explicitSQL Serverpermissionsneeded —Audit Managerhandles theSQL Serverpermissions
Creating Active Directory securitygroups with SQL Server loginsenables you to manage access to thedatabases required for auditingthrough Active Directory groupmembership without the help of thedatabase administrator.
Centrify-Auditors for theuser accountsthat use AuditAnalyzer.
Centrify-Collectors forthe computeraccounts thathost thecollector service.
Auditing security groups
Determining storage requirements for auditing
There are two important policy decisions your organization must make todetermine howmuch disk space you need for storing audit data and howfrequently you should plan to rotate the active database. Early on in thedeployment, your organization should consider the following policy decisions:
n What is your rotation policy?To answer this question, you should decide the period of time auditedsessions should be available in the active and attached database forauditors to review using the Audit Analyzer console. For example, youmight decide that you want to be able to query audited activity for aminimum of 90 days. Alternatively, you might want to define a rotationpolicy that is based on the size of the database, so that the activedatabase is not allowed to exceed a specific size. For example, you mightdecide that the database should not exceed 4GB to optimize performancefor archiving.
n What is your retention policy?
• • • • • •
Planning an audit installation 39

To answer this question, you should decide the period of time to keepaudited data available in attached databases and the maximum period oftime to keep archived audit data available before purging data that’s nolonger needed.
To illustrate how these policies affect database management, consider arotation policy based on a monthly schedule. In this example, an organizationdecides that audit data must be available for querying for a minimum of 90 days.On the first of each month, a new active database is brought online and theprevious 3 months remain available as attached databases to support querying90 to 120 days of audit data.
In this model, there are four databases online at the same time. This exampleorganization has also decided on a two-stage retention policy. In the first stage,older databases are detached from Audit Analyzer, but remain stored on theSQL Server instance for up to one year. The detached databases provide up to ayear of audit history and can be reattached, if that data is needed. In the secondstage of the retention policy, the organization archives the audit store databasesfor up to 3 years. After three years, the oldest data is permanently purged.
Depending on your requirements, you might use a similar retention policy orhave different policies based on the session activity you are capturing. Forexample, you might keep sessions that capture normal user activity for threeyears, but keep sessions that capture SOX compliance for ten years.
To project your storage requirements, you will need additional information that isspecific to your organization, including the number of computers you plan toaudit, the number of sessions that are active on audited computers, and whetheryou record all activity using video capture or only summaries of user activity. Tocollect this information, you should monitor a pilot deployment. You can then usethe information from the pilot deployment as described in Estimating databaserequirements based on the data you collect to estimate your storage
• • • • • •
Auditing Administrator’s Guide 40

requirements based on howmuch audit data you are generating. The decisionsyou make for the rotation and retention policies will help you further refine thoseestimations as you expand the deployment.
Note: If you define a rotation policy similar to this example, you canautomate the monthly database rotation using Centrifyapplication programming interfaces or using scheduled SQLServer jobs or scripts that perform database maintenanceoperations. For more information, see the Database ManagementGuide.
What’s involved in the deployment process
Most of the planning in this chapter has focused on designing the auditinginfrastructure and deciding where to install components. The followingillustration provides a visual summary of the complete deployment process andhighlights the keys to success. The sections after the flowchart provideadditional details about what’s involved in each phase or the decisions you willneed to make, such as who should be part of the deployment team, where toinstall the software, and who has permission to do what.
• • • • • •
Planning an audit installation 41

Plan
During the first phase of the deployment, you collect and analyze details aboutyour organization’s requirements and goals. You can then also make preliminarydecisions about sizing, network communication, and where to installcomponents.
Here are the key steps involved:
n Identify the goals of the deployment.n Is auditing important for specific computers?
n Is auditing important for computers used to perform administrativetasks?
n Is auditing important for computers that host specific applications orsensitive information?
n Should auditing be required for users in specific groups or withspecific roles?
n Assemble a deployment team with Active Directory, UNIX, and otherexpertise, including at least one Microsoft SQL Server databaseadministrator.
n Provide basic training on Centrify architecture, concepts, and terminology.
n Analyze the existing environment to identify target computers where youplan to install Centrify auditing infrastructure components.
n Plan for permissions and the appropriate separation of duties for yourorganization.
n Review network connections, port requirements, firewallconfiguration.
n Identify computers for Audit Manager and Audit Analyzer consoles.
n Identify computers to be used as collectors, audit stores, and themanagement Database.
n Verify that you have reliable, high-speed network connectionsbetween components that collect and transfer audit data andsufficient disk storage for the first audit store database.
n Identify the initial target group of computers to be audited.
n Define and document your data archiving and data retention policies.
• • • • • •
Auditing Administrator’s Guide 42

Prepare
After you have analyzed the environment, you should prepare the ActiveDirectory groups to use. You can then install administrative consoles and theauditing infrastructure.
Here are the key steps involved:
n (Optional) Create the additional Active Directory security groups for yourorganization.
n Groups can simplify permission management and the separation-of-dutiessecurity model.
n Install Audit Manager and Audit Analyzer on at least one administrativeWindows computer.
n Create a new audit installation and a management database on onecomputer.
n Create an audit store and audit store database on at least one computer.
n Install a collector on at least two computers.
Deploy
After you have prepared Active Directory, installed administrative consoles on atleast one computer, and created at least one installation, you are ready to deployagents on the computers to be audited.
Here are the key steps involved:
n Install the agent on the computers you want to audit.
n Join the appropriate domains and zones.
n Prepare a Group Policy Object for deploying agents remotely using a grouppolicy.
n Assign the appropriate permissions to the users and groups who shouldhave access to audit data.
• • • • • •
Planning an audit installation 43

Validate
After you have deployed agents on target computers, you should test and verifyoperations before deploying on additional computers.
Here are the key steps involved:
n Log on locally to a target computer using an Active Directory user accountand password to verify Active Directory authentication.
n Open Audit Analyzer and query for your user session.
Manage
After you have tested and verified auditing operations, you are ready to beginmanaging your audit installation.
Here are the key steps involved:
n Secure the installation.
n Add auditor roles and assign permissions to the appropriate users andgroups.
n Create new databases and rotate the active database.
n Archive and delete old audit data.
• • • • • •
Auditing Administrator’s Guide 44

Installing Centrify Audit &Monitoring Service
This chapter describes how to install Centrify Audit & Monitoring Service in aproduction environment. In production environments, you should use a differentcomputer for each component. For example, you should install the collector on itsown computer separate from the computer used for the audit store database,and on a separate computer from the audit management database.
To create a simpler installation with all components on the same computer forevaluation purposes, see the Evaluation Guide for Linux and UNIX. Forevaluation of auditing features in aWindows-only environment, see theEvaluation Guide for Windows.
The following topics are covered:
Installation preview 46
Installing and configuring Microsoft SQL Server for auditing 48
Installing the Audit Manager and Audit Analyzer consoles 53
Creating a setup user account for installation 55
Creating a new installation 55
Installing the audit collectors 66
Installing the Centrify Agent for Windows 69
Installing the Audit Management Server 88
Enabling or disabling auditing onWindows computers 89
Installing an Centrify Agent for *NIX 90
Enabling or disabling auditing on Linux and UNIX computers 92
Enabling or disabling video capture auditing 95
• • • • • •
Auditing Administrator’s Guide 45

Installing additional Audit Manager or Audit Analyzer consoles 96
Checklist for auditing systems outside of Active Directory 96
Auditing systems that are inside a DMZ 99
Installation preview
As a preview of what’s involved in the installation process, the following stepssummarize what you need to do and the information you should have on handfor a successful deployment of Centrify software.
To prepare for deployment:
1. Analyze your network topology to determine where to install componentsand services and any hardware or software updates required.For a review of the decisions to make and recommended hardwareconfiguration, see Planning an audit installation.
2. Create a list of the computers where you plan to install differentcomponents.
For example, list the computers where you plan to install agents, collectors,audit store databases, and consoles.
For a review of the requirements associated with each component, seePlanning an audit installation.
3. Determine the scope of the audit installation.
The most common deployment scenario is a single installation for an ActiveDirectory site, but you can have more than one installation, if needed, anduse subnets to limit the scope of the installation.
For a review of what constitutes an installation, see Deploying auditingcomponents in an audit installation and Deciding on the scope of theinstallation.
4. Create Active Directory security groups for managing the permissions thatare required for accessing the databases that store audit-relatedinformation.
For a review of the Active Directory security groups to create, see CheckingSQL Server logins for auditing.
• • • • • •
Installing Centrify Audit & Monitoring Service 46

5. Install Microsoft SQL Server.
If you are not a database administrator in your organization, you shouldsubmit a service request or contact an administrator who has permissionto create databases.
For more information about preparing a SQL Server database engine forauditing, see Installing and configuring Microsoft SQL Server for auditing.
6. Install the Audit Manager and Audit Analyzer consoles.
For more information about installing the consoles, see Installing the AuditManager and Audit Analyzer consoles.
7. Create a service account with the permissions to create a new installation.For details, see Creating a setup user account for installation.
8. Open Audit Manager to create a new installation.
For more information about using Audit Manager to create a newinstallation and audit store, see Creating a new installation.
9. Install the audit collector service on at least twoWindows computers.
You can add collectors to the installation at any time. For more informationabout installing and configuring collectors, see Installing the auditcollectors.
10. Install the Audit Management Server on aWindows computer.
For more information, see Installing the Audit Management Server.
11. Install a Centrify agent on eachWindows, Linux, or UNIX computer youwant to audit.
For more information about installing Centrify agents, see Installing theCentrify Agent for Windows and Installing an Centrify Agent for *NIX.
12. Make sure agents are enabled for auditing. For details, see Enabling ordisabling auditing onWindows computers and Enabling or disablingauditing on Linux and UNIX computers.
13. Install additional Audit Manager or Audit Analyzer consoles on anyWindows computer that you want to use to manage the installation orquery and play back session data.
After the initial deployment, you can add new agents, collectors, audit stores,and audit store databases to the installation or create additional installations.
• • • • • •
Auditing Administrator’s Guide 47

Installing and configuring Microsoft SQL Server forauditing
If you want to audit user activity onWindows, you must have at least oneMicrosoft SQL Server database instance for the audit management databaseand audit store databases. Centrify recommends that you use a dedicatedinstance of SQL Server for the audit management database. A dedicated SQLServer instance is an instance that does not share resources with otherapplications. The audit store databases can use the same dedicated instance ofSQL Server or their own dedicated instances.
There are three database deployment scenarios for your audit installation:
n Evaluation—You can install Microsoft SQL Server Express with Advancedfeatures directly from the configuration wizard or by running theSQLEXPRADV_x64_ENU.exe setup program to create a new Microsoft SQLServer Express database instance for testing. However, if you are auditinga production environment, you should not use Microsoft SQL ServerExpress.
If you choose to install a different version of Microsoft SQL Server Expressfor an evaluation and the version requires .NET version 3.5 SP1, you willneed to manually install the .NET files yourself (the installer doesn't includethese files)..
n Manual installation with system administrator privileges—Install aMicrosoft SQL Server database instance for which you are a systemadministrator or have been added to the system administrator role.
n Manual installation without system administrator privileges—Have thedatabase administrator (DBA) install an instance of Microsoft SQL Serverand provide you with system administrator credentials or informationabout the database instance so that you can create the managementdatabase and audit store databases.
Downloading and installing SQL Server manually
You can use an existing instance of Microsoft SQL Server or install a newinstance. You can install Microsoft SQL Server directly from the Centrify ISO orZIP, or download it from the Microsoft web site. In selecting a version of SQLServer to download, you should be sure it includes Advanced Services.
• • • • • •
Installing Centrify Audit & Monitoring Service 48

Advanced Services are required to support querying using SQL Server full-textsearch.
After downloading an appropriate software package, run the setup programusing your Active Directory domain account and follow the instructionsdisplayed to complete the installation of the Microsoft SQL Server instance.
When selecting the components to install in the setup program, expand theDatabase Services and select Full Text Search as a feature to be installed. Forthe authentication mode, select Windows authentication if all connectionsbetween auditing components will be in the same forest. If any communicationwill be outside of the forest, use Mixed Mode authentication and select the optionto add the current user to the SQL Server Administrator role.
Note: Centrify does not recommend running SQL Server under a highprivilege account such as a LocalSystem account.
Configuring SQL Server to prepare for auditing
After you install the SQL Server database engine and management tools, youshould configure the SQL Server instance for auditing. For example, dependingon the version of SQL Server you install, you might need to manually enablefull-text search.
To prepare a Microsoft SQL Server database instance for storing audit data:
n Use SQL Server Surface Area Configuration for Services and Connectionsto check the status and start the database engine, full-text search, andSQL Server Browser services.
n Use SQL Server Surface Area Configuration for Services and Connectionsor SQL Server Configuration Manager to enable remote connections forTCP/IP.
n Verify whether SQL Native Client Configuration Client Protocol is using thedefault TCP port 1433 for network communications. If you use a differentport, you should note the port number because you will need to specify it inthe server name when you create the management and audit storedatabases.
n Use SQL Server Configuration Manager to restart the SQL Server and SQLServer Browser services.
n Create a database backend service account in the system administrator(sa) fixed server role on the selected database server; you'll specify this
• • • • • •
Auditing Administrator’s Guide 49

account when you create the audit installation. This account is used to runbackend stored procedures. If desired, this can be the same account thatyou use the create the audit installation, as mentioned in Creating a setupuser account for installation.
Configuring Amazon RDS for SQL Server for auditing
You can deploy audit store databases on Amazon RDS instances, if desired.Centrify supports Amazon RDS for 2016 and earlier versions (not 2017).
You must host the audit management database on a traditional SQL Server,such as SQL Server Express, Standard, or Enterprise.
If you want to use an instance of Amazon RDS for SQL Server for audit storedatabases you need to do the following configurations:
n After you set up your Amazon RDS for SQL Server, join the RDS SQL serverto AWSMicrosoft Active Directory.
n Enable these DB Parameter Group settings on RDS SQL Server:n clr enabled
n show advanced options
You can use the AWSManagement Console, API, or the AWS commandline interface to enable these settings.
For more details, seehttp://docs.aws.amazon.com/AmazonRDS/latest/UserGuide/USER_WorkingWithParamGroups.html.
n Set up a one-way or two-way forest trust between the AWSMicrosoftActive Directory and your on-premise Active Directory forest so that usersof your on-premise Active Directory forest can access resources in theAWSMicrosoft Active Directory.
Note: Amazon RDS for SQL Server with High Availability is supported.
Amazon RDS for SQL Server required permissions
The permissions for Amazon RDS for SQL Server vary a little from thepermissions for local or network instances of SQL Server. This section covers theAmazon RDS for SQL Server permission required or granted for each auditingcomponent.
Permissions to the audit store database stored procedures service account
• • • • • •
Installing Centrify Audit & Monitoring Service 50

The stored procedures service account (in other words, the ‘execute as’ account)no longer requires the sysadmin server role permission if the audit storedatabase is on Amazon RDS for SQL Server.
The service account requires only the db_owner database role permission andthe account will be added to be member of db_owner database role by AddAudit Store Database wizard.
Note: You do not need to grant the permissions manually. The AuditManager console, Powershell cmdlet, or SDK grants thepermissions to the service account.
Collector account permissions for audit store databases on Amazon RDS forSQL Server
The collector account requires the following server level permissions on theAmazon RDS for SQL Server:
n 'View Any Definition' server level permission
n 'View Server State' server level permission
The collector account requires the following database level permissions on theaudit store database:
n Amember of the 'collector' database role
Note: You do not need to grant the permissions manually. The AuditManager console, Powershell cmdlet, SDK, or the CollectorConfiguration wizard grants the permissions to the collectoraccount.
Management Database Account permissions for audit store databases onAmazon RDS for SQL Server
The management database account requires the following server levelpermissions on the RDS SQL server:
n 'Alter Trace' server level permission
n 'Alter Any Login' server level permission
n Grant permission of 'Alter Any Login' server level permission
n Grant permission of 'View Any Definition' server level permission
n Grant permission of 'View Server State' server level permission
• • • • • •
Auditing Administrator’s Guide 51

The management database account requires the following database levelpermissions on the audit store database:
n Amember of 'managementdb' database role
Note: You do not need to grant the permissions manually. The AuditManager console, Powershell cmdlet, or SDK grants thepermissions to the management database account.
Permissions to create the audit store database on Amazon RDS for SQLServer
In order to create an audit store database on Amazon RDS for SQL Server, youmust have the following permissions:
n 'Create Any Database' server level permission to create the database onthe server
n 'Alter Any Login' server level permission to create the login for themanagement database account and the collector account
n Alter Any Login' server level permission to grant the 'Alter Any Login'permission to the management database account
n 'Alter Trace' server level permission to grant the 'Alter Trace' permission tothe management database account
n 'View Any Definition' server level permission to grant the 'View AnyDefinition' (with grant) permission to the management database accountand also to grant the 'View Any Definition' permission to the collectoraccount
n Grant permission of 'View Server State' server level permission to grant the'View Server State' (with grant) permission to the management databaseaccount and also to grant the 'View Server State' permission to thecollector account
Permissions to upgrade the audit store database on Amazon RDS for SQLServer
The required permission to upgrade the audit store database on Amazon RDSfor SQL Server is the ‘db owner’ permission on the database. No server levelpermissions are required
• • • • • •
Installing Centrify Audit & Monitoring Service 52

Installing the Audit Manager and Audit Analyzerconsoles
You can install Audit Manager and Audit Analyzer on the same computer or ondifferent computers. The computers where you install the consoles must bejoined to the Active Directory domain and be able to access the managementdatabase.
In most cases, the consoles are installed together on at least one computer.
You can use either the individual console installers or the main installer.
n Install Audit Manager using the console installer
n Install Audit Analyzer using the console installer
n Install both consoles using the main installer
To install Audit Manager using the individual console installer:
1. Log on using an Active Directory domain account.
2. Open the ISO file, and navigate to the following folder:
\DirectAudit\Console\
3. Run the Audit Manager installer : Centrify DirectAudit AdministratorConsole64.exe.
4. At theWelcome page, click Next.
5. Review the terms of the license agreement, click I accept the terms in thelicense agreement, then click Next.
6. On the Destination Folder page, review the installation location and clickNext to continue.
7. If you want to install the console in a different location, click Change andnavigate to the desired folder.
8. Click Install to begin the installation.
9. The installer installs the necessary files. To open the console, keep theLaunch Centrify Audit Manager option selected. Otherwise, deselect theoption.
10. Click Finish to close the installer.
• • • • • •
Auditing Administrator’s Guide 53

After you install Audit Manager, you can open Audit Manager to create a newinstallation.
To install Audit Analyzer using the individual console installer:
1. Log on using an Active Directory domain account.
2. Open the ISO file, and navigate to the following folder:
\DirectAudit\Console\
3. Run the Audit Manager installer : Centrify DirectAudit AuditorConsole64.exe.
4. At theWelcome page, click Next.
5. Review the terms of the license agreement, click I accept the terms in thelicense agreement, then click Next.
6. On the Destination Folder page, review the installation location and clickNext to continue.
7. If you want to install the console in a different location, click Change andnavigate to the desired folder.
8. Click Install to begin the installation.
9. The installer installs the necessary file. To open the console, keep theLaunch Centrify Audit Analyzer option selected. Otherwise, deselect theoption.
10. Click Finish to close the installer.
To install Audit Manager and Audit Analyzer on the same computer using themain installer:
1. Log on using an Active Directory domain account.
2. Open the ISO file.If you created a physical CD from the ISO file that you downloaded, theGetting Started page is displayed automatically. If the page is notdisplayed, open the autorun.exe file to start the installation.
3. On the Getting Started page, click Audit & Monitor to start the setupprogram for audit and monitoring service components.
4. At theWelcome page, click Next.
• • • • • •
Installing Centrify Audit & Monitoring Service 54

5. Review the terms of the license agreement, click I accept the terms in thelicense agreement, then click Next.
6. Select Centrify Administration to install both Audit Manager and AuditAnalyzer, then click Next.
7. In the rare case where the administrator should not have access to theAudit Analyzer, select Audit Manager, then click Next.
8. After you install Audit Manager, you are prompted to create a newinstallation. If you want to create the installation at a later time, you canrun the setup program again to create a new installation.
Creating a setup user account for installation
You'll need to create an account to use when you create the audit installation,set up audit stores, and so forth. This account needs to have the followingpermissions:
n Active Directory:n Permission to create serviceConnectionPoint objects on the containeror organizational unit you select for publishing installationinformation
n SQL Server:n Be a member of the system administrator (sa) fixed server role
This user account needs these permissions for the initial installation and somemaintenance tasks. It's a good practice to add this account to your Centrify-admins security group, as mentioned in Creating security groups for auditing.
Creating a new installation
Before you can begin auditing, you must create at least one audit installationand a management database. Creating the management database, however,requires SQL Server system administrator privileges on the computer that hoststhe SQL Server instance. If possible, you should have a database administratoradd your Active Directory domain account to the SQL Server systemadministrators role.
If you have not been added to the system administrators role, you should contacta database administrator to assist you. For more information about creating a
• • • • • •
Auditing Administrator’s Guide 55

new installation when you don’t have system administrator privileges, see Howto create an installation without system administrator privileges.
To create a new installation and management database as a systemadministrator:
1. Log on using an Active Directory account with permission to installsoftware on the local computer and permissions listed in Creating a setupuser account for installation.
2. Open Audit Manager.Note: If you haven’t configured an audit installation yet, the New
Installation wizard opens automatically.
3. If this isn’t your first audit installation: in Audit Manager, right-click CentrifyAudit Manager and select New Installation to open the New Installationwizard.
4. Enter a name for the new installation, then click Next.
Tip: Name the installation to reflect its administrative scope. Forexample, if you are using one installation for your entireorganization, you might include the organization name andAll or Global in the installation name, such as AcmeAll. If youplan to use separate installations for different regions ordivisions, you might include that information in the name, forexample AcmeBrazil for a regional installation orAcmeFinance for an installation that audits computers in theFinance department.
5. Select the option to create a newmanagement database and verify theSQL Server computer name, instance name, and database name arecorrect.If the server does not use the default TCP port (1433), you must provide theserver and instance names separated by a backslash, then type a commaand the appropriate port number. For example, if the server name is ACME,the instance name is BOSTON, and the port number is 1234, the servername would be ACME\BOSTON,1234.
If you're installing on a SQL cluster, enter the SQL cluster name in theSQL Server computer name field.
• • • • • •
Installing Centrify Audit & Monitoring Service 56
If you’re connecting to a SQL Server availability group listener, click Options(next to the Server Name) and enter the following connection stringparameters:MultiSubnetFailover=Yes
Click Next to continue.
6. Select Use the default NT AUTHORITY\SYSTEM account to use theinternal account or select a specific SQL login account with sufficientprivileges, then click Next.A SQL login account is required to run the stored procedures that read andwrite information to the management database. The account must amember of the system administrator (sa) fixed server role on the selecteddatabase server, as mentioned in Configuring SQL Server to prepare forauditing.
7. Type the license key you received, then click Add or click Import to importthe keys directly from a file, then click Next.
8. Accept the default location or click Browse to select a different ActiveDirectory location for publishing installation information, then click Next.
You must have the Active Directory permission to CreateserviceConnectionPoint objects on the container or organizational unit youselect for publishing installation information.
9. Select the installation-wide auditing options you want to enable, then clickNext.
n Select Enable video capture recording of user activity if you want tocapture shell or desktop activity on computers when users areaudited, then click Next.Selecting this option enables you to review everything displayedduring an audited user session, but will increase the audit storedatabase storage requirements for the installation. You can deselectthis option if you are only interested in a summary of user activity inthe form of audit trail events. Audit trail events are recorded whenusers log on, open applications, and select and use role assignmentswith elevated rights.
n Select Do not allow any users to review their own sessions toprevent all users from updating the review status for their ownsessions or adding comments to their own sessions.
• • • • • •
Auditing Administrator’s Guide 57

n Select Do not allow any users to delete their own sessions toprevent all users from deleting their own sessions.
If you set either of the installation-wide policies disallowing user activity,the policy takes precedence over any rights provided by a user’s audit role.
10. Review details about the installation and management database, thenclick Next.If you have SQL Server system administrator (sa) privileges and canconnect to the SQL Server instance, the wizard automatically creates themanagement database.
11. Select the Launch Add Audit Store Wizard option if you want to start theAdd Audit Store wizard, then click FinishIf you want to create the first audit store database on a different SQLServer instance, you should deselect the Launch Add Audit Store Wizardoption and click Finish.
For more information about adding the first audit store database, see Creatingthe first audit store.
How to create an installation without system administratorprivileges
If you do not have the appropriate permission to create SQL Server databases,you cannot use the New Installation wizard to create the management databasewithout the assistance of a database administrator.
If you do not have system administrator privileges, the wizard prompts you tospecify another set of credentials or generate SQL scripts to give to a databaseadministrator. For example:
• • • • • •
Installing Centrify Audit & Monitoring Service 58

If you don’t have a database administrator immediately available who can enterthe credentials for you, you cannot continue with the installation.
To create an installation when you don’t have system administrator privileges:
1. Select the option to generate the SQL scripts, then click Next.
2. Select the folder location for the scripts, then click Next.
3. Review details about the installation and management database you wantcreated, then click Next.The wizard generates two scripts: Script1 prepares the SQL Serverinstance for the management database and Script2 creates the database.
4. Click Finish to exit the New Installation wizard.
5. Send the scripts to a database administrator with a service or change-control request.
Note: You should notify the database administrator that the scriptsmust be run in the proper sequence and not modified in anyway. Changes to the scripts could render the databaseunusable.
6. After the database administrator creates the database using the scripts,open the Audit Manager console to run the New Installation wizard again.
7. Type the name of the installation, then click Next.
8. Select Use an existing database and verify the database server andinstance name, then click the Database name list to browse for thedatabase name that the database administrator created for you.
If the server does not use the default TCP port, specify the port number aspart of the server name. For example, if the port number is 1234, the servername would be similar to ACME\BOSTON,1234.
If you're installing on a SQL cluster, enter the SQL cluster name in theSQL Server computer name field.
9. Select the database name from the list of available databases, click OK,then click Next.You should only select an existing database if the database was createdusing scripts provided by Centrify.
10. Select Use the default NT AUTHORITY\SYSTEM account to use theinternal account or select a specific SQL login account with sufficient
• • • • • •
Auditing Administrator’s Guide 59

privileges, then click Next.A SQL login account is required to run the stored procedures that read andwrite information to the management database. The account must amember of the system administrator (sa) fixed server role on the selecteddatabase server.
11. Type a license key or import licenses from a file, then click Next.
12. Review details about the management database to be installed, then clickNext.
13. Select the Launch Add Audit Store Wizard option if you want to start theAdd Audit Store wizard, then click Finish.
Creating the first audit store
If you selected the Launch Add Audit StoreWizard check box at the end of theNew InstallationWizard, the Add Audit StoreWizard opens automatically. Youcan also open the wizard at any time by right-clicking the Audit Stores node inthe Audit Manager console and choosing Add Audit Store.
To create the first audit store:
1. Type a display name for the audit store, then click Next.Tip: If your plan specifies multiple audit stores, use the name to
reflect the sites or subnets serviced by this audit store. Notethat an audit store is actually a record in the managementdatabase. It is not a separate process running on anycomputer. You use a separate wizard to create thedatabases for an audit store.
2. Select the type of systems that the audit store will serve.
You can choose to separateWindows traffic from UNIX traffic if both typesof agents belong to the same site or subnet.
The options are:
n Windows and UNIX
n Windows
n UNIX
Click Next to continue.
• • • • • •
Installing Centrify Audit & Monitoring Service 60

3. Click Add Site or Add Subnet to specify the sites or subnets in this auditstore.
n If you select Add Site, you are prompted to select an Active Directorysite.
n If you select Add Subnet, you are prompted to type the networkaddress and subnet mask.
After you make a selection or type the address, click OK. You can then addmore sites or subnets to the audit store. When you are finished adding sitesor subnets, click Next to continue.
The computer you use to host the audit store database should be no morethan one gateway or router away from the computers being audited. Ifyour Active Directory sites are too broad, you can use standard networksubnets to limit the scope of the audit store.
4. Review information about the audit store display name and sites orsubnets, then click Next.
5. Select the Launch Add Audit Store Database Wizard option if you wantto create the first audit store database, then click Finish.
Creating the first audit store database
If you selected the Launch Add Audit Store DatabaseWizard check box at theend of the Launch Add Audit StoreWizard, the Add Audit Store DatabaseWizard opens automatically. You can also open the wizard at any time from theAudit Manager console by expanding an audit store, right-clicking theDatabases node, and choosing Add Audit Store Database.
To create the first audit store database:
1. Type a display name for the audit store database, then click Next.The default name is based on the name of the audit store and the date thedatabase is created.
2. Select the option to create a new database and verify that the SQL Servercomputer name, instance name, and database name are correct.The default database name is the same as the display name. You canchange the database name to be different from the display name, if youwant to use another name.
• • • • • •
Auditing Administrator’s Guide 61

If the server does not use the default TCP port, specify the port number aspart of the server name. For example, if the port number is 1234, the servername would be similar to ACME\BOSTON,1234.
If you're installing on a SQL cluster, enter the SQL cluster name in theSQL Server computer name field.
When entering the SQL Server host computer name, note that you canenter either the server short name (which is automatically resolved to itsfully qualified domain name, or FQDN) or the actual server FQDN or theCNAME alias for the server.
If the database is an Amazon RDS SQL Server:
a. Select the This is an Amazon RDS SQL Server option.
b. In the Server Name field, enter the RDS SQL Server databaseinstance endpoint name used for Kerberos authentication.For example, if the database host name is northwest1 and thedomain name is sales.acme.com, then the endpoint name would benorthwest1.sales.acme.com.
Click Options to enter additional connection string parameters or to enabledata integrity checking.
n If you’re connecting to a SQL Server availability group listener, clickOptions (next to the Server Name) and enter the following connectionstring parameters:MultiSubnetFailover=Yes
n You can enable or disable data integrity checking once, when youcreate the audit store database. To change the state, you must rotateto a new audit store database.When you create your audit store database, you have the option toenable data integrity checking. Data integrity checking provides theability to detect if auditing data has been tampered. For example,data integrity checking can detect if a user who has write privilegesover the Audit Store database directly manipulates the auditedsession data by making a direct connection to the Microsoft SQLServer database. Data integrity checking cannot detect tampering if adatabase administrator deletes an entire session or database.
Click Next to continue.
3. Because this is the first audit store database, you also want to make it theactive database. This option is selected by default. If you are creating the
• • • • • •
Installing Centrify Audit & Monitoring Service 62

database for future use and don’t want to use it immediately, you candeselect the Set as active database option. The option to create a newdatabase is also selected by default.Click Next to continue.
4. Specify the stored procedures services account:n Select Use the default NT AUTHORITY\SYSTEM account to use theinternal account
n Or, select Specify a SQL Login account and enter a specific SQL loginaccount with sufficient privileges.A SQL Server login account is required to run the stored proceduresthat read and write information to the management database.
For local or network databases, the account must a member of thesystem administrator (sa) fixed server role on the selected databaseserver.
If the database is an Amazon RDS for SQL Server, the account youspecify will be added as a member of the db_owner fixed databaserole in Amazon RDS for SQL Server.
Click Next to continue.
5. Review details about the audit store database, then click Next.If you have the correct privileges and can connect to the SQL Serverinstance, the wizard automatically creates the audit store database.
Connecting to SQL Server on a remote computer
To create an audit store database on a remote computer, there must be a one-way or two-way trust between the domain of the computer on which you arerunning the Add Audit Database wizard and the domain of the computer hostingSQL Server. The Active Directory user account that you used to log on to thecomputer where the Audit Manager is installed must be in a domain trusted bythe computer running SQL Server. If there is no trust relationship, you must logon using an account in the same domain as the computer running SQL Server. Ifyou are accessing the computer running SQL Server remotely, you can use theRun As command to change your credentials on the computer from which youare running the wizard.
Verify network connectivity
The computer hosting the SQL Server database for the active audit store servermust be online and available from the Audit Manager console and from the
• • • • • •
Auditing Administrator’s Guide 63

clients in the Active Directory site or the subnet segments you have defined forthe audit store. You should verify that there are no network connectivity issuesbetween the computers that will host collectors and those hosting the SQLServer databases.
How to create the database without system administrator privileges
If you do not have system administrator privileges, the wizard prompts you tospecify another set of credentials or generate SQL scripts to give to a databaseadministrator. If you don’t have database administrator credentials or adatabase administrator immediately available who can enter the credentials foryou, you should generate the scripts, then follow the prompts displayed to exitthe wizard.
To add the database to the audit store after you have generated the scripts:
1. Send the scripts to a database administrator with a service or change-control request.You should notify the database administrator that the scripts must be runin the proper sequence and not modified in any way. Changes to the scriptscould render the database unusable.
2. After the database administrator creates the database using the scripts,open the Audit Manager console.
3. Expand the installation node, then expand Audit Stores and the specificaudit store you for which you want a new database.
4. Select Databases, right-click, then click Add Audit Store Database.
5. Type a display name for the audit store database, then click Next.
6. Enter the database server name:
The default database name is the same as the display name. You canchange the database name to be different from the display name, if youwant to use another name.
If the server does not use the default TCP port, specify the port number aspart of the server name. For example, if the port number is 1234, the servername would be similar to ACME\BOSTON,1234.
If you're installing on a SQL cluster, enter the SQL cluster name in theSQL Server computer name field.
If the database is an Amazon RDS SQL Server:
• • • • • •
Installing Centrify Audit & Monitoring Service 64

a. Select the This is an Amazon RDS SQL Server option.
b. In the Server Name field, enter the RDS SQL Server databaseinstance endpoint name used for Kerberos authentication.For example, if the database host name is northwest1 and thedomain name is sales.acme.com, then the endpoint name would benorthwest1.sales.acme.com.
Click Options to enter additional connection string parameters or to enabledata integrity checking.
n If you’re connecting to a SQL Server availability group listener, clickOptions (next to the Server Name) and enter the following connectionstring parameters:MultiSubnetFailover=Yes
n You can enable or disable data integrity checking once, when youcreate the audit store database. To change the state, you must rotateto a new audit store database.When you create your audit store database, you have the option toenable data integrity checking. Data integrity checking provides theability to detect if auditing data has been tampered. For example,data integrity checking can detect if a user who has write privilegesover the Audit Store database directly manipulates the auditedsession data by making a direct connection to the Microsoft SQLServer database. Data integrity checking cannot detect tampering if adatabase administrator deletes an entire session or database.
7. Select Use an existing database and select the database that thedatabase administrator created for you.Because this is the first audit store database, you also want to make it theactive database. This option is selected by default. If you are creating thedatabase for future use and don’t want to use it immediately, you candeselect the Set as active database option.
If the server does not use the default TCP port, specify the port number aspart of the server name. For example, if the port number is 1234, the servername would be similar to ACME\BOSTON,1234.
The installation, management database, and first audit store database are nowready to start receiving user session activity. Next, you should install thecollectors and, finally, the agents to complete the deployment of the auditinginfrastructure.
• • • • • •
Auditing Administrator’s Guide 65

Installing the audit collectors
After you have created a new installation, with an audit management databaseand at least one audit store and audit store database, you must add thecollectors that will receive audit records from the agents and forward thoserecords to the audit store. For redundancy and scalability, you should have atleast two collectors. For more information about planning howmany collectorsto use and the recommended hardware and network configuration for thecollector computers, see Deciding where to install collectors and audit stores.
Set the required permission
Before you configure a collector, you should check whether your user accounthas sufficient permissions to add new collector accounts to the audit storedatabase. If you are a database administrator or logged on with an account thathas system administrator privileges, you should be able to configure the collectorwithout modifying your account permissions. If you have administrative rights onthe computer that hosts Audit Manager but are not a database administrator,you can set the appropriate permission before continuing.
To set the permission required to add accounts to the audit store database:
1. Open Audit Manager.
2. Expand the installation, then expand Audit Stores.
3. Select the audit store that the collector will connect to, right-click, then clickProperties.
4. Click the Security tab.
5. Click Add to search for and select the user who will configure the collector.
• • • • • •
Installing Centrify Audit & Monitoring Service 66

6. Select theManage SQL Logins right, then click OK.
Install the collector service using the setup program
If your user account has sufficient permissions to add new collector accounts tothe audit store database, you can install a collector by running the setupprogram on the computer on which you want to install the collector. When youare prompted to select components, select Audit Collector and deselect all of theother components, then click Next. Follow the instructions in the wizard to selectthe location for installing files and to confirm your selections, then click Finish tocomplete the installation.
The collector installer is in the \DirectAudit\Collector folder in yourinstallation media.
Configure the audit collector service
By default, when you click Finish, the setup program opens the CollectorConfigurationWizard. Alternatively, you can launch the configuration wizard atany time by clicking Configure in the Collector Control Panel.
• • • • • •
Auditing Administrator’s Guide 67

To configure the collector service:
1. On the first screen of the Collector ConfigurationWizard, select theDirectAuditinstallation to assign this collector to.
If the computer is also enrolled in the Centrify Cloud Platform and you havealready enabled auditing in the Admin Portal, you can choose which kind ofaudit installation to assign the collector to:
n Automatic: This option configures the collector to receive audit datafrom systems that are enrolled in the Centrify Cloud Platform andsystems that are joined to Active Directory.
You use the Admin Portal to configure which installation is used bythese systems. The systems have either the Centrify Client for Linuxor Centrify Client for Windows and the audit packages installed sothat auditing is enabled. These systems do not have to be joined toActive Directory.
n Manual: This option configures the collector to receive audit datafrom systems that are joined to Active Directory and have either theCentrify Agent for *NIX or Centrify Agent for Windows installed andthe system is enabled for auditing. For this option, select the auditinstallation.
Computers that are not enrolled in the Centrify Cloud Platform have asingle list of audit installations to pick from.
Click Next to continue.
The configuration wizard verifies that the specified installation has anaudit store that services the site that the collector is in and that thecollector and its audit store database are compatible.
2. Enter the port number(s) that the collector will use to communicate with theaudited systems.
n The default port is 5063 for systems that have either the CentrifyAgent for *NIX or Centrify Agent for Windows installed.
n If the computer is also enrolled in the Centrify Cloud Platform, thedefault port is 5064 for systems that have either the Centrify Client forLinux or Centrify Client for Windows installed.
n If you set the installation to Manual in the previous step, CentrifyClient System port is greyed out.
• • • • • •
Installing Centrify Audit & Monitoring Service 68

For either port, if you specify a different port and have the defaultWindows firewall turned on, the wizard checks whether the port isopen. If the port isn't open, the wizard offers to open it for you.
If you are using another vendor’s firewall, open the port with the toolsprovided by that vendor. If there’s an upstream firewall—such as adedicated firewall appliance—between the collector and thecomputers to be audited, contact the appropriate personnel to openthe port on that firewall.
Click Next to continue.
3. If the computer where you’re configuring a collector belongs to multipleaudit stores in the auditing installation, choose which audit store thiscollector will connect to, then click Next.
For example, two audit stores can have an overlapping scope if one auditstore scope is configured for Active Directory sites and another one is setby subnets.
4. Select whether you want to useWindows authentication or SQL Serverauthentication when the collector authenticates to the audit storedatabase, then click Next.
In most cases, you should chooseWindows authentication to add thecomputer account to the audit store database as a trusted, incoming user.
If Microsoft SQL Server is in a different forest or in an untrusted forest, youshould use SQL Server Management Studio to set up one or more SQLServer login accounts for the collector. After you create the SQL Serverlogin account for the collector to use, you can select SQL Serverauthentication, then type the SQL Server login name and password in thewizard.
5. Type the maximum number of connections for the Microsoft SQL Serverconnection pool, then click Next.
6. Review the settings for the collector, then click Next.
7. Click Finish to close the wizard and start the collector service.
Installing the Centrify Agent for Windows
You must install an agent on everyWindows computer that you want audit. Youcan install the agent in the following ways:
• • • • • •
Auditing Administrator’s Guide 69

n Interactively, by running the Centrify setup program on each computer.When the installation finishes, the agent configuration wizard launchesautomatically. You can configure the agent right away, or exit theconfiguration wizard and configure the agent later. See Installinginteractively using the setup program for details.
n Silently, by executing appropriate commands in a terminal window oneach computer.You can installation silently on a local computer or use a softwaredistribution product, such as Microsoft System Center ConfigurationManager (SCCM), to execute the appropriate commands remotely todeploy agents on remote computers. After installation, you can change thedefault agent settings, if needed. See Installing silently by using theMicrosoft Windows Installer for details.
n Silently and centrally, by using a group policy to execute commandsremotely on the computers in a domain or organizational unit.If you use the Centrify Group Policy Deployment files, you can both installand configure the registry on remote computers from a central locationwithout a separate software distribution product. However, you mustconfigure theWindows agent registry settings in a file before deploying.See Installing from a central location by using group policy for details.
Regardless of the deployment method you choose, you should first make surethat the computers where you plan to deploy meet all of the installationprerequisites.
Verify prerequisites
Before installing theWindows agent, verify the computer on which you plan toinstall meets the following requirements:
n The computer is running a supportedWindows operating system version.
n The computer is joined to Active Directory.
n The computer has sufficient processing power, memory, and disk space forthe agent to use.
n The computer has the .NET Framework, version 4.5.2 or later.
n The computer hasWindows Installer version 3.1, or later.
If you are installing interactively using the setup program, the setup program cancheck that the local computer meets these requirements and install any missing
• • • • • •
Installing Centrify Audit & Monitoring Service 70

software. If you are installing silently from the command line or by using a GroupPolicy Object, you should verify the computers where you plan to install meetthese requirements. If you are installing silently and a computer does not meetthese requirements, the installation will fail.
Installing interactively using the setup program
If you select auditing when you install theWindows agent, the agent startscapturing user session activity immediately after it is installed. Therefore, youshould be sure that you have an installation, audit store database, and collectorprepared and available before installing an agent. If the agent cannot connect toan installation, it stores the captured session data locally and can quicklyoverload the local computer’s resources.
To install the agent onWindows using the setup program:
1. Log on to the computer and insert the CD or browse to the location whereyou have saved downloaded Centrify files.If the Getting Started page is not displayed automatically, open theautorun.exe file.
2. On the Getting Started page, click Agent to start the setup program for theWindows agent.
3. At theWelcome page, click Next.
4. Review the terms of the license agreement, click I accept the terms in theLicense Agreement, then click Next.
5. Verify the location where files will be installed, then click Next.
If you want to install in a location other than the default location, clickBrowse, select a different location, then click Next.
6. Click Install.
7. Click Finish to complete the installation and start the agent configurationwizard.
8. In the Centrify Agent Configuration window, click Add Service.
• • • • • •
Auditing Administrator’s Guide 71

9. In the dialog box that opens, select the Centrify Auditing and MonitoringService option and click OK.
10. In the Enable session capture and replay window, select the auditinginstallation to which you want the agent on this computer to connect.
Click Next to continue.
The Centrify Auditing and Monitoring Service is now listed as an enabledservice.
11. Close the Agent configuration window and click Exit in the installerwindow.
Configuring the agent settings for auditing
The agent configuration wizard automatically configures several default settingsin the agent registry. If you want to view or change the agent settings forauditing on aWindows computer after running the configuration wizard—or ifyou did not use the configuration wizard immediately after installation—you canuse the Agent ConfigurationWizard.
To configure the agent settings for auditing:
1. Click Start > All Programs > Centrify Server Suite 2021 > Centrify Agentfor Windows Configuration > Agent Configuration.
• • • • • •
Installing Centrify Audit & Monitoring Service 72

2. In the Centrify Agent Configuration window, locate the Centrify Auditingand Monitoring Service option, and click Settings.The Centrify Auditing and Monitoring Service Settings window opens.
3. On the General tab, click Configure.
4. Select the maximum color quality for recorded sessions, then click Next.
If your audit installation has video capture auditing enabled, you canconfigure the color depth of the sessions to control the size of data thatmust be transferred over the network and stored in the database. A highercolor depth increases the CPU overhead on audited computers butimproves resolution when the session is played back. A lower color depthdecreases network traffic and database storage requirements, but reducesthe resolution of recorded sessions.
The default color quality is Low (8-bit).
5. Specify the offline data location and the maximum percentage of disk thatthe offline data file should be allowed to occupy, then click Next.If the agent cannot connect to a collector, it saves session activity in theoffline data location you specify until it can contact a collector.
The spool threshold defines the minimum percentage of disk space thatshould be available to continue auditing. It is intended to prevent auditedcomputers from running out of disk space if the agent is sending data to itsoffline data storage location because no collectors are available.
For example, if you set this threshold to 10%, auditing will continue whilespooling data to the offline file location as long as there's at least 10% diskspace is available on the spool partition. When the disk space availablereaches the threshold, auditing will stop until a collector is available.
The agent checks the spool disk space by periodically running abackground process. By default, the background process runs every 15seconds. Because of the delay between background checks, it is possiblefor the actual disk space available to fall below the threshold setting. If thiswere to occur, auditing would stop at the next interval. You can configurethe interval for the background process to run by editing theHKLM\Software\Centrify\DirectAudit\Agent\DiskCheckInterval registrysetting.
6. Select the installation that the agent belongs to, then click Next.
7. If the computer where you’re configuring an agent belongs to multiple auditstores in the auditing installation, choose which audit store this agent will
• • • • • •
Auditing Administrator’s Guide 73

connect to, then click Next.
8. In the Summary page, review your settings, then click Next.
The agent is now configured and enabled for auditing.
9. Click Finish to close the agent configuration wizard, then click Close to exitthe Centrify Auditing and Monitoring Service Settings window.
Deciding to install with or without joining the computer to azone
Before you begin a silent installation, you should decide whether you will waituntil later to join the computer to a zone, or join the computer to a zone as part ofthe installation procedure.
If you install without joining a zone during installation:
See Installing silently by using the Microsoft Windows Installer for details aboutthe registry settings that you can configure manually after the installationfinishes.
See Installing silently without joining a zone for details about performing theinstallation.
If you install and join a zone during installation:
You use a transform (MST) file that is provided with Centrify Server Suite toconfigure a default set of agent-specific registry keys during the silentinstallation.
You can optionally edit the MST file before performing the installation tocustomize agent-specific registry settings for your environment.
You can optionally use the agent configuration control panel or the registryeditor to configure registry settings after the installation finishes.
See Installing silently by using the Microsoft Windows Installer for details aboutthe registry settings that you can configure by editing the MST file.
See Installing silently by using the Microsoft Windows Installer for details abouthow to edit the MST file before you perform the installation.
See Installing and joining a zone silently for details about performing theinstallation.
• • • • • •
Installing Centrify Audit & Monitoring Service 74

Installing silently without joining a zone
This section describes how to install the agent silently without joining thecomputer to a zone. This procedure includes configuring registry settingsmanually using the registry editor or a third-party tool.
Note: To install the agent and join the computer to a zone duringinstallation, see Installing and joining a zone silently for moreinformation.
Check prerequisites:
1. Verify that the computers where you plan to install meet the prerequisitesdescribed in Verify prerequisites. If prerequisites are not met, the silentinstallation will fail.
2. If you are installing audit and monitoring service, verify that the followingtasks have been completed:a. Installed and configured the SQL Server management database and
the SQL Server audit store database.
b. Installed and configured one or more collectors.
c. Configured and applied the Centrify DirectAudit Settings group policythat specifies the installation name.
To install the Centrify Agent for Windows silently without joining the computerto a zone:
1. Open a Command Prompt window or prepare a software distributionpackage for deployment on remote computers.For information about preparing to deploy software on remote computers,see the documentation for the specific software distribution product youare using. For example, if you are using Microsoft System CenterConfiguration Manager (SCCM), see the Configuration Managerdocumentation.
2. Run the installer for the Centrify Agent for Windows package. For example:msiexec /qn /i "Centrify Agent for Windows64.msi"
By default, none of the services are enabled.
3. Use the registry editor or a configuration management product to configurethe registry settings for each agent.
• • • • • •
Auditing Administrator’s Guide 75

For example, under HKEY_LOCAL_MACHINE\Software\Centrify\DirectAudit\Agent, you could set theDiskCheckThreshold key to a value other than the default value of 10%.
To install the Centrify Agent for Windows and add a computer to a zone duringinstallation:
1. Prepare a computer account in the appropriate zone using AccessManager or the PowerShell command New-CdmManagedComputer.
2. You will use the default transform file Group Policy Deployment.mst inStep 3 to update the MSI installation file so that the computer is joined tothe zone in which it was pre-created in Step 1. You can optionally modifyGroup Policy Deployment.mst to change or add additional registrysettings during installation.If you want to edit Group Policy Deployment.mst to change or addadditional registry settings and have not yet done so, edit it now asdescribed in Installing silently by using the Microsoft Windows Installer.
In order for the computer to join the zone from Step 1, the Group Policy
Deployment.mst filemust specify the GPDeployment property with a valueof 1.
3. Run the following command:msiexec /i "Centrify Agent for Windows64.msi" /qnTRANSFORMS="Group Policy Deployment.mst"
Installing and joining a zone silently
This section describes how to install the agent and join the computer to a zone atthe same time. The procedure described here includes the following steps inaddition to executing the MSI file:
n You first prepare (pre-create) theWindows computer account in theappropriate zone.
You execute an MST file together with the MSI file to join the computer to a zoneand configure registry settings during the installation.
Installing silently by using the Microsoft Windows Installer
If you want to perform a “silent” (also called unattended) installation of theCentrify Agent for Windows, you can do so by specifying the appropriate
• • • • • •
Installing Centrify Audit & Monitoring Service 76

command line options and Microsoft Windows Installer (MSI) file to deploy. Youmust execute the commands on everyWindows computer that you want toaudit.
You can also use silent installation commands to automate the installation orupgrade of theWindows agent on remote computers if you use a softwaredistribution product, such as Microsoft System Center Configuration Manager(SCCM), that enables you to run commands remotely to deploy softwarepackages. However, only the command-line instructions are covered in thisguide.
Configuring registry settings
When you perform a silent installation, several registry settings specific to theagent are configured by the default MSI file. In addition, a default transform(MST) file is provided for you to use if you join the computer to a zone as part ofthe installation procedure. When executed together, the default MSI and MSTfiles ensure that the computer is joined to a zone, and that a default set of agent-specific registry keys is configured.
If your environment requires different or additional registry settings, you can editthe MST file before performing an installation. Then, when you execute the MSIand MST files to perform an installation, your customized registry settings areimplemented. For details about how to edit the MST file, see Editing the defaulttransform (MST) file.
Note: If you do not join the computer to a zone during installation, you donot use the MST file. In this situation, you can create or editregistry keys manually after the installation finishes by using the ,or the registry editor.
The following table describes the agent-specific registry settings that areavailable for you to configure during installation (by using the MST file) or afterinstallation (by using the or the registry editor). Use the information in this table ifyou need to configure registry settings differently than how they are configuredby the default MSI and MST files. Keep the following in mind as you review theinformation in the table:
n The default MSI file is named Centrify Agent for Windows64.msi, and islocated in the Agent folder in the Centrify download location.
n The default MST file is named Group Policy Deployment.mst, and islocated in the Agent folder in the Centrify download location.
• • • • • •
Auditing Administrator’s Guide 77

n All of the settings in the following table are optional, although some areincluded in the default MSI and MST files so that they are configured whenthe MSI and MST files execute during an installation.
n Settings that are included in the default MSI and MST files are noted in thetable.
n Some settings are environment-specific, and therefore do not have adefault value. Others are not environment-specific, and do have a defaultvalue.
n The settings described in the table are located in the MSI file’s Propertytable.
n The Setting column shows both the property name in the MSI file, and thename (in parentheses) of the registry key in theWindows registry.
• • • • • •
Installing Centrify Audit & Monitoring Service 78

Service Setting Description
Auditing andMonitoring
REG_MAX_FORMAT(MaxFormat)
Specifies the color depth of sessionsrecorded by the agent.
The color depth affects the resolution ofthe activity recorded and the size of therecords stored in the audit storedatabase when you have video captureauditing enabled. You can set the colordepth to one of the following values:
n 0 to use the native color depth onan audited computer.
n 1 for a low resolution with an 8-bitcolor depth
n 2 for medium resolution with a 16-bit color depth (default)
n 4 for highest resolution with a 32-bit color
This setting is included in the defaultMSI file. In the registry, this setting isspecified by a numeral (for example, 1).In the MSI file Property table, it isspecified by the # character and anumeral (such as #1). The default valueis 1.
• • • • • •
Auditing Administrator’s Guide 79

Service Setting Description
Auditing andMonitoring
REG_DISK_CHECK_THRESHOLD(DiskCheckThreshold)
Specifies the minimum amount of diskspace that must be available on the diskvolume that contains the offline datastorage file. You can change thepercentage required to be available bymodifying this registry key value.
This setting is included in the defaultMSI file. In the registry, this setting isspecified by a numeral (for example, 1).In the MSI file Property table, it isspecified by the # character and anumeral (such as #10).
The default value is 10, meaning that atleast 10% of the disk space on thevolume that contains the offline datastorage file must be available. If thisthreshold is reached and there are nocollectors available, the agent stopsspooling data and audit data is lost.
Auditing andMonitoring
REG_SPOOL_DIR(SpoolDir)
Specifies the offline data storagelocation.
The folder location you specify will bewhere the agent saves (“spools”) datawhen it cannot connect to a collector.
This setting is not included in thedefault MSI file. To use it, you must editthe default transform (MST) file so thatit is processed together with the MSI fileduring installation, or create it manuallyin the registry after the installationfinishes.
Auditing andMonitoring
REG_INSTALLATION_ID(InstallationId)
Specifies the unique global identifier(GUID) associated with the installationservice connection point.
This setting is not included in thedefault MSI file. To use it, you must editthe default transform (MST) file so thatit is processed together with the MSI fileduring installation, or create it manuallyin the registry after the installationfinishes.
• • • • • •
Installing Centrify Audit & Monitoring Service 80

Service Setting Description
Auditing andMonitoring
REG_LOG_LEVEL_DA(LogLevel)
Specifies what level of information, ifany, is logged. Possible values are:
n off
n information
n warning
n error
n verbose
This setting is included in the defaultMSI file. The default value isinformation.
Authentication& Privilege
REG_RESCUEUSERSIDS(RescueUserSids)
Specifies which users have rescuerights. Type user SID strings in a commaseparated list. For example:
user1SID,user2SID,usernSID
This setting is not included in thedefault MSI file. To use it, you must editthe default transform (MST) file so thatthe setting is processed together withthe MSI file during installation, or createit manually in the registry after theinstallation finishes.
• • • • • •
Auditing Administrator’s Guide 81

Service Setting Description
Authentication& Privilege
REG_LOG_LEVEL_DZ(LoggingLevel)
Specifies what level of information, ifany, is logged. Possible values are:
n off
n information
n warning
n error
n verbose
This setting is included in the defaultMSI file. The default value isinformation.
Authentication& Privilege
GPDeployment
Specifies whether the computer is joinedto the zone where the computer waspre-created. This setting is used onlyduring installation and does not have acorresponding registry key. Possiblevalues are:
n 0 - The computer is not joined to thezone.
n 1 - The computer is joined to thezone.
This setting is included in the defaulttransform (MST) file. To use it, youmust execute the MST file when youexecute the default MSI file. The defaultvalue is 1, meaning that the pre-createdcomputer is joined to the zone.
Editing the default transform (MST) file
The default transform file, Group Policy Deployment.mst, enables you tospecify registry key settings that are different from the default settings that aredefined in the MSI file. You can use the Group Policy Deployment.mst file tocustomize a silent installation for a specific environment.
If you want to customize the agent settings for your environment, you shouldedit the Group Policy Deployment.mst file before executing the command toperform a silent installation. If you want to use the default settings specified inthe MSI file, you can skip this section and go directly to Installing silently from thecommand line.
• • • • • •
Installing Centrify Audit & Monitoring Service 82
You must use the Orca MSI editor to edit the Group Policy Deployment.mstfile. Orca is one of the tools available in theWindows SDK. If you do not have theWindows SDK or Orca installed on your computer, you can download and installit from this location: http://msdn.microsoft.com/en-us/library/aa370557(v=vs.85).aspx.
To edit the default MST file:
1. In the Agent folder in the Centrify download location, create a backup copyof the default Group Policy Deployment.mst file.
2. Open a Command Prompt window and execute the following command tolaunch Orca:Orca.exe
3. In Orca, select File > Open and open the Centrify Windows Agent64.msi
file located in the Agent folder in the Centrify download location.
4. In Orca, select Transform > Apply Transform.
5. In Orca, navigate to the Agent folder in the Centrify download location andopen Group Policy Deployment.mst.
The file is now in transform edit mode, and you can modify data rows in it.
6. In the Orca left pane, select the Property table.Notice that a green bar displays to the left of “Property” in the left pane.This indicates that the Property table will be modified by the MST file.
The right pane displays the properties that configure registry keys whenyou execute the command to install the agent using the MSI file. Notice thatthe last property in the table, GPDeployment, is highlighted in a green box.This indicates that the GPDeployment property will be added to the MSI fileby the MST file.
7. In the right pane, edit or add properties as necessary to configure registrykeys for your environment.
• • • • • •
Auditing Administrator’s Guide 83

Property Description
REG_MAX_FORMAT
Sets the MaxFormat registry key to specify the color depth ofsessions recorded by the agent.
The color depth affects the resolution of the activity recorded andthe size of the records stored in the audit store database whenyou have video capture auditing enabled.
In the MSI file Property table, you can set the color depth to one ofthe following values:
n #0 to use the native color depth on an audited computer.
n #1 for a low resolution with an 8-bit color depth.
n #2 for medium resolution with a 16-bit color depth.
n #4 for highest resolution with a 32-bit color.
The default value is #1. To edit this property, double-click theValue column and type a new value.
REG_DISK_CHECK_THRESHOLD
Sets the DiskCheckThreshold registry key to specify theminimum amount of disk space that must be available on the diskvolume that contains the offline data storage file.
In the MSI file Property table, the default value is #10, meaningthat at least 10% of the disk space on the volume that containsthe offline data storage file must be available. You can changethe percentage required to be available. To edit this property,double-click the Value column and type a new value.
REG_SPOOL_DIR
Sets the SpoolDir registry key to specify the offline datastorage location.
The folder location you specify will be where the agent savesdata when it cannot connect to a collector.
To add a this property to the transform file, right-click anywherein the property table, then select Add Row.
• • • • • •
Installing Centrify Audit & Monitoring Service 84

Property Description
REG_INSTALLATION_ID
Sets the InstallationId registry key to specify the uniqueglobal identifier (GUID) associated with the installation serviceconnection point.
This property is not required if you are using the Installationgroup policy to identify the audit installation to use. If you are notusing group policy to identify the audit installation, you can add athis property to the transform file. Right-click anywhere in theproperty table, then select Add Row to add the property andvalue to the file.
REG_LOG_LEVEL_DA
Sets the LogLevel registry key to specifies what level ofinformation, if any, is logged. Possible values are:
n off
n information
n warning
n error
n verbose
The default value is information. To edit this property,double-click the Value column and type a new value.
8. After you have made the necessary modifications, select Transform >Generate Transform to save your modifications to the default MST file.Be sure to save the MST file in the same folder as the MSI file. If the MSTand MSI files are in different folders, the MST file will not execute when youexecute the MSI file.
The MST file is now ready to be used as described in Installing silently from thecommand line.
Installing silently from the command line
If you want to perform a “silent” or unattended installation of the Centrify Agentfor Windows, you can do so by specifying the appropriate command line optionsand Microsoft Windows Installer (MSI) file to deploy.
Before running the installation command, you should verify the computers whereyou plan to install meet the prerequisites described in Verify prerequisites. If theprerequisites are not met, the silent installation will fail. You should have alsocompleted the following tasks:
n Installed and configured the SQL Server management database and theSQL Server audit store database.
n Installed and configured one or more collectors.
• • • • • •
Auditing Administrator’s Guide 85

n Configured and applied the Centrify DirectAudit Settings group policy thatspecifies the installation name.
You can use similar steps to install the Centrify Common Component using theCentrify Common Component64.msi file before you install the agent. If youinstall the common component first, information about the agent installation isrecorded in a log file for troubleshooting purposes. However, you are notrequired to install the common component separately from the agent.
To install the Centrify Agent for Windows silently:
1. Open a Command Prompt window or prepare a software distributionpackage for deployment on remote computers.
2. Run the installer for the Centrify Agent for Windows package for a 64-bitarchitecture with the appropriate command line options.For example, to install the Centrify Common Component on a computerwith 64-bit architecture, run the following command:msiexec /i "Centrify Common Component64.msi" /qn
If you want to enable both auditing and access control features on acomputer with a 64-bit operating system and use the values defined in theGroup Policy Deployment.mst file, you would run the followingcommand:msiexec /i "Centrify Windows Agent64.msi" /qn TRANSFORMS="GroupPolicy Deployment.mst"
Installing from a central location by using group policy
You can use a Group Policy Object (GPO) to automate the deployment of CentrifyAgents for Windows. Because automated installation fails if all the prerequisitesare not met, be sure that all the computers on which you intend to install meetthe requirements described in Verify prerequisites.
You can use similar steps to install the Centrify Common Component using theCentrify Common Component64.msi file before you install the agent. If youinstall the common component first, information about the agent installation isrecorded in a log file for troubleshooting purposes. However, you are notrequired to install the common component separately from the agent.
In most cases, you can use the default agent settings defined in theGroup Policy Deployment.mst transform file. If you want to modify the default
• • • • • •
Installing Centrify Audit & Monitoring Service 86

settings prior to installation, see the instructions in Installing silently by using theMicrosoft Windows Installer.
To create a Group Policy Object for the deployment of Centrify Agents forWindows:
1. Copy the Centrify Windows Agent64.msi and Group Policy
Deployment.mst files to a shared folder on the domain controller or alocation accessible from the domain controller.When you select a folder for the files, right-click and selectShare with > Specific people to verify that the folder is shared withEveryone or with appropriate users and groups.
2. On the domain controller, click Start > Administrative Tools >Group Policy Management.
3. Select the domain or organizational unit that has theWindows computerswhere you want to deploy the Centrify agent, right-click, then select Createa GPO in this domain, and Link it here.
For example, you might have an organizational unit specifically forCentrify-managedWindows computers. You can create a group policyobject and link it to that specific organizational unit.
4. Type a name for the new Group Policy Object, for example,Centrify Agent Deployment, and click OK.
5. Right-click the new Group Policy Object and click Edit.
6. Expand Computer Configuration > Policies > Software Settings.
7. Select Software installation, right-click, and select New > Package.
8. Navigate to the folder you selected in Step 1, select the Centrify Windows
Agent64.msi file, and click Open.
9. Select Advanced and click OK.
10. Click theModifications tab and click Add.
11. Select the Group Policy Deployment.mst file, click Open, and click OK.
12. Close the Group Policy Management Editor, right-click theCentrify Agent Deployment group policy object, and verify that LinkEnabled is selected.
By default, when computers in the selected domain or organizational unit receivethe next group policy update or are restarted, the agent will be deployed and the
• • • • • •
Auditing Administrator’s Guide 87

computer will be automatically rebooted to complete the deployment of theagent.
If you want to test deployment or deploy immediately, you can open a CommandPrompt window to log on to aWindows client as a domain administrator andforce group policies to be updated immediately by running the followingcommand:
gpupdate /force
After installation, all of the registry settings that were specified in the MSI andMST files are configured. If you need to change any of the default agent settings,open the DirectAudit Agent Control Panel or the Registry Editor.
For more information about how to configure and use Group Policy Objects, seethe documentation on the Microsoft Windows website.
Installing the Audit Management Server
It's a best practice to install the Audit Management Server after you've installedyour audit stores, audit store databases, and installed your collectors. You caninstall the Audit Management Server either on a new computer or one whereyou've installed a collector.
To install the Audit Manager Server:
1. Log on using an Active Directory domain account.
2. Open the ISO file, and navigate to the following folder:
\DirectAudit\Audit Management Server\
3. Run the Audit Management Server installer : Centrify DirectAuditAudit Management Server64.exe.
4. At theWelcome page, click Next.
5. Review the terms of the license agreement, click I accept the terms in thelicense agreement, then click Next.
6. On the Destination Folder page, review the installation location and clickNext to continue.
7. If you want to install the console in a different location, click Change andnavigate to the desired folder.
8. Click Install to begin the installation.
• • • • • •
Installing Centrify Audit & Monitoring Service 88

9. The installer installs the necessary files. To open the console, keep the RunAudit Management Configuration Wizard option selected. Otherwise,deselect the option.
10. Click Finish to close the installer.
Configuring the Audit Management Server
By default, when you finish installing the Audit Management Server, the installeropens the Audit Management Server ConfigurationWizard.
To configure the Audit Management Server:
1. On the first page, select the installation for which you want to configure theAudit Management Server.
If you have one installation, it's already selected.
Click Next to continue.
2. On the Authentication Type page, specify which kind of authentication thatthe Audit Management Server will use. The choices are:
n Windows Authentication: Specify the computer account that will runthe Audit Management Server.
n SQL Server Authentication: Specify the SQL Server user name andpassword to use. Click Test Connection to make sure that the logincredentials work.
Click Next to continue.
3. On the Summary page, review the Audit Management Server configurationdetails, and click Next to continue.
4. Click Finish to close the configuration wizard.
Enabling or disabling auditing onWindowscomputers
You enable or disabling auditing for aWindows computer by adding orremoving the audit and monitoring service from the agent configuration.
• • • • • •
Auditing Administrator’s Guide 89

To enable auditing on aWindows computer:
n Use the Agent Configuration wizard to configure the Centrify Agent forWindows to connect to the Centrify Audit & Monitoring Service.
The agent configuration wizard runs automatically after you've installedthe Centrify Agent for Windows.
To disable auditing on aWindows computer:
n In the Centrify Agent Configuration window, select Centrify Audit &Monitoring Service and click Remove.
To enable or disable video capture editing for an entire installation, see Enablingor disabling video capture auditing . To enable or disable auditing on a per-userbasis you can use a group policy and the audited user list and non-audited userlists. For details, see the Group Policy Guide.
Installing an Centrify Agent for *NIX
You can install the auditing services for Linux or UNIX computers interactivelythe agent installation script, install.sh. If you want to run the installation scriptsilently or use a native package manager to install UNIX agents, see Installingthe UNIX agent on remote computers.
The steps in this section describe how to install interactively using theinstall.sh script, which automatically installs platform-specific softwarepackages and invokes the proper installation mechanism and options for acomputer’s operating system.
To install the agent using the installation script:
1. Log on as a user with root privileges.
2. Mount the cdrom device using the appropriate command for the localcomputer’s operating environment, if necessary.
Note: If you are not using the CD, verify the location and go on tothe next step.
• • • • • •
Installing Centrify Audit & Monitoring Service 90

3. Change to the appropriate directory.For example, to install on an AIX computer from the Centrify CD or ISO file,change to the UNIX directory:cd Agent_Unix22
4. Run the installer and respond to its questions:./install.sh
If there is an installation with the name DefaultInstallation, the UNIXagent uses it by default. If you are using an installation with a name otherthan DefaultInstallation, you must identify the installation by usingdacontrol or group policy after installing the agent. For more information,see Checking the status of the UNIX agent.
5. After installing the package, use dainfo to verify that the agent is installedand running. You should see output similar to the following that indicatesthe agent is Online:Pinging adclient: adclient is available
Daemon status: Online
Current installation: 'PistolasSF' (configured locally)
Current collector: DC2008r2-LG.pistolas.org:5063:HOST/[email protected] ...
If the output of dainfo indicates that the agent is Offline or that auditingis not enabled, verify your network connections and try restarting theauditing service or run the command to enable auditing manually asdescribed in Enabling or disabling auditing on Linux and UNIX computers.
You must adjust the disk space requirements higher if you allocate a largeamount of offline storage to use when none of the collectors servicing the auditstore can be reached. This and other parameters are in a text file namedcentrifyda.conf in /etc/centrifyda on each audited computer that has theUNIX agent installed. For more information about setting configurationparameters, see Configuring the UNIX agent off-line database. For informationabout all of the configuration parameters available to customize auditing, seethe Configuration and Tuning Reference Guide.
• • • • • •
Auditing Administrator’s Guide 91

Enabling or disabling auditing on Linux and UNIXcomputers
After you install the agent, you can enable auditing with the dacontrolcommand. The dacontrol command links all shells to the cdash shell wrapperby way of NSS. When a user opens a terminal, cdash is automatically loadedinstead of the user’s shell, then cdash loads the appropriate shell for the userand begins auditing the session.
You can also choose to enable video capture editing for an installation butdisable it for specific computers. You disable or enable video capture auditing fora specific computer or set of computers by using group policy settings or bymodifying the agent.video.capture setting. For details, see the Group PolicyGuide or the Configuration and Tuning Reference Guide.
Shell or terminal window auditing
To enable auditing on a Linux or UNIX computer:
1. Log on as a user with root privileges.
2. Run dacontrolwith the -e option:dacontrol -e
3. Run dacontrol again to verify that auditing has been enabled or rundainfo.For example, the output of the dacontrol command shows something likethis:dacontrol --query
This machine has been configured through group policy to useinstallation 'DefaultInstallation'
DirectAudit NSS module: Active
DirectAudit is not configured to audit individual commands.
When you enable auditing, the NSS module shows as active. You can alsosee if auditing is enabled or not for a system in the Audit Manager console.
After you enable auditing on a Linux or UNIX computer, you can control whetherthe auditing of shell activity applies for all users or for selected users by usingrole assignments. If auditing is enabled and the agent is not running, users withan active role assignment that requires logging are not allowed to log in.
• • • • • •
Installing Centrify Audit & Monitoring Service 92

For more information about configuring and assigning roles, see theAdministrator’s Guide for Linux and UNIX.
To disable auditing on a Linux or UNIX computer:
1. Log on as a user with root privileges.
2. Run dacontrolwith the -d option or the --disable option:dacontrol -d
dacontrol --disable
3. Run dacontrol again to verify that auditing has been disabled or rundainfo.For example:dacontrol --query
This machine has been configured through group policy to useinstallation 'DefaultInstallation'
DirectAudit NSS module: Inactive
DirectAudit is not configured to audit individual commands
When you disable auditing, the NSS module shows as inactive. You canalso see if auditing is enabled or not for a system in the Audit Managerconsole.
Linux desktop auditing
In addition to shell auditing, for some Linux systems you can also enable desktopauditing. When desktop auditing is enabled, the user's entire screen iscontinuously monitored to record all graphical interactions. More specifically,desktop auditing captures the following:
n The application name and window title when the user switches the focusto that application. For example, if a user opens a web browser or aterminal window.
n Changes to the application window title that currently has focus. Forexample, if a user opens a web browser and goes to a new web page,desktop auditing records the title of a web page.
The supported platforms for Linux desktop auditing are as follows:
n RHEL 6, 7, and 8 with GNOME v3
n CentOS 6, 7, and 8 with GNOME v3
• • • • • •
Auditing Administrator’s Guide 93

Linux sessions must be running X as the primary display manager (notWayland).
Linux desktop auditing requires shell session auditing.
To enable desktop auditing on a Linux computer:
1. Log on as a user with root privileges.
2. Run dacontrolwith the -x option or the --desktop-audit option:dacontrol -x
dacontrol --desktop-audit
To enable both shell and desktop auditing at the same time, use both the -eand -x options:dacontrol -e -x
3. Run dainfo to verify that desktop auditing has been enabled.For example, the relevant information from the dainfo command looks likethis:Pinging adclient: adclient is availableDaemon status: OnlineCurrent installation: 'DirectAudit' (configured locally)Current collector: test.acme.com:5063:HOST/[email protected] NSS module: Active...DirectAudit desktop auditing: EnabledUser (root) audited status: Yes
When you enable auditing, the desktop auditing module shows asEnabled. You can also see if auditing is enabled or not for a system in theAudit Manager console.
To disable desktop auditing on a Linux computer:
1. Log on as a user with root privileges.
2. Run dacontrolwith the -z option or the --no-desktop-audit option:dacontrol -z
dacontrol --no-desktop-audit
3. Run dainfo to verify that desktop auditing has been disabled.For example, the relevant information from the dainfo command looks likethis:Pinging adclient: adclient is availableDaemon status: Online
• • • • • •
Installing Centrify Audit & Monitoring Service 94
Current installation: 'DirectAudit' (configured locally)Current collector: test.acme.com:5063:HOST/[email protected] NSS module: Inactive...DirectAudit desktop auditing: DisabledUser (root) audited status: No
When you disable auditing, the desktop auditing module shows asDisabled. You can also see if auditing is enabled or not for a system in theAudit Manager console.
Enabling or disabling video capture auditing
In most cases, you decide whether to enable video capture auditing when youcreate a new installation. You can, however, choose to enable or disable videocapture auditing for an installation at any time. For example, you might enablefull video capture auditing of user activity during your initial deployment andlater find that you are capturing user activity that is of no interest or requires toomuch database management to store. Conversely, you might initially decide notto enable video capture and later discover that you want to record completeinformation about user activity when users run privileged commands or opencertain applications.
You can also choose to enable video capture editing for an installation butdisable it for specific computers. You disable or enable video capture auditing fora specific computer or set of computers by using group policy settings or bymodifying the agent.video.capture setting. For details, see the Group PolicyGuide or the Configuration and Tuning Reference Guide.
For information about enabling or disabling auditing onWindows or Linux/UNIXcomputers, see Enabling or disabling auditing onWindows computers andEnabling or disabling auditing on Linux and UNIX computers
To enable or disable video capture auditing for an installation:
1. In the Audit Manager console, right-click the installation name, then selectProperties.
2. Click the Audit Options tab.
3. Select Enable video capture auditing of user activity if it is not selected tostart capturing a visual record of all user activity when users perform tasksusing a role that is configured to be audited.
• • • • • •
Auditing Administrator’s Guide 95

Deselect this option to stop all video capture auditing. If you disable videocapture auditing, you will not be able to replay session activity.
4. Click OK or Apply.
Installing additional Audit Manager or AuditAnalyzer consoles
If you need to make Audit Manager or Audit Analyzer consoles available to otherusers, you can install additional consoles on other computers. For example,install Audit Analyzer on computers used by auditors in your organization.
Checklist for auditing systems outside of ActiveDirectory
Here is the overall process for auditing a computer that isn't joined to ActiveDirectory, including links to documented procedures.
Step#
Actions Details
Create the audit installation1 For the audit store that includes the collector that you will
enroll to the Privileged Access Service, edit the audit storescope so that it includes the following:
n The site or subnet that the collector is in
n The IP address or subnet of the system to be audited(the one that isn't in Active Directory)
Creating a newinstallation
Add the audit installation to the Admin Portaland enable auditing
2 Install a connector on aWindows computer in the ActiveDirectory domain
Note: For now, do not install a connector on the samecomputer as a collector.
"How to install aconnector" in thePrivileged AccessService help(docs.centrify.com)
• • • • • •
Installing Centrify Audit & Monitoring Service 96

Step#
Actions Details
3 In the Admin Portal, enable auditing for the auditinstallation.
"Enabling auditingfor remote sessions"in the PrivilegedAccess Service help(docs.centrify.com)
4 Verify the connector status in the Admin Portal.
Note: If your deployment is across multiple ActiveDirectory forests or you have multipleDirectAudit installations, your deploymentwill include multiple cloud connectors. Inthis kind of deployment, you shouldconfigure each non-Active Directorysystem to use only the cloud connectorsthat are in the same Active Directory forestas the desired DirectAudit installation. Youcan configure which connectors should beused in the system's Connector settings inthe Admin Portal.
For details, see the "Selecting theconnectors to use" topic in the PrivilegedAccess Service help (docs.centrify.com).
"Reference content -Connectorconfigurationprogram" in thePrivileged AccessService help(docs.centrify.com)
Configure the collector5 On the computer where the collector is or will be, install the
Centrify client and enroll the computer in the PrivilegedAccess Service.
The collector needs to be joined to Active Directory andenrolled in the Privileged Access Service.
"Installing and usingthe Centrify Clientfor Windows" in thePrivileged AccessService help(docs.centrify.com)
6 Install a new collector or reconfigure an existing collector sothat the collector receives audit data according to the cloudsettings.
Configure the auditcollector service
Configure the computer to be audited
• • • • • •
Auditing Administrator’s Guide 97

Step#
Actions Details
7 In the Admin Portal, download the Centrify Client installersand get an enrollment code
"Installing and usingthe Centrify Clientfor Windows" in thePrivileged AccessService help(docs.centrify.com)
"Enrolling andmanagingcomputers usingCentrify Clients forLinux" in thePrivileged AccessService help(docs.centrify.com)
"Enrolling acomputer" in thePrivileged AccessService help(docs.centrify.com)
8 In the Admin Portal, make sure that the user account you'lluse to run the installer has the permissions to enroll thesystem.
"Admin Portaladministrativerights" in thePrivileged AccessService help(docs.centrify.com)
9 On the computer to be audited, make sure that its DNSsetting are set so that it can contact and be contacted bythe collector computer.
On the computer tobe audited, makesure that its DNSsettings are set sothat it can contactthe collectorcomputer by its fullyqualified domainname (FQDN).
• • • • • •
Installing Centrify Audit & Monitoring Service 98

Step#
Actions Details
10 Install the client and enroll the computer in the PrivilegedAccess Service.
"Installing and usingthe Centrify Clientfor Windows" in thePrivileged AccessService help(docs.centrify.com)
"Enrolling andmanagingcomputers usingCentrify Clients forLinux" in thePrivileged AccessService help(docs.centrify.com)
11 In the Admin Portal, verify the enrollment. In the Admin Portal,go to Resources> Systems to verifythe enrollmentstatus.
12 Install the audit client package(s):
n Windows: Install theWindows audit package.
n Linux: First install the OpenSSL package, and theninstall the Linux audit package..
"Downloading theaudit packages forthe Centrify Clients"in the PrivilegedAccess Service help(docs.centrify.com)
13 In Audit Manager, verify that the computer is being audited. Managing auditedcomputers andagents
Auditing systems that are inside a DMZ
If you haveWindows or UNIX/Linux systems that are deployed inside of anetworking DMZ, you can audit those systems without having to set up aseparate audit installation.
Organizations often use a DMZ to host a group of systems in a section of thecorporate network in between the intranet and the public internet access.Firewall settings define the perimeter of the DMZ; the firewall helps limit accessto internal networks from the outside network.
In order to audit systems inside of a DMZ, the following must be true for yourdeployment:
• • • • • •
Auditing Administrator’s Guide 99

n All theWindows or UNIX/Linux systems in the DMZ are joined to the DMZdomain (for example, acme.dmz).
n You've already set up the audit installation in your main domain for yourorganization (for example, acme.corp) and you're auditing systems in thatdomain.
n The SQL Server that hosts the audit databases is also joined to the maindomain.
n There's either no Active Directory trust between the main and DMZdomains or there's a one-way trust where the DMZ domain trusts the maindomain (for example, acme.dmz trusts acme.corp).
n All the audit administrator and auditor accounts belong to the maindomain.
Before you go to set up auditing on DMZ systems, be sure to do the following:
n Deploy at least one audit collector on a system that's joined to theDMZ domain. This is because an audited system can only look for auditcollectors in its own forest.
n Configure the SQL Server to use mixed-mode authentication. This isbecause a collector in a DMZ cannot authenticate with SQL Server in themain domain usingWindows authentication.
n Configure the necessary firewall exceptions for the SQL Server deployed inthe main domain so that the audit collector in the DMZ can connect to theSQL Server. This includes the firewall exceptions for the SQL Server listenerport as well as other ports, such as UDP 1434 (which is used by theSQL browser service).
To audit systems in a DMZ:
1. Prepare the audit store:a. Set up an audit store that contains the audited data for the systems in
the DMZ. You can either create a new audit store or modify anexisting one so that the audit store scope includes the sites or subnetsof the systems in the DMZ.
b. Add a new audit store database to the DMZ audit store and mark thedatabase as active.
For more information, see Creating the first audit store.
• • • • • •
Installing Centrify Audit & Monitoring Service 100

2. Prepare the SQL authentication account:a. In Audit Manager, right-click the audit store database that you just
created and select Properties.
b. In the Advanced tab, under the Allowed incoming collectors, clickAdd.
c. For the authentication, select SQL Server authentication. Select anexisting account or click the list to create a new SQL Login account.
This SQL Login account is what the collectors in the DMZ domain willuse to authentication with the SQL Server in the main domain. As abest practice, it's recommended to create a dedicated incomingcollector account for all collectors in the DMZ.
3. Publish the audit installation information to the DMZ domain:
n If there's a one-way trust between the DMZ and main domains:
a. In Audit Manager, right click the installation name and clickProperties.
b. In the Publication tab, click Add.
c. Select an OU or container in the DMZ domain to which you'llpublish the audit installation information. Click OK to continue,and click OK again to close the dialog box and publish the auditinstallation information to the DMZ.
For more information, see Publishing installation information.
n If there's no trust between the DMZ and main domains:
a. In Audit Manager, right-click the installation name and clickProperties.
b. In the Publication tab, click Export to export the auditinstallation information to an LDIF file.
c. Provide the LDIF file to the Active Directory administrator of theDMZ domain and request that they manually import the file intoan OU or container in the DMZ domain. They can import theLDIF file using the LDIFDE.exe utility.
For more information, see Exporting installation information.
4. Install a collector on at least oneWindows system in the DMZ: a. Run the Collector Configuration wizard, and select the audit
installation and specify the port number.
• • • • • •
Auditing Administrator’s Guide 101

b. In the Authentication type screen, select SQL Server authenticationand enter the credentials for the SQL authentication account that youcreated earlier.
c. Click Test Connection to ensure that the credentials work and theSQL Server is reachable.
d. Finish the rest of the wizard. If there are any warnings whenvalidating the permissions, you can safely ignore them.
If you login to the collector computer as a user from your DMZdomain, that user will most certainly not have the permissions toconnect to the audit installation and, as a result, the CollectorConfiguration wizard (which runs in context of the logged-in user)may fail to validate certain permissions and show warning messagesinstead.
For details about configuring a collector, see Installing the auditcollectors.
5. Install and configure the agent on the systems in the DMZ.
For details, see Installing the Centrify Agent for Windows.
• • • • • •
Installing Centrify Audit & Monitoring Service 102

Managing an installation
This chapter describes how to secure and manage an audit installation after theinitial deployment of Centrify software. It includes tasks that are done by usersassigned the Master Auditor role for an installation and users who areMicrosoft SQL Server database administrators.
The following topics are covered:
Securing an installation 104
Configuring selective auditing 109
Configuring agents to prefer collectors 111
Audit license enforcement 112
Enabling audit notification onWindows 113
Preventing users from reviewing or deleting sessions 114
Adding an installation 115
Publishing installation information 116
Removing or deleting an installation 118
Managing audit store databases 119
Managing audit stores 129
Managing the audit management database 132
Maintaining database indexes 134
Managing collectors 135
Managing audited computers and agents 138
Delegating administrative permissions 139
Managing audit roles 140
• • • • • •
Auditing Administrator’s Guide 103

Securing an installation
For production deployments, you can take the following steps to secure theinstallation:
n Use the Installation group policy to specify which installation agents andcollectors are part of. By enabling the Installation group policy you canprevent local administrators from configuring a computer to be part of anunauthorized installation.
n Configure a trusted group of collectors to prevent a hacker from creating arogue collector to collect data from agents.
n Configure a trusted group of agents to prevent a hacker from performing aDenial of Service attack on the collector and database by flooding acollector with bogus audit data.
n Encrypt all data sent from the collector to the database.
Before you can follow these steps to secure an installation, you must haveaccess to an Active Directory user account with permission to create ActiveDirectory security groups, enable group policies, and edit Group Policy Objects.
To secure an installation usingWindows group policy:
1. Open the Group Policy Management console.
2. Expand the forest and domains to select the Default Domain Policy object.
3. Right-click, then click Edit to open Group Policy Management Editor.
4. Expand Computer Configuration > Policies > Centrify Audit Settings,then select Common Settings.
5. Double-click the Installation policy in the right pane.
6. On the Policy tab, select Enabled.
7. Click Browse to select the installation you want to secure, then click OK.
8. Click OK to close the Installation properties.
Securing an audit store with trusted collectors and agents
By default, audit stores are configured to trust all audited computers andcollectors in the installation. Trusting all computers by default makes it easier to
• • • • • •
Managing an installation 104

deploy and test auditing in an evaluation or demonstration environment. For aproduction environment, however, you should secure the audit store by explicitlydefining the computers the audit store can trust.
You can define two lists of trusted computers:
n Audited computers that can be trusted.
n Collector computers that can be trusted.
To secure an audit store:
1. Open the Audit Manager console.
2. Expand the installation and Audit Stores nodes.
3. Select the audit store you want to secure, right-click, then selectProperties.
4. Click the Advanced tab.
5. Select Define trusted Collector list, then click Add.
6. Select a domain, click OK, then search for and select the collectors to trustand click OK to add the selected computers to the list.Only the collectors you add to the trusted list are allowed to connect to theaudit store database. All other collectors are considered untrusted andcannot write to the audit store database.
7. Select Define trusted Audited System list, then click Add.
8. Select a domain, click OK, then search for and select the audited computersto trust and click OK to add the selected computers to the list.
Only the audited computers you add to the trusted list are allowed toconnect to the trusted collectors. All other computers are considereduntrusted and cannot send audit data to trusted collectors.
9. Click OK to close the audit store properties dialog box.
The following example illustrates the configuration of trusted collectors andtrusted audited computers.
• • • • • •
Auditing Administrator’s Guide 105

In this example, the audit store trusts the computers represented by P, Q, andR.Those are the only computers that have been identified as trusted collectors inthe audit store Properties. list. The audit store has been configured to trust theaudited computers represented by D, E, and F. As a result of this configuration:
n Audited computers D, E, and F only send audit data to the trusted collectorsP, Q, and R.
n Trusted collectors P, Q, and R only accept audit data from the trustedaudited computers D, E, and F.
n The audit store database only accepts data for its trusted collectors P, Q,and R, and therefore only stores audit data that originated on the trustedaudited computers D, E, and F.
Disabling a trusted list
After you have added trusted collectors and audited computers to these lists,you can disable either one or both lists at any time to remove the securityrestrictions. For example, if you decide to allow auditing data from all auditedcomputers, you can open the audit store properties, click the Advanced tab, and
• • • • • •
Managing an installation 106

deselect the Define trusted Audited System list option. You don’t have toremove any computers from the list. The audit store continues to only acceptdata from trusted collectors.
Using security groups to define trusted computers
You can use Active Directory security groups to manage trusted computeraccounts. For example, if you create a group for trusted audited computers and agroup for trusted collectors, you can use those groups to define the list of trustedcollectors and audited computers for the audit store. Any time you add a newcomputer to one of those groups, thereafter, it is automatically trusted, withoutrequiring any update to the audit store properties.
Securing network traffic with encryption
The last step in securing an installation is to secure the data collected and storedthrough encryption. The following summarizes how data is secured as it movesfrom component to component:
n Between an audited computer and the spooler that stores the data locallywhen no collectors are available, audit data is not encrypted. Only the rootuser or local Administrator account can access the data by default.
n Between the audited computer’s data collection service (dad on UNIX orwdad onWindows) and the collector, data is secured using Generic SecurityServices Application Program Interface (GSSAPI) with Kerberos encryption.
n Between the collector and the audit store database, data can be securedusing Secure Socket Layer (SSL) connections and ARC4 or AES encryptionif the database is configured to use SSL connections.
n Between the audit store and management databases, data can be securedusing Secure Socket Layer (SSL) connections and ARC4 or AES encryptionif the database is configured to use SSL connections.
n Between the management database and the Audit Manager console, datacan be secured using Secure Socket Layer (SSL) connections and ARC4 orAES encryption if the database is configured to use SSL connections.
The following illustration summarizes the flow of data and how network traffic issecured from one component to the next.
• • • • • •
Auditing Administrator’s Guide 107

Enabling Secure Socket Layer (SSL) communication
Although the database connections can be secured using SSL, you mustconfigure SSL support for Microsoft SQL Server as part of SQL Serveradministration. You must also have valid certificates installed on clients and thedatabase server. If you are not the database administrator, you should contactthe database administrator to determine whether encryption has been enabledand appropriate certificates have been installed. For more information aboutenabling SSL encryption for SQL Server and installing the required certificates,see the following Microsoft support article:
https://support.microsoft.com/en-us/help/316898/how-to-enable-ssl-encryption-for-an-instance-of-sql-server-by-using-mi
Enabling encryption for Microsoft SQL Server Express
If you use Microsoft SQL Server Express, encryption is turned off by default. Tosecure the data transferred to the database server, you should turn encryptionon.
To enable encryption for each audit store and management database:
1. Log on to the computer hosting an audit store or management databasewith an account that has database administrator authority.
2. Open SQL Server Configuration Manager.
3. Select the SQL Server Network Configuration node, right-click Protocolsfor DBINSTANCE, then select Properties.
4. On the Flags tab, select Yes for the Force Encryption option, then click OKto save the setting.
• • • • • •
Managing an installation 108
Using a service account for Microsoft SQL Server
When you install Microsoft SQL Server, you specify whether to useWindowsauthentication or a mix of Windows and SQL Server authentication. You alsospecify the accounts that the database services should use. By default, systemaccounts are used. If SQL Server uses a domain user account instead of asystem account, you should ensure that the account has permission to updatethe SQL Server computer object in Active Directory. If the account haspermission to update the computer where SQL Server is running, SQL Server canpublish its service principal name (SPN) automatically. Getting the correctservice principal name is important becauseWindows authentication relies onthe SPN to find services andaudit and monitoring service usesWindowsauthentication for console-to-audit management database connections. If theSPN is not found, the connection between the console and audit managementdatabase fails.
The audit management database-to-audit store connection and the collector-to-audit store connection can use either Windows authentication or SQL Serverauthentication. If SQL Server authentication is used, it does not matter whetherthe SQL Server instance uses a system account or a service account. If you haveconfigured SQL Server to useWindows authentication only, be sure that theWindows account is allowed to connect to the audit management database andto the audit store database.
If the domain user account running SQL Server services does not havepermission to update the computer object, see the following Microsoftknowledge base article for information about how to manually register the SPNfor SQL Server:
https://support.microsoft.com/en-us/help/909801/how-to-make-sure-that-you-are-using-kerberos-authentication-when-you-c
Configuring selective auditing
By default, the agent captures activity for all users on audited computers, butyou can limit auditing to specified users. If you are using authentication andprivilege elevation, you can control auditing by configuring role definitions withdifferent audit requirements then assigning those role definitions to differentsets of Active Directory users.
If you are using the Centrify Audit & Monitoring Service without accessmanagement:
• • • • • •
Auditing Administrator’s Guide 109

n You can use group policies to specify whichWindows users to audit andwhichWindows users should not be audited.For information about configuring group policies to customize auditing, seethe Group Policy Guide.
n For UNIX users, you can use the dash.user.skiplist configurationparameter to specify the UNIX user accounts and Active Directory UNIXnames that you don’t want to audit.For more information about setting the dash.user.skiplist parameter,see the comments in the /etc/centrifyda/centrifyda.conf file. Forinformation about all of the configuration parameters available tocustomize auditing, see the Configuration and Tuning Reference Guide.
To control auditing by using group policies:
1. Open the Group Policy Management console.
2. Expand the forest and domains to select the Default Domain Policy object.
3. Right-click, then click Edit to open Group Policy Management Editor.
4. Expand Computer Configuration > Policies > Centrify Audit Settings,then selectWindows Agent Settings.
5. Select the Audited user list policy and change the policy setting from NotConfigured to Enabled, then click Add if you want to identify specific usersto audit.When you enable this group policy, only the users you specify in the policyare audited. If this policy is not configured, all users are audited.
6. Select the Non-audited user list policy and change the policy setting fromNot Configured to Enabled, then click Add if you want to identify specificusers that should not be audited.When you enable this group policy, only the users you specify are notaudited. If this policy is not configured, all users are audited. If you enableboth the Audited user list and the Non-audited user list policies, the usersyou include in the Non-audited user list take precedence over the Auditeduser list.
The following table details the effect of choosing to enable the Audited user listpolicy, the Non-audited user list policy, or a combination of both policies.
• • • • • •
Managing an installation 110

Non-auditeduser list
Auditeduser list
How the setting affects auditing
Notconfigured
Notconfigured
No users are defined for either policy, so all users accessingaudited computers are audited.
Notconfigured Enabled
Only the users you specify in the Audited user list policy areaudited.
If you do not specify any users when you enable this policy, nousers are audited.
Enabled Notconfigured
Only the users you specify in the Non-audited user list are exemptfrom auditing.
If you enable this policy but do not specify any users, no users areexempt from auditing. All users are audited.
Enabled Enabled
If both policies are enabled, the non-audited user takesprecedence over the audited list of users.
If a user is specified in the audited list, that user is explicitlyaudited.
If a user is specified in the non-audited list, that user is explicitlynot audited.
If the same user is specified in both lists or no users are specifiedfor either policy, no users are audited because the non-auditeduser takes precedence.
Configuring agents to prefer collectors
If desired, you can specify that agents first use the collectors that are in the samesite as the agent. You configure this option for each audit store.
For example, consider the following installation setup:
n One audit store
n Two sites (SantaClara and SanDiego)
n Two collectors in SantaClara, and two collectors in SanDiego
If you enable the option for the agents to prefer collectors in the same site as theagent, the agents in the SantaClara site use the collectors in that site, and theagents in the SanDiego site use the collectors there.
If for some reason all collectors in a site are down, the agents use collectors inanother site or configured subnet.
• • • • • •
Auditing Administrator’s Guide 111
Once an agent fails over and uses a collector in another site, the agent continuesto use that collector until a rebinding occurs. You can do a rebinding with thedareload -b command. During the time that the agent is using a collector inanother site, dadiag displays a warning message.
If your installation uses agents older than version 2017, those older agentsignore the collector preference setting.
To specify agents use collectors in the same site:
1. Open the Audit Manager console window.
2. Expand Audit Stores, and right-click the desired audit store and selectProperties.
3. In the Audit Store Properties dialog box, click Advanced.
4. Select Agents must prefer collectors in the same site as the agent.By default, this option is not enabled.
5. Click OK to save the changes.
It may take several minutes for the changes to take effect, depending on ActiveDirectory replication delays and policy sets.
Audit license enforcement
Any time you open the Audit Manager console, Audit Analyzer console, or thesession player, a background process determines the availability of auditlicenses. Only the audited computers that are currently connected to a collectorare included in the license count to determine license usage and compliance.Computers that have been previously audited and have data in the audit storedatabase but are not currently connected to a collector and haven't beenconnected to a collector for over 45 days are not included in the license count.
As you increase the number of licenses in use, license enforcement isprogressive. If the number of audited computers is less than 90% of the numberof licenses you have purchased, there’s no affect on any auditing features. If thenumber of audited computers is more than 90% of the licenses purchased,enforcement depends on the number of licenses in use:
n 90-100% of the licensing limit displays a warning message that you areclose to over-deployment, but you can continue to use all auditing features.
• • • • • •
Managing an installation 112
n 100-120% of the licensing limit displays a warning message that you mustacknowledge by clicking OKwhen you open any console, after which youcan resume using the console or session player.
n Over 120% of the licensing limit displays a warning message for 60seconds when you open any console. If you see the 60 second warningmessage, use the License dialog box to add license keys to continue usingauditing features.
You can contact Centrify to purchase additional licenses or remove some auditedcomputers from the installation to bring the number of licenses used intocompliance.
Agents and licenses from previous versions
An installation can include agents and licenses from previous versions ofCentrify Server Suite. For example, an installation might include a mix of UNIXandWindows agents from DirectAudit 2.x, or DirectAudit 3.x, or all new agentson the computers you want to audit.
Enabling audit notification onWindows
If you enable audit notification, users see a message informing them that theiractions are being auditing when they log on. After you enable notification, themessage is always displayed on audited computers if the session activity isbeing recorded.
Note: This audit notification banner mentioned below displays onWindows systems. For notifying users on UNIX or Linux systems,the messages specified in the dash.prompt.message.fileparameter apply. For details, see the Configuration and TuningReference Guide.
To enable audit notification for an installation:
1. In the Audit Manager console, right-click the installation name, then selectProperties.
2. Click the Notification tab.
3. Select Enable notification.
• • • • • •
Auditing Administrator’s Guide 113

Deselect this option to turn off notification.
4. Click the browse button to locate and select a text file that contains themessage you want to display.
A notification message is required if you select the Enable notificationoption. The contents of the file you select are displayed below the filelocation. The maximum text file size is 30 KB.
5. Click the browse button to locate and select an image to appear as abanner across the top of the audit notification.
Displaying a banner image is optional when you enable notification. Themaximum image file size is 15 KB. For the best image display, use an imagethat is 468 pixels wide by 60 pixels high.
Note: Animated GIF files are not supported for use as auditnotifications. If you do specify an animated GIF, the imagedisplays as a static image.
6. Click OK or Apply.
Users will see the notification message the next time they log in.
7. If you enable notification after you have deployed agents, update the localpolicy on the audited computers by running the following command:gpupdate /FORCE
Preventing users from reviewing or deletingsessions
By default, users can update the review status, add comments, and delete theirown sessions if they have an audit role with the appropriate permissions.However, there are installation-wide options to prevent any users from updatingthe review status or deleting their own sessions. These installation-wide optionstake precedence over audit role permissions for all users.
• • • • • •
Managing an installation 114

To prevent all users from updating the review status or deleting their ownsessions in an installation:
1. In the Audit Manager console, right-click the installation name, then selectProperties.
2. Click the Audit Options tab.
3. Select the appropriate settings for your installation.n Select Do not allow any users to review their own sessions if you toprevent all users from updating the review status or addingcomments to their own sessions in Audit Analyzer.
n Select Do not allow any users to delete their own sessions if you toprevent all users from deleting their own sessions in Audit Analyzer.
4. Click OK or Apply.
Adding an installation
Although a single installation is the most common deployment scenario, you canconfigure multiple installations. For example, you can use separate installationsto provide concurrent production and test-bed deployments or to supportmultiple administrative domains within your organization.
To create a new installation:
1. Open Audit Manager.
2. Select the root node, right-click, then select New Installation.
3. Follow the prompts displayed.The steps are the same as the first installation. For more information, seeCreating a new installation.
4. Choose the appropriate installation for each collector using the CollectorConfiguration wizard.
5. Choose the appropriate installation for each agent using the AgentConfiguration wizard.
Once you have multiple installations, you can choose which one each collector ispart of using the Collector Configuration wizard. You can choose whichinstallation each agent is part of using the Agent Configuration wizard. You canalso configure collectors and agents using group policy.
• • • • • •
Auditing Administrator’s Guide 115

Note: Agents can communicate with a collector only if the agents andcollector are in the same Active Directory forest.
Delegating administrative tasks for a new installation
The account you use to create a new installation is the default administrator andMaster Auditor with full control over the entire installation and the ability todelegate administration tasks to other Active Directory users or groups. You cangrant permission to perform administrative tasks to other users by opening theProperties for each component, then clicking the Security tab.
Opening an installation in a new console
If you create multiple installations at the same site, you can select the installationname, right-click, then select NewWindow From Here to keep consoles fordifferent installations separate from each other. Creating a new window foreach installation can help you avoid performing operations on one installationthat you intended to perform on another.
Closing an installation
The Audit Manager console allows you to manage multiple installations. Toremove the current installation from the console, but not physically remove thedatabase or the information published to Active Directory, you can select theinstallation name, right-click, then select Close.
Publishing installation information
Centrify Audit & Monitoring Service publishes installation information to aservice connection point (SCP) object in Active Directory so that auditedcomputers and collectors can look up the information. If the published locationsfor multiple SCPs in the same installation are not the same, or if collectors cannotread from at least one of the published locations, the collectors are unable todetermine which audit store is the best match for the sites and subnets, and sothey do not attempt to connect to an audit store.
• • • • • •
Managing an installation 116

Permission to publish to Active Directory
Only administrators who have been delegated permission to modify variousattributes of the installation can publish those attributes to Active Directory.
At a minimum, you must have the Active Directory permission toCreate serviceConnectionPoint objects on the container or organizational unitthat you have identified for publishing installation information.
If you do not have Active Directory permission to modify the installation, theupdates are kept in the audit management database, and a message is issuedto notify you that the installation information could not be updated in ActiveDirectory.
Synchronizing installation information
If you have an Active Directory account with permission to publish informationabout the installation, you can update the service connection point.
To publish the service connection point for an installation:
1. Open Audit Manager.
2. Select the installation name, right-click, then click Properties.
3. Click the Publication tab, then click Synchronize to publish the information.In a multi-forest or DMZ environment, this tab lists multiple Active Directorylocations to which to publish.
4. Click OK to close the installation properties.
Exporting installation information
If you have an Active Directory account with permission to access installationinformation, you can export the service connection point that contains theinstallation information to a file in LDAP Data Interchange Format (LDIF).Exporting installation information can be useful if you want to add the domainfor a perimeter network to an existing installation. After exporting installationinformation to a file, you can modify the file—for example, to use a differentdomain component—then import the modified file using the ldifde command.
• • • • • •
Auditing Administrator’s Guide 117

To export and import installation information:
1. Open Audit Manager.
2. Select the installation name, right-click, then click Properties.
3. Click the Publication tab.
4. Select the Active Directory location, then click Export.
5. Select a file location and type a file name, then click Save.
6. Click OK to close the installation properties.
7. Use a text editor to modify the file, as needed.For example, you might use a different domain component—such asDC=dmz1,DC=ajax, DC=org in place of DC=internal, DC=ajax, DC=org—to differentiate between the perimeter and internal networks.
8. Import the modified file using a command similar to the following in aCommand Prompt window:ldifde -i -f C:\Users\Administrator\Desktop\sample-dmz.ldif
Removing or deleting an installation
Before you can remove or delete an installation, you must do the following:
n Run the setup program to remove all agents and collectors and collectorservice connection points (SCPs).
n Detach and remove all audit store databases.
n Open the Installation Properties and click the Publications tab to makesure only one installation service connection point (SCP) is listed.
Note: To remove service connection points on other sites, contactan administrator with publication permission on those sites.
To remove or delete an installation, select the installation in the Audit Managerconsole, right-click, then select Remove to open the Remove installation dialogbox.
n Click Remove to remove the installation but not delete the managementdatabase from the SQL Server instance.
n Click Delete to remove the installation and delete the managementdatabase from the installation of SQL Server.
• • • • • •
Managing an installation 118

Note: All the publications published to Active Directory are removedwhen you remove or delete an installation.
Managing audit store databases
During the initial deployment, your installation only has one audit storedatabase. As you begin collecting audit data, however, that database canquickly increase in size and degrade performance. Over time, an installationtypically requires several Microsoft SQL Server databases to store the databeing captured and historical records of session activity, login and role changeevents, and other information. As part of managing an installation, you mustmanage these databases to prevent overloading any one database and to avoidcorrupting or losing data that you want to keep.
One of the biggest challenges in preparing and managing Microsoft SQL Serverdatabases for storing audit data is that it is difficult to estimate the level ofactivity and howmuch data will need to be stored. There are several factors toconsider that affect how you configure Microsoft SQL Server databases forauditing data, including the recovery method, memory allocation, and yourbackup and archiving policies.
The sections below provide guidelines for sizing and managing the MicrosoftSQL Server databases you use for audit data. For more complete informationabout managing and configuring SQL Server, however, you should refer to yourMicrosoft SQL Server documentation.
Selecting a recovery model
Standard backup and restore procedures come in three recovery models:
n Simple—The Simple recovery model allows high-performance bulk copyoperations, minimizes the disk space required, and requires the leastadministration. The Simple Recovery model does not provide transactionlog backups, so you can only recover data to the point of the most recentfull or differential backup. The default recovery model is Simple, but is notappropriate in cases where the loss of recent changes is not acceptable.
n Full—The Full recovery model has no work-loss exposure, limits log loss tochanges since the most recent log backup, and provides recovery to anarbitrary time point. However, the Full recovery model uses much more diskspace.
• • • • • •
Auditing Administrator’s Guide 119

n Bulk-logged—The Bulk-logged recovery model provides higherperformance and minimizes the log space used by disk-intensiveoperations, such as create index or bulk copy. With the Bulk-loggedrecovery model, you can only recover data to the point of the most recentfull or differential backup. However, because most databases undergoperiods of bulk loading or index creation, you can switch between Bulk-logged and Full recovery models to minimize the disk space used to logbulk operations.
When a database is created, it has the same recovery model as themodeldatabase. Although the Simple recovery model is the default, the Full and Bulk-Logged recovery models provide the greatest protection for data, and the Fullrecovery model provides the most flexibility for recovering databases to anearlier point in time. To change the recovery model for a database, use the ALTERDATABASE statement with a RECOVERY clause.
Regardless of the recovery model you choose, you should keep in mind thatbackup, restore, and archive operations involve heavy disk I/O activity. Youshould schedule these operations to take place in off-peak hours. If you use theSimple recovery model, you should set the backup schedule long enough toprevent backup operations from affecting production work, but short enough toprevent the loss of significant amounts of data.
Configuring the maximum memory for audit store databases
Because Microsoft SQL Server uses physical memory to hold databaseinformation for fast query results, you should use a dedicated instance to storeauditing data. Because SQL Server dynamically acquires memory whenever itneeds it until it reaches the maximum server memory you have configured, youshould set constraints on howmuch physical memory it should be allowed toconsume.
The maximum server memory (max server memory) setting controls themaximum amount of physical memory that can be consumed by the MicrosoftSQL Server buffer pool. The default value for this setting is such a high numberthat the default maximum server memory is virtually unlimited. Because of thisdefault value, SQL Server will try to consume as much memory as possible toimprove query performance by caching data in memory.
Processes that run outside SQL Server, such as operating system processes,thread stacks, socket connections and Common Language Runtime (CLR) storedprocedures are not allowed to use the memory allocated to the Microsoft SQL
• • • • • •
Managing an installation 120

Server buffer pool. Because those other processes can only use the remainingavailable memory, they might not have enough physical memory to perform theiroperations. In most casts, the lack of physical memory forces the operatingsystem to read and write to disk frequently and reduces overall performance.
To prevent Microsoft SQL Server from consuming too much memory, you can usethe following formula to determine the recommended maximum server memory:
n Reserve 4GB from the first 16GB of RAM and then 1GB from eachadditional 8GB of RAM for the operating system and other applications.
n Configure the remaining memory as the maximum server memoryallocated for the Microsoft SQL Server buffer pool.
For example, if the computer hosting the Microsoft SQL Server instance has32GB of total physical memory, you would reserve 4GB (from first 16 GB) + 1GB(from next 8 GB) + 1 GB (from next 8 GB) for the operating system, then set theMaximum server memory for Microsoft SQL server to 26GB (32GB – 4GB – 1GB –1GB = 26).
For more information about how to configure Microsoft SQL Server maximummemory setting and other memory options, see the following Microsoft article:
http://msdn.microsoft.com/en-us/librms178067(v=sql.105).aspxary/ms178067(v=sql.105).aspx
You should configure the maximummemory allowed for the Microsoft SQLServer instances hosting audit store databases and the management database.However, this setting is especially important to configure on the Microsoft SQLServer instance hosting the active audit store database.
Using Transact-SQL to configure minimum and maximummemory
You can control the minimum and maximummemory that the SQL Server buffermanager uses by issuing Transact-SQL commands. For example:
sp_configure ‘show advanced options’, 1reconfiguregosp_configure ‘min server memory’, 60reconfiguregosp_configure ‘max server memory’, 100reconfigurego
• • • • • •
Auditing Administrator’s Guide 121

For more information about configuring SQL Server and setting minimum andmaximum server memory using T-SQL, see https://docs.microsoft.com/en-us/sql/database-engine/configure-windows/server-memory-server-configuration-options?view=sql-server-2017
Estimating database requirements based on the data youcollect
To determine how auditing will affect database capacity, you should monitor apilot deployment of 20 to 25 agents with representative activity to see howmuch data is produced daily. For example, some audited computers might havefew interactive user sessions or only short periods of activity. Other auditedcomputers might have many interactive user sessions or long sessions of activityon average.
During the pilot deployment, you want to the following information:
n Howmany interactive user sessions occur daily on each computer?
n How long do sessions last on average?
n What are the activities being captured, and what is the average size ofeach session being captured?
n How long do you need to store the captured data to balance performanceand storage?
n What is the data retention period for audited data?
From the information you collect in the pilot deployment and the data retentionpolicy for your organization, you can estimate the database size using thefollowing guideline:
For example, if an average session generated 100 KB in the database and theinstallation had 250 agents, 10 sessions per agent, and a six-month retentionperiod (about 130 working days), the storage requirement for the audit storedatabase would be 36.9 GB:
250 agents x 10 sessions/agent each day x 100 KB/session x 130 days =32,500,000 KB
• • • • • •
Managing an installation 122

The following table shows examples of the data storage requirement in aninstallation withWindows agents, typical levels of activity with an average ofone session per day on each audited computer, and the recovery mode set toSimple:
Agents Average session length Average session size Daily Weekly 6 Months
100 20 minutes 806 KB - low activity 79 MB 394 MB 10 GB
50 25 minutes 11.56 MB - high activity 578 MB 2.81 GB 73.36 GB
100 20 minutes 9.05 MB - high activity 905 MB 4.42 GB 115 GB
In this example, an installation with 100Windows agents with low activitywould require approximately 10 GB for the audit store database to keep auditdata for 6 months. An increase in the number of interactive sessions, sessionlength, or average session size would increase the database storage required.
If SQL Server requires more space to accommodate the new data, it expands thedatabase file immediately, which can cause degraded performance. To reducethe effect of database expansion on performance, allocate sufficient space tosupport database growth. In addition, monitor database space and when spaceis low, schedule a database expand operation for an off-peak time.
Reducing color depth to decrease disk usage
If you enable video capture auditing of user activity for an installation, the colordepth setting affects the size of sessions stored in the audit store database.Depending on whether you want higher quality video playback or lower diskconsumption, you can modify this setting. The growth rate is linear as youincrease or decrease the color depth.
Based on a simulation of user activity, changing the color depth from 16-bit to 8-bit reduces disk space by 42%. Changing the color depth from 32-bit to 16-bitreduces disk space by 34 to 39%. If you can accept the lower quality videoplayback, changing the color depth from 32-bit to 8-bit reduces disk space by 62to 65%.
Using SQL Server availability groups with multi-subnetfailover for audit store databases
If you add an audit store database to a SQL Server availability group that hasmultiple subnet failover functionality, the SQL Server that hosts the management
• • • • • •
Auditing Administrator’s Guide 123

database must be SQL Server 2012 or above. This restriction applies only toavailability groups that have multi-subnet failover configured.
For details about availability group multi-subnet failovers, seehttps://msdn.microsoft.com/en-us/library/hh213417.aspx#SupportAgMultiSubnetFailover.
Adding new audit store databases to an installation
When you first set up an installation, you also create the first audit store andaudit store database. By default, that first database is the active database. Asyou begin collecting audit data, you might want to add databases to the auditstore to support a rolling data retention policy and to prevent any one databasefrom becoming a bottleneck and degrading performance.
Only one database can be the active database in an audit store at any giventime. The computer hosting the active database should be optimized forread/write performance. As you add databases, you can change the olderdatabase from active to attached. Attached databases are only used forquerying stored information and can use lower cost storage options.
Note: A single instance of Microsoft SQL Server can host multipledatabases. Those databases can support different versions of theagent.
Audit store databases have the following characteristics:
n A database can be active, attached, or detached.
n Only one database can be actively receiving audit data from collectors.
n A database cannot be detached while it is the active database.
n A database that was previously the active database cannot again be theactive database.
n If a detached database contains parts of sessions presented to the AuditAnalyzer, a warning is displayed when the auditor replays those sessions.
Rotating the active database
Database rotation is a management policy to help you control the size of theaudit store database and the performance of database operations. There are
• • • • • •
Managing an installation 124

several reasons to do database rotation:
n It is more difficult to manage one large database than multiple smalldatabases.
n Performance is better with multiple small databases.
n Backing up, restoring, archiving, and deleting data all take significantlymore time if you work with one large database.
n Database operations take very little time when you work with multiplesmall databases.
For audit and monitoring service, you can implement a database rotation policyby having the collector write data to a new database after a certain period oftime. For example, the collector in site A writes data to the database siteA-2015-11 in November, then write data to database siteA-2015-12 in Decemberand to the database siteA-2016-01 in January. By rotating from one activedatabase to another, each database stays more compact and manageable.
Creating a new database for rotation
You can rotate from one active database to another at any time using the AuditManager console.
To create a new database for rotation:
1. Open Audit Manager.
2. Expand the installation node, then expand Audit Stores and a specific auditstore name.
3. Select Databases, right-click, then select Add Audit Store Database tocreate a new database.For details on setting up the database, see Creating the first audit storedatabase.
4. Select the Set as Active database option so collectors start writing to thenewly created database.
You can also use Centrify application programming interfaces (APIs) to write ascript that automates the database rotation process. For API details and samplecode, see the Centrify SDK documentation.
• • • • • •
Auditing Administrator’s Guide 125

Database archiving
To implement periodic archiving, add a new active database, leave one or moreprevious databases attached, and take the oldest database off-line forarchiving.
Queries during rotation and archiving
If the database backup program supports online backups, the Audit Analyzercan still query the database while the backup is in progress. However, thebackup program may block updates to the session review status. If the backupprogram does not support online backup, the database will be offline until thebackup is complete.
Database backups
You can back up a database whether it is attached to the audit store ordetached from the audit store.
Reattaching a restored backup of a database
If you need to query sessions from an older database that is offline anddetached, you can restore the database from a backup and reattach it to yourauditing installation. You might need to do this is your auditing installation islarge, you do frequent database rotation, and you don’t keep many databasesattached and online.
Understand that after you restore a database from a backup, you need to fix acouple of settings in the database before you can reattach it to your auditinginstallation. During the backup operation, the database owner and trustworthyproperties get set in such a way that prevents you from reattaching thedatabase to your auditing installation unless you fix these properties.
To reattach a restored database to your auditing installation:
1. Run the following command to reset the database owner to [sa]:ALTER AUTHORIZATION ON DATABASE::<db_name> TO [sa]
2. Run the following command to reset the trustworthy property:
• • • • • •
Managing an installation 126
ALTER DATABASE <db_name> SET TRUSTWORTHY ON
You can now reattach the database to your auditing installation.
Allowed incoming accounts
You can specify the accounts that are allowed to access the audit storedatabase. By configuring these accounts, you can control which collectorcomputers can connect to the audit store database and which managementdatabases have access to the data stored in the audit store database.
Your account must have Manage SQL Login permission to configure theincoming accounts.
To configure allowed accounts:
1. Open Audit Manager.
2. Expand the installation node, then expand Audit Stores and select aspecific audit store name.
3. Select a database under the audit store, right-click, then select Properties.
4. Click the Advanced tab.
5. Click Add to add a collector or management database account. Forexample:
• • • • • •
Auditing Administrator’s Guide 127
6. Select an authentication type.n If you select Windows authentication, you can browse to select acomputer, user, or group to add.
n If you select SQL Server authentication, you can select an existingSQL Server login or create a new login.
Connections should useWindows authentication whenever possible. However,computers in an untrusted forest cannot connect to an audit managementdatabase usingWindows authentication. To allow connections from anuntrusted forest, add a SQL Server login account as the incoming account for themanagement database.
Detecting data tampering and verifying session integrity
When you create your audit store database, you have the option to enable dataintegrity checking. Data integrity checking provides the ability to detect ifauditing data has been tampered with.
For example, data integrity checking can detect if a user who has write privilegesover the Audit Store database directly manipulates the audited session data bymaking a direct connection to the Microsoft SQL Server database.
Session data that is stored in audit store databases is typically accessible todatabase administrators and/or database owners in an unrestricted fashion. Forthese users with write privileges on the audit store database, it’s fairly easy totamper with data in such a way that it can help manipulate the outcome of anAQL query.
For example, someone could change the searchable tags in such a way so thatthe session is never returned by a query. Or, someone could remove suspiciousactivity from a recorded session, such as by changing the list of commands thatare executed or changing the command output.
Note: Data integrity checking cannot detect tampering if a databaseadministrator deletes an entire session or database. Also, dataintegrity checking is not yet available for audit trail events.
Once you enable data integrity checking, you can do the following:
n Use the Audit Analyzer console or a PowerShell cmdlet to check theintegrity of audited sessions.
• • • • • •
Managing an installation 128

n Determine if any data in the following tables has been modified and whereit was modified:
n Session
n RawData
n Command
n SyscallCommand
n SyscallFilemon
n WashData
n WashEvent
n Determine if any database rows belonging to an audited session werepermanently deleted.
If you have not enabled an audit store database for data integrity checking andyou try to check session integrity in Audit Analyzer, an error message appears.
Managing audit stores
An audit store is a collection of databases that contain audit data. All attacheddatabases in the audit store are available to the audit management database.Typically each site has one audit store, but you can add audit stores as requiredfor large or multi-site installations. For details, see Adding more audit stores toan installation.
Configuring audit store scope
The scope of an audit store defines which audited computers send their auditdata to the audit store, and which collectors are assigned to the audit store. Thescope is a set of Active Directory sites and/or subnets. To configure the scope foran audit store, open its Properties page and select the Scope tab. To add a site,click Add Site and select the site from the list. To add a subnet, click Add Subnetand type a subnet address and mask.
• • • • • •
Auditing Administrator’s Guide 129

Configuring permissions for an audit store
To configure audit store security, open the audit store’s Properties page andselect the Security tab.
Only users with Change Permission permission on the audit store are allowed tomodify the user rights on the Security tab of the audit store’s Properties page.
The following table lists the rights that can be granted to active Directory usersor groups, and the operations that the users granted such rights (“trustees”) areallowed to perform.
The audit store administrator by definition has all of these user rights (FullControl).
User Right Allowed Operations
Full Control n All of the operations listed in the following rows of this table
Change Permissions n Modify permissions on this audit store
Modify Name n Modify display name for this audit store
Manage Scopesn Add a subnet or active Directory site
n Remove a subnet or active Directory site
Manage SQL Loginsn Set the allowed incoming accounts for this audit store’sdatabases
n Set the allowed incoming accounts for collectors
Manage collectors
n Enable collector trusted group for this audit store
n Add collector to the trusted collector group in this audit store
n Remove collector from the trusted collector group in this auditstore
n Remove disconnected collector record from this audit store
Manage AuditedSystems
n Enable audited computers trusted group for this audit store
n Add audited computer to the trusted audited computer group inthis audit store
n Remove audited computer from the trusted audited computerlist in this audit store
n Remove disconnected audited computer record from this auditstore
• • • • • •
Managing an installation 130

User Right Allowed Operations
Manage Databases
n Add audit store database to this audit store
n Attach audit store database to this audit store
n Detach an audit store database from this audit store
n Change active database in this audit store
n Modify the display name of a version 2 audit store database
Manage DatabaseTrace
n Enable or disable database trace
n Export database trace
Adding more audit stores to an installation
The audit store typically maps one-to-one with an Active Directory site.However, in some situations it is desirable to define the scope of an audit storedifferently:
n A subnet that Active Directory considers part of a site may be connectedover a slow link. In this situation, you probably want to configure anotheraudit store and collectors that service audited computers in the remotesubnet.
n A very large site may require multiple audit stores for load distribution. Youcan accomplish this by partitioning an Active Directory site into multipleaudit stores based on subnets. Each subnet has its own audit store and setof collectors and audited computers.
Two common audit store actions are:
n Adding a new audit store in a new site, and using the Select Scope page inthe Add Audit Store Wizard to configure the site settings.
• • • • • •
Auditing Administrator’s Guide 131

n Splitting an audit store in two, using the audit store’s Property page toadjust the scope of the existing audit store, and then adding a new auditstore.
To configure the audit store to support a particular subnet, click the Subnet radiobutton, and fill in the subnet IP address and mask.
Managing the audit management database
The audit management database keeps track of where components are installedand information about the installation. To connect to the database or manage itsproperties, select a specific installation name in Audit Manager, right-click, thenselectManagement Databases. From this dialog box, you can view informationabout the current audit management database, remove or connect to amanagement database, or change the properties for a management database.
Configuring audit management database scope
Select the audit management database you want to configure, then clickProperties. From the Properties, click the Scope tab to configure auditmanagement database scope. Click Add Site if you want to add a new ActiveDirectory site to the management database or click Add Subnets to add asubnet for the management database to serve. Select the site or subnet from the
• • • • • •
Managing an installation 132

list of sites or subnets found, then click OK. You can add or remove sites andsubnets from the management database at any time using the Scope tab.
Note: All components useWindows authentication whenever possible.However, an audit management database in another forestcannot connect to an audit store database usingWindowsauthentication.
Setting audit management database security
Select the audit management database you want to configure, then clickProperties. From the Properties, click the Security tab to configure securitysettings for the management database. Click the Add page to add groups orusers to the list of trustees who can manage, modify, or remove installation-widecomponents. Type all or part of the user or group name, select the appropriateuser or group from the results, then click OK.
Select the appropriate rights you want to grant to the selected Active Directoryusers or groups, and the operations that the users granted such rights(“trustees”) are allowed to perform.
Select this right To grant permission for these operations
Full Control n All of the operations listed in the following rows of this table.
Change Permissions n Modify permissions on this audit management database.
Modify Name n Modify display name for this audit management database.
Manage Sitesn Add a subnet or Active Directory site.
n Remove a subnet or Active Directory site.
Remove Database n Remove this audit management database from theinstallation.
Manage SQL Logins
n Set the allowed incoming accounts for this audit managementdatabase.
n Set the outgoing account for this audit managementdatabase.
Manage DatabaseTrace
n Enable or disable database trace
n Export database trace
Only users with Change Permission permission on the audit managementdatabase can modify the user rights on the Security tab. By definition, themanagement database administrator has Full Control over all of the user rightsand is an allowed incoming user.
• • • • • •
Auditing Administrator’s Guide 133

Configuring the maximum memory for the managementdatabase
Because SQL Server dynamically acquires memory whenever it needs it until itreaches the maximum server memory you have configured, you should setconstraints on howmuch physical memory it should be allowed to consume. Youcan use the formula described in Configuring the maximummemory for auditstore databases to determine the maximummemory you should allow for theMicrosoft SQL Server instances hosting the management database.
For more information about how to configure Microsoft SQL Server maximummemory setting and other memory options, see the following Microsoft article:
https://docs.microsoft.com/en-us/sql/database-engine/configure-windows/server-memory-server-configuration-options
Removing an audit management database
Select a specific installation name in Audit Manager, right-click, then selectManagement Databases. Select the audit management database you want toremove, then click Remove.
Because it is not recommended that you have multiple management databasesin a single installation, you ordinarily would not separately remove an auditmanagement database, but rather remove it as part of deleting an installation.
Maintaining database indexes
To ensure better performance and prevent database corruption, Centrifyrecommends you rebuild the database indexes for all the audit store databasesand the management database as a regularly scheduled task that your run atleast once a week. Rebuilding the indexes is especially important for the activeaudit store database to reduce fragmentation, but as a best practice you shouldrebuild indexes for all attached databases and the management database.
The following sample SQL statements illustrate how to rebuild all indexes on allthe databases in one script:
=== BEGIN SQL statements ===DECLARE @Database NVARCHAR(128)DECLARE @Table NVARCHAR(128)DECLARE @Command NVARCHAR(500)
• • • • • •
Managing an installation 134

-- To skip index rebuilding for a database, add its name to the listbelowDECLARE DatabaseCursor CURSOR FORSELECT name FROM master.dbo.sysdatabasesWHERE name NOT IN ('master','msdb','tempdb','model')ORDER BY 1
OPEN DatabaseCursorFETCH NEXT FROM DatabaseCursor INTO @DatabaseWHILE @@FETCH_STATUS = 0BEGIN
PRINT 'Processing database ' + @DatabaseSET @Command = 'DECLARE TableCursor CURSOR FOR SELECT
''['' + TABLE_CATALOG + ''].['' + TABLE_SCHEMA+ ''].['' +
TABLE_NAME + '']'' as TableName FROM [' + @Database+ '].INFORMATION_SCHEMA.TABLES
WHERE TABLE_TYPE = ''BASE TABLE'''EXEC (@Command)OPEN TableCursor
FETCH NEXT FROM TableCursor INTO @TableWHILE @@FETCH_STATUS = 0BEGIN
PRINT 'Rebuilding all indexes on ' + @TableSET @Command = 'ALTER INDEX ALL ON ' + @Table
+ ' REBUILD'EXEC (@Command)
FETCH NEXT FROM TableCursor INTO @TableEND
CLOSE TableCursorDEALLOCATE TableCursor
FETCH NEXT FROM DatabaseCursor INTO @DatabaseENDCLOSE DatabaseCursorDEALLOCATE DatabaseCursor=== END SQL statements ===
Managing collectors
You can select the Collector node in Audit Manager to view details about eachcollector you have added to the installation. You can then expand the Collectorsnode and select an individual collector in the left pane to display informationabout the audited computers that send sessions to that collector in the rightpane.
The following table describes the columns available in the right pane forcollectors.
• • • • • •
Auditing Administrator’s Guide 135

Column name Description
Collector Name of the collector
IP Address Location of the collector on the network
Status
Whether the collector is disconnected from or connected to the audit store.
If a collector has never been successfully assigned to an audit store, it is noteven shown in the left-pane list.
Uptime How long a connected collector has been running since it was last booted
Last UpdateTime The date and time of the last update received by the collector.
Port Number The port through which the collector communicates with its assigned auditedcomputers and audit store. Default is 5063.
Audit Store The audit store to which this collector is assigned
Audit StoreDatabase The active database to which the collector is currently sending audit data
ConnectedMachines
The number of audited computers currently connected to this collector.
Because agents can communicate with a collector only if the agents andcollector are in the same Active Directory forest, this column only includesaudited computers that are in the same forest as the collector.
DisconnectedMachines
The number of audited computers of which the collector is aware but that arenot currently connected to this collector.
Note that the collector is only aware of audited computers that were at onetime connected to it.
CollectorVersion The version of the collector software installed on the computer.
Monitoring collector status
The Collector Control Panel is available from the Start menu on anyWindowscomputer on which you have installed a collector.
The Collector Control Panel enables you to monitor the local collector by givingyou an overview of collector connectivity and status, including the collector’scurrent installation, audit store, audit store database, port number, and servicestatus. To change the collector’s port number, installation, or authentication, clickConfigure. If you change the collector configuration, it might take a minute forthe change to be reflected in the Collector Control Panel.
You can also use the Collector Control Panel to start, stop, or restart the collectorservice, and to generate more detailed information about the status of thecollector. To see detailed information about the installation, audit store, audit
• • • • • •
Managing an installation 136

store database, trusted agents, and connectivity between components, click theTroubleshooting tab, then click Diagnostics. The collector will generate a reportand display the information in a separate window.
Modifying the command prompt recognized by the collector
For the collector to identify the command events executed in a session, it mustalso be able to identify the command prompt. Although there are severalcharacters that are commonly used and recognized by default, most computersalso allow you to customize the command prompt. If a customized commandprompt is not detected by the collector, commands will not be displayed properlyin the session Events list, making it difficult for auditors to see the commandsexecuted in a selected session.
To enable the collector to detect custom or unusual command prompts, you canadd a registry key on the computer where the collector is installed and specify atext string or a regular expression that will match the command prompt.
To specify a regular expression for the command prompt:
1. Log on to the computer where the collector component is installed andrunning.
2. Open the Registry Editor.
3. Expand the HKEY_LOCAL_MACHINE > SOFTWARE > Centrify >DirectAudit registry.
4. Select the Collector component, right-click, then select String Value.
5. Type Prompt as the new key name.
6. Select the new Prompt key, right-click, then selectModify.
7. Type a text string or regular expression that will enable the collector toidentify the command prompt you are using on computers you are auditing.If you don’t define a registry value, the default regular expression ^[^#%>\$]*[#%>\$]\s* is used to detect the command prompt.
Removing collectors
If you want to remove a collector, go to the installer and select the collector. TheCollector Setup wizardWelcome page appears.
• • • • • •
Auditing Administrator’s Guide 137

Because a collector is present on the computer, the next page enables you toselect Change, Repair, or Remove the collector. Click Remove.
Managing audited computers and agents
You can monitor agent status from the Audit Manager console. With auditedcomputers selected in the left pane, Audit Manager displays the name and IPaddress for audited computers, whether the agent is currently connected ordisconnected, and how long the agent has been running since last restarted. Youcan also see the collector to which the agent is sending data, the audit store andaudit store database where the audit data is stored, and the version of the agentsoftware installed on the computer.
Audited systems can be either a computer or a network device. Audit Managerdisplays two kinds of audited systems:
n System-based: AWindows or UNIX computer that is running an agent.You can access these systems either directly or from the Privileged AccessService Admin Portal.
n Vault-based: AWindows or UNIX computer or a network device that is notrunning an agent (agentless). You can access these systems from thePrivileged Access Service Admin Portal.
Because agentless systems do not have an agent installed, the Audit Managerdisplays slightly different information for these kinds of systems. For thesesystems, you can see the name, IP address, the collector, audit store, and auditstore database.
Monitoring agent status
You can use the dainfo -d command on audited Linux and UNIX computers toview information about the configuration, connectivity, and auditing status ofthe agent.
Configuring the UNIX agent off-line database
If the UNIX agent is unable to connect to a collector, it spools the session data tolocal storage. When a collector becomes available, it then sends the spooleddata to that collector.
• • • • • •
Managing an installation 138

By default, the minimum amount of allocated disk space that must be availableto the offline database before spooling stops and warnings are posted to theagent error log is 10%. You can change this percentage by assigning a differentvalue to spool.diskspace.min in the /etc/centrifyda/centrifyda.conf file.For example, to change the minimum to 15%, set the following value:
spool.diskspace.min: 15
If the threshold is reached and a collector is still not available, the agent stopsspooling data, and further audit data is lost. If this happens frequently orunexpectedly, you may want to increase the disk space allocation.
Removing an audited computer
If an audited computer has been removed from the audit installation, the auditedcomputer will continue to be listed on the Audit Manager as Disconnected. Toremove the decommissioned audited computer, select Delete from its contextmenu.
Delegating administrative permissions
You can facilitate the administration of a large installation by delegating tasksand, if needed, setting up additional Audit Manager consoles.
Whoever creates the installation is the first administrator in the system, with fullcontrol of the entire installation and the ability to delegate administration tasksto any Active Directory user or group. You can grant permissions to other userson the Security tab of the Properties page for each component.
Publishing installation information
Audit Manager publishes information about your installation to a serviceconnection point (SCP) object in Active Directory so that audited computers andcollectors can look up the information. If the published locations for multipleSCPs in the same installation are not in synch, or if agents cannot read from atleast one of the published locations, the agents are unable to determine whichaudit store is the best match for the sites and subnets, and so they do notattempt to connect to an audit store.
• • • • • •
Auditing Administrator’s Guide 139

Permission to publish to Active Directory
Only administrators who have been delegated permission to modify variousattributes of the installation can publish those attributes to Active Directory.
If you do not have Active Directory permission to modify the installation, theupdates are kept in the audit management database, and a message is issuedto notify you that the installation information could not by updated in ActiveDirectory.
Synchronizing installation information
If you have an Active Directory account with permission to modify theinstallation, you can click Synchronize the Installation Properties pagePublication tab to publish the information.
In a multi-forest or DMZ environment, this tab lists multiple Active Directorylocations to which to publish.
Managing audit roles
By default, each installation automatically has a Master Auditor role that hasaccess to all audit data.The Master Auditor can read, replay, update reviewstatus, and delete all audit sessions in the installation. You cannot delete orchange the permissions for the Master Auditor role itself. You can change theusers or groups who are assigned to the Master Auditor role and the permissionsgranted to each role member, but you cannot make any other changes to thisrole. You can, however, create your own custom audit roles for the installation.
Creating custom audit roles
Audit roles allow specific auditors to search and replay specific sessions, reviewspecific events, or generate reports using the Audit Analyzer console based onthe criteria you define. Each role specifies the criteria to use, the users andgroups that are assigned to the role, and the specific permissions those usersand groups have been granted.
For example, you might specify the criteria for filtering sessions to be only thesession activity recorded on a particular audited computer or all UNIX sessionsrecorded after a specific date and time.
• • • • • •
Managing an installation 140

The collection of auditors is identified by specifying either explicit auditors, or anActive Directory group of auditors. Using Active Directory groups isrecommended because this puts all of a user's privileges under the commonActive Directory infrastructure.
For each audit role, you can also configure the specific permissions granted toeach member of the role. For example, some audit roles might permit auditors toread and replay sessions but not update the status, add review comments, ordelete the sessions to which they have access.
To create and assign audit roles:
1. Open Audit Manager and expand the audit installation to which you areconnected.
2. Select Audit Roles, right-click, then select Add Audit Role.
3. Type a name and, optionally, a description of the audit role, then click Next.
4. Select the type of sessions—UNIX sessions, Windows sessions, or bothUNIX andWindows sessions—to include for auditors assigned to this auditrole, then click Add to specify filtering criteria for the role.
5. Select an attribute for filtering information from the list of Attributes.For example, you can match sessions based on the period of time in whichthey were active, based on a specific state, or based on Active Directorygroup membership. You can also match sessions based on the specificactivity that took place during the session. For example, you can findsessions where specific UNIX commands or Windows applications wereused.
6. Select the appropriate criteria for the attribute you have selected, then clickOK.The specific selections you can make depend on the attribute selected. Forexample, if the attribute is Review Status, you can choose between“Equals” and “Not equals” and the specific review status you want to find,such as “To be Reviewed.” If you select the attribute Comment, you canspecify “Contains any of” and type the text string that you want to find anypart of. If you select the attribute Group, you can select “Is (exactly)” andthe user principal name (UPN) of an Active Directory group, such as [email protected].
You can specify multiple attributes, by clicking Add and selecting additionalattributes and criteria. You can test the filtering criteria you have added by
• • • • • •
Auditing Administrator’s Guide 141

clicking Execute Query and examining the results. When you have finishedadding filters, click Next.
7. Select the privileges for the audit role, then click Next.
8. Review your settings for the audit role, click Next, then click Finish.
You can assign users and groups to the audit role immediately by runningthe Assign users and Groups wizard or at a later time by right-clicking onthe role name.
9. Type all or part of name to search for and select Active Directory users andgroups to assign to the audit role.
Changing audit role properties
After creating an audit role, you can modify its properties.
To change properties for an audit role:
1. Open Audit Manager and expand the audit installation to which you areconnected.
2. Expand Audit Roles, select an audit role name and right-click, then selectProperties.
3. Click the General tab to change the name or description of an audit role.
4. Click the Access tab to change the filtering attributes and criteria an auditrole.
5. Click the Privilege tab to change what members of the audit role can dowith the sessions matching the criteria you specify.
6. Click the Security tab to change permissions for the audit role itself.For example, you allow another user or group to change role membershipfor an audit role, you would click Security, then click Add to search for andselect a user or group, the select the Change Role Membership permissionto allow the selected user or group to modify the membership of the auditrole.
• • • • • •
Managing an installation 142

Granting permissions to manage audit roles
Anyone you assign the Manage Audit Roles permission on an installation has fullcontrol over all of the audit roles for that installation. After you grant users orgroups the Manage Audit Roles permission, they can create and remove roles,change the filtering criteria, modify audit role permissions for other users andgroup, and select the users or groups who are assigned to the role.
The following examples illustrate how users or groups granted the ManageAudit Roles permission might modify the audit roles for an installation:
n Assign the Master Auditor role to other users and groups.
n Create a UNIX Session Viewer role for UNIX auditors that allows them toview (read) UNIX sessions—but not replay, update, or delete—all UNIXsessions in the installation.
n Create a Finance Managers role that includes both UNIX andWindowssessions filtered by the Active Directory group Finance Operators, so thatusers assigned to the Finance Managers audit role can read, replay,update, and delete all of the session activity generated by members of theFinance Operators group, but no other groups.
n Create an audit role that enables investigators who are assigned to therole to read and replay only the activity captured when a specific commandor application is used.
These are only a few examples of how you can use the Manage Audit Rolespermission to define filtering criteria and privileges that control what differentusers or groups who are assigned to audit roles can see and do.
• • • • • •
Auditing Administrator’s Guide 143

Querying and reviewingaudited activity
This section describes how to use Audit Analyzer to find and review the auditedsessions and audit trail events in which you are interested. If you are the MasterAuditor or been assigned an audit role, you can use Audit Analyzer to create andstore queries that retrieve information from one or more audit stores. When youlocate sessions or events of interest, you can review a summary of activity, playback all or part of the session, mark the session for follow-up, or change thestatus of the session.
The following topics are covered:
Accessing audited sessions 145
Predefined queries for audit sessions 145
Predefined queries for audit events 147
Predefined queries for reports 147
Creating new session queries 151
Creating queries for audit events 158
Organizing queries in custom folders 161
Exporting and importing query definitions 161
Displaying session information 162
Adding session reviewers without designating auditing roles 162
Changing the review status for audited sessions 163
Playing back a session 165
Exporting sessions 169
Deleting sessions 171
• • • • • •
Auditing Administrator’s Guide 144

Viewing sessions outside of Audit Analyzer 172
Accessing audited sessions
Your access to audited sessions is controlled either through the audit roles youhave been assigned, or through designation as a reviewer if you do not have anauditing role assigned to you. For more information on designating audit sessionreviewers, see Adding session reviewers without designating auditing roles.
If you have been assigned at least one audit role, or have been designated as areviewer without an audit role, you can use Audit Analyzer to search for andreplay the audited session activity collected from audited computers. Dependingon the permissions defined for your audit role, you might also be able toannotate, update the status of, or delete the audited sessions to which you haveaccess. If you have been designated as a reviewer of an audit session, you canonly review and updated the status of the sessions to which you have access.
The first time you start Audit Analyzer, you are prompted to select aninstallation. If you have an audit role in that installation and the connection issuccessful, Audit Analyzer opens and displays the default categories forpredefined queries:
n Audit Sessions
n Audit Events
n Reports
Predefined queries for audit sessions
Audit Analyzer includes many predefined queries that you can use to find thesessions in which you are interested. To access the predefined queries, expandAudit Sessions. You can then select a predefined query to display a list of theaudited sessions that meet the conditions of that query. For example, if you wantto search for sessions by user, you can use the All, Grouped by User, then selectthe specific user whose sessions are of interest to see a list of all the sessionscaptured for that user. For example, in the right pane, you would select a userfrom the list:
• • • • • •
Querying and reviewing audited activity 145

After you select the user, Audit Analyzer displays detailed information abouteach of that user’s sessions. For each session, Audit Analyzer lists the user namewho started the session, the user display name, the account name used duringthe session, the name of the audited computer, the audit store where the sessionis stored, the start and end time for the session, current state, whether theaudited session is a console or terminal client session, the review status of thesession, any comments that have been added to the session, and the sessionsize. For example:
Note that only completed sessions display the session size in Audit Analyzer.
Depending on the permissions associated with your audit role, you can right-click any session to view an indexed list of the activity captured, export thesession activity to a comma-separated values file, update the review status forthe session, or delete the session. If you have video capture auditing enabled forthe installation, you can also select a session, right-click, then select Replay toreview the session in the session player.
To view a description and definition for any predefined query, select the query,right-click, then select Properties. You can also export the query definition or theresults from a query and perform other tasks on predefined queries. To perform
• • • • • •
Auditing Administrator’s Guide 146

any of these additional tasks, select the predefined query, right-click, then selectthe action you want to take.
Predefined queries for audit events
Audit Analyzer includes predefined queries that you can use to find the sessionsthat recorded audit trail events. To access the predefined queries for locatingaudit trail events, expand Audit Events. You can then select a predefined queryto display a list of the audit trail events that meet the conditions of that query.You navigate to indexed lists of commands and events and replay sessions ofinterest for audit event queries in exactly the same way as audit session queriesand you have the same options for viewing the activity captured. However, thedetails displayed for audit event queries are different from audit session queries.
For each event, Audit Analyzer lists the name of the user, the name of theaudited computer, the time of the event, the event name and description, andwhether access was successful.
Predefined queries for reports
Audit Analyzer includes predefined queries for generating reports. By default,the reports include information for all audited users, computers, and sessions.Select the type of report you are interested in generating, then specify additionalcriteria for filtering the report output. You can then save the modified reportquery or show the report.
If you click Show Report, the report is generated and displayed in a new window.You can then save the report as an HTML, PDF, CSV, or XML document.
User activity report
The default User Activity Report provides a detailed record of user actions for allaudited users. The report includes the user name, the computer where theactivity occurred, the time at which the activity occurred, and the event recorded.For example, if a user opened aWindows application or ran a UNIX command,the event would be recorded and included in the report you generate.
You should note that the User Activity Report does not include all desktopchanges, such as navigation through directories usingWindows Explorer.
• • • • • •
Querying and reviewing audited activity 147

Instead, the report provides information about specific events. For example, thereport will include information about when an application is opened, operationsare performed, and when the application is closed. For more detailed informationabout user activity, you can enable video capture auditing for the installationand for specific desktops, applications, or commands using roles in AccessManager.
For information about enabling video capture auditing, see Enabling or disablingvideo capture auditing .
You can customize and filter the information included in a User Activity Reportby specifying the query criteria and saving the report definition.
Privileged activity report
The default Privileged Activity Report provides a record of all actions taken withelevated privileges for all audited users and computers. The report includes theuser name, the computer where the activity occurred, the time at which theactivity occurred, and the event recorded. For example, if a user selected a rolewith administrative privileges, the event would be recorded and included in thereport you generate.
You can customize and filter the information included in a Privileged ActivityReport by specifying the query criteria and saving the report definition.
Centrify zone administration activity report
The default Centrify Zone Administration Activity Report provides a record of allzone-related administrative actions taken for all audited users and computers.The report includes the user name, the computer where the activity occurred, thetime at which the activity occurred, the client name, and the event recorded. Forexample, if an administrator created a new zone or delegated a managementtask to another user or group, the event would be recorded and included in thereport you generate.
You can customize and filter the information included in a Centrify ZoneAdministration Activity Report by specifying the query criteria and saving thereport definition.
• • • • • •
Auditing Administrator’s Guide 148

Login by user report
The default Login By User Report provides a record of both successful and failedlogin attempts for all audited users, computers, and sessions. The report includesthe user name, the computer where the user attempted to log on, the time of thelogin attempt, and whether access was granted.
You can customize and filter the information included in a Login By User Reportby specifying the query criteria and saving the report definition.
Login by computer report
The default Login By Computer Report provides a record of both successful andfailed login attempts for all audited users, computers, and sessions. The reportincludes the user name, the computer where the user attempted to log on, thetime of the login attempt, and whether access was granted.
You can customize and filter the information included in a Login By ComputerReport by specifying the query criteria and saving the report definition.
Authorization failure report
The default Authorization Failure Report provides a record of authorizationfailure events for all audited users, computers, and sessions. The report includesthe user name, the computer where the user attempted to log on or use a role,the time of the attempt, and the reason the user was denied access.
You can customize and filter the information included in a Authorization FailureReport by specifying the query criteria and saving the report definition.
Monitored execution report
If you have configured your auditing installation for advanced monitoring, thenthis Monitored Execution report shows the monitored commands being executedon the audited computers. This report includes information on commands thatare run individually or as part of scripts. This report shows who ran one of themonitored commands even if that person is not an audited user.
• • • • • •
Querying and reviewing audited activity 149

The Monitored Execution report includes the user name, the computer where thecommands were run, the time the command was run, the name of the commandand the command arguments used, the process and parent process IDs, the “runas” user, the directory in which the command run, and whether the commandwas successful.
Note: In the report, the Access Status column lists out whether thecommand was started successfully or not. This field does notdescribe whether the command completed successfully or not.
Note: Advanced monitoring does not generate an audit trail event forcommands for which you’ve enabled per-command auditing.
You can customize and filter the information included in a Monitored Executionreport by specifying the query criteria and saving the report definition.
Detailed execution report
If you have configured your auditing installation to perform advancedmonitoring, then this Detailed Execution report shows all of the commands beingexecuted on the audited machines—including commands that are run as part ofscripts or other commands.
The Detailed Execution report includes the user name, the computer where theactivity occurred, the time at which the activity occurred, the command that wasentered, the process and parent process IDs, the current directory, the actualcommand that was executed, the command arguments, the “run as” user,whether the command started or not (access status), and any additional accessstatus details (such as “permission denied” if the access status is “failed”).
Note: In the report, the Access Status column lists out whether thecommand was started successfully or not. This field does notdescribe whether the command completed successfully or not.
Note: Advanced monitoring does not generate an audit trail event forcommands for which you’ve enabled per-command auditing.
You can customize and filter the information included in a Detailed Executionreport by specifying the query criteria and saving the report definition.
• • • • • •
Auditing Administrator’s Guide 150

File monitor report
If you have configured your auditing installation to perform advancedmonitoring, the File Monitor report shows the sensitive files being modified byusers on the audited machines. The File Monitor report includes any activity byany user (except root, -1) in the following protected areas on audited machines:
n /etc/
n /var/centrify/
n /var/centrifydc/
n /var/centrifyda/
The report includes the user name, the computer where the activity occurred, thetime at which the activity occurred, the filename, the current directory, the kind offile access was attempted, if the file access was successful or not, the commandthat was used, the process and parent process IDs, and the “run as” user.
Note: If a monitored file is renamed, the report displays both the originaland new filename. The order of filenames may differ slightly oneach operating system.
MFA Failure Report
The default MFA Failure Report provides a record of multi-factor authentication(MFA) failure events for all audited users, computers, and sessions. The reportincludes the user’s name, the computer where the user attempted to log on oruse a role, the time of the attempt, and the reason that MFA authenticationfailed.
You can filter the information included in a MFA Failure Report by specifying thequery criteria and saving the report definition.
Creating new session queries
You can create your own queries from existing queries or based on the criteriayou define. Depending on the type of information you want to define as searchcriteria and whether you want to make the queries private or public, there aredifferent type of queries you can define.
To search for audited sessions, you can create:
• • • • • •
Querying and reviewing audited activity 151

n Quick queries
n Private queries
n Shared queries
If you create a quick, private, or shared query, a new node is added to the AuditAnalyzer console for that type of query under the Audit Sessions node. If youwant to search for audit trail events, you can also create queries for audit events,which are added to Audit Analyzer under the Audit Events node.
Creating a new quick query
A quick query is a full-text search of the audit store database for a simple stringor keyword. With a quick query, you can start typing the search string and see alist of potential matches from which you can select an item to look for sessionsthat contain the item. You should use quick queries when you want to findsessions based on a simple text string, such as a captured input or output, orbased on a particular attributes, such as a user name or application, rather thanusing complex expressions.
To create a new quick query:
1. Open Audit Analyzer, select Audit Sessions, right-click, then select NewQuick Query.
2. Type a search string into the search field.As you type, the Quick Query displays a list of possible matches that startwith the text you are typing. For example, if you start typing the string “da”as the search term, the Quick Query list displays captured commands suchas dacontrol, dad, and dadebug as potential matches:
• • • • • •
Auditing Administrator’s Guide 152

If a text string in the list is what you are looking for, select it. By default, thequery will search for sessions that contain all of the text specified. If youwant to search for any portion of the text specified, select Find sessionscontaining ANY instead of ALL of the search terms.
3. Click Find to display the matching logon sessions in the right pane.
Searching for a specific string
If you want to search for a specific string, you can enclose the command linestring with quotation marks. For example, you can type “dacontrol -i” to onlyreturn sessions that captured dacontrolwith the -i option. If you type the samesearch string without quotation marks and select Find sessions containing ANYinstead of ALL of the search terms, the quick query will return sessions thatinclude dacontrolwith and without the -i option.
Modifying a quick query
You can edit a quick query by selecting the query in the left pane, right-clicking,then selecting Properties. You can change the name and add a description onthe General tab. Click the Definition tab to change the query text.
Creating a new private query
A private query is a set of search criteria that you define for your own use.Private queries are only visible to the auditor who creates them. You createprivate queries by selecting options in Audit Analyzer dialog boxes. Your
• • • • • •
Querying and reviewing audited activity 153

selections are translated into complex expressions in the SQL Server querylanguage. You can also save any predefined or shared query as a private query ifyou want to modify an existing query for private use.
To create a new private query:
1. Open Audit Analyzer, select Audit Sessions, right-click, then select NewPrivate Query.
2. Type a name and description for the query.After you save the query, this information is available for viewing andediting on the General tab when you display the query’s properties.
3. Select the type of sessions that you want the query to find.You can search for UNIX sessions, Windows sessions, and Linux Desktopsessions. By default, new queries search for all types of sessions.
4. Select an attribute for grouping query results, if applicable.You can select one or more attributes for grouping query results. If youspecify more than one attribute, results are displayed as nested groupsaccording to the order in which you specified the attributes. For example, ifyou select audit store, then user, then date, the query results are groupedby audit store, then by user for each audit store, then by date for each user.
5. Select an attribute for ordering query results within each group, ifapplicable.You can select ascending or descending sort order for each attribute. Forexample, you might group query results by user name and set the sortorder for user to ascending, but the sort order for time to descending.
6. Click Add to add search criteria to filter the results of the query.
7. Select an appropriate attribute from the Attribute list based on the sessionsyou want to find.
For example, you can search for sessions based on the period of time inwhich they were active or based on a specific state. You can also search forsessions based on the activity that took place during the session. Forexample, you can find sessions where specific UNIX commands orWindows applications were used.
8. Select the appropriate criteria for the attribute you have selected, then clickOK.
• • • • • •
Auditing Administrator’s Guide 154

The specific selections you can make depend on the attribute selected. Forexample, if the attribute is Review Status, you can choose between“Equals” and “Not equals” and the specific review status you want to find.,such as “To be Reviewed.” If you select the attribute Comment, you canspecify “Contains any of” and type the text string that you want to find anypart of.
When creating queries for user names or computers, you might want touse the “Starts with” option. If you use the default to match “Is (exactly)”,you must include the fully qualified domain name of the user or computer.
9. Click Add to add another filter to the criteria for the query, or click OK tosave the query and find the sessions that match the criteria you havespecified.
Adding multiple filters to the query criteria
If you have more than one filter, different criteria attributes, such as Time andState, are separated by an implicit AND operation. Only sessions that matchboth criteria are returned. If you have repeated criteria attributes, for example, if
• • • • • •
Querying and reviewing audited activity 155

you have two Time filters (time is not in past 10 days; time is in last
month), the attributes are separated by an implicit OR operation. Sessions thatmatch either criteria are returned.
Editing and removing filters from the query criteria
You can edit and remove any of the filters you specify. For example, if you are notfinding the appropriate sessions, you might need to change or remove thecriteria you have defined. After you have saved a query, you can right-click thequery name, then select Properties to modify the query definition.
Specifying command or application filters in the query criteria
When you specify criteria for commands, applications, or outputs, the entry fielddisplays a list of possible matches from audited sessions based on the text youare typing. For example, if you select “Windows Applications” as the attributeand “Contains any of” and start typing “word” as the text string, the entry fielddisplays a list of possible matches that contain “word” in the application name.You can select a potential match or continue typing to specify the application byits display name or the executable file name. For example, you can specifywinword.exe, Microsoft Word, or both.
Creating a new shared query
A shared query is a set of search criteria that you define for other auditors to use.Shared queries are visible to the auditors you specify. Only the auditor whocreates a query can grant permission to other auditors to use the query. Youcreate shared queries by selecting options in Audit Analyzer dialog boxes inexactly the same way as you create private queries. Your selections are thentranslated into complex expressions in the SQL Server query language. You canalso convert a private or quick query to a shared query.
To create a new shared query:
1. Open Audit Analyzer, select Audit Sessions, right-click, then selectNew Shared Query.
2. Type the query name and select the session type, grouping, ordering, andother criteria for the query.If you need more information about specifying information for any field inthe new query, press F1 to display context-sensitive help.
• • • • • •
Auditing Administrator’s Guide 156

3. Click Add to add another filter to the criteria for the query, or click OK tosave the query and find the sessions that match the criteria you havespecified.
4. Expand Shared Queries, select the query name you specified in Step 2,right-click, then select Properties.
5. Click the Security tab.
6. Click Add.
7. Type the user or group name to identify the auditors who should havepermission to use this query, then click OK.
You can add multiple users or groups from the Select Users or Groupsdialog box. You can also type part of the name, then click Check Names tolook up user and group names.
8. Select each user or group, then select the appropriate permissions.
Searching for shared queries
After you publish queries and give other users permission to access them, otherauditors can search for and select the shared queries they want to use. Theshared queries are not automatically visible to users who have permission to usethem.
• • • • • •
Querying and reviewing audited activity 157

To find shared queries you have permission to use:
1. Open Audit Analyzer, select Audit Sessions, right-click, then selectOpen Shared Queries.
2. Type the query name or click Show existing queries, then click Find Now.
3. Select one or more queries from the results returned, then click OK to addthe query to your list of Shared Queries.
Creating queries for audit events
In addition to the predefined queries for audit events, you can create your ownqueries based on the criteria you define. Audit events are recorded for manyactivities, including both successful and failed operations. For example, you cansearch for events that are recorded when users attempt to log on andauthentication fails or when users run commands or use applications with a rolethat grants elevated privileges. Audit trail events are also recorded when thereare changes to the auditing infrastructure, and when there are changes toCentrify zones.
To specify the search criteria for a new audit event query:
1. Open Audit Analyzer, select Audit Events, right-click, then select QueryAudit Events.
2. Type the query name and, optionally a description for the query.
3. Type a user name if you want to filter the event query by user name.You can specify one or more user names in userPrincipalName format(user@domain). Use semi-colons (;) to separate multiple user names. Forexample, to limit the search for audit events to events recorded for actionstaken by the users ben, maya, and fred, you could type the following:ben;maya;fred
4. Type a computer name if you want to filter the event query by computer.You can specify multiple computer names separated by semi-colons.
5. Select the Event time option if you want to specify a time frame to filter thequery based on when the event occurred.If you select this option, you can search for events that occurred:
• • • • • •
Auditing Administrator’s Guide 158

n before, not before, after, not after, between, or not between specificdates and times.
n in or not in the last specified number of days, hours, or minutes.
n during the specified period of time.
6. Select the Type option to search for events based on the type of activityperformed.If you select this option, you must click > to view and select the eventcategories in which you are interested. For details about the type of eventsrecorded in each category, select the category and review the Descriptiondisplayed for that category.
7. Select the Result option to search for events based on the result of theactivity performed.For example, you can use this option in combination with other options tosearch for only successful or failed operations.
8. Select the Role option, then a role name and zone if you want to filter theevent query by role.
9. Select the Parameter option if you want to filter the query based on aspecific parameter.
If you select this option, you must click > to view and select the eventparameters that are currently available and in which you are interested.
10. Click OK to save and run the new query.
After you create a new query, you can export the query definition or its results,email it to others, or modify its properties.
How Access Manager roles affect audit trail events
If you only enable auditing without access control and privilege managementfeatures, audit trail events are recorded for all successful and failed operationson audited computers. The events are stored in the audit store database and canbe returned in response to queries. These events are not associated with roles,so you should not use the Role filter in your query definition.
If you enable auditing with access control and privilege management, however,user activity is only recorded when a role with “auditing required” or “audit ifpossible” setting is used to perform one or more tasks. In most cases, roles thatallow users to perform tasks using elevated privileges or in a restricted shell
• • • • • •
Querying and reviewing audited activity 159

environment are configured with one of these audit settings. By default, theWindows Login and UNIX Login roles are also configured to “audit if possible” tocapture all audit trail events on the computers where the auditing service isrunning. If a role is configured with audit not requested or required, only audittrail events are recorded.
If the auditing service is running on the computer where the user logs on orwhere the administrative tasks are performed, the audit trail event is collectedand transferred to the audit store database. Only the audit trail events that arecaptured and stored in the audit store database can be returned in response toaudit event queries. Therefore, from Audit Analyzer, you can only query andreport on audit trail events that are stored in the audit store database while auser performs tasks in an audited role on an audited computer.
Querying by audit event type or by role
In many cases, querying for audit trail events by event type produces morepredictable results than querying for events by role. For example, to query forsuccessful and failed login attempts, select Type, then select the Login Eventcategory. In this particular case, theWindows Login and UNIX Login roles donot—as a user’s effective role—capture successful and failed login attempts, sothey should not be used as filters for querying successful and failed login events.
If you query using the Role filter, Audit Analyzer only returns the audit trailevents associated with the selected role. In some cases, this might be theinformation you are looking for—for example, to review the execution ofcommands using a role with elevated privileges. On UNIX computers, however,many audit trail events are not linked directly to the actions taken with a specificrole. For example, on a Linux or UNIX computer with the auditing service running,many command-line activities record audit trail events. These events are storedin the audit store database and can be queried, but are not associated with anyrole and not reported if you select a role filter.
Populating and deleting the roles available
The list of roles available for querying is based on the roles you have definedusing Access Manager. If you add a role definition, the new role displays in thelist of roles when an audit trail about the role is generated.
If you delete a role from all zones, however, it will remain in the list until the lastsession that has events associated with that role is deleted or the audit storedatabase is detached.
• • • • • •
Auditing Administrator’s Guide 160

Organizing queries in custom folders
By default, queries are organized into folders by type. You can choose toorganize your queries in other ways. For example, you can create a customhierarchy of folders and move your queries into those folders. The folderinformation is stored locally and does not affect other auditors, so each auditorcan have a private folder structure for favorite queries.
To create a custom folder hierarchy:
1. Open Audit Analyzer, select Audit Sessions, right-click, then selectNew Folder.
2. Select the new folder, right-click, then select Rename and type a newfolder name.
3. Right-click the new top-level folder, then select New Folder to create sub-folders.
Exporting and importing query definitions
You can export and import query definitions from one Audit Analyzer console toanother to make queries available to different groups of auditors. You can alsoexport query definitions for individual queries or for queries stored a customfolder hierarchy. For example, if you have a custom “Queries Required at AllSites” folder, you can select that folder and only export those query definitions.
To export query definitions:
1. Open Audit Analyzer, select the Audit Analyzer root node, right-click, thenselect Export Query Definitions.
2. Select a location and type a file name, then click Save.All of the query definitions are saved to an xml file.
To import query definitions:
1. Open Audit Analyzer, select the Audit Analyzer root node, right-click, thenselect Import Query Definitions.
• • • • • •
Querying and reviewing audited activity 161

2. Navigate to the location that contains the .xml file you want to import,then click Open.The imported queries are created as private queries. If you have an auditrole with Manage Shared Query privileges, you can publish the importedqueries as shared queries.
Displaying session information
After you select a query to see a list of sessions, such as the Today query to seea list of today’s sessions or an individual user to see a list of sessions for thatuser, you can view an indexed list of the activity that took place during any of theindividual UNIX or Windows sessions captured.
For example, you can select aWindows session, right-click, then select IndexedEvent List to review a list of the applications that were opened during thesession, in the order in which they were opened, the title of the active window,the type of activity, the desktop role used to access the application, and whetheraudit data was captured for the role being used. If you have video captureauditing enabled for the installation, you can replay the session entirely or fromany point in the indexed list.
Similarly, for UNIX sessions, you can select a specific session, right-click, thenselect Indexed Command List to display a list of commands executed and theorder they occurred. If you have video capture auditing enabled for theinstallation, you can replay the session entirely or from any point in the indexedlist.
Adding session reviewers without designatingauditing roles
If you have been assigned an auditing role that allows you to replay, delete, andupdate the status of an auditing session, you can also designate users or groupsthe permission to replay and update the status of that session, even if they donot have an assigned auditing role.
Note: Users and groups assigned as session reviewers cannot deleteauditing sessions, and therefore cannot change the reviewer listfor the sessions available to them.
• • • • • •
Auditing Administrator’s Guide 162

To designate users or groups as reviewers of one or more auditing sessions:
1. In Audit Analyzer, select the session or sessions you want to be reviewed.You can do this by selecting the predefined groupings or by definingspecific criteria using a query.
2. Right-click the selected sessions and select Set Reviewers.
3. Type all or part of the name of the user or group that you want to add tothe list of reviewers and click Check Names.If you would like to add multiple reviewers, separate the full or partialnames by semicolons.
4. Click OK.
To remove reviewers from a session, right-click the session and select ClearReviewers.
Changing the review status for audited sessions
You can use the review status to keep track of audited sessions. For example, ifyou have a formal review process, you can change the state of sessions toindicate whether they are in the queue to be reviewed, have been reviewed, areawaiting some type of action, or should be deleted. For each change of state,you can add comments to more fully document what’s been done or if anyfollow-up by another auditor is required.
By default, all audited sessions start with a review status of None.
To update the review status for a session:
1. Open Audit Analyzer and navigate to the session.
2. Select the session in the right pane, right-click, then select Update ReviewStatus.
3. Select the appropriate new status.For example, select To be Reviewed if the session requires a review or Tobe Deleted if the session has no activity requiring further review or datathat must be retained.
4. Type any notes for yourself or other auditors in the Comments dialog box,then click OK.
• • • • • •
Querying and reviewing audited activity 163

Viewing status history
The changes you and other auditors make to the review status for a session arerecorded and cumulative, so that you can view the complete status changehistory for any session.
To view the status change history for a session:
1. Open Audit Analyzer and navigate to the session.
2. Select the session in the right pane, right-click, then select Properties.
3. Click the Review Status tab.Changes to the review status are listed with the most recent change at thetop of the list and proceeding back in historical order. You can select anyreview status change in the list to see who made the change and anycomments recorded when the change was made.
Adding comments to a session
The comments associated with a session are cumulative. For example, if youselect To Be Reviewed and type a comment, then later change the state toReviewedwith another comment, both comments are displayed on theComments tab if you view the session’s Properties.
You can also add comments to a session without changing its review status. Toadd comments to a session without changing the review status, right-click thesession, select Properties, then click the Comments tab. You can use this tab torecord detailed information about sessions of interest. You can also use theReview Status attribute to find sessions by review status, and the Commentattribute to find sessions by comment text.
Reviewing and deleting your own sessions
By default, you can update the review status, add comments, and delete yourown sessions if you have an audit role with the appropriate permissions.However, there are installation-wide options to prevent any users from updatingthe review status or deleting their own sessions. These installation-wide optionstake precedence over your audit role permissions. Depending on how theseoptions are set, you might be prevented from updating the review status and
• • • • • •
Auditing Administrator’s Guide 164

adding comments to your own sessions, prevented from deleting any of yourown sessions, or prevented from both. If either installation-wide option is set,you might be blocked when you attempt to add a comment or delete a session.
Playing back a session
If you select the Enable video capture auditing option for an installation, youcan replay session activity captured on auditedWindows or UNIX computers.
For Windows computers, the video record captures desktop activity when usersselect roles with auditing enabled.
For UNIX sessions, the video record captures complete input and output typed ina UNIX shell during a session.
If the Replay option is available for a session on the right-click menu, you canview a summary of the commands executed or applications opened in thesession player. You can also search for commands, parameters, or events,control the playback speed and magnification from the session player, andupdate the session review status.
To play back a session when video capture auditing is enabled:
1. Open Audit Analyzer and navigate to the session.
2. Select the session in the right pane, right-click, then select Replay to openthe session player.The left pane of the session player displays a summary of activity similar tothe indexed list. For example, if the session is aWindows session:
• • • • • •
Querying and reviewing audited activity 165

You can search on any column to find events of interest. If the session is aUNIX session, you can search the full session for any text string. Forexample, if you are playing a UNIX session, the right pane displays the shellsession and a search field.
• • • • • •
Auditing Administrator’s Guide 166

3. Click the Play/Pause icon ( ) at the bottom of the session player to start orstop the session you are viewing.You can also fast forward session playback by clicking the Speed controlicon to play back at 2x or 3x the normal speed. The dark blue playback lineacross the bottom of the window represents the total time of the session.You can drag the Timepoint needle to go directly to a specific point in thesession.
The Real-time icon toggles to allow you to play back a session as it wasrecorded in real time or move swiftly from one user action to the next. TheSession point in the lower right corner identifies the date and time of thecurrent point in the session playback.
4. To update the session review status:a. Select Session > Update Review Status, and then select the desired
review status.
b. Add your review comments and click OK.
The updated session review status displays in the session player.
5. Close the session player.
Starting the session player separately
In most cases, you start the session player from Audit Analyzer. However, youcan also start the session player from aWindows command prompt usingstandardWindows command line options or by specifying a Uniform ResourceIdentifier (URI).
Using Window command line options
If you use theWindows command line to start the session play, the installationname and session ID are required. The other arguments are optional.
daplayer /installation=installation_name /id=session_guid[/conn=auditserver_connection_string][/store=auditstore_ID][/time=timestamp]
For example:
daplayer.exe /installation=MyInstallation/id="{f533142a-d3e8-4b4a-ae9f-86ce156bdad0}"/store=1
• • • • • •
Querying and reviewing audited activity 167

If you don’t specify the audit server connection string, the session playerattempts to bind to an appropriate audit management database. The sessionplayer can replay sessions from only one audit store, but the audit store ID isoptional because sessions usually reside in a single audit store. An individualsession can span multiple audit store databases within a single audit store. If asession spans multiple audit stores, that is, different subnets or sites, you shouldspecify which audit store to play it from.
The timestamp option is a 32-bit integer that tells the session player to jump tothe point where the event of interest occurred.
Using the Uniform Resource Identifier (URI)
The Uniform Resource Identifier identifies the session player, the installationname, and the session GUID for each session. This format is especially usefulwhen used with the Copy Session URImenu item. The URI link can then bepasted into an email or instant messenger message. On a computer where AuditAnalyzer is installed, the recipient can simply click on the URI link and the sessionplayer starts automatically.
Playing back a session from a web browser
On computers that have Audit Analyzer installed, you can also play backsessions from a web browser. Because the cda:// protocol is automaticallyregistered on the computer with Audit Analyzer, you can use a web browser toreplay a specific session. If you want to play back a session from a web browser,you can extract the installation and session identifier from the session URI.
To get the installation and session identifier:
1. Select a session and right-click or open the session in the session player,then select File > Copy Session URI.
2. Open a text editor and paste the session URI into the file.
3. Delete the portion of the URI that identifies the player, so that only theinstallation and the object GUID remain.For example, if the URI looks like this:rep://myInstallation/b62bc280-678c-439a-aec3-09a9b7ee4395
Remove the first part of the URI so that you only have the installation nameand session identifier://myInstallation/b62bc280-678c-439a-aec3-09a9b7ee4395
• • • • • •
Auditing Administrator’s Guide 168

To play back a specific session from a web browser:
1. Open a web browser.
2. Type the installation name and session ID in the address bar of the webbrowser:cda://<installationName>/<session_id>
For example:cda://myInstallation/b62bc280-678c-439a-aec3-09a9b7ee4395
The session player opens and plays the specified session.
Exporting sessions
Depending on whether you have selected the Enable video capture auditingoption for an installation, you might have different options for exporting sessiondata to a file. The options available also depend on whether the session activitywas captured on an auditedWindows computer or an audited UNIX computer.
To view your export options, select the session and right-click or open thesession in the session player, then click the File menu. Depending on the sessiontype or installation settings, you might see the following export options:
Export to Command List
Exports the time stamp and UNIX shell commands as comma separated values(csv) in a text file. The file contains the same information as displayed in theIndexed Command List for UNIX sessions.
Export to Event List
Exports the time stamp, application name, and other details as separated values(csv) in a text file. The file contains the same information as displayed in theIndexed Event List for Windows sessions.
• • • • • •
Querying and reviewing audited activity 169

Copy Session URI
Copies the URI of the selected session to the clipboard. You can then paste theURI into a web browser to open the session.
Check Session Data Integrity
Checks the session for any possible data tampering. If the session is fine, amessage displays that the data integrity check passed. If the session has beentampered with, a message displays with details of what data was affected.
Export to TXT
Saves the selected UNIX session(s) or UNIX session(s) and user input (stdin) as aplain text file.
If you selected multiple sessions, a message displays that asks you if you wantto export the multiple sessions to a single file. Click Yes to save the sessions in asingle file or No to save the sessions in separate files.
If you select the Export Session with User Inputs option, user input is noted witha line number of K or “keyboard” input.
Export Detailed Executions
Saves the session in HTML, PDF, CSV, or XML format if you have enabledadvanced monitoring and the session includes any detailed executions.
Export to CDF
Saves the selectedWindows session in Computable Document Format. You canthen open the CDF file with the session player (daplayer filename.cdf).Because the session player reads the session information directly from the CDFfile, you don’t need to specify an installation name or connect to a database toreplay the session.
• • • • • •
Auditing Administrator’s Guide 170

Export to WMV
Saves the selected session in Microsoft Windows Media Video format. You canuseWindows Media Player or other media players to play back sessions in thisformat. However, sessions exported toWMV files do not include the summaryinformation such as the user name, the computer name, start and end times, orthe list of events captured.
Deleting sessions
Auditing allows you collect detailed information about activity in yourorganization. In some cases, however, you might have sessions that collectinformation that you are not interested in capturing or include information thatyou don’t want to store or make available to other auditors. For example, youmight find there are sessions with very little activity or sessions that have beenreviewed and are no longer needed. You might also notice that there aresessions that captured personally-identifying or medical data that other auditorsshould not be allowed to see. To handle these cases, you can selectively deletesessions from the audit store database.
In most cases, if you are the Master Auditor or have been granted permission tochange the status of a session, you can mark sessions for deletion in AuditAnalyzer. As noted in Reviewing and deleting your own sessions, however, youmight be prevented from deleting your own sessions if the installation-levelsetting prevents users from deleting their own sessions.
To delete a specific session:
1. Open Audit Analyzer console, then use a predefined or custom query tofind the sessions that you want to delete.
2. Select the sessions that you want to delete.
3. Right-click, then select Delete.Audit Analyzer displays a confirmation message indicating that thedeletion cannot be reversed.
4. Click Yes to continue.
• • • • • •
Querying and reviewing audited activity 171

To delete all sessions in a query:
1. Open Audit Analyzer, right-click a query node, then select Delete AllSessions.Audit Analyzer prompts you to confirm the deletion of all sessions returnedby the query.
2. Click Yes to continue.Audit Analyzer prompts you to confirm the deletion of sessions with areview status of To be Reviewed or Pending for Action.
3. Click Yes to delete those sessions, or click No to continue the deletion ofother sessions but preserve the sessions marked for retention.While the delete operations runs, you can click Stop Delete if needed.Sessions are partially deleted up until the point where the delete operationwas cancelled.
Viewing sessions outside of Audit Analyzer
You can view audited sessions while working in other Centrify managementconsoles. For example, on computers that have Audit Analyzer and AccessManager installed, you can start the session player from Access Manager orfrom Active Directory Users and Computers. You can also launch the sessionplayer by itself or from a web page or a software program.
Viewing sessions from Access Manager
On computers where both the Access Manager console and the Audit Analyzerconsole are installed, you can search for and view sessions directly from theAccess Manager console.
To view audited sessions in Access Manager:
1. Navigate to a computer, user, or role assignments node in the left pane ofAccess Manager.
2. In the right pane, right-click the object and select View DirectAuditSessions.
3. Specify any additional criteria, then click Find.
• • • • • •
Auditing Administrator’s Guide 172

Viewing sessions in Active Directory Users and Computers
On computers where you have Active Directory Users and Computers withAccess Manager properties and Audit Analyzer, you can view audited sessionsdirectly from Active Directory Users and Computers.
To view audited sessions from Active Directory Users and Computers:
1. Navigate to the Users node in the left pane of the Active Directory Usersand Computers.
2. In the right pane, right-click the user and select All Tasks > ViewDirectAuditSessions.
3. Specify any additional criteria, then click Find.
Using Find Sessions
Find Sessions is a separate executable file, installed in the same directory asAudit Analyzer, that you can use to find and open audited sessions. The programprovides a graphical user interface and a command line interface for specifyingthe search criteria. You can use either interface to find sessions of interest. Fromthe Find Sessions graphical user interface, you can also replay, update thereview status, view the desktops used for any sessions found, display the list ofindexed commands or events, and copy the session URI.
To start Find Sessions from theWindows command line, you can type thefollowing in a Command prompt window:
findsessions /ia
Specifying the sessions to find
You can use the Common or Advanced search criteria to find sessions of interest.The Find Sessions dialog box then displays the results that match the criteria youspecify. In most cases, you can find the sessions you are interested in throughsome combination of user name, computer name, and session time displayed onthe Common tab. If you want to specify additional criteria, such as review statusor auditor name, you can click the Advanced tab.
• • • • • •
Querying and reviewing audited activity 173

Using the command line interface
You can run Find Sessions as a command line utility on computers where AuditAnalyzer is installed. The command line interface can be useful, for example, ifyou may want to find, export, or delete sessions as part of a script. You can viewusage information for the command line interface using the /help option.Specify search criteria for finding sessions using the following format:
findsessions /i=”InstallationName” /u=”username” /m=”computerName”/t=”yyyy-MM-dd”
Using a web browser to access sessions
On computers that have Audit Analyzer installed, you can also find and playback sessions from a web browser. Because the cda:// protocol isautomatically registered on the computer with Audit Analyzer, you can use aweb browser to open Find Sessions or to replay a specific session. For example,you can embed a cda:// link in a web page to automatically generate a list ofsessions, or you might want to embed a link to a session or set of sessions in aweb-based report or event notification.
You must be able to specify a query using AQL syntax to open Find Sessionsfrom a web browser. If you want to start playing back a session from a webbrowser, you must know the session identifier. You can extract the sessionidentifier from the session URI.
To start Find Sessions from a web browser:
1. Open a web browser.
2. Type the installation name and a search string using AQL syntax in theaddress bar of the web browser.For example, if you want to search an installation namedMyInstallation5 for sessions that involved the Administrator user, youwould type the following in the address bar:cda://DefaultInstallation5/?search=\"1 user=\"Administrator*\"\"
3. Click Allow to open the Find Sessions with the Advanced tab displayedand “user=Administrator*” listed for the Define Criteria.
4. Click Find Now to find sessions matching the criteria you specified.
For more information about using Find Sessions, see the Find Sessions help.
• • • • • •
Auditing Administrator’s Guide 174

Advanced monitoring
The Centrify Audit & Monitoring Service captures input and output for auditedusers and commands and then uses this information to provide a history ofexecuted commands.
However, you may want to gather additional information about which users andwhat programs are accessing or modifying production systems. For example,you may want to know when any user runs a highly privileged program, even ifthe user runs it from a script or by modifying system configuration files. You canuse advanced monitoring to capture these kinds of activities.
One of the big differences in advanced monitoring is that you can track whenany user performs a particular activity, not just an audited user.
Advanced monitoring uses the Linux system auditing tools to capture thefollowing user and program activity:
• • • • • •
Auditing Administrator’s Guide 175

Use case Where to reviewthe user activity
Are audit trailevents generatedfor this activity?
When any user executes a particular program, notjust audited users.
n AuditAnalyzer
n Linux agentsyslog
n MonitoredExecutionreport
n MonitoredExecutionList
yes
When any user (not just audited users) attempts tomodify system configuration files in monitoreddirectories specified by an administrator.
n AuditAnalyzer
n Linux agentsyslog
n File Monitorreport
yes
Which programs are executed in an audited session,regardless of how the program is invoked-- whetherit’s run by way of a script, the use of a commandalias, and so forth.
n AuditAnalyzer
n DetailedExecutionreport
no - there wouldbe too manyevents for theinformation to beuseful.
The following topics are covered:
Set up advanced monitoring 176
Using the advanced monitoring reports 179
Set up advanced monitoring
To configure advanced monitoring, make sure that your computer meets therequirements, make some configuration changes in the centrifyda.conf file,and then enable advanced monitoring either by using the dacontrol command orthe “Enable Advanced Monitoring” group policy.
• • • • • •
Advanced monitoring 176

Advanced monitoring requirements
n Currently, Centrify supports only 64-bit Linux distributions from RedHat(RHEL, Fedora, CentOS). For more information about supported platformsand versions, please refer to the current Centrify Audit & Monitoring Servicerelease notes.
n Verify that you have the Linux audit package running. For example, run thiscommand:rpm -qa audit
n Ensure that the Linux audit package that you have is supported for usewith Centrify Audit & Monitoring Service. Version 1.2.8 or later of Linuxaudit package is required. However, Centrify Audit & Monitoring Serviceprefers the Linux audit package version 2.4.5 or later because earlierversions may have issues with startup.
n Ensure that your collector and audit store database are running CentrifyServer Suite 2017 or 2017.1, or Centrify Infrastructure Services 2017.2 orlater.
Configuring advanced monitoring
You have some options and choices as to how you configure advancedmonitoring. To use any of these parameters, you must also enable advancedmonitoring (by using the dareload -m command or the “Enable AdvancedMonitoring” group policy). Here’s a list of the configuration parameters that youcan edit in the centrifyda.conf file:
n event.file.monitorUse the event.file.monitor parameter to enable advanced monitoringfor configuration files.
n event.file.monitor.process.skiplistFor any areas that you’ve specified to monitor (usingevent.file.monitor), use theevent.file.monitor.process.skiplistparameter to ignore any specificprocesses in those areas.
n event.file.monitor.user.skiplistUse the event.file.monitor.user.skiplist parameter to specify a listof users to exclude from advanced monitoring for files. For these users, the
• • • • • •
Auditing Administrator’s Guide 177

auditing service does not record any write access to directories specified inevent.file.monitor.
n event.execution.monitorUse the event.execution.monitor parameter to monitor all programsthat users run in an audited session.
n event.monitor.commandsUse the event.monitor.commands parameter to specify a list ofcommands to monitor. Be sure to list each command using the full pathname of the command. The auditing service generates an audit trail eventwhen a user runs any of these monitored commands, unless the user islisted in the event.monitor.commands.user.skiplist parameter.
n event.monitor.commands.user.skiplistUse the event.execution.monitor.user.skiplist parameter to specifya list of users to exclude from advanced monitoring for program execution.For these users, the auditing service does not record any programs thatthey run, even when the parameter event.execution.monitor is set totrue.
After you make the configuration changes in the centrifyda.conf file, run thedareload -m command to apply the changes.
Enabling advanced monitoring
After you’ve made your configuration changes in the centrifyda.conf file, thenext step is to enable advanced monitoring.
To enable advanced monitoring:
n Run the following command:dacontrol -m
n Or, use the Enable Advanced Monitoring group policy.
To disable advanced monitoring:
n Run the following command:dacontrol -n
n Or, discontinue using the Enable Advanced Monitoring group policy.
• • • • • •
Advanced monitoring 178

Using the advanced monitoring reports
These reports provide details on what your advanced monitoring configurationhas tracked:
n Monitored execution reportIf you have configured your auditing installation for advanced monitoring,then this Monitored Execution Report provides a detailed record of thesessions where a user ran one of the commands that you’ve configured tomonitor. This report shows who ran one of the monitored commands evenif that person is not an audited user. Also, this report includes informationon commands that are run individually or as part of scripts.
n Detailed execution reportIf you have configured your auditing installation to perform advancedmonitoring, then this Detailed Execution report shows all of the commandsbeing executed on the audited machines—including commands that arerun as part of scripts or other commands.
n File monitor reportThe File Monitor report shows the sensitive files being modified by users onthe audited machines. The File Monitor report includes any activity by anyuser (except root) in the following protected areas on audited computers:
n /etc/
n /var/centrifydc/
n /var/centrifyda/
n /var/centrify/
• • • • • •
Auditing Administrator’s Guide 179

Troubleshooting andcommon questions
This chapter describes how to view and manage log files and diagnostics forcomponents of the auditing infrastructure on UNIX computers. This chapter alsodescribes how to identify and resolve common problems you might encounterwhen auditing user activity or managing the auditing infrastructure.
The following topics are covered:
Checking the status of the UNIX agent 180
Viewing and changing log file settings 183
Tracing database operations 188
Stopping auditing on a computer 191
Determining collector status and connectivity 192
Managing Microsoft SQL Server databases 195
Publishing installation information in Active Directory 197
Monitoring file system disk space usage 198
Checking the status of the UNIX agent
After you install and enable auditing for a UNIX computer, you can check thestatus of the agent using the dainfo command to verify the connection to thecorrect installation. For example, the agent might not automatically connect tothe installation if you use an installation name other than DefaultInstallation.
To check the status of the agent and the auditing infrastructure, run thefollowing command as a user with root privileges:
dainfo --diag
• • • • • •
Auditing Administrator’s Guide 180

The --diag option returns detailed information about the local computer andabout the installations, audit stores, trusted collectors, trusted agents, and theactive audit store database that the agent is sending its data to. The diagnosticoutput also includes details about the Active Directory location and objectidentifier for each installation.
Configuring the installation for an agent
If the command indicates that the status is offline or the installation is notconfigured, use dacontrol to explicitly identify the correct installation. Forexample:
dacontrol -i installation_name
You can then rerun dainfo --diag to verify the installation is configuredcorrectly. Note that you cannot use dacontrol to connect to a differentinstallation name if the installation is configured using the Installation grouppolicy. In a secure installation, the Installation group policy identifies the ActiveDirectory location that contains the service connection point object for theinstallation. If you are not using group policy to identify the installation, you canmanually configure agents and collectors to use a specific installation name.
Checking for disconnected agents using Audit Manager
You can also use Audit Manager to see the status of all agents in the installation.If any agent is listed as Disconnected, you should check whether the auditedcomputer is shut down, If the audited computer is not shut down, the agentmight be outside the scope of any audit store or unable to find a collector. Usethe diagnostic services to check communication between components.
Starting and stopping the UNIX agent
In most cases, the UNIX agent is automatically started when an auditedcomputer is first powered on and remains running until the audited computer isshut down. Starting the agent when a computer starts up ensures the agent cancapture activity for all shell sessions.
Although you typically start and stop the dad process as part of a computer’sstartup and shutdown scripts, you can also start the agent directly from thecommand line on a local computer.
• • • • • •
Troubleshooting and common questions 181

If the agent is not running, run the following command to start it:
/usr/share/centrifydc/bin/centrifyda start
Detecting the Centrify Server Suite installation status
If you’re encountering any issues with your Centrify Server Suite installation, youcan run the dacheck program on your UNIX computers. The dacheck commanddetects the following errors in your Centrify Server Suite installation:
n Auditing binaries linkage problems
n Disk space
n DNS, collector, dad, adclient health
n Logging status
n Auditing file permissions/ownership
n Auditing installation configuration
n If ActiveDirectory joined
n Auditing database integrity
n If root in user.ignore and other criteria that affect root login
n var/centrifyda, /tmp write permission
n nsswitch.conf (or method.cfg, user.cfg for AIX)
n Selinux status
n Nscd (pwgrd) status
n User's cdax/real shell existence, permission, ownership.
n DNS Reverse lookup for collector's hostname
n Report Domain Controller
To check the status of the agent and the auditing infrastructure, run thefollowing command as a user with root privileges:
n dacheck
The dacheck command is available in the same location as the adcheckcommand: /usr/share/centrifydc/bin.
• • • • • •
Auditing Administrator’s Guide 182

Viewing and changing log file settings
Log files are text files that record information about operations performed byauditing components on a local computer. If you have administrative privilegeson a computer, you can open log files with any text editor.
You can view log files, change the location of the log file, and change the level ofdetail recorded in the log file from the Log Settings dialog box. Depending on thecomputer you are using, there are different ways to open the Log Settings.
Audit Manager
By default, the log file for Audit Manager is located in theC:\Users\User\AppData\Roaming\Centrify\DirectAudit\Log directory.Select the Audit Manager top-level node, right-click, then select Log Settings tochange the location or the level of detail recorded in the log file. By default, onlyerror and warning messages are logged. You should only modify log settings ifinstructed to do so by Centrify Support.
Audit Analyzer
By default, the log file for Centrify Audit Analyzer is located in theC:\Users\User\AppData\Roaming\Centrify\DirectAudit\Logs directory.Select the Audit Analyzer top-level node, right-click, then select Options todisplay the Log Settings tab. You can use the tab to change the location or thelevel of detail recorded in the log file. By default, only error and warningmessages are logged. You should only modify log settings if instructed to do soby Centrify Support.
Audit Management Server
By default, the log file for the audit management server is located in theC:\Program Files\Common Files\Centrify Shared\Log directory. You canopen the Audit Management Server Control Panel, click the Troubleshootingtab, then click the Options to display Log Settings if you want to change thelocation or the level of detail recorded in the log file. By default, error, warning,and informational messages are logged. You should only modify log settings ifinstructed to do so by Centrify Support.
• • • • • •
Troubleshooting and common questions 183

Collectors
By default, the log file for the collector service is located in theC:\Program Files\Common Files\Centrify Shared\Log directory. You canopen the Collector Control Panel, click the Troubleshooting tab, then click theOptions to display Log Settings if you want to change the path to the log file orchange the level of detail recorded in the log file. By default, error, warning, andinformational messages are logged. You should only modify log settings ifinstructed to do so by Centrify Support.
Audited computers
By default, the log file for the Centrify Agent for Windows is located in theC:\Program Files\Common Files\Centrify Shared\Log directory. You canopen the auditing Agent Control Panel, click the Troubleshooting tab, the clickOptions to display Log Setting if you want to change the path to the log file orchange the level of detail recorded in the log file. By default, error, warning, andinformational messages are logged. You should only modify log settings ifinstructed to do so by Centrify Support. On UNIX computers, detailed logging isdisabled by default. For information about enabling logging, see Enablingdetailed logging for Linux and UNIX computers.
Note: A list of auditing agent error codes is available in KB-7541 in theCentrify Knowledge Base.
Enabling detailed logging for Linux and UNIX computers
In most cases, troubleshooting auditing-related issues requires informationabout the operation of the agent, the collector service, and database activity. Forperformance reasons, you should only enable agent logging when you need tocapture detailed information about agent operations. For troubleshootingpurposes, however, you can use the dadebug command to turn on detailedlogging.
• • • • • •
Auditing Administrator’s Guide 184

To enable audit-related logging on audited Linux or UNIX computers:
1. Switch to the root user.
2. Run the dadebug clear command to remove any existing detailed loggingfrom previous operations.dadebug clear
3. Run the dadebug on command to enable detailed logging on for audit-related agent operations.dadebug on
Detailed messages are recorded in the /var/log/centrifydc.log file. Youcan view the contents of the log file with a text editor. In most cases,however, you should collect additional information and send all of thelogged information to Centrify Support.
4. Restart the auditing service./usr/share/centrifydc/bin/centrifyda restart
5. Run the dainfo diagnostic command and save the output to a text file.dainfo --diag > /tmp/dainfo.txt
6. Run the adinfo diagnostic command and save the output to a text file.adinfo --diag > /tmp/adinfo.txt
7. Stop detailed logging of audit-related activity.dadebug off
8. Send an email to Centrify Support with the log files and the agentconfiguration file as an attachment./var/log/centrifydc.log
/tmp/dainfo.txt
/tmp/adinfo.txt
/etc/centrifyda/centrifyda.conf
To check whether detailed logging is enabled:
1. Run dadebugwithout parameters to see if detailed logging is currentlyenabled.dadebug
Centrify DirectAudit debug logging is on.
2. Run addebugwithout parameters to see if detailed logging is currentlyenabled.
• • • • • •
Troubleshooting and common questions 185

addebug
3. Run addebug off to disable logging, if needed.
Enabling detailed logging for the collector service
If you are troubleshooting an auditing-related issue, you should enable detailedlogging for the collector service on the computers where the collector serviceruns.
To enable detailed logging on a collector:
1. Log on to a computer with a collector service.
2. Click Start > All Programs > Centrify Server Suite 2021 > Centrify Audit &Monitoring Service > Audit Collector Control Panel to open the CollectorControl Panel.
3. Click the Troubleshooting tab.
4. Click Options, change the logging level to Trace messages, then clickApply.
5. Note the log folder location or click Browse to specify a different locationfor the log file, then click OK.
6. Click View Log to view the current log file.From the log file window, you can also click File > Save As to save the logfile.
7. Click Close to close the Collector Control Panel.
8. Send an email to Centrify Support with the log file from the locationspecified in Step 5 as an attachment.
9. Open the Collector Control Panel, click the Troubleshooting tab, clickOptions, change the logging level back to its default setting ofInformational messages, then click OK.
Enabling detailed logging for auditing consoles
In most cases, troubleshooting auditing-related issues requires informationabout the operation of the agent and the collector or database activity. However,
• • • • • •
Auditing Administrator’s Guide 186

in some cases, it might be necessary to capture detailed information about theoperation of Audit Manager or Audit Analyzer.
To capture detailed information for Audit Manager:
1. Log on to a computer with the Audit Manager console.
2. Click Start > All Programs > Centrify Server Suite 2021 > Audit Managerto open the Audit Manager console.
3. Select the Audit Manager node, right-click, then click Log Settings.
4. Change the logging level to Trace messages, then click Apply.
5. Note the log folder location or click Browse to specify a different locationfor the log file, then click OK.
6. Send an email to Centrify Support with the log file from the locationspecified in Enabling detailed logging for the collector service as anattachment.
7. Right-click Audit Manager, click Log Settings, change the logging levelback to its default setting ofWarning messages, then click OK.
To capture detailed information for Audit Analyzer:
1. Log on to a computer with the Audit Analyzer console.
2. Click Start > All Programs > Start > All Programs > Centrify Server Suite2021 > Audit Analyzer> to open the Audit Analyzer console.
3. Select the Audit Analyzer node, right-click, then click Options.
4. Change the logging level to Trace messages, then click Apply.
5. Note the log folder location or click Browse to specify a different locationfor the log file, then click OK.
6. Send an email to Centrify Support with the log file from the locationspecified in Enabling detailed logging for the collector service as anattachment.
7. Right-click Audit Analyzer, click Options, change the logging level back toits default setting ofWarning messages, then click OK.
• • • • • •
Troubleshooting and common questions 187

Tracing database operations
Database traces are used to help diagnose problems in the managementdatabase or audit store databases. For example, database traces can help toidentify inconsistencies caused by hardware errors or network interruptions.After you enable database tracing, Audit Manager tracks all of the SQLstatements and debug messages from the audit management database or auditstore, and records the information in the database server.
Note: Tracing database operations affects database performance. Youshould only activate a database trace if you require thisinformation for troubleshooting. Before you start a databasetrace, try to reduce the load on the database instance as much aspossible, then only perform the actions needed to reproduce theissue you are troubleshooting. Turn off database tracing as soonas you have logged the activity you need for the analysis ofdatabase operations. The trace for each database can take up to800MB of server disk space. After you turn off database tracing,restart the SQL Server instance to reset the disk space.
Starting a database trace
You can start a database trace for a management database or an audit storedatabase.
To start database tracing:
1. Open Audit Manager.
2. Select an installation name, right-click, then click Properties.
3. Click the Database Trace tab.This tab displays basic information about the management databases andaudit store databases for the selected installation. In the Trace Statuscolumn, you can see whether tracing is enabled or disabled for eachdatabase.
4. Select a management or audit store database in the list, then click Enableto start tracing on the database selected.
5. Click OK, then perform the database actions for which you want to captureinformation.
• • • • • •
Auditing Administrator’s Guide 188

Stopping the database trace
You should turn off database tracing immediately after you have logged theactivity you need for the analysis of database operations.
To stop database tracing:
1. Open Audit Manager.
2. Select the installation name, right-click, then click Properties.
3. Click the Database Trace tab.
4. Select the management or audit store database that has tracing enabled,then click Disable to stop tracing on the database selected.
5. Click Export to save the database trace from the selected databases to afile with comma-separated values (.csv).
6. Follow the prompts displayed in the Export Database Trace wizard to savethe information to a file.
Exporting the database trace for a management database
The Export Database Trace wizard prompts you for different informationdepending on whether the database trace is for a management database or anaudit store database. For example, if you generate a database trace for amanagement database then click Export, the Export Database Trace wizardprompts you for user accounts.
To export the database trace:
1. Select a start date and time for the From filter and an end date and time forthe To filter, then click Next.
2. Click Add to search for and select users, then click Next.By default, you can search for users in the entire directory, you can clickObject Types or Locations to change the scope of the search scope, or clickAdvanced specify other criteria.
3. Accept the default folder location or click Browse to select a differentlocation, then click Next.
• • • • • •
Troubleshooting and common questions 189

4. Review your selections, then click Next.By default, the wizard save the file as installation_name.csv and opens thefile location.
5. Click Finish, then click OK to close the installation properties.
Exporting the database trace for audit store databases
When you select an audit store from the lower area of the Database Trace tabon the Properties page and click the lower Export button, the wizard opens witha date/time Export Criteria page. On the second page, the wizard asks you topick the domain and computer.
To export the database trace:
1. Select a start date and time for the From filter and an end date and time forthe To filter, then click Next.
2. Click Add to search for and select collectors, then click Next.By default, you can search for computers in the entire directory, you canclick Object Types or Locations to change the scope of the search scope, orclick Advanced specify other criteria.
3. Click Add to search for and select management database computers, thenclick Next.
4. Accept the default folder location or click Browse to select a differentlocation, then click Next.
5. Review your selections, then click Next.
By default, the wizard save the file as audit_store_name.csv and opens thefile location.
6. Click Finish, then click OK to close the installation properties.
Delegating database trace management
You can delegate the authority to manage database tracing by granting theManage Database Trace permission to other users for a management databaseor an audit store database.
• • • • • •
Auditing Administrator’s Guide 190

Stopping auditing on a computer
Several actions can directly or indirectly stop auditing on a computer. Forexample:
n Someone powers down the audited computer.
n Someone logs in on the audited computer and stops the agent.
n The audited computer is moved to a different audit store, causing the initialaudit store to consider the audited computer disconnected.
n The administrator checks the Define trusted audited computer list on theAdvanced tab of an Audit Store Properties page, and does not include theaudited computer on that list.
Resuming auditing if the agent stops
If the dad service stops running for any reason, audited shell sessions will stopworking and you will be prompted to resume or quit auditing. If you resumeauditing, the cdawatch process attempts to start dad and connect to theinstallation. However, if you have manually stopped the dad process, forexample by running /usr/share/centrifydc/bin/centrifyda stop, you mustmanually restart the agent.
If you decide to quit auditing when the dad service has stopped running, you areprompted to confirm that you want to terminate the session before the sessionends.
Allowing users to log in when auditing is stopped
If auditing is required but the agent is not running, users might be preventedfrom logging in. You can log in as a user with root privileges and either restartthe agent or temporarily disable auditing using dacontrol -d to allow users tolog in.
You can also run dainfo --diag or check the log file to get more information.For example, if the adclient process is not running, you might be unable torestart auditing.
If you cannot immediately correct the problem, you can temporarily disable allauditing.
• • • • • •
Troubleshooting and common questions 191

Determining collector status and connectivity
You can use the Collector Control Panel to generate a complete diagnostic checkof the collector. The diagnostic report includes detailed information about thecurrent status of the collector and the installation and audit store to which thecollector sends data.
To generate diagnostics on a collector:
1. Log on to a computer with a collector service.
2. Click Start > All Programs > Centrify Server Suite 2021 > Centrify Audit &Monitoring Service > Audit Collector Control Panel to open the CollectorControl Panel.
3. Click the Troubleshooting tab.
4. Click Diagnostics.
The results are displayed in a Diagnostic Information window. If connections aresuccessful and components are configured correctly, you should see resultssimilar to this:
Establishing connection with Collector: SuccessGetting collector's current status: RunningGetting Collector's current Installation: DefaultInstallation (locally
configured)Getting Collector's current Audit Store: Data
Source=pysql.py.dev\CENTRIFYSUITE;Initial Catalog=AuditStoreWindows-2018-11-02
Machine IP address(es): 10.140.16.59Machine is joined to: py.devForest: py.devUsing Domain Controller: pydc.py.devIs Global Catalog Available: TrueUsing Global Catalog: pydc.py.devMachine is in site: [email protected]:DefaultInstallationAD Object: py.dev/Program Data/Centrify/DirectAudit/Vegas-Installation-
d97d8fc9-7876-4f5b-b161-4a7b3736b8ecObject GUID: 1563b2e1-1ea3-4307-ac51-7c92fdf5cb8aInstallation ID: f7b36b73-0384-4283-b6f7-63a1cdb77b17Audit Stores:AuditStoreUNIXSite(s): ([email protected])Subnet(s): None configuredAffinity: UNIXTrusted Agents: None configuredTrusted Collectors: None configuredAudit Store Active Database:Data Source=pysql.py.dev\CENTRIFYSUITE
• • • • • •
Auditing Administrator’s Guide 192

Initial Catalog=AuditStoreUNIX-2018-11-02Additional Connection Parameters=<none>
AuditStoreWindowsSite(s): ([email protected])Subnet(s): None configuredAffinity: WindowsTrusted Agents: None configuredTrusted Collectors: None configuredAudit Store Active Database:Data Source=pysql.py.dev\CENTRIFYSUITEInitial Catalog=AuditStoreWindows-2018-11-02Additional Connection Parameters=<none>Machine's Installation: DefaultInstallation (locally configured)This machine's Audit Store is 'AuditStoreWindows' based on preferred
Audit Store (locally configured)Attempting to connect to Audit Store:Data Source=pysql.py.dev\CENTRIFYSUITEInitial Catalog=AuditStoreWindows-2018-11-02Integrated Security=TRUEPooling=TrueMax Pool Size=1000Encrypt=TrueTrustServerCertificate=TrueAdditional Connection Parameters=<none>Connected to Audit Store successfully
Done.
You can copy the results to a file and send them to Centrify Support for help.
Resolving connectivity issues between a collector and anaudit store
If the diagnostic report or the Collector Configuration wizard indicates that thecollector cannot connect to an audit store database, check the following:
n Verify the account you logged in with has permission to add a collector.
n Verify the collector service has permission to connect to the active auditstore database. You can grant this permission from Audit Manager.
n Check whether the SQL Server instance needs to be restarted. Forexample, make sure the SQL Server instance is not waiting for a restart tocomplete ASP.NET registration changes.
n Check whether there is a firewall between the collector and the SQL Serverinstance blocking access.
n Check whether SQL Server is configured to allow named pipes and TCP/IPconnections.
n Check whether SQL Server is configured to allow remote connections.
• • • • • •
Troubleshooting and common questions 193

n Compare the site or subnet that the collector is configured to use with thescope of the audit store. For example, make sure the audit store site orsubnet matches the site or subnet in the audit store properties.AuditStore
Site(s): ([email protected])Subnet(s): None configured
Resolving authentication issues
If you configure the collector service to use an Active Directory account insteadof the local system account, you might encounter problems with Kerberosauthentication when the collector attempts to connect to the audit storedatabase. Kerberos authentication uses the service principal names (SPN)registered for the SQL Server account to authenticate a service. When thecollector (client) wants to connect to SQL Server, it locates an instance of theservice, composes an SPN for that instance, connects to the service, andpresents the SPN for the service to authenticate. If the collector service accountdoes not have any SPNs, the Kerberos authentication request fails.
To resolve this problem, go to KB-1311 in the Centrify Knowledge Base, selectAttachments, and click View > Open > Run to run the checkspn.vbs script on acomputer that is joined to Active Directory.
Note: The user who is running this command must have permission toregister the SPN on the service account.
By default, this script runs in report-only mode. It checks whether the requiredSPNs are present on the service account in question and issues a prompt to fix it,if not. This script registers the SPN in the service accountservicePrincipalName attribute in the format:
MSSQLSvc/<FQDN>:<tcpport>
Monitoring collector performance counters
If you have enabled auditing and installed the collector service on a localWindows computer, you can add audit-specific performance counters toPerformance Monitor to help you analyze and resolve audit-related issues.When you install the collector, the performance counters are addedautomatically, if you uninstall the collector, the counters are also automaticallyremoved from Performance Monitor.
• • • • • •
Auditing Administrator’s Guide 194

To add Centrify Server Suite performance counters:
1. Log on to a computer with a collector service.
2. Click Start > Administrative Tools > Performance Monitor.
3. Expand Monitoring Tools and select Performance Monitor.
4. Click the green plus (+) icon in the toolbar.
5. Find the Audit Collector from the list, and expand it to show the list ofavailable performance counters.The performance counters generally fall into one of three categories; agentinformation, packet volume, and data loads. For example, if you add thecounter # Connected Agent, you will be able to view the number of agentscurrently connected. If you add the counter # Unix Meta Message Packet,you will be able to view the number of Unix meta message packets. If youadd the counter, Bytes Unix Command, you will be able to view Unixcommand data in bytes.
6. Choose the performance counter you would like to add and click Add.
7. Repeat Step 6 until you have added the counters you want to monitor.
8. Click OK.
Managing Microsoft SQL Server databases
Managing an audit installation requires permission to create new SQL Serverdatabases on a SQL Server instance. In a production environment, this is anongoing process to keep databases small and efficient. Because themanagement of the audit databases is not a one-time setup operation, Centrifyrecommends that you have at least one dedicated SQL Server instance for theaudit administrator to use. The audit administrator should also be a member ofthe SQL Server system administrator role to ensure full control over thedatabases created and archived.
Selecting SQL Server or Windows authentication
When you configure the Microsoft SQL Server instance to use for auditing, youmust specify the type of authentication to use. The appropriate type ofauthentication depends on how your production environment is configured. For
• • • • • •
Troubleshooting and common questions 195

example, if you have a firewall between components or one-way trustrelationship between forests, you must allow SQL Server authentications.
To support the auditing infrastructure, you can use the following types ofauthentication:
n Windows authentication for creating new databases.
n Windows authentication or both SQL Server authentication andWindowsauthentication for connections between collectors and audit stores.
n Windows authentication or both SQL Server authentication andWindowsauthentication for connections between audit stores and the auditmanagement database.
n SQL Server authentication for collectors in an untrusted forest and an auditstore in a trusted forest.
n SQL Server authentication for audit store databases in a trusted forest andaudit management database in an untrusted forest.
If you chooseWindows authentication, you can perform actions with your ownlogon account or using another Windows account name and password.
Connecting to an installation or database
If you unable to connect to the SQL Server database, the problem might becaused by one of the following issues:
n A firewall blocking access to the SQL Server instance.
n TCP/IP has not been enabled for the SQL Server instance of SQL Server
n Remote connections have not been enabled for the SQL Server instance.
For information about areas to check, see the following article:
https://blog.sqlauthority.com/2009/05/21/sql-server-fix-error-provider-named-pipes-provider-error-40-could-not-open-a-connection-to-sql-server-microsoft-sql-server-error/
Assigning the service principal name for SQL Server
If you get error messages when performing database operations, such ascreating a new audit management database using Audit Manager, the problem
• • • • • •
Auditing Administrator’s Guide 196

is likely because the service principal name (SPN) for the SQL Server instance isassigned to the wrong Active Directory container.
n If the SQL Server startup account is a local system account, the appropriatecontainer is the computer name.
n If it is any other account, the appropriate container is the SQL Serverstartup account.
Because authentication tries to use the first SPN it finds, make sure that no SPNsare assigned to inappropriate containers. Usually this error occurs when theadministrator does not remove a manually added SPN from the Active Directorycontainer after changing the SQL Server service account.
For help troubleshooting this problem, read the following article:
https://support.microsoft.com/en-us/help/811889/how-to-troubleshoot-the-cannot-generate-sspi-context-error-message
Publishing installation information in ActiveDirectory
The default location for publishing audit installation information in ActiveDirectory is:
domain/Program Data/Centrify/DirectAudit
In most cases, this location is accessible to any administrative user. If you cannotaccess the publication location, check the following:
n Make sure you have permission to publish information to Active Directory.
n Verify that the publication location exists in Active Directory.
n Check the network for problems.
Moving a service connection point from its published location can result inconnection problems. If you delete the default publication location and add anew publication location, you might not have permissions on the new location. Ifyou do not have the appropriate permissions on the new location, ask the ActiveDirectory administrator to grant you such permissions before running any of thewizards to reconfigure agents and collectors.
• • • • • •
Troubleshooting and common questions 197

Note: A new location might not be reflected immediately in the listcurrent published locations. However, this has no any adverseeffects apart from not being able to see the published location.
Monitoring file system disk space usage
Like most software applications, Centrify agents require adequate disk space tobe available to operate properly. For example, agents read and write temporaryfiles to authenticate processes and ensure data integrity. If your operatingsystem does not have enough disk space to accommodate these temporary files,the agent might be unable to run and prevent users from logging on or activityfrom being audited.
To prevent problems with disk space allocation, you should monitor keydirectories, such as the /tmp and /var directories, to ensure free space isavailable. The disk space required by different directories depends on theconfiguration and operating systems of the computer and the Active Directoryenvironment. However, if any directory approaches 100% of its allocation, youshould allocate more disk or remove older files to free up space for continuedoperation.
• • • • • •
Auditing Administrator’s Guide 198

Command line programsfor managing auditedsessions
This chapter provides an overview of the command line interface that you canuse to manage audited computers. For complete reference information about therequired and optional parameters for each command, see the man page providedlocally on the Centrify-managed computer.
The following topics are covered:
How to use command line programs 199
Displaying usage information and man pages 200
Using commands for administrative tasks 200
How to use command line programs
Command-line programs allow you to perform administrative tasks directly froma UNIX shell or by using a shell script. These programs are installed when youinstall the Centrify UNIX agent, and are installed by default in the followingdirectories:
n /usr/sbin
n /usr/bin
You can use the UNIX command-line programs to take action directly on a localUNIX computer, for example to enable or disable auditing manually on a localcomputer. You can also use these programs to perform administrative ordiagnostic tasks when it is more convenient to run them on the UNIX computerthan through Audit Manager. For example, you might find it more convenient to
• • • • • •
Auditing Administrator’s Guide 199

view details about the agent configuration or diagnostic information directly ona local computer rather than through Audit Manager or the Agent Control Panel.
Displaying usage information and man pages
You can display a summary of usage information for any UNIX command-lineprogram by typing the command plus the --help or -h option. For example, tosee the usage information for the dacontrol command:
dacontrol --help
For more complete information about any command, read the command’s manpage. For example, to see the man page for the dacontrol command, type:
man dacontrol
Using commands for administrative tasks
The command-line programs allow you to perform administrative tasks—suchas enable or disable shell auditing on UNIX computers or generate diagnosticinformation—directly on an audited computer. The following table provides asummary of the auditing-related programs installed with the Centrify Agent for*NIX and the Centrify Client for Linux audit package. For complete informationabout the syntax and options for any command, see the man page for thatcommand.
• • • • • •
Command line programs for managing auditedsessions 200

Use this command To do this
dacheck
The dacheck command performs operating system, network, andActive Directory tests to verify a computer meets the systemrequirements for a successful installation. For example, the install.shscript runs the dacheck program.
The dacheck command is located in the same place as the adcheckcommand: /usr/share/centrify/dc/bin.
dacontrol
Enable or disable session or individual command auditing on acomputer. You can also use this command to manually configure theaudit installation to use for a local computer if you are not identifyingthe installation by group policy.
Only users with root privileges can run the dacontrol command.
Note: If the audited system is not joined to Active Directoryand it is audited by way of the Centrify Client for Linux,you cannot change the audit installation with thedacontrol command.
dad
Start the dad process manually.
The dad process records terminal activity on the UNIX computer andtransfers the data to a collector. In most cases, it is automaticallystarted when the computer is first booted. However, you can run thiscommand to manually start the audit process on a local computer.
Only users with root privileges can run the dad command.
dadebug
Enable or disable logging for the dad process on an audited computer.
If you enable logging, the dad process writes messages to the/var/log/centrifydc.log file. If you run dadebugwithoutspecifying an option, the command returns a status message thatindicates whether logging is currently enabled or disabled.
Only users with root privileges can run the dadebug command.
dadiag
Display detailed information about the configuration and currentauditing status for a local computer.
This command displays the same information as dainfo --diag.
• • • • • •
Auditing Administrator’s Guide 201

Use this command To do this
daflush
Clear the auditing service in-memory cache of name service queries andinstallation information.
If you run this command without any arguments, it removes bothauditing-related name service query results and audit installationinformation from the in-memory cache. If you run this command with noarguments or specify the --name-service option, the command alsoautomatically clears the cache for common name services—such asnscd and pwgrd—if those services are running on the local computer.
Clearing the cache of name service query results is useful if you makechanges that would affect the results of a name service query, andwant to ensure you get updated information. For example, if you removethe UNIX Login role for an Active Directory user, some information forthat user might remain in the auditing service cache and be returnedwhen you run a command such as getent passwd for that user. Youcan run daflush to ensure the user is removed completely from thelocal computer cache, including the auditing service cache.
Only users with root privileges can run the daflush command.
dainfoDisplay detailed information about the status and configuration of anaudited computer.
dareload
Force the dad process to reload configuration properties from the/etc/centrifyda/centrifyda.conf file or the advancedmonitoring properties from /etc/centrifyda/libaudit.conf.This command enables you to apply configuration changes withoutrestarting the agent.
Only users with root privileges can run the dareload command.
dashellfix.sh
Reset shells to their source shell on computers that are not beingaudited in an audited zone.
On audited computers, the cdash shell is used to capture and forwardaudit data instead of the original shell. This script enables you to restorethe user’s original shell choice if the auditing service and wrapper shellare removed.
daspool
Display information about the size and content of the auditing-relatedoffline cache (spool) files.
If an audited computer cannot contact a collector service, it cachessession, audit trail, and other information locally until a collectorbecomes available. This command enables you to review informationabout these offline cache files.
Only users with root privileges can run the daspool command.
• • • • • •
Command line programs for managing auditedsessions 202
Configuring duplicate audit session cleanup
Sometimes the auditing service records duplicate sessions if your auditinginstallation includes one or more UNIX computers where both of the followingsituations occur:
n The DirectAudit agent is installed.
n A user can log in to the computer from the Admin Portal and the cloudtenant is enabled for auditing.
To avoid this situation, add the following environment variable to your/etc/centrifydc/ssh/sshd_config file:
AcceptEnv centrify_cip_da_data
Note that the above /etc/centrifydc/ssh/ path applies if you're using theCentrify OpenSSH server. If you're using a different SSH server, the file path maybe different-- so be sure to update the appropriate SSH daemon configurationfile for your system.
With the environment variable set, the agent uses that to verify the SSH publickey of the associated tenant. That way the auditing service can determine whichsessions are duplicated and remove them. Also, the agent on the UNIX computerwill no longer record sessions that originate from the Admin Portal on the samecomputer.
Downloading the tenant SSH public key
There's a script called dadownloadsshpublickey.tcl that downloads thetenant's SSH public key. With the public key and the centrify_cip_da_data
environment variable, the auditing service can determine which audit sessionsare duplicates and remove them.
The agent installer puts this tcl script into /usr/bin, except for CoreOS systemswhere the installer puts the script into /opt/centrify/bin. This script requiresroot privilege to run. The output file specified by dad for the script is/var/centrifyda/tenant_rsa.pub.
If dad fails to download the public key or if you need to change the public keyafter dad has started, you can manually run this tcl script.
/usr/bin/dadownloadsshpublickey.tcl --output-file/var/centrifyda/tenant_rsa.pub
Use the following options when you run this script:
• • • • • •
Auditing Administrator’s Guide 203

n --cip, --i <cloud tenant URL>
This option is optional.If the computer is not joined to the domain currently, use this option to specify thecloud tenant URL. If you don't use this option, the script finds the URL automatically ifthe computer is joined to the domain.
n --output-file, -o <file>
This option is required.Use this option to specify the output filename for the tenant's SSH public key. This filemust be in a parent directory that is writable by root only and the directory cannot bea symlink.
• • • • • •
Command line programs for managing auditedsessions 204

Installing the UNIX agenton remote computers
In most cases, you install the UNIX agent locally on a computer using theinstall.sh script interactively. You can install the UNIX agent on remotecomputers using the install.sh script and a configuration file or using virtuallyany software distribution or package installer program. This chapter provides anoverview of these alternatives for installing the agent on UNIX or Linuxcomputers.
The following topics are covered:
Installing the agent silently using a configuration file 205
Using other programs to install the UNIX agent 206
Installing the agent silently using a configurationfile
You can automate agent installation by running the install.sh script in non-interactive mode:
install.sh -n
In this mode, the script uses configuration details specified in the centrifyda-install.cfg file. If this file is not found, the install.sh script uses its built-indefault values.
To specify configuration values, edit the sample centrifyda-install.cfg file inits default location, or create a new text file with the same name, and then runthe install.sh script.
In the file, INSTALL=Y installs the agent, and INSTALL=U upgrades the agent.
• • • • • •
Auditing Administrator’s Guide 205

By default, the script returns an exit code of 0 if the operation is successful. Toreturn exit codes that provide more detailed information about the result, use:
install.sh -n --custom_rc
This returncode
Indicates
CODE_SIN=0 Successful install
CODE_SUP=0 Successful upgrade
CODE_SUN=0 Successful uninstallCODE_NIN=24 Did nothing during install
CODE_NUN=25 Did nothing during uninstall
CODE_EIN=26 Error during install
CODE_EUP=27 Error during upgrade
CODE_EUN=28 Error during uninstall
CODE_ESU=29
Error during setup; for example, unsupported operating environment or invalidarguments
Using other programs to install the UNIX agent
Auditing-related files are bundled with the core Centrify agent files into aplatform-specific software package. You must install the Centrify agent on theaudited computer before you enable the auditing service.
To install auditing using a native installation mechanism:
1. Log on as a user with root privileges.
2. If you want to install from a CD and the drive is not mounted automatically,use the OS-specific command to mount the cdrom device.
3. Copy the appropriate package to a local directory.For Solaris 10:cp /cdrom/cdrom0/Unix/centrifyda-n.n.n-sol10-sparc-local.tgz .
For Red Hat Enterprise Linux:cp /mnt/cdrom/Unix/centrifyda-n.n.n-rhel5-x86_64.rpm .
• • • • • •
Installing the UNIX agent on remote computers 206

For SuSE Linux:cp /mnt/cdrom/Unix/centrifyda-n.n.n-suse11-x86_64.rpm .
4. If the software package is a compressed file, unzip and extract thecontents. For example, on Solaris:gunzip -d centrifyda-n.n.n-sol10-local.tgztar -xf centrifyda-n.n.n-sol10-sparc-local.tar
5. Run the installation command appropriate to the operating environment.For Red Hat Linux, you can use:rpm –ivh centrifyda-n.n.n-rhel5-x86_64.rpm
For SuSE Linux, you can use:rpm –ivh centrifyda-n.n.n-suse11-x86_64.rpm
For Solaris, you can use:pkgadd –d CentrifyDA -a admin
Note: You can also use other programs, such as SMIT or YAST, toinstall the agent package.
6. If you are using an installation with a name other thanDefaultInstallation, you need to configure it with dacontrol or usinggroup policy.If there is an installation with the name DefaultInstallation the UNIXagent uses it by default. For more information about specifying theinstallation, see Configuring the installation for an agent.
7. After installing the package, use dainfo to verify that auditing is installedand running. You should see output similar to the following:Pinging adclient: adclient is availableDaemon status: OnlineCurrent collector: DC2008r2-LG.pistolas.org:
5063:HOST/[email protected] offline store size: 0.00 BytesSession despool rate: 0.00 Bytes/secondAudit trail offline store size: 0.00 BytesAudit trail despool rate: 0.00 Bytes/secondGetting offline database information:
Size on disk: 52.00 KBDatabase filesystem use: 3.06 GB used,
15.52 GB total, 12.45 GB freeDirectAudit NSS module: ActiveUser (root) audited status: YesDirectAudit is not configured for per-command auditing.
• • • • • •
Auditing Administrator’s Guide 207

Permissions required toperform administrativeand auditing tasks
This chapter describes the permissions required to perform various auditing-related activities.
The following topics are covered:
Setting and synchronizing audit-related permissions 208
Installation permissions 210
Management database permissions 213
Audit store and audit store database permissions 215
Audit role permissions 216
Auditor permissions 216
Setting and synchronizing audit-relatedpermissions
As a Master Auditor, you can set the permissions that control what all otheradministrators and auditors can do. In most cases, you set these permissions bymaking selections in Audit Manager. Your selections are saved in themanagement database for each installation, then published in Active Directorywhenever you synchronize the management database with the serviceconnection point for the installation.
• • • • • •
Auditing Administrator’s Guide 208

The permissions you can set consist of a specific action that can be taken, ascope to which the action applies, and the specific Active Directory user or groupto which you are granting the permission.
For example, a permission might specify an action, such as ability to modify aname or detach a database with a scope such as a specific installation or auditstore database. For each action and scope, you select the Active Directory useror group to be granted that permission. After users or groups are granted apermission, they are called a trustee for that action and scope.
To view the existing permissions, right-click an installation or an audit store andselect Properties, then click the Security tab.
Component by component permissions
The table below lists the permissions needed to create or add to an installationone component at a time.
To do this Required permissions and roles(scope)
Create an audit installation
Create an audit console
Create a SQL Server instance
Check a SQL Server service account
Add a service connection point
Add a publication locationAudit server administrator orManage Publication Locations(Installation)
Add a UNIX agent to an audited machine
Add aWindows agent to an audited machine
Enable trusted audited machine list for an auditstore
Audit server administrator orManage Collectors (Installation)
Add an audited machine to the trusted list for anaudit store
Audit server administrator orManage Collectors (Installation)
Add a collector [does not require any specialpermissions to install]
Enable trusted collector list for an audit store Audit server administrator orManage Collectors (Installation)
Add a collector to the trusted list for an audit store Audit server administrator orManage Collectors (Installation)
• • • • • •
Permissions required to perform administrative andauditing tasks 209

To do this Required permissions and roles(scope)
Add an audit store Audit server administrator orManage Audit Store List (Installation)
Add an audit store database
SQL: Database owner (dbo) ora delegated member of thedb_owner role orAudit store administrator(Installation) orAudit server administrator(Installation) orManage Databases (Installation)
Attach an audit store databaseChange which DB is activeAttach DA version 1 database
Audit Store administrator(Installation) orAudit server administrator(Installation) orManage Databases (Installation)
Change which DB is activeAudit Store administrator orAudit server administrator orManage Databases
Add a subnet or AD site to the audit storeAudit Store administrator orAudit server administrator orManage Sites (Audit store)
Add an audit server Manage Audit Server List (Installation)
Add an audit role; change its definition, menbershipor permissions
Creator of installation (Installation) orAudit server administrator(Installation) orManage Audit Roles (Installation)
Installation permissions
Installation permissions allow users or groups to modify different aspects of aninstallation’s properties. By default, the Master Auditor and the managementdatabase administrator have Full Control over the installation and can assignthe following permissions to other users and groups:
• • • • • •
Auditing Administrator’s Guide 210

Thispermission
Enables trustees to do this
Full Control Perform all administrative tasks on the selected installation and assignpermissions to other users and groups.
ChangePermissions
Add, modify, or remove Active Directory users and groups that have specificpermissions.
A user or group granted this permission can display the properties for theinstallation, then click the Security tab to select permissions for other usersand groups.
Modify Name
Modify the name of the selected installation.
A user or group granted this permission can display the properties for theinstallation, then click the General tab to change the installation name.
ManageManagementDatabase List
Add or remove a management database for the selected installation.
A user or group granted this permission can right-click the installation namein Audit Manager and selectManagement Databases to add or remove amanagement database.
Deleting the management database from Microsoft SQL Server requiresadditional SQL Server permissions.
Manage AuditStore List
Add, modify, or remove audit stores and audit store databases for theselected installation.
A user or group granted this permission can use the Add Audit Store wizardor right-click the installation name in Audit Manager, selectManagementDatabases, then click Properties to add or remove sites or subnetsassociated with the installation.
ManageCollectors Add, modify, or remove collectors for the selected installation.
ManageAuditedSystems
Add, modify, or remove audited computers for the selected installation.
Manage AuditRoles Add, modify, or remove audit roles for the selected installation.
ManageQueries Add, modify, or remove queries for the selected installation.
• • • • • •
Permissions required to perform administrative andauditing tasks 211

Thispermission
Enables trustees to do this
ManagePublications
Add, modify, or remove publication locations in Active Directory for theservice connection point associated with the selected installation.
A user or group granted this permission can display the properties for theinstallation, then click the Publication tab to change the publication locationin Active Directory for the installation.
A user or group granted this permission can also update the informationstored in Active Directory to keep the information in Active Directorysynchronized with the information stored in the management database.However, users or groups with this permission must have sufficient Windowsrights to be able to update objects in Active Directory.
ManageLicense
Add or remove license keys for an installation.
A user or group granted this permission can display the properties for theinstallation, click the General tab, then click Details to manage licenses forthe installation.
ModifyNotification
Enable or disable the audit notification message for the selected installation.
A user or group granted this permission can display the properties for theinstallation, then click the Notification tab to manage the notificationmessage and image for the installation.
Modify AuditOptions
Enable or disable video capture auditing for the selected installation.
Control whether users are allowed to update the review status of their ownsessions.
Control whether users are allowed to delete their own sessions.
A user or group granted this permission can display the properties for theinstallation, then click the Audit Optionstab to manage installation-wideauditing options.
View
Enable read-only permission for the selected installation.
If a user has only View permission, they can see all the auditing componentsin the Audit Manager console, but they do not have access to auditedsessions nor can they change any installation details.
Setting installation permissions
You can set installation permissions for a specific installation, by selecting theinstallation name in Audit Manager.
• • • • • •
Auditing Administrator’s Guide 212

To set permissions on an installation:
1. Open Audit Manager and select the installation name.
2. Right-click, then click Properties.
3. Click the Security tab.
4. Click Add to open Select Users and Groups.
5. Type the user or group name who should be granted installationpermissions, then click OK.You can add multiple users or groups from the Select Users or Groupsdialog box. You can also type part of the name, then click Check Names tolook up user and group names.
6. Select the specific permissions you want to grant to the selected user orgroup.
Management database permissions
Management database permissions allow users or groups to modify differentaspects of an installation’s management database. By default, the MasterAuditor and the management database administrator have Full Control over themanagement database and can assign the following permissions to other usersand groups:
Thispermission
Enables trustees to do this
Full Control Perform all administrative tasks on the selected management database andassign permissions to other users and groups.
ChangePermissions
Add, modify, or remove Active Directory users and groups that have specificpermissions.
A user or group granted this permission can display the properties for themanagement database, then click the Security tab to select permissions forother users and groups.
Modify Name
Modify the name displayed for the selected management database.
A user or group granted this permission can display the properties for themanagement database, then click the General tab to change the managementdatabase name.
• • • • • •
Permissions required to perform administrative andauditing tasks 213

Thispermission
Enables trustees to do this
ManageScopes
Add, modify, or remove sites or subnets for a management database.
A user or group granted this permission can display the properties for themanagement database, then click the Scope tab to add or remove sites andsubnets.
RemoveDatabase
Remove a management database from an installation.
Deleting the management database from Microsoft SQL Server requiresadditional SQL Server permissions.
Manage SQLLogins
Add or remove the Allowed incoming users for the selected managementdatabase.
A user or group granted this permission can display properties for themanagement database, then click the Advanced tab to add or remove allowedaccounts, or to change the outgoing account or authentication type.
ManageDatabaseTrace
Enable, disable, or export database traces for the selected managementdatabase.
Setting management database permissions
You can set management database permissions for a specific installation, byselecting the installation name in Audit Manager.
To set permissions on an management database:
1. Open Audit Manager and select the installation name.
2. Right-click, then clickManagement Databases.
3. Select the management database, click Properties, then click the Securitytab.
4. Click Add, type the user or group name who should be grantedpermissions, then click OK.
5. Select the specific permissions you want to grant to the selected user orgroup.
• • • • • •
Auditing Administrator’s Guide 214

Audit store and audit store database permissions
Audit store permissions allow users or groups to modify different aspects of anaudit store or audit store database. By default, the Master Auditor and the auditstore database administrator have Full Control over the audit store and itsdatabase and can assign the following permissions to other users and groups:
Thispermission
Enables trustees to do this
Full Control Perform all administrative tasks on the selected audit store database andassign permissions to other users and groups.
ChangePermissions
Add, modify, or remove Active Directory users and groups that have specificpermissions.
A user or group granted this permission can display the properties for the auditstore, then click the Security tab to select permissions for other users andgroups.
Modify Name
Modify the name displayed for the selected audit store.
A user or group granted this permission can display the properties for the auditstore, then click the General tab to change the audit store name.
ManageScopes
Add, modify, or remove sites or subnets for the audit store.
A user or group granted this permission can display the properties for the auditstore, then click the Scope tab to add or remove sites and subnets.
Manage SQLLogins
Add or remove the allowed incoming collectors and management databaselogins for the selected audit store database.
A user or group granted this permission can display properties for the auditstore database, then click the Advanced tab to add or remove accounts forcollectors and management databases.
ManageCollectors
Add, modify, or remove trusted collectors for the audit store.
A user or group granted this permission can display properties for the auditstore, then click the Advanced tab to add or remove accounts trustedcollectors.
ManageAuditedSystems
Add, modify, or remove trusted audited computers for the audit store.
A user or group granted this permission can display properties for the auditstore, then click the Advanced tab to add or remove accounts trusted auditedcomputers.
ManageDatabases
Add, attach, detach, or delete audit store databases for the selected auditstore.
ManageDatabaseTrace
Enable, disable, or export database traces for the selected audit store.
• • • • • •
Permissions required to perform administrative andauditing tasks 215

Audit role permissions
Audit role permissions allow users or groups to modify different aspects of anaudit role. By default, the Master Auditor has Full Control over the audit roles andcan assign the following permissions to other users and groups:
Thispermission
Enables trustees to do this
Full Control Perform all administrative tasks on the selected audit role and assignpermissions to other users and groups.
ChangePermissions
Add, modify, or remove Active Directory users and groups that have specificpermissions.
A user or group granted this permission can display the properties for theaudit role, then click the Security tab to select permissions for other users andgroups.
Change RoleMembership
Add, modify, or remove Active Directory users and groups that are assigned tothe selected role.
A user or group granted this permission can use the Add Audit Role wizard toassign users and groups to an audit role or select an audit role name, right-click, then select Assign Users and Groups to modify the role membership.
Change RoleDefinition
Modify the name, description, access, or privileges for the selected audit role.
A user or group granted this permission can display the properties for theaudit role, then:
n Click the General tab to modify the role name or description.
n Click the Access tab to modify the type of session and other criteria.
n Click the Privileges tab to modify hat users and groups assigned to therole can do.
Auditor permissions
Auditor permissions allow users or groups to view, create, share, and deletequeries. For an installation, the Master Auditor can control access to AuditAnalyzer and queries using the Manage Queries permission and the assignmentof audit roles. The privileges associated with an audit role also control whetherauditor can update the review status or replay sessions. By default, the MasterAuditor has Full Control over the auditor permissions and audit roles and canassign the following permissions to other users and groups:
• • • • • •
Auditing Administrator’s Guide 216

Thispermission
Enables trustees to do this
Full Control Perform all administrative tasks on the selected query and assign permissionsto other users and groups.
ChangePermissions
Add, modify, or remove Active Directory users and groups that have specificpermissions.
A user or group granted this permission can display the properties for thequery, then click the Security tab to select permissions for other users andgroups.
Read Read the selected query definition, session results, and indexed commands.
Delete Delete the selected query definition, session results, and indexed commands.
Modify Modify the selected query definition, session results, and indexed commands.
• • • • • •
Permissions required to perform administrative andauditing tasks 217

Sizing recommendationsfor audit installations
A typical deployment of Centrify Audit & Monitoring Serviceconsists of a numberof components such as one or more audited Systems (UNIX/Linux or Windows),one or more collectors, audit management server, management database, oneor more audit store databases and consoles (the Audit Manager and the AuditAnalyzer consoles) which all communicate with each other. Given the complexityof this communication and number of components involved, good planning isimportant for a successful deployment of the product. When planning adeployment, some of the most common questions that we asked are below:
n Will just one installation of Centrify Audit & Monitoring Service suffice? Orare multiple installations needed or recommended?
n Howmany audit stores need to be provisioned in each of the installationsand how should their scope be configured?
n Howmany collectors will be needed and what kind of hardware isrecommended for each of them?
n What is the recommended version/edition of SQL Server and what kind ofhardware is recommended to host this SQL Server?
You must take into consideration a number of factors when deciding how to planand configure the audit and monitoring servicedeployment and what kind ofhardware will be needed to deploy the key components. This section will helpyou understand these factors in detail and come up with answers to suchquestions.
• • • • • •
Auditing Administrator’s Guide 218

The following topics are covered:
Planning an audit and monitoring service deployment 219
Best practices for an audit installation 223
Creating an initial estimate of your database storage needs 227
Guidelines for determining hardware configuration 227
Identifying typical deployment issues 232
Settings to adjust for performance improvement 233
Conclusion 237
Planning an audit and monitoring servicedeployment
System Integrators often rely on the number of audited systems to estimate thehardware requirements and to come up with the overall strategy of audit andmonitoring service deployment. For example, an environment with 100 auditedsystems may look like a small setup and one may incorrectly conclude that it's asmall scale deployment that won’t require a powerful hardware to support it.Once setup however, such assumptions may turn it into a deployment thatseldom scales and often produces poor performance, both when capturing theaudit activity and when querying the already captured audit data.
• • • • • •
Permissions required to perform administrative andauditing tasks 219

Below are a few factors that you must consider before making any deploymentdecisions,
SQL Server
Out of all the components in the audit and monitoring service ecosystem, SQL isthe most heavyweight and will share most of the burden when it comes toworkload. Using a properly equipped and optimally configured SQL Server isvery important. The version and edition of SQL Server being used (such asExpress or Standard or Enterprise) or the type of machine being used to host theSQL Server (such as a virtual or physical machine) can noticeably improve theoverall performance. On the contrary, a poorly configured SQL Server mayproduce a very poor performance no matter how powerful the underlyinghardware is.
Number of concurrently audited users
Relying on the number of audited systems is not always a good assumption. Forexample, an environment may have just a handful of systems but may have alarge number of users logging into these systems on a daily basis. A jumpboxscenario such as Citrix XenApp Server is a perfect example. When planning, youshould plan for the number of concurrently audited users, not just the totalnumber of audited systems. User activity patterns and behaviors also play animportant role in overall performance and storage requirements. For example,the audited data will be much smaller in an environment where no logins areexpected most of the time as compared to a network control systems whereinaudited users are logging on and logging out throughout the day. The sizingguidelines specified in the later section of this whitepaper have all been basedon workload simulations for the exact same reason.
What needs to be captured
What's being captured controls the overall workload on various components.Capturing video is more expensive than not doing so in terms of disk usage andload on collectors and SQL Server. Similarly, capturing interactive sessions isalways going to produce more audited data when compared to capturing ahandful of commands thus putting system under more pressure. Capturing largequantities of data has another side effect; it slows down database backups and
• • • • • •
Auditing Administrator’s Guide 220

other maintenance processes which is not always liked by the databaseadministrators.
Who needs to be audited
Who is being audited is equally important. Under default settings, the audit andmonitoring service audits everything and everybody and this may not be apractical solution in many large environments. In production environments, it'svery common to see processes or scheduled tasks that periodically monitorUNIX/Linux or Windows systems for their health by remotely executing certaincommands (System Monitoring and Management software, such as BMC Patrolthat periodically runs vmstat or iostat command on each of the UNIX/Linuxsystems is a good example). Activities like these needlessly generate thousandsof Audited sessions on a daily basis and in many cases create tremendous loadon an entire audit and monitoring service system.
UNIX/Linux and Windows
The type of system being audited influences the amount of data that will becaptured from that system and the overall CPU load on collectors. For example,aWindows audited system almost always generates more data per daycompared to a UNIX audited system with comparable number of concurrentusers. This also means that an environment withWindows audited systems willmost likely be more demanding (in terms of hardware resources) compared to anenvironment with same number of UNIX/Linux audited systems.
Query performance
Query performance is one factor that often gets ignored. Capturing user activityand storing it in the database in a reasonable time is important. What's alsoimportant is to be able to search these records in a predictable time frameirrespective of the combined size and number of all the databases in the CentrifyAudit & Monitoring Service system.
• • • • • •
Permissions required to perform administrative andauditing tasks 221

Audit data retention policy
Audit data retention policy dictates howmany days of data should be online andreadily available for querying purpose and this number varies from oneenterprise to another. Pay special attention to data retention policy requirementsin the target environment. A longer retention policy typically results in largedatabases which also suffer from poor query performance if databases are notwell maintained. On the contrary, too frequent rotation will also result in poorquery performance if you keep too many inactive databases attached to theaudit store.
System overheads
Keep in mind the overhead that is caused by the Centrify Audit & MonitoringService system itself; there are a number of background jobs carried out byvarious components of the audit and monitoring service system, including theaudited systems themselves, collectors, and the Audit Management Server. Thisincludes activities such as sending the audited system's heartbeat to thedatabase (by way of collector), sending the collector's heartbeat to thedatabase, processing active sessions list, processing and synchronizinginformation of audit roles with Active Directory Group criteria, calculatingeffective size of audited sessions, storing license usage information in ActiveDirectory, and many more.
Latency
Geography/Network topology play an important role as it introduces latency. Forexample, an environment may well have just a handful of audited systems but ifthey're not geographically co-located, you may see delays in getting the auditeduser activity to its final destination (the database server); the same may happenif audited systems are not connected to collectors by a network link withreasonable bandwidth. A general rule of thumb is to group together auditedsystems, collectors and databases that are connected by a high speed networkusing the concept of audit store.
• • • • • •
Auditing Administrator’s Guide 222

Best practices for an audit installation
The previous section listed out a number of factors that may affect how a auditand monitoring service system will be deployed. Below is a set of best practicesthat are derived from these factors. Follow these practices for planning any auditand monitoring service deployment (large or small). You can also refer to the lastsection of this whitepaper that discusses how to tweak settings in an existingenvironment to improve performance.
Plan based on concurrently audited users
When planning, always focus on the number of concurrently audited users, notjust the total number of audited systems. Take into consideration user sessionsthat might be generated as a result of automated monitoring activity fromSystem Monitoring and Management software, such as BMC Patrol etc.
Avoid single box deployment
Always avoid installing key components such as SQL Server, collectors andAudit Management Server on the same system, especially in environments withheavy workload. Keep in mind that a collector’s workload is CPU intensive andSQL Server’s workload is CPU, IO, and memory intensive. If both a collector andSQL Server are installed on the same system, they’ll slow each other down.
Control the amount of data
It’s always a good practice to establish rules to avoid capturing unnecessarydata. This typically includes blacklisting commands such as top or tail (whichgenerate large outputs and seldom contain any meaningful user activity) orenable per-command auditing instead of session auditing. Also, compile a list ofusers that do not really need to be audited and add them to the non-auditeduser’s list. This often includes user accounts that are used to run automated jobsfrom System Monitoring and Management software, such as BMC Patrol and soforth.
• • • • • •
Permissions required to perform administrative andauditing tasks 223

Scope the audit stores efficiently
Always visualize the flow of traffic, not just when audited activity is beingcaptured but also when it’s being searched and replayed. It’s better to avoidtraffic over slow links by splitting the audited systems into multiple audit storesbased on their geographic location, even if it may mean that you’ll be deployingmore collectors and SQL Servers. In certain cases, splitting audited systems intomultiple audit stores may not be sufficient enough and you may even need toconsider provisioning multiple audit and monitoring service installations. Whenaudited data is being queried, all calls are routed to the audit store databases byway of the Management database. If the Management database is notconnected to the console or to the audit store databases by way of a fastnetwork link, the queries will always return the results slowly no matter howgood the performance of SQL Server is.
Estimate storage requirement based on pilot data
No two customers are the same and you can never accurately predict how muchdata will be collected over a period of time in each environment. Hence, it’simportant to analyze existing data in a customer’s environment (from pilotproject) to predict the future data growth. A pilot testing is an effective way tohelp you understand a number of things such as the following factors:
n Understand workload patterns and come up with an overall configurationstrategy that determines how the audit stores will be scoped, which usersshould or should not be audited, which commands should be blacklistedand so forth.
n Database storage requirement – Roughly, how much data will be collectedover the retention policy period? This will also help you establish the activeaudit store database rotation policy.
n What kind of hardware will be needed for the SQL Server to serve theproduction workload?
n Howmany collectors will be needed in each audit store (this number isespecially important when auditingWindows systems)?
The Centrify Audit & Monitoring Service Data Analysis tool (see KB-4496) can bevery helpful to understand data trends. If the Centrify Audit & Monitoring ServiceData Analysis tool reveals that more than anticipated amount of data is beingcaptured, you can always use the database rotation to keep the active audit
• • • • • •
Auditing Administrator’s Guide 224

store database’s size in control thus controlling the storage requirements for allattached databases.
Maintain databases periodically
Apart from taking regular backups, it’s also important to keep the databaseshealthy by maintaining them periodically. This includes activities such asreorganizing or rebuilding indexes; these tasks must be done by a customer’sDBA periodically. Centrify recommends reorganizing indexes if they are 5% to30% fragmented and rebuilding indexes if they are more than 30% fragmented.
Control the size of active databases
A large active audit store database often results in poor performance as a resultof fragmented indexes, lengthy backups, and out of date database statistics,especially when the databases are not maintained periodically. Centrifyrecommends keeping the active audit store database size between 250GB-500GB (as of Suite 2016). Consider rotating databases whenever the sizeexceeds the recommended thresholds. You can rotate databasesprogrammatically by using either the Centrify DirectManage SDK or the CentrifyAudit PowerShell Module, or manually using the Audit Manager console). It’salso a good practice not to keep too many audit store databases attached to anaudit store, because doing so affects query performance.
Plan database rotation based on retention policy
Always try to align the audit data retention policy with the active audit storedatabase rotation. For example, if the audit data retention policy requires last 90days of data to be online, try to rotate the active audit store database every 90days. This strategy makes it easy to find achieved data if it’s ever needed forreviewing purpose in the future. One exception to this strategy is an environmentwhere the audit data retention policy is so long that the active audit storedatabase is guaranteed to exceed the recommended maximum size of the active audit store database (as mentioned in the previous section). In such cases,you can divide the entire retention policy period into small periods (for example,one database for each month) and continue to rotate the active audit storedatabase at the recommended intervals. Irrespective of which strategy youchoose and implement, it’s always recommended to detach all audit store
• • • • • •
Permissions required to perform administrative andauditing tasks 225

databases that contain data outside of the retention policy period. This not onlyimproves the query performance but also reduces the disk usage on thedatabase server.
Configure SQL Server optimally
Centrify recommends setting the SQL Server machine’s power plan settings(Control Panel > Power Options) to High Performance.
SQL Server has a setting called Max Server Memory that controls the maximumamount of physical memory that can be consumed by the SQL Server’s bufferpool. An incorrectly configured Max Server Memory may either result in the SQLengine causing high IO or OS/other programs starving for more memory. It’scritical to configure the Max Server memory correctly based on the amount oftotal physical memory available. Always configure this value as recommendedbefore deployment begins.
Centrify recommends storing the transaction logs and data files that areassociated with any SQL Server database on two separate volumes. For moreinformation, see the Microsoft Knowledge base articlehttps://support.microsoft.com/en-us/kb/2033523.
Other recommendations
Centrify recommends deploying at least two collectors per audit store forredundancy purpose.
Understand that any hardware has its limits
It’s entirely possible that even after following all the best practices, the CentrifyAudit & Monitoring Service system continues to perform poorly. In such cases,you must consider splitting the workload by deploying additional SQL Servers orcollectors, depending on where the bottleneck is. Deploying an additional SQLServer will almost always result in reconfiguring scope of the audit stores (inorder to redirect some traffic to the new SQL Server) and it must be done withcareful planning.
• • • • • •
Auditing Administrator’s Guide 226

Creating an initial estimate of your databasestorage needs
Here's a way that you can do an initial but rough guess of your recommendedstorage needs. For a more detailed estimate, please refer to Guidelines fordetermining hardware configuration.
n 1 MB per minute per Windows or Linux Desktop session with nominalactivity
You could need considerably more storage than this if sessions will includeflash animation, video replay, and so forth.
n Use a ratio of users to number of systemsn For example, you could have 50 users for 1000 systems, which wouldbe a 5% ratio; you would then multiply the number of users with theabove estimates.
n 50Windows users would require 50 MB/minute, or 120 GB/week, or1.5TB/quarter.
Guidelines for determining hardware configuration
The overall performance of the audit and monitoring service ecosystemultimately depends on the performance of SQL Server and the collectors. Tocome up with guidelines for hardware, we have created a test environmentwherein the SQL Server hardware configuration has been categorized into threevariants: a low end SQL Server, a high end server SQL Server, and a mid-levelSQL Server. Below are the test environment configuration details:
Low end hardwarespecification
Mid-level hardwarespecification
High end hardwarespecification
Physicalmachine DIY PC S5000 Intel Xeon Dell R730
Physicalmemory 8 GB (2x4GB) 16 GB (2x8GB) 32 GB (2x16GB)
CPU Intel i5-650, 3.2 GHz E5420 (2.5 GHz) 2xIntel Xeon E5-1620 v3(2.4 GHz, 8C/16T)
HDD 1x1TB (7200 rpm SATA) 1x1TB (7200 rpm SATA) 1x1TB (7200 rpm SAS6Gbps)
• • • • • •
Permissions required to perform administrative andauditing tasks 227
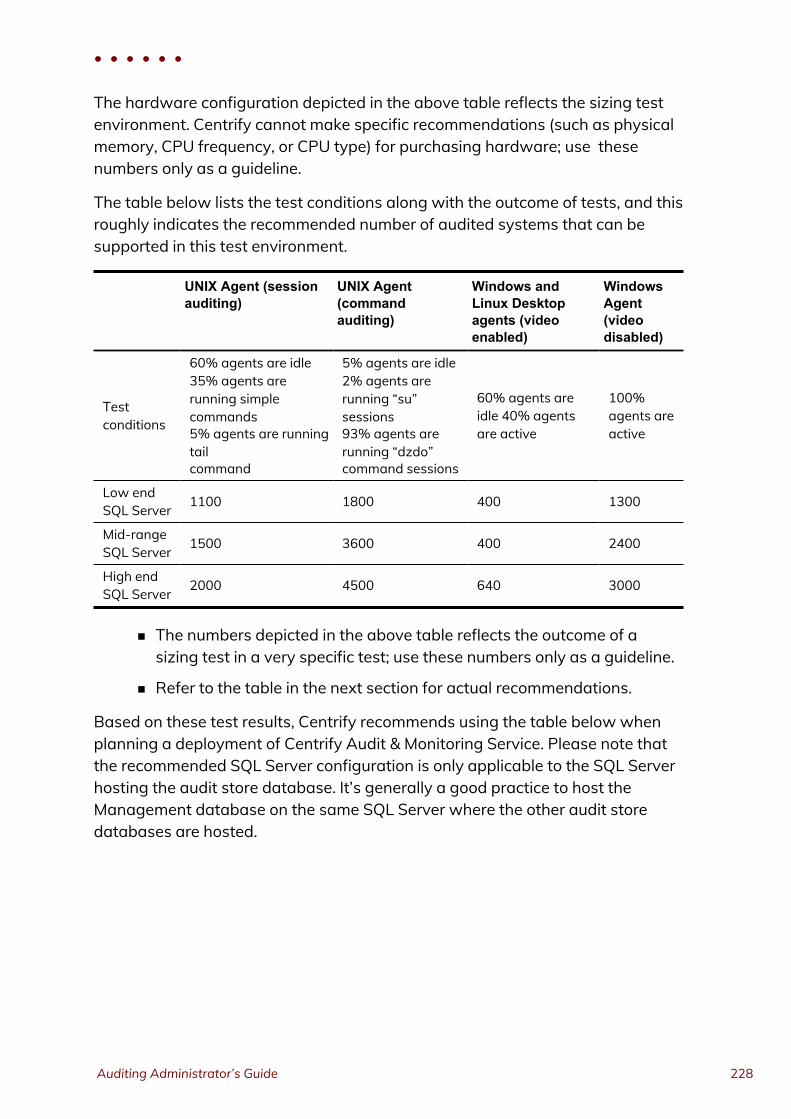
The hardware configuration depicted in the above table reflects the sizing testenvironment. Centrify cannot make specific recommendations (such as physicalmemory, CPU frequency, or CPU type) for purchasing hardware; use thesenumbers only as a guideline.
The table below lists the test conditions along with the outcome of tests, and thisroughly indicates the recommended number of audited systems that can besupported in this test environment.
UNIX Agent (sessionauditing)
UNIX Agent(commandauditing)
Windows andLinux Desktopagents (videoenabled)
WindowsAgent(videodisabled)
Testconditions
60% agents are idle35% agents arerunning simplecommands5% agents are runningtailcommand
5% agents are idle2% agents arerunning “su”sessions93% agents arerunning “dzdo”command sessions
60% agents areidle 40% agentsare active
100%agents areactive
Low endSQL Server 1100 1800 400 1300
Mid-rangeSQL Server 1500 3600 400 2400
High endSQL Server 2000 4500 640 3000
n The numbers depicted in the above table reflects the outcome of asizing test in a very specific test; use these numbers only as a guideline.
n Refer to the table in the next section for actual recommendations.
Based on these test results, Centrify recommends using the table below whenplanning a deployment of Centrify Audit & Monitoring Service. Please note thatthe recommended SQL Server configuration is only applicable to the SQL Serverhosting the audit store database. It’s generally a good practice to host theManagement database on the same SQL Server where the other audit storedatabases are hosted.
• • • • • •
Auditing Administrator’s Guide 228

AuditedSystemType
Audit Type NumberofAuditedSystems
ExpectedActivity
Recommended SQL ServerConfiguration
Recommended Number ofCollectors
AverageResponseTime (ms)
UNIX Commandauditing 1800
5% agentsare idle 2%agents arerunning“su”sessions93%agents arerunning“dzdo”commandsessions
Low end 2 83
UNIX Commandauditing 3600
5% agentsare idle 2%agents arerunning“su”sessions93%agents arerunning“dzdo”commandsessions
Mid-range 2 60
UNIX Commandauditing 4500
5% agentsare idle 2%agents arerunning“su”sessions93%agents arerunning“dzdo”commandsessions
High end 4 102
• • • • • •
Permissions required to perform administrative andauditing tasks 229

AuditedSystemType
Audit Type NumberofAuditedSystems
ExpectedActivity
Recommended SQL ServerConfiguration
Recommended Number ofCollectors
AverageResponseTime (ms)
UNIX Sessionauditing 1100
60%agents areidle 35%agents arerunningsimplecommands5% agentsare runningtailcommand
Low end 2 87
UNIX Sessionauditing 1500
60%agents areidle 35%agents arerunningsimplecommands5% agentsare runningtailcommand
Mid-range 2 76
UNIX Sessionauditing 2000
60%agents areidle 35%agents arerunningsimplecommands5% agentsare runningtailcommand
High end 4 104
Windows Videodisabled 1300
100%agents areactive
Low end 2 91
Windows Videodisabled 2400
100%agents areactive
Mid-range 3 67
Windows Videodisabled 3000
100%agents areactive
High end 4 100
• • • • • •
Auditing Administrator’s Guide 230

AuditedSystemType
Audit Type NumberofAuditedSystems
ExpectedActivity
Recommended SQL ServerConfiguration
Recommended Number ofCollectors
AverageResponseTime (ms)
Windowsor LinuxDesktop
Videoenabled 400
60%agents areidle 40%agents areactive
Low end 5 85
Windowsor LinuxDesktop
Videoenabled 400
60%agents areidle 40%agents areactive
Mid-range 5 88
Windowsor LinuxDesktop
Videoenabled 640
60%agents areidle 40%agents areactive
High end 8 113
n Expected activity is based on 8 hours of work every day. Results may varyif the target environment has a different pattern for user activity/behavior,different workload/ratio of idle to active systems compared to the testenvironment.
n Average response time is the total time taken in milliseconds to send a unitof data from audited system to the SQL Server by way of collector.
n All recommended numbers are based on the assumption that the targetenvironment is stable in terms of performance of individual componentsand network throughput. Intermittent transient errors are expected andtypically do not impact the sizing assessments.
n Windows and Linux Desktop audited systems generate large amount ofaudit data when video capture is enabled and such environments requirehigh performance SQL Server storage. This is the primary reason why thenumber of agents supported between the low and medium SQL Serverconfiguration are similar. The artificial load generated by the testsimulators is also higher than the expected daily activity in a typicalproduction environment. With high performance storage, the total numberof Windows and Linux Desktop audited systems supported will likely behigher compared to the numbers recommended.
n When monitoring bothWindows and UNIX/Linux audited systems in thesame environment, use theWindows numbers as a guideline.
• • • • • •
Permissions required to perform administrative andauditing tasks 231

Identifying typical deployment issues
It's fairly easy to identify scaling/performance issues with a Centrify Audit &Monitoring Service system that are typically a result of poor planning ordeployment. Below are some of the most common deployment issues.
Large spool files on audited systems
A healthy audit and monitoring service system should be able to keep up thepace with users’ audited activity. When the system cannot keep up the pace, itmeans either the user's audited activity is generating too much data (such aswhen a user runs the cat command on a very large file) or the audit andmonitoring service system components (such as collectors and databases) arenot able to process and store the generated data fast enough. In such cases,you'll typically see large spool files on the audited systems that often need moretime to get despooled completely.
Constant high CPU on collector/SQL Server
It's perfectly normal to see high CPU activity on collector and SQL Servermachines during peak hours as this is the time when data is continuously gettingpumped from the audited system to the collector and finally to the database.However, when you see similar activity during off-peak hours (especially when itdoesn’t correspond to the number of active users in that environment at thattime), it indicates that the audit and monitoring service system is gettingbacklogged.
Low despool rate
The despool rate largely depends on the type of data being captured, the speedof network/latency between audited system and collector, the speed of thenetwork/latency between the collector and the database, and ultimately theperformance of the SQL Server itself. Because of these factors, there’s no idealvalue or range for the despool rate. However, you should not see a despool ratethat’s significantly lower than the rate of data capture, especially when there areno known issues related to network speed or SQL Server performance.
• • • • • •
Auditing Administrator’s Guide 232

False “Agent disconnected” alerts
Each Agent periodically sends its heartbeat to the database (by way of collector)and the Audit Manager console relies on this ping to determine if the Agent isconnected or not. If there are deployment issues with audit and monitoringservice, the Agent heartbeat may not get registered even if the Agent is online,and this may raise false alarms as the system will be shown as disconnected inAudit Manager Console. Whenever you see such contradicting informationregarding the status of the audited system, it typically is indicative of underlyingdeployment issues.
Too many SQL Server tasks in queue
SQL Server has a fixed set of worker threads that it can use to perform its joband this number depends on the CPU architecture, such as 32-bit or 64-bit, andthe total number of CPUs on the SQL Server. If SQL Server is given more tasksthan it can finish, they’ll end up waiting at the bottom of this queue, thusconsuming memory and degrading overall system performance. Always consultthe DBA to confirm if the environment is consistently showing a lot of tasks inthe worker queue; this can indicate that the workload is too much for this SQLServer to handle. For more information, see the Microsoft articlehttps://msdn.microsoft.com/en-us/library/ms177526(v=sql.105).aspx.
Settings to adjust for performance improvement
In an environment where Centrify Audit & Monitoring Service is already deployedand experiencing scalability/performance issue, it’s not always possible to re-architect the deployment or make significant configuration changes (such as re-scoping the audit stores or adding a new SQL Server may not be practical); thisis true especially in large environments. The table below that lists some keysettings that you may try to change in order to improve the overall performanceof various audit and monitoring service components.
• • • • • •
Permissions required to perform administrative andauditing tasks 233

Title Summary When to adjust Component
Agent Settings
Agent heartbeat interval forUnix/Linux Audited Systems(dad.timer.update.agent.status)
Controls theinterval forsendingUnix/LinuxAuditedSystem’sheartbeat tothe Collector
When SQL activitymonitor shows highCPU usage at apredictable intervalas a result ofheartbeatregistration or whenCollector logs revealrepeated failures inregistering AuditedSystem’s heartbeator when AuditManager consolefrequently shows alot of disconnectedAudited Systemseven if they are allonline.
For more detailsabout theconfigurationparameter, see theConfiguration andTuning ReferenceGuide.
Unix/Linux Agent(centrifyda.conf)
Agent heartbeat interval forWindows Audited Systems(SessionPingInterval)
Controls theinterval forsendingWindowsAuditedSystem’sheartbeat tothe Collector
When the SQLactivity monitorshows high CPUusage at apredictable intervalas a result ofheartbeatregistration or whenCollector logs revealrepeated failures inregistering AuditedSystem’s heartbeator when AuditManager consolefrequently shows alot of disconnectedAudited Systemseven if they are allonline.
Windows Agent(registry setting)
• • • • • •
Auditing Administrator’s Guide 234

Title Summary When to adjust Component
User blacklisting(dash.user.skiplist)
Allowsspecifyingblacklist ofusers thatshould not beaudited onUnix/Linuxsystems
Useful in preventingcapture of auditactivity of users suchas BMC Patrol agentor ServiceNowservice accounts orusers that do notreally need to beaudited.
For more detailsabout theconfigurationparameter, see theConfiguration andTuning ReferenceGuide.
Unix/Linux Agent(centrifyda.conf)and also availablevia Group Policy
Audited/Non-audited users list
Allowsspecifyingwhitelist orblacklist ofusers thatshould orshould not beaudited onWindowssystems
Useful in preventingcapture of auditactivity of unwantedusers.
Group Policy
BindingCheckInterval
Controls theinterval atwhich Agentchecks if it’sconnected tothe correctCollector or not
When binding checkcauses load on theDomain Controller asa result of periodicActive Directory calls(for example, whenyou notice an ActiveDirectory call fromeach Audited Systemevery 10 seconds)
Windows Agent(registry setting)
Collector settings
• • • • • •
Permissions required to perform administrative andauditing tasks 235

Title Summary When to adjust Component
Agent global heartbeat interval(AgentMinimumUpdateInterval)
Controls theinterval forsendingAuditedSystem’sheartbeat tothe Collector atthe Collectorlevel (in caseit’s notpractical totweak thissetting on eachof the AuditedSystems)
When SQL activitymonitor shows highCPU usage at apredictable intervalas a result ofheartbeatregistration or whenCollector logs revealrepeated failures inregistering AuditedSystem’s heartbeator when AuditManager consolefrequently shows alot of disconnectedAudited Systemseven if they are allonline.
Collector (registrysetting)
Maximum concurrent SQLconnections per Collector(MaxPoolSize)
Controls howmany SQLconnections(maximum)can be openedby theCollector at atime
In order to reduce theworkload caused byCollector on the SQLServer. Reducing theMaxPoolSize willreduce the totalnumber ofconnections open onthe SQL Server butmay also reduce thedespool rate.
Collector (registrysetting)
Installation level settings
• • • • • •
Auditing Administrator’s Guide 236

Title Summary When to adjust Component
Command blacklisting
Allowsspecifying oneor morecommandswhose outputis not requiredto be captured
When you see largeaudited sessions thatare a result ofrunning commandswith large output (forexample, commandssuch as tail or top)and you need tocontrol disk spaceconsumed by suchaudited activity.
Group Policy
Enable/Disable video audit
Allowsenabling ordisabling videocapture (atinstallationlevel or on aper machinebasis) whenstoring auditeduser activity inthe database
When video captureis resulting into largesessions consuminga lot of disk spaceand/or it’s notdesirable to store thevideo.
Audit Managerconsole or grouppolicy
n Not all configuration parameters/settings are available in releases prior toSuite 2015.1. Please contact Centrify Support for additional information onolder releases.
n Agent heartbeat interval can configured per audited system or globally byconfiguring it in collector’s registry setting. Centrify recommendsconfiguration the heartbeat interval on the collector if you want all theaudited systems to send their heartbeat at an identical interval.
n Tweaking the configuration settings may not always help or eliminate thedeployment issues completely. In such cases, making significantdeployment/configuration changes may be the only option. Please contactCentrify Support to evaluate possible solutions.
Conclusion
This sizing recommendation section has provided some information as to whatfactors can affect Centrify Audit & Monitoring Service performance. Keep inmind, however, that every installation is unique and we cannot anticipate every
• • • • • •
Permissions required to perform administrative andauditing tasks 237

use case. If you continue seeing performance degradation after following thebest practices outlined in this document, contact Centrify Support for assistance.
• • • • • •
Auditing Administrator’s Guide 238

Glossary
Administrator console An earlier version of the Audit Manager console used toconfigure and monitor audit installations and to grant and manage auditor rightsfor users and groups.
Audit Analyzer console A GUI that auditors use to search audit data. Theconsole enables auditors to query audit store databases, select sessions toreplay, and flag sessions for follow-up.
Audit Manager console The management console that is used to configure andmonitor the audit installation and to grant and manage auditor rights for usersand groups.
Audit management database The audit management database is a MicrosoftSQL Server database instance that keeps track of all of the components in asingle audit installation. When users query and display audit data using AuditAnalyzer, the audit management database connects to the appropriate auditstores to respond to the requests. In previous versions, the component wascalled the audit server.
Audit management server TheWindows service that collects audit trail eventswhen there are no audit store databases available. Only one instance of thisservice should run for a single audit installation.
Audit role A specification that defines a set of audit data and access privilegesfor an assigned set of users or groups. Users or groups who are assigned to oneor more audit roles are identified as auditors. An administrator creates differentaudit roles to give auditors specific access rights to appropriate audit data.
Audit store A component of the auditing infrastructure that defines a scope ofaudit data in a Microsoft SQL Server database. An audit store can encompass anentire Active Directory site or a specific subnet. Only one SQL Server databasecan be actively receiving audit data from collectors at a time. However, an auditstore can have multiple attached databases. All attached databases in the auditstore are available to the audit management database, which presents auditdata to auditors in response to requests from Audit Analyzer. Typically, eachActive Directory site has one audit store.
• • • • • •
Auditing Administrator’s Guide 239

Audit store database A Microsoft SQL Server database that contains capturedsession data.
Audited computer AWindows, Linux, or UNIX computer that has an agentinstalled to capture user activity. When auditing is enabled, it starts when a userlogs on.
Audited system Another term used interchangeably with audited computer todescribe aWindows, Linux, or UNIX computer that has an agent installed tocapture user activity.
Auditor console An earlier version of the Audit Analyzer console that auditorsuse to search audit data, select sessions to replay, flag sessions for follow-up,and query audit store databases.
Audit trail The list of commands that were audited.
Centrify Agent for *NIX The collection of components on a UNIX computerresponsible for access control, privilege management, and sending audit data toa collector. The Centrify Agent for *NIX encompasses all required and optionalservices that provide authentication and privilege elevation and audit andmonitoring service features on Linux and UNIX computers. On audited UNIXcomputers, these components include the service that intercepts traffic (cdash),the data collection service (dad), the agent configuration file (centrifyda.conf),and command line programs.
Centrify Agent for Windows The collection of components on an auditedWindows computer responsible for sending audit data to a collector. OnWindows, these components include the service that intercepts traffic (wash), thedata collection service (wdad), and the agent configuration control panel.
Collector AWindows service that collects audit data from audited systems andsends it to an audit store.
Common component AWindows service that captures diagnostic loginformation from all auditing-related components.
DirectAudit installation A named collection of audited computers, collectors,audit stores, and an audit management database that interact. Each installationhas a Master Auditor with full control over all of the components in theinstallation. The installation defines the boundary of audit data available. Anorganization can have multiple installations. For example, two corporatedivisions can deploy isolated installations; or a test installation can bemaintained separately from the production deployment.
• • • • • •
Glossary 240

Installation A named collection of audited computers, collectors, audit stores,and an audit management database that interact. Each installation has aMaster Auditor with full control over all of the components in the installation. Theinstallation defines the boundary of audit data available. An organization canhave multiple installations. For example, two corporate divisions can deployisolated installations; or a test installation can be maintained separately fromthe production deployment.
Management database The Microsoft SQL Server database instance that keepstrack of all of the components in a single installation. When users query anddisplay audit data, the management database connects to the appropriate auditstores to respond to the requests. In previous versions, the component wascalled the audit server.
Master Auditor role The user account that has full administrative control over aninstallation. You cannot modify the permissions associated with the MasterAuditor role. You can change who is assigned to the role.
• • • • • •
Auditing Administrator’s Guide 241