DHL WEBSHIPPING CORPORATE SUPER ADMINISTRATOR GUIDE … · DHL WebShipping Corporate Super...
46
DHL WEBSHIPPING CORPORATE SUPER ADMINISTRATOR GUIDE CREATION DATE: MARCH 2015
-
Upload
truonghuong -
Category
Documents
-
view
223 -
download
0
Transcript of DHL WEBSHIPPING CORPORATE SUPER ADMINISTRATOR GUIDE … · DHL WebShipping Corporate Super...

DHL WEBSHIPPING CORPORATE
SUPER ADMINISTRATOR GUIDE
CREATION DATE: MARCH 2015
DHL WebShipping Corporate Super Administrator Guide 2
CONTENTS
1. Getting Started 4
1.1. System Requirements 4 1.2. Logging In 5 1.3. Registration 6 1.4. Shipment Approval Dashboard 7 1.5. Users 9
2. User Maintenance 10
2.1. Group Maintenance 10
2.1.1. Adding Groups 11 2.1.2. Editing Groups 13 2.1.3. Deleting Groups 14 2.1.4. Exporting Group Records 15
2.2. Group Administrator Management 16
2.2.1. Adding Group Administrators 17 2.2.2. Editing Group Administrators 19 2.2.3. Deleting Group Administrators 20 2.2.4. Exporting Group Administrator Records 21
2.3. Shipper Reference Management 22
2.3.1. Adding Shipper References 23 2.3.2. Editing Shipper References 23 2.3.3. Deleting Shipper References 24
Contents

DHL WebShipping Corporate Super Administrator Guide 3Contents
2.3.4. Exporting Shipper Reference Records 25
2.4. End User Management 26
2.4.1. Adding End Users 27 2.4.2. Editing End Users 30 2.4.3. Deleting End Users 31 2.4.4. Exporting End User Records 32
3. Approving Shipments 33
3.1. Approval Processing Status 33 3.2. Approving Multiple Shipments at the Same Time 34 3.3. Approving or Declining Each Shipment Request Individually 35 3.4. Declined Shipments 37
4. Viewing Shipment History 38
4.1. Searching Shipment Data 39 4.2. Tracking Shipments 39 4.3. View Pickup Details 40 4.4. Download 42
5. Maintaining the Address Book 43
5.1. Adding Contacts to the Address Book 44
6. Group Administrator Rights 45
7. New Feature Now Available in WebShipping Corporate 46

DHL WebShipping Corporate Super Administrator Guide 4
PURPOSE OF THIS GUIDE
This guide describes the tasks that Super Administrators perform to set up, maintain and use DHL WebShipping Corporate.
1. GETTING STARTEDFollow these steps to get started:
• Please contact DHL to receive the URL and login credentials to access the system.
• Assign a Super Administrator from your company to set up the company hierarchy and user logins for your company.
• Set up the business rules for your departments or user groups.
1.1. SYSTEM REQUIREMENTS
The following are required to use WebShipping Corporate:
PC: Computer with Internet access; https capable
OS: Microsoft Windows®
Browser: Internet Explorer® 6 or later, Firefox, Chrome
Cookies: Overwrite-enabled
Reader: Adobe® Reader®
Printer: Laser or thermal printer
Getting Started

DHL WebShipping Corporate Super Administrator Guide 5
1.2. LOGGING IN
TO LOG IN
1. Please contact DHL to receive the URL and login credentials to access the system.
2. Enter the email address and temporary password provided by DHL.
3. If the same email address and password are used for Super Administrator, End User and Group Administrator roles, this screen is displayed:
4. Select Super Administrator and then click Login.
Getting Started

DHL WebShipping Corporate Super Administrator Guide 6
1.3. REGISTRATION
The User Settings screen is displayed when you first log in and is always visible under My profile:
CHANGE PASSWORD
At first login, you must change the temporary password issued when your super administrator account was created. You can change the password again whenever you wish.
PASSWORD
Type a new password, between 6 and 20 characters long.
VERIFY PASSWORD
Retype the password.
REMINDER QUESTION
A reminder question is required if you forget your password. Please select a reminder question from the drop-down list.
REMINDER WORD
Type a word that answers the reminder question. Make sure it is a word that you will remember easily.
DEFAULT SETTINGS
The radio buttons are set to default settings. You can modify the default settings the first time you log in, or at any time, by clicking My Profile and making your changes in this screen.
HIDE ACCOUNT NUMBER
A super administrator can choose to hide his or her account number by selecting Yes.
If you specify Yes, the account number will not appear on any shipment documentation.
Getting Started

DHL WebShipping Corporate Super Administrator Guide 7
IS SHIPPER REFERENCE MANDATORY?
Choose either Yes or No. If you select Yes, end users must specify a shipper reference for each shipment.
SHIPPER REFERENCE SELECTION
Choose either Drop-Down or Free Text. Drop-Down triggers the Shipper Reference menu option in the left menu (under User Maintenance), which you can use to create a list of references (up to 35 characters each). Free Text will leave the shipper reference field empty for the user to fill in with a reference of his or her choice (up to 35 characters).
HIDE FILE UPLOAD
Choose either Yes or No. If you select No, end users will have the option of uploading a document or file with their shipment requests.
Supported file types: .xls, .xlsx, .doc, .docx, .pdf, .jpg and .tiff.
Maximum size: 4 MB.
MULTIPLE ACCOUNT CONFIGURATION
Choose either Yes or No. If you select Yes, the super administrator can assign or modify accounts in a specific group.
ALLOW GROUP ADMIN TO CREATE AND COMPLETE SHIPMENT
Choose either Yes or No. If you select Yes, the group administrator can create shipments on his/her own; and edit, complete and/or approve shipments created by end users in his group.
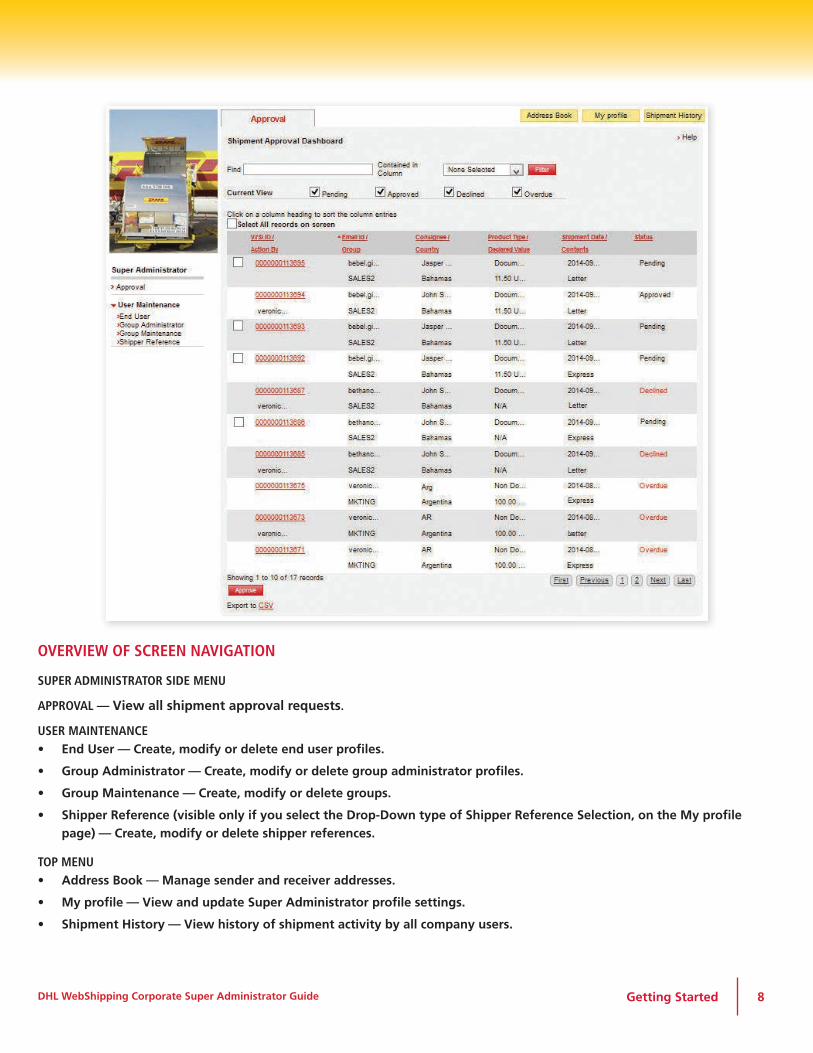
1.4. SHIPMENT APPROVAL DASHBOARD
After logging in, the Shipment Approval Dashboard is displayed. You can check the selection boxes to specify whether to view shipments that are pending, approved, declined or overdue.
You can open the dashboard at any time by clicking Approval in the Super Administrator side menu.
Getting Started
DHL WebShipping Corporate Super Administrator Guide 8
OVERVIEW OF SCREEN NAVIGATION
SUPER ADMINISTRATOR SIDE MENU
APPROVAL — View all shipment approval requests.
USER MAINTENANCE • End User — Create, modify or delete end user profiles.
• Group Administrator — Create, modify or delete group administrator profiles.
• Group Maintenance — Create, modify or delete groups.
• Shipper Reference (visible only if you select the Drop-Down type of Shipper Reference Selection, on the My profile page) — Create, modify or delete shipper references.
TOP MENU • Address Book — Manage sender and receiver addresses.
• My profile — View and update Super Administrator profile settings.
• Shipment History — View history of shipment activity by all company users.
Getting Started

DHL WebShipping Corporate Super Administrator Guide 9
1.5. USERS
The following diagram outlines the administrative hierarchy of super administrators, group administrators and end users in WebShipping Corporate.
Getting Started

DHL WebShipping Corporate Super Administrator Guide 10
2. USER MAINTENANCE
2.1. GROUP MAINTENANCE
You can add, edit and delete groups. You can also export your group records to a comma-separated values file (.csv file).
TO ADD, EDIT OR DELETE A GROUP • On the User Maintenance menu, click Group Maintenance.
ADD
Click Add to create a new group.
EDIT
Select the group to edit and then click Edit.
DELETE
Select the group to delete and then click Delete.
CSV
Click CSV to export group records to a .csv file.
Each of these actions is described in greater detail in the following sections.
User Maintenance

DHL WebShipping Corporate Super Administrator Guide 11
2.1.1. ADDING GROUPS
GROUP MAINTENANCE
GROUP ID
Create a unique ID for each group. For example:
• Sales group 1 in department 2: SLS1-2
• Technology: TECH
• Administration: ADMIN
Use Unicode characters only.
GROUP NAME
Create a unique group name.
PRODUCT TYPE APPROVAL REQUEST?
Click Yes if shipment approval is required; No if shipment approval is not required.
Set shipment approval to either Yes or No for each shipment type (Document and Non Document).
ADDRESS BOOK VISIBILITY
Address books can be shared at the company or group level. This option specifies which address books members of the group can view.
• My Own End users can view their own address book.
• Group End users of this group can view the address books from all end users belonging to the group.
• Company End users of this group can view the company address book.
Super administrators can view all addresses entered by any user.
User Maintenance
DHL WebShipping Corporate Super Administrator Guide 12
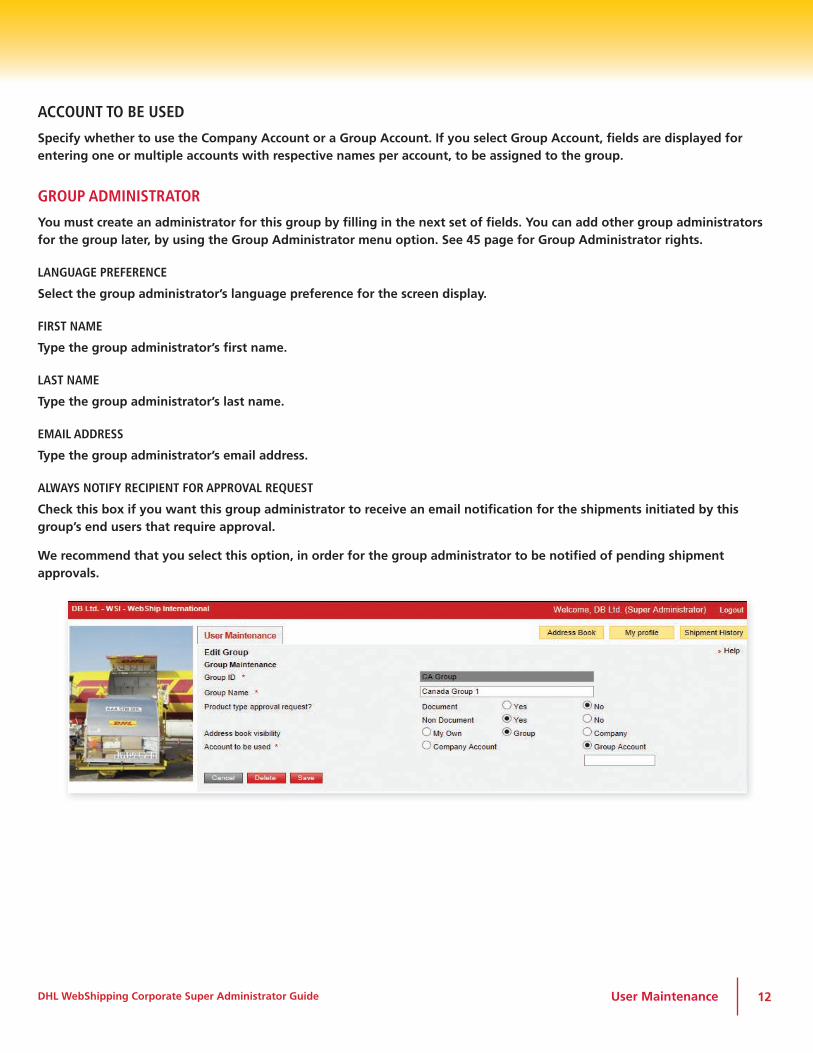
ACCOUNT TO BE USED
Specify whether to use the Company Account or a Group Account. If you select Group Account, fields are displayed for entering one or multiple accounts with respective names per account, to be assigned to the group.
GROUP ADMINISTRATOR
You must create an administrator for this group by filling in the next set of fields. You can add other group administrators for the group later, by using the Group Administrator menu option. See 45 page for Group Administrator rights.
LANGUAGE PREFERENCE
Select the group administrator’s language preference for the screen display.
FIRST NAME
Type the group administrator’s first name.
LAST NAME
Type the group administrator’s last name.
EMAIL ADDRESS
Type the group administrator’s email address.
ALWAYS NOTIFY RECIPIENT FOR APPROVAL REQUEST
Check this box if you want this group administrator to receive an email notification for the shipments initiated by this group’s end users that require approval.
We recommend that you select this option, in order for the group administrator to be notified of pending shipment approvals.
User Maintenance

DHL WebShipping Corporate Super Administrator Guide 13
CREATING END USERS
Like super administrators, group administrators can create end users. Just after logging in, click on User Maintenance (at the far left-hand side of the screen) to pull up End User. When you click on End User, you will see displayed red Add, Edit and Delete buttons. Clicking on Add allows group administrators to add end users or edit an end user profile or delete an end user.
2.1.2. EDITING GROUPS
You can edit any of the group settings except the Group ID. See the previous section for descriptions of the options.
User Maintenance

DHL WebShipping Corporate Super Administrator Guide 14
2.1.3. DELETING GROUPS
You cannot delete a group if there are end users assigned to this group.
When you delete a group, the profiles of all administrators assigned to the group are also deleted.
TO DELETE A GROUP
1. Select the group to delete and then click Delete.
2. Click OK to confirm the deletion.
User Maintenance

DHL WebShipping Corporate Super Administrator Guide 15
2.1.4. EXPORTING GROUP RECORDS
You can export the group records to a .csv (comma-separated values) file. This is a standard spreadsheet format.
TO EXPORT THE GROUP RECORDS TO A CSV FILE
1. Click the CSV link.
2. Depending on which web browser you are using, and how you have configured it, the browser might display a window or message that allows you to specify whether to save or open the file. For example:
3. Make your selection.
User Maintenance

DHL WebShipping Corporate Super Administrator Guide 16
2.2. GROUP ADMINISTRATOR MANAGEMENT
A group administrator is automatically created when you create a group. However, you can add other administrators for the group.
You can add, edit and delete group administrators. You can also export your group administrator records to a .csv file.
TO ADD, EDIT OR DELETE A GROUP ADMINISTRATOR • On the User Maintenance menu, click Group Administrator.
ADD
Click Add to create a new group administrator.
EDIT
Select the group administrator to edit and then click Edit.
DELETE
Select the group administrator to delete and then click Delete.
CSV
Click CSV to export group administrator records to a .csv file.
User Maintenance

DHL WebShipping Corporate Super Administrator Guide 17
Each of these actions is described in greater detail in the next sections.
2.2.1. ADDING GROUP ADMINISTRATORS
LANGUAGE PREFERENCE
Select the group administrator’s language preference for the screen display.
GROUP ID
Select the ID of the group that the administrator will manage.
FIRST NAME
Type the group administrator’s first name.
LAST NAME
Type the group administrator’s last name.
EMAIL ADDRESS
Type the group administrator’s email address. Each administrator for a group must have a unique email address.
ALWAYS NOTIFY RECIPIENT FOR APPROVAL REQUEST
Check this box if you want this group administrator to receive an email notification for the shipments initiated by this group’s end users that require approval.
One user (one email address) can be the administrator for multiple groups. However, the individuals within a group must each have a unique email address.
User Maintenance

DHL WebShipping Corporate Super Administrator Guide 18
AUTOMATIC PASSWORD SENT BY EMAIL
When you save the group administrator record, DHL WebShipping Corporate sends an email notification with the login name and a password to the registered group administrator’s email address. The password is an automatically generated temporary password. The group administrator will be prompted to change the password at the first login.
SAMPLE EMAIL
User Maintenance

DHL WebShipping Corporate Super Administrator Guide 19
2.2.2. EDITING GROUP ADMINISTRATORS
Each group must have at least one group administrator. If a group has only one group administrator, the group administrator cannot transfer to another group or change the selected group ID.
CHANGE GROUP ADMINISTRATOR SETTINGS
If a group has multiple group administrators, you can change the Group ID and transfer one of those administrators to a new group. In that case, the address book created by that group administrator transfers to a the new group.
NOTE:
DHL WebShipping Corporate does not send a notification email when the group administrator makes email addess changes.
User Maintenance

DHL WebShipping Corporate Super Administrator Guide 20
2.2.3. DELETING GROUP ADMINISTRATORS
You can only delete a group administrator if there is another group administrator in the same group.
If a group administrator is deleted, the address book created by that group administrator is also deleted.
TO DELETE A GROUP ADMINISTRATOR
1. Select the group administrator to delete and then click Delete.
2. Click OK to confirm the deletion.
User Maintenance
DHL WebShipping Corporate Super Administrator Guide 21
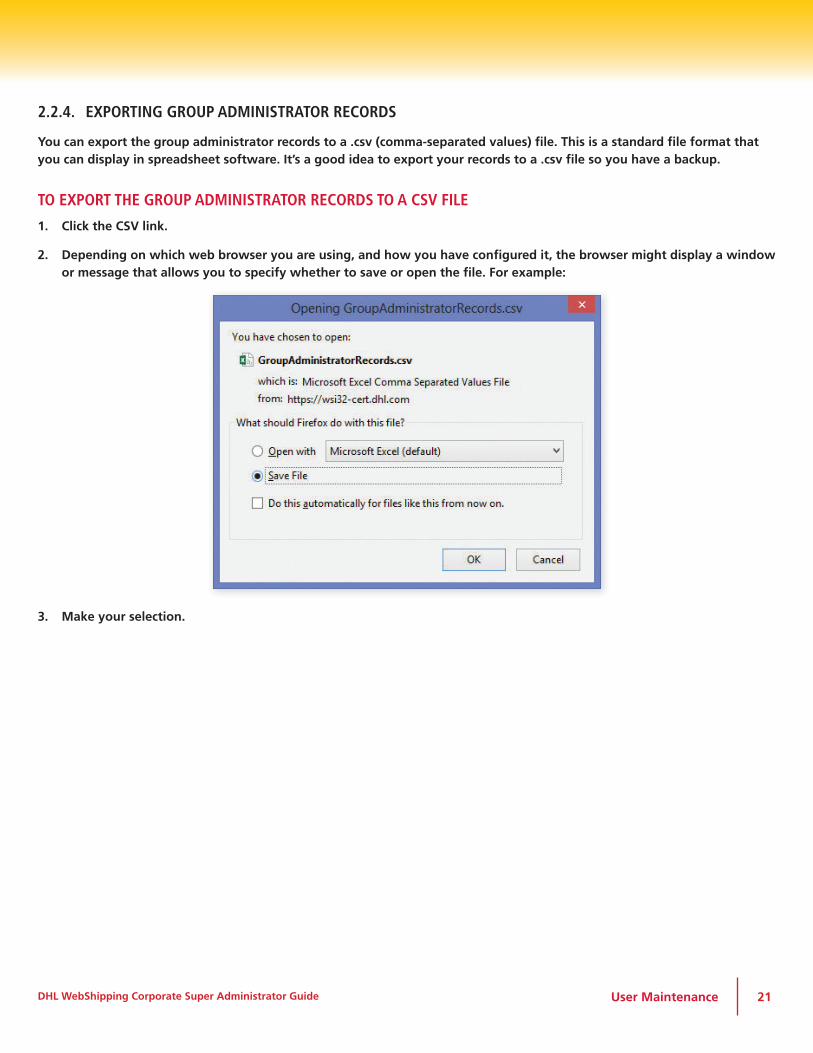
2.2.4. EXPORTING GROUP ADMINISTRATOR RECORDS
You can export the group administrator records to a .csv (comma-separated values) file. This is a standard file format that you can display in spreadsheet software. It’s a good idea to export your records to a .csv file so you have a backup.
TO EXPORT THE GROUP ADMINISTRATOR RECORDS TO A CSV FILE
1. Click the CSV link.
2. Depending on which web browser you are using, and how you have configured it, the browser might display a window or message that allows you to specify whether to save or open the file. For example:
3. Make your selection.
User Maintenance

DHL WebShipping Corporate Super Administrator Guide 22
2.3. SHIPPER REFERENCE MANAGEMENTIf you wish to create a list of shipper references that end users can select from, you must specify the Drop-Down type of shipping reference in the User Settings page, under Shipper Reference Selection. (Open the page by clicking My profile in the top menu.)
You can add, edit and delete shipper references. You can also export your shipper reference records to a .csv file.
TO ADD, EDIT OR DELETE A SHIPPER REFERENCE • On the User Maintenance menu, click Shipper Reference.
ADD
Click Add to create a new shipper reference.
EDIT
Select the shipper reference to edit and then click Edit.
DELETE
Select the shipper reference to delete and then click Delete.
CSV
Click CSV to export shipper reference records to a .csv file.
Each of these actions is described in greater detail in the next sections.
User Maintenance

DHL WebShipping Corporate Super Administrator Guide 23
2.3.1. ADDING SHIPPER REFERENCES
SHIPPER REFERENCE
Enter a unique name or number.
DESCRIPTION
Enter details regarding the new shipper reference.
2.3.2. EDITING SHIPPER REFERENCES
You can edit the description field.
User Maintenance
DHL WebShipping Corporate Super Administrator Guide 24
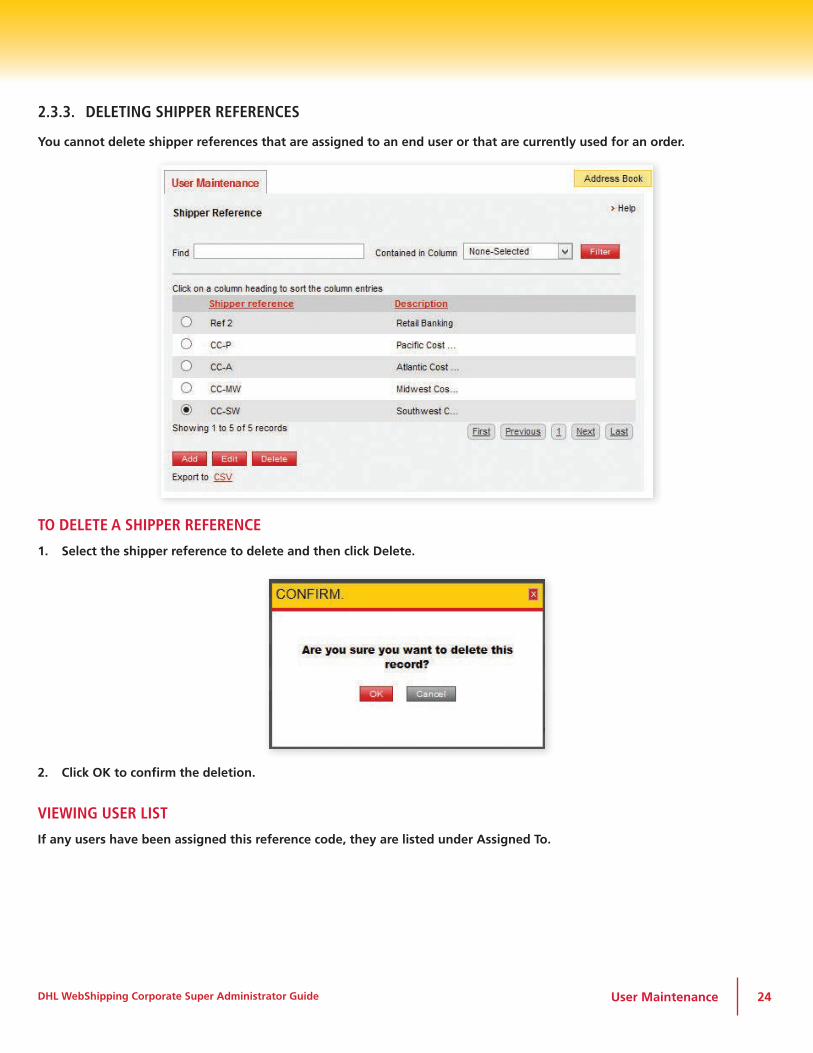
2.3.3. DELETING SHIPPER REFERENCES
You cannot delete shipper references that are assigned to an end user or that are currently used for an order.
TO DELETE A SHIPPER REFERENCE
1. Select the shipper reference to delete and then click Delete.
2. Click OK to confirm the deletion.
VIEWING USER LIST
If any users have been assigned this reference code, they are listed under Assigned To.
User Maintenance

DHL WebShipping Corporate Super Administrator Guide 25
2.3.4. EXPORTING SHIPPER REFERENCE RECORDS
You can export the shipper reference records to a .csv (comma-separated values) file. This is a standard spreadsheet format.
TO EXPORT THE SHIPPER REFERENCE RECORDS TO A CSV FILE
1. Click the CSV link.
2. Depending on which web browser you are using, and how you have configured it, the browser might display a window or message that allows you to specify whether to save or open the file. For example:
3. Make your selection.
User Maintenance

DHL WebShipping Corporate Super Administrator Guide 26
2.4. END USER MANAGEMENT
You can add, edit and delete end users. You can also export your end user records to a .csv file.
TO ADD, EDIT OR DELETE AN END USER • On the User Maintenance menu, click End User.
ADD
Click Add to create a new end user.
EDIT
Select the end user to edit and then click Edit.
DELETE
Select the end user to delete and then click Delete.
CSV
Click CSV to export end user records to a .csv file.
Each of these actions is described in greater detail in the next sections.
User Maintenance

DHL WebShipping Corporate Super Administrator Guide 27
2.4.1. ADDING END USERS
LANGUAGE PREFERENCE
Select the end user’s language preference for the screen display.
GROUP ID
Select the ID of the group that the end user will belong to.
FIRST NAME
Type the end user’s first name.
LAST NAME
Type the end user’s last name.
EMAIL ADDRESS
Type the end user’s email address. Each end user in a group must have a unique email address.
ASSIGNING A DEFAULT SHIPPER TO AN END USER
You can assign a shipper from the Address Book to default those shipper details for an end user. The default shipper’s details will be pre-populated in the Ship From fields of the shipping form when the end user prepares a new shipment.
NUMBER OF COPIES REQUIRED
To print shipping documents, select the number of copies desired for each type of document. If no amount is indicated, the default setting will be used. Set the default number of copies for each type of document. End users can change the number of print copies required under My profile when they are logged in.
User Maintenance

DHL WebShipping Corporate Super Administrator Guide 28
TO ASSIGN A DEFAULT SHIPPER WHILE ADDING OR EDITING AN END USER
1. Under Default Settings, click the Add/Edit button next to the Shipper field.
The Default Shipper Assignment window opens.
2. Select a default shipper from the list and then click Save.
TO ASSIGN A SHIPPER REFERENCE WHILE ADDING OR EDITING AN END USER
1. Under Default Settings, click the Add button next to the Shipper reference field.
The Shipper Reference Assignment window opens.
User Maintenance
DHL WebShipping Corporate Super Administrator Guide 29
2. Select one or more shipper references from the list and then click Save.
3. To remove a previously selected shipper reference, click Clear.
4. To add another shipper reference, click Add More.
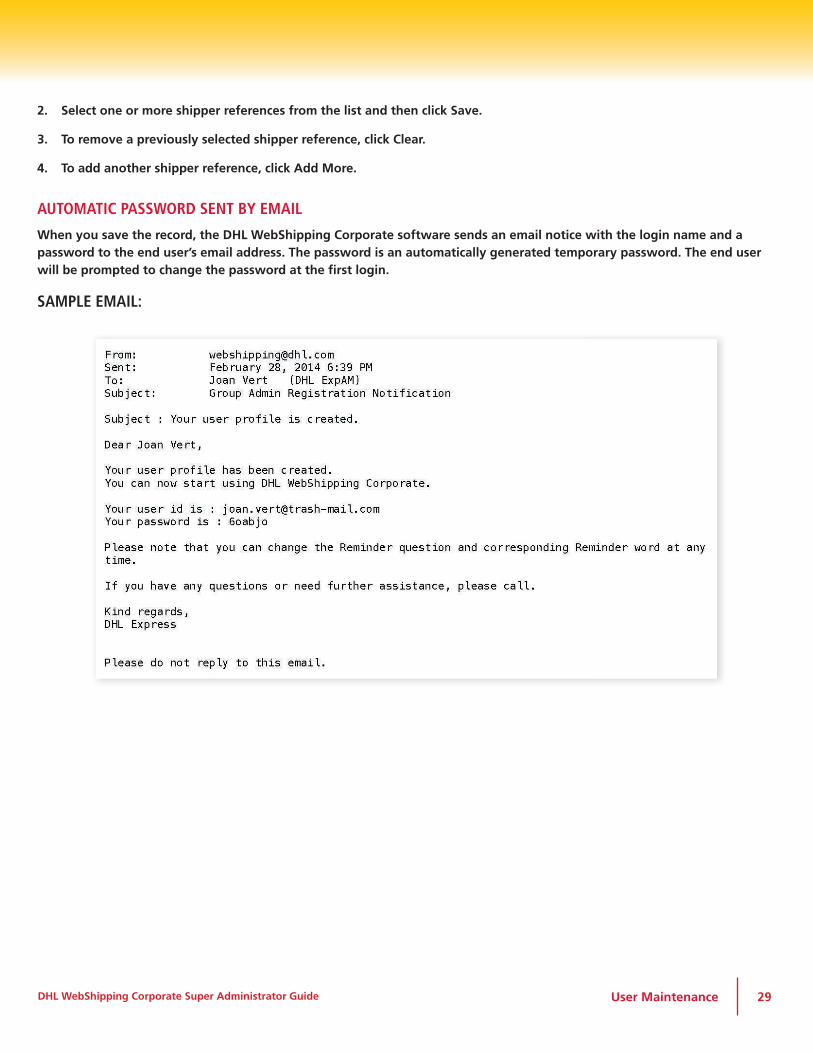
AUTOMATIC PASSWORD SENT BY EMAIL
When you save the record, the DHL WebShipping Corporate software sends an email notice with the login name and a password to the end user’s email address. The password is an automatically generated temporary password. The end user will be prompted to change the password at the first login.
SAMPLE EMAIL:
User Maintenance
DHL WebShipping Corporate Super Administrator Guide 30
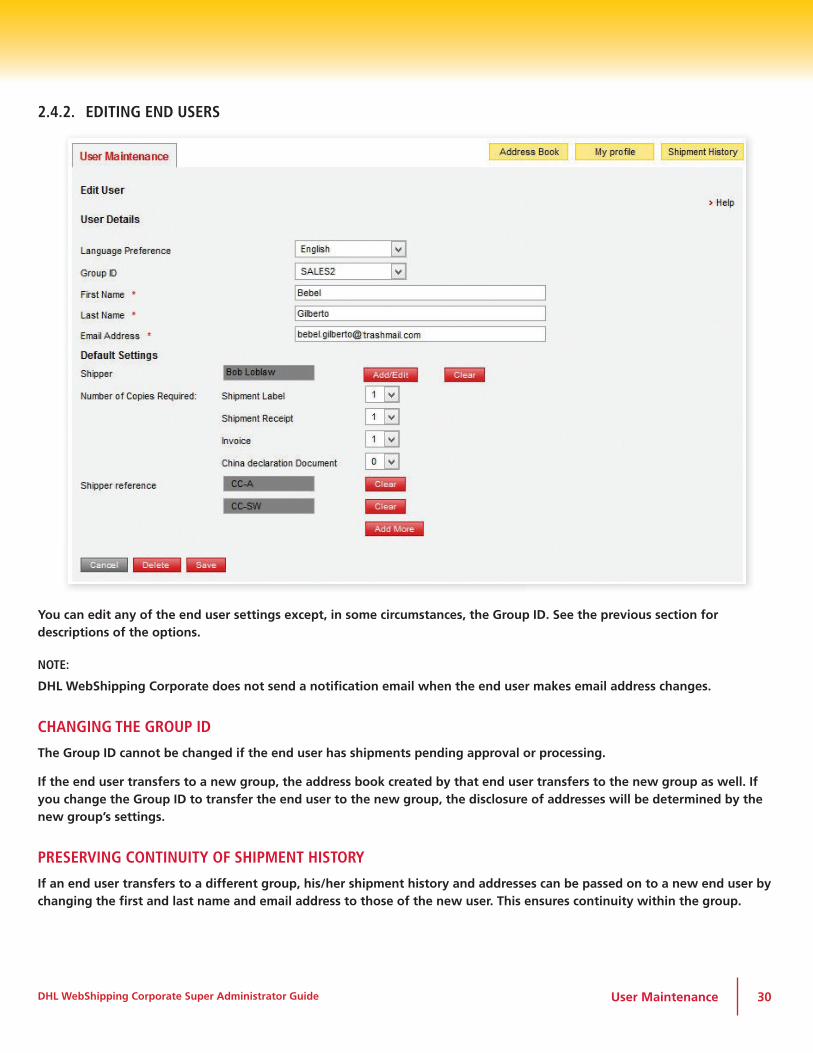
2.4.2. EDITING END USERS
You can edit any of the end user settings except, in some circumstances, the Group ID. See the previous section for descriptions of the options.
NOTE:
DHL WebShipping Corporate does not send a notification email when the end user makes email address changes.
CHANGING THE GROUP ID
The Group ID cannot be changed if the end user has shipments pending approval or processing.
If the end user transfers to a new group, the address book created by that end user transfers to the new group as well. If you change the Group ID to transfer the end user to the new group, the disclosure of addresses will be determined by the new group’s settings.
PRESERVING CONTINUITY OF SHIPMENT HISTORY
If an end user transfers to a different group, his/her shipment history and addresses can be passed on to a new end user by changing the first and last name and email address to those of the new user. This ensures continuity within the group.
User Maintenance

DHL WebShipping Corporate Super Administrator Guide 31
2.4.3. DELETING END USERS
If you delete an end user, the addresses created by that end user are also deleted. However, shipment history data is retained.
Data for items pending approval cannot be deleted.
TO DELETE AN END USER
1. Select the end user to delete and then click Delete.
2. Click OK to confirm the deletion.
User Maintenance

DHL WebShipping Corporate Super Administrator Guide 32
2.4.4. EXPORTING END USER RECORDS
You can export the end user records to a .csv (comma-separated values) file. This is a standard spreadsheet format file.
TO EXPORT THE END USER RECORDS TO A CSV FILE
1. Click the CSV link.
2. Depending on which web browser you are using, and how you have configured it, the browser might display a window or message that allows you to specify whether to save or open the file. For example:
3. Make your selection.
User Maintenance

DHL WebShipping Corporate Super Administrator Guide 33
3. APPROVING SHIPMENTS
TO VIEW, EVALUATE AND APPROVE OR DECLINE SHIPMENTS
• Click Approval on the side menu to open the Shipment Approval Dashboard.
3.1. APPROVAL PROCESSING STATUS
Select one or more checkboxes beside Current View to specify the statuses of shipments to view.
PENDING
Shipment request has been made by the end user and is pending approval from the super administrator or group administrator.
APPROVED
Shipment is approved, but shipment documents still need to be printed by the end user.
DECLINED
Shipment request has been rejected by either the super administrator or the group administrator.
OVERDUE
Shipment date has passed. As a result, a new shipment request must be created and the request must be re-submitted.
Note: Super administrators and group administrators can only approve or decline shipments. They cannot modify shipment information. If a shipment is declined, the end user will have to create a new shipment.
Approving Shipments
DHL WebShipping Corporate Super Administrator Guide 34
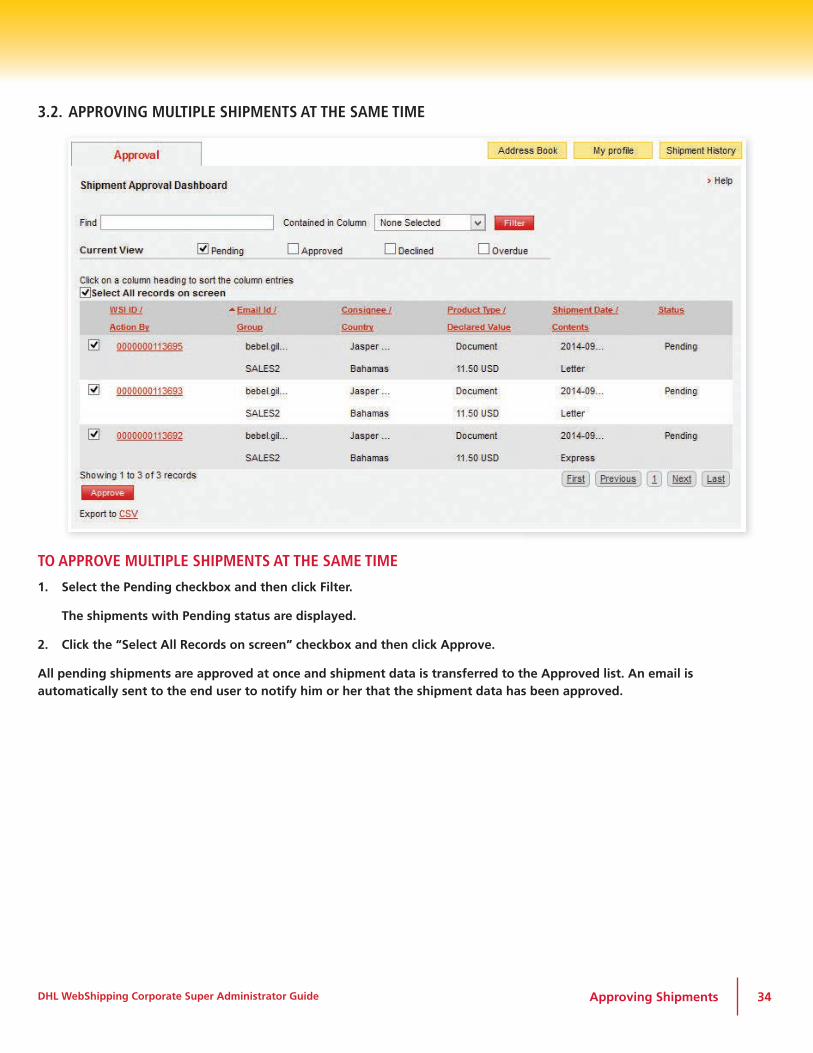
3.2. APPROVING MULTIPLE SHIPMENTS AT THE SAME TIME
TO APPROVE MULTIPLE SHIPMENTS AT THE SAME TIME
1. Select the Pending checkbox and then click Filter.
The shipments with Pending status are displayed.
2. Click the “Select All Records on screen” checkbox and then click Approve.
All pending shipments are approved at once and shipment data is transferred to the Approved list. An email is automatically sent to the end user to notify him or her that the shipment data has been approved.
Approving Shipments

DHL WebShipping Corporate Super Administrator Guide 35
3.3. APPROVING OR DECLINING EACH SHIPMENT REQUEST INDIVIDUALLY
TO APPROVE A SINGLE SHIPMENT • Click the checkbox for the shipment request and then click Approve.
Approving Shipments
DHL WebShipping Corporate Super Administrator Guide 36
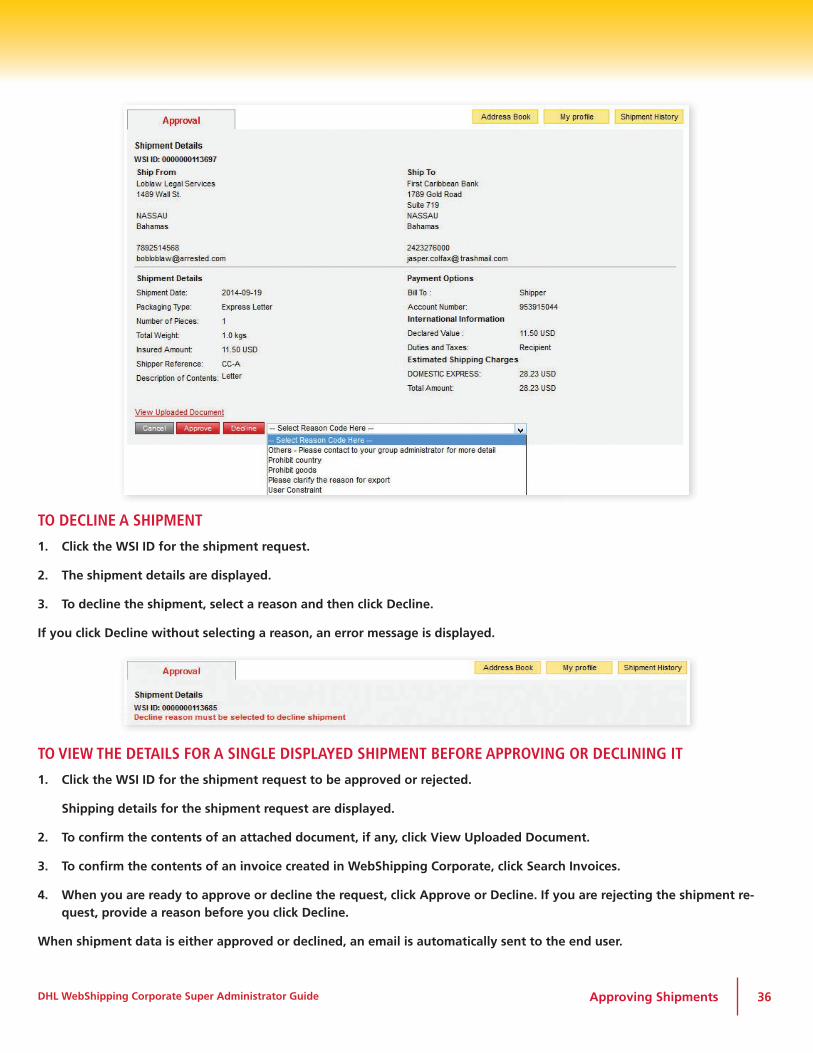
TO DECLINE A SHIPMENT
1. Click the WSI ID for the shipment request.
2. The shipment details are displayed.
3. To decline the shipment, select a reason and then click Decline.
If you click Decline without selecting a reason, an error message is displayed.
TO VIEW THE DETAILS FOR A SINGLE DISPLAYED SHIPMENT BEFORE APPROVING OR DECLINING IT
1. Click the WSI ID for the shipment request to be approved or rejected.
Shipping details for the shipment request are displayed.
2. To confirm the contents of an attached document, if any, click View Uploaded Document.
3. To confirm the contents of an invoice created in WebShipping Corporate, click Search Invoices.
4. When you are ready to approve or decline the request, click Approve or Decline. If you are rejecting the shipment re-quest, provide a reason before you click Decline.
When shipment data is either approved or declined, an email is automatically sent to the end user.
Approving Shipments

DHL WebShipping Corporate Super Administrator Guide 37
SAMPLE EMAIL:
3.4. DECLINED SHIPMENTS
End users can view the shipment status for declined shipments. However, they cannot view the reason that the shipment was declined.
Approving Shipments

DHL WebShipping Corporate Super Administrator Guide 38
4. VIEWING SHIPMENT HISTORYShipment data for each shipment is transferred to Shipment History. Shipment data is displayed for 10 days, by default, calculated from the shipment date (as specified during the request for approval). The super administrator can access the shipment history of all users within the company, for up to 90 days. The group administrator can only access the history of the users within his or her group.
TO VIEW SHIPMENT HISTORY
1. Click Shipment History.
2. To specify a different time period for which to view shipment history, type a number of days in the “Display shipment for past” box.
3. To view the details for a particular shipment, click its WayBill Number.
4. Shipment history reports may be generated by clicking on the +Show icon at the top of the screen. Clicking on this field will open a Shipment Report screen with fields to generate a report by shipment status and time period.
Viewing Shipment History

DHL WebShipping Corporate Super Administrator Guide 39
4.1. SEARCHING SHIPMENT DATA
TO SEARCH THE SHIPMENT DATA FOR A PARTICULAR ITEM OR TERM
1. Enter a search word in the Find field.
2. Select a column in the Contained in Column list.
3. Click Go.
You can sort the displayed data by clicking on the red column headings.
4.2. TRACKING SHIPMENTS
TO TRACK SHIPMENTS FROM THE SHIPMENT HISTORY SCREEN
There are three ways to find the status of shipments:
1. Check the box next to the shipment you want to track and then click Track Shipment at the bottom of the screen. Enter the WayBill number and click Go to display the tracking results.
2. Click the WayBill Number. The shipment details are displayed and you can then click Track Shipment.
3. Enter the WayBill number in Fast Track at the bottom of the screen and click Go to display the tracking results.
Viewing Shipment History

DHL WebShipping Corporate Super Administrator Guide 40
4.3. VIEW PICKUP DETAILS
1. Select a shipment by clicking on the box next to the WayBill number or WayBill number itself.
2. Next click the red View Pickup Details button at the bottom to see pickup information for that shipment.
3. A pickup log will then be displayed with package location, date, ready by, confirmation number and status indicated.
• To see the details of a shipment, click on the WayBill number and then the red View Shipment Details button.
Viewing Shipment History

DHL WebShipping Corporate Super Administrator Guide 41
• When you select a shipment, a shipment receipt will be generated like the following example. You will have the option of clicking on Track Shipment, Print and Return to Shipment History.
Viewing Shipment History

DHL WebShipping Corporate Super Administrator Guide 42
4.4. DOWNLOAD
1. To obtain a spreadsheet with all the details of a shipment, click on a shipment number and then the red Download but-ton at the bottom of the screen.
2. A spreadsheet labeled ShipmentLogsRecords is then downloaded to your computer with names of shipment creators, group Id, dates, costs and recipients.
Viewing Shipment History

DHL WebShipping Corporate Super Administrator Guide 43
5. MAINTAINING THE ADDRESS BOOK
TO ADD, EDIT, COPY, DELETE, DOWNLOAD OR IMPORT ADDRESSES • Click Address Book on the top menu.
ADD
Create a new contact.
EDIT
View or modify data for an existing contact.
COPY
Copy data from an existing contact in your Address Book and enter a nickname for the new record.
DELETE
Delete a record from your Address Book.
DOWNLOAD ADDRESS BOOK
Export address data to a .csv (comma-separated values) file. This is a standard spreadsheet format file.
IMPORT
Import address data from an external .csv file. You can import multiple shipper or receiver addresses at once.
NOTES
Addresses in the super administrator’s Address Book are shared with all users.
The super administrator can edit and delete addresses created by other users.
Maintaining the Address Book

DHL WebShipping Corporate Super Administrator Guide 44
5.1. ADDING CONTACTS TO THE ADDRESS BOOK
TO ADD A NEW CONTACT
1. Click Add.
2. Select either Sender or Recipient to identify the type of contact.
3. Specify a Nick Name for the contact. This is a short name that uniquely identifies the contact.
4. For recipients, select a country. For senders, the country is their country of origin.
After you select a country, the screen adapts the address or tax fields to the needs of the selected country.
5. Specify the remaining address and tax details, if any. You must enter data in the fields identified with an asterisk.
6. Click Save and Exit.
Maintaining the Address Book
DHL WebShipping Corporate Super Administrator Guide 45
6. GROUP ADMINISTRATOR RIGHTSWhile the super administrator has full permission to manage WebShipping Corporate on behalf of the company, he or she can also designate group administrators to manage different groups within a company.
Group administrators have the following rights:
CREATE END USERS
A group administrator can create profiles for end users in his/her group.
ASSIGN SHIPPER REFERENCE TO END USERS
From the list of references created by the super administrator, the group administrator can assign one or multiple references to the end users in his/her group.
APPROVE/REJECT PENDING SHIPMENTS
A group administrator has the right to approve or reject shipments for any end user in his or her group whose profile has been set up to require shipment approval.
VIEW SHIPMENT HISTORY OF ALL USERS WITHIN THE GROUP
A group administrator is able to view all shipment activity of the end users in his/her group.
CREATE GROUP LEVEL ADDRESSES
New entries to the group administrator address book will be visible to the end users in a group administrator’s group.
CREATE SHIPMENTS
A group administrator can create shipments like end users if allowed to do so by the super administrator, but without requiring approval.
MODIFY OR COMPLETE SHIPMENTS CREATED BY END USERS
A group administrator has the right to edit or change shipments created by the end users in his/her group and then complete them or complete them without making any changes, such as printing and sending.
MANAGE MULTIPLE GROUPS
One group administrator can manage multiple groups if a super administrator allows it.
Group Administrator Rights

DHL WebShipping Corporate Super Administrator Guide 46
7. NEW FEATURE NOW AVAILABLE IN WEBSHIPPING CORPORATEAs of March 2015, WebShipping Corporate offers return shipment capability, by allowing users to create one-leg or two-leg shipments in a seamless and quick way.
MAIN BENEFITS: • Multiple return scenarios to cover customers’ needs.
• Ease of use by copying over export and invoice details onto the return label.
• Saves time and reduces manual work by entering details once for two shipments.
• Ability to either print or email return paperwork.
• Return shipper will receive DHL instructions (in their local language) on how to process the return label.
• Return shipment information is retained for 3 months.
• Multiple options for return shippers to schedule pickups without needing a DHL account.
• Return shipment is billed to your Import Express account number without being revealed to other parties.
• No charges for the return service if return label is not used.
For further information on this feature, please contact your local DHL representative.
New Features Now Available