Afs 2012 Manual
59
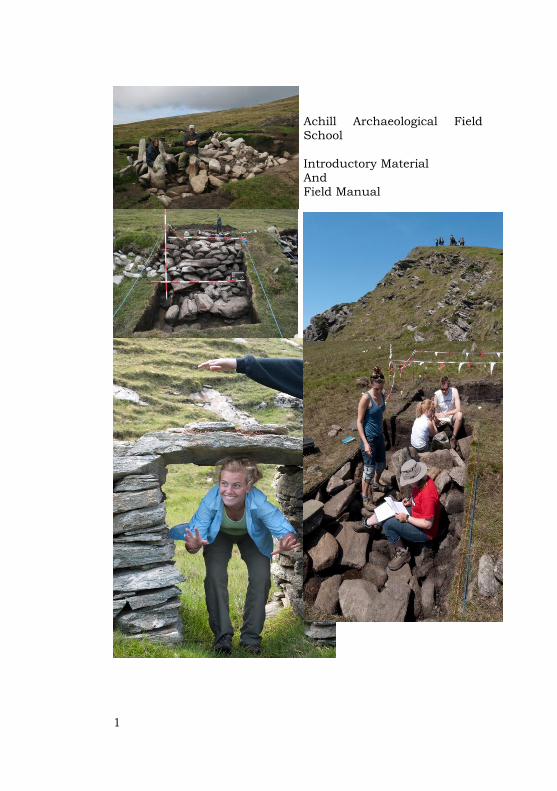
1 Achill Archaeological Field School Introductory Material And Field Manual
-
Upload
john-alexander-gallin -
Category
Documents
-
view
231 -
download
1
description
Archaeology Field School Manual Training College University
Transcript of Afs 2012 Manual
1
Achill Archaeological Field School
Introductory Material And Field Manual
2
Achill Archaeological Field School Manual Welcome to the 2012 Achill Archaeological Field School! This brief manual is designed to enhance your experience of the field school through providing general information about the
schedule, facilities, and your responsibilities, as well as specific information which you will need to help you in learning and performing fieldwork tasks. Please read through carefully, and if you have any questions, always feel free to seek out a member of staff. Also, please get in the habit of bringing your manual to site (safely protected in its plastic bag!) as you will definitely need it for your work.
Contents
Part One: General information ............................................... 5 1. FIELD SCHOOL STAFF ..................................................... 5 2. FIELD SCHOOL FACILITIES .............................................. 5
Achill Archaeology Centre ................................................... 5 Student Accommodation - “The Two-Storey” in Dooagh ...... 5
3. FIELD SCHOOL SCHEDULE ............................................. 6 Field work .......................................................................... 6 Laboratory work ................................................................. 6 Lecture series ..................................................................... 6 Evening lecture series ........................................................ 6 Weekly Field Trips .............................................................. 7 Field trip schedule ............................................................. 8
4. REQUIREMENTS AND STUDENT RESPONSIBILITIES ..... 11 Assessment and participation .......................................... 11 Safety considerations ....................................................... 12 Archaeological site etiquette ............................................. 13
5. THE DESERTED VILLAGE PROJECT .............................. 14 Background ..................................................................... 14 The Deserted Village ......................................................... 14 The Excavations ............................................................... 16
House 23 ...................................................................... 16 House 36 ...................................................................... 17 The Village Roadway ..................................................... 17 The Semi-Subterranean Structure................................. 18 Roundhouse 1 .............................................................. 18 Roundhouse 2 .............................................................. 20
6. PUBLIC ARCHAEOLOGY ................................................. 22
3
Part Two: Field Methods ...................................................... 23 1. INTRODUCTION .............................................................. 23 2. SURVEYING TECHNIQUES ............................................. 25
Triangulation ................................................................ 25 Plane table .................................................................... 25 Dumpy Level and theodolite .......................................... 26 Digital survey ................................................................ 26
3. PRINCIPLES OF ARCHAEOLOGICAL STRATIGRAPHY AND THE HARRIS MATRIX.......................................................... 30
Context and stratigraphy ................................................. 30 Harris Matrix ................................................................... 30
4. EXCAVATION TECHNIQUES ........................................... 34 Troweling ...................................................................... 34 Excavating features ....................................................... 35 Artefact recording ......................................................... 36
5. CONTEXT SHEETS ......................................................... 37 6. SOILS DESCRIPTION ...................................................... 42 7. DESCRIBING CUTS ......................................................... 47 8. DESCRIBING STRUCTURE .............................................. 47 9. ARCHAEOLOGICAL PHOTOGRAPHY ............................... 48 10. DRAWING CONTEXTS IN PLAN AND IN SECTION ......... 48 11. ARCHITECTURAL RECORDING ..................................... 52
Manual produced by Dr. Audrey Horning, Achill Archaeological Field School, 2005. Revised and updated 2006, 2007, 2008, 2009, 2010 & 2012

4
Notes:
5
Part One: General information
1. FIELD SCHOOL STAFF
Managing Director: Theresa McDonald
Director of Fieldwork: Dr Rory Sherlock
Field School Co-ordinator, Dolores Kilbane-McNamara
Environmental Archaeology Consultant: Susan Lyons
Trainee Supervisors: Eric Parrinello
2. FIELD SCHOOL FACILITIES
ACHILL ARCHAEOLOGY CENTRE
Access to the library and the computers available at the following times:
Mon-Fri: 6PM -10PM
Saturday: 11AM-6PM
Sunday: by arrangement if needed for essay research
STUDENT ACCOMMODATION - “THE TWO-STOREY” IN DOOAGH
Achill Archaeological Field School runs a strict recycling and energy saving programme. All participants on AAFS courses are required to participate in terms of minimising waste, recycling all glass and cardboard. Notices providing guidelines for reducing energy consumption are located throughout the AAFS buildings, please adhere to them. Your cooperation is gratefully appreciated!
6
3. FIELD SCHOOL SCHEDULE
FIELD WORK
Every morning except for field trip days, we meet at 8:45AM SHARP in front of the Archaeology Centre for transportation to site. We take a morning break from 11:00- 11:20, lunch from 1:00-1:30, and an afternoon break from 3:00-3:20. We will leave the site at 5:00 for transport back to Dooagh.
LABORATORY WORK
Similar timings will apply to the days during which we are working in the laboratory, participating in lectures and seminars, and conducting research.
LECTURE SERIES
During the course of the module, periodic lectures will be presented by staff on all periods of Irish archaeology as well as particular research projects. Scheduling will be dependent upon weather, but topics to be covered include Introduction to Irish archaeology, the archaeology of the Irish Mesolithic, Neolithic, Bronze Age, Iron Age, Early Medieval period, Medieval period, and Post-Medieval period, the development of the Archaeological Profession in Ireland and Ethical Challenges in Irish Archaeology.
EVENING LECTURE SERIES
Public lectures are scheduled for every second Tuesday evening, featuring eminent Irish archaeologists. Students MUST attend the evening lecture series, and are expected to contribute to the question and answer session following the
lecture. 22 May: Theresa McDonald
Village and Booley on Achill 29 May: Name TBA
Title TBA
7
5 June: Dr Carleton Jones, School of Geography and
Archaeology, NUI Galway
Bronze Age Ritual and the Dowris Hoard
12 June: Prof. Charlotte Damm, School of Geography and Archaeology, NUI Galway
Mesolithic and Neolithic religious perceptions in Scandinavia
19 June: Name TBA
Title TBA 3 July: Dr Colin Breen, University of Ulster
Warriors and merchants: Ulster and Scotland in the later Middle Ages
10 July: Eve Campbell, Doctoral Scholar, NUI Galway
‘Hell or Connacht’: an archaeology of the Cromwellian transplantation
17 July: Ruairi O Baoill, Centre for Archaeological Fieldwork,
QUB, Belfast.
Hidden History Below Our Feet: the Archaeological Story of Belfast
24 July: Dr Ger Dowling, The Discovery Programme
The Late Iron Age and ‘Roman’ Ireland Project 30 July: Dr Kieran O’Conor, School of Geography and
Archaeology, NUI Galway
Title TBA
7 August: Dr Rory Sherlock, Achill Archaeological Field School
The Chronology of the Irish Tower House: Using new techniques to date old castles
WEEKLY FIELD TRIPS
Each Wednesday will begin with a brief lecture detailing one of the major Irish archaeological periods. After a short break following the lecture we will set out on a field trip which is designed to illustrate the variety and complexity of
8
archaeological monuments on Achill Island and its immediate environs. The field trips also provide ample opportunities for students to learn to ‘read’ the landscape—to recognize evidence for human activity in the alteration of the physical environment and to appreciate the existence and significance
of natural resources. Because we will be travelling by foot over uneven terrain, climbing mountains, and traversing bogs, safety and proper preparation is ESSENTIAL. You will need waterproof clothing, sturdy boots, sun and wind protection, water, and food. As we are hiking, it is essential for group safety that you stay close
to your fellow students and the field trip leaders. Even if we are in an area that you are familiar with, you still need to stay with the group. We also recommend that you bring a small digital camera as the sites and scenery that we visit are amongst the finest of their types in the whole of Ireland.
FIELD TRIP SCHEDULE
(Please note: subject to change depending upon weather conditions)
Week 1: Deserted Village (Induction Day Afternoon) We will walk to the Deserted Village from Dooagh along a historic road. On the way, we will see a structure once used for producing fertilizer through burning, we will look at the formation of the bog, examine the remnants of an early twentieth-century quartz quarry, we will look at a Napoleonic-era watch tower, and then we will spend the rest of the day exploring the Deserted Village.
Week 2: Slievemore Old Graveyard, Megalithic Tombs, the Achill Mission settlement and Caraun Point We will start at the Slievemore graveyard looking at evidence
for its early medieval origins, and then we climb up the slopes of Slievemore Mountain to examine a series of classified and unclassified megalithic tombs and associated Neolithic field walls. We will then walk to Dugort and discuss the nature and legacy of the Protestant mission established by the Reverend Nangle during the mid-nineteenth century. Following this we will walk across a rare ‘machair landscape’ out to Caraun
9
Point where will we examine a cilean and an 18th century settlement eroding from the sand dunes.
Week 3: Keem Bay and Bunowna Booley Village We will begin our field trip on Keem Bay Beach after leaving the Folklife Centre, looking at geological features and the traces of Achill’s shark fishing industry. Next we climb above the beach and look the traces of an abandoned medieval/post-medieval settlement, a penal Mass altar and the possible evidence for early medieval activity. We will continue to climb up away from the sea to look at the abandoned home of Captain Boycott, a notorious Achill landlord of the late
nineteenth century, and the landscape evidence for significant agricultural improvement efforts. Next, we will spend time examining the remains of the Bunowna booley village used for seasonal grazing during the medieval and post-medieval eras. We then may up to hike back to Keem Bay along the edge of dramatic cliffs which afford a stunning view of the Atlantic Ocean.
Week 4: Kildavnet and Achill Beg Island The trip will begin by visiting the church, graveyard, and medieval tower house at Kildavnet; and then will be followed by a trip across to Achill Beg Island in an Achill currach. On Achill Beg, we will examine a Bronze Age/Iron Age shell midden, a promontory fort of Bronze or Iron Age date, an early medieval monastic enclosure, an early medieval shell midden, and post-medieval field systems and dwellings.
Week 5: Corraun peninsula The trip will leave the island and head deep into the bog to see a newly discovered settlement on the spectacular Corraun peninsula. Guided by our fearless leader, Theresa MacDonald we will undertake the first detailed field survey of this site, preparing written and photographic records of the settlement and completing a Total Station (EDM) and GPS survey.
Week 6: Annagh Booley Village We will journey into the bog to visit the settlement at Tawnaghmore and then over the mountain to the sea at Annagh, to see the hut remains of the Annagh booley village, used seasonally for cattle grazing. On the shore, we will also

10
view the remains of a portal tomb and the traces of buildings associated with a late nineteenth-century fishing station. Depending on time and weather, we may visit a spectacular ‘corrie’ lake on our way back to Dooagh.
11
4. REQUIREMENTS AND STUDENT
RESPONSIBILITIES
ASSESSMENT AND PARTICIPATION
Students are expected to complete a 1500 word essay during the first four weeks of their stay. The essay should examine a particular aspect of Irish archaeology that is of interest to them. Topics should be chosen during the first week and should be submitted to the Director of Fieldwork for approval
and advice. The essays should be completed by the end of the third week of the course and submitted to the Director of Fieldwork for review and comments. Should any student not submit their essay by the end of the third week they shall not be permitted to return to the excavation until a completed essay has been received. During the fourth week students are expected to respond to the review by the Director of Fieldwork and re-submit a final version of their essay. After marking by the staff of AFS, the essays will be sent to NUI Galway for external marking.
Students will be set a weekly exam in a multiple choice format. This will be taken on a Friday afternoon and may ask questions derived from any aspect of the course, including the lecture series, the field trips and the excavations. Students are required to present portfolios of their work at the end of their course. The contents of the portfolio will include examples of each recording task that the student has undertaken, but will vary depending on the duration of their stay. Completion of the portfolio of work is compulsory and will require the student to work with the Trainee Supervisors during the evenings.
Students are expected to use the resources of the Archaeology Centre Library. Materials are non-circulating and may not leave the Archaeology Centre. Please consult a member of staff for assistance in returning books to their proper location. A list of supplementary off-prints is available in the library. Unfortunately, any materials damaged or mislaid will have to
12
be charged at replacement prices. Photocopying is available by arrangement with the office staff.
SAFETY CONSIDERATIONS
Your safety, the safety of visitors, and the protection of the
archaeological resource is paramount.
Please advise staff of medical conditions you have and any
medication you require during the Induction Day
Hangovers are never an acceptable excuse for tardiness or
poor performance - please be sensible in your visits to pubs and be sure that you get enough sleep to maximize your enjoyment of field and laboratory training experiences
Please always dress appropriately - warm, waterproof clothing and sturdy waterproof shoes are essential for field work and field trips
Please be exceptionally careful on site - the terrain is
uneven, wet, and boggy so walk, don’t run
Please avoid walking on or through the houses, or on field
walls for your safety and the preservation of the structures
In case of an emergency, follow the chain of command and
stay put - field school staff should be immediately notified of any incident. A mobile telephone will be carried by a staff member at all times.
Be careful using excavation equipment - e.g. always lay a
shovel or spade facing down; look around you before swinging a shovel, etc.
Avoid pools of stagnant water - sheep carry unpleasant diseases…
Water for hand washing will be available on site
Please avoid or ignore sheepdogs - some are very
unfriendly and cannot be trusted
Always stay with the group on field trips. No exceptions.
No student should ever be out of site or ‘shouting distance’ of another member of the group
If you choose to hike anywhere at the weekends or evenings, please be sure that someone knows where you are going and when you expect to return. Achill Island can be a dangerous place, particularly given the sudden
changes in weather which can drastically affect visibility
13
and therefore sense of direction. Rescue exercises and even injury and death are not uncommon. Be sensible.
ARCHAEOLOGICAL SITE ETIQUETTE
Always stand back from the edge of an excavation
Never ever walk on someone’s freshly trowelled surface!
Please do not bring portable music players to site
If you smoke, please do not smoke in or around the
excavation areas and carry a bag to place your butts in
Please do not litter—this includes toilet paper- please pack
it into a Ziploc bag and dispose of it properly (e.g. in a bin!)
A Portaloo and ‘open air’ toilet facilities are available on
Slievemore, please be sensible and respectful. Mind the presence of stinging nettles, and please dispose of any paper waste appropriately.
Never be afraid to ask questions, no matter how daft they
may seem. The staff are dedicated to your education, but we will only know if you don’t understand something if you let us know!
14
5. THE DESERTED VILLAGE PROJECT
BACKGROUND
The Deserted Village Project commenced in 1991 with the research objective of completing a thorough archaeological survey of all sites and monuments (prehistoric and historic) that make up the diverse and significant archaeological landscape of Slievemore. Excavation of selected dwellings and their associated gardens has been an integral part of the fieldwork since 1991, and represents a pioneering effort at
addressing the material lives of a much neglected segment of Irish society in a period often overlooked or dismissed by archaeologists., Over one thousand students from around the world have been introduced to archaeological field methods, accompanied by rigorous instruction in all periods of Irish archaeology. Field Reports from 1991 onwards are available for perusal at the Centre’s library.
THE DESERTED VILLAGE
‘No one knew enough to relate when and why the village was forsaken’
(Heinrich Böll, The Irish Journal, 1957) The Deserted Village is located on the southern slopes of Slievemore Mountain, Achill Island. The settlement straddles the 200 foot contour and stretches from west to east for about 1.5km. Three villages make up the settlement, linked by an ancient pathway. Today, access to the village is via a relatively recent trackway (1914), south of the modern graveyard at Slievemore. Seventy-four houses remain out of 137 which were recorded on the first edition Ordnance Survey of 1838. Over 90% of the
houses are aligned north-south, parallel to each other and fall into three categories - single chambered, two-chambered and a
single chamber with an outhouse or stable attached. A majority of the houses at Slievemore were one-roomed cabins, called ‘byre-houses’ because of the practice of keeping livestock indoors during winter. A channel separated the human area from the byre area and this type of dwelling was
15
the prototype of the classic three-roomed house that can still be seen in most Achill villages. Associated with the village are extensive lazy-bed field
systems, an agricultural method suited to the sloping hillside at Slievemore where water coursing downhill would drain away in the furrow separating the potato beds. The farming system at Slievemore was known as ‘Rundale’, a system of joint ownership of detached areas of land: each family had their holding of arable land scattered amongst those of the neighbours. Associated with ‘Rundale’ was the practice of ‘booleying’ where livestock were moved to mountain grazing
during the growing season so that crops could mature undisturbed Analysis of the ceramic material from the excavations at Slievemore suggest an occupation date commencing no earlier than 1750 and ending with the desertion sometime in the 1850s, although the village continued to be used on a seasonal basis into the 1940s. While the village was not abandoned during the Great Irish Famine (1845-1850), this catastrophic event reduced the overall population of Achill Island by 16%, from 4901 in 1841 to 4075 in 1851. An increase in rent, the impoverishment of land and the availability of grants for fishing boats led the remaining population at Slievemore to move to Dooagh where their descendants still live. Today, the Achill Archaeological Field School is investigating the material traces left by all those who lived on the mountain,
from the Neolithic farmers who built their field walls and megalithic tombs 5,500 years ago, to the families who occupied the carefully constructed stone byre dwellings in the 19th century. Archaeology is a method of systematically investigating the physical traces of the past which helps us to reconstruct and appreciate the experiences of those, like the
Slievemore villagers, who may have left little documentary trace but whose lives continue to resonate in story, song, place, and memory. The environment and landscape of Slievemore Mountain, at 2,214 feet the highest peak on Achill Island, has long attracted human settlement. Ample evidence for Neolithic activity can be
16
found in the remains of a series of court and portal tombs situated on the southern and eastern slopes of Slievemore in the townlands of Dugort West, and Keel East. Possible evidence for Neolithic agricultural activities can be traced on the slopes north of the post-medieval village in the collection of
pre-bog field boundaries, some of which extend nearly as high as the western ridge top of the mountain. Similarly, Bronze Age activity on the mountain may be reflected by these field systems, and by several enigmatic round house sites. Iron Age activity on Slievemore, assuming there was any, has left no physical trace as yet recognised. Early medieval and medieval activity, by contrast, is supported by the probable antiquity of
the Slievemore graveyard with the presence of an equal armed cross and the remains of a church of possible early medieval provenance.
THE EXCAVATIONS
Since 1991 six different areas of Slievemore’s archaeology have been investigated through excavation. These excavations represent a cross section of the visible archaeological remains on Slievemore, although as yet no archaeology has been examined that definitely dates to the Neolithic, Iron Age or Medieval periods.
House 23 Excavations at House 23 were begun in 2004 by Audrey Horning and have continued over the last 5 years under the direction of a number of different archaeologists. The excavations have examined the interior of the structure down to the floor surface, revealing a series of internal drainage channels and the fireplace which has a stone seat built into the adjacent wall. A number of external features have also been examined including the garden plots to the north and
west of the building, a lean too structure attached to the north gable end wall, the manure pit located to the eastern side, a field wall in the northern garden and a large dry stone revetment to the south.
With the exception of two sherds of North Devon coarse earthenware, an English utilitarian ceramic dating to the seventeenth and very early eighteenth centuries, all materials excavated in the area of House 23 date to the mid-nineteenth
17
through early twentieth centuries which appears to be the principal period of agricultural activity in the vicinity of House 23. So far over 2500 artefacts have been recovered from the excavations of House 23. Of the ceramics, the vast majority—surprisingly—represent refined white earthenware tableware,
many of which were decorative (sponge-decorated wares from Scotland, English transfer prints, and moulded plain glazed refined white earthenware likely from the Staffordshire potteries). Very few shards of black glazed coarse earthenware were unearthed, even though this ware type represents those utilitarian forms such as milk pans, and storage jars which would be expected to be present in a nineteenth-century rural
household. Numerous fragments of recognisable cast iron cooking ware were unearthed, along with a range of as yet unidentified ferrous objects which may also relate to household utensils and cookware.
House 36 Excavations at House 36 were undertaken between 1991 and 2003 under the direction of Theresa McDonald. Up to 0.5m of rubble was carefully removed from the interior to reveal a fine flagstone floor with a cross drain running from east to west and a hearth set against the northern gable wall. Two areas of unpaved floor are suspected to have been sleeping areas. The house was surrounded by a network of pathways which also acted as drains and traces of a large cobbled yard surface were found in numerous locations. A large stone lined manure pit was excavated to the east of the house and shown to have had a cobbled base. Work in the adjoining garden plots revealed a substantial build up of ‘Plaggen’ soils (Plaggen soils are artificial soils formed by the prolongued application of sea sand, seaweed and stable manure) indicating the labour
intensive processes which were involved in manuring the garden plots.
The Village Roadway The roadway that runs through the deserted village (not the more recent track that is now used to access the site) has been investigated in two areas. A first trench was placed across it in an area between House 36 and House 23, immediately east of the Semi-Subterranean Structure described below. The first road surface encountered in this excavation was located 0.15m underneath the present turf-line and consisted of small
18
pebbles forming a dense road surface, When this was removed it was found to sit on top of a deep sand deposit that was up to 0.3m deep. Surprisingly this sand deposit was found to overlie an earlier road surface consisting of larger stones.
A second section of the roadway was excavated to the south west of House 23 in 2008-9. This excavation was limited to a 2m by 1m trench and was only excavated down to the upper road surface, but again suggested surprising complexity. At the eastern end of the trench the surface consisted of small cobbling, but at the west there was an abrupt change to medium sized angular stones.
This complexity has been taken to indicate that the community of the Deserted Village were able to organise communal engineering works on a large scale, and this can also be seen in the canalisation of the larger streams running down the mountainside and passing through the village. It is probably a reflection on the communal work ethic inherent in the Rundale farming system, that such work could be undertaken without the need for centralised planning or funding.
The Semi-Subterranean Structure Located to the south east of House 23 this small structure was excavated between 2005 and 2007. It is constructed of large upright stone slabs, known as orthostats, which form a circular chamber with a curving entrance to the south east. A burnt deposit in the entrance was dated to the 7th century AD, suggesting that the structure is a small souterrain belonging to the Early Medieval period. However the roof of the structure is covered by the earliest of the road surfaces associated with
the deserted village, which may indicate a later date of construction. To add to the confusion it has also been suggested that it could be the remains of a small passage tomb, dating from the Earlier Neolithic period, although this
idea is simply a reflection of its form and there is as yet no dating evidence to support it.
Roundhouse 1 The site of Roundhouse 1 is located on the south eastern side of Slievemore Mountain, Achill, Co. Mayo. It is the western most of a pair of seemingly similar structures situated

19
approximately 50m apart. The structures are located on steeply sloping ground approximately 150m above sea level. A field wall that runs north to south, directly up the mountain, is located equidistant between the two structures. This field wall is one of a number of such features present on Slievemore
which consistently run directly upslope extending far beyond the maximum elevation of more recent fieldwalls associated with the Deserted Village. It is suspected that these fieldwalls are part of a prehistoric co-axial field system, although this has yet to be proved through excavation. Excavations have revealed Roundhouse 1 to be genuinely massive in scale, its true size having previously been masked by the depth of
overlying peat. The structure consists of a complicated stone wall constructed in different ways around its circuit and which has a maximum surviving width of 2m and height of 1.7m. An easterly entrance consists of a passage through the wall, edged with large upright stone slabs and with pairs of pillar like orthostats at either end. In many places internal and external kerb stones have been recorded retaining the core of the wall. The use of these large stone elements lends the structure a positively megalithic appearance. Within the interior a centrally located hearth was found and partially excavated as were two adjacent post holes and a number of stakeholes. No other features were recorded elsewhere within the interior, and there was no evidence to suggest that the roof had been supported on a post ring, the typical design for circular structures with wooden roofs. It seems then that the roof simply rested on the walls and a central post that supported the apex. At present the only properly dated context is a buried turf that overlays the collapse of the structure and which contained
frequent charcoal, a sample of which has been dated to the 1411 - 1210 cal BC, in the Middle Bronze Age. However this date is a terminus ante quem, and the original construction date must be considerably older. A date from samples of the
hearth material is eagerly awaited. Definite artefacts have not been recovered in any quantity, and are limited to a fragment of a small plano-convex flint knife, a small flint scraper, a fragment of a chert knife and three pieces of flint debitage. A large quantity of pieces of fragmented quartz have been recovered from various contexts but none of the pieces represent definite artefacts. It is possible that these pieces are
20
analogous to Middle Bronze Age bi-polar reduced flint assemblages that have only recently been identified in the Irish Archaeological record. However quartz is found all over Slievemore, and has even been mined nearby in recent times. The quartz may have been brought to the structure simply to
be used for its decorative properties, or it may simply represent the naturally high occurrence of quartz in the locality.
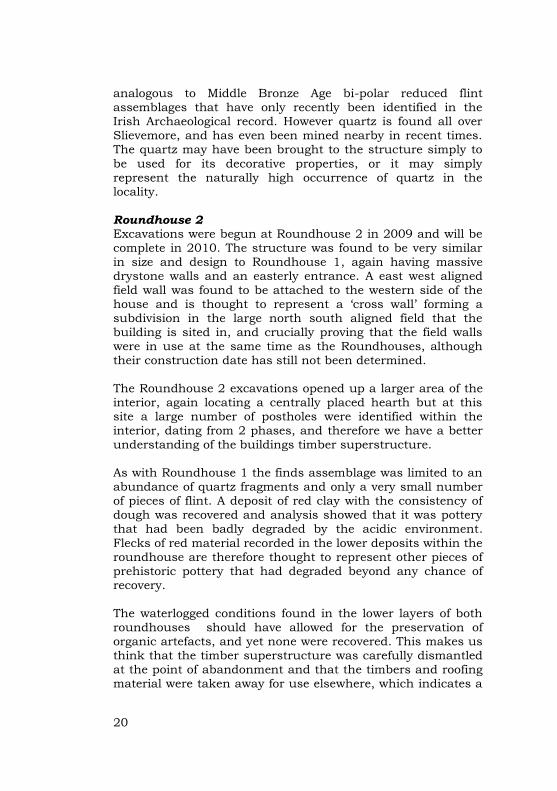
Roundhouse 2 Excavations were begun at Roundhouse 2 in 2009 and will be complete in 2010. The structure was found to be very similar
in size and design to Roundhouse 1, again having massive drystone walls and an easterly entrance. A east west aligned field wall was found to be attached to the western side of the house and is thought to represent a ‘cross wall’ forming a subdivision in the large north south aligned field that the building is sited in, and crucially proving that the field walls were in use at the same time as the Roundhouses, although their construction date has still not been determined. The Roundhouse 2 excavations opened up a larger area of the interior, again locating a centrally placed hearth but at this site a large number of postholes were identified within the interior, dating from 2 phases, and therefore we have a better understanding of the buildings timber superstructure. As with Roundhouse 1 the finds assemblage was limited to an abundance of quartz fragments and only a very small number of pieces of flint. A deposit of red clay with the consistency of dough was recovered and analysis showed that it was pottery that had been badly degraded by the acidic environment.
Flecks of red material recorded in the lower deposits within the roundhouse are therefore thought to represent other pieces of prehistoric pottery that had degraded beyond any chance of recovery.
The waterlogged conditions found in the lower layers of both roundhouses should have allowed for the preservation of organic artefacts, and yet none were recovered. This makes us think that the timber superstructure was carefully dismantled at the point of abandonment and that the timbers and roofing material were taken away for use elsewhere, which indicates a

21
careful management of such resources, and fits in with what is known about environmental conditions in Mayo during the Bronze Age when woodland became very scarce and timber would have been in short supply.
What these two structures were used for is a hotly debated topic. The simplest explanation is that it was a domestic building housing a family that farmed the southern slopes of Slievemore sometime in the Early or Middle Bronze Age. However the scale of the structure and its use of orthostats and kerb stones is also highly unusual and it appears that the design deliberately emphasises the appearance of the
structure when viewed from the south. The construction is unlike any other recorded in Ireland, and originally it was wondered if the buildings had a non-domestic function, perhaps as cult house or a place where certain rituals or specialised activities occurred. However the association with between the field wall and Roundhouse 2 and the recovery of the degraded pottery are now taken as confirming a domestic role, and we must imagine that in the Early or Middle Bronze Age, when the environment would have been very different, that the southern side of Slievemore was covered in a series of small farmsteads that worked long co-axial fields. The charcoal in the preserved turf which postdates the abandonment of the structure in Roundhouse 1 seems to indicate that the site was frequently visited after it had lost its roof and began to collapse. Whilst the ruins may have simply provided a convenient shelter in which to light a fire, it is tempting that the local community remembered the sites former importance and that the ruins continued to play an important and active part in their lives. In this regard it is
worth pointing out that a similar period of re-occupation had occurred at the Deserted Village after it was abandoned as a permanent settlement, and whilst the two cannot be directly related, they do provide a neat symmetry at the start and end
of occupation on Slievemore.
22
6. PUBLIC ARCHAEOLOGY
All field school participants are expected to engage in the public interpretation of the history and archaeology of Slievemore, considered to be an essential component of archaeological training and of 21st century archaeology. Each day many visitors will walk to the excavation areas while visiting the village. All students are expected to engage with visitors, and to be polite, helpful, and informative at all times. Remember each time a member of the public visits an
excavation and has an enjoyable time it reflects well on the whole archaeological profession. Public support and interest is what protects archaeological sites and funds research and excavation. It is therefore imperative for archaeologists to ensure that members of the public have positive experiences when visiting an actual excavation. Finally, if you are asked a question you do not know the answer to, please ask a Trainee Supervisor or the Director of Fieldwork for assistance.
23
Part Two: Field Methods
1. INTRODUCTION
Archaeology is inherently destructive, and therefore excavation should only ever be carried out as part of a carefully constructed and well-thought out project with a coherent research design; the end result of which must be the publication and dissemination of the archaeological data. Our work on Slievemore is driven by research concerns and the
educational priorities of the field school. Student learning and training is primary, so take your time and ALWAYS ask questions if you do not understand anything you have been asked to do, or anything you observe in the course of recording
and excavation. Because archaeology is destructive, the proper recording of each excavator’s actions is ESSENTIAL. You are ultimately responsible for the work you carry out. Remember, you also have a responsibility to the people in the past whose lives we are seeking to understand through their material remains. The methodology employed by the AFS relies upon open-area excavation and single context recording. The single context recording approach is enhanced through the employment of a Harris Matrix stratigraphic diagram (updated daily on site). Being forced to consider the relationship between archaeological contexts in order to ascertain their stratigraphic position prior to excavation prevents reverse excavation and loss of sequential data. Increased horizontal control of deposits is assured through the employment of a grid system excavation in conjunction with an open area approach. Imposition of such a grid system allows for the continuing extension of excavation but imposes regularity to the individual excavation units to enhance the comparability and
quantitative validity of archaeological samples. While one could arguable excavate in units of any size, shape or orientation, it is critical that the basic unit shape and size be consistent so that it is possible to compare deposits across a site area. For example, if one is to interpret the significance of inclusions within a layer that extends across several units, if the units being compared do not contain the same volume of
24
soil then it is very difficult to discern the significance of differentiation in inclusions. Individual archaeological contexts (layers, fills, interfaces or cuts) are assigned unique numbers within each unit, but tied
into the overall site matrix employing a master context system. In other words, context 200 may be assigned to topsoil in Unit 1, and context 201 to topsoil in Unit 2, but on the overall site matrix the layer is expressed as Master Context 1. While a layer may be broadly consistent across a site, it is the slight variations in content, thickness, appearance, and disturbance across a site area that contain clues regarding past human
behaviour as linked to site spatiality. An artefact recovered from the sieving of topsoil from a two metre square unit will always be linked to that unit- to a two metre area, rather than to a context number which includes material from topsoil from a ten metre square area. The following information is intended as an overview to assist you in the field.
25
2. SURVEYING TECHNIQUES
The archaeological record is 3 dimensional and located in time and space. The aim of archaeological recording is to tie each site, feature, layer and object spatially into the universe. Hence, surveying is a crucial aspect of all archaeological recording, from the laying out of a basic grid, to the detailed recording of an extensive cultural landscape. You will be introduced to all the principal means of surveying employed by archaeologists.
Offsets Offset or baseline surveys rely upon the use of a central baseline across the area to be surveyed, generally marked at either end with ranging rods with tape or string in between. Measurements are taking at a perpendicular offset from the baseline employing right angles and tapes (for cruder surveys over large areas, you might rely upon pacing). Right angles can be set with instruments such as a dumpy level, theodolite, prismatic compass, or optical square.
Triangulation Triangulation surveys are more accurate than offset surveys, and rely upon the use of a 3-4-5 triangle to establish a right
angle. Remember Pythagoras? To determine a right angle, add a squared to b squared, which equals c squared (e.g. 3 squared = 9; 4 squared = 16; 9 + 16 = 25 (which equals 5 squared!)). Helpful hypotenuse lengths for laying out grids: 1 by 1 metre: 1.41 6 by 6 metre: 9.22 2 by 2 metre: 2.83 7 by 7 metre: 9.90 3 by 3 metre: 4.24 8 by 8 metre: 11.31 4 by 4 metre: 5.66 9 by 9 metre: 12.73 5 by 5 metre: 7.07 10 by 10 metre: 14.14
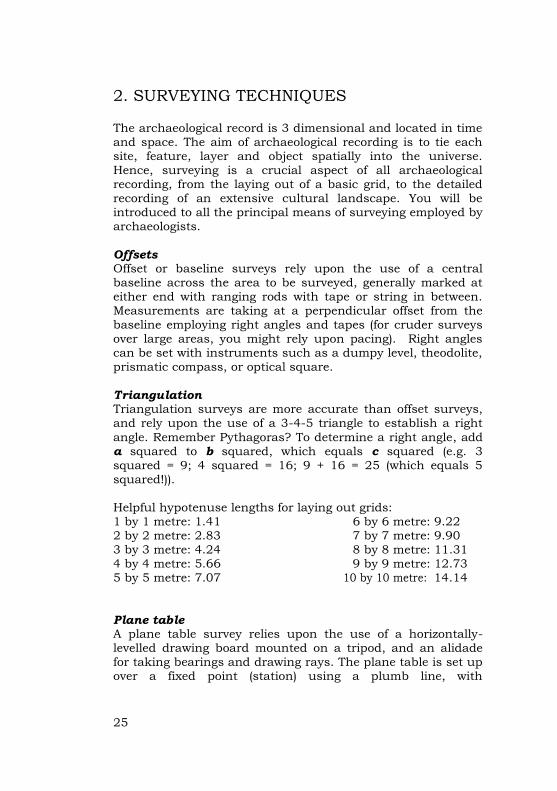
Plane table A plane table survey relies upon the use of a horizontally-levelled drawing board mounted on a tripod, and an alidade for taking bearings and drawing rays. The plane table is set up over a fixed point (station) using a plumb line, with
26
measurements taken employing a tape and ranging rod. These are transferred to the drawing board, at scale.
Plane table and alidade in use
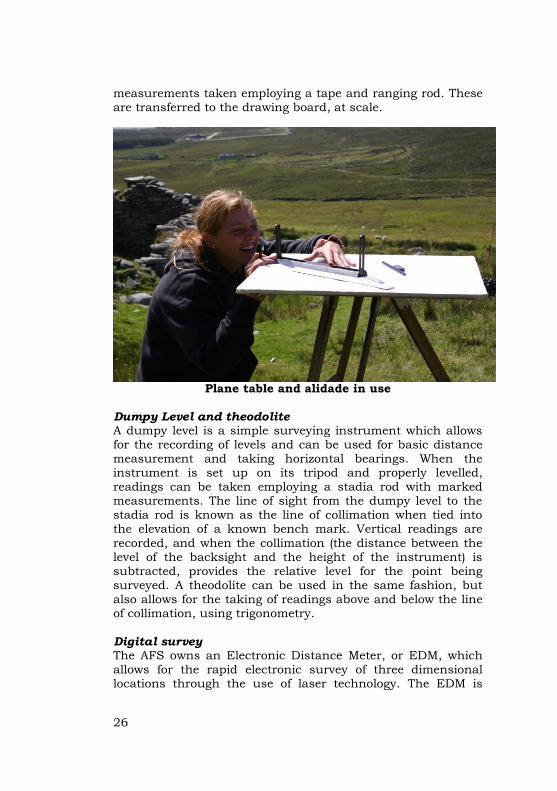
Dumpy Level and theodolite A dumpy level is a simple surveying instrument which allows for the recording of levels and can be used for basic distance measurement and taking horizontal bearings. When the instrument is set up on its tripod and properly levelled, readings can be taken employing a stadia rod with marked measurements. The line of sight from the dumpy level to the stadia rod is known as the line of collimation when tied into the elevation of a known bench mark. Vertical readings are
recorded, and when the collimation (the distance between the level of the backsight and the height of the instrument) is subtracted, provides the relative level for the point being surveyed. A theodolite can be used in the same fashion, but
also allows for the taking of readings above and below the line of collimation, using trigonometry.
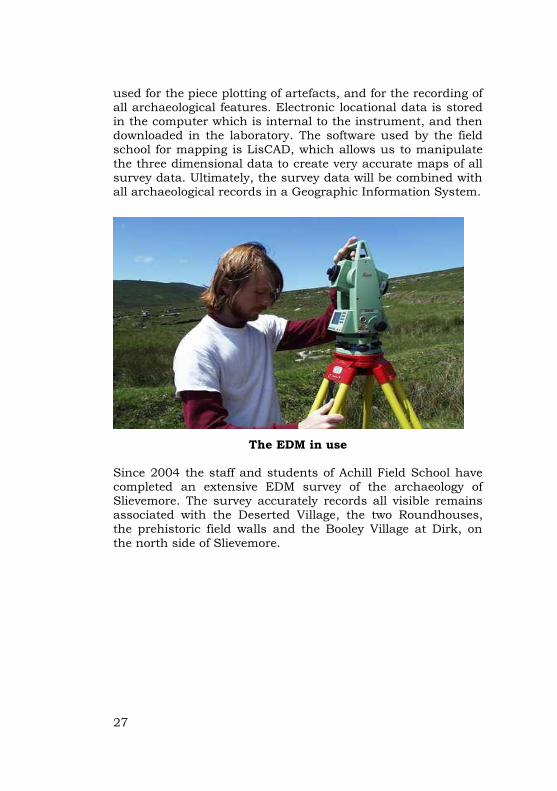
Digital survey The AFS owns an Electronic Distance Meter, or EDM, which allows for the rapid electronic survey of three dimensional locations through the use of laser technology. The EDM is
27
used for the piece plotting of artefacts, and for the recording of all archaeological features. Electronic locational data is stored in the computer which is internal to the instrument, and then downloaded in the laboratory. The software used by the field school for mapping is LisCAD, which allows us to manipulate
the three dimensional data to create very accurate maps of all survey data. Ultimately, the survey data will be combined with all archaeological records in a Geographic Information System.
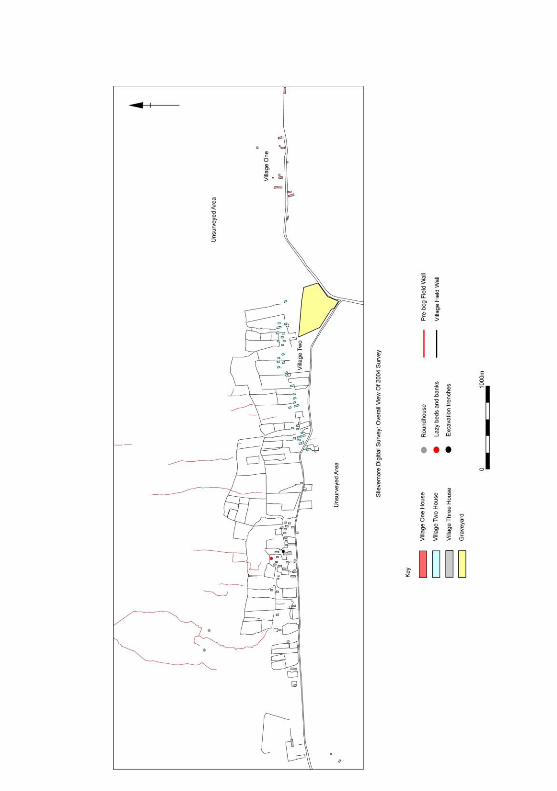
The EDM in use Since 2004 the staff and students of Achill Field School have completed an extensive EDM survey of the archaeology of Slievemore. The survey accurately records all visible remains associated with the Deserted Village, the two Roundhouses, the prehistoric field walls and the Booley Village at Dirk, on
the north side of Slievemore.
28

29
30
3. PRINCIPLES OF ARCHAEOLOGICAL
STRATIGRAPHY AND THE HARRIS MATRIX
CONTEXT AND STRATIGRAPHY
The key to archaeological recording and ultimately to an understanding of past human behaviour as reflected in the archaeological record, is CONTEXT. Context can be defined as
“the immediate environment in which an artefact (or stratum or site) is found and the relationships between that artefact and all others in the vicinity.” Context is multidimensional and includes a study of the interrelationships between the matrix (physical medium – soil, sand, gravel, rock), provenience (3 dimensional location), and association (relationship between
items in a matrix). Understanding context requires an understanding of stratigraphy, defined as “the archaeological
evaluation of the temporal and depositional meaning of the observed strata,” or in other words, the sequence and accumulation of cultural deposits over time.
HARRIS MATRIX
In archaeology, the dating of objects is not only obtained by absolute dating evidence (like radiocarbon dating), but also by relative dating evidence. Relative dating of archaeological contexts is better known as stratigraphy. Archaeological stratigraphy was systematized in the early 1970s by an excavation team in Winchester, England confronted by an extremely complex excavation. Edward Harris, a member of that team, subsequently refined and published what is now widely known as the Harris Matrix. The Harris Matrix provides a means to express and present the diachronic and synchronic relationships between
individual contexts. Archaeological contexts (layers, fills, interfaces or cuts) are assigned unique numbers. Each context designation is depicted within a rectangle, with lines drawn between individual contexts which share a direct relationship. The relations are drawn as lines and the positions of the connected rectangles describe the type of the relation.
31
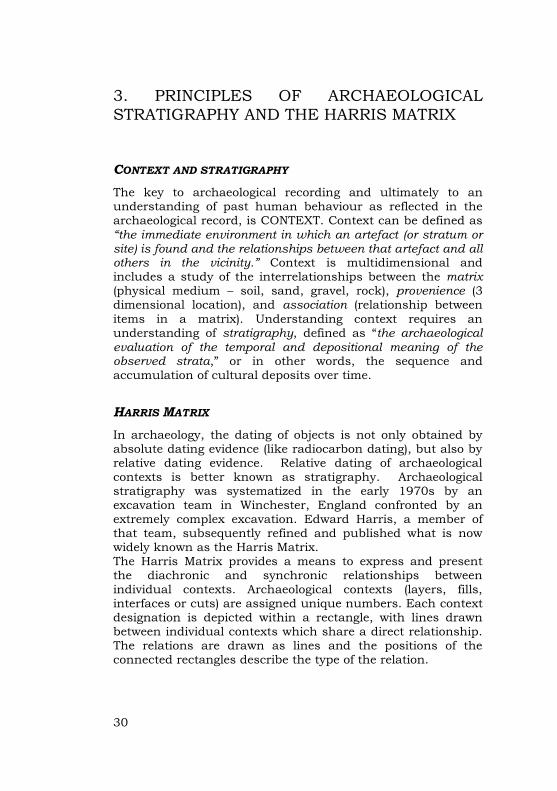
The basic relations between two layers (let us call them 1 and 2) are:
1. 1 is later than 2 :
2. 2 is later than 1 :
3. 1 and 2 have no direct relation :
This graphic representation corresponds well to the common image of archaeological excavations: one should expect that the younger layer is above the older one. But since there are exceptions to this rule (life is not a layer cake!), the real relations must be confirmed by additional observations. From a mathematical point of view the "Later Than"- relation as described above is called a partially ordered set. From this fact one can easily draw additional rules for the relations:
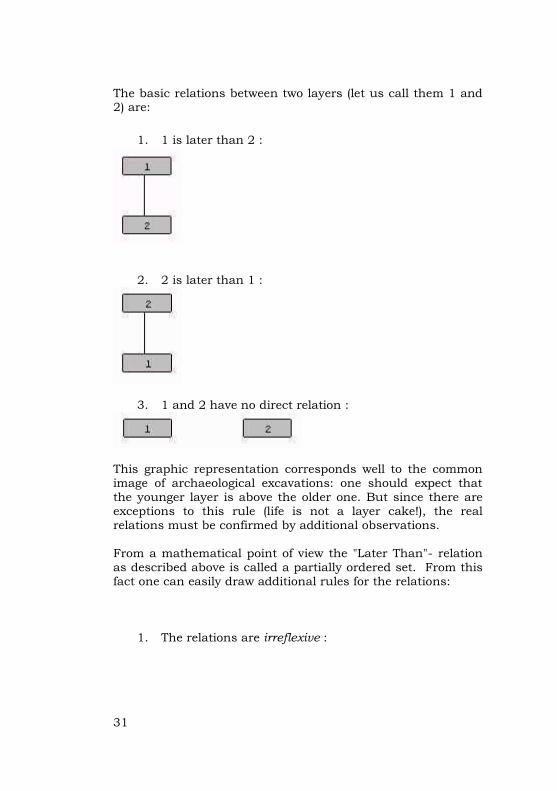
1. The relations are irreflexive :
32
1 cannot be later than 1 itself
2. The relations are antisymmetric :
If 1 is later than 2 it is impossible at the same time for 2 to be later
than 1.
3. The relations are transitive :
If 1 is later than 2, 2 is later than 3, then 1 is also later than 3.
4. The relations are anticyclic : If 1 is later than 2, 2 is later than 3, then 3 can’t be later than 1. Sample matrix from a two metre square excavation unit :
Plan view of features found following the removal of topsoil and Harris Matrix diagram
33
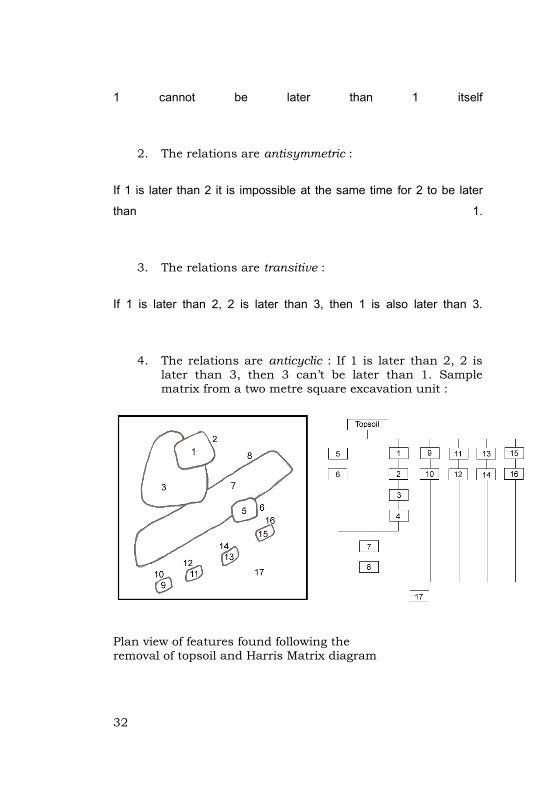
It is imperative on all excavations that the matrix chart be kept continually up to date. Maintaining the Harris Matrix ensures that one has to stop and think about the relationships between contexts, which helps to prevent excavation errors. Reconstructing/ building a matrix after the fact robs the
matrix of much of its utility as an excavation guide. While the site director is ultimately responsible for maintaining the overall matrix diagram, each excavator has a responsibility to keep a ‘sub’ matrix for their individual excavation area, and to be able to describe the relationships between archaeological contexts. Each context form contains boxes for expressing these relationships.
Following is the Harris Matrix diagram for excavations at House 23 in 2005:
34
4. EXCAVATION TECHNIQUES
BASIC APPROACHES
There are five basic ways to excavate: 1. Test pits - These are useful in that they can show the type of stratigraphy present and can be an indicator of the presence (or absence) of archaeological deposits. These may however, inadvertently destroy important parts of the site if features are not recognized.
2. Trenching - will also show the pattern of stratigraphy as well as soil changes over time. A long trench across a site will give a good cross-section of the general stratigraphy of the site. 3. Grid Plan with sections and baulk. With this method, the vertical stratigraphy seen in section acts as a guide to what may come up in the horizontal stratigraphy; however, the use of baulks can obscure the relationship between features and layers. 4. Open Area excavation – Open area excavation combines the use of a grid to maintain control of horizontal information but eliminates the use of baulks for recording vertical stratigraphy. Instead, the vertical sequence of deposition is recorded through the careful and continually updated use of a matrix chart combined with planning and electronic recordation of contexts and finds.
TROWELING
Excavation in the Deserted Village is accomplished principally through hand trowelling. While heavier implements (shovels, mattocks, and the occasional backhoe) all have archaeological
utility, the nature of the deposits and the research focus of the Deserted Village project precludes their use. A few simple rules
guide the effective practice of trowelling: 1. The troweller should always move backwards across
the site, so that he/she does not kneel on the freshly trowelled surface. Be careful to avoid stepping all over someone else’s trowelled surface as well!! The aim of
35
trowelling is to examine the newly-revealed surface in order to distinguish soil colour and texture changes that occur.
2. Hold the trowel so that the blade is nearly level with the soil you are excavating—this will help keep the
surface level and clean. 3. Never use the point of the trowel to excavate!! 4. In taking down layers, there is no way of knowing in
advance what underlies the uppermost layer at any point even if a visibly underlying layer runs under its edge. Layers can peter out abruptly or an intervening layer may start. Therefore, the best policy to adopt in
excavation is to remove the uppermost layers until a change of any kind is encountered, or in other words, until something different turns up. Again, no one should ever walk on an excavated surface.
5. The direction in which the surfaces are excavated is of fundamental importance. Trowelling in all directions causes total confusion and hinders interpretation. The ideal situation is to have a line of diggers, stretching across the width of the site, all trowelling in the same direction.
EXCAVATING FEATURES
Features to be excavated should always be sectioned (excavated one half at a time). Great care must be taken in the excavation of a feature such as a post-hole, particularly if it has been backfilled or if the post-hole has been cut through earlier features. A golden rule is to tackle all excavation problems horizontally from above. Do not dig in from the side of a feature to determine its limits, but lower the surface, if necessary a few millimetres at a time, until the soil differences can be seen. This will avoid serious mistakes being made. If pits, graves, gullies, post-holes or other features have
been cut into earlier layers, examination of their sides once they have been emptied provides a sneak preview of the layers to come.
36
ARTEFACT RECORDING
Where-ever possible all artefacts recovered from the excavation
will have their find location recorded in three dimensions. For piece-plotted artefacts, a tag with the finds number must be placed in the ground where the artefact was found when you transfer the find to the finds bag. The Trainee Supervisors will
show you how to record the location of the tag and remove it so that you may continue excavating. Artefacts should be placed in a 'finds bag' and the bag marked with the finds number, unit or area number, context number, type of artefact if known, the date, and the initials of the finder The finds will be washed/cleaned and marked, re-bagged and entered into the computer database. Appropriate First Aid (conservation) should be taken where necessary.
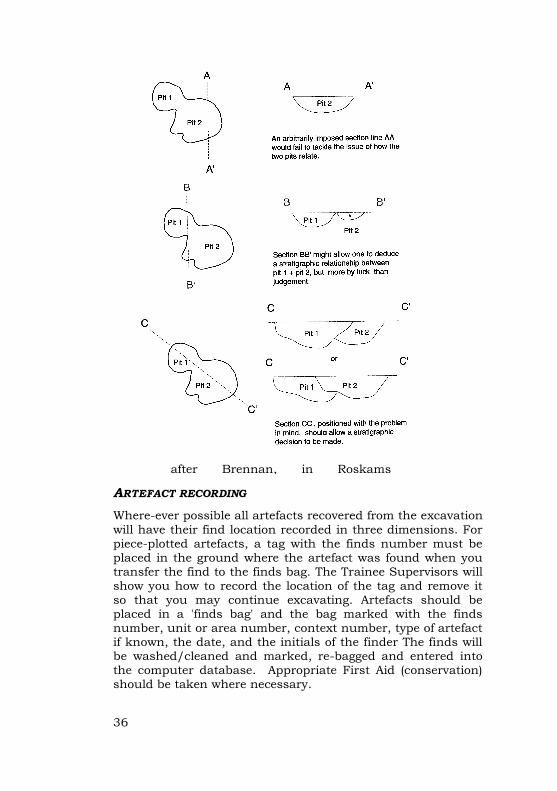
after Brennan, in Roskams ‘Excavation’2001
37
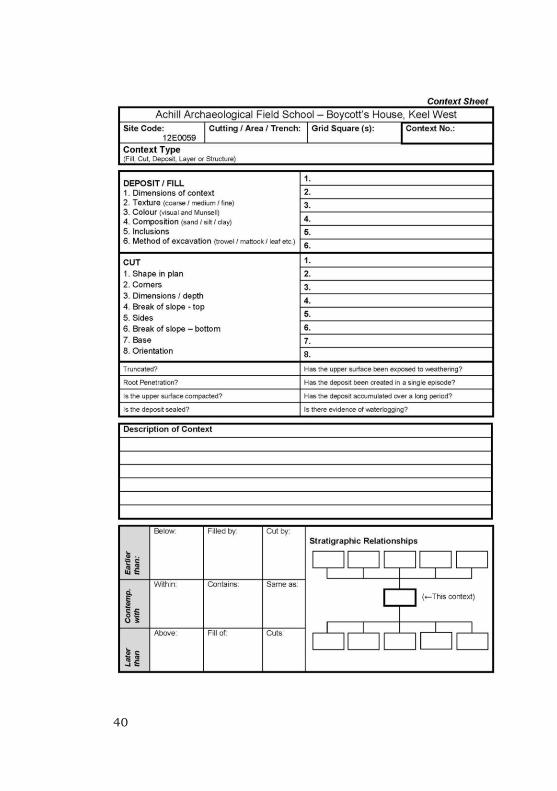
5. CONTEXT SHEETS
INTRODUCTION
The individual context record form serves as the principal means of recording information about individual archaeological contexts. You are responsible for properly filling out these forms for every context that you excavate. Once the context has been excavated, it is not possible to return to the form and do the paperwork in retrospect. You must keep up with the paperwork!
How to fill out a context record sheet: The top of the form provides information on the exact location of the context being recorded. For example, if you are excavating a layer within a two metre square unit at House 23, you would fill in the following information: Cutting/Area/Trench: Trench 1; Grid Square: The local coordinates [3,2] - the coordinates are linked to the site grid and are read from the northwest corner of your unit; Context number: taken from the context register, e.g. context 227. Next, you must record the type of context: Cut- refers to an interface or a void—and allows us to separate human actions in the past. For example, picture someone digging a pit and leaving it open. Two years later, the pit is filled with debris by a different person. The archaeological evidence you see today includes the fill that went into the pit and the pit itself once it is emptied of its fill. If you are recording a context that is a cut, you are concerned with space and past action rather than soil.
Fill- See above. Fills are deposits that are within features. Fills are associated with cuts or interfaces. Layer- layers generally reflect horizontal deposition over time, for example topsoil, sheet midden, plough soil and can be
natural as well as cultural. Deposit- a deposit refers to a discrete context that is not associated with a cut—for example, picture someone dumping a bucket full of oyster shells on the ground (rather than in a hole) following a feast. The shells land atop a topsoil layer, and then soil begins to naturally accumulate over the deposit and the topsoil. There are clearly three different contexts reflecting different depositional episodes.
38
Structure: refers to an architectural or built feature, for example a wall or a drain. Some structures may be associated with cuts (like a drain). If you are recording a fill, layer, or a deposit, then you have
soil to describe in terms of its colour, compaction/ texture, type, and inclusions. Please refer to the section on soils for more information. Next, please record how the context was excavated—trowel? mattock? spade?, was the soil sieved? Also, please record the weather conditions—like it or not, our judgment and attention is often affected by working conditions.
If your context is a cut, then you need to describe its appearance, for example, a posthole cut may be circular in plan and u-shaped in profile, while a ditch cut might be linear in plan, u-shaped in profile, and oriented east-west. Either one may be cut or truncated by another context. Next, complete the eight questions on the centre of the sheet and then write in the description of the feature (including appearance, contents, and location). This is different to the interpretation (possible function, relationships, chronology), since Description is objective and Interpretation is subjective – the first goes on the front the sheet, the second on the reverse – don’t mix them up! Next, you must situate the context stratigraphically. You only need to record the direct relations between contexts in your unit – consult the director or supervisor if you have any queries about this section, as it is a key component of the context information.
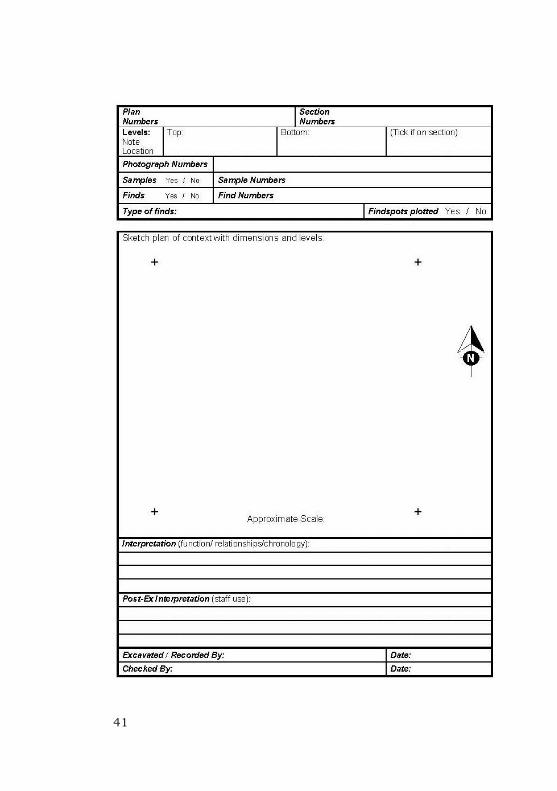
On the reverse of the context sheet are spaces to be filled in with the numbers that link your context record to other records—for example, each drawing (plan views and section
views) gets a unique number which needs to be written on the form. Similarly, every photograph (black and white, slide, and digital) also gets a number, as do any environmental samples that are taken (wood, charcoal, macrobotanical). Each artefact gets its own number. All of these unique identifiers tie archaeological data back to their CONTEXT. Numbers are carefully recorded in individual registers and should only be
39
assigned by a member of staff who is responsible for maintaining the register. Also on the rear of the form are boxes for recording the levels of the context, generally taken from the top and the bottom. Levels will be taken both with the EDM and at times with the dumpy level.
Space for a sketch plan of the context is also provided on the rear of the form. Depending upon the context, you may also need to produce a measured plan or section drawing in addition to the sketch plan. Please orient your sketch according to the indicated north and include at least two identified grid pegs in the sketch.
Next, you, the excavator, need to think about what you are excavating and what it might mean. All of your thoughts need to be recorded because you are the link to the data. The Director will rely on your information in writing up the report. Don’t be shy! Finally, at the bottom of the sheet you MUST fill in your name and the date! Accountability is key. If there is a question about any particular context, the Director must be able to identify the person who did the excavating and recording. You are accountable for your work.
40
41

42
6. SOILS DESCRIPTION
INTRODUCTION
Reading the soil is a critical skill for any archaeologist. Often subtle differences in colour, texture, and composition can provide critically important information about different types of deposits. It is imperative to apply the same set of criteria and categorizations to soil descriptions rather than relying solely upon subjective terms and impressions.
SOIL COLOUR
Soil colour is determined through using the Munsell system of colour notation. A range of Munsell colour charts are bound in a vinyl covered notebook which should be treated gently and used for filling out the soils description on the context sheets. Colours are read through comparison with the colour chips in the notebook. In transcribing the colour notation, record the page number (e.g. 10YR) and then the chroma (listed on the row along the side of the page) over the hue (listed along the bottom of the page), e.g. 10YR3/4. Be sure to:
measure all colour in adequate daylight- in shade, not
in direct sunlight
record the colour from moist soil from a freshly
cleaned area
if the soil colour is not uniform, also record the shades of the mottling
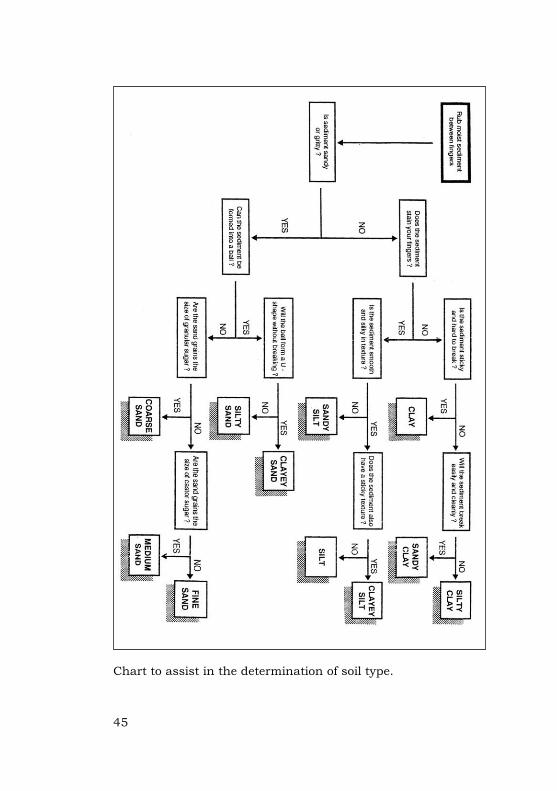
SOIL TYPE
The general texture of a soil is determined by the relative proportion of particles of different sizes which make up the soil. The particles range in size from gravel to sand to silt to clay. Generally, the texture of a soil can be determined by working a small, moist sample with the fingers. Soil size grades:
43
Sand: Loose and clean-grained material with particles
that are visible to the naked eye. Particles easily felt between the fingers.
Silt: Particles are too small to be seen with the naked
eye and cannot be detected individually with the fingers. Silt rubbed between the fingers feels silky.
Clay: Particles are too small to be seen or felt. When
moist, clay is sticky, cohesive and plastic.
COMMON PARTICLE COMBINATIONS
Loam: feels gritty in the hand but has a reasonably
smooth texture and is rather plastic. The moist sediment will form a good cast and is composed of nearly equal parts of silt and sand, with about half their amounts of clay
Sandy loam: contains mostly sand but has enough silt
and clay to make it cohesive. Will form a cast when moist, but the cast is easily broken. A true sandy loam contains 50% sand, 30% silt, and 20% clay.
Silty loam: has a slightly silky feel and forms clods when dry. The lumps are easily broken and the resulting material feels rather soft and floury. Contains at least 50% sand and silt together with
about 12-25% clay.
Clay loam: Fine textured deposit which readily breaks into clods or lumps that are hard when dry. Moist sediment is plastic and cohesive, containing nearly equal amounts of sand and clay.
SOIL TEXTURE AND COHERENCE
The way that individual grains in a soil are held
together is known as coherence. For loamy, silty, or clayey soil, take a sample of moist soil between the
thumb and forefinger and apply pressure. For sands, observe the average size of particles.
LOAMS, SILT, AND CLAY
Silty: crumbles under light pressure
Friable: crumbles under moderate pressure
44
Sticky: sticks to the fingers and barely crumbles
Plastic: does not crumble at all, more like Play-Doh (!)
in texture
Sands range from granular (composed of extremely
small particles) to gravelly (composed of particles over 2mm in diametre). Fine, medium, and coarse are acceptable descriptions.
INCLUSIONS
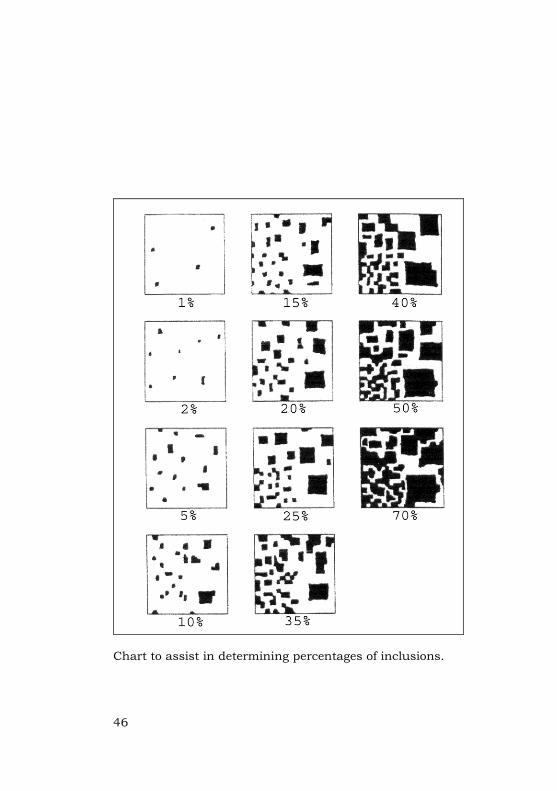
Any element forming less than 10% should be referred to as an
inclusion. A chart for determining percentages is outlined below.
45
Chart to assist in the determination of soil type.
46
Chart to assist in determining percentages of inclusions.
47
7. DESCRIBING CUTS
Shape in plan: Describe the shape in plan: circular, oval, square, rectangular, sub-rectangular, kidney-shaped, regular or irregular.
Corners: Are the corners rounded or angular?
Profile: U-shaped/Vshaped/etc
Base: Is it even or uneven? Is it pointed or flat? If it is a
stakehole try to discern the shape of the wood. Chisel point/pencil point/flat bottomed…Orientation: Is there a difference between the width and length of the feature or is
it a linear feature, give the orientation. If it is a posthole or stakehole, give the relationship between the base and top.
Truncated by: Is it truncated by a later feature? If so,
what? Can you discern or postulate on the original shape?
Break of slope top: Sharp/Gradual/Not Perceptible
Slope: Vertical/Steep/Gently sloping
Break of slope base: Sharp/Gradual/Not perceptible.
Inclination of axis: If it is a stakehole or posthole, which
direction and at what angle does it project? This information is directly related to extrapolating the shape of a superstructure.
8. DESCRIBING STRUCTURE
Form: Is it a wall, drain, foundation, repair, etc?
Size of material: Note the size and range of the material.
Number of courses: How many courses make up the context?
Finish: Is it finished/faced roughly, with regular coursing,
with cut stone, with roughly cut stone or Ashlar.
Material: Is it built of stone, bricks, block, etc?
Tool Marks: Are there any local tool marks evident on the
construction material?
Bonding: Has any bonding material been used in the construction. Describe it.
Faces: How many faces does it have and which directions
do they face?
Rendering: Is there any rendering material? Describe it.
48
9. ARCHAEOLOGICAL PHOTOGRAPHY
Photographs represent an essential element of any site archive, and also serve as the principal means of conveying the practice and results of any excavation to the public. “Record” shots are taken of each archaeological context, while “working” shots are taken systematically during the course of the excavation. Preparing for record shots is a time-consuming but absolutely
necessary process. All visible surfaces should be carefully trowelled to ensure maximum visibility of features and interfaces. Roots should be clipped, and masonry and stones brushed. All extraneous material should be out of the photograph, for example Coke cans, wellies, clipboards, pencils, gloves, hats, brushes, buckets trowels and other people’s feet! Every photograph should have a scale and a north arrow. The first image taken on each camera should also include a menu board to identify the site, unit, context, direction, and date. The board and the north arrow should be placed parallel to the camera view. All photographs are recorded in the Photo Log
book. Photographs will be taken employing black and white film, colour slide film, and digital file. Cameras should be handled carefully and with clean hands only!!
10. DRAWING CONTEXTS IN PLAN AND IN SECTION
Plan drawings are measured recordings of a context or contexts viewed from above. Generally, contexts are planned at a scale of 1:20 following a set of standard drawing conventions. All plan drawings receive a unique drawing number assigned by the drawings technician or another member of staff. It is imperative that information about the context, recorder, date and plan number are recorded on a label which is placed on the drawing. All measured plan and

49
section drawings are made on drawing film, which is placed on a drawing board over lined graph paper. When a field drawing is complete, it is removed from the board and carefully rolled up. All drawings will be ‘inked-in’ in the laboratory for permanent archival storage and publication.
Section and elevation drawings will be made of any sectioned feature, the edges of excavation areas, and architectural features such as walls. The appropriate scale used will depend upon the size of the section; however, all feature drawings should be produced at 1:10. Again, please use standard drawing conventions as illustrated.
When writing a title block, please follow the relevant order outlined below. The title block should be written in the top left hand corner of the sheet in block letters) e.g. c.2-3mm high). The plan and section number should be duplicated in larger print (c.10mm high), in the top right-hand corner. Please, try to write legibly and remember that often what you are creating a record of will be destroyed.
50
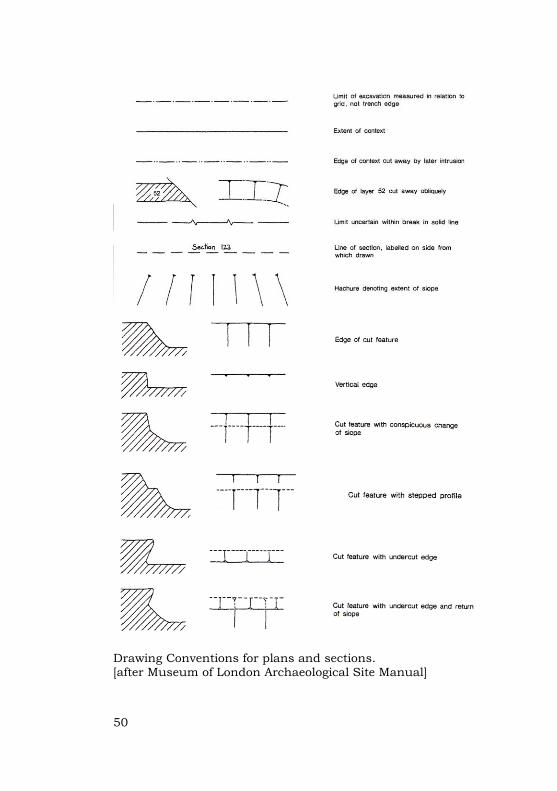
Drawing Conventions for plans and sections. [after Museum of London Archaeological Site Manual]
51

52
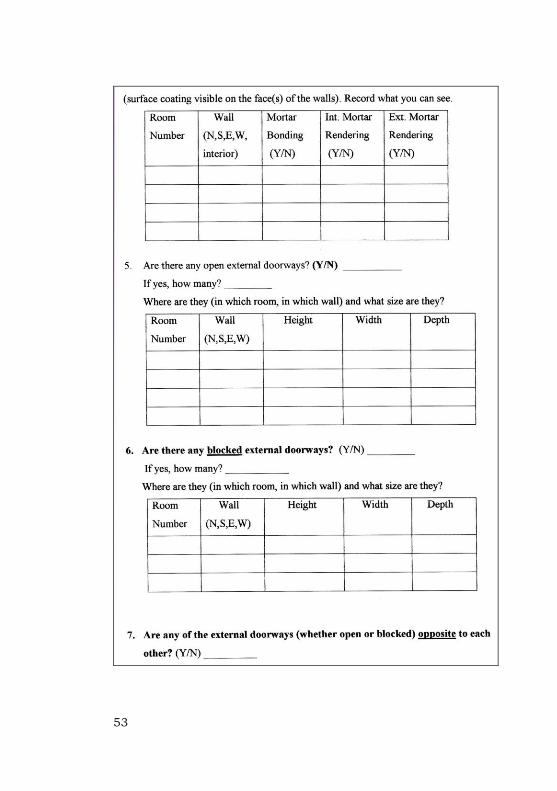
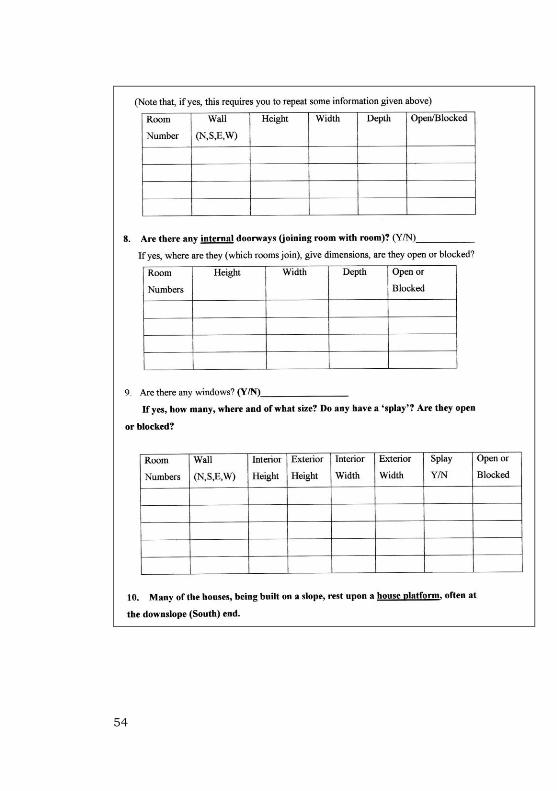
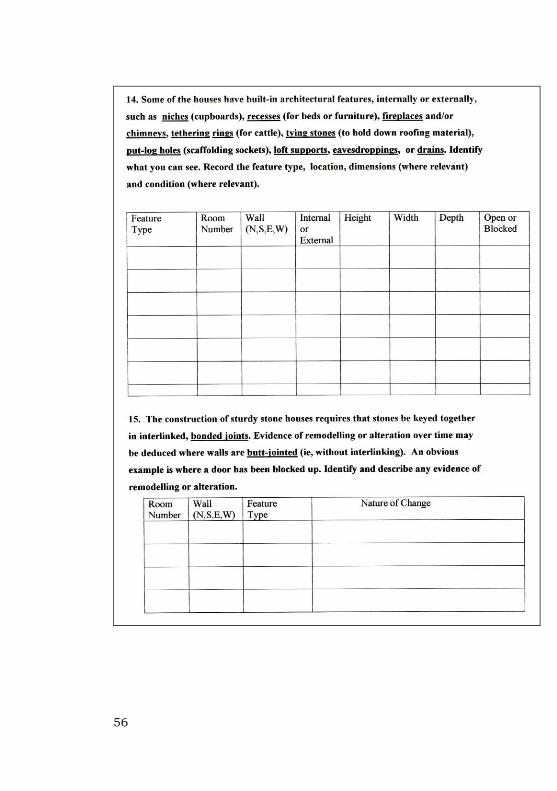
11. ARCHITECTURAL RECORDING
Part of your training will also include learning to ‘read’ masonry buildings. Following is the form that will be used for the recording of structures in the Deserted Village.
53
54

55
56

57

58

59
NOTES