
Adobe flash catalyst_cs5_classroom_in_a_book_thethingy
284
-
Upload
rohit-chintu -
Category
Education
-
view
1.025 -
download
0
Transcript of Adobe flash catalyst_cs5_classroom_in_a_book_thethingy

ptg
ptg
www.adobepress.com
ADOBE® FLASH® CATALYST™ CS5CLASSROOM IN A BOOK®Th e offi cial training workbook from Adobe Systems

ptg
Adobe® Flash Catalyst® CS5 Classroom in a Book®
© 2010 Adobe Systems Incorporated and its licensors. All rights reserved.
If this guide is distributed with software that includes an end user agreement, this guide, as well as the software
described in it, is furnished under license and may be used or copied only in accordance with the terms of such license.
Except as permitted by any such license, no part of this guide may be reproduced, stored in a retrieval system, or
transmitted, in any form or by any means, electronic, mechanical, recording, or otherwise, without the prior written
permission of Adobe Systems Incorporated. Please note that the content in this guide is protected under copyright law
even if it is not distributed with software that includes an end user license agreement.
Th e content of this guide is furnished for informational use only, is subject to change without notice, and should not be
construed as a commitment by Adobe Systems Incorporated. Adobe Systems Incorporated assumes no responsibility or
liability for any errors or inaccuracies that may appear in the informational content contained in this guide.
Please remember that existing artwork or images that you may want to include in your project may be protected under
copyright law. Th e unauthorized incorporation of such material into your new work could be a violation of the rights of
the copyright owner. Please be sure to obtain any permission required from the copyright owner.
Any references to company names in sample fi les are for demonstration purposes only and are not intended to refer to
any actual organization.
Adobe, the Adobe logo, Adobe ActionScript, Adobe After Eff ects, Adobe AIR, Adobe Captivate, Adobe Dreamweaver,
Adobe Encore, Adobe Fireworks, Adobe Flash, Adobe Flash Builder, Adobe Flash Catalyst, Adobe Flash Player, Adobe
Flex, Adobe Illustrator, Adobe InDesign, Adobe Media Encoder, Adobe Media Player, Adobe Photoshop, Adobe
Presenter, Adobe Premiere, and Classroom in a Book are either registered trademarks or trademarks of Adobe Systems
Incorporated in the United States and/or other countries.
Apple, Mac OS, and Macintosh, are trademarks of Apple, registered in the U.S. and other countries. Microsoft,
Windows, and Internet Explorer are either registered trademarks or trademarks of Microsoft Corporation in the U.S.
and/or other countries. Java and JavaScript are registered trademarks of Sun Microsystems. All other trademarks are
the property of their respective owners.
Adobe Systems Incorporated, 345 Park Avenue, San Jose, California 95110-2704, USA
Notice to U.S. Government End Users. Th e Software and Documentation are “Commercial Items,” as that term is
defi ned at 48 C.F.R. §2.101, consisting of “Commercial Computer Software” and “Commercial Computer Software
Documentation,” as such terms are used in 48 C.F.R. §12.212 or 48 C.F.R. §227.7202, as applicable. Consistent with
48 C.F.R. §12.212 or 48 C.F.R. §§227.7202-1 through 227.7202-4, as applicable, the Commercial Computer Software
and Commercial Computer Software Documentation are being licensed to U.S. Government end users (a) only as
Commercial Items and (b) with only those rights as are granted to all other end users pursuant to the terms and condi-
tions herein. Unpublished-rights reserved under the copyright laws of the United States. Adobe Systems Incorporated,
345 Park Avenue, San Jose, CA 95110-2704, USA. For U.S. Government End Users, Adobe agrees to comply with all
applicable equal opportunity laws including, if appropriate, the provisions of Executive Order 11246, as amended,
Section 402 of the Vietnam Era Veterans Readjustment Assistance Act of 1974 (38 USC 4212), and Section 503 of the
Rehabilitation Act of 1973, as amended, and the regulations at 41 CFR Parts 60-1 through 60-60, 60-250, and 60-741.
Th e affi rmative action clause and regulations contained in the preceding sentence shall be incorporated by reference.
Adobe Press books are published by Peachpit, a division of Pearson Education located in Berkeley, California. For the
latest on Adobe Press books, go to www.adobepress.com. To report errors, please send a note to [email protected].
For information on getting permission for reprints and excerpts, contact [email protected].
Writer: Scott Tapley
Project Editor: Rebecca Freed
Development Editor: Robyn G. Th omas
Production Editor: Cory Borman
Copyeditor: Scout Festa
Technical Editor: Angela Nimer
Compositor: David Van Ness
Indexer: James Minkin
Cover design: Eddie Yuen
Interior design: Mimi Heft
Printed and bound in the United States of America
ISBN-13: 978-0-321-70358-3
ISBN-10: 0-321-70358-8
9 8 7 6 5 4 3 2 1

ptg
Each lesson has its own folder inside the Lessons folder. You will need to copy these lesson folders to your hard drive before you can begin each lesson.
Lesson fi les
Th e Adobe Flash Catalyst CS5 Classroom in a Book disc includes the lesson fi les
that you’ll need to complete the exercises in this book, as well as other content
to help you learn more about Adobe Flash Catalyst CS5 and use it with greater
effi ciency and ease. Th e diagram below represents the contents of the disc, which
should help you locate the fi les you need.
WHAT’S ON THE DISCHere is an overview of the contents of the Classroom in a Book disc
Online resources
Adobe Press
Links to Adobe Community Help, product Help and Support pages, Adobe certifi cation programs, Adobe TV, and other useful online resources can be found inside a handy HTML fi le. Just open it in your Web browser and click on the links, including a special link to this book’s product page where you can access updates and bonus material.
Adobe, the Adobe logo, Classroom in a Book and Flas
h Cat
alys
t are
trad
emar
ks o
f Ado
be S
yste
ms
Inco
rpor
ated
. Mac
OS
is a
trad
emar
k of
App
le, r
egist
ered
in th
e U.S. a
nd other countrie
s. Windows is either a registered trademark or a trademark of Microsoft Corporation in the U .S. and/or other countries. CLASSROOM IN A BOOK®
ADOBE® FLASH® CATALYSTTM CS5WINDOWS®/MAC OS®
© 2010 Adobe Systems IncorporatedAll rights reserved. Made in the USA.ISBN-13: 978-0-321-70358-3ISBN-10: 0-321-70358-85/10
Find information about other Adobe Press titles, covering the full spectrum of Adobe products, in the Online Resources fi le.
ptg
iv CONTENTS
CONTENTS
GETTING STARTED 1
About Classroom in a Book . . . . . . . . . . . . . . . . . . . . . . . . . . . . . . . . . . 1
Prerequisites . . . . . . . . . . . . . . . . . . . . . . . . . . . . . . . . . . . . . . . . . . . . . . . 2
Installing Flash Catalyst . . . . . . . . . . . . . . . . . . . . . . . . . . . . . . . . . . . . . 2
Optimizing performance . . . . . . . . . . . . . . . . . . . . . . . . . . . . . . . . . . . . 3
Checking for updates . . . . . . . . . . . . . . . . . . . . . . . . . . . . . . . . . . . . . . . 3
Flash Player version . . . . . . . . . . . . . . . . . . . . . . . . . . . . . . . . . . . . . . . . . 3
Copying the lesson fi les . . . . . . . . . . . . . . . . . . . . . . . . . . . . . . . . . . . . . 3
How to use these lessons . . . . . . . . . . . . . . . . . . . . . . . . . . . . . . . . . . . 4
Standard elements in the book . . . . . . . . . . . . . . . . . . . . . . . . . . . . . . 4
Additional resources . . . . . . . . . . . . . . . . . . . . . . . . . . . . . . . . . . . . . . . . 5
Adobe certifi cation . . . . . . . . . . . . . . . . . . . . . . . . . . . . . . . . . . . . . . . . . 6
1 GETTING TO KNOW ADOBE FLASH CATALYST CS5 8
Lesson Overview . . . . . . . . . . . . . . . . . . . . . . . . . . . . . . . . . . . . . . . . . . . 8
About Flash Catalyst . . . . . . . . . . . . . . . . . . . . . . . . . . . . . . . . . . . . . . . 10
Is Flash Catalyst the right tool for you? . . . . . . . . . . . . . . . . . . . . . . 10
Key features . . . . . . . . . . . . . . . . . . . . . . . . . . . . . . . . . . . . . . . . . . . . . . . 11
Additional benefi ts for designers . . . . . . . . . . . . . . . . . . . . . . . . . . . 11
Flash Catalyst design workfl ow . . . . . . . . . . . . . . . . . . . . . . . . . . . . . 12
Opening a new Flash Catalyst project. . . . . . . . . . . . . . . . . . . . . . . 14
Finding your way around . . . . . . . . . . . . . . . . . . . . . . . . . . . . . . . . . . 15
Design workspace . . . . . . . . . . . . . . . . . . . . . . . . . . . . . . . . . . . . . . . . . 15
Code workspace . . . . . . . . . . . . . . . . . . . . . . . . . . . . . . . . . . . . . . . . . . . 18
Opening an existing Flash Catalyst project . . . . . . . . . . . . . . . . . . 19
ptg
ADOBE FLASH CATALYST CS5 CLASSROOM IN A BOOK v
Exploring the Design workspace . . . . . . . . . . . . . . . . . . . . . . . . . . . 19
Moving around the workspace . . . . . . . . . . . . . . . . . . . . . . . . . . . . . 20
Adjusting panels . . . . . . . . . . . . . . . . . . . . . . . . . . . . . . . . . . . . . . . . . . . 20
Zooming the artboard . . . . . . . . . . . . . . . . . . . . . . . . . . . . . . . . . . . . . 21
Panning the artboard . . . . . . . . . . . . . . . . . . . . . . . . . . . . . . . . . . . . . . 22
Previewing a project in a browser . . . . . . . . . . . . . . . . . . . . . . . . . . 22
Getting Flash Catalyst Help . . . . . . . . . . . . . . . . . . . . . . . . . . . . . . . . . 24
2 PREPARING, IMPORTING, AND PLACING ARTWORK 28
Lesson Overview . . . . . . . . . . . . . . . . . . . . . . . . . . . . . . . . . . . . . . . . . . 28
Preparing a design document . . . . . . . . . . . . . . . . . . . . . . . . . . . . . . 30
Choose your design application . . . . . . . . . . . . . . . . . . . . . . . . . . . . 30
Plan the structure of your application . . . . . . . . . . . . . . . . . . . . . . 30
Group complex objects . . . . . . . . . . . . . . . . . . . . . . . . . . . . . . . . . . . . 32
Flatten artwork with fi lters and eff ects . . . . . . . . . . . . . . . . . . . . . . 32
Name everything . . . . . . . . . . . . . . . . . . . . . . . . . . . . . . . . . . . . . . . . . . 33
Embed images in the design document . . . . . . . . . . . . . . . . . . . . 33
Manage fonts when sharing fi les . . . . . . . . . . . . . . . . . . . . . . . . . . . 34
Identify duplicate component assets . . . . . . . . . . . . . . . . . . . . . . . 34
Set component properties in Flash Catalyst . . . . . . . . . . . . . . . . . 35
Create sample artwork for a list of images or text . . . . . . . . . . . 35
Hide, show, and lock layers . . . . . . . . . . . . . . . . . . . . . . . . . . . . . . . . . 36
Exporting an FXG fi le from Adobe Fireworks . . . . . . . . . . . . . . . . 36
Importing artwork . . . . . . . . . . . . . . . . . . . . . . . . . . . . . . . . . . . . . . . . . 37
Import a design document . . . . . . . . . . . . . . . . . . . . . . . . . . . . . . . . . 37
Import additional images . . . . . . . . . . . . . . . . . . . . . . . . . . . . . . . . . . 40
Position images in the artboard . . . . . . . . . . . . . . . . . . . . . . . . . . . . 41
Optimizing artwork . . . . . . . . . . . . . . . . . . . . . . . . . . . . . . . . . . . . . . . . 41
Optimize artwork . . . . . . . . . . . . . . . . . . . . . . . . . . . . . . . . . . . . . . . . . . 42

ptg
vi CONTENTS
3 MANAGING THE LIBRARY 46
Lesson Overview . . . . . . . . . . . . . . . . . . . . . . . . . . . . . . . . . . . . . . . . . . 46
Viewing the Library panel . . . . . . . . . . . . . . . . . . . . . . . . . . . . . . . . . . 48
How do assets get into the Library panel? . . . . . . . . . . . . . . . . . . 48
Add assets to the Library panel . . . . . . . . . . . . . . . . . . . . . . . . . . . . . 49
Preview fi les in the Library panel . . . . . . . . . . . . . . . . . . . . . . . . . . . 51
Deleting assets from the project. . . . . . . . . . . . . . . . . . . . . . . . . . . . 52
Compressing images in the Library panel . . . . . . . . . . . . . . . . . . . 53
Renaming project assets . . . . . . . . . . . . . . . . . . . . . . . . . . . . . . . . . . . 53
Using assets in the Library panel . . . . . . . . . . . . . . . . . . . . . . . . . . . 54
Sharing project libraries . . . . . . . . . . . . . . . . . . . . . . . . . . . . . . . . . . . . 56
Export a library package . . . . . . . . . . . . . . . . . . . . . . . . . . . . . . . . . . . 56
Import a library package . . . . . . . . . . . . . . . . . . . . . . . . . . . . . . . . . . . 57
4 MANAGING LAYERS 60
Lesson Overview . . . . . . . . . . . . . . . . . . . . . . . . . . . . . . . . . . . . . . . . . . 60
Exploring the Layers panel . . . . . . . . . . . . . . . . . . . . . . . . . . . . . . . . . 62
Expand and collapse layers . . . . . . . . . . . . . . . . . . . . . . . . . . . . . . . . . 62
Show and hide layers . . . . . . . . . . . . . . . . . . . . . . . . . . . . . . . . . . . . . . 63
Lock and unlock layers . . . . . . . . . . . . . . . . . . . . . . . . . . . . . . . . . . . . . 65
Grouping objects . . . . . . . . . . . . . . . . . . . . . . . . . . . . . . . . . . . . . . . . . . 66
Renaming objects in the Layers panel . . . . . . . . . . . . . . . . . . . . . . 66
Optimizing complex groups . . . . . . . . . . . . . . . . . . . . . . . . . . . . . . . . 67
Adding and deleting layers . . . . . . . . . . . . . . . . . . . . . . . . . . . . . . . . . 69
Stacking artwork using layers . . . . . . . . . . . . . . . . . . . . . . . . . . . . . . 69
5 WORKING WITH PAGES AND STATES 74
Lesson Overview . . . . . . . . . . . . . . . . . . . . . . . . . . . . . . . . . . . . . . . . . . 74
Page and component states . . . . . . . . . . . . . . . . . . . . . . . . . . . . . . . . 76
Duplicating and modifying page states . . . . . . . . . . . . . . . . . . . . . 77
Save time by duplicating page states . . . . . . . . . . . . . . . . . . . . . . . 77
Give page states descriptive names . . . . . . . . . . . . . . . . . . . . . . . . 78
ptg
ADOBE FLASH CATALYST CS5 CLASSROOM IN A BOOK vii
Show and hide artwork in each page state . . . . . . . . . . . . . . . . . . 78
Adding and deleting states . . . . . . . . . . . . . . . . . . . . . . . . . . . . . . . . . 81
Add a blank page state . . . . . . . . . . . . . . . . . . . . . . . . . . . . . . . . . . . . . 81
Add objects to blank page states . . . . . . . . . . . . . . . . . . . . . . . . . . . 82
Delete objects from specifi c states . . . . . . . . . . . . . . . . . . . . . . . . . 84
Delete page states . . . . . . . . . . . . . . . . . . . . . . . . . . . . . . . . . . . . . . . . . 85
6 CREATING INTERACTIVE COMPONENTS 88
Lesson Overview . . . . . . . . . . . . . . . . . . . . . . . . . . . . . . . . . . . . . . . . . . 88
The building blocks of RIAs . . . . . . . . . . . . . . . . . . . . . . . . . . . . . . . . . 90
Components . . . . . . . . . . . . . . . . . . . . . . . . . . . . . . . . . . . . . . . . . . . . . . 90
Interactions . . . . . . . . . . . . . . . . . . . . . . . . . . . . . . . . . . . . . . . . . . . . . . . 90
Using wireframe components . . . . . . . . . . . . . . . . . . . . . . . . . . . . . . 91
Add and modify wireframe buttons . . . . . . . . . . . . . . . . . . . . . . . . . 91
Add wireframe text input fi elds . . . . . . . . . . . . . . . . . . . . . . . . . . . . . 95
Add wireframe radio buttons . . . . . . . . . . . . . . . . . . . . . . . . . . . . . . . 96
Add a wireframe check box . . . . . . . . . . . . . . . . . . . . . . . . . . . . . . . . . 96
Add wireframe scroll bars . . . . . . . . . . . . . . . . . . . . . . . . . . . . . . . . . . 97
Converting artwork to built-in components . . . . . . . . . . . . . . . . . 99
Convert artwork to buttons . . . . . . . . . . . . . . . . . . . . . . . . . . . . . . .100
Create a reusable navigation button . . . . . . . . . . . . . . . . . . . . . . . 101
Enable and disable buttons . . . . . . . . . . . . . . . . . . . . . . . . . . . . . . . 103
Create next and previous buttons . . . . . . . . . . . . . . . . . . . . . . . . .104
Create a custom toggle button . . . . . . . . . . . . . . . . . . . . . . . . . . . . 105
Convert artwork to scroll bars . . . . . . . . . . . . . . . . . . . . . . . . . . . . .106
Work with text . . . . . . . . . . . . . . . . . . . . . . . . . . . . . . . . . . . . . . . . . . . .109
Create a scroll panel from artwork . . . . . . . . . . . . . . . . . . . . . . . . . 112
Creating custom components . . . . . . . . . . . . . . . . . . . . . . . . . . . . . 113
Adding interactivity . . . . . . . . . . . . . . . . . . . . . . . . . . . . . . . . . . . . . . . 115
Add page navigation . . . . . . . . . . . . . . . . . . . . . . . . . . . . . . . . . . . . . .116
Create conditional interactions . . . . . . . . . . . . . . . . . . . . . . . . . . . .116
Link to external content . . . . . . . . . . . . . . . . . . . . . . . . . . . . . . . . . . .119
ptg
viii CONTENTS
7 CREATING TRANSITIONS AND ACTION SEQUENCES 122
Lesson Overview . . . . . . . . . . . . . . . . . . . . . . . . . . . . . . . . . . . . . . . . . 122
Transitions and action sequences . . . . . . . . . . . . . . . . . . . . . . . . . .124
Inspecting default transition eff ects . . . . . . . . . . . . . . . . . . . . . . . 125
Adding smooth transitions . . . . . . . . . . . . . . . . . . . . . . . . . . . . . . . . 127
Fine-tuning transitions . . . . . . . . . . . . . . . . . . . . . . . . . . . . . . . . . . . .129
Adjust transition duration . . . . . . . . . . . . . . . . . . . . . . . . . . . . . . . . .130
Change transition timing. . . . . . . . . . . . . . . . . . . . . . . . . . . . . . . . . . 131
Ease transitions . . . . . . . . . . . . . . . . . . . . . . . . . . . . . . . . . . . . . . . . . . . 132
Adding and changing eff ects . . . . . . . . . . . . . . . . . . . . . . . . . . . . . . 133
Swap one eff ect for another . . . . . . . . . . . . . . . . . . . . . . . . . . . . . . .134
Add multiple eff ects to the same object . . . . . . . . . . . . . . . . . . .136
Adding action sequences . . . . . . . . . . . . . . . . . . . . . . . . . . . . . . . . .138
Add an action sequence interaction . . . . . . . . . . . . . . . . . . . . . . .138
Edit an action sequence in the Timeline . . . . . . . . . . . . . . . . . . .139
Flash Catalyst helper eff ects . . . . . . . . . . . . . . . . . . . . . . . . . . . . . . .140
8 ADDING AND CONTROLLING VIDEO AND SOUND 142
Lesson Overview . . . . . . . . . . . . . . . . . . . . . . . . . . . . . . . . . . . . . . . . . 142
Preparing video for the web . . . . . . . . . . . . . . . . . . . . . . . . . . . . . . .144
What is encoding? . . . . . . . . . . . . . . . . . . . . . . . . . . . . . . . . . . . . . . . .144
What is a video codec? . . . . . . . . . . . . . . . . . . . . . . . . . . . . . . . . . . . .144
How do I encode my video? . . . . . . . . . . . . . . . . . . . . . . . . . . . . . . . 145
Importing and previewing video and sound . . . . . . . . . . . . . . .146
Import video and sound . . . . . . . . . . . . . . . . . . . . . . . . . . . . . . . . . . 147
Preview video and sound . . . . . . . . . . . . . . . . . . . . . . . . . . . . . . . . . 147
Adding video to an application . . . . . . . . . . . . . . . . . . . . . . . . . . . .148
Add video to the artboard . . . . . . . . . . . . . . . . . . . . . . . . . . . . . . . . .148
Set video player properties . . . . . . . . . . . . . . . . . . . . . . . . . . . . . . . .150
Controlling video playback . . . . . . . . . . . . . . . . . . . . . . . . . . . . . . . . 152
Attach controls to the video . . . . . . . . . . . . . . . . . . . . . . . . . . . . . . . 152
ptg
ADOBE FLASH CATALYST CS5 CLASSROOM IN A BOOK ix
Add interactions to control video playback . . . . . . . . . . . . . . . . 155
Reset the video after playing . . . . . . . . . . . . . . . . . . . . . . . . . . . . . . 155
Adding sound eff ects . . . . . . . . . . . . . . . . . . . . . . . . . . . . . . . . . . . . . 157
9 INTEGRATING SWF CONTENT FROM OTHER CREATIVE SUITE TOOLS 162
Lesson Overview . . . . . . . . . . . . . . . . . . . . . . . . . . . . . . . . . . . . . . . . . 162
SWF fi les. . . . . . . . . . . . . . . . . . . . . . . . . . . . . . . . . . . . . . . . . . . . . . . . . .164
Creating SWF fi les for Flash Catalyst . . . . . . . . . . . . . . . . . . . . . . .164
Using SWF fi les in Flash Catalyst . . . . . . . . . . . . . . . . . . . . . . . . . . . 165
Adding SWF fi les to Flash Catalyst . . . . . . . . . . . . . . . . . . . . . . . . .166
Import a SWF fi le to the artboard . . . . . . . . . . . . . . . . . . . . . . . . . . 167
Preview a SWF animation . . . . . . . . . . . . . . . . . . . . . . . . . . . . . . . . .168
Controlling the playback of SWF fi les . . . . . . . . . . . . . . . . . . . . . .169
Play or stop a SWF fi le . . . . . . . . . . . . . . . . . . . . . . . . . . . . . . . . . . . . .169
Play the SWF movie from a specifi c frame . . . . . . . . . . . . . . . . . . 171
Adding a SWF fi le to a component . . . . . . . . . . . . . . . . . . . . . . . . . 172
Position a SWF fi le . . . . . . . . . . . . . . . . . . . . . . . . . . . . . . . . . . . . . . . . 173
Add eff ects to play the animation . . . . . . . . . . . . . . . . . . . . . . . . .174
10 DESIGNING WITH DATA 176
Lesson Overview . . . . . . . . . . . . . . . . . . . . . . . . . . . . . . . . . . . . . . . . .176
Flash Catalyst data lists. . . . . . . . . . . . . . . . . . . . . . . . . . . . . . . . . . . .178
A list is not always a list . . . . . . . . . . . . . . . . . . . . . . . . . . . . . . . . . . .178
What is design-time data? . . . . . . . . . . . . . . . . . . . . . . . . . . . . . . . . .179
Preview a data list . . . . . . . . . . . . . . . . . . . . . . . . . . . . . . . . . . . . . . . .179
Creating a Data List component . . . . . . . . . . . . . . . . . . . . . . . . . . . 181
Design a sample record . . . . . . . . . . . . . . . . . . . . . . . . . . . . . . . . . . . 181
Convert the sample record into a Data List component . . . . . 183
Defi ne the repeated item . . . . . . . . . . . . . . . . . . . . . . . . . . . . . . . . .184
Setting data list properties . . . . . . . . . . . . . . . . . . . . . . . . . . . . . . . . 185
Size and position the bounding box . . . . . . . . . . . . . . . . . . . . . . . 185
Edit the repeated item layout . . . . . . . . . . . . . . . . . . . . . . . . . . . . .186
ptg
x CONTENTS
Edit the repeated item states . . . . . . . . . . . . . . . . . . . . . . . . . . . . . . 187
Using design-time data . . . . . . . . . . . . . . . . . . . . . . . . . . . . . . . . . . .188
Replace design-time images . . . . . . . . . . . . . . . . . . . . . . . . . . . . . .188
Edit design-time text. . . . . . . . . . . . . . . . . . . . . . . . . . . . . . . . . . . . . .190
Add and delete design-time data . . . . . . . . . . . . . . . . . . . . . . . . . . 191
Add and remove elements in the repeated item. . . . . . . . . . . . 191
Using a wireframe data list . . . . . . . . . . . . . . . . . . . . . . . . . . . . . . . .194
11 DRAWING AND EDITING ARTWORK 196
Lesson Overview . . . . . . . . . . . . . . . . . . . . . . . . . . . . . . . . . . . . . . . . .196
Flash Catalyst drawing tools . . . . . . . . . . . . . . . . . . . . . . . . . . . . . . .198
Using the rulers, guides, and grid . . . . . . . . . . . . . . . . . . . . . . . . . .199
Show and hide rulers . . . . . . . . . . . . . . . . . . . . . . . . . . . . . . . . . . . . .199
Edit grid and guide settings . . . . . . . . . . . . . . . . . . . . . . . . . . . . . . .200
Set guides for precise drawing . . . . . . . . . . . . . . . . . . . . . . . . . . . . 201
Drawing basic shapes and lines . . . . . . . . . . . . . . . . . . . . . . . . . . . 203
Preview a drawing example . . . . . . . . . . . . . . . . . . . . . . . . . . . . . . . 203
Draw rectangles . . . . . . . . . . . . . . . . . . . . . . . . . . . . . . . . . . . . . . . . . . 203
Draw rounded rectangles . . . . . . . . . . . . . . . . . . . . . . . . . . . . . . . . . 205
Draw ellipses . . . . . . . . . . . . . . . . . . . . . . . . . . . . . . . . . . . . . . . . . . . . .206
Draw basic lines . . . . . . . . . . . . . . . . . . . . . . . . . . . . . . . . . . . . . . . . . . 207
Changing stroke and fi ll . . . . . . . . . . . . . . . . . . . . . . . . . . . . . . . . . . .208
Change the fi ll color . . . . . . . . . . . . . . . . . . . . . . . . . . . . . . . . . . . . . .208
Change stroke color and weight . . . . . . . . . . . . . . . . . . . . . . . . . . . 211
Add and modify gradient fi lls . . . . . . . . . . . . . . . . . . . . . . . . . . . . . . 212
Grouping and transforming . . . . . . . . . . . . . . . . . . . . . . . . . . . . . . .214
Group objects . . . . . . . . . . . . . . . . . . . . . . . . . . . . . . . . . . . . . . . . . . . . 215
Transform shapes . . . . . . . . . . . . . . . . . . . . . . . . . . . . . . . . . . . . . . . . . 215
Size and position objects . . . . . . . . . . . . . . . . . . . . . . . . . . . . . . . . . .216
Applying and removing fi lters . . . . . . . . . . . . . . . . . . . . . . . . . . . . .216
Add and modify a bevel . . . . . . . . . . . . . . . . . . . . . . . . . . . . . . . . . . . 217

ptg
ADOBE FLASH CATALYST CS5 CLASSROOM IN A BOOK xi
Add and modify a drop shadow . . . . . . . . . . . . . . . . . . . . . . . . . . .218
Round-trip editing with Adobe Illustrator and Adobe Photoshop . . . . . . . . . . . . . . . . . . . . . . . . . . . . . . . . . . . . . . . . . . . . . . .219
Launch and edit in Adobe Illustrator . . . . . . . . . . . . . . . . . . . . . . .220
Download and install the Adobe FXG extensions for Photoshop . . . . . . . . . . . . . . . . . . . . . . . . . . . . . . . . . . . . . . . . . . . . . . . 221
Launch and edit in Adobe Photoshop . . . . . . . . . . . . . . . . . . . . . 222
12 PUBLISHING A PROJECT 226
Lesson Overview . . . . . . . . . . . . . . . . . . . . . . . . . . . . . . . . . . . . . . . . .226
Delivery options . . . . . . . . . . . . . . . . . . . . . . . . . . . . . . . . . . . . . . . . . .228
Publishing your application . . . . . . . . . . . . . . . . . . . . . . . . . . . . . . .228
Accessibility . . . . . . . . . . . . . . . . . . . . . . . . . . . . . . . . . . . . . . . . . . . . . .229
Embedding fonts . . . . . . . . . . . . . . . . . . . . . . . . . . . . . . . . . . . . . . . . .229
Before you publish . . . . . . . . . . . . . . . . . . . . . . . . . . . . . . . . . . . . . . . .229
Publish to SWF . . . . . . . . . . . . . . . . . . . . . . . . . . . . . . . . . . . . . . . . . . .230
Viewing the published fi les . . . . . . . . . . . . . . . . . . . . . . . . . . . . . . . . 231
Publishing to the web with Adobe Dreamweaver CS5 . . . . . . 235
Create a local root folder and site structure . . . . . . . . . . . . . . . . 235
Connect to a remote site . . . . . . . . . . . . . . . . . . . . . . . . . . . . . . . . . .236
Upload fi les . . . . . . . . . . . . . . . . . . . . . . . . . . . . . . . . . . . . . . . . . . . . . . .238
13 EXTENDING YOUR PROJECT USING ADOBE FLASH BUILDER 240
Lesson Overview . . . . . . . . . . . . . . . . . . . . . . . . . . . . . . . . . . . . . . . . .240
Adobe Flash Builder . . . . . . . . . . . . . . . . . . . . . . . . . . . . . . . . . . . . . . . 242
Extending the application . . . . . . . . . . . . . . . . . . . . . . . . . . . . . . . . . 242
Bind components to a data source . . . . . . . . . . . . . . . . . . . . . . . . 242
Create, Read, Update, and Delete (CRUD) . . . . . . . . . . . . . . . . . . 243
Provide a keyword search . . . . . . . . . . . . . . . . . . . . . . . . . . . . . . . . . 243
Collect user input . . . . . . . . . . . . . . . . . . . . . . . . . . . . . . . . . . . . . . . . . 243
Use sliders to set values . . . . . . . . . . . . . . . . . . . . . . . . . . . . . . . . . . . 243
Create printer controls . . . . . . . . . . . . . . . . . . . . . . . . . . . . . . . . . . . .244

ptg
xii CONTENTS
Exploring designer-developer workfl ows . . . . . . . . . . . . . . . . . .244
Linear workfl ow . . . . . . . . . . . . . . . . . . . . . . . . . . . . . . . . . . . . . . . . . .244
Iterative workfl ow . . . . . . . . . . . . . . . . . . . . . . . . . . . . . . . . . . . . . . . . 245
Preparing fi les for a developer . . . . . . . . . . . . . . . . . . . . . . . . . . . . . 245
Meet with your development team early . . . . . . . . . . . . . . . . . . 245
Use data lists and design-time data . . . . . . . . . . . . . . . . . . . . . . . .246
Name everything . . . . . . . . . . . . . . . . . . . . . . . . . . . . . . . . . . . . . . . . .246
Delete unused assets . . . . . . . . . . . . . . . . . . . . . . . . . . . . . . . . . . . . .246
Opening a Flash Catalyst project in Flash Builder . . . . . . . . . . .246
Review the fi nal Flash Catalyst project fi le (FXP) . . . . . . . . . . . .246
Import the FXP into Flash Builder . . . . . . . . . . . . . . . . . . . . . . . . . .248
Import an edited FXP fi le into Flash Builder . . . . . . . . . . . . . . . . 251
Compare and integrate code between projects . . . . . . . . . . . . 252
Importing a Flash Catalyst library fi le (FXPL) . . . . . . . . . . . . . . .254
Import the FXPL . . . . . . . . . . . . . . . . . . . . . . . . . . . . . . . . . . . . . . . . . .254
Associate the FXPL with your application . . . . . . . . . . . . . . . . . . 255
INDEX 259

ptg
ADOBE FLASH CATALYST CS5 CLASSROOM IN A BOOK 1
Flash Catalyst is a tool for designers who want to create rich application inter-
faces and interactive content without authoring a single line of code. Examples
include interactive ads, product guides, design portfolios, microsites, data-
centric rich Internet applications (RIAs), and more.
If you’re familiar with other Adobe design tools, such as Photoshop, Illustrator,
and Fireworks, then you’re going to really like the Flash Catalyst workfl ow. For
example, you can design the artwork for your Flash Catalyst project using
Photoshop, and then import the entire design document into Flash Catalyst.
Convert the artwork and other assets into interactive components, such as
navigation buttons and scroll bars. Defi ne the diff erent states, or views, of your
application. Add interactions used to transition from one page or component
state to another, link to a website, or control animation, video, and sound
eff ects. Add smooth transitions, 3D animation, and other special eff ects.
Finally, publish your project to the web or as an Adobe AIR desktop application.
Flash Catalyst is a great tool for quickly producing interactive application
prototypes using a collection of built-in wireframe components.
Flash Catalyst also allows you to work more effi ciently with developers who use
Adobe Flash Builder 4 (formerly Flex Builder) and the Adobe Flex 4 Software
Development Kit (SDK). You design the functional user experience in Flash
Catalyst and then provide the project fi le to developers who use Flash Builder
to add additional functionality and integration with data and services.
With the introduction of Flash Catalyst, you now have complete control over
the integrity of your original artwork and design vision when producing inter-
active content.
About Classroom in a BookAdobe Flash Catalyst CS5 Classroom in a Book is part of the offi cial train-
ing series for the Adobe Flash platform. Th e lessons are designed so that you
can learn at your own pace. If you’re new to Flash Catalyst, you’ll learn the
fundamental concepts and features you’ll need to accomplish a wide range of
techniques covered in the book, but also gain enough understanding of the
application to be able to learn additional techniques on your own. If you’ve
GETTING STARTED
ptg
2 GETTING STARTED
already started working with Flash Catalyst, you’ll fi nd that Classroom in a Book
teaches advanced features, including tips and technique and best practices.
Although each lesson provides step-by-step instructions for completing specifi c
skills, and each lesson builds upon the previous lessons, there is room for experi-
mentation. You can follow the book from start to fi nish, or do only the lessons that
match your interests and needs. Each lesson concludes with a review section sum-
marizing what you’ve covered.
PrerequisitesBefore you begin to use Adobe Flash Catalyst CS5 Classroom in a Book, make sure
that your system is set up correctly and that you’ve installed the required software.
You should know how to use the mouse and standard menus and commands, and
also how to open, save, and close fi les. If you need to review these techniques, see
the printed or online documentation included with your Microsoft Windows or
Apple Mac OS software.
Th is book is intended for any designer who produces interactive content for the
web or desktop. You will have more success with Flash Catalyst if you are already
familiar with Adobe Illustrator, Adobe Photoshop, or Adobe Fireworks, and have a
basic understanding of structuring artwork using layers and groups.
Th is book assumes no programming experience. If you are a designer wishing to
learn Flash Catalyst, but perhaps are a little daunted by code, this book is for you.
Installing Flash CatalystYou must purchase the Adobe Flash Catalyst CS5 software either as a stand-alone
application or as part of Adobe Creative Suite. By default, Flash Player 10, Adobe
Media Encoder CS5, Adobe AIR, and Adobe Media Player are installed along with
Flash Catalyst. For system requirements and complete instructions on installing the
Flash Catalyst software, see the ReadMe.pdf fi le on the application DVD.
Install Flash Catalyst from the Adobe Flash Catalyst CS5 application DVD onto your
hard disk. You cannot run the program from the DVD. Follow the onscreen instruc-
tions. Make sure that your serial number is accessible before installing the application.
You can fi nd the serial number on the registration card or on the back of the DVD case.
Optimizing performanceFlash Catalyst CS5 requires a minimum of 1 GB of RAM; 2 GB is highly recom-
mended. Th e more RAM available to Flash Catalyst, the faster the application will
work for you. A 1024 x 768 minimum display, with 16-bit or greater video card, is
required; a 1280 x 800 or greater display is recommended.
ptg
ADOBE FLASH CATALYST CS5 CLASSROOM IN A BOOK 3
Checking for updatesAdobe periodically provides updates to software. You can easily obtain these
updates through Adobe Updater, as long as you have an active Internet connection.
1 In Flash Catalyst CS5, choose Help > Update. Th e Adobe Application Manager
automatically checks for updates available for your Adobe software.
2 In the Adobe Application Manager dialog box, select and download the updates
you want to install. A message tells you if your application is already up to date.
If the application is up to date, click Quit to close the Application Manager
dialog box and return to Flash Catalyst.
Flash Player versionTh e lessons in this book are created to work with Flash Player 10 or higher. Th e
applications you will develop using Flash Catalyst are deployed as SWF fi les (the
Flash Player fi le format) and viewed using a browser with Flash Player 10. For infor-
mation on Flash Player version penetration visit:
www.adobe.com/products/player_census/fl ashplayer
In Lesson 12, you will publish a project as an Adobe AIR application for deploying
to the desktop. When you install and play the AIR application, you may be required
to install or update your version of the Adobe AIR runtime.
Copying the lesson fi lesTh roughout the lessons in this book, you’ll be working with several interactive
applications. Flash Catalyst application projects are stored within a single FXP
fi le. Most of the lessons use additional resources such as audio, video, image, and
text fi les. To complete the lessons in this book, you must copy these fi les from the
Adobe Flash Catalyst CS5 Classroom in a Book CD (located inside the back cover of
this book) to your computer.
Copy the Lessons folder (which contains folders named Lesson01, Lesson02, and so
on) from the Adobe Flash Catalyst CS5 Classroom in a Book CD onto your com-
puter by dragging it to your hard drive.
When you begin each lesson, you will be instructed where to navigate within the
Lessons folder to fi nd all the assets you need to complete the lesson.
If you have limited storage space on your computer, you can copy each Lesson
folder individually as you need it and delete it afterward if desired. Some lessons
build on preceding lessons, but even then, the assets in each lesson folder are self-
contained and don’t require materials from other lesson folders. You do not have to
save any fi nished project if you don’t want to or if you have limited hard disk space.
� Note: To set your preferences for future updates, click Preferences in the dialog box. Select which applications to update automatically and how you would like to be informed when new updates are available. Click Done to accept the new settings.
ptg
4 GETTING STARTED
How to use these lessonsEach lesson in this book provides step-by-step instructions for creating portions of
a project that illustrates essential Flash Catalyst techniques. Some lessons build on
projects created in preceding lessons; others stand alone. All the lessons build on each
other in terms of concepts and skills, so the best way to learn from this book is to
proceed through the lessons in sequential order. Some techniques and processes
are explained and described in detail only the fi rst few times you perform them. Many
of the most essential processes are repeated throughout the exercises so that you can
build a familiarity as well as a level of comfort with the basic tools in the language.
Each of the lesson folders contains the fi les that you will use to complete the lesson.
Some of the lessons also include other fi les and folders with media and resources
needed to complete the lesson’s project. Be sure to keep each folder’s content together.
Standard elements in the bookBoldface text: Words that appear in boldface indicate text that you must type
while working through the steps in the lessons.
Italicized text: Words that appear in italics are either for emphasis or are new
vocabulary.
Menu commands and keyboard shortcuts: Menu commands are shown with
angle brackets between the menu names and commands: Menu > Command >
Subcommand. Keyboard shortcuts are shown with a dash between the names of
keys to indicate that you should press the keys simultaneously; for example, Ctrl-
Enter means that you should press the Ctrl and Enter keys at the same time.
Windows and Mac commands and keystrokes: When the commands or keys
required to complete a task are diff erent in the Windows and Mac operating
systems, the commands or keys are separated by a forward slash. Th e fi rst key
or command listed is for Windows and the second one is for Mac. For example:
Click Open and then click Select/Choose.
Additional resourcesAdobe Flash Catalyst CS5 Classroom in a Book is not meant to replace documen-
tation that comes with the program or to be a comprehensive reference for every
feature. Only the commands and options used in the lessons are explained in this
book. For comprehensive information about program features and tutorials, refer
to these resources:
Adobe Community Help: Community Help brings together active Adobe product
users, Adobe product team members, authors, and experts to give you the most useful,
� Tips: Alternative ways to perform tasks and suggestions to consider when applying the skills you are learning.
� Notes: Additional background informa-tion to expand your knowledge and advanced techniques you can explore to further develop your skills.
ptg
ADOBE FLASH CATALYST CS5 CLASSROOM IN A BOOK 5
relevant, and up-to-date information about Adobe products. Whether you’re looking
for a code sample or an answer to a problem, have a question about the software,
or want to share a useful tip or recipe, you’ll benefi t from Community Help. Search
results will show you not only content from Adobe, but also from the community.
With Adobe Community Help you can:
• Access up-to-date defi nitive reference content online and offl ine
• Find the most relevant content contributed by experts from the Adobe
community, on and off Adobe.com
• Comment on, rate, and contribute to content in the Adobe community
• Download Help content directly to your desktop for offl ine use
• Find related content with dynamic search and navigation tools
To access Community Help: If you have any Adobe CS5 product, then you already
have the Community Help application. To invoke Help, choose Help > Flash
Catalyst Help. Th is companion application lets you search and browse Adobe and
community content, plus you can comment on and rate any article just like you
would in the browser. However, you can also download Adobe Help and language
reference content for use offl ine. You can also subscribe to new content updates
(which can be automatically downloaded) so that you’ll always have the most up-
to-date content for your Adobe product at all times. You can download the applica-
tion from www.adobe.com/support/chc/index.html
Adobe content is updated based on community feedback and contributions. You
can contribute in several ways: add comments to content or forums, including links
to web content; publish your own content using Community Publishing; or contrib-
ute Cookbook Recipes. Find out how to contribute: www.adobe.com/community/
publishing/download.html
See http://community.adobe.com/help/profi le/faq.html for answers to frequently
asked questions about Community Help.
Adobe Flash Catalyst Help and Support: www.adobe.com/support/Flash Catalyst
is where you can fi nd and browse Help and Support content.
Adobe TV: http://tv.adobe.com is an online video resource for expert instruction
and inspiration about Adobe products, including a How To channel to get you
started with your product.
Adobe Design Center: www.adobe.com/designcenter off ers thoughtful articles
on design and design issues, a gallery showcasing the work of top-notch designers,
tutorials, and more.
Adobe Developer Connection: www.adobe.com/devnet is your source for techni-
cal articles, code samples, and how-to videos that cover Adobe developer products
and technologies.
ptg
6 GETTING STARTED
Resources for educators: www.adobe.com/education includes three free curricu-
lums that use an integrated approach to teaching Adobe software and can be used
to prepare for the Adobe Certifi ed Associate exams.
Adobe Forums: http://forums.adobe.com lets you tap into peer-to-peer discus-
sions, questions, and answers on Adobe products.
Adobe Marketplace & Exchange: www.adobe.com/cfusion/exchange is a central
resource for fi nding tools, services, extensions, code samples, and more to supple-
ment and extend your Adobe products.
Adobe Flash Catalyst CS5 product home page: www.adobe.com/products/Flash
Catalyst
Adobe Labs: http://labs.adobe.com gives you access to early builds of cutting-edge
technology, as well as forums where you can interact with the Adobe develop-
ment teams building that technology and with other like-minded members of the
community.
Adobe certifi cationTh e Adobe training and certifi cation programs are designed to help Adobe custom-
ers improve and promote their product-profi ciency skills. Th ere are four levels of
certifi cation:
• Adobe Certifi ed Associate (ACA)
• Adobe Certifi ed Expert (ACE)
• Adobe Certifi ed Instructor (ACI)
• Adobe Authorized Training Center (AATC)
Th e Adobe Certifi ed Associate (ACA) credential certifi es that individuals have the
entry-level skills to plan, design, build, and maintain eff ective communications
using diff erent forms of digital media.
Th e Adobe Certifi ed Expert program is a way for expert users to upgrade their
credentials. You can use Adobe certifi cation as a catalyst for getting a raise, fi nding
a job, or promoting your expertise.
If you are an ACE-level instructor, the Adobe Certifi ed Instructor program takes
your skills to the next level and gives you access to a wide range of Adobe resources.
Adobe Authorized Training Centers off er instructor-led courses and training
on Adobe products, employing only Adobe Certifi ed Instructors. A directory of
AATCs is available at http://partners.adobe.com.
For information on the Adobe Certifi ed programs, visit www.adobe.com/support/
certifi cation/main.html.
ptg
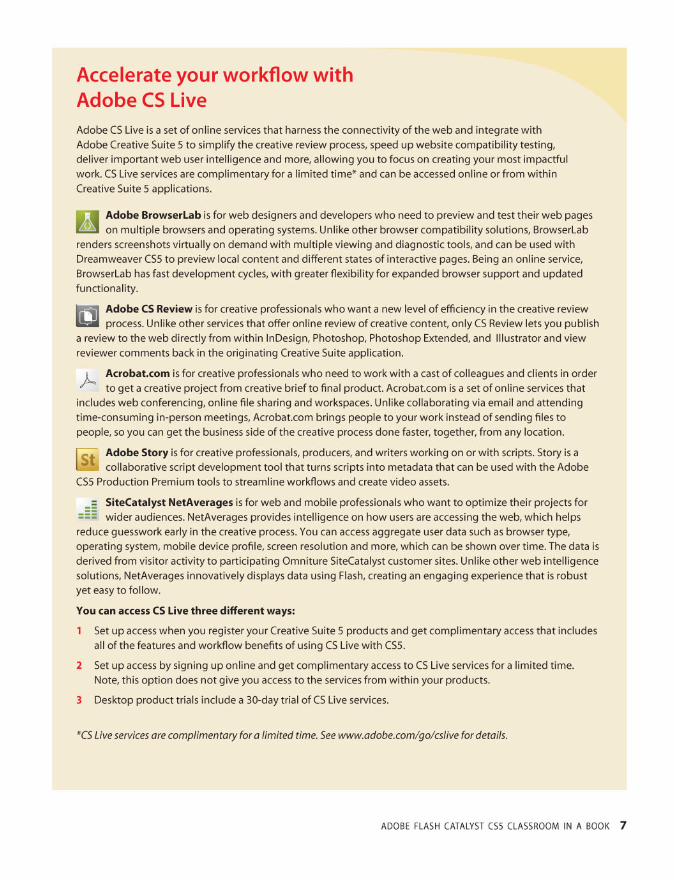
Accelerate your workflow withAdobe CS LiveAdobe CS Live is a set of online services that harness the connectivity of the web and integrate withAdobe Creative Suite 5 to simplify trie creative review process, speed up website compatibility testing,deliver important web user intelligence and more, allowing you to focus on creating your most impactfulwork. CS Live services are complimentary for a limited time* and can be accessed online or from withinCreative Suite 5 applications.
Adobe BrowserLab is for web designer; and developers who need to preview and test their web pageson multiple browsers and operating systems. Unlike other browser compatibility solutions, BrowserLab
renders screenshots virtually on demand with multiple viewing and diagnostic tools, and can be used withDreamweaver CSS to preview local content and different states of interactive pages. Being an online service,BrowserLab has fast development cycles, with greater flexibility for expanded browser support and updatedfunctionality.
|J=a Adobe CS Review is for creative professionals who want a new level of efficiency in the creative reviewIBB process. Unlike other services that offer online review of creative content, onlyCS Review lets you publisha review to the web directly from within InDesign, Photoshop, Photoshop Extended, and Illustrator and viewreviewer comments back in the originating Creative Suite application.
Acrobat.com is for creative professionals who need to work with a cast of colleagues and clients in orderto get a creative project from creative brief to final product.Acrobat.com is a set of online service; that
includes web conferencing, online file sharing and workspaces. Unlike collaborating via email and attendingtime-consuming in-person meetings, Acrobat.com brings people to your work instead of sending files topeople, so you can get the business side of the creative process done faster, together, from any location.
Adobe Story is for creative professionals, producers, and writer; working on or with scripts. Story is acollaborative script development tool that turns scripts into metadata that can be used with the Adobe
CSS Production Premium tools to streamline workflows and create video assets.
SiteCatalyst NetAverages i; for web and mobile professionals who want to optimize their projects forwider audiences. NetAverage; provides intelligence on how user; are acce;;ing the web, which help;
reduce guesswork early in the creative process. You can acces; aggregate user data such as browser type,operating system, mobile device profile, screen resolution and more, which can be shown over time. The data isderived from visitor activity to participating Omniture SiteCatalyst customer sites. Unlike other web intelligencesolutions, NetAverages innovatively displays data using Flash, creating an engaging experience that is robustyet easy to follow.
You can access CS Live three different ways:
1 Set up access when you register your Creative Suite 5 product; and get complimentary access that includesall of the features and workflow benefit; of using CS Live with CS5.
2 Set up access by signing up online and get complimentary access to CS Live services for a limited time.Note, this option doe; not give you acces; to the services from within your products.
3 Desktop product trials include a 30-day trial of CS Live services.
*C5 Live services are complimentary for a limited time. See www.adobe.com/go/cslive for derails.
ADOBE FLASH CATALYST C55 CLASSROOM IN A BOOK 7
ptg
8
1 GETTING TO KNOW ADOBE FLASH CATALYST CS5
Lesson OverviewUsing Adobe Flash Catalyst CS5, you can produce beautifully designed
and highly interactive content for the web or desktop without author-
ing any code. Th is lesson introduces you to some of the key features
and benefi ts of Flash Catalyst. You will explore the basic layout of the
Flash Catalyst Design workspace, open a new project fi le, and preview
a completed project.
You’ll learn how to do the following:
• Open a new Flash Catalyst project
• Set dimensions and background color
• Switch between the Design and Code workspaces
• Find your way around the Design workspace
• Show and hide workspace panels
• Zoom and pan the artboard
• Open an existing project fi le
• Preview a project in a browser
• Find additional help documents, demos, and tutorials online
Th is lesson will take about 50 minutes to complete. Copy the Lesson01
folder into the lessons folder that you created on your hard drive for
these projects (or create it now), if you haven’t already done so. As you
work on this lesson, you won’t be preserving the start fi les; if you need
to restore the start fi les, copy them from the Adobe Flash Catalyst CS5
Classroom in a Book CD.

ptg
9
Throughout this course, you will learn the skills needed to build a wide range of rich Internet applica-tions. Two examples used in this course include an online restaurant guide, and its companion interactive banner ad, both shown above.

ptg
10 LESSON 1 Getting to Know Adobe Flash Catalyst CS5
About Flash CatalystFlash Catalyst empowers designers with complete control over the integrity of their
artwork and design when producing interactive content. A common challenge for
many designers is handing off static artwork and describing the user experience to
developers. Much of their original vision is left to interpretation and sometimes lost
to the limitations of data-centric development tools.
Using Flash Catalyst, designers can quickly transform their original artwork created
in Adobe Photoshop, Adobe Illustrator, and Adobe Fireworks into fully functioning
interactive applications, without writing a single line of code.
Is Flash Catalyst the right tool for you?Flash Catalyst is intended for any designer who produces interactive content for the
web or desktop. Th ese designers include:
Interactive web designers and interaction designers are responsible for the visual
design of interactive experiences.
Information architects create high-level interaction models for various media.
Sometimes this task involves the need to quickly produce rough wireframes for the
creative process.
Graphic designers and creative directors generate original artwork and interac-
tive elements for a wide range of applications.
Rich Internet application developers work with Flash Catalyst project fi les to add
advanced data-centric functionality.
Rich Internet applicationsWhether conducting research, doing business, or purely seeking entertainment, people have come to expect a higher quality of content when surfi ng the web. Viewer engagement is also critical to transforming viewers into active advocates for products, brands, movements, ideas, and so on. The good news is that this has led to greater collaboration between designers and developers and to more exciting and eff ective content on the web. These highly interactive and engaging applications are often referred to as rich Internet applications, or RIAs.
Building RIAs with Flash Catalyst produces highly visual, interactive, and reliable cross-platform content. Adobe Flash Player reaches 98% of Internet-enabled desk-tops and more than 450 million devices, off ering greater reach than any other client technology available. You can also use Flash Catalyst to publish Adobe AIR applica-tions. AIR leverages the power of Flash Player while adding the capability to deploy RIAs directly to the desktop.

ptg
ADOBE FLASH CATALYST CS5 CLASSROOM IN A BOOK 11
Key featuresFlash Catalyst off ers tremendous power, including some key features.
• Design using your favorite Adobe Creative Suite applications. Flash Catalyst
off ers a fast learning curve by leveraging what you already know in Photoshop,
Illustrator, and Fireworks.
• Import and store images, video, sound, and Adobe Flash (SWF) content in the
project library.
• Place objects in the exact location you want them to appear with pixel-level
accuracy consistently across operating systems and devices.
• Quickly transform artwork into interactive components, such as buttons,
check boxes, lists, and scroll bars.
• Create interactive forms using built-in components like text input and
check boxes.
• Add interactions that defi ne the behavior of components, such as what happens
when someone clicks a button, or when predefi ned conditions are met.
• Add smooth animated transitions between pages or the diff erent states (views) of
a component with the click of a button.
• Round-trip edit graphics using Photoshop and Illustrator right from within the
Flash Catalyst workspace.
• Create vector artwork directly in Flash Catalyst using the built-in drawing tools.
• Convert artwork into a data list that has a variable number of items or rows. Th e
records in your data list can include images, text, or both.
• Use built-in wireframe components to create interactive prototypes.
• Publish accessible projects that are ready to deploy to the web or desktop.
Additional benefi ts for designersDesigners enjoy some additional benefi ts.
• Sell your ideas by showing functional designs rather than static screens.
• Ensure that your creative vision is accurately expressed.
• Work more effi ciently when collaborating with developers to build rich Internet
applications.

ptg
12 LESSON 1 Getting to Know Adobe Flash Catalyst CS5
Flash Catalyst design workfl owTh ere are two main types of Flash Catalyst applications. Th ese applications include
microsites and data-centric applications. You can think of a microsite as an appli-
cation that is complete when published in Flash Catalyst. No additional develop-
ment is required. A data-centric application requires additional development, such
as integrating components with external data or web services. A Flex developer
completes the development using Adobe Flash Builder. You’ll learn more about
data-centric applications later in this course. As when creating any project, fol-
lowing a consistent workfl ow helps in project management. Th e workfl ows for
designing microsites and data-centric applications are similar. Both include these
general steps.
Plan the application.
Begin with a detailed project
specifi cation. Th is specifi cation
describes each page or screen,
including user navigation, the artwork on each page, interactive components, and
the diff erent states of each component.
Create or acquire assets, such as artwork, video, and sound.
Create the artwork, video, and sound for the application. You can create a layered
design document in Photoshop, Illustrator, or Fireworks.
Bring assets into Flash Catalyst.
Import the design document you created in Photoshop, Illustrator, or Fireworks.
Bring additional graphic fi les and assets, such as video, sound, and animated content
published in the SWF fi le format. SWF fi les can be used to deliver static and ani-
mated vector graphics, text, video, and sound. For data-centric components, such as
a data list, import a representative sample of the data (text or images).
Create and modify pages.
A Flash Catalyst project typically begins with one page state. Duplicate this page or
add pages according to the project specifi cation. Show and hide the artwork in each
page state to create the diff erent pages or screens of your application. You can also
use other assets that you’ve imported, such as video.
Create interactive components.
Convert your original artwork to interactive components, such as buttons, scroll
bars, panels, and lists. Or use Flash Catalyst wireframe components to quickly add
common elements with a generic appearance. You can design custom components
for behaviors that you can’t capture with the built-in components. Some designers
prefer to create components before adding new page states. Adding pages and creat-
ing components are interchangeable steps.
Create interfaceartwork
Interactiondesign
SWF AIRPublish
� Note: If you import an Illustrator fi le with multiple artboards, each artboard is added to a diff erent page state in Flash Catalyst. You can also import individual Photoshop Layer Comps directly to separate page states in Flash Catalyst.

ptg
ADOBE FLASH CATALYST CS5 CLASSROOM IN A BOOK 13
Defi ne component states.
Components can have multiple states, such as the up, over, down, and disabled
states of a button. Create or modify the diff erent states of each interactive compo-
nent, according to your project specifi cation.
Defi ne interactions and transitions.
Add interactions that defi ne what happens as users interact with the application.
For example, you can add interactions that transition from one page or component
state to another when a user clicks a button. You can also add interactions that
play animation, control video playback, or open another web page. Using the Flash
Catalyst Timelines panel, you can quickly change the timing and appearance of the
animated transitions between pages and component states.
Test and publish the project.
Run the application in a browser, and then publish the project as a web or desk-
top application. Or, save the project fi le (FXP) for further development in Adobe
Flash Builder.
The Adobe Flash PlatformThe Adobe Flash Platform includes a collection of integrated Adobe technologies for designing, creating, deploying, and viewing rich Internet applications, content, and video to the widest possible audience.
Adobe Flash Catalyst CS5 is an interaction design tool used to rapidly create expressive interfaces and interactive content without writing code.
Adobe Flash Builder is an integrated development environment (IDE) for developing cross-platform data-centric content. Developers create entire
applications using Flash Builder, or import a project created using Flash Catalyst and then use Flash Builder to connect the application to data and web services.
Adobe Flex is the open-source framework for both Flash Catalyst and Flash Builder.
Adobe Flash Professional CS5 is an interactive multimedia content author-ing environment for designers and developers who want pixel-perfect
typographic fi delity and layout, more realistic animation eff ects, and code author-ing. Content created in Flash Professional can be imported into Flash Catalyst projects as SWF fi les.
Adobe Flash Player is a cross-platform browser plug-in that delivers rich web experiences. Flash Player must be installed to view content created in
Flash Catalyst, Flash Builder, and Flash Professional.
The Adobe AIR runtime lets developers build rich Internet applications that run on the desktop, without a browser or Internet connection. You can
publish a Flash Catalyst project as an Adobe AIR application.

ptg
14 LESSON 1 Getting to Know Adobe Flash Catalyst CS5
Adobe Flex framework and MXMLThe applications you build with Flash Catalyst are Flex applications. Flex is an open-source framework for building and deploying applications that run on all major web browsers, desktops, and operating systems. MXML is the language developers use to defi ne the layout, appearance, and behaviors in Flex applications. ActionScript 3.0 is the language used to defi ne the client-side application logic. When you publish a Flash Catalyst project, your MXML and ActionScript are compiled as a SWF fi le.
Flex includes a prebuilt class library and application services. These services include data binding, drag-and-drop management, interface layout, and animation for things like smooth page transitions. The Flex component library includes interface controls such as simple buttons, check boxes, data grids, and rich text editors.
The Flex compiler is available as a stand-alone utility in the Adobe Flex 4 software development kit (SDK), or as part of the Adobe Flash Builder software. Design and development can occur in Flash Catalyst, Flash Builder, or an integrated develop-ment environment (IDE) of your choice.
Opening a new Flash Catalyst projectWhen you fi rst start Flash Catalyst, you are presented with the Welcome screen.
From the Welcome screen, you can open an existing project, create a new blank
project, or create a new project from a design fi le.
1 Start Flash Catalyst.
2 In the Create New Project section of the Welcome screen, choose Adobe Flash
Catalyst Project.

ptg
ADOBE FLASH CATALYST CS5 CLASSROOM IN A BOOK 15
Th e New Project dialog box opens and is where
you name the project and enter values for the
size and color of the artboard.
3 Enter a name for the project.
4 Set the width, height, and color, and click OK.
A new blank project opens. By default, the
Design workspace is open.
Finding your way aroundTh e Flash Catalyst user interface has two workspaces. Th ese workspaces include
Design and Code. Each workspace contains its own set of panels and tools.
Design workspaceTh e Design workspace shows a graphical representation of your application. Th is
workspace includes the panels and tools used to create and edit projects.
Search fi eld
Workspace menu
Artboard
Tools panel
Heads-Up Display (HUD)
Breadcrumbs bar
Workspace menu
Use the Workspace menu to toggle between the Design and Code workspaces.
� Tip: If you already have a project open, choose File > New Project to begin a new blank project.

ptg
16 LESSON 1 Getting to Know Adobe Flash Catalyst CS5
Artboard
Th e artboard represents what users see when they view the published application.
Th e artboard is where you place artwork, interactive components, and other objects
that make up the application interface.
Pages/States panel
Th e Pages/States panel displays a thumbnail for each page in the application. If a
component is selected, it shows the diff erent states for the selected component. You
can duplicate, remove, add, and rename pages and component states according to
your project specifi cation.
Tools panel
Th e Tools panel includes tools for creating, selecting, and transforming objects,
including simple lines, shapes, and text.
Layers panel
Th e Layers panel is an organized collection of the objects in the application (art-
work, components, video, and so on). If you import a design document created in
Illustrator, Photoshop, or Fireworks, the original layer structure is preserved. As
you add pages and component states to the application, you use the Layers panel to
show or hide objects in each state.
Library panel
Th e Library panel displays the entire list of reusable assets (components, images,
media, and optimized graphics) available in the project, including objects that do
not appear in any page or state.
Wireframe Components panel
Th e Wireframe Components panel includes ready-to-use interactive components
with a simple default appearance. You can drag these components to the artboard
and use them “as is” or modify them to fi t the appearance of your application.
Interactions panel
You can use the Interactions panel to add interactions that defi ne what happens as
users interact with the application.
Timelines panel
Th e Timelines panel provides controls for creating and editing transitions and
action sequences. You can also use the Timelines panel to control the playback of
video and SWF content, and to add sound eff ects.
ptg
ADOBE FLASH CATALYST CS5 CLASSROOM IN A BOOK 17
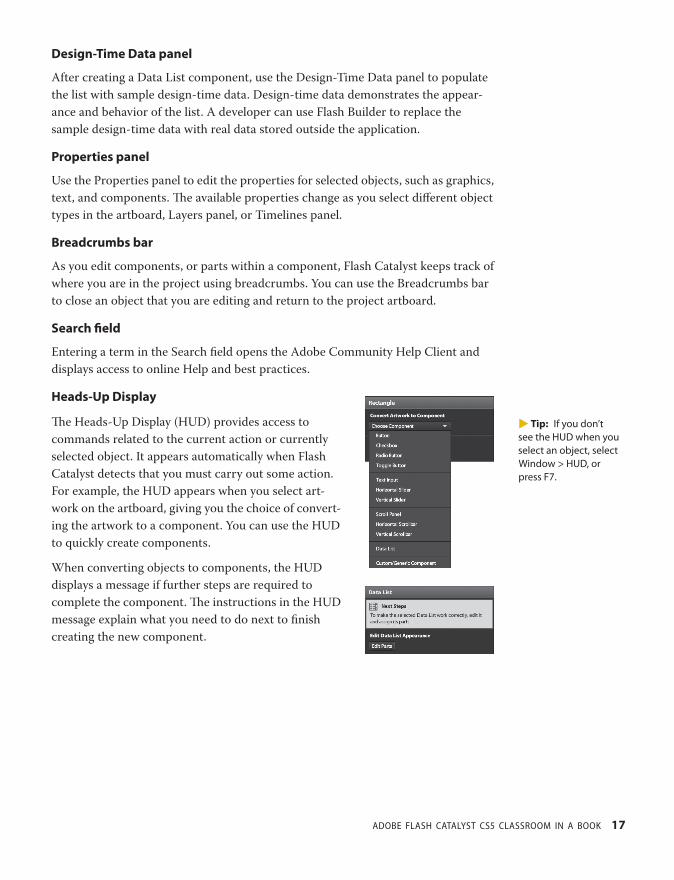
Design-Time Data panel
After creating a Data List component, use the Design-Time Data panel to populate
the list with sample design-time data. Design-time data demonstrates the appear-
ance and behavior of the list. A developer can use Flash Builder to replace the
sample design-time data with real data stored outside the application.
Properties panel
Use the Properties panel to edit the properties for selected objects, such as graphics,
text, and components. Th e available properties change as you select diff erent object
types in the artboard, Layers panel, or Timelines panel.
Breadcrumbs bar
As you edit components, or parts within a component, Flash Catalyst keeps track of
where you are in the project using breadcrumbs. You can use the Breadcrumbs bar
to close an object that you are editing and return to the project artboard.
Search fi eld
Entering a term in the Search fi eld opens the Adobe Community Help Client and
displays access to online Help and best practices.
Heads-Up Display
Th e Heads-Up Display (HUD) provides access to
commands related to the current action or currently
selected object. It appears automatically when Flash
Catalyst detects that you must carry out some action.
For example, the HUD appears when you select art-
work on the artboard, giving you the choice of convert-
ing the artwork to a component. You can use the HUD
to quickly create components.
When converting objects to components, the HUD
displays a message if further steps are required to
complete the component. Th e instructions in the HUD
message explain what you need to do next to fi nish
creating the new component.
� Tip: If you don’t see the HUD when you select an object, select Window > HUD, or press F7.
ptg
18 LESSON 1 Getting to Know Adobe Flash Catalyst CS5
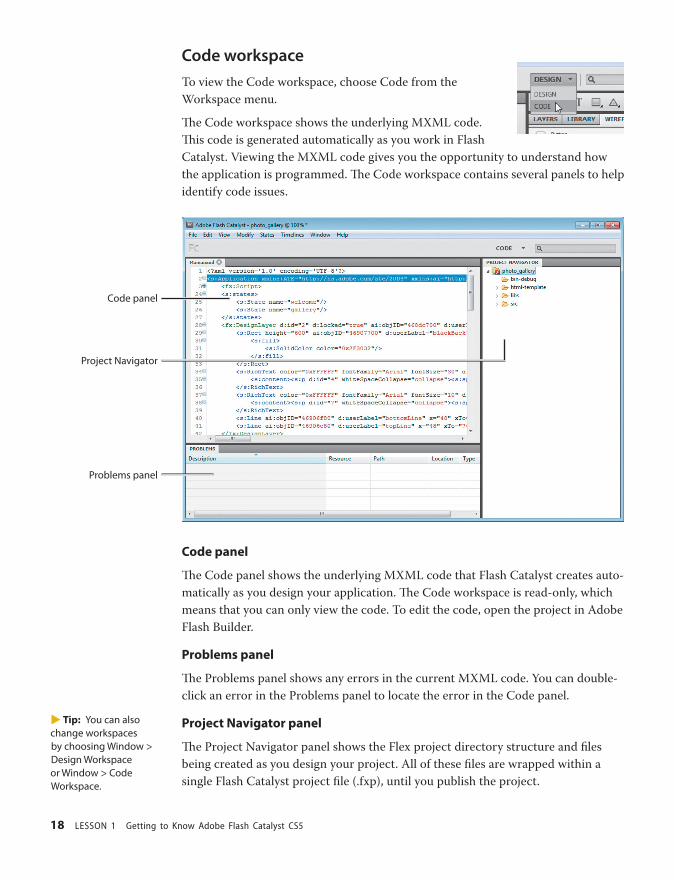
Code workspaceTo view the Code workspace, choose Code from the
Workspace menu.
Th e Code workspace shows the underlying MXML code.
Th is code is generated automatically as you work in Flash
Catalyst. Viewing the MXML code gives you the opportunity to understand how
the application is programmed. Th e Code workspace contains several panels to help
identify code issues.
Code panel
Project Navigator
Problems panel
Code panel
Th e Code panel shows the underlying MXML code that Flash Catalyst creates auto-
matically as you design your application. Th e Code workspace is read-only, which
means that you can only view the code. To edit the code, open the project in Adobe
Flash Builder.
Problems panel
Th e Problems panel shows any errors in the current MXML code. You can double-
click an error in the Problems panel to locate the error in the Code panel.
Project Navigator panel
Th e Project Navigator panel shows the Flex project directory structure and fi les
being created as you design your project. All of these fi les are wrapped within a
single Flash Catalyst project fi le (.fxp), until you publish the project.
� Tip: You can also change workspaces by choosing Window > Design Workspace or Window > Code Workspace.

ptg
ADOBE FLASH CATALYST CS5 CLASSROOM IN A BOOK 19
Opening an existing Flash Catalyst projectTo help you understand the structure and layout of a typical Flash Catalyst project,
here’s a sample application fi le that includes multiple page states and various inter-
active components.
Th e example used here is an interactive restaurant guide.
1 Choose File > Open Project and browse to the Lesson01 folder from the CD.
2 Select the RIA.fxp fi le, and click Open.
Th is project includes three main page states named Start, Home, and SubPages.
Exploring the Design workspaceAs you build your application in Flash Catalyst, you’ll need to navigate the Design
workspace. You’ll fi nd it helpful to rearrange the workspace as you perform various
tasks. For example, you may want to close or resize one panel to see more of another
one. You can also view the entire artboard to get the big picture, and then quickly
zoom in extremely close for precise editing.
You should still have the RIA.fxp fi le open.
� Note: Flash Catalyst projects have the .fxp fi lename extension.
� Tip: You have a couple of other ways to open an existing Flash Catalyst project.• You can choose
Open Project in the Welcome screen.
• You can use the keyboard shortcut Ctrl+O/Command+O.

ptg
20 LESSON 1 Getting to Know Adobe Flash Catalyst CS5
Moving around the workspaceMost projects include more than one page. You can move from one page to another
by using the Pages/States panel. Some panels share the same screen space. To use a
panel, click its tab to bring it to the foreground.
1 Click the Wireframe Components panel tab to bring it to the foreground.
2 Click the Layers panel tab to bring it to the foreground.
3 In the Pages/States panel, click the picture (not the name) for the Home page.
Th e contents of the Home page are shown in the artboard.
4 Click through each of the three pages in the Pages/States panel to view the
various images, components, text, and video. As you move from page to page,
pay attention to the Layers panel and to how the assets on each page are
organized. Notice that some layers are hidden, while others are visible.
Adjusting panelsMany panels share the same location in the workspace, and sometimes a panel
needs to be stretched to see more of its contents.
You can resize a panel by dragging its borders.
You can also double-click a panel tab to collapse
or expand the entire panel or panel group.
1 Click the Layers panel to select it.
Th e project includes several layers, but some
of these layers may not be visible.
2 Position the pointer along the gray border
between the Interactions panel and the
Layers panel.
Th e pointer changes to a two-headed arrow.
3 Drag the border down to make more room for
the Layers panel above it.
You can also drag the border between the artboard and the panels on the right,
or the Timelines and Design-Time Data panels below.
4 Double-click the Timelines panel tab.
Th e Timelines and Design-Time Data panels collapse (or expand if they were
already collapsed).
Double-clicking an open panel collapses the entire panel, along with any other
panels that share the same location in the workspace.
ptg
ADOBE FLASH CATALYST CS5 CLASSROOM IN A BOOK 21
5 Double-click the Timelines panel tab again to reopen it.
6 Choose Window > Hide All Panels (or press the F4 key).
Hiding all panels is helpful when you need more space to view the artboard.
7 Choose Window > Show All Panels (F4) to unhide the panels.
8 Choose Window > Reset Workspace and click OK to return the workspace to its
default settings.
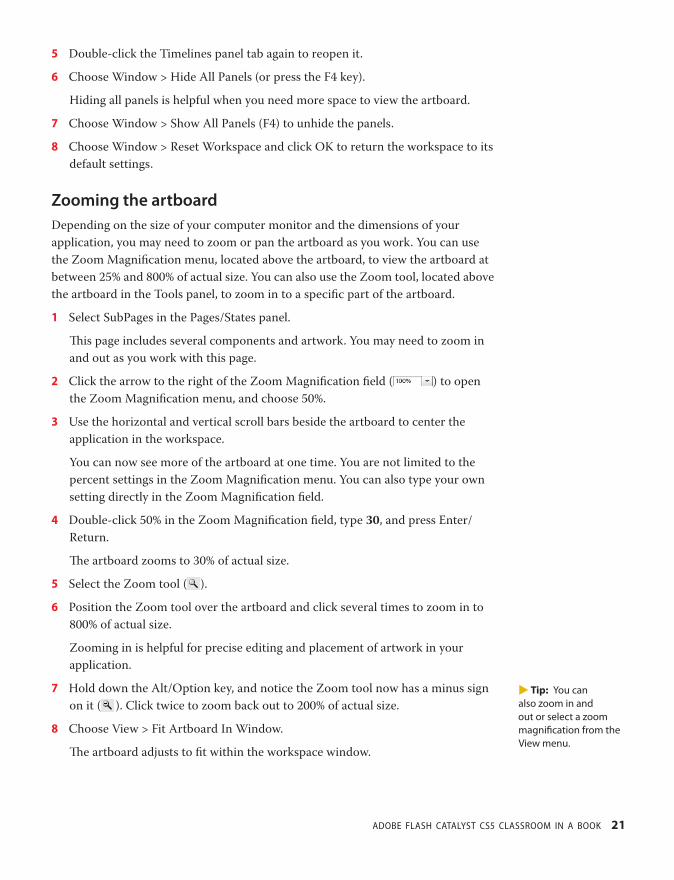
Zooming the artboardDepending on the size of your computer monitor and the dimensions of your
application, you may need to zoom or pan the artboard as you work. You can use
the Zoom Magnifi cation menu, located above the artboard, to view the artboard at
between 25% and 800% of actual size. You can also use the Zoom tool, located above
the artboard in the Tools panel, to zoom in to a specifi c part of the artboard.
1 Select SubPages in the Pages/States panel.
Th is page includes several components and artwork. You may need to zoom in
and out as you work with this page.
2 Click the arrow to the right of the Zoom Magnifi cation fi eld ( ) to open
the Zoom Magnifi cation menu, and choose 50%.
3 Use the horizontal and vertical scroll bars beside the artboard to center the
application in the workspace.
You can now see more of the artboard at one time. You are not limited to the
percent settings in the Zoom Magnifi cation menu. You can also type your own
setting directly in the Zoom Magnifi cation fi eld.
4 Double-click 50% in the Zoom Magnifi cation fi eld, type 30, and press Enter/
Return.
Th e artboard zooms to 30% of actual size.
5 Select the Zoom tool ( ).
6 Position the Zoom tool over the artboard and click several times to zoom in to
800% of actual size.
Zooming in is helpful for precise editing and placement of artwork in your
application.
7 Hold down the Alt/Option key, and notice the Zoom tool now has a minus sign
on it ( ). Click twice to zoom back out to 200% of actual size.
8 Choose View > Fit Artboard In Window.
Th e artboard adjusts to fi t within the workspace window.
� Tip: You can also zoom in and out or select a zoom magnifi cation from the View menu.

ptg
22 LESSON 1 Getting to Know Adobe Flash Catalyst CS5
Panning the artboardYou may fi nd it helpful to pan (move right and left) the artboard, as an alternative to
scrolling. Th is is especially helpful when zoomed in close. You can pan the artboard
using the Hand tool, which is located above the artboard and in the Tools panel.
1 Select the Hand tool ( ).
2 Using the Hand tool, drag to view a diff erent part of the artboard.
You can also pan the artboard by moving the scroll bars, but by using the Hand
tool you can do this in one step.
Previewing a project in a browserBefore publishing a project, you can run and test the application in a web browser.
Th is is something you will do often when creating projects in Flash Catalyst.
You should still have the RIA.fxp fi le open.
1 Choose File > Run Project, or press Ctrl+Enter/Command+Return.
Flash Catalyst compiles the project and the project opens in your default web
browser. Th e fi rst page state of this project begins with a video and then presents
the main navigation elements. Th is application includes an animated SWF
movie, buttons, data lists, and several custom interactive components.

ptg
ADOBE FLASH CATALYST CS5 CLASSROOM IN A BOOK 23
2 Explore and test the application by doing the following:
• Mouse over the interactive components to view their behavior.
• Click the right and left navigation buttons to browse additional items in
the list of restaurants.
• Click any item in the list (any restaurant) to view more information.
• Click Gallery and Build Your Order.
• Click Main Menu to return to the fi rst page of the application.
• Open and close the Category menu.
3 Choose File > Open Project.
A message prompts you to save your change. You cannot have more than one
Flash Catalyst project open at the same time.
4 Click No to close the project without saving.
5 In the Open dialog box, browse to the Lesson01 folder and open the
Banner.fxp fi le.
Th is is another project that you’ll work on during this course. It’s an interactive
advertisement banner.
6 Choose File > Run Project to preview the application in a browser.
Click through each of the fi ve pages using the numbered navigation buttons at
the top of the banner.
� Note: Even though this application has only three main page states, there are several diff erent views. This was accomplished by creating custom com-ponents. By nesting components inside other components you can add to the structure and depth of the application without adding pages. You’ll learn more about components later in this course.
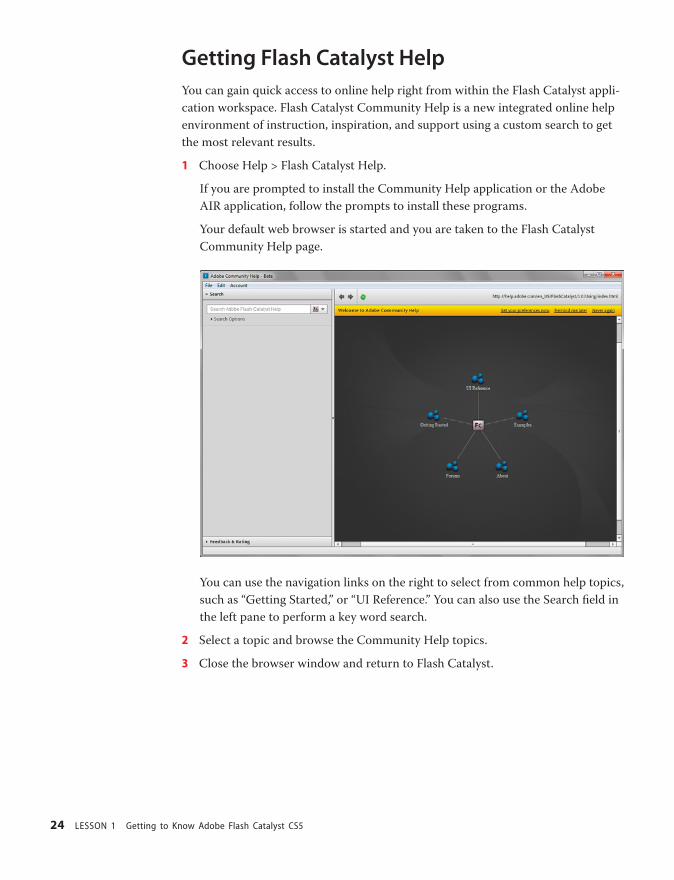
ptg
24 LESSON 1 Getting to Know Adobe Flash Catalyst CS5
Getting Flash Catalyst HelpYou can gain quick access to online help right from within the Flash Catalyst appli-
cation workspace. Flash Catalyst Community Help is a new integrated online help
environment of instruction, inspiration, and support using a custom search to get
the most relevant results.
1 Choose Help > Flash Catalyst Help.
If you are prompted to install the Community Help application or the Adobe
AIR application, follow the prompts to install these programs.
Your default web browser is started and you are taken to the Flash Catalyst
Community Help page.
You can use the navigation links on the right to select from common help topics,
such as “Getting Started,” or “UI Reference.” You can also use the Search fi eld in
the left pane to perform a key word search.
2 Select a topic and browse the Community Help topics.
3 Close the browser window and return to Flash Catalyst.
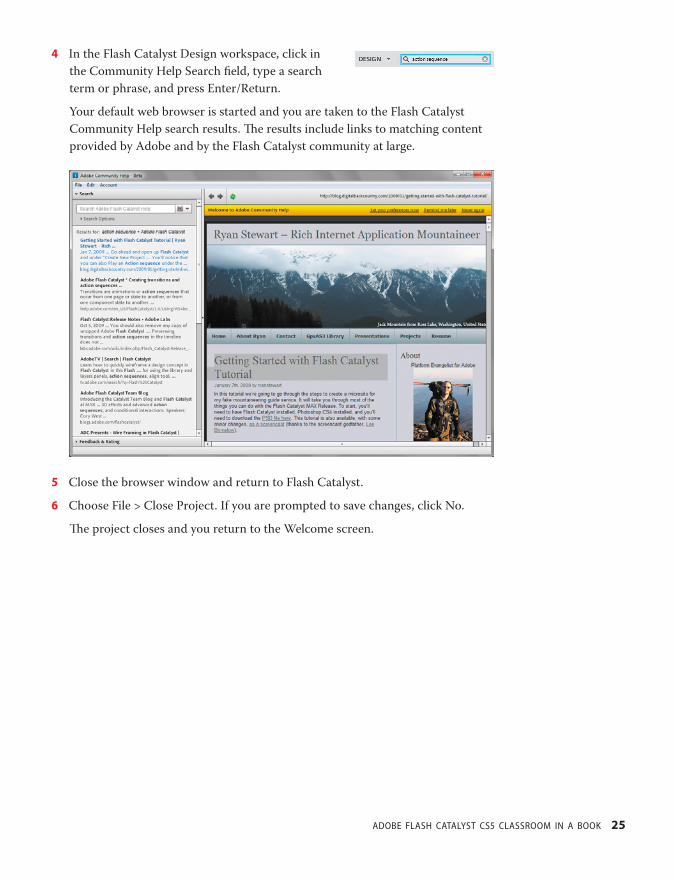
ptg
ADOBE FLASH CATALYST CS5 CLASSROOM IN A BOOK 25
4 In the Flash Catalyst Design workspace, click in
the Community Help Search fi eld, type a search
term or phrase, and press Enter/Return.
Your default web browser is started and you are taken to the Flash Catalyst
Community Help search results. Th e results include links to matching content
provided by Adobe and by the Flash Catalyst community at large.
5 Close the browser window and return to Flash Catalyst.
6 Choose File > Close Project. If you are prompted to save changes, click No.
Th e project closes and you return to the Welcome screen.

ptg
26 LESSON 1 Getting to Know Adobe Flash Catalyst CS5
Review questions1 Which Adobe Creative Suite applications are used to produce layered design
documents for import into a new Flash Catalyst project?
2 How does Flash Catalyst benefi t designers who want to create interactive content
without writing code?
3 When you fi rst start Flash Catalyst, what are two things you can do from the
Welcome screen?
4 Where in the Design workspace do you place and manipulate artwork?
5 What Flash Catalyst feature is used to organize the diff erent screens or main areas
within the application interface?
6 In addition to using the Flash Catalyst menus, which part of the Design workspace can
you use to convert artwork into components?
7 What part of the Design workspace is used to show or hide artwork in a selected page
or component state?
ptg
ADOBE FLASH CATALYST CS5 CLASSROOM IN A BOOK 27
Review answers1 You can use Adobe Photoshop, Adobe Illustrator, and Adobe Fireworks to create your
layered design and artwork.
2 Flash Catalyst helps designers sell their ideas by showing functional designs rather than
static screens. Flash Catalyst ensures that each design is accurately expressed, and it
allows more effi cient collaboration between designers and developers who build rich
Internet applications.
3 From the Welcome screen, you can begin a blank Flash Catalyst project or open an
existing project.
4 Th e artboard is where you place and work with artwork, interactive components, and
other objects that make up the application interface.
5 Th e Pages/States panel displays a thumbnail for each page in the application. You can
duplicate, remove, add, and rename pages and component states according to your
project specifi cation.
6 Th e Heads-Up Display (HUD) appears automatically when Flash Catalyst detects that
you must carry out some action. Th e HUD appears when you select artwork on the
artboard, giving you the choice to convert the artwork to a component.
7 Th e Layers panel is an organized collection of the objects in the application. As you add
pages and component states to the application, you use the Layers panel to show or
hide objects in each state.
ptg
28
2 PREPARING, IMPORTING, AND PLACING ARTWORK
Lesson OverviewIt’s a common complaint. You’ve spent hours perfecting artwork and
layout—positioning images to the exact pixel, choosing a perfect
stroke, tweaking fades and fi lters, and organizing layers to clearly
show the relationship between various states of interactive objects.
But still, you worry that the fi nished product won’t look or behave
the way you want. Your vision is often compromised by limitations in
development tools, or simply lost in translation—but not anymore.
With Flash Catalyst, you can preserve the integrity of your artwork,
from vision to publishing.
In this lesson, you’ll learn how to do the following:
• Prepare a design document for import
• Export an FXG fi le from Adobe Fireworks
• Import a layered design document into Flash Catalyst
• Select fi delity options when importing a design document
• Import artwork into Flash Catalyst
• Position artwork in the Flash Catalyst artboard
• Optimize artwork
Th is lesson will take about 45 minutes to complete. Copy the Lesson02
folder into the lessons folder that you created on your hard drive for
these projects (or create it now), if you haven’t already done so. As you
work on this lesson, you won’t be preserving the start fi les; if you need
to restore the start fi les, copy them from the Adobe Flash Catalyst CS5
Classroom in a Book CD.

ptg
29
Flash Catalyst is tightly integrated with leading design tools from Adobe, including Adobe Illustrator and Adobe Photoshop. You can create and edit artwork using your favorite design tools, and then use Flash Catalyst to turn static objects into fully functioning rich Internet applications.

ptg
30 LESSON 2 Preparing, Importing, and Placing Artwork
Preparing a design documentKnowing that you can turn your static artwork into working applications is pretty
exciting. But before you get started, take a moment to review these best practices for
preparing your design document. Th e way you approach the design and organiza-
tion of your artwork has a signifi cant impact on the structure of the project in Flash
Catalyst and the underlying code. Th e following ideas will help protect the integrity
of your design and minimize re-working or re-structuring assets after bringing them
into Flash Catalyst.
Choose your design applicationFlash Catalyst imports fi les saved in the Flash XML Graphics format (FXG). You
can generate the FXG fi le from any document created in Adobe Fireworks, Adobe
Illustrator, or Adobe Photoshop.
In fact, if you create your design using Photoshop or Illustrator, you can save
yourself the step of exporting the FXG fi le. Flash Catalyst has an import feature that
makes opening PSD and AI fi les a cinch! We’ll get to that in a moment.
What is FXG?When creating structured graphics for use in Adobe Flex or Adobe Flash Catalyst, you can save your design in the Flash XML Graphics format (FXG). FXG is a graphics fi le format based on a subset of MXML, the XML-based programming language used by the Flex framework. You can use FXG fi les in Adobe Flash Catalyst to develop rich Internet applications and experiences. When saving as FXG, images must be under 6,777,216 total pixels and less than 8,192 pixels in width or height.
� Tip: In Photoshop and Fireworks, set your design document color mode to RGB. Spot and process colors are not supported in Flash Catalyst. Set an image resolution of 72 pixels per inch.
Plan the structure of your applicationTh ere are diff erent approaches to structuring your application. Th e two most com-
mon ways to structure the application are:
• Import all artwork in the design document to a single page state. Distribute
artwork to pages in Flash Catalyst using the Flash Catalyst Pages/States and
Layers panels.
• Defi ne the main pages of the application in your design document using Layer
Comps in Photoshop or multiple artboards in Illustrator.
In both approaches your design document includes a hierarchy of clearly named
layers and groups to defi ne the pages and functional component of the application.
Any layers and groups that you defi ne in Illustrator, Photoshop, or Fireworks are
maintained when you import the project into Flash Catalyst.
� Tip: When choosing Adobe Illustrator as your design application for Flash Catalyst artwork, use the Illustrator Flash Catalyst document preset. In the Create New section of the Adobe Illustrator Welcome screen, choose Create Flash Catalyst Document.
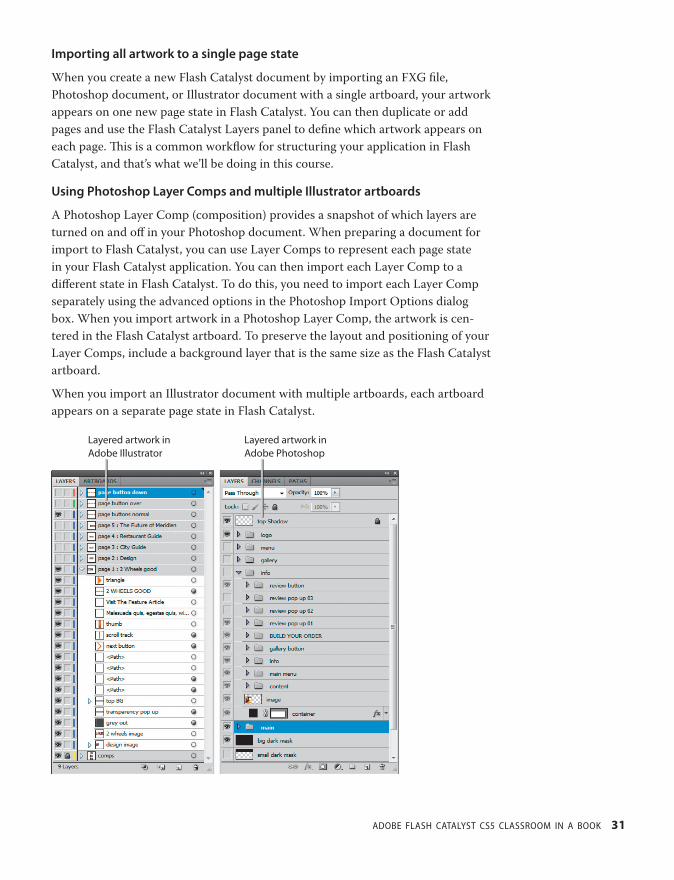
ptg
ADOBE FLASH CATALYST CS5 CLASSROOM IN A BOOK 31
Importing all artwork to a single page state
When you create a new Flash Catalyst document by importing an FXG fi le,
Photoshop document, or Illustrator document with a single artboard, your artwork
appears on one new page state in Flash Catalyst. You can then duplicate or add
pages and use the Flash Catalyst Layers panel to defi ne which artwork appears on
each page. Th is is a common workfl ow for structuring your application in Flash
Catalyst, and that’s what we’ll be doing in this course.
Using Photoshop Layer Comps and multiple Illustrator artboards
A Photoshop Layer Comp (composition) provides a snapshot of which layers are
turned on and off in your Photoshop document. When preparing a document for
import to Flash Catalyst, you can use Layer Comps to represent each page state
in your Flash Catalyst application. You can then import each Layer Comp to a
diff erent state in Flash Catalyst. To do this, you need to import each Layer Comp
separately using the advanced options in the Photoshop Import Options dialog
box. When you import artwork in a Photoshop Layer Comp, the artwork is cen-
tered in the Flash Catalyst artboard. To preserve the layout and positioning of your
Layer Comps, include a background layer that is the same size as the Flash Catalyst
artboard.
When you import an Illustrator document with multiple artboards, each artboard
appears on a separate page state in Flash Catalyst.
Layered artwork in Adobe Illustrator
Layered artwork in Adobe Photoshop
ptg
32 LESSON 2 Preparing, Importing, and Placing Artwork
Th e organization of your content is extremely important. You’ll need to identify
and select these objects when separating artwork onto diff erent pages and states or
converting artwork into functional components in Flash Catalyst.
Here are some tips for organizing your artwork using layers:
• Use top-level layers (or Layer Groups in Photoshop) to represent the main pages
or screens of the application.
• Add a layer for common objects that appear on every page. For example, you
may want a layer named “background” or a layer named “navigation.”
• Use sublayers (or layers within a Layer Group in Photoshop) to represent the
elements on each page.
• Use sublayers to organize the building blocks or parts of individual Flash
Catalyst components such as scroll bars, menus, and buttons.
Group complex objectsMuch of the artwork you create is made from a collection of complex parts, includ-
ing images, shapes, lines, text, symbols, and so on. Grouping complex objects before
bringing them into Flash Catalyst makes them easier to manage.
Flatten artwork with fi lters and eff ectsIn Illustrator, Photoshop, and Fireworks, you can use layers to apply a large selec-
tion of fi lters and eff ects to artwork and text. Some examples include drop shadows,
opacity masks, and blends. In Photoshop these are called Adjustment layers. By
placing the eff ect or fi lter in a separate layer, you preserve the original artwork or
text. Unfortunately, not all fi lters and eff ects import correctly into Flash Catalyst.
When you import a Photoshop fi le, Flash Catalyst rasterizes all Layer Eff ects for
image, shape, and text layers. Use the following settings to help preserve the appear-
ance of artwork created in Photoshop:
• For text layers with eff ects or masks, use Vector Outlines or Flatten Bitmap Image.
• For masks applied at the Layer Group level, use Flatten Bitmap Image.
• For opacity changes at the Layer Group level, use Flatten Bitmap Image.
Th e following Illustrator fi lters are supported in Flash Catalyst. All other fi lters and
eff ects are rasterized or expanded during import.
• Drop Shadow
• Inner Glow
• Outer Glow
• Gaussian Blur
� Tip: Flash Catalyst includes a small collection of fi lters, including blurs, shadows, bevels, and glows. You can apply these to objects by using the Properties panel in Flash Catalyst.
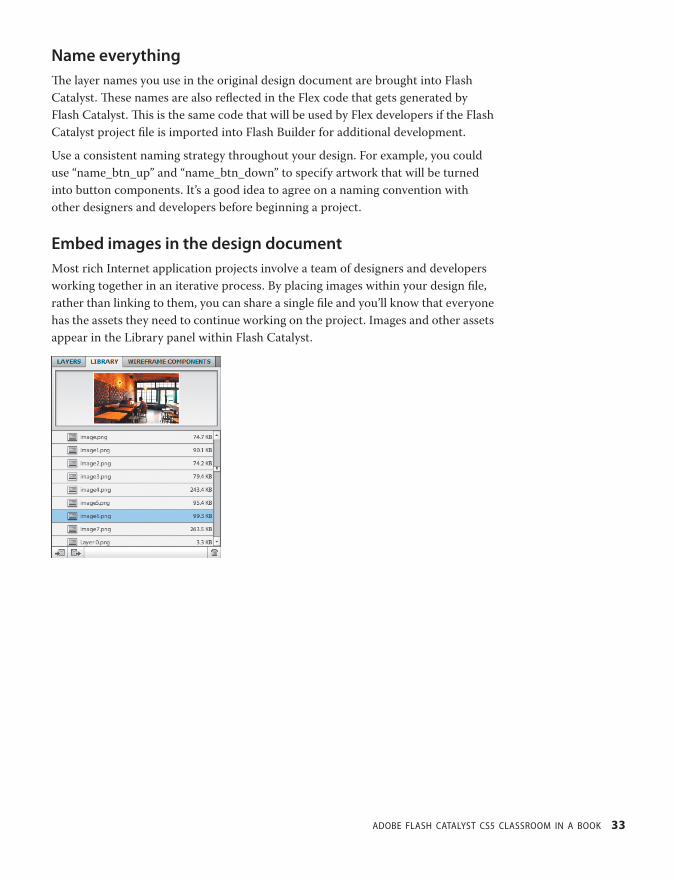
ptg
ADOBE FLASH CATALYST CS5 CLASSROOM IN A BOOK 33
Name everythingTh e layer names you use in the original design document are brought into Flash
Catalyst. Th ese names are also refl ected in the Flex code that gets generated by
Flash Catalyst. Th is is the same code that will be used by Flex developers if the Flash
Catalyst project fi le is imported into Flash Builder for additional development.
Use a consistent naming strategy throughout your design. For example, you could
use “name_btn_up” and “name_btn_down” to specify artwork that will be turned
into button components. It’s a good idea to agree on a naming convention with
other designers and developers before beginning a project.
Embed images in the design documentMost rich Internet application projects involve a team of designers and developers
working together in an iterative process. By placing images within your design fi le,
rather than linking to them, you can share a single fi le and you’ll know that everyone
has the assets they need to continue working on the project. Images and other assets
appear in the Library panel within Flash Catalyst.

ptg
34 LESSON 2 Preparing, Importing, and Placing Artwork
Manage fonts when sharing fi lesWhen collaborating with teams, make sure that everyone has the necessary fonts
installed. Th is is essential if you plan to keep your text editable, for example if the
design includes body copy that needs to change over time. Even with the neces-
sary fonts installed, editable text doesn’t always look the same when brought into
Flash Catalyst. Th ings like kerning or leading may diff er. For text objects that need
to look exactly as you’ve designed them (a logo is a good example), you can:
• Convert text to a shape or bitmap (raster) image.
• Convert text to vector outlines in Illustrator.
Identify duplicate component assetsIt’s often necessary to include repeated buttons, text input areas, and other visual
elements to represent the overall visual design of the application. In Flash Catalyst,
you want to defi ne a single object for each unique piece of artwork, but avoid
defi ning objects where the artwork is the same. To make your work easier in Flash
Catalyst, you can identify any duplicate items in your design document.
Th ere are several ways to do this. You can use a unique naming convention for
duplicate components, such as inputText (for the master) and _inputText (for
a duplicate). Another option is to identify them visually using color or opacity.
Identify reusable objects, such as this text fi eld. In Flash Catalyst, you can delete the duplicate objects and use copies (instances) of a single object.

ptg
ADOBE FLASH CATALYST CS5 CLASSROOM IN A BOOK 35
Set component properties in Flash CatalystBefore you begin a design, take a few minutes to explore the available properties
for formatting text, shapes, and components in Flash Catalyst. Th is will help you
determine which objects and states to defi ne in the design document, and which to
save for Flash Catalyst.
Flash Catalyst Properties panel
Create sample artwork for a list of images or textWhen browsing the web, you may notice that lots of applications include scrolling
lists of data (images and text). In Flash Catalyst, a Data List component is used to
display a collection of data that is stored outside the application. When designing
artwork for a Data List component that will be bound to an external data source,
you don’t need to include every item in the list, just a representative model. A best
practice when preparing your design document is to include the fi rst item and a
separate group that serves as a guide for alignment and spacing.
You will use the fi rst item in the list as the repeating part of the Data List component.
The group is used for spacing and alignment only and can be thrown away when you create the Data List component.

ptg
36 LESSON 2 Preparing, Importing, and Placing Artwork
Hide, show, and lock layersWhen you import a layered design document into Flash Catalyst, the layer structure
is preserved. Th is includes which layers are locked or hidden. You can save yourself
a few steps by locking layers that you don’t need to edit, such as background or
border graphics. You can also hide layers that are hidden in their initial state, such
as the over and down states for an interactive button.
Exporting an FXG fi le from Adobe FireworksAdobe Fireworks users may feel a little left out when they fi rst launch Flash Catalyst.
One of the fi rst things they’ll notice is the absence of a direct Fireworks import
option in the Welcome screen. In reality, Flash Catalyst imports only FXG docu-
ments regardless of where they originated—in Photoshop, Illustrator, or Fireworks.
Flash Catalyst just happens to have the ability to convert your PSD and AI fi les into
the FXG format automatically. Following are the general steps for exporting an FXG
fi le from Fireworks to import into Flash Catalyst. Th e steps to export an FXG fi le
from Fireworks CS4 and CS5 are diff erent. Refer to the appropriate steps below for
instructions on exporting FXG fi les from your version of Fireworks.
Fireworks CS4
1. Start Adobe Fireworks CS4 and open the design document you want to import
into Flash Catalyst.
2. Choose Commands > Export To FXG.
Th e Select Folder dialog box appears.
3. Locate and select a destination folder for the FXG fi le.
4. Enter a name for the fi le and click OK.
You can now import the FXG fi le into Flash Catalyst.
Fireworks CS5
1. Start Adobe Fireworks CS5 and open the design document you want to import
into Flash Catalyst.
2. Choose File > Export.
Th e Export dialog box appears.
3. Open the Export pop-up menu and choose FXG And Images.
4. Open the Pages pop-up menu and select which pages to include in the FXG.
5. Click Save.
You can now import the FXG fi le into Flash Catalyst.

ptg
ADOBE FLASH CATALYST CS5 CLASSROOM IN A BOOK 37
Importing artworkFantastic! You’ve followed the recommended best practices. Now your design docu-
ment is ready to go from static art to a living application—complete with motion
graphics, animated transitions, and interactive controls.
Th ere are four ways to get your artwork into Flash Catalyst.
• Import a layered design document created in Adobe Photoshop, Adobe
Illustrator, or Adobe Fireworks. Th is is the preferred method for beginning a
new project in Flash Catalyst.
• Import images using the File > Import > Image command in Flash Catalyst.
• Copy and paste graphics into the Flash Catalyst artboard.
• Import a Flash Catalyst library package. You will learn how to create a library
package later in this course.
Import a design documentYou can import a design document from the Flash Catalyst Welcome screen.
1 Start Flash Catalyst.
Th e Welcome screen includes three options for importing a design fi le: From
Adobe Illustrator AI File, From Adobe Photoshop PSD File, and From FXG File.
For this task, you will import an Adobe Illustrator fi le.
2 In the Create New Project from Design File section of the Welcome screen,
choose From Adobe Illustrator AI File.
Th e Import dialog box appears.
� Note: Flash Catalyst imports design documents that are less than 40MB.
� Note: When you import an FXG fi le exported from a multilayered Fireworks document, all objects import as a group. You can break these objects into multiple layers in Flash Catalyst by ungrouping them.
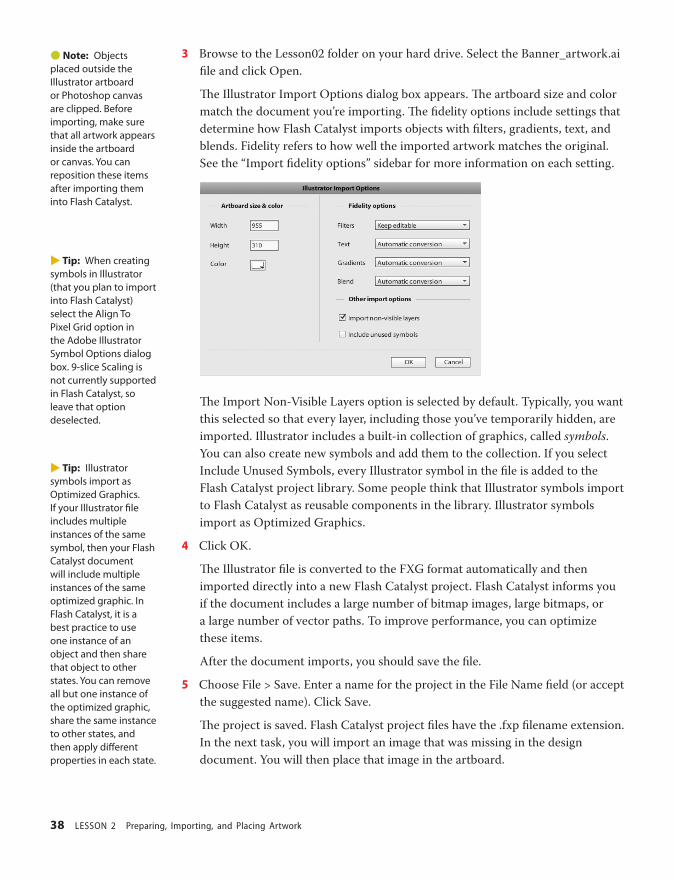
ptg
38 LESSON 2 Preparing, Importing, and Placing Artwork
3 Browse to the Lesson02 folder on your hard drive. Select the Banner_artwork.ai
fi le and click Open.
Th e Illustrator Import Options dialog box appears. Th e artboard size and color
match the document you’re importing. Th e fi delity options include settings that
determine how Flash Catalyst imports objects with fi lters, gradients, text, and
blends. Fidelity refers to how well the imported artwork matches the original.
See the “Import fi delity options” sidebar for more information on each setting.
Th e Import Non-Visible Layers option is selected by default. Typically, you want
this selected so that every layer, including those you’ve temporarily hidden, are
imported. Illustrator includes a built-in collection of graphics, called symbols.
You can also create new symbols and add them to the collection. If you select
Include Unused Symbols, every Illustrator symbol in the fi le is added to the
Flash Catalyst project library. Some people think that Illustrator symbols import
to Flash Catalyst as reusable components in the library. Illustrator symbols
import as Optimized Graphics.
4 Click OK.
Th e Illustrator fi le is converted to the FXG format automatically and then
imported directly into a new Flash Catalyst project. Flash Catalyst informs you
if the document includes a large number of bitmap images, large bitmaps, or
a large number of vector paths. To improve performance, you can optimize
these items.
After the document imports, you should save the fi le.
5 Choose File > Save. Enter a name for the project in the File Name fi eld (or accept
the suggested name). Click Save.
Th e project is saved. Flash Catalyst project fi les have the .fxp fi lename extension.
In the next task, you will import an image that was missing in the design
document. You will then place that image in the artboard.
� Note: Objects placed outside the Illustrator artboard or Photoshop canvas are clipped. Before importing, make sure that all artwork appears inside the artboard or canvas. You can reposition these items after importing them into Flash Catalyst.
� Tip: When creating symbols in Illustrator (that you plan to import into Flash Catalyst) select the Align To Pixel Grid option in the Adobe Illustrator Symbol Options dialog box. 9-slice Scaling is not currently supported in Flash Catalyst, so leave that option deselected.
� Tip: Illustrator symbols import as Optimized Graphics. If your Illustrator fi le includes multiple instances of the same symbol, then your Flash Catalyst document will include multiple instances of the same optimized graphic. In Flash Catalyst, it is a best practice to use one instance of an object and then share that object to other states. You can remove all but one instance of the optimized graphic, share the same instance to other states, and then apply diff erent properties in each state.

ptg
ADOBE FLASH CATALYST CS5 CLASSROOM IN A BOOK 39
Import fi delity optionsThe Illustrator import fi delity options control how Flash Catalyst handles fi lters, gradients, text, and blends. The Photoshop import fi delity options control how Flash Catalyst imports image, shape, and text layers.
In the Fidelity Options section of the dialog box, you can open the pop-up menus and choose import fi delity options. The options in the menus are similar for Photoshop and Illustrator. They include:
Keep editable (AI & PSD): Keeps the item in an editable form, even if it might lose fi delity (lose some quality or look diff erent from the original). For example, if you choose “Keep editable” for text, then the text will import as an actual text item in Flash Catalyst. Editable text may not look exactly the same in Flash Catalyst as it did in Photoshop or Illustrator.
Expand (AI only): Converts an object with a fi lter into a set of vectors or bitmaps that approximate the original appearance in Illustrator. For example, expanding a drop shadow fi lter on a rectangle might create an image of the drop shadow behind the original rectangle.
Flatten (AI & PSD): Converts objects into a single bitmap (raster) image.
Vector outlines (AI & PSD): Converts text into a vector path that approximates the rendered appearance of the text.
Crop (PSD Shape layers only): The vector mask that defi nes a shape in Photoshop Shape layers is imported as a mask into Flash Catalyst. However, instead of applying that mask to a bitmap that inherits the same dimensions as the original Photoshop fi le, this option crops the resulting bitmap to the boundary of the mask.
Automatic conversion (AI only): Flash Catalyst chooses whether to keep a given item editable, rasterize it, or convert it to vectors. The result is based on various heuristics such as the complexity of the item. For example, a simple blend might be expanded to vectors, whereas a complex blend (that would produce a lot of paths) would be rasterized.
Advanced (PSD only): Click the Advanced button in the Photoshop Import Options dialog box to specify exactly which layers to import. You can select and deselect layers to import, regardless of their visibility in Photoshop. You can also choose to import specifi c Photoshop Layer Comps, if they exist in the document. The selected layers import to the current page state in Flash Catalyst.
� Note: When you import an FXG fi le, there are no import options.
� Note: In Photoshop, you can also use the advanced import options to set import fi delity options for each layer separately.

ptg
40 LESSON 2 Preparing, Importing, and Placing Artwork
Import additional imagesYou’ve spent days, maybe even weeks, getting your design perfect and you’ve fi nally
imported your design document into Flash Catalyst. You’ve started separating
artwork into meaningful pages and component states, only to realize that you’re
missing key images that won’t be available for another week. No problem. Just leave
a placeholder and import those images separately. Flash Catalyst accepts bitmap
images with the fi lename extensions: PNG, GIF, JPG, JPEG, and JPE.
Your Flash Catalyst project should still be open from the previous task.
1 In the Flash Catalyst Layers panel, select the page1:Feature layer.
Th e layer highlights in light blue, indicating that it’s the target layer for new
content.
2 Choose File > Import > Image.
Th e Import dialog box appears.
3 Browse to the Lesson02 folder on your hard drive. Select man.jpg and
click Open.
When you import a single image, it appears in the artboard and a master copy
is added to the project library. In the next task, you’ll position this image in
the artboard.A single imported image is added to the artboard and the project library.
4 In the Layers panel, click the small triangle to expand the page1:Feature layer.
Th e image was added as a new object in the target layer.
� Tip: You’re not limited to importing a single design document. You can import other layered Photoshop, Illustrator, or FXG fi les into an existing Flash Catalyst project by choosing File > Import, and then choosing the type of document you want to import.
� Note: If you import a large image, a message appears reminding you to reduce the size of the image before importing.
� Tip: You can also copy artwork in Illustrator or Fireworks and paste it directly into the Flash Catalyst artboard.

ptg
ADOBE FLASH CATALYST CS5 CLASSROOM IN A BOOK 41
Position images in the artboardWhen you import objects to the artboard, they’re placed in the artboard of the tar-
get layer. You can position objects by dragging, nudging (using the Arrow keys), or
by choosing alignment commands in the Modify menu.
1 Make sure the Select tool ( ) is selected in the Tools panel.
2 Drag the image you imported to the blank white space on the right side of the
artboard. Th e positioning doesn’t need to be perfect. You’ll fi x that next.
For more precise positioning, you can use the arrow keys on your keyboard to
nudge the image up, down, left, or right.
Th is image is supposed to be aligned in the bottom-right corner of the artboard.
To do this, you can use the Align commands in the Modify menu.
3 Make sure the image is still selected. Choose Modify > Align > Right. Th en,
choose Modify > Align > Bottom.
Th e image is now perfectly aligned in the bottom-right corner of the artboard.
Optimizing artworkIn Flash Catalyst, graphic optimization options include converting vector graph-
ics to bitmaps, compressing images, and converting embedded images to linked
fi les. When you import a design document, you can choose fi delity options that do
some of the graphic optimization for you. But even after importing graphics into
your Flash Catalyst project, you can use the optimization options in the Heads-Up
Display (HUD) or the Modify menu to apply settings to individual images.

ptg
42 LESSON 2 Preparing, Importing, and Placing Artwork
When you select artwork, the optimization
options appear in the HUD. Th e options include:
Optimize Vector Graphics compiles a selected
graphic into a low-level Flash object that displays
more quickly in Flash Catalyst and at runtime.
Once you optimize a vector drawing in Flash
Catalyst, you can no longer edit its stroke and fi ll.
In an optimized vector graphic fi le, all MXML
information (vector, stroke, path, fi ll, and so on) is kept separately in an FXG fi le.
When you optimize a vector graphic, a new optimized graphic is added to the
Library panel in the Optimized Graphics category. Th e new optimized graphic
replaces your original graphic in the artboard.
Rasterize converts a static vector graphic or text into a bitmap image. It replaces the
image in the artboard with a PNG fi le and places a copy of the PNG in the Library
panel. Use this option to optimize static vector graphics or text.
Compress adds compression to a bitmap image. It places a smaller (lower-quality)
copy of the bitmap image in the Library panel. When you compress an image with
transparency, the transparency is lost.
Convert To Linked Image converts an embedded image to a linked image. By
default the images you add to your application are embedded and will be published
as part of the SWF fi le. To reduce the size of your application, you can link images.
Linking an image stores it outside the SWF fi le and loads the image when you run
the application.
Optimize artworkWhen you imported the Illustrator fi le, Flash Catalyst suggested you optimize
graphics to improve the performance of your application. Th e gray border at the top
of the artboard is made up of a rectangle shape and several small paths used to cre-
ate the horizontal stripes. You don’t need to work with these items separately, so you
can optimize the Top Graphic.
1 In the Layers panel, click the small triangle
to expand the Top Graphic layer.
Th e Top Graphic layer includes two
objects: Group and Rectangle.
2 Click the small triangle to expand the
Group row.
Every stripe in the graphic is a separate
path.
� Tip: When you select an optimized vector graphic, the Optimize Vector Graphics option changes to Break Apart Graphic. To edit the parts of a complex vector graphic that has been optimized, you must fi rst break it apart.
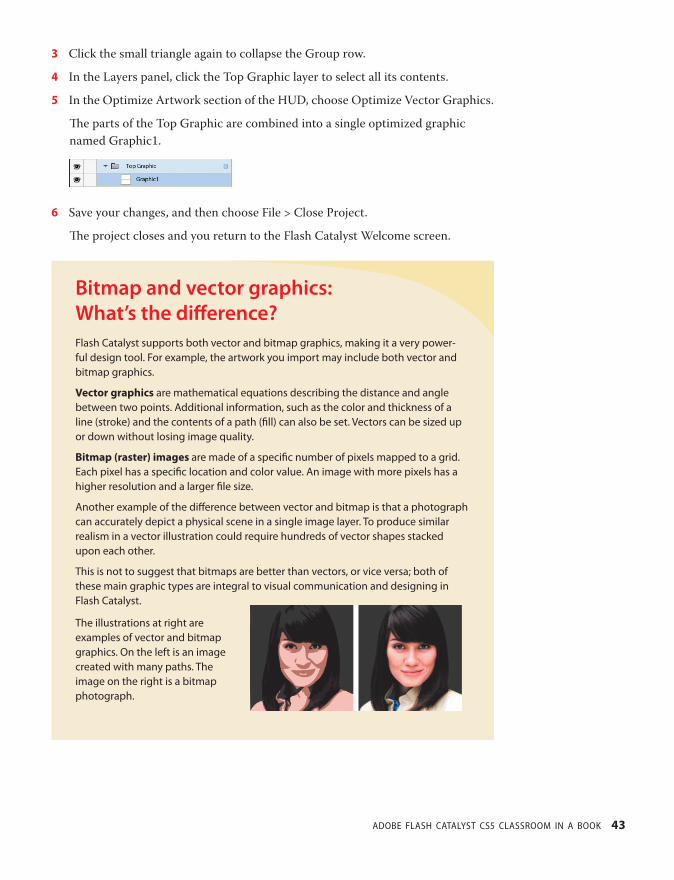
ptg
ADOBE FLASH CATALYST CS5 CLASSROOM IN A BOOK 43
3 Click the small triangle again to collapse the Group row.
4 In the Layers panel, click the Top Graphic layer to select all its contents.
5 In the Optimize Artwork section of the HUD, choose Optimize Vector Graphics.
Th e parts of the Top Graphic are combined into a single optimized graphic
named Graphic1.
6 Save your changes, and then choose File > Close Project.
Th e project closes and you return to the Flash Catalyst Welcome screen.
Bitmap and vector graphics: What’s the diff erence?Flash Catalyst supports both vector and bitmap graphics, making it a very power-ful design tool. For example, the artwork you import may include both vector and bitmap graphics.
Vector graphics are mathematical equations describing the distance and angle between two points. Additional information, such as the color and thickness of a line (stroke) and the contents of a path (fi ll) can also be set. Vectors can be sized up or down without losing image quality.
Bitmap (raster) images are made of a specifi c number of pixels mapped to a grid. Each pixel has a specifi c location and color value. An image with more pixels has a higher resolution and a larger fi le size.
Another example of the diff erence between vector and bitmap is that a photograph can accurately depict a physical scene in a single image layer. To produce similar realism in a vector illustration could require hundreds of vector shapes stacked upon each other.
This is not to suggest that bitmaps are better than vectors, or vice versa; both of these main graphic types are integral to visual communication and designing in Flash Catalyst.
The illustrations at right are examples of vector and bitmap graphics. On the left is an image created with many paths. The image on the right is a bitmap photograph.
ptg
44 LESSON 2 Preparing, Importing, and Placing Artwork
Review questions1 When creating a new project from a layered design document, which fi le types will
Flash Catalyst import?
2 How does importing a layered design document created in Adobe Photoshop diff er
from importing a document created in Adobe Fireworks?
3 Why would you consider fl attening layers before opening a design document in Flash
Catalyst?
4 What can you do if you don’t want text in your design document to be editable in Flash
Catalyst, or if you want to ensure the text looks exactly as designed?
5 What does the Filter: Expand fi delity option do when opening an Adobe Illustrator
document in Flash Catalyst?
6 What happens when you import a range of bitmap images (File > Import > Image)
versus importing a single image?
7 Which type of graphic can be sized up or down without losing image quality?
ptg
ADOBE FLASH CATALYST CS5 CLASSROOM IN A BOOK 45
Review answers1 You can create a new Flash Catalyst project by importing Adobe Photoshop (PSD),
Adobe Illustrator (AI), or FXG fi les.
2 You must fi rst export an FXG fi le from Fireworks before the design can be opened
in Flash Catalyst. Th ere is no direct import option for layered Fireworks PNG
documents. However, you can import a Photoshop document (PSD) directly from the
Flash Catalyst Welcome screen, or by choosing File > Import > Adobe Photoshop File.
3 Some fi lters and eff ects are not supported in Flash Catalyst. One solution is to fl atten
or rasterize these objects before bringing them into Flash Catalyst.
4 If you create vector outlines or rasterize text in the original design document, it will
not be editable in Flash Catalyst. You can also choose the Vector Outlines or Flatten
fi delity options when importing the document in Flash Catalyst.
5 Th e Filter: Expand fi delity option converts an object that has a fi lter applied to it into
a set of vectors or bitmaps that approximate the original appearance in Illustrator. For
example, expanding a drop shadow fi lter on a rectangle might create an image of the
drop shadow behind the original rectangle.
6 When you import a range of bitmap images, the images appear in the project library,
but are not placed in the artboard. When you import a single image, it’s placed in the
library and an instance of that image is added to the target layer in the artboard.
7 Vectors can be sized up or down without losing image quality.
ptg
46
3 MANAGING THE LIBRARY
Lesson OverviewTh e Flash Catalyst project library is a storage area for the reusable con-
tent that you add to a Flash Catalyst project. Th is content includes the
bitmap images and other media (video, sound, Adobe Flash movies,
and more) that you import. You can import assets individually, as a
group, or as a library package. Th e library also stores the components
that you create—things like navigation buttons, scrolling panels, and
lists of data.
In this lesson, you’ll learn how to do the following:
• Identify project assets in the Library panel
• Preview images, video, and sound
• Rename assets
• Delete assets from the project
• Use and swap assets in the library
• Compress all instances of a bitmap image
• View the source of library fi les in the Code workspace
• Import and export a library package
Th is lesson will take about 40 minutes to complete. Copy the Lesson03
folder into the lessons folder that you created on your hard drive for
these projects (or create it now), if you haven’t already done so. As you
work on this lesson, you won’t be preserving the start fi les; if you need
to restore the start fi les, copy them from the Adobe Flash Catalyst CS5
Classroom in a Book CD.

ptg
47
You can use the Flash Catalyst Library panel to store, locate, manage, and apply reusable components, images, Flash movies, videos, and sounds. Quickly apply global changes across your entire application. Swap images with a single click. Share your entire col-lection of project assets with other designers and Flex developers by using Flash Catalyst Library Packages.

ptg
48 LESSON 3 Managing the Library
Viewing the Library panelTh e reusable assets that you add to a project are organized into one of four groups
in the Library panel.
Images are bitmap (raster) fi les (PNG, GIF, JPG, JPE, JPEG) and SWF content.
Media refers to video and sound fi les (FLV/F4V fi les, mp3).
Components are the building blocks of your project. Examples of components
include buttons, scroll bars, sliders, check boxes, panels, and scrolling lists.
Optimized graphics are added to the Library panel when you choose Optimize
Vector Graphics in the Heads-Up Display (HUD). Th is is true when you optimize
an image that you’ve imported and when you optimize an object that you’ve drawn
using the Flash Catalyst drawing tools.
How do assets get into the Library panel?Assets get into the Library panel in the following ways:
• When you import a design document, the bitmap images in the document are
grouped together in a folder within the Images category of the Library panel. If
the design document includes Illustrator symbols, the symbols are converted to
optimized graphics and stored in the Optimized Graphics category.
• When you import or copy and paste a single bitmap image, SWF fi le, or video
fi le, the fi le is added to the artboard and to the Library panel.
• When you import multiple assets at the same time, the assets are added to the
Library panel, but not the artboard.
• When you import a sound fi le, it’s added to the Library panel.
• When you import a Flash Catalyst Library Package (FXPL) that was exported
from another project, the entire collection of assets is added to the Library panel.
• When you optimize an image in the artboard, an optimized copy of the image is
added to the Library panel.
• If you compress an image in the Library panel or in the artboard, a compressed
copy of the image is added to the Library panel.
• When you convert vector drawings into a component, optimized graphic, raster
image, or compressed image, an object is added to the Library panel.
• If you add a wireframe component to the artboard and then modify it, the
modifi ed component is added to the Library panel.
ptg
ADOBE FLASH CATALYST CS5 CLASSROOM IN A BOOK 49
Add assets to the Library panelIn this exercise, you will add a few more assets to the Library panel. When you
import a single bitmap image, it’s added to the artboard and the Library panel. But
when you import a series of bitmaps or media fi les (sound and video), they’re added
directly to the Library panel, but not the artboard.
1 Start Flash Catalyst.
2 In the Welcome screen, choose Open Project. Browse to the Lesson03 folder on
your hard drive, select the Lesson03_Banner.fxp fi le, and click Open.
Th is is a copy of the fi le you created in Lesson 2, “Preparing, Importing, and
Placing Artwork.” It includes the images you imported from Adobe Illustrator
and a single bitmap image you imported separately.
3 Select the Library panel to bring it into view.
Library assets are divided into categories, such as Components, Images, Media,
and Optimized Graphics. Th ese categories can be expanded or collapsed by
clicking the small triangle to the left of the category name.
Th e Images category includes bitmap images
that were imported to the project. Th is includes
images that were imported individually or as
part of a design document (AI, PSD, FXG). Th is
also includes Adobe Flash movies (SWF fi les), if
there are any.
When you import a design document, its
images are grouped together in a subfolder.
Th e folder inherits the name of the original
design document, which in this case is the
Banner_artwork (Adobe Illustrator) document
you imported in Lesson 2.
4 Expand the Banner_artwork folder.
5 Collapse the Banner_artwork folder.
6 Choose File > Import > Video/Sound File.
7 Browse to the Lesson03 folder, Shift-click to
select the interlude.mp3 and restaurants.fl v fi les,
and click Open.
Th e sound and video fi les are added to the Media
category in the Library panel. Th is project now
includes three types of assets: Images, Media,
and Optimized graphics.
� Note: At fi rst, the Library panel only displays categories for the types of assets that exist in the project. For example, if your project has no media, the Media category does not exist. After adding media, such as a video fi le, the Media category appears. Once added, the category remains in the Library panel, even after deleting all its contents.
ptg
50 LESSON 3 Managing the Library
8 Choose File > Import > Image.
9 Browse to the Lesson03 folder, Shift-click to select the 2wheels.jpg, design.jpg,
future.jpg, map.jpg, and restaurants.jpg fi les. Click Open.
Th e images are added to the Library panel, but not the artboard.
10 Click to select the picture of the man in the lower-right corner of the artboard
(you may need to scroll).
Th is was the single bitmap image that you imported in Lesson 2. In the Common
category of the Properties panel, notice that the source of this image is man.jpg.
Th ere is a direct link between instances in the artboard and the source assets in
the library.
The Properties panel includes a link to the source asset in the Library panel.
11 In the HUD, open the Optimize Artwork
menu, and choose Optimize Vector Graphics.
Th e source in the Properties panel
(below) changes to Graphic2.
In the Library panel (shown at right), the new
optimized version of this image appears in the
Optimized Graphics category.
� Note: Vector shapes that you draw in Flash Catalyst or import from Adobe Illustrator are not added to the Library panel until you convert this artwork to an optimized graphic, raster image, compressed fi le, or component.

ptg
ADOBE FLASH CATALYST CS5 CLASSROOM IN A BOOK 51
Preview fi les in the Library panelAs your project grows, it can be hard to identify assets by name alone. You’ll want
to preview fi les before adding them to your application. An easy way to do this is to
view the fi le in the preview area at the top of the Library panel.
1 Select future.jpg in the Images category of the Library panel.
A preview of the image appears at the top of the Library panel.
2 In the Media category, select interlude.mp3 (a sound fi le) and click the Play
button at the top of the Library panel.
Play button Rewind and Pause buttons
As the audio fi le plays, the Play button changes to the Rewind and Pause buttons.
3 In the Media category, select restaurants.fl v (a video fi le) and click the small Play
button in the lower-right corner of the preview area.
Play button Rewind and Pause buttons
As the video plays, the Play button changes to the Rewind and Pause buttons.
� Tip: When previewing interactive components in the Library panel, you only see a preview of the initial component state. To preview a component’s behavior, you need to add it to the application and then run the project in a browser or publish the application.
� Tip: You cannot preview SWF fi les in the Library panel. To view a SWF animation, you must add it to the application and run the project in a browser or publish the application.

ptg
52 LESSON 3 Managing the Library
4 Change to the Code workspace.
5 In the Project Navigator panel, expand the main
project folder, Lesson03_Banner. Expand the src
and assets folders. Expand the graphics, images,
and media folders.
Th ese folders store the fi les represented in the
Library panel. For each optimized graphic, all
MXML information (vector, stroke, path, fi ll, and
so on) is kept separately in an FXG fi le. Project
components, if there are any, are stored in an
src/components directory.
6 Change back to the Design workspace.
Deleting assets from the projectEvery project entails a little trial and error. As your project evolves, you’ll end up
with assets in the library that you no longer need in the fi nished application.
Eliminating outdated or unused assets from the library reduces the size of the proj-
ect fi le, and makes the entire project more manageable. Removing unwanted assets
is easy. Just delete them in the Library panel.
1 In the Images category of the Library panel, select man.jpg.
2 Click the Delete icon ( ) in the bottom-right corner of the Library panel.
A message informs you that you can’t delete the image because it’s being used by
the optimized graphic called Graphic2. You cannot delete an optimized graphic’s
source fi le. However, you can delete the optimized graphic or compressed copy
of the image.
3 Click OK to close the message.
4 In the Optimized Graphics category, select Graphic2 and click the Delete
icon ( ).
A message informs you that removing this asset will remove the asset and all
references to it. Deleting an object in the Library panel is a fast way to remove
every instance of an object from the application.
� Note: When you delete an asset from the Library panel, it removes every instance of that asset from the project. This includes hidden pages and component states.

ptg
ADOBE FLASH CATALYST CS5 CLASSROOM IN A BOOK 53
5 Choose OK to delete every instance of the image.
Th e image vanishes from the Library panel, and from the artboard. Deleting the
image left a hole in the artboard, but you’ll fi x that in a minute.
Compressing images in the Library panelOne of the advantages of a project library is that you can use the same assets
throughout your application, and then make global changes to the project by modi-
fying the source fi le in the library.
For example, you can quickly compress all instances of a bitmap (raster) image to
reduce the overall fi le size of your application.
1 In the Images category of the Library panel, right-click man.jpg and choose
Compression Options.
Th e Compress Image dialog box appears.
2 Leave the Quality setting at 70% and click OK.
A compressed copy of the image named man1.jpg is added to the Images
category. You can tell by the reduced fi le size that the image is compressed.
The compressed fi le has a smaller fi le size.
Renaming project assetsJust imagine if everyone you worked with were named Bob. Th ings could get a little
confusing around the offi ce. I suppose you could start calling people Bob1, Bob2,
and so on. But that’s not much better. If you’re not careful, your Flash Catalyst
project can end up looking like a room full of Bobs. In the world of Flash Catalyst,
� Tip: You cannot delete library assets by pressing the Delete key. However, pressing Delete removes objects that are selected in the artboard. If you have an object selected and you accidentally press the Delete key, you will remove the selected object from the current state only.
� Tip: Avoid compressing images that have transparency, because your trans-parency will be lost.

ptg
54 LESSON 3 Managing the Library
it’s Graphic1, Graphic2, Graphic3, and so on. An easy way to avoid this is to assign
descriptive names to project assets in the Library panel.
1 In the Images category of the Library panel, right-click the man1.jpg (the
compressed copy of the image) and choose Rename.
Th e image name is highlighted.
2 Type man_compressed, and press Enter/Return.
Th e fi le is renamed in the Library panel. When you rename a fi le, any links to the
fi le are updated automatically.
Using assets in the Library panelAfter adding assets to the project library, you can use them over and over in diff er-
ent parts of your application. You simply drag the item from the Library panel and
position it in the artboard.
After placing an item in the artboard, the Properties panel shows a link to the source
fi le in the project library. You can quickly swap an object in your application with a
diff erent asset through the source link in the Properties panel.
Let’s give it a try by placing the original man.jpg fi le in the artboard, and then swap-
ping it for the compressed version of the same image.
1 In the Images category of the Library panel, drag man.jpg from the Library panel
to the artboard.
2 Position the image in the lower-right corner of the artboard.
3 With the image still selected in the artboard,
look in the Common category of the
Properties panel.
Th e source of this image is the man.jpg fi le in
the Library panel. Th e image in the artboard
is an instance of this asset and is linked to the
source fi le in the Library panel.
� Tip: When you drag a library item to the artboard, a new layer is created (in the target layer folder). Best practice is to give a descriptive name to each object in the Layers panel. Renaming an instance of an item in the Layers panel does not aff ect the original item defi nition name in the Library panel.
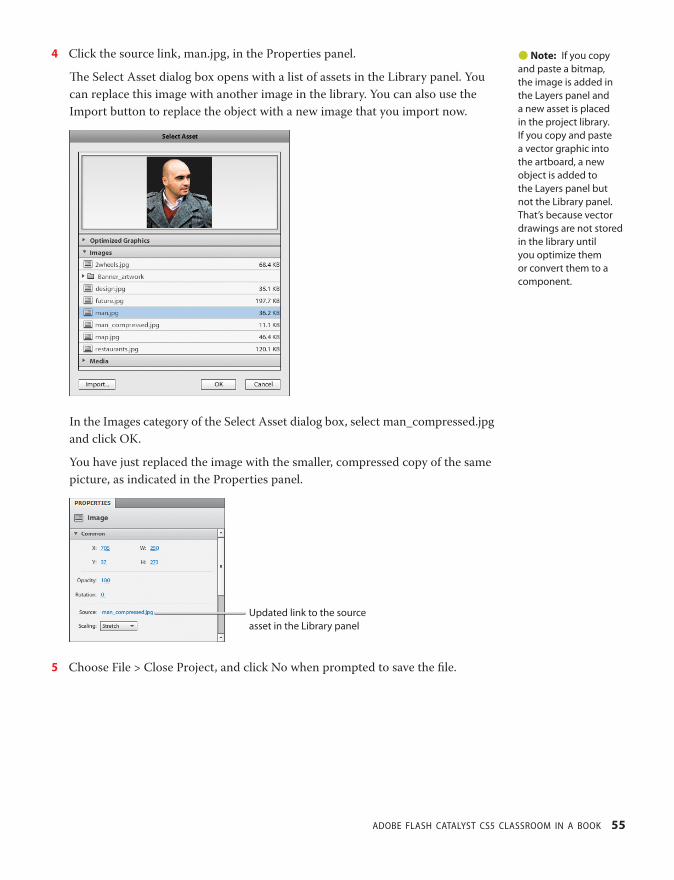
ptg
ADOBE FLASH CATALYST CS5 CLASSROOM IN A BOOK 55
4 Click the source link, man.jpg, in the Properties panel.
Th e Select Asset dialog box opens with a list of assets in the Library panel. You
can replace this image with another image in the library. You can also use the
Import button to replace the object with a new image that you import now.
In the Images category of the Select Asset dialog box, select man_compressed.jpg
and click OK.
You have just replaced the image with the smaller, compressed copy of the same
picture, as indicated in the Properties panel.
Updated link to the source asset in the Library panel
5 Choose File > Close Project, and click No when prompted to save the fi le.
� Note: If you copy and paste a bitmap, the image is added in the Layers panel and a new asset is placed in the project library. If you copy and paste a vector graphic into the artboard, a new object is added to the Layers panel but not the Library panel. That’s because vector drawings are not stored in the library until you optimize them or convert them to a component.
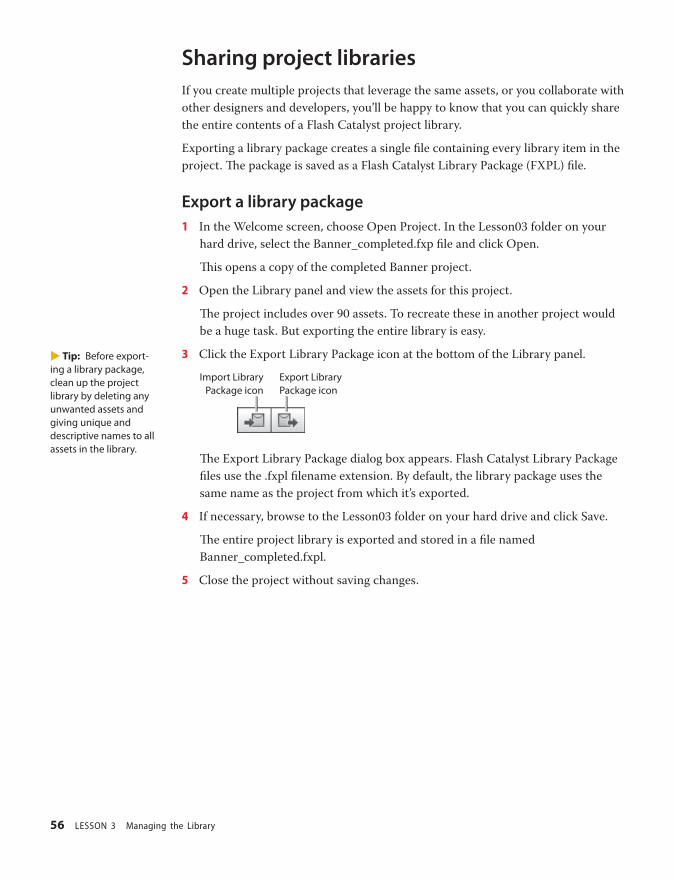
ptg
56 LESSON 3 Managing the Library
Sharing project librariesIf you create multiple projects that leverage the same assets, or you collaborate with
other designers and developers, you’ll be happy to know that you can quickly share
the entire contents of a Flash Catalyst project library.
Exporting a library package creates a single fi le containing every library item in the
project. Th e package is saved as a Flash Catalyst Library Package (FXPL) fi le.
Export a library package1 In the Welcome screen, choose Open Project. In the Lesson03 folder on your
hard drive, select the Banner_completed.fxp fi le and click Open.
Th is opens a copy of the completed Banner project.
2 Open the Library panel and view the assets for this project.
Th e project includes over 90 assets. To recreate these in another project would
be a huge task. But exporting the entire library is easy.
3 Click the Export Library Package icon at the bottom of the Library panel.
Import Library Package icon
Export Library Package icon
Th e Export Library Package dialog box appears. Flash Catalyst Library Package
fi les use the .fxpl fi lename extension. By default, the library package uses the
same name as the project from which it’s exported.
4 If necessary, browse to the Lesson03 folder on your hard drive and click Save.
Th e entire project library is exported and stored in a fi le named
Banner_completed.fxpl.
5 Close the project without saving changes.
� Tip: Before export-ing a library package, clean up the project library by deleting any unwanted assets and giving unique and descriptive names to all assets in the library.

ptg
ADOBE FLASH CATALYST CS5 CLASSROOM IN A BOOK 57
Linked vs. embedded imagesBy default, the images you add in Flash Catalyst are embedded in the SWF fi le when you publish the application. You can also tell Flash Catalyst to store images outside the published application and establish a link to these fi les. The images are loaded by the application at runtime. Linking to large images is one way to reduce the size of the published application. It can also make updating or replacing images easier without needing to republish the application.
To convert an image from embedded to linked, right-click the image in the Library panel and choose Convert to Linked Image. The Linked Image icon appears, to show which images are linked.
To embed a linked image, right-click the image in the Library panel and choose Embed Image.
Linked Image icon
Import a library package1 In the Welcome screen, choose Adobe Flash Catalyst Project to create a
new project.
Th e New Project dialog box appears. Normally you would match the project
dimensions to the artwork, but for now just accept the default project settings.
2 Click OK to accept the default settings and open a new blank project.
A new project opens. Notice the Library panel is empty.
3 Click the Import Library Package icon.
4 In the Import Library Project dialog box, select the Banner_completed.fxpl fi le
you created in the last task, and choose Open.
Th e entire library package is added to the project. Th e assets appear in the
Library panel.
� Tip: A Flash Catalyst Library Package (FXPL) can be imported by a developer into Adobe Flash Builder as a Flex library project. These objects will maintain any behaviors, transitions, and so on, that you’ve added to them in Flash Catalyst.
� Tip: You can also choose File > Import > Library Package to open the Import Library Project dialog box.
� Note: When you add a library package to a project with existing library assets, the new assets are added to the existing library. No fi les are deleted.
ptg
58 LESSON 3 Managing the Library
Review questions1 What types of assets appear in the Library panel?
2 How does a vector drawing that you create in Flash Catalyst end up in the Library panel
as a reusable asset?
3 What are some diff erent ways that you can add fi les to the Library panel?
4 When you select an image in the artboard, how can you tell which asset the image
refers to in the Library panel?
5 What types of assets can you preview in the Library panel (list at least three)?
6 What happens to images in the application if you delete an image in the Library panel?
7 Why would you choose to include a linked image in your project?

ptg
ADOBE FLASH CATALYST CS5 CLASSROOM IN A BOOK 59
Review answers1 Assets in the Library panel include bitmap (raster) images, optimized graphics,
components that you create from artwork, wireframe components that have been
modifi ed, SWF fi les, and media (video and sound).
2 You must convert a vector drawing into a component or optimized graphic before it
becomes a reusable asset in the Library panel. To optimize the drawing, select it in the
artboard. Th en, in the HUD, open the Optimize Artwork menu and choose Optimize
Vector Graphics, Rasterize, or Compress.
3 To add fi les to the Library panel, you can import bitmaps, SWF fi les, video, and sound.
You can also create components and optimize artwork. Wireframe components must
be modifi ed before they appear in the Library panel.
4 Th e Common category in the Properties panel shows the source asset for the selected
image. You can use this link to swap the image for another image.
5 You can preview images, video, sound, and components in the Library panel. However,
to see the behavior of a component or SWF fi le, you must run the application in a
browser.
6 When you delete an image from the Library panel, all instances of the image, along with
any references to the image, are removed from the application.
7 Linked images are stored outside the published SWF fi le. Linking to large image fi les
can reduce the published fi le size of the application. Linking to images allows you to
update the images later without republishing the application.

ptg
60
4 MANAGING LAYERS
Lesson OverviewTh e Flash Catalyst Layers panel is like a master control center for
designing your application. It provides an organized structure for
viewing and managing every object in the artboard. With the click of a
button, you direct which of those objects are present and visible in the
current page or component state.
In this lesson, you’ll learn how to do the following:
• Identify target and selected layers
• Expand and collapse layers
• Show and hide objects in the current page or state
• Lock and unlock layers, groups, and objects
• Group complex object parts
• Optimize complex groups
• Add and delete layers
• Rename objects in the Layers panel
• Use layers to locate selected objects
• Change the stacking order of objects
Th is lesson will take about 30 minutes to complete. Copy the Lesson04
folder into the lessons folder that you created on your hard drive for
these projects (or create it now), if you haven’t already done so. As you
work on this lesson, you won’t be preserving the start fi les; if you need
to restore the start fi les, copy them from the Adobe Flash Catalyst CS5
Classroom in a Book CD.
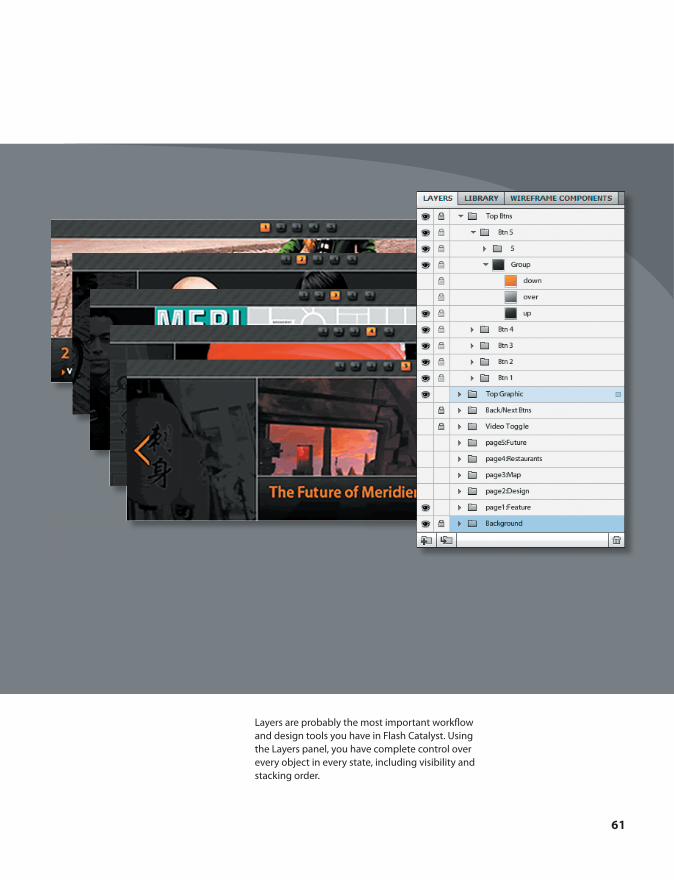
ptg
61
Layers are probably the most important workfl ow and design tools you have in Flash Catalyst. Using the Layers panel, you have complete control over every object in every state, including visibility and stacking order.

ptg
62 LESSON 4 Managing Layers
Exploring the Layers panelTh e Layers panel shows every object in the application using a collection of stacked
rows. Rows can represent layers, sublayers, objects (images, text, components, and
so on), and groups (grouped objects). Th e target layer is always shaded light blue.
Any objects that you add to the artboard are placed in the target layer. To select
a target layer, just click in its row. A layer must be unlocked and visible to act as the
target layer.
Show/Hide layer
Lock/Unlock layer
Create new layerCreate new sublayer
Expand/Collapse layer Selected object
Delete object
Layer contains selected objects(s)
Target layer
� Note: Layers and sublayers are sometimes referred to as layer folders, because they are identifi ed by a small fi le folder icon.
Expand and collapse layersTh e Layers panel lets you organize your project using a hierarchy of related objects.
Items are nested together into collapsible layers and groups for quick access and
easy viewing.
1 Start Flash Catalyst. Browse to the Lesson04 folder and open
Lesson04_Banner.fxp.
2 Click the Layers panel tab to bring it to the foreground.
Th is project includes artwork that was imported from an Adobe Illustrator fi le
with a single artboard. Th e original layer structure is preserved in Flash Catalyst.
Th e application has ten top-level layers (layer folders), and each layer includes
several objects. Th is project began with one new page state. Right now, all the
artwork for this application is stacked together in one page state. Eventually,
you will create additional pages, and then use the Layers panel to show and
hide diff erent objects in each page state. For now, let’s take a closer look at the
Layers panel.
� Tip: A collection of related objects can be grouped in Flash Catalyst or in the design document (AI, PSD, or FXG) before importing.

ptg
ADOBE FLASH CATALYST CS5 CLASSROOM IN A BOOK 63
3 Click the small gray triangle beside the page1:Feature layer to expand it. Th is is a
toggle button used to expand and collapse a layer.
Th e page1:Feature layer holds the artwork for Page1 of the interactive banner
application. It includes several objects, including one group and one sublayer.
Expanded layer
Group
Sublayer
4 Collapse the page1:Feature layer.
Show and hide layersYou control which objects appear in each page or component state by selecting a
state in the Pages/States panel, and then turning on and off layers. When you fi rst
add objects to a page or component state, they are present, which means they exist
in that state. When an object is present, it can be made visible or hidden using the
Layers panel. Th e following information will help to identify the presence and vis-
ibility of objects in the current state using the Layers panel:
• Present and visible: Th e name of the object is listed using dark text (present),
and the eyeball icon is dark (visible).
• Present and hidden: Th e name of the object is listed using dark text (present),
but there is no eyeball icon showing (hidden). If the eyeball appears dimmed,
the object’s visibility is on but its parent layer is hidden. When a parent layer or
group is hidden, its children are hidden automatically.
• Not present: Th e name of the object is listed using dimmed text (not present).
Th e object is not present in the current state, but it does exist in one or more
other states of the application.
� Note: Layer names, such as page1:Feature, were preserved from the original design document. You can change layer names to anything you want, as long as they clearly describe their contents.

ptg
64 LESSON 4 Managing Layers
Try expanding and hiding the page2:Design layer.
1 Expand the page2:Design layer.
You can tell that its contents are hidden because there is no eyeball icon beside
the layer name. But notice that the eyeballs for each of its objects are dimmed. A
dimmed eyeball means the object is turned on, but its parent layer is currently
hidden.
This layer is hidden.
These layers are temporarily hidden because their parent
layer is turned off .
2 Take a look at the artboard.
Even though we have the artwork for Page2 stacked above the artwork for Page1,
we don’t see it because its layer is turned off .
3 Click the empty Show/Hide box beside the page2:Design layer in the Layers panel.
Th e artwork for Page2 becomes visible in the artboard and the eyeball icon
appears beside the layer name.
4 Click the eyeball icon beside the page2:Design layer to hide it.
Once again, the artwork for Page2 is hidden and you see the artwork for Page1.
Th at’s what you want because you’re still working on Page1, as shown in the
Pages/States panel.
5 Collapse the page2:Design layer in the Layers panel.
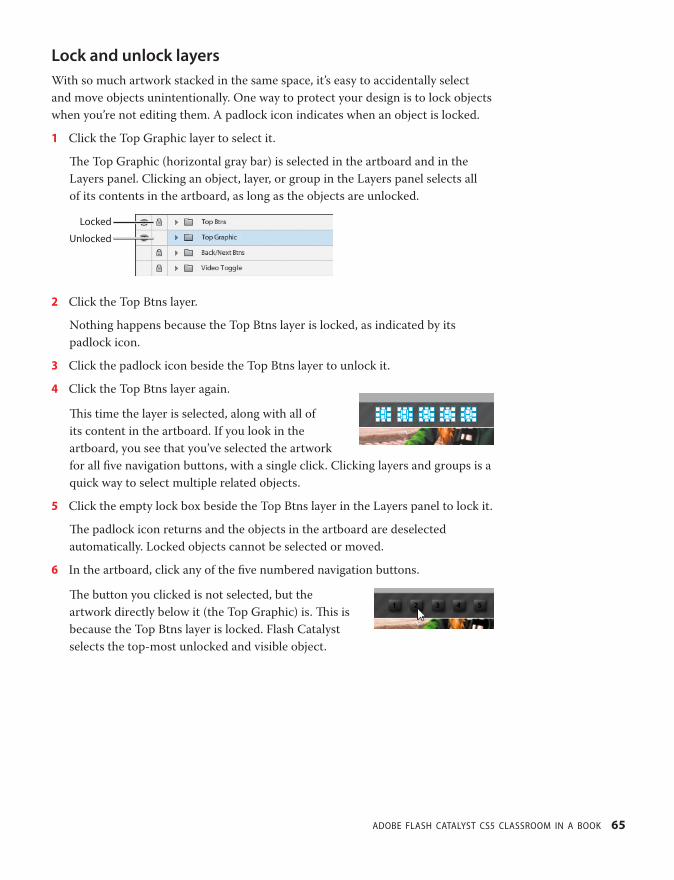
ptg
ADOBE FLASH CATALYST CS5 CLASSROOM IN A BOOK 65
Lock and unlock layersWith so much artwork stacked in the same space, it’s easy to accidentally select
and move objects unintentionally. One way to protect your design is to lock objects
when you’re not editing them. A padlock icon indicates when an object is locked.
1 Click the Top Graphic layer to select it.
Th e Top Graphic (horizontal gray bar) is selected in the artboard and in the
Layers panel. Clicking an object, layer, or group in the Layers panel selects all
of its contents in the artboard, as long as the objects are unlocked.
Locked
Unlocked
2 Click the Top Btns layer.
Nothing happens because the Top Btns layer is locked, as indicated by its
padlock icon.
3 Click the padlock icon beside the Top Btns layer to unlock it.
4 Click the Top Btns layer again.
Th is time the layer is selected, along with all of
its content in the artboard. If you look in the
artboard, you see that you’ve selected the artwork
for all fi ve navigation buttons, with a single click. Clicking layers and groups is a
quick way to select multiple related objects.
5 Click the empty lock box beside the Top Btns layer in the Layers panel to lock it.
Th e padlock icon returns and the objects in the artboard are deselected
automatically. Locked objects cannot be selected or moved.
6 In the artboard, click any of the fi ve numbered navigation buttons.
Th e button you clicked is not selected, but the
artwork directly below it (the Top Graphic) is. Th is is
because the Top Btns layer is locked. Flash Catalyst
selects the top-most unlocked and visible object.

ptg
66 LESSON 4 Managing Layers
Grouping objectsGroups are created in the Layers panel automatically when you group objects in
the original design document. Th is makes their parts more manageable in Flash
Catalyst. You can also group related objects after importing them. Th is is helpful
when your design includes a large collection of parts that make up a single graphic.
For example a vector drawing may include hundreds of smaller paths. Grouping
them makes them a lot easier to manage in the Layers panel.
1 Expand the page1:Feature layer.
2 In the Layers panel, click to select the Line object.
3 Hold down the Shift key and click to
select Transparency BG (seven rows
below).
A range of eight objects is selected in
the artboard and in the Layers panel.
4 Choose Modify > Group.
Th e selected objects are combined
into a single Group.
Renaming objects in the Layers panelNow that you’ve grouped a range of artwork in the page1:Feature layer, there are
two groups with the same name. Th at’s because all new groups are created with the
default name, Group. Th is is also true when you add new images or components.
Each new object in the Layers panel begins with a generic name, such as Image,
Button, Scroll Panel, and so on. Th is can be a little confusing unless you take the
time to assign more descriptive names.
1 In the Layers panel, double-click the Group name you created in the previous
exercise.
Th e name is highlighted in the Layers panel.
� Tip: You can also Control-click/Command-click to select a non-contiguous range of objects in the Layers panel.
� Note: Groups can be expanded in the Layers panel and ungrouped by choosing Modify > Ungroup.
� Note: When you import artwork from a design document created in Adobe Illustrator, Adobe Photoshop, or Adobe Fireworks, the objects in the Layers panel are named automatically using the original layer names you provided in the design document.
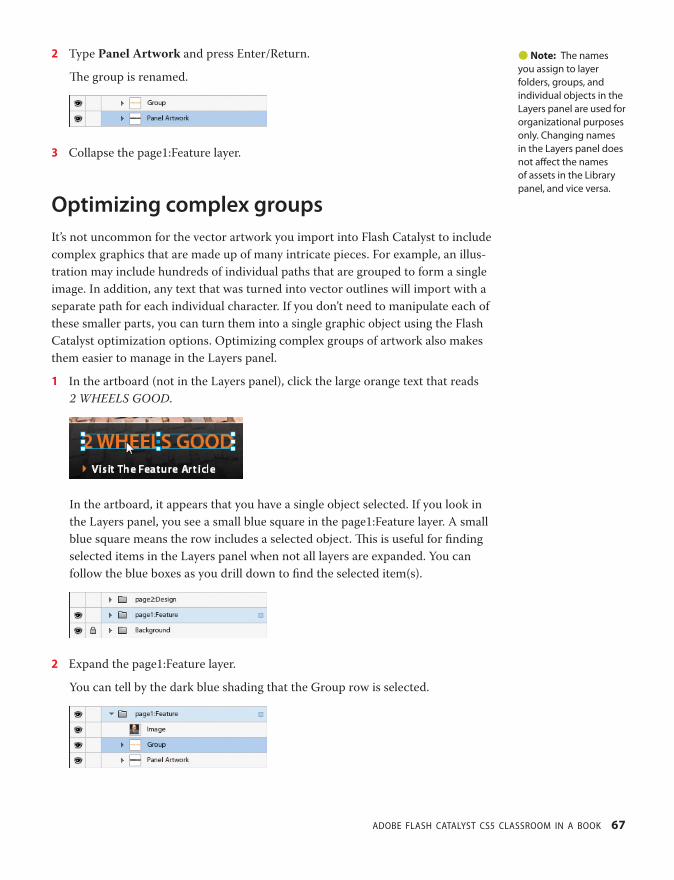
ptg
ADOBE FLASH CATALYST CS5 CLASSROOM IN A BOOK 67
2 Type Panel Artwork and press Enter/Return.
Th e group is renamed.
3 Collapse the page1:Feature layer.
Optimizing complex groupsIt’s not uncommon for the vector artwork you import into Flash Catalyst to include
complex graphics that are made up of many intricate pieces. For example, an illus-
tration may include hundreds of individual paths that are grouped to form a single
image. In addition, any text that was turned into vector outlines will import with a
separate path for each individual character. If you don’t need to manipulate each of
these smaller parts, you can turn them into a single graphic object using the Flash
Catalyst optimization options. Optimizing complex groups of artwork also makes
them easier to manage in the Layers panel.
1 In the artboard (not in the Layers panel), click the large orange text that reads
2 WHEELS GOOD.
In the artboard, it appears that you have a single object selected. If you look in
the Layers panel, you see a small blue square in the page1:Feature layer. A small
blue square means the row includes a selected object. Th is is useful for fi nding
selected items in the Layers panel when not all layers are expanded. You can
follow the blue boxes as you drill down to fi nd the selected item(s).
2 Expand the page1:Feature layer.
You can tell by the dark blue shading that the Group row is selected.
� Note: The names you assign to layer folders, groups, and individual objects in the Layers panel are used for organizational purposes only. Changing names in the Layers panel does not aff ect the names of assets in the Library panel, and vice versa.

ptg
68 LESSON 4 Managing Layers
3 Expand the Group.
Th e 2 WHEELS GOOD text was turned into vector outlines before importing
the design document. Each character is a separate path. You don’t need to edit
this text, so let’s optimize this artwork using the Heads-Up Display (HUD).
4 Th e Group is still selected, so in the Optimize Artwork section of the HUD, click
Choose Command, and choose Optimize Vector Graphics.
Th e vector paths are turned into a single object in the Layers panel named
Graphic1.
5 Change the name from Graphic1 to 2 WHEELS GOOD.
� Tip: You can also optimize graphics by choosing Modify > Optimize Vector Graphics.

ptg
ADOBE FLASH CATALYST CS5 CLASSROOM IN A BOOK 69
Adding and deleting layersAdding new layers in the Layers panel is simple; you simply add a new layer folder.
To add a new top-level layer folder, click the Create New Layer icon ( ). To add
a new sublayer folder, select an existing top-level layer and click the Create New
Sublayer icon ( ). Deleting layers is just as easy. Select the layer folder and click
the Delete icon ( ). When you add or delete layer folders, the changes appear in
every page state (or component state when editing a component).
1 In the Layers panel, click the Create New Layer icon ( ).
A new top-level layer folder is added at the top of the Layers panel. New layers
are named Layer1, Layer2, and so on. You can rename this layer folder, just like
any other object in the Layers panel.
2 Select the new layer folder (Layer1), and click the Delete icon ( ) in the bottom-
right corner of the Layers panel.
Th e new layer folder is gone. If this application had more than one page, the
layer would be removed from all pages. If this layer contained any objects, those
objects would also be removed from every page.
� Note: If an object name appears dimmed in the Layers panel, it means the object is not present in the current state, but it does appear in another state of the application.
Stacking artwork using layersTo change the stacking order of objects in the application, you can drag rows up or
down in the Layers panel. You can also change the stacking order of objects within a
layer or group.
1 Look at the artboard and notice that the orange 2 WHEELS GOOD text appears
over a semi-transparent gray background.
� Tip: To remove an object from the current state without removing it from other states, select the object and press Delete.
� Note: The stacking order of layers is constant across all states. You can’t have a diff erent stacking order in diff erent states.
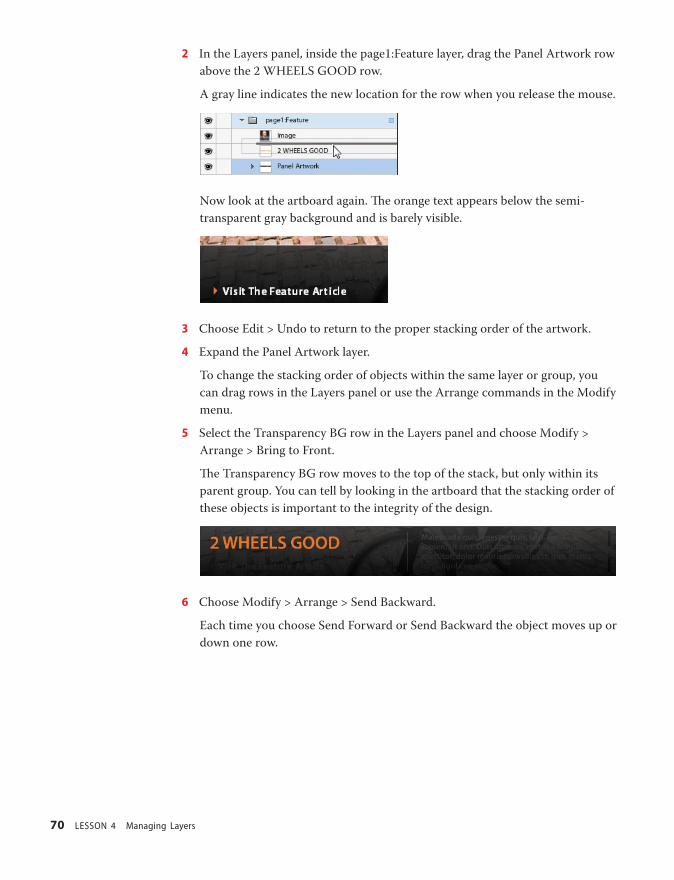
ptg
70 LESSON 4 Managing Layers
2 In the Layers panel, inside the page1:Feature layer, drag the Panel Artwork row
above the 2 WHEELS GOOD row.
A gray line indicates the new location for the row when you release the mouse.
Now look at the artboard again. Th e orange text appears below the semi-
transparent gray background and is barely visible.
3 Choose Edit > Undo to return to the proper stacking order of the artwork.
4 Expand the Panel Artwork layer.
To change the stacking order of objects within the same layer or group, you
can drag rows in the Layers panel or use the Arrange commands in the Modify
menu.
5 Select the Transparency BG row in the Layers panel and choose Modify >
Arrange > Bring to Front.
Th e Transparency BG row moves to the top of the stack, but only within its
parent group. You can tell by looking in the artboard that the stacking order of
these objects is important to the integrity of the design.
6 Choose Modify > Arrange > Send Backward.
Each time you choose Send Forward or Send Backward the object moves up or
down one row.

ptg
ADOBE FLASH CATALYST CS5 CLASSROOM IN A BOOK 71
7 Choose Modify > Arrange > Send to Back.
Th e Transparent BG layer moves back to the bottom of the stack, where it
belongs.
8 Drag the 2 WHEELS GOOD row into the Panel Artwork layer and position it at
the top of the stack.
9 Collapse and lock the Panel Artwork layer.
Th ere is one last change that needs to be made to the arrangement of the objects
in the page1:Feature layer. Th e Image row, at the top of the stack, belongs inside
the Sample Images sublayer folder.
10 Drag the Image row (with the picture of a man) down until it’s directly over the
Sample Images row. Th is causes the Sample Images row to expand automatically.
When it does, drag the Image row above the 2 wheels image row and release the
mouse button.
Th e Image row is now inside the Sample Images sublayer folder.
ptg
72 LESSON 4 Managing Layers
Review questions1 What is the target layer, and how is it identifi ed in the Layers panel?
2 What types of items appear in the Layers panel?
3 What does a small blue square in the Layers panel indicate?
4 In a new Flash Catalyst project, why do some rows have descriptive names, while other
rows have generic names, such as Image, Graphic, or Group?
5 How can you make the Layers panel more manageable when your project includes
artwork, such as illustrations or text outlines, that contains several small paths?
6 How do you change the stacking order of objects in the Layers panel.
7 When you add a bitmap image from the Library panel to the artboard, a new Image
is added to the Layers panel. What happens to the image in the Library panel if you
rename this object in the Layers panel?
ptg
ADOBE FLASH CATALYST CS5 CLASSROOM IN A BOOK 73
Review answers1 You can make any unlocked and visible layer the target layer by selecting it. When
you add a new object to the artboard, either by dragging from the Library panel, by
importing, by drawing shapes, or by adding new text, the new object is placed in the
target layer. Th e target layer is identifi ed in the Layers panel by light blue shading.
2 Th e Layers panel shows every object in the application using a collection of stacked
rows. Rows can represent layers, sublayers, objects (images, vector drawings, text,
media, and components), and groups (grouped objects).
3 A small blue square means the row includes a selected object. Th is is useful for fi nding
selected items in the Layers panel when not all layers are expanded. You can follow the
boxes as you drill down to fi nd the selected item(s).
4 When you create a new Flash Catalyst project from a design document you created in
Photoshop, Illustrator, or Fireworks, the naming and structure of the design document
is preserved in Flash Catalyst. When you add new objects in Flash Catalyst, these new
objects begin with generic names, such as Group and Image.
5 Grouping complex graphics is one way to keep the Layers panel more manageable. If
you don’t need to work with the individual parts of a vector graphic, you can select its
parts and create a single optimized graphic. Once you do this, it becomes a reusable
optimized graphic in the Library panel.
6 To change the stacking order of objects, you can drag rows up or down in the Layers
panel. You can also change the stacking order of objects within a layer or group using
the Arrange commands in the Modify menu.
7 Th ere is no link between the names of objects in the Layers panel and the names of
assets in the Library panel. You can change the name of objects in the Layers panel
without aff ecting the name of the source asset in the project library.
ptg
74
5 WORKING WITH PAGES AND STATES
Lesson OverviewRich Internet applications are engaging, informative, relevant, and
fresh. Th ey pack lots of dynamic content into very limited screen
space. A common goal is to keep the interface simple, yet fi lled with
information that’s easy to locate, and even easier to navigate. Th is is
done by carefully organizing your application into just a few meaning-
ful pages or views. Th en within each of those pages, you present large
amounts of content using interactive components—windows, menus,
lists, or panels that expand, collapse, fl ip, or morph in some way to
show and hide information at just the right moment. In Flash Catalyst,
this organization begins with pages and states.
In this lesson, you’ll learn how to do the following:
• Create and name states
• Modify states by showing and hiding objects
• Add and remove objects in a specifi c state
• Delete objects from all states
• Delete states
Th is lesson will take about 30 minutes to complete. Copy the Lesson05
folder into the lessons folder that you created on your hard drive for
these projects (or create it now), if you haven’t already done so. As you
work on this lesson, you won’t be preserving the start fi les; if you need
to restore the start fi les, copy them from the Adobe Flash Catalyst CS5
Classroom in a Book CD.
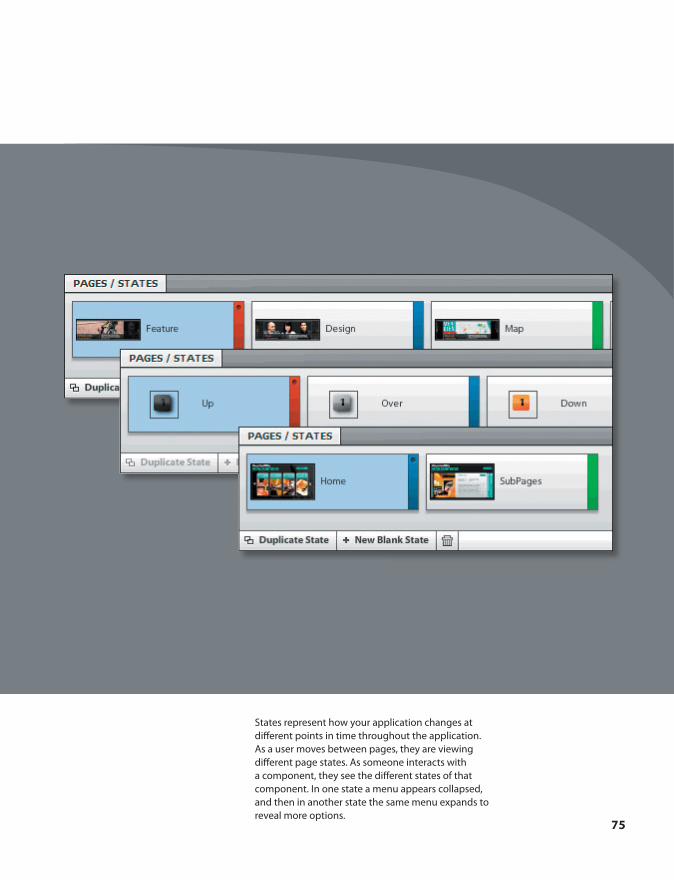
ptg
75
States represent how your application changes at diff erent points in time throughout the application. As a user moves between pages, they are viewing diff erent page states. As someone interacts with a component, they see the diff erent states of that component. In one state a menu appears collapsed, and then in another state the same menu expands to reveal more options.
ptg
76 LESSON 5 Working with Pages and States
Page and component statesMost rich Internet applications present information on more than one page or
screen, and each page can include various interactive components. Examples of
interactive components are navigation menus, scrollable panels, buttons, multi-
media controls, and so on. Th e diff erent views a user sees when interacting with
the application and components are called states. In Flash Catalyst, there are two
types of states.
Page states, also referred to as pages, are the diff erent pages or screens of the
application. Page states usually represent the topmost level in the application
hierarchy.
Component states are the diff erent views or states of an interactive component,
such as the Up, Over, Down, and Disabled states of a button component.
To view the diff erent page states of the application, you simply select a page in
the Pages/States panel. To view the diff erent states within a component, you can
double-click the component in the artboard to edit it in Edit-In-Place mode and
view its states in the Pages/States panel.
In this lesson, you will begin to develop the page states for an interactive banner,
but the same principles apply when creating and modifying the states of a custom
component.
Less is moreFlash Catalyst applications can have up to 20 page states (or 20 unique states in a custom component). That may seem like a limitation, but adding too many pages to an application can slow performance, not to mention that it makes the application diffi cult for users to navigate.
When it comes to interface design, keep it simple. In an application, 20 pages are more than enough. Fewer is even better. Instead of creating a separate page for every unique view, you can encapsulate content into related subcategories using custom components that present the right information at just the right time. Use menus that collapse and expand, scrolling lists, or panels that fl ip to reveal more information. You can even nest components inside other components to create more depth and structure in the application without adding more application pages.
� Note: Most built-in components have very specifi c states, such as the Normal and Disabled states of a text entry fi eld. These states cannot be duplicated, deleted, or renamed. On the other hand, custom components are created and edited much like page states.
� Note: When a component is being edited in Edit-In-Place mode, the Layers panel splits into sections. It shows layers for the main application and the components you are editing.
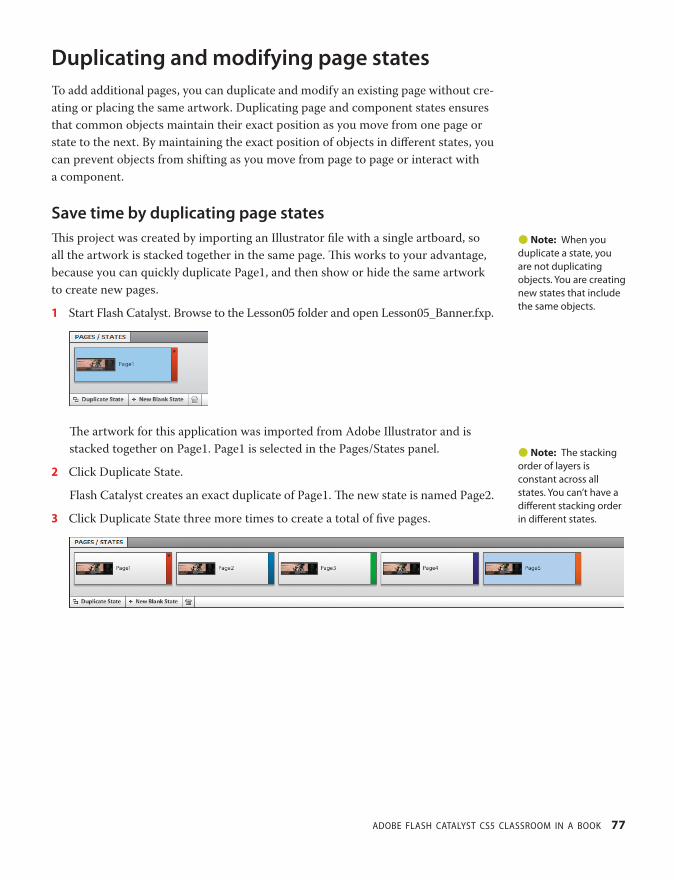
ptg
ADOBE FLASH CATALYST CS5 CLASSROOM IN A BOOK 77
Duplicating and modifying page statesTo add additional pages, you can duplicate and modify an existing page without cre-
ating or placing the same artwork. Duplicating page and component states ensures
that common objects maintain their exact position as you move from one page or
state to the next. By maintaining the exact position of objects in diff erent states, you
can prevent objects from shifting as you move from page to page or interact with
a component.
Save time by duplicating page statesTh is project was created by importing an Illustrator fi le with a single artboard, so
all the artwork is stacked together in the same page. Th is works to your advantage,
because you can quickly duplicate Page1, and then show or hide the same artwork
to create new pages.
1 Start Flash Catalyst. Browse to the Lesson05 folder and open Lesson05_Banner.fxp.
Th e artwork for this application was imported from Adobe Illustrator and is
stacked together on Page1. Page1 is selected in the Pages/States panel.
2 Click Duplicate State.
Flash Catalyst creates an exact duplicate of Page1. Th e new state is named Page2.
3 Click Duplicate State three more times to create a total of fi ve pages.
� Note: When you duplicate a state, you are not duplicating objects. You are creating new states that include the same objects.
� Note: The stacking order of layers is constant across all states. You can’t have a diff erent stacking order in diff erent states.

ptg
78 LESSON 5 Working with Pages and States
Give page states descriptive namesFlash Catalyst names new pages Page1, Page2, Page3, and so on. You may fi nd that
giving descriptive names to pages will help you match artwork to the appropriate
page. For example, if you have a top-level layer folder for each page, you can name
the pages to match those folders.
Consider the following when naming pages and component states:
• State names must begin with a letter.
• State names cannot contain spaces.
• State names cannot contain special characters, such as !@#$%^&*().
Let’s rename some pages:
1 Double-click Page1 in the Pages/States panel.
2 Type Feature and press Enter/Return.
3 Rename Page2 Design.
4 Rename Page3 Map.
5 Rename Page4 Restaurants.
6 Rename Page5 Future.
Th e page names now relate to the layer folders used to organize their artwork.
You can see this by comparing the Pages/States panel with the Layers panel.
Show and hide artwork in each page stateNow that you’ve made fi ve copies of the same page, you can use the Layers panel to
show and hide the artwork for each page.
1 In the Pages/States panel, select Feature.
If you look in the Layers panel, you can see which layers are visible on this
page. Th is page includes the Top Btns, Top Graphic, and Background layers,
and the artwork in the page1:Feature layer. Th is is the correct artwork for the
Feature page.

ptg
ADOBE FLASH CATALYST CS5 CLASSROOM IN A BOOK 79
2 In the Pages/States panel, select Design.
3 In the Layers panel, click the eyeball icon to hide the page1:Feature layer and
show the page2:Design layer.
Th is is the correct artwork for the Design page.
4 In the Pages/States panel, select Map.
5 In the Layers panel, hide the page1:Feature layer and show the page3:Map layer.
6 In the Pages/States panel, select Restaurants.
� Note: Any change that aff ects the appli-cation hierarchy is shared across all states automatically. For example, if you group objects or convert objects to components, the change applies to all states. If you edit a component, you edit the component defi nition in the project library. The changes apply to all instances of the component in all states.
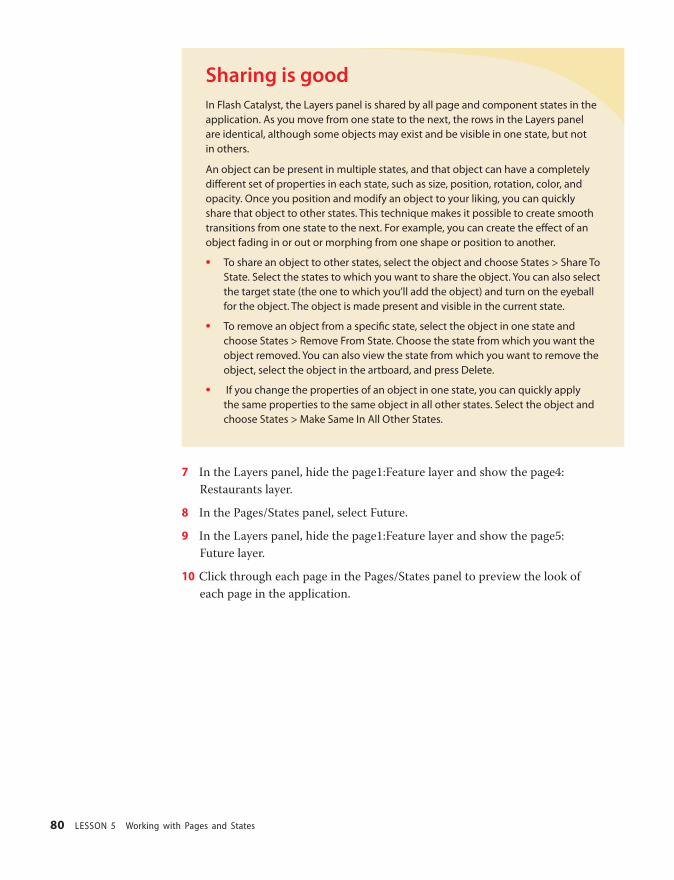
ptg
80 LESSON 5 Working with Pages and States
Sharing is goodIn Flash Catalyst, the Layers panel is shared by all page and component states in the application. As you move from one state to the next, the rows in the Layers panel are identical, although some objects may exist and be visible in one state, but not in others.
An object can be present in multiple states, and that object can have a completely diff erent set of properties in each state, such as size, position, rotation, color, and opacity. Once you position and modify an object to your liking, you can quickly share that object to other states. This technique makes it possible to create smooth transitions from one state to the next. For example, you can create the eff ect of an object fading in or out or morphing from one shape or position to another.
• To share an object to other states, select the object and choose States > Share To State. Select the states to which you want to share the object. You can also select the target state (the one to which you’ll add the object) and turn on the eyeball for the object. The object is made present and visible in the current state.
• To remove an object from a specifi c state, select the object in one state and choose States > Remove From State. Choose the state from which you want the object removed. You can also view the state from which you want to remove the object, select the object in the artboard, and press Delete.
• If you change the properties of an object in one state, you can quickly apply the same properties to the same object in all other states. Select the object and choose States > Make Same In All Other States.
7 In the Layers panel, hide the page1:Feature layer and show the page4:
Restaurants layer.
8 In the Pages/States panel, select Future.
9 In the Layers panel, hide the page1:Feature layer and show the page5:
Future layer.
10 Click through each page in the Pages/States panel to preview the look of
each page in the application.

ptg
ADOBE FLASH CATALYST CS5 CLASSROOM IN A BOOK 81
Adding and deleting statesNot every new page or component state is derived from an existing state. For
example, when you begin a new blank project it opens with a blank page. You can
also add new blank states to any application or custom component from the Pages/
States panel. A blank state off ers a clean slate on which you can design an entirely
fresh layout.
Add a blank page stateNew blank states are always added after the last state.
1 In the Pages/States panel, click New Blank State.
A blank page state is added to the end of the Pages/States panel, after the Future
page. You may need to scroll the Pages/States panel to see the new page.
2 Rename the new page Gardens.
Th e artboard appears to be completely blank. A blank artboard can mean that
every object in the current state is hidden, or that no objects are present in the
current state. In the case of a new blank state, there are no objects present. It is
truly blank.
3 Take a look at the Layers panel.
In a new blank state, every layer folder is made visible by default. So why don’t
we see any of this artwork in the new page?

ptg
82 LESSON 5 Working with Pages and States
4 In the Layers panel, expand the Top Graphic layer, the Page1:Feature layer, and
the Panel Artwork sublayer.
All layers are visible, but the objects within those layers are not present in the
current state. When an object is present somewhere in the application (in
another state), but does not exist in the current state, it appears dimmed in the
Layers panel.
Add objects to blank page statesYou can add objects to a new blank state using a few diff erent methods:
• Share objects from other states.
• Import new images, video, SWF fi les, or layered artwork from Adobe Illustrator,
Adobe Photoshop, or FXG documents.
• Drag an object from the Library panel to the new blank artboard.
Let’s add an object to the blank state:
1 In the Layers panel, show the TopGraphic row (the graphic object, not the
parent layer).
Th e eyeball icon appears for this object. You
have just shared or copied the graphic to
the current state, as seen in the artboard.
� Tip: Anytime a project asset appears in another state, you’re better off sharing that item to a new state rather than dragging another instance from the Library panel. Each time you add an item from the Library panel, you create a new instance. If the item already exists in the application, you’ll end up with duplicate objects in the Layers panel.

ptg
ADOBE FLASH CATALYST CS5 CLASSROOM IN A BOOK 83
2 Click the eyeball icon to hide the TopGraphic object.
Th e graphic is hidden in the artboard, but the object’s name still appears dark in
the Layers panel (it’s not dimmed). Th is means the object is still present in the
current state, but now it’s hidden from view.
3 Show the TopGraphic object again so the gray rectangle is visible at the top of
the artboard.
4 Add a new layer in the Layers panel and name it page6:Gardens.
5 Drag the page6:Gardens layer so that it is positioned directly above the
page5:Future layer.
6 If it’s not already selected, select the page6:Gardens layer to make it the target
layer (light blue) for new content.
7 Choose File > Import > Adobe Photoshop File (.psd). Browse to the Lesson05
folder, select garden.psd, and click Open. Click OK to accept the default
import options.
Layered artwork from the Photoshop design document is added to the
application.

ptg
84 LESSON 5 Working with Pages and States
8 Expand the page6:Gardens layer.
Th e new artwork is placed inside the target
layer and is visible in the current page state.
9 Select any of the other fi ve pages in the
Pages/States panel.
Th e artwork you just added appears dimmed in the Layers panel for the other
fi ve pages. Th is artwork is only present in the new page state.
Delete objects from specifi c statesDepending on how you delete an object, it can be removed from the current state,
from a specifi c state that you select, or from the entire application.
1 In the Pages/States panel, select Gardens.
2 Select only the TopGraphic object in the artboard. You can do this by clicking the
graphic in the artboard, or by clicking the TopGraphic layer in the Layers panel.
3 Press the Delete key.
Th e TopGraphic object appears dimmed in the Layers panel. Pressing the Delete
key removes selected objects from the current state. If the object(s) exist in other
states, those instances are not aff ected.
4 Select any of the other fi ve pages in the Pages/States panel.
Th e TopGraphic object still exists in these states.
5 Return to the Gardens page in the Pages/States panel.
6 In the artboard, click to select the image with the green leaves on it (page6sm in
the Layers panel).
7 Choose States > Remove from State.
A menu appears with a list of every page state in the application. A dimmed
menu option means the object doesn’t exist in that state. From here, you can
delete objects from a specifi c state only.
� Tip: If you want the object to fade in or out as you transition between states, then leave the object present in both states and hide it or change its Opacity to 0, instead of deleting it.
� Note: Deleting a reusable library asset from the application (all states) does not remove it from the project library. The asset can be added again from the Library panel.
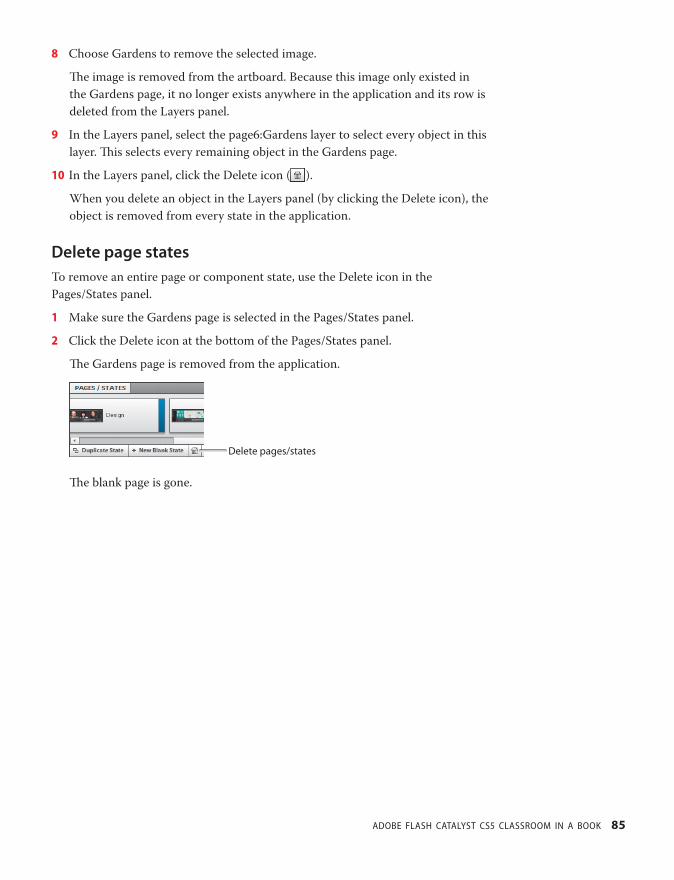
ptg
ADOBE FLASH CATALYST CS5 CLASSROOM IN A BOOK 85
8 Choose Gardens to remove the selected image.
Th e image is removed from the artboard. Because this image only existed in
the Gardens page, it no longer exists anywhere in the application and its row is
deleted from the Layers panel.
9 In the Layers panel, select the page6:Gardens layer to select every object in this
layer. Th is selects every remaining object in the Gardens page.
10 In the Layers panel, click the Delete icon ( ).
When you delete an object in the Layers panel (by clicking the Delete icon), the
object is removed from every state in the application.
Delete page statesTo remove an entire page or component state, use the Delete icon in the
Pages/States panel.
1 Make sure the Gardens page is selected in the Pages/States panel.
2 Click the Delete icon at the bottom of the Pages/States panel.
Th e Gardens page is removed from the application.
Delete pages/states
Th e blank page is gone.
ptg
86 LESSON 5 Working with Pages and States
Review questions1 What is the fastest way to create a new page or component state based on an existing
state in the application or component?
2 What is the maximum number of pages that you can add to a Flash Catalyst application?
3 How is new content added to a blank page state?
4 What is a fast way to copy artwork from one state to another state where that artwork
is not present?
5 What does it mean when a row in the Layers panel appears dimmed?
6 What happens if you select objects in the artboard and press the Delete key?
7 How can you remove selected objects from every state of the application with a
single click?
Review answers1 You can quickly create a new page or component state based on an existing page.
Duplicate the existing page in the Pages/States panel and use the Layers panel to show
or hide artwork in the new state.
2 Each Flash Catalyst application can have up to 20 page states, but fewer is better.
Whenever possible, consider adding new views or screens by creating custom
components. You can even create components that exist within other components.
3 Th ere are a few ways to add new content to blank pages. You can drag assets from the
Library panel, import new assets, or share assets from another state in the application.
4 When artwork exists in the application, but is not present in the current state, the
artwork appears dimmed in the Layers panel. By clicking the Show/Hide box in the
Layers panel, you add a copy of the object to the current state.
5 A dimmed row in the Layers panel represents an object that exists in the application in
another state, but is not present in the currently selected state.
6 When you select objects and press the Delete key, those objects are removed from the
current state only. If those objects exist in other states, they are not aff ected.
7 You can delete selected objects from the entire application (every state) by clicking the
Delete icon ( ) in the Layers panel.

ptg
This page intentionally left blank
ptg
88
6 CREATING INTERACTIVE COMPONENTS
Lesson OverviewYou’ve seen them in just about every computer application—a win-
dow that scrolls, options in a dialog box, menus and buttons that take
you from one page to the next. Th ese and other interactive elements
are the building blocks of applications. In Flash Catalyst they’re called
components.
In this lesson, you’ll learn how to do the following:
• Use wireframe components for rapid prototyping
• Convert artwork to built-in components
• Create custom navigation and toggle buttons
• Create custom scroll bars and scrolling panels
• Build custom components and navigation buttons
• Add and format text
• Modify components using Edit-In-Place mode
• Share artwork between component states
• Add and delete Flash Catalyst interactions
Th is lesson will take about 90 minutes to complete. Copy the
Lesson06 folder into the lessons folder that you created on your hard
drive for these projects (or create it now), if you haven’t already done
so. As you work on this lesson, you won’t be preserving the start fi les;
if you need to restore the start fi les, copy them from the Adobe Flash
Catalyst CS5 Classroom in a Book CD.

ptg
89
Design interactive components, like scroll bars, but-tons, and sliders. Begin with ready-to-use wireframe components, or convert your custom artwork to one of several built-in components, and then add interac-tivity like page navigation, UI controls, and links.

ptg
90 LESSON 6 Creating Interactive Components
The building blocks of RIAsTh e building blocks of rich Internet applications (RIAs) are components and the
interactions that bring them to life.
ComponentsFlash Catalyst provides a collection of components with built-in states and behav-
iors, such as the up, over, down, and disabled states of a simple button. You can also
create a custom component where you defi ne the states and behavior from scratch.
You can even create components that include other components. For example, you
can have a scroll panel that includes a scroll bar and buttons.
Creating components
Th ere are a few diff erent ways that you can add a Flash Catalyst component to your
application. Th ese include:
• Drag wireframe components with a generic appearance from the Wireframe
Components panel.
• Convert artwork into one of several built-in components (button, check box,
and so on).
• Convert artwork to make a custom component.
Using Edit-In-Place
After adding a component to the artboard, you can edit the component using
Edit-In-Place and modify its individual parts. When using Edit-In-Place, you are
editing the component’s defi nition in the project library. Th e changes apply to every
instance of that component in every state of the application. Th is is diff erent than
applying properties. When you select a component and change its properties in the
Properties panel, the properties apply only to the current state. To apply the same
properties to the component in all other states, you can select the component and
choose States > Make Same In All Other States.
InteractionsYou can add Flash Catalyst interactions that defi ne a desired behavior when a user
interacts with a component (or grouped artwork). An interaction is like a set of
instructions that tells the program what to do in response to a user event, such as
clicking a button.
� Tip: When editing components in Edit-In-Place mode, the Layers panel divides into separate sections for the main application layers and the component layers. You can drag objects from the main application into the component and vice versa.
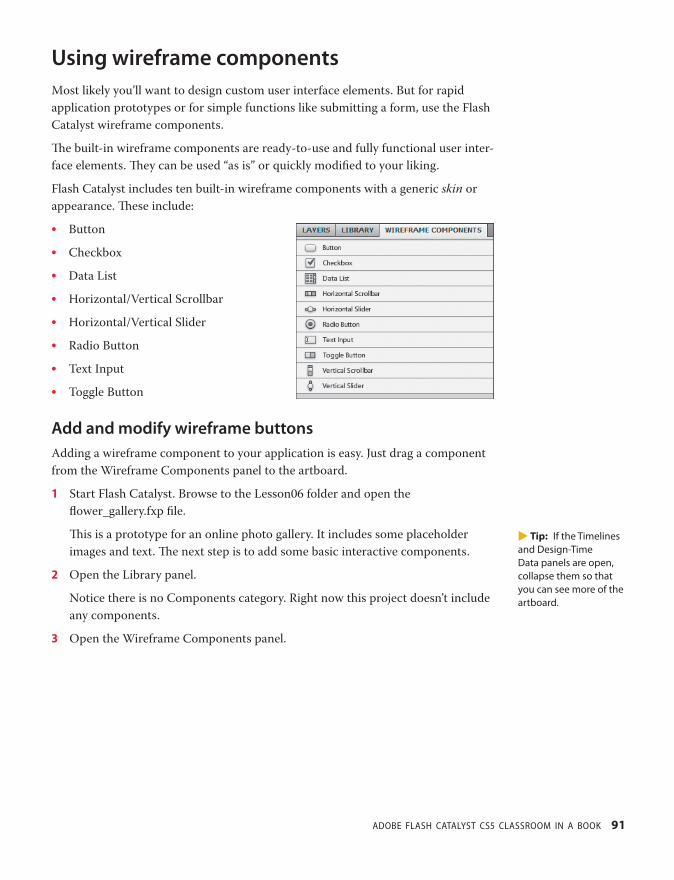
ptg
ADOBE FLASH CATALYST CS5 CLASSROOM IN A BOOK 91
Using wireframe componentsMost likely you’ll want to design custom user interface elements. But for rapid
application prototypes or for simple functions like submitting a form, use the Flash
Catalyst wireframe components.
Th e built-in wireframe components are ready-to-use and fully functional user inter-
face elements. Th ey can be used “as is” or quickly modifi ed to your liking.
Flash Catalyst includes ten built-in wireframe components with a generic skin or
appearance. Th ese include:
• Button
• Checkbox
• Data List
• Horizontal/Vertical Scrollbar
• Horizontal/Vertical Slider
• Radio Button
• Text Input
• Toggle Button
Add and modify wireframe buttonsAdding a wireframe component to your application is easy. Just drag a component
from the Wireframe Components panel to the artboard.
1 Start Flash Catalyst. Browse to the Lesson06 folder and open the
fl ower_gallery.fxp fi le.
Th is is a prototype for an online photo gallery. It includes some placeholder
images and text. Th e next step is to add some basic interactive components.
2 Open the Library panel.
Notice there is no Components category. Right now this project doesn’t include
any components.
3 Open the Wireframe Components panel.
� Tip: If the Timelines and Design-Time Data panels are open, collapse them so that you can see more of the artboard.

ptg
92 LESSON 6 Creating Interactive Components
4 Drag a Button component from the Wireframe Components panel to the
artboard. Position the button below the Request Information text, just above the
thumbnail images.
Th e button has a default label of Button. You can see the label on the button
itself and in the Common category of the Properties panel. In the Properties
panel, the current skin for this button is Wireframe. Th is means that it’s using
the generic wireframe artwork for the button. Skin refers to the artwork or
set of instructions that defi nes the graphical representation of the button.
SkinLabel
5 Open the Library panel again, and notice there is still no Button component in
the library.
Th is is because you added a wireframe component, and there’s no reason
to place another copy in the project library. It’s available in the Wireframe
Components panel already. For minor customization, you can change its
properties in the Properties panel, but if you edit the button it becomes a new
skin in the Library panel. Th is is done to preserve the original wireframe and so
that you can reuse your edited button in other parts of the application.
6 With the button still selected, double-click the Label fi eld in the Common
category of the Properties panel. Type Submit and press Enter/Return.
Th e label on the button changes to Submit.
7 Double-click the button or click Up in the Heads-Up Display (HUD).
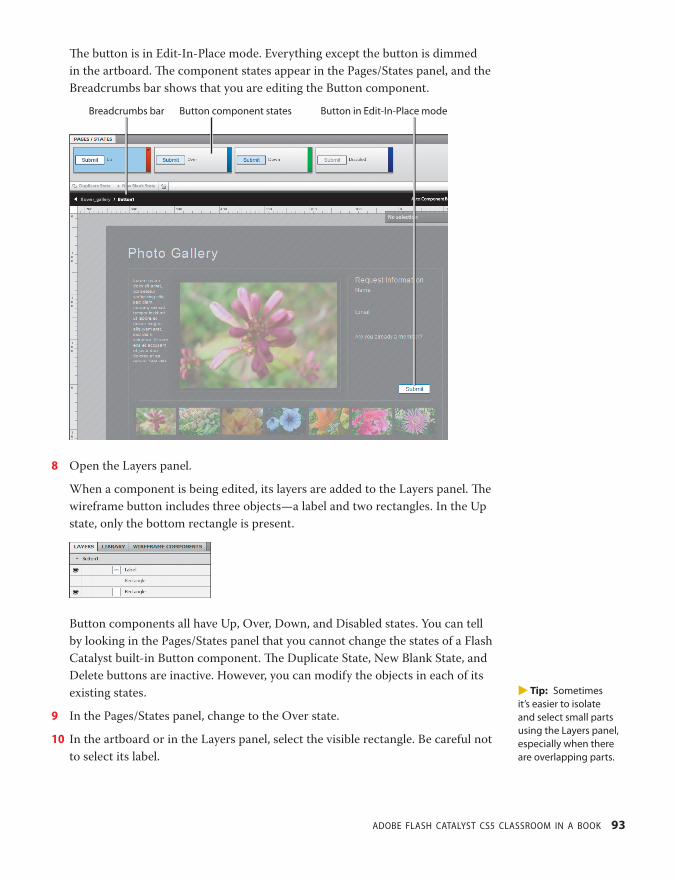
ptg
ADOBE FLASH CATALYST CS5 CLASSROOM IN A BOOK 93
Th e button is in Edit-In-Place mode. Everything except the button is dimmed
in the artboard. Th e component states appear in the Pages/States panel, and the
Breadcrumbs bar shows that you are editing the Button component.
Breadcrumbs bar Button component states Button in Edit-In-Place mode
8 Open the Layers panel.
When a component is being edited, its layers are added to the Layers panel. Th e
wireframe button includes three objects—a label and two rectangles. In the Up
state, only the bottom rectangle is present.
Button components all have Up, Over, Down, and Disabled states. You can tell
by looking in the Pages/States panel that you cannot change the states of a Flash
Catalyst built-in Button component. Th e Duplicate State, New Blank State, and
Delete buttons are inactive. However, you can modify the objects in each of its
existing states.
9 In the Pages/States panel, change to the Over state.
10 In the artboard or in the Layers panel, select the visible rectangle. Be careful not
to select its label.
� Tip: Sometimes it’s easier to isolate and select small parts using the Layers panel, especially when there are overlapping parts.

ptg
94 LESSON 6 Creating Interactive Components
11 In the Common category of the Properties panel, click the Fill Color swatch to
open the Color Picker and select a new color from the palette.
Fill Color swatch
Th e Over state of the button changes color.
12 Press Esc to exit Edit-In-Place mode.
13 Open the Library panel again.
Th is time the Library panel includes a Button component. Th is is because you
edited the wireframe button in Edit-In-Place mode, which creates a new skin
(based on the wireframe) automatically.
In the Properties panel, the skin for this button now refers to the name of the
new component, Button1, in the Library panel.
� Tip: You can also use the Breadcrumbs bar or double-click anywhere in the dimmed part of the artboard to exit Edit-In-Place mode.

ptg
ADOBE FLASH CATALYST CS5 CLASSROOM IN A BOOK 95
Add wireframe text input fi eldsTh ere are some components that you probably don’t need to customize. A text input
fi eld used in a form is a good example.
1 Change back to the Wireframe Components panel and drag a Text Input
component to the artboard. Position it below the text that reads “Name.”
As long as you haven’t edited a wireframe component, it can be sized using the
selection handles or by changing its Height (H) and Width (W) values in the
Properties panel.
2 In the Common category of the Properties panel, change the Width (W) of the
Text Input fi eld to 180. You can type the new value.
� Tip: Using the Max Characters property in the Properties panel automatically sizes a Text Input fi eld to accommodate a specifi c number of characters. This is only applicable when a wireframe text input fi eld has not been manually sized.
3 Expand the Text category in the Properties panel.
You can format the text that appears when someone types in the text fi eld. Th ese
default settings are fi ne.
� Tip: If you select the Display As Password property in the Properties panel, the text input fi eld’s contents appear as a series of asterisks when someone types in the fi eld. This is used to protect the secrecy of passwords.
4 Drag another Text Input component below the text that reads “Email.” Using the
selection handles, widen the Email fi eld to match the Name fi eld.
� Tip: When you place the pointer over a value in the Properties panel, it turns into a two-headed arrow. You can drag across the top of the value to change it. Dragging to the right increases the value. Dragging to the left decreases the value.
� Tip: You can use the Align options on the Modify menu to align one component relative to another.

ptg
96 LESSON 6 Creating Interactive Components
Add wireframe radio buttonsRadio buttons, also known as option buttons, typically present a choice for users.
Th ese choices are mutually exclusive and the user must choose only one option.
For example, you may have a form that asks a yes or no question, or you may want
someone to rate something by selecting from a group of options. When you add
radio buttons to the application, each button represents an option. Th e user can
select only one option at a time.
1 In the Wireframe Components panel, drag a Radio Button component to the
artboard and place it below the text that reads “Are you already a member?”
Th e blue text is hard to read over the dark background.
2 In the Properties panel, change the radio button’s label to Yes and change the
color of the text to white.
3 Add another Radio Button component next to the fi rst one. Change its label to
No and change the text color to white.
Only one radio button within a group of radio buttons can be selected. Radio but-
tons are in the same group when:
• Th eir Radio Button Group property is set to the same name in the Properties
panel.
• Th e buttons have been selected and grouped by choosing Modify > Group.
• Th ey are all part of the same component.
• Th ey exist at the main application level (as in this example).
Add a wireframe check boxCheck boxes are used when answering a question is optional, or when a user can
select more than one option in a list. Each check box is independent of the others.
Typically a single check box is used for a single option that the user can turn on or
off , opt in, opt out, and so on.
1 In the Wireframe Components panel, drag a Checkbox component to the
artboard. Position it directly below the two radio buttons.
2 In the Properties panel, change its label to Send me the newsletter.
� Tip: To present multiple questions and choices using radio buttons, group each set of radio buttons or assign them to a common group using the Radio Button Group property in the Properties panel.
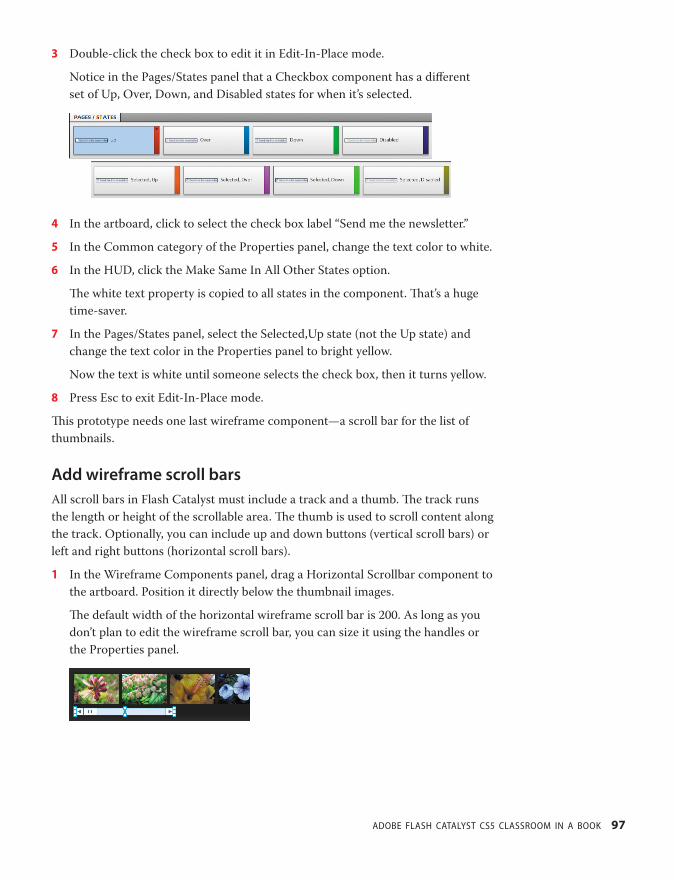
ptg
ADOBE FLASH CATALYST CS5 CLASSROOM IN A BOOK 97
3 Double-click the check box to edit it in Edit-In-Place mode.
Notice in the Pages/States panel that a Checkbox component has a diff erent
set of Up, Over, Down, and Disabled states for when it’s selected.
4 In the artboard, click to select the check box label “Send me the newsletter.”
5 In the Common category of the Properties panel, change the text color to white.
6 In the HUD, click the Make Same In All Other States option.
Th e white text property is copied to all states in the component. Th at’s a huge
time-saver.
7 In the Pages/States panel, select the Selected,Up state (not the Up state) and
change the text color in the Properties panel to bright yellow.
Now the text is white until someone selects the check box, then it turns yellow.
8 Press Esc to exit Edit-In-Place mode.
Th is prototype needs one last wireframe component—a scroll bar for the list of
thumbnails.
Add wireframe scroll barsAll scroll bars in Flash Catalyst must include a track and a thumb. Th e track runs
the length or height of the scrollable area. Th e thumb is used to scroll content along
the track. Optionally, you can include up and down buttons (vertical scroll bars) or
left and right buttons (horizontal scroll bars).
1 In the Wireframe Components panel, drag a Horizontal Scrollbar component to
the artboard. Position it directly below the thumbnail images.
Th e default width of the horizontal wireframe scroll bar is 200. As long as you
don’t plan to edit the wireframe scroll bar, you can size it using the handles or
the Properties panel.

ptg
98 LESSON 6 Creating Interactive Components
2 Using the selection handles or the Properties panel, change the width of the
scroll bar to match the width of the thumbnails. In the Properties panel, this is
about W:660.
3 Choose File > Run Project to run the project and view the new components in a
web browser.
4 In the web browser, type something in the Name and Email fi elds. Select a radio
button, and select the check box. Roll over and click the Submit button, and test
the thumb and scroll arrows of the scroll bar.
When you select the check box, the text turns yellow. Th e scroll bar is not
attached to any content yet, so you won’t see the thumbnails move.
5 Close the browser window and return to Flash Catalyst.
6 Save and close the fl ower_gallery.fxp project.
� Tip: When you run the project, the focus changes from one component to another as the user presses Tab or clicks to select a component. Focus is indicated by a subtle blue highlight called the focus ring. The focus ring color can be changed in the Appearance section of the Properties panel. You can also change the Tab order of the objects on a page by changing their Tab Index property in the Component section of the Properties panel. Lower numbers place the item earlier in the sequence. The –1 indicates a default order, which is based on the order of objects in the Layers panel.
Sliders vs. scroll barsYou may be wondering when it’s best to use a Slider component versus a Scrollbar component.
Scroll bars are best for scrolling an area of the screen or a group of content up and down or from side to side. Use scroll bars to fi t lots of information in a small space.
Sliders let users set contiguous values, such as volume or brightness. A slider is a good choice when the value is a relative quantity, not a fi xed numeric value. For example, a slider can be used to control changes to the hue, saturation, or lumi-nosity values of an image. A slider is a good option when you want to give users control over a relative setting and allow them to see the eff ects of their change immediately.
In Flash Catalyst, you can use the Horizontal and Vertical Slider components in the Wireframe Components panel or design your own by converting artwork. Once you add a slider in Flash Catalyst, a developer can add the desired functionality using Adobe Flash Builder.
� Note: If you edit the scroll bar in Edit-In-Place, it becomes a custom skin. You can no longer control its size in the Properties panel. To size a custom scroll bar, you need to edit the size of its parts in Edit-In-Place mode.
� Note: If the Tab To Focus component property is deselected, pressing tab will not give the component keyboard focus. It must be clicked to get focus.

ptg
ADOBE FLASH CATALYST CS5 CLASSROOM IN A BOOK 99
Converting artwork to built-in componentsWireframe components are convenient, but the real magic happens when you begin
to transform your well-crafted original artwork into rich interactive user interfaces.
Flash Catalyst provides 11 types of built-in components that you can customize
using your own artwork. But if the built-in components don’t fi t your needs, you can
use the Custom/Generic Component option to design additional components with
up to 20 unique states.
Th e built-in component types include:
• Button
• Checkbox
• Radio Button
• Toggle Button
• Text Input
• Horizontal Slider
• Vertical Slider
• Scroll Panel
• Horizontal Scrollbar
• Vertical Scrollbar
• Data List
• Custom/Generic Component
When you convert artwork to a component, Flash Catalyst stores the new compo-
nent in the Library panel, creates a new component object in the Layers panel, and
replaces your artwork with an instance of the new component in the artboard.
Some components have special requirements and will not function properly until
you defi ne their required parts. For example, a Data List component must have a
repeating item, and a scroll bar must have a track and a thumb. If the component
has special requirements, a message appears in the HUD with instructions on how
to complete the component.
� Tip: To rename a component in the Library panel, right-click the component and choose Rename. Type a new name and press Enter/Return.
� Tip: To create a new component based on an existing component, right-click the component in the Library panel and choose Duplicate.
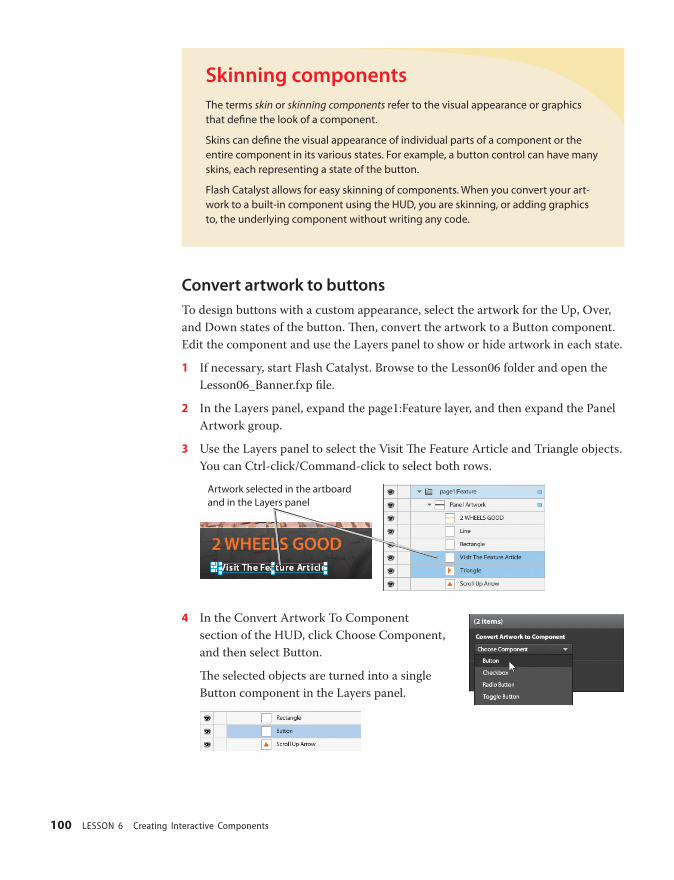
ptg
100 LESSON 6 Creating Interactive Components
Skinning componentsThe terms skin or skinning components refer to the visual appearance or graphics that defi ne the look of a component.
Skins can defi ne the visual appearance of individual parts of a component or the entire component in its various states. For example, a button control can have many skins, each representing a state of the button.
Flash Catalyst allows for easy skinning of components. When you convert your art-work to a built-in component using the HUD, you are skinning, or adding graphics to, the underlying component without writing any code.
Convert artwork to buttonsTo design buttons with a custom appearance, select the artwork for the Up, Over,
and Down states of the button. Th en, convert the artwork to a Button component.
Edit the component and use the Layers panel to show or hide artwork in each state.
1 If necessary, start Flash Catalyst. Browse to the Lesson06 folder and open the
Lesson06_Banner.fxp fi le.
2 In the Layers panel, expand the page1:Feature layer, and then expand the Panel
Artwork group.
3 Use the Layers panel to select the Visit Th e Feature Article and Triangle objects.
You can Ctrl-click/Command-click to select both rows.
Artwork selected in the artboard and in the Layers panel
4 In the Convert Artwork To Component
section of the HUD, click Choose Component,
and then select Button.
Th e selected objects are turned into a single
Button component in the Layers panel.

ptg
ADOBE FLASH CATALYST CS5 CLASSROOM IN A BOOK 101
5 In the HUD, click Over to edit the button in Edit-In-Place mode.
Th e Over state is selected in the Pages/States panel. Th e Layers panel includes
the objects used to create the button.
6 In the Layers panel, click to select Visit Th e Feature Article.
Th e text is selected in the Layers panel and in the artboard.
7 In the Common category of the Properties panel, change the text color to
orange.
8 Press Esc to exit Edit-In-Place mode.
9 Run the project and test the new button.
When you roll over the button, the text turns orange. Later in this lesson, you
will use this button to link to another web page.
10 Close the browser, return to Flash Catalyst, and lock the page1:Feature layer.
Create a reusable navigation buttonAny button can be used for navigation, including wireframe buttons. If your naviga-
tion buttons look the same, you can use repeated instances of the same button. For
example, in the interactive banner application, the navigation buttons at the top of
the window are identical except for their labels. Instead of creating fi ve new but-
tons, create one button that you can use fi ve times. You can change the label in each
instance using the Label property.
1 In the Layers panel, unlock and expand the Top Btns layer.
Th ese buttons are placeholders to show you how the fi nal navigation should
look. You will use one of these objects to make a reusable navigation button, so
you can delete the repeated artwork.
2 In the Layers panel, select the Btn 5, Btn 4, Btn 3, and Btn 2 objects. Ctrl-click/
Command-click to select multiple rows.
3 Click the Delete icon ( ) in the Layers panel (not the Delete key on the
keyboard) to remove these objects from all states.
4 In the Layers panel, click the Btn 1 object to select the layer and all of its
contents.
Th e Btn 1 artwork is selected in the artboard. You may want to zoom in on the
artboard to see this artwork close-up. About 200% should do it.
� Tip: When creating buttons from small text, add a transparent rectangle to defi ne a larger clickable area. The larger transparent shape makes the button much easier to use. Make sure that Transparency Accepts Mouse is selected in the Properties panel. If it’s not selected, all mouse actions will pass through the transparent areas to the layers below the component.
� Tip: You can Shift-click to select a contiguous range of objects in the Layers panel.

ptg
102 LESSON 6 Creating Interactive Components
5 In the Convert Artwork To Component section of the HUD, click Choose
Component, and then select Button.
6 In the HUD, click Up to edit the button in Edit-In-Place mode.
7 In the Layers panel, expand the Btn 1 layer
and the group within it.
Th e button includes text and the artwork
for each state of the button. You need to
convert the Text object into a button label
so that you can change the number on each
instance of the button.
8 Click the Text object in the Layers panel to select the text.
9 In the Convert To Button Part section of the HUD, click Choose Part, and then
select Label.
In the Layers panel, the text object changes to Label. Next, you need to defi ne
the appearance in each state of the button. To do this you will select each state
and then show and hide artwork in the Layers panel.
10 Make sure the Up state is selected in the Pages/States panel and the Up row is
visible in the Layers panel.
11 Select the Over state in the Pages/States panel. In the Layers panel, hide the Up
row and show the Over row.
12 Select the Down state, hide the Up row, and show the Down row.
13 Select the Disabled state, hide the Up row, and show the Down (orange) row.
You’re using the orange Down button as the Disabled state so that you can
disable a button in any state to make it appear selected (orange). You can disable
a button in the Properties panel.
14 Press Esc to exit Edit-In-Place mode.
Th e next step is to add additional instances of the button to the artboard.
15 Open the Library panel and use the Preview window to
locate the new button in the Components category. It
will be called something like Btn1Button.
16 Drag another instance of the button from the
Library panel to the artboard and place it beside
the fi rst button.
� Note: Defi ning a label part in a button is an optional step, but it allows you to easily change the text label for each instance of the button by modifying its Label property.
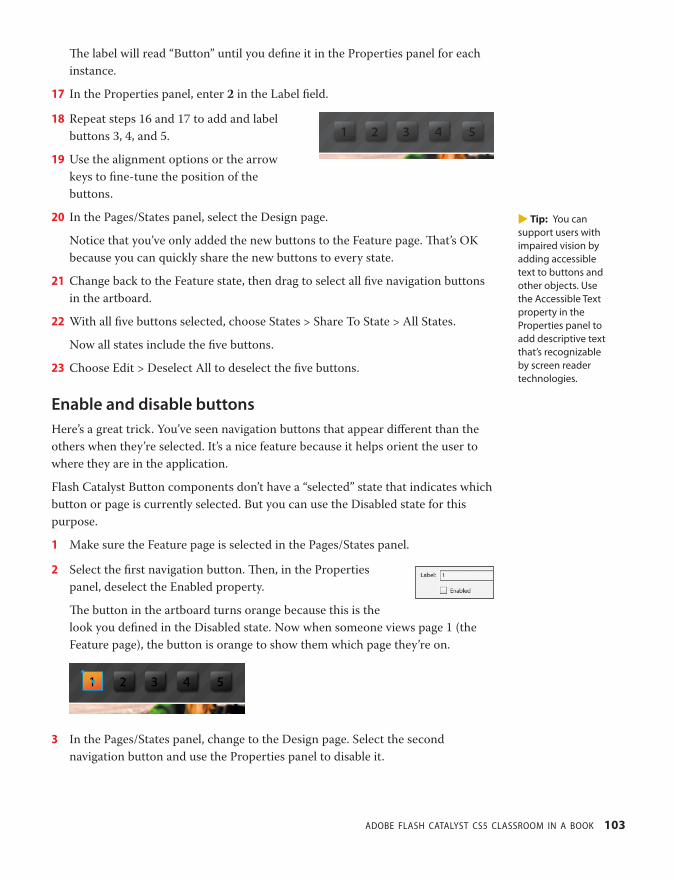
ptg
ADOBE FLASH CATALYST CS5 CLASSROOM IN A BOOK 103
Th e label will read “Button” until you defi ne it in the Properties panel for each
instance.
17 In the Properties panel, enter 2 in the Label fi eld.
18 Repeat steps 16 and 17 to add and label
buttons 3, 4, and 5.
19 Use the alignment options or the arrow
keys to fi ne-tune the position of the
buttons.
20 In the Pages/States panel, select the Design page.
Notice that you’ve only added the new buttons to the Feature page. Th at’s OK
because you can quickly share the new buttons to every state.
21 Change back to the Feature state, then drag to select all fi ve navigation buttons
in the artboard.
22 With all fi ve buttons selected, choose States > Share To State > All States.
Now all states include the fi ve buttons.
23 Choose Edit > Deselect All to deselect the fi ve buttons.
Enable and disable buttonsHere’s a great trick. You’ve seen navigation buttons that appear diff erent than the
others when they’re selected. It’s a nice feature because it helps orient the user to
where they are in the application.
Flash Catalyst Button components don’t have a “selected” state that indicates which
button or page is currently selected. But you can use the Disabled state for this
purpose.
1 Make sure the Feature page is selected in the Pages/States panel.
2 Select the fi rst navigation button. Th en, in the Properties
panel, deselect the Enabled property.
Th e button in the artboard turns orange because this is the
look you defi ned in the Disabled state. Now when someone views page 1 (the
Feature page), the button is orange to show them which page they’re on.
3 In the Pages/States panel, change to the Design page. Select the second
navigation button and use the Properties panel to disable it.
� Tip: You can support users with impaired vision by adding accessible text to buttons and other objects. Use the Accessible Text property in the Properties panel to add descriptive text that’s recognizable by screen reader technologies.
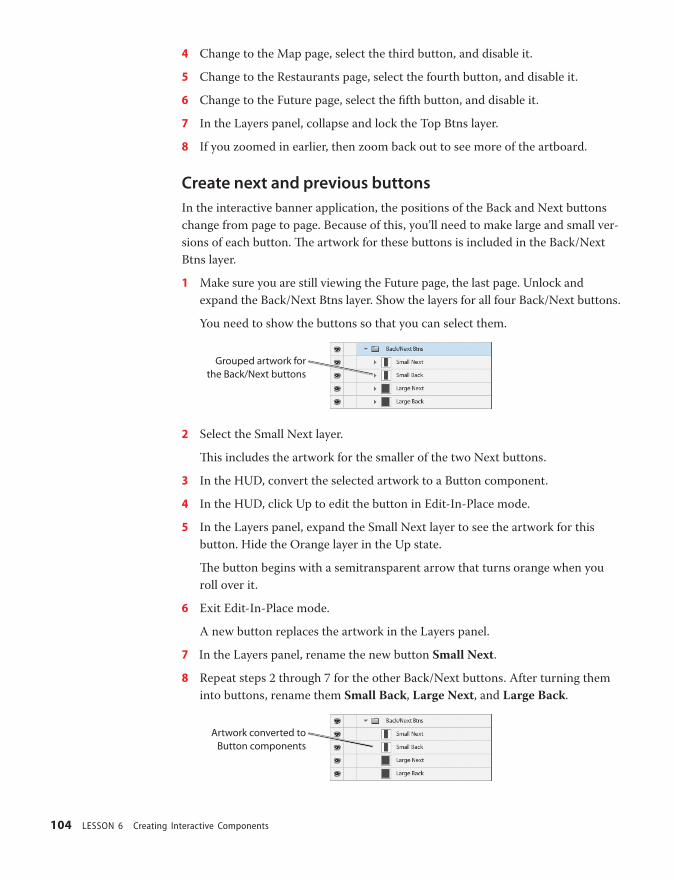
ptg
104 LESSON 6 Creating Interactive Components
4 Change to the Map page, select the third button, and disable it.
5 Change to the Restaurants page, select the fourth button, and disable it.
6 Change to the Future page, select the fi fth button, and disable it.
7 In the Layers panel, collapse and lock the Top Btns layer.
8 If you zoomed in earlier, then zoom back out to see more of the artboard.
Create next and previous buttonsIn the interactive banner application, the positions of the Back and Next buttons
change from page to page. Because of this, you’ll need to make large and small ver-
sions of each button. Th e artwork for these buttons is included in the Back/Next
Btns layer.
1 Make sure you are still viewing the Future page, the last page. Unlock and
expand the Back/Next Btns layer. Show the layers for all four Back/Next buttons.
You need to show the buttons so that you can select them.
Grouped artwork for the Back/Next buttons
2 Select the Small Next layer.
Th is includes the artwork for the smaller of the two Next buttons.
3 In the HUD, convert the selected artwork to a Button component.
4 In the HUD, click Up to edit the button in Edit-In-Place mode.
5 In the Layers panel, expand the Small Next layer to see the artwork for this
button. Hide the Orange layer in the Up state.
Th e button begins with a semitransparent arrow that turns orange when you
roll over it.
6 Exit Edit-In-Place mode.
A new button replaces the artwork in the Layers panel.
7 In the Layers panel, rename the new button Small Next.
8 Repeat steps 2 through 7 for the other Back/Next buttons. After turning them
into buttons, rename them Small Back, Large Next, and Large Back.
Artwork converted to Button components

ptg
ADOBE FLASH CATALYST CS5 CLASSROOM IN A BOOK 105
9 In the Future page, use the Layers panel to show the Large Back button and hide
the other Back/Next buttons.
Th e other four pages already have the correct buttons showing and hidden.
10 Collapse and lock the Back/Next Btns layer.
Create a custom toggle buttonToggle buttons are typically used to trigger simple on/off functions. For example,
you can use a toggle button to turn music on and off or play and stop a video. Th e
interactive banner application requires a toggle button to play and stop the videos
that you’ll add later to pages 4 and 5.
1 In the Pages/States panel, select the Restaurants page.
2 In the Layers panel, show, unlock, and expand the Video Toggle layer.
Th e artwork for the toggle button includes pause and play symbols and a
semitransparent orange circle.
3 Click the Video Toggle layer to select all the artwork for the toggle button.
4 In the HUD, convert the artwork to a Toggle Button component and then click
Up to edit the component in Edit-In-Place mode.
Toggle buttons have eight states that cannot be duplicated, added to, or deleted.
Th ere are two sets of Up, Over, Down, and Disabled states—one for when the
button is in its initial state, and another for when the button is selected.
5 In the Layers panel, expand the Video Toggle layer.
6 Hide the Pause symbol in the Up, Over, and Down states.

ptg
106 LESSON 6 Creating Interactive Components
7 In the Disabled state, hide the Toggle Button layer so that the entire button is
invisible when disabled.
8 Hide the Play symbol in the Selected,Up, Selected,Over, and Selected,Down
states.
9 In the Selected Disabled state, hide the Video Toggle layer to make it invisible.
10 Press Esc to exit Edit-In-Place mode.
Th e new button is visible on page 4, the Restaurants page.
11 Select the Future page, the last page, and show the toggle button.
Th e toggle button needs to be moved a little to the right on this page. Objects,
including components, can have their own unique set of properties in each state
(including position), so moving the button here will not aff ect its position on
the previous page.
12 Drag the toggle button so that it’s centered in the photograph.
13 Lock the Toggle Button row in the Layers panel.
Convert artwork to scroll barsYou can quickly turn your graphics into vertical and horizontal scroll bars of any
size. You can use just about any artwork. Th e only rule is that you have to include
a track and a thumb. Th e up, down, right, and left scroll buttons are optional. Th e
parts of a scroll bar can be positioned anywhere, on or off the artboard.
1 In the Pages/States panel, select the Feature page.
2 In the Layers panel, unlock and expand the page1:Feature layer and its Panel
Artwork group (if they’re not already expanded).
Th e Panel Artwork group includes the artwork for the lower design panel of this
page, including the vertical scroll bar that you’ll use to scroll a block of text.
� Tip: You can change the position of components in the artboard by using their X and Y coordinates in the Properties panel.

ptg
ADOBE FLASH CATALYST CS5 CLASSROOM IN A BOOK 107
3 In the Layers panel, Ctrl-click/Command-click to select the following four
objects: Scroll Up Arrow, Scroll Down Arrow, Th umb, and Scroll Track.
4 Use the HUD to convert the selected artwork to a Vertical Scrollbar component.
Th e Auto Change Warning message appears telling you that selected objects
have interactions or eff ects attached. You’re getting this message because the
objects are present in more than one state so Flash Catalyst added some default
transitions between states.
5 Click OK to continue.
A message in the HUD reminds you that to
make the scroll bar work correctly, you need
to assign its parts. Flash Catalyst needs to
know which artwork to use as the thumb and
the track.
6 Click Edit Parts in the HUD to edit the scroll
bar in Edit-In-Place mode.
7 Select the artwork for the Th umb (thin vertical orange rectangle).
8 In the Convert To Vertical Scrollbar Part
section in the HUD, click Choose Part, and
then select Th umb.
9 Select the artwork for the Scroll Track (thin
vertical black rectangle).
� Tip: When editing a component with small parts, you can zoom in on the artboard for a closer view.
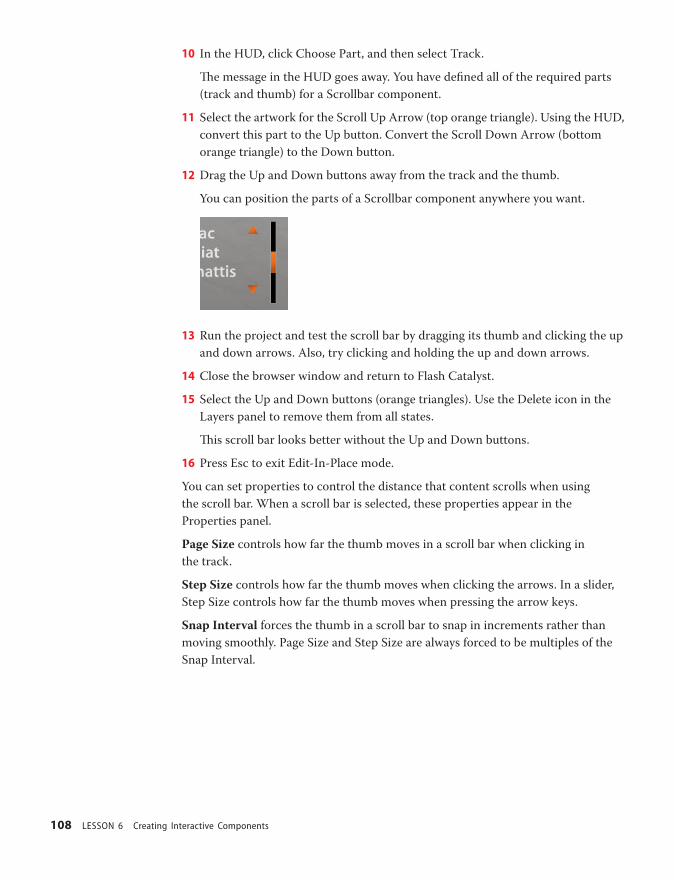
ptg
108 LESSON 6 Creating Interactive Components
10 In the HUD, click Choose Part, and then select Track.
Th e message in the HUD goes away. You have defi ned all of the required parts
(track and thumb) for a Scrollbar component.
11 Select the artwork for the Scroll Up Arrow (top orange triangle). Using the HUD,
convert this part to the Up button. Convert the Scroll Down Arrow (bottom
orange triangle) to the Down button.
12 Drag the Up and Down buttons away from the track and the thumb.
You can position the parts of a Scrollbar component anywhere you want.
13 Run the project and test the scroll bar by dragging its thumb and clicking the up
and down arrows. Also, try clicking and holding the up and down arrows.
14 Close the browser window and return to Flash Catalyst.
15 Select the Up and Down buttons (orange triangles). Use the Delete icon in the
Layers panel to remove them from all states.
Th is scroll bar looks better without the Up and Down buttons.
16 Press Esc to exit Edit-In-Place mode.
You can set properties to control the distance that content scrolls when using
the scroll bar. When a scroll bar is selected, these properties appear in the
Properties panel.
Page Size controls how far the thumb moves in a scroll bar when clicking in
the track.
Step Size controls how far the thumb moves when clicking the arrows. In a slider,
Step Size controls how far the thumb moves when pressing the arrow keys.
Snap Interval forces the thumb in a scroll bar to snap in increments rather than
moving smoothly. Page Size and Step Size are always forced to be multiples of the
Snap Interval.

ptg
ADOBE FLASH CATALYST CS5 CLASSROOM IN A BOOK 109
Can I make a scroll bar with no track or thumb?Technically, every Scrollbar component must have a track and a thumb. But suppose you want a pair of buttons (up and down or left and right) that scroll a range of content without the use of a track and a thumb.
Fortunately, you can place the parts of a scroll bar anywhere you want. As long as the scroll bar includes a track and a thumb, it will work.
1 Create a scroll bar with a track, a thumb, and buttons (up/down or left/right). Edit the Scrollbar component in Edit-In-Place mode.
2 Drag the track and thumb parts below or to the side of the artboard, so they are not visible to the user.
3 Position your scroll buttons where you want them in the artboard.
When you run the project, this cre-ates the illusion of a scroll bar with no track and no thumb.
Work with textFlash Catalyst includes a tool for adding text. Th is is mainly intended for creating
labels or short blocks of text. Flash Catalyst is not the best place to generate large
amounts of copy. A better workfl ow is to write and edit your copy in another appli-
cation, such as Microsoft Word, and then copy and paste the spell-checked, edited,
and approved copy into your Flash Catalyst design.
1 Make sure the Feature page is still selected.
2 Select the Temporary Text object in the Panel Artwork group of the
page1:Feature layer.
Th is is just placeholder text.
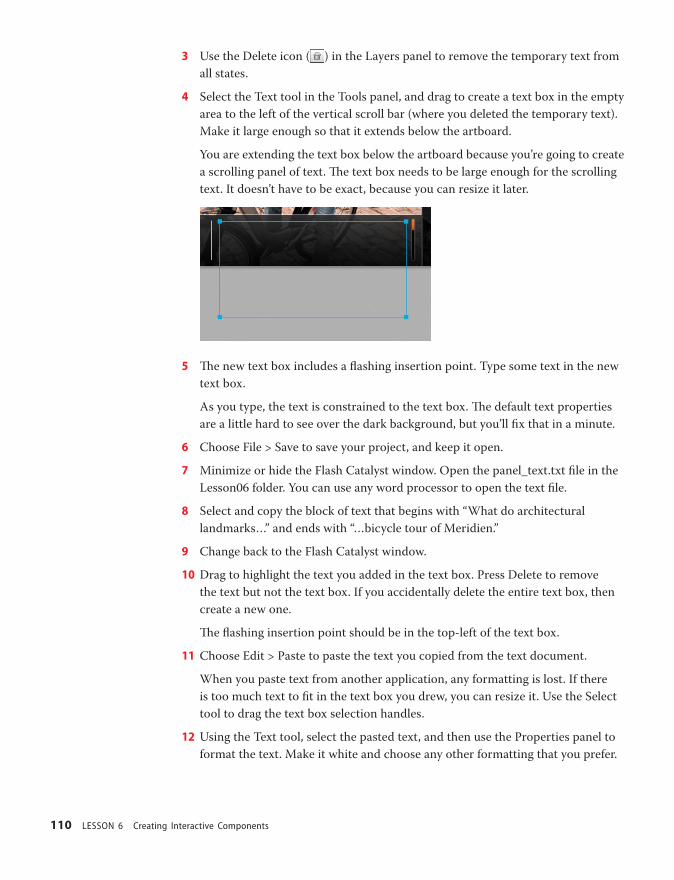
ptg
110 LESSON 6 Creating Interactive Components
3 Use the Delete icon ( ) in the Layers panel to remove the temporary text from
all states.
4 Select the Text tool in the Tools panel, and drag to create a text box in the empty
area to the left of the vertical scroll bar (where you deleted the temporary text).
Make it large enough so that it extends below the artboard.
You are extending the text box below the artboard because you’re going to create
a scrolling panel of text. Th e text box needs to be large enough for the scrolling
text. It doesn’t have to be exact, because you can resize it later.
5 Th e new text box includes a fl ashing insertion point. Type some text in the new
text box.
As you type, the text is constrained to the text box. Th e default text properties
are a little hard to see over the dark background, but you’ll fi x that in a minute.
6 Choose File > Save to save your project, and keep it open.
7 Minimize or hide the Flash Catalyst window. Open the panel_text.txt fi le in the
Lesson06 folder. You can use any word processor to open the text fi le.
8 Select and copy the block of text that begins with “What do architectural
landmarks…” and ends with “…bicycle tour of Meridien.”
9 Change back to the Flash Catalyst window.
10 Drag to highlight the text you added in the text box. Press Delete to remove
the text but not the text box. If you accidentally delete the entire text box, then
create a new one.
Th e fl ashing insertion point should be in the top-left of the text box.
11 Choose Edit > Paste to paste the text you copied from the text document.
When you paste text from another application, any formatting is lost. If there
is too much text to fi t in the text box you drew, you can resize it. Use the Select
tool to drag the text box selection handles.
12 Using the Text tool, select the pasted text, and then use the Properties panel to
format the text. Make it white and choose any other formatting that you prefer.
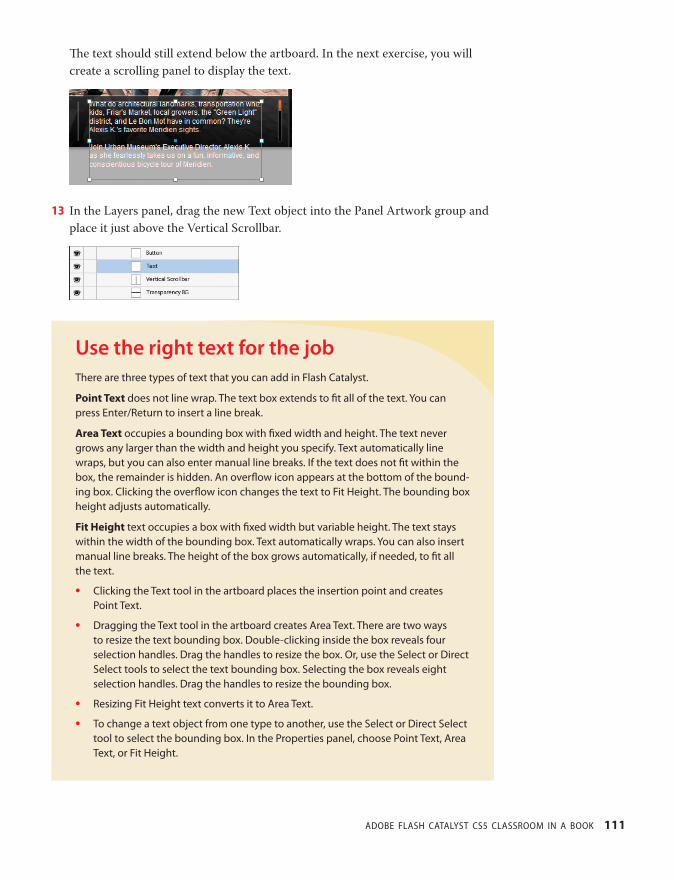
ptg
ADOBE FLASH CATALYST CS5 CLASSROOM IN A BOOK 111
Th e text should still extend below the artboard. In the next exercise, you will
create a scrolling panel to display the text.
13 In the Layers panel, drag the new Text object into the Panel Artwork group and
place it just above the Vertical Scrollbar.
Use the right text for the jobThere are three types of text that you can add in Flash Catalyst.
Point Text does not line wrap. The text box extends to fi t all of the text. You can press Enter/Return to insert a line break.
Area Text occupies a bounding box with fi xed width and height. The text never grows any larger than the width and height you specify. Text automatically line wraps, but you can also enter manual line breaks. If the text does not fi t within the box, the remainder is hidden. An overfl ow icon appears at the bottom of the bound-ing box. Clicking the overfl ow icon changes the text to Fit Height. The bounding box height adjusts automatically.
Fit Height text occupies a box with fi xed width but variable height. The text stays within the width of the bounding box. Text automatically wraps. You can also insert manual line breaks. The height of the box grows automatically, if needed, to fi t all the text.
• Clicking the Text tool in the artboard places the insertion point and creates Point Text.
• Dragging the Text tool in the artboard creates Area Text. There are two ways to resize the text bounding box. Double-clicking inside the box reveals four selection handles. Drag the handles to resize the box. Or, use the Select or Direct Select tools to select the text bounding box. Selecting the box reveals eight selection handles. Drag the handles to resize the bounding box.
• Resizing Fit Height text converts it to Area Text.
• To change a text object from one type to another, use the Select or Direct Select tool to select the bounding box. In the Properties panel, choose Point Text, Area Text, or Fit Height.

ptg
112 LESSON 6 Creating Interactive Components
Create a scroll panel from artworkA common challenge in web design is fi nding space in the available window to
display all the necessary content. One solution is to create scrolling panels. A panel
creates a well-defi ned container for content in the user interface. By adding scrolling
content and a scroll bar, you can place a large amount of information in a limited
space. To create a scroll panel component in Flash Catalyst, you need:
• An object that will scroll, such as a long block of text or a series of images
• A scroll bar for scrolling the content
• An object to defi ne the panel area, such as a rectangle shape (optional)
1 In the Layers panel, select the Text and Vertical Scrollbar objects.
By selecting the objects in the Layers panel, you are able to select the two parts
of the scroll panel without selecting any of the other artwork in the artboard.
2 In the HUD, convert the selected artwork to a Scroll Panel component.
Th e Auto Change Warning message appears telling you that selected objects
have interactions or eff ects attached. You’re getting this message because the
objects are present in more than one state so Flash Catalyst added some default
transitions between states. If you don’t get the Auto Change Warning message,
then you can skip step 3 below.
� Note: You can create a scroll panel without a scroll bar, but it’s useless unless users can scroll to see the hidden content.
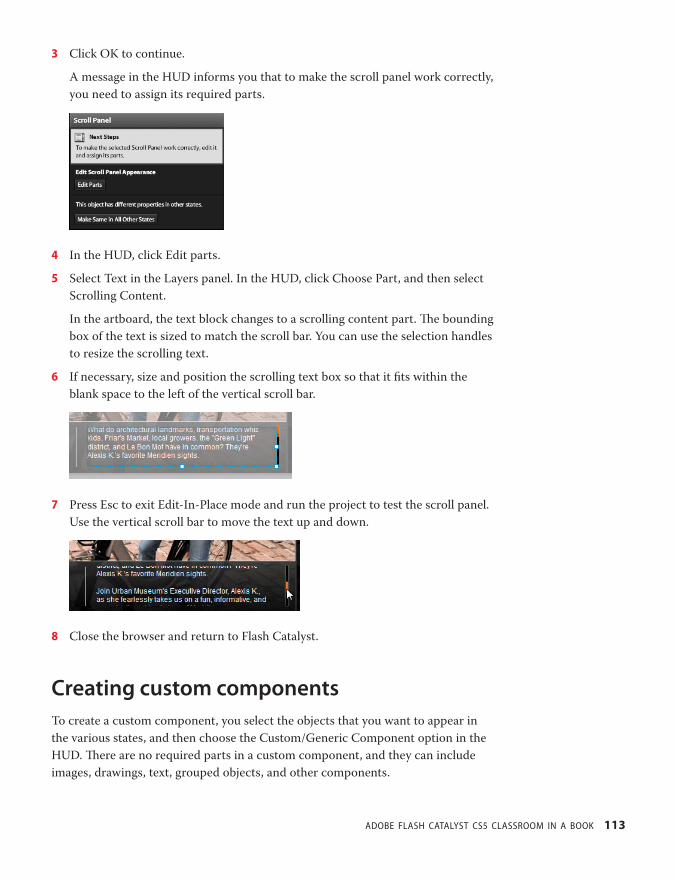
ptg
ADOBE FLASH CATALYST CS5 CLASSROOM IN A BOOK 113
3 Click OK to continue.
A message in the HUD informs you that to make the scroll panel work correctly,
you need to assign its required parts.
4 In the HUD, click Edit parts.
5 Select Text in the Layers panel. In the HUD, click Choose Part, and then select
Scrolling Content.
In the artboard, the text block changes to a scrolling content part. Th e bounding
box of the text is sized to match the scroll bar. You can use the selection handles
to resize the scrolling text.
6 If necessary, size and position the scrolling text box so that it fi ts within the
blank space to the left of the vertical scroll bar.
7 Press Esc to exit Edit-In-Place mode and run the project to test the scroll panel.
Use the vertical scroll bar to move the text up and down.
8 Close the browser and return to Flash Catalyst.
Creating custom componentsTo create a custom component, you select the objects that you want to appear in
the various states, and then choose the Custom/Generic Component option in the
HUD. Th ere are no required parts in a custom component, and they can include
images, drawings, text, grouped objects, and other components.
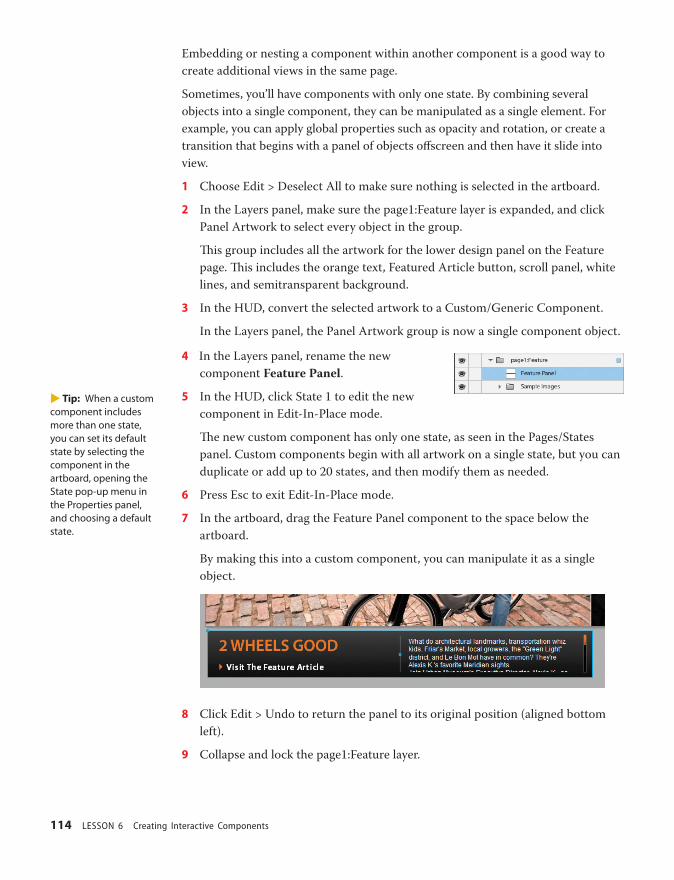
ptg
114 LESSON 6 Creating Interactive Components
Embedding or nesting a component within another component is a good way to
create additional views in the same page.
Sometimes, you’ll have components with only one state. By combining several
objects into a single component, they can be manipulated as a single element. For
example, you can apply global properties such as opacity and rotation, or create a
transition that begins with a panel of objects off screen and then have it slide into
view.
1 Choose Edit > Deselect All to make sure nothing is selected in the artboard.
2 In the Layers panel, make sure the page1:Feature layer is expanded, and click
Panel Artwork to select every object in the group.
Th is group includes all the artwork for the lower design panel on the Feature
page. Th is includes the orange text, Featured Article button, scroll panel, white
lines, and semitransparent background.
3 In the HUD, convert the selected artwork to a Custom/Generic Component.
In the Layers panel, the Panel Artwork group is now a single component object.
4 In the Layers panel, rename the new
component Feature Panel.
5 In the HUD, click State 1 to edit the new
component in Edit-In-Place mode.
Th e new custom component has only one state, as seen in the Pages/States
panel. Custom components begin with all artwork on a single state, but you can
duplicate or add up to 20 states, and then modify them as needed.
6 Press Esc to exit Edit-In-Place mode.
7 In the artboard, drag the Feature Panel component to the space below the
artboard.
By making this into a custom component, you can manipulate it as a single
object.
8 Click Edit > Undo to return the panel to its original position (aligned bottom
left).
9 Collapse and lock the page1:Feature layer.
� Tip: When a custom component includes more than one state, you can set its default state by selecting the component in the artboard, opening the State pop-up menu in the Properties panel, and choosing a default state.

ptg
ADOBE FLASH CATALYST CS5 CLASSROOM IN A BOOK 115
Adding interactivityInteractions are events that occur in response to a user action, such as the click of
a button. Flash Catalyst has many built-in interactions that you can quickly add to
components or grouped objects. Th ese include:
• Play a transition from one page or component state to another
• Trigger an action sequence, such as playing a sound, moving an object, or
playing an animation
• Go to a URL
• Play, pause, or stop a video clip
Events used to trigger an interaction include:
• On Click
• On Mouse Down
• On Mouse Up
• On Roll Out
• On Roll Over
To add interactions you must either create a component or group the artwork. Use
groups to hold interactions when you don’t need a reusable component.
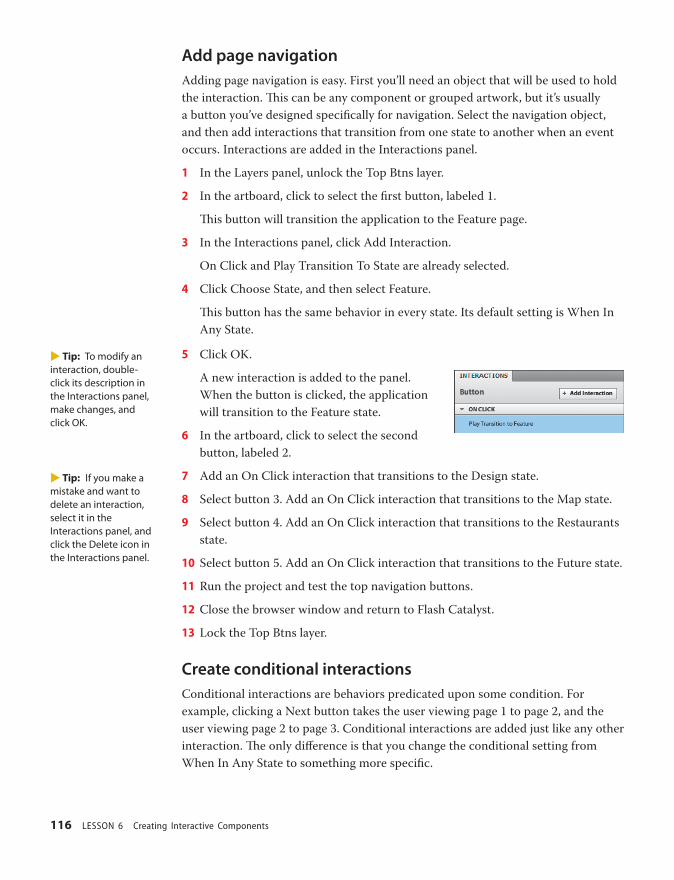
ptg
116 LESSON 6 Creating Interactive Components
Add page navigationAdding page navigation is easy. First you’ll need an object that will be used to hold
the interaction. Th is can be any component or grouped artwork, but it’s usually
a button you’ve designed specifi cally for navigation. Select the navigation object,
and then add interactions that transition from one state to another when an event
occurs. Interactions are added in the Interactions panel.
1 In the Layers panel, unlock the Top Btns layer.
2 In the artboard, click to select the fi rst button, labeled 1.
Th is button will transition the application to the Feature page.
3 In the Interactions panel, click Add Interaction.
On Click and Play Transition To State are already selected.
4 Click Choose State, and then select Feature.
Th is button has the same behavior in every state. Its default setting is When In
Any State.
5 Click OK.
A new interaction is added to the panel.
When the button is clicked, the application
will transition to the Feature state.
6 In the artboard, click to select the second
button, labeled 2.
7 Add an On Click interaction that transitions to the Design state.
8 Select button 3. Add an On Click interaction that transitions to the Map state.
9 Select button 4. Add an On Click interaction that transitions to the Restaurants
state.
10 Select button 5. Add an On Click interaction that transitions to the Future state.
11 Run the project and test the top navigation buttons.
12 Close the browser window and return to Flash Catalyst.
13 Lock the Top Btns layer.
Create conditional interactionsConditional interactions are behaviors predicated upon some condition. For
example, clicking a Next button takes the user viewing page 1 to page 2, and the
user viewing page 2 to page 3. Conditional interactions are added just like any other
interaction. Th e only diff erence is that you change the conditional setting from
When In Any State to something more specifi c.
� Tip: To modify an interaction, double-click its description in the Interactions panel, make changes, and click OK.
� Tip: If you make a mistake and want to delete an interaction, select it in the Interactions panel, and click the Delete icon in the Interactions panel.

ptg
ADOBE FLASH CATALYST CS5 CLASSROOM IN A BOOK 117
1 Unlock and expand the Back/Next Btns layer.
2 In the Pages/States panel, select the Feature page (the fi rst page).
Th e Large Next button is visible on this page only and navigates to the
Design page.
3 Select the Large Next button.
4 In the Interactions panel, click Add Interaction.
5 Click Choose State, and then select Design.
6 Click When In Any State, and then select Feature.
7 Click OK.
Th is is a conditional interaction. When someone clicks the button while in the
Feature state, the application transitions to the Design page. Th is button is only
present in the Feature page, so it only needs one interaction.
8 Change to the Design page and select the Small Next button.
Th e Small Next button is visible on the Design, Map, and Restaurants pages.
It needs to perform diff erently in each state.
9 Add an On Click interaction that transitions to the Map state when in the
Design state.
10 With the Small Next button still selected, add another On Click interaction that
transitions to the Restaurants state when in the Map state.
11 Add a third On Click interaction that
transitions to the Future state when in the
Restaurants state.
Th e Small Next button now includes three
conditional interactions.
12 In the Layers panel, select the Small Back
button.
13 Add an On Click interaction that
transitions to the Feature state when in the Design state.
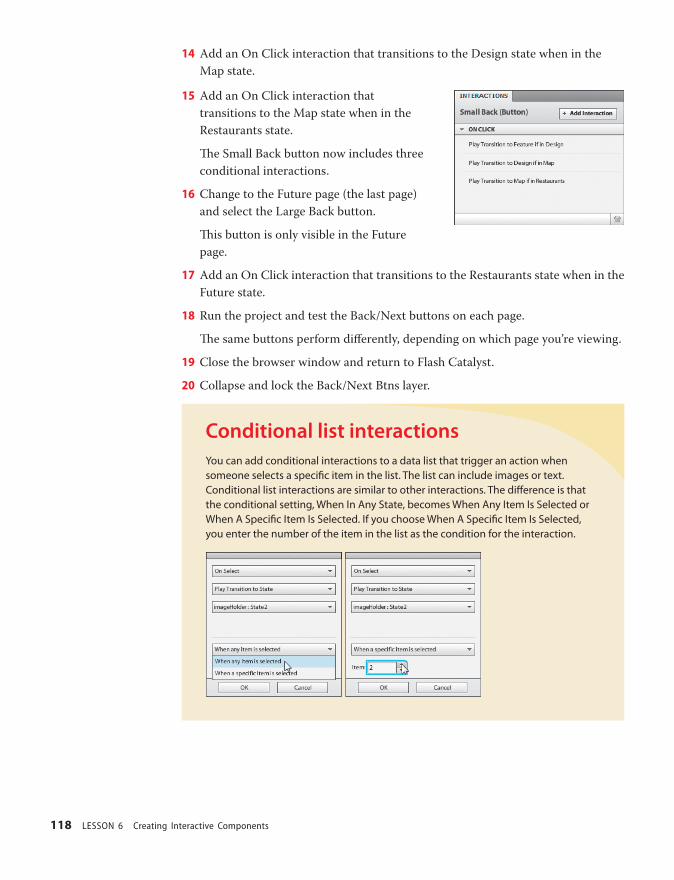
ptg
118 LESSON 6 Creating Interactive Components
14 Add an On Click interaction that transitions to the Design state when in the
Map state.
15 Add an On Click interaction that
transitions to the Map state when in the
Restaurants state.
Th e Small Back button now includes three
conditional interactions.
16 Change to the Future page (the last page)
and select the Large Back button.
Th is button is only visible in the Future
page.
17 Add an On Click interaction that transitions to the Restaurants state when in the
Future state.
18 Run the project and test the Back/Next buttons on each page.
Th e same buttons perform diff erently, depending on which page you’re viewing.
19 Close the browser window and return to Flash Catalyst.
20 Collapse and lock the Back/Next Btns layer.
Conditional list interactionsYou can add conditional interactions to a data list that trigger an action when someone selects a specifi c item in the list. The list can include images or text. Conditional list interactions are similar to other interactions. The diff erence is that the conditional setting, When In Any State, becomes When Any Item Is Selected or When A Specifi c Item Is Selected. If you choose When A Specifi c Item Is Selected, you enter the number of the item in the list as the condition for the interaction.
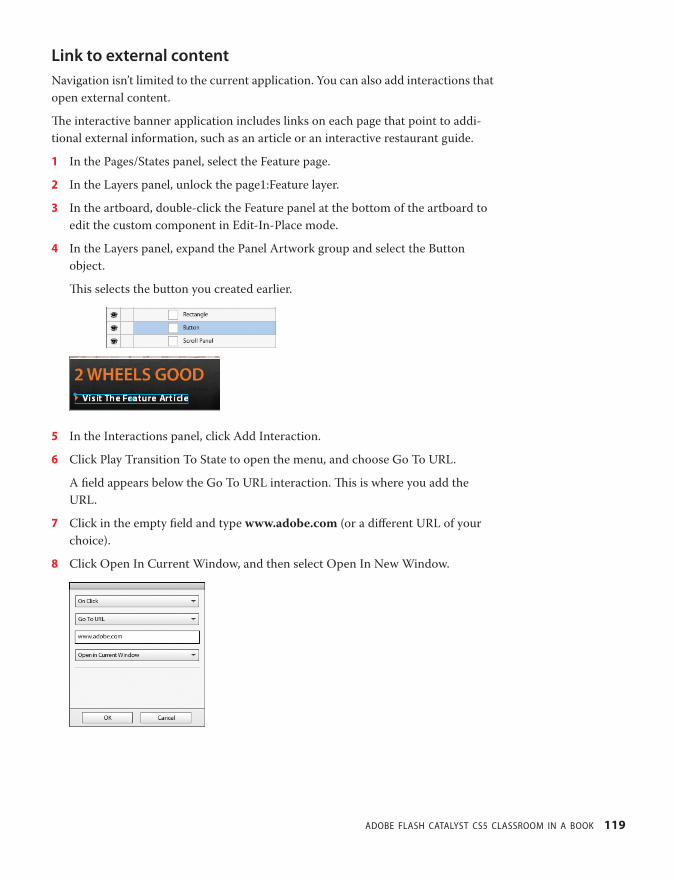
ptg
ADOBE FLASH CATALYST CS5 CLASSROOM IN A BOOK 119
Link to external contentNavigation isn’t limited to the current application. You can also add interactions that
open external content.
Th e interactive banner application includes links on each page that point to addi-
tional external information, such as an article or an interactive restaurant guide.
1 In the Pages/States panel, select the Feature page.
2 In the Layers panel, unlock the page1:Feature layer.
3 In the artboard, double-click the Feature panel at the bottom of the artboard to
edit the custom component in Edit-In-Place mode.
4 In the Layers panel, expand the Panel Artwork group and select the Button
object.
Th is selects the button you created earlier.
5 In the Interactions panel, click Add Interaction.
6 Click Play Transition To State to open the menu, and choose Go To URL.
A fi eld appears below the Go To URL interaction. Th is is where you add the
URL.
7 Click in the empty fi eld and type www.adobe.com (or a diff erent URL of your
choice).
8 Click Open In Current Window, and then select Open In New Window.

ptg
120 LESSON 6 Creating Interactive Components
9 Click OK.
Th is button now links to the URL you entered.
10 Press Esc to exit Edit-In-Place mode and run the project.
11 In the browser window, test the link by clicking the button.
Th e URL you entered opens in a new browser window.
12 Close the browser and return to Flash Catalyst.
13 Save and close the project.
On application start interactionsNot all interactions are initiated by user events such as clicking a button. You can also include interactions that happen automatically when the application starts.
For example, you may want a video or SWF movie to begin playing automatically. Or, you can defi ne a default page state by creating an On Application Start interaction that goes to a specifi c state when the application opens.
On Application Start interactions are added in the Interactions panel. Make sure nothing is selected in the artboard, and click Add Interaction. When noth-ing is selected in the artboard, the event is set to On Application Start. It’s the only option available.

ptg
ADOBE FLASH CATALYST CS5 CLASSROOM IN A BOOK 121
Review questions1 What is the diff erence between the built-in wireframe components and the built-in
component options in the HUD?
2 What happens to a wireframe component after it has been edited in Edit-In-Place mode?
3 What are the required parts in a Flash Catalyst Scrollbar component?
4 What is the best type of component for collecting answers to yes or no questions?
5 How can the Disabled button state and the Enabled button property be used together to
help orient users to which page or state is currently selected?
6 What types of objects can be used to trigger an interaction?
7 What is a conditional interaction?
Review answers1 Th e wireframe components are ready to use “as is” and include a generic skin or
appearance. Th e built-in components in the HUD require that you provide the artwork
for the new component.
2 When you edit a wireframe component in Edit-In-Place mode, the component becomes
a new skin in the Library panel. Th e component can no longer be sized using the
Properties panel.
3 A Flash Catalyst Scrollbar component must have a track and a thumb. Th e up, down,
left, and right buttons are optional.
4 Radio buttons are best for presenting choices that are mutually exclusive. Th e user must
choose only one option.
5 When a button is used to navigate to a specifi c state, you can format the button’s
Disabled state to appear selected or highlighted, and then disable the button in the
target state.
6 Interactions can be added to components or grouped artwork. You can also create
On Application Start interactions that occur automatically when someone starts the
application.
7 Conditional interactions are behaviors predicated upon some condition. For example,
clicking a Next button takes the user viewing page 1 to page 2, and the user viewing
page 2 to page 3. Conditional interactions are added just like any other interaction. Th e
only diff erence is that you change the conditional setting from When In Any State to
something more specifi c.

ptg
122
7 CREATING TRANSITIONS AND ACTION SEQUENCES
Lesson OverviewWe’ve come to expect a lot from our online experience. With the
introduction of high-quality streaming video and motion graphics,
the boundaries between fi lm, television, and the web are fuzzier than
ever. As an application designer, your audience has come to expect
similar production quality. We can learn a lot from fi lm and televi-
sion. Talk to any fi lm or video producer and they’ll tell you that much
of what shapes our viewing experience are the subtle things we’re not
even aware of—lighting, ambient sound, and of course transitions.
Placing smooth animated transitions between the pages and states of
your application can change the entire user experience.
In this lesson, you’ll learn how to do the following:
• Preview default transitions
• Add smooth transitions between states
• Fine-tune transition timing and other properties
• Add special eff ects to transitions
• Add and modify action sequences
• Preserve the fi delity of transitions as you edit the project
Th is lesson will take about 45 minutes to complete. Copy the
Lesson07 folder into the lessons folder that you created on your hard
drive for these projects (or create it now), if you haven’t already done
so. As you work on this lesson, you won’t be preserving the start fi les;
if you need to restore the start fi les, copy them from the Adobe Flash
Catalyst CS5 Classroom in a Book CD.

ptg
123
Reproducing fi lm-like transitions in web applications used to be a very time-consuming, specialized task for computer animators. But with the introduction of Flash Catalyst, you can now produce smooth, professional-looking animated transitions with just a few clicks of the mouse.
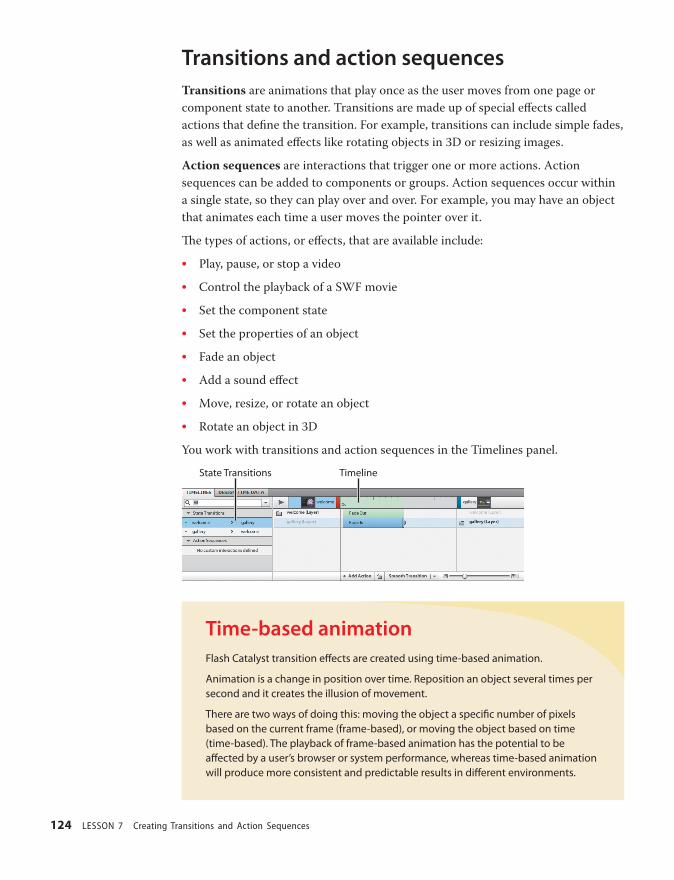
ptg
124 LESSON 7 Creating Transitions and Action Sequences
Transitions and action sequencesTransitions are animations that play once as the user moves from one page or
component state to another. Transitions are made up of special eff ects called
actions that defi ne the transition. For example, transitions can include simple fades,
as well as animated eff ects like rotating objects in 3D or resizing images.
Action sequences are interactions that trigger one or more actions. Action
sequences can be added to components or groups. Action sequences occur within
a single state, so they can play over and over. For example, you may have an object
that animates each time a user moves the pointer over it.
Th e types of actions, or eff ects, that are available include:
• Play, pause, or stop a video
• Control the playback of a SWF movie
• Set the component state
• Set the properties of an object
• Fade an object
• Add a sound eff ect
• Move, resize, or rotate an object
• Rotate an object in 3D
You work with transitions and action sequences in the Timelines panel.
State Transitions Timeline
Time-based animationFlash Catalyst transition eff ects are created using time-based animation.
Animation is a change in position over time. Reposition an object several times per second and it creates the illusion of movement.
There are two ways of doing this: moving the object a specifi c number of pixels based on the current frame (frame-based), or moving the object based on time (time-based). The playback of frame-based animation has the potential to be aff ected by a user’s browser or system performance, whereas time-based animation will produce more consistent and predictable results in diff erent environments.

ptg
ADOBE FLASH CATALYST CS5 CLASSROOM IN A BOOK 125
Inspecting default transition eff ectsAnytime the content in one state diff ers from the content in another state, default
transition eff ects are added to identify those changes. Th e default transition eff ects
start out with durations of zero seconds, so they’re really more like placeholders.
You bring them to life by increasing their duration.
You can view and edit transitions in the Timelines panel. Th e types of eff ects (Fade,
Move, and so on) in each transition will vary depending on the objects in each state
and how each object diff ers from one state to another.
Let’s start by taking a look at how the default transitions appear when you run the
application. Knowing which content exists in each state will help you edit transi-
tions more eff ectively.
1 Start Flash Catalyst, browse to the Lesson07 folder on your hard drive, and open
the Lesson07_Banner.fxp fi le.
Th e interactive banner application includes fi ve page states, as seen in the Pages/
States panel.
2 Choose File > Run Project to view the project in a browser.
Th e fi rst page includes background images and a semitransparent panel at
the bottom. Th e panel includes graphics, a button, and scrolling text. Th is page
also includes navigation buttons (at the top) and a side navigation button (on
the right).
Panel component Images
Page navigation buttons
Side navigation button (Next)
3 Use the top or side navigation buttons to view each page in the application.
Each page includes a diff erent set of images and a similar-looking panel at the
bottom. Th e last two pages include a play/pause toggle button. Th ese pages will
include video.
Notice that as you move from one page to the next, the change happens
very quickly. What you’re seeing (or not seeing) are the zero-second default
transition eff ects.
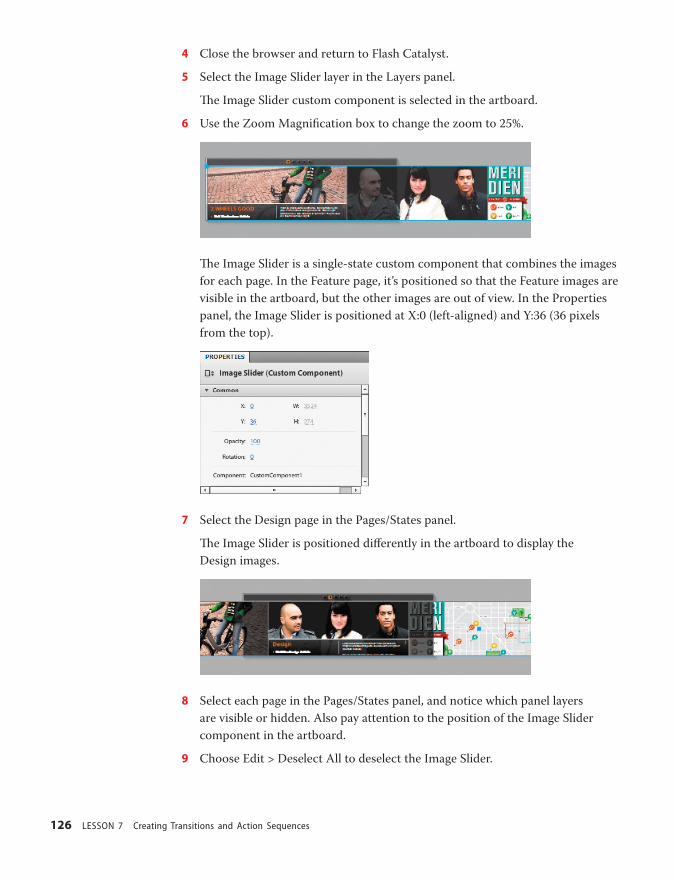
ptg
126 LESSON 7 Creating Transitions and Action Sequences
4 Close the browser and return to Flash Catalyst.
5 Select the Image Slider layer in the Layers panel.
Th e Image Slider custom component is selected in the artboard.
6 Use the Zoom Magnifi cation box to change the zoom to 25%.
Th e Image Slider is a single-state custom component that combines the images
for each page. In the Feature page, it’s positioned so that the Feature images are
visible in the artboard, but the other images are out of view. In the Properties
panel, the Image Slider is positioned at X:0 (left-aligned) and Y:36 (36 pixels
from the top).
7 Select the Design page in the Pages/States panel.
Th e Image Slider is positioned diff erently in the artboard to display the
Design images.
8 Select each page in the Pages/States panel, and notice which panel layers
are visible or hidden. Also pay attention to the position of the Image Slider
component in the artboard.
9 Choose Edit > Deselect All to deselect the Image Slider.

ptg
ADOBE FLASH CATALYST CS5 CLASSROOM IN A BOOK 127
10 Change the artboard view to 66% magnifi cation. If necessary, scroll the
workspace so the artboard is visible.
11 Open the Timelines panel at the bottom of the Design workspace.
Th e Timelines panel shows every transition in the application.
12 Select Feature > Design in the State Transitions section of the Timelines panel.
Th e Feature page is the start state of the transition, and the Design page is
the end state. Default transition eff ects are added for each change that occurs
between the start and end states. Default transitions have durations of zero
seconds.
Selected transition
Play Transition button
Default transition eff ects
Start state
End state
Th e default eff ects for this transition include fi ve fades and one move:
• Th e Small Next and Small Back buttons start out hidden in the Feature page
and become visible in the Design page.
• Th e Large Next button is visible in the Feature page, but hidden in the
Design page.
• Th e Design panel fades in as the Feature panel fades out.
• Th e Image Slider, which is visible in both states, moves to a new position.
13 Click the Play Transition button.
Th e transition is instantaneous, due to the zero-second eff ect durations.
Adding smooth transitionsAdding smooth transitions is easy. You simply change the duration of the eff ects
from zero seconds to something a little longer, making the transition visible when
you run the application.
1 Make sure the Feature > Design transition is still selected in the State Transitions
section of the Timelines panel.
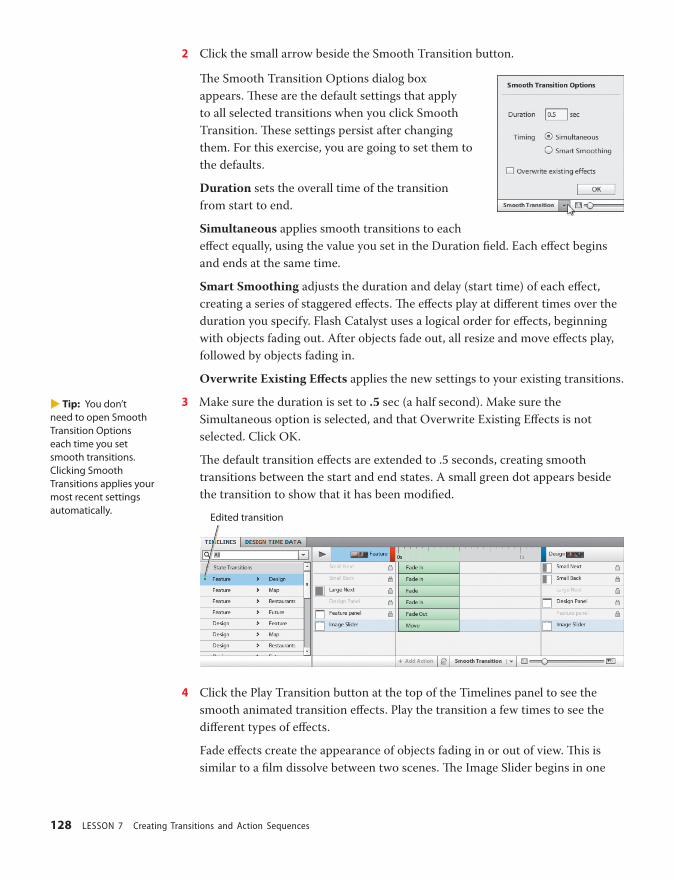
ptg
128 LESSON 7 Creating Transitions and Action Sequences
2 Click the small arrow beside the Smooth Transition button.
Th e Smooth Transition Options dialog box
appears. Th ese are the default settings that apply
to all selected transitions when you click Smooth
Transition. Th ese settings persist after changing
them. For this exercise, you are going to set them to
the defaults.
Duration sets the overall time of the transition
from start to end.
Simultaneous applies smooth transitions to each
eff ect equally, using the value you set in the Duration fi eld. Each eff ect begins
and ends at the same time.
Smart Smoothing adjusts the duration and delay (start time) of each eff ect,
creating a series of staggered eff ects. Th e eff ects play at diff erent times over the
duration you specify. Flash Catalyst uses a logical order for eff ects, beginning
with objects fading out. After objects fade out, all resize and move eff ects play,
followed by objects fading in.
Overwrite Existing Eff ects applies the new settings to your existing transitions.
3 Make sure the duration is set to .5 sec (a half second). Make sure the
Simultaneous option is selected, and that Overwrite Existing Eff ects is not
selected. Click OK.
Th e default transition eff ects are extended to .5 seconds, creating smooth
transitions between the start and end states. A small green dot appears beside
the transition to show that it has been modifi ed.
Edited transition
4 Click the Play Transition button at the top of the Timelines panel to see the
smooth animated transition eff ects. Play the transition a few times to see the
diff erent types of eff ects.
Fade eff ects create the appearance of objects fading in or out of view. Th is is
similar to a fi lm dissolve between two scenes. Th e Image Slider begins in one
� Tip: You don’t need to open Smooth Transition Options each time you set smooth transitions. Clicking Smooth Transitions applies your most recent settings automatically.
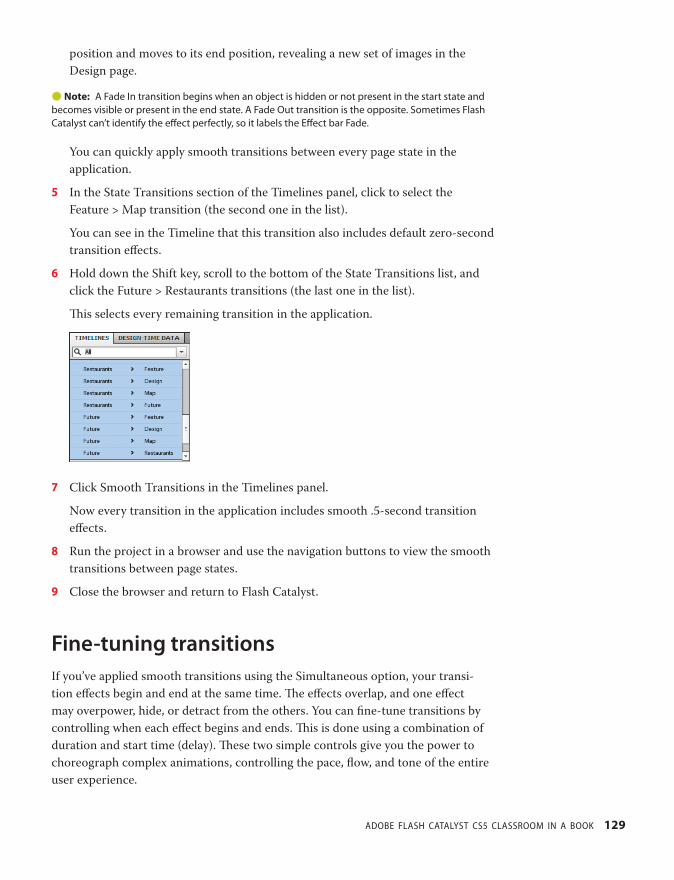
ptg
ADOBE FLASH CATALYST CS5 CLASSROOM IN A BOOK 129
position and moves to its end position, revealing a new set of images in the
Design page.
� Note: A Fade In transition begins when an object is hidden or not present in the start state and becomes visible or present in the end state. A Fade Out transition is the opposite. Sometimes Flash Catalyst can’t identify the eff ect perfectly, so it labels the Eff ect bar Fade.
You can quickly apply smooth transitions between every page state in the
application.
5 In the State Transitions section of the Timelines panel, click to select the
Feature > Map transition (the second one in the list).
You can see in the Timeline that this transition also includes default zero-second
transition eff ects.
6 Hold down the Shift key, scroll to the bottom of the State Transitions list, and
click the Future > Restaurants transitions (the last one in the list).
Th is selects every remaining transition in the application.
7 Click Smooth Transitions in the Timelines panel.
Now every transition in the application includes smooth .5-second transition
eff ects.
8 Run the project in a browser and use the navigation buttons to view the smooth
transitions between page states.
9 Close the browser and return to Flash Catalyst.
Fine-tuning transitionsIf you’ve applied smooth transitions using the Simultaneous option, your transi-
tion eff ects begin and end at the same time. Th e eff ects overlap, and one eff ect
may overpower, hide, or detract from the others. You can fi ne-tune transitions by
controlling when each eff ect begins and ends. Th is is done using a combination of
duration and start time (delay). Th ese two simple controls give you the power to
choreograph complex animations, controlling the pace, fl ow, and tone of the entire
user experience.

ptg
130 LESSON 7 Creating Transitions and Action Sequences
Adjust transition durationEach transition has an overall duration. Th is is defi ned by the start of the fi rst eff ect
and the end of the last eff ect. You can adjust the duration of each individual eff ect by
dragging its resize handle or by changing its duration value in the Properties panel.
1 Select Feature > Design in the State Transitions section of the Timelines panel
(the fi rst transition in the list).
2 Click the green Eff ect bar of the Move transition eff ect to select it.
Th is is the eff ect that moves the Image Slider to its new position in the
Design page.
Eff ect bar
Resize handle
When a transition eff ect is selected, its
Eff ect bar turns blue and its properties
appear in the Properties panel. Th ese
include the duration of the transition, delay
(when the transition begins), and easing.
You’ll learn about easing transitions in a
moment.
3 Drag the Move Eff ect bar resize handle
to the left to shorten the duration of the
transition. Drag the handle to the right to
lengthen the transition.
As you drag, a tool tip shows the new duration of the eff ect.
4 In the Properties panel, set the Duration value to 1 second.
5 Run the project and view the transition between pages 1 and 2.
Th e Image Slider takes longer to move between pages—1 second to be exact.
Compare this to the timing of other transitions as you move from page to page.
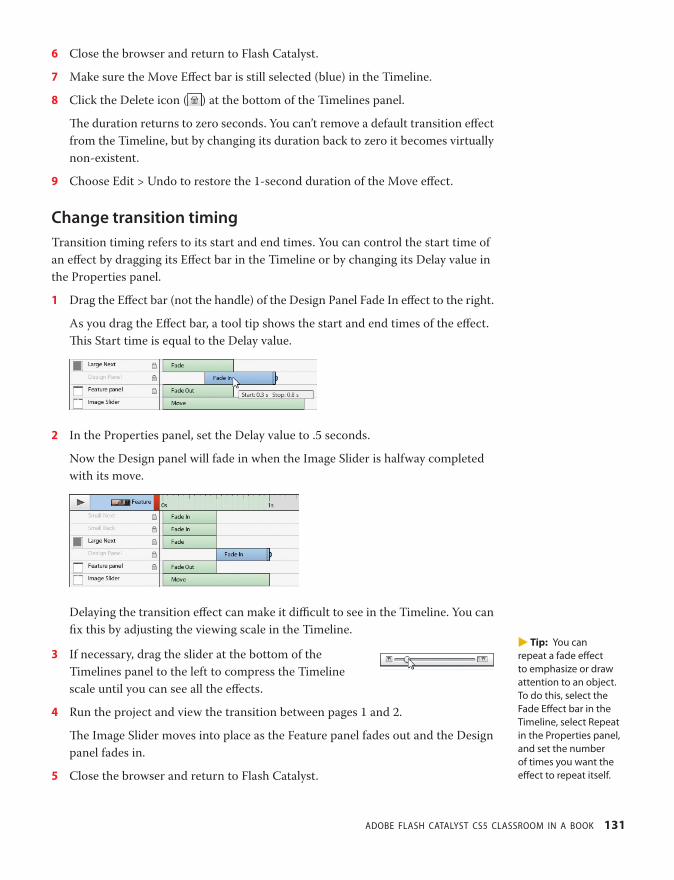
ptg
ADOBE FLASH CATALYST CS5 CLASSROOM IN A BOOK 131
6 Close the browser and return to Flash Catalyst.
7 Make sure the Move Eff ect bar is still selected (blue) in the Timeline.
8 Click the Delete icon ( ) at the bottom of the Timelines panel.
Th e duration returns to zero seconds. You can’t remove a default transition eff ect
from the Timeline, but by changing its duration back to zero it becomes virtually
non-existent.
9 Choose Edit > Undo to restore the 1-second duration of the Move eff ect.
Change transition timingTransition timing refers to its start and end times. You can control the start time of
an eff ect by dragging its Eff ect bar in the Timeline or by changing its Delay value in
the Properties panel.
1 Drag the Eff ect bar (not the handle) of the Design Panel Fade In eff ect to the right.
As you drag the Eff ect bar, a tool tip shows the start and end times of the eff ect.
Th is Start time is equal to the Delay value.
2 In the Properties panel, set the Delay value to .5 seconds.
Now the Design panel will fade in when the Image Slider is halfway completed
with its move.
Delaying the transition eff ect can make it diffi cult to see in the Timeline. You can
fi x this by adjusting the viewing scale in the Timeline.
3 If necessary, drag the slider at the bottom of the
Timelines panel to the left to compress the Timeline
scale until you can see all the eff ects.
4 Run the project and view the transition between pages 1 and 2.
Th e Image Slider moves into place as the Feature panel fades out and the Design
panel fades in.
5 Close the browser and return to Flash Catalyst.
� Tip: You can repeat a fade eff ect to emphasize or draw attention to an object. To do this, select the Fade Eff ect bar in the Timeline, select Repeat in the Properties panel, and set the number of times you want the eff ect to repeat itself.
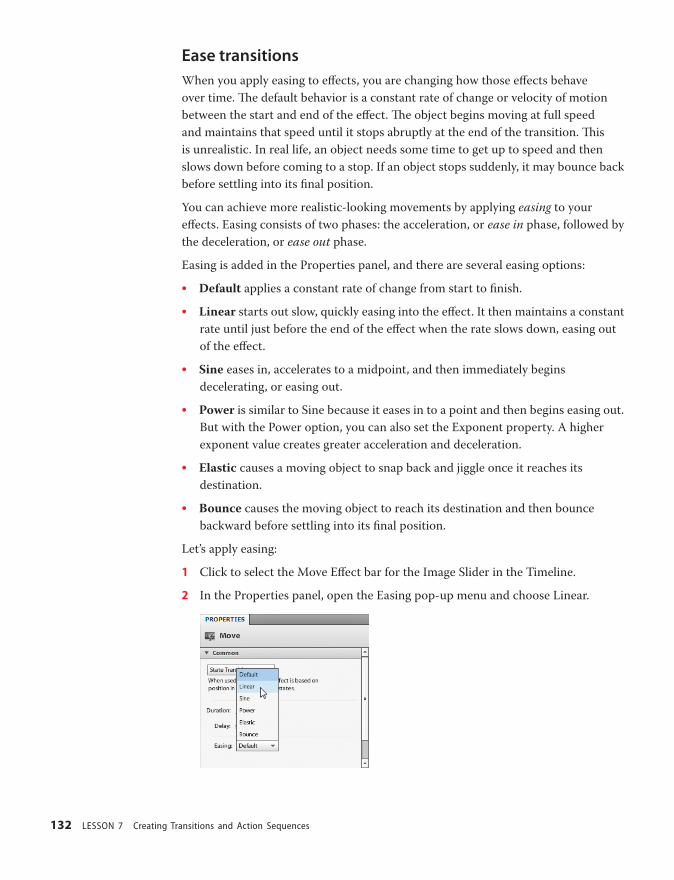
ptg
132 LESSON 7 Creating Transitions and Action Sequences
Ease transitionsWhen you apply easing to eff ects, you are changing how those eff ects behave
over time. Th e default behavior is a constant rate of change or velocity of motion
between the start and end of the eff ect. Th e object begins moving at full speed
and maintains that speed until it stops abruptly at the end of the transition. Th is
is unrealistic. In real life, an object needs some time to get up to speed and then
slows down before coming to a stop. If an object stops suddenly, it may bounce back
before settling into its fi nal position.
You can achieve more realistic-looking movements by applying easing to your
eff ects. Easing consists of two phases: the acceleration, or ease in phase, followed by
the deceleration, or ease out phase.
Easing is added in the Properties panel, and there are several easing options:
• Default applies a constant rate of change from start to fi nish.
• Linear starts out slow, quickly easing into the eff ect. It then maintains a constant
rate until just before the end of the eff ect when the rate slows down, easing out
of the eff ect.
• Sine eases in, accelerates to a midpoint, and then immediately begins
decelerating, or easing out.
• Power is similar to Sine because it eases in to a point and then begins easing out.
But with the Power option, you can also set the Exponent property. A higher
exponent value creates greater acceleration and deceleration.
• Elastic causes a moving object to snap back and jiggle once it reaches its
destination.
• Bounce causes the moving object to reach its destination and then bounce
backward before settling into its fi nal position.
Let’s apply easing:
1 Click to select the Move Eff ect bar for the Image Slider in the Timeline.
2 In the Properties panel, open the Easing pop-up menu and choose Linear.
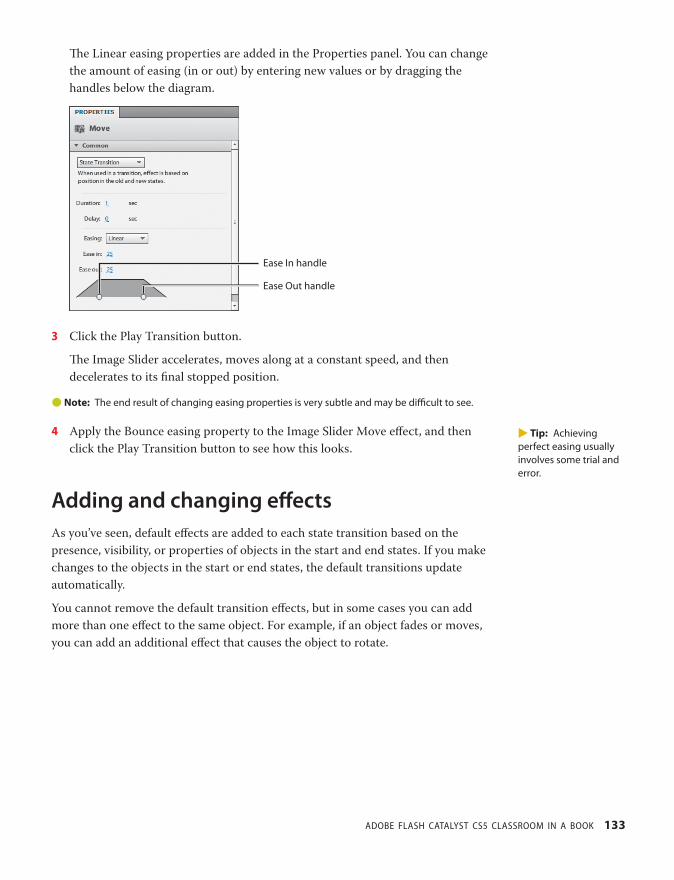
ptg
ADOBE FLASH CATALYST CS5 CLASSROOM IN A BOOK 133
Th e Linear easing properties are added in the Properties panel. You can change
the amount of easing (in or out) by entering new values or by dragging the
handles below the diagram.
Ease In handle
Ease Out handle
3 Click the Play Transition button.
Th e Image Slider accelerates, moves along at a constant speed, and then
decelerates to its fi nal stopped position.
� Note: The end result of changing easing properties is very subtle and may be diffi cult to see.
4 Apply the Bounce easing property to the Image Slider Move eff ect, and then
click the Play Transition button to see how this looks.
Adding and changing eff ectsAs you’ve seen, default eff ects are added to each state transition based on the
presence, visibility, or properties of objects in the start and end states. If you make
changes to the objects in the start or end states, the default transitions update
automatically.
You cannot remove the default transition eff ects, but in some cases you can add
more than one eff ect to the same object. For example, if an object fades or moves,
you can add an additional eff ect that causes the object to rotate.
� Tip: Achieving perfect easing usually involves some trial and error.

ptg
134 LESSON 7 Creating Transitions and Action Sequences
Swap one eff ect for anotherTo swap one eff ect for another, you need to change the presence, visibility, or
properties of the object in either the start or end state of the transition. For
example, to change a fade to a move, you make the object visible in both states
(removing the fade), and then place the object in diff erent start and end positions
(adding the move).
To see how this works, let’s change the Small Back button transition from a
Fade In to a Move eff ect so that it slides into view from the left of the artboard.
1 Make sure the Feature page is selected in the Pages/States panel and the
Feature > Design transition is still selected in the State Transitions section
of the Timelines panel.
Th e Back/Next Btns layer is locked. When an object is locked in the Layers
panel, it is also locked in the Timeline. To change or apply new eff ects to an
object, you need to unlock it.
Locked layer and transition
2 In the Layers panel, unlock and expand the Back/Next Btns layer.
Th e Small Back button is hidden in the Feature page and visible in the Design
page, creating the Fade In eff ect.
3 In the Layers panel, show the Small Back button in the Feature page.
Th e Small Back button now appears in both the start and end states, so the
Fade In transition disappears from the Timeline.
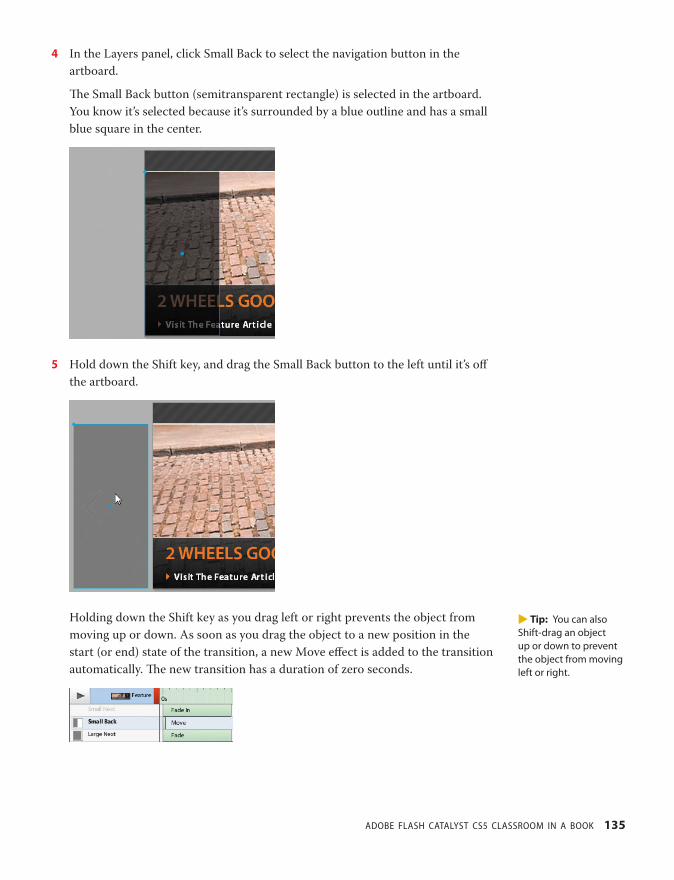
ptg
ADOBE FLASH CATALYST CS5 CLASSROOM IN A BOOK 135
4 In the Layers panel, click Small Back to select the navigation button in the
artboard.
Th e Small Back button (semitransparent rectangle) is selected in the artboard.
You know it’s selected because it’s surrounded by a blue outline and has a small
blue square in the center.
5 Hold down the Shift key, and drag the Small Back button to the left until it’s off
the artboard.
Holding down the Shift key as you drag left or right prevents the object from
moving up or down. As soon as you drag the object to a new position in the
start (or end) state of the transition, a new Move eff ect is added to the transition
automatically. Th e new transition has a duration of zero seconds.
� Tip: You can also Shift-drag an object up or down to prevent the object from moving left or right.

ptg
136 LESSON 7 Creating Transitions and Action Sequences
6 In the Timeline, click the new Move eff ect to select it. Th en drag its resize handle
or use the Properties panel to change its duration to .5 seconds.
7 Run the project to view the eff ect in a browser.
Th e Small Back navigation button (on the left) slides into view as you move to
the Design page.
8 Close the browser and return to Flash Catalyst.
Add multiple eff ects to the same objectYou may want to apply more than one change to an object during the same transi-
tion. Th ere are two ways to do this. You can make additional changes to the object
in the start or end state of the transition, or add new eff ects from the Add Actions
menu in the Timelines panel.
1 In the Layers panel, hide the Small Back row in the Feature page state.
A Fade In eff ect is added to the Small Back
button in the transition. Th is object now has
two eff ects applied to it: a fade and a move.
Th is will look better without the fade, so let’s go ahead and remove it.
2 Select the Fade In Eff ect bar for the Small Back object (the one you just added).
3 Click the Delete icon ( ) at the bottom of the Timelines panel.
Th e Fade In Eff ect bar is still there. To remove this eff ect, you need to make its
visibility identical in both states.
4 In the Layers panel, show the Small Back row in the Feature page state.
Th e eff ect is removed from the transition in the Timeline. Th e Small Back button
will move but not fade.
You can also add eff ects from the Add Action menu at the bottom of the
Timelines panel.
5 Select the Restaurants page in the Pages/States
panel.
Th is page includes a pause/play toggle button.
Th e same button appears in the Future page,
but in a diff erent position.

ptg
ADOBE FLASH CATALYST CS5 CLASSROOM IN A BOOK 137
6 In the State Transitions section of the Timelines panel, select the Restaurants >
Future transition.
In this transition, the Toggle Button object starts in one position in the
Restaurants page and moves to a new position in the Future page.
7 Unlock the Toggle Button object in the Layers panel.
8 In the Timelines panel, click the Toggle Button transition to select it.
Th e Add Action button at the bottom of the Timelines panel becomes active.
9 Click Add Action to open the pop-up menu,
and choose Rotate 3D.
A Rotate 3D Eff ect bar is added to the
Timeline and its properties appear in
the Properties panel. You can adjust the
duration and timing of this eff ect, just like
other transitions. You can choose to rotate
the object in three dimensions. Th e default
setting is to rotate the object 360 degrees (one rotation) around a vertical axis.
10 Click the Play Transition button in the Timeline to preview the new transition
eff ects.
Now the toggle button rotates as it slides into its new position in the Future
page. Sometimes the best way to get the exact eff ect you want is to experiment
with diff erent settings in the Properties panel.

ptg
138 LESSON 7 Creating Transitions and Action Sequences
11 Experiment by changing the properties for the Rotate 3D eff ect in the Properties
panel. After setting a new property, click the Play Transition button to see the
eff ect of each change.
12 Run the project and view the new eff ects in a browser.
Th e toggle button moves and rotates in 3D when you go from the Restaurants
page to the Future page.
13 Close the browser and return to Flash Catalyst.
Adding action sequencesWhereas a transition is used to defi ne one or more eff ects that occur as the applica-
tion transitions from one state to another, an action sequence is used to apply one
or more eff ects to an object in a single state. For example, you can use an action
sequence to move an option around the artboard and cause it to rotate, change
color, and fade, all while in the same state.
An action sequence is a type of interaction, so it can be triggered by a user event,
such as clicking a button, or it can be triggered automatically when the application
starts. Because an action sequence occurs within a single state, it can play over and
over. For example, an object can animate each time a user moves the pointer over it.
Add eff ects with a purposeHaving too many complex transitions or action sequences can result in application performance issues at runtime, not to mention that they can overwhelm or distract users.
Each time you think about adding an eff ect, ask yourself this question, “Does it add something important to my application?”
Use eff ects when needed to defi ne the pace or tone of the application, but resist the temptation to create special eff ects simply for the fun of it.
If you’re confi dent that an eff ect is a positive addition to the user experience or improves usability, then it’s probably worth including.
Add an action sequence interactionAction sequences can be added to components or grouped objects in the
Interactions panel.
1 Select the Future page in the Pages/States panel.
2 Select the orange play/pause toggle button in the artboard.
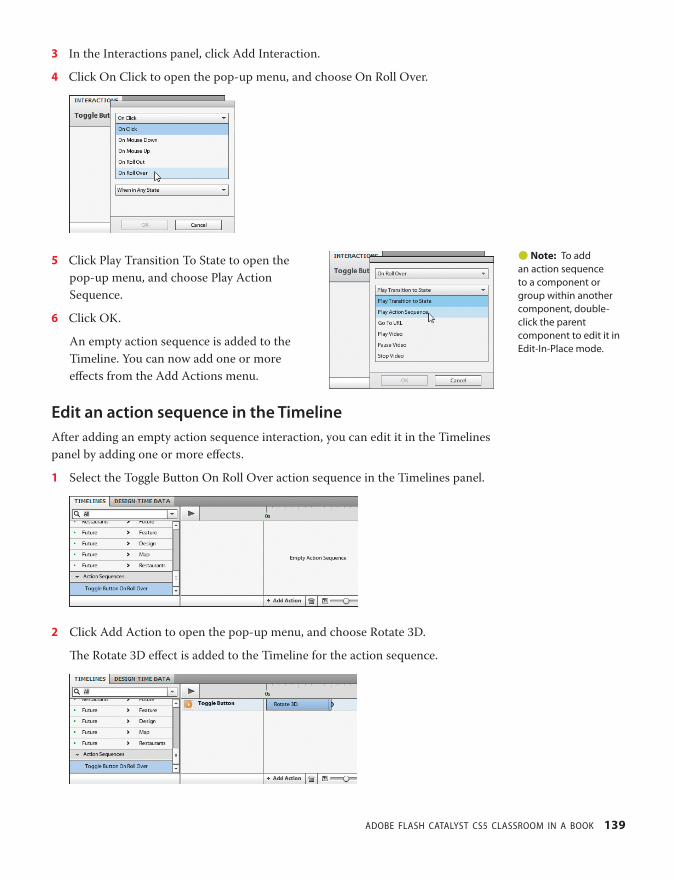
ptg
ADOBE FLASH CATALYST CS5 CLASSROOM IN A BOOK 139
3 In the Interactions panel, click Add Interaction.
4 Click On Click to open the pop-up menu, and choose On Roll Over.
5 Click Play Transition To State to open the
pop-up menu, and choose Play Action
Sequence.
6 Click OK.
An empty action sequence is added to the
Timeline. You can now add one or more
eff ects from the Add Actions menu.
Edit an action sequence in the TimelineAfter adding an empty action sequence interaction, you can edit it in the Timelines
panel by adding one or more eff ects.
1 Select the Toggle Button On Roll Over action sequence in the Timelines panel.
2 Click Add Action to open the pop-up menu, and choose Rotate 3D.
Th e Rotate 3D eff ect is added to the Timeline for the action sequence.
� Note: To add an action sequence to a component or group within another component, double-click the parent component to edit it in Edit-In-Place mode.

ptg
140 LESSON 7 Creating Transitions and Action Sequences
3 Run the project to preview the action sequence in a browser. Navigate to the
Restaurants (page 4) or Future (page 5) pages and roll over the play/pause toggle
button to see the button rotate. Th e eff ect can play repeatedly because the eff ect
occurs in one state at a time. Th e eff ect plays in any state where the Toggle
Button object is visible.
Flash Catalyst helper eff ectsIn some cases, making changes to objects that are currently part of a transition can
negatively aff ect the appearance of the transition. Flash Catalyst adds additional
“helper” eff ects to adjust for your changes and correct the transition automati-
cally. Th e added eff ects appear as yellow Eff ect bars and a message appears in the
Heads-Up Display (HUD) to let you know that Flash Catalyst has added the extra
eff ects to preserve the fi delity of your transitions.
Here’s an example of what you will see in the HUD:
"This group has children with different properties in other states. Extra effects were added to your timelines to make them play correctly."
Some examples of edits that may require helper eff ects include:
• Grouping objects after they’ve been used in a move transition eff ect.
• Moving a group (or its children on one side of a transition).
Follow these rules to preserve the fi delity of transitions with helper eff ects:
• If you change the Delay value of a transition, change the Delay value for the
yellow Eff ect bar to match. Th e original Eff ect bar and the yellow Eff ect bar must
stay in sync.
• Do not manually change the duration of a yellow Eff ect bar. Flash Catalyst will
adjust the yellow Eff ect bar duration if necessary.
A yellow Eff ect bar is a helper eff ect added by Flash Catalyst
� Tip: You can add additional eff ects to the same action sequence by selecting the action sequence in the Timelines panel and then adding eff ects from the Add Action menu.

ptg
ADOBE FLASH CATALYST CS5 CLASSROOM IN A BOOK 141
Review questions1 What causes Flash Catalyst to add a default transition eff ect to the application?
2 How do you change the default settings for smooth transitions?
3 What does the Simultaneous smooth transition option do?
4 How do you change the duration of a transition eff ect?
5 What eff ect property lets you control the acceleration and deceleration of an object as it
moves from start to fi nish during a transition?
6 How do you add multiple eff ects to the same object in a transition?
7 What is the diff erence between a transition and an action sequence?
Review answers1 When an object in one state is not present or visible or has diff erent properties
(position, opacity, and so on) in another state, a transition eff ect is added between the
two states.
2 You change the default settings for smooth transitions by clicking the arrow beside the
Smooth Transition button in the Timelines panel. Th is opens the Smooth Transition
Options dialog box.
3 Th e Simultaneous smooth transition option applies smooth transitions to each eff ect
equally, using the value you set in the Duration fi eld. Each eff ect begins and ends at the
same time.
4 You can change the duration of a transition eff ect by dragging the Eff ect bar resize
handle, or by changing the Duration value in the Properties panel.
5 You can achieve more realistic-looking movements by applying easing to your eff ects.
Easing consists of two phases: the acceleration, or ease in phase, followed by the
deceleration, or ease out phase. When you apply easing to eff ects, you are changing how
those eff ects behave over time.
6 To add additional eff ects to an object in a transition, you can make additional changes
to the object in the start or end state of the transition, or add new eff ects from the Add
Actions menu in the Timelines panel.
7 Transitions are eff ects that play between two states. An action sequence is an
interaction that plays within a single state. You can add an interaction to components
or grouped objects to trigger one or more eff ects. Action Sequence interactions can be
played over and over because they exist within the same state.

ptg
142
8 ADDING AND CONTROLLING VIDEO AND SOUND
Lesson OverviewWeb video is everywhere—news, sports, entertainment, e-commerce,
corporate communications, education, blogs, and social networking
are a just few examples. Th anks to sites like YouTube and Hulu, more
and more people are going directly to the web for their daily dose of
information, and they expect to be entertained.
In this lesson, you’ll learn how to do the following:
• Prepare video for the web
• Import video and sound
• Preview video and sound
• Add video to an application
• Control video playback
• Add sound eff ects
Th is lesson will take about 60 minutes to complete. Copy the Lesson08
folder into the lessons folder that you created on your hard drive for
these projects (or create it now), if you haven’t already done so. As you
work on this lesson, you won’t be preserving the start fi les; if you need
to restore the start fi les, copy them from the Adobe Flash Catalyst CS5
Classroom in a Book CD.
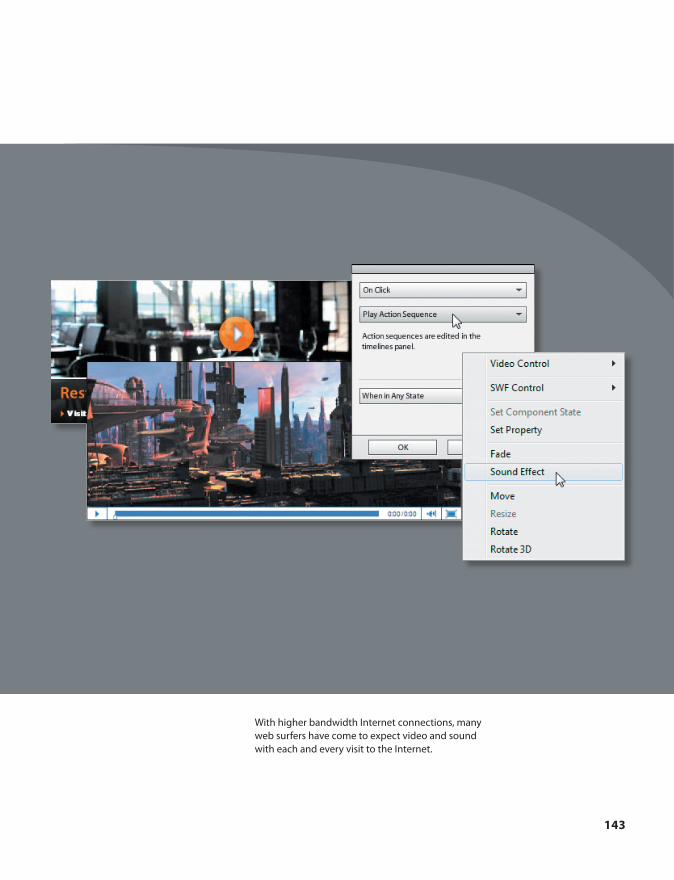
ptg
143
With higher bandwidth Internet connections, many web surfers have come to expect video and sound with each and every visit to the Internet.

ptg
144 LESSON 8 Adding and Controlling Video and Sound
Preparing video for the webMost web browsers have Adobe Flash Player installed, making it easier than ever to
include Flash video fi les (FLV and F4V) in a web page. But before you can add video
to your rich Internet applications, you must encode it for web delivery.
What is encoding?In Flash Catalyst, encoding involves converting your fi nal edited video footage to a
format compatible with Adobe Flash Player. Flash Catalyst supports FLV and F4V
video fi les. FLV and F4V are container formats for Flash video. FLV fi les generally
contain video data that is encoded using the On2 VP6 or Sorenson Spark codec and
audio data encoded using an MP3 audio codec. F4V fi les generally contain video
data that is encoded using an H.264 video codec and the AAC audio codec.
What is a video codec?A codec is an encoding/decoding algorithm that controls how video fi les are com-
pressed during encoding, and decompressed during playback.
• H.264 is an MPEG-4–based standard for web delivery. H.264 is recommended
for a variety of devices, including high-defi nition (HD) video, 3GPP cell phones,
video iPods, and PlayStation Portable (PSP) devices.
• On2 VP6 is the standard codec for encoding Flash video (FLV) fi les for Flash
Player 8 and higher.
• Sorenson Spark is the required video compression format for Flash Player 6
and 7.
• MP3 is a standard fi le format on the Internet and on many portable digital
audio players.
• Advanced Audio Coding (AAC) is a standardized encoding scheme for digital
audio. Designed to be the successor to the MP3 format, AAC generally achieves
better sound quality than MP3 at similar bit rates.

ptg
ADOBE FLASH CATALYST CS5 CLASSROOM IN A BOOK 145
How do I encode my video?Th ere are several applications that you can use to create FLV and F4V fi les, includ-
ing Adobe Flash Professional CS5, Adobe Premiere Pro CS5, Adobe After Eff ects
CS5, Adobe Media Encoder, and Sorenson Squeeze.
Each of these programs includes many presets, so most editors will not need to
adjust any parameters when preparing their video for the web. You can simply select
a format (FLV/F4V) and choose from a collection of presets, such as Web - Medium
Quality for Flash 8 and higher. When you choose a preset, the video and audio
codec and other settings are set automatically, including picture size, frame rate, bit
rate, and so on. You can also begin with a preset, and then modify individual set-
tings, if needed.
Whenever possible, encode a fi le from its uncompressed form. If you convert a fi le
that has already been compressed using a diff erent format, and then recompress that
fi le into the FLV or F4V format, the previous encoder can introduce video noise.
To explain each format’s unique characteristics goes well beyond the scope
of this course. For more information on preparing video for the web, visit
the Adobe Developer Connection Video Technology Center online at
www.adobe.com/devnet/video.
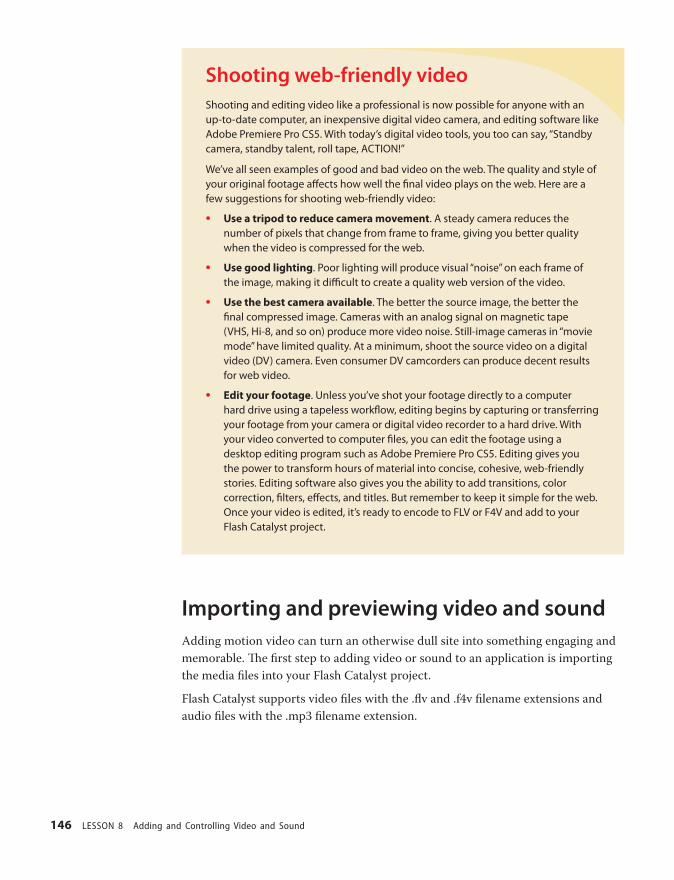
ptg
146 LESSON 8 Adding and Controlling Video and Sound
Shooting web-friendly videoShooting and editing video like a professional is now possible for anyone with an up-to-date computer, an inexpensive digital video camera, and editing software like Adobe Premiere Pro CS5. With today’s digital video tools, you too can say, “Standby camera, standby talent, roll tape, ACTION!”
We’ve all seen examples of good and bad video on the web. The quality and style of your original footage aff ects how well the fi nal video plays on the web. Here are a few suggestions for shooting web-friendly video:
• Use a tripod to reduce camera movement. A steady camera reduces the number of pixels that change from frame to frame, giving you better quality when the video is compressed for the web.
• Use good lighting. Poor lighting will produce visual “noise” on each frame of the image, making it diffi cult to create a quality web version of the video.
• Use the best camera available. The better the source image, the better the fi nal compressed image. Cameras with an analog signal on magnetic tape (VHS, Hi-8, and so on) produce more video noise. Still-image cameras in “movie mode” have limited quality. At a minimum, shoot the source video on a digital video (DV) camera. Even consumer DV camcorders can produce decent results for web video.
• Edit your footage. Unless you’ve shot your footage directly to a computer hard drive using a tapeless workfl ow, editing begins by capturing or transferring your footage from your camera or digital video recorder to a hard drive. With your video converted to computer fi les, you can edit the footage using a desktop editing program such as Adobe Premiere Pro CS5. Editing gives you the power to transform hours of material into concise, cohesive, web-friendly stories. Editing software also gives you the ability to add transitions, color correction, fi lters, eff ects, and titles. But remember to keep it simple for the web. Once your video is edited, it’s ready to encode to FLV or F4V and add to your Flash Catalyst project.
Importing and previewing video and soundAdding motion video can turn an otherwise dull site into something engaging and
memorable. Th e fi rst step to adding video or sound to an application is importing
the media fi les into your Flash Catalyst project.
Flash Catalyst supports video fi les with the .fl v and .f4v fi lename extensions and
audio fi les with the .mp3 fi lename extension.

ptg
ADOBE FLASH CATALYST CS5 CLASSROOM IN A BOOK 147
Import video and soundWhen you import a single video fi le, a new Video Player object is created in the tar-
get layer and added to the artboard. Th e source video is stored in the project library.
When you import more than one video fi le, or an audio fi le, the fi les are stored in
the library until you decide to use them.
1 Start Flash Catalyst, browse to the Lesson08 folder on your hard drive, and open
the Lesson08_Banner.fxp fi le.
2 Choose File > Import > Video/Sound File.
Th e Import dialog box opens.
3 Browse to the Lesson08 folder on your hard drive. Ctrl/Command-click to select
cityscape.fl v, restaurants.fl v, and button_click.mp3.
4 Click Open.
5 Open the Library panel and expand the Media category.
Th e video and sound fi les you imported appear in the Library panel.
Preview video and soundIf your video and sound fi les have similar names, such as video1, video2, and so on,
you can quickly identify them by previewing media in the Library panel. It’s a good
idea to preview media fi les before adding them to the application.
1 Select cityscape.fl v in the Library panel.
A still image appears at the top of the Library panel. Th e image includes a Play
button. If you play the video, Rewind and Pause buttons appear.
Play button
Rewind and Pause buttons
2 Preview the cityscape.fl v and restaurants.fl v video fi les.

ptg
148 LESSON 8 Adding and Controlling Video and Sound
3 Select the button_click.mp3 sound fi le in the Library panel.
A Play button appears at the top of the Library panel. If you play the sound,
Rewind and Pause buttons appear.
Play button Rewind and Pause buttons
4 Preview the button_click.mp3 sound fi le.
It sounds like a button click.
Adding video to an applicationTh ere are two ways to add video to the application.
• Import a single video fi le directly into the current state.
• Drag a video from the Library panel to the artboard in the current state.
When you add a video to the application, the source video is stored in the library
and a Video Player object is added to the current state and appears in the Layers
panel. Th e Video Player is a container used to hold and play the video.
Add video to the artboardTh e interactive banner application includes a custom component called Image
Slider. Th e Image Slider component includes background images for each page. You
are going to replace the background image for the Restaurants page with a short
video clip.
1 Select the Restaurants page in the Pages/States panel.
2 Collapse the Timelines panel so you can see more of the artboard. If you can’t see
the entire artboard in the workspace, then change the workspace magnifi cation
to 66%.
3 In the Layers panel, unlock the Image Slider row.
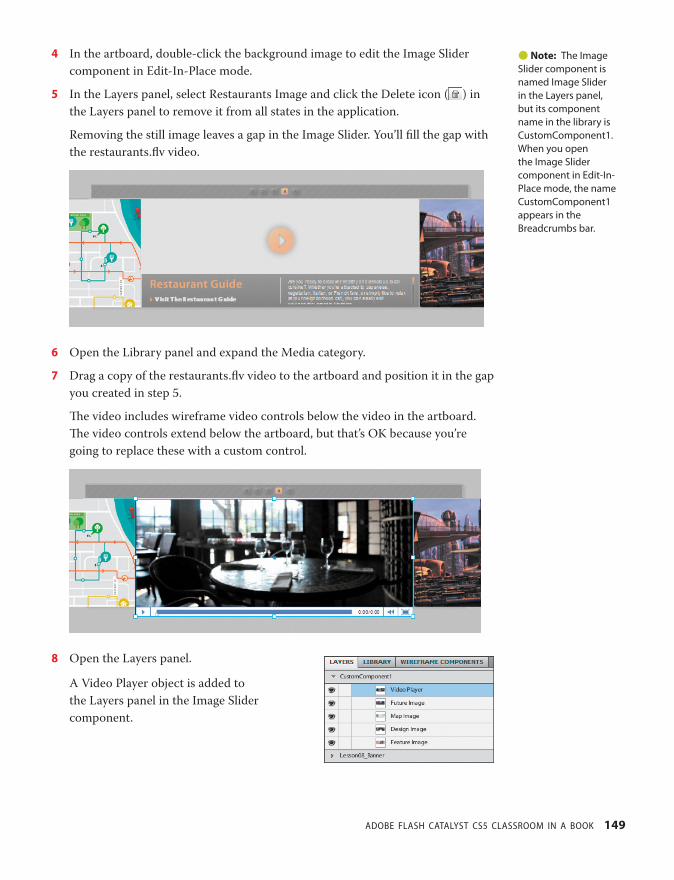
ptg
ADOBE FLASH CATALYST CS5 CLASSROOM IN A BOOK 149
4 In the artboard, double-click the background image to edit the Image Slider
component in Edit-In-Place mode.
5 In the Layers panel, select Restaurants Image and click the Delete icon ( ) in
the Layers panel to remove it from all states in the application.
Removing the still image leaves a gap in the Image Slider. You’ll fi ll the gap with
the restaurants.fl v video.
6 Open the Library panel and expand the Media category.
7 Drag a copy of the restaurants.fl v video to the artboard and position it in the gap
you created in step 5.
Th e video includes wireframe video controls below the video in the artboard.
Th e video controls extend below the artboard, but that’s OK because you’re
going to replace these with a custom control.
8 Open the Layers panel.
A Video Player object is added to
the Layers panel in the Image Slider
component.
� Note: The Image Slider component is named Image Slider in the Layers panel, but its component name in the library is CustomComponent1. When you open the Image Slider component in Edit-In-Place mode, the name CustomComponent1 appears in the Breadcrumbs bar.

ptg
150 LESSON 8 Adding and Controlling Video and Sound
Set video player propertiesAs with other objects, a video player can exist in more than one state, and it can
have a unique set of properties in each state where it exists. You modify Video
Player properties in the Properties panel.
1 Open the Common section in the
Properties panel.
You can set the position, size, opacity,
and rotation of the video. By default, the
wireframe video controls are added below
the video. To change which video appears
in the controller, you can use the Source
link in the Properties panel. Th is allows
you to update the video without going
through the steps to add, position, and set
properties all over again. Th e properties
apply to the Video Player, not the video fi le
it contains.
2 Open the Video Controls menu and choose Standard.
Th e controls below the video player change from the blue wireframe controls to
a standard set of black and white controls.
3 Open the Scale Mode pop-up menu and choose Letterbox. Th is should be the
default setting. Scale Mode controls how the video scales when you drag its
selection handles.
None sizes the video player but not the video picture. If you make the bounding
box smaller than the video, the video is cropped.
Letterbox scales uniformly as large as possible without cropping the video.
Black or white bars appear around the video if the video is a diff erent aspect
ratio than the video player bounding box.
� Tip: Using the same video player to load and control diff erent videos in diff erent states is one way to optimize the performance of your application.

ptg
ADOBE FLASH CATALYST CS5 CLASSROOM IN A BOOK 151
Stretch matches the size of the video picture to the size of the video player
window. Th is does not maintain its height to width ratio. Th e video is not
cropped, but can appear distorted from the non-uniform scaling.
Zoom sizes and crops the video to match the size of the video player while
maintaining the video’s height to width ratio.
In the Properties panel, you can set the video to begin playing automatically
(Auto Play), loop repeatedly (Loop), or begin with its sound muted (Muted).
You can enter Accessible text, which is recognized by screen readers and other
accessibility programs.
4 Open the Component section of the
Properties panel.
If the video includes sound, you can adjust
its volume. You can also create a tooltip for
the video player.
5 Open the Text section
in the Properties panel,
click the Color swatch
and select a new color,
such as red.
Th e text in the video
controls change to the
color you selected. You
can also change the style,
opacity, and size of the text.
6 In the Common section of the Properties panel, open the Video Controls menu
and choose None.
Th is removes the video controls below the video player. You’re going to replace
these with a custom play/pause button.
7 Press Esc to exit Edit-In-Place mode.
� Tip: You can add fi lters to a video player in the Filters section of the Properties panel. For example, you can use a drop shadow to make it look like the video is fl oating above the artboard. You’ll learn more about applying fi lters later in this course.

ptg
152 LESSON 8 Adding and Controlling Video and Sound
Controlling video playbackNow that you’ve hidden the default video controls, you need to give the user another
way of playing and stopping the video in the Restaurants page.
You can use original artwork to create a custom video controller component. Th e
controller can be as simple as a button used to play the video, or it can be a com-
plex custom component that contains separate controls for things like play, pause,
rewind, and so on.
Once you defi ne the parts of your controller, you need to add interactions to control
video playback. A control can be created from any component or group.
Attach controls to the videoTh e interactive banner application includes a Play/Pause toggle button that was
created earlier. We can use this button to control the video, but the button and the
video need to exist together, either at the main application level, or together inside
the same component. Right now, the video player containing the restaurants video is
located inside the Image Slider component, so we need to add the Toggle Button to
the Image Slider.
1 Select the Restaurants page in the Pages/States panel, if it’s not already selected.
2 In the Layers panel, unlock the Toggle Button row.
You are going to move the Toggle Button into the Image Slider component, but
to do this it needs to be unlocked.
3 Select Image Slider in the Layers panel, and click State1 in the Heads-Up Display
(HUD) to edit the component in Edit-In-Place mode.
4 In the Layers panel, expand the Lesson08_Banner section. Drag the Toggle
Button from the Lesson08_Banner section into the Image Slider component
(CustomComponent1). Position the Toggle Button as the topmost layer.
A message warns you that if you move the Toggle Button, you will lose any
eff ects or interactions that are applied to it. Th is includes transitions and action
sequences. If you want to use the Toggle Button component to control the video
inside the Image Slider, you need to place the button inside the Image Slider
component.
5 Click OK.
Th e Toggle Button is the top layer in the Image Slider component.
� Note: You could have deleted the Toggle Button in the main application layers, and then dragged a new instance of the Toggle Button from the Library panel into the Image Slider custom component. But dragging the button from the main application into the component is faster.
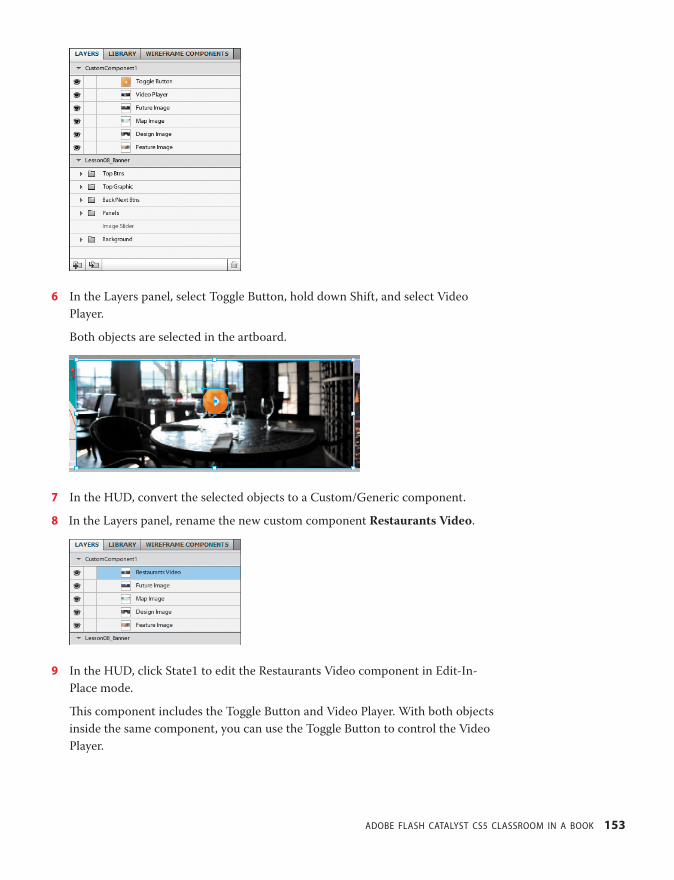
ptg
ADOBE FLASH CATALYST CS5 CLASSROOM IN A BOOK 153
6 In the Layers panel, select Toggle Button, hold down Shift, and select Video
Player.
Both objects are selected in the artboard.
7 In the HUD, convert the selected objects to a Custom/Generic component.
8 In the Layers panel, rename the new custom component Restaurants Video.
9 In the HUD, click State1 to edit the Restaurants Video component in Edit-In-
Place mode.
Th is component includes the Toggle Button and Video Player. With both objects
inside the same component, you can use the Toggle Button to control the Video
Player.
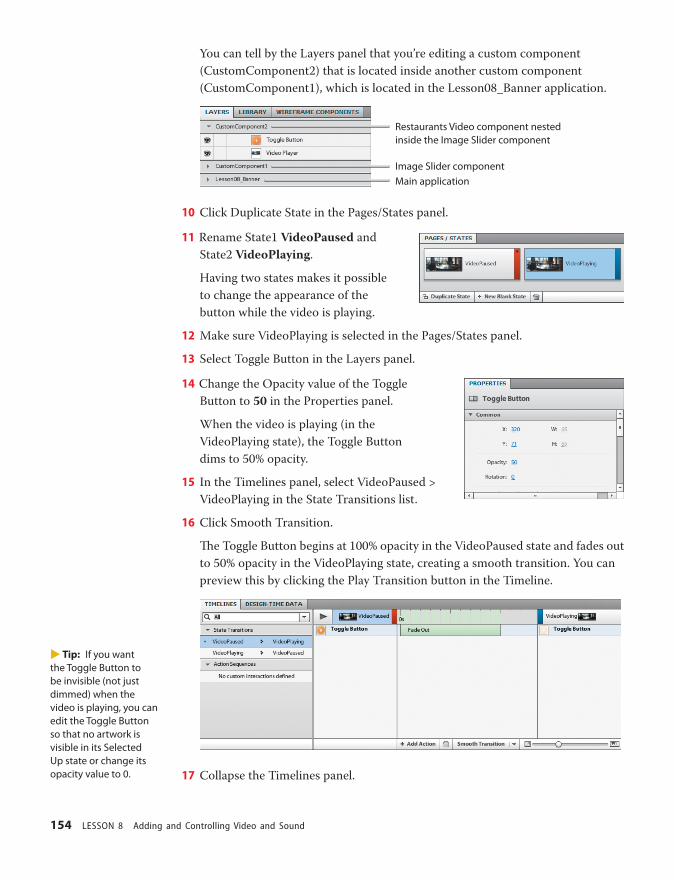
ptg
154 LESSON 8 Adding and Controlling Video and Sound
You can tell by the Layers panel that you’re editing a custom component
(CustomComponent2) that is located inside another custom component
(CustomComponent1), which is located in the Lesson08_Banner application.
Restaurants Video component nested inside the Image Slider component
Image Slider componentMain application
10 Click Duplicate State in the Pages/States panel.
11 Rename State1 VideoPaused and
State2 VideoPlaying.
Having two states makes it possible
to change the appearance of the
button while the video is playing.
12 Make sure VideoPlaying is selected in the Pages/States panel.
13 Select Toggle Button in the Layers panel.
14 Change the Opacity value of the Toggle
Button to 50 in the Properties panel.
When the video is playing (in the
VideoPlaying state), the Toggle Button
dims to 50% opacity.
15 In the Timelines panel, select VideoPaused >
VideoPlaying in the State Transitions list.
16 Click Smooth Transition.
Th e Toggle Button begins at 100% opacity in the VideoPaused state and fades out
to 50% opacity in the VideoPlaying state, creating a smooth transition. You can
preview this by clicking the Play Transition button in the Timeline.
17 Collapse the Timelines panel.
� Tip: If you want the Toggle Button to be invisible (not just dimmed) when the video is playing, you can edit the Toggle Button so that no artwork is visible in its Selected Up state or change its opacity value to 0.

ptg
ADOBE FLASH CATALYST CS5 CLASSROOM IN A BOOK 155
Add interactions to control video playbackWith the Video Player and the Toggle Button together in the same component, the
Toggle Button can now control the video.
1 Select the Toggle Button.
2 In the Interactions panel, add the following four On Click interactions:
• Play Video, Video Player – restaurants.fl v, When In VideoPaused.
• Play Transition To State, VideoPlaying, When In VideoPaused.
• Pause Video, Video Player – restaurants.fl v, When In VideoPlaying.
• Play Transition To State, VideoPaused, When In VideoPlaying.
Th e Toggle Button now includes four On Click interactions.
3 Run the project in a browser, navigate to the Restaurants page (page 4), and test
the video controls.
Notice that when the video fi nishes playing, the Toggle Button remains at 50%
opacity and doesn’t toggle back to the play symbol. Th ere are two problems.
Th e Restaurants Video component is ending in the VideoPlaying state, and
the Toggle Button stays selected (pause symbol). It should toggle back to its
deselected Up state (play symbol). You’ll fi x that next.
4 Close the browser and return to Flash Catalyst.
Th e Restaurants Video component is still in edit in Edit-In-Place mode.
Reset the video after playingTo reset the video and Toggle Button after playing, you must do two things:
• Add an interaction that returns the Restaurants Video component to its
VideoPaused state.
• Sync the Toggle Button so that its properties in each state match its natural on/
off behavior, allowing it to toggle to the correct setting when returning to the
VideoPaused state.
� Tip: The clickable area of a button is defi ned by its boundaries. To enlarge the clickable area of a button, you can add a shape that’s larger than the button. Place the shape in a new layer inside the button component, and change the shape’s opacity value to 0.
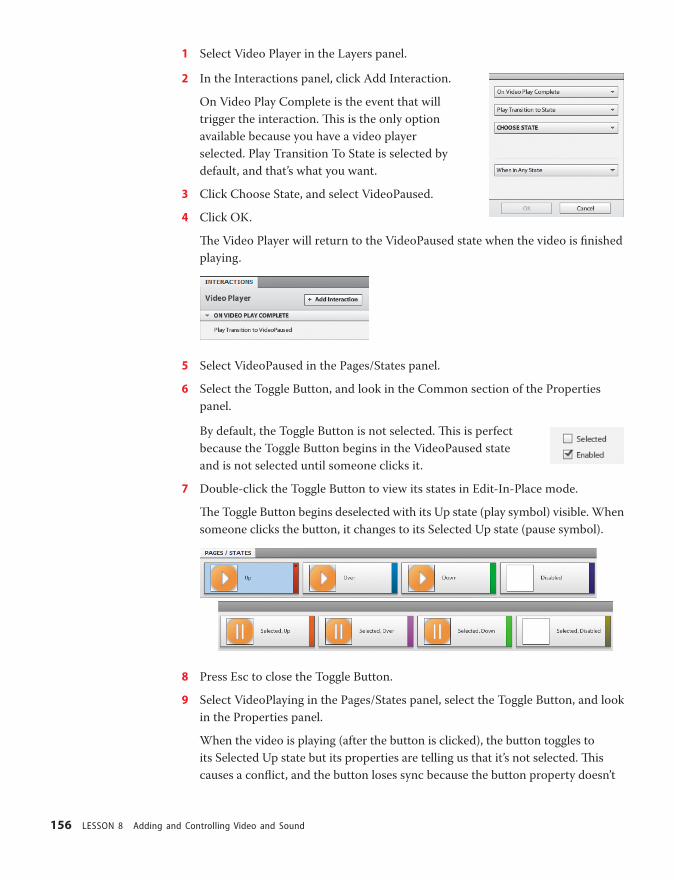
ptg
156 LESSON 8 Adding and Controlling Video and Sound
1 Select Video Player in the Layers panel.
2 In the Interactions panel, click Add Interaction.
On Video Play Complete is the event that will
trigger the interaction. Th is is the only option
available because you have a video player
selected. Play Transition To State is selected by
default, and that’s what you want.
3 Click Choose State, and select VideoPaused.
4 Click OK.
Th e Video Player will return to the VideoPaused state when the video is fi nished
playing.
5 Select VideoPaused in the Pages/States panel.
6 Select the Toggle Button, and look in the Common section of the Properties
panel.
By default, the Toggle Button is not selected. Th is is perfect
because the Toggle Button begins in the VideoPaused state
and is not selected until someone clicks it.
7 Double-click the Toggle Button to view its states in Edit-In-Place mode.
Th e Toggle Button begins deselected with its Up state (play symbol) visible. When
someone clicks the button, it changes to its Selected Up state (pause symbol).
8 Press Esc to close the Toggle Button.
9 Select VideoPlaying in the Pages/States panel, select the Toggle Button, and look
in the Properties panel.
When the video is playing (after the button is clicked), the button toggles to
its Selected Up state but its properties are telling us that it’s not selected. Th is
causes a confl ict, and the button loses sync because the button property doesn’t

ptg
ADOBE FLASH CATALYST CS5 CLASSROOM IN A BOOK 157
refl ect that it is selected while playing. To fi x that, we need to change the button’s
Selected property to match its Selected Up state when the video is playing.
10 In the Properties panel for the Toggle Button, click the Selected
property to select it.
11 Run the project in a browser, navigate to the Restaurants page
(page 4), and test the video controls.
Now when the video fi nishes playing, it automatically returns to the
VideoPaused state and the button toggles to the play symbol.
12 Close the browser and return to Flash Catalyst.
13 Click Lesson08_Banner in the Breadcrumbs bar to exit Edit-In-Place mode.
14 Lock the Image Slider layer in the Layers panel.
Adding sound eff ectsSound eff ects aren’t just fun. Th ey improve usability by identifying buttons, menus,
and other interactive objects.
You can add sound eff ects to components or groups by adding an action sequence
interaction and then adding a Sound Eff ect to the action sequence in the Timelines
panel.
1 Unlock the Top Btns layer in the Layers panel, and open the Timelines panel.
Th e Top Btns layer includes the top fi ve navigation buttons. You can add sound
eff ects that play when someone clicks a button.
2 In the artboard, click to select the top navigation button labeled 1.
3 In the Interactions panel, click Add Interaction.
4 Choose On Roll Over, Play Action Sequence, and When In Any State.

ptg
158 LESSON 8 Adding and Controlling Video and Sound
5 Click OK.
An empty On Button Roll Over action sequence is added to the Timelines panel.
6 Click Add Action, and choose Sound Eff ect.
Th e Select Asset dialog box opens. You can add a sound from the Media
category in the library or import a new sound.
7 Click Import.
Th e Import dialog box opens to the Adobe Flash Catalyst CS5 sound eff ects
directory.
8 Select the Flash Beep.mp3 fi le, and click Open.
Th e Flash Beep.mp3 fi le is added to the Media category in the library and is
selected in the Select Asset dialog box.
� Note: If, when importing a sound eff ect from the Select Asset dialog box, your sound eff ects library does not include the Flash Beep.mp3 fi le, there is a copy of this fi le in the Lesson08/xtra-sound folder on your hard drive. You can browse to this fi le, select it, and click Open.
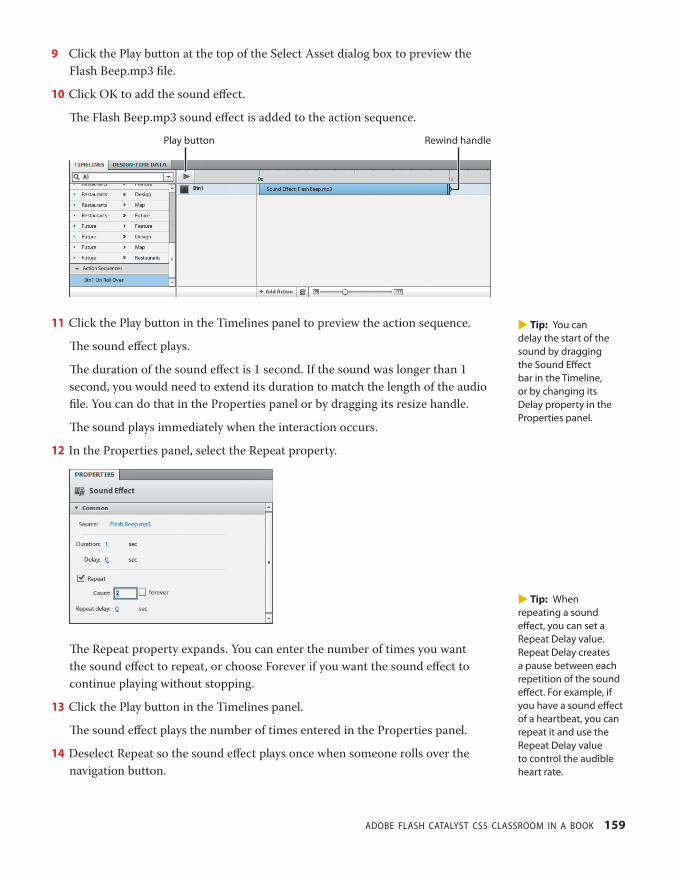
ptg
ADOBE FLASH CATALYST CS5 CLASSROOM IN A BOOK 159
9 Click the Play button at the top of the Select Asset dialog box to preview the
Flash Beep.mp3 fi le.
10 Click OK to add the sound eff ect.
Th e Flash Beep.mp3 sound eff ect is added to the action sequence.
Play button Rewind handle
11 Click the Play button in the Timelines panel to preview the action sequence.
Th e sound eff ect plays.
Th e duration of the sound eff ect is 1 second. If the sound was longer than 1
second, you would need to extend its duration to match the length of the audio
fi le. You can do that in the Properties panel or by dragging its resize handle.
Th e sound plays immediately when the interaction occurs.
12 In the Properties panel, select the Repeat property.
Th e Repeat property expands. You can enter the number of times you want
the sound eff ect to repeat, or choose Forever if you want the sound eff ect to
continue playing without stopping.
13 Click the Play button in the Timelines panel.
Th e sound eff ect plays the number of times entered in the Properties panel.
14 Deselect Repeat so the sound eff ect plays once when someone rolls over the
navigation button.
� Tip: You can delay the start of the sound by dragging the Sound Eff ect bar in the Timeline, or by changing its Delay property in the Properties panel.
� Tip: When repeating a sound eff ect, you can set a Repeat Delay value. Repeat Delay creates a pause between each repetition of the sound eff ect. For example, if you have a sound eff ect of a heartbeat, you can repeat it and use the Repeat Delay value to control the audible heart rate.
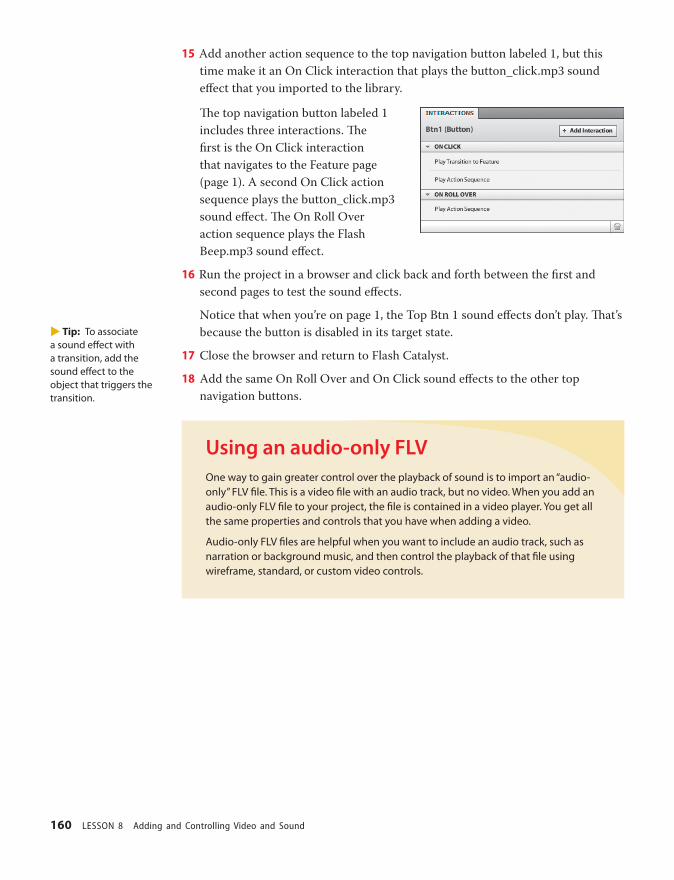
ptg
160 LESSON 8 Adding and Controlling Video and Sound
15 Add another action sequence to the top navigation button labeled 1, but this
time make it an On Click interaction that plays the button_click.mp3 sound
eff ect that you imported to the library.
Th e top navigation button labeled 1
includes three interactions. Th e
fi rst is the On Click interaction
that navigates to the Feature page
(page 1). A second On Click action
sequence plays the button_click.mp3
sound eff ect. Th e On Roll Over
action sequence plays the Flash
Beep.mp3 sound eff ect.
16 Run the project in a browser and click back and forth between the fi rst and
second pages to test the sound eff ects.
Notice that when you’re on page 1, the Top Btn 1 sound eff ects don’t play. Th at’s
because the button is disabled in its target state.
17 Close the browser and return to Flash Catalyst.
18 Add the same On Roll Over and On Click sound eff ects to the other top
navigation buttons.
Using an audio-only FLVOne way to gain greater control over the playback of sound is to import an “audio-only” FLV fi le. This is a video fi le with an audio track, but no video. When you add an audio-only FLV fi le to your project, the fi le is contained in a video player. You get all the same properties and controls that you have when adding a video.
Audio-only FLV fi les are helpful when you want to include an audio track, such as narration or background music, and then control the playback of that fi le using wireframe, standard, or custom video controls.
� Tip: To associate a sound eff ect with a transition, add the sound eff ect to the object that triggers the transition.
ptg
ADOBE FLASH CATALYST CS5 CLASSROOM IN A BOOK 161
Review questions1 How can you import a video fi le directly to the artboard for the current state in the
application (without dragging it from the Library panel)?
2 How do you set a video to play continuously?
3 How can I set a video to begin playing automatically, without requiring someone to
click a Play button?
4 By default, what is used to control the playback of video?
5 What rule applies when using a component to control video playback?
6 What types of objects can include sound eff ects?
7 How do you add a sound eff ect to a component or group?
Review answers1 If you import one video at a time, the video is added to the current state. Importing
multiple videos places them in the library only.
2 Select the video player and select Loop in the Properties panel to play a video
continuously.
3 Select the video player and select Auto Play in the Properties panel to play a video
automatically.
4 By default, the wireframe video controls are added below the video in the video
player. In the video player Properties panel, you can change to the standard controls,
or hide the controls by choosing None, and then create custom controls using other
components.
5 Th e component and the video player must both be in the main application layers or
together inside the same component. For example, a component in the main application
layers cannot be used to control a video that is nested inside other components.
6 You can attach sound eff ects to components and groups.
7 To add a sound eff ect, select the component or group. Add an action sequence to the
component or group. In the Timelines panel, open the Add Action menu and add a
Sound Eff ect.
ptg
162
9INTEGRATING SWF CONTENT FROM OTHER CREATIVE SUITE TOOLS
Lesson OverviewWhen it comes to eff ective visual communication, keeping the atten-
tion of your audience is a challenge. Designing engaging and mean-
ingful content requires thinking outside the box and leveraging a
wide range of design tools, including vector-based animation, with a
purpose—to tell a story, explain a concept, demonstrate a procedure,
or simply entertain.
Flash Catalyst does an excellent job with smooth transitions using
simple fades and movement. You can also produce more elaborate
animation using other Adobe Creative Suite tools and then publish
your movie as a SWF fi le. Th e SWF fi le is imported as an asset in your
Flash Catalyst project.
In this lesson, you’ll learn how to do the following:
• Use SWF fi les in Flash Catalyst projects
• Add SWF fi les to an application
• Control the playback of a SWF fi le
• Play a SWF fi le from a specifi c frame
• Create an animated button using a SWF fi le
Th is lesson will take about 40 minutes to complete. Copy the Lesson09
folder into the lessons folder that you created on your hard drive for
these projects (or create it now), if you haven’t already done so. As you
work on this lesson, you won’t be preserving the start fi les; if you need
to restore the start fi les, copy them from the Adobe Flash Catalyst CS5
Classroom in a Book CD.

ptg
163
Quickly extend the capabilities of your Flash Catalyst project by importing complex interactive animation and movies published in the SWF fi le format. Add immersive content or interactive video created in Adobe Flash Professional to create a more compelling user experience.

ptg
164 LESSON 9 Integrating SWF Content from other Creative Suite Tools
SWF fi lesSWF, pronounced swif, is short for Shockwave Flash and is the dominant format for
displaying animated vector graphics and text, as well as sound and video, over the
Internet. Th e SWF fi le format delivers vector graphics, text, video, and sound and is
viewed using Adobe Flash Player and Adobe AIR software. Flash Player reaches over
98 percent of Internet-enabled desktops and more than 800 million hand helds and
mobile devices.
Creating SWF fi les for Flash CatalystBrowse the web and you’ll fi nd page after page of computer programs for publish-
ing your fi nished web content in the SWF fi le format. Th ese include several Adobe
Creative Suite applications and a long list of third-party programs.
You can use the following Adobe applications to output SWF fi les:
• Adobe Flash Professional CS4 or CS5 (recommended for Flash Catalyst
SWF content)
• Adobe Premiere Pro
• Adobe After Eff ects
• Adobe Encore
• Adobe Fireworks
• Adobe InDesign
• Adobe Illustrator
• Adobe Media Encoder
• Adobe Captivate*
• Adobe Presenter*
� Note: * Indicates an application that is not part of Adobe Creative Suite.
Searchable SWF contentA common complaint when using SWF content is that it’s virtually impossible to locate using today’s search engines. But that’s all changing.
Adobe is working with Google and Yahoo to enable one of the largest fundamental improvements in web search results by making the Flash fi le format (SWF) a fi rst-class citizen in searchable web content. This will enable top search engines to locate the content you’ve embedded inside the rich Internet applications you build using Flash Catalyst. This will also provide more relevant automatic search rankings of the millions of RIAs and other dynamic content that run in Adobe Flash Player.
ptg
ADOBE FLASH CATALYST CS5 CLASSROOM IN A BOOK 165
Using SWF fi les in Flash CatalystWith so many applications capable of outputting SWF content, there’s a lot of
potential to leverage existing materials in your rich Internet applications. However,
it’s important to know that not all SWF content is created equal. Take a few minutes
to review the following tips before acquiring SWF content for use in your Flash
Catalyst projects:
• Controlling the playback of SWF content in Flash Catalyst. You can add
Flash Catalyst eff ects in the Timelines panel to control the playback of a SWF
fi le. Only SWF content written in ActionScript 3.0 and published using Adobe
Flash Professional can be controlled using Flash Catalyst eff ects.
• Importing Flash Professional SWF content. You can import SWF fi les created
in Flash Professional into Flash Catalyst, but there is no direct integration
between the two applications. If you need to edit the SWF fi le, make your changes
in Flash Professional, republish, and import the new fi le into Flash Catalyst. Th en,
select the SWF Asset in your application and use the Source link in the Properties
panel to swap the old SWF fi le for the new one you’ve added to the library.
• Loading content dynamically. Many SWF fi les are complex interactive
applications that load content dynamically at runtime. For example, a movie.swf
fi le may include a link to video stored externally in a folder named My Video.
You can import the movie.swf fi le into Flash Catalyst, but you’ll need to
manually copy the source video to your published Flash Catalyst project folders.
Th e linked video must maintain the same position relative to Main.swf that it
had relative to movie.swf. For example, if the video is stored in the My Video
folder next to movie.swf, then copy the My Video folder and paste it next to
the Main.swf fi le that’s created when you publish your Flash Catalyst project. If
you publish more than one version of the application (for example, web, offl ine,
AIR), you’ll need to manually copy the video to all locations.
The movie.swf fi le is imported into Flash Catalyst.
It will only work if the video goes here.
In the Flash Catalyst project directory, the SWF fi le resides in assets/images, so you might think the video goes here too.
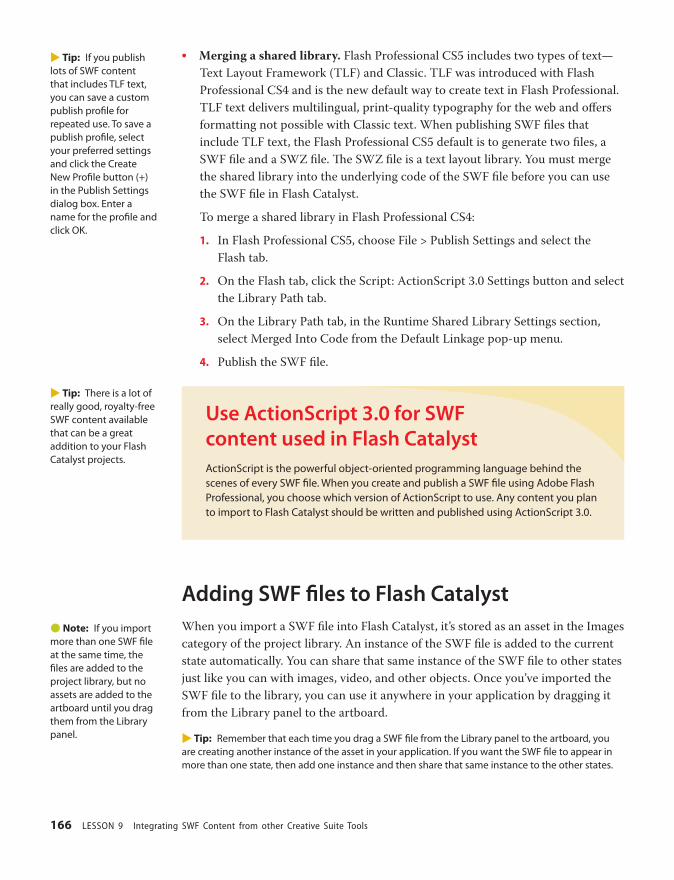
ptg
166 LESSON 9 Integrating SWF Content from other Creative Suite Tools
• Merging a shared library. Flash Professional CS5 includes two types of text—
Text Layout Framework (TLF) and Classic. TLF was introduced with Flash
Professional CS4 and is the new default way to create text in Flash Professional.
TLF text delivers multilingual, print-quality typography for the web and off ers
formatting not possible with Classic text. When publishing SWF fi les that
include TLF text, the Flash Professional CS5 default is to generate two fi les, a
SWF fi le and a SWZ fi le. Th e SWZ fi le is a text layout library. You must merge
the shared library into the underlying code of the SWF fi le before you can use
the SWF fi le in Flash Catalyst.
To merge a shared library in Flash Professional CS4:
1. In Flash Professional CS5, choose File > Publish Settings and select the
Flash tab.
2. On the Flash tab, click the Script: ActionScript 3.0 Settings button and select
the Library Path tab.
3. On the Library Path tab, in the Runtime Shared Library Settings section,
select Merged Into Code from the Default Linkage pop-up menu.
4. Publish the SWF fi le.
Use ActionScript 3.0 for SWF content used in Flash CatalystActionScript is the powerful object-oriented programming language behind the scenes of every SWF fi le. When you create and publish a SWF fi le using Adobe Flash Professional, you choose which version of ActionScript to use. Any content you plan to import to Flash Catalyst should be written and published using ActionScript 3.0.
Adding SWF fi les to Flash CatalystWhen you import a SWF fi le into Flash Catalyst, it’s stored as an asset in the Images
category of the project library. An instance of the SWF fi le is added to the current
state automatically. You can share that same instance of the SWF fi le to other states
just like you can with images, video, and other objects. Once you’ve imported the
SWF fi le to the library, you can use it anywhere in your application by dragging it
from the Library panel to the artboard.
� Tip: Remember that each time you drag a SWF fi le from the Library panel to the artboard, you are creating another instance of the asset in your application. If you want the SWF fi le to appear in more than one state, then add one instance and then share that same instance to the other states.
� Tip: If you publish lots of SWF content that includes TLF text, you can save a custom publish profi le for repeated use. To save a publish profi le, select your preferred settings and click the Create New Profi le button (+) in the Publish Settings dialog box. Enter a name for the profi le and click OK.
� Tip: There is a lot of really good, royalty-free SWF content available that can be a great addition to your Flash Catalyst projects.
� Note: If you import more than one SWF fi le at the same time, the fi les are added to the project library, but no assets are added to the artboard until you drag them from the Library panel.

ptg
ADOBE FLASH CATALYST CS5 CLASSROOM IN A BOOK 167
Import a SWF fi le to the artboardLet’s add the animated logo for the Restaurant Guide application. Th e logo is a
SWF fi le that we can import directly to the artboard.
1 Start Flash Catalyst, browse to the Lesson09 folder on your hard drive, and
open the Lesson09_Restaurants.fxp fi le.
Th is fi le is an interactive restaurant guide. An animated logo belongs at the top
of the page. Th e logo was created and published as a SWF fi le.
2 Select the Home page in the Pages/States panel.
3 Choose File > Import > SWF File.
4 Browse to the Lesson09 folder on your hard drive, select logo_wave.swf, and
click Open.
Th e SWF movie appears in the artboard on the Home page and the SWF Asset
appears in the Layers panel.
5 In the artboard, drag the animated logo (SWF Asset) to position it in the empty
space at the top of the page.
SWF Asset
Th e fi rst frame of the SWF movie is visible in the artboard. Th e entire content of
this SWF fi le is located in Frame 1 of the movie, including the animated fl ag, so
you don’t need to play the movie to see it.
6 Make sure the SWF fi le is selected, and choose States > Share To State >
SubPages.
Th e SWF fi le is added to the top of the SubPages state.
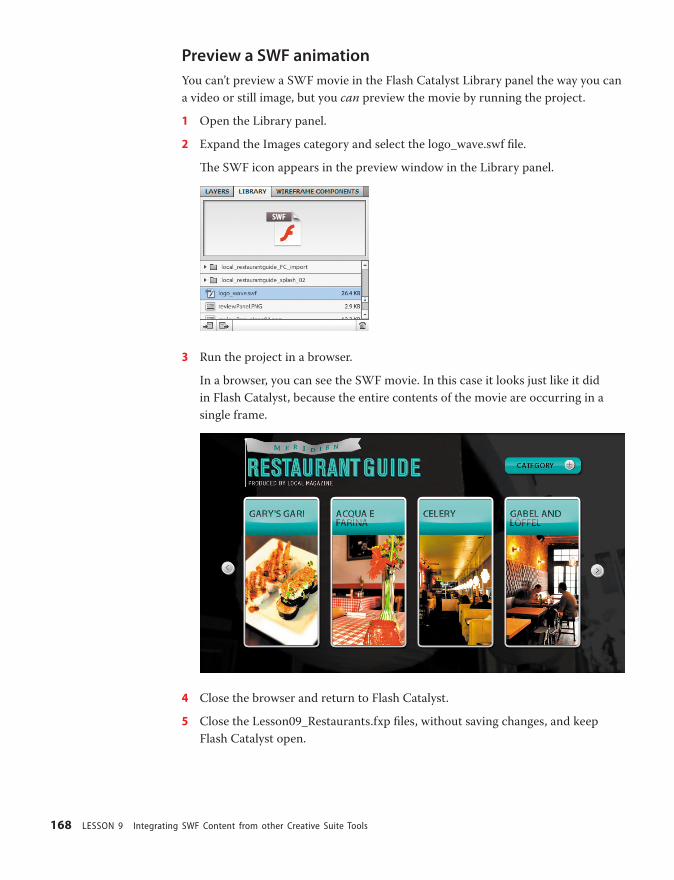
ptg
168 LESSON 9 Integrating SWF Content from other Creative Suite Tools
Preview a SWF animationYou can’t preview a SWF movie in the Flash Catalyst Library panel the way you can
a video or still image, but you can preview the movie by running the project.
1 Open the Library panel.
2 Expand the Images category and select the logo_wave.swf fi le.
Th e SWF icon appears in the preview window in the Library panel.
3 Run the project in a browser.
In a browser, you can see the SWF movie. In this case it looks just like it did
in Flash Catalyst, because the entire contents of the movie are occurring in a
single frame.
4 Close the browser and return to Flash Catalyst.
5 Close the Lesson09_Restaurants.fxp fi les, without saving changes, and keep
Flash Catalyst open.
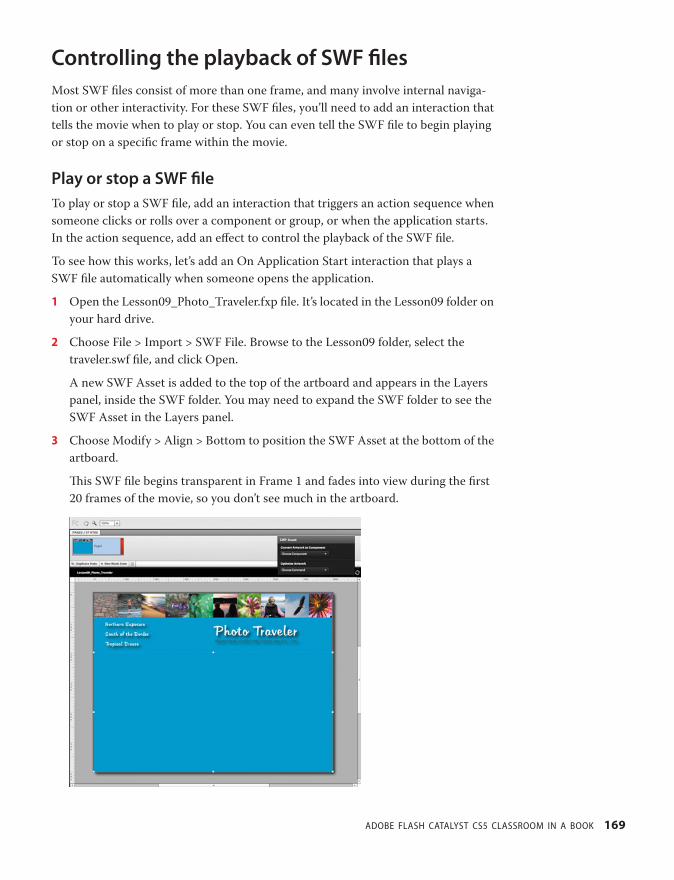
ptg
ADOBE FLASH CATALYST CS5 CLASSROOM IN A BOOK 169
Controlling the playback of SWF fi lesMost SWF fi les consist of more than one frame, and many involve internal naviga-
tion or other interactivity. For these SWF fi les, you’ll need to add an interaction that
tells the movie when to play or stop. You can even tell the SWF fi le to begin playing
or stop on a specifi c frame within the movie.
Play or stop a SWF fi leTo play or stop a SWF fi le, add an interaction that triggers an action sequence when
someone clicks or rolls over a component or group, or when the application starts.
In the action sequence, add an eff ect to control the playback of the SWF fi le.
To see how this works, let’s add an On Application Start interaction that plays a
SWF fi le automatically when someone opens the application.
1 Open the Lesson09_Photo_Traveler.fxp fi le. It’s located in the Lesson09 folder on
your hard drive.
2 Choose File > Import > SWF File. Browse to the Lesson09 folder, select the
traveler.swf fi le, and click Open.
A new SWF Asset is added to the top of the artboard and appears in the Layers
panel, inside the SWF folder. You may need to expand the SWF folder to see the
SWF Asset in the Layers panel.
3 Choose Modify > Align > Bottom to position the SWF Asset at the bottom of the
artboard.
Th is SWF fi le begins transparent in Frame 1 and fades into view during the fi rst
20 frames of the movie, so you don’t see much in the artboard.

ptg
170 LESSON 9 Integrating SWF Content from other Creative Suite Tools
4 Choose Edit > Deselect All to make sure nothing is selected in the artboard.
5 In the Interactions panel, click Add Interaction.
Because nothing is selected in the artboard, the interaction defaults to
On Application Start.
6 Choose Play Action Sequence as the interaction type.
7 Click OK.
Th e new On Application Start action sequence is selected in the Timelines panel.
8 In the Layers panel, expand the SWF folder and click SWF Asset to select the
SWF fi le in the artboard.
9 In the Timelines panel, click Add Action and choose SWF Control > Play - play().
A Play SWF eff ect is added to the On Application Start action sequence in the
Timeline.
Play SWF eff ect
10 Run the project in a browser.
Th e SWF movie begins playing as soon as the application starts.
Th e application links at the top of the window aren’t connected to any pages yet,
but you can test the SWF fi le by clicking its right and left arrow keys.

ptg
ADOBE FLASH CATALYST CS5 CLASSROOM IN A BOOK 171
Next button
11 Explore the SWF movie by clicking the Next button (right arrow) twice. When
you’re fi nished exploring, close the browser and return to Flash Catalyst.
Play the SWF movie from a specifi c frameYou can tell the movie to begin playing on a specifi c frame in the SWF fi le’s main
timeline. Th is allows you to build controls in Flash Catalyst that go to and play or
stop at diff erent locations within the SWF movie.
1 Select the Play SWF eff ect in the Timelines panel.
2 In the Timelines panel, click the Delete icon ( ) to delete the eff ect.
Deleting the eff ect does not remove the action sequence, only the eff ect. Th e On
Application Start action sequence is still selected in the Timelines panel.
3 Click Add Action and choose SWF Control > Go To Frame And
Play - gotoAndPlay().
Th e Go To Frame And Play eff ect appears in the Timeline.

ptg
172 LESSON 9 Integrating SWF Content from other Creative Suite Tools
4 In the Properties panel, change the Start
Frame value to 31.
Th is tells the action sequence to begin
playing the SWF movie at Frame 31 of its
main timeline.
5 Run the project in a browser.
Th is time when the application starts, the SWF movie plays automatically, but it
begins on Frame 31.
6 Close the Lesson09_Photo_Traveler.fxp fi le without saving changes, but leave
Flash Catalyst open.
Adding a SWF fi le to a componentYou can use an imported SWF fi le to bring buttons and other components to life
by using creative animation techniques that aren’t available in the current Flash
Catalyst collection of eff ects.
To illustrate this, let’s add some animation to a sample button. We’ve already created
a simple animated SWF fi le of two gears rotating in opposite directions. Th is will be
a nice complement to our button.
� Note: In this activity you use a Go To Frame And Play eff ect to begin a movie at Frame 31, but why Frame 31? This is a starting point of another section in the movie, but you can just as easily go to any other frame. Having knowledge of the SWF fi le’s main timeline will help determine which frame to use in a Go To Frame And Play (or Stop) eff ect.
� Tip: You can add Go To Frame And Play or Go To Frame And Stop interactions to navigation buttons that you create in Flash Catalyst, and then use the diff erent buttons to quickly begin playing or go to and stop a SWF movie at various locations.

ptg
ADOBE FLASH CATALYST CS5 CLASSROOM IN A BOOK 173
Position a SWF fi leFirst, you need to position the SWF fi le on the sample button.
1 Open the Lesson09_Animated_Button fi le. It’s located in the Lesson09 folder on
your hard drive.
Th e fi le includes a navigation button that’s partially designed. To complete the
button, you will add a SWF animation.
Partially designed Button component
2 In the Layers panel, select the Button object. In the Heads-Up Display (HUD),
click Up to edit the button in Edit-In-Place mode.
Th e button opens with the Up state selected.
3 Import the gear_button.swf fi le. It’s located in the Lesson09 folder.
Th e SWF Asset is added as a new object in the Button component layers.
4 In the artboard, position the
gear_button SWF fi le so that it’s
centered above the text in the Button
component.
5 With the button selected in the Up
state, choose States > Share To State >
All States to copy the SWF fi le to the
Over, Down, and Disabled states.

ptg
174 LESSON 9 Integrating SWF Content from other Creative Suite Tools
Add eff ects to play the animationWith the SWF Asset in all states of the button, you can use transition eff ects to
control when the animation is playing or stopped.
1 In the Timelines panel, select the Up > Over transition.
2 Select the SWF Asset in the artboard, if it’s not already selected.
3 In the Timelines panel, choose Add Action > SWF Controls > Play - play().
Th e play eff ect is added to the transition between the Up and Over states of the
button.
4 Select the Over > Up transition.
5 Choose Add Action > SWF Controls > Stop - stop().
Th e stop eff ect is added to the Over > Up transition.
6 Press Esc to exit Edit-In-Place mode.
7 Run the project in a browser and test the button.
When you roll over the button, the SWF animation plays and the gears appear to
spin in opposite directions. When you move the pointer away from the button,
the animation stops.
8 Close the browser and return to Flash Catalyst.
9 Close the Lesson09_Animated_Button fi le without saving changes.
ptg
ADOBE FLASH CATALYST CS5 CLASSROOM IN A BOOK 175
Review questions1 What is the recommended application for creating SWF content for use in Flash
Catalyst projects?
2 What types of SWF fi les can be controlled using interactions in Flash Catalyst?
3 Does Flash Catalyst support SWF fi les that include links to external data, such as video
that loads at runtime?
4 If a SWF fi le includes Text Layout Framework (TLF) text, what must be done to the fi le
before it will play correctly in Flash Catalyst?
5 How do you preview a SWF fi le?
6 When does a SWF fi le play automatically without adding any type of interaction or
transition eff ects in Flash Catalyst?
7 What are two ways to add play or stop controls to a SWF fi le in Flash Catalyst?
Review answers1 Th e recommended application for creating Flash Content is Adobe Flash Professional
CS4 or CS5.
2 Only SWF content written in ActionScript 3.0 and published using Adobe Flash
Professional can be controlled in Flash Catalyst.
3 Flash Catalyst supports SWF fi les with links to external fi les, but the linked content
must maintain its original position relative to the SWF fi le being imported. If you
publish more than one version of the application, you’ll need to manually copy the
linked content to all locations in the published directories.
4 Flash Professional includes two types of text: Text Layout Framework (TLF) and
Classic. When publishing SWF fi les that include TLF text, Flash Professional’s default
is to generate two fi les, a SWF fi le and a SWZ fi le. Th e SWZ fi le is a text layout library.
You must merge the shared library into the underlying code of the SWF fi le before you
can use the SWF fi le in Flash Catalyst.
5 To preview a SWF fi le, you must run the project in a browser or publish the project.
You cannot preview a SWF fi le in the Library or Timelines panels.
6 If the entire SWF movie occurs in the fi rst frame of its internal main timeline, the SWF
fi le plays without adding controls in Flash Catalyst.
7 You can control a SWF fi le in Flash Catalyst by using an action sequence with a SWF
Control eff ect. You can also add the SWF fi le to the Up and Over states in a Button
component and then add a SWF Control eff ect to the transitions between states.

ptg
176
10 DESIGNING WITH DATA
Lesson OverviewWhat do you get when you combine Flash Catalyst’s visual interface
design functionality with its design-time data feature for building
pixel-perfect models of data-centric applications? As a designer, you
get the fl exibility to rapidly generate data-driven interface components
with both style and substance. You also maintain complete control
over the look and feel of your fi nal application, even after you hand it
off to developers for integration with data servers and services.
In this lesson, you’ll learn how to do the following:
• Design visually interesting interface components for browsing and
displaying large collections of data
• Create a Data List component using images and text
• Set data list properties
• Use design-time data to demonstrate the appearance and behavior
of a data list
• Add a wireframe Data List component
Th is lesson will take about 60 minutes to complete. Copy the Lesson10
folder into the lessons folder that you created on your hard drive for
these projects (or create it now), if you haven’t already done so. As you
work on this lesson, you won’t be preserving the start fi les; if you need
to restore the start fi les, copy them from the Adobe Flash Catalyst CS5
Classroom in a Book CD.

ptg
177
Collaborate more eff ectively with developers by providing them with fully designed data-centric user interface components that can be extended using Adobe Flash Builder to add functionality and integra-tion with servers and services.

ptg
178 LESSON 10 Designing with Data
Flash Catalyst data listsA data list is a special type of component used to retrieve and display a series of
related items. You can design a data list using Flash Catalyst. Typically, you’ll include
enough sample records to demonstrate the layout and behavior of the list. Once you
fi nalize the look and feel, a Flex developer can use Adobe Flash Builder to connect
your Data List component to a web service that retrieves and displays any number
of records when the application runs.
A list is not always a listTh e name data list is a little misleading. Each unique record in a Flash Catalyst data
list can include artwork, text, or a combination of both. It doesn’t need to be a list at
all. Traditionally, a data list might look something like a spreadsheet or data table.
Using Flash Catalyst, you can build a Data List component that displays a tiled wall
of images.
A list can be a scrolling fi lmstrip or series of thumbnails, from which you select and
view other content or navigate to new locations in the application. By adding a scroll
bar, you can extend the list to include any number of items.

ptg
ADOBE FLASH CATALYST CS5 CLASSROOM IN A BOOK 179
Of course, there’s nothing stopping you from making your data list look like an
ordinary list if that’s what you want. In fact, there’s even a built-in wireframe Data
List component.
By default, the records in a data list can have diff erent Normal, Over, and Selected
states. You can use the Over state to reveal more information about a record when a
user rolls over an item.
Normal state Over state
What is design-time data?When developing an application that’s used to present large amounts of data, it’s
not always possible to see the end result until the application is running and con-
nected to a back-end data source. Th at is unless you’re using a Flash Catalyst Data
List component and design-time data. Design-time data allows you to use dummy
content, such as sample database records or bitmap images, without having to actu-
ally connect to a back-end system. Th is gives you, the designer, complete control
over the fi nal look and feel of the user experience. Th is also makes it possible for a
developer using Adobe Flash Builder to replace the design-time data with real data
from a database or web service while maintaining the interactions and pixel-perfect
design from Flash Catalyst.
Preview a data listBefore you dive in and start making a new data list, let’s take a moment to preview
how a list appears when it’s put together. Seeing a Data List component in action
will help you to understand each of its parts and how they relate to one another in a
working application.
1 Start Flash Catalyst. Browse to the Lesson10 folder on your hard drive and open
the Restaurants_fi nished.fxp fi le.
2 Run the project in a browser.

ptg
180 LESSON 10 Designing with Data
When the application starts, it plays a short video and then stops on a horizontal
list of restaurants. Th is is a horizontal data list. If you roll over an item in the list,
you see its Over state. Scroll arrows let you move forward and backward through
the list.
Data list items or records Scroll arrow
3 Click the right scroll arrow to see more restaurants in the data list.
4 Click any restaurant.
Clicking an item in the data list takes you to a diff erent page in the application.
Each restaurant includes a Reviews button.
5 Click Reviews.
Th e restaurant reviews are included in a vertical data list. Each item in the list
includes an image, the name of the reviewer, a short review, and a star rating.
6 Roll over and click a few of the reviews in the list.
Th e reviews have diff erent Normal, Over, and Selected states. In the next
exercise, you are going to re-create this data list.
7 Close the browser and return to Flash Catalyst.
8 Close the project without saving changes.

ptg
ADOBE FLASH CATALYST CS5 CLASSROOM IN A BOOK 181
Creating a Data List componentTh ere are three main steps to making a Data List component. Th ese are:
• Design a sample item or record in the list. Add a scroll bar if your list will extend
beyond the available space in the user interface.
• Convert the sample record (and scroll bar) into a Data List component.
• Defi ne the elements that represent the repeated item (a single record).
Design a sample recordIf you think about a traditional data list, there are typically columns and rows of
information. Each row represents a unique record in the database. For each record
there may be several columns of information. For example, an employee list dis-
plays each employee in a diff erent row and includes columns for employee name,
number, department, hire date, and so on.
In Flash Catalyst, records can be listed horizontally, vertically, or tiled. Each record
can include text, numbers, images, and other artwork. Th e fi rst step to making a
Data List component is to pull together the elements that make up a single record.
If your list requires a scroll bar, you can place it relative to the fi rst item in the list.
1 Browse to the Lesson10 folder on your hard drive and open the Lesson10_
Restaurants.fxp fi le.
2 Select SubPages in the Pages/States panel.
3 In the Layers panel, select Sub Pages.
Th is selects the Sub Pages custom com-
ponent in the artboard. Th e restaurant
reviews data list will be nested inside the Info
state in the Sub Pages custom component.
Nesting components is an effi cient way to
create multiple views without adding additional application pages.
4 In the Heads-Up Display (HUD), click Info to edit the Sub Pages custom
component in Edit-In-Place mode.
Th e component opens with the Info state selected. Th e Info state includes
another nested component called Review Popup.
5 In the Layers panel, expand the Sub Pages layer folder, expand the Info layer
folder, and select Review Popup.
Th e Review Popup custom component is selected in the artboard.
6 In the HUD, click Reviews to edit the Review Popup component in Edit-In-Place
mode with the Reviews state selected.

ptg
182 LESSON 10 Designing with Data
Th is is where the restaurant reviews belong. Th is data list will include more
reviews than can fi t vertically in the Reviews Popup, so you’ll need to add a
vertical scroll bar.
7 In the Library panel, expand the
Components category and select the
Review_Popup_VerticalScrollbar
component.
8 Drag the Review_Popup_VerticalScrollbar
from the Library panel to the artboard.
Position it along the right side of the empty
white space.
Now let’s import the artwork for a sample review that was designed in Adobe
Photoshop.
9 Choose File > Import > Adobe Photoshop File (.psd). Browse to the Lesson10
folder, select the DataList_art.psd fi le, and click Open. Click OK to accept the
default import fi delity options.
Th e sample review artwork is imported and selected in the artboard.

ptg
ADOBE FLASH CATALYST CS5 CLASSROOM IN A BOOK 183
10 Position the artwork at the top of the reviews panel and to the left of the scroll bar.
You now have one sample record and a scroll bar.
Convert the sample record into a Data List componentWith the parts of a data list arranged in the artboard, the next step is to select them
and convert the individual parts into a new Data List component. If your data list
includes a scroll bar, make sure to include it in the selection.
1 Make sure the artwork you imported in the previous task is still selected.
2 Hold down Shift and click the scroll bar to add it to the selection.
3 In the HUD, convert the artwork to a Data List component.
A message in the HUD informs you that to
make the data list work correctly, you need to
assign its parts. You need to tell it which parts
to use as the repeated item.

ptg
184 LESSON 10 Designing with Data
Defi ne the repeated itemEvery Data List component must include a master item called the repeated item.
Th e repeated item is a template that defi nes the appearance of every item or record
in the list, including its Normal, Over, and Selected states.
Changes applied to the repeated item template are applied to every item in the list
automatically at runtime. For example, if you change the opacity of an image in the
Over state of the repeated item, this change applies to every record. Keep in mind
that your application might display thousands of records. It’s a huge time-saver and
guarantees a consistent look across all records.
1 In the HUD, click Edit Parts to edit the data list in Edit-In-Place mode.
2 Select all fi ve parts of the sample review record, including the round image, the
line, the stars, and both lines of text. Do not select the scroll bar.
3 In the Convert To Data List Part section of the HUD, click Choose Part and
select Repeated Item.
Th e artwork is turned into a repeated item. By default, the repeated item is
arranged vertically in the data list. If it doesn’t fi t perfectly in the designed space,
you can resize it. You’ll do that next.
� Tip: When a component is in Edit-In-Place mode, you can drag to select its parts without selecting other objects in the artboard. You can also choose Edit > Select All and only objects in the component you’re editing are selected.

ptg
ADOBE FLASH CATALYST CS5 CLASSROOM IN A BOOK 185
Setting data list propertiesTh e layout of a Data List component is determined mainly by its repeated item
properties—size, position, orientation, spacing, and so on.
You can modify its properties in the artboard and by changing its values in the
Properties panel.
Size and position the bounding boxTh e repeated item bounding box indicates the visible and scrollable area in the
data list. You defi ne this space by sizing the bounding box in the artboard or in the
Properties panel.
1 Make sure the repeated item is still selected.
2 In the Common section of the Properties panel, change the height (H:) value
to 500.
Th e bounding box height adjusts. You can now see the fi ve sample records
that were added to the list automatically. You can also size the bounding box
using its handles.

ptg
186 LESSON 10 Designing with Data
3 Use the handles to resize
the bounding box height
and width and position
it to fi t in the space
designed for the reviews.
Th e height of the box
should be equal to the
height of the vertical
scroll bar.
Edit the repeated item layoutBy default, the repeated item is aligned vertically. Th ere is a small amount of space
between each record in the list, and the artwork is positioned right up against the
left, right, top, and bottom sides of the bounding box. Th is is called padding. You
can change these settings in the Layout section of the Properties panel. You can also
change the appearance of objects in the Normal, Over, and Selected states.
1 Make sure the repeated item is still selected.
2 Expand the Layout section of the Properties
panel.
A repeated item has three possible layouts.
Th ese include Vertical, Horizontal, and Tile.
Th e default setting is Vertical, and that’s
what you want for the restaurant reviews.
You can also change the alignment of the
list within the bounding box.
3 Change the Spacing value to 10.
Spacing is the distance between each item in the list. Padding refers to the space
between the list items and the bounding box.
4 Select the Horizontal layout option.
Th e items align horizontally.
5 Select the Tile layout option.
Th e Tile option is used to arrange a collec-
tion of images or text in a tiled mosaic
pattern. You can adjust the direction and
alignment of the tiles. You can also adjust
the spacing between rows and columns in
the mosaic.
� Tip: A data list has the same properties as every other Flash Catalyst built-in com-ponent. For example, you can change its size, opacity, and rotation. You can enable or disable it, add a tooltip, or add a drop shadow.
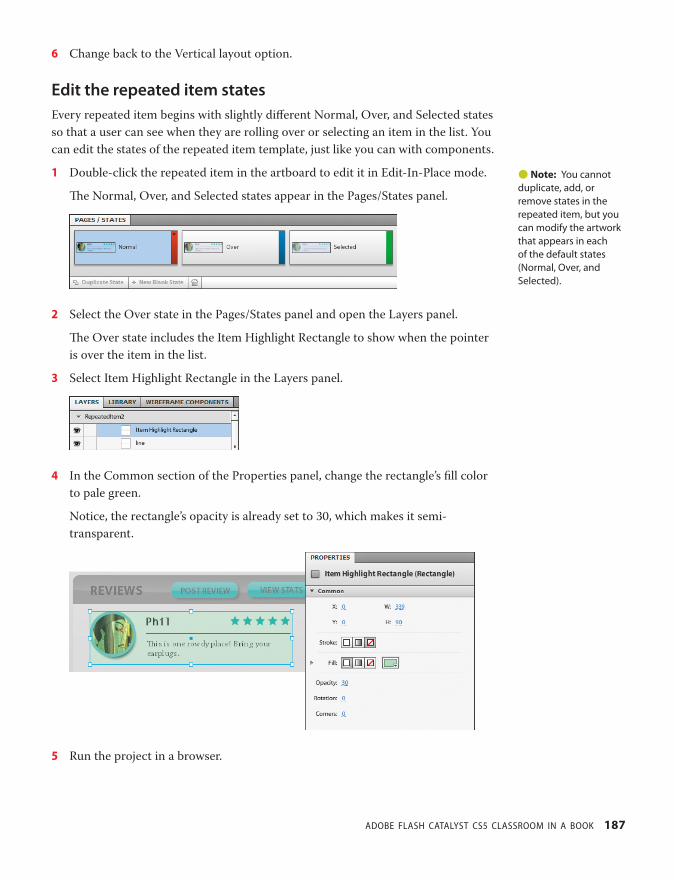
ptg
ADOBE FLASH CATALYST CS5 CLASSROOM IN A BOOK 187
6 Change back to the Vertical layout option.
Edit the repeated item statesEvery repeated item begins with slightly diff erent Normal, Over, and Selected states
so that a user can see when they are rolling over or selecting an item in the list. You
can edit the states of the repeated item template, just like you can with components.
1 Double-click the repeated item in the artboard to edit it in Edit-In-Place mode.
Th e Normal, Over, and Selected states appear in the Pages/States panel.
2 Select the Over state in the Pages/States panel and open the Layers panel.
Th e Over state includes the Item Highlight Rectangle to show when the pointer
is over the item in the list.
3 Select Item Highlight Rectangle in the Layers panel.
4 In the Common section of the Properties panel, change the rectangle’s fi ll color
to pale green.
Notice, the rectangle’s opacity is already set to 30, which makes it semi-
transparent.
5 Run the project in a browser.
� Note: You cannot duplicate, add, or remove states in the repeated item, but you can modify the artwork that appears in each of the default states (Normal, Over, and Selected).

ptg
188 LESSON 10 Designing with Data
6 Click any of the restaurants in the horizontal list, and then click Reviews to see
your new data list.
7 Use the scroll bar to see all fi ve items in the list.
Right now every item has the same artwork. You are going to change that next
using design-time data.
8 Roll over and select an item in the list to see the Normal, Over, and Selected
states.
9 Close the browser and return to Flash Catalyst.
10 Click Review_Popup in the Breadcrumbs bar.
Th is closes the repeated item and the data list. Th e Review_Popup component is
still in Edit-In-Place mode.
Using design-time dataMost data lists are connected to a data source and populated with data dynamically
at runtime. A developer can make this connection using Adobe Flash Builder. In
Flash Catalyst, you can add placeholder data to display in the Data List component
using the Design-Time Data panel. In fact, fi ve sample records are created automati-
cally when you fi rst create the Data List component. Each sample record is a copy
of the repeated item in the data list. Using the Design-Time Data panel, you can
replace the sample repeated images and text with more realistic examples of the
actual data that you want displayed. Th is dummy data is called design-time data.
It’s a good idea to include a representative sample, so that your developer knows
exactly how you want the data to appear in the fi nished application.
Replace design-time imagesReplacing the repeated sample data is easy. Open the Design-Time Data panel and
swap the images for new ones.
1 Select the Data List component in the Layers panel.
Th e data list is selected in the artboard. Using the Layers panel to select the data
list is a good way to make sure you select only the data list and not the image
below it.
2 Open the Design-Time Data panel and drag the top border of the panel to make
it taller.
Th e Design-Time Data panel organizes sample data similarly to a traditional
data table. Each record is listed as a separate row, and the information in each
record (images and text) is listed in columns. In this list, each item includes three
images (stars, a round image, and a line) and two pieces of text (the review and
� Tip: There is nothing stopping you from creating a fi nished data list using design-time data and images in the project library. You don’t have to connect the application to an external data source. However, if your appli-cation is used to display large amounts of data that change over time, binding your list to external data is a better choice.

ptg
ADOBE FLASH CATALYST CS5 CLASSROOM IN A BOOK 189
the reviewer’s name). At fi rst, the design-time data includes fi ve copies of the
repeated item, numbered from 0 to 4.
3 Click the round image (in the Image 2 column) in row number 1 (the second
row). Be sure to select the image in row number 1, not row number 0.
Th e Select Asset dialog box appears. You can choose an image in the project
library or choose Import to add another image.
4 Select reviewPopupIcon01.png and click OK.
Th e new image appears in the Design-Time Data panel.
5 Click the stars (in the Image 1 column) in row 1.
6 In the Select Asset dialog box, select reviewPopup4Stars.png and click OK.
Th e second review now has a four-star rating.

ptg
190 LESSON 10 Designing with Data
7 Replace the round image in row 2 with reviewPopupIcon02.png.
8 Replace the stars in row 2 with reviewPopup3Stars.png.
9 Replace the round image in row 3 with reviewPopupIcon03.png.
10 Replace the stars in row 3 with reviewPopup2Stars.png.
11 Replace the round image in row 4 with reviewPopupIcon04.png.
12 Replace the stars in row 4 with reviewPopup1Star.png.
Th e design-time data for the restaurant reviews data list now includes a more
realistic collection of sample images.
Edit design-time textReplacing sample design-time text is even easier than swapping images. Open the
Design-Time Data panel, and enter new text for each record.
1 In the Design-Time Data panel, click in the Text 1 column for row 1 and type a
new review.
2 Click in the Text 2 column for row 1 and type a new reviewer name.
3 Add new reviews and reviewer names for the design-time data in rows 2, 3, and 4.
4 Run the project in a browser.
5 Click any of the restaurants in the horizontal list, and then click Reviews to see
the updated data list with its new design-time data.
6 Close the browser and return to Flash Catalyst.
� Tip: By default, a data list opens with nothing selected. You can set the list to open with a specifi c record selected. To do this, select a row in the Design-Time Data panel. Then in the Component section of the Properties panel, enter 1 as the value for the Selected Index property. The row you selected will display its Selected state when the application runs.
� Tip: You can press the Tab key to quickly move between text fi elds in the Design-Time Data panel.
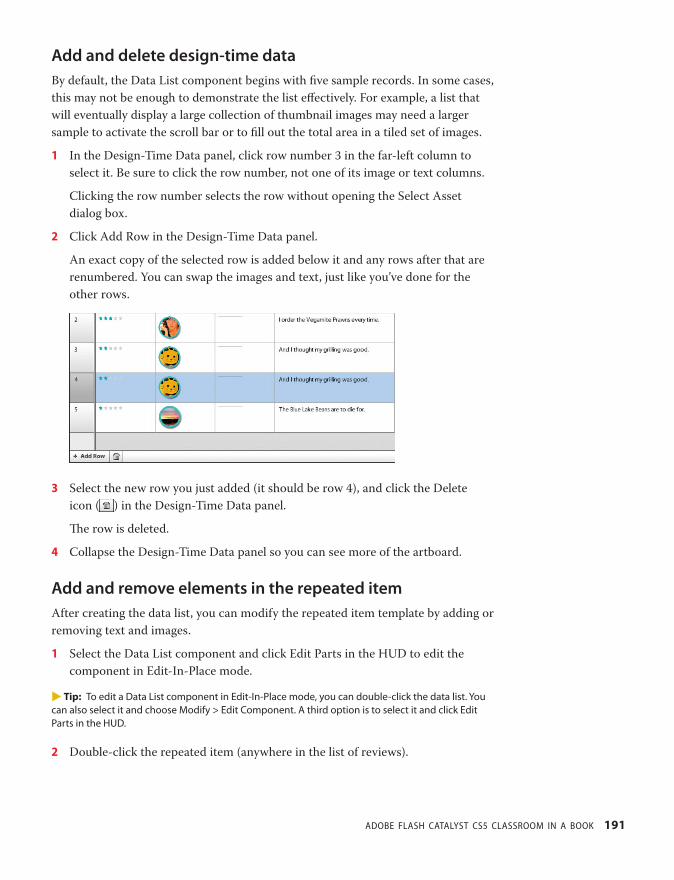
ptg
ADOBE FLASH CATALYST CS5 CLASSROOM IN A BOOK 191
Add and delete design-time dataBy default, the Data List component begins with fi ve sample records. In some cases,
this may not be enough to demonstrate the list eff ectively. For example, a list that
will eventually display a large collection of thumbnail images may need a larger
sample to activate the scroll bar or to fi ll out the total area in a tiled set of images.
1 In the Design-Time Data panel, click row number 3 in the far-left column to
select it. Be sure to click the row number, not one of its image or text columns.
Clicking the row number selects the row without opening the Select Asset
dialog box.
2 Click Add Row in the Design-Time Data panel.
An exact copy of the selected row is added below it and any rows after that are
renumbered. You can swap the images and text, just like you’ve done for the
other rows.
3 Select the new row you just added (it should be row 4), and click the Delete
icon ( ) in the Design-Time Data panel.
Th e row is deleted.
4 Collapse the Design-Time Data panel so you can see more of the artboard.
Add and remove elements in the repeated itemAfter creating the data list, you can modify the repeated item template by adding or
removing text and images.
1 Select the Data List component and click Edit Parts in the HUD to edit the
component in Edit-In-Place mode.
� Tip: To edit a Data List component in Edit-In-Place mode, you can double-click the data list. You can also select it and choose Modify > Edit Component. A third option is to select it and click Edit Parts in the HUD.
2 Double-click the repeated item (anywhere in the list of reviews).

ptg
192 LESSON 10 Designing with Data
3 In the Images category in the Library panel, locate the categoryIcon_Japanese.
png fi le.
It’s a little piece of sushi.
4 Drag the categoryIcon_Japanese.png fi le to the artboard and position it to the
left of the stars.
Right now, the sushi graphic is only in the Normal state of the repeated item.
5 Choose States > Share To State > All States.
Now the sushi icon appears in the Normal, Over, and Selected states.
6 In the Design-Time Data section of the HUD, choose Add Image To
Design-Time Data.
7 Click Review_Popup in the Breadcrumbs bar.
Every item in the data list now includes the sushi graphic.
8 Expand the Design-Time Data panel.
A new column, Image 4, is added to the Design-Time Data panel.
� Note: If you add new text in the repeated item, the option in the Design-Time Data section of the HUD changes to Add Text To Design-Time Data.

ptg
ADOBE FLASH CATALYST CS5 CLASSROOM IN A BOOK 193
9 Click the Image 4 sushi graphic in row 1.
10 In the Select Asset dialog box, select categoryIcon_Cafe.png and click OK.
Th e sushi is now a cup of coff ee.
11 Collapse the Design-Time Data panel.
Th e icons are updated in the list.
12 Double-click the Data List component to edit it in Edit-In-Place mode.
13 Double-click the repeated item (anywhere in the list of reviews) to edit it.
14 Select the sushi graphic.
15 In the HUD, choose Remove Image From
Design-Time Data.
Th e image is no longer part of the design-time
data, but it still appears in the artboard.
16 Select the sushi graphic, open the Layers panel, and click the Delete icon ( ) in
the Layers panel to remove it from the application.
17 Close the project without saving changes and leave Flash Catalyst open.
� Tip: You can also add or remove repeated item template images and text by choosing Modify > Add Image (or Text) To Design-Time Data; or choosing Modify > Remove From Design-Time Data.
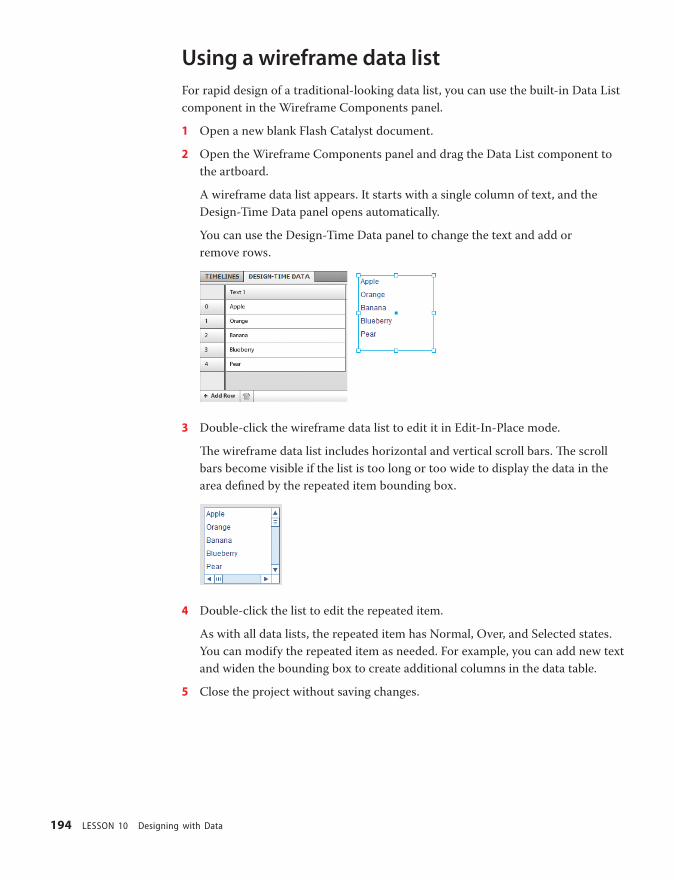
ptg
194 LESSON 10 Designing with Data
Using a wireframe data listFor rapid design of a traditional-looking data list, you can use the built-in Data List
component in the Wireframe Components panel.
1 Open a new blank Flash Catalyst document.
2 Open the Wireframe Components panel and drag the Data List component to
the artboard.
A wireframe data list appears. It starts with a single column of text, and the
Design-Time Data panel opens automatically.
You can use the Design-Time Data panel to change the text and add or
remove rows.
3 Double-click the wireframe data list to edit it in Edit-In-Place mode.
Th e wireframe data list includes horizontal and vertical scroll bars. Th e scroll
bars become visible if the list is too long or too wide to display the data in the
area defi ned by the repeated item bounding box.
4 Double-click the list to edit the repeated item.
As with all data lists, the repeated item has Normal, Over, and Selected states.
You can modify the repeated item as needed. For example, you can add new text
and widen the bounding box to create additional columns in the data table.
5 Close the project without saving changes.
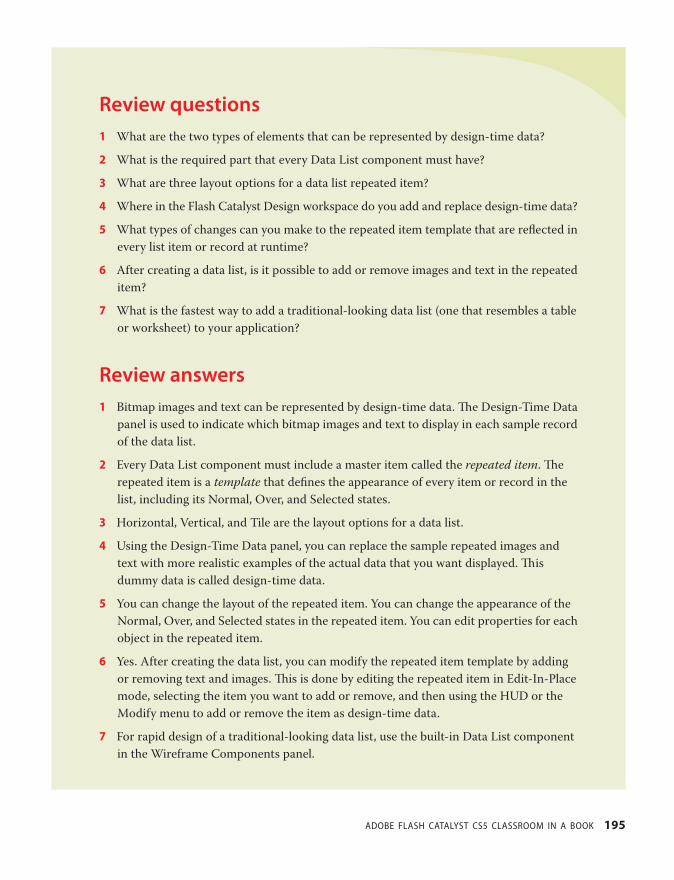
ptg
ADOBE FLASH CATALYST CS5 CLASSROOM IN A BOOK 195
Review questions1 What are the two types of elements that can be represented by design-time data?
2 What is the required part that every Data List component must have?
3 What are three layout options for a data list repeated item?
4 Where in the Flash Catalyst Design workspace do you add and replace design-time data?
5 What types of changes can you make to the repeated item template that are refl ected in
every list item or record at runtime?
6 After creating a data list, is it possible to add or remove images and text in the repeated
item?
7 What is the fastest way to add a traditional-looking data list (one that resembles a table
or worksheet) to your application?
Review answers1 Bitmap images and text can be represented by design-time data. Th e Design-Time Data
panel is used to indicate which bitmap images and text to display in each sample record
of the data list.
2 Every Data List component must include a master item called the repeated item. Th e
repeated item is a template that defi nes the appearance of every item or record in the
list, including its Normal, Over, and Selected states.
3 Horizontal, Vertical, and Tile are the layout options for a data list.
4 Using the Design-Time Data panel, you can replace the sample repeated images and
text with more realistic examples of the actual data that you want displayed. Th is
dummy data is called design-time data.
5 You can change the layout of the repeated item. You can change the appearance of the
Normal, Over, and Selected states in the repeated item. You can edit properties for each
object in the repeated item.
6 Yes. After creating the data list, you can modify the repeated item template by adding
or removing text and images. Th is is done by editing the repeated item in Edit-In-Place
mode, selecting the item you want to add or remove, and then using the HUD or the
Modify menu to add or remove the item as design-time data.
7 For rapid design of a traditional-looking data list, use the built-in Data List component
in the Wireframe Components panel.

ptg
196
11 DRAWING AND EDITING ARTWORK
Lesson OverviewWhen it comes to designing application prototypes, or for creating
simple icons, background shapes, panels, and buttons, you’ll fi nd
everything you need right here in Flash Catalyst.
If you have a copy of Adobe Photoshop CS5 or Adobe Illustrator CS5
installed, you can also take advantage of the Flash Catalyst integrated
round-trip editing features. Select the artwork you want to edit, launch
Illustrator or Photoshop, and then return the edited artwork to Flash
Catalyst. Th e artwork maintains its exact location in the application.
In this lesson, you’ll learn how to do the following:
• Use the rulers, guides, and grid
• Draw basic shapes and lines
• Change stroke and fi ll settings
• Add and modify gradient fi lls
• Group and position objects
• Apply and remove fi lters
• Launch and edit using Photoshop CS5 and Illustrator CS5
Th is lesson will take about 90 minutes to complete. Copy the
Lesson11 folder into the lessons folder that you created on your hard
drive for these projects (or create it now), if you haven’t already done
so. As you work on this lesson, you won’t be preserving the start fi les;
if you need to restore the start fi les, copy them from the Adobe Flash
Catalyst CS5 Classroom in a Book CD.

ptg
197
Flash Catalyst includes a set of tools for creating and modifying basic shapes and text. These tools are typi-cally used for rapid prototyping of applications. Other uses include customizing the built-in wireframe com-ponents or quickly adding elements that don’t require the advanced features of a Creative Suite application.

ptg
198 LESSON 11 Drawing and Editing Artwork
Flash Catalyst drawing toolsTh e shapes you create with the drawing tools are vector graphics. Text in Flash
Catalyst is also a vector, but you’ll be focusing on shapes in this exercise.
Some tools share the same location in the Tools panel. To select a hidden tool, click
and hold down the mouse button to open the pop-up menu and then select a tool.
Transform (Rotate) Text Line
HandZoom
Select (dark arrow): Select, move, and size grouped or ungrouped objects.
Direct Select (light arrow): Select, move, and size objects that are part of a group.
Transform (Rotation): Size and rotate grouped and ungrouped objects.
Text: Dragging creates text that is confi ned within the box you drew, while click-
ing to place an insertion point creates text that can grow indefi nitely in width as
you type.
Rectangle: Drag to draw rectangles. Hold down Shift to draw a perfect square.
Rounded Rectangle: Drag to draw a rectangle with rounded corners. Hold down
Shift to draw squares with rounded corners.
Ellipse: Drag to draw an ellipse. Hold down Shift to draw a perfect circle.
Triangle: Drag to draw a triangle. Move the mouse to the right or left to rotate the
shape as you draw. Hold down Shift to rotate the triangle at 45-degree increments
as you draw.
Hexagon: Drag to draw a hexagon. Move the mouse to the right or left to rotate the
shape as you draw.
Octagon: Drag to draw an octagon. Move the mouse to the right or left to rotate the
shape as you draw.
Star: Drag to draw a fi ve-point star. Move the mouse to the right or left to rotate the
shape as you draw.
ptg
ADOBE FLASH CATALYST CS5 CLASSROOM IN A BOOK 199
Line: Drag to draw a straight line. Move the mouse to the right or left to rotate
the line as you draw. Hold down Shift to rotate the line at 45-degree increments as
you draw.
Hand: Drag to pan the artboard. Th is is a fast way of scrolling left and right in the
artboard.
Zoom: Click in the artboard to zoom in for a closer view. Alt/Option-click to zoom
back out. Th e zoom tool is synchronized with the Zoom Magnifi cation box above
the artboard.
Using the rulers, guides, and gridFlash Catalyst off ers four main aids to assist you while drawing. Th ese include the
rulers, the custom guides, a visible grid for measuring and aligning artwork, and the
Properties panel for positioning and sizing objects down to the exact pixel.
Show and hide rulersBy default, rulers appear above and to the left of the artboard. Th e rulers help you
position artwork, but they’re even more useful when placing custom guides. You
can hide the rulers to gain a little extra room in the workspace, but they take up so
little space you’ll probably want to leave them turned on all the time.
1 Browse to the Lesson11 folder on your hard drive and open the
Lesson11_Drawing.fxp fi le.
Rulers appear above and to the left of the artboard in the Design workspace.
Vertical ruler Horizontal ruler
2 Choose View > Show Rulers to deselect it and hide the rulers.
Th e rulers disappear, creating a little more space above and to the left of the
artboard.
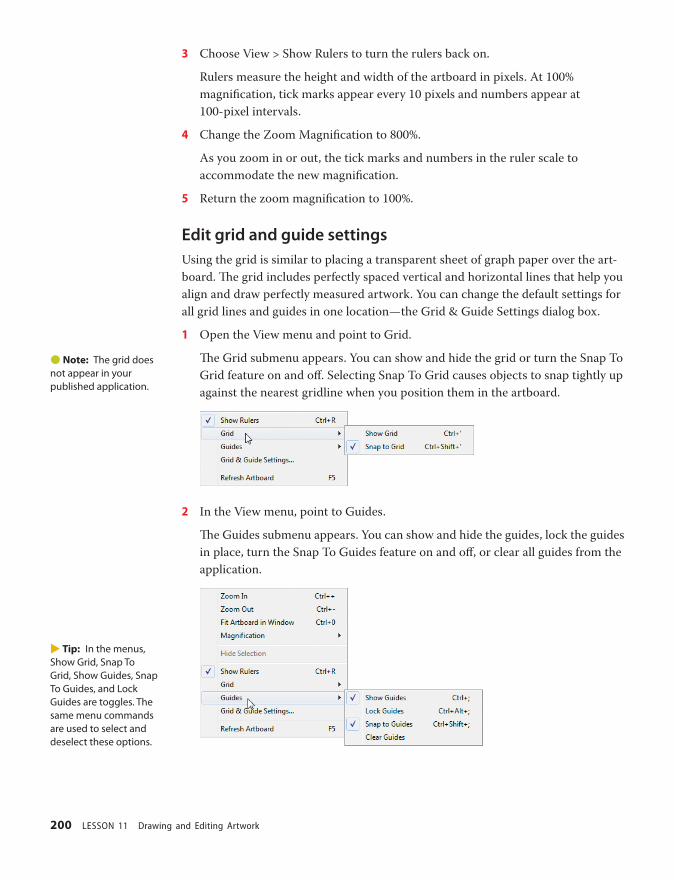
ptg
200 LESSON 11 Drawing and Editing Artwork
3 Choose View > Show Rulers to turn the rulers back on.
Rulers measure the height and width of the artboard in pixels. At 100%
magnifi cation, tick marks appear every 10 pixels and numbers appear at
100-pixel intervals.
4 Change the Zoom Magnifi cation to 800%.
As you zoom in or out, the tick marks and numbers in the ruler scale to
accommodate the new magnifi cation.
5 Return the zoom magnifi cation to 100%.
Edit grid and guide settingsUsing the grid is similar to placing a transparent sheet of graph paper over the art-
board. Th e grid includes perfectly spaced vertical and horizontal lines that help you
align and draw perfectly measured artwork. You can change the default settings for
all grid lines and guides in one location—the Grid & Guide Settings dialog box.
1 Open the View menu and point to Grid.
Th e Grid submenu appears. You can show and hide the grid or turn the Snap To
Grid feature on and off . Selecting Snap To Grid causes objects to snap tightly up
against the nearest gridline when you position them in the artboard.
2 In the View menu, point to Guides.
Th e Guides submenu appears. You can show and hide the guides, lock the guides
in place, turn the Snap To Guides feature on and off , or clear all guides from the
application.
� Note: The grid does not appear in your published application.
� Tip: In the menus, Show Grid, Snap To Grid, Show Guides, Snap To Guides, and Lock Guides are toggles. The same menu commands are used to select and deselect these options.

ptg
ADOBE FLASH CATALYST CS5 CLASSROOM IN A BOOK 201
3 In the View menu, choose Grid & Guide
Settings.
Th e Grid & Guide Settings dialog box
appears. You can change the color,
opacity, and style (straight dotted lines)
for the grid and guides. You can adjust
the scale of the grid by changing the
Width and Height values. Th e default
is a 20 x 20 pixel grid. You can show
or hide the grid and guides or turn
snapping on and off . You can also lock
and unlock the guide lines.
4 In the Guides section, select Show and
Snap. Make sure that Lock is deselected.
5 In the Grid section of the dialog box, change the opacity to 50%.
Reducing the opacity to 50% makes the grid lines less distracting as you draw
new shapes and lines.
6 In the Grid section, select Show and Snap.
7 Make sure the grid Height and Width are both set to 20px.
8 Click OK to confi rm the settings and close the dialog box.
Th e grid appears at 50% opacity in the artboard.
Grid lines are 20 pixels apart
Set guides for precise drawingGuides are another great tool for aligning and placing one or more objects in the
artboard. Unlike the grid, you can place horizontal or vertical guides anywhere you
want. Use the ruler for exact placement of your custom guides. Th e same guides
persist across all pages in the application.
1 Move the pointer over the top (horizontal) ruler.
2 Drag toward the artboard. You will see a horizontal guide appear. Release the
mouse button to place the guide in the artboard.
� Tip: The guides you set for the main pages in the application do not appear when you edit a component in Edit-In-Place mode. When a component is in Edit-In-Place mode, you can place new guides that are unique to that component.

ptg
202 LESSON 11 Drawing and Editing Artwork
3 Select the Select tool (dark arrow) in the Tools
panel.
4 Position the pointer over the guide. Th e
pointer changes to a two-headed arrow. Drag
the guide so that it’s positioned at exactly 100
pixels from the top of the artboard, as shown
in the vertical ruler.
5 Move the pointer over the left (vertical) ruler.
6 Drag a vertical guide into the artboard and
place it at 100 pixels from the left edge, as
shown in the top (horizontal) ruler.
7 Add two more guides: a vertical guide at 500
pixels and a horizontal guide at 400 pixels.
Using guides, you’ve created boundaries for a
400 x 300 panel that you’re going to draw using
basic shapes and lines.
8 Choose View > Guides > Lock Guides.
Locking the guides prevents them from being accidentally moved when
selecting and positioning objects in the artboard.
� Tip: To remove a single guide, drag it off the artboard.
� Tip: To clear all guides from the application, choose View > Guides > Clear Guides. Guides that you’ve set inside a component are not aff ected. To remove guides in a component, edit the component in Edit-In-Place mode and then clear the guides.
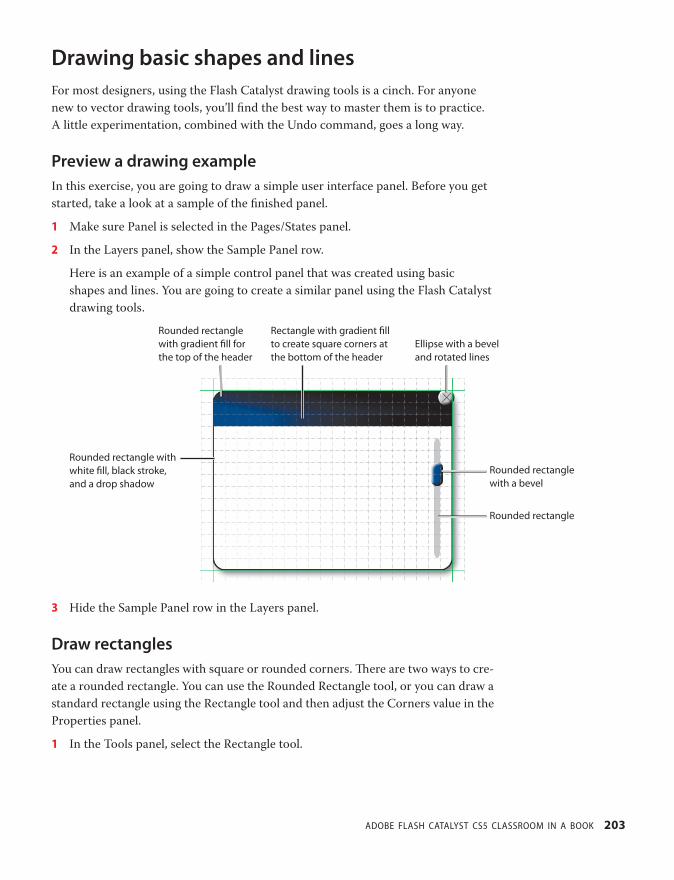
ptg
ADOBE FLASH CATALYST CS5 CLASSROOM IN A BOOK 203
Drawing basic shapes and linesFor most designers, using the Flash Catalyst drawing tools is a cinch. For anyone
new to vector drawing tools, you’ll fi nd the best way to master them is to practice.
A little experimentation, combined with the Undo command, goes a long way.
Preview a drawing exampleIn this exercise, you are going to draw a simple user interface panel. Before you get
started, take a look at a sample of the fi nished panel.
1 Make sure Panel is selected in the Pages/States panel.
2 In the Layers panel, show the Sample Panel row.
Here is an example of a simple control panel that was created using basic
shapes and lines. You are going to create a similar panel using the Flash Catalyst
drawing tools.
Ellipse with a bevel and rotated lines
Rounded rectangle with a bevel
Rounded rectangle
Rounded rectangle with gradient fi ll for the top of the header
Rectangle with gradient fi ll to create square corners at the bottom of the header
Rounded rectangle with white fi ll, black stroke, and a drop shadow
3 Hide the Sample Panel row in the Layers panel.
Draw rectanglesYou can draw rectangles with square or rounded corners. Th ere are two ways to cre-
ate a rounded rectangle. You can use the Rounded Rectangle tool, or you can draw a
standard rectangle using the Rectangle tool and then adjust the Corners value in the
Properties panel.
1 In the Tools panel, select the Rectangle tool.
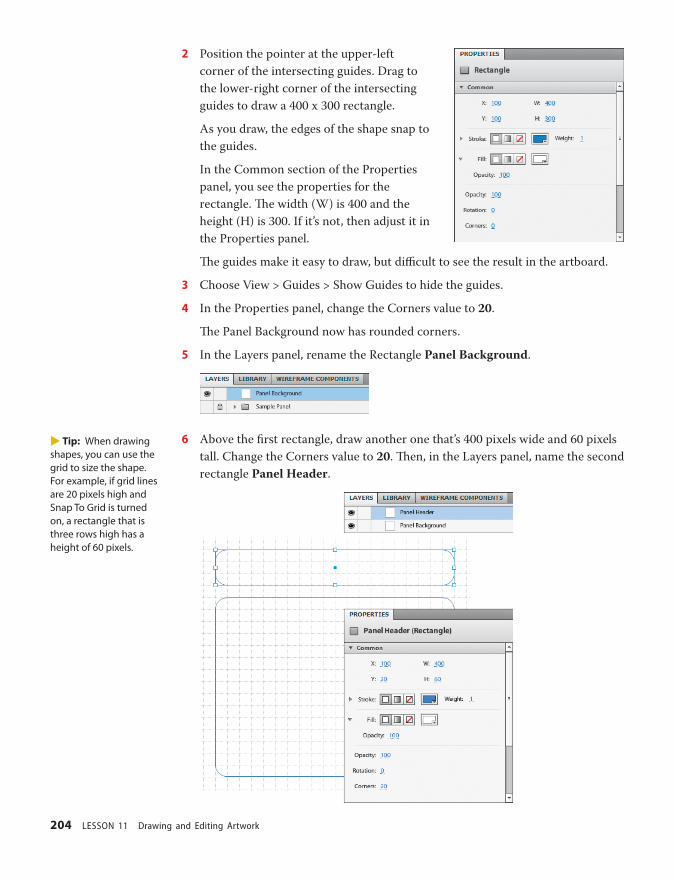
ptg
204 LESSON 11 Drawing and Editing Artwork
2 Position the pointer at the upper-left
corner of the intersecting guides. Drag to
the lower-right corner of the intersecting
guides to draw a 400 x 300 rectangle.
As you draw, the edges of the shape snap to
the guides.
In the Common section of the Properties
panel, you see the properties for the
rectangle. Th e width (W) is 400 and the
height (H) is 300. If it’s not, then adjust it in
the Properties panel.
Th e guides make it easy to draw, but diffi cult to see the result in the artboard.
3 Choose View > Guides > Show Guides to hide the guides.
4 In the Properties panel, change the Corners value to 20.
Th e Panel Background now has rounded corners.
5 In the Layers panel, rename the Rectangle Panel Background.
6 Above the fi rst rectangle, draw another one that’s 400 pixels wide and 60 pixels
tall. Change the Corners value to 20. Th en, in the Layers panel, name the second
rectangle Panel Header.
� Tip: When drawing shapes, you can use the grid to size the shape. For example, if grid lines are 20 pixels high and Snap To Grid is turned on, a rectangle that is three rows high has a height of 60 pixels.

ptg
ADOBE FLASH CATALYST CS5 CLASSROOM IN A BOOK 205
7 Below the Panel Background, draw another rectangle that’s exactly 400 pixels
wide by 30 pixels high. You can adjust its fi nal size in the Properties panel if
needed. Leave the Corners value set to 0.
8 In the Layers panel, name the new rectangle Header Overlay. We’ll use this to
hide the rounded corners at the bottom of the header.
Now let’s draw a track for the panel scroll bar.
Draw rounded rectanglesOK, so technically you’ve already drawn some rounded rectangles using the
Rectangle tool and the Properties panel. But the Rounded Rectangle tool provides a
shortcut by adding rounded corners automatically.
1 Select the Rounded Rectangle tool.
2 Draw a tall rectangle that’s 200 pixels high and about 10 pixels wide (halfway
between two grid lines). In the Layers panel, name the rectangle Track.
By default, the corner radius is 10, which is fi ne for the scroll bar track.
� Tip: To move a shape or grouped objects, use the Select tool. To select and move a single object within a group, use the Direct Select tool.
� Tip: You can change between shape tools by using their shortcut keys. For example, to select the Rectangle tool, press M. To select the Rounded Rectangle, press U. To select the Ellipse tool, press L.
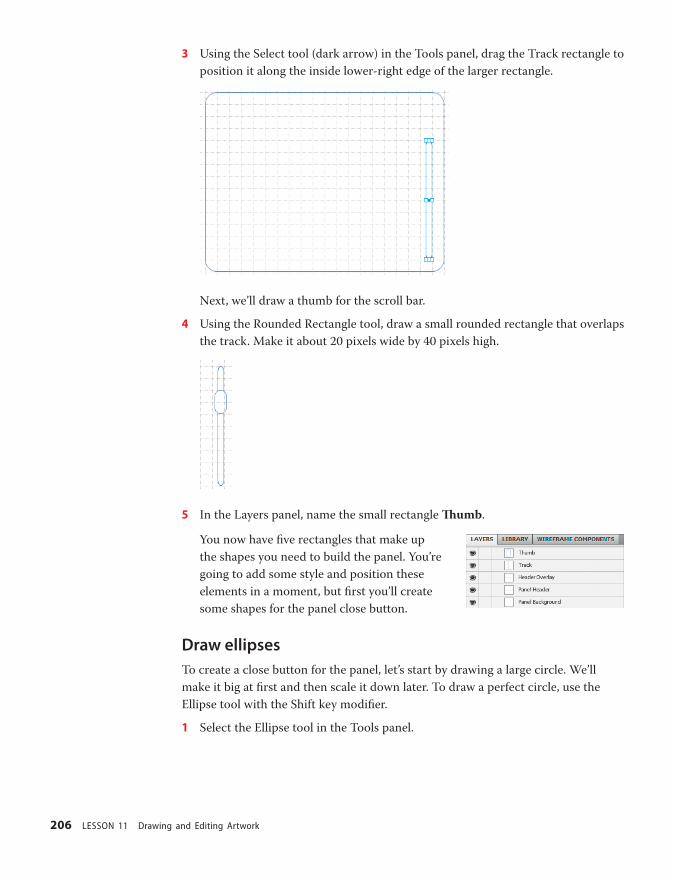
ptg
206 LESSON 11 Drawing and Editing Artwork
3 Using the Select tool (dark arrow) in the Tools panel, drag the Track rectangle to
position it along the inside lower-right edge of the larger rectangle.
Next, we’ll draw a thumb for the scroll bar.
4 Using the Rounded Rectangle tool, draw a small rounded rectangle that overlaps
the track. Make it about 20 pixels wide by 40 pixels high.
5 In the Layers panel, name the small rectangle Th umb.
You now have fi ve rectangles that make up
the shapes you need to build the panel. You’re
going to add some style and position these
elements in a moment, but fi rst you’ll create
some shapes for the panel close button.
Draw ellipsesTo create a close button for the panel, let’s start by drawing a large circle. We’ll
make it big at fi rst and then scale it down later. To draw a perfect circle, use the
Ellipse tool with the Shift key modifi er.
1 Select the Ellipse tool in the Tools panel.
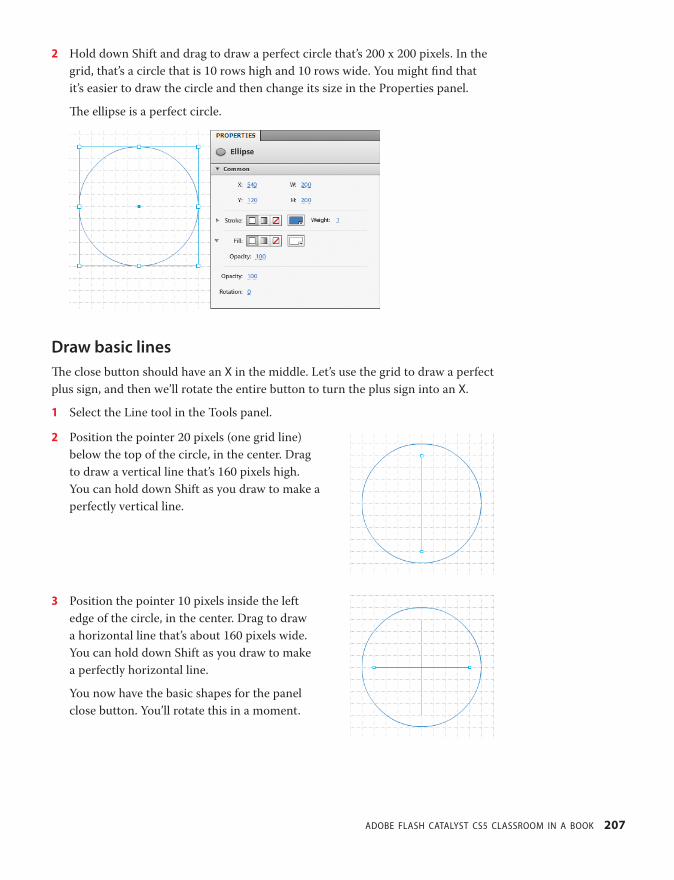
ptg
ADOBE FLASH CATALYST CS5 CLASSROOM IN A BOOK 207
2 Hold down Shift and drag to draw a perfect circle that’s 200 x 200 pixels. In the
grid, that’s a circle that is 10 rows high and 10 rows wide. You might fi nd that
it’s easier to draw the circle and then change its size in the Properties panel.
Th e ellipse is a perfect circle.
Draw basic linesTh e close button should have an X in the middle. Let’s use the grid to draw a perfect
plus sign, and then we’ll rotate the entire button to turn the plus sign into an X.
1 Select the Line tool in the Tools panel.
2 Position the pointer 20 pixels (one grid line)
below the top of the circle, in the center. Drag
to draw a vertical line that’s 160 pixels high.
You can hold down Shift as you draw to make a
perfectly vertical line.
3 Position the pointer 10 pixels inside the left
edge of the circle, in the center. Drag to draw
a horizontal line that’s about 160 pixels wide.
You can hold down Shift as you draw to make
a perfectly horizontal line.
You now have the basic shapes for the panel
close button. You’ll rotate this in a moment.
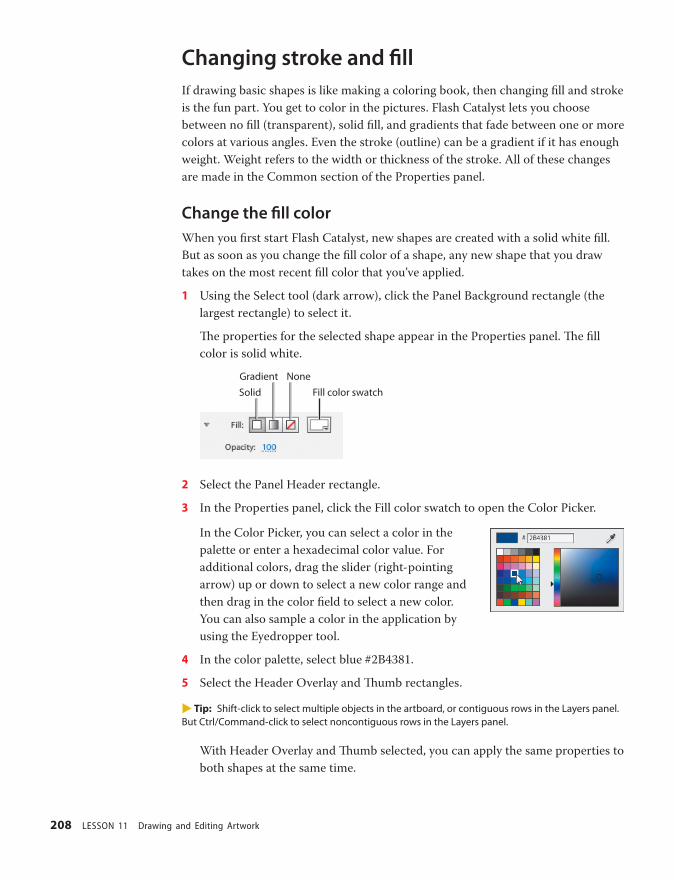
ptg
208 LESSON 11 Drawing and Editing Artwork
Changing stroke and fi llIf drawing basic shapes is like making a coloring book, then changing fi ll and stroke
is the fun part. You get to color in the pictures. Flash Catalyst lets you choose
between no fi ll (transparent), solid fi ll, and gradients that fade between one or more
colors at various angles. Even the stroke (outline) can be a gradient if it has enough
weight. Weight refers to the width or thickness of the stroke. All of these changes
are made in the Common section of the Properties panel.
Change the fi ll colorWhen you fi rst start Flash Catalyst, new shapes are created with a solid white fi ll.
But as soon as you change the fi ll color of a shape, any new shape that you draw
takes on the most recent fi ll color that you’ve applied.
1 Using the Select tool (dark arrow), click the Panel Background rectangle (the
largest rectangle) to select it.
Th e properties for the selected shape appear in the Properties panel. Th e fi ll
color is solid white.
SolidGradient
Fill color swatchNone
2 Select the Panel Header rectangle.
3 In the Properties panel, click the Fill color swatch to open the Color Picker.
In the Color Picker, you can select a color in the
palette or enter a hexadecimal color value. For
additional colors, drag the slider (right-pointing
arrow) up or down to select a new color range and
then drag in the color fi eld to select a new color.
You can also sample a color in the application by
using the Eyedropper tool.
4 In the color palette, select blue #2B4381.
5 Select the Header Overlay and Th umb rectangles.
� Tip: Shift-click to select multiple objects in the artboard, or contiguous rows in the Layers panel. But Ctrl/Command-click to select noncontiguous rows in the Layers panel.
With Header Overlay and Th umb selected, you can apply the same properties to
both shapes at the same time.
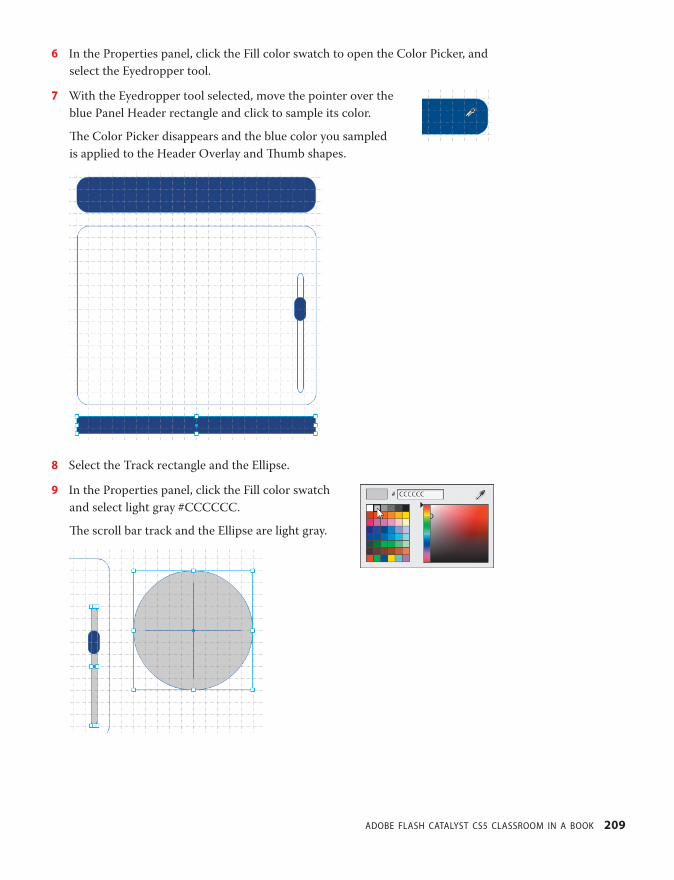
ptg
ADOBE FLASH CATALYST CS5 CLASSROOM IN A BOOK 209
6 In the Properties panel, click the Fill color swatch to open the Color Picker, and
select the Eyedropper tool.
7 With the Eyedropper tool selected, move the pointer over the
blue Panel Header rectangle and click to sample its color.
Th e Color Picker disappears and the blue color you sampled
is applied to the Header Overlay and Th umb shapes.
8 Select the Track rectangle and the Ellipse.
9 In the Properties panel, click the Fill color swatch
and select light gray #CCCCCC.
Th e scroll bar track and the Ellipse are light gray.

ptg
210 LESSON 11 Drawing and Editing Artwork
Understanding hexadecimal color valuesThe colors you see on your computer monitor are produced using various combinations of red, green, and blue (RGB). You may have noticed the numbers in the Color Picker. These are referred to as hexadecimal color codes. Hexadecimal color codes defi ne the amounts of red, green, and blue used to create a color. The levels of red, green, and blue are measured using a numbering system that runs from 0 to 255. For example, the color black is created by mixing 0 red, 0 green, and 0 blue. White is represented by 255 red, 255 green, and 255 blue. Yellow is 255 each of red and green, and 0 blue.
While RGB color values are based on the decimal system (base 10), hexadecimal color values are represented by a hexadecimal numbering system (base 16).
In the decimal system, when you write 43 it means 4 tens and 3 ones. When you write 43 in hexa-decimal it means 4 sixteens and 3 ones. 43 in hexadecimal is (4x16) + 3 = 67.
In hexadecimal, A = 10, B = 11, C = 12, and so on to F, which is 15. The highest possible two-digit number in hexadecimal is FF. It means 15 sixteens and 15 ones, which is 255 (the most amount of any color).
Hexadecimal color codes always consist of a number sign (#) followed by a combination of six characters.
• The fi rst two digits determine how much red is in the color.
• The middle two digits determine how much green is in the color.
• The last two digits determine how much blue is in the color.
• The code for black is #000000.
Colors containing RGB values of FF contain the most amount of a color (255 or 100%). For example, the hexadecimal value for white is #FFFFFF, which means it contains the most amount of red, green and blue.
When specifying colors in a web application, you can use hexadecimal values instead of RGB values. An advantage of using hexadecimal codes to choose colors is that you can limit your design’s color palette to colors that are considered safe for viewing on the web. Web-safe colors consist of any three of the pairs 00, 33, 66, 99, CC, or FF in the hexadecimal range. For example, #FF9900 is a web-safe color, whereas #39C6C5 does not appear in the web-safe color palette.
The importance of these safe colors has been reduced dramatically over the years as display monitors have become more capable of displaying many colors.

ptg
ADOBE FLASH CATALYST CS5 CLASSROOM IN A BOOK 211
Change stroke color and weightStroke is the line or outline that defi nes a shape you draw in Flash Catalyst—as in
the “stroke of the pen” or “brush strokes.” In Flash Catalyst, you can choose a solid
stroke, a gradient stroke, or no stroke at all.
A gradient is when two or more colors gradually blend together. A gradient stroke
may seem strange, but if you make the weight of the stroke heavy enough, it
becomes almost like an outer shape surrounding an inner shape.
Solid stroke No strokeGradient stroke
Our panel design doesn’t require any fancy gradient strokes, but we do need to
make a few minor modifi cations, beginning with the panel background.
1 Select the Panel Background rectangle (the larger rectangle).
2 In the Properties panel, make sure the Solid Stroke property is selected. Click the
Stroke color swatch, and change the stroke color to black #000000.
3 Change the Weight value to 2.
4 Use the Layers panel to select the Ellipse, Th umb, Track, Header Overlay, and
Panel Header.
5 In the Properties panel, click the No Stroke property to remove the stroke from
all fi ve selected shapes.
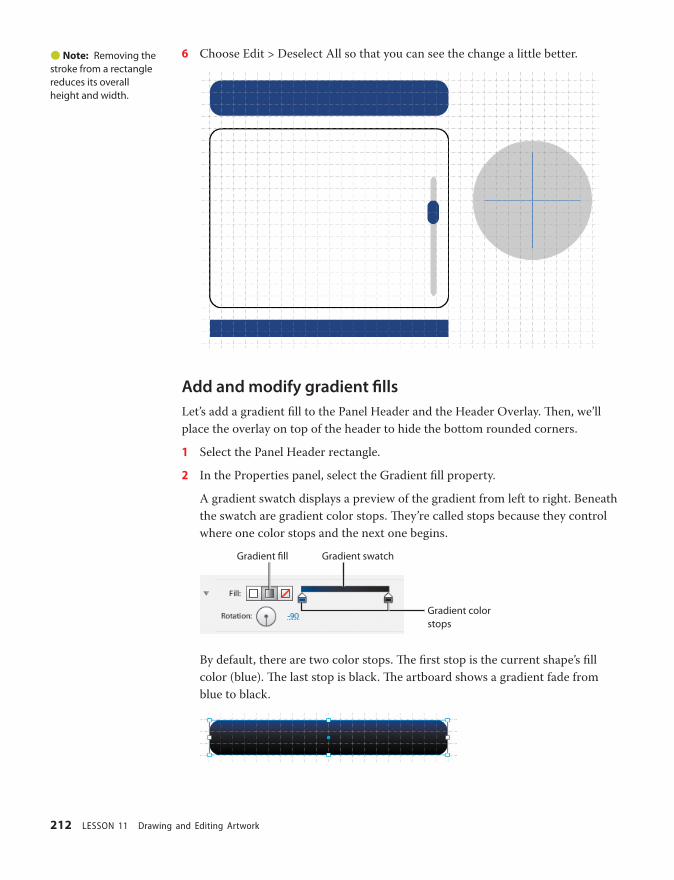
ptg
212 LESSON 11 Drawing and Editing Artwork
6 Choose Edit > Deselect All so that you can see the change a little better.
Add and modify gradient fi llsLet’s add a gradient fi ll to the Panel Header and the Header Overlay. Th en, we’ll
place the overlay on top of the header to hide the bottom rounded corners.
1 Select the Panel Header rectangle.
2 In the Properties panel, select the Gradient fi ll property.
A gradient swatch displays a preview of the gradient from left to right. Beneath
the swatch are gradient color stops. Th ey’re called stops because they control
where one color stops and the next one begins.
Gradient fi ll Gradient swatch
Gradient color stops
By default, there are two color stops. Th e fi rst stop is the current shape’s fi ll
color (blue). Th e last stop is black. Th e artboard shows a gradient fade from
blue to black.
� Note: Removing the stroke from a rectangle reduces its overall height and width.
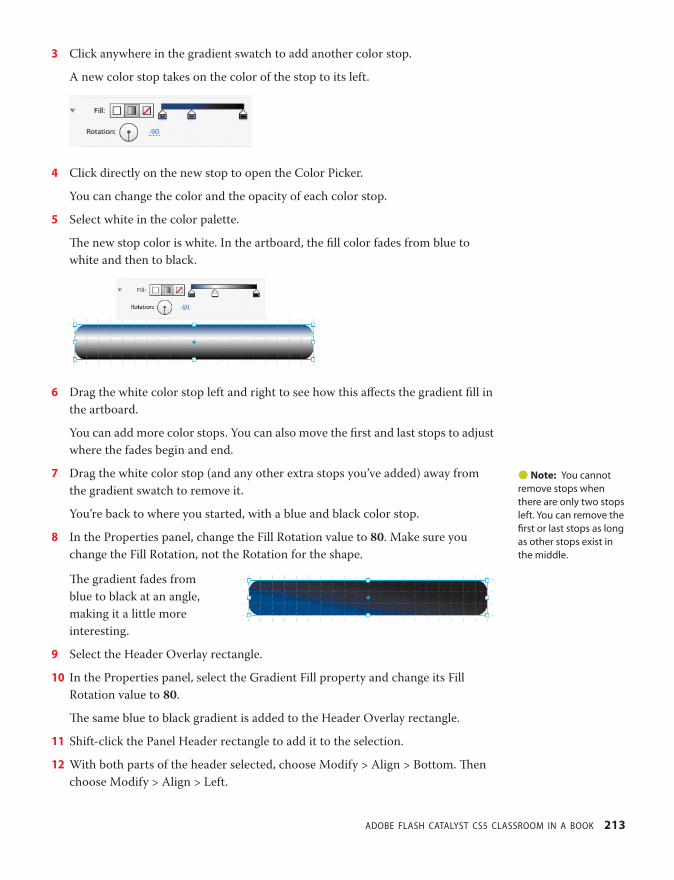
ptg
ADOBE FLASH CATALYST CS5 CLASSROOM IN A BOOK 213
3 Click anywhere in the gradient swatch to add another color stop.
A new color stop takes on the color of the stop to its left.
4 Click directly on the new stop to open the Color Picker.
You can change the color and the opacity of each color stop.
5 Select white in the color palette.
Th e new stop color is white. In the artboard, the fi ll color fades from blue to
white and then to black.
6 Drag the white color stop left and right to see how this aff ects the gradient fi ll in
the artboard.
You can add more color stops. You can also move the fi rst and last stops to adjust
where the fades begin and end.
7 Drag the white color stop (and any other extra stops you’ve added) away from
the gradient swatch to remove it.
You’re back to where you started, with a blue and black color stop.
8 In the Properties panel, change the Fill Rotation value to 80. Make sure you
change the Fill Rotation, not the Rotation for the shape.
Th e gradient fades from
blue to black at an angle,
making it a little more
interesting.
9 Select the Header Overlay rectangle.
10 In the Properties panel, select the Gradient Fill property and change its Fill
Rotation value to 80.
Th e same blue to black gradient is added to the Header Overlay rectangle.
11 Shift-click the Panel Header rectangle to add it to the selection.
12 With both parts of the header selected, choose Modify > Align > Bottom. Th en
choose Modify > Align > Left.
� Note: You cannot remove stops when there are only two stops left. You can remove the fi rst or last stops as long as other stops exist in the middle.
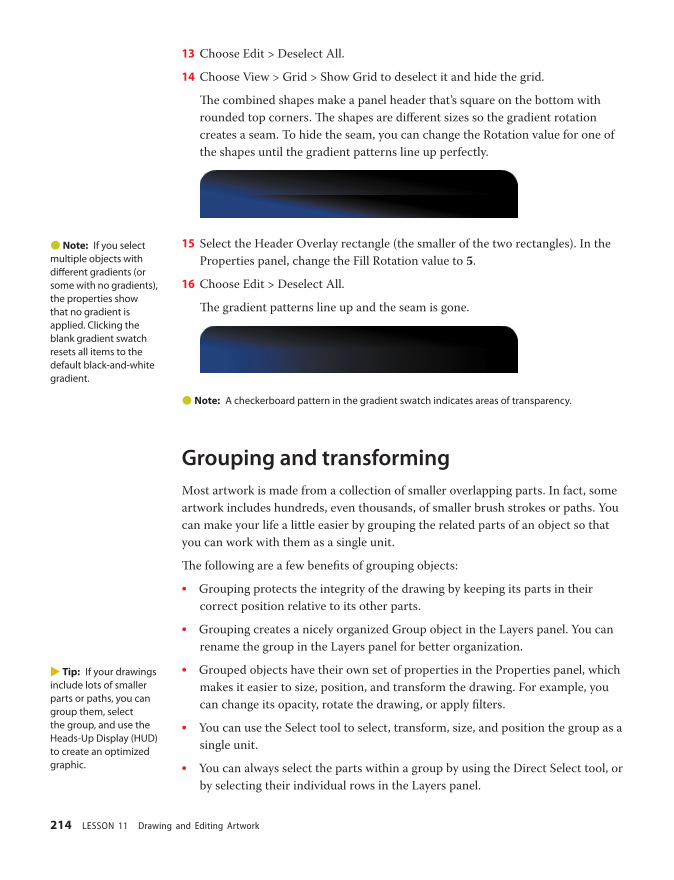
ptg
214 LESSON 11 Drawing and Editing Artwork
13 Choose Edit > Deselect All.
14 Choose View > Grid > Show Grid to deselect it and hide the grid.
Th e combined shapes make a panel header that’s square on the bottom with
rounded top corners. Th e shapes are diff erent sizes so the gradient rotation
creates a seam. To hide the seam, you can change the Rotation value for one of
the shapes until the gradient patterns line up perfectly.
15 Select the Header Overlay rectangle (the smaller of the two rectangles). In the
Properties panel, change the Fill Rotation value to 5.
16 Choose Edit > Deselect All.
Th e gradient patterns line up and the seam is gone.
� Note: A checkerboard pattern in the gradient swatch indicates areas of transparency.
Grouping and transformingMost artwork is made from a collection of smaller overlapping parts. In fact, some
artwork includes hundreds, even thousands, of smaller brush strokes or paths. You
can make your life a little easier by grouping the related parts of an object so that
you can work with them as a single unit.
Th e following are a few benefi ts of grouping objects:
• Grouping protects the integrity of the drawing by keeping its parts in their
correct position relative to its other parts.
• Grouping creates a nicely organized Group object in the Layers panel. You can
rename the group in the Layers panel for better organization.
• Grouped objects have their own set of properties in the Properties panel, which
makes it easier to size, position, and transform the drawing. For example, you
can change its opacity, rotate the drawing, or apply fi lters.
• You can use the Select tool to select, transform, size, and position the group as a
single unit.
• You can always select the parts within a group by using the Direct Select tool, or
by selecting their individual rows in the Layers panel.
� Note: If you select multiple objects with diff erent gradients (or some with no gradients), the properties show that no gradient is applied. Clicking the blank gradient swatch resets all items to the default black-and-white gradient.
� Tip: If your drawings include lots of smaller parts or paths, you can group them, select the group, and use the Heads-Up Display (HUD) to create an optimized graphic.

ptg
ADOBE FLASH CATALYST CS5 CLASSROOM IN A BOOK 215
Group objectsTh e panel you’re creating includes the rounded Panel Header and Header Overlay
rectangles. You’ve already aligned these objects perfectly, so let’s go ahead and group
them. Th at’ll make it easier to position them at the top of the panel. While we’re at
it, let’s also group the ellipse and lines used to make the close button. Th is will make
rotating, sizing, and positioning these parts a lot easier too.
1 Select the Panel Header and Header Overlay rectangles.
2 Choose Modify > Group.
Th e two gradient rectangles are grouped and share one set of selection handles.
3 In the Layers panel, rename the group Panel Header.
4 Select the Ellipse shape and the two lines.
5 Choose Modify > Group.
6 In the Layers panel, rename the group Close.
Transform shapesLet’s use the Transform tool to rotate the close button and turn the plus sign into an
X for “close.”
1 In the Layers panel, select the Close group.
2 Select the Transform (Rotate) tool in the Tools panel.
Transform handles appear around the group.
3 Position the pointer over the selected shapes.
Th e pointer changes to the Transform tool.
4 Drag to rotate the selected shapes by 45 degrees.
Th e Rotation value changes in the Properties panel.
5 In the Properties panel, make sure the Rotation value is exactly 45 or -45 to turn
the crossed lines into an X.
� Note: You can also use the transform tool to resize or rotate other objects, such as a bitmap image or vector drawing that you’ve imported.
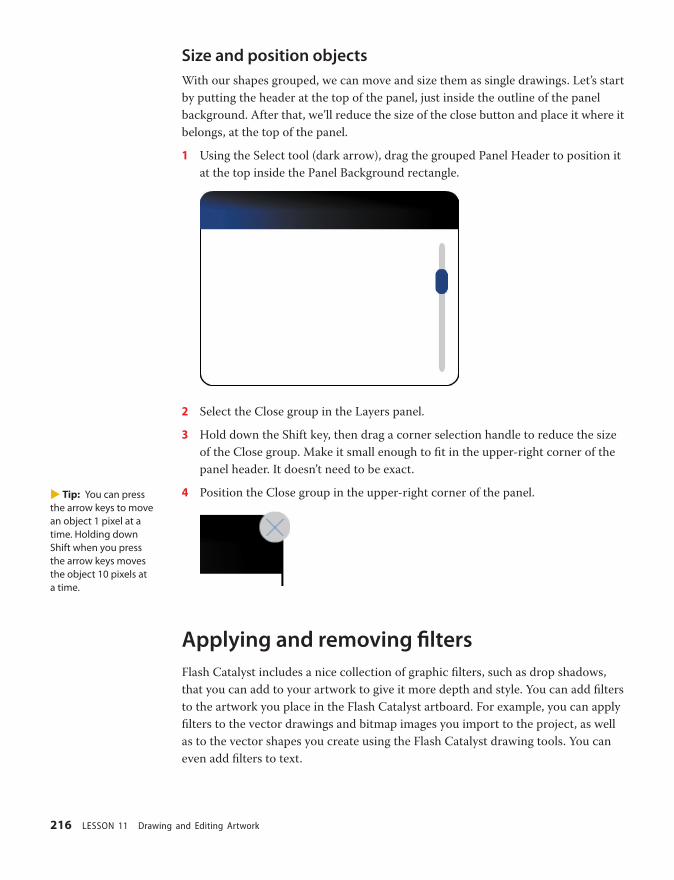
ptg
216 LESSON 11 Drawing and Editing Artwork
Size and position objectsWith our shapes grouped, we can move and size them as single drawings. Let’s start
by putting the header at the top of the panel, just inside the outline of the panel
background. After that, we’ll reduce the size of the close button and place it where it
belongs, at the top of the panel.
1 Using the Select tool (dark arrow), drag the grouped Panel Header to position it
at the top inside the Panel Background rectangle.
2 Select the Close group in the Layers panel.
3 Hold down the Shift key, then drag a corner selection handle to reduce the size
of the Close group. Make it small enough to fi t in the upper-right corner of the
panel header. It doesn’t need to be exact.
4 Position the Close group in the upper-right corner of the panel.
Applying and removing fi ltersFlash Catalyst includes a nice collection of graphic fi lters, such as drop shadows,
that you can add to your artwork to give it more depth and style. You can add fi lters
to the artwork you place in the Flash Catalyst artboard. For example, you can apply
fi lters to the vector drawings and bitmap images you import to the project, as well
as to the vector shapes you create using the Flash Catalyst drawing tools. You can
even add fi lters to text.
� Tip: You can press the arrow keys to move an object 1 pixel at a time. Holding down Shift when you press the arrow keys moves the object 10 pixels at a time.
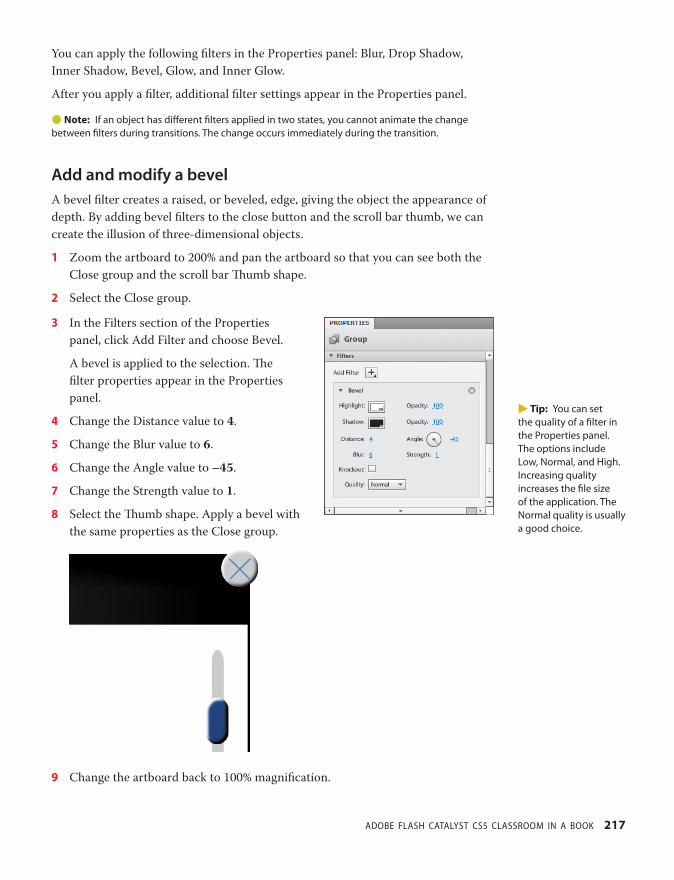
ptg
ADOBE FLASH CATALYST CS5 CLASSROOM IN A BOOK 217
You can apply the following fi lters in the Properties panel: Blur, Drop Shadow,
Inner Shadow, Bevel, Glow, and Inner Glow.
After you apply a fi lter, additional fi lter settings appear in the Properties panel.
� Note: If an object has diff erent fi lters applied in two states, you cannot animate the change between fi lters during transitions. The change occurs immediately during the transition.
Add and modify a bevelA bevel fi lter creates a raised, or beveled, edge, giving the object the appearance of
depth. By adding bevel fi lters to the close button and the scroll bar thumb, we can
create the illusion of three-dimensional objects.
1 Zoom the artboard to 200% and pan the artboard so that you can see both the
Close group and the scroll bar Th umb shape.
2 Select the Close group.
3 In the Filters section of the Properties
panel, click Add Filter and choose Bevel.
A bevel is applied to the selection. Th e
fi lter properties appear in the Properties
panel.
4 Change the Distance value to 4.
5 Change the Blur value to 6.
6 Change the Angle value to –45.
7 Change the Strength value to 1.
8 Select the Th umb shape. Apply a bevel with
the same properties as the Close group.
9 Change the artboard back to 100% magnifi cation.
� Tip: You can set the quality of a fi lter in the Properties panel. The options include Low, Normal, and High. Increasing quality increases the fi le size of the application. The Normal quality is usually a good choice.

ptg
218 LESSON 11 Drawing and Editing Artwork
Add and modify a drop shadowTh e most common type of fi lter is the drop shadow. Using drop shadows adds style
and depth and gives a softer look to artwork and text. By adjusting the direction and
distance of the shadow, you create the perception of lighting.
Adding a shadow to the Panel Background rectangle will give it the appearance that
it’s fl oating slightly above the main user interface.
1 Select the Panel Background rectangle.
2 In the Filter section of the Properties panel,
click Add Filter and choose Drop Shadow.
A drop shadow is applied to the selection.
Th e fi lter properties appear in the
Properties panel.
3 Change the Distance value to 10.
4 Change the Blur value to 10.
5 Change the Opacity value to 60.
6 Change the Angle value to –45.
7 Change the Strength value to 1.
8 Choose Edit > Deselect All.
Th e panel is complete.
� Tip: The Knockout Drop Shadow property hides the original object, but it shows only the parts of the fi lter that would be seen if the object were visible (the fi lter is masked/knocked out by the object). Hide Object hides the original object and shows the fi lter, including parts that would have been obscured if the object were visible. This has no eff ect if Knockout is also selected.

ptg
ADOBE FLASH CATALYST CS5 CLASSROOM IN A BOOK 219
Round-trip editing with Adobe Illustrator and Adobe PhotoshopUsing the Launch and Edit features of Flash Catalyst, you can modify artwork using
the rich editing capabilities of Adobe Illustrator CS5 and Adobe Photoshop CS5.
Open the artwork in Illustrator or Photoshop, make changes, and then return to
Flash Catalyst.
Take a moment to review the following tips for round-trip editing with Illustrator
and Photoshop:
• Use Illustrator to round-trip edit bitmaps and vectors.
• Use Photoshop to round-trip edit bitmaps.
• When you edit a vector (shape or text) in Illustrator and the vector is not part
of a component, changes apply only to the state in which you select and edit the
vector. If the vector was shared to other states, they are not aff ected by the edit.
• When you edit an image or component that is stored in the Flash Catalyst
library, you are editing the object defi nition in the library. If you’ve shared the
image across states, the changes apply in all states. If the image is used inside a
component, the changes are refl ected in the component.
• You cannot round-trip edit vectors or bitmaps that you’ve optimized by choosing
Optimize Vector Graphics in the HUD.
• You cannot round-trip edit more than one component at a time.
• Make all structural changes to objects in Flash Catalyst. Changing the structure
of objects during round-trip editing can break the intended behavior of objects
or transitions in which they occur.
• When you round-trip edit a button (or other components), the component
states are shown as separate layers in Illustrator and Photoshop. If you round-
trip edit a group, its children are shown as separate layers.
• When you round-trip edit an object, the surrounding objects in the artboard are
visible (but dimmed) for reference. Th ese objects appear as locked background
layers in Illustrator and Photoshop and cannot be edited.
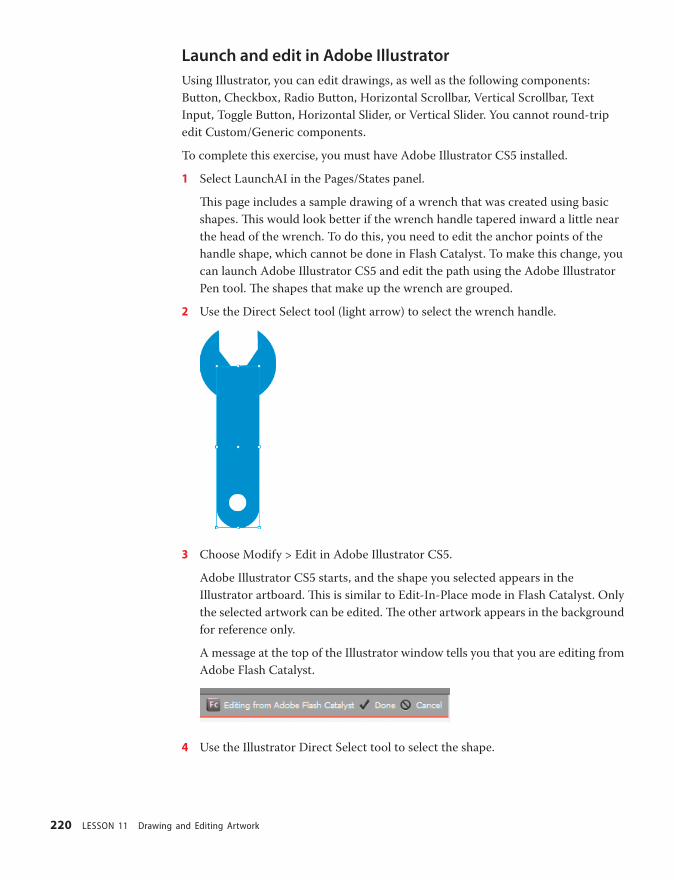
ptg
220 LESSON 11 Drawing and Editing Artwork
Launch and edit in Adobe IllustratorUsing Illustrator, you can edit drawings, as well as the following components:
Button, Checkbox, Radio Button, Horizontal Scrollbar, Vertical Scrollbar, Text
Input, Toggle Button, Horizontal Slider, or Vertical Slider. You cannot round-trip
edit Custom/Generic components.
To complete this exercise, you must have Adobe Illustrator CS5 installed.
1 Select LaunchAI in the Pages/States panel.
Th is page includes a sample drawing of a wrench that was created using basic
shapes. Th is would look better if the wrench handle tapered inward a little near
the head of the wrench. To do this, you need to edit the anchor points of the
handle shape, which cannot be done in Flash Catalyst. To make this change, you
can launch Adobe Illustrator CS5 and edit the path using the Adobe Illustrator
Pen tool. Th e shapes that make up the wrench are grouped.
2 Use the Direct Select tool (light arrow) to select the wrench handle.
3 Choose Modify > Edit in Adobe Illustrator CS5.
Adobe Illustrator CS5 starts, and the shape you selected appears in the
Illustrator artboard. Th is is similar to Edit-In-Place mode in Flash Catalyst. Only
the selected artwork can be edited. Th e other artwork appears in the background
for reference only.
A message at the top of the Illustrator window tells you that you are editing from
Adobe Flash Catalyst.
4 Use the Illustrator Direct Select tool to select the shape.
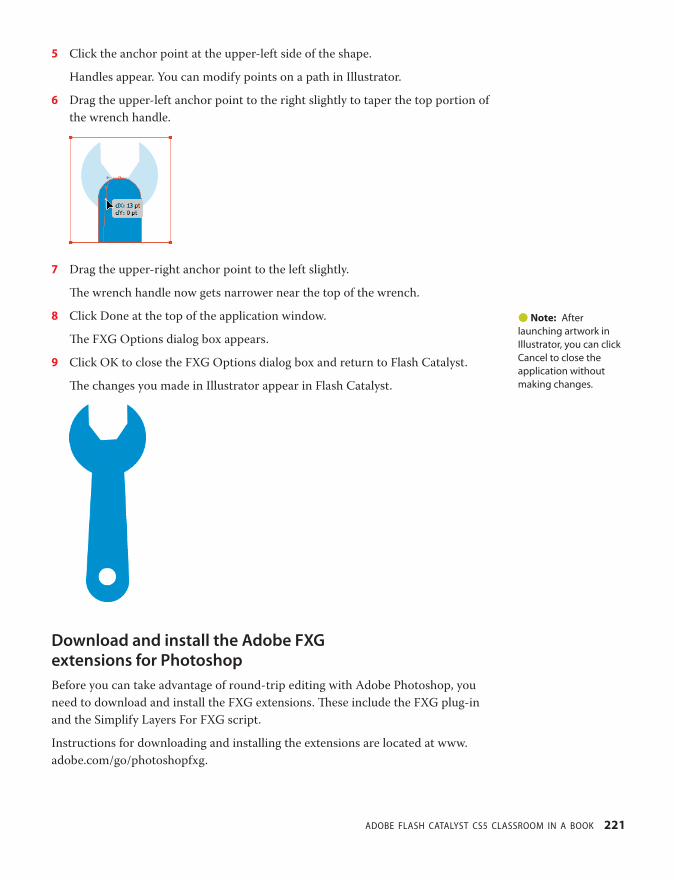
ptg
ADOBE FLASH CATALYST CS5 CLASSROOM IN A BOOK 221
5 Click the anchor point at the upper-left side of the shape.
Handles appear. You can modify points on a path in Illustrator.
6 Drag the upper-left anchor point to the right slightly to taper the top portion of
the wrench handle.
7 Drag the upper-right anchor point to the left slightly.
Th e wrench handle now gets narrower near the top of the wrench.
8 Click Done at the top of the application window.
Th e FXG Options dialog box appears.
9 Click OK to close the FXG Options dialog box and return to Flash Catalyst.
Th e changes you made in Illustrator appear in Flash Catalyst.
Download and install the Adobe FXG extensions for PhotoshopBefore you can take advantage of round-trip editing with Adobe Photoshop, you
need to download and install the FXG extensions. Th ese include the FXG plug-in
and the Simplify Layers For FXG script.
Instructions for downloading and installing the extensions are located at www.
adobe.com/go/photoshopfxg.
� Note: After launching artwork in Illustrator, you can click Cancel to close the application without making changes.

ptg
222 LESSON 11 Drawing and Editing Artwork
Launch and edit in Adobe PhotoshopUse Photoshop to edit bitmap images, a selection of multiple images, or a group
containing only images.
To complete this exercise, you must have Adobe Photoshop CS5 installed.
1 Select LaunchPS in the Pages/States panel.
2 Select the bitmap image of the surfer.
3 Choose > Modify > Edit In Adobe Photoshop CS5.
A message reminds you that you need to download and install the FXG
extensions for Photoshop.
4 Click OK to close the message and launch Photoshop.
Adobe Photoshop CS5 starts, and the bitmap image you selected appears in the
Photoshop canvas for editing. A message at the top of the canvas reminds you to
run the script to simplify layers before returning to Flash Catalyst.
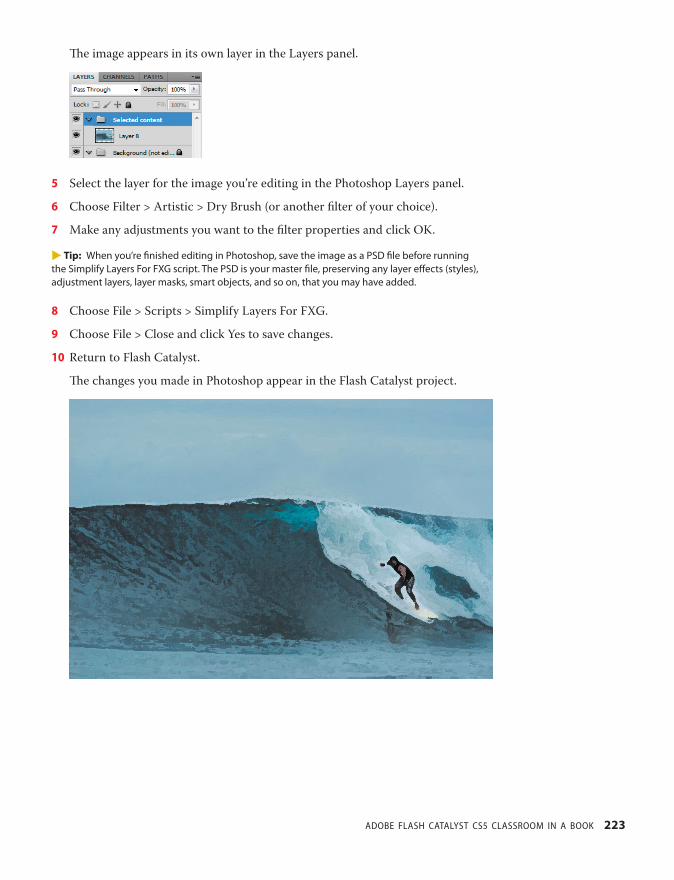
ptg
ADOBE FLASH CATALYST CS5 CLASSROOM IN A BOOK 223
Th e image appears in its own layer in the Layers panel.
5 Select the layer for the image you’re editing in the Photoshop Layers panel.
6 Choose Filter > Artistic > Dry Brush (or another fi lter of your choice).
7 Make any adjustments you want to the fi lter properties and click OK.
� Tip: When you’re fi nished editing in Photoshop, save the image as a PSD fi le before running the Simplify Layers For FXG script. The PSD is your master fi le, preserving any layer eff ects (styles), adjustment layers, layer masks, smart objects, and so on, that you may have added.
8 Choose File > Scripts > Simplify Layers For FXG.
9 Choose File > Close and click Yes to save changes.
10 Return to Flash Catalyst.
Th e changes you made in Photoshop appear in the Flash Catalyst project.

ptg
224 LESSON 11 Drawing and Editing Artwork
Understanding blend modesAs you’ve been working in Flash Catalyst, you’ve probably noticed a property that’s common to just about everything you select in the artboard, including components, bitmap images, imported vector drawings, text, and the shapes you draw. This is the Blend Modes property in the Appearance section of the Properties panel.
Blend modes are used to determine how layered objects blend together. It’s helpful to think in terms of the following colors when visualizing a blend mode eff ect:
• The base color is the original color in the image.
• The blend color is the color being applied in a layer above it.
• The result color is the color resulting from the blend.
For more information on blend modes in Flash Catalyst, refer to the blend_modes.pdf document in the Lesson11 folder.
Review questions1 What is the diff erence between the Select tool (dark arrow) and the Direct Select tool
(light arrow)?
2 What are two methods for drawing rectangles with rounded corners?
3 When fi lling a shape with a solid color, how can you ensure that its color is an exact
match to the color of another object in the artboard?
4 How do you control the colors used in a gradient fi ll?
5 What are some advantages of grouping objects?
6 When applying a Drop Shadow fi lter, what is the diff erence between the Knockout and
Hide Object properties?
7 What are some diff erences between round-trip editing in Adobe Illustrator compared
to round-trip editing in Adobe Photoshop?
ptg
ADOBE FLASH CATALYST CS5 CLASSROOM IN A BOOK 225
Review answers1 You can use the Select tool to select, move, and size grouped or ungrouped objects. You
can use the Direct Select tool to select, move, and size objects that are part of a group.
2 You can draw a rectangle using the Rectangle tool and then add rounded corners by
changing the Corners value in the Properties panel. You can draw a rectangle that
begins with rounded corners by using the Rounded Rectangle tool.
3 You can use the Eyedropper tool to sample a color from another object in the artboard.
Or, you can select the object that has the source color, open the Fill Color Picker, and
copy the color’s hexadecimal color value. Th en, select the target object, open the Color
Picker, and paste the color value. Using the Eyedropper is a lot easier.
4 Begin by adding a gradient fi ll in the Properties panel. Th e gradient begins with two
colors—usually the fi ll color fading to black or white. Click a color stop below the
gradient swatch to open the Color Picker and change its color. Click in the gradient
swatch to add additional color stops. Slide color stops or adjust the Rotation value to
stylize the gradient pattern. Drag stops away from the gradient swatch to remove them.
5 Grouping protects the integrity of the drawing by keeping its parts in their correct
position relative to its other parts. Grouping creates a nicely organized Group object
in the Layers panel. Grouped objects have their own set of properties. You can select,
edit, size, and position the group as a single unit. You can add interactions to groups.
6 Knockout hides the original object, but it shows only the parts of the fi lter that would
be seen if the object were visible (the fi lter is masked/knocked out by the object). Hide
Object hides the original object and shows the fi lter, including parts that would have
been obscured if the object were visible. Th is has no eff ect if Knockout is also selected.
7 You can use Illustrator to edit vectors and bitmaps. You can use Photoshop to edit
bitmaps only. Before you can edit in Photoshop, you must download and install the
FXG plug-in and the Simplify Layers For FXG script. After editing in Photoshop, make
sure you run the Simplify Layers For FXG script before returning the edited graphic to
Flash Catalyst.
ptg
226
12 PUBLISHING A PROJECT
Lesson OverviewYou’ve created and imported artwork, designed interactive com-
ponents, and built the application structure. Your project includes
smooth animated transitions and sound eff ects. You’ve even added
video that users can control, and now it’s time to share your master-
piece with the world (or at least with your client—for review and
feedback).
In this lesson, you’ll learn how to do the following:
• Choose a delivery option
• Prepare the application for publishing
• Publish the application fi les
• View and share published fi les
• Publish to the web using Adobe Dreamweaver CS5
Th is lesson will take about 40 minutes to complete. Copy the
Lesson12 folder into the lessons folder that you created on your hard
drive for these projects (or create it now), if you haven’t already done
so. As you work on this lesson, you won’t be preserving the start fi les;
if you need to restore the start fi les, copy them from the Adobe Flash
Catalyst CS5 Classroom in a Book CD.

ptg
227
Export your fi nished project as a SWF fi le that lever-ages the ubiquity of Flash Player 10 or later. Output an offl ine version of the product for iterative design or client review. Publish to the web or create an Adobe AIR installation fi le and distribute the program as a desktop application.
ptg
228 LESSON 12 Publishing a Project
Delivery optionsTh ere are three ways to publish and distribute a Flash Catalyst application. One ver-
sion includes the necessary fi les to run the project as a web application, but cannot
run locally. A second version can run locally, but cannot be run from a web server or
launch URLs. Th ere is also an option to build an Adobe AIR application. We’ll refer
to these as the deploy-to-web, run-local, and AIR versions of the application.
Deploy-to-web produces a smaller SWF fi le, along with the Flex 4 framework
fi les. Th is version includes everything you need to publish the application to a web
server for viewing online.
Run-local is a larger SWF fi le with all of its assets included and no dependencies. Th e
purpose of this redistributable version is to share it. For example, you can share the
fi le with a client and they’ll have everything they need to view the application locally.
AIR is a stand-alone desktop application that runs without a web browser or
Internet connection. Flash Catalyst publishes a single AIR application fi le used to
download and install the application.
Adobe AIRWith Adobe AIR, you can stop asking that nagging old question, “Will my applica-tion run the same on both Windows and Mac?” Yes. Adobe AIR is a cross-operating system runtime that allows you to build and deploy rich Internet applications (RIAs) to the desktop. Using Flash Catalyst, you can publish the project as an Adobe AIR application and then upload the published fi le to your web server. This allows someone to download and install the application locally. The application runs on the user’s desktop without a web browser or an Internet connection.
The user installs the AIR runtime once on their computer. After that, they can install any number of AIR applications and use them just like any other desktop program.
The AIR runtime eliminates cross-browser testing by ensuring consistent functional-ity and interactions across desktops running Mac, Windows, or Linux.
� Note: Even with a data-centric project that requires further development in Flash Builder, you may want to publish preliminary versions of the appli cation for sharing with clients or colleagues during the design and develop ment workfl ow.
Publishing your applicationWhen you publish a Flash Catalyst project, you choose which version(s) of the
application to create. You can also choose to include accessibility features and
whether or not to embed fonts.
� Note: For applications that require additional work by a Flex developer, you’ll save and share the Flash Catalyst project fi le (.fxp). The project fi le contains all the assets and code the developer needs to continue working with the project in Adobe Flash Builder.
ptg
ADOBE FLASH CATALYST CS5 CLASSROOM IN A BOOK 229
AccessibilityYour Flash Catalyst projects are built for accessibility by default to support assistive
technologies such as screen readers. Th is improves the user experience and makes
projects readily apparent and easily navigable for visually impaired users. Th is
capability is enabled through the Flex framework accessibility support. Including
accessibility features in your project increases the size of the SWF fi le to accommo-
date the support. Th e only reason that you’d choose not to build for accessibility is
to reduce the size of your published application.
Embedding fontsYou can make sure that everyone sees text as you’ve designed it to look by embed-
ding fonts in the application’s SWF fi le.
Th e main limitation to using embedded fonts is that embedded fonts increase the
fi le size of your application.
Before you publishIt’s always a good idea to do a little clean-up and test your projects before publishing.
Take a look at the following pre-publishing ideas for optimizing your application.
• Delete objects that are not used in the application. If an object is not being used
in a state, then select it and press the Delete key to remove it from the current
state only. If an object is not used anywhere in the application, select it and click
the Delete icon ( ) in the Layers panel.
• Before publishing, you can optimize vector graphics by using the Optimize
Artwork options in the Heads-Up Display (HUD) or by choosing Modify >
Optimize Vector Graphics.
• To reduce the fi le size of the application, compress graphics in the Library panel.
Right-click a graphic in the Library panel and choose Compression Options.
Reduce the Quality setting and click OK.
• Your Flash Catalyst applications are Flex projects. Before publishing, you can
switch over to the Code workspace and see how the components and states are
created. You can also view the Problems panel in Code view to make sure that
your project doesn’t have any issues that need resolving.
• Run the project and test it before publishing. Check to make sure that all
navigation and links are working properly. Preview all transitions to make sure
they run smoothly. Test any video or sound controls.
• Save the project prior to publishing.

ptg
230 LESSON 12 Publishing a Project
Publish to SWFLet’s publish the Interactive Banner application so that we can take a look at the
publishing options and the diff erent fi les that get produced.
1 Start Flash Catalyst, browse to the Lesson12 folder on your hard drive, and open
the Lesson12_Banner.fxp fi le.
2 Choose File > Publish To SWF/AIR.
Th e options to Build
For Accessibility, Build
Version For Upload To
A Web Server, and Build
Version To View Offl ine
are selected by default.
You need to choose an
Output Directory for the
published fi les.
3 Click Browse and navigate to the Lesson12 folder on your hard drive. Select the
Lesson12 folder and click OK/Open.
4 Select the Build AIR Application option.
5 Select the Embed Fonts option.
Selecting Embed Fonts activates the Advanced button.
6 Click Advanced to open the Font Embedding dialog box.
You can specify which fonts and character ranges to embed. For example,
exclude specifi c language options, such as Greek and Th ai. Limiting what you
choose to embed can help reduce the size of your published SWF fi le.
� Note: If your project does not include fonts that you can embed, the Embed Fonts check box is disabled.

ptg
ADOBE FLASH CATALYST CS5 CLASSROOM IN A BOOK 231
7 Click OK to accept the default font embedding settings.
8 Click Publish.
� Note: When you publish a project that has already been published, a message asks if you want to overwrite the existing fi les. You can choose Cancel and publish to a diff erent directory, or choose Overwrite to replace the existing fi les.
When should I embed a font?In general, don’t embed fonts if you know that users already have them. To be safe, embed any fonts other than Arial, Courier New, Georgia, Times New Roman, and Verdana. Embedding non-web fonts ensures that users see the design exactly as you do, even if they don’t have the same fonts on their computer. If you do embed fonts, use the Advanced button in the Publish To SWF dialog box to limit how much of the font is embedded. For example, if you know that your text includes only Basic Latin characters and numerals, then deselect the All option and select Uppercase, Lowercase, Numerals, Punctuation, and Basic Latin. Leave the remaining languages deselected.
Viewing the published fi lesPublishing a project generates the Main.swf fi le, along with any other fi les needed to
run the application, depending on the options you select.
Flash Catalyst creates a new subfolder in the location you choose as the Output
Directory. Th e new folder has the same name as your project fi le. Within that
folder, you’ll fi nd a separate folder for each version of the application you choose to
create—deploy-to-web, run-local, and AIR.
deploy-to-web is the folder containing the deployable web version of the application.
run-local is the folder containing the offl ine version of the application.
AIR is the folder containing the AIR application fi le.
1 Open the Lesson12 folder on your hard drive.
Th e folder includes the Output Directory with the same name as the project fi le,
Lesson12_Banner.
2 Open the Lesson12_Banner Output
Directory folder.
Th e three versions of your application are
stored here.
� Tip: You can rename the deploy-to-web and other application folders to something more descriptive of your application. Keep in mind that if you rename the folder, republishing the project will not overwrite the previous version.

ptg
232 LESSON 12 Publishing a Project
3 Open the deploy-to-web folder.
Th e deployable web version of the application includes all the necessary fi les
to run the application from a web server. Th ese are the fi les you upload to your
web server if you want to deploy the application online.
Th e deploy-to-web fi les include the Main.swf application fi le and the main.html
wrapper for the SWF fi le. Th is fi le references the swfobject.js code that performs
Flash Player version checks and redirects a user to upgrade their Flash Player, if
needed. If you choose to place the SWF fi le inside a diff erent HTML page, you
can copy and paste this code. Th e Flex framework fi les are also included and
are external to the application SWF fi le. Th is helps to keep the size of the SWF
fi le small, which is better for web delivery. Th e assets folder includes any linked
assets. In the case of the Banner project, the sound and video fi les are stored
here. All images are embedded in this project. Th e history folder includes a set of
fi les that allow a Flex application to store browser history as you move from page
to page within the application.
4 Close the deploy-to-web folder and open the run-local folder.
You can share the contents of the run-local folder with others to view the
application. As long as they have Flash Player 10 or later installed, they can open
the application in a web browser. In the run-local version of the application, the
Flex framework is built into the SWF fi le. Th e reason for doing this is so that you
� Note: Since Flash Player 9, the Flex framework fi les are cached by the Flash Player. Over time, most users will have the Flex framework as part of their Flash Player. In these cases, they’ll just need to download the much smaller SWF fi le from your web server. But until then, it’s best to put these fi les on your web server next to the SWF fi le.

ptg
ADOBE FLASH CATALYST CS5 CLASSROOM IN A BOOK 233
can pass it around to someone else (a client) and they’ll have everything they
need to run the SWF fi le locally. Th e trade-off is that it makes the SWF fi le much
bigger, but it has no external dependencies.
5 Double-click the Main.html fi le.
Th e Main.html fi le opens and loads the Main.swf fi le.
6 Close the browser.
7 Close the run-local folder and open the AIR folder.
Th e AIR folder includes one fi le.
Anyone that has this fi le can install and
run the AIR application.
8 Double-click the Lesson12_Banner.air
fi le.
Th e Application Install dialog box opens. If the application was already installed,
you’ll have the option to run the installation again or uninstall the program.
� Note: Links to URLs don’t work when viewing the run-local version of the application.
� Note: If you don’t have the Adobe AIR runtime installed, or if your version of the AIR runtime needs updating, then you may need to install that fi rst. Follow the prompts to install or update the AIR runtime if prompted.

ptg
234 LESSON 12 Publishing a Project
9 Click Install.
Th e Installation options appear.
10 Make sure that Start Application After Installation is selected, and click
Continue.
Th e program installs. When the installation is complete, the Lesson12_Banner
application starts in a new application window.
11 Test the application by moving from page to page and viewing the videos on
pages 4 and 5.
12 Close the application window.
13 Double-click the Lesson12_Banner.air fi le again.
Th e installer recognizes that you already have the application installed.
14 Click Uninstall.
Th e uninstaller removes the application from your computer.
15 When the application removal is complete, click Finish to close the dialog box.
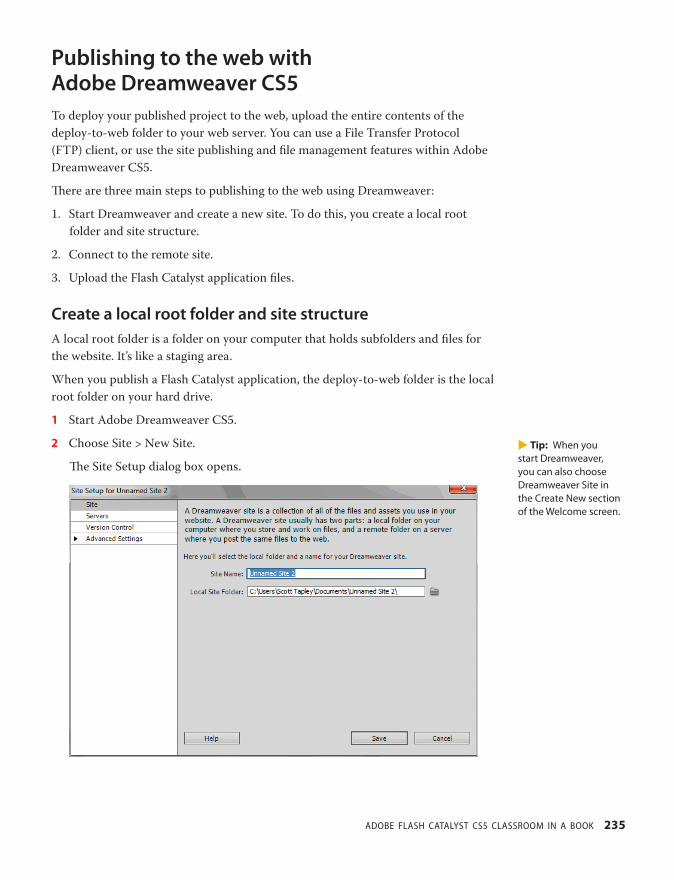
ptg
ADOBE FLASH CATALYST CS5 CLASSROOM IN A BOOK 235
Publishing to the web with Adobe Dreamweaver CS5To deploy your published project to the web, upload the entire contents of the
deploy-to-web folder to your web server. You can use a File Transfer Protocol
(FTP) client, or use the site publishing and fi le management features within Adobe
Dreamweaver CS5.
Th ere are three main steps to publishing to the web using Dreamweaver:
1. Start Dreamweaver and create a new site. To do this, you create a local root
folder and site structure.
2. Connect to the remote site.
3. Upload the Flash Catalyst application fi les.
Create a local root folder and site structureA local root folder is a folder on your computer that holds subfolders and fi les for
the website. It’s like a staging area.
When you publish a Flash Catalyst application, the deploy-to-web folder is the local
root folder on your hard drive.
1 Start Adobe Dreamweaver CS5.
2 Choose Site > New Site.
Th e Site Setup dialog box opens.
� Tip: When you start Dreamweaver, you can also choose Dreamweaver Site in the Create New section of the Welcome screen.
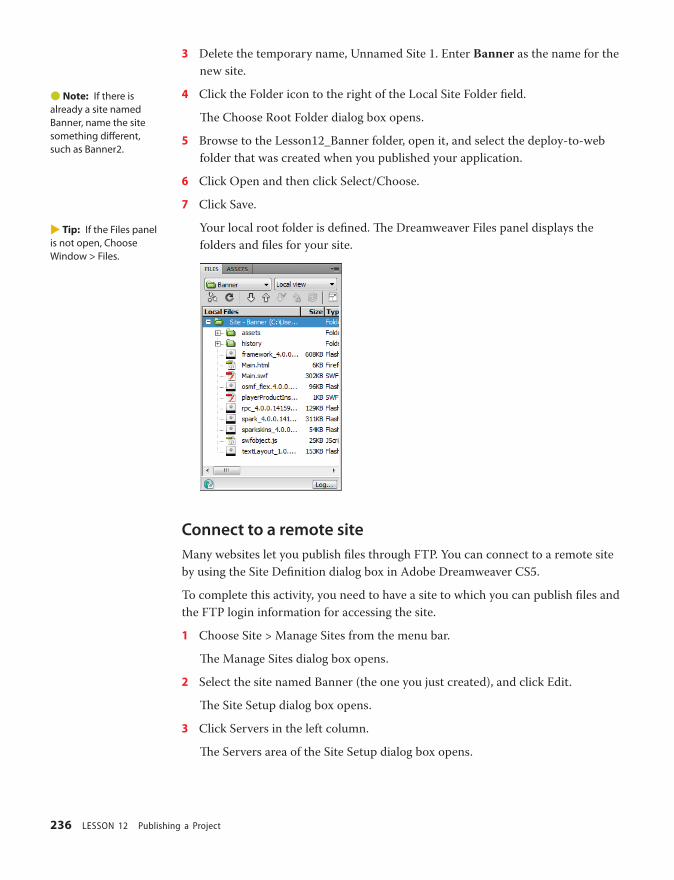
ptg
236 LESSON 12 Publishing a Project
3 Delete the temporary name, Unnamed Site 1. Enter Banner as the name for the
new site.
4 Click the Folder icon to the right of the Local Site Folder fi eld.
Th e Choose Root Folder dialog box opens.
5 Browse to the Lesson12_Banner folder, open it, and select the deploy-to-web
folder that was created when you published your application.
6 Click Open and then click Select/Choose.
7 Click Save.
Your local root folder is defi ned. Th e Dreamweaver Files panel displays the
folders and fi les for your site.
Connect to a remote siteMany websites let you publish fi les through FTP. You can connect to a remote site
by using the Site Defi nition dialog box in Adobe Dreamweaver CS5.
To complete this activity, you need to have a site to which you can publish fi les and
the FTP login information for accessing the site.
1 Choose Site > Manage Sites from the menu bar.
Th e Manage Sites dialog box opens.
2 Select the site named Banner (the one you just created), and click Edit.
Th e Site Setup dialog box opens.
3 Click Servers in the left column.
Th e Servers area of the Site Setup dialog box opens.
� Note: If there is already a site named Banner, name the site something diff erent, such as Banner2.
� Tip: If the Files panel is not open, Choose Window > Files.

ptg
ADOBE FLASH CATALYST CS5 CLASSROOM IN A BOOK 237
4 Click the Add Server button ( ).
5 Enter your FTP access information.
6 Click Test to test the connection.
Dreamweaver confi rms the connection.
7 Click Save.
Th e new server appears in the list of servers in the Site Setup dialog box.
8 Click Save to close the Site Setup dialog box.
9 Click Done to close the Manage Sites dialog box.
� Note: You can get your FTP access information from your site administrator or Internet service provider.

ptg
238 LESSON 12 Publishing a Project
Upload fi lesOnce you establish an FTP connection, you can publish fi les directly from the
Files panel.
1 Make sure the Dreamweaver Files panel is open.
Connect to Remote Host
Expand/Collapse
Refresh Synchronize
Get File(s) Put File(s) Check Out File(s) Check In
2 Click the Expand/Collapse icon in the Files panel toolbar.
Th e Files panel expands.
3 Click the Connect To Remote Host icon to select it, if it’s not already selected.
Dreamweaver connects to the web server.
4 Select the root folder for your site in the Local (right) pane.
5 Click the Put Files icon. If you are asked to confi rm the fi le transfer, then
click OK.
Dreamweaver uploads the application fi les and opens the Background File
Activity dialog box. You can save a log fi le with details about the fi le transfer.
6 Click Close to close the dialog box.
7 Click the Expand/Collapse icon to collapse the Files panel.
8 Choose File > Exit to close Dreamweaver.
� Tip: To upload one or more folders or fi les without uploading the entire site, select them and click the Put Files icon.

ptg
ADOBE FLASH CATALYST CS5 CLASSROOM IN A BOOK 239
Review questions1 What are the three types of applications you can publish from your Flash Catalyst project?
2 Which two application types are published by default?
3 Why would you ever choose not to build a project for accessibility?
4 Which fonts should be embedded in the application when you publish?
5 What is an Adobe AIR application?
6 What are the main steps you need to complete when publishing an application to the
web using Adobe Dreamweaver?
7 Which of the published application folders do you use as the site root folder when you
upload your application to the web?
Review answers1 You can publish three types of applications. One version includes the necessary fi les to run
the project as a web application, but cannot run locally. A second version can run locally,
but cannot be run from a web server or launch URLs. Th e third version is an Adobe AIR
application that runs from the desktop without a browser or Internet connection.
2 Deploy-to-web and run-local are published by default.
3 Including the accessibility options when you publish a project results in a larger SWF fi le.
You can deselect Build For Accessibility to reduce the size of your application SWF fi le.
4 In general, don’t embed fonts if you know that users already have them. To be safe,
embed any fonts other than Arial, Courier New, Georgia, Times New Roman, and
Verdana. Embedding non-web fonts ensures that users see the design exactly as you
do, even if they don’t have the same fonts on their computer.
5 Adobe AIR is a cross-operating system runtime that allows you to build and deploy
rich Internet applications (RIAs) to the desktop. Using Flash Catalyst, you can publish
the project as an Adobe AIR application and then upload the published fi le to your
web server. Th is allows someone to download and install the application locally. Th e
application runs on their desktop without a web browser or an Internet connection.
6 Start Dreamweaver and create a new site. To do this, you create a local root folder and
site structure. Connect to the remote site. Upload the Flash Catalyst application fi les.
7 Th e deploy-to-web folder can be used as the site root folder when publishing the
application to the web using Dreamweaver.

ptg
240
13 EXTENDING YOUR PROJECT USING ADOBE FLASH BUILDER
Lesson OverviewUsing Flash Catalyst and Adobe Flash Builder, designers and develop-
ers work together to create the perfect mix of artwork, interactivity,
usability, and data. Art is joined to data, which then becomes art.
Th is lesson explores a few ways that you can extend your Flash
Catalyst project using Flash Builder, and off ers a few tips for prepar-
ing a project fi le (FXP) for handoff to a developer. Developing in Flash
Builder goes beyond the scope of this course, but for those who have
Flash Builder installed, we’ve included the steps to opening a Flash
Catalyst project in Flash Builder, updating an existing project, and
importing a Flash Catalyst project library.
In this lesson, you’ll learn how to do the following:
• Extend an application by connecting it to data and web services
• Prepare the application for handoff to a developer using Flash
Builder
• Import a Flash Catalyst project into Flash Builder
• Compare and integrate code between two projects
• Import a Flash Catalyst project library into Flash Builder
Th is lesson will take about 45 minutes to complete. Copy the Lesson13
folder into the lessons folder that you created on your hard drive for
these projects (or create it now), if you haven’t already done so. As you
work on this lesson, you won’t be preserving the start fi les; if you need
to restore the start fi les, copy them from the Adobe Flash Catalyst CS5
Classroom in a Book CD.

ptg
241
Extend the reach and functionality of your Flash Catalyst projects with Adobe Flash Builder. Create a dashboard for managing a database, searching for records, and running reports. Link a photo gallery to an unlimited portfolio of images. Collect user informa-tion, process forms, and a whole lot more.

ptg
242 LESSON 13 Extending Your Project Using Adobe Flash Builder
Adobe Flash BuilderAs wonderful as it is, Flash Catalyst has its limitations as a standalone RIA produc-
tion tool. After all, it’s an interaction design tool, not a development environment.
When your application needs to retrieve data at runtime from a web server, web
service, or third-party API (application programming interface), use Flash Builder.
Adobe Flash Builder 4 (formerly Flex Builder) is an integrated development envi-
ronment (IDE) for developing cross-platform data-centric content. It provides
features that are aimed at those who are developing RIAs using ActionScript and
the Flex framework.
� Note: An integrated development environment (IDE) is a software application that provides comprehensive tools to computer programmers for software development.
Extending the applicationAlthough you can use Flash Catalyst to publish fully functional applications, or
microsites, many RIAs require additional development, such as binding a component
to a data source or web service. Th at’s where Flash Builder comes in. Remember, the
applications you create with Flash Catalyst are Flex applications. A Flex developer
can open your projects in Flash Builder and pick up right where you left off .
Th e following are a few examples of ways that a developer can extend the capabili-
ties of your Flash Catalyst project using Flash Builder.
Bind components to a data sourceCreate a Data List component in Flash Catalyst and use design-time data to defi ne
the appearance and behavior of the list. Th en, have your developer bind the compo-
nent to a data source using Flash Builder. When the application runs, your data list
includes every record in the data source. Th e data is kept separate from the applica-
tion, so the data can change at any time without redesigning or republishing the
application.
Using Flash Builder, you can connect the application to several service types:
• BlazeDS
• ColdFusion
• HTTP
• LCDS
• PHP
• WSDL (Web Service)
• XML
� Tip: In addition to displaying lists of text and images, your Flash Catalyst project can be a dashboard to provide insight into a corporate database, or perhaps your application will provide a new front-end to an existing ColdFusion or PHP application.

ptg
ADOBE FLASH CATALYST CS5 CLASSROOM IN A BOOK 243
Create, Read, Update, and Delete (CRUD)Use Flash Catalyst to design a data management control center to view, edit, add,
and delete records in a database. For example, you can use a wireframe Data List
component to build the data grid, and then add controls to accomplish tasks, such
as add new records, submit changes, or cancel. A developer can use Flash Builder
to implement the CRUD functionality by binding the controls you design in Flash
Catalyst to web services.
Provide a keyword searchYou can connect your application to a data source and then let users search for spe-
cifi c records by entering keywords in a search fi eld that you design. A developer can
implement the feature using Flash Builder.
Collect user inputFlash Catalyst is an excellent tool for designing user input controls, including text
input fi elds, radio buttons, check boxes, and the button used to submit a form.
Design your forms using Flash Catalyst and then have your developer add the code
to collect, store, and circulate the information by email.
Validate user input
You can assign rules to the fi elds in a form; determine which information is required
and optional; test a password and either grant entrance or display an error message.
Test the user entry in a ZIP code text input fi eld and display an error message if
the entry doesn’t have exactly fi ve numerals. Th ese types of interactions cannot be
implemented in Flash Catalyst. But you can use Flash Catalyst to design the fi elds
and error states. Th e developer implements the logic for these interactions using
Adobe Flash Builder.
Add a combo box
Improve the usability of a form by adding a combo box control. A combo box is a
combination of a drop-down list and a single-line text input fi eld, allowing users to
either type a value directly into the control or choose from a list of existing options
that you specify. You can design a combo box using a custom component, or let
your developer add a combo box control using Flash Builder.
Use sliders to set valuesYou can use Horizontal and Vertical Slider components to select a value by moving
a slider thumb between the end points of the slider track. Th e current value of the
slider is determined by the relative location of the thumb between the end points of
the slider, corresponding to the slider’s minimum and maximum values. Once you

ptg
244 LESSON 13 Extending Your Project Using Adobe Flash Builder
add a slider in Flash Catalyst, a developer can add the desired functionality using
Adobe Flash Builder.
Create printer controlsDesign a print button using custom artwork in Flash Catalyst. Your developer can
add the code used to initiate print commands and options.
Exploring designer-developer workfl owsTechnically speaking, Flash Catalyst and Flash Builder are not “integrated.”
However, they are designed to work together.
Every project created in Flash Catalyst can be opened in Flash Builder. A Flex
developer completes the project using Flash Builder, while maintaining all the
pixel-perfect layout and interactions you’ve designed in Flash Catalyst.
Create interface artwork
Interaction design
Publish
SWF AIR
Develop
Th ere are several possible workfl ows that designers and developers can use to col-
laborate during RIA design and development. Most fall into two general categories:
linear and iterative.
Linear workfl owIn a linear workfl ow, you will create your project in Flash Catalyst and then pass it
off to the developer to use in creating the application, with little or no iteration. Th e
following is one example of a linear workfl ow:
1. Create your artwork in a Creative Suite tool.
2. Import it into Flash Catalyst and use the features in Flash Catalyst to add states,
animation, and interactivity.
3. Save your project as an FXP fi le.

ptg
ADOBE FLASH CATALYST CS5 CLASSROOM IN A BOOK 245
4. Provide the FXP fi le to the person who will be responsible for implementing the
additional functionality in the application. Th is could be yourself or a developer
on the production team.
5. Import the Flex Project (FXP) fi le into Flash Builder.
6. In Flash Builder, defi ne calls to remote operations that will fetch data at runtime.
7. Publish the completed project from Flash Builder.
Iterative workfl owIt’s possible that you’ll need to make changes to the visual design of the application
or its components following the export from Flash Catalyst and import into Flash
Builder. But, it’s not possible to re-open a Flex project in Flash Catalyst once you’ve
imported it into Flash Builder. If you think you’ll need to make changes to the art-
work used in the component skins, or elsewhere in the application, you can use the
following approach:
1. Open the original project fi le (FXP) in Flash Catalyst. Use the same fi le you
originally imported into Flash Builder.
2. Use Save As to create a new version of the project fi le (FXP) using a new name.
3. Make the necessary design changes to the new project fi le in Flash Catalyst.
4. In Flash Builder, import the updated FXP fi le as a new copy of the project.
5. Copy edited code in the new project to the original project using the Flash
Builder Compare feature. By comparing the original and edited projects, you
can identify and copy code between projects.
Preparing fi les for a developerAs you design and create your Flash Catalyst project, keep in mind that you have
an internal client—your Flex developer. Th e following tips will help you create a
well-organized Flash Catalyst project that’s prepared for a smooth transition into
Flash Builder.
Meet with your development team earlyA little planning goes a long way. When designing a Flash Catalyst project for Flash
Builder, meet with your developer fi rst to discuss which Flash Catalyst components
and properties to use. If you’ve created a design specifi cation, provide that to your
developer along with the Flash Catalyst project fi le.

ptg
246 LESSON 13 Extending Your Project Using Adobe Flash Builder
Use data lists and design-time dataIf your application presents a list of items (images or text) from an external data
source, you do not need to add every item to the component in Flash Catalyst.
Instead, add a few design-time data items as a prototype. Be sure to include enough
to demonstrate the desired look and behavior of the component. For example, if the
list is meant to scroll, include enough data to activate the scroll bar. A nice thing
about creating your data lists in Flash Catalyst is that the states of your repeated
item are preserved in Flash Builder. Th e Normal, Over, and Selected states look and
behave the same for every record.
Name everythingUse descriptive names for all layers and objects in the Layers panel. Give unique and
identifi able names to all page states, components, and component states. Give all
library assets unique names that your developer can recognize. Your developer will
thank you for it.
Delete unused assetsIn just about every project, you’ll end up with at least a few unused assets. Using
the Library panel in Flash Catalyst, remove any components, images, media, and
optimized graphics that aren’t being used in the project. Th e less clutter you bring
into Flash Builder the better. Removing these assets also keeps your fi le to a more
manageable size.
Opening a Flash Catalyst project in Flash BuilderLet’s take a look at the main steps for getting a Flash Catalyst project into Flash
Builder. We’ll start by viewing a fi nal Flash Catalyst project fi le (FXP) and importing
the fi le into Flash Builder. After that, we’ll import an edited version of the project
and use the Compare feature to integrate the changes between the old and new
projects.
Review the fi nal Flash Catalyst project fi le (FXP)A Flash Catalyst project is a Flex project. To make sure your developer is working
with the most recent copy of the project fi le (FXP), it’s always a good idea to open
the fi le, review the elements that need further development, and resave the fi le
before handing it over to a developer.
Let’s open a fi nished copy of the Restaurant Guide application. We’ll take a look at
what needs to be completed in Flash Builder.

ptg
ADOBE FLASH CATALYST CS5 CLASSROOM IN A BOOK 247
1 Start Flash Catalyst, browse to the Lesson13 folder on your hard drive, and open
the Lesson13_Restaurants.fxp fi le.
2 Choose File > Run Project.
Th e application includes a list of restaurants. You can use the left and right scroll
arrows to see more restaurants. Th is is a Data List component displaying design-
time data. A developer can connect this to a data source, thereby extending the
list to an unlimited number of restaurants stored in a database. As the restaurant
information changes, the list remains current without the need to redesign or
republish the application.
3 Click any restaurant and choose Reviews.
Th e application includes another data list with sample design-time customer
reviews. Th e reviews need to be replaced by real reviews.

ptg
248 LESSON 13 Extending Your Project Using Adobe Flash Builder
4 Click Post Review.
Nothing happens. Th is feature requires that users add new reviews, or records,
to the database. Th is can be implemented using Flash Builder.
5 Click Build Your Order (on the right side of the window).
Users can fi ll out a form and submit their order. Th is feature can be
implemented using Flash Builder.
6 Close the browser and return to Flash Catalyst.
Normally, you would save any last minute changes that you’ve made, but this fi le
is already complete and ready to import into Flash Builder.
7 Close the project and exit Flash Catalyst.
Import the FXP into Flash BuilderTo bring your design into Flash Builder, you will start Flash Builder and import
the FXP fi le. You’ll have the option to import a fi le or a project folder. You want to
import the FXP fi le that you created and saved in Flash Catalyst.
You need to have Adobe Flash Builder installed to complete this exercise.
1 Start Flash Builder.
2 Choose File > Import Flex Project (FXP).
Th e Import Flex Project dialog box opens. Th e entire project is stored in a single
fi le, so we’ll leave the File option selected.
� Note: When importing an FXP project created with Adobe Flash Catalyst, the imported project can contain references to fonts that are not available on your system. The Import wizard provides the option to fi x font references using CSS. If you select this option, Flash Builder imports the Flash Catalyst style sheet Main.css. Main.css contains references to the fonts used in the project.

ptg
ADOBE FLASH CATALYST CS5 CLASSROOM IN A BOOK 249
3 Browse to the Lesson13 folder on your hard drive, select the Lesson13_
Restaurants.fxp fi le, and click Open.
Th e path to the fi le is added to the dialog box. Flash Builder will create a new
project and import the code and assets that Flash Catalyst generated during the
interaction design phase of the project.
4 Click Finish.
Th e new Flex project is created.
5 In the Package Explorer (on the left), expand the project and then expand the src
and assets folders.
Th e project includes any assets (graphics, images, and media) that you added to
the project in Flash Builder.
6 Expand the images folder to view the images in the project.
7 Collapse the images folder, and expand the media folder to see the media for
the project.
� Note: If you import the same FXP or FXPL fi le again, a new project is added with the same name, followed by the number 2. If you add it again, the name is followed by 3, and so on. To remove these fi les, you need to delete the project by selecting it in the Package Explorer and choosing Edit > Delete > Yes. You must also delete the project folder at the location you specifi ed when you imported the fi le.
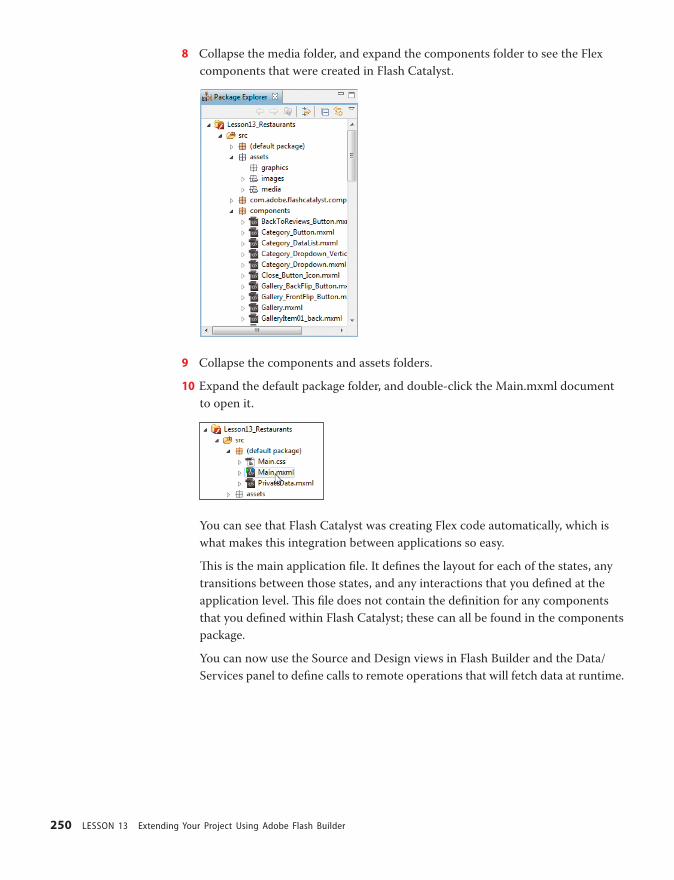
ptg
250 LESSON 13 Extending Your Project Using Adobe Flash Builder
8 Collapse the media folder, and expand the components folder to see the Flex
components that were created in Flash Catalyst.
9 Collapse the components and assets folders.
10 Expand the default package folder, and double-click the Main.mxml document
to open it.
You can see that Flash Catalyst was creating Flex code automatically, which is
what makes this integration between applications so easy.
Th is is the main application fi le. It defi nes the layout for each of the states, any
transitions between those states, and any interactions that you defi ned at the
application level. Th is fi le does not contain the defi nition for any components
that you defi ned within Flash Catalyst; these can all be found in the components
package.
You can now use the Source and Design views in Flash Builder and the Data/
Services panel to defi ne calls to remote operations that will fetch data at runtime.
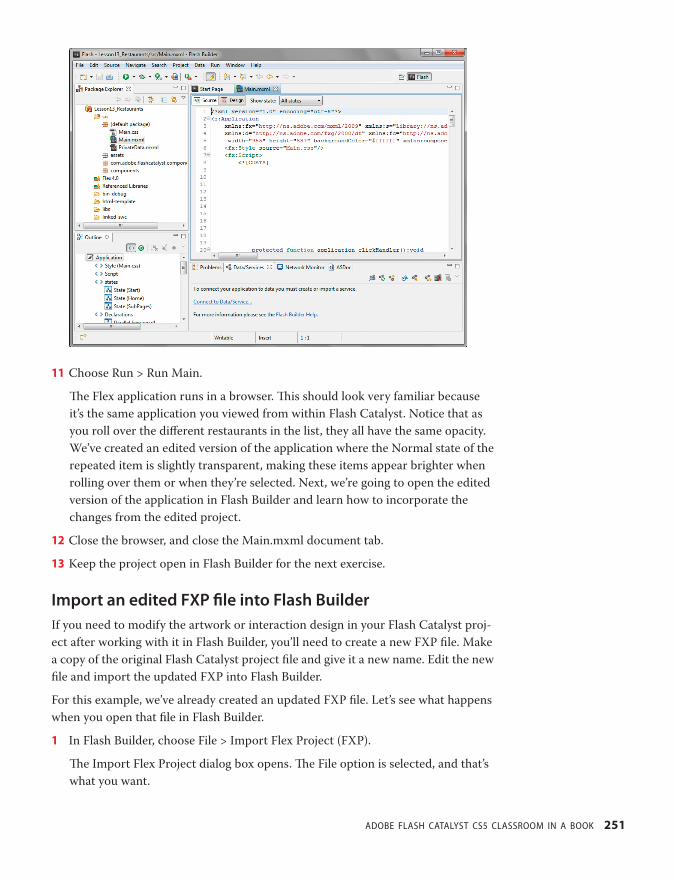
ptg
ADOBE FLASH CATALYST CS5 CLASSROOM IN A BOOK 251
11 Choose Run > Run Main.
Th e Flex application runs in a browser. Th is should look very familiar because
it’s the same application you viewed from within Flash Catalyst. Notice that as
you roll over the diff erent restaurants in the list, they all have the same opacity.
We’ve created an edited version of the application where the Normal state of the
repeated item is slightly transparent, making these items appear brighter when
rolling over them or when they’re selected. Next, we’re going to open the edited
version of the application in Flash Builder and learn how to incorporate the
changes from the edited project.
12 Close the browser, and close the Main.mxml document tab.
13 Keep the project open in Flash Builder for the next exercise.
Import an edited FXP fi le into Flash BuilderIf you need to modify the artwork or interaction design in your Flash Catalyst proj-
ect after working with it in Flash Builder, you’ll need to create a new FXP fi le. Make
a copy of the original Flash Catalyst project fi le and give it a new name. Edit the new
fi le and import the updated FXP into Flash Builder.
For this example, we’ve already created an updated FXP fi le. Let’s see what happens
when you open that fi le in Flash Builder.
1 In Flash Builder, choose File > Import Flex Project (FXP).
Th e Import Flex Project dialog box opens. Th e File option is selected, and that’s
what you want.

ptg
252 LESSON 13 Extending Your Project Using Adobe Flash Builder
2 Browse to the Lesson13 folder on your hard drive, select the Lesson13_Edit.fxp
fi le, and click Open.
Th e path to the fi le is added to the dialog box. Flash Builder will create a new
project and import the edited version of the code and assets.
3 Click Finish.
Th e new project, Lesson13_Edit, is added to the Package Explorer. With both
projects open in Flash Builder, you can compare and update any code that has
changed.
4 Leave both projects open for the next exercise.
Compare and integrate code between projectsYou can use the Flash Builder Compare feature to incorporate the changes from the
edited Flash Catalyst project into the original copy of the project in Flash Builder.
1 In the Package Explorer, right-click Lesson13_Edit and choose Compare Project
With Version > Lesson13_Restaurants.
Flash Builder compares all the fi les contained within both projects and provides
a list of fi les in which there are diff erences.
2 In the Structure Compare pane of the Compare tab, expand the src folder,
expand the components folder, and double-click the RepeatedItem4.mxml
document to open it.
Th e two versions of the RepeatedItem4.mxml document open side by side.
Th e compare tool provides a visual preview of the diff erences between the
original and the new fi le so that you can determine whether a change should be
incorporated into the project. Any diff erences in the code are highlighted. In
this case, the opacity in the Normal state of the repeated item has changed, as
shown in Line 30 of the code.

ptg
ADOBE FLASH CATALYST CS5 CLASSROOM IN A BOOK 253
You can use the toolbar to step through the changes and to copy changed code from
the left to right window, or from right to left as appropriate.
Copy All From Left To Right
Next/Previous Diff erence
Next/Previous Change
Copy All Non-Confl icting Changes From Right To Left
Copy Current Changes From Left To Right/Right To Left
3 Click the Copy All From Left To Right icon.
4 Close the Compare tab.
A message asks if you want to save the change you made to the code.
5 Click Yes to save the changes.
6 In the Package Explorer, double-click to open the Main.mxml fi le for the
Lesson13_Restaurants project.
7 Choose Run > Run Main to open the project in a browser.
Th e edits we made in Flash Catalyst show up in the original Flash Builder
project. Now the restaurants in the data list begin slightly dimmed (due to the
change in opacity), and when you roll over them, they appear brighter. If you
select a restaurant and then return to the Main Menu, the selected item appears
brighter than the others.
8 Close the browser and return to Flash Builder.
9 Close the Main.mxml document tab.

ptg
254 LESSON 13 Extending Your Project Using Adobe Flash Builder
Importing a Flash Catalyst library fi le (FXPL)An FXPL contains only the component skins, item renderers, custom components,
and supporting assets that you’ve defi ned in your project and not the main appli-
cation MXML document. Th is makes the Flash Catalyst Library Package ideal for
sharing a set of reuseable component designs across multiple Flash Catalyst proj-
ects and makes it possible to deliver updated sets of component skins in a single
package for use in Flash Builder.
Import the FXPLWhen you import a Flash Catalyst Library Package (FXPL) into Flash Builder, a Flex
Library project is created. Th is type of project contains code that has been designed
for use with one or more Flex applications.
1 In Flash Builder, choose File > Import Flex Project (FXP).
Th e Import Flex Project dialog box opens. Th e File option is selected, and that’s
what you want.
2 Browse to the Lesson13 folder on your hard drive, select Restaurants_library.fxpl,
and click Open.
Th e path to the fi le is added to the dialog box. You have the option of importing
the library as a new project or importing the contents of the library directly into
an existing project.
3 Click Finish to import the library package as a new Library project in
Flash Builder.

ptg
ADOBE FLASH CATALYST CS5 CLASSROOM IN A BOOK 255
Th e Flex Library project, Restaurants_library, is added to the Package Explorer.
You can now associate this library with any existing application.
Library project
Associate the FXPL with your applicationNow that you’ve imported the Flash Catalyst Library Package (FXPL) as a new Flex
Library project in Flash Builder, you can associate the library and its assets with one
or more Flex projects.
1 Select Lesson13_Restaurants in the Package Explorer and choose File >
Properties.
2 Select Flex Build Path in the left pane.
3 On the Library Path tab, click Add Project.
Th e Add Project Library dialog box shows any Flex Library projects you
have open.

ptg
256 LESSON 13 Extending Your Project Using Adobe Flash Builder
4 Select Restaurants_library and click OK.
Th e Restauraunts_library is added to the list of build path libraries. When you
compile the application, the relevant code from the Library project will be
included automatically in your compiled SWF fi le.
Th e components package containing all the component skins, as created by
Flash Catalyst, is now available for use within your Flex application, and you can
associate skins with appropriate components using the skinClass attribute on the
component tag or in a CSS document.
� Tip: When additional component skins become available or existing skins are updated, you can import a new FXPL fi le and replace the existing Flex Library project. The new component skins are available within your Flex application. For this approach to work, avoid making changes to the fi les within the components package in Flash Builder.
Congratulations. You’ve reached the end of this course on Adobe Flash Catalyst CS5.
We’ve covered a lot of information, but when you think about the potential for
designing rich Internet applications using Flash Catalyst, we’ve really just scratched
the surface.
Now it’s time to take what you’ve learned and combine it with a little more practice
and some imagination. Before you know it, you’ll be quickly turning your favorite
design ideas into fully functioning web and desktop applications. Have fun.
ptg
ADOBE FLASH CATALYST CS5 CLASSROOM IN A BOOK 257
Review questions1 What are some reasons you would bring your Flash Catalyst project into Flash Builder
for further development?
2 What service types can you connect to in Flash Builder?
3 What does CRUD functionality refer to?
4 What are some things that you can do to make your Flash Catalyst fi le (FXP) easier to
work with in Flash Builder?
5 Which fi le do you open in Flash Builder to run the application?
6 If you need to make changes to the Flash Catalyst document after development has
begun in Flash Builder, what should you do?
7 How can you add components that you’ve designed in Flash Catalyst to a project in
Flash Builder?
Review answers1 Although you can use Flash Catalyst to publish fully functional applications, or
microsites, many RIAs require additional development, such as binding a component
to a data source or web service.
2 BlazeDS, ColdFusion, HTTP, LCDS, PHP, WSDL (Web Service), and XML.
3 Create, Read, Update, and Delete. You can use Flash Catalyst to design a data
management control center used to view, edit, add, and delete records in a database. A
developer can use Flash Builder to map CRUD functionality to data service calls, and
then apply them to the controls you design in Flash Catalyst.
4 Use design-time data in a Data List component. Use descriptive names for pages, states,
layers, and assets in the library. Delete assets from the library if they’re not used in the
application.
5 Open the Main.mxml fi le, and choose Run > Run Main.
6 Save a backup copy of the original FXP document. Edit the copy and import the copy
into Flash Builder as a new project. Use the Compare feature in Flash Builder to
compare changes to the code and update the project.
7 In Flash Catalyst, export the project library. Th en, import the library as a new Flex
Library project in Flash Builder and associate it with the application by adding it to the
application’s list of build path libraries.

ptg
This page intentionally left blank

ptg
ADOBE FLASH CATALYST CS5 CLASSROOM IN A BOOK 259
A
AAC fi les, 144
about this book, 1–2
accessibility support, 103, 229
Accessible Text property, 103, 151
Acrobat.com website, 7
action sequences, 124, 138–140
adding, 138–139
editing, 139–140
sound eff ects for, 157–160
See also transitions
ActionScript 3.0, 14, 165, 166
Add Action menu, 136, 137, 139, 140
Add Project Library dialog box, 255
Add Server button, 237
Adjustment layers, 32
Adobe AIR, 2, 3, 13, 228
See also AIR applications
Adobe Application Manager, 3
Adobe Authorized Training Center (AATC), 6
Adobe BrowserLab, 7
Adobe Certifi ed Associate (ACA), 6
Adobe Certifi ed Expert (ACE), 6
Adobe Certifi ed Instructor (ACI), 6
Adobe Certifi ed programs, 6
Adobe Community Help, 4, 24–25
Adobe Creative Suite, 2, 7
Adobe CS Live, 7
Adobe CS Review, 7
Adobe Design Center, 5
Adobe Developer Connection, 5, 145
Adobe Dreamweaver. See Dreamweaver CS5
Adobe Fireworks. See Fireworks
Adobe Flash Builder. See Flash Builder
Adobe Flash Catalyst CS5. See Flash
Catalyst CS5
Adobe Flash Catalyst CS5 Classroom in
a Book
about, 1–2
copying lesson fi les from CD, 3-4
how to use lessons in, 4
prerequisites for using, 2
standard elements in, 4–5
Adobe Flash Platform, 13
Adobe Flash Player, 2, 3, 13, 144, 232
Adobe Flash Professional, 13, 165, 166
Adobe Flex 4 Software Development Kit
(SDK), 1, 14
Adobe Flex framework, 13, 14
Adobe forums, 6
Adobe Illustrator. See Illustrator
Adobe Labs, 6
Adobe Marketplace & Exchange, 6
Adobe Media Encoder CS5, 2
Adobe Media Player, 2
Adobe Photoshop. See Photoshop
Adobe Story, 7
Adobe TV, 5
Adobe Updater, 3
Advanced Audio Encoding (AAC) fi les, 144
AIR applications, 3, 10, 228, 231, 233–234
Align commands, 41
animations
eff ects for playing, 174
previewing SWF, 168
time-based, 124
See also SWF fi les; transitions
Application Install dialog box, 233
Application Manager dialog box, 3
applications
AIR, 3, 10, 228, 231, 233–234
deploy-to-web, 228, 231, 232
extending with Flash Builder, 242–244
optimizing, 229
planning, 12
publishing, 226–239
run-local, 228, 231, 232–233
starting with interactions, 120
structuring, 30–32
uploading, 238
video in, 148–151
See also rich Internet applications
Area text, 111
INDEX

ptg
260 INDEX
B
Back/Next buttons, 104–105
Background File Activity dialog box, 238
bevel fi lter, 217
bitmap images
compressing, 53
project library and, 55
vector graphics vs., 43
blank page states, 81–84
adding objects to, 82–84
creating, 81–82
blend modes, 224
boldface text, 4
Bounce easing option, 132
Breadcrumbs bar, 17, 93
Bring to Front command, 70
browsers. See web browsers
built-in components, 99–113
converting artwork to, 99–113
list of included, 99
navigation buttons, 101–104
next and previous buttons, 104–105
scroll bars, 106–109
scroll panels, 112–113
toggle buttons, 105–106
Button components, 92–94
converting artwork to, 100–101
states available for, 93
buttons
animation added to, 172–174
clickable area of, 155
converting artwork to, 100–101
enabling/disabling, 103–104
labels for, 102
navigation, 101–104
next and previous, 104–105
radio, 96
toggle, 105–106
wireframe, 91–94, 96
C
CD lesson fi les, 3–4
check boxes, 96–97
Checkbox component, 96–97
Choose Root Folder dialog box, 236
circles, drawing, 206–207
Classic text, 166
clipped artwork, 38
Code panel, 18
Code workspace, 18
Arrange commands, 70–71
arrow keys, 41
artboard, 16
blank, 81
dragging assets to, 54
importing images to, 40
importing SWF fi les to, 167
panning, 22
positioning images in, 41
video added to, 148–149
zooming, 21
artwork
buttons from, 100–106
clipping of, 38
converting to components, 99–113
copying and pasting, 40
creating sample, 35
dimmed in Layers panel, 84
drawing, 196–218
fi lters for, 216–218
fl attening, 32
grouping, 214–215
importing, 30, 31, 37–41
layers for organizing, 32
naming convention for, 33
optimizing, 41–43
round-trip editing of, 219–223
scroll bars from, 106–109
scrolling panels from, 112–113
showing/hiding in page states, 78–80
stacking, 69–70
transforming, 215
See also design documents
assets
adding to the Library panel, 48, 49–50
creating/acquiring, 12
deleting from projects, 52–53
identifying duplicate, 34
importing into Flash Catalyst, 12
Library panel categories of, 48, 49
removing unused, 246
renaming, 53–54, 99
selecting from Library panel, 55
audio
importing, 147
previewing, 147–148
volume setting, 151
See also sound eff ects; sound fi les
audio-only FLV fi les, 160
Auto Change Warning message, 107, 112
Automatic conversion option, 39
automatic updates, 3

ptg
ADOBE FLASH CATALYST CS5 CLASSROOM IN A BOOK 261
codecs, video, 144
collapsing layers, 62–63
color
blended, 224
fi ll, 208–209
gradient, 212–214
hexadecimal codes for, 210
stroke, 211–212
Color Picker, 94, 208
combo box control, 243
Community Help, 4, 24–25
Compare feature, 252–253
complex objects, 32
component states, 76
deleting, 85
duplicating, 77
naming, 78
See also page states
components, 48, 88–121
animating, 172–174
built-in, 99–113
buttons, 91–94, 101–106
check boxes, 96–97
converting artwork to, 99–113
creating, 12, 90
custom, 113–114
data list, 35, 178–188
duplicating, 99
editing, 90, 93, 98
identifying duplicate, 34
interactions added to, 115–120
navigation buttons, 101–104
nesting, 23, 181
next and previous buttons, 104–105
overview of lesson on, 88
radio buttons, 96
renaming, 99
review questions/answers on, 121
scroll bars, 97–98, 106–109
scroll panels, 112–113
setting properties for, 35
skinning of, 100
states of, 13, 76
SWF fi les added to, 172–174
text input fi elds, 95
toggle buttons, 105–106
views or states of, 76
wireframe, 91–98
Compress Image dialog box, 53
Compress option, 42
compressing images, 53
conditional interactions, 116–118
data lists and, 118
steps for creating, 117–118
Connect to Remote Host icon, 238
contiguous selections, 101
controls
attaching to video, 152–154
SWF fi le playback, 169–172
Convert to Linked Image option, 42
copying and pasting
artwork, 40
text, 110
Create New Layer icon, 69
Create New Profi le button, 166
Create New Sublayer icon, 69
creative directors, 10
Crop option, 39
CRUD functionality, 243
custom components, 23, 113–114
Custom/Generic Component option, 113–114
D
Data List components, 35, 178–188
binding to data source, 242
creating, 181–184
design-time data, 188–193
editing, 191
previewing, 179–180
properties, 185–188
repeated items, 184, 185–188
sample records, 181–183
wireframe, 194
data lists, 176–195
conditional interactions in, 118
design-time data in, 179, 188–193
explanation of, 178
external data sources for, 188
opening to specifi c records, 190
overview of lesson on, 176
preparing for developers, 246
previewing, 179–180
repeated items in, 184, 185–188
review questions/answers on, 195
sample records for, 181–183
setting properties for, 185–188
steps for creating, 181–184
types of, 178–179
wireframe, 194
data-centric applications, 12, 228
Default easing option, 132
default transitions, 125–126, 131

ptg
262 INDEX
gradient fi lls, 212–214
grid and guide for, 200–201
grouping objects and, 214–215
overview of lesson on, 196
previewing an example of, 203
rectangles, 203–206
review questions/answers on, 224–225
rounded rectangles, 205–206
rulers for, 199–200
sizing/positioning objects and, 216
stroke color/weight for, 211–212
tools for, 198–199
transforming shapes and, 215
Dreamweaver CS5, 235–238
application fi le uploads, 238
local root folder creation, 235–236
remote site connection, 236–237
drop shadows, 151, 218
dummy content. See design-time data
duplicate components, 34
Duplicate State option, 77
duplicating
components, 99
page states, 77
duration of transitions, 128, 130–131
dynamic loading of content, 165
E
easing transitions, 132–133
editable text, 39
editing
action sequences, 139–140
artwork, 219–223
components, 90, 93, 98, 191
data lists, 191
design-time text, 190
round-trip, 219–223
video, 146
Edit-In-Place mode, 76, 90, 93, 184, 191, 201
educator resources, 6
Eff ect bar
helper eff ects, 140
transition eff ects, 130, 131, 137
eff ects
action sequence, 138–140
easing applied to, 132–133
fl attening artwork containing, 32
helper, 140
multiple, 136–138
playing animations using, 174
purpose for adding, 138
Delay value, 131, 140, 159
Delete icon, 52, 69, 85, 229
deleting
assets from projects, 52–53
design-time data, 191
interactions, 116
layers, 69
objects, 229
page states, 85
unused assets, 246
See also removing
deploy-to-web applications, 228, 231, 232
descriptive names, 246
design applications, 30
design documents
embedding images in, 33
fl attening artwork in, 32
grouping complex objects in, 32
hiding or locking layers in, 36
identifying duplicate items in, 34
importing, 12, 37–38, 39
managing fonts in, 34
naming strategy for, 33
preparing to import, 30–36
sample artwork for, 35
See also artwork
Design page, Timelines panel, 127
design portfolios, 1
Design workspace, 15–17
features, 15–17
illustrated, 15
navigating, 19–22
designer-developer workfl ows, 244–245
design-time data, 188–193
adding, 191
deleting, 191
editing, 190
explained, 179
repeated item changes, 191–193
replacing, 188–190
Design-Time Data panel, 17, 188–191
Developer Connection, 5, 145
Direct Select tool, 198, 205
disabling buttons, 103–104
Display As Password property, 95
displaying. See showing/hiding
documents. See design documents
drawing, 196–218
basic lines, 207
ellipses, 206–207
fi ll color, 208–209
fi lters for, 216–218
ptg
ADOBE FLASH CATALYST CS5 CLASSROOM IN A BOOK 263
names of objects imported from, 66
Fit Height text, 111
Flash Beep.mp3 fi le, 158–159
Flash Builder, 1, 13, 240–257
Compare feature, 252–253
designer-developer workfl ows and, 244–245
extending applications with, 242–244
importing FXP fi les into, 248–252
importing FXPL fi les into, 57, 249, 254–256
integrating project code in, 252–253
opening Flash Catalyst projects in, 246–253
overview of lesson on, 240
preparing fi les for, 245–246
review questions/answers on, 257
Flash Catalyst CS5
about, 10–14
benefi ts for designers, 11
design workfl ow, 12–13
Help and Support, 5, 24–25
installing, 2
key features, 11
limitations of, 242
overview of, 1, 10–14
performance optimization, 2
product home page, 6
project library, 46–59
resources, 5–6
updating, 3
Welcome screen, 14, 37
workspaces, 15–18
Flash Catalyst Library Package (FXPL) fi les, 56–57,
254–256
associating with applications, 255–256
importing into Flash Builder, 57, 249, 254–256
Flash Player, 2, 3, 13, 144, 232
Flash Professional, 13, 165, 166
Flash video (FLV) fi les, 144, 160
Flash XML Graphics format. See FXG fi les
fl attening artwork, 32, 39
Flex 4 Software Development Kit (SDK), 1, 14
Flex Builder, 1, 242
Flex compiler, 14
Flex component library, 14
Flex framework, 13, 14, 232
Flex Library Build Path option, 255
Flex Library projects
associating with applications, 255–256
imported FXPL fi les and, 57, 254–255, 256
FLV (Flash video) fi les, 144
audio-only, 160
focus ring, 98
swapping, 134–136
transition, 125–138, 174
Elastic easing option, 132
Ellipse tool, 198, 206–207
ellipses, drawing, 206–207
embedding
fonts, 229, 230–231
images, 33, 57
enabling/disabling buttons, 103–104
encoding video, 144–145
Expand/Collapse icon, 238
expanding layers, 62–63
Export Library Package icon, 56
exporting
Flash Catalyst library packages, 56
FXG fi les from Fireworks, 36
external links, 119–120
eyeball icon, 82–83
Eyedropper tool, 209
F
F4V video fi les, 144
fade eff ects, 84, 128–129, 131
Fade In/Out transitions, 129
Feature page, Timelines panel, 127
fi delity
import, 38, 39
transition, 140
File Transfer Protocol (FTP) client, 235
fi lename extensions
accepted in Flash Catalyst, 40
for Flash Catalyst Library Packages, 56
for Flash Catalyst projects, 19
fi les
copying from CD, 3–4
dynamic loading of, 165
overwriting existing, 231
previewing in Library panel, 51–52
reducing the size of, 229
See also specifi c types of fi les
Files panel, 236, 238
fi ll color, 208–209
Fill Color swatch, 94, 208–209
fi lters, 216–218
bevel, 217
drop shadow, 151, 218
fl attening artwork containing, 32
fi ne-tuning transitions, 129–133
Fireworks
color mode setting, 30
exporting FXG fi les from, 36

ptg
264 INDEX
ungrouping, 66
guides, 200–202
adjusting settings for, 200–201
setting for precise drawing, 201–202
H
H.264 video codec, 144
Hand tool, 22, 199
Heads-Up Display (HUD), 17
Help and Support resources, 5, 24–25
helper eff ects, 140
hexadecimal color codes, 210
Hexagon tool, 198
hiding
artwork in page states, 78–80
grid and guides, 200
layers, 36, 63–64
rulers, 199–200
Horizontal layout option, 186
horizontal scroll bars, 97, 106
horizontal sliders, 243
I
Illustrator
design document preparation, 30
editing artwork in, 219, 220–221
fi lters supported in Flash Catalyst, 32
importing documents from, 37–38, 39
multiple artboards in, 12, 31
names of objects imported from, 66
Illustrator Import Options dialog box, 37
Image Slider component, 148–149, 152
images, 48
bitmap vs. vector, 43
compressing, 53
design-time, 188–190
embedded, 33, 57
importing, 40
linked, 57
positioning, 41
previewing, 51
See also artwork
Import dialog box, 147, 158
Import Flex Project dialog box, 248–249, 251, 254
Import Library Package icon, 56, 57
Import Library Project dialog box, 57
Import Non-Visible Layers option, 38
importing
artwork, 30, 31, 37–41
folders
AIR, 231, 233–234
deploy-to-web, 231, 232
layer, 62, 69
local root, 235–236
run-local, 231, 232–233
Font Embedding dialog box, 230
fonts
embedding, 229, 230–231
managing, 34
forums, Adobe, 6
Frame value, 172
frame-based animation, 124
FTP client, 235
FXG fi les, 30
exporting from Fireworks, 36
importing into Flash Catalyst, 30
installing for Photoshop, 221
FXP fi les, 19
importing into Flash Builder, 248–252
reviewing in Flash Catalyst, 246–248
saving and sharing, 228
FXPL fi les, 56–57, 254–256
associating with applications, 255–256
importing into Flash Builder, 57, 249, 254–256
G
Go To Frame And Play eff ect, 171–172
Go To Frame And Stop eff ect, 172
Go To URL interaction, 119
gradient color stops, 212, 213
Gradient Fill property, 212, 213
gradient fi lls, 212–214
Gradient Stroke property, 211
gradient swatch, 212
graphic designers, 10
graphics
bitmap vs. vector, 43
compressing, 229
in Library panel, 48
optimizing, 42, 50, 68, 229
See also artwork
grid, 200–201
Grid & Guide Settings dialog box, 200, 201
groups
benefi ts of, 214
creating, 32, 66, 215
optimizing complex, 67–68
radio button, 96
renaming, 66–67
ptg
ADOBE FLASH CATALYST CS5 CLASSROOM IN A BOOK 265
L
labels, button, 102
Layer Comps, 12, 31
layer folders, 62, 69
Layer Groups, 32
layers, 60–73
adding, 69
arranging, 70–71
deleting, 69
expanding/collapsing, 62–63
hiding, 36
locking/unlocking, 36, 65
naming convention for, 33
organizing artwork using, 32
overview of lesson on, 60
renaming, 63
review questions/answers on, 72–73
showing/hiding, 36, 63–64
stacking order of, 69–71, 77
Layers panel, 16, 60–73
dimmed objects in, 82, 84
editing components in, 93
grouping objects in, 66
illustrated, 62
optimizing complex groups in, 67–68
renaming objects in, 54, 66–67
stacking order in, 69–71
states viewed in, 80
lesson fi les, 3–4
Letterbox video option, 150
library packages
exporting, 56
importing, 57
Library panel, 16, 46–59
adding assets to, 48, 49–50
compressing images in, 53
deleting assets from, 52–53
dragging SWF fi les from, 166
overview of lesson on, 46
previewing fi les in, 51–52, 147–148
renaming assets in, 53–54
review questions/answers on, 58–59
types of assets in, 48
using assets in, 54–55
video and sound fi les in, 147–148
wireframe components and, 92, 94
See also project library
Line tool, 199, 207
Linear easing option, 132
linear workfl ow, 244–245
design documents, 12, 37–38, 39
fi delity options for, 38, 39
fi le size limits for, 37
images, 40
library packages, 57
sound fi les, 147
SWF fi les, 166–167
video, 147
Include Unused Symbols option, 38
information architects, 10
information resources, 5–6
installing Flash Catalyst, 2
instances, 34
best practice for using, 38
link between source fi les and, 50, 54
removing all for specifi c assets, 52–53
renaming in the Layers panel, 54
integrated development environment (IDE),
14, 242
integrating code, 252–253
interactions, 13, 90, 115–120
action sequence, 124, 138–140
built-in, 115
conditional, 116–118
deleting, 116
external link, 119–120
modifying, 116
On Application Start, 120
page navigation, 116
review questions/answers on, 121
triggering, 115
video control, 155
Interactions panel, 16, 116
interactive ads, 1, 9
interactive components. See components
interactive links, 119–120
interactive web designers, 10
Internet applications. See rich Internet applications
italicized text, 4
Item Highlight Rectangle, 187
iterative workfl ow, 245
K
Keep editable option, 39
keyboard shortcuts, 4
for opening projects, 19
for shape tools, 205
keyword search, 243
Knockout Drop Shadow property, 218
ptg
266 INDEX
NetAverages, 7
New Blank State option, 81
New Project dialog box, 15
next/previous buttons, 104–105
non-contiguous selections, 66, 101
notes and tips, 4
O
objects
adding to states, 82–84
deleting, 229
dimmed in Layers panel, 82, 84
fading in/out, 84
grouping, 32, 66, 215
positioning, 216
removing from states, 69, 80, 84–85
renaming, 66–67
selecting range of, 66, 101
sharing to states, 80
sizing, 216
stacking, 69–70
Octagon tool, 198
On2 VP6 video codec, 144
On Application Start interactions, 120, 169
On Click interactions, 115, 116–117, 155, 160
On Roll Over interactions, 160
Opacity setting, 84, 154, 201
opening
existing projects, 19
new projects, 14–15
Optimize Vector Graphics option, 42, 50, 68
Optimized Graphics category, 38, 48, 50
optimizing
artwork, 41–43
complex groups, 67–68
pre-publishing, 229
program performance, 3
Over state, 187
Overwrite Existing Eff ects option, 128
P
Package Explorer, 249, 252
padding, 186
padlock icon, 65
page navigation, 116
Page Size property, 108
page states, 76–80
adding objects to, 82–84
creating blank, 81–82
lines, drawing, 207
Linked Image icon, 57
linked images, 57
links
interactive, 119–120
links (continued)
non-functioning, 233
local root folder, 235–236
locking
guides, 202
layers, 36, 65
M
Mac commands/keystrokes, 4
magnifi cation options, 21
Main.mxml document, 250, 251
Main.swf fi le, 231, 232
Manage Sites dialog box, 236
managing fonts, 34
Map transition, 129
marginal tips and notes, 4
Max Characters property, 95
media, 48
previewing in Library panel, 51, 147–148
See also audio; video
menu commands, 4
merging shared libraries, 166
microsites, 12
Modify menu, 41
Move eff ect, 130, 131, 134–136
movies. See video
MP3 fi le format, 144
MXML code, 14, 18
N
naming/renaming
assets, 53–54
components, 99
descriptive, 246
groups, 66–67
layers, 33, 63
pages, 78
navigation
button components for, 101–103
of Design workspace, 19–22
navigation buttons, 101–104
creating reusable, 101–103
enabling/disabling, 103–104
nesting components, 23, 181

ptg
ADOBE FLASH CATALYST CS5 CLASSROOM IN A BOOK 267
previewing
data lists, 179–180
drawing samples, 203
fi les in the Library panel, 51–52
projects in a browser, 22–23
sound fi les, 147–148
SWF animations, 168
video, 147–148
previous/next buttons, 104–105
printer controls, 244
Problems panel, 18
product guides, 1
product home page, 6
profi les, publish, 166
project (FXP) fi les, 19
importing into Flash Builder, 248–252
reviewing in Flash Catalyst, 246–248
saving and sharing, 228
project library, 46–59
compressing images in, 53
deleting assets from, 52–53
importing assets into, 48–50
overview of lesson on, 46
previewing fi les in, 51–52, 147–148
renaming assets in, 53–54
review questions/answers on, 58–59
sharing, 56–57
SWF fi les added to, 166
types of assets in, 48
using assets in, 54–55
video and sound fi les in, 147–148
See also Library panel
Project Navigator panel, 18
projects
deleting assets from, 52–53
extending with Flash Builder, 240–257
fi lename extension for, 19
opening existing, 19
opening new, 14–15
previewing in a browser, 22–23
publishing, 13, 226–239
running, 98
testing, 13
properties
data list, 185–188
scroll bar, 108
setting for components, 35, 94
sharing across states, 80
sound eff ect, 159
text input fi eld, 95
transition, 130–131, 132–133
video player, 150–151
deleting, 85
duplicating, 77
limiting use of, 76
naming/renaming, 78
removing objects from, 84–85
review questions/answers on, 86
sharing objects to, 80
showing/hiding artwork in, 78–80
viewing in Pages/States panel, 76, 93
Pages/States panel, 16
creating blank states in, 81–82
deleting objects from states in, 84
moving between pages in, 20
viewing states in, 76, 93
panels
adjusting, 20–21
moving between, 20
See also specifi c panels
panning the artboard, 22
password display, 95
pasting. See copying and pasting
Photoshop
Adjustment layers in, 32
advanced import options, 39
color mode setting, 30
design document preparation, 30
editing artwork in, 219, 222–223
fl attening artwork created in, 32
FXG extensions for, 221
importing fi les from, 12, 39
Layer Comps in, 12, 31
names of objects imported from, 66
placeholder data, 188
dummy content as, 179
temporary text as, 109
See also design-time data
planning the application, 12, 245
Play Action Sequence interaction, 170
Play Transition button, 127, 128, 154
Play/Pause toggle button, 152
playing
SWF fi les, 169–172
video fi les, 147–148
Point text, 111
positioning
images, 41
objects, 216
SWF fi les, 173
Power easing option, 132
Preferences option, 3
ptg
268 INDEX
remote site connections, 236–237
removing
assets from projects, 52–53
guides from components, 202
objects from states, 69, 80, 84–85
See also deleting
renaming. See naming/renaming
Repeat Delay value, 159
Repeat property, 159
repeated item template, 184, 185–188
bounding box properties, 185–186
defi ning for data lists, 184
layout properties, 186–187
removing elements in, 191–193
state properties, 187–188
resizing. See sizing/resizing
resources, 5–6
Review Popup component, 181
review questions/answers
on components, 121
on data lists, 195
on Flash Builder, 257
on interactions, 121
on layers, 72–73
on project library, 58–59
on publishing projects, 239
on sound eff ects, 161
on SWF fi les, 175
on transitions, 141
on video, 161
RGB color values, 210
rich Internet applications (RIAs), 10
Adobe AIR and, 228
building blocks of, 90
encoding video for, 144–145
extending with Flash Builder, 242–244
Rotate 3D eff ect, 137, 138, 139
Rotate tool, 198, 215
Rounded Rectangle tool, 198, 203, 205–206
rounded rectangles, 205–206
round-trip editing, 219–223
general tips for, 219
in Illustrator, 220–221
in Photoshop, 222–223
review of, 224, 225
royalty-free SWF fi les, 166
rulers, 199–200
Run Project command
for reviewing FXP fi les, 247
for transition eff ects, 125
for wireframe components, 98
run-local applications, 228, 231, 232–233
Properties panel, 17
Accessible Text property, 103
Appearance section of, 224
Common category of, 54, 94, 150
Component section of, 151
Delay property, 159
Display As Password property, 95
Easing pop-up menu, 132–133
Enabled property, 103
Fill Color swatch, 208–209
Filter section of, 151, 217, 218
Gradient Fill property, 212, 213
Layout section of, 186
Max Characters property, 95
Radio Button Group property, 96
Repeat property, 159
State pop-up menu in, 114
Stroke properties, 211
Text section of, 151
Transparency Accepts Mouse property, 101
PSD fi les, 223
Publish to SWF dialog box, 230
publishing projects, 13, 226–239
accessibility support for, 229
delivery options for, 228
Dreamweaver CS5 used for, 235–238
embedded fonts for, 229
optimization ideas for, 229
overview of lesson on, 226
overwriting existing fi les, 231
review questions/answers on, 239
saving custom profi les for, 166
steps in process of, 230–231
viewing published fi les, 231–234
Put Files icon, 238
R
Radio Button component, 96
Radio Button Group property, 96
radio buttons, 96
RAM requirements, 2
raster images, 43
Rasterize option, 42
ReadMe.pdf fi le, 2
records
converting into Data List component, 183
designing for data lists, 181–183
Rectangle tool, 198, 203–204
rectangles
drawing, 203–206
rounded, 205–206
ptg
ADOBE FLASH CATALYST CS5 CLASSROOM IN A BOOK 269
rulers, 199–200
Simplify Layers for FXG script, 223
Simultaneous transition option, 128
Sine easing option, 132
Site Defi nition dialog box, 236
Site Setup dialog box, 235–236
SiteCatalyst NetAverages, 7
sizing/resizing
object positioning and, 216
repeated item bounding box, 185–186
text bounding box, 111, 113
wireframe components, 95, 98
skinClass attribute, 256
skins, 100
custom, 94, 98
replacing, 256
wireframe, 92
sliders
scroll bars vs., 98
setting values using, 243–244
Smart Smoothing transition option, 128
Smooth Transition button, 128
Smooth Transition Options dialog box, 128
Snap Interval property, 108
Snap to Grid feature, 200
Snap to Guides feature, 200
Software Development Kit (SDK), 1, 14
Solid Stroke property, 211
Sorenson Spark video codec, 144
sound eff ects, 157–160
adding to components, 157–160
associating with transitions, 160
review questions/answers on, 161
setting properties for, 159
sound fi les
importing, 147
previewing, 147–148
See also audio
spacing, 186
stacking objects, 69–70
Star tool, 198
State pop-up menu, 114
State Transitions list, 127, 129
states, 74–86
adding objects to, 82–84
creating blank, 81–82
defi ning, 13
deleting, 85
duplicating, 77
limiting use of, 76
naming, 78
overview of lesson on, 74
S
sample records
converting into Data List component, 183
designing for data lists, 181–183
Scale Mode pop-up menu, 150
scaling video, 150–151
scroll bars
converting artwork to, 106–109
sliders compared to, 98
track and thumb for, 97, 106, 107–108, 109
wireframe, 97–98
scroll panels, 112–113
Search fi eld, 17
searches
keyword, 243
SWF fi le, 164
Select Asset dialog box, 55, 158, 189
Select tool, 41, 198, 205, 208
Selected Up state, 156–157
selecting
contiguous range of objects, 101
non-contiguous range of objects, 66, 101
selection handles, 95, 98, 111, 113
Send Backward command, 70
Send Forward command, 70
Send to Back command, 71
shadows, drop, 218
shape tools
Ellipse tool, 206–207
Rectangle tool, 203–205
Rounded Rectangle tool, 205–206
shortcut keys for, 205
shapes
drawing, 203–207
fi ll color for, 208–209
gradient fi lls for, 212–214
stroke color/weight for, 211–212
transforming, 215
shared libraries
library packages and, 56–57
merging in Flash Professional, 166
sharing
objects to states, 80
project libraries, 56–57
Shift-dragging objects, 135
Shockwave Flash fi les. See SWF fi les
shortcut keys. See keyboard shortcuts
showing/hiding
artwork in page states, 78–80
grid and guides, 200
layers, 36, 63–64
ptg
270 INDEX
scroll panel for, 112–113
TLF vs. Classic, 166
types of, 111
video control, 151
text box, 110
Text Input component, 95
text input fi elds, 95
Text Layout Framework (TLF) text, 166
Text tool, 110, 198
thumb, scroll bar, 97, 106, 107–108, 109
Tile layout option, 186
time-based animation, 124
Timelines panel, 16, 124, 127
Add Action menu, 136, 137, 139, 140, 158
Play Transition button, 127, 128
Smooth Transition button, 128
State Transitions section, 127, 129
timing, transition, 131
tips and notes, 4
TLF text, 166
toggle buttons
creating custom, 105–106
resetting after using, 155–157
video control, 152–157
tools, drawing, 198–199
See also specifi c tools
Tools panel, 16, 198
Top Graphic layer, 42–43
track, scroll bar, 97, 106, 107–108, 109
Transform tool, 198, 215
transforming shapes, 215
transitions, 13, 122–138
default, 125–126, 133
description of, 124
duration settings for, 130–131
easing applied to, 132–133
fade eff ects for, 84, 128–129, 131
fi ne-tuning, 129–133
helper eff ects for, 140
multiple eff ects for, 136–138
overview of lesson on, 122
play eff ect added to, 174
preserving fi delity of, 140
review questions/answers on, 141
smooth, 127–129
sound eff ects for, 160
swapping eff ects for, 134–136
time-based animation for, 124
timing for, 131
See also action sequences
states (continued)
page and component, 76
removing objects from, 69, 79, 84–85
repeated item, 187–188
review questions/answers on, 86
setting default, 114
sharing objects to, 80
showing/hiding artwork in, 78–80
stacking order and, 69
viewing, 76
Step Size property, 108
Stretch video option, 151
stroke color/weight, 211–212
Sub Pages component, 181
sublayers, 32
swapping eff ects, 134–136
SWF fi les, 3, 162–175
ActionScript 3.0 and, 166
adding to components, 172–174
controlling playback of, 169–172
creating, 164
description of, 164
eff ects for playing, 174
importing, 166–167
overview of lesson on, 162
playing, 169–172
positioning, 173
previewing, 51, 168
review questions/answers on, 175
royalty-free, 166
searching for, 164
specifi c-frame playback of, 171–172
tips for acquiring, 165–166
TLF text in, 166
swfobject.js code, 232
symbols, Illustrator, 38
system requirements, 2
T
Tab to Focus property, 98
target layers, 62
template, repeated item, 184, 185–188
testing projects, 13
text
accessible, 103, 151
adding, 109–111
converting, 34
design-time, 190
editable, 39
input fi elds, 95

ptg
ADOBE FLASH CATALYST CS5 CLASSROOM IN A BOOK 271
setting properties for, 150–151
VideoPaused state, 155–156, 157
viewing
page and component states, 76, 93
published fi les, 231–234
See also previewing
vision impaired users, 103
volume setting, 151
W
web browsers
playing Flash video in, 144
previewing projects in, 22–23, 168
web designers, 10
websites
deploying applications to, 228, 231, 232
preparing video for, 144–145
publishing with Dreamweaver, 235–238
rich Internet applications on, 10
shooting video for, 146
Welcome screen, 14, 37
Windows commands/keystrokes, 4–5
wireframe components, 91–98
adding, 91–92
buttons, 91–94
check boxes, 96–97
data lists, 194
list of included, 91
radio buttons, 96
scroll bars, 97–98
text input fi elds, 95
Wireframe Components panel, 16, 91–92, 194
workfl ows
designer-developer, 244–245
Flash Catalyst design, 12–13
Workspace menu, 15
workspaces
changing, 18
Code workspace, 18
Design workspace, 15–17
Z
zero-second transition eff ects, 125, 129
Zoom Magnifi cation menu, 21
Zoom tool, 21, 199
Zoom video option, 151
zooming the artboard, 21
transparency
button components and, 101
image compression and, 53
Transparency Accepts Mouse property, 101
Triangle tool, 198
triggering interactions, 115
TV, Adobe, 5
U
Undo command, 70, 203
Ungroup command, 55
uninstalling applications, 234
unlocking layers, 65
unused assets, 246
updating Flash Catalyst, 3
URL link interactions, 119–120
user input controls, 243
V
validating user input, 243
vector graphics
bitmap images vs., 43
optimizing, 42, 50, 68, 229
project library and, 55
Vertical layout option, 186
vertical scroll bars, 97, 106, 107
vertical sliders, 243
video, 142–157
adding to applications, 148–151
attaching controls to, 152–154
controlling playback of, 152–157
encoding for the web, 144–145
importing, 147
interactions added to, 155
loading SWF fi les as, 165
overview of lesson on, 142
previewing, 147–148
resetting after playing, 155–157
review questions/answers on, 161
scale options for, 150–151
shooting web-friendly, 146
video card, 2
video codecs, 144
Video Controls menu, 150, 151
video player
adding to current state, 148
attaching controls to, 152–154
resetting after using, 155–157