5 Awesome Bunker Plans on a...
42
5 Awesome Bunker Plans on a Budget 1
Transcript of 5 Awesome Bunker Plans on a...

5 Awesome Bunker Plans on a Budget
1

5 Awesome Bunker Plans on a Budget
2
Contents
Introduction: ................................................. 3
Glossary of Items Common to Bunker Plans . 5
Plan #1: The Low-Cost Budget Bunker ............ 8
Dimensions to Plan for and Be Aware of: ... 10
Plan #2: The Cheap Bunker ........................... 14
Plan #3: A Cheap and Easy Travel Trailer/Bus
Bunker ........................................................... 20
Plan #4: The Above Ground Bunker .............. 27
Plan #5: A Long Term, High Tech,
Nuclear/EMP/Bio-Weapon Hardened Bunker
....................................................................... 33
Building the Deluxe Survive-All Bunker ....... 36
Conclusion ................................................... 41

5 Awesome Bunker Plans on a Budget
3
5 Awesome Bunker
Plans on a Budget
Introduction:
The world has reached a point unlike any other in history.
Population density and growth has created not just one but
several environmental crisis, of which we have already begun to
see the effects of, such as radiation and animal die-offs from
Fukushima, sink holes in Oregon and the chemical spill in
Colorado which has contaminated a major river. Agriculture
has reached an all-time low with less people participating in
food production than ever before in history and American
5 Awesome Bunker Plans on a Budget
4
agriculture shrinking each year. Things just aren’t as safe as
they used to be which has you thinking it’s time to create a few
extra options.
“I know that having a nuclear bunker might sound like too
much, even for the most dedicated preppers. But this is only
because things are going well now. In a time of war, having
access to a nuclear bunker won’t sound weird at all. And in
times of peace, it can be used as a tornado shelter, a hideout,
or a root cellar.”
Before you build your bunker you will need to sit down and
consider your needs very carefully. A bunker can be a safe
refuge to protect you from the big “event” or it could be just
end up being an elaborate coffin. You will need to ask yourself
the following questions:
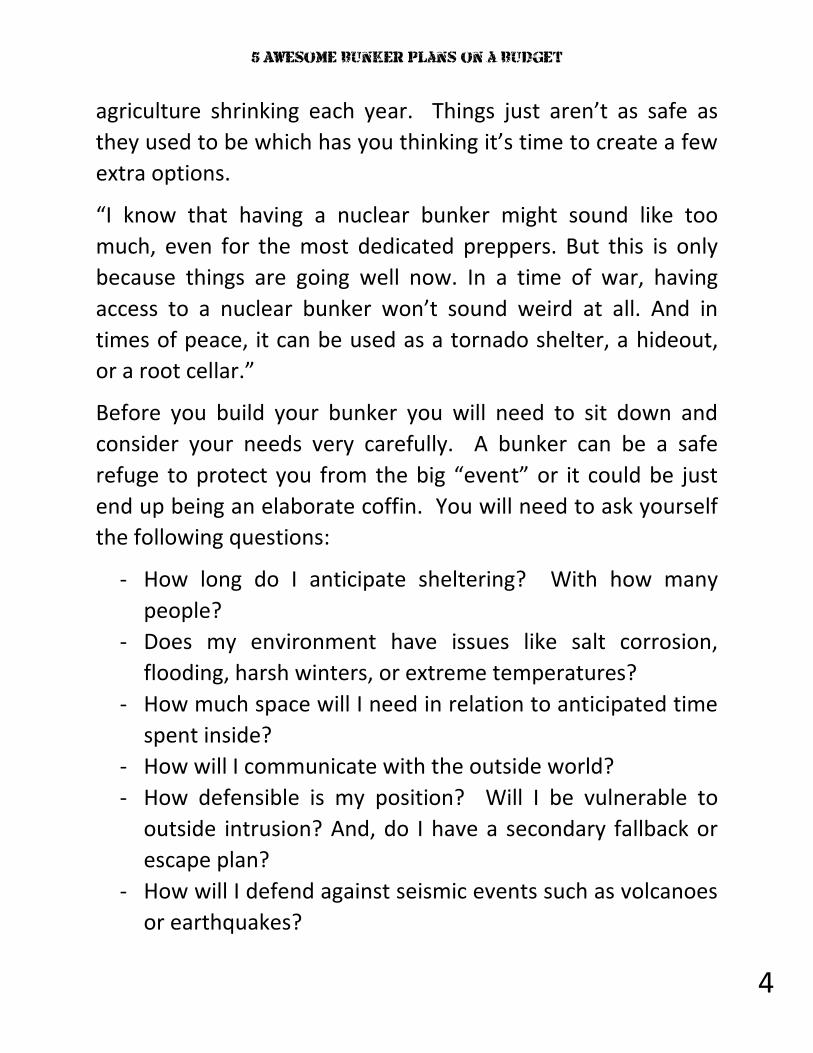
- How long do I anticipate sheltering? With how many
people?
- Does my environment have issues like salt corrosion,
flooding, harsh winters, or extreme temperatures?
- How much space will I need in relation to anticipated time
spent inside?
- How will I communicate with the outside world?
- How defensible is my position? Will I be vulnerable to
outside intrusion? And, do I have a secondary fallback or
escape plan?
- How will I defend against seismic events such as volcanoes
or earthquakes?

5 Awesome Bunker Plans on a Budget
5
- What kind of survival culture will I need in the event that
the disaster leads to a long term survival situation? Food
cultivation, foraging and hunting may become necessary.
You can never rely 100% on any one plan for the disaster which
may hit you. For each primary choice you should have a
secondary and tertiary option. Safety features such as fire
control and emergency escape hatches should be planned
ahead of time. A bunker is primarily for a short term storm or
event. Long term survival will eventually at some point require
you to venture outward for food or even defense. Once your
bunker is finished you should do a dry-run practice with your
family to see if everything you need is available. Spend a day, a
few nights or even a week inside your bunker to get a feel for
how things are going to pan out. Don’t forget entertainment
options either. A few decks of playing cards, pencils and paper
and a few books can go a long way in occupying your time for
the duration of your stay.
Glossary of Items Common to Bunker Plans
Sump Pump: A small 1/3 horsepower pump installed in
homes with basements, underground storage or underground
buildings. Any structure underground will need to have
drainage or a sump pump to keep them dry. Place a 30-gallon
barrel in the lowest point of your hole nestled down in the pea
gravel. Ensure that you have an uninterruptable power source
such as a generator, solar or batteries to run this pump for the
expected duration of an emergency event.

5 Awesome Bunker Plans on a Budget
6
Cost: Between $300 - $2,500 Dollars
French Drain: A gravity fed drain used to move standing water
away from problem areas like buildings or garden areas. A
great off-grid solution to high water table issues like standing
water and seepage.
1. Find a run-off point that is lower than the lowest point of
your basement or underground structure. This is where you
want the groundwater to go via gravity.
2. Create a trench from the problem area to the run-off spot.
You should slope down one inch for every 10 inches of run.
(1”/10”)
3. Line with landscape fabric or anything which will retain
mud/earth without breaking down over time.
4. Line with 2-3 inches of gravel.
5. Place a pvc pipe with holes in it, downward towards the
gravel on top of your cloth or mesh retaining fabric.
6. Fold any additional retaining fabric or mesh over the top of
the pipe and backfill dirt.
Now your French Drain is ready to move the water out of the
problem area and into the nearest runoff area.
Average Cost: $25/foot
Pea Gravel Base: In most bunker/underground spaces you
will need to lay down a 6” bed of pea gravel to help lend to

5 Awesome Bunker Plans on a Budget
7
drainage and stability. Shipping will add more expense unless
you have your own truck. This is much cheaper than pouring a
concrete slab. Check local building supply stores for local costs.
This can work into your French drain system and provide a base
to build on top of.
Average Cost: $3-4/ton
Gabion Basket: Any structure which you plan to bury or
create must have walls which can withstand hydraulic force on
the sides and varying amounts of pressure on top based on
depth and local geology. A Gabion basket is a wire mesh basket
measuring 2’ wide and as long as your hole/walls. When filled
with river rock the basket creates a contained wall which can
be backfilled with sand/concrete to further stabilize the
fortification.
Average Cost: $35/cubic yard
Faraday Cage: This should be a consideration for any type of
bunker you construct. A faraday cage is basically a shielded
garage, cabinet, barrel or box, which you can use to store
electronics. In the event of an EMP detonation over North
America or your respective country you won’t just lose your cell
phone signal, your unshielded electronics will be permanently
fried.
1. The basic idea is to build it from non-conductive materials
(wood, cardboard) and then wrap or seal it on all sides
5 Awesome Bunker Plans on a Budget
8
with a conductive material (aluminum foil or silver, for
example)
2. Note: a Faraday cage/shield, will not protect against solar
coronal mass injections (or solar flare).
3. Don’t forget to put aluminum tape around all of your door
seams as that is the weakest point.
4. Once you have finished your Faraday cage, test it by
placing a radio signal inside. An easy test is to place your
cell phone inside and then call it. If it rings you aren’t
shielded properly.
Average Cost: Free up to thousands of dollars. It is impossible
to predict the cost effectively because you can create a small
one from items found around your home, to a medium size
cabinet or even the size of your entire bunker facility.
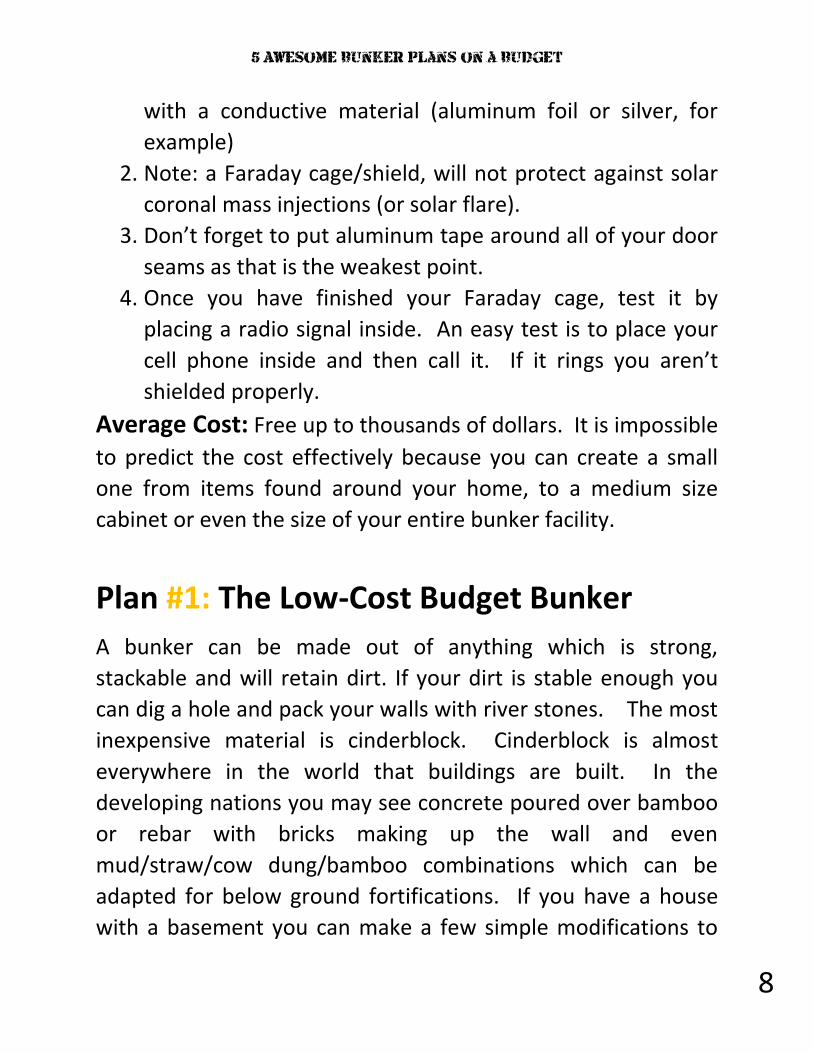
Plan #1: The Low-Cost Budget Bunker
A bunker can be made out of anything which is strong,
stackable and will retain dirt. If your dirt is stable enough you
can dig a hole and pack your walls with river stones. The most
inexpensive material is cinderblock. Cinderblock is almost
everywhere in the world that buildings are built. In the
developing nations you may see concrete poured over bamboo
or rebar with bricks making up the wall and even
mud/straw/cow dung/bamboo combinations which can be
adapted for below ground fortifications. If you have a house
with a basement you can make a few simple modifications to
5 Awesome Bunker Plans on a Budget
9
create an in-home bunker/shelter space. Your cost is directly
proportional to the size of the room you will build and the
accessories you want to have inside. This is where the location
comes into play the most. Each region of the world has
regional craft and culture adapted to the landscape and
geology combined with available materials. Try to find a local
handicraftsman or even eco-building classes which can give you
valuable advice and tips which will save you time and money. A
few of these ecologically sound, but dirt cheap methods may
include: tires, recycled bottles, and pounded dirt. Remember, it
must be able to withstand moisture and pressure. If you live in
a tropical, high humid or rainy area, you need something which
will breathe but withstand high moisture, over a period of time,
against corrosion.
Here is a planning flow for a simple cinderblock shelter /
bunker. You can adapt these guidelines to your space and
needs.
The biggest job is digging a hole or using a natural feature to
create a shelter. Your cost is directly proportional to the size of
the room you will build and the accessories you want to have
inside. The basic box itself will be fairly standard. Start with a
hole 9 to 12 feet deep for a shelter, 8 feet wide, 8 feet tall, and
10 feet long, then you will have a 4-foot cover. (8 ft. x 8ft. x
10ft.) In a real pinch, even a foot and a half of cover will be ok
and you won’t have to dig as deep either. Digging by hand is

5 Awesome Bunker Plans on a Budget
10
free, but time consuming. Hiring an excavator is more costly
but very time-efficient.
Dimensions to Plan for and Be Aware of:
Hole depth: 12 ft.
Total length: 12 ft.
Width: 10 ft.
The standard cinderblock block is 8” wide x 8” tall x 16” long,
you must build to accommodate that size. For example, you
want a 10’ long room but you must actually make it almost 12’
long to account for that 8” of width on either end where you
will be placing your bricks or cinderblocks for the wall.
Foundation/Floor:
A cement slab if you can afford it, packed dirt with wood or
gravel surface if you can’t. The main thing for the floor level is
drainage. Use a French drain and/or a sump pump for this.
Walls:
Cinderblock. Two important things to remember about walls
and foundation: drainage and access. It won’t be zombie proof
but it will do in a pinch. As you lay your block you can pour it
full of concrete and put rebar inside each hole and pack with
sticky mud, sand or sand/cement powder mix and then backfill
it. This will create a pretty strong and resistant wall. See Image
1.1 for dimensions and basic layout. Be sure to equip the
structure with a strong inward opening door.

5 Awesome Bunker Plans on a Budget
11
Ceiling Structure:
Four feet of dirt above ceilings is best, but in a pinch you can do
one and a half foot (1 ½ ft.) Be sure to pick a location which if it
starts raining it won’t just fill with water. The idea is to get
some wood for your rafters and overlay it with anything which
will support weight. For the ceiling you should use 4 in. x 6 in.
timbers a foot apart and a 1 1/8-inch plywood to support 4 feet
of dirt. This is not recommended for extreme depths. Be sure
to plan for ventilation. You can add an ordinary filter like the
one which comes in a shop vacuum to help keep out dust and
particulate matter from entering. Be sure to account for tubing
running up one side of the other to allow that air in, plus an
easy way to clean it and prevent blockages. To prevent erosion,
be sure to have your topside seeded with grass or native plants
according to natural landscape.
Interior:
You must have some way to keep your room dry, moisture
breeds mold and can create bigger problems inside than those
outside. You also need storage. The minimalist solution is a
room for sitting/sleeping and one for food/water/medicine
storage. You will need a bucket with a detachable toilet seat
and a lid for 1-2 days at a time. For more people, more
buckets, or more trips to the outside. Be sure to stock water (7
liters per person/per day), MRE’s (Meals Ready to Eat),
dehydrated foods and canned foods. This bunker plan may or
may not include the ability to cook or heat water. Beef jerky,
5 Awesome Bunker Plans on a Budget
12
peanut butter and nuts are great, inexpensive options for
protein and fat, but can store for long periods of time. Be sure
to consult expiration dates on packaging. Plan for shelves to
store food, blankets, water, a weather radio, flashlight/lantern,
batteries and a first aid kit. Folding chairs and cots, or pull
down bunks are good space saving options for overnight,
multiple day use. Wet wipes are a great item to store for basic
hygiene. See Image 1.2.
Estimated cost:
$1,000+ depending on what you already have to work with or
use, and labor for making it happen. With a bit of creativity
you can repurpose most of the interior items from second hand
stores or whatever you have in storage. Look around the house
for ways to reuse old stuff which you don’t “need.”
Pea Gravel will cost you $3 to $4 dollars per ton. A standard full
size pickup truck bed will hold up to 1,500 lbs if you use your
own vehicle or rent one. Check costs against delivery prices.
A sump pump will cost $300-500 dollars if you stay on the low
end of the scale.
French Drain is free or quite inexpensive if you have the
materials or can find recycled items. Otherwise you will pay
$25 dollars per foot on the average.

5 Awesome Bunker Plans on a Budget
13
Figure 1: Basic Bunker

5 Awesome Bunker Plans on a Budget
14
Figure 2: Things to consider
Plan #2: The Cheap Bunker
If you have a little bit of savings put back and want to get the
most out of it, then I recommend something fairly simple like
this idea. Storage containers are revolutionizing green
construction in so many ways. From store’s, to homes, to
animal sheds, a container is a great pre-fab structure which can
be cut up and modified to fit your needs quickly. On a side
note however, you will need to plan very carefully for water
drainage, structural stability and humidity if you decide to put
one of these in the ground in order to prevent bigger problems.
Keep in mind that for a similar cost you can also do a larger

5 Awesome Bunker Plans on a Budget
15
cinderblock structure. As the Baltic Dry Index continues to
collapse, shipping containers may end up going down even
further in cost. Something to pay attention to.
Here is a planning flow for a simple underground storage
container shelter/bunker:
Your standard shipping container, is going to be 8 feet wide and
10 feet tall. Containers will come in lengths of 20 feet or 40
feet, which will give you more space. Additionally, these
containers are made with ¼” plate steel and ¼” C-channel
which can buckle under very little pressure so reinforcement
will be a concern during the planning phase. If you go with the
longer container then your total costs will double. It is
absolutely essential that you create Gabion Baskets (See
Glossary) to reinforce the sides or you and your family can end
up buried alive.
Before you bury the container:
1. Seal the main doors and cut a smaller door which opens
inward on the opposite end. If you aren’t concerned
about nuclear/bio/EMP then you can put the ceiling flush
with the top, simple forms, concrete slab, and then backfill
some dirt over it or incorporate into a building, storage
shed or garage.
2. Be sure to install a sump pump on a UPS, (or
uninterruptable power supply), to prevent the risk of it
filling with water. The low-tech way to do this is install a

5 Awesome Bunker Plans on a Budget
16
French drain and ensure that the water has a place to go
or you will be back to having to use a sump pump. If you
can create your shelter in a hillside you will have the ideal
situation for drainage. See Glossary for information on
how to create a French drain.
3. Use a sealant and paint on the outside of the container to
help prevent rust from corroding your structure. It might
even be a good idea to put a stucco such as Shotcrete ($5-
$8/square foot).
Preparing Your Hole:
1. Dig 2’ deeper than your ceiling height (10 feet). And 3’
wider and longer than your structure to allow room for
placing Gabion baskets which are 2’ wide.
2. Prepare 6” of pea gravel as a bed to place your container
onto. The hole should be big enough to set a 30-gallon
barrel in the gravel bed for your sump pump. You will
need a minimum of 20 yards to cover this area.
3. Be sure to plan your entrance by building a slope and
pouring concrete steps or building wooden and/or metal
steps. Two I-beams extending from the top of the
container outwards will help create the support you need
for your entrance. Then you can build forms on top of
those for your exit tunnel and the concrete which will be
poured on top.
4. Don’t forget to run a septic pipe into your existing septic
tank or to another septic tank and outflow for waste. If

5 Awesome Bunker Plans on a Budget
17
you live in an area with a high water table, you may want
to consider a composting toilet instead of the extra
plumbing. Waste removal is vital to prevent disease.
Ceiling Structure:
1. Four feet (4 ft.) is the premium depth for any bunker to
resist radiation if you can afford it. You also need a ceiling
which will support 4’ of dirt. This is the part which can get
expensive based on how deep you do it. Ventilation. You
need one vent on each end to allow air to enter and exit.
This is where filtering comes in handy. Human breathing
creates moisture and you need a way to expel that. Each
vent is a 6” diameter pipe attached to the top upper
corner of the structure and its corresponding opposing
diagonal corner.
2. You will build forms over everything and then pour a
cement cap. This is overall the most advantageous way to
do it. Over the top of the container and sides of the
Gabion baskets you will lay down some corrugated metal
and basic 6” concrete forms. Cost of concrete will depend
on how many yards of area you are filling which will be
roughly 7-8 yards. Once you have your concrete slab you
can either build another building on top or backfill dirt and
then plan to have a few trees and bushes planted for
erosion control.
3. Don’t forget to install your ventilation pipes, electrical
conduit pipe and water/sewage during this phase. Be sure
5 Awesome Bunker Plans on a Budget
18
to plan water storage as city water can become
contaminated or shut off in the event of an ongoing
disaster.
Walls:
1. You don’t have to add insulation but if you want it to last
longer, then it might be a good idea. Just paint it with
roofing repair paste and overlay with 2” Styrofoam sheets,
then backfill against it with your Gabion basket. This will
create a vapor barrier and keep ground moisture away
from the metal container. If Gunite is available, it is the
better situation. Tar and Styrofoam will be cheaper
though.
Interior:
1. Should have ventilation pipes of 6” in diameter on two
corners diagonally to allow air to enter, circulate and then
exit, plus a stove pipe connected to your exhaust/output
to permit cooking. Be sure to have your intake capped off
with a screen and a basic air filter to prevent rain and dust
from entering.
2. For waste removal, consider a composting toilet or simple
buckets with lids if this space is only for short term
purposes.
3. If you can afford the extra cost, a solar panel can help
provide for basic electrical needs to charge phones,
flashlights, lanterns, etc.
5 Awesome Bunker Plans on a Budget
19
4. A weather radio is a must. A ham radio is a good addition.
Contact your local ham radio club to learn more.
Expenses:
8 ft. x 10 ft. x 20 ft. Shipping Container @
$2,500 USD
8 ft. x 10 ft. x 40 ft. Shipping Container @
$3,200 to $4,500 USD for a good one.
Container prices may change by region and availability to
shipping lanes where these containers are passed around
frequently.
For digging your hole, most excavation companies hire out a
machine and operator on an hourly basis ($40-$150 or more an
hour) for a wide variety of work. They typically bid on
residential excavation for the entire project based on the
number of yards of dirt to be moved $50-$200 per yard. 4
yards x 3 yards approximately =
$2,000 for excavation.
For a 20’ shipping container you will need about 10 yards or a
full dump load of peat gravel. 2 full dump truck loads should be
enough. This is much cheaper than pouring a concrete slab.
Pea gravel is $3-4 per ton x 26 tons = $78 dollars

5 Awesome Bunker Plans on a Budget
20
Other costs: Wood costs, Plumbing supplies for intake/output
vents, sewage, running water/gray water. ($1,000 +) Interior
based on furniture costs, supplies and quantity. ($1000 +)
Concrete: Full cement truck is about $300 USD and holds 10
cubic yards.
Total Estimated Cost for Shipping Container Bunker
Project: ~ $7,000 to $12,000
Plan #3: A Cheap and Easy Travel
Trailer/Bus Bunker
There is one cheap bunker idea which is an awesome solution if
you are on a budget with very little wiggle room, yet feeling
needful of something more than a root cellar. Take a travel
trailer or a bus and bury it. Any vehicle with living space can be
buried as long as you plan appropriately for wall fortification
and ceiling structure. The basic excavation is the same as the
shipping container substituting a travel trailer/bus set on blocks
inside your hole. This option won’t last as long as the shipping
container but it will be at least 1/3rd less in cost because the
interior is mostly finished. Travel trailers are a good solution
for low budget preppers who may already have a vehicle in
their possession. With a travel trailer or bus you might already
have a small, space-saving interior equipped with a bed,
shower, toilet and social/eating space. If you are short on time
or money then this might be your best option. Note: This is

5 Awesome Bunker Plans on a Budget
21
ideal for dry, arid climate with low water tables. Extra
precautions must be taken to seal and insulate the walls of your
travel trailer in order to prevent humidity from seeping in.
Here is a planning flow for a buried bus or travel trailer
shelter/bunker. You can adapt these guidelines to your space
and needs:
Review Plan # 2 for the excavation requirements. Once again
you will need strong, reinforced sides that prevent pressure
from collapsing the walls of the travel trailer. It is absolutely
essential that you create Gabion Baskets to reinforce the sides
or you and your family can end up buried alive. Place these
boxes around the sides of the travel trailer and you will have
the reinforcement you need. You may also want to replace all
existing windows with a solid insert. Your hole will once again
have a pea gravel base and the trailer will have to be mounted
on blocks to prevent movement and stabilize the foundation.
Additional insulation can be added to wheel wells or close them
or convert them to extra storage space.
Before You Bury:
1. Review Plan #2 for base and wall requirements. Measure
the height of your trailer/bus then plan the hole to be a
foot and a half to two feet deeper than that height. You
can apply tar and insulation the same way we did for the
storage container to help seal the walls and create
something that will help your shelter to stay a constant
temperature.

5 Awesome Bunker Plans on a Budget
22
2. This is a great project if you are working with recycled
materials. Aside from the basic structural details you can
get pretty creative in finding ways to get lengths of PVC
pipe, pieces of wood, insulation sheets etc.
Preparing Your Hole:
Again, review Plan #2 for the requirements of the bottom of
your hole with one exception: Plan a wider hole with a side
entrance where the natural door of the bus or trailer is located.
Sump pump and/or French drain will be required for any
climate which has a ground water table close to the surface.
Test your ground water table by digging a bucket sized hole
with a shovel. When you reach a depth where your hole starts
filling with water you have arrived at the ground water table.
Also keep in mind that this can change according to seasons.
You should know what the ground water does in both winter
and summer when planning a shelter.
A travel trailer is going to be similar to the storage container
structurally. This is a great tornado/storm shelter. You will not
be able to protect from Nuclear or Bio-weapons with this type
but you can at least avoid any high stress/danger event as
needed. Leave yourself at least a foot and a half extra in depth
for the pea gravel and a wood or concrete roof structure to cap
it all off. Be sure to plan for erosion control after you finish by
planting trees or shrubs on top.

5 Awesome Bunker Plans on a Budget
23
Setting The Trailer:
1. There are couple ways you can do this. If you are using a
hillside or natural dip you can roll the vehicle into the slot
and then fill in around it once you have placed your gabion
baskets. Or you can get a septic tank company to lower it
in there and set it down on the base you have prepared for
it.
Ceiling:
1. Four feet (4 ft.) is the premium depth for any bunker to
resist radiation if you can afford it. You also need a ceiling
which will support 4’ of dirt. This is the part which can get
expensive based on how deep you do it. Ventilation. You
need one vent on each end to allow air to enter and exit.
This is where filtering comes in handy. Human breathing
creates moisture and you need a way to expel that. Each
vent is a 6” diameter pipe attached to the top upper
corner of the structure and its corresponding opposing
diagonal corner.
2. You will build forms over everything and then pour a
cement cap. This is overall the most advantageous way to
do it. Over the top of the container and sides of the
Gabion baskets you will lay down some corrugated metal
and basic 6” concrete forms. Cost of concrete will depend
on how many yards of area you are filling which will be
roughly 7-8 yards. Once you have your concrete slab you
can either build another building on top or backfill dirt and

5 Awesome Bunker Plans on a Budget
24
then plan to have a few trees and bushes planted for
erosion control.
3. Don’t forget to install your ventilation pipes, electrical
conduit pipe and water/sewage during this phase. Be sure
to plan water storage as city water can become
contaminated or shut off in the event of an ongoing
disaster.
Finishing the Hole:
By now you should have your hole excavated, your base and
structural issues resolved, and the vehicle you plan to bury all in
place. Now you need to cap the hole off and finish your
entrance. This is fairly straightforward as you will use the exact
same process to cap your hole for this that you used for the
storage unit. Be sure you have planned the following:
1. Air Ventilation: two 6” pipes on opposite corners. A good
way to set this up would be to use the windows of the
bus/trailer to run your intake and output on opposite
ends.
2. Electrical/power supply: Another pipe brings your
electrical connection in. This should be pretty easy since
the travel trailer will have a connection that you can just
plug into without having to run electrical to the areas you
need to have power.
3. Sewage: Run a pipe to your existing septic tank or devise a
method to pump the existing sewage tank out periodically

5 Awesome Bunker Plans on a Budget
25
after each storm event. You may just want to have a
simple bucket with lid to haul out by hand.
4. Entrance. Since most busses and trailers have a side
entrance you will need to plan this hole differently.
Consider making it wider instead of longer with a ladder,
staircase or tunnel which will take you from point A to
point B.
Estimated Cost For Project:
Travel Trailer or Bus: This number can vary wildly. You might
already have a vehicle, you might find an old one to renovate
for free or you may go out and buy one that is new or used. In
the US/Canada you can get a pretty nice one for about $5000
dollars.
For digging your hole, most excavation companies hire out a
machine and operator on an hourly basis ($40-$150 or more an
hour) for a wide variety of work. They typically bid on
residential excavation for the entire project based on the
number of yards of dirt to be moved $50-$200 per yard. 4
yards x 3 yards approximately =
$2,000 for excavation.
Same thing as the shipping container, you will need about 10
yards or a full dump load of peat gravel. 2 full dump truck loads
should be enough. This is much cheaper than pouring a
concrete slab. Pea gravel is $3-4 per ton x 26 tons = $78 dollars

5 Awesome Bunker Plans on a Budget
26
Other costs: Wood costs, Plumbing supplies for intake/output
vents, sewage, running water/gray water. ($1,000 +) Interior
based on furniture costs, supplies and quantity. ($1000 +)
Total Estimated Cost for Travel Trailer/Bus Bunker
Project: ~ $5,000 to $12,000
Figure 3: Cross-Section of Travel Trailer Bunker
5 Awesome Bunker Plans on a Budget
27
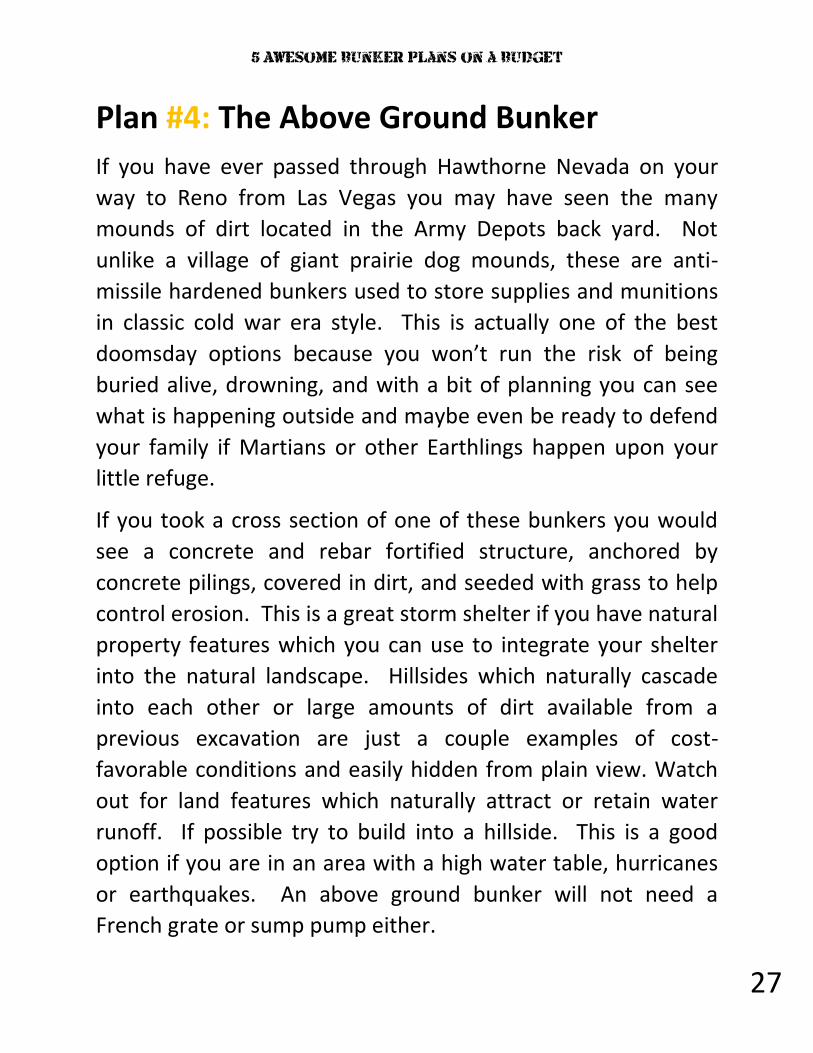
Plan #4: The Above Ground Bunker
If you have ever passed through Hawthorne Nevada on your
way to Reno from Las Vegas you may have seen the many
mounds of dirt located in the Army Depots back yard. Not
unlike a village of giant prairie dog mounds, these are anti-
missile hardened bunkers used to store supplies and munitions
in classic cold war era style. This is actually one of the best
doomsday options because you won’t run the risk of being
buried alive, drowning, and with a bit of planning you can see
what is happening outside and maybe even be ready to defend
your family if Martians or other Earthlings happen upon your
little refuge.
If you took a cross section of one of these bunkers you would
see a concrete and rebar fortified structure, anchored by
concrete pilings, covered in dirt, and seeded with grass to help
control erosion. This is a great storm shelter if you have natural
property features which you can use to integrate your shelter
into the natural landscape. Hillsides which naturally cascade
into each other or large amounts of dirt available from a
previous excavation are just a couple examples of cost-
favorable conditions and easily hidden from plain view. Watch
out for land features which naturally attract or retain water
runoff. If possible try to build into a hillside. This is a good
option if you are in an area with a high water table, hurricanes
or earthquakes. An above ground bunker will not need a
French grate or sump pump either.

5 Awesome Bunker Plans on a Budget
28
Here is a planning flow for an above ground shelter/bunker.
You can adapt these guidelines to your space and needs.
Planning
You will need to plan your foundation. You can drive rebar
pilings into the ground or pour concrete pilings. You don’t need
to go too deep, set down some cement forms or pour your own
form using the characteristics of your hole. This could get
costly depending on excavation and forms needed. If you are
building in the side of the hill you may only need pilings on the
front side if you are anchored into something like bedrock
which is a natural shelter condition. Make sure you talk to a
local builder for area specific information.
Laying Your Foundation:
Pilings and Concrete base: If you are on sand or shale you will
need to plan this carefully. The best way to do it is pour a slab
but have rebar reinforcement in the corners and 2-foot-thick
walls. The building should be capable of lifting a bit without
coming apart basically. Especially in coastal regions, the earth
tends to shift and change over time. You can drive ¾” rebar
into the ground and pour concrete over it. A 6” concrete slab
can be poured for everything to sit on top of. Just like the
ceiling, you will have the rebar criss-crossed every 6” for
optimum strength.

5 Awesome Bunker Plans on a Budget
29
Walls:
1. You will need to build your wall forms. Once you have
your gravel or concrete base you will set the wall forms.
2. Minimum thickness to protect against fallout is 12”. You
can either stack a double row of cinderblock or have a
cinderblock layer with a brick layer and the whole thing
filled in with sand or concrete to fortify it further.
3. The ramping of the dirt can even be a benefit if you have a
preexisting barn, garage or even a side of your home
structure to build against you can help to save time and
money while using your space more efficiently. For
stability your dirt slope must be a minimum of a 45 degree
angle.
4. The bare concrete walls in dry country can be backfilled
with dirt. In wet country you will need to apply a sealant
to protect from excessive humidity like Henry’s Bar Repair,
a concrete wall sealant which is commonly used and
readily available.
Ceiling:
If you plan to create, or add onto a freestanding structure
which isn’t buried, you will need a concrete ceiling and then
you can put a simple wood roof over the top for aesthetic
appeal. In the event of a tornado or high winds you might lose
the roof but that concrete ceiling will stay put.

5 Awesome Bunker Plans on a Budget
30
1. Build your roof forms with wood, corrugated iron and
rebar then pour the concrete over the top of the form you
have created.
2. Like your walls you will need 12” of concrete to protect
from nuclear fallout adequately.
3. For bioweapon attacks you will need to seal everything off
and have an off-grid air filtration system with an exhaust
system for output ventilation.
Exterior:
The exterior will depend on whether you are going to bury it in
dirt or leave it as a freestanding structure. If you bury it with
dirt, make sure your slope is a minimum of 45 degrees to
prevent erosion and ensure you have enough cover.
Interior:
1. Air Ventilation: The simple way to do it would be to allow air
to enter in by the front door and then allow natural convection
to take its course. Otherwise, you can buy an industrial exhaust
system and install that for the bio-weapon scenario. Either
way, even in an above ground building, this will be a concern.
2. Electrical/power supply: Solar panels or a wind turbine would
be ideal methods to generate off-grid electricity. If you have
running water nearby you can even devise a simple water
wheel to generate electricity.
3. Sewage: Run a pipe to your existing septic tank or devise a
method to compost or remove human waste after the big

5 Awesome Bunker Plans on a Budget
31
event. You may just want to have a simple bucket with lid to
haul out by hand.
4. Entrance. You can buy a storm door which is specially built
for shelters or you can make your own door which will seal and
lock from the inside in the event of a tornado, nuclear attack or
EMP. Just make sure you have devised a foolproof way to be
able to see out in order to help determine safety for exit and
intruders.
Total Estimated Costs: $15,000+ Depending on size and
land features.
For backfilling the dirt. Most excavation companies hire out a
machine and operator on an hourly basis ($40-$150 or more an
hour) for a wide variety of work. They typically bid on
residential excavation for the entire project based on the
number of yards of dirt to be moved $50-$200 per yard.
Rebar: ½” (#4) 20 ft costs $3-4. 5/8” (#5) a bit more. One
rebar every 12” for walls. For the foundation/ceiling or the
floor of the second structure you will create a lattice with the
rebar crossing every 6”. If your ground is unstable, like sand or
shale, you will need more.
PVC pipe: Small stuff can run 3-4 dollars per length (20 feet).
ABS black plastic pipe for sewer $3-4 dollars for 3” or
$30/length (20 feet).
Pex: a flexible, new design for water supply, all the connections
snap together with a push/pull fitting which is fast and easy to

5 Awesome Bunker Plans on a Budget
32
do. 100 ft roll might cost about $60 dollar depending on
location and availability. Blue: water. Red: hot etc
Electrical wiring: 100 ft roll of romex copper #12 is about $80,
and will cover all the electrical needs for lights, plug in etc.
Mikes Bar Repair: $60 for 5 gallon bucket.
Cinderblock: $1.50/block
Concrete: Full cement truck is about $300 USD and holds 10
cubic yards.
Figure 4.1: Cross-Section of Above Ground Bunker

5 Awesome Bunker Plans on a Budget
33
Figure 4.2 1Cross Section & Slope for Above Ground Bunker
Plan #5: A Long Term, High Tech,
Nuclear/EMP/Bio-Weapon Hardened
Bunker
This is the most expensive and complex bunker but it’s the best
option in a long-term, extreme circumstance situation. You will
be planning a much bigger space for food storage, water
storage, water filtration and pumping, habitat areas for people
and even pets. Interior can be outfitted in any way which
serves the size and complexity of your family. Be sure to plan

5 Awesome Bunker Plans on a Budget
34
space efficient but functional exercise and entertainment
options. An interior decorator can help you devise the best use
of space when installing the furniture and storage features.
Whether you are planning for a week, 6 months or several
years, this plan should give you the basic elements in getting
you started, from there this design can be modified or
integrated with existing/future land features and structures. Be
sure to plan tactical security for obscuring the location from
zombie invasions or pandemic outbreaks where you might have
survivors knocking on your door or throwing smoke grenades
down your ventilation pipes.
Here is a planning flow for a long term, sophisticated
cinderblock or concrete shelter/bunker. You can adapt these
guidelines to your space and needs:
Planning
You will need to prepare for long term water needs by storing,
pumping from underground aquifers or purifying water from an
existing above-ground uninterruptable water source. In the
event of a bio-weapon or nuclear attack you will need oxygen
filtration/air purification equipment which can run on solar and
batteries in the event of a grid-down scenario. You will need a
special system in regards to cooking food and heating water
from underground. You may need the ability to not emit smoke
which could give away your location. Waste disposal will also
be a bigger issue requiring a special output or recycling system.
Food sources must be accounted for. This may include small

5 Awesome Bunker Plans on a Budget
35
farm animals, hydroponics, aquaponics or earth boxes. Finally
be sure to have training and preparation in the event you must
defend from intruders should your exterior defenses be
breached. Obviously at some point you will need to consult a
professional builder for design and structure specifications. I
will try to point out the items of importance and things to keep
in mind with planning along with a basic sketch to inspire your
imagination. At this point the sky is the limit of your budget so
plan carefully and efficiently.
Items to Note:
1. Nuclear Events: You will need to shield against the initial
blast and then the radioactive fallout following the
explosion. Minimum shielding to protect against radiation
is 4 inches of soil, this will provide a minimal layer
protection. 4 feet of earth over your head is the best
scenario. Underground sheltering will increase your
chances by 90% compared to other types of shelters.
Don’t forget to have a detection device to measure
radiation over time after the event.
2. EMP Blasts: Included in your construction you should have
a faraday cage to protect electronics from being fried. See
Glossary for instructions. However, your Faraday shielding
is only really needed for any wires or electronics which
may be running from the inside to the outside, this is
easily avoided if the electrical source is self-contained, like
a generator.

5 Awesome Bunker Plans on a Budget
36
3. Bio-chemical Protection: For this you will need air
purification and/or an oxygen supply readily available. Gas
masks will work for the short term but it’s hard to function
when wearing them over extended periods. Costs will vary
depending on what system you use. Check out this site:
here, for an air filter system with a manual back up power
feature (the only one of its type), and government quality
filtration.
Building the Deluxe Survive-All Bunker
Excavation:
1. If possible use an existing basement, if money isn’t a
concern you will be digging a pretty big hole to create a
two level structure with a storage/production level and a
living area upper level. Plan 4-5 feet in addition to the
height of your structure for backfilling and then erosion
control on top of that.
2. You will need a sump pump with a much larger capacity
due to the size of your hole and the groundwater levels.
3. In this plan we are going to pour a 6” concrete slab base
for everything to sit on top of and to build your walls
upward from.

5 Awesome Bunker Plans on a Budget
37
Foundation:
1. Each corner is going to be either a pre-cast or poured form
which will penetrate at least 2 feet deep. These “feet” will
have rebar inside and will serve to stabilize the whole
structure while still allowing the ground around or
underneath to shift and the structure with it. This is
important in earthquake prone areas where ground
elevation and location may change suddenly.
2. You can create 2’ stem walls by pouring concrete into
forms or stacking cinderblocks with rebar inside of them
and then pouring concrete inside. Once you have your
foundation laid you can either continue to build upwards
using cinderblock, brick or metal. Don’t forget to plan
your sewage/gray water run-off prior to pouring concrete.
Plastic conduit pipe is helpful to be included in your stem
walls and for any current or future expansion and to run all
your electrical wires.
Walls:
This is mostly your preference. A standard 12” cinderblock
thickness is sufficient since you are going to be shielded by dirt
on all sides. You may need to apply a sealant to prevent water
seepage.
1. Bearing Load of lowest compartment. You will need to
fortify the lower structure according to the weight which
will be above it. This may require more rebar and/or more

5 Awesome Bunker Plans on a Budget
38
cinderblock cells depending on how big it is. The wider
you go the more consideration for internal columns.
2. Every 8 to 10 feet wide or long you will need a column or
support. If you go 15’ wide, you will need to consider a
column every few feet.
3. Insulation. The temperature will typically stabilize at 50
degrees underground. This will save you money on
heating and air conditioning since in a crisis you won’t
need either one.
Ceiling:
This is going to be pretty standard. We discussed corrugated
iron, rebar and concrete. This is a great method to build a
strong floor and ceiling.
Corrugated steel, rebar and concrete. Just like a parking
garage. This is the type of structure which you will be
building. It will be the strongest material and the most
resistant. Decking contractors carry the corrugated metal
which is thick enough and strong enough to support the
weight you need.
Interior:
This is going to be mostly your preference. It would take too
much time to adequately cover interior
needs/ideas/suggestions in this report so I am just going to
mention a few ideas to keep in mind when planning your
interior floor plan.

5 Awesome Bunker Plans on a Budget
39
Lighting: If you are planning for long term be sure to put back
spares, candles and/or flashlights.
Storage: Check with an interior decorator or California closet
professional to plan your storage with the best strategy
regarding what you will need and when.
Food: You will need to not only put back food that you actually
want to eat, but you will also need a system for tracking
expiration dates and rotation. Don’t forget to pack plenty of
salt and spices! In a long-term situation you may even want to
have a way to grow your own food via
hydroponics/aquaponics/container gardening etc.
Water: Plan for 7 liters per day per person, minimum. Try to
devise water-less cleaning options to help conserve supplies. If
your water is stored in a tank you will need to add appropriate
purification tablets to prevent algae growth.
Supplies: Don’t forget a med kit, which may include a suture kit,
blood transfusion kit, snakebite/bee sting kit, antibiotics and
bandages. Be sure to take appropriate training classes for
treating and caring for emergency situations.
Estimated Cost for High End Sophisticated Bunker:
$60,000
For digging your hole, most excavation companies hire out a
machine and operator on an hourly basis ($40-$150 or more an
hour) for a wide variety of work. They typically bid on
5 Awesome Bunker Plans on a Budget
40
residential excavation for the entire project based on the
number of yards of dirt to be moved $50-$200 per yard.
To calculate total yardage: Depth x Width x Length
Rebar: ½” (#4) 20 ft long costs $3-4. 5/8” (#5) a bit more. One
rebar every 12” for walls. For the foundation/ceiling or the
floor of the second structure you will create a lattice with the
rebar crossing every 6”. If your ground is unstable you will
need more.
PVC pipe: Small stuff can run 3-4 dollars per length (20 feet).
ABS black plastic pipe for sewer $3-4 dollars for 3” or
$30/length (20 feet).
Pex: a flexible, new design for water supply, all the connections
snap together with a push/pull fitting which is fast and easy to
do. 100 ft roll might cost about $60 dollar depending on
location and availability. Blue: water. Red: hot etc
Electrical wiring: 100 ft roll of romex copper #12 is about $80,
and will cover all the electrical needs for lights, plug in etc.
Mikes Bar Repair: $60 for 5 gallon bucket.
Cinderblock: $1.50/block
Concrete: Full cement truck is about $300 USD and holds 10
cubic yards.
5 Awesome Bunker Plans on a Budget
41
Conclusion
Hopefully this report will give you a glimpse of the elements
necessary for short or long-term survival situations. Be sure to
read each plan even if you are going to build the most humble
budget bunker or the most elaborate survival retreat, as each
one helps to fill in gaps in the others by highlighting important
pieces of information. Always check with local zoning
ordinances before you dig to ensure that you won’t run into
legal issues halfway through your project. If other people are
working on your bunker besides you and your family it probably
isn’t going to stay secret, so plan appropriately. Don’t forget to
call your country inspector before you dig to mark off the
location of electrical, gas and sewer.
On a final note there is two more items which is the most
important of all. Your mindset and proper training.
The biggest disaster or the smallest issue, is nothing without a
resilient mindset. The survivalist mindset is an attitude of “I
can do it,” no matter what comes. It’s the ability to stay
positive, and help others around you do the same, even when
you want to give up. This attitude is cultivated through
patience and practice. Some will call on their personal faith,
others will rely on science and logic. Whatever it is that keeps
you going, make sure you have plenty of it. Studies have shown
again and again, that cancer patients who stay optimistic are
more likely to overcome their disease and survive than those
who can’t. Don’t be that person who creates a grand plan for

5 Awesome Bunker Plans on a Budget
42
you and your family without having the mental training to back
it up. Meditation, yoga and karate are all activities which focus
not just on physical, but mental strength and control. This
leads into the second item: proper training.
The eve of destruction is too late to start practicing your suture
skills. That being said, be sure you have the training to go along
with your preparations. Any prepper who is truly serious about
survival must have his mind and body trained and ready to
respond at all times. Much of this training doesn’t even require
much of an investment thanks to the many websites, videos,
and books available. Be sure you and your family have a
minimum of emergency medical and self-defense. It’s also a
good idea to have a trade which you can use to feed, protect
and provide for your family, in a doomsday scenario.
Blacksmithing, farming, and construction, are just a few
examples. From here the rest is in the details.