1.9” round ADA compliant railing for Residential ...€¦ · 1.9” round ADA compliant railing...
12
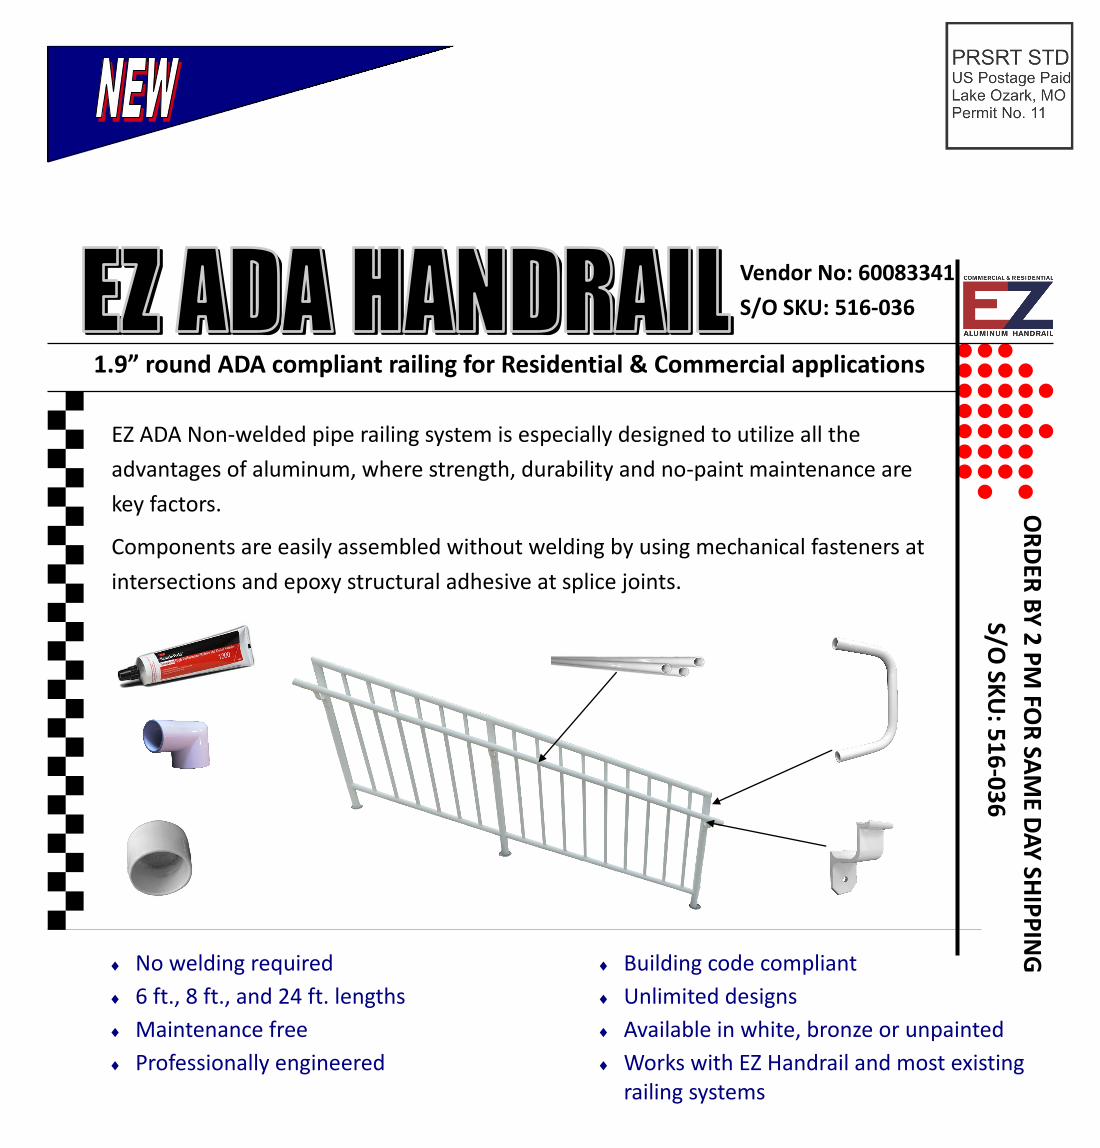
No welding required 6 ft., 8 ft., and 24 ft. lengths Maintenance free Professionally engineered Building code compliant Unlimited designs Available in white, bronze or unpainted Works with EZ Handrail and most existing railing systems 1.9” round ADA compliant railing for Residential & Commercial applications EZ ADA Non-welded pipe railing system is especially designed to utilize all the advantages of aluminum, where strength, durability and no-paint maintenance are key factors. Components are easily assembled without welding by using mechanical fasteners at intersections and epoxy structural adhesive at splice joints. Vendor No: 60083341 S/O SKU: 516-036 S/O SKU: 516-036 ORDER BY 2 PM FOR SAME DAY SHIPPING
Transcript of 1.9” round ADA compliant railing for Residential ...€¦ · 1.9” round ADA compliant railing...
No welding required
6 ft., 8 ft., and 24 ft. lengths
Maintenance free
Professionally engineered
Building code compliant
Unlimited designs
Available in white, bronze or unpainted
Works with EZ Handrail and most existing railing systems
1.9” round ADA compliant railing for Residential & Commercial applications
EZ ADA Non-welded pipe railing system is especially designed to utilize all the
advantages of aluminum, where strength, durability and no-paint maintenance are
key factors.
Components are easily assembled without welding by using mechanical fasteners at
intersections and epoxy structural adhesive at splice joints.
Vendor No: 60083341
S/O SKU: 516-036
S/O SK
U: 5
16
-03
6
OR
DER
BY
2 P
M FO
R SA
ME D
AY
SHIP
PIN
G

40 - 80 tooth saw blade Safety glasses Variable speed drill
Metal file
Ketone Solvent Level
Tape measure
5/16” Drill and Hex Bits
Chop or hack saw
Understand how to use all power tools, and follow their safety instructions!
Carpenter or Regular Pencil
Ear protection
Tools You Will Need
Vice Grips
2
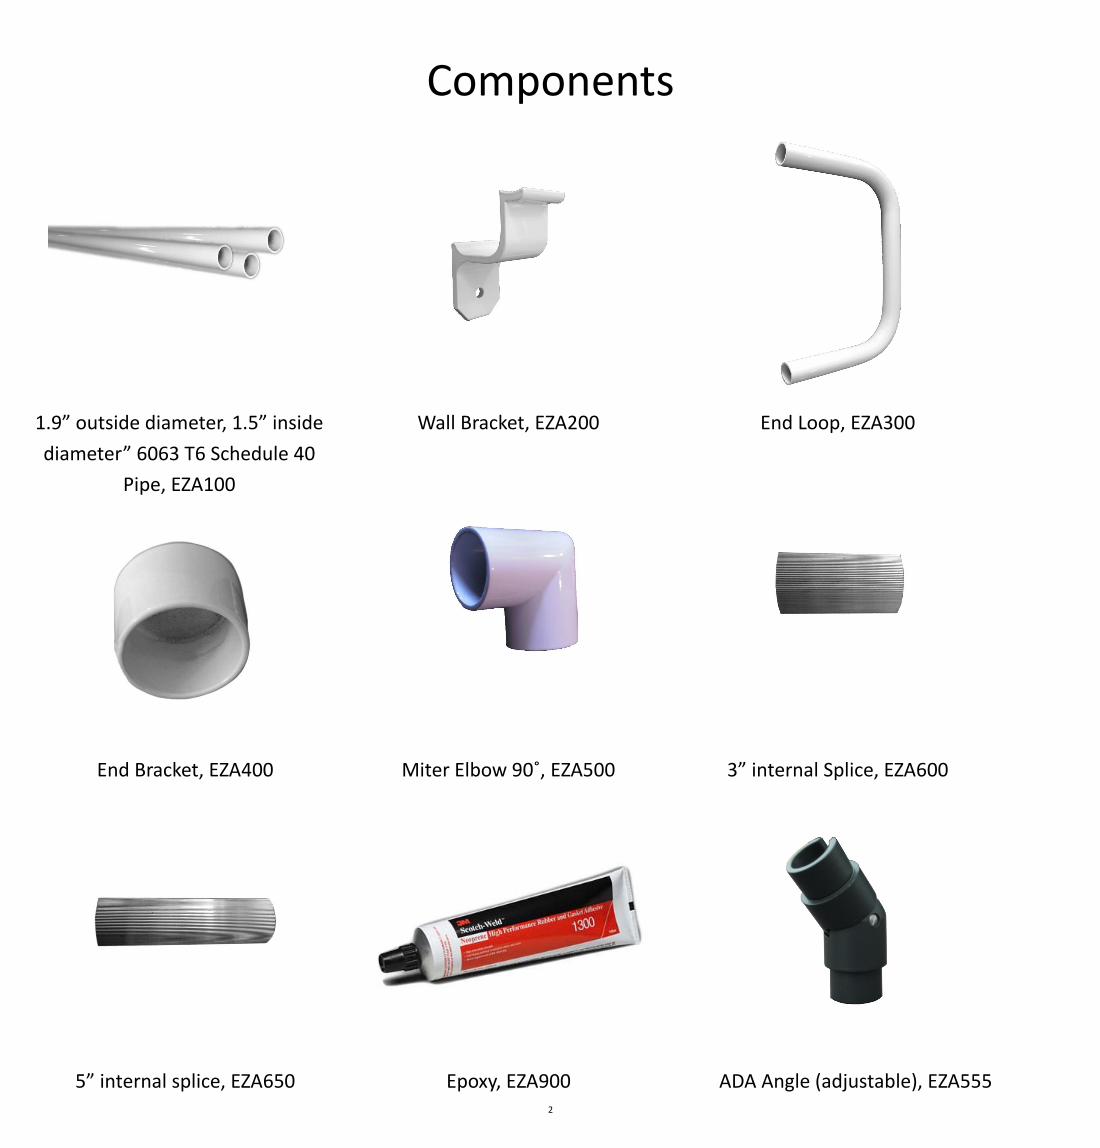
Components
End Loop, EZA300
3” internal Splice, EZA600 Miter Elbow 90˚, EZA500
Wall Bracket, EZA200 1.9” outside diameter, 1.5” inside
diameter” 6063 T6 Schedule 40
Pipe, EZA100
Epoxy, EZA900
End Bracket, EZA400
5” internal splice, EZA650 ADA Angle (adjustable), EZA555

3
Additional Components Available
90˚Radius Elbow, EZA585 Rail Elbow, EZA525 Wall return, EZA575
#8x1” Self tap hex screw
Fasteners
Thru bolt with washers and lock nut

4
Assembly Instructions
Step
One
Remove all ADA components from packaging and get familiar with the parts and pieces, (See page 3). De-
velop an idea of installation by reading these instructions entirely before you start your build.
First decide your railing installation height. Be sure your chosen height meets your intended use. For exam-
ple, the Americans with Disabilities Act Amendments Act of 2008 requires: Top of gripping surfaces of
handrails shall be 34 inches (865 mm) minimum and 38 inches (965 mm) maximum vertically above walking
surfaces, stair nosings, and ramp surfaces. Refer to http://www.ada.gov/2010ADAstandards_index.htm for
complete code requirements.
Once you determine the height of placement, mount one wall bracket EZA200
to end post using 3-1/2” thru bolts or appropriate fasteners for your surface.
For 3x3 aluminum posts, drill a 5/16” hole through the front and rear post wall.
Using a 3-1/2” thru bolt and (2) painted or non painted flat washers, attach the
bracket to the side of the post as shown to the right using a lock nut and wash-
ers, finger tighten only at this time.
It is important to remember that if your railing is traveling on a sloped grade,
your bracket will need to follow the slope. You can always snap a chalk line for
long runs.
**It’s best not to tighten rail brackets until all railing is in place**
Mount second bracket in the same fashion as stated in “Step Two”. Set the pipe on the brackets and mark
the ends for cutting. Pipe should extend to the end of each post. Once the pipe is cut, attach to the brack-
ets using the supplied hex or phillips head fasteners.
If mounting to multiple posts, follow the above instructions in “Step Two” mounting to post 1 and post 4,
but not exceeding the length of pipe. Fasten wall bracket EZA200 to post 2 and 3 leveling any sag out of the
railing as you go. Continue until all posts have been completed. (Do not fasten pipe until all wall bracket
EZA200 have been attached to posts).
1. Multiple ADA pipe and end loops will use the 5” EZA650 splice and epoxy (see epoxy and splice
directions on next page).
2. Elbows will use the 3” EZA600 splice and epoxy (See epoxy and splice directions on next page).
Step
Two
Step
Three

5
Assembly Instructions Cont.
Debur with file
Railing Splices
Railing splices are designed for a tight press fit and must be compressed with vice grips to
permit them to slip into the pipe. The areas to be joined should be cleaned thoroughly prior to
mixing adhesive. Pipe will also need to be deburred or edges filed down as shown to the right.
1. Mix adhesive according to manufacturer’s directions. Mix only enough that you can use
within a half hour.
2. Apply adhesive to inside surface of all pipe at least 1/2”, use a mixing stick to apply to the
circumference of the inside pipe. (See below in epoxy instructions)
3. Compress splice sleeve with pliers or vice grips, then slip into the pipe with the gap facing upward.
4. Wipe off excess adhesive after components are properly joined using the Ketone solvent (as shown on page 2). The areas
connected together should be left undisturbed for a min of eight hours, longer in colder weather. (See page 9-10 for details).
**** Caution! Ketone can adversely effect painted surfaces.
Epoxy Adhesive Instructions:
1. Mix epoxy thoroughly before applying.
2. All joints must have epoxy applied.
3. Once epoxy is mixed, you have 90 minutes to work with it. After that, the assembled
railing must not be moved for 8 hours. If the railing joints do get moved or bumped,
the joints may become loose.
4. Tying the assembled railing joints together with straps will assure a minimum crack
between joints.
5. Epoxy will not harden at temperatures below 40 degrees Fahrenheit.
6. Make sure joints are clear of residue before applying epoxy.
7. If a joint is assembled improperly, SEE TECHNICAL SUPPORT SECTION ON PAGE 7.

6
Assembly Instructions
Once all EZ ADA rail has been set , fastened, glued and allow to cure, its time to finish off the railing with end
loops & wall brackets.
If using an end loop and wall mount to finish off your end post, dry fit the pieces to locate your placement for
the wall mount. Use the 5” splice for end loop and 3” splice for elbows; this connection is critical and must be
adhered completely with the epoxy. Be sure to cut and test fit before any epoxy is applied.
Once you have determined the location of the wall mount, fasten the bracket to the post using the provided
1” #8 self tapping screw for EZ Post. If mounting to other than Aluminum posts such as block, concrete, wood,
steel, or vinyl.
Complete the end loop installation by using splice EZA650 and the epoxy EZA900 on all components. Please
read the epoxy instructions again if unfamiliar on working times.
Note: Pop rivets (sold separately) may be used to secure railing while adhesive cures.
For Continuous spans in excess of 30 feet, expansion joints should be provided. To make an expansion joint,
one end of the spliced joint should not have structural adhesive applied so that it is free to move in or out of
the pipe. If a joint is provided every 30 feet, the width of the gap should allow 1/8” expansion for each 40˚F of
expected temperature rise.
All pipe railing splices should be no more than 12” from the nearest support post.
If joint needs to be separated after installation and use of epoxy, heat the joint with a propane torch moving
rapidly around the splice to heat the glue. The distance of the flame is critical for preventing damage to the
finish. Once the glue is heated, remove the joint and clean glue out of joint while still tacky. **Important:
Paint damage will occur from the heating process, repaint by spray can will be necessary and clear coat. Spray
paint color may not match exactly.
All rails shall be formed from extruded 6063-T6 aluminum of 1-1/2 in. inside diameter (1.9 in. outside diame-
ter) , except where there are formed elbows, whereby 6063-T4 is used.
Step
Four
Technical
Support
Materials

7
Assembly Instructions Cont.
All pipe cuts shall be square and accurate for minimum joint-gap. Cuts shall be clean and free from chamfer,
from de-burring, nicks and burrs.
Contractors and Homeowners: When field cutting the grab rail pipe, cut clean and square to maintain factory
spec.
**Use a metal file to be sure no burrs are left on the material as to cause hand injury during use. Metal blade
with a maximum 80 tooth count is recommended for cutting .
All fasteners should be tightened so that completed railing is rigid and free of play at all joints and component
attachments.
Workmanship
Rigidity
CAUTION
During installation the work area should be roped off so occupants do not disturb the epoxy while curing.
Also, do not allow occupants do not use ADA railing until all epoxy and fasteners are secured.

8
Thank you for choosing EZ ADA for your handrail needs. We look forward to your continued
patronage. Take a look at the additional EZ Products available at your favorite building materials
supplier:
EZ Handrail — Code compliant picket railing
EZ Handrail Glass Edition— 8” glass slat railing
EZ Screen Room— Screen wall panel for
openings up to 8 ft. wide x 10 ft. tall
S/O SKU: 516-036


3Scotch-Weld™
Neoprene High Performance Rubber & Gasket Adhesives1300 • 1300L
Technical Data September, 2010
Typical PhysicalProperties
Note: The following technical information and data should be considered representativeor typical only and should not be used for specification purposes.
Product 3M™ Scotch-Weld™ Neoprene High PerformanceRubber and Gasket Adhesives
1300 1300L
Viscosity (approx.): 1500 - 4000 cps 250 - 1000 cps
Brookfield Viscometer: RVF #4 sp @ RVF #2 sp @20 rpm@80°F (27°C) 20 rpm@80°F (27°C)
Solids (by wt.): 34 - 39% 26 - 33%
Base: Polychloroprene Polychloroprene
Color: Yellow Yellow
Net Wt. (approx.): 7.1 - 7.5 lbs/gal 6.9 - 7.3 lbs/gal
Flashpoint (c.c.): -14°F (-26°C) -14°F (-26°C)
Solvent:* Petroleum distillate, Petroleum distillate,methyl ethyl ketone methyl ethyl ketone
and toluene and toluene
Features • 3M™ Scotch-Weld™ Neoprene High Performance Rubber & Gasket Adhesive1300L meets specification requirements of MMM-A-121.
• Temperature performance range is -30°F (-34°C) to 300°F (149°C).
• Bonding Range: Scotch-Weld Adhesive 1300 up to 12 minutes;Scotch-Weld Adhesive 1300L up to 8 minutes.
• Bonds neoprene, SBR, butyl and other types of rubber to various substrates.
• Scotch-Weld Adhesive 1300L is a lower solids viscosity version of Scotch-WeldAdhesive 1300, for easier brushing and sprayability.
Product Description 3M™ Scotch-Weld™ Neoprene High Performance Rubber & Gasket Adhesives1300 and 1300L are the most versatile of our rubber and gasket adhesives. They maybe used to bond metal, wood, most plastics, and neoprene, reclaim, SBR, and butylrubber. They have high immediate strength and excellent heat resistance. Scotch-Weld Adhesive 1300L is a lower solids, lower viscosity version of Scotch-WeldAdhesive 1300.
*These products contain non-photochemically reactive solvent.

Here are some friendly faces of your support team
THE HOME DEPOT
EZ ADA HANDRAIL SUPPORT TEAM
CORY H. MARY ANNE M. DAN H.
WEB: Www.hdezhandrail.com
Vendor No: 60083341 S/O SKU: 516-036
Vendor No: 60083341 S/O SKU: 516-036
SPEAK DIRECTLY WITH THE SUPPORT TEAM
ORDERS ARRIVE IN 4-DAYS OR LESS TO ALL 48 STATES—ORDERS SHIP SAME/NEXT DAY
QUESTIONS PROMPTLY ANSWERED WHILE YOUR CUSTOMER IS AT THE COUNTER
SAME DAY QUOTES, TAKE-OFFS, AND MATERIAL LISTS FROM ANY DRAWING OR
DIMENSIONS
PHOTOS AT WWW.HDEZHANDRAIL.COM TO HELP SUPPORT SALES