© Copyright June 2004
17
AVANT Installation Manual Rev 2 Effective Date August 25, 2005 Installation Manual © Copyright June 2004
Transcript of © Copyright June 2004

AVANT Installation Manual Rev 2 Effective Date August 25, 2005
Installation Manual
© Copyright June 2004
2
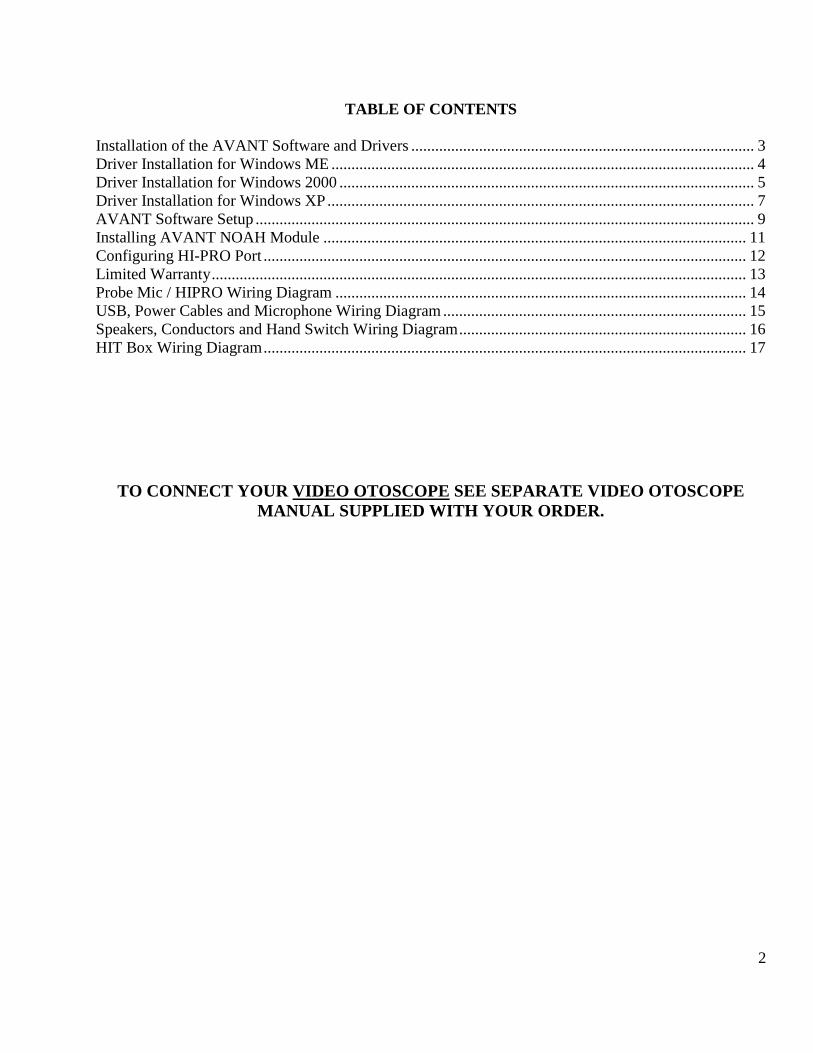
TABLE OF CONTENTS
Installation of the AVANT Software and Drivers ...................................................................................... 3
Driver Installation for Windows ME .......................................................................................................... 4
Driver Installation for Windows 2000 ........................................................................................................ 5
Driver Installation for Windows XP ........................................................................................................... 7
AVANT Software Setup ............................................................................................................................. 9
Installing AVANT NOAH Module .......................................................................................................... 11
Configuring HI-PRO Port ......................................................................................................................... 12
Limited Warranty ...................................................................................................................................... 13
Probe Mic / HIPRO Wiring Diagram ....................................................................................................... 14
USB, Power Cables and Microphone Wiring Diagram ............................................................................ 15
Speakers, Conductors and Hand Switch Wiring Diagram ........................................................................ 16
HIT Box Wiring Diagram ......................................................................................................................... 17
TO CONNECT YOUR VIDEO OTOSCOPE SEE SEPARATE VIDEO OTOSCOPE
MANUAL SUPPLIED WITH YOUR ORDER.

3
Installation of the AVANT Software and Drivers
Insert the AVANT CD-ROM into the CD drive. Wait until the Setup program starts. If the Setup
does not start, open the Windows Explorer and double-click on the CD-ROM icon.
On the Setup screen, choose Install AVANT. Follow the instructions on the screen. The
installation may ask you to update DirectX. If it does, follow the DirectX setup instructions on
the screen.
Reboot the computer.
Follow the Driver Installation instructions to install the drivers for your operating system.
Follow the AVANT Setup instruction for setting up the software before the first use.

4
Driver Installation for Windows ME
1. Close all running applications.
2. Insert the AVANT CD-ROM into CD drive. If the AVANT Setup screen appears, exit it by clicking
on the Exit button.
3. Connect the power source to the AVANT unit.
4. Plug the USB cable into the AVANT and into any available USB port on your computer.
5. Windows should find and install three new devices: two FTDI USB serial ports and SoundBlaster
Audigy 2 NX sound card.
5.1. If Windows does not find new hardware, it usually means that USB support is not enabled on
your machine. Check the machine BIOS settings and enable USB if necessary (you may need
the help of a computer technician.)
6. Wait until Windows finds new hardware and displays the Hardware Wizard screen.
7. Make sure Automatic search for a better driver is selected and then click Next.
8. Wait until Windows scans the CD-ROM, finds the driver, and installs it. Click Finish when
prompted.
9. Repeat the last three steps when Windows finds more hardware to install.
10. Once Windows has finished installing the drivers, run the Setup program from the
AVANT Installation disk. From the Setup screen, choose Update Audio Driver. Follow the
instructions on the screen. Note: Updating the audio driver may take few minutes.
Please follow the AVANT Setup instructions to complete the installation.

5
Driver Installation for Windows 2000
1. Close all running applications.
2. Insert the AVANT CD-Rom into CD drive. If the AVANT Setup screen appears, exit it by clicking
on Exit.
3. Connect the power source to the AVANT unit.
4. Plug the USB cable into the AVANT and into any available USB port on your computer.
5. Windows should find and install three new devices: two FTDI USB serial ports and SoundBlaster
Audigy 2 NX sound card.
5.1. If Windows does not find new hardware, it usually means that USB support is not enabled on
your machine. Check the machine BIOS settings and enable USB if necessary (you may need
the help of a computer technician.)
6. Wait until Windows finds new hardware and displays the Hardware Wizard screen.
7. Make sure Install the software automatically is selected and then click Next.
8. Wait until Windows scans the CD-ROM, finds the driver, and installs it. Click Finish when
prompted.
9. Repeat the last three steps when Windows finds more hardware to install.
10. By default Windows 2000 installs a generic driver for the USB sound card. This driver is incorrect
and therefore has to be replaced.
11. To replace the driver, click on the Start icon, then click with the right mouse button on the
My Computer icon, and then choose (left-click) Properties from the menu. The System Properties
screen will open.
12. On the System Properties screen choose Hardware tab and then click on Device Manager.
13. In the device list, click on the [+] next to Sound, video and game controllers. In the expanded list,
double-click on the USB Audio Device.

6
14. On the Device properties screen, choose the Driver tab, and then click on Update Driver.
15. Follow the instruction on the screen. On the Hardware Wizard screen, make sure
Install the Software Automatically is selected and click Next. Wait until Windows installs the
drivers. Reboot the computer if asked.
16. Once Windows has finished installing the drivers, run the Setup program from the AVANT
Installation disk. From the Setup screen, choose Update Audio Driver. Follow the instructions on the
screen. Note: Updating the audio driver may take few minutes.
17. If you ever change the USB port on your computer for the AVANT, you will need to re-install the
drivers for this port. When you plug the USB cable to a different USB port, Windows will prompt
you to install new hardware. Follow the Driver Installation instructions to reinstall the drivers.
Please follow the AVANT Setup instructions to complete the installation.

7
Driver Installation for Windows XP
1. Close all running applications.
2. Insert the AVANT CD-ROM into CD drive. If the AVANT Setup screen appears, exit it by clicking
on Exit.
3. Connect the power source to the AVANT unit.
4. Plug the USB cable into the AVANT and into any available USB port on your computer.
5. Windows should find and install three new devices: two FTDI USB serial ports and SoundBlaster
Audigy 2 NX sound card.
5.1. If Windows does not find new hardware, it usually means that USB support is not enabled on
your machine. Check the machine BIOS settings and enable USB if necessary (you may need
the help of a computer technician.)
6. Wait until Windows finds new hardware and displays the Hardware Wizard screen.
7. Make sure Install the software automatically is selected and then click Next.
7.1. If the Logo Testing compatibility prompt appears, ignore it by clicking on Continue Anyway.
8. Wait until Windows scans the CD-ROM, finds the driver, and installs it. Click Finish when
prompted.
9. Repeat the last three steps when Windows finds more hardware to install.
10. By default Windows XP installs a generic driver for the USB sound card. This driver is incorrect and
therefore has to be replaced.
11. To replace the driver, click on the Start icon, then click with the right mouse button on the
My Computer icon, and then choose (left-click) Properties from the menu. The System Properties
screen will open.
12. On the System Properties screen choose Hardware tab and then click on Device Manager.
13. In the device list, click on the [+] next to Sound, video and game controllers. In the expanded list,
double-click on the USB Audio Device.

8
14. On the Device properties screen, choose the Driver tab, and then click on Update Driver.
15. Follow the instruction on the screen. On the Hardware Wizard screen, make sure
Install the Software Automatically is selected and click Next. Wait until Windows installs the
drivers. Reboot the computer if asked.
16. Once Windows has finished installing the drivers, run the Setup program from the AVANT
Installation disk. From the Setup screen, choose Update Audio Driver. Follow the instructions on the
screen. Note: Updating the audio driver may take few minutes.
17. If you ever change the USB port on your computer for the AVANT, you will need to re-install the
drivers for this port. When you plug the USB cable to a different USB port, Windows will prompt
you to install new hardware. Follow the Driver Installation instructions to reinstall the drivers.
Please follow the AVANT Setup instructions to complete the installation.

9
AVANT Software Setup
The AVANT Software and the drivers must be installed prior to following this document
Start the AVANT software by clicking on the AVANT icon on Windows desktop.
From the AVANT main screen choose File, and then choose Advanced Options.
On the Advanced Option screen choose the Audio tab.
On the Audio page, click on Audio Properties to open Sound and Multimedia Properties screen.
On the Sound and Multimedia Properties screen, make sure the Audio page is selected.
Click the Preferred device box for both Sound Playback and Sound Recording. In both cases
make sure to select the preferred devices different from the Sound Blaster Audigy 2 NX.
Normally they should be set to the sound card that is installed on your computer. If you do not
have a sound card installed on your computer, leave the preferred devices set to
Sound Blaster Audigy 2 NX. Once the preferred devices are set, click on the OK button.

10
(Note: Windows uses the preferred devices for regular needs, such as playing back event sounds or music files. Setting the
preferred device different from the one used by the AVANT will prevent Windows and AVANT trying to use the same sound
device at the same time.)
On the AVANT Audio properties page, click on the Output Device box and select
Creative SB Audigy 2 NX from the list.
Make sure the Input Device and Mixer Device are also set to Sound Blaster Audigy 2 NX. If not,
click on the appropriate box and change the device.
Leave Input Line set to <Default Line>.
When finished, click on OK.
Calibrating the System
From the AVANT main screen, choose Functions, then Calibrate, and then System. The
Calibration Screen will open.

11
On the Calibration screen, click on Start and wait until calibration is finished. Click on Close to
exit the calibration screen.
From the AVANT main screen, choose Functions, then Calibrate, and then
Load Calibration Files. The Load Calibration screen will open.
Insert the AVANT Calibration CD-ROM disk into CD-ROM drive.
Click Load on the Load Calibration screen. The program will search for the calibration files and
load them.
Installing AVANT NOAH Module
Insert the AVANT CD-ROM into CD drive.
Start NOAH.
Follow the NOAH Module Installation procedure.
When asked to provide the path to a new module, type: D:\NOAH
(Note: D: is the actual CD-ROM drive letter. On some systems it may be different.)
(Note: In NOAH 3 it is necessary to point at Install.ini file when prompted.)
Wait until NOAH installs the module.
Configuring HI-PRO Port
If your AVANT has built-it HIPRO board, please follow the Configuring HI-PRO Port
document.

12
Configuring HI-PRO Port
Prior to following this document, the AVANT drivers must be installed and AVANT software installed and configured
HI-PRO cannot use COM ports higher than COM3, therefore the HI-PRO port has to be configured to
use one of the first three serial ports.
18. To detect which port will be used with the HI-PRO, start the AVANT by clicking on the AVANT
icon on the desktop. From the AVANT front screen choose File, and then Advanced Options.
19. On the Advanced Options screen click on the Detect Port. Wait until the port is detected.
20. Note which port has been detected (e.g. COM7.) Close the Advanced Options screen and exit the
AVANT.
21. Click with the right mouse button on the My Computer icon, and then choose (left-click) Properties
from the menu. The System Properties screen will open.
21.1. My Computer icon is located either on the Windows Desktop, or in the Start menu on
Windows XP.
22. Choose Device Manager.
22.1. In Windows 2000 and Windows XP Device Manager is located on the Hardware panel.
23. In the device list, click on the [+] sign next to Ports (COM & LPT). A list of ports will expand.
24. In the expanded list, locate USB Serial Port with the number different from the one detected by the
AVANT (e.g. if COM6 and COM7 are listed as USB Serial Ports, and COM7 has been detected by
the AVANT, select COM6.)
25. Double-click on the selected USB Serial Port.
26. Choose Port Settings tab.
27. Choose Advanced.
28. Change the COM Port Number to a number within COM1-COM3 range (COM3 recommended.)
28.1. If the port says In Use, ignore it.
29. Choose Ok and then close the System Properties.
30. Check the HI-PRO communications by running the HI-PRO test. HI-PRO test can be found on the
AVANT CD-ROM or in your fitting software.

13
Limited Warranty
MedRx, Inc warrants the AVANT System to be free from defects in material and workmanship for one
year from the time of purchase. If this system fails to perform as specified during this period, the
purchaser is responsible for calling MedRx at (888) 392-1234. The company’s representative will advise
the owner to either return specific components or the entire system to:
MedRx Inc.
1200 Starkey Road, #105
Largo, FL 33771
MedRx will repair or replace any defective parts, fully test the system and/or components and ship the
system promptly back to the owner. There is no cost for this warranty service, provided the system is
one year old or less and has not been misused, abused or damaged. Such damage includes, but is not
limited to, dropping, exposure to excessive heat greater than 100ºF and water/liquid damage.
Repair or replacement of the system as provided under this warranty is the sole and exclusive remedy of
the purchaser. MedRx shall not be liable for any consequential or incidental damages, or for breach of
any express or implied warranty. Except to the extent of applicable law, any implied warranty,
merchantability or fitness of this product is limited to the duration of this warranty.
MedRx will, at its discretion, service and repair out of warranty components at the purchaser’s request,
charging for parts and labor as necessary.
The limited warranty is deemed void if software or hardware is installed on the AVANT which is not
pre-approved by MedRx, Inc. Approved software includes NOAH and HIMSA approved hearing aid
manufacture programming modules for fitting hearing aids. Installation of HIPRO box is approved.
MedRx, Inc is not responsible for problems resulting from installation of unapproved software or
hardware. In the event of unapproved software or hardware installed on the system causing a conflict
with the AVANT functions, MedRx will service the problem for a fee to be determined at the time of
service.
MedRx has supplied with every system Microsoft Backup. MedRx strongly recommends that you
backup your database daily to insure no loss of data.
Consult your MedRx Technical support member for other alternatives for back up.

14
Probe Mic / HIPRO Wiring Diagram

15
USB, Power Cables and Microphone Wiring Diagram

16
Speakers, Conductors and Hand Switch Wiring Diagram

17
HIT Box Wiring Diagram