


Languages
Pages
Legal


8/6/2019 VSL Quick Start 1 0
http://slidepdf.com/reader/full/vsl-quick-start-1-0 1/16
VSL - Virtual StudioLive is a part of the Universal Control application. As with all FireStudio- and
StudioLive-family interfaces, Universal Control includes two windows: the Launcher window and the
Device window. For the StudioLive, the Device window is the VSL (Virtual StudioLive) application. VSL
provides bidirectional control of channel, subgroup, and main-bus levels; Fat Channel parameters;
aux mixes; effects; and the graphic EQ. It also provides a visual overview of your StudioLive settings
so that you can see, adjust, and organize them. VSL includes a librarian, allowing you to easily
manage your presets and Scenes.
Controlling your StudioLive with VSL is as easy as drag-and-drop. Load Fat Channel presets and
scenes by simply dragging them onto the channel or mixer overview. You can load Fat Channelpresets as a complete channel strip or as individual gate, compressor, or EQ presets. Through VSL,
you can back up all of the Scenes and presets stored on your StudioLive. These stored settings can
be loaded from disk or sent to, and stored internally on, the StudioLive. You can even drag presets
out of the browser and email, IM, or disk-swap them with other StudioLive owners.
Since the control is bidirectional, fader moves and parameter changes made on the StudioLive are
reflected in VSL, as well. So, for example, you can set up the StudioLive the way you want it and
then save your Scene or other presets in VSL.
VSL also includes an auxiliary-inputs router to allow you the freedom to choose which additional
buses to route to the sixteen stereo auxiliary FireWire sends. It also lets you create a password for
your StudioLive so that you can lock out unauthorized users. From the Launcher window, you canset basic parameters such as buffer size and sample rate. In addition, you can use the Launcher
window to configure your WDM outputs (PC only). Note that the Meter Style and Meter Decay
options in the Launcher window are not active when only a StudioLive is connected to a computer.
VSL - Virtual StudioLive Quick Start Guide

8/6/2019 VSL Quick Start 1 0
http://slidepdf.com/reader/full/vsl-quick-start-1-0 2/16
Changes the Clock Source for Chained FireStudio-
family Devices
The StudioLive cannot slave to an external clock.
However, if you are cascading it with FireStudio-familyproducts that do feature digital inputs, the clock source
becomes selectable.
The clock source setting will determine where the device
chain is receiving word-clock information. This keeps the
chained devices in sync with other digital devices and
with each other. The menu options are determined by the
available digital inputs in the chain.
In general, you will want the StudioLive to be your Master
Clock, in which case set the clock to StudioLive-Internal.
VSL Virtual StudioLive Quick Start Guide
Universal Control: Launch Window
Sample Rate Selector Changes StudioLive Sample Rate.
Set the sample rate to 44.1 or 48 kHz from the Launcher
window when your StudioLive is connected to a computer.
A higher sample rate will increase the fidelity of the
recording. It will also increase the file size and the amount
of system resources necessary to process the audio.
To ensure the safety of the audio equipment connected to
it, the StudioLive will mute all post-converter outputs for
two seconds when the sample rate is changed or when
the mixer is connecting to a computer. This includes the
main and the control-room outputs, as well as the aux
and subgroup outputs. While this offers a good measure of protection to your sound system, it could put the
brakes on a live show. Because of this, it very important
that the sample rate be selected and locked in prior to
beginning any recording or performance.
Clocksource
8/6/2019 VSL Quick Start 1 0
http://slidepdf.com/reader/full/vsl-quick-start-1-0 3/16
VSL Virtual StudioLive Quick Start Guide
Universal Control: Launch Window
Device Window Button Opens the Device Window
Click on this button to open the VSL Virtual StudioLive
application.
To give your StudioLive a custom name, double-click on
the default label (StudioLive) to open a text field. When
you have finished entering your custom name, hit the
Enter key.
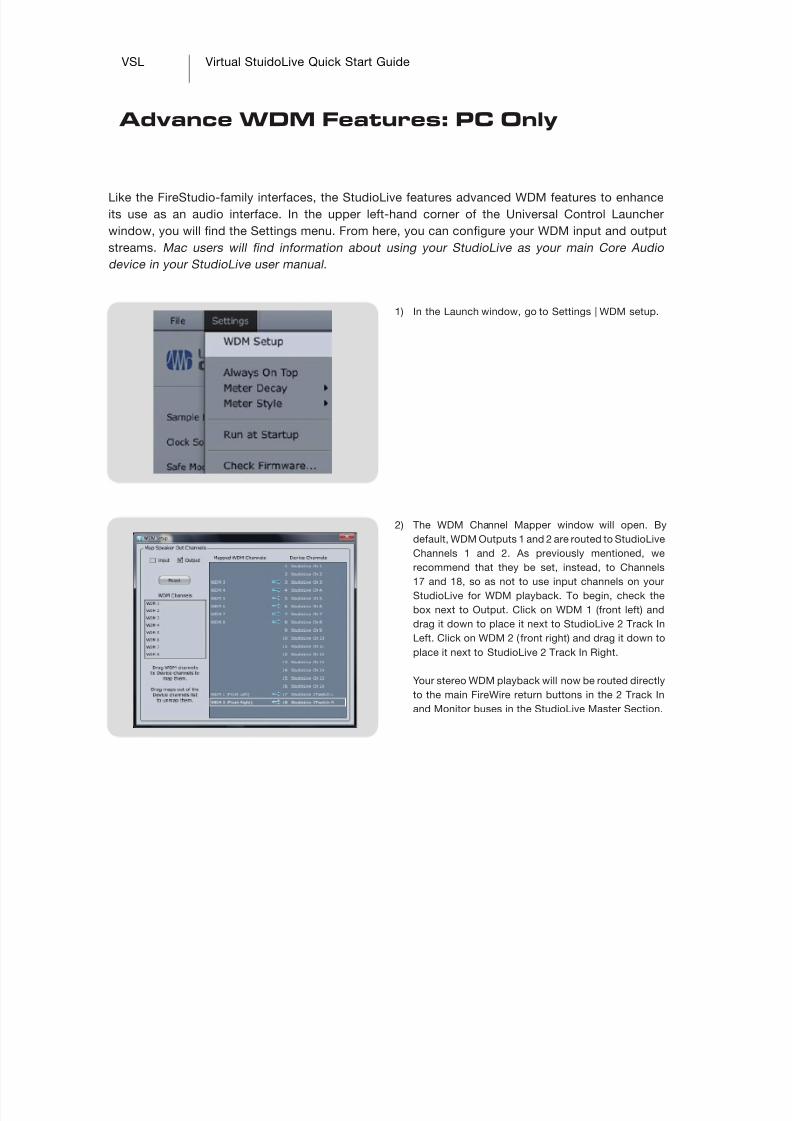
Buffer Size Selector (PC only) Changes the StudioLive Buffer Size.
You can set the buffer size from 64 to 4,096 samples. The
buffer size determines the roundtrip time it takes audio
data to be converted from analog to digital and back to
analog. As a general rule, the higher the buffer size, the
better the system performance, but the less playable
virtual instruments and the like become. In general, 512
samples (11 to 12 milliseconds) will provide you with a
large enough buffer for optimum system performance,
but low enough to be unobtrusive. You should set your
buffer size and sample rate prior to launching your host
application.
On the Mac, the buffer size is set from inside your host
application.
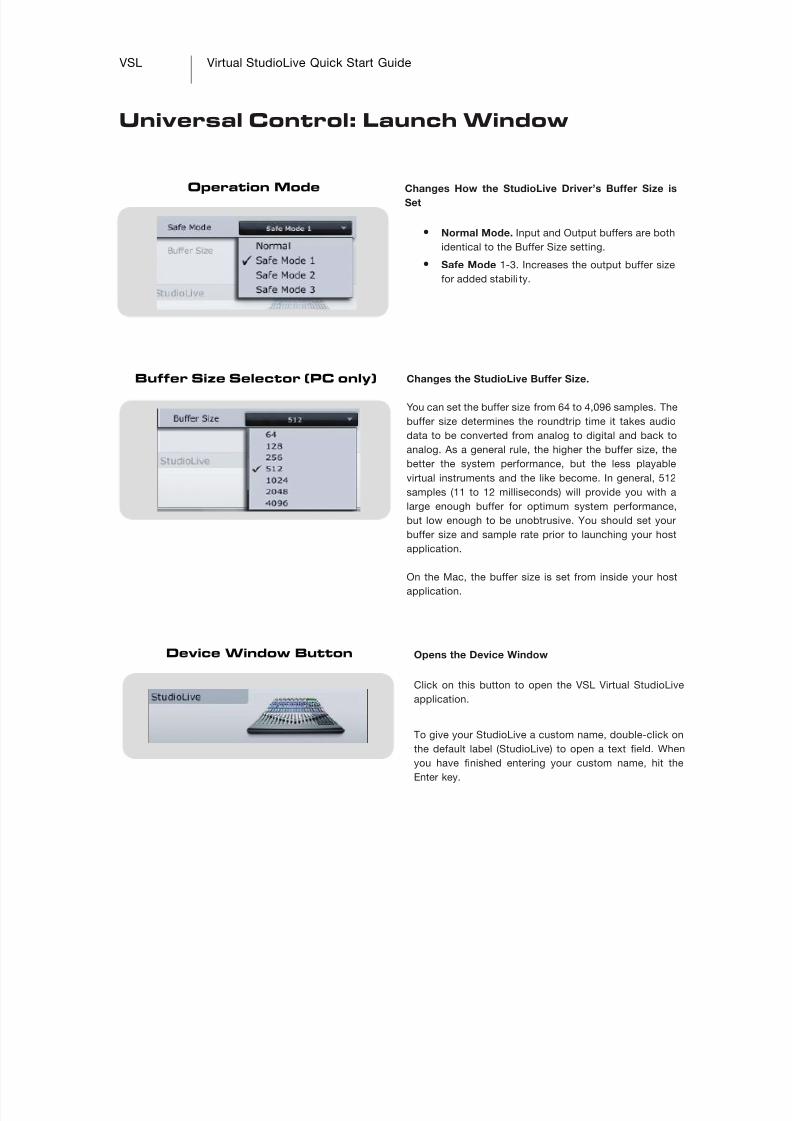
Operation Mode Changes How the StudioLive Driver’s Buffer Size is
Set
• Normal Mode. Input and Output buffers are both
identical to the Buffer Size setting.
• Safe Mode 1-3. Increases the output buffer size
for added stabili ty.

8/6/2019 VSL Quick Start 1 0
http://slidepdf.com/reader/full/vsl-quick-start-1-0 4/16
File Menu Opens and Closes Launch and Device Windows
From the File menu of the Launch Window, you can open
and close both windows, as well as quit the Universal
Control application
• Close Window. Closes just the Launch window.
• Show All Devices. Opens the Device window for
all of the connected FireStudio-family interfaces.
• Close All Devices. Closes the Device window for
all of the connected FireStudio-family interfaces.
• Quit. Quits the Universal Control application.
Settings: Check Firmware Scans Your StudioLive and Updates the Firmware
A firmware updater is built into the Universal Control
application. Periodically, a driver update will require that
the firmware on your StudioLive be updated. Whenever
you install an update for the Universal Control or add
a new FireStudio-family product to your system, you
should use this feature to ensure that the firmware is up
to date. If the firmware needs to be updated, the update
application will launch automatically.
Settings: Run at Startup Launches the Universal Control Application
Automatically on Startup (Windows Only)
When this is enabled, the Universal Control application
will automatically launch each time you boot your
Windows PC.
VSL Virtual StudioLive Quick Start Guide
Universal Control: Launch Window

8/6/2019 VSL Quick Start 1 0
http://slidepdf.com/reader/full/vsl-quick-start-1-0 5/16
VSL Virtual StudioLive Quick Start Guide
Universal Control: Launch Window
Settings: WDM Setup Opens the WDM Channel Mapper
The StudioLive features advanced WDM features. See
the next page for details.
Settings: Always on Top Allows the Launch Window to Stay in View When
Other Applications Are in Use
When this is enabled, the Launch window will remain
in the foreground when other applications are active,
rather than being in the background behind the current
application’s window.
8/6/2019 VSL Quick Start 1 0
http://slidepdf.com/reader/full/vsl-quick-start-1-0 6/16
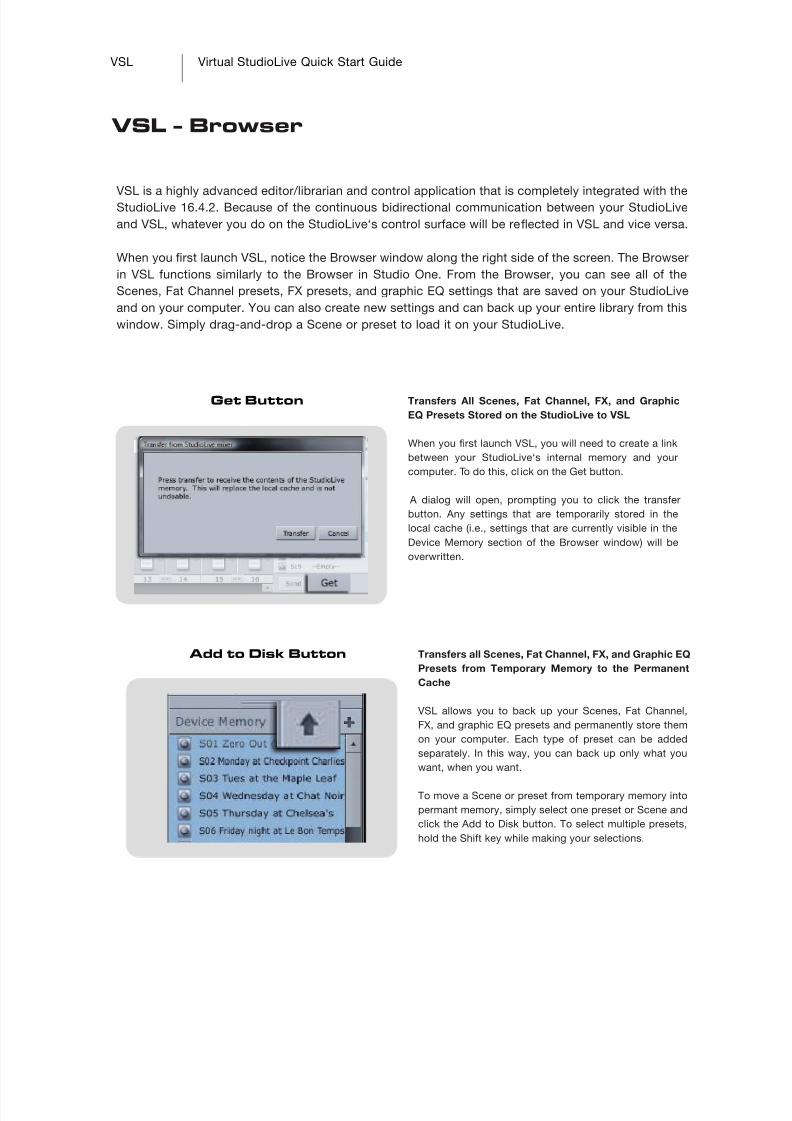
Like the FireStudio-family interfaces, the StudioLive features advanced WDM features to enhanceits use as an audio interface. In the upper left-hand corner of the Universal Control Launcher
window, you will find the Settings menu. From here, you can configure your WDM input and output
streams. Mac users will fi nd information about using your StudioLive as your main Core Audio
device in your StudioLive user manual.
1) In the Launch window, go to Settings | WDM setup.
2) The WDM Channel Mapper window will open. By
default, WDM Outputs 1 and 2 are routed to StudioLive
Channels 1 and 2. As previously mentioned, we
recommend that they be set, instead, to Channels
17 and 18, so as not to use input channels on your
StudioLive for WDM playback. To begin, check the
box next to Output. Click on WDM 1 (front left) and
drag it down to place it next to StudioLive 2 Track In
Left. Click on WDM 2 ( front right) and drag it down to
place it next to StudioLive 2 Track In Right.
Your stereo WDM playback will now be routed directly
to the main FireWire return buttons in the 2 Track In
and Monitor buses in the StudioLive Master Section.
VSL Virtual StuidoLive Quick Start Guide
Advance WDM Features: PC Only
8/6/2019 VSL Quick Start 1 0
http://slidepdf.com/reader/full/vsl-quick-start-1-0 7/16
VSL Virtual StudioLive Quick Start Guide
VSL - Browser
VSL is a highly advanced editor/librarian and control application that is completely integrated with theStudioLive 16.4.2. Because of the continuous bidirectional communication between your StudioLive
and VSL, whatever you do on the StudioLive‘s control surface will be reflected in VSL and vice versa.
When you first launch VSL, notice the Browser window along the right side of the screen. The Browser
in VSL functions similarly to the Browser in Studio One. From the Browser, you can see all of the
Scenes, Fat Channel presets, FX presets, and graphic EQ settings that are saved on your StudioLive
and on your computer. You can also create new settings and can back up your entire library from this
window. Simply drag-and-drop a Scene or preset to load it on your StudioLive.
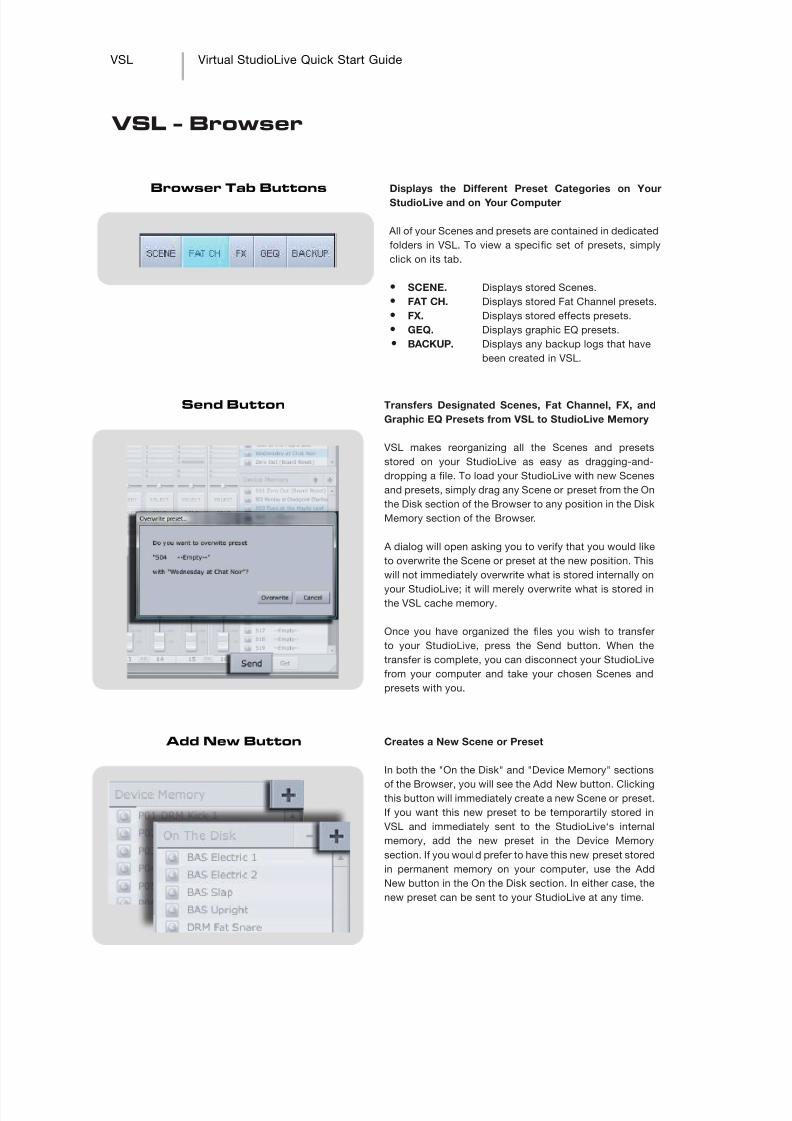
Get Button Transfers All Scenes, Fat Channel, FX, and Graphic
EQ Presets Stored on the StudioLive to VSL
When you first launch VSL, you will need to create a link
between your StudioLive‘s internal memory and your
computer. To do this, cl ick on the Get button.
A dialog will open, prompting you to click the transfer
button. Any settings that are temporarily stored in the
local cache (i.e., settings that are currently visible in the
Device Memory section of the Browser window) will be
overwritten.
Add to Disk Button Transfers all Scenes, Fat Channel, FX, and Graphic EQ
Presets from Temporary Memory to the Permanent
Cache
VSL allows you to back up your Scenes, Fat Channel,
FX, and graphic EQ presets and permanently store them
on your computer. Each type of preset can be added
separately. In this way, you can back up only what you
want, when you want.
To move a Scene or preset from temporary memory into
permant memory, simply select one preset or Scene and
click the Add to Disk button. To select multiple presets,
hold the Shift key while making your selections.
8/6/2019 VSL Quick Start 1 0
http://slidepdf.com/reader/full/vsl-quick-start-1-0 8/16
Browser Tab Buttons Displays the Different Preset Categories on Your
StudioLive and on Your Computer
All of your Scenes and presets are contained in dedicated
folders in VSL. To view a specific set of presets, simply
click on its tab.
• SCENE. Displays stored Scenes.
• FAT CH. Displays stored Fat Channel presets.
• FX. Displays stored effects presets.
• GEQ. Displays graphic EQ presets.
• BACKUP. Displays any backup logs that have
been created in VSL.
Send Button Transfers Designated Scenes, Fat Channel, FX, and
Graphic EQ Presets from VSL to StudioLive Memory
VSL makes reorganizing all the Scenes and presets
stored on your StudioLive as easy as dragging-and-
dropping a file. To load your StudioLive with new Scenes
and presets, simply drag any Scene or preset from the On
the Disk section of the Browser to any position in the Disk
Memory section of the Browser.
A dialog will open asking you to verify that you would like
to overwrite the Scene or preset at the new position. This
will not immediately overwrite what is stored internally on
your StudioLive; it will merely overwrite what is stored inthe VSL cache memory.
Once you have organized the files you wish to transfer
to your StudioLive, press the Send button. When the
transfer is complete, you can disconnect your StudioLive
from your computer and take your chosen Scenes and
presets with you.
Add New Button Creates a New Scene or Preset
In both the "On the Disk" and "Device Memory" sections
of the Browser, you will see the Add New button. Clickingthis button will immediately create a new Scene or preset.
If you want this new preset to be temporartily stored in
VSL and immediately sent to the StudioLive‘s internal
memory, add the new preset in the Device Memory
section. If you would prefer to have this new preset stored
in permanent memory on your computer, use the Add
New button in the On the Disk section. In either case, the
new preset can be sent to your StudioLive at any time.
VSL Virtual StudioLive Quick Start Guide
VSL - Browser

8/6/2019 VSL Quick Start 1 0
http://slidepdf.com/reader/full/vsl-quick-start-1-0 9/16
Remove Button Deletes a Stored Scene or Preset
In the On the Disk section of the Browser, notice the
Remove button. Clicking this button will delete a stored
Scene or preset.
Back-up Tab Creates and Restores Backups of Your StudioLive
The Backup tab allows you to create complete snapshots
of your StudioLive. This can be especially useful when
completing a project that may need to be revisited in the
future. To create a backup, simply click on the Backup
button.
To restore any backup file, select it in the On the Disk
portion of the Browser and click the Restore button. You
will be warned that any Scene or preset currently loaded
in your StudioLive will be overwritten.
VSL Virtual StudioLive Quick Start Guide
VSL - Browser

8/6/2019 VSL Quick Start 1 0
http://slidepdf.com/reader/full/vsl-quick-start-1-0 10/16
VSL Virtual StudioLive Quick Start Guide
VSL - Overview Tab
At the top of the VSL window, you will see three tabs: Overview, Channel, and Setup. The Overview tab
provides you with a complete graphical representation of your StudioLive. As you adjust parameterson the StudioLive, you will notice that the VSL overview is also updated. If you use your mouse to
adjust a parameter in VSL, the StudioLive will be updated remotely. It is important to remember that
every button, knob, slider, and fader on the VSL corresponds directly to a button, knob, slider, or fader
on your StudioLive. The graphic below identifies each controller and labels it with its corresponding
control on the StudioLive. To engage/disengage the same button over multiple channels, simply click
it for one channel and swipe your mouse over the rest of the channels. To move multiple faders or
sliders to the same position, move one to the desire position and then right-click and swipe your
mouse over the faders or sliders on the other channels. Holding the Shift-key while making changes
to make minute incremental adjustments.
8/6/2019 VSL Quick Start 1 0
http://slidepdf.com/reader/full/vsl-quick-start-1-0 11/16
VSL Virtual StudioLIve Quick Start Guide
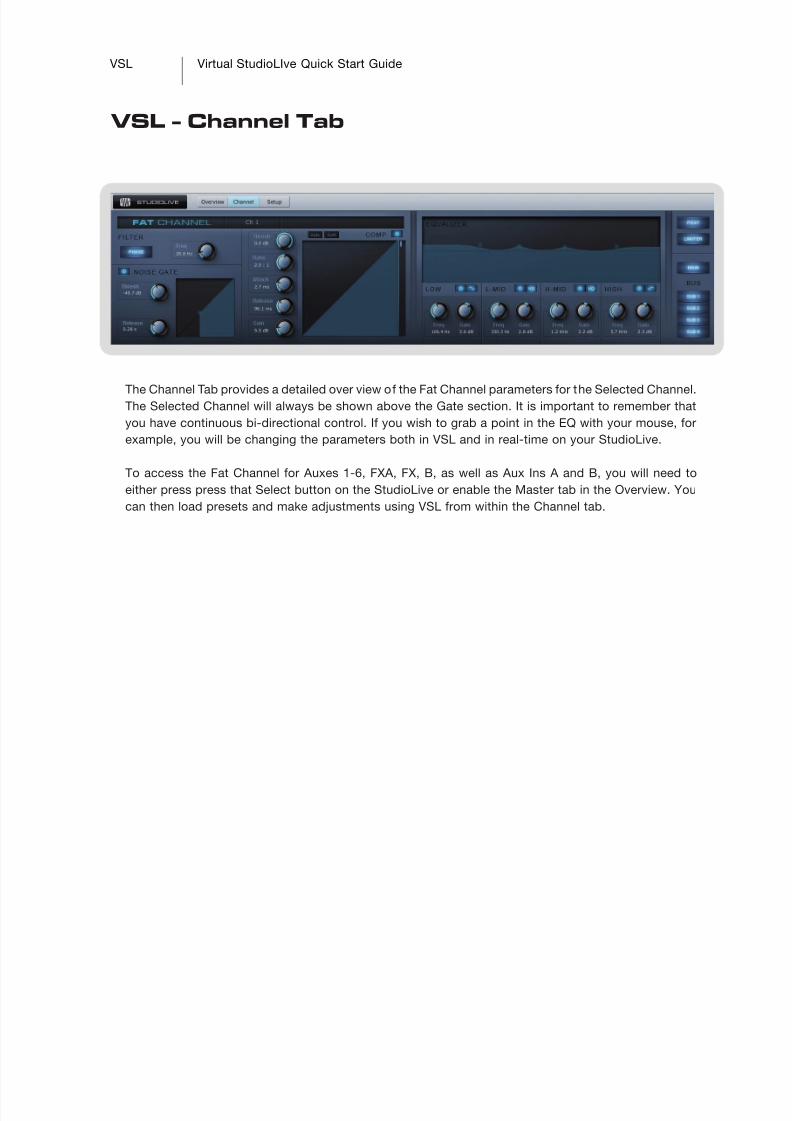
VSL - Channel Tab
The Channel Tab provides a detailed over view of the Fat Channel parameters for the Selected Channel.The Selected Channel will always be shown above the Gate section. It is important to remember that
you have continuous bi-directional control. If you wish to grab a point in the EQ with your mouse, for
example, you will be changing the parameters both in VSL and in real-time on your StudioLive.
To access the Fat Channel for Auxes 1-6, FXA, FX, B, as well as Aux Ins A and B, you will need to
either press press that Select button on the StudioLive or enable the Master tab in the Overview. You
can then load presets and make adjustments using VSL from within the Channel tab.

8/6/2019 VSL Quick Start 1 0
http://slidepdf.com/reader/full/vsl-quick-start-1-0 12/16
VSL Virtual StudioLive Quick Start Guide
Loading Scenes and Presets from VSL
As stated in the previous section, the Browser window in VSL functions much in the same way asthe Browser in Studio One. This means that to load a Scene or preset from the Browser window, you
simply select it and drag it over the mixer or channel you wish to load it on. Scenes and presets can
be dragged from either the On Disk or the Device Memory section of the Browser and dropped onto
the Overview or the Channel tab.
Loading a Scene
To load a new scene on your StudioLive, select
it from the Browser window and drag it over the
mixer in either the Overview or the Channel tab.
The window will grey out indicating that a new
scene is about to be loaded. Please note: onlythe parameters that have been enabled for recall
on the StudioLive will be recalled on the mixer.
Loading an Entire Fat Channel
PresetTo load every component in a Fat Channel
preset (Gate, Compressor, EQ), select it from
the Browser window and drag it over any part
of the desired channel. If you drag it over any of
the component quick views, it will load only that
component (i.e. if you drag a preset over the
Gate Quick View, only the Gate will be loaded)

8/6/2019 VSL Quick Start 1 0
http://slidepdf.com/reader/full/vsl-quick-start-1-0 13/16
VSL Virtual StudioLive Quick Start Guide
Loading Scenes and Presets from VSL
Loading an FX Preset
To load an FX preset, select it from the Browser
window and drag it over any part of the desired
FX bus in the Master section of the Overview tab.
Once it is loaded, you can use the FX Type menu
to change the effect and create new presets.
Loading a GEQ Preset
To load a graphic EQ preset, select the preset
from the Browser window and drag it over any
part of the graphic EQ in the Master section of
the Overview tab. Once it is loaded, you can
use the sliders in VSL or the encoders on the
StudioLive to make adjustments. Note that you
must be on the GEQ page in the System menuto have control over the graphic EQ in VSL from
the StudioLive.

8/6/2019 VSL Quick Start 1 0
http://slidepdf.com/reader/full/vsl-quick-start-1-0 14/16
The StudioLive allows you to route any 16 of 23 buses and inputs, in addition to the 16 input
channels. This is done via the Auxiliary Inputs Router on the Setup tab. To route FireWire sends 17-
32, first decide which buses and inputs you would like to record, in addition to your input channels.
Once you’ve determined your input pairs, patch them to a stereo pair of auxiliary inputs of your
choice. Remember, all of these buses and inputs are automatically set to send their signals post-
Fat Channel dynamics processing and EQ (where applicable). The inputs and buses selected in the
Auxiliary Input Router will be displayed in your recording application, along with the name of their
routing.
For instance, the routed pairs in the above picture would translate as follows in your host recording
application:
PHYSICAL SOFTWARE
Main Mix L/R Auxiliary Ins 17-18
Subgroup 1 and 2 Auxiliary Ins 19-20
Subgroup 3 and 4 Auxiliary Ins 21-22
Aux Send 1 and 2 Auxiliary Ins 23-24
Aux Send 3 and 4 Auxiliary Ins 25-26
Aux Send 5 and 6 Auxiliary Ins 27-28
Talkback L/R Auxiliary In 29-30
Solo L/R Auxiliary In 31-32
VSL Virtual StudioLive Quick Start Guide
VSL - Setup Tab

8/6/2019 VSL Quick Start 1 0
http://slidepdf.com/reader/full/vsl-quick-start-1-0 15/16
The Auxiliary Input Router also allows you to designate a specific bus to the S/PDIF output and
select which stereo pair will be recorded on an additioanl stereo track in Capture. When the
StudioLive is not connected to a computer, the S/PDIF output is routed using the System Menu.
However, when your StudioLive is synced to your computer, you can send any of the 14 routable
buses to the S/PDIF output by assigning them to FireWire sends 31 and 32. In addition to being
available for recording via Aux In 31 and Aux In 32, these sends are normalled to the S/PDIF output.
Capture enables you to record a stereo mix track in addition to the 16 channel inputs on the
StudioLive. Auxiliary FireWire Inputs 17 and 18 are the source for this main track in Capture, and it
is user-definable through the Auxiliary Input Router. Whichever source is routed to Channels 17/18
can be recorded as a stereo track in Capture. For more details on the main track and Capture,
please consult the Capture User Manual that came with your StudioLive.
VSL Virtual StudioLive Quick Start Guide
VSL - Setup Tab

8/6/2019 VSL Quick Start 1 0
http://slidepdf.com/reader/full/vsl-quick-start-1-0 16/16
To lock your StudioLive, press the System
button in the Digital Effects | Master Control
section and navigate to Page 4: Lockout. Your
StudioLive cannot be locked unless this page
is active. If you have multiple StudioLive mixers
connected, you only need to lock the Master
unit to lock all mixers in the chain.
At its lowest level of security, Lockout mode allows you to freeze the current Fat Channel and effects
settings. Faders, aux mixing, and Scene recall can still be enabled. Each of these mix functions can
be added to Lockout mode. To lock your StudioLive, press the Select buttons that correspond to the5-digit password you have set. In this example, the password is 12345, so you would press the Select
buttons for Channels 1, 2, 3, 4, and 5, in that order. The Panel Status will switch to Locked, indicating
that Lockout mode is now active.
To unlock your StudioLive, navigate back to Page 4: Lockout in the System menu if this page is
not currently active. Press the same sequence of Select buttons. The Panel Status will change to
Unlocked, and you will be able to resume your mix.
VSL Virtual StuidoLive Quick Start Guide
Enabling Lockout Mode
Your StudioLive features a Lockout mode that allows you to temporarily disable nearly every feature
on the StudioLive, although analog features (e.g., input-trim knobs, faders, and cue, tape-input,and monitor levels) can still be adjusted. Because of this, after unlocking your StudioLive and
before resuming mixing, you should take a quick glance at your input trims and output levels. If you
have locked your fader position, you will be able to recall your pre-lockout fader positions using
the Locate button in the meter section. Until you connect your StudioLive to a computer, the mixer
cannot be locked, so don’t worry about accidentally locking yourself out.
With your StudioLive connected and synced
to your computer, launch VSL and click on the
Setup Tab. Click on the Lock button.
To set your custom password, click on the box
next to “Device is Lockable.” At this point, a
cursor will appear in the password box. Enter
a 5-digit code, using any number between 1
and 9, and click the Set button. Your password
will no longer be displayed. Should you need
to change your password, simply click on the
box next to “Device is Lockable.” Your old
password will be deleted, and you will be able
to enter a new password. Once you have set
your password, the StudioLive can be locked
with or without being synced to a computer.
Top Related