


Languages
Pages
Legal


ePlan Applicant User Guide Last Updated 2/26/15 1
Table of Contents Introduction to ePlan............................................................................................................. 2
Electronic Plan Submission…………………………………………………………………….... 3-11
ePlan Review Invitation………………………………………………………………….… 3
Installing the Required ePlan Components….……………………………………….… 4
Logging In………….……………………………………..……………………………..….. 4-5
Standards……………………………………………………………………………………………. 6-11
Plan File Naming………………………………………………………………………….... 6
File Type…………………………………………………………………………………….. 7
Design Professional Seals and Signatures……………….…………………………… 8-9
Folder Structure…………………………………………………………………………….. 10
Graphic Scale……………………………………………………………………………..... 10
File Sheet Size and Orientation..……………………………………………………….… 10-11
Uploading Plan Drawings and Documents…………………………………………….……… 12-14
Notifying Submissions to Begin Prescreening………………………………………...... 13-14
Security Timeout…………………………………………………………………………............... 14
Prescreening………………………………………………………………………………………… 15
Prescreening Has Been Returned……………………………………………………….. 16
Change Requests and Plan Resubmit …………………………………………...…………….. 17-24
Accepting the Applicant Resubmit Task ………………………………………………… 17
Markups and Changemarks ……………………………………………………………… 18-21
Outside User Access ………………………………………………………………..……. 22
Uploading Corrections and Completing the Applicant Resubmit Task.........…..……. 23
Approval .……………………………………………………………………………………………. 26
Building Permits - Completing the Payment Selection Task.………………………….. 26
Building Permit Approval………………………………………………………………….. 27
Planning & Development Project Approval……………………………………………… 28
Plan Revisions During Construction………………………………………………………….... 29-30

ePlan Applicant User Guide Last Updated 2/26/15 2
Introduction to ePlan Electronic Plan Review (ePlan) is a web-based solution that allows plans for Building Permits and
Development Projects to be submitted electronically, replacing the traditional paper-based review
method. ePlan will improve the plan review cycle, reduce costs associated with obtaining building
permits and development approvals as well as support green initiatives.
This manual provides basic documentation on the steps involved in the Electronic Plan Review
(ePlan) process. It has been prepared as a general reference guide and is not designed to present
every detail or situations on every element of the process. There are text descriptions and screen
images of the step-by-step tasks necessary to complete a submittal and review using ePlan.
If at any time in the process you have questions or concerns, do not hesitate to call. Be sure to ask
to speak to a System Administrator in one of the following divisions:
Development Services Department
Planning and Development Division
407-665-7371
Building Division
407-665-7050
ePlan Web Address
https://eplan.seminolecountyfl.gov/epr
NOTE: In addition to this user manual, please reference the help documentation available within the
ePlan Review Web portal for further assistance.

ePlan Applicant User Guide Last Updated 2/26/15 3
Electronic Plan Submission Please complete the following prior to getting started:
For Building Permits, review the “How to Apply for Your Permit Online” guide for
instructions on submitting an application online. You must receive an email invitation
to use ePlan before electronically uploading your plan drawings and documents.
For Planning & Development projects, please visit the “Electronic Plan Review” webpage
for instructions on submitting an application.
Review the standards for naming your drawing and document files, sheet sizes, file
formats accepted, etc. (Review the entire “Standards” section of this guide.)
ePlan Review Invitation
When your application for a Building Permit or Development Project is reviewed and accepted,
an Electronic Plan Review invitation will be sent to the ePlan email address provided to
Seminole County on your application. For first time users, the invitation email will contain your
login information, temporary password and information about the project, including a link to the
ePlan web portal.
TIP! ePlan is designed to function
using Internet Explorer (IE).
Limited functionality is
available using (Chrome,
Firefox, Safari, etc.). Users
experiencing issues accepting
tasks or viewing files in these
browsers should log out and
switch back to IE.

ePlan Applicant User Guide Last Updated 2/26/15 4
Logging In
New Users First Time Login (Internet Explorer Users)
1. Prior to logging into Electronic Plan Review (ePlan), your computer must be configured
properly. For detailed configuration instructions, please visit:
http://www.seminolecountyfl.gov/gm/ElectronicPlanReview/EPRSetup.aspx
User Account Control (UAC) must be turned off initially for the ePlan installation to
occur correctly. It can be reset back to the previous setting following installation.
If using a computer with Internet Explorer (IE) 9 or 10 or 11, you must enable
Compatibility View.
Pop-ups must be disabled in your browser or an exception added to allow pop-ups for
eplan.seminolecountyfl.gov. If you login to ePlan and no ePlan window appears, you
probably have a pop-up blocker in use that is preventing the main project window
from opening.
The login page has an MSI (Microsoft Silent Install) component required to install
Electronic Plan Review ActiveX controls when using Internet Explorer (see image
below). This installation will only need to be done once; if you utilize a different
computer, it will require another installation of the components for that computer.
TIP!
Click the ePlan Support and
Documentation link shown here
to access the County ePlan
informational webpage.

ePlan Applicant User Guide Last Updated 2/26/15 5
2. To sign in, enter your email address and temporary password provided in the invitation
email. Click the “Accept & Login” button shown in the image of the login screen above.
3. Enter your new password and personal account information. All fields in yellow are
required. Click on the “Save” button to save your profile.
Existing Users
If you are a returning user, login to ePlan
with your full email address and password.
If you have forgotten your password, click on
the “Forgot Password” button so that you
can retrieve it through your security
question.
NOTE: No one can see your password or
security question answer. If you cannot
access your account after trying to retrieve
your account information, contact a
Seminole County ePlan Administrator at
407-665-7050 for Building Permits or 407-
665-7371 for Development Projects to have
your password reset. An email will be
automatically generated and sent to the
account holder email address with a
temporary password.
TIPS!
Passwords are case-sensitive!
Some ePlan customers find that it is
helpful to utilize a generic email account
that can be accessed by multiple
designated staff within the company.
Keep in mind that doing so limits
Seminole County’s ability to determine
who may have taken certain actions
within the customer’s tasks in the ePlan
site.

ePlan Applicant User Guide Last Updated 2/26/15 6
TIP!
Use a decimal to insert a plan
page into the existing plans in
the order you wish it to appear.
Example:
001 CV Cover Sheet and Index
001.5 C.5 Inserted Page
002 C1 Site Plan
Standards Plan File Naming Standards
When preparing to upload your drawings / plan pages to the ePlan system, please follow the file naming structure and file types shown below:
Drawings
1. All drawings must be uploaded as individual PDF file types to the “Drawings” folder and saved in a landscape orientation, by sheet name.
2. All file names will begin with an ePlan three digit number that flows in sequence. Example: 001, 002, 003 etc. IMPORTANT NOTE: The plan Cover Sheet must always begin with 001 and the Index Sheet must always begin with 002 (unless combined with the cover sheet).
3. The second part of the file name will be any alpha-numeric number you have assigned to each page. Example: L1 Landscaping, E1 Electrical, etc.
4. The third part of the file name will be the title that you have given each sheet. Example: Building Elevation Detail, Electrical Riser, Site Lighting, Foundation, etc.
See below for a sample of sheet names using the requested ePlan numerical sequence with
your individual alpha-numeric sheet # and sheet titles:
ePlan sequence number Your Alpha-Numeric Sheet # Your Sheet Title
001 CV Cover Sheet and Index
002 C1 Site Plan
ePlan Applicant User Guide Last Updated 2/26/15 7
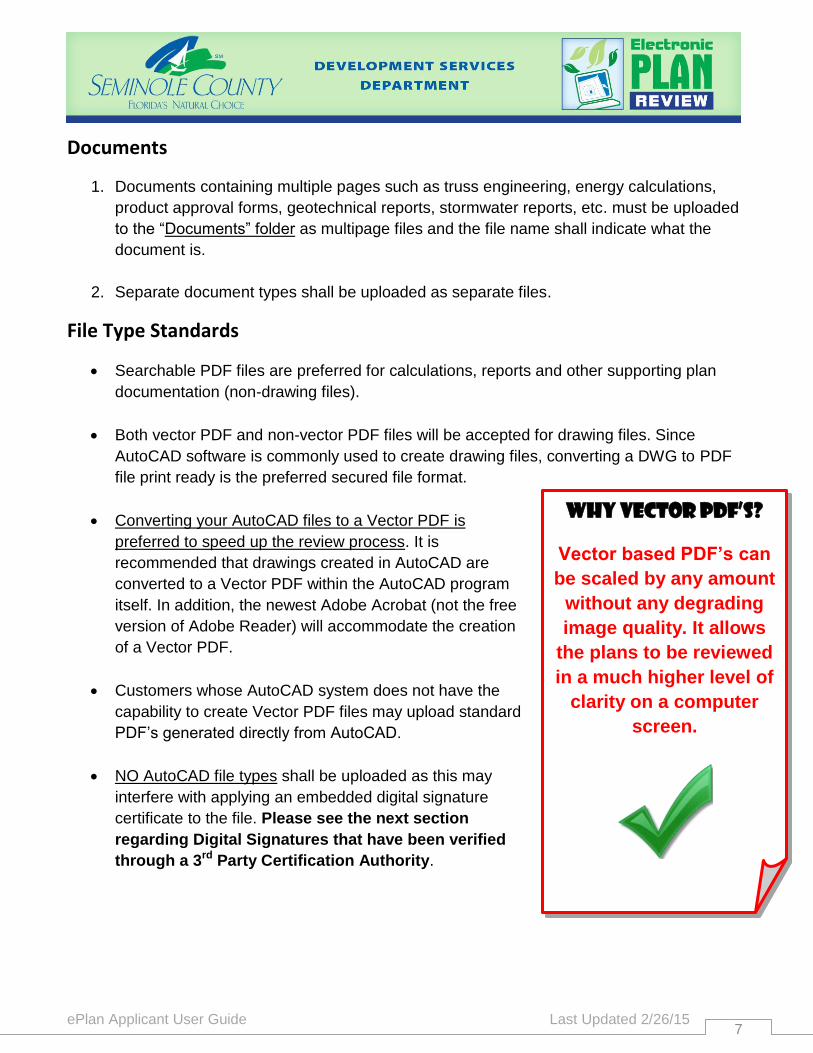
Why Vector PDF’s?
Vector based PDF’s can
be scaled by any amount
without any degrading
image quality. It allows
the plans to be reviewed
in a much higher level of
clarity on a computer
screen.
Documents
1. Documents containing multiple pages such as truss engineering, energy calculations,
product approval forms, geotechnical reports, stormwater reports, etc. must be uploaded
to the “Documents” folder as multipage files and the file name shall indicate what the
document is.
2. Separate document types shall be uploaded as separate files.
File Type Standards
Searchable PDF files are preferred for calculations, reports and other supporting plan
documentation (non-drawing files).
Both vector PDF and non-vector PDF files will be accepted for drawing files. Since
AutoCAD software is commonly used to create drawing files, converting a DWG to PDF
file print ready is the preferred secured file format.
Converting your AutoCAD files to a Vector PDF is
preferred to speed up the review process. It is
recommended that drawings created in AutoCAD are
converted to a Vector PDF within the AutoCAD program
itself. In addition, the newest Adobe Acrobat (not the free
version of Adobe Reader) will accommodate the creation
of a Vector PDF.
Customers whose AutoCAD system does not have the
capability to create Vector PDF files may upload standard
PDF’s generated directly from AutoCAD.
NO AutoCAD file types shall be uploaded as this may
interfere with applying an embedded digital signature
certificate to the file. Please see the next section
regarding Digital Signatures that have been verified
through a 3rd Party Certification Authority.

ePlan Applicant User Guide Last Updated 2/26/15 8
Tip!
It may take 1 to 2 weeks to
have your identity verified
and receive your digital
signature certificate from the
certification authority you
have contracted with. Keep
this in mind when planning to
submit applications to
Seminole County.
Digital Signatures - Design Professional Stamps and Signature Standards
Digital signatures are permitted by the State of Florida Administrative Code that governs
each design professional’s license.
Effective July 1, 2015, all files prepared for upload to the Seminole County ePlan Review
System by any licensed design professionals shall contain a digital signature certificate
that has been issued by a valid 3rd party certification authority (CA) and contain an image
representing the design professional, their license number and their name.
Embedded Digital Signature Image Samples Contained in Seminole County Public Records:
Files signed with a digital signature will have the digital signature applied to the file in
such a way as it is visible and embedded in the originating PDF document. Scanned files
of applied digital signatures are not accepted as valid.
Digital signature certificates for Engineers
cannot be self-validated / self-issued per the
Electronic Signatures Act of 1996 and Chapter
Florida Statute 668. Seminole County requires
all design professionals to have certificates
issued by a 3rd party CA.
It is highly recommended that design
professionals provide their digital signature
certificate in advance before submitting their
work to Seminole County. Doing so allows
their digital signature certificate to be
authenticated and distributed to appropriate
review staff to add to their list of trusted
certificates. To complete this, design
professionals must complete and submit the
Digital Signature Affidavit form as instructed on
our webpage located here.

ePlan Applicant User Guide Last Updated 2/26/15 9
A trusted 3rd party certification authority is a non-biased commercial entity that verifies
the design professional’s identity using various methods. Once the design professional’s
identity has been verified by the CA, the CA issues a digital signature security certificate
to the design professional for a fee. The digital signature has both a private and public
key and an expiration period.
The private key issued by the CA is known only to the design professional for their sole
use as described in the Florida Administrative Code.
The public key is an automation tool contained in the embedded digital signature
certificate that is used by County review staff to access the digital security certificate to
verify its authenticity.
Electronic Signatures – Professional’s Electronic Data Delivery System
(PEDDS)
Effective June 30, 2015, the use of PEDDS 3.7 by design professionals as a
paperless signing method will expire. This will coincide with the Florida Department of
Transportation’s sunsetting of the PEDDS Client in favor of digital signature certificates
issued by a 3rd party CA. FDOT will no longer provide technical support for the PEDDS
Client.
PEDDS is a free program that is used to electronically sign and seal documents and may
be used in lieu of a digital signature on electronic files for any permit or project applied
for on or before June 30, 2015. PEDDS does NOT place a visual indicator on the files
and requires two hard copy reports be printed, signed and sealed. After signing and
sealing the reports, they should be scanned with the following naming format: PEDDS
[last name] [signing date]. The PEDDS reports should be uploaded to the “Documents”
folder in the ePlan Review System by the ePlan Review applicant. The hard copies are
to be retained by the design professional in their secure project folder structure for later
access if necessary.
PEDDS has the ability to authenticate a signing by interacting with the PEDDS client. If
nothing on the project files has changed after the initial signing, the authentication
process will yield a report indicating that no changes have been made since the last
signing.
PEDDS can be downloaded here. Please refer to the PEDDS Visual User Guide for detailed
instructions.

ePlan Applicant User Guide Last Updated 2/26/15 10
Folder Structure Standards
All Building permit or Development project
application forms must be uploaded into the
“Application Documents” folder for each
project.
All drawing files must be uploaded into the
“Drawings” folder for each project.
All supporting documents must be uploaded into the “Documents” folder for each project.
Sample document types would be truss engineering, energy calculations, product
approval forms, geotechnical reports, stormwater reports, etc.
The eForm Attachments folder is not used for uploading of files.
Graphic Scale Standards
Plan pages should be properly oriented in landscape
mode for efficient review.
Each sheet must have a typical graphic scale as
shown in the image to the right.
When more than one scale is used on a sheet, an
independent graphic scale must accompany the
applicable detail.
All plans must be drawn to scale.
File Sheet Size and Orientation Standards
For Development Projects, all drawing files must be drawn and formatted for a minimum
landscape 24” x 36” sheet file, except Plats which are drawn to a 20”x24” sheet file. Any
exceptions must be approved by the Planning & Development Division.
For Building Permits, all drawing files must be drawn and formatted for a minimum
landscape 24” x 36” sheet file or landscape 11” x 17” sheet file for smaller scale jobs
(pool enclosures, pools, termite repairs, etc.).

ePlan Applicant User Guide Last Updated 2/26/15 11
Application Documents shall be saved and uploaded
in portrait orientation as individual files.
Plan pages shall be saved and uploaded in
landscape orientation as individual files.
Documents shall be saved and uploaded in portrait
orientation. If a document contains multiple pages, it
may be uploaded as a multipage file, the file name
describing what it is (truss engineering, energy
calculations, stormwater reports, etc.)
TIP!
Please read this entire
section before attempting to
upload. Once all required
items are uploaded, you
MUST notify the
Submissions Group (see
steps 7-12).

ePlan Applicant User Guide Last Updated 2/26/15 12
Uploading Plan Drawings and Documents
1. When you have successfully logged in to ePlan, the “Project” screen will display. Any
projects for which you have access will display in this list. Any outstanding tasks that require
your action are displayed in the “My Tasks” area below the project list. Select the specific
project that corresponds to the plans you will be uploading by clicking on the project
number. The projects are listed in order by application number (i.e. BP11-00001234,
Planning & Development projects will have a PZ prefix).
2. Click the “Drawings” folder name to upload your plans or the “Documents” folder name to
upload supporting plan documents or the “Application Documents” folder name for all
forms related to the project application. Follow the prompts for uploading your plans
and documents.
3. Click the “Upload Files” button.
4. Select or browse to the file location
on your computer. Select or
highlight the files you want to
upload; multiple files can be
selected by using your Shift or Ctrl
keys. Click the “Open” button.

ePlan Applicant User Guide Last Updated 2/26/15 13
NOTE: Seminole County requires that all drawings be uploaded as individual
files and in landscape orientation, by sheet name according to the file
naming standards contained in this guide. All documents shall be uploaded
in portrait orientation. See pages 6 & 9 respectively.
5. After reviewing the files, click the “Upload Now”
button. The files will be copied to the upload
window. Click on the
“Close” button to
close out of the
dialog box.
6. Once files are uploaded to the folder(s), the folder list
is populated with thumbnail images of each file
contained in the folder. Under each thumbnail, the file
name, author, date, and any relevant file icons
display.
7. Once all documents and drawings have been uploaded, the Submissions Group needs to
know that you are ready to begin the Prescreening process. Do this by clicking the
icon near the top right corner of the ePlan window.
8. A window will pop up; click the “Add Topic” button.

ePlan Applicant User Guide Last Updated 2/26/15 14
9. Select the “Begin Prescreen Review”
category from the drop down menu.
10. Enter a subject and brief description
then choose “Save & Prepare
Email”.
11. Place a checkmark in
the “Submissions”
group and click
“Send”.
12. You have successfully finished part one of submitting your plans electronically.
13. Please logout after your session is complete.
NOTE: For Planning & Development projects, fees must be paid at the
time of application submittal.
NOTE: For Building Division permits, plan review deposits are required
to be made prior to plan review by cash/check or by setting up an escrow
account.
Security Timeout
Due to security and resource concerns, the system will automatically sign you out after 90
minutes of inactivity. When you are ready to resume working with the system, click any button
on the ePlan screen. The system will automatically load the sign-in page for you. You can also
close the web browser window and reload the sign-in page manually in a new browser window.
https://eplan.seminolecountyfl.gov/epr
ePlan Applicant User Guide Last Updated 2/26/15 15
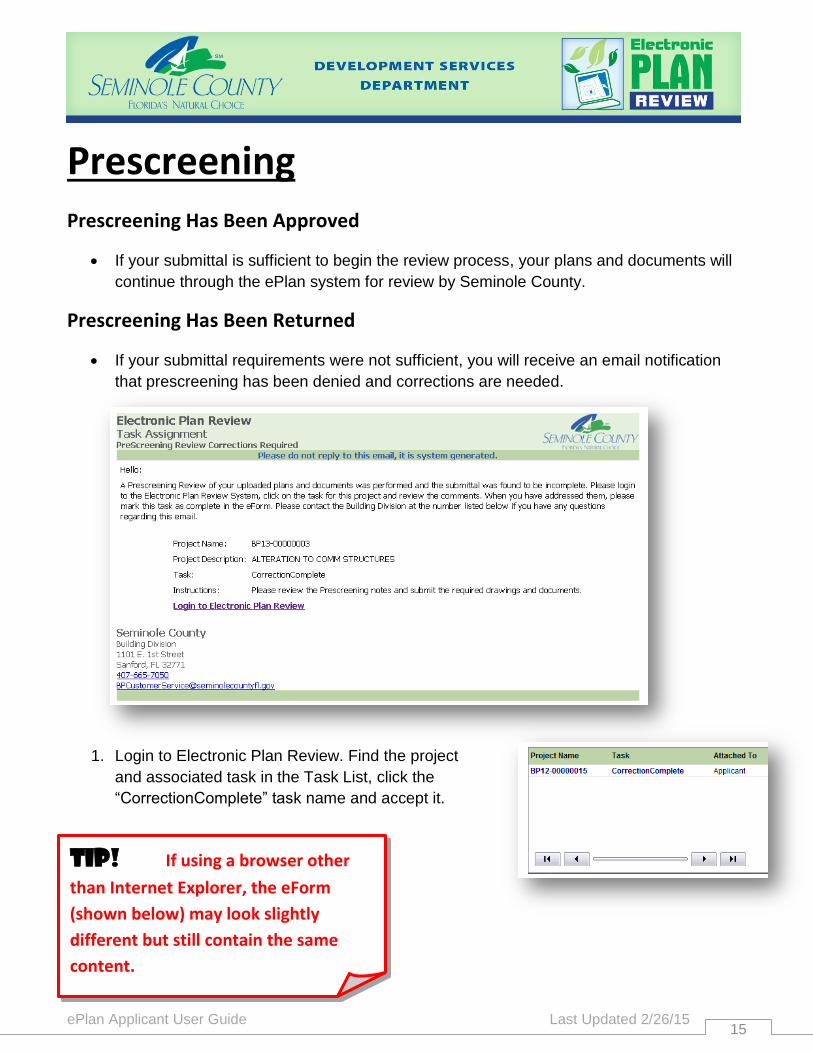
Prescreening Prescreening Has Been Approved
If your submittal is sufficient to begin the review process, your plans and documents will
continue through the ePlan system for review by Seminole County.
Prescreening Has Been Returned
If your submittal requirements were not sufficient, you will receive an email notification
that prescreening has been denied and corrections are needed.
1. Login to Electronic Plan Review. Find the project
and associated task in the Task List, click the
“CorrectionComplete” task name and accept it.
TIP! If using a browser other
than Internet Explorer, the eForm
(shown below) may look slightly
different but still contain the same
content.

ePlan Applicant User Guide Last Updated 2/26/15 16
2. Review the checklist items (if any) by clicking on the Checklist Items tab and read any
items listed in the Task Instructions text box. Click the “Save And Close” button at the
bottom of the screen until you are ready to upload missing or corrected drawings and/or
documents.
3. After you have identified the missing or corrected drawings and/or documents to upload,
click on the project to open the project page.
4. Upload the drawings and/or documents as instructed earlier in this guide.
5. Click on the “Task List” button in the project
view and select the “CorrectionComplete” task
in the Task List section.
6. After you are satisfied that all the requirements
have been met, select the “I have uploaded
the corrected documents and/or drawings as
indicated below” box and click the “Corrections
Complete” button at the bottom of the form. This will notify the Electronic Plan Review
Submission Group that you are ready for Prescreen Review again.
Task Instructions text box
Checklist Items Tab
ePlan Applicant User Guide Last Updated 2/26/15 17
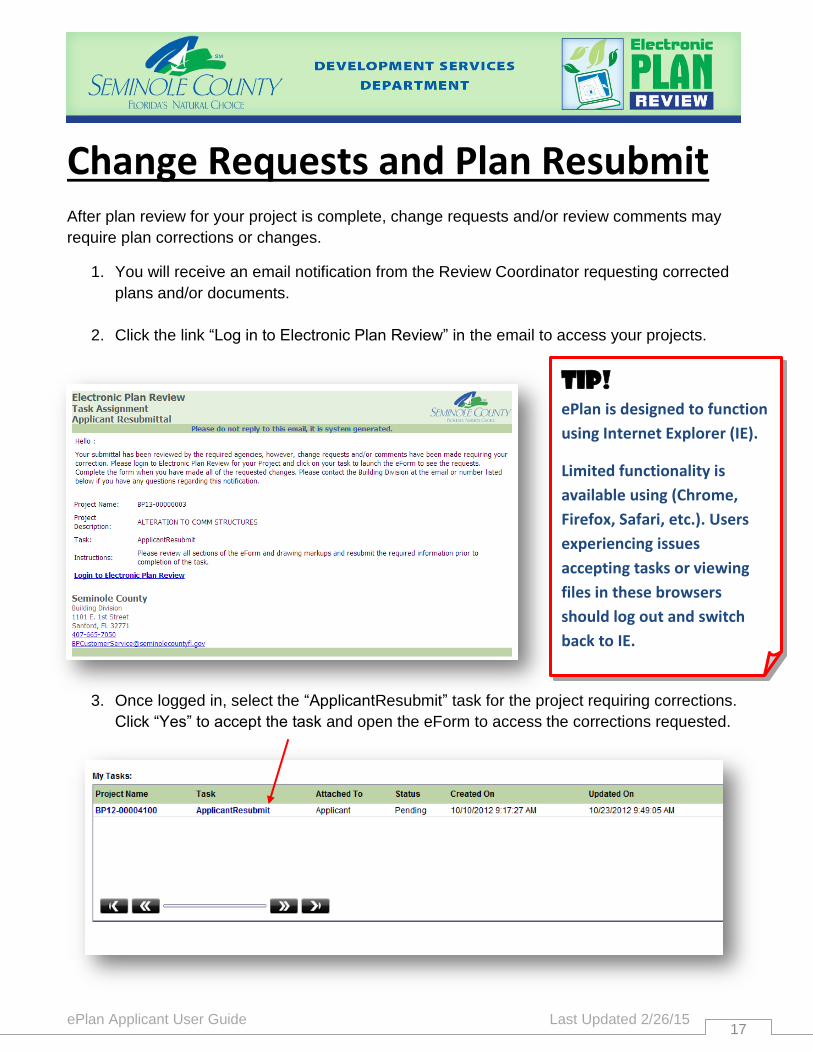
Change Requests and Plan Resubmit After plan review for your project is complete, change requests and/or review comments may
require plan corrections or changes.
1. You will receive an email notification from the Review Coordinator requesting corrected
plans and/or documents.
2. Click the link “Log in to Electronic Plan Review” in the email to access your projects.
3. Once logged in, select the “ApplicantResubmit” task for the project requiring corrections.
Click “Yes” to accept the task and open the eForm to access the corrections requested.
TIP! ePlan is designed to function
using Internet Explorer (IE).
Limited functionality is
available using (Chrome,
Firefox, Safari, etc.). Users
experiencing issues
accepting tasks or viewing
files in these browsers
should log out and switch
back to IE.

ePlan Applicant User Guide Last Updated 2/26/15 18
4. The eForm has three important sections that provide you with correction information:
The “Checklist Items” Tab
The “Markups” section
The “Status & Notes” section
5. If there are markups attached, you will see the markup links in the Changemarks section
in the middle of the eForm (see above image). In the “Department Review” section, the
review agencies are displayed.

ePlan Applicant User Guide Last Updated 2/26/15 19
6. Click on the “Save And Close” button at the bottom to exit the eForm until you are ready
to submit your corrected drawings/documents back to Seminole County.
7. Correct the plan drawing(s) as requested.
How to Open Markups From the eForm
1. From the “Applicant Resubmit” eForm, click the review link in the Changemark section
to open the file that contains markups for your review and correction.
2. Another way to open the files is from the main “Projects” page. After selecting the
project you want to work with from the projects page, you must left click the
appropriate folder name to open and access the list of files in the folder.

ePlan Applicant User Guide Last Updated 2/26/15 20
3. If markups exist on the file a markup icon will be displayed.
4. Click the markups icon to open the list of markups attached to the file.
5. To view the markups on the file, click the “View” box beside the markup name(s) and
then click the “View” button.
Sample Changemark

ePlan Applicant User Guide Last Updated 2/26/15 21
How to Open Markups on a File Already Open:
1. Click “Review” and markups open for review will appear.
2. Click on the markup(s) you wish to display and click “OK”.
3. Markups can be exported to your preferred document program (Word, Outlook, etc).
ePlan Applicant User Guide Last Updated 2/26/15 22
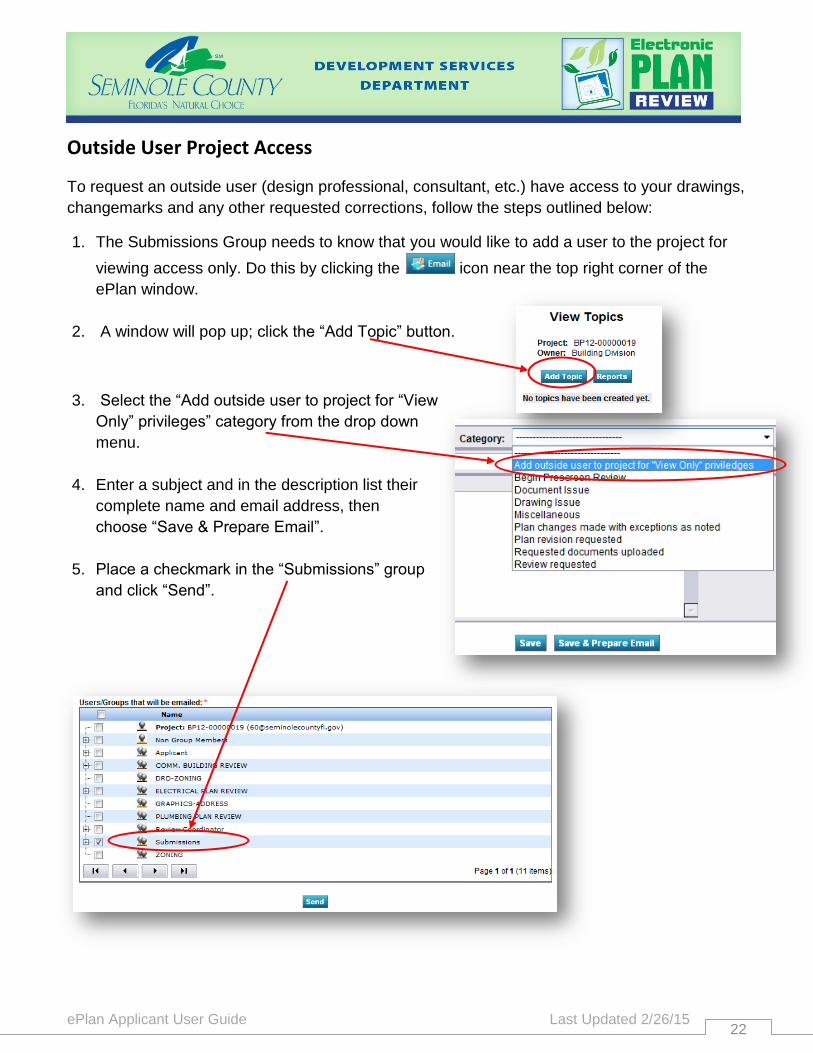
Outside User Project Access
To request an outside user (design professional, consultant, etc.) have access to your drawings,
changemarks and any other requested corrections, follow the steps outlined below:
1. The Submissions Group needs to know that you would like to add a user to the project for
viewing access only. Do this by clicking the icon near the top right corner of the
ePlan window.
2. A window will pop up; click the “Add Topic” button.
3. Select the “Add outside user to project for “View
Only” privileges” category from the drop down
menu.
4. Enter a subject and in the description list their
complete name and email address, then
choose “Save & Prepare Email”.
5. Place a checkmark in the “Submissions” group
and click “Send”.

ePlan Applicant User Guide Last Updated 2/26/15 23
Upload Corrections
1. Login to Electronic Plan Review to upload the corrected drawing(s) and/or document(s).
2. Ensure that the corrected drawings retain the same file name and size as the originals.
3. Check if a new version number is created when you upload. If no new version number is created, confirm the file actually changed. If there were no changes to the file, a new version will not be created.
4. Verify all plans and documents that have markups have been corrected. Failure to submit corrected plans will result in a submittal returned for corrections.
5. When your corrected document(s) or drawing(s) have been successfully uploaded into the correct folders, click on “Applicant Resubmit” task to open the eForm and go to the “Review Information” tab.
Confirm you have completed all task steps by reading and checking each box.
Click the “Complete” button. IMPORTANT: Without completing this step,
you’re application WILL NOT move forward in the review process. This action
will notify the Review Coordinator Group of your resubmittal.

ePlan Applicant User Guide Last Updated 2/26/15 24
REVIEW AGENCY MARKUP NAME –
Reviewer Initials
CHANGEMARK
TITLE MARKUP
COLOR
Building Division BLDG BLDG 01-Issue Name Orange
Environmental Services ENV ENV 01-Issue Name Brown
Health Department HEALTH HEALTH 01-Issue Name Yellow
Impact Analysis IMPT IMPT 01-Issue Name Light Blue
Natural Resources
NAT NAT 01-Issue Name Green
Project Manager PM PM 01-Issue Name Light Green
Public Safety - Fire FIRE FIRE 01-Issue Name Red
Public Safety - Addressing ADDR ADDR 01-Issue Name Pink
Public Works - Engineering ENG ENG 01-Issue Name Purple
Telecommunications TELE TELE 01-Issue Name Gray
Utilities UTIL
UTIL 01-Issue Name Blue
Public Works - Vacate ENG VAC 01-Issue Name TEAL
Public Works - Survey ENG SVY 01-Issue Name Dark Blue
Standard Colors for Markups and Changemarks:
Standard markup names and colors will be used for each reviewing agency for easy
identification. (See tables below and on the following page)
A markup can have one or more changemarks.
A changemark is a plan callout created by County review staff to quickly identify a
markup and associated comments. (See sample changemark on the following page)
Changemarks are created to quickly identify a markup and associated comments.
Each agency changemark will be numbered starting from 01 for each sheet/file.
Markup Name and Changemark Color Standards for Planning &
Development Projects

ePlan Applicant User Guide Last Updated 2/26/15 25
Markup Name and Changemark Color Standards for Building Permits
REVIEW AGENCY MARKUP NAME –
Reviewer Initials
CHANGEMARK
TITLE MARKUP
COLOR
Arbor ARBOR ARBOR 01-Issue Name Green
Building BLDG BLDG 01-Issue Name Orange
Electrical ELEC ELEC 01-Issue Name Yellow
Fire FIRE FIRE 01-Issue Name Red
Flood Prone FLOOD FLOOD 01-Issue Name Blue
Fuel Tanks TANKS FUEL 01-Issue Name Gray
Graphics-Address ADDR ADDR 01-Issue Name Pink
Mechanical MECH MECH 01-Issue Name Blue
Plumbing PLBG PLBG 01-Issue Name Light Brown
Product Approval PA PA 01-Issue Name Dark Brown
P&D-Boat Dock DOCK DOCK 01-Issue Name Light Green
P&D-Extended Review PDEXT PDEXT 01-Issue Name Light Green
P&D-Impact Fees IMPT IMPT 01-Issue Name Light Blue
P&D-Site Plan Review PDSP PDSP 01-Issue Name Light Green
P&D-Zoning PDZN PDZN 01-Issue Name Light Green
Signs-Zoning SIGN SIGN 01-Issue Name Teal
Zoning BDZN BDZN 01-Issue Name Purple
ePlan Applicant User Guide Last Updated 2/26/15 26
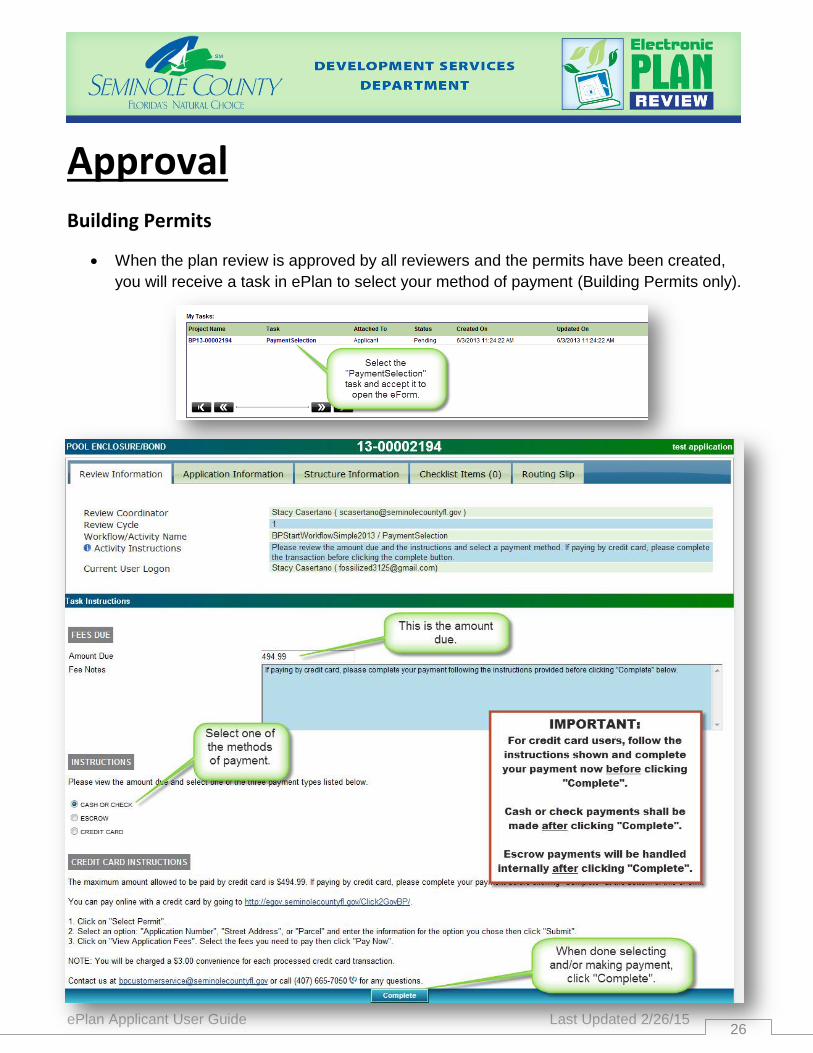
Approval Building Permits
When the plan review is approved by all reviewers and the permits have been created,
you will receive a task in ePlan to select your method of payment (Building Permits only).

ePlan Applicant User Guide Last Updated 2/26/15 27
After payment for the building permit has been processed internally, you will receive an
email notification that your approved plans and documents are available for download in
the Approved Drawings and/or Approved Documents folder(s).
The plans and associated
specifications / documents need to be
present on the jobsite. You can print
files by opening them and clicking on
the printer icon as shown to the lower
right.
NOTE: If you aren’t able to print large
scale plans, you will need to have the
stamped plans printed at your local print
shop. You can download all the files using the
download icon in the project window.
The PEDDS Signature Document and the
Signature Report need to be attached to the
plans on the jobsite.

ePlan Applicant User Guide Last Updated 2/26/15 28
Planning & Development Projects
When the plan review is approved by all reviewers, you will receive an approval letter in
writing via postal mail or email.
If a Pre-Construction meeting is required for your project, scheduling instructions for this
meeting will be included in the approval letter. Your Approved Drawings and/or Approved
Documents will not be made available to you until the assigned Project Manager in the
Planning & Development Division has been notified by the Public Works Development
Inspections Team that a site permit was issued.
When you receive the system generated email shown below, this is an indication that you
have access to the Approved Drawings and/or Approved Documents.
Click on Approved Drawings and/or Approved Documents folder to view/download/print
the files.

ePlan Applicant User Guide Last Updated 2/26/15 29
Plan Revisions During Construction After your plans have been approved and construction has begun, sometimes changes arise
that require revisions to your approved plans or documents.
1. To do so, login to ePlan and enter the project for
which you wish to submit a revision.
2. Click the “Email” icon near the top right corner of
the ePlan window.
3. A window will pop up; click the “Add Topic” button.
4. Select the “Plan revision requested”
category from the drop down menu.
5. Enter a subject and brief description
then choose “Save & Prepare Email”.
6. Place a checkmark in the
“Submissions” Group and click “Send”.
ePlan Applicant User Guide Last Updated 2/26/15 30
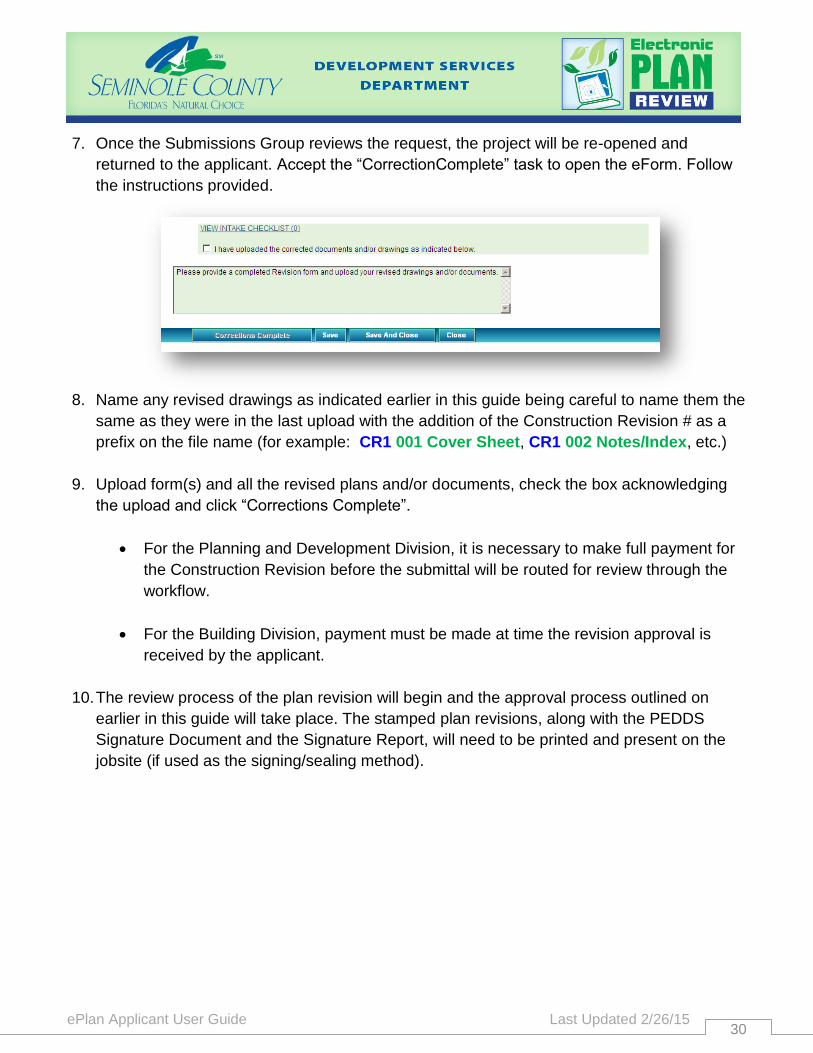
7. Once the Submissions Group reviews the request, the project will be re-opened and
returned to the applicant. Accept the “CorrectionComplete” task to open the eForm. Follow
the instructions provided.
8. Name any revised drawings as indicated earlier in this guide being careful to name them the
same as they were in the last upload with the addition of the Construction Revision # as a
prefix on the file name (for example: CR1 001 Cover Sheet, CR1 002 Notes/Index, etc.)
9. Upload form(s) and all the revised plans and/or documents, check the box acknowledging
the upload and click “Corrections Complete”.
For the Planning and Development Division, it is necessary to make full payment for
the Construction Revision before the submittal will be routed for review through the
workflow.
For the Building Division, payment must be made at time the revision approval is
received by the applicant.
10. The review process of the plan revision will begin and the approval process outlined on
earlier in this guide will take place. The stamped plan revisions, along with the PEDDS
Signature Document and the Signature Report, will need to be printed and present on the
jobsite (if used as the signing/sealing method).
Top Related