


Languages
Pages
Legal


OWNER’SMANUALFOR THE RESERVE™ SERIES OVER/UNDER BREAK ACTIONSHOTGUN
IMPORTANT “SAFETY WARNINGS” — NOTE THE SYMBOL
THESE SAFETY WARNINGS ARE FOR YOUR PROTECTION AS WELL ASTHE SAFETY OF OTHERS. DISREGARDING INFORMATION IN THIS MANUALMAY RESULT IN SERIOUS INJURY OR DEATH.
Be certain this owner’s manual is available for reference and is kept withthis firearm if transferred to another party. If the manual is lost or misplaced,contact Mossberg International for a free replacement copy.
After performing any work on your firearm such as cleaning, adjustments,disassembly, or installation of any accessory, the firearm should be checked for proper functioning before firing live ammunition.
Firearms are complex mechanisms. Any modification, alteration, orimproper fitting of parts may result in a dangerous malfunction, damageto the firearm and injury to the shooter and/or other persons. Thefirearm’s owner is responsible for the correct reassembly and functioningof the firearm after any disassembly or replacement of parts.
If you do not understand any of the material in this manual or have anyquestions, contact Mossberg International or a qualified gunsmith directly.
Do not attempt to load or use any firearm until you have read and under-stood the information contained in its owner’s manual. Before handlingyour firearm, you should learn how it operates and how to maintain it. Thisincludes knowing its basic parts, how the manual safety and other safetyfeatures operate, how to safely open and close the firearm, and how tosafely load and unload ammunition from the firearm. Improper use and handling is dangerous and could cause serious injury or death to you orthose around you. All users of the firearm must become thoroughly familiar with the warnings and instructions in this manual.
distributed byMOSSBERG INTERNATIONAL, INC.
P.O. BOX 497 • 7 GRASSO AVENUE, NORTH HAVEN, CT 06473PHONE (800) 363-3555www.mossbergintl.com
Safety and safe firearms handling is everyone’s responsibility.
TM

PART NO. MI17296 REV. B
As the owner of a firearm, you must undertake the full-time responsibilityof safe firearms handling and storage for your own safety and the safetyof those around you:
• Keep all firearms and ammunition out of the reach of children.• Store your firearms and ammunition separately.• Never store a loaded firearm.• Never leave a loaded firearm unattended.• Never transport a loaded firearm in a vehicle.• Unload your firearm when you have stopped shooting and when
you have to climb a tree, fence, cross a slippery surface or haveto transport it in a vehicle.
• Do not load your firearm before you are in a place where it is safeto shoot, and keep your finger off the trigger until you are on target and have decided to fire.
• Never shoot at water, rocks or any hard surfaces. Shots mayglance off such surfaces and cause injuries.
• Do not use alcohol or drugs before or while handling firearms.• Do not touch the trigger while the safety button is being engaged
or disengaged.Always point the muzzle of your firearm in a safe direction, regardless of whether the firearm is loaded or unloaded.Always treat every firearm as if it were loaded. Give your firearm to someone with the action open and safety fully rearward in the “ON”(SAFE) position, after you verify the firearm is unloaded. Insist on thesame procedure when receiving a firearm from someone else. Learn thelocation of all the safety features of your firearm and how they operate.Wear eye and ear protection when shooting. Shooting without proper earprotection can cause hearing damage. The use of eye protection duringany type of shooting is important to protect your vision.WE SPECIFICALLY DISCLAIM ANY RESPONSIBILITY FOR DAMAGEOR INJURY WHATSOEVER OCCURRING IN CONNECTION WITH,OR AS A RESULT OF, THE USE OF FAULTY, OR NON-SAAMI STANDARD, OR “REMANUFACTURED” OR HAND-LOADED(RELOADED) AMMUNITION. ADDITIONALLY, WE DISCLAIM ANYRESPONSIBILITY FOR DAMAGE OR INJURY WHICH RESULTSFROM ANY MODIFICATIONS OR CHANGES THAT ARE NOT A PARTOF THE FIREARM AS DELIVERED FROM THE FACTORY.Learn to clean your firearm thoroughly and make certain no oil, grease,or other materials are blocking the barrel. Obstructions of any kind cancause damage to the firearm and may result in serious personal injury tothe shooter and/or others nearby.Practice proper firearm maintenance and safety. Make sure all exposedmetal surfaces are coated with a thin film of oil, especially after beingexposed to damp weather. (See proper section of this manual for cleaning instructions.) Do not plug barrel or store in a fabric-lined casethat will absorb lubricants from the firearms. Before using after storage,follow complete instructions stated in this manual for refamiliarization withthe firearm. A thorough inspection and function test should be performedbefore going into the field. Have your firearm periodically checked by aqualified gunsmith.
TABLE OF CONTENTS
Page
Mechanical Safety ...................................................................................... 2
Assembly ..................................................................................................... 3-6
Loading the Shotgun ................................................................................... 6
Firing the Shotgun ...................................................................................... 7
Unloading the Shotgun ............................................................................... 8
Cleaning and Lubrication ............................................................................ 8
Function Testing .......................................................................................... 9
Choke Tubes ............................................................................................... 10
Service Instructions .................................................................................... 11
Warranty Information .................................................................................. 12
Notes ........................................................................................................... 13-15
Parts List ..................................................................................................... 16
Exploded View ............................................................................................ 17
The Basic Rules of Safe Firearms Handling ...................................... Back Cover
A note about the warnings and information contained in this Manual:
We strongly suggest that you check with your local licensed retailer or statepolice for additional information concerning firearms ownership, or hunting ortarget shooting rules that may be required by local law or regulation. Since suchrules and regulations are subject to change, local authorities are in the bestposition to advise you on such matters.
67424 6/2/09 9:49 AM Page 1
OPERATING INSTRUCTIONS
Read and understand this entire manual and its safety warnings beforehandling the shotgun.
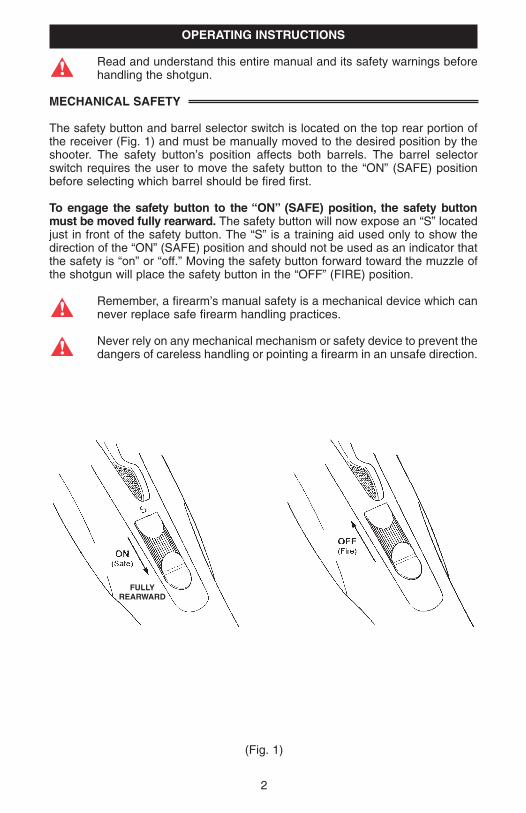
MECHANICAL SAFETY
The safety button and barrel selector switch is located on the top rear portion ofthe receiver (Fig. 1) and must be manually moved to the desired position by theshooter. The safety button’s position affects both barrels. The barrel selectorswitch requires the user to move the safety button to the “ON” (SAFE) positionbefore selecting which barrel should be fired first.
To engage the safety button to the “ON” (SAFE) position, the safety buttonmust be moved fully rearward. The safety button will now expose an “S” locatedjust in front of the safety button. The “S” is a training aid used only to show thedirection of the “ON” (SAFE) position and should not be used as an indicator thatthe safety is “on” or “off.” Moving the safety button forward toward the muzzle ofthe shotgun will place the safety button in the “OFF” (FIRE) position.
Remember, a firearm’s manual safety is a mechanical device which cannever replace safe firearm handling practices.
Never rely on any mechanical mechanism or safety device to prevent thedangers of careless handling or pointing a firearm in an unsafe direction.
2
(Fig. 1)
FULLYREARWARD
67424 6/2/09 9:49 AM Page 2

3
ASSEMBLY
Before assembly and/or performing any work on your firearm, visuallyand physically inspect it to be sure that the firearm is completelyunloaded. Keep the firearm pointed in a safe direction at all times.
The shotgun is shipped from the factory with the barrel and forearm assembliesdisassembled from the receiver/stock assembly.
After carefully removing both components from the box, inspect the inside of bothbarrels to ensure they are free of any excess oil, grease or obstructions.Obstructions of any kind can cause damage to the firearm and may result in serious personal injury to the shooter and/or others nearby.
To assemble the barrels to the receiver you must first remove the forend. Locatethe latch on the underside of the forend. Lifting the latch and pulling the forendaway from the barrels will allow you to remove the forend.
(Fig. 4)
BARREL
FOREARMFOREARMLATCH
FOREARM PLATE
67424 6/2/09 9:49 AM Page 3

Next, take the stock/receiver assembly and make certain that the safety button isfully rearward in the “ON” (SAFE) position (Fig. 1).
To assemble the barrels to the receiver, the top lever must be locked in the extremeright-hand position. Move the lever to the right until it stops and stays in the extremeright-hand position.
The stock/receiver is now ready to accept the barrel assembly. To assemble the barrel to the stock/receiver assembly, locate the half-round cuts in the barrel lug(Fig. 2.5) and the round hinge pins inside of the receiver. With the barrel assemblyheld approximately 45 degrees to the stock/receiver assembly, mate the round cutsof the barrel assembly to pivot on the round receiver hinge pins.
4
(Fig. 2.5)
LEVER
STOCK/RECEIVERASSEMBLY
(Fig. 2)
SAFETY“ON”
1
2
67424 6/2/09 9:49 AM Page 4
5
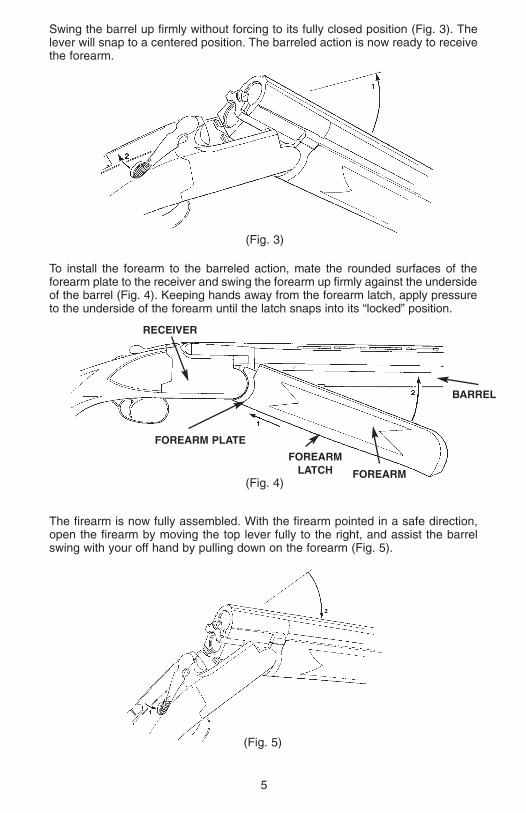
Swing the barrel up firmly without forcing to its fully closed position (Fig. 3). Thelever will snap to a centered position. The barreled action is now ready to receivethe forearm.
To install the forearm to the barreled action, mate the rounded surfaces of the forearm plate to the receiver and swing the forearm up firmly against the undersideof the barrel (Fig. 4). Keeping hands away from the forearm latch, apply pressureto the underside of the forearm until the latch snaps into its “locked” position.
The firearm is now fully assembled. With the firearm pointed in a safe direction,open the firearm by moving the top lever fully to the right, and assist the barrelswing with your off hand by pulling down on the forearm (Fig. 5).
(Fig. 3)
(Fig. 4)
(Fig. 5)
RECEIVER
BARREL
FOREARM
FOREARMLATCH
FOREARM PLATE
67424 6/2/09 9:49 AM Page 5

6
Inspect the bore and chamber for excess oil, grease or other obstructions. (Thechamber is the rear portion of the barrels where the cartridges will be inserted.) Youcan now close the firearm to check for binding. You may want to repeat opening andclosing the firearm several times to become familiar with its function, and to ensurethat it is properly assembled.
LOADING
Do not load firearm until ready for use! The safety button should always befully rearward in the “ON” (SAFE) position whether or not the firearm isloaded.
With the firearm pointed in a safe direction, move the safety button fully rearward tothe “ON” (SAFE) position. Open the firearm as previously described, inspect thebores and chambers for any foreign matter.
Check the gauge stamped on the barrel you are loading, and load cartridges of that gauge only when you are ready to fire.
Inspect the ammunition before loading; check the primer and be sure it isflush or below the cartridge base. A cartridge discharged by closing thebreech can result in possible serious injury to the shooter and/or other persons. Insert a cartridge(s) of the correct gauge only when you areready to fire.
Making sure the muzzle is pointed in a safe direction, close the action. The firearmis now loaded and cocked. You should verify that the safety button is fully rearwardin the “ON” (SAFE) position (Fig. 1).
The safety button should be kept fully rearward in the “ON” (SAFE) positionuntil you are on target and have actually decided to fire. Keep the muzzlepointed in a safe direction at all times and your fingers and any otherobjects outside the trigger guard and away from the trigger area.
If the firearm with a cartridge in the chamber (Fig. 10) does not close readily, do not force it. Check the gauge and length of the ammunitionagainst the barrel markings to be sure they are identical. Next, check thechambers and bores to be sure they are free from obstructions, dirt, anddebris. Obstructions of any kind can cause damage to the firearm and may result in serious personal injury to the shooter and/or others nearby.
67424 6/2/09 9:49 AM Page 6

FIRING
The barrel selector is integral to the safety button. The selector allows you to choosethe barrel that will fire first. To select the barrel that you will fire first, move the safetybutton fully to the rear “ON” (SAFE) position and fully to the left to fire the top bar-rel (selector exposes the “O”) or fully to the right to fire the lower barrel (selectorexposes the “U”) (Fig. 6).
Barrel Selectors – The “O” (over) and the “U” (under) located next to the selectorswitch are for training purposes only. The selector must be moved fully to either the left or right and must never be set in between these settings as damage to thesafety mechanism and/or selector switch can result.
While pointing the firearm at your intended target, push the safety button fully forwardto the “OFF” (FIRE) position. Place your index finger on the trigger and squeeze the trigger fully rearward. This will discharge the cartridge. If both chambers were loaded,pulling the trigger a second time will fire the other barrel.
Discharging firearms in poorly ventilated areas, cleaning firearms, or handling ammunition may result in exposure to lead and/or substancesknown to cause birth defects, reproductive harm and/or other serious physical injury. Have adequate ventilation at all times. Wash hands thoroughly after exposure.
Should the round fail to fire, keep the firearm pointed in a safe direction.Move the safety button fully rearward to the “ON” (SAFE) position. Wait afew moments and then remove the misfired round and keep it separatefrom other ammunition. Do not attempt to re-fire a misfired round.
7
(Fig. 6)
67424 6/2/09 9:49 AM Page 7

8
If at any time during firing, the sound of any round is noticeably louder orsofter than the previous rounds fired, STOP! Do not load or fire additionalrounds until you have moved the safety button fully rearward to the “ON”(SAFE) position. Safely unload your firearm and inspect it for possibledamage or an obstruction in the chamber or bore. (The bore is the insidesurface of the barrel.) Firing a firearm with a bore obstruction can causedamage to the firearm and may result in serious personal injury to theshooter and/or others nearby.
UNLOADING
Move the safety button fully rearward to the “ON” (SAFE) position (Fig. 1). Openthe firearm. The extractor will position live or spent cartridges for removal by hand.
Visually and physically check both chambers to be certain the firearm isunloaded.
CLEANING AND LUBRICATION
With proper care and handling, your Mossberg International™ firearm will provideyou with years of dependable service. Your firearm should be inspected and cleanedperiodically to insure that it remains in good condition. Clean your firearm as soon aspossible after each use. This is especially important if your firearm has been exposedto moisture.
Use the instructions and equipment provided with a quality gun cleaning kit.
All metal parts should be cleaned with an appropriate gun cleaning solvent and lightlylubricated with gun oil. Over lubrication should be avoided. Use only lubricants specifically designed for firearms. Avoid the use of abrasives, which may damagethe metal finish.
Scrub the bores and chambers with solvent and follow with cleaning patches untilthe barrels are clean. A final pass with a lightly oiled patch will provide a protectivecoating. Clean and remove any deposits in the barrels.
Be sure not to leave cleaning patches or excessive oil or grease in thebores as they can create dangerous obstructions. Obstructions of anykind can cause damage to the firearm and may result in serious personalinjury to the shooter and/or others nearby.
Normal use requires only that the mechanisms be free of excessive shootingresidue. Very little lubrication other than a light oiling of internal and external surfaces is needed to prevent rust.
(Fig. 7)
67424 6/2/09 9:49 AM Page 8

9
If the firearm is to be stored for a long period of time it should be thoroughlycleaned and oiled. Do not plug the barrel or store the firearm in a fabric-lined casethat will absorb lubricant from the firearm.
The barrel and forearm assemblies can be removed from the stock/receiverassembly and the stock can be removed from the receiver assembly, but furtherdisassembly should be performed by the manufacturer, Mossberg Internationaland/or a qualified gunsmith only.
Camo guns: Caution should be exercised to avoid exposure of camouflage patternto strong solvents.
FUNCTION TESTING
After performing any work on your firearm such as cleaning or disassemblyand assembly, check your firearm for proper functioning before loading orfiring live ammunition.
Visually and physically check to be sure the firearm is completely unloaded,and keep the firearm pointed in a safe direction at all times.
Move the button fully rearward to the “ON” (SAFE) position (Fig. 1).
Open and close the firearm several times to check for free movement of the barrel assembly. Close the firearm and leave the safety button fully rearward inthe “ON” (SAFE) position. Pull the trigger fully rearward. The hammer should notfall (NO FIRE).
Remove your finger from the trigger. Move the safety button fully forward to the“OFF” (FIRE) position. The hammer should not fall (NO FIRE).
Leave the safety button fully forward in the “OFF” (FIRE) position. Pull the triggerfully rearward. The hammer should fall (FIRE). Release the trigger and pull the trigger fully rearward again. The second hammer should fall (FIRE).
IF YOUR FIREARM DOES NOT PERFORM AS DESCRIBED IN ANY OFTHE PREVIOUS STEPS, CONTACT THE FACTORY AUTHORIZEDPRODUCT SERVICE CENTER IMMEDIATELY. DO NOT ATTEMPT TOUSE THE FIREARM.
Firearms are complex mechanisms. Any modification, alteration, orimproper fitting of parts may result in a dangerous malfunction, damage tothe firearm and injury to the shooter and/or other persons. The firearm’sowner is responsible for the correct re-assembly and functioning of thefirearm after any disassembly or replacement of parts.
If you do not understand any of the information in this manual orhave any questions, contact the Product Service Center or a qualified gunsmith.
67424 6/2/09 9:49 AM Page 9
10
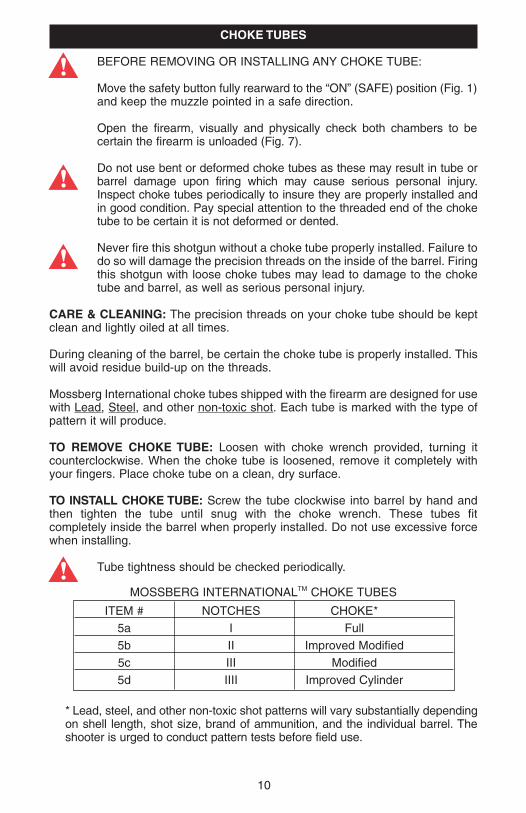
CHOKE TUBES
BEFORE REMOVING OR INSTALLING ANY CHOKE TUBE:
Move the safety button fully rearward to the “ON” (SAFE) position (Fig. 1)and keep the muzzle pointed in a safe direction.
Open the firearm, visually and physically check both chambers to be certain the firearm is unloaded (Fig. 7).
Do not use bent or deformed choke tubes as these may result in tube orbarrel damage upon firing which may cause serious personal injury.Inspect choke tubes periodically to insure they are properly installed andin good condition. Pay special attention to the threaded end of the choketube to be certain it is not deformed or dented.
Never fire this shotgun without a choke tube properly installed. Failure todo so will damage the precision threads on the inside of the barrel. Firingthis shotgun with loose choke tubes may lead to damage to the choketube and barrel, as well as serious personal injury.
CARE & CLEANING: The precision threads on your choke tube should be keptclean and lightly oiled at all times.
During cleaning of the barrel, be certain the choke tube is properly installed. Thiswill avoid residue build-up on the threads.
Mossberg International choke tubes shipped with the firearm are designed for usewith Lead, Steel, and other non-toxic shot. Each tube is marked with the type ofpattern it will produce.
TO REMOVE CHOKE TUBE: Loosen with choke wrench provided, turning it counterclockwise. When the choke tube is loosened, remove it completely withyour fingers. Place choke tube on a clean, dry surface.
TO INSTALL CHOKE TUBE: Screw the tube clockwise into barrel by hand andthen tighten the tube until snug with the choke wrench. These tubes fit completely inside the barrel when properly installed. Do not use excessive forcewhen installing.
Tube tightness should be checked periodically.
MOSSBERG INTERNATIONALTM CHOKE TUBES
ITEM # NOTCHES CHOKE*5a I Full5b II Improved Modified5c III Modified5d IIII Improved Cylinder
* Lead, steel, and other non-toxic shot patterns will vary substantially dependingon shell length, shot size, brand of ammunition, and the individual barrel. Theshooter is urged to conduct pattern tests before field use.
67424 6/2/09 9:49 AM Page 10

11
SERVICE INSTRUCTIONS
Should your firearm, or any component of your firearm require service, kindly shipyour entire firearm (please do not send components only), via your chosen carrier, postage paid (we do not accept C.O.D. shipments), following these instructions:
• Make absolutely certain your firearm is unloaded.• Do not send ammunition with your firearm.• Remove all accessories from your firearm such as scopes, slings,
mounts, etc.• Ship your firearm in a suitable container, packaging it securely to
prevent parts from shifting and/or harm during shipping.• Include a note with a clear description of the service you wish us to
perform, your complete return shipping address (no P.O. boxes please),your daytime telephone number and your e-mail address (if available). It is advisable to place your correspondence inside your shipping container when shipping.
SHIPPING ADDRESSMaverick Arms, Inc.1001 Industrial BoulevardEagle Pass, TX 78853Attn: Product Service Center
If you have any questions, please call the Product Service Center at (800) 363-3555.
TO ORDER PARTS FROM THE FACTORY SERVICE CENTERTo order parts, you can fax, phone, mail, or e-mail your order to us at one of thebelow numbers/addresses.
Fax Number: (830) 773-5893Phone Number: (800) 363-3555E-mail Address: [email protected] Address: Maverick Arms, Inc.
Attn: Product Service Center – Order Department1001 Industrial BoulevardEagle Pass, TX 78853
Please provide your name, address, city, state, zip, your daytime phone numberand e-mail address. We will need the Model #, Serial #, Gauge/Caliber, Finish, Part # and Part Name. We have a $7.50 (U.S.) minimum parts order charge. Weaccept most major credit cards, money orders, and bank drafts.
Service outside of the U.S.A.For Mossberg International firearm parts and service requirements outside of theUnited States, customers are requested to contact the closest Mossberg Internationalstocking dealer/distributor.
67424 6/2/09 9:49 AM Page 11
12
MOSSBERG INTERNATIONAL WARRANTYMODEL OVER/UNDER SHOTGUN
ONE (1) YEAR LIMITED WARRANTY
Limited Warranty: Mossberg International, Inc. (“Mossberg”) warrants to you, the original retailpurchaser of a new Mossberg InternationalTM firearm (the “Mossberg firearm”), that the Mossbergfirearm will be free of defects in material or manufacture for a period of one (1) year from the dateof your purchase of the new Mossberg firearm (the “Warranty Period”) in the United States orCanada. This is the only express warranty on the Mossberg firearm. MOSSBERG MAKES NOOTHER WARRANTIES OF ANY KIND OR CONDITIONS, INCLUDING, BUT NOT LIMITED TOANY IMPLIED WARRANTY OF MERCHANTABILITY OR FITNESS FOR A PARTICULAR PURPOSE. This Limited Warranty gives you specific legal rights, and you may have other rightsthat vary from State to State.
Purchaser’s Remedy: During the Warranty Period, Mossberg will, at its sole option, (1) repairthe Mossberg firearm or any part thereof that, upon examination and testing by Mossberg, doesnot conform to the Limited Warranty without charge to you for parts or labor, or (2) replace theMossberg firearm with a new or similar model. THIS REMEDY SHALL BE YOUR EXCLUSIVEAND SOLE REMEDY FOR ANY BREACH OF WARRANTY. MOSSBERG SHALL NOT BERESPONSIBLE FOR ANY OTHER EXPENSES, LOSSES OR INCONVENIENCE THAT YOUMAY SUSTAIN AS A RESULT OF THE PURCHASE, USE, MALFUNCTION OR DEFECTIVECONDITION OF THE MOSSBERG FIREARM. Mossberg reserves the right to inspect, examineand/or test the Mossberg firearm to assess any claim made under the Limited Warranty.
EXCLUSIONS: THIS WARRANTY DOES NOT COVER THE COSMETIC APPEARANCE OFTHE MOSSBERG FIREARM OR ANY DAMAGE CAUSED BY:
(1) NORMAL WEAR AND TEAR;(2) FAILURE TO PERFORM PROPER CARE AND MAINTENANCE;(3) ACCIDENTS, ABUSE OR NEGLECT;(4) BARREL OR BORE OBSTRUCTIONS; (5) FAILURE TO FOLLOW THE INSTRUCTIONS AND WARNINGS THAT ACCOMPANY THE
MOSSBERG FIREARM; OR(6) THE USE OF DEFECTIVE, NON-SAAMI STANDARD, REMANUFACTURED, HAND-
LOADED, AND/OR RELOADED AMMUNITION.
IN ADDITION, ANY UNAUTHORIZED REPAIRS, ALTERATIONS OR MODIFICATIONS TO THEMOSSBERG FIREARM WILL AUTOMATICALLY VOID THE LIMITED WARRANTY.
LIMITATION OF DAMAGES: EXCEPT WHERE PROHIBITED BY LAW, MOSSBERG WILL NOTBE LIABLE FOR ANY LOSS OR DAMAGE WHATSOEVER ARISING FROM THE USE OF THISMOSSBERG FIREARM, WHETHER DIRECT, INDIRECT, SPECIAL, INCIDENTAL, CONSE-QUENTIAL OR PUNITIVE, REGARDLESS OF THE LEGAL THEORY ASSERTED, INCLUDINGCONTRACT, WARRANTY, NEGLIGENCE, OR STRICT LIABILITY. SOME JURISDICTIONS DONOT ALLOW LIMITATIONS ON HOW LONG AN IMPLIED WARRANTY LASTS, OR THE EXCLU-SION OF INCIDENTAL OR CONSEQUENTIAL DAMAGES, SO THE ABOVE LIMITATIONS MAYNOT APPLY TO YOU.
Warranty Service: To obtain service under this Limited Warranty, you must follow the instructionsfound in the “Service Instructions” section of the Owner’s Manual and return the Mossberg firearmto the authorized Product Service Center. You are responsible for all shipping costs to the ProductService Center. Mossberg will not accept COD shipments of any Mossberg firearm for service.After repair or replacement, the Mossberg firearm or a similar model will be returned to you, returnpostage paid by Mossberg. If we replace the Mossberg firearm, we will keep the firearm that youreturned to Mossberg.
Modification of Warranty: No agent, representative, distributor, or authorized dealer ofMossberg firearms has any authority to modify the terms or conditions of the Limited Warranty inany way. The Limited Warranty may only be modified in writing by an authorized officer ofMossberg.
THIS LIMITED WARRANTY IS EFFECTIVE JANUARY 1, 2004.
67424 6/2/09 9:49 AM Page 12

13
NOTES
67424 6/2/09 9:49 AM Page 13

14
NOTES
67424 6/2/09 9:49 AM Page 14

15
NOTES
67424 6/2/09 9:49 AM Page 15

PAR
TS
LIS
T
ITE
MD
ES
CR
IPT
ION
ITE
MD
ES
CR
IPT
ION
1B
AR
RE
LA
SS
EM
BLY
29F
IRIN
G P
IN2
FR
ON
TS
IGH
T30
FIR
ING
PIN
3E
XT
RA
CTO
R31
FIR
ING
PIN
SP
RIN
G4
EX
TR
AC
TOR
SC
RE
W32
PIN
5C
HO
KE
TU
BE
S33
CO
CK
ING
LE
VE
R6
RE
CE
IVE
R34
CO
CK
ING
LE
VE
R S
PR
ING
7C
OC
KIN
G R
OD
35P
IN8
PIN
36R
ETA
ININ
G P
LAT
E9
BLO
CK
ER
PLA
TE
37F
LOAT
ING
BLO
CK
10TO
PLE
VE
R38
FLO
ATIN
G B
LOC
K P
IN11
TOP
LEV
ER
SC
RE
W39
TR
IGG
ER
12TO
PLE
VE
R P
IN40
TR
IGG
ER
PIN
13TO
PLE
VE
R S
PR
ING
41R
EC
EIV
ER
UN
DE
R C
OV
ER
14P
IN42
PIN
15TO
PLE
VE
R T
UB
E43
TR
IGG
ER
GU
AR
D16
TOP
LEV
ER
TU
BE
SP
RIN
G44
PIN
17S
AF
ET
YA
ND
BA
RR
EL
SE
LEC
TOR
45T
RIG
GE
R G
UA
RD
RE
TAIN
ING
PIN
18S
ELE
CTO
R P
LAT
E S
PR
ING
46F
OR
EA
RM
19S
ELE
CTO
R S
PR
ING
47F
OR
EA
RM
PLA
TE
20S
ELE
CTO
R P
IN48
FO
RE
AR
M S
CR
EW
21LE
FT
INN
ER
TR
IGG
ER
49F
OR
EA
RM
BO
LT22
RIG
HT
INN
ER
TR
IGG
ER
50F
OR
EA
RM
BO
LTS
CR
EW
23H
AM
ME
R S
PR
ING
51LA
TC
H F
RA
ME
24P
IN52
FO
RE
AR
M L
ATC
H S
CR
EW
25H
AM
ME
R53
STO
CK
26P
IN54
RE
CO
ILP
AD
27H
AM
ME
R S
PR
ING
PIN
55R
EC
OIL
PA
D S
CR
EW
28H
AM
ME
R S
PR
ING
56S
TO
CK
BO
LT
16
67424 6/2/09 9:49 AM Page 16

17
67424 6/2/09 9:49 AM Page 17

From the time an individual picks up a firearm, that individual shooter becomesa part of a system over which he has complete control. He is the only part ofthe system that can make a gun safe – or unsafe. Hunting and target shootingare among the safest of all sports. This booklet is intended to make them evensafer – by re-emphasizing and reaffirming the basics of safe gun handling andstorage and by reminding each individual shooter that he or she is the key tofirearms safety. You can help meet this responsibility by enrolling in huntersafety or shooting safety courses. You must constantly stress safety when han-dling firearms, especially to children and non-shooters. Newcomers in particu-lar must be closely supervised when handling firearms with which they may notbe acquainted. Don’t be timid when it comes to gun safety. If you observe any-one violating any safety precautions, you have an obligation to suggest saferhandling practices, such a those in this booklet. Please read these rules care-fully and follow the safety procedures outlined. Firearms safety is up to you.Make no mistake about it.
1. ALWAYS KEEP THE MUZZLE POINTED IN A SAFE DIRECTION.
2. FIREARMS SHOULD BE UNLOADED WHEN NOT ACTUALLY IN USE.
3. DON’T RELY ON YOUR GUN’S “SAFETY”.
4. BE SURE OF YOUR TARGET AND WHAT’S BEYOND IT.
5. USE CORRECT AMMUNITION.
6. IF YOUR GUN FAILS TO FIRE WHEN THE TRIGGER IS PULLED,HANDLE WITH CARE.
7. ALWAYS WEAR EYE AND EAR PROTECTION WHEN SHOOTING.
8. BE SURE THE BARREL IS CLEAR OF OBSTRUCTIONS BEFORE SHOOTING.
9. DO NOT ALTER OR MODIFY YOUR GUN, AND HAVE GUNS SERVICED REGULARLY.
10. LEARN THE MECHANICAL AND HANDLING CHARACTERISTICS OF THE FIREARM YOU ARE USING.
Courtesy of Sporting Arms and Ammunition Manufacturers’ Institute, Inc.
FIREARMS SAFETY DEPENDS ON YOU.MAKE NO MISTAKE ABOUT IT!
67424 6/2/09 9:49 AM Page 18
Top Related