


Languages
Pages
Legal

Table of Contents
1. Revision History2. Introduction
2.1. Document Purpose2.2. Prerequisites2.3. Target Readers2.4. Terminology Description
3. Setup Overview4. Setup Flow5. Middleware Setup
5.1. Database5.2. Web Application Server5.3. Apache Cassandra5.4. Apache Solr
6. WAR File Creation6.1. Project Creation and Module Creation6.2. Editing Configuration File6.3. WAR File Output
7. Web Application Server Startup8. WAR File Deployment9. Tenant Environment Setup
9.1. System Administrator Information9.2. Tenant Information9.3. Tenant Environment Information9.4. Tenant Administrator Information9.5. LDAP Linkage/Setting9.6. Apache Cassandra Connection Information9.7. Apache Solr Connection Information9.8. Registration
10. Uninstallation10.1. WAR File Undeployment10.2. Application Deletion10.3. Storage Area Deletion10.4. Middleware Product Deletion
Please proceed to [ Introduction ].
Quick Setup GuideVERSION 3 2014-08-01
intra-mart Accel Platform
1

Revision History
RevisionDate Updated Contents
2014-01-01
Initial Version
2014-04-01
Version 2 Following additions/changes have been made.
Table of contents structure has been improved.
2014-08-01
Version 3 Following additions/changes have been made.
Added descriptions to each wizard page [Tenant Environment Setup ].Added the link to [Solr Administrator Guide] to [Apache Solr ].
intra-mart Accel Platform
2

Introduction
Document Purpose
In this document, easy way to set up intra-mart Accel Platform is described.Setup contents are for the users who set up intra-mart Accel Platform for the first time.
Note
[*] intra-mart Accel Platform to be set up is stand alone (minimum configuration).[*] Apache Cassandra and Apache Solr can be optionally set up.
Prerequisites
System requirements described in the release note should be met.Please refer to [Release Note ]-[System Requirements ] for details.
Note
If you use TRY version, setup can be made even when you are using the OS that is not listed in the serverrequirments in the release note above.intra-mart Accel Platform will operate on any OS which supports JDK.For example, setup can be performed in Windows 7 environment.
Every environment such as the environment set up in this document and the environment accessed by Web browser mustreside in the same enclosure (local environment).
Target Readers
Following users are the target readers.
Users who set up intra-mart Accel Platform for the first time
Note
Please refer to [Setup Guide ] for the setup contents in detail.
Terminology Description
Directory which Resin is installed is abbreviated as %RESIN_HOME%.Directory to be used as Storage is abbreviated as %STORAGE_PATH%.Directory to be used as PublicStorage is abbreviated as %PUBLIC_STORAGE_PATH%.
Go to [ Setup Overview ].
Setup Overview
intra-mart Accel Platform
3
Setup overview is as follows.
1. Set up middleware.Subjects for setup are JDK, Database, Resin, Apache Cassandra, and Apache Solr.
Warning
If you do not use IMBox, you do not have to set up Apache Cassandra,but you must remove IMBox module. Details are described in [ How to remove IMBox Module ].If IMBox module is included, connection error to Apache Cassandra would occur during setup.
Warning
If you do not use IM-ContentsSearch for Accel Platform, Apache Solr setup is not necessary.
2. Create WAR file using IM-Juggling.
Note
What is WAR file?
It is a Web Application Archive file defined in JavaEE,and various types of files necessary for the operations of intra-mart Accel Platform are stored.WAR file for intra-mart Accel Platform is created by IM-Juggling.Various files necessary for the operations of intra-mart Accel Platform are stored, andby deploying the WAR file created by IM-Juggling to Web Application Server such as Resin,and by starting Web Application Server,intra-mart Accel Platform itself or various applications that support intra-mart Accel Platform stored in theWAR filewill be started and be made available.
3. Deploy(expand) the created WAR file on Web Application Server ( Resin ).
4. Access from the browser and execute tenant environment setup (such as data input to the database).
Go to [ Setup Flow ].
Setup Flow
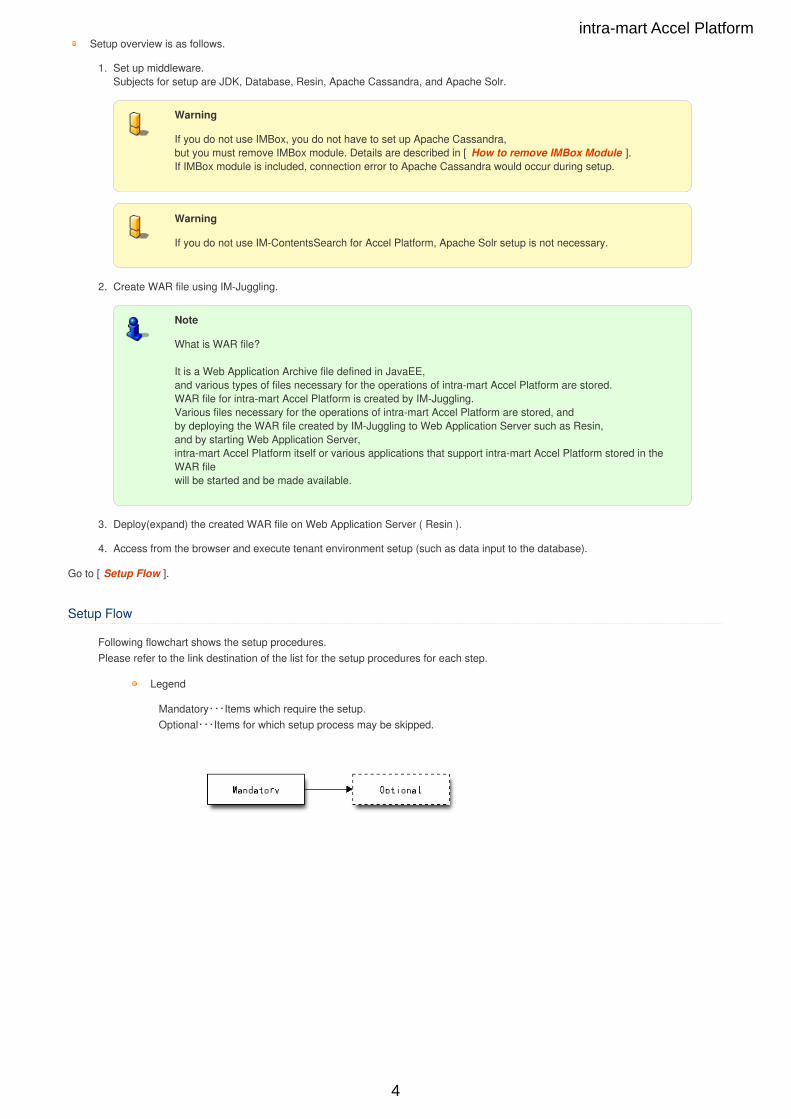
Following flowchart shows the setup procedures.Please refer to the link destination of the list for the setup procedures for each step.
Legend
Mandatory・・・Items which require the setup.Optional・・・Items for which setup process may be skipped.
intra-mart Accel Platform
4

Name Description
start
JDK JDK
Database Database Server
JDBC Driver JDBC Driver
ApplicationServer Web Application Server
Apache Cassandra Apache Cassandra
Apache Solr Apache Solr
Module Selection WAR File Creation - Project Creation and ModuleCreation
Configuration File WAR File Creation - Editing Configuration File
WAR File Output WAR File Creation - WAR File Output
Startup Web Application Server Startup
Deployment WAR File Deployment
Tenant Build Tenant Environment Setup
License Registration License Registration
end
Middleware Setup
Following should be installed and set for the setup of intra-mart Accel Platform.
Database
Following installations and settings which are required for Database setup should be performed.
Database Server
Topics
intra-mart Accel Platform
5

PostgreSQL Build Example
PostgreSQL Build Example
PostgreSQL is used in this document.
PostgreSQL Installation
PostgreSQL can be downloaded from the URL below.After you download the one appropriate to the environment, please proceed on the installation.
http://www.enterprisedb.com/products-services-training/pgdownload (English)In case of PostgreSQL 9.3 (32bit), click <Win x86-32>.In case of PostgreSQL 9.3 (64bit), click <Win x86-64>.
Database and Log-in Role Creation
1. Start up pgAdmin tool.
2. Log-in rule creation
Right click [Log-in Role] from [Object Browser] and click [New Log-in Role].
Sub-window is displayed.
Enter following items and click [OK].
Property Tab [Role Name] (optional)
Definition Tab [Password] (optional)
Note
Following contents are specified as an example in this document.
Role name [imart]
Password [imart]
3. Database Creation
Right click [Database] from [Object Browser] and click [New Database].
Sub-window is displayed.
intra-mart Accel Platform
6

Enter following items, select them, and click [OK].
Property Tab [Name](optional) [Owner](log-in role which was created in [2. Log-in Rule Creation] described above)
Note
Following contents are specified as an example in thisdocument.
Name [iap_db]
Owner [imart]
Go to [ JDBC Driver ].
JDBC Driver
Warning
JDBC driver to be used by intra-mart Accel Platform is JDBC 4. JDBC 4.1 has notbeen verified yet.
1. JDBC driver of PostgreSQL can be downloaded from the URL below.
In case of PostgreSQL 9.3, please obtain <postgresql-9.3-1100.jdbc4.jar> file.http://jdbc.postgresql.org/download/postgresql-9.3-1100.jdbc4.jar
Go to [ Web Application Server ].
Web Application Server
Topics
Obtaining ResinInstallationResin SettingJDBC Driver Placement
intra-mart Accel Platform
7
Obtaining Resin
Note
If you use TRY version, Resin can be downloaded from [TRY version Downloading Site] shownbelow.
http://www.intra-mart.jp/support/try_j.html
[*] Please fill in the questionnaire, and download the one listed below from the page aftertransition.-> Caucho Resin (Application Server)
Resin 4.0.37.zip (Windows)
Note
In case of Product Version DVD, it is included in the directory below.
%Product Version media image (DVD)%/Products/tools/iap/Resin Directory-> resin-pro-4.0.37.zip
Installation
Expand <Resin> archive file which is included in the media to arbitrary path.
Note
In this document, following directory is specified as an example.[C:/Resin4.0.40]
Warning
[.NET Framework 3.5] is necessary to start Resin.In Windows Server 2012 environment, only [.NET Framework 4.5] is installed,so please do the setup of [.NET Framework 3.5].Please refer to [ .NET Framework Setup ] for details.
Resin Setting
1. Open <C:/Resin4.0.40/conf/resin.properties> file.
2. Set memory value and maximum heap size suitable for the installation environment to [jvm_args] property.
In this ducument, following value is set as an example.
# Arg passed directly to the JVMjvm_args : -Xmx1024m -XX:MaxPermSize=256m
Warning
Setting value should be [1024m] or larger.If you set the value less than [1024m], it may not work properly.
Note
If the error which indicates the duplication of port at Resin startup time occurs,please change the setting of port number after Resin is stopped.
intra-mart Accel Platform
8
java.lang.RuntimeException: java.net.BindException: Address already in use: JVM_Bind Can't bind to *:8080. Check for another server listening to that port.
Please change [8080] which is set to [app.http] property to the unused port numbersuch as [8081].
# Set HTTP and HTTPS ports.# Use overrides for individual server control, for example: app-0.http : 8081app.http : 8081
Please restart Resin after the change is completed.
JDBC Driver Placement
1. Copy the downloaded JDBC driver to the following directory.
C:/Resin4.0.40/lib
Go to [ Apache Cassandra ].
Apache Cassandra
Apache Cassandra Setting
Topics
Apache Cassandra SetupEditing Configuration FileApache Cassandra Startup
Apache Cassandra Setup
Note
In this setup, Apache Cassandra is set up on the same machine with intra-mart Accel Platform.
Obtain Apache Cassandra.
Apache Cassandra can be downloaded from the URL below.
http://archive.apache.org/dist/cassandra/1.1.12/apache-cassandra-1.1.12-bin.tar.gz
After downloading, <apache-cassandra-1.1.12-bin.tar.gz> file is expanded to the arbitrary path.
[*] Please use unzip tool that can expand zip file in TAR-GZ format for file expansion.
Note
Following directory is specified as an example in this document.
[C:/apache-cassandra-1.1.12]
Open <C:/apache-cassandra-1.1.12/bin/cassandra.bat> file by the editor.
Memory value suitable for the installation environment is specified.
Specify the minimum heap size to [Xms] property and the maximum heap sizefor [Xmx] property.
Note
set JAVA_OPTS=-ea^-javaagent:”%CASSANDRA_HOME%libjamm-0.2.5.jar”^
intra-mart Accel Platform
9
-Xms512M^-Xmx512M^
Warning
The value to be set should be [512M] or larger.As Cassandra, it is recommended to set it to 1GB or above.If you set the value which is smaller than [512M], it may notwork properly.
Add the home directory where JDK7 is installed to the Windows environment variable.
Please set as follows according to the Windows OS manual.
Variable JAVA_HOMEValue Home directory where JDK is installed.
Editing Configuration File
Environment setting is to be made.
*Open <C:/apache-cassandra-1.1.12/conf/cassandra.yaml> file by editor.
Warning
This file has read-only attribute immediately after file expansion, soplease remove it in advance.
Specify save location of the data.If there is no specified directory, it would be automatically created at startuptime.
Specify the arbitrary path to [data_file_directories] property.
Note
Following contents should be specified as anexample in this document.
data_file_directories:- C:/apache-cassandra-1.1.12/data_file
Specify save location of CommitLog.If there is no specified directory, it would be automatically created at startuptime.
Specify arbitrary path to [commitlog_directory] property.
Note
Following contents are specified as an example inthis document.
# commit logcommitlog_directory: C:/apache-cassandra-1.1.12/commit_log
Specify save location of cache data.If there is no specified directory, it would be automatically created at startuptime.
Specify arbitrary path to [saved_caches_directory] property.
Note
Following contents are specified as an example inthis document.
# saved cachessaved_caches_directory: C:/apache-
intra-mart Accel Platform
10

cassandra-1.1.12/saved_caches
Open <C:/apache-cassandra-1.1.12/conf/log4j-server.properties> file by editor.
Warning
This file has read-only attribute immediately after fileexpansion, so please remove it in advance.
Specify save location of system log.
Specify arbitrary path to [log4j.appender.R.File] property.
Note
Following contens are specified as anexample in this document.
log4j.appender.R.File=C:/apache-cassandra-1.1.12/system.log
Apache Cassandra Startup
Start up Apache Cassandra.
Double click <C:/apache-cassandra-1.1.12/bin/cassandra.bat>.
Startup would be completed if the message below is displayed on the command prompt.
INFO 12:55:11,319 Using synchronous/threadpool thrift server on localhost/127.0.0.1 : 9160INFO 12:55:11,320 Listening for thrift clients...
Note
When you start up Apache Cassandra, please change the port number setting ifthe following error occurs.
Error : Agent throws the exception : java.rmi.server.ExportException: Port already in use: 7199;nested exception is: java.net.BindException: Address already in use: JVM_Bind
Open <C:/apache-cassandra-1.1.12/bin/cassandra.bat> file by the editor.
Please change [7199] that is set toDcom.sun.management.jmxremote.port propertyto the port number which has not been used such as [7198].
-Dcom.sun.management.jmxremote.port=7198^
If the change was successful, please start up Apache Cassandra again.
Note
If the startup from the second and subsequent time does not work properly,
Delete <C:/apache-cassandra-1.1.12/commit_log> directory andstart up Apache Cassandra.
Note
How to stop Apache Cassandra
Execute [Ctrl] + [C] command on the command prompt thatappeared at startup time, and stop the process.
Please refer to [Cassandra Administrator Guide ] for more detailed settings.
Then, please proceed to [ Apache Solr ].
intra-mart Accel Platform
11

Apache Solr
Topics
PrerequisitesApache Solr Setup[Apache Solr] Startup, Connection to Admin Screen, and Stoppage
Prerequisites
When you set up [Apache Solr] on [Resin], [Resin] should be already installed.
If you select [Standard Application]-[IM-ContentsSearch for Accel Platform] module on IM-Juggling anduse [IM-ContentsSearch for Accel Platform], [Apache Solr] server should be built.
Apache Solr Setup
1. Expand <solr_setup.zip> file which is included in the media to the arbitrary path.
[Apache Solr] setup tool can also be downloaded from the URL below.
http://www.intra-mart.jp/download/product/iap/im_contents_search/solr_setup.zip
Note
The directory below is specified as an example in this document.
[C:/solr]
2. Open command prompt and move to the next path.
C:/solr/solr_setup
3. Enter the following command.
If you press <Enter> key, setup tool would be executed and setup tool command list and its description wouldbe displayed.
C:/solr/solr_setup> setup.bat
C:\solr\solr_setup>C:\solr\solr_setup> setup.batBuildfile: C:\solr\solr_setup\build\build.xml
usage: [echo] Welcome to the Apache Solr Installation! [echo] Use '' to display usage [echo] Use 'usage' to display usage [echo] Use 'jetty' to download the jetty zip file, solr zip file and the solr.war and unzip the zip files and config the jetty port [echo] Use 'jetty.start' to download the jetty zip file, solr zip file and the solr.war and unzip the zip files and config the jetty port and start the jetty [echo] Use 'resin' to download the solr zip file and the solr.war for resin and unzip the zip file [echo] Use 'tomcat' to download the solr zip file and the solr.war for tomcat and unzip the zip file
BUILD SUCCESSFULTotal time: 1 second
C:\solr\solr_setup>
4. Set up to Resin.
If you execute C:/solr/solr_setup> setup.bat resin, resin directory will be created in ./dist directory.
Note
Shown below is a part of screen which is displayed after setup. bat resin is executed.
intra-mart Accel Platform
12
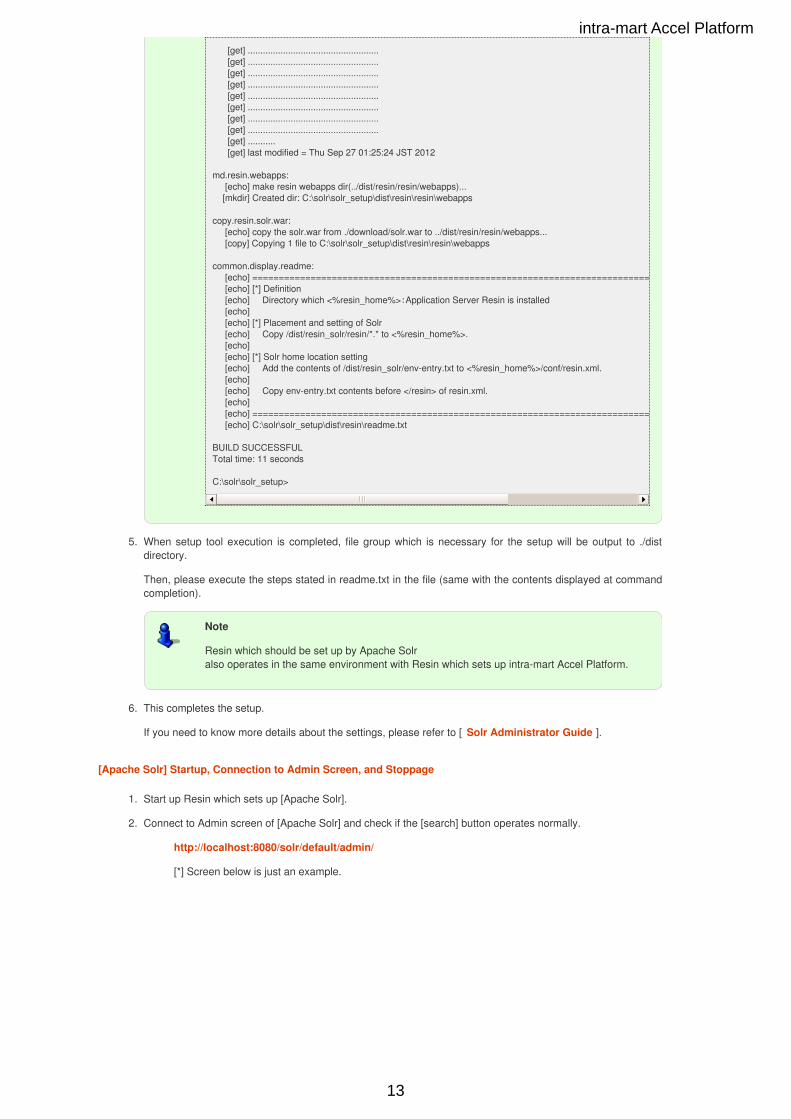
[get] .................................................... [get] .................................................... [get] .................................................... [get] .................................................... [get] .................................................... [get] .................................................... [get] .................................................... [get] .................................................... [get] ........... [get] last modified = Thu Sep 27 01:25:24 JST 2012
md.resin.webapps: [echo] make resin webapps dir(../dist/resin/resin/webapps)... [mkdir] Created dir: C:\solr\solr_setup\dist\resin\resin\webapps
copy.resin.solr.war: [echo] copy the solr.war from ./download/solr.war to ../dist/resin/resin/webapps... [copy] Copying 1 file to C:\solr\solr_setup\dist\resin\resin\webapps
common.display.readme: [echo] ========================================================================================================== [echo] [*] Definition [echo] Directory which <%resin_home%>:Application Server Resin is installed [echo] [echo] [*] Placement and setting of Solr [echo] Copy /dist/resin_solr/resin/*.* to <%resin_home%>. [echo] [echo] [*] Solr home location setting [echo] Add the contents of /dist/resin_solr/env-entry.txt to <%resin_home%>/conf/resin.xml. [echo] [echo] Copy env-entry.txt contents before </resin> of resin.xml. [echo] [echo] ========================================================================================================== [echo] C:\solr\solr_setup\dist\resin\readme.txt
BUILD SUCCESSFULTotal time: 11 seconds
C:\solr\solr_setup>
5. When setup tool execution is completed, file group which is necessary for the setup will be output to ./distdirectory.
Then, please execute the steps stated in readme.txt in the file (same with the contents displayed at commandcompletion).
Note
Resin which should be set up by Apache Solralso operates in the same environment with Resin which sets up intra-mart Accel Platform.
6. This completes the setup.
If you need to know more details about the settings, please refer to [ Solr Administrator Guide ].
[Apache Solr] Startup, Connection to Admin Screen, and Stoppage
1. Start up Resin which sets up [Apache Solr].
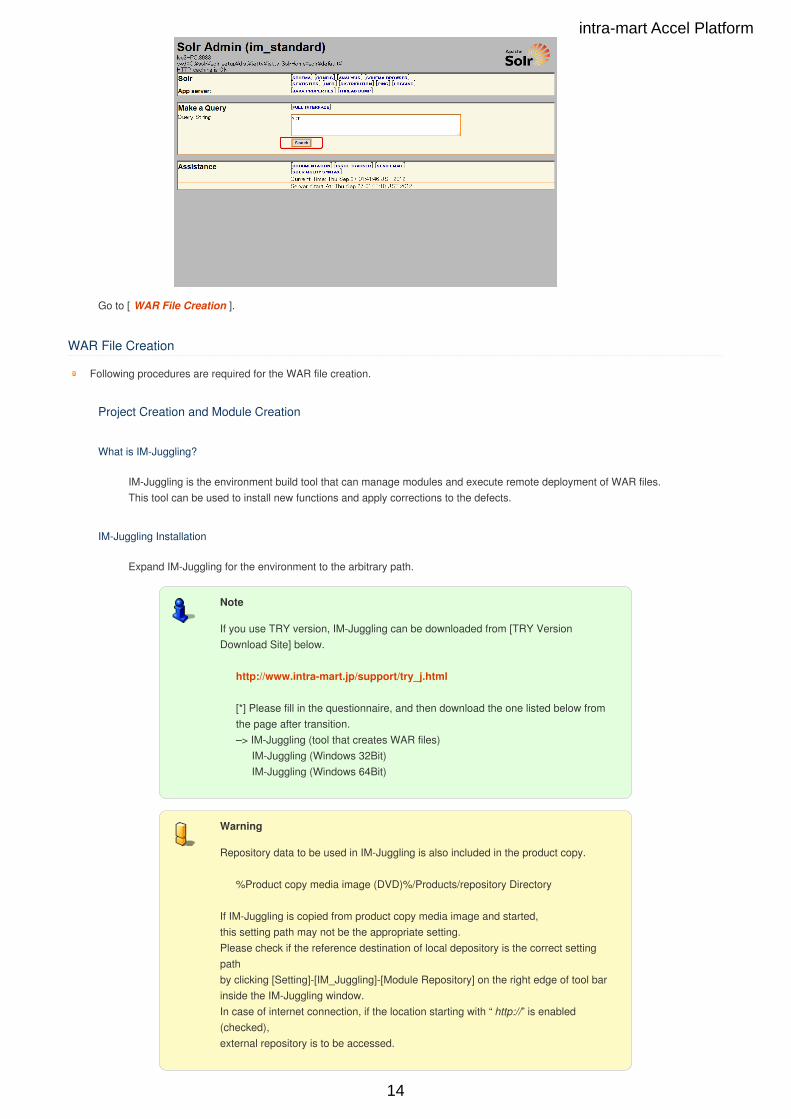
2. Connect to Admin screen of [Apache Solr] and check if the [search] button operates normally.
http://localhost:8080/solr/default/admin/
[*] Screen below is just an example.
intra-mart Accel Platform
13
Go to [ WAR File Creation ].
WAR File Creation
Following procedures are required for the WAR file creation.
Project Creation and Module Creation
What is IM-Juggling?
IM-Juggling is the environment build tool that can manage modules and execute remote deployment of WAR files.This tool can be used to install new functions and apply corrections to the defects.
IM-Juggling Installation
Expand IM-Juggling for the environment to the arbitrary path.
Note
If you use TRY version, IM-Juggling can be downloaded from [TRY VersionDownload Site] below.
http://www.intra-mart.jp/support/try_j.html
[*] Please fill in the questionnaire, and then download the one listed below fromthe page after transition.–> IM-Juggling (tool that creates WAR files)
IM-Juggling (Windows 32Bit)IM-Juggling (Windows 64Bit)
Warning
Repository data to be used in IM-Juggling is also included in the product copy.
%Product copy media image (DVD)%/Products/repository Directory
If IM-Juggling is copied from product copy media image and started,this setting path may not be the appropriate setting.Please check if the reference destination of local depository is the correct settingpathby clicking [Setting]-[IM_Juggling]-[Module Repository] on the right edge of tool barinside the IM-Juggling window.In case of internet connection, if the location starting with “ http://” is enabled(checked),external repository is to be accessed.
intra-mart Accel Platform
14
Warning
If proxy setting is required in the environment to be used, please open [Setting]-[General]-[Network Connection].If [Native] is selected as active provider, proxy server setting information of InternetExplorer will be inherited.(It is the proxy server setting displayed when you display menu by pressing [Alt] keyin Internet Explorer and clicking [Tool]–>[Internet Option]–>[Connection] tab–>[LANSetting].
Please select [Manual Operation] as the active provider,and click [Edit] of [HTTP] of proxy entry.And set [Host], [Port], and [Authentication Information] on [Proxy Entry Edit] screenand click [OK].
Warning
If the error such as repository information obtaining occurs when you create project orWAR file using IM-Juggling,please delete the data in the following directory and start IM-Juggling again.
%OS user directory%/juggling/workspace/.repository Directory
Old information may be the cause of the error.By deleting this old file, the latest data would be obtained again and you can avoidthe issue.
Project New Creation
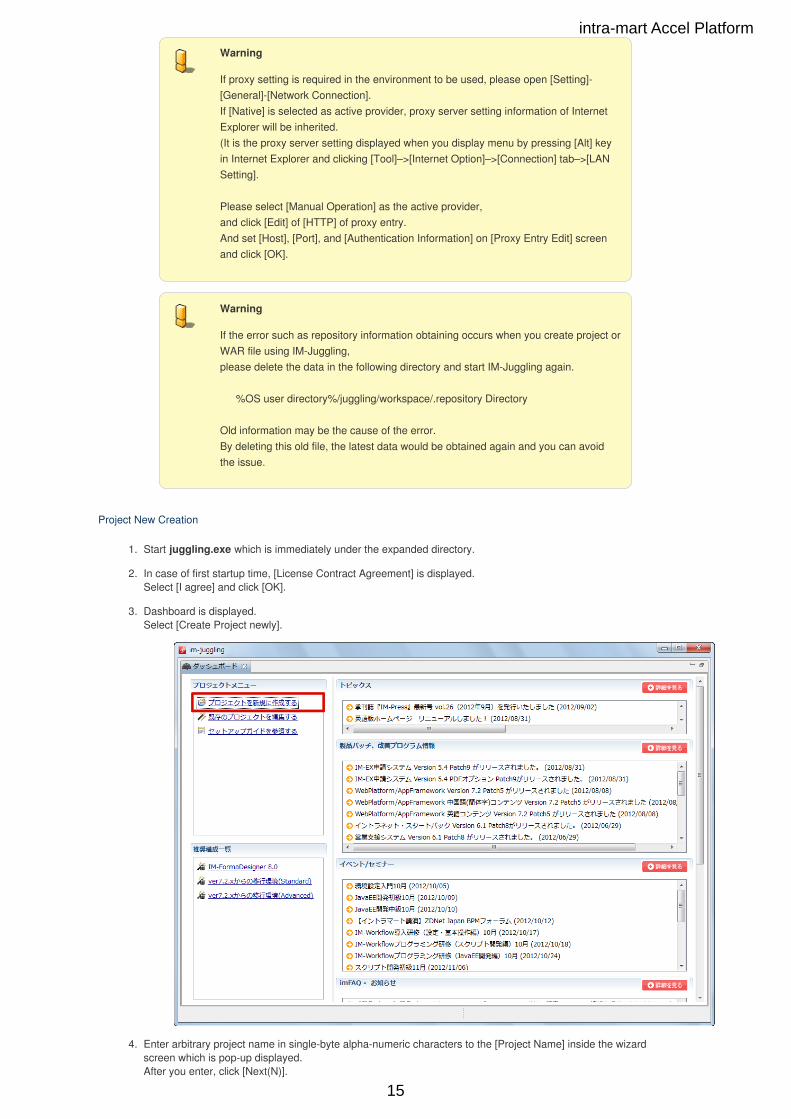
1. Start juggling.exe which is immediately under the expanded directory.
2. In case of first startup time, [License Contract Agreement] is displayed.Select [I agree] and click [OK].
3. Dashboard is displayed.Select [Create Project newly].
4. Enter arbitrary project name in single-byte alpha-numeric characters to the [Project Name] inside the wizardscreen which is pop-up displayed.After you enter, click [Next(N)].
intra-mart Accel Platform
15
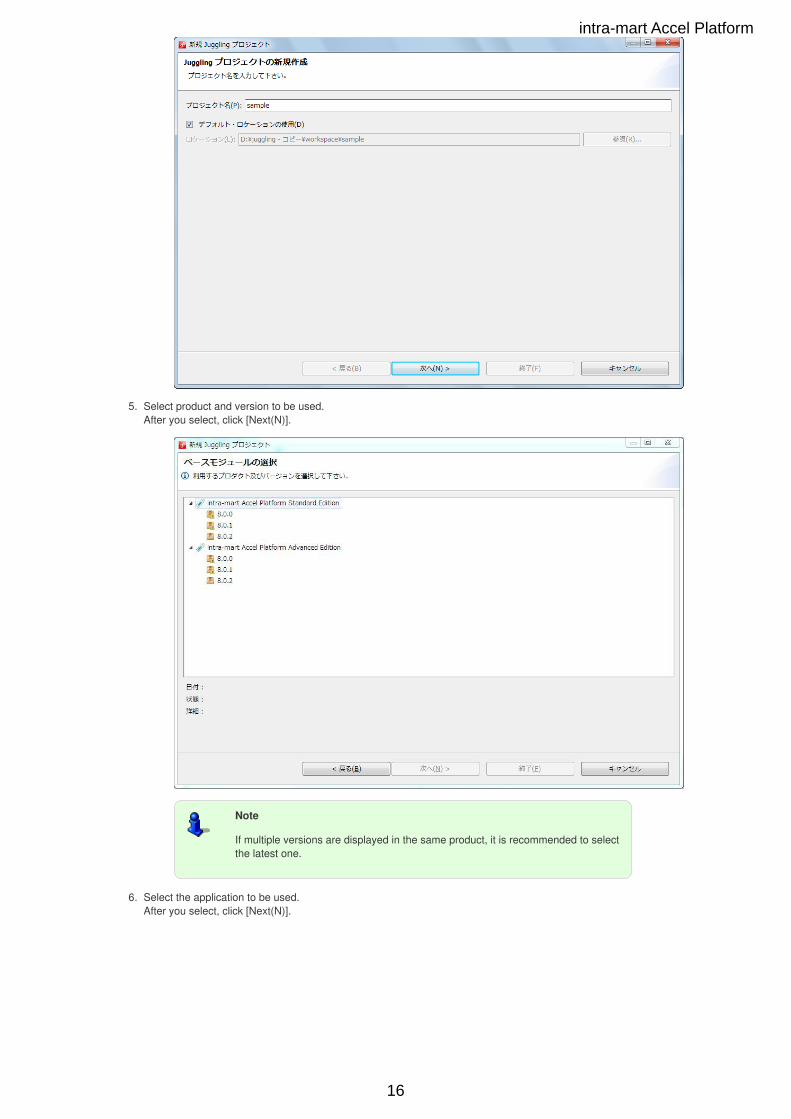
5. Select product and version to be used.After you select, click [Next(N)].
Note
If multiple versions are displayed in the same product, it is recommended to selectthe latest one.
6. Select the application to be used.After you select, click [Next(N)].
intra-mart Accel Platform
16

Warning
[Migration Tool] and [Compatibility Function] are selected for the migration fromversion7.2.Please do not select it since you do not need it in the setup in this document.
7. Screen to select additional source (configuration file etc.) for the platform to be used is displayed,but just click [Next(N)] without any change.
8. Click [Finish(F)] at last.
intra-mart Accel Platform
17
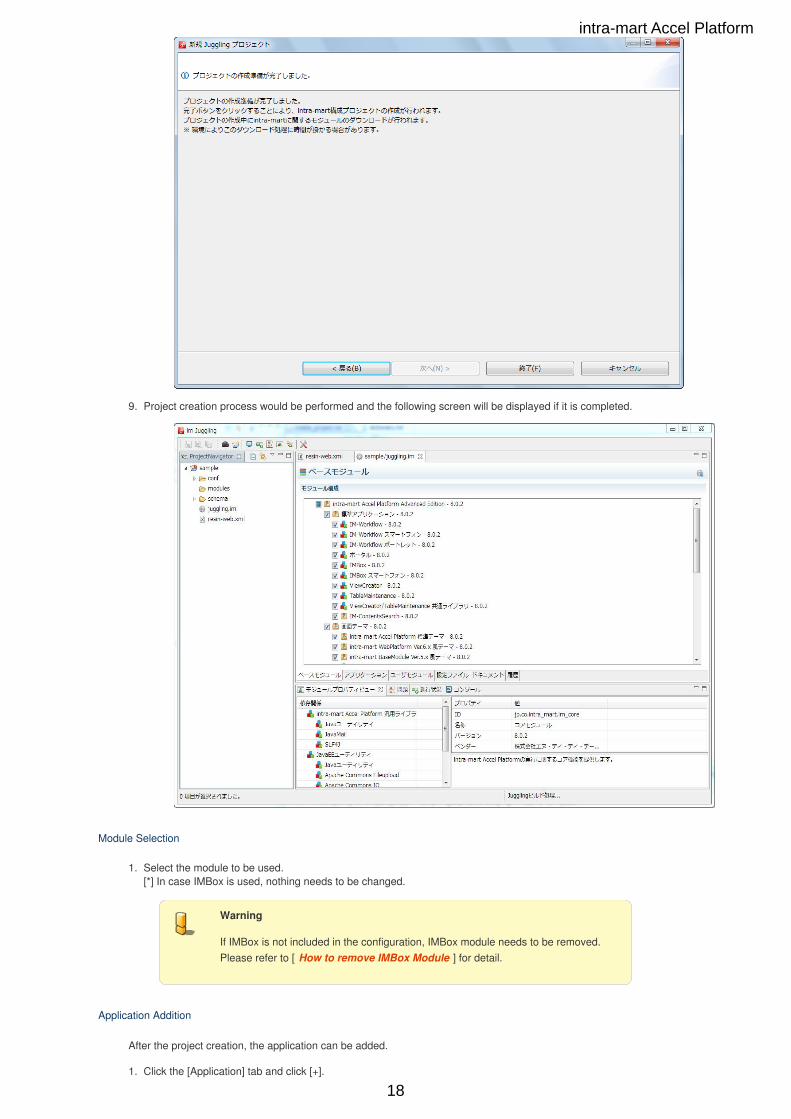
9. Project creation process would be performed and the following screen will be displayed if it is completed.
Module Selection
1. Select the module to be used.[*] In case IMBox is used, nothing needs to be changed.
Warning
If IMBox is not included in the configuration, IMBox module needs to be removed.Please refer to [ How to remove IMBox Module ] for detail.
Application Addition
After the project creation, the application can be added.
1. Click the [Application] tab and click [+].
intra-mart Accel Platform
18
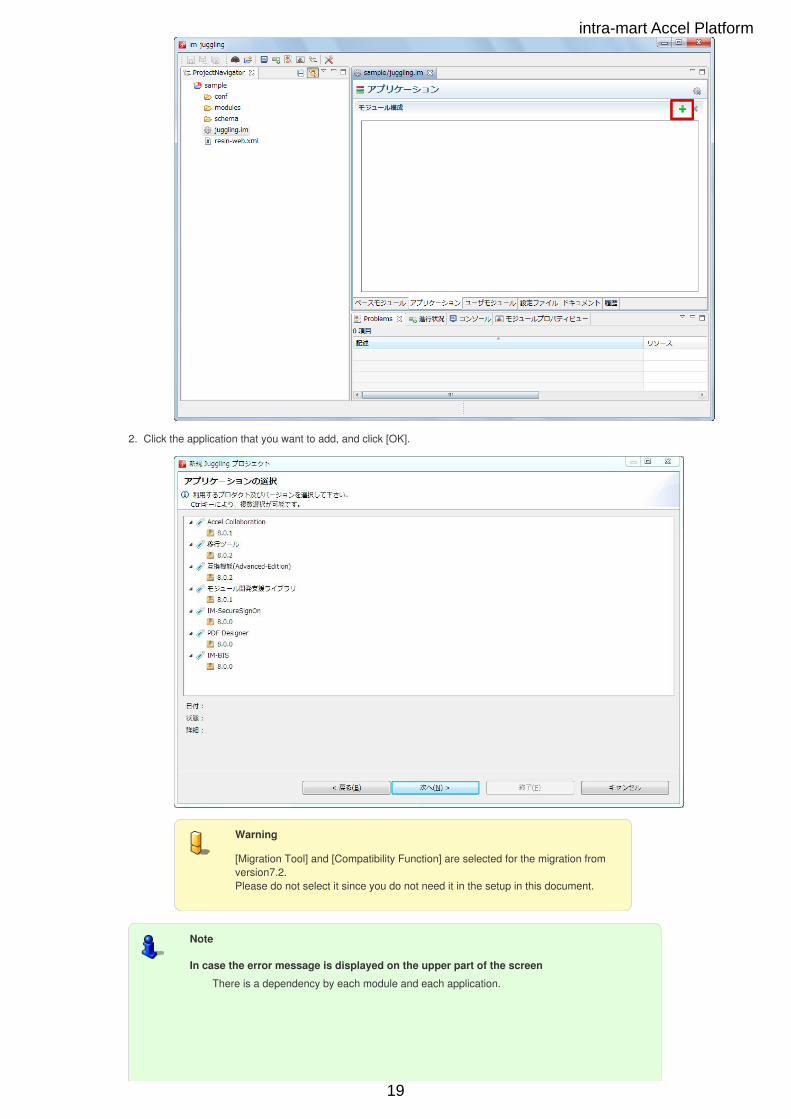
2. Click the application that you want to add, and click [OK].
Warning
[Migration Tool] and [Compatibility Function] are selected for the migration fromversion7.2.Please do not select it since you do not need it in the setup in this document.
Note
In case the error message is displayed on the upper part of the screen
There is a dependency by each module and each application.
intra-mart Accel Platform
19

Necessary setting can be added by the following procedures.
1. Click the message.2. Click [OK] on [Resolve Dependency] screen.
Go to [ Editing Configuration File ].
Editing Configuration File
Following files should be edited to operate intra-mart Accel Platform.
DataSource
Setting of Database( PostgreSQL ) used on intra-mart Accel Platform is made.
1. Open <(project name)/resin_web.xml> file inside the [ProjectNavigator] by doubleclicking and select [Source] tab.
2. Database connection information of connection destination is set to <web-app>/<database>/<driver>.
<driver> <type>org.postgresql.Driver</type> <url>jdbc:postgresql://localhost:5432/iap_db</url> <user>imart</user> <password>imart</password></driver>
Go to [ Storage ].
Storage
Path to be used as Storage area is specified.
1. Open <(project name)/conf/storage-config.xml> inside the[ProjectNavigator] by double clickingand select [Source] tab.
2. Storage area path is set to <storage-config>/<storage-info>/<root-path-name>.
<root-path-name>/tmp/storage</root-path-name>
Warning
In case of default setting ([/tmp/storage]), Storage folderwill be created on the drive that starts Resin.
Example: In case Resin is started on [C Drive],Storage folder will be created in [C:/tmp/storage] folder.
intra-mart Accel Platform
20
Go to [ WAR File Output ].
Note
If there is no configuration file on the tree inside the [ProjectNavigator],
1. Double click <(project name)/juggling.im> file.2. Click [Configuration File] tab.3. Select the subject configuration file and click [Output] on the right.4. Double click on the file displayed on the tree in [ProjectNavigator] to edit it.
Go to [ DataSource ].
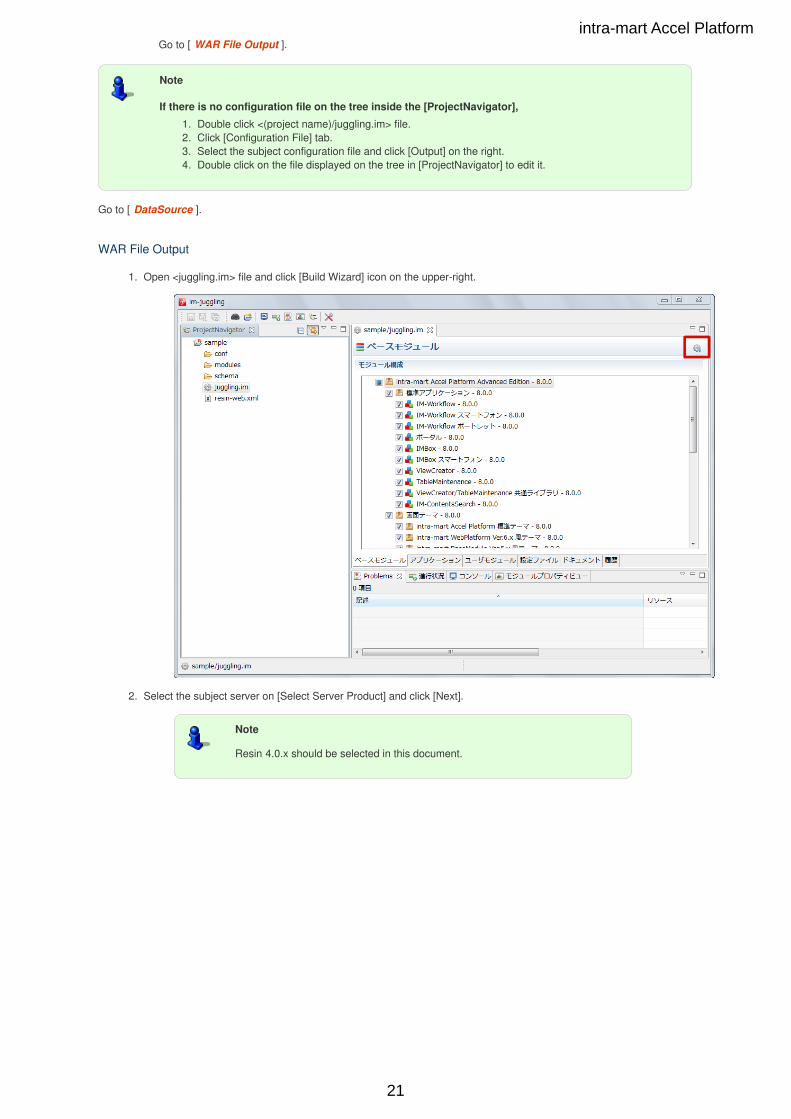
WAR File Output
1. Open <juggling.im> file and click [Build Wizard] icon on the upper-right.
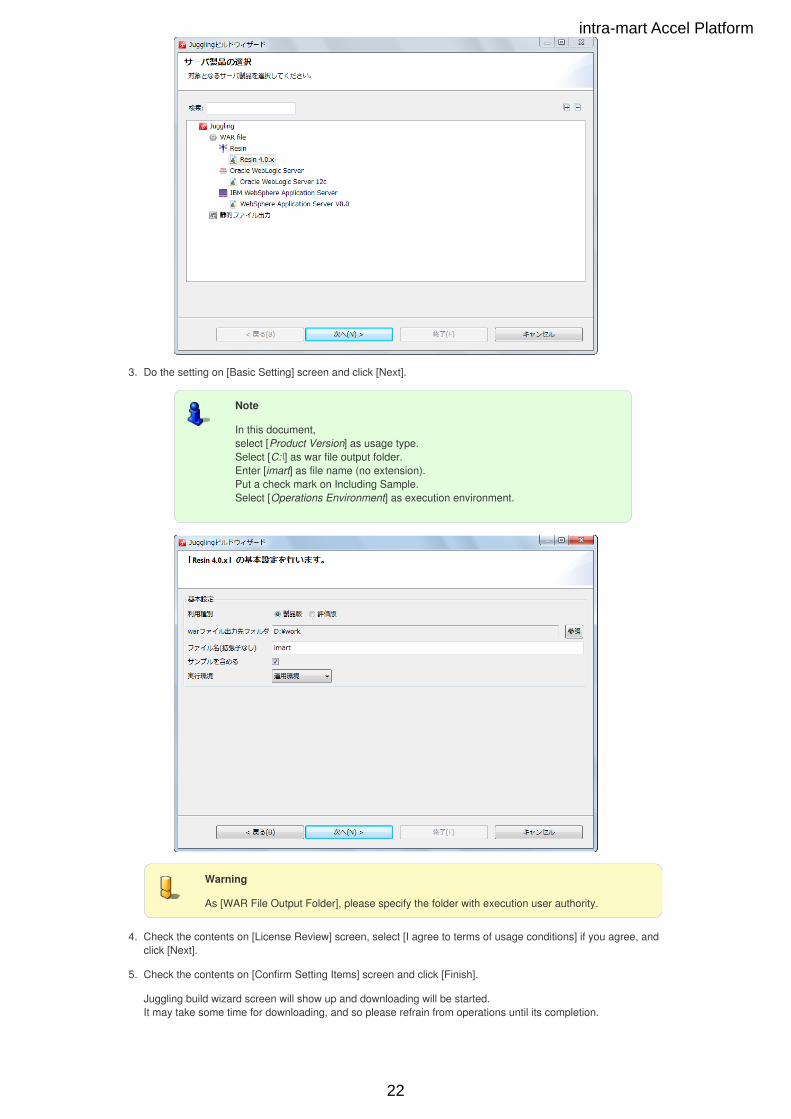
2. Select the subject server on [Select Server Product] and click [Next].
Note
Resin 4.0.x should be selected in this document.
intra-mart Accel Platform
21
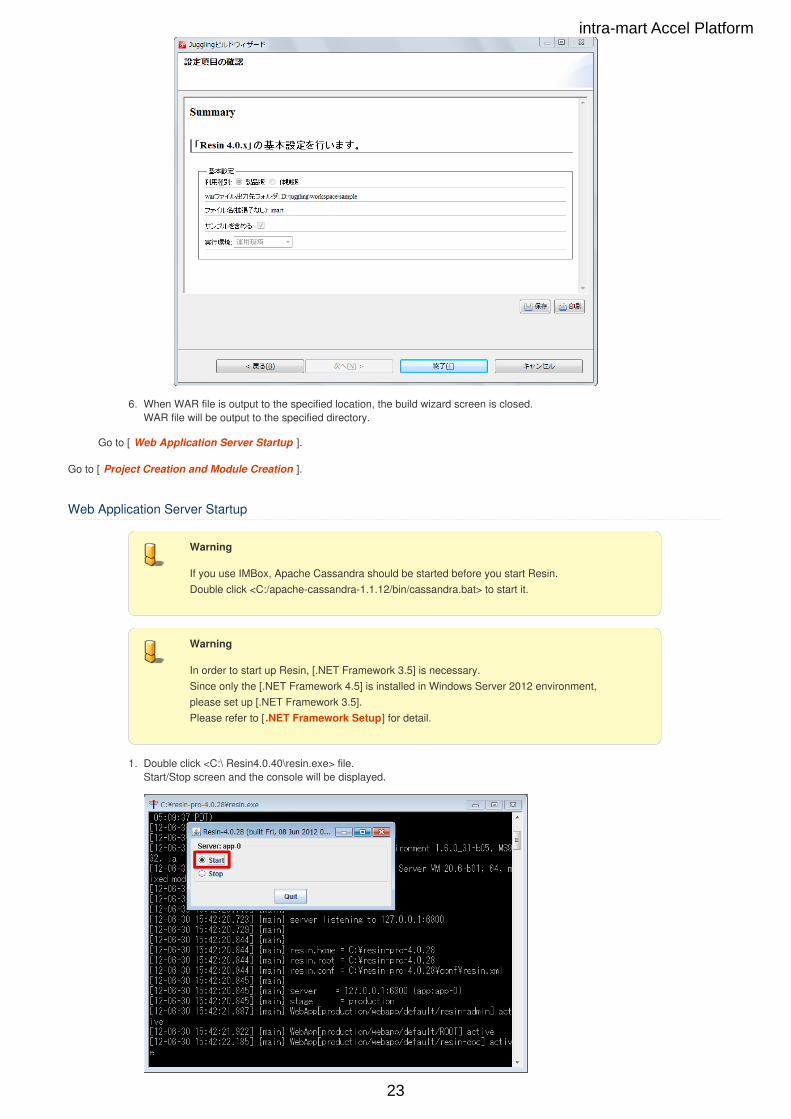
3. Do the setting on [Basic Setting] screen and click [Next].
Note
In this document,select [Product Version] as usage type.Select [C:\] as war file output folder.Enter [imart] as file name (no extension).Put a check mark on Including Sample.Select [Operations Environment] as execution environment.
Warning
As [WAR File Output Folder], please specify the folder with execution user authority.
4. Check the contents on [License Review] screen, select [I agree to terms of usage conditions] if you agree, andclick [Next].
5. Check the contents on [Confirm Setting Items] screen and click [Finish].
Juggling build wizard screen will show up and downloading will be started.It may take some time for downloading, and so please refrain from operations until its completion.
intra-mart Accel Platform
22
6. When WAR file is output to the specified location, the build wizard screen is closed.WAR file will be output to the specified directory.
Go to [ Web Application Server Startup ].
Go to [ Project Creation and Module Creation ].
Web Application Server Startup
Warning
If you use IMBox, Apache Cassandra should be started before you start Resin.Double click <C:/apache-cassandra-1.1.12/bin/cassandra.bat> to start it.
Warning
In order to start up Resin, [.NET Framework 3.5] is necessary.Since only the [.NET Framework 4.5] is installed in Windows Server 2012 environment,please set up [.NET Framework 3.5].Please refer to [ .NET Framework Setup] for detail.
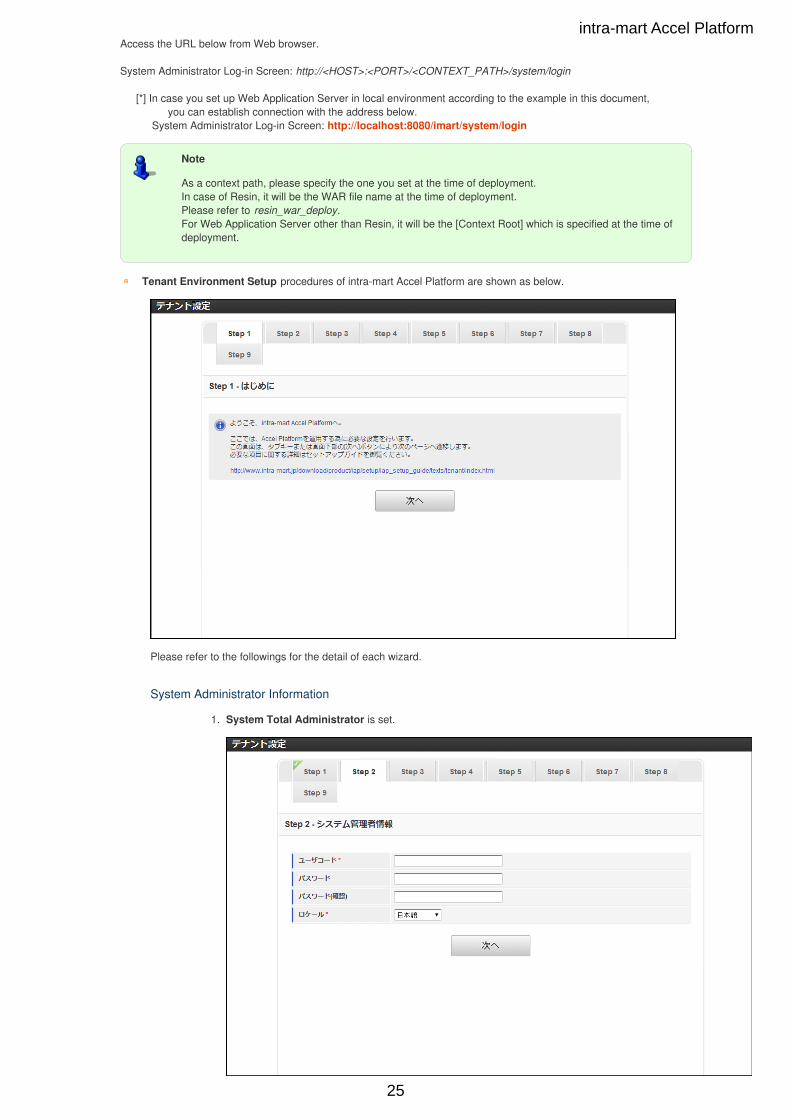
1. Double click <C:\ Resin4.0.40\resin.exe> file.Start/Stop screen and the console will be displayed.
intra-mart Accel Platform
23

2. Startup would be completed if the following messages are displayed on the console.
[12-07-02 18:30:00.000] {main} http listening to *:8080[12-07-02 18:30:00.000] {main}[12-07-02 18:30:00.000] {main} Resin[id=app-0] started in 55480ms
Note
Resin Stoppage
1. Click [Stop] on the Start/Stop screen which was displayed at startup time.
2. It has been stopped when the following message is displayed on the console.
{resin-shutdown} Shutdown Resin reason: OK
Go to [ WAR File Deployment ].
WAR File Deployment
1. Place the war file which was created in IM-Juggling to the arbitrary directory.
2. Start the command prompt and execute following commands.
> cd C:\ Resin4.0.40\> resin deploy ..\imart.war
Warning
Resin needs to be started for WAR file deployment.
Note
In case you need to stop Resin
1. Click [Stop] on the start/stop screen which was displayed at startup time.
It has been stopped when the following message is displayed on console.
{resin-shutdown} Shutdown Resin reason: OK
Go to [ Tenant Environment Setup ].
Tenant Environment Setup
Do Tenant Environment Setup using the Web browser.
intra-mart Accel Platform
24
Access the URL below from Web browser.
System Administrator Log-in Screen: http://<HOST>:<PORT>/<CONTEXT_PATH>/system/login
[*] In case you set up Web Application Server in local environment according to the example in this document,you can establish connection with the address below.
System Administrator Log-in Screen: http://localhost:8080/imart/system/login
Note
As a context path, please specify the one you set at the time of deployment.In case of Resin, it will be the WAR file name at the time of deployment.Please refer to resin_war_deploy.For Web Application Server other than Resin, it will be the [Context Root] which is specified at the time ofdeployment.
Tenant Environment Setup procedures of intra-mart Accel Platform are shown as below.
Please refer to the followings for the detail of each wizard.
System Administrator Information
1. System Total Administrator is set.
intra-mart Accel Platform
25

Item Mandatory/Optional DescriptionUser Code Mandatory Enter user code of system administrator.Password Optional Enter password of system administrator.Password(confirmation)
Optional Enter password of system administrator.
Locale Mandatory Select the locale of system administrator.
Tenant Information
1. Tenant Basic Information is set.
Item Mandatory/Optional DescriptionTenant ID Mandatory Enter the Tenant ID.DefaultLocale
Mandatory Select the default locale of tenant.
Time Zone Mandatory Select the time zone of tenant.Number ofAccountLicenses
Optional Enter the number of account licenses oftenant.
Tenant Environment Information
1. Tenant Environment Information is set.
Warning
In the case of Web Application Server other than Resin,setting for Resource Reference Name, Storage Path, and BaseURL are not displayed.
intra-mart Accel Platform
26

Item Mandatory/Optional DescriptionResourceReferenceName
Optional Resource Reference Name is selected.
Storage Path Optional Enter the path to Public Storage.Base URL Optional Enter the Base URL.
Note
If it is not specified, contents of each setting file will be in effect.
Tenant Administrator Information
1. Tenant Administrator is set.
Item Mandatory/Optional DescriptionUser Code Mandatory Enter user code of tenant administrator.Pssword Optional Enter password of tenant administrator.
intra-mart Accel Platform
27

Password(confirmation)
Optional Enter password of tenant administrator.Item Mandatory/Optional Description
Note
If the setup is interrupted because of the error that has occurredduring tenant environment setup, tenant administrator will not beregistered even if you do the setup again.In case the normal registration of tenant administrator could not bedone, you need to start from the Tenant Management Screen toregister tenant administrator.For the deails, please refer to the [Newly Create TenantAdministrator] section of [System Administrator OperationsGuide]- [Tenant Management].
LDAP Linkage/Setting
1. LDAP Linkage/Setting Information is set.
Note
Contents of Project /conf/ldap-certification-config.xml of IM-Juggling will bedisplayed initially.Please note that the value of <enable> tag is false.
Warning
LDAP authentication is enabled only when the contents of <enable> tag istrue.In case LDAP authetication is made enabled, please do the correct setting ofautheticated LDAP.
Item Mandatory/Optional Description
intra-mart Accel Platform
28

SettingContents
Mandatory LDAP Authentication Enable/Disable andInformation of Authenticated LDAP are entered.Please refer to the descriptions of [LDAPAuthentication Setting File] for input contents.
Item Mandatory/Optional Description
Apache Cassandra Connection Information
1. Apache Cassandra Connection Information is entered.
Warning
Apache Cassandra connection information is diplayed onlywhen IMBox is used.Before you execute tenant environment setup, it is necessarythat Apache Cassandra is set and launched.For the details of Apache Cassandra setting, please refer to[IMBox Cassandra Administrator Guide].
IMBox Cassandra Administrator Guide (Japanese)
IMBox Cassandra Administrator Guide (English)
IMBox Cassandra Administrator Guide (Chinese)
Item Mandatory/Optional DescriptionCluster Name Mandatory Enter cluster name of Cassandra
server.Key Space Mandatory Enter key space of Cassandra server.ConnectionDestination
Mandatory Enter IP address and port number ofthe server Cassandra is operated on.Connection destination is entered by[IP addess] or [IP address:portaddress]. (In case port number isomitted, use 9160.)In case port number other than 9160is specified, error will occur in the newnode detection function.If multiple Cassandra’s are operatedin the distributed configuration, pleaseenter every connection destination ineach line one by one.
intra-mart Accel Platform
29

ReplicationFactor
Mandatory Enter the number of Replicas of datainside the cluster.Replication factor is used only whenthe key space is created.
AuthenticationInformationSetting
Optional Select authentication usage inCassandra connection.In case authentication information isset, it is necessary to create the keyspace in advance to check the writeauthority.
AuthenticationUser Name
It is mandatory onlywhen authenticationsetting is used.
Enter connection user name inCassandra authentication connection.It is displayed only whenauthentication setting is used.
AuthenticationPassword
It is mandatory onlywhen authenticationsetting is used.
Enter password in Cassandraauthentication connection.It is displayed only whenauthentication setting is used.
TestConnection
You can test if Cassandra connectioncan be established with the contentsentered.It is recommended that you alwaysperform it when any tenant is created.
Item Mandatory/Optional Description
Note
Initial value of Cassandra connection information at registrationtime will be the setting value of Cassandra server connectionsetting (cassandra-config.xml).For the details of cassandra-config.xml, please refer toCassandra Server Connection Setting(cassandra-config.xml) .
Apache Solr Connection Information
1. Apache Solr Connection Information is entered.
Warning
Apache Solr connection information is displayed, only when IM-ContentsSearch for Accel Platform is used.In case IM-ContentsSearch for Accel Platform is used, it isnecessary to set up Apache Solr.For the details about setup of Apache Solr, please refer to[Apache Solr].
intra-mart Accel Platform
30
Item Mandatory/Optional DescriptionSet Solrconnectioninformation.
Optional When tenant environment setup ismade, this button switches if ApacheSolr connection information is set ornot.
Group ID Fixed (“default”) Group ID of standard connectiondestination may not be changed from“default”.
StandardConnectionDestination
Mandatory (onlywhen [SolrConnectionInformation] button isenabled)
Select connection destination.It can be selected only when [SolrConnection Information] button isenabled.Connection destination which is set asthe standard connection destination foranother tenant will not be displayed.If this is the initial tenant environmentsetup or if there is no setting for Solrconnection,Solr connection setting (“default”)which is defined in Solr ServerConnection Configuration file (solr-config.xm) is displayed in the selectionitems.
Note
By making the items to non-display by [Set Solr ConnectionInformation] button, tenant environment setup can be executedwithout setting the Apache Solrconnection information.On the Tenant Management Screen of System AdministratorMenu, Apache Solr connection information can be set to thecreated tenant.If the Solr Server Connection Configuration file (solr-config.xml)does not exist or cannot be loaded, items are not displayed.They are always skipped.
Note
If the setting value (“default”) of Solr Server ConnectionConfiguration file (solr-config.xml) is selected and tenantenvironment setup is executed,setting value which is set in the setting value of solr-config.xml(<group name=”default”>) is registered to the system databaseas Solr connection information.For the details about solr-config.xml, please refer to [ SolrServer Connection Setting (solr-config.xml) ].
Registration
1. When the setting of each step has been completed, please click [Register].
intra-mart Accel Platform
31
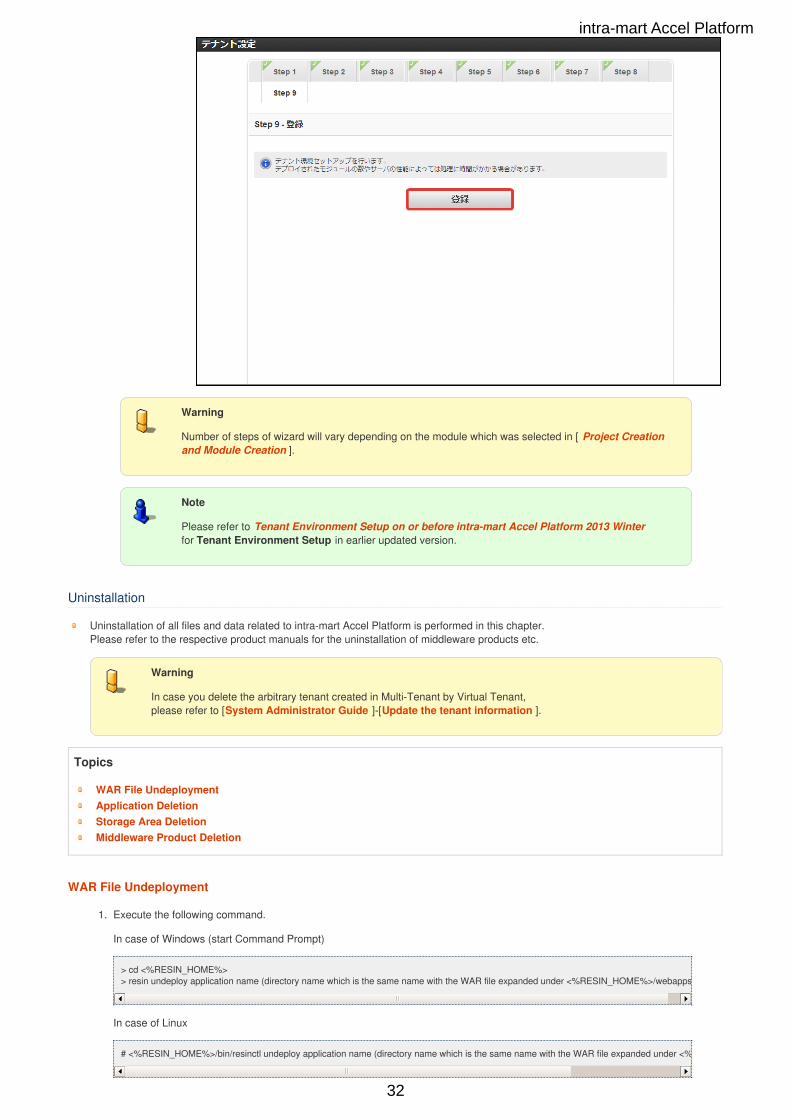
Warning
Number of steps of wizard will vary depending on the module which was selected in [ Project Creationand Module Creation ].
Note
Please refer to Tenant Environment Setup on or before intra-mart Accel Platform 2013 Winterfor Tenant Environment Setup in earlier updated version.
Uninstallation
Uninstallation of all files and data related to intra-mart Accel Platform is performed in this chapter.Please refer to the respective product manuals for the uninstallation of middleware products etc.
Warning
In case you delete the arbitrary tenant created in Multi-Tenant by Virtual Tenant,please refer to [System Administrator Guide ]-[Update the tenant information ].
Topics
WAR File UndeploymentApplication DeletionStorage Area DeletionMiddleware Product Deletion
WAR File Undeployment
1. Execute the following command.
In case of Windows (start Command Prompt)
> cd <%RESIN_HOME%>> resin undeploy application name (directory name which is the same name with the WAR file expanded under <%RESIN_HOME%>/webapps)
In case of Linux
# <%RESIN_HOME%>/bin/resinctl undeploy application name (directory name which is the same name with the WAR file expanded under <%RESIN_HOME%>/webapps)
intra-mart Accel Platform
32

2. After undeployment, delete the following file manually.
Directory which is the same name with the WAR file under <%RESIN_HOME%/webapps>.
Note
If you use multi-tenants, please repeat the operation above for each WAR file which is subject toundeployment.
Warning
Resin should be started for WAR file undeployment.
Application Deletion
1. Delete the following file directory which is expanded on Resin.
File directory under <%RESIN_HOME%/resin-data>
Directory under <%RESIN_HOME%/webapps>
Warning
Resin should be stopped.Please refer to Web Application Server Startup for how to stop.
Storage Area Deletion
1. Delete the file directory under <%STORAGE_PATH%>.
2. Delete the file directory under <%PUBLIC_STORAGE_PATH%>.
Middleware Product Deletion
Resin
Delete <%RESIN_HOME%> directory.
Database
Refer to Database manual that you are using.
Web Server
Please refer to Web Server manual that you are using.
Warning
Delete the file directory under <%WEB_PATH%> directory which places static file.
Apache Cassandra
Delete directory which sets up Apache Cassandra.
Apache Solr
Delete the directory which sets up Web Application Server ( Jetty, Resin, tomcat ) that operates Apache Solr.
Please proceed to [ Introduction ].
Copyright © 2014 NTT DATA INTRAMART CORPORATION
intra-mart Accel Platform
33
Top Related