ZSI_375_MANUAL_FOR_OR-ENGLISH
12
For Operating Room ZSI 375 - English V.11_br May 2013 LOCAL DISTRIBUTOR ZEPHYR SURGICAL IMPLANTS SÀRL Route des Jeunes 4 1227 Acacias (Geneva) SWITZERLAND E-mail: [email protected] www.zephyr-si.com This document is a complementary checklist to the two training videos, which you can be accessed and download from our website: ZSI 375 Training Video, ZSI 375 Functioning Protocol. Please watch the videos before reading the document. NOTE
-
Upload
zephyr-surgical-implants -
Category
Documents
-
view
217 -
download
0
description
http://www.zephyr-si.com/images/products/zsi375/ZSI_375_MANUAL_FOR_OR-ENGLISH.pdf
Transcript of ZSI_375_MANUAL_FOR_OR-ENGLISH
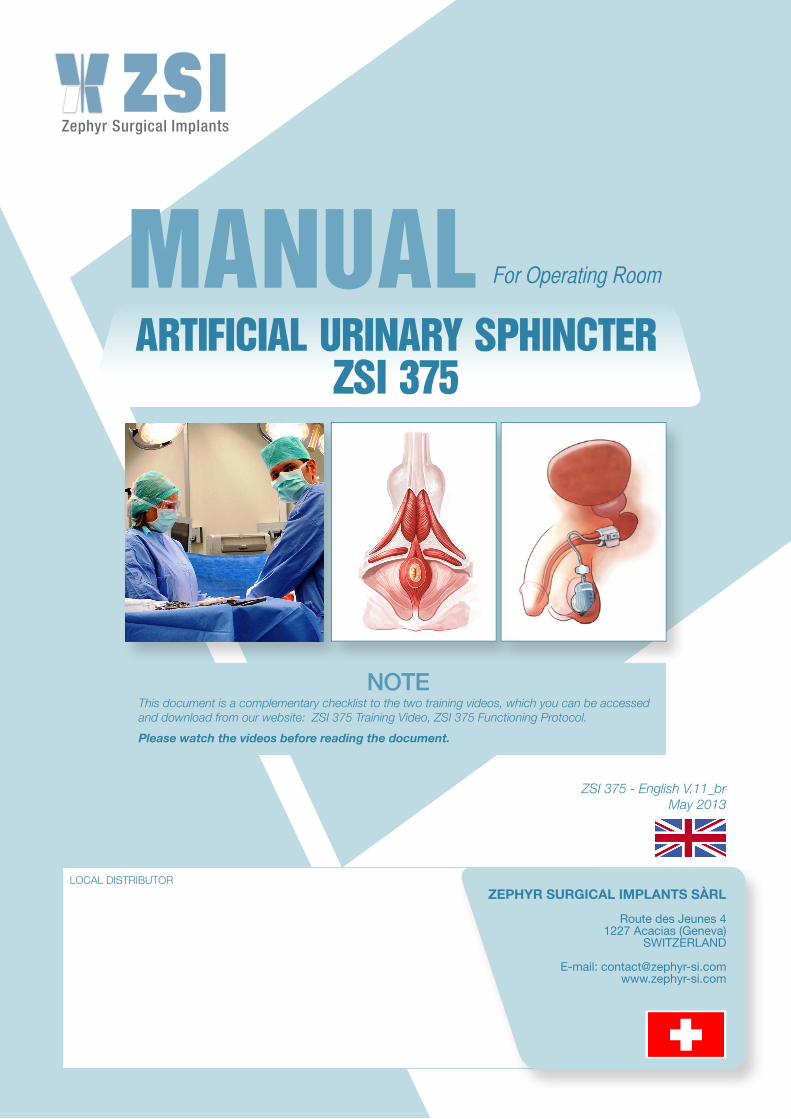
For Operating Room
ZSI 375 - English V.11_brMay 2013
LOCAL DISTRIBUTORZEPHYR SURGICAL IMPLANTS SÀRL
Route des Jeunes 41227 Acacias (Geneva)
SWITZERLAND
E-mail: [email protected]
This document is a complementary checklist to the two training videos, which you can be accessed and download from our website: ZSI 375 Training Video, ZSI 375 Functioning Protocol.Please watch the videos before reading the document.
NOTE

2 - Manual ZSI 375
Contents
Artificial urinary Sphincter ZSI 375 presentation...…………… 3
Fight against infection and antibioprophylaxis .……..……….. 4
Preparation ……………………………………………….........… 5
Dissection …………………………………………………..……. 7
Implantation ……………….....................................................…. 8
Implantation of the pump.…................................................…... 9
Activation and guarantee ………………………….........…..… 10
Trouble shooting ....………………………………………...…… 11

3 - Manual ZSI 375
PRESENTATION
ARTIFICIAL SPHINCTER ZSI 375ZSI 375 is a one-piece assembly medical device that can be implanted in men. It is made of a silicone elastomer and filled with sterile normal saline solution. It is designed to treat severe urinary incontinence secondary to an intrinsic urinary sphincter deficiency.
Packaging contents
Date of implantation ............................. / ...................... / ....................
(m/d/y)Type of implanted medical device ARTIFICIAL URINARY
SPHINCTER ZSI 375ZF 63V1
ZEPHYR Surgical Implants SÀRL, Route des Jeunes 4, 1227 Acacias Geneva SWITZERLAND
Place the traceability label sticker here

4 - Manual ZSI 375
FIGHT AGAINST INFECTION
GENERAL INFORMATION• The implantation of the device must be the first procedure in the morning, to reduce the bacteria in the ope-
rating room.• Reduce traffic in the operating room and doors must be closed to avoid air movement, many bacteria are aloft.• Reduce procedure time and minimize time device is open to air. The longer is the procedure, the higher is the
infection rate.• Minimize prosthesis skin contact, because there are plenty of bacteria on the skin.• Reduce bleeding. Blood clots are a breeding ground for bacteria.• An antibioprophylaxis is necessary, use antibiotic adapted to the bacteria of your region prior to the incision.
PREPARATION OF THE PATIENT• Shave genital area in the holding area or operating room, to minimize bacteria colonization of the skin. The
most common contaminant is STAPH EPIDERMIDIS. • Wash genital area with antibacterial soap and antiseptic solution for 5 minutes. When all drapes are places
wash a third time. Use new clean scrubs for every case.• Insert a sterile Foley catheter in order to drained the bladder.
PREPARATION OF THE SURGEON• All surgeons use full gown, hood (no cap) and two pairs of gloves at all times.• All surgeons replace gloves after draping the area, before skin incision and before touching the device.
IRRIGATION OF THE IMPLANTATION SITE• Before implanting the device, irrigate with local antibiotic the scrotal pouch and the perineal incision. Use
Gentamycin 80 mg pure or Cefotoxin.
PREPARATION OF THE DEVICE• Change gloves to touch the device.• Minimize time device is open to air; some bacteria are aloft.• Dip device in a bowl filled with antibiotic solution (Gentamycin 80 mg or Cefotoxin).• Place the device in clean gauze for the transit from the bowl to the implantation site.
PRECAUTION WITH PUMP• During preparation time and implantation time, Pump is wrapped in a clean gauze; it must not touch the skin.
Always remember that the skin is source of microbes.
LAST PRECAUTION• Final antibiotic irrigation with pure Gentamycin 80 mg, is done with device installed.• Remove/wash out the blood clots on the device. Blood clots are an ideal environment for bacteria proliferation.• Sew multiple layers over the device in order to have the maximum of tissue between the device and the skin,
so even if they separate the device cannot be exposed.
ANTIBIOPROPHYLAXIS
• Inject 2 g of CEFOTOXIN, using a slow intravenous injection. For a procedure of more than 4 hrs, inject 1 g more of CEFOTOXIN.
• Antibiotics may be continued 48 hours postoperatively.
Antibiotic must be adapted to the bacteria you encounter in your region. The injection is prior to the incision:
• 5 mg / kg Gentamycin + 1 g of Metronidazol injected as one intravenous injection.
In case of allergy, instead of using CEFOTOXIN, you can use:

5 - Manual ZSI 375
PREPARATION
Change gloves for preparation. Change the gloves if any contact is made with the skin.
1
There should be minimal contact with the device and only the uro-logist should handle it.
2
Place the device into a normal saline solution with antibiotics. Minimize the time the device is exposed to open air.
3
Prepare: One 5 ml syringe for normal sa-line solution. One 20 ml syringe to create a vacuum.
4
This is the correct position. Create a vacuum. Do not aspirate more than 15 ml.
6Check that the cuff is flat after performing the vacuum.
7
Inject 4.5-4.8 ml of normal saline solution. This is the correct position to aspirate the bubbles from the pump. Remove the bubbles from the hydraulic circuit.
8This is the correct position to aspirate the bubbles from the cuff.
9
Create a vacuum. Aspirate 15 ml. Inject 4.5 ml of normal saline solu-tion. Do not remove the bubbles from the compensation pouch.
10
Place the needle in the slot and pierce the septum.
5
The device is prepared when the spring is above the “ + “ sign.
11
PREPARATION OF THE HYDRAULIC CIRCUIT
PREPARATION OF THE COMPENSATION POUCH
Press-Release 3 or 4 times until the spring is fully compressed.
12
Wait for the spring to return above the “ + “ sign. It takes 3 minutes. When it does the test has been successful.
13
TEST THE SPRING
6 - Manual ZSI 375
(DEVICE DEACTIVATED) (DEVICE PROPERLY DEACTIVATED)
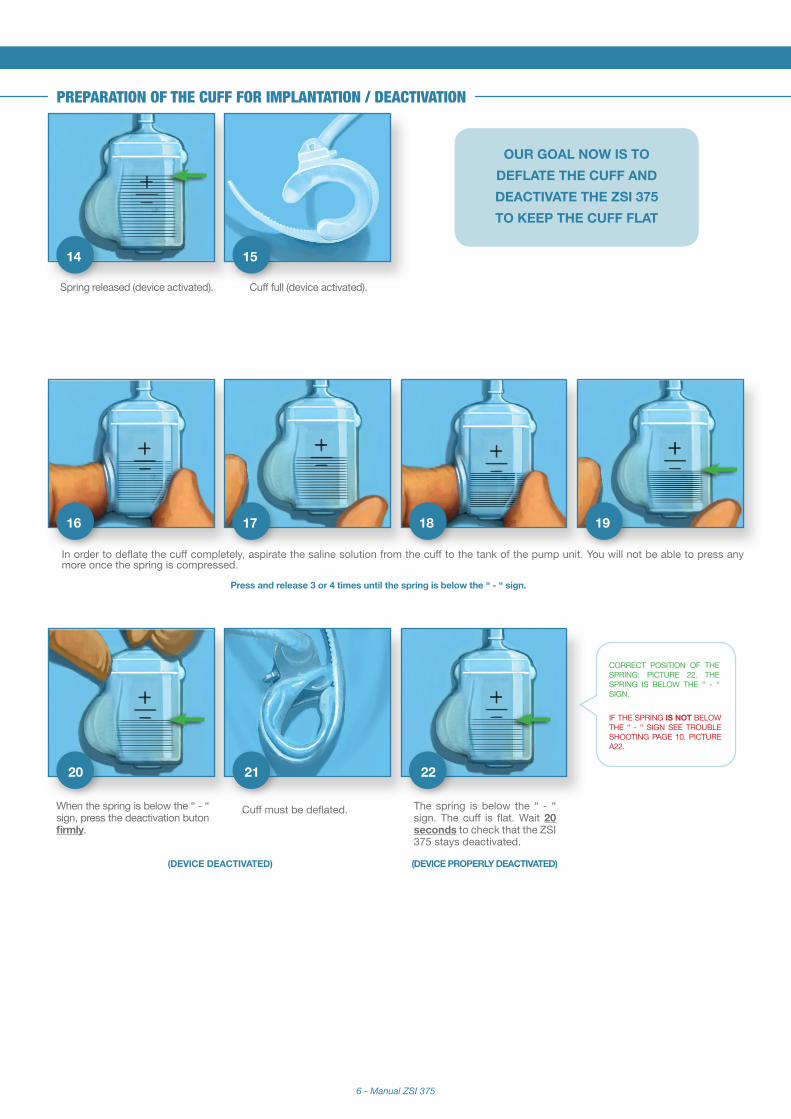
PREPARATION OF THE CUFF FOR IMPLANTATION / DEACTIVATION
Spring released (device activated).
14
Cuff full (device activated).
15
OUR GOAL NOW IS TO DEFLATE THE CUFF AND DEACTIVATE THE ZSI 375 TO KEEP THE CUFF FLAT
In order to deflate the cuff completely, aspirate the saline solution from the cuff to the tank of the pump unit. You will not be able to press any more once the spring is compressed.
16 17 18 19
Press and release 3 or 4 times until the spring is below the “ - “ sign.
20 21 22
The spring is below the “ - “ sign. The cuff is flat. Wait 20 seconds to check that the ZSI 375 stays deactivated.
CORRECT POSITION OF THE SPRING: PICTURE 22. THE SPRING IS BELOW THE “ - “ SIGN.
Cuff must be deflated.When the spring is below the “ - “ sign, press the deactivation buton firmly.
IF THE SPRING IS NOT BELOW THE “ - “ SIGN SEE TROUBLE SHOOTING PAGE 10. PICTURE A22.

7 - Manual ZSI 375
DISSECTION
Instruments. Do not forget a large maier clamp.
23
Place the patient in lithotomy position. All surgeons should use new, clean scrubs for every operation. Use a certified operating room. Try to minimize traffic.
24
Install a size 16 Foley catheter (no smaller).
25
Perform a perineal incision. The Foley catheter helps to identify the urethra during dissection.
26
Dissect the fat and the bulbospongious muscle covering the urethra.
27
Dissect two centimetres of the urethra that is surrounded by the corpus spongious.
28
Perform an inguinal incision. It is easier to find the subdartos space from an inguinal incision than a scrotal incision.
29
Prepare a subdartos pouch for the pump unit, with the scissors and the maier clamp. The subdartos pouch is the space used for orchidopexy.
30
Open the passage between the perineal in-cision and the inguinal incision with the in-dex and middle fingers. Stay parallel to the urethra. The passage is behind the sperma-tic cord of the testis.
31
Help the fingers go through the tissue with a gauze pad.
32
Check the passage. The sudartos pouch, which receives the pump unit, is between 2 layers: the dartos and the cremaster muscles. Enlarge the passage with 2 fingers for the pump unit to go through easily.
33 34

8 - Manual ZSI 375
The spring is below the “ - “ sign. Wait 20 seconds to be sure the zsi 375 stays deactivated.
IMPLANTATION
Install the deflated cuff and pro-tect the pump with a gauze pad. The device should never be in contact with the skin.
35
Suture the cuff to secure the closure, while the size 16 Fr Foley catheter is still calibrating the urethra.
36 37
Press and release once or twice, until the spring is fully stressed and the cuff is flat. We have to deflate the cuff and deactivate the ZSI 375 to keep the cuff deflated during healing.
44 45 46 47
IMPLANTATION OF THE CUFF / SUTURE OF THE CUFF
DEACTIVATION BEFORE IMPLANTATION OF THE PUMP
IV
Remove the size 16 Fr Foley catheter.
38
CONTROL OF THE ISSUED PRESSURE
40
After pressing the activation button the spring will go up spon-taneously and stop at the midline.
41 42 43
The spring will come back just be-low to the midline to achieve the correct delivered pressure. It takes 2 minutes.
Press the activation button to activa-te the device in order to check that the correct pressure is delivered.
39
(DEVICE DEACTIVATED)
PRESS RELEASE
TEST : CHECK THE DELIVERED PRESSURE AGAIN(DEVICE PROPERLY ACTIVATED)
Firmly press the deactivation button.
(DEVICE DEACTIVATED) (DEVICE PROPERLY ACTIVATED)
PICTURE 43 SHOWS THE CORRECT POSITION OF THE SPRING. THE SPRING IS JUST BELOW THE MIDLINE. THE ZSI 375 DELIVERS THE PROPER PRESSURE.
IF THE SPRING IS NOT BELOW THE MIDLINE, SEE TROUBLE SHOOTING PAGE 10. PICTURE A43 & D43.
PICTURE 47 SHOWS THE CO-RRECT POSITION OF THE SPRING. THE SPRING IS JUST BELOW THE “ - “ SIGN. THE ZSI 375 IS PROPERLY DEACTIVATED, THE CUFF IS DEFLATED.
IF THE SPRING IS NOT BELOW THE “ - “ SIGN SEE TROUBLE SHOOTING PAGE 10. PICTURE A47.
!
9 - Manual ZSI 375
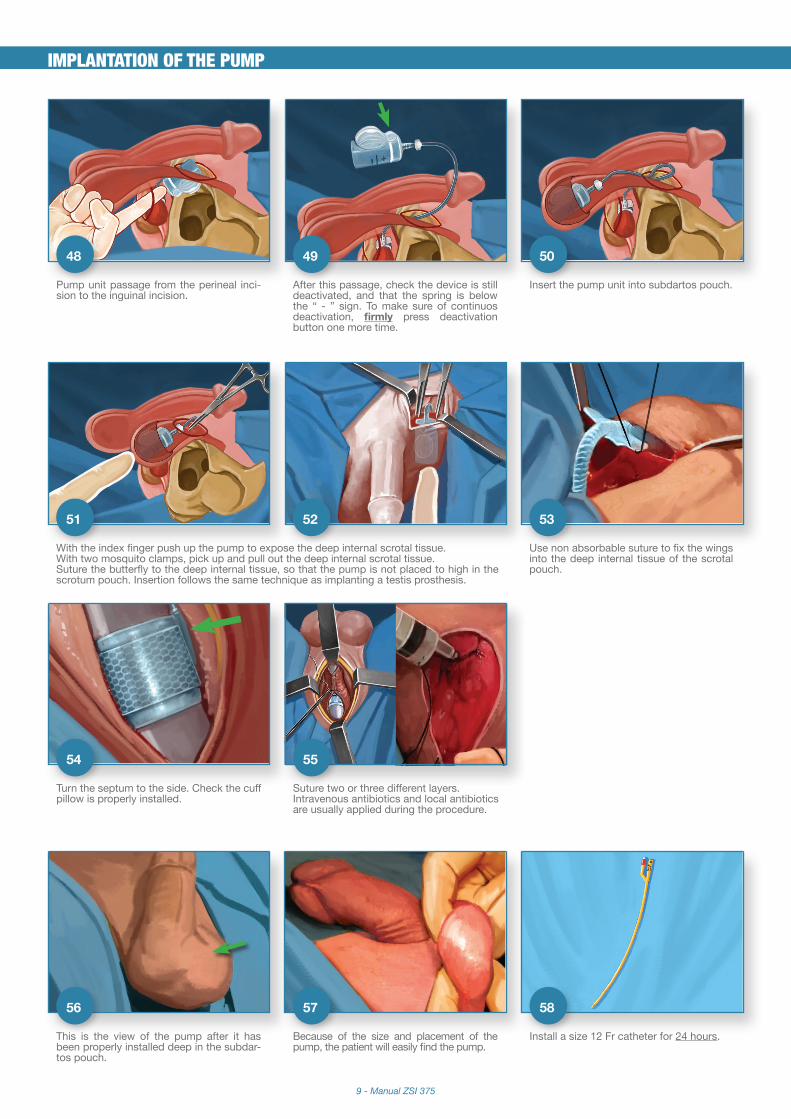
IMPLANTATION OF THE PUMP
Pump unit passage from the perineal inci-sion to the inguinal incision.
48 49
Insert the pump unit into subdartos pouch.
50
With the index finger push up the pump to expose the deep internal scrotal tissue.With two mosquito clamps, pick up and pull out the deep internal scrotal tissue.Suture the butterfly to the deep internal tissue, so that the pump is not placed to high in the scrotum pouch. Insertion follows the same technique as implanting a testis prosthesis.
51 52
Use non absorbable suture to fix the wings into the deep internal tissue of the scrotal pouch.
53
Turn the septum to the side. Check the cuff pillow is properly installed.
54
Suture two or three different layers.Intravenous antibiotics and local antibiotics are usually applied during the procedure.
55
This is the view of the pump after it has been properly installed deep in the subdar-tos pouch.
56
Because of the size and placement of the pump, the patient will easily find the pump.
57
Install a size 12 Fr catheter for 24 hours.
58
After this passage, check the device is still deactivated, and that the spring is below the “ - ” sign. To make sure of continuos deactivation, firmly press deactivation button one more time.
10 - Manual ZSI 375
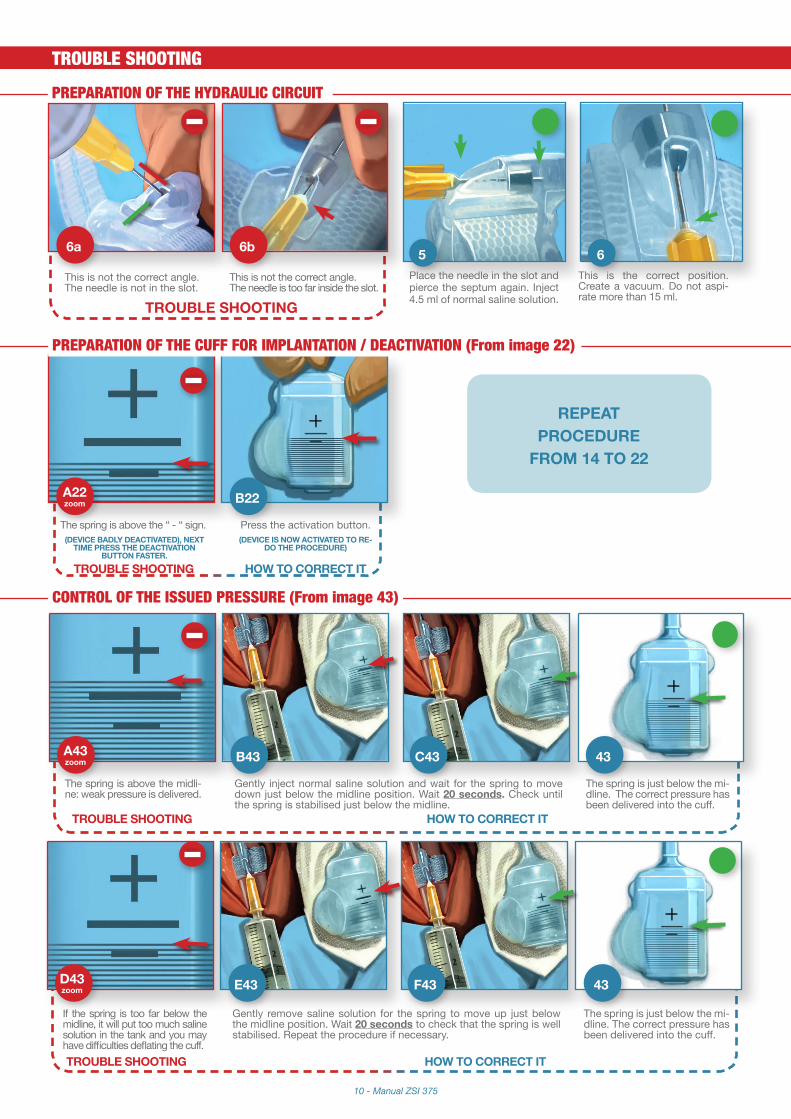
PREPARATION OF THE HYDRAULIC CIRCUIT
HOW TO CORRECT ITTROUBLE SHOOTING
HOW TO CORRECT ITTROUBLE SHOOTING
TROUBLE SHOOTING
The spring is above the “ - “ sign.
A22zoom B22
PREPARATION OF THE CUFF FOR IMPLANTATION / DEACTIVATION (From image 22)
The spring is above the midli-ne: weak pressure is delivered.
A43zoom
Gently inject normal saline solution and wait for the spring to move down just below the midline position. Wait 20 seconds. Check until the spring is stabilised just below the midline.
B43 C43
The spring is just below the mi-dline. The correct pressure has been delivered into the cuff.
43
CONTROL OF THE ISSUED PRESSURE (From image 43)
Press the activation button.(DEVICE IS NOW ACTIVATED TO RE-
DO THE PROCEDURE)(DEVICE BADLY DEACTIVATED), NEXT
TIME PRESS THE DEACTIVATION BUTTON FASTER.
REPEAT PROCEDURE
FROM 14 TO 22
If the spring is too far below the midline, it will put too much saline solution in the tank and you may have difficulties deflating the cuff.
D43zoom
Gently remove saline solution for the spring to move up just below the midline position. Wait 20 seconds to check that the spring is well stabilised. Repeat the procedure if necessary.
E43 F43
The spring is just below the mi-dline. The correct pressure has been delivered into the cuff.
43
HOW TO CORRECT ITTROUBLE SHOOTING
TROUBLE SHOOTING
This is not the correct angle. The needle is not in the slot.
6a
This is not the correct angle. The needle is too far inside the slot.
6b
This is the correct position. Create a vacuum. Do not aspi-rate more than 15 ml.
6Place the needle in the slot and pierce the septum again. Inject 4.5 ml of normal saline solution.
5
11 - Manual ZSI 375
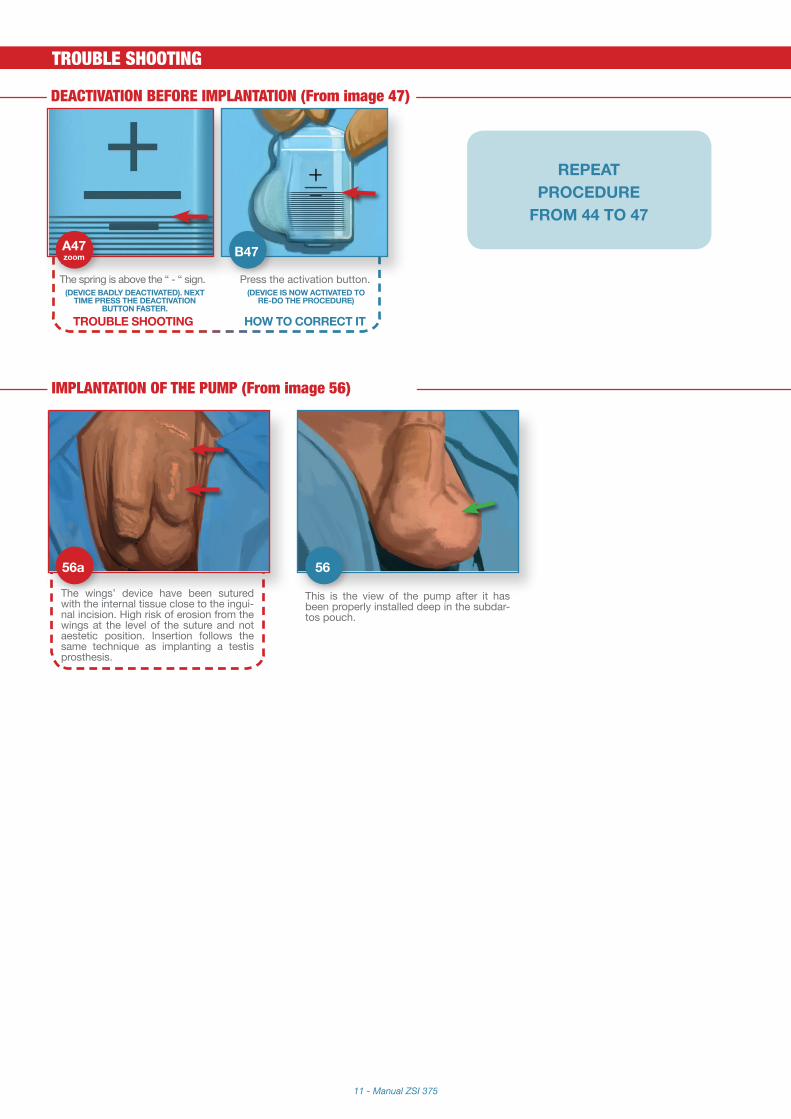
TROUBLE SHOOTING
The spring is above the “ - “ sign.
A47zoom B47
HOW TO CORRECT ITTROUBLE SHOOTING
DEACTIVATION BEFORE IMPLANTATION (From image 47)
Press the activation button.
REPEAT PROCEDURE
FROM 44 TO 47
(DEVICE IS NOW ACTIVATED TO RE-DO THE PROCEDURE)
(DEVICE BADLY DEACTIVATED). NEXT TIME PRESS THE DEACTIVATION
BUTTON FASTER.
IMPLANTATION OF THE PUMP (From image 56)
The wings’ device have been sutured with the internal tissue close to the ingui-nal incision. High risk of erosion from the wings at the level of the suture and not aestetic position. Insertion follows the same technique as implanting a testis prosthesis.
56a
This is the view of the pump after it has been properly installed deep in the subdar-tos pouch.
56

12 - Manual ZSI 375
Properly complete the patient information form and send it back to ZEPHYR in order to activate the guarantee for mecha-nical failure. Do not forget to stick the traceability label of the ZSI 375 you have implanted.
Fax us or email us the document at: [email protected].
In case of emergency, phone : ..............................................................
Hospital ....................................................................................................
Dr .............................................. Phone: ..................................................
Forename ...................................................................
Last name ..................................................................
Address .......................................................................
State ............................................................................
Country ........................................................................
The bearer of this card has an implanted medical device
ZEPHYR Surgical Implants SÀRL
Give the patient his implantation card.
ACTIVATION AND GUARANTEE:
Date of implantation ............................. / ...................... / ....................(m/d/y)
Type of implanted medical device
ARTIFICIAL URINARY SPHINCTER ZSI 375
ZF 63V1
ZEPHYR Surgical Implants SÀRL, Route des Jeunes 4, 1227 Acacias Geneva SWITZERLAND
Place the traceability label
sticker here
59
8 WEEKS AFTER
IMPLANTATIONXRAY
The ZSI 375 is DEACTIVATED for 8 weeks after implantation: the tank is full and the spring is fully stressed, the cuff is deflated, the urethra is open: the patient will be incontinent. You can control that the ZSI 375 is deactivated with a scrotal radiography: the spring is fully stressed; it is below the top of the cylinder.
60 61 62 63
To ACTIVATE the ZSI 375 after 2 months of healing, press the ACTIVATION BUTTON. The spring is released and pushes the normal saline solution from the tank to the cuff, drop by drop. Wait 120 seconds for the cuff to squeeze the urethra: the patient will be continent.
64
XRAYThe ZSI 375 is ACTIVATED: the spring is released and at the midline. The cuff is squeezing the urethra: the patient is continent. You can control that the ZSI 375 is activated with a scrotal radiography: the spring is released; it is at the top of the cylinder.
Place the traceability label sticker here


![...(EPUU) 21 I English IA] r Integrated English rintegrated English 101), rintegrated English 11 I I Is English IJ e. UT, rAdvanced English 11], English 111] r Integrated English Study](https://static.fdocuments.net/doc/165x107/5f9c0b33f8367823672ad80f/-epuu-21-i-english-ia-r-integrated-english-rintegrated-english-101-rintegrated.jpg)