XX – 500 DISH WASHERS (500X500 BASKET)
12
3$66 7+528*+ +22' ',6+:$6+(5 '0+'0+ [ 00 %$6.(7 7KLV RYHQ ZDV SURGXFHG DW HQYLURQPHQWDOO\ IULHQGO\ IDFLOLWHV ZLWKRXW FDXVLQJ DQ\ KDUP WR WKH QDWXUH
Transcript of XX – 500 DISH WASHERS (500X500 BASKET)

������
������������
� ��������������� ����

1
Dear User, Thank you for choosing Italinox glasswashers-dishwashers. This pass through hood glasswasher-dishwasher that you have selected has been designed to work for many years even at the busiest times of your business. Please read this manual for getting the maximum efficiency from your machine and also to use it easier. This manual should be kept in a safe place for the new users in your commercial kitchen or possible future owners. You can contact your technical service, your dealer or us for any questions.

2
ITALINOX PASS THROUGH HOOD DISHWASHER INSTRUCTIONS FOR INSTALLATION AND USE
CONTENTS Page
- Appliance identification 4 I. MAIN CHARACTERISTICS 5 1. Description of appliance 5 2. Main components (exploded diagrams) 5 - Table 1: Technical data 6 3. Precautions 7 4. Safeguarding the environment 8 II. INSTALLATION INSTRUCTIONS 9 1. Installation place 9 2. Positioning 9 3. Electrical conection 9 4. Water main connections 9 5. Safety devices 10 6. Operation test 10 7. Servicing 10 8. Troubleshooting 10 9. Layout of main components 10 III. INSTRUCTIONS FOR USE 11 1. Description of panel 11 - Using the appliance 11 2. Commissioning 11 3. Working cycles 11 4. Turning off the appliance in the event of faults 12 5. Care and maintenance 12 IV. CONTROL PANEL FIGURE 13 Appliance identification

3
I.MAIN CHARACTERISTICS 1.DESCRIPTION OF APPLIANCE This handbook describes a number of appliance models. For more detailed information about the model in your possession, refer to “ Technical Data” table 1. The appliance has the following features:
Automatic cleaning system running on the door is closed Two-way active in the cabin top and bottom of to the
arm system is available. Automatic rinse aid and detergent dosing pump
(optional) Consumer-friendly energy consumption values even
with intensive use.
2. MAIN COMPONENTS The components marked by a hatched line are defined for following models:
“DMH005/DMH006” IDENTIFICATIONS 1) Washing Motor 2) Control Panel 3) Hood 4) Heating Elements 5) Washing Arms
2
5
3
1
4

4
TABLE 1: TECHNICAL DATA
TITLES TYPE PROPERTIES
BASKET SIZE (MM) 500 x 500 x 100
MODEL DMH005/DMH006
INPUT VOLTAGE (VOLT)
220 V OR 380 V (SEE TECHNICAL DATA PLATE OF YOUR DISHWASHER)
FREQUENCY (HZ) 50
ELECTRICITY CONSUMPTION (KW) 9,75
POWER SUPPLY CABLE SECTION (MM) 5 x 2,5
WASHING MOTOR POWER (KW) 0,60
TOTAL HEATING POWER (KW) 9
NET WEIGHT (KG) 95

5
3. PRECAUTIONS The following symbols are used in the manual to mark and identify the various types of hazards:
ATTENTION! HEALTH AND SAFETY HAZARD TO THE OPERATOR
ATTENTION! ELECTRICAL HAZARD CONTAINS DANGEROUS VOLTAGE
ATTENTION! ELEMENT OF THE MACHINEIS AVAILABLE DAMAGING
● Before installing and commissioning the appliance, carefully read this instructions handbook which cantains important information about the safety, operation and maintenance of the appliance. ● Keep this instructions handbook in a safe place for consultation by users or future owners if the appliance is resold.
Important: The installation and maintenance of displacement of the device if necessary, at the same time, the process should be done only by personnel authorized by the manufacturer
● This device is designed for definitely washing dishes (plates, forks, spoons). Wash is not suitable for other types of material or object.
The appliance must only be used by trained staff. ● This appliance is not intended for use by people (including children) with limited physical, sensory or mental abilities or without experience and knowledge of it, unless they are supervised or instructed in its use by a person responsible for their safety. ● Switch off the appliance if it breaks down or malfunctions.
● Repairs must only be carried out by authorised service centres using original spare parts. Failure to comply with this obligation may jeopardise the safety of the appliance and invalidate the guarantee.
● Do not wash the appliance with jets of water.
● Do not use products containing chlorine (bleach,
hydrochloric acid etc.) even diluted, to clean the steel surfaces.
● Do not use corrosive substances (i.e. muriatic acid) to clean the floor underneath the appliance. ● For further information, refer to the chapter on “Care and maintenence”.
3.1 PERSONAL PROTECTION EQUIPMENTS Give below is a summary table of the Personal Protection
Equipment (PPE) to be used during the various stages of the machine’s service life.
(*) During Normal use, gloves must be heat proof to protect hands when removing the hot pan from the appliance. Failure to use the personal protection equipment by operators, specialised technicians or users can involve exposure to chemical risk and possible damage to health.
Stage
Safety
Clothing
Shoe
Glove
Glasses
Earmuff
Mask
Safety Helmet
Transport X
Carrying X
Unpacking X
Assembly X
Daily Use X X X(*)
Placement X
Routine Cleaning
X X
Special Cleaning
X X
Maintenance X
Disassembly X
SYMBOL NECESSARY NECESSARY IN CASE OF NEED UNNECCESSARY
X

6
3.2 RESIDUAL RISKS The machine has several risks that were not completely eliminated from a design stand point or with the installation of adequate protection devices. For the Customer’s complete information, the residual risks remaining on the machine are indicated below: such actions are to be considered incorrect and therefore strictly forbidden.
RESIDUAL RISK DESCRIPTION OF HAZARDOUS SITUATION
Slipping or falling The operator can slip due to
water or dirt on the floor
Burns
The operator deliberately or unintentionally touches some components inside the machine or dishes at the outfeed without using gloves or witout allowing them to cool.
Danger of electric discharge (Electrocution)
Contact with live parts during maintenance operations carried out with the electrical panel powered. The operator intervenes (wwith a power tool or without disconnecting the power to the machine) lying down on the floor.
Hear unusual noises from the machine
During the washing machine during maintenance or damage as a result of improper use of accessory
Chemical hazard Contact with chemical substances (e.g. Detergent, rinse aid, scale remover, etc.) without taking adequate safety precautions. Therefore always refer to the safety cards and labels on the products used.
3.3 TECHNICAL DATA PLATE
Meaning of fields given on the plate M.Mod: Product modelSer. No: Serial number MKS: Manufacturer Made in Turkey: Place of manufacture EL: power supply, voltage, phase type Hz: power supply frequency kW: max. power input EL: electrical CE: CE marking IP: degree of protection When you request information on the device serial plate informations are priority values to be your assistant.
4. SAFEGUARDING THE ENVIRONMENT 4.1 PACKAGING ● All the packaging materials used are environmentally friendly. They may be stored at no risk or burnt at an authorised incineration plant. Plastic materials suitable for recycling are marked with the following symbols:
Polyethtlene: external wrapping film, instructions booklet bag and gas injectors bag. Polypropylene: top packaging panels and straps Expanded polystyrene: protective surround elements
4.2. USE ● Our appliances have been designed and prefected by means of laboratory tests to guarantee high levels of performance and efficiency. However, to minimise energy consumption (electricity, gas and water), avoid using the appliance under no-load conditions or conditions that impair optimal performance, i.e., with the door open. 4.3 CLEANING To minimise the emission of harmful substances into the atmosphere, clean the appliance (externally and, where necessary, internally) with products which are at least 90% biodegradable. 4.4 DISPOSAL ● The appliances must be disposed of properly at the end of its service life. ● Our appliances are made from %90 recyclable materials (stainless steel, iron, aluminium, galvanised steel, etc.). These materials may therefore be recycled in accordance with local waste disposal regulations at a conventional recycling plant. ● Make the appliance unusable by cutting off the power cable Also remove any closure device fitted on the appliance to prevent children from becoming trapped inside
7
The symbol on the product indicates that this product should not be treated as domestic waste, but must be correctly disposed of in order to prevent possible negative consequences for the environmet and the human health. Regarding the recycling of this product, please contact the sales agent or the dealer of your product, your after-sales services or the appropriate waste disposal service.
II. INSTALLATION INSTRUCTION
1. INSTALLATION PLACE ● The appliance must only be installed in adequately ventilated premises. Device is locatedon the ground if necessary, must have a hood and exhaust fans.
2. POSITIONING ● Unpack the appliance and carefully remove the protective film from the external panels. Use a suitable solvent to remove any glue residue left on the panels. ● Remove the protective film and make sure the packing material is not dispersed in the environment but disposed of according to the current regulations in the country where the product is used. ●Left and right side of the machine during installation so that the space should be given to the nearest 10cm (if any bench is not used). ●Position the device on a flat surface and if necessary, adjust the height according to the characteristics of the environment by means of the feet is required. ●Dispose of the packaging as instructed in the chapter on “Safeguarding the environment”. ●At the beginning of this manual for the device in general dimensions and connections, see installation diagrams.
3. ELECTRICAL CONNECTION ●The device must be connected to the power supply in accordance with necessary regulations. ●Before connecting the appliance to the mains power supply, make sure the voltage and frequency shown on the appliance rating plate correspond with that of the power supply. ● The appliance must be permanently connected to the mains power supply using an H05 RN-F type cable. ●Care must be installed in front of the device during the device can be locked in open position (lockplug, key lock, or similar instruments). ● The appliance must be suitably earthed. Otherwise, the Authorized Service will not be by the mounting of the product. ●In addition, the device must be connected to a system of copotentiality. ●The outlet is connected to the line only for the load of the device must have a fuse of 32 A ( if the dishwasher is threephase), 50 A (if the dishwasher is monophase).
3.1 INSTALLING THE POWER SUPPLY CABLE To connect the power supply cable, proceed as follows: ●The power cordis in the back right of the device output. ●The leakage current of 30 Ma (if the dishwasher is threephase), 63 Ma (if the dishwasher is monophase) is connected to the relay, even with the mainboard should have an fuse system. The manufacturer declines any responsibility for failure to
comply with existing accident prevention standards.
4. WATER MAINS CONNECTIONS (Refer to the installation diagrams at the beginning of this handbook). Fit a mechanical fitler and shut-off cock between water inlet pipe and the mains water supply. Before connecting the fitler, run off a certain amount of water to remove any ferrous particles from the piping. ● The water inlet must be connected to a drinking water supply with pressure of 4 bar. 4.2 WATER DRAINAGE SYSTEM Earn drain plug located on the left goes to the machine with the help of water in waste water flows through the line. This is the place where the line goes to work correctly, the machine must be above the level. Folding and pinching all along the line of drain hose and the metal brackets on the check and drain pipe line system to prevent the accumulation of water at least 5 ° Make sure the slope.
Important: Ventilation at the bottom of the device status is appropriate, and please make sure that waste water evacuation system is working actively.

8
5. SAFETY DEVICESThe appliance is fitted with the following safety devices: Resistance temperature safety thermostat(manual reset type) is mounted under the frame. Safety thermostat heater power of the machine is set to cut if necessary. Safety thermostat can be reset only by QUALIFIED TECHNICIANS. Washing motor thermal protection thermal fuse in case of over heating, causing shut off the device (check the wiring diagram). The device is intended top revent big damage that may occur. Over heating engines to disable entering a thermal origin. Commissioning and causes of the problem only can be provided by authorized service technician will be determined by the authorized person. (Optional)
6. OPERATION TEST - Follow the directions for use on the appliance. - The information contained in this User's guide contains information about the routine operation and cleaning, and allows for the desired manner.
Important: -Never open the hood while the machine is performing a washing, wait for the process to end. -Do not cover the top of the appliance during use.
7. SERVICING Components that require routine maintenance access can be achieved by opening the front of the lowertrunk lid and the top cover. This process is carried out only by qualified service personnel.
8. TROUBLE SHOOTING Certain faults may occur during normal use of the appliance: The machine has less heated or not heated washing water. Reason: ● Failure of resistance. ● Resistance contactor failure. ● Thermostat failure. ● Failure of switch.
Shuts down the machine Reason: ● Over heating of engine breakdowns ● The main control circuit board to take insurance
The machine receives continuous water Reason:
●Pressure switch metering may be an issue. Boiler water to pour into the machine again, this work should be done. ●Pressure switch failure. Coming off the dirty dishes Reason: ● The network pressure may be low (2 bar below). ● Rinse arms obstruction. Disassembled and cleaned parts of the arms. If there is scale problem of should be taken measure absolutely. ● Appropriate of the chemical product not used. ● Low temperature of water. If the machine is doing foam Reason: ● The boiler water temperature reaches the desired level has begun the process of washing (See. 2.1 Instruction). ● Put into the machine as a result of the wrong type of detergent
9. MAIN COMPONENTS LAY OUT (All work inside the appliance must only be carried out by a trained installer authorised by the manufacturer.) Get behind the bottom of the device or open the door to reach the following components. (Figure A) ● Water solenoid valve. Note: All electrical components of the device, including all of the power source terminal and protective fuses can be accessed by opening the front bottom cover. ● Opening the bottom cover by removing the front lower pannel, engine thermostats and heating elements can be accessed.
(Figure A)
9
II. INSTRUCTIONS FOR USE
Before switching on the appliance, carefully read this instructions manual which contains important information about correct and optimum use of the appliance. For further information about the performance characteristics and washing machine consult your local dealer. ● Every six months the performance of a wash and rinse the other parts of the line product is going to be mounted by a qualified technician will ensure that there is no decrease in performance. ● Periodically (at least once a year) should be general control of device. For this purpose, we recommend a service agreement with the competent service. ● The maximum water hardness 12°F and 1000mS /cm (25 °C) conductivity value. Fail to comply with these values on a product may occur breakdowns when using tap water. These kind of breakdowns are not covered by the guarantee. Consult your authorised water supplier to check your water hardness. Use water softener system in case of need. ● The machine will be placed into the plates using a basket placed at intervals allowed by the appropriate area. ●Do not place dishes into the machine excessing interior cabin height of maximum 185 mm.
1.DESCRIPTION OF THE CONTROL PANEL 1.1. INTRODUCTION To facilitate familiarisation with the dishwashers functions, refer to the fold-out page at the end of this booklet, illustrating the control panel. The different functions available on the various models are described below. Some functions are common to all models while others are only available on certain models. 1.2. CONTROL PANEL (refer to figure at the end of booklet) A - On-Off And Program Switch B - Power Lamp C - Heat Lamp D - Washing Lamp E - Rinsing Lamp F - Drain Button
USING THE APPLIANCE 2.COMMISSIONING (Please refer to the shape of the control panel at the end of the booklet)
Information
Before opening the device, make sure the device is connected to the ground line and power source. Water on / off, turn the valve must open. 2.1 TURNING ON THE APPLIANCE ● Turn right "A" On-Off switch. “B” power light will illuminate. Make sure the machine's hood is closed. The machine will begin the process of obtaining water. At the end of the water obtain process automatically, the water heating process will start. After heating process is completed "C" the heat lamp will be on. This is the time when the dishwasher is ready for loading. In this case, place the basket into the machine with soiled dishes to be washed. After placing the baskets, close the hood of dishwasher. To begin the process of washing turn right the switch “A” to 1st, 2nd, 3rd or 4th programs (1, 2, 3 or 4 minutes washing) according to your desired washing time. The machine will begin the process of washing. During this process, "D" indicator light will illuminate to indicate washing continues. When the light turns off, washing is finished. But after waiting for 5 seconds, the dishwasher will start the rinsing process which will take between 15-20 seconds. During this process “E” lamp will illuminate to indicate rinsing continues. After this process, the light E will be off and all washing cycle will be completed. Open the machine’s hood and remove the basket with clean dishes. ● Try to put the dishes into the machine free of rough waste. This will significantly affect washing performance. ● At the very first washing cycle, using the machine while water temperature is not heated enough will create a negative situation. Cleaning chemicals will action with unheated water in the machine which will create a foamy water. Therefore, make sure that the heating indicator lamp lit before starting the washing process. ● The built-in automatic rinse aid dosing pump (optional) and the built-in automatic detergent dosing pump (optional) takes place through the process itself. Make sure that the button on the pumps are switched on. Plunge the mouths of the pumps hoses directly into the detergent and rinse aid liquid boxes. Always use high quality detergent and rinse aid liquids to reach perfect washing results. You can get more information on this significant subject from the authorized dealer or technical service.
10
2.1 TURN OFF THE APPLIANCE
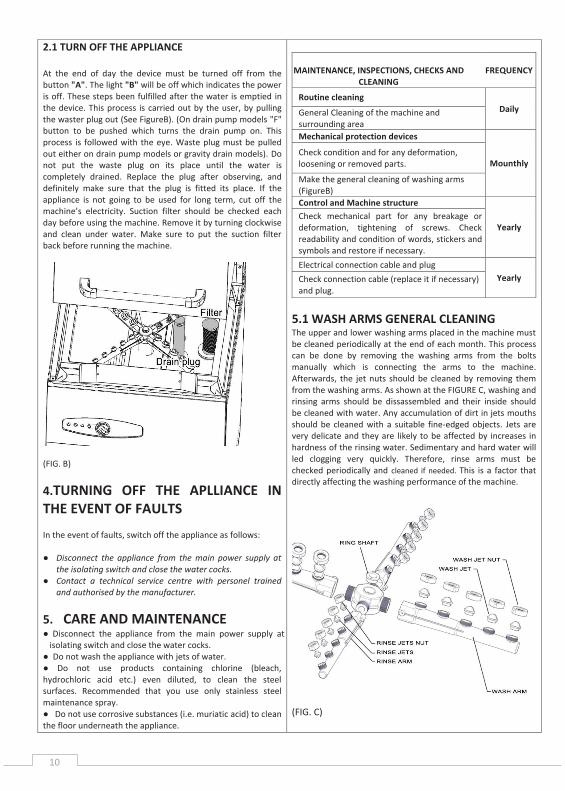
At the end of day the device must be turned off from the button "A". The light "B" will be off which indicates the power is off. These steps been fulfilled after the water is emptied in the device. This process is carried out by the user, by pulling the waster plug out (See FigureB). (On drain pump models "F" button to be pushed which turns the drain pump on. This process is followed with the eye. Waste plug must be pulled out either on drain pump models or gravity drain models). Do not put the waste plug on its place until the water is completely drained. Replace the plug after observing, and definitely make sure that the plug is fitted its place. If the appliance is not going to be used for long term, cut off the machine’s electricity. Suction filter should be checked each day before using the machine. Remove it by turning clockwise and clean under water. Make sure to put the suction filter back before running the machine.
(FIG. B)
4.TURNING OFF THE APLLIANCE IN THE EVENT OF FAULTS
In the event of faults, switch off the appliance as follows: ● Disconnect the appliance from the main power supply at
the isolating switch and close the water cocks. ● Contact a technical service centre with personel trained
and authorised by the manufacturer.
5. CARE AND MAINTENANCE ● Disconnect the appliance from the main power supply at
isolating switch and close the water cocks. ● Do not wash the appliance with jets of water. ● Do not use products containing chlorine (bleach, hydrochloric acid etc.) even diluted, to clean the steel surfaces. Recommended that you use only stainless steel maintenance spray. ● Do not use corrosive substances (i.e. muriatic acid) to clean the floor underneath the appliance.
MAINTENANCE, INSPECTIONS, CHECKS AND
CLEANING FREQUENCY
Routine cleaning Daily General Cleaning of the machine and
surrounding area Mechanical protection devices
Mounthly Check condition and for any deformation, loosening or removed parts.
Make the general cleaning of washing arms (FigureB) Control and Machine structure
Yearly Check mechanical part for any breakage or deformation, tightening of screws. Check readability and condition of words, stickers and symbols and restore if necessary. Electrical connection cable and plug
Yearly Check connection cable (replace it if necessary) and plug.
5.1 WASH ARMS GENERAL CLEANING The upper and lower washing arms placed in the machine must be cleaned periodically at the end of each month. This process can be done by removing the washing arms from the bolts manually which is connecting the arms to the machine. Afterwards, the jet nuts should be cleaned by removing them from the washing arms. As shown at the FIGURE C, washing and rinsing arms should be dissassembled and their inside should be cleaned with water. Any accumulation of dirt in jets mouths should be cleaned with a suitable fine-edged objects. Jets are very delicate and they are likely to be affected by increases in hardness of the rinsing water. Sedimentary and hard water will led clogging very quickly. Therefore, rinse arms must be checked periodically and cleaned if needed. This is a factor that directly affecting the washing performance of the machine.
(FIG. C)

11
Important: The step by step instructions describing how to operate your dishwasher is located at page 11, under II. INSTRUCTIONS FOR USE part. Make sure that you read the instructions before operating your dishwasher.
CONTROL PANEL
A
B E C D
A - On-Off And Program Switch
B - Power Lamp
C - Heat Lamp
D - Washing Lamp
E - Rinsing Lamp
F - Drain Button
F