
Wood Spiral Installation - Salter Stairs 1. Getting Started 1. Organize the treads, balusters,...
12
Salter Industries Wood Spiral Stair Installation Thank you for choosing Salter Industries as your spiral stair supplier. After reading the instructions, if you have any questions please call us at 1-800-368-8280. WARNING - Oak Handling and Finishing When you receive the stair, it is very important to store the components in a dry and stable environment. Do not locate the stair in an area where a gas or propane heater will create excessive heat or an extremely dry environment. Salters cannot guarantee against checking in these conditions. Unfinished treads and handrails on the job site for more than one week absorb moisture from the air. They must be sealed. Plastering, tile work, cement or brickwork introduce enough water into the air for the wood to react unfavorably. A. Sand all wood surfaces before applying any stain or polyurethane. Nearly 100% of tread and handrail finishing problems occur because little or no final sanding is done at the job site prior to application of stain or polyurethane. Treads rub together or against surfaces during handling and transportation. This creates shiny spots, which will not absorb finishing material evenly. Wood can absorb moisture, raising the grain and ruining any finish applied without being sanded. B. Sand all wood surfaces with 100 to 220 grit. C. Apply a stain if you want the color of the wood other than a natural finish. D. Three coats of sealer must be applied to all surfaces of the wood. Inadequate finishing of all six sides of a tread including the bottom will permit the absorption of moisture. IMPORTANT NOTE: Check with your paint specialty dealer for complete finishing instructions. Things to know before you start A. Spiral stairs are assembled from the top down. B. All the treads are the same. C. Do not walk on the stair until all the treads and balusters are installed. D. The stair was built to be installed the way it was ordered. Before you start, review and understand the original layout. The stair is not reversible.
Transcript of Wood Spiral Installation - Salter Stairs 1. Getting Started 1. Organize the treads, balusters,...

Salter Industries
Wood Spiral Stair InstallationThank you for choosing Salter Industries as your spiral stair supplier.
After reading the instructions, if you have any questions please call us at 1-800-368-8280.
WARNING - Oak Handling and Finishing
When you receive the stair, it is very important to store the components in a dry and stable environment. Donot locate the stair in an area where a gas or propane heater will create excessive heat or an extremely dryenvironment. Salters cannot guarantee against checking in these conditions.
Unfinished treads and handrails on the job site for more than one week absorb moisture from the air. Theymust be sealed. Plastering, tile work, cement or brickwork introduce enough water into the air for the wood toreact unfavorably.
A. Sand all wood surfaces before applying any stain or polyurethane. Nearly 100% of tread and handrailfinishing problems occur because little or no final sanding is done at the job site prior to application ofstain or polyurethane. Treads rub together or against surfaces during handling and transportation. Thiscreates shiny spots, which will not absorb finishing material evenly. Wood can absorb moisture, raisingthe grain and ruining any finish applied without being sanded.
B. Sand all wood surfaces with 100 to 220 grit.
C. Apply a stain if you want the color of the wood other than a natural finish.
D. Three coats of sealer must be applied to all surfaces of the wood. Inadequate finishing of all six sidesof a tread including the bottom will permit the absorption of moisture.
IMPORTANT NOTE: Check with your paint specialty dealer for complete finishing instructions.
Things to know before you startA. Spiral stairs are assembled from the top down.B. All the treads are the same.C. Do not walk on the stair until all the treads and balusters are installed.D. The stair was built to be installed the way it was ordered. Before you start, review and understand the
original layout. The stair is not reversible.

Tips: For the top tread assemblyA. Keep the bolt centered to the hole in the column.B. Inspect the seam between the tread and the column.C. Measure the riser height between the platform and the tread top. Do this at both ends of the tread; they
should be the same.D. Once again it is extremely important to be certain that the top baluster is plumb prior to making your
final connection to the platform.E. All balusters are connected to the tread with three 3” wood screws. A pilot hole will need to be made for
each wood screw installed.
Group 1A. Baluster spacing tool.B. Drilling template.C. Steel baluster tips. ( jig )
Group 2A. Primary Baluster.B. Center Baluster.C. Well Enclosure or Platform Baluster.D. Newel Post that extends the center column above the platform.
Group 3A. ˚” Combination bolt
to connect the platform to the center column.B. ˚” x 5” bolt
to connect the tread to the center column.C. 3/8” x 5” lag screw
to connect the platform to your top framing.D. 3/8” x 2” lag screw
to connect the steel base plate to the floor.E. # 12 wood screw
to connect the steel base plate to the bottom of the column.F. ˘” Combination screw to connect the center balusters to the tread.G. 3” wood screw to connect the baluster to a tread.H. Square drive bit to install 3” wood screws.I. Counter sink & drill bit to make the proper pilot & counter sink for the 3” screws.J. ∫” drill bit to drill the holes to install the handrail to the balusters.
A
BC
A B C D
A B C D E F G HI J

STEP 1. Getting Started
1. Organize the treads, balusters, hardware and other components into matching piles.
2. The primary baluster has a machine screw, which has been factory installed in the bottom of the baluster.
(A)
3. Screw the primary balusters into the corner of each tread. This connection should be hand tight as
possible. The baluster should be square to the front and side of the tread. (B)
4. Repeat this to all the treads.
5. Slide the large hole of the baluster spacing tool over the baluster. (C)
6. Repeat this to all the treads. (D)
Note: The baluster spacing tool will need to curve the same direction as the stair.
A
DCA
B

STEP 2. Prepare the center column and platform
1. Screw the steel base plate to the center column with the two #12 wood screws supplied. (A)2. Slide the wood base plate cover over the center column. (B)3. Working on the floor, attach the center column to the platform with the ˚” combination screw. (C & D)
Note: The screw should be left loose enough so that the column can still rotate.4. Stand the center column and platform up into the desired location and attach the platform with the 3/8” x
5” lag screws. (E)Note: The platform must be level and flush with your finished floor. If the platform is not level in both directions it will affectthe plumb of your first baluster.
A
B
C
D
E
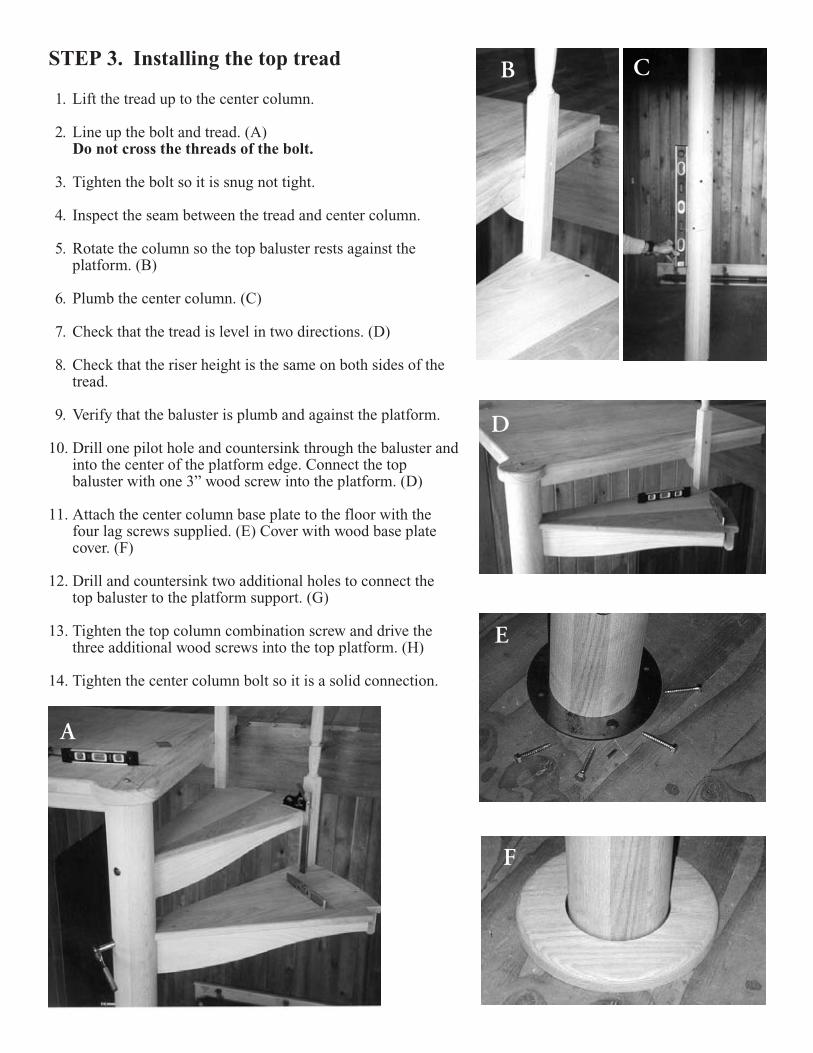
STEP 3. Installing the top tread
1. Lift the tread up to the center column.
2. Line up the bolt and tread. (A)Do not cross the threads of the bolt.
3. Tighten the bolt so it is snug not tight.
4. Inspect the seam between the tread and center column.
5. Rotate the column so the top baluster rests against theplatform. (B)
6. Plumb the center column. (C)
7. Check that the tread is level in two directions. (D)
8. Check that the riser height is the same on both sides of thetread.
9. Verify that the baluster is plumb and against the platform.
10. Drill one pilot hole and countersink through the baluster andinto the center of the platform edge. Connect the topbaluster with one 3” wood screw into the platform. (D)
11. Attach the center column base plate to the floor with thefour lag screws supplied. (E) Cover with wood base platecover. (F)
12. Drill and countersink two additional holes to connect thetop baluster to the platform support. (G)
13. Tighten the top column combination screw and drive thethree additional wood screws into the top platform. (H)
14. Tighten the center column bolt so it is a solid connection.
A
CB
D
E
F

STEP 4. Installing the treads
1. Lift the tread up to the center column. 2. Slide the baluster through the spacing tool of the upper tread. (B) 3. Line up the bolt and tread. Do not cross the threads of the bolt. 4. Tighten the bolt so it is snug not tight. 5. Inspect the seam between the tread and center column. 6. Inspect the baluster to see if it is square to the tread above.
You may need to rotate the baluster so it will be a tight seam. 7. Check that the tread is level in two directions. (A) 8. Check that the riser height is the same on both sides of the tread. (A) 9. Mark your holes, drill and countersink the top hole and drive your first screw. (C & D)10. Once again check the tread for level. Drill and countersink for the remaining two screws. (E)11. Tighten the column bolt so it is a solid connection.12. Continue this procedure for all the treads. (F & G)
Note: Always loosely tighten the treadbolt, then connect the baluster to thetread and go back and tighten the centercolumn bolt last.
Note: It is extremely important not tocross the threads when you startbolting the tread to the column.
B
D
E
G HNote: Always looselytighten the tread bolt,then connect the balusterto the tread and goback and tighten thecenter column bolt last.
Note: It is extremelyimportant not to crossthe threads when you startbolting the tread to thecolumn.
A B C

E
G
STEP 4. Installing the tread (continued from previous page)
D
F

STEP 5. Installing the bottom baluster
1. Measure from the top of a primary baluster down to the top of the tread. (A)
This dimension will be about 34”.
2. Mark a baluster to that length. (B)
3. Measure from the top of the bottom tread to the top of the finished floor.
4. Subtract the thickness of the bottom baluster bracket.
5. Cut the baluster to length.
6. Connect the bottom baluster bracket to the baluster. (C)
7. Connect the baluster to the tread with one screw. (D)
8. Plumb the baluster and connect the baluster to the floor with two wood screws. (D)
9. Install two more wood screws into the tread. (D)
B C
CC DA B

B
STEP 6. Installing center balusters
1. You may have 1, 2 or 3 center balusters and each one will be a different length.The balusters have been factory prepared to your specifications.
2. Screw the balusters into the treads hand tight.
3. Keep the baluster spacing tool in place. (B)
A

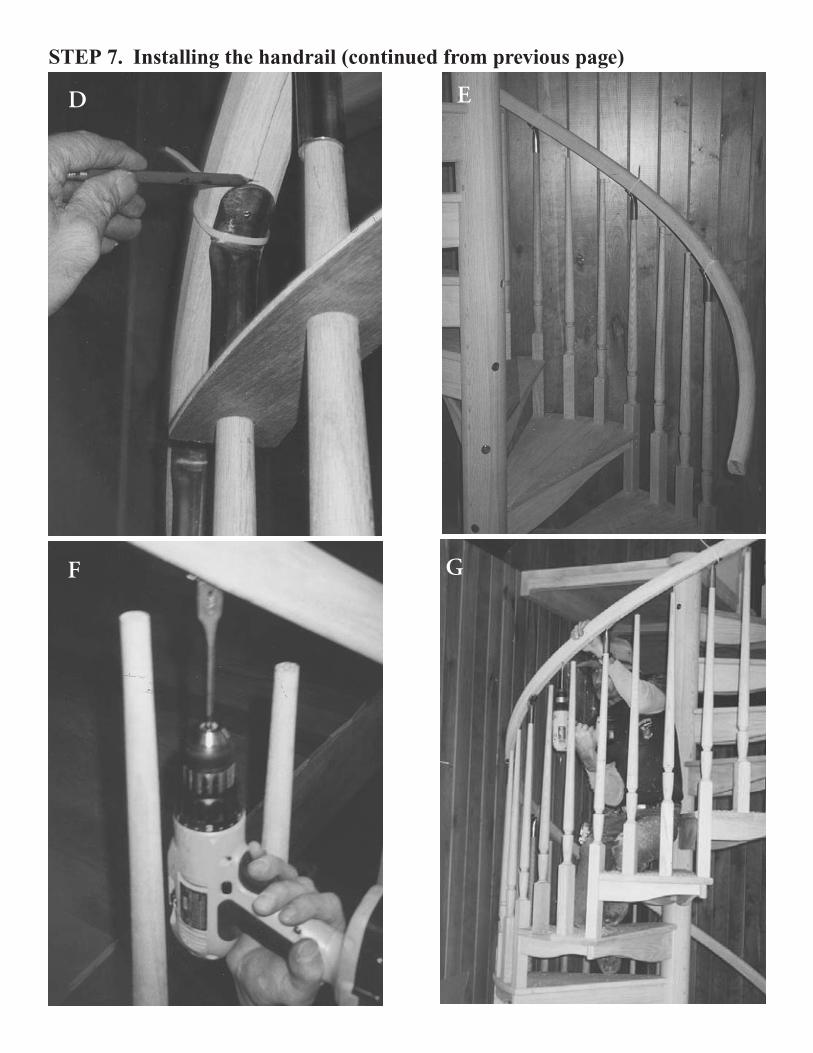
STEP 7. Installing the handrail
1. The wooden handrail has a rounded side and a flat side. Using a combination square, mark a centerlineon the flat side the entire length of the rail. (A)
2. Place all the steel baluster jigs over the balusters. (B) 3. Place the handrail on top of the steel tips and hold the rail in place with the plastic ties supplied. The
handrail is sent longer then needed, so keep an equal amount of handrail at the top and bottom. Use onetie on every other baluster to hold the rail in place. (C)
4. Mark the top of the steel baluster tip. Some baluster tips may need to be raised up to the handrail to getan accurate mark. Keep the tip plumb. (D)
5. Remove the handrail from the stair. 6. Remove all the steel baluster jigs. 7. Remove all the baluster spacing tools. 8. Place steel baluster tips on the primary balusters. (E) 9. Place the handrail back on to the stair with the plastic ties.10. Keep your marks between the balusters so you can drill the handrail between the balusters. (F & G)11. Drill all the holes about 1” deep. (H)12. Remove the handrail and jigs.13. Working from the top down, line up the holes to the balusters and work them into place. (I)14. With a piece of scrap wood and a hammer you will need to hammer the rail down onto the balusters.15. Using a brad nailer or trim screws attach the handrail to the baluster.16. Plumb cut and sand the handrail to its final length.
A B C
STEP 7. Installing the handrail (continued from previous page)
G
E
F
D

H I
J K
STEP 7. Installing the handrail (continued from previous page)