
Web+Center Version 9 - inet-sciences.com · Chapter 11 Customizing Web+Center Labels and...
30
1 Programmer’s Guide And Internationalization Options Web+Center Version 9.0 Version: January 4, 2017 © 1996-2017 Internet Software Sciences Table of Contents Chapter 1 Introduction ........................................................................................................ 3 Chapter 2 Database Tables, relationships and tools............................................................ 3 Chapter 3 Directories, files and files types ......................................................................... 6 Chapter 4 ASP Programming and customizations and Upgrades ....................................... 8 Chapter 5 ASP Page Security systems and monitoring options ....................................... 13 Chapter 6 Importing data into the Web+Center Database ................................................ 15 Chapter 7 Version Information and reporting Problems to ISS ........................................ 20 Chapter 8 Graphical and User Interface Changes ............................................................. 21 Chapter 9 Migrating from Access to SQL*Server (For 3.5, 4.0 Versions only) .............. 21 Chapter 10 Customer Authentication Login Methods ...................................................... 22 Chapter 11 Customizing Web+Center Labels and Internationalization Options ............. 23 Chapter 12 Integration of Customer Center with WordPress ........................................... 24 Chapter 13 Use of Stylesheets and CSS ........................................................................... 26 Chapter 14 Hosting Multiple Web+Center Systems on a single server ........................... 28 Appendix A - ASP Resources ........................................................................................... 29
Transcript of Web+Center Version 9 - inet-sciences.com · Chapter 11 Customizing Web+Center Labels and...

1
Programmer’s Guide
And
Internationalization Options
Web+Center
Version 9.0 Version: January 4, 2017
© 1996-2017 Internet Software Sciences
Table of Contents
Chapter 1 Introduction ........................................................................................................ 3 Chapter 2 Database Tables, relationships and tools ............................................................ 3
Chapter 3 Directories, files and files types ......................................................................... 6 Chapter 4 ASP Programming and customizations and Upgrades ....................................... 8 Chapter 5 ASP Page Security systems and monitoring options ....................................... 13 Chapter 6 Importing data into the Web+Center Database ................................................ 15 Chapter 7 Version Information and reporting Problems to ISS ........................................ 20
Chapter 8 Graphical and User Interface Changes ............................................................. 21
Chapter 9 Migrating from Access to SQL*Server (For 3.5, 4.0 Versions only) .............. 21
Chapter 10 Customer Authentication Login Methods ...................................................... 22 Chapter 11 Customizing Web+Center Labels and Internationalization Options ............. 23 Chapter 12 Integration of Customer Center with WordPress ........................................... 24 Chapter 13 Use of Stylesheets and CSS ........................................................................... 26 Chapter 14 Hosting Multiple Web+Center Systems on a single server ........................... 28 Appendix A - ASP Resources ........................................................................................... 29

2

3
Chapter 1 Introduction
Welcome to the Web+Center Programmers Guide. To help advanced Web+Center users
to expand, customize or integrate the Web+Center web-based support suite into their own
support and business processes, we determine that a Web+Center Programmers Guide
was necessary for advanced users who wished to exploit the customization features of the
product.
Web+Center does not have to be customized by programmers to be operational, and this
guide should only be referenced by very technically capable Web+Center administrators
and configurators who wish to expand the functionality of the product or perform some
customizations required for their support or business processes.
This guide is designed for Web+Center users who are capable of customizations to the
product using the ASP (Active Server Pages) programming language. User must also
have some knowledge of databases, tables, ASP programming and the SQL query
language.
Customizations, enhancements, and any changes made to the software will not be
supported by Internet Software Sciences for licensed or un-licensed customers. If
necessary, the ISS Consulting Group can provide fee based consulting services to help
develop and or debug your changes if necessary.
Any changes you make to the system must be integrated by you if new versions are
released. Included in this document are suggestions on how to minimize the changes that
would be required when integrating a new Web+Center version with your system if you
have made changes.
Included in the Appendix is a list of related on-line and book based programming guides
we recommend for learning the ASP programming language.
Chapter 2 Database Tables, relationships and tools
The Web+Center product is a web-enabled database application. Web based scripts
written in ASP (MS Active Server Pages) form the code base to the Web+Center
application. The application scripts performs database lookups, inserts, deletes and
updates against the database and then outputs the necessary HTML based pages back to
the individual users browser.
The database consists of tables which contain columns which hold the Web+Center data.
The database is the central repository for all of the web+center information and system
configurations. Changing any of the tables, columns or even the data itself may cause
database problems including referential integrity and user application errors.
4
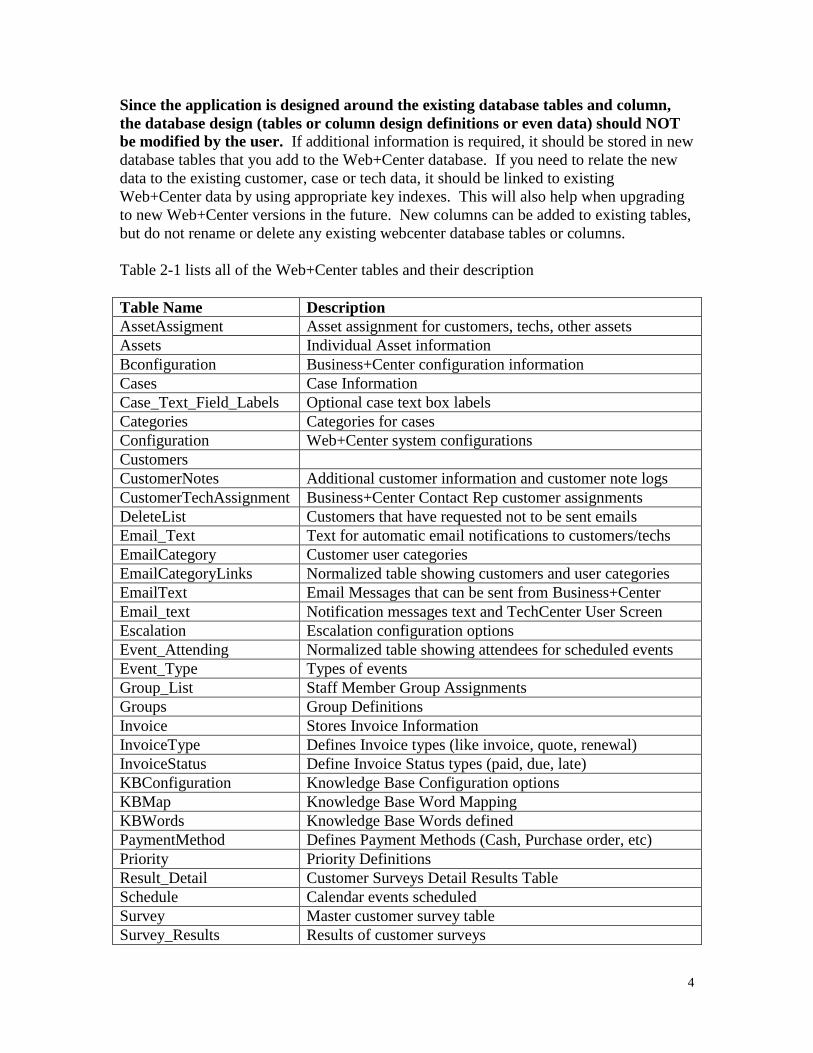
Since the application is designed around the existing database tables and column,
the database design (tables or column design definitions or even data) should NOT
be modified by the user. If additional information is required, it should be stored in new
database tables that you add to the Web+Center database. If you need to relate the new
data to the existing customer, case or tech data, it should be linked to existing
Web+Center data by using appropriate key indexes. This will also help when upgrading
to new Web+Center versions in the future. New columns can be added to existing tables,
but do not rename or delete any existing webcenter database tables or columns.
Table 2-1 lists all of the Web+Center tables and their description
Table Name Description
AssetAssigment Asset assignment for customers, techs, other assets
Assets Individual Asset information
Bconfiguration Business+Center configuration information
Cases Case Information
Case_Text_Field_Labels Optional case text box labels
Categories Categories for cases
Configuration Web+Center system configurations
Customers
CustomerNotes Additional customer information and customer note logs
CustomerTechAssignment Business+Center Contact Rep customer assignments
DeleteList Customers that have requested not to be sent emails
Email_Text Text for automatic email notifications to customers/techs
EmailCategory Customer user categories
EmailCategoryLinks Normalized table showing customers and user categories
EmailText Email Messages that can be sent from Business+Center
Email_text Notification messages text and TechCenter User Screen
Escalation Escalation configuration options
Event_Attending Normalized table showing attendees for scheduled events
Event_Type Types of events
Group_List Staff Member Group Assignments
Groups Group Definitions
Invoice Stores Invoice Information
InvoiceType Defines Invoice types (like invoice, quote, renewal)
InvoiceStatus Define Invoice Status types (paid, due, late)
KBConfiguration Knowledge Base Configuration options
KBMap Knowledge Base Word Mapping
KBWords Knowledge Base Words defined
PaymentMethod Defines Payment Methods (Cash, Purchase order, etc)
Priority Priority Definitions
Result_Detail Customer Surveys Detail Results Table
Schedule Calendar events scheduled
Survey Master customer survey table
Survey_Results Results of customer surveys

5
Tech_Staff Staff Member table
TimeSpent Stored Extended Time Spent entries for cases
Top_Cases Stores the Customer FAQ list of cases
UserCategory Stores User Categories
Version 6.0 tables
TextAgentAvailable Text Messaging table to record available techs for msging
TextChat Stores Txt chat Messages
Companies Separate companies table to sync company/customer info
Pnotes Private notes field (viewable by techs only)for support cases
Media_type Reservation+Center catalog types
Media_Schedule Reservation+Center scheduling of equipment
Media_Inventory Reservation+Center equipment inventory
Version 7.0 tables
AssetGroup Stores names of Asset Groups
AssetGroupValues Mapping table between Assets and Asset Groups
EmailToCaseConfig Stores configuration information for EmailToCase feature
Inspection Stores information about inspection of Assets
InspectionStatus Stores list of inspection statuses Table 2-1 Web+Center Table Definitions
The 49 Web+Center database tables are constructed within a Relational Database
Management System (RDMS) such as Access, or SQL*Server, that allows for
relationships and efficient querying access to the data. The database has been constructed
for 3rd normal form optimization for query efficiency and data storage optimization.
Database View, Design and Access Tools
The tables can directly be viewed and edited using tools provided with Access or
SQL*Server. We do not recommend you use these tool for editing any table information,
since there may be application specific filtering and database creation algorithms that are
done by the application that will not be done if you directly add, edit or delete data from
the database. The DESIGN of the tables and columns can also be viewed and modified
with tools provided by the Database vendor. We highly recommend you DO NOT
modify the design or structure of any of the database tables.
The Web+Center application also provides a low level, web-based, direct table view tool
in the Business+Center application under Business+Center Administration. This option,
called the Web+Center Table Builder, is only available for System Configurator level
users that have logged into the Business+Center.
To access the Web+Center table builder, log into the Business+Center with your System
Configurator account and press the Administration button. Then click on the
Web+Center Table Builder Menu option to view or edit the Web+Center tables.

6
This Web+Center Table Builder is only meant to display and perform table edits for
special situations. Editing, adding or deleting a table column without understanding all
of the implications can cause some database referential integrity and potential application
errors. Use this tool with extreme caution.
Another tool for viewing data exists under the Tech+Center administration called the
database snooper. This is a read only query tool that can be used to directly view the
contents of the database.
Chapter 3 Directories, files and files types
Directories:
The Web+Center application is installed into 9 directories consisting of:
TechCenter – The directory for all of the Tech+Center application code and graphics
TechMobile – The directory for all of the Tech+Mobile application code and graphics
CustomerCenter – The directory for all of the Customer+Center application code.
CustomerMobile – The directory for all of the Customer+mobile application code.
BusinessCenter – The directory for all of the Business+Center application code.
Database – Contains the Access seed database (webcenter90.mdb) and the SQL scripts
to create the SQL*Server seed database.
Language – The directory for all of the Web+Center labels and buttons graphics. All of
the definitions have been placed into this directory for easy language text substitutions
and internationalization of the Web+Center product for languages other than english.
Labels and graphics are all located in this directory so they can be easily shared between
all of the Web+Center applications.
ASP Mailer – Contains the Licensed ASP mailer DLLs from Email Architect. This
aosmtp.dll is installed and registered when the Web+Center application is installed. This
ASP mailer is not an SMTP program that will compete with exchange or any other SMTP
mail server on that machine. Sometimes this aosmtp.dll ASP mailer must be system
registered into the system by running the “regsvr32 aosmtp.dll” command inside of the
ASP mailer directory. It also contains the pop mail services API dll for processing
incoming mails This directory contains the 64 bit version of these DLL’s.
ASP Mailer32bits – Contains the Licensed ASP mailer DLLs from Email Architect. It
contains the 32 bit versions of these DLL’s.

7
Reservation –This directory contains the ASP code for the Reservation+Center. The
Reservation+Center is a sixth component in the Web+Center suite of web-based
applications. This component allows techs and customers to reserve equipment, media
devices and facilities from a catalog of resources in a true reservation system approach of
scheduling and reserving based on availability of that resource.
ProgramFolder –This directory contains the HTML files and images for the Program..
Applications start page for the Web+Center application. If you want to launch
Web+Center from the program application, the files for that method are defined in this
folder.
When the Web+Center is installed, it is installed by default into the Program Files folder
like:
C:\program files (x86)\Internet Software Sciences\web+center 9.0\
Wctempfiles – This folder is a special folder to hold temporary files that are created for
web+center calendar functions and file downloads for cases, asset attachments, etc.
Calendar files are placed into this directory and a link is created to retrieve that file out of
this directory. This allows the application to create the exact file type (such as vCalendar
file type) and lets the user click on that link and it will automatically be processed by the
browser based on the application file name extension and rules setup for handling
different types of files.
The Web+Center application directories (Techcenter, customercenter, techmobile,
customermobile, reservationcenter and businesscenter) contain a combination of the
following types of files:
*.asp Active Server Pages Scripts
*.gif GIF web graphics
*.inc Activer Server Pages INClude files included by ASP module
*.jpg JPEG web graphics
*.dll ISAPI (Compiled C++) DLL
*.htm HTML files
Each of the applications require a IIS webserver “APPLICATION” directory to be
established and will have a default “home page” with a file called default.asp which the
webserver configured as the default page for a particular application directory. Most of
the Web+Center applications default home page uses an default.asp page as the primary
page, but a backup default.htm page exists that does a quick redirect to default.asp if the
default.htm page is picked up first. The default.asp allows more programming options
for the first login page so with starting with version 6.0, the default pages have been
mapped to default.asp.

8
For example, the Tech+Center home page that is accessed when you enter the URL of
http://<hostname>/tech90/ will display the default.htm page in the techcenter
directory.
The database directory contains files:
*.mdb Web+Center Database in Access Format
*.sql SQLServer or mySQL scripts to create Web+Center Database
*.asp Some database upgrade scripts.
The language directory contains *.inc files and graphics that are referenced by all of the 3
Web+Center applications.
The Program Folder Directory
This folder is created to allow the users to run the program from the Program..
start menu.
Determining which script is called
To determine which ASP or DLL script is being called, review either the link in the
Browser URL window, or the URL link as you move over the link. For HTML form
based pages, one will have to perform a View Frame Source File option or a View Source
option on the preceding HTML page and search for the <form action=….> HTML tag.
This will tell you what page the form is calling.
The basic file naming convention is that first form page for a particular function like
registration is called “registration.asp”. The following HTML submit processing page for
that form is called “DoRegistration.asp”, where the word “Do” has been added in front of
the preceeding ASP file name. Many of the ASP File names can be found by “mousing
over” the button panel and viewing the URL listed at the bottom of the browser.
All of the ASP scripts (*.asp and *.inc) are ASCII based files that can be edited with a
plain ASCII editor such as NotePad or Textpad. Do not edit these ASP scripts with an
HTML editor such as DreamWeaver or a word processor like Microsoft Word. We
recommend the TextPad editor which can be downloaded from the web at their
website: http://www.textpad.com.
Chapter 4 ASP Programming and customizations and
Upgrades
One of the advantages of the Web+Center Customer Support/Help Desk Product over
other web-based support products is that it is customizable to a very large degree since
we provide you all of ASP scripting source code for the application and document the
complete database architecture and software designs.

9
The Web+Center application is written in ASP (Active Server Pages) (Visual Basic)
scripting language. The only part of the Web+Center application that is not written and
modifiable by the user is the Web+Center License key technology. This tiny piece is
written and compiled in C++ and can not be modified by the end user. This compiled
component is only accessed when adding technicians to your system or during periodic
checks on the techs and license keys for compliance.
Active Server Pages (ASP) scripting technology that comes installed with the MS
Internet Information Server (IIS) is almost equivalent to Visual Basic.
The ASP web scripting language is very easy to learn, easy to debug, and very fast for
development and deployment of customizations to the Web+Center product.
What makes this language easy for development is its error reporting and error parsing
that instantly tells what module is at fault, the line number where the run time or parsing
error occurred, and it will even point out where in the line the error is found.
To make changes to the code, simply edit the ASP file (registration.asp for example) with
your ASCII editor, edit and save the change. The next time that ASP script is referenced
by the web, the modified script will be called and executed. No compiler or compilations
are required.
ASP modules are combinations of HTML code and embedded script code. The script
and logic code is separated from the HTML code with the special code delimiters tags
like “<% and %> tags.
For example, a simple ASP file that writes 15 numbers to the page might be:
<html>
<head>
</head>
<body>
Here are 10 numbers created by an ASP script:
<% ‘ Here is the code
For I = 1 to 15
Response.write (I) & “,”
Next
%>
That’s it !
</body>
</html>
This would display an HTML page that looks like

10
Here are 15 numbers created by an ASP script: 1,2,3,4,5,6,7,8,9,10 That’s It!
The VB language is a fairly functionality complete programming language that is
sufficient to customize your Web+Center application for your particular business
requirements.
There are numerous resources on the ASP programming language available on-line or in
book format. Here is a very short list to get your started.
11
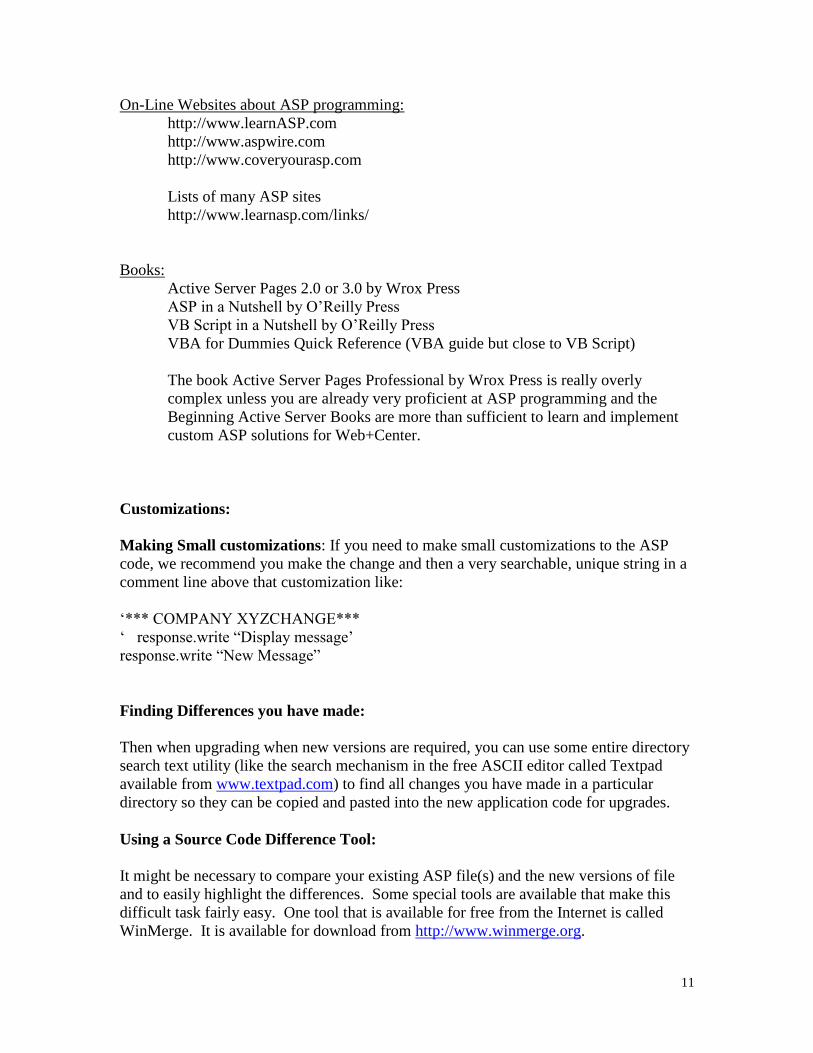
On-Line Websites about ASP programming:
http://www.learnASP.com
http://www.aspwire.com
http://www.coveryourasp.com
Lists of many ASP sites
http://www.learnasp.com/links/
Books:
Active Server Pages 2.0 or 3.0 by Wrox Press
ASP in a Nutshell by O’Reilly Press
VB Script in a Nutshell by O’Reilly Press
VBA for Dummies Quick Reference (VBA guide but close to VB Script)
The book Active Server Pages Professional by Wrox Press is really overly
complex unless you are already very proficient at ASP programming and the
Beginning Active Server Books are more than sufficient to learn and implement
custom ASP solutions for Web+Center.
Customizations:
Making Small customizations: If you need to make small customizations to the ASP
code, we recommend you make the change and then a very searchable, unique string in a
comment line above that customization like:
‘*** COMPANY XYZCHANGE***
‘ response.write “Display message’
response.write “New Message”
Finding Differences you have made:
Then when upgrading when new versions are required, you can use some entire directory
search text utility (like the search mechanism in the free ASCII editor called Textpad
available from www.textpad.com) to find all changes you have made in a particular
directory so they can be copied and pasted into the new application code for upgrades.
Using a Source Code Difference Tool:
It might be necessary to compare your existing ASP file(s) and the new versions of file
and to easily highlight the differences. Some special tools are available that make this
difficult task fairly easy. One tool that is available for free from the Internet is called
WinMerge. It is available for download from http://www.winmerge.org.

12
Another utility called WinDiff can be found with the MS Visual studio set of utilities and
can be used to compare files and directories and identify differences.
Making Larger customizations:
The easiest approach to creating new Web+Center ASP code is to copy and paste existing
Web+Center modules into new modules (rename) that you create and then modify.
Existing Web+Center modules have the necessary overall ASP/HTML structure, and
database connection code, security and permission code, and include some required basic
configuration files.
Once you create, test and debug a new module, you can link it to the existing site in
several ways. If you edit and modify the ASP modules, the next time you upgrade to
another version you will need to merge in your changes into new version.
Checking for Software Updates:
To determine if your installed Web+Center ASP modules are the most current or not with
the most currently released software, ISS has developed a special Version server and
each version of Web+Center comes with companion software to check your installed
versions against the currently released version. To run this file version check utility, run
the script call CheckVersions.asp which is located in the each of the Techcenter,
customercenter, pocketcenter, businesscenter and language directories.
For example, to check if your Tech+Center application is current, with your browser run
the URL:
http://<your host name>/tech90/checkversions.asp
http://<your host name>/techmobile90/checkversions.asp
The other applications versions can be checked by running:
Customer+Center:
http://<your host name>/customer90/checkversions.asp
Business+Center:
http://<your host name>/business90/checkversions.asp
Language Directory:
http://<your host name>/language90/checkversions.asp

13
Reservation+Center Directory:
http://<your host name>/reservation90/checkversions.asp
This will provide a report showing what files are newer, older or modified by you. You
can individually download and install versions that are out of date by clicking on the
appropriate file name link.
Once you have downloaded the file, you will need to compare it to your existing version
and if necessary integrate your custom changes into the new module. There is a tool
called “WinDiff.exe” that comes with the MS developers tools that provides a good line
by line file comparison utility to help merge in any changes. Also the tool WinMerge
from www.WinMerge.org can be used to compare differences.
If you plan on doing extensive changes to a module, we recommend that you copy and
paste the whole module into newly renamed module, maybe a module name that has your
company or organization name it like RegistrationMyCompany.asp. Then make all of
your changes to that module.
Then search the ASP files in that directory that are called the original module
(registration.asp for example) and modify the pages that call Registration.asp to now call
RegistrationMyCompany.asp. The TextPad editor available from www.textpad.com has
“Find In File” feature to make this search across the entire directory easy to find.
Another option if you plan on doing extensive modification or even new ASP code to
perform functions not already provided by Web+Center code base is to create and test the
new code and then add a link or button to that module from somewhere in the application
where it is appropriate.
Additional Tech+Center reports can also be added to the Report.asp or the custom reports
page module by simply adding another link to the reports.asp or customreports.asp file.
Chapter 5 ASP Page Security systems and monitoring options
All five of the applications (Tech+Center, Business+Center and Customer+Center,
Reservation+Center, Customer+Mobile and Tech+Mobile) use a cookie-based method of
login security.
When a Tech Staff member, Business+Center user or customer logs into the Web+Center
application, the application sends an browser based “Cookie” back to user web browser
from the server that authenticates the user if the correct Login ID and password were
passed in the Login form. This cookie is unique for each of the applications and does not
allow a user to run mutiple Tech+Center or Business+Center logins at the same time.
with the same browser.

14
As each Customer+Center, Business+Center or Tech+Center page is executed, it first
checks that the user has previously successfully logged into the application by checking
for the correct “Cookie”. For some Tech+Center applications, it not only checks for the
Login cookie, but it also checks the security level for that user by checking with the
database to get the current security settings. For example, when the Tech Staff member
runs the reports page (reports.asp), it check for the cookie and then performs a database
security level lookup on the logged in user and verify that the user is at least
Administrative level. For certain Tech+Center pages including reports, administration
and configuration pages, the user must have “Administrator” or “Configurator” level
accounts. If the program detect that this page is attempted to be called by either an un-
authenticated user (no cookie detected) or if the user does not have the right security
level, a special INVALID USER page will be displayed to the user.
The invalid user page will display large red text to the user about the access violation. If
you wish to edit the text that is displayed when this error occurs, edit the invaliduser.inc
file with your own security access message.
The toptions.asp page in the techcenter directory is the ASP module that displays the
button panel in the left hand side of the Tech+Center application. Inside of that module
are the definitions to control which buttons appears for which security level
(configuration, administrator, tech,etc) of the logged in user. The boptions.asp is the
similar module in the businesscenter directory to control which buttons appears in the
business+center application.
Another option if users attempt to access pages they are not provided links to, is to enable
some email logging options in the invaliduser.inc page. Simply add some code to create
an email message that specifies the page that is being attempted to be accessed, the user
ID (obtained from the cookie) and time and date of the access violation. Once that
message is created, send off an email to Web+Center administrator using the
SendEmail() function that is provided for you in the invaliduser.inc page.
You could provide additional information by grabbing the IP address of the user if the
user does not have their cookie set properly and they are still attempting to access pages
they do not have permission to access.
When a user logs in, they should only be shown buttons and links that they have
permission to use and users should not get this page without hacking attempts. If a user
book marks a page within the application, and closes the browser and comes back they
will also get this error page. Users should be told not to Browser book mark pages within
the application since the call on server may change without notice to the end user.
Cookies will automatically be lost when the browser is closed or if they press the Logout
option. Web+Center Cookies are not saved in the disk based cookie files (like
cookies.txt) since we tell the browser to save them only as long as the browser session is
active. This provides a fairly good level of security from persons attempting to duplicate
a logged in cookie setting.

15
Browsers must have their “cookies” enabled for any of the applications to work. A
Tech+Center user will experience three frames with errors if cookies are not enabled on
the browser.
There are no other cookies that are set by the Web+Center application besides these
Login ID cookies.
To monitor and log web pages hit by users, enable the Web Server logs or the Extented
server logs. Every HTTP request for ASP pages, or graphics will be defined in the web
server logs. Enabling web server logs is available in the Default WebSite Properties
window near the botton. Check the Enable Logging option and select an Active Log
Format from the choice of logging options available.
Chapter 6 Importing data into the Web+Center Database
One of the benefits of the Web+Center Help Desk product is the open architecture and
straight forward design of the database and the application. The table names, columns
and database relationships are meant to be self documenting for those that wish to
integrate custom applications into the Web+Center suite of products.
Although the tables, columns and relationships are easy to understand, certain rules and
data requirements must be followed to ensure database consistency and maintain database
referential integrity. Referential integrity is lost, for example, when a customer record is
deleted, but other records which have customer_ID keys pointing to that customer record
still exist.
We DO NOT recommend you import data into your Web+Center database table using
import filters provided by Microsoft or other vendors. Instead of using tools provided by
the database vendor, we recommend you use or create new ASP “scripts” that directly
connect to the database tables and then modify and insert the data into the database as
needed on a record by record basis. This allows for far better control of the data being
inserted and you can add additional logic to set default fields to certain values when
special conditions exist. Special Import scripts have already been developed for
importing Customer Records and Asset Records. Additional information about these
scripts is listed below.
Importing Customer Records
The best way to import external customer records into the Web+Center database is to use
the web-based Import Customers Wizard which can be launched by clicking on
Administration… System Configuration Menu and Import Customers Wizard link.

16
Before you launch this customer import utility, you must first create an ODBC-compliant
database of your external customers with first name, and last name as the minimum. To
run this script, you must have the name of the ODBC DSN and the name of the table
where your external customers are stored.
Before running this script, one should back up the database incase the script does not
properly import records and you need to start the import process from the beginning.
It is recommended that you attempt to import a few records first before importing an
external database.
The Import Customers Wizard is designed to be used in both a new import of customers
as well as an update of existing records and the software provides options to determine if
a duplicate record should be created or a record updated.
This utility consists of three scripts named ImportCustomers.asp,
DoImportCustomers.asp and DoImportCustomers2.asp and it is located in the Techcenter
physical directory.
Other Customer Import Scripts:
Internet Software Sciences has also written 2 other customer import scripts that exist in
the Tech+Center (techcenter) directory. Customize or review these scripts for
information on how to create and perform proper customer record imports.
The two scripts (ImportFilter.asp) and (ImportLDAP.asp, DoImportLDAP) are a starting
point to develop your own customer import code. Open up the scripts using an ASCII
editor and review, edit and customize them to your requirements. They will not run
properly without your customizations. Before running any imports, back up your
database completely and be prepared to run the import process a few times before
you get it working correctly.
The ImportLDAP.asp and DoImportLDAP.asp scripts were originally created to import a
table of customers created by an LDAP export. This script will still work for other
customer imports as well.
Customer records are stored in the “Customers” table. The only required field for this
table is the customer_id field, which is a 20 character text primary key field. This field is
created in the Web+Center application as the customer’s Last Name + “underscore” +
First Name. For example, if Mary Smith were the customer’s name, the customer_ID
field created for that customer would be: “Smith_Mary”. If there already exists a Mary
Smith in the database, the application will add a 3 digit random number at the end of the
string to create a unique Customer_ID index. This Customer_ID field is required and
indexed and must be unique. Although the other fields are not required at the database
level, we recommend, as a minimum, populating the contact_fname (first name),

17
contact_lname (last name) and email fields with information when performing any
imports.
Another way to import customer records is to use the LDAP integration method when
your customers are all located in an LDAP or active directory. Please refer to the Active
Directory integration and configuration guide in the documentation directory.
Importing Asset Records
A script called ImportAssets.asp exists in the \techcenter directory. If you plan to do any
asset information, we recommend that you use this script. It will be need to be
customized to your individual asset column naming conventions.
The table that the asset information will be inserted into is the Assets table. This table is
driven by an Auto-number Integer primary field key called Asset_Number. As soon as
you attempt to insert a new record, a new asset_number will be created for that asset.
This table has one required integer field called “dummy” and it must be filled in with
some integer value when inserting new records. This field exists to maintain
compatibility with previous versions.
Although the other fields are optional at the database level, we recommend populating the
equipment_type field as a minimum. If you put any information into the property_tag,
ip_address, serial_number, monitor_serial_number or the computer_id fields, they must
be unique values or left as NULL. These fields are indexed and must be unique. You
will get a database insert error if this unique condition is not met on any of these fields.
There are also 5 custom asset fields (custom_field1… custom_field5) where you can
store information that does not match the current asset column definitions. To change the
label in front of the field, simply edit the AssetInfo.asp ASP module with your field
names.
Asset assignments are stored in a separate table called AssetAssignment. You must first
add and obtain the index (asset_number) for the asset before you can assign the asset to a
customer, tech or to another asset. To assign an asset to a customer, insert the original
asset and obtain the asset_number created by the auto-number feature of this field. Then
add a new record into the AssetAssignment table setting the Asset_number field to the
newly created asset_number, and setting the customer_id field to the customer_id of that
customer.
Importing Cases
We don’t currently provide any case import scripts but case imports can be created using
the existing customer import scripts and editing the script to handle case imports rather
than customer imports.
18
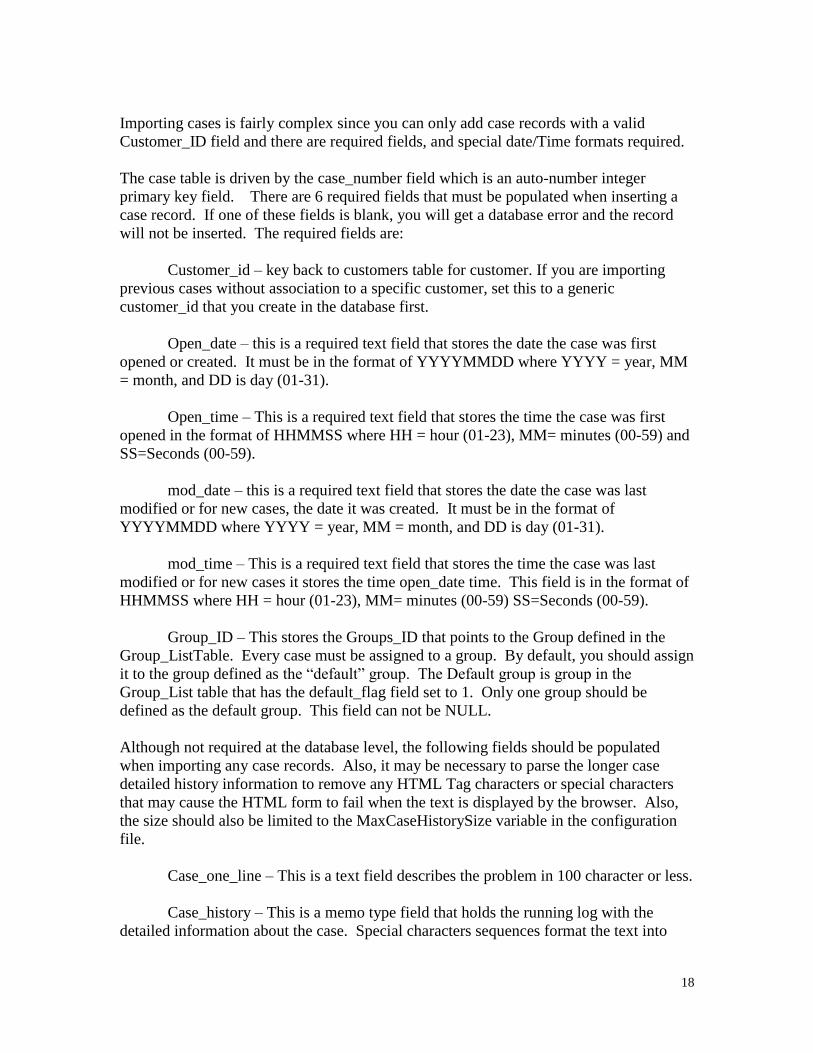
Importing cases is fairly complex since you can only add case records with a valid
Customer_ID field and there are required fields, and special date/Time formats required.
The case table is driven by the case_number field which is an auto-number integer
primary key field. There are 6 required fields that must be populated when inserting a
case record. If one of these fields is blank, you will get a database error and the record
will not be inserted. The required fields are:
Customer_id – key back to customers table for customer. If you are importing
previous cases without association to a specific customer, set this to a generic
customer_id that you create in the database first.
Open_date – this is a required text field that stores the date the case was first
opened or created. It must be in the format of YYYYMMDD where YYYY = year, MM
= month, and DD is day (01-31).
Open_time – This is a required text field that stores the time the case was first
opened in the format of HHMMSS where HH = hour (01-23), MM= minutes (00-59) and
SS=Seconds (00-59).
mod_date – this is a required text field that stores the date the case was last
modified or for new cases, the date it was created. It must be in the format of
YYYYMMDD where YYYY = year, MM = month, and DD is day (01-31).
mod_time – This is a required text field that stores the time the case was last
modified or for new cases it stores the time open_date time. This field is in the format of
HHMMSS where HH = hour (01-23), MM= minutes (00-59) SS=Seconds (00-59).
Group_ID – This stores the Groups_ID that points to the Group defined in the
Group_ListTable. Every case must be assigned to a group. By default, you should assign
it to the group defined as the “default” group. The Default group is group in the
Group_List table that has the default_flag field set to 1. Only one group should be
defined as the default group. This field can not be NULL.
Although not required at the database level, the following fields should be populated
when importing any case records. Also, it may be necessary to parse the longer case
detailed history information to remove any HTML Tag characters or special characters
that may cause the HTML form to fail when the text is displayed by the browser. Also,
the size should also be limited to the MaxCaseHistorySize variable in the configuration
file.
Case_one_line – This is a text field describes the problem in 100 character or less.
Case_history – This is a memo type field that holds the running log with the
detailed information about the case. Special characters sequences format the text into

19
Red and Green fonts which make it more readable. Review the DoTCaseform.asp
module to see how case history text is formatted with information on the date, time and
user information.
Status – This should be set to one of the integer values below. It should not be
left empty or NULL.
Valid Case Status Numbers
0 = Open (Active)
1 = Closed
2 = Open (Waiting)
3 = Open( On Hold)
A case can either “Open” (case status 0, 2, or 3) or “Closed” (case status = 1).
There are places in the code where we only determine if the case is Closed (status=1) or
any Open state (0, 2, 3).
Severity (referred to as Priority) – This is an integer field that should be set to “0”
if the priority is un-assigned, or to a value from 1 to 10 with 1 typically defined as the
highest priority. The priorities are defined in a separate “Priority” Table. Only populate
your cases with priority values that exist in the priority table.
Modified_flag is integer flag field that is set when a case is initially created or
modified by the customer and then reset when the assigned Tech Staff member reads
(opens up) the case ticket. The Tech Staff member does not have to update the case but
only needs to view the case ticket to reset this field back to un-modified (0). This flag is
used to enable the cases to appear in red font in the Open Cases windows so technicians
can immediately identify cases that are new or updated. Set this to either 1 (modified) or
0 (un-modified or reviewed).
Category Fields C1, C2, C3, C4, C5…C100
The fields C1, C2, C3… C100 hold the category setting for each of the categories
for that case. They should be left as NULL or set to 0 for the N.A. (Not Applicable)
setting, or to a valid Category_ID for that category number.
Categories and their corresponding sub “category items” are defined in the
Categories Table. The example table below shows how the Categories_table would be
populated with two categories each with 3 category items.
Category Table Entries Category_Number Item_number Category_name Item_name State
1 1 Operating System Windows NT 1
1 2 Operating System Windows 2000 1
1 3 Operating System Linux 1
2 1 Computer Type Dell 1
2 2 Computer Type Compaq 1

20
2 3 Computer Type HP 1
Figure 6-1 Example Categories Table
The table above defines two categories that will create two category drop-down boxes in
the case form for the customer and tech staff member. The first category drop-down box
will be labeled Operating System with “Category Items” of Windows NT, Windows 2000
and Linux.
If a user selects the Windows 2000 item from the drop down box, the application will
save the item number (2) into the C1 column in the case table. The column C1 is mapped
by combining “C” plus the Category Number to create “C1”.
The database can store up to 100 categories although we don’t recommend using more
than about 4-6 categories since the users or tech won’t fill them out at all if there are too
many. Any category column (C1… C100) in the database not set to a category item
value should be defaulted to “0”.
If you create an import script that set category values, you must analyze your categories
table to determine the Category_Number and Item_Number values. There is example
category setting code in the DoTCaseForm.asp module in the TechCenter directory.
browser run the URL:
Chapter 7 Version Information and reporting Problems to ISS
If you feel you have found a bug in a particular ASP module, check the Version Server to
see if a new version of that file exists. If the CheckVersion.asp script determines that a
newer version is available, backup your current version, and replace that file with the new
one from the version server.
Each major release (2.0. 3.0, 4.0 5.0, 6.0 7.0, 8.0, 9.0 etc) of Web+Center will have its
own CheckVersion.asp script that will reference updates in that release. The current
major release version is 9.0.
When version 9.0 is released, user must perform a full upgrade to 9.0 before they will be
able to access the 9.0 version server.
Upgrades:
To upgrade from version 8.0 or 9.0 requires a special upgrade script that is NOT part of
the FREE (2) tech system package. License users must have a current support/upgrade
contract to obtain the necessary upgrade script to upgrade the database from the 5.0 or 6.0
to 7.0 database structures and still keep all of their existing information.
Free (2) tech user must purchase a one-time upgrade script that will enable them to
upgrade from 6.0 , 7 or 8 to 9.0 database structures.
21
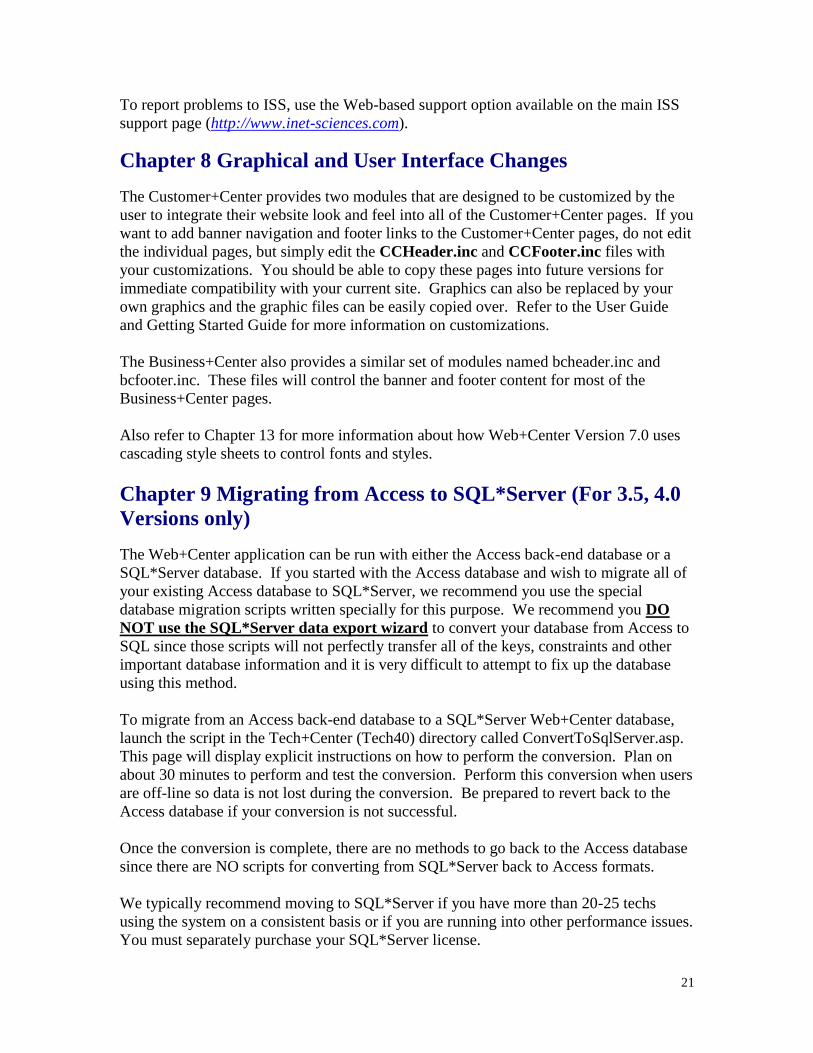
To report problems to ISS, use the Web-based support option available on the main ISS
support page (http://www.inet-sciences.com).
Chapter 8 Graphical and User Interface Changes
The Customer+Center provides two modules that are designed to be customized by the
user to integrate their website look and feel into all of the Customer+Center pages. If you
want to add banner navigation and footer links to the Customer+Center pages, do not edit
the individual pages, but simply edit the CCHeader.inc and CCFooter.inc files with
your customizations. You should be able to copy these pages into future versions for
immediate compatibility with your current site. Graphics can also be replaced by your
own graphics and the graphic files can be easily copied over. Refer to the User Guide
and Getting Started Guide for more information on customizations.
The Business+Center also provides a similar set of modules named bcheader.inc and
bcfooter.inc. These files will control the banner and footer content for most of the
Business+Center pages.
Also refer to Chapter 13 for more information about how Web+Center Version 7.0 uses
cascading style sheets to control fonts and styles.
Chapter 9 Migrating from Access to SQL*Server (For 3.5, 4.0
Versions only)
The Web+Center application can be run with either the Access back-end database or a
SQL*Server database. If you started with the Access database and wish to migrate all of
your existing Access database to SQL*Server, we recommend you use the special
database migration scripts written specially for this purpose. We recommend you DO
NOT use the SQL*Server data export wizard to convert your database from Access to
SQL since those scripts will not perfectly transfer all of the keys, constraints and other
important database information and it is very difficult to attempt to fix up the database
using this method.
To migrate from an Access back-end database to a SQL*Server Web+Center database,
launch the script in the Tech+Center (Tech40) directory called ConvertToSqlServer.asp.
This page will display explicit instructions on how to perform the conversion. Plan on
about 30 minutes to perform and test the conversion. Perform this conversion when users
are off-line so data is not lost during the conversion. Be prepared to revert back to the
Access database if your conversion is not successful.
Once the conversion is complete, there are no methods to go back to the Access database
since there are NO scripts for converting from SQL*Server back to Access formats.
We typically recommend moving to SQL*Server if you have more than 20-25 techs
using the system on a consistent basis or if you are running into other performance issues.
You must separately purchase your SQL*Server license.

22
Chapter 10 Customer Authentication Login Methods
Customers log into the Customer+Center by providing a Login ID or customer username
and a password. Two optional method exists if all of the users are authenticated NT
domain users.
The first is a fairly complex but complete approach to integrating Active directory users
and the web+center customer database. Please refer to the separate Active Directory
Integration and configuration guide available in the documentation directory for complete
information. This approach provides automatic download of information from active
directory in the web+center customer database and automatic syncing of information
from AD to web+center customer database.
If you are looking for just login without automatic customer information retrieval and
sync, follow these steps below:
Put your users NT login name into the customer_username field in the Web+Center
customer database. The Web+Center customer_username field is limited to 20
characters. You can enter this information into the customer record using customer
import tools like ImportLDAP.asp and DoImportLDAP.asp or the new customer import
utility or they can be entered individually in the Tech+Center.
Change the file permissions on just the DoAuthLogin.asp file in the customercenter
directory and set the permissions for this file to just domain users.
Create a web link to this file like http://<ip or domain>/customer70/DoAuthLogin.asp
The Internet Information Server Default Website Directory security must be set up for
Integrated Windows Authentication as well as Anonymous user access. This is the
default setting for the default website but that setting can be confirmed by selecting
properties for the default website, clicking on Directory Security and click on the Edit
button for the Anonymous access and authentication control. Confirm that the
Anonymous access checkbox is set and the Integrated Windows Authentication is check
in the Authentication access area.
This page login script works by grabbing the LOGON_USER value from the HTTP
headers and using that for the Customer+Center login customer_username. This field is
then checked with the Customer+Center Customers Username field. If it exists, then the
user will log into the Customer+Center.
If you are having difficulty getting the DoAuthLogin.asp authentication script to properly
run, try opening up the ASP module with an ASCII editor and un-commenting some of
the debugging statements in the code that exist between lines 37 and 55 to see what
authentication information is being returned by the server. Sometimes full domain
information is returned along with the NT login information and this should be stripped

23
out or handled by some method. Once the script is debugged and working, simply re-
comment back those debugging statements.
Chapter 11 Customizing Web+Center Labels and
Internationalization Options
Starting with Version 4.0, the Web+Center application has the ability to easily change
labels on any Web+Center ASP page. All of the labels of the Web+Center are now
defined as string variables that are defined in *.inc (include) files that are located in the
\language sub directory of the WebCenter folder.
In addition to text labels defined in the language directory, all of the button graphics are
also commonly located in this language directory as well.
The language include files and the graphics are referenced from the Web+Center
application by two methods. First they are referenced as files using a relative physical
directory file approach that goes up one directory from the (techcenter, customercenter,
pocketcenter, etc) directory and then down into the language directory using the “parent
Paths” method of referencing files. The second approach to referencing language files is
through a virtual directory definition called “langauge70”. Both access methods are used
due to the architecture of ISS and ASP scripting language.
To customize the labels and buttons for another language or to simply change some of the
text labels, try one of the two methods listed below:
(1) For English language customers, one may wish to change the labels to another set of
words but do not want to change every ASP page code that uses them. In version 4.0, all
of the labels are defined in a few label and word definitions files that are located in the
language subdirectory. All four of the applications (Customer+Center, Tech+Center, and
Business+Center, Pocket+Center) all used the same language definition files so if a
change is made to a common label, it is changed for all of the applications.
For example, the case status label of “Open (on-hold)” is now defined as phrase
definition in the wclabels.inc include file as:
wc_Open_On_Hold = "Open (On-hold)"
To change this phrase definition to Open (Wait for Customer), edit this line in the
wclabels.inc file to:
wc_Open_On_Hold = "Open (Wait for Customer)"
Now in all of the Web+Center applications that use this phrase, the “Open (On-hold)”
label will now read “Open (Wait for Customer)”. These language definitions are
included by all (4) of the applications so that any required text label changes only have to
be performed in a single location.

24
(2) For non-English language Web+Center users, the Web+Center can now be converted
quickly to an entirely new language. In addition to translating the text labels, all of the
buttons have been moved to this common directory to allow the buttons to be recreated
with translated text. See the table below describing all of the language dependent items
that must be converted for a different language.
To convert Web+Center to a new language or if you plan to make extensive language
changes, please use the following steps:
Step 1: First COPY and PASTE the whole \language directory into a new directory called
“languagebackup” for backup purposes. Make any changes in the original language sub
directory since the code will be attempting to reference files in the “language” using both
relative file methods and virtual directory definitions. The “languagebackup” can be
used as backup to recover original files if needed.
Step 2: Make any necessary language changes to the *.inc (include) files and graphic files
listed below in the language directory. When making changes to the include files, only
the string value should be adjusted, and DO NOT adjust the variable name.
For example to change the label “Customer” to “Staff Member” change:
Wc_Customer = “Customer”
To
Wc_Customer = “Staff Member”
Table 11-1 List of Files and graphics for language conversions
File Type or Name Contents
Wclabels.inc Most of the Web+Center language definitions
Wclabel2.inc More Web+Center language definitions
Wclabelsadmin.inc Administration Function language definitions
AssetLabels.inc Asset label definitions only
Table_Builder_Caution.inc Table Builder Long text note
CalendarDays.inc Names of days and months
HelpEditCategory.inc Help instructions for categories
EmailHTMLIinfo Information on how to email HTML documents
*.gif/jpg (graphics files) Buttons and other graphics that may content text
Chapter 12 Integration of Customer Center with WordPress
Web+Center requires Active Server Pages (ASP) and installation on a Microsoft web
server. Since WordPress is generally not installed in this environment, you can still
25
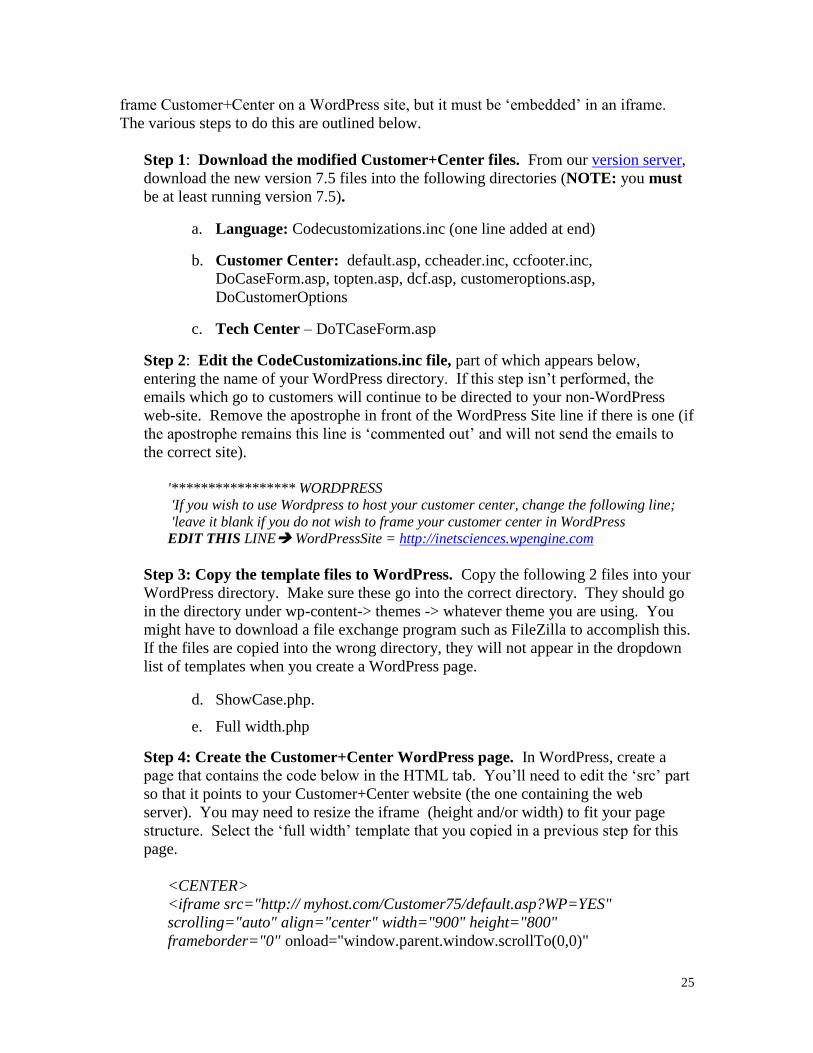
frame Customer+Center on a WordPress site, but it must be ‘embedded’ in an iframe.
The various steps to do this are outlined below.
Step 1: Download the modified Customer+Center files. From our version server,
download the new version 7.5 files into the following directories (NOTE: you must
be at least running version 7.5).
a. Language: Codecustomizations.inc (one line added at end)
b. Customer Center: default.asp, ccheader.inc, ccfooter.inc,
DoCaseForm.asp, topten.asp, dcf.asp, customeroptions.asp,
DoCustomerOptions
c. Tech Center – DoTCaseForm.asp
Step 2: Edit the CodeCustomizations.inc file, part of which appears below,
entering the name of your WordPress directory. If this step isn’t performed, the
emails which go to customers will continue to be directed to your non-WordPress
web-site. Remove the apostrophe in front of the WordPress Site line if there is one (if
the apostrophe remains this line is ‘commented out’ and will not send the emails to
the correct site).
'***************** WORDPRESS
'If you wish to use Wordpress to host your customer center, change the following line;
'leave it blank if you do not wish to frame your customer center in WordPress
EDIT THIS LINE WordPressSite = http://inetsciences.wpengine.com
Step 3: Copy the template files to WordPress. Copy the following 2 files into your
WordPress directory. Make sure these go into the correct directory. They should go
in the directory under wp-content-> themes -> whatever theme you are using. You
might have to download a file exchange program such as FileZilla to accomplish this.
If the files are copied into the wrong directory, they will not appear in the dropdown
list of templates when you create a WordPress page.
d. ShowCase.php.
e. Full width.php
Step 4: Create the Customer+Center WordPress page. In WordPress, create a
page that contains the code below in the HTML tab. You’ll need to edit the ‘src’ part
so that it points to your Customer+Center website (the one containing the web
server). You may need to resize the iframe (height and/or width) to fit your page
structure. Select the ‘full width’ template that you copied in a previous step for this
page.
<CENTER>
<iframe src="http:// myhost.com/Customer75/default.asp?WP=YES"
scrolling="auto" align="center" width="900" height="800"
frameborder="0" onload="window.parent.window.scrollTo(0,0)"

26
></iframe>
</CENTER>
Step 5: Create a page for displaying a case. In WordPress, create a blank page
called ‘DCF’. Use ‘ShowCase’ as the template for this page. This is the page that
will display the case when a customer uses the ‘Login’ link on an email that gets sent
after a case is created or updated.
It is possible to use other pages from Customer+Center in your WordPress site.
For example, if you wish to display a ‘FAQs’ page, just use a page like the one you
created for Customer+Center (with an iframe) and use the following for ‘src’
(replacing the domain name):
http://MyHost/Top.Ten.asp?WP=YES
The ‘WP=YES’ (all capitals) in the URL indicates to Customer+Center that this is a
WordPress-framed page so it doesn’t put up the normal headers and footers. It is
stored in a cookie.
Chapter 13 Use of Stylesheets and CSS and Bootstrap in V9
Starting in Version 9.0, we have upgraded from just HTML / CSS styles to a higher level
of packaged styles in a HTML 5 styles environment called Boostrap.
For more information on Bootstrap, please visit their website at http://getbootstrap.com/.
Completely integrated with your Web+Center install is all of the bootstrap HTML 5 style
definitions.
For the tech+center and business+center applications, the bootstrap CSS styles are first
referenced by calling the
BootstrapNav.inc file which brings in 4 style and javascripts files in the HEAD portion
of the HTML document:
<link rel="stylesheet" href="css/bootstrap.min.css">
<link href="css/sb-admin.css" rel="stylesheet">
<script src="js/jquery-1.12.4.min.js"></script>
<script src="js/bootstrap.min.js"></script>
Calling these allows one to call bootstrap responsive and HTML 5 styles and UI
elements. Note all of these styles and JS scripts are stored locally rather than being
placed on a CDN (Content Delivered Network). This was by design.

27
To assist Web+Center users who wish to customize Web+Center and use the new
Bootstrap UI elements, we have created a new set of Web+Center/Bootstrap
demonstration pages that are available in the tech+Center under:
Click: Administration
Under the Bootstrap Docs and Examples area you will see three examples
Bootstrap Documentation
Simple Customer Search Example
Web+Center CSS Styles/Test Edit
Version 9.0 uses Bootstrap to replace the FRAME/FRAMESET documents of
Tech+Center and Business+Center that existing with Version 8.0 and preceding versions.
Most of the pages inside of the application still use other CSS style techniques to remain
compatible with previous versions and your past customizations.
In versions prior to Version 5, all screen formatting was achieved purely through the use
of “pure” HTML (i.e. through the use of embedded <b> and <font> tags and similar).
This “lowest common denominator” approach was used to ensure compatibility with the
widest possible set of web browsers including old versions.
Version 8 and related information
With the release of Version 5, the use of Cascading Stylesheets (CSS) has become
common in the industry and is supported by all common web browsers. This allows much
better use of the limited space and an enhanced User Interface, as well as much easier
modification of the UI (colors and sizes of fonts etc.). This is because a modification of
e.g. font-size need only be applied to the external stylesheet rather than within each
individual program module.
In Web+Center Version 5.0 and later, use of CSS has been incorporated into all the main
user-screens, while the old interface may still be found in lesser used screens. However,
to maintain maximum compatibility across all common browsers, the use of CSS has
been restricted to employing only the most common elements and in a conservative
fashion.
While CSS is now employed in the most frequently used screens, not all modules have
been re-engineered. The old mechanism is still found in some screens, e.g. those used
primarily by the system administrator or error-screens and so forth.
In each of the other three main applications (Tech+Center, Business+Center and
Customer+Center) an externally defined set of styles is supplied in a file (located in each
directory) called wc_Style.css. As released, this file is identical in each of the three
directories but users can modify one or the other if they wish to modify the user interface
for that application. They were replicated across the three directories (rather than being
restricted to a single copy for all applications) so that users can make modifications to
one of the three major application without it then impacting the others.

28
Caution should be used in modifying the supplied style definitions in that many of the
style definitions are inter-linked in their effects – thus a color in one definition may have
been deliberately chosen to contrast well with another for readability purposes. Changing
one may cause a change to have to be made to another – and so on, causing a ripple of
side-effects.
In Tech+Center and Business+Center external stylesheets are invoked near the beginning
of each module (inside the <head> part of the page, usually just after the <title> tag) by
means of a line of the form:
<!-- #INCLUDE FILE="Stylesheet.inc" -->
This in turn brings in some code which when executed generates a line in the web-page
of the form
<link rel='stylesheet' href='wc_Style.css' type='text/css'>
Thus if you want to bring in a completely different stylesheet (with a different file name)
or even wish to bring in one of a set of different stylesheets depending on some user
attribute, you can do so by modifying the executable code in the file called Stylesheet.inc
in just this one place rather than having to modify the code within each program module.
In Customer+Center, the same mechanism is employed, but the relevant code is
contained in the module called CCHeader.inc rather than Stylesheet.inc.
Note – Before version 5 of Web+Center, the system administrator could choose the
“background color” of screens through the Administration interface (Button in left-panel
of Tech+Center). In later versions this facility still exists but is only applicable to those
modules/screens which have not been converted to use CSS. In most screens the
background color is now specified in the relevant stylesheet for each application – except
for Pocket Center which still uses the older interface.
If you are not familiar with the use of Cascading Stylesheets, good tutorials may be found
on the web at:
http://www.htmldog.com/
http://www.echoecho.com/cssintroduction.htm
Chapter 14 Hosting Multiple Web+Center Systems on a single
server
It is possible to host multiple versions of Web+Center on a single server with some minor
customizations. The Web+Center product is specially designed to accommodate multiple

29
instances of the Web+Center application hosted on a single server. Before a second
Web+Center system is installed on a single server, one should confirm the following
licensing requirements for Licensed System as described in the End User Licensing
Agreement (EULA) provided during program installation.
For each Web+Center licensed system, one is allowed to have (1) one production system
with a single database instance and (1) one test system with a single database instance
with the provided license key for the authorized number of techs. If you need another
production system that requires another database instance and has more than (2) techs,
then one must purchase another license key from Internet Software Sciences.
If you want to host multiple Web+Center systems on a single server follow the steps
below:
Step 1) First install one system on the machine and setup the necessary virtual directories
and ODBC connections and verify it is operational.
Step 2) Copy and paste the whole Web+Center folder tree to another directory or perform
a second installation into a second different directory tree.
Step 3) Setup new virtual directories for Tech+Center, Customer+Center,
Business+Center, Documentation and Language with different virtual directory names for
this new Web+Center directory tree. Internet Information Services will not let you create
duplicate virtual directory names so the virtual directory names can not be Tech90,
Customer90, Business90 and Pocket90 and so on.
Step 4) Setup another ODBC DSN pointing to the second system Webcenter database. It
must be called something other than webcenter90_db.
Step 5) Edit the (4) Global.asa files which are located in the techcenter, customercenter ,
businesscenter pocketcenter, and reservationcenter directories. Edit the myDSN ODBC
DSN connection string definition to point to the newly defined ODBC DSN name created
in Step 4 above and also set the language90 virtual directory definition located near the
bottom of the global.asa file.
Step 6) Log into the Tech+Center of the second system and click on Administration,
System Configuration Menu…More Configuration. Enter the appropriate new virtual
directory names under the Application Directory Names column. Press Submit to save
these changes.
Appendix A - ASP Resources
On-Line Websites about ASP programming:
http://www.learnASP.com
http://www.aspwire.com
http://www.coveryourasp.com

30
Lists of many ASP sites
http://www.learnasp.com/links/
Books:
Active Server Pages 2.0 or 3.0 by Wrox Press
ASP in a Nutshell by O’Reilly Press
VB Script in a Nutshell by O’Reilly Press
VBA for Dummies Quick Reference (VBA guide but close to VB Script)
ASCII Text Editors:
Textpad editor from www.textpad.com - This editor has line numbers and
numerous features that make it efficient for reviewing and editing the Web+Center ASP
modules.