WDM Security Guidelines -...
27
WYSE TECHNOLOGY INC. WDM Security Guidelines Whitepaper v1.0 This document provides details on configuring Wyse Device Manager (WDM) to securely manage your Wyse cloud clients and zero clients. It provides general guidance and specific instructions on configuring WDM and Wyse devices for secure management.
Transcript of WDM Security Guidelines -...

WYSE TECHNOLOGY INC.
WDM Security Guidelines Whitepaper
v1.0
This document provides details on configuring Wyse Device Manager (WDM) to securely manage your Wyse cloud clients and zero clients. It provides general guidance and specific instructions on configuring WDM and Wyse devices for secure management.
© 2012 Wyse Technology, Inc. 1
Table of Contents
1. INTRODUCTION ............................................................................................................................................. 2
2. SCOPE ............................................................................................................................................................ 2
3. REFERENCES .................................................................................................................................................. 2
4. WDM ARCHITECTURE .................................................................................................................................... 3
5. SECURITY GUIDELINES OVERVIEW ................................................................................................................. 4
6. DETAILED SECURITY GUIDELINES ................................................................................................................... 4
6.1. ENABLE SECURE MODE (HTTPS) ......................................................................................................................... 4
6.2. DISABLE NON-SECURE COMPONENTS AND SERVICES ................................................................................................ 4
6.2.1. Disable FTP Repository ........................................................................................................................ 4
6.2.2. Disable HTTP Repository ...................................................................................................................... 5
6.2.3. TFTP Server/Services ............................................................................................................................ 5
6.3. CHANGE DEFAULT PASSWORDS AND DEFAULT SETTINGS IN WDM ............................................................................. 5
6.3.1. SQL Database Password ...................................................................................................................... 5
6.3.2. Software Repositories .......................................................................................................................... 5
6.3.3. Ports used for Communications ........................................................................................................... 5
6.3.4. Firewall Settings .................................................................................................................................. 6
During Installation ................................................................................................................................................ 6
After Installation ................................................................................................................................................... 6
6.4. CHANGE DEFAULT DEVICE SETTINGS ..................................................................................................................... 8
6.4.1. Write-Filter .......................................................................................................................................... 8
6.4.2. Remote Shadowing (VNC) ................................................................................................................... 8
6.4.3. Passwords for BIOS and Users ............................................................................................................. 9
6.4.4. Domain-join ....................................................................................................................................... 10
6.4.5. PXE Imaging ....................................................................................................................................... 10
6.5. USE LATEST FIRMWARE AND SOFTWARE ON WYSE DEVICES .................................................................................... 10
6.6. ACTIVE DIRECTORY INTEGRATION AND DELEGATION............................................................................................... 11
6.7. NETWORK SETTINGS ........................................................................................................................................ 11
APPENDIX A – CHECKLIST OF ITEMS ..................................................................................................................... 12
APPENDIX B - ENABLE SECURE MODE (HTTPS) IN IIS ............................................................................................ 13
© 2012 Wyse Technology, Inc. 2
WDM Security Guidelines
1. Introduction This document provides details on configuring Wyse Device Manager (WDM) to securely manage your
Wyse cloud clients and zero clients. It provides general guidance and specific instructions on configuring
WDM and Wyse devices for secure management. It is highly recommended to enable the secure settings
provided in this document to ensure that your devices are only managed by approved WDM servers.
2. Scope The guidelines and recommendations are specific to WDM version 4.9 and also are applicable to older,
currently supported versions of WDM. Some of the configuration steps are related to a specific
operating system where WDM is installed. This document uses Windows Server 2008 R2 as the OS
where WDM 4.9 is installed. Similar settings are applicable to all other supported OS’s. The document
uses devices to refer to cloud clients, also known as thin clients and zero clients. It also uses agents to
refer to WDM agents, also known as HAgents.
General Recommendations:
Use the latest WDM version (including any applicable hotfixes), OS/firmware versions, and the
latest HAagents available from the Wyse Support site.
Read this guide entirely before your WDM deployment. Some security-related settings such as
using non-default passwords are easier to setup before or during installation. It is also
recommended to use the ‘Custom’ option during installation to set non-default values for ports
and passwords.
3. References In addition to this document you can refer to the following documents:
Documentation
o WDM
WDM Installation Guide
WDM Administrators Guide
o Wyse enhanced SUSE Linux INI Reference Guide
o Wyse enhanced Ubuntu Linux INI Reference Guide
o ThinOS INI Reference Guide
o Windows Embedded
Common Criteria Certification report for WDM
o www.commoncriteriaportal.org/files/epfiles/Wyse_CR.pdf
o www.commoncriteriaportal.org/files/epfiles/Wyse_ST.pdf
o www.commoncriteriaportal.org/

© 2012 Wyse Technology, Inc. 3
Wyse Software Downloads
o www.wyse.com > Support > Downloads, select a specific product
o https://appservices.wyse.com/pages/serviceandsupport/support/downloads.asp
4. WDM Architecture WDM Enterprise provides a distributed architecture that allows the major components to be installed
on separate servers for better performance, scalability and bandwidth optimization. All the components
can also be installed on a single server. In WDM Workgroup, all components will be installed on a single
server only. For more information on comparison of Workgroup and Enterprise features refer to
http://www.wyse.com/products/software/management/WDM .
Figure 1: WDM Enterprise Architecture
© 2012 Wyse Technology, Inc. 4
5. Security Guidelines Overview Following is a list of security guidelines that you should follow to securely manage your Wyse devices.
1. Enable secure mode (HTTPS)
2. Disable non-secure components and services
3. Change default passwords and default settings in WDM
4. Change default device settings
5. Use latest firmware and software on Wyse devices
6. Use Active Directory integration and delegation
7. Network settings
6. Detailed Security Guidelines This section provides detailed information on security features of WDM and configuration steps for each
item listed in the previous section.
6.1. Enable Secure Mode (HTTPS) WDM can use two protocols to manage the devices: non-secure (HTTP) and secure(HTTPS). During
installation of WDM default mode is configured to use non-secure mode (HTTP). After installation,
customers can enable HTTPS. This section provides detailed steps for configuring WDM, IIS and agents
to use HTTPS.
Steps to Configure Secure Mode (HTTPS)
1. Configure IIS to use HTTPS
Refer to Appendix B - Enable Secure Mode (HTTPS) in IIS for a step-by-step guide.
2. Enable HTTPS and CA validation in WDM
a) Open WDM GUI
b) Navigate to Configuration Manager > Software Repositories and double-click to on a
repository
c) Enable ‘Secure(HTTPS)’
d) Enable ‘CA Validation’
3. Deploy certificates to devices
Refer to the WDM Administrators Guide for information on how to deploy the root/CA
authority’s public certificates to the devices. In addition, devices running WTOS, SUSE Linux and
Ubuntu Linux OS provide an additional method of deploying certificates via INI files.
6.2. Disable Non-secure Components and Services To maintain a secure management environment the following services and features should be disabled.
6.2.1. Disable FTP Repository1
a) Open WDM GUI
1 PCoIP devices (P20) support firmware update using FTP only; disabling the FTP repository will result in inability to
update their firmware.
© 2012 Wyse Technology, Inc. 5
b) Navigate to Configuration Manager > Software Repositories and double-click to on a
repository
c) Set Transfer Type to ‘HTTP’
6.2.2. Disable HTTP Repository
After HTTPS has been enabled using steps provided in Appendix B - Enable Secure Mode (HTTPS)
in IIS, use the following steps to disable HTTP communications in IIS.
a) Click Start > in the ‘Search programs and files’ textbox type ‘inetmgr’ to open IIS Manager
b) Navigate to Sites > Rapport HTTP Server > Rapport HTTP Server and click on ‘Bindings...’ on
right most pane to open Site Bindings window
c) In Site Bindings window, click the row for http
d) Click Remove and Close
6.2.3. TFTP Server/Services
On the WDM server:
a) Press Start > All Programs > Administrative Tools > Services
b) Find ‘WDM TFTP
c) Double-click and select ‘Stop’
d) Set ‘Startup type’ to Disabled
e) Press Ok
6.3. Change Default Passwords and Default Settings in WDM During installation of WDM the installer will set default passwords and default settings for a number of
components used by WDM. Some of these can be set to non-default values after installation; others
must be set at the time of installation.
List of default settings used by WDM Installer:
6.3.1. SQL Database Password
WDM uses a SQL Server instance named ‘rapportdb’ with privileges for the ‘sa’ user. See the
‘During Installation’ sections below on how to set non-default password.
6.3.2. Software Repositories
WDM supports use of FTP, HTTP and/or HTTPS-based software repositories (password (Master
Software Repository of WDM and one/more Remote Software Repositories)). See the ‘During
Installation’ and ‘After Installation’ sections below on how to set non-default passwords.
6.3.3. Ports used for Communications
WDM uses various ports for communicating with WDM components and HAgents. A listing for
these ports is provided in the Installation Guide. It is recommended to use non-standard (non-
default) ports for the following components:
o WDM SQL Database: default TCP port 1433 used by SQL Server
o WDM HTTP and HTTPS ports

© 2012 Wyse Technology, Inc. 6
6.3.4. Firewall Settings
WDM requires specific ports to be excluded from the firewall rules on computers where WDM
components are installed; enable (add exceptions) only for services and features that you plan
to use.
For example, if you do not have PCoIP devices such as P20, then you do not need to add
exceptions for TCP ports 9880 and 50,000 used by the ThreadX Manager Service.
The rest of this section provides specific steps that can be used to change default settings, either during
installation or after installation of WDM.
During Installation
a. Database Settings
It is easier to configure non-default settings for the SQL Server database than after
installation.
o SQL Server Password
WDM installer includes Microsoft SQL Express as a built-in database (instance name:
RAPPORTDB) for the user ‘sa’. If the installation is done as ‘Typical’ then a default
password is used; during a ‘Custom’ installation you can set this password. Custom
installation also allows you to use an existing (from a previous WDM version install)
or different database (such as a full SQL Server), instead of the built-in database.
o SQL Server Communications Port
WDM uses the following port for communicating with SQL Server database: default
TCP port 1433. This port can be set by selecting a ‘Custom’ installation.
b. Software Repositories Password
WDM agents connect to WDM repositories using a user called ‘rapport’. It is
recommended to change the password for the ‘rapport’ user instead of the default
value. If the installation is done as ‘Typical’ then a default password is used; during a
‘Custom’ installation you can set this password.
c. Firewall Settings
Starting with WDM 4.9, during installation a pre-requisite utility allows administrators to
configure the default firewall ports. If you plan to configure non-default ports or are
using an older version of WDM, it is recommended to not run the Firewall Settings
component of the utility, and configure the firewall port exceptions manually.
After Installation
Ports used for Communications
Ports used by WDM can be configured as follows:
IIS
WDM uses Internet Information Services (IIS) webserver for communicating
with devices; following changes should be performed on the IIS settings of the
server where WDM is installed.
Web Server HTTP (non-secure) port: default TCP port 80
Web Server HTTPS (secure) port: default TCP port 443

© 2012 Wyse Technology, Inc. 7
1. Click Start > in the ‘Search programs and files’ textbox type
‘inetmgr’ to open IIS Manager
2. Navigate to Sites > Rapport HTTP Server > Rapport HTTP
Server and click on ‘Bindings...’ on right most pane to open Site
Bindings window
3. In Site Bindings window, click the row for http or https
4. Click Edit and provide a new value for Port
5. Click Ok, and then Close
6. Restart the IIS server for the settings to take effect:
Go to ‘Rapport HTTP Server’ page of IIS Manager
Click on ‘Restart from the right-side panel ‘Manage Web
Site’
Note: After these changes are made open the WDM Preferences
panel to see if the new settings are configured in WDM.
Software Repositories Password
1. On the Windows server where WDM is installed open Control Panel
2. Go to ‘User Accounts’
3. Change password for the user ‘rapport’
4. Open WDM GUI
5. Navigate to Configuration Manager > Software Repositories
6. Double-click on a repository and in the HTTP section type the same password
for the rapport user in the Password and Verification textboxes
SQL Server Communications Port
To change the SQL port (instead of default 1433) follow the steps below:
Database server
1. Press Start and navigate to ‘Microsoft SQL Server’ >
Configuration Tools
2. Open SQL Server Configuration Manager
3. Navigate to ‘SQL Server network Configuration’ > ‘Protocols for
RAPPORTDB’
4. Double-click on TCP/IP from the right-side pane
5. On the IP Addresses tab stet a specific TCP Port value for the IP
address corresponding to the database machine
6. Restart the WDM machine
All computers running WDM components, including GUI and software
repositories (for a distributed install)
1. Open Registry Editor (Start > type “regedit”)

© 2012 Wyse Technology, Inc. 8
2. Navigate to Software > Wow6432Node > Rapport >
Database
3. Change the value of DBPort to match the value set on the SQL
Server
4. Restart the GUI
WDM Preferences:
Open WDM GUI
Navigate to Configuration Manager > Preferences
Double-click on Service Preferences and select “Serv/Port Settings”
6.4. Change Default Device Settings To securely manage your devices settings on the devices also need to be configured to reduce
vulnerability of attacks. This section provides an overview of the different types of settings that should
be managed. It provides some details on how these settings should be configured. For complete details
(such as INI settings that can be sent remotely) refer to the administrator’s guide for the specific
platform. These include:
1. Write-Filter
2. Remote Shadowing (VNC)
3. Passwords for BIOS and Users
4. Domain-join
5. PXE imaging
6.4.1. Write-Filter
Windows Embedded products from Wyse include a protection mechanism called “Write Filter”, which is
enabled by default. When the Write-Filter is enabled (on, indicated by a green button in the system tray)
any changes done on the device are not retained after a reboot. Only an administrator can enable or
disable the Write-Filter.
It is recommended to leave the Write-Filter enabled. WDM will remotely enable/disable the Write-Filter
when it is performing any updates on the device.
6.4.2. Remote Shadowing (VNC)
Wyse devices, except P20, include a remote shadowing server that allows WDM administrators to view
the user’s device display from the WDM GUI. This allows administrators and help desk users to provide
hands-on technical support without visiting the end-user’s desk/site.
The VNC client resides on the WDM server. The remote shadow feature uses the VNC protocol. By
default, when a remote shadow session is established the WDM administrator must provide a password
to initiate the session, and the end-user is notified; the end-user can decline the remote shadow
request. After a remote shadow session is established, with user approval or after a timeout, a system
tray icon provides the end-user information on an active session.

© 2012 Wyse Technology, Inc. 9
Following are the options to make reverse shadow more secure:
Remove VNC client from the device
Disable VNC client, and enable it explicitly when debugging
Change the default password used by VNC for remote shadowing
Replace the built-in VNC client (in WDM) and server (on device) with more secure, 3rd party,
versions, that provide encryption and logging
Set default behavior of VNC server (on device) when a remote shadow request is received
Set VNC server (on device) to only accept connections from known or approved sources (such as
WDM server)
6.4.3. Passwords for BIOS and Users
Wyse devices use passwords for local users and local administrators; these values should be changed to
ensure that non-authorized users do not gain access to the devices or elevate their privilege levels for
malicious use.
Refer to the platform/OS specific administrators guide for steps on configuring these settings on
individual devices. Alternatively you can configure a reference device with these settings, copy/pull the
OS or firmware using the Wyse USB Firmware Tool and then deploy it to all your devices through WDM.
Below is a list of settings and passwords that should be changed:
1. BIOS Settings
This is applicable to devices running WTOS, Windows Embedded or Wyse enhanced SUSE Linux
operating systems. Products running these operating systems have a local BIOS password that
protects the BIOS settings (including boot devices, boot order preferences).
Level Windows Embedded
Wyse enhanced SUSE Linux
Wyse enhanced Ubuntu Linux (ARM-based T50)
WTOS (except ARM-based T102)
Per-device (directly on the device)
At boot time press the ‘Del’ key to enter the BIOS menu
At boot time press the ‘Del’ key to enter the BIOS menu
At boot time press the power button and Del key3
At boot time press the power button and Del key
Through WDM Deploy updated OS and BIOS through WDM
Deploy updated OS, BIOS and INI settings through WDM
Deploy updated OS, BIOS and INI settings through WDM
Deploy updated OS, BIOS and INI settings through WDM
2ARM-based WTOS platforms (T10) do not have any local boot or BIOS options; all related preferences can only be
set from remotely deployed INI files.
3 There are two options at boot time: Power button + P key to select boot order, Power button + Del key to set
passwords.

© 2012 Wyse Technology, Inc. 10
Table 1: BIOS or Boot menu Options on Wyse Devices
Each platform provides platform-specific settings that can be controlled, including:
BIOS password
Boot order
Boot from USB devices
2. Local and administrative user passwords
This is applicable to all Wyse devices including those running WTOS and PCoIP devices (like P20).
Operating System/Platform Local users Local Administrator
Windows Embedded User Administrator
Wyse enhanced SUSE Linux Thinuser Admin
Wyse enhanced Ubuntu Linux
Thinuser guest
Admin
WTOS <none> Admin4
PCoIP (P20) <none> <admin password can be set> Table 2: Users and Administrator Accounts on Wyse Devices
6.4.4. Domain-join
Windows Embedded devices can also be attached to the Active Directory (AD) domain of the enterprise,
and all end-users can be required to use their AD-based credentials to login. This can add an additional
layer of security and monitoring through normal AD-based tools.
6.4.5. PXE Imaging
Wyse devices running on x86-based platforms can be imaged using PXE protocol. WDM includes a TFTP
server to provide PXE-based imaging. WDM supports use of non-PXE or other methods of updating (INI-
based) the OS/firmware.
It is also recommended to disable the TFTP service of WDM that responds to PXE requests from devices.
It is recommended to set PXE as a lower priority in the boot order, or to disable PXE support in the
device BIOS settings. This is normally a custom or special request that requires system engineering and
services support.
6.5. Use Latest Firmware and Software on Wyse Devices Wyse product teams update software running on the devices on a regular basis. These software updates
are published on the website’s Support > Downloads section. The updates include following categories:
WDM agents (HAgent)
OS or firmware updates
Software updates for 3rd party components such as Citrix Receiver, VMware View client
4 Can be set through INI configuration files delivered via WDM
© 2012 Wyse Technology, Inc. 11
6.6. Active Directory Integration and Delegation It is recommended that access to computer where WDM (and its components) is installed should be
controlled through normal Windows credentials. Access to WDM GUI should be provided on an as-
needed basis and each user that is permitted to access the WDM computer must be assigned specific
privileges in the WDM GUI.
WDM can be installed on a computer that is already joined to an Active Directory domain. Additional
administrators should only have access to a computer where only WDM GUI is installed.
Active Directory and delegation settings can be controlled through the following settings:
Open WDM GUI
Navigate to the Configuration Manager > User Permissions node in the left panel
Right-click and select New > User/Group
Add a user from the local machine’s domain or from the AD domain
Assign specific privileges for managing devices, such as:
o Device specific: Remote shadow, real-time (reboot, shutdown), delete,
o Create, edit, register, and deploy packages (OS/firmware, software, configuration)
o Create and view reports
o Create, modify Views
6.7. Network Settings This section provides general guidance to ensure that the network where WDM and Wyse devices are
being used follows common security guidelines applicable to any computing environment.
DNS and DHCP Servers
Wyse devices use DNS and DHCP based discovery methods to automatically register with WDM.
It is recommended to restrict access to DNS and DHCP servers to ensure that unauthorized
settings on these servers do not lead to unauthorized management of the devices. Refer to the
WDM Administrator’s Guide for more information on the specific DNS and DHCP settings
needed for automatic discovery.
PXE Traffic
Refer to the PXE Imaging section (in section 6.4) for more information on use of PXE protocol by
Wyse products. It is recommended to restrict/block PXE traffic in the network.
Passwords Policy
Follow generally accepted guidelines for setting strong passwords on all computer systems.

© 2012 Wyse Technology, Inc. 12
Appendix A – Checklist of Items
THIS SECTION PROVIDES A LIST OF SETTINGS COVERED IN THE MAIN DOCUMENT.
1. INTRODUCTION ............................................................................................................................................. 2
2. SCOPE ............................................................................................................................................................ 2
3. REFERENCES .................................................................................................................................................. 2
4. WDM ARCHITECTURE .................................................................................................................................... 3
5. SECURITY GUIDELINES OVERVIEW ................................................................................................................. 4
6. DETAILED SECURITY GUIDELINES ................................................................................................................... 4
6.1. ENABLE SECURE MODE (HTTPS) ......................................................................................................................... 4
6.2. DISABLE NON-SECURE COMPONENTS AND SERVICES ................................................................................................ 4
6.2.1. Disable FTP Repository ........................................................................................................................ 4
6.2.2. Disable HTTP Repository ...................................................................................................................... 5
6.2.3. TFTP Server/Services ............................................................................................................................ 5
6.3. CHANGE DEFAULT PASSWORDS AND DEFAULT SETTINGS IN WDM ............................................................................. 5
6.3.1. SQL Database Password ...................................................................................................................... 5
6.3.2. Software Repositories .......................................................................................................................... 5
6.3.3. Ports used for Communications ........................................................................................................... 5
6.3.4. Firewall Settings .................................................................................................................................. 6
During Installation ................................................................................................................................................ 6
After Installation ................................................................................................................................................... 6
6.4. CHANGE DEFAULT DEVICE SETTINGS ..................................................................................................................... 8
6.4.1. Write-Filter .......................................................................................................................................... 8
6.4.2. Remote Shadowing (VNC) ................................................................................................................... 8
6.4.3. Passwords for BIOS and Users ............................................................................................................. 9
6.4.4. Domain-join ....................................................................................................................................... 10
6.4.5. PXE Imaging ....................................................................................................................................... 10
6.5. USE LATEST SOFTWARE ON WYSE DEVICES .......................................................................................................... 10
6.6. ACTIVE DIRECTORY INTEGRATION AND DELEGATION............................................................................................... 11
6.7. NETWORK SETTINGS ........................................................................................................................................ 11
APPENDIX A – CHECKLIST OF ITEMS ..................................................................................................................... 12
APPENDIX B - ENABLE SECURE MODE (HTTPS) IN IIS ............................................................................................ 13

© 2012 Wyse Technology, Inc. 13
Appendix B - Enable Secure Mode (HTTPS) in IIS
Configure Secure Communication using HTTPS or Root Certificate Authority
Configure Secure Communication using SSL
There are different ways to install SSL in IIS 6.0 and IIS 7 (and 7.5). In order to configure SSL in IIS 6.0,
use the following guidelines:
Configure SSL in IIS 6.0 on Windows Server 2003
Use the following guidelines:
Download IIS 6.0 Resource Kit Tools from the link IIS 6.0 Resource Kit Tools.
1. Install IIS 6.0 Resource Kit Tools.
2. Go to command prompt and change the directory to the location of binary selfssl.exe (e.g.
"c:\Program Files\IIS Resources\SelfSSL").
3. Execute the utility selfssl with the following parameters:
4. selfssl /N:cn=certificate_name /S:site_id (e.g. selfssl /N:cn=MyComputer.Sample.com /S:1, if
site id is 1, cn should be a combination of computer's FQDN name and IP address)
4. After that do the following to configure SSL settings:
Go to command prompt and change the directory to the location of file adsutil.vbs (e.g.
"c:\Inetpub\AdminScripts").
Run the adsutil.vbs from the command prompt as mentioned below:
cscript.exe adsutil.vbs set /w3svc/site_id/SecureBindings ":443 (e.g.
cscript.exe adsutil.vbs set /w3svc/1/SecureBindings ":443, if site id is 1).
Configure SSL in IIS 7 on Windows Server 2008 R2
Use the following guidelines:
Download SelfSSL7 utility from the link SelfSSL.exe.
1. Call the utility SelfSSL7.exe with the below mentioned parameters:
2. SelfSSL7.exe /Q /N cn=Certificate_Name /I /S Web_Site_Name. e.g. SelfSSL7.exe /Q /N
cn="TestCert.TestLab.com" /I /S "Default Web Site"
Configure Secure Communication using Root Certificate Authority

© 2012 Wyse Technology, Inc. 14
Install Root Certificate Authority in IIS 7 on Windows Server 2008 R2
Use the following guidelines:
In order to install the certificate, two steps need to be followed:
Install the certificate on Domain Controller server.
Install the certificate on WDM server.
Install the certificate on Domain Controller server:
Use the following guidelines:
1. Go to the Server Manager.
2. In the tree pane select Roles->Add Roles.
3. In Add Roles wizard, select Server Roles from the tree pane.
4. In select Server Role window, check Active Directory Certificate Service from Roles.

© 2012 Wyse Technology, Inc. 15
5. Click Next->Next. Then in Role Services, check the options Certification Authority and
Certificate Authority Web Enrolment.
6. After checking the option Certification Authority Web Enrollment, if IIS is not installed in the
server, another window, Add Roles Wizard, will appear.
7. On the above window, click on Add Required Role Services button and click Next to invoke
Specify Setup Type window.
© 2012 Wyse Technology, Inc. 16
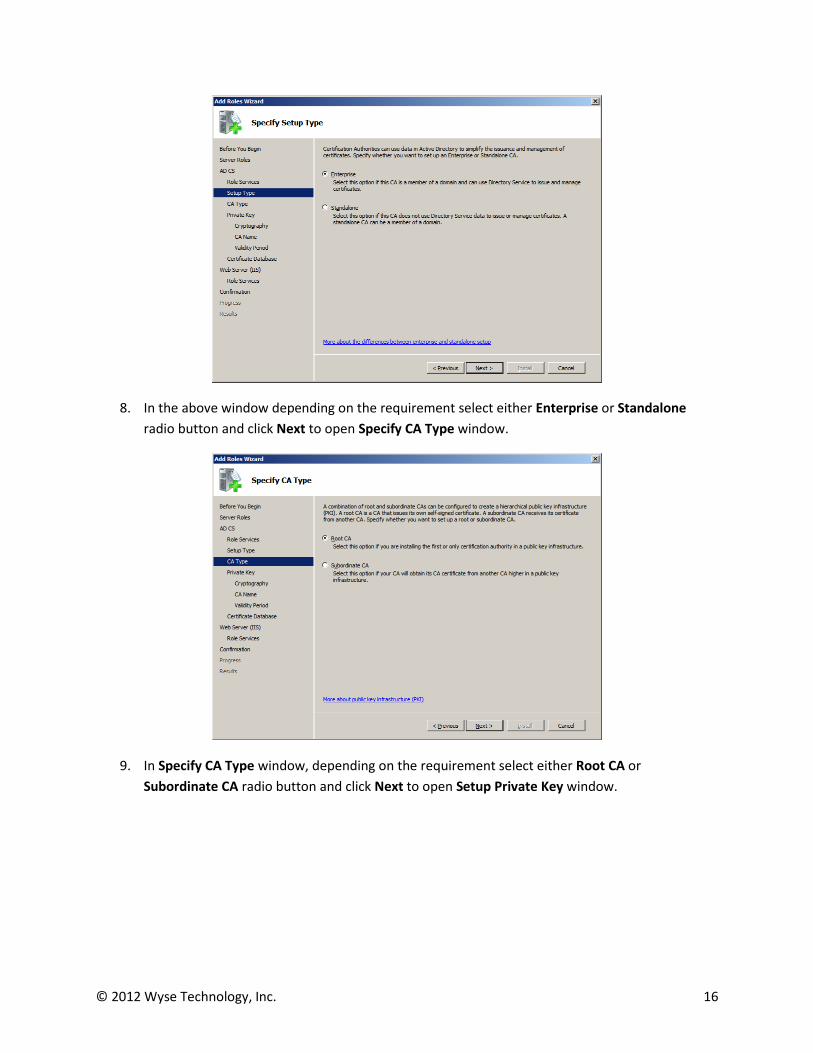
8. In the above window depending on the requirement select either Enterprise or Standalone
radio button and click Next to open Specify CA Type window.
9. In Specify CA Type window, depending on the requirement select either Root CA or
Subordinate CA radio button and click Next to open Setup Private Key window.

© 2012 Wyse Technology, Inc. 17
10. In Setup Private Key window, depending on the requirement, select either Create a new private
key or Use existing private key radio button and click Next to open Configure Cryptography for
CA window.
11. In Configure Cryptography for CA window, depending on the requirement, select the value for
field Select a cryptography service provider (CSP) from the combo box, provide the Key
character length from the combo box, select the value for field Select the Hash algorithm for
signing certificate issued by this CA and either check or uncheck Allow administrator
interaction when the private key is accessed by the CA check box and click Next button to open
Configure CA Name window.
© 2012 Wyse Technology, Inc. 18
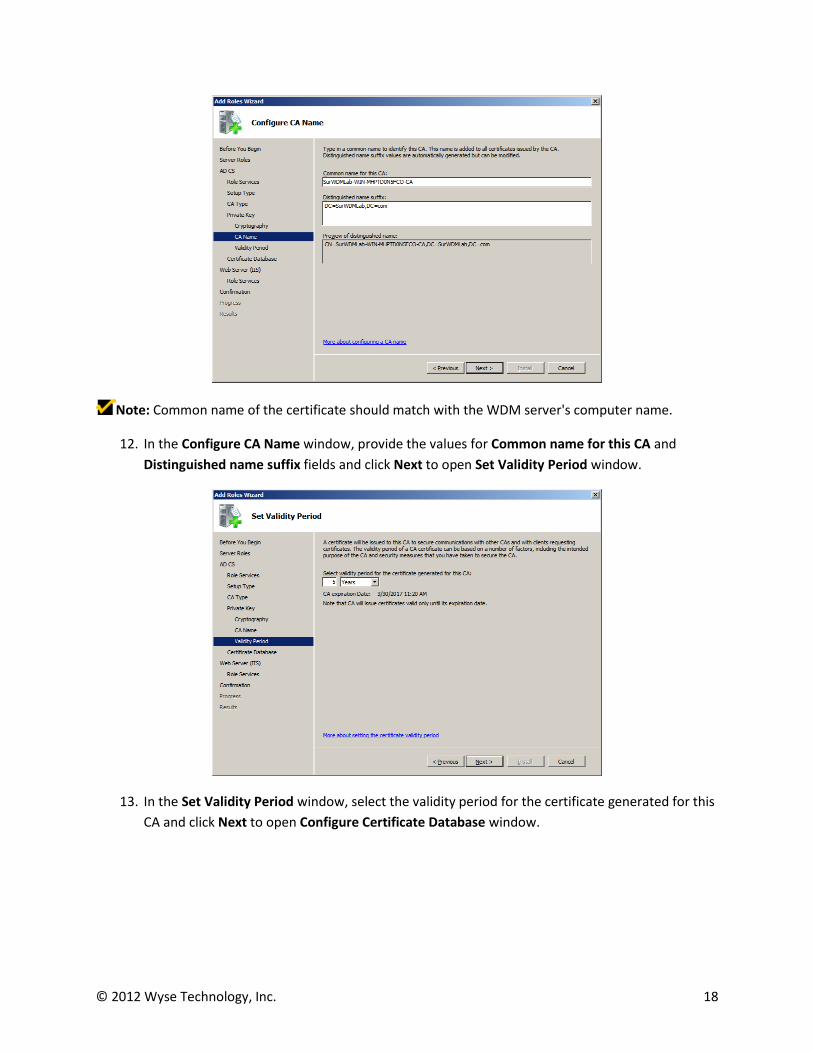
Note: Common name of the certificate should match with the WDM server's computer name.
12. In the Configure CA Name window, provide the values for Common name for this CA and
Distinguished name suffix fields and click Next to open Set Validity Period window.
13. In the Set Validity Period window, select the validity period for the certificate generated for this
CA and click Next to open Configure Certificate Database window.
© 2012 Wyse Technology, Inc. 19
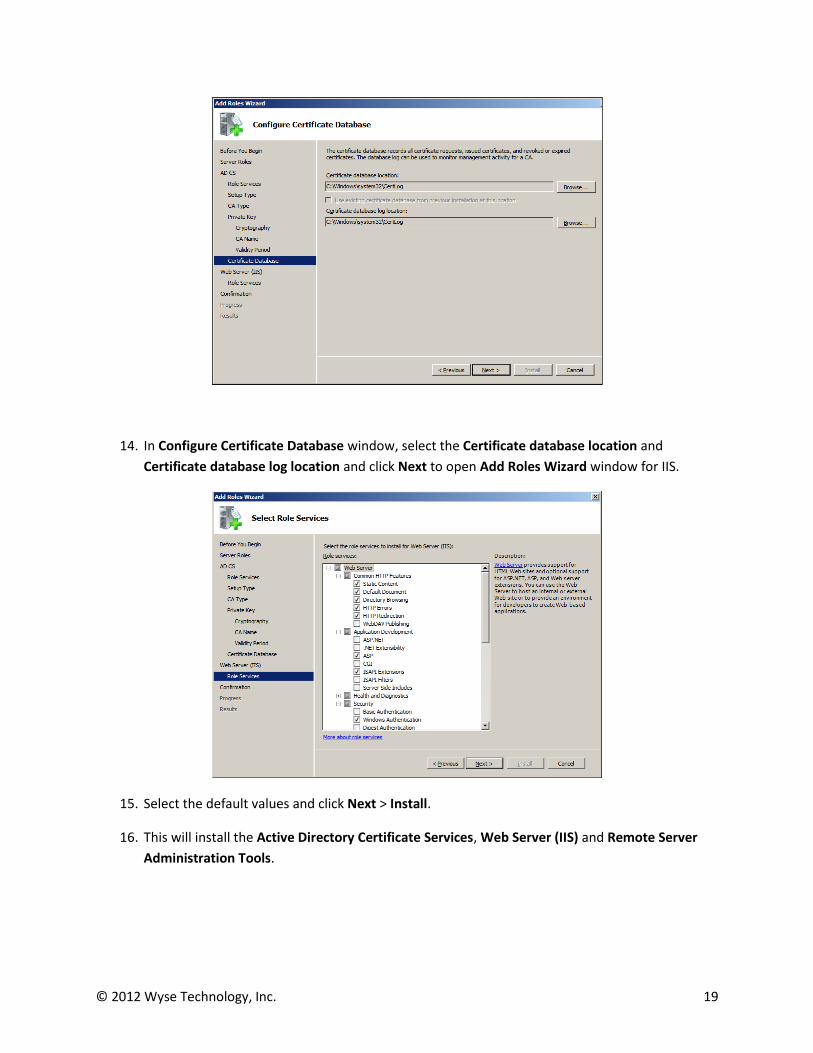
14. In Configure Certificate Database window, select the Certificate database location and
Certificate database log location and click Next to open Add Roles Wizard window for IIS.
15. Select the default values and click Next > Install.
16. This will install the Active Directory Certificate Services, Web Server (IIS) and Remote Server
Administration Tools.
© 2012 Wyse Technology, Inc. 20
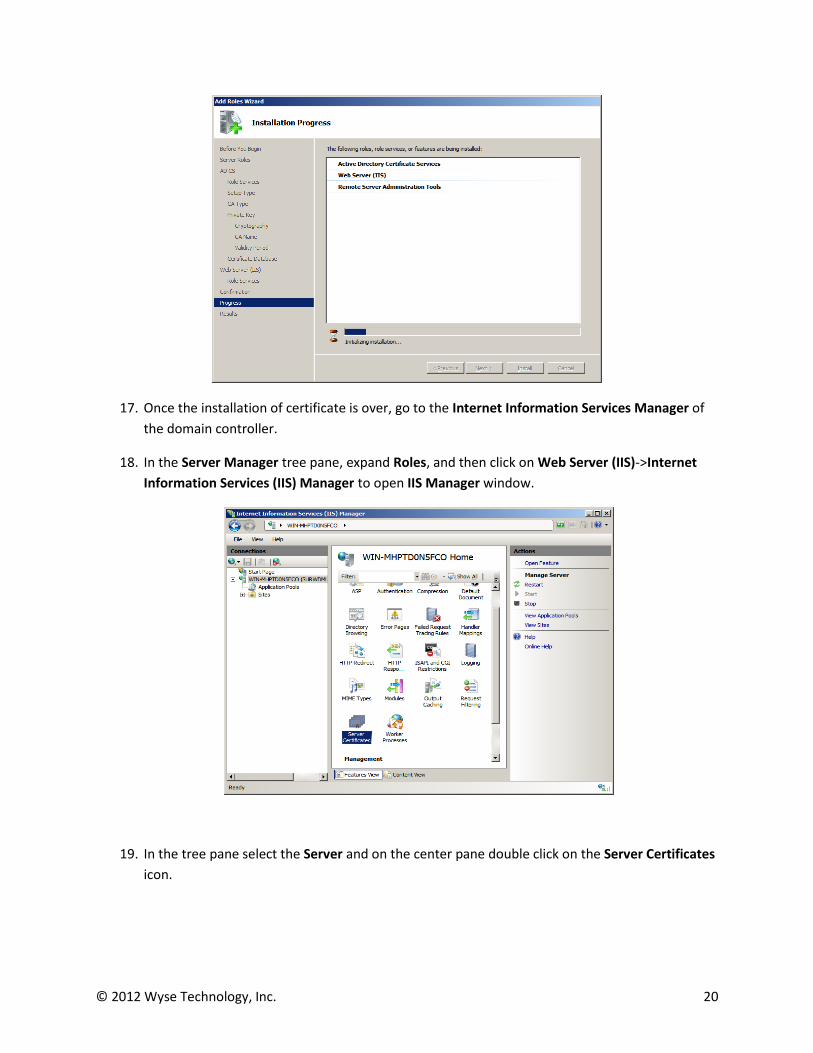
17. Once the installation of certificate is over, go to the Internet Information Services Manager of
the domain controller.
18. In the Server Manager tree pane, expand Roles, and then click on Web Server (IIS)->Internet
Information Services (IIS) Manager to open IIS Manager window.
19. In the tree pane select the Server and on the center pane double click on the Server Certificates
icon.
© 2012 Wyse Technology, Inc. 21
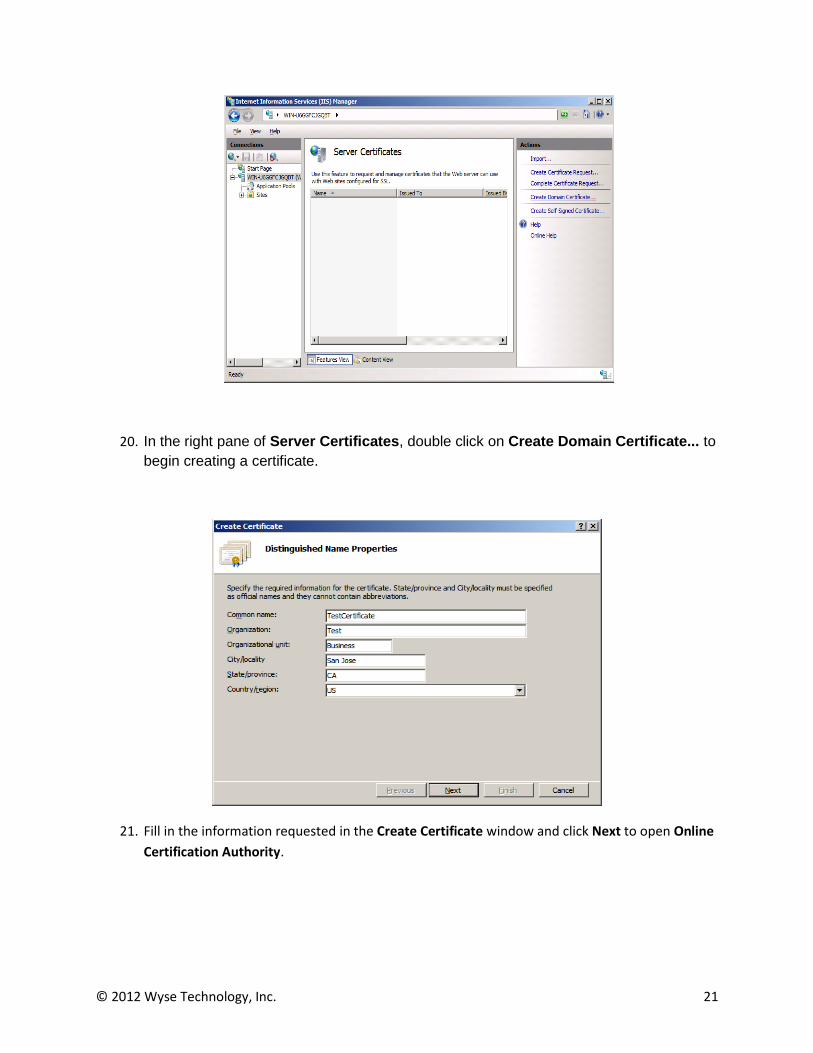
20. In the right pane of Server Certificates, double click on Create Domain Certificate... to
begin creating a certificate.
21. Fill in the information requested in the Create Certificate window and click Next to open Online
Certification Authority.
© 2012 Wyse Technology, Inc. 22
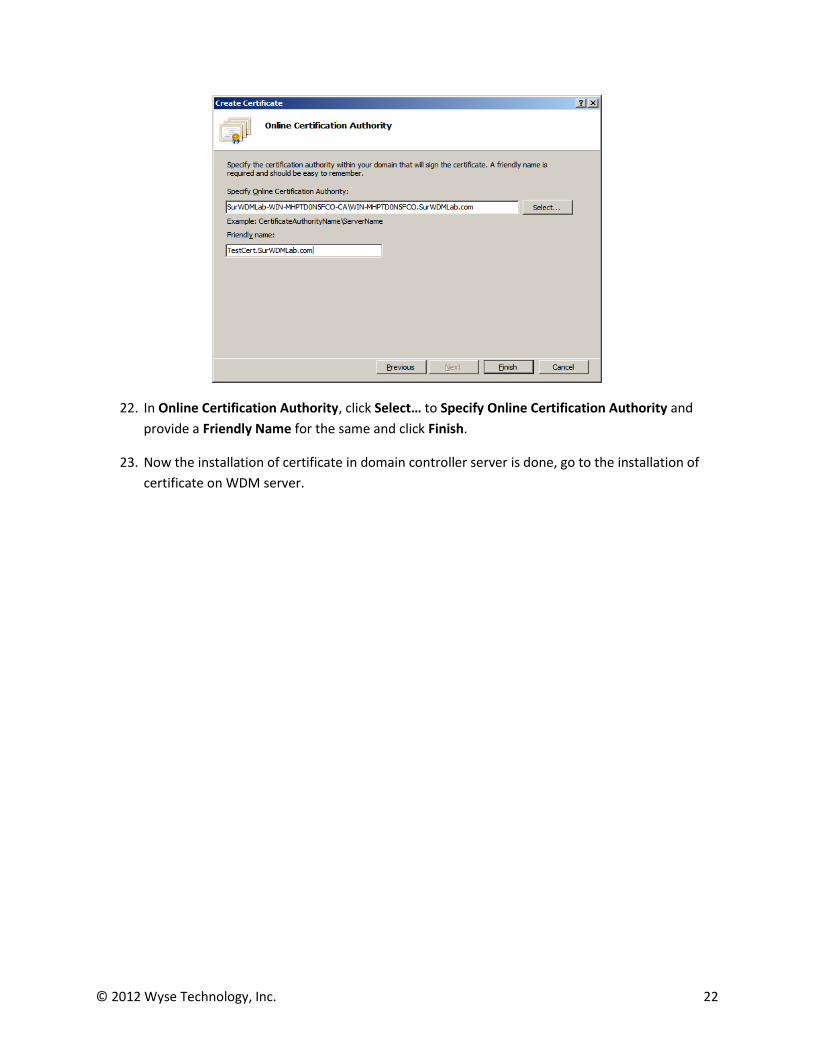
22. In Online Certification Authority, click Select… to Specify Online Certification Authority and
provide a Friendly Name for the same and click Finish.
23. Now the installation of certificate in domain controller server is done, go to the installation of
certificate on WDM server.
© 2012 Wyse Technology, Inc. 23
Install the certificate on WDM server:
Use the following guidelines:
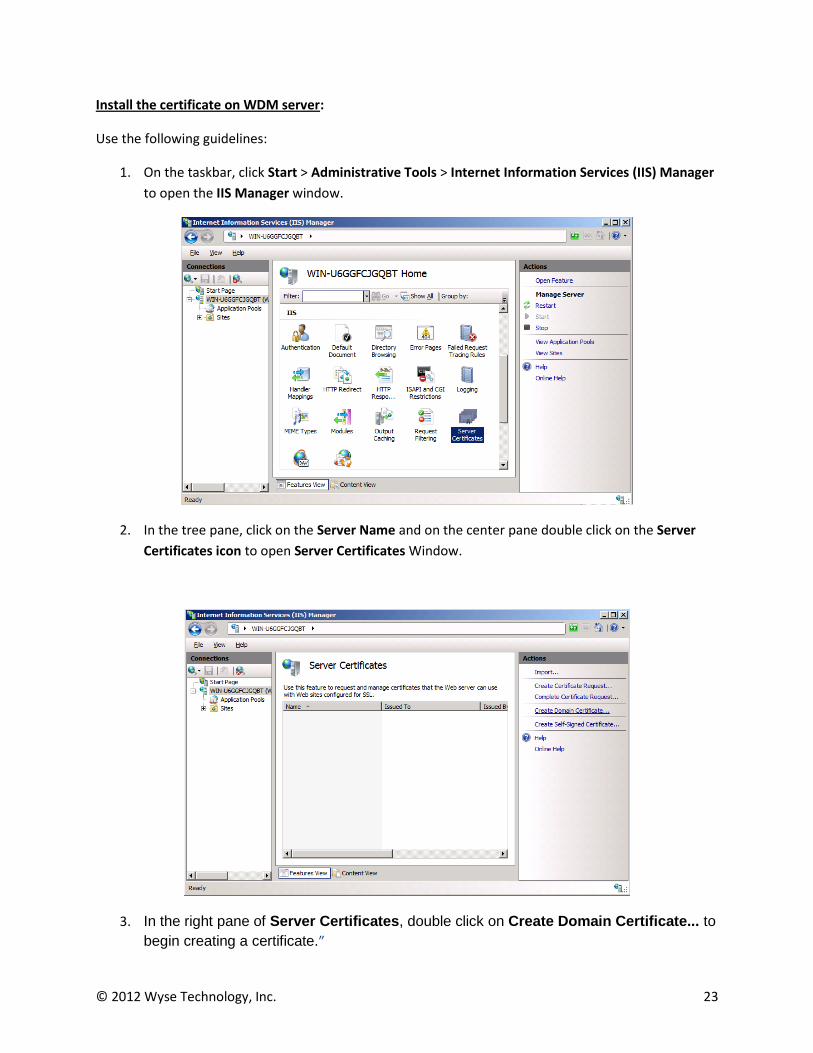
1. On the taskbar, click Start > Administrative Tools > Internet Information Services (IIS) Manager
to open the IIS Manager window.
2. In the tree pane, click on the Server Name and on the center pane double click on the Server
Certificates icon to open Server Certificates Window.
3. In the right pane of Server Certificates, double click on Create Domain Certificate... to
begin creating a certificate.”
© 2012 Wyse Technology, Inc. 24
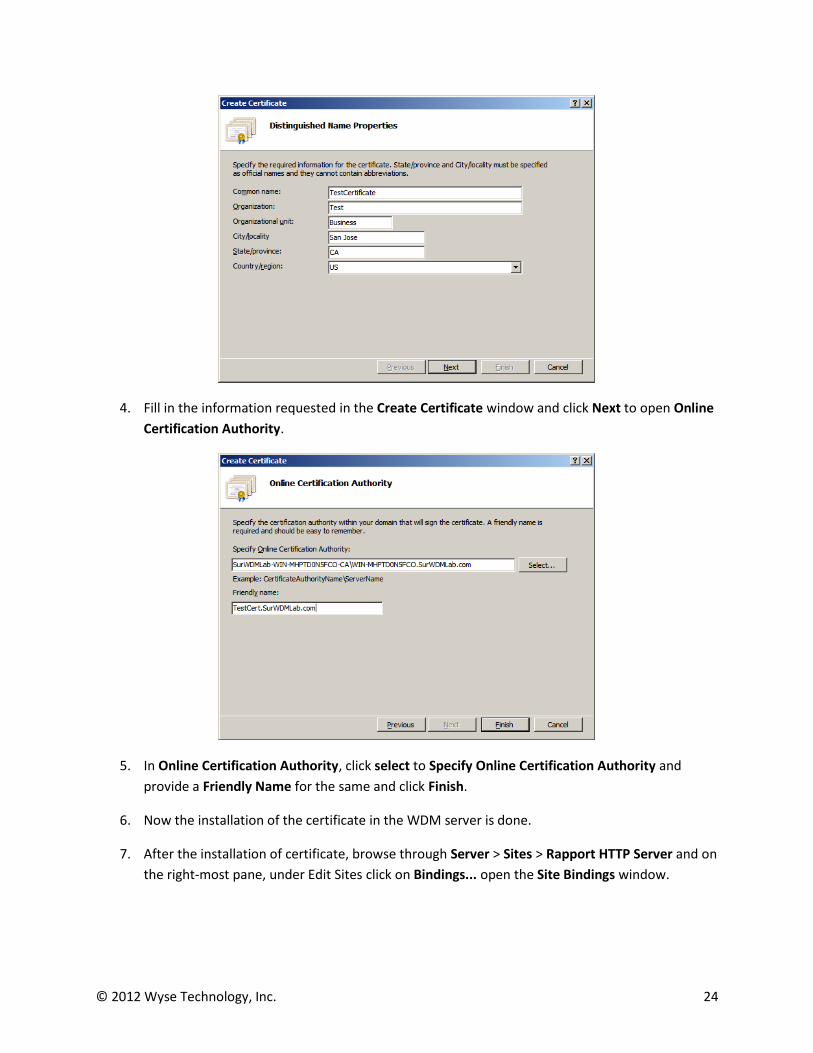
4. Fill in the information requested in the Create Certificate window and click Next to open Online
Certification Authority.
5. In Online Certification Authority, click select to Specify Online Certification Authority and
provide a Friendly Name for the same and click Finish.
6. Now the installation of the certificate in the WDM server is done.
7. After the installation of certificate, browse through Server > Sites > Rapport HTTP Server and on
the right-most pane, under Edit Sites click on Bindings... open the Site Bindings window.

© 2012 Wyse Technology, Inc. 25
8. In Site Bindings window, click Add to Add Site Binding
9. In Add Site Binding, select the recently created certificate from SSL Certificate combo box and
click OK button.
10. In order to start only HTTPS communication, select:
SSL Settings under Server > Sites > Rapport HTTP Server.

© 2012 Wyse Technology, Inc. 26
11. In SSL Settings, select Require SSL check box and Apply the setting.


![IT Security Guidelines [G3]](https://static.fdocuments.net/doc/165x107/61ae53c0c8b20b7cc7045d83/it-security-guidelines-g3.jpg)