WADE DEVELOPMENT TUTORIAL - Jade Sitejade.tilab.com/wade/doc/tutorial/WADE-Tutorial.pdf · WADE...
29
WADE DEVELOPMENT TUTORIAL L AST U PDATE : 12 N OVEMBER 2013 WADE 3.3 OR LATER WOLF 3. X OR LATER A UTHORS : Giovanna Sacchi - Telecom Italia S.p.A. Annalisa Marando - University of Reggio Calabria Elena Quarantotto - Telecom Italia S.p.A. Giovanni Caire - Telecom Italia S.p.A.
Transcript of WADE DEVELOPMENT TUTORIAL - Jade Sitejade.tilab.com/wade/doc/tutorial/WADE-Tutorial.pdf · WADE...

WA D E D E V E L O P M E N T T U TO R I A L
LAST UPDATE: 12 NOVEMBER 2013
WADE 3.3 OR LATER
WOLF 3.X OR LATER
AUTHORS:
Giovanna Sacchi - Telecom Italia S.p.A.
Annalisa Marando - University of Reggio Calabria
Elena Quarantotto - Telecom Italia S.p.A.
Giovanni Caire - Telecom Italia S.p.A.
1 INTRODUCTION .......................................................................................................... 3
1.1 Installation .............................................................................................................................. 4
1.2 The “Toys Assembler” case study ........................................................................................ 5 1.2.1 Additional material .............................................................................................................. 6
2 CREATING A “FULL FEATURED WADE” APPLICATION ........................................ 7
2.1 Creating the “Toys Assembler” project ............................................................................... 7
2.2 Starting the Toys Assembler application Main Container ................................................. 8
2.3 Application Structure ............................................................................................................ 9
2.4 Main Agent classes and types .............................................................................................. 10
3 CREATING WORKFLOWS ........................................................................................ 13
3.1 Creating a module ................................................................................................................ 13
3.2 Creating the AssemblingToyWorkflow ............................................................................. 13
3.3 Creating activities ................................................................................................................ 14
3.4 Workflow parameters .......................................................................................................... 16
3.5 Creating Transitions ............................................................................................................ 16
3.6 The Assembling Toy Workflow .......................................................................................... 17
3.7 Invoking Web Services ........................................................................................................ 18
3.8 Subflows ................................................................................................................................ 21 3.8.1 Joining asynchronous flows ............................................................................................... 22
3.9 Workflow class structure..................................................................................................... 22
4 LAUNCHING WORKFLOWS FROM CODE .............................................................. 23
5 LAUNCHING A WADE APPLICATION ..................................................................... 25
5.1 The Toys Assembler application configuration file .......................................................... 25
5.2 Launching the Toys Assembler application inside Eclipse .............................................. 25
5.3 Launching the Toys Assembler application outside Eclipse ............................................ 27
1 Introduction
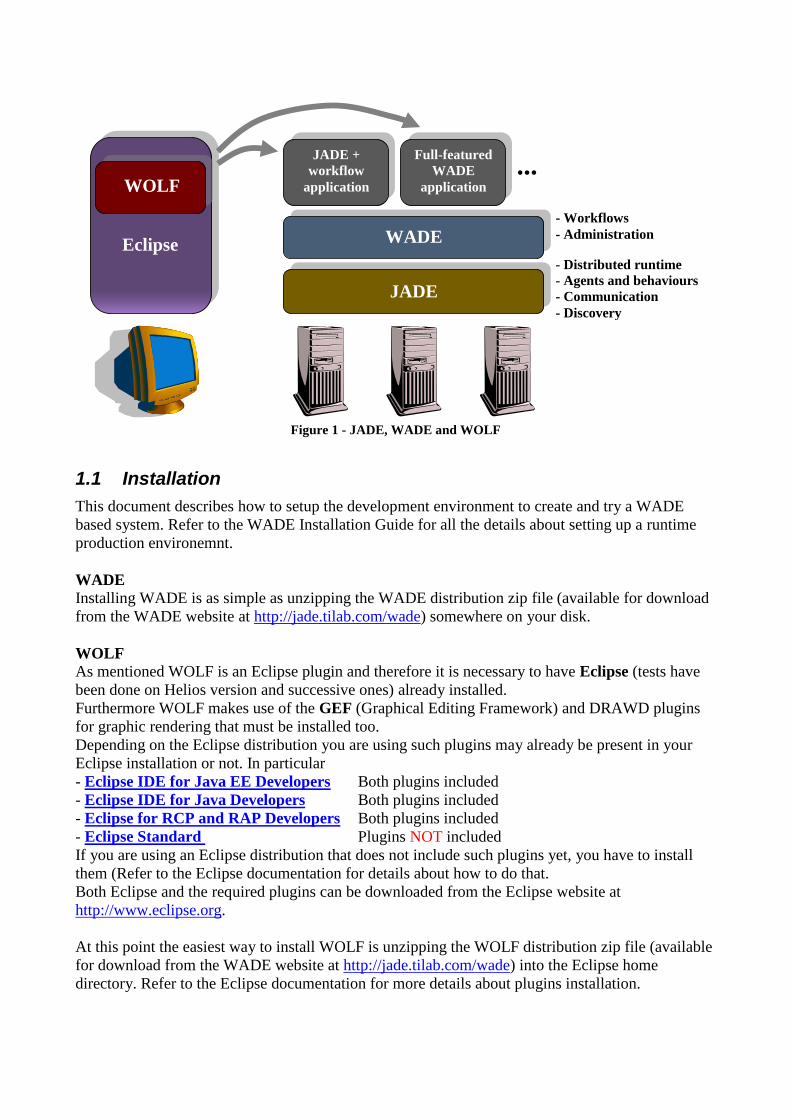
This tutorial describes how to create applications exploiting agents and workflows based on the
WADE (Workflow and Agents Development Environment) platform. WADE is an extension of
JADE (http://jade.tilab.com) a popular Open Source framework for the development of distributed
agent oriented applications. WADE adds to JADE
1. The possibility of defining agent tasks according to the workflow metaphor
2. An architecture and additional components and mechanisms that facilitate the administration
of a distributed WADE based application in terms of configuration, activation and monitoring.
Being WADE an extension of JADE, a WADE-based application is also a JADE-based application
and inherits the basic JADE architectural elements: agents, containers, main container, AMS and
DF. A fairly good understanding of JADE basic features (agents, behaviours and messaging in
particular) is a prerequisite for the comprehension of this tutorial. People not familiar with JADE
are encouraged to read the JADE Administration Tutorial
(http://jade.tilab.com/doc/tutorials/JADEAdmin/index.html) and JADE Programming Tutorial
(http://jade.tilab.com/doc/JADEProgramming-Tutorial-for-beginners.pdf) first.
The two main features (i.e. workflows and administration support) provided by WADE can be used
separately and, as a consequence, WADE-based applications can be classified in two main
categories
Simple JADE applications where some agent tasks (“behaviours” according to the JADE
terminology) are defined as workflows (we will talk about “JADE plus workflows applications”
in this case).
Applications structured according to the complete WADE architecture and therefore able to
exploit all WADE features (we will talk about “Full featured WADE applications” in this case).
This tutorial focuses on Full featured WADE applications. For a detailed explanation of the
complete WADE architecture and functionality the reader can refer to the WADE User Guide
(http://jade.tilab.com/wade/doc/WADE-User-Guide.pdf).
In principle an application built on top of WADE can be created using “notepad-programming”.
However, considering that its most carachterizing feature is the possibility of defining agent tasks as
workflows, WADE is coupled with a graphical development environment called WOLF. WOLF is
an Eclipse (www.eclipse.org) plugin and allows
Easily configuring an Eclipse project targeting the development of a WADE- based application.
Graphically creating and maintaining workflows that can be executed by WADE agents.
Trying and debugging workflows as well as the whole system inside Eclipse.
Creating the installation package to install the system in the production environment.
Figure 1 summarizes the concepts described above.
JADE
WADE Eclipse
WOLF
- Distributed runtime
- Agents and behaviours
- Communication
- Discovery
- Workflows
- Administration
JADE +
workflow
application
... Full-featured
WADE
application
Figure 1 - JADE, WADE and WOLF
1.1 Installation
This document describes how to setup the development environment to create and try a WADE
based system. Refer to the WADE Installation Guide for all the details about setting up a runtime
production environemnt.
WADE
Installing WADE is as simple as unzipping the WADE distribution zip file (available for download
from the WADE website at http://jade.tilab.com/wade) somewhere on your disk.
WOLF
As mentioned WOLF is an Eclipse plugin and therefore it is necessary to have Eclipse (tests have
been done on Helios version and successive ones) already installed.
Furthermore WOLF makes use of the GEF (Graphical Editing Framework) and DRAWD plugins
for graphic rendering that must be installed too.
Depending on the Eclipse distribution you are using such plugins may already be present in your
Eclipse installation or not. In particular
- Eclipse IDE for Java EE Developers Both plugins included
- Eclipse IDE for Java Developers Both plugins included
- Eclipse for RCP and RAP Developers Both plugins included
- Eclipse Standard Plugins NOT included
If you are using an Eclipse distribution that does not include such plugins yet, you have to install
them (Refer to the Eclipse documentation for details about how to do that.
Both Eclipse and the required plugins can be downloaded from the Eclipse website at
http://www.eclipse.org.
At this point the easiest way to install WOLF is unzipping the WOLF distribution zip file (available
for download from the WADE website at http://jade.tilab.com/wade) into the Eclipse home
directory. Refer to the Eclipse documentation for more details about plugins installation.
If a previous version of WOLF is already installed, it is recommended to remove it from the Eclipse
plugins directory (by simply deleting the subdirectory related to WOLF) before installing the
new one.
Both WADE and WOLF require Java 6 or later.
1.2 The “Toys Assembler” case study
In order to show how to develop WADE based applications this tutorial makes use of a simple case
study where we want to create an application that is able to assemble toys. More in details the
application must be able to assemble “puppets” rather than “wagons” by putting together the
necessary components.
A puppet is composed of
o 1 head
o 1 body
o 2 arms
o 2 legs
A wagon is composed of
o 1 cockpit
o 4 wheels
Components are stored in a store-room. An external application (StoreKeeper) embeds an inventory
where components availability and position in the store room are recorded. The StoreKeeper
application makes available such information by means of a Web Service interface that gets the
required type (head, leg, wheel...) and quantity of component as input parameters.
However the Toys Assembler application we are developing must take into account that the real
position of components in the store room can be different with respect to that provided by the
StoreKeeper, because someone may have moved the components without updating the inventory. In
that case the Toys Assembler application must be able to find the components itself.
The Toys Assembler application must get the type of toy (puppet or wagon) to assemble from the
user, check the availability of the related components and retrieve their position invoking the
StoreKeeper web service, retrieve the components in the store room and finally assemble the toy. In
order to retrieve the components in the store room the Toys Assembler application has to control
some robots able to perform three different actions
- Fix a destination in the store room
- Move towards the currently fixed destination
- Look around and load components in sight
Of course these robots, as well as the actual toy components assembling operation are
completely emulated.
Figure 2 summarizes the Toys Assembler scenario.
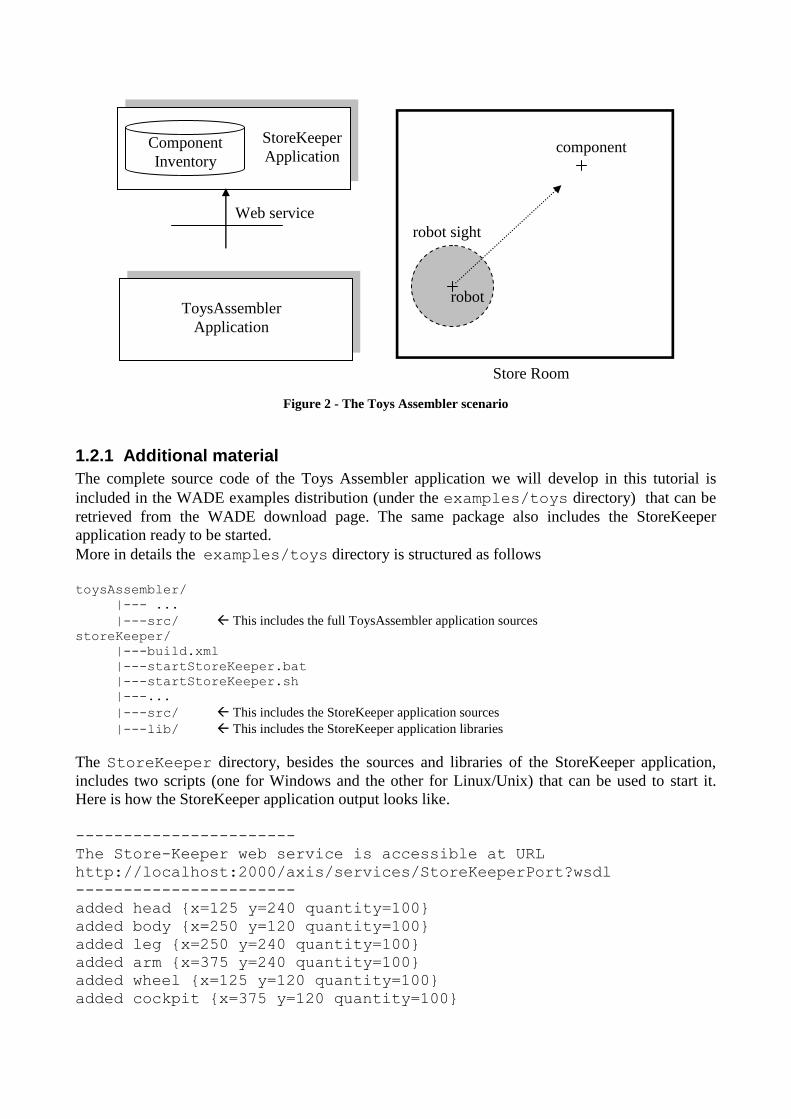
Component
Inventory
StoreKeeper
Application
ToysAssembler
Application
component
robot
robot sight
Store Room
Web service
Figure 2 - The Toys Assembler scenario
1.2.1 Additional material
The complete source code of the Toys Assembler application we will develop in this tutorial is
included in the WADE examples distribution (under the examples/toys directory) that can be
retrieved from the WADE download page. The same package also includes the StoreKeeper
application ready to be started.
More in details the examples/toys directory is structured as follows
toysAssembler/
|--- ...
|---src/ This includes the full ToysAssembler application sources
storeKeeper/ |---build.xml
|---startStoreKeeper.bat
|---startStoreKeeper.sh
|---...
|---src/ This includes the StoreKeeper application sources
|---lib/ This includes the StoreKeeper application libraries
The StoreKeeper directory, besides the sources and libraries of the StoreKeeper application,
includes two scripts (one for Windows and the other for Linux/Unix) that can be used to start it.
Here is how the StoreKeeper application output looks like.
-----------------------
The Store-Keeper web service is accessible at URL
http://localhost:2000/axis/services/StoreKeeperPort?wsdl
-----------------------
added head {x=125 y=240 quantity=100}
added body {x=250 y=120 quantity=100}
added leg {x=250 y=240 quantity=100}
added arm {x=375 y=240 quantity=100}
added wheel {x=125 y=120 quantity=100}
added cockpit {x=375 y=120 quantity=100}
As can be seen from the output above, when activated the StoreKeeper application prints to the
standard output the URL where the WSDL describing its Web Service interface can be retrieved.
2 Creating a “Full featured WADE” application
In this section we start creating the Toys Assembler application and in particular we will setup an
Eclipse project suitable to develop it, define the application structure and write the code of the main
agent classes. In next section we will focus on the definition of the tasks our agents will have to
execute in form of workflows.
2.1 Creating the “Toys Assembler” project
Having installed WOLF into the Eclipse IDE as described in section 1.1, the first step to develop
the Toys Assembler application is to create a suitable Java project (note that WADE, as well as
JADE, is fully written in Java and therefore an Eclipse project targeting the development of a
WADE based application is always a Java project). Let’s call it ToysAssembler.
Be sure that the project uses Java 6 or later, because, as mentioned before, both WADE and WOLF
require it.
In order to enable all the features supported by WOLF on the ToysAssembler Java project it is
necessary to add the WADE nature to the project. This can be done by right-clicking on the project
root and selecting the “WADE Tools --> Add WADE Nature” menu item (refer to the
Eclipse documentation for more details about “natures”).
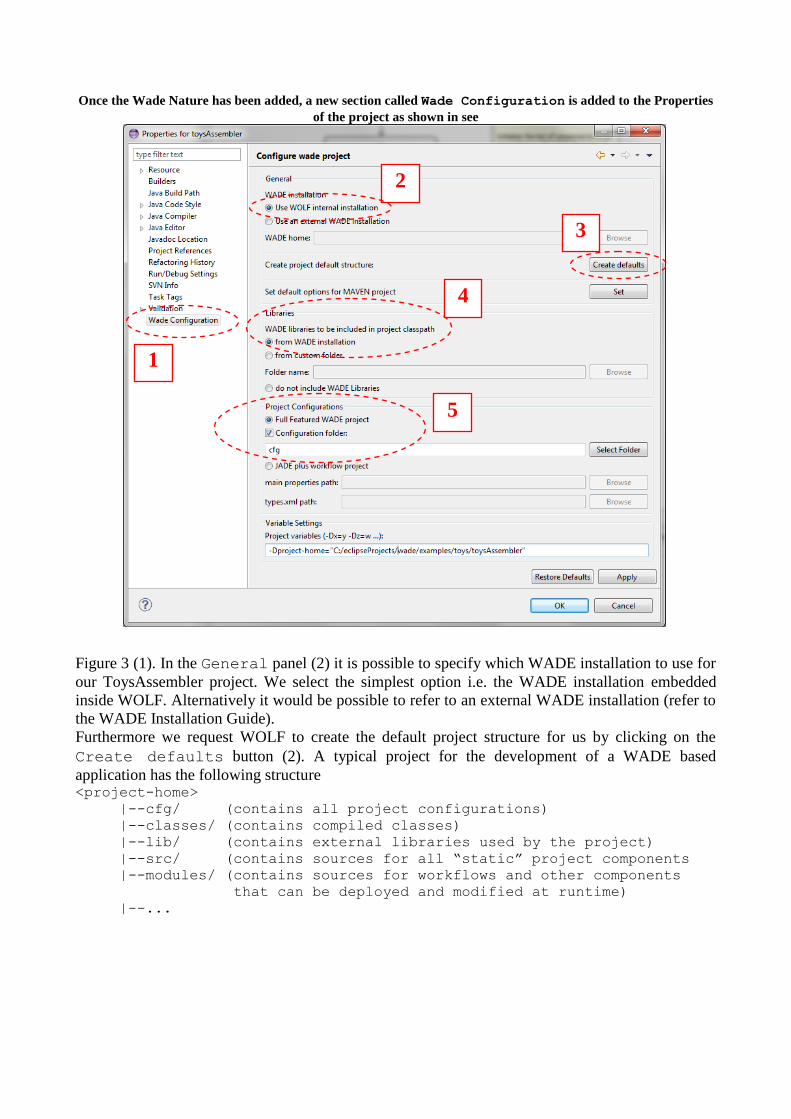
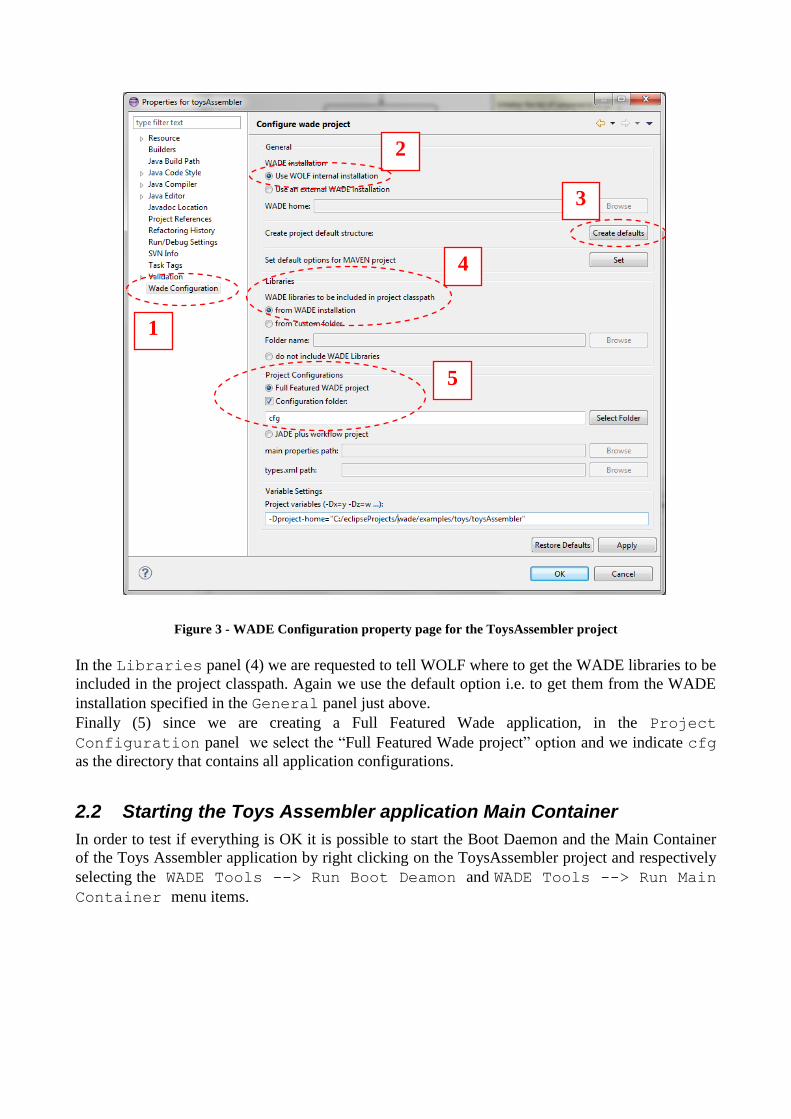
Once the Wade Nature has been added, a new section called Wade Configuration is added to the Properties
of the project as shown in see
1
2
4
5
3
Figure 3 (1). In the General panel (2) it is possible to specify which WADE installation to use for
our ToysAssembler project. We select the simplest option i.e. the WADE installation embedded
inside WOLF. Alternatively it would be possible to refer to an external WADE installation (refer to
the WADE Installation Guide).
Furthermore we request WOLF to create the default project structure for us by clicking on the
Create defaults button (2). A typical project for the development of a WADE based
application has the following structure <project-home>
|--cfg/ (contains all project configurations)
|--classes/ (contains compiled classes)
|--lib/ (contains external libraries used by the project)
|--src/ (contains sources for all “static” project components
|--modules/ (contains sources for workflows and other components
that can be deployed and modified at runtime)
|--...
1
2
4
5
3
Figure 3 - WADE Configuration property page for the ToysAssembler project
In the Libraries panel (4) we are requested to tell WOLF where to get the WADE libraries to be
included in the project classpath. Again we use the default option i.e. to get them from the WADE
installation specified in the General panel just above.
Finally (5) since we are creating a Full Featured Wade application, in the Project
Configuration panel we select the “Full Featured Wade project” option and we indicate cfg
as the directory that contains all application configurations.
2.2 Starting the Toys Assembler application Main Container
In order to test if everything is OK it is possible to start the Boot Daemon and the Main Container
of the Toys Assembler application by right clicking on the ToysAssembler project and respectively
selecting the WADE Tools --> Run Boot Deamon and WADE Tools --> Run Main
Container menu items.
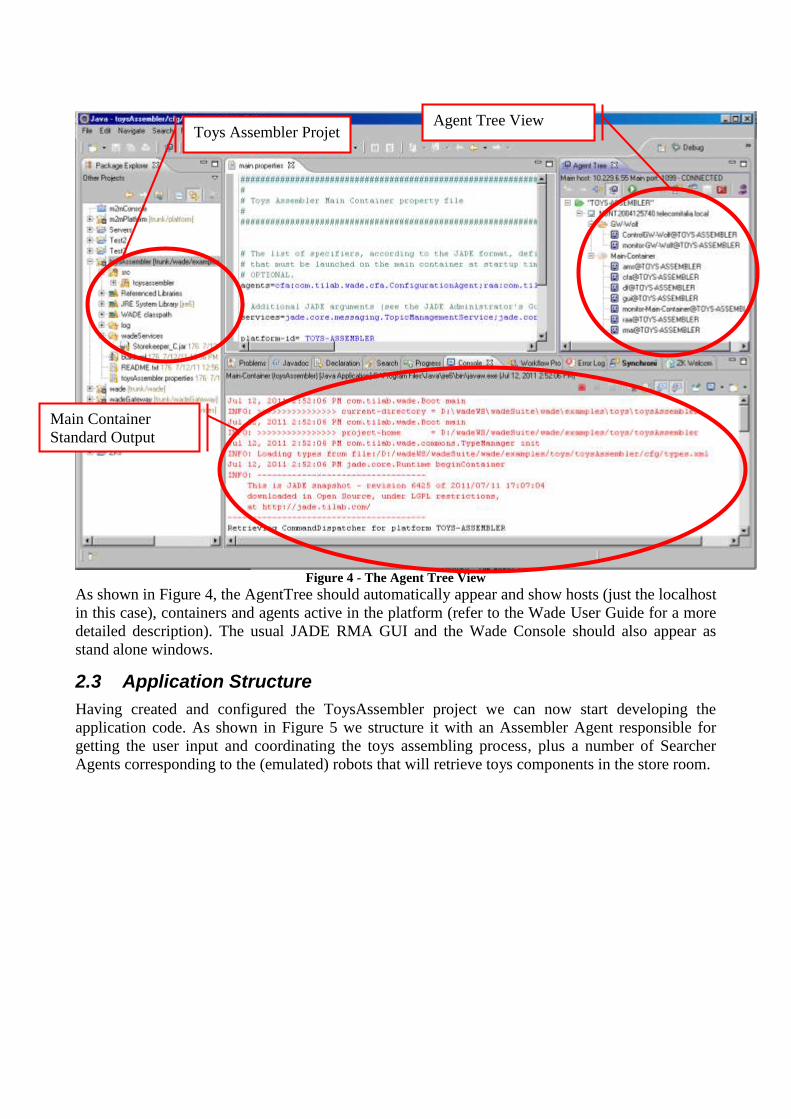
Figure 4 - The Agent Tree View
As shown in Figure 4, the AgentTree should automatically appear and show hosts (just the localhost
in this case), containers and agents active in the platform (refer to the Wade User Guide for a more
detailed description). The usual JADE RMA GUI and the Wade Console should also appear as
stand alone windows.
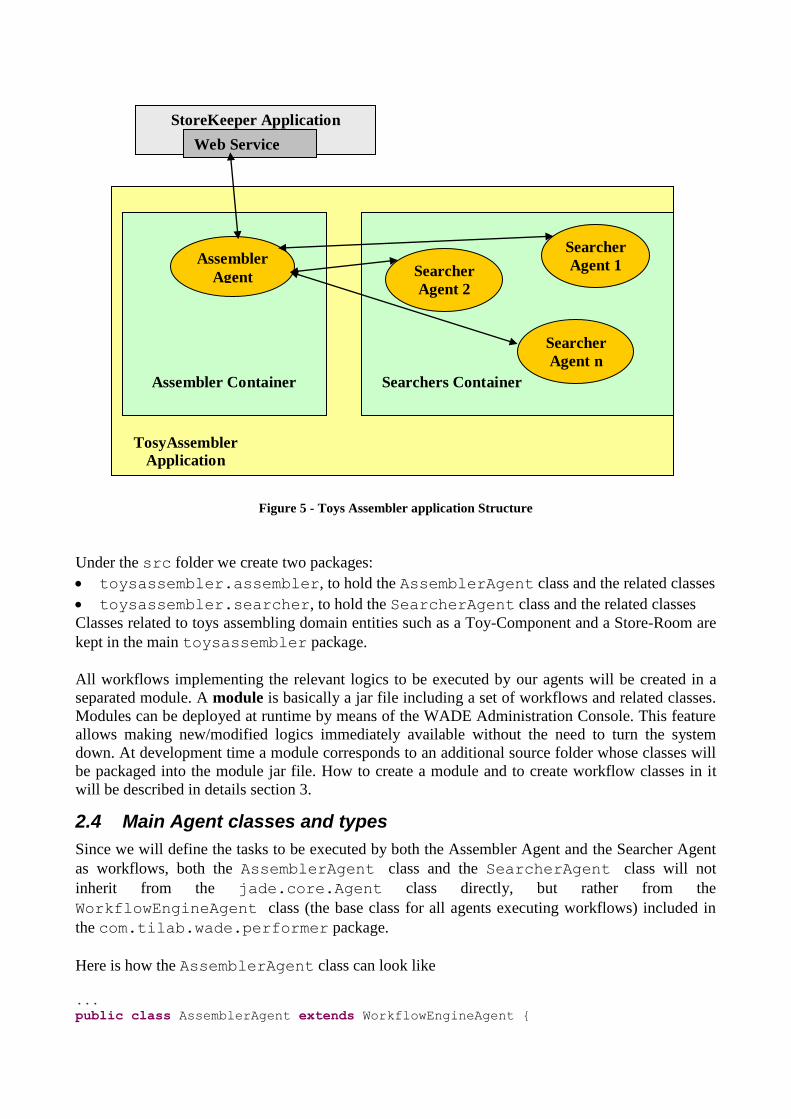
2.3 Application Structure
Having created and configured the ToysAssembler project we can now start developing the
application code. As shown in Figure 5 we structure it with an Assembler Agent responsible for
getting the user input and coordinating the toys assembling process, plus a number of Searcher
Agents corresponding to the (emulated) robots that will retrieve toys components in the store room.
Toys Assembler Projet
Main Container
Standard Output
Agent Tree View
StoreKeeper Application
Web Service
Assembler
Agent
Searcher
Agent n
Searcher
Agent 1 Searcher
Agent 2
TosyAssembler
Application
Searchers Container Assembler Container
Figure 5 - Toys Assembler application Structure
Under the src folder we create two packages:
toysassembler.assembler, to hold the AssemblerAgent class and the related classes
toysassembler.searcher, to hold the SearcherAgent class and the related classes
Classes related to toys assembling domain entities such as a Toy-Component and a Store-Room are
kept in the main toysassembler package.
All workflows implementing the relevant logics to be executed by our agents will be created in a
separated module. A module is basically a jar file including a set of workflows and related classes.
Modules can be deployed at runtime by means of the WADE Administration Console. This feature
allows making new/modified logics immediately available without the need to turn the system
down. At development time a module corresponds to an additional source folder whose classes will
be packaged into the module jar file. How to create a module and to create workflow classes in it
will be described in details section 3.
2.4 Main Agent classes and types
Since we will define the tasks to be executed by both the Assembler Agent and the Searcher Agent
as workflows, both the AssemblerAgent class and the SearcherAgent class will not
inherit from the jade.core.Agent class directly, but rather from the
WorkflowEngineAgent class (the base class for all agents executing workflows) included in
the com.tilab.wade.performer package.
Here is how the AssemblerAgent class can look like
...
public class AssemblerAgent extends WorkflowEngineAgent {
private AssemblerAgentGui myGui;
private DispatchingCapabilities dc = new DispatchingCapabilities();
private List searcherAgents = new ArrayList();
private int index = 0;
/**
* Agent initialization
*/
protected void agentSpecificSetup() throws AgentInitializationException {
super.agentSpecificSetup();
// Create and show the gui
myGui = new AssemblerAgentGui(this);
myGui.initGui();
myGui.setVisible(true);
// Initialize the DispatchingCapabilities instance used
// to launch workflows
dc.init(this);
// Subscribe to the DF to keep the searchers list up to date
ServiceDescription sd = new ServiceDescription();
sd.setType("Searcher Agent");
DFAgentDescription dfTemplate = new DFAgentDescription();
dfTemplate.addServices(sd);
SearchConstraints sc = new SearchConstraints();
sc.setMaxResults(new Long(-1));
ACLMessage subscribe = DFService.createSubscriptionMessage(
this,
getDefaultDF(),
dfTemplate,
sc);
addBehaviour(new SubscriptionInitiator(this, subscribe) {
...
} );
}
...
/**
* Select a suitable SearcherAgent
*/
public AID getSearcherAgent() {
if (searcherAgents.isEmpty()) {
throw new RuntimeException("No SearcherAgent available");
}
if (index >=searcherAgents.size()) {
index = 0;
}
return (AID) searcherAgents.get(index++);
}
/**
* The method invoked by the GUI when the user requests
* the assembling of a toy
*/
void assembleToy(final String type) {
...
}
}
As all WADE agents (i.e. agents extending the WADEAgentImpl class) the
WorkflowEngineAgent class already defines the setup() method to perform WADE
specific initializations. Therefore agents extending it will have to put their initialization code in the
agentSpecificSetup() method. Such initializations in the case of the AssemblerAgent
class basically corresponds to
The creation and display of a GUI by means of which the Assembler Agent can get the type of
toy to assemble from the user.
The initialization of a DispatchingCapabilities instance that will be used to start the
execution of workflows.
The activation of a behaviour that subscribes to the DF and keeps up to date a list of agents of
type “Searcher-Agent” (the searcherAgents member variable). This list is used to
select a suitable SearcherAgent (method getSearcherAgent()) to delegate the
component retrieval task to as will be described section 3.8.
WADE agents automatically register with the DF providing a default description. Such description
contains, among others, the agent type as indicated in the cfg/types.xml file where relevant
agent types are declared. The default project structure created by Wolf already includes a basic
types.xml file. Therefore we just need to add Toys Assembler specific types to it as shown
below.
<platform>
...
<agentTypes>
<agentType description="Assembler Agent"
className="toysassembler.assembler.AssemblerAgent"/>
<agentType description="Searcher Agent"
className="toysassembler.searcher.SearcherAgent"/>
...
Such types will be referenced when declaring which agents we want to start as described in chapter
5.
The AssemblerAgentGui class is a minimal Swing GUI whose code is out of the scope of this
tutorial. The only interesting thing to know is that the assembleToy(String toyType)
callback method of the AssemblerAgent class is invoked whenever the user selects a type of toy
and presses OK. In this method the execution of the AssemblingToy workflow is launched by
means of a DispatchingCapabilities instance as will be described in section 4.
.
The code of the SearcherAgent is definitely simpler since, unlike the AssemblerAgent, it
does not have agent-wide variables or non-workflow behaviours.
public class SearcherAgent extends WorkflowEngineAgent {
...
/**
* Agent initialization
*/
public void agentSpecificSetup() throws AgentInitializationException {
super.agentSpecificSetup();
// A SearcherAgent can search for 1 component set at a time

// --> Set the pool-size to 1 so that we cannot execute workflows
// in parallel
setPoolSize(1);
}
...
}
The only interesting things to note is the setting of the workflow execution pool size to 1. This
means that Searcher Agents will be able to execute one workflow at a time. This reflects the fact
that for instance a robot retrieving 4 wheels in the store room to assemble a wagon cannot retrieve 2
arms at the same time.
3 Creating workflows
In this section we describe how to create workflows that can be executed by
WorkflowEngineAgent-s. Workflows in WADE are Java classes that extend the
com.tilab.wade.performer.WorkflowBehaviour base class.
Even if this is not strictly necessary, it is a good and strongly suggested practice to organize
workflows inside one or more modules (see 2.3). Consistently with that practice we create a
workflows module to hold Toys Assembler workflows as described below.
3.1 Creating a module
To create the workflow module right-click on the project root and select the “WADE Tools --
> Add Module” menu item. The Add Module dialog box appears, as depicted in Figure 6Figure
5, where we can define the module name and optionally the category and a description.
Figure 6 – Adding a module
As mentioned, at development time a module is just a separated source folder. As such first of all
we create a package called toysassembler.workflows that will include our workflow
classes
3.2 Creating the AssemblingToyWorkflow
In order to create a new workflow right-click on the toysassembler.workflows package inside the
modules/workflows source folder and select New --> Other -->
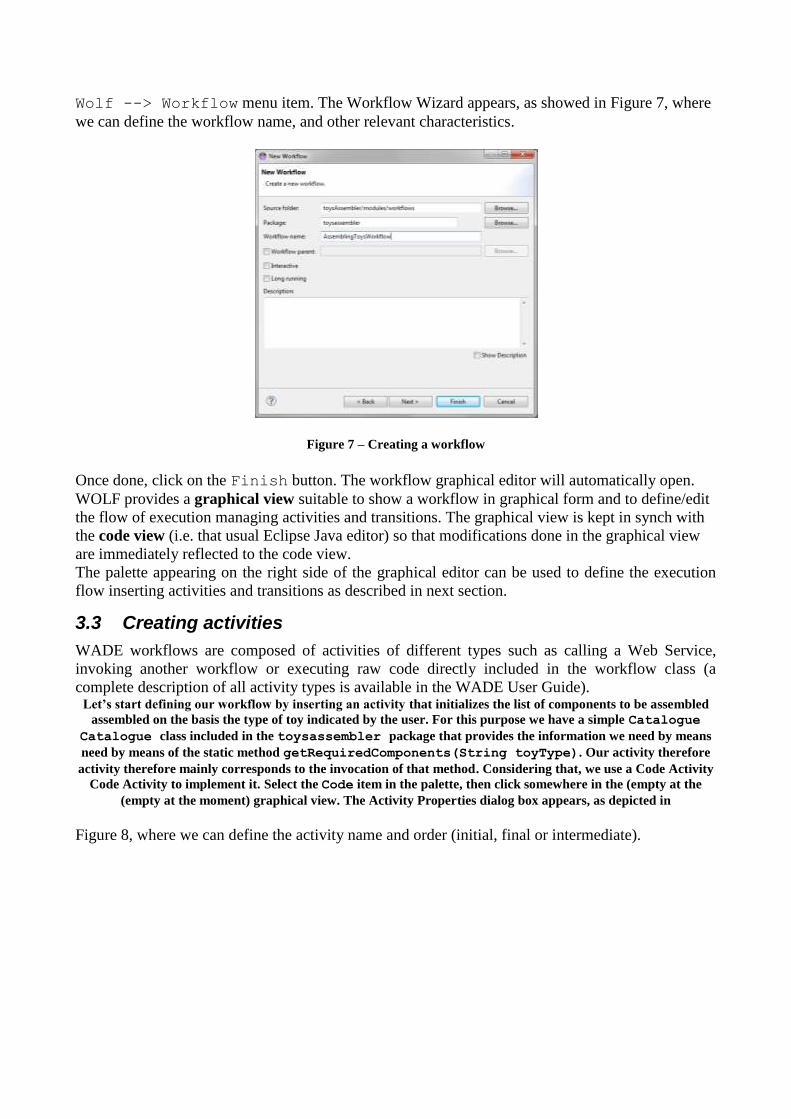
Wolf --> Workflow menu item. The Workflow Wizard appears, as showed in Figure 7, where
we can define the workflow name, and other relevant characteristics.
Figure 7 – Creating a workflow
Once done, click on the Finish button. The workflow graphical editor will automatically open.
WOLF provides a graphical view suitable to show a workflow in graphical form and to define/edit
the flow of execution managing activities and transitions. The graphical view is kept in synch with
the code view (i.e. that usual Eclipse Java editor) so that modifications done in the graphical view
are immediately reflected to the code view.
The palette appearing on the right side of the graphical editor can be used to define the execution
flow inserting activities and transitions as described in next section.
3.3 Creating activities
WADE workflows are composed of activities of different types such as calling a Web Service,
invoking another workflow or executing raw code directly included in the workflow class (a
complete description of all activity types is available in the WADE User Guide). Let’s start defining our workflow by inserting an activity that initializes the list of components to be assembled
assembled on the basis the type of toy indicated by the user. For this purpose we have a simple Catalogue
Catalogue class included in the toysassembler package that provides the information we need by means
need by means of the static method getRequiredComponents(String toyType). Our activity therefore
activity therefore mainly corresponds to the invocation of that method. Considering that, we use a Code Activity
Code Activity to implement it. Select the Code item in the palette, then click somewhere in the (empty at the
(empty at the moment) graphical view. The Activity Properties dialog box appears, as depicted in
Figure 8, where we can define the activity name and order (initial, final or intermediate).
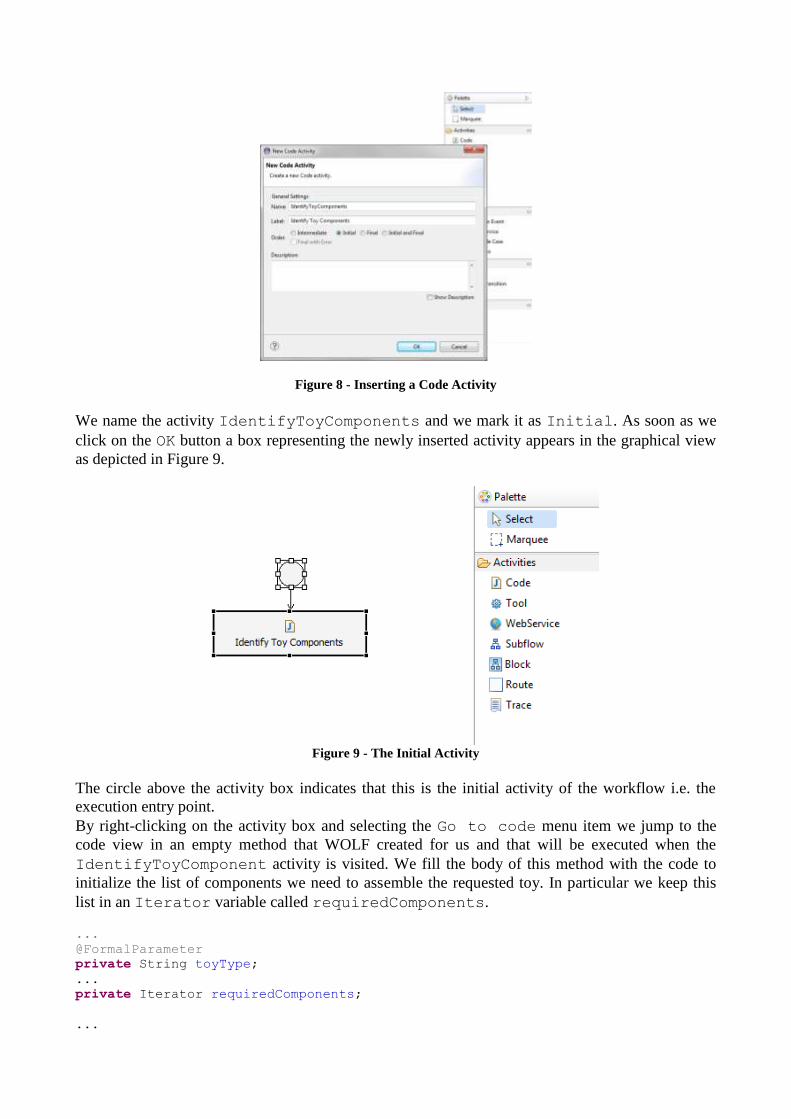
Figure 8 - Inserting a Code Activity
We name the activity IdentifyToyComponents and we mark it as Initial. As soon as we
click on the OK button a box representing the newly inserted activity appears in the graphical view
as depicted in Figure 9.
Figure 9 - The Initial Activity
The circle above the activity box indicates that this is the initial activity of the workflow i.e. the
execution entry point.
By right-clicking on the activity box and selecting the Go to code menu item we jump to the
code view in an empty method that WOLF created for us and that will be executed when the
IdentifyToyComponent activity is visited. We fill the body of this method with the code to
initialize the list of components we need to assemble the requested toy. In particular we keep this
list in an Iterator variable called requiredComponents.
...
@FormalParameter
private String toyType;
...
private Iterator requiredComponents;
...
protected void executeIdentifyToyComponents() throws Exception {
System.out.println("--- Start assembling "+toyType+"...");
List l = Catalogue.getRequiredComponents(toyType);
requiredComponents = l.iterator();
}
...
3.4 Workflow parameters
In the code snippet presented in previous section we make use of a member variable called
toyType of type String that represents the type of toy we have to assemble. This variable is
annotated with the @FormalParameter annotation included in the
com.tilab.wade.performer package (refer to the Java documentation for information about
annotations). This means that this variable represnts a parameter of our workflow and will be
automatically initialized at workflow execution time with the value passed as actual parameter in
the workflow execution request (see section 4).
// INPUT parameter: the type of toy to assemble
@FormalParameter
private String toyType;
// OUTPUT parameters: whether or not the toy was successfully assembled and,
// in case it is not, the component that was not available
@FormalParameter(mode=FormalParameter.OUTPUT)
private boolean toyAssembled = false;
@FormalParameter(mode=FormalParameter.OUTPUT)
private String missingComponent;
The code above shows that our Assembling Toy Workflow also has two output parameters (a
boolean parameter indicating whether or not the toy was successfully assembled and a String
parameter indicating, in case the toy could not be assembled, the missing component) whose values
will be automatically passed back to the requester when the workflow execution completes.
3.5 Creating Transitions
Going on in the definition of the Assembling Toy Workflow we can now add new activities and
link them by means of transitions. In particular we add a second activity where we get the next
Component Set to retrieve. Note that what we get from the Catalogue of toy components in the
first activity is actually a list of ComponentSetDescriptor objects each one describing a set
of required components in terms of their type and quantity. For instance to build a wagon we need
1 cockpit (component set #1)
4 wheels (component set #2)
After that we add a transition from the IdentifyToyComponents activity to the
SelectNextComponetSetToSearch activity. To do that select the Transition item in the
palette, click on the source activity box, and then click again on the destination activity box. The
Transition Properties dialog box appears. As soon as we click the OK button a thin arrow connecting
the two activities appears as depicted in Figure 10.

Figure 10 - Unconditioned Transition
The transition we inserted is unconditioned. Of course it is possible to associate a condition to a
transition by checking the Add a condition to the transition checkbox in the
Transition Properties dialog box. For each transition condition WOLF generates a boolean
method in the workflow class that implements it. Such method is executed each time the condition
is evaluated. If the method returns true the related transition is followed.
3.6 The Assembling Toy Workflow
By adding new activities and transitions to our Assembling Toy workflow we end up with the
execution flow depicted in Figure 11. In particular the activity labeled Get Component-Set
Coordinates invokes the web service provided by the StoreKeeper external application and gets
back whether or not the required quantity of components of a given type (e.g. 4 wheels) is available
in the store room and, in that case, the position where to find them. WebService activities are
described in more details in section 3.7.
Two transitions exit from this activity: if the components described in the current component-set are
available (conditioned transition) the execution flow goes on to the MapCoordinatesToRoom
activity; alternatively (unconditioned transition) the ComponentNotAvailable activity is
executed where we simply fill the missingComponent output parameter as shown below.
protected void executeComponentNotAvailable() throws Exception {
System.out.println("--- "+currentComponentSet+" not available!");
missingComponent = currentComponentSet.getType();
}
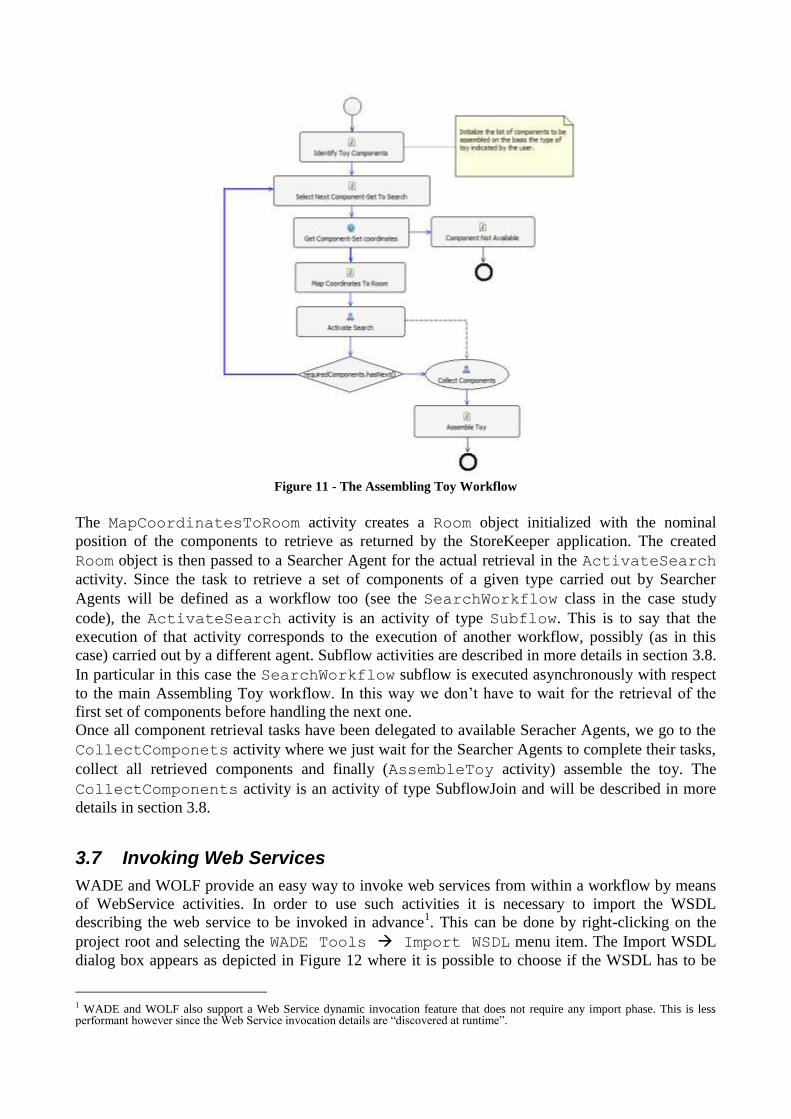
Figure 11 - The Assembling Toy Workflow
The MapCoordinatesToRoom activity creates a Room object initialized with the nominal
position of the components to retrieve as returned by the StoreKeeper application. The created
Room object is then passed to a Searcher Agent for the actual retrieval in the ActivateSearch
activity. Since the task to retrieve a set of components of a given type carried out by Searcher
Agents will be defined as a workflow too (see the SearchWorkflow class in the case study
code), the ActivateSearch activity is an activity of type Subflow. This is to say that the
execution of that activity corresponds to the execution of another workflow, possibly (as in this
case) carried out by a different agent. Subflow activities are described in more details in section 3.8.
In particular in this case the SearchWorkflow subflow is executed asynchronously with respect
to the main Assembling Toy workflow. In this way we don’t have to wait for the retrieval of the
first set of components before handling the next one.
Once all component retrieval tasks have been delegated to available Seracher Agents, we go to the
CollectComponets activity where we just wait for the Searcher Agents to complete their tasks,
collect all retrieved components and finally (AssembleToy activity) assemble the toy. The
CollectComponents activity is an activity of type SubflowJoin and will be described in more
details in section 3.8.
3.7 Invoking Web Services
WADE and WOLF provide an easy way to invoke web services from within a workflow by means
of WebService activities. In order to use such activities it is necessary to import the WSDL
describing the web service to be invoked in advance1. This can be done by right-clicking on the
project root and selecting the WADE Tools Import WSDL menu item. The Import WSDL
dialog box appears as depicted in Figure 12 where it is possible to choose if the WSDL has to be
1 WADE and WOLF also support a Web Service dynamic invocation feature that does not require any import phase. This is less performant however since the Web Service invocation details are “discovered at runtime”.
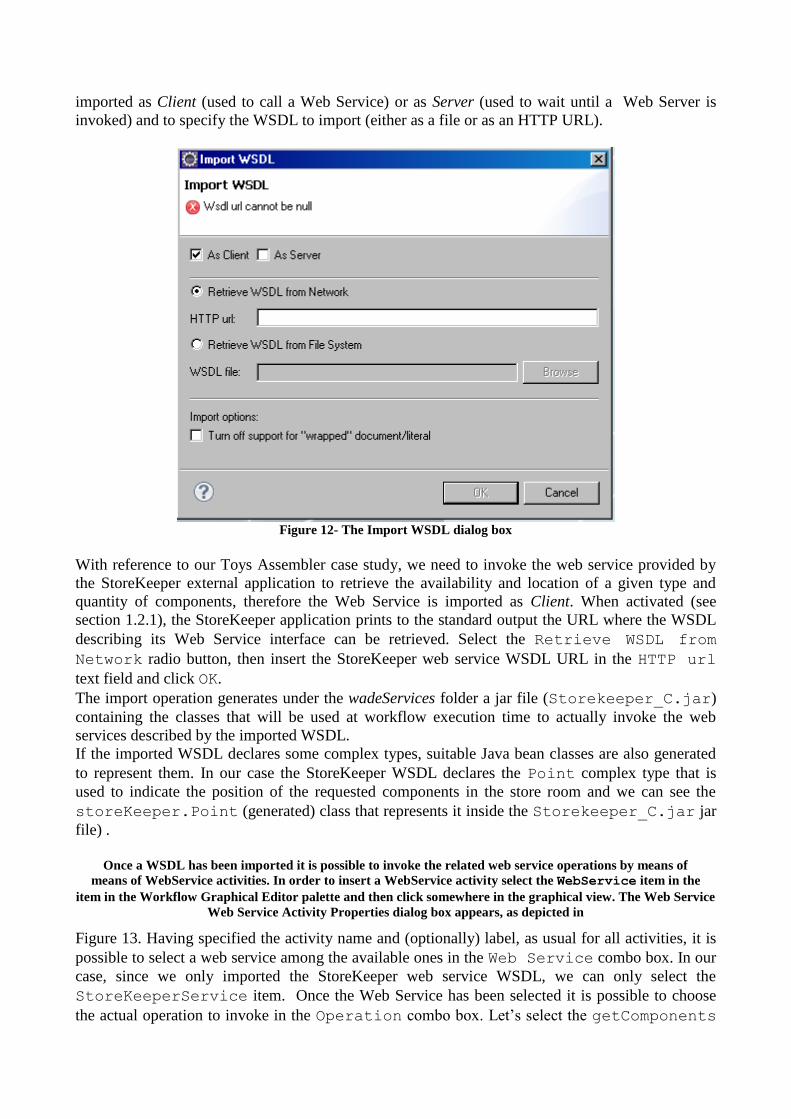
imported as Client (used to call a Web Service) or as Server (used to wait until a Web Server is
invoked) and to specify the WSDL to import (either as a file or as an HTTP URL).
Figure 12- The Import WSDL dialog box
With reference to our Toys Assembler case study, we need to invoke the web service provided by
the StoreKeeper external application to retrieve the availability and location of a given type and
quantity of components, therefore the Web Service is imported as Client. When activated (see
section 1.2.1), the StoreKeeper application prints to the standard output the URL where the WSDL
describing its Web Service interface can be retrieved. Select the Retrieve WSDL from
Network radio button, then insert the StoreKeeper web service WSDL URL in the HTTP url
text field and click OK.
The import operation generates under the wadeServices folder a jar file (Storekeeper_C.jar)
containing the classes that will be used at workflow execution time to actually invoke the web
services described by the imported WSDL.
If the imported WSDL declares some complex types, suitable Java bean classes are also generated
to represent them. In our case the StoreKeeper WSDL declares the Point complex type that is
used to indicate the position of the requested components in the store room and we can see the
storeKeeper.Point (generated) class that represents it inside the Storekeeper_C.jar jar
file) .
Once a WSDL has been imported it is possible to invoke the related web service operations by means of
means of WebService activities. In order to insert a WebService activity select the WebService item in the
item in the Workflow Graphical Editor palette and then click somewhere in the graphical view. The Web Service
Web Service Activity Properties dialog box appears, as depicted in
Figure 13. Having specified the activity name and (optionally) label, as usual for all activities, it is
possible to select a web service among the available ones in the Web Service combo box. In our
case, since we only imported the StoreKeeper web service WSDL, we can only select the
StoreKeeperService item. Once the Web Service has been selected it is possible to choose
the actual operation to invoke in the Operation combo box. Let’s select the getComponents
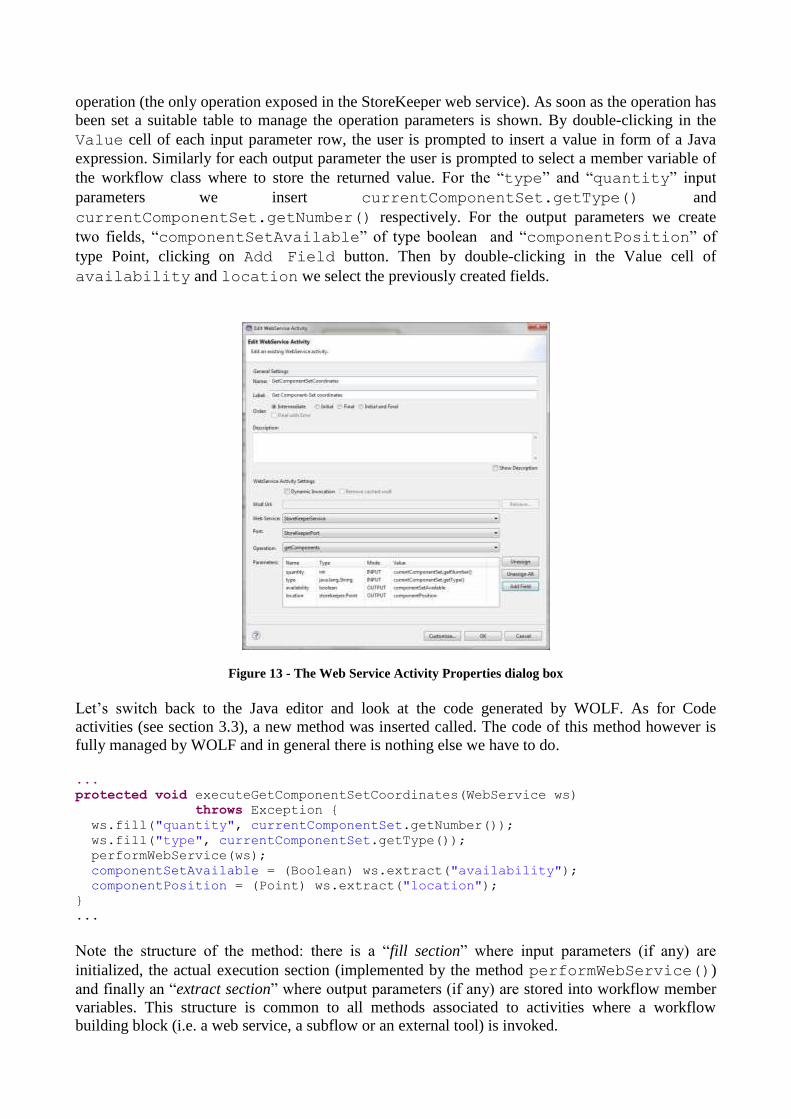
operation (the only operation exposed in the StoreKeeper web service). As soon as the operation has
been set a suitable table to manage the operation parameters is shown. By double-clicking in the
Value cell of each input parameter row, the user is prompted to insert a value in form of a Java
expression. Similarly for each output parameter the user is prompted to select a member variable of
the workflow class where to store the returned value. For the “type” and “quantity” input
parameters we insert currentComponentSet.getType() and
currentComponentSet.getNumber() respectively. For the output parameters we create
two fields, “componentSetAvailable” of type boolean and “componentPosition” of
type Point, clicking on Add Field button. Then by double-clicking in the Value cell of
availability and location we select the previously created fields.
Figure 13 - The Web Service Activity Properties dialog box
Let’s switch back to the Java editor and look at the code generated by WOLF. As for Code
activities (see section 3.3), a new method was inserted called. The code of this method however is
fully managed by WOLF and in general there is nothing else we have to do.
...
protected void executeGetComponentSetCoordinates(WebService ws)
throws Exception {
ws.fill("quantity", currentComponentSet.getNumber());
ws.fill("type", currentComponentSet.getType());
performWebService(ws);
componentSetAvailable = (Boolean) ws.extract("availability");
componentPosition = (Point) ws.extract("location");
}
...
Note the structure of the method: there is a “fill section” where input parameters (if any) are
initialized, the actual execution section (implemented by the method performWebService())
and finally an “extract section” where output parameters (if any) are stored into workflow member
variables. This structure is common to all methods associated to activities where a workflow
building block (i.e. a web service, a subflow or an external tool) is invoked.
3.8 Subflows
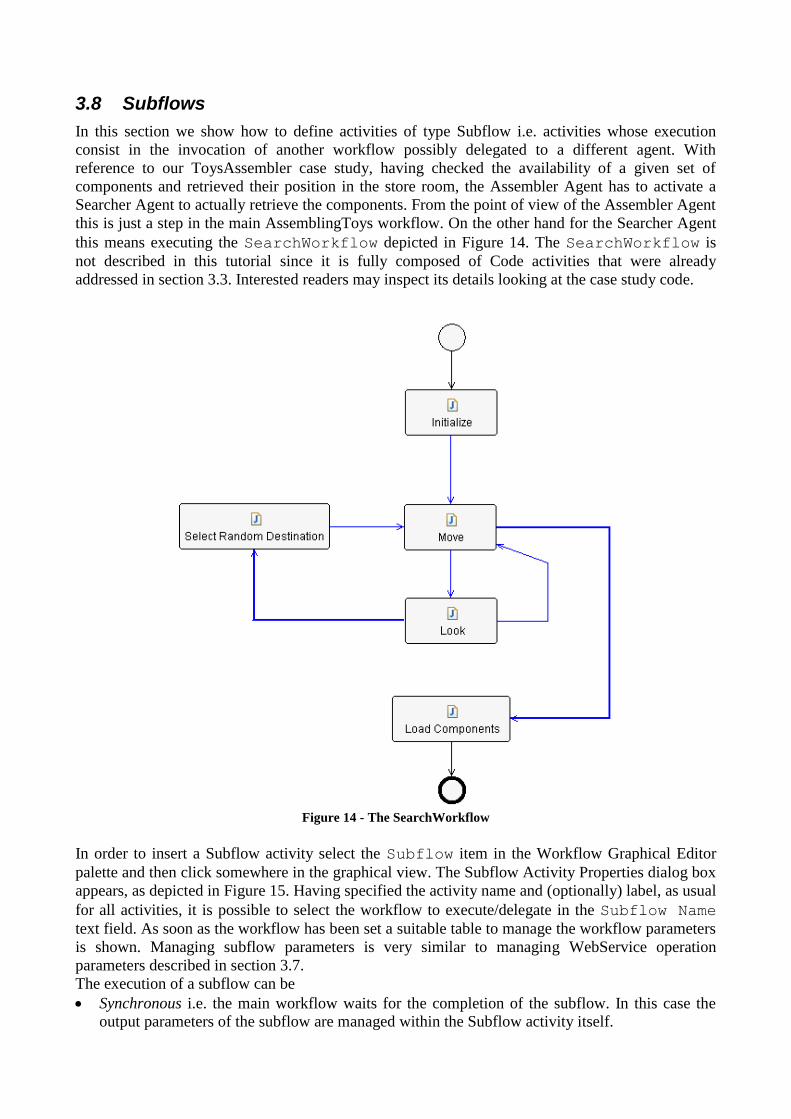
In this section we show how to define activities of type Subflow i.e. activities whose execution
consist in the invocation of another workflow possibly delegated to a different agent. With
reference to our ToysAssembler case study, having checked the availability of a given set of
components and retrieved their position in the store room, the Assembler Agent has to activate a
Searcher Agent to actually retrieve the components. From the point of view of the Assembler Agent
this is just a step in the main AssemblingToys workflow. On the other hand for the Searcher Agent
this means executing the SearchWorkflow depicted in Figure 14. The SearchWorkflow is
not described in this tutorial since it is fully composed of Code activities that were already
addressed in section 3.3. Interested readers may inspect its details looking at the case study code.
Figure 14 - The SearchWorkflow
In order to insert a Subflow activity select the Subflow item in the Workflow Graphical Editor
palette and then click somewhere in the graphical view. The Subflow Activity Properties dialog box
appears, as depicted in Figure 15. Having specified the activity name and (optionally) label, as usual
for all activities, it is possible to select the workflow to execute/delegate in the Subflow Name
text field. As soon as the workflow has been set a suitable table to manage the workflow parameters
is shown. Managing subflow parameters is very similar to managing WebService operation
parameters described in section 3.7.
The execution of a subflow can be
Synchronous i.e. the main workflow waits for the completion of the subflow. In this case the
output parameters of the subflow are managed within the Subflow activity itself.
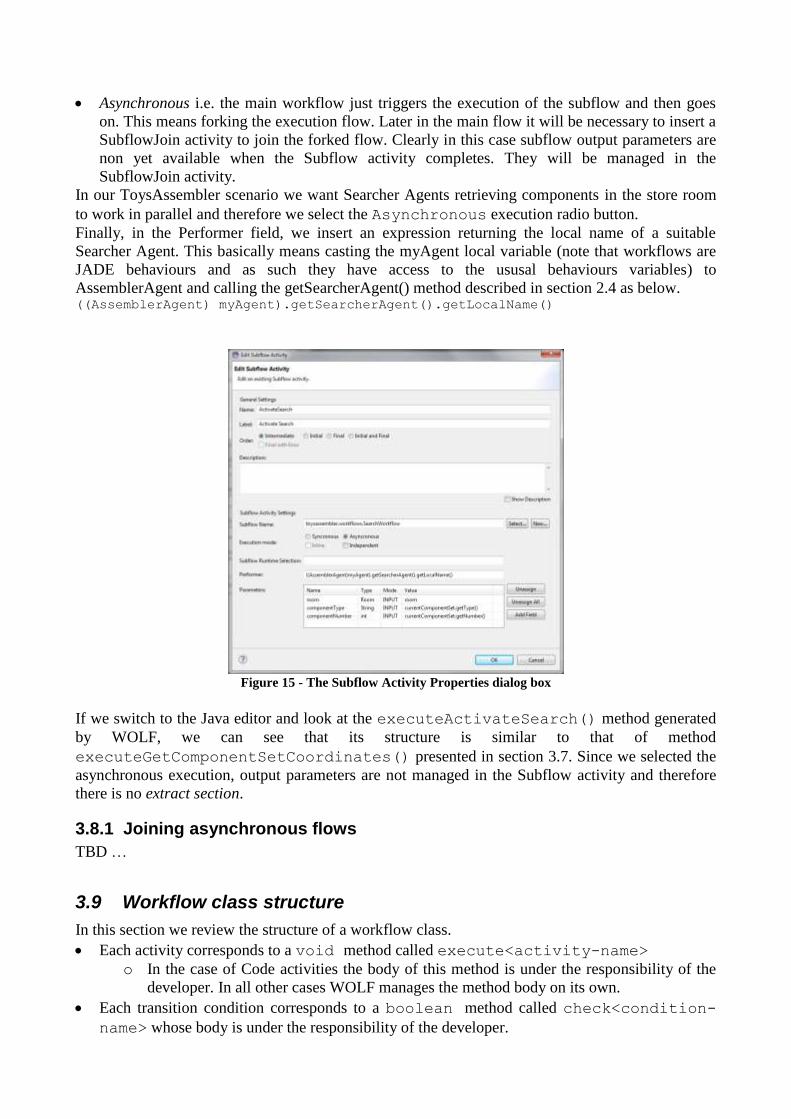
Asynchronous i.e. the main workflow just triggers the execution of the subflow and then goes
on. This means forking the execution flow. Later in the main flow it will be necessary to insert a
SubflowJoin activity to join the forked flow. Clearly in this case subflow output parameters are
non yet available when the Subflow activity completes. They will be managed in the
SubflowJoin activity.
In our ToysAssembler scenario we want Searcher Agents retrieving components in the store room
to work in parallel and therefore we select the Asynchronous execution radio button.
Finally, in the Performer field, we insert an expression returning the local name of a suitable
Searcher Agent. This basically means casting the myAgent local variable (note that workflows are
JADE behaviours and as such they have access to the ususal behaviours variables) to
AssemblerAgent and calling the getSearcherAgent() method described in section 2.4 as below. ((AssemblerAgent) myAgent).getSearcherAgent().getLocalName()
Figure 15 - The Subflow Activity Properties dialog box
If we switch to the Java editor and look at the executeActivateSearch() method generated
by WOLF, we can see that its structure is similar to that of method
executeGetComponentSetCoordinates() presented in section 3.7. Since we selected the
asynchronous execution, output parameters are not managed in the Subflow activity and therefore
there is no extract section.
3.8.1 Joining asynchronous flows
TBD …
3.9 Workflow class structure
In this section we review the structure of a workflow class.
Each activity corresponds to a void method called execute<activity-name>
o In the case of Code activities the body of this method is under the responsibility of the
developer. In all other cases WOLF manages the method body on its own.
Each transition condition corresponds to a boolean method called check<condition-
name> whose body is under the responsibility of the developer.
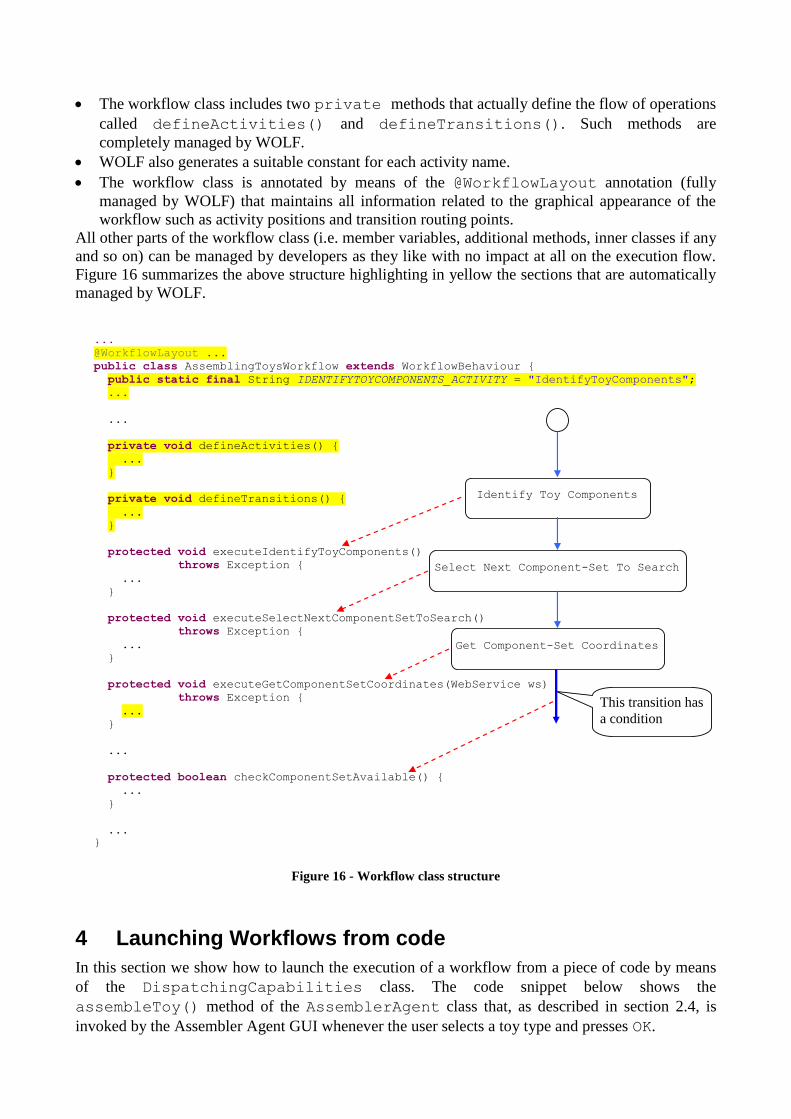
The workflow class includes two private methods that actually define the flow of operations
called defineActivities() and defineTransitions(). Such methods are
completely managed by WOLF.
WOLF also generates a suitable constant for each activity name.
The workflow class is annotated by means of the @WorkflowLayout annotation (fully
managed by WOLF) that maintains all information related to the graphical appearance of the
workflow such as activity positions and transition routing points.
All other parts of the workflow class (i.e. member variables, additional methods, inner classes if any
and so on) can be managed by developers as they like with no impact at all on the execution flow.
Figure 16 summarizes the above structure highlighting in yellow the sections that are automatically
managed by WOLF.
... @WorkflowLayout ...
public class AssemblingToysWorkflow extends WorkflowBehaviour {
public static final String IDENTIFYTOYCOMPONENTS_ACTIVITY = "IdentifyToyComponents";
...
...
private void defineActivities() {
...
}
private void defineTransitions() {
...
}
protected void executeIdentifyToyComponents()
throws Exception {
...
}
protected void executeSelectNextComponentSetToSearch()
throws Exception {
...
}
protected void executeGetComponentSetCoordinates(WebService ws)
throws Exception {
...
}
...
protected boolean checkComponentSetAvailable() {
...
}
...
}
Identify Toy Components
Select Next Component-Set To Search
Get Component-Set Coordinates
This transition has
a condition
Figure 16 - Workflow class structure
4 Launching Workflows from code
In this section we show how to launch the execution of a workflow from a piece of code by means
of the DispatchingCapabilities class. The code snippet below shows the
assembleToy() method of the AssemblerAgent class that, as described in section 2.4, is
invoked by the Assembler Agent GUI whenever the user selects a toy type and presses OK.

void assembleToy(final String type) {
// Prepare the WorkflowDescriptor including the workflow class
// and INPUT parameters
Map params = new HashMap ();
params.put("toyType", type);
WorkflowDescriptor wd = new WorkflowDescriptor(
"toysassembler.workflows.AssemblingToysWorkflow",
params);
try {
// Dispatch the workflow to myself
dc.launchWorkflow(getAID(), wd, new WorkflowResultListener() {
...
public void handleExecutionCompleted(jade.util.leap.List results,
AID executor,
String executionId) {
// The workflow was successfully executed
System.out.println("Execution OK ("+executionId+")");
Map params = ElementDescriptor.paramListToMap(results);
Boolean assembled = (Boolean) params.get("toyAssembled");
String missingComponent = (String) params.get("missingComponent");
if (!assembled.booleanValue()){
myGui.showMessage("Can not assemble "+type+"!\n"+
missingComponent+" not available!","Failure!!!",
JOptionPane.WARNING_MESSAGE);
}
else{
myGui.showMessage(type+" successfully assembled!",
"Success!!!",
JOptionPane.INFORMATION_MESSAGE);
}
}
}, null);
} catch (WorkflowException e) {
// TODO Auto-generated catch block
e.printStackTrace();
}
}
The code above creates a WorkflowDescriptor object including the workflow fully qualified
class name and the input parameters in form of a Map. Then it uses the launchWorkflow()
method of the DispatchingCapabilities object initialized at agent startup (see section 2.4)
to dispatch the workflow execution request to the local agent. Of course the
DispatchingCapabilities class can be used to dispatch workflow execution requests to
remote agents as well. The third parameter of the launchWorkflow() method allows
specifying a WorkflowResultListener that will be notified when the launched workflow
completes (method handleExecutionComplete()). The output parameters of the executed
workflow are stored in the first parameter of the handleExecutionComplete() method in
the form of a jade.util.leap.List of Parameter objects. However in general it is more
convenient to handle them as a Map. The paramListToMap static method of the
ElementDescriptor class can be used for that purpose.
5 Launching a WADE application
5.1 The Toys Assembler application configuration file
Before launching our Toys Assempler application we still need to declare which agents we want to
activate in it. This can be done by means of an “Application Configuration File” i.e. an xml file that
specifies which hosts our application will run on, which containers to create in each host and which
agents to start in each container (see the WADE User Guide for a detailed description). The default
project structure created by Wolf already includes a sample application configuration file
(cfg/configuration/sample.xml) and we can just rename it in e.g.
ToysAssempler.xml and customize it as shown below
<platform description="ToysAssempler configuration file" name="Toys">
<hosts>
<host name="localhost">
<containers>
<container name="Assembler">
<agents>
<agent name="assembler" type="Assembler Agent"/>
</agents>
</container>
<container name="Searchers">
<agents>
<agent name="searcher1" type="Searcher Agent"/>
<agent name="searcher2" type="Searcher Agent"/>
</agents>
</container>
</containers>
</host>
</hosts>
</platform>
Just for the sake of showing how an application configuration file can look like we decide to create
two containers one for the Assembler agent and another one for the Searcher agents. It should be
noticed that the type of an agent is one of those declared in the cfg/types.xml file described in
section 2.4.
5.2 Launching the Toys Assembler application inside Eclipse
We are now ready to launch the Toys Assembler application.
Activate the Boot Daemon and Main container as described in section 2.2.
In the Wolf AgentTree view import the ToysAssembler configuration defined in previous section,
using the import configuration feature as shown in Figure 16.
Then click on the Start button (again in the AgentTree view) to tear the application up.
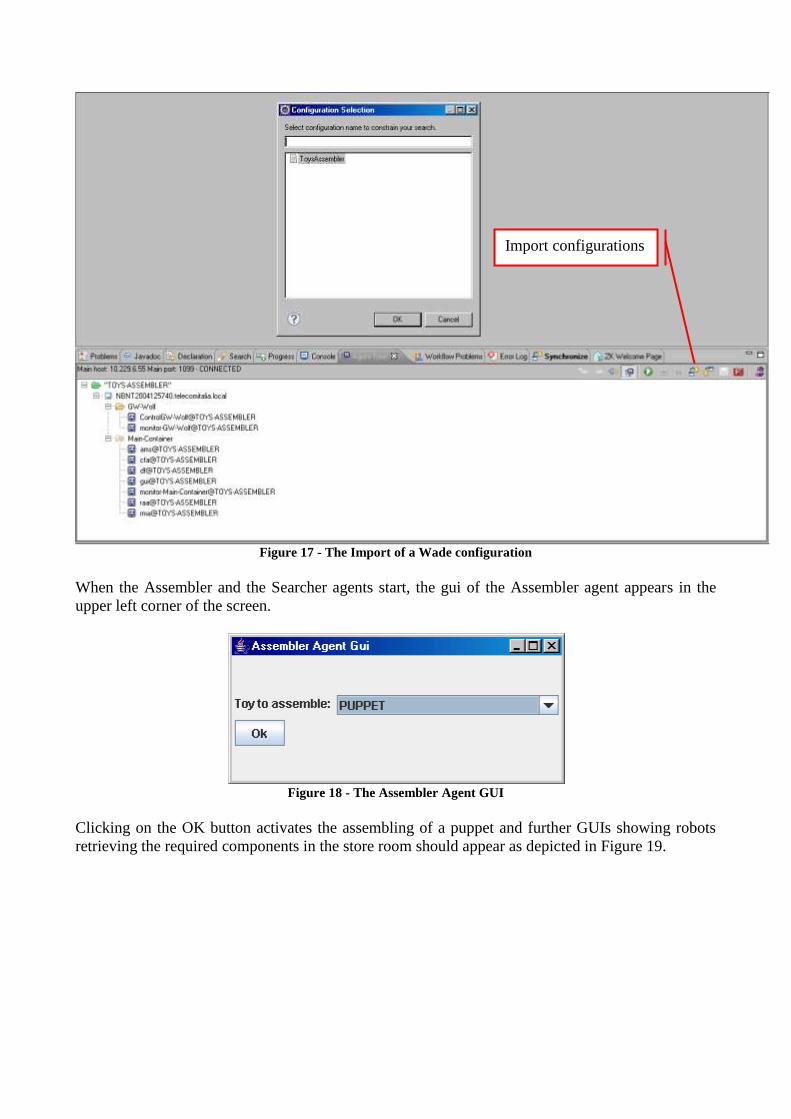
Figure 17 - The Import of a Wade configuration
When the Assembler and the Searcher agents start, the gui of the Assembler agent appears in the
upper left corner of the screen.
Figure 18 - The Assembler Agent GUI
Clicking on the OK button activates the assembling of a puppet and further GUIs showing robots
retrieving the required components in the store room should appear as depicted in Figure 19.
Import configurations
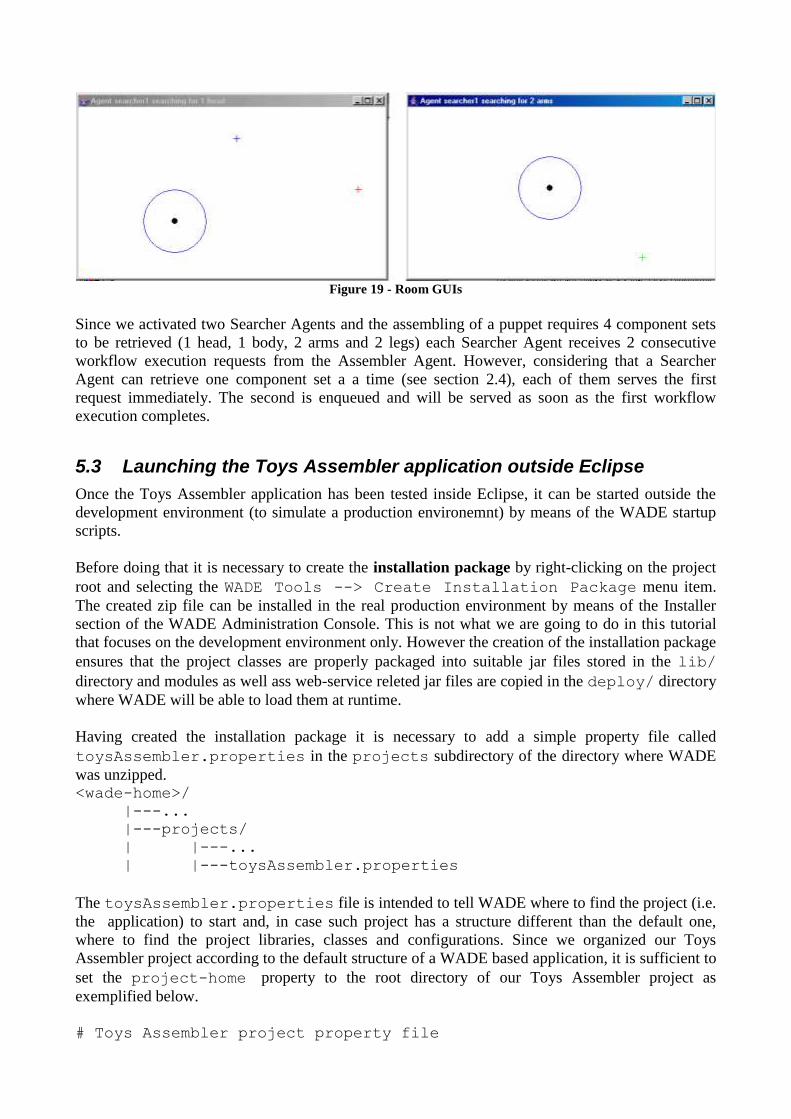
Figure 19 - Room GUIs
Since we activated two Searcher Agents and the assembling of a puppet requires 4 component sets
to be retrieved (1 head, 1 body, 2 arms and 2 legs) each Searcher Agent receives 2 consecutive
workflow execution requests from the Assembler Agent. However, considering that a Searcher
Agent can retrieve one component set a a time (see section 2.4), each of them serves the first
request immediately. The second is enqueued and will be served as soon as the first workflow
execution completes.
5.3 Launching the Toys Assembler application outside Eclipse
Once the Toys Assembler application has been tested inside Eclipse, it can be started outside the
development environment (to simulate a production environemnt) by means of the WADE startup
scripts.
Before doing that it is necessary to create the installation package by right-clicking on the project
root and selecting the WADE Tools --> Create Installation Package menu item.
The created zip file can be installed in the real production environment by means of the Installer
section of the WADE Administration Console. This is not what we are going to do in this tutorial
that focuses on the development environment only. However the creation of the installation package
ensures that the project classes are properly packaged into suitable jar files stored in the lib/
directory and modules as well ass web-service releted jar files are copied in the deploy/ directory
where WADE will be able to load them at runtime.
Having created the installation package it is necessary to add a simple property file called
toysAssembler.properties in the projects subdirectory of the directory where WADE
was unzipped. <wade-home>/
|---...
|---projects/
| |---...
| |---toysAssembler.properties
The toysAssembler.properties file is intended to tell WADE where to find the project (i.e.
the application) to start and, in case such project has a structure different than the default one,
where to find the project libraries, classes and configurations. Since we organized our Toys
Assembler project according to the default structure of a WADE based application, it is sufficient to
set the project-home property to the root directory of our Toys Assembler project as
exemplified below.
# Toys Assembler project property file
project-home=C:/eclipseProject/wade/examples/toys/ToysAssembler
Having created the toysAssembler.properties file as described above, the Toys Assembler
application can be launched by going to the <wade-home>/bin directory and typing startBootdaemon
to activate the Bootdaemon startMain toysAssembler
to activate the Toys Assembler Main Container