Volume 4 / Issue 1 Sedna: Beyond VVFP 9FP...
52
Reporting, COM Interop, Upsizing, Deployment and more… Use Team System with VFP! Sedna: Beyond VFP 9 VFP 9 LINQ: You’ll Query Almost Anything in .NET Use the “My” Namespace in Sedna! Web Services and WCF with VFP and .NET The New and Improved Data Explorer Volume 4 / Issue 1 Sedna Content!
Transcript of Volume 4 / Issue 1 Sedna: Beyond VVFP 9FP...

Reporting, COM Interop, Upsizing, Deployment and more…
Use Team System with VFP!
Sedna: Beyond VFP 9VFP 9
LINQ: You’ll Query Almost Anything in .NET
Use the “My” Namespace in Sedna!
Web Services and WCF with VFP and .NET
The New and Improved Data Explorer
Volume 4 / Issue 1
Sedn
a
Conten
t!


Features 5 Leveraging Sedna Reporting
Bo takes you on a whirlwind tour of Senda’s reporting enhancements.Bo Durban
8 The Missing LINQImagine being able to query almost anything that has structure—that’s what Language Integrated Query (LINQ) will offer to C# 3.0 and Visual Basic 9.0 developers.Markus Egger
12 From VFP to .NETSo you’re thinking about moving a Visual FoxPro application to .NET. Where will the pain points be? How do you evaluate your options? Mike has years of experience doing just this and offers an overview and some great suggestions.Mike Yeager
18 Upsizing SimplifiedUsing Visual FoxPro’s Upsizing Wizard in the past and has not always produced spectacular results. Wait until you see how great Sedna’s Upsizing Wizard will make this process.Rick Schummer
24 Visual FoxPro Web Services RevisitedIf you’ve struggled with getting your Visual FoxPro applications to communicate with today’s fairly robust Web services, this article is for you. It still isn’t easy, but Rick walks you though how to do it.Rick Strahl
28 Welcome to the Future of DeploymentVisual FoxPro applications can benefi t from ClickOnce technologies. Craig shows you how it works. Soon you’ll be using ClickOnce to deploy your next application updates!Craig Boyd
30 The My Namespace in SednaSedna will offer the same great fl exibility (and reduced typing) that Visual Basic 2005 developers are enjoying with the My namespace. Learn more about it from Doug.Doug Hennig
38 The Baker’s Dozen: 13 Productivity Tips for Moving from VFP to .NETSo you’re exploring .NET. What are the some of the most critical things you need to discover in .NET that you know how to do in Visual FoxPro? Kevin explains…Kevin S. Goff
40 Integrating VFP into VSTS Team ProjectsMicrosoft developed some very powerful technologies to help teams of developers work better together. Visual Studio Team System is extensible so that Visual FoxPro developers can tap into it too.John M. Miller
42 COM Interop Over Easy.NET and COM haven’t always been easy for developers to use in an application but some new tools in Sedna will make it easier for Visual FoxPro developers to do just that.Craig Boyd
44 The New and Improved Data ExplorerVisual FoxPro 9.0 introduced the Data Explorer to help Visual FoxPro developers work with different data sources. Sedna will extend the Data Explorer and offer Visual FoxPro developers even better options.Rick Schummer
Departments11 Advertisers Index
46 Code Compilers
US subscriptions are US $29.99 for one year. Subscriptions outside the US pay US $44.99. Payments should be made in US dollars drawn on a US bank. American Express, MasterCard, Visa, and Discover credit cards are accepted. Bill me option is available only for US subscriptions. Back issues are available. For subscription information, send e-mail to [email protected] or contact customer service at 832-717-4445 ext 10.
Subscribe online at www.code-magazine.com
CoDe Component Developer Magazine (ISSN # 1547-5166) is published bimonthly by EPS Software Corporation, 6605 Cypresswood Drive., Suite 300, Spring, TX 77379. POSTMASTER: Send address changes to CoDe Component Developer Magazine, 6605 Cypresswood Drive., Suite 300, Spring, TX 77379.
TAB
LE O
F C
ON
TEN
TS
3Table of Contentswww.code-magazine.com

4 www.code-magazine.com
This special CoDe Focus issue for Visual FoxPro covers many of the new features that I showed in detail, including things like My, Net4COM,
the Upsizing Wizard and others. My presentation also covered some features that just didn’t fi t into this magazine—like DDEX. So I thought I’d take the opportunity to give one of my favorite features a quick overview.
DDEX is part of the Visual Studio Software De-veloper Kit (in other words, one of the ways of ex-tending Visual Studio). It allows Visual Studio to “understand” a data source. Microsoft is creating a DDEX provider for Visual FoxPro, allowing Visual Studio to understand all of the extended properties of VFP. In simpler terms, it allows you to see the DBGetProp() data of your database as well as your stored procs while in Visual Studio. Why is this im-portant? Well, it lets Visual Studio’s wizards and IDE perform better against VFP data—meaning that if you use Visual Studio you’ll be able to more easily work with your existing information.
The hallmark of Sedna is connectivity. Whether it’s connectivity to your data thru Sedna’s report-ing enhancements; to SQL Server thru Sedna’s Data Explorer and upsizing classes and wizard; to .NET via Net4COM and My; to Visual Studio via DDEX or the Interop Forms Toolkit; to Win-dows Vista via our toolkit and added support; or to the Community via CodePlex and the VFP exten-sions in the projects there; Sedna will focus hard on making sure that VFP works really well in the larger world.
Speaking of community, I’m really glad that we could work with the folks at CoDe Magazine to have some of the various community people write sidebars about their projects. As I’ve been show-ing around the world, some great enhancements to VFP are happening through the community at www.codeplex.com—Microsoft’s site for commu-nity-driven shared source application. I’ve really enjoyed showing people things like classes that give access to GDI+, an Outlook control written in VFP—and the fact that they’re available to any-one—and even better, that Microsoft has enabled the developers of these projects to access a Visual Studio Team Foundation Server from VFP to host their applications and provide version control, wish lists, and forums. We’re breaking physical location
barriers and allowing folks in South American to collaborate with those in Europe, the U.S.A., and elsewhere. Pretty awesome.
I hope you like what’s in Sedna—and I think that the articles in this issue will give you a great idea of some of the things that are coming with its release.
Welcome!Welcome to the third Fox Focus issue! As I write this (publishing deadlines being what they are) I’ve recently returned from a trip to Europe where I spoke at three different Visual FoxPro conferences in Germany, Amsterdam, and France. I showed off many of the new features coming in Sedna as well as a number of the enhancements being created by the community using the awesome extensibility built into VFP.O
NLI
NE
QU
ICK
ID
07
03
01
2
Welcome
Yair Alan GriverYair Alan Griver is the architect for the Microsoft.com community properties. As architect, he is responsible for creating a coherent underlying platform for properties that include blogs.msdn.com, forums.msdn.com, GotDotNet, chats and CodePlex. In addition to MSCOM architect, Alan is also responsible for the continued development of Visual FoxPro. Prior to the architect role, Alan was Group Manager for the Visual Studio Data group. As Group Manager, Alan’s teams produced the tools used inside of Visual Studio .NET, Office and SQL Server that surface data capabilities, as well as Visual FoxPro. Prior to this position, Alan was a Lead Program Manager and Community Evangelist for Visual Basic .NET, driving community interests into Visual Basic .NET. Before joining Microsoft, Alan was Chief Information Officer at GoAmerica, a publicly traded telecommunications (wireless internet) company, and co-founder and CIO of Flash Creative Management a business strategy and technology consulting company. Alan is the author of five books on Visual FoxPro and Visual Basic, the creator of various development frameworks, and has developed database systems ranging into the thousands of users. He has spoken around the world on databases, object orientation, and development team management issues, as well as XML and messaging-based applications.
Yair Alan Griver
COMMUNITY TIP
Outlook2003BarWritten entirely in VFP, the Outlook2003Bar control has the same look and feel of Microsoft Outlook 2003 navigation bar. You can change the look of the control using the predefined themes or create your own. It’s easy to use and FREE!
Take a look at: <http://www.codeplex.com/VFPX/Wiki/View.aspx?title=Outlook2003Bar>
Emerson Santon Reed, Systems Analyst
Folhamatic Tecnologia em Sistemas

5www.code-magazine.com
Visual FoxPro 9 introduced many new report-ing enhancements. The most exciting aspect of these enhancements was that you could
extend both the Report Designer and the Report Output engines using xBase code. Sedna will intro-duce even more ways to extend the VFP Reporting Engine.
The Report Designer now has the ability to add custom tabs to the Report Designer’s Properties dialog boxes. Prior to Sedna developers could not extend the existing Prop-erties dialogs but they could replace them using the Event Handler Registry. This was problematic because creat-ing a custom Properties dialog is not an easy task and different Properties dialogs, created by dif-ferent developers, could not be used at the same time. Sedna’s enhancement is a welcome addi-tion for anyone who wants to provide a user in-terface element in the Report Designer to accom-pany a custom Report rendering object they have created.
Sedna also makes it easier to extend the Report Output process. REPORTOUTPUT.APP, included with Sedna, provides a way to hook into the report output using custom classes. The new classes are called Handlers and consist of two types: FX and GFX. The FX Handlers provide extended function-ality to the report run but do not handle any draw-ing or rendering to the report canvas. A progress meter would be an example of an FX Handler. The GFX Handlers actually render to the report canvas and provide the ability to either extend the current rendering or replace it all together.
Enhanced Properties Dialogs
Sedna includes several new FX and GFX Handlers as well as new tabs, added to the Control Proper-ties dialog boxes, to accompany these handlers. This provides a user interface for these Handlers at de-sign time.
The next few sections briefl y discuss the new tabs included with Sedna.
Document Properties Tab
The FoxPro team added a new tab to the Report Properties dialog called “Document Properties” that shows a list of custom properties that you can set to either store additional information about the
document or to control the re-port rendering into a document. Table 1 provides a brief descrip-tion of the extended properties included with Sedna.
The property names beginning with “HTML” are specifi c to HTML output and are currently only supported by the HTML-Listener (included in the _Re-portListener.vcx FFC library).
Any ReportListener that generates documents can use the other property names.
For example, if you set the custom document prop-erties shown in Figure 1, the following text will be included with the generated HTML fi le if a report is rendered using the HTML Report Listener:
Sedna reporting enhancements take the ReportListener class to
the next level, making it more practical than ever to
customize report output and design.
Fast Facts
Leveraging Sedna ReportingSedna’s reporting features have made both the designing and rendering of a VFP report more extensible. In this article you’ll learn about a few of the new rendering objects that Sedna includes such as rotation and hyperlinks. You will also learn how to create your own custom rendering object and how to include a custom Builder interface element for it in the Report Designer. O
NLI
NE
QU
ICK
ID
07
02
02
2
Bo DurbanBo Durban is a partner and consultant with Moxie Data, Inc. He has been a software developer for over 13 years with an emphasis on reporting and Web development. He is the author of several reporting utilities including Moxie Objects for Visual FoxPro.
www.moxiedata.com
Bo is the project manager for the GDIPlusX project, which is part of VFPX, a community effort to create open source add-ons for Visual FoxPro 9.0
Http://www.codeplex.com/VFPX
Bo has spoken at Visual FoxPro conferences as well as local user group meetings.
Property Description
Document.Title Specifi es a title for the report document. For HTML output, this will appear as a TITLE tag in the rendered document.
Document.Author Specifi es author information for the report document. Appears as a META tag for HTML output.
Document.Description
Specifi es a description for the report document. Appears as a META tag for HTML output.
Document.Keywords
Specifi es keywords to include with the report document. Appears as a META tag for HTML output.
Document.Copyright
Specifi es copyright information for the report document. Appears as a META tag for HTML output.
Document.Date Specifi es a date for the report document.
HTML.CSSFile HTML output only. Specifi es the name of an external CSS fi le for the generated document to use.
HTML.Metatag.HTTP-EQUIV
HTML output only. Specifi es an HTTP-EQUIV tag to include in the HTML output.
HTML.TextAreasOff
HTML output only. Suppress the use of TEXTAREA tag for stretch with overfl ow fi elds.
Table 1: List of custom report properties that are built into the new Report Designer.
Leveraging Sedna Reporting
6 www.code-magazine.com
<title>My Custom Report</title><META name="description" content="Just afew words about this report"><META name="author" content="Bo Durban"><META name="copyright" content="Copyright2006 CoDe Magazine"><META name="keywords" content="VisualFoxPro Sedna Reporting">
While this data is not visible on a Web page, this can be useful information when creating document indexes for search engines. Prior to Sedna, there wasn’t a convenient way to include this information in an HTML report document.
You can add custom properties to the property list, but they won’t be recognized by the standard Re-portListener. Any new custom properties must be handled by a new custom ReportListener or a cus-tom FX or GFX Handler.
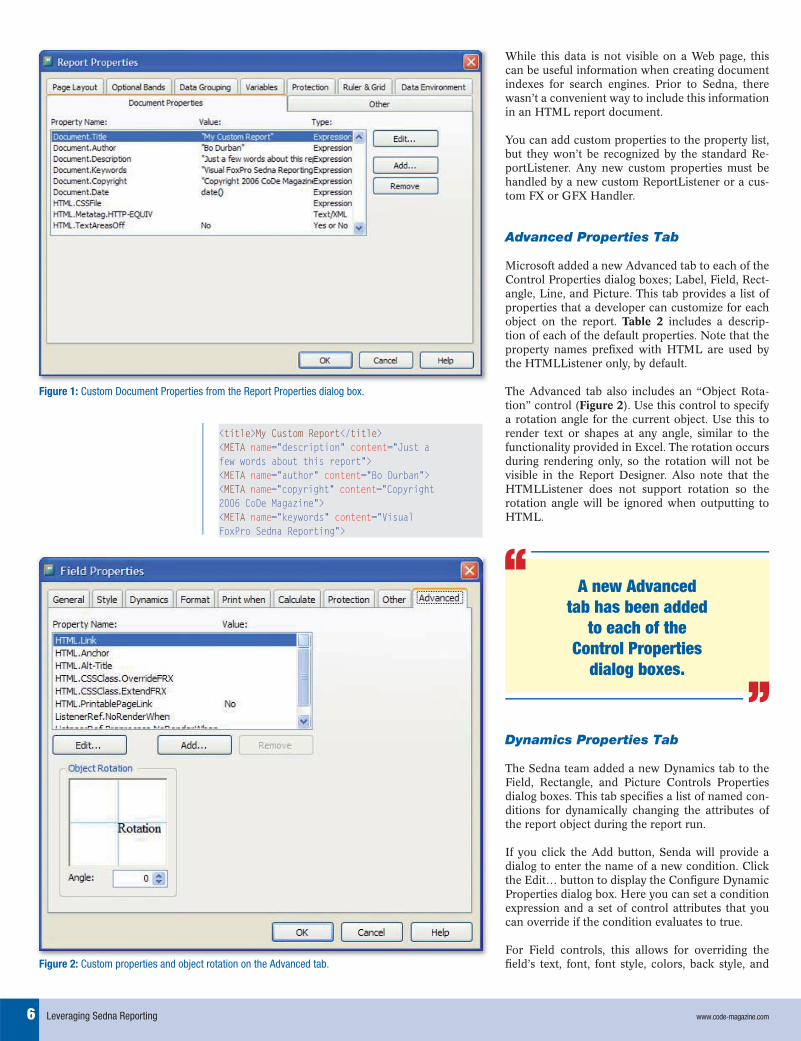
Advanced Properties Tab
Microsoft added a new Advanced tab to each of the Control Properties dialog boxes; Label, Field, Rect-angle, Line, and Picture. This tab provides a list of properties that a developer can customize for each object on the report. Table 2 includes a descrip-tion of each of the default properties. Note that the property names prefi xed with HTML are used by the HTMLListener only, by default.
The Advanced tab also includes an “Object Rota-tion” control (Figure 2). Use this control to specify a rotation angle for the current object. Use this to render text or shapes at any angle, similar to the functionality provided in Excel. The rotation occurs during rendering only, so the rotation will not be visible in the Report Designer. Also note that the HTMLListener does not support rotation so the rotation angle will be ignored when outputting to HTML.
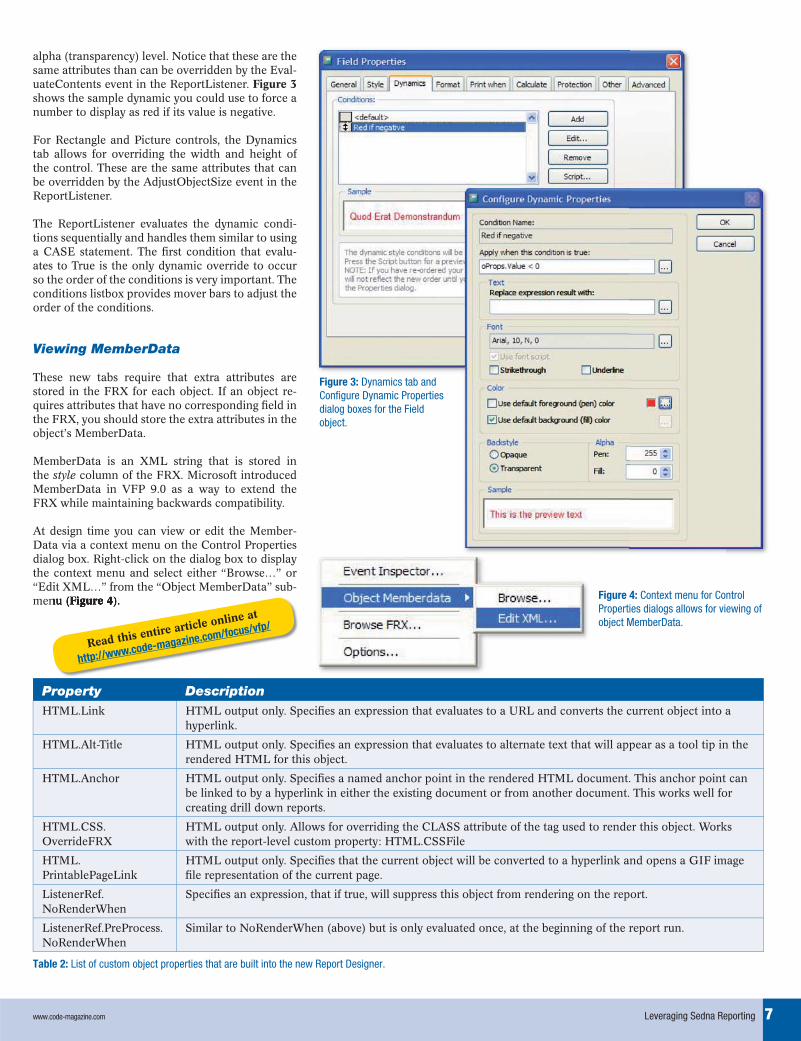
Dynamics Properties Tab
The Sedna team added a new Dynamics tab to the Field, Rectangle, and Picture Controls Properties dialog boxes. This tab specifi es a list of named con-ditions for dynamically changing the attributes of the report object during the report run. If you click the Add button, Senda will provide a dialog to enter the name of a new condition. Click the Edit… button to display the Confi gure Dynamic Properties dialog box. Here you can set a condition expression and a set of control attributes that you can override if the condition evaluates to true.
For Field controls, this allows for overriding the fi eld’s text, font, font style, colors, back style, and
A new Advanced tab has been added
to each of the Control Properties
dialog boxes.
Figure 1: Custom Document Properties from the Report Properties dialog box.
Figure 2: Custom properties and object rotation on the Advanced tab.
Leveraging Sedna Reporting
7www.code-magazine.com
alpha (transparency) level. Notice that these are the same attributes than can be overridden by the Eval-uateContents event in the ReportListener. Figure 3 shows the sample dynamic you could use to force a number to display as red if its value is negative.
For Rectangle and Picture controls, the Dynamics tab allows for overriding the width and height of the control. These are the same attributes that can be overridden by the AdjustObjectSize event in the ReportListener.
The ReportListener evaluates the dynamic condi-tions sequentially and handles them similar to using a CASE statement. The fi rst condition that evalu-ates to True is the only dynamic override to occur so the order of the conditions is very important. The conditions listbox provides mover bars to adjust the order of the conditions.
Viewing MemberData
These new tabs require that extra attributes are stored in the FRX for each object. If an object re-quires attributes that have no corresponding fi eld in the FRX, you should store the extra attributes in the object’s MemberData.
MemberData is an XML string that is stored in the style column of the FRX. Microsoft introduced MemberData in VFP 9.0 as a way to extend the FRX while maintaining backwards compatibility.
At design time you can view or edit the Member-Data via a context menu on the Control Properties dialog box. Right-click on the dialog box to display the context menu and select either “Browse…” or “Edit XML…” from the “Object MemberData” sub-menu (Figure 4).
Property Description
HTML.Link HTML output only. Specifi es an expression that evaluates to a URL and converts the current object into a hyperlink.
HTML.Alt-Title HTML output only. Specifi es an expression that evaluates to alternate text that will appear as a tool tip in the rendered HTML for this object.
HTML.Anchor HTML output only. Specifi es a named anchor point in the rendered HTML document. This anchor point can be linked to by a hyperlink in either the existing document or from another document. This works well for creating drill down reports.
HTML.CSS.OverrideFRX
HTML output only. Allows for overriding the CLASS attribute of the tag used to render this object. Works with the report-level custom property: HTML.CSSFile
HTML.PrintablePageLink
HTML output only. Specifi es that the current object will be converted to a hyperlink and opens a GIF image fi le representation of the current page.
ListenerRef.NoRenderWhen
Specifi es an expression, that if true, will suppress this object from rendering on the report.
ListenerRef.PreProcess.NoRenderWhen
Similar to NoRenderWhen (above) but is only evaluated once, at the beginning of the report run.
Table 2: List of custom object properties that are built into the new Report Designer.
Figure 4: Context menu for Control Properties dialogs allows for viewing of object MemberData.
Figure 3: Dynamics tab and Configure Dynamic Properties dialog boxes for the Field object.
Leveraging Sedna Reporting
Read this entire article online at
http://www.code-magazine.com/focus/vfp/

8 www.code-magazine.com
LINQ’s core features will seem very familiar to Visual FoxPro developers. LINQ provides the ability to execute SELECT statements
as part of the core .NET languages, C# and Vi-sual Basic. Anyone familiar with Visual FoxPro’s query commands or T-SQL’s SELECT syntax will fi nd familiar commands and capabilities. How-ever, LINQ does not aim to reproduce VFP/SQL Server features exactly. Instead, LINQ provides many unique features that go much beyond simple data query capabilities. Therefore, knowing other query languages is an advan-tage for developers who want to take advantage of LINQ, but at the same time, I recom-mend not getting too hung up on whether certain things are exactly identical to standard-ized SELECT-syntax. LINQ is a separate language with dif-ferent features and somewhat different syntax.
A Feature Overview
So what exactly does LINQ do? Let me put it this way: The very fi rst time I got a private introduction to LINQ quite some time ago, Anders Hejlsberg (the “father of C#”) told me the goal was to create query abili-ties inside of C# and Visual Basic that could “query anything that has structure.” So what is it that “has structure”?
Well, in C# and Visual Basic, quite a lot as it turns out. First and foremost of course: data. This means that you can use LINQ to query data sources such as ADO.NET DataSets or SQL Server tables and views. But LINQ can query a lot more. XML also “has structure”. LINQ allows queries against any XML data source including an XML fi le or an XML string in memory. Objects also have structure. And of course, everything in .NET is an object. In fact, it turns out that LINQ is an engine that mainly queries objects, and features used to query “other” things, such as data or XML, are sitting on top of the object query engine.
Let’s take a look at an example—an array of strings. Since both arrays and strings are objects in .NET,
The Missing LINQVisual FoxPro’s (VFP) Data Manipulation Language (DML) is one of VFP’s most compelling features. It is also the most obvious feature VFP developers miss in .NET languages such as C# and Visual Basic. However, Language Integrated Query (LINQ), a new query language for .NET developers, is a new feature in the upcoming releases of C# 3.0 and Visual Basic 9.0 that addresses these shortcomings. O
NLI
NE
QU
ICK
ID
07
03
03
2
you can use LINQ to query from string arrays. Con-sider the following Visual Basic array of names:
Dim names As String()names = New String(4)names(0) = "Smith"names(1) = "Snyder"names(2) = "Baker"names(3) = "Jonson"names(4) = "Ballmer"
Or the C# equivalent:
string[] names;names = new string[5];names[0] = "Smith";names[1] = "Snyder";names[2] = "Baker";names[3] = "Jonson";names[4] = "Ballmer";
Using LINQ you can query from these arrays. First I’ll show you an equivalent of SQL Server’s SELECT *. In Visual Basic, you’ll use this LINQ syntax to return all “fi elds” and all “records” from this array:
From name In names Select name
Or in C#:
from name in names select name;
As you can see, this is not exactly like a SELECT statement you know from VFP and SQL Server, but still similar. In T-SQL you would use this equivalent:
SELECT name FROM names
You can see two main differences between these simple LINQ selects and the simple T-SQL SE-LECT. First, the LINQ statement seems to be back-ward. While T-SQL specifi es fi rst what to select and then where to select it from, LINQ goes the opposite way by specifying the source (the “from” part) fi rst. In the world of strong typing and Intel-liSense, the LINQ approach makes more sense. From a functional point of view however, the result remains the same.
Markus EggerMarkus is an international speaker, having presented sessions at numerous conferences in North & South America and Europe. Markus has written many articles for publications including CoDe Magazine, Visual Studio Magazine, MSDN Brazil, asp.netPro, FoxPro Advisor, Fuchs, FoxTalk and Microsoft Office & Database Journal. Markus is the publisher of CoDe Magazine.
Markus is also the President and Chief Software Architect of EPS Software Corp., a custom software development and consulting firm located Houston, Texas. He specializes in consulting for object-oriented development, Internet development, B2B, and Web Services. EPS does most of its development using Microsoft Visual Studio. EPS has worked on software projects for Fortune 500 companies including Philip Morris, Qualcomm, Shell, and Microsoft. Markus has also worked as a contractor on the Microsoft Visual Studio team, where he was mostly responsible for object modeling and other object- and component-related technologies.
Markus received the Microsoft MVP Award (1996-2006) for his contributions to the developer community. Visual LandPro, one of the applications Markus was responsible for, was nominated three times in the Microsoft Excellence [email protected]
LINQ provides to C# and Visual Basic what many Visual FoxPro
developers have long known as a must-have feature:
An integrated query language. However, LINQ goes beyond
the ability to query data and instead queries data as well as XML and practically
any sort of object data source.
Fast Facts
The Missing LINQ

9www.code-magazine.com
Second, T-SQL simply says “from names” while LINQ uses the seemingly more complex “from name in names” syntax. LINQ supports more possible sources than T-SQL. In T-SQL, “names” must be a table (or some equivalent source such as a view). In LINQ, the source could be any ob-ject containing other objects of any complexity. The above LINQ example specifi es that within the “names” array, I expect items that I choose to each refer to “name”, allowing me to then use that “name” in various ways. In this very simple exam-ple LINQ queries the entire “name” into the result list, but in more complex examples (see below), LINQ can use the “name” item in different ways.
The LINQ examples I’ve shown you so far are not very exciting since the resulting list is exactly the same as the source array. However, I’ll now spice things up a little bit. Consider this Visual Basic ex-ample:
From name In names _ Order By name _ Where name.StartsWith("S") _ Select name
Or, once again, the C# equivalent:
from name in names orderby name where name.StartsWith("S") select name;
These queries return only the names that start with “S” and sorts the result set. You can see how to use each item (referred to as “name” in this case) as part of the overall syntax. Without the “name in names” syntax, you couldn’t use “name.StartsWith()”.
Now suppose I choose an array of complex objects instead of a simple string array, such as an array of customer objects, where each object has fi rst and last name properties (among others). I might form a query like so:
From customer In customers _ Order By customer.FirstName _ Where customer.LastName.StartsWith("S") _ Select New { customer.FullName, _ customer.Address}
In addition to the fact that this example uses properties on the “name” items, the actual “se-lect” part of the statement is somewhat unusual. Instead of returning a list of customer objects, this example returns a list of new objects where each object in the list has “FullName” and “Address” properties.
Note: Since each LINQ feature that I’ll discuss works equally well in Visual Basic and C# and the features have similar syntax, I will stop listing sepa-rate language examples.
Now I’ll improve this example further by messing with the return value. Keep in mind that LINQ can
return any object, allowing for much greater fl ex-ibility than you would typically expect from query statements. Consider this example:
From customer In customers _ Order By customer.FirstName _ Where customer.LastName.StartsWith("S") _ Select New CustomerEditForm(customer.Key)
In this example, the result is a list of customer edit forms, each of which is instantiated with the pri-mary key of the customer from the source list.
This example shows a very interesting ability of LINQ queries: The result set can consist of things that weren’t even in the source. This is possible since LINQ has all the capabilities of .NET lan-guages at its disposal.
Other Data Sources
To keep the initial examples simple I’ve only used arrays as the data source in my examples. LINQ allows you to easily envision other sources, such as collections. The limited scope of this article means that I cannot nearly do the possibilities justice, but consider possible sources such as the collection of controls on a form (query all controls and join them with some other data source for instance), or the list of currently running processes. Also note that it does not matter where the collection originates. It is possible, for instance, to query a collection of stock quotes returned from a Web service.
Most developers seem to instinctively associate LINQ with the ability to query tabular data from SQL Server or a DataSet. Considering that query-ing from such a data source is the main feature of most query languages, it is an understandable assumption, and that assumption is correct. (Al-beit that assumption is often too limited. I want to make sure you understand that querying a conven-tional data source is just one possible case.)
One variation of queries over conventional data sources are queries against data that already exists in a DataSet (regardless of where that data origi-nated). The following C# query, which assumes that a DataSet named “dsCustomers” has been created beforehand, returns items from a table within a Da-taSet:
DataTable customers = dsCustomers.Tables[0];var customerQuery = orders.ToQueryable();var result = from c in customerQuery where c.Field<string>("Name").StartsWith("S") select new {FullName = c.Field<string>("FullName")};
You may have expected different syntax. For in-stance, you must fi rst retrieve a reference to the table within the DataSet you’re interested in (Da-taSets are like in-memory database containers and can contain any number of tables). Then, you have
GenericsMicrosoft introduced generics in .NET 2.0 (both in C# and Visual Basic). Generics allow you to create strongly typed constructs, where every type (such as string, decimal,…) is known by the developer, yet still do so in a generic fashion. For instance, you may want to create a collection object that you want to use for any kind of object. Without generics you can only specify the type of the collection as “object”. At run time you can choose to store any type of object, (strings, decimals, or forms), inside that collection since they all are objects. However, if you want a particular instance of that collection for strings only, yet someone adds a decimal value to the collection, then the compiler cannot understand the potential problem, and a run-time problem may occur. With generics you can still create a similar collection, however, once the collection is used, the developer specifies that in a particular instance, only a certain type (such as a string) is applicable. If someone accidentally tries to store a decimal in the same collection, then the compiler can catch that problem ahead of time, and an incorrect use is not possible.
For more information on generics and how they relate to concepts used in Visual FoxPro, visit www.VFPConversion.com
Get the LINQ CTPLINQ is currently available as a Community Technology Preview. To get the preview, visit
http://msdn.microsoft.com/data/ref/linq
The Missing LINQ

10 www.code-magazine.com
to access that table as a “queryable” data source so you call the “ToQueryable()” method on the DataTable object. This is due to an implementa-tion peculiarity of DataSets, which use .NET 1.1 style collections rather than generic collections. (If you are interested in the exact technical de-tails: DataSets implement IEnumerable and not IEnumerable<T>, which is what LINQ is based upon.)
In addition, standard DataSets do not expose in-dividual fi elds in a strongly typed fashion, but in-stead, every fi eld in a DataSet is of type “object” (which can be seen as a generic type). However, in order to query certain fi eld types such as strings in a meaningful way, you must know their type. An “object” typed fi eld, for instance, does not have a “StartsWith()” method. To solve this problem, you can either cast the type to something meaningful on the fl y and also deal with other related issues such as checking for null-values, or, you can use the generic Field<T>(fi eldName) method, which allows you to directly specify the type of the fi eld in ques-tion (such as .Field<string>("Name")).
Note: See the sidebar, Generics, for more informa-tion.
Much of what I said here only applies for default DataSets. Typed DataSets (DataSets with a defi ned structure), on the other hand do, not have these prob-lems. Therefore, if you used a typed DataSet in this example you could have used the following syntax:
var result = from c in dsCustomers.Customers where c.Name.StartsWith("S") select new { c.FullName };
LINQ to Databases
An extension to LINQ known as LINQ to Data-bases allows a completely different way of accessing data. LINQ to Databases allows direct queries into SQL Server databases.
Of course, as mentioned above, LINQ always re-quires some sort of object-setup to perform que-ries. SQL Server (currently?) does not expose any of the database tables and fi elds as objects, so at least for the time being, you have to create client-side classes that represent tables in SQL Server. You can do this by hand, but typically you’ll use Microsoft’s LINQ to Databases designer that will integrate into Visual Studio. Figure 1 shows that tool in action.
Once SQL Server objects are exposed to LINQ by means of client-side .NET objects as demonstrated here, you can run LINQ queries against those data sources, as demonstrated in the following C# ex-ample:
NorthwindDataContext db = new NorthwindDataContext();Table<Customer>customers = db.GetTable<Customer>();var result = from c in customers where c.LastName.StartsWith("S") select new {c.CompanyName, c.ContactName};
This example creates a data context and a DataT-able object. Consider this conceptually like opening a connection to the database and the table you are interested in. Note that I say conceptually, because
COMMUNITY TIP
ClassBrowserXClassBrowserX is an improvement to the normal VFP Class Browser (you use ClassBrowserX instead of VFP Class Browser). ClassBrowserX makes a working PRG (or HTML) from every form, class or project. Instead of using the normal Class Browser that generates only a content (or list) of each form, class or project as a PRG form, ClassBrowserX generates a working PRG that works exactly the same as the original form, class, or project.
At the moment ClassBrowserX has one significant deficiency: it can’t recognize all ActiveX controls from the form (class, project).
ClassBrowserX recognizes an ActiveX control from an original object (form, class, or project) so that its CLSID value is read (decrypted) from a binary OLE field and then based on that CLSID value, its OleClass value (like MSComctlLib.ListViewCtrl.2 ) is read from the Windows registry and used in the generated PRG code.
Figure 1: You can use Visual Studio’s integrated LINQ to Databases designer to expose SQL Server objects (tables).
The Missing LINQ

11www.code-magazine.com
in reality, LINQ doesn’t open a connection until the actual query executes. However, LINQ needs these fi rst four lines of code to fi gure out where the actual data source resides.
The actual query is a LINQ query using standard C# syntax (or standard Visual Basic syntax if you choose to write in Visual Basic). The actual query that runs on SQL Server, however, is executed in standard T-SQL syntax. The above example results in a server-side T-SQL query similar to the follow-ing:
SELECT CompanyName, ContactName FROM Customers WHERE LastName LIKE 'S%'
The “translation” of the queries happens by means of a fascinating technology known as expression trees. A complete discussion of expression trees is beyond the scope of this article (for more details, visit www.code-magazine.com and www.VFPConversion.com). However, the short conclusion to the long story is that LINQ’s expression trees allow you to execute any expression that you can form in C# or Visual Basic that is sensible for queries on SQL Server.
XML Support
LINQ has a special dialect known as LINQ to XML that you can use to query and create XML. Like LINQ to Databases, LINQ to XML also needs to represent XML in some sort of objectifi ed fashion. For this purpose, LINQ to XML provides a few new classes for the specifi c purpose of creating and pars-ing XML. Think of these classes as an alternative to the XMLDOM and other XML parsing mecha-nisms.
Two of the main classes for LINQ to XML’s XML parsing are the XElement and XAttribute classes. The following C# example takes an in-memory XML string and loads it into an XElement object:
XElement customers = XElement.Parse( @"<customers> <customer> <name>Smith</name> </customer> <customer> <name>Jones</name> </customer> </customers>");
Once you have XML available inside an XElement object you can use it in LINQ to XML queries:
from c in customers.Descendants("customer") select c.Element("name").Value;
You can also use LINQ to XML to create XML on the fl y as the result set of queries. In C#, this hap-pens by means of using XElement and XAtrtribute objects as the result set. Visual Basic goes a step
further and supports XML directly as part of its na-tive syntax. This Visual Basic example creates an XML string containing the names of all the fi les in the root directory:
Dim result As XElement = _ <Files><%= From fi le In My.Computer.FileSystem.GetFiles("c:\") _ Where fi le.IndexOf(".") > -1 _ Select <File><%= fi le %></File> %> </Files>Dim xml As String = result.ToString()
Of course, even in Visual Basic you can alternative-ly use XElement and XAttribute objects to achieve this result.
Above and Beyond
This short article hardly manages to scratch the sur-face of what’s possible in LINQ and how powerful this new engine is. CoDe Magazine features several more articles on LINQ as well as related topics such as new C# language features. You can view these ar-ticles online at www.code-magazine.com/focus/vfp and www.VFPConversion.com.
The problem is how to find an offset of where to find the CLSID value from the OLE field. Through trial and error I’ve figure out tree offsets for where to find the CLSID value but there are some (lots?) of ActiveX controls that don’t have CLSID values at those offsets. If you know how to read a binary formed OLE field from a form, class or project file, then you can help finalize ClassBrowserX for the Fox Community!
You can download the current code from
http://www.gotdotnet.com/codegallery/releases/viewuploads.aspx?id=0826d7a6-1dab-4a71-8e70-f2170c3c1661 or http://www.codeplex.com/Release/ProjectReleases.aspx?ProjectName=VFPX&ReleaseId=66
Arto ToikkaGNC Finland Ltd
Markus Egger
The Missing LINQ
Reporting, COM Interop, Upsizing, Deployment and more…
Use Team System with VFP!
Sedn
a
Conten
t!
Sedna: Beyond VFP 9
LINQ: You’ll Query Almost Anything in .NET
Use the “My” Namespace in Sedna!
Web Services and WCF with VFP and .NET
The New and Improved Data Explorer
Volume 4 / Issue 1
Karus Systems Limited 51 www.karus.com
Micromega Systems 2www.micromega.com
Moxie Data, Inc. 51 www.moxiedata.com
Stonefi eld Systems Group Inc. 35 www.stonefi eld.com
Sweet Potato Software 17 www.sweetpotatosoftware.com
VFP Conversion 26-27 www.vfpconversion.com
VFP Conversion Tools 52 www.vfpconversion.com/tools
West Wind Technologies 37 www.west-wind.com
White Light Computing, Inc. 23 www.whitelightcomputing.com
Advertising Sales:Vice President,Sales and MarketingTom Buckley832-717-4445 ext. [email protected]
Sales ManagersErna Egger+43 (664) 151 0861 [email protected]
Tammy Ferguson832-717-4445 ext [email protected]
Advertisers Index
This listing is provided as a courtesy to our readers and advertisers.
The publisher assumes no responsibility for errors or omissions.
AD
VER
TIS
ING
IN
DEX

12 www.code-magazine.com
If you are currently involved in a conversion ef-fort or are planning a conversion effort, then this article is for you. If you’re new to .NET or SQL
Server, this article can help you look at those technologies from a VFP perspective.
A solid plan for conversion consists of the following:
• Document your existing system.
• Understand the separate conversion functions re-quired.
• Evaluate the best strategy for converting your application.
• Discover the level of effort required to tackle each function.
• Document the plan of attack.• Implement.
In this article, I’ll focus on the most typical ex-ample of a Microsoft-centric conversion to SQL Server for a data store and a C# or Visual Basic code base. However you can apply this process to a conversion to other databases and languages. In addition, I’ll address specifi c techniques for con-verting VFP to .NET in the Implementation sec-tion so that you’ll know how to get started with the hands-on work.
Document Your Existing System
Before you begin any development work, you’ll document the existing application in order to provide metrics, a basis for your estimates, and a roadmap for the process. Documenting the ex-isting application can range from a list of how many PRGs, SCXs, and FRXs you have to so-phisticated metrics that attach weighted values to every part of your application. You can fi nd a free tool written in VFP8 at VFPConversion.com (see sidebar, Tools for Conversion) that will scan a PJX (project) fi le and output some mea-surements for the project. This tool provides a good starting point for documenting an existing VFP application.
Understanding where you are today will be a key step in a successful conversion effort. Assessment documents give the non-technical members of the
team, including management, an understanding of the size and scope of the project. They also serve as a common non-technical description of the work to be done.
Understand the Separate Conversion Functions Required
The functions required to convert an application vary from project to project based on the goals you have for the conversion. At one end of the spec-trum you’ll fi nd simply converting an existing VFP application to use SQL Server instead of DBFs to store data. On the other end of the spectrum you’ll see a complete rewrite of an application to change its basic architecture, give it a face lift, and use the knowledge gained with the old application to create a completely new version. In this article, I’ll discuss the most typical conversion project—producing a .NET version of an existing VFP application with current functionality.
The possible conversion functions follow:
• Upsize DBFs to SQL Server.• Tune SQL Server.• Convert an existing application to use a SQL
Server back end.• Convert visual aspect of forms.• Convert data environments of forms.• Convert form code.• Convert visual aspect of reports.• Convert data environments of reports.• Convert expressions and code in reports.• Convert method code and PRGs.• Convert functionality provided by ActiveX
controls and FLLs.• Convert visual aspect of menus and toolbars.• Convert menus and toolbar code.• Handle special issues—unique programming
challenges.
From VFP to .NETA practical look at what’s involved in converting your Visual FoxPro (VFP) applications to Visual Studio and SQL Server.Let me say up front that I am a long-time FoxPro developer and that I love VFP. I also love .NET and SQL Server and I’ve headed up and participated in many conversions. Most of the conversions I’ve worked on were not driven by technical necessity, but by customer demand that software be built with .NET and SQL Server. Whatever the reason, conversion from VFP to .NET is a significant undertaking.
Microsoft has not published a roadmap for moving
from Visual FoxPro to .NET and SQL Server. Nevertheless, the road has been successfully navigated and third-party maps
are now available.
Fast Facts
Mike [email protected]
Mike Yeager has a BA in Computer Science from Rutgers University. He first started xBase development with dBaseIII and the Quicksilver compiler, and then moved to Fox+ for Mac and FoxPro for DOS 2.0. He’s used almost every version of FoxPro and has built applications on SQL Server since v6.5.
Mike is a senior developer for EPS Software Corp., in Houston, TX, where he works with many technologies including VFP, C#, and SQL Server.
Mike has written several articles for various FoxPro publications and has been active on the Universal Thread for many years.
ON
LIN
E Q
UIC
K I
D 0
70
30
42
From VFP to .NET

13www.code-magazine.com
Evaluate the Best Strategy for Converting Your Application
If the existing application uses DBFs to store data, you must decide whether to modify it to work with a SQL Server back end prior to converting any code to .NET. This approach works well when the sup-port staff is not already familiar with SQL Server and when there is suffi cient time in the timeline, because it allows the staff to become familiar with administering SQL Server and allows time for fi ne tuning the database prior to switching to an entirely new code base. In multi-application conversions, having the database converted and functional up front allows for an incremental conversion. Un-fortunately, when you take this approach you’ll do some work on the existing code base and you’ll have to toss that work aside when moving to the new code base.
You can convert systems that are currently built as several individual applications or modules accessing a SQL Server back end in an incremental fashion, one application or module at a time. If the existing appli-cations aren’t already divided neatly into functional areas, do that now so that you can turn on function-ality in the new application and turn off functionality in the old application in stages, giving you a smooth transition path to the new application.
Much has been written about using interop between VFP and .NET in a conversion, so I won’t try to cover all of that here. Essentially, if you’ve got VFP COM objects or VFP Web services, .NET can easily consume them. Likewise, VFP can consume .NET Web services and DLLs exposed as COM objects. In a new twist, Microsoft recently released the Interop Forms Toolkit 1.0 as a power pack for Visual Ba-sic 2005 which makes it easy to expose .NET forms written in Visual Basic as COM objects. While Mi-crosoft developed this toolkit to allow Visual Basic 6.0 applications to run .NET forms, it works with any environment that can use COM, including VFP. I’ve tried the toolkit and have successfully run .NET forms within my VFP application. With a little work, you can even save VFP cursors as XML, pass the XML to a .NET form, and reconstitute it as a .NET DataTable. You can also use your DBFs in your .NET applications—especially with the new DDEX provider shipping as part of Sedna.
Initially, you’ll do a little work on each of the areas needing conversion so that you can discover the level of effort required for the conversion as described in the next section. However after the initial phase, you will divide the work into classifi cations described earlier in “Understand the Separate Conversion Functions
Required”. The most successful order for performing the conversion has historically been to convert the main program and window for the application, and then convert the visual aspects such as forms, menus, and reports. This gives you a complete skeleton of the application, though not a fully functional applica-tion. Once you have a skeleton in place, convert the data aspects of the individual elements, followed by the method code, resolving special issues, testing, and Quality Control (QC). In some instances, developers will have more success converting all aspects of each form, report, and menu before moving on to the next. In other cases, specialization of skills makes the pro-cess fl ow better when you carry out each conversion process separately from the others. Making a good decision for your situation depends on knowing the strengths of your team.
Discover the Level of Effort Required to Tackle Each Conversion Function
In order to accurately determine the level of effort required in a conversion project, you must complete samples of each type of conversion task and measure the time it takes to complete them. Just like making pancakes, you will generally throw out the very fi rst effort as non-representative since it will involve a lot of discovery. The very fi rst form you convert will probably take a fairly long time if you’ve never done it before. Measuring the time it takes to convert the sec-ond and third forms, however, can give you valuable information about how long it will take to convert the next 200 forms. Even though developers will get better at conversion tasks and will convert the 200th form much more quickly than the 4th form, they will also run into what I call “special issues.” Special issues are problems unique to one or two of your forms. On average, the increase in effi ciency you achieve from repetition will be offset by special issues that must be tackled so these early measurements will turn out to be more accurate than you might suspect.
Document the Plan of Attack
Armed with metrics about the size and complex-ity of your applications, a strategy for doing the conversion, and estimates that give you a level of effort expected, you’ll be ready for the next steps: document the plan, develop timelines, do resource planning, and create guidelines for implementation. The larger the application, the larger the conversion team, the more valuable a documented strategy be-comes. But even on small projects, it’s important that all team members, including management, un-derstand what to expect.
Implement
Database Upsizing to SQL Server
You’ll fi nd two common paths to take in upsizing DBFs (with or without DBCs) to a SQL Server da-
There is no point-and-click wizard that converts Visual FoxPro
applications to .NET.
From VFP to .NET
COMMUNITY TIP
A Scrollable Container for VFP!Carlos Alloatti’s ctl32_scontainer provides VFP 9 developers with a commercial quality scrollable container component that’s both easy to use and full featured. Like all of Carlos Alloatti’s ctl32 components, this control is free and comes with fully commented source code and excellent documentation.
At its simplest, the ctl32_scontainer is a VFP container with native Windows scrollbars. These scrollbars are aware of Windows XP and Windows Vista themes and automatically match the appearance and behavior of scrollbars on a user’s system. Because the ctl32_scontainer is based on a VFP container, you can easily integrate it into your existing projects—there are no learning curves regarding PEM’s and container appearance, the behavior will match what VFP developer are already accustomed too. Bonus: This control is implemented entirely in VFP 9 so there are no DLL’s, FLL’s or ActiveX components to register or distribute. This control adds 2 small classes (an additional 100K or about 25K compressed) to your distribution.
Once you start building interfaces with scrollable regions, you’ll quickly realize that scrollbars are only part of the solution. Today’s users expect to navigate scrollable containers via their mouse wheel or by clicking and dragging on the container’s background (ala Google map style navigation). Ctl32_scontainer supports both forms of advanced scrolling and

14 www.code-magazine.com
tabase. The fi rst is to use the VFP SQL Server upsiz-ing Wizard in a one-time process. The wizard has proven effective for the initial conversion of small to medium sized databases. Once the structure of the database resides in SQL Server you will tweak and maintain it there. The data will very likely be imported into the new SQL Server database struc-ture many times after the initial upsizing either via the “import” function of SQL Server Management Studio or through the second method of upsizing—custom SQL Server Integration Services packages (formerly known as DTS packages).
In complex upsizing scenarios you can use SQL Server Integration Services (SSIS) to map the VFP data into an entirely new SQL Server database structure and it can perform complex conversions on the data during the import. I want to mention for those not targeting SQL Server as their new back-end data store, that SSIS does not require either the source or the target for the data migration package to be SQL Server. You can use SSIS, for example, as an effective tool to upsize VFP or Microsoft Access databases to Oracle or Informix—or even the other way around!
Along with any transformations to the new database, you will normally practice the importing of data several times to insure the process is bullet proof when it comes time to convert the live database. You’ll also fi nd the importing process valuable for testing and QC purposes. VFP reports run against a certain VFP dataset should match exactly those run against the SQL Server version of the same dataset. In order to accomplish this, testers often have their own copies of the VFP and SQL Servers versions of specifi c datasets.
More often than you think, you will have to tweak the SQL Server database structure as the conversion process progresses. After you make these changes, you can re-run the import routines to create clean copies of the development and test databases and to verify that the import process is still valid.
When working with large databases, you will create and use smaller subsets of the production data to facilitate both the developers and testers and you will do full-sized conversions to accommodate per-formance testing.
VFP Application Conversion for SQL Back End
VFP supports two ways to talk to SQL Server, SQL pass-through and Remote Views. SQL pass-through is both faster and more fl exible, but it’s also harder to convert in an automated fashion and it doesn’t support binary data. Still, in most cases SQL pass-through will be your go-to technology for the major-ity of your application.
SQL pass-through does not, by default, support pushing updates made to the local cursor back to
the server. Fortunately, you can push updates back to the server in code. This approach emulates VFP’s native ability to support inline SQL language syntax in your code. Instead of executing the SQL directly as a command, you’ll make a function call with the SQL statement and you will use parameters to combat SQL injection attacks. On a typical editing form, you might use SQL pass-through to retrieve a cursor that you will bind to a combo box, another to calculate some values for display, and another to re-trieve the record that you’ll be editing. Only the last cursor needs to be updatable, so you’ll run this code against the cursor so that a simple TableUpdate() will push the changes back to SQL Server.
When the table you’re working with contains bina-ry data, remote views are your only choice. When used in a data environment, remote views are also relatively easy to convert automatically to .NET. But remote views are relatively slow and they are statically defi ned and must reside in a DBC. Though you can create remote views program-matically, the fact that they must reside in a DBC means that excessive creation and destruction of remote view defi nitions will result in bloating of the database’s memo fi le and the process will fur-ther decrease performance.
Database Tuning
VFP programmers have a tremendous amount of knowledge of SQL databases. However, SQL Server is not exactly like VFP and there is a learning curve associated with it. Some of the main issues you’ll en-counter in a conversion are the differences in column types and the differences in indexes. For the most part, SQL Server has many more column type choic-es than VFP. For instance, if you’re storing the value for a 3-option radio button in a DBF, you can choose either Numeric(1,0) or Integer. In SQL Server, you’ll want to choose a TinyInt (numeric type that can hold values from 0–255). The one notable exception to SQL having more choices of data types is VFP’s Date type which has no direct equivalent in SQL Server. SQL Server supports DateTime and SmallDateTime, but you must always store the time portion—even if you don’t want to use it. Even more strange is that SQL Server does not have a convenient way to strip the time portion from a DateTime value so that it can easily be used as a date. Luckily, VFP handles that by mapping SQL DateTime columns to VFP Date columns, but when coding for .NET you’ll have to accommodate this difference.
Indexes in SQL Server bear little resemblance to those in VFP, though they have the same intent. SQL Server indexes cannot be based on expres-sions—only columns. This isn’t as bad as it sounds because the most common expressions used in VFP indexes are UPPER() and DELETED(). By default, SQL Server’s use of indexes is case-insensitive, and there is no concept of a deleted record. When you think that you never access an index directly in SQL Server (you can’t in fact), it’s actually a much easier system to work with. In SQL Server, indexes are
From VFP to .NET
Ctrl+mousewheel zoom-in/zoom-out scrolling when hosting image controls. In addition, ctl32_scontainer also supports auto scrolling during data entry so that hidden controls automatically scroll into view when they gain focus.
Advanced developers can customize scrollbar appearance, visibility, enabled status and small-large-wheel-change values as needed.
This a must-have product in your development toolkit!
Check out ctl32_scontainer as well as other high quality controls available from Carlos’ ctl32 Web site at http://www.ctl32.com.ar. All of Carlos’controls are highly recommended.
Malcolm [email protected] Software

15www.code-magazine.com
made up of one or more columns and indexes can be primary keys, unique (candidate in VFP-speak), or regular indexes.
I can’t even begin to tell you all you need to know about tuning indexes in SQL Server, but covered indexes are a good place to start. Covered indexes contain all of the columns used in a query. They’re much faster than non-covered indexes because in-stead of using the index to determine which re-cords are qualifi ed, looking up the records and re-turning the data, SQL Server can return all of the data straight from the index, without ever looking up the underlying records.
You should also know about clustered indexes. By default, the SQL Server Management Studio UI makes any primary key that you create with it a clustered index. In many (if not most) cases, this is not a good idea. A clustered index isn’t really an index at all. What it really does is specify that as records are added to a table or modifi ed, they are to be physically sorted. Since you’re specify-ing a physical sort, you can have a maximum of one clustered index per table (you can’t physically sort the same table two ways at once). Going back to the discussion about covered indexes and how SQL Server no longer has to look up the base re-cords in order to return data for a query, think of clustered indexes as an improved version of covered indexes. Since the records are physically sorted, you have access to every single column in a selected record without doing a second lookup. In addition, the records are physically located next to one another on disk, so operations working on consecutive records are very fast. Clustered index-es are very powerful if used correctly—but horrible if used incorrectly. Imagine setting a primary key to a Uniqueidentifi er (GUID) column and making it a clustered index. Every insert on the table will cause a re-sort on disk—YUCK! When in doubt, do NOT use a clustered index unless you are abso-lutely sure about it.
A good rule of thumb for those new to SQL Serv-er indexing is to begin by adding a non-clustered primary key to every table. As performance issues arise, add new indexes judiciously to alleviate the issues.
Visual Conversion
While often thought of as the “easy part” of the conversion because it doesn’t involve coding and algorithms, visual conversion from VFP to .NET often takes more of the time in a conversion proj-ect than any other task and usually comprises a large portion of the cost of the project.
If your goals in the conversion are to change the look and feel or the core architecture and work-fl ow of the application, you’ll be re-creating your forms from scratch. You may choose to do the same with reports. However, in the majority of cases tools can do the visual conversion of forms
and reports in a matter of minutes. Then you can plug converted forms and reports into the .NET project to create a non-functioning skeleton. Like the framing of a house, you get a great feeling of satisfaction because a great deal of change is read-ily apparent with comparatively little effort. With the skeleton of the forms and reports in place, you can add functionality to the application in an in-cremental fashion as you make the forms and re-ports, one-by-one.
Data Environment Conversion
One of VFP’s key strengths is that data manipu-lation is baked right into the language. Unfortu-nately, this removes some of the structure imposed on other languages and makes an automated ap-proach to data environment conversion problem-atic. If your application uses private data sessions in conjunction with local or remote views in all of its forms and reports, it is likely that you’ll be suc-cessful in converting your data environments auto-matically using a tool or a custom utility. However, if your data environments are built on the fl y us-ing the language in various places throughout your forms, you will have a more manual process on your hands.
.NET treats data in an object-oriented fashion. The languages do not have the concept of a data en-vironment the way that VFP does. Instead, forms hold references to DataSets and/or DataTables. A DataSet is somewhat analogous to a data environ-ment in VFP because it contains tables, but there are signifi cant differences. For instance, you can easily have more than one DataSet in use by a .NET form while it’s not easy to use multiple private data sessions in forms in VFP.
.NET also has a MUCH more limited ability to ma-nipulate data than VFP. The syntax is cumbersome, relying on DataSet and DataTable objects (which are part of ADO.NET) to handle data manipula-tion. Code such as the following in C# shows you how ugly it can be:
int someValue = (int)myDataSet.Tables["MyTable"].Rows[currentRow] ["SomeColumn"];
Many good .NET developers create classes just to interact with the data, a process called Object Re-lational Mapping (ORM), allowing them to work with strongly typed properties of a class and have the class deal with the details of the DataTables and DataSets. The strongly typed DataSets in .NET are simple examples of this strategy for ac-cessing data and most .NET Frameworks and so-lution platforms include some implementation as well.
Some of this is set to change in the next version of Visual Studio when both the Visual Basic and C# compilers will support Language Integrated Que-ry (LINQ). You’ll fi nd LINQ even more powerful
From VFP to .NET
COMMUNITY TIP
GDIPlus-XMy experience working with the VFP-X community and Bo Durban and Craig Boyd has been very exciting. Working on the GDIPlus-X project, I have had the opportunity to learn a lot of new things and discuss new approaches and techniques. I’m in Brazil and it’s been very amazing to be able to work together with other great developers so many miles away from my home.
GDIPlus-X (<http://www.codeplex.com/VFPX/Wiki/View.aspx?title=GDIPlusX>) is a VFP-X Community project that reproduces the System.Drawing namespace of Visual Studio .NET. With this library, developers will be able to easily translate any .NET sample using System.Drawing into VFP code. GDIPlus-X wraps all 603 GDIPlus.dll functions and brings to VFP developers many new possibilities including the ability to create charts, drawings, styled texts, change the IDE, recreate controls, work with Windows themes, and more.
It also brings some new functions and classes, such as the Image Canvas class that permits rendering graphics on a VFP form, bringing the possibility to draw directly to a VFP Image control, instead of drawing using the form’s HWnd. This way developers don’t need to worry about the Windows Paint updates. It works super fast-images are stored in memory, avoiding disk access and performance loss.
Download the latest stable release and run the samples to have an idea of the power of this library. You’re also encouraged to participate in this project through coding, testing, giving suggestions or reporting errors. Please send a message to our project manager, Bo Durban ([email protected]) or post directly on the Codeplex message boards.
Cesar [email protected]

16 www.code-magazine.com
than the data manipulation features in VFP, but it will still be a version 1.0 product, so it’s likely to be lacking in several areas as well. Still, in the coming years LINQ may blow the lid off of what VFP developers have always enjoyed over our fel-low data-challenged non-VFP developers.
Code Conversion
You’ll quickly fi nd that code conversion is one of the most diffi cult parts of the conver-sion process. It requires the most skill in both VFP and .NET. You should think of this process more as a translation process than a conversion pro-
cess—like translating a book from one language to another. It’s not a matter of translating each word; it’s a matter of translating the meaning.
To some extent you can automate the conversion of the control structure of the code. Just about every language has a counterpart for a control construct in every other language—or a way to emulate it. For instance, a DO CASE in VFP translates very closely to if () … else if () in C#, but only in some cases does it map to the switch() statement, which at fi rst glance looks like the most similar construct.
You can also convert expressions in an automated way. For example, libraries exist that will let you run an expression such as the following directly in .NET:
TRANSFORM(DOW(DATE()+1))
You can also fi nd utilities that will convert that ex-pression to C# or Visual Basic equivalent source code (see the Tools for Conversion sidebar).
Translating entire blocks of code to produce the same results in another language will require the most attention. If, for instance, you’ve used a third-party library to incorporate TCP capabilities into your VFP application, you’ll be pleased to know that TCP support is now native in the .NET Frame-work and easy to use at that. Unfortunately, you will now have to rewrite your TCP functionality. If you’re converting data-specifi c functionality, you might fi nd yourself converting a SCAN loop into a foreach() working against the rows of a DataT-able—or you may fi nd that rewriting the code as a stored procedure in SQL Server is the best ap-proach.
Exception handling is another area that will re-quire attention. VFP has default error handlers, Er-ror() methods, ON ERROR statements, and TRY/CATCH blocks. C# and Visual Basic only have TRY/CATCH blocks.
Still, in a well-constructed VFP application, the blocks of code will be small and discreet and will lend themselves to incremental conversion, one
method at a time. As the conversion takes place, the visual walking skeleton of the application becomes functional.
Special Issues (A/X, FLL, OCX, Frameworks)
.NET does support ActiveX controls and COM ob-jects through wrappers that encapsulate the unman-aged code; however, in most cases you will fi nd that the control’s authors also make a managed .NET version that you can use instead. If you fi nd a man-aged .NET version of the control, USE IT! If you must use an unmanaged control, you’ll fi nd that .NET supports them MUCH better than VFP. No messing with AutoYield settings or using timers to get around weird UI quirks.
FLLs are not supported in .NET, but in recent years, FLLs are becoming scarcer in VFP apps. Function-ality found in VFP FLLs such as JKEY’s incremen-tal search for grids is baked right into .NET. In fact, .NET grids support advanced features such as sort-ing by any column in ascending or descending order right out of the box.
Some of the companies that built frameworks for VFP have also built .NET frameworks—OakLeaf’s Mere Mortals framework for example, though the frameworks are not directly equivalent and there is no offi cial upgrade path. In some cases like Visual Extend, the “framework” produces native VFP code and doesn’t add components to the project. In al-most all cases you won’t fi nd a conversion for your VFP framework and will have to code accordingly. Frameworks are not nearly as prevalent in the .NET world though the case for them is still compelling.
If you want to incorporate a .NET framework such as StrataFrame or Milos (part of the Milos Solution Platform) into your converted application, it will become part of your conversion effort at every level and you’ll fi nd it well worth the effort.
Testing and QC
The testing process begins on the fi rst day of your conversion and continues after you write the last line of code. Unlike creating a brand-new applica-tion, conversion projects have the advantage that you already know how the system should perform. If the new functionality matches the old functional-ity, it’s correct. If the new report comes out exactly the same as the old report, it’s correct. There is not the same level of work involved as there is devel-oping a new system and gathering and refi ning re-quirements.
.NET code has a lot more support for testing than VFP. If you’re not familiar with the concepts of unit testing, look into NUnit or the unit testing built into the Team System versions of Visual Studio. You have a unique opportunity to incorporate testing
In most cases SQL pass-through will be your go-to
technology for the majority of your application.
From VFP to .NET
Tools for ConversionVFPConversion.com provides tools, training, and expertise for organizations converting Visual FoxPro applications to the .NET platform and to SQL Server. The Web portal gives you access to white papers, blogs, tools, and resources. There you can download a free VFP project evaluation tool to help you with your planning. VFPConversion.com also has tools that automate much of the conversion process including Vfp2Net(Reports) report converter and Vfp2Net(Forms) form converter.

17www.code-magazine.com
into your application during the conversion pro-cess, because you will test to ensure that the .NET version of your code performs at least as well as the VFP version. Capturing these tests will not only help you in your conversion effort, but will give you invaluable tools for testing changes you make to your application later in its life. How many times have you been afraid to make a change to your ap-plication because you didn’t know the consequenc-es? Having a battery of tests available helps you to answer that question with confi dence.
In addition to unit testing, converting an applica-tion will mean you do a lot of regression testing. Regression testing is more of an end-to-end user experience test than a unit test. For example, while unit testing can validate the tax calculation for an invoice, it can’t test the user experience or validate that the newly calculated tax rate gets printed on the invoice correctly when the sale is over. Generally after you’ve converted each form, report, and pro-cess, you’ll pass it to the testers to “bang on.” As you convert entire groups of items and functions, your team will test them again as units. Finally, when the entire application is ready, it is tested again to see how it works as a whole.
Testing requires frequent conversions of the data-base as well as new versions of the code. In com-
parison to new product development, testing of conversion projects is faster and easier, but it is also more critical because the new code is designed to replace a mature application and the bugs that are expected in new software are not tolerated nearly as much in converted applications.
Conclusion
There is no point-and-click wizard that converts Visual FoxPro applications to .NET. VFP program-mers who remember the wizards that converted FoxPro DOS and FoxPro Win applications to Vi-sual FoxPro and Visual Basic programmers who have tried the tools and wizards for converting VB6 apps to Visual Basic .NET will tell you that automatic conversion of complex systems from one paradigm to another (let alone one language to another) doesn’t often work out as you hope. Still, conversion projects happen, tool vendors write tools that make the challenge a little less daunt-ing, and you will have the experience of those who have gone before you. The task is neither trivial nor impossible. It’s another challenge—an oppor-tunity to grow and learn.
Mike Yeager
From VFP to .NET

18 www.code-magazine.com
Fox developers have long mocked the Upsiz-ing Wizard as a weak attempt to assist VFP developers migrating VFP database containers
to the SQL Server database platform. The Sedna release completely changes the perception and gives you a great tool to migrate data easily to SQL Server 2000 and SQL Server 2005.
The fi rst thing you should know about the Sedna Upsiz-ing Wizard is it is more than a standard wizard. It has a stan-dard wizard user interface to step you through the process of selecting the appropriate settings to migrate the data-base structures and optionally the data as one would expect. Sedna’s new architecture sepa-rates the wizard user interface from the upsizing engine so developers can programmatically control a migra-tion. This means you can skip the user interface and take control of the process so you do not need to re-select your choices again as you step through the user interface each time you want to test a mi-gration. In addition, the entire process is extend-ible in true VFP tradition.
This article will address each of the steps in the updated wizard, discuss the changes and im-provements the Fox Team made to the process, and provide you an example of programmatically controlling the engine along with properties you set and methods you call to perform a database upsizing. I’ve based the changes discussed in this article on the Sedna October 2006 Community Tech Preview (CTP). Please note that at the time I’m writing this article, Microsoft has not fi nal-ized the features that they’ll include in the fi nal release.
Upsizing Wizard UI
The Fox Team has revamped and modernized the Sedna Upsizing Wizard user interface (UI). The UI uses a standard wizard to step through choices and make appropriate selections for the migration.
Previously, Visual FoxPro’s Upsizing Wizard in-cluded nine steps but the Sedna Upsizing Wizard reduces the number of steps to six steps, thereby streamlining the process and placing the steps in a
more logical order. For exam-ple, in Sedna, Microsoft moved step fi ve (selecting the target database) of Visual FoxPro’s Upsizing Wizard to step three because that seems more logi-cal. Microsoft also consolidated steps three (choose tables) and four (map fi eld data types) into a single step.
You can start the Upsizing Wiz-ard in one of three ways. If you are running the CTP inside of VFP 9.0 (with or without any of the service packs) and try to run it from the Tools > Wizards menu you will still get the old
Upsizing SimplifiedThe Sedna Upsizing Wizard is leaps and bounds better than the version previously shipped by Microsoft in any version of Visual FoxPro. The Fox Team listened to the complaints from the Fox Community over the years about the wizard being deficient, with some fatal flaws, and recognized how it became outdated with the advent of SQL Server 2005. Sedna attempts to correct all of this and more.
Most Visual FoxPro developers who tried the
VFP 9.0 and earlier Upsizing Wizard hoped to find a tool to simply take their VFP database container and make it into a SQL Server database.
These same developers usually tried it once or twice, and
watched it not do the complete job the way
they hoped it would and quickly abandoned the idea.
Fast Facts
Rick [email protected]
Rick Schummer is the president and lead geek at White Light Computing, Inc. headquartered in southeast Michigan, USA. He prides himself in guiding his customer’s information technology investment toward success. He is a co-author of Visual FoxPro Best Practices for the Next Ten Years, What’s New in Nine: Visual FoxPro’s Latest Hits, Deploying Visual FoxPro Solutions, MegaFox: 1002 Things You Wanted to Know About Extending Visual FoxPro, and 1001 Things You Always Wanted to Know About Visual FoxPro. He is regular presenter at user groups in North America and has enjoyed presenting at GLGDW, Essential Fox, VFE DevCon, Southwest Fox, German DevCon and Advisor DevCon conferences. You can find all of his developer tools at his company Web site: http://whitelightcomputing.com
Figure 1: You can run the Upsizing Wizard directly from the Sedna version of the Data Explorer.
ON
LIN
E Q
UIC
K I
D 0
70
30
52
Upsizing Simplified

19www.code-magazine.com
wizard. Since the CTP is pre-beta, it does not overwrite the existing wizard with the CTP version. The fi nal version of the Sedna components will have the new wizard connected to the menu.
You can also run the Upsizing Wizard in the Command win-dow:
DO UpsizingWizard.app
The wizard accepts three op-tional parameters if you want to control how it runs: name and path of the source data-base container, the name of the target database in SQL Server, and a logical parameter indicat-ing whether the target database is new or not. Using these pa-rameters you can call the wiz-ard programmatically as part of a migration process or from a custom developer menu.
You can also use the Data Explorer (Figure 1) to call the Upsizing Wizard from the shortcut menu for VFP Database connections. Starting the Upsizing Wizard this way selects the local database and creates the target database for you.
The Fox Team didn’t make signifi cant changes to step one (select local database). You only upsize one database at a time. The listbox shows all open database containers. You can use the Open… but-ton to open up another database and add it to the list. Select the VFP database you want to upsize and move on to step two.
Next you’ll select the destination database (Fig-ure 2) to defi ne the connection to SQL Server. In previous versions of the Upsizing Wizard you could use a predefi ned ODBC Data Source Name (DSN) or a VFP connection in the database con-tainer you are upsizing. The Sedna version still retains the VFP database connection option, but now allows you to select any VFP database, not just the one you are upsizing. You do not upsize two different databases. Rather, you use the con-nection in the second database container to con-nect to the SQL Server. If you select the ODBC route you get the option of using a predefi ned DSN, a helpful connection string generation tool, or you can just code the connection string di-rectly. These changes give you more options and you get to predefi ne the way you want the security handled for logins on one dialog. The fl exibility set up for the destination database is very useful when testing out the upsizing process or you need to convert multiple databases residing on differ-ent servers.
In step three you name the target database. You also indicate if the database already exists on the SQL Server or not. If it does, the Upsizing Wizard pres-ents you with a drop down list of databases for the server selected in step two. If the database doesn’t exist, you enter in the name you want for the data-base. If you enter a name for a new database that already exists you will not be able to move to the next step until this is corrected.
Step four (Figure 3) is where you indicate what ta-bles and views to upsize and how you want to map the column data types and sizes. I really like having the selection of tables/views and the column details on one page. This consolidation saves time moving back and forth when you determine which ta-bles you want to migrate. If you want to work with columns from a specifi c table, fi rst select the table and the Upsizing Wiz-ard will refresh the column grid with column details.
Like in the old Upsizing Wiz-ard, you still get the same set-tings for the column details with the option to change the data type for the server side from the default mapping to one that meets your needs. If you change the data type and the column is part of a relation, you get a warning to change the related columns in the other tables just like the older version. The Sedna Upsizing Wizard also
I think after reading this article on the Sedna version of the Upsizing Wizard you will try it.
The Senda Upsizing Wizard does a much better job upsizing
not only the structures, but a better and quicker job of migrating the
data up to SQL Server.
Figure 2: There are many new choices when you select the destination database including the ability to pick different SQL Servers available on the network when you are building a connection string.
Upsizing Simplified

20 www.code-magazine.com
lets you determine if the column can accept null values or not on the SQL Server side.
Step fi ve (Figure 4) lets you set some upsizing op-tions. Notable differences in the Senda Upsizing Wizard include the ability to select the location of the upsizing report output, the ability to determine if you want to use bulk inserts if you are uploading
data (highly recommended), and if you want blank FoxPro dates to be upsized as a NULL or if you want it to work like the old upsizing wizard and have it change blank dates to January 1, 1900. (I’ll discuss more details on this feature in the Upsizing Improvements section later in this article).
I have observed the huge performance improve-ments the bulk XML insert brings to the process. It is really impressive. Doug Hennig (http://dough-ennig.blogspot.com) blogged about this on July 7, 2006 in an entry titled SQLXMLBulkLoad Rocks! His testing in one case demonstrated the load tak-ing 10% of the time it took to load with direct table inserts saving him over 100 minutes.
Step fi ve of the Sedna Upsizing Wizard offers an-other new feature I recommend—changing the loca-tion of the output folder. Prior to the Sedna Upsiz-ing Wizard, Microsoft had hard-coded the output folder as your current default folder plus a folder named “Upsize”. If you are like me, you are not al-ways sure what your current folder is set to, or you’d
like to know where the Upsizing Wizard put the output it created, so make sure to pick the folder. Otherwise you may fi nd out the wizard overwrote some output you wanted to retain.
Step six provides the fi nal three choices before you perform the database upsizing. You can choose to upsize the database, just create scripts and docu-mentation for the upsizing pro-cess, or do both. There is no change in the last step of the wizard.
Click fi nish to begin the process. You’ll see a progress bar show-ing how far along you are and a message box when the wizard is fi nished. I am still amazed when I look into SQL Server and see the database with all the data migrated. I have writ-ten numerous data conversion programs over the years and know all the problems you can run into when running conver-sions. This generic wizard has not failed me in converting ev-
ery VFP database I have thrown at it. The most impressive part is the fact I am testing it with a pre-beta version and it appears to be very stable. Naturally, your mileage might vary so I highly rec-ommend that you test the Sedna Upsizing Wizard so the team at Microsoft can iron out as many of the hidden problems as possible before the fi nal release.
Upsizing Improvements
Microsoft has introduced a few subtle changes to the way the Upsizing Wizard upsizes the data un-der the hood. I already mentioned the signifi cant performance improvement of the upsizing based on how it uses bulk XML loading of the data into SQL Server.
Another signifi cant improvement in Sedna address-es a complaint developers had about the way the previous Upsizing Wizard upsized character fi elds in VFP into SQL Server Varchar fi elds. In VFP a character fi eld is always the same length no matter how much data the user or application entered into the fi eld. The fi eld is always right fi lled with spaces. When the old version of the Upsizing Wizard up-sized this data it passed the extra spaces along to a Varchar fi eld. This completely defeated the purpose of the Varchar fi eld in SQL Server. The Sedna ver-sion of the wizard trims the spaces for all Character fi elds upsized to a Varchar fi eld. This will save space in the SQL Server database and save developers from creating post conversion routines to clean out the extra spaces.
I have observed the huge performance improvements
the bulk XML insert brings to the process.
Figure 3: In step four you’ll make all the decisions with respect to what tables and views are upsized and how you want the columns to be on the SQL Server side.
Upsizing Simplified
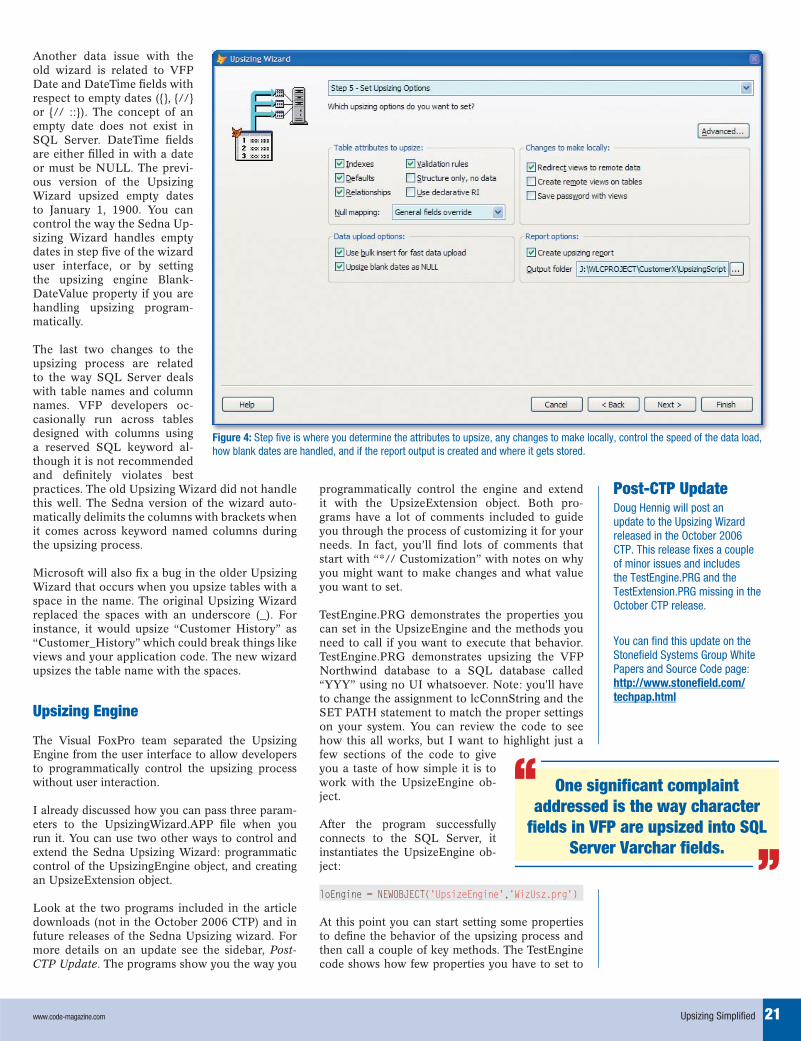
21www.code-magazine.com
Another data issue with the old wizard is related to VFP Date and DateTime fi elds with respect to empty dates ({}, {//} or {// ::}). The concept of an empty date does not exist in SQL Server. DateTime fi elds are either fi lled in with a date or must be NULL. The previ-ous version of the Upsizing Wizard upsized empty dates to January 1, 1900. You can control the way the Sedna Up-sizing Wizard handles empty dates in step fi ve of the wizard user interface, or by setting the upsizing engine Blank-DateValue property if you are handling upsizing program-matically.
The last two changes to the upsizing process are related to the way SQL Server deals with table names and column names. VFP developers oc-casionally run across tables designed with columns using a reserved SQL keyword al-though it is not recommended and defi nitely violates best practices. The old Upsizing Wizard did not handle this well. The Sedna version of the wizard auto-matically delimits the columns with brackets when it comes across keyword named columns during the upsizing process.
Microsoft will also fi x a bug in the older Upsizing Wizard that occurs when you upsize tables with a space in the name. The original Upsizing Wizard replaced the spaces with an underscore (_). For instance, it would upsize “Customer History” as “Customer_History” which could break things like views and your application code. The new wizard upsizes the table name with the spaces.
Upsizing Engine
The Visual FoxPro team separated the Upsizing Engine from the user interface to allow developers to programmatically control the upsizing process without user interaction.
I already discussed how you can pass three param-eters to the UpsizingWizard.APP fi le when you run it. You can use two other ways to control and extend the Sedna Upsizing Wizard: programmatic control of the UpsizingEngine object, and creating an UpsizeExtension object.
Look at the two programs included in the article downloads (not in the October 2006 CTP) and in future releases of the Sedna Upsizing wizard. For more details on an update see the sidebar, Post-CTP Update. The programs show you the way you
Figure 4: Step five is where you determine the attributes to upsize, any changes to make locally, control the speed of the data load, how blank dates are handled, and if the report output is created and where it gets stored.
Post-CTP UpdateDoug Hennig will post an update to the Upsizing Wizard released in the October 2006 CTP. This release fixes a couple of minor issues and includes the TestEngine.PRG and the TestExtension.PRG missing in the October CTP release.
You can find this update on the Stonefield Systems Group White Papers and Source Code page:http://www.stonefield.com/techpap.html
programmatically control the engine and extend it with the UpsizeExtension object. Both pro-grams have a lot of comments included to guide you through the process of customizing it for your needs. In fact, you’ll fi nd lots of comments that start with “*// Customization” with notes on why you might want to make changes and what value you want to set.
TestEngine.PRG demonstrates the properties you can set in the UpsizeEngine and the methods you need to call if you want to execute that behavior. TestEngine.PRG demonstrates upsizing the VFP Northwind database to a SQL database called “YYY” using no UI whatsoever. Note: you'll have to change the assignment to lcConnString and the SET PATH statement to match the proper settings on your system. You can review the code to see how this all works, but I want to highlight just a few sections of the code to give you a taste of how simple it is to work with the UpsizeEngine ob-ject.
After the program successfully connects to the SQL Server, it instantiates the UpsizeEngine ob-ject:
loEngine = NEWOBJECT('UpsizeEngine','WizUsz.prg')
At this point you can start setting some properties to defi ne the behavior of the upsizing process and then call a couple of key methods. The TestEngine code shows how few properties you have to set to
Upsizing Simplified
One significant complaint addressed is the way character
fields in VFP are upsized into SQL Server Varchar fields.

22 www.code-magazine.com
defi ne class UpsizeExtension as Custom function CreateTargetDB(toUpsizeEngine) messagebox('In CreateTargetDB method') endfunc
function AnalyzeFields(tlAllTables, ; toUpsizeEngine) messagebox('In AnalyzeFields method') endfunc
function SendData(toUpsizeEngine) messagebox('In SendData method') endfunc
function AnalyzeIndexes(toUpsizeEngine) messagebox('In AnalyzeIndexes method') endfunc
function CreateIndexes(toUpsizeEngine)
messagebox('In CreateIndexes method') endfunc
function CreateTriggers(toUpsizeEngine) messagebox('In CreateTriggers method') endfunc
function CreateScript(toUpsizeEngine) messagebox('In CreateScript method') endfunc
function BuildReport(toUpsizeEngine) messagebox('In BuildReport method') endfunc
function UpsizeComplete(toUpsizeEngine) messagebox('In UpsizeComplete method') endfuncenddefi ne
Listing 1: Partial code listing of the UpsizeExtension object defined in the TestExtension program
upsize a database. I have detailed some of these properties in Table 1 and some of the methods used to set properties in Table 2.
Once you’ve set all the properties you populate the various lists with the items you want converted
(tables, views, relationships, indexes, and fi elds). You accomplish this using a couple of key methods (Table 2) and then you call one method to kick off the upsizing process:
loEngine.ProcessOutput()
The example code also shows how you can use the VFP BINDEVENTS() function to hook in your own behavior to the initialization process, the up-date process, and the completed process:
BINDEVENT(loEngine, 'InitProcess', ; SomeObject, 'InitProcess')BINDEVENT(loEngine, 'UpdateProcess', ; SomeObject, 'UpdateProcess')BINDEVENT(loEngine, 'CompleteProcess', ; SomeObject, 'CompleteProcess')
You create the SomeObject reference and bind it to the different methods of the UpsizeEngine object. The UpsizeEngine object raises the three events using RAISEEVENT(), which in turn delegates to your code.
The TestExtension program is almost identical to the TestEngine program, with one caveat; it cre-ates a second object known as an UpsizeExten-sion object (Listing 1) and assigns the reference to this object to the oExtension property of the UpsizeEngine object. The object follows the hook design pattern. Inside the UpsizeEngine object are methods with the same name as the UpsizeExten-sion object. The methods in the UpsizeEngine ob-ject look at the UpsizeExtension object if it is set
Property Description
lQuiet Flag you set to true (.T.) if you want the upsizing process to run without a user interface and false of you want the user interface.
MasterConnHand Reference to the connection you have opened to SQL Server
ServerVer This is the version of SQL Server. You can set this automatically by calling the UpsizeEngine object method GetServerVersion() as long as the MasterConnHand property is set to open connection.
SourceDB VFP database container you are upsizing. Note: you need to open this database container to perform the upsizing.
ServerDBName Target database name.
CreateNewDB Set to true (.T.) if you want this to be a new database, or false (.F.) if you want to overwrite an existing database.
DoUpsize Tells the Upsizing Engine to run the upsizing process.
DoScripts Tells the Upsizing Engine to generate the upsizing scripts and save them to a folder specifi ed by the property NewDir.
DoReport Tells the Upsizing Engine to generate the upsizing analysis reports and save them to a folder specifi ed by the property NewDir.
Overwrite Set to true (.T.) if the tables, views, etc. are overwritten in the SQL Server database.
BlankDateValue The value stored in date time fi elds when a blank date is upsized.
NormalShutdown Set to false (.F.) if you want the analysis tables to not be deleted after the upsizing is done.
HadError Is set true (.T.) by the engine if errors occur during the process. This allows you to message the developer as appropriate.
Table 1: A partial list of the properties in the Sedna Upsizing Wizard engine object and how they affect the behavior of the upsizing process.
I think you might be getting the idea that the upsizing
engine is extremely powerful and extremely extensible in true
VFP tradition.
Upsizing Simplified

23www.code-magazine.com
and check for the method on the UpsizeExtension object. If it exists, the method in the UpsizeExten-sion object is run. This is very similar to the event handling with COM objects and implementing the programming interface of the COM object. Note: you do not have to defi ne every function in the Up-sizeExtension object that resides in the UpsizeEn-gine object. You only have to defi ne the methods you want to extend.
I think you might be getting the idea that the up-sizing engine is extremely powerful and extremely extensible in true VFP tradition.
Microsoft released the source code for the Sedna Upsizing Wizard with the October CTP and will release the fi nal version when Sedna ships. This means you can review it, extend it, and enhance it. I anticipate that if there is enough interest in the Fox Community, this could become a project in the open source project VFPX (http://www.codeplex.com/Wiki/View.aspx?ProjectName=VFPX).
Conclusion
The Sedna Upsizing Wizard will become a viable choice for VFP developers when it comes to creat-
Method Description
GetServerVersion() Returns the version of SQL Server. It is a good idea to store the returned value in the ServerVer property.
AnalyzeTables() Populates the list of tables available for upsizing.
ReadViews() Populates the list of views available for upsizing.
AnalyzeFields() Populates the list of fi elds for the tables and maps the default data types used in the upsizing.
AnalyzeIndexes() Populates the list of indexes with default settings for index migration.
ProcessOutput() Run the upsizing process.
Table 2: A partial list of the methods of the Sedna Upsizing Wizard engine object and actions they perform during the upsizing process.
ing a strategy to migrate Visual FoxPro database containers to SQL Server 2000 and SQL Server 2005. In the best case you have designed your VFP database just as you want it in SQL Server and all you have to do is run the wizard. Those data-bases that need a bit of reengineering will not be as simple to upsize, but the scripts generated by the wizard might be useful as the last step of your migration.
Rick Schummer
Upsizing Simplified

24 www.code-magazine.com
Today more and more applications interact and communicate via Web services either as clients or as publishers. It’s becoming quite common
for many application development scenarios to in-clude Web service functionality as an integral part of the development process. The good news is that Web service technology has stabilized and today interoperability is much better. It’s much easier to call a Java Web service from .NET or Visual FoxPro than it was in the early days of constantly moving standards and incom-patible Web service platform implementations. Over time Web services have also become more complex, especially in regards to the data that is sent over the wire. It’s very common today to have Web services that send complex mes-sages that contain many nested types of information in single messages.
The State of FoxPro Web Services
For Visual FoxPro developers, dealing with complex Web services has always been problematic because the default tool that is natively available through COM—the SOAP Toolkit—is limited. Whether you’re building or consuming Web services in Vi-sual FoxPro, your fi rst stop likely takes you to the Soap Toolkit. Visual FoxPro ships and installs this COM-based tool. FoxPro’s internal Web service cli-ent and server Wizards both rely on it to publish and consume Web services. The SOAP Toolkit is a pretty crude tool by today’s standards—it provides only the bare basics of Web service interoperability and can’t easily deal with Web services that need to consume complex types or need to use extended Web service protocols like the WS-* Web service specifi cations.
If you’re using the SOAP Toolkit to consume Web services that are returning anything but simple type values you will quickly fi nd that it’s pretty tedious to deal with the data that is returned, as you end up having to parse the XML messages on your own. Alternately you can also resort to implementing convoluted type interfaces using the SOAP Toolkit’s
Visual FoxPro Web Services RevisitedWeb services with Visual FoxPro (VFP) have never been easy. The most common Web service tool for FoxPro is the SOAP Toolkit, which has been discontinued and which had a host of problems when dealing with complex types passed over Web services. In this article I’ll show how you can leverage the powerful Web service features of .NET and the new Windows Communication Foundation in your FoxPro application through COM Interop.
extension interfaces that allow mapping of classes. However, this process is almost more work than parsing the XML data. In my experience this lack of support for complex types is a major stumbling block as almost all Web services that are published
by providers commercially are based on complex message types using objects, arrays or collections, and enumerations, none of which are handled na-tively by the SOAP Toolkit.
For publishing Web services the SOAP Toolkit fares no bet-ter—it provides the ability to use
either an ASP or ISAPI listener to publish COM objects as Web services. Although Visual FoxPro’s Web service Wizard does a decent job of publish-ing simple Web services, the services published are limited in that you can’t easily publish anything but simple types from your exposed service meth-ods. Add to that some limitations in Visual FoxPro to expose nested types to COM and it becomes very diffi cult to publish any content that requires anything but single hierarchy objects. This may be workable in simple scenarios or in FoxPro-to-Fox-Pro calling scenarios where you can often use raw XML strings to pass data across applications, but for many Web service and Service Oriented Archi-tecture (SOA) scenarios that need to interact with non-FoxPro applications, this limited functionality is not adequate.
The last straw for the SOAP Toolkit, however, is the fact that it is no longer offi cially updated or sup-ported by Microsoft. All new development on it has stopped so there won’t be any future improvements or bug fi xes (other than critical hotfi xes for secu-rity), so it won’t keep up with the latest standards should they change.
This makes the SOAP Toolkit a somewhat volatile solution, especially if you are interoperating with Web services from the Java and .NET platforms, which are constantly changing and updating to the latest standards. Currently the SOAP Toolkit is still in line with the latest SOAP 1.2 specifi cation, but it doesn’t deal with any of the WS-* specifi cations or any of the upcoming SOAP 2.0 specifi cations.
This article covers publishing and consuming
of Web services with Visual FoxPro and .NET
using COM Interop.
Fast Facts
Rick StrahlRick Strahl is president of West Wind Technologies in Maui, Hawaii. The company specializes in Web and distributed application development and tools, with focus on Windows server products, .NET, Visual Studio, and Visual FoxPro. Rick is the author of West Wind Web Connection, West Wind Web Store, and West Wind HTML Help Builder. He’s also a C# MVP, a frequent contributor to magazines and books, a frequent speaker at international developer conferences, and the co-publisher of CoDe Magazine. For more information please visit his Web site at www.west-wind.com or contact Rick at [email protected]
ON
LIN
E Q
UIC
K I
D 0
70
30
62
Visual FoxPro Web Services Revisited

25www.code-magazine.com
Using .NET to Provide a Web Service Bridge
Microsoft’s offi cial recommendation for Web ser-vices is to use .NET to access and publish Web ser-vices. .NET is Microsoft’s preferred Web services platform where all future development and support for new technologies is implemented, so Microsoft is recommending that developers use .NET in com-bination with COM for non- .NET technologies like Visual FoxPro. While this may seem arrogant at fi rst it makes sense in that the .NET 2.0 Web services stack and Windows Communications Foundation (WCF) are .NET-only technologies.
Web Service Client
For FoxPro developers, creating a .NET Web ser-vices client means that you can create a .NET Web service client and use COM Interop to interact with this generated proxy object from FoxPro.
This process is not diffi cult. The process actually makes the experience of consuming Web services easier than with the SOAP Toolkit because .NET deals much better with complex Web services and provides a strongly typed interface to them, including automatic message type creation (pa-rameters and return values) and full IntelliSense support. In many cases you can simply pass the complex result messages back to Visual FoxPro and access them directly over COM.
You can drive the Web service proxy either di-rectly from FoxPro by passing the proxy back to FoxPro over COM or by creating a shim (meth-ods in .NET code that act as front ends to the Web service). The latter is more work, but pro-vides more fl exibility through abstracting the Web service with a client interface that can handle er-rors, perform data conversions, and protect client code from future implementation changes of the service.
Web Service Publishing
.NET also supports easy publishing of Web ser-vices through the ASP.NET ASMX framework. ASMX Web services—named for the fi le extension that is used—are a special ASP.NET handler that can execute Web service classes and expose these classes to the Web. Like ASP.NET you can use
COM Interop to access FoxPro code from these ASMX Web services.
The process to do this is straightforward as you sim-ply create a FoxPro COM object and call it from the Web service methods. The actual Web service class uses .NET code; typically, it only uses a little bit of code to call the FoxPro business logic to generate the result for the Web service methods. .NET man-ages all the type serialization as well as automatic generation of the service metadata, which is the WSDL defi nition for the service.
It’s easy to create FoxPro COM objects for use in .NET; however, the administrative aspects of going to COM Interop from ASP.NET are tricky as you have to set proper permissions for COM compo-nents and any fi les that need to be accessed. Debug-ging is also diffi cult as FoxPro COM components run inside of IIS and can’t be easily debugged or shut down. If you’re new to COM and dealing with COM in a Web Server environment, this process can be daunting to work with at fi rst. In the end, it’s just a mechanical process that you have to remem-ber and follow—there’s nothing diffi cult about the process, it’s only tedious.
The big benefi t over the SOAP Toolkit is that you get a rich, mature, and effi cient Web service frame-work that makes it fairly easy to create complex Web services.
Windows Communication Foundation
In addition to native .NET Web services, Micro-soft recently released .NET Framework 3.0, which includes Windows Communication Foundation (WCF). WCF provides a service-based architecture (SOA) for .NET that, among other things, provides both Web service client and service support. WCF expands on the base Web service functionality by providing extended support for the WS-* extended Web service specifi cations that provide encryption, authentication, transaction management, binary transports and attachments, and much more.
For plain HTTP-based Web services, ASMX ser-vices and the .NET 2.0 Web service client are easier to use than WCF, but WCF provides a unifi ed ar-chitecture for creating services for inter-application communication. The same service architecture that can publish and access plain HTTP-based Web ser-vices can also work for more high performance pro-tocols like raw TCP/IP, Named Pipes, and Message Queues among others. Essentially by building a ser-vice once you can expose the service to a variety of different endpoint protocols with a single code base and even have all of the protocols be accessible at the same time.
The SOAP Toolkit is officially discontinued and no longer supported
by Microsoft.
Visual FoxPro Web Services Revisited
Read this entire article online at
http://www.code-magazine.com/focus/vfp/

Ready to Adopt .NET?

www.VFPConversion.com
EPS Can Help!EPS Software provides:
Conversion ServicesApplication AnalyticsMentoringProject ManagementSituation AssessmentTrainingVFP Conversion Tools• Forms Converter• Reports Converter• Expression Evaluator• Project Analyzer• Data Access Conversion• Milos Components
Contact us at:[email protected]
28 www.code-magazine.com
using System;using System.Diagnostics;
namespace DotNetLauncher{ static class Program { /// <summary> /// The main entry point for /// the application. /// </summary> [STAThread] static void Main() { Process.Start("VFPApp.exe"); } }}
Listing 1: The C# code used in Program.cs to launch VFPApp.exe, an external Visual FoxPro application
ON
LIN
E Q
UIC
K I
D 0
70
30
72
ClickOnce, Microsoft’s newest deployment technology, allows developers to publish an application on a server so users can install the
application by clicking a hyper-link in a Web page. And not only can you use a ClickOnce deployment strategy to initially install a distributed application, but you can also use ClickOnce to issue updates by merely in-crementing the publish version number in the Visual Studio project and then republishing it. Users install the application –Click! Users run the application – Click! Users receive update notifi ca-tions –Click! ClickOnce strives to make deploying and updating desktop applications as easy as updat-ing and visiting a Web page.
Using ClickOnce to Deploy Visual FoxPro Applications
How does ClickOnce apply to Visual FoxPro ap-plications? Isn’t it just for Visual Studio projects? While Microsoft primarily designed ClickOnce for Visual Studio applications, Visual FoxPro develop-ers can take advantage of the benefi ts ClickOnce provides by using the information contained in this article. Let me take you on a tour of ClickOnce from a Visual FoxPro developer’s perspective.
Create a Visual FoxPro Project
Creating a Visual FoxPro application that you want to deploy using ClickOnce does not require any additional steps in Visual FoxPro than you would normally go through to create a project and build an application from it. The brunt of the de-ployment and confi guration work is either already provided for by ClickOnce or can be accomplished using Visual Studio 2005 and an install builder such as InstallShield or Inno Setup. A distributed application that is in dire need of a good deploy-ment solution is a prime candidate for ClickOnce deployment.
On the off-chance that there is someone reading this article who doesn’t know how to create a Win-
Welcome to the Future of DeploymentYou can use ClickOnce to revolutionize how you install and update Visual FoxPro (VFP) applications. A dream come true, ClickOnce can put a stop to many of the deployment nightmares associated with distributing applications.
dows desktop application in Visual FoxPro, here are the steps.
1. Open up Visual FoxPro 9.0 and click New on the stan-dard toolbar.
2. Select the Project option button in the New dialog box and then click New File.
3. Save the project. The project I’ll create and use for this ar-ticle (available in the down-load) is called vfpapp.pjx.
4. Next, in the Project Manager for the project, switch to the Documents tab and add a new form to the project.
5. Set the form’s WindowType property to 1.6. Drag a label and a button onto the form from
the Forms Controls Toolbar.7. Change the Caption property of the label to
Version 1.0 and the Caption property of the button to close.
8. Next open the button’s Click event and add a Thisform.Release() to it. You’ve developed the application.
9. Save the Visual FoxPro form by closing the form and click Save when prompted.
ClickOnce strives to make deploying and updating
desktop applications as easy as updating and
visiting a Web page.
Fast Facts
Craig [email protected]
Craig Boyd is the CEO of Sweet Potato Software, Inc. (SPS) and a Microsoft Visual FoxPro MVP. Craig has years of experience developing applications for US and international clients. He specializes in helping other software companies meet challenging deadlines, solve complex problems, and upgrade project interfaces. Craig has built a solid reputation for getting jobs done on time and within budget. When he‘s not working on client projects, writing blog entries, or helping members of the Visual FoxPro Community out on the forums, he writes magazine articles for technical publications.
Figure 1: Form1 of a simple Visual FoxPro application to deploy and update using ClickOnce. Note the “Version 1.0” label so you can see when ClickOnce has updated the application.
Welcome to the Future of Deployment

29www.code-magazine.com
10. Before closing Visual FoxPro, compile the project into an executable by clicking Build on the Project Manager dialog box. Assuming you had no errors, VFP will create a vfpapp.exe fi le in the project directory.
When fi nished, the form should look similar to the one shown in Figure 1. The application in-cludes the label so that when you update the application you can easily see the version. Now that you’ve created the Visual FoxPro application you want to distribute, a ClickOnce application (that will act as a loader for your Visual FoxPro application) will be created in Visual Studio. A ClickOnce application is essentially any appli-cation that someone has deployed using Click-Once. This article explains how to deploy a Click-Once application from a C# perspective. While the code syntax is different, most of the steps are either exactly the same or somewhat similar in Visual Basic.
Create a Visual Studio Project
The following steps are used to create a new C# project in Visual Studio 2005:
1. Open Visual Studio 2005.2. Create a new project by clicking the New Proj-
ect button on the standard toolbar, or alter-nately from the File menu click New.
3. Select the C# Windows Application template in the New Project dialog box.
4. Type in a name for the project. For this article I named the project DotNetLauncher (Figure 2).
5. Click OK and Visual Studio will create the C# project.
With the DotNetLauncher project open in Visual Studio 2005, go into the Solution Explorer and delete the C# form that Visual Studio automati-cally generated with the new project by right-clicking on the form item in the Solution Explorer and selecting Delete (Figure 3). Add the Visual FoxPro application created earlier and the Visual FoxPro runtimes to the DotNetLauncher project as shown in Figures 4 and 5. There is a much better way to distribute the Visual FoxPro runtimes than add-ing them directly to the .NET proj-ect, and I will explore this preferred method of inclusion/deployment in the Bootstrapper section later in this article.
Once you’ve added the runtimes to the DotNetLauncher project, open the main C# program fi le named Program.cs and replace its contents with the code in Listing 1. Note in the code that the main entry point of the .NET application uses the static
Start method of the System.Diagnostics.Process class to start the vfpapp.exe. This .NET assembly will act as a launcher/loader for the vfpapp.exe. The DotNet-Launcher is now ready to be built and published using the ClickOnce features available in Visual Studio.
Figure 2: New Project dialog box in Visual Studio 2005. You’ll use the C# Windows Application template to create the DotNetLauncher project.
Figure 3: You can delete the default form created by Visual Studio since the DotNetLauncher won’t use it.
Figure 4: Add the Visual FoxPro application and runtime files to the DotNetLauncher application by right-clicking on the project in the Solution Explorer and selecting Add -> Existing Item.
Figure 5: The Solution Explorer shows what the DotNetLauncher application looks like after you’ve added the Visual FoxPro application and runtimes files.
Welcome to the Future of Deployment
Read this entire article online at
http://www.code-magazine.com/focus/vfp/

30 www.code-magazine.com
In his MDSN article “Navigate the .NET Frame-work and Your Projects with My” (http://msdn.microsoft.com/msdnmag/issues/04/05/Visual-
Basic2005/default.aspx), Duncan Mackenzie pro-vides an example of why My is a great addition to Visual Basic (VB). Instead of writing the following to read the contents of a text fi le:
Dim sr As New IO.StreamReader("c:\fi le.txt")contents = sr.ReadToEndsr.Close()
you can write this:
contents = _ My.Computer.FileSystem.ReadAllText("c:\fi le.txt")
Thanks to IntelliSense on the My namespace, not only is it easier to fi gure out how to do this task, it’s also less code to write and debug.
Sedna includes a My namespace as well, for the same reasons that VB 2005 does. Many of the My classes are wrappers for SYS() functions, Windows API functions, Windows Script Host properties and methods, and so on. For example, the Play method of Audio, which plays an audio fi le, is a wrapper for the sndPlaySound Windows API function. So, without hav-ing to DECLARE this function or even know it ex-ists, your VFP application can play a sound fi le. You can replace this code:
#defi ne SND_SYNC 0declare integer sndPlaySound in WinMM.dll ; string lpszSoundName, integer uFlagssndPlaySound(SoundFile, SND_ASYNC)
with this:
My.Computer.Audio.Play(SoundFile)
In the article, I’ll introduce My in Sedna, showing you some of the namespaces available. I’ll also de-
scribe in detail how My controls IntelliSense to dis-play just the members of the namespace you want to see, and how it dynamically instantiates a class hierarchy at run time. Finally, I’ll show you how to extend My to add your own classes as namespaces so they’re easily accessible.
Introduction to My
My is included with the Sedna Community Technol-ogy Preview (CTP) available from the VFP Web site (http://msdn.microsoft.com/vfoxpro). You must register My with IntelliSense before you can use it; to do so, run My.APP. You can then type “LOCAL My as” in a code window and choose My from the list of types that appears. The following code is automatically
inserted:
local My as MyMy = newobject('My', 'my.vcx')
Type “My.” to see a list of the namespaces available within My. They are:
• App: provides application methods and properties, in-cluding Execute to open a fi le such as an HTML document.
• Computer: provides access to various components of the computer system, including the fi le system, audio, print-ers, and Registry.
• Data: provides data-handling features, such as methods to close all cursors opened by some code.
The My Namespace in SednaNew to Sedna, Visual FoxPro emulates the My namespace first introduced in Visual Basic 2005. The My namespace makes .NET Framework classes more discoverable and allows you to write less code. Sedna, the next version of Visual FoxPro (VFP), includes a My namespace as well, for the same reasons. In this article, I’ll look at how Sedna implements My.
New to Sedna, Visual FoxPro emulates the My namespace first introduced in Visual Basic 2005. It makes complex tasks, such as downloading files from Web sites or determining the location of a
user’s MyDocuments folder, both discoverable and easy.
Even better, it’s data-driven and
extensible so you can add your own classes.
Fast Facts
Doug [email protected]
Doug Hennig is the author of the award-winning Stonefield Database Toolkit (SDT), the award-winning Stonefield Query, the MemberData Editor, Anchor Editor, and CursorAdapter and DataEnvironment builders that come with Microsoft Visual FoxPro, and the My namespace and Upsizing Wizard in Sedna. Doug is co-author of the What’s New in Visual FoxPro series (the latest being What’s New in Nine) and The Hacker’s Guide to Visual FoxPro 7.0, available from Hentzenwerke Publishing (http://www.hentzenwerke.com)
Doug has spoken at every Microsoft FoxPro Developers Conference (DevCon) since 1997 and at user groups and developer conferences all over the world. He is one of the administrators for the VFPX community extensions Web site (http://www.codeplex.com/Wiki/View/aspx?ProjectName=VFPX).
Doug has been a Microsoft Most Valuable Professional (MVP) since 1996 and was named the 2006 winner of the FoxPro Community Lifetime Achievement Award. His Web sites are http://www.stonefield.com and http://www.stonefieldquery.com, and his blog is at http://doughennig.blogspot.com
The My help file, My.CHM, documents the My namespaces
and their properties and methods in detail, including sample code.
ON
LIN
E Q
UIC
K I
D 0
70
30
82
The My Namespace in Sedna
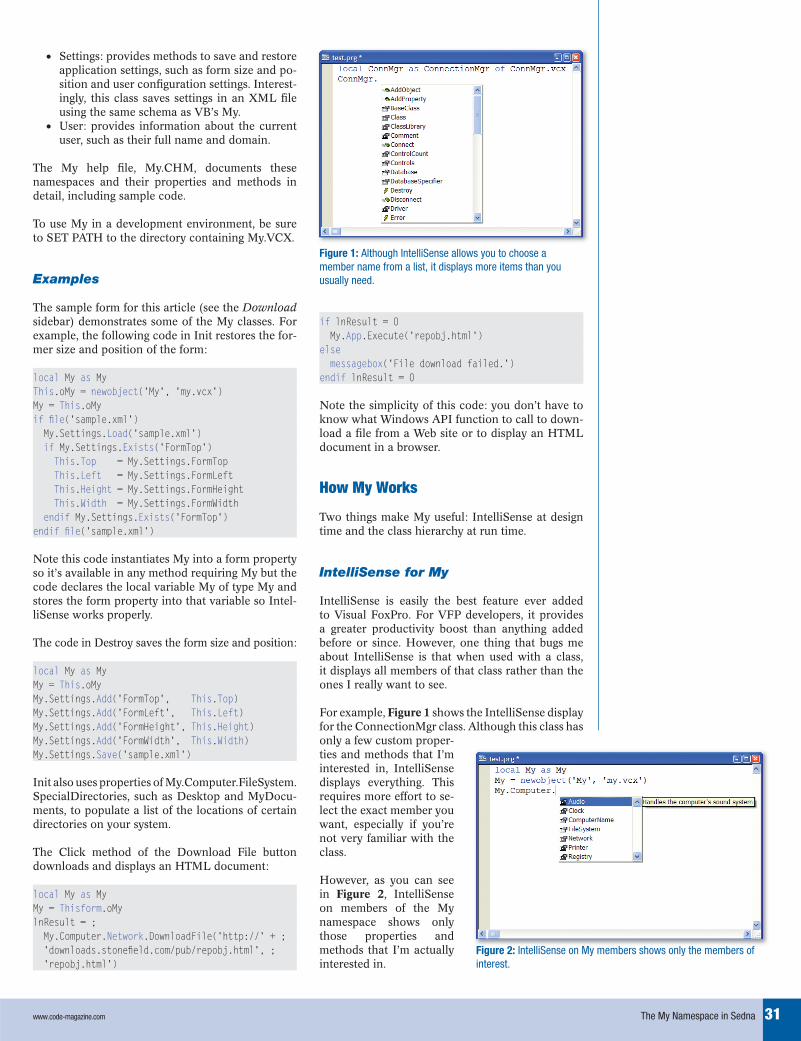
31www.code-magazine.com
• Settings: provides methods to save and restore application settings, such as form size and po-sition and user confi guration settings. Interest-ingly, this class saves settings in an XML fi le using the same schema as VB’s My.
• User: provides information about the current user, such as their full name and domain.
The My help fi le, My.CHM, documents these namespaces and their properties and methods in detail, including sample code.
To use My in a development environment, be sure to SET PATH to the directory containing My.VCX.
Examples
The sample form for this article (see the Download sidebar) demonstrates some of the My classes. For example, the following code in Init restores the for-mer size and position of the form:
local My as MyThis.oMy = newobject('My', 'my.vcx')My = This.oMyif fi le('sample.xml') My.Settings.Load('sample.xml') if My.Settings.Exists('FormTop') This.Top = My.Settings.FormTop This.Left = My.Settings.FormLeft This.Height = My.Settings.FormHeight This.Width = My.Settings.FormWidth endif My.Settings.Exists('FormTop')endif fi le('sample.xml')
Note this code instantiates My into a form property so it’s available in any method requiring My but the code declares the local variable My of type My and stores the form property into that variable so Intel-liSense works properly.
The code in Destroy saves the form size and position:
local My as MyMy = This.oMyMy.Settings.Add('FormTop', This.Top)My.Settings.Add('FormLeft', This.Left)My.Settings.Add('FormHeight', This.Height)My.Settings.Add('FormWidth', This.Width)My.Settings.Save('sample.xml')
Init also uses properties of My.Computer.FileSystem.SpecialDirectories, such as Desktop and MyDocu-ments, to populate a list of the locations of certain directories on your system.
The Click method of the Download File button downloads and displays an HTML document:
local My as MyMy = Thisform.oMylnResult = ; My.Computer.Network.DownloadFile('http://' + ; 'downloads.stonefi eld.com/pub/repobj.html', ; 'repobj.html')
if lnResult = 0 My.App.Execute('repobj.html')else messagebox('File download failed.')endif lnResult = 0
Note the simplicity of this code: you don’t have to know what Windows API function to call to down-load a fi le from a Web site or to display an HTML document in a browser.
How My Works
Two things make My useful: IntelliSense at design time and the class hierarchy at run time.
IntelliSense for My
IntelliSense is easily the best feature ever added to Visual FoxPro. For VFP developers, it provides a greater productivity boost than anything added before or since. However, one thing that bugs me about IntelliSense is that when used with a class, it displays all members of that class rather than the ones I really want to see.
For example, Figure 1 shows the IntelliSense display for the ConnectionMgr class. Although this class has only a few custom proper-ties and methods that I’m interested in, IntelliSense displays everything. This requires more effort to se-lect the exact member you want, especially if you’re not very familiar with the class.
However, as you can see in Figure 2, IntelliSense on members of the My namespace shows only those properties and methods that I’m actually interested in.
Figure 1: Although IntelliSense allows you to choose a member name from a list, it displays more items than you usually need.
Figure 2: IntelliSense on My members shows only the members of interest.
The My Namespace in Sedna

32 www.code-magazine.com
* This is main routine that gets called from the IntelliSense* script for My.
lparameters toFoxCodelocal lcNameSpace, ; loData, ; lcReturn, ; lcTriggerwith toFoxCode .ValueType = 'V'
* Get the namespace and an object from the My table for that* namespace.
lcNameSpace = .Data loData = This.GetMyMember(.UserTyped, lcNameSpace) lcReturn = '' do case
* You couldn't fi gure out which member was specifi ed.
case vartype(loData) <> 'O'
* If you're on the LOCAL statement, handle that by returning text* you want inserted.
case atc(lcNameSpace, .MenuItem) > 0 lcReturn = This.HandleLOCAL(toFoxCode, lcNameSpace, ; trim(loData.Class), trim(loData.Library))
* Other IntelliSense. Start by getting the character that triggered* IntelliSense.
otherwise
lcTrigger = right(.FullLine, 1) do case
* If you were triggered by a ".", display a list of members.
case lcTrigger = '.' This.DisplayMembers(toFoxCode, loData)
* If you were triggered by a "(" (to start a method parameter list)* and the method accepts enumerated values specifi ed in the LIST* memo, display them.
case lcTrigger = '(' and not empty(loData.List) This.DisplayEnumeratedValues(toFoxCode, loData)
* If you were triggered by a "(" (to start a method parameter* list), an "=" (for a property), or "," (to enter a new parameter)* and you have a script, execute it.
case inlist(lcTrigger, '=', '(', ',') and ; not empty(loData.Script) lcReturn = execscript(loData.Script, toFoxCode, loData)
* If you were triggered by a "(" (to start a method parameter list)* or "," (to enter a new parameter), display the parameters for the* method.
case inlist(lcTrigger, '(', ',') and not empty(loData.Tip) .ValueTip = loData.Tip .ValueType = 'T' endcase endcaseendwithreturn lcReturn
Listing 2: The Main method of MyFoxCode does all the work of handling IntelliSense for My
lparameters toFoxcodelocal loFoxCodeLoader, ; luReturnif fi le(_codesense) set procedure to (_codesense) additive loFoxCodeLoader = createobject('FoxCodeLoader') luReturn = loFoxCodeLoader.Start(toFoxcode) loFoxCodeLoader = .NULL. if atc(_codesense, set('PROCEDURE')) > 0 release procedure (_codesense) endif atc(_codesense, set('PROCEDURE')) > 0else luReturn = ''endif fi le(_codesense)return luReturn
defi ne class FoxCodeLoader as FoxCodeScript cProxyClass = 'MyFoxCode' cProxyClasslib = 'Path\my.vcx'
procedure Main local loFoxCode, ; luReturn loFoxCode = newobject(This.cProxyClass, This.cProxyClasslib) if vartype(loFoxCode) = 'O' luReturn = loFoxCode.Main(This.oFoxCode) else luReturn = '' endif vartype(loFoxCode) = 'O' return luReturn endprocenddefi ne
Listing 1: The code in the DATA memo of the MyScript record in the IntelliSense table executes every time you type My in a code window (in this code, Path is replaced with the path for My.VCX)
The secret behind My’s IntelliSense lies in two things: how IntelliSense deals with things defi ned as “types” in the IntelliSense table and IntelliSense scripts. The IntelliSense table contains type records for data types, such as Integer or Character, and base classes, such as CheckBox and Form. How-
ever, you can defi ne other things, such as custom classes or COM objects, as types as well, either by manually adding records with TYPE set to “T” or using the IntelliSense Manager in the Tools menu. This provides IntelliSense for these classes or COM objects. My uses a type record in the table as well,
The My Namespace in Sedna

33www.code-magazine.com
but it also customizes how IntelliSense works using a script and a custom IntelliSense-handling class.
Look in your IntelliSense table (USE (_FOX-CODE) AGAIN and BROWSE) after registering My and you’ll see two new records at the end of the table. One is the type record for the namespace; it doesn’t contain much information other than “My” in the ABBREV and DATA fi elds and “{myscript}” as the name of the script to use for IntelliSense pur-poses in the CMD fi eld. The other is a script record, with TYPE set to “S” and ABBREV containing “myscript.”
The DATA memo of script record contains the code shown in Listing 1. This code defi nes a subclass of the FoxCodeScript class contained in the Intelli-Sense application specifi ed by the _CODESENSE system variable. This subclass overrides the Main method, which IntelliSense automatically calls. Main instantiates the MyFoxCode class in My.VCX and calls its Main method, passing it a reference to the IntelliSense data object. This object con-tains information about what the user typed and other IntelliSense settings. As a result of this script, MyFoxCode.Main executes for all IntelliSense tasks for My, such as when you select “My” from the In-telliSense list displayed when you type LOCAL My AS or when you type one of the “trigger” charac-ters—such as a period, an opening parenthesis, or an equals sign—in a statement containing My.
MyFoxCode
The MyFoxCode class does all of the custom Intel-liSense work for My, so I’ll examine this class in detail.
The Init method does just two things: turns on de-bugging in system components (without this, you can’t easily debug problems in the code) and opens the My table, which contains information about the My namespace members (I’ll dis-cuss this table in more detail later), by calling OpenMyTable. If the table can’t be opened, Init displays an error message and returns .F. so the class isn’t instantiated. Since My uses a table of members, it’s data-driven. As you’ll see later on, having My be data-driven gives a number of benefi ts.
* Turn debugging on.
sys(2030, 1)
* Open the My table.
local llReturnllReturn = This.OpenMyTable()if not llReturn messagebox(ccERR_COULD_NOT_OPEN_MY_LOC, ; MB_ICONEXCLAMATION, ccCAP_MY_FOXCODE_LOC)endif not llReturnreturn llReturn
As you saw earlier, the IntelliSense script calls the Main method (Listing 2), passing it a FoxCode object. Main handles all of the IntelliSense tasks for My. If the MenuItem property of the FoxCode object contains “My”, you must be on the LOCAL My AS statement, so Main calls the HandleLO-CAL method to deal with it. Otherwise, Main de-
The secret behind My’s IntelliSense lies in two things:
how IntelliSense deals with things defined as
“types” in the IntelliSense table and IntelliSense scripts.
DownloadYou can download the sample form discussed in this article from the Technical Papers page of my Web site (http://www.stonefield.com/techpap.html). This download includes an updated version of My.VCX that fixes a couple of bugs in the CTP version.
* Determine which member of the namespace the user typed and return* a SCATTER NAME object from the appropriate record in the FFI* table.
lparameters tcUserTyped, ; tcNameSpacelocal loReturn, ; lcUserTyped, ; llFound, ; lnPos, ; lcMember, ; lnSelect
* Grab what the user typed. If it ends with an opening parenthesis,* strip that off.
loReturn = .NULL.lcUserTyped = alltrim(tcUserTyped)if right(lcUserTyped, 1) = '(' lcUserTyped = substr(lcUserTyped, len(lcUserTyped) - 1)endif right(lcUserTyped, 1) = '('
* Find the record for the class in the FFI table. If there's a
* period in the typed text, try to fi nd a record for the member.
if seek(upper(padr(tcNameSpace, len(__My.CLASS))), '__My', ; 'MEMBER') llFound = .T. lnPos = at('.', lcUserTyped) if lnPos > 0 lcMember = alltrim(__My.MEMBER) + substr(lcUserTyped, lnPos) llFound = seek(upper(padr(lcMember, len(__My.MEMBER))), ; '__My', 'MEMBER') endif lnPos > 0
* If you found the desired record, create a SCATTER NAME object for* it.
if llFound lnSelect = select() select __My scatter memo name loReturn select (lnSelect) endif llFoundendif seek(upper(padr(tcNameSpace ...return loReturn
Listing 3: The GetMyMember method looks for the member you typed in the My table
The My Namespace in Sedna

34 www.code-magazine.com
termines which character triggered IntelliSense and calls the GetMyMember method to determine which My member you typed (it could also be My itself) and returns a SCATTER NAME object from the appropriate record in the My table. If the trig-ger character is a period, you need to display a list of the registered My members, so Main calls Dis-playMembers to do the work. If the trigger charac-ter is an opening parenthesis and the LIST fi eld in the My table is fi lled in, you’ll call DisplayEnumer-atedValues to display a list of enumerated values available for a parameter for the method (similar to what IntelliSense displays when you type “DB-GETPROP()”. Finally, if the trigger character is an opening parenthesis, an equals sign, or a comma and the TIP memo of the My record is fi lled in, Main uses the trigger character as the tooltip for IntelliSense. This displays the signature of a meth-od, such as “Login(UserName as String, Password as String) as Boolean.”
Listing 3 shows the code for GetMyMember. This method, called from Main, looks for the member you typed in the My table. It uses the UserTyped
property of the FoxCode object (passed as a pa-rameter), which contains the text you typed per-taining to the namespace. For example, when you type:
llStatus = My.Computer.Audio.Play(
UserTyped contains “Computer.Audio.Play”. Get-MyMember fi nds the record for the appropriate member in the My table and it returns a SCATTER NAME object from that record.
Main calls DisplayMembers, shown in Listing 4, to tell IntelliSense to display a list of registered My members when you type a period in the command line. DisplayMembers calls GetMembers to retrieve a collection of members for the specifi ed member. It then fi lls the Items array of the FoxCode object with the names and descriptions of the members and sets the object’s ValueType property to “L,” which tells IntelliSense to display a list box with the contents of the Items array. This code shows one slight design fl aw in IntelliSense: the FoxCode object has a single Icon property which contains
* Builds a list of members for IntelliSense to display.
lparameters toFoxCode, ; toDatalocal loMembers, ; lcPath, ; lnI, ; loMemberwith toFoxCode
* Get a collection of members for the current class.
loMembers = This.GetMembers(alltrim(toData.Member)) if loMembers.Count > 0
* Add each member to the Items array of the FoxCode object.
dimension .Items[loMembers.Count, 2] lcPath = iif(fi le('propty.bmp'), '', home() + 'FFC\Graphics\')
for lnI = 1 to loMembers.Count loMember = loMembers.Item(lnI) .Items[lnI, 1] = loMember.Name .Items[lnI, 2] = loMember.Description if loMember.Type = 'P' .Icon = lcPath + 'propty.bmp' else .Icon = lcPath + 'method.bmp' endif loMember.Type = 'P' next loMember
* Set the FoxCode object's ValueType property to "L", meaning* display a list box containing the items defi ned in the Items* array.
.ValueType = 'L' endif loMembers.Count > 0endwith
Listing 4: DisplayMembers fills the Items array of the FoxCode object so IntelliSense displays the desired members of a My class
* Add all member objects registered in the My table.
local lnSelect, ; lcNameSpace, ; lnLen, ; lcCursor, ; lcMember, ; lcLibrary
* Create a cursor of all objects in this namespace.
lnSelect = select()lcNameSpace = upper(This.cNameSpace) + '.'lnLen = len(lcNameSpace) + 1lcCursor = sys(2015)select * from __MY where upper(MEMBER) = lcNameSpace and ;
not empty(CLASS) and not deleted() into cursor (lcCursor)
* Go through the members, adding any that are directly within this* namespace (for example, if this is "My", add "My.Computers"* but not "My.Computers.Audio").
scan lcMember = alltrim(substr(MEMBER, lnLen)) lcLibrary = fullpath(alltrim(LIBRARY), This.ClassLibrary) if at('.', lcMember) = 0 and fi le(lcLibrary) This.NewObject(lcMember, alltrim(CLASS), lcLibrary) endif at('.', lcMember) = 0 ...endscanuseselect (lnSelect)
Listing 5: AddMembers dynamically instantiates all registered members of the current namespace
Favorites for IntelliSenseThe Technical Papers page of my Web site has an article and source code for Favorites for IntelliSense (FFI). FFI is a more generalized version of My, providing the ability to control exactly what IntelliSense displays for any class.
The My Namespace in Sedna
35www.code-magazine.com
the name of the image fi le to display in the list box. You actually need an additional column in the Items array, since in this case, you want to display different images for properties and methods. Un-fortunately, you get only a single image displayed for all items.
Run-time Class Hierarchy
IntelliSense is one thing; it’s another to actually have the My namespace work when you run the code. Although it would be simple to have a class called My with members named App, Computer, Data, and so forth, My is actually more extensible than that; like IntelliSense, it’s data-driven (in fact, using the same My table).
The My class is actually a subclass of MyBase, as is the Computer, User, and other classes. MyBase, a subclass of Custom, dynamically adds members to itself based on what it fi nds in the My table. Ad-dMembers, called from Init, does the work.
Listing 5 shows the code for AddMembers. This method selects records from the My table matching the namespace specifi ed in the custom cNameSpace property, which contains the namespace of this object (for example, “My” for the My class and “My.Computer” for the Computer class). It then instantiates the classes specifi ed in those records and adds them as members. For example, for the My namespace, the My table has records for mem-bers named My.App, My.Computer, My.Data, and My.User. Thus, instantiating the My class, which is based on MyBase, dynamically creates all of the members registered in the My table. My actu-ally has no code; it simply has cNameSpace set to “My.”
Computer, the class representing the My.Computer member, is also a subclass of MyBase. So, when the AddMembers method of My instantiates it, its AddMembers method goes through the My table, looking for members of the My.Computer namespace, such as My.Computer.Audio, My.Computer.FileSystem, and so on. Those classes are also based on MyBase, so simply instantiating one class (My) builds a hierarchy as deep as nec-essary. For example, My has four levels of classes for the My.Computer.FileSystem.SpecialFolders namespace.
Since there’s one record in the My table for every class,
property, and method, it would be tedious to fill out this table by hand. Fortunately, there’s
an easier way: with a builder.
The My Namespace in Sedna
Data-Driven Design
Figure 3 shows the structure of the My table. The MEMBER fi eld contains the name of the member the record is for, with a fully qualifi ed namespace. The TYPE column indicates what type of record
this is: “C” for class, “M” for method, and “P” for property. DESCRIP contains a description for the member displayed as a tooltip in the IntelliSense member list. TIP contains the tooltip for a method displayed when you type the opening parenthesis;

36 www.code-magazine.com
IntelliSense displays this tooltip as the sig-nature of the method. LIST contains a list of enumerated values displayed for the pa-rameter of a method; this listing capabil-ity was discussed earlier. CLASS and LIBRARY contain
the class and class library for the class to instantiate for “C” records.
Since there’s one record for every class, property, and method, it would be tedious to fi ll out this table by hand. Fortunately, there’s an easier way: using a builder. My-Base has a custom Builder property contain-ing “My.VCX,MyBuilderForm.” This tells VFP to use MyBuilderForm in My.VCX as the builder for this class and any class based on it. You can register a subclass of My and its members in the My table by right-click-ing the class and choosing Builder. Figure 4 shows what the builder form looks like.
The My Registration Builder allows you to specify the namespace for the class. It de-faults to “My.” plus the name of the class, but you can specify something else if you wish. For example, the FileSystem class is a member of My.Computer, so its namespace
is My.Computer.FileSystem. IntelliSense displays the description as the tooltip for the class in the type list. The description defaults to the class de-scription as specifi ed in the Class Info function in the Class menu or by choosing the Edit Descrip-tion function in the Project menu when you select the class in the Project Manager.
The TreeView shows public custom properties and methods for the class; if you want native members displayed as well, change the AMEMBERS() state-ment in the LoadTree method of the MyBuilder-Form class in My.VCX. The check box before the name indicates whether IntelliSense displays the
member or not; by default, all custom members are included. IntelliSense displays the de-scription as the tooltip for the member in the member list; it defaults to the description you entered for the member when you created it. IntelliSense dis-plays the method signature as a tooltip for a method when you type an open parenthesis or a comma in the parameter list for the method; this tooltip
shows you what parameters you can pass to the method. The signature defaults to the method name and the contents of any LPARAMETERS statement in the method, but you can edit it to dis-play anything you wish, including the data type of the return value. The Enumerated Parameters edit
box allows you to see the list of enumerated values for the method’s parameter.
Extending My
What if you want to add your own namespaces to My? You could do that by subclassing MyBase to create new classes with the desired functional-ity, but what if you already have a class you want to use that isn’t based on MyBase? No problem: open the class and DO FORM MyBuilderForm. This form is an instance of the MyBuilderForm class and can register any class in the My table. Of course, since classes that aren’t based on MyBase won’t dynamically add members to themselves, these classes won’t have a dynamic hierarchy be-low them nor will you get IntelliSense on members that are objects.
To see this in action, open the ConnectionMgr sample class in ConnMgr.VCX, and then DO FORM MyBuilderForm. Make the desired chang-es, and then choose OK. Close the class. In a PRG window, type LOCAL My as My followed by My.ConnectionMgr. You see IntelliSense on the members you specifi ed.
Summary
My is an exciting new feature in Sedna. It provides easy access to many Windows API functions and Windows Script Host properties and methods, making them both discoverable and easy to use. Like IntelliSense, My is data-driven, so it’s exten-sible, allowing you to add your own classes to the My namespace so they’re more discoverable and you have more control over what IntelliSense dis-plays for them. Be sure to check out My and see how it can help your application development ef-forts.
What if you want to add your own namespaces to My?
No problem: open the class and DO FORM
MyBuilderForm.
Figure 4: The My Registration Builder makes short work of registering a class in the My table.
Doug Hennig
Figure 3: The My table allows My to be data-driven.
The My Namespace in Sedna


38 www.code-magazine.com
Beginning with the End in Mind
I have the same goal in writing this article that I have in my Baker’s Dozen articles in CoDe Magazine: I’ll write a set of how-to tips that I would love to have read when I set out to learn a new technology or feature. I started developing software in 1987 and can honestly say that the transition from VFP to .NET was the most challenging (and also rewarding) endeavor of my career.
In this article, I’ll cover the following:
• Understanding .NET projects, solutions, and assemblies, and a quick language primer
• A quick tour through the common .NET Framework classes
• How to use refl ection in place of the VFP macro• Building a .NET data access class• .NET Generics and anonymous methods in C#• Some powerful features in ASP.NET 2.0 and
AJAX• The Baker’s Dozen Spotlight: building a re-
usable data maintenance form class (this cov-ers the next four tips)
• Subclassing Windows Forms controls and im-plementing reusable data binding
• Building a data maintenance criteria container (UserControl)
• Building a data maintenance results container (UserControl)
• Building a data maintenance entry/edit con-tainer (UserControl)
• Working with data in DataSets using ADO.NET
At the end of this article, I’ll include a list of books, articles, and other resources that I recommend for further research.
Watching My Language
I wrote the example code in this article in C#. I prefer C# because I previously wrote C and C++. In most instances, developers can take the code in this article and port it to Visual Basic. However, Tip 5 contains
code that uses anonymous methods, a new C# lan-guage feature with that doesn’t have a Visual Basic equivalent though it will be available in the next version. For that situation I’ll provide a workaround that works today.
Less Talk, More Code
I set a goal for this article to be short on talk and long on code. When I began the .NET learning curve, I got the most value out of books and articles that contained meaningful code samples. So for each tip, as much as possible, I’ll minimize the yak-king and focus on the hacking. (There was a time when hacker meant something complimentary!)
Tip 1: Understanding .NET Solutions, Projects, Assemblies, and References
Let’s start by looking at the solution and proj-ect structure in Visual Studio 2005 for an actual
The Baker’s Dozen: 13 Productivity Tips for Moving from VFP to .NET When Visual FoxPro developers take the plunge to learn .NET, the most common reaction is, “I could do such-and-such, this-and-that in VFP—how can I do it in .NET?” This special edition of The Baker’s Dozen will offer solutions for many of the typical challenges that VFP developers face when tackling .NET. I’ll start by covering .NET solution and project structures and an overview of the .NET Framework, and I’ll spend time showing how to use .NET reflection to do some of the things that VFP developers could accomplish with macro-expansion. Then I’ll cover different .NET features such as Generics, ASP.NET 2.0, and I’ll show how to create a reusable data access component. Finally, I’ll build the architecture for a set of reusable data maintenance classes in .NET.
This article contains a number of .NET/C# code samples to
show VFP developers how to do common tasks in .NET.
Fast Facts
Kevin S. [email protected]
Kevin S. Goff, a Microsoft MVP award recipient for 2007, is the founder and principal consultant of Common Ground Solutions, a consulting group that provides custom Web and desktop software solutions in .NET, VFP, SQL Server, and Crystal Reports. Kevin is the author of Pro VS 2005 Reporting using SQL Server and Crystal Reports, published by Apress. Kevin has been building software applications since 1988. He has received several awards from the U.S. Department of Agriculture for systems automation. He has also received special citations from Fortune 500 companies for solutions that yielded six-figure returns on investment. He has worked in such industries as insurance, accounting, public health, real estate, publishing, advertising, manufacturing, finance, consumer packaged goods, and trade promotion. In addition, Kevin provides many forms of custom training. Contact Kevin at [email protected]
ON
LIN
E Q
UIC
K I
D 0
70
30
92
The Baker’s Dozen: 13 Productivity Tips for Moving from VFP to .NET

39www.code-magazine.com
.NET application. Figure 1 shows the complete solution for a demo .NET database application. A .NET solution is a collection of .NET projects. The .NET solution in Figure 1 consists of the fol-lowing:
• Two solution folders, one for a framework of reusable classes (Common Ground Frame-work), and one for an actual demo application (Construction Demo).
• Subfolders to further categorize projects with-in a main folder.
• Under each solution you’ll see a series of .NET projects. Each project contains one or more related class fi les that compile to a single separate DLL. For instance, the project CGS.DataAccess contains a class fi le for basic data access functionality. The project compiles to CGS.DataAccess.DLL and can be used from other .NET projects.
• In addition, the project ConstructionDemo.Client.Winforms (in the folder structure Con-struction Demo…Client…Winforms) appears in bold, because I’ve defi ned it as the startup project. When I build this project, Visual Stu-dio 2005 will create an executable fi le.
Many classes will refer to functions in base libraries, and will also inherit from previous classes in other .NET projects. In these situations, it is necessary to set add a reference to parent libraries. You can right-click on a project and select Add Reference from the short-cut menu (Figure 2).
Figure 1: Solution structure. Figure 2: Solution project options.
The Baker’s Dozen: 13 Productivity Tips for Moving from VFP to .NET
Read this entire article online at
http://www.code-magazine.com/focus/vfp/

40 www.code-magazine.com
VSTS is comprised of client applications and a Team Foundation Server (TFS). The client applications are available in several fl avors of
Visual Studio 2005 targeting a variety of roles including developers, testers, architects, and most recently, database administrators. You can in-stall the client application for accessing the TFS, Team Ex-plorer, in an existing Visual Studio 2005 installation or as a stand-alone application. Team Explorer provides the user interface for all of the TFS features; when installed on top of Visual Studio, Team Explorer is tightly integrated into the Visual Studio IDE.
TFS is composed of a logical application tier and a logical data tier. The logical applica-tion tier exposes a Web service API to the Team Explorer cli-ent and any other client that writes to the API. The logical data tier leverages SQL Server 2005 for storage as well as SQL Server Reporting Services and SQL Analysis Service for reporting. Additionally, TFS provides an intranet portal built on Windows SharePoint Services, which provides a fi le repository and a collaboration tool.
Software Development the Team System Way
While VSTS can support any development pro-cess, the out-of-the-box feature set supports a
development life-cycle as shown in Figure 1. The process starts with the creation of a work item.
The work item, a Scenario in this example, represents some capability the users would like the software to support. Once the Scenario is assigned to a developer for implemen-tation, they write the code and one or more unit tests. You may write the tests fi rst if you’re using Test Driven De-velopment.
Once all of the unit tests pass and the developer determines the code is ready for further testing, they check the code into TFS version control.
A build is initiated as a result of the check-in event (Con-tinuous Integration), a sched-uled event (Daily Build), or a user action. The build re-
trieves all of the source code from the version con-trol repository, builds each executable, and places the executables in a drop folder, typically on a net-work share.
In addition to building the binaries, the build pro-cess can also run build verifi cation tests, which en-sure that the individual units still function properly when integrated. If a project fails to build or if any build verifi cation test fails, the process stops and TFS creates a bug work item. You could then as-sign this bug to a developer to correct. Once the developer fi xes the problem and checks in the changes, you can attempt the build again.
Integrating VFP into VSTS Team Projects Whenever more than one person works on a software development project, introducing some process to coordinate the activities of the team members is a priority. The larger the team, the harder it is to manage. To meet this need, Microsoft created Visual Studio Team System (VSTS). VSTS is a state-of-the-art Software Development Life Cycle tool suite that is tightly integrated into Microsoft Visual Studio 2005. VSTS provides deep support for .NET projects; however, whenever a software solution includes components developed on a platform other than .NET, such as Microsoft Visual FoxPro (VFP), VSTS loses some of its value because the projects aren’t integrated into VSTS. Leveraging the extensibility features of VSTS and VFP, this article will help you integrate VFP projects into VSTS team projects enabling your team to apply a comprehensive process to your entire software development effort.
VSTS is used by the Developer Division at Microsoft in developing Visual Studio. This is referred to as dogfooding. As in, “we eat our own
dog food.” Here are a few of the statistics for November 2006:
Recent users: 944 (up 72)Work items: 142,693 (up 11,000)Files: 67,665,148 (up 5.5M)Folders: 13,857,564 (up 1.4M)Local Version: 279M (up 35M)Check-ins: 141,739 (up 8,000)Pending changes: 993,915 (up 9,000)
Source: http://shrinkster.com/kd
Fast Facts
John M. [email protected](949) 454-1400
John is the Chief Software Architect for Protocol Direct Marketing. He builds systems using both VFP and .NET technologies. John has presented sessions on VSTS for numerous developer groups and has spoken at the Microsoft Professional Developer Conference.
John wrote articles for both FoxTalk and FoxPro Advisor and wrote one of the original Pros Talk Fox books for Pinnacle Publishing, Inc, Template Programming in FoxPro 2.0.
ON
LIN
E Q
UIC
K0
ID
07
03
10
2
Integrating VFP into VSTS Team Projects

41www.code-magazine.com
When the build completes successfully and all build verifi cation tests pass, the executables in the drop folder can undergo system testing and user accep-tance testing. When these tests pass, the product is ready for wider release.
As indicated in Figure 1, TFS supports the develop-ment life cycle by providing the following:
• Work item tracking • A testing framework that supports unit test-
ing, build verifi cation testing, load testing, and manual testing
• A version-control repository • A build service that supports automated build
testing
VFP Integration Challenges
Whenever a software development effort involves multiple development environments it complicates the software development life cycle. Integrating VFP with VSTS presents a number of signifi cant challenges.
Work Items
Visual FoxPro’s Task List provides a local reposi-tory of tasks and provides limited extensibility. VFP is not designed to support a shared task list so tasks can be managed by others. VFP also doesn’t sup-port workfl ow to guide tasks through to completion in compliance with team policies.
Work items are the lifeblood of the TFS software development process. You use work items to record what needs to be done, who needs to do the work, and to provide an immutable history of what has been accomplished.
Developers who spend most of their day work-ing in the VFP IDE need convenient access to the work item repository—not only to see and update their assigned work items, but also to create new work items for themselves and others. While Team Explorer provides such access, the context switch of leaving the development environment to edit work items puts VFP developers at a disadvan-tage.
Automated Testing
Development teams increasingly use automated unit testing and automated build verifi cation test-ing to both increase the quality of software and to allow software to be easily refactored. It is essen-tial that VFP developers have the ability to create unit tests and build verifi cation tests for VFP ap-plications and to automate the execution of these tests if we are to be fi rst-class members of a multi-disciplinary team.
Version Control
In addition to the ability to simply store VFP source code, you need to be able to take advantage of the advanced features of the TFS version-control re-pository.
For example, it is possible to establish a check-in policy that requires a work item be associated with every check in. This provides a means for identifying all code changes necessitated by a specifi c work item and provides a way of justifying each code modifi cation. VFP developers need to be able to conform to the policies of their team without being forced to leave the development environment.
Other version-control fea-tures are equally impor-tant, including shelving, branching, and merging. The challenge is to make these features easily avail-able to VFP developers.
Build Automation
Automating the build process is another technique used to increase the quality of soft-ware. By having a consistent build process, a team ensures that they can compile and assemble all the required components and that the executables pass verifi cation testing. Establishing a minimum baseline of quality before further testing begins allows teams to fi nd and fi x problems sooner—saving both time and money. The challenge is to automate the building of VFP executables and automate the execution of VFP tests.
Whenever a software development effort involves more than one development
environment, it significantly complicates the software development
lifecycle.
Figure 1: Common development life cycle supported by VSTS.
Integrating VFP into VSTS Team Projects
Read this entire article online at
http://www.code-magazine.com/focus/vfp/

42 www.code-magazine.com
The .NET and COM platforms are not designed to communicate directly with one another and Mi-crosoft knew it needed to provide a way for de-
velopers to bridge the gap. Microsoft came up with a way to wrap the respective com-ponents in two special wrappers known as the Runtime Callable Wrapper (RCW) and the COM Callable Wrapper (CCW). The RCW and CCW act as proxies to facilitate communication be-tween COM and .NET.
RCW
In .NET, developers use RCW, also known as an in-terop assembly, to communicate with COM compo-nents. A developer can create an RCW for a COM component by either using the Add Reference fea-ture in Visual Studio 2005 or by using tlbimp.exe. To create the RCW for a COM component through the Add Reference feature, a developer performs the following steps:
1. Right-click the project in the Solution Explor-er and select the Add Reference item from the context menu.
2. Select the COM tab in the Add Reference dia-log box.
3. Select the desired COM component from the list provided.
4. Click OK (Figure 1).
Visual Studio will then create an RCW for the se-lected COM component and save it into the proj-ect’s bin directory. As noted above, there is another way to accomplish this. To use the tlbimp.exe to cre-ate the RCW for a COM component, a developer performs the following steps (Figure 2):
1. Open the Visual Studio 2005 Command Prompt and use the CD command to navigate to the directory that contains the COM com-ponent.
2. Type “tlbimp MyCOMServer.dll /out:MyIn-teropAssembly.dll” at the Command Prompt, where MyComServer is the name of your DLL and MyInteropAssembly is the name of the corresponding .NET assembly that you want tlbimp to create.
Using the above steps will cause the tlbimp com-mand-line tool to generate the RCW (MyInteropAs-sembly.dll), which you can then add to a .NET proj-ect by using the Add Reference dialog box.
An instance of the System.Runtime.InteropServices.Ty-peLibConverter class generates the interop assembly (RCW) re-gardless of which of the above methods you use. After the in-stance of the System.Runtime.InteropServices.TypeLibConver-ter creates the interop assem-
bly and you’ve added the interop assembly to the project, you can then add a reference to the interop assembly’s namespace in code, utilizing the Imports keyword in Visual Basic or the using keyword in C#, and then reference the classes in the RCW directly. You’re not required to reference the namespace. You could choose to fully qualify the class instead. Just use the RCW in a .NET project just like any other assembly and access the COM component’s public OLE classes in a straightforward and natural way.
CCW
The CCW provides for the reverse scenario than that presented for the RCW. The CCW provides access to .NET components from a COM client, such as a Visual FoxPro application. The way that developers create a .NET component to provide the CCW is a little more complex than creating an RCW, but most developers will fi nd the following steps straightfor-ward and doable.
When creating a CCW from Visual Studio 2005, developers create and build the .NET classes and the resultant assembly in the usual way for the most part. Basically, the only additional things a devel-oper needs to do to expose public .NET classes in an assembly is to perform the following steps before building the project:
1. Add a reference to the System.Runtime.In-teropServices namespace in the class fi le.
2. Make the assembly COM-visible.3. Register the assembly for COM interop when
it is built.4. Sign the assembly.
COM Interop Over EasyThis article highlights some of the new toolkits and components coming out of Redmond for COM Interop. The Interop Forms Toolkit, the Interop UserControl Prototype, and the techniques used in Sedna’s NET4COM allow Visual FoxPro developers to incorporate .NET components into their applications.
Developers using COM-aware languages, such as Visual FoxPro, can easily build and incorporate powerful .NET components into
their applications.
Fast Facts
Craig [email protected]
Craig Boyd is the CEO of Sweet Potato Software, Inc. (SPS) and a Microsoft Visual FoxPro MVP. Craig has years of experience developing applications for US and international clients. He specializes in helping other software companies meet challenging deadlines, solve complex problems, and upgrade project interfaces. Craig has built a solid reputation for getting jobs done on time and within budget. When he’s not working on client projects, writing blog entries, or helping members of the Visual FoxPro Community out on the forums, he writes magazine articles for technical publications.
ON
LIN
E Q
UIC
K I
D 0
70
31
12
COM Interop Over Easy

43www.code-magazine.com
Developers can add a reference to the namespace by including either “Imports System.Runtime.In-teropServices” in Visual Basic or “using System.Runtime.InteropServices;” in C#.
To make the assembly COM-visible in Visual Stu-dio, select the “Make assembly COM-Visible” check box in the Assembly Information dialog box (Proj-ect Properties screen > Application page > Assem-bly Information button > Make assembly COM-Vis-ible check box) as shown in Figure 3.
Register the assembly in Visual Studio by selecting the “Register for COM interop” check box (Project Properties screen > Compile page) (Figure 4).
Finally, you’ll sign the assembly with a strong name key fi le. This is done so that the developer can in-stall the assembly into the Global Assembly Cache (GAC), which requires that assemblies be signed. Also, developers can avoid a number of ominous warning messages when they register the assembly into a location other than the GAC using the /code-base switch. More on registering the assembly in a moment; for now, let’s take a look at the two ways to produce the strong name key fi le that a developer needs to sign the assembly.
Creating a Strong Name Key File
You can create a strong name key fi le using the Strong Name tool (sn.exe). Follow these steps (Fig-ure 5):
1. Open the Visual Studio 2005 Command Prompt.
2. Type “sn –k myproject.snk” at the Command Prompt, where myproject is the name you’ve given your Visual Studio project.
Using a COM-visible assembly from Visual FoxPro is no
different than using any other COM component.
This is the magic of the CCW.
Figure 1: By adding a reference to a COM component, Visual Studio will generate the RCW needed to use the classes the COM component contains. Visual Studio reads the type definitions in the COM type library and converts them into their .NET equivalents. It then builds the .NET equivalents into an assembly that can be used natively in code.
Figure 2: You can use Tlbimp.exe, a command-line tool, to generate an assembly that contains the .NET equivalent of the type definitions found in a COM type library. You can then reference and use the assembly generated in a .NET project in lieu of the COM server.
Figure 3: Select the “Make assembly COM-Visible” check box tells Visual Studio that it should export all public classes, properties, events, and methods when it builds the project. Visual Studio will automatically generate the GUIDs needed for the class and interfaces it exports.
Figure 4: Use the “Register for COM interop” check box to tell Visual Studio whether to register the assembly on the developer’s machine once it is built. Among other things, Visual Studio will create PROGID and CLSID entries in the registry for the COM-visible types in the assembly.
COM Interop Over Easy
Read this entire article online at
http://www.code-magazine.com/focus/vfp/

44 www.code-magazine.com
The Sedna release of the Data Explorer adds new features and corrects some recognized bugs. Each of the enhancements and improvements
came from suggestions made by the Fox Commu-nity, problems submitted to Microsoft, and at least one bug fi x came directly from code blogged with the correction.
The changes discussed in this article are based on the version shipped in the Sedna October 2006 Community Tech Pre-view (CTP) and some additions made just after the CTP release. You can download the Sedna components from Microsoft’s Visual FoxPro Web site (http://msdn.microsoft.com/vfoxpro/). It is important to note that at the time this article was written, Microsoft has not fi nalized the features to be included in the gold release.
Data Explorer Main Form
One change you immediately notice is the buttons on the top of the main form seen side-by-side in Figure 1 with the newer version on the right. The toolbar buttons of the Data Explorer now mimic the functionality as well as the look and feel of the Server Explorer inside of Visual Studio .NET. You can use the new Refresh button to update the con-tents of the tree view. This feature is available us-ing the Data Explorer shortcut menu even in the original version. In addition, you’ll use the Refresh button when you make changes to the schemas in a database, or you have multiple copies of the Data Explorer open and make changes to the connec-tions in another instance and you want to update the current instance of the Data Explorer. You can optionally include the icons and make the toolbar buttons hot tracking. These two settings are avail-able on the Options dialog box and discussed later in this article.
Microsoft enhanced the main form so the treeview nodes no long collapse when you return to the Data
Explorer window from the Options dialog box. This saves time when you make code changes to the various extensions like the shortcut menu, drag and drop functionality, or the query add-ins. You now jump directly to the node you are using to test the changes instead of having to drill down every
time you return to the Data Ex-plorer.
The original version of the Data Explorer allows you to sort ob-jects for each connection. Turn-ing on this setting will sort all the tables, views, and stored procedures by name. Unfortu-nately, this setting also sorts the column names by name. Most developers want the tables, views, and stored procedures sorted, but prefer the column names in natural column or-der. The Sedna Data Explorer allows you to choose how you want the column names or-dered for VFP and SQL Server
connections separate from the object sorting setting. This is one of my favorite enhancements. Microsoft enhanced the property dialog boxes for these con-nections (Figure 2) so you can make your prefer-ences more granularly than the original version of the Data Explorer.
Shortcut Menu
You’ll fi nd most of the Data Explorer functionality on the shortcut menu for the treeview. Sedna has several new features that don’t automatically show
The New and Improved Data ExplorerThe Data Explorer introduced in VFP 9.0 allows developers to work with different types of data from diverse data sources independent of specific projects. The Sedna update extends this already powerful and productive tool.
The Sedna Data Explorer provides numerous
enhancements and essential bug fixes to a tool introduced in VFP
9.0. This article highlights the new changes made to the Data Explorer so developers can be more productive managing and
querying VFP, SQL Server, Oracle, and any other data source you can connect to using OLE DB
through ADO.
Fast Facts
Rick [email protected]
Rick Schummer is the president and lead geek at White Light Computing, Inc. headquartered in southeast Michigan, USA. He prides himself in guiding his customer’s information technology investment toward success. He is a co-author of Visual FoxPro Best Practices for the Next Ten Years, What’s New in Nine: Visual FoxPro’s Latest Hits, Deploying Visual FoxPro Solutions, MegaFox: 1002 Things You Wanted To Know About Extending Visual FoxPro, and 1001 Things You Always Wanted to Know About Visual FoxPro. He is regular presenter at user groups in North America and has enjoyed presenting at GLGDW, Essential Fox, VFE DevCon, Southwest Fox, German DevCon, and Advisor DevCon conferences. You can find all of his developer tools at his company Web site: http://whitelightcomputing.com
ON
LIN
E Q
UIC
K I
D 0
70
31
22
The New and Improved Data Explorer
The main form has been enhanced so the tree view nodes no long collapse when you return
to the Data Explorer window from the Options
dialog box.

45www.code-magazine.com
up on the menu if you’ve previously used the Data Explorer because the functionality for the shortcut menu is stored in the metadata: DataExplorer.DBF in the HOME(7) folder. The new functionality is stored inside the DataExplorer.APP fi le internally in a DBF fi le. If you want the new menu function-ality and want to retain your existing connections and extensions you have added or downloaded you need to use the Options dialog box to update your DataExplorer.DBF metadata.
From the Data Explorer toolbar click Options and then fi nd the button called Restore to Default. You might hesitate thinking that this option might set your Data Explorer back to the factory settings, and indeed this is possible, but you can also retain the connection settings and the extensions you have added to the menu, to the Run Query dialog box, and the drag and drop functionality. Click Restore to Default to start the update process. You’ll see this message: “Do you want to maintain connections and customizations that were done by you or a third-party vendor?” Click yes if you want to save your changes and get the new enhancements. Click no if you really want to reset your installation to factory settings including the new functionality distributed by Microsoft in the Sedna release. Note that if you made any enhancements to the code included in the original Data Explorer features, it is possible the Data Explorer will reset it. See the sidebar, Update Shortcut Menu Can Overwrite Your Code Changes, for more details and recommendations.
SQL ShowPlan
Another feature that Sedna adds to the shortcut menu will display the SQL ShowPlan (Figure 3) for local views. Besides the actual ShowPlan details, the results include:
• The ShowPlan level passed to the SYS(3054) function
• SQL-SELECT code stored in the local view• How long the query ran in seconds• Number of records returned from the query• View parameter(s) and their data types• Optional messages to indicate how slow
the query ran based on your threshold prefer-ences
• Date and time the analysis was completed
One aspect of the ShowPlan output you can cus-tomize in the code is the threshold of when a view is considered moderately slow, just plain slow, super slow, or critically slow. Each of these thresholds can differ between developers. You can change these #DEFINEs to meet different localization require-ments.
Figure 1: One of the enhancements to the Sedna version of the Data Explorer (shown on the right side) is to the toolbar at the top of the main form. One of the bugs fixed is the default values (highlighted in the description pane) now show the setting correctly for VFP tables.
Figure 2: You can now sort objects without sorting column names because Sedna splits out the two options for VFP and SQL connections.
Figure 3: One of the new shortcut menu items for local views is to display the SQL ShowPlan to analyze the Rushmore optimization for the query. The results are displayed in the FoxPro text editor.
The New and Improved Data Explorer

46 www.code-magazine.com
#DEFINE cnCRITICALSLOW 60.0#DEFINE cnSUPERSLOW 20.0#DEFINE cnSLOW 10.0#DEFINE cnMODERATESLOW 4.0#DEFINE ccCRITICALCAPTION "Critical Slow"#DEFINE ccSUPERSLOWCAPTION "Super Slow"#DEFINE ccSLOWCAPTION "Slow"#DEFINE ccMODERATESLOWCAPTION "Moderate Slow"
Visual FoxPro determines the ShowPlan for a view when it opens or requeries a view. One of the tricky parts of writing generic code to open a view is to deal with the possibility of view parameters. The script code for this feature looks at the view param-eter list for the view and places empty values based on the data type of the view parameter if this is set. If you haven’t added the view parameters to the parameter list in the View Designer, in your view script code (if you are avoiding the View Designer), or by your favorite view editor, VFP will prompt you to enter in the value when the view is opened. This will artifi cially slow down the performance of the view, but will not affect the ShowPlan details.
Database Documenter
The Fox Team also added the Database Documenter for VFP databases to the shortcut menu. The version released with the October CTP creates text-based documentation displayed in a VFP text editor. The Fox Team greatly enhanced the latest version of the Database Documenter to include more database details as well as presenting it in HTML format
(Figure 4) using a cascad-ing style sheet (CSS) you can control. The resulting HTML is displayed in your default Web browser and has a table of content links at the beginning so you can go directly to the different sections for tables, views, connections, relations, and some other status details.
The CSS code is stored in the menu option’s Tem-plate code. Listing 1 shows an example of the cascad-ing style.
If you want to know what styles affect what parts of the HTML, just review the script code for the new menu option. If you prefer the simpler text version of the output, all you have to do is modify one line of code in the script. Change the following line of code:
llHTML = .T.
Set the llHTML variable to false and the output will be unformatted text.
Call the New Upsizing Wizard
Microsoft completely revamped and improved the SQL Server Upsizing Wizard. Another article in this issue covers the new and improved features. However, one new feature of the Data Explorer demonstrates how to programmatically call the Upsizing Wizard. One of the Upsizing Wizard APIs allows you to pass it the database container and the name of the SQL Server database you pre-fer as the default name. The wizard will start with the settings made for the fi rst and third steps al-ready completed.
The script code (Listing 2) shows you how you can determine the name of the database container to pass to the wizard. You can edit this code using the Manage Menus button on the Data Explorer Op-tions dialog box.
The only “magic” involved in the script is to deter-mine where the Upsizing Wizard is located. You set the location of the wizard on the enhanced Options dialog box. A property of the Data Ex-plorer Engine object called UpsizingWizardLo-cation stores the location. The fl exibility here is important in case you want to run a customized Upsizing Wizard that meets your project needs, or even if you want to replace the Microsoft ver-sion with your own or one from a third-party pro-vider.
CO
DE
CO
MP
ILER
S
Feb 2007 Volume 4 Issue 1
Group Publisher Markus Egger
Associate PublisherRick Strahl
Managing EditorEllen Whitney
Content EditorsH. Kevin FanslerErik Ruthruff
Writers In This IssueCraig Boyd Cesar ChalomBo Durban Markus EggerKevin S. Goff Malcom GreeneY. Alan Griver Doug HennigJohn M. Miller Emmerson ReedRick Schummer Rick StrahlArto Toikka Mike Yeager
Technical ReviewersAlan Griver Ellen Whitney
Art & LayoutKing Laurin [email protected]
ProductionFranz WimmerKing Laurin GmbH39057 St. Michael/ Eppan, Italy
PrintingFry Communications, Inc.800 West Church Rd.Mechanicsburg, PA 17055
Advertising SalesVice President, Sales and MarketingTom Buckley832-717-4445 ext [email protected]
Sales ManagersErna Egger+43 (664) 151 [email protected] Ferguson832-717-4445 ext [email protected]
Circulation & DistributionGeneral Circulation: EPS Software Corp. Newsstand:Ingram Periodicals, Inc.Media SolutionsWorldwide Media
SubscriptionsCirculation ManagerCleo Gaither832-717-4445 ext [email protected]
US subscriptions are US $29.99 for one year. Subscriptions outside the US are US $44.99. Payments should be made in US dollars drawn on a US bank. American Express, MasterCard, Visa, and Discover credit cards accepted. Bill me option is available only for US subscriptions. Back issues are available. For subscription information, email [email protected] or contact customer service at 832-717-4445 ext 10.
Subscribe online atwww.code-magazine.com
CoDe Component Developer Magazine EPS Software Corporation / Publishing Division6605 Cypresswood Drive, Ste 300,Spring, Texas 77379 Phone: 832-717-4445Fax: 832-717-4460
The New and Improved Data Explorer
Figure 4: The Database Documenter creates HTML output enhanced with a cascading style sheet (CSS) so you can control the look and feel of the results.

47www.code-magazine.com
Bug Fixes
One of the bug fi xes I really wanted fi xed is to dis-play the default values for VFP tables in the Data Explorer. Figure 1 shows the correct schema infor-mation for VFP tables in the description pane at the bottom of the Data Explorer. You can see in the original version the default value was completely wrong—often blank or as a logical false (.F.)—even for non-logical fi elds in the table. The Sedna version properly displays the default value as it is set in the Table Designer.
You can drag and drop from a table or view in the Data Explorer to the Form Designer to create a grid. In the previous release it did not set the grid’s RecordSource property, but in the Sedna version it correctly sets the RecordSource to the table or view name.
One obscure bug that Sedna fi xes occurred dur-ing a drag and drop operation when you have a bad fi eld mapping set up. Under normal conditions you would set up the fi eld mapping via the Visual FoxPro Options dialog or use the Environment Manager in either the Task Pane Manager or run standalone. These two tools enforce your selections
body { color: black; font-family: 'Trebuchet MS'; font-size: 16px; background: white }a:link { color: #ff8080 }a:visited { color: #ff0000 }a:active { color: #a05050 }a.case1:link { background: green }h1 { color: Purple; line-height: 30px; font-family: 'arial' ; font-size: 30px; background: white }h2 { color: green; line-height: 20px; font-family: 'tahoma' ; font-size: 20px; background: white }pre { color: black; font-family: 'courier new' ; font-style: bold font-size: 15px; background: white }
Listing 1: You can customize the output of the HTML by altering the cascading style sheet maintained in the template code
LPARAMETERS loParameter
#DEFINE ccMSGBOXCAPTION "Data Explorer"
LOCAL lnLines, ; lnRow, ; lcDBC, ; lnDatabases, ; lcUpsizingWizard, ; lcOldDirectory
DIMENSION laOptionData[1]DIMENSION laDatabase[1,2]
lcOldDirectory = FULLPATH(CURDIR())lnLines = ALINES(laOptionData, ; loParameter.CurrentNode.OptionData)lnRow = ASCAN(laOptionData, "DatabaseName=")
IF lnRow > 0 lcDBC = SUBSTRC(laOptionData[lnRow], ATC("=",; laOptionData[lnRow]) + 1) lnDatabases = ADATABASES(laDatabase) lcUpsizingWizard = ; loParameter.oDataExplorerEngine.UpsizingWizardLocation IF EMPTY(lcUpsizingWizard) lcUpsizingWizard = HOME() + ; "Wizards\UpsizingWizard.app" ENDIF
* Run Upsizing Wizard IF FILE(lcUpsizingWizard) lcUpsizingWizPath = ;
JUSTPATH(lcUpsizingWizard) CD (lcUpsizingWizPath) * Run Upsizing Wizard with DBC name, the * name you want for SQL Server, and * indicate it is new DO (lcUpsizingWizard) WITH lcDBC, ; JUSTSTEM(lcDBC), .T. ELSE MESSAGEBOX("Could not fi nd Upsizing " + ; " Wizard, check options " + ; "setting location.", ; 0+48, ; ccMSGBOXCAPTION) ENDIFELSE * Little problem, could not fi nd database. MESSAGEBOX("Database specifi ed was " + ; "not found.", ; 0+48, ; ccMSGBOXCAPTION)ENDIF
IF NOT EMPTY(lcOldDirectory) AND ; DIRECTORY(lcOldDirectory, 1) CD (lcOldDirectory)ENDIF
RETURN
Listing 2: The script code found in the Data Explorer to run the new and improved Upsizing Wizard
The New and Improved Data Explorer

48 www.code-magazine.com
for the class and class libraries to exist. Some de-velopers use a projecthook to set up the fi eld map-pings programmatically when opening a project. It is also possible you can set it incorrectly using pro-jecthook code. You might rename a class or move it to another library, or delete it completely and for-get to correct this in the fi eld mapping settings. If you have the fi eld mapping pointing to an invalid class and drag and drop a fi eld from a table on to the Form Designer in the previous version of the Data Explorer it will cause errors to happen and in some scenarios would even trigger the dreaded and fatal C5 error. The Data Explorer now handles the case of a bad fi eld mapping gracefully by displaying a message (Figure 5) letting you know your fi eld mapping needs to be corrected.
Prior to Sedna, the Data Explorer Browse form would lose the grid columns if you tried to change VFP data in the grid column based on auto-incre-menting fi elds in a table (Figure 9). The Fox Team corrected the root problem by making columns read-
only when the data is an auto-incrementing data type. The grid no longer loses the columns.
Options Dialog Box
Use the Options dialog box (Figure 6) to confi gure different option preferences and access the different extensibility func-tionality of the Data Explorer. Enhancements to the Options dialog box provide you more customization so the Data Ex-plorer works the way you want it to work.
Sedna’s Data Explorer includes a couple new features to display Rushmore optimization details so you can understand how well optimized your VFP data queries are when executed. The Rushmore Query Optimization Level (ShowPlan) setting on the Options dialog box allows you to select the type of optimiza-tion checked when the Show-Plan details are included. This incorporates the proper param-eter to the SYS(3054) function. You may wonder why I didn’t include parameter values 2 and 12 in the list. The functionality to display the SQL statement in the output is already includ-ed. You only have to choose between not displaying any optimization results, displaying Rushmore fi lter optimization levels, or Rushmore join opti-mization levels.
You can determine which Upsizing Wizard appli-cation you want to integrate with the Data Ex-plorer by selecting it via the ellipse button to the right of the Upsizing Wizard textbox. This is im-portant because you might enhance the Upsizing Wizard and want to integrate with yours instead of the one shipped by Microsoft. More and more projects are showing up in open source efforts like VFPX and there is the possibility the Fox Community may extend the Upsizing Wizard in the future and you might have several copies in-cluded in your development toolkit. This provides a lot of fl exibility for you, but you must ensure any version you select runs with the same Applica-tion Programming Interface (API) as the original shipped by Microsoft.
You can also use the Options dialog box to change the look and feel of the toolbar icons. You can set the button style to display only the caption, the icons only (with tool tip text), or with the caption and the icon. You can select a checkbox
Update Shortcut MenuCan Overwrite YourCode ChangesIf you update the Data Explorer shortcut menu by restoring the default configuration on the Options dialog box you can choose to save your connections and enhancements you or a third-party provider completed. Note that if you made changes to Microsoft’s
Figure 5: If you do not have your field mapping set up with a valid class in a valid class library you will see this message show up when you drag and drop a field on to the Form Designer instead of a C5 crash.
Figure 6: The changes to the Options dialog box allow you to set Rushmore optimization levels, determine which copy of the Upsizing Wizard you want to use, how the toolbar buttons look, and the option to back up the Data Explorer metadata table.
original functionality, restoring the default configuration will reset to the original Microsoft code.
For instance, I changed the behavior of the Design option for VFP tables and views to run the White Light Computing ViewEditor instead of the native View Designer. Each time I restore the native functionality I select the option to save my connections and additions. It does that, but restores the original code for the Design feature and I need to reset the code to work the way I want it to.
I suggest that you create a backup of the DataExplorer.DBF file using the Options dialog box before you restore the functionality. This way you can get your customized code for the native features and restore the code overwritten during this process.
The New and Improved Data Explorer

49www.code-magazine.com
to enable hot tracking or not. By default buttons have the caption only and don’t enable hot track-ing.
The DataExplorer.DBF metadata fi le found in the HOME(7) folder stores your connections, many important settings, and all of the extensibil-ity items you have included in the Data Explorer. Including this folder and the DataExplorer.DBF free table in your backup scheme is important if you want to retain this information during a re-covery effort after a hard drive crash. Occasion-ally you should make a quick backup of this fi le if you are making some risky changes to your scripts or want to try out a new connection. With the previous version of the Data Explorer you have to hunt down the HOME(7) folder and copy the fi le to a different folder or make a duplicate fi le in the metadata folder. The Sedna Options dialog box includes the Backup DataExplorer.DBF but-ton to make a backup copy of the Data Explor-er. VFP will back up the Data Explorer to a fi le called DataExplorerBackup_XX.DBF, where XX is a sequential number increased by one each time you create a backup. You still need to ensure you include the HOME(7) folder in your hard drive backup scheme.
Run Query Dialog Box
In the Run Query dialog box (Figure 7) you can interactively build and test queries for the connec-tions you have set up in the Data Explorer. Sedna includes several enhancements to improve your productivity with queries.
Feature discovery is always a challenge for software developers. You can expose a feature in your ap-plication using a menu, a user interface object, and keystroke combinations. One feature in the Run Query dialog box is the Run button. If you use the SQL Server Query Analyzer you are probably used to pressing the F5 key to run the query. Most devel-opers I have talked to about the Run Query dialog box just click on the Run button and don’t think about pressing the F5 key. The F5 hotkey is in the previous version, but not frequently discovered by developers using the tool. The Sedna version ex-poses this for developers by adding it to the button caption.
The output on the Messages tab (Figure 8) for the result set now includes the Rushmore optimization (via the ShowPlan) and record counts of the query result set for VFP data.
Sedna includes two new query result add-ins that create quick reports. One report shows results in a form style (fi elds stacked vertically in the detail band), and the other shows results in a column style (fi elds horizontally positioned across the de-tail band). When you click on one of the new quick report buttons, VFP will prompt you to name the report you want to create. The default report name is DataExplorerQuickReport.FRX, but you can
name it anything you want and save it to any fold-er you want. After you’ve saved the fi le, VFP will open the report in the Report Designer. You can use any of the features of the Report Designer (in-cluding the menus and toolbars) to alter the report to your liking. You can save the changes and close
Using Cascading Style Sheets (CSS) to Control HTML Output for the Database DocumenterI believe most developers have at least dabbled in HTML and use cascading style sheets to control the look and feel of the HTML rendering. The style sheet “code” is straightforward. First you have the style name, followed by the attributes and settings for the attributes in curly braces.
The CSS included in the Database Documenter template has styles set up for different HTML tags. The body style is regular text in the HTML between the <body> and </body> tags. The pre style is for the source code contained
Figure 9: You will not see this situation (grid losing the columns) when browsing data using the Sedna version of the Data Explorer.
Figure 7: The changes to the Run Query dialog box include additional query messages, some new query result add-ins, and a few bug fixes.
Figure 8: The new messages on the Messages tab of the Run Query dialog box includes the number of rows returned in the result set and the Rushmore optimization results.
The New and Improved Data Explorer
50 www.code-magazine.com
the Report Designer; VFP will display the report in the Report Preview window and allow you to print the report if you select a printer.
I like this new feature to create a quick report to demonstrate a data problem to another developer on my team, or even create a quick report for a cus-tomer. I prefer this feature to the Copy Results to Clipboard option which does not send the contents of the memo fi elds to the clipboard.
Sedna includes two bug fi xes. Sedna fi xes an “Alias not found” error if you clicked on any of the query result add-ins when the Messages tab was visible. In addition, prior to Sedna if you attempted to explore a General fi eld in the result set grid the Data Explorer triggered a “Field must be a Memo fi eld.” error. The new behavior modifi es the Gen-eral fi eld.
Extensibility Dialogs
The Data Explorer has three existing dialog boxes to manage the extensibility options. I work with Menu Manager and the Add-in Manager frequently when I am writing a new Data Explorer feature. The scenario is fairly typical of most developers writing extensions. You open the Options dialog box, click the button to open the extensibility dialog box, se-lect the option you want to work with in the list, click the script page, and then click Modify. It takes fi ve steps altogether to edit the code, which is very tedious if you want to test and debug the code in rapid iterations.
Sedna reduces some of the tedious steps by letting you double-click on the list. This brings forward the Script to Run page. You can now right-click the Script edit box to bring up your script in the pro-gram editor. Overall you have fewer mouse clicks and more importantly, you use your mouse less to get to the program code editor.
Other Changes
Several dialog boxes (Run Query, Browse, View Defi nition, View Stored Procedure) have some changes to fonts to respect the font attributes you selected in the Options dialog box.
David Fung posted a blog entry (http://weblogs.foxite.com/davidfung/archive/2006/08/19/2275.aspx) with a fi x for stored procedure sorting when the database uses a Korean code page. Microsoft will include this fi x in the Sedna version of the Data Explorer.
Wrap Up
Microsoft really has an impressive tool with the Data Explorer. It is very fl exible and extremely ex-tensible in true VFP tradition. I fi nd the Data Ex-plorer easier to use than SQL Server 2000 Enter-prise Manager, Query Analyzer, and the SQL Serv-
er 2005 Management Studio. Even better, it works with native VFP data, SQL Server, Oracle, and any data you can connect to with ADO. Sedna has nu-merous enhancements and addresses some critical bugs to make the experience even better.
Programmatically Creating a Quick ReportI believe most VFP developers understand the idea of a quick report in the context of using the VFP IDE. Microsoft included the ability to programmatically build a report using the CREATE REPORT command.
CREATE REPORT <rpt name>;
FROM <alias/table/cursor> ;
FORM
VFP will generate a report from the data you identify with the FROM clause of the CREATE REPORT command. This means it can be data direct from a VFP table, or any query pulled from any source including a backend database. It does not matter how it was created (direct access, local or remote view, CursorAdapter, or SQL Pass through code).
The last clause of the REPORT command (FORM in the example) tells VFP to create a quick report using the “form” layout. If you want a columnar report you substitute the FORM clause with COLUMN.
The Data Explorer often is easier to use than SQL Server
2000 Enterprise Manager, Query Analyzer,
or the SQL Server 2005 Management Studio.
in the HTML. The a:link, a:visited, a:active, and a:case1:link are for the hyperlinks included as a table of contents at the top of the HTML. Finally the H1 and H2 are just the different headers included in the output. You have full control of the font name and colors, sizes, and positioning. You can even replace the template with your Web site template or HTML Help template if you want to integrate the output.
You’ll find dozens of CSS help sites available on the Internet. I prefer a CSS editor called TopStyle from Newsgator. You can find more details about this product at http://www.newsgator.com/.
Rick Schummer
The New and Improved Data Explorer


Migration Headache?
For immediate relief, visit
www.VFPConversion.com today!
VFP Conversion is a migration services brand of EPS Software Corp., providing expert upgrading of VFP applications to the latest technologies available from Microsoft. To learn more about how VFP Conversion can assist your enterprise, call toll free: 1 (866) 529-3682. [email protected] www.VFPConversion.com