VISION Training Manual 2013 - Final8-1support.customerfocus.com/froot/4035/uploads/VISION... · 5...
88
VISION Training Manual 2013 1 Table of Contents I. VISION Introduction…………………………………… 4 a. Login b. Dashboard Overview c. Calendar II. VISION Administration and Settings………………… 9 a. Calendar b. My Profile, Company and Employees c. Permissions d. System i. Terms and Conditions ii. Sale Price Control iii. Decorator Methods iv. Codes and Phrases, Industry Codes, Marketing Tags III. Customer Relations Management (CRM)…………… 12 a. Adding/Editing a Contact b. Customer Record: Contacts, Addresses, Marketing, Payment, Notes, Files and Activities. c. Adding Suppliers d. Importing Customers IV. Products & Product Research………………………… 16 a. Featured Products b. Virtual Sampling/My Logos c. Product Research i. Keyword Searches ii. Search Filters iii. Search Results Displays d. Product Detail e. Clipboard f. Add a Product
Transcript of VISION Training Manual 2013 - Final8-1support.customerfocus.com/froot/4035/uploads/VISION... · 5...
VISION Training Manual 2013
1
Table of Contents I. VISION Introduction…………………………………… 4
a. Login b. Dashboard Overview c. Calendar
II. VISION Administration and Settings………………… 9
a. Calendar b. My Profile, Company and Employees c. Permissions d. System
i. Terms and Conditions ii. Sale Price Control iii. Decorator Methods iv. Codes and Phrases, Industry Codes, Marketing Tags
III. Customer Relations Management (CRM)…………… 12 a. Adding/Editing a Contact b. Customer Record: Contacts, Addresses, Marketing, Payment,
Notes, Files and Activities. c. Adding Suppliers d. Importing Customers
IV. Products & Product Research………………………… 16
a. Featured Products b. Virtual Sampling/My Logos c. Product Research
i. Keyword Searches ii. Search Filters iii. Search Results Displays
d. Product Detail e. Clipboard f. Add a Product

VISION Training Manual 2013
2
V. Projects……………………………………………………… 25 a. Creating a Project
i. Using the Clipboard ii. From Product Window iii. Project Dropdown Menu
b. Editing a Project c. Project Overview
i. Activities/Notes and Files
VI. Presentations and Quotes……………………………… 33 a. Building a Presentation
i. Editing Products, Additional Costs, etc. b. Adding a Logo c. Building Quote
i. Editing Products, Additional Costs, Roll Up Pricing, etc. d. Separator Line e. Design View f. Sending a Presentation/Quote g. Converting Quotes to Sales Orders
VII. Sales Orders/Point of Sale…………………………… 53 a. Project Overview b. Sales Orders
i. Editing Sales Order Information (Additional Addresses, Billing info, job box, etc.)
ii. Editing Product Information iii. Adding Additional Costs, etc. iv. Separator Line
c. Deposits d. Design View
i. Proforma Invoices ii. Production Copies
VIII. Purchase Orders………………………………………… 64
a. Raising Purchase Orders b. Split Purchase Orders c. Editing Purchase Orders d. Batching and sending Purchase Orders e. Receiving Goods, Purchase Order Reconciliation

VISION Training Manual 2013
3
IX. Sales Invoices …………………………………………… 72
a. Creating Customer Invoices b. Editing Invoices c. Receiving Payment
X. Job Management Tools…………………………………… 75 a. Job Board b. Production Planner
XI. Reports…………………………………………………… 78
XII. Customer Websites……………………………………… 79 a. Creating Websites b. Company/Category STOREs c. Marketing Options d. Administration and Management

VISION Training Manual 2013
4
I. VISION INTRODUCTION Login into Trade Only VISION
Step 1: Ensure you have an Internet connection
Step 2: Enter the following URL into your web browser
https://usa.tradeonly.com/vision
Click LOG IN

VISION Training Manual 2013
5
Step 3: Enter your email address and password into the relevant fields, which are indicated below.
NOTE: If you have forgotten your password, click the 'Retrieve forgotten password' l ink - this will send an email to your registered address with some instructions on how to retrieve your password.

VISION Training Manual 2013
6
Dashboard Overview
The Dashboard is your HOME page within VISION. This will give you a snapshot of your projects, company performance and calendar.
Navigation Toolbar:
The Toolbar is located at the top of the screen and can be accessed from any page in VISION.
Home: This is the first Icon located on the toolbar. This will bring you back to the dashboard from anywhere in VISION.

VISION Training Manual 2013
7
Products: From this dropdown you can: 1. Search products, view product and supplier details. 2. View My Products: These are products that you have added to
VISION 3. Add products to your product database.
Reports: Here you can view detailed stats, create reports and send it to anyone on your team. Websites: From here you can view or create an instant company STORE for you and your customers. Dashboard Screen Information Featured Products: This window will display EME preferred items.
1. New and Noteworthy- This is indicated by a sun icon in the top, left corner of the product.
2. Special Offers – This is indicated by a red price tag in the top, left corner of the product.
3. Best Sellers – This is indicted by a green dollar sign in the top, left corner of the product.
Search Products: This window allows you to perform a general products search.
1. By keyword 2. Product Title 3. Supplier or Vendor
Projects: This window will show your most recent projects. Clicking more will take you to your “Projects Overview Screen.”
NOTE: Another icon that appears in the top, r ight corner of some
of the products is the Qual ity Certif icat ion All iance. This
indicates products that meet qual ity and safety standards.

VISION Training Manual 2013
8
Company Performance: This window gives you a brief financial snapshot of your company performance for last month, this month and this year. Quick Stats allows you to view the status of your Quotes, Sales Orders and Purchase Orders. Clicking on more within either of these windows will take you to the Reports section.

VISION Training Manual 2013
9
II. ADMINISTRATION AND SETTINGS Calendar Adding a Calendar Entry 1. To add a Calendar entry or reminder, click Calendar, located at the top
right of the screen.
1. You can add an entry by double clicking on the date or by selecting
Add Event, located at the top right of the screen.

VISION Training Manual 2013
10
2. Select customer, prospect or personal entry. NOTE: To enhance CRM
you should assign calendar entries to a customer. This way you can record and tract all activities for a customer. To give this Calendar entry a category, click on the Category button. Make your selection.
3. Select Allocated to, time, duration and category type. 4. Enter an objective and action.
5. Click Save, once you have entered your information and made your
selections. Settings Click Settings at the top right corner of your screen. This will take you to the backend of VISION where you are able to set up company information, user information, permissions and system settings. Once this information has been updated, you are not required to go back into this area unless you want to make additional changes. My Profile This is where all your user information is stored.
VISION Training Manual 2013
11
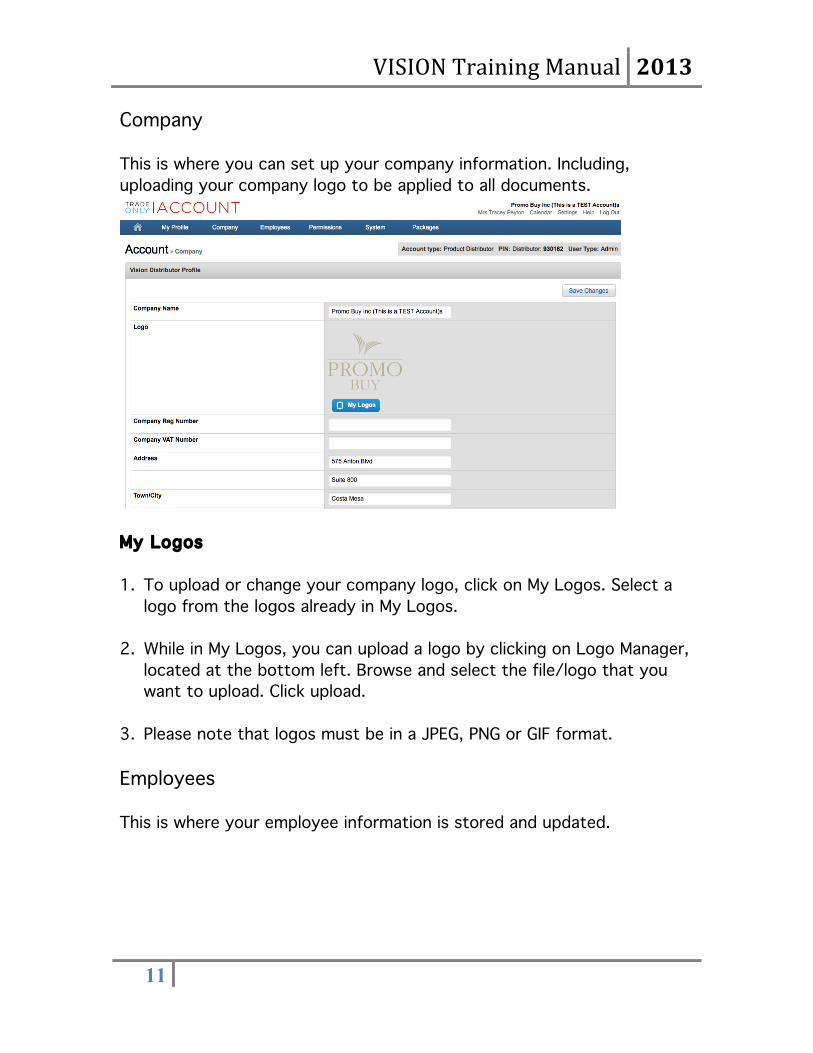
Company This is where you can set up your company information. Including, uploading your company logo to be applied to all documents.
My Logos 1. To upload or change your company logo, click on My Logos. Select a
logo from the logos already in My Logos. 2. While in My Logos, you can upload a logo by clicking on Logo Manager,
located at the bottom left. Browse and select the file/logo that you want to upload. Click upload.
3. Please note that logos must be in a JPEG, PNG or GIF format. Employees This is where your employee information is stored and updated.

VISION Training Manual 2013
12
Add New User 1. Click on Add New User, located at the bottom left of the screen.
2. Fill out all the fields and select Save Changes, located at the bottom
right of the screen. Permissions This selection allows you to add specific access levels for each VISION user in the company.

VISION Training Manual 2013
13
1. Groups – User groups are located in the left column. When you select a
user group (highlight) you will see what permissions an individual belonging to that group is able to perform.
2. Permissions are indicated in the center column. A green check indicates that this is a function that an individual belonging to this group has the ability to perform. A red X indicates a function that is not allowed.
3. Members – The right column lists all system users. The user group that each user belongs to is indicated in parenthesis.
• To add a member to a group, highlight the group you want that user to belong to and then click add next to the user name.

VISION Training Manual 2013
14
System Settings
Terms and Conditions You are able to edit what appears on quotes, sales orders, purchase orders and invoices.
VISION Training Manual 2013
15
To edit, Select the type of document that you want to add text to. Click into the text field and type. Use the toolbar to change fonts, bold, highlight etc.
Sale Price Control Decoration Methods Marketing Tags

VISION Training Manual 2013
16
III. CUSTOMER RELATION MANAGEMENT (CRM)
• Enter the customer name. • Select Customer and Business type. • Fill out the customer information fields provided: address, phone
number, fax, email, web address, etc. • Click Save
1. The Company Info screen allows you to enter all of the data and
demographic information for your new contact, along with an option to select source, status, competitor, Company size, organization, and industry.
2. Click Save, to save entry to your customer or vendor database.

VISION Training Manual 2013
17
Viewing and Editing an Existing Contact 1. From the Contacts dropdown, select Customers or Vendors. Highlight
the customer you want to view or make edits to. a. Once selected, you can view Company Details, Contact Details
and some Recent Activity for the customer. b. Click the contact name or account number to look up the
contact details and make edits. You can email the contact by clicking on the blue email link located under Company Details.

VISION Training Manual 2013
18
Customer or Vendor Record
1. Click on the tabs within the Customer or Vendor Record and fill out the fields in each tab. General Company information is found on the Company Info tab. 2. Contact Info – Here you are able to add contacts. There is no limit to
the number of contacts that you are able to add.
3. Additional Addresses – This is where you can add additional addresses for the customer or vendor.
4. Marketing Tags – Here you can group customers together by buying
trends, size, organization, etc. You can then create e-mail campaigns and send them to specific customer groups.
5. Payment Information – This is where all billing and tax information is held for the customer.
6. Notes – This tab provides an excellent way to add and keep track of
notes that pertain to a customer. When you add a note, the system will time, date and put the person’s name next to the note added.

VISION Training Manual 2013
19
7. Activities- This tab will show all activities associated with a customer,
including, calendar entries, quotes, sales orders, purchase orders, invoices and files.
8. Logos – This is where you can upload a customer logo to the customer
record to be used on documents, company stores and virtual samples. These logos need to be in a JPEG, PNG or GIF format.
9. Once you are happy with your changes click Save

VISION Training Manual 2013
20
IV. PRODUCT RESEARCH Search Product There are three ways to enter the product research section within VISION.
From your navigation toolbar, go to Products, and select Overview from the dropdown menu.
Click more within the Featured Products window located on the Dashboard.
Enter search criteria within the keyword and vendor areas located in the Search Product window on the Dashboard and select search.

VISION Training Manual 2013
21
Virtual Sampling/My Logos My Logos- This is where your customer’s company logos are stored. You can apply logos to all products within the research area of VISION by using the My Logos button. Uploaded logos must be in a JPEG or GIF format. Keywords and Filtering Options Keyword and filtering options are located on the left of your Product Research screen. Below are some of the research options that you have. 1. You can search by Keywords or use the filtering options provided.
2. To perform a keyword search type the keyword in the box. For
example, mugs. You can also type in the vendor reference code. 3. Some searches may result in a large amount of options. Therefore,
Filtering is a good idea.
4. You can filter by: • Vendor or Category, • Niche (Cups, pens, apparel, etc.), by price and delivery time. • Favorite Vendors – If you check the box next to favorite
vendors. You will only search products from those vendors chosen. To select your favorite vendors from the list of vendors in the system. Click EDIT, located to the right of favorite vendors, then select vendors from the vendor list and click save.
• My Products – These are products that you have added. • QCA Approved – These are products that have met safety and
quality standards. • Subcategories • Color and Pricing • Lead time • Country of origin

VISION Training Manual 2013
22
Search Result Displays
You have three options in which to display your product research results. 1. List Mode – This will provide you with one product per row; within the
product window you will be able to see an image of the product and some basic product description and detail.
2. Two Per Row – This will provide you with two products per row,
within the product window you will be able to see an image of the product and some basic product description and detail.
3. Grid – This will provide you with four products per row, within the
product window you will only be able to view the product image. Image Displays - You are also able to see a larger image of the product by hovering over the product window
NOTE: At the top of your search results you are able to see how
many total products appear in your search. You can see how many
categories those products fall into. If you cl ick on categories, you
can choose to view only those products in that specif ic category.

VISION Training Manual 2013
23
Product Selection You are given a few options when making product selections for your customer. 1. Add product to the Clipboard 2. View product details 3. Add product directly to a project, quote or sales order. Clipboard My Clipboard - This is your idea center. Products that you may want to include in a customer quote or sales order can be stored in your clipboard. You can add as many items to the clipboard as you want.

VISION Training Manual 2013
24
View Product Details
When you hover over a product window/image, click on details. This will take you to the Product Detail Screen, where you can get a very detailed description of the product–including: pricing, imprint methods, live inventory and general product descriptions such as; colors and sizes, vendor information and production times.

VISION Training Manual 2013
25
Inventory You are able to view product inventory for those suppliers who are integrated with Trade Only. Suppliers include: Bodek and Rhodes, Broder, HIT and Sanmar. There are two areas in which you can view product inventory 1. Product Details within the product research area: To view inventory from the product Detail Screen, click on the inventory tab. Select color and it will show the sizes and locations where inventory is found.
2. Product Details on the Build a Quote Screen or POS: To view inventory click the blue arrow next to the product to view product details, select Show Inventory, located above the product description. Then select color from the dropdown.

VISION Training Manual 2013
26
Add Product to the Clipboard You can add products to your clipboard two ways. When hovering over a product image, you will see and option title Clipboard. If you click on Clipboard, the product will be added to 1. Your clipboard and will be available for you to use in a project, quote or
sales order. 2. You can also add a product to your clipboard from the Product Details
Screen by clicking on the Add Product button.
Add Product Directly to a Project, Quote or Sales Order There are two ways to add a product directly to a project, quote or sales order that you are currently working on (have open). 1. Hover over the product window/image and select project, quote or
sales order. 2. You can also go into your clipboard select the product or products
that you want to add. Then make sure project, current quote or current sales order is selected. Click the Go button and the products will be added to the document you have open.
VISION Training Manual 2013
27
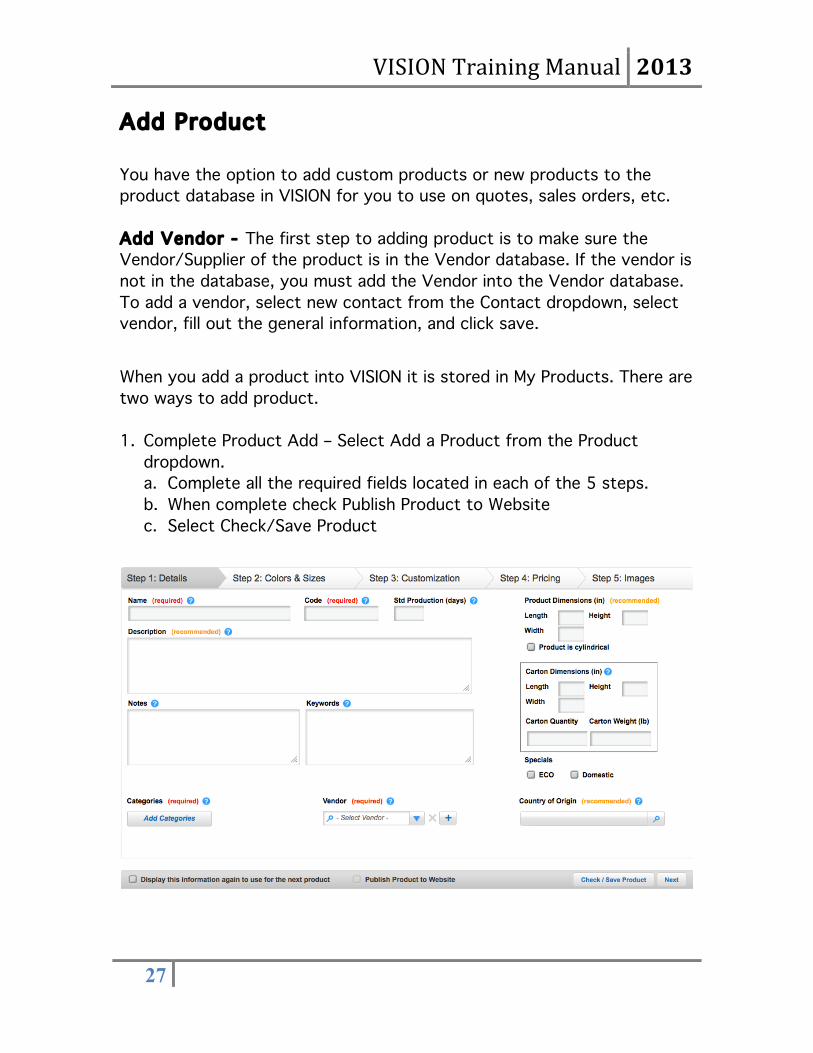
Add Product You have the option to add custom products or new products to the product database in VISION for you to use on quotes, sales orders, etc. Add Vendor - The first step to adding product is to make sure the Vendor/Supplier of the product is in the Vendor database. If the vendor is not in the database, you must add the Vendor into the Vendor database. To add a vendor, select new contact from the Contact dropdown, select vendor, fill out the general information, and click save. When you add a product into VISION it is stored in My Products. There are two ways to add product. 1. Complete Product Add – Select Add a Product from the Product
dropdown. a. Complete all the required fields located in each of the 5 steps. b. When complete check Publish Product to Website c. Select Check/Save Product

VISION Training Manual 2013
28
2. Quick Product Add – You can add product from the Build a Quote or Sales order Screen by clicking the Add Product Tab.
i. Enter Product Code, Quantity, Sale Price, Cost Price Margin, Total Price, Vendor (click Vendor button and select vendor), Description and Image. Click Save.
ii. When using quick product add you are able to add product directly
to the quote or sales order as well as into My Products for future use.
Note: You are able to access My Products from the Product dropdown located on the navigation toolbar.

VISION Training Manual 2013
29
V. PROJECTS Creating Projects
A project is where your quotes, sales orders, purchase orders and invoices are stored. Under one project, you could have one of each, or multiple. Each document within your project has a unique identification number, and the project has its own identifying number. Both are reflected on any document sent to a contact. There are three ways to create a project within VISION. 1. Select New Project from the Projects dropdown located on your
Navigation Toolbar 2. Create a Project from the Clipboard 3. Create a project by selecting Project within the product research
window located on the Product Overview screen. New Project from the Projects Dropdown 1. Select New Project from the Projects dropdown.

VISION Training Manual 2013
30
2. Enter a subject that describes your project. Note: Be as detailed as possible. It is good to reference location and date of event. The project title will appear on documents sent to your customer, so check for spelling and typos
3. Select Type. This refers to whom the project is being created for.
Customer, Prospect or Vendor 4. Type the first few letters of the customer’s name. A dropdown will
populate with customer’s to choose from. If you do not know the customer name then click the magnifying glass next to Customer to access your customer database.
5. Highlight the customer that you are creating the project for and click
the Select button. 6. Select the Customer Contact from the dropdown provided.
7. Select the Sales Representative within your company that you want to
assign this project to. The Sales Representative will automatically default to the person who is signed into VISION when creating the project.
8. Enter in Additional Notes anything that is relative to the project. These notes are for your reference only. They will NOT appear on documents sent to the customer.
9. Once you have entered all of the required project data, hover over the
Next button. You will be given three options: Create a Quote, Create a Sales Order or Copy a Sales Order. Upon selecting one of these options, you can begin the order management cycle for a customer.
NOTE: You have the option of adding a customer or contact to
VISION without leaving your project screen by cl icking on the
plus sign next to the text f ield.

VISION Training Manual 2013
31
Creating a Project from the Clipboard
1. You can access the Clipboard from the Product Overview screen. The
Clipboard is where you store products that you may want to present to a customer.
3. Click the My Clipboard Button 4. Check the box next to the item that you want to include in your
project. You can also click the X to remove the item from your Clipboard.
5. Once you have made your product selections, make sure New Project
is selected from the project dropdown and then click Go. 6. Create a Project screen will appear, Fill out the project information that
is requested and select ‘Next’.
NOTE: You can add an unl imited number of products to your
Clipboard for future use.

VISION Training Manual 2013
32
7. From here, you can create a Quotation, Sales Order or copy an existing
Sales Order. Creating a Project from Product Research Window 1. Once you have conducted a product search, hover over the product
window or image.
2. You will be presented with three options: clipboard, details or project. Select project to add the selected product to a new project.
3. Upon selecting project, the Create a Project screen will appear. 4. Fill out the project information that is requested and select Next. 5. From here, you can create a Quotation, Sales Order or copy an existing
Sales Order. Project Overview 1. You can also view the Projects that you have created. To access
these Projects, go to the Projects dropdown on the Toolbar. 2. Then select Overview. 3. From the Project Overview screen, you can see all of the projects that
you have created. 4. You can do a search to find specific projects by Status, Sales Rep or
Project, Quote, Sales Order or Customer Account number.
5. To view a project, click on the Project number, along the left side.
VISION Training Manual 2013
33
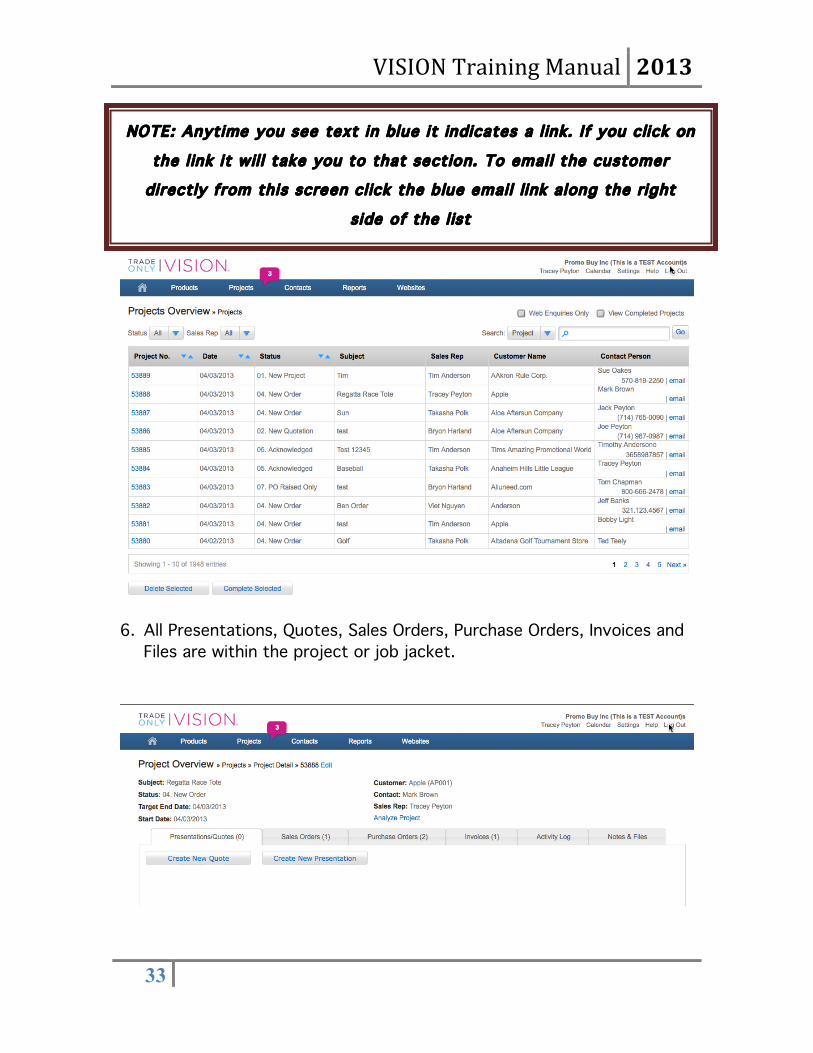
6. All Presentations, Quotes, Sales Orders, Purchase Orders, Invoices and
Files are within the project or job jacket.
NOTE: Anytime you see text in blue it indicates a l ink. If you click on
the l ink it wil l take you to that sect ion. To email the customer
directly from this screen cl ick the blue email link along the right
side of the l ist
NOTE: Anytime you see text in blue it indicates a l ink. If you click on
the l ink it wil l take you to that section. To email the customer
directly from this screen cl ick the blue email link along the right
side of the l ist

VISION Training Manual 2013
34
7. You can add Activities within the Activity Tab. Select Add Activity.
8. Fill out the information – Select date, time, type of activity from the
dropdown, enter the details and click save. You have the ability to complete activities by checking the box.
9. You can add Notes and files to a project by clicking on the Notes Tab
within the Project

VISION Training Manual 2013
35
10. Select Add Document to upload artwork, proofs and any other
documents that pertain to the project.

VISION Training Manual 2013
36
VI. PRESENTATIONS and QUOTES
Creating a Presentation From New Project Screen 1. Select New Project from the Projects dropdown located on the
navigation toolbar at the top of your screen. Fill out all project data required.
2. Click ‘Next’ at top right or bottom right of the screen. A drop down
with options will appear. Select Create a Presentation. Upon selection, The Build A Presentation screen will appear.
From the Project Overview Screen 1. Select Overview from the Projects dropdown located on the navigation
toolbar at the top of your screen.
2. Open the project that you want to build a presentation for. Click on the Presentation/Quotes tab. Choose create a presentation, located at the bottom of the screen.
Building a Presentation

VISION Training Manual 2013
37
1. Check project details at the top of the Build A Presentation screen. 2. General Tab - Select Sales Representative from the dropdown. Note:
Sales Representative will automatically be defaulted to the sales representative who is signed into VISION, however, you do have the option to allocate it to any sales representative within your company by using the drop down.
3. General Tab – Select from dropdown the Marketing tags that apply.
4. Shipping Tab - Select a Customer Contact from the dropdown and
make sure the correct customer address is chosen. Click Select to choose another address for that customer.
5. Apply a customer logo to products selected on your quote by clicking on the My Logos button.
Adding Products to a Presentation Choose products from the clipboard, find product, or add product that you want to include on your presentation. Clipboard Select Clipboard, mark your product selections, select Presentation then click Go. Find Product You can also search for more items by clicking the Find Product button. This will take you to the Product Overview screen where you can search for more products. You can add products by clicking on quote in the product window or adding the product to the clipboard.
VISION Training Manual 2013
38
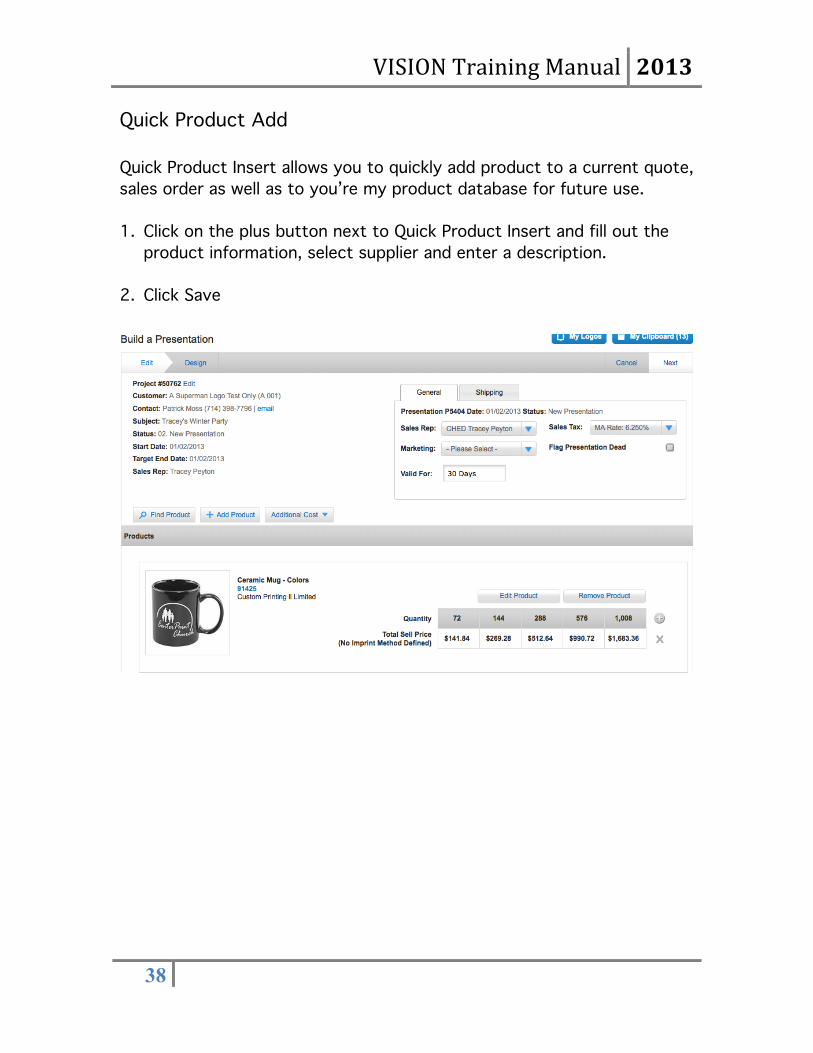
Quick Product Add Quick Product Insert allows you to quickly add product to a current quote, sales order as well as to you’re my product database for future use. 1. Click on the plus button next to Quick Product Insert and fill out the
product information, select supplier and enter a description. 2. Click Save
VISION Training Manual 2013
39
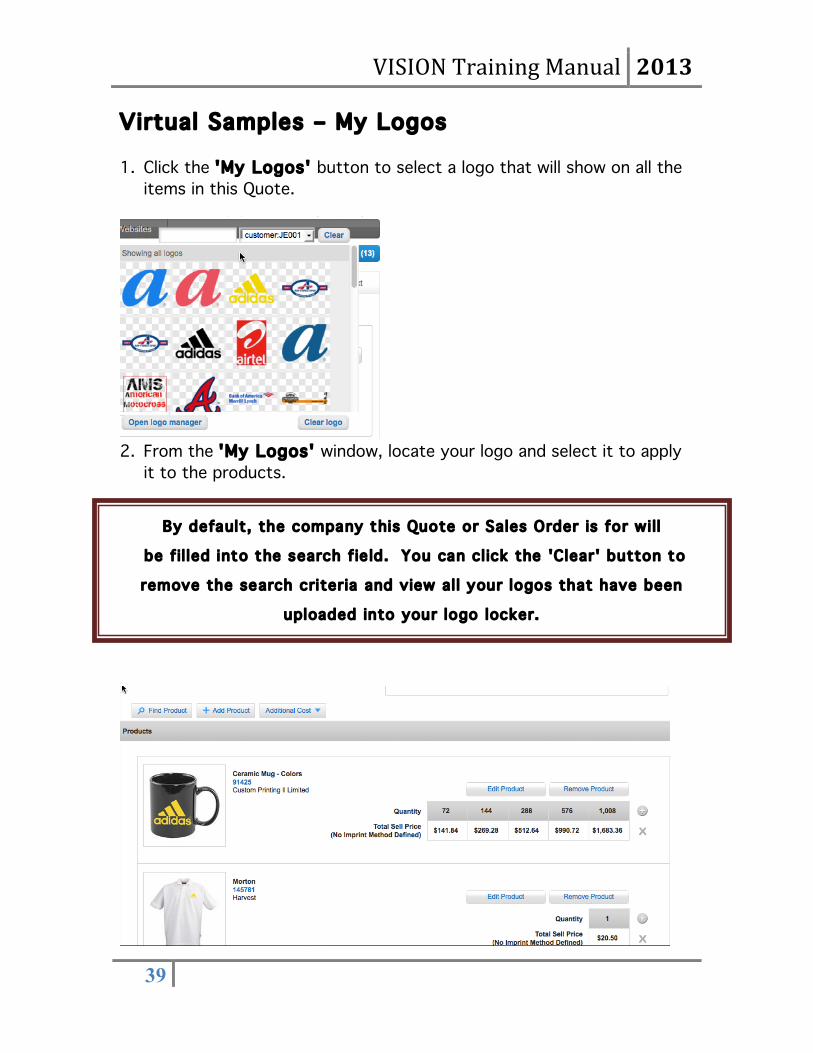
Virtual Samples – My Logos 1. Click the 'My Logos' button to select a logo that will show on all the
items in this Quote.
2. From the 'My Logos' window, locate your logo and select it to apply
it to the products.
By default, the company this Quote or Sales Order is for wi ll
be f il led into the search f ie ld. You can cl ick the 'Clear' button to
remove the search criter ia and view al l your logos that have been
uploaded into your logo locker.

VISION Training Manual 2013
40
3. The logos are now reflected on all of the products. Edit Product 1. To make changes to pricing and description, click the Edit Product
button. This will also allow you to add additional costs to the product.
2. Click the My Logos button to assign a logo that will only show on this
product. 3. From this screen, you also have the option to change the Product
Name or Description. Click the Next button when you are ready to move on to step 2.

VISION Training Manual 2013
41
3. In step 2, you can add imprint methods and change the pricing. Click
the Imprint Method dropdown to make your selection. 4. Select your Imprint Method and options from the dropdown. In
addition, type in the imprint colors and details in the text box. 5. You may see that the Price per Print line is automatically entered upon
making your selections. You also have the ability to add lines of additional costs by selecting decoration, setup, shipping and misc.
6. Select the pricing field and make your change. Type in the amount
and press Enter or Tab to enter an amount in the adjacent field. 7. You can change the Unit Sell Price and the field’s Gross Margin field will
be changed. 8. You can also change the Total Sell Price and the rest of the pricing in
that column will be updated.

VISION Training Manual 2013
42
9. To add an Additional Cost, such as Setup, click the Additional Cost button.
10. Unique marketing tags to use for email campaigns.
11. To remove a row, click the X at the end of the row. Adding an Option: 1. You can also present your customer with an option for a specific
product by clicking the plus button located to the right of the quantities on the pricing grid.
2. From here you can make changes to the Imprint Method and pricing
the same as you could when in Edit Product. 3. Once you have made your selections and changed the pricing, click
Save.
When adding additional costs such as embroidery be sure to select
vendor, so that a purchase order can be generated for the additional
cost.

VISION Training Manual 2013
43
Example: The example below displays multiple options. One option for a 2-color screen, and the other for a 4-color screen.

VISION Training Manual 2013
44
Design View Design View is where you can see a preview of your document and view exactly what your recipient will see
On all documents your will company information with logo will be displayed on the top right of the document and your customer’s company information with logo will be displayed on the top left of the document. However, you have some options as to what you would like to include in the document.
1. Include cover page (select from templates) 2. Addresses (all pages or first page only) 3. Terms and Conditions 4. Product pricing 5. Additional charges 6. Notes 7. Product Images 8. Product Details

VISION Training Manual 2013
45
Make your selections. Select Save and Close from the NEXT dropdown to save changes to your project. 1. From your navigation toolbar, select Reports. Send and Share
To send your document to the customer, select Send and Share from the NEXT dropdown. This will allow you to send an email to the customer and the document will automatically be attached as a PDF for the customer to view.
VISION Training Manual 2013
46
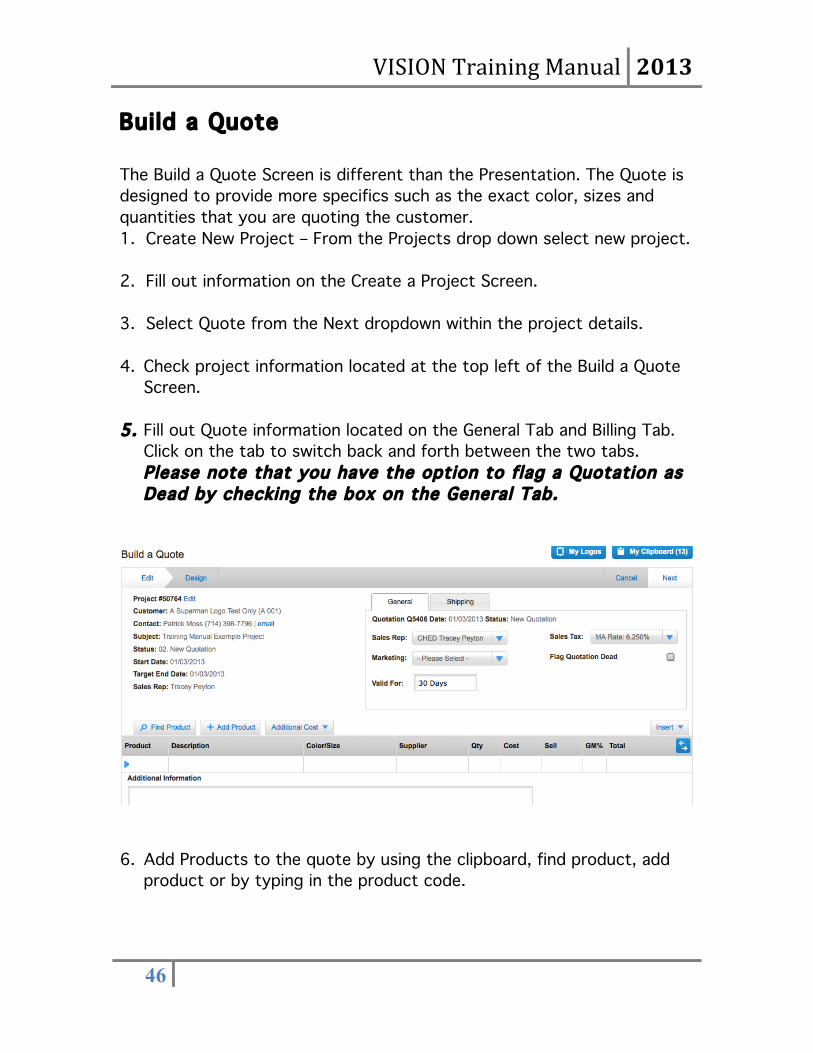
Build a Quote
The Build a Quote Screen is different than the Presentation. The Quote is designed to provide more specifics such as the exact color, sizes and quantities that you are quoting the customer. 1. Create New Project – From the Projects drop down select new project. 2. Fill out information on the Create a Project Screen. 3. Select Quote from the Next dropdown within the project details. 4. Check project information located at the top left of the Build a Quote
Screen.
5. Fill out Quote information located on the General Tab and Billing Tab. Click on the tab to switch back and forth between the two tabs. Please note that you have the option to flag a Quotation as Dead by checking the box on the General Tab.
6. Add Products to the quote by using the clipboard, find product, add
product or by typing in the product code.
VISION Training Manual 2013
47
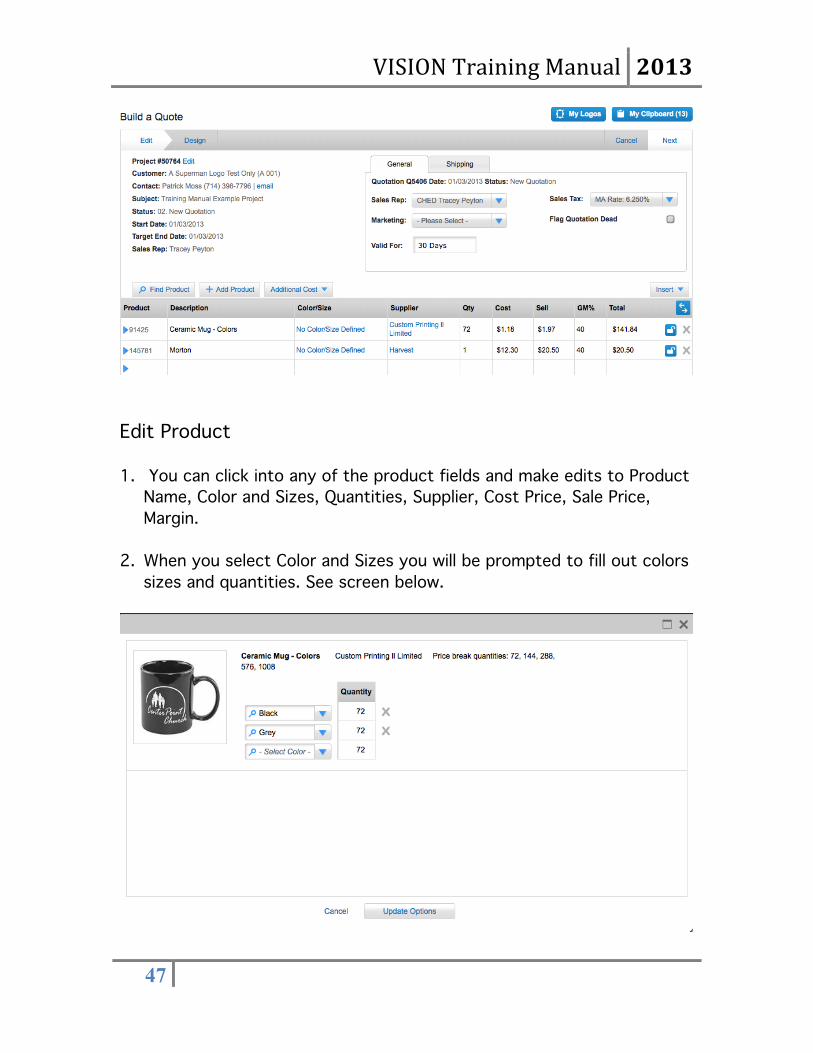
Edit Product 1. You can click into any of the product fields and make edits to Product
Name, Color and Sizes, Quantities, Supplier, Cost Price, Sale Price, Margin.
2. When you select Color and Sizes you will be prompted to fill out colors sizes and quantities. See screen below.

VISION Training Manual 2013
48
3. Select the double arrow button, located next to the Total Column to
hide the supplier and cost information.
4. Click the blue arrow to view product detail including, image,
description, imprint method, imprint details and imprint colors. Click the arrow again to save changes.

VISION Training Manual 2013
49
Adding Additional Costs/Decoration 1. To add additional costs, select the type of additional cost that you
want to apply from the Additional Costs dropdown. NOTE: If you have added in your preferred decorators and decoration methods, you will have additional tabs for embroidery and/or screen etc. across the top of the screen for you to choose from.
2. A Line will appear on the quote for you to edit. You can customize the
description, select supplier, and cost and sell pricing.

VISION Training Manual 2013
50
In the example above an additional charge has been added for digitization and for embroidery. 3. You can roll the additional charges/amortize setups into product
pricing by checking the Roll Up Price box, located next to the description.
4. To delete anything off the quote select the X located at the far right
of the product line. Separator Line In the example above you will notice the additional charges (embroidery) have been calculated for both the polo and mug. The separator line has been created so that you can separate products and the additional costs associated with them on the Quote or Sales Order. Thus allowing you to have multiple products and multiple decoration methods on one quote or sales order.

VISION Training Manual 2013
51
1. Select Line Break from the Insert Dropdown.
1. You also have the option to edit and view existing banners and campaigns.
2. This will add a line break to the bottom of the quote or sales order. Move the line break by clicking on it and dragging it to where you want it on the quote or sales order.
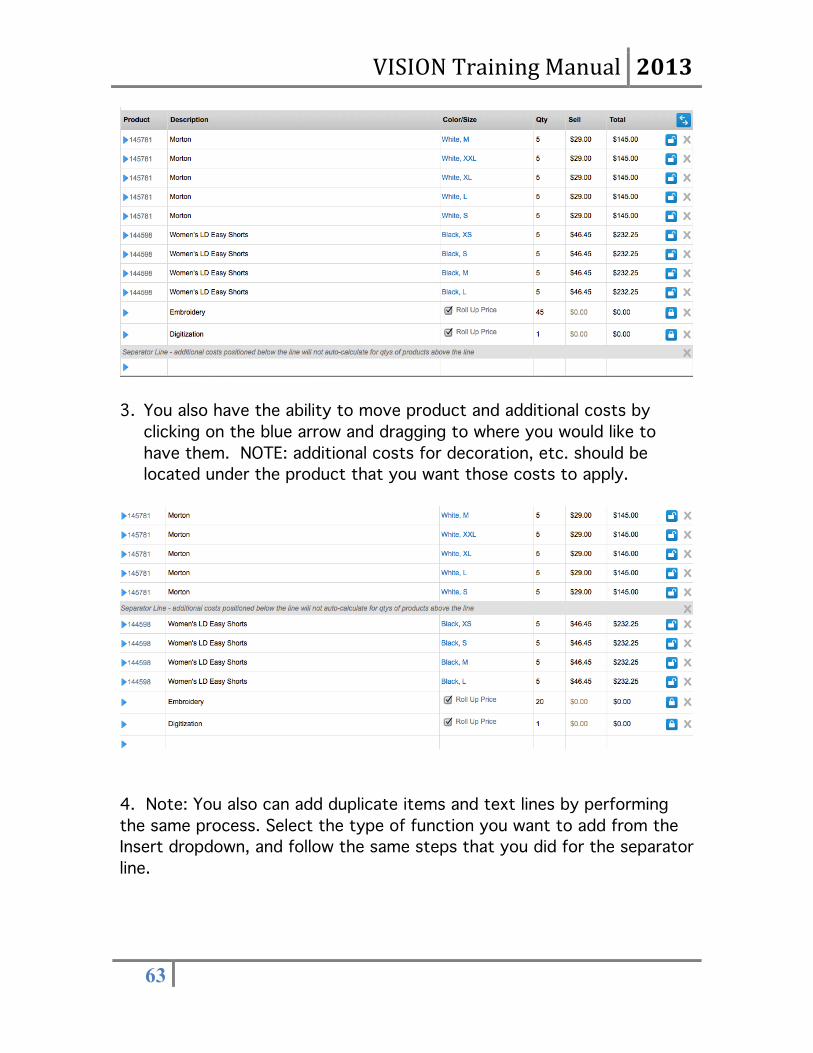
3. You also have the ability to move product and additional costs by clicking on the blue arrow and dragging to where you would like to have them. NOTE: additional costs for decoration, etc. should be located under the product that you want those costs to apply.

VISION Training Manual 2013
52
4. Note: You also can add duplicate items and text lines by performing
the same process. Select the type of function you want to add from the Insert dropdown, and follow the same steps that you did for the separator line.
Design View 1. Once you have built your quote you can view it in Design Mode by
clicking Design.
2. You have options for how you want your quote displayed. These options are located to the left of the screen.

VISION Training Manual 2013
53
3. The quote defaults to the table view, but you can provide more details
to the customer, including providing an image, by selecting detailed view.

VISION Training Manual 2013
54
Convert Quote to Sales Order 1. To convert a quote to a sales order, select the quote from the Project
Overview Screen. You can also look up a quote from the Project dropdown on the toolbar and select Quotes.
2. Once you are in the Quote Screen, Select Convert to Sales Order from
the NEXT dropdown, located at the top right of the screen.
3. Enter your colors; sizes and quantities then click Create Sales Order.

VISION Training Manual 2013
55
4. The Build a Sales Order Screen will populate with the products and information from the quote. Here you can make edits and add products.

VISION Training Manual 2013
56
VII. SALES ORDER The Build a Sales Order Screen will be where you process all orders for your store. 1. Create New Project – From the Projects drop down select new project.
2. Fill out information on the Create a Project Screen.
3. Select Create Sales Order from the Next dropdown within the project
details.
4. Project information is located at the top left of the Build a Quote Screen.
5. Sales Order information located at the top right of the Build Sales
Order Screen. 6. Fill out the information on all three tabs: General, Shipping and Billing
Tabs. Click on the tab to switch back and forth between the two tabs.

VISION Training Manual 2013
57
7. General Tab: You will find the sales order number at the top along with the status. Fill out the Customer PO number if you have one.
a. Enter Sales Rep, Marketing Tags, In Hands Date, Sales Tax and
Marketing Tags.
8. Shipping Tab: Select Contact and verify address. If products are being shipped to a different address, click on the address to edit.

VISION Training Manual 2013
58
9. Here you can add an entry, select a different address, or select multiple shipping destinations. Note: if you select multiple shipping destinations, you will need to input the addresses in the notes section on the sales order.
10. Billing Tab: Select billing contact and billing address.
11. Add Products to the Sales Order by using the clipboard, find product, add product or by typing in the product code.

VISION Training Manual 2013
59
Edit Product 1. You can click into any of the product fields and make edits to Product
Name, Color and Sizes, Quantities, Supplier, Cost Price, Sale Price, Margin.
2. When you select Color and Sizes you will be prompted to fill out colors
sizes and quantities. See screen below.

VISION Training Manual 2013
60
3. Select the double arrow button, located next to the Total Column to hide the supplier and cost information.
4. Click the blue arrow to view product detail including, image,
description, imprint method, imprint details and imprint colors.
5. Click the arrow again to save changes. 6. Note: In the product details section there is a place to check whether
or not another vendor will fulfill the decoration outside. This will be used to manage jobs on the production planner.

VISION Training Manual 2013
61
Adding Additional Costs/Decoration 1. To add additional costs, select the type of additional cost that you
want to apply from the Additional Costs dropdown. NOTE: If you have added in your preferred decorators and decoration methods, you will have additional tabs for embroidery and/or screen etc. across the top of the screen for you to choose from.
2. A Line will appear on the quote for you to edit. You can customize the
description, select supplier, and cost and sell pricing.

VISION Training Manual 2013
62
In the example above an additional charge has been added for digitization and for embroidery. 3. You can roll the additional charges/amortize setups into product
pricing by checking the Roll Up Price box, located next to the description.
4. To delete anything off the quote select the X located at the far right
of the product line. Separator Line In the example above you will notice the additional charges (embroidery) have been calculated for both the polo and shorts. The separator line has been created so that you can separate products and the additional costs associated with them on the Quote or Sales Order. Thus allowing you to have multiple products and multiple decoration methods on one quote or sales order. 1. Select Line Break from the Insert Dropdown.
2. This will add a line break to the bottom of the quote or sales order.
Move the line break by clicking on it and dragging it to where you want it on the quote or sales order.
VISION Training Manual 2013
63
3. You also have the ability to move product and additional costs by
clicking on the blue arrow and dragging to where you would like to have them. NOTE: additional costs for decoration, etc. should be located under the product that you want those costs to apply.
4. Note: You also can add duplicate items and text lines by performing the same process. Select the type of function you want to add from the Insert dropdown, and follow the same steps that you did for the separator line.

VISION Training Manual 2013
64
Deposits You have the ability to take deposits while in the POS. The system will automatically default to the recommended deposit of 50%.
1. From the NEXT dropdown, select Apply Deposit.
2. Fill out the fields, key in the deposit payment given and select Post Payment.

VISION Training Manual 2013
65
3. It will update the payment information at the bottom of the POS Screen.
Design View 1. Once you have built your Sales Order you can view it in Design Mode
by clicking Design.
2. You have options for how you want your sales order to be displayed. These options are located to the left of the screen.
3. The Sales Order defaults to the table view, but you can provide more
details to the customer, including providing an image, by selecting detailed view.
VISION Training Manual 2013
66
4. You also have the option to print as a Proforma Invoice or Production
Copy. 5. From the NEXT dropdown you have options to Send and Share, Save
and Close, Generate Invoice or Create Purchase Orders without having to exit the POS Screen.

VISION Training Manual 2013
67
VIII. PURCHASE ORDERS Create Purchase Orders To create purchase orders you must be in the Sales Order or Point of Sale Screen. You can access the Sales Order the following ways: 1. From the Projects dropdown, located on your toolbar, select Sales
Orders and select the sales order that you want to create purchase order (s) for.
2. You can also go to Projects, Select Overview and click on the Project
that you want to create a Purchase Order for. a. Once you are in the Project, click on the Sales Order Tab. b. Select Edit Document
3. From the POS (while in the Sales Order) select Create Purchase Order
from the dropdown.
4. Purchase Orders will be created for the products on the Sales Order.
a. If you have products from two different vendors, a Split PO will automatically be created.

VISION Training Manual 2013
68
Split Purchase Orders Split purchase orders are generated when you have products from multiple vendors/suppliers on one sales order. When you raise a purchase order, the system will automatically raise a purchase order for each supplier, including suppliers/vendors that are providing a service, such as embroidery or some other type of decoration.
1. To Edit a Purchase Order, click Edit Document. You have all the same
functionality that you have on the Build a Quote and POS Screens.

VISION Training Manual 2013
69
Generating Purchase Orders It is common practice that you wait to send the purchase order to the supplier until you have enough goods to get free shipping. Most likely you combine purchase orders that are created from multiple sales orders into one purchase order for the supplier. We refer to this as Batching purchase orders. The following describes the process for batching purchase orders. 1. From the Projects dropdown select Purchase Orders.
2. From here you can search purchase orders by Status, Sales rep or
Purchase Order number. You can also edit a purchase order by clicking on the purchase order number.
3. You can sort by purchase orders that have been fully delivered by checking the box at the top right of the screen
Click generate to batch purchase orders together.

VISION Training Manual 2013
70
4. All Purchase orders that need to be sent to the supplier will be
grouped by together. You can click on the red X at the end of the purchase order, to leave it off the batch. Ultimately, leaving it for later.
5. To Exclude Non Acknowledged Orders and/or Exclude Invoiced Sales orders click the box at the top.
6. You can select DD for purchase orders needing direct delivery. 7. You can select the red X under OF to exclude purchase orders where
decoration is being fulfilled outside. 8. Select Create POs

VISION Training Manual 2013
71
9. If the purchase order applies to multiple sales orders it will have
various for the Project number.
10. Click the PO number to view or edit the purchase orders that have been generated.

VISION Training Manual 2013
72
NOTE: The Sales Order numbers that the purchase order applies to will be displayed in the additional information field.

VISION Training Manual 2013
73
Receiving Goods 1. Select Purchase Orders from the Projects dropdown. 2. To receive goods against a purchase order, the purchase order has to
have been delivered to the supplier and in New Order Status.
3. Find the purchase order you want to reconcile, Click Receive PO under
the delivered column. 4. Fill out the fields: You can select fully delivered or partial delivered. If
your select partial then you will need to input the quantities that were received and the shipping method used.
5. Select confirm delivery.

VISION Training Manual 2013
74
6. The status will now change from Receive PO to Partially Delivered. You
are able to sort purchase orders by whether or not they are fully delivered or partially delivered. By checking the appropriate box in the purchase order database.

VISION Training Manual 2013
75
IX. SALES INVOICES Creating Sales Invoices 1. Sales invoices have to be created from the sales order or POS screen.
2. Select Sales Order or Project from the Projects dropdown. 3. Locate the sales order that you want to generate the invoice for. 4. Once in the Sales Order you can select generate Invoice from the NEXT
dropdown, located at the top right of the Sales Order Screen/POS.

VISION Training Manual 2013
76
5. The sales Invoice is created and you are able to make the necessary edits to the sales invoice in the Build an Invoice screen.
6. Editing product and information on the sales invoice is the same as making edits to any of the documents within the system
7. View the invoice in design view and send the invoice to the customer
by selecting Send and Share from the NEXT dropdown.
8. Once an invoice has been printed or sent, you are able to receive payment.
Receive Payment 1. Select the invoice you want to receive payment for.
VISION Training Manual 2013
77
2. Once in the Build an Invoice screen you can select receive payment
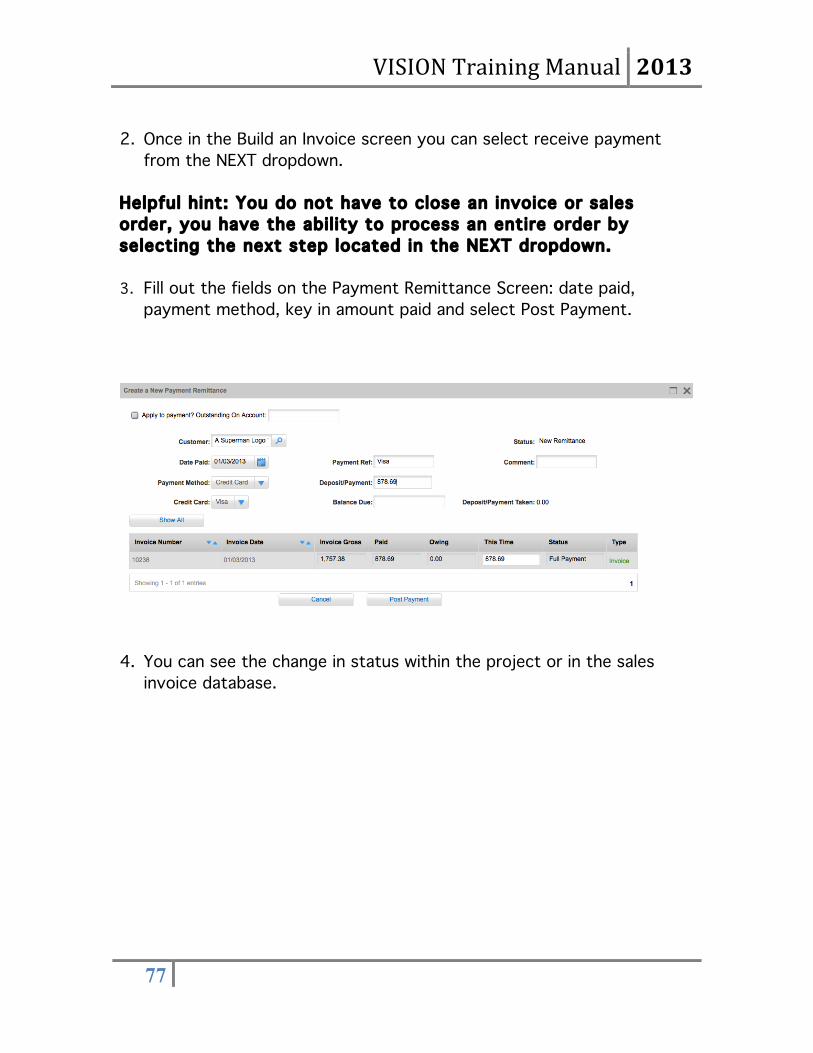
from the NEXT dropdown. Helpful hint: You do not have to close an invoice or sales order, you have the abil ity to process an entire order by selecting the next step located in the NEXT dropdown. 3. Fill out the fields on the Payment Remittance Screen: date paid,
payment method, key in amount paid and select Post Payment.
4. You can see the change in status within the project or in the sales
invoice database.
VISION Training Manual 2013
78
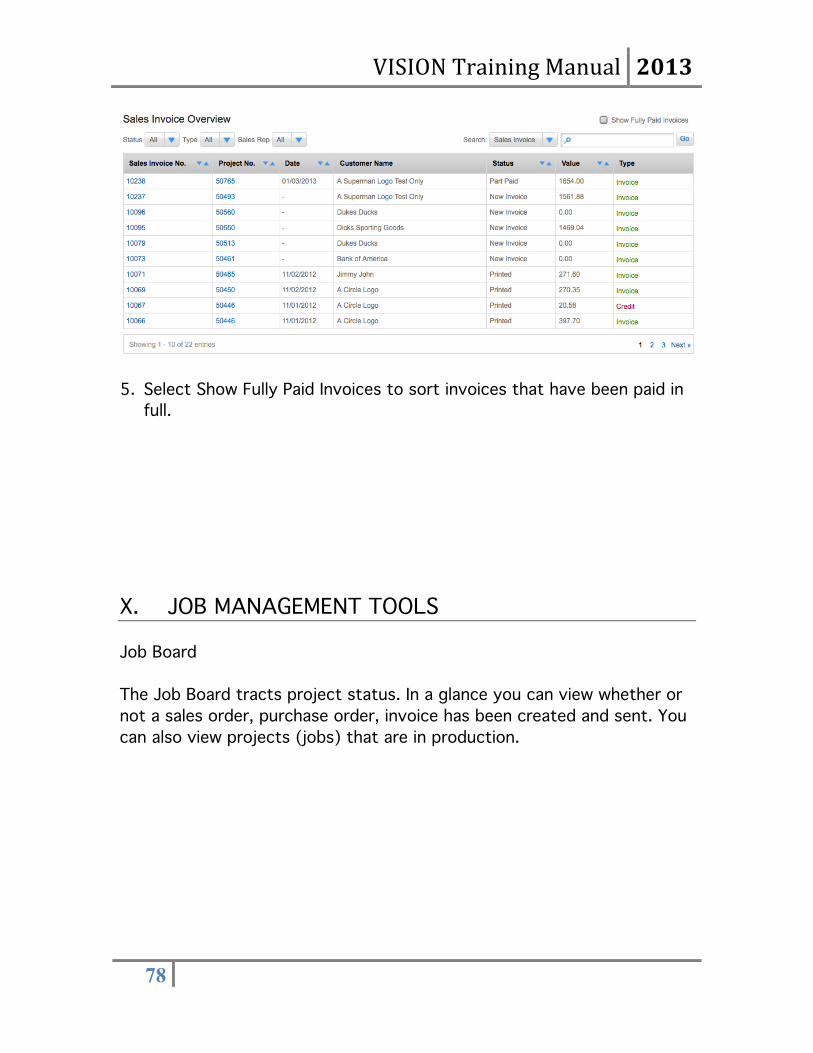
5. Select Show Fully Paid Invoices to sort invoices that have been paid in
full.
X. JOB MANAGEMENT TOOLS
Job Board The Job Board tracts project status. In a glance you can view whether or not a sales order, purchase order, invoice has been created and sent. You can also view projects (jobs) that are in production.

VISION Training Manual 2013
79
1. The Job Board Tool bar across the top shows jobs that are overdue,
due today, due this week, due this month, in production and ready to invoice. Click on the blue links to sort Job Board by categories.
2. You can sort by target date or project ID, project number, customer, quote, sales order, invoice and purchase order number.
3. Select how many projects you want to display per page. 4. Click the project number (blue link) on the Job Board to see all the
details of a project.
XI. REPORTS There are a number of reports that you are able to run within your VISION system. You are able to view and enter report criteria from the Build a Report screen in VISION. 1. From your navigation toolbar, select Reports.

VISION Training Manual 2013
80
2. Once in the Build a Report screen, select the report criteria that you
would like to include in your report. Reports can be generated on any of the following:
3. Products 4. Projects 5. Quotes, Sales orders, Purchase Orders, and Invoices 6. Customer Information and History
XII. WEBSITES AND COMPANY STORES Overview
1. Select the Websites button located on the navigation toolbar.

VISION Training Manual 2013
81
2. Located on the left of the My Websites screen, you see a list of STORES that you have created. Click on Name, and to the right of the screen you will see a preview of that site.
3. Select View to see the front end of the site. 4. Click Manage to log into the back end of your site and make edits to
overall layout, add pages, and change style and colors. 5. Click Delete to delete that company STORE. Create Company STORE 1. To create a new company STORE, click the Create New STORE' button
located at the top right of the My Website screen. 2. Choose who you want to create the site for by selecting the radial
button next to My Company or Customer/prospect
• Clicking 'Customer/Prospect' will let you create a site for a specific customer. This will open up the customer select window. Select the customer that you want to build the site for from your list of customers.
• You also have the option of creating a new customer. • Upon selecting the customer, their logo will automatically be chosen
as the Company Logo. • You can change the logo by selecting the 'My Logos' button. Click the 'My Logos' under 'Branding Logo' button to brand every product on this site with your selected logo.

VISION Training Manual 2013
82
Once you have completed the fields in Step 1, to proceed to Step 2, click the 'Next' button.

VISION Training Manual 2013
83
1. Select the template that you like. You also have some color options.
You have many more color options from within the manage section of your STORE site.
2. To select specific or all product categories, click the dropdown for
Categories. • Locate your selection. • Click the check box next to the desired product. • If you would like to make another selection, find the desired
category and check the box. 3. You can also include specific Vendors. Click the dropdown next to
Vendors. • Click the check box next to your desired Vendor. Check the box
All to include all vendors. 4. You can select a markup or markdown option for this site. Click the
dropdown to make the selection. • Choose Increase by or Decrease by from this dropdown. • Enter desired amount
5. When you have completed your selections in Step 2, click the Create
button.

VISION Training Manual 2013
84
You should see this window appear, click 'OK'.
This is an example of a STORE that you are able to create. Notice the company logo appears on the top left and the products are all branded with a different logo that we selected.

VISION Training Manual 2013
85
Website Administration: 1. To log into the Manage section of your STORE, type your URL into a
browser such as Firefox and add the suffix/manage. • For Example: joessite.usa.cickpromo.com/manage.
2. Your login box will appear. Enter your email and password. 3. The “Home” screen will appear and you can begin to edit your new
STORE/Website. Banners and Campaigns Banners and Campaigns can be displayed on the home page and any other page.
2. To add, select add a Banner or campaign from the Banner dropdown.
3. You also have the option to edit and view existing banners and
campaigns. Pages You can add new pages and edit existing pages by hovering over the Pages tab in the manage/editing section. My Pages shows you a list of all the pages on your STORE. You have the option to edit each page as well as redirect them and delete them if you wish. When you click on My Pages you will see the following options for each page.

VISION Training Manual 2013
86
For all pages you can Edit Attributes – Change page and menu titles, add Meta Keywords and Descriptions and even Password protect a page if you wish. Make your changes and click save in the top left of the screen to apply the changes you have made. Edit Layout and Contents: Here is where you can edit what actually appears on the pages displayed on your STORE/Website. When you click on this button you will see an editable preview of the web page you are editing. Make your changes Insert Module allows you to add new modules/sections to each page. Choose from the dropdown of options. For example, Bookmarks, Banners, Google Maps, Search Box, Page Location, etc. Once new add a new module, a screen will automatically pop up allowing you to edit the new module/section. Use the Editing Toolbar to edit the section of a page, such as text size and add images and links. Click “Save Changes” when you are finished. Click “Publish” to publish/make your changes live on your website. You can also edit, hide and delete existing modules on each page while on the editing screen.
You can move modules around by clicking on the Grey bar, holding it down and dragging to where you want it. Style The Style tab allows you to make changes to the overall style of your website. 1. By clicking Overall Layout from the Style Dropdown you can do the
following:
VISION Training Manual 2013
87
• Change the banner for your site, the tabs along the top of your main site and modules around the sides of the home page and other pages.
• You can also change the way products are displayed and color of your site/STORE.
2. Edit a Banner-
• Click the “E” of the module containing your banner image. • Right click on the image to edit it. • Upload a new one by Clicking Image Properties.
Forms You can add forms to your STORE to allow you to capture information from customers visiting your site. Examples are: A customer Survey, Need further ideas, and Help with choosing products. 1. Select Add a Form from the Forms Dropdown.
• You have many options to choose how you want to collect information from visiting customers. For example: text boxes, tick boxes and a dropdown option.
2. Fill out the reference, texts and enter an email address then click Save
Changes.
3. When adding a field, Click Add, then give it a title, description and add in any options you want the customer to see.
Customers
The Customer Tab allows you to view existing customers who have used your STORE/site.
You have the option to view existing customers, view unconfirmed registrations and download a spreadsheet of your website customers. Inquiries

VISION Training Manual 2013
88
The Inquiries Tab allows you to view and download inquiries made on your website. You can also view fields on the Inquiry form. Products The Products Tab allows you to view suppliers and categories on your STORE/site, remove suppliers & categories, and make suppliers preferred so that their products appear first in the list. General Settings Here you can change the number of settings including adding Search Engine Optimization to the main site and also adding favicons and re-pointing the site to another domain. 1. Managers: Specify who will receive emails and have access to the
manage section of your STORE/site. 2. Contact Details: Change address and contact details 3. Third Party Settings: Add Google Analytics and other tools to you’re
website.
4. Phrases: Make phrase changes for standard text that appears on the site.
5. Uploads: Upload a file. 6. JavaScript: For the website designers among you, can upload any
JavaScript here. Changing Your Password
Trade Only provides you with a user name and password when you get your new STORE/site. To change the password, log onto the manage section of your website and click on your name in the right top of the manage/editing screen.