VGB200 manual en 20150313 - August Int · Thank you for buying this August product. You may already...
12
VGB200 USB 2.0 Video Capture Stick Clé de Capture Vidéo USB 2,0 USB 2,0 Video Capture Stick Video Capture Stick USB 2,0 Grabador de videos USB 2,0 August International Ltd United Kingdom Telephone: +44 (0) 845 250 0586 www.augustint.com EN FR DE IT ES
Transcript of VGB200 manual en 20150313 - August Int · Thank you for buying this August product. You may already...

VGB200
USB 2.0 Video Capture Stick
Clé de Capture Vidéo USB 2,0
USB 2,0 Video Capture Stick
Video Capture Stick USB 2,0
Grabador de videos USB 2,0
August International LtdUnited Kingdom
Telephone: +44 (0) 845 250 0586www.augustint.com
EN
FR
DE
IT
ES
Thank you for buying this August product. You may already be
familiar with using similar products but please take the time to
read these instructions carefully. They are designed to
familiarise you with the product’s many features and to ensure
that you get the very best from your purchase.
SafetyIn order to ensure your safety and the safety of others, please
read the Safety Instructions before using this product.
DisposalPlease ensure the product and its accessories are disposed of in
compliance with WEEE (Waste Electrical and Electronic
Equipment) Directive and any other applicable regulations.
Please check with your local authority for regional disposal
regulations.
Customer ServiceShould you need support with this product, please contact our
Customer Service Centre:Telephone: +44 (0) 845 250 0586Email: [email protected]
User Manual Contents
1. Introduction
2. Hardware Connections
3. Driver and Software Installation
4. ShowBiz (PC Software)
5. iGrabber (MAC Software)
. Warranty
6. Troubleshooting
7
1
2
2
15
19
19
20
En
glish

-2-
1. Introduction
1.1 OverviewThe VGB200 video capture stick creates digital videos on your Hard Drive. With S-Video and RGB In, you can capture and edit footage from your camcorder, VCR, DVD player and other video devices. Capable of recording in MPEG 1/2, AVI, WMV, ASF, MP4 and QTMOV in 720x576 pixels.
1.2 Features Transfer video from VHS to your PC Create files in multiple formats Create DVD’s from your favourite clips Capture still images from footage Easily share videos on YouTube 3-Phono (Composite) and S-Video input Compatible with PAL/NTSC/SECAM formats USB powered, no plug needed
1.3 System Requirements Operating System: Mac OS X v10.5 or higher, Windows 8/7/Vista/XP CPU: P4 1.7G or higher RAM:256MB or higher Graphics Card: 512MB or higher Microsoft DirectX9.0 or higher Sound Card, CD-ROM, USB2.0 port 1GB free hard disk space
-1-
En
glish
1.4 Package Contents VGB200 AV multi-cable Software CD User Manual
2. Hardware Connections
3. Driver and Software Installation
3.1 Windows OS
3.1.1 Driver Installation
Step 1: Plug the device into a USB 2.0 port and connect your video source via AV or S-Video cable.
-Windows XP & Vista usersWhen the “Found New Hardware” wizard appears click “Cancel”.

-3-
Step 2: vgb200
Insert the CD supplied. From the pop up menu click “Driver Install” If the menu does not appear run: .exe from the CD.
.
-4-
Step 3: Click “Install”.
En
glish
Note: can be downloaded at www.augustint.com/download.htm.
Do not use this mini disc on a slot loading CD drive! The driver
When the “ ” appears click.
-Windows 7 usersInstalling device driver software , the window
to open the “Driver Software Installation” window Then click “Close” to stop the automatic driver installation.
When the “ ” appears click “ ”.-Windows 8 users
Device Setup , Close

-6-
En
glish
-5-
Step 5: “iGrabber” .
After successful installation you will find in: “System->Hardware->Device Manager” If they have not appeared, please restart installation.
3.1.2 Software Installation
Step 1: Click “Software Install”.
Step 4: Click “Finish”.
Step 2: Click “Next”.

En
glish
-8--7-
Step 5: Click “Next” to continue or “Browse” to choose a destination folder.
Step 6: Click “Next” after choosing destination folder.
Step 3: Click “Yes” to accept the license agreement.
Step 4: Note: Please keep the License Key for future use as we will not be able to replace any lost License Keys.
Choose a User Name and enter your License Key from the CD case.

En
glish
-10--9-
Step 7: Please wait whilst ShowBiz installs.
Step 8: Click “Finish” to complete the installation.
3.2 Mac OS
Do not use this mini disc on a slot loading CD drive! The driver can be downloaded at www.augustint.com/download.htm.
Step 1: Run mac148software\iGrabber OS X 1.4.8.pkg. from the CD.
Step 2: Click “Continue”.
Step 9: The Acrsoft ShowBiz icon will now be on your desktop.

En
glish
-12--11-
Step 6: Click “Install” to start the installation. If you want to change the install location, click “Change Install Location”.
Step 4: Click “Continue”.
Step 5: Click “Agree” to accept the license agreement.Step 3: Click “Continue”.

-14--13-
Step 7: Enter your MAC OS Name and Password and then click “OK”.
Step 8: Please wait whilst the software installs.
Step 9: Click “Restart” to restart your computer and finish the installation.
Step 10: The application can be found in Applications\iGrabber.
En
glish
-15-
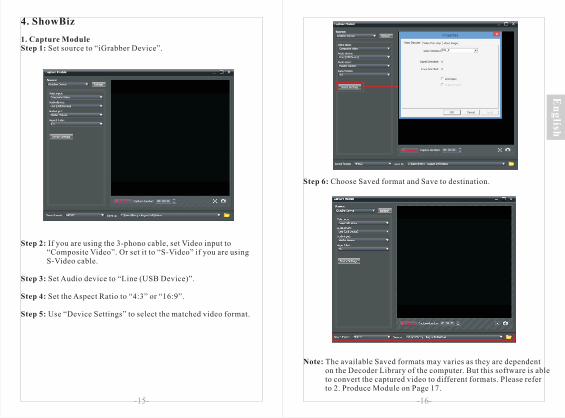
4. ShowBiz
-16-
En
glish
Step 2: If you are using the 3-phono cable, set Video input to “Composite Video”. Or set it to “S-Video” if you are using S-Video cable.
Step 3: Set Audio device to “Line (USB Device)”.
Step 4: Set the Aspect Ratio to “4:3” or “16:9”.
Step 5: Use “Device Settings” to select the matched video format.
Step 6: Choose Saved format and Save to destination.
1. M Set source to “iGrabber Device”.
Capture oduleStep 1:
Note The available Saved formats may varies as they are dependent on the Decoder Library of the computer. But this software is able to convert the captured video to different formats. Please refer to 2. Produce Module on Page 17.
:

-18-
En
glish
-17-
Step 7: Click “Capture” to start recording and “Stop” to stop.
2. Produce Module
Step 1: In “Edit” module, click “Open” icon to open the folder where the desired video file saved.
ShowBiz allows you to convert the format of a video file.
Step 2: Select the desired video file and drag it to the Storyboard.
Step 3: Enter Produce module and click “Create File”.
Step 4: Set Format to a desired format. Set Quality/Speed to High Quality, Standard or Low Quality. In Settings, more options can be set.
Step 5: Set the “Save to” to the desired destination folder.
Step 6: Click “Start” to start the convert.
Note:For further support with the ShowBiz software use the “ ? ” for online help.

This product is guaranteed for twelve months from the date of the original purchase. In the unlikely event of any defect arising due to faulty materials or workmanship, the unit will be either replaced or repaired free of charge (where possible) during this period. An alternative product will be offered in case the product is no longer available or repairable.
This warranty is subject to the following conditions: The warranty is only valid within the country where the product is purchased. The product must be correctly installed and operated in accordance to the instructions given in this user manual. The product must be used solely for domestic purposes. The warranty only covers the main unit, and does not cover the accessories. The warranty does not cover the damage caused by misuse, negligence, accident and natural disaster. The warranty will be rendered invalid if the product is resold or has been damaged by inexpert repairs. The manufactures disclaim any liability for incidental or consequential damages. Please consult our customer adviser before returning any product; we are not responsible for any unexpected product returns. Any faulty product must be kept and returned in the original packaging with all the accessories and the original copy of the purchase receipt.
The warranty is in addition to, and does not diminish, your statutory or legal rights.
Customer Service:Telephone: +44 (0) 845 250 0586Email: [email protected]
7. Warranty
- -20
En
glish
-1 -9
5. iGrabber (For Mac Computer)
6 Troubleshooting.
The problems listed below do not necessarily signify a fault with the device. Please check this list before requesting repairs.
6.1. Cannot detect any video signal. If the VGB200 is connected via a USB Hub, try connecting it directly to a USB port.
Check the cables between the VGB200 and Source device for a secure connection.
Check that the source device is set to output mode (this can be tested by connecting the source device to a TV).
Set the video format to the correct settings for your source device (Step 5 on p15).
If you are connecting through a SCART adaptor, please ensure it is a bidirectional adaptor and set to output.
6.2. The picture is black and white.
Set the video format to the correct settings for your source device (Step 5 on p15).
6.3. Cannot select other saved format.
The available saved formats are dependent on the decoder library on the computer. You can use ShowBiz to convert the captured video to other formats. Please refer to 2. Produce Module on Page 17.
6.4. In device manager, the USB device shows the icon with a yellow mark. And the device does not work.
In device manager, right click the USB device. Select “Uninstall”, check the box in front of “Delete the driver software for this device” then click “OK”. Unplug and re-plug the USB device and follow the steps in 3.1 Driver Installation on Page 2.
After installation the software manual can be found here: Applications\iGrabber\iGrabber ReadMe.rtfd.