User's Guide - Medtronic
153
User’s Guide
Transcript of User's Guide - Medtronic

User’s Guide

This device is protected under one or more of the following U.S.Patents:[US]4,562,751 [US]5,050,764 [US]5,376,070[US]4,678,408 [US]5,080,653 [US]5,399,823[US]4,685,903 [US]5,097,122Other U.S. and/or foreign patents may be pending.
D9195742-013 7/03

Introduction to the model 508 insulin pump - - - - - - - - - - - - - - - - - - - - 1
Let’s Get Started! - - - - - - - - - - - - - - - - - - - - - - - - - - - - - 2
In Preparation for Your Pump Start - - - - - - - - - - - - - - - - 2
Becoming Familiar With Your Pump - - - - - - - - - - - - - - - - 5
Buttons - - - - - - - - - - - - - - - - - - - - - - - - - - - - - - - - - - - 6
Liquid Crystal Display (LCD) - - - - - - - - - - - - - - - - - - - - - 6
Turn Your Pump Over - - - - - - - - - - - - - - - - - - - - - - - - - 7
Main Programming Screens - - - - - - - - - - - - - - - - - - - - - - 8
Setup I - - - - - - - - - - - - - - - - - - - - - - - - - - - - - - - - - - - - 8
Setup II - - - - - - - - - - - - - - - - - - - - - - - - - - - - - - - - - - - 9
508 Quick Start Guide - - - - - - - - - - - - - - - - - - - - - - 11
Verifying & Setting the Time and Date: - - - - - - - - - - - - 12
Setting Your Basal Rate - - - - - - - - - - - - - - - - - - - - - - - - 14
Reviewing Your Profiles - - - - - - - - - - - - - - - - - - - - - - - - 16
The Reservoir and Infusion Set - - - - - - - - - - - - - - - - - - 17
Changing the Reservoir and Infusion Set - - - - - - - - - - - 18
Reservoir Placement - - - - - - - - - - - - - - - - - - - - - - - - - 18
To Remove the Reservoir Converter - - - - - - - - - - - - - - 20
To Reinstall the Reservoir Converter - - - - - - - - - - - - - - 21
Sof-set and Reservoir Change - - - - - - - - - - - - - - - - - - 22
Reservoir Change Using Silhouette and Quick-set - - - - - 24
Installing the Reservoir and Infusion Set - - - - - - - - - - 26
Removing the Reservoir and Infusion Set - - - - - - - - - - - 28
Table of Contents

Priming the Pump - - - - - - - - - - - - - - - - - - - - - - - - - - - - - 29
Bolus - - - - - - - - - - - - - - - - - - - - - - - - - - - - - - - - - - - - - - 31
Setting A Normal Bolus - - - - - - - - - - - - - - - - - - - - - - - 31
Stopping and Restarting Your Pump - - - - - - - - - - - - - - 32
To Stop or Put Your Pump in ‘Suspend’ - - - - - - - - - - - - 32
To Restart Your Pump - - - - - - - - - - - - - - - - - - - - - - - - 33
Prime History and Use - - - - - - - - - - - - - - - - - - - - - - - - - 34
Reservoir Volume and Low Volume Alert - - - - - - - - - - - 35
Initial Pump Settings - - - - - - - - - - - - - - - - - - - - - - - - - - - 37
Basal Rates: why and how - - - - - - - - - - - - - - - - - 41
Q & A - - - - - - - - - - - - - - - - - - - - - - - - - - - - - - - - - - - - - 41
Setting the Maximum Basal Rate - - - - - - - - - - - - - - - - - - 44
Setting Your Basal Rate - - - - - - - - - - - - - - - - - - - - - - - - 45
Personal Delivery Patterns - - - - - - - - - - - - - - - - - - - - - - 47
To Turn Personal Delivery Patterns ON - - - - - - - - - - - - - 47
To Set Personal Delivery Patterns - - - - - - - - - - - - - - - - 47
Setting a Temporary Basal Rate - - - - - - - - - - - - - - - - - - 49
Verifying Delivery - - - - - - - - - - - - - - - - - - - - - - - - - - - 50
Stopping or Resetting a Temporary Basal Rate - - - - - - 51
Verifying the Change - - - - - - - - - - - - - - - - - - - - - - - - - 52
Insulin Boluses: why and how - - - - - - - - - - - - - 53
Q & A - - - - - - - - - - - - - - - - - - - - - - - - - - - - - - - - - - - - - 53
Setting the Maximum Bolus Limit - - - - - - - - - - - - - - - - - 55
Reviewing Bolus History - - - - - - - - - - - - - - - - - - - - - - - - 56
Variable Bolus - - - - - - - - - - - - - - - - - - - - - - - - - - - - - - - 57
Setting A Normal Bolus - - - - - - - - - - - - - - - - - - - - - - - - 58
Square Wave Bolus Option - - - - - - - - - - - - - - - - - - - - - - 59
Dual Wave Bolus Option - - - - - - - - - - - - - - - - - - - - - - - - 60
Audio Bolus - - - - - - - - - - - - - - - - - - - - - - - - - - - - - - - - - 62

To Turn Audio Bolus Feature On - - - - - - - - - - - - - - - - - 62
To Set an Audio Bolus - - - - - - - - - - - - - - - - - - - - - - - - 63
Daily Totals and History - - - - - - - - - - - - - - - - - - - - - - - - 64
Clocks and Alarms - - - - - - - - - - - - - - - - - - - - - - - - - 65
Changing the Time Display - - - - - - - - - - - - - - - - - - - - - - 65
Setting the Beep Volume - - - - - - - - - - - - - - - - - - - - - - - 66
Reviewing Your Alarms - - - - - - - - - - - - - - - - - - - - - - - - - 67
Setting the Automatic Off - - - - - - - - - - - - - - - - - - - - - - 68
Alarm Type - - - - - - - - - - - - - - - - - - - - - - - - - - - - - - - - - - 69
Other Useful Features - - - - - - - - - - - - - - - - - - - - - - 71
Using The Remote Control - - - - - - - - - - - - - - - - - - - - - - 71
Using the Remote Control to Deliver a Bolus - - - - - - - - 74
Using the Remote Control
to Suspend/Restart the Pump - - - - - - - - - - - - - - - - - - - 75
Child Block Activation - - - - - - - - - - - - - - - - - - - - - - - - - 76
Setting Your Insulin Concentration - - - - - - - - - - - - - - - - 77
Pump Function Evaluation Options - - - - - - - 79
Self Test - - - - - - - - - - - - - - - - - - - - - - - - - - - - - - - - - - - - 79
Lead Screw Rotation Test - - - - - - - - - - - - - - - - - - - - - - - 81
Pump Care and Maintenance - - - - - - - - - - - - - - 83
Batteries - - - - - - - - - - - - - - - - - - - - - - - - - - - - - - - - - - - 83
Low Battery & Vibration - - - - - - - - - - - - - - - - - - - - - 83
To Remove the Battery Carrier - - - - - - - - - - - - - - - - - - 84
To Install New Batteries - - - - - - - - - - - - - - - - - - - - - - - 85
Installation of the Spring Belt Clip - - - - - - - - - - - - - - - - 86
Pump Care - - - - - - - - - - - - - - - - - - - - - - - - - - - - - - - - - - 87
If Your Pump is Dropped - - - - - - - - - - - - - - - - - - - - - - 87
If Your Pump Becomes Submerged in Water - - - - - - - - - 88
Exposure to Extreme Temperatures - - - - - - - - - - - - - - - 89
Cleaning Your Pump - - - - - - - - - - - - - - - - - - - - - - - - - 90

X-Rays, MRI’S and CT Scans - - - - - - - - - - - - - - - - - - - - 90
Remote Control Care and Maintenance - - - - - - - - - - - - 91
Installation of the Battery - - - - - - - - - - - - - - - - - - - - - 91
If Your Remote Control is Dropped - - - - - - - - - - - - - - - 91
If Your Remote Control
Becomes Submerged in Water - - - - - - - - - - - - - - - - - - 92
Exposure to Extreme Temperatures - - - - - - - - - - - - - - - 92
Cleaning Your Remote Control - - - - - - - - - - - - - - - - - - 92
FCC Notice for the Remote Control - - - - - - - - - - - - - - - 93
Pump User Safety Information - - - - - - - - - - - - - 95
Caution - - - - - - - - - - - - - - - - - - - - - - - - - - - - - - - - - - - - - 95
Indications - - - - - - - - - - - - - - - - - - - - - - - - - - - - - - - - - - 95
Contraindications - - - - - - - - - - - - - - - - - - - - - - - - - - - - - 95
Warnings - - - - - - - - - - - - - - - - - - - - - - - - - - - - - - - - - - - 96
Precautions - - - - - - - - - - - - - - - - - - - - - - - - - - - - - - - - - 97
General - - - - - - - - - - - - - - - - - - - - - - - - - - - - - - - - - - 97
Infusion Sets and Sites - - - - - - - - - - - - - - - - - - - - - - - 99
Hypoglycemia - - - - - - - - - - - - - - - - - - - - - - - - - - - - 100
Hyperglycemia and Diabetic Ketoacidosis (DKA) - - - - 101
Adverse Reactions - - - - - - - - - - - - - - - - - - - - - - - - - - - 102
Hyperglycemia and Diabetic Ketoacidosis (DKA) - - - - 102
Hypoglycemia - - - - - - - - - - - - - - - - - - - - - - - - - - - - 103
Site Infection/Abscesses - - - - - - - - - - - - - - - - - - - - - 103
Troubleshooting: Alarms and Screen Messages - - - - - - - - - - - - - - 105
Error Messages - - - - - - - - - - - - - - - - - - - - - - - - - - - - - - 105
Error Restart Procedure - - - - - - - - - - - - - - - - - - - - - - 105
Alarm Messages - - - - - - - - - - - - - - - - - - - - - - - - - - - - - 106
Alarm Restart Procedure - - - - - - - - - - - - - - - - - - - - - 106

Troubleshooting & DiabetesManagement Issues - - - - - - - - - - - - - - - - - - - - - - - - 109
Blood Glucose Monitoring - - - - - - - - - - - - - - - - - - - - - 109
Low Blood Glucose - Hypoglycemia - - - - - - - - - - - - - 111
Problems & Solutions - - - - - - - - - - - - - - - - - - - - - - - 111
Prevention and Treatment Tips - - - - - - - - - - - - - - - - - 112
Hyperglycemia and Diabetic Ketoacidosis – DKA - - - 113
High Blood Glucose Problems & Solutions - - - - - - - - 113
Sick Day Management - - - - - - - - - - - - - - - - - - - - - - - - 116
Infusion Sets and Infusion Sites - - - - - - - - - - - - - - - - - 118
Skin Site Selection - - - - - - - - - - - - - - - - - - - - - - - - - 118
Problems & Solutions - - - - - - - - - - - - - - - - - - - - - - - 119
Daily Living, Lifestyle Activities - - - - - - - - - - - - - - - - - - 120
Temporary Removal Guidelines - - - - - - - - - - - - - - - - - 121
Physical Activity - - - - - - - - - - - - - - - - - - - - - - - - - - - - - 122
Pump Overview - - - - - - - - - - - - - - - - - - - - - - - - - - - - 125
Pump Specifications - - - - - - - - - - - - - - - - - - - - - - - - - - 125
Memory - - - - - - - - - - - - - - - - - - - - - - - - - - - - - - - - - - - 127
Safety Features - - - - - - - - - - - - - - - - - - - - - - - - - - - - - - 128
Factory Settings - - - - - - - - - - - - - - - - - - - - - - - - - - - - 130
Icon Table - - - - - - - - - - - - - - - - - - - - - - - - - - - - - - - - - 131
Glossary - - - - - - - - - - - - - - - - - - - - - - - - - - - - - - - - - - - 133
Index - - - - - - - - - - - - - - - - - - - - - - - - - - - - - - - - - - - - - - - 139
Check Point Answers - - - - - - - - - - - - - - - - - - - - - - - 145

1
Introduction to the model508 insulin pump
Whether you are beginning pump therapy for the first time, orupgrading from a previous model, we are pleased that you have cho-sen Medtronic MiniMed as your partner to help you gain better con-trol of your diabetes. We believe that the combination of state-of-the-art technology with simple, menu-driven programming will providemany benefits.
There are three main sections to this user’s guide:
•A ‘Quick Start’ guide is available beginning on page 11. Ithas been designed to get you up and pumping!
•Following the ‘Quick Start’ guide, you will find moredetailed information on specific programming features andmore advanced options.
•A detailed troubleshooting guide and glossary are alsoincluded.
Throughout, you will find NNEEEEDD TTOO KKNNOOWW facts, and Checkpointsincluded in the margins and at the end of many sections. These arecues for you to check your understanding.
answers can be found in the Checkpoint answers section.
This user’s guide is designed to help you learn to use your pump,however, working with your health care professional will speed yourfamiliarity with the pump and pump therapy.
Welcome
Let’s Get Started!
IN PREPARATION FOR YOUR PUMP START
The Medtronic MiniMed 508 has been designed to be very simple tolearn and most pump wearers find the time spent learning how tooperate their pump enjoyable! However, valuable time will be lost toboth you and your health care team if you have not become familiarwith your pump prior to your pump start.
Pump Start "Homework"
Along with your pump, remote control (where applicable) and sup-plies, you have received:
•This user’s guide with ‘Quick Start’ guide •Programming and Alarm Cards
With your pump in hand, watch the video and review the user’sguide and ‘Quick Start’ guide. After doing this you should come tothe pump start comfortable with the following basic functions:
•Using the SEL button to move through the pump screens•Using the ACT button to choose a pump feature•Changing the Time and Date on the pump•Delivering a Bolus•Stopping the pump by placing the pump in Suspend and
then restarting the pump•Setting three (3) Basal Rates and changing them•Setting a Temporary Basal Rate and then canceling it•Filling a Medtronic MiniMed reservoir syringe, attaching an
infusion set to the syringe and priming the tubing (use tapwater or a bottle of saline - no need to waste insulin!)
• Inserting the syringe into your pump and delivering a Primeto take up "slack" in the system
Welcome2
Please bring the following items with you to your pump start:
•One (1) Medtronic MiniMed pump, remote control and allthe supplies that came in your pump box
•Two or three (2-3) extra Medtronic MiniMed reservoirsyringes and infusion sets (Sof-set®, Silhouette™, etc.)
•Three or Four (3-4) tape patches (IV3000*, Polyskin, etc.)• Insulin•Any questions that you have from your "homework"
Coming prepared will help make your pump start a comfortablelearning experience. Do not hesitate to call your MedtronicMiniMed representative or your health care professional if you haveany questions during your preparation for your pump start.
3Welcome
NEED TO KNOW
ALWAYS TREAT YOUR DIABETES FIRST!!!
As you start pump therapy REMEMBER:Your pump uses only fast acting, Regular insulin. This means you do nothave longer-acting insulin in your body. Without insulin your bloodglucose will rise and you could experience diabetic ketoacidosis(DKA), which could result in hospitalization.
If your insulin delivery is interrupted for any reason, you must be pre-pared to replace the missed insulin injection immediately.
The quickest way to do so is to TTAAKKEE AANN IINNJJEECCTTIIOONN OOFF RREEGGUULLAARRIINNSSUULLIINN..
* IV3000 is a trademark of Smith & Nephew
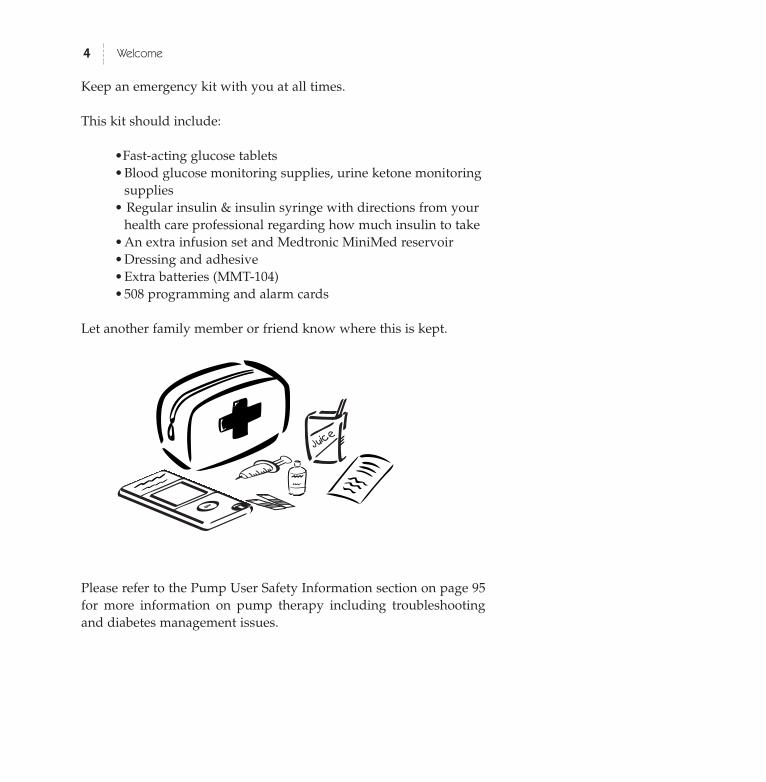
Keep an emergency kit with you at all times.
This kit should include:
•Fast-acting glucose tablets•Blood glucose monitoring supplies, urine ketone monitoring
supplies• Regular insulin & insulin syringe with directions from your
health care professional regarding how much insulin to take•An extra infusion set and Medtronic MiniMed reservoir•Dressing and adhesive•Extra batteries (MMT-104)•508 programming and alarm cards
Let another family member or friend know where this is kept.
Please refer to the Pump User Safety Information section on page 95for more information on pump therapy including troubleshootingand diabetes management issues.
Welcome4
Becoming Familiar With Your Pump
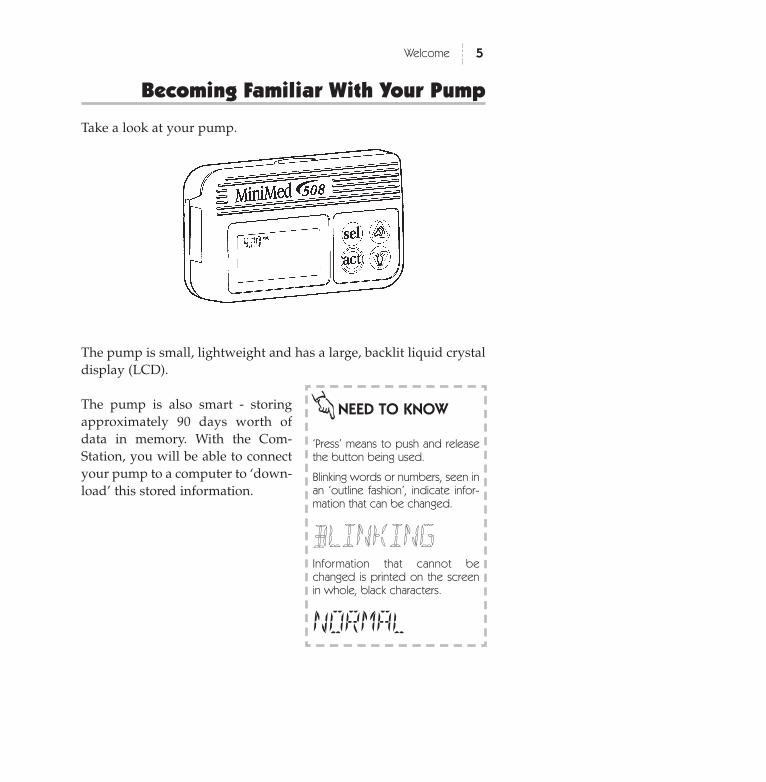
Take a look at your pump.
The pump is small, lightweight and has a large, backlit liquid crystaldisplay (LCD).
The pump is also smart - storingapproximately 90 days worth ofdata in memory. With the Com-Station, you will be able to connectyour pump to a computer to ‘down-load’ this stored information.
5Welcome
NEED TO KNOW
‘Press’ means to push and releasethe button being used.
Blinking words or numbers, seen inan ‘outline fashion’, indicate infor-mation that can be changed.
BBLLIINNKKIINNGGInformation that cannot bechanged is printed on the screenin whole, black characters.
NORMAL
Welcome
BUTTONS
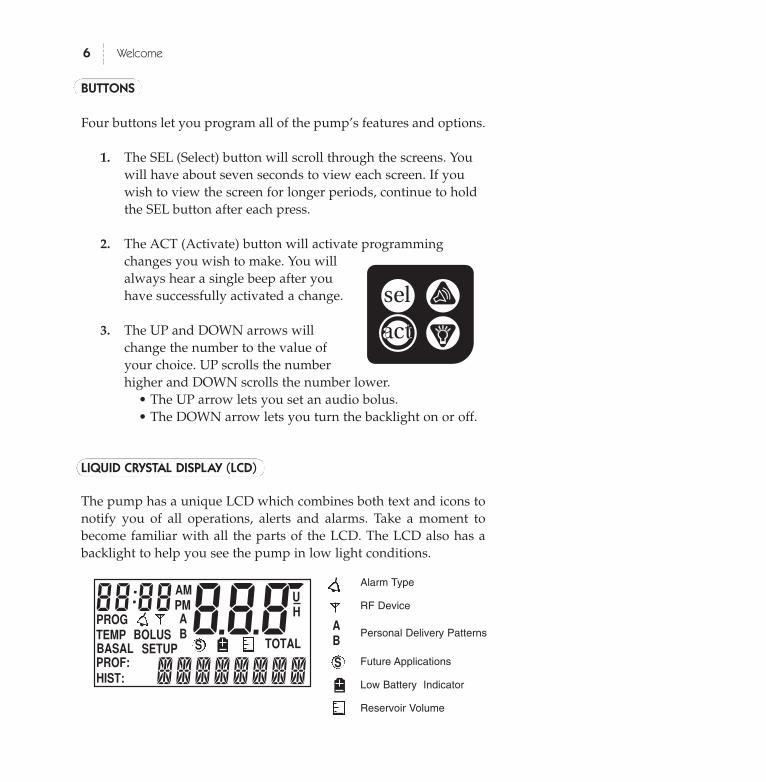
Four buttons let you program all of the pump’s features and options.
1. The SEL (Select) button will scroll through the screens. Youwill have about seven seconds to view each screen. If youwish to view the screen for longer periods, continue to holdthe SEL button after each press.
2. The ACT (Activate) button will activate programmingchanges you wish to make. You willalways hear a single beep after youhave successfully activated a change.
3. The UP and DOWN arrows willchange the number to the value ofyour choice. UP scrolls the numberhigher and DOWN scrolls the number lower.
• The UP arrow lets you set an audio bolus.• The DOWN arrow lets you turn the backlight on or off.
LIQUID CRYSTAL DISPLAY (LCD)
The pump has a unique LCD which combines both text and icons tonotify you of all operations, alerts and alarms. Take a moment tobecome familiar with all the parts of the LCD. The LCD also has abacklight to help you see the pump in low light conditions.
6
8.8.ZAMPM
PROG
SETUPTEMPBASAL
BOLUSTOTAL
PROF:HIST:
UH
........
88:88
S
AB
S
AB
Alarm Type
RF Device
Personal Delivery Patterns
Future Applications
Low Battery Indicator
Reservoir Volume
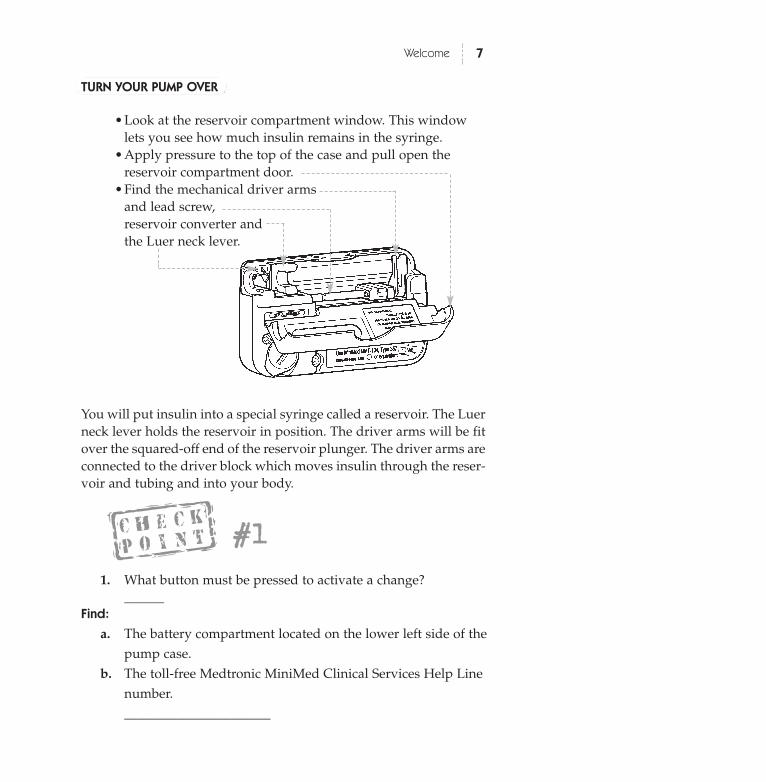
TURN YOUR PUMP OVER
•Look at the reservoir compartment window. This windowlets you see how much insulin remains in the syringe.
•Apply pressure to the top of the case and pull open thereservoir compartment door.
•Find the mechanical driver armsand lead screw, reservoir converter and the Luer neck lever.
You will put insulin into a special syringe called a reservoir. The Luerneck lever holds the reservoir in position. The driver arms will be fitover the squared-off end of the reservoir plunger. The driver arms areconnected to the driver block which moves insulin through the reser-voir and tubing and into your body.
7Welcome
1. What button must be pressed to activate a change? ______
Find:
a. The battery compartment located on the lower left side of thepump case.
b. The toll-free Medtronic MiniMed Clinical Services Help Linenumber.______________________
#1
Welcome8
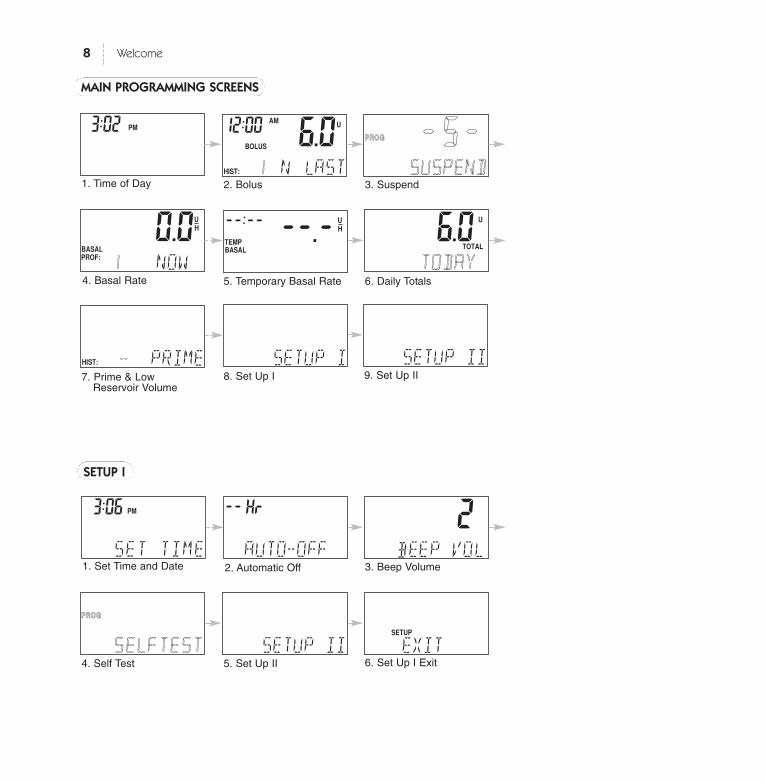
MAIN PROGRAMMING SCREENS
SETUP I
AMPM03:02 8.6.0
AMPM
BOLUS
HIST:
U
11 .N .LAST
12:00 ++..55..++PPRROOGG
SSUUSSPPEENNDD
++.+TEMPBASAL
UH
........
++:++8.0.0AMPM
PROG
BASALPROF:
UH
11 NOW
88:88
2.AMPM
PROG
BEEP8VOL
++:Hr
8.2.0AMPM
PPRROOGG
SSEELLFFTTEESSTT
++:Hr
06.0TOTAL
U
TTOODDAAYY.
HIST: ..PRIME SETUP8I
SETUP8II
8.8.ZAMPM
SET.TIME
83:06
SETUP
EXIT8888
1. Time of Day 2. Bolus 3. Suspend
4. Basal Rate 5. Temporary Basal Rate 6. Daily Totals
7. Prime & Low Reservoir Volume
8. Set Up I
1. Set Time and Date 2. Automatic Off 3. Beep Volume
4. Self Test 5. Set Up II 6. Set Up I Exit
SETUP8II9. Set Up II
8.0.0AMPM
PROG
AUT0--0FF
++:Hr
Welcome 9
1.0.0AMPM
BOLUS
HIST:
U
MAXIMUM8
12:00
O.FFAMPM
BOLUS
HIST:
U
AUDIO8M
12:00
32.0AMPM
PROG
BASALPROF:
UH
MAXIMUM8
88:88
O.FFnAMPM
PROG
BASALPROF:
UH
PATTERNS
88:88 O.FFnAMPM
PROG
BASALPROF:
UH
BLOCK8
88:88
HIST: .ALARM9
OffRF.DEV.
TYPE..
8.0.0AMPM
PROG
DISPLAY
12:Hr 1.0.0AMPM
PROG
INSULIN
12:HU
SETUP II
SETUP
EXIT8888
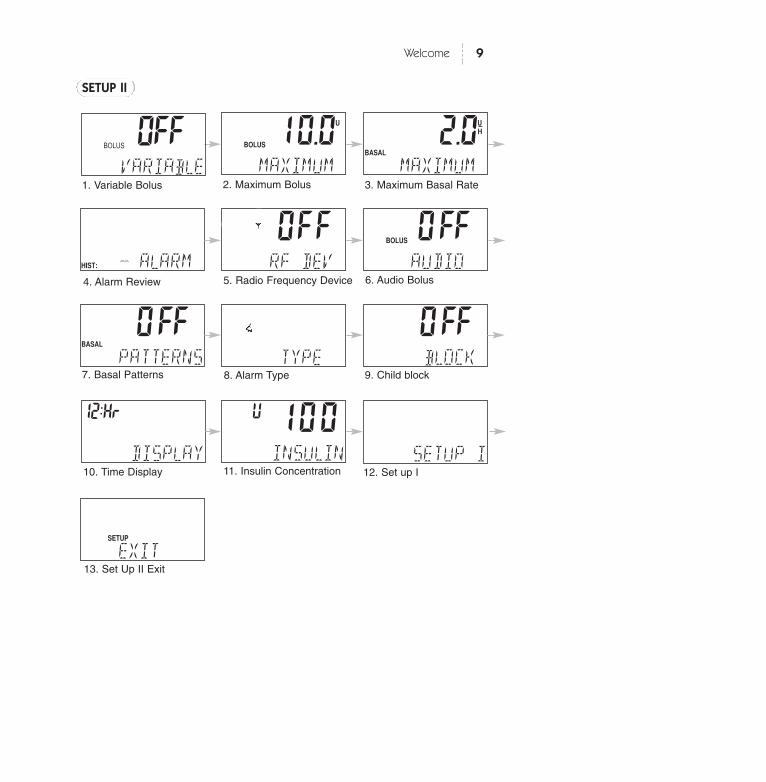
1. Variable Bolus 2. Maximum Bolus 3. Maximum Basal Rate
4. Alarm Review 5. Radio Frequency Device 6. Audio Bolus
7. Basal Patterns 8. Alarm Type 9. Child block
10. Time Display 11. Insulin Concentration
13. Set Up II Exit
SETUP8I12. Set up I
0FFAMPM
BOLUS
HIST:
U
VARIABLE
12:00

10 Welcome

11Quick Start
508 Quick Start GuideThe following guidelines are basic instructions to get you startedusing your pump. Please refer to the detailed instructions in thisuser’s guide regarding additional options including various bolusand basal rates.

12 Quick Start
Verifying & Setting the Time and Date
Why: Sets the time and date for your specific area.
Where: SET UP I on the SET TIME screen.
How:
1. From the TIME OF DAY screen, press SEL to SET UP I thenpress ACT. You will see the SETTIME screen. Press ACT, “PROGHOURS” will appear.
2. Use the arrows to select the hour,then press ACT. The screen willsay “PROG MINUTES”.
3. Use the arrows to select the min-utes and press ACT. The screenwill say “PROG YEAR”.
4. Use the arrows to select the yearand press ACT. The screen willsay “PROG MONTH”.
5. Use the arrows to select themonth and press ACT. Thescreen will say “PROG DAY”.
6. Use the arrows to select the dayand press ACT.
8.8.ZAMPM
SET.TIME
83:06
8.8.ZAMPM
HOURS
833:06
8.8.ZAMPM
MINUTES
84:0066
PROG
PROG
00..9999AMPM
YEAR
84:07PROG
00..1122AMPM
MONTH
84:07PROG
00..0044AMPM
DAY
84:07PROG
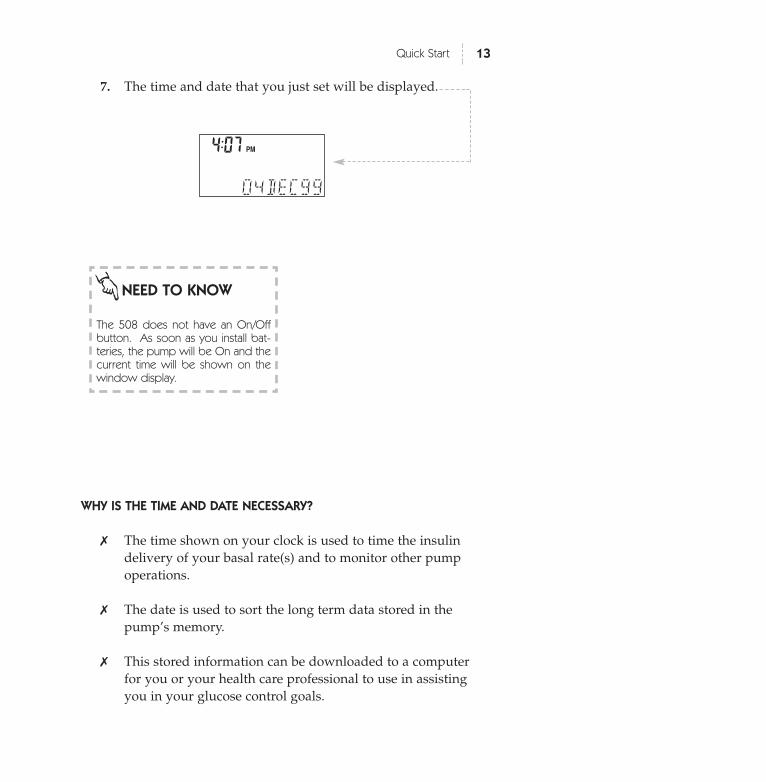
7. The time and date that you just set will be displayed.
13Quick Start
WHY IS THE TIME AND DATE NECESSARY?
✗ The time shown on your clock is used to time the insulindelivery of your basal rate(s) and to monitor other pumpoperations.
✗ The date is used to sort the long term data stored in thepump’s memory.
✗ This stored information can be downloaded to a computerfor you or your health care professional to use in assistingyou in your glucose control goals.
NEED TO KNOW
The 508 does not have an On/Offbutton. As soon as you install bat-teries, the pump will be On and thecurrent time will be shown on thewindow display.
8.8.ZAMPM
04DEC99
84:07
14 Quick Start
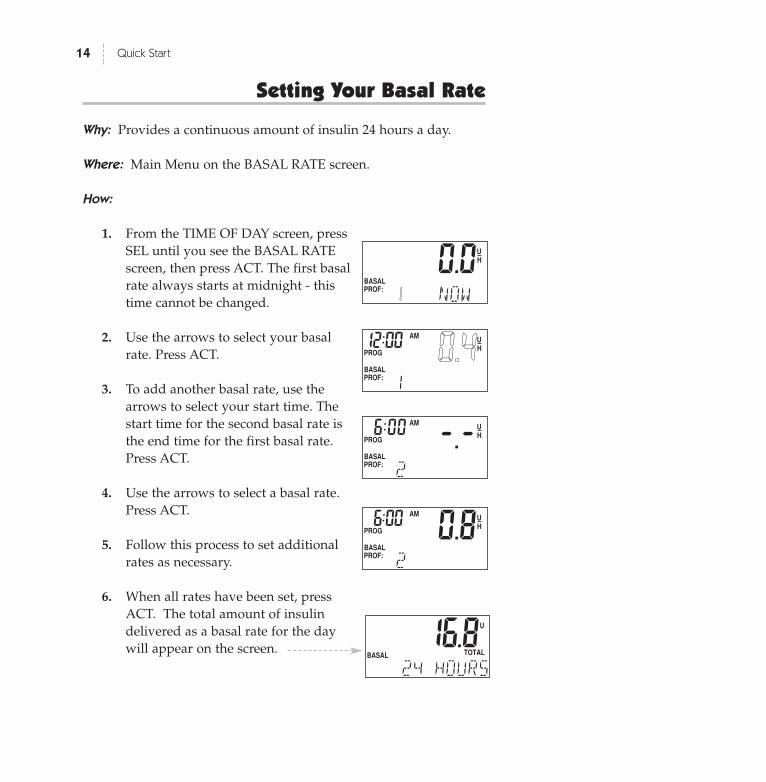
Setting Your Basal Rate
Why: Provides a continuous amount of insulin 24 hours a day.
Where: Main Menu on the BASAL RATE screen.
How:
1. From the TIME OF DAY screen, pressSEL until you see the BASAL RATEscreen, then press ACT. The first basalrate always starts at midnight - thistime cannot be changed.
2. Use the arrows to select your basalrate. Press ACT.
3. To add another basal rate, use thearrows to select your start time. Thestart time for the second basal rate isthe end time for the first basal rate.Press ACT.
4. Use the arrows to select a basal rate.Press ACT.
5. Follow this process to set additionalrates as necessary.
6. When all rates have been set, pressACT. The total amount of insulindelivered as a basal rate for the daywill appear on the screen.
8.0.0AMPM
PROG
BASALPROF:
UH
11 NOW
88:88
8.00..44AMPM
PROG
BASALPROF:
UH
1
12:00
8.+.+AMPM
PROG
BASALPROF:
UH
2
6:00
8.0.8AMPM
PROG
BASALPROF:
UH
2
6:00
1.16.8BASAL TOTAL
U
24.HOURS
15Quick Start
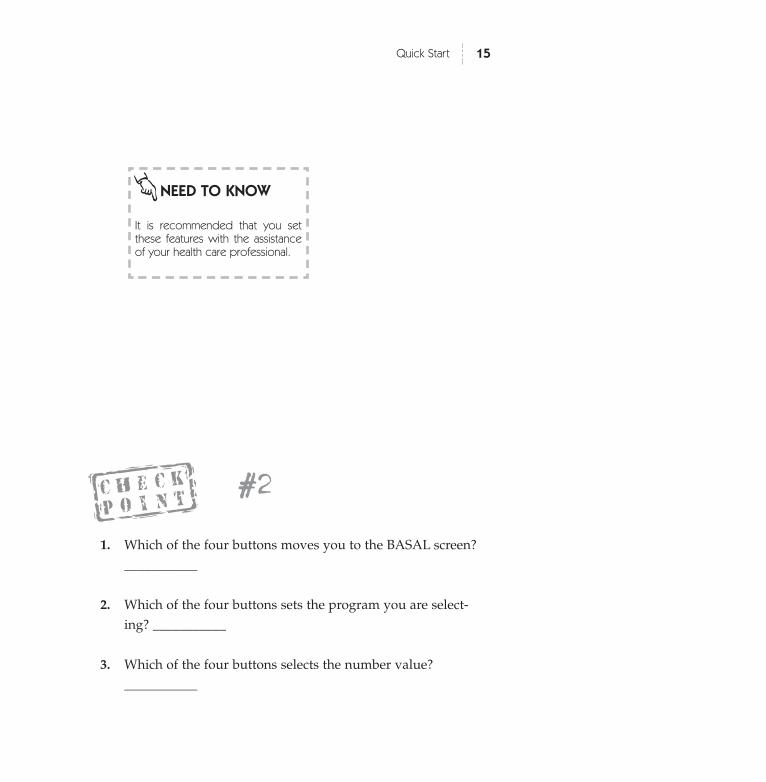
1. Which of the four buttons moves you to the BASAL screen?___________
2. Which of the four buttons sets the program you are select-ing? ___________
3. Which of the four buttons selects the number value?___________
NEED TO KNOW
It is recommended that you setthese features with the assistanceof your health care professional.
#2
16 Quick Start
Reviewing Your Profiles
Why: Confirms that basal rates are entered correctly.
Where: Main Menu on the BASAL RATE screen.
How:
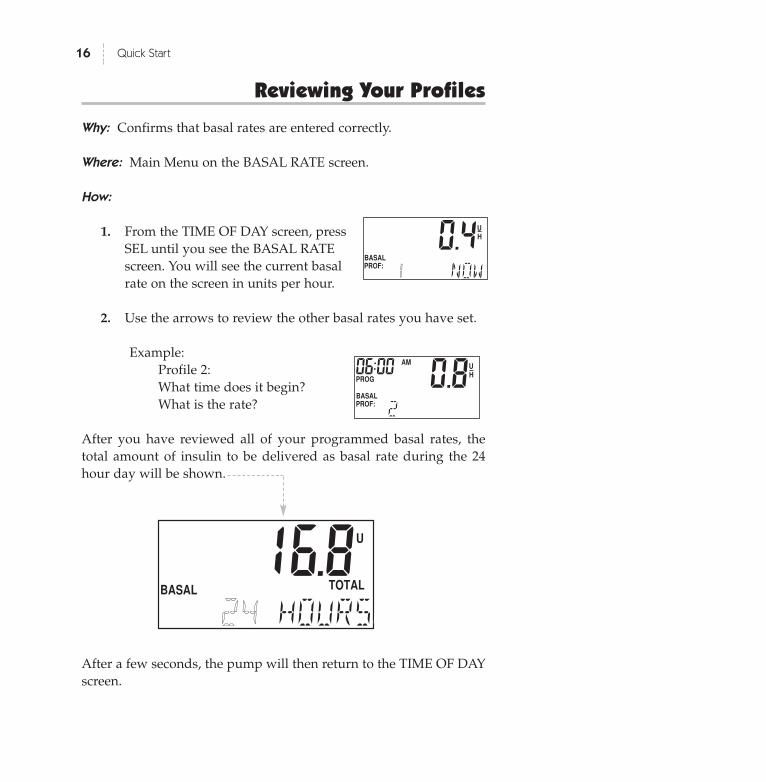
1. From the TIME OF DAY screen, pressSEL until you see the BASAL RATEscreen. You will see the current basalrate on the screen in units per hour.
2. Use the arrows to review the other basal rates you have set.
Example:Profile 2:What time does it begin? What is the rate?
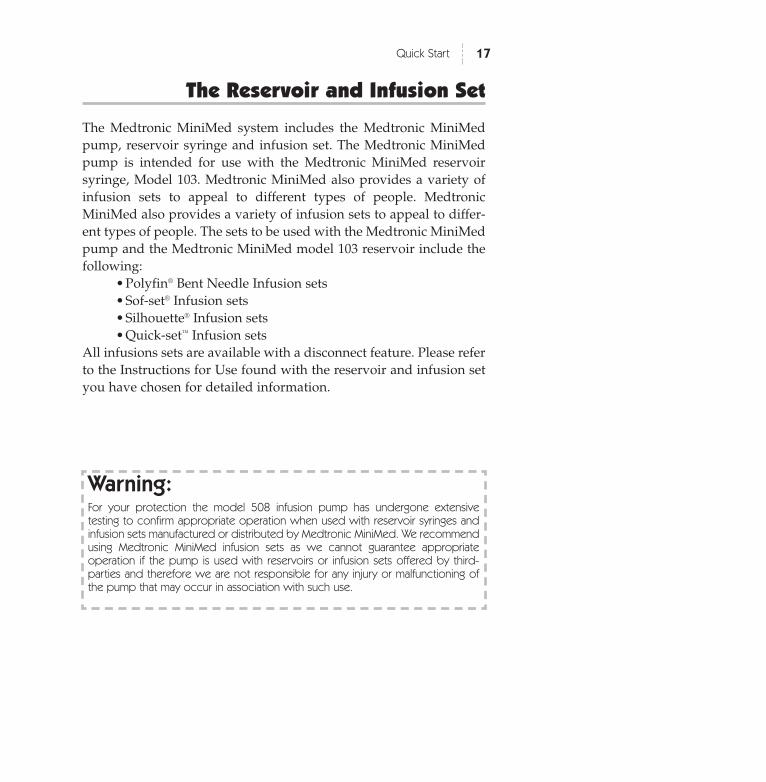
After you have reviewed all of your programmed basal rates, thetotal amount of insulin to be delivered as basal rate during the 24hour day will be shown.
After a few seconds, the pump will then return to the TIME OF DAYscreen.
8.0.4AMPM
PROG
BASALPROF:
UH
11 NOW
88:88
8.0.8AMPM
PROG
BASALPROF:
UH
2
06:00
16.8BASAL TOTAL
U
2244 HOURS8
17Quick Start
The Reservoir and Infusion Set
The Medtronic MiniMed system includes the Medtronic MiniMedpump, reservoir syringe and infusion set. The Medtronic MiniMedpump is intended for use with the Medtronic MiniMed reservoirsyringe, Model 103. Medtronic MiniMed also provides a variety ofinfusion sets to appeal to different types of people. MedtronicMiniMed also provides a variety of infusion sets to appeal to differ-ent types of people. The sets to be used with the Medtronic MiniMedpump and the Medtronic MiniMed model 103 reservoir include thefollowing:
•Polyfin® Bent Needle Infusion sets •Sof-set® Infusion sets •Silhouette® Infusion sets•Quick-set™ Infusion sets
All infusions sets are available with a disconnect feature. Please referto the Instructions for Use found with the reservoir and infusion setyou have chosen for detailed information.
Warning:For your protection the model 508 infusion pump has undergone extensive testing to confirm appropriate operation when used with reservoir syringes and infusion sets manufactured or distributed by Medtronic MiniMed. We recommendusing Medtronic MiniMed infusion sets as we cannot guarantee appropriate operation if the pump is used with reservoirs or infusion sets offered by third-parties and therefore we are not responsible for any injury or malfunctioning ofthe pump that may occur in association with such use.
18 Quick Start
Changing the Reservoir and Infusion Set
Why: It is important that you change the infusion set at least every 2-3days. Rotating the site will help to avoid any problems with your skin,or with your infusion site. Also, the insulin will absorb best when youchange the set regularly. For complete information, refer to theInstructions for Use that come with your reservoir and infusion set.
RESERVOIR PLACEMENT
There are two methods of installing the reservoir in your pump.These are the Short Reservoir method and the Full or Long Reservoirmethod. Please discuss with your health care professional which isright for you.
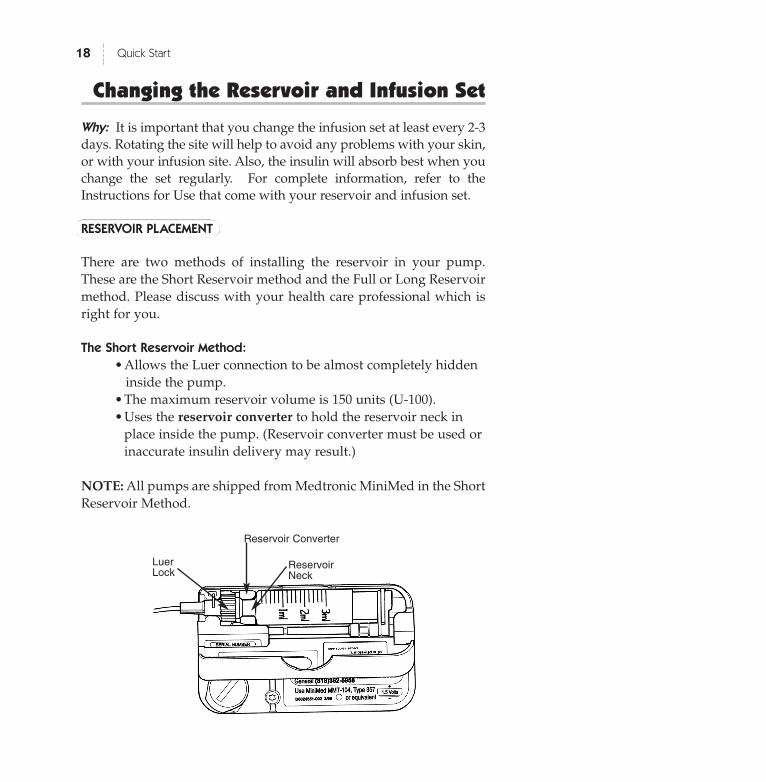
The Short Reservoir Method:
•Allows the Luer connection to be almost completely hiddeninside the pump.
•The maximum reservoir volume is 150 units (U-100).•Uses the reservoir converter to hold the reservoir neck in
place inside the pump. (Reservoir converter must be used orinaccurate insulin delivery may result.)
NOTE: All pumps are shipped from Medtronic MiniMed in the ShortReservoir Method.
Reservoir Converter
Reservoir Neck
LuerLock
19Quick Start
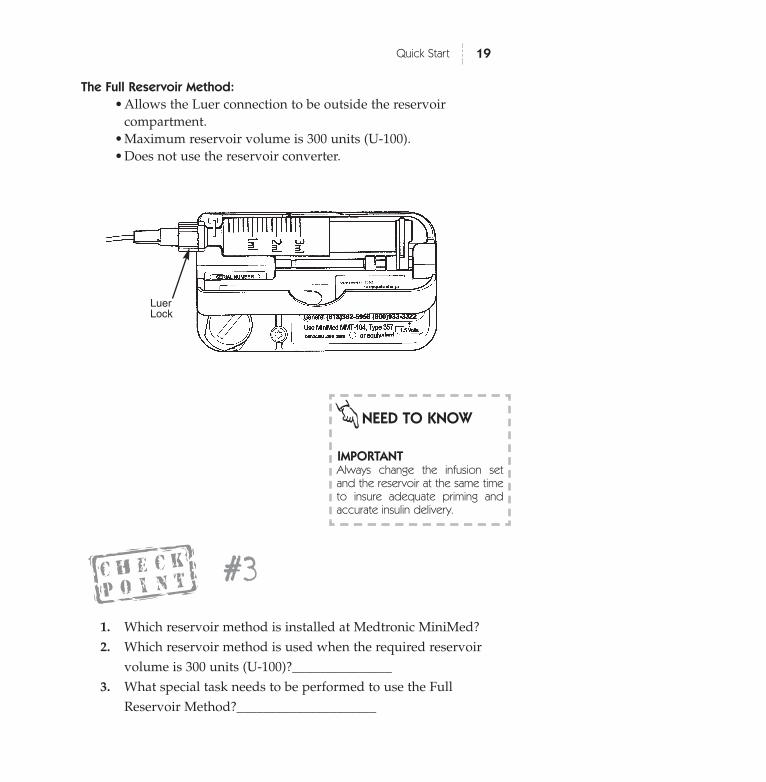
The Full Reservoir Method:
•Allows the Luer connection to be outside the reservoir compartment.
•Maximum reservoir volume is 300 units (U-100).•Does not use the reservoir converter.
1. Which reservoir method is installed at Medtronic MiniMed?2. Which reservoir method is used when the required reservoir
volume is 300 units (U-100)?_______________3. What special task needs to be performed to use the Full
Reservoir Method?_____________________
NEED TO KNOW
IMPORTANT Always change the infusion setand the reservoir at the same timeto insure adequate priming andaccurate insulin delivery.
#3
LuerLock
20 Quick Start
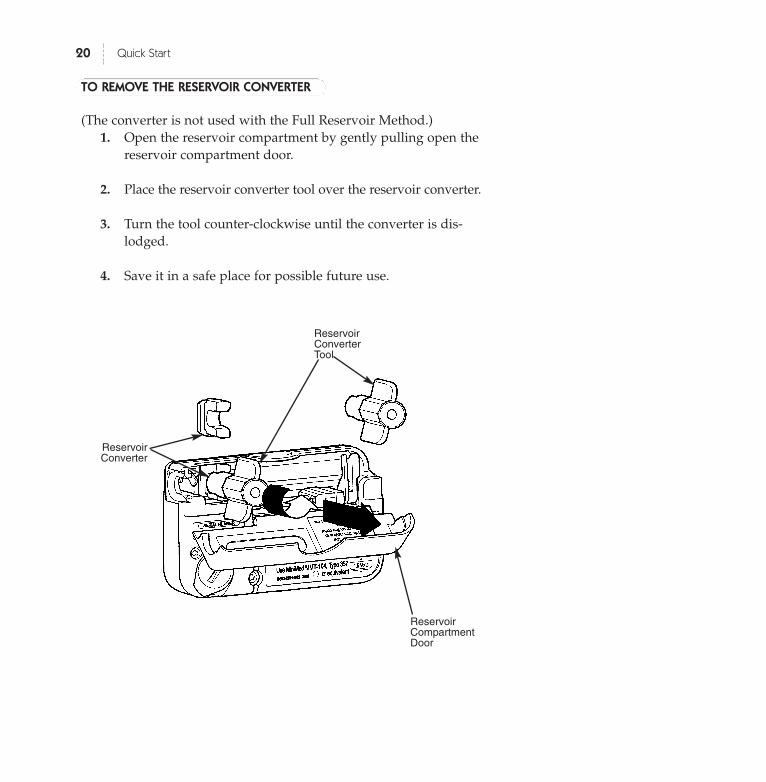
TO REMOVE THE RESERVOIR CONVERTER
(The converter is not used with the Full Reservoir Method.)1. Open the reservoir compartment by gently pulling open the
reservoir compartment door.
2. Place the reservoir converter tool over the reservoir converter.
3. Turn the tool counter-clockwise until the converter is dis-lodged.
4. Save it in a safe place for possible future use.
ReservoirConverter
ReservoirConverterTool
ReservoirCompartmentDoor

21Quick Start
TO REINSTALL THE RESERVOIR CONVERTER
(Used in the Short Reservoir Method)If the reservoir converter is not in place, reinstall the converter by fol-lowing these steps:
1. Open the reservoir compartment by gently pulling open thereservoir compartment door.
2. Insert the reservoir converter tool in the reservoir converter.
3. Insert the converter horizontally between the marked slotsin reservoir compartment.
4. Check that the flat edge is facing toward the battery com-partment.
5. Turn the reservoir converter tool clockwise until the convert-er is securely in place.
Flat Edge ofReservoirConverter
ReservoirConverterTool
BatteryCompartment
22 Quick Start
SOF-SET AND RESERVOIR CHANGE
1. Wash your hands.
2. Gather a new reservoir, Sof-set, alcohol swab or site prep(e.g. IV Prep), Sof-serter, and insulin vial.
3. Discard old set and reservoir: pull off set at site first, thenremove reservoir.
4. Cycle the syringe. Fill new reservoir with 2-3 days worth ofinsulin plus 25 extra priming units.
5. Remove the filling needle from the reservoir after purgingair bubbles.
6. Open the Sof-set package and attach the reservoir to infusionset. Make sure the connection is tight!
7. Manually prime the infusion set by pressing slowly on theplunger until you see a drop of insulin come out of the Sof-set introducer needle.
8. Clear away air bubbles from tubing.
9. Open reservoir compartment door, pull driver arms up(towards you) and slide driver block to the far right of thecase.
10. Place reservoir in pump with numbers facing upwards.
11. Lower the driver arms so that one arm is on each side of thereservoir plunger.
12. Close the reservoir compartment door.
13. Load the Sof-set into Sof-serter with tubing between theprongs.
14. Push the Sof-set down until it clicks into place.
15. Program pump to deliver a 5.0 unit prime bolus to “take upthe slack.” Set the reservoir volume amount.
16. Watch to see insulin exit the introducer needle.
17. Clean the site with alcohol or IV Prep.
18. While holding the Sof-set wings, remove the white tab andneedle guard.
19. Position the Sof-serter on the site and press the ACT button.
20. While holding the Sof-set wings, gently remove theSof-serter and slide it off the blue needle hub.
21. Place Sof-set tape over the blue needle hub.
22. Holding the wings, give the blue hub ¼ turn and remove. Discard using proper needle disposal products.
23. Program 0.5 unit prime bolus to fill cannula.
24. Check your blood glucose level 3 hours later.
23Quick Start

24 Quick Start
RESERVOIR CHANGE USING SILHOUETTE AND QUICK-SET
1. Wash your hands.
2. Gather new reservoir, infusion set, alcohol swab, and insulinvial.
3. Discard old set and reservoir: pull off set at site first, thenremove reservoir.
4. Cycle the syringe. Fill new reservoir with 2-3 days worth ofinsulin plus 25 extra priming units.
5. Remove filling needle from the reservoir after purging airbubbles.
6. Open infusion set package. Attach reservoir to infusion set.Make sure connection is tight!
7. Manually prime the infusion set by pressing slowly on theplunger until you see a drop of insulin come out of theconnector needle.
8. Clear away air bubbles from tubing.
9. Open reservoir compartment door, pull driver arms up(towards you) and slide driver block to the far right of thecase.
10. Place reservoir in pump with numbers facing upwards.
11. Lower the driver arms so that one arm is on each side of thereservoir plunger.
12. Close the reservoir compartment door.
13. Program pump to deliver a 5.0 unit prime bolus to “take upthe slack.” Set the reservoir volume amount.
14. Watch to see insulin exit the connector needle.
15. Clean site with alcohol or IV Prep.
Steps 16-21 are for the Silhouette only (refer to the Quick-setInstructions for Use for insertion instructions.)
16. Remove the front half of the back paper from the whiteadhesive tape. Remove the plastic protective cap from theneedle.
17. While using the index finger to hold back the forward flapof the white adhesive, insert the Silhouette at a 30° angle.(Talk with your health care professional about any changesto your individual angle of insertion.)
18. Carefully smooth out the front half of the backing paperonto the skin.
19. Remove the introducer needle. Put one finger just in front ofthe see-through window to keep Silhouette in place andwith your other hand, press gently the side clips with twofingers while simultaneously withdrawing the introducerneedle.
20. Remove the back side of the backing paper and smooth outthe white adhesive tape to make sure good skin contact isachieved.
21. Connect site side of infusion set to the tubing side of theinfusion set. Program 1.0 unit prime to fill the cannula.
22. Check your blood glucose level 3 hours later.
25Quick Start

INSTALLING THE RESERVOIR AND INFUSION SET
Follow the directions on page 18. After this is complete, follow thesesteps to correctly insert the reservoir and infusion set into yourpump.
1. Open the reservoir compartment door.
2. Lift up on the two driver arms and slide them to the end ofthe lead screw (away from the luer neck lever). Lift up thesilver-colored Luer neck lever.
3. Align the reservoir neck with the reservoir converter (for theshort reservoir method ) or with the silver-colored Luer necklever (for the full reservoir method), and insert it into thepump.
26 Quick Start
Luer Neck Lever
DriverArms
Reservoir Neck
Reservoir Neck
Reservoir Converter
ReservoirCompartmentDoor
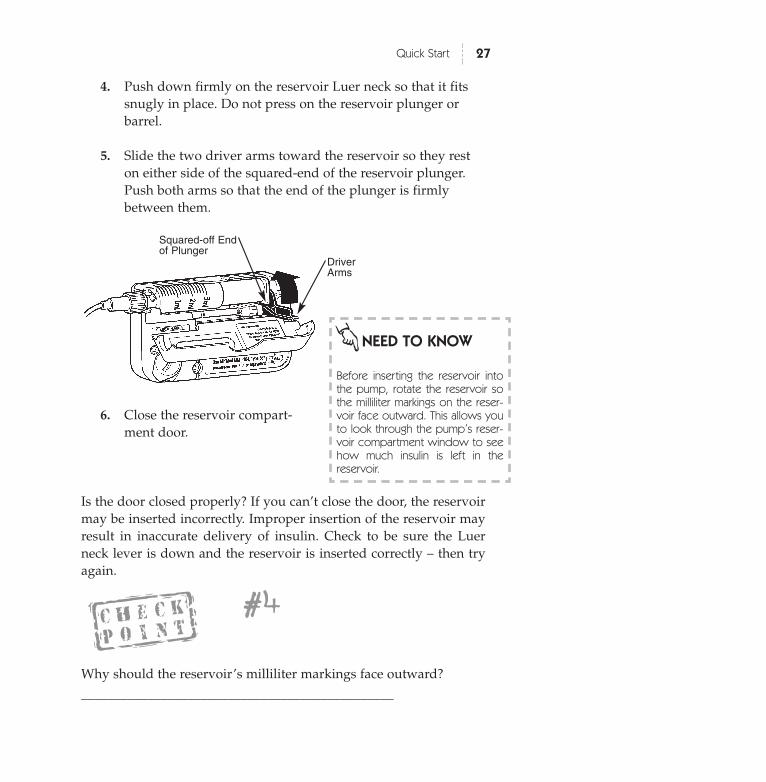
4. Push down firmly on the reservoir Luer neck so that it fitssnugly in place. Do not press on the reservoir plunger orbarrel.
5. Slide the two driver arms toward the reservoir so they reston either side of the squared-end of the reservoir plunger.Push both arms so that the end of the plunger is firmlybetween them.
6. Close the reservoir compart-ment door.
Is the door closed properly? If you can’t close the door, the reservoirmay be inserted incorrectly. Improper insertion of the reservoir mayresult in inaccurate delivery of insulin. Check to be sure the Luerneck lever is down and the reservoir is inserted correctly – then tryagain.
27Quick Start
Why should the reservoir’s milliliter markings face outward?_______________________________________________
DriverArms
Squared-off End of Plunger
NEED TO KNOW
Before inserting the reservoir intothe pump, rotate the reservoir sothe milliliter markings on the reser-voir face outward. This allows youto look through the pump’s reser-voir compartment window to seehow much insulin is left in thereservoir.
#4
28 Quick Start
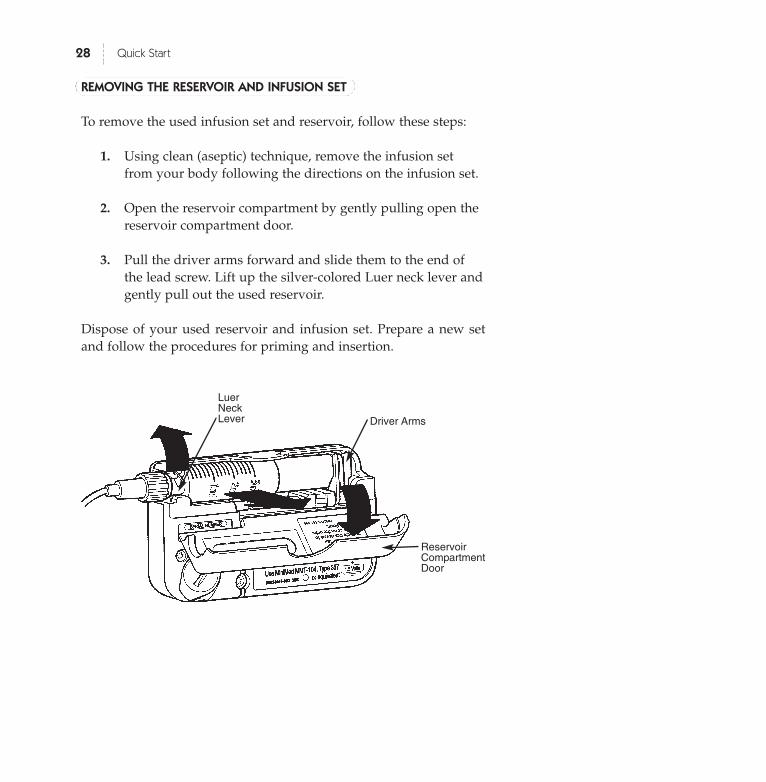
REMOVING THE RESERVOIR AND INFUSION SET
To remove the used infusion set and reservoir, follow these steps:
1. Using clean (aseptic) technique, remove the infusion setfrom your body following the directions on the infusion set.
2. Open the reservoir compartment by gently pulling open thereservoir compartment door.
3. Pull the driver arms forward and slide them to the end ofthe lead screw. Lift up the silver-colored Luer neck lever andgently pull out the used reservoir.
Dispose of your used reservoir and infusion set. Prepare a new setand follow the procedures for priming and insertion.
LuerNeckLever Driver Arms
ReservoirCompartmentDoor
29Quick Start
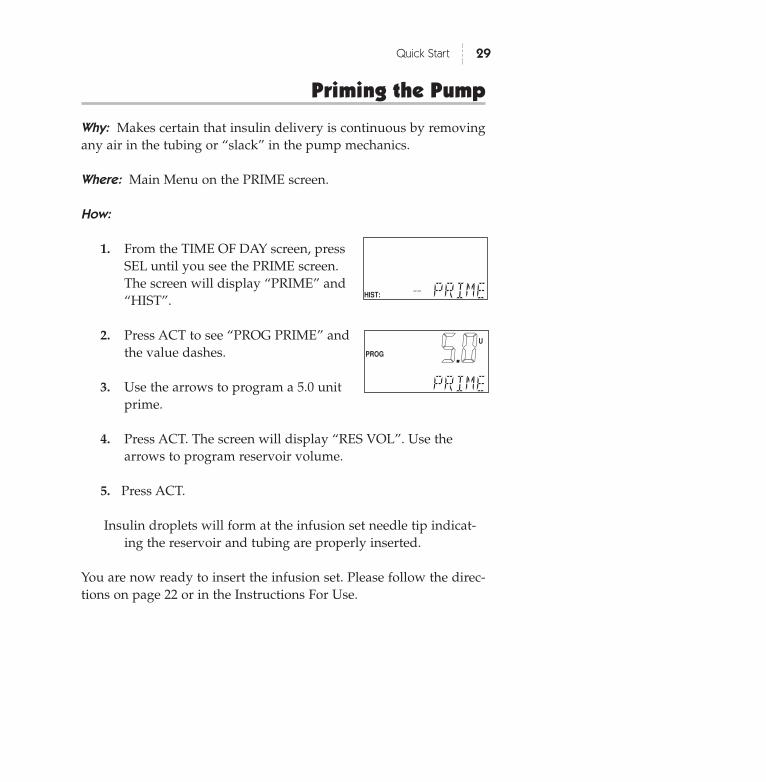
Priming the Pump
Why: Makes certain that insulin delivery is continuous by removingany air in the tubing or “slack” in the pump mechanics.
Where: Main Menu on the PRIME screen.
How:
1. From the TIME OF DAY screen, pressSEL until you see the PRIME screen.The screen will display “PRIME” and“HIST”.
2. Press ACT to see “PROG PRIME” andthe value dashes.
3. Use the arrows to program a 5.0 unitprime.
4. Press ACT. The screen will display “RES VOL”. Use thearrows to program reservoir volume.
5. Press ACT.
Insulin droplets will form at the infusion set needle tip indicat-ing the reservoir and tubing are properly inserted.
You are now ready to insert the infusion set. Please follow the direc-tions on page 22 or in the Instructions For Use.
8..55.00AMPM
PROG
BASALPROF:
UH
PRIME
88:88
HIST: ..PRIME
30 Quick Start
After inserting a new reservoir and infusion set, what must you do tomake sure delivery is uninterrupted? _________________________
TIP
Some pump users have told us that it is easy to use the followingsteps to Prime the set:
1. From the PRIME screen press ACT, then press the DOWNarrow - this will automatically set a prime for the maximumbolus amount.
2. Watch for insulin to appear at the end of the infusion set.When it appears, stop the prime by placing the pump intoSuspend.
3. Insert the infusion set and restart the pump.
#5

31Quick Start
Bolus
SETTING A NORMAL BOLUS
Why: Provides an immediate amount of insulin to cover currentneeds.
Where: Main Menu on the BOLUS screen.
How:
1. From the TIME OF DAY screen, pressSEL until you see the BOLUS screen.
2. Press ACT. The dashes for units willblink, letting you know you canchange this number.
3. Use the arrows to select the bolusamount you want. Press ACT.
8.0.6AMPM
BOLUS
HIST:
U
11 .N .LAST
12:00
++++.++AMPM
BOLUS
HIST:
U
.NORMAL
12:00PROG
8.0.6PM
BOLUS
U
DELIVERY
83:45
32 Quick Start
Stopping and Restarting Your Pump
TO STOP OR PUT YOUR PUMP IN ‘SUSPEND’
Why: Stops all delivery (basal and bolus) by the pump.
Where: Main Menu on the SUSPEND screen.
How:
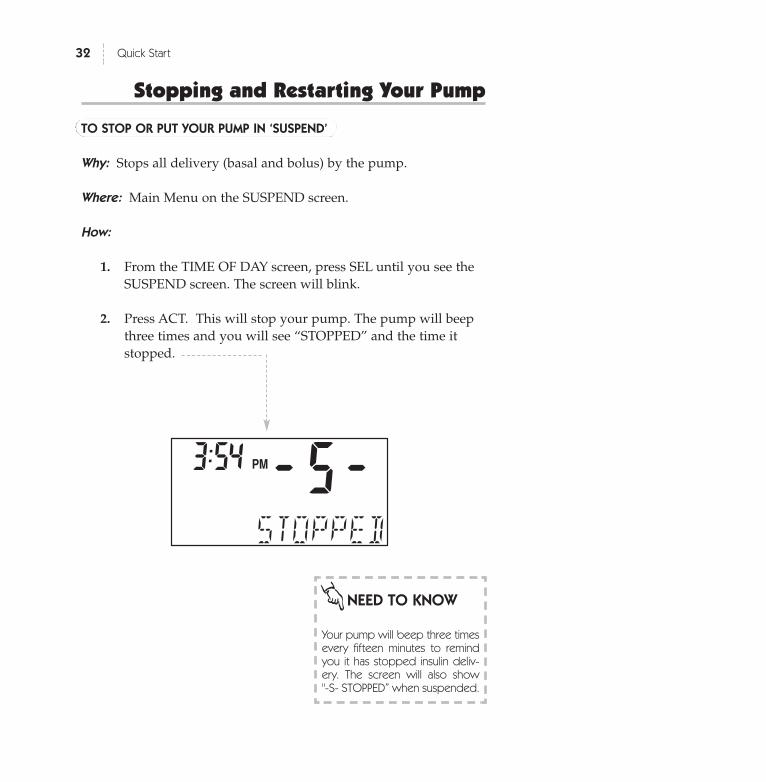
1. From the TIME OF DAY screen, press SEL until you see theSUSPEND screen. The screen will blink.
2. Press ACT. This will stop your pump. The pump will beepthree times and you will see “STOPPED” and the time itstopped.
+.5.+PM
STOPPED
83:54
NEED TO KNOW
Your pump will beep three timesevery fifteen minutes to remindyou it has stopped insulin deliv-ery. The screen will also show "-S- STOPPED” when suspended.
TO RESTART YOUR PUMP
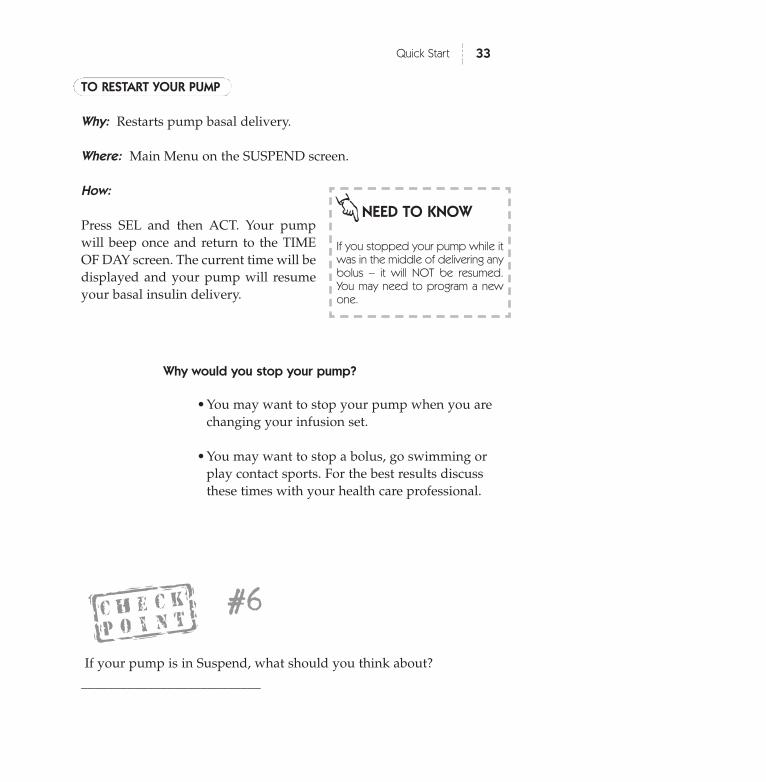
Why: Restarts pump basal delivery.
Where: Main Menu on the SUSPEND screen.
How:
Press SEL and then ACT. Your pumpwill beep once and return to the TIMEOF DAY screen. The current time will bedisplayed and your pump will resumeyour basal insulin delivery.
33Quick Start
Why would you stop your pump?
•You may want to stop your pump when you arechanging your infusion set.
•You may want to stop a bolus, go swimming orplay contact sports. For the best results discussthese times with your health care professional.
NEED TO KNOW
If you stopped your pump while itwas in the middle of delivering anybolus – it will NOT be resumed.You may need to program a newone.
If your pump is in Suspend, what should you think about? ___________________________
#6

Prime History and Use
Why: Provides a method of delivery:•To fill the Sof-set cannula after removing the introducer
needle•To deliver a small bolus just prior to reconnecting the QR®
•To conduct the 7.2 unit bolus test while disconnected fromyour pump
•To take up slack between the reservoir plunger and the driv-er arms after putting in a new reservoir.
Where: Main Menu on the PRIME screen.
How:
1. From the TIME OF DAY screen, pressSEL until you see the PRIME screen.The screen will display “PRIME” and“HIST”.
2. Use the arrows to review the pastnine Prime uses, beginning with themost recent.
3. To set a Prime, press ACT. The words“PROG PRIME” will appear withblinking dashes. Use the arrows toset the Prime amount.
4. Press ACT. “RES VOL” (reservoirvolume) will appear with eitherdashes (if it is a new reservoir) or theamount of insulin remaining in yourreservoir.
34 Quick Start
HIST: ..PRIME
8.2.0AMPM
HIST:
U
11P.03NOV
85:20
++++.++PROG
U
PRIME
++++++PROG
RES VOL
U

Reservoir Volume andLow Volume Alert
Why: Provides a ‘sound’ or ‘vibration’ when the insulin level in thereservoir reaches 20 Units and again at 10 Units.
Where: Main Menu on the PRIME screen.
How:
1. To get to the PRIME screen, follow the steps on page 34. Usethe arrows to record the amount of insulin in the reservoir.
2. Press ACT. The Low Volume Alert is now activated and thePrime feature will begin. The screen will show “PRIME”along with the amount being delivered.
3. Every time you install a new reservoir, you should reset thereservoir volume.
35Quick Start
NEED TO KNOW
PPrriimmee iiss uusseedd oonnllyy wwhheenn tthhee iinnssuulliinn iissnnoott bbeeiinngg ddeelliivveerreedd iinnttoo yyoouurr bbooddyy..
The Prime amounts are not counted intoyour daily total amount of insulin.
Do not use the Prime feature to fill a newinfusion set – follow the Instructions ForUse.
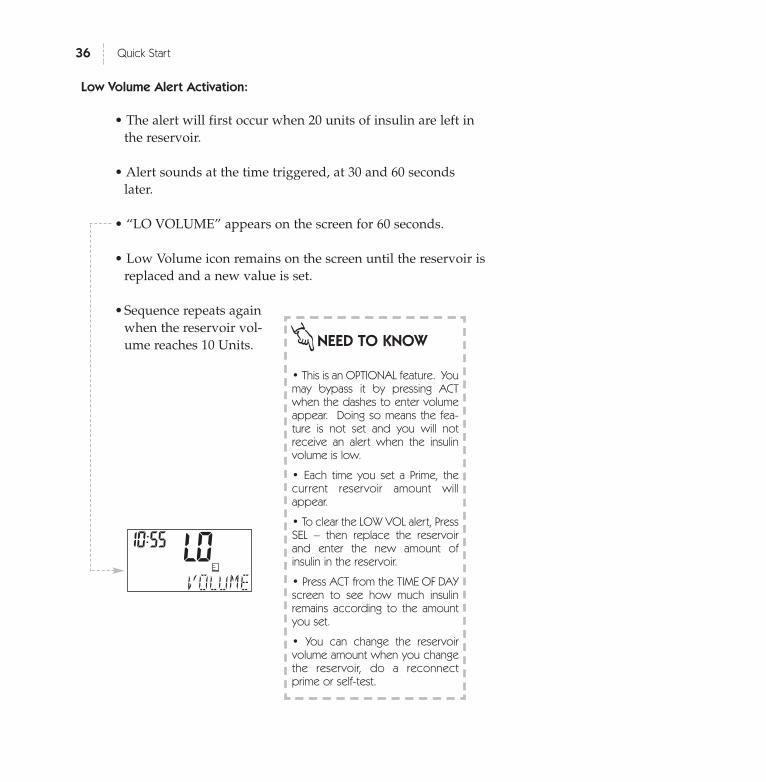
Low Volume Alert Activation:
• The alert will first occur when 20 units of insulin are left inthe reservoir.
• Alert sounds at the time triggered, at 30 and 60 secondslater.
• “LO VOLUME” appears on the screen for 60 seconds.
• Low Volume icon remains on the screen until the reservoir isreplaced and a new value is set.
•Sequence repeats againwhen the reservoir vol-ume reaches 10 Units.
36 Quick Start
NEED TO KNOW
• This is an OPTIONAL feature. Youmay bypass it by pressing ACTwhen the dashes to enter volumeappear. Doing so means the fea-ture is not set and you will notreceive an alert when the insulinvolume is low.
• Each time you set a Prime, thecurrent reservoir amount willappear.
• To clear the LOW VOL alert, PressSEL – then replace the reservoirand enter the new amount ofinsulin in the reservoir.
• Press ACT from the TIME OF DAYscreen to see how much insulinremains according to the amountyou set.
• You can change the reservoirvolume amount when you changethe reservoir, do a reconnectprime or self-test.
LOVOLUME
10:55
Initial Pump Settings
This is the information you will need on the day that you begin usingyour pump with insulin. • If your pump start is going to take place in your health care pro-fessional’s office, you will be given the settings that day. • If your pump start is going to take place in another location, makesure to get in touch with your health care professional to determineyour basal rate and bolus amounts. This may require making anappointment to review your blood glucose logs in order to make anaccurate determination.
37Quick Start
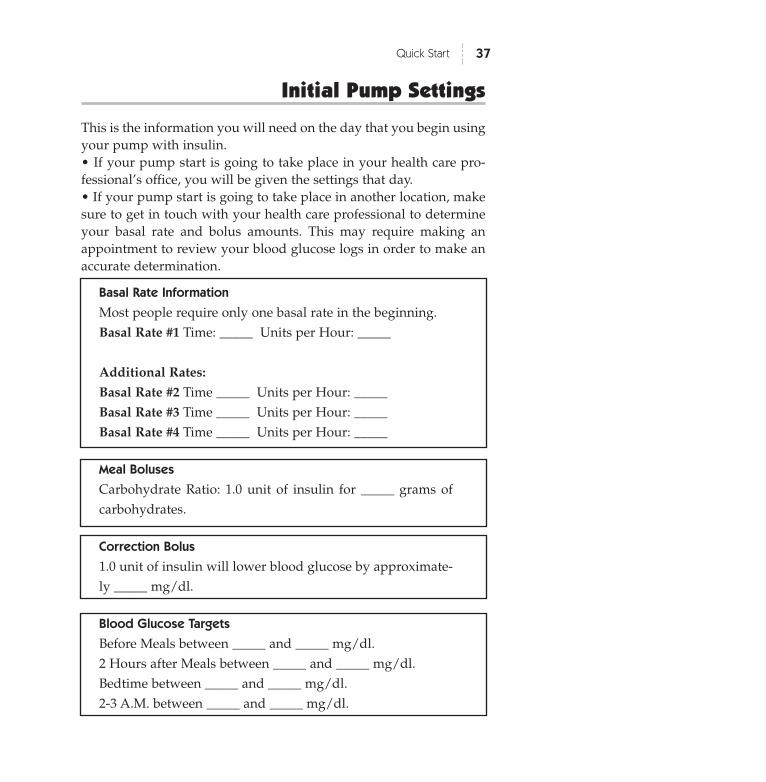
Basal Rate Information
Most people require only one basal rate in the beginning.Basal Rate #1 Time: _____ Units per Hour: _____
Additional Rates:
Basal Rate #2 Time _____ Units per Hour: _____Basal Rate #3 Time _____ Units per Hour: _____Basal Rate #4 Time _____ Units per Hour: _____
Meal Boluses
Carbohydrate Ratio: 1.0 unit of insulin for _____ grams ofcarbohydrates.
Correction Bolus
1.0 unit of insulin will lower blood glucose by approximate-ly _____ mg/dl.
Blood Glucose Targets
Before Meals between _____ and _____ mg/dl.2 Hours after Meals between _____ and _____ mg/dl.Bedtime between _____ and _____ mg/dl.2-3 A.M. between _____ and _____ mg/dl.

38 Quick Start
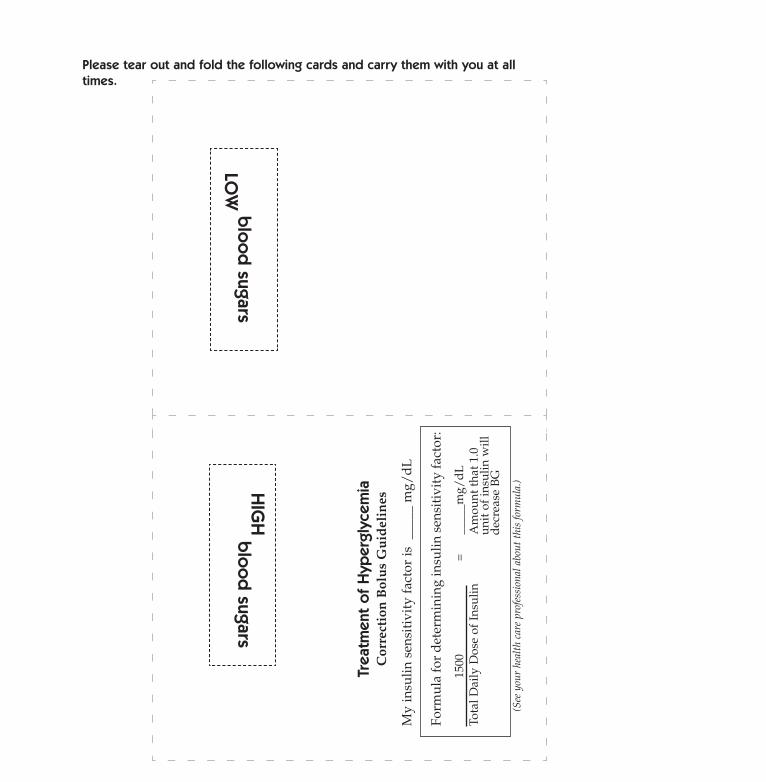
Treatm
ent
of
Hyp
erg
lycem
iaC
orre
ctio
n B
olu
s G
uid
elin
es
My
insu
lin s
ensi
tivi
ty f
acto
r is
___
__ m
g/d
L
Form
ula
for
det
erm
inin
g in
sulin
sen
siti
vity
fact
or:
1500
=
____
_mg/
dL
Tota
l Dai
ly D
ose
of I
nsul
inA
mou
nt th
at 1
.0un
it o
f in
sulin
will
dec
reas
e B
G
(See
you
r he
alth
car
e pr
ofes
sion
al a
bout
thi
s fo
rmul
a.)
HIG
Hb
loo
d su
gars
LOW
blo
od
sugars
Please tear out and fold the following cards and carry them with you at all
times.

The R
ule
of 1
5
If blo
od
glu
co
se is 7
0 m
g/d
l or b
elo
w-
Treat with 15 gram
s of carbohydrate
-C
heck BG
in 15 minutes.
If not above 70 mg/
dl, repeat treatm
ent and check
BG
in 15 minutes
Th
ese have 15 gram
s of carboh
ydrate:
-G
lucose tablets - three 5 grams tablets
or four 4 gram tablets
-4 oz. of juice
-1/
2 can regular soda pop
-6 lifesavers
-2 tablespoons table sugar or honey
-Tube of glucose gel
Carry carbohyd
rate with you at all tim
es for treatinghypoglycem
ia.
Hig
h B
loo
d G
luco
se Tre
atm
ent
If you h
ave nau
sea or vomitin
g, check
blood
glucose an
d u
rine k
etones im
med
iately!!!
If this b
loo
d g
luco
se is a
bo
ve 2
50 m
g/d
L and
keto
nes a
re m
od
era
te o
r larg
e:
Take insulin injection by syringe and contact physi-
cian(follow insulin sensitivity factor on back of card
for amount of insulin).
Change insulin infusion set.
Drink liquid
with no calories every 30 m
inutes.
Check B
G every 2 hours and
continue to take insulinuntil B
G reaches target.
Check urine for ketones. C
all physician if your BG
and urine ketones rem
ain elevated or you are unable
to drink.
If this b
loo
d g
luco
se is ab
ove
250
mg/d
Land
keto
nes a
re sm
all, tra
ce o
r negative
:
Take insulin correction bolus (follow guid
elines onback of card
).
Check B
G every tw
o hours and give correction insulin
bolus if BG
is above target.

41Basal Rates
Basal Rates:why and how
Q & A
Why is a basal rate needed?
✗ Basal insulin is the amount that the body needs to maintaintarget glucose values under fasting conditions.
✗ The basal rate accounts for approximately 50 percent of thebody’s total daily insulin requirements. If it could, your pan-creas would provide this basal rate. Your pump mimics yourpancreas by delivering insulin continuously over the 24hours in the day.
✗ You can set your insulin pump to provide one or more dif-ferent rates, called”profiles”. Some people only use one ratewhile others find they need more. It depends upon yourlifestyle and insulin requirements.
Why program a maximum basal rate?
✗ A maximum basal rate is a safety feature to help you fromprogramming a basal rate that is too high for your require-ments.
✗ You should discuss this with your health care professional todecide on the maximum amount of basal insulin that can bedelivered over an hour. This is usually based upon yourblood glucose values and body’s requirement for insulin.
42 Basal Rates
Are the profiles set each day?
✗ Once set, these individual basal rates or profiles form yourcomplete basal rate and the pump repeats them every 24hours. There is no need to reprogram them.
✗ You have the option of programming a new basal rate every30 minutes. However, most people find that only a few areneeded.
Why start and stop times?
✗ The start time of one basal rate is the stop time of the previ-ous one – giving you continuous basal insulin over 24 hours.
✗ You cannot set a start time for a basal rate that overlaps thenext profile. The new profile will cancel any basal rates thatfollow.
✗ It may be helpful for you to record your basal rates on paperuntil you are familiar with the process or have the computercapacity to download this information.
✗ For best results, discuss setting or changing your basal ratewith your health care professional.
When would a temporary basal rate be useful?
✗ Temporary basal rates offer an easy way to meet temporarysituations that may affect your blood glucose levels.
✗ The stress of illnesses can elevate your blood sugar. Setting atemporary basal rate to meet this rise in glucose can help inyour recovery.
✗ Setting a lower temporary basal rate during times of exer-cise may help prevent post-exercise hypoglycemia.
Why should I review my profiles?
✗ Comparing your profiles to your blood glucose recordshelps you and your health care professional identify youroptimal basal rate(s).
About personal delivery patterns:
✗ Personal Delivery Patterns allow you to establish multiplesets of basal rates in order to match different lifestyle needs.
• Do sleep patterns change?• Do weekday and weekend schedules change?
✗ For best results discuss this option with your health careprofessional.
✗ Each pattern must have at least one basal rate set or it willnot be accepted as a pattern.
✗ Keep a paper copy of the pattern(s) and basal rate(s) youhave programmed.
Are your basal rates set correctly?
✗ Review with your health care professional how to verify thatyour basal rates are set correctly.
43Basal Rates
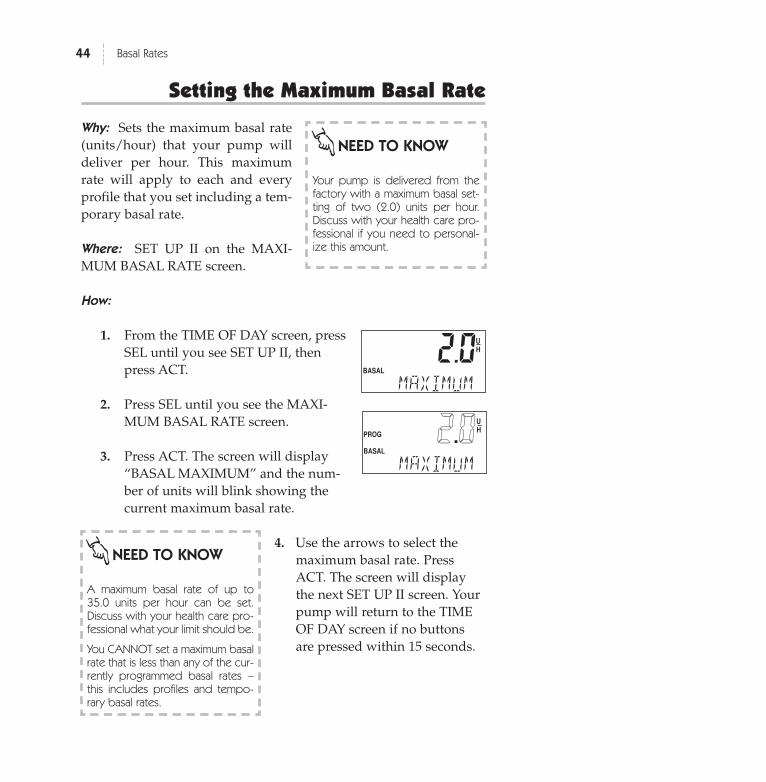
Setting the Maximum Basal Rate
Why: Sets the maximum basal rate(units/hour) that your pump willdeliver per hour. This maximumrate will apply to each and everyprofile that you set including a tem-porary basal rate.
Where: SET UP II on the MAXI-MUM BASAL RATE screen.
How:
1. From the TIME OF DAY screen, pressSEL until you see SET UP II, thenpress ACT.
2. Press SEL until you see the MAXI-MUM BASAL RATE screen.
3. Press ACT. The screen will display“BASAL MAXIMUM” and the num-ber of units will blink showing thecurrent maximum basal rate.
4. Use the arrows to select themaximum basal rate. PressACT. The screen will displaythe next SET UP II screen. Yourpump will return to the TIMEOF DAY screen if no buttonsare pressed within 15 seconds.
44 Basal Rates
NEED TO KNOW
A maximum basal rate of up to35.0 units per hour can be set.Discuss with your health care pro-fessional what your limit should be.
You CANNOT set a maximum basalrate that is less than any of the cur-rently programmed basal rates –this includes profiles and tempo-rary basal rates.
NEED TO KNOW
Your pump is delivered from thefactory with a maximum basal set-ting of two (2.0) units per hour.Discuss with your health care pro-fessional if you need to personal-ize this amount.
32.0AMPM
PROG
BASALPROF:
UH
MAXIMUM8
88:88
3322.00AMPM
PROG
BASALPROF:
UH
MAXIMUM8
88:88

45Basal Rates
Setting Your Basal Rate
Why: Provides continuous insulin delivery 24 hours a day.
Where: Main Menu on the BASAL RATE screen.
How: It is important that you follow these steps to set your basal rates toavoid any programming or delivery errors. Work with your health care pro-fessional to set the basal rates best for you.
1a. If your pump does not have any basal rates set, talk with yourhealth care professional about the rates for you to use as you beginpump therapy.
1b. If you currently have basal rates set in your pump:• From the Basal Rate screen, use the arrow buttons to make a list
of your current basal rates. Be careful to record the start timeand rate of each basal rate.
• After you have made a list of your current basal rates, clear allof your basal rates.To do this:
• Press ACT on the main BASAL RATE screen. Use thearrows to reset Basal Rate 1 to 0.0 u/h. Press ACT.
• Use the arrows to reset the start time for Basal Rate 2 to dashes (--:--). Press ACT to complete.
NEED TO KNOW
You cannot change the start timeof Profile 1 - only the rate. Profile1 always starts at 12:00 A.M.
You are ready to begin setting basal rates.
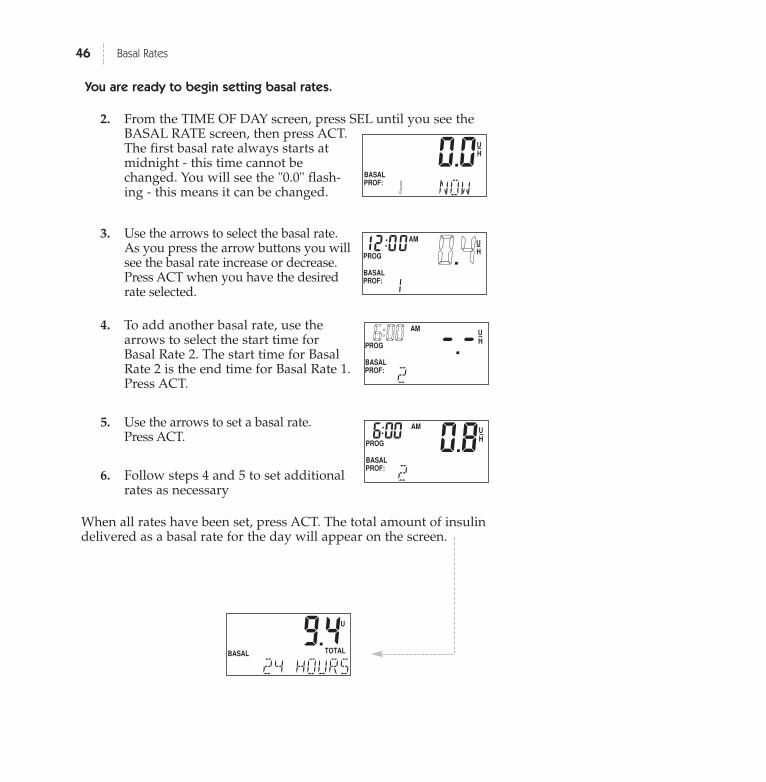
2. From the TIME OF DAY screen, press SEL until you see theBASAL RATE screen, then press ACT.The first basal rate always starts atmidnight - this time cannot bechanged. You will see the "0.0" flash-ing - this means it can be changed.
3. Use the arrows to select the basal rate.As you press the arrow buttons you willsee the basal rate increase or decrease.Press ACT when you have the desiredrate selected.
4. To add another basal rate, use thearrows to select the start time forBasal Rate 2. The start time for BasalRate 2 is the end time for Basal Rate 1.Press ACT.
5. Use the arrows to set a basal rate. Press ACT.
6. Follow steps 4 and 5 to set additionalrates as necessary
When all rates have been set, press ACT. The total amount of insulindelivered as a basal rate for the day will appear on the screen.
46 Basal Rates
8.0.8AMPM
PROG
BASALPROF:
UH
2
6:00
1.9.4BASAL TOTAL
U
24.HOURS
8.+.+AMPM
PROG
BASALPROF:
UH
2
66::0000
8.0.0AMPM
PROG
BASALPROF:
UH
11 NOW
88:88
8.00.44AMPM
PROG
BASALPROF:
UH
1
12:00
Personal Delivery Patterns
TO TURN PERSONAL DELIVERY PATTERNS ON
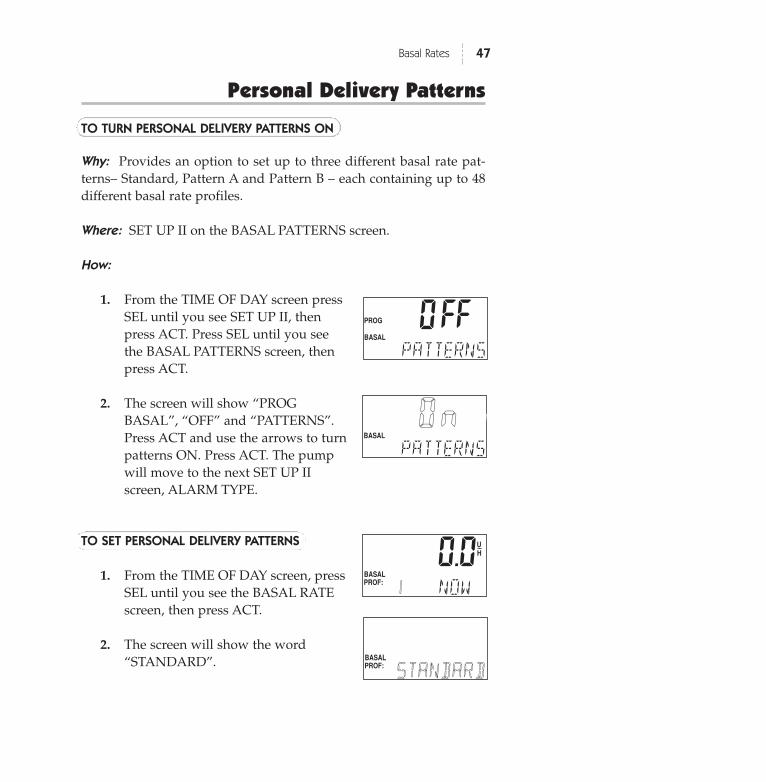
Why: Provides an option to set up to three different basal rate pat-terns– Standard, Pattern A and Pattern B – each containing up to 48different basal rate profiles.
Where: SET UP II on the BASAL PATTERNS screen.
How:
1. From the TIME OF DAY screen pressSEL until you see SET UP II, thenpress ACT. Press SEL until you seethe BASAL PATTERNS screen, thenpress ACT.
2. The screen will show “PROGBASAL”, “OFF” and “PATTERNS”.Press ACT and use the arrows to turnpatterns ON. Press ACT. The pumpwill move to the next SET UP IIscreen, ALARM TYPE.
TO SET PERSONAL DELIVERY PATTERNS
1. From the TIME OF DAY screen, pressSEL until you see the BASAL RATEscreen, then press ACT.
2. The screen will show the word“STANDARD”.
47Basal Rates
O.FFnAMPM
PROG
BASALPROF:
UH
PATTERNS
88:88
OO..nnFnAMPM
PROG
BASALPROF:
UH
PATTERNS
88:88
8.0.0AMPM
PROG
BASALPROF:
UH
11 NOW
88:88
8.0.0AMPM
PROG
BASALPROF:
UH
SSTTAANNDDAARRDD
88:88
48 Basal Rates
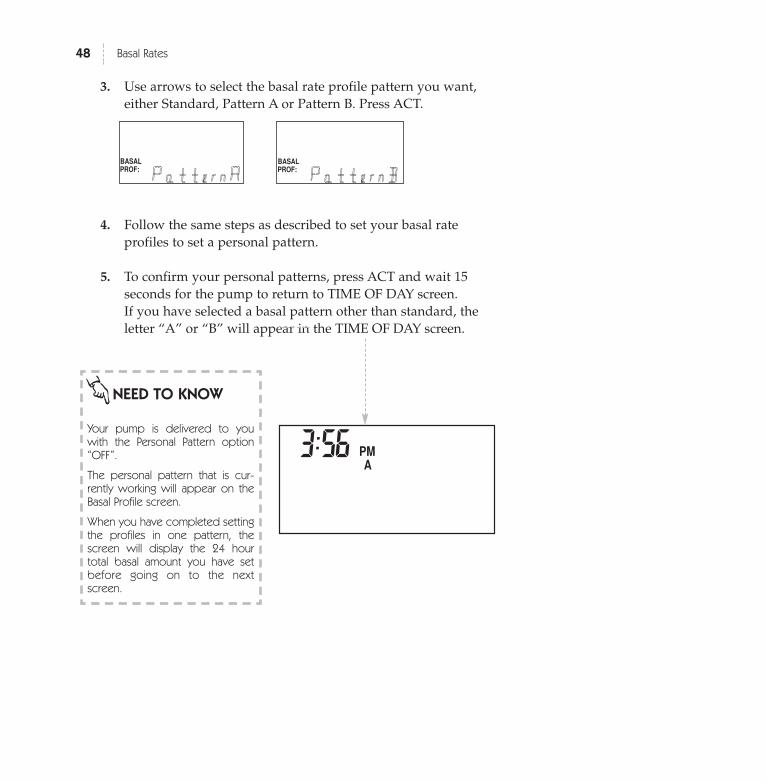
3. Use arrows to select the basal rate profile pattern you want,either Standard, Pattern A or Pattern B. Press ACT.
4. Follow the same steps as described to set your basal rateprofiles to set a personal pattern.
5. To confirm your personal patterns, press ACT and wait 15seconds for the pump to return to TIME OF DAY screen.If you have selected a basal pattern other than standard, theletter “A” or “B” will appear in the TIME OF DAY screen.
8.0.0AMPM
PROG
BASALPROF:
UH
PP aa tt tt ee rr nn AA
88:88 8.0.0AMPM
PROG
BASALPROF:
UH
PP aa tt tt ee rr nn BB
88:88
PM83:56A
NEED TO KNOW
Your pump is delivered to youwith the Personal Pattern option“OFF”.
The personal pattern that is cur-rently working will appear on theBasal Profile screen.
When you have completed settingthe profiles in one pattern, thescreen will display the 24 hourtotal basal amount you have setbefore going on to the nextscreen.
49Basal Rates
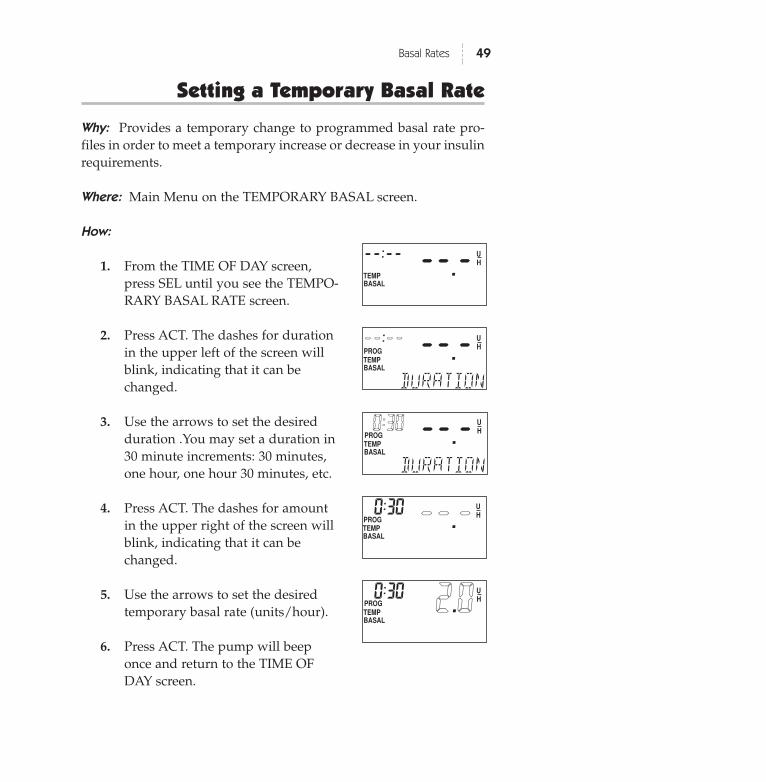
Setting a Temporary Basal Rate
Why: Provides a temporary change to programmed basal rate pro-files in order to meet a temporary increase or decrease in your insulinrequirements.
Where: Main Menu on the TEMPORARY BASAL screen.
How:
1. From the TIME OF DAY screen,press SEL until you see the TEMPO-RARY BASAL RATE screen.
2. Press ACT. The dashes for durationin the upper left of the screen willblink, indicating that it can bechanged.
3. Use the arrows to set the desiredduration .You may set a duration in30 minute increments: 30 minutes,one hour, one hour 30 minutes, etc.
4. Press ACT. The dashes for amountin the upper right of the screen willblink, indicating that it can bechanged.
5. Use the arrows to set the desiredtemporary basal rate (units/hour).
6. Press ACT. The pump will beeponce and return to the TIME OFDAY screen.
++.+TEMPBASAL
UH
........
++:++
++.+TEMPBASAL
UH
DURATION
++++:++++
++.+TEMPBASAL
UH
DURATION
+00::3300
++++.++TEMPBASAL
UH
DURATION
0:30
++22.00TEMPBASAL
UH
DURATION
0:30
PROG
PROG
PROG
PROG

VERIFYING DELIVERY
You can verify that a temporary basal rate is delivering by checkingthe following screens:
1. The TIME OF DAY screen displays“TEMP BASAL” verifying it is active.Also your pump will beep three timeson every hour.
2. The BASAL RATE screen shows that the current profile is“OFF”.
3. The TEMPORARY BASAL RATEscreen tells you the current tempo-rary rate that is set and tells you thetime remaining on the temporaryrate.
50 Basal Rates
AMPM
TEMPBASAL
4:05
NEED TO KNOW
If you have set a ‘profile’ to deliver a spe-cific basal rate at the same time you setthe temporary basal rate, the profile willbe inactive. The screen will read: “BASALPROF: ‘X’ IS OFF”.
The temporary basal rate will not repeat.If you want to repeat it, you will have togo through the process on the next day.
8.0.8AMPM
PROG
BASALPROF:
UH
110IS0OFF
88:88A
++2.0TEMPBASAL
UH
DURATION
0:21PROG
51Basal Rates
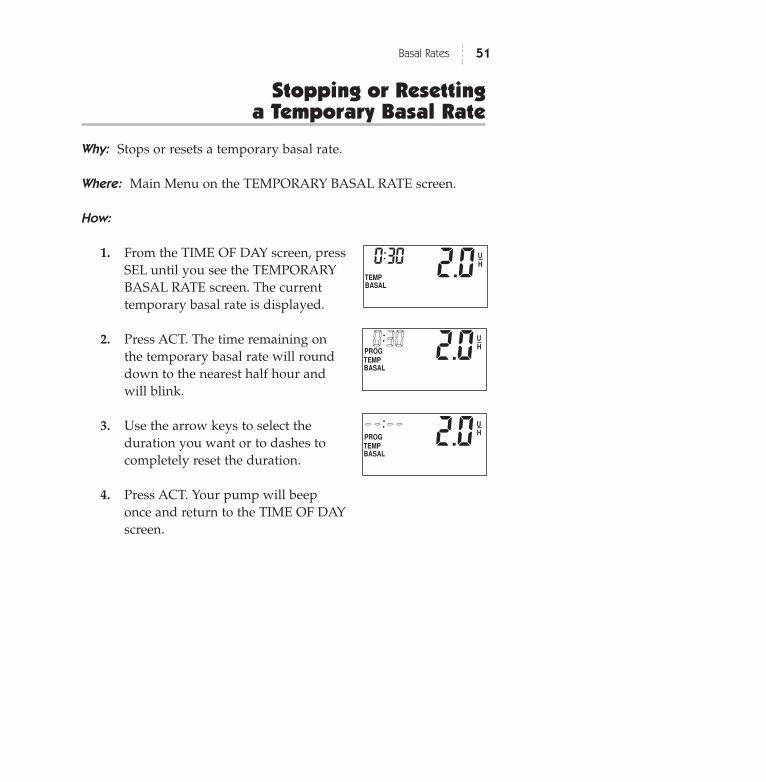
Stopping or Resetting a Temporary Basal Rate
Why: Stops or resets a temporary basal rate.
Where: Main Menu on the TEMPORARY BASAL RATE screen.
How:
1. From the TIME OF DAY screen, pressSEL until you see the TEMPORARYBASAL RATE screen. The currenttemporary basal rate is displayed.
2. Press ACT. The time remaining onthe temporary basal rate will rounddown to the nearest half hour andwill blink.
3. Use the arrow keys to select theduration you want or to dashes tocompletely reset the duration.
4. Press ACT. Your pump will beeponce and return to the TIME OF DAYscreen.
++2.0TEMPBASAL
UH
DURATION
00:3300PROG
++2.0TEMPBASAL
UH
DURATION
++++:++++PROG
++2.0TEMPBASAL
UH
DURATION
0:30PROG
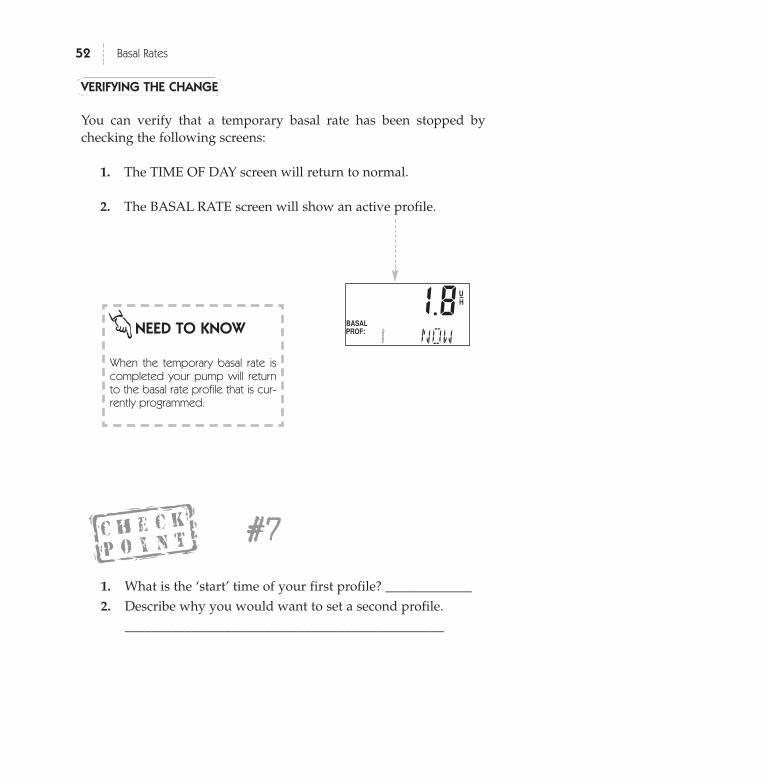
VERIFYING THE CHANGE
You can verify that a temporary basal rate has been stopped bychecking the following screens:
1. The TIME OF DAY screen will return to normal.
2. The BASAL RATE screen will show an active profile.
52 Basal Rates
NEED TO KNOW
When the temporary basal rate iscompleted your pump will returnto the basal rate profile that is cur-rently programmed.
1. What is the ‘start’ time of your first profile? _____________2. Describe why you would want to set a second profile.
________________________________________________
#7
81.8AMPM
PROG
BASALPROF:
UH
11 NOW
88:88

53Boluses
Insulin Boluses:why and how
The following bolus options will be discussed: Audio bolus, Variablebolus including Normal, Square Wave, Dual Wave and Normal on aSquare Wave.
Q & A
What do the letters mean on the bolus screen?
✗ The Medtronic MiniMed 508 sets different types of boluses:✗ ‘N’ stands for Normal bolus✗ ‘S’ stands for Square Wave✗ ‘D’ stands for Dual Wave indicating a Normal bolus fol-
lowed by a Square Wave.
Setting the Bolus Maximum:
✗ Discuss with your health care professional what the maxi-mum bolus amount should be for you. This feature can beset anywhere from 0.0 to 25.0 units.
Why choose a Square Wave bolus?
✗ The Square Wave bolus option can be a very useful tool touse when you have a long meal, are doing extended snack-ing or if you have gastroparesis. By extending the bolusdelivery over a period of time, (30 minutes to eight hours),the insulin is more likely to be available to match your indi-vidual needs.

What can I do if I want to eat more than the Square Wave I have pro-
grammed?
✗ The 508 will let you program a Normal bolus if you have aSquare Wave programmed, and need to give some addition-al insulin. The Normal bolus will "interrupt" the SquareWave that is being delivered, and then the Square Wave willresume after it is finished.
What is the advantage of the Dual Wave?
✗ This bolus option is useful for meals that contain both rapid-ly and slowly absorbed carbohydrates. (Example: buffets orcombinations of starch, fruit and medium fat protein). Thisoption meets both immediate and extended insulin needs.
54 Boluses
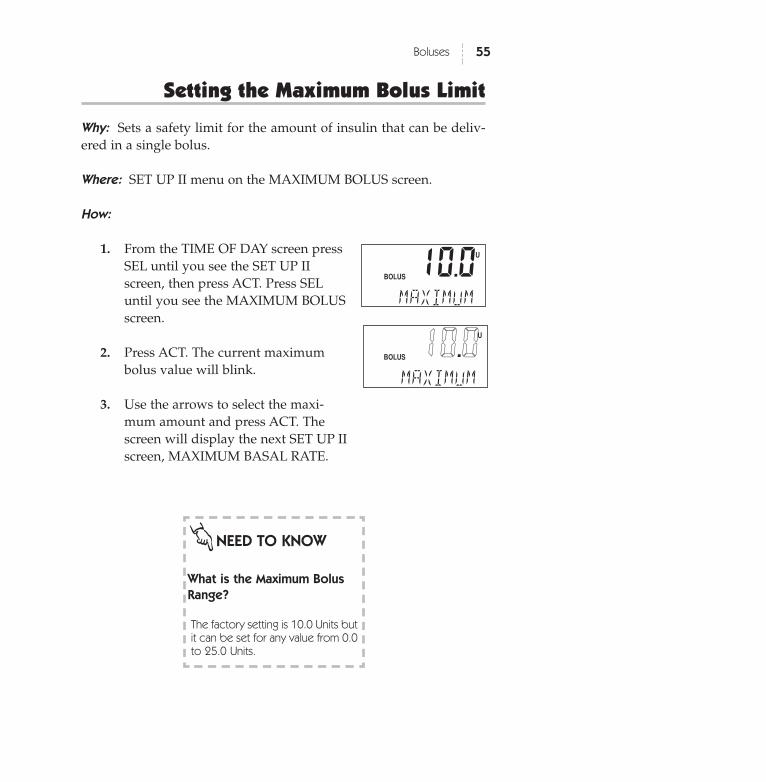
Setting the Maximum Bolus Limit
Why: Sets a safety limit for the amount of insulin that can be deliv-ered in a single bolus.
Where: SET UP II menu on the MAXIMUM BOLUS screen.
How:
1. From the TIME OF DAY screen pressSEL until you see the SET UP IIscreen, then press ACT. Press SELuntil you see the MAXIMUM BOLUSscreen.
2. Press ACT. The current maximumbolus value will blink.
3. Use the arrows to select the maxi-mum amount and press ACT. Thescreen will display the next SET UP IIscreen, MAXIMUM BASAL RATE.
55Boluses
NEED TO KNOW
What is the Maximum Bolus
Range?
The factory setting is 10.0 Units butit can be set for any value from 0.0to 25.0 Units.
1.0.0AMPM
BOLUS
HIST:
U
MAXIMUM8
12:00
11..00.00AMPM
BOLUS
HIST:
U
MAXIMUM8
12:00
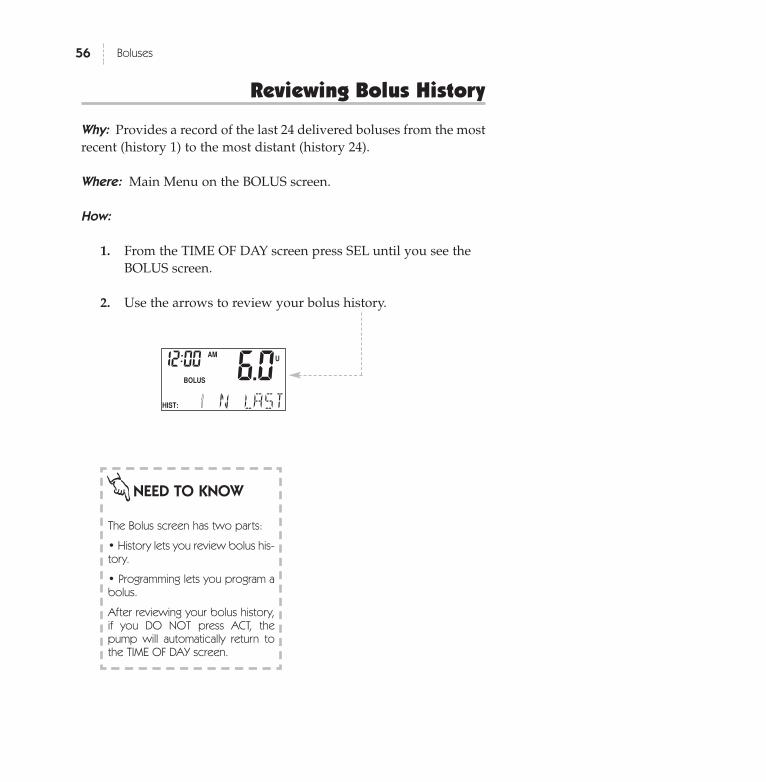
Reviewing Bolus History
Why: Provides a record of the last 24 delivered boluses from the mostrecent (history 1) to the most distant (history 24).
Where: Main Menu on the BOLUS screen.
How:
1. From the TIME OF DAY screen press SEL until you see theBOLUS screen.
2. Use the arrows to review your bolus history.
56 Boluses
NEED TO KNOW
The Bolus screen has two parts:
• History lets you review bolus his-tory.
• Programming lets you program abolus.
After reviewing your bolus history,if you DO NOT press ACT, thepump will automatically return tothe TIME OF DAY screen.
8.6.0AMPM
BOLUS
HIST:
U
11 .N .LAST
12:00
Variable Bolus
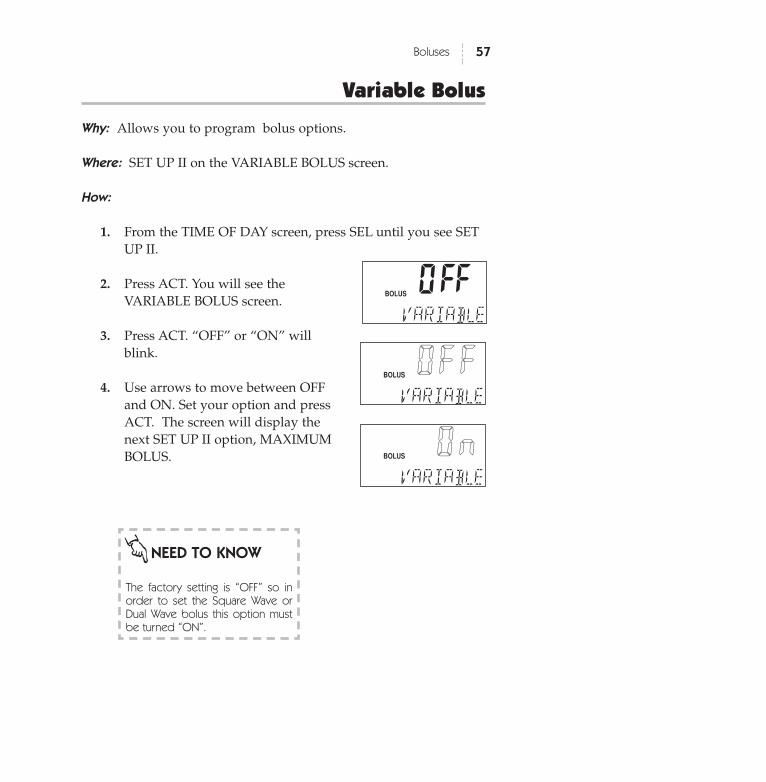
Why: Allows you to program bolus options.
Where: SET UP II on the VARIABLE BOLUS screen.
How:
1. From the TIME OF DAY screen, press SEL until you see SETUP II.
2. Press ACT. You will see theVARIABLE BOLUS screen.
3. Press ACT. “OFF” or “ON” willblink.
4. Use arrows to move between OFFand ON. Set your option and pressACT. The screen will display thenext SET UP II option, MAXIMUMBOLUS.
57Boluses
NEED TO KNOW
The factory setting is “OFF” so inorder to set the Square Wave orDual Wave bolus this option mustbe turned “ON”.
O.ffAMPM
BOLUS
HIST:
U
VARIABLE
12:00
OO.ff..ffAMPM
BOLUS
HIST:
U
VARIABLE
12:00
8.00..nnAMPM
BOLUS
HIST:
U
VARIABLE
12:00
Setting A Normal Bolus
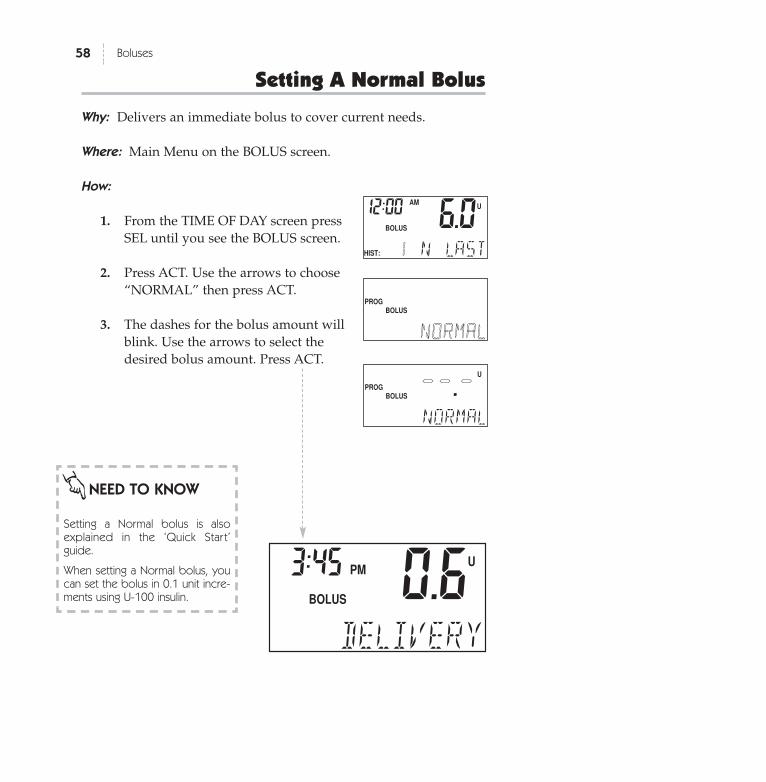
Why: Delivers an immediate bolus to cover current needs.
Where: Main Menu on the BOLUS screen.
How:
1. From the TIME OF DAY screen pressSEL until you see the BOLUS screen.
2. Press ACT. Use the arrows to choose“NORMAL” then press ACT.
3. The dashes for the bolus amount willblink. Use the arrows to select thedesired bolus amount. Press ACT.
58 Boluses
NEED TO KNOW
Setting a Normal bolus is alsoexplained in the ‘Quick Start’guide.
When setting a Normal bolus, youcan set the bolus in 0.1 unit incre-ments using U-100 insulin.
8.6.0AMPM
BOLUS
HIST:
U
11 .N .LAST
12:00
++++.++AMPM
BOLUS
HIST:
U
.NORMAL
12:00PROG
++++.++AMPM
BOLUS
HIST:
U
.NNOORRMMAALL
12:00PROG
8.0.6PM
BOLUS
U
DELIVERY
83:45
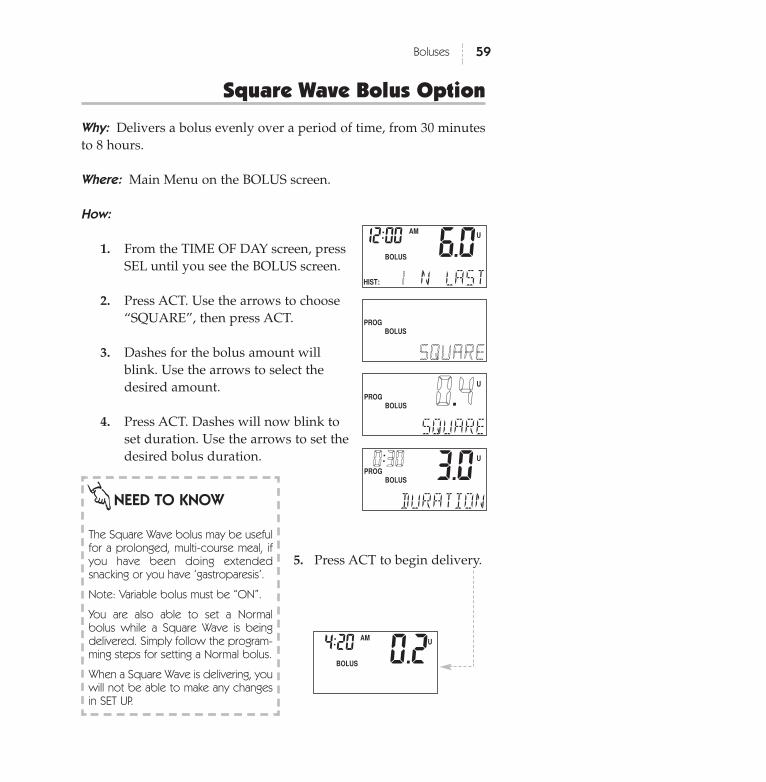
Square Wave Bolus Option
Why: Delivers a bolus evenly over a period of time, from 30 minutesto 8 hours.
Where: Main Menu on the BOLUS screen.
How:
1. From the TIME OF DAY screen, pressSEL until you see the BOLUS screen.
2. Press ACT. Use the arrows to choose“SQUARE”, then press ACT.
3. Dashes for the bolus amount willblink. Use the arrows to select thedesired amount.
4. Press ACT. Dashes will now blink toset duration. Use the arrows to set thedesired bolus duration.
5. Press ACT to begin delivery.
59Boluses
NEED TO KNOW
The Square Wave bolus may be usefulfor a prolonged, multi-course meal, ifyou have been doing extendedsnacking or you have ‘gastroparesis’.
Note: Variable bolus must be “ON”.
You are also able to set a Normalbolus while a Square Wave is beingdelivered. Simply follow the program-ming steps for setting a Normal bolus.
When a Square Wave is delivering, youwill not be able to make any changesin SET UP.
8.6.0AMPM
BOLUS
HIST:
U
11 .N .LAST
12:00
8.0.2AMPM
BOLUS
HIST:
U
11 .N .LAST
4:20
++++.++AMPM
BOLUS
HIST:
U
SSQQUUAARREE
12:00PROG
++00.44AMPM
BOLUS
HIST:
U
SQUARE
12:00PROG
++3.0AMPM
BOLUS
HIST:
U
DURATION
00:3300PROG
60 Boluses
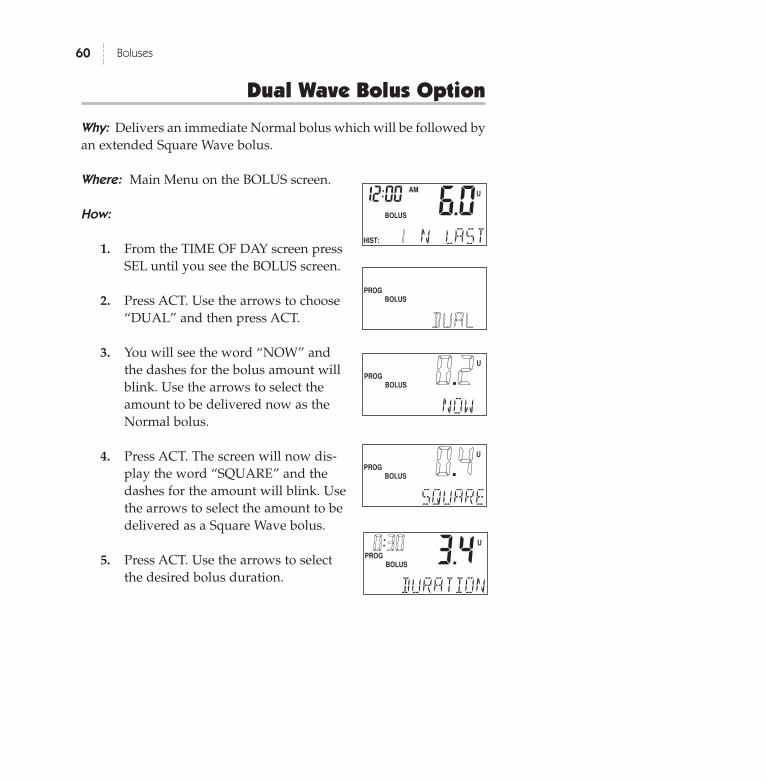
Dual Wave Bolus Option
Why: Delivers an immediate Normal bolus which will be followed byan extended Square Wave bolus.
Where: Main Menu on the BOLUS screen.
How:
1. From the TIME OF DAY screen pressSEL until you see the BOLUS screen.
2. Press ACT. Use the arrows to choose“DUAL” and then press ACT.
3. You will see the word “NOW” andthe dashes for the bolus amount willblink. Use the arrows to select theamount to be delivered now as theNormal bolus.
4. Press ACT. The screen will now dis-play the word “SQUARE” and thedashes for the amount will blink. Usethe arrows to select the amount to bedelivered as a Square Wave bolus.
5. Press ACT. Use the arrows to selectthe desired bolus duration.
8.6.0AMPM
BOLUS
HIST:
U
11 .N .LAST
12:00
++++.++AMPM
BOLUS
HIST:
U
DDUUAALL00
12:00PROG
++00.22AMPM
BOLUS
HIST:
U
NOW0
12:00PROG
++00.44AMPM
BOLUS
HIST:
U
SQUARE
12:00PROG
++3.4AMPM
BOLUS
HIST:
U
DURATION
00:3300PROG
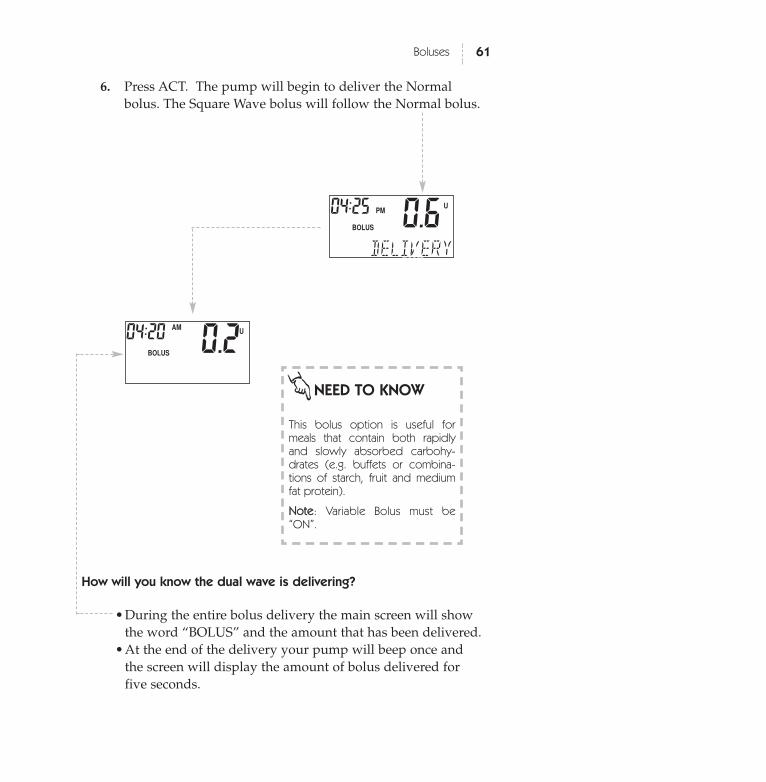
6. Press ACT. The pump will begin to deliver the Normalbolus. The Square Wave bolus will follow the Normal bolus.
61Boluses
NEED TO KNOW
This bolus option is useful formeals that contain both rapidlyand slowly absorbed carbohy-drates (e.g. buffets or combina-tions of starch, fruit and mediumfat protein).
NNoottee: Variable Bolus must be“ON”.
How will you know the dual wave is delivering?
•During the entire bolus delivery the main screen will showthe word “BOLUS” and the amount that has been delivered.
•At the end of the delivery your pump will beep once andthe screen will display the amount of bolus delivered forfive seconds.
++0.6AMPM
BOLUS
HIST:
U
DELIVERY
04:25PROG
8.0.2AMPM
BOLUS
HIST:
U
11 .N .LAST
04:20
Audio Bolus
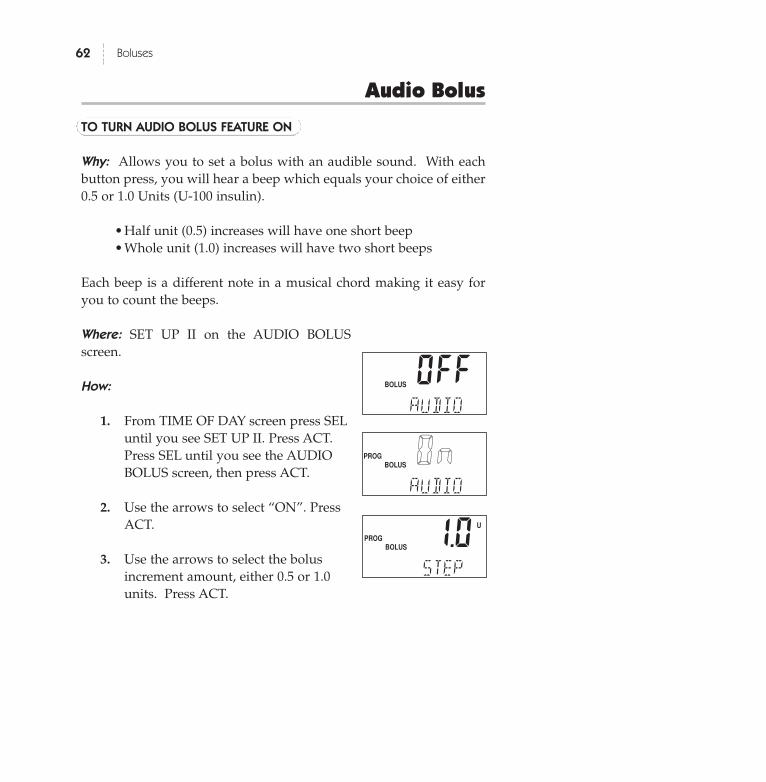
TO TURN AUDIO BOLUS FEATURE ON
Why: Allows you to set a bolus with an audible sound. With eachbutton press, you will hear a beep which equals your choice of either0.5 or 1.0 Units (U-100 insulin).
•Half unit (0.5) increases will have one short beep •Whole unit (1.0) increases will have two short beeps
Each beep is a different note in a musical chord making it easy foryou to count the beeps.
Where: SET UP II on the AUDIO BOLUSscreen.
How:
1. From TIME OF DAY screen press SELuntil you see SET UP II. Press ACT.Press SEL until you see the AUDIOBOLUS screen, then press ACT.
2. Use the arrows to select “ON”. PressACT.
3. Use the arrows to select the bolusincrement amount, either 0.5 or 1.0units. Press ACT.
62 Boluses
OFFnAMPM
BOLUS
HIST:
U
AUDIO8M
12:00
OOnnFnAMPM
BOLUS
HIST:
U
AUDIO8M
12:00PROG
01.0AMPM
BOLUS
HIST:
U
STEP8M
12:00PROG
63Boluses
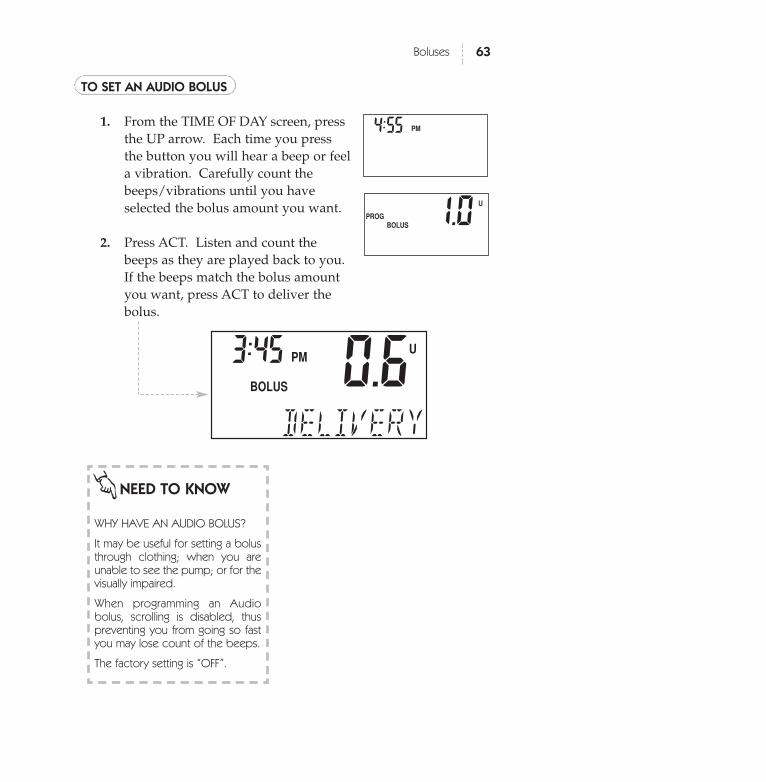
TO SET AN AUDIO BOLUS
1. From the TIME OF DAY screen, pressthe UP arrow. Each time you pressthe button you will hear a beep or feela vibration. Carefully count thebeeps/vibrations until you haveselected the bolus amount you want.
2. Press ACT. Listen and count thebeeps as they are played back to you.If the beeps match the bolus amountyou want, press ACT to deliver thebolus.
01.0AMPM
BOLUS
HIST:
U
STEP8M
12:00PROG
NEED TO KNOW
WHY HAVE AN AUDIO BOLUS?
It may be useful for setting a bolusthrough clothing; when you areunable to see the pump; or for thevisually impaired.
When programming an Audiobolus, scrolling is disabled, thuspreventing you from going so fastyou may lose count of the beeps.
The factory setting is “OFF”.
AMPM04:55
8.0.6PM
BOLUS
U
DELIVERY
83:45

64 Boluses
Daily Totals and History
Why: Allows you to recall the daily total amount that you havereceived in each of the past seven days.
Where: Main Menu on the DAILY TOTALS screen.
How:
1. From the TIME OF DAY screen,press SEL until you see the DAILYTOTALS screen. You will see theamount of insulin delivered for thatday and the word “TODAY” willblink.
2. Use the arrows to review the dailytotals for the last seven days.
3. When you have completed yourreview the pump will return to theTIME OF DAY screen.
NEED TO KNOW
The daily total includes all bolus and all basal amounts that have beendelivered for that day since midnight.
The daily total does not include any insulin used with the Prime feature.
A 90 day review is kept by the pump’s computer but is only availableby downloading.
IIff yyoouu cchhaannggee oorr rree--sseett tthhee ddaayy ooff tthhee wweeeekk ffoorr aannyy rreeaassoonn,, tthhee ddaaiillyyttoottaall wwiillll bbee eerraasseedd ffoorr tthhaatt ddaayy..
06.0TOTAL
U
TTOODDAAYY.
06.2TOTAL
U
01NOV99
Clocks and Alarms
The following section covers: Changing the Time Display Format,Setting the Beep Volume, How to Review Alarms, Alarm Type andSetting the Automatic Off. Setting the Time and Day is discussed inthe Quick Start guide. Please refer to page 13 if you have questions.
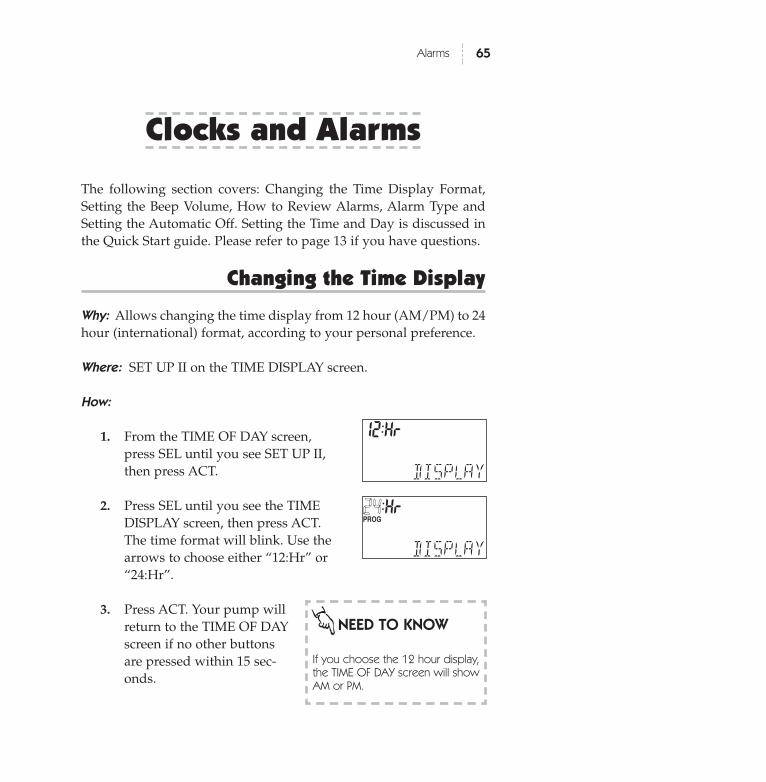
Changing the Time Display
Why: Allows changing the time display from 12 hour (AM/PM) to 24hour (international) format, according to your personal preference.
Where: SET UP II on the TIME DISPLAY screen.
How:
1. From the TIME OF DAY screen,press SEL until you see SET UP II,then press ACT.
2. Press SEL until you see the TIMEDISPLAY screen, then press ACT.The time format will blink. Use thearrows to choose either “12:Hr” or“24:Hr”.
3. Press ACT. Your pump willreturn to the TIME OF DAYscreen if no other buttonsare pressed within 15 sec-onds.
65Alarms
NEED TO KNOW
If you choose the 12 hour display,the TIME OF DAY screen will showAM or PM.
8.0.0AMPM
PROG
DISPLAY
12:Hr
8.0.0AMPM
PROG
DISPLAY
2244:Hr
Setting the Beep Volume
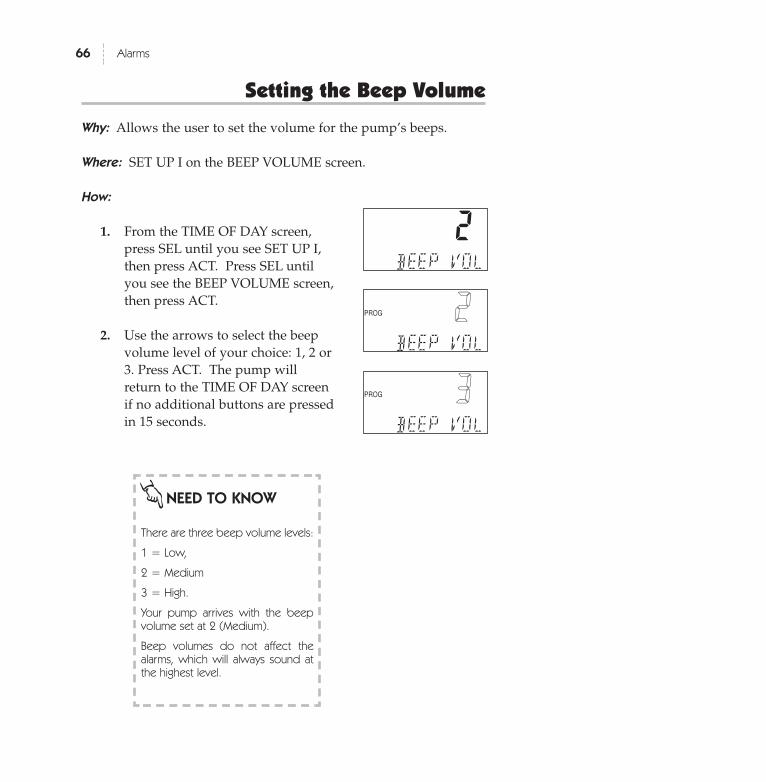
Why: Allows the user to set the volume for the pump’s beeps.
Where: SET UP I on the BEEP VOLUME screen.
How:
1. From the TIME OF DAY screen,press SEL until you see SET UP I,then press ACT. Press SEL untilyou see the BEEP VOLUME screen,then press ACT.
2. Use the arrows to select the beepvolume level of your choice: 1, 2 or3. Press ACT. The pump willreturn to the TIME OF DAY screenif no additional buttons are pressedin 15 seconds.
66 Alarms
NEED TO KNOW
There are three beep volume levels:
1 = Low,
2 = Medium
3 = High.
Your pump arrives with the beepvolume set at 2 (Medium).
Beep volumes do not affect thealarms, which will always sound atthe highest level.
2MM
ROG
BEEP8VOL
++:Hr
22AMPM
PROG
BEEP8VOL
++:Hr
33AMPM
PROG
BEEP8VOL
++:Hr
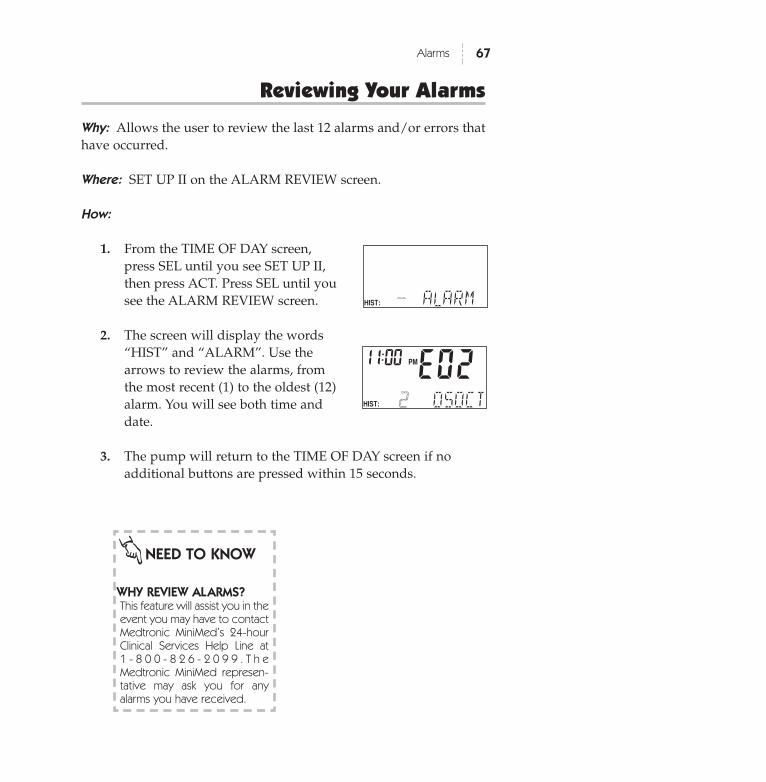
Reviewing Your Alarms
Why: Allows the user to review the last 12 alarms and/or errors thathave occurred.
Where: SET UP II on the ALARM REVIEW screen.
How:
1. From the TIME OF DAY screen,press SEL until you see SET UP II,then press ACT. Press SEL until yousee the ALARM REVIEW screen.
2. The screen will display the words“HIST” and “ALARM”. Use thearrows to review the alarms, fromthe most recent (1) to the oldest (12)alarm. You will see both time anddate.
3. The pump will return to the TIME OF DAY screen if noadditional buttons are pressed within 15 seconds.
67Alarms
NEED TO KNOW
WHY REVIEW ALARMS?This feature will assist you in theevent you may have to contactMedtronic MiniMed’s 24-hourClinical Services Help Line at1 - 8 0 0 - 8 2 6 - 2 0 9 9 . T h eMedtronic MiniMed represen-tative may ask you for anyalarms you have received.
HIST: .ALARM9
E02MPM
HIST: 220000050CT
11:00
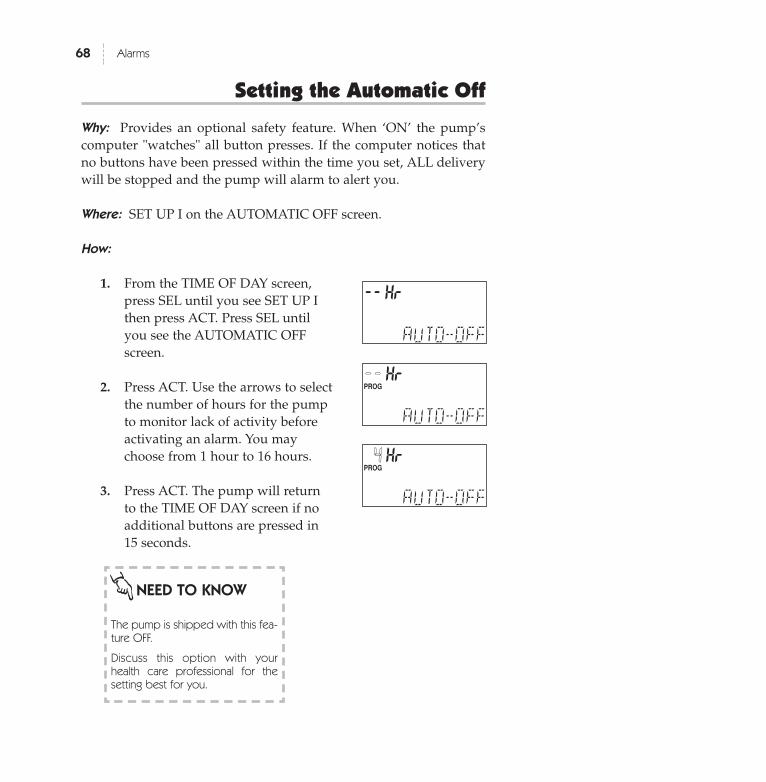
Setting the Automatic Off
Why: Provides an optional safety feature. When ‘ON’ the pump’scomputer "watches" all button presses. If the computer notices thatno buttons have been pressed within the time you set, ALL deliverywill be stopped and the pump will alarm to alert you.
Where: SET UP I on the AUTOMATIC OFF screen.
How:
1. From the TIME OF DAY screen,press SEL until you see SET UP Ithen press ACT. Press SEL untilyou see the AUTOMATIC OFFscreen.
2. Press ACT. Use the arrows to selectthe number of hours for the pumpto monitor lack of activity beforeactivating an alarm. You maychoose from 1 hour to 16 hours.
3. Press ACT. The pump will returnto the TIME OF DAY screen if noadditional buttons are pressed in15 seconds.
68 Alarms
NEED TO KNOW
The pump is shipped with this fea-ture OFF.
Discuss this option with yourhealth care professional for thesetting best for you.
8.0.0AMPM
PROG
AUT0--0FF
++:Hr
8.0.0AMPM
PROG
AUT0--0FF
++++:Hr
8.0.0AMPM
PROG
AUT0--0FF
44:Hr
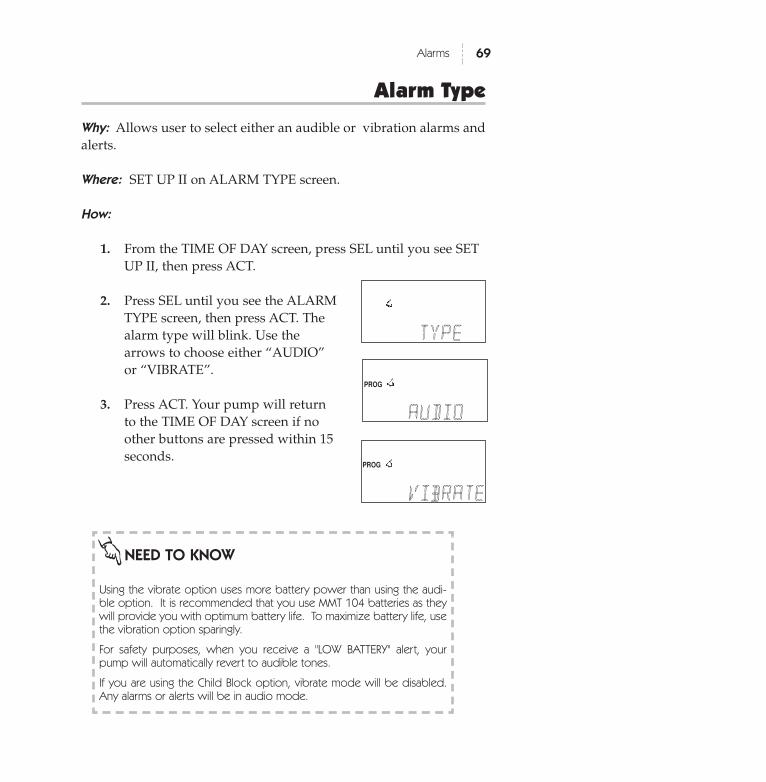
Alarm Type
Why: Allows user to select either an audible or vibration alarms andalerts.
Where: SET UP II on ALARM TYPE screen.
How:
1. From the TIME OF DAY screen, press SEL until you see SETUP II, then press ACT.
2. Press SEL until you see the ALARMTYPE screen, then press ACT. Thealarm type will blink. Use thearrows to choose either “AUDIO”or “VIBRATE”.
3. Press ACT. Your pump will returnto the TIME OF DAY screen if noother buttons are pressed within 15seconds.
69Alarms
TTYYPPEE..
AAUUDDIIOO..
PROG
NEED TO KNOW
Using the vibrate option uses more battery power than using the audi-ble option. It is recommended that you use MMT 104 batteries as theywill provide you with optimum battery life. To maximize battery life, usethe vibration option sparingly.
For safety purposes, when you receive a "LOW BATTERY" alert, yourpump will automatically revert to audible tones.
If you are using the Child Block option, vibrate mode will be disabled.Any alarms or alerts will be in audio mode.
VVIIBBRRAATTEE
PROG

70 Alarms

71Other Features
Other Useful Features
Using The Remote Control
The Model 500 Remote Control is an optional accessory item for yourmodel 508 insulin pump that allows you to program a bolus or sus-pend and restart your pump without pressing any of the pump’s but-tons! The Remote Control contains a transmitter that sends signals toa receiver in your 508 pump. This is designed to add more freedomand flexibility to your daily activities! Of course, you can still pro-gram your pump by using the four main pump buttons.
NEED TO KNOW
The Remote Control is a very sim-ple and easy to use device.
Three buttons control all the pro-gramming:
• ‘STOP’: Suspends or restartsyour pump
• ‘BOL’: Allows you to set anAudio bolus
• ‘ACT’: activates your program-ming choices
Why: It allows the user, by way of ‘radio frequency waves’, to sus-pend, restart and program an Audio bolus without using the buttonson the 508 pump. This “links” the remote control to the pump.
Where: SET UP II on the RADIO FRE-QUENCY DEVICE screen.
How: To use the Remote Control, youmust turn this feature ON in your 508pump.
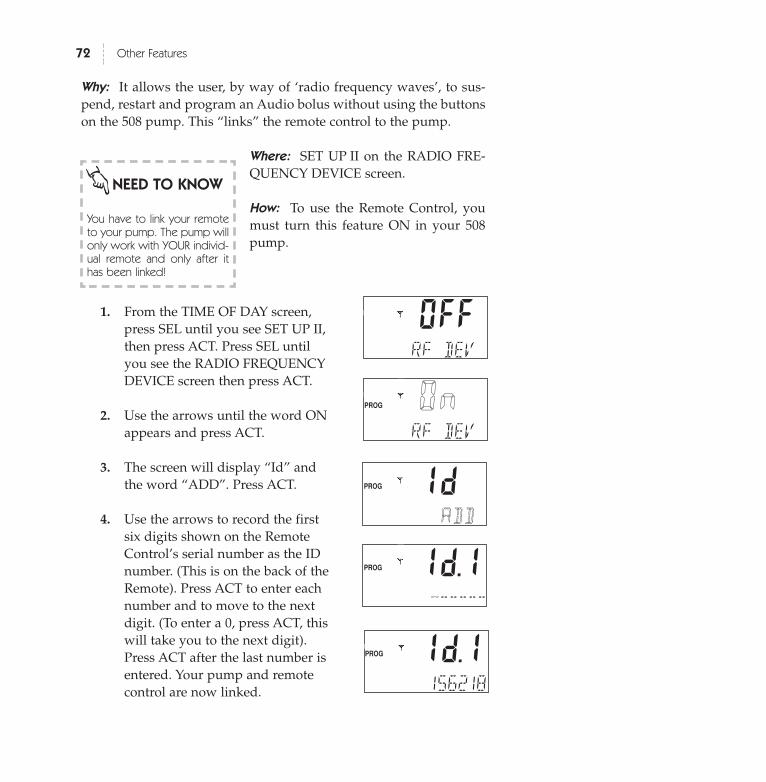
1. From the TIME OF DAY screen,press SEL until you see SET UP II,then press ACT. Press SEL untilyou see the RADIO FREQUENCYDEVICE screen then press ACT.
2. Use the arrows until the word ONappears and press ACT.
3. The screen will display “Id” andthe word “ADD”. Press ACT.
4. Use the arrows to record the firstsix digits shown on the RemoteControl’s serial number as the IDnumber. (This is on the back of theRemote). Press ACT to enter eachnumber and to move to the nextdigit. (To enter a 0, press ACT, thiswill take you to the next digit).Press ACT after the last number isentered. Your pump and remotecontrol are now linked.
Off.RF.DEV.
OOnnff .RF.DEV.
1.d.1PROG
PROG
AADDDD.
1.d.1PROG
----------
72 Other Features
NEED TO KNOW
You have to link your remoteto your pump. The pump willonly work with YOUR individ-ual remote and only after ithas been linked!
1.d.1PROG
156218
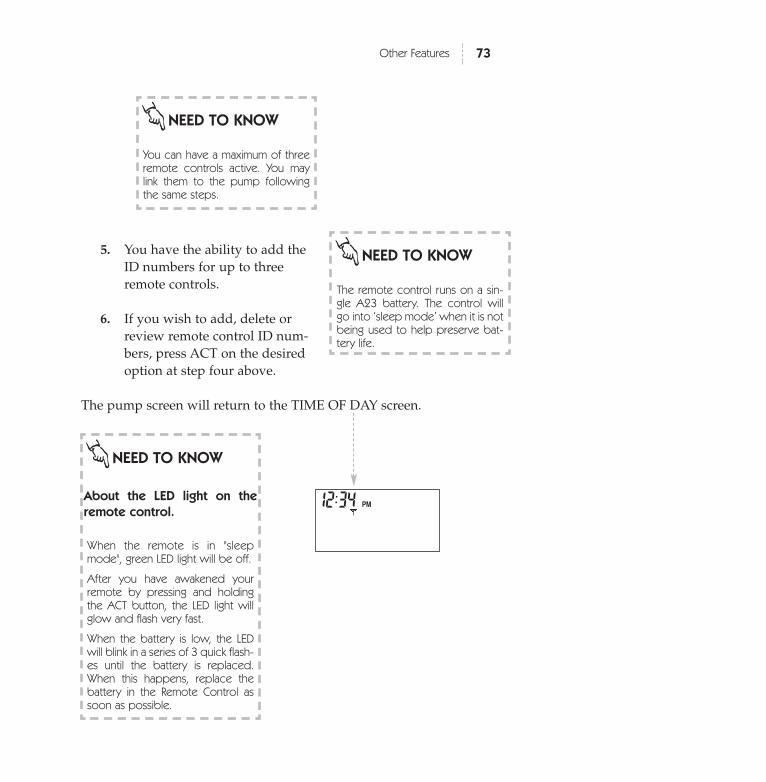
5. You have the ability to add theID numbers for up to threeremote controls.
6. If you wish to add, delete orreview remote control ID num-bers, press ACT on the desiredoption at step four above.
The pump screen will return to the TIME OF DAY screen.
NEED TO KNOW
The remote control runs on a sin-gle A23 battery. The control willgo into ‘sleep mode’ when it is notbeing used to help preserve bat-tery life.
NEED TO KNOW
About the LED light on the
remote control.
When the remote is in "sleepmode", green LED light will be off.
After you have awakened yourremote by pressing and holdingthe ACT button, the LED light willglow and flash very fast.
When the battery is low, the LEDwill blink in a series of 3 quick flash-es until the battery is replaced.When this happens, replace thebattery in the Remote Control assoon as possible.
73Other Features
NEED TO KNOW
You can have a maximum of threeremote controls active. You maylink them to the pump followingthe same steps.
PM12:34
74 Other Features
USING THE REMOTE CONTROL TO DELIVER A BOLUS
Why: Allows you to deliver an audio bolus using the remote control.
Where: The BOL button on remote control.
How:
1. Press and hold ACT on the remote control for at least fiveseconds to ‘wake up’ the pump. When the pump is awake, itwill beep or vibrate. You will now be able to program anAudio bolus.
2. Slowly, press the BOL button as many times as you want toselect the bolus amount. Each press will result in a beep ora vibration. For example, with Audio bolus feature ‘ON’ andthe increment set at 1.0 units a five unit bolus would be fivepresses of the BOL button.
3. Press ACT. The pump will playback the amount you justselected. Press ACT to deliver.
NEED TO KNOW
The remote control will workbetween a range of 12 to 18 inches.
The Audio bolus feature must be“ON” to set a bolus using the remotecontrol.
Your pump ‘looks’ for a signal fromthe remote control every 2 or 3 sec-onds. This is why you need to pressand hold the ACT button on theremote control before you can pro-gram.
USING THE REMOTE CONTROL TO SUSPEND/RESTART THE PUMP
1. Press and hold ACT on the remote control for at least fiveseconds to ‘wake up’ the pump. When the pump is awake, itwill beep or vibrate.
2. To Suspend: Press STOP then press ACT. You will hear threeaudible beeps or vibrations confirming that the pump is insuspend.
3. To Restart: Press and hold ACT on the remote control forfive seconds. This will “wake-up” the pump. Press STOPand then press ACT. The pump will beep and or vibrateonce and then resume normal operations.
75Other Features
NEED TO KNOW
If you make a mistake you can letthe pump time out. (just do notpress any buttons), and in about15 seconds the pump will resetand return to the TIME OF DAYscreen.
To start programming, you need to“wakeup” the pump by pressingand holding ACT for 5 seconds.

Child Block Activation
Why: Restricts access to the pump’s features except by the RemoteControl, Suspend ON/OFF and Self Test.
Where: SET UP II on the CHILD BLOCK screen.
How:
1. From the TIME OF DAY screen,press SEL until you see SET UP IIthen press ACT. Press SEL until yousee the CHILD BLOCK screen, thenpress ACT.
2. Use the arrows to select “ON”. PressACT. If no additional buttons arepressed, the screen will return to theTIME OF DAY screen in 15 seconds.
76 Other Features
NEED TO KNOW
You will not be able to change anyof the programmed basal rates, orPersonal Pattern information whenChild Block is ON.
You will be able to program aNormal bolus and stop and restartthe pump with the remote control.You will only be able to Suspendand run a Self Test when ChildBlock is ON.
For safety, when Child Block is ON,the pump will disable Vibratemode and all alarms and alerts willbe in Audio mode.
O.FFnAMPM
PROG
BASALPROF:
UH
BLOCK8
88:88
OO..nnAMPM
PROG
BASALPROF:
BLOCK8
88:88
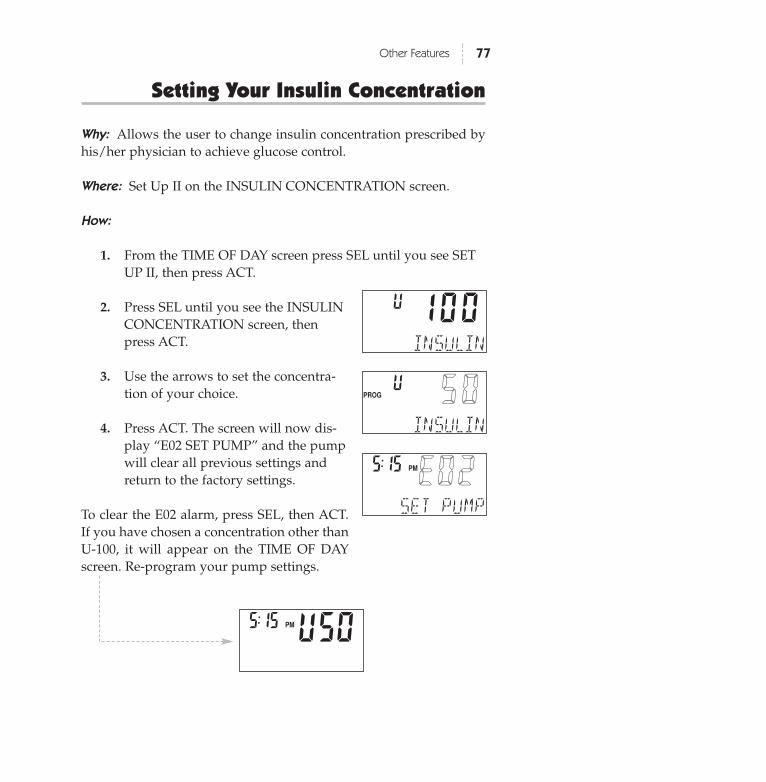
Setting Your Insulin Concentration
Why: Allows the user to change insulin concentration prescribed byhis/her physician to achieve glucose control.
Where: Set Up II on the INSULIN CONCENTRATION screen.
How:
1. From the TIME OF DAY screen press SEL until you see SETUP II, then press ACT.
2. Press SEL until you see the INSULINCONCENTRATION screen, thenpress ACT.
3. Use the arrows to set the concentra-tion of your choice.
4. Press ACT. The screen will now dis-play “E02 SET PUMP” and the pumpwill clear all previous settings andreturn to the factory settings.
To clear the E02 alarm, press SEL, then ACT.If you have chosen a concentration other thanU-100, it will appear on the TIME OF DAYscreen. Re-program your pump settings.
77Other Features
1.0.0AMPM
PROG
INSULIN
12:HU
11..55..00AMPM
PROG
INSULIN
12:HU
EE0022AMPM
SET8PUMP
15:15
U50AMPM
PROG
SET8PUMP
15:15
78 Other Features
NEED TO KNOW
Your pump is shipped with theinsulin concentration set for U – 100.
The rate of your insulin delivery isbased on your insulin concentration:
U - 100 . . .0.1 U per stroke
U - 50 . . . .0.05 U per stroke
U - 40 . . . .0.04 U per stroke
If you change the insulin concentra-tion from the pre-set type to anoth-er type, an alarm will sound toremind you to re-program your pro-files and maximum values for basaland bolus rates.
This safety step is necessary toensure accurate delivery of insulinafter you change the insulin concen-tration.
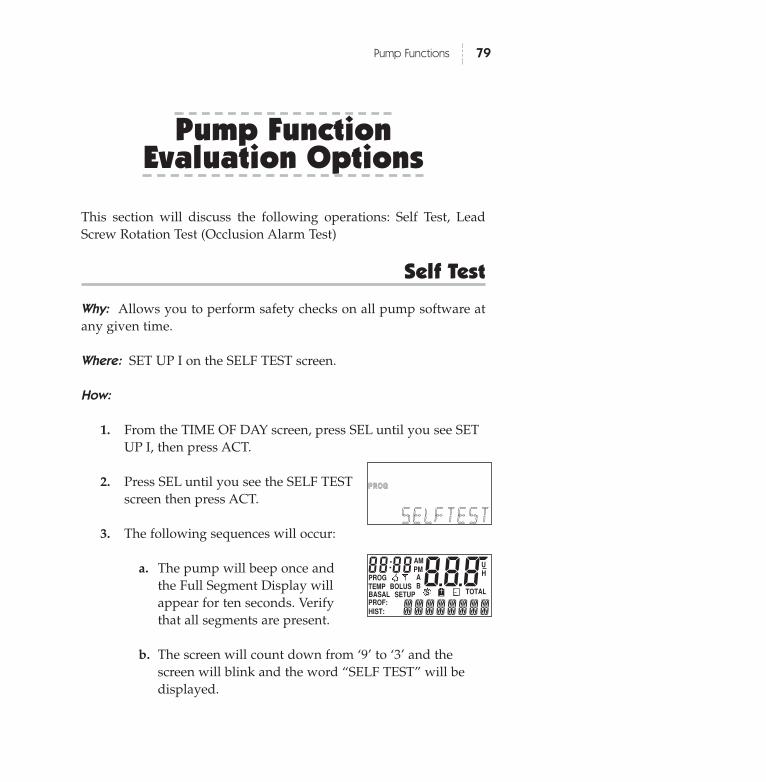
Pump FunctionEvaluation Options
This section will discuss the following operations: Self Test, LeadScrew Rotation Test (Occlusion Alarm Test)
Self Test
Why: Allows you to perform safety checks on all pump software atany given time.
Where: SET UP I on the SELF TEST screen.
How:
1. From the TIME OF DAY screen, press SEL until you see SETUP I, then press ACT.
2. Press SEL until you see the SELF TESTscreen then press ACT.
3. The following sequences will occur:
a. The pump will beep once andthe Full Segment Display willappear for ten seconds. Verifythat all segments are present.
b. The screen will count down from ‘9’ to ‘3’ and thescreen will blink and the word “SELF TEST” will bedisplayed.
79Pump Functions
8.2.0PPRROOGG
SSEELLFFTTEESSTT
++:Hr
8.8.ZAMPM
PROG
SETUPTEMPBASAL
BOLUSTOTAL
PROF:HIST:
UH
........
88:88
S
AB
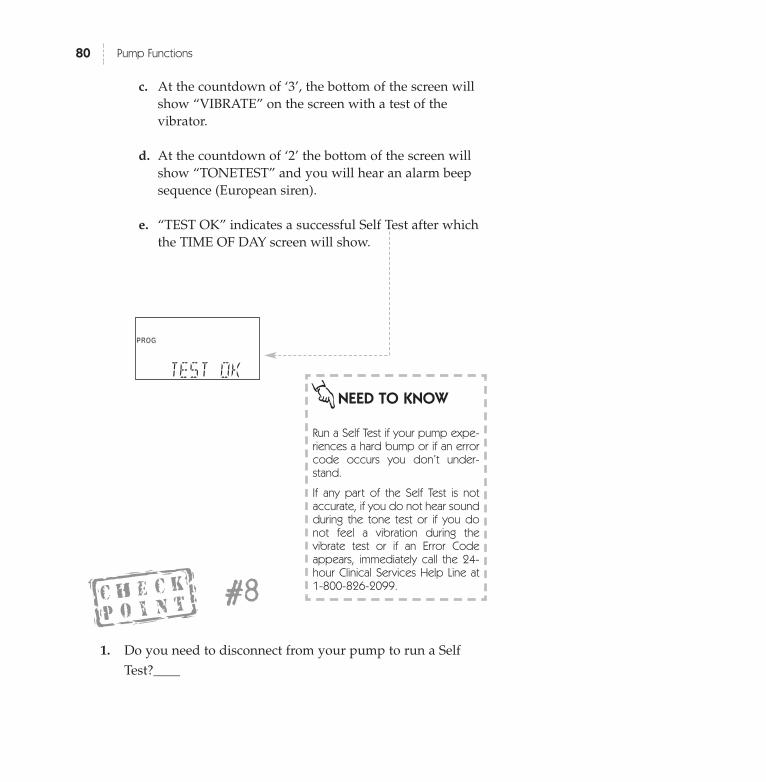
c. At the countdown of ‘3’, the bottom of the screen willshow “VIBRATE” on the screen with a test of thevibrator.
d. At the countdown of ‘2’ the bottom of the screen willshow “TONETEST” and you will hear an alarm beepsequence (European siren).
e. “TEST OK” indicates a successful Self Test after whichthe TIME OF DAY screen will show.
80 Pump Functions
1. Do you need to disconnect from your pump to run a SelfTest?____
8.0AMPM
PPRROOGG
TEST0OK
++:Hr
NEED TO KNOW
Run a Self Test if your pump expe-riences a hard bump or if an errorcode occurs you don’t under-stand.
If any part of the Self Test is notaccurate, if you do not hear soundduring the tone test or if you donot feel a vibration during thevibrate test or if an Error Codeappears, immediately call the 24-hour Clinical Services Help Line at1-800-826-2099.#8
81Pump Functions
Lead Screw Rotation Test
Why: Provides a method for you to ver-ify that the lead screw turns properly.
How:
1. Disconnect from the pump byeither of the following:
a. If you are using an infusion set with a Quick Releasefeature, disconnect by using the QR. Leave the fluidfilled reservoir in the pump.
b. If you are not using an infusion set with a QuickRelease feature, remove the infusion set from yourbody. Leave the reservoir in the pump.
2. Find the ‘landmark’ on the lead screw. This is the groove(white/yellow mark) which is placed on the end of the leadscrew closest to the serial number.
3. Using the Prime feature, program a 7.2 unit bolus of U-100insulin (3.6 of U-50, 2.88 of U-40). The lead screw will makeone complete turn. The groove will return to its initiallocation.
If no insulin flow is seen during test:
1. Check that no air is in the infusion set. If air is seen, primethe set until insulin appears at the end.
2. Check that no obstruction is present in the infusion set tub-ing or needle. If there is an obstruction, prepare and insert anew infusion set.
NEED TO KNOW
If you have questions regardingthe lead screw test, call the 24-hour Clinical Services Help Line at1-800-826-2099.

3. Make sure the driver block and driver arms are snug aroundthe syringe:
a. Disengage the two driver arms of the driver block bypulling both driver arms upwards toward you.
b. Slide the driver block away from the reservoir plungeralong the lead screw.
c. Return the driver block snugly against the reservoirplunger.
d. Re-engage the two driver arms of the driver block bypushing both arms inward to secure the back of theplunger between them.
4. Repeat the Lead ScrewRotation Test.
82 Pump Functions
NEED TO KNOW
Correct turning of the lead screwconfirms that you will receive thecorrect amount of insulin.
Disconnection from your pumpMUST be performed in one ofthese two options so you do notdeliver a 7.2 unit insulin bolus dur-ing the test.
Check:
a. The yellow mark has moved.
b. The yellow mark has returned to its originalposition after 7.2 unitshave been delivered.
What is the purpose of Lead Screw Rotation Test?_____________________________________________________
#9
Pump Care andMaintenance
This section will cover Installation of Batteries, General Pump Careand Cleaning Your Pump.
Batteries
Certain features on the 508 pump use a lot of battery power.
• Remote Control• Backlight • Vibration alarms• Downloading with the Com-Station.
If you use these features a lot, your bat-teries will need to be replaced more fre-quently.
LOW BATTERY & VIBRATION
When your pump receives a low bat-tery alert, your pump will revert backto “audio mode” and vibration will bedisabled.
83Pump Care
NEED TO KNOW
Your Medtronic MiniMed pumpuses three 1.5 volt silver oxide bat-teries.
For best results use MedtronicMiniMed Model 104 batteries(EverReady model 357) or equiva-lent batteries; however results mayvary.
It is important that you DDOO NNOOTTuse aallkkaalliinnee,, lliitthhiiuumm oorr zziinncc--aaiirr bat-teries in your Medtronic MiniMedInsulin Pump.
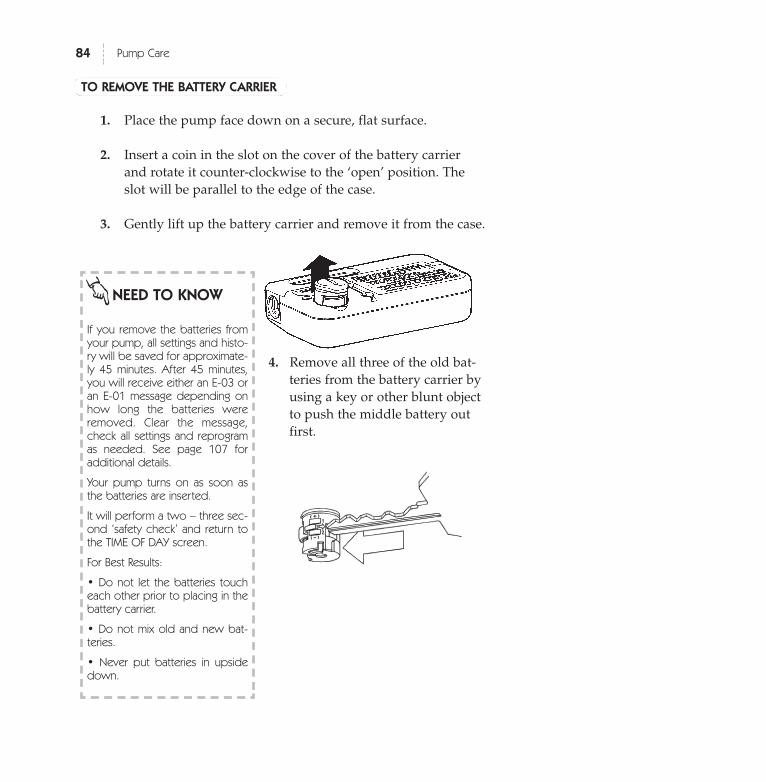
84 Pump Care
TO REMOVE THE BATTERY CARRIER
1. Place the pump face down on a secure, flat surface.
2. Insert a coin in the slot on the cover of the battery carrierand rotate it counter-clockwise to the ‘open’ position. Theslot will be parallel to the edge of the case.
3. Gently lift up the battery carrier and remove it from the case.
4. Remove all three of the old bat-teries from the battery carrier byusing a key or other blunt objectto push the middle battery outfirst.
NEED TO KNOW
If you remove the batteries fromyour pump, all settings and histo-ry will be saved for approximate-ly 45 minutes. After 45 minutes,you will receive either an E-03 oran E-01 message depending onhow long the batteries wereremoved. Clear the message,check all settings and reprogramas needed. See page 107 foradditional details.
Your pump turns on as soon asthe batteries are inserted.
It will perform a two – three sec-ond ‘safety check’ and return tothe TIME OF DAY screen.
For Best Results:
• Do not let the batteries toucheach other prior to placing in thebattery carrier.
• Do not mix old and new bat-teries.
• Never put batteries in upsidedown.
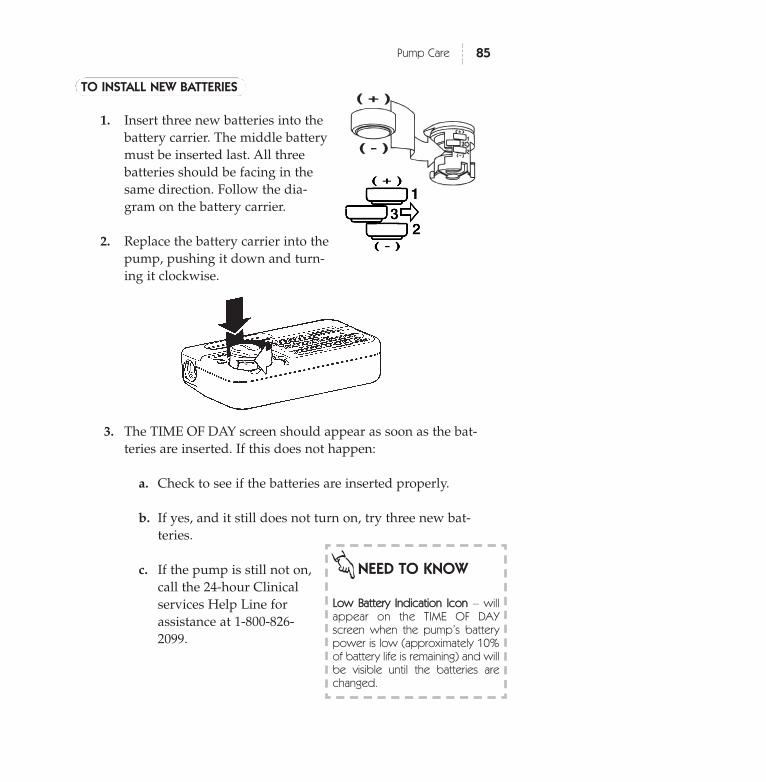
TO INSTALL NEW BATTERIES
1. Insert three new batteries into thebattery carrier. The middle batterymust be inserted last. All threebatteries should be facing in thesame direction. Follow the dia-gram on the battery carrier.
2. Replace the battery carrier into thepump, pushing it down and turn-ing it clockwise.
3. The TIME OF DAY screen should appear as soon as the bat-teries are inserted. If this does not happen:
a. Check to see if the batteries are inserted properly.
b. If yes, and it still does not turn on, try three new bat-teries.
c. If the pump is still not on,call the 24-hour Clinicalservices Help Line forassistance at 1-800-826-2099.
85Pump Care
NEED TO KNOW
LLooww BBaatttteerryy IInnddiiccaattiioonn IIccoonn – willappear on the TIME OF DAYscreen when the pump’s batterypower is low (approximately 10%of battery life is remaining) and willbe visible until the batteries arechanged.
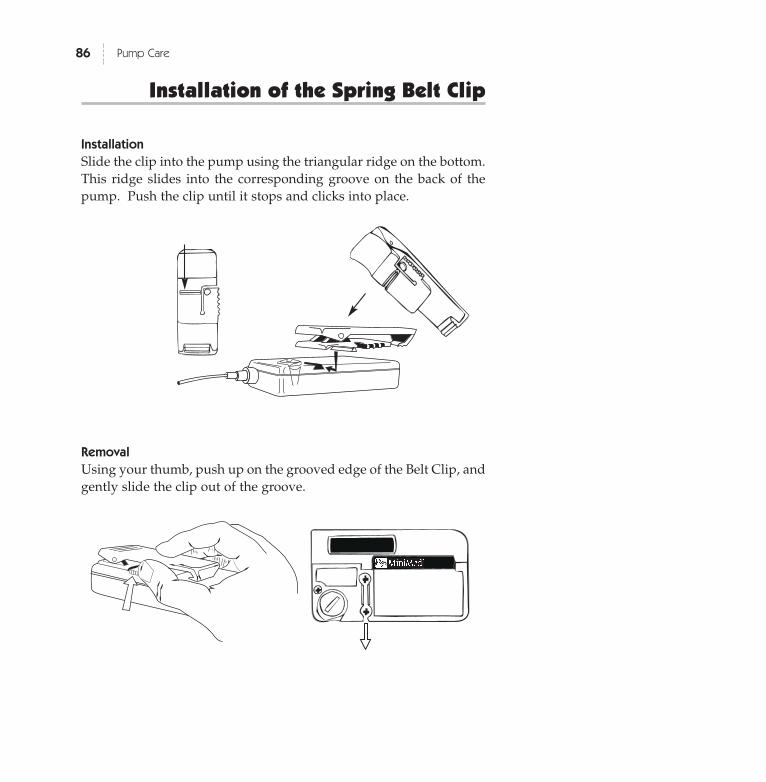
Installation of the Spring Belt Clip
Installation
Slide the clip into the pump using the triangular ridge on the bottom.This ridge slides into the corresponding groove on the back of thepump. Push the clip until it stops and clicks into place.
Removal
Using your thumb, push up on the grooved edge of the Belt Clip, andgently slide the clip out of the groove.
86 Pump Care
87Pump Care
Pump Care
IF YOUR PUMP IS DROPPED
1. Check that the driver arms and infusion set connections arenot damaged and are still correctly in place.
2. Check for leaks, cracks or damage to the keyboard and reser-voir syringe.
3. Review your PROFILES and ALL the SET UP options toensure they are still properly programmed.
4. Perform a Self Test. (See page 79)
NEED TO KNOW
Read your warranty statementincluded with your pump for infor-mation on what is covered duringyour warranty period.
Take care to protect your pumpfrom being dropped.
IF YOUR PUMP BECOMES SUBMERGED IN WATER
1. Pat the outside of the case until dry.
2. Open the reservoir compartment and check the compart-ment and reservoir for water. If wet, dry it completely with-in ten minutes of exposure to water. Exposure to liquids,including water or insulin, can corrode the mechanism.
3. Dry the reservoir completely – do not place a wet reservoirin your pump.
4. Do not use HOT AIR to dry your pump, as this may damageinternal electronics.
5. Check the battery compartment and the batteries - if wet, letthem dry completely before resuming use of the pump.
6. Check the battery carrier. If you need a new one, call theClinical Services Help Line at 1-800-826-2099.
88 Pump Care
NEED TO KNOW
Your pump is watertight butshould not be deliberately sub-merged in liquids.
We recommend using an infusionset with a Quick Release feature todisconnect before showering,bathing, etc.
You can also use a Shower Pak™or a SportGuard™.
89Pump Care
EXPOSURE TO EXTREME TEMPERATURES
1. Avoid exposure of your Medtronic MiniMed pump to tem-peratures above 104 °F (40°C) or below 33°F (0.5°C). Insulinsolutions freeze near 32° F and degrade at high tempera-tures. If you are outside in cold weather, wear your pumpclose to your body and cover it with warm clothing. If youare in warm weather, take measures to keep your pump andinsulin cool.
2. If you live in a cold, dry climate, protect your pumpfrom ElectrostaticDischarge (ESD) which cancause your pump to alarm.Using the leather case canhelp protect your pumpfrom ESD. If this happens,contact the Clinical ServicesHelp Line for assistance 1-800-826-2099.
3. Do not steam sterilize or autoclave your Medtronic MiniMedpump.
NEED TO KNOW
A leather case can provide greaterprotection for your pump.
If you have to remove and storeyour pump, it is recommended thatyou store it with the batteries inplace. Keep a record of your cur-rent basal rates and reset the ratesto zero to preserve battery life.
CLEANING YOUR PUMP
1. Use a damp (not wet) cloth and mild soap to clean the out-side of your Medtronic MiniMed pump.
2. Never use organic solvents, such as lighter fluid, nail polishremover or paint thinner to clean your pump.
3. Keep the reservoir compartment free from moisture.
4. Each time you change your batteries, clean the lead screwwith a stiff brush. A brush for cleaning the lead screw islocated in your pump box.
Your Medtronic MiniMed pump mechanism has been treated withspecial dry lubricants designed to last the life of the pump. DO NOTuse any lubricants on this mechanism.
X-RAYS, MRI’S AND CT SCANS
If you are going to have an X-ray, CT scan, MRI or any other type ofradiation therapy, TAKE YOUR PUMP AND REMOTE CONTROLOFF.
90 Pump Care
NEED TO KNOW
The Medtronic MiniMed pump isdesigned to withstand commonelectrostatic and electromagneticinterference, including airport securitysystems.
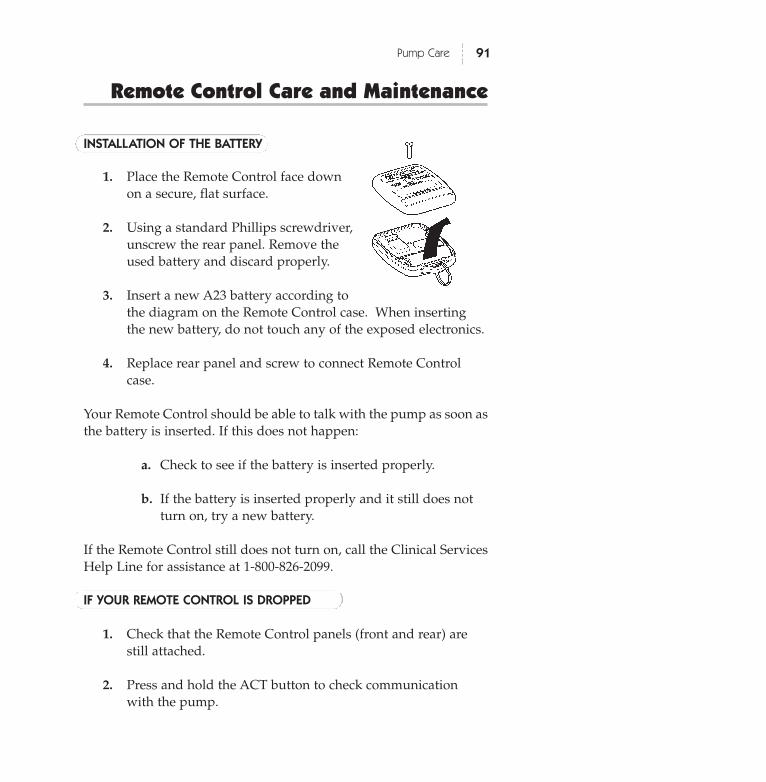
91Pump Care
Remote Control Care and Maintenance
INSTALLATION OF THE BATTERY
1. Place the Remote Control face downon a secure, flat surface.
2. Using a standard Phillips screwdriver,unscrew the rear panel. Remove theused battery and discard properly.
3. Insert a new A23 battery according tothe diagram on the Remote Control case. When insertingthe new battery, do not touch any of the exposed electronics.
4. Replace rear panel and screw to connect Remote Controlcase.
Your Remote Control should be able to talk with the pump as soon asthe battery is inserted. If this does not happen:
a. Check to see if the battery is inserted properly.
b. If the battery is inserted properly and it still does notturn on, try a new battery.
If the Remote Control still does not turn on, call the Clinical ServicesHelp Line for assistance at 1-800-826-2099.
IF YOUR REMOTE CONTROL IS DROPPED
1. Check that the Remote Control panels (front and rear) arestill attached.
2. Press and hold the ACT button to check communicationwith the pump.
92 Pump Care
IF YOUR REMOTE CONTROL BECOMES SUBMERGED IN WATER
1. Pat the outside of the case until dry.
2. Following the battery installation procedure above, unscrewthe rear panel and dry out the two sections.
3. Do not use HOT AIR to dry your Remote Control as thismay damage internal electronics.
4. If you need assistance, call the Clinical Services Help Line at1-800-826-2099.
EXPOSURE TO EXTREME TEMPERATURES
1. Avoid exposure of your Medtronic MiniMed Remote Controlto temperatures above 104 °F (40°C) or below 33°F (0.5°C).
2. Do not steam sterilize or autoclave your Remote Control.
CLEANING YOUR REMOTE CONTROL
1. Use a damp (not wet) cloth and mild soap to clean the out-side of your Remote Control.
2. Never use organic solvents, such as lighter fluid, nail polishremover or paint thinner to clean your Remote Control. Eachtime you change your battery, clean the compartment toremove any debris or lint that may have accumulated in thisarea.
FCC Notice for theRemote Control
This device complies with Part 15 of the FCC Rules. Operation is sub-ject to the following two conditions: (1) This device may not causeharmful interference and (2) This device must accept any interferencereceived, including interference that may cause undesirable opera-tion.
This device has been tested and found to comply with the limits fora Class B digital device, pursuant to Part 15 of the FCC Rules. Theselimits are designed to provide reasonable protection against harmfulinterference in a residential installation. This device generates, uses,and can radiate radio frequency energy and, if installed and used inaccordance with the instruction, may cause harmful interference toradio communications. However, there is no guarantee that interfer-ence will not occur in a particular installation. If this device doescause harmful interference to radio or television reception, the user isencouraged to try to correct the interference by one or more of the fol-lowing measures:
•Reorient or relocate the Remote Control• Increase the separation between the Remote Control and the
device that is receiving/emitting interference•Consult Medtronic MiniMed’s 24-hour Clinical Services
Help Line at 1-800-826-2099 if you have any questions.
Caution: Any changes or modifications to the devices not expresslyapproved by Medtronic MiniMed could void your ability to operatethe equipment.
93Pump Care

94 Pump Care
95User Safety
Pump User SafetyInformation
Caution
Federal (USA) law restricts this device to sale by or on the order of aphysician.
Indications
The Medtronic MiniMed Model 508 Insulin Pump is indicated for thecontinuous delivery of insulin at set and variable rates for the man-agement of diabetes mellitus in persons requiring insulin.
Contraindications
Pump therapy is not recommended for people who are unwilling orunable to perform at least four to six blood glucose tests per day andto maintain contact with their health care professional.
96 User Safety
Warnings
The following conditions may occur while using an insulin pump.
Hypoglycemia
The intensive management of diabetes has been associated with anincrease in the incidence of hypoglycemia (low blood glucose).
Diabetic Ketoacidosis (DKA)
Insulin pump therapy uses only Regular (short-acting) insulin, there-fore, any interruption in the delivery of insulin may result in therapid onset of diabetic ketoacidosis.
Skin Infections
Infection at the infusion site is a risk of pump therapy.Please refer to the Troubleshooting sections for more information.

97User Safety
Precautions
GENERAL
Monitor your blood sugar levels at least FOUR to SIX times per dayand ALWAYS:
•before you go to bed•when you get up in the morning•whenever you feel nauseous•before driving a car
Act quickly to respond to abnormal blood sugars! Notify your healthcare professional of any serious hypoglycemia or hyperglycemia, orof an increased frequency in low or high blood sugars.
Develop a protocol with your health care professional in the eventthat a problem occurs and you are unable to reach him/her foradvice. (There is also a troubleshooting section in this manual foryour reference.)
Periodically check your 3:00 A.M. blood sugar levels. Discuss anyabnormal readings with your health care professional.
Always carry an "emergency kit" of conventional insulin supplies incase you develop a problem with your pump and your insulin deliv-ery is stopped. This kit should include:
•Fast-acting glucose tablets•Blood glucose monitoring supplies, urine ketone monitoring
supplies• Regular insulin & insulin syringe with directions from your
health care professional regarding how much insulin to take•An extra infusion set and Medtronic MiniMed reservoir•Dressing and adhesive•Extra batteries (MMT-104)•508 programming and alarm cards

98 User Safety
Check the amount of insulin remaining in your reservoir at least oncea day.
Your Medtronic MiniMed pump is watertight, but should not bedeliberately submerged in liquids. If the reservoir area does becomewet, dry it completely within ten minutes. Wet reservoirs should notbe placed in the pump. Continued exposure of the reservoir area toliquids, including water or insulin, can corrode the mechanism.
Do not use any lubricants on the Medtronic MiniMed pump mecha-nism. It has been treated with a special dry lubricant designed to lastthe life of the pump.
Use only 3.0 ml reservoirs labeled "for use with Medtronic MiniMedpumps." Other manufacturers’ syringes can deliver the wrongamount of insulin.
If a display or function appears incomplete or differs from thedescriptions contained in this manual, initiate a Self Test and contactthe Medtronic MiniMed Clinical Services Help Line at 800-826-2099.
Successful operation of the Medtronic MiniMed pump requires bothvisual and auditory acuity. While features exist to help facilitatepump usage, Medtronic MiniMed does not recommend the use ofthis product by individuals whose impaired vision or hearing doesnot allow full recognition of the pump signals and alarms.

99User Safety
INFUSION SETS AND SITES
To help prevent problems with infusion sets or sites, routinely followthese precautions:
1. Always check for leaks after changing your reservoir andinfusion set. Wrap a tissue around the Luer connectionbetween the reservoir and infusion set and check for leaks.
2. Never use insulin that appears cloudy, as this may indicatethe insulin is inactive. Do not expose your insulin to extremechanges in temperature.
3. Change your infusion site regularly every 2-3 days, accord-ing to your health care professional’s suggestions andaccording to the Instructions for Use which accompany theinfusion sets.
4. Practice aseptic technique when inserting infusion sets.
5. Check the infusion site often for redness, irritation andinflammation. Many health care professionals recommendthat pump wearers check the site at the following times:
• before getting up in the morning
• before going to bed in the evening
• whenever blood sugar levels are elevated
6. Use an infusion set or dressing that provides anti-microbialprotection against infection.
7. Rotate the infusion site each time you change the infusionset to ensure proper absorption of insulin. The new siteshould be at least one inch from the previously used site.
100 User Safety
8. Avoid using an infusion site that will be irritated by clothingand accessories, or by rigorous movement and stretchingdue to exercise.
9. If using the Short Reservoir method, the reservoir convertermust be in place or inaccurate insulin delivery may result.
HYPOGLYCEMIA
To help prevent hypoglycemic (low blood glucose) episodes, routine-ly follow these precautionary steps:
1. Know the symptoms of hypoglycemia and never ignorethese symptoms, no matter how mild they may be.
2. Always carry a fast-acting sugar replacement (such as candy,juice or glucose tabs) in the event of a hypoglycemicepisode.
3. Have a current glucagon kit in your possession. Periodicallyreview the proper procedure for administering glucagonwith family members and significant others. Periodicallycheck the expiration date of the kit.
4. Monitor your blood glucose frequently, at least four to sixtimes a day, including periodic 3:00A.M. values. Discuss anappropriate protocol with your health care professional foradjustment of your insulin.
5. Never go to bed if your blood glucose is below your bedtimetarget level. Bedtime target levels are often set higher thanother blood glucose levels.
6. Do not skip a bedtime snack prescribed by your health careprofessional. Use extra caution whenever you program abedtime bolus.
101User Safety
7. Test before you drive. Blood glucose should be above 100mg/dl.
8. Set Automatic Off feature of your pump (see page 68)
HYPERGLYCEMIA AND DIABETIC KETOACIDOSIS (DKA)
To help prevent serious hyperglycemia (high blood glucose) and thepossibility of diabetic ketoacidosis (DKA), follow these precautions:
1. Monitor your blood glucose at least four to six times a dayand always before you go to bed, when you get up in themorning and whenever you feel nauseous.
2. If your blood glucose is above 250 mg/dl twice in a row,give regular insulin by injection (shot). Check blood glucoseagain in 1-2 hours.
3. Take insulin by injection (shot) at the first sign of nauseaif blood glucose is above 250 mg/dl. Check blood glucoseagain in 1-2 hours.
4. Check urine ketones if blood glucose is above 250 mg/dl oryou feel nauseous. If positive, call your doctor immediately.
5. Change your infusion set if blood glucose is elevated above250 mg/dl at two consecutive readings, AFTER you havetaken an injection (shot).
6. Note: Remember, nausea and vomiting are often the firstsigns of DKA. The key to avoiding DKA is to be preparedand act quickly! Do not assume your blood glucose is highbecause you are under stress, have the flu or miscalculatedyour last meal bolus.
102 User Safety
Adverse Reactions
HYPERGLYCEMIA AND DIABETIC KETOACIDOSIS (DKA)
Pump wearers use only Regular short-acting insulin. As a result youwill not have a reserve of long-acting insulin. You must be aware thatinterruption of insulin delivery due to infusion set clogs, leaks, lossof insulin potency or pump malfunction can result in a rapid rise ofblood glucose levels within two to four hours and the developmentof DKA within four to ten hours. In addition, the sudden onset ofstress caused by infection or an emotional event can result in a rapidrise of blood glucose levels and the development of DKA.
Although the pump has multiple safety alarms, it cannot alarm if theset is leaking or the insulin has lost its potency.
Therefore, it is essential that you make frequent (at least four to sixtimes per day) blood glucose determinations. If blood glucose levelsare high (over 250 mg/dl), you must be prepared to give an injectionof regular insulin and troubleshoot the pump and infusion set toinsure that it is delivering the necessary amount of insulin. Youshould also check for urine ketones whenever blood glucose valuesare elevated, above 250 mg/dl. Establish a protocol with your healthcare professional for rapidly identifying and treating hyperglycemiato prevent the onset of diabetic ketoacidosis and possible hospital-ization.
HYPOGLYCEMIA
Hypoglycemia can be more subtle for pump users than with patientson conventional therapy and may occur even when the pump isworking properly. Check blood glucose levels at least four to sixtimes per day with periodic checks at 3:00A.M. Notify your healthcare professional if you are experiencing repeated or severe lowblood glucose reactions. Besides reviewing your insulin, food andexercise, you and your physician should also discuss your targetblood glucose goals. Never go to bed with a blood glucose valuebelow your target level. Also, blood glucose tests should be per-formed before driving a car because hypoglycemia may go unnoticedwhile concentrating on traffic. Set Automatic Off feature of yourpump (see page 68).
SITE INFECTION/ABSCESSES
Infections at the insertion site may occur, but can be minimized bygood site preparation and the frequent changing of infusion sets. Theset should always be changed immediately if the site becomes sore,red, or swollen. Follow the advice of your health care professionaland product Instructions for Use regarding proper insertion tech-niques.
103User Safety

104 User Safety
105Troubleshooting: Alarms
Troubleshooting:Alarms and
Screen Messages
Your Medtronic MiniMed pump has a sophisticated network of safe-ty checks and systems which continually monitor the computer soft-ware, operations and programs.
If the safety network detects anything unusual, your pump hasalarms and signals to alert you to problems for immediate attention.
Error Messages
When you see an “E-XX” message, note the message and then restartyour pump. If you receive the same error message, call the ClinicalServices Help Line at 800-826-2099.
ERROR RESTART PROCEDURE
1. Press SEL, then ACT toclear the error message. Afew alarms will result in themessage “PROG PUMPE-01” appearing on the dis-play.
2. Press SEL and then ACT toclear the E-01 message.
3. Reprogram ALL of your settings.
NEED TO KNOW
Safety check messages are dividedinto two groups: ERRORS (EXX)and ALARMS (AXX).
XX represents a number that cor-responds to the safety check mes-sage seen on the screen.

Alarm Messages
When you see an ‘AXX’ message, look up the number on this trouble-shooting list to determine the problem and how to remedy it. PressSEL and then ACT to restart your pump.
ALARM RESTART PROCEDURE
Press SEL then ACT. Your pump should restart. All of your prior pro-gramming will be intact – you do not have to reprogram your set-tings.
106 Troubleshooting: Alarms
Pump has beenprogrammed tostop delivery.
To restart thepump, pressSEL, then ACT.
3 beeps/vibrationsevery 15 minutes.
Alarm Message Cause What to do
Low battery.(Pump is stilldelivering. 10%battery liferemains.)
Replace withMMT-104 bat-teries as soon aspossible alwaysbefore going tobed, and priorto download-ing.
3 beeps when the alarmis triggered.
6 beeps every minute.*
6 beeps/vibrations everyminute.*
Depleted bat-tery.
Replace batter-ies now. Pumphas stoppedinsulin delivery.
No deliverydue to excesspressure causedby an occlusionor empty reser-voir.
Press SEL, thenACT to stop thealarm. Checkreservoir, infu-sion set andblood glucose.Replace as nec-essary.
•Displayed as A-05 in Alarm Review Feature.
•Displayed as A-04 in Alarm Review Feature.
+5+AM
STOPPED
11:44
LO PM
BATTERY
10:25
NOPM
DELIVERY
12:38
OFFPM
NO POWER
9:38
•Vibration is disabled when pump has a Low Battery message.

107Troubleshooting: Alarms
3 beeps/vibrations every hour.
6 beeps/vibrations every minute.*
Temporarybasal rate isactive.
No action neces-sary unless youwant to stop thetemporary rate.
No buttonswere pressedduring theautomatic-offtime period.
To restart the pump, press SEL, then ACT.Check timeduration forautomatic off.
Over-deliveryprotection“Watchdog.”†
Press SEL, then ACT.
•Displayed as A-06 in Alarm Review Feature.
+0+AM
ALARM
11:43
AM
RATETEMPBASAL
9:41
A-51PM12:38
6 beeps/vibrations every minute.*
Alarm Message Cause What to do
Pump time anddate has beenreset.
Press SEL, then ACT.Reprogram ALLsettings includ-ing time, profilesand set-upoptions.
Change ininsulin concen-tration hascleared profiles& maximumsettings.
Press SEL, then ACT.Reprogram profiles & maxi-mum settings.
E-01AM
SET PUMP
12:00
E-02PM
SET PUMP
7:58
6 beeps/vibrations every minute.*
Batteries havebeen removedfor longer than45 minutes.
Press SEL, then ACT. Re-set time anddate. Verify allother settingsremain.
E-03AM
SET TIME
12:00
6 beeps/vibrations every minute.*
6 beeps/vibrations every minute.*
Time safetycheck.
Press SEL, then ACT. Re-set time anddate. Verify allother settingsremain.
E-20AM
SET TIME
12:00
6 beeps/vibrations every minute.*
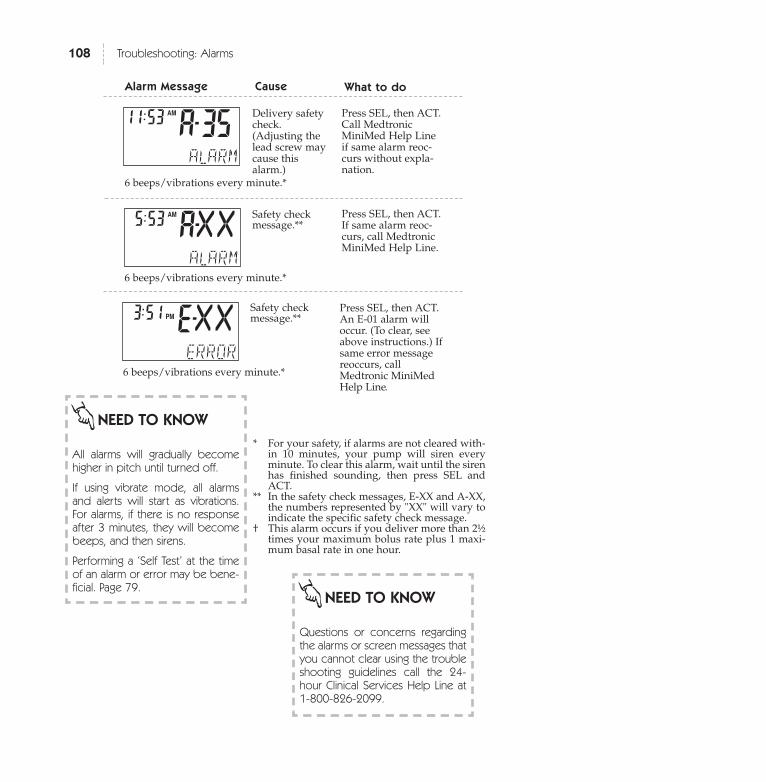
108 Troubleshooting: Alarms
Alarm Message
Safety checkmessage.**
Press SEL, then ACT.An E-01 alarm willoccur. (To clear, seeabove instructions.) Ifsame error messagereoccurs, callMedtronic MiniMedHelp Line.
Cause What to do
e-PM
ERROR
3:51 xx
6 beeps/vibrations every minute.*
Delivery safetycheck.(Adjusting thelead screw maycause thisalarm.)
Press SEL, then ACT.Call MedtronicMiniMed Help Lineif same alarm reoc-curs without expla-nation.
Safety checkmessage.**
Press SEL, then ACT. If same alarm reoc-curs, call MedtronicMiniMed Help Line.
A-35AM
ALARM
11:53
A-AM
ALARM
5:53
6 beeps/vibrations every minute.*
xx
6 beeps/vibrations every minute.*
NEED TO KNOW
All alarms will gradually becomehigher in pitch until turned off.
If using vibrate mode, all alarmsand alerts will start as vibrations.For alarms, if there is no responseafter 3 minutes, they will becomebeeps, and then sirens.
Performing a ‘Self Test’ at the timeof an alarm or error may be bene-ficial. Page 79.
NEED TO KNOW
Questions or concerns regardingthe alarms or screen messages thatyou cannot clear using the troubleshooting guidelines call the 24-hour Clinical Services Help Line at1-800-826-2099.
* For your safety, if alarms are not cleared with-in 10 minutes, your pump will siren everyminute. To clear this alarm, wait until the sirenhas finished sounding, then press SEL andACT.
** In the safety check messages, E-XX and A-XX,the numbers represented by "XX" will vary toindicate the specific safety check message.
† This alarm occurs if you deliver more than 2½times your maximum bolus rate plus 1 maxi-mum basal rate in one hour.

109Diabetes Management
Troubleshooting& Diabetes
Management Issues
These are general suggestions. Consult with your health care profes-sional for detailed guidelines.
Blood Glucose Monitoring
Why: Regular monitoring ofblood glucose provides the useran ‘external’ view of ‘internal’responses to insulin basal rates,boluses, ingested food, physicalactivity, stress or anything elsethan can impact the blood glu-cose.
SUGGESTED FREQUENCY OF BLOOD GLUCOSE MONITORING
General:
1. Four to six times daily – before each meal and at bedtime.
2. Periodically at 3:00A.M. When pre-breakfast readings areoutside of target range – do a 3:00A.M test.
3. Consult with your health care professional regardingchanges to remedy these out of range values.
NEED TO KNOW
Teach another person in your fam-ily or close personal circle how tocheck your blood glucose in caseof an emergency and what to do ifimmediate action is necessary.
110 Diabetes Management
During Sick Days:
It is recommended that you check your blood sugar every two to fourhours, 24 hours a day. The blood glucose results can alert you toDKA. Urine ketones should also be checked. See Sick Day Guidelineson page 116.
Exercise:
1. ½ hour before start of activity.2. Midway point of activity more than 1 hour.3. Within ½ hour after activity.
New physical activity (change in exercise routine):
1. Before activity.2. Midway if new activity is
longer than usual.3. Within ½ hour after activity.
Stress - family, work, school, social,
etc.
1. Review your pre-meal andpre-bedtime values to see ifadditional monitoring is nec-essary during the period oftime.
2. Discuss these findings withyour health care professionalto develop an interventionplan.
NEED TO KNOW
Keep daily records of BG results,associated activities like exercise,parties, stress, illnesses, etc. anduse this information to make insulinprofile adjustments.
Watch for drops or elevations thatfollow basal profiles and insulinboluses.
Discuss your physical activity rou-tine or new activity with yourhealth care professional. Changesusually need to be made to basalprofiles.
Changes in activity frequentlyoccur with the changing of sea-sons – develop a plan for yourbasal rate profiles to meet thatchallenge.
Look at your blood glucose valuesfor monthly patterns of ups ordowns.
Low Blood Glucose - Hypoglycemia
May be experienced as: sudden sweat-ing, trembling, hunger, weakness,pounding heart/rapid pulse, tingling ofhands, lips or tongue, blurred vision,headache, dizziness, sweating,impaired speech or confusion.
Others may notice that they may nothave any symptoms.
PROBLEMS & SOLUTIONS
Decreased food intake
•Adjust insulin bolus.
Increased physical activity
•Adjust insulin by decreasing basal or bolus dose beforeactivity. Monitor blood glucose 1 – 2 hours after stoppingactivity.
Programming Error:
•Review pump programs: basal rates, profiles, concentrationand total insulin delivered. Reprogram and adjust insulin asneeded.
Improper disconnection of infusion set from reservoir:
•Adjust insulin as needed. Review proper method for discon-nection to prevent excess insulin infusion.
Alcohol consumption:
•Check with your health care professional regarding thehypoglycemic effect of alcohol consumption. Check yourblood glucose more frequently when consuming alcohol.Always eat food with any alcohol consumed. Check yourblood glucose before going to bed and during the night.
111Diabetes Management
NEED TO KNOW
Treat signs and symptoms of lowblood glucose IMMEDIATELY. Keepa fast-acting source of glucoseavailable - glucose tablets, juice ornon-diet soda, hard candies.
Follow this action with blood glu-cose monitoring, a carb/proteinsnack or meal if it is that time, andre-test your blood sugars 15 min-utes after the first treatment.

Bedtime BG less than target:
•Eat your snack plus a protein. Do a 3:00A.M. test.
Unexplained:
•Correct hypoglycemia. Check pump programs and yourinfusion set.
PREVENTION AND TREATMENT TIPS
1. Keep fast acting glucose tablets everywhere: car, office,purse, briefcase, bedside, kitchen, frequently used rooms athome, exercise bag, etc.
2. Have a regular blood glucose monitoring schedule and keeprecords.
3. Keep in contact with your health care professional/diabeteseducator for fine tuning of your diabetes management.
112 Diabetes Management
NEED TO KNOW
TTRROOUUBBLLEESSHHOOOOTT this episode of lowblood glucose – think about why ithappened and how to prevent it.
Teach family members and closefriends the signs/symptoms and treat-ment.
Keep a current glucagon kit with you.Teach a family member or closefriend how and when to use it.
GOOD NEWS: Pump therapy hasbeen shown to reduce hypo-glycemic episodes due to the morepredictable delivery of insulin.Bode BW, et al. Diabetes Care1996;19:324-327.
113Diabetes Management
Hyperglycemia and Diabetic Ketoacidosis – DKA
May be experienced as: high blood glucose (over 250 mg/dl) and/orpositive urine ketone test, nausea and vomiting, abdominal pain, fre-quent urination, dehydration, blurred vision, breathing difficultiesand fruity smelling breath.
HIGH BLOOD GLUCOSE PROBLEMS & SOLUTIONS
Forgot/delayed meal bolus
•Adjust your insulin accordingto your health professional’sinstructions. Review carbohy-drate counting with a healthcare professional.
Illness, stress, menses
•Adjust your insulin according to a pre-set plan.
Programming error
•Review basal rate and profiles, insulin concentration andtotal delivered. Make necessary changes.
NEED TO KNOW
Nausea and vomiting may bethe first signs you have of DKA.
Develop a plan for immediatetreatment of possible DKA withyour health care professional.
Teach a family member or closefriend about the plan.
NEED TO KNOW
Treat signs and symptoms ofhyperglycemia and DKA immedi-ately.
• Take an injection of regular insulinwith a syringe.
• If urine ketones are present, callyour physician.
• Change your syringe, insulin andinfusion set.
• Begin drinking eight ounces ofwater every 30 minutes until bloodglucose target is near.
114 Diabetes Management
Empty reservoir
•Replace the reservoir; adjust insulin as necessary.
Leaks in infusion set or reservoir
•Change the reservoir and move the infusion sets, as cracksmay be difficult to see.
Obstructed set or poor site absorption
•Change the infusion set and site at least 1 inch from the pre-vious site.
Infusion set left in too long
•Change immediately and go to a consistent change scheduleaccording to instructions.
PVC infusion set
•Change to Polyolefin infusion set.
Inactivated insulin due to temperature extremes
•Protect the pump and infusion set from extremes in temper-ature. Change the infusion set, reservoir and insulin at thefirst sign of abnormal sugars.
Air bubbles or obstruction in infusion set or reservoir
•Change the infusion set and site. Fill the reservoir with roomtemperature insulin.
Inactive insulin
•Check the insulin for cloudiness and for expiration date. If indoubt, use a new vial.
Dawn phenomenon
•Check 3:00 A.M. blood glucose; notify health care profes-sional if elevation of blood glucose occurs between 3:00 A.M.and pre-breakfast BG value. Adjust basal insulin accordingto their recommendations.
Unexplained
•Take insulin by injection (shot) if your blood glucose isabove 250 mg/dl twice in a row. Check blood glucose againin 1-2 hours. Check ketones. If positive, call your health careprofessional. If negative, change your infusion set and verifythat pump is functioning.
115Diabetes Management
NEED TO KNOW
If you need to seek emergencyhealth care, DO NOT drive your-self! Call for emergency help orhave a family member or frienddrive you there.
Change your infusion set as recom-mended.

116 Diabetes Management
Sick Day Management
May be experienced as: flu, diarrhea, bronchitis, ‘common cold’ orother illnesses.
•Discuss extra insulin intake with your health care profes-sional to use during ‘sick days’.
•Always take insulin. NEVER omit insulin, even if you areunable to eat.
•Do not take off your pump unless you are taking adequateamounts of insulin by injection.
•Begin to monitor your blood glucose and urine ketone test-ing as soon as your symptoms begin and continue to testevery two hours, 24 hours a day until symptoms are goneand blood glucose returns to target. Keep accurate recordsand report these to your health care professional.
•Take extra insulin whenever BG results are 250 mg/dl ormore and ketones are moderate or large. To take extrainsulin safely, take small doses and check blood glucose twohours later. Extra insulin may be taken as often as every twoto three hours. The amount of insulin for sick days dependson:
Blood glucose levelPresence of urine ketonesIf you are able to eat and drink.
•See page 101 for additional guidelines.
•Call health care professional immediately if you are vomit-ing or if blood glucose is still elevated after injection (shot).
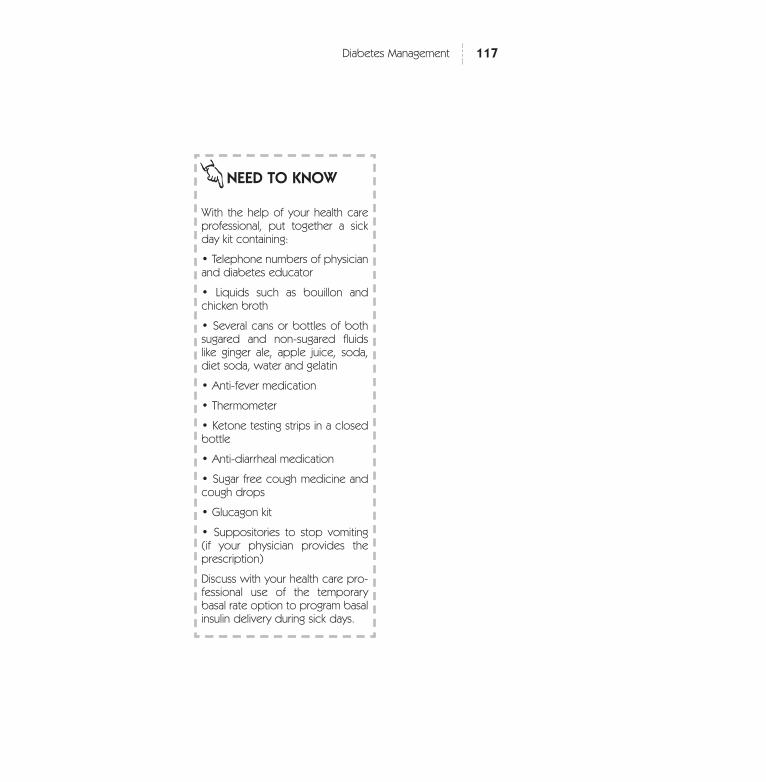
117Diabetes Management
NEED TO KNOW
With the help of your health careprofessional, put together a sickday kit containing:
• Telephone numbers of physicianand diabetes educator
• Liquids such as bouillon andchicken broth
• Several cans or bottles of bothsugared and non-sugared fluidslike ginger ale, apple juice, soda,diet soda, water and gelatin
• Anti-fever medication
• Thermometer
• Ketone testing strips in a closedbottle
• Anti-diarrheal medication
• Sugar free cough medicine andcough drops
• Glucagon kit
• Suppositories to stop vomiting(if your physician provides theprescription)
Discuss with your health care pro-fessional use of the temporarybasal rate option to program basalinsulin delivery during sick days.
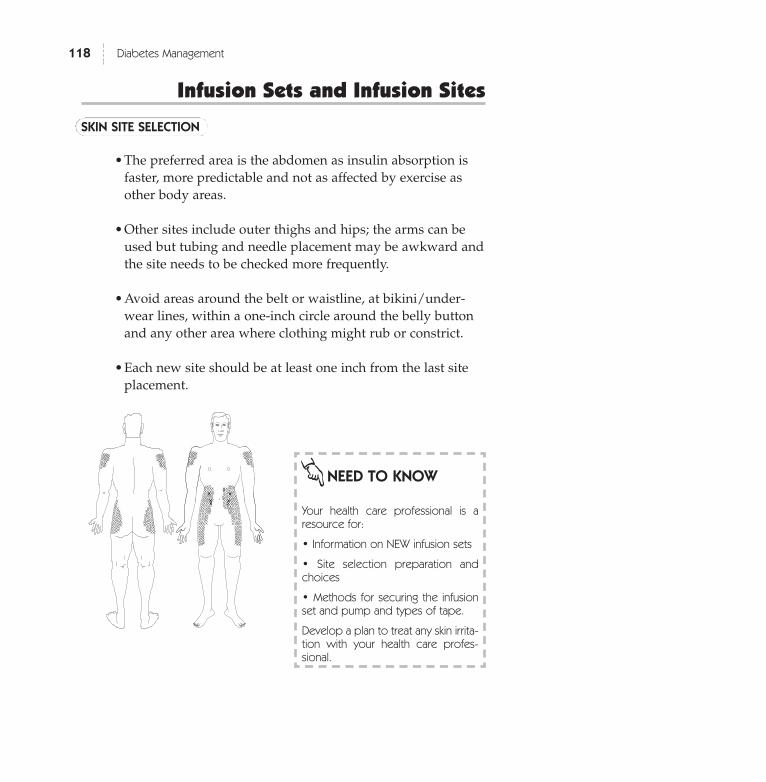
118 Diabetes Management
Infusion Sets and Infusion Sites
SKIN SITE SELECTION
•The preferred area is the abdomen as insulin absorption isfaster, more predictable and not as affected by exercise asother body areas.
•Other sites include outer thighs and hips; the arms can beused but tubing and needle placement may be awkward andthe site needs to be checked more frequently.
•Avoid areas around the belt or waistline, at bikini/under-wear lines, within a one-inch circle around the belly buttonand any other area where clothing might rub or constrict.
•Each new site should be at least one inch from the last siteplacement.
NEED TO KNOW
Your health care professional is aresource for:
• Information on NEW infusion sets
• Site selection preparation andchoices
• Methods for securing the infusionset and pump and types of tape.
Develop a plan to treat any skin irrita-tion with your health care profes-sional.
PROBLEMS & SOLUTIONS
Site area used longer than 72 hours, possibly red or irritated.
•Change infusion set and site immediately. Put skin treatmentplan into effect. The new site should be at least one inchfrom red area.
•Use aseptic technique to prevent infection and discomfort.
Infusion site irritation
•Change site. Do not use infusion sites which may be irritatedby clothing, belts, etc.
Allergic reaction to metal needles
•Ask your health care professional about non-needle sets,such as the Sof-set or Silhouette infusion sets.
Poor site absorption
•Change the set and site. The new site should be at least 1inch from previous site. Avoid areas with scar tissue orstretch marks.
Blood in tubing (site may have been bumped or irritated)
•Change the site and infusion set.
119Diabetes Management

Daily Living, Lifestyle Activities
The following are tips for wearing and protecting your pump:
•Use a belt clip to attach your pump to a belt or waistband.
•Keep your pump in a jacket, pant or skirt pocket.
•Sew a button hole behind a shirt pocket and place yourpump in pocket.
Use a pump case or baby sock as a protective covering. Pump casescan be color coordinated to match clothing.
120 Diabetes Management
NEED TO KNOW
Make a list of all your activities frommorning rising to bedtime and dis-cuss each with your diabetes edu-cator for pump management.

Temporary Removal Guidelines
Time Off the Pump (one to four hours):
•Monitor blood glucose every two to four hours.
•Take an injection of Regular insulin equal to basal amountmissed.
•Take an injection of Regular insulin to cover carbohydratesconsumed.
•Take an injection of Regular insulin based upon blood glu-cose value.
•Decrease insulin dose, usually 10 to 50%, if exercising.Discuss this with your health care professional.
Time Off the Pump (Overnight):
•Monitor blood glucose every four hours.
•Take an injection of Regular insulin equal to amount of basalmissed every four hoursduring the sleep period.
•Take an injection of Regularinsulin based upon bloodglucose value.
121Diabetes Management
NEED TO KNOW
For best results discuss pump dis-connection with your health careprofessional.
Plans need to be made for insulinand carbohydrate coverage dur-ing the time away from your pump.
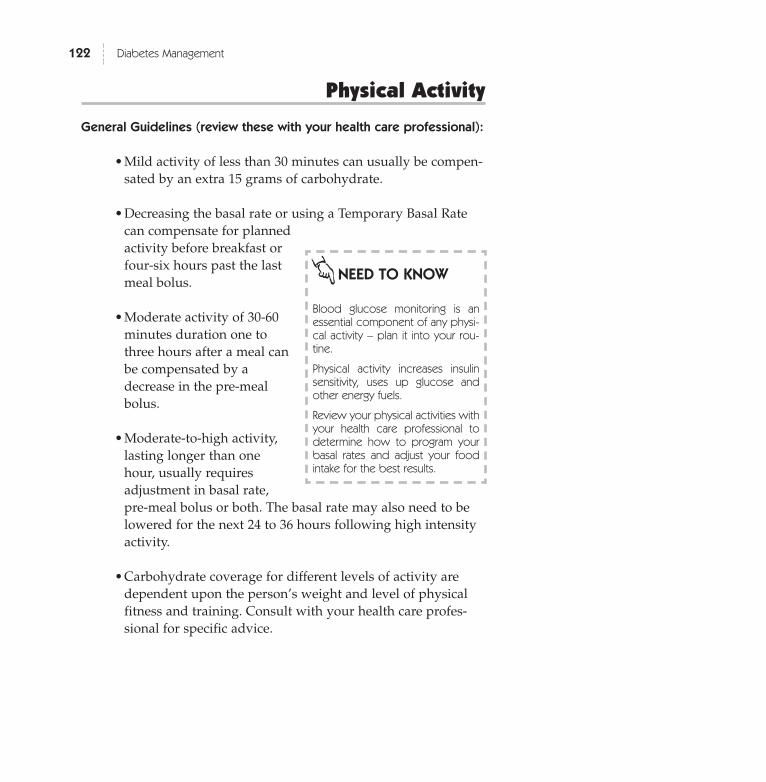
122 Diabetes Management
Physical Activity
General Guidelines (review these with your health care professional):
•Mild activity of less than 30 minutes can usually be compen-sated by an extra 15 grams of carbohydrate.
•Decreasing the basal rate or using a Temporary Basal Ratecan compensate for plannedactivity before breakfast orfour-six hours past the lastmeal bolus.
•Moderate activity of 30-60minutes duration one tothree hours after a meal canbe compensated by adecrease in the pre-mealbolus.
•Moderate-to-high activity,lasting longer than onehour, usually requiresadjustment in basal rate,pre-meal bolus or both. The basal rate may also need to belowered for the next 24 to 36 hours following high intensityactivity.
•Carbohydrate coverage for different levels of activity aredependent upon the person’s weight and level of physicalfitness and training. Consult with your health care profes-sional for specific advice.
NEED TO KNOW
Blood glucose monitoring is anessential component of any physi-cal activity – plan it into your rou-tine.
Physical activity increases insulinsensitivity, uses up glucose andother energy fuels.
Review your physical activities withyour health care professional todetermine how to program yourbasal rates and adjust your foodintake for the best results.
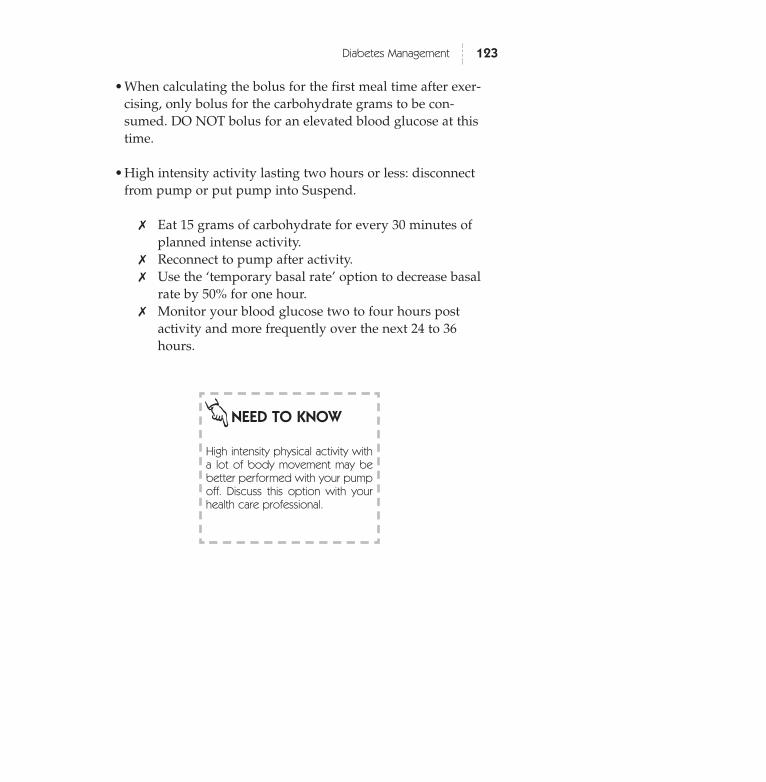
•When calculating the bolus for the first meal time after exer-cising, only bolus for the carbohydrate grams to be con-sumed. DO NOT bolus for an elevated blood glucose at thistime.
•High intensity activity lasting two hours or less: disconnectfrom pump or put pump into Suspend.
✗ Eat 15 grams of carbohydrate for every 30 minutes ofplanned intense activity.
✗ Reconnect to pump after activity.✗ Use the ‘temporary basal rate’ option to decrease basal
rate by 50% for one hour.✗ Monitor your blood glucose two to four hours post
activity and more frequently over the next 24 to 36hours.
123Diabetes Management
NEED TO KNOW
High intensity physical activity witha lot of body movement may bebetter performed with your pumpoff. Discuss this option with yourhealth care professional.

124 Diabetes Management
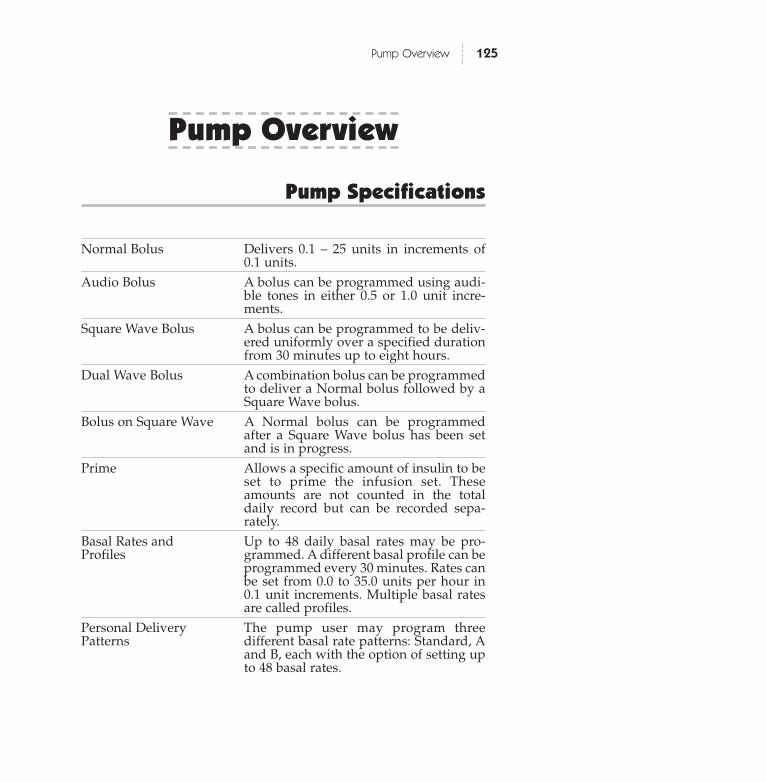
125Pump Overview
Pump Overview
Pump Specifications
Normal Bolus Delivers 0.1 – 25 units in increments of0.1 units.
Audio Bolus A bolus can be programmed using audi-ble tones in either 0.5 or 1.0 unit incre-ments.
Square Wave Bolus A bolus can be programmed to be deliv-ered uniformly over a specified durationfrom 30 minutes up to eight hours.
Dual Wave Bolus A combination bolus can be programmedto deliver a Normal bolus followed by aSquare Wave bolus.
Bolus on Square Wave A Normal bolus can be programmedafter a Square Wave bolus has been setand is in progress.
Prime Allows a specific amount of insulin to beset to prime the infusion set. Theseamounts are not counted in the totaldaily record but can be recorded sepa-rately.
Basal Rates and Up to 48 daily basal rates may be pro-Profiles grammed. A different basal profile can be
programmed every 30 minutes. Rates canbe set from 0.0 to 35.0 units per hour in0.1 unit increments. Multiple basal ratesare called profiles.
Personal Delivery The pump user may program three Patterns different basal rate patterns: Standard, A
and B, each with the option of setting upto 48 basal rates.

Temporary Basal Rate Allows the user to temporarily increaseor decrease the current basal rate for aduration of 30 minutes to 24 hours.
Remote Control The Remote Control uses ‘radio frequen-cy’ to allow the user to program aNormal bolus or suspend/restart theirpump.
Back Light Pressing the Down arrow will activatethe back light on the LCD display.
126 Pump Overview

Memory
Pump Accessible Memory (These histories can be viewed on the
pump)
Bolus History The pump stores the last 24 boluses inreverse chronological order.
Daily Totals The pump stores the last 7 days ofcombined daily totals, (bolus deliveries +basal rates) in reverse chronologicalorder.
Alarms The pump stores the last 12 alarms orerror messages received, including type,date and time in reverse chronologicalorder.
Primes The pump stores the last 9 Primes inreverse chronological order.
Stored Memory (This data is retrieved through downloading with addi-
tional equipment)
Bolus History The pump stores the last 450 bolus with atime and date stamp.
Daily Totals The pump stores approximately 90 daysof combined daily totals (bolus deliveries+ basal rates).
Alarms The pump stores the last 50 alarms withtime and date stamp.
Primes The pumps stores the last 50 Primes withtime and date stamp.
127Pump Overview

128 Pump Overview
Safety Features
Feature Performance
Solenoid Motor Motor has a unique, patented designwhich delivers in precise 0.1 unit incre-ments and is incapable of over-delivery.
Program Safety Checks Over 50 independent safety systems arecontinuously monitoring all pump oper-ations.
Alarms & Error Over 50 safety alarms and error mes-sages.
Messages Messages alert the user by an audibletone or a vibration. All alarms and errorshave a visible message or icon on theTIME OF DAY screen.
Time Display User has the choice of AM/PM or inter-national time format. Time is always dis-played on the TIME OF DAY screen.
Date Display User sets the date in month, day, year for-mat.
Insulin Concentration User can select either U-100, U-50 or U-40insulin.
Child Block Activation of the ‘Child Block’ restrictsaccess to all features except the Suspend,Self Test and programming with theRemote Control.
Reservoir An impact-resistant, highly insulin com-patible polypropylene syringe holds upto 300 units of U-100 insulin. Unit mark-ings ensure accuracy. A clear pump win-dow allows user to see the remainingamount of insulin.
Power Supply Powered by standard 1.5 V & Batteries silver oxide batteries. For best results use
MMT-104 available through MedtronicMiniMed. If MMT-104s are not available,use EverReady or silver oxide model 357batteries. Batteries are available at photoshops and drug stores .
Pump Size 1.9 x 3.4 x 0.8 inches (4.8 x 8.6 x 2.0 cm).
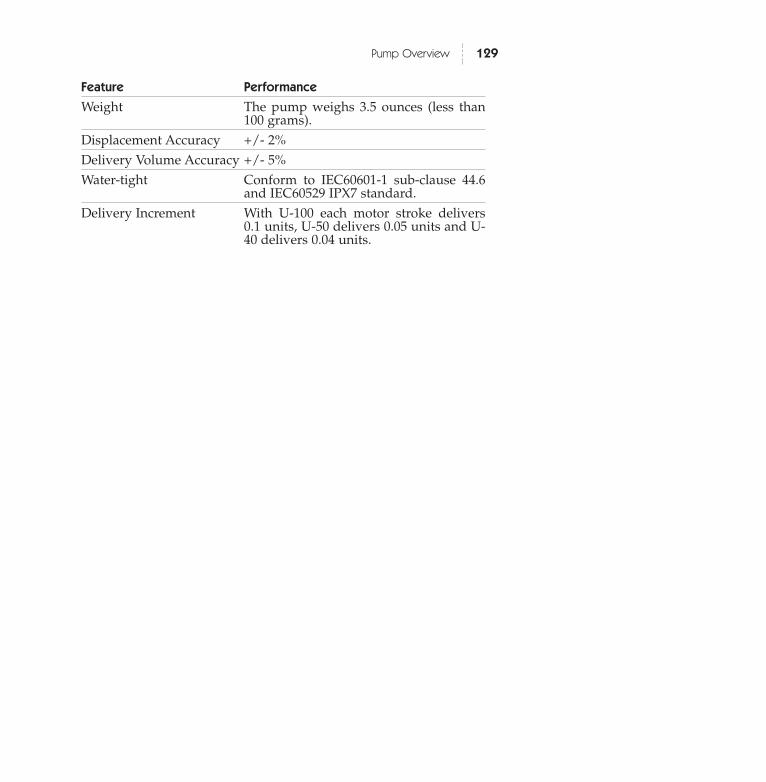
Feature Performance
Weight The pump weighs 3.5 ounces (less than100 grams).
Displacement Accuracy +/- 2% Delivery Volume Accuracy +/- 5% Water-tight Conform to IEC60601-1 sub-clause 44.6
and IEC60529 IPX7 standard.Delivery Increment With U-100 each motor stroke delivers
0.1 units, U-50 delivers 0.05 units and U-40 delivers 0.04 units.
129Pump Overview
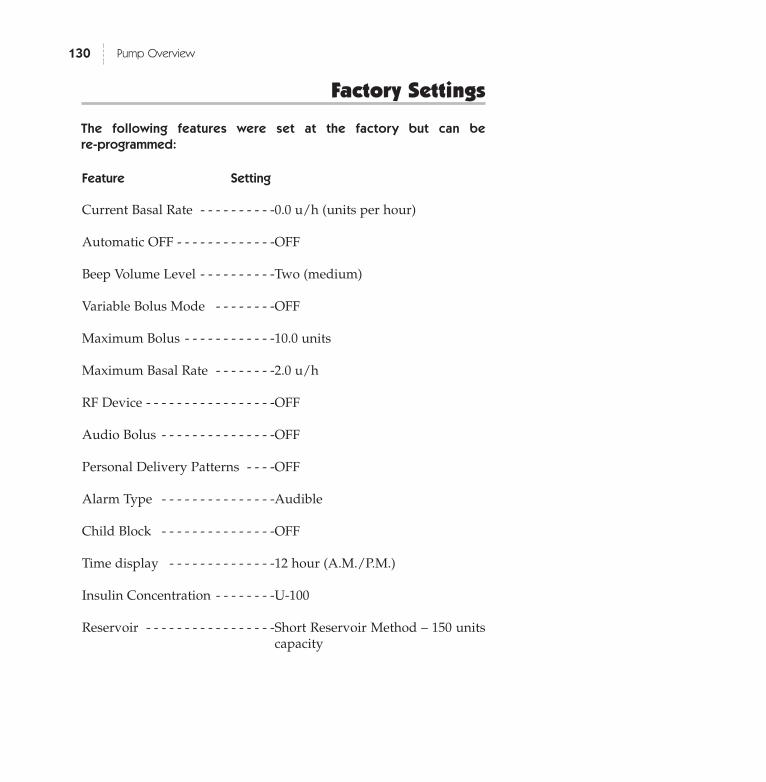
Factory Settings
The following features were set at the factory but can be
re-programmed:
Feature Setting
Current Basal Rate - - - - - - - - - -0.0 u/h (units per hour)
Automatic OFF - - - - - - - - - - - - -OFF
Beep Volume Level - - - - - - - - - -Two (medium)
Variable Bolus Mode - - - - - - - -OFF
Maximum Bolus - - - - - - - - - - - -10.0 units
Maximum Basal Rate - - - - - - - -2.0 u/h
RF Device - - - - - - - - - - - - - - - - -OFF
Audio Bolus - - - - - - - - - - - - - - -OFF
Personal Delivery Patterns - - - -OFF
Alarm Type - - - - - - - - - - - - - - -Audible
Child Block - - - - - - - - - - - - - - -OFF
Time display - - - - - - - - - - - - - -12 hour (A.M./P.M.)
Insulin Concentration - - - - - - - -U-100
Reservoir - - - - - - - - - - - - - - - - -Short Reservoir Method – 150 unitscapacity
130 Pump Overview
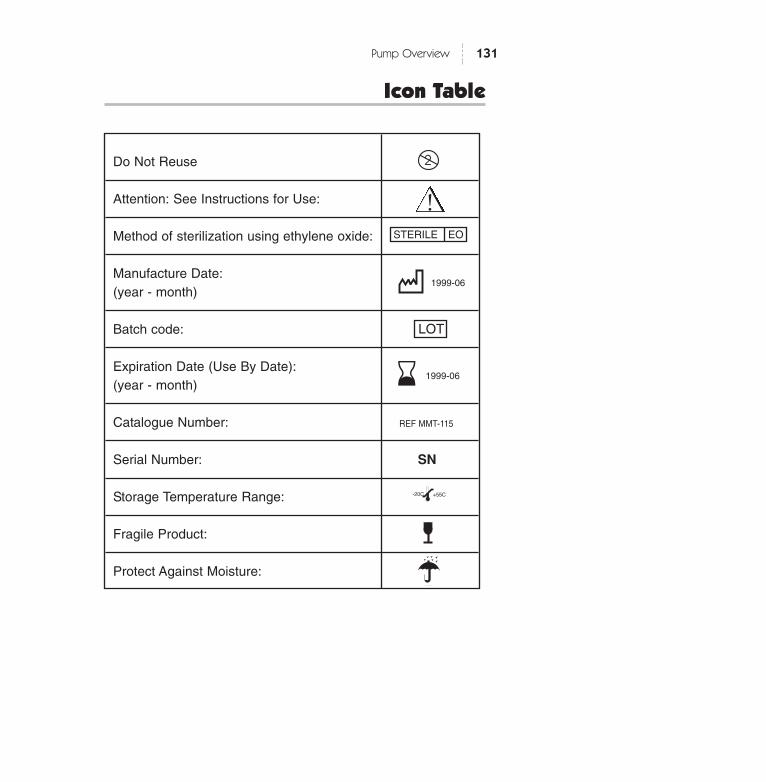
131Pump Overview
Do Not Reuse
Attention: See Instructions for Use:
Method of sterilization using ethylene oxide:
Manufacture Date:(year - month)
Batch code:
Expiration Date (Use By Date):(year - month)
Catalogue Number: REF MMT-115
Serial Number:
Storage Temperature Range:
Fragile Product:
Protect Against Moisture:
+ 55CC
!
LOT
STERILE EO
1999-06
1999-06
-20C +55C
Icon Table
SN

132 Pump Overview

133Glossary
Glossary
Activate Key:
The ACT button is located on the keypad of the insulin pump and onthe Remote Control and allows the user to activate or change values.
AADE:
American Association of Diabetes Educators is composed of healthcare professionals with special knowledge in diabetes education andmanagement. AADE maintains a free telephone line for those whowould like to contact a diabetes educator in their geographic area call(1–800–TEAM UP-4)
ADA:
American Diabetes Association is composed of health professionalsand people living with diabetes, as well as researchers, and otherinterested parties. They endeavor to develop educational programsand materials for professionals and the public, raise research funds tocure diabetes, increase awareness about the signs and symptoms ofdiabetes and provide general information to all peoples regardingdiabetes. Their toll free number is 1-800-232-3472.
ADtA:
American Dietetic Association is an international organization offood and nutrition professionals. They maintain a consumer nutri-tion hot line staffed by registered dietitians at 1-800-366-1655.
Basal Rate:
The amount of insulin required by the individual’s body to regulatethe production and availability of fats, carbohydrates and proteinsunder fasting conditions. The user’s physician calculates this rate. Abasal rate is also called a profile. Multiple basal rates can be pro-grammed depending upon the user’s needs. Bolus:
134 Glossary
A specific amount of insulin released into the body to cover the esti-mated amount of carbohydrates in a given meal.
Bolus on Square Wave:
Provides increased flexibility for the user by allowing a Normal bolusduring a programmed Square Wave bolus. This program providesthe user the option to take more insulin to cover an unexpected addi-tion to their meal.
Child Block:
Prevents accidental changing of set values in the SET UP I and SETUP II menu options. This is a ‘lock-out’ function and must be pro-grammed into the pump.
CSII:
Continuous subcutaneous insulin infusion.
Default:
A specific setting that has been programmed into the pump’s com-puter at the factory. The user cannot change this value.
Diabetes Educator:
A health care professional who has experience and training in assist-ing those with diabetes to understand how to manage this disease. ACertified Diabetes Educator (C.D.E.) is a diabetes educator whopassed a national exam on diabetes education and management.
DKA:
Diabetic Ketoacidosis occurs when the blood glucose level becomeselevated, the insulin levels are low and the body uses fat for energy.This process produces ketone bodies which upset the body’s acid-base balance leading to a potentially life threatening situation.
Dual Wave Bolus:
135Glossary
This provides for a Normal bolus and a Square Wave bolus to be pro-grammed at the same time to cover the calories of a specific mealover two different time periods. The Normal bolus is infused first,followed by the Square Wave bolus which will be delivered over alonger period of time.
Hyperglycemia:
Elevated blood glucose over 240mg/dl as seen by monitoring bloodglucose levels with any or all of the following symptoms: nausea,vomiting, blurred vision, headache, gastric distress, frequent urina-tion of large amounts and lethargy. Insulin pump users need to takeimmediate treatment action (see page 113).
Hypoglycemia:
Low blood glucose less than 80 mg/dl as seen by monitoring bloodglucose levels, with or without any or all of the following suddenlyappearing symptoms: excessive hunger, shaking or tremors, perspi-ration, ‘dancing’ vision, headache, slurred speech, sudden moodswings or personality change. Insulin pump users need to takeimmediate treatment action (see page 111).
Icons:
Visual symbols that signify an action. (See page 131 for a list of theicons and their function.)
JDF:
Juvenile Diabetes Foundation – an organization dedicated tofundraising for juvenile diabetes research. Their toll free number is1-800-223-1138.
Lead Screw Rotation Test:
Method whereby the insulin pump user can visually check that thepump is delivering insulin.
Low Volume Alert:
136 Glossary
Audible sound to warn the user that the amount of insulin in thereservoir is low.
Low Battery Indicator:
Icon shown on LCD which indicates the amount of power remainingin the batteries is low.
LCD:
Liquid Crystal Display – this is the visual screen on the front of theinsulin pump where functions and messages are displayed.
Normal Bolus:
This is a specific amount of insulin that can be programmed into theinsulin pump’s computer and infused immediately.
Prime:
This is insulin used for priming the infusion set, taking up slack inthe pump drive system, etc., that is not intended to be delivered tothe body.
Profile:
This is a basal rate with a start and stop time. A user may programseveral different profiles, each with a different basal rate, during a 24-hour period of time to achieve better glucose control.
Reservoir:
A specially designed syringe for use with the Medtronic MiniMedinsulin pump. Any other type should not be used as inaccurate deliv-ery may occur.
Remote Control:
A Remote Control which uses radio frequency which to “talk” withyour pump. Lets you deliver a Normal bolus and suspend andrestart the insulin pump without pressing the buttons on the pump.
137Glossary
Scroll:
This is the process of pushing the button on the keypad to move theinsulin pump screens to another option or of pressing the arrows toreach a specific number value.
Select Key:
SEL is identified on the button of the keypad on the insulin pump. Itis used to select an option but NOT to change a value.
Self Test:
This a factory initiated program built into the pump to perform asafety check of all functions. The user has the option of initiating theSelf Test at any time.
Square Wave Bolus:
A specific amount of insulin to be delivered over a longer period oftime.
Suspend:
This function will stop ALL (both basal and bolus) delivery pro-grammed into the pump. The user must restart the pump in order fordelivery to resume.
Temporary Basal Rate:
This is a specific amount of insulin programmed to cover a short termneed different than a programmed basal rate, (e.g., for exercise peri-ods or for sick days).
Watch Dog Alarm:
An independent circuit within the insulin pump that monitors oper-ations of the primary microprocessor. Deviations from normal oper-ations will result in a continuous tone (see troubleshooting alarms onpage 105.)

138

139Index
Index
Accuracy, pump delivery, 128,129
Alarm, reviewing, 67,127,128type, 69,130vibration, 69
Automatic Off,setting, 68,130
Audio Bolus, feature, 62-63on/off, 62
Backlight, 6 Basal Rate,
description, 41-43, 125, 130, 133maximum, 41,44,130multiple, 43, 125, 133patterns, 43, 47-48, 76, 125, 130profiles, 16, 41-42, 43, 45-46, 47-48, 51, 125, 136, reviewing, 16resetting, 51screen, 8-9setting, 14-15, 44, 45-46, 49temporary, 42, 49-50, 51-52, 126, 137
Batteries,battery carrier, 84changing, 84-85low battery alert, 69, 83,85, 106, 136 type, 69, 73, 83, 128
Beep Volume, 66, 130Block Feature, 69, 76, 128, 120, 134
setting, 76

140 Index
Blood Glucose Monitoring, 109Bolus,
audio, 62-63, 125, 130 delivery, 53, 58, 61dual wave, 60-61, 53, 54, 125, 135history, 56, 127maximum, 53, 55, 130normal, 31, 543, 54, 58, 134, 125remote control, 74screen, 8-9setting, 31, 55-62square wave, 53, 54, 59, 60-61, 125, 134, 135, 137stopping, 51variable, 57-130
CT Scan, 90Cleaning, 90Daily Totals,
reviewing, 64, 127Date,
setting/changing, 12Diabetic Ketoacidosis (DKA), 96, 134 Dual Wave Bolus, 60-61, 53, 54, 125, 135Emergency Kit,
content, 4, 97Factory Settings, 130Glucagon, 100, 112, 117Hyperglycemia, 39-40, 97, 101, 102, 113, 135 Hypoglycemia, 39-40, 42, 96, 97, 100, 103, 111, 112, 135 Icon Table, 131Infusion Set,
installing, 22-25, 26, 118 removing, 28priming, 22, 24, 29-30
Infusion Site, irritation, 99, 118, 119
Insulin concentration,Setting, 77-78, 128, 130

141Index
Lead Screw Test, 81, 135 Low Volume Alert, 35-36, 136
setting reservoir volume, 35Main Programming Screens, 8Maximum Basal Rate, 41,44,130Maximum Bolus, 53, 55, 130Multiple Basal Rate, 43, 125, 133MRI, 90Normal Bolus, 31, 543, 54, 58, 134, 125Performance Options, 128-129Personal Delivery Pattern,
feature, 43, 47-48, 76, 125, 130 setting, 47-48
Polyfin, 17Precautions,
general, 97hypoglycemia, 39-40, 100, 111, 135hyperglycemia, 30-40, 101, 113, 135infusion sets & sites, 118-119
Prime Feature, 29-30, 34, 125, 127, 136low volume indicator, 35-36
Prime History, review, 34
Priming, 29Profiles,
description, 41-42, 125, 136reviewing, 16, 43resetting, 51setting, 45-46, 47-48
Programming,screens, 8-9time-out, 75
Pump,buttons, 6batteries, 69, 83-85 128care, 83, 87-90cleaning, 90components, 6-7

142 Index
factory settings, 130memory, 127overview, 5-9, 125-131performance options, 128-129restarting, 32-33safety features, 128screens, 8-9specifications, 125 starting, 32-33stopping, 32-33, 121user safety, 95-103user options, 79-81
Quick Release, 34Quick Start, 11-37 Remote Control,
audio bolus, 74batteries, 73, 91, care & maintenance, 91-92, 126, 136cleaning, 92regulatory notification, 93suspend, 75
RF Device Feature, 72-130Reservoir,
air bubbles, 22-24converter, 20-21, 18filling, 22, 24installation, 18-23, 26-27, 136 priming, 29-30
Safety Features, 128-129 Self Test, 79-80, 137Set Up Options,
screens, 8-9 Set Up I, 8Set Up II, 9Silhouette, 24 Sof-set, 17, 22Sof-serter, 23

Specifications, pump, 125
Spring Belt Clip, 86Square Wave Bolus, 53, 54, 59, 60-61, 125, 134, 135, 137Suspend, 137
restarting pump, 32remote control, 75
Temporary Basal Rate, 42, 49-50, 51-52, 126, 137screen, 8, 49setting, 49-50 stopping, 51-52
Time12-hour format, 65, 128-13024-hour format, 65, 128setting/changing, 12-13, 65
Troubleshooting,alarms & error messages, 105, 108blood glucose monitoring, 109high blood sugars, 39-40, 97, 101, 102, 113, 135low blood sugars, 39-40, 42, 96, 97, 100, 103, 111, 112, 135infusion sites & sets, 118physical activity, 120, 122sick day management, 116temporary removal guidelines, 121
U-100 Insulin, 19, 77, 78, 81, 128, 130 U-40 Insulin, 78, 81, 128U-50 Insulin, 77, 78, 81, 128Variable Bolus, 57-130X-Rays, 90
143Index

144 Glossary
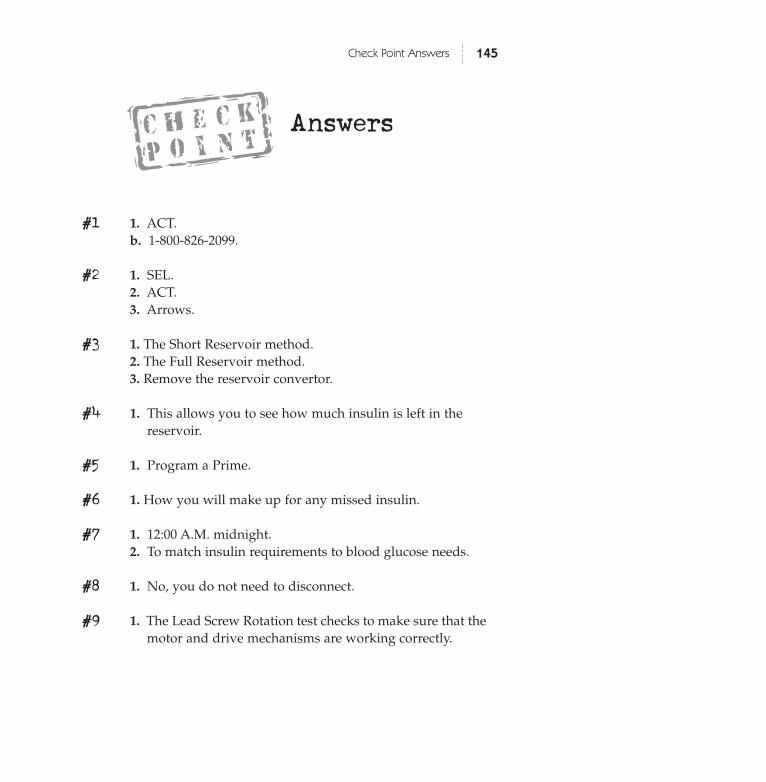
145Check Point Answers
#1 1. ACT. b. 1-800-826-2099.
#2 1. SEL.2. ACT.3. Arrows.
#3 1. The Short Reservoir method.2. The Full Reservoir method.3. Remove the reservoir convertor.
#4 1. This allows you to see how much insulin is left in thereservoir.
#5 1. Program a Prime.
#6 1. How you will make up for any missed insulin.
#7 1. 12:00 A.M. midnight.2. To match insulin requirements to blood glucose needs.
#8 1. No, you do not need to disconnect.
#9 1. The Lead Screw Rotation test checks to make sure that the motor and drive mechanisms are working correctly.
Answers
Check Point Answers