User Manual - Recreation Management Software -...
184
User Manual (updated 10/9/12) Receivables Gift Certificate Sales and Use Invoicing Payments/Credits Refunds General Ledger Setup General Ledger Export Credit Card Setup
Transcript of User Manual - Recreation Management Software -...
User Manual (updated 10/9/12)
Receivables
Gift Certificate Sales and Use
Invoicing
Payments/Credits
Refunds
General Ledger Setup
General Ledger Export
Credit Card Setup
2
Table of Contents
ADMINISTRATIVE .................................................................................................................................................................. 6
ORGANIZATION SETUP ........................................................................................................................................................... 6 Address/Phone ................................................................................................................................................................ 6 Company/Family ............................................................................................................................................................. 7 Receivables ..................................................................................................................................................................... 9 Miscellaneous ................................................................................................................................................................ 11 Facility Scheduling ........................................................................................................................................................ 11 Registration/League Scheduling ................................................................................................................................... 13 CC/ACH ......................................................................................................................................................................... 13 Online Registration ........................................................................................................................................................ 18 Action Log Setup ........................................................................................................................................................... 18
CC/ACH ACCOUNT ADMINISTRATION ................................................................................................................................... 19 Service Account Information ......................................................................................................................................... 19 Proxy Information .......................................................................................................................................................... 19 Admin Password ........................................................................................................................................................... 19
CC/ACH TRANSACTION LOG ............................................................................................................................................... 20 Filter Criteria .................................................................................................................................................................. 20 Find Customer ............................................................................................................................................................... 20 Transaction Grid ............................................................................................................................................................ 21 Result Message............................................................................................................................................................. 21
GENERAL SETUP ................................................................................................................................................................ 22
ITEMS ................................................................................................................................................................................. 22 Items .............................................................................................................................................................................. 24 Transaction Event Items (by Facility) ............................................................................................................................ 25 Event Rate Items (by Customer) ................................................................................................................................... 26 Copy Item ...................................................................................................................................................................... 27
ITEM PACKAGES .................................................................................................................................................................. 28 ITEM CATEGORIES ............................................................................................................................................................... 28 GL ACCOUNTS .................................................................................................................................................................... 30
Add as Group ................................................................................................................................................................ 30 GL ACCOUNT GROUPS ........................................................................................................................................................ 31 PAYMENT METHODS ............................................................................................................................................................ 32
Refunds ......................................................................................................................................................................... 32 PAYMENT TERMS ................................................................................................................................................................. 32 TAX TYPES .......................................................................................................................................................................... 32 TAX LOCATIONS .................................................................................................................................................................. 33 TAX CLASSES (LINE TAX) ..................................................................................................................................................... 34 TAX TYPES (LINE TAX) ......................................................................................................................................................... 34 TAX LOCATIONS (LINE TAX) ................................................................................................................................................. 35
Tax on Tax .................................................................................................................................................................... 35
INVENTORY ......................................................................................................................................................................... 36
ADJUSTMENTS/TRANSFERS .................................................................................................................................................. 36 Adjustments ................................................................................................................................................................... 36 Purchases ..................................................................................................................................................................... 36 Sales ............................................................................................................................................................................. 37 Transfers ....................................................................................................................................................................... 37
MASS ADJUSTMENTS ........................................................................................................................................................... 38 Filter Criteria .................................................................................................................................................................. 38 Zero On Hand Quantities .............................................................................................................................................. 38
RELIEVE INVENTORY ............................................................................................................................................................ 39 LOCATIONS ......................................................................................................................................................................... 39 ITEMS ................................................................................................................................................................................. 40
Item Types ..................................................................................................................................................................... 40 Item Statuses ................................................................................................................................................................ 41 Item Categories ............................................................................................................................................................. 41
3
Tax Class ...................................................................................................................................................................... 41 Modules ......................................................................................................................................................................... 41 Special Use Items ......................................................................................................................................................... 42 Locations ....................................................................................................................................................................... 42 Aliases ........................................................................................................................................................................... 44 Transaction Event Items ............................................................................................................................................... 44 Find an Item .................................................................................................................................................................. 45 Copy Item ...................................................................................................................................................................... 45
PACKAGES .......................................................................................................................................................................... 46 VENDORS ............................................................................................................................................................................ 47
Quick Vendor ................................................................................................................................................................. 47 ITEM CATEGORIES ............................................................................................................................................................... 47 ALIAS TYPES ....................................................................................................................................................................... 49 GL ACCOUNT GROUPS ........................................................................................................................................................ 49
RECEIVABLES ..................................................................................................................................................................... 50
TRANSACTIONS ................................................................................................................................................................... 51 New Transactions.......................................................................................................................................................... 52 Payments ...................................................................................................................................................................... 53 CVV Authorization ......................................................................................................................................................... 55 Invoice ........................................................................................................................................................................... 56 Find Transactions .......................................................................................................................................................... 57 Get Credits .................................................................................................................................................................... 58 Get Prepay (Same Customer) ....................................................................................................................................... 60 Get Prepay (Different Customer) .................................................................................................................................. 61 Scan Prepay .................................................................................................................................................................. 63 Deleting Unpaid Transactions ....................................................................................................................................... 65 Deleting Paid Transactions ........................................................................................................................................... 66 Invoice ........................................................................................................................................................................... 67 Edit Transactions........................................................................................................................................................... 69 Refund Transaction Process ......................................................................................................................................... 70 Refund Transactions – Credit Card............................................................................................................................... 72 Refund Transactions – On Account .............................................................................................................................. 73 Refund Transactions – Onto a Gift Card ....................................................................................................................... 74 Email Transaction Receipt ............................................................................................................................................ 75 Preview Transaction Receipt ........................................................................................................................................ 76 Print Transaction Receipt .............................................................................................................................................. 76
PREPARE INVOICES ............................................................................................................................................................. 76 Adjust Overpayments .................................................................................................................................................... 78 Auto-Apply Credits ........................................................................................................................................................ 78
PRINT INVOICES .................................................................................................................................................................. 79 Mark invoices as printed and increment print count? .................................................................................................... 81 Adding scheduled events after a Customer has already been invoiced ....................................................................... 81
CREATE A SINGLE INVOICE ................................................................................................................................................... 82 EDIT INVOICE ...................................................................................................................................................................... 84
Add Transactions .......................................................................................................................................................... 84 Remove Transactions ................................................................................................................................................... 86 Delete Invoice ................................................................................................................................................................ 87
PAYMENTS/CREDITS ............................................................................................................................................................ 88 Filter .............................................................................................................................................................................. 90 Issue Credit ................................................................................................................................................................... 90 Apply Payment to Transaction(s) .................................................................................................................................. 91 Apply Payment to Invoice(s) ......................................................................................................................................... 93 Edit-Payment/Credit ...................................................................................................................................................... 95 Auto Apply-Payment/Credit ........................................................................................................................................... 95 Delete-Payment/Credit .................................................................................................................................................. 96 Print Receipt .................................................................................................................................................................. 96 Refund Unapplied Amounts .......................................................................................................................................... 96 Unapply Payment/Credit ............................................................................................................................................... 98 Unapply All Payments/Credits ....................................................................................................................................... 98
4
NSF (NON-SUFFICIENT FUNDS) FEATURES .......................................................................................................................... 99 Set up NSF defaults ...................................................................................................................................................... 99 Flag “NSF” checks and create reversing entry ............................................................................................................. 99 Repay the Original Transaction and NSF Fee ............................................................................................................ 101 Delete NSF (Non-Sufficient Funds) Transaction ......................................................................................................... 102
BAD CHECK TRACKING FEATURES ...................................................................................................................................... 103 Set up Bad Check Tracking defaults ........................................................................................................................... 103 Track Check ID #’s ...................................................................................................................................................... 103 Flag “Bad” Checks....................................................................................................................................................... 103
PREPAYS .......................................................................................................................................................................... 104 Sell Single Prepay ....................................................................................................................................................... 105 Edit Prepay – New Payment ....................................................................................................................................... 106 Edit Prepay – Edit Payment ........................................................................................................................................ 107 Edit Prepay – Delete Payment .................................................................................................................................... 108
SELL PREPAYS .................................................................................................................................................................. 109 Sell Multiple Prepays ................................................................................................................................................... 109 Print Last Receipt ........................................................................................................................................................ 110
INVOICE INQUIRY ............................................................................................................................................................... 111 View Customer Account History .................................................................................................................................. 111 Delete an Invoice......................................................................................................................................................... 112 Edit an Invoice ............................................................................................................................................................. 112 Recurring Payments .................................................................................................................................................... 113
RECURRING INVOICE PAYMENTS ........................................................................................................................................ 114 PROCESS RECURRING TRANSACTIONS ............................................................................................................................... 116
New Batch ................................................................................................................................................................... 116 Check CC Expire ......................................................................................................................................................... 117 Process CC+ACH ....................................................................................................................................................... 117 Complete Batch ........................................................................................................................................................... 118 Delete Batch ................................................................................................................................................................ 118 Print Batch ................................................................................................................................................................... 118
DELETE A BATCH OF INVOICES ........................................................................................................................................... 119 AUTO-APPLY ALL CREDITS ................................................................................................................................................. 119
GENERAL LEDGER EXPORT ........................................................................................................................................... 120
PERIOD SETUP .................................................................................................................................................................. 122 GL Periods .................................................................................................................................................................. 122 Estimate ...................................................................................................................................................................... 122 Test ............................................................................................................................................................................. 122
GL SETUP CHECK ............................................................................................................................................................. 123 GL STARTUP ..................................................................................................................................................................... 124
GL Restart ................................................................................................................................................................... 125 UPDATE JOURNAL ............................................................................................................................................................. 126
Cash Basis and Accrual .............................................................................................................................................. 126 Accrual Only ................................................................................................................................................................ 126
VIEW/EDIT JOURNAL .......................................................................................................................................................... 127 EXPORT JOURNAL ENTRIES................................................................................................................................................ 128
Exporting GL Journal Entries ...................................................................................................................................... 128 Re-Exporting Existing GL Journal Entries ................................................................................................................... 130
VIEW/DELETE EXPORT BATCH ........................................................................................................................................... 131 GL ACCOUNTS .................................................................................................................................................................. 131 GL ACCOUNT GROUPS ...................................................................................................................................................... 132 GL EXPORT DEFINITIONS ................................................................................................................................................... 133
CREDIT CARD PROCESSING .......................................................................................................................................... 135
ESTABLISH A MERCHANT ACCOUNT .................................................................................................................................... 135 ACQUIRE A PAYMENT PROCESSING SERVICE ...................................................................................................................... 136
Payflow Pro Pricing: .................................................................................................................................................... 136 PAYFLOW PRO INSTALLATION INSTRUCTIONS ...................................................................................................................... 137 ELEMENT EXPRESS INSTALLATION INSTRUCTIONS ............................................................................................................... 139 CC/ACH ACCOUNT ADMINISTRATION ................................................................................................................................. 140
5
Pay Pal ........................................................................................................................................................................ 140 AuthorizeNet ................................................................................................................................................................ 141 PSiGate ....................................................................................................................................................................... 142 Element Express ......................................................................................................................................................... 143
PRINTING REPORTS ......................................................................................................................................................... 144
GENERAL .......................................................................................................................................................................... 144 Report Selection Screens ........................................................................................................................................... 144 Report Notes ............................................................................................................................................................... 145 Command Buttons....................................................................................................................................................... 146
E-MAILING REPORTS ......................................................................................................................................................... 148 Preview ........................................................................................................................................................................ 148 Using Microsoft
® Outlook
® or Microsoft Outlook Express
® ......................................................................................... 148
Using any other e-mail program .................................................................................................................................. 148 RECEIVABLES REPORTS .................................................................................................................................................... 150
Print Invoices ............................................................................................................................................................... 150 Open Invoices ............................................................................................................................................................. 151 Invoice List .................................................................................................................................................................. 151 Invoice Summary......................................................................................................................................................... 152 Payment/Credit Summary ........................................................................................................................................... 153 Aging Summary ........................................................................................................................................................... 155 Statements .................................................................................................................................................................. 155 Transaction Listing ...................................................................................................................................................... 155 Unpaid Transactions ................................................................................................................................................... 157 Unapplied Credit Summary ......................................................................................................................................... 157 Credit Card Expiration (Recurring) .............................................................................................................................. 158 CC Reconciliation ........................................................................................................................................................ 158 Prepay Listing .............................................................................................................................................................. 159 Recurring Invoice/Transaction Summary .................................................................................................................... 160
INVOICES .......................................................................................................................................................................... 161 Standard Invoice ......................................................................................................................................................... 161 Invoice with Schedule Details ..................................................................................................................................... 162 Invoice with Other Charge Detail ................................................................................................................................ 163 Invoice with Multiple Activity/Membership Transactions ............................................................................................. 163 Invoice with Different Payment Address ..................................................................................................................... 164 Invoice with Customizable Invoice Message .............................................................................................................. 165 Invoice with Customizable User Defined Fields .......................................................................................................... 166 Invoice with Contact Information ................................................................................................................................. 167 Invoice with Payment Detail ........................................................................................................................................ 167 Invoice with Customer Account ID .............................................................................................................................. 168
GENERAL LEDGER REPORTS .............................................................................................................................................. 169 GL Account List ........................................................................................................................................................... 169 GL Account Standing .................................................................................................................................................. 169 GL Journal Listing ....................................................................................................................................................... 170
ADMINISTRATIVE REPORTS ................................................................................................................................................ 170 GL Account Distribution .............................................................................................................................................. 171 GL Account List ........................................................................................................................................................... 172 GL Payment Distribution ............................................................................................................................................. 172 Earned Revenue ......................................................................................................................................................... 174 Earned Revenue – Registrations ................................................................................................................................ 175 Departmental Sales ..................................................................................................................................................... 177 Inventory Item Listing .................................................................................................................................................. 179 Sales Analysis ............................................................................................................................................................. 180 Sales GL Distribution .................................................................................................................................................. 182 Tax Summary .............................................................................................................................................................. 183 Tax Summary (Line Tax) ............................................................................................................................................. 183
6
Administrative
Organization Setup
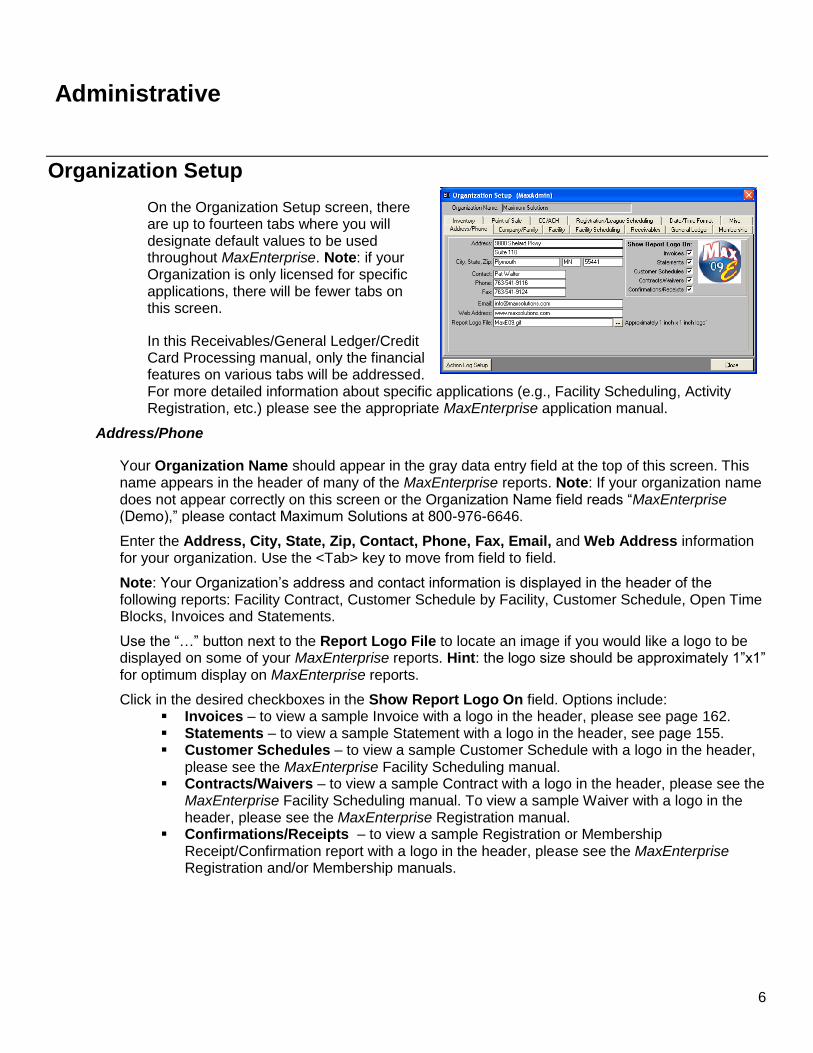
On the Organization Setup screen, there are up to fourteen tabs where you will designate default values to be used throughout MaxEnterprise. Note: if your Organization is only licensed for specific applications, there will be fewer tabs on this screen.
In this Receivables/General Ledger/Credit Card Processing manual, only the financial features on various tabs will be addressed. For more detailed information about specific applications (e.g., Facility Scheduling, Activity Registration, etc.) please see the appropriate MaxEnterprise application manual.
Address/Phone
Your Organization Name should appear in the gray data entry field at the top of this screen. This name appears in the header of many of the MaxEnterprise reports. Note: If your organization name does not appear correctly on this screen or the Organization Name field reads “MaxEnterprise (Demo),” please contact Maximum Solutions at 800-976-6646.
Enter the Address, City, State, Zip, Contact, Phone, Fax, Email, and Web Address information for your organization. Use the <Tab> key to move from field to field.
Note: Your Organization’s address and contact information is displayed in the header of the following reports: Facility Contract, Customer Schedule by Facility, Customer Schedule, Open Time Blocks, Invoices and Statements.
Use the “…” button next to the Report Logo File to locate an image if you would like a logo to be displayed on some of your MaxEnterprise reports. Hint: the logo size should be approximately 1”x1” for optimum display on MaxEnterprise reports.
Click in the desired checkboxes in the Show Report Logo On field. Options include: Invoices – to view a sample Invoice with a logo in the header, please see page 162. Statements – to view a sample Statement with a logo in the header, see page 155. Customer Schedules – to view a sample Customer Schedule with a logo in the header,
please see the MaxEnterprise Facility Scheduling manual. Contracts/Waivers – to view a sample Contract with a logo in the header, please see the
MaxEnterprise Facility Scheduling manual. To view a sample Waiver with a logo in the header, please see the MaxEnterprise Registration manual.
Confirmations/Receipts – to view a sample Registration or Membership Receipt/Confirmation report with a logo in the header, please see the MaxEnterprise Registration and/or Membership manuals.
7
Company/Family
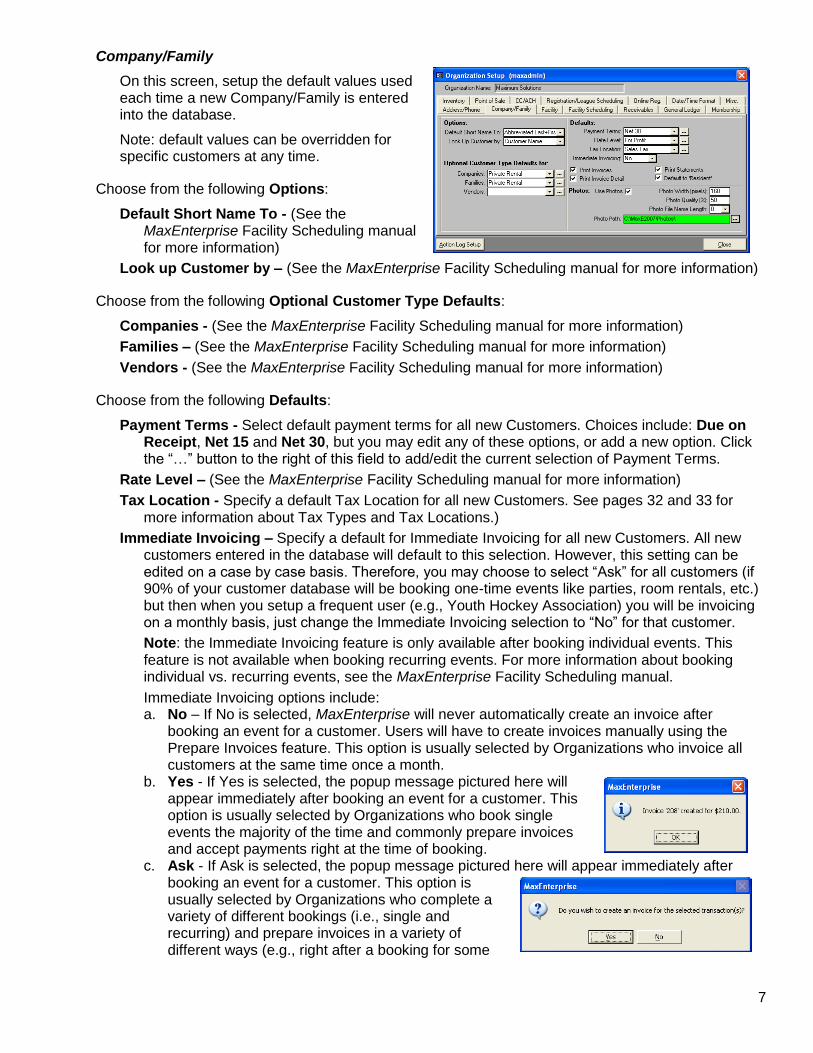
On this screen, setup the default values used each time a new Company/Family is entered into the database.
Note: default values can be overridden for specific customers at any time.
Choose from the following Options:
Default Short Name To - (See the MaxEnterprise Facility Scheduling manual for more information)
Look up Customer by – (See the MaxEnterprise Facility Scheduling manual for more information)
Choose from the following Optional Customer Type Defaults:
Companies - (See the MaxEnterprise Facility Scheduling manual for more information)
Families – (See the MaxEnterprise Facility Scheduling manual for more information)
Vendors - (See the MaxEnterprise Facility Scheduling manual for more information)
Choose from the following Defaults:
Payment Terms - Select default payment terms for all new Customers. Choices include: Due on Receipt, Net 15 and Net 30, but you may edit any of these options, or add a new option. Click the “…” button to the right of this field to add/edit the current selection of Payment Terms.
Rate Level – (See the MaxEnterprise Facility Scheduling manual for more information)
Tax Location - Specify a default Tax Location for all new Customers. See pages 32 and 33 for more information about Tax Types and Tax Locations.)
Immediate Invoicing – Specify a default for Immediate Invoicing for all new Customers. All new customers entered in the database will default to this selection. However, this setting can be edited on a case by case basis. Therefore, you may choose to select “Ask” for all customers (if 90% of your customer database will be booking one-time events like parties, room rentals, etc.) but then when you setup a frequent user (e.g., Youth Hockey Association) you will be invoicing on a monthly basis, just change the Immediate Invoicing selection to “No” for that customer.
Note: the Immediate Invoicing feature is only available after booking individual events. This feature is not available when booking recurring events. For more information about booking individual vs. recurring events, see the MaxEnterprise Facility Scheduling manual.
Immediate Invoicing options include: a. No – If No is selected, MaxEnterprise will never automatically create an invoice after
booking an event for a customer. Users will have to create invoices manually using the Prepare Invoices feature. This option is usually selected by Organizations who invoice all customers at the same time once a month.
b. Yes - If Yes is selected, the popup message pictured here will appear immediately after booking an event for a customer. This option is usually selected by Organizations who book single events the majority of the time and commonly prepare invoices and accept payments right at the time of booking.
c. Ask - If Ask is selected, the popup message pictured here will appear immediately after booking an event for a customer. This option is usually selected by Organizations who complete a variety of different bookings (i.e., single and recurring) and prepare invoices in a variety of different ways (e.g., right after a booking for some
8
customers, once a month for some customers, once a season for some customers, etc.)
Print Invoices - Checking this box will cause the ‘Print Invoices’ checkbox to automatically be checked on each new Customer screen.
Print Invoice Detail - Checking this box will cause the ‘Print Invoice Detail’ checkbox to automatically be checked on each new Customer screen.
Print Statements - Checking this box will cause the ‘Print Statements’ checkbox to automatically be checked on each new Customer screen.
Default to ‘Resident’ – Click in this checkbox if you would like all new Customers entered in the database to automatically be designated as a Resident. Note: Resident/Non-Resident status is only important if your Organization uses the Activity Registration and/or Membership modules in MaxEnterprise and offers fees based on residency status. For more information about ‘Resident’ status and how it is used, please see the MaxEnterprise Activity Registration/Online Registration or MaxEnterprise Membership Management manual.
Photos – check in the Use Photos checkbox if your organization will be taking photographs. See the MaxEnterprise Membership or Activity Registration/Online Registration manuals for more information about where/why/how photos are used in MaxEnterprise.
9
Receivables
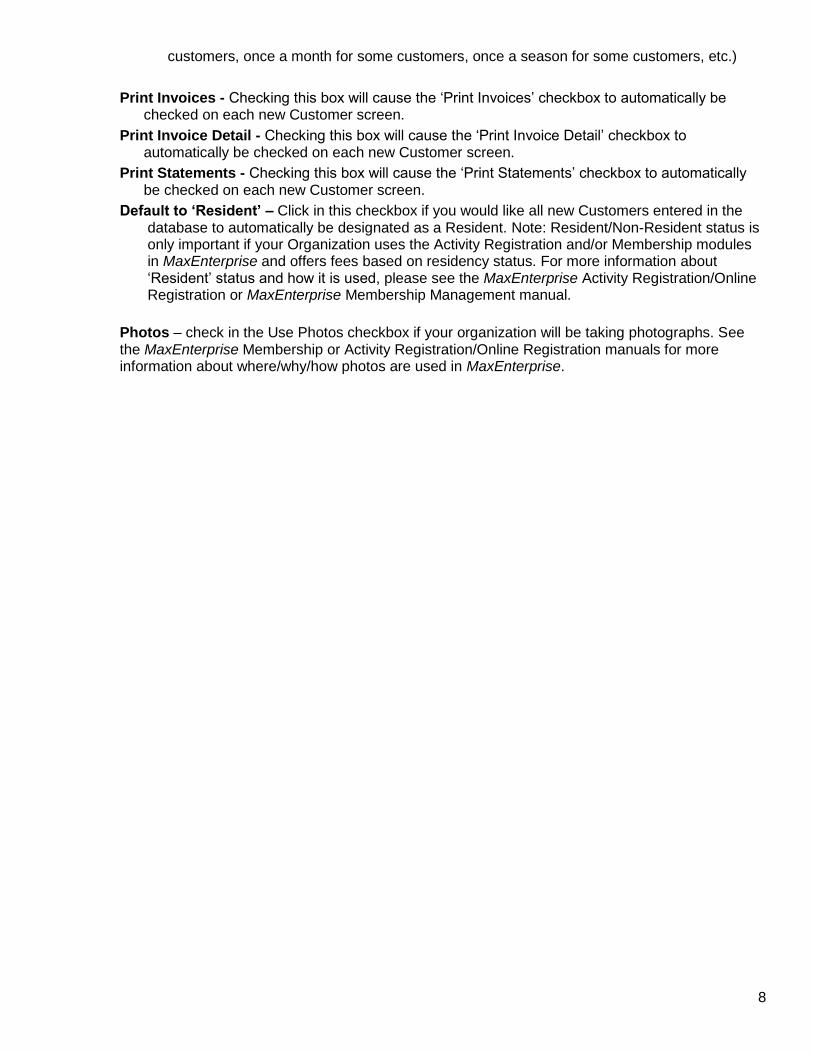
Choose from the following options:
Print Zero Balance Invoices - Check this box if you want MaxEnterprise to print invoices for ALL customers (even if they have zero balances) during the Print Invoices process.
Print Zero Balance Statements - Check this box if you want MaxEnterprise to print statements for ALL customers (even if they have zero balances) during the Print Statements process.
NSF Checks
Allow NSF – select “No” if your Organization does not accept checks as a form of payment method. Select “Yes” if your organization accepts checks and NSF checks will be tracked through MaxEnterprise. Select “Password” if NSF checks will be tracked through MaxEnterprise, but only by an administrator. Note: this password is the Admin Override Password entered on the Misc. tab (see page 11). For detailed instructions about how to handle NSF checks, see page 99.
Add NSF Transaction – select “No” if your Organization does not charge an additional fee for returned checks. Select “Yes” if your organization charge an additional fee for returned checks. Select “Ask” if the NSF charge is decided on a case-by-case basis.
NSF Fee Item – select an Item from the pick list, or use the “…” to add a new Item to the database. For more information about entering Fees in the database, see page 22. The NSF Fee Item will automatically be added to every NSF check if Yes is selected for “Add NSF Transactions” above. Note: when adding the NSF Fee Item to the database, you do not need to enter a dollar value. Just use the Items screen to tie the NSF Item to a GL Account. The actual fee amount will be entered in the NSF Fee field below.
NSF Fee – enter the penalty amount charged by your Organization for NSF checks. Change/Refund Item – this item is only necessary if your Organization allows customers to
write checks for amounts over/above the actual purchase amount. Therefore, if the check eventually bounces (and additional “change” was given back to the customer during the original purchase), the NSF Fee transaction needs to include the change amount, too. Click the “…” button next to this field and create an Item called “Change Given” or something similar, so MaxEnterprise can create a line item for this amount when reversing NSF check payments and creating a new NSF Fee transaction. For more detailed information about handling NSF checks, see page 99.
Bad Check Tracking
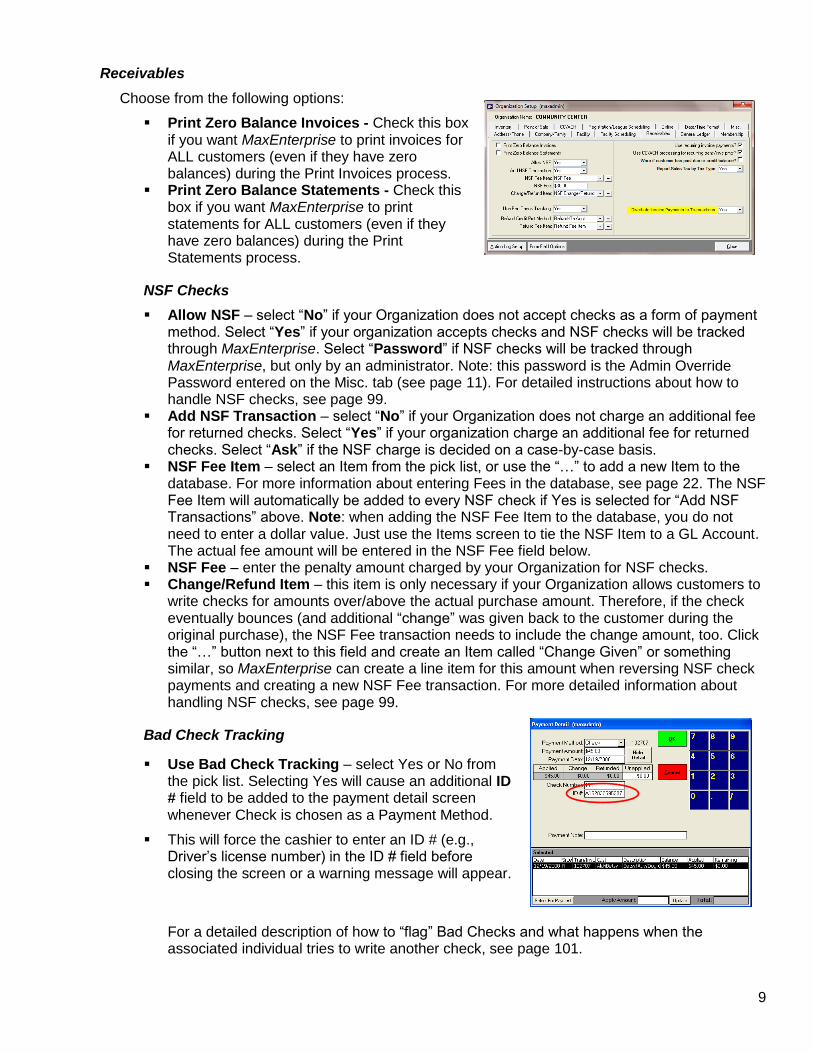
Use Bad Check Tracking – select Yes or No from the pick list. Selecting Yes will cause an additional ID # field to be added to the payment detail screen whenever Check is chosen as a Payment Method.
This will force the cashier to enter an ID # (e.g., Driver’s license number) in the ID # field before closing the screen or a warning message will appear.
For a detailed description of how to “flag” Bad Checks and what happens when the associated individual tries to write another check, see page 101.
10
Refunds
Refund Credit Pmt Method – If your organization will allow refunds to become credits in the system (in addition to or instead of issuing a cash, check or credit card refund), specify a Payment Method for all such refunds, here. Example: click the “…” button next to the pick list and create a payment method of “Refund Credit.” Note: this Payment Method must be designated as a Method Type of ‘Other’ on the Payment Methods screen. After specifying a Refund Credit Pmt Method here, upon arrival to the Payment Details screen during the refund process, a button labeled “On Acct.” will appear and the balance may be placed on account instead of refunding the amount in cash, check, or credit card. For more information about Payment Methods, see page 32.
Refund Fee Item – If a ‘Refund Fee’ item has been designated here, the system will automatically add this fee as a line item to all refunds and reduce the amount of the refund. Example: if your organization always keeps a $3.00 administrative fee when giving registration refunds, specify that Item here. For more information about Items, see page 22.
Recurring Payments Use Recurring Invoice Payments – check this box if your Organization plans to use the
recurring payment feature in MaxEnterprise (e.g., monthly fees for recurring memberships, or payment plans for activity registrations).
Use CC/ACH processing for recurring trans/inv pmts – check in this box if your Organization plans to use the MaxEnterprise integrated credit card processing system for recurring payments.
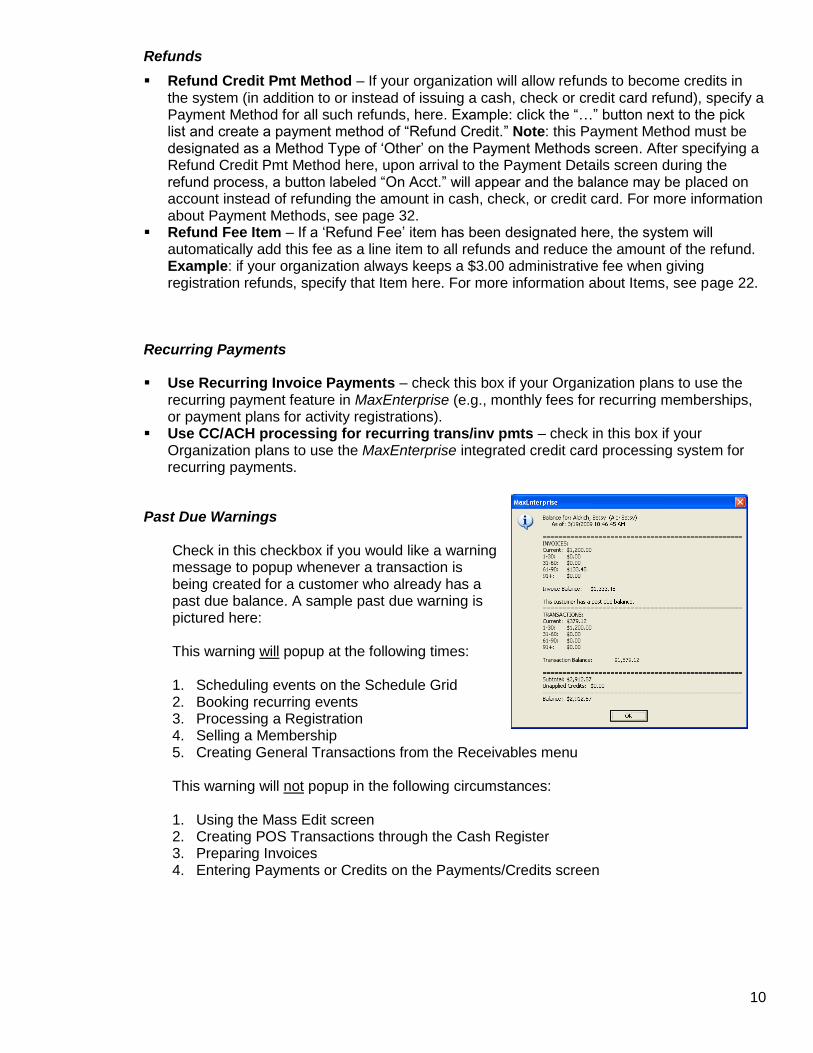
Past Due Warnings
Check in this checkbox if you would like a warning message to popup whenever a transaction is being created for a customer who already has a past due balance. A sample past due warning is pictured here:
This warning will popup at the following times: 1. Scheduling events on the Schedule Grid 2. Booking recurring events 3. Processing a Registration 4. Selling a Membership 5. Creating General Transactions from the Receivables menu This warning will not popup in the following circumstances: 1. Using the Mass Edit screen 2. Creating POS Transactions through the Cash Register 3. Preparing Invoices 4. Entering Payments or Credits on the Payments/Credits screen
11
Use Line Tax
Check in this checkbox if your Organization utilizes multiple sales tax types (e.g., GST and PST). For more detailed information about the Line Tax feature, see pages 34 and 35.
Report Sales Tax by Tax Type
Select Yes or No depending on the Line Tax Selection above. Select No if your Organization only tracks one tax type (e.g., Sales Tax). Select Yes if your Organization tracks multiple tax types (State Tax and County Tax, GST and PST, etc.). If “Yes” is selected, the different tax types will be broken out on the Sales Tax Summary report. See page 183 to view a sample Sales Tax Summary report with multiple tax types.
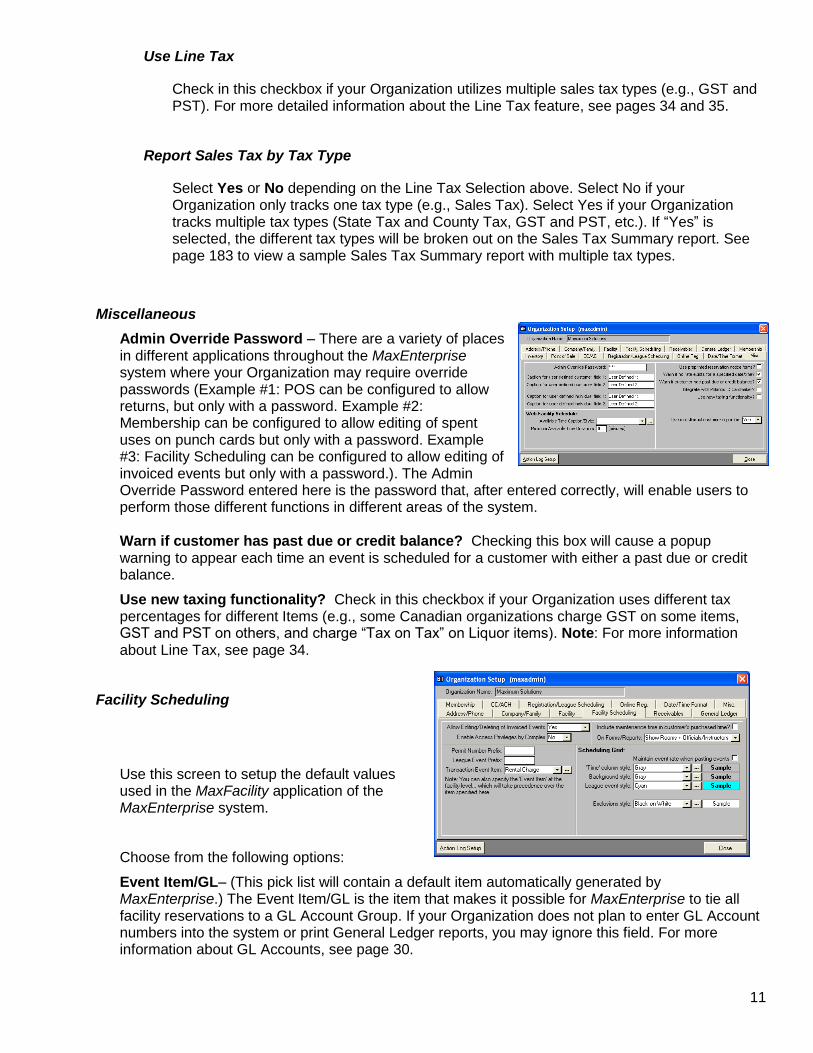
Miscellaneous
Admin Override Password – There are a variety of places in different applications throughout the MaxEnterprise system where your Organization may require override passwords (Example #1: POS can be configured to allow returns, but only with a password. Example #2: Membership can be configured to allow editing of spent uses on punch cards but only with a password. Example #3: Facility Scheduling can be configured to allow editing of invoiced events but only with a password.). The Admin Override Password entered here is the password that, after entered correctly, will enable users to perform those different functions in different areas of the system.
Warn if customer has past due or credit balance? Checking this box will cause a popup warning to appear each time an event is scheduled for a customer with either a past due or credit balance.
Use new taxing functionality? Check in this checkbox if your Organization uses different tax percentages for different Items (e.g., some Canadian organizations charge GST on some items, GST and PST on others, and charge “Tax on Tax” on Liquor items). Note: For more information about Line Tax, see page 34.
Facility Scheduling
Use this screen to setup the default values used in the MaxFacility application of the MaxEnterprise system.
Choose from the following options:
Event Item/GL– (This pick list will contain a default item automatically generated by MaxEnterprise.) The Event Item/GL is the item that makes it possible for MaxEnterprise to tie all facility reservations to a GL Account Group. If your Organization does not plan to enter GL Account numbers into the system or print General Ledger reports, you may ignore this field. For more information about GL Accounts, see page 30.

12
To add/edit an Item in the list, click the “…” button. For more information about the Items screen, see page 22. Note: You may also designate Event Item/GL Accounts at the facility level and/or the customer level that will override the default item specified here. For example, you may designate an Event Item/GL Account for multiple facilities of the same type, or even for each individual facility. Alternatively, specific Event Item/GL Accounts can be tied to special customers. It depends upon how detailed you would like your financial reporting to be. For more information about the Event Item/GL field on the Facilities screen, see page 25. For more information about the Event Item/GL field on the Families or Companies screens, see page 26. For more information about the Departmental Sales and Sales Analysis reports, see pages 172 and 180.

13
Registration/League Scheduling
Designate whether or not to Default ‘Earned Revenue’ to True for Registration Transactions.
Choose No if your Organization does not plan to use the Earned Revenue report to track Activity revenue. To view a sample earned revenue report, see page 174.
Choose Yes if your Organization does plan to use the Earned Revenue report to track revenue during Activities. This will cause the “Include Events on Earned Revenue Reports” pick list to default to “Yes” when setting up new activities in MaxEnterprise. Note: The earned revenue report does not show revenue earned on the day it was invoiced, nor the date the customer paid. Rather, this report displays revenue based on when the events actually took place in an Activity. To view a sample earned revenue report, see page 174.
Designate whether or not to Default ‘Earned Revenue’ to True for League Transactions. Choose No if your Organization does not plan to use the Earned Revenue report to track
League revenue. To view a sample earned revenue report, see page 174. Choose Yes if your Organization does plan to use the Earned Revenue report to track
revenue during Leagues. This will cause the “Include Events on Earned Revenue Reports” pick list to default to “Yes” when setting up new leagues in MaxEnterprise. Note: The earned revenue report does not show revenue earned on the day it was invoiced, nor the date the customer paid. Rather, this report displays revenue based on when the events actually took place in a League. To view a sample earned revenue report, see page 174.
(Optional) Select a Default Customer for Transactions from the pick list, or use the “…” button to add a “default customer” to the database. Note: Maximum Solutions does NOT RECOMMEND specifying a Default Customer for Transactions, especially for organizations that need each financial transaction to be tied to the correct customer (i.e., not a default customer) and for whom detailed financial reporting is important.
CC/ACH
CC/ACH Service – Select from the following options:
None – Choose this if you will not be using the integrated credit card processing service in MaxEnterprise.
VeriSign – Choose this option if you will be using the integrated credit card processing service in MaxEnterprise and VeriSign is your card processing vendor of choice.
ICVerify – Choose this option if your Organization will be using the integrated credit card processing service in MaxEnterprise and ICVerify is your card processing vendor of choice.
14
Transaction Log Options – Select from the following options:
No Log – Choose this option if your Organization does not plan to view or print a Transaction Log of any credit card transactions completed through MaxEnterprise.
Log Successful Transactions – Choose this option if your Organization would like to be able to view or print a Transaction Log of successful credit card transactions completed through MaxEnterprise.
Log All Transactions – Choose this option if your Organization would like to be able to view or print a Transaction Log of all credit card transactions (Successful and Unsuccessful) completed through MaxEnterprise.
Activate CVV Functionality – Select from the following options:
No – Choose this option if your Organization does not plan to enter a 3-digit CVV (Card Verification Value) for any credit card transactions completed through MaxEnterprise.
Yes – Choose this option if your Organization does plan to enter a 3-digit CVV (Card Verification Value) for credit card transactions completed through MaxEnterprise. If “Yes” is selected, an additional CVV field will appear on the Payment Detail screen (see page 55). However, selecting “Yes” does not mean that a CVV number is required for every credit card transaction. The field will simply be available for use if desired. Note: even if your Organization turns the CVV functionality on in MaxEnterprise, MaxWeb Interface is not yet configured to require this information during the online registration process.
15
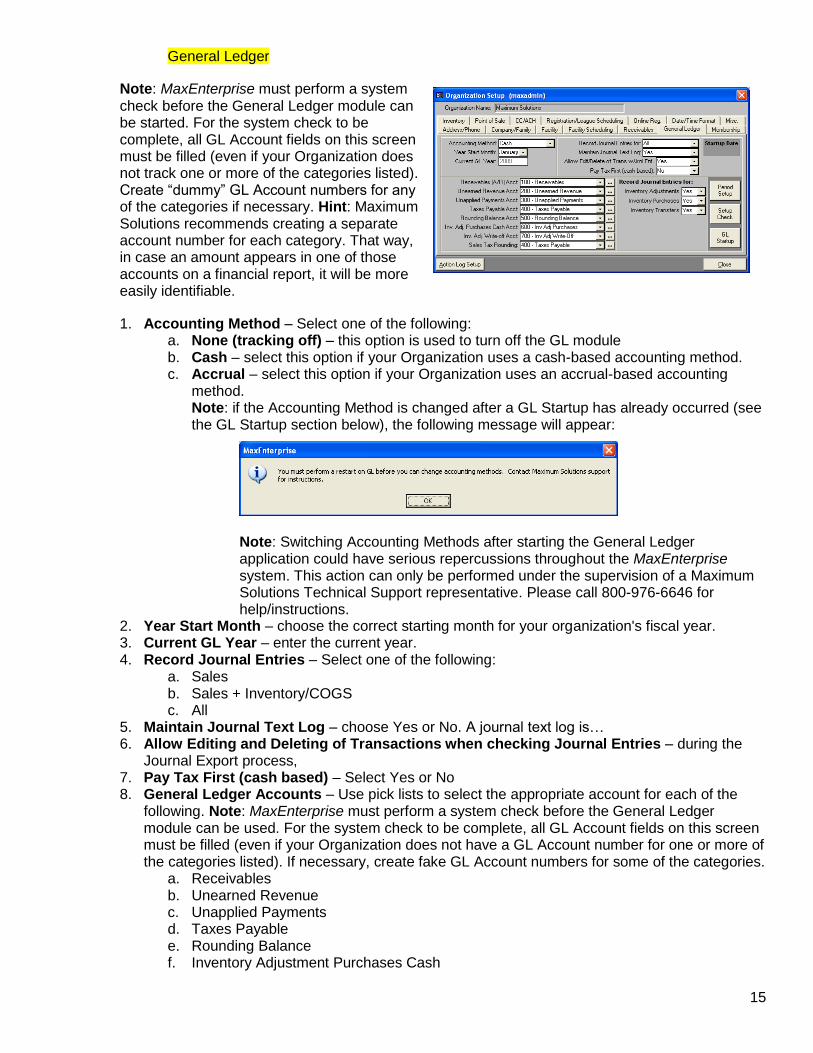
General Ledger
Note: MaxEnterprise must perform a system check before the General Ledger module can be started. For the system check to be complete, all GL Account fields on this screen must be filled (even if your Organization does not track one or more of the categories listed). Create “dummy” GL Account numbers for any of the categories if necessary. Hint: Maximum Solutions recommends creating a separate account number for each category. That way, in case an amount appears in one of those accounts on a financial report, it will be more easily identifiable.
1. Accounting Method – Select one of the following: a. None (tracking off) – this option is used to turn off the GL module b. Cash – select this option if your Organization uses a cash-based accounting method. c. Accrual – select this option if your Organization uses an accrual-based accounting
method. Note: if the Accounting Method is changed after a GL Startup has already occurred (see the GL Startup section below), the following message will appear:
Note: Switching Accounting Methods after starting the General Ledger application could have serious repercussions throughout the MaxEnterprise system. This action can only be performed under the supervision of a Maximum Solutions Technical Support representative. Please call 800-976-6646 for help/instructions.
2. Year Start Month – choose the correct starting month for your organization's fiscal year. 3. Current GL Year – enter the current year. 4. Record Journal Entries – Select one of the following:
a. Sales b. Sales + Inventory/COGS c. All
5. Maintain Journal Text Log – choose Yes or No. A journal text log is… 6. Allow Editing and Deleting of Transactions when checking Journal Entries – during the
Journal Export process, 7. Pay Tax First (cash based) – Select Yes or No 8. General Ledger Accounts – Use pick lists to select the appropriate account for each of the
following. Note: MaxEnterprise must perform a system check before the General Ledger module can be used. For the system check to be complete, all GL Account fields on this screen must be filled (even if your Organization does not have a GL Account number for one or more of the categories listed). If necessary, create fake GL Account numbers for some of the categories.
a. Receivables b. Unearned Revenue c. Unapplied Payments d. Taxes Payable e. Rounding Balance f. Inventory Adjustment Purchases Cash
16
g. Inventory Adjustments Write-Off h. Sales tax Rounding
Hint: Maximum Solutions recommends creating a separate account number for each category. That way, in case an amount appears under one of those headings on a report, it will be easily identifiable. Use the “…” button to add new GL Accounts. For more details about GL Accounts and GL Account Groups, see pages 30 and 31.
9. Record Journal Entries – Select Yes or No for each of the following: a. Inventory Adjustments – Adjustments b. Inventory Adjustments – Purchases c. Inventory Adjustments – Transfers
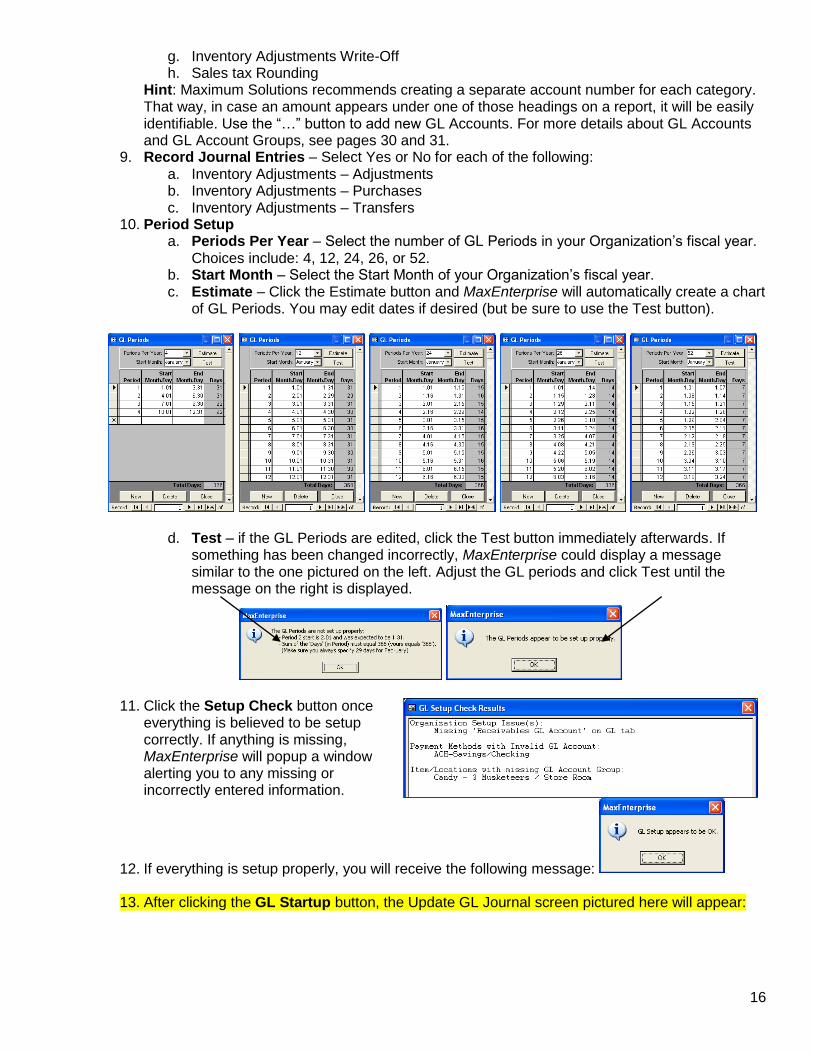
10. Period Setup a. Periods Per Year – Select the number of GL Periods in your Organization’s fiscal year.
Choices include: 4, 12, 24, 26, or 52. b. Start Month – Select the Start Month of your Organization’s fiscal year. c. Estimate – Click the Estimate button and MaxEnterprise will automatically create a chart
of GL Periods. You may edit dates if desired (but be sure to use the Test button).
d. Test – if the GL Periods are edited, click the Test button immediately afterwards. If something has been changed incorrectly, MaxEnterprise could display a message similar to the one pictured on the left. Adjust the GL periods and click Test until the message on the right is displayed.
11. Click the Setup Check button once
everything is believed to be setup correctly. If anything is missing, MaxEnterprise will popup a window alerting you to any missing or incorrectly entered information.
12. If everything is setup properly, you will receive the following message:
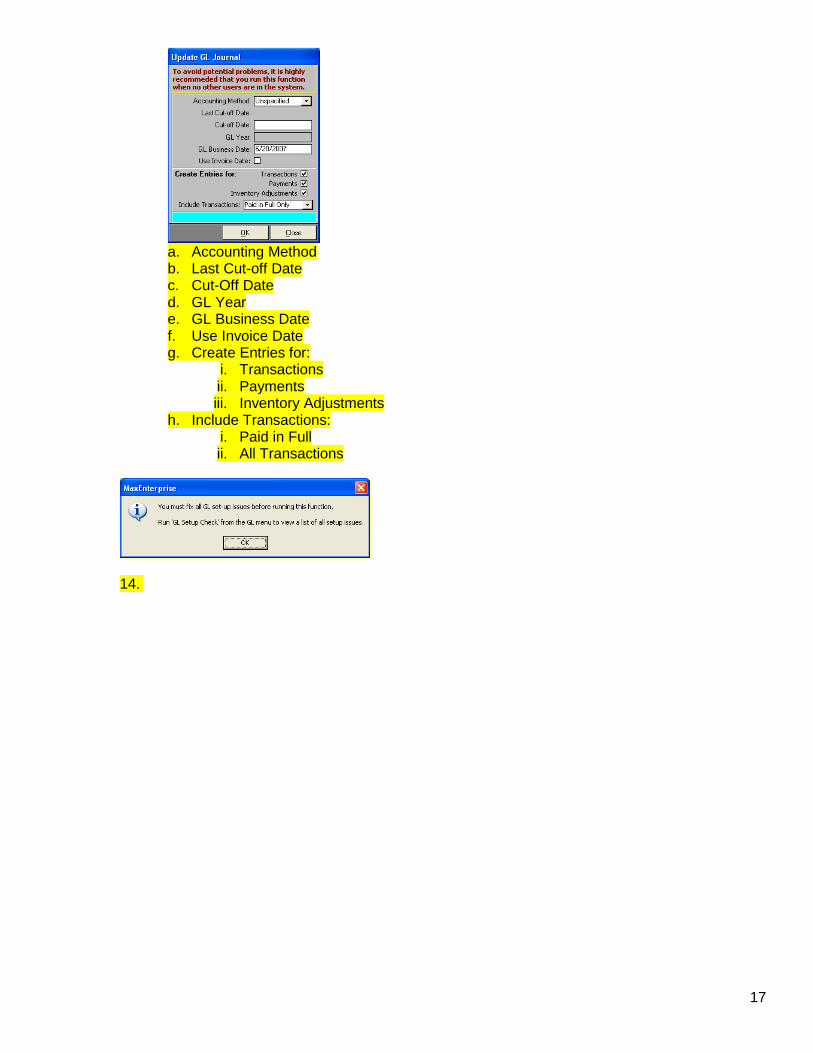
13. After clicking the GL Startup button, the Update GL Journal screen pictured here will appear:
17
a. Accounting Method b. Last Cut-off Date c. Cut-Off Date d. GL Year e. GL Business Date f. Use Invoice Date g. Create Entries for:
i. Transactions ii. Payments iii. Inventory Adjustments
h. Include Transactions: i. Paid in Full ii. All Transactions
14.
18
Online Registration
1. Use Online Registration – Click this checkbox if your Organization is ready to display activities online. (Hint: leave this unchecked while doing data setup for activities and then check it when everything is ready.)
2. Select a Default Facility to be displayed for online activity registrations. Hint: If you do not know what facility an activity will take place in (or you do not want to enter all of the potential “away” sites in your Facility database), create one default facility called “TBD” and set it as your default.
3. Template Customer – Select a default Template Customer to be used 4. Credit Card Pmt Method – Select a default Credit Card Payment Method to be used 5. Tax Location – Select a default Tax Location to be used 6. Inventory Location – Select a default Inventory Location to be used 7. Shift Tracking – Select an option from the Shift Tracking pick list. Choices include:
a. No Shift Tracking – Select this option if you do not want Online transactions to be tied to any POS reports in MaxEnterprise.
b. Auto-Create when prior shift is closed – Select this option if you want MaxEnterprise to auto-create a shift whenever there is not one open (i.e., so there will always be a shift open to which online registrations can be tied.)
8. Prior Shift ID – (This field will display the last open shift number) 9. Shift Register – (Note: this field is only enabled if “Auto-Create when prior shift is closed” in the
Shift Tracking pick list mentioned above.) Select a default Cash Register to be used for all online transactions. Hint: There should be a specific, separate cash register setup for all online transactions in order to keep them separate from in-house transactions. For more information about Register Setup, see the MaxEnterprise POS manual.
10. Cashier – (Note: this field is only enabled if “Auto-Create when prior shift is closed” in the Shift Tracking pick list mentioned above.) Select a default Cashier to be used for all online transactions. Hint: There should be a specific, separate cashier setup for all online transactions in order to keep them separate from other cashier transactions. For more information about Cashier Setup, see the MaxEnterprise POS manual.
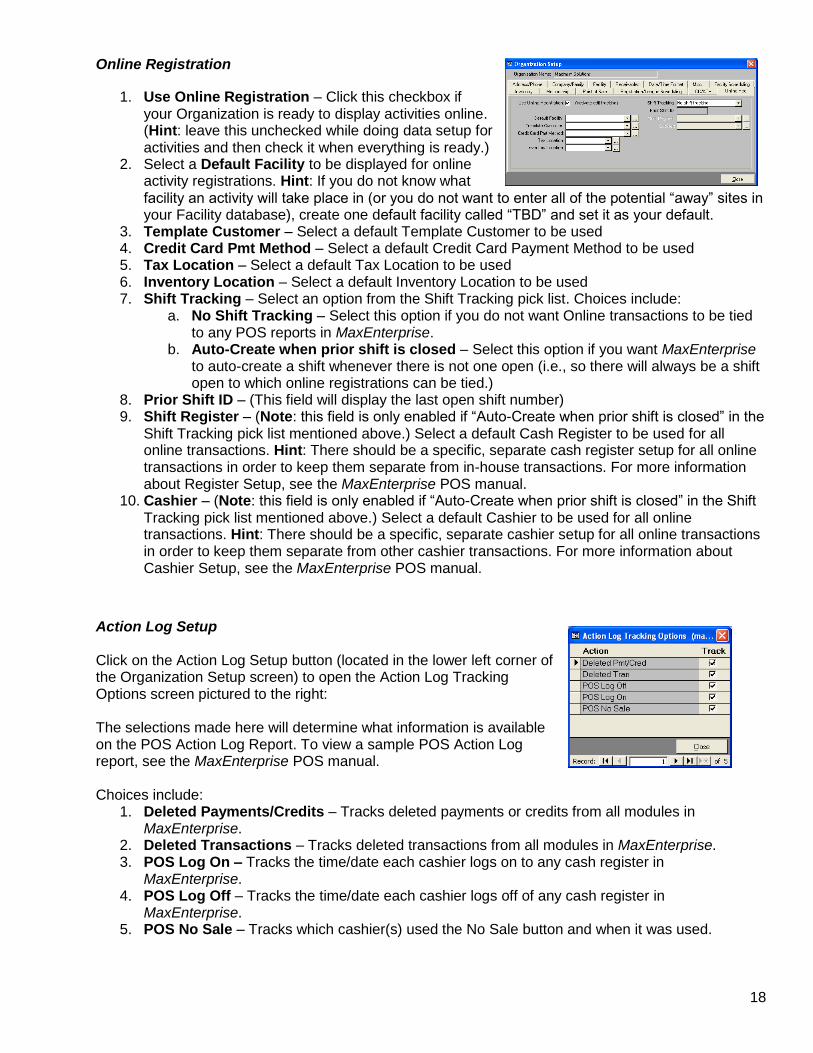
Action Log Setup Click on the Action Log Setup button (located in the lower left corner of the Organization Setup screen) to open the Action Log Tracking Options screen pictured to the right: The selections made here will determine what information is available on the POS Action Log Report. To view a sample POS Action Log report, see the MaxEnterprise POS manual. Choices include:
1. Deleted Payments/Credits – Tracks deleted payments or credits from all modules in MaxEnterprise.
2. Deleted Transactions – Tracks deleted transactions from all modules in MaxEnterprise. 3. POS Log On – Tracks the time/date each cashier logs on to any cash register in
MaxEnterprise. 4. POS Log Off – Tracks the time/date each cashier logs off of any cash register in
MaxEnterprise. 5. POS No Sale – Tracks which cashier(s) used the No Sale button and when it was used.
19
CC/ACH Account Administration
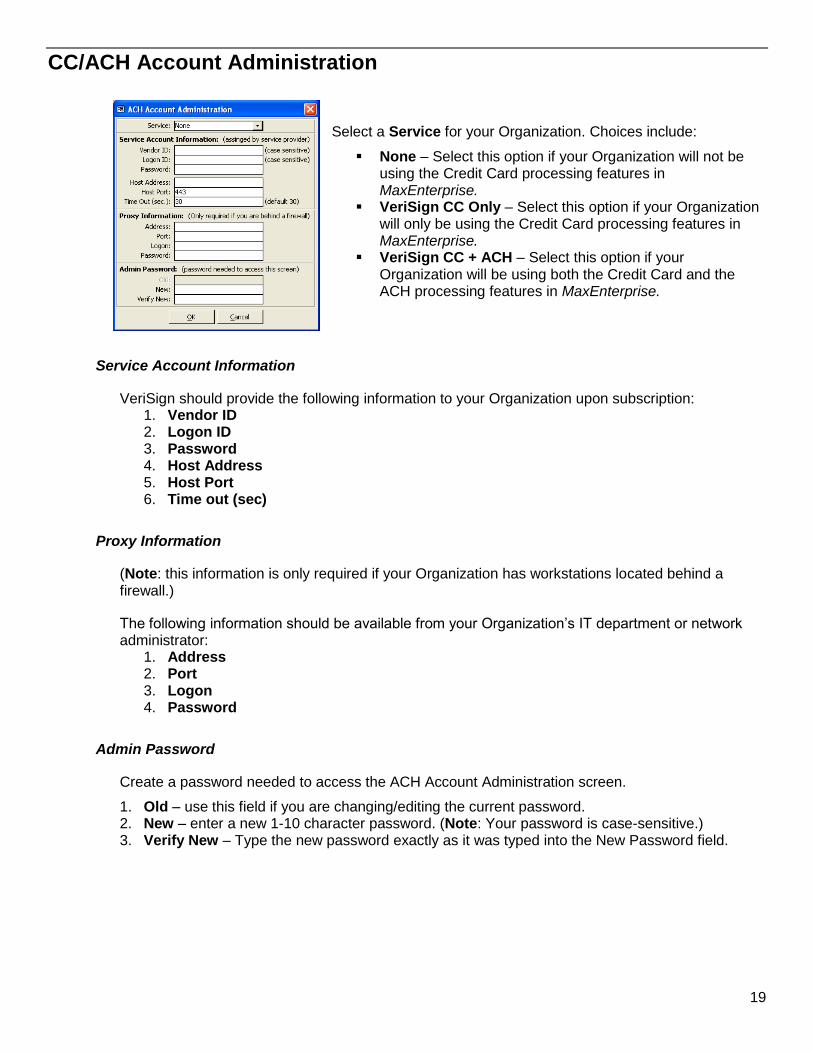
Select a Service for your Organization. Choices include:
None – Select this option if your Organization will not be using the Credit Card processing features in MaxEnterprise.
VeriSign CC Only – Select this option if your Organization will only be using the Credit Card processing features in MaxEnterprise.
VeriSign CC + ACH – Select this option if your Organization will be using both the Credit Card and the ACH processing features in MaxEnterprise.
Service Account Information
VeriSign should provide the following information to your Organization upon subscription: 1. Vendor ID 2. Logon ID 3. Password 4. Host Address 5. Host Port 6. Time out (sec)
Proxy Information
(Note: this information is only required if your Organization has workstations located behind a firewall.)
The following information should be available from your Organization’s IT department or network administrator:
1. Address 2. Port 3. Logon 4. Password
Admin Password
Create a password needed to access the ACH Account Administration screen.
1. Old – use this field if you are changing/editing the current password. 2. New – enter a new 1-10 character password. (Note: Your password is case-sensitive.) 3. Verify New – Type the new password exactly as it was typed into the New Password field.
20
CC/ACH Transaction Log
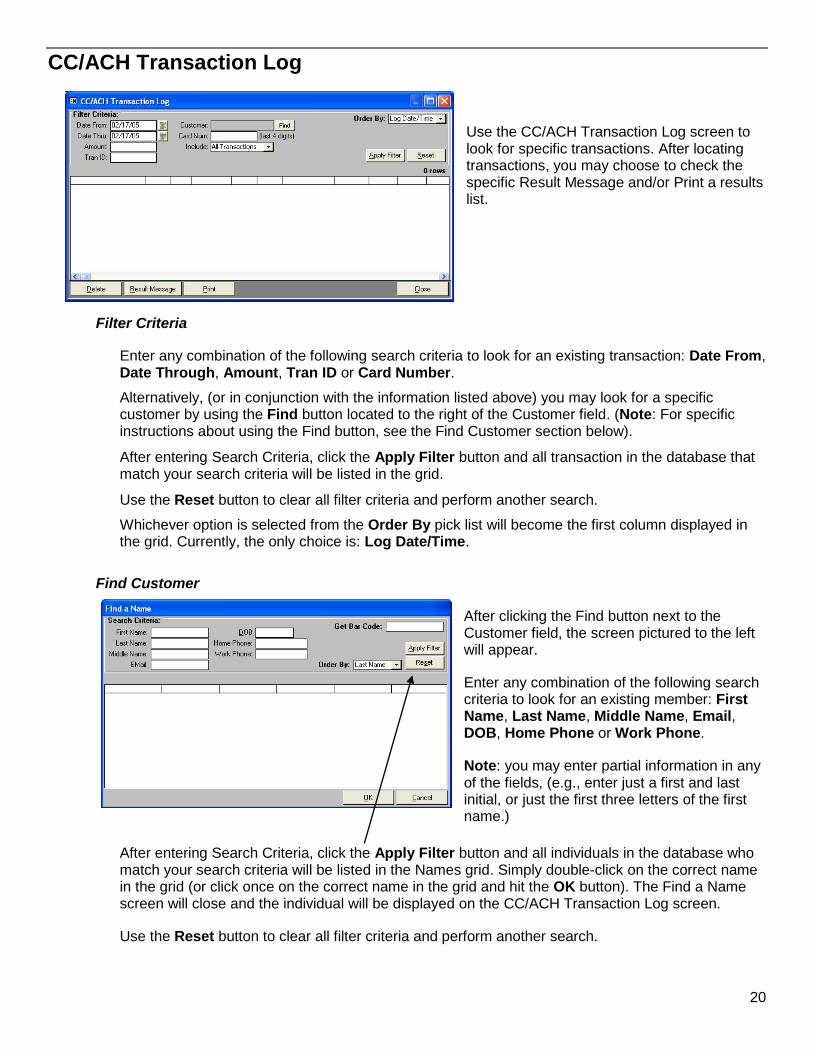
Use the CC/ACH Transaction Log screen to look for specific transactions. After locating transactions, you may choose to check the specific Result Message and/or Print a results list.
Filter Criteria
Enter any combination of the following search criteria to look for an existing transaction: Date From, Date Through, Amount, Tran ID or Card Number.
Alternatively, (or in conjunction with the information listed above) you may look for a specific customer by using the Find button located to the right of the Customer field. (Note: For specific instructions about using the Find button, see the Find Customer section below).
After entering Search Criteria, click the Apply Filter button and all transaction in the database that match your search criteria will be listed in the grid.
Use the Reset button to clear all filter criteria and perform another search.
Whichever option is selected from the Order By pick list will become the first column displayed in the grid. Currently, the only choice is: Log Date/Time.
Find Customer
After clicking the Find button next to the Customer field, the screen pictured to the left will appear.
Enter any combination of the following search criteria to look for an existing member: First Name, Last Name, Middle Name, Email, DOB, Home Phone or Work Phone.
Note: you may enter partial information in any of the fields, (e.g., enter just a first and last initial, or just the first three letters of the first name.)
After entering Search Criteria, click the Apply Filter button and all individuals in the database who match your search criteria will be listed in the Names grid. Simply double-click on the correct name in the grid (or click once on the correct name in the grid and hit the OK button). The Find a Name screen will close and the individual will be displayed on the CC/ACH Transaction Log screen.
Use the Reset button to clear all filter criteria and perform another search.
21
Transaction Grid
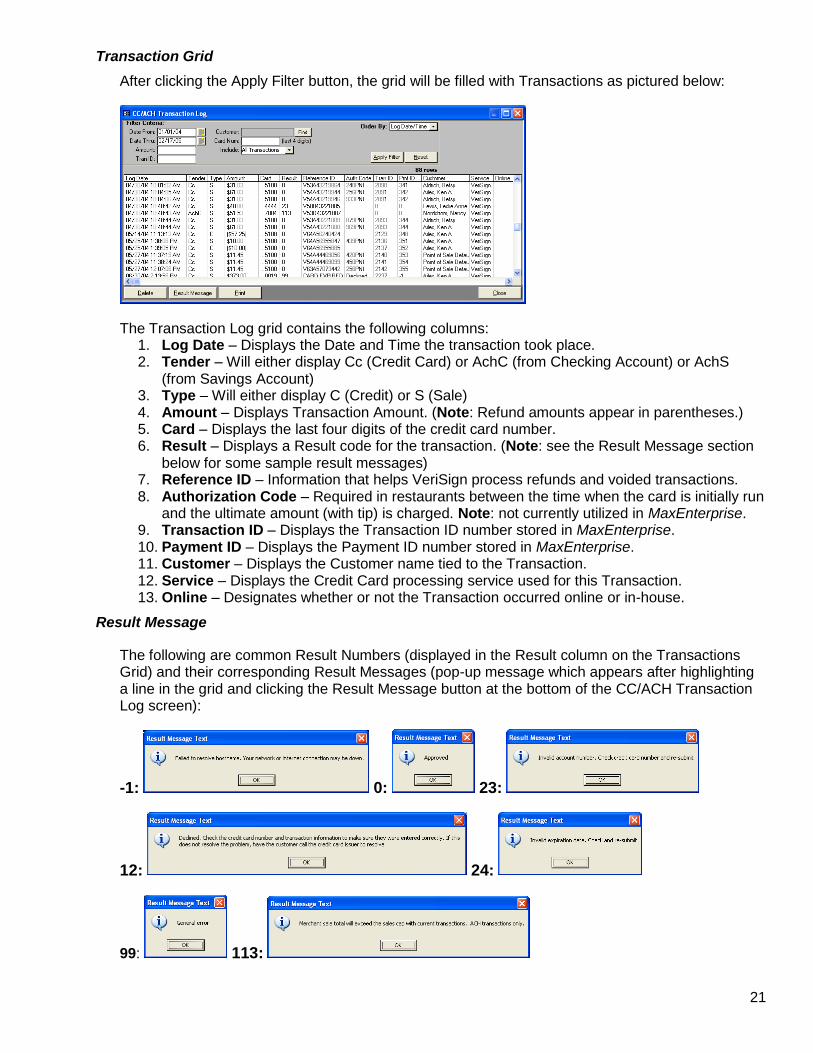
After clicking the Apply Filter button, the grid will be filled with Transactions as pictured below:
The Transaction Log grid contains the following columns: 1. Log Date – Displays the Date and Time the transaction took place. 2. Tender – Will either display Cc (Credit Card) or AchC (from Checking Account) or AchS
(from Savings Account) 3. Type – Will either display C (Credit) or S (Sale) 4. Amount – Displays Transaction Amount. (Note: Refund amounts appear in parentheses.) 5. Card – Displays the last four digits of the credit card number. 6. Result – Displays a Result code for the transaction. (Note: see the Result Message section
below for some sample result messages) 7. Reference ID – Information that helps VeriSign process refunds and voided transactions. 8. Authorization Code – Required in restaurants between the time when the card is initially run
and the ultimate amount (with tip) is charged. Note: not currently utilized in MaxEnterprise. 9. Transaction ID – Displays the Transaction ID number stored in MaxEnterprise. 10. Payment ID – Displays the Payment ID number stored in MaxEnterprise. 11. Customer – Displays the Customer name tied to the Transaction. 12. Service – Displays the Credit Card processing service used for this Transaction. 13. Online – Designates whether or not the Transaction occurred online or in-house.
Result Message
The following are common Result Numbers (displayed in the Result column on the Transactions Grid) and their corresponding Result Messages (pop-up message which appears after highlighting a line in the grid and clicking the Result Message button at the bottom of the CC/ACH Transaction Log screen):
-1: 0: 23:
12: 24:
99: 113:
22
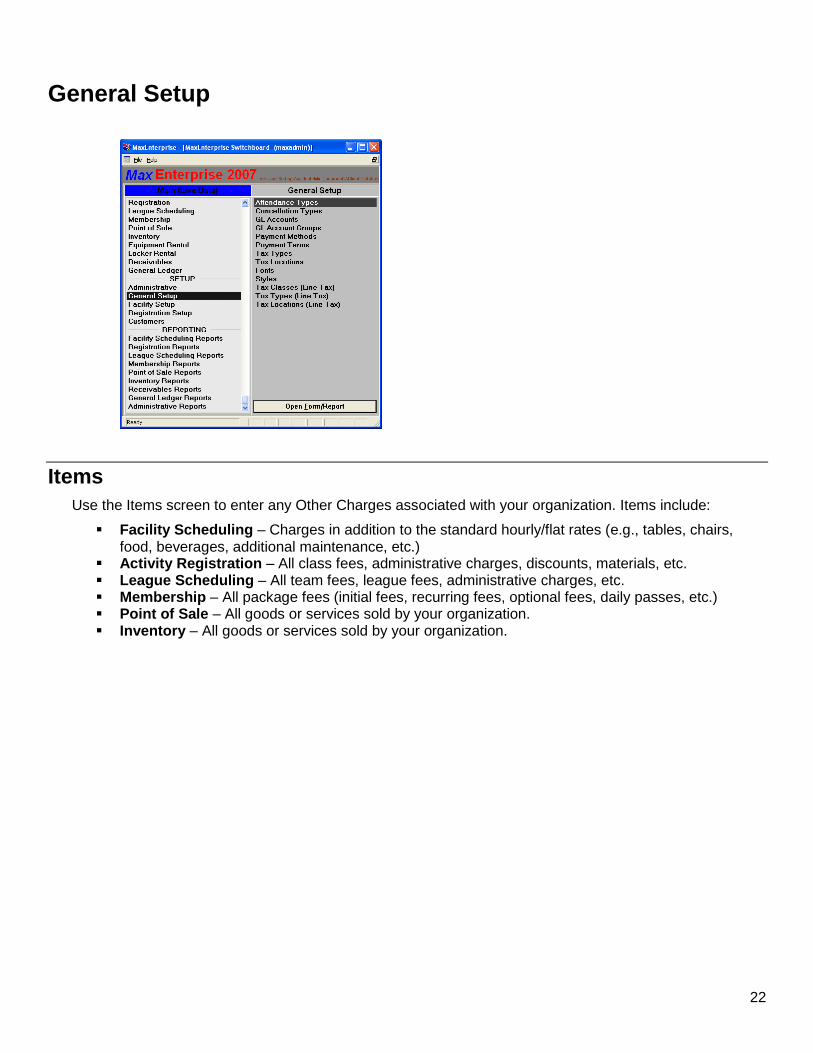
General Setup
Items
Use the Items screen to enter any Other Charges associated with your organization. Items include:
Facility Scheduling – Charges in addition to the standard hourly/flat rates (e.g., tables, chairs, food, beverages, additional maintenance, etc.)
Activity Registration – All class fees, administrative charges, discounts, materials, etc. League Scheduling – All team fees, league fees, administrative charges, etc. Membership – All package fees (initial fees, recurring fees, optional fees, daily passes, etc.) Point of Sale – All goods or services sold by your organization. Inventory – All goods or services sold by your organization.
23
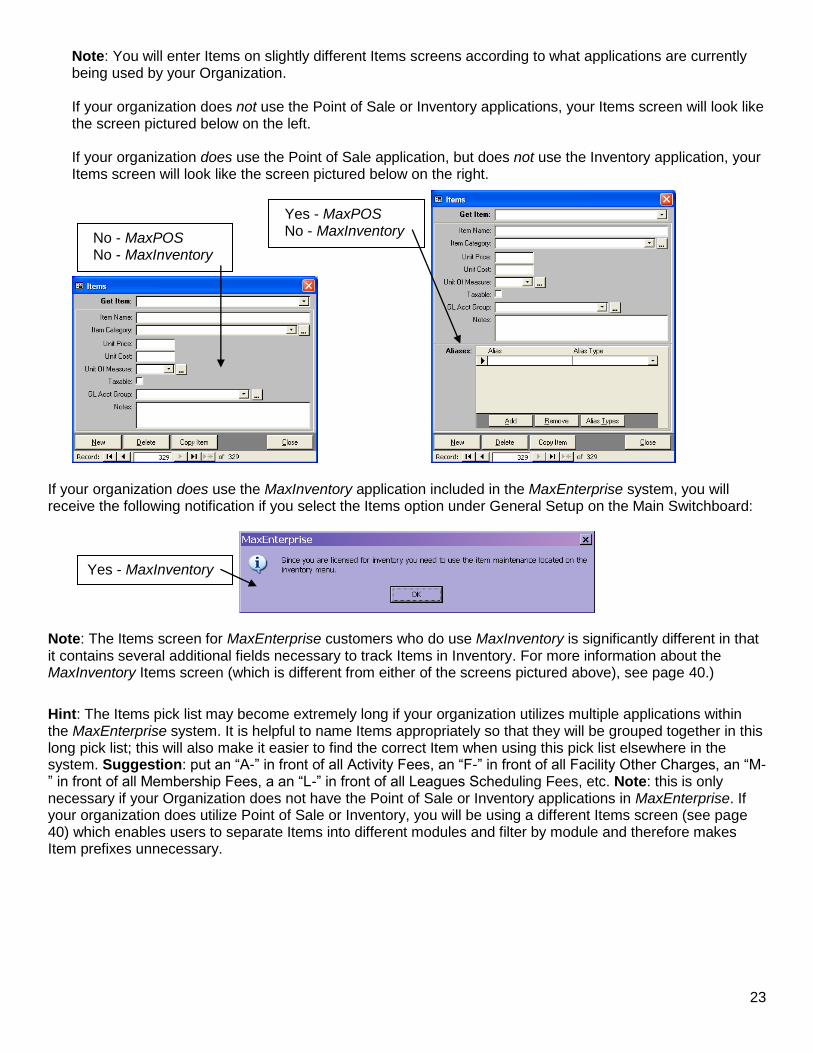
Note: You will enter Items on slightly different Items screens according to what applications are currently being used by your Organization. If your organization does not use the Point of Sale or Inventory applications, your Items screen will look like the screen pictured below on the left. If your organization does use the Point of Sale application, but does not use the Inventory application, your Items screen will look like the screen pictured below on the right.
If your organization does use the MaxInventory application included in the MaxEnterprise system, you will receive the following notification if you select the Items option under General Setup on the Main Switchboard:
Note: The Items screen for MaxEnterprise customers who do use MaxInventory is significantly different in that it contains several additional fields necessary to track Items in Inventory. For more information about the MaxInventory Items screen (which is different from either of the screens pictured above), see page 40.)
Hint: The Items pick list may become extremely long if your organization utilizes multiple applications within the MaxEnterprise system. It is helpful to name Items appropriately so that they will be grouped together in this long pick list; this will also make it easier to find the correct Item when using this pick list elsewhere in the system. Suggestion: put an “A-” in front of all Activity Fees, an “F-” in front of all Facility Other Charges, an “M-” in front of all Membership Fees, a an “L-” in front of all Leagues Scheduling Fees, etc. Note: this is only necessary if your Organization does not have the Point of Sale or Inventory applications in MaxEnterprise. If your organization does utilize Point of Sale or Inventory, you will be using a different Items screen (see page 40) which enables users to separate Items into different modules and filter by module and therefore makes Item prefixes unnecessary.
No - MaxPOS No - MaxInventory
Yes - MaxPOS No - MaxInventory
Yes - MaxInventory
24
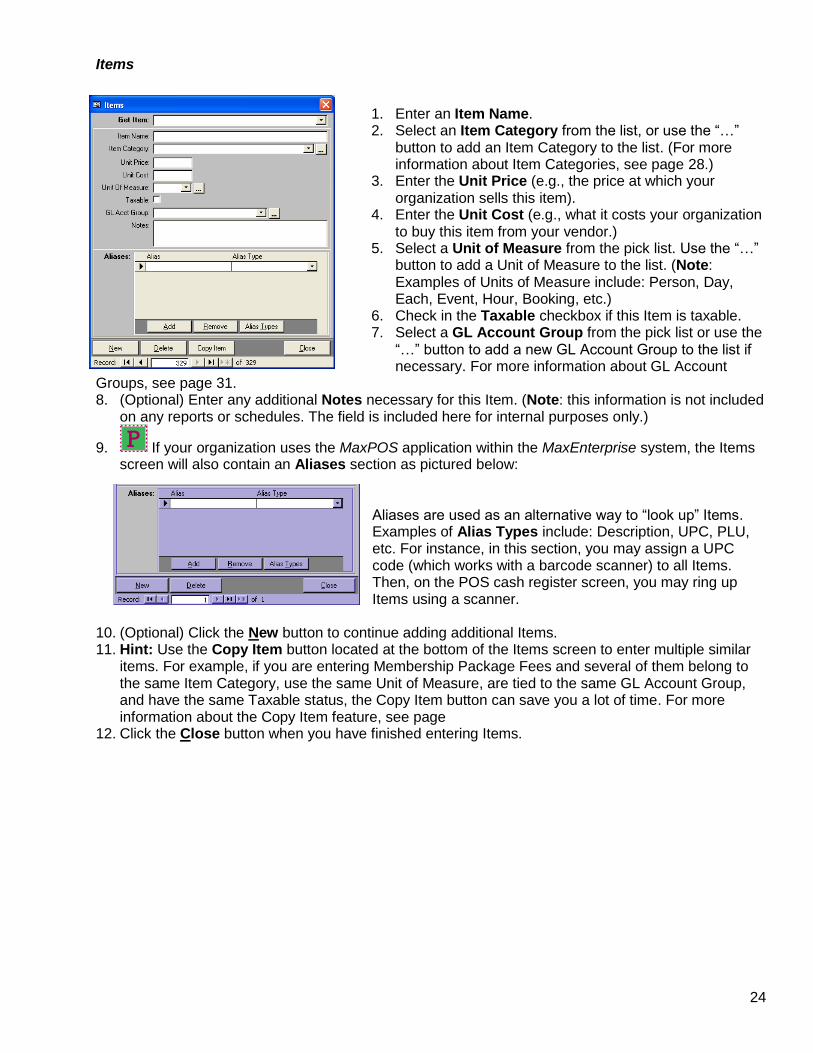
Items
1. Enter an Item Name. 2. Select an Item Category from the list, or use the “…”
button to add an Item Category to the list. (For more information about Item Categories, see page 28.)
3. Enter the Unit Price (e.g., the price at which your organization sells this item).
4. Enter the Unit Cost (e.g., what it costs your organization to buy this item from your vendor.)
5. Select a Unit of Measure from the pick list. Use the “…” button to add a Unit of Measure to the list. (Note: Examples of Units of Measure include: Person, Day, Each, Event, Hour, Booking, etc.)
6. Check in the Taxable checkbox if this Item is taxable. 7. Select a GL Account Group from the pick list or use the
“…” button to add a new GL Account Group to the list if necessary. For more information about GL Account
Groups, see page 31. 8. (Optional) Enter any additional Notes necessary for this Item. (Note: this information is not included
on any reports or schedules. The field is included here for internal purposes only.)
9. If your organization uses the MaxPOS application within the MaxEnterprise system, the Items screen will also contain an Aliases section as pictured below:
Aliases are used as an alternative way to “look up” Items. Examples of Alias Types include: Description, UPC, PLU, etc. For instance, in this section, you may assign a UPC code (which works with a barcode scanner) to all Items. Then, on the POS cash register screen, you may ring up Items using a scanner.
10. (Optional) Click the New button to continue adding additional Items. 11. Hint: Use the Copy Item button located at the bottom of the Items screen to enter multiple similar
items. For example, if you are entering Membership Package Fees and several of them belong to the same Item Category, use the same Unit of Measure, are tied to the same GL Account Group, and have the same Taxable status, the Copy Item button can save you a lot of time. For more information about the Copy Item feature, see page
12. Click the Close button when you have finished entering Items.
25
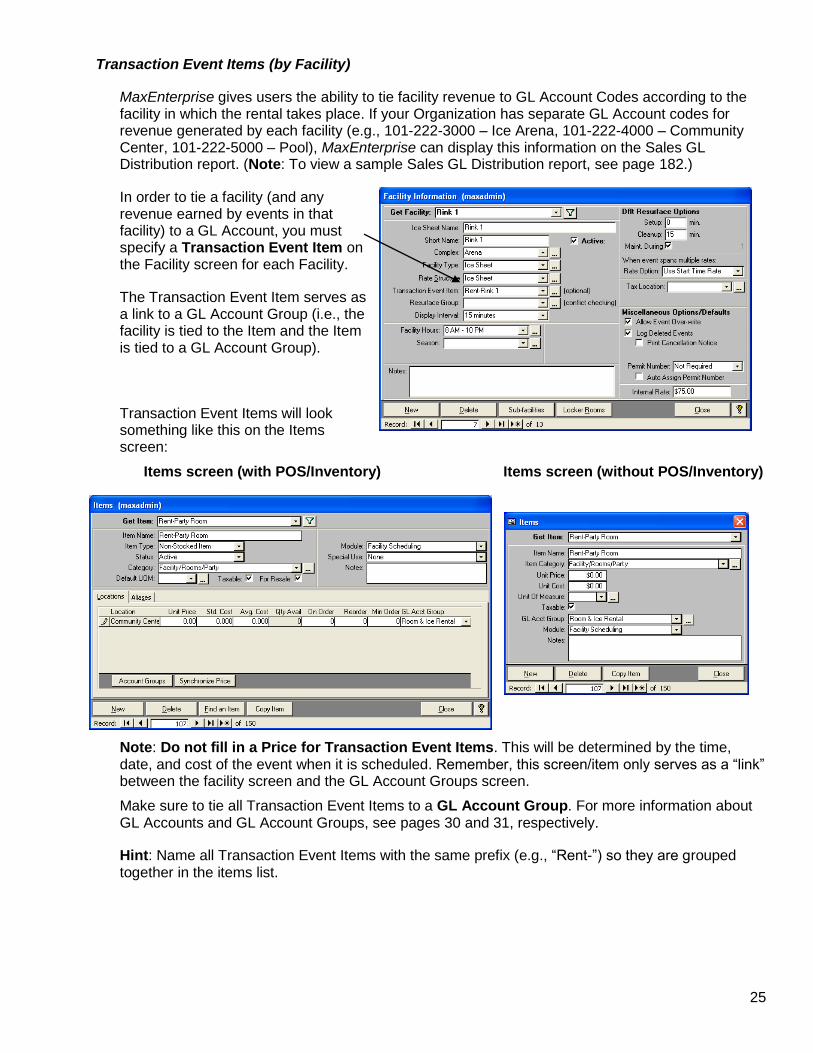
Transaction Event Items (by Facility)
MaxEnterprise gives users the ability to tie facility revenue to GL Account Codes according to the facility in which the rental takes place. If your Organization has separate GL Account codes for revenue generated by each facility (e.g., 101-222-3000 – Ice Arena, 101-222-4000 – Community Center, 101-222-5000 – Pool), MaxEnterprise can display this information on the Sales GL Distribution report. (Note: To view a sample Sales GL Distribution report, see page 182.)
In order to tie a facility (and any revenue earned by events in that facility) to a GL Account, you must specify a Transaction Event Item on the Facility screen for each Facility.
The Transaction Event Item serves as a link to a GL Account Group (i.e., the facility is tied to the Item and the Item is tied to a GL Account Group).
Transaction Event Items will look something like this on the Items screen:
Items screen (with POS/Inventory) Items screen (without POS/Inventory)
Note: Do not fill in a Price for Transaction Event Items. This will be determined by the time, date, and cost of the event when it is scheduled. Remember, this screen/item only serves as a “link” between the facility screen and the GL Account Groups screen.
Make sure to tie all Transaction Event Items to a GL Account Group. For more information about GL Accounts and GL Account Groups, see pages 30 and 31, respectively.
Hint: Name all Transaction Event Items with the same prefix (e.g., “Rent-”) so they are grouped together in the items list.
26
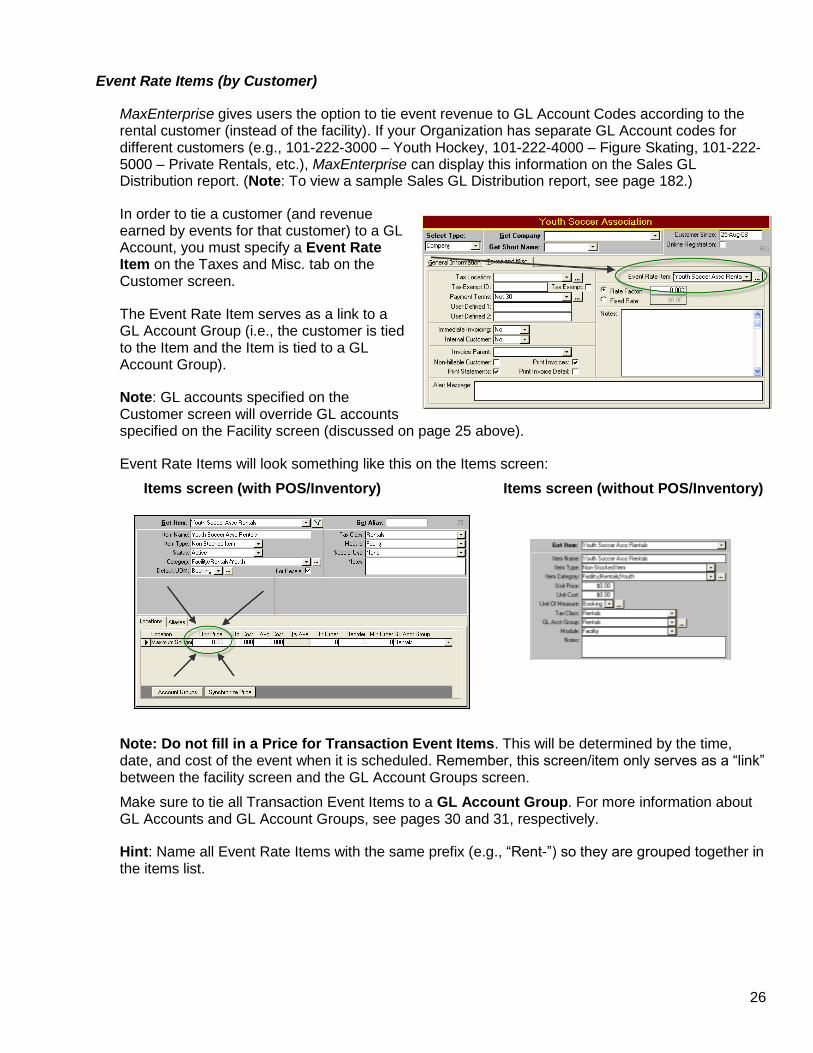
Event Rate Items (by Customer)
MaxEnterprise gives users the option to tie event revenue to GL Account Codes according to the rental customer (instead of the facility). If your Organization has separate GL Account codes for different customers (e.g., 101-222-3000 – Youth Hockey, 101-222-4000 – Figure Skating, 101-222-5000 – Private Rentals, etc.), MaxEnterprise can display this information on the Sales GL Distribution report. (Note: To view a sample Sales GL Distribution report, see page 182.)
In order to tie a customer (and revenue earned by events for that customer) to a GL Account, you must specify a Event Rate Item on the Taxes and Misc. tab on the Customer screen.
The Event Rate Item serves as a link to a GL Account Group (i.e., the customer is tied to the Item and the Item is tied to a GL Account Group).
Note: GL accounts specified on the Customer screen will override GL accounts specified on the Facility screen (discussed on page 25 above).
Event Rate Items will look something like this on the Items screen:
Items screen (with POS/Inventory) Items screen (without POS/Inventory)
Note: Do not fill in a Price for Transaction Event Items. This will be determined by the time, date, and cost of the event when it is scheduled. Remember, this screen/item only serves as a “link” between the facility screen and the GL Account Groups screen.
Make sure to tie all Transaction Event Items to a GL Account Group. For more information about GL Accounts and GL Account Groups, see pages 30 and 31, respectively.
Hint: Name all Event Rate Items with the same prefix (e.g., “Rent-”) so they are grouped together in the items list.

27
Copy Item
Use the Copy Item feature to save time when entering multiple similar items. For example, if you are entering Membership Package Fees and several of them belong to the same Item Category, use the same Unit of Measure, are tied to the same GL Account Group, and have the same Taxable status, then the Copy Item button can save several steps. Complete the following steps:
1. Enter the first Item as pictured below. 2. Highlight over the Item Name and click Ctrl-C on your keyboard (to “copy” the name of the Item.)
3. Click the Copy Item button and the following screen will appear:
4. Click Ctrl-V on your keyboard and the Item name will be “pasted” into the “To Item/Fee Name” field. 5. Edit the Item Name as necessary. 6. Edit the Unit Price (if necessary). 7. Click OK.
You will be returned to the Items screen where the new Item will be displayed:
The Item Category, Unit of Measure, Taxable checkbox, Notes, and GL Account Group Information were all copied for the new Item.
Note: any additional information may be edited at this time if necessary.
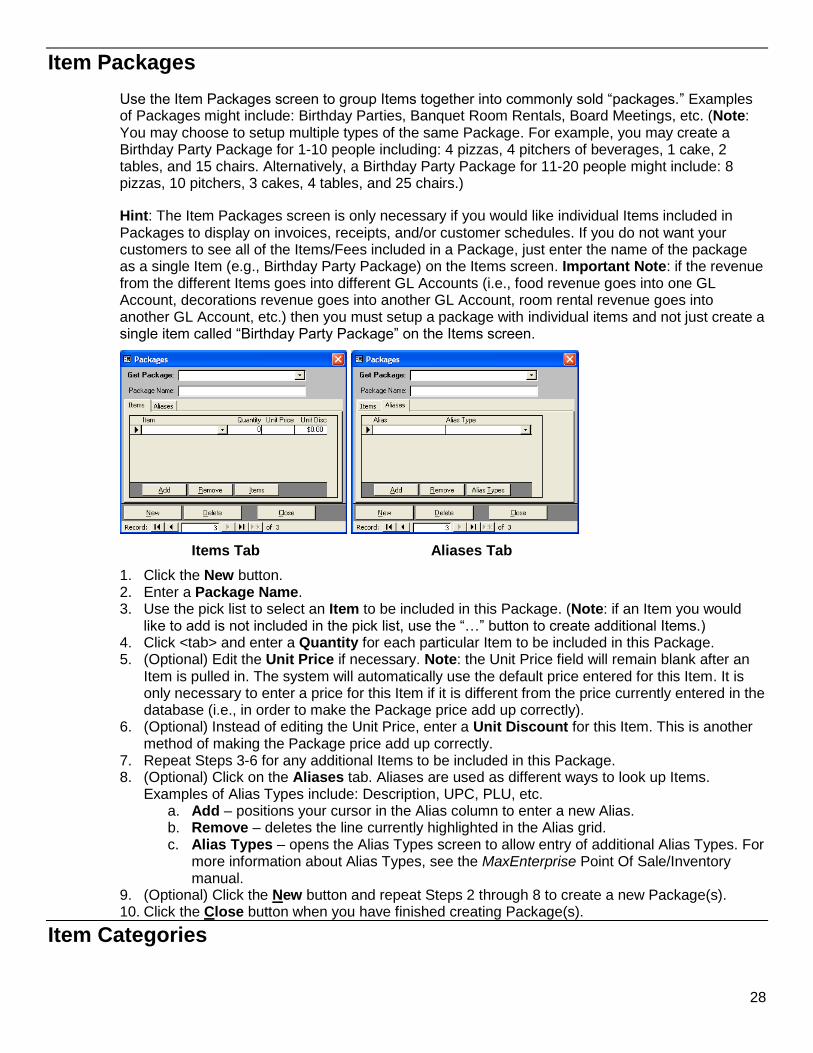
28
Item Packages
Use the Item Packages screen to group Items together into commonly sold “packages.” Examples of Packages might include: Birthday Parties, Banquet Room Rentals, Board Meetings, etc. (Note: You may choose to setup multiple types of the same Package. For example, you may create a Birthday Party Package for 1-10 people including: 4 pizzas, 4 pitchers of beverages, 1 cake, 2 tables, and 15 chairs. Alternatively, a Birthday Party Package for 11-20 people might include: 8 pizzas, 10 pitchers, 3 cakes, 4 tables, and 25 chairs.)
Hint: The Item Packages screen is only necessary if you would like individual Items included in Packages to display on invoices, receipts, and/or customer schedules. If you do not want your customers to see all of the Items/Fees included in a Package, just enter the name of the package as a single Item (e.g., Birthday Party Package) on the Items screen. Important Note: if the revenue from the different Items goes into different GL Accounts (i.e., food revenue goes into one GL Account, decorations revenue goes into another GL Account, room rental revenue goes into another GL Account, etc.) then you must setup a package with individual items and not just create a single item called “Birthday Party Package” on the Items screen.
Items Tab Aliases Tab
1. Click the New button. 2. Enter a Package Name. 3. Use the pick list to select an Item to be included in this Package. (Note: if an Item you would
like to add is not included in the pick list, use the “…” button to create additional Items.) 4. Click <tab> and enter a Quantity for each particular Item to be included in this Package. 5. (Optional) Edit the Unit Price if necessary. Note: the Unit Price field will remain blank after an
Item is pulled in. The system will automatically use the default price entered for this Item. It is only necessary to enter a price for this Item if it is different from the price currently entered in the database (i.e., in order to make the Package price add up correctly).
6. (Optional) Instead of editing the Unit Price, enter a Unit Discount for this Item. This is another method of making the Package price add up correctly.
7. Repeat Steps 3-6 for any additional Items to be included in this Package. 8. (Optional) Click on the Aliases tab. Aliases are used as different ways to look up Items.
Examples of Alias Types include: Description, UPC, PLU, etc. a. Add – positions your cursor in the Alias column to enter a new Alias. b. Remove – deletes the line currently highlighted in the Alias grid. c. Alias Types – opens the Alias Types screen to allow entry of additional Alias Types. For
more information about Alias Types, see the MaxEnterprise Point Of Sale/Inventory manual.
9. (Optional) Click the New button and repeat Steps 2 through 8 to create a new Package(s). 10. Click the Close button when you have finished creating Package(s).
Item Categories

29
All of the Items sold by your Organization will be organized into Departments, Categories, and Sub-categories.
These subdivisions allow your Organization to generate financial reports on several different levels (i.e., totaled by Department, Category, Sub-category, or individual Item).
A sampling of different Departments, Categories, and Sub-categories are pictured on this page.
Activities
Clicking on a Department in the first column will cause the related Categories to be displayed in the second column.
Clicking on a Category in the second column will cause the related Sub-categories to be displayed in the third column.
Reminder: the Departments/Categories/Sub-Categories displayed here are suggestions only. Every Organization can customize this information as desired.
Athletics
Concessions: and
Facilities: and
Membership:
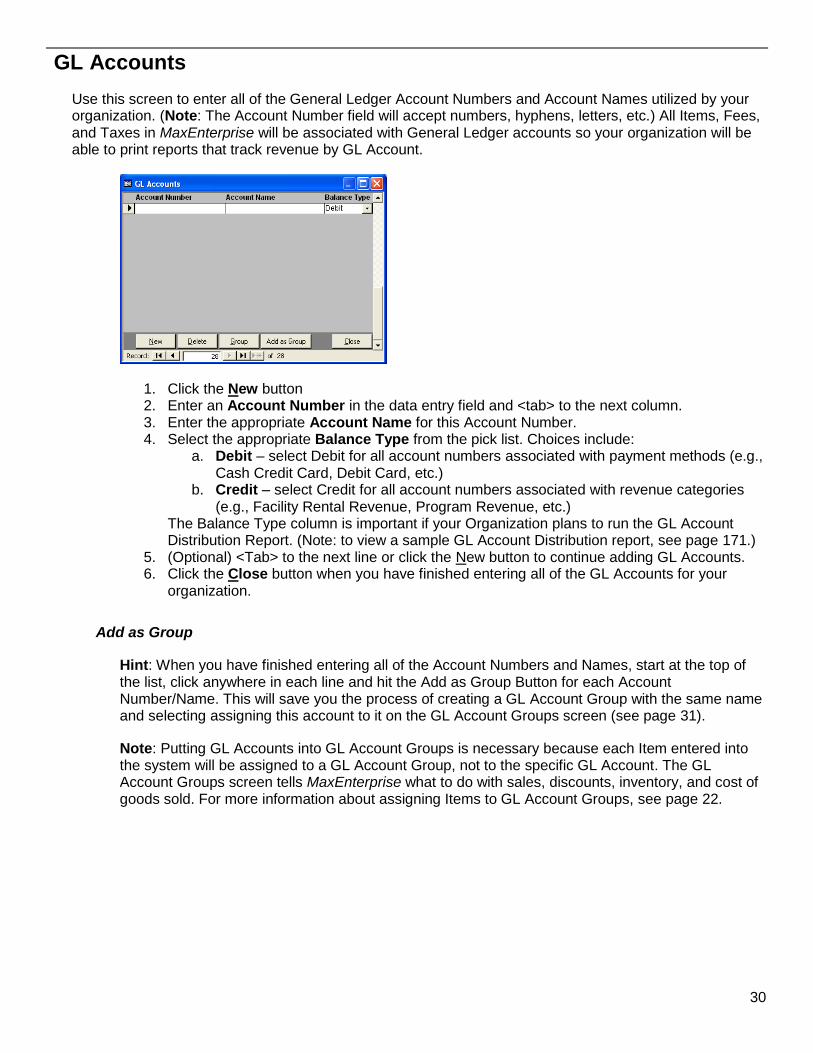
30
GL Accounts
Use this screen to enter all of the General Ledger Account Numbers and Account Names utilized by your organization. (Note: The Account Number field will accept numbers, hyphens, letters, etc.) All Items, Fees, and Taxes in MaxEnterprise will be associated with General Ledger accounts so your organization will be able to print reports that track revenue by GL Account.
1. Click the New button 2. Enter an Account Number in the data entry field and <tab> to the next column. 3. Enter the appropriate Account Name for this Account Number. 4. Select the appropriate Balance Type from the pick list. Choices include:
a. Debit – select Debit for all account numbers associated with payment methods (e.g., Cash Credit Card, Debit Card, etc.)
b. Credit – select Credit for all account numbers associated with revenue categories (e.g., Facility Rental Revenue, Program Revenue, etc.)
The Balance Type column is important if your Organization plans to run the GL Account Distribution Report. (Note: to view a sample GL Account Distribution report, see page 171.)
5. (Optional) <Tab> to the next line or click the New button to continue adding GL Accounts. 6. Click the Close button when you have finished entering all of the GL Accounts for your
organization.
Add as Group
Hint: When you have finished entering all of the Account Numbers and Names, start at the top of the list, click anywhere in each line and hit the Add as Group Button for each Account Number/Name. This will save you the process of creating a GL Account Group with the same name and selecting assigning this account to it on the GL Account Groups screen (see page 31).
Note: Putting GL Accounts into GL Account Groups is necessary because each Item entered into the system will be assigned to a GL Account Group, not to the specific GL Account. The GL Account Groups screen tells MaxEnterprise what to do with sales, discounts, inventory, and cost of goods sold. For more information about assigning Items to GL Account Groups, see page 22.
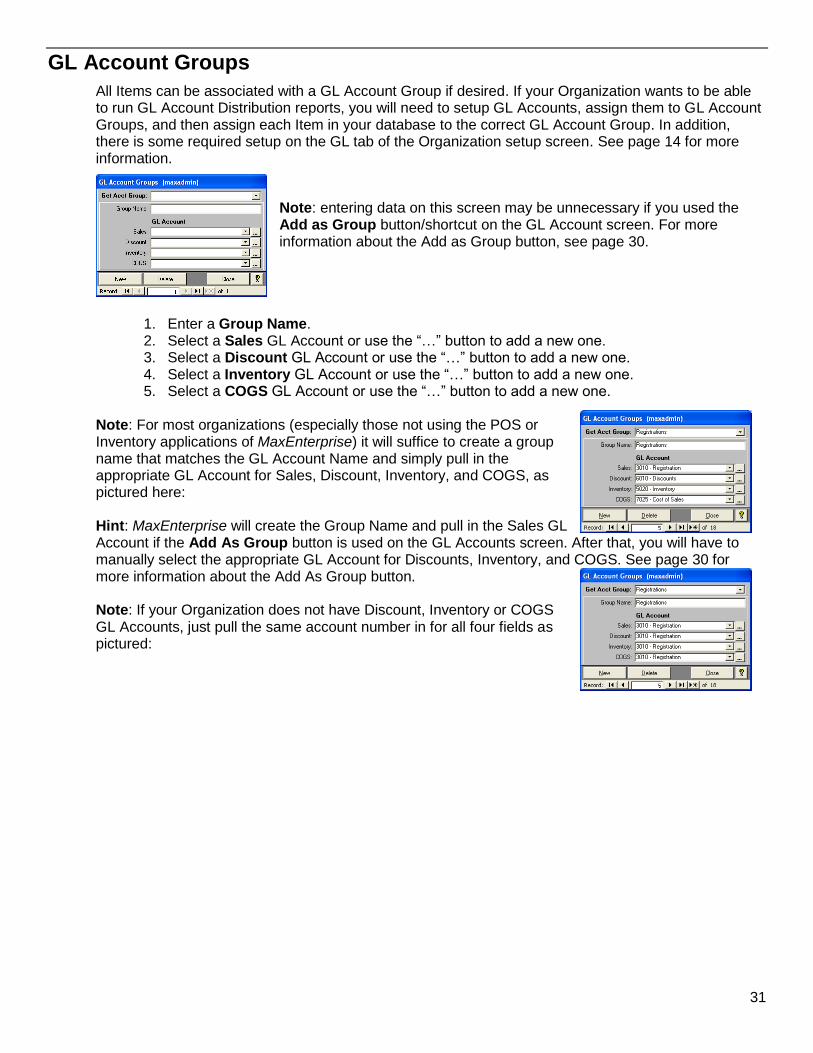
31
GL Account Groups
All Items can be associated with a GL Account Group if desired. If your Organization wants to be able to run GL Account Distribution reports, you will need to setup GL Accounts, assign them to GL Account Groups, and then assign each Item in your database to the correct GL Account Group. In addition, there is some required setup on the GL tab of the Organization setup screen. See page 14 for more information.
Note: entering data on this screen may be unnecessary if you used the Add as Group button/shortcut on the GL Account screen. For more information about the Add as Group button, see page 30.
1. Enter a Group Name. 2. Select a Sales GL Account or use the “…” button to add a new one. 3. Select a Discount GL Account or use the “…” button to add a new one. 4. Select a Inventory GL Account or use the “…” button to add a new one. 5. Select a COGS GL Account or use the “…” button to add a new one.
Note: For most organizations (especially those not using the POS or Inventory applications of MaxEnterprise) it will suffice to create a group name that matches the GL Account Name and simply pull in the appropriate GL Account for Sales, Discount, Inventory, and COGS, as pictured here: Hint: MaxEnterprise will create the Group Name and pull in the Sales GL Account if the Add As Group button is used on the GL Accounts screen. After that, you will have to manually select the appropriate GL Account for Discounts, Inventory, and COGS. See page 30 for more information about the Add As Group button.
Note: If your Organization does not have Discount, Inventory or COGS GL Accounts, just pull the same account number in for all four fields as pictured:
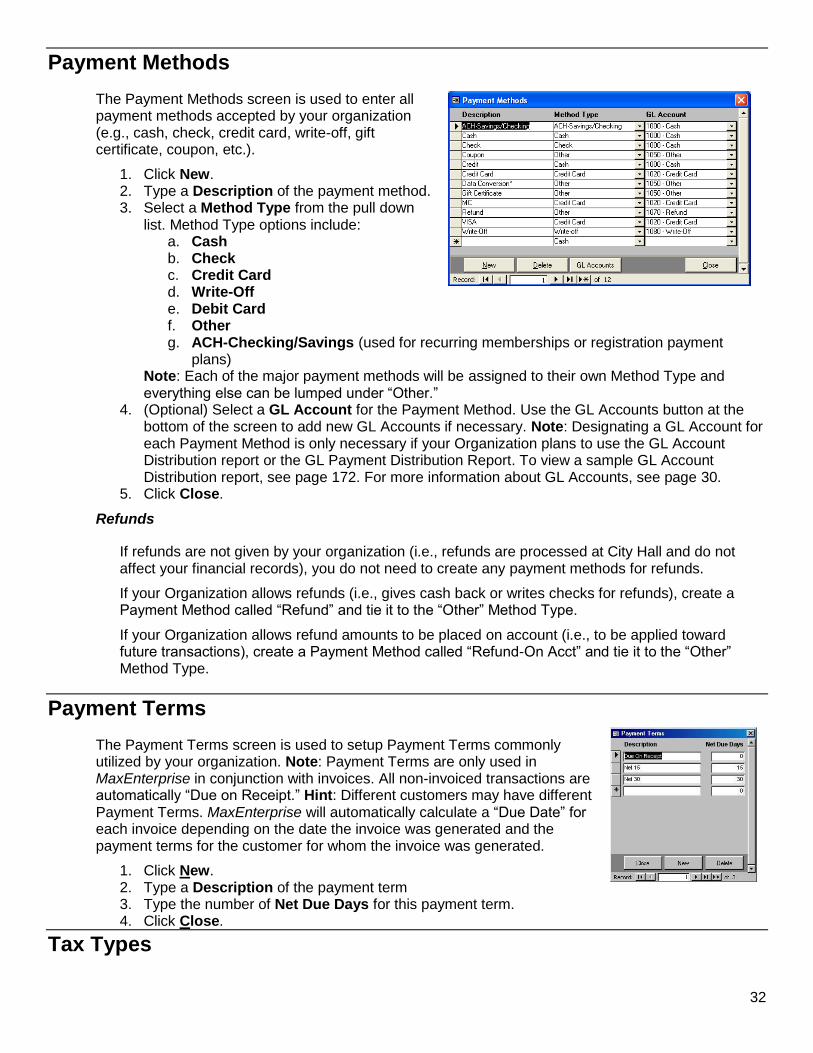
32
Payment Methods
The Payment Methods screen is used to enter all payment methods accepted by your organization (e.g., cash, check, credit card, write-off, gift certificate, coupon, etc.).
1. Click New. 2. Type a Description of the payment method. 3. Select a Method Type from the pull down
list. Method Type options include: a. Cash b. Check c. Credit Card d. Write-Off e. Debit Card f. Other g. ACH-Checking/Savings (used for recurring memberships or registration payment
plans) Note: Each of the major payment methods will be assigned to their own Method Type and everything else can be lumped under “Other.”
4. (Optional) Select a GL Account for the Payment Method. Use the GL Accounts button at the bottom of the screen to add new GL Accounts if necessary. Note: Designating a GL Account for each Payment Method is only necessary if your Organization plans to use the GL Account Distribution report or the GL Payment Distribution Report. To view a sample GL Account Distribution report, see page 172. For more information about GL Accounts, see page 30.
5. Click Close.
Refunds
If refunds are not given by your organization (i.e., refunds are processed at City Hall and do not affect your financial records), you do not need to create any payment methods for refunds.
If your Organization allows refunds (i.e., gives cash back or writes checks for refunds), create a Payment Method called “Refund” and tie it to the “Other” Method Type.
If your Organization allows refund amounts to be placed on account (i.e., to be applied toward future transactions), create a Payment Method called “Refund-On Acct” and tie it to the “Other” Method Type.
Payment Terms
The Payment Terms screen is used to setup Payment Terms commonly utilized by your organization. Note: Payment Terms are only used in MaxEnterprise in conjunction with invoices. All non-invoiced transactions are automatically “Due on Receipt.” Hint: Different customers may have different Payment Terms. MaxEnterprise will automatically calculate a “Due Date” for each invoice depending on the date the invoice was generated and the payment terms for the customer for whom the invoice was generated.
1. Click New. 2. Type a Description of the payment term 3. Type the number of Net Due Days for this payment term. 4. Click Close.
Tax Types
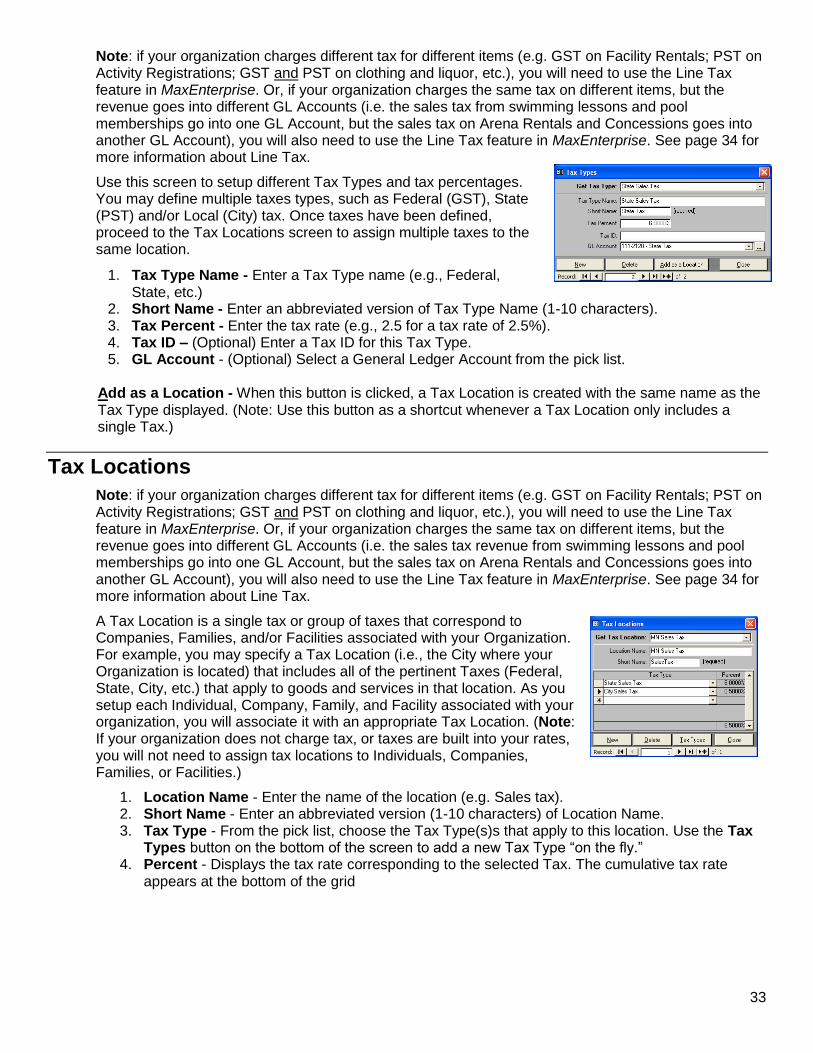
33
Note: if your organization charges different tax for different items (e.g. GST on Facility Rentals; PST on Activity Registrations; GST and PST on clothing and liquor, etc.), you will need to use the Line Tax feature in MaxEnterprise. Or, if your organization charges the same tax on different items, but the revenue goes into different GL Accounts (i.e. the sales tax from swimming lessons and pool memberships go into one GL Account, but the sales tax on Arena Rentals and Concessions goes into another GL Account), you will also need to use the Line Tax feature in MaxEnterprise. See page 34 for more information about Line Tax.
Use this screen to setup different Tax Types and tax percentages. You may define multiple taxes types, such as Federal (GST), State (PST) and/or Local (City) tax. Once taxes have been defined, proceed to the Tax Locations screen to assign multiple taxes to the same location.
1. Tax Type Name - Enter a Tax Type name (e.g., Federal, State, etc.)
2. Short Name - Enter an abbreviated version of Tax Type Name (1-10 characters). 3. Tax Percent - Enter the tax rate (e.g., 2.5 for a tax rate of 2.5%). 4. Tax ID – (Optional) Enter a Tax ID for this Tax Type. 5. GL Account - (Optional) Select a General Ledger Account from the pick list.
Add as a Location - When this button is clicked, a Tax Location is created with the same name as the Tax Type displayed. (Note: Use this button as a shortcut whenever a Tax Location only includes a single Tax.)
Tax Locations
Note: if your organization charges different tax for different items (e.g. GST on Facility Rentals; PST on Activity Registrations; GST and PST on clothing and liquor, etc.), you will need to use the Line Tax feature in MaxEnterprise. Or, if your organization charges the same tax on different items, but the revenue goes into different GL Accounts (i.e. the sales tax revenue from swimming lessons and pool memberships go into one GL Account, but the sales tax on Arena Rentals and Concessions goes into another GL Account), you will also need to use the Line Tax feature in MaxEnterprise. See page 34 for more information about Line Tax.
A Tax Location is a single tax or group of taxes that correspond to Companies, Families, and/or Facilities associated with your Organization. For example, you may specify a Tax Location (i.e., the City where your Organization is located) that includes all of the pertinent Taxes (Federal, State, City, etc.) that apply to goods and services in that location. As you setup each Individual, Company, Family, and Facility associated with your organization, you will associate it with an appropriate Tax Location. (Note: If your organization does not charge tax, or taxes are built into your rates, you will not need to assign tax locations to Individuals, Companies, Families, or Facilities.)
1. Location Name - Enter the name of the location (e.g. Sales tax). 2. Short Name - Enter an abbreviated version (1-10 characters) of Location Name. 3. Tax Type - From the pick list, choose the Tax Type(s)s that apply to this location. Use the Tax
Types button on the bottom of the screen to add a new Tax Type “on the fly.” 4. Percent - Displays the tax rate corresponding to the selected Tax. The cumulative tax rate
appears at the bottom of the grid
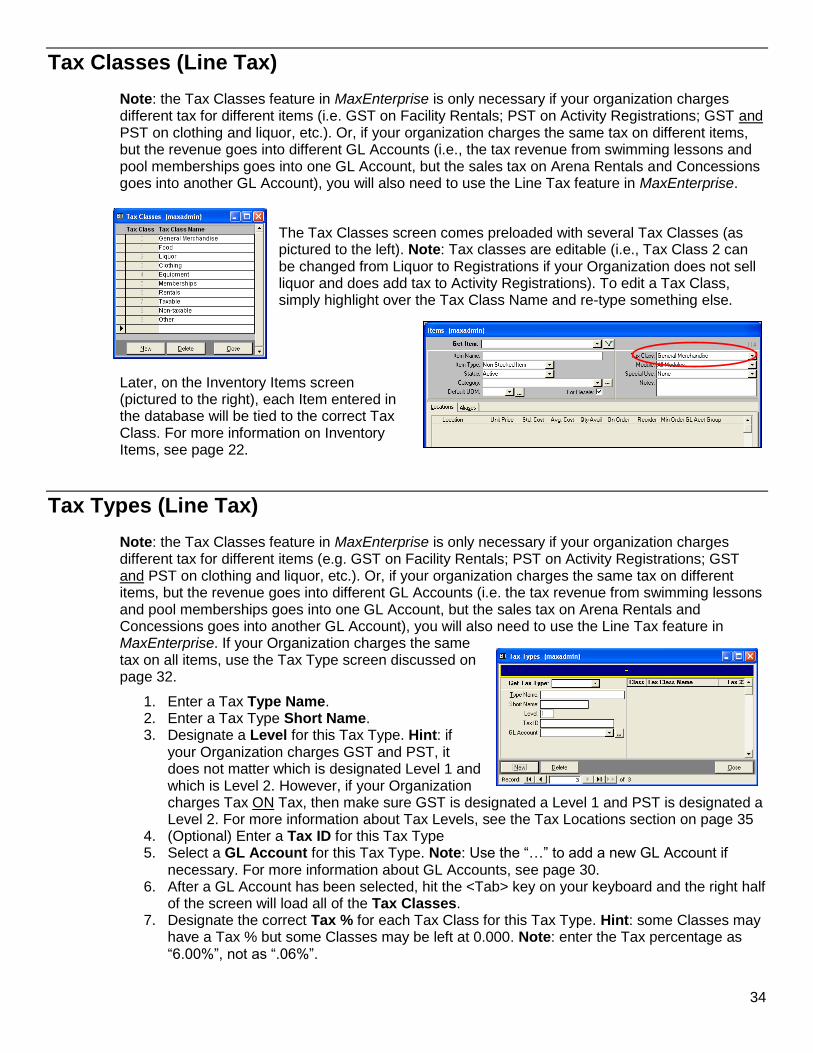
34
Tax Classes (Line Tax)
Note: the Tax Classes feature in MaxEnterprise is only necessary if your organization charges different tax for different items (i.e. GST on Facility Rentals; PST on Activity Registrations; GST and PST on clothing and liquor, etc.). Or, if your organization charges the same tax on different items, but the revenue goes into different GL Accounts (i.e., the tax revenue from swimming lessons and pool memberships goes into one GL Account, but the sales tax on Arena Rentals and Concessions goes into another GL Account), you will also need to use the Line Tax feature in MaxEnterprise.
The Tax Classes screen comes preloaded with several Tax Classes (as pictured to the left). Note: Tax classes are editable (i.e., Tax Class 2 can be changed from Liquor to Registrations if your Organization does not sell liquor and does add tax to Activity Registrations). To edit a Tax Class, simply highlight over the Tax Class Name and re-type something else.
Later, on the Inventory Items screen (pictured to the right), each Item entered in the database will be tied to the correct Tax Class. For more information on Inventory Items, see page 22.
Tax Types (Line Tax)
Note: the Tax Classes feature in MaxEnterprise is only necessary if your organization charges different tax for different items (e.g. GST on Facility Rentals; PST on Activity Registrations; GST and PST on clothing and liquor, etc.). Or, if your organization charges the same tax on different items, but the revenue goes into different GL Accounts (i.e. the tax revenue from swimming lessons and pool memberships goes into one GL Account, but the sales tax on Arena Rentals and Concessions goes into another GL Account), you will also need to use the Line Tax feature in MaxEnterprise. If your Organization charges the same tax on all items, use the Tax Type screen discussed on page 32.
1. Enter a Tax Type Name. 2. Enter a Tax Type Short Name. 3. Designate a Level for this Tax Type. Hint: if
your Organization charges GST and PST, it does not matter which is designated Level 1 and which is Level 2. However, if your Organization charges Tax ON Tax, then make sure GST is designated a Level 1 and PST is designated a Level 2. For more information about Tax Levels, see the Tax Locations section on page 35
4. (Optional) Enter a Tax ID for this Tax Type 5. Select a GL Account for this Tax Type. Note: Use the “…” to add a new GL Account if
necessary. For more information about GL Accounts, see page 30. 6. After a GL Account has been selected, hit the <Tab> key on your keyboard and the right half
of the screen will load all of the Tax Classes. 7. Designate the correct Tax % for each Tax Class for this Tax Type. Hint: some Classes may
have a Tax % but some Classes may be left at 0.000. Note: enter the Tax percentage as “6.00%”, not as “.06%”.
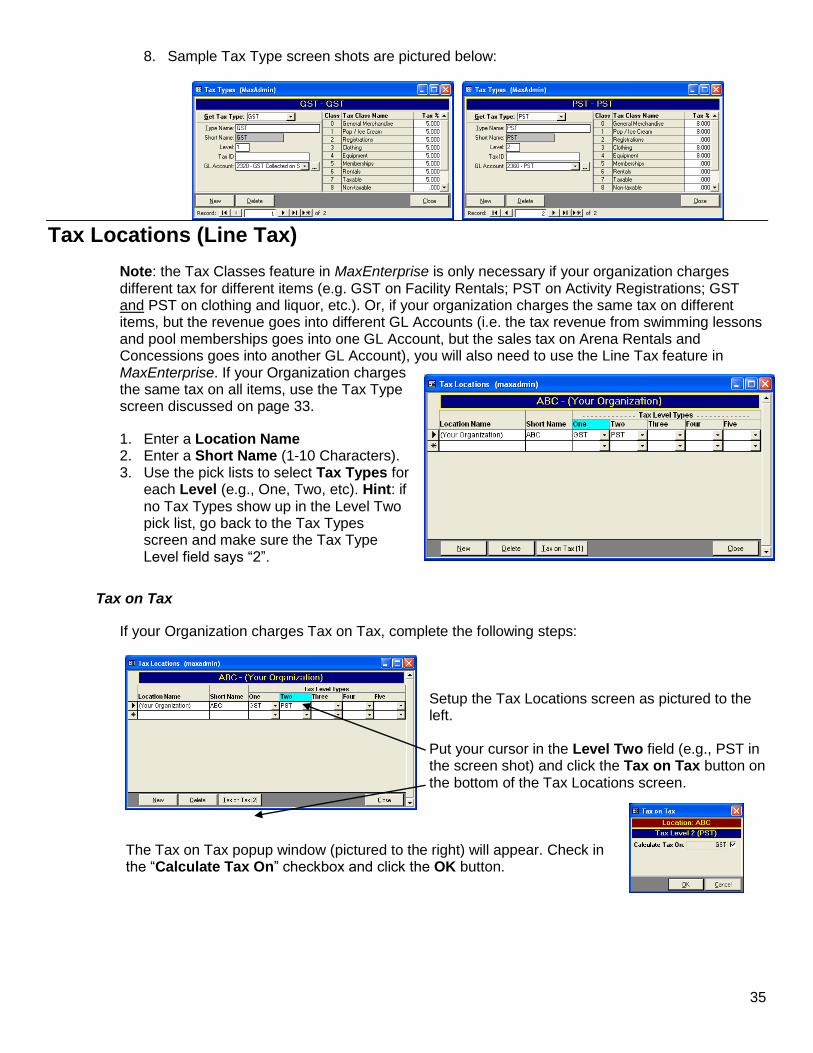
35
8. Sample Tax Type screen shots are pictured below:
Tax Locations (Line Tax)
Note: the Tax Classes feature in MaxEnterprise is only necessary if your organization charges different tax for different items (e.g. GST on Facility Rentals; PST on Activity Registrations; GST and PST on clothing and liquor, etc.). Or, if your organization charges the same tax on different items, but the revenue goes into different GL Accounts (i.e. the tax revenue from swimming lessons and pool memberships goes into one GL Account, but the sales tax on Arena Rentals and Concessions goes into another GL Account), you will also need to use the Line Tax feature in MaxEnterprise. If your Organization charges the same tax on all items, use the Tax Type screen discussed on page 33.
1. Enter a Location Name 2. Enter a Short Name (1-10 Characters). 3. Use the pick lists to select Tax Types for
each Level (e.g., One, Two, etc). Hint: if no Tax Types show up in the Level Two pick list, go back to the Tax Types screen and make sure the Tax Type Level field says “2”.
Tax on Tax
If your Organization charges Tax on Tax, complete the following steps:
Setup the Tax Locations screen as pictured to the left.
Put your cursor in the Level Two field (e.g., PST in the screen shot) and click the Tax on Tax button on the bottom of the Tax Locations screen.
The Tax on Tax popup window (pictured to the right) will appear. Check in the “Calculate Tax On” checkbox and click the OK button.

36
Inventory
Adjustments/Transfers
Once the Inventory application has been configured for your organization, the Adjustments/ Transfers screen will be used frequently. However, the Locations (page 39), Items (page 40), Packages (page 46), and Vendors (page 47) screens should all be filled out before an Adjustment or Transfer can be made successfully.
Adjustments
Use this screen to “adjust” amounts in Inventory. Adjustments are made when Items have been lost or stolen, or to account for “waste” at the end of a shift (i.e., unsold hot dogs, stale buns, etc.). 1. Select “Adjustment” from the
Transaction Type pick list. 2. (Today’s Date will automatically appear
in the Date field.) Edit the Date if necessary. 3. Select an Item from the pick list. Note: For more information about Items, see page 40. 4. Select the Location of this Item from the pick list. For more about Locations, see page 39. 5. Enter a Quantity of Items existing. Important Note: MaxInventory does not adjust for cases,
boxes, etc. Therefore, if there are 5 cases of juice (24 bottles/case), the Quantity should be 120. 6. The Unit of Measure field will fill automatically according to values specified on the Items
screen. For more information about Items, see page 40. Select a different Unit of Measure from the pick list if desired or use the “…” button to add a new Unit of Measure if necessary.
7. (Ignore the Unit Cost field) 8. Enter a Comment about this Item if necessary (i.e., “50 sweatshirts lost due to flood”) 9. (Ignore the Ext. Cost field) 10. (Optional) Continue adding additional Items to this Adjustment if necessary.
Purchases
Use this screen to enter purchases made from various Vendors.
1. Select “Purchase” from the Transaction Type pick list.
2. (Today’s Date will automatically appear in the Date field.) Edit the Date if necessary.
3. Select a Vendor from the pick list. 4. Select an Item from the pick list. Note: For more information about Items, see page 40. 5. Select the Location where these items will be added to inventory. 6. Enter a Quantity of Items. Important Note: MaxInventory does not adjust for cases, boxes, etc.
Therefore, if a purchase includes 5 cases of juice (24 bottles/case), the Quantity should be 120. 7. Enter a Unit Cost for these Items. For more information about Items, see page 40. 8. Enter a Comment about this Item if necessary (i.e., “Got sale price from vendor for bulk order”)
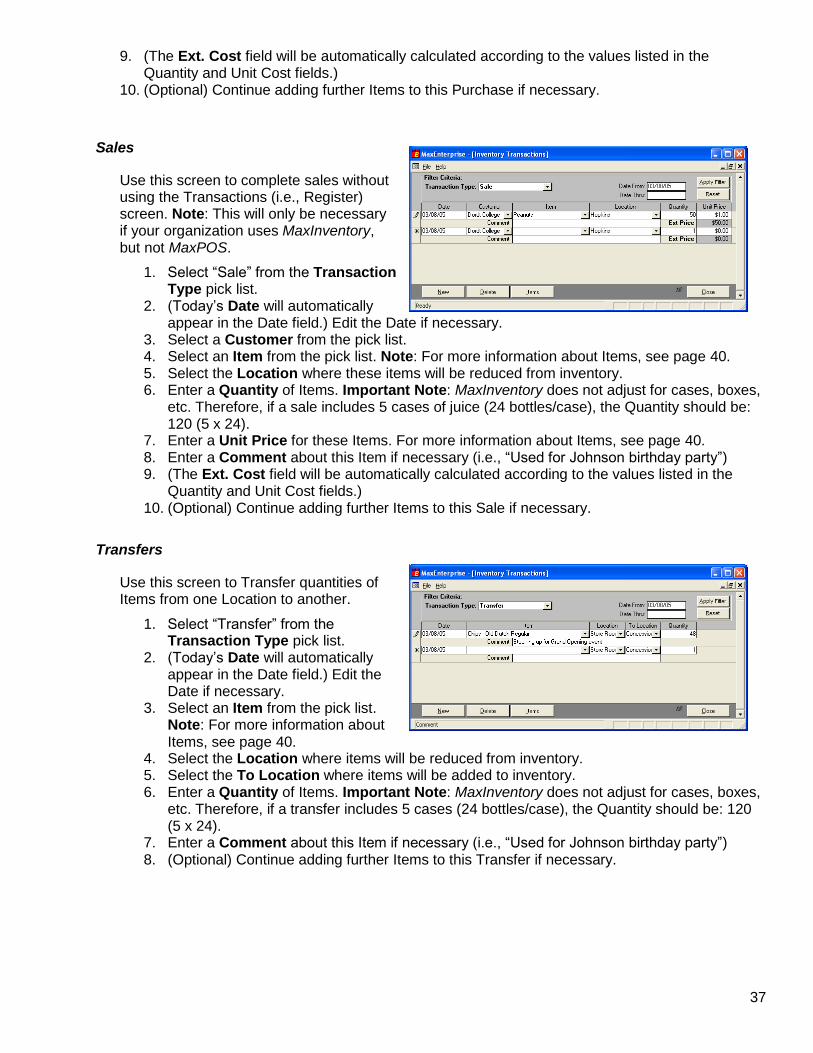
37
9. (The Ext. Cost field will be automatically calculated according to the values listed in the Quantity and Unit Cost fields.)
10. (Optional) Continue adding further Items to this Purchase if necessary.
Sales
Use this screen to complete sales without using the Transactions (i.e., Register) screen. Note: This will only be necessary if your organization uses MaxInventory, but not MaxPOS.
1. Select “Sale” from the Transaction Type pick list.
2. (Today’s Date will automatically appear in the Date field.) Edit the Date if necessary.
3. Select a Customer from the pick list. 4. Select an Item from the pick list. Note: For more information about Items, see page 40. 5. Select the Location where these items will be reduced from inventory. 6. Enter a Quantity of Items. Important Note: MaxInventory does not adjust for cases, boxes,
etc. Therefore, if a sale includes 5 cases of juice (24 bottles/case), the Quantity should be: 120 (5 x 24).
7. Enter a Unit Price for these Items. For more information about Items, see page 40. 8. Enter a Comment about this Item if necessary (i.e., “Used for Johnson birthday party”) 9. (The Ext. Cost field will be automatically calculated according to the values listed in the
Quantity and Unit Cost fields.) 10. (Optional) Continue adding further Items to this Sale if necessary.
Transfers
Use this screen to Transfer quantities of Items from one Location to another.
1. Select “Transfer” from the Transaction Type pick list.
2. (Today’s Date will automatically appear in the Date field.) Edit the Date if necessary.
3. Select an Item from the pick list. Note: For more information about Items, see page 40.
4. Select the Location where items will be reduced from inventory. 5. Select the To Location where items will be added to inventory. 6. Enter a Quantity of Items. Important Note: MaxInventory does not adjust for cases, boxes,
etc. Therefore, if a transfer includes 5 cases (24 bottles/case), the Quantity should be: 120 (5 x 24).
7. Enter a Comment about this Item if necessary (i.e., “Used for Johnson birthday party”) 8. (Optional) Continue adding further Items to this Transfer if necessary.
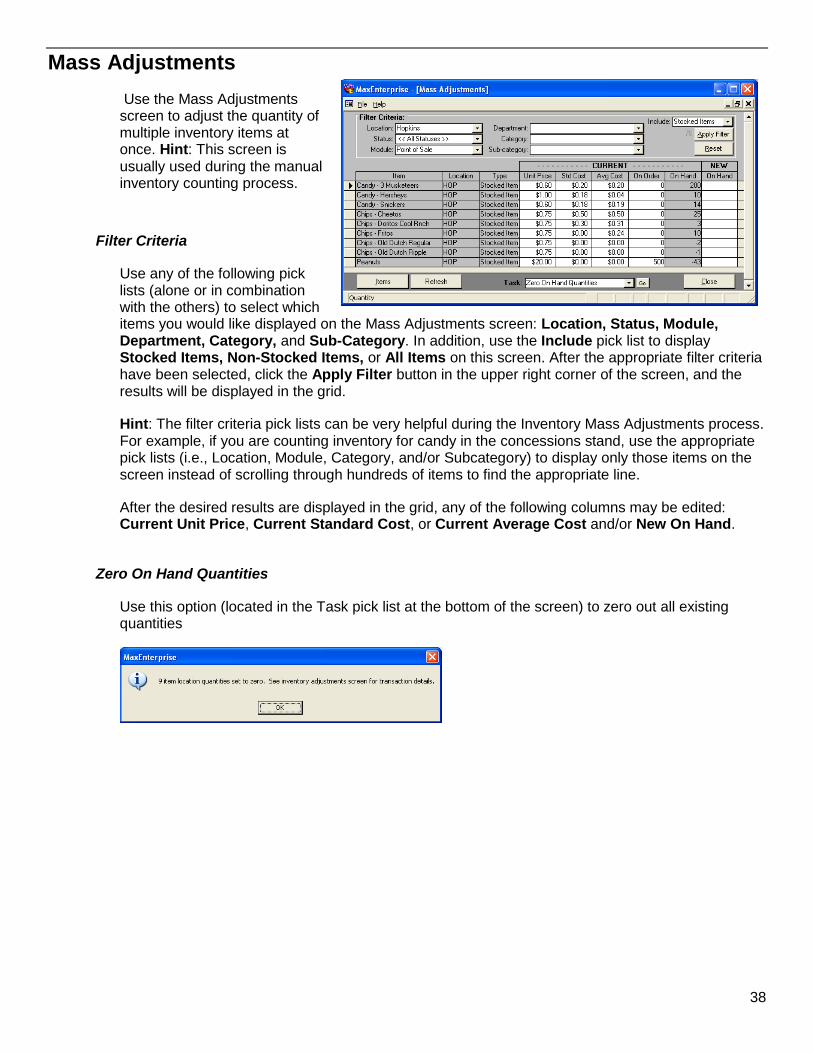
38
Mass Adjustments
Use the Mass Adjustments screen to adjust the quantity of multiple inventory items at once. Hint: This screen is usually used during the manual inventory counting process.
Filter Criteria
Use any of the following pick lists (alone or in combination with the others) to select which items you would like displayed on the Mass Adjustments screen: Location, Status, Module, Department, Category, and Sub-Category. In addition, use the Include pick list to display Stocked Items, Non-Stocked Items, or All Items on this screen. After the appropriate filter criteria have been selected, click the Apply Filter button in the upper right corner of the screen, and the results will be displayed in the grid.
Hint: The filter criteria pick lists can be very helpful during the Inventory Mass Adjustments process. For example, if you are counting inventory for candy in the concessions stand, use the appropriate pick lists (i.e., Location, Module, Category, and/or Subcategory) to display only those items on the screen instead of scrolling through hundreds of items to find the appropriate line.
After the desired results are displayed in the grid, any of the following columns may be edited: Current Unit Price, Current Standard Cost, or Current Average Cost and/or New On Hand.
Zero On Hand Quantities
Use this option (located in the Task pick list at the bottom of the screen) to zero out all existing quantities
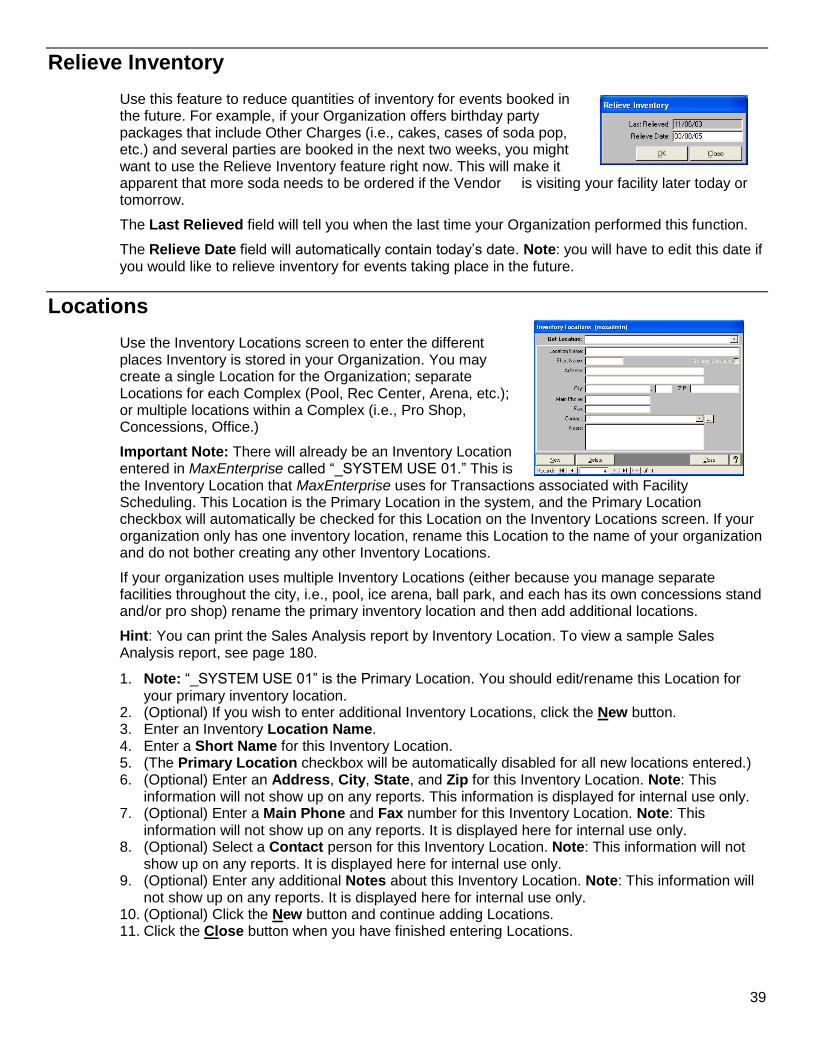
39
Relieve Inventory
Use this feature to reduce quantities of inventory for events booked in the future. For example, if your Organization offers birthday party packages that include Other Charges (i.e., cakes, cases of soda pop, etc.) and several parties are booked in the next two weeks, you might want to use the Relieve Inventory feature right now. This will make it apparent that more soda needs to be ordered if the Vendor is visiting your facility later today or tomorrow.
The Last Relieved field will tell you when the last time your Organization performed this function.
The Relieve Date field will automatically contain today’s date. Note: you will have to edit this date if you would like to relieve inventory for events taking place in the future.
Locations
Use the Inventory Locations screen to enter the different places Inventory is stored in your Organization. You may create a single Location for the Organization; separate Locations for each Complex (Pool, Rec Center, Arena, etc.); or multiple locations within a Complex (i.e., Pro Shop, Concessions, Office.)
Important Note: There will already be an Inventory Location entered in MaxEnterprise called “_SYSTEM USE 01.” This is the Inventory Location that MaxEnterprise uses for Transactions associated with Facility Scheduling. This Location is the Primary Location in the system, and the Primary Location checkbox will automatically be checked for this Location on the Inventory Locations screen. If your organization only has one inventory location, rename this Location to the name of your organization and do not bother creating any other Inventory Locations.
If your organization uses multiple Inventory Locations (either because you manage separate facilities throughout the city, i.e., pool, ice arena, ball park, and each has its own concessions stand and/or pro shop) rename the primary inventory location and then add additional locations.
Hint: You can print the Sales Analysis report by Inventory Location. To view a sample Sales Analysis report, see page 180.
1. Note: “_SYSTEM USE 01” is the Primary Location. You should edit/rename this Location for your primary inventory location.
2. (Optional) If you wish to enter additional Inventory Locations, click the New button. 3. Enter an Inventory Location Name. 4. Enter a Short Name for this Inventory Location. 5. (The Primary Location checkbox will be automatically disabled for all new locations entered.) 6. (Optional) Enter an Address, City, State, and Zip for this Inventory Location. Note: This
information will not show up on any reports. This information is displayed for internal use only. 7. (Optional) Enter a Main Phone and Fax number for this Inventory Location. Note: This
information will not show up on any reports. It is displayed here for internal use only. 8. (Optional) Select a Contact person for this Inventory Location. Note: This information will not
show up on any reports. It is displayed here for internal use only. 9. (Optional) Enter any additional Notes about this Inventory Location. Note: This information will
not show up on any reports. It is displayed here for internal use only. 10. (Optional) Click the New button and continue adding Locations. 11. Click the Close button when you have finished entering Locations.
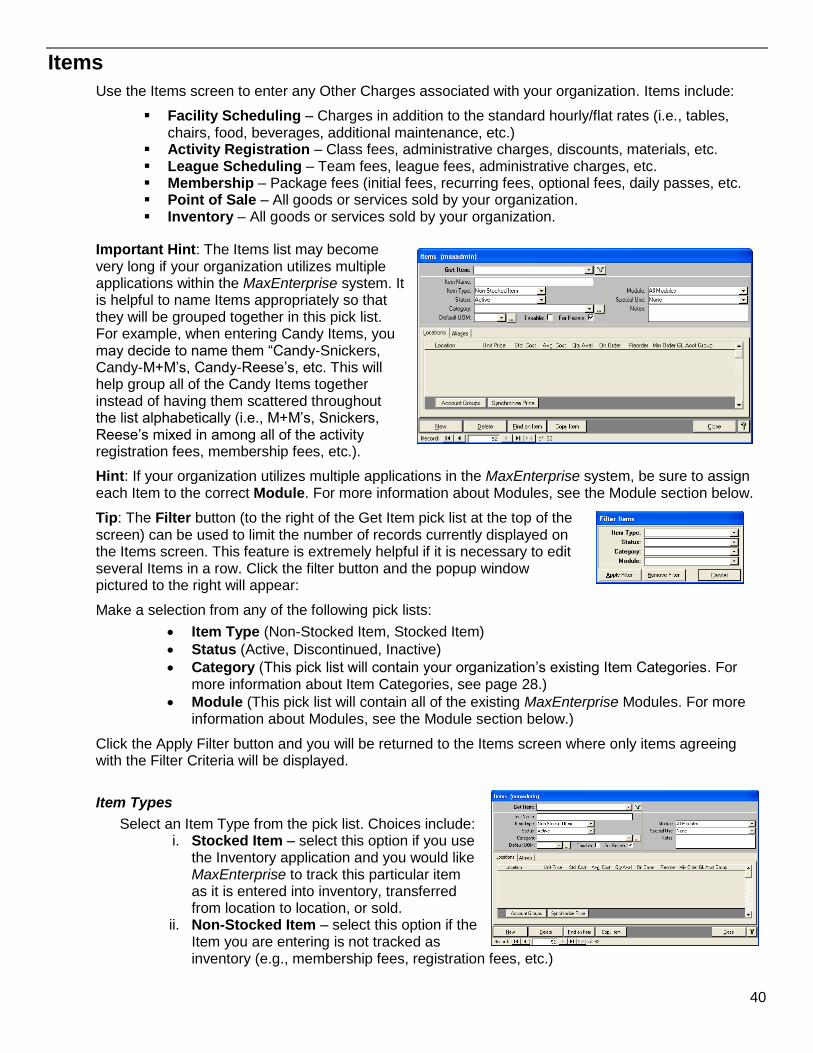
40
Items
Use the Items screen to enter any Other Charges associated with your organization. Items include:
Facility Scheduling – Charges in addition to the standard hourly/flat rates (i.e., tables, chairs, food, beverages, additional maintenance, etc.)
Activity Registration – Class fees, administrative charges, discounts, materials, etc. League Scheduling – Team fees, league fees, administrative charges, etc. Membership – Package fees (initial fees, recurring fees, optional fees, daily passes, etc. Point of Sale – All goods or services sold by your organization. Inventory – All goods or services sold by your organization.
Important Hint: The Items list may become very long if your organization utilizes multiple applications within the MaxEnterprise system. It is helpful to name Items appropriately so that they will be grouped together in this pick list. For example, when entering Candy Items, you may decide to name them “Candy-Snickers, Candy-M+M’s, Candy-Reese’s, etc. This will help group all of the Candy Items together instead of having them scattered throughout the list alphabetically (i.e., M+M’s, Snickers, Reese’s mixed in among all of the activity registration fees, membership fees, etc.).
Hint: If your organization utilizes multiple applications in the MaxEnterprise system, be sure to assign each Item to the correct Module. For more information about Modules, see the Module section below.
Tip: The Filter button (to the right of the Get Item pick list at the top of the screen) can be used to limit the number of records currently displayed on the Items screen. This feature is extremely helpful if it is necessary to edit several Items in a row. Click the filter button and the popup window pictured to the right will appear:
Make a selection from any of the following pick lists:
Item Type (Non-Stocked Item, Stocked Item)
Status (Active, Discontinued, Inactive)
Category (This pick list will contain your organization’s existing Item Categories. For more information about Item Categories, see page 28.)
Module (This pick list will contain all of the existing MaxEnterprise Modules. For more information about Modules, see the Module section below.)
Click the Apply Filter button and you will be returned to the Items screen where only items agreeing with the Filter Criteria will be displayed.
Item Types
Select an Item Type from the pick list. Choices include: i. Stocked Item – select this option if you use
the Inventory application and you would like MaxEnterprise to track this particular item as it is entered into inventory, transferred from location to location, or sold.
ii. Non-Stocked Item – select this option if the Item you are entering is not tracked as inventory (e.g., membership fees, registration fees, etc.)
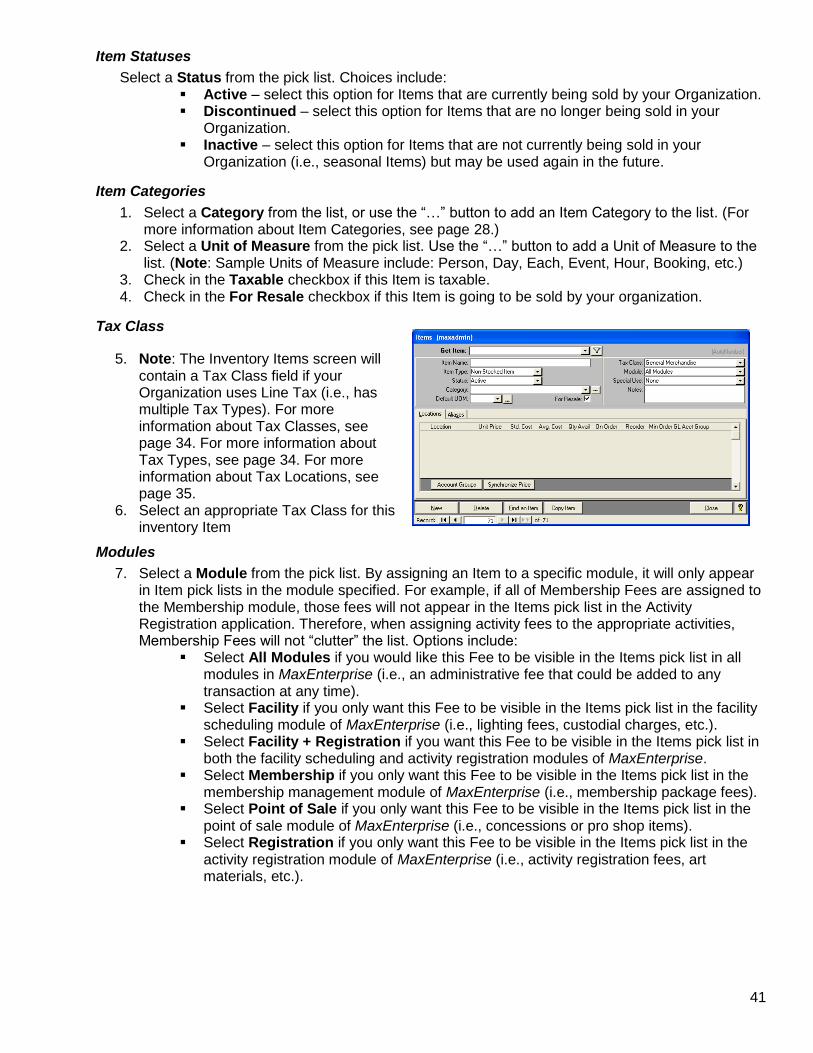
41
Item Statuses
Select a Status from the pick list. Choices include: Active – select this option for Items that are currently being sold by your Organization. Discontinued – select this option for Items that are no longer being sold in your
Organization. Inactive – select this option for Items that are not currently being sold in your
Organization (i.e., seasonal Items) but may be used again in the future.
Item Categories
1. Select a Category from the list, or use the “…” button to add an Item Category to the list. (For more information about Item Categories, see page 28.)
2. Select a Unit of Measure from the pick list. Use the “…” button to add a Unit of Measure to the list. (Note: Sample Units of Measure include: Person, Day, Each, Event, Hour, Booking, etc.)
3. Check in the Taxable checkbox if this Item is taxable. 4. Check in the For Resale checkbox if this Item is going to be sold by your organization.
Tax Class
5. Note: The Inventory Items screen will contain a Tax Class field if your Organization uses Line Tax (i.e., has multiple Tax Types). For more information about Tax Classes, see page 34. For more information about Tax Types, see page 34. For more information about Tax Locations, see page 35.
6. Select an appropriate Tax Class for this inventory Item
Modules
7. Select a Module from the pick list. By assigning an Item to a specific module, it will only appear in Item pick lists in the module specified. For example, if all of Membership Fees are assigned to the Membership module, those fees will not appear in the Items pick list in the Activity Registration application. Therefore, when assigning activity fees to the appropriate activities, Membership Fees will not “clutter” the list. Options include:
Select All Modules if you would like this Fee to be visible in the Items pick list in all modules in MaxEnterprise (i.e., an administrative fee that could be added to any transaction at any time).
Select Facility if you only want this Fee to be visible in the Items pick list in the facility scheduling module of MaxEnterprise (i.e., lighting fees, custodial charges, etc.).
Select Facility + Registration if you want this Fee to be visible in the Items pick list in both the facility scheduling and activity registration modules of MaxEnterprise.
Select Membership if you only want this Fee to be visible in the Items pick list in the membership management module of MaxEnterprise (i.e., membership package fees).
Select Point of Sale if you only want this Fee to be visible in the Items pick list in the point of sale module of MaxEnterprise (i.e., concessions or pro shop items).
Select Registration if you only want this Fee to be visible in the Items pick list in the activity registration module of MaxEnterprise (i.e., activity registration fees, art materials, etc.).
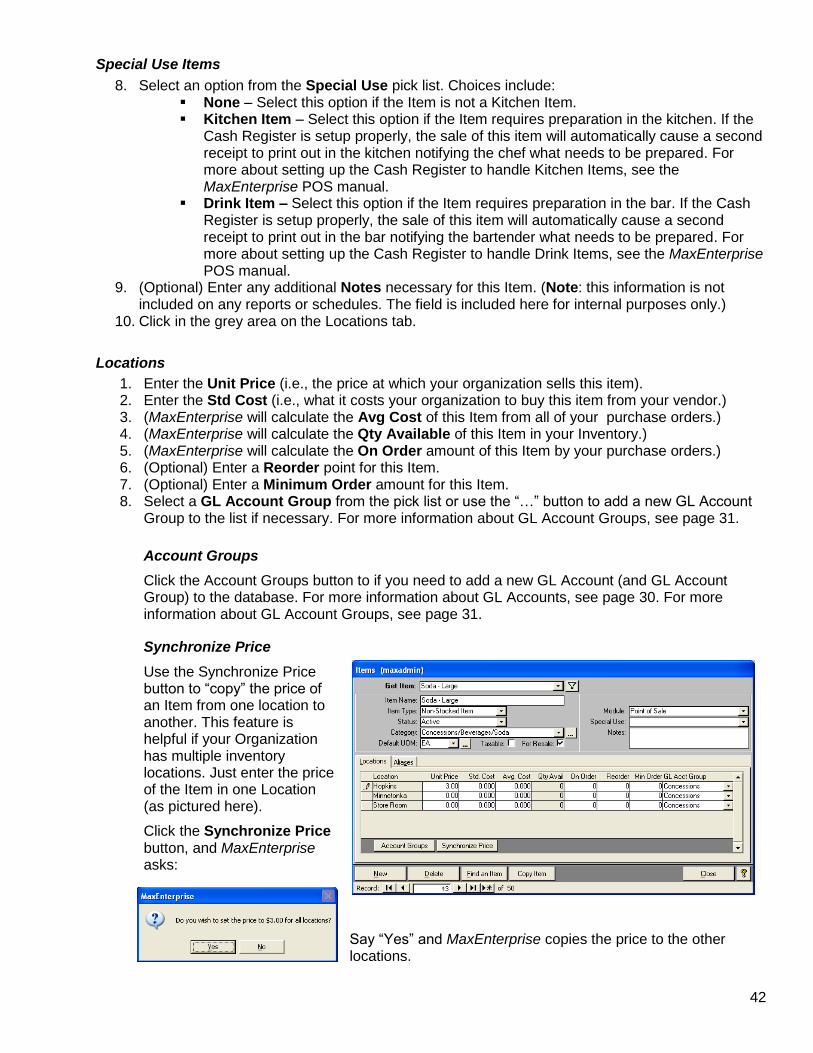
42
Special Use Items
8. Select an option from the Special Use pick list. Choices include: None – Select this option if the Item is not a Kitchen Item. Kitchen Item – Select this option if the Item requires preparation in the kitchen. If the
Cash Register is setup properly, the sale of this item will automatically cause a second receipt to print out in the kitchen notifying the chef what needs to be prepared. For more about setting up the Cash Register to handle Kitchen Items, see the MaxEnterprise POS manual.
Drink Item – Select this option if the Item requires preparation in the bar. If the Cash Register is setup properly, the sale of this item will automatically cause a second receipt to print out in the bar notifying the bartender what needs to be prepared. For more about setting up the Cash Register to handle Drink Items, see the MaxEnterprise POS manual.
9. (Optional) Enter any additional Notes necessary for this Item. (Note: this information is not included on any reports or schedules. The field is included here for internal purposes only.)
10. Click in the grey area on the Locations tab.
Locations
1. Enter the Unit Price (i.e., the price at which your organization sells this item). 2. Enter the Std Cost (i.e., what it costs your organization to buy this item from your vendor.) 3. (MaxEnterprise will calculate the Avg Cost of this Item from all of your purchase orders.) 4. (MaxEnterprise will calculate the Qty Available of this Item in your Inventory.) 5. (MaxEnterprise will calculate the On Order amount of this Item by your purchase orders.) 6. (Optional) Enter a Reorder point for this Item. 7. (Optional) Enter a Minimum Order amount for this Item. 8. Select a GL Account Group from the pick list or use the “…” button to add a new GL Account
Group to the list if necessary. For more information about GL Account Groups, see page 31.
Account Groups
Click the Account Groups button to if you need to add a new GL Account (and GL Account Group) to the database. For more information about GL Accounts, see page 30. For more information about GL Account Groups, see page 31.
Synchronize Price
Use the Synchronize Price button to “copy” the price of an Item from one location to another. This feature is helpful if your Organization has multiple inventory locations. Just enter the price of the Item in one Location (as pictured here).
Click the Synchronize Price button, and MaxEnterprise asks:
Say “Yes” and MaxEnterprise copies the price to the other locations.

43
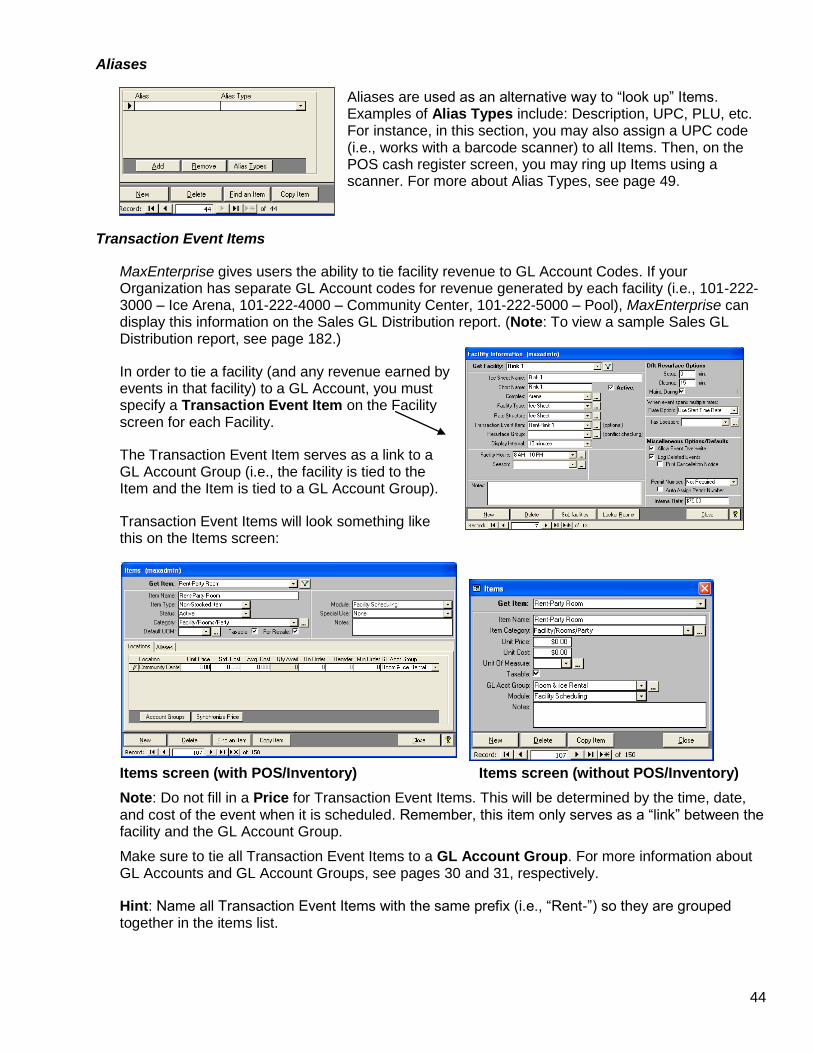
44
Aliases
Aliases are used as an alternative way to “look up” Items. Examples of Alias Types include: Description, UPC, PLU, etc. For instance, in this section, you may also assign a UPC code (i.e., works with a barcode scanner) to all Items. Then, on the POS cash register screen, you may ring up Items using a scanner. For more about Alias Types, see page 49.
Transaction Event Items
MaxEnterprise gives users the ability to tie facility revenue to GL Account Codes. If your Organization has separate GL Account codes for revenue generated by each facility (i.e., 101-222-3000 – Ice Arena, 101-222-4000 – Community Center, 101-222-5000 – Pool), MaxEnterprise can display this information on the Sales GL Distribution report. (Note: To view a sample Sales GL Distribution report, see page 182.)
In order to tie a facility (and any revenue earned by events in that facility) to a GL Account, you must specify a Transaction Event Item on the Facility screen for each Facility.
The Transaction Event Item serves as a link to a GL Account Group (i.e., the facility is tied to the Item and the Item is tied to a GL Account Group).
Transaction Event Items will look something like this on the Items screen:
Items screen (with POS/Inventory) Items screen (without POS/Inventory)
Note: Do not fill in a Price for Transaction Event Items. This will be determined by the time, date, and cost of the event when it is scheduled. Remember, this item only serves as a “link” between the facility and the GL Account Group.
Make sure to tie all Transaction Event Items to a GL Account Group. For more information about GL Accounts and GL Account Groups, see pages 30 and 31, respectively.
Hint: Name all Transaction Event Items with the same prefix (i.e., “Rent-”) so they are grouped together in the items list.
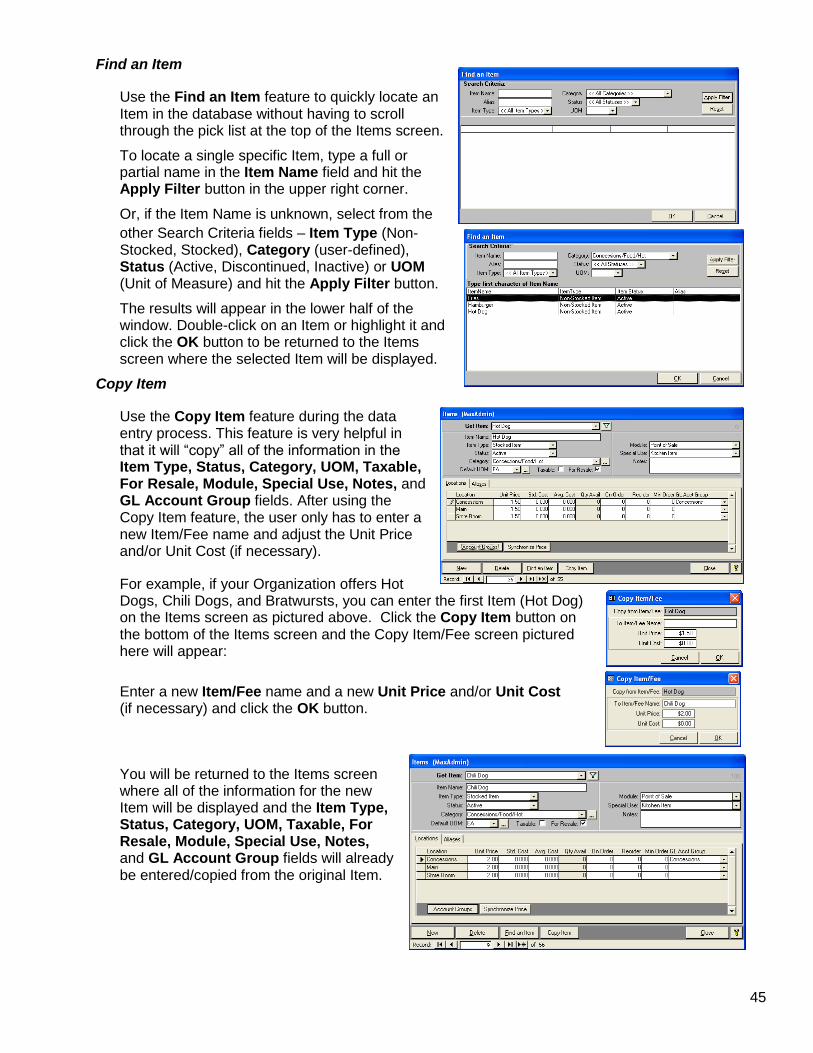
45
Find an Item
Use the Find an Item feature to quickly locate an Item in the database without having to scroll through the pick list at the top of the Items screen.
To locate a single specific Item, type a full or partial name in the Item Name field and hit the Apply Filter button in the upper right corner.
Or, if the Item Name is unknown, select from the
other Search Criteria fields – Item Type (Non-Stocked, Stocked), Category (user-defined), Status (Active, Discontinued, Inactive) or UOM (Unit of Measure) and hit the Apply Filter button.
The results will appear in the lower half of the window. Double-click on an Item or highlight it and click the OK button to be returned to the Items screen where the selected Item will be displayed.
Copy Item
Use the Copy Item feature during the data entry process. This feature is very helpful in that it will “copy” all of the information in the Item Type, Status, Category, UOM, Taxable, For Resale, Module, Special Use, Notes, and GL Account Group fields. After using the Copy Item feature, the user only has to enter a new Item/Fee name and adjust the Unit Price and/or Unit Cost (if necessary).
For example, if your Organization offers Hot Dogs, Chili Dogs, and Bratwursts, you can enter the first Item (Hot Dog) on the Items screen as pictured above. Click the Copy Item button on the bottom of the Items screen and the Copy Item/Fee screen pictured here will appear:
Enter a new Item/Fee name and a new Unit Price and/or Unit Cost (if necessary) and click the OK button.
You will be returned to the Items screen where all of the information for the new Item will be displayed and the Item Type, Status, Category, UOM, Taxable, For Resale, Module, Special Use, Notes, and GL Account Group fields will already be entered/copied from the original Item.
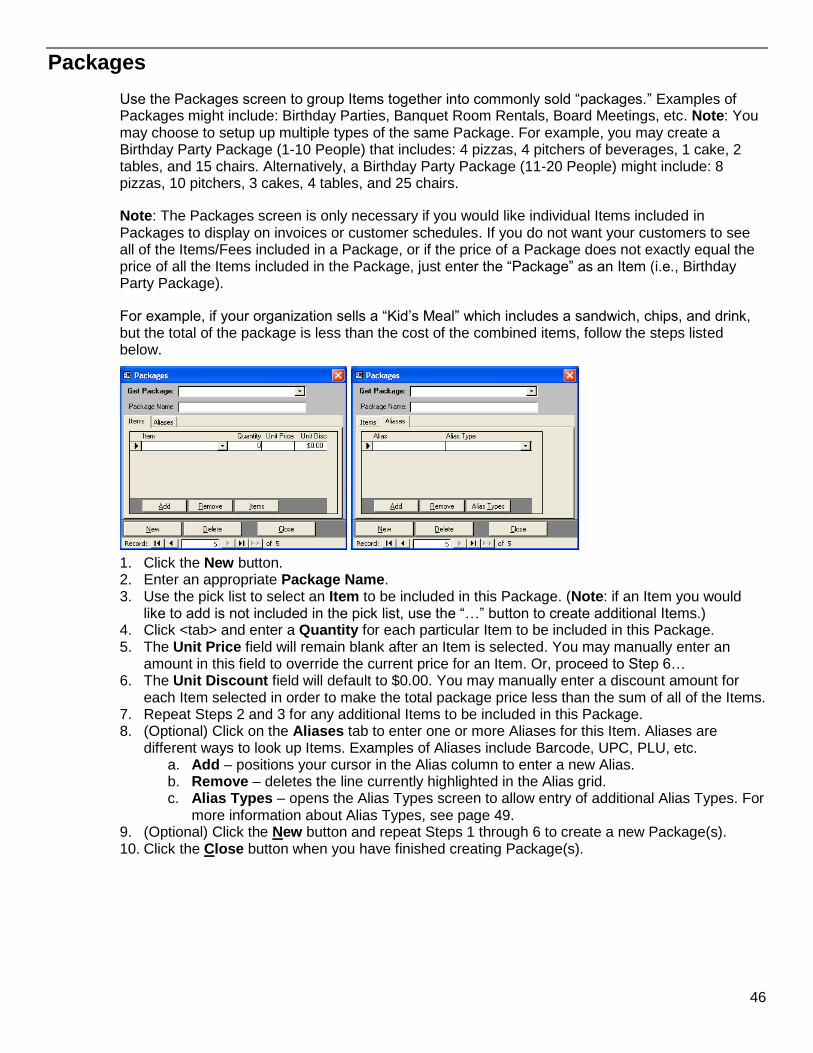
46
Packages
Use the Packages screen to group Items together into commonly sold “packages.” Examples of Packages might include: Birthday Parties, Banquet Room Rentals, Board Meetings, etc. Note: You may choose to setup up multiple types of the same Package. For example, you may create a Birthday Party Package (1-10 People) that includes: 4 pizzas, 4 pitchers of beverages, 1 cake, 2 tables, and 15 chairs. Alternatively, a Birthday Party Package (11-20 People) might include: 8 pizzas, 10 pitchers, 3 cakes, 4 tables, and 25 chairs.
Note: The Packages screen is only necessary if you would like individual Items included in Packages to display on invoices or customer schedules. If you do not want your customers to see all of the Items/Fees included in a Package, or if the price of a Package does not exactly equal the price of all the Items included in the Package, just enter the “Package” as an Item (i.e., Birthday Party Package).
For example, if your organization sells a “Kid’s Meal” which includes a sandwich, chips, and drink, but the total of the package is less than the cost of the combined items, follow the steps listed below.
1. Click the New button. 2. Enter an appropriate Package Name. 3. Use the pick list to select an Item to be included in this Package. (Note: if an Item you would
like to add is not included in the pick list, use the “…” button to create additional Items.) 4. Click <tab> and enter a Quantity for each particular Item to be included in this Package. 5. The Unit Price field will remain blank after an Item is selected. You may manually enter an
amount in this field to override the current price for an Item. Or, proceed to Step 6… 6. The Unit Discount field will default to $0.00. You may manually enter a discount amount for
each Item selected in order to make the total package price less than the sum of all of the Items. 7. Repeat Steps 2 and 3 for any additional Items to be included in this Package. 8. (Optional) Click on the Aliases tab to enter one or more Aliases for this Item. Aliases are
different ways to look up Items. Examples of Aliases include Barcode, UPC, PLU, etc. a. Add – positions your cursor in the Alias column to enter a new Alias. b. Remove – deletes the line currently highlighted in the Alias grid. c. Alias Types – opens the Alias Types screen to allow entry of additional Alias Types. For
more information about Alias Types, see page 49. 9. (Optional) Click the New button and repeat Steps 1 through 6 to create a new Package(s). 10. Click the Close button when you have finished creating Package(s).
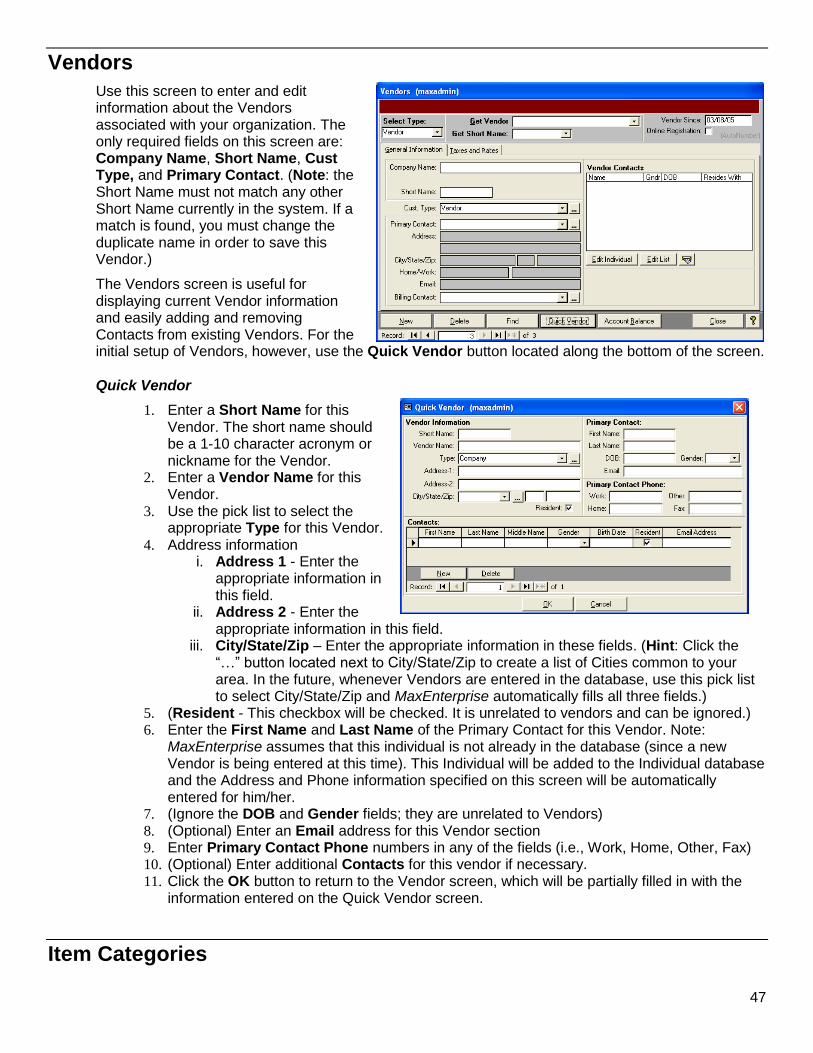
47
Vendors
Use this screen to enter and edit information about the Vendors associated with your organization. The only required fields on this screen are: Company Name, Short Name, Cust Type, and Primary Contact. (Note: the Short Name must not match any other Short Name currently in the system. If a match is found, you must change the duplicate name in order to save this Vendor.)
The Vendors screen is useful for displaying current Vendor information and easily adding and removing Contacts from existing Vendors. For the initial setup of Vendors, however, use the Quick Vendor button located along the bottom of the screen.
Quick Vendor
1. Enter a Short Name for this Vendor. The short name should be a 1-10 character acronym or nickname for the Vendor.
2. Enter a Vendor Name for this Vendor.
3. Use the pick list to select the appropriate Type for this Vendor.
4. Address information i. Address 1 - Enter the
appropriate information in this field.
ii. Address 2 - Enter the appropriate information in this field.
iii. City/State/Zip – Enter the appropriate information in these fields. (Hint: Click the “…” button located next to City/State/Zip to create a list of Cities common to your area. In the future, whenever Vendors are entered in the database, use this pick list to select City/State/Zip and MaxEnterprise automatically fills all three fields.)
5. (Resident - This checkbox will be checked. It is unrelated to vendors and can be ignored.) 6. Enter the First Name and Last Name of the Primary Contact for this Vendor. Note:
MaxEnterprise assumes that this individual is not already in the database (since a new Vendor is being entered at this time). This Individual will be added to the Individual database and the Address and Phone information specified on this screen will be automatically entered for him/her.
7. (Ignore the DOB and Gender fields; they are unrelated to Vendors) 8. (Optional) Enter an Email address for this Vendor section 9. Enter Primary Contact Phone numbers in any of the fields (i.e., Work, Home, Other, Fax) 10. (Optional) Enter additional Contacts for this vendor if necessary. 11. Click the OK button to return to the Vendor screen, which will be partially filled in with the
information entered on the Quick Vendor screen.
Item Categories
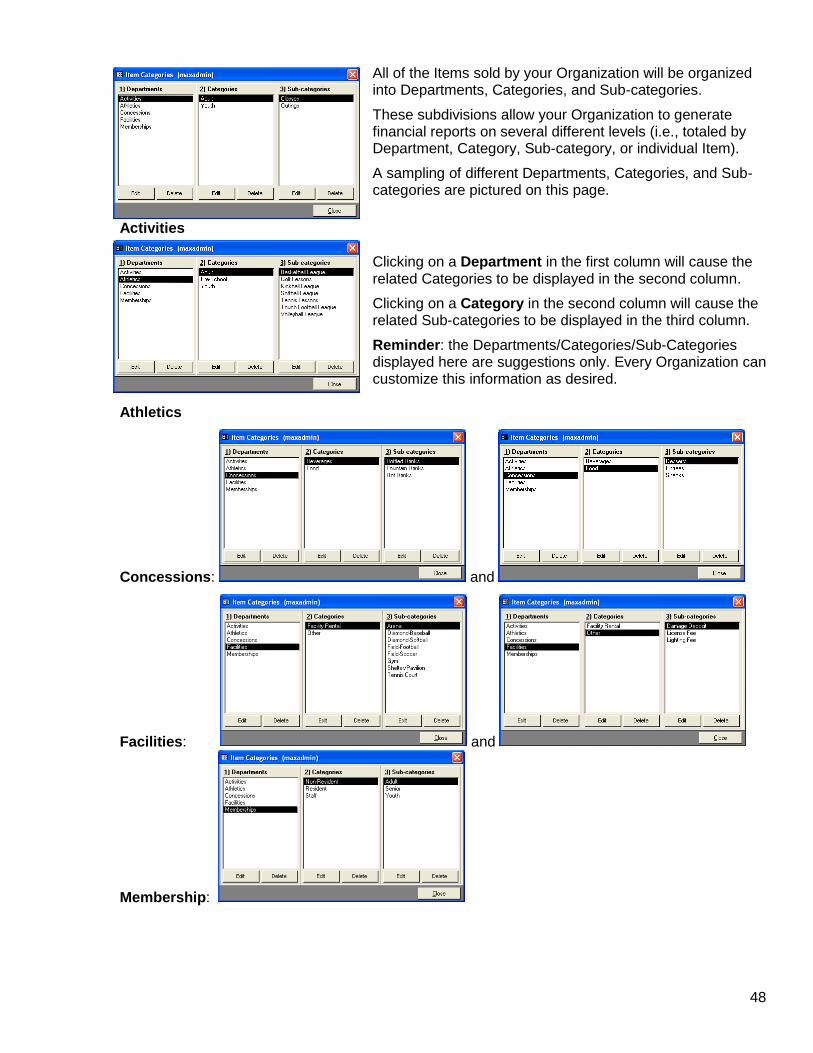
48
All of the Items sold by your Organization will be organized into Departments, Categories, and Sub-categories.
These subdivisions allow your Organization to generate financial reports on several different levels (i.e., totaled by Department, Category, Sub-category, or individual Item).
A sampling of different Departments, Categories, and Sub-categories are pictured on this page.
Activities
Clicking on a Department in the first column will cause the related Categories to be displayed in the second column.
Clicking on a Category in the second column will cause the related Sub-categories to be displayed in the third column.
Reminder: the Departments/Categories/Sub-Categories displayed here are suggestions only. Every Organization can customize this information as desired.
Athletics
Concessions: and
Facilities: and
Membership:
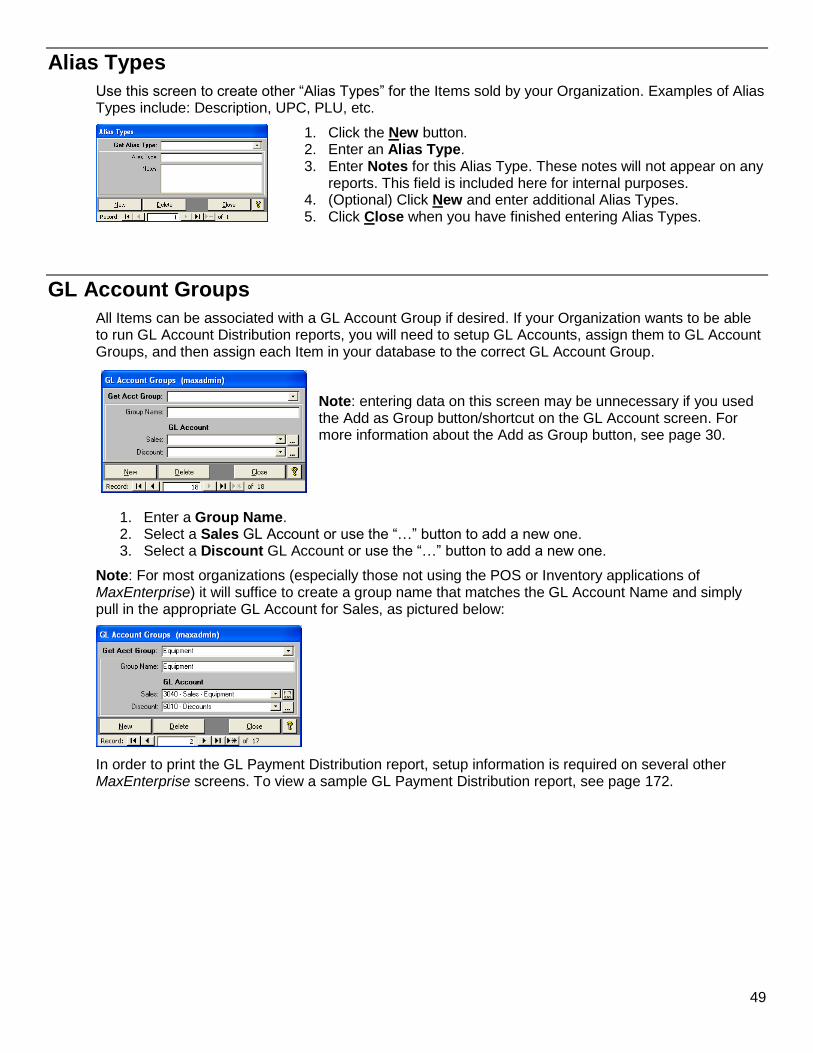
49
Alias Types
Use this screen to create other “Alias Types” for the Items sold by your Organization. Examples of Alias Types include: Description, UPC, PLU, etc.
1. Click the New button. 2. Enter an Alias Type. 3. Enter Notes for this Alias Type. These notes will not appear on any
reports. This field is included here for internal purposes. 4. (Optional) Click New and enter additional Alias Types. 5. Click Close when you have finished entering Alias Types.
GL Account Groups
All Items can be associated with a GL Account Group if desired. If your Organization wants to be able to run GL Account Distribution reports, you will need to setup GL Accounts, assign them to GL Account Groups, and then assign each Item in your database to the correct GL Account Group.
Note: entering data on this screen may be unnecessary if you used the Add as Group button/shortcut on the GL Account screen. For more information about the Add as Group button, see page 30.
1. Enter a Group Name. 2. Select a Sales GL Account or use the “…” button to add a new one. 3. Select a Discount GL Account or use the “…” button to add a new one.
Note: For most organizations (especially those not using the POS or Inventory applications of MaxEnterprise) it will suffice to create a group name that matches the GL Account Name and simply pull in the appropriate GL Account for Sales, as pictured below:
In order to print the GL Payment Distribution report, setup information is required on several other MaxEnterprise screens. To view a sample GL Payment Distribution report, see page 172.
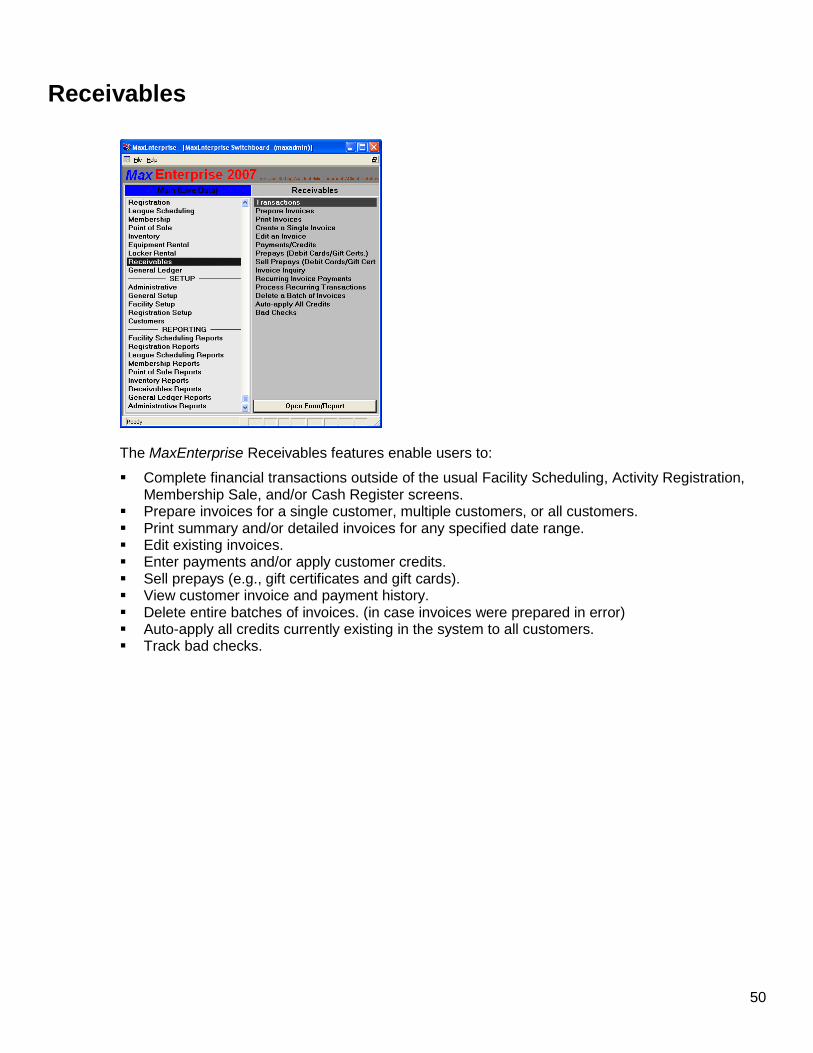
50
Receivables
The MaxEnterprise Receivables features enable users to:
Complete financial transactions outside of the usual Facility Scheduling, Activity Registration, Membership Sale, and/or Cash Register screens.
Prepare invoices for a single customer, multiple customers, or all customers. Print summary and/or detailed invoices for any specified date range. Edit existing invoices. Enter payments and/or apply customer credits. Sell prepays (e.g., gift certificates and gift cards). View customer invoice and payment history. Delete entire batches of invoices. (in case invoices were prepared in error) Auto-apply all credits currently existing in the system to all customers. Track bad checks.
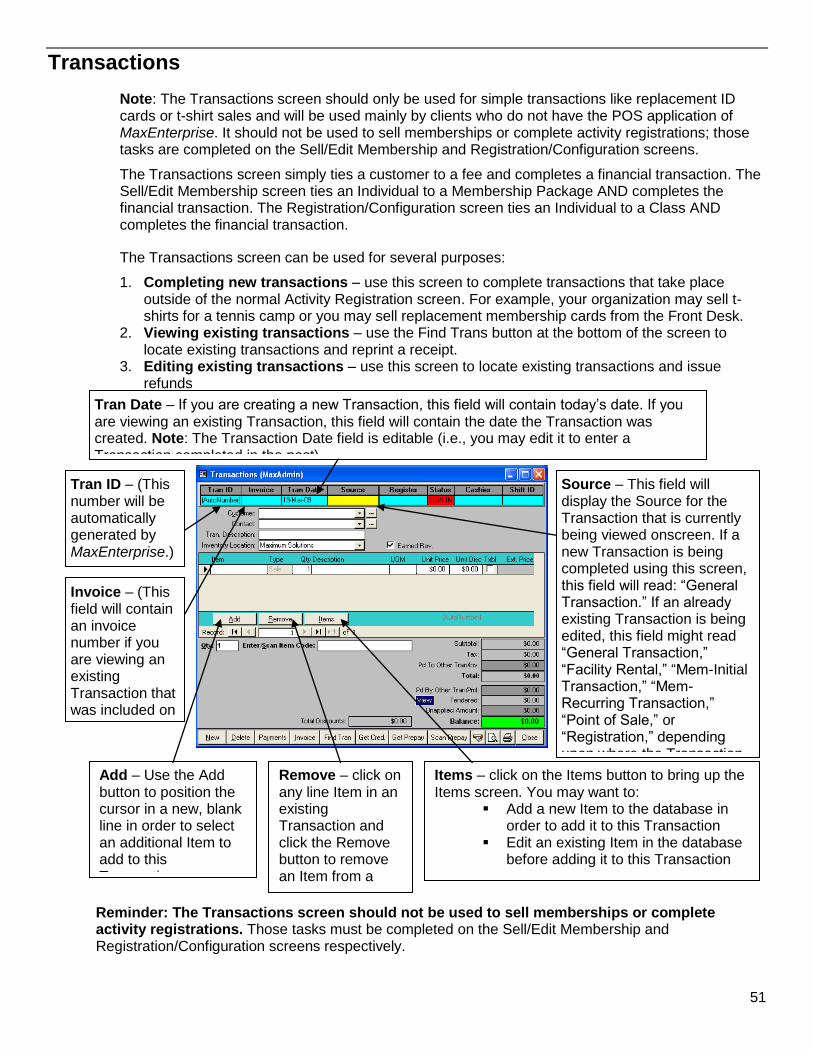
51
Transactions
Note: The Transactions screen should only be used for simple transactions like replacement ID cards or t-shirt sales and will be used mainly by clients who do not have the POS application of MaxEnterprise. It should not be used to sell memberships or complete activity registrations; those tasks are completed on the Sell/Edit Membership and Registration/Configuration screens.
The Transactions screen simply ties a customer to a fee and completes a financial transaction. The Sell/Edit Membership screen ties an Individual to a Membership Package AND completes the financial transaction. The Registration/Configuration screen ties an Individual to a Class AND completes the financial transaction.
The Transactions screen can be used for several purposes:
1. Completing new transactions – use this screen to complete transactions that take place outside of the normal Activity Registration screen. For example, your organization may sell t-shirts for a tennis camp or you may sell replacement membership cards from the Front Desk.
2. Viewing existing transactions – use the Find Trans button at the bottom of the screen to locate existing transactions and reprint a receipt.
3. Editing existing transactions – use this screen to locate existing transactions and issue refunds
Reminder: The Transactions screen should not be used to sell memberships or complete activity registrations. Those tasks must be completed on the Sell/Edit Membership and Registration/Configuration screens respectively.
Tran ID – (This number will be automatically generated by MaxEnterprise.)
Invoice – (This field will contain an invoice number if you are viewing an existing Transaction that was included on an invoice)
Tran Date – If you are creating a new Transaction, this field will contain today’s date. If you are viewing an existing Transaction, this field will contain the date the Transaction was created. Note: The Transaction Date field is editable (i.e., you may edit it to enter a Transaction completed in the past).
Source – This field will display the Source for the Transaction that is currently being viewed onscreen. If a new Transaction is being completed using this screen, this field will read: “General Transaction.” If an already existing Transaction is being edited, this field might read “General Transaction,” “Facility Rental,” “Mem-Initial Transaction,” “Mem-Recurring Transaction,” “Point of Sale,” or “Registration,” depending upon where the Transaction was originally completed. Add – Use the Add
button to position the cursor in a new, blank line in order to select an additional Item to add to this Transaction.
Remove – click on any line Item in an existing Transaction and click the Remove button to remove an Item from a Transaction.
Items – click on the Items button to bring up the Items screen. You may want to:
Add a new Item to the database in order to add it to this Transaction
Edit an existing Item in the database before adding it to this Transaction
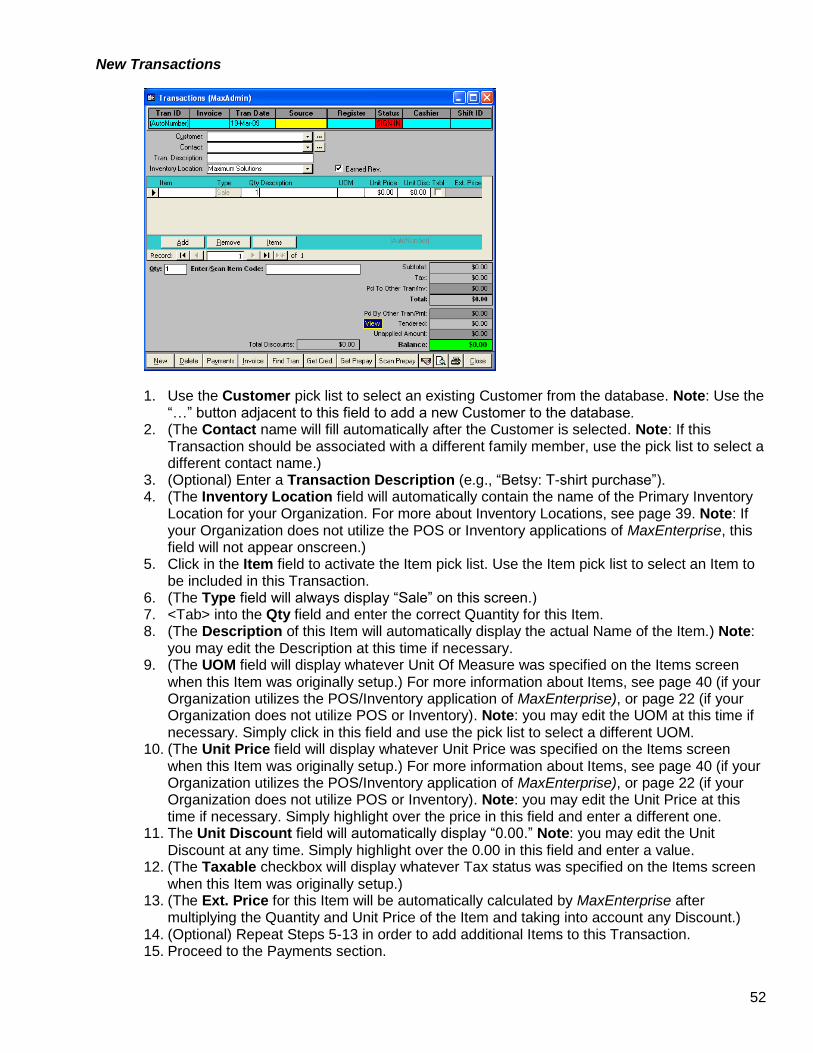
52
New Transactions
1. Use the Customer pick list to select an existing Customer from the database. Note: Use the “…” button adjacent to this field to add a new Customer to the database.
2. (The Contact name will fill automatically after the Customer is selected. Note: If this Transaction should be associated with a different family member, use the pick list to select a different contact name.)
3. (Optional) Enter a Transaction Description (e.g., “Betsy: T-shirt purchase”). 4. (The Inventory Location field will automatically contain the name of the Primary Inventory
Location for your Organization. For more about Inventory Locations, see page 39. Note: If your Organization does not utilize the POS or Inventory applications of MaxEnterprise, this field will not appear onscreen.)
5. Click in the Item field to activate the Item pick list. Use the Item pick list to select an Item to be included in this Transaction.
6. (The Type field will always display “Sale” on this screen.) 7. <Tab> into the Qty field and enter the correct Quantity for this Item. 8. (The Description of this Item will automatically display the actual Name of the Item.) Note:
you may edit the Description at this time if necessary. 9. (The UOM field will display whatever Unit Of Measure was specified on the Items screen
when this Item was originally setup.) For more information about Items, see page 40 (if your Organization utilizes the POS/Inventory application of MaxEnterprise), or page 22 (if your Organization does not utilize POS or Inventory). Note: you may edit the UOM at this time if necessary. Simply click in this field and use the pick list to select a different UOM.
10. (The Unit Price field will display whatever Unit Price was specified on the Items screen when this Item was originally setup.) For more information about Items, see page 40 (if your Organization utilizes the POS/Inventory application of MaxEnterprise), or page 22 (if your Organization does not utilize POS or Inventory). Note: you may edit the Unit Price at this time if necessary. Simply highlight over the price in this field and enter a different one.
11. The Unit Discount field will automatically display “0.00.” Note: you may edit the Unit Discount at any time. Simply highlight over the 0.00 in this field and enter a value.
12. (The Taxable checkbox will display whatever Tax status was specified on the Items screen when this Item was originally setup.)
13. (The Ext. Price for this Item will be automatically calculated by MaxEnterprise after multiplying the Quantity and Unit Price of the Item and taking into account any Discount.)
14. (Optional) Repeat Steps 5-13 in order to add additional Items to this Transaction. 15. Proceed to the Payments section.
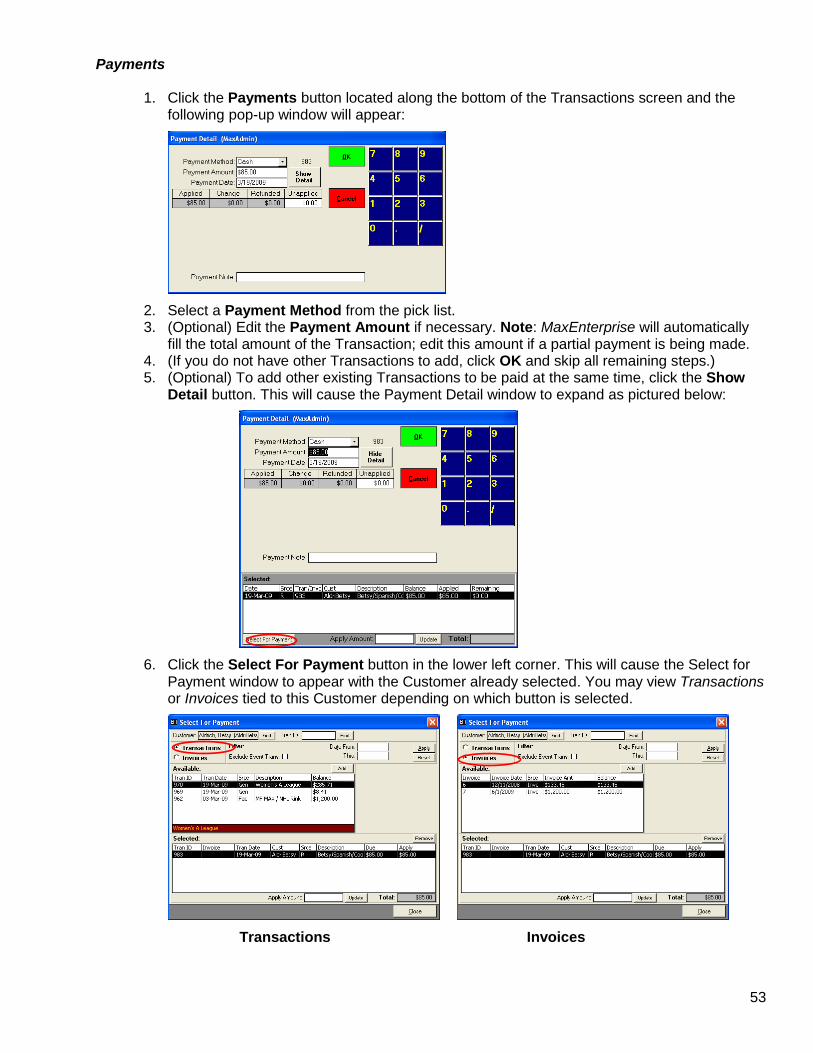
53
Payments 1. Click the Payments button located along the bottom of the Transactions screen and the
following pop-up window will appear:
2. Select a Payment Method from the pick list. 3. (Optional) Edit the Payment Amount if necessary. Note: MaxEnterprise will automatically
fill the total amount of the Transaction; edit this amount if a partial payment is being made. 4. (If you do not have other Transactions to add, click OK and skip all remaining steps.) 5. (Optional) To add other existing Transactions to be paid at the same time, click the Show
Detail button. This will cause the Payment Detail window to expand as pictured below:
6. Click the Select For Payment button in the lower left corner. This will cause the Select for Payment window to appear with the Customer already selected. You may view Transactions or Invoices tied to this Customer depending on which button is selected.
Transactions Invoices
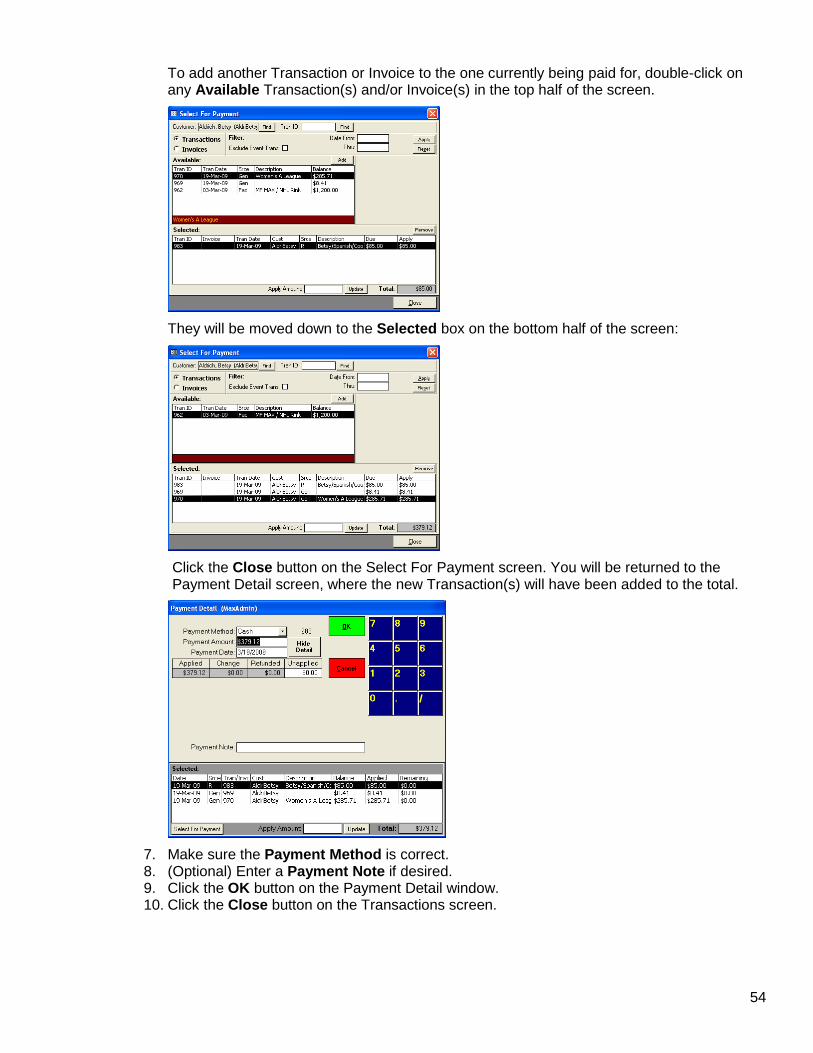
54
To add another Transaction or Invoice to the one currently being paid for, double-click on any Available Transaction(s) and/or Invoice(s) in the top half of the screen.
They will be moved down to the Selected box on the bottom half of the screen:
Click the Close button on the Select For Payment screen. You will be returned to the Payment Detail screen, where the new Transaction(s) will have been added to the total.
7. Make sure the Payment Method is correct. 8. (Optional) Enter a Payment Note if desired. 9. Click the OK button on the Payment Detail window. 10. Click the Close button on the Transactions screen.
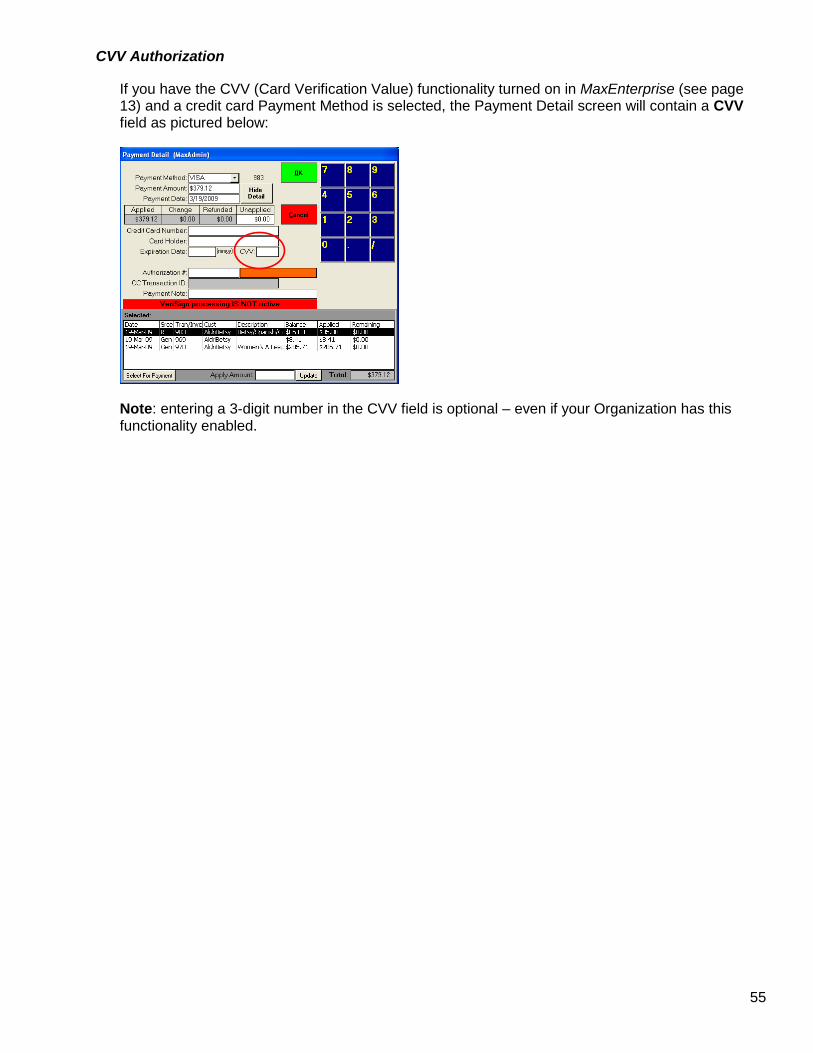
55
CVV Authorization
If you have the CVV (Card Verification Value) functionality turned on in MaxEnterprise (see page 13) and a credit card Payment Method is selected, the Payment Detail screen will contain a CVV field as pictured below:
Note: entering a 3-digit number in the CVV field is optional – even if your Organization has this functionality enabled.
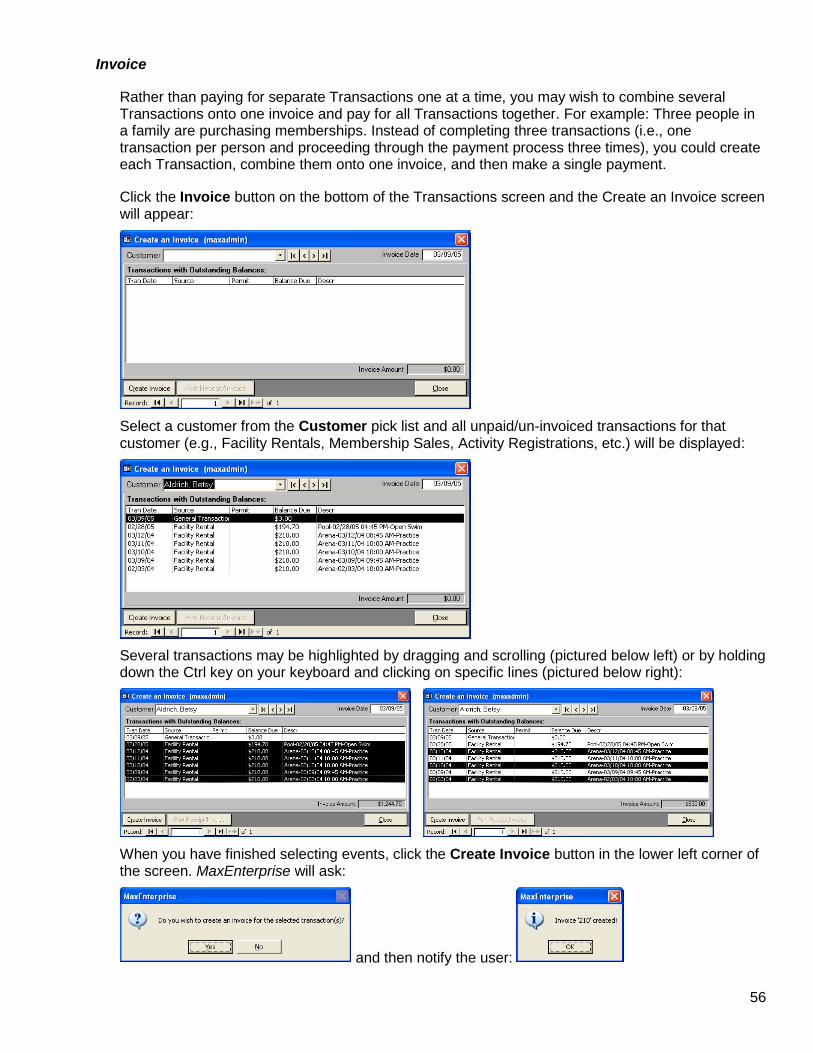
56
Invoice
Rather than paying for separate Transactions one at a time, you may wish to combine several Transactions onto one invoice and pay for all Transactions together. For example: Three people in a family are purchasing memberships. Instead of completing three transactions (i.e., one transaction per person and proceeding through the payment process three times), you could create each Transaction, combine them onto one invoice, and then make a single payment.
Click the Invoice button on the bottom of the Transactions screen and the Create an Invoice screen will appear:
Select a customer from the Customer pick list and all unpaid/un-invoiced transactions for that customer (e.g., Facility Rentals, Membership Sales, Activity Registrations, etc.) will be displayed:
Several transactions may be highlighted by dragging and scrolling (pictured below left) or by holding down the Ctrl key on your keyboard and clicking on specific lines (pictured below right):
When you have finished selecting events, click the Create Invoice button in the lower left corner of the screen. MaxEnterprise will ask:
and then notify the user:
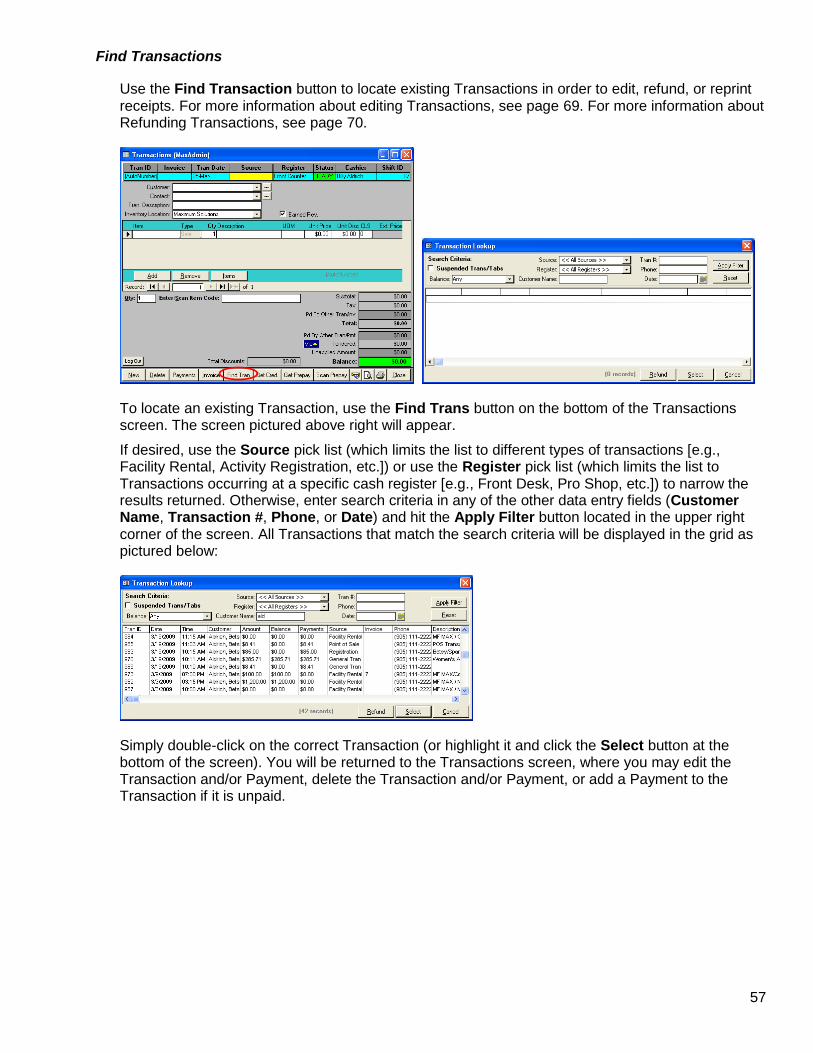
57
Find Transactions
Use the Find Transaction button to locate existing Transactions in order to edit, refund, or reprint receipts. For more information about editing Transactions, see page 69. For more information about Refunding Transactions, see page 70.
To locate an existing Transaction, use the Find Trans button on the bottom of the Transactions screen. The screen pictured above right will appear.
If desired, use the Source pick list (which limits the list to different types of transactions [e.g., Facility Rental, Activity Registration, etc.]) or use the Register pick list (which limits the list to Transactions occurring at a specific cash register [e.g., Front Desk, Pro Shop, etc.]) to narrow the results returned. Otherwise, enter search criteria in any of the other data entry fields (Customer Name, Transaction #, Phone, or Date) and hit the Apply Filter button located in the upper right corner of the screen. All Transactions that match the search criteria will be displayed in the grid as pictured below:
Simply double-click on the correct Transaction (or highlight it and click the Select button at the bottom of the screen). You will be returned to the Transactions screen, where you may edit the Transaction and/or Payment, delete the Transaction and/or Payment, or add a Payment to the Transaction if it is unpaid.
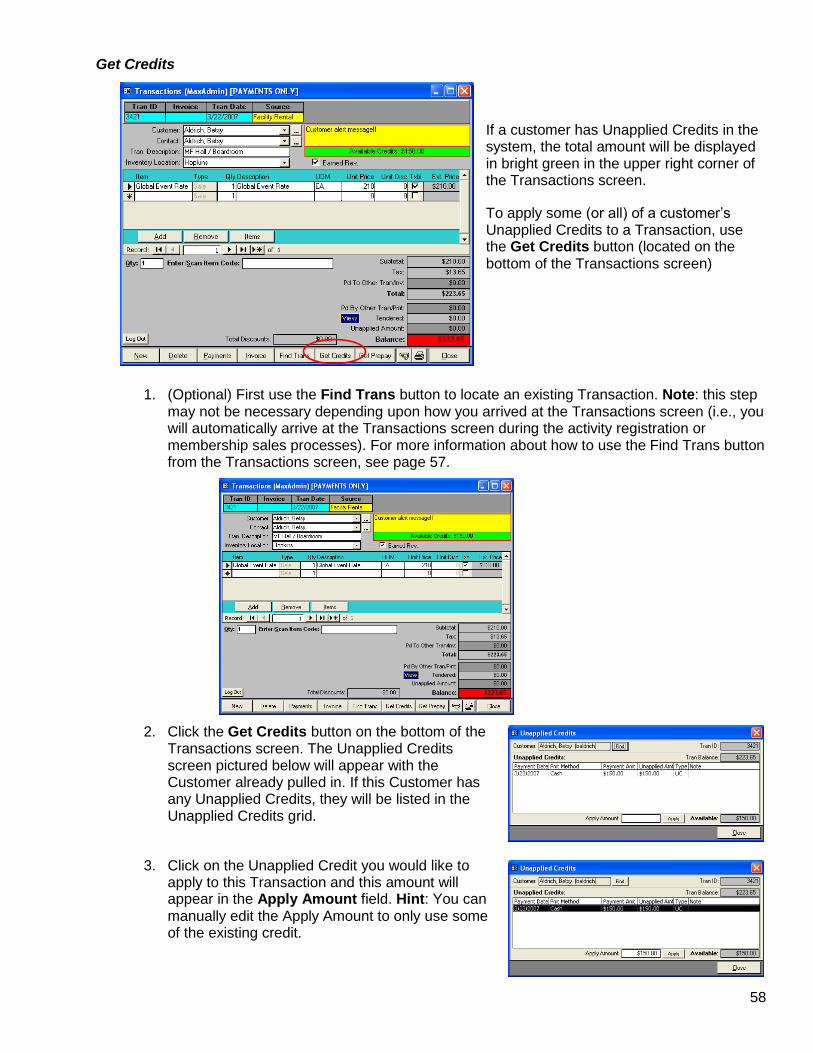
58
Get Credits
If a customer has Unapplied Credits in the system, the total amount will be displayed in bright green in the upper right corner of the Transactions screen.
To apply some (or all) of a customer’s Unapplied Credits to a Transaction, use the Get Credits button (located on the bottom of the Transactions screen)
1. (Optional) First use the Find Trans button to locate an existing Transaction. Note: this step may not be necessary depending upon how you arrived at the Transactions screen (i.e., you will automatically arrive at the Transactions screen during the activity registration or membership sales processes). For more information about how to use the Find Trans button from the Transactions screen, see page 57.
2. Click the Get Credits button on the bottom of the Transactions screen. The Unapplied Credits screen pictured below will appear with the Customer already pulled in. If this Customer has any Unapplied Credits, they will be listed in the Unapplied Credits grid.
3. Click on the Unapplied Credit you would like to apply to this Transaction and this amount will appear in the Apply Amount field. Hint: You can manually edit the Apply Amount to only use some of the existing credit.
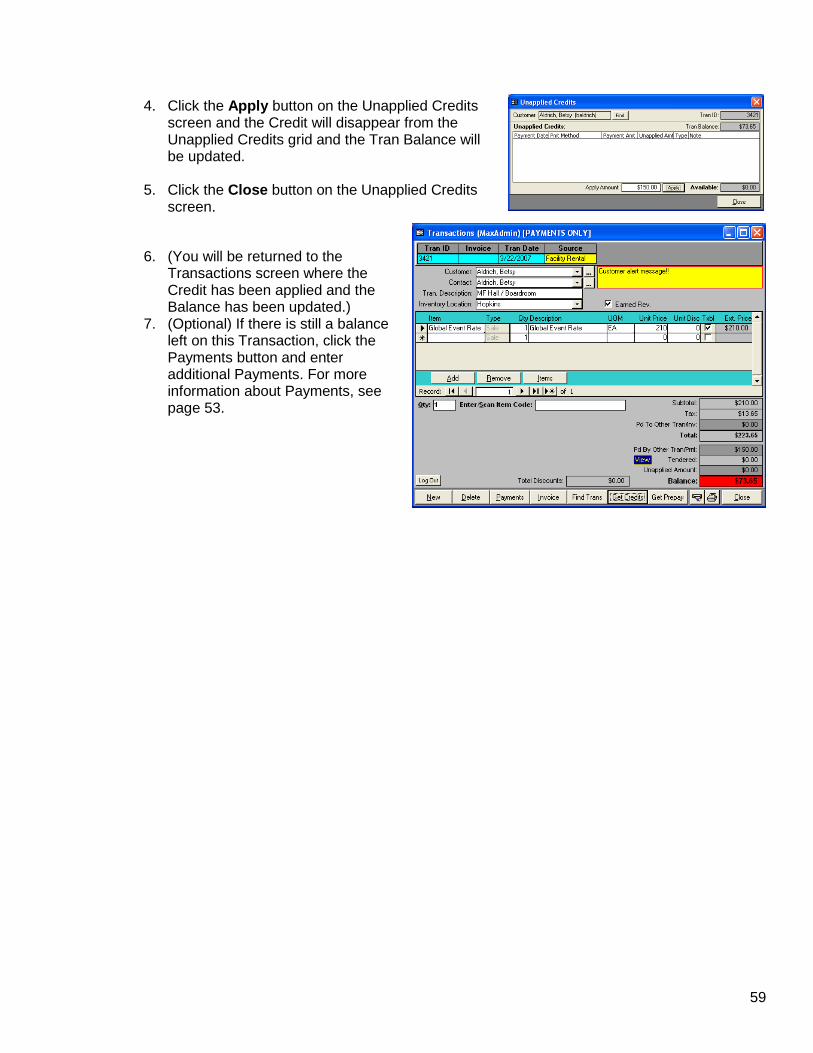
59
4. Click the Apply button on the Unapplied Credits screen and the Credit will disappear from the Unapplied Credits grid and the Tran Balance will be updated.
5. Click the Close button on the Unapplied Credits
screen.
6. (You will be returned to the Transactions screen where the Credit has been applied and the Balance has been updated.)
7. (Optional) If there is still a balance left on this Transaction, click the Payments button and enter additional Payments. For more information about Payments, see page 53.
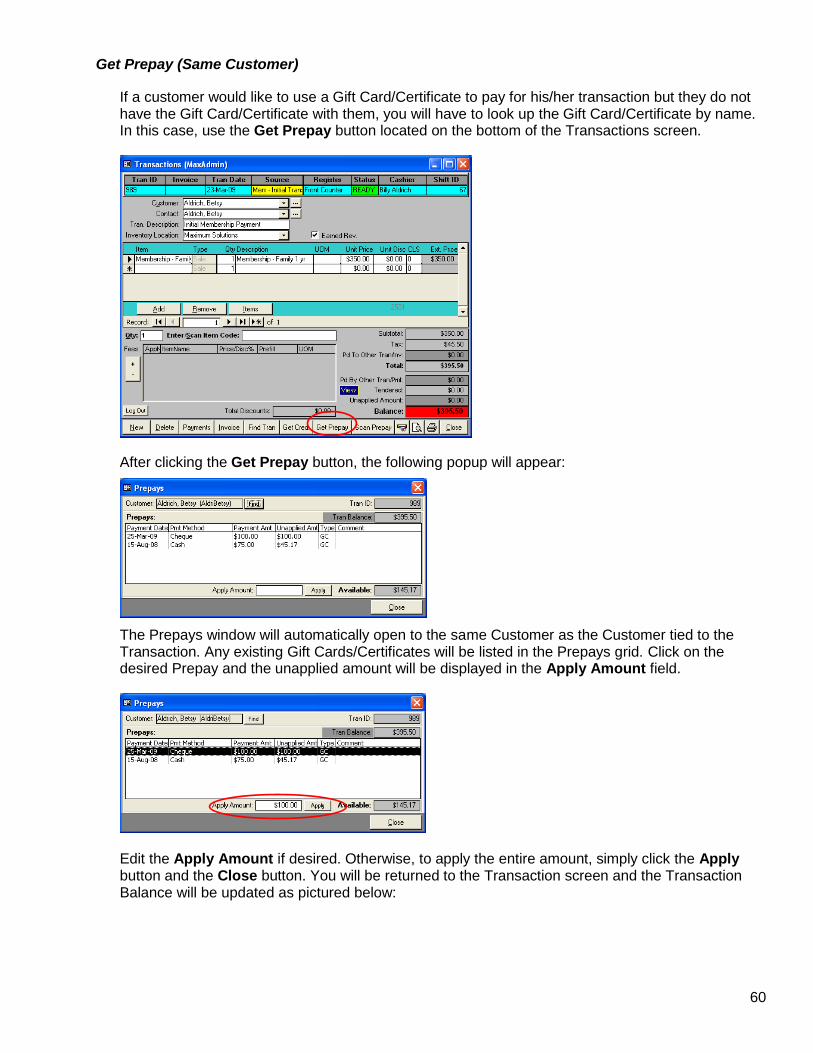
60
Get Prepay (Same Customer)
If a customer would like to use a Gift Card/Certificate to pay for his/her transaction but they do not have the Gift Card/Certificate with them, you will have to look up the Gift Card/Certificate by name. In this case, use the Get Prepay button located on the bottom of the Transactions screen.
After clicking the Get Prepay button, the following popup will appear:
The Prepays window will automatically open to the same Customer as the Customer tied to the Transaction. Any existing Gift Cards/Certificates will be listed in the Prepays grid. Click on the desired Prepay and the unapplied amount will be displayed in the Apply Amount field.
Edit the Apply Amount if desired. Otherwise, to apply the entire amount, simply click the Apply button and the Close button. You will be returned to the Transaction screen and the Transaction Balance will be updated as pictured below:
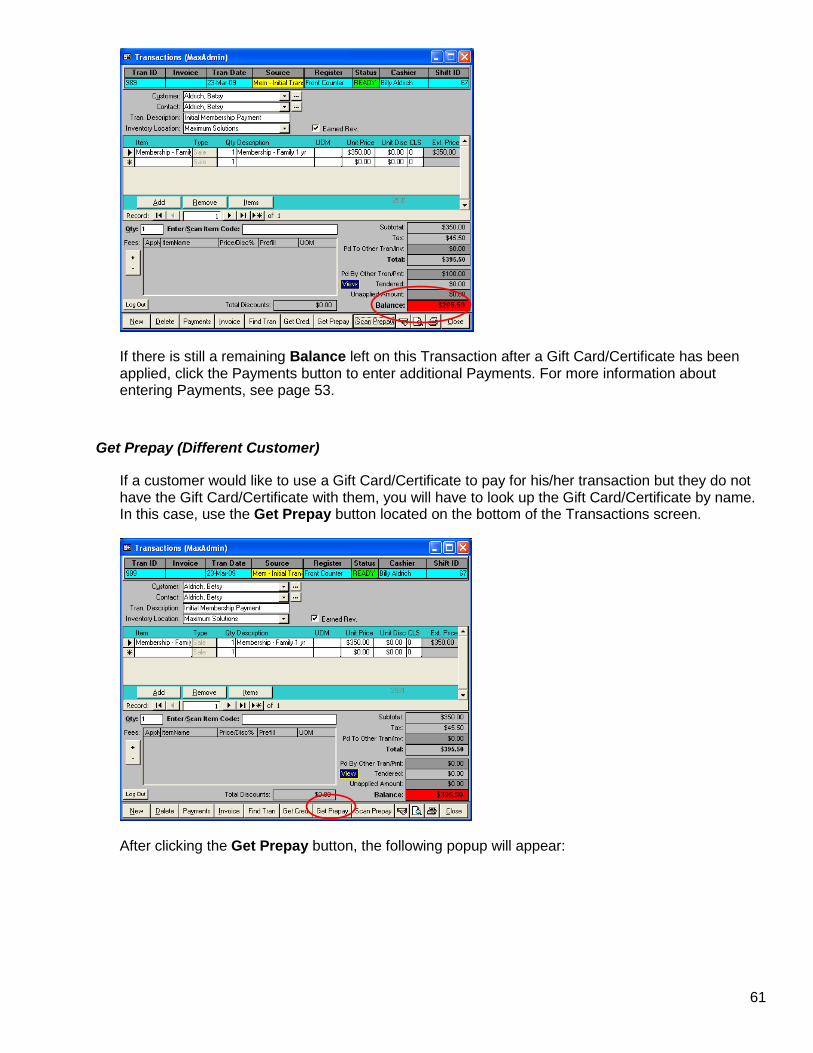
61
If there is still a remaining Balance left on this Transaction after a Gift Card/Certificate has been applied, click the Payments button to enter additional Payments. For more information about entering Payments, see page 53.
Get Prepay (Different Customer)
If a customer would like to use a Gift Card/Certificate to pay for his/her transaction but they do not have the Gift Card/Certificate with them, you will have to look up the Gift Card/Certificate by name. In this case, use the Get Prepay button located on the bottom of the Transactions screen.
After clicking the Get Prepay button, the following popup will appear:
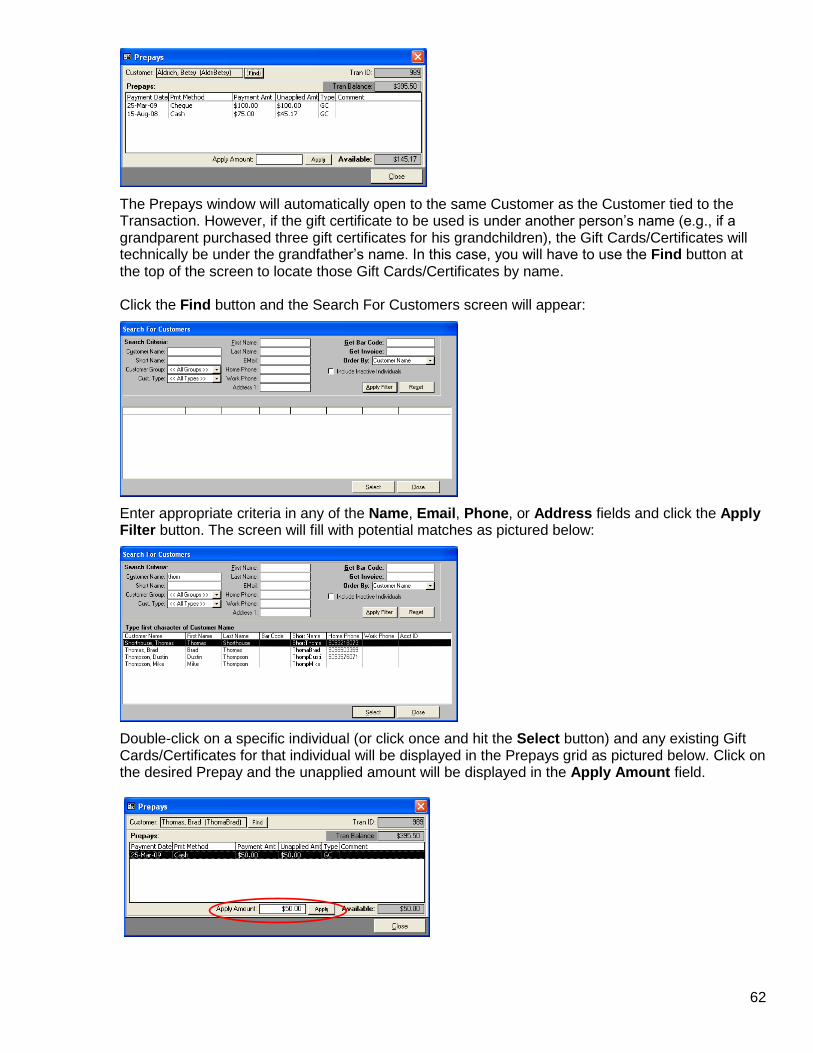
62
The Prepays window will automatically open to the same Customer as the Customer tied to the Transaction. However, if the gift certificate to be used is under another person’s name (e.g., if a grandparent purchased three gift certificates for his grandchildren), the Gift Cards/Certificates will technically be under the grandfather’s name. In this case, you will have to use the Find button at the top of the screen to locate those Gift Cards/Certificates by name. Click the Find button and the Search For Customers screen will appear:
Enter appropriate criteria in any of the Name, Email, Phone, or Address fields and click the Apply Filter button. The screen will fill with potential matches as pictured below:
Double-click on a specific individual (or click once and hit the Select button) and any existing Gift Cards/Certificates for that individual will be displayed in the Prepays grid as pictured below. Click on the desired Prepay and the unapplied amount will be displayed in the Apply Amount field.
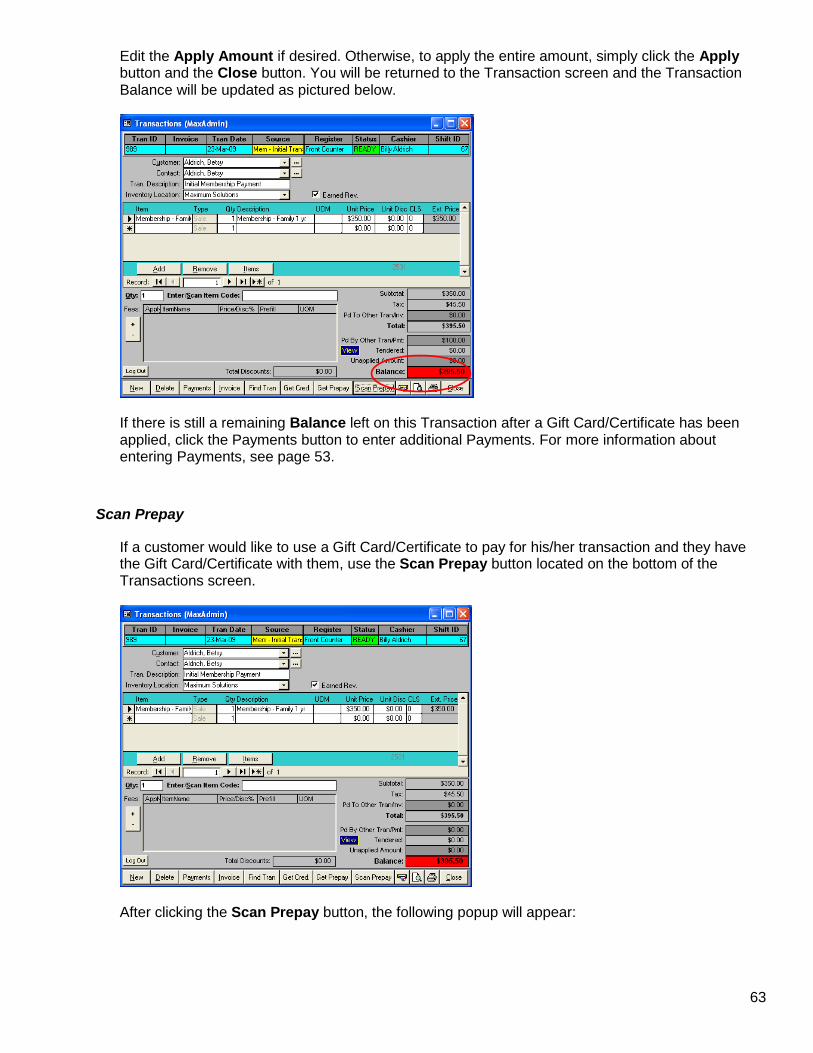
63
Edit the Apply Amount if desired. Otherwise, to apply the entire amount, simply click the Apply button and the Close button. You will be returned to the Transaction screen and the Transaction Balance will be updated as pictured below.
If there is still a remaining Balance left on this Transaction after a Gift Card/Certificate has been applied, click the Payments button to enter additional Payments. For more information about entering Payments, see page 53.
Scan Prepay
If a customer would like to use a Gift Card/Certificate to pay for his/her transaction and they have the Gift Card/Certificate with them, use the Scan Prepay button located on the bottom of the Transactions screen.
After clicking the Scan Prepay button, the following popup will appear:

64
(Optional) Click the Check Balance checkbox enter the Serial Number/Barcode of the Prepay (i.e., Gift Certificate or Debit Card), and click Enter on your keyboard. The remaining Balance of the Prepay will be displayed in the Balance field as pictured here:
After you have checked the balance of the Prepay, uncheck the Check Balance checkbox and click the OK button and some or all of the Prepay (as much as is needed) will be applied to the Transaction as pictured below.
If there is still a remaining Balance left on this Transaction after a Gift Card/Certificate has been applied, click the Payments button to enter additional Payments. For more information about entering Payments, see page 53.
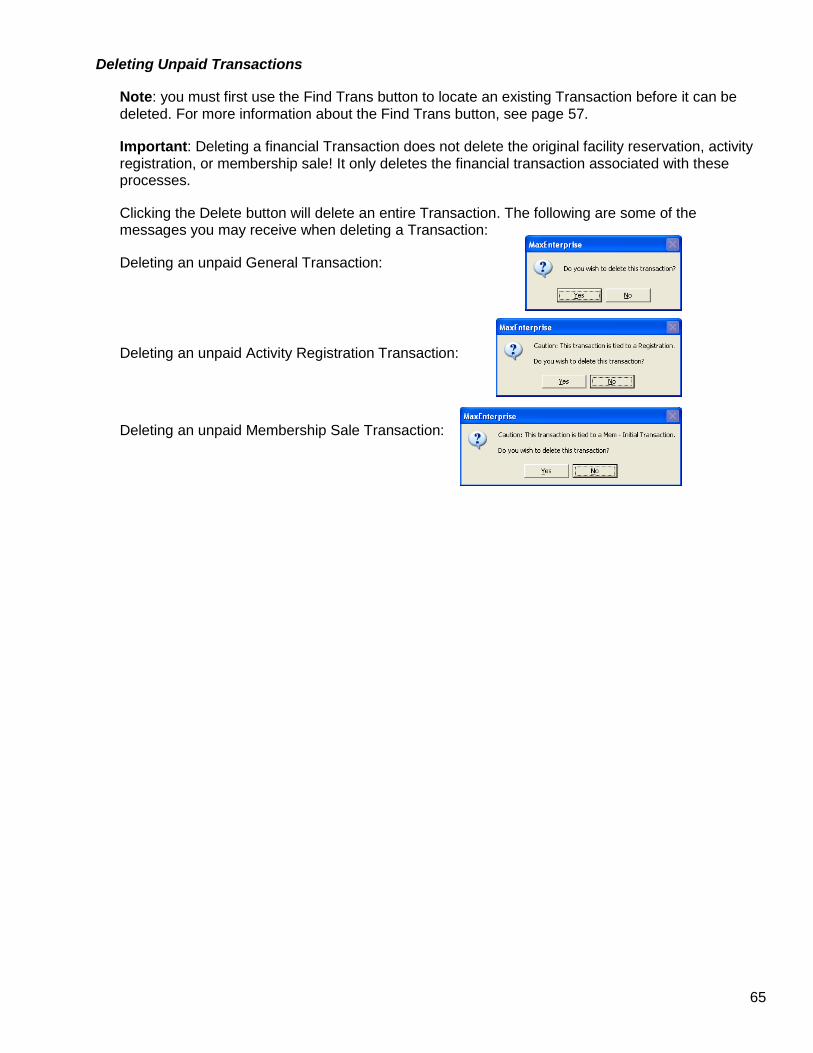
65
Deleting Unpaid Transactions
Note: you must first use the Find Trans button to locate an existing Transaction before it can be deleted. For more information about the Find Trans button, see page 57.
Important: Deleting a financial Transaction does not delete the original facility reservation, activity registration, or membership sale! It only deletes the financial transaction associated with these processes.
Clicking the Delete button will delete an entire Transaction. The following are some of the messages you may receive when deleting a Transaction:
Deleting an unpaid General Transaction:
Deleting an unpaid Activity Registration Transaction:
Deleting an unpaid Membership Sale Transaction:

66
Deleting Paid Transactions
Note: If payments have already been applied to the transaction(s) you are trying to delete, one of the following messages will appear:
If you are deleting a paid Registration Transaction:
Note: If you wish to issue a refund for this registration, do not use the Delete button. There is a Refund button located on the bottom of the Transaction Lookup screen. For more detailed instructions about Refunding Activity Registrations, see the MaxEnterprise
Registration manual.
Warning: Using the Delete button to delete a Registration Transaction will delete the financial Transaction, but will not delete the actual Registration (i.e., the individual will remain in the Activity, appear on Class Lists/Team Rosters, etc.). If you would like to remove an individual from an activity and issue a refund, see the MaxEnterprise Registration manual..
If you are deleting a paid Membership Transaction, the following message will appear:
Note: If you wish to issue a refund for this transaction, do not use the Delete button. There is a Refund button located on the bottom of the Transaction Lookup screen. For more detailed instructions about Refunding Membership Transactions, see the MaxEnterprise Membership manual.
Warning: Using the Delete button to delete a Membership Transaction will delete the financial Transaction, but will not delete the actual Membership (i.e., the individual will still have a valid membership). If you would like to delete an individual’s membership and issue a full or partial refund, see the MaxEnterprise Membership manual.
If you try to delete a paid Transaction that has been invoiced (i.e., multiple transactions combined into an invoice in order to make one payment), the following message will appear:
Note: Deleting invoices is more complicated than deleting Transactions (because a payment may have been applied to multiple transactions on an invoice). For this reason, you will need to delete the payments and the invoices separately. In this scenario, look in the Invoice field at the top of the Transactions screen. The invoice number on which this Transaction was included will appear in this field. Proceed to the Payments/Credits screen to delete the Payment (see page 84). Proceed to the Invoice Inquiry screen to delete the Invoice (see page 112).
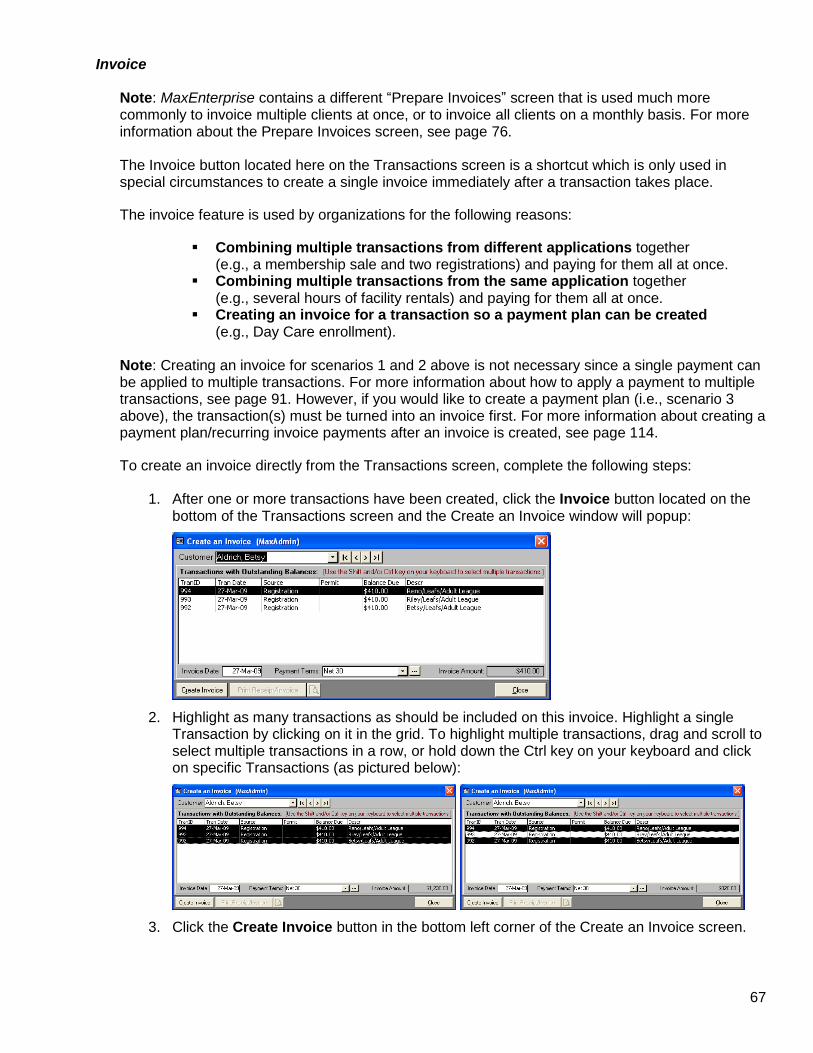
67
Invoice Note: MaxEnterprise contains a different “Prepare Invoices” screen that is used much more commonly to invoice multiple clients at once, or to invoice all clients on a monthly basis. For more information about the Prepare Invoices screen, see page 76. The Invoice button located here on the Transactions screen is a shortcut which is only used in special circumstances to create a single invoice immediately after a transaction takes place.
The invoice feature is used by organizations for the following reasons:
Combining multiple transactions from different applications together (e.g., a membership sale and two registrations) and paying for them all at once.
Combining multiple transactions from the same application together (e.g., several hours of facility rentals) and paying for them all at once.
Creating an invoice for a transaction so a payment plan can be created (e.g., Day Care enrollment).
Note: Creating an invoice for scenarios 1 and 2 above is not necessary since a single payment can be applied to multiple transactions. For more information about how to apply a payment to multiple transactions, see page 91. However, if you would like to create a payment plan (i.e., scenario 3 above), the transaction(s) must be turned into an invoice first. For more information about creating a payment plan/recurring invoice payments after an invoice is created, see page 114.
To create an invoice directly from the Transactions screen, complete the following steps:
1. After one or more transactions have been created, click the Invoice button located on the bottom of the Transactions screen and the Create an Invoice window will popup:
2. Highlight as many transactions as should be included on this invoice. Highlight a single Transaction by clicking on it in the grid. To highlight multiple transactions, drag and scroll to select multiple transactions in a row, or hold down the Ctrl key on your keyboard and click on specific Transactions (as pictured below):
3. Click the Create Invoice button in the bottom left corner of the Create an Invoice screen.
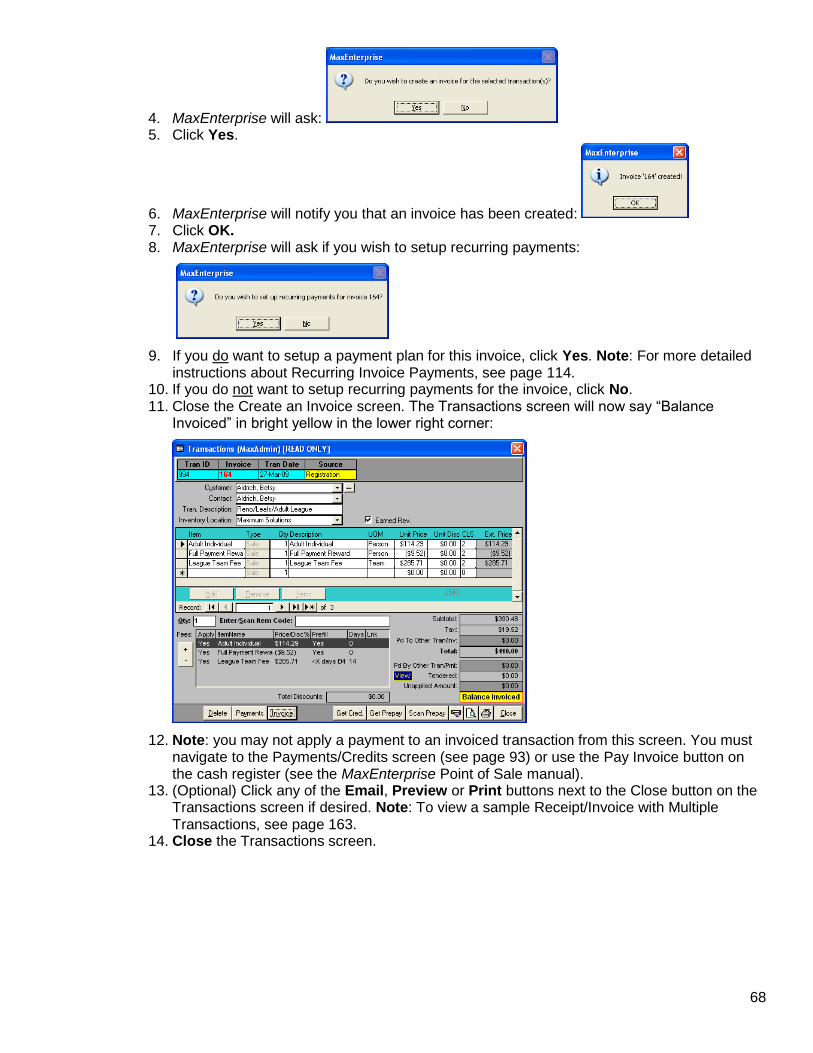
68
4. MaxEnterprise will ask: 5. Click Yes.
6. MaxEnterprise will notify you that an invoice has been created: 7. Click OK. 8. MaxEnterprise will ask if you wish to setup recurring payments:
9. If you do want to setup a payment plan for this invoice, click Yes. Note: For more detailed instructions about Recurring Invoice Payments, see page 114.
10. If you do not want to setup recurring payments for the invoice, click No. 11. Close the Create an Invoice screen. The Transactions screen will now say “Balance
Invoiced” in bright yellow in the lower right corner:
12. Note: you may not apply a payment to an invoiced transaction from this screen. You must navigate to the Payments/Credits screen (see page 93) or use the Pay Invoice button on the cash register (see the MaxEnterprise Point of Sale manual).
13. (Optional) Click any of the Email, Preview or Print buttons next to the Close button on the Transactions screen if desired. Note: To view a sample Receipt/Invoice with Multiple Transactions, see page 163.
14. Close the Transactions screen.
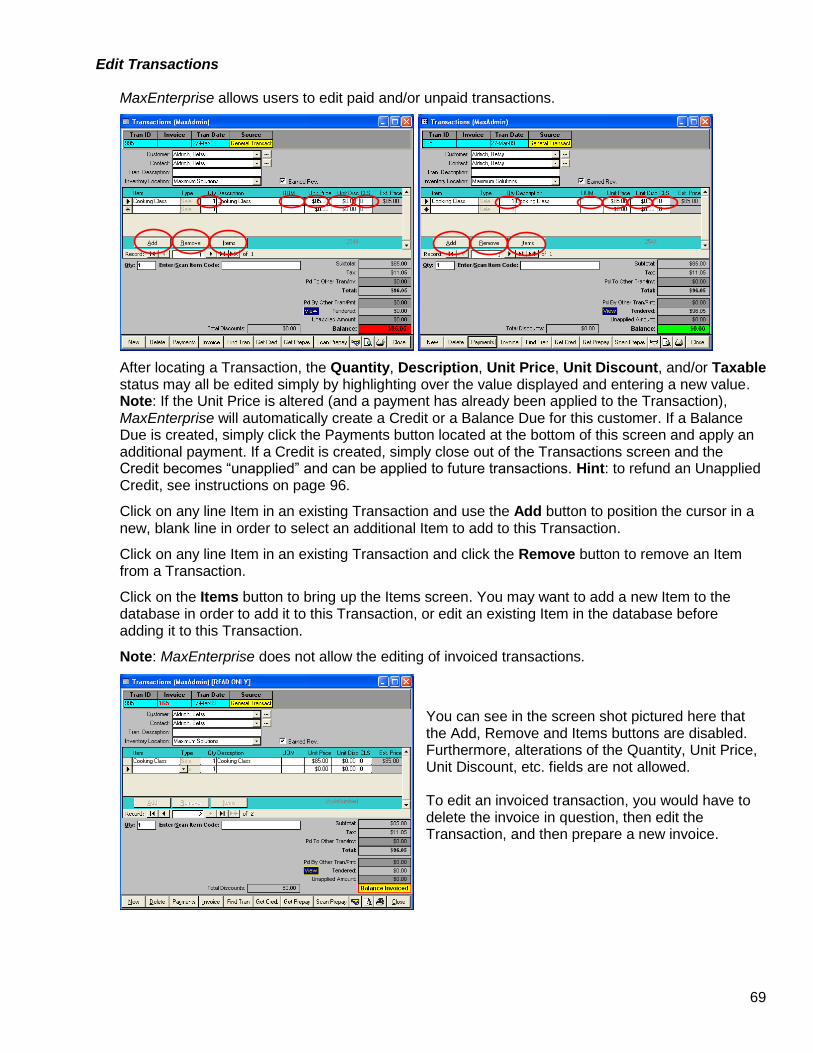
69
Edit Transactions MaxEnterprise allows users to edit paid and/or unpaid transactions.
After locating a Transaction, the Quantity, Description, Unit Price, Unit Discount, and/or Taxable status may all be edited simply by highlighting over the value displayed and entering a new value. Note: If the Unit Price is altered (and a payment has already been applied to the Transaction), MaxEnterprise will automatically create a Credit or a Balance Due for this customer. If a Balance Due is created, simply click the Payments button located at the bottom of this screen and apply an additional payment. If a Credit is created, simply close out of the Transactions screen and the Credit becomes “unapplied” and can be applied to future transactions. Hint: to refund an Unapplied Credit, see instructions on page 96.
Click on any line Item in an existing Transaction and use the Add button to position the cursor in a new, blank line in order to select an additional Item to add to this Transaction.
Click on any line Item in an existing Transaction and click the Remove button to remove an Item from a Transaction.
Click on the Items button to bring up the Items screen. You may want to add a new Item to the database in order to add it to this Transaction, or edit an existing Item in the database before adding it to this Transaction.
Note: MaxEnterprise does not allow the editing of invoiced transactions.
You can see in the screen shot pictured here that the Add, Remove and Items buttons are disabled. Furthermore, alterations of the Quantity, Unit Price, Unit Discount, etc. fields are not allowed.
To edit an invoiced transaction, you would have to delete the invoice in question, then edit the Transaction, and then prepare a new invoice.
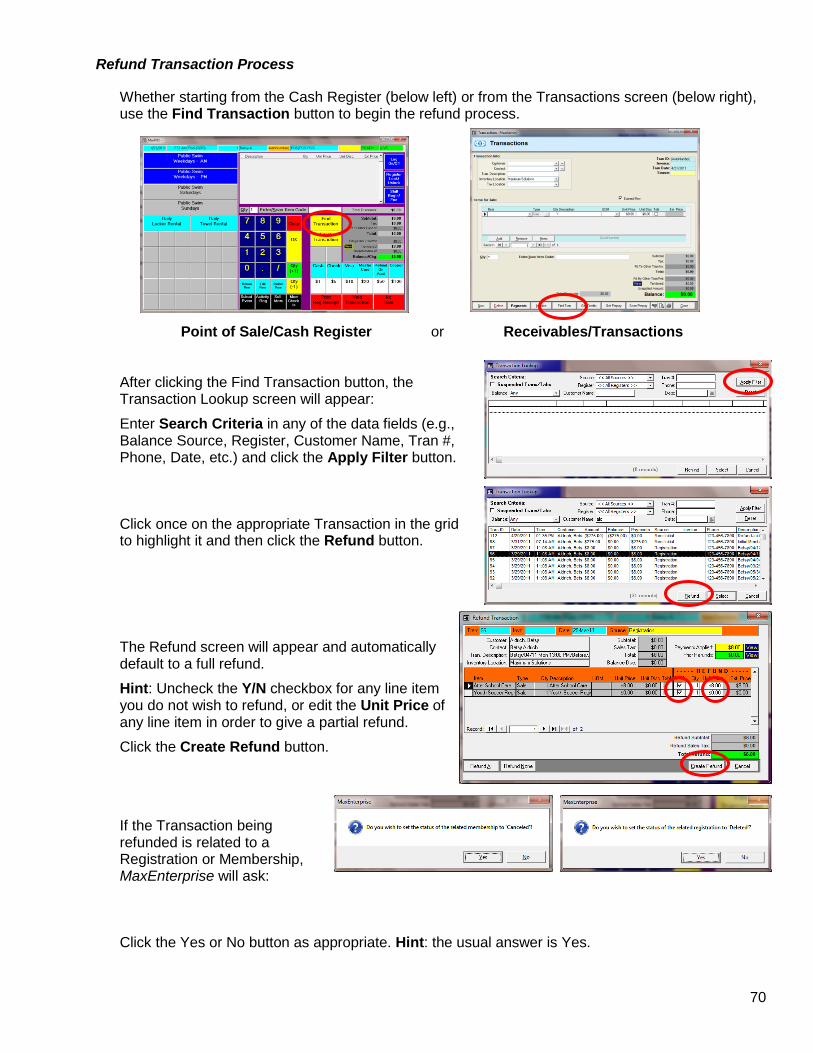
70
Refund Transaction Process
Whether starting from the Cash Register (below left) or from the Transactions screen (below right), use the Find Transaction button to begin the refund process.
Point of Sale/Cash Register or Receivables/Transactions After clicking the Find Transaction button, the Transaction Lookup screen will appear:
Enter Search Criteria in any of the data fields (e.g., Balance Source, Register, Customer Name, Tran #, Phone, Date, etc.) and click the Apply Filter button.
Click once on the appropriate Transaction in the grid to highlight it and then click the Refund button.
The Refund screen will appear and automatically default to a full refund.
Hint: Uncheck the Y/N checkbox for any line item you do not wish to refund, or edit the Unit Price of any line item in order to give a partial refund.
Click the Create Refund button.
If the Transaction being refunded is related to a Registration or Membership, MaxEnterprise will ask:
Click the Yes or No button as appropriate. Hint: the usual answer is Yes.
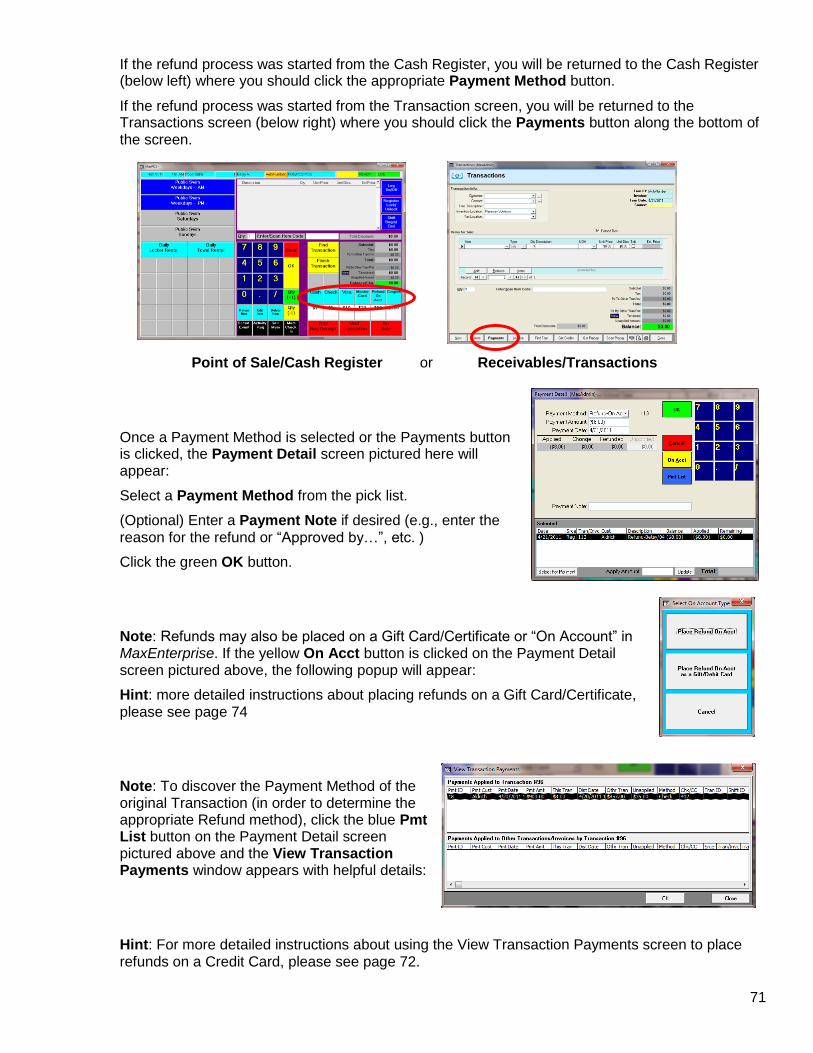
71
If the refund process was started from the Cash Register, you will be returned to the Cash Register (below left) where you should click the appropriate Payment Method button.
If the refund process was started from the Transaction screen, you will be returned to the Transactions screen (below right) where you should click the Payments button along the bottom of the screen.
Point of Sale/Cash Register or Receivables/Transactions
Once a Payment Method is selected or the Payments button is clicked, the Payment Detail screen pictured here will appear:
Select a Payment Method from the pick list.
(Optional) Enter a Payment Note if desired (e.g., enter the reason for the refund or “Approved by…”, etc. )
Click the green OK button.
Note: Refunds may also be placed on a Gift Card/Certificate or “On Account” in MaxEnterprise. If the yellow On Acct button is clicked on the Payment Detail screen pictured above, the following popup will appear:
Hint: more detailed instructions about placing refunds on a Gift Card/Certificate, please see page 74
Note: To discover the Payment Method of the original Transaction (in order to determine the appropriate Refund method), click the blue Pmt List button on the Payment Detail screen pictured above and the View Transaction Payments window appears with helpful details:
Hint: For more detailed instructions about using the View Transaction Payments screen to place refunds on a Credit Card, please see page 72.
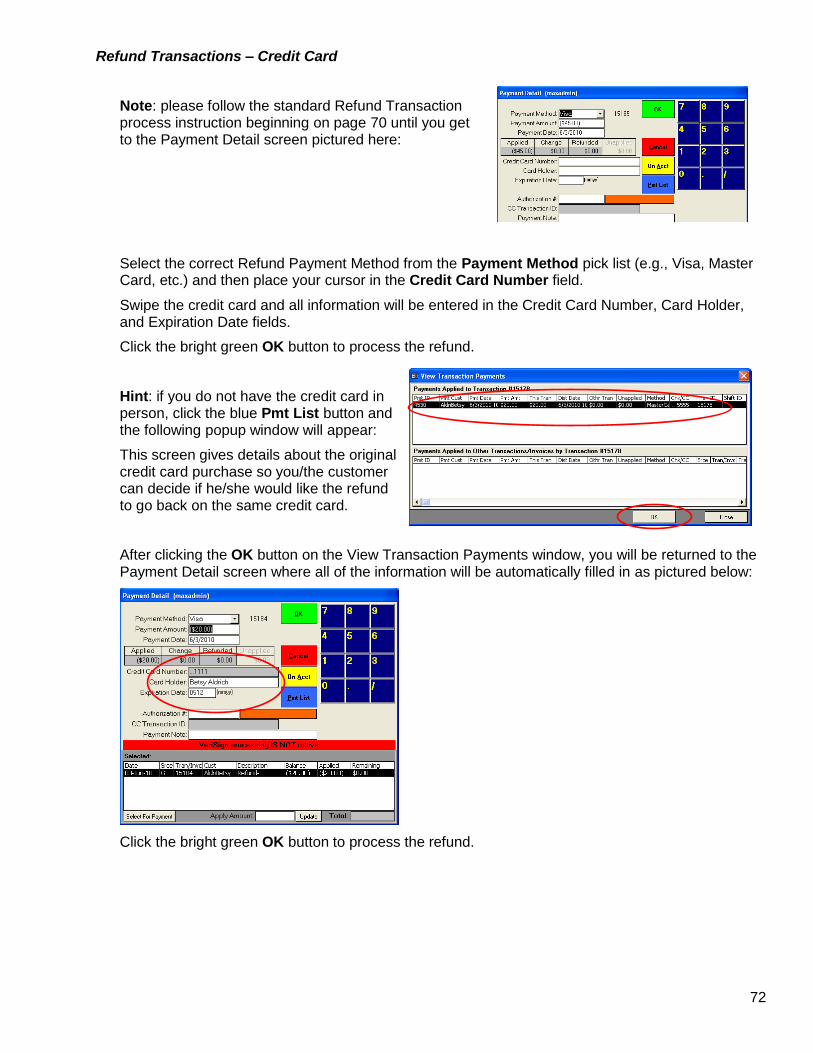
72
Refund Transactions – Credit Card
Note: please follow the standard Refund Transaction process instruction beginning on page 70 until you get to the Payment Detail screen pictured here:
Select the correct Refund Payment Method from the Payment Method pick list (e.g., Visa, Master Card, etc.) and then place your cursor in the Credit Card Number field.
Swipe the credit card and all information will be entered in the Credit Card Number, Card Holder, and Expiration Date fields.
Click the bright green OK button to process the refund.
Hint: if you do not have the credit card in person, click the blue Pmt List button and the following popup window will appear:
This screen gives details about the original credit card purchase so you/the customer can decide if he/she would like the refund to go back on the same credit card.
After clicking the OK button on the View Transaction Payments window, you will be returned to the Payment Detail screen where all of the information will be automatically filled in as pictured below:
Click the bright green OK button to process the refund.
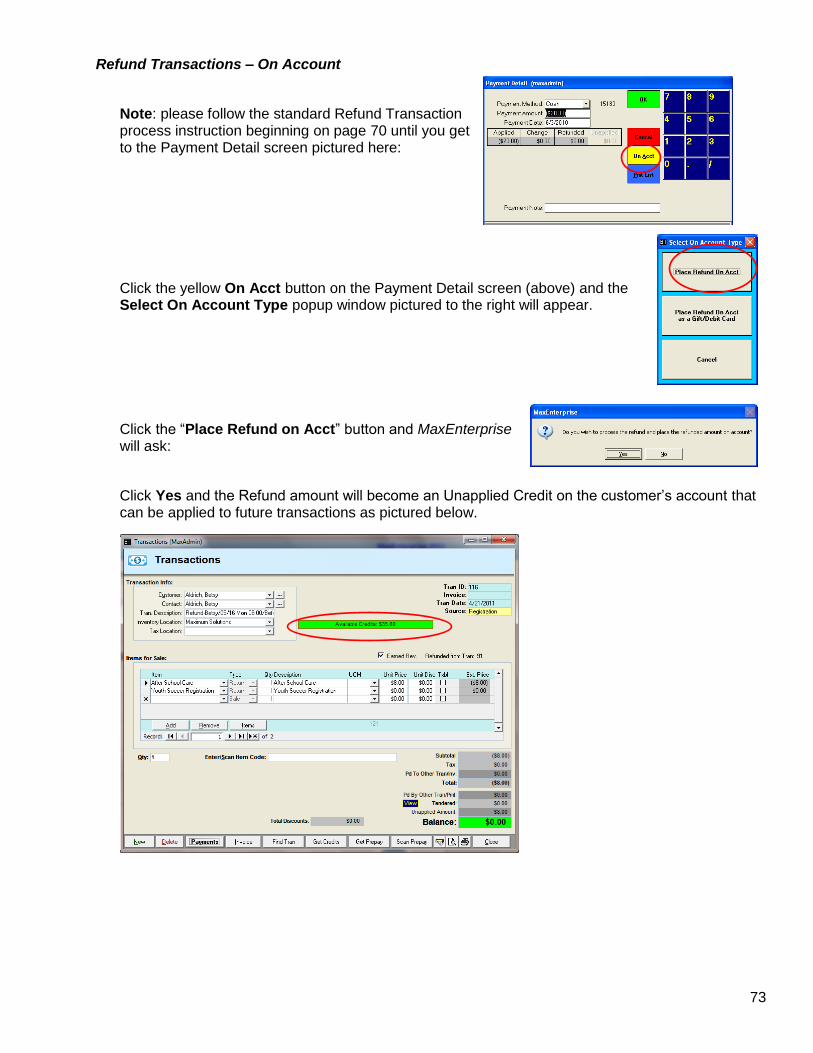
73
Refund Transactions – On Account
Note: please follow the standard Refund Transaction process instruction beginning on page 70 until you get to the Payment Detail screen pictured here:
Click the yellow On Acct button on the Payment Detail screen (above) and the Select On Account Type popup window pictured to the right will appear.
Click the “Place Refund on Acct” button and MaxEnterprise will ask:
Click Yes and the Refund amount will become an Unapplied Credit on the customer’s account that can be applied to future transactions as pictured below.
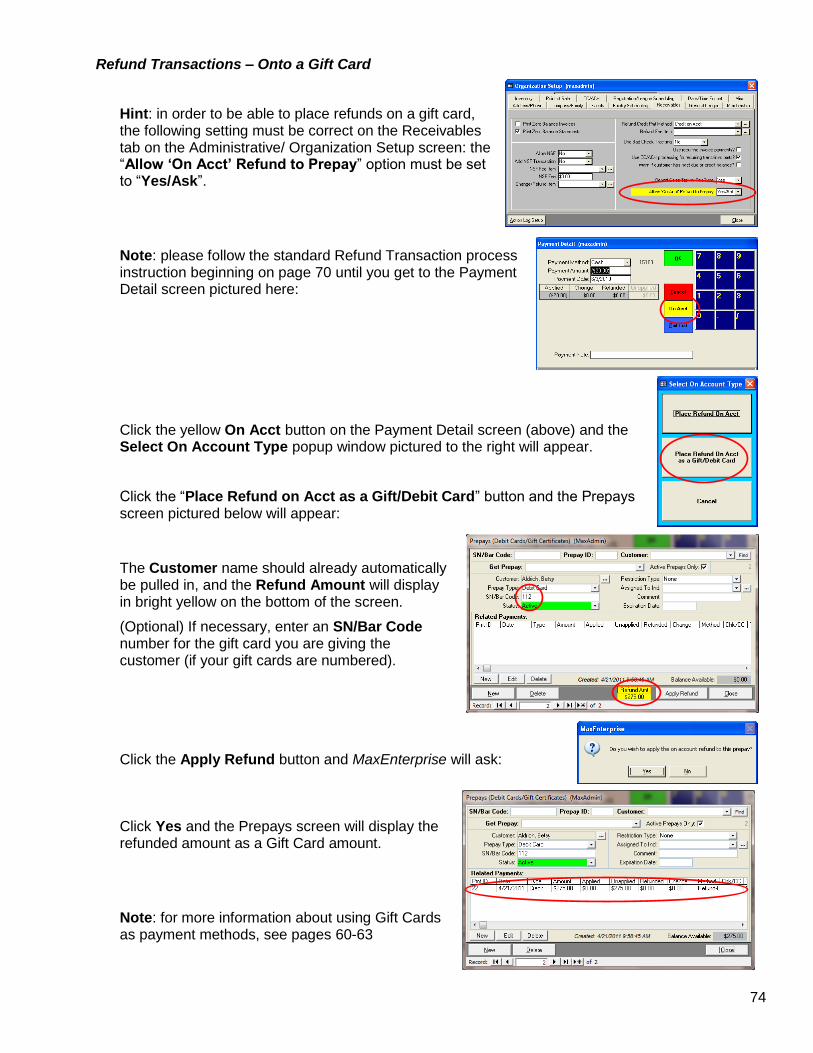
74
Refund Transactions – Onto a Gift Card
Hint: in order to be able to place refunds on a gift card, the following setting must be correct on the Receivables tab on the Administrative/ Organization Setup screen: the “Allow ‘On Acct’ Refund to Prepay” option must be set to “Yes/Ask”.
Note: please follow the standard Refund Transaction process instruction beginning on page 70 until you get to the Payment Detail screen pictured here:
Click the yellow On Acct button on the Payment Detail screen (above) and the Select On Account Type popup window pictured to the right will appear.
Click the “Place Refund on Acct as a Gift/Debit Card” button and the Prepays screen pictured below will appear:
The Customer name should already automatically be pulled in, and the Refund Amount will display in bright yellow on the bottom of the screen.
(Optional) If necessary, enter an SN/Bar Code number for the gift card you are giving the customer (if your gift cards are numbered).
Click the Apply Refund button and MaxEnterprise will ask:
Click Yes and the Prepays screen will display the refunded amount as a Gift Card amount.
Note: for more information about using Gift Cards as payment methods, see pages 60-63
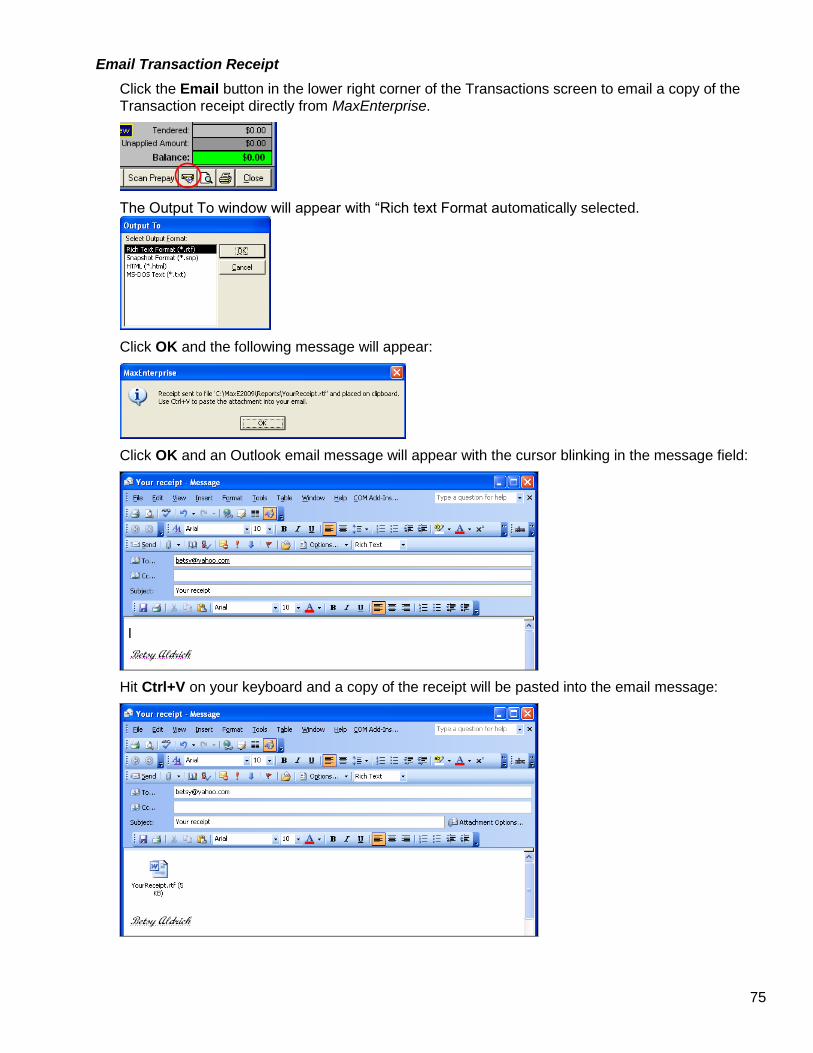
75
Email Transaction Receipt
Click the Email button in the lower right corner of the Transactions screen to email a copy of the Transaction receipt directly from MaxEnterprise.
The Output To window will appear with “Rich text Format automatically selected.
Click OK and the following message will appear:
Click OK and an Outlook email message will appear with the cursor blinking in the message field:
Hit Ctrl+V on your keyboard and a copy of the receipt will be pasted into the email message:
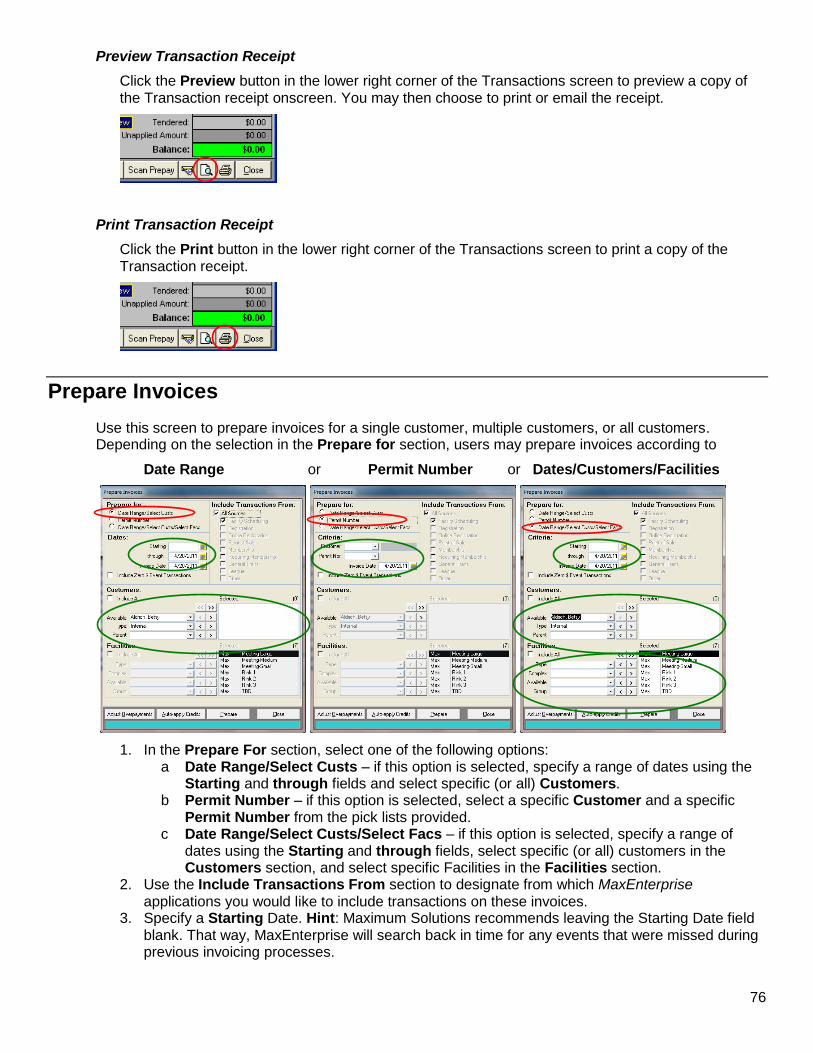
76
Preview Transaction Receipt
Click the Preview button in the lower right corner of the Transactions screen to preview a copy of the Transaction receipt onscreen. You may then choose to print or email the receipt.
Print Transaction Receipt
Click the Print button in the lower right corner of the Transactions screen to print a copy of the Transaction receipt.
Prepare Invoices
Use this screen to prepare invoices for a single customer, multiple customers, or all customers. Depending on the selection in the Prepare for section, users may prepare invoices according to
Date Range or Permit Number or Dates/Customers/Facilities
1. In the Prepare For section, select one of the following options: a Date Range/Select Custs – if this option is selected, specify a range of dates using the
Starting and through fields and select specific (or all) Customers. b Permit Number – if this option is selected, select a specific Customer and a specific
Permit Number from the pick lists provided. c Date Range/Select Custs/Select Facs – if this option is selected, specify a range of
dates using the Starting and through fields, select specific (or all) customers in the Customers section, and select specific Facilities in the Facilities section.
2. Use the Include Transactions From section to designate from which MaxEnterprise applications you would like to include transactions on these invoices.
3. Specify a Starting Date. Hint: Maximum Solutions recommends leaving the Starting Date field blank. That way, MaxEnterprise will search back in time for any events that were missed during previous invoicing processes.
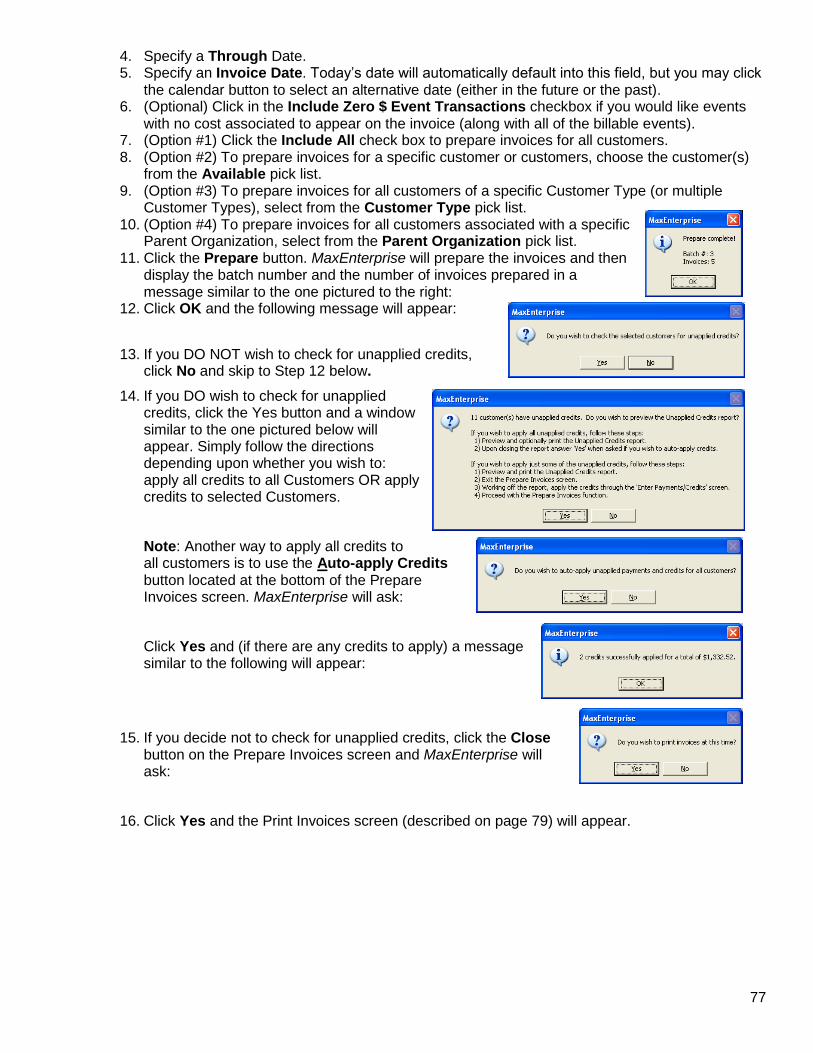
77
4. Specify a Through Date. 5. Specify an Invoice Date. Today’s date will automatically default into this field, but you may click
the calendar button to select an alternative date (either in the future or the past). 6. (Optional) Click in the Include Zero $ Event Transactions checkbox if you would like events
with no cost associated to appear on the invoice (along with all of the billable events). 7. (Option #1) Click the Include All check box to prepare invoices for all customers. 8. (Option #2) To prepare invoices for a specific customer or customers, choose the customer(s)
from the Available pick list. 9. (Option #3) To prepare invoices for all customers of a specific Customer Type (or multiple
Customer Types), select from the Customer Type pick list. 10. (Option #4) To prepare invoices for all customers associated with a specific
Parent Organization, select from the Parent Organization pick list. 11. Click the Prepare button. MaxEnterprise will prepare the invoices and then
display the batch number and the number of invoices prepared in a message similar to the one pictured to the right:
12. Click OK and the following message will appear:
13. If you DO NOT wish to check for unapplied credits, click No and skip to Step 12 below.
14. If you DO wish to check for unapplied credits, click the Yes button and a window similar to the one pictured below will appear. Simply follow the directions depending upon whether you wish to: apply all credits to all Customers OR apply credits to selected Customers.
Note: Another way to apply all credits to all customers is to use the Auto-apply Credits button located at the bottom of the Prepare Invoices screen. MaxEnterprise will ask:
Click Yes and (if there are any credits to apply) a message similar to the following will appear:
15. If you decide not to check for unapplied credits, click the Close button on the Prepare Invoices screen and MaxEnterprise will ask:
16. Click Yes and the Print Invoices screen (described on page 79) will appear.
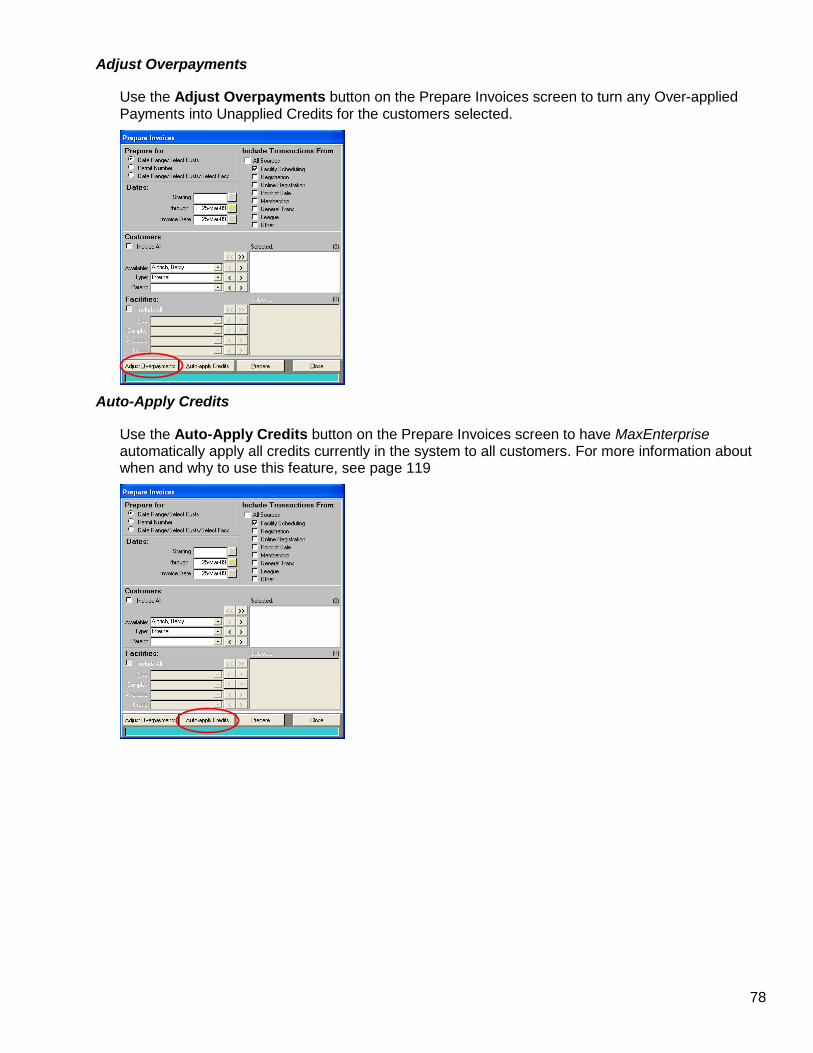
78
Adjust Overpayments
Use the Adjust Overpayments button on the Prepare Invoices screen to turn any Over-applied Payments into Unapplied Credits for the customers selected.
Auto-Apply Credits
Use the Auto-Apply Credits button on the Prepare Invoices screen to have MaxEnterprise automatically apply all credits currently in the system to all customers. For more information about when and why to use this feature, see page 119
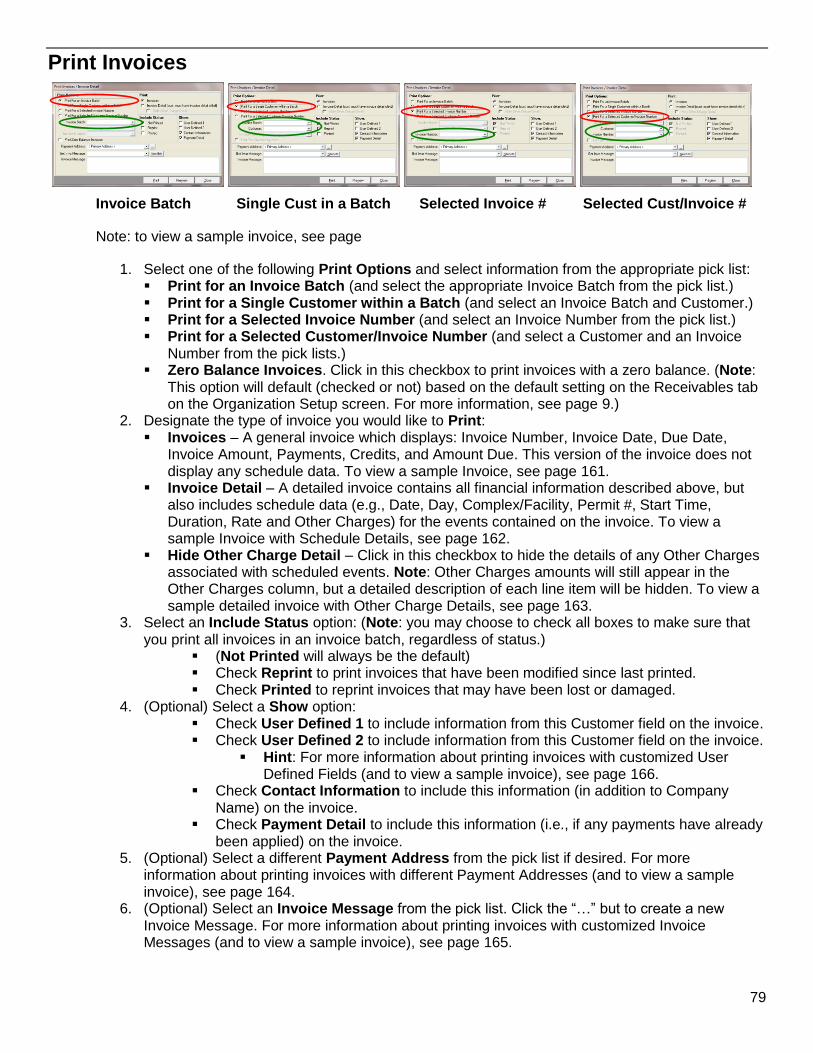
79
Print Invoices
Invoice Batch Single Cust in a Batch Selected Invoice # Selected Cust/Invoice #
Note: to view a sample invoice, see page
1. Select one of the following Print Options and select information from the appropriate pick list: Print for an Invoice Batch (and select the appropriate Invoice Batch from the pick list.) Print for a Single Customer within a Batch (and select an Invoice Batch and Customer.) Print for a Selected Invoice Number (and select an Invoice Number from the pick list.) Print for a Selected Customer/Invoice Number (and select a Customer and an Invoice
Number from the pick lists.) Zero Balance Invoices. Click in this checkbox to print invoices with a zero balance. (Note:
This option will default (checked or not) based on the default setting on the Receivables tab on the Organization Setup screen. For more information, see page 9.)
2. Designate the type of invoice you would like to Print: Invoices – A general invoice which displays: Invoice Number, Invoice Date, Due Date,
Invoice Amount, Payments, Credits, and Amount Due. This version of the invoice does not display any schedule data. To view a sample Invoice, see page 161.
Invoice Detail – A detailed invoice contains all financial information described above, but also includes schedule data (e.g., Date, Day, Complex/Facility, Permit #, Start Time, Duration, Rate and Other Charges) for the events contained on the invoice. To view a sample Invoice with Schedule Details, see page 162.
Hide Other Charge Detail – Click in this checkbox to hide the details of any Other Charges associated with scheduled events. Note: Other Charges amounts will still appear in the Other Charges column, but a detailed description of each line item will be hidden. To view a sample detailed invoice with Other Charge Details, see page 163.
3. Select an Include Status option: (Note: you may choose to check all boxes to make sure that you print all invoices in an invoice batch, regardless of status.)
(Not Printed will always be the default) Check Reprint to print invoices that have been modified since last printed. Check Printed to reprint invoices that may have been lost or damaged.
4. (Optional) Select a Show option: Check User Defined 1 to include information from this Customer field on the invoice. Check User Defined 2 to include information from this Customer field on the invoice.
Hint: For more information about printing invoices with customized User Defined Fields (and to view a sample invoice), see page 166.
Check Contact Information to include this information (in addition to Company Name) on the invoice.
Check Payment Detail to include this information (i.e., if any payments have already been applied) on the invoice.
5. (Optional) Select a different Payment Address from the pick list if desired. For more information about printing invoices with different Payment Addresses (and to view a sample invoice), see page 164.
6. (Optional) Select an Invoice Message from the pick list. Click the “…” but to create a new Invoice Message. For more information about printing invoices with customized Invoice Messages (and to view a sample invoice), see page 165.

80
7. Click the Preview or the Print button. (Hint: Maximum Solutions recommends always previewing – to check that date range, hourly rates, etc. are correct - before printing invoices.)
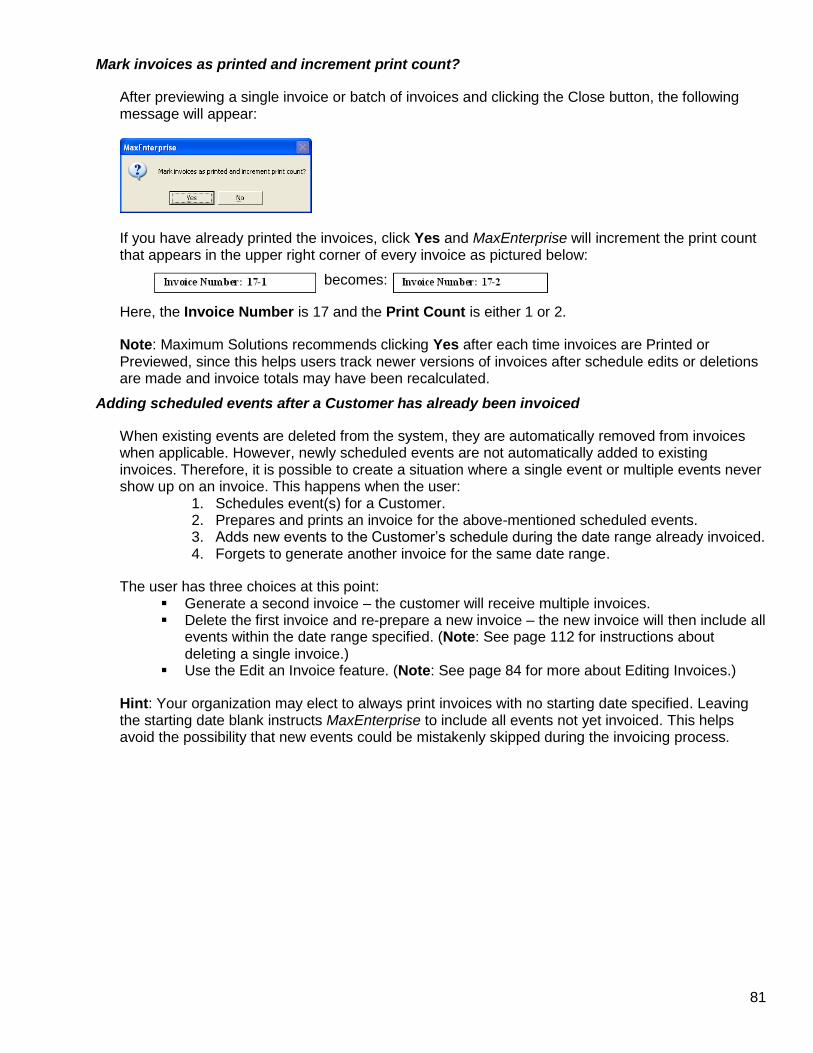
81
Mark invoices as printed and increment print count?
After previewing a single invoice or batch of invoices and clicking the Close button, the following message will appear:
If you have already printed the invoices, click Yes and MaxEnterprise will increment the print count that appears in the upper right corner of every invoice as pictured below:
becomes:
Here, the Invoice Number is 17 and the Print Count is either 1 or 2.
Note: Maximum Solutions recommends clicking Yes after each time invoices are Printed or Previewed, since this helps users track newer versions of invoices after schedule edits or deletions are made and invoice totals may have been recalculated.
Adding scheduled events after a Customer has already been invoiced
When existing events are deleted from the system, they are automatically removed from invoices when applicable. However, newly scheduled events are not automatically added to existing invoices. Therefore, it is possible to create a situation where a single event or multiple events never show up on an invoice. This happens when the user:
1. Schedules event(s) for a Customer. 2. Prepares and prints an invoice for the above-mentioned scheduled events. 3. Adds new events to the Customer’s schedule during the date range already invoiced. 4. Forgets to generate another invoice for the same date range.
The user has three choices at this point: Generate a second invoice – the customer will receive multiple invoices. Delete the first invoice and re-prepare a new invoice – the new invoice will then include all
events within the date range specified. (Note: See page 112 for instructions about deleting a single invoice.)
Use the Edit an Invoice feature. (Note: See page 84 for more about Editing Invoices.)
Hint: Your organization may elect to always print invoices with no starting date specified. Leaving the starting date blank instructs MaxEnterprise to include all events not yet invoiced. This helps avoid the possibility that new events could be mistakenly skipped during the invoicing process.
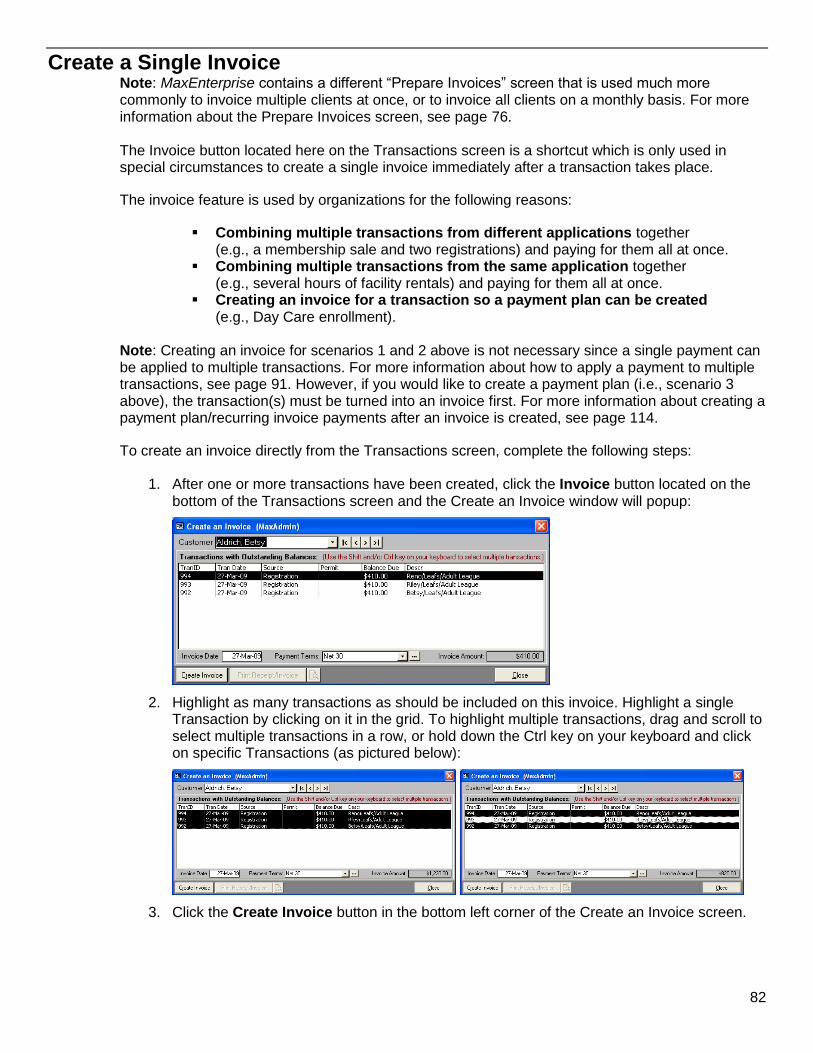
82
Create a Single Invoice
Note: MaxEnterprise contains a different “Prepare Invoices” screen that is used much more commonly to invoice multiple clients at once, or to invoice all clients on a monthly basis. For more information about the Prepare Invoices screen, see page 76. The Invoice button located here on the Transactions screen is a shortcut which is only used in special circumstances to create a single invoice immediately after a transaction takes place.
The invoice feature is used by organizations for the following reasons:
Combining multiple transactions from different applications together (e.g., a membership sale and two registrations) and paying for them all at once.
Combining multiple transactions from the same application together (e.g., several hours of facility rentals) and paying for them all at once.
Creating an invoice for a transaction so a payment plan can be created (e.g., Day Care enrollment).
Note: Creating an invoice for scenarios 1 and 2 above is not necessary since a single payment can be applied to multiple transactions. For more information about how to apply a payment to multiple transactions, see page 91. However, if you would like to create a payment plan (i.e., scenario 3 above), the transaction(s) must be turned into an invoice first. For more information about creating a payment plan/recurring invoice payments after an invoice is created, see page 114.
To create an invoice directly from the Transactions screen, complete the following steps:
1. After one or more transactions have been created, click the Invoice button located on the bottom of the Transactions screen and the Create an Invoice window will popup:
2. Highlight as many transactions as should be included on this invoice. Highlight a single Transaction by clicking on it in the grid. To highlight multiple transactions, drag and scroll to select multiple transactions in a row, or hold down the Ctrl key on your keyboard and click on specific Transactions (as pictured below):
3. Click the Create Invoice button in the bottom left corner of the Create an Invoice screen.
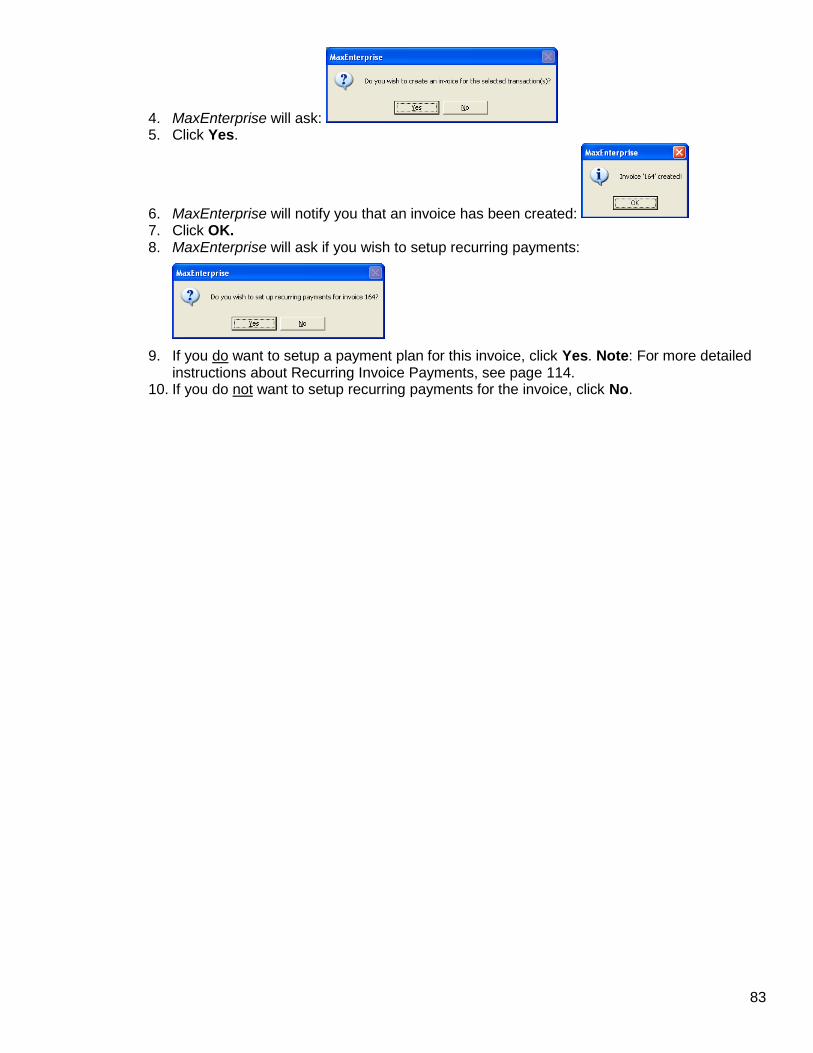
83
4. MaxEnterprise will ask: 5. Click Yes.
6. MaxEnterprise will notify you that an invoice has been created: 7. Click OK. 8. MaxEnterprise will ask if you wish to setup recurring payments:
9. If you do want to setup a payment plan for this invoice, click Yes. Note: For more detailed instructions about Recurring Invoice Payments, see page 114.
10. If you do not want to setup recurring payments for the invoice, click No.
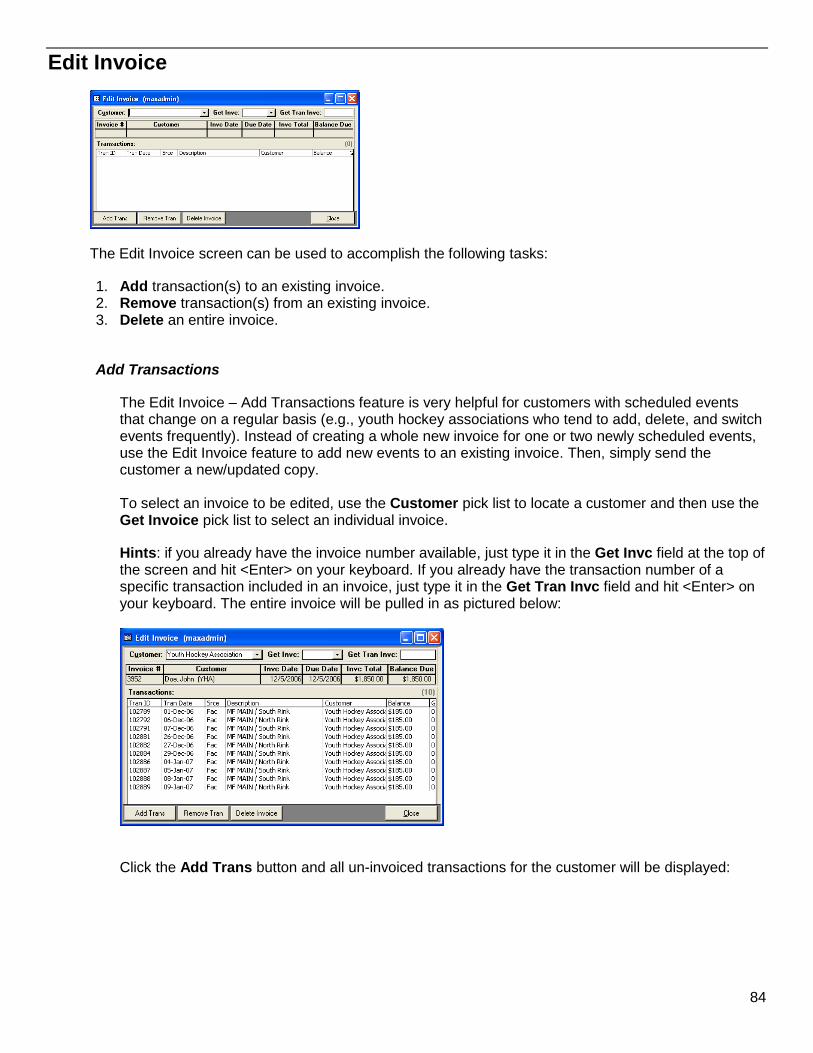
84
Edit Invoice
The Edit Invoice screen can be used to accomplish the following tasks:
1. Add transaction(s) to an existing invoice. 2. Remove transaction(s) from an existing invoice. 3. Delete an entire invoice.
Add Transactions
The Edit Invoice – Add Transactions feature is very helpful for customers with scheduled events that change on a regular basis (e.g., youth hockey associations who tend to add, delete, and switch events frequently). Instead of creating a whole new invoice for one or two newly scheduled events, use the Edit Invoice feature to add new events to an existing invoice. Then, simply send the customer a new/updated copy. To select an invoice to be edited, use the Customer pick list to locate a customer and then use the Get Invoice pick list to select an individual invoice.
Hints: if you already have the invoice number available, just type it in the Get Invc field at the top of the screen and hit <Enter> on your keyboard. If you already have the transaction number of a specific transaction included in an invoice, just type it in the Get Tran Invc field and hit <Enter> on your keyboard. The entire invoice will be pulled in as pictured below:
Click the Add Trans button and all un-invoiced transactions for the customer will be displayed:
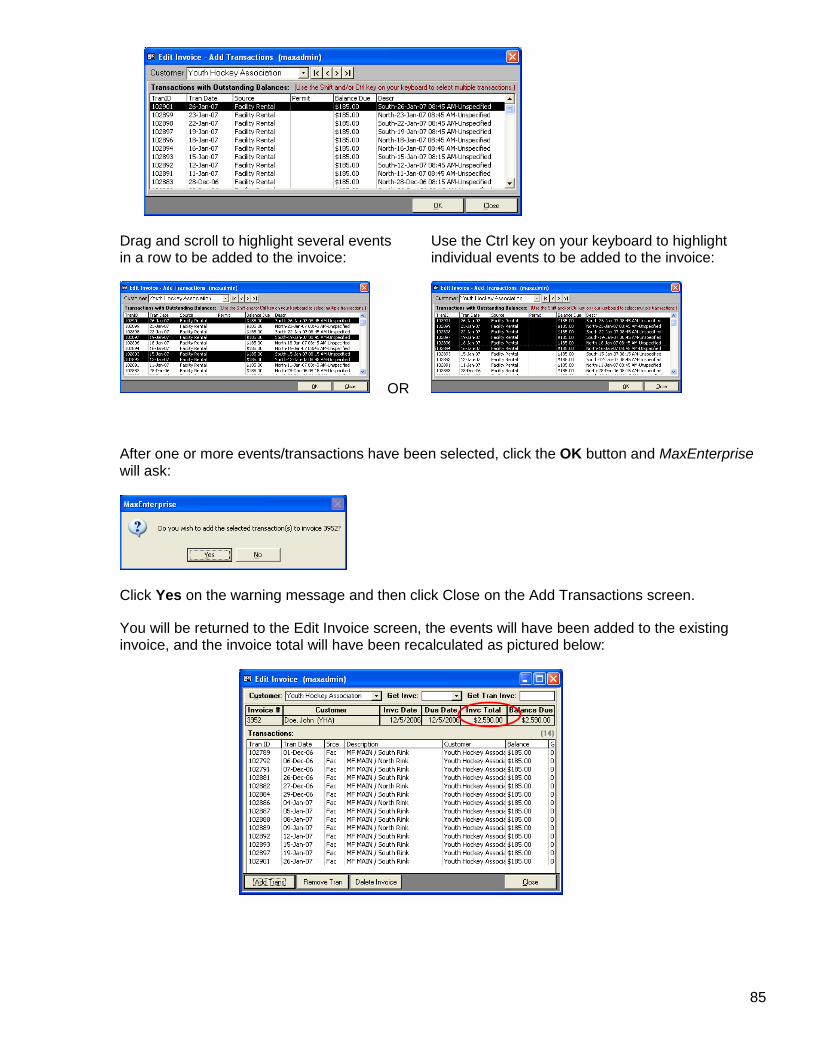
85
Drag and scroll to highlight several events Use the Ctrl key on your keyboard to highlight in a row to be added to the invoice: individual events to be added to the invoice:
OR
After one or more events/transactions have been selected, click the OK button and MaxEnterprise will ask:
Click Yes on the warning message and then click Close on the Add Transactions screen.
You will be returned to the Edit Invoice screen, the events will have been added to the existing invoice, and the invoice total will have been recalculated as pictured below:
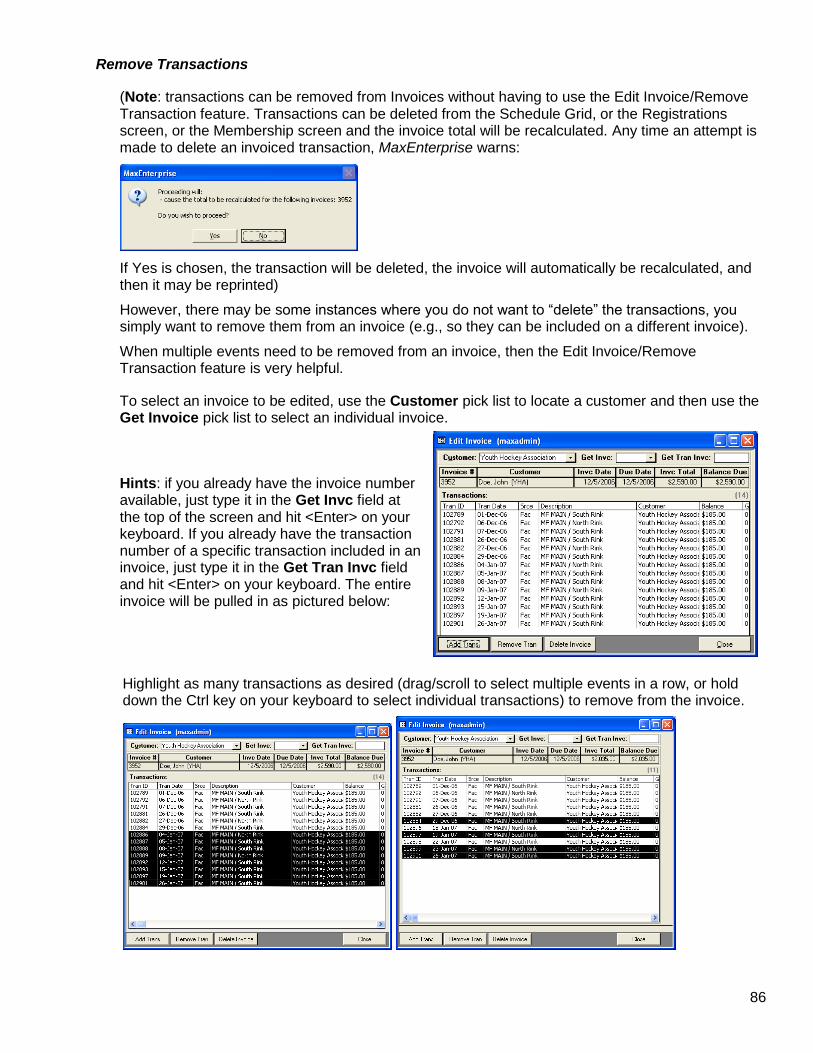
86
Remove Transactions
(Note: transactions can be removed from Invoices without having to use the Edit Invoice/Remove Transaction feature. Transactions can be deleted from the Schedule Grid, or the Registrations screen, or the Membership screen and the invoice total will be recalculated. Any time an attempt is made to delete an invoiced transaction, MaxEnterprise warns:
If Yes is chosen, the transaction will be deleted, the invoice will automatically be recalculated, and then it may be reprinted)
However, there may be some instances where you do not want to “delete” the transactions, you simply want to remove them from an invoice (e.g., so they can be included on a different invoice).
When multiple events need to be removed from an invoice, then the Edit Invoice/Remove Transaction feature is very helpful.
To select an invoice to be edited, use the Customer pick list to locate a customer and then use the Get Invoice pick list to select an individual invoice.
Hints: if you already have the invoice number available, just type it in the Get Invc field at the top of the screen and hit <Enter> on your keyboard. If you already have the transaction number of a specific transaction included in an invoice, just type it in the Get Tran Invc field and hit <Enter> on your keyboard. The entire invoice will be pulled in as pictured below:
Highlight as many transactions as desired (drag/scroll to select multiple events in a row, or hold down the Ctrl key on your keyboard to select individual transactions) to remove from the invoice.
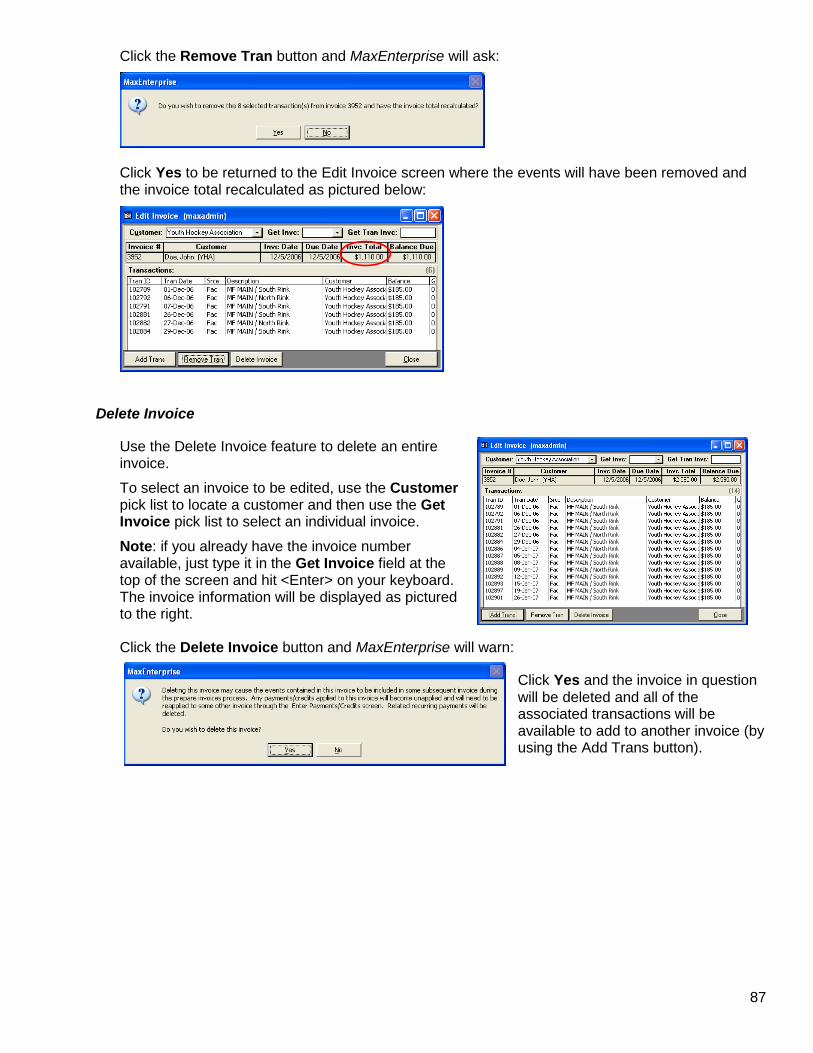
87
Click the Remove Tran button and MaxEnterprise will ask:
Click Yes to be returned to the Edit Invoice screen where the events will have been removed and the invoice total recalculated as pictured below:
Delete Invoice
Use the Delete Invoice feature to delete an entire invoice.
To select an invoice to be edited, use the Customer pick list to locate a customer and then use the Get Invoice pick list to select an individual invoice.
Note: if you already have the invoice number available, just type it in the Get Invoice field at the top of the screen and hit <Enter> on your keyboard. The invoice information will be displayed as pictured to the right. Click the Delete Invoice button and MaxEnterprise will warn:
Click Yes and the invoice in question will be deleted and all of the associated transactions will be available to add to another invoice (by using the Add Trans button).
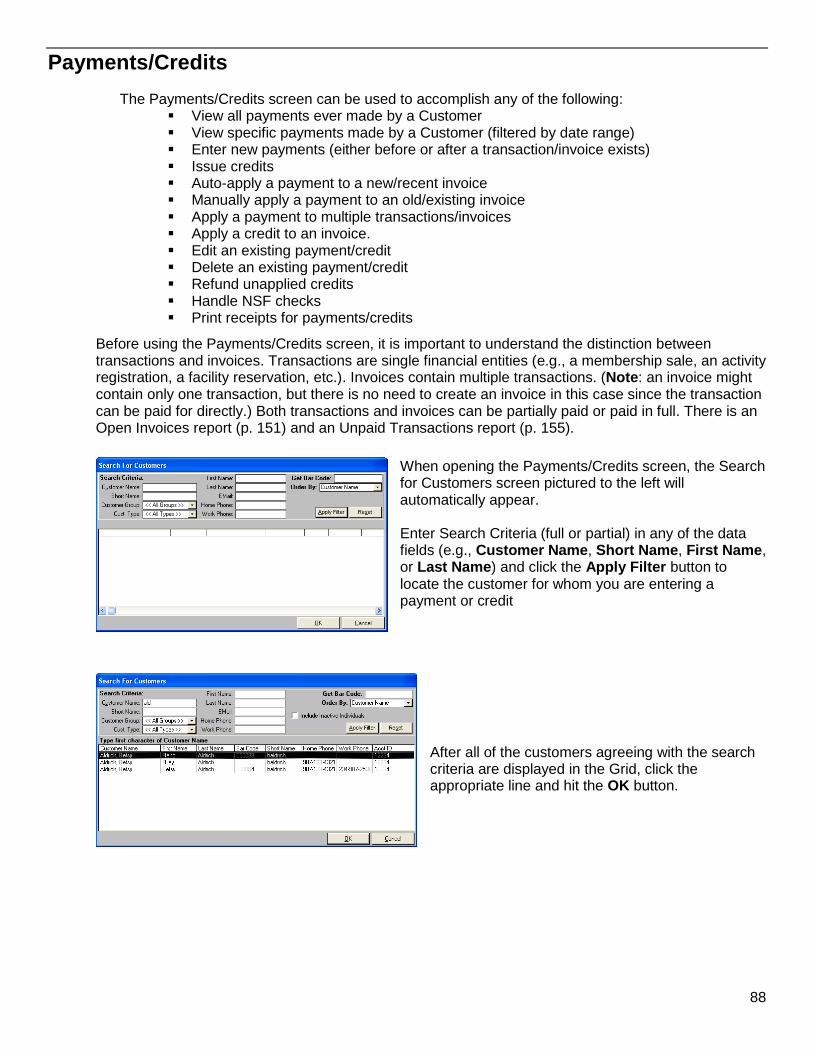
88
Payments/Credits
The Payments/Credits screen can be used to accomplish any of the following: View all payments ever made by a Customer View specific payments made by a Customer (filtered by date range) Enter new payments (either before or after a transaction/invoice exists) Issue credits Auto-apply a payment to a new/recent invoice Manually apply a payment to an old/existing invoice Apply a payment to multiple transactions/invoices Apply a credit to an invoice. Edit an existing payment/credit Delete an existing payment/credit Refund unapplied credits Handle NSF checks Print receipts for payments/credits
Before using the Payments/Credits screen, it is important to understand the distinction between transactions and invoices. Transactions are single financial entities (e.g., a membership sale, an activity registration, a facility reservation, etc.). Invoices contain multiple transactions. (Note: an invoice might contain only one transaction, but there is no need to create an invoice in this case since the transaction can be paid for directly.) Both transactions and invoices can be partially paid or paid in full. There is an Open Invoices report (p. 151) and an Unpaid Transactions report (p. 155).
When opening the Payments/Credits screen, the Search for Customers screen pictured to the left will automatically appear.
Enter Search Criteria (full or partial) in any of the data fields (e.g., Customer Name, Short Name, First Name, or Last Name) and click the Apply Filter button to locate the customer for whom you are entering a payment or credit
After all of the customers agreeing with the search criteria are displayed in the Grid, click the appropriate line and hit the OK button.
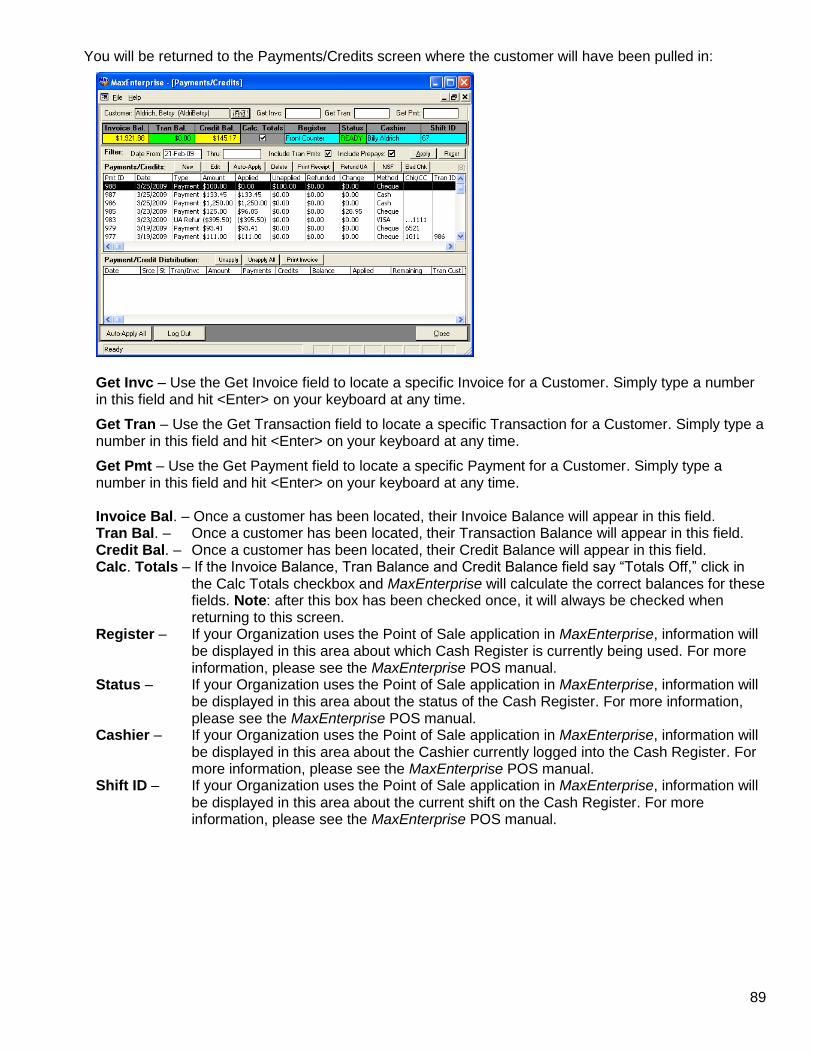
89
You will be returned to the Payments/Credits screen where the customer will have been pulled in:
Get Invc – Use the Get Invoice field to locate a specific Invoice for a Customer. Simply type a number in this field and hit <Enter> on your keyboard at any time.
Get Tran – Use the Get Transaction field to locate a specific Transaction for a Customer. Simply type a number in this field and hit <Enter> on your keyboard at any time.
Get Pmt – Use the Get Payment field to locate a specific Payment for a Customer. Simply type a number in this field and hit <Enter> on your keyboard at any time.
Invoice Bal. – Once a customer has been located, their Invoice Balance will appear in this field. Tran Bal. – Once a customer has been located, their Transaction Balance will appear in this field. Credit Bal. – Once a customer has been located, their Credit Balance will appear in this field. Calc. Totals – If the Invoice Balance, Tran Balance and Credit Balance field say “Totals Off,” click in
the Calc Totals checkbox and MaxEnterprise will calculate the correct balances for these fields. Note: after this box has been checked once, it will always be checked when returning to this screen.
Register – If your Organization uses the Point of Sale application in MaxEnterprise, information will be displayed in this area about which Cash Register is currently being used. For more information, please see the MaxEnterprise POS manual.
Status – If your Organization uses the Point of Sale application in MaxEnterprise, information will be displayed in this area about the status of the Cash Register. For more information, please see the MaxEnterprise POS manual.
Cashier – If your Organization uses the Point of Sale application in MaxEnterprise, information will be displayed in this area about the Cashier currently logged into the Cash Register. For more information, please see the MaxEnterprise POS manual.
Shift ID – If your Organization uses the Point of Sale application in MaxEnterprise, information will be displayed in this area about the current shift on the Cash Register. For more information, please see the MaxEnterprise POS manual.
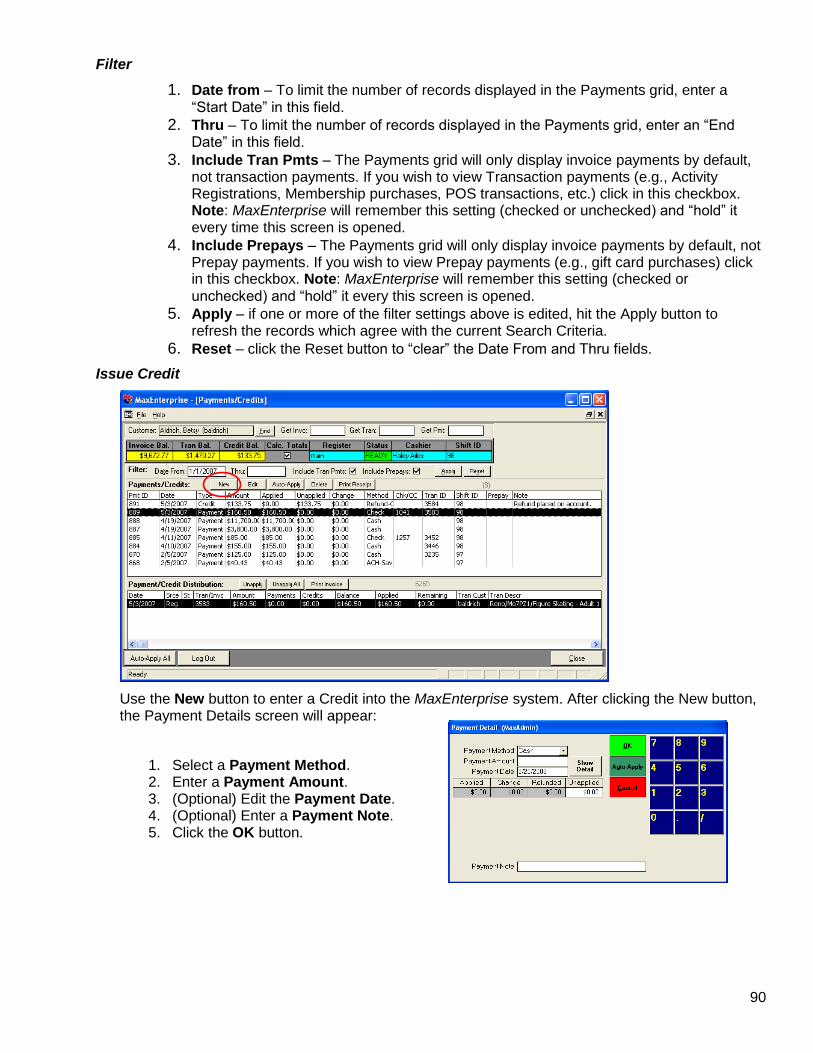
90
Filter
1. Date from – To limit the number of records displayed in the Payments grid, enter a “Start Date” in this field.
2. Thru – To limit the number of records displayed in the Payments grid, enter an “End Date” in this field.
3. Include Tran Pmts – The Payments grid will only display invoice payments by default, not transaction payments. If you wish to view Transaction payments (e.g., Activity Registrations, Membership purchases, POS transactions, etc.) click in this checkbox. Note: MaxEnterprise will remember this setting (checked or unchecked) and “hold” it every time this screen is opened.
4. Include Prepays – The Payments grid will only display invoice payments by default, not Prepay payments. If you wish to view Prepay payments (e.g., gift card purchases) click in this checkbox. Note: MaxEnterprise will remember this setting (checked or unchecked) and “hold” it every this screen is opened.
5. Apply – if one or more of the filter settings above is edited, hit the Apply button to refresh the records which agree with the current Search Criteria.
6. Reset – click the Reset button to “clear” the Date From and Thru fields.
Issue Credit
Use the New button to enter a Credit into the MaxEnterprise system. After clicking the New button, the Payment Details screen will appear:
1. Select a Payment Method. 2. Enter a Payment Amount. 3. (Optional) Edit the Payment Date. 4. (Optional) Enter a Payment Note. 5. Click the OK button.
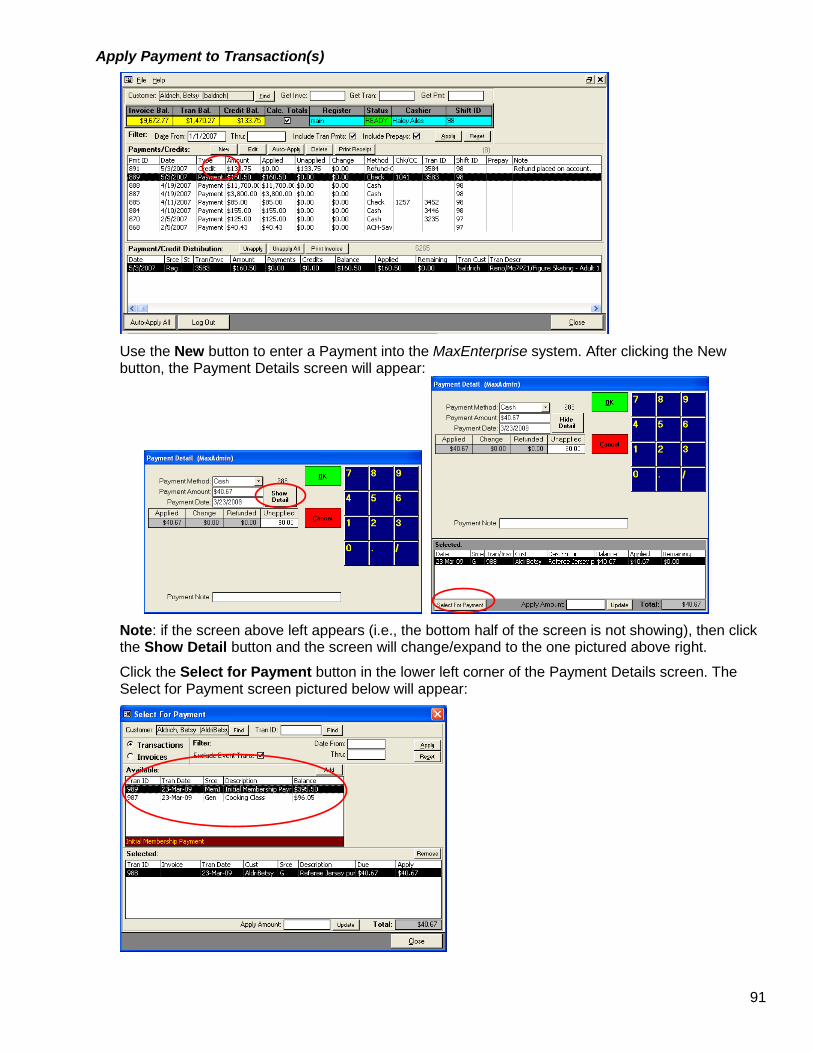
91
Apply Payment to Transaction(s)
Use the New button to enter a Payment into the MaxEnterprise system. After clicking the New button, the Payment Details screen will appear:
Note: if the screen above left appears (i.e., the bottom half of the screen is not showing), then click the Show Detail button and the screen will change/expand to the one pictured above right.
Click the Select for Payment button in the lower left corner of the Payment Details screen. The Select for Payment screen pictured below will appear:
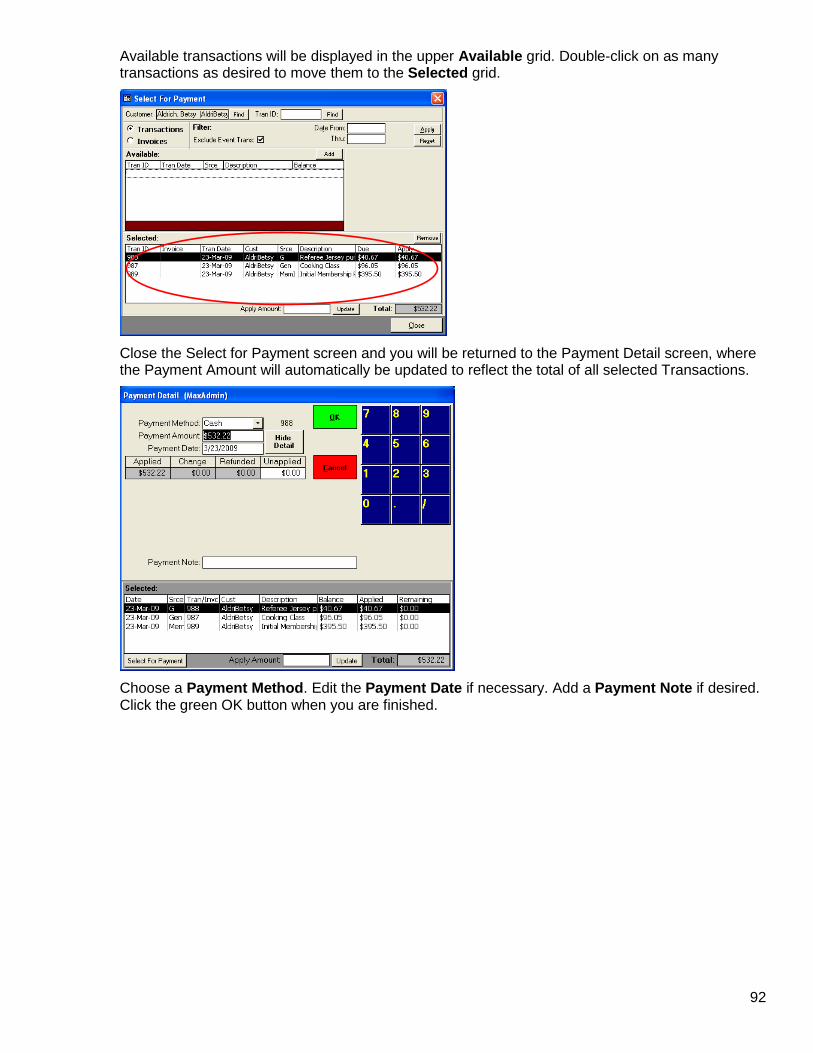
92
Available transactions will be displayed in the upper Available grid. Double-click on as many transactions as desired to move them to the Selected grid.
Close the Select for Payment screen and you will be returned to the Payment Detail screen, where the Payment Amount will automatically be updated to reflect the total of all selected Transactions.
Choose a Payment Method. Edit the Payment Date if necessary. Add a Payment Note if desired. Click the green OK button when you are finished.
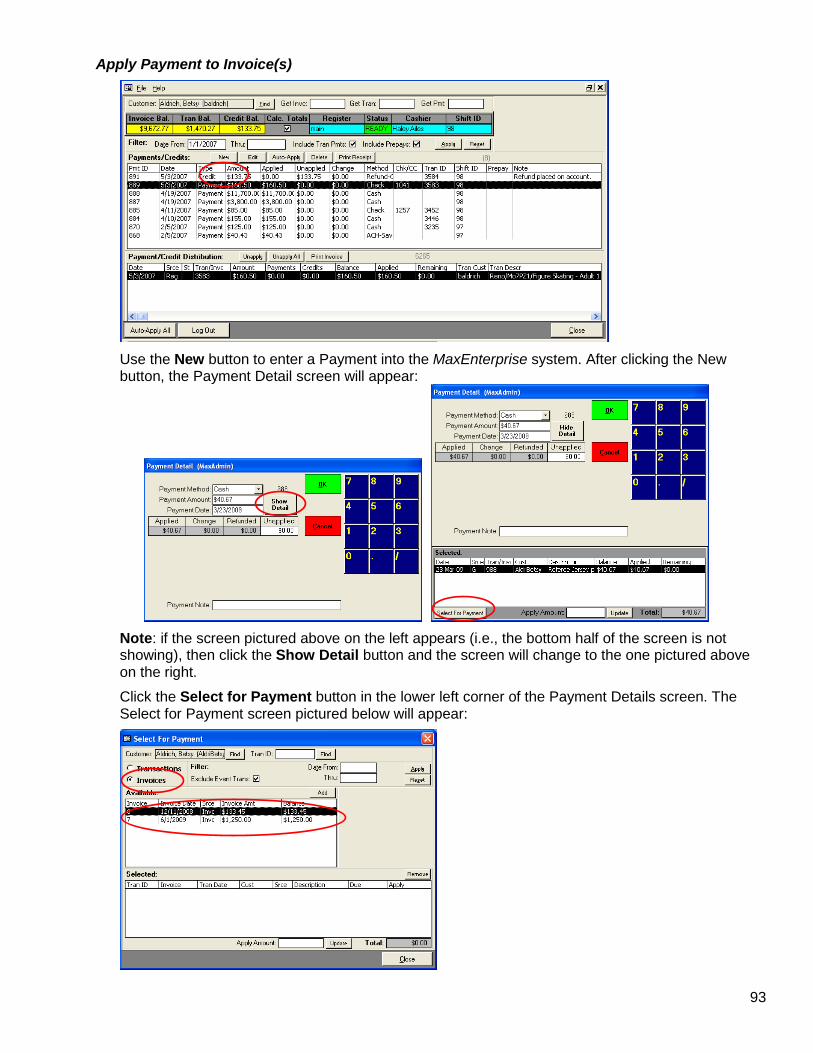
93
Apply Payment to Invoice(s)
Use the New button to enter a Payment into the MaxEnterprise system. After clicking the New button, the Payment Detail screen will appear:
Note: if the screen pictured above on the left appears (i.e., the bottom half of the screen is not showing), then click the Show Detail button and the screen will change to the one pictured above on the right.
Click the Select for Payment button in the lower left corner of the Payment Details screen. The Select for Payment screen pictured below will appear:
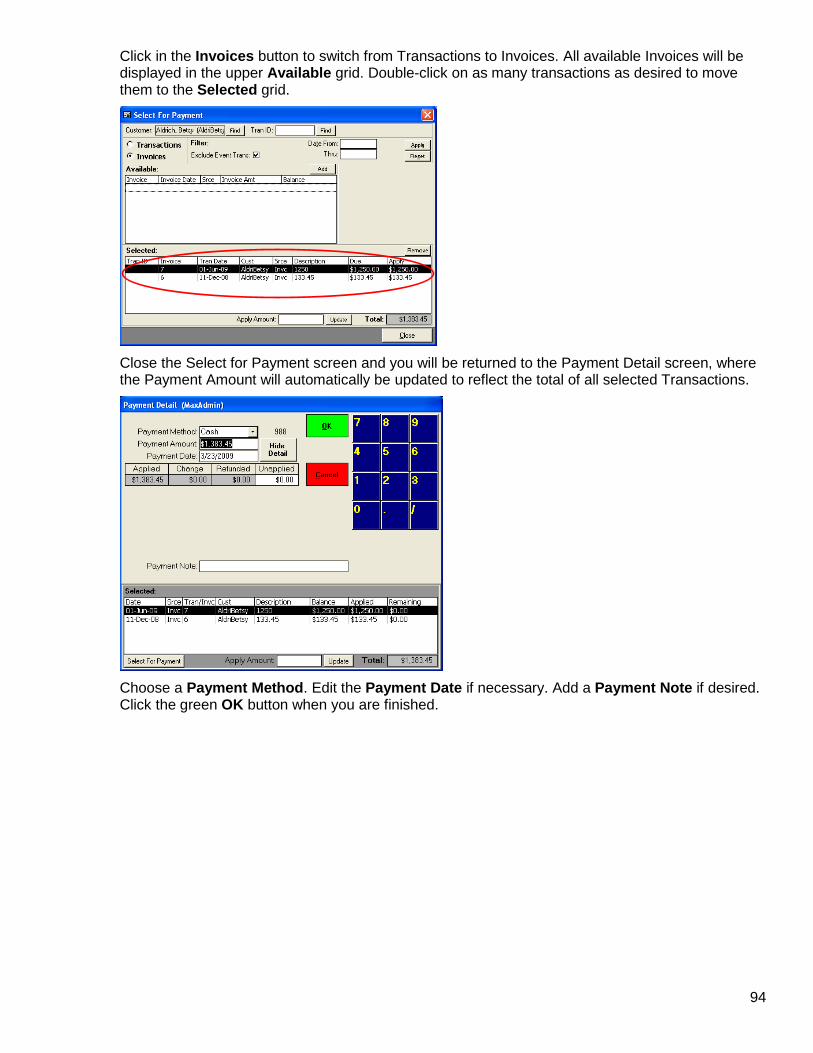
94
Click in the Invoices button to switch from Transactions to Invoices. All available Invoices will be displayed in the upper Available grid. Double-click on as many transactions as desired to move them to the Selected grid.
Close the Select for Payment screen and you will be returned to the Payment Detail screen, where the Payment Amount will automatically be updated to reflect the total of all selected Transactions.
Choose a Payment Method. Edit the Payment Date if necessary. Add a Payment Note if desired. Click the green OK button when you are finished.
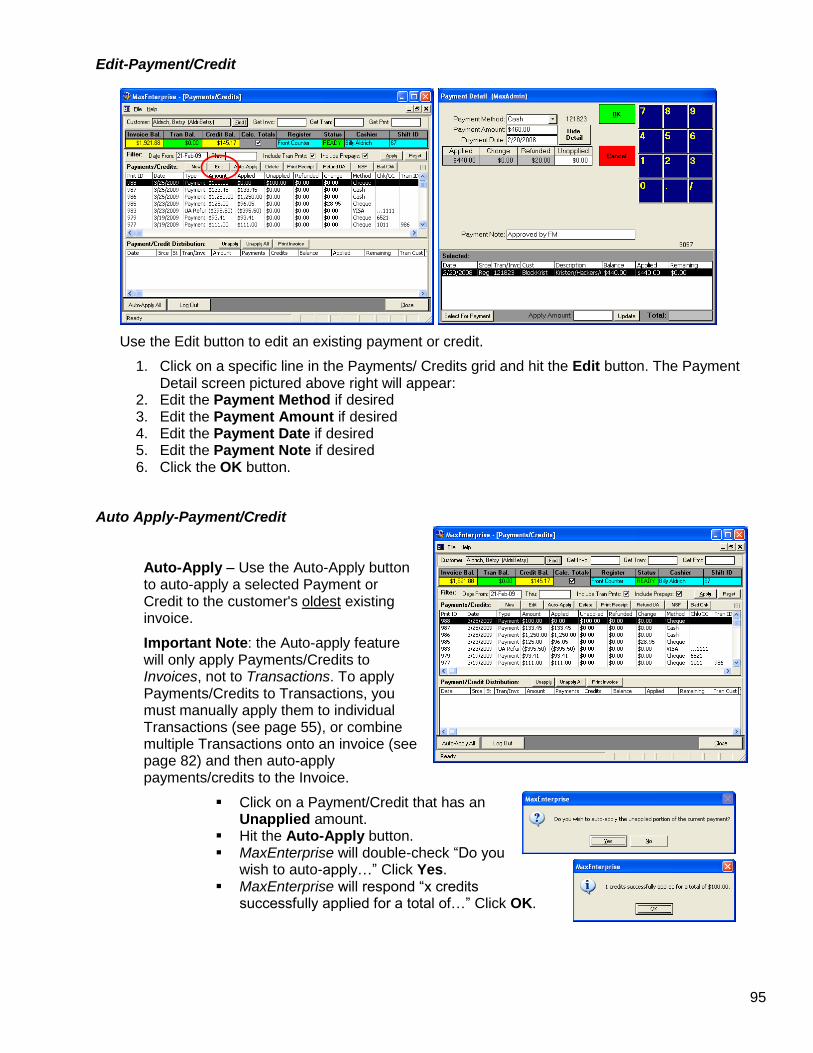
95
Edit-Payment/Credit
Use the Edit button to edit an existing payment or credit.
1. Click on a specific line in the Payments/ Credits grid and hit the Edit button. The Payment Detail screen pictured above right will appear:
2. Edit the Payment Method if desired 3. Edit the Payment Amount if desired 4. Edit the Payment Date if desired 5. Edit the Payment Note if desired 6. Click the OK button.
Auto Apply-Payment/Credit
Auto-Apply – Use the Auto-Apply button to auto-apply a selected Payment or Credit to the customer's oldest existing invoice.
Important Note: the Auto-apply feature will only apply Payments/Credits to Invoices, not to Transactions. To apply Payments/Credits to Transactions, you must manually apply them to individual Transactions (see page 55), or combine multiple Transactions onto an invoice (see page 82) and then auto-apply payments/credits to the Invoice.
Click on a Payment/Credit that has an Unapplied amount.
Hit the Auto-Apply button. MaxEnterprise will double-check “Do you
wish to auto-apply…” Click Yes. MaxEnterprise will respond “x credits
successfully applied for a total of…” Click OK.
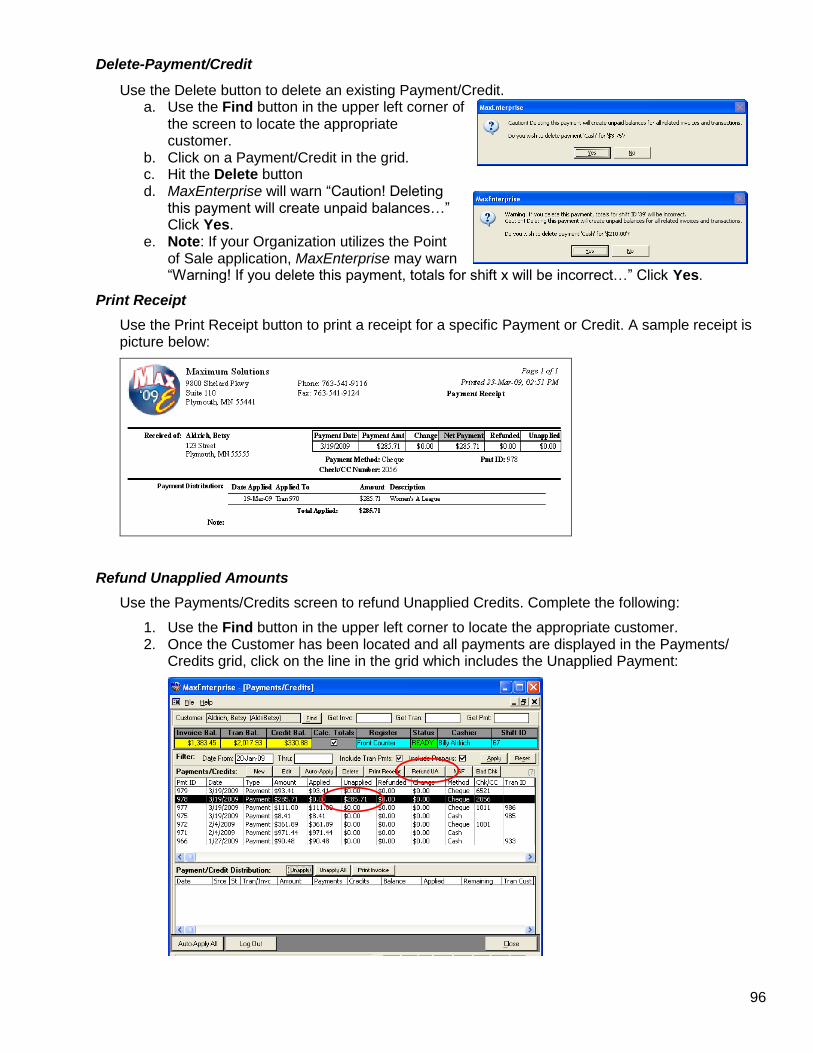
96
Delete-Payment/Credit
Use the Delete button to delete an existing Payment/Credit. a. Use the Find button in the upper left corner of
the screen to locate the appropriate customer.
b. Click on a Payment/Credit in the grid. c. Hit the Delete button d. MaxEnterprise will warn “Caution! Deleting
this payment will create unpaid balances…” Click Yes.
e. Note: If your Organization utilizes the Point of Sale application, MaxEnterprise may warn “Warning! If you delete this payment, totals for shift x will be incorrect…” Click Yes.
Print Receipt
Use the Print Receipt button to print a receipt for a specific Payment or Credit. A sample receipt is picture below:
Refund Unapplied Amounts
Use the Payments/Credits screen to refund Unapplied Credits. Complete the following:
1. Use the Find button in the upper left corner to locate the appropriate customer. 2. Once the Customer has been located and all payments are displayed in the Payments/
Credits grid, click on the line in the grid which includes the Unapplied Payment:
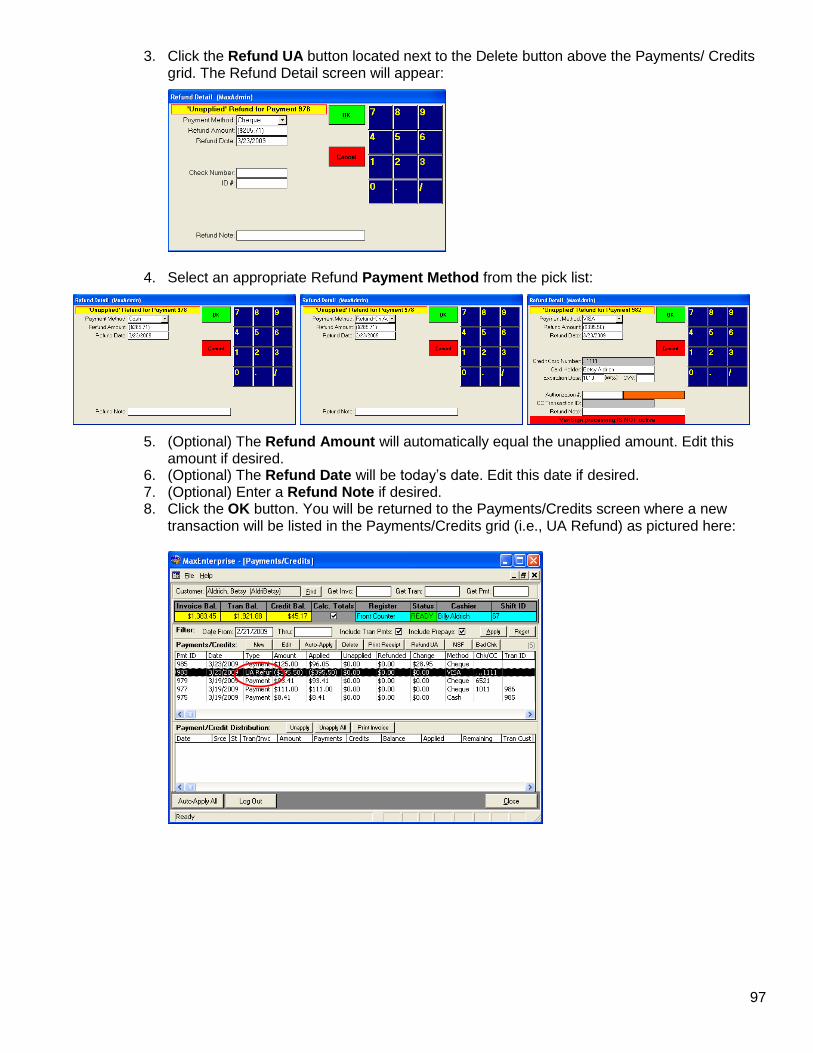
97
3. Click the Refund UA button located next to the Delete button above the Payments/ Credits grid. The Refund Detail screen will appear:
4. Select an appropriate Refund Payment Method from the pick list:
5. (Optional) The Refund Amount will automatically equal the unapplied amount. Edit this amount if desired.
6. (Optional) The Refund Date will be today’s date. Edit this date if desired. 7. (Optional) Enter a Refund Note if desired. 8. Click the OK button. You will be returned to the Payments/Credits screen where a new
transaction will be listed in the Payments/Credits grid (i.e., UA Refund) as pictured here:
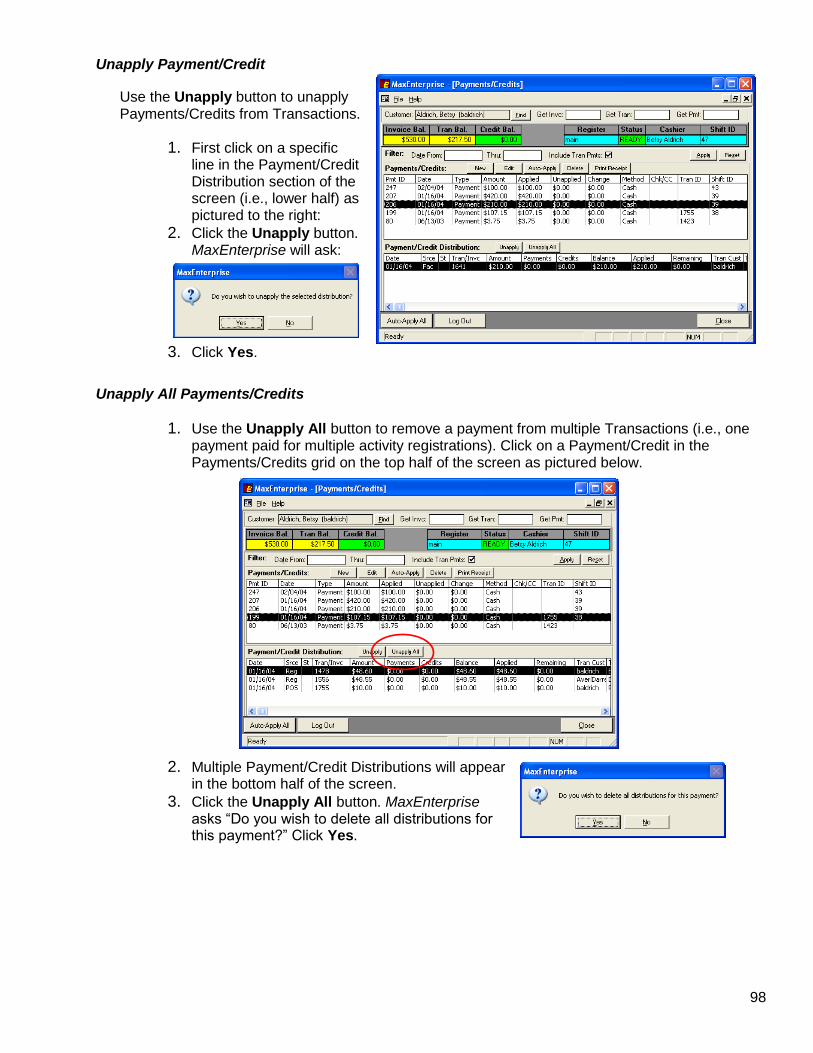
98
Unapply Payment/Credit
Use the Unapply button to unapply Payments/Credits from Transactions.
1. First click on a specific line in the Payment/Credit Distribution section of the screen (i.e., lower half) as pictured to the right:
2. Click the Unapply button. MaxEnterprise will ask:
3. Click Yes.
Unapply All Payments/Credits
1. Use the Unapply All button to remove a payment from multiple Transactions (i.e., one payment paid for multiple activity registrations). Click on a Payment/Credit in the Payments/Credits grid on the top half of the screen as pictured below.
2. Multiple Payment/Credit Distributions will appear in the bottom half of the screen.
3. Click the Unapply All button. MaxEnterprise asks “Do you wish to delete all distributions for this payment?” Click Yes.
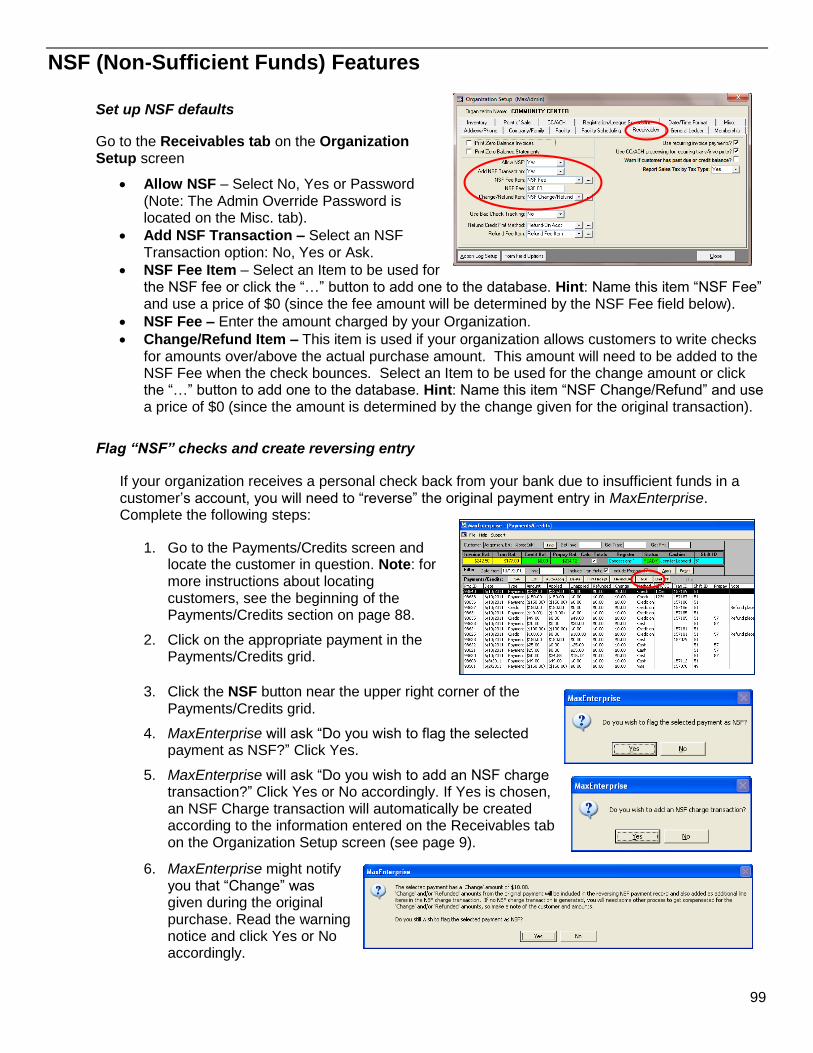
99
NSF (Non-Sufficient Funds) Features
Set up NSF defaults
Go to the Receivables tab on the Organization Setup screen
Allow NSF – Select No, Yes or Password (Note: The Admin Override Password is located on the Misc. tab).
Add NSF Transaction – Select an NSF Transaction option: No, Yes or Ask.
NSF Fee Item – Select an Item to be used for the NSF fee or click the “…” button to add one to the database. Hint: Name this item “NSF Fee” and use a price of $0 (since the fee amount will be determined by the NSF Fee field below).
NSF Fee – Enter the amount charged by your Organization.
Change/Refund Item – This item is used if your organization allows customers to write checks for amounts over/above the actual purchase amount. This amount will need to be added to the NSF Fee when the check bounces. Select an Item to be used for the change amount or click the “…” button to add one to the database. Hint: Name this item “NSF Change/Refund” and use a price of $0 (since the amount is determined by the change given for the original transaction).
Flag “NSF” checks and create reversing entry
If your organization receives a personal check back from your bank due to insufficient funds in a customer’s account, you will need to “reverse” the original payment entry in MaxEnterprise. Complete the following steps:
1. Go to the Payments/Credits screen and locate the customer in question. Note: for more instructions about locating customers, see the beginning of the Payments/Credits section on page 88.
2. Click on the appropriate payment in the Payments/Credits grid.
3. Click the NSF button near the upper right corner of the Payments/Credits grid.
4. MaxEnterprise will ask “Do you wish to flag the selected payment as NSF?” Click Yes.
5. MaxEnterprise will ask “Do you wish to add an NSF charge transaction?” Click Yes or No accordingly. If Yes is chosen, an NSF Charge transaction will automatically be created according to the information entered on the Receivables tab on the Organization Setup screen (see page 9).
6. MaxEnterprise might notify you that “Change” was given during the original purchase. Read the warning notice and click Yes or No accordingly.
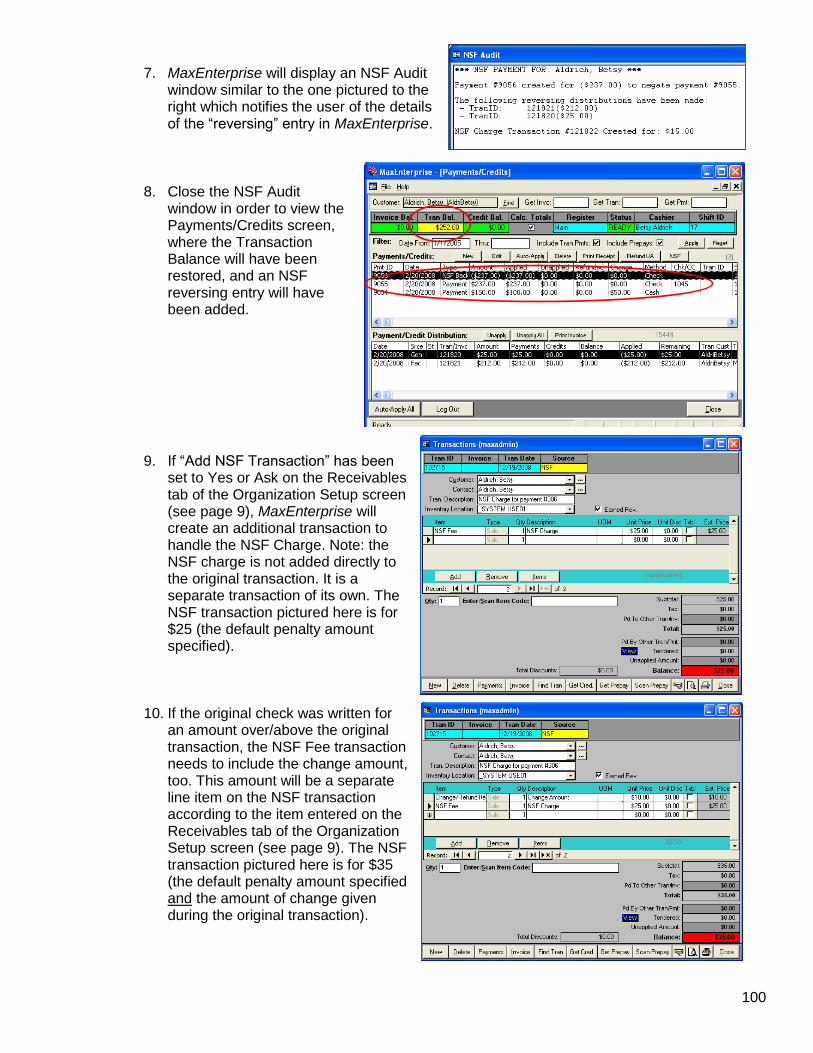
100
7. MaxEnterprise will display an NSF Audit
window similar to the one pictured to the right which notifies the user of the details of the “reversing” entry in MaxEnterprise.
8. Close the NSF Audit
window in order to view the Payments/Credits screen, where the Transaction Balance will have been restored, and an NSF reversing entry will have been added.
9. If “Add NSF Transaction” has been
set to Yes or Ask on the Receivables tab of the Organization Setup screen (see page 9), MaxEnterprise will create an additional transaction to handle the NSF Charge. Note: the NSF charge is not added directly to the original transaction. It is a separate transaction of its own. The NSF transaction pictured here is for $25 (the default penalty amount specified).
10. If the original check was written for an amount over/above the original transaction, the NSF Fee transaction needs to include the change amount, too. This amount will be a separate line item on the NSF transaction according to the item entered on the Receivables tab of the Organization Setup screen (see page 9). The NSF transaction pictured here is for $35 (the default penalty amount specified and the amount of change given during the original transaction).

101
Repay the Original Transaction and NSF Fee
When an individual returns to resolve his/her NSF issue, you will need to apply the new payment to their original transaction (and the NSF Fee if applicable). Complete the following steps:
1. Go to the Receivables/ Payments/Credits screen and locate the customer in question.
2. Click the New button and the Payment Detail
screen will appear.
3. Select a Payment Method from the pick list and click the
Select for Payment button in the lower left corner of the Payment Detail screen.
4. MaxEnterprise will ask the following:
Say Yes and the Select for Payment screen appears.
5. The original transaction (and an NSF charge transaction if applicable) will be displayed in the Available grid on the top half of the page.
6. Double-click on as many transactions as desired to add
them to the Selected grid on the bottom half of the screen.
7. Click the Close button on the Select for Payment
screen. 8. You will be returned to the Payment Detail screen where
the total Payment Amount will have been calculated. Double-check that the Payment Method is correct and click OK.
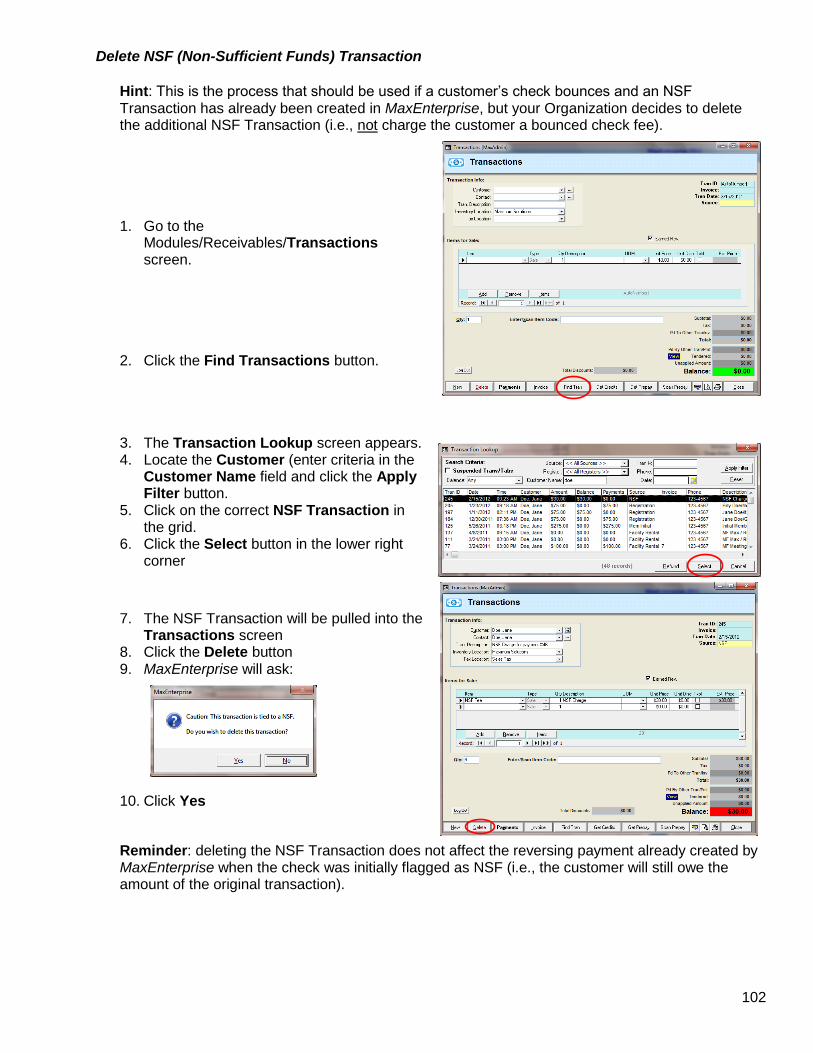
102
Delete NSF (Non-Sufficient Funds) Transaction
Hint: This is the process that should be used if a customer’s check bounces and an NSF Transaction has already been created in MaxEnterprise, but your Organization decides to delete the additional NSF Transaction (i.e., not charge the customer a bounced check fee).
1. Go to the Modules/Receivables/Transactions screen.
2. Click the Find Transactions button.
3. The Transaction Lookup screen appears. 4. Locate the Customer (enter criteria in the
Customer Name field and click the Apply Filter button.
5. Click on the correct NSF Transaction in the grid.
6. Click the Select button in the lower right corner
7. The NSF Transaction will be pulled into the
Transactions screen 8. Click the Delete button 9. MaxEnterprise will ask:
10. Click Yes
Reminder: deleting the NSF Transaction does not affect the reversing payment already created by MaxEnterprise when the check was initially flagged as NSF (i.e., the customer will still owe the amount of the original transaction).
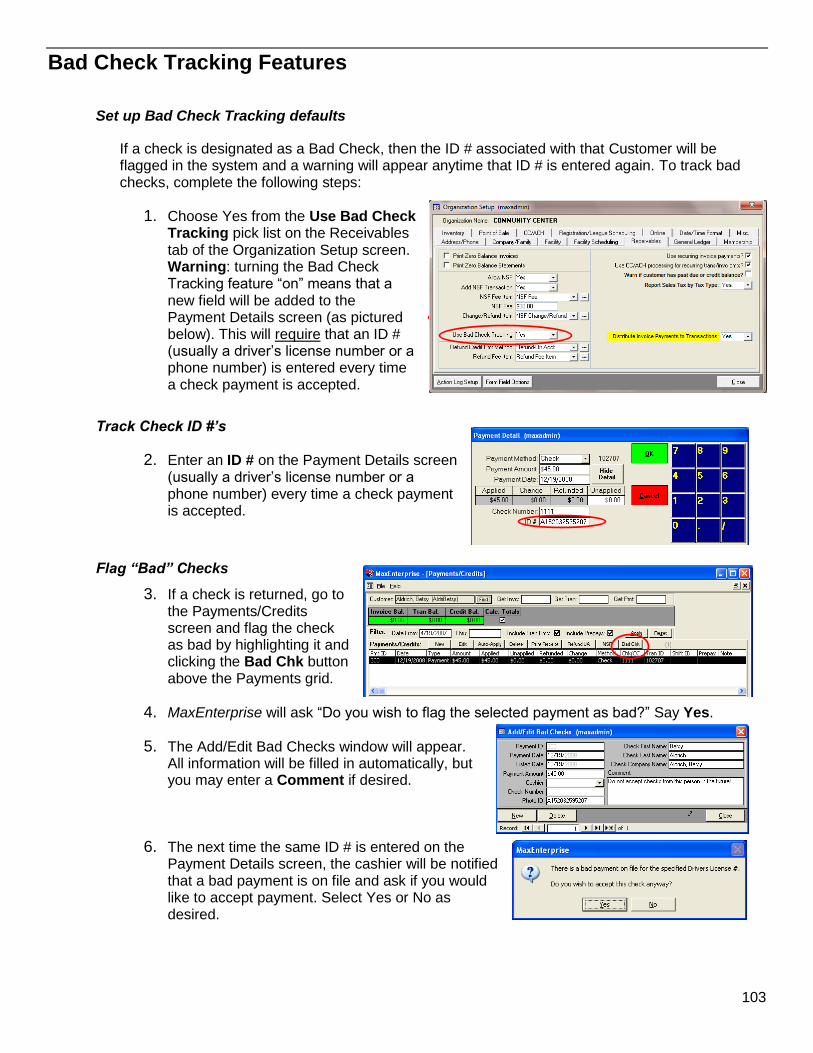
103
Bad Check Tracking Features
Set up Bad Check Tracking defaults
If a check is designated as a Bad Check, then the ID # associated with that Customer will be flagged in the system and a warning will appear anytime that ID # is entered again. To track bad checks, complete the following steps:
1. Choose Yes from the Use Bad Check Tracking pick list on the Receivables tab of the Organization Setup screen. Warning: turning the Bad Check Tracking feature “on” means that a new field will be added to the Payment Details screen (as pictured below). This will require that an ID # (usually a driver’s license number or a phone number) is entered every time a check payment is accepted.
Track Check ID #’s
2. Enter an ID # on the Payment Details screen (usually a driver’s license number or a phone number) every time a check payment is accepted.
Flag “Bad” Checks
3. If a check is returned, go to the Payments/Credits screen and flag the check as bad by highlighting it and clicking the Bad Chk button above the Payments grid.
4. MaxEnterprise will ask “Do you wish to flag the selected payment as bad?” Say Yes.
5. The Add/Edit Bad Checks window will appear. All information will be filled in automatically, but you may enter a Comment if desired.
6. The next time the same ID # is entered on the Payment Details screen, the cashier will be notified that a bad payment is on file and ask if you would like to accept payment. Select Yes or No as desired.

104
Prepays
The MaxEnterprise system gives users the ability to sell gift cards and/or certificates.
In general, gift cards are usually prepaid balances on a plastic card which can be used in concession stands, for public admissions, etc. so individuals do not have to bring cash to the facility. Gift certificates are usually prepaid balances on a paper card/certificate that are sold by your facility and frequently given as gifts to other individuals.
Note: Currently, gift cards and gift certificates are identical features in the MaxEnterprise system (i.e., they are handled in exactly the same manner). The two different options are available in preparation for additional development in the future. In this manual, the word “prepay” refers to either debit cards or gift certificates.
The Prepays screen is used to sell single prepays and edit prepays (i.e. “top them off”) after they have been sold. Hint: for more information about selling multiple prepays in one step, see page 109).
SN/Bar Code – use this field to locate an existing Gift Card/Certificate. Enter a Bar Code or Serial Number and hit <Enter> on your keyboard. Once a Gift Card/Certificate has been located, it can be edited. You may change the “Restriction Type” or “Assigned to Individual” information, or add a new payment to increase/replenish the amount remaining on the Card/Certificate).
Prepay ID – use this field to locate an existing Gift Card/Certificate. Enter a Prepay ID number and hit <Enter> on your keyboard. The Prepay ID number is a number automatically assigned by MaxEnterprise each time a Gift Card/Certificate is sold. Once a Gift Card/Certificate has been located, it can be edited. You may change the “Restriction Type” or “Assigned to Individual” information, or add a new payment to increase/replenish the amount remaining on the Card/Certificate).
Customer – use this pick list to locate a customer. Hint: some client create a single generic customer called “Gift Certificate” and sell all gift certificates that way.
Find – use this pick list to locate a customer. The following screen will appear: Enter Search Criteria (full or partial) in any of the data fields (e.g., Customer Name, Short Name, First Name, or Last Name) and click the Apply Filter button to locate the customer.
After all customers matching the search criteria are displayed in the Grid, click on the appropriate line and hit the Select button.
You will be returned to the Edit Gift Cards screen where the customer will have been pulled in.
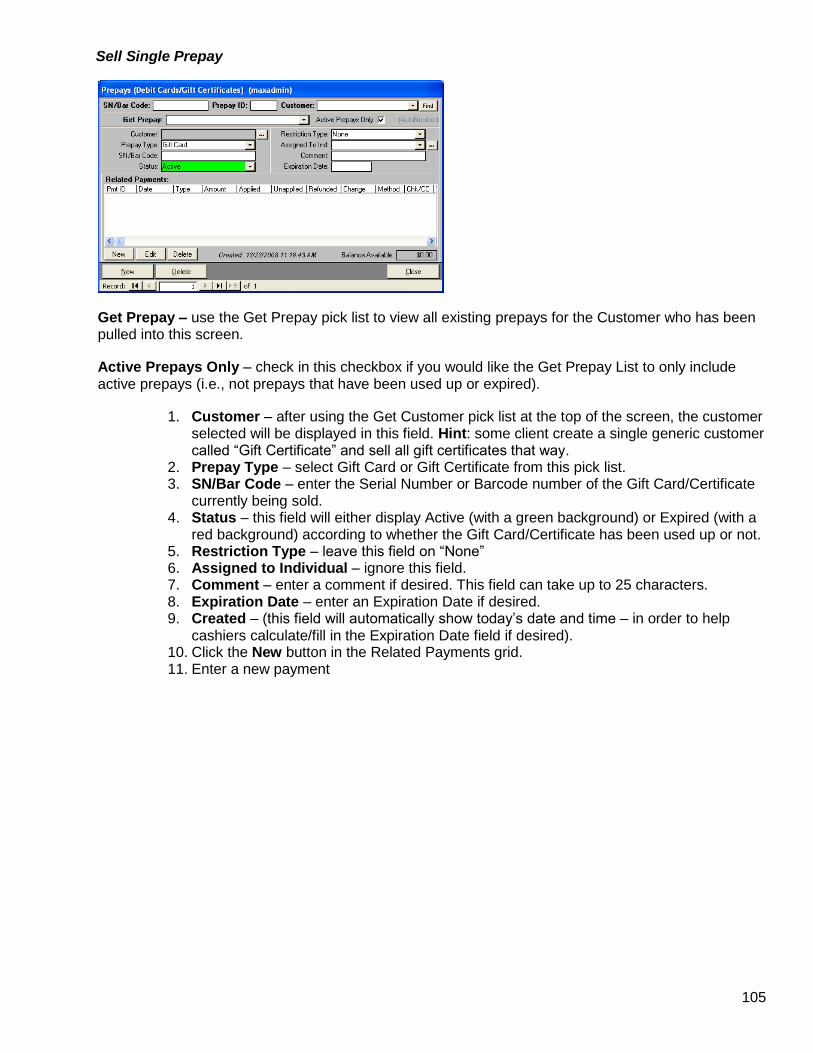
105
Sell Single Prepay
Get Prepay – use the Get Prepay pick list to view all existing prepays for the Customer who has been pulled into this screen.
Active Prepays Only – check in this checkbox if you would like the Get Prepay List to only include active prepays (i.e., not prepays that have been used up or expired).
1. Customer – after using the Get Customer pick list at the top of the screen, the customer selected will be displayed in this field. Hint: some client create a single generic customer called “Gift Certificate” and sell all gift certificates that way.
2. Prepay Type – select Gift Card or Gift Certificate from this pick list. 3. SN/Bar Code – enter the Serial Number or Barcode number of the Gift Card/Certificate
currently being sold. 4. Status – this field will either display Active (with a green background) or Expired (with a
red background) according to whether the Gift Card/Certificate has been used up or not. 5. Restriction Type – leave this field on “None” 6. Assigned to Individual – ignore this field. 7. Comment – enter a comment if desired. This field can take up to 25 characters. 8. Expiration Date – enter an Expiration Date if desired. 9. Created – (this field will automatically show today’s date and time – in order to help
cashiers calculate/fill in the Expiration Date field if desired). 10. Click the New button in the Related Payments grid. 11. Enter a new payment
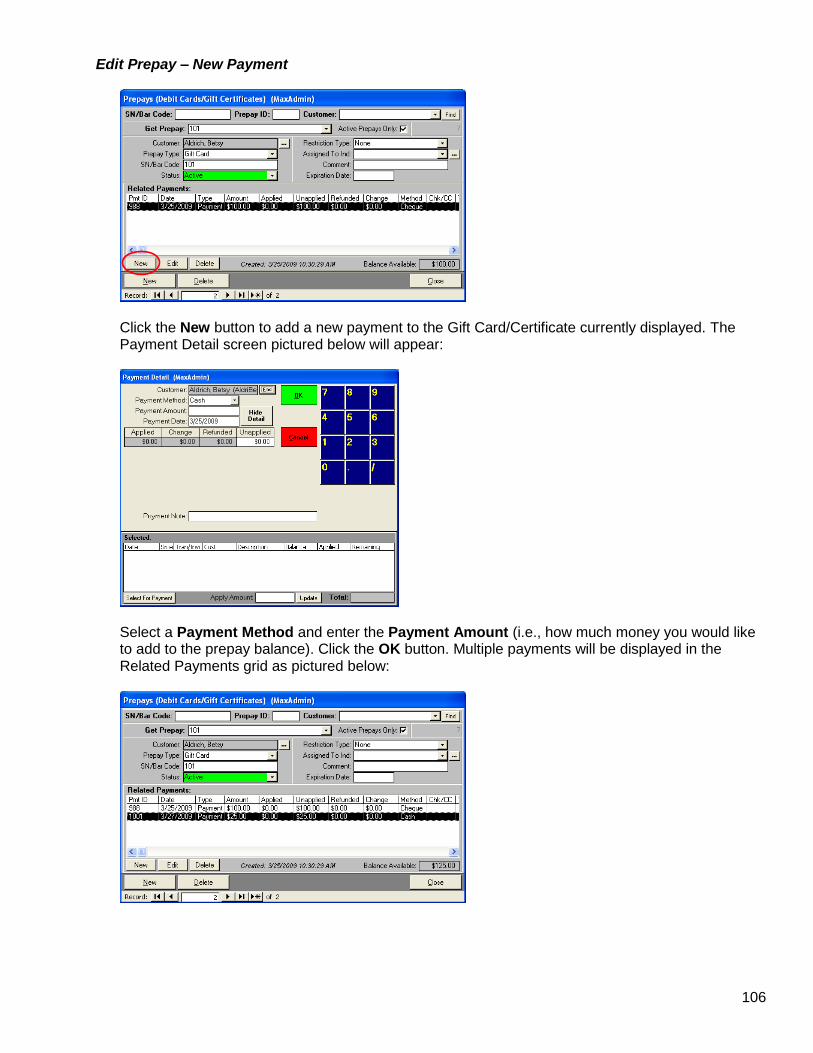
106
Edit Prepay – New Payment
Click the New button to add a new payment to the Gift Card/Certificate currently displayed. The Payment Detail screen pictured below will appear:
Select a Payment Method and enter the Payment Amount (i.e., how much money you would like to add to the prepay balance). Click the OK button. Multiple payments will be displayed in the Related Payments grid as pictured below:
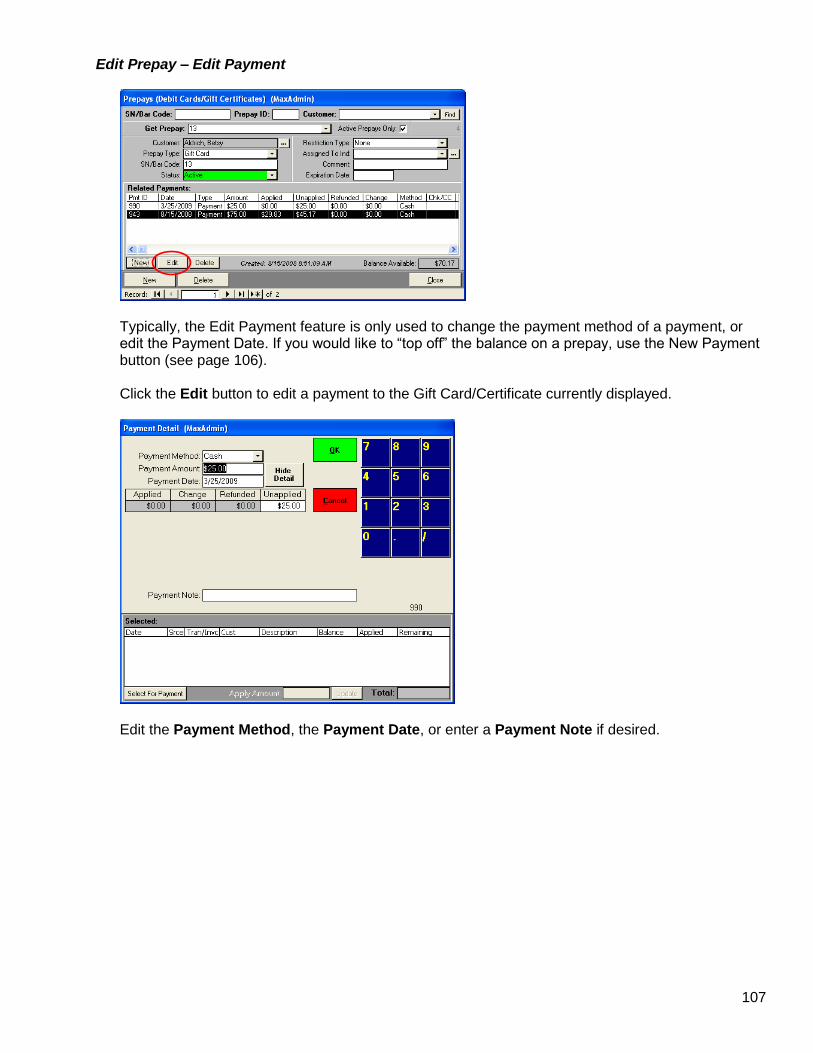
107
Edit Prepay – Edit Payment
Typically, the Edit Payment feature is only used to change the payment method of a payment, or edit the Payment Date. If you would like to “top off” the balance on a prepay, use the New Payment button (see page 106). Click the Edit button to edit a payment to the Gift Card/Certificate currently displayed.
Edit the Payment Method, the Payment Date, or enter a Payment Note if desired.

108
Edit Prepay – Delete Payment Typically, the Delete Payment feature is only used in case of an error. Click the Delete button to delete a payment tied to the Gift Card/Certificate currently displayed.
MaxEnterprise will warn:
Click Yes and the payment will be deleted from the Prepays screen and the Balance Available will be updated as pictured below:
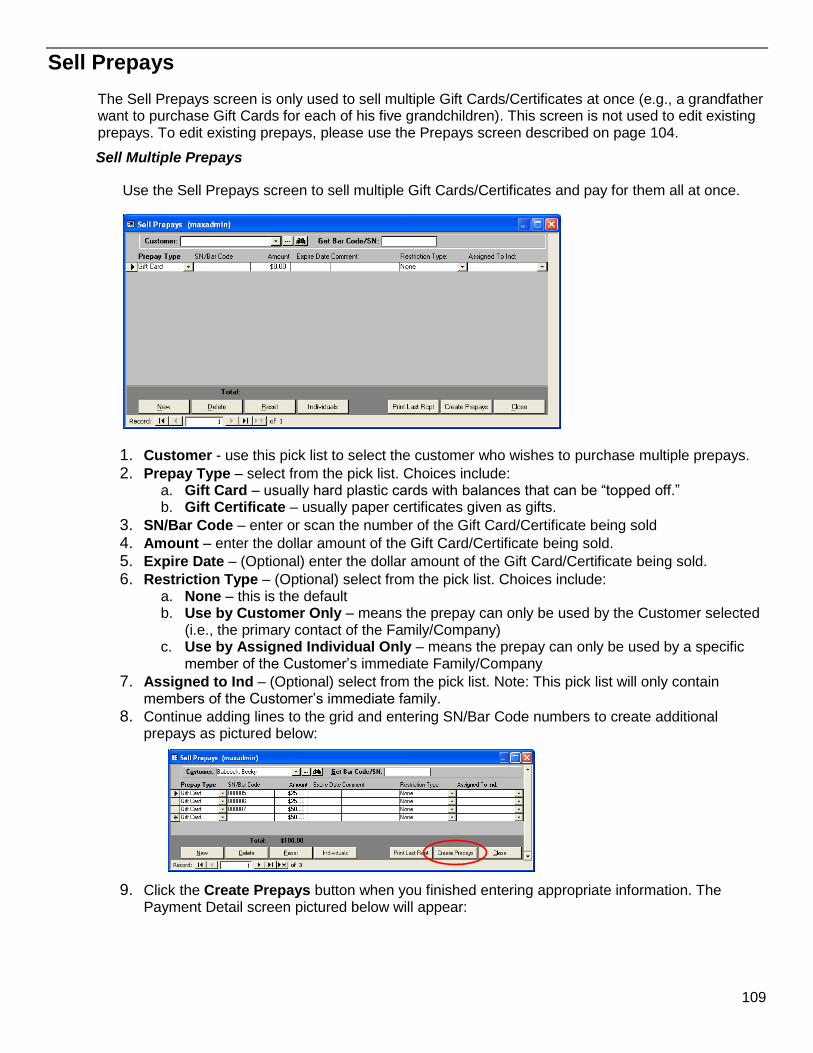
109
Sell Prepays
The Sell Prepays screen is only used to sell multiple Gift Cards/Certificates at once (e.g., a grandfather want to purchase Gift Cards for each of his five grandchildren). This screen is not used to edit existing prepays. To edit existing prepays, please use the Prepays screen described on page 104.
Sell Multiple Prepays
Use the Sell Prepays screen to sell multiple Gift Cards/Certificates and pay for them all at once.
1. Customer - use this pick list to select the customer who wishes to purchase multiple prepays.
2. Prepay Type – select from the pick list. Choices include: a. Gift Card – usually hard plastic cards with balances that can be “topped off.” b. Gift Certificate – usually paper certificates given as gifts.
3. SN/Bar Code – enter or scan the number of the Gift Card/Certificate being sold
4. Amount – enter the dollar amount of the Gift Card/Certificate being sold.
5. Expire Date – (Optional) enter the dollar amount of the Gift Card/Certificate being sold.
6. Restriction Type – (Optional) select from the pick list. Choices include: a. None – this is the default b. Use by Customer Only – means the prepay can only be used by the Customer selected
(i.e., the primary contact of the Family/Company) c. Use by Assigned Individual Only – means the prepay can only be used by a specific
member of the Customer’s immediate Family/Company
7. Assigned to Ind – (Optional) select from the pick list. Note: This pick list will only contain members of the Customer’s immediate family.
8. Continue adding lines to the grid and entering SN/Bar Code numbers to create additional prepays as pictured below:
9. Click the Create Prepays button when you finished entering appropriate information. The Payment Detail screen pictured below will appear:
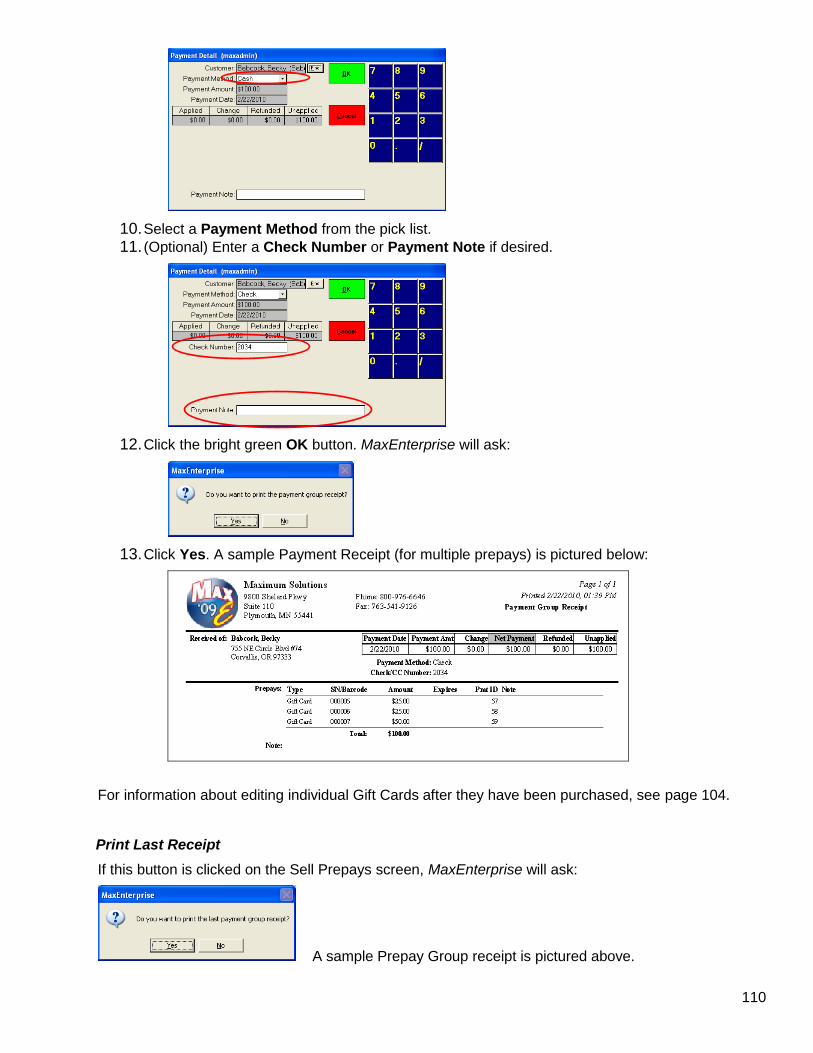
110
10. Select a Payment Method from the pick list.
11. (Optional) Enter a Check Number or Payment Note if desired.
12. Click the bright green OK button. MaxEnterprise will ask:
13. Click Yes. A sample Payment Receipt (for multiple prepays) is pictured below:
For information about editing individual Gift Cards after they have been purchased, see page 104.
Print Last Receipt
If this button is clicked on the Sell Prepays screen, MaxEnterprise will ask:
A sample Prepay Group receipt is pictured above.
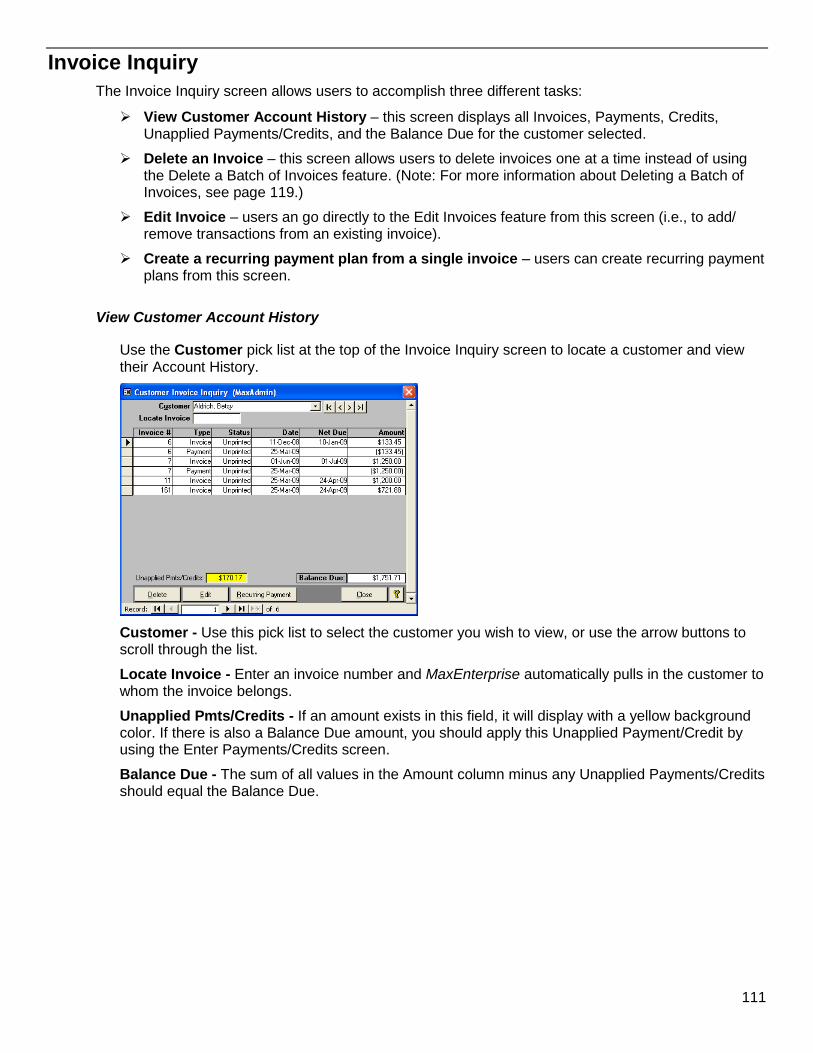
111
Invoice Inquiry
The Invoice Inquiry screen allows users to accomplish three different tasks:
View Customer Account History – this screen displays all Invoices, Payments, Credits, Unapplied Payments/Credits, and the Balance Due for the customer selected.
Delete an Invoice – this screen allows users to delete invoices one at a time instead of using the Delete a Batch of Invoices feature. (Note: For more information about Deleting a Batch of Invoices, see page 119.)
Edit Invoice – users an go directly to the Edit Invoices feature from this screen (i.e., to add/ remove transactions from an existing invoice).
Create a recurring payment plan from a single invoice – users can create recurring payment plans from this screen.
View Customer Account History
Use the Customer pick list at the top of the Invoice Inquiry screen to locate a customer and view their Account History.
Customer - Use this pick list to select the customer you wish to view, or use the arrow buttons to scroll through the list.
Locate Invoice - Enter an invoice number and MaxEnterprise automatically pulls in the customer to whom the invoice belongs.
Unapplied Pmts/Credits - If an amount exists in this field, it will display with a yellow background color. If there is also a Balance Due amount, you should apply this Unapplied Payment/Credit by using the Enter Payments/Credits screen.
Balance Due - The sum of all values in the Amount column minus any Unapplied Payments/Credits should equal the Balance Due.
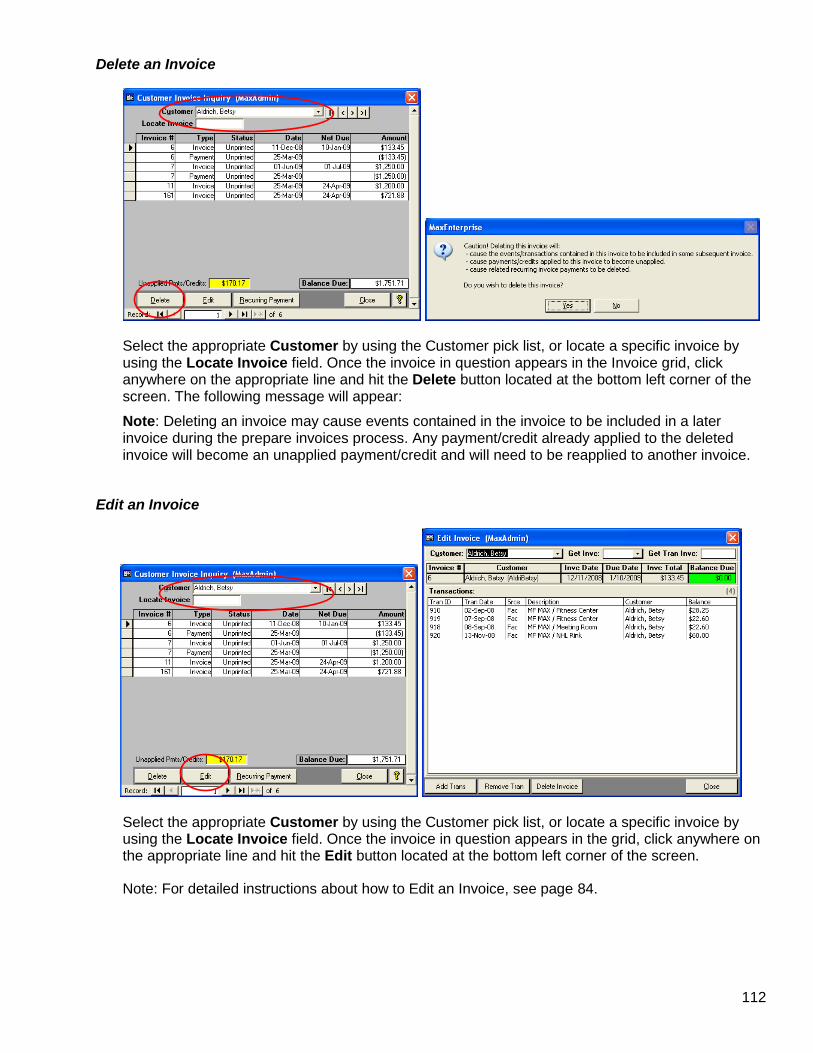
112
Delete an Invoice
Select the appropriate Customer by using the Customer pick list, or locate a specific invoice by using the Locate Invoice field. Once the invoice in question appears in the Invoice grid, click anywhere on the appropriate line and hit the Delete button located at the bottom left corner of the screen. The following message will appear:
Note: Deleting an invoice may cause events contained in the invoice to be included in a later invoice during the prepare invoices process. Any payment/credit already applied to the deleted invoice will become an unapplied payment/credit and will need to be reapplied to another invoice.
Edit an Invoice
Select the appropriate Customer by using the Customer pick list, or locate a specific invoice by using the Locate Invoice field. Once the invoice in question appears in the grid, click anywhere on the appropriate line and hit the Edit button located at the bottom left corner of the screen.
Note: For detailed instructions about how to Edit an Invoice, see page 84.
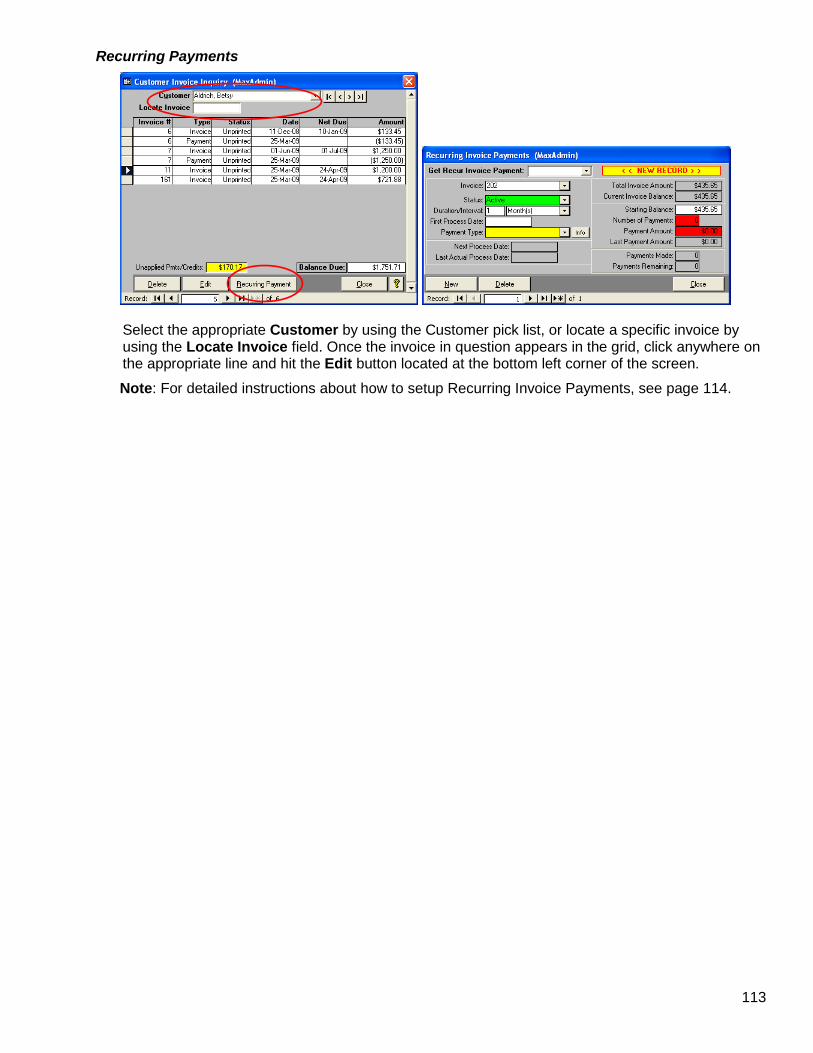
113
Recurring Payments
Select the appropriate Customer by using the Customer pick list, or locate a specific invoice by using the Locate Invoice field. Once the invoice in question appears in the grid, click anywhere on the appropriate line and hit the Edit button located at the bottom left corner of the screen.
Note: For detailed instructions about how to setup Recurring Invoice Payments, see page 114.
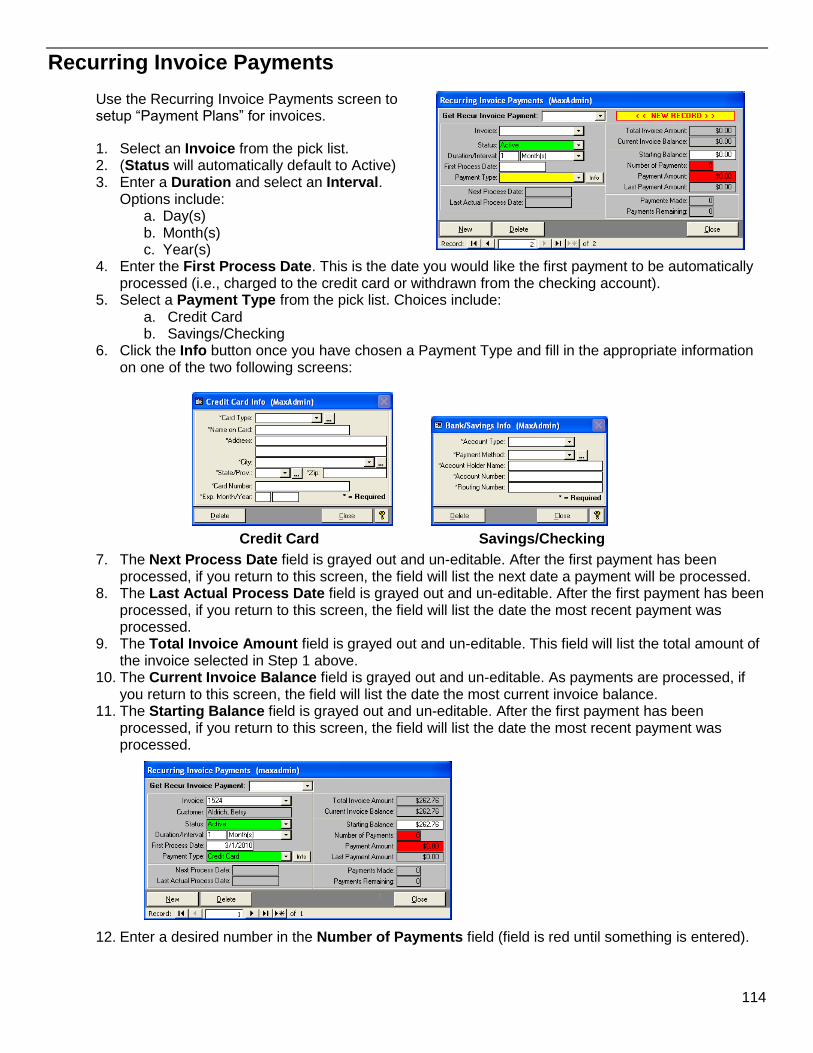
114
Recurring Invoice Payments
Use the Recurring Invoice Payments screen to setup “Payment Plans” for invoices.
1. Select an Invoice from the pick list. 2. (Status will automatically default to Active) 3. Enter a Duration and select an Interval.
Options include: a. Day(s) b. Month(s) c. Year(s)
4. Enter the First Process Date. This is the date you would like the first payment to be automatically processed (i.e., charged to the credit card or withdrawn from the checking account).
5. Select a Payment Type from the pick list. Choices include: a. Credit Card b. Savings/Checking
6. Click the Info button once you have chosen a Payment Type and fill in the appropriate information on one of the two following screens:
Credit Card Savings/Checking
7. The Next Process Date field is grayed out and un-editable. After the first payment has been processed, if you return to this screen, the field will list the next date a payment will be processed.
8. The Last Actual Process Date field is grayed out and un-editable. After the first payment has been processed, if you return to this screen, the field will list the date the most recent payment was processed.
9. The Total Invoice Amount field is grayed out and un-editable. This field will list the total amount of the invoice selected in Step 1 above.
10. The Current Invoice Balance field is grayed out and un-editable. As payments are processed, if you return to this screen, the field will list the date the most current invoice balance.
11. The Starting Balance field is grayed out and un-editable. After the first payment has been processed, if you return to this screen, the field will list the date the most recent payment was processed.
12. Enter a desired number in the Number of Payments field (field is red until something is entered).

115
13. After a Number of Payments have been entered, the Payment Amount for each payment will be automatically calculated as pictured below (fields turn green after a Number of Payments has been entered and the Payment Amounts have been calculated):
14. The Last Payment Amount field is grayed out and un-editable. As payments are processed, if you return to this screen, the field will list the date the most recent payment amount.
15. The Payments Made field is grayed out and un-editable. As payments are processed, if you return to this screen, the field will list the number of payments made toward the invoice balance.
16. The Payments Remaining field is grayed out and un-editable. As payments are processed, if you return to this screen, the field will list the number of payments remaining to pay off the invoice balance.
17.
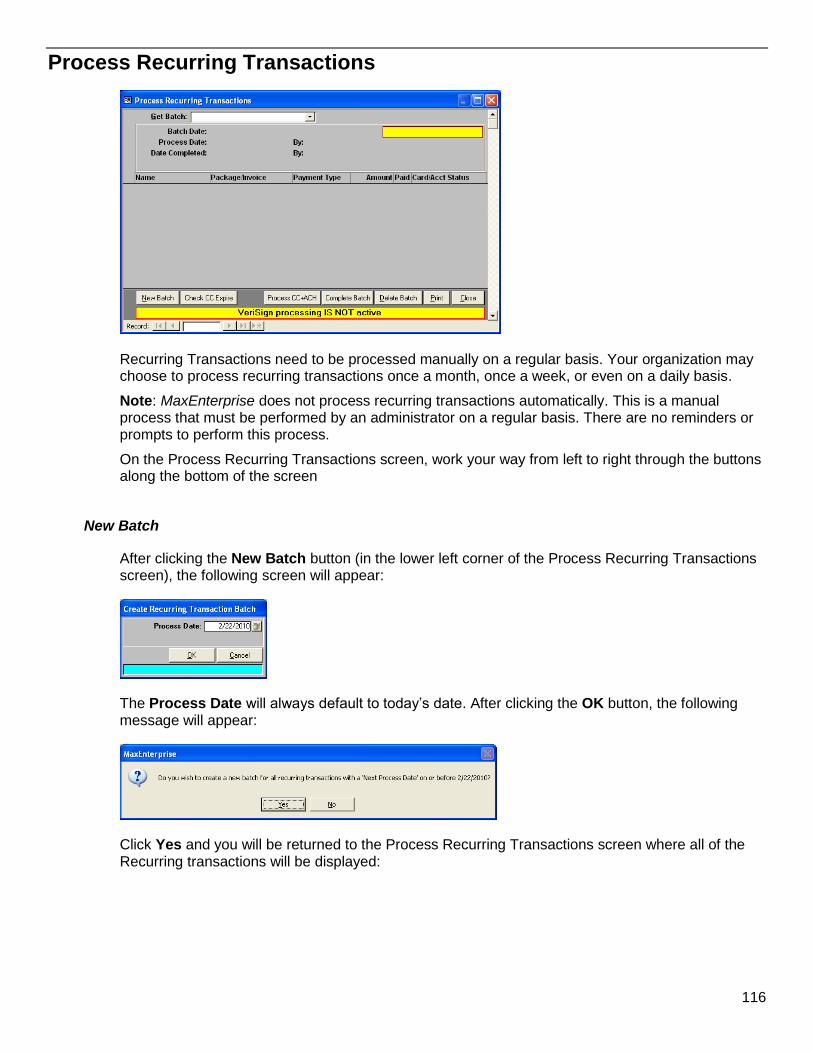
116
Process Recurring Transactions
Recurring Transactions need to be processed manually on a regular basis. Your organization may choose to process recurring transactions once a month, once a week, or even on a daily basis.
Note: MaxEnterprise does not process recurring transactions automatically. This is a manual process that must be performed by an administrator on a regular basis. There are no reminders or prompts to perform this process.
On the Process Recurring Transactions screen, work your way from left to right through the buttons along the bottom of the screen
New Batch
After clicking the New Batch button (in the lower left corner of the Process Recurring Transactions screen), the following screen will appear:
The Process Date will always default to today’s date. After clicking the OK button, the following message will appear:
Click Yes and you will be returned to the Process Recurring Transactions screen where all of the Recurring transactions will be displayed:
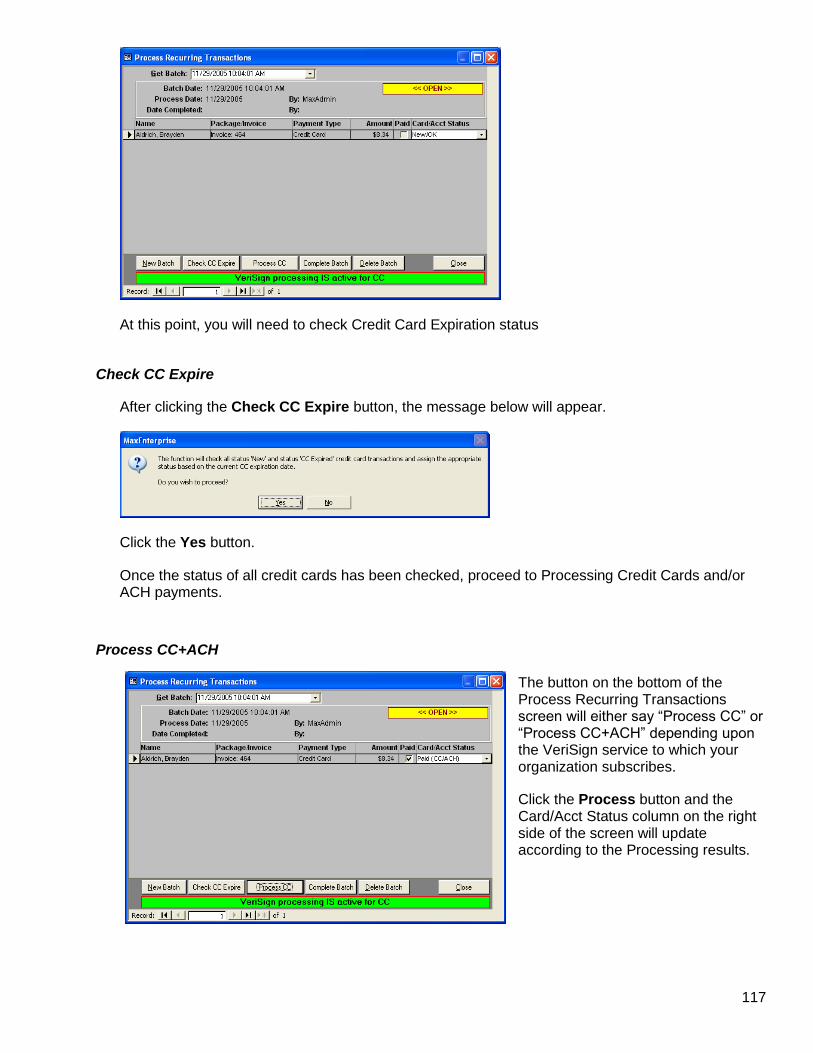
117
At this point, you will need to check Credit Card Expiration status
Check CC Expire
After clicking the Check CC Expire button, the message below will appear.
Click the Yes button.
Once the status of all credit cards has been checked, proceed to Processing Credit Cards and/or ACH payments.
Process CC+ACH
The button on the bottom of the Process Recurring Transactions screen will either say “Process CC” or “Process CC+ACH” depending upon the VeriSign service to which your organization subscribes.
Click the Process button and the Card/Acct Status column on the right side of the screen will update according to the Processing results.

118
Complete Batch
After the Batch has been processed (above), it will need to be “completed.”
After clicking the Complete Batch button, the following message will appear:
Click Yes to Complete Batch.
Click No if there are still some manual adjustments that need to be made in the Card/Acct Status column (i.e., after expired credit card information has been updated, etc.)
Delete Batch
Use the Delete Batch button to delete a batch of recurring transactions. Note: Batches cannot be deleted after they have been “Completed” so this button can only be used if a batch was prepared in error and you want to start over early in the process.
Print Batch
Use the Print Batch button to print a report displaying all recurring transactions processed.
A sample Batch Summary report is pictured below:
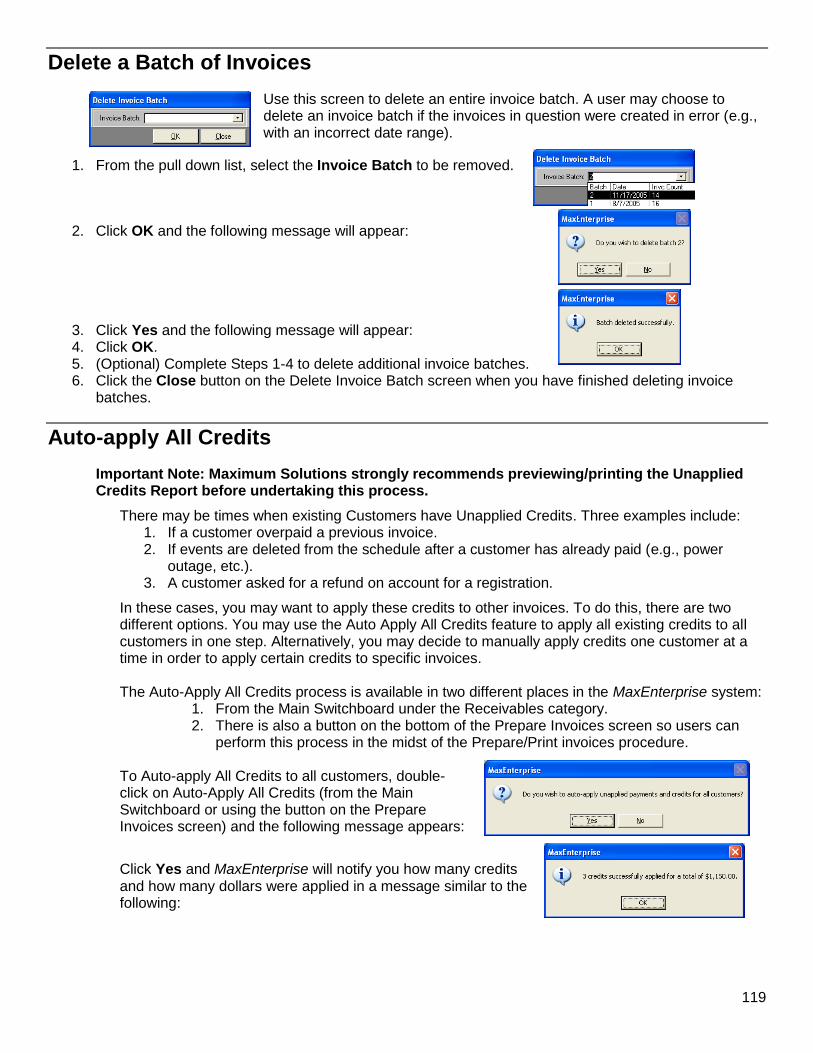
119
Delete a Batch of Invoices
Use this screen to delete an entire invoice batch. A user may choose to delete an invoice batch if the invoices in question were created in error (e.g., with an incorrect date range).
1. From the pull down list, select the Invoice Batch to be removed.
2. Click OK and the following message will appear:
3. Click Yes and the following message will appear: 4. Click OK. 5. (Optional) Complete Steps 1-4 to delete additional invoice batches. 6. Click the Close button on the Delete Invoice Batch screen when you have finished deleting invoice
batches.
Auto-apply All Credits
Important Note: Maximum Solutions strongly recommends previewing/printing the Unapplied Credits Report before undertaking this process.
There may be times when existing Customers have Unapplied Credits. Three examples include: 1. If a customer overpaid a previous invoice. 2. If events are deleted from the schedule after a customer has already paid (e.g., power
outage, etc.). 3. A customer asked for a refund on account for a registration.
In these cases, you may want to apply these credits to other invoices. To do this, there are two different options. You may use the Auto Apply All Credits feature to apply all existing credits to all customers in one step. Alternatively, you may decide to manually apply credits one customer at a time in order to apply certain credits to specific invoices. The Auto-Apply All Credits process is available in two different places in the MaxEnterprise system:
1. From the Main Switchboard under the Receivables category. 2. There is also a button on the bottom of the Prepare Invoices screen so users can
perform this process in the midst of the Prepare/Print invoices procedure. To Auto-apply All Credits to all customers, double-click on Auto-Apply All Credits (from the Main Switchboard or using the button on the Prepare Invoices screen) and the following message appears:
Click Yes and MaxEnterprise will notify you how many credits and how many dollars were applied in a message similar to the following:
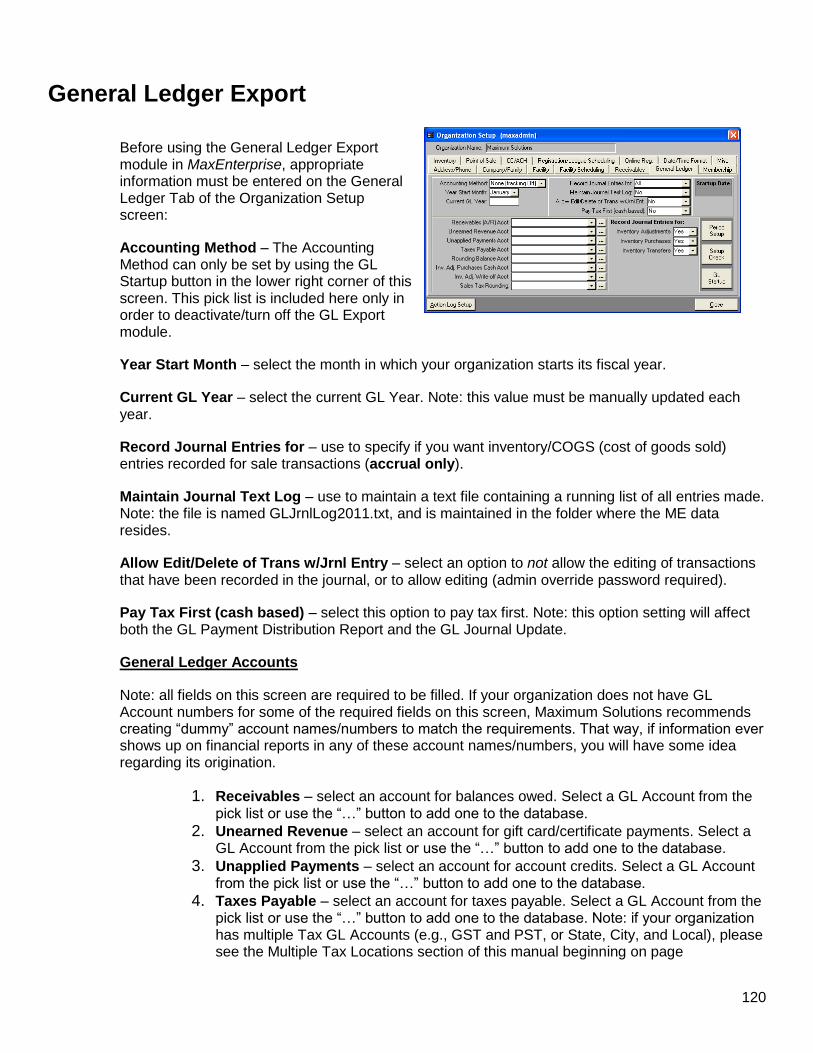
120
General Ledger Export
Before using the General Ledger Export module in MaxEnterprise, appropriate information must be entered on the General Ledger Tab of the Organization Setup screen:
Accounting Method – The Accounting Method can only be set by using the GL Startup button in the lower right corner of this screen. This pick list is included here only in order to deactivate/turn off the GL Export module.
Year Start Month – select the month in which your organization starts its fiscal year.
Current GL Year – select the current GL Year. Note: this value must be manually updated each year.
Record Journal Entries for – use to specify if you want inventory/COGS (cost of goods sold) entries recorded for sale transactions (accrual only).
Maintain Journal Text Log – use to maintain a text file containing a running list of all entries made. Note: the file is named GLJrnlLog2011.txt, and is maintained in the folder where the ME data resides.
Allow Edit/Delete of Trans w/Jrnl Entry – select an option to not allow the editing of transactions that have been recorded in the journal, or to allow editing (admin override password required).
Pay Tax First (cash based) – select this option to pay tax first. Note: this option setting will affect both the GL Payment Distribution Report and the GL Journal Update.
General Ledger Accounts
Note: all fields on this screen are required to be filled. If your organization does not have GL Account numbers for some of the required fields on this screen, Maximum Solutions recommends creating “dummy” account names/numbers to match the requirements. That way, if information ever shows up on financial reports in any of these account names/numbers, you will have some idea regarding its origination.
1. Receivables – select an account for balances owed. Select a GL Account from the pick list or use the “…” button to add one to the database.
2. Unearned Revenue – select an account for gift card/certificate payments. Select a GL Account from the pick list or use the “…” button to add one to the database.
3. Unapplied Payments – select an account for account credits. Select a GL Account from the pick list or use the “…” button to add one to the database.
4. Taxes Payable – select an account for taxes payable. Select a GL Account from the pick list or use the “…” button to add one to the database. Note: if your organization has multiple Tax GL Accounts (e.g., GST and PST, or State, City, and Local), please see the Multiple Tax Locations section of this manual beginning on page
121
5. Rounding Balance – select an account for payment/refund rounding. Select a GL Account from the pick list or use the “…” button to add one to the database.
6. Inventory Adjustment Purchases Cash (for accrual) – select an account for inventory purchase adjustments. Select a GL Account from the pick list or use the “…” button to add one to the database.
7. Inventory Adjustments Write-off (for accrual) – select an account for inventory adjustments (loss/damage) writeoffs. Select a GL Account from the pick list or use the “…” button to add one to the database.
8. Sales Tax Rounding – select an account for sales tax rounding. Select a GL Account from the pick list or use the “…” button to add one to the database.
Record Journal Entries for: If using accrual accounting, use this section to specify inventory functions to be recorded.
1. Inventory Adjustments – select recording option for inventory adjustments (loss/damages)
2. Inventory Purchases – select recording option for inventory purchases 3. Inventory Transfers – select recording option for inventory transfers (for existing
inventory transferred from one location to another)
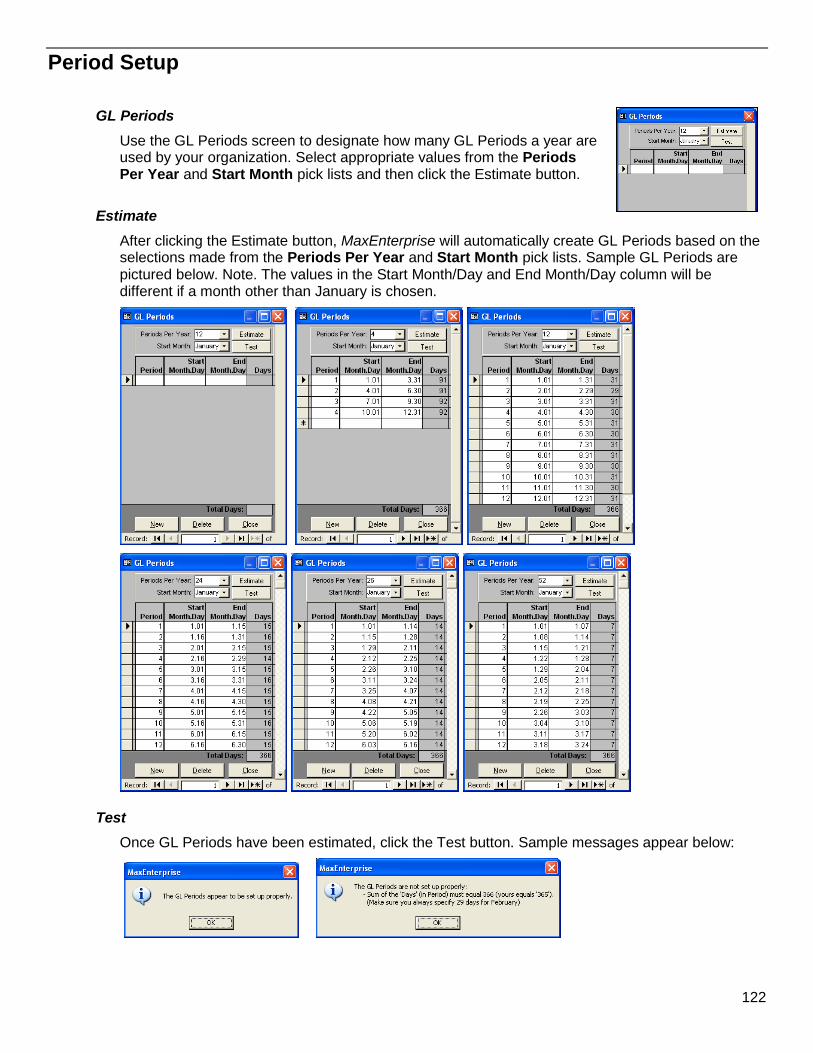
122
Period Setup
GL Periods
Use the GL Periods screen to designate how many GL Periods a year are used by your organization. Select appropriate values from the Periods Per Year and Start Month pick lists and then click the Estimate button.
Estimate
After clicking the Estimate button, MaxEnterprise will automatically create GL Periods based on the selections made from the Periods Per Year and Start Month pick lists. Sample GL Periods are pictured below. Note. The values in the Start Month/Day and End Month/Day column will be different if a month other than January is chosen.
Test
Once GL Periods have been estimated, click the Test button. Sample messages appear below:
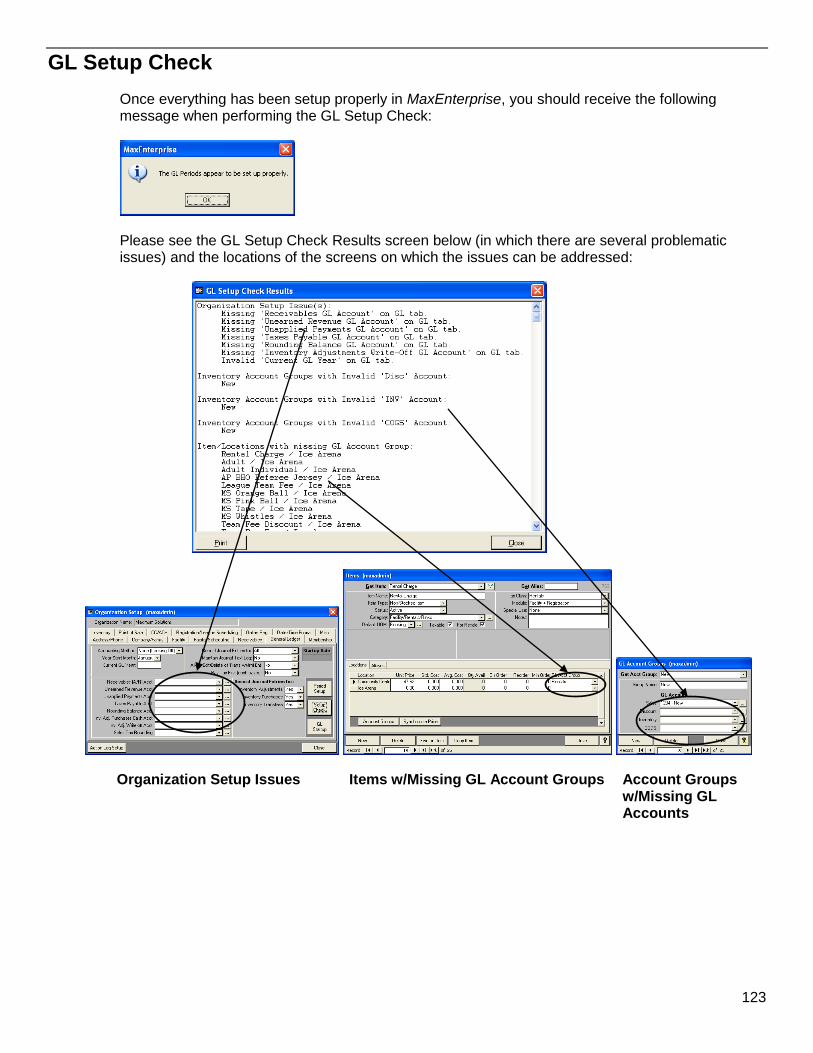
123
GL Setup Check
Once everything has been setup properly in MaxEnterprise, you should receive the following message when performing the GL Setup Check:
Please see the GL Setup Check Results screen below (in which there are several problematic issues) and the locations of the screens on which the issues can be addressed:
Organization Setup Issues Items w/Missing GL Account Groups Account Groups w/Missing GL Accounts

124
GL Startup
When you are ready to start using the GL module, you must run the GL Startup.
This function sets the GL startup date, allows you to select an accounting method (cash or accrual) and updates the status for all transaction, payments and inventory adjustments previously recorded to the GL (prior to a specified cut-off date).
Note: Period Setup and a Setup Check must be performed before GL can be started. Use the Period Setup button to run a system check.
Running GL Startup: 1. Click the GL Startup button on the GL tab of the Organization Setup screen. The
following popup window will appear:
2. Select an Accounting Method. 3. Select a Cut-off Date (Note: This is the cut-off date for transactions to be recorded in
the journal. This will default to the current date.) 4. Click OK. 5. MaxEnterprise will notify you:
6. Click OK
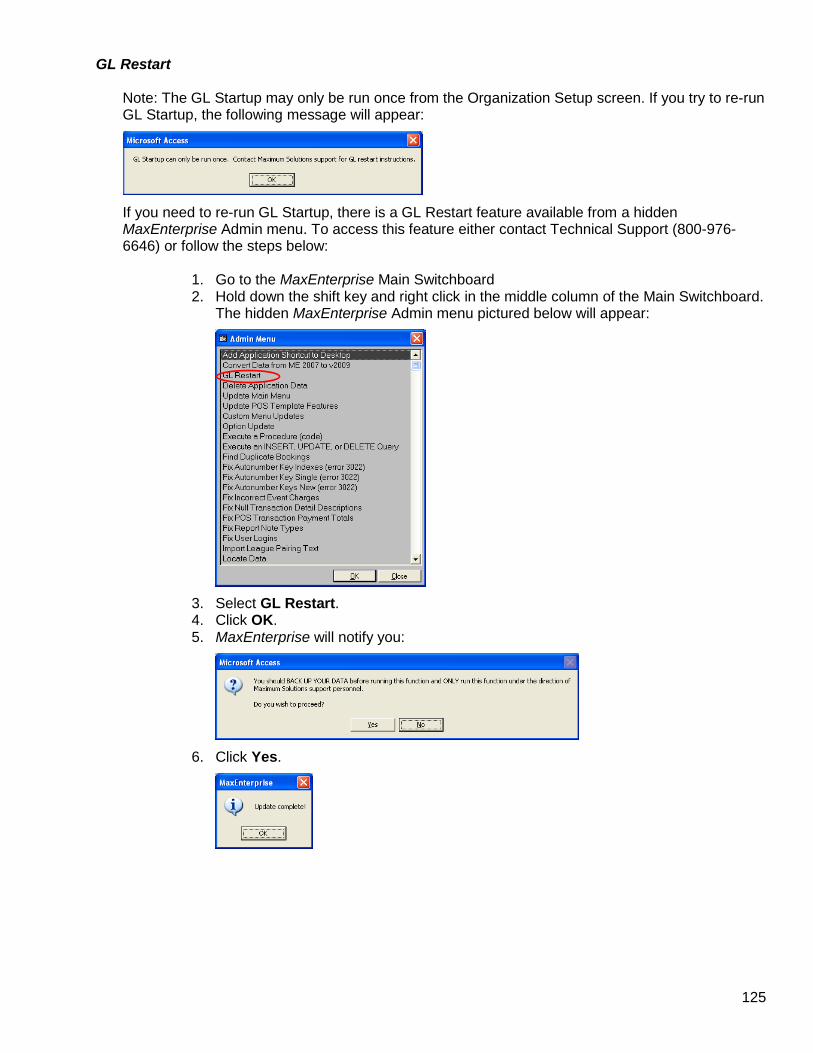
125
GL Restart Note: The GL Startup may only be run once from the Organization Setup screen. If you try to re-run GL Startup, the following message will appear:
If you need to re-run GL Startup, there is a GL Restart feature available from a hidden MaxEnterprise Admin menu. To access this feature either contact Technical Support (800-976-6646) or follow the steps below:
1. Go to the MaxEnterprise Main Switchboard 2. Hold down the shift key and right click in the middle column of the Main Switchboard.
The hidden MaxEnterprise Admin menu pictured below will appear:
3. Select GL Restart. 4. Click OK. 5. MaxEnterprise will notify you:
6. Click Yes.
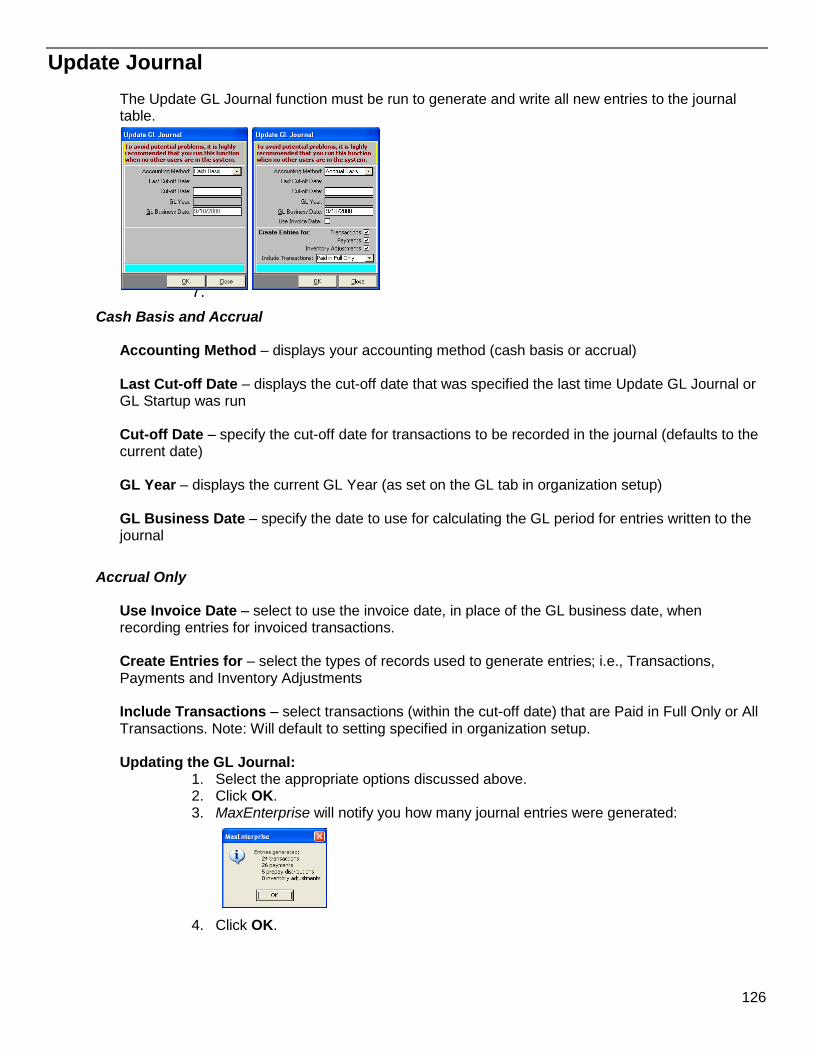
126
Update Journal
The Update GL Journal function must be run to generate and write all new entries to the journal table.
1.
2.
3.
4. ii.
5.
6.
7.
Cash Basis and Accrual Accounting Method – displays your accounting method (cash basis or accrual) Last Cut-off Date – displays the cut-off date that was specified the last time Update GL Journal or GL Startup was run Cut-off Date – specify the cut-off date for transactions to be recorded in the journal (defaults to the current date) GL Year – displays the current GL Year (as set on the GL tab in organization setup) GL Business Date – specify the date to use for calculating the GL period for entries written to the journal
Accrual Only Use Invoice Date – select to use the invoice date, in place of the GL business date, when recording entries for invoiced transactions. Create Entries for – select the types of records used to generate entries; i.e., Transactions, Payments and Inventory Adjustments Include Transactions – select transactions (within the cut-off date) that are Paid in Full Only or All Transactions. Note: Will default to setting specified in organization setup.
Updating the GL Journal:
1. Select the appropriate options discussed above. 2. Click OK. 3. MaxEnterprise will notify you how many journal entries were generated:
4. Click OK.

127
View/Edit Journal
The View/Edit Journal screen allows you to view/edit journal entry groups that have been written to the journal via the update journal feature.
Filter Criteria – allows you to filter and sort the entries for viewing. (Note: The Payment ID and Tran ID filter options are only available when using the Cash Method, as are the PmtID and TranID columns in the journal list box.) Edit Group – select to edit existing journal entries (see GL Journal - Edit screen below). (Note: Caution should be used when editing journal entries.) New Group – select to add a miscellaneous entry group (for manual entries). Delete Group – select to delete an entry group. Tasks
1. Create Reversing Entries for Selected Entry Group – opens the GL Journal Edit screen, where you can create reversing entries (e.g., converting debits into credits, etc.) for the selected entry group.
2. Print Current List - use to print a list of entries based on current filtering. 3. View Export Batch Info – use to view exported batch information (see Export Batch
screen below).
GL Journal – Edit Screen
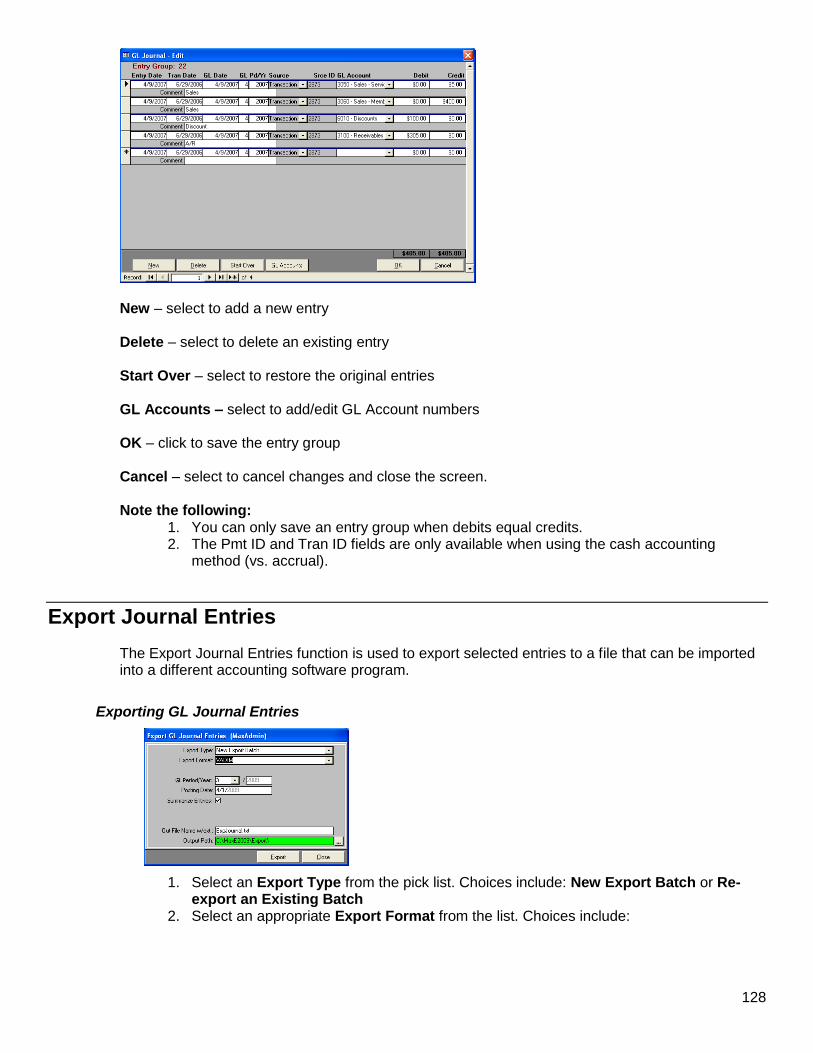
128
New – select to add a new entry Delete – select to delete an existing entry Start Over – select to restore the original entries GL Accounts – select to add/edit GL Account numbers OK – click to save the entry group Cancel – select to cancel changes and close the screen. Note the following:
1. You can only save an entry group when debits equal credits. 2. The Pmt ID and Tran ID fields are only available when using the cash accounting
method (vs. accrual).
Export Journal Entries
The Export Journal Entries function is used to export selected entries to a file that can be imported into a different accounting software program.
Exporting GL Journal Entries
1. Select an Export Type from the pick list. Choices include: New Export Batch or Re-export an Existing Batch
2. Select an appropriate Export Format from the list. Choices include:
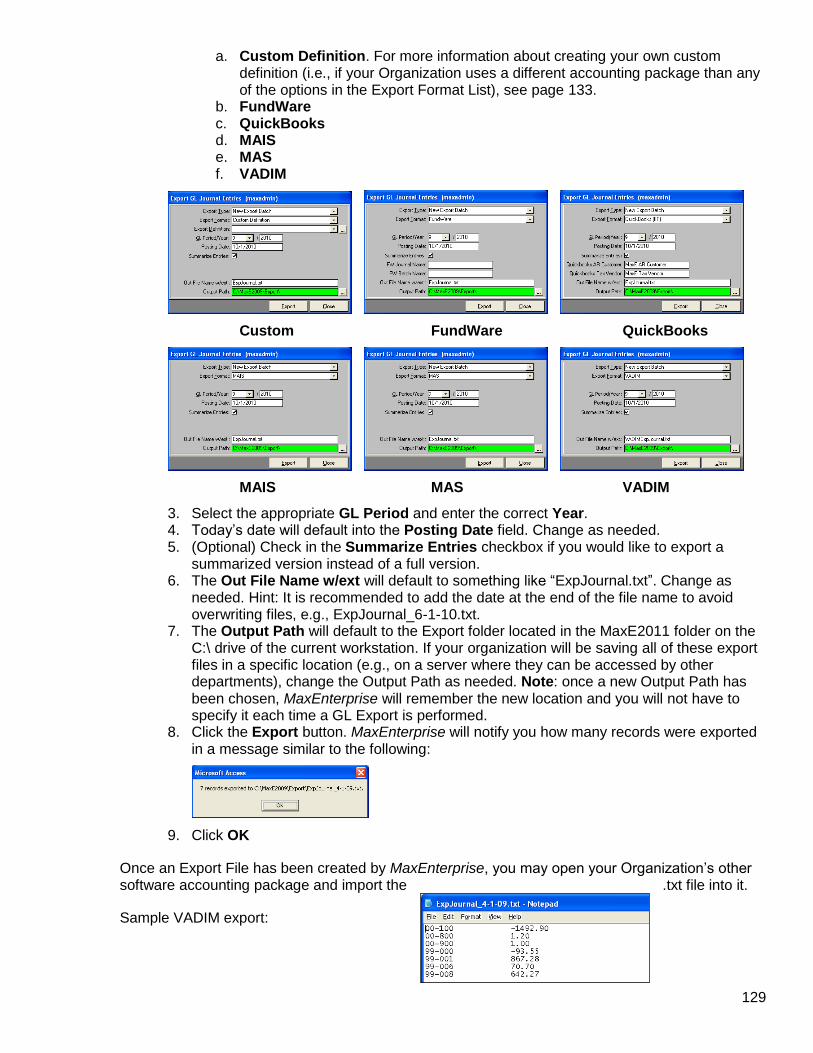
129
a. Custom Definition. For more information about creating your own custom definition (i.e., if your Organization uses a different accounting package than any of the options in the Export Format List), see page 133.
b. FundWare c. QuickBooks d. MAIS e. MAS f. VADIM
Custom FundWare QuickBooks
MAIS MAS VADIM
3. Select the appropriate GL Period and enter the correct Year. 4. Today’s date will default into the Posting Date field. Change as needed. 5. (Optional) Check in the Summarize Entries checkbox if you would like to export a
summarized version instead of a full version. 6. The Out File Name w/ext will default to something like “ExpJournal.txt”. Change as
needed. Hint: It is recommended to add the date at the end of the file name to avoid overwriting files, e.g., ExpJournal_6-1-10.txt.
7. The Output Path will default to the Export folder located in the MaxE2011 folder on the C:\ drive of the current workstation. If your organization will be saving all of these export files in a specific location (e.g., on a server where they can be accessed by other departments), change the Output Path as needed. Note: once a new Output Path has been chosen, MaxEnterprise will remember the new location and you will not have to specify it each time a GL Export is performed.
8. Click the Export button. MaxEnterprise will notify you how many records were exported in a message similar to the following:
9. Click OK
Once an Export File has been created by MaxEnterprise, you may open your Organization’s other software accounting package and import the .txt file into it.
Sample VADIM export:
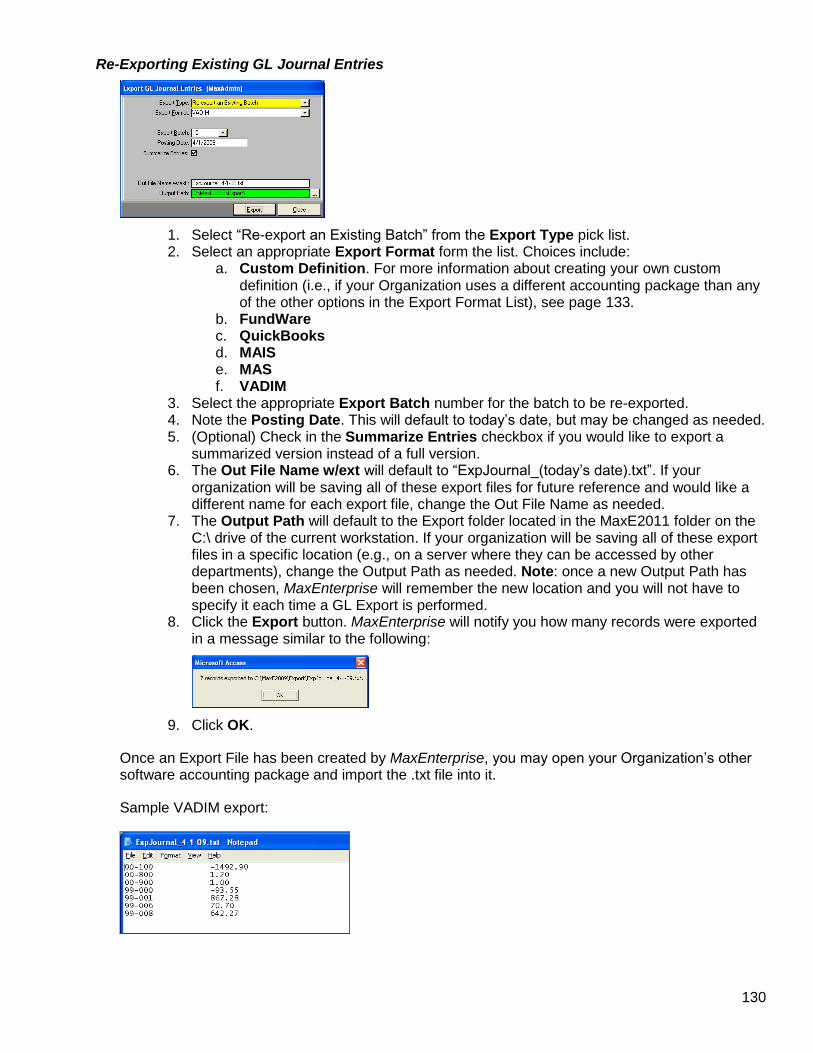
130
Re-Exporting Existing GL Journal Entries
1. Select “Re-export an Existing Batch” from the Export Type pick list. 2. Select an appropriate Export Format form the list. Choices include:
a. Custom Definition. For more information about creating your own custom definition (i.e., if your Organization uses a different accounting package than any of the other options in the Export Format List), see page 133.
b. FundWare c. QuickBooks d. MAIS e. MAS f. VADIM
3. Select the appropriate Export Batch number for the batch to be re-exported. 4. Note the Posting Date. This will default to today’s date, but may be changed as needed. 5. (Optional) Check in the Summarize Entries checkbox if you would like to export a
summarized version instead of a full version. 6. The Out File Name w/ext will default to “ExpJournal_(today’s date).txt”. If your
organization will be saving all of these export files for future reference and would like a different name for each export file, change the Out File Name as needed.
7. The Output Path will default to the Export folder located in the MaxE2011 folder on the C:\ drive of the current workstation. If your organization will be saving all of these export files in a specific location (e.g., on a server where they can be accessed by other departments), change the Output Path as needed. Note: once a new Output Path has been chosen, MaxEnterprise will remember the new location and you will not have to specify it each time a GL Export is performed.
8. Click the Export button. MaxEnterprise will notify you how many records were exported in a message similar to the following:
9. Click OK.
Once an Export File has been created by MaxEnterprise, you may open your Organization’s other software accounting package and import the .txt file into it.
Sample VADIM export:
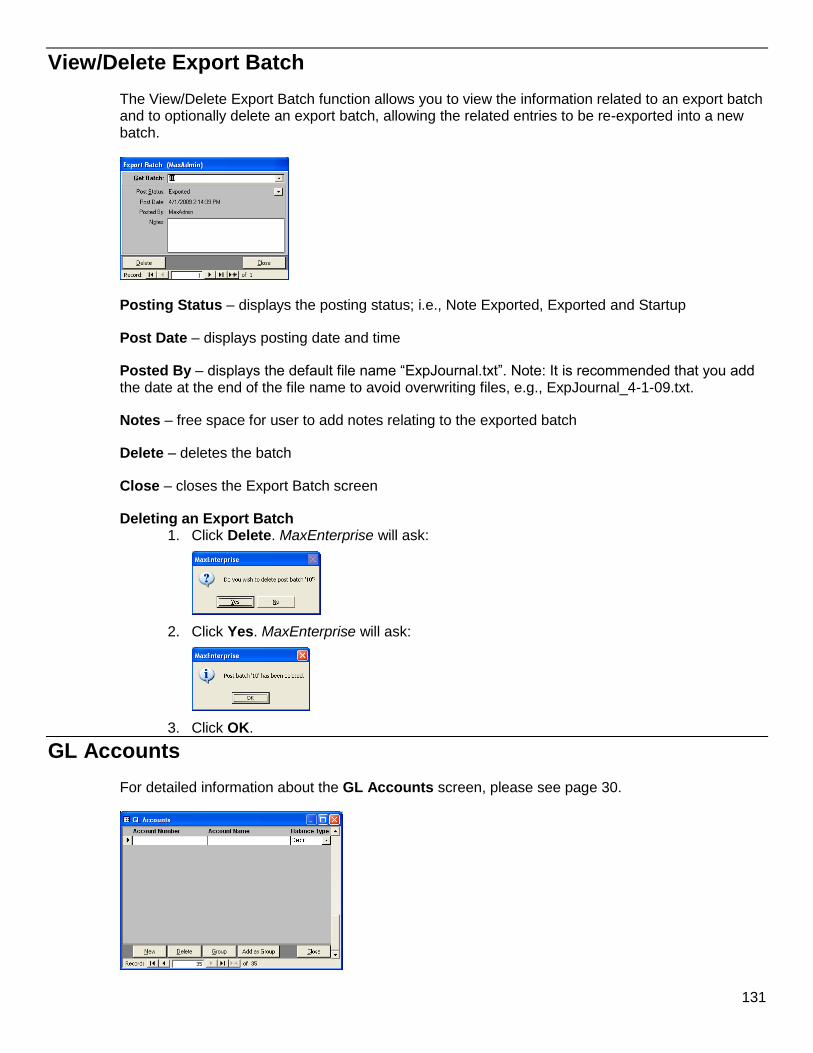
131
View/Delete Export Batch
The View/Delete Export Batch function allows you to view the information related to an export batch and to optionally delete an export batch, allowing the related entries to be re-exported into a new batch.
Posting Status – displays the posting status; i.e., Note Exported, Exported and Startup
Post Date – displays posting date and time
Posted By – displays the default file name “ExpJournal.txt”. Note: It is recommended that you add the date at the end of the file name to avoid overwriting files, e.g., ExpJournal_4-1-09.txt.
Notes – free space for user to add notes relating to the exported batch
Delete – deletes the batch
Close – closes the Export Batch screen
Deleting an Export Batch 1. Click Delete. MaxEnterprise will ask:
2. Click Yes. MaxEnterprise will ask:
3. Click OK.
GL Accounts
For detailed information about the GL Accounts screen, please see page 30.
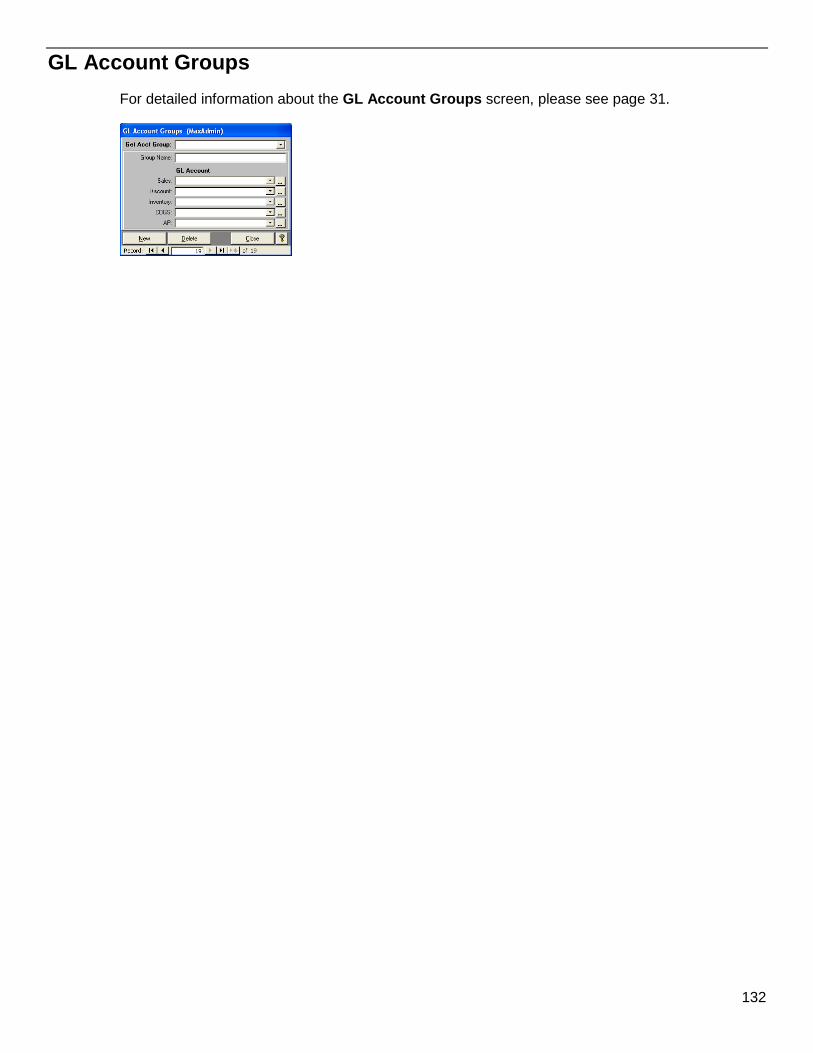
132
GL Account Groups
For detailed information about the GL Account Groups screen, please see page 31.
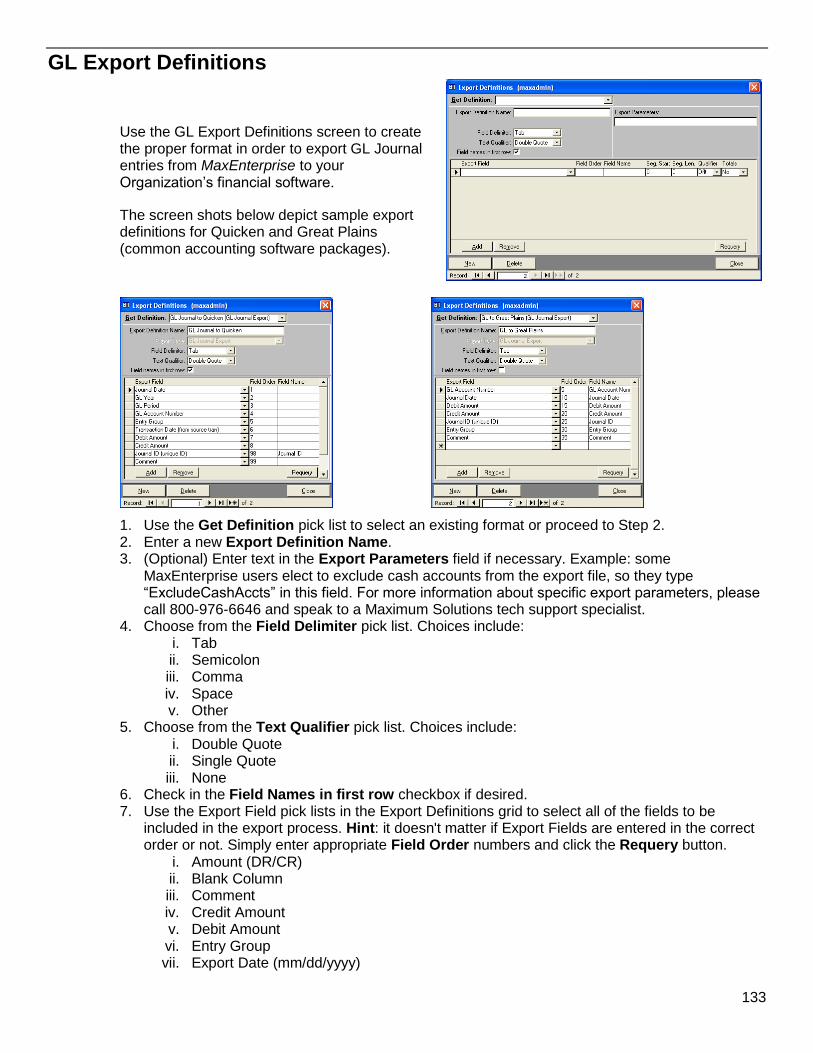
133
GL Export Definitions
Use the GL Export Definitions screen to create the proper format in order to export GL Journal entries from MaxEnterprise to your Organization’s financial software.
The screen shots below depict sample export definitions for Quicken and Great Plains (common accounting software packages).
1. Use the Get Definition pick list to select an existing format or proceed to Step 2. 2. Enter a new Export Definition Name. 3. (Optional) Enter text in the Export Parameters field if necessary. Example: some
MaxEnterprise users elect to exclude cash accounts from the export file, so they type “ExcludeCashAccts” in this field. For more information about specific export parameters, please call 800-976-6646 and speak to a Maximum Solutions tech support specialist.
4. Choose from the Field Delimiter pick list. Choices include: i. Tab ii. Semicolon iii. Comma iv. Space v. Other
5. Choose from the Text Qualifier pick list. Choices include: i. Double Quote ii. Single Quote iii. None
6. Check in the Field Names in first row checkbox if desired. 7. Use the Export Field pick lists in the Export Definitions grid to select all of the fields to be
included in the export process. Hint: it doesn't matter if Export Fields are entered in the correct order or not. Simply enter appropriate Field Order numbers and click the Requery button.
i. Amount (DR/CR) ii. Blank Column iii. Comment iv. Credit Amount v. Debit Amount vi. Entry Group vii. Export Date (mm/dd/yyyy)
134
viii. Export Date (mmddyy) ix. Export Date (yyyy-mm-dd) x. Exported By xi. GL Account xii. GL Account (Diamond/Great Plains Fmt) xiii. GL Account 01-06 xiv. GL Account 08- xv. GL Account Name xvi. GL Account Segment xvii. GL Period xviii. GL Year xix. Journal Date (mm/dd/yyyy) xx. Journal Date (mmddyy) xxi. Journal Date (yyyy-mm-dd) xxii. Journal ID (unique ID) xxiii. Transaction Date (from source tran)
8. Enter a Field Name for each Export Field if you checked in the Field Names in first row checkbox
9. Enter a Segment Start value if necessary. 10. Enter a Segment Length value if necessary. 11. Select a Qualifier from the pick list if necessary. Options include: Default, No or Yes. 12. Select from the Totals pick list. Options include: No, Sum or Count.
Use the Add button to position your cursor in a new, blank line at the bottom of the grid. Use the Remove button to delete a line from an existing definition.
135
Credit Card Processing
(Note: For a thorough understanding of the online payment process, read the following article: “Online Payment Processing – What You Need To Know” located at http://www.verisign.com/resources/gd/enablePayment/index.html)
Your organization will need to complete the following in order to begin processing credit cards through MaxEnterprise:
1) Establish a Merchant Account. 2) Acquire a Payment Processing Service. 3) Configure your PC. 4) Setup CC Account Administration in MaxEnterprise.
Establish a Merchant Account
Before you can process credit cards from within the system, you must obtain a Merchant Account. A Merchant Account is an account with a financial institution that enables you to process payments over the Internet. Merchant Accounts are available for multiple payment types (e.g., credit cards, debit cards, ACH transfers, and electronic checks). Note: at this time, the MaxEnterprise system is only designed to support credit card payments.
** If your organization currently accepts credit cards, and already has an Merchant Account but you are currently using a different payment processing service (e.g., ICVERIFY, or a similar product), you will need to switch to Payflow Pro (i.e., the payment processing service offered by VeriSign which is currently integrated into the MaxEnterprise system). Proceed to Step 2.
** If your organization does not currently accept credit cards, you will need to establish a Merchant Account with an “Acquiring Bank.” In the online payment-processing world, an Acquiring Bank provides Merchant Accounts. Your organization must open a Merchant Account with an Acquiring Bank to enable online credit card authorization and payment processing. Examples of Acquiring Banks include Merchant eSolutions and most major banks.
Option: since you will be working with VeriSign to acquire a Payment Processing Service in Step 2 below, your organization may also choose to partner with VeriSign in order to establish a Merchant Account.
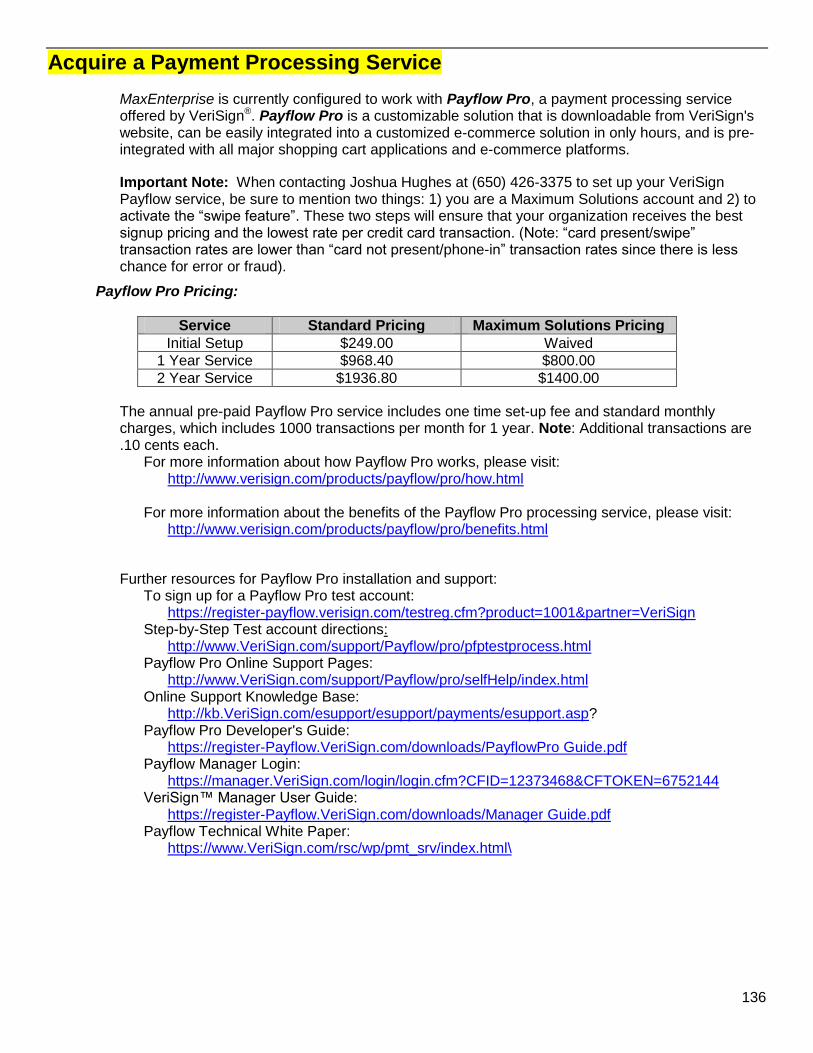
136
Acquire a Payment Processing Service
MaxEnterprise is currently configured to work with Payflow Pro, a payment processing service offered by VeriSign®. Payflow Pro is a customizable solution that is downloadable from VeriSign's website, can be easily integrated into a customized e-commerce solution in only hours, and is pre-integrated with all major shopping cart applications and e-commerce platforms.
Important Note: When contacting Joshua Hughes at (650) 426-3375 to set up your VeriSign Payflow service, be sure to mention two things: 1) you are a Maximum Solutions account and 2) to activate the “swipe feature”. These two steps will ensure that your organization receives the best signup pricing and the lowest rate per credit card transaction. (Note: “card present/swipe” transaction rates are lower than “card not present/phone-in” transaction rates since there is less chance for error or fraud).
Payflow Pro Pricing:
Service Standard Pricing Maximum Solutions Pricing
Initial Setup $249.00 Waived
1 Year Service $968.40 $800.00
2 Year Service $1936.80 $1400.00
The annual pre-paid Payflow Pro service includes one time set-up fee and standard monthly charges, which includes 1000 transactions per month for 1 year. Note: Additional transactions are .10 cents each.
For more information about how Payflow Pro works, please visit: http://www.verisign.com/products/payflow/pro/how.html
For more information about the benefits of the Payflow Pro processing service, please visit:
http://www.verisign.com/products/payflow/pro/benefits.html
Further resources for Payflow Pro installation and support: To sign up for a Payflow Pro test account:
https://register-payflow.verisign.com/testreg.cfm?product=1001&partner=VeriSign Step-by-Step Test account directions:
http://www.VeriSign.com/support/Payflow/pro/pfptestprocess.html Payflow Pro Online Support Pages:
http://www.VeriSign.com/support/Payflow/pro/selfHelp/index.html Online Support Knowledge Base:
http://kb.VeriSign.com/esupport/esupport/payments/esupport.asp? Payflow Pro Developer's Guide:
https://register-Payflow.VeriSign.com/downloads/PayflowPro Guide.pdf Payflow Manager Login:
https://manager.VeriSign.com/login/login.cfm?CFID=12373468&CFTOKEN=6752144 VeriSign™ Manager User Guide:
https://register-Payflow.VeriSign.com/downloads/Manager Guide.pdf Payflow Technical White Paper:
https://www.VeriSign.com/rsc/wp/pmt_srv/index.html\
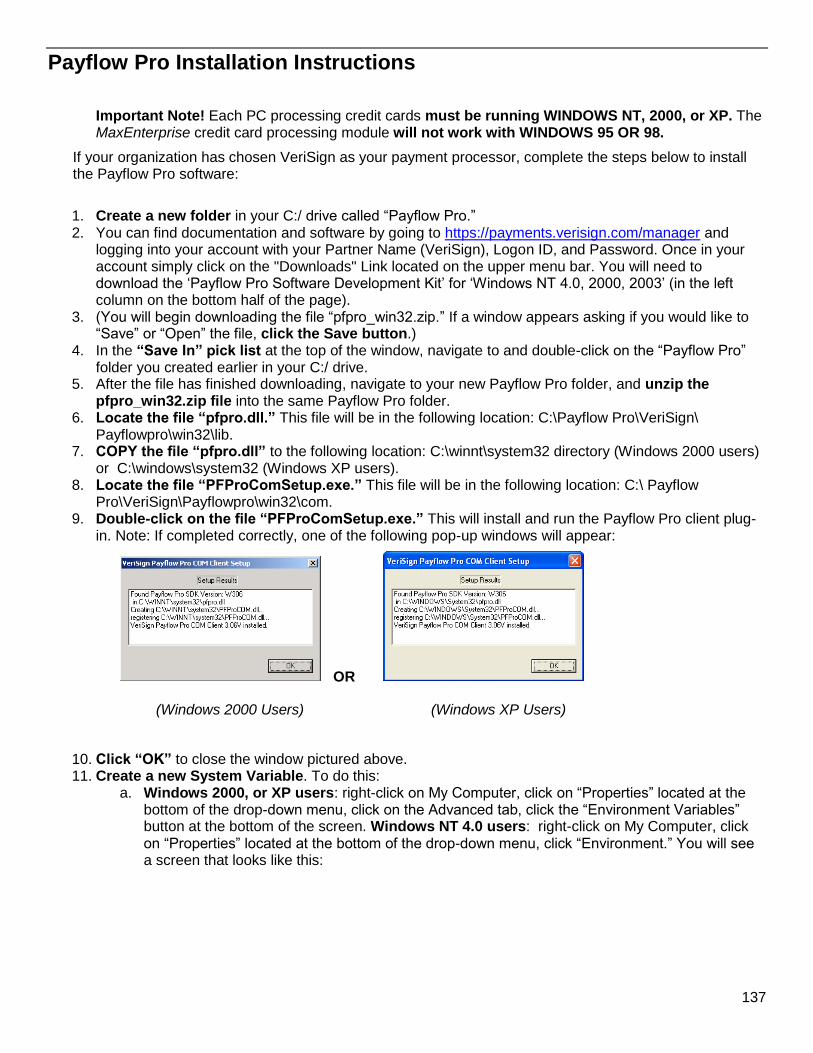
137
Payflow Pro Installation Instructions
Important Note! Each PC processing credit cards must be running WINDOWS NT, 2000, or XP. The MaxEnterprise credit card processing module will not work with WINDOWS 95 OR 98.
If your organization has chosen VeriSign as your payment processor, complete the steps below to install the Payflow Pro software:
1. Create a new folder in your C:/ drive called “Payflow Pro.” 2. You can find documentation and software by going to https://payments.verisign.com/manager and
logging into your account with your Partner Name (VeriSign), Logon ID, and Password. Once in your account simply click on the "Downloads" Link located on the upper menu bar. You will need to download the ‘Payflow Pro Software Development Kit’ for ‘Windows NT 4.0, 2000, 2003’ (in the left column on the bottom half of the page).
3. (You will begin downloading the file “pfpro_win32.zip.” If a window appears asking if you would like to “Save” or “Open” the file, click the Save button.)
4. In the “Save In” pick list at the top of the window, navigate to and double-click on the “Payflow Pro” folder you created earlier in your C:/ drive.
5. After the file has finished downloading, navigate to your new Payflow Pro folder, and unzip the pfpro_win32.zip file into the same Payflow Pro folder.
6. Locate the file “pfpro.dll.” This file will be in the following location: C:\Payflow Pro\VeriSign\ Payflowpro\win32\lib.
7. COPY the file “pfpro.dll” to the following location: C:\winnt\system32 directory (Windows 2000 users) or C:\windows\system32 (Windows XP users).
8. Locate the file “PFProComSetup.exe.” This file will be in the following location: C:\ Payflow Pro\VeriSign\Payflowpro\win32\com.
9. Double-click on the file “PFProComSetup.exe.” This will install and run the Payflow Pro client plug-in. Note: If completed correctly, one of the following pop-up windows will appear:
OR
(Windows 2000 Users) (Windows XP Users)
10. Click “OK” to close the window pictured above. 11. Create a new System Variable. To do this:
a. Windows 2000, or XP users: right-click on My Computer, click on “Properties” located at the bottom of the drop-down menu, click on the Advanced tab, click the “Environment Variables” button at the bottom of the screen. Windows NT 4.0 users: right-click on My Computer, click on “Properties” located at the bottom of the drop-down menu, click “Environment.” You will see a screen that looks like this:
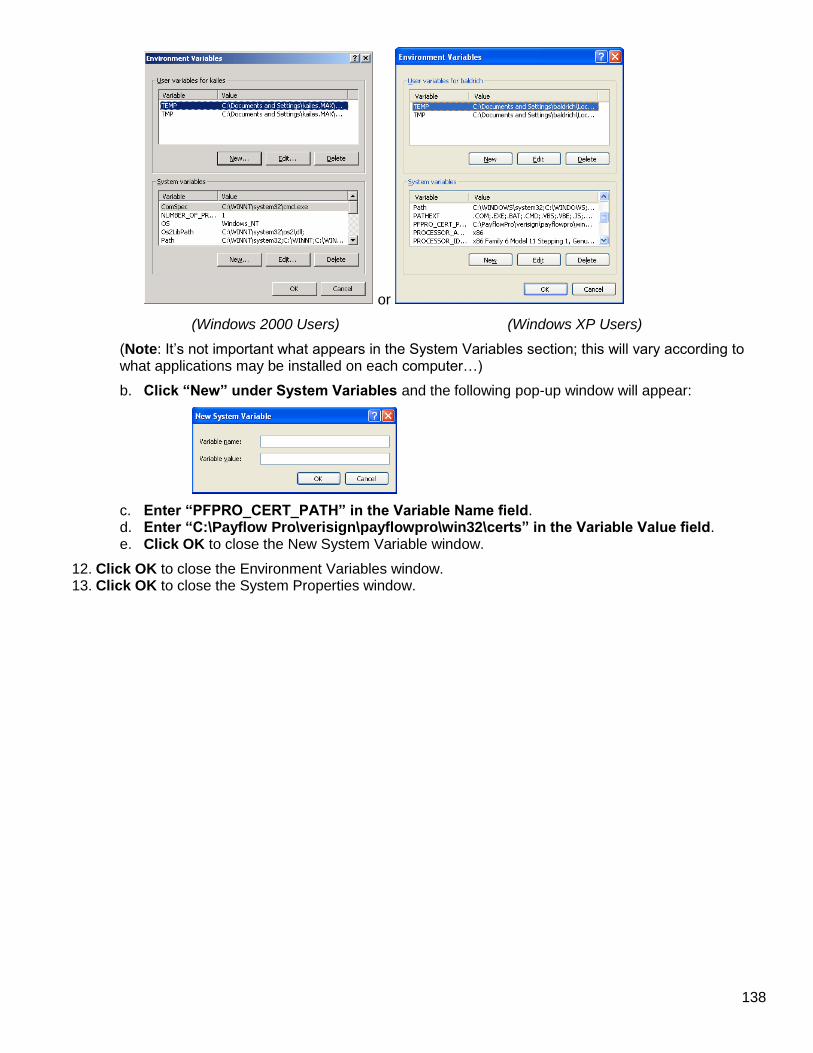
138
or
(Windows 2000 Users) (Windows XP Users)
(Note: It’s not important what appears in the System Variables section; this will vary according to what applications may be installed on each computer…)
b. Click “New” under System Variables and the following pop-up window will appear:
c. Enter “PFPRO_CERT_PATH” in the Variable Name field. d. Enter “C:\Payflow Pro\verisign\payflowpro\win32\certs” in the Variable Value field. e. Click OK to close the New System Variable window.
12. Click OK to close the Environment Variables window. 13. Click OK to close the System Properties window.
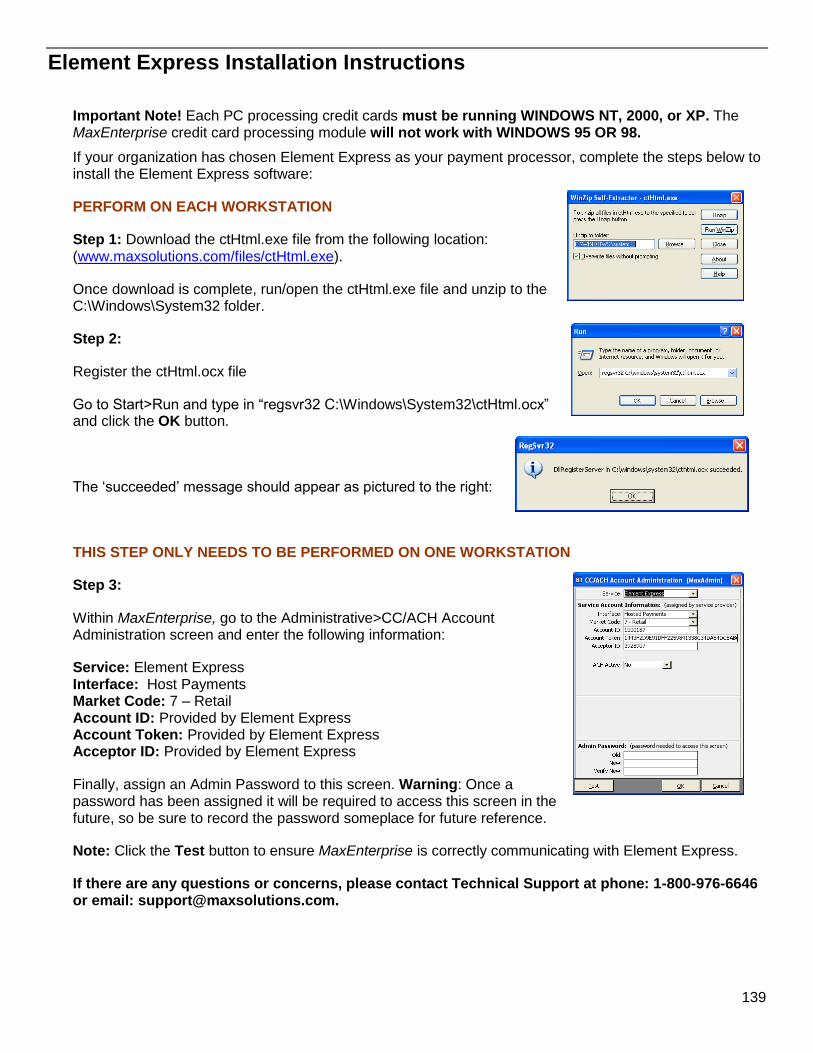
139
Element Express Installation Instructions
Important Note! Each PC processing credit cards must be running WINDOWS NT, 2000, or XP. The MaxEnterprise credit card processing module will not work with WINDOWS 95 OR 98.
If your organization has chosen Element Express as your payment processor, complete the steps below to install the Element Express software:
PERFORM ON EACH WORKSTATION
Step 1: Download the ctHtml.exe file from the following location: (www.maxsolutions.com/files/ctHtml.exe).
Once download is complete, run/open the ctHtml.exe file and unzip to the C:\Windows\System32 folder.
Step 2:
Register the ctHtml.ocx file
Go to Start>Run and type in “regsvr32 C:\Windows\System32\ctHtml.ocx” and click the OK button.
The ‘succeeded’ message should appear as pictured to the right:
THIS STEP ONLY NEEDS TO BE PERFORMED ON ONE WORKSTATION
Step 3:
Within MaxEnterprise, go to the Administrative>CC/ACH Account Administration screen and enter the following information:
Service: Element Express Interface: Host Payments Market Code: 7 – Retail Account ID: Provided by Element Express Account Token: Provided by Element Express Acceptor ID: Provided by Element Express
Finally, assign an Admin Password to this screen. Warning: Once a password has been assigned it will be required to access this screen in the future, so be sure to record the password someplace for future reference.
Note: Click the Test button to ensure MaxEnterprise is correctly communicating with Element Express.
If there are any questions or concerns, please contact Technical Support at phone: 1-800-976-6646 or email: [email protected].

140
CC/ACH Account Administration
Within MaxEnterprise, from the Main Switchboard, select Administrative in the left column and double-click on CC Account Administration in the middle column. The CC/ACH Account Administration screen will appear. Select a Service from the pick list at the top of the screen:
PayPal (CC Only) PayPal (CC +ACH) AuthorizeNet (CC Only) PSiGate (CC Only) Element Express
Pay Pal
1. Service Account Information a. In the Partner field, enter “verisign” b. Enter the Vendor ID given to you by your Merchant Account financial institution. c. Enter the Logon ID given to you by your Merchant Account financial institution.
(Note: this will usually be the same as the Vendor ID) d. Enter the Password you selected when you opened your Merchant Account. e. In the Host Address field, enter “payflow.verisign.com” f. (The Host Port field should automatically say “443”) g. (The Time Out (sec.) field should automatically say “30”)
2. Proxy Information (only required if you are behind a firewall) a. Enter the IP Address of your organization. b. Enter a Port number for your IP Address. c. (Optional) Enter the Logon necessary to get through your proxy server. d. (Optional) Enter the Password necessary to get through your proxy server.
3. Admin Password (password needed to access this screen) a. (Leave the Old password field blank) b. Enter a New password to access this screen. c. Retype the password in the Verify New field.
4. Click the Test button. The following message should appear: 5. Click the OK button.
At this point, your organization is ready to process credit cards through MaxEnterprise!
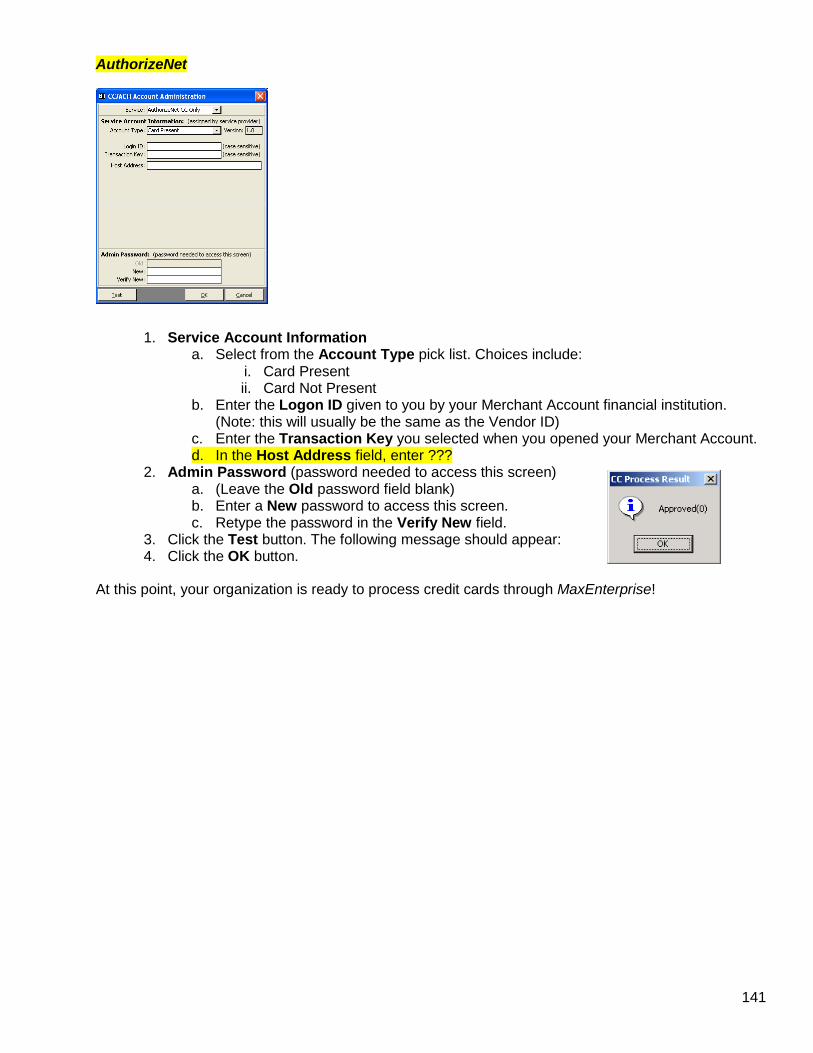
141
AuthorizeNet
1. Service Account Information
a. Select from the Account Type pick list. Choices include: i. Card Present ii. Card Not Present
b. Enter the Logon ID given to you by your Merchant Account financial institution. (Note: this will usually be the same as the Vendor ID)
c. Enter the Transaction Key you selected when you opened your Merchant Account. d. In the Host Address field, enter ???
2. Admin Password (password needed to access this screen) a. (Leave the Old password field blank) b. Enter a New password to access this screen. c. Retype the password in the Verify New field.
3. Click the Test button. The following message should appear: 4. Click the OK button.
At this point, your organization is ready to process credit cards through MaxEnterprise!
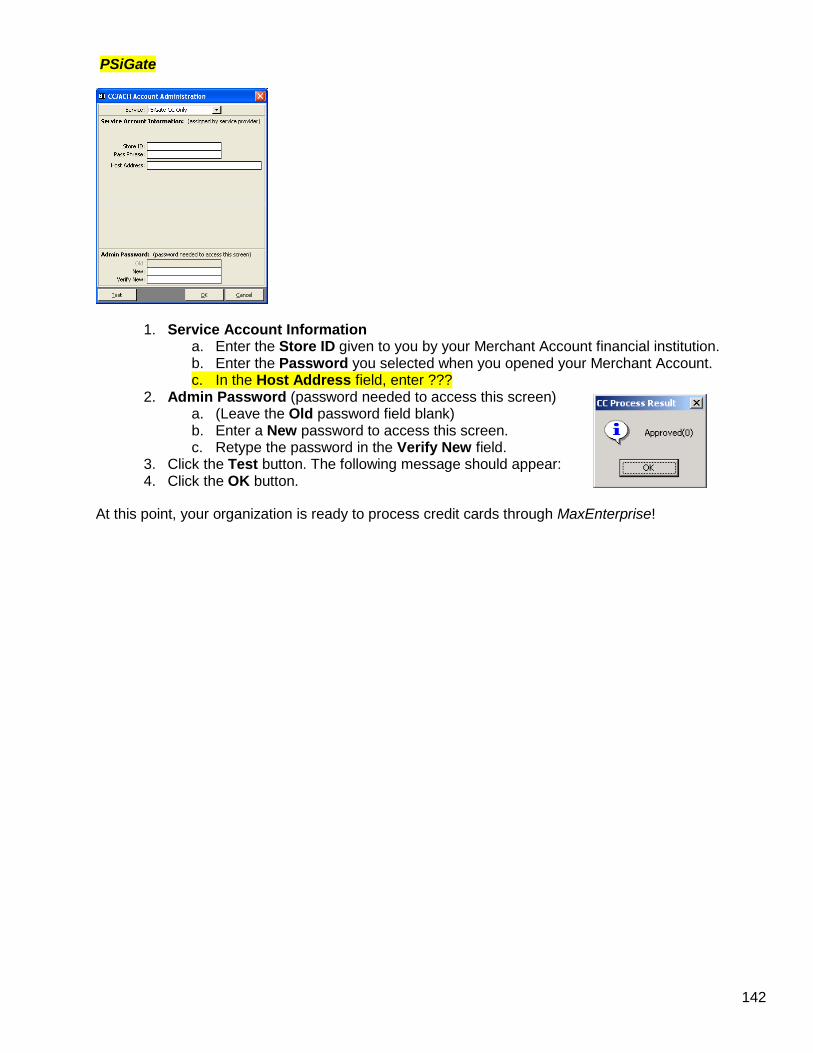
142
PSiGate
1. Service Account Information a. Enter the Store ID given to you by your Merchant Account financial institution. b. Enter the Password you selected when you opened your Merchant Account. c. In the Host Address field, enter ???
2. Admin Password (password needed to access this screen) a. (Leave the Old password field blank) b. Enter a New password to access this screen. c. Retype the password in the Verify New field.
3. Click the Test button. The following message should appear: 4. Click the OK button.
At this point, your organization is ready to process credit cards through MaxEnterprise!

143
Element Express
Service: Element Express Interface: Host Payments Market Code: 7 – Retail Account ID: Provided by Element Express Account Token: Provided by Element Express Acceptor ID: Provided by Element Express
Finally, assign an Admin Password to this screen. Warning: Once a password has been assigned it will be required to access this screen in the future, so be sure to record the password someplace for future reference.
Note: Click the Test button to ensure MaxEnterprise is correctly communicating with Element Express.
The following message should appear:
Click the OK button.
At this point, your organization is ready to process credit cards through MaxEnterprise!
If there are any questions or concerns, please contact Technical Support at: 1-800-976-6646 or email: [email protected].

144
Printing Reports
General
Report Selection Screens
Printing Options
For many of the reports, you will be able to select what data will be included in the report according to some or all of the following criteria.
Date Range – You may limit a report to a date range. Facility – You may limit a report to single, multiple, or all facilities. Complex – You may limit a report to single, multiple, or all complexes. Customer - You may limit a report to single, multiple or all customers.
Sorting Options
For some reports, you will have the option of selecting how the data is sorted. Common sorting options include:
Facility Start Time Customer Type Hourly Rate
You will specify the above printing options and sorting options on a “report selection screen.” A sample report screen is pictured here.
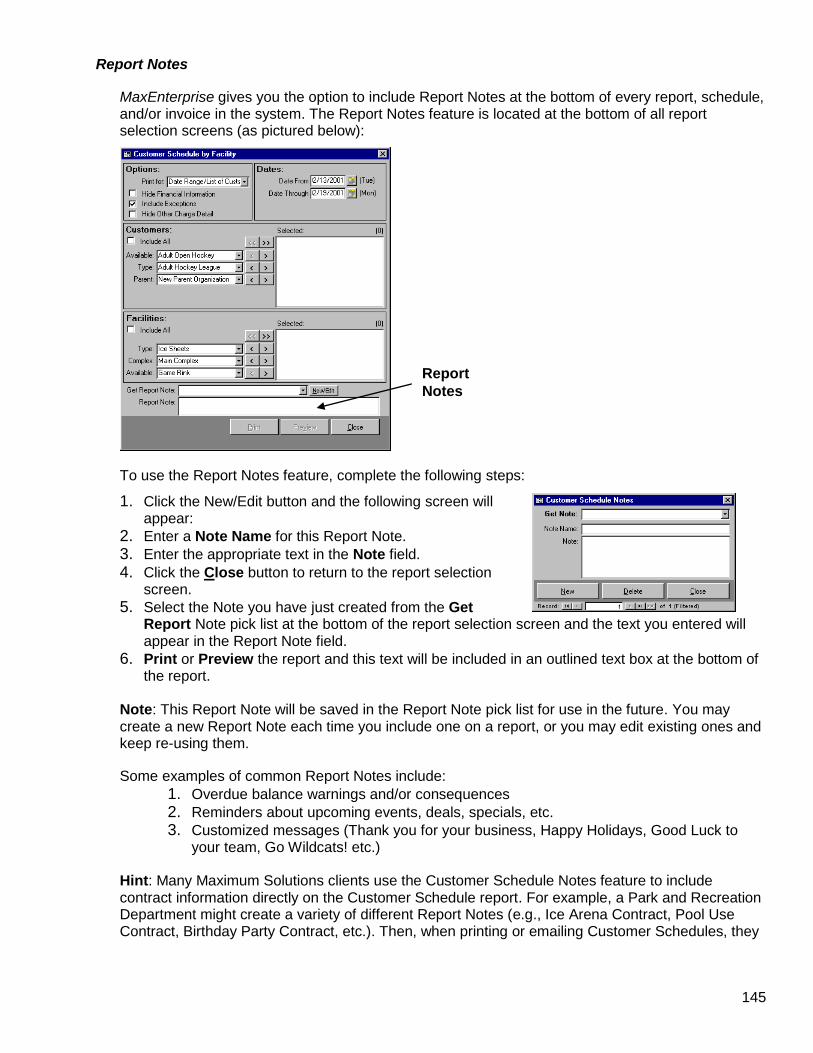
145
Report Notes
MaxEnterprise gives you the option to include Report Notes at the bottom of every report, schedule, and/or invoice in the system. The Report Notes feature is located at the bottom of all report selection screens (as pictured below):
To use the Report Notes feature, complete the following steps:
1. Click the New/Edit button and the following screen will appear:
2. Enter a Note Name for this Report Note.
3. Enter the appropriate text in the Note field.
4. Click the Close button to return to the report selection screen.
5. Select the Note you have just created from the Get Report Note pick list at the bottom of the report selection screen and the text you entered will appear in the Report Note field.
6. Print or Preview the report and this text will be included in an outlined text box at the bottom of the report.
Note: This Report Note will be saved in the Report Note pick list for use in the future. You may create a new Report Note each time you include one on a report, or you may edit existing ones and keep re-using them.
Some examples of common Report Notes include:
1. Overdue balance warnings and/or consequences
2. Reminders about upcoming events, deals, specials, etc.
3. Customized messages (Thank you for your business, Happy Holidays, Good Luck to your team, Go Wildcats! etc.)
Hint: Many Maximum Solutions clients use the Customer Schedule Notes feature to include contract information directly on the Customer Schedule report. For example, a Park and Recreation Department might create a variety of different Report Notes (e.g., Ice Arena Contract, Pool Use Contract, Birthday Party Contract, etc.). Then, when printing or emailing Customer Schedules, they
Report
Notes
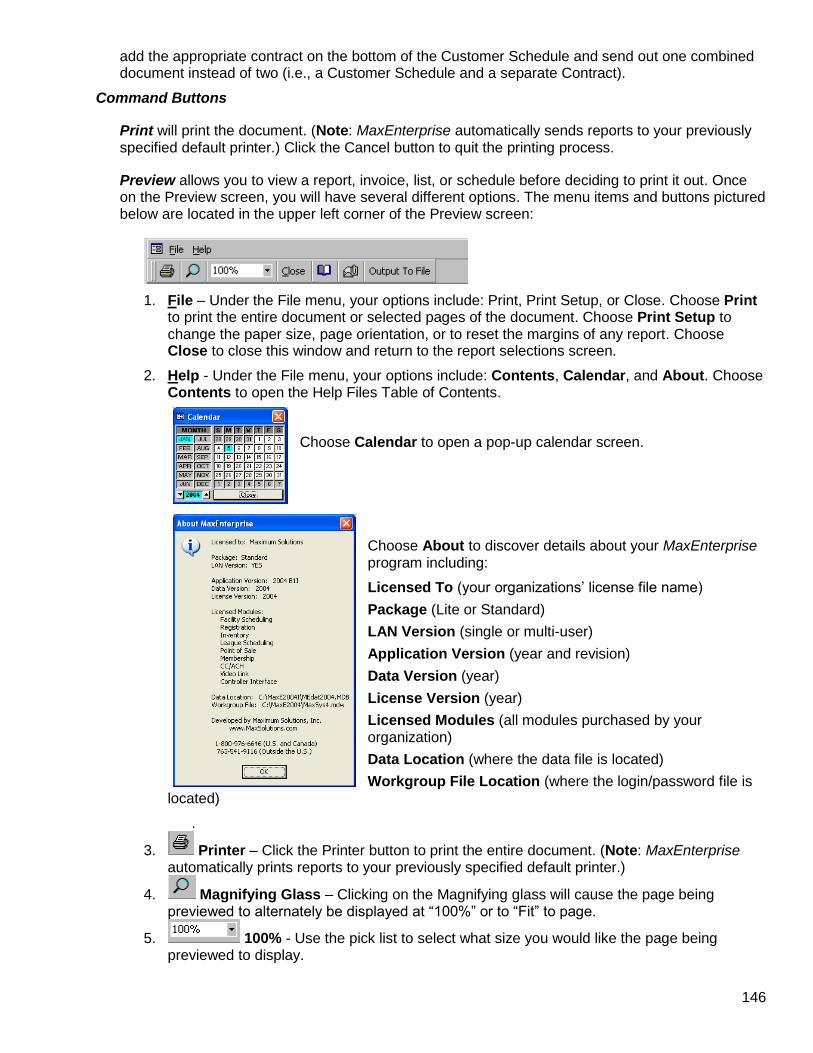
146
add the appropriate contract on the bottom of the Customer Schedule and send out one combined document instead of two (i.e., a Customer Schedule and a separate Contract).
Command Buttons
Print will print the document. (Note: MaxEnterprise automatically sends reports to your previously specified default printer.) Click the Cancel button to quit the printing process.
Preview allows you to view a report, invoice, list, or schedule before deciding to print it out. Once on the Preview screen, you will have several different options. The menu items and buttons pictured below are located in the upper left corner of the Preview screen:
1. File – Under the File menu, your options include: Print, Print Setup, or Close. Choose Print to print the entire document or selected pages of the document. Choose Print Setup to change the paper size, page orientation, or to reset the margins of any report. Choose Close to close this window and return to the report selections screen.
2. Help - Under the File menu, your options include: Contents, Calendar, and About. Choose Contents to open the Help Files Table of Contents.
Choose Calendar to open a pop-up calendar screen.
Choose About to discover details about your MaxEnterprise program including:
Licensed To (your organizations’ license file name)
Package (Lite or Standard)
LAN Version (single or multi-user)
Application Version (year and revision)
Data Version (year)
License Version (year)
Licensed Modules (all modules purchased by your organization)
Data Location (where the data file is located)
Workgroup File Location (where the login/password file is located)
.
3. Printer – Click the Printer button to print the entire document. (Note: MaxEnterprise automatically prints reports to your previously specified default printer.)
4. Magnifying Glass – Clicking on the Magnifying glass will cause the page being previewed to alternately be displayed at “100%” or to “Fit” to page.
5. 100% - Use the pick list to select what size you would like the page being previewed to display.
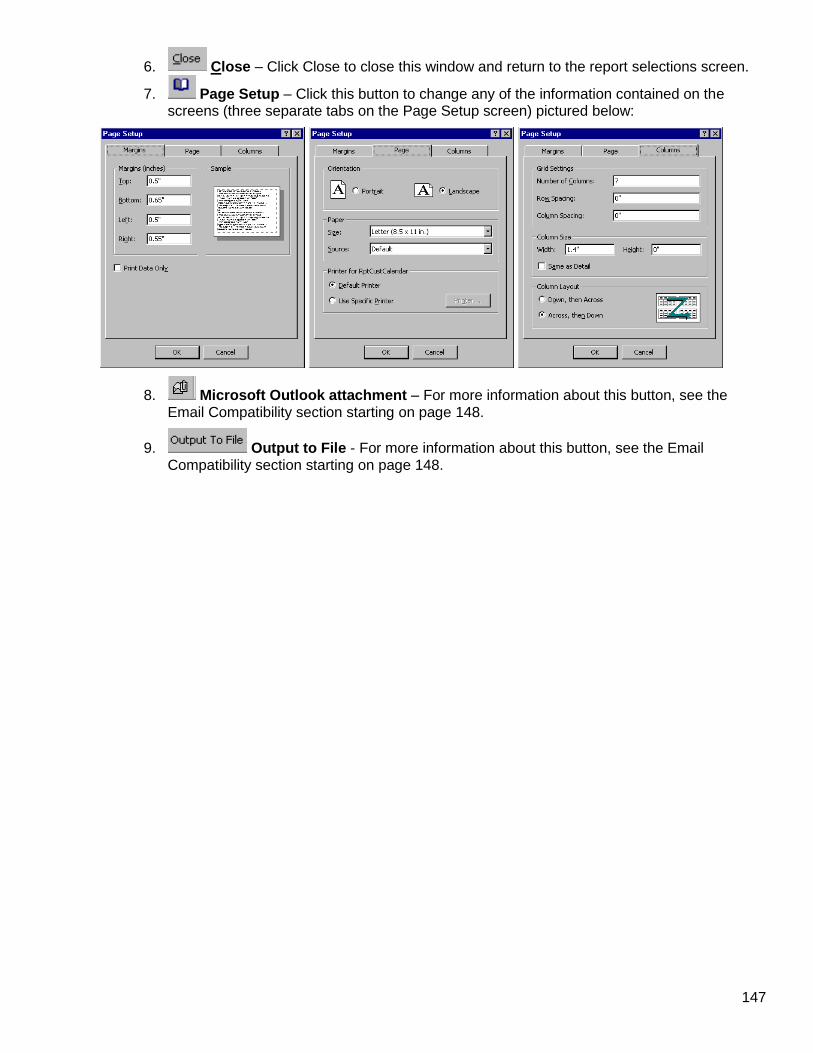
147
6. Close – Click Close to close this window and return to the report selections screen.
7. Page Setup – Click this button to change any of the information contained on the screens (three separate tabs on the Page Setup screen) pictured below:
8. Microsoft Outlook attachment – For more information about this button, see the Email Compatibility section starting on page 148.
9. Output to File - For more information about this button, see the Email Compatibility section starting on page 148.
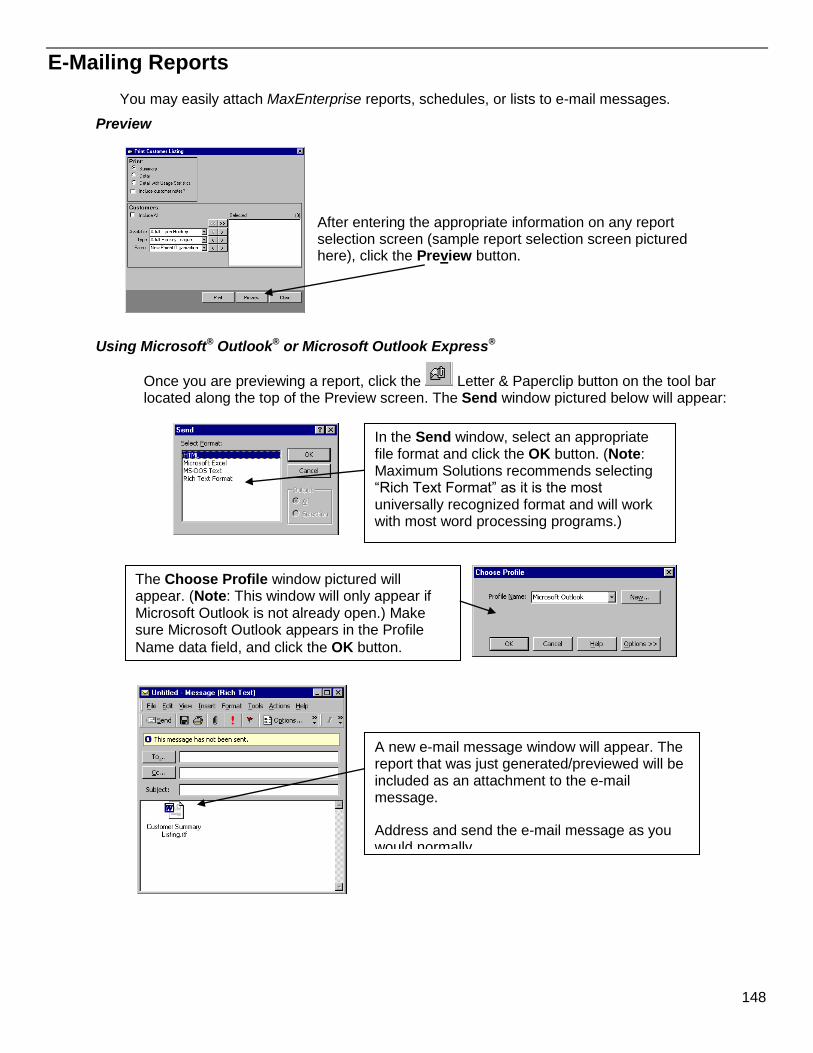
148
E-Mailing Reports
You may easily attach MaxEnterprise reports, schedules, or lists to e-mail messages.
Preview
After entering the appropriate information on any report selection screen (sample report selection screen pictured here), click the Preview button.
Using Microsoft® Outlook® or Microsoft Outlook Express®
Once you are previewing a report, click the Letter & Paperclip button on the tool bar located along the top of the Preview screen. The Send window pictured below will appear:
In the Send window, select an appropriate file format and click the OK button. (Note: Maximum Solutions recommends selecting “Rich Text Format” as it is the most universally recognized format and will work with most word processing programs.)
The Choose Profile window pictured will appear. (Note: This window will only appear if Microsoft Outlook is not already open.) Make sure Microsoft Outlook appears in the Profile
Name data field, and click the OK button.
A new e-mail message window will appear. The report that was just generated/previewed will be included as an attachment to the e-mail message.
Address and send the e-mail message as you would normally.
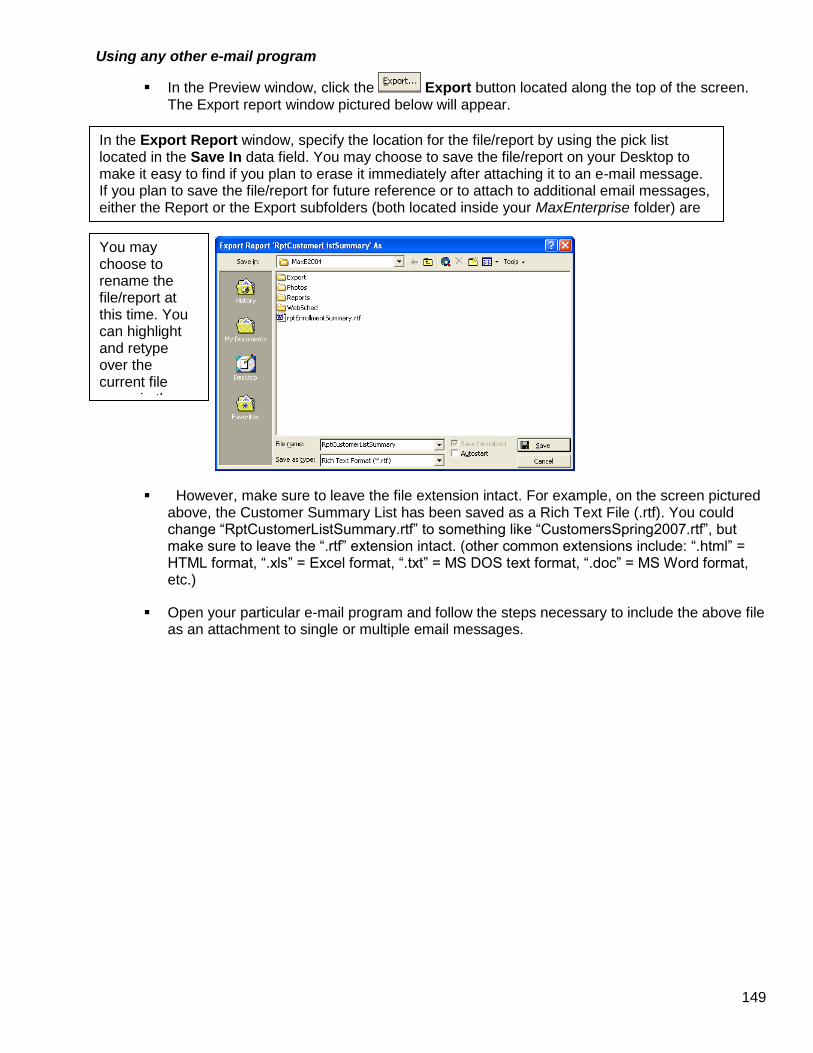
149
Using any other e-mail program
In the Preview window, click the Export button located along the top of the screen. The Export report window pictured below will appear.
However, make sure to leave the file extension intact. For example, on the screen pictured above, the Customer Summary List has been saved as a Rich Text File (.rtf). You could change “RptCustomerListSummary.rtf” to something like “CustomersSpring2007.rtf”, but make sure to leave the “.rtf” extension intact. (other common extensions include: “.html” = HTML format, “.xls” = Excel format, “.txt” = MS DOS text format, “.doc” = MS Word format, etc.)
Open your particular e-mail program and follow the steps necessary to include the above file as an attachment to single or multiple email messages.
In the Export Report window, specify the location for the file/report by using the pick list located in the Save In data field. You may choose to save the file/report on your Desktop to make it easy to find if you plan to erase it immediately after attaching it to an e-mail message. If you plan to save the file/report for future reference or to attach to additional email messages, either the Report or the Export subfolders (both located inside your MaxEnterprise folder) are good choices for storage.
You may choose to rename the file/report at this time. You can highlight and retype over the current file name in the File name data field.
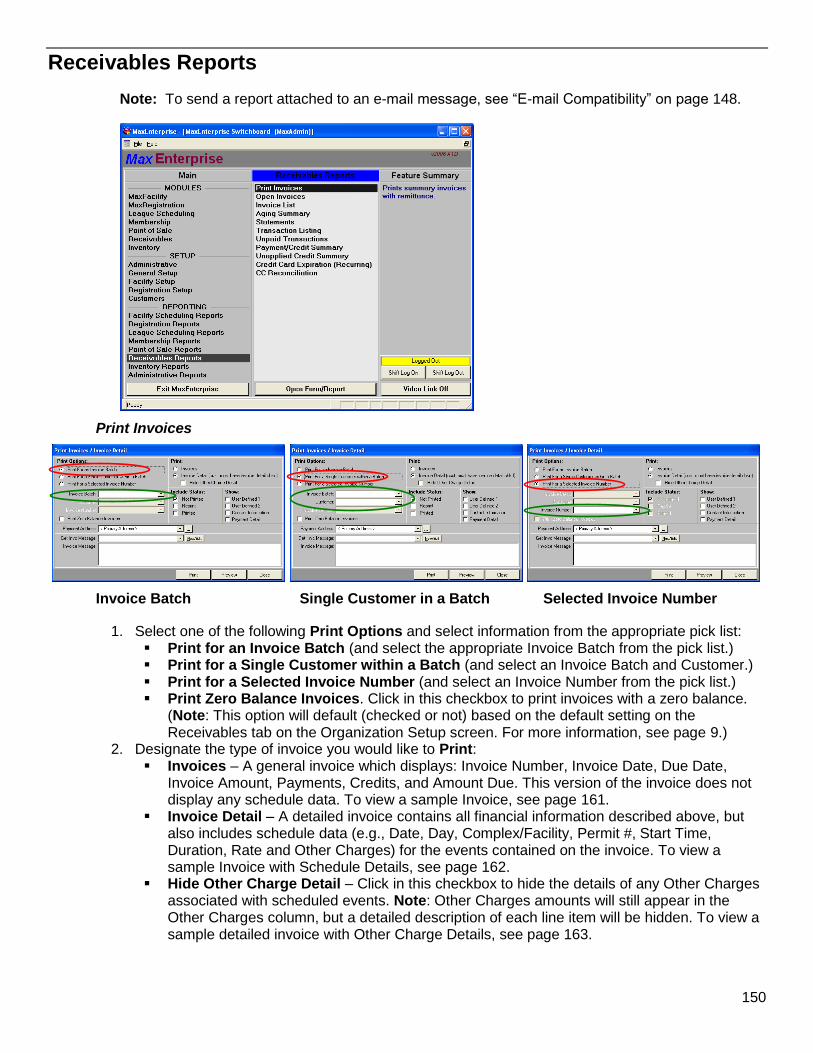
150
Receivables Reports
Note: To send a report attached to an e-mail message, see “E-mail Compatibility” on page 148.
Print Invoices
Invoice Batch Single Customer in a Batch Selected Invoice Number
1. Select one of the following Print Options and select information from the appropriate pick list: Print for an Invoice Batch (and select the appropriate Invoice Batch from the pick list.) Print for a Single Customer within a Batch (and select an Invoice Batch and Customer.) Print for a Selected Invoice Number (and select an Invoice Number from the pick list.) Print Zero Balance Invoices. Click in this checkbox to print invoices with a zero balance.
(Note: This option will default (checked or not) based on the default setting on the Receivables tab on the Organization Setup screen. For more information, see page 9.)
2. Designate the type of invoice you would like to Print: Invoices – A general invoice which displays: Invoice Number, Invoice Date, Due Date,
Invoice Amount, Payments, Credits, and Amount Due. This version of the invoice does not display any schedule data. To view a sample Invoice, see page 161.
Invoice Detail – A detailed invoice contains all financial information described above, but also includes schedule data (e.g., Date, Day, Complex/Facility, Permit #, Start Time, Duration, Rate and Other Charges) for the events contained on the invoice. To view a sample Invoice with Schedule Details, see page 162.
Hide Other Charge Detail – Click in this checkbox to hide the details of any Other Charges associated with scheduled events. Note: Other Charges amounts will still appear in the Other Charges column, but a detailed description of each line item will be hidden. To view a sample detailed invoice with Other Charge Details, see page 163.
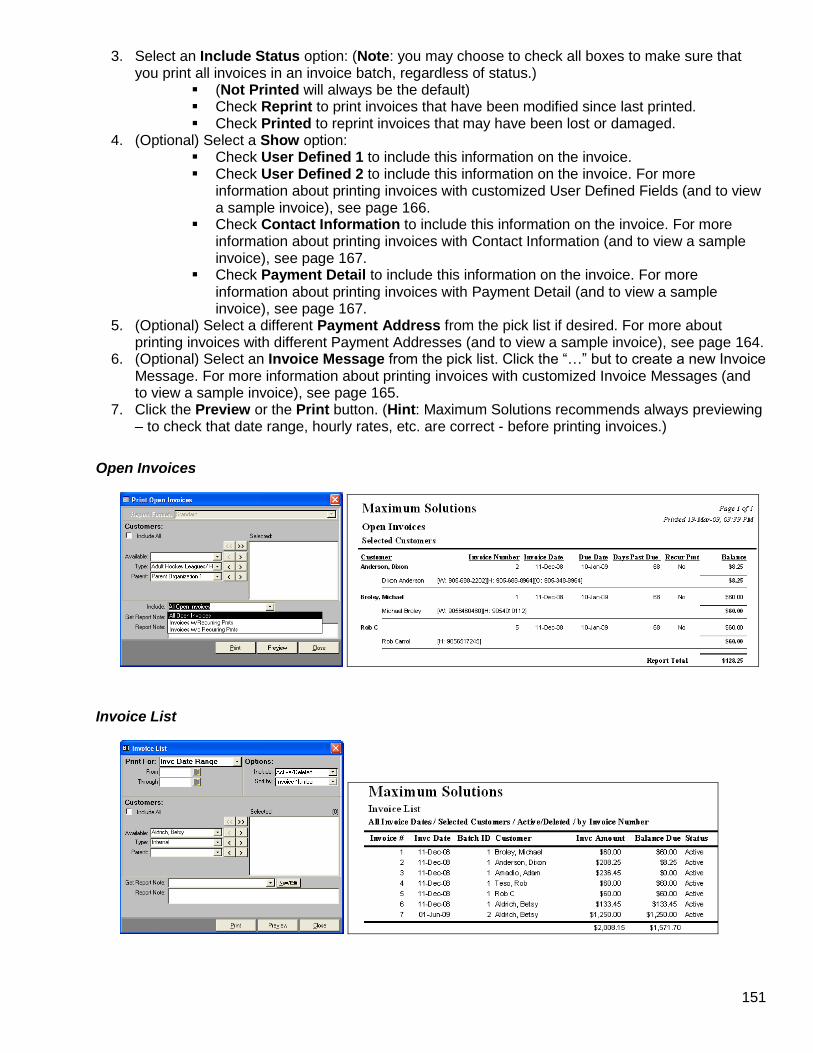
151
3. Select an Include Status option: (Note: you may choose to check all boxes to make sure that you print all invoices in an invoice batch, regardless of status.)
(Not Printed will always be the default) Check Reprint to print invoices that have been modified since last printed. Check Printed to reprint invoices that may have been lost or damaged.
4. (Optional) Select a Show option: Check User Defined 1 to include this information on the invoice. Check User Defined 2 to include this information on the invoice. For more
information about printing invoices with customized User Defined Fields (and to view a sample invoice), see page 166.
Check Contact Information to include this information on the invoice. For more information about printing invoices with Contact Information (and to view a sample invoice), see page 167.
Check Payment Detail to include this information on the invoice. For more information about printing invoices with Payment Detail (and to view a sample invoice), see page 167.
5. (Optional) Select a different Payment Address from the pick list if desired. For more about printing invoices with different Payment Addresses (and to view a sample invoice), see page 164.
6. (Optional) Select an Invoice Message from the pick list. Click the “…” but to create a new Invoice Message. For more information about printing invoices with customized Invoice Messages (and to view a sample invoice), see page 165.
7. Click the Preview or the Print button. (Hint: Maximum Solutions recommends always previewing – to check that date range, hourly rates, etc. are correct - before printing invoices.)
Open Invoices
Invoice List
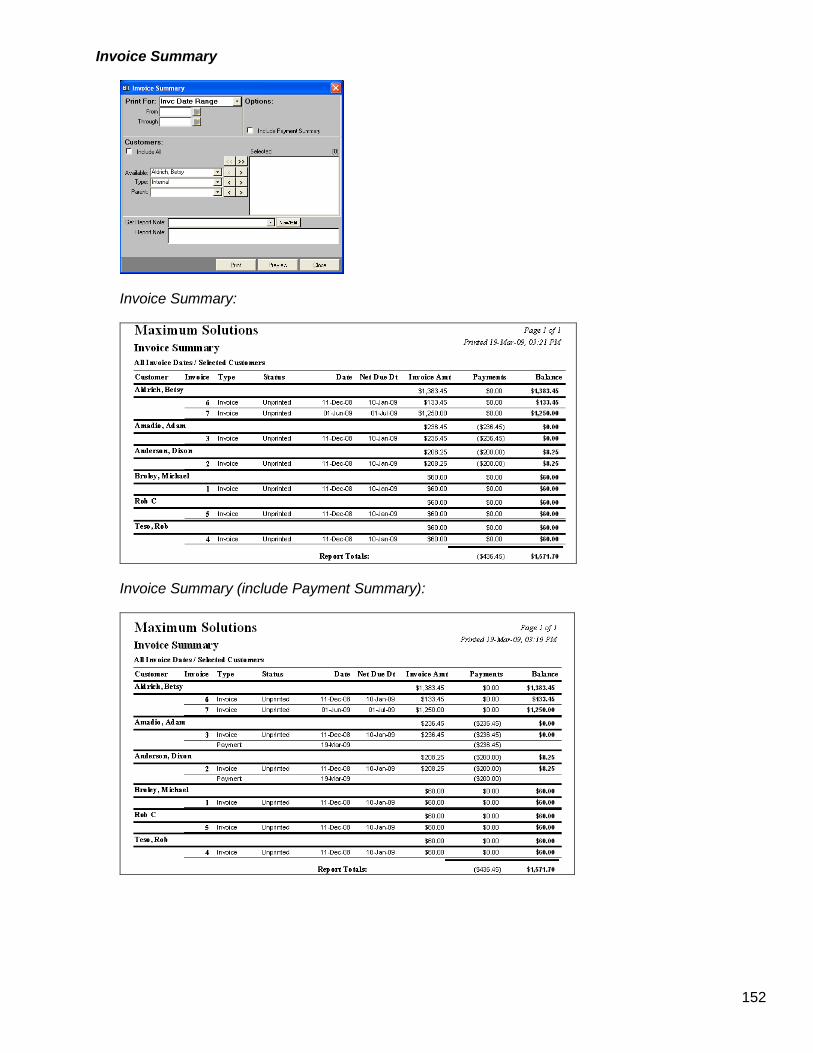
152
Invoice Summary
Invoice Summary:
Invoice Summary (include Payment Summary):
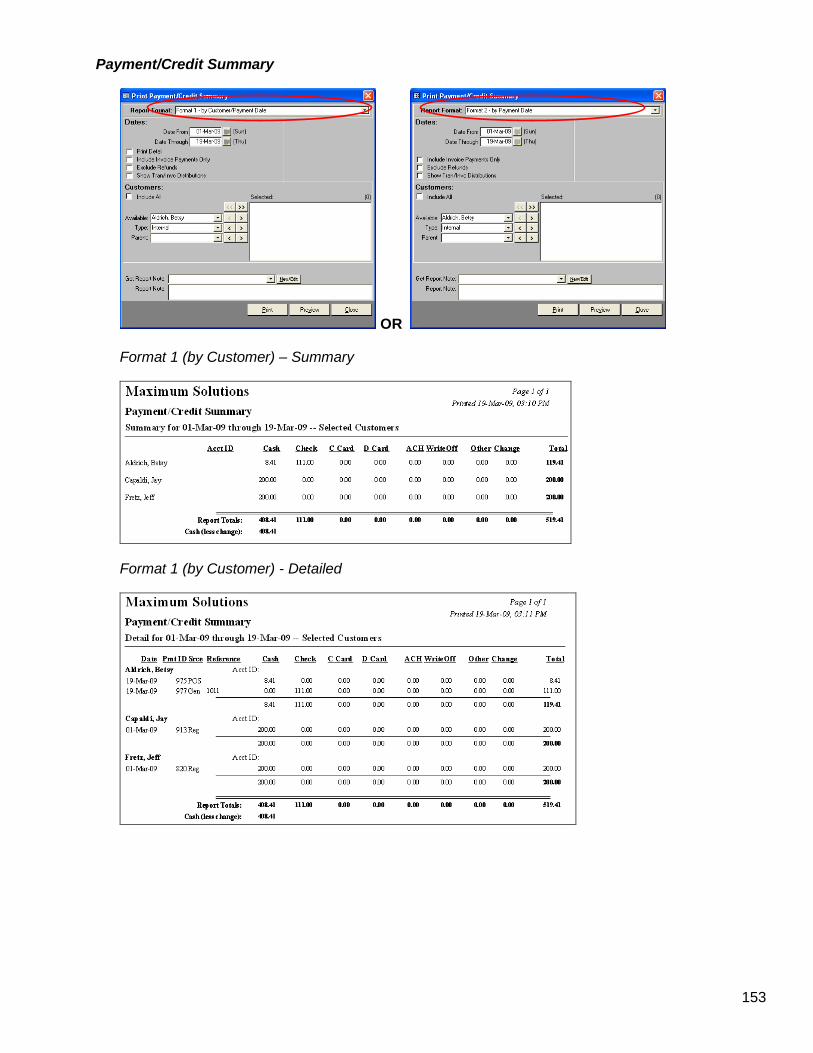
153
Payment/Credit Summary
OR
Format 1 (by Customer) – Summary
Format 1 (by Customer) - Detailed
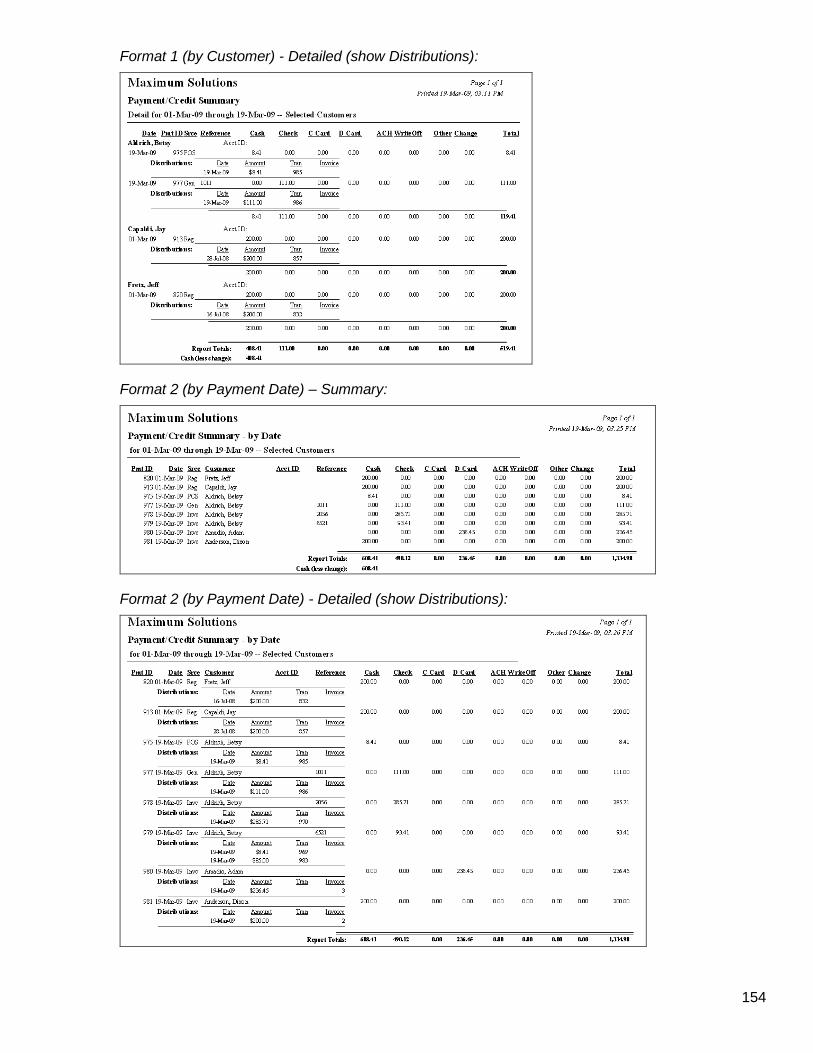
154
Format 1 (by Customer) - Detailed (show Distributions):
Format 2 (by Payment Date) – Summary:
Format 2 (by Payment Date) - Detailed (show Distributions):
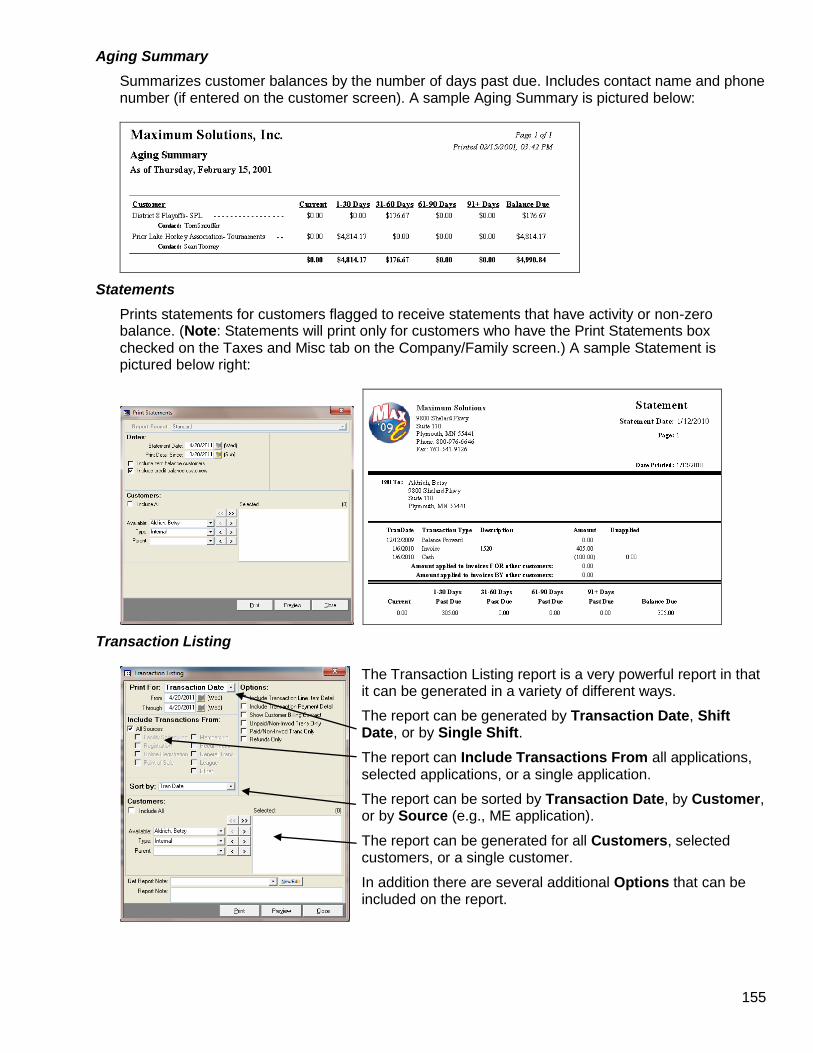
155
Aging Summary
Summarizes customer balances by the number of days past due. Includes contact name and phone number (if entered on the customer screen). A sample Aging Summary is pictured below:
Statements
Prints statements for customers flagged to receive statements that have activity or non-zero balance. (Note: Statements will print only for customers who have the Print Statements box checked on the Taxes and Misc tab on the Company/Family screen.) A sample Statement is pictured below right:
Transaction Listing
The Transaction Listing report is a very powerful report in that it can be generated in a variety of different ways.
The report can be generated by Transaction Date, Shift Date, or by Single Shift.
The report can Include Transactions From all applications, selected applications, or a single application.
The report can be sorted by Transaction Date, by Customer, or by Source (e.g., ME application).
The report can be generated for all Customers, selected customers, or a single customer.
In addition there are several additional Options that can be included on the report.
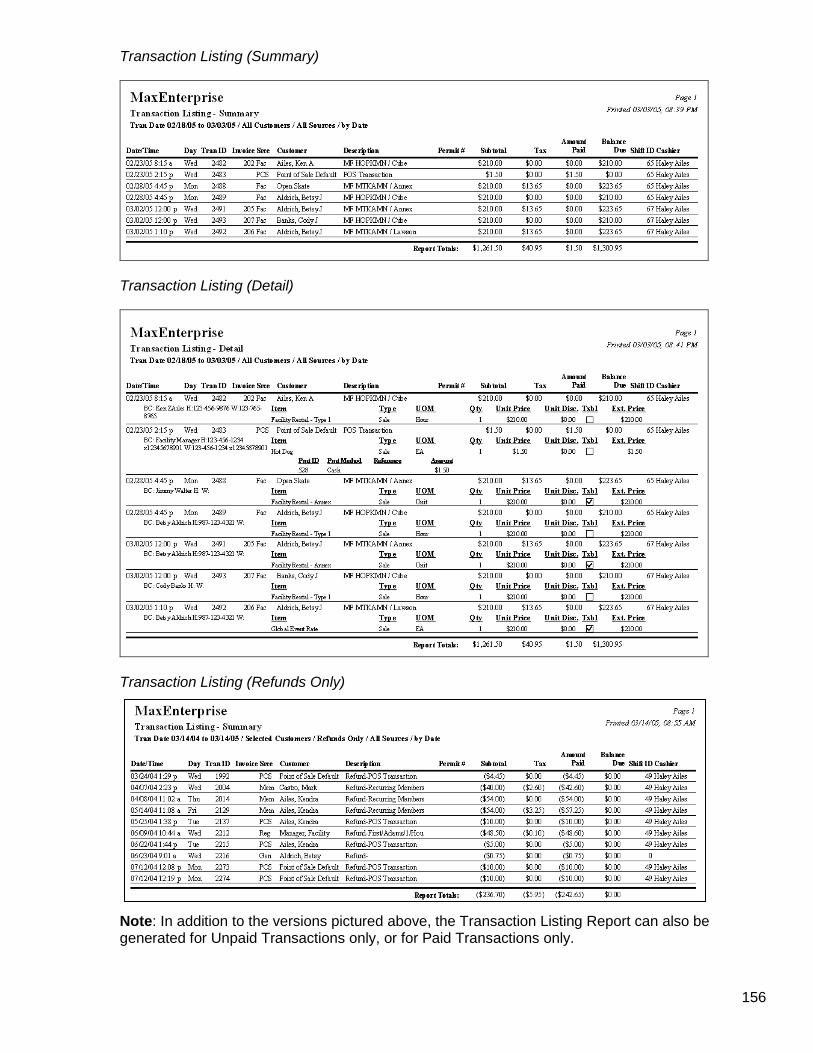
156
Transaction Listing (Summary)
Transaction Listing (Detail)
Transaction Listing (Refunds Only)
Note: In addition to the versions pictured above, the Transaction Listing Report can also be generated for Unpaid Transactions only, or for Paid Transactions only.
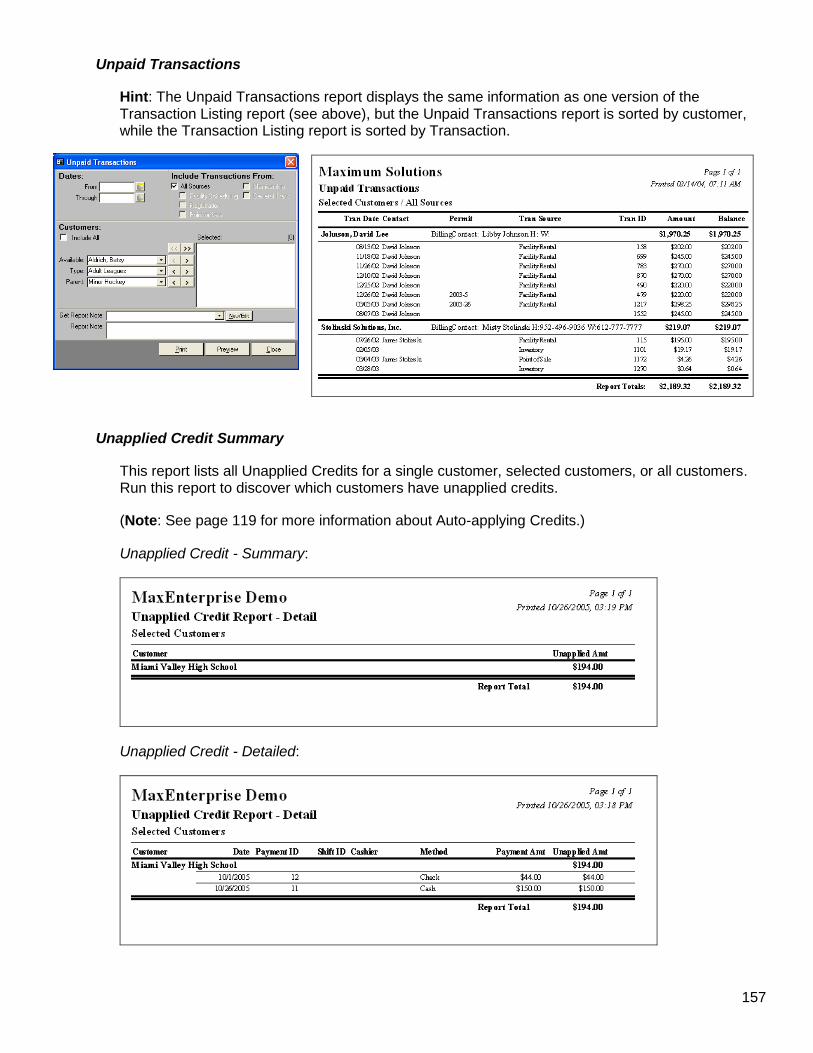
157
Unpaid Transactions
Hint: The Unpaid Transactions report displays the same information as one version of the Transaction Listing report (see above), but the Unpaid Transactions report is sorted by customer, while the Transaction Listing report is sorted by Transaction.
Unapplied Credit Summary
This report lists all Unapplied Credits for a single customer, selected customers, or all customers. Run this report to discover which customers have unapplied credits.
(Note: See page 119 for more information about Auto-applying Credits.)
Unapplied Credit - Summary:
Unapplied Credit - Detailed:
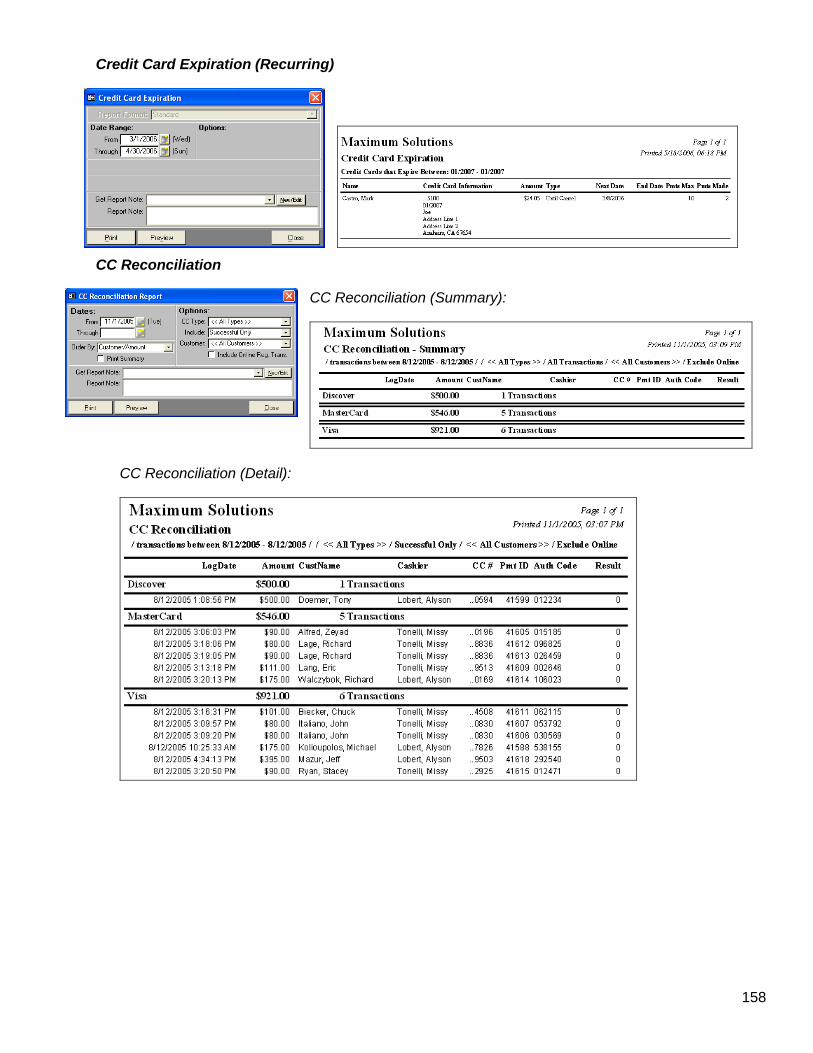
158
Credit Card Expiration (Recurring)
CC Reconciliation
CC Reconciliation (Summary):
CC Reconciliation (Detail):
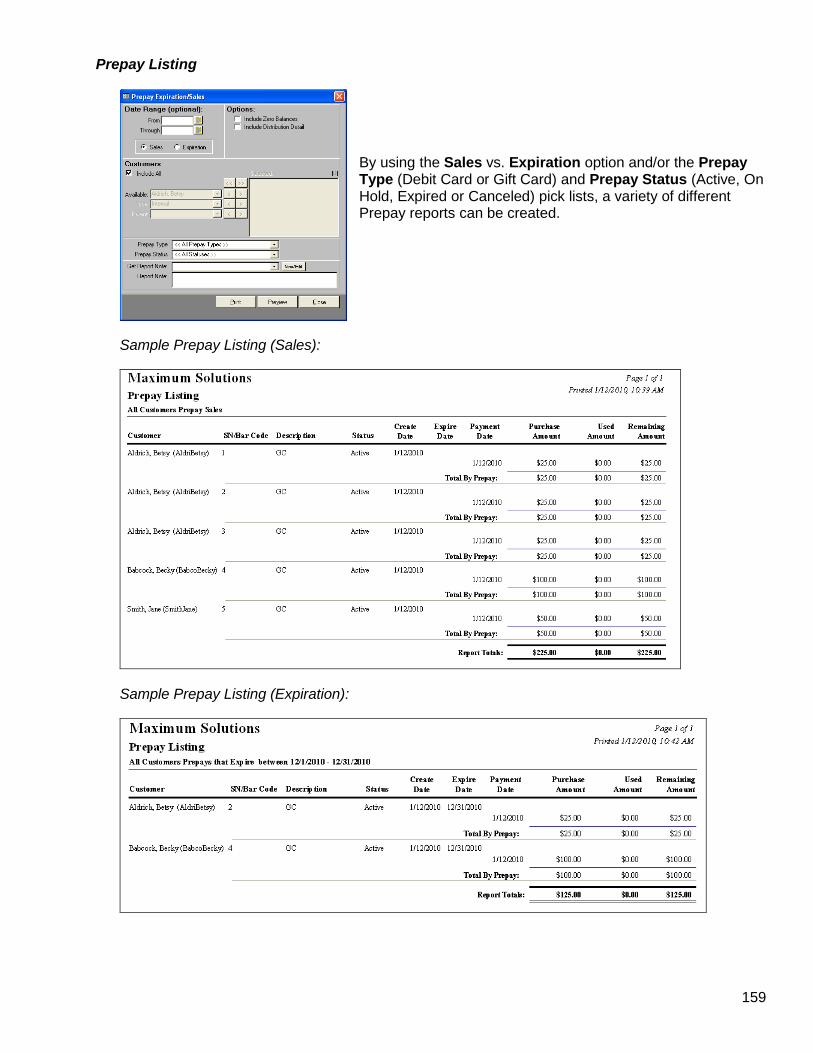
159
Prepay Listing
By using the Sales vs. Expiration option and/or the Prepay Type (Debit Card or Gift Card) and Prepay Status (Active, On Hold, Expired or Canceled) pick lists, a variety of different Prepay reports can be created.
Sample Prepay Listing (Sales):
Sample Prepay Listing (Expiration):

160
Recurring Invoice/Transaction Summary
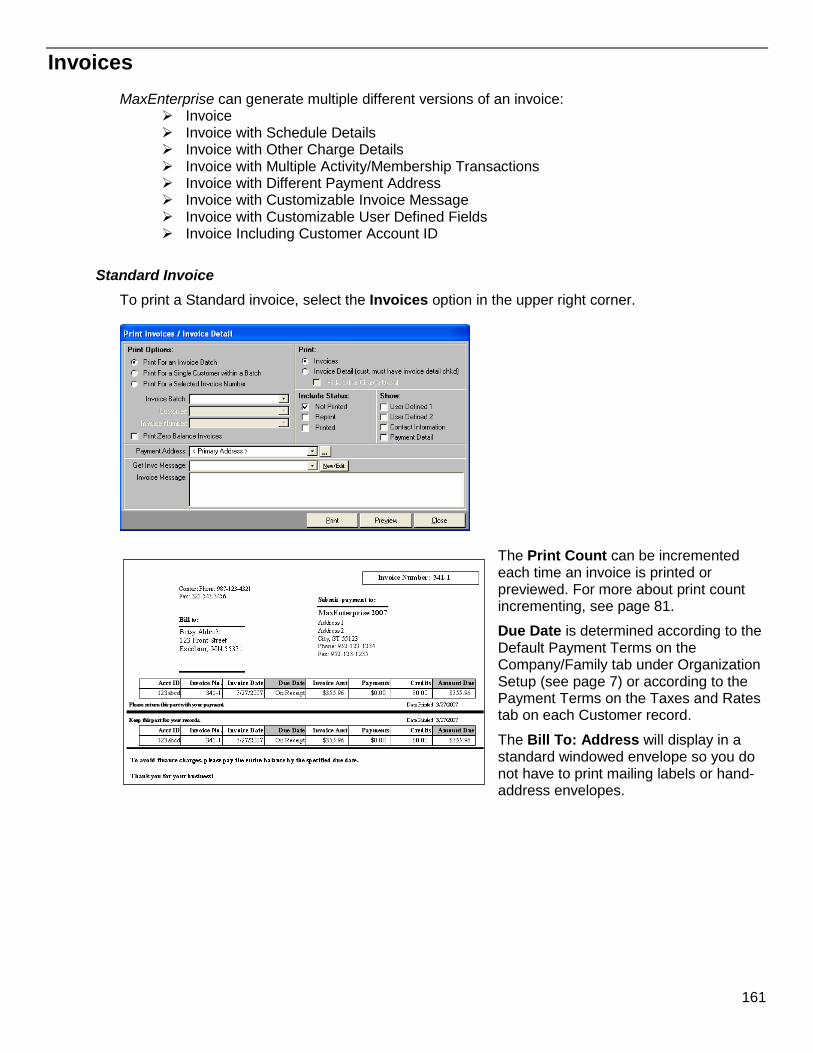
161
Invoices
MaxEnterprise can generate multiple different versions of an invoice: Invoice Invoice with Schedule Details Invoice with Other Charge Details Invoice with Multiple Activity/Membership Transactions Invoice with Different Payment Address Invoice with Customizable Invoice Message Invoice with Customizable User Defined Fields Invoice Including Customer Account ID
Standard Invoice
To print a Standard invoice, select the Invoices option in the upper right corner.
The Print Count can be incremented each time an invoice is printed or previewed. For more about print count incrementing, see page 81.
Due Date is determined according to the Default Payment Terms on the Company/Family tab under Organization Setup (see page 7) or according to the Payment Terms on the Taxes and Rates tab on each Customer record.
The Bill To: Address will display in a standard windowed envelope so you do not have to print mailing labels or hand-address envelopes.
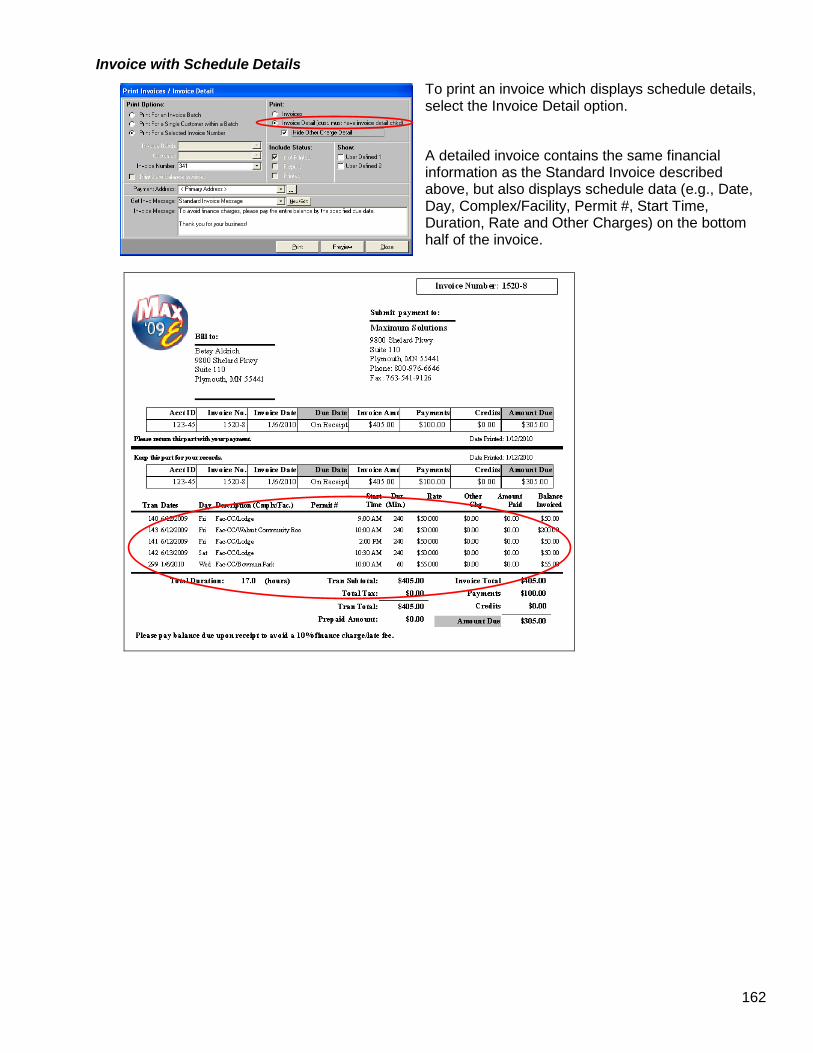
162
Invoice with Schedule Details
To print an invoice which displays schedule details, select the Invoice Detail option.
A detailed invoice contains the same financial information as the Standard Invoice described above, but also displays schedule data (e.g., Date, Day, Complex/Facility, Permit #, Start Time, Duration, Rate and Other Charges) on the bottom half of the invoice.
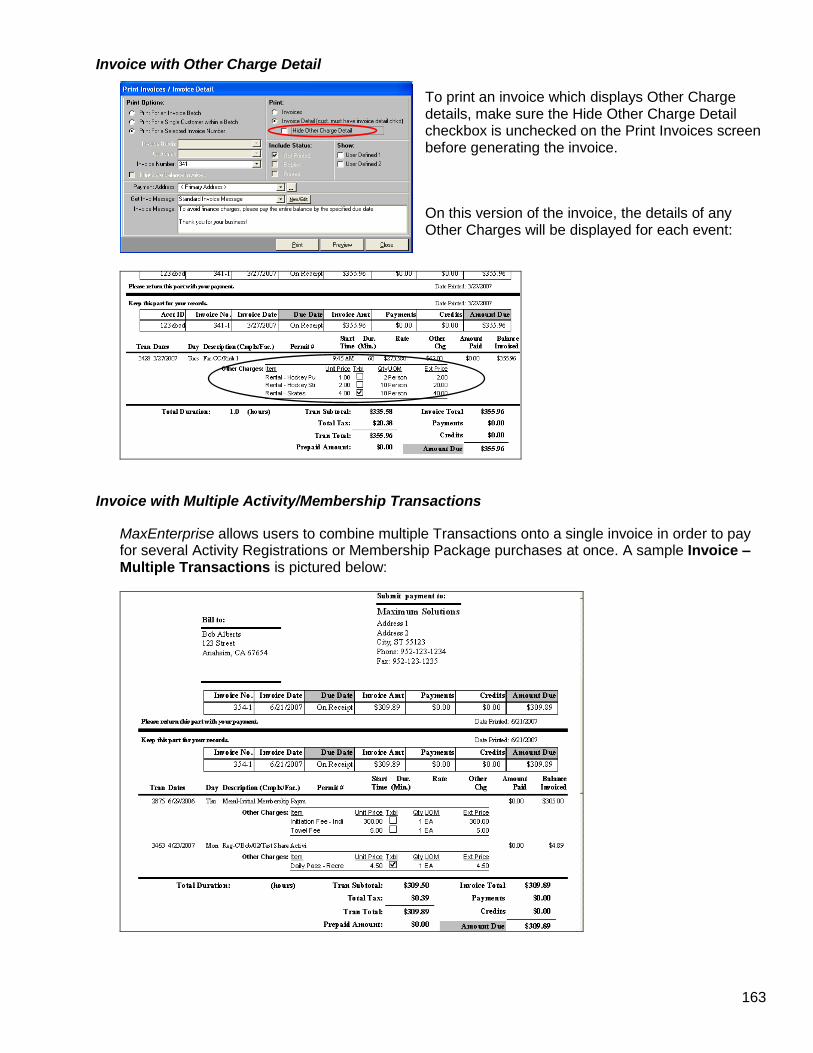
163
Invoice with Other Charge Detail
To print an invoice which displays Other Charge details, make sure the Hide Other Charge Detail checkbox is unchecked on the Print Invoices screen before generating the invoice.
On this version of the invoice, the details of any Other Charges will be displayed for each event:
Invoice with Multiple Activity/Membership Transactions
MaxEnterprise allows users to combine multiple Transactions onto a single invoice in order to pay for several Activity Registrations or Membership Package purchases at once. A sample Invoice – Multiple Transactions is pictured below:
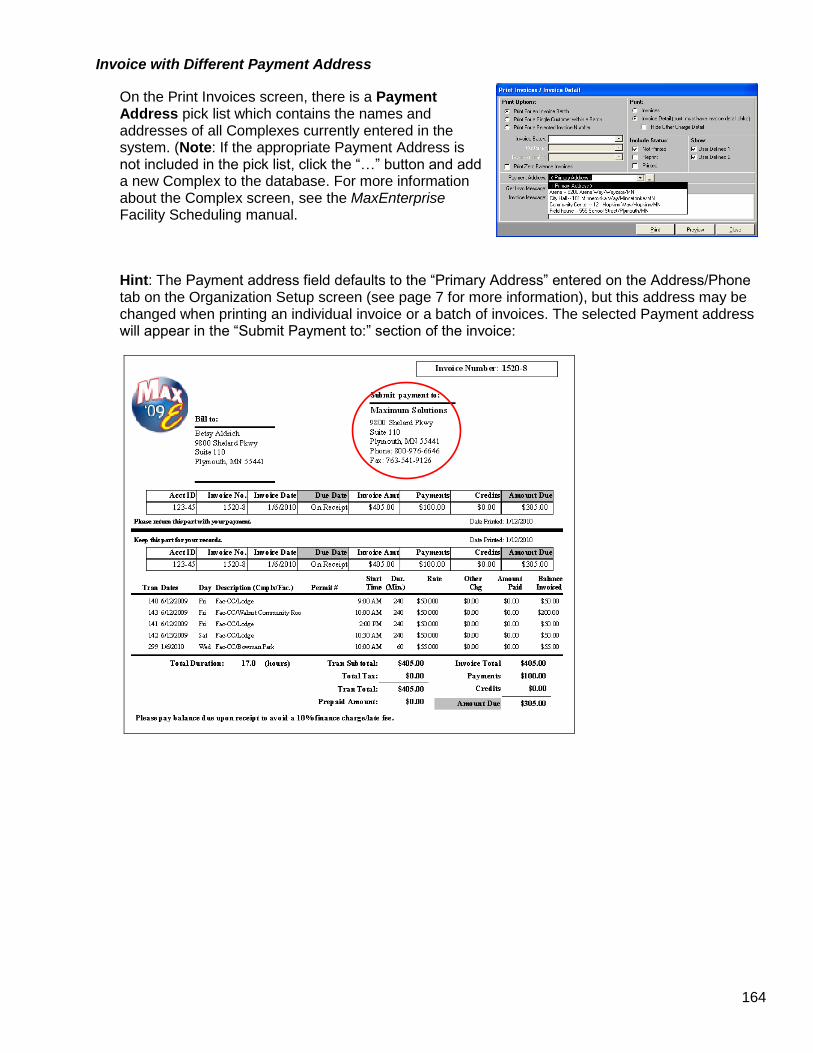
164
Invoice with Different Payment Address
On the Print Invoices screen, there is a Payment Address pick list which contains the names and addresses of all Complexes currently entered in the system. (Note: If the appropriate Payment Address is not included in the pick list, click the “…” button and add a new Complex to the database. For more information about the Complex screen, see the MaxEnterprise Facility Scheduling manual.
Hint: The Payment address field defaults to the “Primary Address” entered on the Address/Phone tab on the Organization Setup screen (see page 7 for more information), but this address may be changed when printing an individual invoice or a batch of invoices. The selected Payment address will appear in the “Submit Payment to:” section of the invoice:
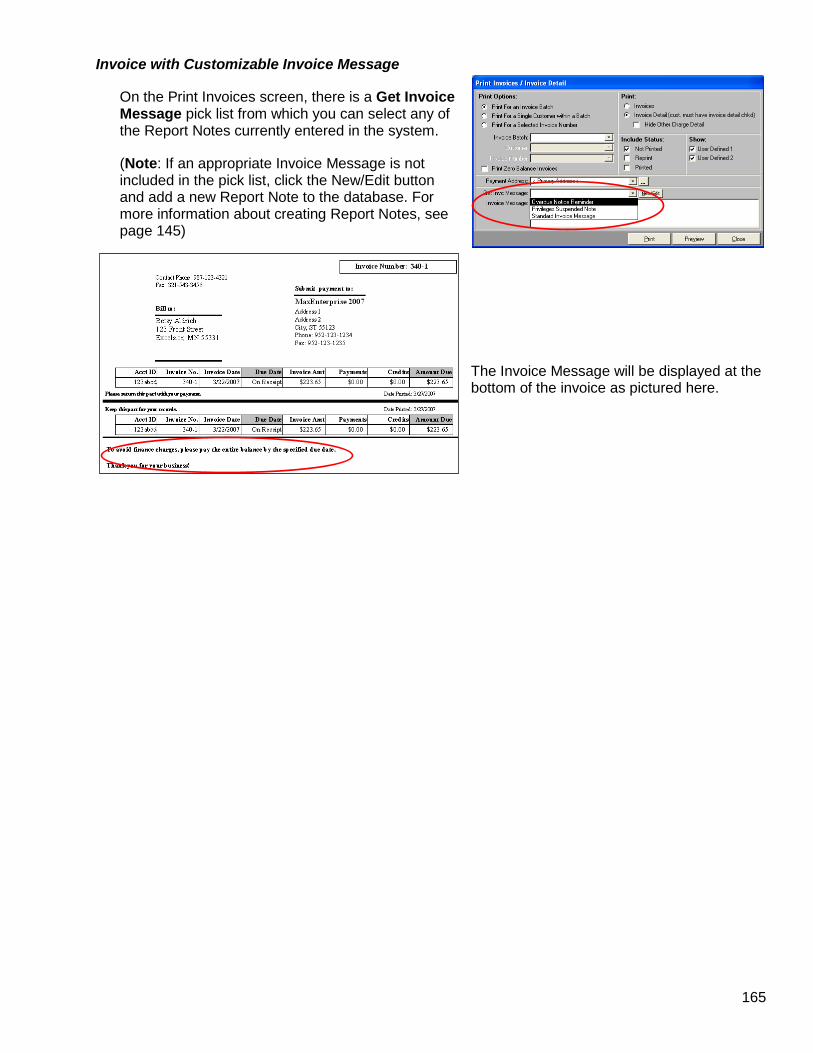
165
Invoice with Customizable Invoice Message
On the Print Invoices screen, there is a Get Invoice Message pick list from which you can select any of the Report Notes currently entered in the system.
(Note: If an appropriate Invoice Message is not included in the pick list, click the New/Edit button and add a new Report Note to the database. For more information about creating Report Notes, see page 145)
The Invoice Message will be displayed at the bottom of the invoice as pictured here.
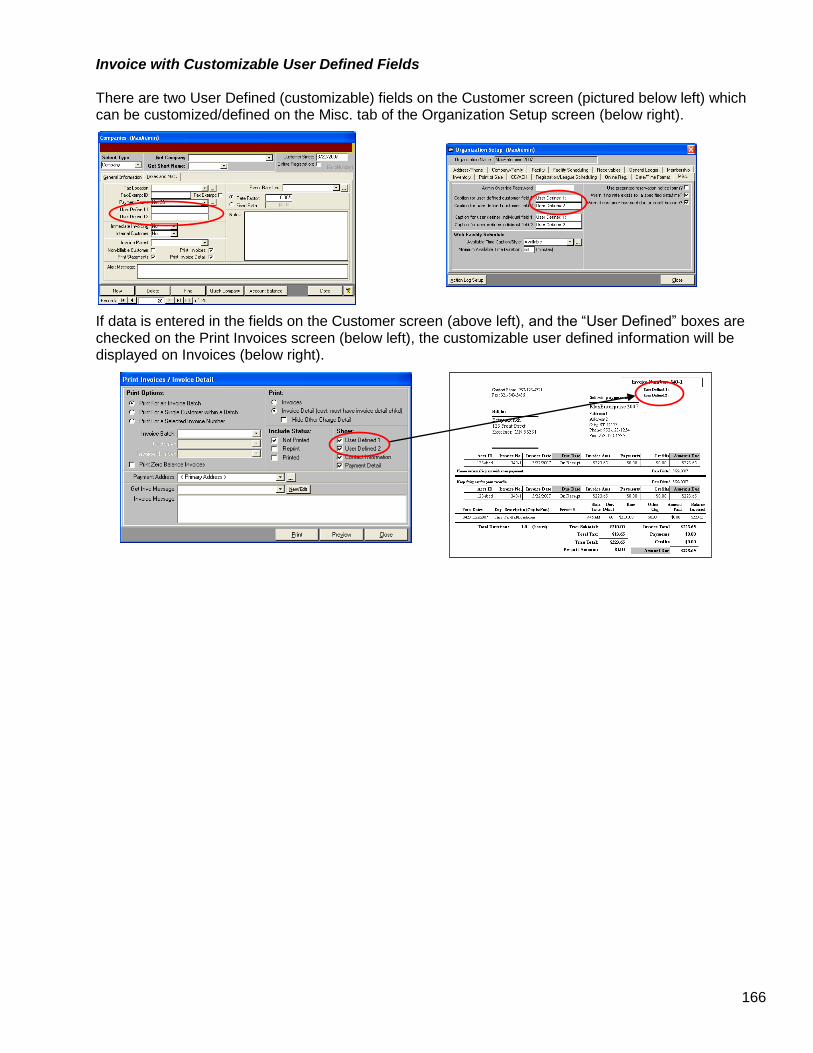
166
Invoice with Customizable User Defined Fields There are two User Defined (customizable) fields on the Customer screen (pictured below left) which can be customized/defined on the Misc. tab of the Organization Setup screen (below right).
If data is entered in the fields on the Customer screen (above left), and the “User Defined” boxes are checked on the Print Invoices screen (below left), the customizable user defined information will be displayed on Invoices (below right).
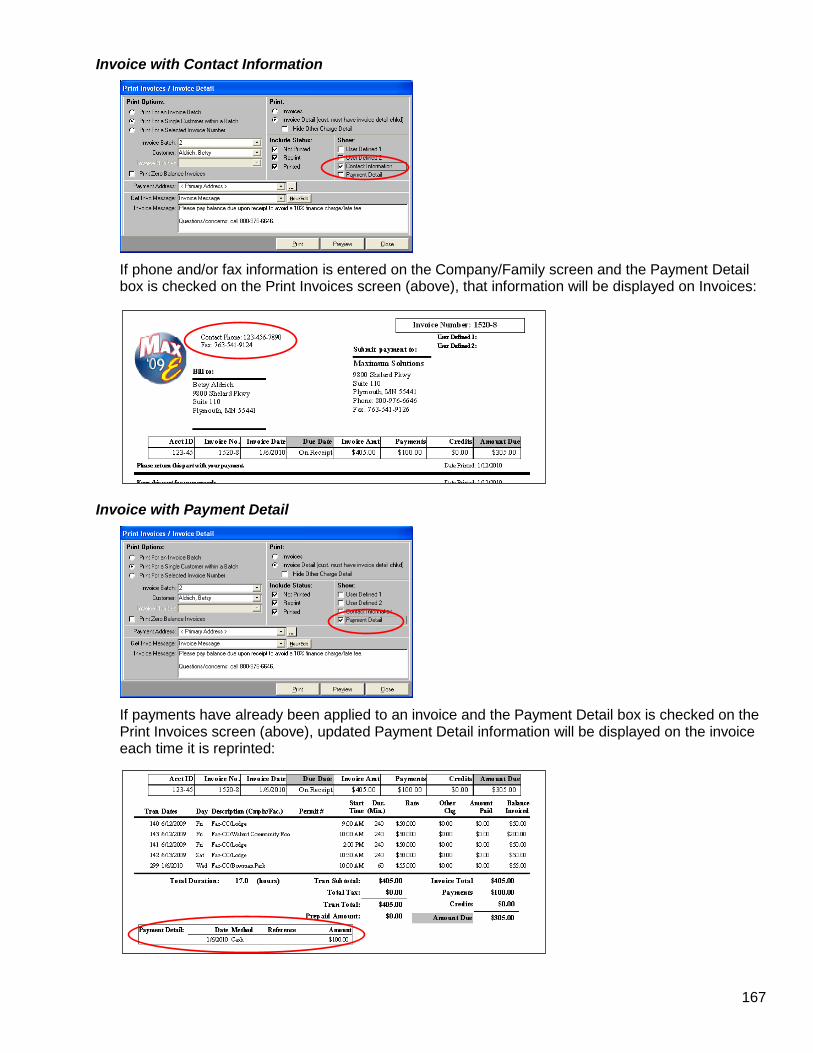
167
Invoice with Contact Information
If phone and/or fax information is entered on the Company/Family screen and the Payment Detail box is checked on the Print Invoices screen (above), that information will be displayed on Invoices:
Invoice with Payment Detail
If payments have already been applied to an invoice and the Payment Detail box is checked on the Print Invoices screen (above), updated Payment Detail information will be displayed on the invoice each time it is reprinted:
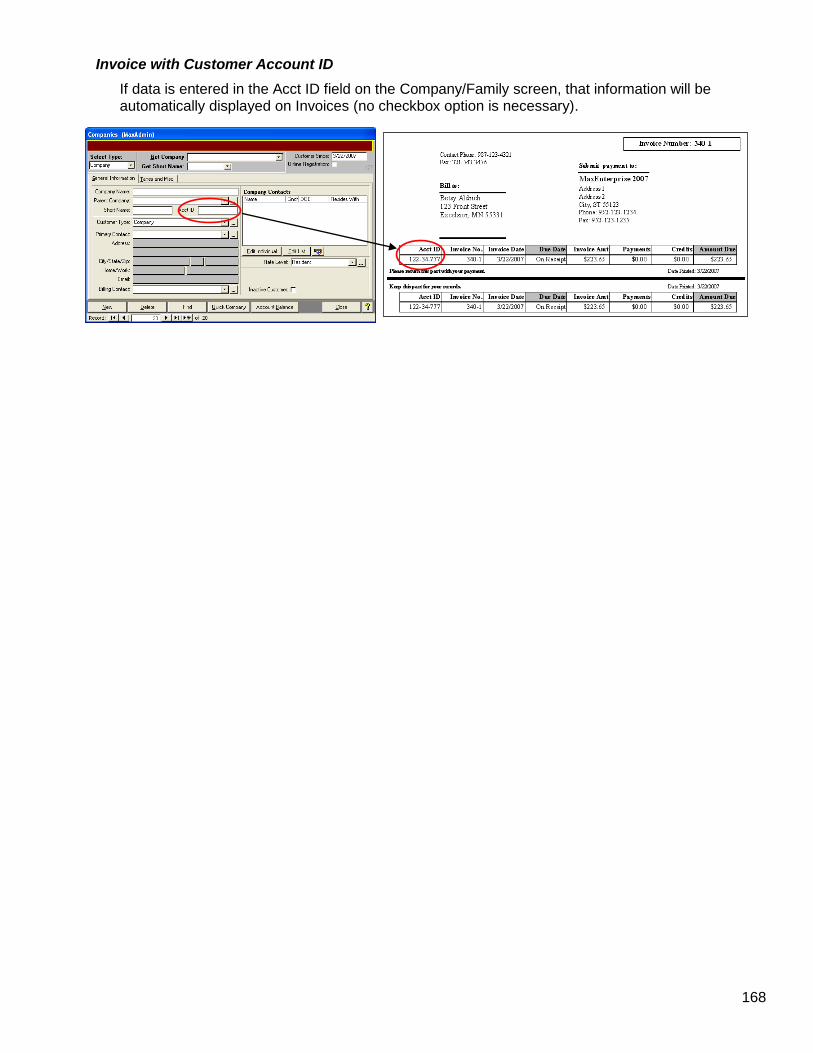
168
Invoice with Customer Account ID
If data is entered in the Acct ID field on the Company/Family screen, that information will be automatically displayed on Invoices (no checkbox option is necessary).
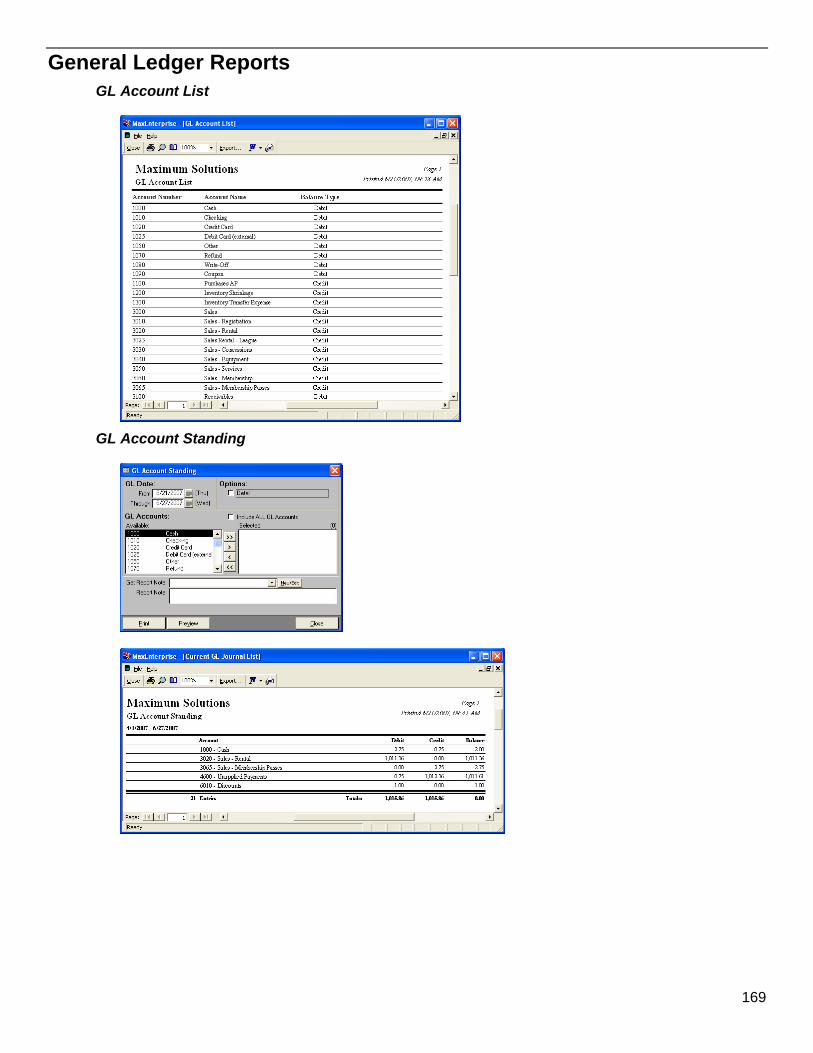
169
General Ledger Reports
GL Account List
GL Account Standing
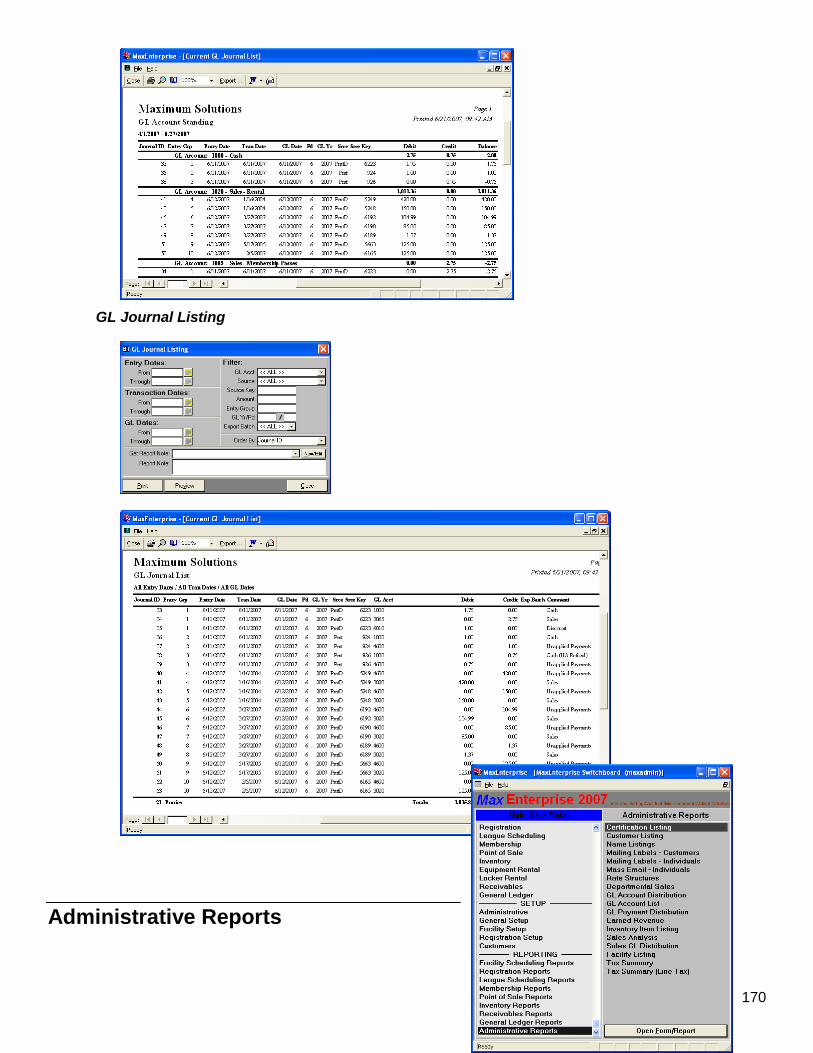
170
GL Journal Listing
Administrative Reports
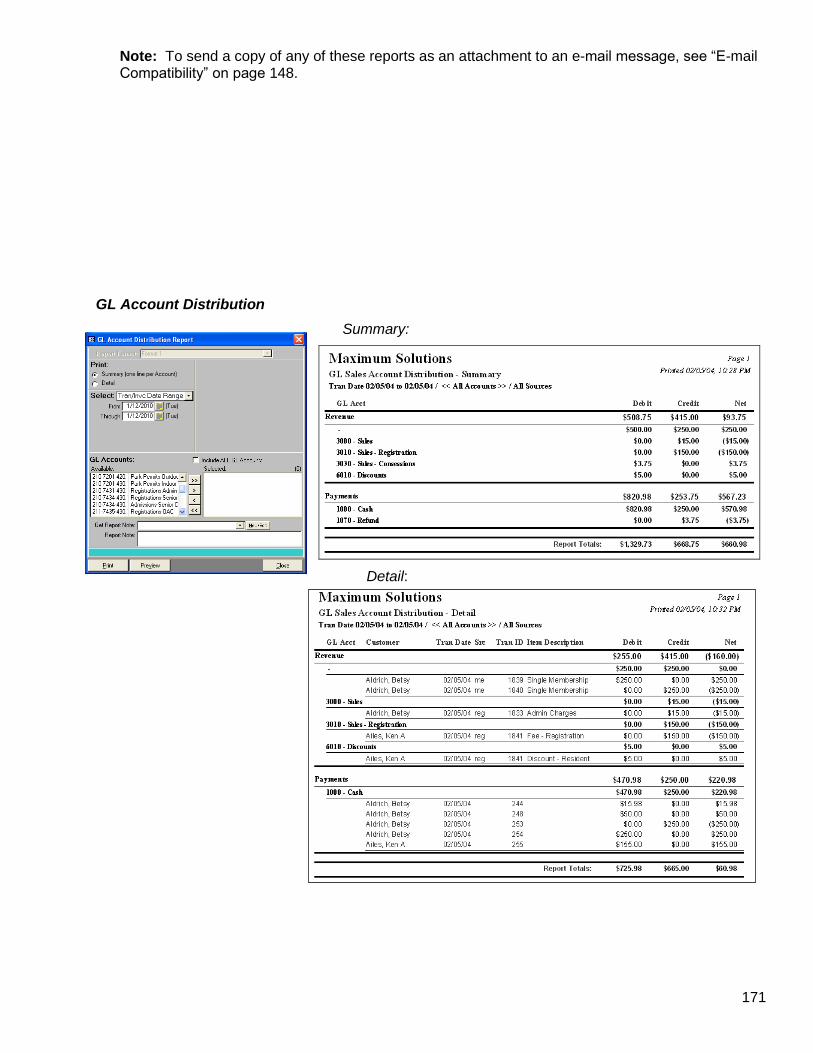
171
Note: To send a copy of any of these reports as an attachment to an e-mail message, see “E-mail Compatibility” on page 148.
GL Account Distribution
Summary:
Detail:
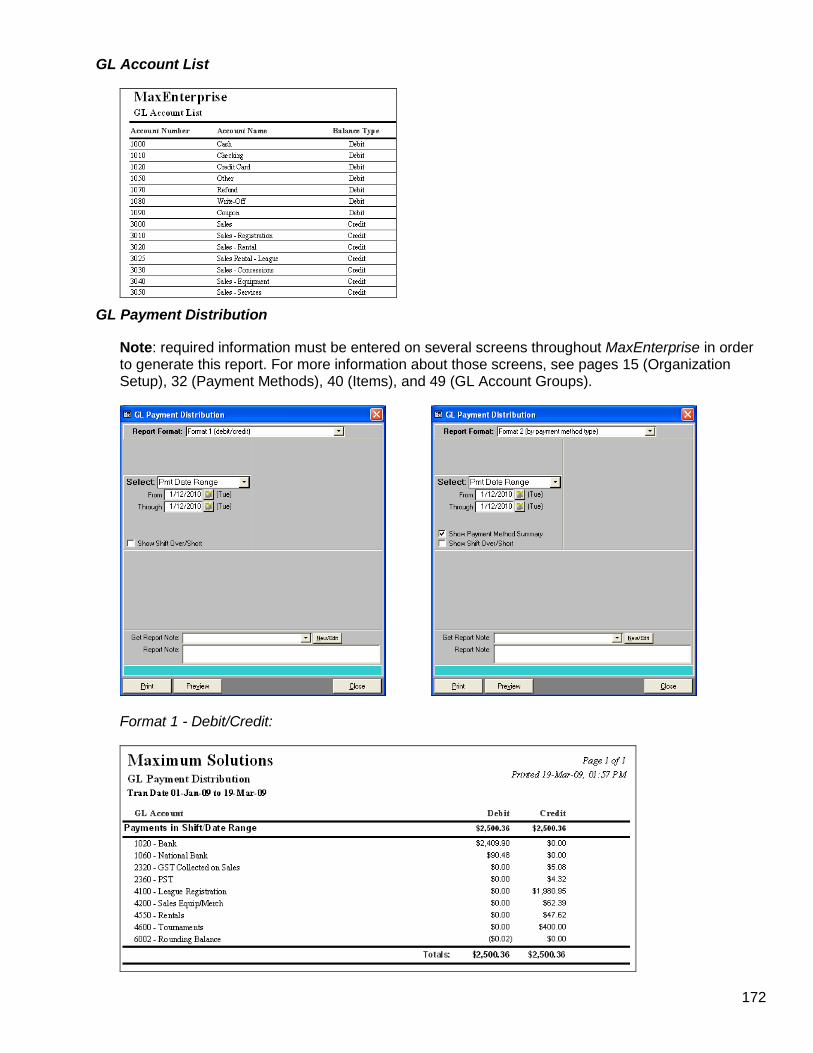
172
GL Account List
GL Payment Distribution
Note: required information must be entered on several screens throughout MaxEnterprise in order to generate this report. For more information about those screens, see pages 15 (Organization Setup), 32 (Payment Methods), 40 (Items), and 49 (GL Account Groups).
Format 1 - Debit/Credit:
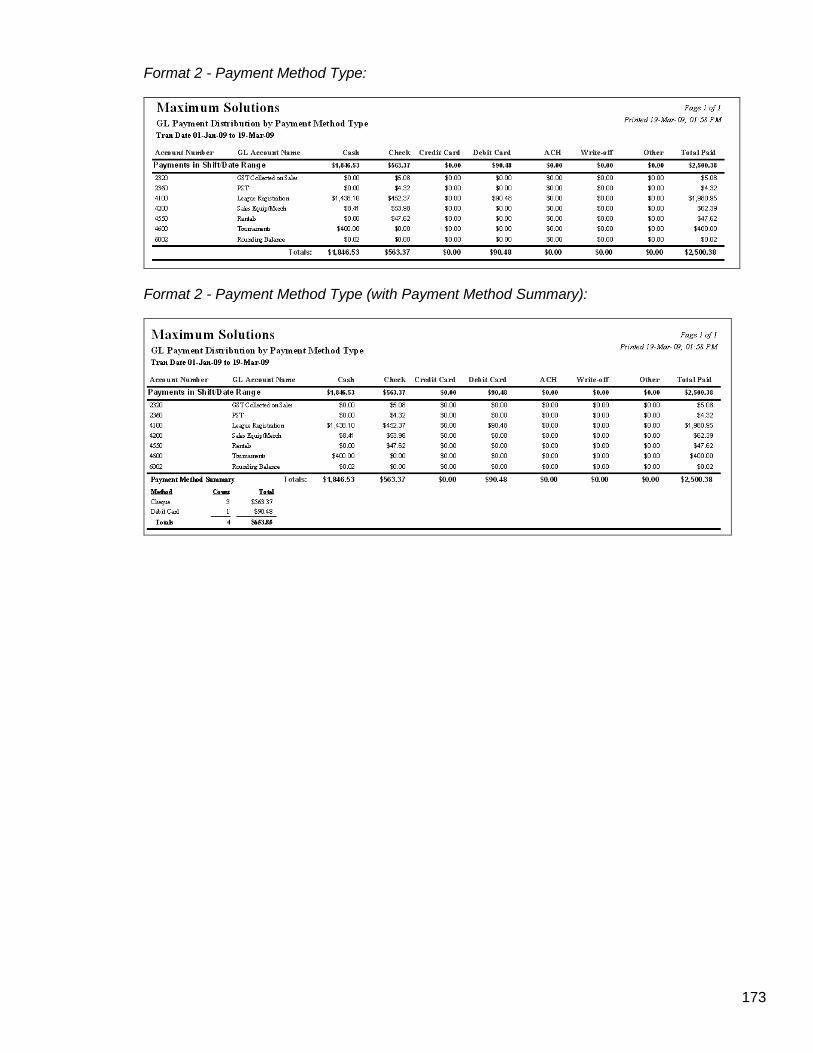
173
Format 2 - Payment Method Type:
Format 2 - Payment Method Type (with Payment Method Summary):
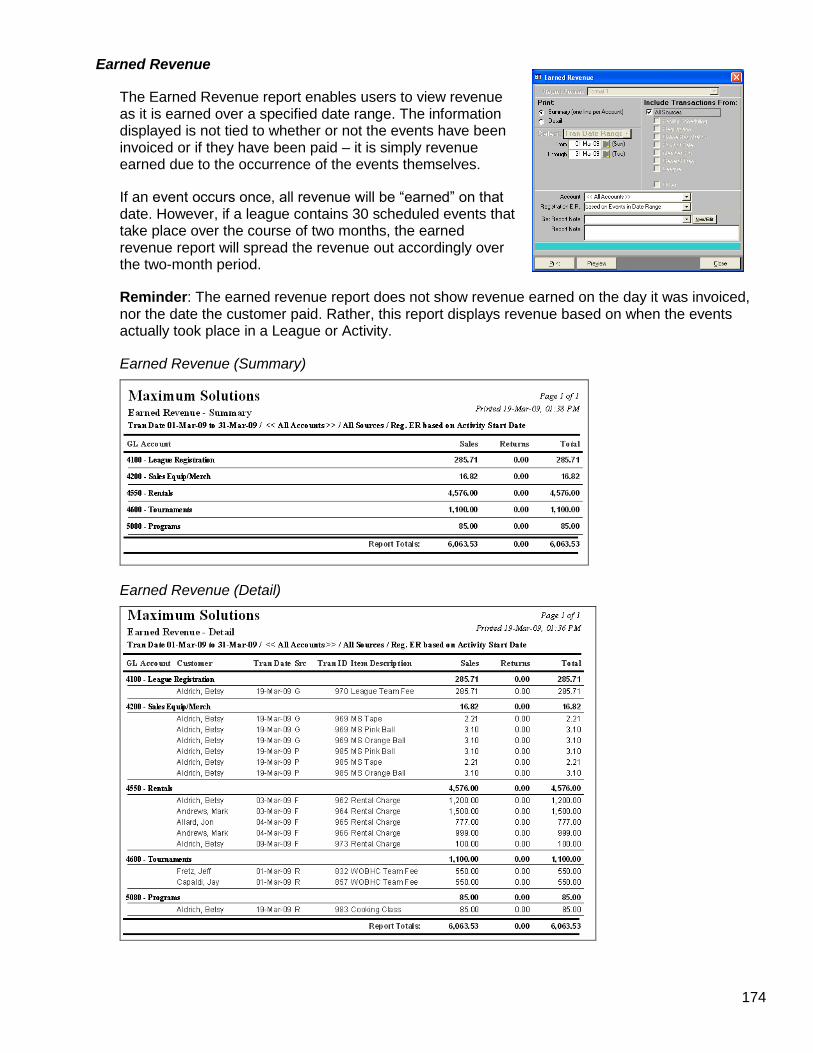
174
Earned Revenue
The Earned Revenue report enables users to view revenue as it is earned over a specified date range. The information displayed is not tied to whether or not the events have been invoiced or if they have been paid – it is simply revenue earned due to the occurrence of the events themselves.
If an event occurs once, all revenue will be “earned” on that date. However, if a league contains 30 scheduled events that take place over the course of two months, the earned revenue report will spread the revenue out accordingly over the two-month period.
Reminder: The earned revenue report does not show revenue earned on the day it was invoiced, nor the date the customer paid. Rather, this report displays revenue based on when the events actually took place in a League or Activity.
Earned Revenue (Summary)
Earned Revenue (Detail)
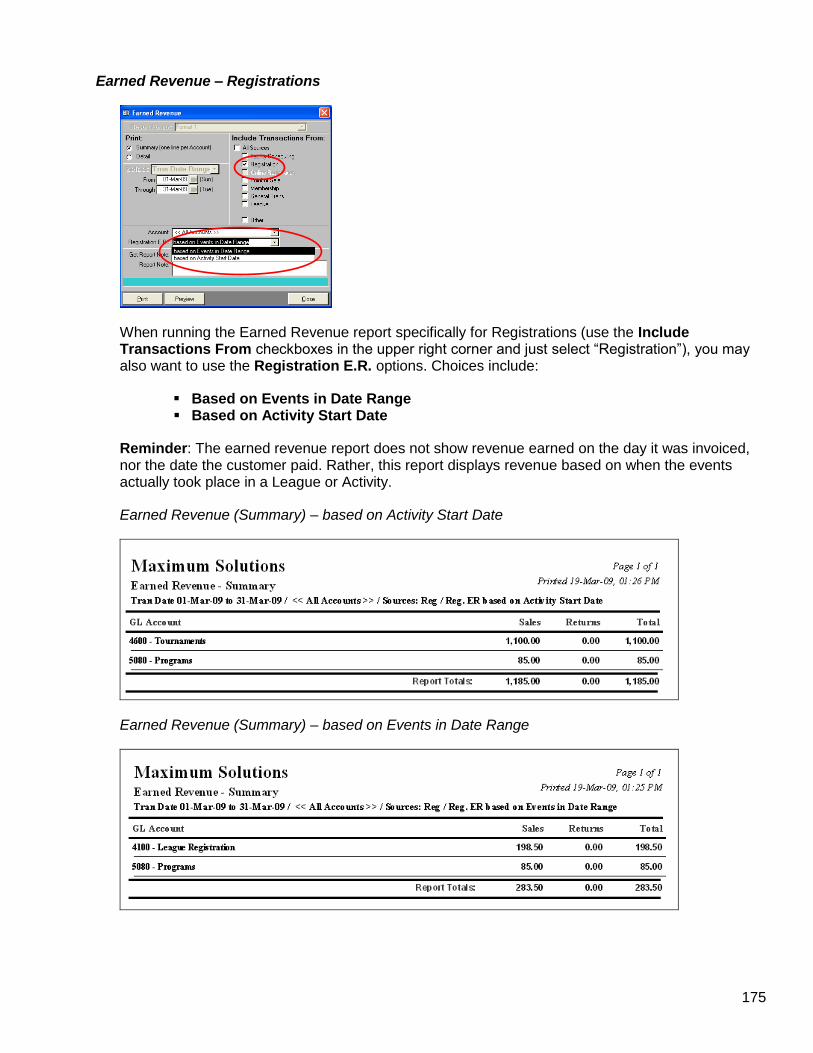
175
Earned Revenue – Registrations
When running the Earned Revenue report specifically for Registrations (use the Include Transactions From checkboxes in the upper right corner and just select “Registration”), you may also want to use the Registration E.R. options. Choices include:
Based on Events in Date Range Based on Activity Start Date
Reminder: The earned revenue report does not show revenue earned on the day it was invoiced, nor the date the customer paid. Rather, this report displays revenue based on when the events actually took place in a League or Activity.
Earned Revenue (Summary) – based on Activity Start Date
Earned Revenue (Summary) – based on Events in Date Range
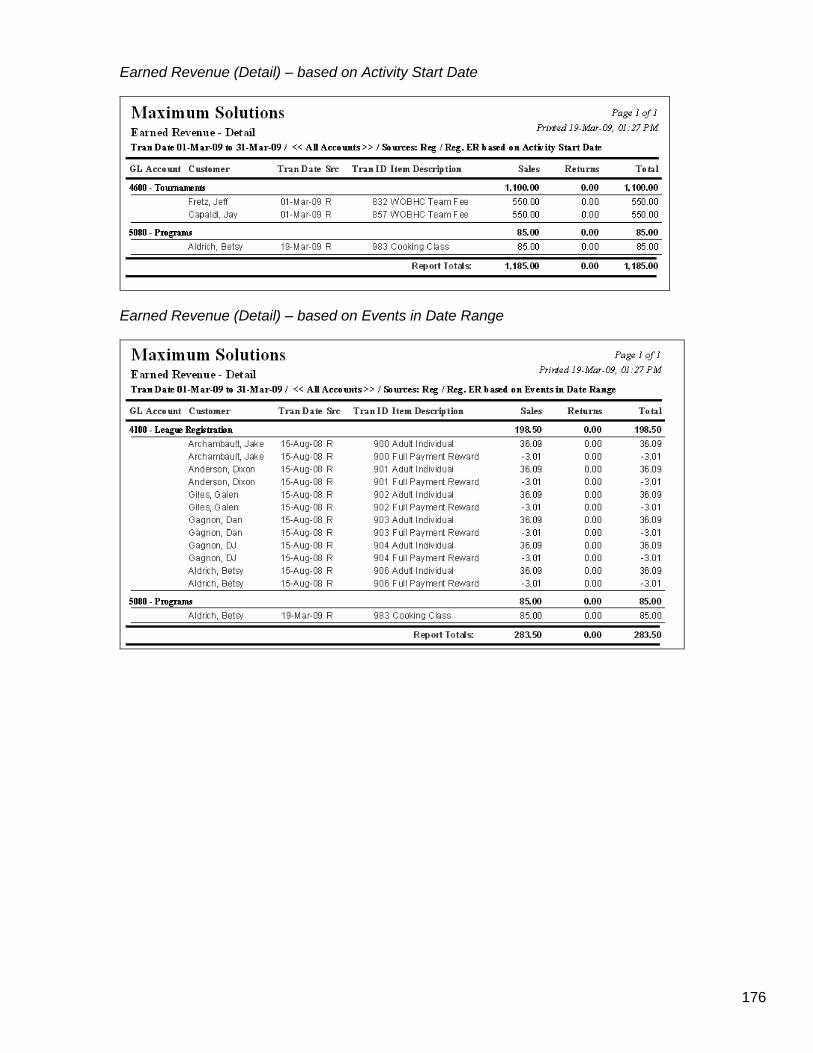
176
Earned Revenue (Detail) – based on Activity Start Date
Earned Revenue (Detail) – based on Events in Date Range
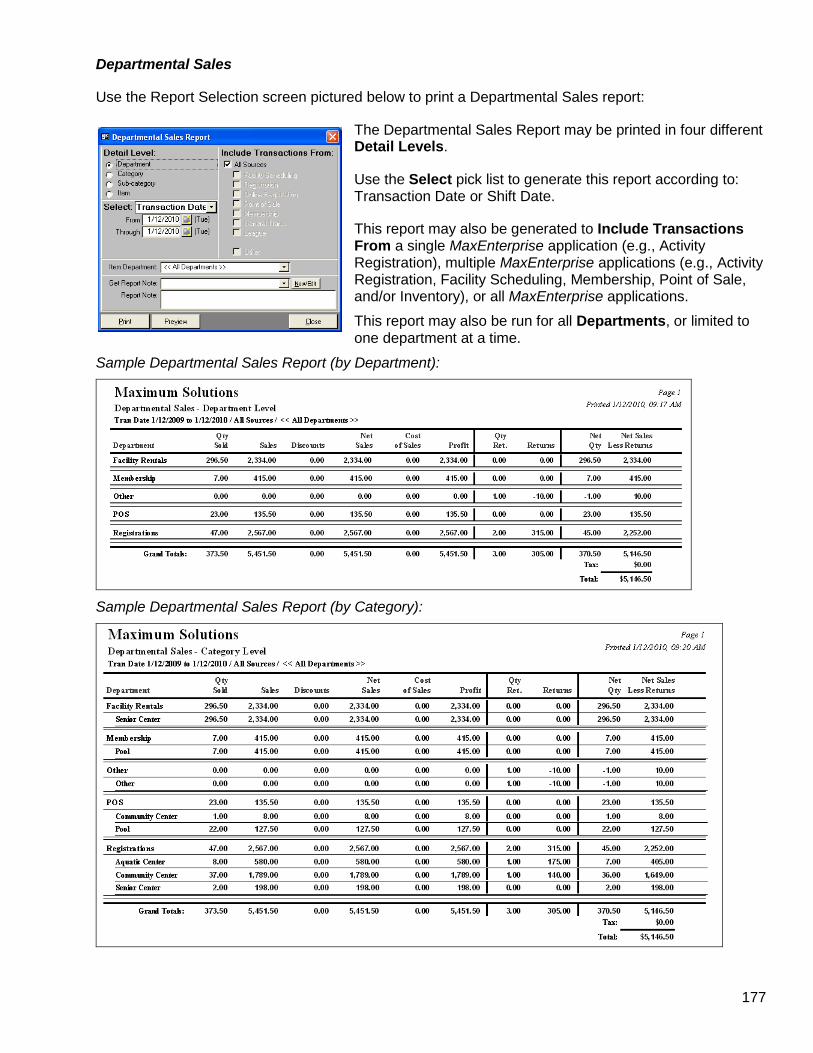
177
Departmental Sales
Use the Report Selection screen pictured below to print a Departmental Sales report:
The Departmental Sales Report may be printed in four different Detail Levels.
Use the Select pick list to generate this report according to: Transaction Date or Shift Date.
This report may also be generated to Include Transactions From a single MaxEnterprise application (e.g., Activity Registration), multiple MaxEnterprise applications (e.g., Activity Registration, Facility Scheduling, Membership, Point of Sale, and/or Inventory), or all MaxEnterprise applications.
This report may also be run for all Departments, or limited to one department at a time.
Sample Departmental Sales Report (by Department):
Sample Departmental Sales Report (by Category):

178
Sample Departmental Sales Report (by Department):
Sample Departmental Sales Report (by Category):
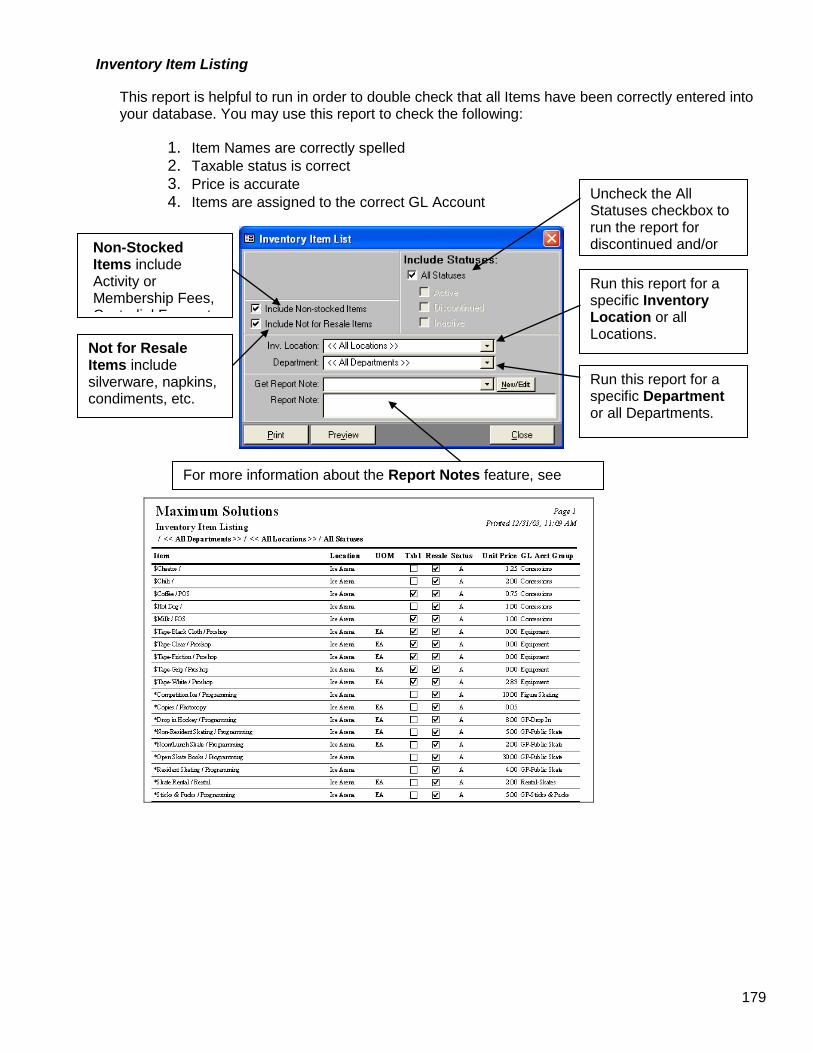
179
Inventory Item Listing
This report is helpful to run in order to double check that all Items have been correctly entered into your database. You may use this report to check the following:
1. Item Names are correctly spelled
2. Taxable status is correct
3. Price is accurate
4. Items are assigned to the correct GL Account
Non-Stocked Items include Activity or Membership Fees, Custodial Fees, etc.
Run this report for a specific Inventory Location or all Locations.
Run this report for a specific Department or all Departments.
Not for Resale Items include silverware, napkins, condiments, etc.
Uncheck the All Statuses checkbox to run the report for discontinued and/or inactive items.
For more information about the Report Notes feature, see page 145.
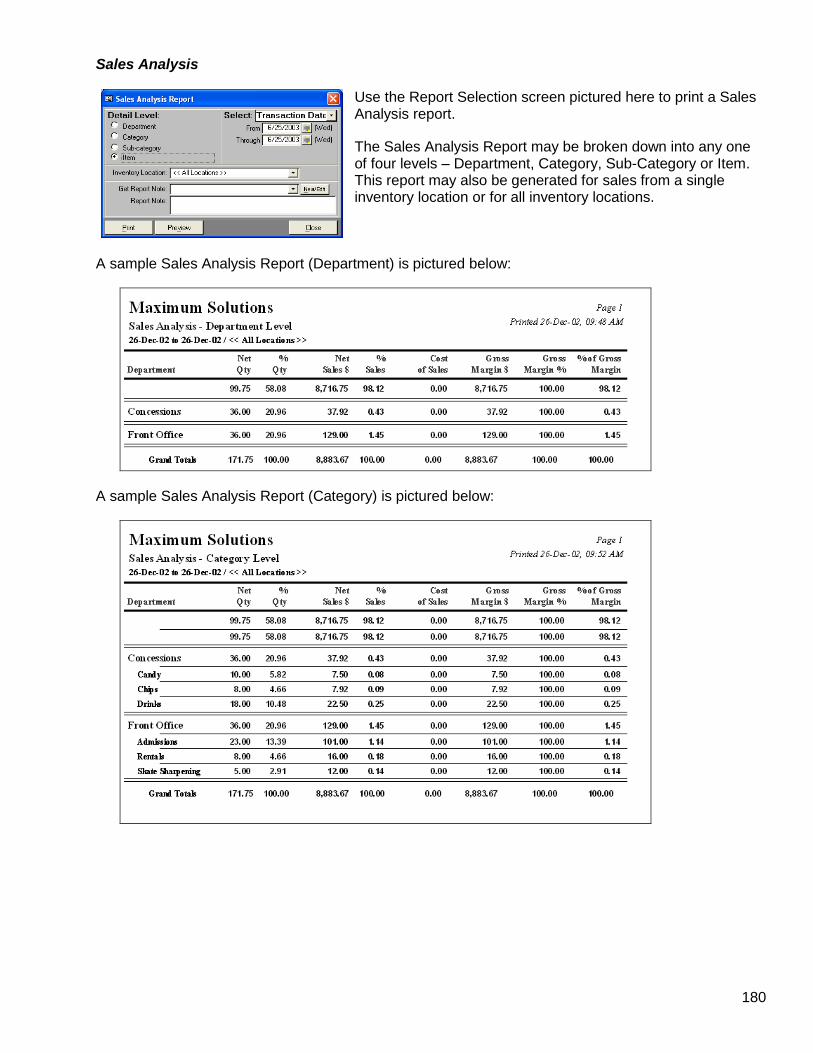
180
Sales Analysis
Use the Report Selection screen pictured here to print a Sales Analysis report.
The Sales Analysis Report may be broken down into any one of four levels – Department, Category, Sub-Category or Item. This report may also be generated for sales from a single inventory location or for all inventory locations.
A sample Sales Analysis Report (Department) is pictured below:
A sample Sales Analysis Report (Category) is pictured below:

181
A sample Sales Analysis Report (Sub-Category) is pictured below:
A sample Sales Analysis Report (Item) is pictured below:
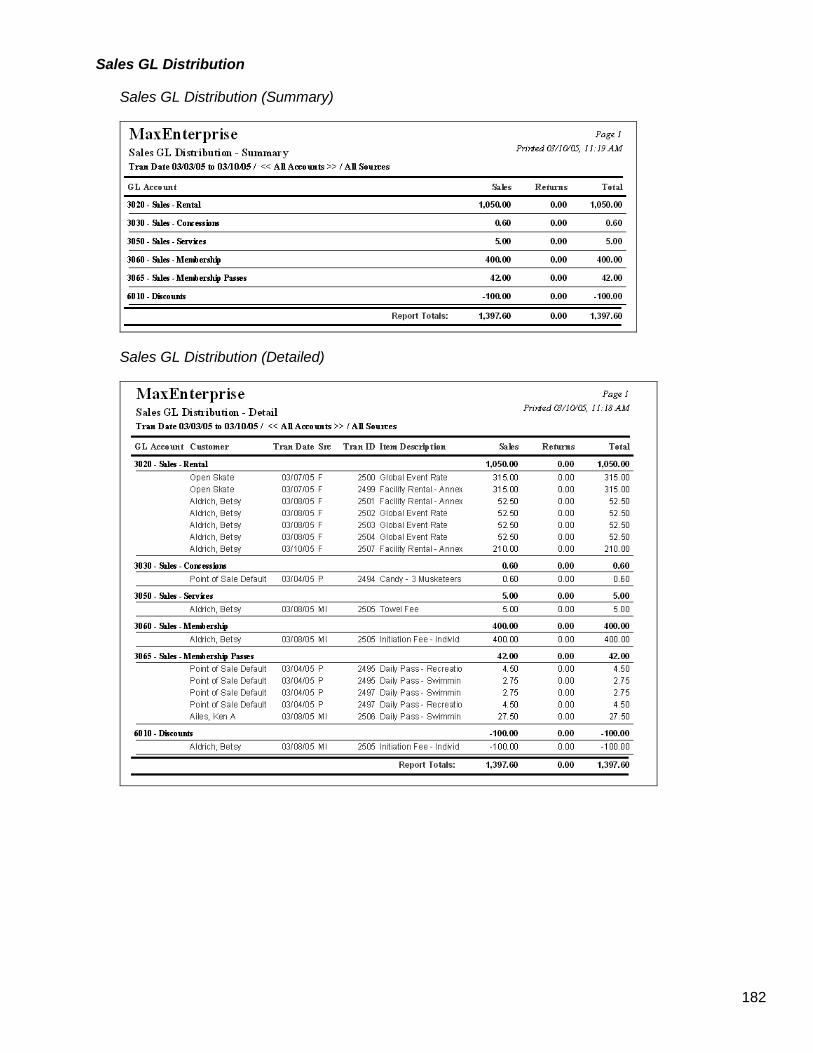
182
Sales GL Distribution
Sales GL Distribution (Summary)
Sales GL Distribution (Detailed)
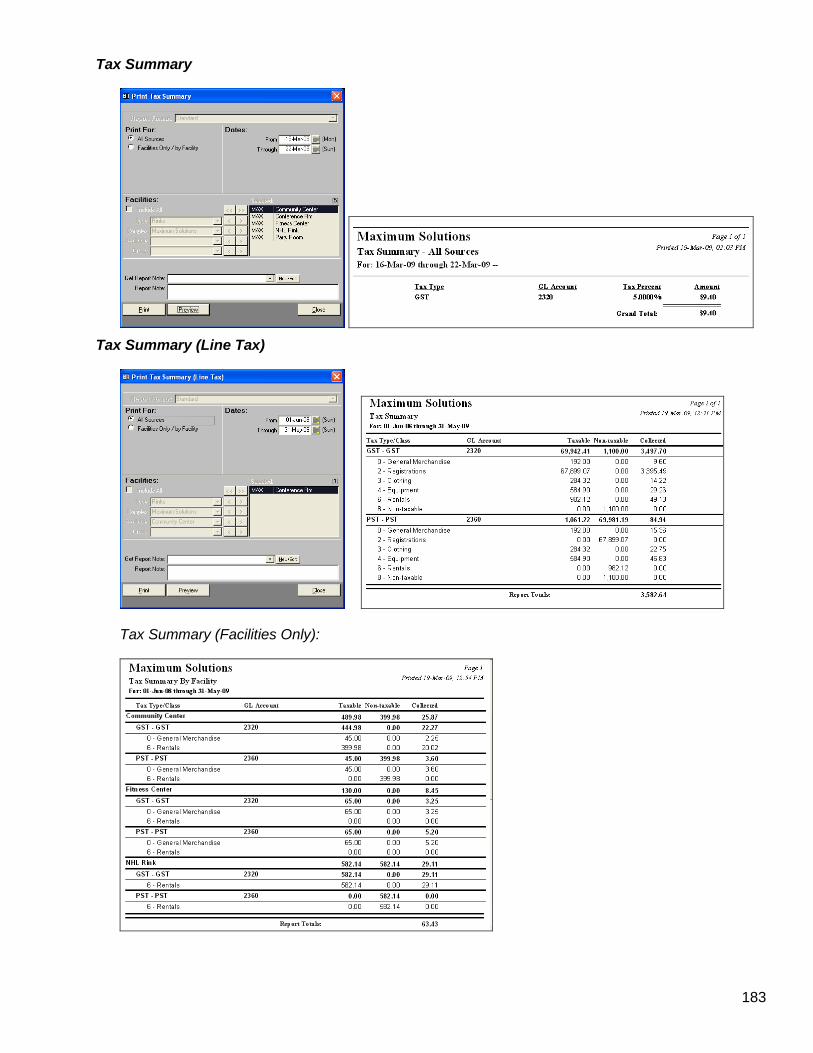
183
Tax Summary
Tax Summary (Line Tax)
Tax Summary (Facilities Only):

184