DS-7200-ST DVR (V1.3.0) HIKVision User Manual of Baseline 20120401 ENG

HikCentral Web ClientUser Manual

Legal Information
User Manual©2018 Hangzhou Hikvision Digital Technology Co., Ltd.
About this ManualThis Manual is subject to domestic and international copyright protection. Hangzhou HikvisionDigital Technology Co., Ltd. ("Hikvision") reserves all rights to this manual. This manual cannot bereproduced, changed, translated, or distributed, partially or wholly, by any means, without theprior written permission of Hikvision.Please use this user manual under the guidance of professionals.
Trademarks
and other Hikvision marks are the property of Hikvision and areregistered trademarks or the subject of applications for the same by Hikvision and/or its affiliates.Other trademarks mentioned in this manual are the properties of their respective owners. No rightof license is given to use such trademarks without express permission.
DisclaimerTO THE MAXIMUM EXTENT PERMITTED BY APPLICABLE LAW, HIKVISION MAKES NO WARRANTIES,EXPRESS OR IMPLIED, INCLUDING WITHOUT LIMITATION THE IMPLIED WARRANTIES OFMERCHANTABILITY AND FITNESS FOR A PARTICULAR PURPOSE, REGARDING THIS MANUAL.HIKVISION DOES NOT WARRANT, GUARANTEE, OR MAKE ANY REPRESENTATIONS REGARDING THEUSE OF THE MANUAL, OR THE CORRECTNESS, ACCURACY, OR RELIABILITY OF INFORMATIONCONTAINED HEREIN. YOUR USE OF THIS MANUAL AND ANY RELIANCE ON THIS MANUAL SHALL BEWHOLLY AT YOUR OWN RISK AND RESPONSIBILITY.REGARDING TO THE PRODUCT WITH INTERNET ACCESS, THE USE OF PRODUCT SHALL BE WHOLLYAT YOUR OWN RISKS. HIKVISION SHALL NOT TAKE ANY RESPONSIBILITIES FOR ABNORMALOPERATION, PRIVACY LEAKAGE OR OTHER DAMAGES RESULTING FROM CYBER ATTACK, HACKERATTACK, VIRUS INSPECTION, OR OTHER INTERNET SECURITY RISKS; HOWEVER, HIKVISION WILLPROVIDE TIMELY TECHNICAL SUPPORT IF REQUIRED.SURVEILLANCE LAWS VARY BY JURISDICTION. PLEASE CHECK ALL RELEVANT LAWS IN YOURJURISDICTION BEFORE USING THIS PRODUCT IN ORDER TO ENSURE THAT YOUR USE CONFORMSTHE APPLICABLE LAW. HIKVISION SHALL NOT BE LIABLE IN THE EVENT THAT THIS PRODUCT IS USEDWITH ILLEGITIMATE PURPOSES.IN THE EVENT OF ANY CONFLICTS BETWEEN THIS MANUAL AND THE APPLICABLE LAW, THE LATERPREVAILS.
HikCentral Web Client User Manual
i

Symbol Conventions
The symbols that may be found in this document are defined as follows.
Symbol Description
DangerIndicates a hazardous situation which, if not avoided, will or couldresult in death or serious injury.
CautionIndicates a potentially hazardous situation which, if not avoided, couldresult in equipment damage, data loss, performance degradation, orunexpected results.
NoteProvides additional information to emphasize or supplementimportant points of the main text.
HikCentral Web Client User Manual
ii

ContentsChapter 1 About This Document ................................................................................................. 1
Chapter 2 Introduction ............................................................................................................... 2
Chapter 3 Administrator Rights ................................................................................................... 4
Chapter 4 Getting Started ........................................................................................................... 5
Chapter 5 Installation and Uninstallation .................................................................................... 6
5.1 Install Module ........................................................................................................................ 6
5.1.1 Install Service Module in Custom Mode ....................................................................... 6
5.1.2 Install Service Module in Typical Mode ......................................................................... 8
5.2 Install Control Client ............................................................................................................... 9
5.3 Uninstall Module .................................................................................................................... 9
5.3.1 Uninstall All Modules .................................................................................................... 9
5.3.2 Uninstall Specific Module ........................................................................................... 10
5.4 Service Manager .................................................................................................................. 11
Chapter 6 Login ........................................................................................................................ 13
6.1 Recommended Running Environment ................................................................................. 13
6.2 First Time Login .................................................................................................................... 13
6.2.1 Login for First Time for admin User ............................................................................. 13
6.2.2 First Time Login for Normal User ................................................................................ 15
6.3 Login via Web Client ............................................................................................................ 16
6.4 Change Password for Reset User ......................................................................................... 17
6.5 Forgot Password ................................................................................................................... 18
Chapter 7 Download Mobile Client ........................................................................................... 20
Chapter 8 Wizard ...................................................................................................................... 21
Chapter 9 Manage License ........................................................................................................ 22
9.1 Activate License - Online ...................................................................................................... 22
9.2 Activate License - Offline ...................................................................................................... 24
HikCentral Web Client User Manual
iii
9.3 Update License - Online ....................................................................................................... 25
9.4 Update License - Offline ....................................................................................................... 26
9.5 Deactivate License - Online .................................................................................................. 27
9.6 Deactivate License - Offline .................................................................................................. 27
Chapter 10 Manage Resource ................................................................................................... 29
10.1 Create Password for Inactive Device(s) .............................................................................. 29
10.2 Edit Online Device's Network Information ......................................................................... 30
10.3 Manage Encoding Device ................................................................................................... 31
10.3.1 Add Online Device ..................................................................................................... 31
10.3.2 Add Device by IP Address or Domain Name ............................................................. 36
10.3.3 Add Devices by IP Segment ....................................................................................... 38
10.3.4 Add Devices by Port Segment ................................................................................... 41
10.3.5 Add Device by Hik-Connect ....................................................................................... 43
10.3.6 Add Devices in a Batch .............................................................................................. 45
10.4 Manage Access Control Device .......................................................................................... 47
10.4.1 Add Online Device ..................................................................................................... 47
10.4.2 Add Device by IP Address .......................................................................................... 50
10.4.3 Add Devices by IP Segment ....................................................................................... 51
10.4.4 Add Access Control Devices by Port Segment ........................................................... 53
10.4.5 Add Devices in a Batch .............................................................................................. 54
10.5 Restore/Reset Device Password ......................................................................................... 55
10.5.1 Reset Device Password ............................................................................................. 55
10.5.2 Restore Device's Default Password ........................................................................... 56
10.6 Manage Remote Site .......................................................................................................... 57
10.6.1 Add Remote Site by IP Address or Domain Name ..................................................... 58
10.6.2 Add Remote Site Registered to Central System ........................................................ 61
10.6.3 Add Remote Sites in Batch ........................................................................................ 63
10.6.4 Back Up Remote Site's Database to Central System ................................................. 65
HikCentral Web Client User Manual
iv
10.6.5 Edit Remote Site ........................................................................................................ 66
10.6.6 View Remote Site's Changes ..................................................................................... 67
10.7 Manage Recording Server .................................................................................................. 69
10.7.1 Manage Cloud Storage Server ................................................................................... 69
10.7.2 Add Hybrid Storage Area Network ............................................................................ 73
10.7.3 Set N+1 Hot Spare ..................................................................................................... 75
10.8 Manage Streaming Server .................................................................................................. 76
10.8.1 Import Service Component Certificate to Streaming Server ..................................... 77
10.8.2 Add Streaming Server ............................................................................................... 77
10.9 Manage Smart Wall ............................................................................................................ 78
10.9.1 Add Decoding Device ................................................................................................ 79
10.9.2 Add Smart Wall ......................................................................................................... 85
10.9.3 Link Decoding Output with Window ......................................................................... 85
Chapter 11 Manage Area .......................................................................................................... 87
11.1 Add Area ............................................................................................................................ 87
11.1.1 Add Area for Current Site .......................................................................................... 87
11.1.2 Add Area for Remote Site ......................................................................................... 89
11.2 Add Element to Area .......................................................................................................... 90
11.2.1 Add Camera to Area for Current Site ........................................................................ 90
11.2.2 Add Camera to Area for Remote Site ........................................................................ 91
11.2.3 Add Door to Area for Current Site ............................................................................. 93
11.2.4 Add Alarm Input to Area for Current Site ................................................................. 94
11.2.5 Add Alarm Output to Area for Current Site ............................................................... 95
11.2.6 Add Under Vehicle Surveillance System to Area for Current Site ............................. 95
11.3 Edit Element in Area .......................................................................................................... 96
11.3.1 Edit Camera for Current Site ..................................................................................... 96
11.3.2 Edit Door for Current Site .......................................................................................... 98
11.3.3 Edit Alarm Input for Current Site ............................................................................ 101
HikCentral Web Client User Manual
v

11.3.4 Edit Alarm Output for Current Site ......................................................................... 101
11.3.5 Edit Under Vehicle Surveillance System for Current Site ........................................ 102
11.3.6 Edit Element for Remote Site .................................................................................. 102
11.4 Remove Element from Area ............................................................................................. 103
11.4.1 Remove Element from Area for Current Site .......................................................... 103
11.4.2 Remove Element from Area for Remote Site .......................................................... 104
Chapter 12 Configure Recording ............................................................................................. 105
12.1 Configure Recording for Cameras on Current Site ........................................................... 105
12.2 Configure Recording Settings for Cameras on Remote Site ............................................. 108
12.3 Configure Picture Storage ................................................................................................ 110
12.4 Configure Recording Schedule Template ......................................................................... 111
Chapter 13 Configure Event and Alarm ................................................................................... 113
13.1 Configure System-Related Event ...................................................................................... 113
13.1.1 Add System-Related Event ...................................................................................... 114
13.1.2 Edit System-Related Event ...................................................................................... 116
13.2 Configure Generic Event .................................................................................................. 116
13.3 Configure User-Defined Event .......................................................................................... 119
13.4 Configure Alarm ............................................................................................................... 120
13.4.1 Alarm Settings ......................................................................................................... 121
13.4.2 Add Alarm for Camera on Current Site ................................................................... 123
13.4.3 Add Alarm for Camera on Remote Site ................................................................... 127
13.4.4 Add Alarm for Door ................................................................................................. 130
13.4.5 Add Alarm for Alarm Input ...................................................................................... 133
13.4.6 Add Alarm for ANPR Camera and UVSS .................................................................. 137
13.4.7 Add Alarm for Person .............................................................................................. 141
13.4.8 Add Alarm for Encoding Device .............................................................................. 145
13.4.9 Add Alarm for Access Control Device ...................................................................... 148
13.4.10 Add Alarm for Server ............................................................................................ 151
HikCentral Web Client User Manual
vi
13.4.11 Add Alarm for HikCentral Server ........................................................................... 153
13.4.12 Add Alarm for User ............................................................................................... 156
13.4.13 Add Alarm for User-Defined Event ........................................................................ 159
13.4.14 Add Alarm for Generic Event ................................................................................ 162
13.4.15 Add Alarm for Remote Site ................................................................................... 166
13.5 Send Event or Alarm Report ............................................................................................. 169
13.6 Configure Arming Schedule Template .............................................................................. 171
13.7 Set Email Template ........................................................................................................... 173
13.7.1 Configure Email Account ......................................................................................... 173
13.7.2 Add Email Template ................................................................................................ 175
Chapter 14 Manage Map ........................................................................................................ 177
14.1 Set GIS Map and Icons ..................................................................................................... 177
14.2 Link E-Map to Area ........................................................................................................... 178
14.3 Search Locations .............................................................................................................. 179
14.4 Locate Sites on Map ......................................................................................................... 180
14.5 Add Hot Spot .................................................................................................................... 181
14.6 Add Hot Region ................................................................................................................ 182
14.7 Add Label ......................................................................................................................... 183
Chapter 15 Manage Vehicle .................................................................................................... 185
15.1 Add Vehicle List ................................................................................................................ 185
15.2 Add Vehicle Information .................................................................................................. 186
15.2.1 Import Vehicle Information in a Batch .................................................................... 186
15.2.2 Manually Add Vehicle Information ......................................................................... 187
Chapter 16 Manage Person List ............................................................................................... 189
16.1 Add Single Person ............................................................................................................ 189
16.2 Batch Add Persons ........................................................................................................... 194
16.3 Batch Add Profiles ............................................................................................................ 195
16.4 Batch Issue Cards to Persons ........................................................................................... 195
HikCentral Web Client User Manual
vii

16.5 Custom Additional Information ....................................................................................... 197
Chapter 17 Manage Access Control ......................................................................................... 198
17.1 Manage Access Group ..................................................................................................... 198
17.1.1 Add Access Group ................................................................................................... 198
17.1.2 Apply All Access Groups to Device .......................................................................... 200
17.2 Manage Access Level ....................................................................................................... 201
17.2.1 Add Access Level ..................................................................................................... 202
17.2.2 Assign Access Level to Access Group ...................................................................... 203
17.3 Set Access Control Schedule Template ............................................................................ 204
Chapter 18 Manage Time and Attendance .............................................................................. 206
18.1 Add Attendance Group .................................................................................................... 206
18.2 Add Shift Schedule ........................................................................................................... 208
18.3 Assign Shift Schedule to Attendance Group .................................................................... 210
18.4 Add Attendance Check Point ........................................................................................... 210
18.5 Manage Attendance Record ............................................................................................ 211
18.5.1 Search Attendance Record ...................................................................................... 211
18.5.2 Correct Attendance Record for Single Person ......................................................... 212
18.5.3 Correct Attendance Records for Multiple Persons .................................................. 214
Chapter 19 Manage Face Comparison Group .......................................................................... 215
19.1 Add Face Comparison Group ........................................................................................... 215
19.2 Apply Face Comparison Group to Device ......................................................................... 217
Chapter 20 Manage Role and User .......................................................................................... 219
20.1 Add Role ........................................................................................................................... 219
20.2 Add Normal User ............................................................................................................. 222
20.3 Import Domain User ........................................................................................................ 224
20.4 Change Password of Current Login User .......................................................................... 226
20.5 Reset Password for admin User ....................................................................................... 227
20.6 Reset Password for Normal User ..................................................................................... 230
HikCentral Web Client User Manual
viii

Chapter 21 Maintenance ........................................................................................................ 231
21.1 Set Database Backup ........................................................................................................ 231
21.2 Restore Database ............................................................................................................. 232
21.3 Export Configuration File ................................................................................................. 233
Chapter 22 Manage System Security ....................................................................................... 234
Chapter 23 System Configuration ............................................................................................ 235
23.1 Set Site Name ................................................................................................................... 235
23.2 Set WAN Access ............................................................................................................... 235
23.3 Set NTP ............................................................................................................................. 236
23.4 Set Active Directory ......................................................................................................... 236
23.5 Set Server Usage Threshold ............................................................................................. 238
23.6 Set Holiday ....................................................................................................................... 238
23.7 Enable Receiving Generic Event ....................................................................................... 239
23.8 Allow for Remote Site Registration .................................................................................. 239
23.9 Register to Central System ............................................................................................... 240
23.10 Set Server NIC ................................................................................................................ 240
23.11 Set Transfer Protocol ...................................................................................................... 241
23.12 Configure System Hot Spare .......................................................................................... 241
23.13 Set Device Access Mode ................................................................................................ 242
23.14 Reset Device Network Information ................................................................................ 242
23.15 Export Service Component Certificate ........................................................................... 243
Chapter 24 Applications .......................................................................................................... 244
24.1 Live View .......................................................................................................................... 244
24.1.1 Start Live View ........................................................................................................ 244
24.1.2 PTZ Control .............................................................................................................. 245
24.2 Playback ........................................................................................................................... 251
24.2.1 Search Video File ..................................................................................................... 251
24.2.2 Play Video File ......................................................................................................... 252
HikCentral Web Client User Manual
ix
24.3 Local Configuration .......................................................................................................... 252
Chapter 25 Important Ports .................................................................................................... 254
HikCentral Web Client User Manual
x

Chapter 1 About This Document
This user manual is intended for the administrator of the system.
The manual guides you to establish and configure the surveillance system. Follow this manual toperform the installation of the system, activation of VSM, access of the system, and configurationof the surveillance task via the provided Web Client, etc. To ensure the properness of usage andstability of the system, refer to the contents below and read the manual carefully beforeinstallation and operation.
HikCentral Web Client User Manual
1

Chapter 2 Introduction
The system is developed by HIKVISION for central management of video monitoring system andfeatures flexibility, scalability high reliability, and powerful functions.
The system provides the central management, information sharing, convenient connection, andmulti-service cooperation. It is capable of adding devices for management, live view, storage andplayback of video files, alarm linkage, access control, time and attendance, face comparison, andso on.
NoteThe displayed modules on the home page vary with the License you purchased. For detailedinformation, contact our technical support.
The complete system contains the following modules. You can install the modules according toactual needs. Refer to Installation and Uninstallation for the detailed installation instructions ofthe system.
Module Introduction
VSM (VideoSurveillanceManagement)
• Provide the unified authentication service for connecting with theclients and servers.
• Provide the centralized management for the users, roles, permissions,devices, and services.
• Provide the configuration interface for surveillance and managementmodule.
• Provide the log management and statistics function.
Streaming Service(Optional)
Provide forwarding and distributing the audio and video data of liveview.
The following table shows the provided clients for accessing or managing system.
Client Introduction
ControlClient
Control Client is a C/S software which provides multiple operating functionalities,including real-time live view, PTZ control, video playback and downloading, alarmreceiving, log query, and so on.
Web Client Web Client is a B/S client for managing system. It provides multiple functionalities,including device management, area management, recording schedule settings,event configuration, user management, and so on.
MobileClient
Mobile Client is the software designed for getting access to the system via Wi-Fi,3G, and 4G networks with mobile device. It fulfills the functions of the devices
HikCentral Web Client User Manual
2

Client Introduction
connected to the system, such as live view, remote playback, PTZ control, and soon.
HikCentral Web Client User Manual
3

Chapter 3 Administrator Rights
When you install and run the service modules, clients, and software, it is important that you haveadministrator rights on the PCs or servers that should run these components. Otherwise, youcannot install and configure the system.
Consult your IT system administrator if in doubt about your rights.
HikCentral Web Client User Manual
4
Chapter 4 Getting Started
The following content describes the tasks typically involved in setting a working system.
Verify Initial Configuration of Devices and other ServersBefore doing anything on system, make sure the devices (camera, DVR, recording server, and soon) you are going to use are correctly installed and connected to the network as specified by themanufacturers. Such initial configuration is required in order to connect the devices to the systemvia network.
Install SystemRefer to Installation and Uninstallation for the detailed installation steps.
Open Web Client and LoginRefer to Login for First Time for admin User .
Activate LicenseRefer to Manage License .
Add Devices to System and Configure AreaThe system can quickly scan your network for relevant devices (camera, DVR, and so on), and addthem to your system. Or you can add the devices by inputting the required information manually.The devices added should be organized into areas for convenient management. Refer to ManageResource and Manage Area .
Configure Recording SettingsYou can record the video files of the cameras on the storage device according to the configuredrecording schedule. The schedule can be set as continuous, alarm triggered, or commandtriggered as desired. Refer to Configure Recording .
Configure Event and AlarmThe camera exception, device exception, server exception, and alarm input can trigger linkageactions in the system. Refer to Configure Event and Alarm .
Configure UsersSpecify who should be able to access your system, and how. You can set the different permissionsfor the users to limit the operation of the system. Refer to Manage Role and User .
HikCentral Web Client User Manual
5

Chapter 5 Installation and Uninstallation
Install the service modules on your servers or PCs to build your HikCentral system.
Two installation packages are available for building your system.Basic Installation Package
Contains all the modules to build the system, including Video Surveillance Management (VSM)Service, Streaming Service, and Control Client.
Control Client Installation PackageContains the Control Client module only.
NoteThe VSM Service and Streaming Service cannot be installed on the same PC.
5.1 Install ModuleTwo installation methods are available for building the modules.
Typical ModeInstall all the service modules (except the Streaming Service) and client.
Custom ModeSelect the installation directory and modules to be installed as desired.
5.1.1 Install Service Module in Custom Mode
You can customize the installation directory and select to install the specified service modules asdesired.
Perform this task when you want to install service module in custom mode.
Steps1. Double-click (HikCentral) to enter the Welcome panel of the InstallShield Wizard.2. Click Next to start the InstallShield Wizard.3. Read the License Agreement.
- Click I accept the terms of the license agreement and continue.- Click I do not accept the terms of the license agreement to cancel the installation.
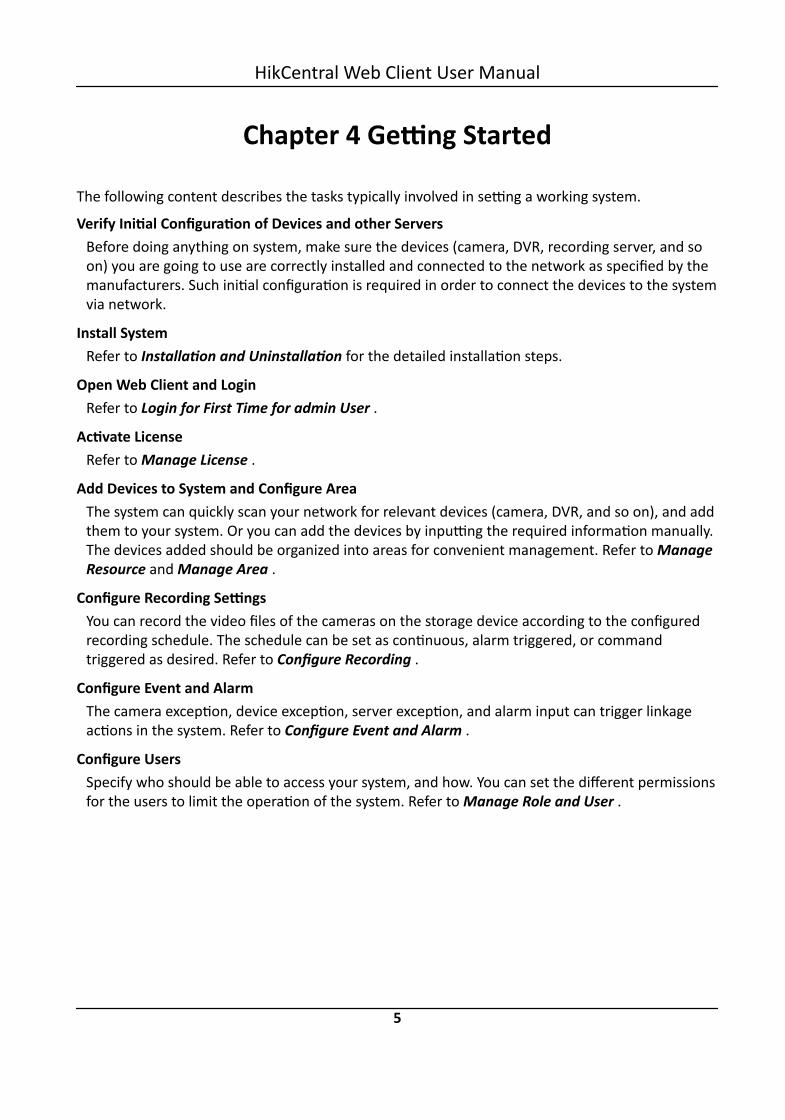
4. Select Custom as setup type and click Next.5. Optional: Click Change... and select a proper directory as desired to install the module(s).6. Click Next to continue.7. Select the module(s) you want to install and click Next.
HikCentral Web Client User Manual
6
Figure 5-1 Select Modules to Install
NoteThe VSM Service and Streaming Service cannot be installed on the same PC.
In this way, you can install the service and client modules to different PCs or servers as desired.8. Optional: Select the hot spare mode if you select to install VSM service in the previous step.
- Select Normal if you do not need to build a hot spare system.- Select Mirror Hot Spare to build a mirror hot spare system. There are two VSM servers in the
hot spare system: host server and spare server. When the host server works, the data in hostserver is copied to the spare server in real time. When the host server fails, the spare serverswitches into operation without interruption, thus increasing the reliability of the system.
- Select Shared Storage Hot Spare to build a shared storage hot spare system. There are twoVSM servers and one HDD (installed on another server) in the hot spare system: host server,spare server, and the selected HDD. When the host server works, the data is stored in theHDD. When the host server fails, the spare server switches into operation and will take overthe HDD to use the same data file.
NoteFor building the hot spare system, contact our technical support engineer.
9. Click Install.A panel indicating progress of the installation will display.
10. Read the post-install information and click Finish to complete the installation.
HikCentral Web Client User Manual
7

NoteYou can check Run Web Client to open the login page of Web Client via web browserautomatically. If the settings of your web browser block opening the login page, follow theprompt on the web browser to allow the proper display of the page.
5.1.2 Install Service Module in Typical Mode
You can install all the service modules (except the Streaming Service) and client on one PC orserver.
Perform this task when you want to install service module in typical mode.
Steps1. Double-click (HikCentral) to enter the welcome panel of the InstallShield Wizard.2. Click Next to start the InstallShield Wizard.3. Read the License Agreement.
- Click I accept the terms of the license agreement and continue.- Click I do not accept the terms of the license agreement to cancel the installation.
4. Select Typical as setup type and click Next.5. Optional: Click Change... and select a proper directory as desired to install the module.6. Click Next to continue.7. Optional: Select the hot spare mode if you select to install VSM service in the previous step.
- Select Normal if you do not need to build a hot spare system.- Select Mirror Hot Spare to build a mirror hot spare system. There are two VSM servers in the
hot spare system: host server and spare server. When the host server works, the data in hostserver is copied to the spare server in real time. When the host server fails, the spare serverswitches into operation without interruption, thus increasing the reliability of the system.
- Select Shared Storage Hot Spare to build a shared storage hot spare system. There are twoVSM servers and one HDD (installed on another server) in the hot spare system: host server,spare server, and the selected HDD. When the host server works, the data is stored in theHDD. When the host server fails, the spare server switches into operation and will take overthe HDD to use the same data file.
NoteFor building the hot spare system, contact our technical support engineer.
8. Read the pre-install information, and click Install to begin the installation.A panel indicating progress of the installation will display.
9. Read the post-install information and click Finish to complete the installation.
HikCentral Web Client User Manual
8
NoteYou can check Run Web Client to open the login page of Web Client via web browserautomatically. If the settings of your web browser block opening the login page, follow theprompt on the web browser to allow the proper display of the page.
5.2 Install Control ClientYou must install HikCentral Control Client on your computer before you can access the system viaControl Client.
Perform this task when you want to install the Control Client.
Steps1. Double-click (HikCentral_Client) to enter the welcome panel of the InstallShield Wizard.2. Click Next to start the InstallShield Wizard.3. Optional: Click Browse and select a proper directory to install the Control Client.4. Click Next to continue.5. Read the pre-install information and click Install to begin the installation.
A panel indicating progress of the installation will display.6. Read the post-install information and click Finish to complete the installation.
NoteYou can also use the basic installation package to install the Control Client.
5.3 Uninstall ModuleTwo uninstallation modes are available for uninstalling the modules.
All Modules UninstallationYou can remove the entire system from PC or server, including surveillance service software,related installation files, and the Control Client.
Specific Modules UninstallationYou can remove the specific modules of the system from PC or server, such as VSM, StreamingService, or the Control Client.
5.3.1 Uninstall All Modules
The entire system contains the surveillance service software, related installation files, and theControl Client. You can remove the entire system from your PC or server if you don't need it.
HikCentral Web Client User Manual
9
Before You Start• Deactivate the activated VSM before removing the VSM, so that the License can be used foractivating another VSM. See Deactivate License - Online or Deactivate License - Offline fordetails.
• Exit all system modules and the system Service Manager.Perform this task when you want to remove the entire system.
Steps
NoteThe following procedures of standard system module removal may be slightly different accordingto the different OS versions.
1. Select Control Panel in Windows' Start menu.- If using Category view, find the Programs category, and click Uninstall a program.- If using Small icons or Large icons view, select Programs and Features.
2. Right-click the system you want to remove in the list of currently installed programs.3. Select Uninstall and follow the removal instructions.
NoteFor uninstalling the VSM, a dialog will pop up to ask you whether to keep the database. If youchoose to keep the database, the resource and configuration data will be saved and can be usedwhen you install the system on this hardware server later.
5.3.2 Uninstall Specific Module
You can remove the specific module of system, such as VSM, Streaming Service, or the ControlClient, from your PC or server if you don't need it.
Before You Start• Deactivate the activated VSM before removing the VSM, so that the License can be used foractivating another VSM. See Deactivate License - Online or Deactivate License - Offline fordetails.
• Exit all system modules and the system Service Manager.Perform this task when you want to remove the specific module of system.
Steps
NoteThe following procedures of standard system module removal may be slightly different accordingto the different OS versions.
1. Select Control Panel in Windows' Start menu.- If using Category view, find the Programs category, and click Uninstall a program.
HikCentral Web Client User Manual
10

- If using Small icons or Large icons view, select Programs and Features.2. Right-click the system you want to remove in the list of currently installed programs.3. Select Change and the InstallShiled Wizard pops up.4. Select Modify and click Next to continue.5. Uncheck the module(s) you want to uninstall and click Next.
Figure 5-2 Select Modules to Uninstall6. Click Uninstall and follow the removal instructions.
NoteFor uninstalling the VSM, a dialog will pop up to ask you whether to keep the database. If youchoose to keep the database, the resource and configuration data will be kept and can be usedwhen you install the system on this hardware server for next time.
The selected modules will be installed and the unselected modules will be removed.
5.4 Service ManagerAfter successfully installing the service module(s), you can run the Service Manager and performthe related operations of service, such as starting, stopping, or restarting the service.
Perform this task when you need to run the Service Manager and perform the related operations.
Steps1. Right-click and select Run as Administrator to run the Service Manager.
HikCentral Web Client User Manual
11
Figure 5-3 Service Manager Main Page
NoteThe displayed items vary with the service modules you selected for installation.
2. Optional: Perform the following operation(s) after starting the Service Management.
Stop All Click Stop All to stop all the service.
Restart All Click Restart All to run the service again.
Stop SpecificService
Select one service and click to stop the service.
Edit Service Click the service name to edit the port of the service.
NoteIf the port number of the service is occupied by other service, the portNo. will be shown in red. You should change the port number to othervalue before the service can work properly.
Open ServiceLocation
Select one service and click to go to the installation directory of theservice.
3. Optional: Check the Auto-Launch checkbox to enable launching the Service Managerautomatically after the PC started up.
NoteIf the auto-launch function is not enabled, all the service modules you installed cannot runautomatically after the server started up.
HikCentral Web Client User Manual
12
Chapter 6 Login
You can access and configure the system via web browser directly, without installing any clientsoftware on the your computer.
6.1 Recommended Running EnvironmentThe following is recommended system requirement for running Web Client.
CPUIntel Pentium IV 3.0 GHz and above
Memory1 GB and above
Video CardRADEON X700 Series
Web BrowserInternet Explorer 10/11 and above (32-bit), Firefox 32 and above (32-bit), Google Chrome 35 andabove (32-bit)
NoteYou should run the web browser as administrator.
6.2 First Time LoginIf this is the first time for you to login, you can choose to login as admin or normal user accordingto your user role.
6.2.1 Login for First Time for admin User
By default, the system predefined the administrator user named admin. When you log in via theWeb Client for the first time, you are required to create a password for the admin user before youcan properly configure and operate the system.
Perform this task when you access the system for the first time.
Steps1. In the address bar of the web browser, input the address of the PC running VSM (Video
Surveillance Management) service and press Enter key.
HikCentral Web Client User Manual
13
ExampleIf the IP address of PC running VSM is 172.6.21.96, and you should enter http://172.6.21.96 orhttps://172.6.21.96 in the address bar.
Note• You should set the transfer protocol before accessing the VSM. For details, refer to Set
Transfer Protocol .• You should set the VSM's IP address before accessing the VSM via WAN. For details, refer to
Set WAN Access .
2. When you login via current Internet Explorer browser for the first time, you should install theplug-in before you can access the functions.1) Click OK in the pop-up dialog to install the plug-in.2) Save the plug-in file to your PC and close the web browser.3) Find the plug-in that stores on your PC and install the plug-in according to the prompt.4) Re-open the web browser and log in to the system (step 1).
3. Input the password and confirm password for the admin user in the pop-up Create Passwordwindow.
NoteThe password strength can be checked by the system and should meet the systemrequirements. The default minimum password strength should be Medium. For detailedsettings of minimum password strength, refer to Manage System Security .
CautionThe password strength of the device can be automatically checked. We highly recommend youchange the password of your own choosing (using a minimum of 8 characters, including at leastthree kinds of following categories: upper case letters, lower case letters, numbers, and specialcharacters) in order to increase the security of your product. And we recommend you reset yourpassword regularly, especially in the high security system, resetting the password monthly orweekly can better protect your product.Proper configuration of all passwords and other security settings is the responsibility of theinstaller and/or end-user.
4. Click OK.Web Client home page displays after you successfully creating the admin password.
Result
After you logging in, the Site Name window opens and you can set the site name for the currentsystem as you want.
HikCentral Web Client User Manual
14
NoteYou can also set it in System → Site Name . See Set Site Name for details.
6.2.2 First Time Login for Normal User
When you log in to the system as normal user via Web Client for the first time, you should changethe initial password and set a new password for login.
Perform this task when you need to access the system as normal user for the first time.
Steps1. In the address bar of the web browser, input the address of the PC running VSM (Video
Surveillance Management Service) and press the Enter key.
ExampleIf the IP address of PC running VSM is 172.6.21.96, and you should enter http://172.6.21.96 inthe address bar.
NoteYou should configure the VSM's IP address in WAN Access of System Configuration beforeaccessing the VSM via WAN. For details, refer to Set WAN Access .
2. Optional: When you login via current Internet Explorer browser for the first time, you shouldinstall the plug-in before you can access the functions.1) Click OK in the pop-up dialog to install the plug-in.2) Save the plug-in file to your PC and close the web browser.3) Find the plug-in that stores on your PC and install the plug-in according to the prompt.4) Re-open the web browser and log in to the system (step 1).
3. Input the user name and password.
NoteContact the administrator for the user name and initial password.
4. Click Login and the Change Password window opens.5. Set a new password and confirm the password.
NoteThe password strength can be checked by the system and should meet the systemrequirements. If password strength is lower than the required minimum strength, you will beasked to change your password. For detailed settings of minimum password strength, refer toManage System Security .
HikCentral Web Client User Manual
15

CautionThe password strength of the device can be checked by the system. We highly recommend youchange the password of your own choosing (using a minimum of 8 characters, including at leastthree kinds of following categories: upper case letters, lower case letters, numbers, and specialcharacters) in order to increase the security of your product. And we recommend you reset yourpassword regularly, especially in the high security system, resetting the password monthly orweekly can better protect your product.Proper configuration of all passwords and other security settings is the responsibility of theinstaller and/or end-user.
6. Click OK to change the password.
Result
Web Client home page displays after you successfully logging in.
6.3 Login via Web ClientYou can access the system via web browser and configure the system.
Perform this task when you need to access the system via Web Client.
Steps1. In the address bar of the web browser, input the address of the PC running VSM (Video
Surveillance Management Service) and press Enter key.
ExampleIf the IP address of PC running VSM is 172.6.21.96, and you should enter http://172.6.21.96 inthe address bar.
NoteYou should configure the VSM's IP address in WAN Access of System Configuration beforeaccessing the VSM via WAN. For details, refer to Set WAN Access .
2. Optional: When you log in via current Internet Explorer browser for the first time, you shouldinstall the plug-in before you can access the functions.1) Click OK in the pop-up dialog to install the plug-in.2) Save the plug-in file to your PC and close the web browser.3) Find the plug-in that stores on your PC and install the plug-in according to the prompt.4) Re-open the web browser and log in to the system (step 1).
3. Input the user name and password.4. Click Login to log in to the system.
HikCentral Web Client User Manual
16

Note• If failed password attempt of current user is detected, you are required to input theverification code. The failed password attempt from current client, other client and otheraddress will all require the verification code.
• The failed password attempt and verification code attempt from current client, other client(e.g., Control Client) and other address will all be accumulated. Your IP address will be lockedfor a specified period of time after specific number of failed password or verification codeattempts detected. For detailed settings of failed login attempts and locking duration, refer toManage System Security .
• The account will be frozen for 30 minutes after 5 failed password attempts. The failedpassword attempt from current client, other client (e.g., Control Client) and other address willall be accumulated.
• The password strength can be checked by the system and should meet the systemrequirements. If password strength is lower than the required minimum strength, you will beasked to change your password. For detailed settings of minimum password strength, refer toManage System Security .
• If your password has expired, you will be asked to change your password when log in. Fordetailed settings of maximum password age, refer to Manage System Security .
Result
Web Client home page displays after you successfully logging in to the system.
6.4 Change Password for Reset UserWhen the normal user's password is reset to the initial password by admin user, he/she shouldchange the initial password and set a new password when logging into HikCentral via the WebClient.
Perform this task when you need to access the system via Web Client by normal user whosepassword has been reset to the initial one.
Steps1. In the address bar of the web browser, input the address of the PC running VSM (Video
Surveillance Management Service) and press Enter key.
ExampleIf the IP address of PC running VSM is 172.6.21.96, and you should enter http://172.6.21.96 inthe address bar.
NoteYou should configure the VSM's IP address in WAN Access of System Configuration beforeaccessing the VSM via WAN. For details, refer to Set WAN Access .
HikCentral Web Client User Manual
17
2. Optional: When you login via current Internet Explorer browser for the first time, you shouldinstall the plug-in before you can access the functions.1) Click OK in the pop-up dialog to install the plug-in.2) Save the plug-in file to your PC and close the web browser.3) Find the plug-in that stores on your PC and install the plug-in according to the prompt.4) Re-open the web browser and log in to the system (step 1).
3. Input the user name and password.
NoteThe initial password for normal user is Abc123.
4. Click Login and a Change Password window opens.5. Set new password and confirm the password.
NoteThe password strength can be checked by the system and should meet the systemrequirements. If password strength is lower than the required minimum strength, you will beasked to change your password. For detailed settings of minimum password strength, refer toManage System Security .
CautionThe password strength of the device can be checked by the system. We highly recommend youchange the password of your own choosing (using a minimum of 8 characters, including at leastthree kinds of following categories: upper case letters, lower case letters, numbers, and specialcharacters) in order to increase the security of your product. And we recommend you reset yourpassword regularly, especially in the high security system, resetting the password monthly orweekly can better protect your product.Proper configuration of all passwords and other security settings is the responsibility of theinstaller and/or end-user.
6. Click OK to change the password.
Result
Web Client home page displays after you successfully changing the password.
6.5 Forgot PasswordIf you forgot the password of admin user, you can reset the password and set a new password foradmin user.
Perform this task when you forgot the password of admin user.
HikCentral Web Client User Manual
18

Steps
NoteIf you forgot the password of other user, contact the admin user to reset the password and thenchange the password for login.
1. Enter the login page.2. Input admin in the User Name field.3. Click Forgot Password to open Reset Password window.4. Input the activation code, new password, and confirm password.
NoteThe password strength can be checked by the system and should meet the systemrequirements. If password strength is lower than the required minimum strength, you will beasked to change your password. For detailed settings of minimum password strength, refer toManage System Security .
CautionThe password strength of the device can be automatically checked. We highly recommend youchange the password of your own choosing (using a minimum of 8 characters, including at leastthree kinds of following categories: upper case letters, lower case letters, numbers, and specialcharacters) in order to increase the security of your product. And we recommend you reset yourpassword regularly, especially in the high security system, resetting the password monthly orweekly can better protect your product.Proper configuration of all passwords and other security settings is the responsibility of theinstaller and/or end-user.
5. Click OK to reset the admin password.
HikCentral Web Client User Manual
19

Chapter 7 Download Mobile Client
On the login page of Web Client, you can scan the QR code to download the Mobile Client that isused for accessing the system via mobile terminal (e.g., mobile phone).
Perform this task when you need to download the Mobile Client.
NoteYou can also search and download the Mobile Client in the App Store or Google Play.
Steps1. In the address bar of the web browser, input the address of the PC running VSM (Video
Surveillance Management Service) and press Enter key.
ExampleIf the IP address of PC running VSM is 172.6.21.96, and you should enter http://172.6.21.96 inthe address bar.
NoteYou should configure the VSM's IP address in WAN Access of System Configuration beforeaccessing the VSM via WAN. For details, refer to Set WAN Access .
2. Scan the corresponding QR code with your mobile terminal to download the Mobile Client.
NoteFor detailed introduction about the Mobile Client, refer to the User Manual of HikCentralMobile Client and User Manual of HikCentral HD Mobile Client.
HikCentral Web Client User Manual
20

Chapter 8 Wizard
The wizard can guide you to go through the basic operations of the system, including addingencoding devices, setting the recording schedule, configuring the event parameters, and managingthe users.
Click on Home page to enter the Start Wizard page.
VideoYou can add the active online encoding devices in the same local subnet with the Web Client, addthe devices by IP address, add the cameras by IP segment or import cameras in batch, etc. SeeManage Encoding Device for detailed configuration.
Access ControlYou can add the access control devices to the system for further operations, and set the accesspermission for persons to access the door, etc. See Manage Access Control Device for detailedconfiguration.
EventYou can configure the detected events with linkage actions for notification. For example, whenmotion is detected, it will trigger a user-defined event. See Configure Event and Alarm for detailedconfiguration.
UserYou can add multiple user accounts to the system for accessing through Web Client, Control Client,or Mobile Client, and you are allowed to assign different roles for different users. The roles can bespecified with different permissions. Refer to Manage Role and User for detailed configuration.
HikCentral Web Client User Manual
21

Chapter 9 Manage License
After you install HikCentral, you have a temporary License for a specified number of cameras andlimited functions. To ensure the proper use of HikCentral, you can activate the VSM to access morefunctions and manage more devices. If you do not want to activate the VSM now, you can skip thischapter and perform this operation later.
Two types of License are available for HikCentral:• Base: You need to purchase at least one basic License to activate HikCentral.• Expansion: If you want to increase the capability of your system (e.g., connect more cameras),
you can purchase an expanded License to get additional features.
Note• Only the admin user can perform the activation, update, and deactivation operation.• If you encounter any problems during activation, update, and deactivation, please send the
server logs to Hikvision's technical support engineers.
9.1 Activate License - OnlineInput the activation code received when you purchase your License for activation.
If the VSM to be activated can properly connect to the Internet, you can perform the followingsteps to activate the License.
Steps1. Log in to HikCentral via the Web Client. Refer to Login via Web Client .
After logging in, you enter the home page of the HikCentral Web Client.2. Click Online Activation in the License area to open the License configuration window.
HikCentral Web Client User Manual
22

Figure 9-1 License Configuration Window3. Input the activation code received when you purchased your License.
Note• At least one basic License is required for activating the system.• If you have purchased more than one License, you can click and input other activation
codes.
4. Optional: Set the Hot Spare switch to ON and input the required parameters if you want tobuild a hot spare system.
Note• You must select Hot Spare mode when you install the system. For details, refer to Install
Module .• For how to build the hot spare system, please contact our technical support engineers.
5. Click OK and the License Agreement dialog opens.6. Read the License Agreement.
- If you accept the terms of the license agreement, select the I accept the terms of theagreement checkbox and click OK to continue.
- If you do not accept the agreement, click Cancel to cancel the activation.The prompt Operation completed will appear when the License is activated.
HikCentral Web Client User Manual
23

9.2 Activate License - OfflineIf the VSM to be activated cannot connect to the Internet, you can perform the following steps toactivate the License.
Perform this task when you need to activate license offline.
NoteYou must enter HIKVISION's website (http://overseas.hikvision.com/) and go to VMS → VMSSupport → License Management , click NEW USER and register an account.
Steps1. Log in to HikCentral via the Web Client. Refer to Login via Web Client .
After logging in, you enter the home page of the HikCentral Web Client.2. Click Export the license request file in the License area to open the License configuration
window.
Figure 9-2 License Configuration Window3. Input the activation code received when you purchased your License.
NoteIf you have purchased more than one License, you can click and input other activation codes.
HikCentral Web Client User Manual
24
4. Optional: Set the Hot Spare switch to ON and input the required parameters if you want tobuild a hot spare system.
Note• You must select Hot Spare mode when you install the system. For details, refer to Install
Module .• For how to build the hot spare system, please contact Hikvision's technical support engineers.
5. Click Export and save the request file to the proper directory or the removable storage medium(e.g., USB flash disk).
6. Copy the request file to the PC that can connect to the Internet.
NoteIf the PC accessing HikCentral via the Web Client can connect to the Internet, you can skip thisstep.
7. Enter HIKVISION's website (http://overseas.hikvision.com/) and go to VMS → VMS Support →License Management page,
8. Login to your account.9. Select How to Activate Your Account and click Browse at the bottom of the page to select the
license request file exported in step 5.10. In the pop-up dialog, click Download to download the generated activation file and set the
name and saving path.11. Save the activation file to the proper directory of the PC that accesses HikCentral via the Web
Client.12. In the License configuration window, click Import the activation file to import the activation
file and the License Agreement dialog opens.13. Read the License Agreement.
- If you accept the terms of the license agreement, select the I accept the terms of theagreement checkbox and click OK to continue.
- If you do not accept the agreement, click Cancel to cancel the activation.The prompt Operation completed will appear when the VSM is successfully activated.
9.3 Update License - OnlineAs your project grows, you may need to increase the connectable number of resources (e.g.,cameras) for your HikCentral.
You can contact your dealer or our sales team to purchase additional features and then performthe following steps to update your License.
Steps1. Log in to HikCentral via the Web Client. Refer to Login via Web Client for details.
After logging in, you enter the home page of the HikCentral Web Client.
HikCentral Web Client User Manual
25
2. Click Update License at the License area to open the update panel.3. Input the activation code received when you purchase your License.
NoteIf you have purchased more than one License, you can click and input other activation codes.
4. Click Update and the License Agreement dialog opens.5. Read the License Agreement.
- If you accept the terms of the license agreement, select the I accept the terms of theagreement checkbox and click OK to continue.
- If you do not accept the agreement, click Cancel to cancel the update.
Result
The prompt Operation completed will appear when the VSM is successfully updated.
9.4 Update License - OfflineAs your project grows, you may need to increase the connectable number of cameras for yourHikCentral.
You can contact your dealer or our sales team to purchase additional features and then performthe following steps to update your License.
Steps1. Log in to HikCentral via the Web Client. Refer to Login via Web Client for details.
After logging in, you enter the home page of the HikCentral Web Client.2. Click Update License in the License area to open the update panel.3. Click Export the license request file in the License area to open the License configuration
window.4. Input the activation code of your additional License.
NoteIf you have purchased more than one License, you can click and input other activation codes.
5. Click Export and save the request file to the proper directory or the removable storage medium(e.g., USB flash disk).
6. Copy the request file to the PC that can connect to the Internet.
NoteIf the PC accessing HikCentral via the Web Client can connect to the Internet, you can skip thisstep.
7. Enter HIKVISION's website ( http://overseas.hikvision.com/ ) and go to VMS → VMS Support →License Management page.
8. Login to your account.
HikCentral Web Client User Manual
26
9. Select How to Update Your Account and click Browse at the bottom of the page to select thelicense request file exported in step 5.
10. Click Submit to generate the update file.11. In the pop-up dialog, click Download to download the generated update file and set the name
and saving path.12. Save the update file to the proper directory of the PC that accesses HikCentral via the Web
Client.13. In the License configuration window, click Import the update file to import the update file and
the License Agreement dialog opens.14. Read the License Agreement.
- If you accept the terms of the license agreement, select the I accept the terms of theagreement checkbox and click OK to continue.
- If you do not accept the agreement, click Cancel to cancel the update.
Result
The prompt Operation completed will appear when the VSM is successfully updated.
9.5 Deactivate License - OnlineIf you want to run the VSM on another PC or server, you should deactivate the VSM first and thenactivate the VSM again. You can also use the License to activate another VSM after you deactivatethe VSM.
Perform this task when you need to deactivate license online.
Steps1. Log in to HikCentral via the Web Client. Refer to Login via Web Client .
After logging in, you enter the home page of the HikCentral Web Client.2. Click Deactivate License in the License area to open the deactivation panel.3. Click Online Deactivation and select the checkbox(es) of the activation code(s) to be
deactivated.4. Click OK to deactivate the license.
Result
The prompt Operation completed will appear when the VSM is successfully deactivated. You canactivate another VSM with the License.
9.6 Deactivate License - OfflineIf you want to run the VSM on another PC or server, you should deactivate the VSM first and thenactivate the VSM again. You can also use the License to activate other VSM after you deactivate theVSM.
HikCentral Web Client User Manual
27

Perform this task when you need to deactivating the license offline.
Steps1. Log in to the HikCentral via Web Client. Refer to Login via Web Client for details.2. Click Deactivate License at the License area to unfold the deactivation panel.3. Click Export the license request file and check the checkbox(es) of the activation code(s) to be
deactivated.4. Click Export and save the request file to the proper directory or the removable storage medium
(e.g., USB flash disk).5. Copy the request file to the PC that can connect to the Internet.
NoteIf the PC accessing the HikCentral via Web Client can connect to the Internet, you can skip thisstep.
6. Enter HIKVISION's website ( http://overseas.hikvision.com/ ) and go to VMS → Support →License Management page,
7. Login with your account.8. Select How to Deactivate Your Account and click Browse at the bottom of the page to select
the license request file exported in step 4.9. In the pop-up dialog, click Download to download the generated deactivation file and set the
name and saving path.10. Save the deactivation file to the proper directory of the PC that accesses the HikCentral via
Web Client.11. In the License configuration window, click Import the deactivation file to import the
deactivation file.12. Deactivate again to complete the deactivation operation.
1)A new request file will be generated automatically and ask you to export it again, or you canclick Export the license request file to export request file manually.
2)Save the request file to the proper directory or the removable storage medium and performstep 4-9 again to complete the deactivation operation.
Result
The prompt Operation completed will pop up when the VSM is successfully deactivated. You canactivate other VSM with the License.
HikCentral Web Client User Manual
28
Chapter 10 Manage Resource
You can add encoding devices for live view, playback, recording settings, event configuration, etc.,add access control devices for access control, time and attendance management, ect., add RemoteSite for central management of multiple systems, add Recording Server for storing the videos, addStreaming Server for getting the video data stream from the server, and add Smart Wall fordisplaying decoded video on smart wall.
10.1 Create Password for Inactive Device(s)For some detected online devices including encoding device, access control device, and decodingdevice, you are required to create the password to activate them before adding them to thesystem. Besides activating the device one by one, you can also deal with multiple ones at the sametime. The devices which are activated in a batch will have the same password.
Before You Start• Make sure the devices (cameras, DVR, etc.) you are going to use are correctly installed and
connected to the network as specified by the manufacturers. Such initial configuration isrequired in order to be able to connect the devices to the HikCentral via network.
• This function should be supported by the device. Make sure the devices you want to activatesupport this function.
Perform this task when you need to activate the detected online devices. Here we take creatingpassword for the encoding device as an example.
Steps1. Click Physical View → Encoding Device to enter the device management page.
Note• For access control devices, click Physical View → Access Control Device to enter the access
control device management page.• For decoding devices, click Physical View → Smart Wall . On the Decoding Device area, click
Add and check Online Devices as Adding Mode.
The detected online devices list in the online device area.2. View the device status (shown on Security column) and select one or multiple inactive devices.3. Click to pop up the Device Activation interface.4. Create a password in the password field, and confirm the password.
HikCentral Web Client User Manual
29
CautionThe password strength of the device can be automatically checked. We highly recommend youchange the password of your own choosing (using a minimum of 8 characters, including at leastthree kinds of following categories: upper case letters, lower case letters, numbers, and specialcharacters) in order to increase the security of your product. And we recommend you reset yourpassword regularly, especially in the high security system, resetting the password monthly orweekly can better protect your product.Proper configuration of all passwords and other security settings is the responsibility of theinstaller and/or end-user.
5. Click Save to create the password for the device.A Operation completed. message is displayed when the password is set successfully.
6. Click in the Operation column of the device and change its IP address, subnet mask, andgateway to the same subnet with your computer if you need to add the device to the system.Refer to Edit Online Device's Network Information .
10.2 Edit Online Device's Network InformationFor the detected online devices, you can edit their network information as desired (e.g., changethe device IP address due to the changes of the network).
Before You StartFor some devices, you must activate it before editing its network information. Refer to CreatePassword for Inactive Device(s) .Perform this task when you need to edit the network information for the detected online devices.Here we take editing encoding device as an example.
Steps1. Click Physical View → Encoding Device to enter the device management page.
Note• For access control devices, click Physical View → Access Control Device to enter the access
control device management page.• For decoding devices, click Physical View → Smart Wall . On the Decoding Device area, click
Add and check Online Devices as Adding Mode.
2. View the device status (shown on Security column) and click in the Operation column of anactive device.
3. Change the required parameters, such as IP address, device port, HTTP port, subnet mask, andgateway.
HikCentral Web Client User Manual
30

NoteThe parameters may vary for different device types.
4. Click .5. Enter device's password.6. Click Save.
10.3 Manage Encoding DeviceYou can add the encoding devices to the system for live view, video recording, event settings, etc.
10.3.1 Add Online Device
The active online encoding devices in the same local subnet with the Web Client will be displayedon a list. You can add one online devices at a time, or add multiple online devices in a batch.
Note• For web browser of Google Chrome, you should install the SADP service according to theinstructions and then the online device detection function is available.
• For web browser of Firefox, you should install the SADP service and import the certificateaccording to the instructions and then the online device detection function is available.
Add Single Online Device
You can add the detected online devices, and here we introduce the process for adding single onedevice.
Before You Start• Make sure the devices (cameras, DVR, etc.) you are going to use are correctly installed and
connected to the network as specified by the manufacturers. Such initial configuration isrequired in order to be able to connect the devices to the HikCentral via network.
• The devices to be added should be activated. Refer to Create Password for Inactive Device(s) fordetailed operation about activating devices.
Perform this task when you need to add single one detected online device.
Steps1. Click Physical View → Encoding Device to enter the device management page.2. In the Online Device area, check the checkbox of the active device to be added .3. Click Add to Device List to open the Add Online Device window.
HikCentral Web Client User Manual
31

Figure 10-1 Add Online Device Window4. Input the required information.
NoteThe device's IP address can be automatically shown in Device Address field.
CautionThe password strength of the device can be automatically checked. We highly recommend youchange the password of your own choosing (using a minimum of 8 characters, including at leastthree kinds of following categories: upper case letters, lower case letters, numbers, and specialcharacters) in order to increase the security of your product. And we recommend you reset yourpassword regularly, especially in the high security system, resetting the password monthly orweekly can better protect your product.Proper configuration of all passwords and other security settings is the responsibility of theinstaller and/or end-user.
5. Optional: Set the Add Camera to Area switch to ON to import the cameras of the added deviceto an area.
HikCentral Web Client User Manual
32
Note• You can import all the cameras or the specified camera(s) of the device to the corresponding
area.• You can create a new area by the device name or select an existing area.• If you do not import cameras to area, you cannot perform the live view, playback, eventsettings, etc., for the cameras.
6. Optional: Select a Streaming Server to get the video stream of the cameras via the server.7. If you choose to add cameras to area, enable the following functions for the cameras.
Synchronize Camera Name (Optional)Check the checkbox to get the camera name from the device.
Get Device's Recording SettingsCheck the checkbox to get the recording schedule from the device and the recording task ofthe cameras of the device will automatically perform according to schedule.
NoteIf the recording schedule configured on device is not continuous recording, it will be changedto event recording on local device.
8. Click Add.9. Optional: Perform the following operations after adding the online device.
RemoteConfigurations
Click to set the remote configurations of the corresponding device.
NoteFor detailed operation steps for the remote configuration, see the usermanual of the device.
Change Password Select the added device(s) and click to change the password for thedevice(s).
Note• You can only change the password for online HIKVISION devices
currently.• If the devices have the same password, you can select multiple
devices to change the password for them at the same time.
Add Online Devices in Batch
For the detected online devices, if they have the same password for the same user name, you canadd multiple devices at a time.
HikCentral Web Client User Manual
33

Before You Start• Make sure the devices (cameras, DVR, etc.) you are going to use are correctly installed and
connected to the network as specified by the manufacturers. Such initial configuration isrequired in order to be able to connect the devices to the HikCentral via network.
• The devices to be added should be activated. Refer to Create Password for Inactive Device(s) fordetailed operation about activating devices.
Perform this task when you need to add the detected online devices in batch.
Steps1. Click Physical View → Encoding Device to enter the device management page.2. In the Online Device area, check the checkbox of the active device(s) to be added.3. Click Add to Device List to open the Add Online Device dialog.
Figure 10-2 Add Online Device Dialog4. Input the required information.
HikCentral Web Client User Manual
34
CautionThe password strength of the device can be automatically checked. We highly recommend youchange the password of your own choosing (using a minimum of 8 characters, including at leastthree kinds of following categories: upper case letters, lower case letters, numbers, and specialcharacters) in order to increase the security of your product. And we recommend you reset yourpassword regularly, especially in the high security system, resetting the password monthly orweekly can better protect your product.Proper configuration of all passwords and other security settings is the responsibility of theinstaller and/or end-user.
5. Optional: Set the Add Camera to Area switch to ON to import the cameras of the added devicesto an area.
Note• You can create a new area by the device name or select an existing area.• If you do not import cameras to area, you cannot perform the live view, playback, eventsettings, etc., for the cameras.
6. Optional: Select a Streaming Server to get the video stream of the cameras via the server.7. If you choose to add cameras to area, enable the following functions for the cameras.
Synchronize Camera Name (Optional)Check the checkbox to get the camera name from the device.
Get Device's Recording SettingsCheck the checkbox to get the recording schedule from the device and the recording task ofthe cameras of the device will automatically perform according to schedule.
8. Click Add.9. Optional: Perform the following operations after adding the online devices in batch.
RemoteConfigurations
Click to set the remote configurations of the corresponding device.
NoteFor detailed operation steps for the remote configuration, see the usermanual of the device.
Change Password Select the added device(s) and click to change the password for thedevice(s).
Note• You can only change the password for online HIKVISION devices
currently.• If the devices have the same password, you can select multiple
devices to change the password for them at the same time.
HikCentral Web Client User Manual
35
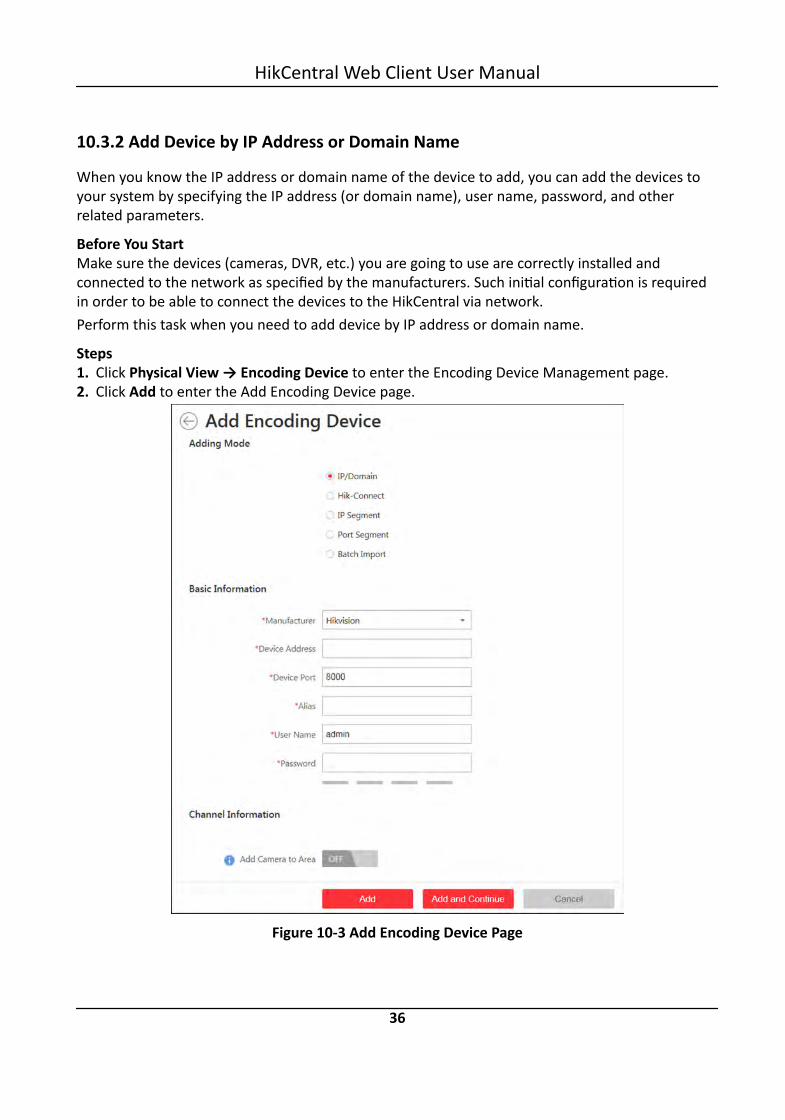
10.3.2 Add Device by IP Address or Domain Name
When you know the IP address or domain name of the device to add, you can add the devices toyour system by specifying the IP address (or domain name), user name, password, and otherrelated parameters.
Before You StartMake sure the devices (cameras, DVR, etc.) you are going to use are correctly installed andconnected to the network as specified by the manufacturers. Such initial configuration is requiredin order to be able to connect the devices to the HikCentral via network.Perform this task when you need to add device by IP address or domain name.
Steps1. Click Physical View → Encoding Device to enter the Encoding Device Management page.2. Click Add to enter the Add Encoding Device page.
Figure 10-3 Add Encoding Device Page
HikCentral Web Client User Manual
36

3. Select IP/Domain as the adding mode.4. Input the required information.
NoteBy default, the device port No. is 8000.
CautionThe password strength of the device can be automatically checked. We highly recommend youchange the password of your own choosing (using a minimum of 8 characters, including at leastthree kinds of following categories: upper case letters, lower case letters, numbers, and specialcharacters) in order to increase the security of your product. And we recommend you reset yourpassword regularly, especially in the high security system, resetting the password monthly orweekly can better protect your product.Proper configuration of all passwords and other security settings is the responsibility of theinstaller and/or end-user.
5. Optional: Set the Add Camera to Area switch to ON to import the cameras of the added devicesto an area.
Note• You can import all the cameras or the specified camera(s) of the device to the corresponding
area.• You can create a new area by the device name or select an existing area.• If you do not import cameras to area, you cannot perform the live view, playback, eventsettings, etc., for the cameras.
6. Optional: If you choose to add cameras to area, select a Streaming Server to get the videostream of the cameras via the server.
7. Optional: If you choose to add cameras to area, check the Synchronize Camera Name checkboxto get the camera name from the device.
8. Optional: If you choose to add cameras to area, enable the Video Storage function and selectthe storage location for recording.Encoding Device
The video files will be stored in the device according to the configured recording schedule.Hybrid Storage Area Network
The video files will be stored in the Hybrid Storage Area Network according to the configuredrecording schedule.
Cloud Storage ServerThe video files will be stored in the Cloud Storage Server according to the configuredrecording schedule.
HikCentral Web Client User Manual
37
Note• For adding the encoding device by domain name, the video files can only be stored in the
local storage of the device.• Configure the Hybrid Storage Area Network or Cloud Storage Server in advance, or its storagelocation cannot display in the drop-down list. You can click Add New to add a new HybridStorage Area Network or Cloud Storage Server.
9. Set the quick recording schedule for added cameras.- Check the Get Device's Recording Settings checkbox to get the recording schedule from the
device and the recording task of the cameras of the device will automatically performaccording to schedule.
- Uncheck the Get Device's Recording Settings and set the required information such asrecording schedule template, stream type, pre-record, etc. Refer to Configure Recording forCameras on Current Site for more details.
10. Finish adding the device.- Click Add to add the encoding device and back to the decoding device list page.- Click Add and Continue to save the settings and continue to add other encoding devices.
11. Optional: Perform the following operations after adding the devices.
RemoteConfigurations
Click to set the remote configurations of the corresponding device.
NoteFor detailed operation steps for the remote configuration, see theuser manual of the device.
ChangePassword
Select the added device(s) and click to change the password forthe device(s).
Note• You can only change the password for online HIKVISION devices
currently.• If the devices have the same password, you can select multiple
devices to change the password for them at the same time.
10.3.3 Add Devices by IP Segment
If the encoding devices having the same user name and password, and their IP addresses arebetween the IP segment, you can specify the start IP address and the end IP address, user name,password, and other related parameters to add them.
HikCentral Web Client User Manual
38
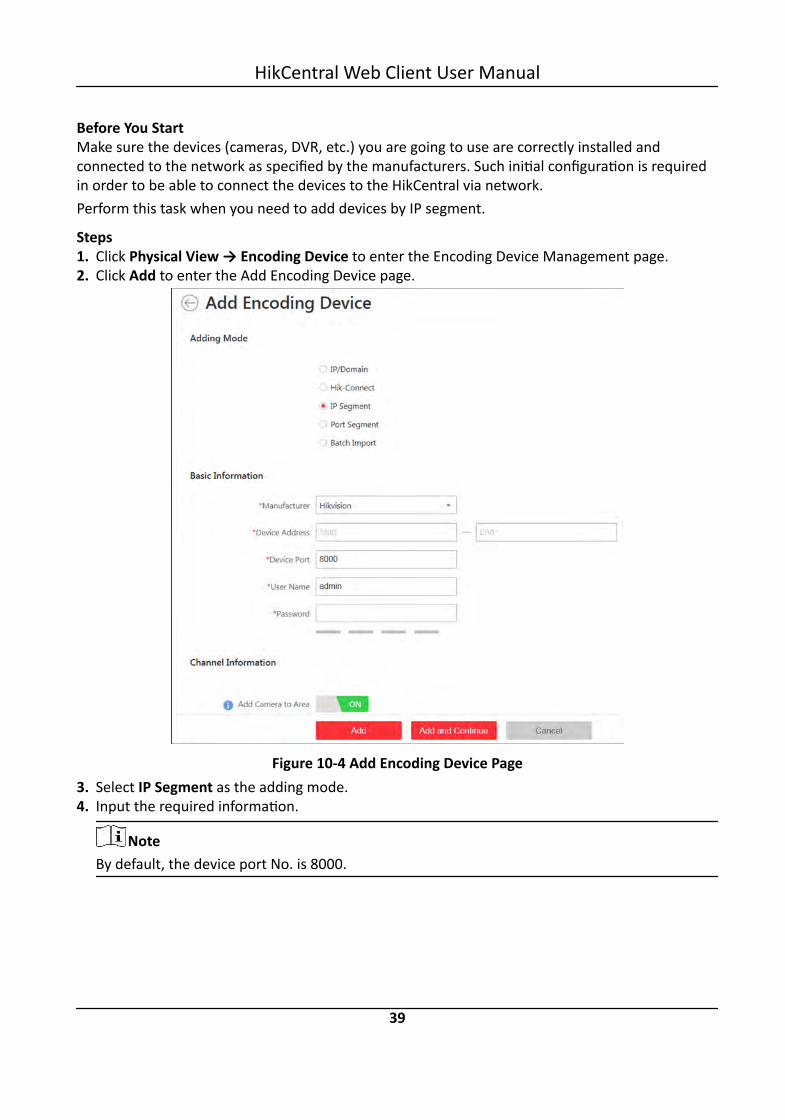
Before You StartMake sure the devices (cameras, DVR, etc.) you are going to use are correctly installed andconnected to the network as specified by the manufacturers. Such initial configuration is requiredin order to be able to connect the devices to the HikCentral via network.Perform this task when you need to add devices by IP segment.
Steps1. Click Physical View → Encoding Device to enter the Encoding Device Management page.2. Click Add to enter the Add Encoding Device page.
Figure 10-4 Add Encoding Device Page3. Select IP Segment as the adding mode.4. Input the required information.
NoteBy default, the device port No. is 8000.
HikCentral Web Client User Manual
39

CautionThe password strength of the device can be automatically checked. We highly recommend youchange the password of your own choosing (using a minimum of 8 characters, including at leastthree kinds of following categories: upper case letters, lower case letters, numbers, and specialcharacters) in order to increase the security of your product. And we recommend you reset yourpassword regularly, especially in the high security system, resetting the password monthly orweekly can better protect your product.Proper configuration of all passwords and other security settings is the responsibility of theinstaller and/or end-user.
5. Optional: Set the Add Camera to Area switch to ON to import the cameras of the added devicesto an area.
Note• You can create a new area by the device name or select an existing area.• If you do not import cameras to area, you cannot perform the live view, playback, eventsettings, etc., for the cameras.
6. Optional: Select a Streaming Server to get the video stream of the cameras via the server.7. Optional: If you choose to add cameras to area, enable the following function for the cameras.
Synchronize Camera NameCheck the checkbox to get the camera name from the device.
8. Finish adding the device.- Click Add to add the devices of which the IP addresses are between the start IP address and
end IP address and back to the device list page.- Click Add and Continue to save the settings and continue to add other encoding devices.
9. Optional: Perform the following operations after adding the devices.
RemoteConfigurations
Click to set the remote configurations of the corresponding device.
NoteFor detailed operation steps for the remote configuration, see the usermanual of the device.
Change Password Select the added device(s) and click to change the password for thedevice(s).
Note• You can only change the password for online HIKVISION devices
currently.• If the devices have the same password, you can select multiple
devices to change the password for them at the same time.
HikCentral Web Client User Manual
40

10.3.4 Add Devices by Port Segment
If the encoding devices having the same user name and password, and their port No. are betweenthe port segment, you can specify the start port No. and the end port No., user name, password,and other related parameters to add them.
Before You StartMake sure the devices (cameras, DVR, etc.) you are going to use are correctly installed andconnected to the network as specified by the manufacturers. Such initial configuration is requiredin order to be able to connect the devices to the HikCentral via network.Perform this task when you want to add devices by port segment.
Steps1. Click Physical View → Encoding Device to enter the encoding device management page.2. Click Add to enter the Add Encoding Device page.
Figure 10-5 Add Encoding Device Page3. Select Port Segment as the adding mode.4. Input the required information.
HikCentral Web Client User Manual
41
CautionThe password strength of the device can be automatically checked. We highly recommend youchange the password of your own choosing (using a minimum of 8 characters, including at leastthree kinds of following categories: upper case letters, lower case letters, numbers, and specialcharacters) in order to increase the security of your product. And we recommend you reset yourpassword regularly, especially in the high security system, resetting the password monthly orweekly can better protect your product.Proper configuration of all passwords and other security settings is the responsibility of theinstaller and/or end-user.
5. Optional: Set the Add Camera to Area switch to ON to import the cameras of the added devicesto an area.
Note• You can create a new area by the device name or select an existing area.• If you do not import cameras to area, you cannot perform the live view, playback, eventsettings, etc., for the cameras.
6. Optional: Select a Streaming Server to get the video stream of the cameras via the server.7. Optional: If you choose to add cameras to area, enable the following functions for the cameras.
Synchronize Camera NameCheck the checkbox to get the camera name from the device.
8. Finish adding the device.- Click Add to add the devices of which the port No. is between the start port No. and end port
No. and back to the device list page.- Click Add and Continue to save the settings and continue to add other devices.
9. Optional: Perform the following operations after adding the devices.
RemoteConfigurations
Click to set the remote configurations of the corresponding device.
NoteFor detailed operation steps for the remote configuration, see the usermanual of the device.
Change Password Select the added device(s) and click to change the password for thedevice(s).
Note• You can only change the password for online HIKVISION devices
currently.• If the devices have the same password, you can select multiple
devices to change the password for them at the same time.
HikCentral Web Client User Manual
42
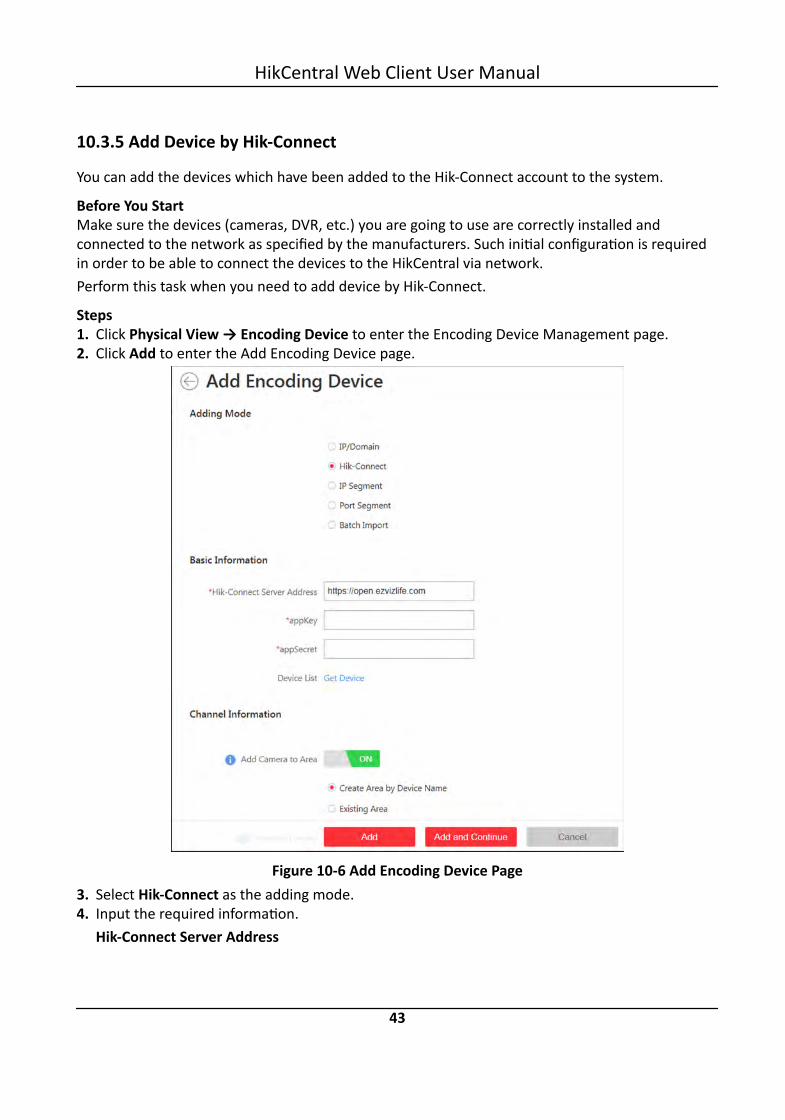
10.3.5 Add Device by Hik-Connect
You can add the devices which have been added to the Hik-Connect account to the system.
Before You StartMake sure the devices (cameras, DVR, etc.) you are going to use are correctly installed andconnected to the network as specified by the manufacturers. Such initial configuration is requiredin order to be able to connect the devices to the HikCentral via network.Perform this task when you need to add device by Hik-Connect.
Steps1. Click Physical View → Encoding Device to enter the Encoding Device Management page.2. Click Add to enter the Add Encoding Device page.
Figure 10-6 Add Encoding Device Page3. Select Hik-Connect as the adding mode.4. Input the required information.
Hik-Connect Server Address
HikCentral Web Client User Manual
43
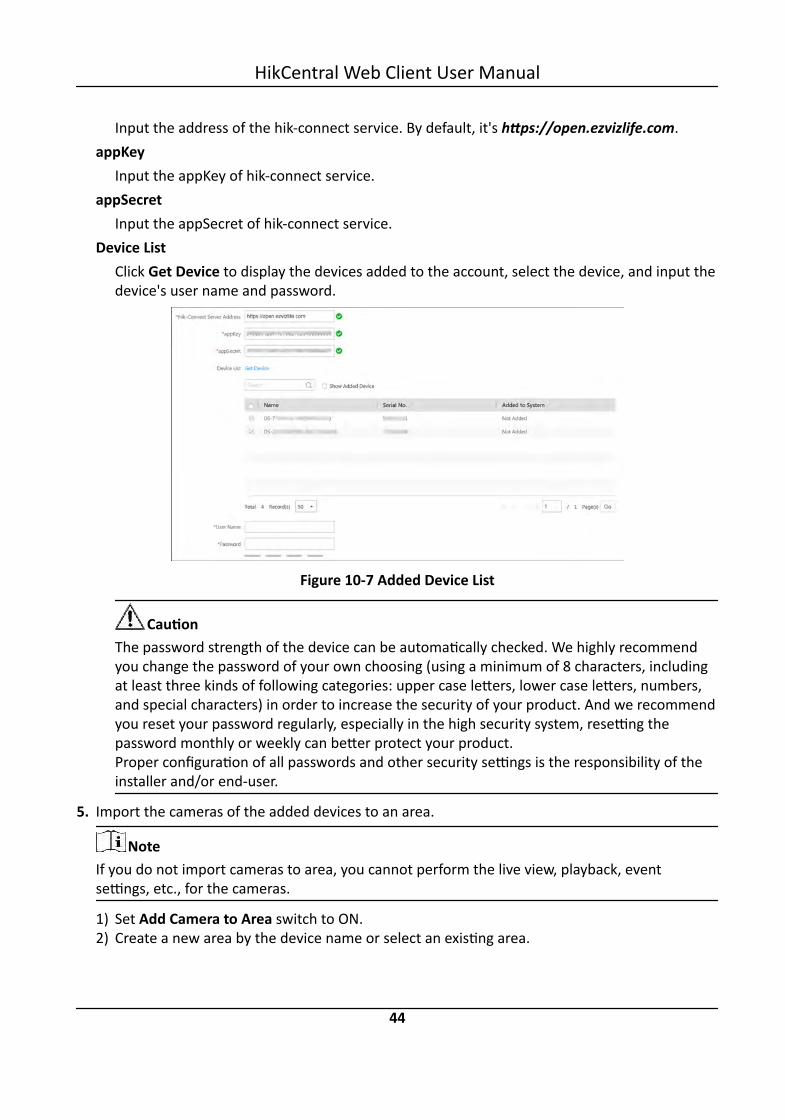
Input the address of the hik-connect service. By default, it's https://open.ezvizlife.com.appKey
Input the appKey of hik-connect service.appSecret
Input the appSecret of hik-connect service.Device List
Click Get Device to display the devices added to the account, select the device, and input thedevice's user name and password.
Figure 10-7 Added Device List
CautionThe password strength of the device can be automatically checked. We highly recommendyou change the password of your own choosing (using a minimum of 8 characters, includingat least three kinds of following categories: upper case letters, lower case letters, numbers,and special characters) in order to increase the security of your product. And we recommendyou reset your password regularly, especially in the high security system, resetting thepassword monthly or weekly can better protect your product.Proper configuration of all passwords and other security settings is the responsibility of theinstaller and/or end-user.
5. Import the cameras of the added devices to an area.
NoteIf you do not import cameras to area, you cannot perform the live view, playback, eventsettings, etc., for the cameras.
1) Set Add Camera to Area switch to ON.2) Create a new area by the device name or select an existing area.
HikCentral Web Client User Manual
44
6. Optional: Select a Streaming Server to get the video stream of the cameras via the server.7. Optional: Check Synchronize Camera Name to get the camera name from the device after
adding cameras to area.8. Finish adding the device.
- Click Add to add the encoding device and back to the decoding device list page.- Click Add and Continue to save the settings and continue to add other encoding devices.
9. Optional: Perform the following operations after adding the devices.
RemoteConfigurations
Click to set the remote configurations of the corresponding device.
NoteFor detailed operation steps for the remote configuration, see the usermanual of the device.
Change Password Select the added device(s) and click to change the password for thedevice(s).
Note• You can only change the password for online HIKVISION devices
currently.• If the devices have the same password, you can select multiple
devices to change the password for them at the same time.
10.3.6 Add Devices in a Batch
You can input the device information into the predefined template to add multiple devices at atime.
Before You StartMake sure the devices (cameras, DVR, etc.) you are going to use are correctly installed andconnected to the network as specified by the manufacturers. Such initial configuration is requiredin order to be able to connect the devices to the HikCentral via network.Perform this task when you need to add devices by importing the template which containsinformation of multiple devices.
Steps1. Click Physical View → Encoding Device to enter the encoding device management page.2. Click Add to enter the Add Encoding Device page.
HikCentral Web Client User Manual
45
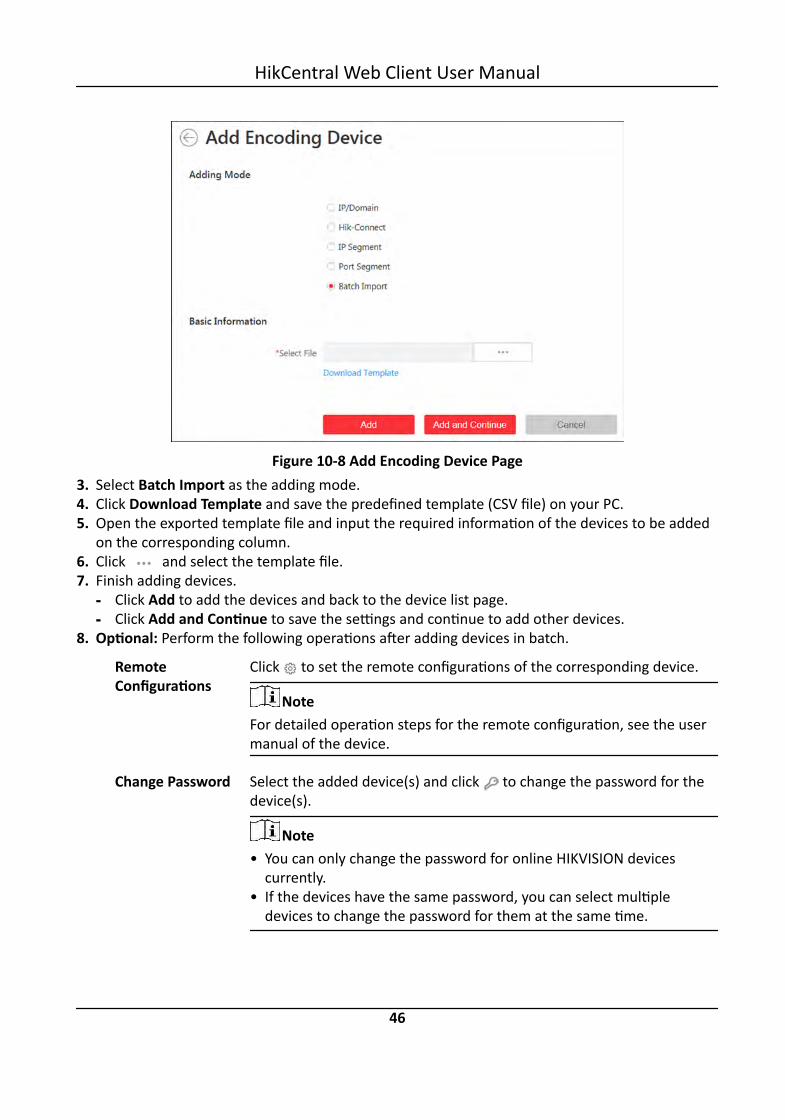
Figure 10-8 Add Encoding Device Page3. Select Batch Import as the adding mode.4. Click Download Template and save the predefined template (CSV file) on your PC.5. Open the exported template file and input the required information of the devices to be added
on the corresponding column.6. Click and select the template file.7. Finish adding devices.
- Click Add to add the devices and back to the device list page.- Click Add and Continue to save the settings and continue to add other devices.
8. Optional: Perform the following operations after adding devices in batch.
RemoteConfigurations
Click to set the remote configurations of the corresponding device.
NoteFor detailed operation steps for the remote configuration, see the usermanual of the device.
Change Password Select the added device(s) and click to change the password for thedevice(s).
Note• You can only change the password for online HIKVISION devices
currently.• If the devices have the same password, you can select multiple
devices to change the password for them at the same time.
HikCentral Web Client User Manual
46

10.4 Manage Access Control DeviceYou can add the access control devices to the system for access permission configuration, time andattendance management, etc.
10.4.1 Add Online Device
The active online access control devices in the same local subnet with the current Web Client willbe displayed on a list. You can add one online device one by one, or add multiple online devices ina batch.
Note• For web browser of Google Chrome, you should install the SADP service according to theinstructions and then the online device detection function is available.
• For web browser of Firefox, you should install the SADP service and import the certificateaccording to the instructions and then the online device detection function is available.
Add Single Online Device
You can add the detected online devices, and here we introduce the process for adding single onedevice.
Before You Start• Make sure the access control devices you are going to use are correctly installed and connected
to the network as specified by the manufacturers. Such initial configuration is required in orderto be able to connect the devices to the HikCentral via network.
• The devices to be added should be activated. Refer to Create Password for Inactive Device(s) fordetailed operation about activating devices.
Perform this task when you need to add single one detected online device.
Steps1. Click Physical View → Access Control Device to enter the device management page.2. In the Online Device area, check the checkbox of the active device to be added .3. Click Add to Device List to open the Add Online Device window.4. Input the required information.
NoteThe device's IP address can be automatically shown in Device Address field.
HikCentral Web Client User Manual
47
CautionThe password strength of the device can be automatically checked. We highly recommend youchange the password of your own choosing (using a minimum of 8 characters, including at leastthree kinds of following categories: upper case letters, lower case letters, numbers, and specialcharacters) in order to increase the security of your product. And we recommend you reset yourpassword regularly, especially in the high security system, resetting the password monthly orweekly can better protect your product.Proper configuration of all passwords and other security settings is the responsibility of theinstaller and/or end-user.
5. Optional: Set the Add Door to Area switch to ON to import the doors of the added device to anarea.
Note• You can import all the doors or the specified door(s) of the device to the corresponding area.• You can create a new area by the device name or select an existing area.• If you do not import doors to area, you cannot perform the further configurations for the
doors.
6. Optional: If you choose to add doors to area, Check the Synchronize Door Name to get the doorname form the device .
7. Click Add.8. Optional: Perform the following operations after adding the online device.
RemoteConfigurations
Click to set the remote configurations of the corresponding device.
Change Password Select the added device(s) and click to change the password for thedevice(s).
Note• You can only change the password for online HIKVISION devices
currently.• If the devices have the same password, you can select multiple
devices to change the password for them at the same time.
Add Online Devices in Batch
For the detected online devices, if they have the same password for the same user name, you canadd multiple devices at a time.
HikCentral Web Client User Manual
48

Before You Start• Make sure the access control devices you are going to use are correctly installed and connected
to the network as specified by the manufacturers. Such initial configuration is required in orderto be able to connect the devices to the HikCentral via network.
• The devices to be added should be activated. Refer to Create Password for Inactive Device(s) fordetailed operation about activating devices.
Perform this task when you need to add the detected online devices in batch.
Steps1. Click Physical View → Access Control Device to enter the device management page.2. In the Online Device area, check the checkbox of the active devices to be added.3. Click Add to Device List to open the Add Online Device dialog.4. Input the required information.
CautionThe password strength of the device can be automatically checked. We highly recommend youchange the password of your own choosing (using a minimum of 8 characters, including at leastthree kinds of following categories: upper case letters, lower case letters, numbers, and specialcharacters) in order to increase the security of your product. And we recommend you reset yourpassword regularly, especially in the high security system, resetting the password monthly orweekly can better protect your product.Proper configuration of all passwords and other security settings is the responsibility of theinstaller and/or end-user.
5. Optional: Set the Add Door to Area switch to ON to import the doors of the added devices toan area.
Note• You can create a new area by the device name or select an existing area.• If you do not import doors to area, you cannot perform the further operations for the doors.
6. Optional: If you choose to add doors to area, check the Synchronize Door Name to get the doorname from the device.
7. Click Add.8. Optional: Perform the following operations after adding the online devices in batch.
RemoteConfigurations
Click to set the remote configurations of the corresponding device.
Change Password Select the added device(s) and click to change the password for thedevice(s).
HikCentral Web Client User Manual
49

Note• You can only change the password for online HIKVISION devices
currently.• If the devices have the same password, you can select multiple
devices to change the password for them at the same time.
10.4.2 Add Device by IP Address
When you know the IP address of the access control device to add, you can add the devices to yoursystem by specifying the IP address, user name, password, and other related parameters.
Before You StartMake sure the access control devices you are going to use are correctly installed and connected tothe network as specified by the manufacturers. Such initial configuration is required in order to beable to connect the devices to the HikCentral via network.Perform this task when you need to add devices by IP address.
Steps1. Click Physical View → Access Control Device to enter the Access control Device Management
page.2. Click Add to enter the Add Access Control Device page.3. Select IP Address as the adding mode.4. Input the required the information.
NoteBy default, the device port No. is 8000.
CautionThe password strength of the device can be automatically checked. We highly recommend youchange the password of your own choosing (using a minimum of 8 characters, including at leastthree kinds of following categories: upper case letters, lower case letters, numbers, and specialcharacters) in order to increase the security of your product. And we recommend you reset yourpassword regularly, especially in the high security system, resetting the password monthly orweekly can better protect your product.Proper configuration of all passwords and other security settings is the responsibility of theinstaller and/or end-user.
5. Optional: Set the Add Door to Area switch to ON to import the doors of the added devices toan area.
HikCentral Web Client User Manual
50

Note• You can import all the doors or the specified door(s) of the device to the corresponding area.• You can create a new area by the device name or select an existing area.• If you don't import doors to area, you cannot perform further operations for the doors.
6. Optional: If you choose to add doors to area, check the Synchronize Door Name to get the doorname from the device.
7. Finish adding the device.- Chick Add to add the access control device and back the access control device list page.- Click Add and Continue to save the settings and continue to add next access control device.
8. Perform the following operations after adding the devices.
RemoteConfigurations
Click to set the remote configurations of the corresponding device.
NoteFor detailed operation steps for the remote configuration, see the usermanual of the device.
Change Password Select the added device(s) and click to change the password for thedevice(s).
Note• You can only change the password for online HIKVISION devices
currently.• If the devices have the same password, you can select multiple
devices to change the password for them at the same time.
10.4.3 Add Devices by IP Segment
If the access control devices having the same user name and password, and their IP addresses arebetween the IP segment, you can specify the start IP address and the end IP address, user name,password, and other related parameters to add them.
Before You StartMake sure the access control devices you are going to use are correctly installed and connected tothe network as specified by the manufacturers. Such initial configuration is required in order to beable to connect the devices to the HikCentral via network.Perform this task when you need to add devices by IP segment.
Steps1. Click Physical View → Access Control Device to enter the Access control Device Management
page.2. Click Add to enter the Add Access Control Device page.
HikCentral Web Client User Manual
51

3. Select IP Segment as the adding mode.4. Input the required the information.
NoteBy default, the device port No. is 8000.
CautionThe password strength of the device can be automatically checked. We highly recommend youchange the password of your own choosing (using a minimum of 8 characters, including at leastthree kinds of following categories: upper case letters, lower case letters, numbers, and specialcharacters) in order to increase the security of your product. And we recommend you reset yourpassword regularly, especially in the high security system, resetting the password monthly orweekly can better protect your product.Proper configuration of all passwords and other security settings is the responsibility of theinstaller and/or end-user.
5. Optional: Set the Add Door to Area switch to ON to import the doors of the added devices toan area.
Note• You can create a new area by the device name or select an existing area.• If you don't import doors to area, you cannot perform further operations for the doors.
6. Optional: If you choose to add doors to area, enable the Synchronize Door Name function forthe doors to get the door name from the device.
7. Finish adding the device.- Chick Add to add the access control device and back the access control device list page.- Click Add and Continue to save the settings and continue to add next access control device.
8. Perform the following operations after adding the devices.
RemoteConfigurations
Click to set the remote configurations of the corresponding device.
NoteFor detailed operation steps for the remote configuration, see the usermanual of the device.
Change Password Select the added device(s) and click to change the password for thedevice(s).
HikCentral Web Client User Manual
52
Note• You can only change the password for online HIKVISION devices
currently.• If the devices have the same password, you can select multiple
devices to change the password for them at the same time.
10.4.4 Add Access Control Devices by Port Segment
If the access control devices having the same user name and password, and their port No. arebetween the port segment, you can specify the start port No. and the end port No., user name,password, and other related parameters to add them.
Before You StartMake sure the access control devices you are going to use are correctly installed and connected tothe network as specified by the manufacturers. Such initial configuration is required in order to beable to connect the devices to the HikCentral via network.Perform this task when you need to add devices by port segment.
Steps1. Click Physical View → Access Control Device to enter the Access control Device Management
page.2. Click Add to enter the Add Access Control Device page.3. Select Port Segment as the adding mode.4. Input the required the information.
CautionThe password strength of the device can be automatically checked. We highly recommend youchange the password of your own choosing (using a minimum of 8 characters, including at leastthree kinds of following categories: upper case letters, lower case letters, numbers, and specialcharacters) in order to increase the security of your product. And we recommend you reset yourpassword regularly, especially in the high security system, resetting the password monthly orweekly can better protect your product.Proper configuration of all passwords and other security settings is the responsibility of theinstaller and/or end-user.
5. Optional: Set the Add Door to Area switch to ON to import the doors of the added devices toan area.
Note• You can create a new area by the device name or select an existing area.• If you don't import doors to area, you cannot perform further operations for the doors.
HikCentral Web Client User Manual
53

6. If you choose to add doors to area, enable the Synchronize Door Name function for the doorsto get the door name from the device.
7. Finish adding the device.- Chick Add to add the access control device and back the access control device list page.- Click Add and Continue to save the settings and continue to add next access control device.
8. Perform the following operations after adding the devices.
RemoteConfigurations
Click to set the remote configurations of the corresponding device.
NoteFor detailed operation steps for the remote configuration, see the usermanual of the device.
Change Password Select the added device(s) and click to change the password for thedevice(s).
Note• You can only change the password for online HIKVISION devices
currently.• If the devices have the same password, you can select multiple
devices to change the password for them at the same time.
10.4.5 Add Devices in a Batch
You can input the access control device information to the predefined template to add multipledevices at a time.
Before You StartMake sure the access control devices you are going to use are correctly installed and connected tothe network as specified by the manufacturers. Such initial configuration is required in order to beable to connect the devices to the HikCentral via network.Perform this task when you need to add devices in a batch.
Steps1. Click Physical View → Access Control Device to enter the Access control Device Management
page.2. Click Add to enter the Add Access Control Device page.3. Select Batch Import as the adding mode.4. Click Download Template and save the predefined template (CSV file) in your PC.5. Open the exported template file and input the required information of the devices to be added
on the corresponding column.6. Click and select the template file.7. Finish adding devices.
HikCentral Web Client User Manual
54
- Chick Add to add the devices and back the device list page.- Click Add and Continue to save the settings and continue to add other devices.
8. Perform the following operations after adding devices in batch.
RemoteConfigurations
Click to set the remote configurations of the corresponding device.
Change Password Select the added device(s) and click to change the password for thedevice(s).
Note• You can only change the password for online HIKVISION devices
currently.• If the devices have the same password, you can select multiple
devices to change the password for them at the same time.
10.5 Restore/Reset Device PasswordIf you forgot the password of the detected online devices, you can restore the device's defaultpassword or reset the device's password through the system .
For detailed operations of restoring device's default password, refer to Restore Device's DefaultPassword .For detailed operations of resetting device's password, refer to Reset Device Password .
10.5.1 Reset Device Password
If you forgot the password of the detected online devices, you can reset the device's passwordthrough the system.
Before You Start• Make sure the devices (cameras, DVR, access control device, etc.) you are going to use are
correctly installed and connected to the network as specified by the manufacturers. Such initialconfiguration is required in order to be able to connect the devices to the HikCentral vianetwork.
• The devices should be activated. Refer to Create Password for Inactive Device(s) for detailedoperations about activating devices.
Perform this task when you need to reset the device's password. Here we take the encoding deviceas an example.
Steps1. Click Physical View → Encoding Device to enter the decoding device management page.
HikCentral Web Client User Manual
55

Note• For access control devices, click Physical View → Access Control Device to enter the access
control device management page.• For decoding devices, click Physical View → Smart Wall . On the Decoding Device area, click
Add and check Online Devices as Adding Mode.
The detected online devices list in the Online Device area.2. In the Online Device area, view the device status (shown on Security column) and click icon in
the Operation column of an active device.A dialog with import file and export file, password and confirm password fields opens.
3. Click Export to save the device file on your PC.4. Send the file to Hikvision technical engineers.
NoteFor the following operations for resetting the password, contact a Hikvision technical supportengineer.
CautionThe password strength of the device can be automatically checked. We highly recommend youchange the password of your own choosing (using a minimum of 8 characters, including at leastthree kinds of following categories: upper case letters, lower case letters, numbers, and specialcharacters) in order to increase the security of your product. And we recommend you reset yourpassword regularly, especially in the high security system, resetting the password monthly orweekly can better protect your product.Proper configuration of all passwords and other security settings is the responsibility of theinstaller and/or end-user.
10.5.2 Restore Device's Default Password
For some encoding devices with old firmware version, if you forgot the password of the detectedonline devices, you can restore the device's default password through the system.
Before You Start• Make sure the devices (cameras, DVR, etc.) you are going to use are correctly installed and
connected to the network as specified by the manufacturers. Such initial configuration isrequired in order to be able to connect the devices to the HikCentral via network.
• The devices should be activated. Refer to Create Password for Inactive Device(s) for detailedoperations about activating devices.
Perform this task when you need to restore the device's default password.
HikCentral Web Client User Manual
56

Steps1. Click Physical View → Encoding Device to enter the Device Management page.
The detected online devices list in the Online Device area.2. In the Online Device area, view the device status (shown on Security column) and click in the
Operation column of an active device.A dialog with security code pops up.
3. Enter the security code and restore the default password of the selected device.
NoteContact Hikvision technical support to obtain a security code.
What to do nextYou must change this default password to better protect against security risks, such as theunauthorized access by others to the product that may prevent the product from functioningproperly and/or lead to other undesirable consequences.
CautionThe password strength of the device can be automatically checked. We highly recommend youchange the password of your own choosing (using a minimum of 8 characters, including at leastthree kinds of following categories: upper case letters, lower case letters, numbers, and specialcharacters) in order to increase the security of your product. And we recommend you reset yourpassword regularly, especially in the high security system, resetting the password monthly orweekly can better protect your product.Proper configuration of all passwords and other security settings is the responsibility of theinstaller and/or end-user.
10.6 Manage Remote SiteYou can add other HikCentral System without RSM (Remote Site Management) module to theHikCentral with RSM module as the Remote Site for central management.
After adding the Remote Site to the Central System, you can manage the Remote Site's cameras(such as live view and playback), add the Remote Site's configured alarms so that you can managethe alarms via the Central System, and set the recording schedule for the Remote Site's camerasand store the recorded video files in the Recording Server added to the Central System. You canalso view the Remote Site's GIS location, hot spot, and hot region settings in Map module.Remote Site
If the HikCentral System doesn't have RSM module (based on the License you purchased), youcan add it to the Central System as Remote Site.
Central System
HikCentral Web Client User Manual
57

If the HikCentral System has RSM module (based on the License you purchased), you can addother Remote Sites to this system. This system and the added Remote Sites are call CentralSystem.
Note• The system with RSM module cannot be added to other Central System as Remote Site.• If one Remote Site has been added to one Central System, it cannot be added to other Central
System.
10.6.1 Add Remote Site by IP Address or Domain Name
When you know the IP address or domain name of the Remote Site to add, you can add the site tothe Central System by inputting the IP address (or domain name), user name, password, and otherrelated parameters.
Perform this task when you need to add Remote Site by IP address or domain name.
Steps
NoteWhen adding Remote Site, the site's cameras and logical area information are imported to theCentral System by default.
1. Click Remote Site Management on home page to open the Remote Site management page.2. Enter the Add Remote Site page.
- If no Remote Site added, click Add Site to enter the Add Remote Site page.- If you have already added Remote Site, click on the left to enter the Add Remote Site
page.
HikCentral Web Client User Manual
58

Figure 10-9 Add Remote Site Page3. Select IP/Domain as the adding mode.4. Input the required information.
AliasEdit a name for the Remote Site as desired. You can check the Synchronize Name tosynchronize the Remote Site's name automatically.
Site PortInput the port No. of the Remote Site. By default, it's 80.
CautionThe password strength of the device can be automatically checked. We highly recommend youchange the password of your own choosing (using a minimum of 8 characters, including at leastthree kinds of following categories: upper case letters, lower case letters, numbers, and specialcharacters) in order to increase the security of your product. And we recommend you reset yourpassword regularly, especially in the high security system, resetting the password monthly orweekly can better protect your product.Proper configuration of all passwords and other security settings is the responsibility of theinstaller and/or end-user.
HikCentral Web Client User Manual
59
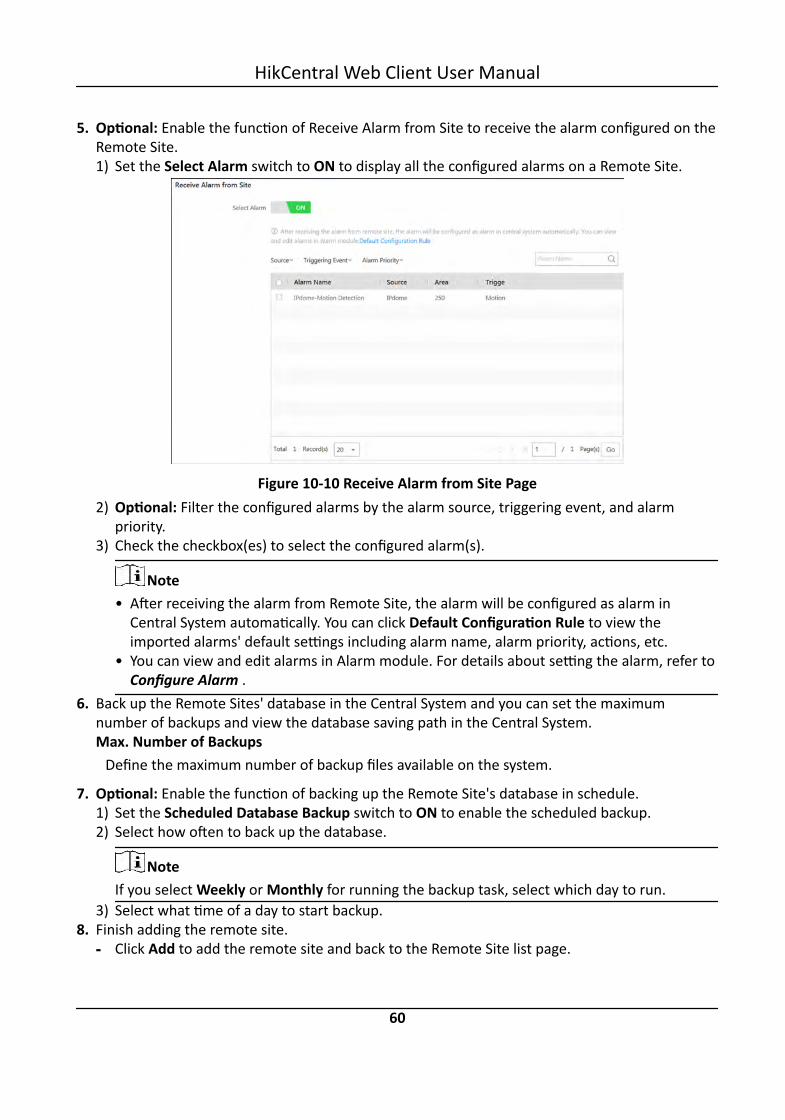
5. Optional: Enable the function of Receive Alarm from Site to receive the alarm configured on theRemote Site.1) Set the Select Alarm switch to ON to display all the configured alarms on a Remote Site.
Figure 10-10 Receive Alarm from Site Page2) Optional: Filter the configured alarms by the alarm source, triggering event, and alarm
priority.3) Check the checkbox(es) to select the configured alarm(s).
Note• After receiving the alarm from Remote Site, the alarm will be configured as alarm in
Central System automatically. You can click Default Configuration Rule to view theimported alarms' default settings including alarm name, alarm priority, actions, etc.
• You can view and edit alarms in Alarm module. For details about setting the alarm, refer toConfigure Alarm .
6. Back up the Remote Sites' database in the Central System and you can set the maximumnumber of backups and view the database saving path in the Central System.Max. Number of BackupsDefine the maximum number of backup files available on the system.
7. Optional: Enable the function of backing up the Remote Site's database in schedule.1) Set the Scheduled Database Backup switch to ON to enable the scheduled backup.2) Select how often to back up the database.
NoteIf you select Weekly or Monthly for running the backup task, select which day to run.
3) Select what time of a day to start backup.8. Finish adding the remote site.
- Click Add to add the remote site and back to the Remote Site list page.
HikCentral Web Client User Manual
60

- Click Add and Continue to save the settings and continue to add other remote sites.
10.6.2 Add Remote Site Registered to Central System
You can add Remote Sites which have been registered to the Central System.
Before You Start• The Remote Site must be registered to the Central System by inputting the Central System's
network parameters (see Register to Central System for details).• The Central System should enable the receiving site registration function (see Allow for Remote
Site Registration for details).Perform this task when you need to add the site which has registered to the Central System.
Steps
NoteWhen adding Remote Site, the site's cameras and logical area information are imported to theCentral System by default.
1. Click Remote Site Management on home page to enter the Remote Site management page.2. Enter the adding Remote Site page.
- If no Remote Site added, click Add Site to enter the Add Remote Site page.- If you have already added Remote Site, click on the left to enter the Add Remote Site
page.
HikCentral Web Client User Manual
61

Figure 10-11 Add Remote Site Page3. Select Site Registered to Central System as the adding mode.
The sites which have already registered to the Central System will display in the list.4. Check the checkbox(es) of the Remote Site(s) and input the user name and password of the
Remote Site(s).
CautionThe password strength of the device can be automatically checked. We highly recommend youchange the password of your own choosing (using a minimum of 8 characters, including at leastthree kinds of following categories: upper case letters, lower case letters, numbers, and specialcharacters) in order to increase the security of your product. And we recommend you reset yourpassword regularly, especially in the high security system, resetting the password monthly orweekly can better protect your product.Proper configuration of all passwords and other security settings is the responsibility of theinstaller and/or end-user.
5. Back up the Remote Sites' database in the Central System and you can set the maximumnumber of backups and view the database saving path in the Central System.Max. Number of BackupsDefine the maximum number of backup files available on the system.
HikCentral Web Client User Manual
62
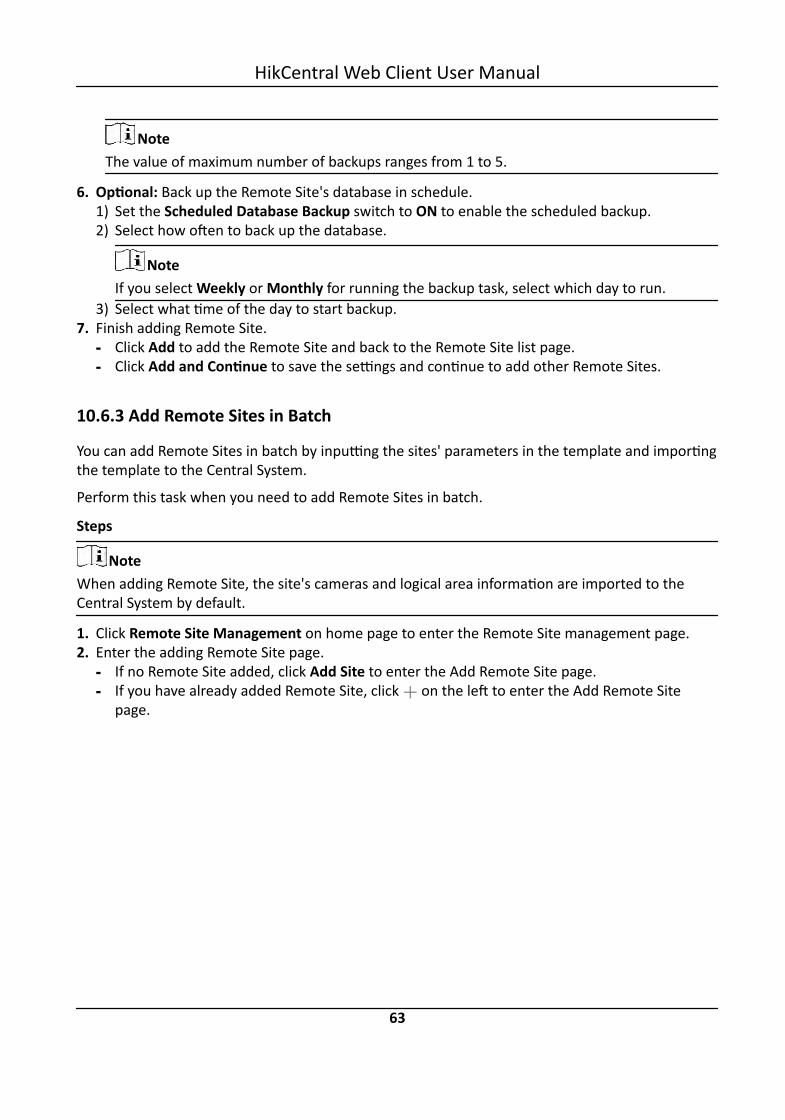
NoteThe value of maximum number of backups ranges from 1 to 5.
6. Optional: Back up the Remote Site's database in schedule.1) Set the Scheduled Database Backup switch to ON to enable the scheduled backup.2) Select how often to back up the database.
NoteIf you select Weekly or Monthly for running the backup task, select which day to run.
3) Select what time of the day to start backup.7. Finish adding Remote Site.
- Click Add to add the Remote Site and back to the Remote Site list page.- Click Add and Continue to save the settings and continue to add other Remote Sites.
10.6.3 Add Remote Sites in Batch
You can add Remote Sites in batch by inputting the sites' parameters in the template and importingthe template to the Central System.
Perform this task when you need to add Remote Sites in batch.
Steps
NoteWhen adding Remote Site, the site's cameras and logical area information are imported to theCentral System by default.
1. Click Remote Site Management on home page to enter the Remote Site management page.2. Enter the adding Remote Site page.
- If no Remote Site added, click Add Site to enter the Add Remote Site page.- If you have already added Remote Site, click on the left to enter the Add Remote Site
page.
HikCentral Web Client User Manual
63
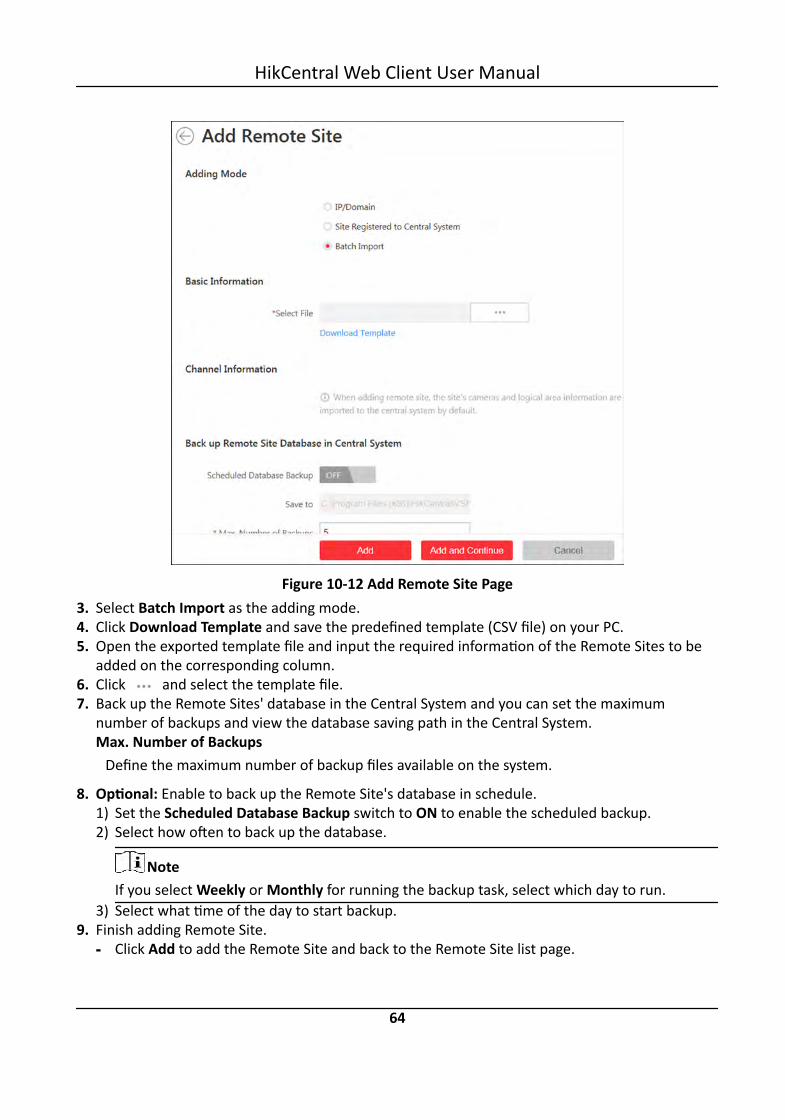
Figure 10-12 Add Remote Site Page3. Select Batch Import as the adding mode.4. Click Download Template and save the predefined template (CSV file) on your PC.5. Open the exported template file and input the required information of the Remote Sites to be
added on the corresponding column.6. Click and select the template file.7. Back up the Remote Sites' database in the Central System and you can set the maximum
number of backups and view the database saving path in the Central System.Max. Number of BackupsDefine the maximum number of backup files available on the system.
8. Optional: Enable to back up the Remote Site's database in schedule.1) Set the Scheduled Database Backup switch to ON to enable the scheduled backup.2) Select how often to back up the database.
NoteIf you select Weekly or Monthly for running the backup task, select which day to run.
3) Select what time of the day to start backup.9. Finish adding Remote Site.
- Click Add to add the Remote Site and back to the Remote Site list page.
HikCentral Web Client User Manual
64
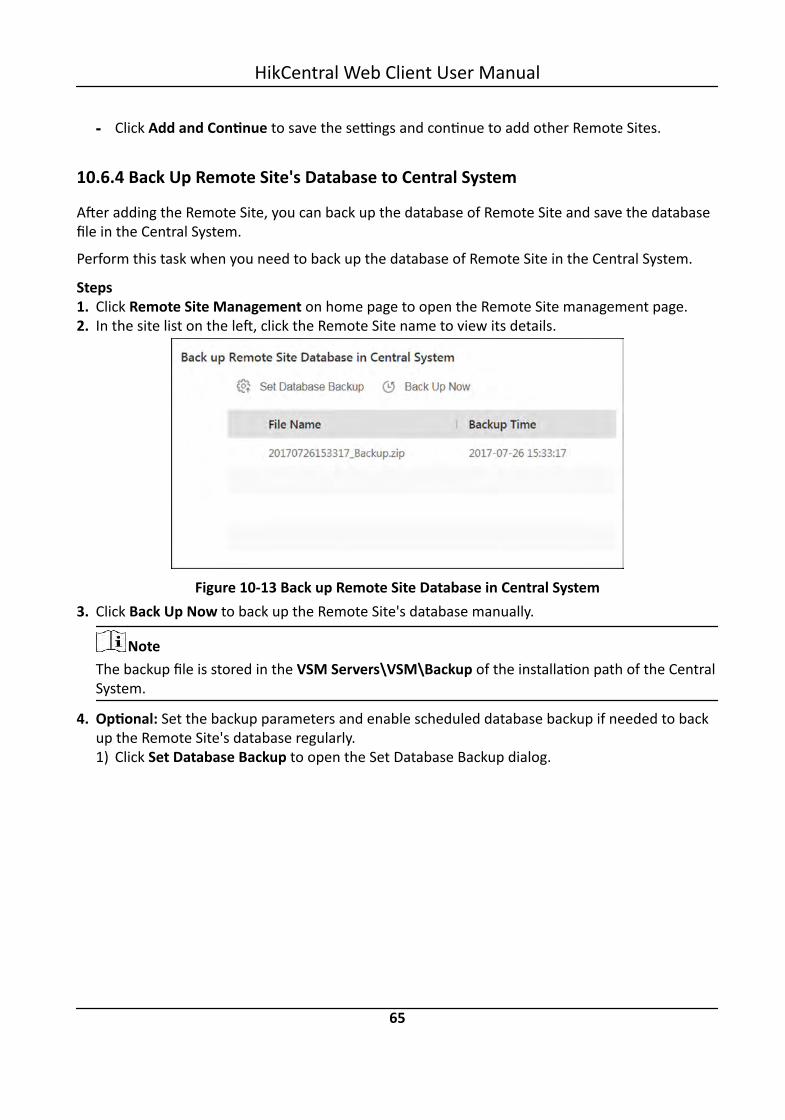
- Click Add and Continue to save the settings and continue to add other Remote Sites.
10.6.4 Back Up Remote Site's Database to Central System
After adding the Remote Site, you can back up the database of Remote Site and save the databasefile in the Central System.
Perform this task when you need to back up the database of Remote Site in the Central System.
Steps1. Click Remote Site Management on home page to open the Remote Site management page.2. In the site list on the left, click the Remote Site name to view its details.
Figure 10-13 Back up Remote Site Database in Central System3. Click Back Up Now to back up the Remote Site's database manually.
NoteThe backup file is stored in the VSM Servers\VSM\Backup of the installation path of the CentralSystem.
4. Optional: Set the backup parameters and enable scheduled database backup if needed to backup the Remote Site's database regularly.1) Click Set Database Backup to open the Set Database Backup dialog.
HikCentral Web Client User Manual
65
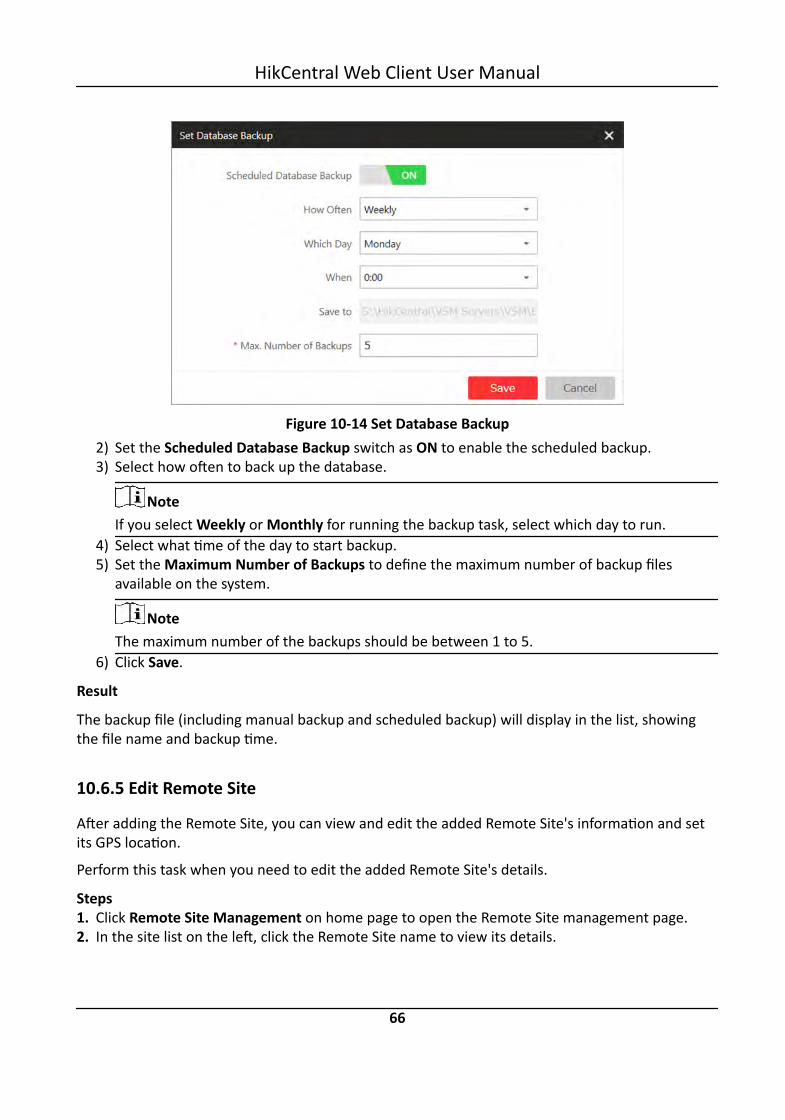
Figure 10-14 Set Database Backup2) Set the Scheduled Database Backup switch as ON to enable the scheduled backup.3) Select how often to back up the database.
NoteIf you select Weekly or Monthly for running the backup task, select which day to run.
4) Select what time of the day to start backup.5) Set the Maximum Number of Backups to define the maximum number of backup files
available on the system.
NoteThe maximum number of the backups should be between 1 to 5.
6) Click Save.
Result
The backup file (including manual backup and scheduled backup) will display in the list, showingthe file name and backup time.
10.6.5 Edit Remote Site
After adding the Remote Site, you can view and edit the added Remote Site's information and setits GPS location.
Perform this task when you need to edit the added Remote Site's details.
Steps1. Click Remote Site Management on home page to open the Remote Site management page.2. In the site list on the left, click the Remote Site name to view its details.
HikCentral Web Client User Manual
66
3. View and edit the basic information of the Remote Site, including IP address, port, alias, etc.
NoteYou cannot edit the address and port of the site registered to the Central System.
4. In the original information field, view the Remote Site's site name, system ID, system version,and GPS location.
NoteIf the GPS location is not configured, click Configuration to set its location in Map module. SeeManage Map for details.
5. Optional: Click Configuration on Site to open the Web Client of the Remote Site and log in forfurther configuration.
NoteThe site must be online if you need to enter its Web Client.
6. Click Save.
10.6.6 View Remote Site's Changes
When the resources on the Remote Site are changed, a red dot will appear on the icon of RemoteSite as . You can view the changed resources including newly added cameras, deleted cameras,and name changed cameras, and synchronize the resources in Central System with the RemoteSite.
Perform this task when you need to view the Remote Site's changes.
Steps
NoteThe site should be online if you need to view the changed resources.
1. Click Remote Site Management on home page to open the Remote Site management page.2. Click in the site list on the left to get the latest status of the Remote Sites.3. Click the site name whose resources are changed (with ) to enter its details page.4. Click Changes of Remote Site to view the changes.
HikCentral Web Client User Manual
67

Figure 10-15 Remote Site Management5. When there are newly added cameras on the site, you can view the added cameras and add
them to the area in Central System.1) If there are some newly added cameras on Remote Site, click Newly Added Camera to
expand the newly added camera list.
Figure 10-16 Changes of Remote Site
You can view the camera name and area name on the Remote Site.2) Select the camera(s) and click Add to Central Area to synchronize the newly added cameras
to the Central System.3) Select the area in the Central System.4) Click Save.
6. When there are some cameras deleted from the site, you can view the deleted cameras andremove them from Central System.1) If there are some cameras deleted from Remote Site, click Deleted Camera to expand the
deleted camera list.
Figure 10-17 Change of Remote Site
You can view the camera name and its area in Central System.2) Click Delete All Cameras Below in Central to delete the deleted cameras in Central System.
7. When there are some cameras whose names are changed on the site, you can view the namechanged cameras and synchronize them to Central System.
HikCentral Web Client User Manual
68
1) If the name of camera of Remote Site is changed, click Name Changed Camera to expand thename changed camera list.
Figure 10-18 Name Changed Camera
You can view the camera names in Remote Site and Central System.2) Select the cameras and click Synchronize Camera Name to synchronize the camera name in
Central System.
10.7 Manage Recording ServerYou can add the Recording Server to the HikCentral for storing the video files. Currently, theRecording Server supports Hybrid Storage Area Network and Cloud Storage Server. You can alsoform an N+1 hot spare system with several Hybrid Storage Area Networks to increase the videostorage reliability of HikCentral.
10.7.1 Manage Cloud Storage Server
You can add a Cloud Storage Server as a Recording Server to the HikCentral for storing the videofiles.
Import Service Component Certificate to Cloud Storage Server
For data security purpose, the Cloud Storage Server's certificate should be same with the VSMserver's. Before adding the Cloud Storage Server to the system, you should import the certificatestored in the VSM server to the Cloud Storage Server first.
Before You StartMake sure the Cloud Storage Server you are going to use are correctly installed and connected tothe network as specified by the manufacturers. Such initial configuration is required in order to beable to connect the devices to the HikCentral via network.Perform this task when you need to import the service component certificate to the Cloud StorageServer.
HikCentral Web Client User Manual
69

Steps
NoteIf the service component certificate is updated, you should export the new certificate and import itto the Cloud Storage Server again to update.
1. Log into the Web Client on the VSM server locally.You enter the home page of the Web Client.
2. Enter System → Service Component Certificate .3. Click Export to export the certificate stored in the VSM server.4. Log in the configuration page of the Cloud Storage Server via web browser.5. Enter System → Configuration → Cloud Configuration .6. Input the root keys salt and keys component according to the parameters in the certificate you
export in Step 3.
7. Click Set.
What to do nextAfter importing the certificate to the Clout Storage Server, you can add the server to the system formanagement. See Add Cloud Storage Server for details.
Add Cloud Storage Server
You can add Cloud Storage Server as Recording Server to the HikCentral for storing the video files.
Before You Start• Make sure the Cloud Storage Servers you are going to use are correctly installed and connected
to the network as specified by the manufacturers. Such initial configuration is required in orderto be able to connect the devices to the HikCentral via network.
• You should import the service component certificate to the Cloud Storage Server first beforeadding it to the system. See Import Service Component Certificate to Cloud Storage Server fordetails.
Perform this task when you need to add Cloud Storage Server to the system.
Steps1. Click Physical View → Recording Server to enter the recording server tab.2. Click Add to enter the adding server page.
HikCentral Web Client User Manual
70

Figure 10-19 Add Recording Server3. Select the type as Cloud Storage Server.4. Optional: Enable the key so that users can search the video files stored in this Cloud Storage
Server via the HikCentral Mobile Client.
NoteFor details about searching video files stored in Cloud Storage Server via Mobile Client, see UserManual of HikCentral Mobile Client.
1) Set the Enable Key to ON to enable this function.2) Input the user's access key and secret key of the Cloud Storage Server.
HikCentral Web Client User Manual
71

NoteYou can download these two keys on the Cloud Storage Server's configuration page (clickVirtualizing → User Management .
5. Input the network parameters.IP Address
The server's IP address in LAN that can communicate with VSM.Control Port
The control port No. of the server. If it is not changed, use the default value.Network Port
The network port of the server. If it is not changed, use the default value.Signaling Gateway Port
If you enable the Enable Key function, you are required to input the signaling gateway portof the server. If it is not changed, use the default value.
6. Input the alias, user name, and password of the server.
CautionThe password strength of the device can be automatically checked. We highly recommend youchange the password of your own choosing (using a minimum of 8 characters, including at leastthree kinds of following categories: upper case letters, lower case letters, numbers, and specialcharacters) in order to increase the security of your product. And we recommend you reset yourpassword regularly, especially in the high security system, resetting the password monthly orweekly can better protect your product.Proper configuration of all passwords and other security settings is the responsibility of theinstaller and/or end-user.
7. Optional: If you need to access the server via WAN, set the Enable WAN Access switch to ONand set the corresponding parameters which are available when you access the server via WAN.
8. Finish adding the server.- Click Add to add the server and back to the server list page.- Click Add and Continue to save the settings and continue to add other servers.The servers will be displayed on the server list for management after added successfully.
9. Optional: Perform the following operations after adding the server:
Edit Server Click Alias field of the server and you can edit the information of theserver and view its storage and camera information.
Delete Server Select the server(s) from the list, and click Delete to remove the selectedserver(s).
ConfigureServer
Click , and the login interface of the Cloud Storage Server displays. Youcan login and configure the Cloud Storage Server.
HikCentral Web Client User Manual
72
10.7.2 Add Hybrid Storage Area Network
You can add the Hybrid CSStorage Area Network as Recording Server to the HikCentral for storingthe video files.
Before You StartMake sure the Hybrid Storage Area Networks you are going to use are correctly installed andconnected to the network as specified by the manufacturers. Such initial configuration is requiredin order to be able to connect the devices to the HikCentral via network.Perform this task when you need to add Hybrid Storage Area Network to the system.
Steps1. Click Physical View → Recording Server to enter the recording server tab.2. Click Add to enter the Add Recording Server page.
HikCentral Web Client User Manual
73
Figure 10-20 Add Recording Server3. Select the type as Hybrid Storage Area Network.4. Input the network parameters.
IP AddressThe server's IP address in LAN that can communicate with VSM.
Control PortThe control port No. of the server. If it is not changed, use the default value.
Network PortThe network port of the server. If it is not changed, use the default value.
5. Optional: If you need to access the server via WAN, set the Enable WAN Access switch to ONand set the corresponding parameters which are available when you access the server via WAN.
6. Input the alias, user name, and password of the server.
HikCentral Web Client User Manual
74

CautionThe password strength of the device can be automatically checked. We highly recommend youchange the password of your own choosing (using a minimum of 8 characters, including at leastthree kinds of following categories: upper case letters, lower case letters, numbers, and specialcharacters) in order to increase the security of your product. And we recommend you reset yourpassword regularly, especially in the high security system, resetting the password monthly orweekly can better protect your product.Proper configuration of all passwords and other security settings is the responsibility of theinstaller and/or end-user.
7. Finish adding the server.- Click Add to add the server and back to the server list page.- Click Add and Continue to save the settings and continue to add other servers.The servers will be displayed on the server list for management after added successfully.
8. Optional: Perform the following operations after adding the server:
Edit Server Click Alias field of the server and you can edit the information of theserver and view its storage and camera information.
Delete Server Select the server(s) from the list, and click Delete to remove theselected server(s).
Configure Server Click , and the login interface of the Hybrid Storage Area Networkdisplays. You can login and configure the Hybrid SAN.
One-TouchConfiguration
If the Hybrid Storage Area Network has not been configured withHybrid Storage Area Network storage settings, click to perform one-touch configuration before you can store the video files of the cameraon the Hybrid Storage Area Network.
10.7.3 Set N+1 Hot Spare
You can form an N+1 hot spare system with several Recording Servers. The system consists ofseveral host servers and a spare server. When the host server fails, the spare server switches intooperation, thus increasing the video storage reliability of HikCentral.
Before You Start• At least two online Hybrid Storage Area Networks should be added to form an N+1 hot spare
system.• Make sure the Hybrid Storage Area Networks you are going to use are correctly installed and
connected to the network as specified by the manufacturers. Such initial configuration isrequired in order to be able to connect the devices to the HikCentral via network.
Perform this task when you need to set N+1 hot spare for the added Recording Servers.
HikCentral Web Client User Manual
75

Steps
Note• The N+1 hot spare function is only supported by Hybrid Storage Area Networks.• The spare server cannot be selected for storing videos until it switches to host server.• The host server cannot be set as a spare server and the spare server cannot be set as a host
server.
1. Click Physical View → Recording Server → N+1 Hot Spare to enter the N+1 Configuration page.
Figure 10-21 N+1 Configuration Page2. Click Add to set the N+1 hot spare.3. Select a Hybrid Storage Area Network in the Spare drop-down list to set as the spare server.4. Check the checkbox(es) in the Host field to select the Hybrid Storage Area Network(s) as the
host server(s).5. Click Add.
NoteThe recording schedules configured on the Hybrid Storage Area Network will be deleted aftersetting it as the spare Recording Server.
6. Optional: After setting the hot spare, you can do one or more of the following:
Edit Click on the Operation column, and you can edit the spare and host settings.
Delete Click on the Operation column to cancel the N+1 hot spare settings.
NoteCanceling the N+1 hot spare will cancel all the host-spare associations and clear therecording schedule on the spare server.
7. Optional: If the host server sending the recording schedule to spare server failed, you can click on the Operation column to send the recording schedule on the host server to the spare one
again.
10.8 Manage Streaming ServerYou can add the Streaming Server to the HikCentral to get the video data stream from theStreaming Server, thus to lower the load of the device.
HikCentral Web Client User Manual
76

NoteFor system which supports Remote Site Management, the cameras imported from Remote Siteadopt the Streaming Server configured on the Remote Site by default. You are not required to addthe Streaming Server to Central System and configure again.
10.8.1 Import Service Component Certificate to Streaming Server
For data security purpose, the Streaming Server's certificate should be same with the VSM server's.Before adding the Streaming Server to the system, you should import the certificate stored in theVSM server to the Streaming Server first.
Perform this task when you need to import the service component certificate to the StreamingServer.
Steps
NoteIf the service component certificate is updated, you should export the new certificate and import itto the Streaming Server again to update.
1. Log into the Web Client on the VSM server locally.You will enter the home page of the Web Client.
2. Enter System → Service Component Certificate .3. Click Export to export the certificate stored in the VSM server.4. Copy the certificate to the computer which has installed with Streaming Service.5. Open the Service Manager, select the Streaming Service and click to import the certificate
you exported in Step 3.
10.8.2 Add Streaming Server
You can add a Streaming Server to the system to forward the video stream.
Perform the following steps when you need to add a Streaming Server to the system.
Steps1. Click Physical View → Streaming Server to enter the Streaming Server management page.2. Click Add to enter the Add Streaming Server page.
HikCentral Web Client User Manual
77

Figure 10-22 Add Streaming Server Page3. Input the required information.
Network LocationSelect LAN IP Address if the Streaming Server and the VSM are in the same LAN. Otherwise,select WAN IP Address.
4. Optional: If you need to access the server via WAN, set the Enable WAN Access switch as ONand set the corresponding parameters which are available when you access the server via WAN.
NoteThe Enable WAN Access switch is available when you set Network Location as LAN IP Address.
5. Finish adding the streaming server.- Click Add to add the server and back to the server list page.- Click Add and Continue to save the server and continue to add other servers.The servers will be displayed on the server list for management after added successfully. Youcan check the related information of the added servers on the list.
10.9 Manage Smart WallYou can add the decoding devices to the system and link the decoding devices with the addedsmart wall to display the video on smart wall.
HikCentral Web Client User Manual
78

10.9.1 Add Decoding Device
You can add the decoding devices to the system for linking with the smart wall. You can add onlinedecoding devices, add decoding devices by IP address, add decoding devices by IP segment, andadd decoding devices by port segment.
Add Online Decoding Device
The active online decoding devices in the same local subnet with the Web Client will display on alist. You can input the IP address or serial No. to search the corresponding devices.
Before You StartMake sure the devices you are going to use are correctly installed and connected to the network asspecified by the manufacturers. Such initial configuration is required in order to be able to connectthe devices to the HikCentral via network.Perform the following steps when you need to add online decoding device.
Steps
Note• For web browser of Google Chrome, you should install the SADP service according to theinstructions and then the online device detection function is available.
• For web browser of Firefox, you should install the SADP service and import the certificateaccording to the instructions and then the online device detection function is available.
1. Click Physical View → Smart Wall to enter the smart wall management page.2. Click Add on Decoding Device panel to enter the Add Decoding Device page.3. Select Online Devices as Adding Mode.4. Check the checkbox of the device(s) to be added.
Note• For the inactive device, you need to create the password for it before you can add it properly.
For detailed steps, see .• If the detected devices have the same password and user name, you can add multiple devices
at a time. Otherwise, you can add them one by one.
5. Set the required information.
CautionThe password strength of the device can be automatically checked. We highly recommend youchange the password of your own choosing (using a minimum of 8 characters, including at leastthree kinds of following categories: upper case letters, lower case letters, numbers, and specialcharacters) in order to increase the security of your product. And we recommend you reset your
HikCentral Web Client User Manual
79

password regularly, especially in the high security system, resetting the password monthly orweekly can better protect your product.Proper configuration of all passwords and other security settings is the responsibility of theinstaller and/or end-user.
6. Finish adding the decoding device.- Click Add to add the decoding device and back to the decoding device list page.- Click Add and Continue to save the settings and continue to add other decoding devices.
7. Optional: Perform the following operations after adding the decoding devices.
Edit Click to edit the device basic information.
RemoteConfigurations
Click to set the remote configurations of the corresponding device.
NoteFor detailed operation steps for the remote configuration, see theuser manual of the device.
Delete Click to delete the corresponding device.
Add Decoding Device by IP Address
You can add the decoding devices by IP address.
Before You StartMake sure the devices you are going to use are correctly installed and connected to the network asspecified by the manufacturers. Such initial configuration is required in order to be able to connectthe devices to the HikCentral via network.Perform the following steps when you need to add the decoding device by IP address.
Steps1. Click Physical View → Smart Wall to enter the smart wall management page.2. Click Add to enter the Add Decoding Device page.
HikCentral Web Client User Manual
80
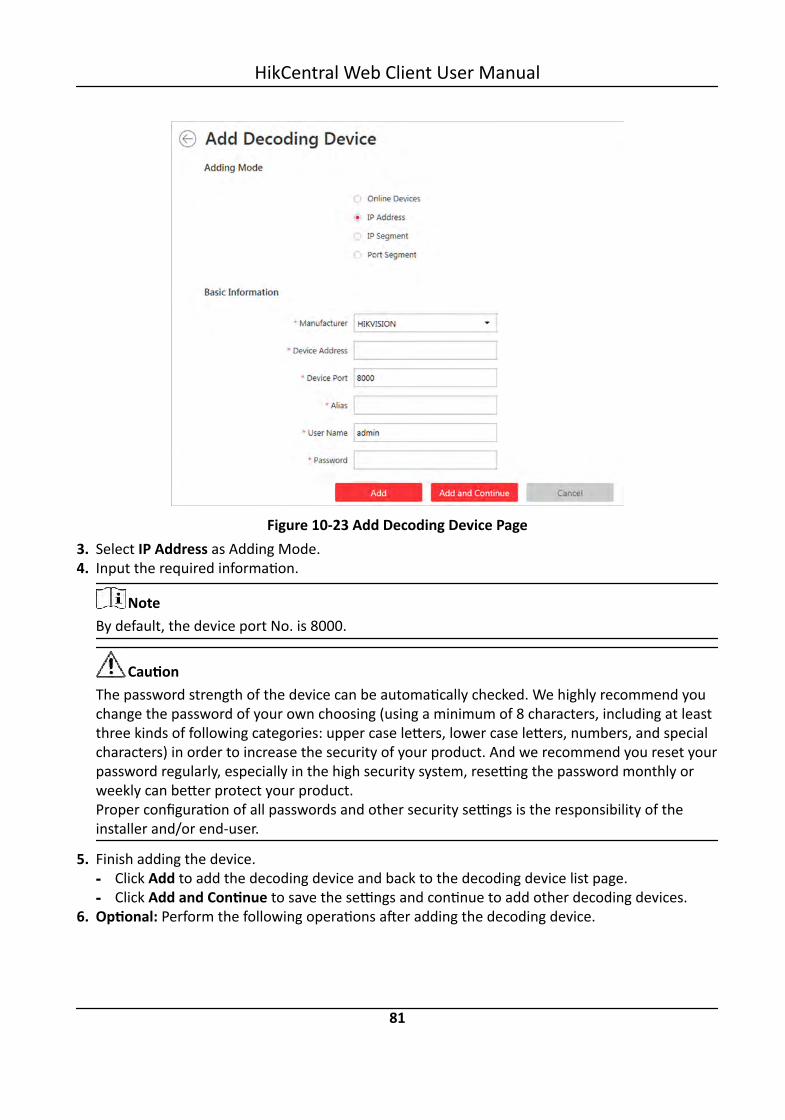
Figure 10-23 Add Decoding Device Page3. Select IP Address as Adding Mode.4. Input the required information.
NoteBy default, the device port No. is 8000.
CautionThe password strength of the device can be automatically checked. We highly recommend youchange the password of your own choosing (using a minimum of 8 characters, including at leastthree kinds of following categories: upper case letters, lower case letters, numbers, and specialcharacters) in order to increase the security of your product. And we recommend you reset yourpassword regularly, especially in the high security system, resetting the password monthly orweekly can better protect your product.Proper configuration of all passwords and other security settings is the responsibility of theinstaller and/or end-user.
5. Finish adding the device.- Click Add to add the decoding device and back to the decoding device list page.- Click Add and Continue to save the settings and continue to add other decoding devices.
6. Optional: Perform the following operations after adding the decoding device.
HikCentral Web Client User Manual
81

View DecodingOutput
Click to show the decoding outputs. You can view the output resolutionand linking status after linking the output to smart wall. For details aboutlinking decoding output with smart wall, see Add Smart Wall .
Edit Click to edit the decoding device.
Configure Click to perform the configurations on decoding device.
Add Decoding Devices by IP Segment
You can add decoding devices by IP segment.
Before You StartMake sure the devices you are going to use are correctly installed and connected to the network asspecified by the manufacturers. Such initial configuration is required in order to be able to connectthe devices to the HikCentral via network.Perform the following steps when you need to add decoding device by IP segment.
Steps1. Click Physical View → Smart Wall to enter the smart wall management page.2. Click Add to enter the Add Decoding Device page.
Figure 10-24 Add Decoding Device Page3. Select IP Segment as Adding Mode.4. Input the required information.
HikCentral Web Client User Manual
82
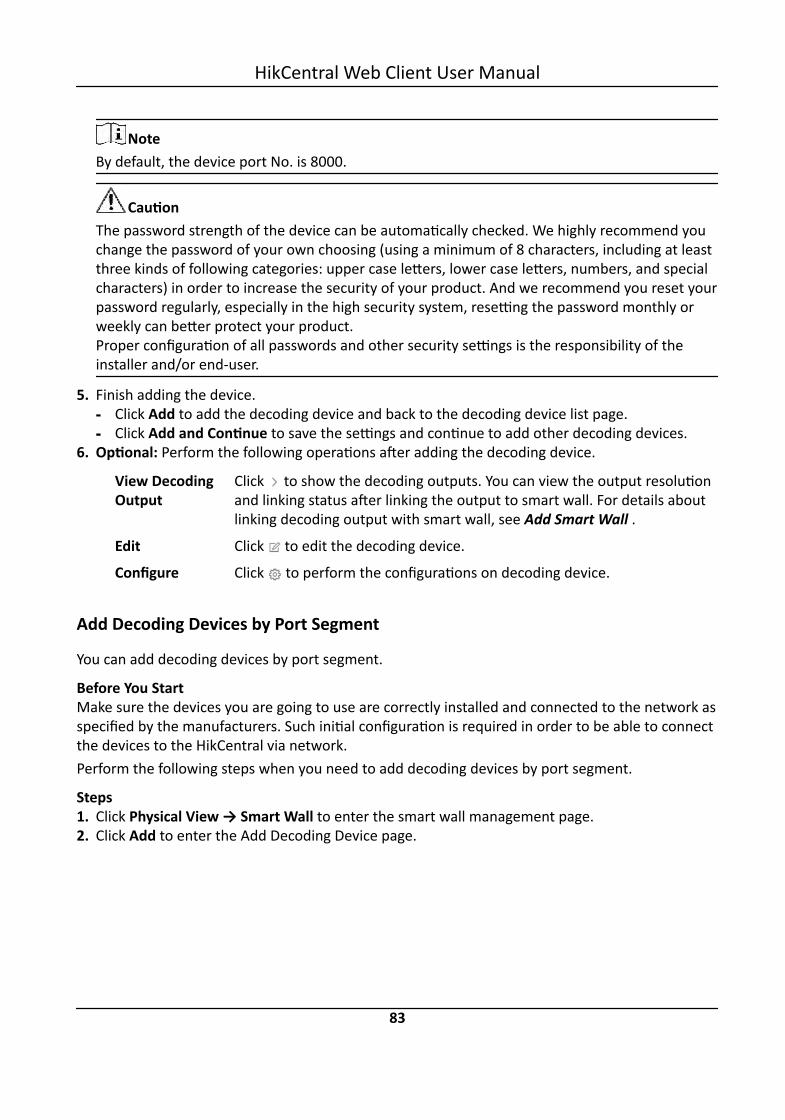
NoteBy default, the device port No. is 8000.
CautionThe password strength of the device can be automatically checked. We highly recommend youchange the password of your own choosing (using a minimum of 8 characters, including at leastthree kinds of following categories: upper case letters, lower case letters, numbers, and specialcharacters) in order to increase the security of your product. And we recommend you reset yourpassword regularly, especially in the high security system, resetting the password monthly orweekly can better protect your product.Proper configuration of all passwords and other security settings is the responsibility of theinstaller and/or end-user.
5. Finish adding the device.- Click Add to add the decoding device and back to the decoding device list page.- Click Add and Continue to save the settings and continue to add other decoding devices.
6. Optional: Perform the following operations after adding the decoding device.
View DecodingOutput
Click to show the decoding outputs. You can view the output resolutionand linking status after linking the output to smart wall. For details aboutlinking decoding output with smart wall, see Add Smart Wall .
Edit Click to edit the decoding device.
Configure Click to perform the configurations on decoding device.
Add Decoding Devices by Port Segment
You can add decoding devices by port segment.
Before You StartMake sure the devices you are going to use are correctly installed and connected to the network asspecified by the manufacturers. Such initial configuration is required in order to be able to connectthe devices to the HikCentral via network.Perform the following steps when you need to add decoding devices by port segment.
Steps1. Click Physical View → Smart Wall to enter the smart wall management page.2. Click Add to enter the Add Decoding Device page.
HikCentral Web Client User Manual
83
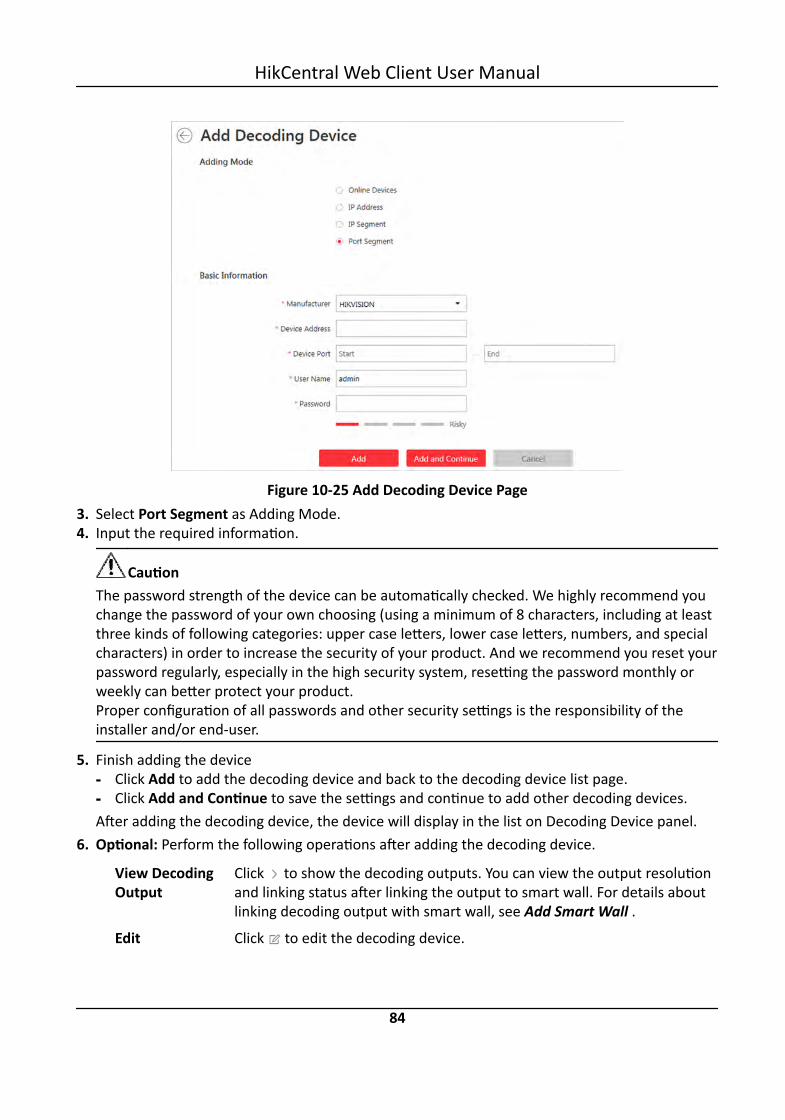
Figure 10-25 Add Decoding Device Page3. Select Port Segment as Adding Mode.4. Input the required information.
CautionThe password strength of the device can be automatically checked. We highly recommend youchange the password of your own choosing (using a minimum of 8 characters, including at leastthree kinds of following categories: upper case letters, lower case letters, numbers, and specialcharacters) in order to increase the security of your product. And we recommend you reset yourpassword regularly, especially in the high security system, resetting the password monthly orweekly can better protect your product.Proper configuration of all passwords and other security settings is the responsibility of theinstaller and/or end-user.
5. Finish adding the device- Click Add to add the decoding device and back to the decoding device list page.- Click Add and Continue to save the settings and continue to add other decoding devices.After adding the decoding device, the device will display in the list on Decoding Device panel.
6. Optional: Perform the following operations after adding the decoding device.
View DecodingOutput
Click to show the decoding outputs. You can view the output resolutionand linking status after linking the output to smart wall. For details aboutlinking decoding output with smart wall, see Add Smart Wall .
Edit Click to edit the decoding device.
HikCentral Web Client User Manual
84

Configure Click to perform the configurations on decoding device.
10.9.2 Add Smart Wall
You can add the smart wall to the system and configure its row and column.
Perform this task when you need to add a smart wall to the system.
Steps1. Click Physical View → Smart Wall to enter the smart wall management page.2. Click Add on Smart Wall panel to pop up the Add Smart Wall dialog.
Figure 10-26 Add Smart Wall Dialog3. Set the name for the smart wall.4. Set the row number and the column number.5. Click Save.6. Optional: After adding the smart wall, you can do one or more of the followings:
Link Decoding Output withWindow
For details about the operations, see Link DecodingOutput with Window .
Edit Smart Wall Edit the name of the smart wall.
Delete Smart Wall Delete smart wall.
10.9.3 Link Decoding Output with Window
After adding the decoding device and smart wall, you should link the decoding device's decodingoutput to the window of the smart wall.
Perform this task when you need to link the decoding output to the smart wall.
Steps1. Click Physical View → Smart Wall to enter the smart wall management page.
The added decoding device and the added smart wall will display.2. Click in front of the decoding device to show the decoding outputs.3. Click in front of the smart wall to show the windows.4. Drag the decoding output from the Decoding Device panel to the display window of the smart
wall, to configure the one-to-one correspondence.
HikCentral Web Client User Manual
85

Figure 10-27 Link Decoding Device with Window5. Optional: Click to release the linkage.
HikCentral Web Client User Manual
86
Chapter 11 Manage Area
You should organize the added cameras, doors, alarm inputs, alarm outputs, Under VehicleSurveillance Systems (UVSSs) into areas for the convenient management. You can get the live view,play back the video files, and do some other operations of the devices after managing the devicesby areas.
NoteIf the current system is a Central System with a Remote Site Management module, you can alsomanage the areas on a remote site and add cameras on remote site into areas.
11.1 Add AreaYou should add an area before you want to manage the elements by areas.
11.1.1 Add Area for Current Site
You can add area for current site to manage the devices.
Perform this task when you need to add an area for current site.
Steps1. Click Logical View on the Home page to enter the Area Management page.2. Select the parent area in the area list panel to add a sub area.
Note• For a Central System with a Remote Site Management module, you can select the current site
from the drop-down site list to show its areas.• The icon indicates that the site is a current site.
3. Click on the area list panel to open the Add Area window.
HikCentral Web Client User Manual
87
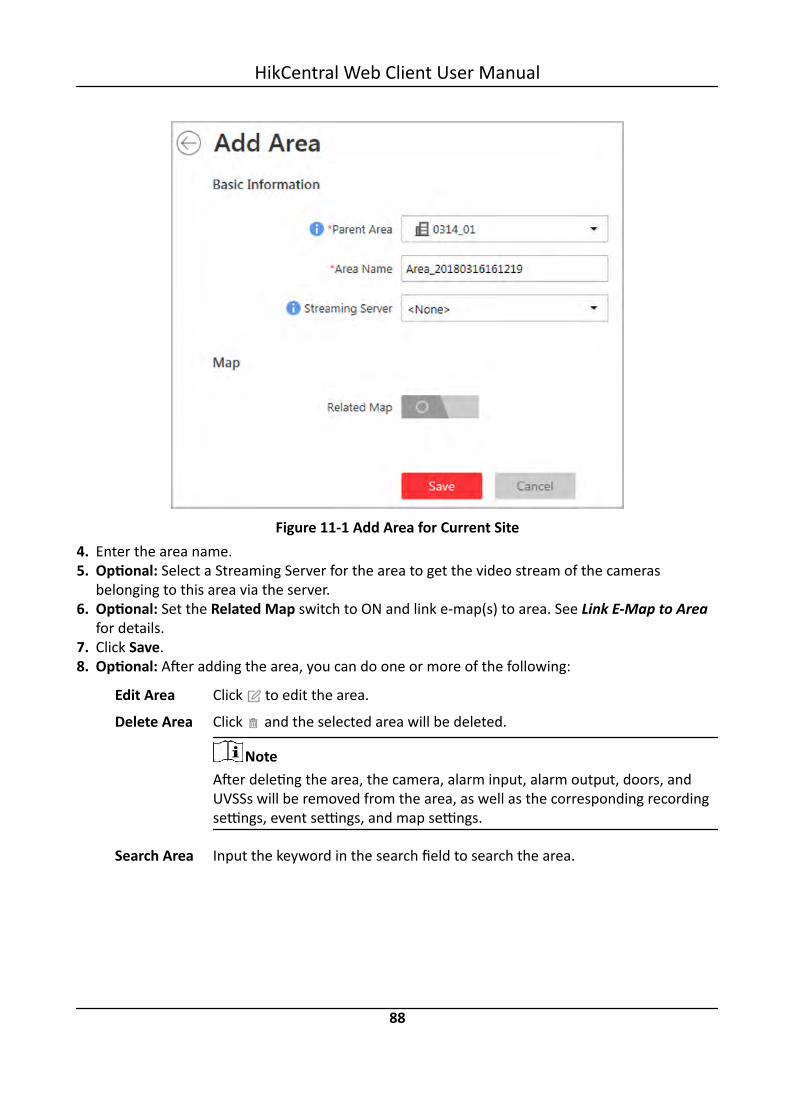
Figure 11-1 Add Area for Current Site4. Enter the area name.5. Optional: Select a Streaming Server for the area to get the video stream of the cameras
belonging to this area via the server.6. Optional: Set the Related Map switch to ON and link e-map(s) to area. See Link E-Map to Area
for details.7. Click Save.8. Optional: After adding the area, you can do one or more of the following:
Edit Area Click to edit the area.
Delete Area Click and the selected area will be deleted.
NoteAfter deleting the area, the camera, alarm input, alarm output, doors, andUVSSs will be removed from the area, as well as the corresponding recordingsettings, event settings, and map settings.
Search Area Input the keyword in the search field to search the area.
HikCentral Web Client User Manual
88
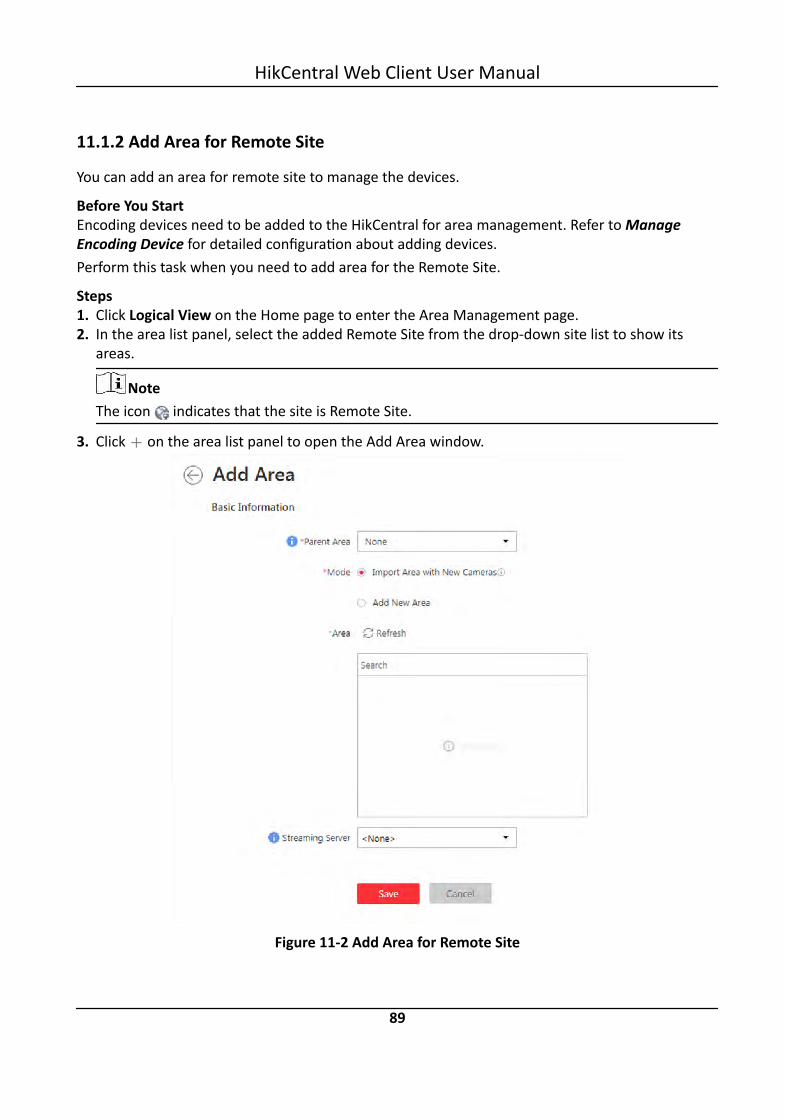
11.1.2 Add Area for Remote Site
You can add an area for remote site to manage the devices.
Before You StartEncoding devices need to be added to the HikCentral for area management. Refer to ManageEncoding Device for detailed configuration about adding devices.Perform this task when you need to add area for the Remote Site.
Steps1. Click Logical View on the Home page to enter the Area Management page.2. In the area list panel, select the added Remote Site from the drop-down site list to show its
areas.
NoteThe icon indicates that the site is Remote Site.
3. Click on the area list panel to open the Add Area window.
Figure 11-2 Add Area for Remote Site
HikCentral Web Client User Manual
89

4. Select the parent area to add a sub area.5. Set the adding mode for adding the area.
Import Area with New CamerasIf there are some cameras newly added to the areas on a Remote Site, you can import theareas as well as those newly added cameras. The areas with newly added cameras willdisplay and you can select the areas to add.
Add New AreaAdd a new area to the parent area and you can enter the area name as well.
6. Optional: Select a Streaming Server for the area to get the video stream of the camerasbelonging to this area via the server.
7. Click Save.8. After adding the area, you can do one or more of the following:
Edit Area Click to edit the area
Delete Area Click and the selected area will be deleted.
NoteAfter deleting the area, the cameras will be removed from the area, as well asthe corresponding recording settings and event settings.
Search Area Input the keyword in the search field to search the area.
11.2 Add Element to AreaYou can add elements including cameras, alarm inputs, alarm outputs, doors, and under vehiclesurveillance systems into areas for management.
11.2.1 Add Camera to Area for Current Site
You can add cameras to areas for the current site for management.
Before You StartEncoding devices need to be added to the HikCentral for area management. Refer to ManageResource for detailed configuration about adding devices.Perform this task when you need to add Current Site's cameras to areas.
Steps
NoteCameras can only belong to one area. You cannot add a camera to multiple areas.
1. Click Logical View on the Home page to enter the Area Management page.
HikCentral Web Client User Manual
90

2. Select an area for adding cameras to.
Note• For a Central System with a Remote Site Management module, you can select the current site
from the drop-down site list to show its areas.• The icon indicates that the site is current site.
3. Select the Cameras tab.4. Click Add to enter the Add Camera page.5. Select the cameras to add.6. Optional: Check Synchronize Camera Name to get the camera name from the device.
NoteYou can only synchronize the camera name of online HIKVISION camera.
7. Optional: Check Get Device's Recording Settings to obtain the recording schedule configuredon the local device and the recording task will automatically perform according to schedule.
NoteIf the recording schedule configured on device is not continuous recording, it will be changed toevent recording on the local device.
8. Optional: Check Add to Map to add the camera to the map.9. Click Add.10. Optional: After adding the cameras, you can do one or more of the followings
Synchronize CameraName
Select the cameras and click Synchronize Camera Name to getthe cameras' names from the device in a batch.
NoteYou can only synchronize the camera name of online HIKVISIONdevice.
Move to Other Area Select the cameras and click Move to Other Area. Then select thetarget area to move the selected cameras to and click Move.
Display Cameras ofChild Areas
Check Include Sub-area to display the cameras of child areas.
11.2.2 Add Camera to Area for Remote Site
If the current system is a Central System with a Remote Site Management module, you can alsoadd cameras from Remote Sites to areas in Central System for management.
HikCentral Web Client User Manual
91
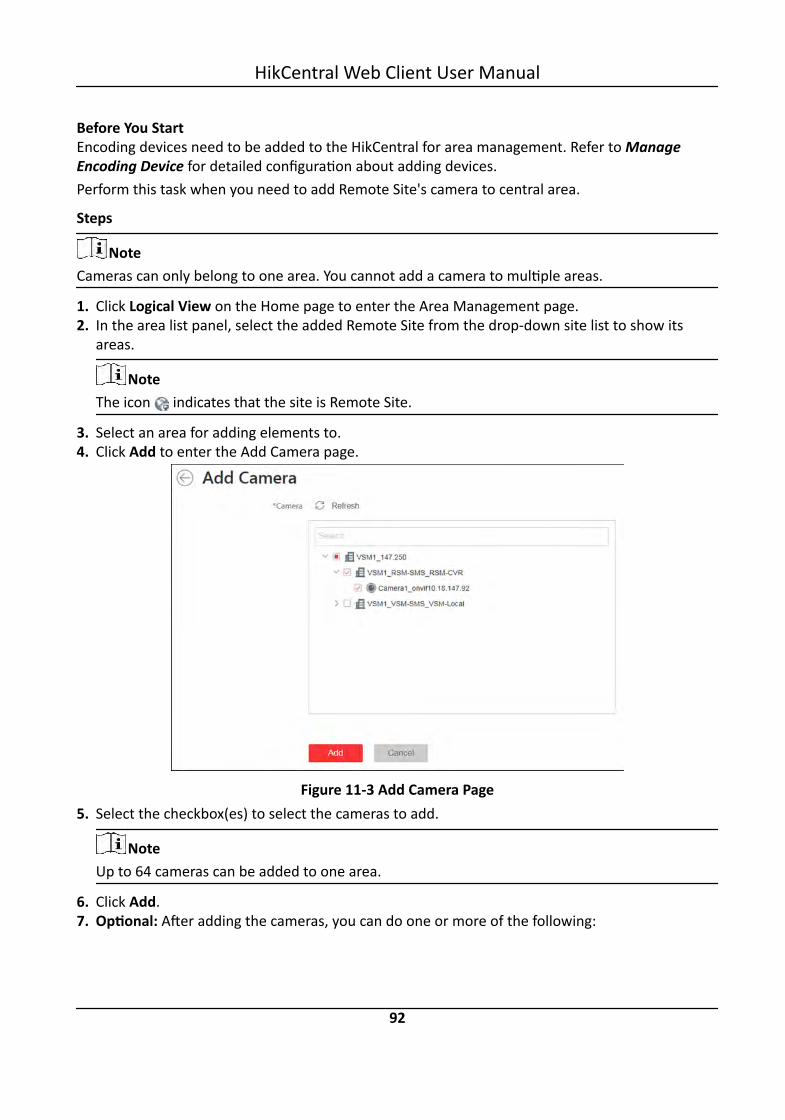
Before You StartEncoding devices need to be added to the HikCentral for area management. Refer to ManageEncoding Device for detailed configuration about adding devices.Perform this task when you need to add Remote Site's camera to central area.
Steps
NoteCameras can only belong to one area. You cannot add a camera to multiple areas.
1. Click Logical View on the Home page to enter the Area Management page.2. In the area list panel, select the added Remote Site from the drop-down site list to show its
areas.
NoteThe icon indicates that the site is Remote Site.
3. Select an area for adding elements to.4. Click Add to enter the Add Camera page.
Figure 11-3 Add Camera Page5. Select the checkbox(es) to select the cameras to add.
NoteUp to 64 cameras can be added to one area.
6. Click Add.7. Optional: After adding the cameras, you can do one or more of the following:
HikCentral Web Client User Manual
92

Synchronize CameraName
Select the camera checkboxes and click to get the cameras'names from the device in batch.
Move to Other Area Select the elements checkboxes and click . Then select thetarget area to move the selected elements to and click Move.
Display Elements ofChild Areas
Select Include Sub-area checkbox to display the elements ofchild areas.
11.2.3 Add Door to Area for Current Site
You can add doors to areas for the current site for management.
Before You StartAccess control devices need to be added to the HikCentral for area management. Refer to ManageResource for detailed configuration about adding devices.Perform this task when you need to add Current Site's doors to areas.
Steps
NoteDoors can only belong to one area. You cannot add a door to multiple areas.
1. Click Logical View on the Home page to enter the Area Management page.2. Select an area for adding doors to.
Note• For a Central System with a Remote Site Management module, you can select the current site
from the drop-down site list to show its areas.• The icon indicates that the site is current site.
3. Select the Doors tab.4. Click Add to enter the Add Door page.5. Select the doors to add.6. Optional: Check Synchronize Door Name to get the door name from the device.
NoteYou can only synchronize the door name of online HIKVISION device.
7. Optional: Check Add to Map to add the door to the map.8. Click Add.9. Optional: After adding the doors, you can do one or more of the followings.
Synchronize DoorName
Select the doors and click Synchronize Door Name to get the doors'names from the device in a batch.
HikCentral Web Client User Manual
93

NoteYou can only synchronize the door name of online HIKVISIONdevice.
Move to Other Area Select the doors and click Move to Other Area. Then select thetarget area to move the selected doors to and click Move.
Display Doors ofChild Areas
Check Include Sub-area to display the doors of child areas.
11.2.4 Add Alarm Input to Area for Current Site
You can add alarm inputs to areas for the current site for management.
Before You StartDevices need to be added to the HikCentral for area management. Refer to Manage Resource fordetailed configuration about adding devices.Perform this task when you need to add Current Site's alarm inputs to areas.
Steps
NoteAlarm input can only belong to one area. You cannot add an alarm input to multiple areas.
1. Click Logical View on the Home page to enter the Area Management page.2. Select an area for adding alarm inputs to.
Note• For a Central System with a Remote Site Management module, you can select the current site
from the drop-down site list to show its areas.• The icon indicates that the site is current site.
3. Select the Alarm Inputs tab.4. Click Add to enter the Add Alarm Inputs page.5. Select the device type.6. Select the alarm inputs to add.7. Optional: Check Add to Map to add the alarm input to the map.8. Click Add.9. Optional: After adding the alarm inputs, you can do one or more of the followings.
Move to Other Area Select the alarm inputs and click Move to Other Area. Then selectthe target area to move the selected alarm inputs to and clickMove.
HikCentral Web Client User Manual
94

Display Alarm Inputsof Child Areas
Check Include Sub-area to display the alarm inputs of child areas.
11.2.5 Add Alarm Output to Area for Current Site
You can add alarm outputs to areas for the current site for management.
Before You StartDevices need to be added to the HikCentral for area management. Refer to Manage Resource fordetailed configuration about adding devices.Perform this task when you need to add Current Site's alarm outputs to areas.
Steps
NoteAlarm output can only belong to one area. You cannot add an alarm output to multiple areas.
1. Click Logical View on the Home page to enter the Area Management page.2. Select an area for adding alarm outputs to.
Note• For a Central System with a Remote Site Management module, you can select the current site
from the drop-down site list to show its areas.• The icon indicates that the site is current site.
3. Select the Alarm Outputs tab.4. Click Add to enter the Add Alarm Outputs page.5. Select the device type.6. Select the alarm outputs to add.7. Optional: Check Add to Map to add the alarm output to the map.8. Click Add.9. Optional: After adding the alarm outputs, you can do one or more of the followings.
Move to Other Area Select the alarm outputs and click Move to Other Area. Thenselect the target area to move the selected alarm outputs to andclick Move.
Display Alarm Outputsof Child Areas
Check Include Sub-area to display the alarm outputs of childareas.
11.2.6 Add Under Vehicle Surveillance System to Area for Current Site
You can add Under Vehicle Surveillance Systems (UVSSs) to areas for the current site formanagement.
HikCentral Web Client User Manual
95

Perform this task when you need to add Current Site's UVSSs to areas.
Steps
NoteUVSSs can only belong to one area. You cannot add a UVSS to multiple areas.
1. Click Logical View on the Home page to enter the Area Management page.2. Select an area for adding UVSSs to.
Note• For a Central System with a Remote Site Management module, you can select the current site
from the drop-down site list to show its areas.• The icon indicates that the site is current site.
3. Select the Under Vehicle Surveillance Systems tab.
NoteIf the map function is enabled, you can click and click UVSSs.
4. Click Add to enter the Add UVSS page.5. Input the required information of UVSS.6. Link cameras to the UVSS.
1) Set Relate Camera switch to ON.2) Select the cameras.
7. Check Add to Map to add the UVSS on the map.8. Click Add.
11.3 Edit Element in AreaYou can edit the area's added elements, such as recording settings, event settings, map settings forcameras, application settings, hardware settings, and attendance settings for doors, and so on.
11.3.1 Edit Camera for Current Site
You can edit basic information, recording settings, event settings, and map settings of the camerafor current site. You can also edit the face comparison group settings of the cameras which supportface picture comparison.
Perform this task when you need to edit camera for current site.
Steps1. Click Logical View on the Home page to enter the Area Management page.2. In the area list panel, select the added Current Site from the drop-down site list to show its
areas.
HikCentral Web Client User Manual
96

NoteThe icon indicates that the site is current site.
3. Select an area.4. Select the Cameras tab to show the added cameras.5. Click Name column to enter the Edit Camera page.6. Edit the camera's basic information, including camera name, stream type, and protocol type.7. Optional: Click to see the live view of the camera and hover over the window and click in
the lower-right corner to switch to video playback.
NoteThe live view and playback functions in the camera details page are only supported by InternetExplorer.
8. Edit the recording settings of the camera. See Configure Recording for details.
NoteIf no recording settings have been configured for the camera, you can click Configuration to setthe parameters.
9. Optional: For cameras which support face picture comparison, you can edit the facecomparison group settings.1) Set the person group for face comparison. You can delete the applied group and view the
group details.
NoteIf no face comparison group have been applied to the camera, you can click Apply FaceConfiguration Group. See Apply Face Comparison Group to Device for details.
2) Set the face comparison similarity threshold which affects the frequency and accuracy of facepicture comparison alarm.
10. Edit the event settings of the camera. See Configure Event and Alarm for details.
NoteIf no event settings have been configured for the camera, you can click Configuration to set theparameters.
11. Add the camera to the map.1)Set the Add to Map switch to ON.2)Select the icon style and name color for displaying the camera on the map.
12. Optional: Click Configuration on Device to set the remote configurations of the correspondingdevice if needed.
HikCentral Web Client User Manual
97

NoteFor detailed operation steps for the remote configuration, refer to the user manual of thedevice.
13. Click Save.
11.3.2 Edit Door for Current Site
You can edit basic information, related cameras, application, hardware settings, access level,attendance settings, event settings, and map settings of the door for current site.
Perform this task when you need to edit the door for current site.
Steps1. Click Logical View on the Home page to enter the Area Management page.2. In the area list panel, select the added Current Site from the drop-down site list to show its
areas.
NoteThe icon indicates that the site is current site.
3. Select an area.4. Select the Doors tab to show the added doors.5. Click Name column to enter the Edit Door page.6. Edit the door's basic information.
Door Magnetic SensorThe door magnetic sensor connection mode.
Exit Button TypeThe exit button connection mode.
Open Duration(s)The time interval between the time when the door is unlocked and locked again.
Extended Open Duration(s)If the person has enabled Extended Access function, the time interval between the timewhen the door is unlocked and locked again.
Door Open Timeout AlarmAfter enabled, if the door has configured with event or alarm, when the door magneticsensor open duration has reached the limit, the event or alarm will be uploaded to thesystem.
Duress CodeIf you enter this code on the card reader keypad, the Control Client will receive an duressevent. It should be different with the super password and dismiss code.
HikCentral Web Client User Manual
98

Super PasswordIf you enter this password on the card reader keypad, you are exempted from all theremaining locked (Credential Failed), anti-passback, and first card authorization restrictions.It should be different with the duress code and dismiss code.
Dismiss CodeIf you enter this code on the card reader keypad, the buzzer's beeping will be stopped. Itshould be different with the duress code and super password.
Free Access ScheduleDuring this schedule, the door remains open. User can open the door without anycredentials.
7. Link the cameras to the door.
NoteUp to two cameras can be selected.
8. Edit the application settings.Anti-passback
The person should exit via the door in the anti-passback if he/she enters via the door in theanti-passback. It minimizes the misuse or fraudulent use of access credentials such as passingback card to an unauthorized person, or tailed access.
Note• Up to 128 anti-passback rules can be added.• Up to 16 doors can be added for one anti-passback rule.
Open Door with First CardAfter swiping the first card, the door will remain unlocked or be authorized. The statusdepends on the card swiping times (odd or even). For odd, the door will remain unlocked orbe authorized. For even, it will exit the unlocked or authorized mode.
9. Edit the hardware settings.1) Set the Card Reader switch to ON and set the card reader related parameters.
OK LED PolarityOnly supported when the device is connected via Wiegand interface. The polarity for OKcore wire connection on the card reader mainboard.
Error LED PolarityOnly supported when the device is connected via Wiegand interface. The polarity for ERRcore wire connection on the card reader mainboard.
Buzzer PolarityOnly supported when the device is connected via Wiegand interface. The polarity forbuzzer connection on the card reader mainboard.
HikCentral Web Client User Manual
99

2) Set the card reader's access mode in normal time periods.
ExampleIf you select Card, you should open the door by swiping the card all the time.
3) Optional: When you want to open the door via another access mode in some special timeperiods, set the card reader's access mode and select the custom time period.
ExampleIf you select Fingerprint and Weekend Schedule, you should open the door via fingerprint atweekends.
NoteYou can add a custom schedule template and up to 3 time periods can be set for each day.See Set Access Control Schedule Template for details.
4) Set the Min. Card Swipe Interval switch to ON and set the interval.Min. Card Swipe Interval
After enabled, you cannot swipe the same card again within the minimum card swipinginterval.
5) Set the maximum time interval of pressing two keys on the keypad. If timed out, the firstentry will be reset.
6) Set the Failed Card Attempts Alarm switch to ON and set the maximum failed attempts.Failed Card Attempts Alarm
After enabled, if the door has configured with event or alarm, when the number ofexcessive failed card swiping attempts has reached the limit, the event or alarm will beuploaded to the system.
10. Add the door to one access level.11. Set the door as attendance check point.12. Edit the event settings of the door. See Configure Event and Alarm for details.
NoteIf no event settings have been configured for the door, you can click Configuration to set theparameters.
13. Add the door to the map.1)Set the Add to Map switch to ON.2)Select the icon style and name color for displaying the door on the map.
NoteUp to 128 doors can be added to one map.
14. Click Save.
HikCentral Web Client User Manual
100

11.3.3 Edit Alarm Input for Current Site
You can edit basic information, event settings, and map settings of the alarm input for current site.
Perform this task when you need to edit alarm input for current site.
Steps1. Click Logical View on the Home Page to enter the Area Management page.2. In the area list panel, select the added Current Site from the drop-down site list to show its
areas.
NoteThe icon indicates that the site is current site.
3. Select the Alarm Inputs tab to show the added alarm inputs.4. Click Name column to enter the Edit Alarm Input page.5. Edit the alarm input name.6. Edit the event settings of the camera. See Configure Event and Alarm for details.
NoteIf no event settings have been configured for the camera, you can click Configuration to set theparameters.
7. Add the alarm input to the map.1) Set the Add to Map switch to ON.2) Select the icon style and name color for displaying the alarm input on the map.
8. Click Save.
11.3.4 Edit Alarm Output for Current Site
You can edit basic information and map settings of the alarm output for current site.
Perform this task when you need to edit alarm output for current site.
Steps1. Click Logical View on the Home Page to enter the Area Management page.2. In the area list panel, select the added Current Site from the drop-down site list to show its
areas.
NoteThe icon indicates that the site is current site.
3. Select the Alarm Outputs tab to show the added alarm outputs.4. Click Name column to enter the Edit Alarm Output page.5. Edit the alarm output name.6. Add the alarm output to the map.
HikCentral Web Client User Manual
101
1) Set the Add to Map switch to ON.2) Select the icon style and name color for displaying the alarm output on the map.
7. Click Save.
11.3.5 Edit Under Vehicle Surveillance System for Current Site
You can edit basic information, related cameras, and map settings of the Under VehicleSurveillance System (UVSS) for current site.
Perform this task when you need to edit UVSS for current site.
Steps1. Click Logical View on the Home page to enter the Area Management page.2. In the area list panel, select the added Current Site from the drop-down site list to show its
areas.
NoteThe icon indicates that the site is current site.
3. Select an area.4. Select the Under Vehicle Surveillance Systerms tab to show the added UVSSs.
NoteIf the map function is enabled, you should click and click UVSSs.
5. Click Name column to enter the Edit UVSS page.6. Edit the UVSS's basic information, such as IP address, port No., and so on.7. Link cameras to the UVSS.
1) Set the Relate Camera switch to ON.2) Select the camera(s).
8. Add the UVSS to the map.1) Set the Add to Map switch to ON.2) Select the icon style and name color for displaying the UVSS on the map.
9. Click Save.
11.3.6 Edit Element for Remote Site
If the current system is a Central System with Remote Site Management module, you can edit thecameras added from the Remote Site.
Perform this task when you need to edit the camera parameters for the Remote Site.
Steps1. Click Logical View on the Home page to enter the Area Management page.2. In the area list panel, select the added Remote Site from the drop-down site list to show its
areas.
HikCentral Web Client User Manual
102

NoteThe icon indicates that the site is a Remote Site.
3. Select an area to show its added cameras.4. Click the Name field to edit the parameters of the cameras including basic information and
recording settings.
NoteFor recording settings, if no recording settings have been configured for the camera, clickConfiguration to set the parameters (for details, refer to Configure Recording Settings forCameras on Remote Site ).
5. Optional: Click to see the live view of the camera and hover over the window and click inthe lower-right corner to switch to video playback.
NoteThe live view and playback functions in the camera details page are only supported by InternetExplorer.
6. Optional: Click Copy to to copy the current camera's specified configuration parameters toother cameras of the Remote Site.
7. Click Save.
11.4 Remove Element from AreaYou can remove the added cameras, alarm inputs, alarm outputs, doors, and Under VehicleSurveillance Systems (UVSSs) from the area.
11.4.1 Remove Element from Area for Current Site
You can remove the added cameras, alarm inputs, alarm outputs, doors, and UVSSs from the areafor current site.
Perform this task when you need to remove element from the area for the current site.
Steps1. Click Logical View on the Home page to enter the Area Management page.2. Select an area in the area list panel to show its added elements.
Note• For a Central System with a Remote Site Management module, you can select the current site
from the drop-down site list to show its areas.• The icon indicates that the site is the current site.
HikCentral Web Client User Manual
103

3. Select the Cameras, Alarm Inputs, Alarm Outputs, Doors, or UVSSs tab to show the addedelements.
4. Select the checkboxes to select the elements.5. Click Delete to remove them from the area.
11.4.2 Remove Element from Area for Remote Site
If the current system is a Central System with a Remote Site Management module, you can alsoremove the added cameras from its area.
Perform this task when you need to remove the element from the area for the Remote Site.
Steps1. Click Logical View on the Home page to enter the Area Management page.2. In the area list panel, select the added Remote Site from the drop-down site list to show its
areas.
NoteThe icon indicates that the site is a Remote Site.
3. Select an area to show its added cameras.4. Select the checkboxes to select the cameras.5. Click Delete to remove them from the area.6. Optional: If appears near the camera name, it means the camera has been deleted from the
Remote Site. Hover the cursor over the and click Delete to delete the camera from the area.
HikCentral Web Client User Manual
104

Chapter 12 Configure Recording
Recording settings are for defining when and how the recording starts with the pre-definedparameters. You can also store the pictures of passing vehicles, and alarms on the VSM.
HikCentral provides three storage location (storing on encoding devices, Hybrid Storage AreaNetwork, or Cloud Storage Server) for storing the recorded video files of the cameras.Encoding Device
The encoding devices, including the DVRs, NVRs, and network cameras, should provide storagedevices such as the HDDs, Net HDDs and SD/SDHC cards for video files. The newly installedstorage devices need to be formatted. Go to the remote configuration page ( Physical View →Configuration ) of the device, click Storage → General , select the HDD, Net HDD or SD/SDHCcard, and click Format to initialize the selected storage device.
Hybrid Storage Area NetworkStore the video files in the added Hybrid Storage Area Network. For details of adding the HybridStorage Area Network, refer to Add Hybrid Storage Area Network .
Cloud Storage ServerStore the video files in the added Cloud Storage Server. For details of adding the Cloud StorageServer, refer to Add Cloud Storage Server .
12.1 Configure Recording for Cameras on Current SiteFor the cameras on the current site, HikCentral provides three storage methods (storing onencoding devices, Hybrid Storage Area Network, or Cloud Storage Server) for storing the video filesof the cameras according to the configured recording schedule. You can get device's recordingsettings when adding camera to an area or configure the recording schedule.
Perform this task when you need to record videos for the cameras on the current site.
Steps1. Enter the recording setting page.
1) Click Logical View → Cameras to enter the area management page.
Note• When adding device by IP address or domain name in Physical View module. Refer to Add
Device by IP Address or Domain Name for more details.• When adding alarm or triggering alarm for system-related event, you can also configure
the recording schedule for the cameras. Refer to Configure Event and Alarm for moredetails.
2) Select an area to show its cameras.
HikCentral Web Client User Manual
105

NoteFor central system with Remote Site Management module, you can select the current site(marked with icon) from the drop-down site list to show its cameras.
3) Select a camera and click the Name field to enter the Edit Camera page.In the Recording Setting area, you can modify the configured schedule or enable the function toadd a new one.
Figure 12-1 Edit Camera Page2. Set the switch of Main Storage to ON and set the main storage location.3. Select the storage location for storing the recorded video file.
NoteIf you select Hybrid Storage Area Network or Cloud Storage Server, specify a server and(optional) select a Streaming Server to get the video stream of the camera via it.
4. Set the template which defines when to record the camera's video.- Select the template as all-day time-based template or all-day event-based template.
HikCentral Web Client User Manual
106

All-Day Time-Based TemplateRecord the video for all-day continuously.
All-Day Event-Based TemplateRecord the video when alarm occurs.
- Click Add New to set the customized template. For settings customized template, refer toConfigure Recording Schedule Template .
5. Optional: Click View to view the details of the template.6. Select the stream type for recording the video.
NoteFor storing on Hybrid Storage Area Network or Cloud Storage Server, dual-stream is notsupported.
7. Set the pre-record and post-record for recording the video.Pre-Record
Record video from periods preceding detected events.
Note• The value of the pre-record period is not editable.• This field displays when the storage location is set as Encoding Device or Cloud Storage
Server, and it is available for the camera that is configured with event-based recording.
Post-RecordRecord video from periods following detected events.
NoteThis field displays when the storage location is set as Encoding Device or Hybrid Storage AreaNetwork. It is available for the camera that is configured with event-based recording.
8. In the Video Files Storage field, select the storage mode for the recorded videos.
NoteThis field displays when the storage location is set as Encoding Device.
OverwriteOverwrite the oldest videos when disk or allocated quota is full.
Expired TimeAutomatically delete the oldest videos after the specified retention period. This method allowsyou to define the longest time period to keep the videos as desired and the actual retentionperiod for the videos depends on the allocated quota.
9. Optional: If you select the Storage Location as Encoding Device or Hybrid Storage AreaNetwork, check Enable ANR to turn the automatic network replenishment on to temporarily
HikCentral Web Client User Manual
107
store the video in the camera when network fails and transport the video to storage devicewhen network recovers.
10. Optional: Switch the Auxiliary Storage to ON and configure another storage location for thevideo files.
11. Click Save to complete adding the recording settings.
12.2 Configure Recording Settings for Cameras on Remote SiteFor the cameras on the remote site, the central system provides two storage methods (storing onHybrid Storage Area Network or Cloud Storage Server) for storing the video files of the camerasaccording to the configured recording schedule.
Perform this task when you need to record videos for the cameras on the remote site.
Steps1. Enter the recording setting page.
1) Click Logical View → Cameras to enter the area management page.2) Select the added remote site form the drop-down list.
NoteThe icon indicates that the site is remote site.
3) Select an area to show its cameras.4) Select a camera and click the Name field to enter the Edit Camera page.5) In the Recording Settings area, click Configuration to show the recording setting page.
HikCentral Web Client User Manual
108

Figure 12-2 Add Recording Settings Page2. Select the storage location in the central system for storing the recorded video file.
NoteYou can choose to store the video files on the Hybrid Storage Area Network or Cloud StorageServer added in the central system.
3. Select the storage location for storing the recorded video file.
NoteYou can select Hybrid Storage Area Network or Cloud Storage Server, specify a server and(optional) select a Streaming Server to get the video stream of the camera via it.
4. Select the schedule template which defines when to record the camera's video.- Select the all-day time-based template or all-day event-based template.
All-Day Time-Based TemplateRecord the video for all-day continuously.
All-Day Event-Based TemplateRecord the video when alarm occurs.
- Click Add New to set the customized template.
HikCentral Web Client User Manual
109

NoteFor settings customized template, refer to Configure Recording Schedule Template .
5. Optional: Click View to view the details of the template.6. Select the stream type for recording the video.7. Set the pre-record and post-record for recording the video.
Pre-RecordRecord video from periods preceding detected events. The value of the pre-record period isnot editable.
Note• The value of the pre-record period is not editable.• This field displays when the storage location is set as Cloud Storage Server, and it is
available for the camera that is configured with event-based recording.
Post-RecordRecord video from periods following detected events.
NoteThis field displays when the storage location is set as Hybrid Storage Area Network, and isavailable for the camera that is configured with event-based recording.
8. Optional: Select a Streaming Server to get the video stream of the camera via it.9. Optional: If you select the Storage Location as Hybrid Storage Area Network, check Enable ANR
to turn the automatic network replenishment on to temporarily store the video in the camerawhen network fails and transport the video to Hybrid Storage Area Network when networkrecovers.
10. Click Add to save the recording settings.11. Click Close to close the pop-up window indicating the configuring result.
12.3 Configure Picture StorageThe pictures, such as passing vehicle's pictures, alarm triggered picture, can be stored on the HDDof VSM server.
Before You StartMake sure that you have at least 1GB free space for picture storage.Perform this task when you need to store the captured pictures.
Steps1. Click System → Picture Storage to enter the picture storage settings page.2. Set the Store Picture on VSM switch to ON to enable the picture storage on VSM server.
The disks of the VSM server are displayed with the free space and total capacity.
HikCentral Web Client User Manual
110
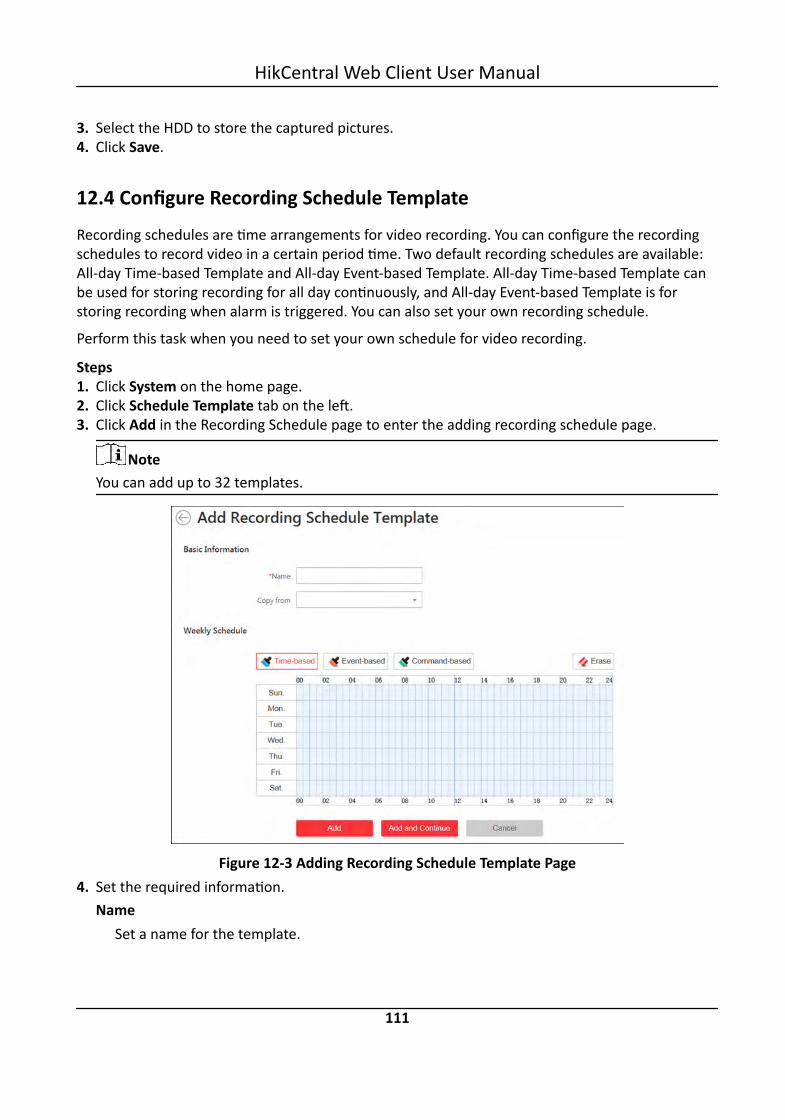
3. Select the HDD to store the captured pictures.4. Click Save.
12.4 Configure Recording Schedule TemplateRecording schedules are time arrangements for video recording. You can configure the recordingschedules to record video in a certain period time. Two default recording schedules are available:All-day Time-based Template and All-day Event-based Template. All-day Time-based Template canbe used for storing recording for all day continuously, and All-day Event-based Template is forstoring recording when alarm is triggered. You can also set your own recording schedule.
Perform this task when you need to set your own schedule for video recording.
Steps1. Click System on the home page.2. Click Schedule Template tab on the left.3. Click Add in the Recording Schedule page to enter the adding recording schedule page.
NoteYou can add up to 32 templates.
Figure 12-3 Adding Recording Schedule Template Page4. Set the required information.
NameSet a name for the template.
HikCentral Web Client User Manual
111

Copy fromOptionally, you can select to copy the settings from other defined template.
5. Select a recording type and click on the time bar to draw a time period.
NoteBy default, the Time-based is selected.
Time-basedContinuous recording according to the time you arranged. The schedule time bar is markedwith blue.
Event-basedThe recording triggered by the alarm (e.g., alarm input alarm or motion detection alarm). Theschedule time bar is marked with orange.
Command-basedThe recording triggered by the ATM command. The schedule time bar is marked with green.
NoteUp to 8 time periods can be set for each day in the recording schedule.
6. Optional: You can click Erase and click on the time bar to clear the drawn time period.7. Complete adding the template.
- Click Add to add the template and back to the recording schedule template list page.- Click Add and Continue to save the settings and continue to add other template.
8. Optional: Perform the following operations on the recording schedule template list page.
View TemplateDetails
Click the template to check the detailed settings.
Edit Template Click in the Operation column to edit template details (exceptthe template(s) in use).
Delete Template Click in the Operation column to delete the template.
Delete All Templates Click Delete All to delete all the schedule templates (except thedefault templates and the template(s) in use).
HikCentral Web Client User Manual
112
Chapter 13 Configure Event and Alarm
You can set the linkage actions for the detected events and alarms. The information of the eventsand alarms can be received by the Control Client, and you can check the details via the ControlClient.
Event can be divided into:System-Related Event
The signal that resource (e.g., camera, device, server) sends when something occurs. System canreceive and record event for checking, and can also trigger alarm for the event.
Generic EventThe signal that resource (e.g., other software, device) sends when something occurs, and can bereceived in the form of TCP or UDP data packages, which the system can analyze and generateevents if they match configured expression.
User-Defined EventThe user-defined event can be used to:• The user can trigger a user-defined event manually in Monitoring and Alarm Center module on
the Control Client when viewing the video or checking the alarm information.• A user-defined event can trigger an alarm if configured.• An alarm's arming schedule will start or end when the user-defined event is triggered.• An alarm can trigger a user-defined event as alarm actions.• Integrate other third-party systems with HikCentral by using the data received from the third-
party system.
Alarm is used to notify security personnel of the particular situation which helps handle thesituation promptly. And alarm can trigger a series of linkage actions (e.g., sending email) fornotification.
13.1 Configure System-Related EventSystem-related event is the signal that resource (e.g., device, camera, server) sends whensomething occurs. System can receive and record event for checking, and can also trigger alarm forthe event. You can check the event related video via Control Client if you set the recording settingsfor the camera.
It supports the following types of event:• Camera Event: the video exception or the events detected in the monitoring area of the camera,
such as motion detection, video loss, line crossing, and so on.• Door Event: the access control event triggered at the door, such as access event, door status
event, etc.• Alarm Input Event: the event triggered by the alarm input.
HikCentral Web Client User Manual
113
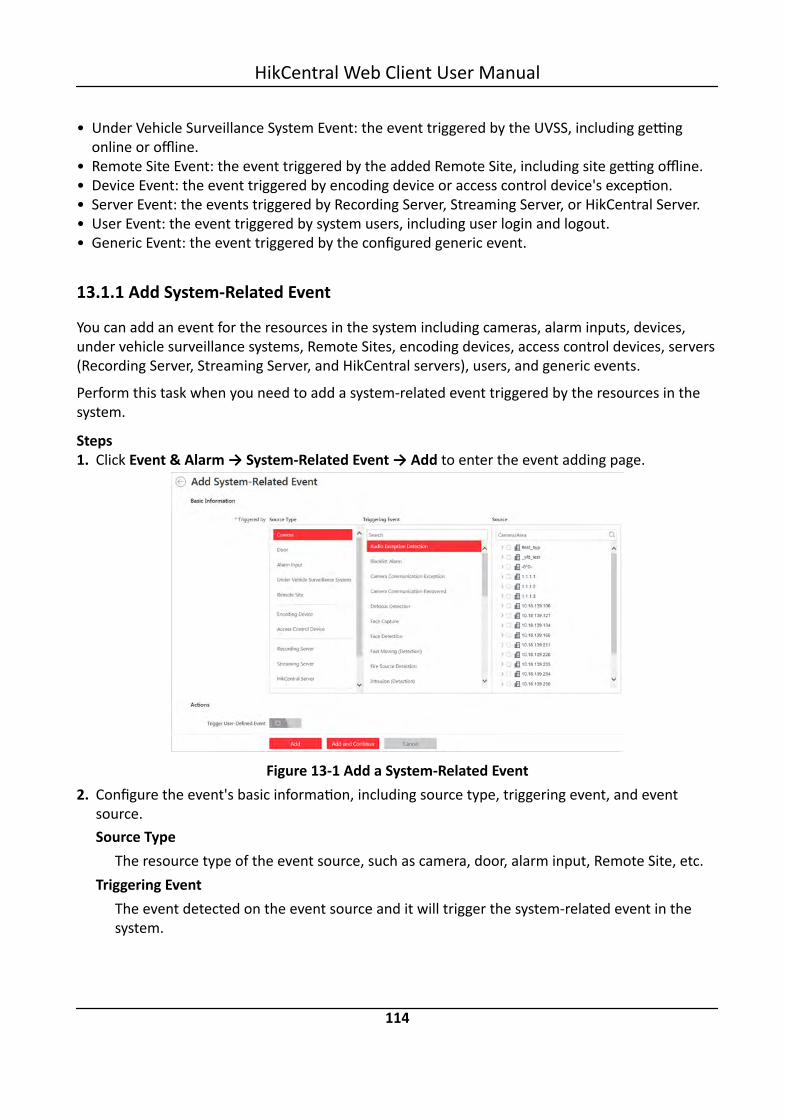
• Under Vehicle Surveillance System Event: the event triggered by the UVSS, including gettingonline or offline.
• Remote Site Event: the event triggered by the added Remote Site, including site getting offline.• Device Event: the event triggered by encoding device or access control device's exception.• Server Event: the events triggered by Recording Server, Streaming Server, or HikCentral Server.• User Event: the event triggered by system users, including user login and logout.• Generic Event: the event triggered by the configured generic event.
13.1.1 Add System-Related Event
You can add an event for the resources in the system including cameras, alarm inputs, devices,under vehicle surveillance systems, Remote Sites, encoding devices, access control devices, servers(Recording Server, Streaming Server, and HikCentral servers), users, and generic events.
Perform this task when you need to add a system-related event triggered by the resources in thesystem.
Steps1. Click Event & Alarm → System-Related Event → Add to enter the event adding page.
Figure 13-1 Add a System-Related Event2. Configure the event's basic information, including source type, triggering event, and event
source.Source Type
The resource type of the event source, such as camera, door, alarm input, Remote Site, etc.Triggering Event
The event detected on the event source and it will trigger the system-related event in thesystem.
HikCentral Web Client User Manual
114

NoteThe triggering event varies with the selected source type.
SourceThe specific resource(s) which can trigger this event.
NoteFor generic event, you should select the configured generic event as the event source. Forsetting the generic event, refer to Configure Generic Event .
3. Optional: Set the linkage actions for the event.Trigger User-Defined Event
Trigger user-defined event(s) when the system-related event is triggered during theconfigured arming schedule.
Note• Up to 16 user-defined events can be selected as event linkage.• For setting the user-defined event, refer to Configure User-Defined Event .
4. Finish adding the event.- Click Add to add the event and back to the event list page.- Click Add and Continue to add the event and continue to add other event.
NoteYou can add events for up to 100 resources at a time.
After adding the event, it displays on the event list, and you can view the event name, eventsource, and triggering event.
5. Optional: Perform the following operation(s) after adding the event.
Trigger Event asAlarm
Click in the Operation column of system-related event settings page toset the alarm properties, recipients, actions, and other parameters.
NoteFor details, refer to Configure Alarm .
Delete Event Click in the Operation column to delete the event.
Delete AllEvents
Click Delete All to delete all the added events.
Manage EventDisabled onDevice
If appears near the event name, it means the event is disabled on thedevice. You should hover the cursor over the and click Configurationon the tooltip and enable the event on the device.
HikCentral Web Client User Manual
115
Manage InvalidEvent
If appears near the event name, it means the event is not supportedby the device and it is invalid. You should hover the cursor over the and click Delete on the tooltip and delete the event.
Delete InvalidEvents
Click Delete Invalid Item to delete all the invalid events in batch.
Filter Event Click to expand the filter conditions. Set the conditions and click Filterto filter the event according to the set conditions.
13.1.2 Edit System-Related Event
After adding the system-related event, you can edit the event settings and trigger the event asalarm.
Before You StartAdd the system-related event. See Add System-Related Event for details.Perform this task when you need to edit the added system-related event or trigger it as alarm.
Steps1. Click Event & Alarm on home page.2. Click System-Related Event tab to enter the event list page.3. Click to enter the event details page.4. Optional: Perform the following operations to edit the event details.
Configure Event onDevice (If Supported)
For some of the source types, click to log in to the device andconfigure the event. See the user manual of the device for details.
Edit Event Name Edit the event name as desired.
Edit Actions Edit the action settings about triggering user-defined event. Fordetails, refer to Add System-Related Event .
5. Save the event settings.- Click Save to save the event settings and back to the event list page.- Click Save and Trigger Alarm to save the event as alarm and enter the alarm settings page for
setting alarm, see Configure Alarm for details.
13.2 Configure Generic EventYou can customize the express to create a generic event to analyze the received TCP and/or UDPdata packages, and trigger events when specified conditions are met. In this way, you can easilyintegrate your system with a very wide range of external sources, such as access control systemsand alarm systems.
Perform this task when you need to configure generic event.
HikCentral Web Client User Manual
116

Steps1. Click Event & Alarm → Generic Event to enter the generic event settings page.
Figure 13-2 Generic Event Settings Page2. Click Add to enter the Add Generic Event page.
Figure 13-3 Add Generic Event Page3. Set a name for the event in the Event Name field.4. Optional: Copy the settings from other defined generic event in the Copy from field.5. Select TCP or UDP to analyze the packages using TCP or UDP protocol.6. Select the match type which indicating how particular your system should be when analyzing
the received data packages:Search:
The received package must contain the text defined in the Expression field.For example, if you have defined that the received packages should contain "Motion" and"Line Crossing", the alarm will be triggered when the received packages contain "Motion","Intrusion" and "Line Crossing".
HikCentral Web Client User Manual
117
Match:The received package must exactly contain the text defined in the Expression field, andnothing else.
7. Define the event rule for analyzing the received package in the Expression field.1) Input the term which should be contained in the expression in the text field.2) Click Add to add it to the expression.3) Click parenthesis or operator button to add it to the expression.4) To add a term, parenthesis or operator to the expression, position the cursor inside the
expression field in order to determine where a new item (term, parenthesis or the operator)should be included, and click Add or one of the parenthesis or operator buttons.
5) To remove an item from the expression, position the cursor inside the field in order todetermine where an item should be removed, and click . The item immediately to the leftof the cursor will be removed.
The parenthesis or operator buttons are described in the following:AND:
You specify that the terms on both sides of the AND operator must be included.For example, if you define the rule as "Motion" AND "Line Crossing" AND "Intrusion", theterm Motion, and Line Crossing as well as the term Intrusion must be all contained in thereceived package for the conditions to be met.
NoteIn generally, the more terms you combine with AND, the fewer events will be detected.
OR:You specify that any term should be contained.For example, if you define the rule as "Motion" OR "Line Crossing" OR "Intrusion", any of theterms (Motion, Line Crossing, or Intrusion) must be contained in the received package for theconditions to be met.
NoteIn generally, the more terms you combine with OR, the more events will be detected.
(:Add the left parenthesis to the rule. Parentheses can be used to ensure that related termsare processed together as a unit; in other words, they can be used to force a certainprocessing order in the analysis.For example, if you define the rule as ("Motion" OR "Line Crossing") AND "Intrusion", the twoterms inside the parentheses will be processed first, then the result will be combined withthe last part of the rule. In other words, the system will first search any packages containingeither of the terms Motion or Line Crossing, then it search the results to look for thepackages that contained the term Intrusion.
HikCentral Web Client User Manual
118
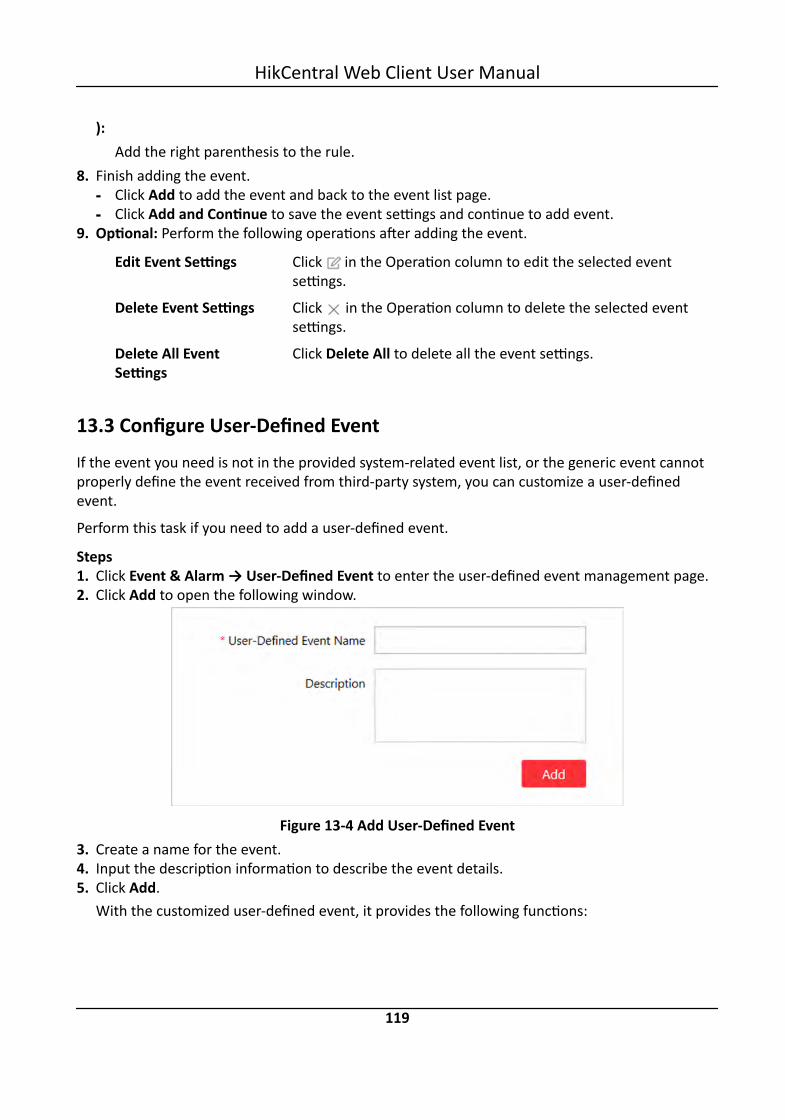
):Add the right parenthesis to the rule.
8. Finish adding the event.- Click Add to add the event and back to the event list page.- Click Add and Continue to save the event settings and continue to add event.
9. Optional: Perform the following operations after adding the event.
Edit Event Settings Click in the Operation column to edit the selected eventsettings.
Delete Event Settings Click in the Operation column to delete the selected eventsettings.
Delete All EventSettings
Click Delete All to delete all the event settings.
13.3 Configure User-Defined EventIf the event you need is not in the provided system-related event list, or the generic event cannotproperly define the event received from third-party system, you can customize a user-definedevent.
Perform this task if you need to add a user-defined event.
Steps1. Click Event & Alarm → User-Defined Event to enter the user-defined event management page.2. Click Add to open the following window.
Figure 13-4 Add User-Defined Event3. Create a name for the event.4. Input the description information to describe the event details.5. Click Add.
With the customized user-defined event, it provides the following functions:
HikCentral Web Client User Manual
119

• The user can trigger a user-defined event manually in Monitoring and Alarm Center moduleon the Control Client when viewing the video or checking the alarm information.
• A user-defined event can trigger an alarm if configured.• You can define the arming time period by the user-defined event: An alarm's arming schedule
will start or end when the user-defined event is triggered.• An alarm can trigger a user-defined event as alarm actions.• Integrate other third-party systems with HikCentral by using the data received from the third-
party system. You can trigger the user-defined events outside the HikCentral. For details,contact our technical support.
Note• For configuring the alarm source, arming schedule, and alarm action, refer to Configure
Alarm .• For triggering the user-defined event on the Control Client, refer to User Manual of HikCentral
Control Client.
13.4 Configure AlarmAlarm is used to notify security personnel of the particular situation which helps handle thesituation promptly. Alarm can trigger a series of linkage actions (e.g., sending email, HikCentral cansend notification email to designated recipient when motion is detected) for notification.
You can set the alarms for the resources on the current site.If the system is Central System with Remote Site Management module, you can also set the alarmfor the camera on Remote Site which has configured with alarm, so that you can receive alarms inCentral System when the alarm is triggered.You can set different linkage actions for the following alarms:• Camera Alarm: the video exception or the events detected in the monitoring area of the camera,
such as motion detection, video loss, line crossing, and so on.• Door Alarm: the alarm triggered at the door, such as access event, door status event, etc.• Alarm Input Alarm: the alarm triggered by the alarm input.• ANPR Alarm: the alarm triggered when the license plates detected by the ANPR camera and
UVSS is matched or mismatched the vehicle information in vehicle list.• Person Alarm: the alarm triggered when the person's face detected by the face recognition
device is matched or mismatched the face picture in the face comparison group.• Remote Site Alarm: the alarm triggered by the added Remote Site, including site getting offline.
NoteRemote Site alarm is available for the system with Remote Site Management module (based onthe license you purchased).
• Device Exception: the alarm triggered by encoding device or access control device's exception.
HikCentral Web Client User Manual
120

• Server Exception: the alarm triggered by Recording Server, Streaming Server, or HikCentralServer.
• User Alarm: the alarm triggered by system users, including user login and logout.• User-Defined Event: the alarm triggered by the configured user-defined event.• Generic Event: the alarm triggered by the configured generic event.
NoteYou can check the received alarm message via Control Client. For details see User Manual ofHikCentral Control Client.
13.4.1 Alarm Settings
The system predefines several alarm priorities and alarm categories for basic needs. You can editthe predefined alarm priority and alarm category, and set customized alarm priority and alarmcategory according to actual needs.
Perform this task when you need to configure the alarm priority and alarm category.Alarm PriorityDefine the priority for the alarm when add the alarm and filter alarms in the Control Client.
Alarm CategoryAlarm category is used when the user acknowledges the alarm in Control Client to indicate whatkind of alarm it is, e,g., false alarm, or alarm to be verified. You can search the alarms by thealarm type in the Alarm Center of Control Client.
Steps1. Click Event & Alarm → Alarm → Alarm Settings to enter the alarm settings page.2. Set the alarm priority according to actual needs. By default, three kinds of alarm priority exist.
Figure 13-5 Alarm Priority Page1) Click Add to add a customized priority.
NoteUp to 255 levels of alarm priority can be added. The priority levels can be used for sortingalarms in Alarm Center of Control Client.
2) Select a level No. for the priority.3) Input a descriptive name for the priority.
HikCentral Web Client User Manual
121
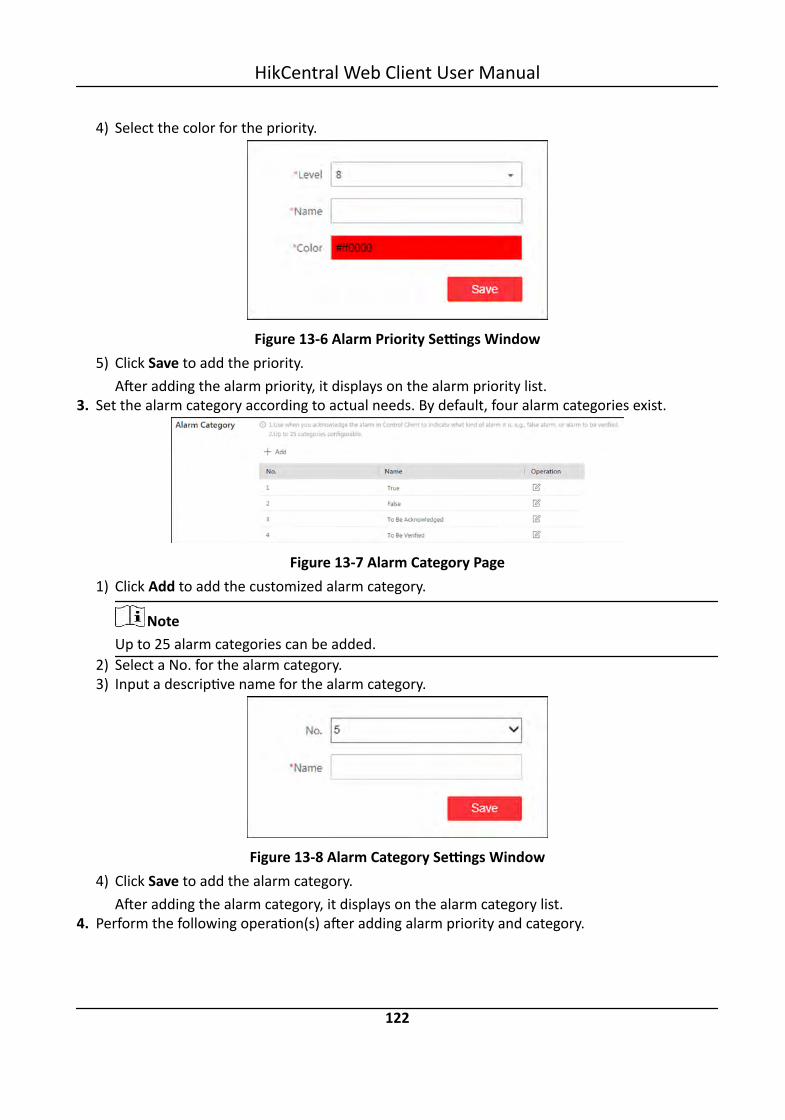
4) Select the color for the priority.
Figure 13-6 Alarm Priority Settings Window5) Click Save to add the priority.
After adding the alarm priority, it displays on the alarm priority list.3. Set the alarm category according to actual needs. By default, four alarm categories exist.
Figure 13-7 Alarm Category Page1) Click Add to add the customized alarm category.
NoteUp to 25 alarm categories can be added.
2) Select a No. for the alarm category.3) Input a descriptive name for the alarm category.
Figure 13-8 Alarm Category Settings Window4) Click Save to add the alarm category.
After adding the alarm category, it displays on the alarm category list.4. Perform the following operation(s) after adding alarm priority and category.
HikCentral Web Client User Manual
122
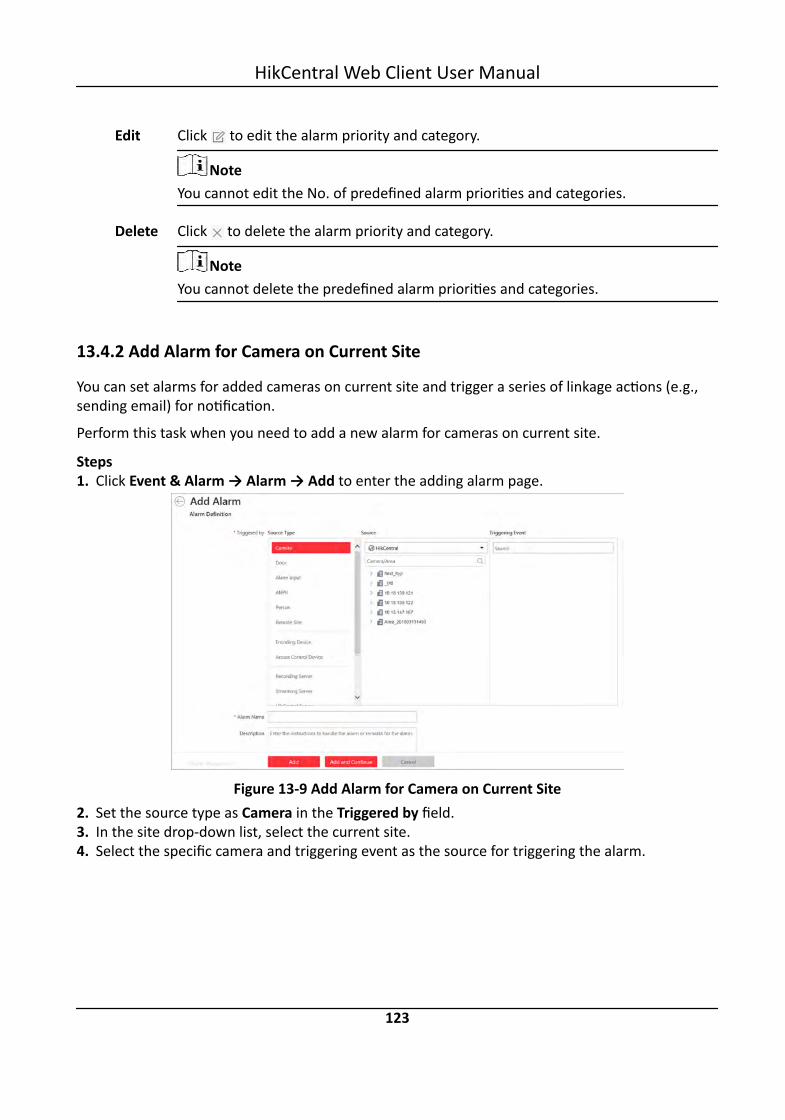
Edit Click to edit the alarm priority and category.
NoteYou cannot edit the No. of predefined alarm priorities and categories.
Delete Click to delete the alarm priority and category.
NoteYou cannot delete the predefined alarm priorities and categories.
13.4.2 Add Alarm for Camera on Current Site
You can set alarms for added cameras on current site and trigger a series of linkage actions (e.g.,sending email) for notification.
Perform this task when you need to add a new alarm for cameras on current site.
Steps1. Click Event & Alarm → Alarm → Add to enter the adding alarm page.
Figure 13-9 Add Alarm for Camera on Current Site2. Set the source type as Camera in the Triggered by field.3. In the site drop-down list, select the current site.4. Select the specific camera and triggering event as the source for triggering the alarm.
HikCentral Web Client User Manual
123
NoteIf the event is not properly configured on the device, Disabled On Device appears under theevent type. You can click and set the parameters for the event in the pop-up interface. Fordetailed settings about the event configuration, please refer to the user manual of the device.
5. Configure the alarm definition including alarm name and description.6. Set the required information.
Arming ScheduleThe camera is armed during the arming schedule and the event occurred during the armingschedule will be triggered as alarm and notify the user. It provides two types of armingschedule:• Schedule Template: Select an arming schedule template for the alarm to define when the
alarm can be triggered. For setting customized template, refer to Configure ArmingSchedule Template .
• Event Based: Specify a user-defined event or an alarm input as the start or end event ofthe arming schedule. When the user defined event or alarm input is triggered, the armingschedule will start or end.
Alarm PriorityDefine the priority for the alarm. Priority can be used for filtering alarms in the ControlClient. For setting alarm priority, refer to Alarm Settings .
Alarm RecipientSelect the user to send the alarm information to and the user can receive the alarminformation when he/she logs in to HikCentral via Control Client or Mobile Client.
Related CameraSelect the related camera to record the alarm video when the alarm is triggered. You canview the live video and play back the recorded video files when alarm occurs in the AlarmCenter of Control Client. You can select the storage location for storing the video files.
Note• By default, the camera itself is added as the related camera.• Make sure the related camera(s) have been configured with recording schedule.• Up to 16 cameras can be set as related camera.
Lock Video Files forSet the days for protecting the video file from being overwritten.
Related MapSelect the map to show the alarm information and you should add the camera to the map asa hot spot (refer to Add Hot Spot ). You can check the map in the Alarm Center and Alarm &Event Search of Control Client.
Trigger Pop-up Window
HikCentral Web Client User Manual
124
Pop up the alarm window on Control Client to display the alarm details and all the alarmrelated cameras' live videos and playback when alarm occurs.
Restrict Alarm Handling TimeWhen the alarm is triggered, you need to handle the alarm on the Control Client. Enable thisfunction to trigger user-defined event(s) or alarm output(s) if the alarm is not handled withinthe configured alarm handling time.
Note• Up to 16 user-defined events and alarm outputs can be set as the triggered event when
handling alarm timed out.• For configuring the user-defined event, refer to Configure User-Defined Event .
7. Set the alarm linkage actions.Trigger Audible Warning
Set the voice text for playing on the PC when alarm is triggered.
NoteYou should set voice engine as the alarm sound on System Settings page of Control Client.
Link DoorSelect the door(s) as the linkage target(s). You can set the door action so that the door will beunlocked, locked, remain unlocked, or remain locked when the alarm is triggered.
NoteUp to 16 doors can be selected as alarm linkage.
Link Alarm OutputSelect the alarm output (if available) and the external device connected can be activatedwhen alarm is triggered.
NoteUp to 64 alarm outputs can be selected as alarm linkage.
Trigger PTZCall the preset, patrol or pattern of the selected camera(s) when alarm is triggered.
NoteUp to 64 PTZ linkages can be selected as alarm linkage.
Display on Smart WallDisplay the alarm video of the related camera on the smart wall. You can select the addedsmart wall and select which window to display the alarm.
HikCentral Web Client User Manual
125
NoteUp to 16 windows can be selected.
Create TagAdd tag to the alarm triggered video if you have selected cameras in Related Cameras field,and the tagged video can be searched and checked via Control Client.You can input the name as desired. You can also click the button below to add the relatedinformation to the name.Set the time range to define the tagged video length. For example, you can set to record thetagged video started from 5 seconds before the event and lasted until and 10 seconds afterthe event. The tagged video can be searched and checked via the Control Client.Add the description to the tagged video as needed.
Send EmailSelect an email template to send the alarm information according to the defined emailsettings. You can select Add New to create a new email template. For details, refer to SetEmail Template .
Trigger User-Defined EventTrigger the user-defined event(s) when alarm is triggered.
Note• Up to 16 user-defined events can be selected as alarm linkage.• For setting the user-defined event, refer to Configure User-Defined Event .
8. Finish adding the alarm.- Click Add to add the alarm and back to the alarm list page.- Click Add and Continue to add the alarm and continue to add other alarm.After adding the alarm, it displays on the alarm list, and you can view the alarm name and alarmstatus.
9. Optional: Perform the following operation(s) after adding the alarm.
Manage AlarmDisabled onDevice
If appears near the alarm name, it means the alarm is disabled onthe device. You should hover the cursor over the and clickConfiguration on the tooltip and enable the alarm on the device.
NoteOnly the alarm that is enabled on both the device and HikCentral iseffective.
Edit Alarm Click in the Operation column to edit the alarm.
Delete Alarm Click in the Operation column to delete the alarm.
Delete All Alarms Click Delete All to delete all the added alarm.
HikCentral Web Client User Manual
126

Enable Alarm Click in the Operation column to enable the alarm.
Enable All Alarms Click Enable All to enable all the added alarms.
Disable Alarm Click in the Operation column to disable the alarm.
Disable All Alarms Click Disable All to disable all the added alarms.
Test Alarm Click to trigger this alarm automatically. You can test if the linkageactions work properly as you want.
13.4.3 Add Alarm for Camera on Remote Site
If the system is central system with Remote Site Management module (based on the license youpurchased), you can also add the alarms configured for the cameras on the Remote Site to theCentral System, and trigger a series of linkage actions for notification.
Before You StartYou should configure the camera alarm for the Remote Site via the Remote Site's Web Client.Perform this task if you need to add the alarms configured for the cameras on Remote Site to theCentral System.
Steps1. Click Event & Alarm → Alarm → Add to enter the adding alarm page.
Figure 13-10 Add Alarm for Camera on Remote Site2. Set the source type as Camera in the Triggered by field.3. Select the Remote Site from the drop-down list.4. Select a specific camera.
The alarms configured on Remote Site will display.5. Select the alarm as the source for triggering the alarm.
HikCentral Web Client User Manual
127
6. Configure the alarm definition including alarm name and description.7. Set the required information.
Alarm PriorityDefine the priority for the alarm. Priority can be used for filtering alarms in the ControlClient. For setting alarm priority, refer to Alarm Settings .
Alarm RecipientSelect the user to send the alarm information to and the user can receive the alarminformation when he/she logs in to HikCentral via Control Client or Mobile Client.
Trigger Pop-up WindowPop up the alarm window on Control Client to display the alarm details and all the alarmrelated cameras' live videos and playback when alarm occurs.
Restrict Alarm Handling TimeWhen the alarm is triggered, you need to handle the alarm on the Control Client. Enable thisfunction to trigger user-defined event(s) or alarm output(s) if the alarm is not handled withinthe configured alarm handling time.
Note• Up to 16 user-defined events and alarm outputs can be set as the triggered event when
handling alarm timed out.• For configuring the user-defined event, refer to Configure User-Defined Event .
8. Set the alarm linkage actions.Trigger Audible Warning
Set the voice text for playing on the PC when alarm is triggered.
NoteYou should set voice engine as the alarm sound on System Settings page of Control Client.
Link Alarm OutputSelect the alarm output (if available) and the external device connected can be activatedwhen alarm is triggered. You can select to automatically close the alarm output after aspecific time, or close the alarm output manually.
NoteUp to 64 alarm outputs can be selected as alarm linkage.
Display on Smart WallDisplay the alarm video of the related camera on the smart wall. You can select the addedsmart wall and select which window to display the alarm.
HikCentral Web Client User Manual
128
NoteUp to 16 windows can be selected.
Send EmailSelect an email template to send the alarm information according to the defined emailsettings. You can select Add New to create a new email template. For details, refer to SetEmail Template .
Trigger User-Defined EventTrigger the user-defined event(s) when alarm is triggered.
Note• Up to 16 user-defined events can be selected as alarm linkage.• For setting the user-defined event, refer to Configure User-Defined Event .
9. Finish adding the alarm.- Click Add to add the alarm and back to the alarm list page.- Click Add and Continue to add the alarm and continue to add other alarm.After adding the alarm, it displays on the alarm list, and you can view the alarm name and alarmstatus.
10. Optional: Perform the following operation(s) after adding the alarm.
Manage AlarmDisabled onDevice
If appears near the alarm name, it means the alarm is disabled onthe device. You should hover the cursor over the and clickConfiguration on the tooltip and enable the alarm on the device.
NoteOnly the alarm that is enabled on both the device and HikCentral iseffective.
Edit Alarm Click in the Operation column to edit the alarm.
Delete Alarm Click in the Operation column to delete the alarm.
Delete All Alarms Click Delete All to delete all the added alarm.
Enable Alarm Click in the Operation column to enable the alarm.
Enable All Alarms Click Enable All to enable all the added alarms.
Disable Alarm Click in the Operation column to disable the alarm.
Disable AllAlarms
Click Disable All to disable all the added alarms.
Test Alarm Click to trigger this alarm automatically. You can test if the linkageactions work properly as you want.
HikCentral Web Client User Manual
129
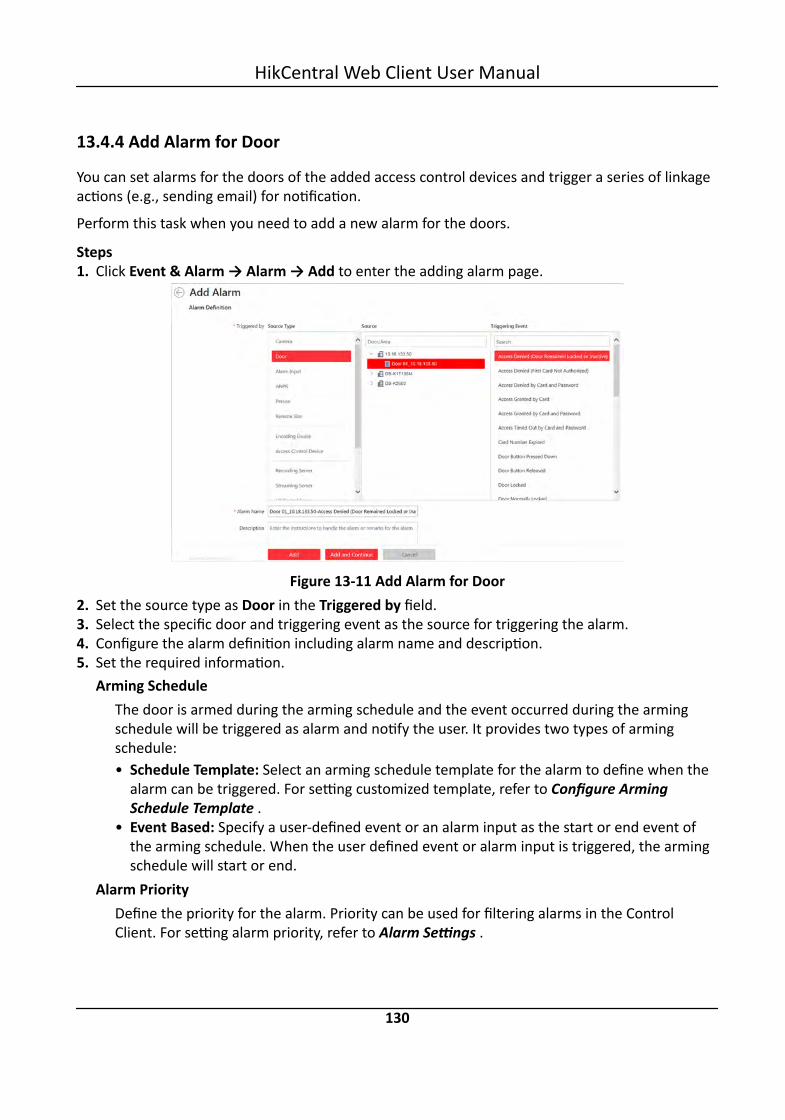
13.4.4 Add Alarm for Door
You can set alarms for the doors of the added access control devices and trigger a series of linkageactions (e.g., sending email) for notification.
Perform this task when you need to add a new alarm for the doors.
Steps1. Click Event & Alarm → Alarm → Add to enter the adding alarm page.
Figure 13-11 Add Alarm for Door2. Set the source type as Door in the Triggered by field.3. Select the specific door and triggering event as the source for triggering the alarm.4. Configure the alarm definition including alarm name and description.5. Set the required information.
Arming ScheduleThe door is armed during the arming schedule and the event occurred during the armingschedule will be triggered as alarm and notify the user. It provides two types of armingschedule:• Schedule Template: Select an arming schedule template for the alarm to define when the
alarm can be triggered. For setting customized template, refer to Configure ArmingSchedule Template .
• Event Based: Specify a user-defined event or an alarm input as the start or end event ofthe arming schedule. When the user defined event or alarm input is triggered, the armingschedule will start or end.
Alarm PriorityDefine the priority for the alarm. Priority can be used for filtering alarms in the ControlClient. For setting alarm priority, refer to Alarm Settings .
HikCentral Web Client User Manual
130

Alarm RecipientSelect the user to send the alarm information to and the user can receive the alarminformation when he/she logs in to HikCentral via Control Client or Mobile Client.
Related CameraSelect the related camera to record the alarm video when the alarm is triggered. You canview the live video and play back the recorded video files when alarm occurs in the AlarmCenter of Control Client. You can select the storage location for storing the video files.
Note• By default, the door's related camera(s) are added as the alarm's related camera(s). Forsetting the door's related camera in the Logical View, refer to Edit Door for Current Site .
• Make sure the related camera(s) have been configured with recording schedule.• Up to 16 cameras can be set as related camera.
Lock Video Files forSet the days for protecting the video file from being overwritten.
Related MapSelect the map to show the alarm information and you should add the door to the map as ahot spot (refer to Add Hot Spot ). You can check the map in the Alarm Center and Alarm &Event Search of Control Client.
Trigger Pop-up WindowPop up the alarm window on Control Client to display the alarm details and all the alarmrelated cameras' live videos and playback when alarm occurs.
Restrict Alarm Handling TimeWhen the alarm is triggered, you need to handle the alarm on the Control Client. Enable thisfunction to trigger user-defined event(s) or alarm output(s) if the alarm is not handled withinthe configured alarm handling time.
Note• Up to 16 user-defined events and alarm outputs can be set as the triggered event when
handling alarm timed out.• For configuring the user-defined event, refer to Configure User-Defined Event .
6. Set the alarm linkage actions.Trigger Audible Warning
Set the voice text for playing on the PC when alarm is triggered.
NoteYou should set voice engine as the alarm sound on System Settings page of Control Client.
Link Door
HikCentral Web Client User Manual
131
Select the door(s) as the linkage target(s). You can set the door action so that the door will beunlocked, locked, remain unlocked, or remain locked when the alarm is triggered.
NoteUp to 16 doors can be selected as alarm linkage.
Link Alarm OutputSelect the alarm output (if available) and the external device connected can be activatedwhen alarm is triggered.
NoteUp to 64 alarm outputs can be selected as alarm linkage.
Trigger PTZCall the preset, patrol or pattern of the selected camera(s) when alarm is triggered.
NoteUp to 64 PTZ linkages can be selected as alarm linkage.
Display on Smart WallDisplay the alarm video of the related camera on the smart wall. You can select the addedsmart wall and select which window to display the alarm.
NoteUp to 16 windows can be selected.
Create TagAdd tag to the alarm triggered video if you have selected cameras in Related Cameras field,and the tagged video can be searched and checked via Control Client.You can input the name as desired. You can also click the button below to add the relatedinformation to the name.Set the time range to define the tagged video length. For example, you can set to record thetagged video started from 5 seconds before the event and lasted until and 10 seconds afterthe event. The tagged video can be searched and checked via the Control Client.Add the description to the tagged video as needed.
Send EmailSelect an email template to send the alarm information according to the defined emailsettings. You can select Add New to create a new email template. For details, refer to SetEmail Template .
Trigger User-Defined EventTrigger the user-defined event(s) when alarm is triggered.
HikCentral Web Client User Manual
132

Note• Up to 16 user-defined events can be selected as alarm linkage.• For setting the user-defined event, refer to Configure User-Defined Event .
7. Finish adding the alarm.- Click Add to add the alarm and back to the alarm list page.- Click Add and Continue to add the alarm and continue to add other alarm.After adding the alarm, it displays on the alarm list, and you can view the alarm name and alarmstatus.
8. Optional: Perform the following operation(s) after adding the alarm.
Edit Alarm Click in the Operation column to edit the alarm.
Delete Alarm Click in the Operation column to delete the alarm.
Delete All Alarms Click Delete All to delete all the added alarm.
Enable Alarm Click in the Operation column to enable the alarm.
Enable All Alarms Click Enable All to enable all the added alarms.
Disable Alarm Click in the Operation column to disable the alarm.
Disable All Alarms Click Disable All to disable all the added alarms.
Test Alarm Click to trigger this alarm automatically. You can test if the linkageactions work properly as you want.
13.4.5 Add Alarm for Alarm Input
You can set alarm input alarm for alarm inputs of the added device and trigger a series of linkageactions (e.g., sending email) for notification.
Perform this task when you need to add alarm for the alarm inputs of the added device.
Steps1. Click Event & Alarm → Alarm → Add to enter the adding alarm page.
HikCentral Web Client User Manual
133

Figure 13-12 Add Alarm for Alarm Input2. Set the source type as Alarm Input in the Triggered by field.3. Select the specific alarm input and triggering event as the source for triggering the alarm.
NoteIf the event is not properly configured on the device, Disabled On Device appears under theevent type. You can click and set the parameters for the event in the pop-up interface. Fordetailed settings about the event configuration, please refer to the User Manual of the device.
4. Configure the alarm definition including alarm name and description.5. Set the required information.
Arming ScheduleThe alarm input is armed during the arming schedule and the event occurred during thearming schedule will be triggered as alarm and notify the user. It provides two types ofarming schedule:• Schedule Template: Select an arming schedule template for the alarm to define when the
alarm can be triggered. For setting customized template, refer to Configure ArmingSchedule Template .
• Event Based: Specify a user-defined event or an alarm input as the start or end event ofthe arming schedule. When the user-defined event or alarm input is triggered, the armingschedule will start or end.
Alarm PriorityDefine the priority for the alarm. Priority can be used for filtering alarms in the ControlClient. For setting alarm priority, refer to Alarm Settings .
Alarm Recipient
HikCentral Web Client User Manual
134

Select the user to send the alarm information to and the user can receive the alarminformation when he/she logs in to HikCentral via Control Client or Mobile Client.
Related CameraSelect the related camera to record the alarm video when the alarm is triggered. You canview the live video and play back the recorded video files when alarm occurs in the AlarmCenter of Control Client. You can select the storage location for storing the video files.
Note• Make sure the related camera(s) have been configured with recording schedule.• Up to 16 cameras can be set as related camera.
Lock Video Files forSet the days for protecting the video file from being overwritten.
Related MapSelect the map to show the alarm information and you should add the alarm input to themap as a hot spot (refer to Add Hot Spot ). You can check the map in the Alarm Center andAlarm & Event Search of Control Client.
Trigger Pop-up WindowPop up the alarm window on Control Client to display the alarm details and all the alarmrelated cameras' live videos and playback when alarm occurs.
Restrict Alarm Handling TimeWhen the alarm is triggered, you need to handle the alarm on the Control Client. Enable thisfunction to trigger user-defined event(s) or alarm output(s) if the alarm is not handled withinthe configured alarm handling time.
Note• Up to 16 user-defined events and alarm outputs can be set as the triggered event when
handling alarm timed out.• For configuring the user-defined event, refer to Configure User-Defined Event .
6. Set the alarm linkage actions.Trigger Audible Warning
Set the voice text for playing on the PC when alarm is triggered.
NoteYou should set voice engine as the alarm sound on System Settings page of Control Client.
Link DoorSelect the door(s) as the linkage target(s). You can set the door action so that the door will beunlocked, locked, remain unlocked, or remain locked when the alarm is triggered.
HikCentral Web Client User Manual
135
NoteUp to 16 doors can be selected as alarm linkage.
Link Alarm OutputSelect the alarm output (if available) and the external device connected can be activatedwhen alarm is triggered. You can select to automatically close the alarm output after aspecific time, or close the alarm output manually.
NoteUp to 64 alarm outputs can be selected as alarm linkage.
Trigger PTZCall the preset, patrol or pattern of the selected camera(s) when alarm is triggered.
NoteUp to 64 PTZ linkages can be selected as alarm linkage.
Display on Smart WallDisplay the alarm video of the related camera on the smart wall. You can select the addedsmart wall and select which window to display the alarm.
NoteUp to 16 windows can be selected.
Create TagAdd tag to the alarm triggered video if you have selected cameras in Related Cameras field,and the tagged video can be searched and checked via Control Client.You can input the name as desired. You can also click the button below to add the relatedinformation to the name.Set the time range to define the tagged video length. For example, you can set to record thetagged video started from 5 seconds before the event and lasted until and 10 seconds afterthe event. The tagged video can be searched and checked via Control Client.Add the description to the tagged video as needed.
Send EmailSelect an email template to send the alarm information according to the defined emailsettings. You can select Add New to create a new email template. For details, refer to SetEmail Template .
Trigger User-Defined EventTrigger the user-defined event(s) when alarm is triggered.
HikCentral Web Client User Manual
136

Note• Up to 16 user-defined events can be selected as alarm linkage.• For setting the user-defined event, refer to Configure User-Defined Event .
7. Finish adding the alarm.- Click Add to add the alarm and back to the alarm list page.- Click Add and Continue to add the alarm and continue to add other alarm.After adding the alarm, it displays on the alarm list, and you can view the alarm name and alarmstatus.
8. Optional: Perform the following operation(s) after adding the alarm:
Edit Alarm Click in the Operation column to edit the alarm.
Delete Alarm Click in the Operation column to delete the alarm.
Delete All Alarms Click Delete All to delete all the added alarm.
Enable Alarm Click in the Operation column to enable the alarm.
Enable All Alarms Click Enable All to enable all the added alarms.
Disable Alarm Click in the Operation column to disable the alarm.
Disable All Alarms Click Disable All to disable all the added alarms.
Test Alarm Click to trigger this alarm automatically. You can test if the linkageactions work properly as you want.
13.4.6 Add Alarm for ANPR Camera and UVSS
You can set plate number matched and mismatched alarm for the added ANPR camera and UVSS(under vehicle surveillance system) and trigger a series of linkage actions (e.g., sending email) fornotification.
Perform this task when you need to add alarm for the added ANPR camera and UVSS.
Steps1. Click Event & Alarm → Alarm → Add to enter the adding alarm page.
HikCentral Web Client User Manual
137
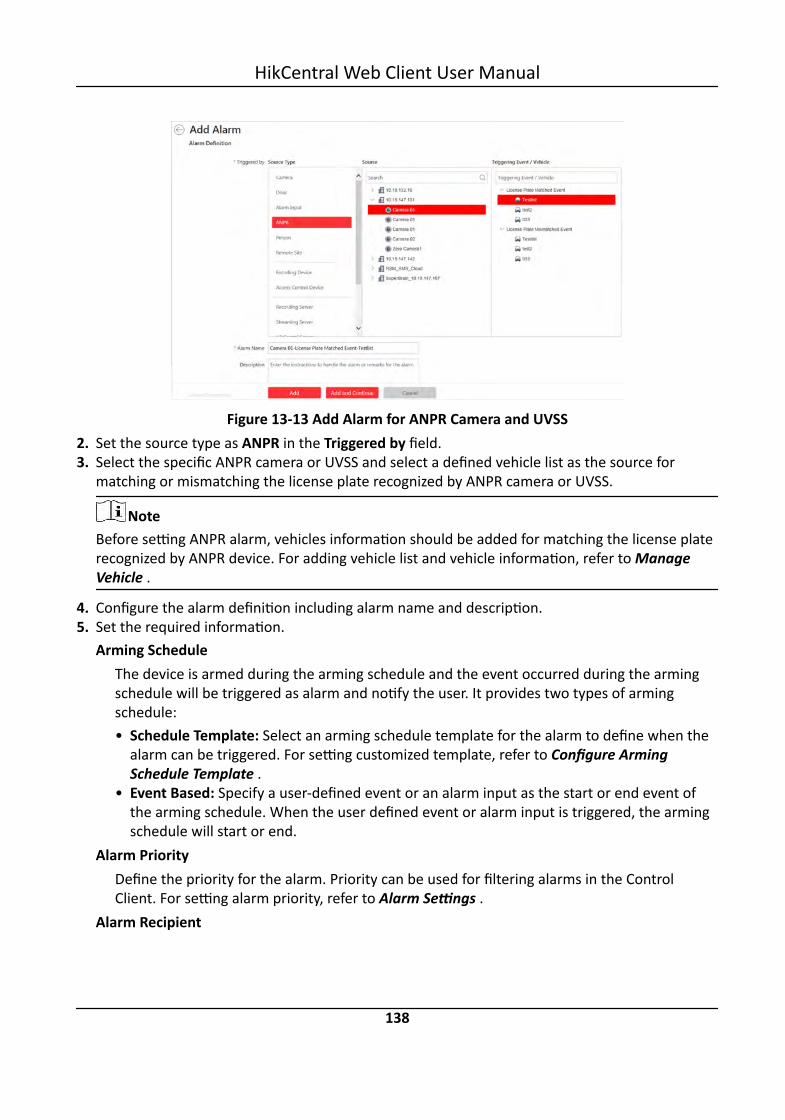
Figure 13-13 Add Alarm for ANPR Camera and UVSS2. Set the source type as ANPR in the Triggered by field.3. Select the specific ANPR camera or UVSS and select a defined vehicle list as the source for
matching or mismatching the license plate recognized by ANPR camera or UVSS.
NoteBefore setting ANPR alarm, vehicles information should be added for matching the license platerecognized by ANPR device. For adding vehicle list and vehicle information, refer to ManageVehicle .
4. Configure the alarm definition including alarm name and description.5. Set the required information.
Arming ScheduleThe device is armed during the arming schedule and the event occurred during the armingschedule will be triggered as alarm and notify the user. It provides two types of armingschedule:• Schedule Template: Select an arming schedule template for the alarm to define when the
alarm can be triggered. For setting customized template, refer to Configure ArmingSchedule Template .
• Event Based: Specify a user-defined event or an alarm input as the start or end event ofthe arming schedule. When the user defined event or alarm input is triggered, the armingschedule will start or end.
Alarm PriorityDefine the priority for the alarm. Priority can be used for filtering alarms in the ControlClient. For setting alarm priority, refer to Alarm Settings .
Alarm Recipient
HikCentral Web Client User Manual
138

Select the user to send the alarm information to and the user can receive the alarminformation when he/she logs in to HikCentral via Control Client or Mobile Client.
Related CameraSelect the related camera to record the alarm video when the alarm is triggered. You canview the live video and play back the recorded video files when alarm occurs in the AlarmCenter of Control Client. You can select the storage location for storing the video files.
Note• For ANPR camera, the camera itself is added as the related camera by default.• For UVSS, the camera in the UVSS is added as the related camera by default.• Make sure the related camera(s) have been configured with recording schedule.• Up to 16 cameras can be set as related camera.
Lock Video Files forSet the time duration for protecting the video file from being deleted.
Related MapSelect the map to show the alarm information and you should add the camera or UVSS to themap as a hot spot (refer to Add Hot Spot ). You can check the map in the Alarm Center andAlarm & Event Search of Control Client.
Trigger Pop-up WindowPop up the alarm window on Control Client to display the alarm details and all the alarmrelated cameras' live videos and playback when alarm occurs.
Restrict Alarm Handling TimeWhen the alarm is triggered, you need to handle the alarm on the Control Client. Enable thisfunction to trigger user-defined event(s) or alarm output(s) if the alarm is not handled withinthe configured alarm handling time.
Note• Up to 16 user-defined events and alarm outputs can be set as the triggered event when
handling alarm timed out.• For configuring the user-defined event, refer to Configure User-Defined Event .
6. Set the alarm linkage actions.Trigger Audible Warning
Set the voice text for playing on the PC when alarm is triggered.
NoteYou should set voice engine as the alarm sound on System Settings page of Control Client.
Link Door
HikCentral Web Client User Manual
139
Select the door(s) as the linkage target(s). You can set the door action so that the door will beunlocked, locked, remain unlocked, or remain locked when the alarm is triggered.
NoteUp to 16 doors can be selected as alarm linkage.
Link Alarm OutputSelect the alarm output (if available) and the external device connected can be activatedwhen alarm is triggered. You can select to automatically close the alarm output after aspecific time, or close the alarm output manually.
NoteUp to 64 alarm outputs can be selected as alarm linkage.
Trigger PTZCall the preset, patrol or pattern of the selected camera(s) when alarm is triggered.
NoteUp to 64 PTZ linkages can be selected as alarm linkage.
Display on Smart WallDisplay the alarm video of the related camera on the smart wall. You can select the addedsmart wall and select which window to display the alarm.
NoteUp to 16 windows can be selected.
Create TagAdd tag to the alarm triggered video if you have selected cameras in Related Cameras field,and the tagged video can be searched and checked via Control Client.You can input the name as desired. You can also click the button below to add the relatedinformation to the name.Set the time range to define the tagged video length. For example, you can set to record thetagged video started from 5 seconds before the event and lasted until and 10 seconds afterthe event. The tagged video can be searched and checked via Control Client.Add the description to the tagged video as needed.
Send EmailSelect an email template to send the alarm information according to the defined emailsettings. You can select Add New to create a new email template. For details, refer to SetEmail Template .
Trigger User-Defined EventTrigger the user-defined event(s) when alarm is triggered.
HikCentral Web Client User Manual
140

Note• Up to 16 user-defined events can be selected as alarm linkage.• For setting the user-defined event, refer to Configure User-Defined Event .
7. Finish adding the alarm.- Click Add to add the alarm and back to the alarm list page.- Click Add and Continue to add the alarm and continue to add other alarm.After adding the alarm, it displays on the alarm list, and you can view the alarm name and alarmstatus.
8. Optional: Perform the following operation(s) after adding the alarm.
Manage AlarmDisabled onDevice
If appears near the alarm name, it means the alarm is disabled onthe device. You should hover the cursor over the and clickConfiguration on the tooltip and enable the alarm on the device.
NoteOnly the alarm that is enabled on both the device and HikCentral iseffective.
Edit Alarm Click in the Operation column to edit the alarm information.
Delete Alarm Click in the Operation column to delete the alarm.
Delete All Alarms Click Delete All to delete all the added alarm.
Enable Alarm Click in the Operation column to enable the alarm.
Enable All Alarms Click Enable All to enable all the added alarms.
Disable Alarm Click in the Operation column to disable the alarm.
Disable All Alarms Click Disable All to disable all the added alarms.
Test Alarm Click to trigger this alarm automatically. You can test if the linkageactions work properly as you want.
13.4.7 Add Alarm for Person
You can set face matched and mismatched alarm for the added face recognition camera and triggera series of linkage actions (e.g., sending email) for notification.
Perform this task when you need to add face matched or mismatched alarm for the person.
Steps1. Click Event & Alarm → Alarm → Add to enter the adding alarm page.
HikCentral Web Client User Manual
141

Figure 13-14 Add Alarm for Person2. Set the source type as Person in the Triggered by field.3. Select the specific face recognition camera and select a face comparison group applied to the
camera as the source for matching or mismatching the person face recognized by the facerecognition camera.
NoteFor configuring the face comparison group and applying to the device, refer to Manage FaceComparison Group .
4. Configure the alarm definition including alarm name and description.5. Set the required information.
Arming ScheduleThe camera is armed during the arming schedule and the event occurred during the armingschedule will be triggered as alarm and notify the user. It provides two types of armingschedule:• Schedule Template: Select an arming schedule template for the alarm to define when the
alarm can be triggered. For setting customized template, refer to Configure ArmingSchedule Template .
• Event Based: Specify a user-defined event or an alarm input as the start or end event ofthe arming schedule. When the user defined event or alarm input is triggered, the armingschedule will start or end.
Alarm PriorityDefine the priority for the alarm. Priority can be used for filtering alarms in the ControlClient. For setting alarm priority, refer to Alarm Settings .
Alarm Recipient
HikCentral Web Client User Manual
142

Select the user to send the alarm information to and the user can receive the alarminformation when he/she logs in to HikCentral via Control Client or Mobile Client.
Related CameraSelect the related camera to record the alarm video when the alarm is triggered. You canview the live video and play back the recorded video files when alarm occurs in the AlarmCenter of Control Client. You can select the storage location for storing the video files.
Note• By default, camera itself is added as the alarm's related camera by details.• Make sure the related camera(s) have been configured with recording schedule.• Up to 16 cameras can be set as related camera.
Lock Video Files forSet the days for protecting the video file from being overwritten.
Related MapSelect the map to show the alarm information and you should add the camera to the map asa hot spot (refer to Add Hot Spot ). You can check the map in the Alarm Center and Alarm &Event Search of Control Client.
Trigger Pop-up WindowPop up the alarm window on Control Client to display the alarm details and all the alarmrelated cameras' live videos and playback when alarm occurs.
Restrict Alarm Handling TimeWhen the alarm is triggered, you need to handle the alarm on the Control Client. Enable thisfunction to trigger user-defined event(s) or alarm output(s) if the alarm is not handled withinthe configured alarm handling time.
Note• Up to 16 user-defined events and alarm outputs can be set as the triggered event when
handling alarm timed out.• For configuring the user-defined event, refer to Configure User-Defined Event .
6. Set the alarm linkage actions.Trigger Audible Warning
Set the voice text for playing on the PC when alarm is triggered.
NoteYou should set voice engine as the alarm sound on System Settings page of Control Client.
Link DoorSelect the door(s) as the linkage target(s). You can set the door action so that the door will beunlocked, locked, remain unlocked, or remain locked when the alarm is triggered.
HikCentral Web Client User Manual
143

NoteUp to 16 doors can be selected as alarm linkage.
Link Alarm OutputSelect the alarm output (if available) and the external device connected can be activatedwhen alarm is triggered.
NoteUp to 64 alarm outputs can be selected as alarm linkage.
Trigger PTZCall the preset, patrol or pattern of the selected camera(s) when alarm is triggered.
NoteUp to 64 PTZ linkages can be selected as alarm linkage.
Display on Smart WallDisplay the alarm video of the related camera on the smart wall. You can select the addedsmart wall and select which window to display the alarm.
NoteUp to 16 windows can be selected.
Create TagAdd tag to the alarm triggered video if you have selected cameras in Related Cameras field,and the tagged video can be searched and checked via Control Client.You can input the name as desired. You can also click the button below to add the relatedinformation to the name.Set the time range to define the tagged video length. For example, you can set to record thetagged video started from 5 seconds before the event and lasted until and 10 seconds afterthe event. The tagged video can be searched and checked via the Control Client.Add the description to the tagged video as needed.
Send EmailSelect an email template to send the alarm information according to the defined emailsettings. You can select Add New to create a new email template. For details, refer to SetEmail Template .
Trigger User-Defined EventTrigger the user-defined event(s) when alarm is triggered.
HikCentral Web Client User Manual
144

Note• Up to 16 user-defined events can be selected as alarm linkage.• For setting the user-defined event, refer to Configure User-Defined Event .
7. Finish adding the alarm.- Click Add to add the alarm and back to the alarm list page.- Click Add and Continue to add the alarm and continue to add other alarm.After adding the alarm, it displays on the alarm list, and you can view the alarm name and alarmstatus.
8. Optional: Perform the following operation(s) after adding the alarm.
Edit Alarm Click in the Operation column to edit the alarm.
Delete Alarm Click in the Operation column to delete the alarm.
Delete All Alarms Click Delete All to delete all the added alarm.
Enable Alarm Click in the Operation column to enable the alarm.
Enable All Alarms Click Enable All to enable all the added alarms.
Disable Alarm Click in the Operation column to disable the alarm.
Disable All Alarms Click Disable All to disable all the added alarms.
Test Alarm Click to trigger this alarm automatically. You can test if the linkageactions work properly as you want.
13.4.8 Add Alarm for Encoding Device
You can set alarm for added encoding device and trigger a series of linkage actions (e.g., sendingemail) for notification.
Perform this task when you need to add alarm for the added encoding device.
Steps1. Click Event & Alarm → Alarm → Add to enter the adding alarm page.
HikCentral Web Client User Manual
145

Figure 13-15 Add Alarm for Encoding Device2. Set the source type as Encoding Devicein the Triggered by field.3. Select the specific encoding device and triggering event as the source for triggering the alarm.
NoteIf the event is not properly configured on the device, Disabled On Device appears under theevent type. You can click and set the parameters for the event in the pop-up interface. Fordetailed settings about the event configuration, please refer to the User Manual of the device.
4. Configure the alarm definition including alarm name and description.5. Set the required information.
Arming ScheduleThe device is armed during the arming schedule and the event occurred during the armingschedule will be triggered as alarm and notify the user. It provides two types of armingschedule:• Schedule Template: Select an arming schedule template for the alarm to define when the
alarm can be triggered. For setting customized template, refer to Configure ArmingSchedule Template .
• Event Based: Specify a user-defined event or an alarm input as the start or end event ofthe arming schedule. When the user defined event or alarm input is triggered, the armingschedule will start or end.
Alarm PriorityDefine the priority for the alarm. Priority can be used for filtering alarms in the ControlClient. For setting alarm priority, refer to Alarm Settings .
Alarm RecipientSelect the user to send the alarm information to and the user can receive the alarminformation when he/she logs in to HikCentral via Control Client or Mobile Client.
HikCentral Web Client User Manual
146

Trigger Pop-up WindowPop up the alarm window on Control Client to display the alarm details.
Restrict Alarm Handling TimeWhen the alarm is triggered, you need to handle the alarm on the Control Client. Enable thisfunction to trigger user-defined event(s) or alarm output(s) if the alarm is not handled withinthe configured alarm handling time.
Note• Up to 16 user-defined events and alarm outputs can be set as the triggered event when
handling alarm timed out.• For configuring the user-defined event, refer to Configure User-Defined Event .
6. Set the alarm linkage actions.Trigger Audible Warning
Set the voice text for playing on the PC when alarm is triggered.
NoteYou should set voice engine as the alarm sound on System Settings page of Control Client.
Link Alarm OutputSelect the alarm output (if available) and the external device connected can be activatedwhen alarm is triggered. You can select to automatically close the alarm output after aspecific time, or close the alarm output manually.
NoteUp to 64 alarm outputs can be selected as alarm linkage.
Send EmailSelect an email template to send the alarm information according to the defined emailsettings. You can select Add New to create a new email template. For details, refer to SetEmail Template .
Trigger User-Defined EventTrigger the user-defined event(s) when alarm is triggered.
Note• Up to 16 user-defined events can be selected as alarm linkage.• For setting the user-defined event, refer to Configure User-Defined Event .
7. Finish adding the alarm.- Click Add to add the alarm and back to the alarm list page.- Click Add and Continue to add the alarm and continue to add other alarm.
HikCentral Web Client User Manual
147

After adding the alarm, it displays on the alarm list, and you can view the alarm name and alarmstatus.
8. Optional: Perform the following operation(s) after adding the alarm.
Edit Alarm Click in the Operation column to edit the alarm.
Delete Alarm Click in the Operation column to delete the alarm.
Delete All Alarms Click Delete All to delete all the added alarm.
Enable Alarm Click in the Operation column to enable the alarm.
Enable All Alarms Click Enable All to enable all the added alarms.
Disable Alarm Click in the Operation column to disable the alarm.
Disable All Alarms Click Disable All to disable all the added alarms.
Test Alarm Click to trigger this alarm automatically. You can test if the linkageactions work properly as you want.
13.4.9 Add Alarm for Access Control Device
You can set alarm for added access control device and trigger a series of linkage actions (e.g.,sending email) for notification.
Perform this task when you need to add alarm for the added access control device.
Steps1. Click Event & Alarm → Alarm → Add to enter the adding alarm page.
Figure 13-16 Add Alarm for Access Control Device2. Set the source type as Access Control Device in the Triggered by field.3. Select the specific device and triggering event as the source for triggering the alarm.
HikCentral Web Client User Manual
148

4. Configure the alarm definition including alarm name and description.5. Set the required information.
Arming ScheduleThe device is armed during the arming schedule and the event occurred during the armingschedule will be triggered as alarm and notify the user. It provides two types of armingschedule:• Schedule Template: Select an arming schedule template for the alarm to define when the
alarm can be triggered. For setting customized template, refer to Configure ArmingSchedule Template .
• Event Based: Specify a user-defined event or an alarm input as the start or end event ofthe arming schedule. When the user defined event or alarm input is triggered, the armingschedule will start or end.
Alarm PriorityDefine the priority for the alarm. Priority can be used for filtering alarms in the ControlClient. For setting alarm priority, refer to Alarm Settings .
Alarm RecipientSelect the user to send the alarm information to and the user can receive the alarminformation when he/she logs in to HikCentral via Control Client or Mobile Client.
Trigger Pop-up WindowPop up the alarm window on Control Client to display the alarm details and all the alarmrelated cameras' live videos and playback when alarm occurs.
Restrict Alarm Handling TimeWhen the alarm is triggered, you need to handle the alarm on the Control Client. Enable thisfunction to trigger user-defined event(s) or alarm output(s) if the alarm is not handled withinthe configured alarm handling time.
Note• Up to 16 user-defined events and alarm outputs can be set as the triggered event when
handling alarm timed out.• For configuring the user-defined event, refer to Configure User-Defined Event .
6. Set the alarm linkage actions.Trigger Audible Warning
Set the voice text for playing on the PC when alarm is triggered.
NoteYou should set voice engine as the alarm sound on System Settings page of Control Client.
Link Door
HikCentral Web Client User Manual
149
Select the door(s) as the linkage target(s). You can set the door action so that the door will beunlocked, locked, remain unlocked, or remain locked when the alarm is triggered.
NoteUp to 16 doors can be selected as alarm linkage.
Link Alarm OutputSelect the alarm output (if available) and the external device connected can be activatedwhen alarm is triggered.
NoteUp to 64 alarm outputs can be selected as alarm linkage.
Send EmailSelect an email template to send the alarm information according to the defined emailsettings. You can select Add New to create a new email template. For details, refer to SetEmail Template .
Trigger User-Defined EventTrigger the user-defined event(s) when alarm is triggered.
Note• Up to 16 user-defined events can be selected as alarm linkage.• For setting the user-defined event, refer to Configure User-Defined Event .
7. Finish adding the alarm.- Click Add to add the alarm and back to the alarm list page.- Click Add and Continue to add the alarm and continue to add other alarm.After adding the alarm, it displays on the alarm list, and you can view the alarm name and alarmstatus.
8. Optional: Perform the following operation(s) after adding the alarm.
Edit Alarm Click in the Operation column to edit the alarm.
Delete Alarm Click in the Operation column to delete the alarm.
Delete All Alarms Click Delete All to delete all the added alarm.
Enable Alarm Click in the Operation column to enable the alarm.
Enable All Alarms Click Enable All to enable all the added alarms.
Disable Alarm Click in the Operation column to disable the alarm.
Disable All Alarms Click Disable All to disable all the added alarms.
Test Alarm Click to trigger this alarm automatically. You can test if the linkageactions work properly as you want.
HikCentral Web Client User Manual
150
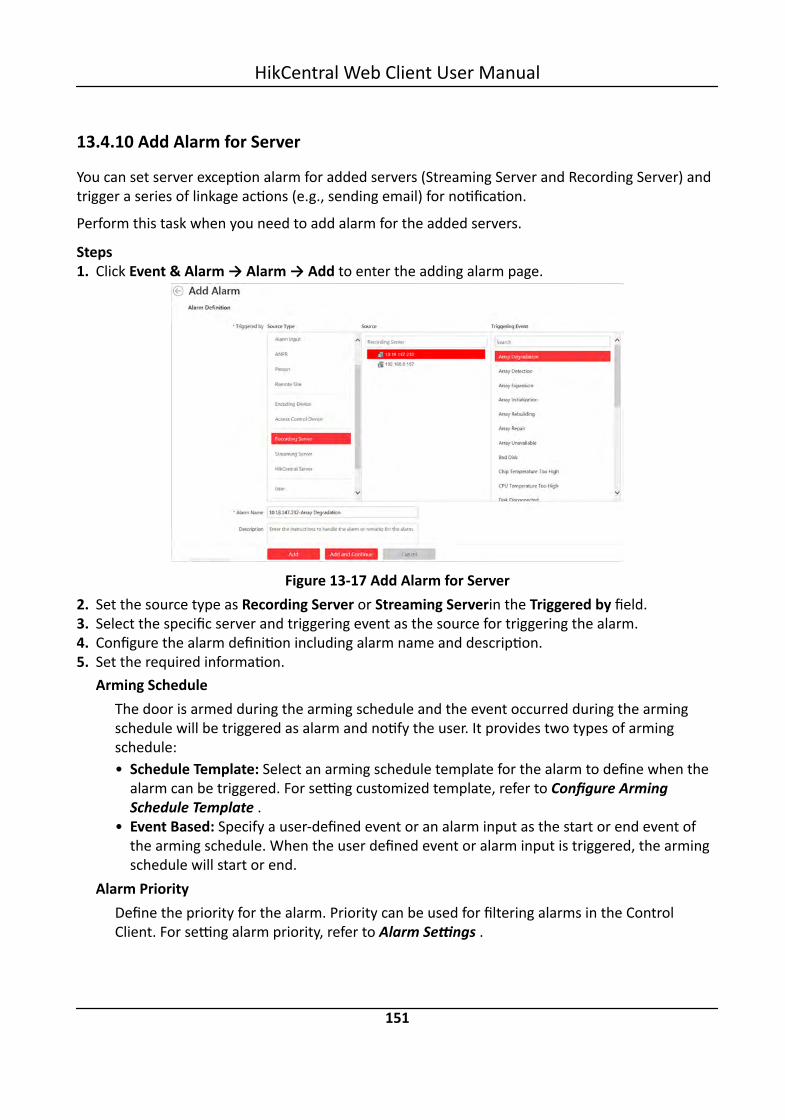
13.4.10 Add Alarm for Server
You can set server exception alarm for added servers (Streaming Server and Recording Server) andtrigger a series of linkage actions (e.g., sending email) for notification.
Perform this task when you need to add alarm for the added servers.
Steps1. Click Event & Alarm → Alarm → Add to enter the adding alarm page.
Figure 13-17 Add Alarm for Server2. Set the source type as Recording Server or Streaming Serverin the Triggered by field.3. Select the specific server and triggering event as the source for triggering the alarm.4. Configure the alarm definition including alarm name and description.5. Set the required information.
Arming ScheduleThe door is armed during the arming schedule and the event occurred during the armingschedule will be triggered as alarm and notify the user. It provides two types of armingschedule:• Schedule Template: Select an arming schedule template for the alarm to define when the
alarm can be triggered. For setting customized template, refer to Configure ArmingSchedule Template .
• Event Based: Specify a user-defined event or an alarm input as the start or end event ofthe arming schedule. When the user defined event or alarm input is triggered, the armingschedule will start or end.
Alarm PriorityDefine the priority for the alarm. Priority can be used for filtering alarms in the ControlClient. For setting alarm priority, refer to Alarm Settings .
HikCentral Web Client User Manual
151

Alarm RecipientSelect the user to send the alarm information to and the user can receive the alarminformation when he/she logs in to HikCentral via Control Client or Mobile Client.
Trigger Pop-up WindowPop up the alarm window on Control Client to display the alarm details.
Restrict Alarm Handling TimeWhen the alarm is triggered, you need to handle the alarm on the Control Client. Enable thisfunction to trigger user-defined event(s) or alarm output(s) if the alarm is not handled withinthe configured alarm handling time.
Note• Up to 16 user-defined events and alarm outputs can be set as the triggered event when
handling alarm timed out.• For configuring the user-defined event, refer to Configure User-Defined Event .
6. Set the alarm linkage actions.Trigger Audible Warning
Set the voice text for playing on the PC when alarm is triggered.
NoteYou should set voice engine as the alarm sound on System Settings page of Control Client.
Link Alarm OutputSelect the alarm output (if available) and the external device connected can be activatedwhen alarm is triggered.
NoteUp to 64 alarm outputs can be selected as alarm linkage.
Send EmailSelect an email template to send the alarm information according to the defined emailsettings. You can select Add New to create a new email template. For details, refer to SetEmail Template .
Trigger User-Defined EventTrigger the user-defined event(s) when alarm is triggered.
Note• Up to 16 user-defined events can be selected as alarm linkage.• For setting the user-defined event, refer to Configure User-Defined Event .
7. Finish adding the alarm.- Click Add to add the alarm and back to the alarm list page.
HikCentral Web Client User Manual
152
- Click Add and Continue to add the alarm and continue to add other alarm.After adding the alarm, it displays on the alarm list, and you can view the alarm name and alarmstatus.
8. Optional: Perform the following operation(s) after adding the alarm.
Edit Alarm Click in the Operation column to edit the alarm.
Delete Alarm Click in the Operation column to delete the alarm.
Delete All Alarms Click Delete All to delete all the added alarm.
Enable Alarm Click in the Operation column to enable the alarm.
Enable All Alarms Click Enable All to enable all the added alarms.
Disable Alarm Click in the Operation column to disable the alarm.
Disable All Alarms Click Disable All to disable all the added alarms.
Test Alarm Click to trigger this alarm automatically. You can test if the linkageactions work properly as you want.
13.4.11 Add Alarm for HikCentral Server
You can set alarm for the exception (including hardware exception and service exception) of theservers which have been installed with the HikCentral services (such as VSM service, third-partydevice access gateway, NGINX service, keyboard proxy service, smart wall management service,etc.) and trigger a series of linkage actions (e.g., sending email) for notification.
Perform this task when you need to add a new alarm for the HikCentral server exception.
Steps1. Click Event & Alarm → Alarm → Add to enter the adding alarm page.2. Set the source type as HikCentral Server in the Triggered by field.
HikCentral Web Client User Manual
153
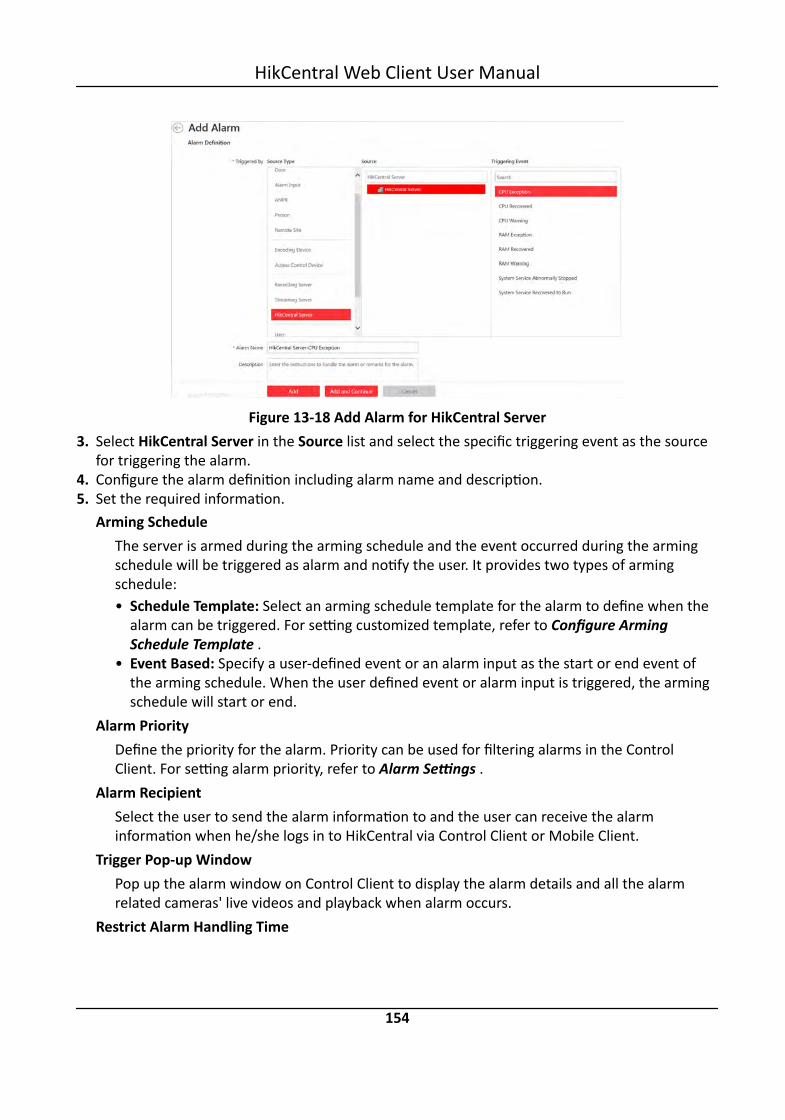
Figure 13-18 Add Alarm for HikCentral Server3. Select HikCentral Server in the Source list and select the specific triggering event as the source
for triggering the alarm.4. Configure the alarm definition including alarm name and description.5. Set the required information.
Arming ScheduleThe server is armed during the arming schedule and the event occurred during the armingschedule will be triggered as alarm and notify the user. It provides two types of armingschedule:• Schedule Template: Select an arming schedule template for the alarm to define when the
alarm can be triggered. For setting customized template, refer to Configure ArmingSchedule Template .
• Event Based: Specify a user-defined event or an alarm input as the start or end event ofthe arming schedule. When the user defined event or alarm input is triggered, the armingschedule will start or end.
Alarm PriorityDefine the priority for the alarm. Priority can be used for filtering alarms in the ControlClient. For setting alarm priority, refer to Alarm Settings .
Alarm RecipientSelect the user to send the alarm information to and the user can receive the alarminformation when he/she logs in to HikCentral via Control Client or Mobile Client.
Trigger Pop-up WindowPop up the alarm window on Control Client to display the alarm details and all the alarmrelated cameras' live videos and playback when alarm occurs.
Restrict Alarm Handling Time
HikCentral Web Client User Manual
154
When the alarm is triggered, you need to handle the alarm on the Control Client. Enable thisfunction to trigger user-defined event(s) or alarm output(s) if the alarm is not handled withinthe configured alarm handling time.
Note• Up to 16 user-defined events and alarm outputs can be set as the triggered event when
handling alarm timed out.• For configuring the user-defined event, refer to Configure User-Defined Event .
6. Set the alarm linkage actions.Trigger Audible Warning
Set the voice text for playing on the PC when alarm is triggered.
NoteYou should set voice engine as the alarm sound on System Settings page of Control Client.
Link Alarm OutputSelect the alarm output (if available) and the external device connected can be activatedwhen alarm is triggered.
NoteUp to 64 alarm outputs can be selected as alarm linkage.
Send EmailSelect an email template to send the alarm information according to the defined emailsettings. You can select Add New to create a new email template. For details, refer to SetEmail Template .
Trigger User-Defined EventTrigger the user-defined event(s) when alarm is triggered.
Note• Up to 16 user-defined events can be selected as alarm linkage.• For setting the user-defined event, refer to Configure User-Defined Event .
7. Finish adding the alarm.- Click Add to add the alarm and back to the alarm list page.- Click Add and Continue to add the alarm and continue to add other alarm.After adding the alarm, it displays on the alarm list, and you can view the alarm name and alarmstatus.
8. Perform the following operation(s) after adding the alarm.
HikCentral Web Client User Manual
155
Manage AlarmDisabled onDevice
If appears near the alarm name, it means the alarm is disabled onthe device. You should hover the cursor over the and clickConfiguration on the tooltip and enable the alarm on the device.
NoteOnly the alarm that is enabled on both the device and HikCentral iseffective.
Edit Alarm Click in the Operation column to edit the alarm information.
Delete Alarm Click in the Operation column to delete the alarm.
Delete All Alarms Click Delete All to delete all the added alarm.
Enable Alarm Click in the Operation column to enable the alarm.
Enable All Alarms Click Enable All to enable all the added alarms.
Disable Alarm Click in the Operation column to disable the alarm.
Disable All Alarms Click Disable All to disable all the added alarms.
Test Alarm Click to trigger this alarm automatically. You can test if the linkageactions work properly as you want.
13.4.12 Add Alarm for User
You can set alarms for the users, including user login and user logout, and trigger a series of linkageactions (e.g., sending email) for notification.
Perform this task when you need to add a new alarm for the system users.
Steps1. Click Event & Alarm → Alarm → Add to enter the adding alarm page.2. Set the source type as User in the Triggered by field.
HikCentral Web Client User Manual
156

Figure 13-19 Add Alarm for User3. Select the specific user and triggering event as the source for triggering the alarm.4. Configure the alarm definition including alarm name and description.5. Set the required information.
Arming ScheduleThe user is armed during the arming schedule and the event occurred during the armingschedule will be triggered as alarm and notify the user. It provides two types of armingschedule:• Schedule Template: Select an arming schedule template for the alarm to define when the
alarm can be triggered. For setting customized template, refer to Configure ArmingSchedule Template .
• Event Based: Specify a user-defined event or an alarm input as the start or end event ofthe arming schedule. When the user defined event or alarm input is triggered, the armingschedule will start or end.
Alarm PriorityDefine the priority for the alarm. Priority can be used for filtering alarms in the ControlClient. For setting alarm priority, refer to Alarm Settings .
Alarm RecipientSelect the user to send the alarm information to and the user can receive the alarminformation when he/she logs in to HikCentral via Control Client or Mobile Client.
Trigger Pop-up WindowPop up the alarm window on Control Client to display the alarm details and all the alarmrelated cameras' live videos and playback when alarm occurs.
Restrict Alarm Handling Time
HikCentral Web Client User Manual
157
When the alarm is triggered, you need to handle the alarm on the Control Client. Enable thisfunction to trigger user-defined event(s) or alarm output(s) if the alarm is not handled withinthe configured alarm handling time.
Note• Up to 16 user-defined events and alarm outputs can be set as the triggered event when
handling alarm timed out.• For configuring the user-defined event, refer to Configure User-Defined Event .
6. Set the alarm linkage actions.Trigger Audible Warning
Set the voice text for playing on the PC when alarm is triggered.
NoteYou should set voice engine as the alarm sound on System Settings page of Control Client.
Link Alarm OutputSelect the alarm output (if available) and the external device connected can be activatedwhen alarm is triggered.
NoteUp to 64 alarm outputs can be selected as alarm linkage.
Send EmailSelect an email template to send the alarm information according to the defined emailsettings. You can select Add New to create a new email template. For details, refer to SetEmail Template .
Trigger User-Defined EventTrigger the user-defined event(s) when alarm is triggered.
Note• Up to 16 user-defined events can be selected as alarm linkage.• For setting the user-defined event, refer to Configure User-Defined Event .
7. Finish adding the alarm.- Click Add to add the alarm and back to the alarm list page.- Click Add and Continue to add the alarm and continue to add other alarm.After adding the alarm, it displays on the alarm list, and you can view the alarm name and alarmstatus.
8. Optional: Perform the following operation(s) after adding the alarm.
Edit Alarm Click in the Operation column to edit the alarm information.
Delete Alarm Click in the Operation column to delete the alarm.
HikCentral Web Client User Manual
158

Delete All Alarms Click Delete All to delete all the added alarm.
Enable Alarm Click in the Operation column to enable the alarm.
Enable All Alarms Click Enable All to enable all the added alarms.
Disable Alarm Click in the Operation column to disable the alarm.
Disable All Alarms Click Disable All to disable all the added alarms.
Test Alarm Click to trigger this alarm automatically. You can test if the linkageactions work properly as you want.
13.4.13 Add Alarm for User-Defined Event
You can set alarms for the added user-defined event and trigger a series of linkage actions (e.g.,sending email) for notification.
Before You StartYou should have created at least one user-defined event. For details, refer to Configure User-Defined Event .Perform this task when you need to add a new alarm for the user-defined event.
Steps1. Click Event & Alarm → Alarm → Add to enter the adding alarm page.2. Set the source type as User-Defined Event in the Triggered by field.
Figure 13-20 Add Alarm for User-Defined Event3. Select the specific user-defined event as the source for triggering the alarm.
HikCentral Web Client User Manual
159
4. Configure the alarm definition including alarm name and description.5. Set the required parameters.
Arming ScheduleThe event is armed during the arming schedule and the event occurred during the armingschedule will be triggered as alarm and notify the user. It provides two types of armingschedule:• Schedule Template: Select an arming schedule template for the alarm to define when the
alarm can be triggered. For setting customized template, refer to Configure ArmingSchedule Template .
• Event Based: Specify a user-defined event or an alarm input as the start or end event ofthe arming schedule. When the user defined event or alarm input is triggered, the armingschedule will start or end.
Alarm PriorityDefine the priority for the alarm. Priority can be used for filtering alarms in the ControlClient. For setting alarm priority, refer to Alarm Settings .
Alarm RecipientSelect the user to send the alarm information to and the user can receive the alarminformation when he/she logs in to HikCentral via Control Client or Mobile Client.
Related CameraSelect the related camera to record the alarm video when the alarm is triggered. You canview the live video and play back the recorded video files when alarm occurs in the AlarmCenter of Control Client. You can select the storage location for storing the video files.
Note• Make sure the related camera(s) have been configured with recording schedule.• Up to 16 cameras can be set as related camera.
Lock Video Files forSet the days for protecting the video file from being overwritten.
Trigger Pop-up WindowPop up the alarm window on Control Client to display the alarm details and all the alarmrelated cameras' live videos and playback when alarm occurs.
Restrict Alarm Handling TimeWhen the alarm is triggered, you need to handle the alarm on the Control Client. Enable thisfunction to trigger user-defined event(s) or alarm output(s) if the alarm is not handled withinthe configured alarm handling time.
HikCentral Web Client User Manual
160
Note• Up to 16 user-defined events and alarm outputs can be set as the triggered event when
handling alarm timed out.• For configuring the user-defined event, refer to Configure User-Defined Event .
6. Set the alarm linkage actions.Trigger Audible Warning
Set the voice text for playing on the PC when alarm is triggered.
NoteYou should set voice engine as the alarm sound on System Settings page of Control Client.
Link DoorSelect the door(s) as the linkage target(s). You can set the door action so that the door will beunlocked, locked, remain unlocked, or remain locked when the alarm is triggered.
NoteUp to 16 doors can be selected as alarm linkage.
Link Alarm OutputSelect the alarm output (if available) and the external device connected can be activatedwhen alarm is triggered.
NoteUp to 64 alarm outputs can be selected as alarm linkage.
Trigger PTZCall the preset, patrol or pattern of the selected camera(s) when alarm is triggered.
NoteUp to 64 PTZ linkages can be selected as alarm linkage.
Display on Smart WallDisplay the alarm video of the related camera on the smart wall. You can select the addedsmart wall and select which window to display the alarm.
NoteUp to 16 windows can be selected.
Create TagAdd tag to the alarm triggered video if you have selected cameras in Related Cameras field,and the tagged video can be searched and checked via Control Client.
HikCentral Web Client User Manual
161
You can input the name as desired. You can also click the button below to add the relatedinformation to the name.Set the time range to define the tagged video length. For example, you can set to record thetagged video started from 5 seconds before the event and lasted until and 10 seconds afterthe event. The tagged video can be searched and checked via the Control Client.Add the description to the tagged video as needed.
Send EmailSelect an email template to send the alarm information according to the defined emailsettings. You can select Add New to create a new email template. For details, refer to SetEmail Template .
Trigger User-Defined EventTrigger the user-defined event(s) when alarm is triggered.
Note• Up to 16 user-defined events can be selected as alarm linkage.• For setting the user-defined event, refer to Configure User-Defined Event .
7. Finish adding the alarm.- Click Add to add the alarm and back to the alarm list page.- Click Add and Continue to add the alarm and continue to add other alarm.After adding the alarm, it displays on the alarm list, and you can view the alarm name and alarmstatus.
8. Optional: Perform the following operation(s) after adding the alarm.
Edit Alarm Click in the Operation column to edit the alarm.
Delete Alarm Click in the Operation column to delete the alarm.
Delete All Alarms Click Delete All to delete all the added alarm.
Enable Alarm Click in the Operation column to enable the alarm.
Enable All Alarms Click Enable All to enable all the added alarms.
Disable Alarm Click in the Operation column to disable the alarm.
Disable All Alarms Click Disable All to disable all the added alarms.
Test Alarm Click to trigger this alarm automatically. You can test if the linkageactions work properly as you want.
13.4.14 Add Alarm for Generic Event
You can set alarms for the added generic event and trigger a series of linkage actions (e.g., sendingemail) for notification.
HikCentral Web Client User Manual
162

Before You StartYou should have created at least one generic event. Refer to Configure Generic Event for creatinggeneric event.Perform this task when you need to add alarm for the added generic event.
Steps1. Click Event & Alarm → Alarm → Add on home page.
Figure 13-21 Add Alarm for Generic Event2. In the Triggered by field, set the source type as Generic Event.3. Select the specific generic event as the source for triggering the alarm.4. Configure the alarm definition including alarm name and description.5. Set the required parameters.
Arming ScheduleThe event is armed during the arming schedule and the event occurred during the armingschedule will be triggered as alarm and notify the user. It provides two types of armingschedule:• Schedule Template: Select an arming schedule template for the alarm to define when the
alarm can be triggered. For setting customized template, refer to Configure ArmingSchedule Template .
• Event Based: Specify a user-defined event or an alarm input as the start or end event ofthe arming schedule. When the user defined event or alarm input is triggered, the armingschedule will start or end.
HikCentral Web Client User Manual
163

Alarm PriorityDefine the priority for the alarm. Priority can be used for filtering alarms in the ControlClient. For setting alarm priority, refer to Alarm Settings .
Alarm RecipientSelect the user to send the alarm information to and the user can receive the alarminformation when he/she logs in to HikCentral via Control Client or Mobile Client.
Related CameraSelect the related camera to record the alarm video when the alarm is triggered. You canview the live video and play back the recorded video files when alarm occurs in the AlarmCenter of Control Client. You can select the storage location for storing the video files.
Note• Make sure the related camera(s) have been configured with recording schedule.• Up to 16 cameras can be set as related camera.
Lock Video Files forSet the days for protecting the video file from being overwritten.
Trigger Pop-up WindowSelect to pop up the alarm window on Control Client to display the alarm details when alarmoccurs.
Restrict Alarm Handling TimeWhen the alarm is triggered, you need to handle the alarm on the Control Client. Enable thisfunction to trigger user-defined event(s) or alarm output(s) if the alarm is not handled withinthe configured alarm handling time.
Note• Up to 16 user-defined events and alarm outputs can be set as the triggered event when
handling alarm timed out.• For configuring the user-defined event, refer to Configure User-Defined Event .
6. Set the alarm linkage actions.Trigger Audible Warning
Set the voice text for playing on the PC when alarm is triggered.
NoteYou should set voice engine as the alarm sound on System Settings page of Control Client.
Link DoorSelect the door(s) as the linkage target(s). You can set the door action so that the door will beunlocked, locked, remain unlocked, or remain locked when the alarm is triggered.
HikCentral Web Client User Manual
164

NoteUp to 16 doors can be selected as alarm linkage.
Link Alarm OutputSelect the alarm output (if available) and the external device connected can be activatedwhen alarm is triggered. You can select to automatically close the alarm output after aspecific time, or close the alarm output manually.
Trigger PTZCall the preset, patrol or pattern of the selected camera(s) when alarm is triggered.
NoteUp to 64 PTZ linkages can be selected as alarm linkage.
Display on Smart WallDisplay the alarm video of the related camera on the smart wall. You can select the addedsmart wall and select which window to display the alarm.
NoteUp to 16 windows can be selected.
Create TagAdd tag to the alarm triggered video if you have selected cameras in Related Cameras field,and the tagged video can be searched and checked via Control Client.You can input the name as desired. You can also click the button below to add the relatedinformation to the name.Set the time range to define the tagged video length. For example, you can set to record thetagged video started from 5 seconds before the event and lasted until and 10 seconds afterthe event. The tagged video can be searched and checked via the Control Client.Add the description to the tagged video as needed.
Send EmailSelect an email template to send the alarm information according to the defined emailsettings. You can select Add New to create a new email template. For details, refer to SetEmail Template .
Trigger User-Defined EventTrigger the user-defined event(s) when alarm is triggered.
Note• Up to 16 user-defined events can be selected as alarm linkage.• For setting the user-defined event, refer to Configure User-Defined Event .
7. Finish adding the alarm.
HikCentral Web Client User Manual
165

- Click Add to add the alarm and back to the alarm list page.- Click Add and Continue to add the alarm and continue to add other alarm.After adding the alarm, it displays on the alarm list, and you can view the alarm name and alarmstatus.
8. Optional: Perform the following operation(s) after adding the alarm.
Edit Alarm Click in the Operation column to edit the alarm.
Delete Alarm Click in the Operation column to delete the alarm.
Delete All Alarms Click Delete All to delete all the added alarm.
Enable Alarm Click in the Operation column to enable the alarm.
Enable All Alarms Click Enable All to enable all the added alarms.
Disable Alarm Click in the Operation column to disable the alarm.
Disable All Alarms Click Disable All to disable all the added alarms.
Test Alarm Click to trigger this alarm automatically. You can test if the linkageactions work properly as you want.
13.4.15 Add Alarm for Remote Site
If the system is Central System with Remote Site Management module (based on the license youpurchased), you can set site offline alarm for the added Remote Site and trigger a series of linkageactions (e.g., sending email) for notification.
Perform this task when you need to add the alarm for Remote Site.
Steps
NoteYou can set alarm for added Remote Site only when the system has Remote Site Managementmodule.
1. Click Event & Alarm → Alarm → Add to enter the adding alarm page.
HikCentral Web Client User Manual
166
Figure 13-22 Add Alarm for Remote Site2. Set the source type as Remote Site in the Triggered by field.3. Select the specific Remote Site and triggering event as the source for triggering the alarm.4. Configure the alarm definition including alarm name and description.5. Set the required information.
Arming ScheduleThe door is armed during the arming schedule and the event occurred during the armingschedule will be triggered as alarm and notify the user. It provides two types of armingschedule:• Schedule Template: Select an arming schedule template for the alarm to define when the
alarm can be triggered. For setting customized template, refer to Configure ArmingSchedule Template .
• Event Based: Specify a user-defined event or an alarm input as the start or end event ofthe arming schedule. When the user defined event or alarm input is triggered, the armingschedule will start or end.
Alarm PriorityDefine the priority for the alarm. Priority can be used for filtering alarms in the ControlClient. For setting alarm priority, refer to Alarm Settings .
Alarm RecipientSelect the user to send the alarm information to and the user can receive the alarminformation when he/she logs in to HikCentral via Control Client or Mobile Client.
Related MapView the Remote Site's location on GIS map when you checking alarm details in the AlarmCenter and Alarm & Event Search of Control Client.
HikCentral Web Client User Manual
167

NoteYou should locate the map on the GIS map first. For details, refer to Locate Sites on Map .
Trigger Pop-up WindowPop up the alarm window on Control Client to display the alarm details.
Restrict Alarm Handling TimeWhen the alarm is triggered, you need to handle the alarm on the Control Client. Enable thisfunction to trigger user-defined event(s) or alarm output(s) if the alarm is not handled withinthe configured alarm handling time.
Note• Up to 16 user-defined events and alarm outputs can be set as the triggered event when
handling alarm timed out.• For configuring the user-defined event, refer to Configure User-Defined Event .
6. Set the alarm linkage actions.Trigger Audible Warning
Set the voice text for playing on the PC when alarm is triggered.
NoteYou should set voice engine as the alarm sound on System Settings page of Control Client.
Link Alarm OutputSelect the alarm output (if available) and the external device connected can be activatedwhen alarm is triggered. You can select to automatically close the alarm output after aspecific time, or close the alarm output manually.
NoteUp to 64 alarm outputs can be selected as alarm linkage.
Send EmailSelect an email template to send the alarm information according to the defined emailsettings. You can select Add New to create a new email template. For details, refer to SetEmail Template .
Trigger User-Defined EventTrigger the user-defined event(s) when alarm is triggered.
Note• Up to 16 user-defined events can be selected as alarm linkage.• For setting the user-defined event, refer to Configure User-Defined Event .
7. Finish adding the alarm.
HikCentral Web Client User Manual
168
- Click Add to add the alarm and back to the alarm list page.- Click Add and Continue to add the alarm and continue to add other alarm.After adding the alarm, it displays on the alarm list, and you can view the alarm name and alarmstatus.
8. Optional: Perform the following operation(s) after adding the alarm.
Edit Alarm Click in the Operation column to edit the alarm.
Delete Alarm Click in the Operation column to delete the alarm.
Delete All Alarms Click Delete All to delete all the added alarm.
Enable Alarm Click in the Operation column to enable the alarm.
Enable All Alarms Click Enable All to enable all the added alarms.
Disable Alarm Click in the Operation column to disable the alarm.
Disable All Alarms Click Disable All to disable all the added alarms.
Test Alarm Click to trigger this alarm automatically. You can test if the linkageactions work properly as you want.
13.5 Send Event or Alarm ReportAfter setting the event and alarm, you can configure a report rule so that the system can send anemail with a report attached to the specified recipient, containing the triggered event or alarmdetails.
Before You Start• Set the email template with recipient information, subject, and content. For details, refer to Set
Email Template .• Set the email settings such as sender address,SMTP server address and port, etc. For details,
refer to Configure Email Account .Perform this task if you need to configure a report rule to send event or alarm report.
Steps1. Click Event & Alarm → Report Settings → Add to enter the adding report page.
HikCentral Web Client User Manual
169

Figure 13-23 Add Report for Event or Alarm2. Create a name for the report rule.3. Set the report content.
1) Select the content type as event or alarm.2) Click Add.
All the added events or alarms will display.3) Optional: Filter the events or alarms by setting the conditions, such as source type, triggering
event, etc.4) Select the event(s) or alarm(s).
Note• Up to 32 events or alarms can be added in one report.• Up to 10,000 events or alarms can be calculated in total.
5) Click Add.4. Set the report type as daily or weekly and set the sending time according to actual needs.
DailyThe system will send the report at the sending time every day, which contains theinformation of the events or alarms triggered within 24 hours before the sending time.
WeeklyThe system will send the report at the sending time every week, which contains theinformation of the events or alarms triggered within 7×24 hours before the sending time.
5. Select the email template from the drop-down list to define the recipient information and emailformat.
HikCentral Web Client User Manual
170
NoteYou can click Add New to add a new email template. For setting the email template, refer to SetEmail Template .
6. Select the report format as Excel or PDF.7. Finish adding the report.
- Click Add to add the report and back to the report list page.- Click Add and Continue to add the report and continue adding other reports.
13.6 Configure Arming Schedule TemplateWhen setting alarm, you can select the predefined arming schedule template to define when thealarm will be triggered. The system predefines three default arming schedule templates: All-dayTemplate, Weekday Template, and Weekend Template. You can also add a customized templateaccording to actual needs.
Perform this task when you need to configure the customized arming schedule template for alarm.
Steps1. Click System on the home page.2. Click Schedule Template tab on the left.3. Click Add in the Arming Schedule page to enter the adding arming schedule page.
NoteYou can add up to 32 templates.
HikCentral Web Client User Manual
171

Figure 13-24 Add Arming Schedule Template Page4. Set the required information.
NameSet a name for the template.
Copy fromOptionally, you can select to copy the settings from other defined template.
5. Draw a time period on the time bar.
NoteUp to 4 time periods can be set for each day.
6. Optional: Click Erase and click on the drawn time period to clear the corresponding drawn timeperiod.
7. Finish adding the arming schedule template.- Click Add to add the template and back to the arming schedule template list page.- Click Add and Continue to add the template and continue to add other template.After adding the arming schedule template, it displays on the arming schedule template list.
8. Optional: Perform the following operations after adding the arming schedule template.
View TemplateDetails
Click the template to view its details.
Edit Template Click in the Operation column to edit template details (exceptthe template(s) in use).
HikCentral Web Client User Manual
172

Delete Template Click in the Operation column to delete the template.
Delete All Templates Click Delete All to delete all the added templates (except thedefault templates).
13.7 Set Email TemplateYou should set the email template properly before sending the alarm message to the designateemail account(s) as email linkage.
13.7.1 Configure Email Account
You should configure the parameters of sender's email account before the system can send themessage to the designate email account(s) as email linkage.
Reform this task when you need to configure the sender's email account.
Steps1. Enter System → Email Template to enter the email template settings.2. Click Email Settings to enter the Email Settings page.
HikCentral Web Client User Manual
173

Figure 13-25 Email Settings3. Configure the parameters according to actual needs.
Server Authentication (Optional)If your mail server requires authentication, check this checkbox to use authentication to login to this server.
Cryptographic ProtocolSelect the cryptographic protocol of the email to protect the email content if required by theSMTP server.
SMTP Server AddressThe SMTP Server IP address or host name (e.g., smtp.263xmail.com).
SMTP Server PortThe default TCP/IP port used for SMTP is 25.
4. Click Email Testto test whether the email settings work.
HikCentral Web Client User Manual
174
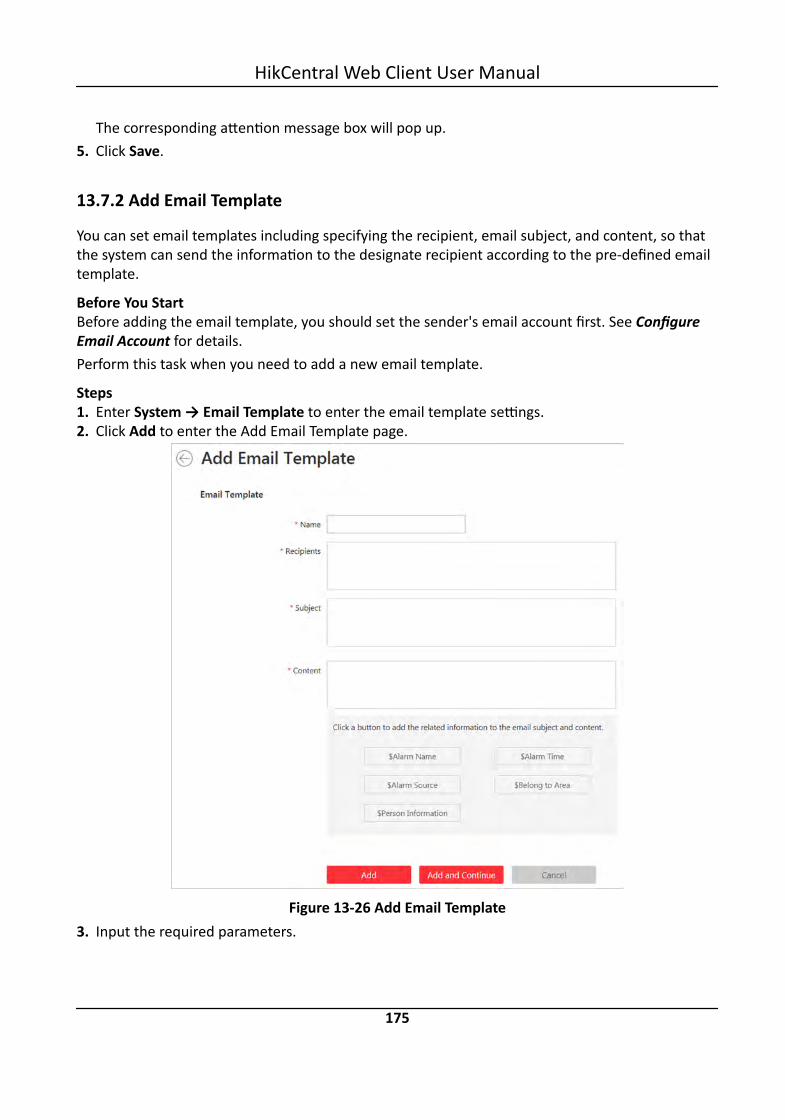
The corresponding attention message box will pop up.5. Click Save.
13.7.2 Add Email Template
You can set email templates including specifying the recipient, email subject, and content, so thatthe system can send the information to the designate recipient according to the pre-defined emailtemplate.
Before You StartBefore adding the email template, you should set the sender's email account first. See ConfigureEmail Account for details.Perform this task when you need to add a new email template.
Steps1. Enter System → Email Template to enter the email template settings.2. Click Add to enter the Add Email Template page.
Figure 13-26 Add Email Template3. Input the required parameters.
HikCentral Web Client User Manual
175

NameCreate a name for the template.
RecipientsInput the recipient(s) email address to send the email to.
NoteYou can input multiple recipients and separate them by ";".
SubjectInput the email subject as desired. You can also click the button in the lower part of thewindow to add the related information to the subject.
ContentDefine the alarm information to be sent. You can also click the button in the lower part of thewindow to add the related information to the content.
NoteIf you select to add the alarm time to the email subject or content, and the email application(such as Outlook) and the system are in different time zones, the displayed alarm time mayhave some deviations.
4. Finish adding the email template.- Click Add to add the template and back to the email template list page.- Click Add and Continue to add the template and continue to add other template.After adding the email template, it displays on the email template list.
5. Perform the following operation(s) after adding the email template:
Edit Template Click in the Operation column to edit template details.
Delete Template Click in the Operation column to delete the template.
Delete All Templates Click Delete All to delete all the added templates.
HikCentral Web Client User Manual
176

Chapter 14 Manage Map
The system provides two types of map: GIS map and E-map. On the GIS map, you can set and viewthe current site, Remote Site, and element's geographic location. On the E-map, which is a staticmap, you can set and view the geographic locations of the installed cameras, alarm inputs, andalarm outputs, etc. After configuring the map via Web Client, you can view the live video andplayback of the resources added to the map via Control Client, and get a notification message fromthe map via Control Client when alarm is triggered.
14.1 Set GIS Map and IconsYou can enable the GIS map function and configure the map API URL to display the GIS map on theWeb Client and Control Client, showing the geographic location of the resources (such as currentsite, Remote Site, cameras). You can also customize the icons of hot region and hot spot (such ascamera, alarm input, alarm output).
Perform this task for setting GIS map API URL and customized icons.
Steps1. Click System → Map to enter the map settings page.2. Set the GIS Map.
1) Set the GIS Map switch to ON to enable the GIS map function.2) Input the GIS map API URL.
NoteThe Google map API is supported currently. Apply for the API URL and the permission forusing it from Google.
3. Set the customized icons.1) Select the icon type as hot region or hot spot in the Type field.2) Set the icon size, including width (px) and height (px).3) Optional: Click the icon to cancel the aspect ratio.
NoteBy default, the aspect ratio is maintained.
4) Click Add in the Picture field to select a picture file from the local path.
NoteThe icon picture format can only be PNG, JPG, or JPEG.
The added pictures display as thumbnail preview in the Picture field.4. Click Save.
HikCentral Web Client User Manual
177
Result
You can view the GIS map in the Logical View page and perform the following operations in themap area.
Filter Click and select the object type you want toshow on the map.
Full Screen Click to show the map in full-screen mode.
Zoom In/Out Scroll the mouse wheel or click / to zoomin or zoom out the map.
Adjust Map Area Click-and-drag the map to adjust the map areafor view.
14.2 Link E-Map to AreaYou can add and link e-maps to the area so that the elements assigned to the area can be added toe-map.
Perform the task when you want to link e-map to area.
Steps1. Click Logical View.2. Three ways are available for adding e-map.
Add E-MapWhenAddingArea
a. Click on the area list panel.b. Set the parameters for adding area.c. Set the Related Map switch to ON.d. Hover the mouse over the Map field and link a map for the area.
You can click Upload Picture and select a picture from local PC as the e-map. Or click Existing Map and select an existing map for linking to currentarea.
e. Optional: Repeat the previous step to add more e-maps for the area.
Add E-MapWhenEditingArea
a. Select a map and click on the area list panel to enter the area editingpage.
b. Edit the area settings as desired.c. Set the Related Map switch to ON if it is OFF.d. Hover the mouse over the empty Map field and link a map for the area.
You can click Upload Picture and select a picture from local PC as the e-map. Or click Existing Map and select an existing map for linking to currentarea.
e. Optional: Repeat the previous step to add more e-maps for the area.
HikCentral Web Client User Manual
178
DirectlyLink Mapto ExistingArea
NoteYou can adopt this way when the GIS map is not enabled.
a. Click to show the map area.b. Click Relate Map for adding and linking map.c. Select the areas for linking e-maps.d. Hover the mouse over the Map field and link a map for the area.
You can click Upload Picture and select a picture from local PC as the e-map. Or click Existing Map and select an existing map for linking to currentarea.
e. Optional: Repeat the previous step to add more e-maps for the area.3. Optional: Hover the mouse over the added e-map area to perform the following operations.
Edit Picture Click and change a picture.
Edit Map Name Click and set a custom name for the map.
Unlink Map Click to remove the map or cancel the linkage between the map and area.4. Click Save to confirm the settings.5. Optional: Perform the following operations after adding map in the map area.
Filter Click and select the object type you want to show on the map.
Full Screen Click to show the map in full-screen mode.
Zoom In/Out Scroll the mouse wheel or click / to zoom in or zoom out the map.
Adjust MapArea
Drag the map or the red window in the lower part to adjust the map areafor view.
14.3 Search LocationsYou can search the locations on the GIS map.
Before You StartYou should enable the GIS Map function and set the GIS Map API URL properly. For details, refer toSet GIS Map and Icons .Perform this task when you need to search the locations on the GIS map.
Steps1. Click Logical View on home page.2. Click to show the map area.3. Input a location name you want to search in the field.
The related locations display in the search field.4. Click to select the location you want to locate from the related locations.
HikCentral Web Client User Manual
179
Result
The location will be located on the map.
14.4 Locate Sites on MapYou can set the current site's and added Remote Site's location to the GIS map.
Before You StartYou should enable the GIS Map function and set the GIS Map API URL properly. For details, refer toSet GIS Map and Icons .Perform this task when you need to set the sites' location to the GIS map.
Steps1. Click Logical View on home page.2. Click to show the map area.3. Select current site or Remote Site from the drop-down list on area list panel.
NoteThe icon indicates that the site is current site, and indicates Remote Site.
4. Click Locate on the GIS map area.
NoteThe Locate button is only available when the site is not located on GIS map.
5. Operate the GIS map to find the location of the site and click on the map to locate the site onthe map.
NoteYou can use you mouse to drag, zoom in, and zoom out the map.
After successfully located, the site icon displays at the location you select.6. Optional: Perform the following operations after adding the site to the GIS map.
View Site Details Click the site icon to view the site details, including site address,location, and remark information
Edit Click the site icon and click Edit to edit the site information.
Delete Click the site icon and click Delete to remove the site from the map.
View Site'sResources
Click the site icon and click View Site's Resources to view the resourcesof the site.
HikCentral Web Client User Manual
180
14.5 Add Hot SpotYou can add elements as the hot spot and place the hot spot on the e-map or GIS map.
Before You StartA map should have been added. Refer to Link E-Map to Area or Set GIS Map and Icons for detailsabout adding e-map or GIS map.Perform this task when you need to get the live view and alarm information of the surveillancescenarios via the hot spot on the map.
Steps1. Click Logical View on the home page.2. Select current site from the drop-down list on area list panel.
NoteThe icon indicates that the site is current site, you can only add current site's elements as thehot spots.
3. Three ways are available for adding hot spot.
Add HotSpot WhenAddingElement toArea
a. Click the tab to enter the corresponding element page.b. Click in the element area.c. Set the required parameters for adding the element to area.
NoteFor details, refer to Add Element to Area .
d. Check Add to Map checkbox and the map area displays.e. In the map area, click to select a map to add the hot spot to.f. Click Add and you can see the adding element result in the pop-up dialog.
DragElement toMap
NoteYou can adopt this way when the element is added to the area but not addedto map.
a. Click the tab to enter the corresponding element page.b. Optional: Click to select an area so that the elements of this area display.c. Click to show the map area.d. In the map area, click to select a map to add the hot spot to.e. Drag an element with Added to Map as No to the map.
Add HotSpot WhenEditing theElement
NoteYou can adopt this way when the element is added to the area but not addedto map.
HikCentral Web Client User Manual
181
a. Click the tab to enter the corresponding element page.b. Optional: Click to select an area so that the elements of this area display.c. Click the Name field of the element with Added to Map as No.d. Set the Add to Map switch as ON.e. In the map area, click to select a map to add the hot spot to.f. Configure the required settings for the hot spot.g. Click Save.
4. Optional: Perform the following operations after adding the hot spot.
Adjust HotSpot Location
Drag the added hot spot on the map to the desired locations.
Edit Hot Spot Click the added hot spot icon on the map and click Edit to edit the detailedinformation (such as setting GPS location (only available when parent mapis GIS map, and refer to Search Locations for details), and selecting iconstyle).For camera hot spot, you can also edit the detection area, including radius,direction and angle, or drag the displayed sector on the map to directlyadjust the detection area.
Delete HotSpot
Click the hot spot icon on the map and click Delete to remove the hot spotfrom the map.
14.6 Add Hot RegionThe hot region function links a map to another map. When you add a map to another map as a hotregion, an icon of the link to the added map is shown on the main map. The added map is calledchild map while the map to which you add the hot region is the parent map.
Before You StartAt least 2 maps should have been added. Refer to Link E-Map to Area or Set GIS Map and Icons fordetails about adding maps.Perform this task when you want to link a map to another map for convenient access.
Steps1. Click Logical View on the home page.2. Select current site from the drop-down list on area list panel.
NoteThe icon indicates that the site is current site, you can only add hot region for current site.
3. Click to show the map area.4. Select an added e-map or GIS map as the parent map.5. Click on the map area and click on the map where you want to place the hot region.
A dialog for setting child map appears.
HikCentral Web Client User Manual
182

6. Select a child map on the panel to set it as the hot region of the current map.7. Click Save on dialog to add the hot region.
The added hot region icon displays on the parent map.8. Optional: Perform the following operation(s) after adding the hot region.
Adjust HotRegionLocation
Drag the added hot region on the parent map to the desired locations.
Edit Hot Region Click the added hot region icon on the map to view and edit the detailedinformation, including GPS location (only available when parent map isGIS map, and refer to Search Locations for details), hot region name, iconstyle, name color, and remarks on the appearing dialog.
Delete HotRegion
Click the hot region icon on the map and click Delete on the appearingdialog to delete the hot region.
14.7 Add LabelYou can add labels with description on the map.
Before You StartAt least one map should have been added. Refer to Link E-Map to Area or Set GIS Map and Iconsfor details about adding e-map or GIS map.Perform this task when you need to add label on the map.
Steps1. Click Logical View on the home page.2. Select current site from the drop-down list on area list panel.
NoteThe icon indicates that the site is current site, you can only add label for current site.
3. Click to show the map area.4. Select a map to add label to.5. Click on the map area and click on the map where you want to place the label.6. Customize a name for the label, and you can input content for the label as desired.7. Click Save.
The added label icon displays on the map.8. Optional: Perform the following operation(s) after adding the label.
Adjust LabelLocation
Drag the added label on the map to the desired locations.
Edit Label Click the added label icon on the map to view and edit the detailedinformation, including name and content on the appearing dialog.
HikCentral Web Client User Manual
183

Delete Label Click the label icon on the map and click Delete on the appearing dialogto delete the label.
HikCentral Web Client User Manual
184

Chapter 15 Manage Vehicle
You can import the vehicle information according to the pre-defined template and you can add thevehicle information manually. The added vehicle information can be used for ANPR alarm whenadding the alarm.
NoteRefer to Add Alarm for ANPR Camera and UVSS for detailed information about adding alarm.
15.1 Add Vehicle ListBefore adding the vehicle information to the system, you should create the vehicle list.
Perform the following steps to add the vehicle list.
NoteUp to 100 vehicle lists can be added to the system.
Steps1. Click Vehicle to enter the Vehicle Management page.2. Click on the left to open the adding vehicle list window.
Figure 15-1 Adding Vehicle List Window3. Set a descriptive name for the vehicle list.4. Optional: Click Download Template and import vehicle information in batch, or you can import
vehicle information when checking vehicle list details. Refer to Add Vehicle Information fordetails.
5. Optional: Check Replace Repeated License Plate Number to replace the existing one with thenew vehicle information if the license plate number for importing already exists in other vehiclelist. Otherwise, the original vehicle information will be reserved.
6. Click Add.
HikCentral Web Client User Manual
185

The added vehicle list will be displayed on the left of the Vehicle page.7. Optional: Perform the following operations on the vehicle list area.
Edit Vehicle List Click on the vehicle list area to edit the vehicle list name.
Delete Vehicle List Click on the vehicle list area to delete the list.
15.2 Add Vehicle InformationAfter adding the vehicle list, you can check the vehicle information in the vehicle list or you can addthe vehicle information to the list.
The added vehicle information can be used for ANPR alarm when adding the alarm.You can import the vehicle information in batch or you can add the vehicle information manually.
NoteEach vehicle list can contain up to 5,000 vehicles.
15.2.1 Import Vehicle Information in a Batch
You can import multiple vehicle information at one time.
Before You StartYou should add the vehicle list before you can add the vehicle information. Refer to Add VehicleList for details.Perform the following task when you need to import vehicle information in batch.
Steps
NoteEach vehicle list can contain up to 5,000 vehicles.
1. Click Vehicle to enter the Vehicle Management page.2. Select a vehicle list.3. Click Import to open the Import window.
Figure 15-2 Import Window
HikCentral Web Client User Manual
186

4. Click Download Template on the Import window to save the template file (CSV format) to yourPC.
5. Open the downloaded template file.6. Input the required vehicle information in the corresponding column.7. Click and select the template file.8. Optional: Check Replace Repeated License Plate Number to replace the existing one with the
new vehicle information if the template contains the license plate number which already existsin the current or other vehicle list. Otherwise, the original vehicle information will be reserved.
9. Click Import.10. Optional: Perform the following operations after importing the vehicle information.
Edit VehicleInformation
Select a piece of vehicle information and click to edit thevehicle information
Delete VehicleInformation
Click to delete the vehicle information
Delete All VehicleInformation
Click Delete All to delete all the vehicle information.
Export VehicleInformation
Click Export to save the vehicle information of the list (CSV file)to your PC, which can be imported to other vehicle list.
15.2.2 Manually Add Vehicle Information
You can add single vehicle information manually.
Before You StartYou should add the vehicle list before you can add the vehicle information. Refer to Add VehicleList for details.Perform this task when you need to add vehicle information manually.
Steps1. Click Vehicle to enter the Vehicle Management page.2. Select a vehicle list.3. Click Add to enter the adding vehicle page.
Figure 15-3 Adding Vehicle Page4. Input the required parameters.5. Upload the undercarriage picture.
HikCentral Web Client User Manual
187

1) Move the cursor to the image area and click Upload.2) In the pop-up window, select the undercarriage picture to upload it.
6. Finish adding the vehicle information.- Click Add to add the vehicle information and back to the vehicle list page.- Click Add and Continue to save the settings and continue to add other vehicles.
NoteIf the license plate number has already existed (in current vehicle list or other vehicle list), a hintbox will pop up to prompt you whether to replace the existed vehicle with the new one.
HikCentral Web Client User Manual
188

Chapter 16 Manage Person List
You can add person information to the system for further operations such as access control (addingthe person to access group), face comparison (adding the person to face comparison group), timeand attendance (adding the person to attendance group), etc. After adding the persons, you canedit and delete the person information if needed.
NoteUp to 10,000 persons can be managed in the system.
16.1 Add Single PersonYou can add the person information to the system one by one.
Before You Start• If you want to link a card to the person, connect a card enrollment station to the PC that running
the Web Client.• If you want to link a fingerprint to the person, connect a fingerprint recorder to the PC that
running the Web Client.Perform this task if you want to add the person information one by one.
Steps1. Click Person → Person List → Add to enter the adding person page.
HikCentral Web Client User Manual
189

Figure 16-1 Add Single Person2. Set the person basic information.
IDThe default ID is generated by the system. You can edit it if needed.
NoteIt should contain 1 to 20 characters and the first character cannot be 0.
Person PictureUpload a person's face picture. You can click Take a Picture to use the PC's webcam to take apicture. Or click Upload Picture to select a picture from your PC.
NoteIt is recommended that the face in the picture should be in full-face view directly facing thecamera, without a hat or head covering.
3. Optional: Set the person's additional information.
NoteYou can customize these items according to actual needs as the person's additional information.For details, refer to Custom Additional Information .
HikCentral Web Client User Manual
190

4. Add the person to the existing face comparison group(s) which will be used for face recognitionand comparison.
NoteIf you add the person to the face comparison group, apply the face comparison group to thedevice to take effect after adding the person. For details about applying face comparison groupto the device, refer to Apply Face Comparison Group to Device .
5. Optional: Set the access control and time & attendance information.Effective Period
Set the effective period for the person in access control application and time & attendanceapplication. For example, if the person is a visitor, his/her effective period may be short andtemporary.
Access GroupAdd the person to the existing access group(s) which can be linked with access level(s). Thelinkage of access level and access group defines the access permission that which person(s)can access which door(s) in the authorized period.You can click the access group name to view its linked access levels.Move the cursor to the access level to view its door and access schedule.
NoteYou can click Add New to add a new access group. For details, refer to Add Access Group .
Bypass Access Control AppsExempt this person from remaining locked (credential failed) restrictions, all anti-passbackrules, and first card authorization.
NoteFor details about setting these functions, refer to Edit Door for Current Site .
Extended AccessWhen the person accessing the door, grant this person more time to pass through doorswhich have been configured with extended open duration. Use this function for the personswith reduced mobility.
NoteYou should set the door's extended open duration in Logical View. For details, refer to EditDoor for Current Site .
Attendance GroupAdd the person to the existing attendance group if the person participant in time andattendance.
HikCentral Web Client User Manual
191
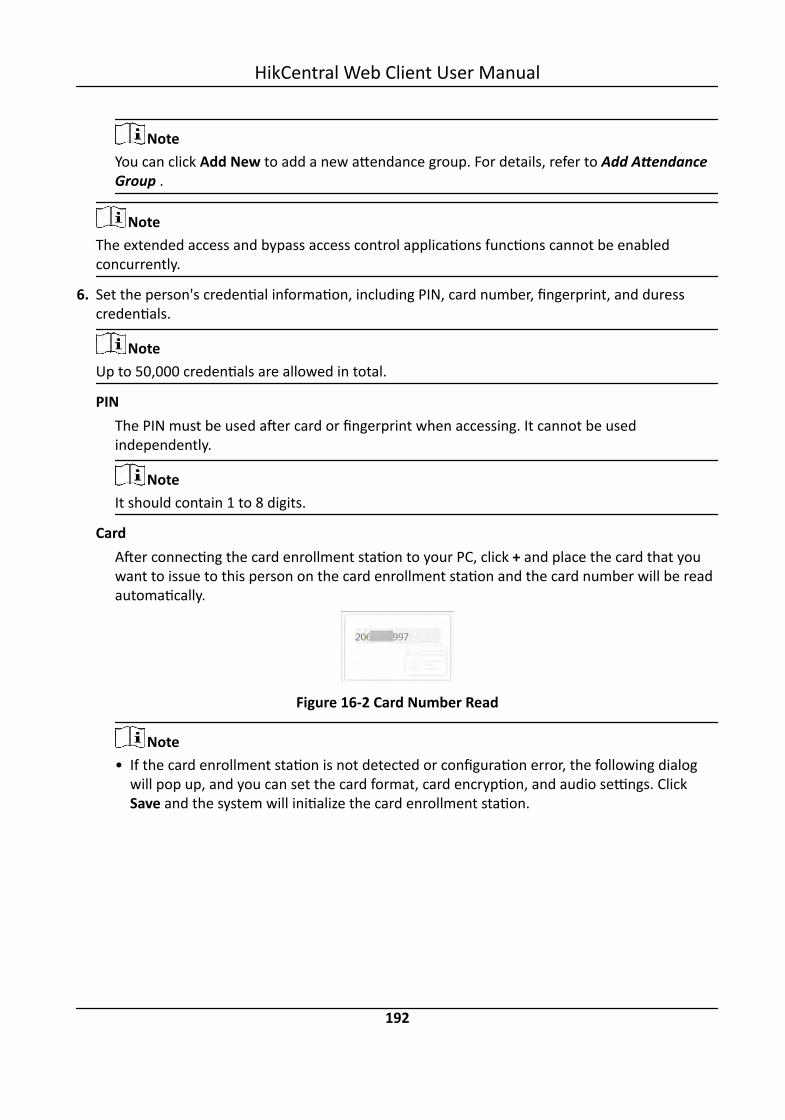
NoteYou can click Add New to add a new attendance group. For details, refer to Add AttendanceGroup .
NoteThe extended access and bypass access control applications functions cannot be enabledconcurrently.
6. Set the person's credential information, including PIN, card number, fingerprint, and duresscredentials.
NoteUp to 50,000 credentials are allowed in total.
PINThe PIN must be used after card or fingerprint when accessing. It cannot be usedindependently.
NoteIt should contain 1 to 8 digits.
CardAfter connecting the card enrollment station to your PC, click + and place the card that youwant to issue to this person on the card enrollment station and the card number will be readautomatically.
Figure 16-2 Card Number Read
Note• If the card enrollment station is not detected or configuration error, the following dialog
will pop up, and you can set the card format, card encryption, and audio settings. ClickSave and the system will initialize the card enrollment station.
HikCentral Web Client User Manual
192

Figure 16-3 Set Card Enrollment Station• Up to 5 cards can be issued to one person.
FingerprintAfter connecting the fingerprint recorder to your PC, click + and lift and rest your fingerprinton the recorder for three times and it will collect your fingerprint automatically.
Figure 16-4 Fingerprint Recorded
NoteUp to 10 fingerprints can be added to one person.
Credential under DuressSet the credentials (card number and fingerprint) so that when you are under duress, youcan swipe the card or scan the fingerprint configured here. The door will be unlocked and theControl Client will receive a duress alarm (if configured) to notify the security personnel.
NoteWhen the person accesses with credentials under duress, he/she cannot be exempted fromremaining locked (credential failed) restrictions, all anti-passback rules, and first cardauthorization. Extended access is not allowed as well.
7. Finish adding the person.- Click Add to add the person and return the person list.- Click Add and Continue to add the person and continue to add other persons.The person will display in the person list and you can view the details.
8. Optional: After adding the person, you can do one or more of the followings:
Edit Person Click the person name to edit the person details.
HikCentral Web Client User Manual
193

Delete Person Select the person(s) and click Delete to delete.
Export AddedPersonInformation
Click Export All to export all the added person information and youcan save the file in your PC. For data security, you are required to set apassword before exporting which is required when decompressing thedownloaded ZIP file.
16.2 Batch Add PersonsYou can add the information of multiple persons to the system by importing a template withperson information.
Perform this task when you need to batch add information of multiple persons.
Steps1. Click Person → Person List to enter the person list page.2. Click Import → Import Persons .
Figure 16-5 Import Persons3. Click Download Template to download the template file and you can save it in your PC.4. In the downloaded template, input the person information following the rules in the template.5. Click Import → Import Persons .6. Select the template with the person information7. Click Import to start importing.
NoteIf the exported person's ID is same with the added person in the list, it will replace the addedperson's information.
The importing progress shows and you can check the results.8. Optional: After adding the person, you can do one or more of the followings:
Edit Person Click the person name to edit the person details.
Delete Person Select the person(s) and click Delete to delete.
Export AddedPersonInformation
Click Export All to export all the added person information and youcan save the file in your PC. For data security, you are required to set apassword before exporting which is required when decompressing thedownloaded ZIP file.
HikCentral Web Client User Manual
194

16.3 Batch Add ProfilesYou can add multiple person pictures to the system by importing a ZIP file with person pictures.
Before You StartName the person picture after the person ID and packet the person pictures to a ZIP file.
Note• Currently it supports pictures in JPG, JPEG, and PNG format.• Recommendation for each picture: Dimensions: 295×412. Size: 60 KB to 100 KB.• The ZIP file should be smaller than 100 MB, or the uploading will fail.
Perform this task when you need to batch add person profiles to the system.
Steps1. Click Person → Person List to enter the person list page.2. Click Import → Import Profiles .
Figure 16-6 Import Profiles3. Select the ZIP file with the person pictures4. Click Import to start importing.
The importing progress shows and you can check the results.
16.4 Batch Issue Cards to PersonsThe system provides a convenient way to issue card to multiple persons in a batch.
Before You StartConnect a card enrollment station to the PC that running the Web Client.Perform this task when you need to issue the cards to multiple persons in a batch.
Steps
NoteUp to 5 cards can be issued to one person.
HikCentral Web Client User Manual
195

1. Click Person → Person List to enter the person list page.
NoteThe selected persons who have less than 5 cards will display.
2. Select the persons to issue the card to.3. Click Batch Issue Cards to Persons to enter the following page.
Figure 16-7 Issue Card to Persons in Batch4. Place the card on the card enrollment station.
The card number will be read automatically and the card will be issued to the first person in thelist.
5. Repeat the above step to issue the cards to the persons in the list in sequence.6. Optional: If the card enrollment station is not detected or configuration error, you need to set
the card format, card encryption, and audio settings to initialize the card enrollment station.
HikCentral Web Client User Manual
196
16.5 Custom Additional InformationYou can customize the additional information items which are not pre-defined in the basicinformation according to actual needs.
Perform this task if you want to customize the additional information.
Steps
NoteUp to five additional information can be customized.
1. Click Person → Person List → Custom Additional Information to enter the custom additioninformation page.
2. Click Add.3. Create a name for this item.
NoteUp to 32 characters are allowed in the name.
4. Click Save.5. Optional: After adding the additional information, you can do one or more of the followings.
Edit Name Click to edit its name.
Delete Click to delete the additional information.
HikCentral Web Client User Manual
197
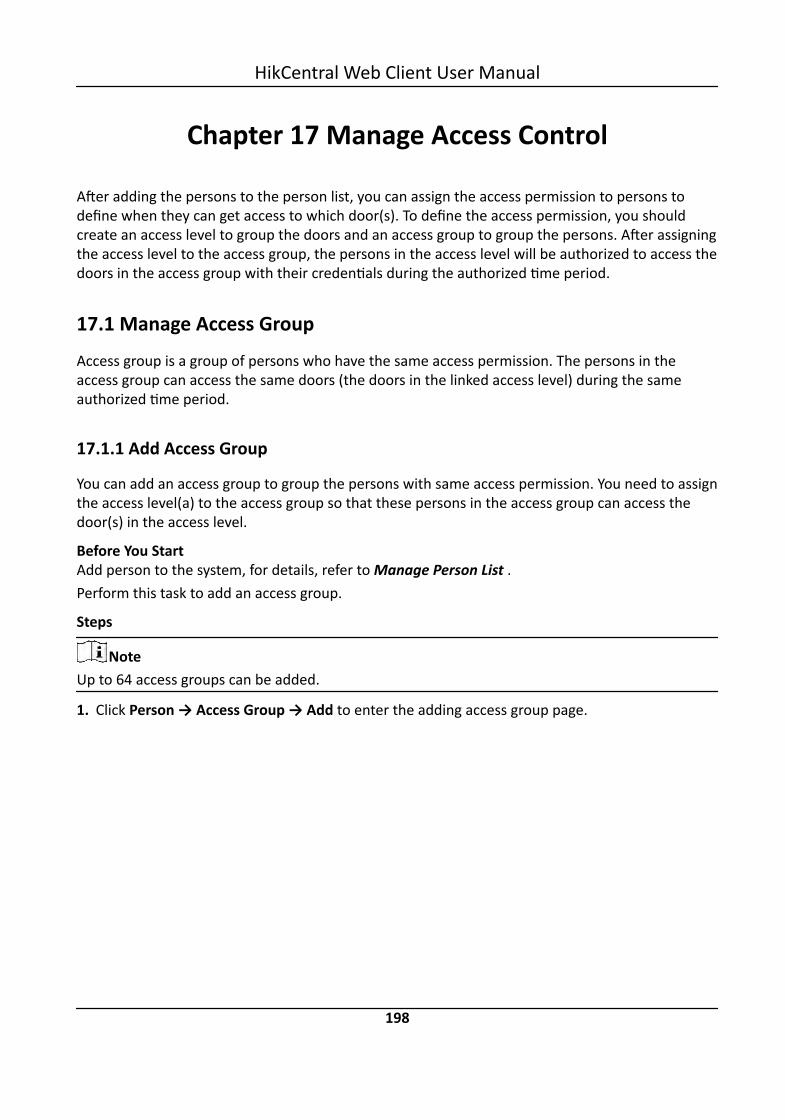
Chapter 17 Manage Access Control
After adding the persons to the person list, you can assign the access permission to persons todefine when they can get access to which door(s). To define the access permission, you shouldcreate an access level to group the doors and an access group to group the persons. After assigningthe access level to the access group, the persons in the access level will be authorized to access thedoors in the access group with their credentials during the authorized time period.
17.1 Manage Access GroupAccess group is a group of persons who have the same access permission. The persons in theaccess group can access the same doors (the doors in the linked access level) during the sameauthorized time period.
17.1.1 Add Access Group
You can add an access group to group the persons with same access permission. You need to assignthe access level(a) to the access group so that these persons in the access group can access thedoor(s) in the access level.
Before You StartAdd person to the system, for details, refer to Manage Person List .Perform this task to add an access group.
Steps
NoteUp to 64 access groups can be added.
1. Click Person → Access Group → Add to enter the adding access group page.
HikCentral Web Client User Manual
198
Figure 17-1 Add Access Group2. Set the basic information.
Access Group NameCreate a name for the access group.
3. Optional: Set the person(s) to add to the access group.1) Click .
All the persons added to the system display. You can view the person name, picture, personID, and remark information.
2) Select the person(s) to add to the access group.3) Optional: You can also select the existing access group or attendance group from the Copy
from drop-down list to copy person information from other group.
NoteFor setting the attendance group, refer to Add Attendance Group .
NoteUp to 1,000 persons can be added to one access group.
4. Optional: Select the access level(s) to link the access group to the access level(s) so that theperson(s) you selected in step 3 can access the doors linked to the access level(s) during theauthorized time period.
HikCentral Web Client User Manual
199
Note• Up to 8 access levels can be assigned to one access group.• You can click Add New to add a new access level. For details, refer to Add Access Level .• Move the cursor to the access level and you can view its door(s) and access schedule.
5. Finish adding the access group.- Click Add to add the access group and return to the access group management page.- Click Add and Continue to add the access group and continue to add other access groups.
6. Optional: After adding the access group, you can do one or more of the followings.
Edit Access Group Click in the Operation column to edit its details.
Delete Access Group Click in the Operation column to delete it.
Delete All Access Groups Click Delete All to delete all the added access groups.
17.1.2 Apply All Access Groups to Device
After setting the linkage between access group and access levels, or if the access level and accessgroup settings are changed, you need to apply the access permission settings to the access controldevice of the doors linked to the access level to take effect. After that, the persons in the accessgroup can access the doors during the authorized time period defined by the related access level.
Manually Apply All Access Groups to Device
You can apply the access groups to the device manually.
Before You StartLink the access group with access level to define the access permission. For details, refer to AssignAccess Level to Access Group or Add Access Group .Perform this task to manually apply all the access groups settings (person settings and accesslevels) to the access control device to take effect.
Steps1. Click Person → Access Group to enter the access group management page.2. Click Apply to Device → Apply All (Manual) to start applying the access groups to the linked
access control device.The applying progress will display.
3. Optional: If the person's access permission settings are changed (such as changes in linkedaccess level, person credientials, etc.), the icon will display near the Apply to Device icon,indicating that these new access permission settings should be applied to the device. You canhover the cursor to it to view that how many persons should be applied to the device.
HikCentral Web Client User Manual
200

NoteYou can click View Details to check the details and apply again.
Regularly Apply All Access Groups to Device
You can set the time and the system can apply all access groups to the device automatically everyday.
Before You StartLink the access group with access level to define the access permission. For details, refer to AssignAccess Level to Access Group or Add Access Group .Perform this task to set a schedule to regularly apply all the access groups to the access controldevice to take effect.
Steps
NoteBy default, the system will apply all the access groups to the device at 01:00 every day.
1. Click Person → Access Group to enter the access group management page.2. Click Apply to Device → Apply All (Scheduled) to open the following window.
Figure 17-2 Apply Access Groups Regularly3. Set a time and the system will apply all the access groups in the system to device at the
configured time automatically.
NoteThe time here is the VSM server's time.
4. Click Save.
17.2 Manage Access LevelIn access control, access level is a group of door(s). After assigning the access level to certainaccess group(s), it defines the access permission that which person(s) can get access to whichdoor(s) during the authorized time period.
HikCentral Web Client User Manual
201
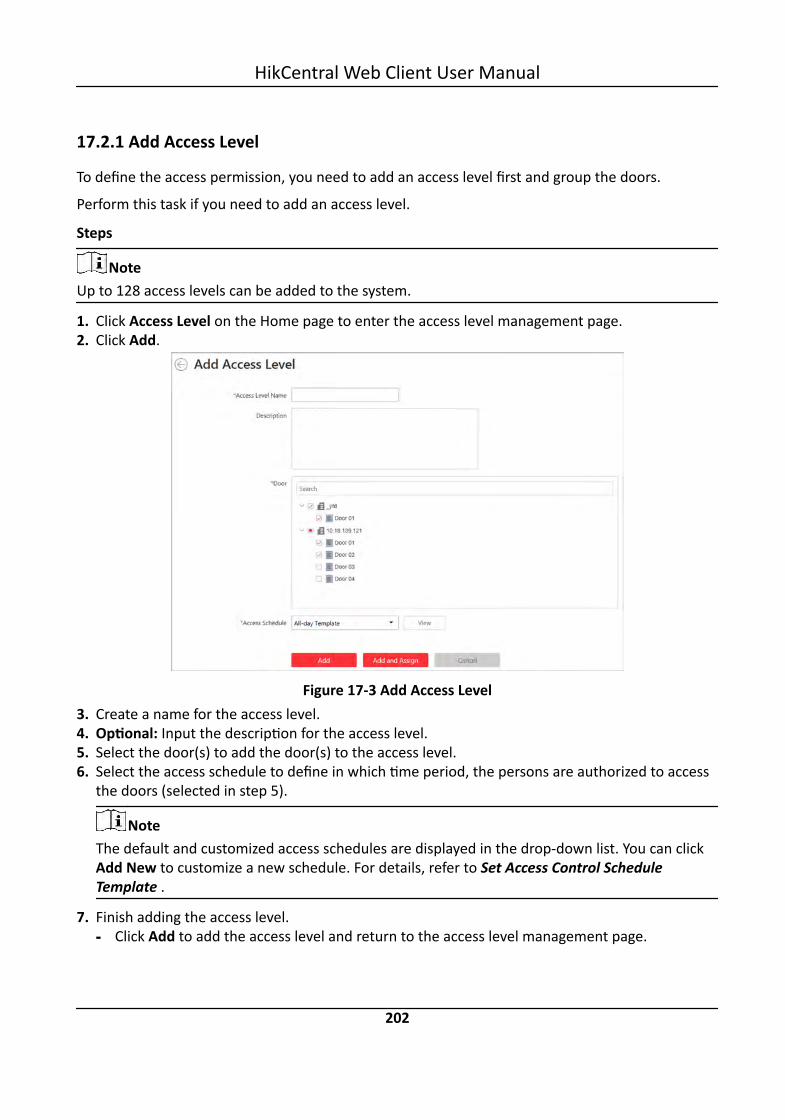
17.2.1 Add Access Level
To define the access permission, you need to add an access level first and group the doors.
Perform this task if you need to add an access level.
Steps
NoteUp to 128 access levels can be added to the system.
1. Click Access Level on the Home page to enter the access level management page.2. Click Add.
Figure 17-3 Add Access Level3. Create a name for the access level.4. Optional: Input the description for the access level.5. Select the door(s) to add the door(s) to the access level.6. Select the access schedule to define in which time period, the persons are authorized to access
the doors (selected in step 5).
NoteThe default and customized access schedules are displayed in the drop-down list. You can clickAdd New to customize a new schedule. For details, refer to Set Access Control ScheduleTemplate .
7. Finish adding the access level.- Click Add to add the access level and return to the access level management page.
HikCentral Web Client User Manual
202
- Click Add and Assign to assign the access level to some access group(s) so that the person(s)in the access group(s) will have the access permission to access the door(s) selected in step5.
Note• For details about assigning the access level to the access group, refer to Assign Access
Level to Access Group .• For setting the access group, refer to Manage Access Group .
8. Optional: After adding the access level, you can do one or more of the followings.
Edit Access Level Click in the Operation column to edit its details. If you want to changethe assigned access group(s), or assign it to access group, clickConfiguration.
Assign to AccessGroup
Click in the Operation column to assign the access level to the addedaccess group(s). For details, refer to Assign Access Level to AccessGroup .
Delete AccessLevel
Click in the Operation column to delete the access level.
Delete All AccessLevels
Click Delete All to delete all the added access levels.
17.2.2 Assign Access Level to Access Group
After adding the access level, you need to assign it to access group(s). After that, the persons in theaccess group(s) will have the permission to access the door(s) linked to the access level.
Before You StartAdd the access group(s). For details, refer to Manage Access Group .Perform this task if you need to assign the access level to the access group(s).
Steps
NoteYou can also link the access group to access level(s) when adding or editing the access group. Thelatest configured linkage will take effect. For details, refer to Add Access Group .
1. Click Access Level on the Home page to enter the access level management page.2. Enter the Assign to Access Group page.
- After you setting the parameters of access level when adding, click Add and Assign.- When editing the access level, click Configuration in the access level details page.- Click in the Operation column.
3. In the Assign to Access Group field, select the access group(s) you want to assign the accesslevel to.
HikCentral Web Client User Manual
203

4. Optional: Click Add New to add a new access group.5. Click Save.
17.3 Set Access Control Schedule TemplateThe access control schedule defines when the person can open the door with credentials, or whenthe door remains unlocked so that person can open the door with free access. The systempredefines three default access control schedule templates: All-day Template, Weekday Template,and Weekend Template. You can also add a customized template according to actual needs.
Perform this task to set the customized access control schedule.
Steps1. Click System on the home page.2. Click Schedule Template tab on the left.3. Click Add in the Access Schedule page to enter the adding access schedule page.
NoteYou can add up to 32 templates.
Figure 17-4 Set Access Control Schedule Template4. Set the required information.
Name
HikCentral Web Client User Manual
204
Set a name for the template.Copy from
Optionally, you can select to copy the settings from other defined template.5. Draw a time period on the time bar.
NoteUp to 8 time periods can be set for each day.
6. Optional: Click Erase and click on the drawn time period to clear the corresponding drawn timeperiod.
7. Optional: Set the holiday schedule. The priority of holiday schedule is higher than the weeklyschedule which means the predefined holidays will adopt the holiday schedule rather than theweekly schedule.1) Click Add Holiday.2) Select the predefined holiday(s), or click Add New to create a new holiday (see Set Holiday
for details).3) Click Add.4) Draw a time period on the time bar.
NoteUp to 8 time periods can be set for each day.
5) Optional: Click Erase and click on the drawn time period to clear the corresponding drawntime period.
8. Finish adding the access control schedule template.- Click Add to add the template and back to the access control schedule template list page.- Click Add and Continue to add the template and continue to add other template.After adding the access control schedule template, it displays on the access control scheduletemplate list.
9. Optional: Perform the following operations after adding the template.
View TemplateDetails
Click the template to view its details.
Edit Template Click in the Operation column to edit template details (except thetemplate(s) in use).
Delete Template Click in the Operation column to delete the template.
Delete All Templates Click Delete All to delete all the schedule templates (except thedefault templates and the template(s) in use).
HikCentral Web Client User Manual
205

Chapter 18 Manage Time and Attendance
After adding the persons to the person list, if you want to track and monitor when the personsstart/stop work and monitor their working hours and late arrivals, early departures, time taken onbreaks, and absenteeism, you can add the person to the attendance group and assign a shiftschedule to the attendance group to define the attendance parameters for the persons in theattendance group.
18.1 Add Attendance GroupAfter adding the persons, you can group the persons into different attendance groups. The personsin the same attendance group are assigned with the same shift schedule.
Perform this task if you need to group the persons into different attendance group.
Steps
Note• Up to 64 attendance groups can be added.• For each person, he/she can be added to up to attendance group.
1. Click Person → Attendance Group → Add to enter the adding attendance group page.
HikCentral Web Client User Manual
206
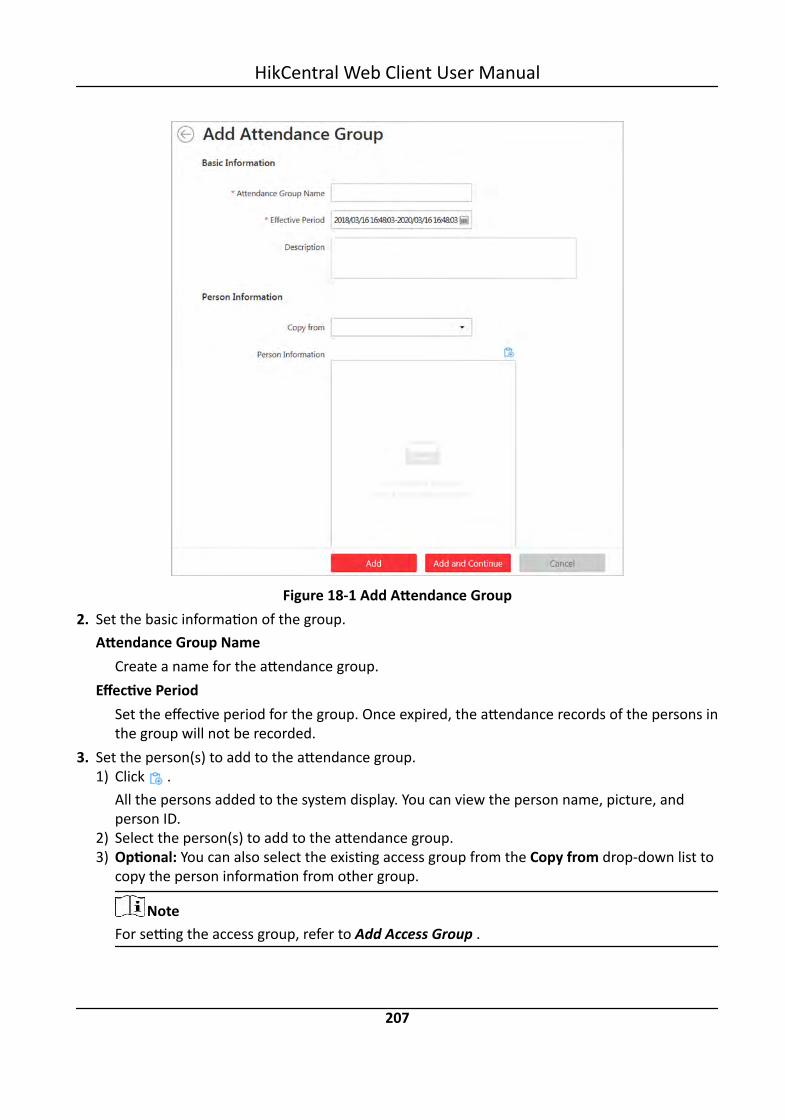
Figure 18-1 Add Attendance Group2. Set the basic information of the group.
Attendance Group NameCreate a name for the attendance group.
Effective PeriodSet the effective period for the group. Once expired, the attendance records of the persons inthe group will not be recorded.
3. Set the person(s) to add to the attendance group.1) Click .
All the persons added to the system display. You can view the person name, picture, andperson ID.
2) Select the person(s) to add to the attendance group.3) Optional: You can also select the existing access group from the Copy from drop-down list to
copy the person information from other group.
NoteFor setting the access group, refer to Add Access Group .
HikCentral Web Client User Manual
207

NoteUp to 1,000 persons can be added to one attendance group.
4. Optional: Set the shift schedule for the persons in the group so that they need to attendaccording to this shift schedule.
NoteClick Add New to add a new shift schedule. For details, refer to Add Shift Schedule .
5. Finish adding the attendance group.- Click Add to add the attendance group and return to the attendance group list page.- Click Add and Continue to add the attendance group and continue to add other groups.
6. After adding the attendance group, you can do one or more of the followings:
Edit Attendance Group Click in the Operation column to edit its details.
Delete Attendance Group Click in the Operation column to delete it.
Delete All Attendance Groups Click Delete All to delete all the added attendance groups.
18.2 Add Shift ScheduleYou can create a rule for the attendance, which is called shift schedule, defining how the schedulerepeats, the shift type, break settings, and the card swiping rule.
Perform this task to add a shift schedule.
Steps
NoteUp to 128 shift schedules can be added to the system.
1. Click Time & Attendance → Shift Schedule → Add to enter the adding shift schedule page.2. Set the shift schedule's basic information, including a custom name and the description.3. Optional: Select other shift schedule from the drop-down list of Copy from field to copy the
schedule information to the current schedule. You can edit the schedule settings on this basis.4. Set the schedule's repeating mode.
WeekThe schedule will repeat every 7 days based on the week.
Day(s)You can customize the number of days in one period. You should set a start date of oneperiod for reference which can define how the schedule repeats.
5. Draw the scheduled work time on the timeline.1) Drag on the timeline to set the range of the scheduled work time.
The detailed schedule rule parameters display.
HikCentral Web Client User Manual
208
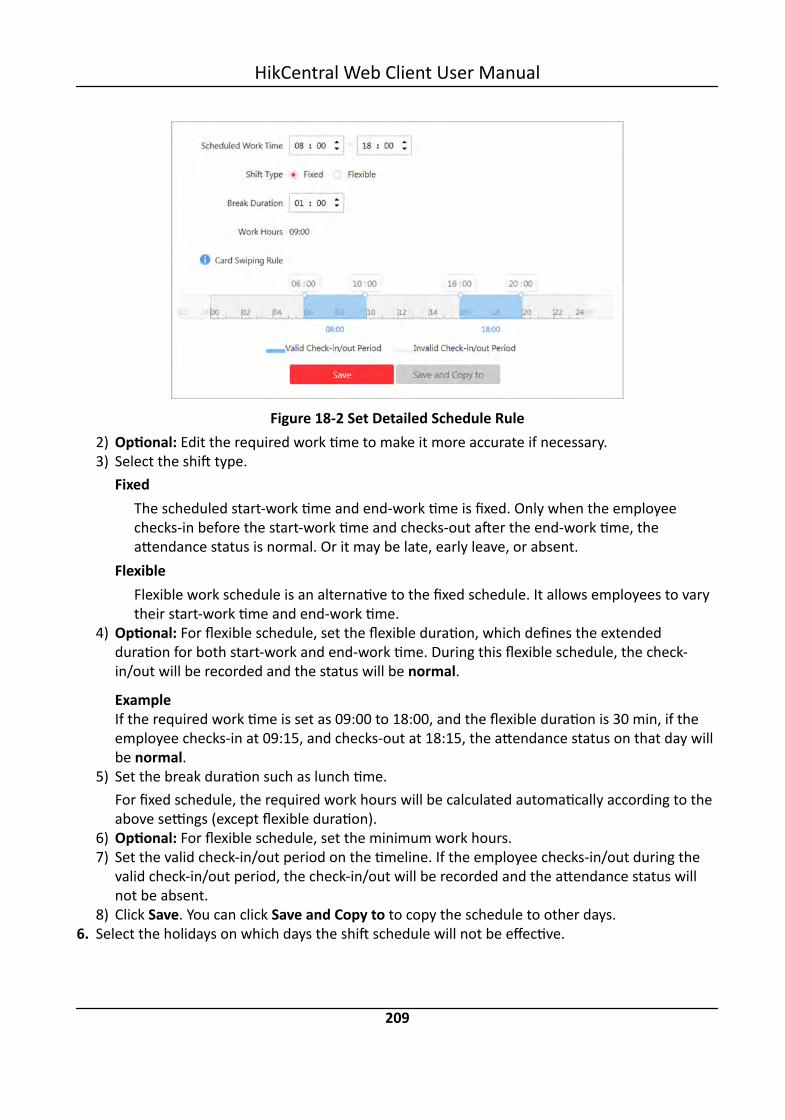
Figure 18-2 Set Detailed Schedule Rule2) Optional: Edit the required work time to make it more accurate if necessary.3) Select the shift type.
FixedThe scheduled start-work time and end-work time is fixed. Only when the employeechecks-in before the start-work time and checks-out after the end-work time, theattendance status is normal. Or it may be late, early leave, or absent.
FlexibleFlexible work schedule is an alternative to the fixed schedule. It allows employees to varytheir start-work time and end-work time.
4) Optional: For flexible schedule, set the flexible duration, which defines the extendedduration for both start-work and end-work time. During this flexible schedule, the check-in/out will be recorded and the status will be normal.
ExampleIf the required work time is set as 09:00 to 18:00, and the flexible duration is 30 min, if theemployee checks-in at 09:15, and checks-out at 18:15, the attendance status on that day willbe normal.
5) Set the break duration such as lunch time.For fixed schedule, the required work hours will be calculated automatically according to theabove settings (except flexible duration).
6) Optional: For flexible schedule, set the minimum work hours.7) Set the valid check-in/out period on the timeline. If the employee checks-in/out during the
valid check-in/out period, the check-in/out will be recorded and the attendance status willnot be absent.
8) Click Save. You can click Save and Copy to to copy the schedule to other days.6. Select the holidays on which days the shift schedule will not be effective.
HikCentral Web Client User Manual
209

NoteFor setting the holiday, refer to Set Holiday .
7. Finish adding the shift schedule.- Click Add to add the shift schedule and return to the shift schedule management page.- Click Add and Assign to add the shift schedule and assign it to the attendance group. For
details, refer to Assign Shift Schedule to Attendance Group .
18.3 Assign Shift Schedule to Attendance GroupAfter setting the shift schedule, you need to assign it to the attendance group so that it willcalculate the attendance records for persons in the attendance group according to this shiftschedule.
Before You Start• Add a shift schedule and set the rule. For details, refer to Add Shift Schedule .• Add a attendance group. For details, refer to Add Attendance Group .Perform this task to assign a shift schedule to attendance group(s).
Steps1. Click Time & Attendance → Shift Schedule to enter the shift schedule management page.2. Enter the Assign to Attendance Group page.
- After you setting the parameters of shift schedule when adding, click Add and Assign.- When editing the shift schedule, click Configuration in the shift schedule details page.- Click in the Operation column.
3. In the Assign to Attendance Group field, select the attendance group(s) you want to assign theshift schedule to.
NoteOnly the attendance groups which haven't been linked to a shift schedule will display.
4. Optional: Click Add New to add a new attendance group.5. Click Save.
18.4 Add Attendance Check PointYou should set a door as an attendance check point, so that the check-in/out by credentials (suchas swiping card on the door's card reader) will be valid and will be recorded.
Perform this task to add a attendance check point.
Steps1. Click Time & Attendance → Attendance Check Point to enter the attendance check point
management page.
HikCentral Web Client User Manual
210

2. Click Add.
Figure 18-3 Add Attendance Check Point
All the doors which haven't been set as attendance check point display.3. Select the door(s).4. Click Add.
The selected door(s) display in the attendance check point list.5. To delete the added attendance check point, select the door(s) and click Delete.
NoteIf the attendance is deleted, the attendance records on this attendance check point will bedeleted as well, and it will affect the persons' attendance results.
18.5 Manage Attendance RecordThe persons' attendance records will be recorded and stored in the system. You can search therecords by setting the search conditions to view the attendance details and view the person'sattendance report. You can also correct check-in/out time for the exceptional records according toactual needs.
18.5.1 Search Attendance Record
You can search the attendance records to view the person's attendance status by setting the searchconditions.
Before You StartMake sure the person's attendance group is not expired. Or the attendance records will not berecorded. For setting the attendance group's effective period, refer to Add Attendance Group .
HikCentral Web Client User Manual
211

Perform this task to search the attendance records.
Steps1. Click Time & Attendance → Attendance Record to enter the attendance record page.2. In the filter panel, set the search conditions.
TimeSet the time range of the attendance records you want to search. You can search the persons'attendance records recorded within one year.
3. Click Filter to filter the attendance records according to the search conditions.If you search the attendance records on one day, you can view the persons' attendance statusand detailed work time (including scheduled work time and actual work time).If you search the attendance records on multiple days, you can view the persons' attendancereport including the times of normal, late, early leave, absent status during the time period, andthe total work hours.
4. Optional: If you search the attendance records on multiple days, hover the cursor on thenumber of late, early leave, or absent times to view the specific date.
5. Optional: Click the person name to view the person's attendance records.
NoteHover the cursor on the date to view the detailed work time, including scheduled work time andactual work time.
6. Optional: You can also correct the check-in/out for the exceptional attendance status ifnecessary. For details, refer to Correct Attendance Record for Single Person .
7. Optional: Click Export and select the items to export the filtered attendance records and save inyour PC.
NoteThe exported file is in CSV format.
18.5.2 Correct Attendance Record for Single Person
After searching the person's attendance record, you can correct one person's check-in/out timeaccording to actual needs if the attendance status is not normal.
Perform this task if you need to correct the person's attendance check-in/check-out time.
Steps1. Click Time & Attendance → Attendance Record to enter the attendance record page.2. Search the attendance records.
HikCentral Web Client User Manual
212

NoteFor details, refer to Search Attendance Record .
3. Optional: If you search the attendance records on one single day, you can perform the followingsteps to correct the check-in/out time.1) Click in the Operation column.2) Set the correct check-in/out time.3) Optional: Input the reason for correction.4) Click OK.
The person's attendance status on that day changes according to the correction.4. Optional: If you search the attendance records on multiple days, you can perform the following
steps to correct the check-in/out time.1) Click the person name to enter the detailed attendance record page.
Figure 18-4 Attendance Detailed Page
The person's attendance statuses are displayed on the calendar.2) Hover the cursor to the date which attendance status is not normal and click Correct Check-
in/out.3) Set the correct check-in/out time.4) Optional: Input the reason for correction.5) Click OK.
The person's attendance status on that day changes according to the correction and the icon will show, indicating that the status is corrected.
HikCentral Web Client User Manual
213

18.5.3 Correct Attendance Records for Multiple Persons
You can correct multiple persons' check-in/out time in a batch according to actual needs if theattendance status is not normal.
Perform this task if you need to correct multiple persons' check-in/out time.
Steps
NoteUp to 50,000 attendance records can be corrected at a time.
1. Click Time & Attendance → Attendance Record to enter the attendance record page.2. Click Batch Correct Check-in/out to open the following window.
Figure 18-5 Batch Correct Attendance Records3. Click Download Template to download the template file and you can save it in your PC.4. In the downloaded template, input the actual start-work time or/and end-work time following
the rules in the template.5. Click Batch Correct Check-in/out and upload the template with the corrected attendance
records.6. Click OK and the progress will display.
NoteThe system will recalculate the attendance results according to the imported attendancerecords.
HikCentral Web Client User Manual
214

Chapter 19 Manage Face Comparison Group
After adding the persons to the person list, you can perform face comparison to the persons byadding the person to the face comparison group. After applying the face comparison group withperson information to the face recognition device, when the person face is detected and matchedor mismatched, an alarm (if configured) will be triggered to notify the security personnel.
NoteFor configuring the face matched or mismatched alarm, refer to Add Alarm for Person .
19.1 Add Face Comparison GroupAfter adding the person, you can add a face comparison group and add person(s) to the group forface comparison.
Perform this task if you want to add a face comparison group.
Steps
NoteUp to 64 face comparison groups can be added.
1. Click Person → Face Comparison Group to enter the face comparison group management page.
Figure 19-1 Add Face Comparison Group2. Add a new face comparison group.
1) Click Add.2) Create a name for the face comparison group.3) Optional: Input the description information if needed.4) Click Add to add the group and back to the face comparison group list. You can also click Add
and Continue to add other groups.3. Add person(s) to the group.
1) In the face comparison group list page, click to show the persons added to the group.
HikCentral Web Client User Manual
215
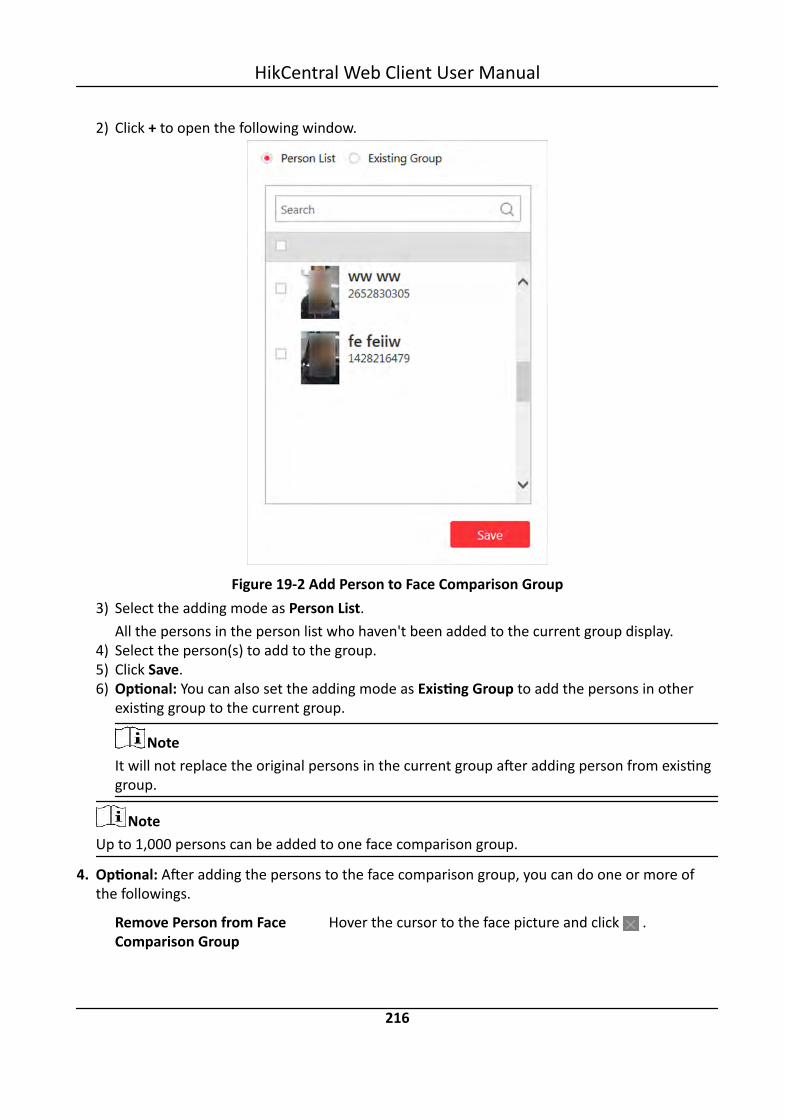
2) Click + to open the following window.
Figure 19-2 Add Person to Face Comparison Group3) Select the adding mode as Person List.
All the persons in the person list who haven't been added to the current group display.4) Select the person(s) to add to the group.5) Click Save.6) Optional: You can also set the adding mode as Existing Group to add the persons in other
existing group to the current group.
NoteIt will not replace the original persons in the current group after adding person from existinggroup.
NoteUp to 1,000 persons can be added to one face comparison group.
4. Optional: After adding the persons to the face comparison group, you can do one or more ofthe followings.
Remove Person from FaceComparison Group
Hover the cursor to the face picture and click .
HikCentral Web Client User Manual
216

Edit Face Comparison Group Click in the Operation column to edit it and view thecameras that it is applied to.
Delete Face Comparison Click in the Operation column to delete it.
Delete All Face ComparisonGroups
Click Delete All to delete all the added face comparisongroups.
What to do nextAfter adding the face comparison group and configuring the persons in the group, apply the groupto the camera which supports face picture comparison to take effect. For details, refer to ApplyFace Comparison Group to Device .
19.2 Apply Face Comparison Group to DeviceAfter setting the face comparison group and adding person(s) to the group, you need to apply thegroup settings to the camera which supports face picture comparison so that the camera cancompare the detected face with the face in the face comparison group and trigger alarm (ifconfigured). After applying the face comparison group to the device, if the data in the group arechanged (such as adding a person to the group, removing person from the group, etc.), the systemwill automatically apply the data in the group to the device to take effect.
Before You StartAdd camera which supports face picture comparison to the system.Perform this task if you need to apply the person information in the face comparison group to thecamera to take effect.
Steps
Note• Currently it only supports applying to camera which supports face picture comparison.• The maximum number of groups that can be applied to the camera depends on the camera
capability.
1. Click Person → Face Comparison Group to enter the face comparison group management page.2. Click Apply to Device.
HikCentral Web Client User Manual
217

Figure 19-3 Apply Face Comparison Group to Device3. Select the face comparison group(s) to be applied.4. Select the camera(s) to apply the selected face comparison group(s) to.5. Set the face comparison similarity threshold which affects the frequency and accuracy of face
picture comparison alarm.
NoteOne camera can only have one similarity threshold. The latest applied threshold will take effect.
6. Click Apply to start applying.The applying progress will display in the Operation column.
7. Optional: If there exists applying failed face comparison group, the icon will display near thegroup name. Hover the cursor to the icon to check the prompt.
NoteYou can click Retry to apply this group to the linked camera(s) again. Click Details to view theexception details.
HikCentral Web Client User Manual
218

Chapter 20 Manage Role and User
The Security page allows you to add and delete users, assign user's permissions for accessing andmanaging the system. Before adding users to the system, you should create roles to define theuser's access rights to system resources and then assign the role to the user for granting thepermissions to the user. A user can link with many different roles.
20.1 Add RoleYou can assign the permissions to the roles as required, and the user can link to the role to obtaindifferent permissions.
Perform this task when you add role.
Steps1. Click Security → Roles to enter the Role Management page.
NoteThe system pre-defines two default roles: administrator and operator. You can click the rolename to view the details and operations. But you cannot edit or delete the two default roles.Administrator
The role that has all the permission of the system.
OperatorThe role that has all the permission for operating the Control Client.
2. Click Add to enter the Add Role page.
Figure 20-1 Add Role Page
HikCentral Web Client User Manual
219

3. Set the role name, expiry date, and description as desired.Expiry Date
The date that this role becomes invalid.
4. Set the permission for the role.- Select the default or pre-defined role from the Copy form drop-down list to copy the
permission settings of selected role.- Assign the permissions to the role.
Area Display RuleShow or hide the specific area(s) for the role. If the area is hidden, the user with the rolecannot view and access the area and its resources on any interface.
Figure 20-2 Area Display Role
Resource PermissionSelect the functions from the left panel and select resources from right panel to assign theselected resources' permissions to the role.
NoteIf you do not check the resources, the resource permission cannot be applied to the role.
HikCentral Web Client User Manual
220

Figure 20-3 Resource Permission
User PermissionAssign the resource permissions, configuration permissions on the Web Client, and thecontrol permissions on the Control Client to the role.
Figure 20-4 User Permission5. Complete adding the role.
- Click Add to add the role.- Click Add and Continue to save the settings and continue to add roles.
6. Optional: After adding the role, you can do one or more of the following:
Edit Role Click the Name field to edit the settings of the role.
Refresh Role Click Refresh All to get the latest status of the roles.
Delete Role Click Delete to delete the role.
HikCentral Web Client User Manual
221
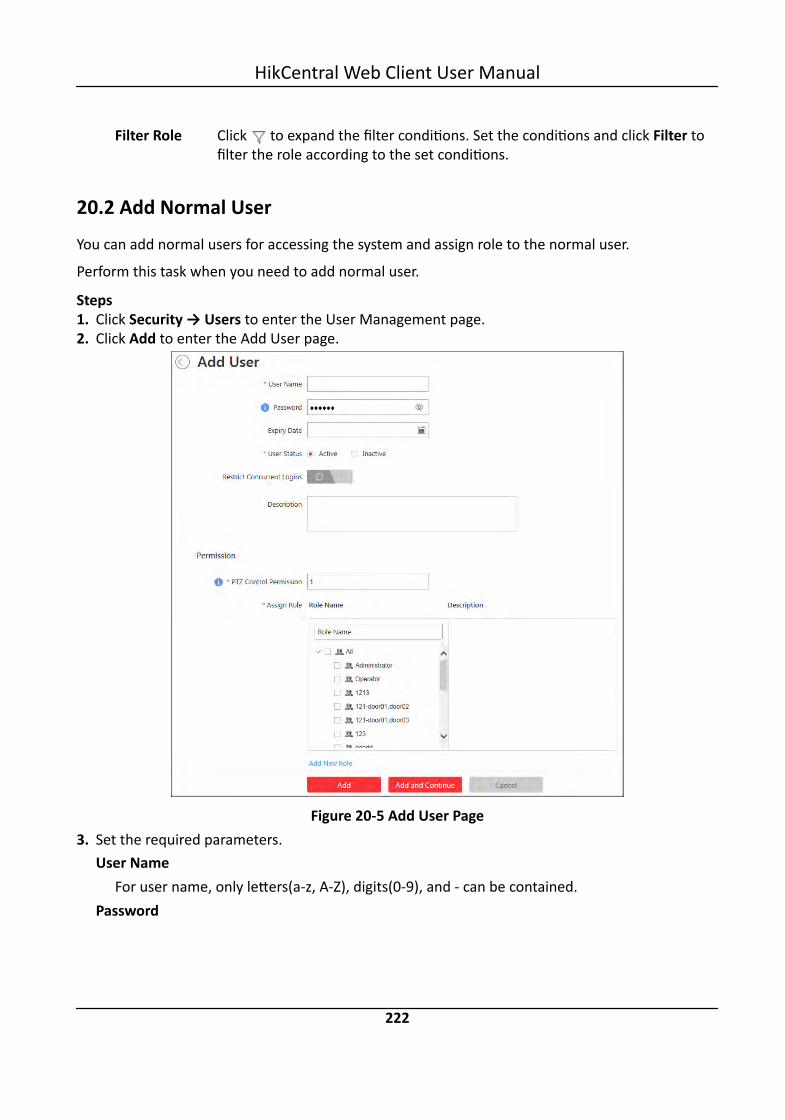
Filter Role Click to expand the filter conditions. Set the conditions and click Filter tofilter the role according to the set conditions.
20.2 Add Normal UserYou can add normal users for accessing the system and assign role to the normal user.
Perform this task when you need to add normal user.
Steps1. Click Security → Users to enter the User Management page.2. Click Add to enter the Add User page.
Figure 20-5 Add User Page3. Set the required parameters.
User NameFor user name, only letters(a-z, A-Z), digits(0-9), and - can be contained.
Password
HikCentral Web Client User Manual
222
The system provides a default password (Abc123). You can use it or customize a strongerpassword. However, you must change the initial password for first time login in.
Expiry DateThe date when this user account becomes invalid.
Restrict Concurrent LoginsIf necessory, set Restrict Concurrent Logins switch to ON and input the maximum number oflogins.
User StatusTwo kinds of status are available. If you select freeze, the user account is inactive until youset the user status as active.
4. Set the permission level (1-100) for PTZ control in PTZ Control Permission.
NoteThe larger the value is, the higher permission level the user has.
ExampleWhen user1 and user2 control the PTZ unit at the same time, the user who has the higher PTZcontrol permission level will take the control of the PTZ movement.
5. Check the existing roles to assign the role(s) for the user.
Note• If no role has been added, two default roles are selectable: administrator and operator.
AdministratorThe role that has all permissions of the system.
OperatorThe role that has all permissions of the system Control Client.
• If you want to add customized roles, you can click Add New Role to quickly enter the AddRole page. See Add Role for details.
6. Complete adding the user.- Click Add to add the user.- Click Add and Continue to save the settings and continue to add users.
NoteYou will be asked to change the password when logging in for first time. See First Time Login forNormal User for details.
7. Optional: Perform the following operations after adding the normal user.
Edit User Click the Name field of the user to edit the information
HikCentral Web Client User Manual
223

ResetPassword
In the Edit User page, click Reset to reset password of the user.
Note• If you reset the password, the user's password will be reset to its initial
password Abc123. The user should log in with initial password and thenchange the password.
• The admin user can reset the passwords of all the other users (exceptdomain user). Other users with Security permission (in Configuration andControl Permission) can reset the passwords of the users withoutSecurity permission. For changing the password, refer to ChangePassword for Reset User .
Delete User Click Delete to delete the user.
Force Logout You can also select the online user and click Force Logout to log out theonline user.
Refresh All Click Refresh All to get the latest status of the users.
Filter User Click to expand the filter conditions. Set the conditions and click Filter tofilter the user according to the set conditions.
NoteThe administrator user named admin was pre-defined by default. It cannot be edited ,deleted,or forced to log out.
20.3 Import Domain UserYou can select to import the domain users to the system and assign role to the domain users.
Before You StartYou should configure the active directory settings. See Set Active Directory for details.Perform this task if you want to import the domain user.
Steps1. Click Security → Users to enter the User Management page.2. Click Import Domain Users to enter the Import Domain Users page.
HikCentral Web Client User Manual
224

Figure 20-6 Import Domain Users Page3. Select the importing mode.
UserImport the specified users. Select the organization unit and check to select the user accountsunder the organization unit which display in the Domain User list on the right.
GroupImport all the users in the group. Select the organization.
4. Optional: Set Restrict Concurrent Logins switch to ON and input the maximum number oflogins.
5. Set the permission level (1-100) for PTZ control in PTZ Control Permission.
NoteThe larger the value is, the higher permission level the user has.
ExampleWhen user1 and user2 control the PTZ unit at the same time, the user who has the higher PTZcontrol permission level will take the control of the PTZ movement.
6. Check the existing roles to assign the role(s) for the selected domain user.
Note• If no role has been added, two default roles are selectable: administrator and operator.
Administrator
HikCentral Web Client User Manual
225
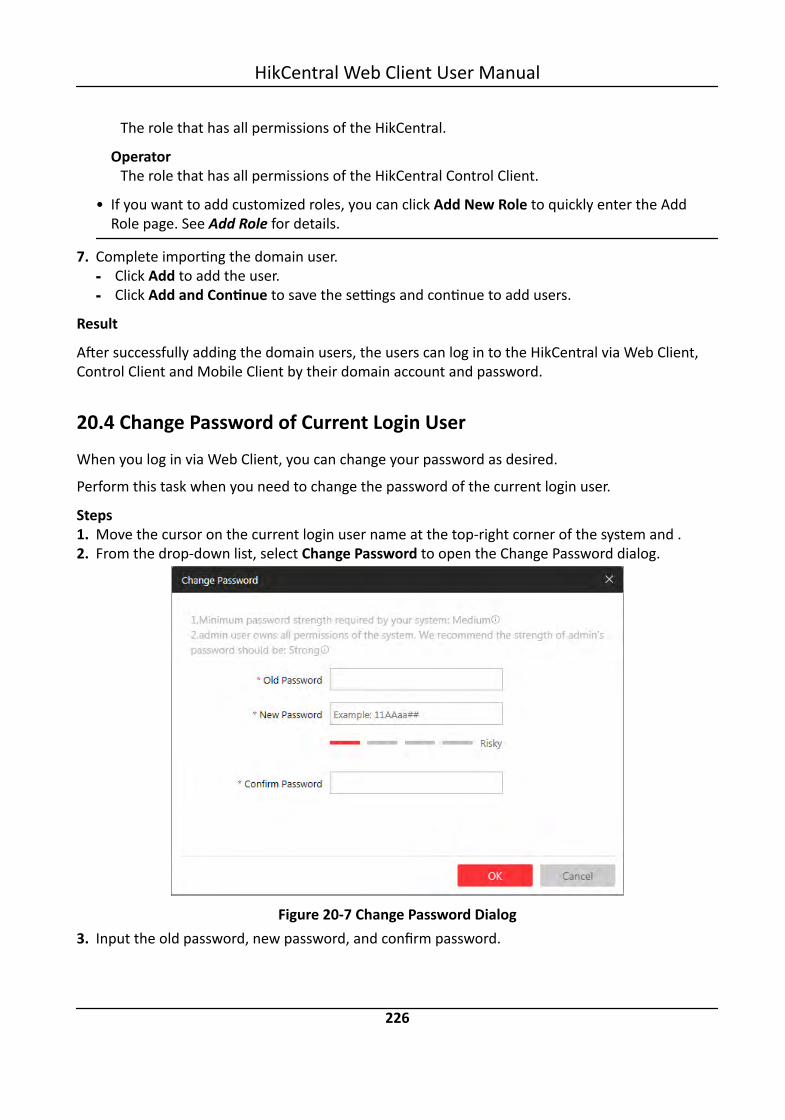
The role that has all permissions of the HikCentral.
OperatorThe role that has all permissions of the HikCentral Control Client.
• If you want to add customized roles, you can click Add New Role to quickly enter the AddRole page. See Add Role for details.
7. Complete importing the domain user.- Click Add to add the user.- Click Add and Continue to save the settings and continue to add users.
Result
After successfully adding the domain users, the users can log in to the HikCentral via Web Client,Control Client and Mobile Client by their domain account and password.
20.4 Change Password of Current Login UserWhen you log in via Web Client, you can change your password as desired.
Perform this task when you need to change the password of the current login user.
Steps1. Move the cursor on the current login user name at the top-right corner of the system and .2. From the drop-down list, select Change Password to open the Change Password dialog.
Figure 20-7 Change Password Dialog3. Input the old password, new password, and confirm password.
HikCentral Web Client User Manual
226

CautionThe password strength of the device can be checked by the system. We highly recommend youchange the password of your own choosing (using a minimum of 8 characters, including at leastthree kinds of following categories: upper case letters, lower case letters, numbers, and specialcharacters) in order to increase the security of your product. And we recommend you reset yourpassword regularly, especially in the high security system, resetting the password monthly orweekly can better protect your product.Proper configuration of all passwords and other security settings is the responsibility of theinstaller and/or end-user.
4. Click OK to change the password.
20.5 Reset Password for admin UserWhen you forgot the password of admin user, you can reset the password and set a new passwordfor admin user.
Perform this task when you forgot the admin user's password.
Steps1. In the address bar of the web browser, input the address of the PC running VSM (Video
Surveillance Management Service) and press Enter.
ExampleIf the IP address of PC running VSM is 172.6.21.96, and you should input http://172.6.21.96 inthe address bar.
NoteYou should configure the VSM's IP address in System → WAN Access before accessing the VSMvia WAN. For details, refer to Set WAN Access .
A login page will pop up.
HikCentral Web Client User Manual
227
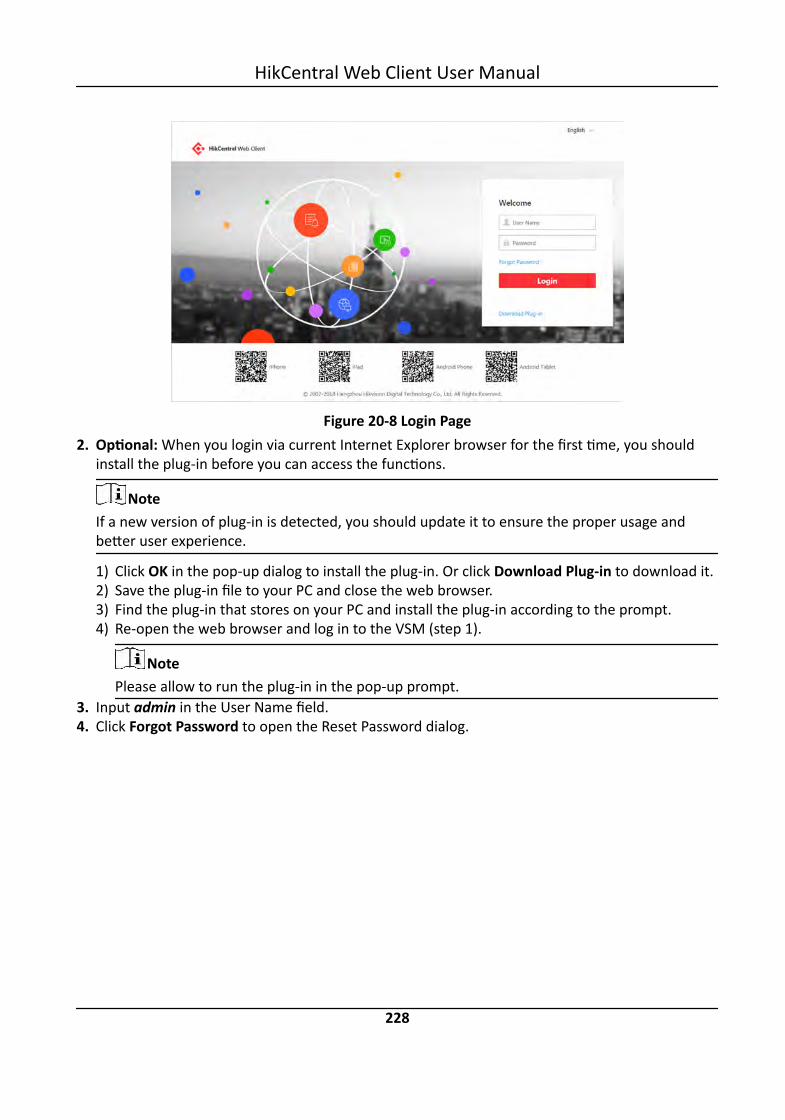
Figure 20-8 Login Page2. Optional: When you login via current Internet Explorer browser for the first time, you should
install the plug-in before you can access the functions.
NoteIf a new version of plug-in is detected, you should update it to ensure the proper usage andbetter user experience.
1) Click OK in the pop-up dialog to install the plug-in. Or click Download Plug-in to download it.2) Save the plug-in file to your PC and close the web browser.3) Find the plug-in that stores on your PC and install the plug-in according to the prompt.4) Re-open the web browser and log in to the VSM (step 1).
NotePlease allow to run the plug-in in the pop-up prompt.
3. Input admin in the User Name field.4. Click Forgot Password to open the Reset Password dialog.
HikCentral Web Client User Manual
228

Figure 20-9 Reset Password5. Input the required parameters in the pop-up dialog, including activation code, new password,
and confirm password.
NoteThe password strength can be checked by the system and should meet the systemrequirements. If password strength is lower than the required minimum strength, you will beasked to change your password. For detailed settings of minimum password strength, refer toManage System Security Security.
CautionThe password strength of the device can be checked by the system. We highly recommend youchange the password of your own choosing (using a minimum of 8 characters, including at leastthree kinds of following categories: upper case letters, lower case letters, numbers, and specialcharacters) in order to increase the security of your product. And we recommend you reset yourpassword regularly, especially in the high security system, resetting the password monthly orweekly can better protect your product.Proper configuration of all passwords and other security settings is the responsibility of theinstaller and/or end-user.
6. Click OK to reset the admin password.
HikCentral Web Client User Manual
229
NoteIf you forgot the password of other users, contact the administrator user to reset the passwordand then change the password for login.
20.6 Reset Password for Normal UserIf the user forgot the password, he/she can contact the users with administrator role to reset thepassword.
Perform this task to reset the password for normal user.
Steps
NoteThe admin user can reset the passwords of all the other users. Other users with administrator rolecan reset the passwords of the users without administrator role. See Add Normal User for detailsabout user's role settings.
1. Click Security to enter the Security Management page.2. Click Users on the left.3. Select one user and click the Name field to enter the user details page.4. Click Reset to reset the password of the selected user.
After resetting the password, the user's password will be reset to its initial password Abc123.
HikCentral Web Client User Manual
230

Chapter 21 Maintenance
HikCentral provides backup of the database, so that your data can be well protected and recoveredwhen an exception occurs.
You can also export the system's configuration data and save it to the local PC.
21.1 Set Database BackupYou can manually back up the database to perform the database backup immediately, or configurethe schedule to run the database backup task regularly.
Perform this task when you need to configure the schedule to run the database backup taskregularly or manually back up the database.
Steps1. Click Back Up and Restore Database on the home page.2. Click Back Up tab in the pop-up dialog to enter the database backup page.
Figure 21-1 Set Database Backup3. Click Back Up Now and click OK in the pop-up dialog if you need to perform the database
backup immediately. Or perform the following steps to configure the schedule for running thedatabase backup task regularly.
4. Set the backup schedule to run database backup regularly.1) Select how often to back up the database.
HikCentral Web Client User Manual
231

NoteIf you select Weekly or Monthly for running the backup task, select which day to run.
2) Select what time of the day to start backup.3) Set the Max. Number of Backups to define the maximum number of backup files available
on the system.
NoteThe value ranges from 1 to 5.
4) Click Save.
21.2 Restore DatabaseWhen an exception occurs, you can restore the database if you have backed up the database.
Before You StartYou should have backed up the database. Refer to Set Database Backup for details.Perform this task when you need to restore the database.
Steps
NoteDatabase recovery will restore the database to an earlier state. Thus, the data added after thatstate will be lost.
1. Click Back Up and Restore Database on the home page.2. Click Restore tab in the pop-up dialog to enter the database restore page.3. Select a backup file to restore the database to an earlier state.
HikCentral Web Client User Manual
232

Figure 21-2 Database Restore4. Click Restore to confirm the database recovery.
What to do nextAfter restoring the database, you must reboot the VSM via Service Manager and log in again viaWeb Client.
21.3 Export Configuration FileYou can export and save configuration data to the local PC, including Remote Site, recordingsettings and etc.
Perform this task when you need to export configuration data.
Steps1. Click Export Configuration Data on the home page to open the Export Configuration Data
dialog.2. Select the configuration data type to export.3. Click Export to save the data to your local PC.
Note• You can set the saving path by following the prompt of the browser.• The configuration data file is in CSV format.
HikCentral Web Client User Manual
233

Chapter 22 Manage System Security
System security is crucial for your system and property, you can set the password strength and lockIP address to prevent malicious attacks, and set other security policy to increase the security of thesystem.
Perform this task to set the minimum password strength, IP address locking, and other securitypolicy settings to prevent malicious attacks.
Steps1. Click Security → Security Settings to open the Security Settings page.2. Set Lock IP Address switch as ON and the number of login attempts is limited.
1) Select the allowable login attempts for accessing HikCentral.
NoteLogin attempt includes failed password attempt and failed verification code attempt.
2) Set the locking duration for this IP address. During the locking duration, the login attemptfrom this IP address is not allowed.
The number of login attempts is limited.3. Select the Minimum Password Strength to define the minimum complexity requirements that
the password should meet.4. Set the maximum password age.
1) Set Enable Maximum Password Age switch as ON to force user to change the passwordwhen password expires.
2) Set the maximum number of days that the password is valid.
NoteAfter this number of days, you will have to change the password. You can select the pre-defined time length or customize the time length.
5. Configure the settings to automatically lock the Control Client after a time period of inactivity onthe Control Client.1) Set Auto Lock Control Client switch as ON to lock the Control Client after a time period of
inactivity on Control Client.2) Select time period for user inactivity. You can select the pre-defined time period or customize
the time period.6. Click Save.
HikCentral Web Client User Manual
234
Chapter 23 System Configuration
You can configure the site name, WAN IP address, NTP settings, active directory, etc. for VSM, andperform other settings for the system.
• For the VSM of Central System, you can enable to receive the registration from Remote Site.• For the VSM without Remote Site Management module, you can set to register to the Central
System as a Remote Site.
23.1 Set Site NameYou can set a name for the current system.
Perform this task when you need to set a site name for the current VSM.
Steps1. Click System → Site Name on home page.2. Input a site name for the current VSM.3. Click Save.
23.2 Set WAN AccessYou can set the static IP address and ports to HikCentral for accessing the VSM server via WAN.
Perform this task when you need to set WAN access.
Steps1. Click System → WAN Access .2. Set the WAN Access switch to ON to enable the WAN access function.3. Input a static IP address for WAN access.4. Set the port for HikCentral, including HTTP, HTTPS, RTSP (Real Time Streaming Port), video file
streaming port, and WebSocket port.5. Optional: If you adopts generic event to integrate HikCentral with external sources, you need to
set the TCP port and UDP port to receiving the TCP and/or UDP data packages.
NoteFor setting the generic event, refer to Configure Generic Event .
6. Optional: For the VSM of Central System, set the port to receive the registration from a RemoteSite.
HikCentral Web Client User Manual
235

NoteThis configuration item is only available for the Central System with a Remote Site Managementmodule based on the License you purchased.
7. Click Save.
23.3 Set NTPYou can set the NTP server for syncing the time between the VSM and the NTP server.
Perform the following task when you need to set NTP server.
Steps1. Click System → NTP Settings .2. Set the Time Synchronization switch to ON to enable the NTP function.3. Set the NTP server address and NTP port.4. Input the interval for the auto time synchronization.5. Optional: Click Test to test the communication between the VSM and NTP server.6. Click Save.
23.4 Set Active DirectoryIf you have the AD (Active Directory) domain controller which contains the information (e.g., userdata, computer information), you can configure the settings to get the related information. In thisway, you can add the users that belong to an organization unit (OU) (e.g., a department of yourcompany) to HikCentral conveniently.
Perform this task when you need to set active directory.
Steps1. Click System → Active Directory on the home page.2. Configure the following parameters to connect to the AD domain controller.
Domain NameThe domain name of the AD domain controller.
Note• HikCentral only supports the NetBIOS format: e.g TEST\user and not the DNS Domain
name format.• To get the NetBIOS domain name, open the CMD window and enter nbtstat – n.
The NetBIOS domain name is the one in GROUP type.
HikCentral Web Client User Manual
236
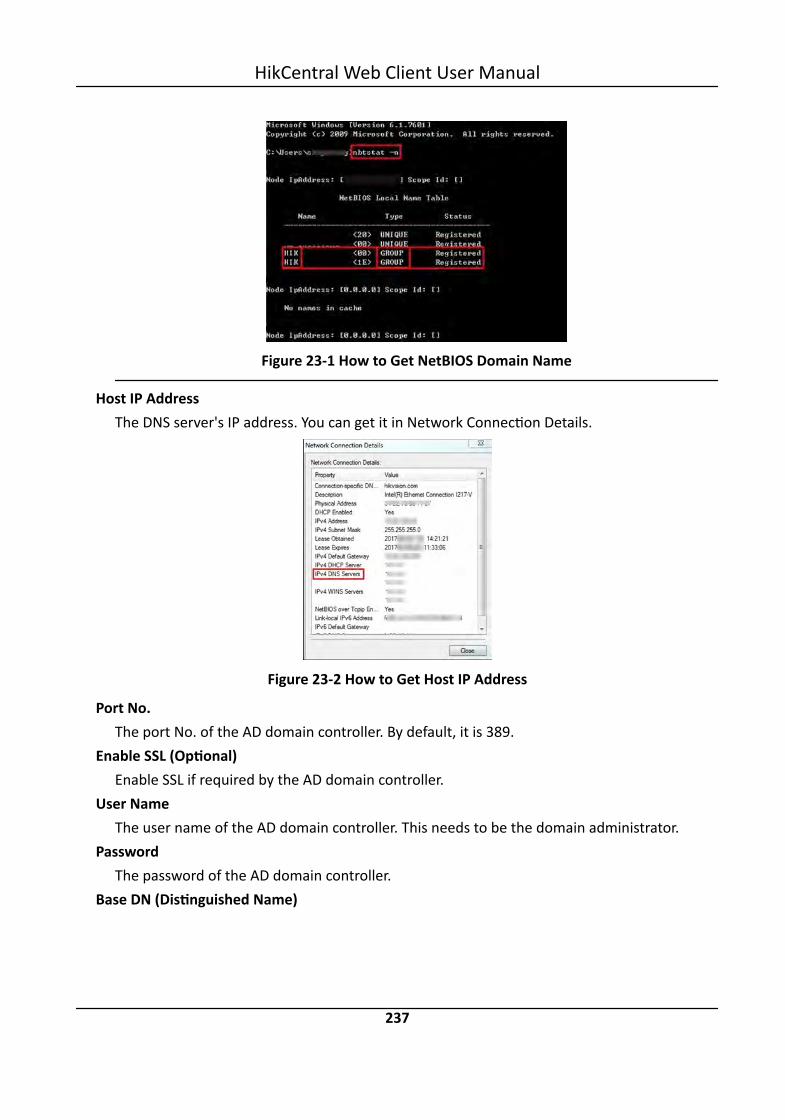
Figure 23-1 How to Get NetBIOS Domain Name
Host IP AddressThe DNS server's IP address. You can get it in Network Connection Details.
Figure 23-2 How to Get Host IP Address
Port No.The port No. of the AD domain controller. By default, it is 389.
Enable SSL (Optional)Enable SSL if required by the AD domain controller.
User NameThe user name of the AD domain controller. This needs to be the domain administrator.
PasswordThe password of the AD domain controller.
Base DN (Distinguished Name)
HikCentral Web Client User Manual
237

Input the filter condition in the text filed if you are familiar with the format. Or you can clickFetch DN to get the filter condition entered automatically.
Note• Only users found within an Organizational Unit (OU) in the domain can be imported. Click
Fetch DN to have the filter condition entered automatically.• If you input the Base DN manually, you need to define the root node as desired. If you click
Fetch DN, then the entire structure stored on the AD domain controller will be obtained.
3. Click Save.After the configuration, the organization unit and domain user information will display whenyou click Import Domain User on User Management page. See Import Domain User for details.
23.5 Set Server Usage ThresholdYou can set the threshold for the VSM server's CPU usage and RAM usage and the related valuecan be checked via the Control Client. You can also set event and alarm for notification if the CPUusage or RAM usage approaches the pre-determined threshold (for example, 60%) and lasts forcertain duration.
Perform the following steps for setting the CPU and RAM usage threshold.
Steps1. Click System → Server Usage Thresholds on the home page.2. Drag the to adjust the CPU and RAM threshold value.3. Define the duration in the Notify if Value Exceeds for (s) field for CPU Usage and RAM Usage.
Example• If you set warning threshold as 60%, and set 20 in the Notify if Value Exceeds for (s) field of CPU
Usage, you can view the CPU status changes to Waring in Health Monitoring in Control Clientwhen the CPU usage reaches the warning threshold and lasts for 20 seconds.
• If you set warning threshold as 60%, and set 20 in the Notify if Value Exceeds for (s) field of CPUUsage, and set an alarm for CPU Warning (see Add Alarm for HikCentral Server ), the alarm willbe triggered when the CPU usage reaches the warning threshold and lasts for 20 seconds.
23.6 Set HolidayYou can add the holiday to define the special days that can adopt different shift schedule or accesscontrol schedule.
Perform this task to add some special days as holiday.
Steps1. Click System → Holiday Settings .2. Click Add to pop up the adding holiday dialog.
HikCentral Web Client User Manual
238
NoteYou can add up to 16 holidays.
3. Set a customized name.4. Click the Time field and define the start date and end date for the holiday period.5. Click Add to save the holiday.6. Optional: Perform the following operations after adding the holiday.
Edit Holiday Click in the Operation column to edit holiday (except the holiday(s)in use).
Delete Holiday Click in the Operation column to delete the holiday.
Delete All Holidays Click Delete All to delete all the holidays (except the holiday(s) in use).
23.7 Enable Receiving Generic EventYou can enable the receiving generic event function so that the system can receive the configuredgeneric events.
Perform this task when you need to enable receiving generic event function.
Steps1. Click System → Receiving Generic Event .2. Check Receiving Generic Event checkbox to enable this function.3. Click Save.
NoteYou can configure the system's port No. for generic event: Open Service Manager (installed onthe PC running VSM service), and click HikCentral Video Surveillance Management Servicename to edit.
23.8 Allow for Remote Site RegistrationFor the system with Remote Site Management module (as we called Central System), it can receivethe registration from other Remote Sites after enabling this function.
Before You StartIf a remote site needs to register to the Central System, it should open the Remote Site's WebClient and enter Registering to Central System to configure the Central System's parameters. SeeRegister to Central System for details.Perform this task when you need to allow the Central System to accept the registration fromRemote Site.
HikCentral Web Client User Manual
239
Steps
NoteAllowing for Remote Site registration is only available for the system with Remote SiteManagement module.
1. Click System → Receiving Site Registration .2. Check Receiving Site Registration checkbox to enable this function.3. Click Save.
23.9 Register to Central SystemFor the system without Remote Site Management module (as we called Remote Site), it canregister to the Central System after enabling this function and setting the Central System'sparameters.
Before You StartFor Central System, it should enable the receiving site registration function so that it can receivethe Remote Site registration. See Allow for Remote Site Registration for details.Perform this task when you need to register the Remote Site to the Central System.
Steps
NoteRegistering to Central System is only available for the system without Remote Site Managementmodule.
1. Click System → Registering to Central System .2. Set the Registering to Central System switch to ON to enable this function.3. Input the IP address and port No. of Central System.
NoteOpen Service Manager (installed on the PC running central system's VSM service), and clickHikCentral Video Surveillance Management Service name if you need to view or edit theCentral System's port.
4. Click Save.
23.10 Set Server NICYou can select the NIC of the current VSM so that the system can receive the alarm information ofthe third-party device or HIKVISION device connected via ONVIF protocol.
Perform this task when you set server NIC.
HikCentral Web Client User Manual
240
Steps1. Click System → Server NIC .2. Select the currently used NIC name of VSM in the drop-down list.
The NIC information including description, MAC address, and IP address will display.3. Click Save.
23.11 Set Transfer ProtocolYou can set the VSM server's transfer protocol to define the access mode for the VSM (via WebClient, Control Client, or Mobile Client) as HTTP or HTTPS. The HTTPS protocol provides higher datasecurity.
Perform this task when you need to set the VSM server's transfer protocol.
Steps
NoteSetting transfer protocol is only available when accessing the Web Client on the VSM server locally.
1. Click System → Transfer Protocol .2. Select the transfer protocol as HTTP or HTTPS.3. If you select it as HTTPS, you are required to set the certificate. You can use the system provided
certificate, or select New Certificate and click to select a new certificate file.
Note• The new certificate should be in PEM format.• The public key and private key certificates are the same one.
4. Click Save.• The VSM server will reboot automatically after changing the transfer protocol or thecertificate.
• The users of the Control Clients and Mobile Clients connecting to this VSM server will beforced logout, and are not allowed to login until rebooting completed.
Result
You can access the VSM via Web Client, Control Client, or Mobile Client by the selected transferprotocol.
23.12 Configure System Hot SpareYou can enable the hot spare function and configure the hot spare property of the current VSMserver as host server or spare server.
HikCentral Web Client User Manual
241
Before You StartYou should build the hot spare system when installing the VSM service. See Install Module fordetails.Perform this task when you need to set system hot spare.
Steps1. Click System → Hot Spare .2. Set the Hot Spare Configuration switch to ON to enable the hot spare function.
The current VSM server's server name and available IP address will display.3. Set the server as host server or spare server in Hot Spare Property.4. Click Save.
23.13 Set Device Access ModeSet the access mode as automatically judge or proxy mode to define how the system accesses allthe added encoding devices.
Perform this task to define how the system accesses all the added encoding devices.
Steps1. Click System → Device Access Mode .2. Set the device access mode as automatically judge or proxy mode.
Automatically JudgeThe system will automatically judge the network connection for accessing the device asaccessing directly or accessing via Streaming Gateway and Management Service.
ProxyThe system will access the device via Streaming Gateway and Management Service. It is lesseffective and less efficient than accessing directly.
3. Click Save to confirm the settings.System accesses all the added encoding devices via the selected mode.
23.14 Reset Device Network InformationWhen system network domain changes (such as server migration), you must reset the networkinformation of the added device to adapt to the new network environment. Otherwise the devicelive view, playback and other functions will be affected.
Perform this task when you need to reset the network information of the added device.
Steps1. Click System → Reset .2. Click Reset to one-touch reset the device network information.
HikCentral Web Client User Manual
242
23.15 Export Service Component CertificateBefore adding the Streaming Server or Cloud Storage Server to the system, you should export theservice component certificate stored in the VSM server and import it to the Streaming Server orCloud Storage Server you want to add so that the certificates of the Streaming Server or CloudStorage Server and VSM are the same.
Perform this task when you need to export service component certificate.
Steps
NoteExporting VSM server's service component certificate is only available when accessing the WebClient on the VSM server locally.
1. Click System → Service Component Certificate .2. Click Export to export the service component certificate and save it in the local PC.
What to do nextImport the exported certificate file to the Cloud Storage Server and Streaming Server you want toadd. For the following operations, see Add Cloud Storage Server and Add Streaming Server fordetails.
HikCentral Web Client User Manual
243

Chapter 24 Applications
The HikCentral also provides functionalities of live view, playback, and local configuration throughweb browser.
Note• If the VSM's transfer protocol is HTTPS, the Applications module (including Live View, Playback,
and Local Configuration) is only available when you accessing the Web Client via InternetExplorer.
• If the VSM's transfer protocol is HTTP, the Live View and Playback modules are available forInternet Explorer, Google Chrome, and Firefox. But Local Configuration module is only availablefor Internet Explorer.
24.1 Live ViewIn the Live View module of Web Client, you can view the live video of the added cameras and dosome basic operations, including picture capturing, recording, PTZ control, and so on.
Note• If the VSM server's transfer protocol is HTTPS, the Live View module is only available when you
accessing the Web Client via Internet Explorer.• Starting live view of Fisheye Camera or PanoVu Series Camera is not supported for Google
Chrome and Firefox web browser.• Starting live view in H.264+ or H.265+ encoding format is not supported for Google Chrome and
Firefox web browser.
24.1.1 Start Live View
After adding the cameras into areas, you can start live view to view the camera's live video, andperform some basic operations via the Web Client.
Before You StartAn area with cameras assigned to is required to be defined for live view.Perform this task when you need to view the live video of the camera via Web Client.
Steps1. Click Live View on home page to enter the Live View page.2. Optional: Move your mouse to in the live view toolbar, and select a window division mode.
HikCentral Web Client User Manual
244

NoteOnly 1-window mode is available when you access the Web Client via the Google Chrome andFirefox web browser.
3. Drag the camera to the display window, or double-click the camera name after selecting thedisplay window to start the live view. The selected window is outlined in red.
Note• For Internet Explore web browser, if the system is Central System with Remote Site
Management module, you can also view the live video of the cameras imported from remotesite. For managing remote site's cameras in areas, refer to Add Camera to Area for RemoteSite .
• For Internet Explore web browser, you can also double-click the area name to start the liveview of cameras in the area. The display windows adapt to the number of cameras in thearea.
4. Optional: Move the mouse over the display window during live view, and you can perform someoperations, such as digital zoom, instant playback, two-way audio, and so on.
24.1.2 PTZ Control
Cameras with the pan/tilt/zoom functionality can be controlled through the web browser. You canalso set the preset, patrol, and pattern for the cameras.
Configure Preset
A preset is a predefined image position which contains configuration parameters for pan, tilt,zoom, focus and other parameters. You can also set a virtual preset after enabling digital zoom.
Perform this task when you need to add a preset for the camera.
Steps1. Click Live View on the home page to enter the live view page.2. Start live view of camera.
NoteSee Start Live View for details about how to start live view.
3. Click on the live view toolbar to open the PTZ control panel.4. Click to enter the PTZ preset configuration panel.
HikCentral Web Client User Manual
245

Figure 24-1 Configure Preset5. Click the direction buttons to move the camera to the desired view or zoom in/out the view.
NoteYou can also scroll the mouse wheel to zoom in or zoom out the view.
6. Select a PTZ preset number from the preset list and click .7. Create a name for the preset.8. Click OK to save the settings.
NoteUp to 256 presets can be added.
9. Optional: After setting the preset, you can do one or more of the followings:
Call Preset Double-click the configured preset in the list, or select the preset and click to call the preset.
Edit Preset Select the configured preset from the list and click to edit it.
Delete Preset Select the configured preset from the list and click to delete it.
HikCentral Web Client User Manual
246

Configure Patrol
A patrol is a scanning track specified by a group of user-defined presets (including virtual presets),with the scanning speed between two presets and the dwell time of the preset separatelyprogrammable.
Before You StartTwo or more presets for one PTZ camera need to be added.
NoteSee Configure Preset for details.
Perform this task when you need to add a patrol for the camera.
Steps1. Click Live View on the home page.2. Start live view of camera.
NoteSee Start Live View for details about how to start live view.
3. Click on the live view toolbar to open the PTZ control panel.4. Click to enter the patrol configuration panel.
HikCentral Web Client User Manual
247

Figure 24-2 Configure Patrol5. Select a patrol and click .6. Click to add a configured preset, and set the dwell time and the patrol speed.
Note• The preset dwell time ranges from 15 to 30s.• The patrol speed ranges from 1 to 40.
7. Repeat the above step to add other presets to the patrol.
HikCentral Web Client User Manual
248

Figure 24-3 Add Preset to Patrol8. Optional: Perform the following operations after you add the preset.
Remove Preset fromPatrol
Select the added preset and click to remove the preset fromthe patrol.
Adjust Preset Sequence Select the added preset and click to adjust the presetposition.
9. Click OK to save the patrol settings.
NoteUp to eight patrols can be configured.
10. Optional: After setting the patrol, you can do one or more of the followings:
Call Patrol Click to start the patrol.
Stop Calling Patrol Click to stop the patrol.
Configure Pattern
You can set patterns to record the movement of the PTZ.
Perform this task when you need to add a pattern for the camera.
HikCentral Web Client User Manual
249
Steps1. Click Live View on the home page to enter the Live View page.2. Start live view of the camera.
NoteSee Start Live View for details about how to start live view.
3. Click on the live view toolbar to open the PTZ control panel.4. Click to enter the PTZ pattern configuration panel.
Figure 24-4 Configure Pattern5. Click to start recording movement pattern path.6. Use the direction buttons and other buttons to control the PTZ movement.7. Click to stop and save the pattern recording.
NoteOnly one pattern can be configured each time, and the newly-defined pattern will overwrite theprevious pattern.
8. Optional: After setting the pattern, you can do one or more of the following:
Call Pattern Click to call the pattern.
Stop Calling Pattern Click to stop calling the pattern.
HikCentral Web Client User Manual
250
Delete Pattern Click to delete the pattern.
24.2 PlaybackThe video files stored on the storage devices such as the HDDs, Net HDDs and SD/SDHC cards onthe local device or the Recording Server can be searched and played back remotely through theweb browser.
NotePlaying video files stored on Hybrid Storage Area Network is not supported for Google Chrome andFirefox web browser.
24.2.1 Search Video File
You can search the video files of cameras and filter the searched video files by video type or bystorage location.
Perform this task when you need to search a specific video files.
Steps1. Click Playback on home page to open the Playback page.2. Drag the camera to the display window, or double-click the camera to start the playback.
NoteIf the system is central system with Remote Site Management module, you can also play backthe recorded video of the cameras imported from remote site. For managing remote site'scameras in areas, refer to Manage Area .
3. Optional: Click the date and time on the toolbar to select the date and time to search the videofiles.
Note• In the calendar panel, the date with video files will be marked with a triangle.• The calendar is not supported by cameras on remote site.
4. Optional: Click on the playback toolbar to select the video file type for playback.5. Optional: Select the storage location of the video files for playback and select the stream type
of the video files for playback.
For camera configured with auxiliarystorage:
Select the storage location of the video files forplayback.
For camera configured with dual-stream recording:
Select the stream type of the video files forplayback.
HikCentral Web Client User Manual
251
NoteFor setting the storage location of recording settings, refer to Configure Recording .
24.2.2 Play Video File
After searching the video files, the playback starts. You can control the video playback via timeline.The timeline indicates the time duration for the video file.
Perform this task when you need to control the playback.
Steps1. Click Playback on home page to open the Playback page.2. Search the video file of cameras for playback. For details, refer to Search Video File .
The playback starts.3. Click the icons on the toolbar to control the playback.
NoteReverse playback and reverse single frame playback are not supported for Google Chrome andFirefox web browser.
4. Click on the timeline or drag the timeline to play back the video of the specific time.5. Optional: Click or or use the mouse wheel to scale up or scale down the timeline bar.6. Optional: Move the cursor to the display window in playback to access further functions,
including capture, clipping, digital zoom, audio control, and displaying video information on theimage.
Note• Clipping video files is not available for Firefox web browser.• Displaying video information is not available for Google Chrome and Firefox web browser.
24.3 Local ConfigurationThe general parameters, such as network performance, play performance, capture mode andsaving paths of files, can be configured through the web browser. You can also view the saving pathof video files and captured pictures on your current PC.
Perform this task when you need to set the general parameters of local configuration via WebClient.
HikCentral Web Client User Manual
252
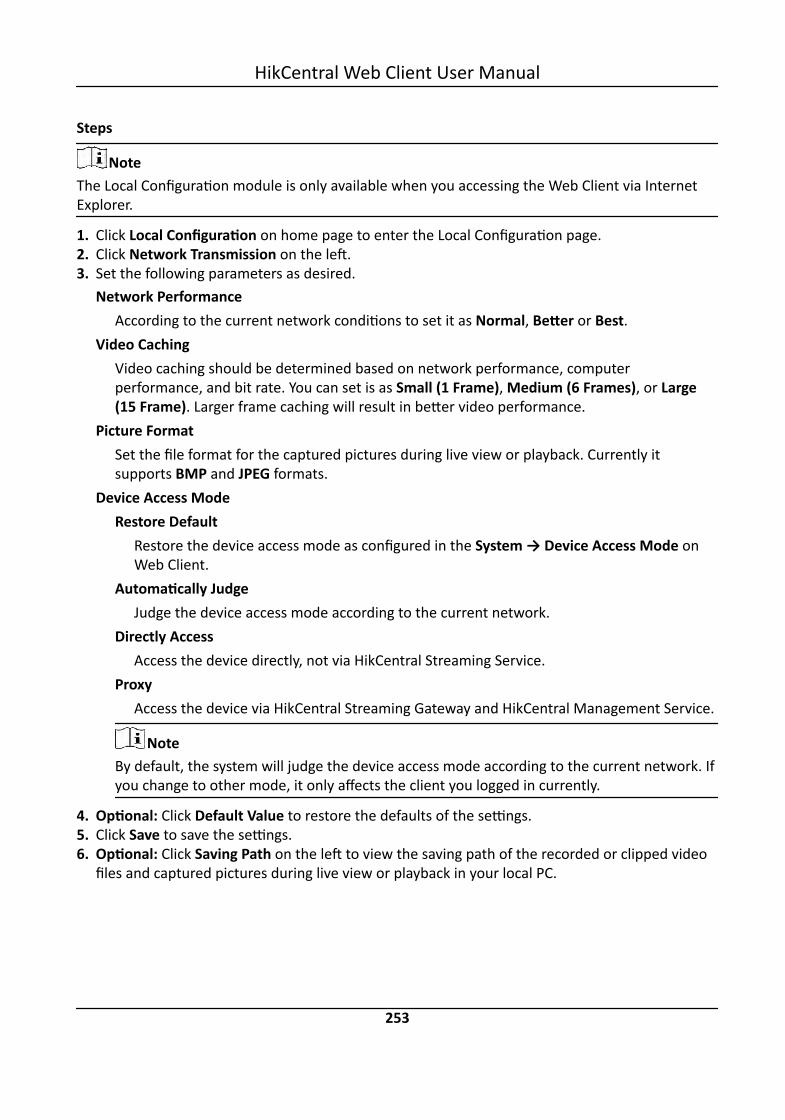
Steps
NoteThe Local Configuration module is only available when you accessing the Web Client via InternetExplorer.
1. Click Local Configuration on home page to enter the Local Configuration page.2. Click Network Transmission on the left.3. Set the following parameters as desired.
Network PerformanceAccording to the current network conditions to set it as Normal, Better or Best.
Video CachingVideo caching should be determined based on network performance, computerperformance, and bit rate. You can set is as Small (1 Frame), Medium (6 Frames), or Large(15 Frame). Larger frame caching will result in better video performance.
Picture FormatSet the file format for the captured pictures during live view or playback. Currently itsupports BMP and JPEG formats.
Device Access ModeRestore Default
Restore the device access mode as configured in the System → Device Access Mode onWeb Client.
Automatically JudgeJudge the device access mode according to the current network.
Directly AccessAccess the device directly, not via HikCentral Streaming Service.
ProxyAccess the device via HikCentral Streaming Gateway and HikCentral Management Service.
NoteBy default, the system will judge the device access mode according to the current network. Ifyou change to other mode, it only affects the client you logged in currently.
4. Optional: Click Default Value to restore the defaults of the settings.5. Click Save to save the settings.6. Optional: Click Saving Path on the left to view the saving path of the recorded or clipped video
files and captured pictures during live view or playback in your local PC.
HikCentral Web Client User Manual
253

Chapter 25 Important Ports
HikCentral uses particular ports when communicating with other servers, devices, and so on.
Make sure that the following ports are not occupied for data traffic on your network and youshould forward these ports on router for WAN access or open these ports in the firewall in caseyou may need to access the system via other networks.
Port No. Description
NGINX Port
80 (TCP) Used for web browser access in HTTP protocol.
443 (TCP) Used for web browser access in HTTPS protocol.
VSM Port
14200 (TCP) Used for Remote Site registration to central system.
15300 (TCP and UDP) Used for receiving generic event.
Streaming Gateway Port
554 (TCP) Used for getting stream (real time streaming port).
559 (TCP) Used for getting stream for Google Chrome or Firefox (WebSocket port).
10000 (TCP) Used for getting stream for playback (video file streaming port).
Keyboard Proxy Service Port
8910 (TCP) Used for network keyboard to access the Keyboard Proxy Service.
NTP Service Port
123 (UDP) NTP port used for time synchronization.
Streaming Service Port
554 (TCP) Used for Streaming Service to get stream (real time streaming port).
559 (TCP) Used for getting stream for Google Chrome or Firefox (WebSocketport).
10000 (TCP) Used for Streaming Service to get stream for playback (video file streamingport).
6001 (UDP) Network management port.
HikCentral Web Client User Manual
254

UD09586B