USER GUIDE ANDROID GLOOKO FOR€¦ · · 2017-08-10GLOOKO FOR ANDROID USER GUIDE ... Samsung...
64
GLOOKO FOR ANDROID USER GUIDE August 2017 IM GLAD 0001 REV M
-
Upload
nguyenduong -
Category
Documents
-
view
225 -
download
3
Transcript of USER GUIDE ANDROID GLOOKO FOR€¦ · · 2017-08-10GLOOKO FOR ANDROID USER GUIDE ... Samsung...

GLOOKO FOR ANDROIDUSER GUIDE
August 2017
IM GLAD 0001 REV M

TABLE OF CONTENTS
GENERAL INFORMATION ......................................................................................................1Product Description ....................................................................................................................................................1Intended Use ...............................................................................................................................................................1Supported Devices ......................................................................................................................................................1
Blood Glucose Meters........................................................................................................................................................3Insulin Pumps ....................................................................................................................................................................6Continuous Glucose Monitors (CGMs) ..............................................................................................................................6
Warnings ......................................................................................................................................................................7Contraindications........................................................................................................................................................7
INSTRUCTIONS FOR USE – GLOOKO MOBILE APP....................................................................8CONTACT SUPPORT ......................................................................................................................8GET STARTED WITH GLOOKO .........................................................................................................8
Log Out of Your Glooko Account ................................................................................................................................8Login to Your Existing Glooko Account ......................................................................................................................9
Get Help Logging into Your Glooko Account ....................................................................................................................9Sign Up.......................................................................................................................................................................10Sign Up with an Activation Code ..............................................................................................................................13
NAVIGATION ...............................................................................................................................15HOME ........................................................................................................................................16SYNC YOUR DIABETES DEVICE DATA..............................................................................................17
The Sync Menu ..........................................................................................................................................................17Access the Sync Menu......................................................................................................................................................17Add a device.....................................................................................................................................................................17Remove a device..............................................................................................................................................................17Sync your diabetes device ..............................................................................................................................................17
Sync Using the MeterSync Blue ................................................................................................................................18Sync a Bluetooth Meter.............................................................................................................................................19Sync Using a USB OTG Cable ....................................................................................................................................20Sync Via CareLink Personal (Medtronic) ..................................................................................................................21
Connect an Existing CareLink Account to Glooko..........................................................................................................22Create a New CareLink Account .....................................................................................................................................23
Sync Using a MeterSync Cable..................................................................................................................................24FITNESS & HEALTH APPS .............................................................................................................25
Connect Your Fitness or Health App.........................................................................................................................25Disconnect Your Fitness or Health App ....................................................................................................................25
GLOOKO METERSYNC BLUE..........................................................................................................26The MeterSync Blue Menu ........................................................................................................................................26Pair a MeterSync Blue to Glooko ..............................................................................................................................27
HISTORY ....................................................................................................................................28Interpret the Day View Graph ...................................................................................................................................28Interpret the History List View ..................................................................................................................................28Edit or Delete an Event from History........................................................................................................................29
EVENTS......................................................................................................................................30Add Events .................................................................................................................................................................30Edit or Delete Events .................................................................................................................................................30Food Events ...............................................................................................................................................................31
Manually Enter Grams.....................................................................................................................................................31

TABLE OF CONTENTS
Search for a Food Item....................................................................................................................................................31Insulin Events ............................................................................................................................................................32
Manually Enter Units of Insulin.......................................................................................................................................32Search for an Insulin .......................................................................................................................................................32
Medication Events .....................................................................................................................................................33Manually Enter Medication Dosage ...............................................................................................................................33Search for a Medication ..................................................................................................................................................33
Exercise Events..........................................................................................................................................................34Manually Enter Exercise Duration ..................................................................................................................................34Search for an Exercise Event...........................................................................................................................................34
Comment Events .......................................................................................................................................................35Manually Enter a Comment ............................................................................................................................................35Search for a Stock Comment ..........................................................................................................................................35
TRENDS .....................................................................................................................................36Trends ........................................................................................................................................................................37
Adjust the Date Range.....................................................................................................................................................37Trends Averages and Statistics ......................................................................................................................................38Trends Graphs .................................................................................................................................................................39Best Days .........................................................................................................................................................................40Comparisons....................................................................................................................................................................40
Overlay.......................................................................................................................................................................41Adjust the Date Range.....................................................................................................................................................41Overlay Averages and Statistics .....................................................................................................................................42Daily Overlay Graphs.......................................................................................................................................................43Patterns ...........................................................................................................................................................................44
SIDE MENU (ADDITIONAL ITEMS) ..................................................................................................45Profile.........................................................................................................................................................................46
View and Edit Your Personal Information ......................................................................................................................46Manage ProConnect Codes.............................................................................................................................................47View and Edit Your Devices .............................................................................................................................................48View and Edit Additional Settings ..................................................................................................................................51
Share Report..............................................................................................................................................................53Reminders..................................................................................................................................................................54
Create a Reminder ..........................................................................................................................................................54Respond to a Reminder...................................................................................................................................................55Disable or Delete a Reminder .........................................................................................................................................55
Joslin HypoMap™ ......................................................................................................................................................56Open a HypoSurvey.........................................................................................................................................................56Complete a HypoSurvey..................................................................................................................................................57
Shop at Glooko..........................................................................................................................................................59About..........................................................................................................................................................................59Help............................................................................................................................................................................59
INDEX...............................................................................................................................60
REVISION HISTORY ............................................................................................................61

GENERAL INFORMATION
GENERAL INFORMATION
PRODUCT DESCRIPTIONGlooko allows people with diabetes to sync data from their meter(s), insulin pump, and/or continuous glucose monitor (CGM) to their Android device. With multiple viewing options, Glooko helps people with diabetes and their healthcare providers visualize fluctuations in their glucose data based on integrated or manually added carb intake, insulin and medication dosage, and fitness and health activity. All diabetes data can be shared with their care team through email or fax, and/or healthcare providers can view their patient’s diabetes data directly in the Glooko web app.
INTENDED USEThe Glooko device system for Glooko Application is data management software intended for use in home and professional settings to aid people with diabetes and their healthcare providers in review, analysis and evaluation of glucose data to support an effective diabetes management program. The Glooko device system for Glooko Application connects to compatible FDA cleared meters, insulin pumps, and CGMs and allows individuals to transfer their diabetes data results to their Android operating system platform.
Glooko is not intended to provide decisions about treatments or be used as a substitute for professional healthcare advice.
SUPPORTED DEVICESTo get started, you will need:
1. A Glooko subscription, which can be purchased from the Glooko web store at shop.glooko.com and is renewed annually.
2. The appropriate syncing device for your diabetes device. View a list of compatible diabetes devices and the necessary syncing devices HERE.
3. The Glooko app, downloaded from Google Play onto your Android device.
4. An Android Device with the following requirements:
Android operating system:GLOOKO DEVICE REQUIRED ANDROID OS VERSIONGlooko MeterSync Blue 1.4.3.0 and newerGlooko MeterSync for Android 2.2.3.3 or newerMicro-to-Female USB OTG Cable 3.4.0.0 or newerMicro-to-Micro USB OTG Cable 4.4.0.0 or newerMicro-to-Mini USB OTG Cable 5.4.0.0 or newer30-pin to Female USB OTG Cable 6.4.0.0 or newer
Screen size specified as normal or large – Glooko works on small Android screens, but it is not optimized for that size.
IM GLAD 0001 REV M 1

GENERAL INFORMATION
The specific Android device models are:
GLOOKO METERSYNC BLUE
HTC One (M8) Huawei Honor 6 LG G3 LG Nexus 4 LG Nexus 5
Motorola G Motorola X Samsung Note II (GT-N7100) Samsung Note III Samsung Galaxy S3 (GT-19300)*
Samsung Galaxy S3 (SGH-I747)* Samsung Galaxy S4 (GT-I9500) Samsung Galaxy S4 (SGH-I337) Samsung Galaxy S5 Xiaomi Redmi Note
GLOOKO METERSYNC FOR ANDROID
HTC Desire HD (A9191) HTC Evo (PC36100) HTC Evo 3D (X515m) HTC Incredible S (S710e) HTC Sense 3.6 HTC Sensation XE with Beats
Audio (Z715e) LG Nexus 4 LG Nexus 5 LG Optimus 2X (LG-P990)
LG Optimus L9 (LG-P765) Motorola Droid X Samsung Ace (GT-S5830T) Samsung Galaxy Nexus Samsung Galaxy Note (GT-N7000) Samsung Note II (GT-N7100) Samsung Galaxy S+ (GT-I9001) Samsung Galaxy S2 (GT-I9100) Samsung Galaxy S2 (SGH-1757M) Samsung Galaxy S3 (GT-19300)
Samsung Galaxy S3 (SGH-I747) Samsung Galaxy S4 (GT-I9500) Samsung Galaxy S4 (SGH-I337) Samsung Galaxy Tab 2 (GT-
P5100) Samsung Galaxy Tab 2 7.0 (GT-
P3113) Samsung Galaxy Tab 3 (SM-T211) Sony Ericsson Xperia S (LT26i)
MICRO-TO-FEMALE USB OTG CABLE
Huawei Honor 6 LG Nexus 5 Samsung Galaxy Nexus Samsung Galaxy Note II (GT-
N7100)
Samsung Galaxy Note III Samsung Galaxy S2 (SGH-1757M) Samsung Galaxy S3 (GT-I9300) Samsung Galaxy S3 (SGH-I747) Samsung Galaxy S4 (GT-I9500)
Samsung Galaxy S4 (SGH-I337)Galaxy S5
Xiaomi Redmi Note
MICRO-TO-MICRO USB OTG CABLE
Huawei Honor 6 LG Nexus 5 Samsung Galaxy Nexus Samsung Galaxy Note II (GT-
N7100)
Samsung Galaxy Note III Samsung Galaxy S2 (SGH-1757M) Samsung Galaxy S3 (GT-I9300) Samsung Galaxy S3 (SGH-I747) Samsung Galaxy S4 (GT-I9500)
Samsung Galaxy S4 (SGH-I337) Galaxy S5 Xiaomi Redmi Note
MICRO-TO-MINI USB OTG CABLE
Huawei Honor 6 LG Nexus 5 Samsung Galaxy Nexus Samsung Galaxy Note II (GT-
N7100)
Samsung Galaxy Note III Samsung Galaxy S2 (SGH-1757M) Samsung Galaxy S3 (GT-I9300) Samsung Galaxy S3 (SGH-I747 Samsung Galaxy S4 (GT-I9500)
Samsung Galaxy S4 (SGH-I337) Galaxy S5 Xiaomi Redmi Note
30-PIN TO FEMALE USB OTG CABLE
Samsung Galaxy Tab 2 7.0 (GT-P3113)
*For the Glooko MeterSync Blue, the Samsung Galaxy S3 is not compatible with the following devices: OneTouch Ultra®2, OneTouch UltraLink®, Nipro TRUEbalanceTM, Nipro TRUEreadTM, Nipro TRUEresultTM, and Nipro TRUEtrackTM. Individuals should use the MeterSync for Android.
IM GLAD 0001 REV M 2
GENERAL INFORMATION
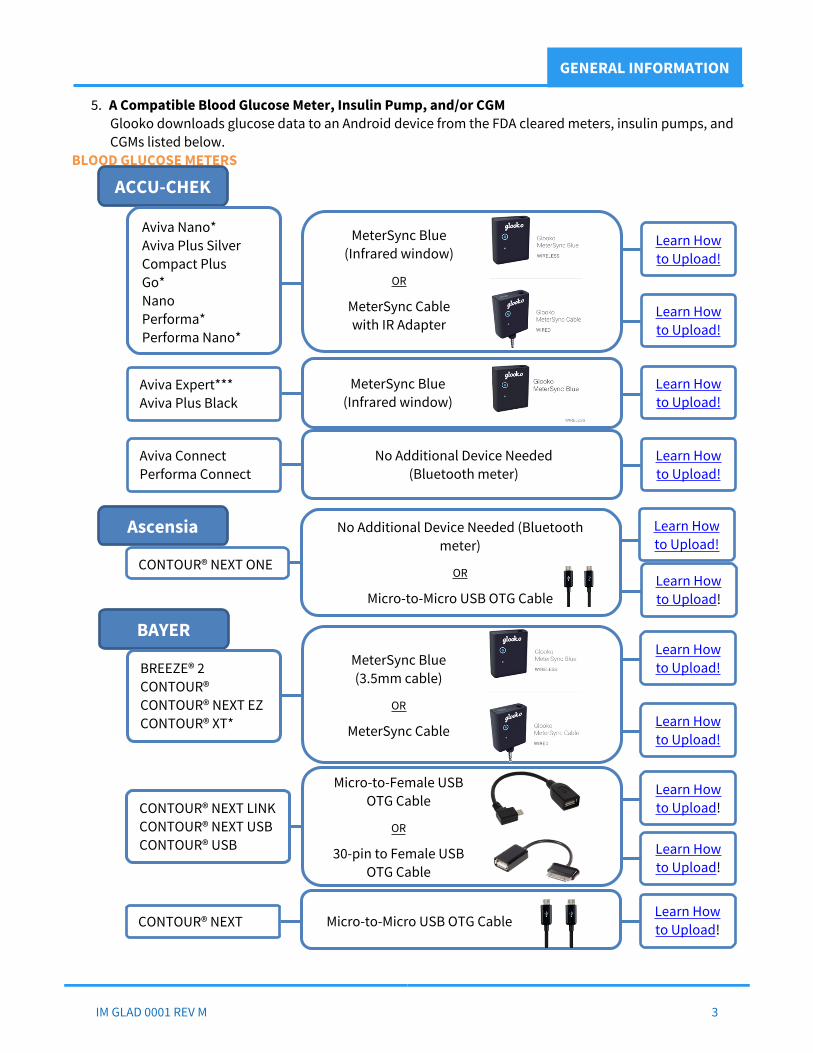
5. A Compatible Blood Glucose Meter, Insulin Pump, and/or CGMGlooko downloads glucose data to an Android device from the FDA cleared meters, insulin pumps, and CGMs listed below.
BLOOD GLUCOSE METERS
ACCU-CHEK
Aviva Nano*Aviva Plus SilverCompact PlusGo*NanoPerforma*Performa Nano*
MeterSync Blue (Infrared window)
OR
MeterSync Cable with IR Adapter
Learn How to Upload!
Learn How to Upload!
MeterSync Blue (Infrared window)
Learn How to Upload!
Aviva Expert***Aviva Plus Black
Aviva ConnectPerforma Connect
Learn How to Upload!
No Additional Device Needed (Bluetooth meter)
BAYERMeterSync Blue(3.5mm cable)
OR
MeterSync Cable
BREEZE® 2CONTOUR®CONTOUR® NEXT EZCONTOUR® XT* Learn How
to Upload!
Learn How to Upload!
CONTOUR® NEXT LINKCONTOUR® NEXT USBCONTOUR® USB
Learn How to Upload!
Learn How to Upload!
Micro-to-Female USB OTG Cable
OR
30-pin to Female USB OTG Cable
Micro-to-Micro USB OTG CableLearn How to Upload! CONTOUR® NEXT
No Additional Device Needed (Bluetooth meter)
OR
Micro-to-Micro USB OTG CableLearn How to Upload!
CONTOUR® NEXT ONE
Ascensia Learn How to Upload!
IM GLAD 0001 REV M 3
GENERAL INFORMATION
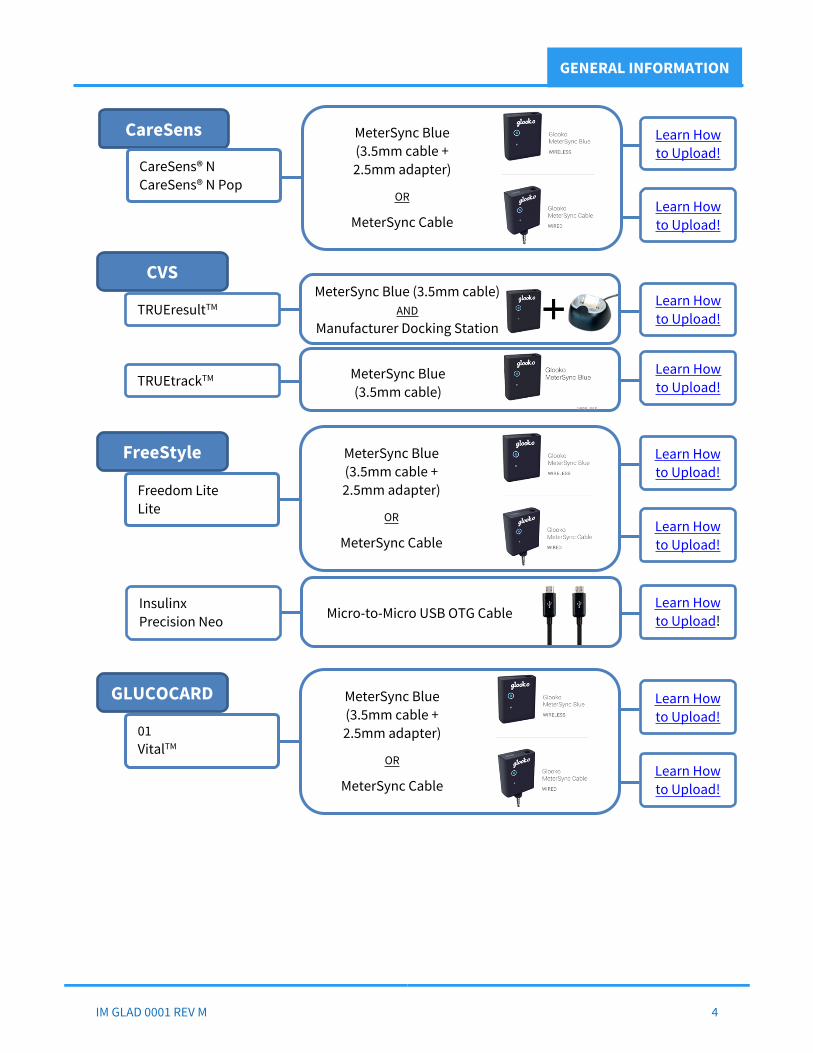
MeterSync Blue(3.5mm cable + 2.5mm adapter)
OR
MeterSync Cable
CareSens Learn How to Upload!
CareSens® NCareSens® N Pop
Learn How to Upload!
MeterSync Blue(3.5mm cable + 2.5mm adapter)
OR
MeterSync Cable
FreeStyle Learn How to Upload!
Freedom LiteLite
Learn How to Upload!
MeterSync Blue(3.5mm cable + 2.5mm adapter)
OR
MeterSync Cable
GLUCOCARD Learn How to Upload!
01VitalTM
Learn How to Upload!
CVS
TRUEresultTMMeterSync Blue (3.5mm cable)
ANDManufacturer Docking Station
Learn How to Upload!
TRUEtrackTM MeterSync Blue (3.5mm cable)
Learn How to Upload!
Micro-to-Micro USB OTG CableLearn How to Upload!
InsulinxPrecision Neo
IM GLAD 0001 REV M 4
GENERAL INFORMATION
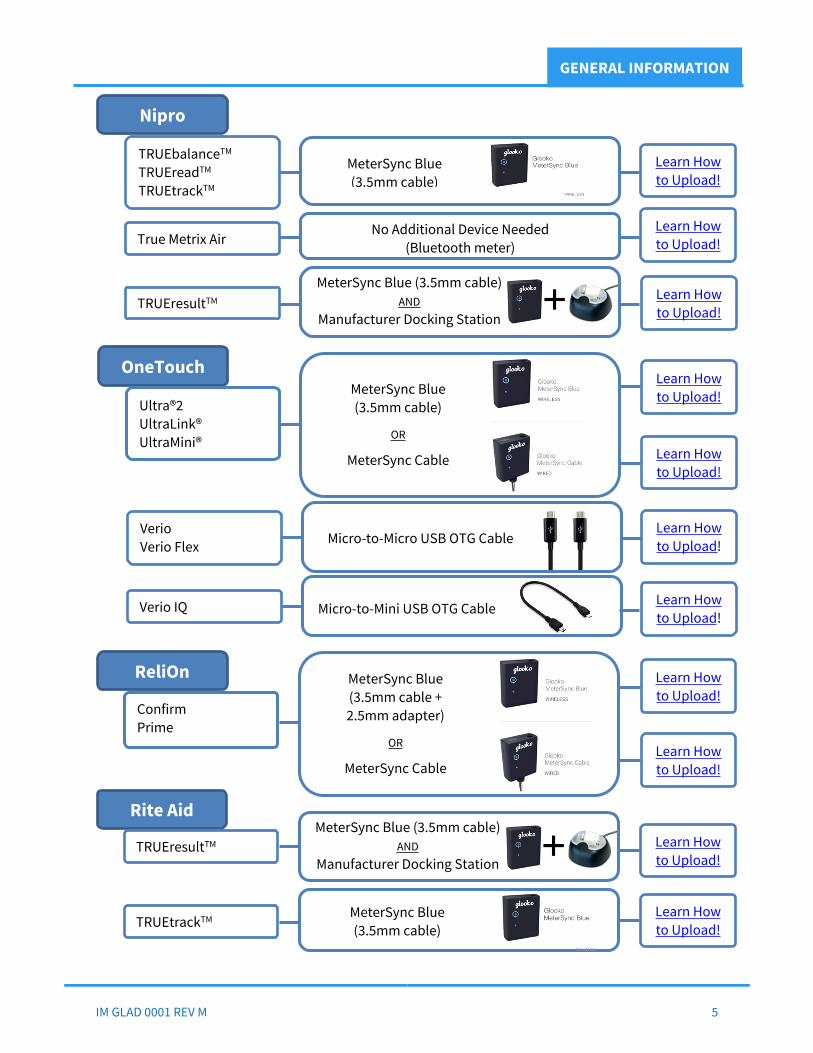
Nipro
MeterSync Blue (3.5mm cable)
TRUEbalanceTM
TRUEreadTM
TRUEtrackTM
Learn How to Upload!
Learn How to Upload!
No Additional Device Needed (Bluetooth meter)True Metrix Air
Learn How to Upload!
TRUEresultTM
MeterSync Blue (3.5mm cable)AND
Manufacturer Docking Station
ConfirmPrime
MeterSync Blue(3.5mm cable + 2.5mm adapter)
OR
MeterSync Cable
ReliOn Learn How to Upload!
Learn How to Upload!
Rite AidMeterSync Blue (3.5mm cable)
ANDManufacturer Docking Station
TRUEresultTM Learn How to Upload!
TRUEtrackTM MeterSync Blue (3.5mm cable)
Learn How to Upload!
OneTouch
Ultra®2UltraLink®UltraMini®
MeterSync Blue(3.5mm cable)
OR
MeterSync Cable
Learn How to Upload!
Learn How to Upload!
Learn How to Upload!
VerioVerio Flex Micro-to-Micro USB OTG Cable
Micro-to-Mini USB OTG Cable Learn How to Upload!
Verio IQ
IM GLAD 0001 REV M 5

GENERAL INFORMATION
* The Bayer’s CONTOUR XT, ACCU-CHEK® Aviva Nano, ACCU-CHEK Go, ACCU-CHEK Performa, ACCU-CHEK Performa Connect, ACCU-CHEK Performa Nano are available in Canada and the European Union. They are not FDA cleared for sale in the United States.** To use Glooko with a TRUEresult meter, a docking station is needed. The docking station can be purchased from Nipro, Inc. by calling 1-866-476-3837. Visit the Nipro website for more information.***The ACCU-CHEK Aviva Expert contains carb and insulin information, in addition to blood glucose. The carb, basal and bolus information from the meter will be transferred to and logged in Glooko as food and insulin events, respectively.
INSULIN PUMPS
CONTINUOUS GLUCOSE MONITORS (CGMS)
Walgreens
TRUEresultTMMeterSync Blue (3.5mm cable)
ANDManufacturer Docking Station
Learn How to Upload!
TRUEtrackTMLearn How to Upload!
MeterSync Blue (3.5mm cable)
Medtronic
MiniMed® 530G System (MMT-551, MMT-751)MiniMed Paradigm REAL-Time Revel™ (MMT-523, MMT-723, MMT-523K, MMT-723K)MiniMed Paradigm (MMT-515, MMT-715, MMT-522, MMT-722, MMT-522K, MMT-722K)
Learn How to Upload!
CareLink Personal Account
ANDMinimed Connect or CareLink USB
Insulet
Omnipod System Learn How to Upload! Micro-to-Mini USB OTG Cable
Dexcom
Dexcom G4 PlatinumDexcom G4 Platinum with Share
Learn How to Upload!
Micro-to-Micro USB OTG Cable
IM GLAD 0001 REV M 6

GENERAL INFORMATION
WARNINGSThe Glooko device system for Glooko Application does not measure, interpret, or make decisions on the data it conveys nor is it intended to provide automated treatment decisions or be used as a substitute for professional judgment. All medical diagnosis and treatment are to be performed under the supervision and oversight of an appropriate healthcare provider.
CONTRAINDICATIONSNone.
IM GLAD 0001 REV M 7

GET STARTED
INSTRUCTIONS FOR USE – GLOOKO MOBILE APPYou will need to create a Glooko account to access the mobile app features on your Android device and to view your glucose, insulin, carb and exercise data on the Glooko web app, MyGlooko, at my.glooko.com. The data contained within the Glooko app will synchronize across your mobile devices and to your MyGlooko, which can be accessed with your Glooko login information. Internet (WiFi or cellular data network) is necessary for your data to synchronize across your mobile device(s) and to MyGlooko.
CONTACT SUPPORTIf you need assistance, please contact Glooko Support:
Website: https://support.glooko.com/ Email support: [email protected] support: 1-800-206-6601 Option 1SMS support: 650-720-5310
GET STARTED WITH GLOOKOWhen you open the Glooko app on your Android device for the first time, the landing page will be displayed. From the landing page, you can start using the Glooko mobile app in one of three ways:
Login to your existing Glooko account Sign Up for a new account Sign up with Activation Code
o NOTE: This option requires an Activation Code from a Glooko partner.
LOG OUT OF YOUR GLOOKO ACCOUNTYou can log out of your Glooko account at any time by going to Profile on the Primary Navigation Bar, selecting Personal at the top, and tapping LOG OUT.
IM GLAD 0001 REV M 8

GET STARTED: LOGIN
LOGIN TO YOUR EXISTING GLOOKO ACCOUNTFrom the landing page screen:
Tap Login on the app landing page. Enter the Email address and Password for your Glooko account. Tap Login.
GET HELP LOGGING INTO YOUR GLOOKO ACCOUNTIf you are unable to remember your password to Login, tap Forgot Password to receive a password reset email. You can also contact Glooko Support for assistance.
IM GLAD 0001 REV M 9
GET STARTED: SIGN UP
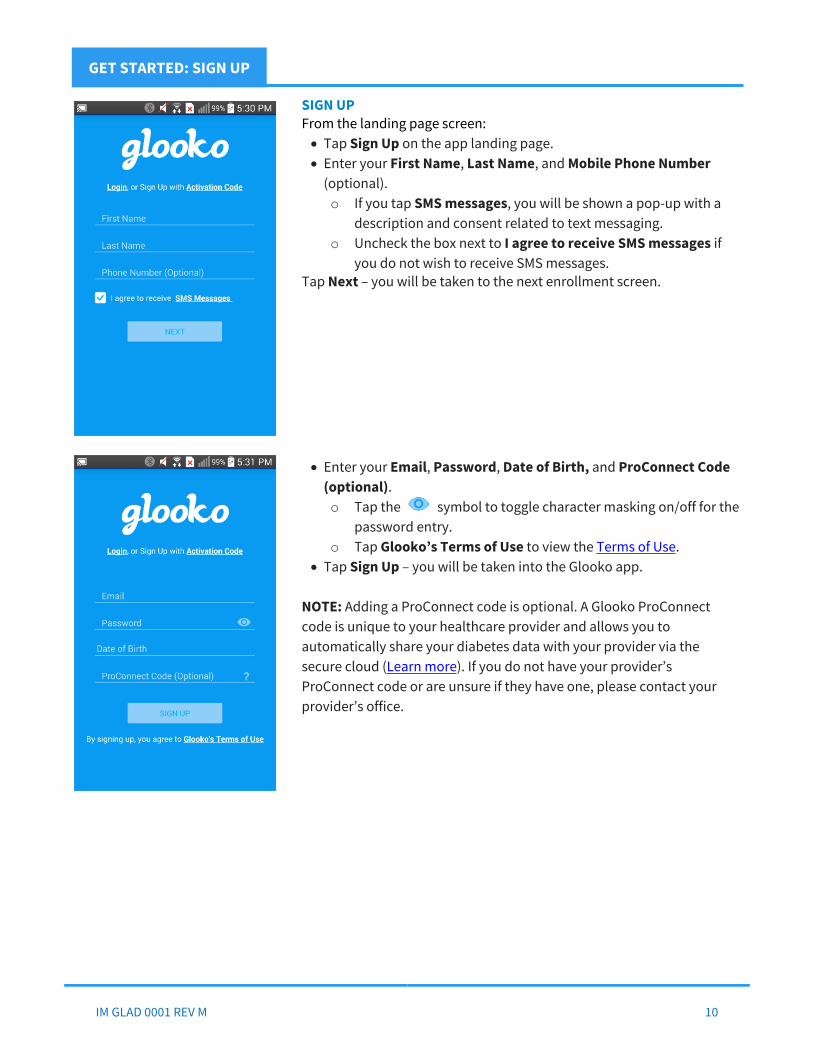
SIGN UP From the landing page screen:
Tap Sign Up on the app landing page. Enter your First Name, Last Name, and Mobile Phone Number
(optional).o If you tap SMS messages, you will be shown a pop-up with a
description and consent related to text messaging.o Uncheck the box next to I agree to receive SMS messages if
you do not wish to receive SMS messages. Tap Next – you will be taken to the next enrollment screen.
Enter your Email, Password, Date of Birth, and ProConnect Code (optional).o Tap the symbol to toggle character masking on/off for the
password entry. o Tap Glooko’s Terms of Use to view the Terms of Use.
Tap Sign Up – you will be taken into the Glooko app.
NOTE: Adding a ProConnect code is optional. A Glooko ProConnect code is unique to your healthcare provider and allows you to automatically share your diabetes data with your provider via the secure cloud (Learn more). If you do not have your provider’s ProConnect code or are unsure if they have one, please contact your provider’s office.
IM GLAD 0001 REV M 10

GET STARTED: SIGN UP
After creating your Glooko account, you will be prompted to complete a series of questions to complete your profile (shown below). These questions include:
Select Your Type of Diabetes Select Time Since Diagnosis Select Your Diabetes Therapy
o If you Pens and Syringes or Insulin Pump, you will be asked to select your insulin on a subsequent screen.
o If you select Pills or Injectables, you will be asked to select your medications on a subsequent screen.
o If you select None of the Above, you will proceed to the Select Your Diabetes Devices screen. Select Your Diabetes Devices
o If you select any of these options, you will be asked to select your specific Diabetes Device(s) and/or Fitness and Health Devices on a subsequent screen (examples shown below).NOTE: If your diabetes device is not listed, the diabetes device may not be compatible with the Glooko mobile app. Please contact Glooko Support for assistance.
IM GLAD 0001 REV M 11

GET STARTED: SIGN UP
If you entered a ProConnect Code when creating your account, you will be taken into the Glooko app after completing the registration screens.
If you did not enter a ProConnect Code when creating your account, you will then be taken to a Shopping Cart that has been pre-populated with the Subscription and Devices you will need in order to sync the devices you selected. o You can unselect devices that you do not wish to order by
tapping the check mark. o After reviewing your Shopping Cart, tap Checkout to enter
payment and shipping information. o If you already have a subscription and the devices you need,
select Have these already? Tap here to continue to be taken to your home screen.
IM GLAD 0001 REV M 12

GET STARTED: SIGN UP WITH ACTIVATION CODE
SIGN UP WITH AN ACTIVATION CODEIf you were provided an Activation Code by an invitation from a Glooko Partner offering a program, select Sign up with Activation Code from the app landing page.
From the landing page screen: Tap Sign Up with Activation Code on the app landing page.
o If you forgot your Activation Code, tap I forgot my Activation Code before the Activation Code field. You will be shown instructions on how to proceed.
o NOTE: you can also access this Sign Up with Activation Code menu by tapping Activation Code on generic the Sign Up page.
Enter your Activation Code, Email, Password, and Date of Birth.o Tap the symbol to toggle character masking on/off for
the password entry. Check/uncheck the box next to Consent to receive SMS
messages. For more information about opting in to SMS messages, tap SMS messages.
Tap Sign Up.
You will be shown a popup which asks you to accept the Terms and Conditions of using the app:
Tap Accept to proceed. Tap View Terms of Use to access the Terms of Use. Tap Cancel to return to the previous screen.
IM GLAD 0001 REV M 13

GET STARTED: SIGN UP WITH ACTIVATION CODE
After creating your Glooko account, you will be prompted to complete a series of questions to complete your profile (shown below). These questions include:
Select Your Diabetes Deviceso If you select any of these options, you will be asked to select your specific Diabetes Device(s)
and/or Fitness and Health Devices on a subsequent screen (examples shown below).
NOTE: If your diabetes device is not listed, the diabetes device may not be compatible with the Glooko mobile app. Please contact Glooko Support for assistance.
Enter your Shipping Addresso This address is used to automatically ship you a Welcome Kit that contains the necessary
hardware to sync your diabetes device(s).
IM GLAD 0001 REV M 14

NAVIGATION
NAVIGATIONA Primary Navigation Bar is displayed at the bottom of the screen throughout the Glooko App for Android.
A Secondary Navigation Bar is displayed at the top of the screen. The Secondary Navigation Bar content adjusts based on the screen you are on and will be described in more detail in future sections.
Use the Primary Navigation Bar to navigate to screens within the Glooko App, such as:
• Home: Access your Home screen by tapping the Home button
• History: View a list of your BG readings, exercise, medications, and insulins in chronological order in your History List View, alongside the Day View graph.
• Quick Add: Tap the symbol to add Foods, Insulins, Medications, Exercises, or Custom Notes using the Quick Add feature.
• Trends: View your diabetes data in two formats: Trends and Overlay.
• Side Menu: Access the Side Menu by tapping the symbol. Use the Side Menu to navigate to these menu items: Profile, Share Report, Reminders, Shop, About, and Help.
IM GLAD 0001 REV M 15

HOME
HOMEThe redesigned home screen displays your blood glucose readings, exercise data, insulin data, and food/carb entries in an easy to use and insightful format.
Tap to Sync your Diabetes Device to Glooko. Learn more.
View summary statistics for Today including: BG/CGM: Color-coded pie chart of readings below range (red), in
range (green), and above range (orange); percentage of readings in range; and average glucose value.
Meals: Average glucose value for pre-meal and post-meal tagged readings (only displayed if BG is selected as Glucose Data Source.)
Exercise: Exercise data (steps, duration, miles) from manual entry or from your connected Fitness or Health App.
Insulin: Total Insulin, bolus insulin, basal insulin, and a pie chart of bolus/insulin ratio. This includes manually entered insulin and insulin uploaded from an insulin pump or the Aviva Expert meter.
Food: Number of carbs and calories will be listed. This includes manually entered carbs and carbs uploaded from an insulin pump or the Aviva Expert meter.
Recent Events from the past 24 hours are displayed. Additional historical events are displayed on the History report.
Patterns provide insight about your blood glucose readings by time of day for a one month period. Learn more.
Comparisons help you interpret your diabetes data by identifying trends over time. Tap on the down arrow to expand a comparison field to see greater detail. Learn More.
Access app features using the Primary Navigation Bar. Learn more.
Glooko identifies your Best Days for the date range selected based on your blood glucose data. This helps you easily contextualize your blood glucose data. Learn More.
Select your date range. NOTE: Statistics below will update.
View summary statistics for date range selected, including BG/CGM data, Meal Tags (BG only), Exercise, Insulin, and Food. Learn more.
IM GLAD 0001 REV M 16
SYNC A DIABETES DEVICE
SYNC YOUR DIABETES DEVICE DATAYou can save time and eliminate errors from manual entry by conveniently downloading your blood glucose readings from your diabetes device to your Android device. You can download data from popular meters, insulin pumps, and CGMs into the Glooko app to have a consolidated diabetes management platform. See the Glooko Compatibility Page for an updated list of compatible diabetes devices, compatible mobile devices, and recommended syncing devices.
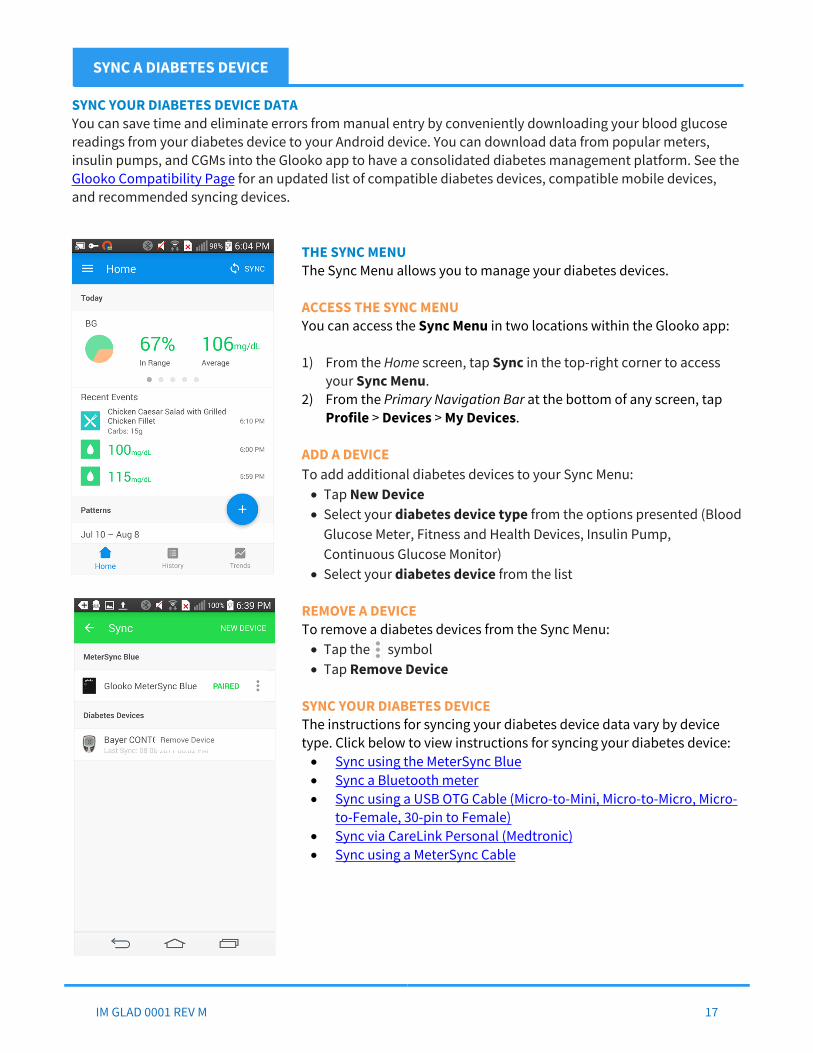
THE SYNC MENUThe Sync Menu allows you to manage your diabetes devices.
ACCESS THE SYNC MENUYou can access the Sync Menu in two locations within the Glooko app:
1) From the Home screen, tap Sync in the top-right corner to access your Sync Menu.
2) From the Primary Navigation Bar at the bottom of any screen, tap Profile > Devices > My Devices.
ADD A DEVICETo add additional diabetes devices to your Sync Menu:
Tap New Device Select your diabetes device type from the options presented (Blood
Glucose Meter, Fitness and Health Devices, Insulin Pump, Continuous Glucose Monitor)
Select your diabetes device from the list
REMOVE A DEVICETo remove a diabetes devices from the Sync Menu:
Tap the symbol Tap Remove Device
SYNC YOUR DIABETES DEVICE The instructions for syncing your diabetes device data vary by device type. Click below to view instructions for syncing your diabetes device:
Sync using the MeterSync Blue Sync a Bluetooth meter Sync using a USB OTG Cable (Micro-to-Mini, Micro-to-Micro, Micro-
to-Female, 30-pin to Female) Sync via CareLink Personal (Medtronic) Sync using a MeterSync Cable
IM GLAD 0001 REV M 17

SYNC A DIABETES DEVICE
SYNC USING THE METERSYNC BLUEThe MeterSync Blue is used with most meters to upload data to Glooko. There are three configurations for using the MeterSync Blue:
Most meters require the MeterSync Blue + the standard 3.5mm cable (included with the MeterSync Blue).
Some meters require the MeterSync Blue + the standard 3.5mm cable + 2.5mm adapter (included with the MeterSync Blue).
Some meters require the MeterSync Blue via infrared technology. The MeterSync Blue infrared window is located on the top of the MeterSync Blue for use with these meters.
Click here to determine the correct syncing device for your meter.
To upload data using the MeterSync Blue: Navigate to the Sync Menu by tapping on the home screen or going to Profile > Devices > My
Devices. If your blood glucose meter is listed, tap on the Meter Name. If it is not, tap New Device. On the next
screen, tap Meters, select your meter from the list, then tap Done. Your device will now be listed on the Sync Menu. Tap on the Meter Name.
o If you have not yet paired your MeterSync Blue, you will be required to pair it to Glooko. Tap Pair to proceed.
You now have the option to watch a tutorial video for the selected meter. This will demonstrate how to put the meter in data transfer mode.o Press the play button. o If you have watched the sync tutorial video or if you’re already familiar with how to sync your
meter, click on I know how to sync. o You can disable the tutorial video by unchecking the box next to Always show this message.
Once you have placed your meter in Data Transfer Mode, tap the sync symbol to initialize the sync.o The Sync button will be green if your Meter Sync Blue is connected to Glooko.o The Sync button will be gray if your MeterSync Blue is not connected to Glooko – ensure that the
MeterSync Blue is ON.
IM GLAD 0001 REV M 18

SYNC A DIABETES DEVICE
SYNC A BLUETOOTH METERCompatible Bluetooth meters do not require additional hardware to sync to Glooko. The Glooko app for Android is currently compatible with these Bluetooth-enabled meters:
o ACCU-CHEK Aviva Connecto ACCU-CHEK Guideo ACCU-CHEK Performa Connecto TRIVIDIA/NIPRO True Metrix Airo Ascensia Contour NEXT ONE
Navigate to the Sync Menu by tapping on the home screen or going to Profile > Devices > My Devices.
If your Bluetooth meter is listed, tap on the Bluetooth Meter Name. If it is not, tap New Device. On the next screen, tap Meters, select your meter from the list, then tap Done.
Your device will now be listed on the Sync Menu. Tap on the Bluetooth Meter Name.o If this is the first time you have uploaded data from the
Bluetooth meter, tapping on the device will take you to an on-screen pairing tutorial.
o Follow the on-screen instructions to set up your Bluetooth meter with Glooko.
Once your Bluetooth meter is paired, Glooko will automatically sync data from your meter to the Glooko app if it is in range, connected via Bluetooth, and the Glooko app is open in the background.
IM GLAD 0001 REV M 19
SYNC A DIABETES DEVICE
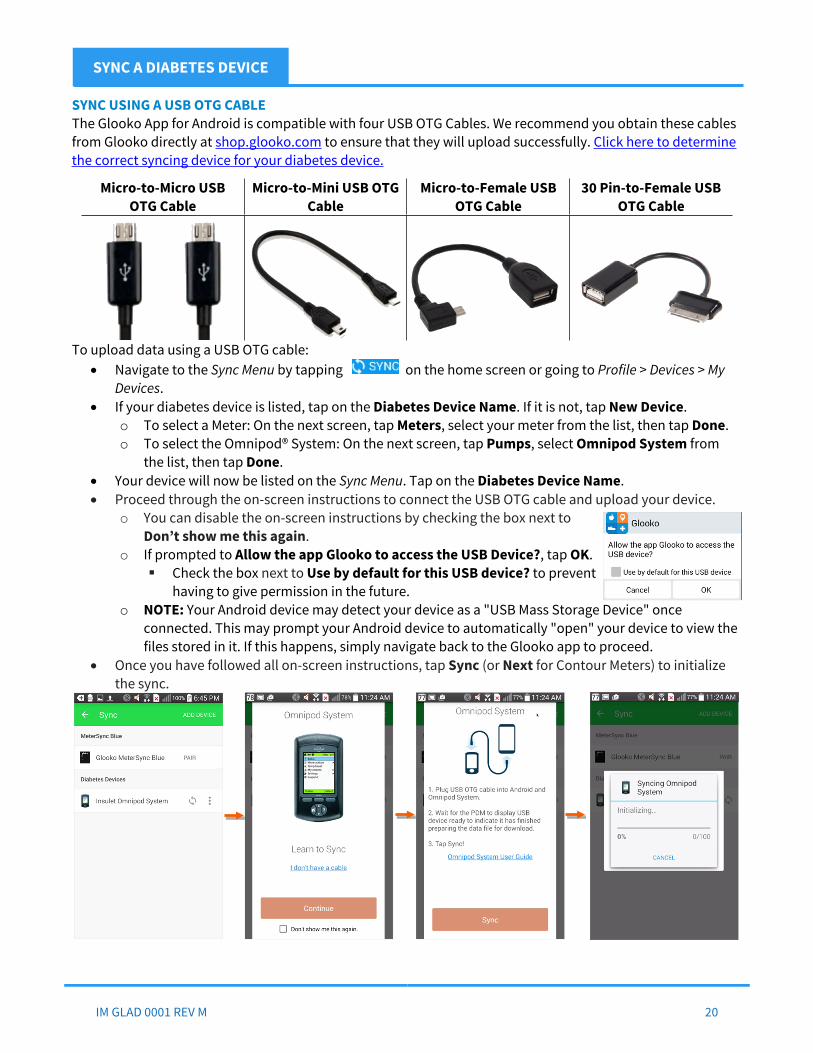
SYNC USING A USB OTG CABLEThe Glooko App for Android is compatible with four USB OTG Cables. We recommend you obtain these cables from Glooko directly at shop.glooko.com to ensure that they will upload successfully. Click here to determine the correct syncing device for your diabetes device.
Micro-to-Micro USB OTG Cable
Micro-to-Mini USB OTG Cable
Micro-to-Female USB OTG Cable
30 Pin-to-Female USB OTG Cable
To upload data using a USB OTG cable: Navigate to the Sync Menu by tapping on the home screen or going to Profile > Devices > My
Devices. If your diabetes device is listed, tap on the Diabetes Device Name. If it is not, tap New Device.
o To select a Meter: On the next screen, tap Meters, select your meter from the list, then tap Done.o To select the Omnipod® System: On the next screen, tap Pumps, select Omnipod System from
the list, then tap Done. Your device will now be listed on the Sync Menu. Tap on the Diabetes Device Name. Proceed through the on-screen instructions to connect the USB OTG cable and upload your device.
o You can disable the on-screen instructions by checking the box next to Don’t show me this again.
o If prompted to Allow the app Glooko to access the USB Device?, tap OK. Check the box next to Use by default for this USB device? to prevent
having to give permission in the future.o NOTE: Your Android device may detect your device as a "USB Mass Storage Device" once
connected. This may prompt your Android device to automatically "open" your device to view the files stored in it. If this happens, simply navigate back to the Glooko app to proceed.
Once you have followed all on-screen instructions, tap Sync (or Next for Contour Meters) to initialize the sync.
IM GLAD 0001 REV M 20

SYNC A DIABETES DEVICE
SYNC VIA CARELINK PERSONAL (MEDTRONIC)Glooko can upload data from compatible Medtronic pumps (using CareLink Personal). You can upload data from your compatible Medtronic Device to Glooko by connecting your CareLink Personal account to Glooko, either with or without a MiniMed Connect.
Navigate to the Sync Menu by tapping on the home screen or going to Profile > Devices > My Devices.
If your Medtronic pump is listed, tap on Medtronic. If it is not listed, tap New Device. On the next screen, tap Pumps, select Medtronic, then tap Done.
Your Medtronic pump will now be listed on the Sync Menu. Tap on Medtronic.
You will be asked to Connect to Carelink:o If you already have a CareLink Account, tap Log into CareLink.
Click for instructions on Connecting an Existing CareLink Account
o If you need to create a NEW CareLink Account, tap Create CareLink Account.Click for instructions on Creating a New CareLink Account
IM GLAD 0001 REV M 21
SYNC A DIABETES DEVICE
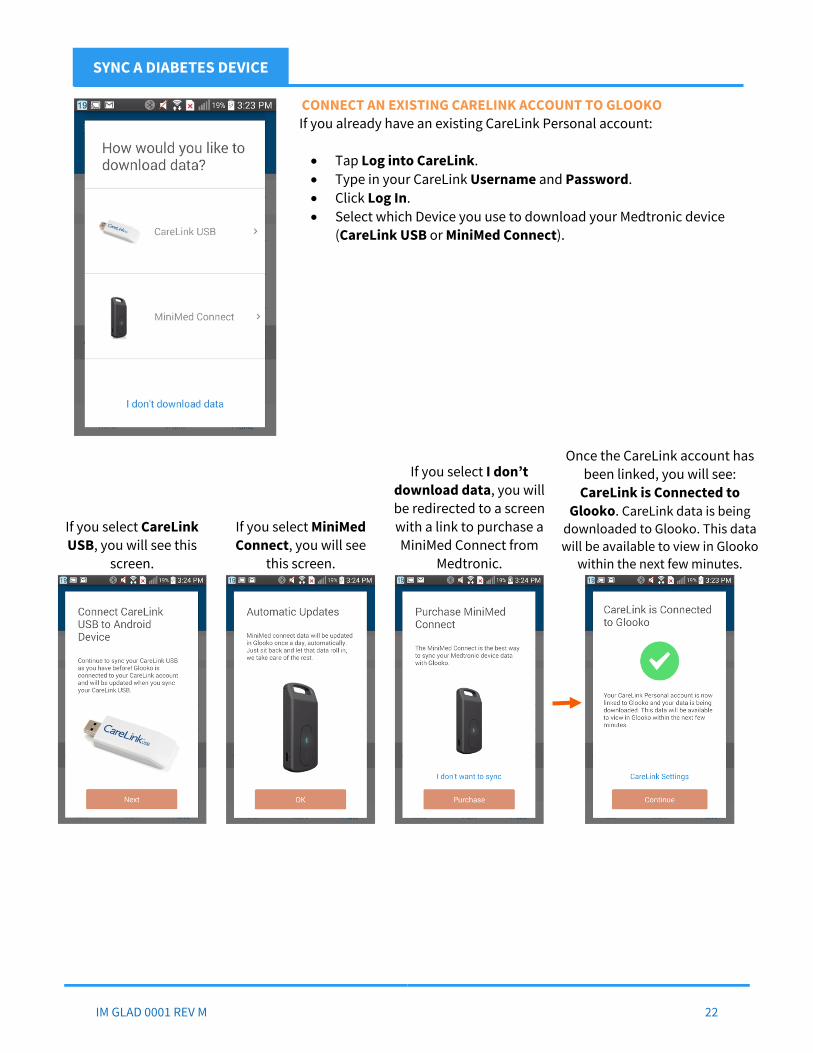
CONNECT AN EXISTING CARELINK ACCOUNT TO GLOOKOIf you already have an existing CareLink Personal account:
Tap Log into CareLink. Type in your CareLink Username and Password. Click Log In. Select which Device you use to download your Medtronic device
(CareLink USB or MiniMed Connect).
If you select CareLink USB, you will see this
screen.
If you select MiniMed Connect, you will see
this screen.
If you select I don’t download data, you will be redirected to a screen with a link to purchase a MiniMed Connect from
Medtronic.
Once the CareLink account has been linked, you will see:
CareLink is Connected to Glooko. CareLink data is being
downloaded to Glooko. This data will be available to view in Glooko
within the next few minutes.
IM GLAD 0001 REV M 22
SYNC A DIABETES DEVICE
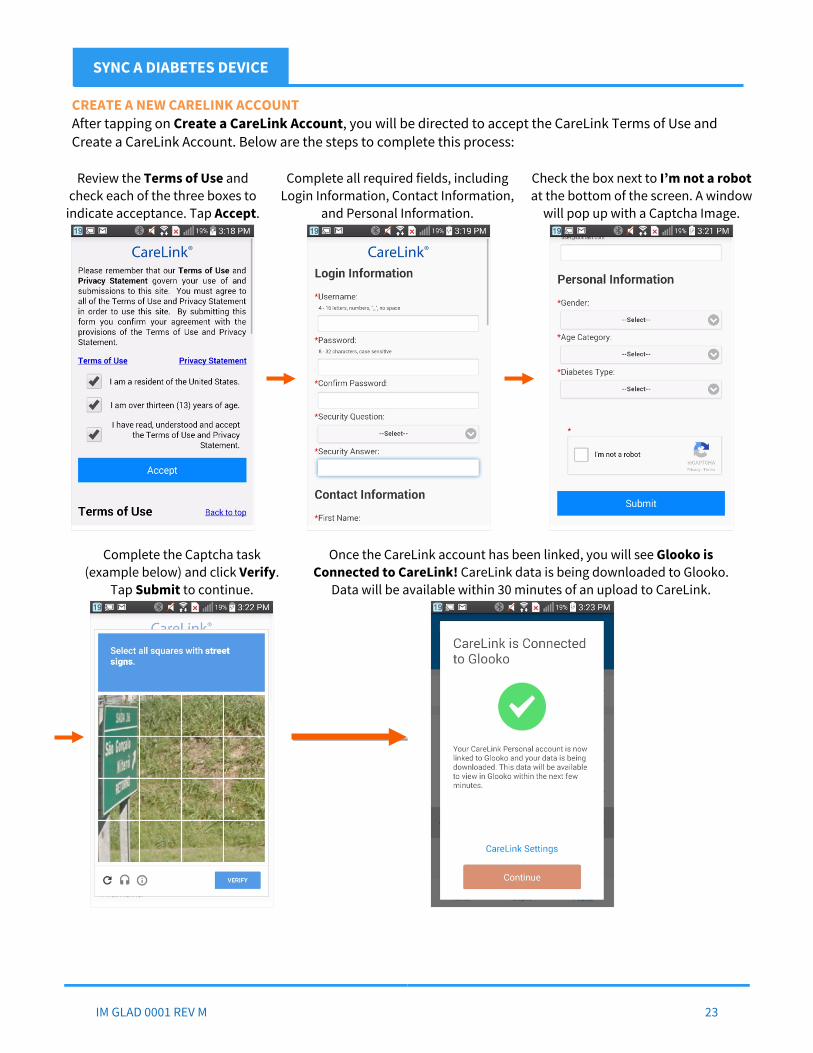
CREATE A NEW CARELINK ACCOUNT After tapping on Create a CareLink Account, you will be directed to accept the CareLink Terms of Use and Create a CareLink Account. Below are the steps to complete this process:
Review the Terms of Use and check each of the three boxes to
indicate acceptance. Tap Accept.
Complete all required fields, including Login Information, Contact Information,
and Personal Information.
Check the box next to I’m not a robot at the bottom of the screen. A window
will pop up with a Captcha Image.
Complete the Captcha task (example below) and click Verify.
Tap Submit to continue.
Once the CareLink account has been linked, you will see Glooko is Connected to CareLink! CareLink data is being downloaded to Glooko.
Data will be available within 30 minutes of an upload to CareLink.
IM GLAD 0001 REV M 23

SYNC A DIABETES DEVICE
SYNC USING A METERSYNC CABLEThe Glooko MeterSync Cable (and the Glooko IR Adapter for MeterSync Cable) is a previous model of the Glooko MeterSync Blue device. The MeterSync Cable and IR Adapter are no longer available for purchase but are available under limited distribution through healthcare providers and/or health systems.
Please refer to the MeterSync Blue section for assistance with your MeterSync Blue device.
Navigate to the Sync Menu by tapping on the home screen or going to Profile > Devices > My Devices.
If your blood glucose meter is listed, tap on the Meter Name. If it is not, tap New Device. On the next screen, tap Meters, select your meter from the list, then tap Done.
Your device will now be listed on the Sync Menu. Tap on the Meter Name.
Tap Glooko MeterSync Cable. Once you have selected the Glooko MeterSync Cable, you will be shown an illustration on how to connect your MeterSync Cable to your meter. o Note: You will need to attach a 2.5 mm adapter if you are
syncing with a CareSens, FreeStyle, GLUCOCARD, or ReliOn meter. You will need to attach the Glooko IR Adapter if you are syncing with an ACCU-CHEK meter.
Follow the on-screen instructions to sync your meter to Glooko.o NOTE: If your Glooko MeterSync Cable is properly plugged
into your Android device, the sync button will be green. If it is not connected, it will be gray.
IM GLAD 0001 REV M 24

FITNESS & HEALTH APPS
FITNESS & HEALTH APPS You can integrate activity, blood pressure and weight data from leading health and fitness applications to Glooko. This allows you to visualize your activity data with your glucose and insulin data. Click to learn how to manually add Exercise Events using the Quick Add Menu.
The following applications and data types can be integrated with the Glooko app:Fitness Routine Weight Blood Pressure
FitbitiHealthJawbone UPWithingsMovesRunkeeperStrava
A fitness activity has a defined duration, and is done with the express purpose of exercising, i.e. going for a jog, playing basketball, etc. This type of activity will appear in the History List View. A routine activity occurs regularly throughout the day without the specific goal of exercise, i.e. total steps taken in an entire day. Routine activity is aggregated throughout the day and appears at the top of each day in your History List View.
CONNECT YOUR FITNESS OR HEALTH APPFrom the Sync menu:
• To select a new Fitness or Health App, tap New Device > tap Fitness and Health Apps > check the box next to the desired Fitness or Health App > tap Done.
• Once you have selected a Fitness or Health App, it will be listed on the Sync menu.• To establish the connection with the Fitness or Health App, tap Connect on the Sync menu.
o You will be taken to a list of compatible apps. Tap the symbol. o You will be re-directed to the application’s login page – enter your Email and Password for that
application’s account. Tap Allow.o You will be redirected back to the Apps & Devices screen where you can see which applications have
been connected.• NOTE: Connect multiple fitness and health applications by repeating the steps above.
DISCONNECT YOUR FITNESS OR HEALTH APP• To disconnect your Fitness or Health App, tap the Fitness and Health App Name on the Sync menu, then
tap the symbol.
IM GLAD 0001 REV M 25

METERSYNC BLUE
GLOOKO METERSYNC BLUEThe MeterSync Blue is a Bluetooth device that is used with many blood glucose meters that transmits blood glucose data over Bluetooth for compatible non-Bluetooth meters. The MeterSync Blue must be paired to your Glooko app and your phone’s Bluetooth must be turned ON in order to use the MeterSync Blue.
To see if you need a MeterSync Blue to sync your blood glucose meter, please review the compatibility list here.
If you do not already have a Glooko MeterSync Blue, go to the Glooko Store to obtain one.
THE METERSYNC BLUE MENUTo access the MeterSync Blue menu, go to Profile, then tap MeterSync Blue. You can also access the MeterSync Blue menu from the Sync menu. The MeterSync Blue menu provides access to pair a new device and lists details about your paired MeterSync Blue:
Set up New Device: Tap Set up New Device and follow on-screen instructions to pair a MeterSync Blue to Glooko. (Detailed instructions found here)
Help: Tap to see detailed on-screen troubleshooting instructions. Device ID: Your MeterSync Blue includes a unique Device ID. If you
MeterSync Blue has been paired, the Device ID will be listed here. Show Video Tutorial: Tap to enable (green) or disable (white) the
on-screen video tutorial for syncing your meter using the MeterSync Blue.
Unpair: If you need to unpair your MeterSync Blue, simply tap Unpair and confirm to remove the pairing.
IM GLAD 0001 REV M 26

METERSYNC BLUE
PAIR A METERSYNC BLUE TO GLOOKOThe MeterSync Blue needs to be paired to your device in order to use it. It will need to be paired any time you log out of your account, if you get a new MeterSync Blue device, or if you delete the current pairing.
A build-in tutorial will guide you through the steps of pairing your MeterSync Blue. Below are the steps to pair the MeterSync Blue:
From the MeterSync Blue Menu: Ensure that Bluetooth is enabled on your mobile device. Tap Set up New Device. Press and hold the blue button on your Glooko MeterSync Blue
for at least one second to turn it ON. o If the light on your MeterSync Blue does not light up when
you press the button, tap What now? to see detailed on-screen troubleshooting instructions.
Once your MeterSync Blue light is blinking green, tap the Next button at the bottom of the screen.
If the pairing was SUCCESSFUL, you will be directed to a screen that says MeterSync Blue Found!
Tap Sync meter now to sync your meter.
If the pairing was UNSUCCESSFUL, ensure the light on the MeterSync Blue is ON and tap Try Again.
You can also tap NEED HELP? to access detailed on-screen troubleshooting instructions.
Still having trouble? Contact Glooko Support.
IM GLAD 0001 REV M 27

HISTORY
HISTORY History displays a consolidated 24-hour Day View summary of your glucose, insulin, and carb data including a detailed list of events.
NAVIGATE HISTORY • View Full Screen: Tap the symbol in the top left to view the graph in full screen. • Day View Graph Details: Tap or place your finger on the graph – a navigation line will appear with
summary data above. With your finger on the line, slowly move your finger to the right and left. As the line moves, the summary data will update to correspond to the data points selected.
• Swipe to a Different Day: To easily move between the next or previous day, place your finger on the graph and swipe to the right or left to move to the previous or next day, respectively.
• Expand History List View: Tap the symbol to expand the History List View.
INTERPRET THE DAY VIEW GRAPHFrom top to bottom of the graph:• Green shaded area: represents your glucose target range. • Small, colored dots: glucose data synced from your CGM. • Large, colored dots: glucose data synced from your meter.• Large, gray dots: manually entered glucose readings.• Gray bar: represents the carb section of the graph.• Turquoise circle: represents carb data as a measure of intake.• Light Purple bars: represents bolus data as a measure of dosage.• Dark Purple bars: represents manually entered insulin data as a
measure of dosage.
INTERPRET THE HISTORY LIST VIEWScroll up and down the History List View section to see your glucose, carb, insulin, and activity data in chronological order. Blood Glucose Readings and Meal Tags can be interpreted using this key:
Blood Glucose readings (from a blood glucose meter or insulin pump): Readings will be color-coded according to your target range:
• Orange: Above target range.• Green: In target range.• Red: Below target range.• Gray Outline: Readings with a gray outline were manually entered in an insulin pump.
The lock symbol indicates that the meal tag was taken directly from your diabetes device. NOTE: These tags cannot be adjusted in the Glooko app.The full apple indicates that the reading was tagged as postprandial (after a meal).
The half-eaten apple indicates that the reading was tagged as preprandial (before a meal).
The gray apple outline indicates that the readings has not been tagged as preprandial (before a meal) or postprandial (after a meal).
• Tap on the gray apple outline to add a meal tag to this reading: • Adjust meal tags for readings that do not display a lock symbol by tapping on the tag.
IM GLAD 0001 REV M 28

HISTORY
EDIT OR DELETE AN EVENT FROM HISTORYEvents and information synced from your diabetes device are not editable within the Glooko mobile app. However, events that you have added from the Quick Add menu can be edited and deleted:
Edit: You can adjust events that have been added from the Quick Add menu by tapping on the event in your History, then selecting EDIT.
Delete: You can delete events that have been added from the Quick Add menu by swiping on the event in your History, then selecting DELETE.
IM GLAD 0001 REV M 29

ADD EVENTS
EVENTSEvents allow you to track your carb intake, insulin dosage, exercise activities, comments, and custom notes. You can add events to a specific reading or add a general event. Events are shown in History alongside your blood glucose readings, exercise, medications, and other data in your account.
ADD EVENTSAccess the Quick Add Menu by tapping the symbol on the Primary Navigation Bar. Adjust the Date/Time of the Event: Tap the date/time to adjust the
date/time of the event. Manually Enter a Value: Tap on the gray word to the right (carbs,
units, or mins) and type in the corresponding value. Tap Add to add it to your history.o NOTE: You can enter multiple Events of different types at once
by completing multiple event entry fields, then tapping Add. Use the Glooko Database to Search for an Event: Tap on the
symbol next to the event type (or tap Search Food Database for foods) to access the built-in database for that event type. Follow the on-screen instructions to add events from the event database.o Learn more about navigating the database for each event type:
Food Events Insulin Events Medication Events Exercise Events Comment Events (Notes)
Events are visible on the History List View, which can be accessed by tapping Graphs on the Primary Navigation Bar.
EDIT OR DELETE EVENTSEvents can be edited or deleted by tapping on the event on your History List View, which can be accessed by tapping Graphs on the Primary Navigation Bar. Edit an Event: From the History List View, tap the event you wish to
edit. Select Edit. Make desired changes, then tap Add.o NOTE: Tap the date/time to adjust the date or time. Scroll to
select the new date and time. Tap OK on the date/time selector.
Delete an Event: From the History List View, tap the event you wish to delete. Select Delete to permanently remove the event.
IM GLAD 0001 REV M 30
ADD EVENTS
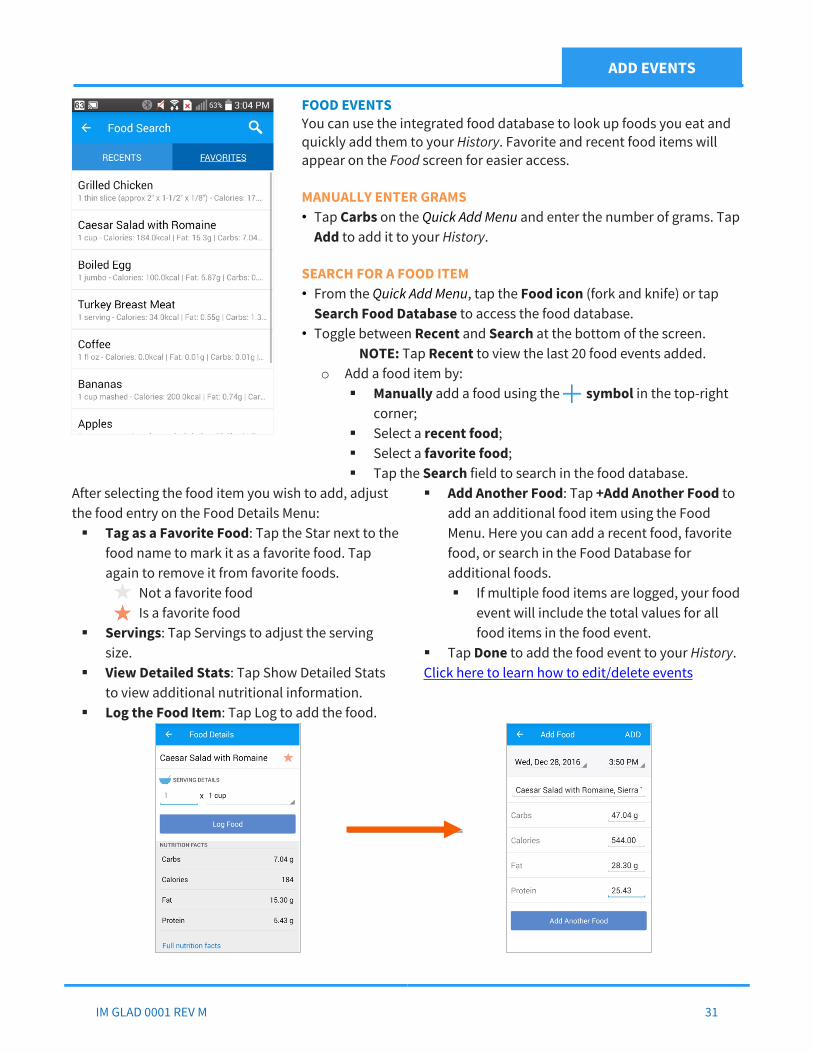
FOOD EVENTSYou can use the integrated food database to look up foods you eat and quickly add them to your History. Favorite and recent food items will appear on the Food screen for easier access.
MANUALLY ENTER GRAMS• Tap Carbs on the Quick Add Menu and enter the number of grams. Tap
Add to add it to your History.
SEARCH FOR A FOOD ITEM• From the Quick Add Menu, tap the Food icon (fork and knife) or tap
Search Food Database to access the food database.• Toggle between Recent and Search at the bottom of the screen.
NOTE: Tap Recent to view the last 20 food events added.o Add a food item by: Manually add a food using the symbol in the top-right
corner; Select a recent food; Select a favorite food; Tap the Search field to search in the food database.
After selecting the food item you wish to add, adjust the food entry on the Food Details Menu: Tag as a Favorite Food: Tap the Star next to the
food name to mark it as a favorite food. Tap again to remove it from favorite foods.
Not a favorite foodIs a favorite food
Servings: Tap Servings to adjust the serving size.
View Detailed Stats: Tap Show Detailed Stats to view additional nutritional information.
Log the Food Item: Tap Log to add the food.
Add Another Food: Tap +Add Another Food to add an additional food item using the Food Menu. Here you can add a recent food, favorite food, or search in the Food Database for additional foods. If multiple food items are logged, your food
event will include the total values for all food items in the food event.
Tap Done to add the food event to your History.Click here to learn how to edit/delete events
IM GLAD 0001 REV M 31

ADD EVENTS
INSULIN EVENTS You can keep track of your insulins administered by creating an Insulin Event. The Insulin screen is pre-populated with a list of insulins, but you can add additional insulins to the list. Every insulin event you add is included in your History.
NOTE: Your most recent Insulin selection will be displayed on the Quick Add Menu. If you have not added any Insulins, you will see “Insulin” as displayed in the image to the left.
NOTE: If your insulin pump has been downloaded to the Glooko app, bolus and basal data from the insulin pump is viewable in your History.
MANUALLY ENTER UNITS OF INSULIN Tap Units on the Quick Add Menu and enter the number of Insulin
(Regular) units. Tap Add to add it to your history.
SEARCH FOR AN INSULIN From the Quick Add Menu, tap the Insulin icon (syringe). You can
now select from two options:o Scroll through the list of insulins and select desired Insulin Recent Insulins are listed at the top. The Insulin list (under Insulin heading) is sorted
alphabetically.o Manually add an insulin by tapping the symbol: Name: Adjust the name. Type: Select from available types Quantity: Adjust quantity. NOTE: Units will adjust based on Type selected.
After selecting the Insulin you wish to add, adjust the entry on the Add Insulin Menu:o Quantity: Adjust quantity.
NOTE: Units will adjust based on Type selected.o Done: Tap Done to log the Insulin Event.
Click here to learn how to edit/delete events
IM GLAD 0001 REV M 32

ADD EVENTS
MEDICATION EVENTS You can keep track of your medications taken by creating a Medication Event. The Medication screen is pre-populated with a list of medications, but you can add additional medications to the list. Every medication event you add is included in your History.
NOTE: Your most recent Medication selection will be displayed on the Quick Add Menu. If you have not added any medications, you will see “Medication” as displayed in the image to the left.
MANUALLY ENTER MEDICATION DOSAGE Tap mg on the Quick Add Menu and enter the number of Medication
mgs. Tap Add to add it to your history.
NOTE: The name listed on the Add Event screen will be displayed on your History along with the dosage added.
SEARCH FOR A MEDICATION From the Quick Add Menu, tap the Medication icon (pill). You can
now select from two options:o Scroll through the list of medications and select desired
medication; or Recent Medications are listed at the top. Medications are organized by type (Oral Medication and
Injectable Medication) and sorted alphabetically within each grouping.
o Manually add a medication by tapping the symbol. Name: Adjust the name. Type: Select from available types Quantity: Adjust quantity. NOTE: Units will adjust based on Type selected.
After selecting the Medication you wish to add, adjust the entry on the Add Medication Menu:o Quantity: Adjust quantity.
NOTE: Units will adjust based on Type selected.o Done: Tap Done to log the Medication Event.
Click here to learn how to edit/delete events
IM GLAD 0001 REV M 33
ADD EVENTS
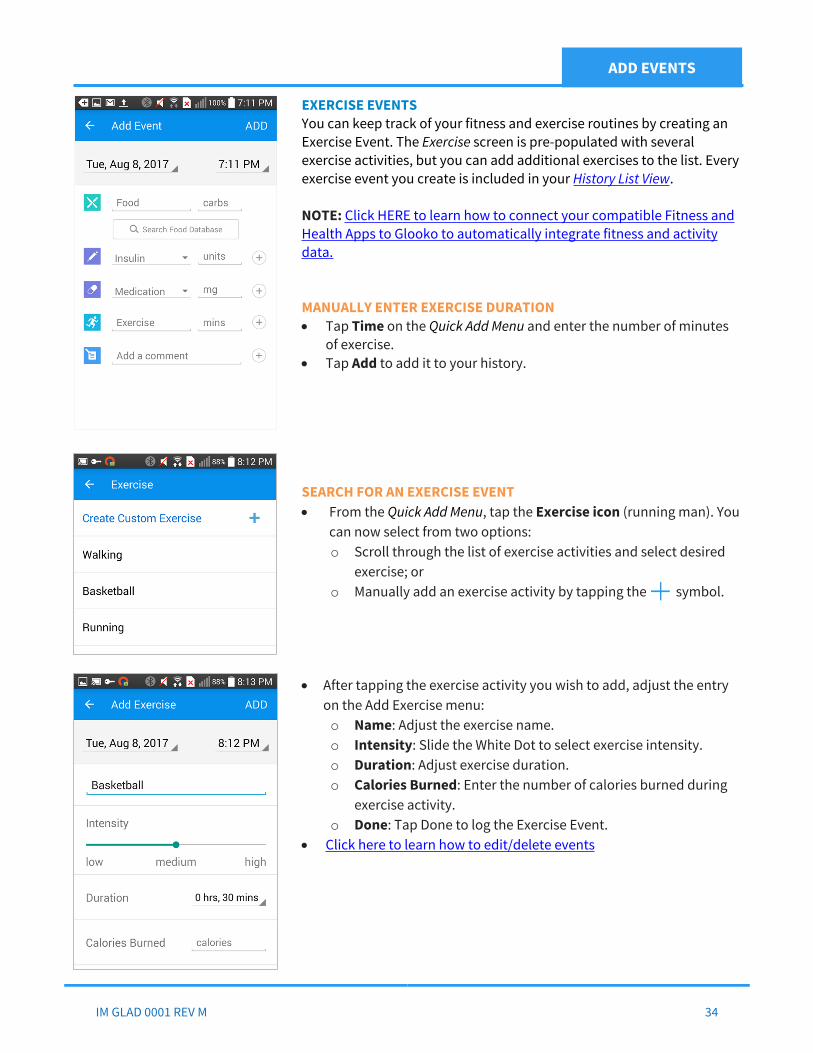
EXERCISE EVENTS You can keep track of your fitness and exercise routines by creating an Exercise Event. The Exercise screen is pre-populated with several exercise activities, but you can add additional exercises to the list. Every exercise event you create is included in your History List View.
NOTE: Click HERE to learn how to connect your compatible Fitness and Health Apps to Glooko to automatically integrate fitness and activity data.
MANUALLY ENTER EXERCISE DURATION Tap Time on the Quick Add Menu and enter the number of minutes
of exercise. Tap Add to add it to your history.
SEARCH FOR AN EXERCISE EVENT From the Quick Add Menu, tap the Exercise icon (running man). You
can now select from two options:o Scroll through the list of exercise activities and select desired
exercise; oro Manually add an exercise activity by tapping the symbol.
After tapping the exercise activity you wish to add, adjust the entry on the Add Exercise menu:o Name: Adjust the exercise name.o Intensity: Slide the White Dot to select exercise intensity. o Duration: Adjust exercise duration.o Calories Burned: Enter the number of calories burned during
exercise activity.o Done: Tap Done to log the Exercise Event.
Click here to learn how to edit/delete events
IM GLAD 0001 REV M 34

ADD EVENTS
COMMENT EVENTS You can keep track of additional information such as stock comments and customized comments using the Comment Events. The Comment screen is pre-populated with several comments, but you can add custom comments as well. Every Comment Event you create is included in your History List View alongside your diabetes device data and other important information.
MANUALLY ENTER A COMMENT Tap Notes on the Quick Add Menu and enter a custom text
comment. Tap Add to add it to your History List View.
SEARCH FOR A STOCK COMMENT From the Quick Add Menu, tap the Comment icon (note symbol). Select from a list of stock comments by Tapping the Comment to
add a check mark. Stock Comments are organized by category: Exercise, Food, Medication, and Wellness.
NOTE: You can select multiple stock comments within a single Comment Event.
After selecting the desired stock comment(s), tap in the top-left corner to return to the Quick Add menu.
Done: Tap Done to log the Comment Event. Click here to learn how to edit/delete events
IM GLAD 0001 REV M 35
TRENDS
TRENDSYour Glooko app displays your diabetes data and manually entered information in graphs and charts to help you easily interpret your diabetes data. The Glooko app offers two Trends pages:
Trends Overlay
IM GLAD 0001 REV M 36

TRENDS: TRENDS
TRENDS Trends provides summary data about your blood glucose reading values, exercise data, insulin, and food/carbs.
Trends consists of four sections: • Averages and Statistics• Trend Graphs• Best Days• Comparisons
ADJUST THE DATE RANGE• Tap to select a preset date range: 1WK, 2WK, 1MO, 3MO, YR• Use the navigation arrows and to shift between
dates for the preset date range selected.• Adjusting the date range adjusts all calculations in Trends.
IM GLAD 0001 REV M 37
TRENDS: TRENDS
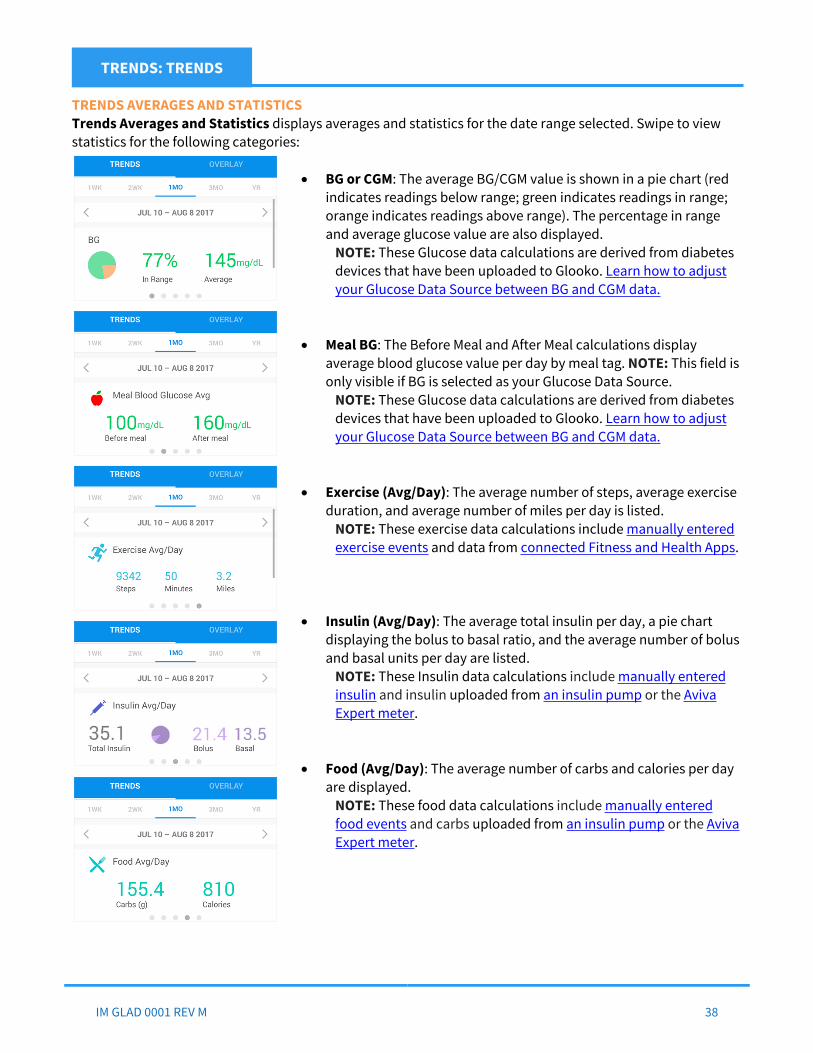
TRENDS AVERAGES AND STATISTICSTrends Averages and Statistics displays averages and statistics for the date range selected. Swipe to view statistics for the following categories:
BG or CGM: The average BG/CGM value is shown in a pie chart (red indicates readings below range; green indicates readings in range; orange indicates readings above range). The percentage in range and average glucose value are also displayed.
NOTE: These Glucose data calculations are derived from diabetes devices that have been uploaded to Glooko. Learn how to adjust your Glucose Data Source between BG and CGM data.
Meal BG: The Before Meal and After Meal calculations display average blood glucose value per day by meal tag. NOTE: This field is only visible if BG is selected as your Glucose Data Source.
NOTE: These Glucose data calculations are derived from diabetes devices that have been uploaded to Glooko. Learn how to adjust your Glucose Data Source between BG and CGM data.
Exercise (Avg/Day): The average number of steps, average exercise duration, and average number of miles per day is listed.
NOTE: These exercise data calculations include manually entered exercise events and data from connected Fitness and Health Apps.
Insulin (Avg/Day): The average total insulin per day, a pie chart displaying the bolus to basal ratio, and the average number of bolus and basal units per day are listed.
NOTE: These Insulin data calculations include manually entered insulin and insulin uploaded from an insulin pump or the Aviva Expert meter.
Food (Avg/Day): The average number of carbs and calories per day are displayed.
NOTE: These food data calculations include manually entered food events and carbs uploaded from an insulin pump or the Aviva Expert meter.
IM GLAD 0001 REV M 38

TRENDS: TRENDS
TRENDS GRAPHSThe Trends Graphs section displays a graph of average blood glucose data (BG or CGM) for the date range selected as well as a dynamic graph that can toggle between Exercise, Insulin, and Carbs. Learn how to adjust your Glucose Data Source between BG and CGM data.
View Graph Details: Tap or place your finger on the graph – a navigation line will appear with summary data above. With your finger on the line, slowly move your finger to the right and left. As the line moves, the summary data will update to correspond to the data points.
BG Avg or CGM Avg: The blood glucose daily summary is displayed on a line chart for the date range selected. The option (BG or CGM) that is selected in the Glucose Data Source will be displayed. Learn how to adjust your Glucose Data Source between BG and CGM data.
o The green shaded area represents the target BG range.o The hollow dots indicate the average BG value for that day.o The solid dots above and below the hollow dots indicate the
highest and lowest of reading values for that day, respectively.
Readings will be color-coded according to your set target range:• Orange: Above target range.• Green: In target range.• Red: Below target range.
Exercise: The total exercise duration per day is displayed on a bar chart for the date range selected.
NOTE: These exercise data calculations include manually entered exercise events and data from connected Fitness and Health Apps.
Insulin: The total units of insulin per day is displayed on a bar chart for the date range selected.
NOTE: These Insulin data calculations include manually entered insulin and insulin uploaded from an insulin pump or the Aviva Expert meter.
Carbs: The total number of carbs per day is displayed on a bar chart for the date range selected.
NOTE: These Carbs calculations include manually entered food events and carbs uploaded from an insulin pump or the Aviva Expert meter.
IM GLAD 0001 REV M 39

TRENDS: TRENDS
BEST DAYSGlooko identifies your Best Days for the date range selected based on your blood glucose data. This helps you easily contextualize your blood glucose data.
This is calculated using your target range and displays your Best Days (if the minimum number of readings criteria are met) for the date range selected.
COMPARISONSComparisons helps you interpret your diabetes data by identifying trends over time. Comparisons uses your set target blood glucose range for calculations.
Tap on the down arrow to expand a trend field to see greater detail. Tap on the up arrow to collapse a trend field to see the shortened summary.
Comparisons are displayed in 4 categories: Your Highs: This statement will help you understand your high
(hyperglycemic) readings during the date range selected.
Your Lows: This statement will help you understand your low (hypoglycemic) readings during the date range selected.
Your Target Range: This statement will help you understand your in-range readings during the date range selected.
Your Average: This statement will help you understand your average blood glucose readings for the date range selected.
IM GLAD 0001 REV M 40
TRENDS: OVERLAY
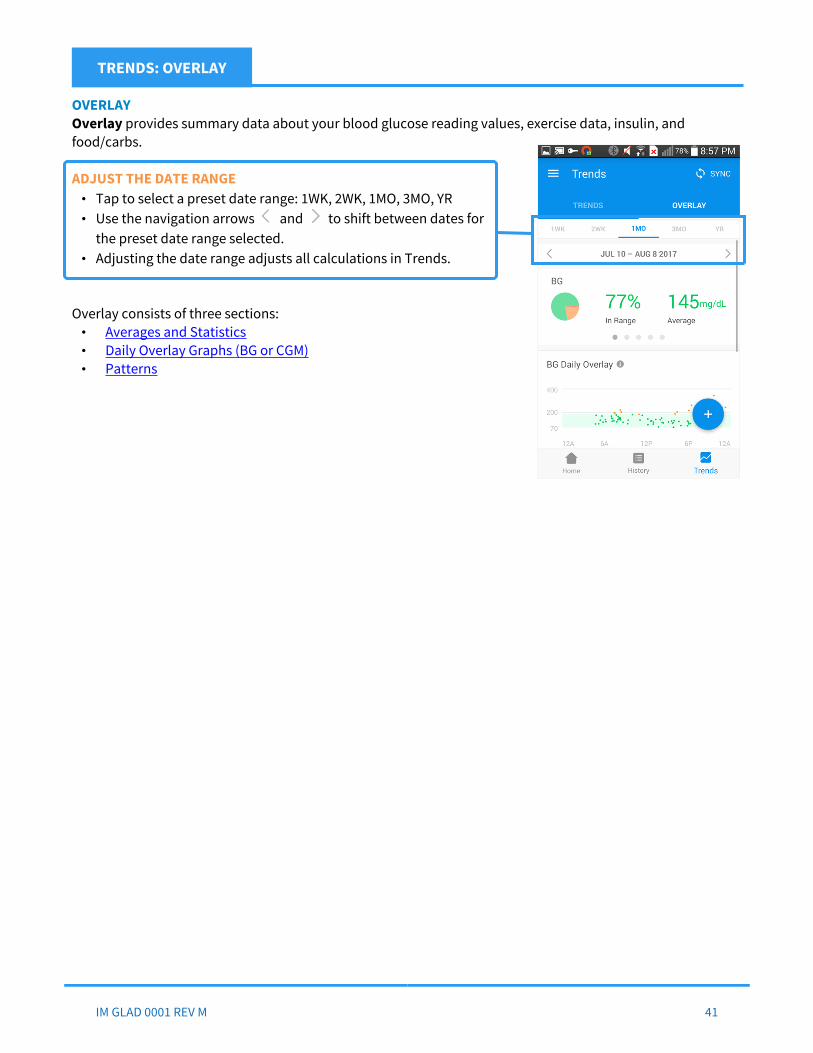
OVERLAY Overlay provides summary data about your blood glucose reading values, exercise data, insulin, and food/carbs.
ADJUST THE DATE RANGE• Tap to select a preset date range: 1WK, 2WK, 1MO, 3MO, YR• Use the navigation arrows and to shift between dates for
the preset date range selected.• Adjusting the date range adjusts all calculations in Trends.
Overlay consists of three sections:• Averages and Statistics• Daily Overlay Graphs (BG or CGM)• Patterns
IM GLAD 0001 REV M 41

TRENDS: OVERLAY
OVERLAY AVERAGES AND STATISTICSOverlay Averages and Statistics displays averages and statistics for the date range selected. Swipe to view statistics for the following categories:
BG or CGM: The average glucose value is shown in a pie chart (redindicates readings below range; green indicates readings in range;orange indicates readings above range). The percentage in rangeand average glucose value are also displayed.
NOTE: These Glucose data calculations are derived from diabetes devices that have been uploaded to Glooko. Learn how to adjust your Glucose Data Source between BG and CGM data.
Meal BG: The Before Meal and After Meal calculations displayaverage blood glucose value per day by meal tag. NOTE: This field isonly visible if BG is selected as your Glucose Data Source.
NOTE: These Glucose data calculations are derived from diabetes devices that have been uploaded to Glooko. Learn how to adjust your Glucose Data Source between BG and CGM data.
Exercise (Avg/Day): The average number of steps, average exerciseduration, and average number of miles per day is listed.
NOTE: These exercise data calculations include manually entered exercise events and data from connected Fitness and Health Apps.
Insulin (Avg/Day): The average total insulin per day, a pie chartdisplaying the bolus to basal ratio, and the average number of bolusand basal units per day are listed.
NOTE: These Insulin data calculations include manually entered insulin and insulin uploaded from an insulin pump or the Aviva Expert meter.
Food (Avg/Day): The average number of carbs and calories per dayare displayed.
NOTE: These food data calculations include manually entered food events and carbs uploaded from an insulin pump or the Aviva Expert meter.
IM GLAD 0001 REV M 42
TRENDS: OVERLAY
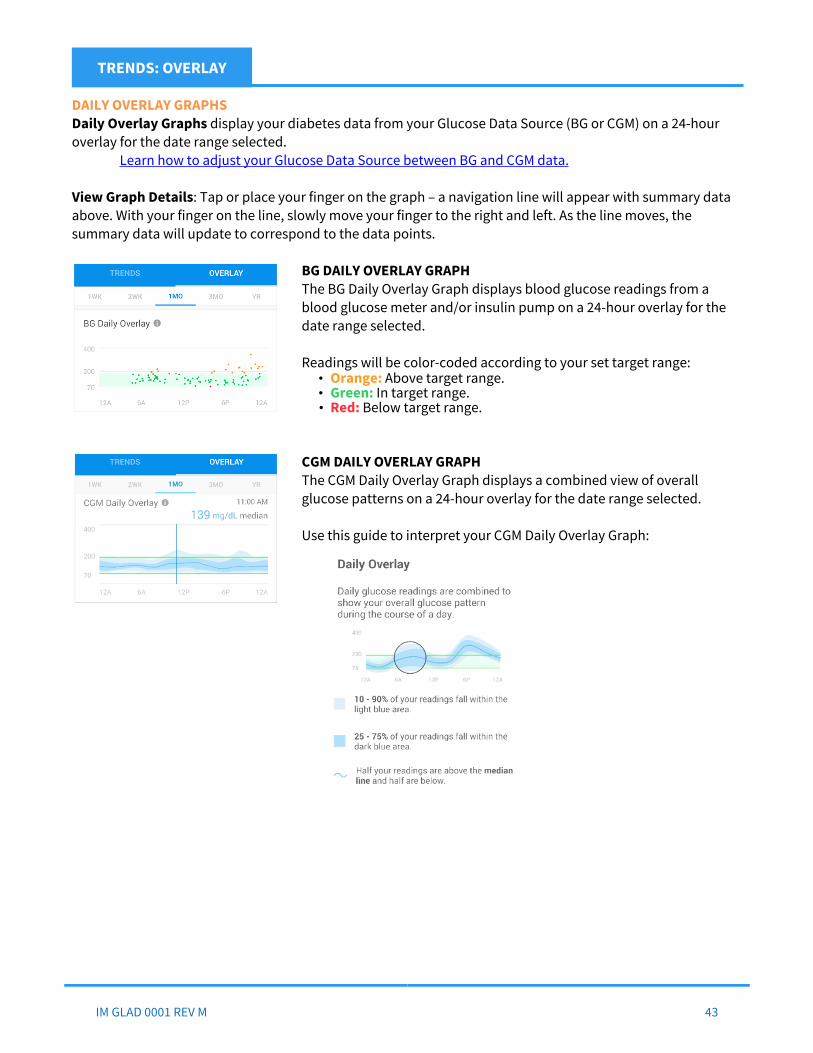
DAILY OVERLAY GRAPHSDaily Overlay Graphs display your diabetes data from your Glucose Data Source (BG or CGM) on a 24-hour overlay for the date range selected.
Learn how to adjust your Glucose Data Source between BG and CGM data.
View Graph Details: Tap or place your finger on the graph – a navigation line will appear with summary data above. With your finger on the line, slowly move your finger to the right and left. As the line moves, the summary data will update to correspond to the data points.
BG DAILY OVERLAY GRAPHThe BG Daily Overlay Graph displays blood glucose readings from a blood glucose meter and/or insulin pump on a 24-hour overlay for the date range selected.
Readings will be color-coded according to your set target range:• Orange: Above target range.• Green: In target range.• Red: Below target range.
CGM DAILY OVERLAY GRAPHThe CGM Daily Overlay Graph displays a combined view of overall glucose patterns on a 24-hour overlay for the date range selected.
Use this guide to interpret your CGM Daily Overlay Graph:
IM GLAD 0001 REV M 43

TRENDS: OVERLAY
PATTERNSThe Patterns feature identifies times of day when your blood glucose readings are notably in range, below range, or above range. This provides at-a-glance insight into your blood glucose data for the date range selected.
NOTE: Patterns are only available for the one month (1MO) date range.
IM GLAD 0001 REV M 44

SIDE MENU
SIDE MENU (ADDITIONAL ITEMS)Access the following items by tapping the button on the top left of the screen:
Profile Share Report Reminders HypoMap Shop About Help
IM GLAD 0001 REV M 45

SIDE MENU: PROFILE
PROFILETap Profile in the Primary Navigation Bar to access your Glooko profile. Here you can personalize your account, view your diabetes devices, and adjust settings that impact your statistics. Profile is broken down into three categories: Personal, Devices, and Settings. These pages can be accessed using the Secondary Navigation Bar within Profile.
VIEW AND EDIT YOUR PERSONAL INFORMATIONTo access your Personal Information from your Profile, tap Personal in the Secondary Navigation Bar at the top of the screen. Here you can:
• Edit your Name, Email, Type of Diabetes, Gender, Date of Birth,Height, and/or Weight.
• Tap ProConnect to ProConnect to your provider. You can add up to5 ProConnect Codes at a time in your Glooko app. Click here tolearn more about managing ProConnect Codes on the mobile app.
• Tap MRN to enter your Medical Record Number.
NOTE: When you are finished, use the Secondary Navigation Bar to access Devices or Settings or use the Primary Navigation Bar to access other features of the app.
IM GLAD 0001 REV M 46
SIDE MENU: PROFILE
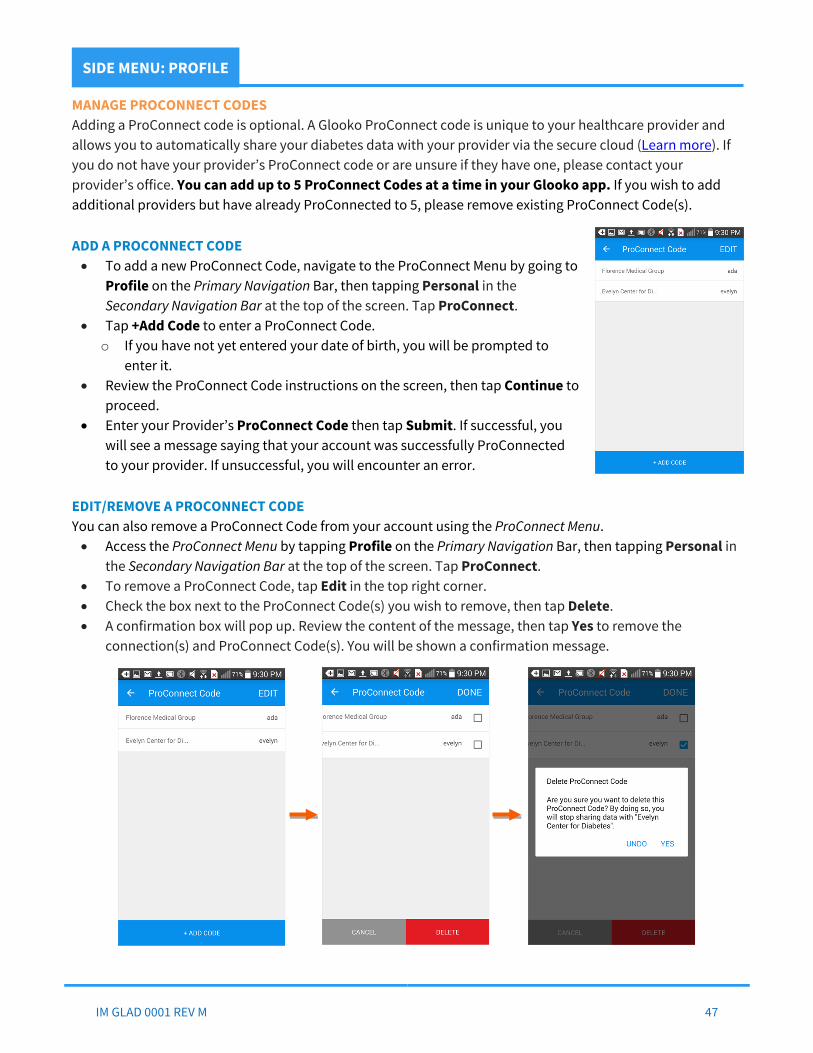
MANAGE PROCONNECT CODES Adding a ProConnect code is optional. A Glooko ProConnect code is unique to your healthcare provider and allows you to automatically share your diabetes data with your provider via the secure cloud (Learn more). If you do not have your provider’s ProConnect code or are unsure if they have one, please contact your provider’s office. You can add up to 5 ProConnect Codes at a time in your Glooko app. If you wish to add additional providers but have already ProConnected to 5, please remove existing ProConnect Code(s).
ADD A PROCONNECT CODE To add a new ProConnect Code, navigate to the ProConnect Menu by going to
Profile on the Primary Navigation Bar, then tapping Personal in theSecondary Navigation Bar at the top of the screen. Tap ProConnect.
Tap +Add Code to enter a ProConnect Code.o If you have not yet entered your date of birth, you will be prompted to
enter it. Review the ProConnect Code instructions on the screen, then tap Continue to
proceed. Enter your Provider’s ProConnect Code then tap Submit. If successful, you
will see a message saying that your account was successfully ProConnected to your provider. If unsuccessful, you will encounter an error.
EDIT/REMOVE A PROCONNECT CODEYou can also remove a ProConnect Code from your account using the ProConnect Menu.
Access the ProConnect Menu by tapping Profile on the Primary Navigation Bar, then tapping Personal inthe Secondary Navigation Bar at the top of the screen. Tap ProConnect.
To remove a ProConnect Code, tap Edit in the top right corner. Check the box next to the ProConnect Code(s) you wish to remove, then tap Delete. A confirmation box will pop up. Review the content of the message, then tap Yes to remove the
connection(s) and ProConnect Code(s). You will be shown a confirmation message.
IM GLAD 0001 REV M 47
SIDE MENU: PROFILE
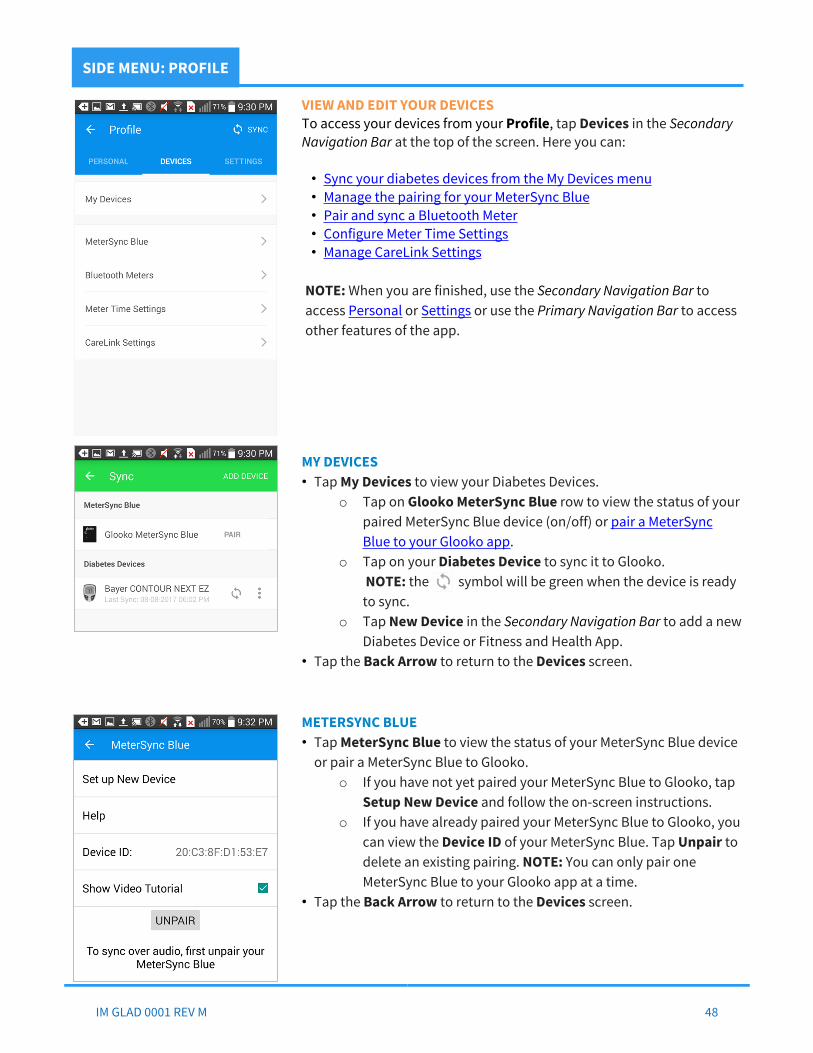
VIEW AND EDIT YOUR DEVICESTo access your devices from your Profile, tap Devices in the Secondary Navigation Bar at the top of the screen. Here you can:
• Sync your diabetes devices from the My Devices menu• Manage the pairing for your MeterSync Blue• Pair and sync a Bluetooth Meter• Configure Meter Time Settings• Manage CareLink Settings
NOTE: When you are finished, use the Secondary Navigation Bar to access Personal or Settings or use the Primary Navigation Bar to access other features of the app.
MY DEVICES• Tap My Devices to view your Diabetes Devices.
o Tap on Glooko MeterSync Blue row to view the status of yourpaired MeterSync Blue device (on/off) or pair a MeterSyncBlue to your Glooko app.
o Tap on your Diabetes Device to sync it to Glooko. NOTE: the symbol will be green when the device is ready to sync.
o Tap New Device in the Secondary Navigation Bar to add a newDiabetes Device or Fitness and Health App.
• Tap the Back Arrow to return to the Devices screen.
METERSYNC BLUE• Tap MeterSync Blue to view the status of your MeterSync Blue device
or pair a MeterSync Blue to Glooko.o If you have not yet paired your MeterSync Blue to Glooko, tap
Setup New Device and follow the on-screen instructions.o If you have already paired your MeterSync Blue to Glooko, you
can view the Device ID of your MeterSync Blue. Tap Unpair todelete an existing pairing. NOTE: You can only pair oneMeterSync Blue to your Glooko app at a time.
• Tap the Back Arrow to return to the Devices screen.
IM GLAD 0001 REV M 48

SIDE MENU: PROFILE
BLUETOOTH METERS• Tap Bluetooth Meters to view a Bluetooth Meter that is paired to your
Glooko app.o If you have not yet paired your Bluetooth Meter to Glooko, tap
Setup New Meter and follow the on-screen instructions.o If you have paired your Bluetooth Meter to Glooko, tap on the
meter name to view additional information including the Device ID of your Bluetooth Meter. Tap Unpair to delete an existing pairing.
• Tap the Back Arrow to return to the Devices screen.
METER TIME SETTINGSYou can allow the Glooko mobile app to update your meter’s time so it matches the time on your phone. Once you sync your meter, if your meter time is off (by 5 minutes or less), Glooko will ask you for permission to fix your meter’s time.
This feature is currently available for the following diabetes devices:
ACCU-CHEK Ascencia Bayer OneTouch FreeStyle• Aviva Connect (in Settings)• Aviva Expert• Aviva Guide (in Settings)• Aviva Nano• Aviva Performa Connect (in
Settings)• Aviva Performa Nano• Aviva Plus Black• Aviva Plus Silver• Compact Plus• Nano
• Contour NEXT ONE • Breeze 2• CONTOUR• CONTOUR NEXT EZ• CONTOUR XT
• UltraMini • Lite• Freedom Lite
• Tap Meter Time Settings to view devices that have been configured to allow Glooko to automatically set the time and date of the blood glucose meter to match the time on your mobile device.
o Toggle the button on (blue) or off (grey) for each connected device.
o If no devices are listed, please sync a compatible device and it will appear on this page.
• Tap the Back Arrow to return to the Devices screen.
IM GLAD 0001 REV M 49

SIDE MENU: PROFILE
CARELINK SETTINGSUse this menu option to manage your connection to your CareLink Personal Account. Click here to learn more about uploading Medtronic data via CareLink Personal.
• Tap your phone’s Back Arrow to return to the Devices screen.
IM GLAD 0001 REV M 50

SIDE MENU: PROFILE
VIEW AND EDIT ADDITIONAL SETTINGSTo access your Additional Settings from your Profile, tap Settings in the Secondary Navigation Bar at the top of the screen. Here you can:
• Glooko Data Source• Meter Units• Daily Time Ranges• Target BG Ranges• Activation Code• Push Notifications
NOTE: When you are finished, use the Secondary Navigation Bar to access Personal or Devices or use the Primary Navigation Bar to access other features of the app.
GLOOKO DATA SOURCEAdjusting the Glooko Data Source changes the source of data displayed throughout the Glooko app.
• Tap Glooko Data Source.• Select CGM or BG to specify the data source.• Tap the Back Arrow to return to the Settings screen.
NOTE: The default Glooko Data Source is CGM if a CGM has been uploaded to the account. If a CGM has not been uploaded to the account, the default Data Source is BG.
METER UNITSAdjusting the Meter Units changes the units for your blood glucose readings throughout the Glooko app.
• Tap Meter Units.• Select mg/dL or mmol/L to change the Meter Units.
IM GLAD 0001 REV M 51

SIDE MENU: PROFILE
DAILY TIME RANGESYou can specify your Daily Time Ranges so when you view your readings in Glooko, you can view statistics by time of day.
• Tap on the Hour or AM/PM for the Time Range (Morning, Afternoon, Evening, and/or Night) you wish to adjust then select the new start time for that time range.
• The Time Ranges you set will impact the way your glucose statistics are calculated.
• Tap the Back Arrow to return to the Settings screen.
TARGET BG RANGESYou can specify your target BG ranges so when you view your readings in Glooko, you can quickly visualize how many readings are below, within, or above your targeted range.
• Tap on Lower Limit, Upper Limit (full apple), and/or Upper Limit (half-eaten apple) to adjust the Target BG Range.
• Enter the new Target BG Range limit.• The Target BG Range you set will impact the way your glucose
statistics are calculated.• Tap the Back Arrow to return to the Settings screen.
ACTIVATION CODEIf you were provided an Activation Code by an invitation from a Glooko Partner offering a program but did not enter the code during enrollment, you can add the Activation Code to activate your account.
• Enter your Activation Code. o Select I forgot my Activation Code to view options for finding
your Activation Code.• Enter your Date of Birth.• Check or uncheck the box next to opt in or opt out of SMS Messages.
o Tap SMS Messages to view additional information about SMS messaging.
• Tap Activate.
IM GLAD 0001 REV M 52

SIDE MENU: SHARE REPORT
SHARE REPORTYou can share a two-week or one-month PDF report of your readings through email or eFax, print a PDF report to a compatible wireless printer, or export your readings and notes into a CSV file. To eliminate paper waste, Glooko restricts the number of faxes sent from the app to three electronic faxes per 30 days.
All Glooko users will be able to share Statistics & Graphs and the Logbook report. Only users who have uploaded an insulin pump or CGM will be able to share specific insulin pump and CGM reports.
From the Side Menu, tap Share Report. Tap desired Share Report Method:
o Share a PDF: Email Fax Open in …
o Share a CSV: Email
Select from report options:o Time Frame: Select either Two Weeks or One Month.o Reports: Select reports to share by toggling the button next to
the report name ON (green).o Comments: Add a customized comment by tapping on the
Comments field and typing in desired text. Tap Done on yourphone’s keyboard.
o Print Options: Toggle between Color or Black and White. Tap Create. Follow on-screen instructions to share the report via
selected method.
IM GLAD 0001 REV M 53
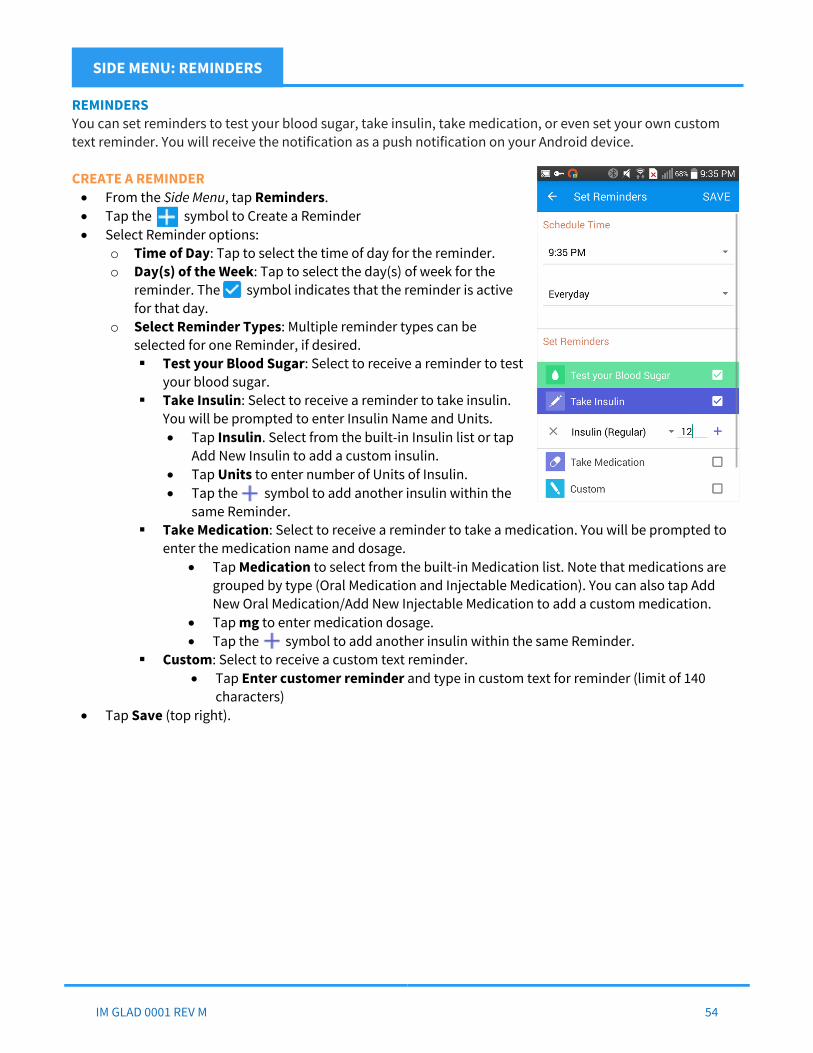
SIDE MENU: REMINDERS
REMINDERSYou can set reminders to test your blood sugar, take insulin, take medication, or even set your own custom text reminder. You will receive the notification as a push notification on your Android device.
CREATE A REMINDER From the Side Menu, tap Reminders. Tap the symbol to Create a Reminder Select Reminder options:
o Time of Day: Tap to select the time of day for the reminder.o Day(s) of the Week: Tap to select the day(s) of week for the
reminder. The symbol indicates that the reminder is active for that day.
o Select Reminder Types: Multiple reminder types can beselected for one Reminder, if desired. Test your Blood Sugar: Select to receive a reminder to test
your blood sugar. Take Insulin: Select to receive a reminder to take insulin.
You will be prompted to enter Insulin Name and Units. Tap Insulin. Select from the built-in Insulin list or tap
Add New Insulin to add a custom insulin. Tap Units to enter number of Units of Insulin. Tap the symbol to add another insulin within the
same Reminder. Take Medication: Select to receive a reminder to take a medication. You will be prompted to
enter the medication name and dosage. Tap Medication to select from the built-in Medication list. Note that medications are
grouped by type (Oral Medication and Injectable Medication). You can also tap AddNew Oral Medication/Add New Injectable Medication to add a custom medication.
Tap mg to enter medication dosage. Tap the symbol to add another insulin within the same Reminder.
Custom: Select to receive a custom text reminder. Tap Enter customer reminder and type in custom text for reminder (limit of 140
characters) Tap Save (top right).
IM GLAD 0001 REV M 54

SIDE MENU: REMINDERS
RESPOND TO A REMINDEROnce you have set a reminder to do a task in the Glooko app, you will receive a push notification on your iOS device with three response options:
Tested (Test your Blood Sugar), Took it (Insulin or Medication), or Done (Custom)o Selecting Tested for the Test your Blood Sugar reminder will prompt you to sync your diabetes
device to Glooko (after responding to all other Reminder Types in the Reminder).o Selecting Took it for the Take Insulin or Take Medication reminder will add the insulin or
medication to your History List View.o Selecting Done for the Custom reminder will add the custom text note to your History List View.
Snooze 15 min: Selecting this option will resend the push notification reminder in 15 minutes. Tap the X in the top-right to Skip the Reminder: This will skip the current reminder but will not disable or
delete the reminder.
DISABLE OR DELETE A REMINDER From the Side Menu, tap Reminders. To Disable a reminder: Toggle the button for the reminder to OFF
(gray). To re-enable the reminder, toggle the button for the reminderto ON (orange)
To Delete a reminder: Tap the symbol then tap Delete. Confirm bytapping Yes.
IM GLAD 0001 REV M 55
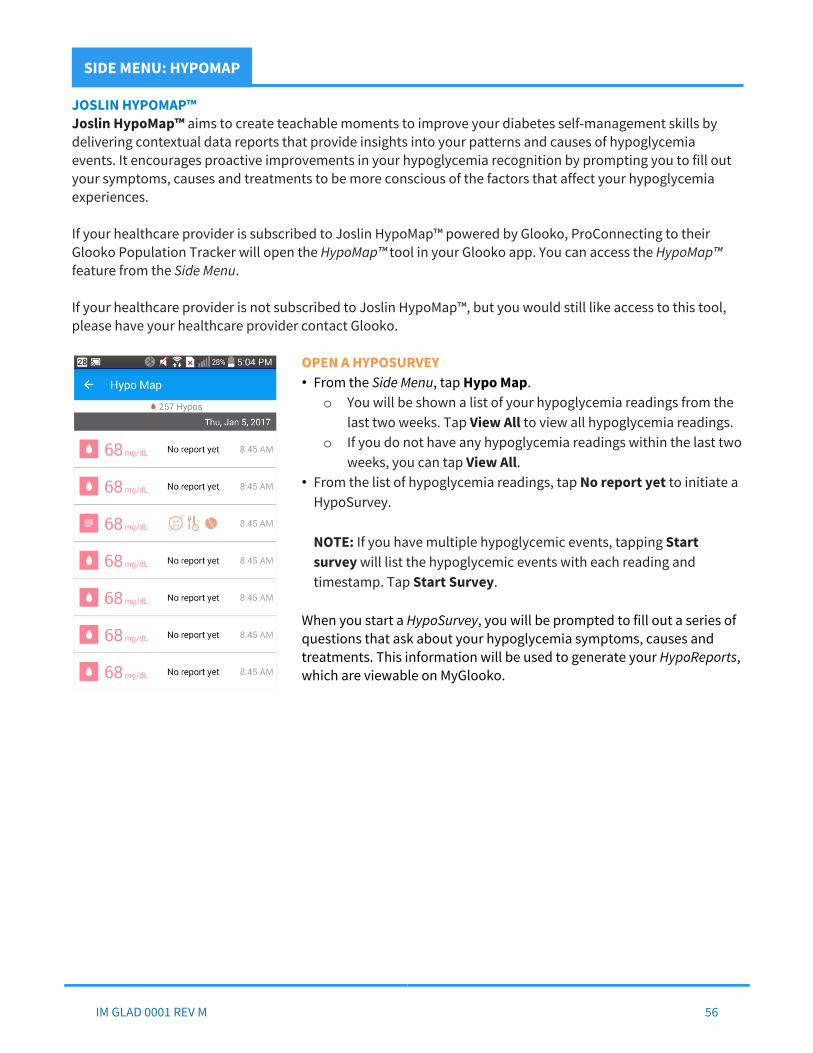
SIDE MENU: HYPOMAP
JOSLIN HYPOMAP™Joslin HypoMap™ aims to create teachable moments to improve your diabetes self-management skills by delivering contextual data reports that provide insights into your patterns and causes of hypoglycemia events. It encourages proactive improvements in your hypoglycemia recognition by prompting you to fill out your symptoms, causes and treatments to be more conscious of the factors that affect your hypoglycemia experiences.
If your healthcare provider is subscribed to Joslin HypoMap™ powered by Glooko, ProConnecting to their Glooko Population Tracker will open the HypoMap™ tool in your Glooko app. You can access the HypoMap™ feature from the Side Menu.
If your healthcare provider is not subscribed to Joslin HypoMap™, but you would still like access to this tool, please have your healthcare provider contact Glooko.
OPEN A HYPOSURVEY• From the Side Menu, tap Hypo Map.
o You will be shown a list of your hypoglycemia readings from thelast two weeks. Tap View All to view all hypoglycemia readings.
o If you do not have any hypoglycemia readings within the last twoweeks, you can tap View All.
• From the list of hypoglycemia readings, tap No report yet to initiate aHypoSurvey.
NOTE: If you have multiple hypoglycemic events, tapping Startsurvey will list the hypoglycemic events with each reading andtimestamp. Tap Start Survey.
When you start a HypoSurvey, you will be prompted to fill out a series of questions that ask about your hypoglycemia symptoms, causes and treatments. This information will be used to generate your HypoReports, which are viewable on MyGlooko.
IM GLAD 0001 REV M 56

SIDE MENU: HYPOMAP
COMPLETE A HYPOSURVEYThe first section of HypoSurvey is Symptoms. If this is your first time filling out a HypoSurvey, you will be shown a pop-up that contains the definition of a symptom. Touch anywhere to close the pop-up and begin filling out a HypoSurvey.
For Symptoms: • Select all symptoms that apply for that hypoglycemia event.
• Icons will turn orange when selected.
If you do not see your symptom listed or wish to add additional information, you can add an additional note:• Scroll down until you see Anything else you want to add?.• Tap on it (a text box will emerge).• Enter your note. Tap Save.• Tap Next to save your symptom(s) and move on to the next section,
Causes.
The second section of HypoSurvey is Causes. If this is your first time filling out a HypoSurvey, you will be shown a pop-up that contains the definition of a cause. Touch anywhere to close the pop-up and to begin filling out a HypoSurvey.
For Causes: • Select all causes that apply for that hypoglycemia event.
• Icons will turn orange when selected.
If you do not see your symptom listed or wish to add additional information, you can add an additional note:• Scroll down until you see Anything else you want to add?.• Enter your note. Tap Save.• Tap Next to save your cause(s) and move on to the next section,
Treatments.
IM GLAD 0001 REV M 57

SIDE MENU: HYPOMAP
The third section of HypoSurvey is Treatment. If this is your first time filling out a HypoSurvey, you will be shown a pop-up that contains the definition of a treatment. Touch anywhere to close the pop-up and to begin filling out a HypoSurvey.
For Treatments: • Select all treatments that apply for that hypoglycemia event.
• Icons will turn orange when selected.o For each treatment selected, a pop-up will emerge asking
you to provide more details. Fill it out and Tap Save.o Specify if you required medical assistance:
• The default is No, you did not require medical assistance.• To indicate that you required assistance and to specify the type of
assistance, turn the toggle from No to Yes by tapping on it.If you do not see your treatment or type of medical assistance listed or if you wish to add additional information, you can add an additional note:• Scroll down until you see Anything else you want to add?.• Enter your note. Tap Save.• Tap Next (top) to save your treatment(s) and move on to the
Summary.
The final section of HypoSurvey is Summary. Here you will see what you selected as your symptom(s), cause(s) and treatment(s).
To edit a specific section of your HypoSurvey, tap the symbol – you will be taken to that section of your HypoSurvey to select new answers.
When you are satisfied with your HypoSurvey entry, tap Save.
IM GLAD 0001 REV M 58

SIDE MENU: SHOP, ABOUT, HELP
SHOP AT GLOOKOFrom the Side Menu, tap Shop to access the Glooko web store. You will be redirected to the Glooko web store at shop.glooko.com.
Use the Glooko web store to purchase a Glooko subscription,which includes the syncing devices you need.
ABOUTFrom the Side Menu, tap About to view additional information about your Glooko app, including:
Glooko Version Number and Build Number (in parenthesis)o For example: Version 4.0 (6679)
Tap Glooko Terms of Use to view the Terms of Use for usingGlooko.
Tap Play Store! to view the Glooko app in the Play Store. To writea review:o Tap Reviews and then Write a Review.NOTE: You must sign into your Google Play account to write areview.
HELPFrom the Side Menu, tap Help for additional support and assistance:
Send us Feedback: Tap to send an email with feedback or supportquestions to Glooko Support directly from the app.
View Support Pages: Tap to view support.glooko.com in yourinternet browser. Select from Help Topics or search for a keyword.
Video Tutorials: Tap to view all available video tutorials. Meter Sync Tutorials: Tap to enable/disable the syncing tutorials
for your diabetes devices. Server Resync: Tap to initiate a full sync with the server if you are
unable to sync your data or do not see your data on all of yourdevices. NOTE: This may take awhile.
Enable Diagnostics: If you are experiencing issues with yourGlooko app, diagnostics provide valuable technical details for theGlooko Support team to investigate the problem. Please ensureDiagnostics are enabled, then recreate the issue you experiencedbefore tapping Send Diagnostics to Glooko.
Send Diagnostics to Glooko: After ensuring Diagnostics areenabled and recreating the issue you experienced, tap SendDiagnostics to Glooko. Write a summary of the issue you areexperiencing in the body of the email before sending the email.
IM GLAD 0001 REV M 59

INDEX
INDEX3
30 Pin-to-Female USB OTG Cable.......................See USB OTG CableA
About GlookoApp Version & Build Number .....................................................59Contact Glooko Support ..............................................................8Product Description and Intended Use.......................................1Terms of Use...............................................................................59
BBluetooth Meter - Upload to Glooko ..............................................19
CCareLink Personal........................................................See MedtronicCompatibility .....................................................................................3
Android Devices............................................................................1Blood Glucose Meters ..................................................................3Continuous Glucose Monitors (CGMs).........................................6Fitness & Health Apps ................................................................25Insulin Pumps...............................................................................6
Contact Glooko Support ...................................................................8D
DiagnosticsEnable Diagnostics.....................................................................59Send Diagnostics to Glooko Support ........................................59
EEvents...............................................................................................30
Comment Events ........................................................................35Edit or Delete Events ..................................................................30Exercise Events...........................................................................34Food Events ................................................................................31Insulin Events .............................................................................32Medication Events ......................................................................33
FFeedback..........................................................................................59Fitbit .................................................................................................25
GGet Glooko
Purchase a Subscription ............................................................59Get Started.........................................................................................8
1. Download the Glooko App for Android ...................................12. Sign up for Glooko ..................................................................103. Download your Diabetes Device Data .....................................34. Track Food, Exercise, Medications, and Notes .....................305. Interpret your Data.................................................................36
Graphs..............................................................................................36History.........................................................................................28Overlay........................................................................................41Trends .........................................................................................37
HHelp ..................................................................................................59Home Screen ...................................................................................16
IiHealth..............................................................................................25
JJawbone UP.....................................................................................25Joslin HypoMap™ ............................................................................56
LLog In..................................................................................................9Log Out...............................................................................................8
MMedical Record Number (MRN).......................................................46Medtronic
Connect an Existing CareLink Account .....................................22
Create a New CareLink Account ................................................23Manage CareLink Settings .........................................................50Upload data using CareLink Personal.......................................21
Meter Time Settings ........................................................................49MeterSync Blue
Pair a MeterSync Blue to Glooko ...............................................27The MeterSync Blue Menu .........................................................26Upload Using the MeterSync Blue.............................................18What is the MeterSync Blue?......................................................26
MeterSync Cable - Upload to Glooko .............................................24Micro-to-Female USB OTG Cable........................See USB OTG CableMicro-to-Micro USB OTG Cable...........................See USB OTG CableMicro-to-Mini USB OTG Cable ............................See USB OTG CableMoves ...............................................................................................25My Devices .......................................................................................48
PPDF report ..........................................................See Share Your DataPersonal Information ......................................................................46
Date of Birth................................................................................46Gender ........................................................................................46Height .........................................................................................46Type of Diabetes.........................................................................46Update Email ..............................................................................46Update Name .............................................................................46Weight .........................................................................................46
Primary Navigation Bar ...................................................................15ProConnect Code
ProConnect to your Provider.....................................................46What is a ProConnect Code?......................................................47
Profile...............................................................................................46R
RemindersCheck your Blood Sugar.............................................................54Create a Reminder......................................................................54Custom Text Reminder ..............................................................54Disable or Delete ........................................................................55Respond to Reminders...............................................................55Take Insulin ................................................................................54Take Medication .........................................................................54
Review Glooko in the Play Store.....................................................59Runkeeper........................................................................................25
SSecondary Navigation Bar ..............................................................15Server Resync ..................................................................................59Share Your Data
CSV File .......................................................................................53Fax...............................................................................................53PDF ..............................................................................................53ProConnect to your Provider.....................................................46
Strava ...............................................................................................25Support ..............................................................................................8Sync your Device to Glooko ............................................................17
UUpload Device Data .........................................................................17USB OTG Cable
30 Pin-to-Female Cable..............................................................20Micro-to-Female Cable...............................................................20Micro-to-Micro Cable..................................................................20Micro-to-Mini Cable....................................................................20
WWithings ...........................................................................................25
IM GLAD 0001 REV M 60

REVISION HISTORY
REVISION HISTORY
Revision DCO # Description of Changes Initiator Effective Date
A 0351 Initial Release S. Tep 10/24/13
B 0367 Additions include compatibility with ACCU-CHEK meters and Statistics. S. Tep 12/10/13
C 0522 Additional BLE support. S. Tep 09/22/14D 0529 Added in integration for fitness and biometric trackers. S. Tep 11/04/14E 0543 Additional meter support. S. Tep 12/08/14F 0546 New app features such as Reminders and a Side Menu. S. Tep 01/26/15
G 0575 Added in compatibility with the ACCU-CHEK Aviva Expert and ACCU-CHEK Aviva Plus Black. S. Tep 03/17/15
H 0613Added in Dexcom and OmniPod compatibility and instructions on how to view the new daily and weekly graphs and statistics.
S. Tep 07/24/15
I 0648 Set Meter Time Automatically section added. J. Baldridge 04/14/16J 0726 Added Medtronic compatibility and instructions J. Baldridge 09/07/16
K 17-001 Mobile App redesign (release 4.0) J. Baldridge 01/24/17
L 17-029
Addition of Activation Code during signup, Multi-ProConnect Feature, Support for Ascensia Contour® NEXT ONE meter, Horizontal Expanded Logbook Graph, addition of Mobile Insulin Dosing System (MIDS)
J. Baldridge 03/16/17
M 17-129New enrollment flow, change to Navigation Bar, new compatibility (ACCU-CHEK Guide, Ascensia Contour NEXT ONE), Profile moved to Side Menu.
J. Baldridge 08/09/17
IM GLAD 0001 REV M 61