User Guide
393
Welcome to Hompath User Family. Hompath Classic Comes in 3 Different Versions Hompath Classic 8.0 Premium Collection Hompath Classic 8.0 Hompath Vital Please Note that basic functioning and principles are same for all three. The Difference will be in some features, Database such as number of Repertories and other books on so. You will find some variation in the screens and functionalities as the user guide belongs to Hompath Classic 8.0 Premium Collection. Kindly bear accept and co-operate. Yours Sincerely Dr. Jawahar Shah
-
Upload
akshay-jain -
Category
Documents
-
view
22 -
download
8
description
HOMPATH 8
Transcript of User Guide

Welcome to Hompath User Family. Hompath Classic Comes in 3 Different Versions Hompath Classic 8.0 Premium Collection Hompath Classic 8.0 Hompath Vital Please Note that basic functioning and principles are same for all three. The Difference will be in some features, Database such as number of Repertories and other books on so. You will find some variation in the screens and functionalities as the user guide belongs to Hompath Classic 8.0 Premium Collection. Kindly bear accept and co-operate. Yours Sincerely Dr. Jawahar Shah

Hompath Vital
USER GUIDE
Dr. Jawahar Shah8, New Hari Niwas, Dattatray Road, Santacruz(W), Mumbai - 400 054, IndiaTel :+91 22 – 26616561/ 26614532Email: [email protected]: www.hompath.com
This manual and the software described within are copyrighted, with all rights reserved. Under the copyright laws this manual cannot be copied, translated, printed or circulated without the consent of Dr. Jawahar Shah. Information in this document is subject to change without notice.Every effort has been made to ensure that the information in this manual is accurate.Hompath is not responsible for printing or clerical errors.
All rights reserved world wide.Dr. Jawahar Shah, Hompath.8 New Hari Niwas, Dattatray Road, Santacruz (W), Mumbai - 400 054, IndiaTel :+91 22 – 26616561/ 26614532
CONTENTS .....
License Agreement Acknowledgements Registration and Support
Getting startedSystem requirementsInstallation and Uninstallation Trouble shooting and commonly asked questionsGetting helpScreen AppearanceQuotes
Patient Select PhysicianNew PatientSelect PatientSpeed CaseSave Speed casePrevious PatientsPrint

Repertory Selection of Repertories and ChaptersRepertory ScreenSearch within a ChapterHidden UtilitiesCombine SymptomMateria Medica ConfirmationRecording Rubrics
Quick Repertorisation Repertorisation Repertorisation ScreenHidden UtilitiesPrint Repertorisation TableRepertorisation GraphsRetrieve Previously Recorded RubricsRepertorisation StrategiesSymptom Forwarding
Common Features Symptom OptionsRemedy Options
Search Global Repertory SearchIntelligent Word SearchQuick Search
Extract Extract Convt. Rep to MMExtract Group Symptoms
Materia Medica Open Materia MedicaSearch Materia MedicaFavorite Materia Medica
View Full Screen GraphsMagnifyOptions
Utilities Remedy ListRemedy EditorSimilimumFeedback

Pack n go
Archives Search Books Search Materia MedicaSearch PhilosophySearch TherapeuticsSearch PharmacySearch ClinicalSearch Regional TherapeuticsSearch Remedy Picture
Open books Open Materia MedicaOpen PhilosophyOpen TherapeuticsOpen PharmacyOpen ClinicalOpen Regional TherapeuticsOpen Remedy Picture
Favorites
Homutil Mother tincturesProphylaxisTherapeuticsWord MeaningsCross ReferencesViva QuestionsQuestion BankGroup Symptoms
Patient Management SystemPatient InformationPatient ‘Do’s and Don’t’ InstructionsPhysician Information Back-up & Restore Auto-BackupNew ReportsPrinting

User License Agreement for Hompath Vital.
IMPORTANT-READ CAREFULLY. This ‘Hompath Vital User License Agreement’ (“HVULA”) is a legal agreement between you (either an individual or a single entity, college, institution, society, trust, research organization or whosoever buys the software.) and Dr. Jawahar Shah, which includes computer software and associated media and printed materials, and may include “online” or electronic documentation (“SOFTWARE PRODUCT” or “SOFTWARE”). By installing, copying or otherwise using the SOFTWARE PRODUCT, you agree to be bound by the terms of “HVULA”. If you do not agree to the terms of “HVULA”, promptly return the unused SOFTWARE PRODUCT to the place from which you obtained it, for a full refund.
SOFTWARE PRODUCT LICENSE
THE SOFTWARE PRODUCT is protected by copyright laws and international copyright treaties, as well as other intellectual property laws and treaties. THE SOFTWARE PRODUCT is licensed, not sold.
1. GRANT OF LICENSE: The “HVULA” grants you the following rights:
Software: You may install and use one copy of the SOFTWARE PRODUCT, or in its place, any prior version for the same operating system, on a single computer. The primary user of the computer on which the SOFTWARE PRODUCT is installed may make a second copy for his or her exclusive use on either a home or portable computer. Storage/Network Use: You may also store or install a copy of the SOFTWARE PRODUCT on a storage device, such as a network server, used only to install or run the SOFTWARE PRODUCT on your other computers over an internal network; however, you must acquire and dedicate a license for each separate computer on which the SOFTWARE PRODUCT is installed or run from the storage device. A license for the SOFTWARE PRODUCT may not be shared or used concurrently on different computers.
2. DESCRIPTION OF OTHER RIGHTS AND LIMITATIONS.
Limitations on Reverse Engineering, Decompilation, and Disassembly: You may not reverse engineer, decompile, or disassemble the SOFTWARE PRODUCT. Separation of Components: The SOFTWARE PRODUCT is licensed as a single product. Its component parts may not be separated for use on more than one computer. Rental: You may not rent or lease the SOFTWARE PRODUCT. Termination: Without prejudice to any other rights, Dr. Jawahar Shah may terminate this “HVULA” if you fail to comply with the terms andconditions of “HCULA”. In such event, you must destroy all copies of the SOFTWARE PRODUCT and all of its component parts.
3. If the SOFTWARE PRODUCT is an upgrade of a component of a package of software programs that you licensed as a single product, the SOFTWARE PRODUCT may be used and transferred only as part of that single product package and may not be separated for use on more than one computer.
4. COPYRIGHT. All title and copyrights in and to the SOFTWARE PRODUCT (including but not limited to any images, photographs, animation, video, audio, music, text, and “applets” incorporated into the SOFTWARE PRODUCT), the accompanying printed materials, and any copies of the SOFTWARE PRODUCT are owned by Dr. Jawahar Shah. The SOFTWARE PRODUCT is protected by copyright laws and international treaty provisions. Therefore, you must treat the SOFTWARE PRODUCT like any other copyrighted material except that you may either (a) make one copy of the SOFTWARE PRODUCT solely for backup or archival purposes or (b) install the SOFTWARE PRODUCT on a single computer provided you keep the original solely for backup or archival purposes. You may not copy the printed materials accompanying the SOFTWARE PRODUCT.
All rights reserved. No part of this work may be reproduced, stored in a retrieval system, adopted or transmitted in any form or by any means, electronic, mechanic, mechanical, photographic, graphic, optic recording or otherwise, translated in any language or computer language without the prior permission of Dr. Jawahar J. Shah.
Although due care has been taken to make this software package as accurate as possible, Dr. Jawahar J. Shah makes no representation or warranties with respect to the contents hereof and shall not be responsible for any loss or damage caused to the user by the direct or indirect use of this package.
Furthermore, Dr. Jawahar J. Shah reserves the right to alter, modify or otherwise change in any matter the contents thereof without any obligation on his part to notify any person of such revison or change.
5. DUAL-MEDIA SOFTWARE. You may receive the SOFTWARE PRODUCT in more than one medium. Regardless of the type or size of medium you receive, you may use only one medium that is appropriate for your single computer. You may not use or install the other medium on another computer. You may not loan, rent, lease, or otherwise transfer the other medium to another user, except as part of the permanent transfer (as provided above) of the SOFTWARE PRODUCT.
This agreement is to be construed and given effect in accordance with the laws of India and is governed exclusively by the laws of India.
LIMITED WARRANTY
Dr. Jawahar Shah warrants that (a) the SOFTWARE PRODUCT will perform substantially in accordance with the accompanying written materials for a period of ninety (90) days from the date of receipt, and (b) any hardware accompanying the SOFTWARE PRODUCT will be free from defects in materials and workmanship under normal use and service for a period of ninety (90) days from the date of receipt. The implied warranty is limited to the software only for a period of 90 days from the date of purchase.
CUSTOMER REMEDIES. Dr. Jawahar Shah’s and his suppliers’ entire liability and your exclusive remedy shall be, at Dr. Jawahar Shah’s option, either (a) return of the price paid, or (b) repair or replacement of the SOFTWARE PRODUCT or hardware that does

not meet Hompath’s Limited Warranty and which is returned to Dr. Jawahar Shah with a copy of your receipt. This limited Warranty is void if failure of the SOFTWARE PRODUCT or hardware has resulted from accident, abuse, or misapplication. Any replacement SOFTWARE PRODUCT or hardware will be warranted for the remainder of the original warranty period of thirty (30) days, whichever is longer.
NO OTHER WARRANTIES: TO THE MAXIMUM EXTENT PERMITTED BY APPLICABLE LAW, DR. JAWAHAR SHAH AND HIS SUPPLIERS DISCLAIM ALL OTHER WARRANTIES EITHER EXPRESSED OR IMPLIED, INCLUDING, BUT NOT LIMITED TO, IMPLIED WARRANTIES OF MERCHANTABILITY AND FITNESS FOR A PARTICULAR PURPOSE, WITH REGARD TO THE SOFTWARE PRODUCT, AND ANY ACCOMPANYING HARDWARE. THIS LIMITED WARRANTY GIVES YOU SPECIFIC LEGAL RIGHTS. YOU MAY HAVE OTHERS, WHICH VARY FROM STATE/JURISDICTION TO STATE/JURISDICTION.
NO LIABILITY FOR CONSEQUENTIAL DAMAGES TO THE MAXIMUM EXTENT PERMITTED BY APPLICABLE LAW, IN NO EVENT SHALL DR. JAWAHAR SHAHOR ITS SUPPLIERS BE LIABLE FOR ANY SPECIAL, INCIDENTAL, INDIRECT, OR CONSEQUENTIAL DAMAGES WHATSOEVER (INCLUDING, WITHOUT LIMITATION, DAMAGES FOR LOSS OF BUSINESS PROFITS, BUSINESS INTERRUPTION, LOSS OF BUSINESS INFORMATION, OR ANY OTHER PECUNIARY LOSS) ARISING OUT OF THE USE OF OR INABILITY TO USE THE SOFTWARE PRODUCT, EVEN IF DR. JAWAHAR SHAH HAS BEEN ADVISED OF THE POSSIBILITY OF DAMAGES.
Acknowledgements
Peace, harmony, balance, happiness and sharing are the basic nature of all human beings. Homoeopathy has been created to provide ALL THESE naturally.
We thank from the bottom of our hearts, Mother Nature for providing the substances with curative properties. We thank Hahnemann for showing us the light and the right path. We thank all who have been associated with homoeopathy directly or indirectly since the last two centuries. This includes everybody – teachers, provers, patients, students, writers, publishers and each and every one of you. Without your inspiration, support and guidance this task was impossible.
The main purpose of creating this software is to provide a better human care and to create a healthy, happy and harmonious homoeopathic world. Let us bring back the natural balance to this Mother Earth.
Dr. Jawahar J. Shah
Registering your purchase
Before going through the manual, please be sure to fill out registration card included within the CD.
Registering yourself will enable you to obtain technical support, which will not be available otherwise.
You will also be included in our mailing list for regular information on upgrades and new products from Hompath and also about various conferences, seminar and work shops being held around the world.You can send it to us at :
Hompath8, Hari Niwas, Dattatray Road,Santacruz (w)Mumbai-400 054INDIATel: 00-91-22 26616561/ 26614532e-mail: [email protected]: www.hompath.com
or to the nearest Hompath Support Service dealer in your area.
Hompath Support Services:
In case of any difficulties encountered in the installation and working of the software, please
- Consult the documentation or other printed information included with your product
- Check on-line help
If you cannot find a solution, you can contact the HOMPATH SUPPORT SERVICES located at the above address or the nearest Hompath dealer in your area.
Note: You must be a registered user to obtain technical support.
INTRODUCTION
Organization of this manual

About Hompath Vital
A compilation of the wisdom of the ages ‘Hompath Vital’ is literally a masterpiece! It includes 105 books authored by the masters of Homoeopathy themselves, taking in a large variety of subjects. And this coupled with the most practical, user-friendly and up to date features are designed to satisfy all your Homoeopathic needs and aspirations.
‘Hompath Vital’ has been created using inputs from the best teachers and practitioners from around the world to create a perfect blend of the requirements of the entire Homoeopathic fraternity.
Hompath Vital has the following features:
Vital:The product incorporates 105 books. The very easy graphical user interface is designed for the novice in computers and Homoeopathy also.
Quick Repertorisation: Unique feature where you simply feed symptoms for instant recording without having to actually open any repertories or chapters.
Largest number of Repertorisation strategies with True Expert System [T.E.S]: Intelligent and practical repertorisation strategies with Expert analysis based on Kent, Boenninghausen and Boger. You can analyze remedies by animal and plant kingdoms and their respective groups and sub-groups. Use the mineral kingdom to take advantage of the periodical table analysis and group remedy analysis. Do a selective analysis using Clipboards and see different permutations and combinations best suited to you using features like Cross, Combine, Elimination, etc.
Comprehensive Repertory and Materia Medica search: A fast and intelligent feature, it skims through all Repertories and Materia Medicae in seconds to provide valuable insight into remedy portraits and rubric occurrences.
Creation of customized repertories: Create your own personal repertory, from the repertory or materia medica search results and use it as any other standard repertory
Compare & Differentiate Remedies: Compare and contrast remedies from Materia Medicae and Repertories.
Group Symptoms:Generate your own group symptoms like Acids, Nosodes, Snakes, Kalis, Natrums etc. Apply different filters like Mineral, Plants, Animals their sub-groups or drug filters like left, right sided, miasmatically, etc. to improve your wisdom. Create your thesis in matter of seconds.
Classical cures with the right Similimum. Helps reach not only the right remedy but also the right potency and right repetition which together constitute the Similimum.

Carry your cases: ‘Pack’ a case to use it for presentations any where in the world. Run the presentation on anyPC or laptop even without installing the ‘Hompath Vital’ program.
Archives:An entire library at your finger tips, includes subjects like materia medica, philosophy, pharmacy etc. This option is designed to search intelligently through all books, thousands of pages and millions of references and produce results within few seconds.
Homutil:Specially Created & Compiled Data on Mother Tinctures, Second Prescription, Prophylaxis, Cross References, Word Meanings, Group Symptoms which help save your time and effort when dealing with patients.
Patient Management System: Efficient case record, follow-up and second prescription guidelines with backup and restore facilities help you maintain efficient records which can be later used for statistical analysis of cases & treatment provided at your clinic. You can print prescriptions on your customised letterheadPatient Instructions: Select from 200 pre-compiled clinical conditions that you can print and handout to the patient. Saves time by avoiding repeated instructions to the patient.
Smooth & easy flowing in design & application, Hompath Vital comes with a user friendly bubble help and extensive on-line context help with easy access to solutions regarding the functions of the software.

GETTING STARTEDSystem RequirementsInstallationUninstallationTrouble-shooting & Commonly asked questionsGetting HelpScreen AppearanceQuotes
GETTING STARTED
This chapter covers, the system requirements needed to run Hompath Vital and also details the installation of this product in few quick and easy steps. A troubleshooting guide in the form of commonly asked questions and answers is also provided.
System Requirements
Before installing the software on your hard disk please make sure to check for the following:
To run Hompath Vital you must have certain specific hardware and software prerequisites already installed on your computer.The minimum requirements are :
You must have any PII or higher configuration.A hard disk having a free space of at least 250 MB.At least 64 megabytes of RAM.A mouse.A SVGA color monitor with 256 colors.WINDOWS 98, 2000, XP.Multimedia Kit A printer (optional).
If you are keen on printing Graphs, kindly check whether your printer supports printing of graphs.

Installation Procedure For Hompath Vital
Classic CD is used to install the modules of- Classic, Archives, HomUtil, PMS, along with the Key (hardware lock-key for software protection) for the complete installation of this software. The installation is simple and you will not need any expert help if you follow the quick and easy steps mentioned below, carefully.
Step-1 : Place the CLASSIC CD in the CD-ROM Drive.
Step-2 : From the ‘Start’ menu select ‘Run’.
Step-3 : From the ‘Run’ dialogue box, click on ‘Browse’. Look in your CD drive.
Step-4 : Choose ‘Setup.exe’. Click on the ‘Open’ button.The ‘Run’ screen will now look as shown.
Step-5 : Click on the OK button.This will start the installation procedure.
Step-6 : The Install program will now guide you step-by-step through the installation procedure.
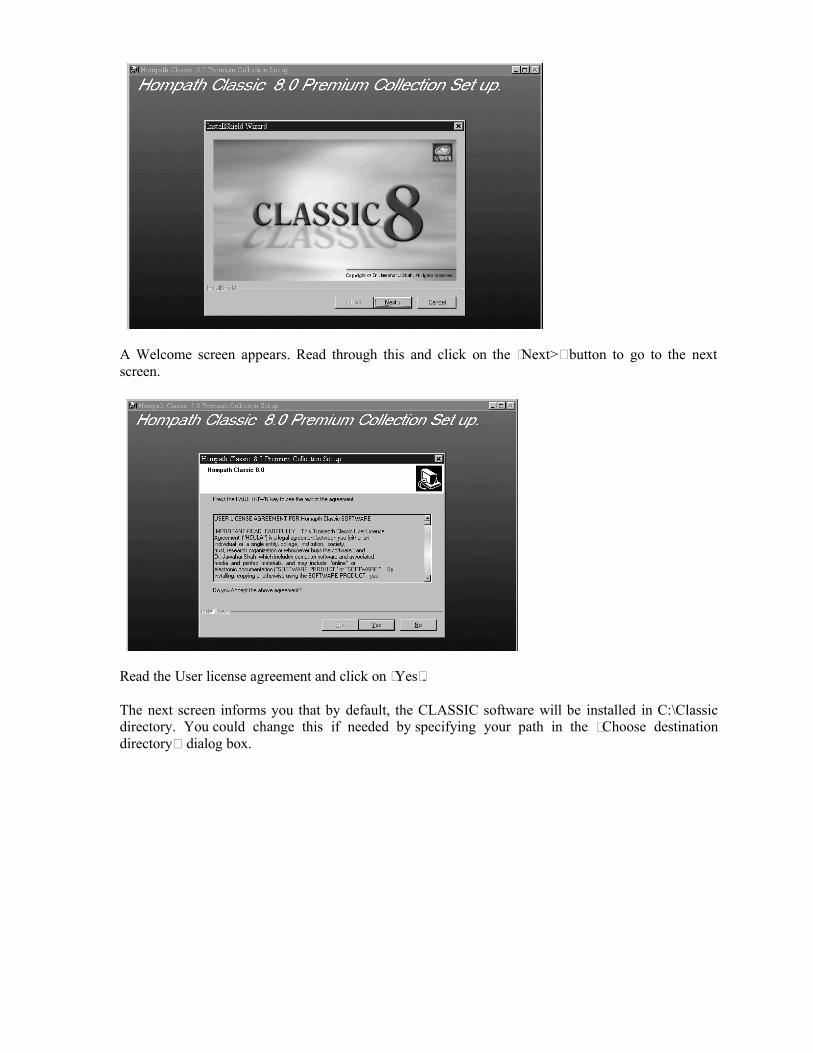
A Welcome screen appears. Read through this and click on the ‘Next>’ button to go to the next screen.
Read the User license agreement and click on ‘Yes’.
The next screen informs you that by default, the CLASSIC software will be installed in C:\Classic directory. You could change this if needed by specifying your path in the “Choose destination directory” dialog box.

Note : Hompath advises you to allow the default installation without any changes to avoid any confusion.
Reconfirm all information in the following screen and click on ‘Next>’.A status indicator will appear as shown.
Wait till the ‘Setup Complete’ screen appears. Then click on ‘OK’.
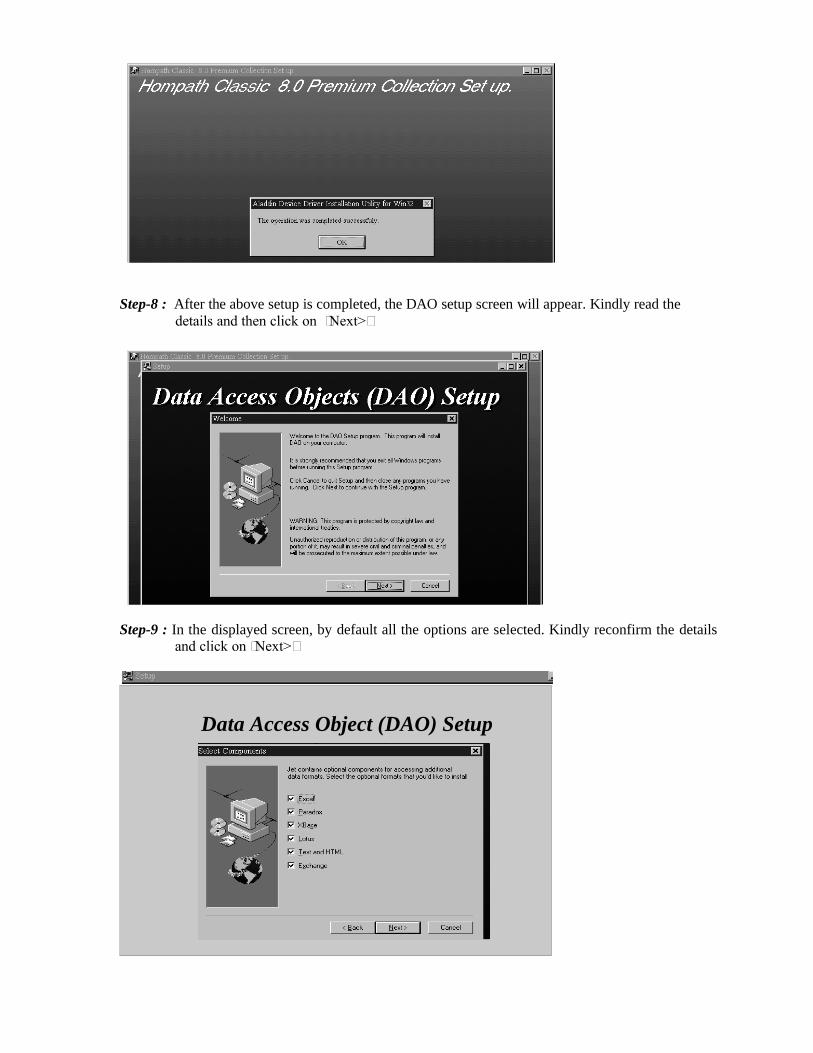
Step-8 : After the above setup is completed, the DAO setup screen will appear. Kindly read the details and then click on ‘Next>’
Step-9 : In the displayed screen, by default all the options are selected. Kindly reconfirm the details and click on ‘Next>’
Data Access Object (DAO) Setup
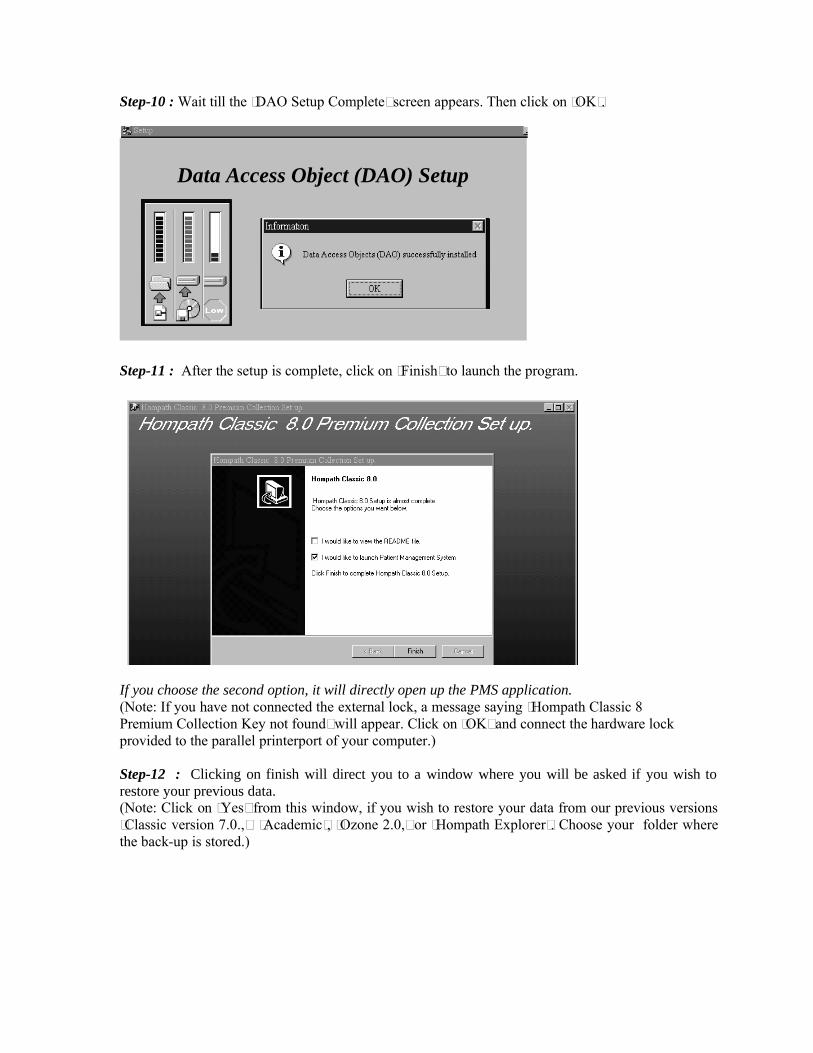
Step-10 : Wait till the ‘DAO Setup Complete’ screen appears. Then click on ‘OK’.
Step-11 : After the setup is complete, click on ‘Finish’ to launch the program.
If you choose the second option, it will directly open up the PMS application.(Note: If you have not connected the external lock, a message saying ‘Hompath Classic 8 Premium Collection Key not found’ will appear. Click on ‘OK’ and connect the hardware lock provided to the parallel printerport of your computer.)
Step-12 : Clicking on finish will direct you to a window where you will be asked if you wish to restore your previous data. (Note: Click on ‘Yes’ from this window, if you wish to restore your data from our previous versions ‘Classic version 7.0.,’ ‘Academic’, ‘Ozone 2.0,’ or ‘Hompath Explorer’. Choose your folder where the back-up is stored.)
Data Access Object (DAO) Setup

Click on ‘No’ if you don’t wish to restore previous data, The ‘Default physician’ screen is displayed.Click on ‘Cancel’ to close the application. To run Classic, the ‘Default physician’ has to be filled first.
Fill in the First name, Last name and the physician’s ID, and then click on ‘Save’.(Note: The fields marked with an ‘*’ are to be filled in compulsorily.)
Step-13 : Next you will be presented with the password window.
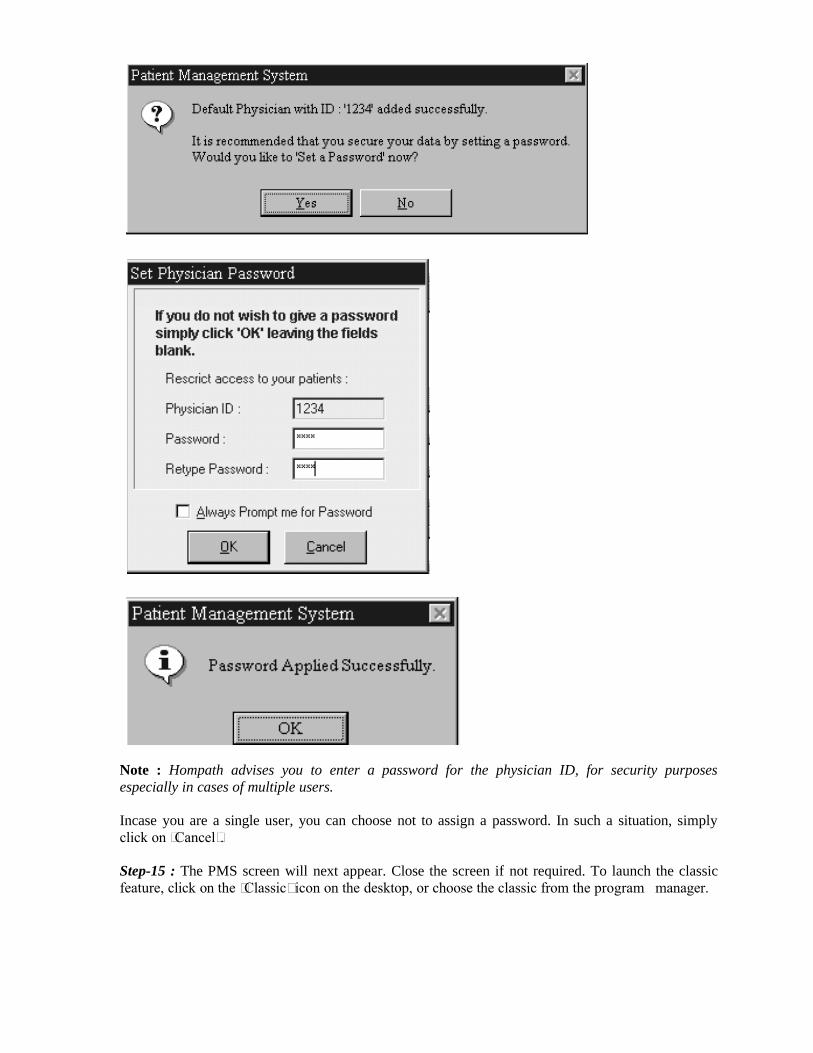
Note : Hompath advises you to enter a password for the physician ID, for security purposes especially in cases of multiple users.
Incase you are a single user, you can choose not to assign a password. In such a situation, simply click on ‘Cancel’.
Step-15 : The PMS screen will next appear. Close the screen if not required. To launch the classic feature, click on the ‘Classic’ icon on the desktop, or choose the classic from the program manager.

Uninstallation
You can safely remove the application from your hard disk using the Uninstall option from the ‘Program Manager’.
Click on ‘Start’ and then choose ‘Settings’. From the control panel, click on the icon named ‘Add/Remove programs’. In the next screen scroll down to highlight ‘Hompath Classic’ and click on the ‘Add/Remove’ button.
Click on ‘Yes’ to the message confirming the uninstallation. This will remove the entire application from your disk.
In case a box asking to “Remove Shared Files” appears, please click on “No to all”. If the uninstall program cannot remove all the files from this application, you can use ‘Windows Explorer’ to delete the ‘Classic’ folder in the specified drive.
Note : You can install and uninstall the software any number of times.
To uninstall the program while saving your list of patients already entered, please refer to “Patient Backup” & “Patient Restore”.
Trouble shooting & Commonly Asked Questions
Before you call the support services, kindly check the following points yourself. You may actually not need any assistance.However if the problem still persists, call your nearest Support Centre.
1. Disk space not available?Change the destination location to another drive where atleast 1 GB of disk space is available.
2. Source drive not found?Recheck the source location i.e. the drive specified for the CD-ROM in your computer. Usually it is either D: or E:
3. Computer hangs during installation?Check for presence of virus in the hard disk. If not, then restart the computer and reinstall the software. Consult your hardware supplier if the problem still persists.
4. A message ‘Hompath Vital Key not found’ appears?Check whether you have connected the hardware lock to the printer port of your computer. If youhave, then tighten it properly using the screws provided.
5. Can the software be installed on two separate machines?Yes. You can install the software in any number of machines but to use it you will have to connect the external lock to that particular machine.
6. How many counts are provided on this software?You can install the software any number of times from the CD.
7. Should the CD be placed in the CD-ROM drive to use the software? No. Hompath Vital gets installed on your hard disk.
Getting Help
To help you navigate through the software using the various buttons and picture icons, you can take advantage of the ‘Bubble Help’ which lets you get information about the items on the screen simply by pointing to them with the mouse.
Hold the cursor at the button for a few seconds for the bubble help to appear. As soon as you move the cursor, the bubble disappears.
Each of the features and function of this software has its own extensive on-line help facility. The information in the help files is a condensed version of the information found in the manual, and is easy to access when you are working.
You can access Help information by : Pressing F1 on the keyboard and a screen with information about that particular section or subsection will open up. Click on and dragging it over the text. The corresponding Help topic will open up. Choose ‘Help’ from the main menu and select ‘Help Topics’.
A screen listing the table of contents will open up.
Click on the required topic to read about the respective feature in detail.
Different ways to view the screens‘Close All’ : Will close all the active screens and bring back the first screen.‘Cascade’ : Will arrange all the open screens in the Cascade form.Tile’ : Will arrange all the open screens in the Tile form.‘Close’ : Will close the currently visible screen.Below this, there is a list of all screens ( chapters or applications) that you have already opened.Clicking on the particular screen name will bring that screen into view immediately.
Tip : Open all the chapters (upto a maximum of 10) from different repertories and then use this option to move easily from one chapter to another.
Shortcut keys and Keyboard access The features of Hompath Vital can be accessed by a number of shortcut keys from the keyboard.
1. All features in the main menu are provided with an underscore on a particular alphabet. Press Alt + the alphabet with the underscore to activate it’s functions. And then press the underscored alphabet in the functions also. (All chapters in the manual mention keyboard access) 2. Most buttons are with shortcut access. Press ALT + underscored alphabet to use that button.3. Use the ‘Tab’ key to move across the various options and buttons available on a particular screen. The ‘Tab’ key moves in one direction highlighting an option or button one by one. Press ‘Enter’ when you reach the desired option.
QuotesEverytime you run the program, a screen displaying tips and quotes credited to famous homeopaths opens up. In case you do not want to see this screen every time you run the program, uncheck on the box “Show Quotes on Startup”. To reset the screen to appear or to read a quote, choose “Help” on themain menu and click on “Quote of the day”. Click on ‘Next Quote’ to view the next randomly generated quote or click on ‘Close’ to close this screen.

Hompath Vital includes following modules:
Classic ArchivesHomutilPatient Management
The Hompath Vital combines the marvels of technology and sublime science of Homoeopathy to enable a practitioner to arrive at a similimum in a minimum possible time using an exhaustive database of repertories, books and research papers.
CLASSIC
Patient Details
New Patient {Ctrl + N} Enter preliminary patient information whenever patient consults you for the first time
Select Patient {Ctrl + O} Select a previously registered patient See previously recorded rubrics See previous repertorisation tables or graphs Repertorise patient symptoms for current date Modify patient particulars
Select Physician {Ctrl + H} Select a physician when there are multiple physicians working on same program Access list of patients of the selected physician
Speed Case {F7} Record rubrics without bothering to record the patient particulars Time saving option to make quick prescriptions
Save Speed Case {Ctrl + S} Save rubrics and repertory charts of speed case and save it as a ‘New Patient’
Previous Patients Select or revert back to any previously accessed patient in any one particular session.
Print {Ctrl + P} Take print-outs of most of the features available in ‘Classic 8’.
Exit {Ctrl +X} Exit the ‘Classic 8’ application.
Patient Details:
From Patient Menu select any of the following options:
You can enter a ‘New patient’, or scroll through a list of registered patients, search for and then work on any data. When there are multiple physicians working on the same program, any user can select his own ID from here itself and directly access his patients.
Note: The ‘Classic’ and ‘Patient Management System’(PMS)’ modules are inter-linked, i.e. When you enter a new patient from here it will automatically be stored in the ‘PMS’ and vice versa. All of the above features + More ‘Patient’ features like entering a New Physician, Case Records, Follow-ups , Prescriptions, Patient Instructions etc. are available in the ‘PMS’ module of the program.
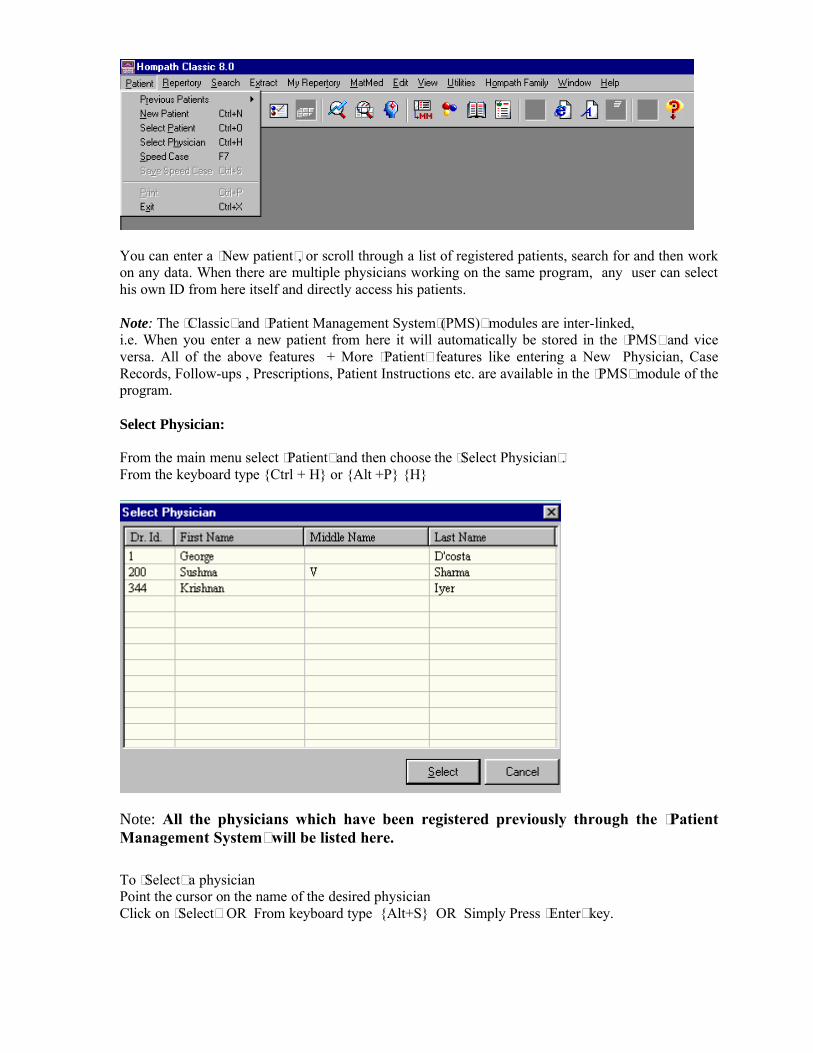
Select Physician:
From the main menu select ‘Patient’ and then choose the ‘Select Physician’.From the keyboard type {Ctrl + H} or {Alt +P} {H}
Note: All the physicians which have been registered previously through the ‘Patient Management System’ will be listed here.
To ‘Select’ a physician Point the cursor on the name of the desired physicianClick on ‘Select’ OR From keyboard type {Alt+S} OR Simply Press ‘Enter’ key.
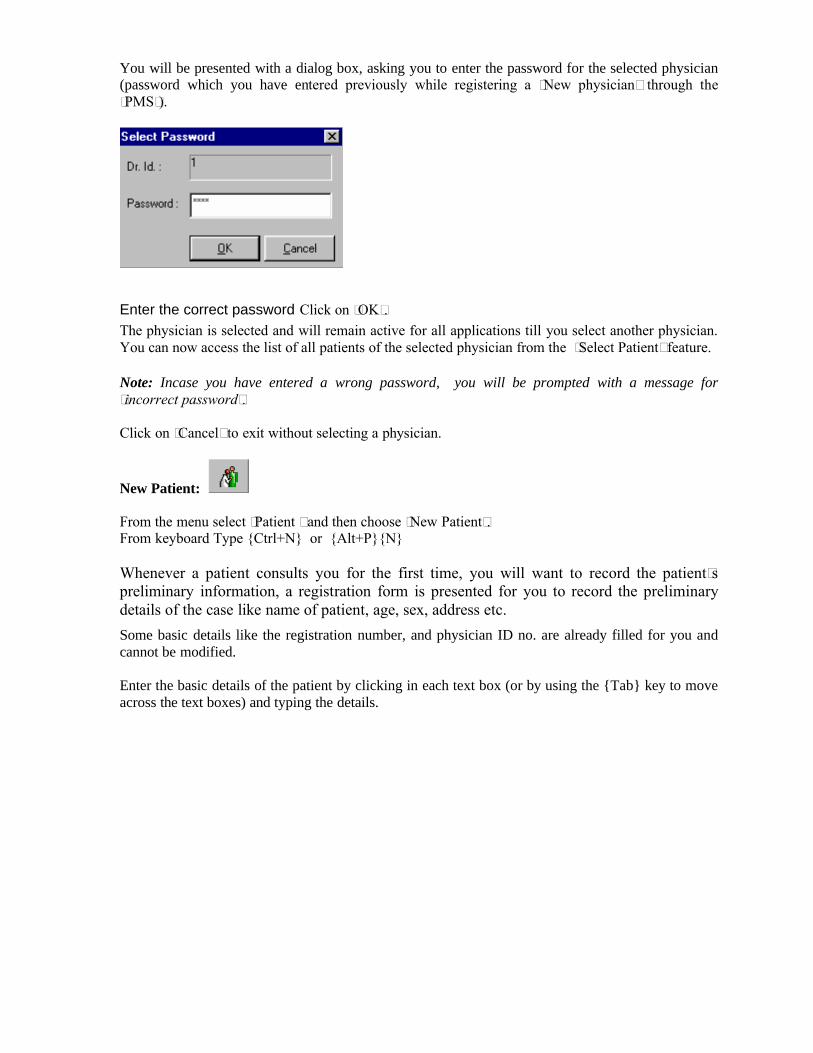
You will be presented with a dialog box, asking you to enter the password for the selected physician (password which you have entered previously while registering a ‘New physician’ through the ‘PMS’).
Enter the correct password Click on ‘OK’.The physician is selected and will remain active for all applications till you select another physician. You can now access the list of all patients of the selected physician from the ‘Select Patient’ feature.
Note: Incase you have entered a wrong password, you will be prompted with a message for ‘incorrect password’.
Click on ‘Cancel’ to exit without selecting a physician.
New Patient:
From the menu select ‘Patient ’ and then choose ‘New Patient’.From keyboard Type {Ctrl+N} or {Alt+P}{N}
Whenever a patient consults you for the first time, you will want to record the patient’s preliminary information, a registration form is presented for you to record the preliminary details of the case like name of patient, age, sex, address etc.Some basic details like the registration number, and physician ID no. are already filled for you and cannot be modified.
Enter the basic details of the patient by clicking in each text box (or by using the {Tab} key to move across the text boxes) and typing the details.

NOTE: Some basic details have to be entered, compulsorily. These are First Name, Last name, and gender of the patient (marked with an asterix). The other details are optional, and may or may not be filled.
After completing the basic details, Click on ‘Save’ to save the new patient details in the program.
Click on ‘Close’ to move to the main screen.
Tip: If you do not want to bother about patient details and want to move to the repertory screen directly use the ‘Speed case’ feature.
Select Patient:
From the menu select ‘Patient ’ and then choose the ‘Select Patient’.From Keyboard type:- {Ctrl+ O} or {Alt+P}{P}
You can use this feature from classic to select patients when you want to:o See previously recorded rubrics o See previous repertorisation tables or graphs.o Repertorise patient symptoms for current dateo Modify patient particulars.
On invoking this feature you will see a list of recorded patients.
8

By default the patient data is arranged according to the respective registration numbers.
Search:To locate the patient you are looking for, type in the first few alphabets of the required first name in the ‘First name’ box .
If you are not able to reach the desired name using this option click in the ‘Search’ box of ‘Last name’ and type the relevant details. Choose the appropriate last name from the list that appears and click on it.
If you are still not able to locate your patient name, use the ‘Registration number’ options as described above.
Once the desired patient name appears, Click on it and then click on ‘Select’ OR Press ‘Enter’ OR From Keyboard type {Alt+S} to start working on any application regarding this patient.
When you have applied any filters, Click on ‘Show All’ OR From keyboard type {Alt+A} to reset the entire list of patients.
Tip: In case a patient reg. no / name is not found in a particular physician list, then that patient reg. no / name may be found (if entered previously) in other physician registered in the program and can only be accessed by that physician using his password.
Dr. D’costa

Sorting Patient List: You can arrange the patient first name, middle name or last name alphabetically by a click on the corresponding ‘Sort By’ options. One click results in Ascending Sort Order. Clicking second time results in Descending Sort Order.
Click on ‘Cancel’ to exit from this feature without selecting the patient.
Speed Case:
From main menu Select ‘Patient’ ‘and then choose ‘Speed Case’From keyboard press ‘F7’ key From keyboard type {Alt+P} {S}
This feature is designed to be a time saving option. Quick prescriptions can be made using this feature, without bothering to record the patient particulars.
On selecting this option, you will be presented with the ‘Rubric Selection’ feature without any further procedures . Choose repertory(ies) and double click on a chapter picture to open it and record the rubrics. (See Rubric Selection for details)
Selected Chapters List
Repertories
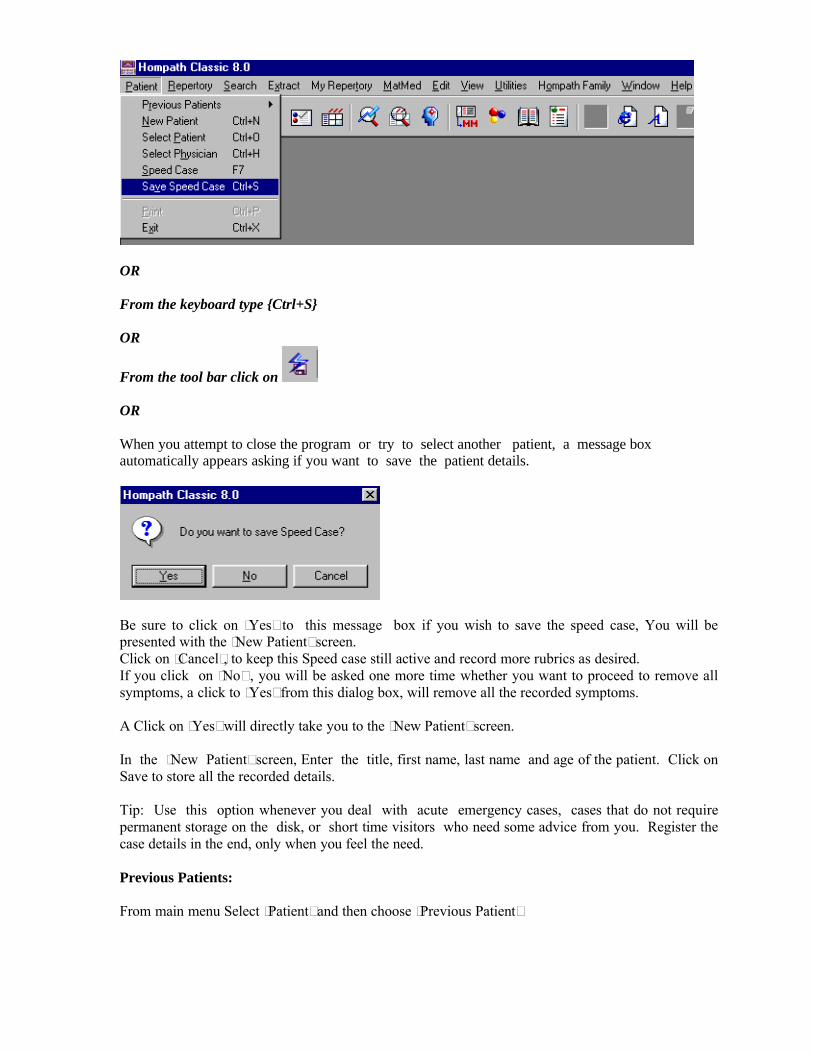
Save Speed Case:
From main menu select ‘Patient’ and then ‘Save Speed Case’
Chapters
OR
From the keyboard type {Ctrl+S}
OR
From the tool bar click on
OR
When you attempt to close the program or try to select another patient, a message box automatically appears asking if you want to save the patient details.
Be sure to click on ‘Yes’ to this message box if you wish to save the speed case, You will be presented with the ‘New Patient’ screen. Click on ‘Cancel’, to keep this Speed case still active and record more rubrics as desired.If you click on ‘No’ , you will be asked one more time whether you want to proceed to remove all symptoms, a click to ‘Yes’ from this dialog box, will remove all the recorded symptoms.
A Click on ‘Yes’ will directly take you to the ‘New Patient’ screen.
In the ‘New Patient’ screen, Enter the title, first name, last name and age of the patient. Click on Save to store all the recorded details.
Tip: Use this option whenever you deal with acute emergency cases, cases that do not require permanent storage on the disk, or short time visitors who need some advice from you. Register the case details in the end, only when you feel the need.
Previous Patients:
From main menu Select ‘Patient‘ and then choose ‘Previous Patient’

This feature is useful if the physician wants to revert back to any of his patients accessed previously in any one particular session.
The arrow next to ‘Previous Patients’ will list all the patients opened / selected in one particular session.Click on the desired patient, from this list to start working on any application regarding the selected patient. This feature will display only those previous patients which have been selected in one given session.
Once the program closes down, all the patient(s) list will be cleared off, even if they were accessed on one particular consulting time or day.
Tip: Use this feature to quickly open a patient’s case instead of using the ‘Select Patient’ feature.
Printing
‘Hompath Classic 8’ offers you to print most of the features available in this program.
From the main menu select ‘Patient’ and then choose ‘Print’ OR
Click on the ‘Print’ for printouts of the following:
o Repertorisation results including all different strategieso Symptom Listo Repertory Search Resultso Convt Rep to MM Resultso Group Symptoms Resultso Materia Medica Search Results / Texto Book Listo Patient bio-datao Patient Listo Previously Recorded Symptomso Similimum Resultso Send Feedback
Note: This button will be enabled wherever ‘Print’ option is available. In the rest of the screens it remains inactivated.

A screen listing the defaults printer and style will appear. Get the printer on-line and click on Ok to take a print-out. You can change the printer, style of printing and resolution by clicking on setup and choosing the desired options.
Exit
From main menu select ‘Patient’ and then choose ‘Exit’From key board type {Ctrl+X} OR {Alt +P} {X} Click on the on main windows to exit from the Classic application
REPERTORY
Repertory and Chapter Selection {Ctrl +R} Select any Repertory(ies) and any of its chapter(s) to search and record rubrics Open any single chapter, multiple chapters of a single repertory or multiple chapters of
multiple repertories to record rubrics for one single case
Repertory Screen Rubrics arranged in an simple comprehensible format which is easy to navigate Quick search within the repertory to reach to the desired rubric
Repertory Search Within a Chapter Jump to a rubric using the level search Search for a specific word or a rubric using internal search especially when you are not sure
where the word is within the repertory
Hidden Utilities Right click on a rubric for ‘Symptom options’ like cross-references, themes etc. to arrive at
the right rubric Right click on a remedy for ‘Remedy options’ for keynotes, drug properties etc.
Materia Medica Confirmation Confirm a ‘repertory rubric’ and its ‘remedy(ies)’ from the ‘materia medica’ source books. To confirm the authenticity of symptom and to understand the context of the symptom as
given in the materia medicae.
Combine Symptom Combine two or more symptoms into one symptom to record and/or save it in your own
customised ‘combine symptom repertory’
Record Rubrics Record rubrics for repertorisation View and edit recorded symptoms through ‘Symptom List’ View the Repertorisation table
Rubric Selection:
From the main menu Select ‘Repertory’ and then choose ‘Rubric Selection’From the keyboard type {Ctrl +R} or {Alt +R} {B}

Rubric selection is the most important part of repertorisation. The way you select rubrics will determine the end result and will put the analysis of the symptoms in the right perspective.A basic plan in the mind, as to which repertories will be used and what will be order of symptoms helps in rubric selection.
The user friendliness of this software becomes obvious right from the opening of the repertories and selection of chapters. The extremely friendly graphical interface allows you to pick up chapters at great speed, convenience and even switch and shuffle between them, the way you want to.
Selection of Repertories and chapters:
The chapters of the repertory are presented in a picture format. The name of the chapter is mentioned under each picture.
Note: You must have a ‘New Patient’, or ‘Old Patient’ or ‘Speed case’ selected in order to activate this feature.
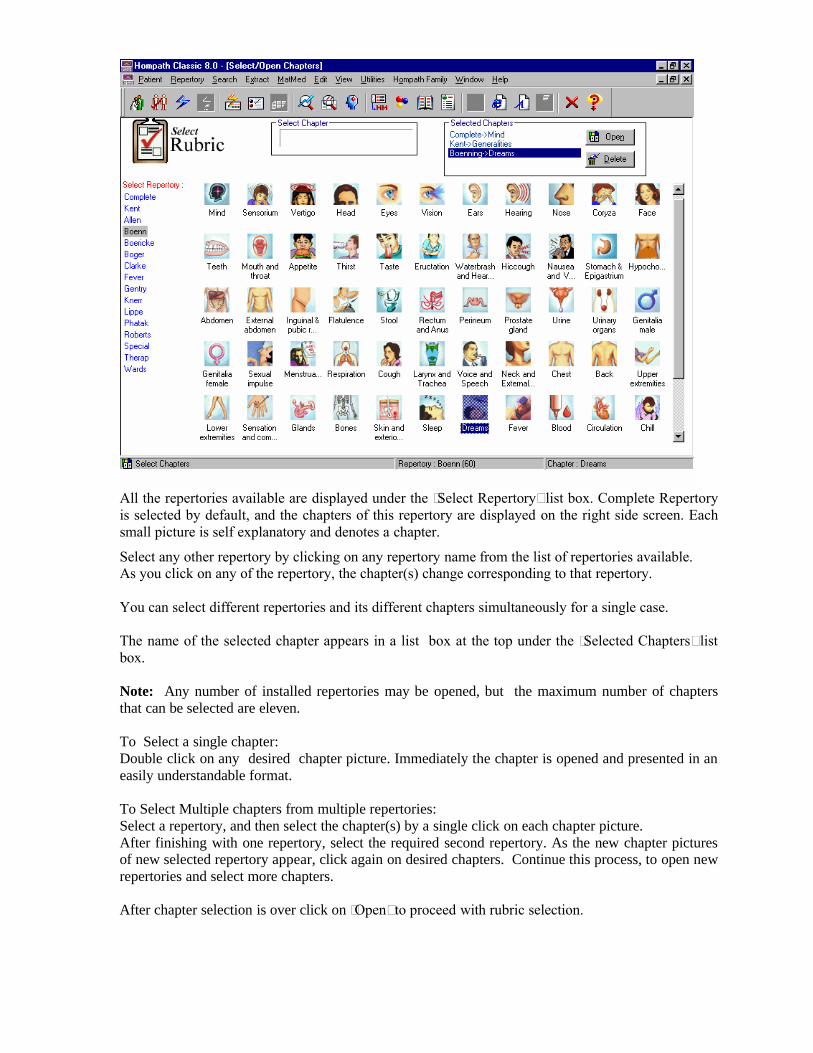
All the repertories available are displayed under the ‘Select Repertory’ list box. Complete Repertory is selected by default, and the chapters of this repertory are displayed on the right side screen. Each small picture is self explanatory and denotes a chapter.
Select any other repertory by clicking on any repertory name from the list of repertories available.As you click on any of the repertory, the chapter(s) change corresponding to that repertory.
You can select different repertories and its different chapters simultaneously for a single case.
The name of the selected chapter appears in a list box at the top under the ‘Selected Chapters’ list box.
Note: Any number of installed repertories may be opened, but the maximum number of chapters that can be selected are eleven.
To Select a single chapter:Double click on any desired chapter picture. Immediately the chapter is opened and presented in an easily understandable format.
To Select Multiple chapters from multiple repertories:Select a repertory, and then select the chapter(s) by a single click on each chapter picture. After finishing with one repertory, select the required second repertory. As the new chapter pictures of new selected repertory appear, click again on desired chapters. Continue this process, to open new repertories and select more chapters.
After chapter selection is over click on ‘Open’ to proceed with rubric selection.

Select Chapter:It is an easier way of ‘chapter selection’.
Click on any repertory from the ‘select repertory’ option. In the ‘Select Chapter’ box type in the first few initials of any chapter name and then click on ‘Enter’
The chapter gets automatically selected under the ‘Selected Chapters’ list box.
Click on ‘Open’ to start with rubric selection
Opening a chapter takes you to the Repertory Screen.
To delete a selected chapter highlight it and press ‘Delete’
To close this screen click on
To get help with chapter selection press ‘F1’ on key board.
Tip: When in the middle of the rubric selection process, you want to open another chapter just click again on ‘Rubric selection’ to get back the chapter selection screen. If you have selected too many chapters, delete some to select new ones.
Repertory Screen:
Understanding and navigating through the repertory screen is important for quick search and selection of rubrics. After all the speed of the person behind the machine is also important.

REMEDIES
SYMPTOMSLEVEL SEARCH
The screen is split into two parts.
At the top, the screen shows the `Full rubric'. Rubrics are displayed in the order :-[Repertory] [Chapter] : [Main Rubric] : [Sub-Rubric] : [Sub-Sub-Rubric] :, etc.
Each sub-rubric is separated by a colon ( : )
Below the rubric, the remedies are displayed in the alphabetical order . The appearance is very similar to the original repertory book, i.e, Ars., Bell., Cham., etc. with the notations of 5, 4, 3, 2, and 1 marks (intensity of a remedy).
The total number of remedies for each selected rubric is listed as ‘Total no. of drugs’ and can be viewed using the ‘Full Symptom'.
Upto 18 remedies are displayed at once. Use the vertical scroll bar to view more remedies.

Remedy Search:Search for a remedy by typing the remedy abbreviation in the `Remedy Search' box on the right. The cursor moves to the remedy if present in the list. If the remedy is not found in the list, the cursor moves to the nearest abbreviation.
The lower 2/3 rd of the screen displays the rubrics in two columns. The current rubric, where the cursor is located is marked by a dotted rectangular area.
The main rubric is in bold lettering and is preceded by the digit `2' (Second level). The subsequent sub rubric is preceded by `3'. (Third level). The sub-sub-rubric is preceded by a `4' (Fourth level) and so on. These are the levels or the hierarchy of a rubric. Each main rubric (second level) is in bold lettering to make it stand out.
Since the rubrics are arranged in two columns, only a maximum of 43 to 45 characters in the rubric appear at the cursor. For rubrics longer than this, the complete rubric can be viewed on top ,along with the drugs.
Note:Certain intentional changes have been made in some repertories and the rubrics may appear with a slight difference from the print. These changes however do not affect the meaning of the rubric, and are necessary to make the computer understand and analyze the hierarchy of the rubrics properly.
For instance in the ‘Generalities’ chapter of Kent’s repertory, the rubrics under ‘Food’. The first main rubric under ‘food’ is ‘food bacon amel’. The sub rubric below this is ‘beans and peas agg’
We understand the intent of the repertory arrangement and read this rubric as ‘Food, beans and peas agg’. But imagine if the computer were to read this, it would join the sub-rubric to the main rubric and read as ‘Food bacon amel., and peas agg.”. This becomes absurd.
Another example is ‘Warm milk amel.’ It is arranged in the repertory as:
Food, bacon amel.:Milk agg.:
Amel.:Warm agg:
Amel,:
The computer when interpreting would join it all and make a foolish rubric, which would read as :[Kent] [Generalities]: Food bacon amel.: Milk agg: warm agg:amel.
In this version we have attempted to rectify this confusion. Without affecting any change in the meaning of the rubric.
We have made some changes and have arranged the rubric as:
2: Food:3:Bacon amel.:3:Milk:4:Agg.:4:Amel:4:Warm:5:Agg5:Amel:
Such changes are made throughout all the repertories.
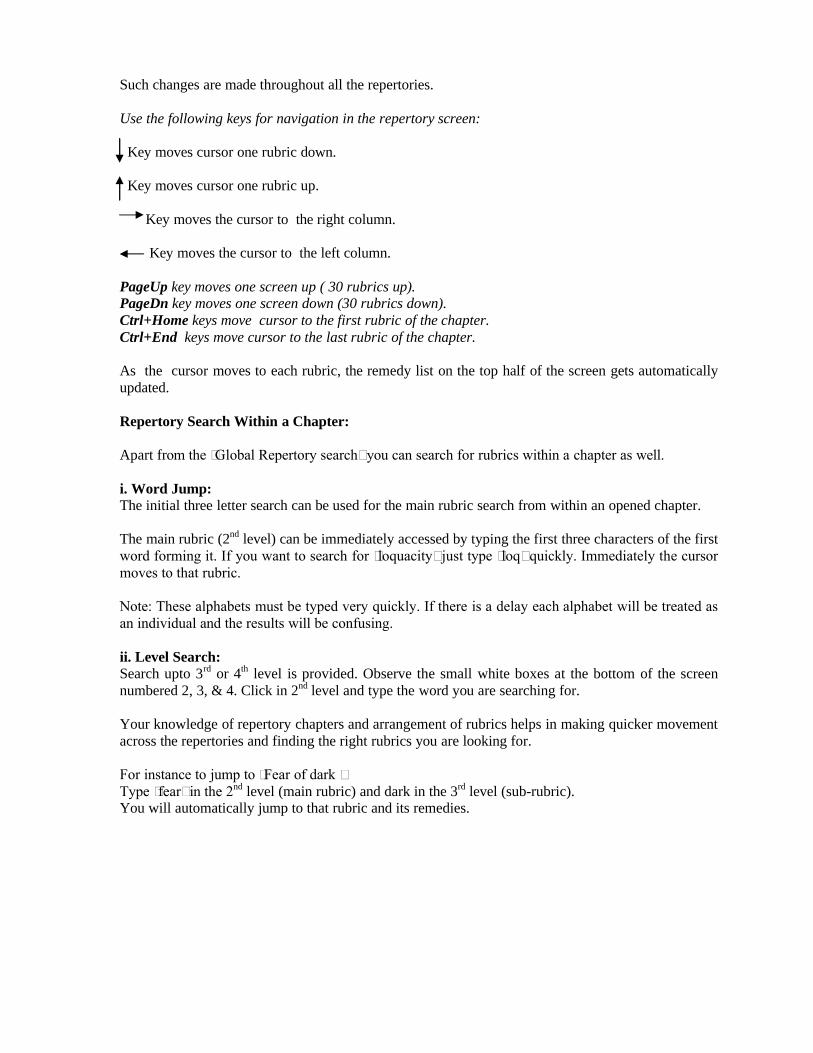
Use the following keys for navigation in the repertory screen:
Key moves cursor one rubric down.
Key moves cursor one rubric up.
Key moves the cursor to the right column.
Key moves the cursor to the left column.
PageUp key moves one screen up ( 30 rubrics up).PageDn key moves one screen down (30 rubrics down).Ctrl+Home keys move cursor to the first rubric of the chapter.Ctrl+End keys move cursor to the last rubric of the chapter.
As the cursor moves to each rubric, the remedy list on the top half of the screen gets automatically updated.
Repertory Search Within a Chapter:
Apart from the ‘Global Repertory search’ you can search for rubrics within a chapter as well.
i. Word Jump:The initial three letter search can be used for the main rubric search from within an opened chapter.
The main rubric (2nd level) can be immediately accessed by typing the first three characters of the first word forming it. If you want to search for ‘loquacity’ just type ‘loq’ quickly. Immediately the cursor moves to that rubric.
Note: These alphabets must be typed very quickly. If there is a delay each alphabet will be treated as an individual and the results will be confusing.
ii. Level Search:Search upto 3rd or 4th level is provided. Observe the small white boxes at the bottom of the screen numbered 2, 3, & 4. Click in 2nd level and type the word you are searching for.
Your knowledge of repertory chapters and arrangement of rubrics helps in making quicker movement across the repertories and finding the right rubrics you are looking for.
For instance to jump to ‘Fear of dark ‘Type ‘fear’ in the 2nd level (main rubric) and dark in the 3rd level (sub-rubric).You will automatically jump to that rubric and its remedies.
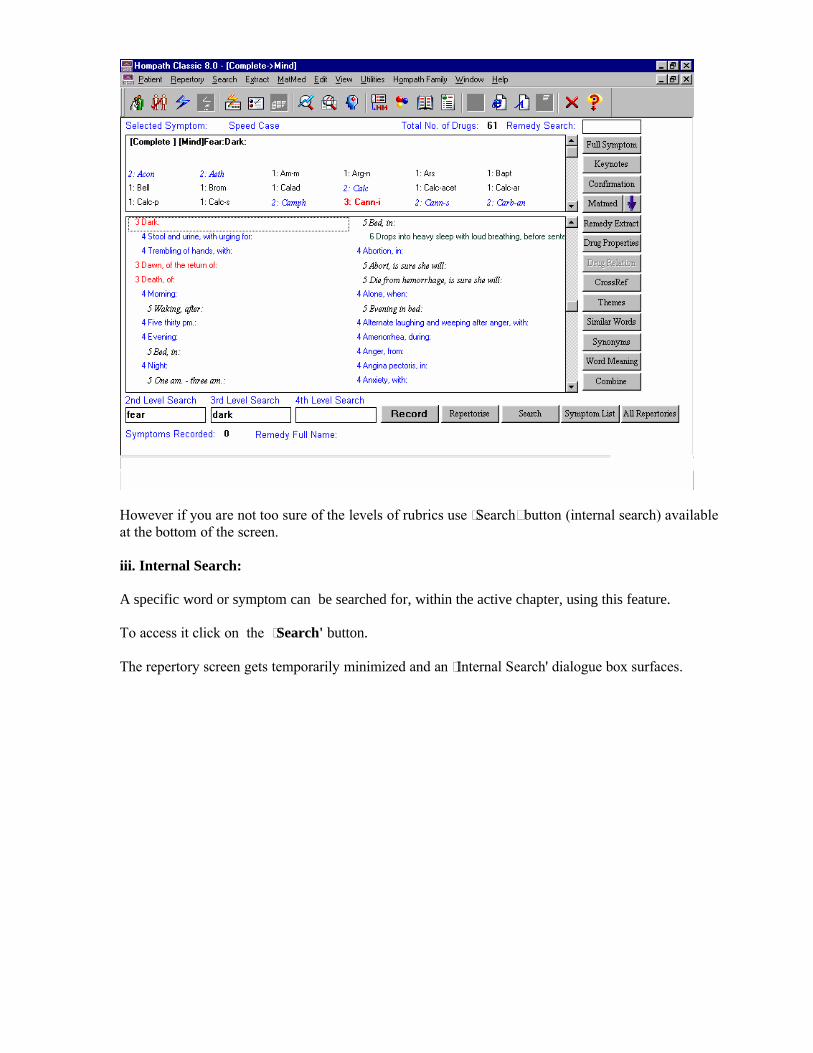
However if you are not too sure of the levels of rubrics use ‘Search’ button (internal search) available at the bottom of the screen.
iii. Internal Search:
A specific word or symptom can be searched for, within the active chapter, using this feature.
To access it click on the ‘Search' button.
The repertory screen gets temporarily minimized and an ‘Internal Search' dialogue box surfaces.

The repertory name and chapter name are displayed for your reference. Type in the word or the symptom using the “AND”, “OR” and “NOT” operators OR ‘Advanced Search Options’ that you are looking for, in the `Search For' text box.
The screen is similar to the ‘Global Repertory Search’ with the ‘Operators’ and ‘Advanced Search Options’
Type the word you are looking for in the ‘Search Query’ box.
Click on ‘GO.'
All occurrences of the word along with the entire rubric and remedies are displayed. Scroll down these search results to go through the rubrics and Click on ‘Record ‘ to select a specific rubric. Click
on to return back to the repertory screen.All Repertories:
This option searches for the selected symptom from ‘All the repertories’ installed in the program and displays the same symptom from other repertories. Thus this feature gives you a choice to choose the right rubric from the desired repertory. Simply highlight the desired symptom from the repertory screen.Click on ‘All Repertories’.All results will be displayed in the ‘Search results screen’Highlight the required symptom Click on ‘Record’ to record the symptom or on ‘Open Rep’ to jump to the relevant repertory.
Click on to return back to the repertory screen.
See ‘All Repertories’ under ‘Common features’ for more details of this feature.
Symptom List:
Gives you the list of all the recorded rubrics and different options like delete / undelete , symptom classification, miasmatic classification etc. for them.

See ‘Symptom List’ under ‘Common features’ for details.
Combine Symptom This feature allows to ‘Combine’ two or more symptoms into one symptom, which can be recorded and /or saved in your own customized ‘Combine Symptom Repertory’ for future use.
See section of ‘Create Combine Symptom Repertory’ under ‘Create Customised Repertory’ for details of this feature.
Hidden Utilities from repertory screen:
i. ‘Right click on a rubric’ for the following options:
Click on ‘Cross References’ to view the cross-references of a symptom. Similarly you can view the ‘Themes’ , ‘Synonyms’ , ‘Similar Words’ and ‘Word Meanings’ for the selected symptom.
Note: These options are also available as buttons on the right side of the repertory screen.
(See ‘Common features’ under ‘Repertory’ section for specific details of all these features.)
Hide LevelsIf you don’t like the presence of level numbers like 2,3,4,etc. on the main repertory page, click on “Hide levels” to hide the numbers from view. The screen now looks like any page in the repertory.
Right click on any symptom and then choose “Show levels” to revert back to levels.
ii. ‘Right click on any remedy abbreviation’ for the following options:

Click on ‘Full Symptom’ to view the entire symptom and all drugs covering it at once. Similarly you can view the ‘Keynotes’, ‘Drug Properties’, ‘Drug Relation’, ‘Remedy Extract’, ‘Materia Medica, and ‘Materia medica confirmation’ for the chosen remedy also.
Note: These options are also available as buttons on the right side of the repertory screen.
(See ‘Common features’ under ‘Repertory’ section for specific details of all these features.)
Materia Medica Confirmation:
‘Right Click’ on a ‘Remedy’ and then ‘Matmed confirmation’orClick on ‘Confirmation’ button from right side of screen
This feature allows you to search / confirm a ‘repertory rubric’ and its ‘remedy(ies)’ from the ‘materia medica’ source books.
Utility of this feature:1. To confirm the authenticity of symptom and its remedy (ies) from the basic materia medica source books written by the pioneers of homoeopathy.2. To understand the context of the symptom and how exactly it has been manifested in the source books.
For instance: Open ‘Complete’ ‘Mind’ Chapter. Consider the symptom of ‘Fear of dark’ Say you want to confirm the remedy ‘Cann-i’ of this rubric from the materia medicae

Right click on this remedy and click on ‘Materia Medica Confirmation’ ORSelect this remedy and then Click on ‘Confirmation’ button available on the right vertical bar.(Like wise you can select any other symptom and any other remedy)
You will be presented with a screen as below:
‘Left side screen’ displays all the words of the rubric.
Highlight desired word(s) one by one by a click on it , to include in the Materia Medica Search.
One can avoid common words like ‘the’ ‘a’ etc. and choose only the ‘keywords’ to be included in the search.
In this case all the words ‘Fear’ ‘Dark’ are selected.

Search Type: Line: This operator extends the search for the words occurring anywhere in a given sentence. By default this is the option selected.
Para: Click on this option to extend the search for the words occurring anywhere in a given para, thus ensuring that you would hardly miss out on any occurrence.
Show Results:For selected remedy: Select this default option to search for the rubric for the ‘selected remedy’.Click on O.K to execute the search.
All results confirming the symptom of ‘Fear of dark’ in the remedy ‘Cann-I’ from all the materia medicae wherever available are displayed.Double click on any occurrence to read the remedy and the exact context in which the symptom has been given.
Close on to close this window. You will return back to the repertory screen.
For all drugs: Click on this option to include ‘all the drugs’ given in the repertory for the selected symptom, from the materia medica source books.
For instance, the rubric ‘Fear of dark’ includes ‘61’ remedies in this repertory.Right click on any remedy of this rubric and Click on ‘Confirmation’.Select the words you want to include in the search by highlighting it, This time select the ‘For all drugs’ option by a click on itClick on Ok to execute the search

All remedies (out of the ‘61’ remedies present in this chapter) containing ‘fear of dark’, from the materia medicae books will be displayed.
Double click on any occurrence to the remedy from source books and the exact context in which the symptom has been given
Close on to close this window. You will return back to the repertory screen
Tip: This feature can also be invoked from the ‘Intelligent Word Search’, under ‘Mmsearch’. Once you select a rubric from there, Click on ‘Mmsearch’ You will be presented with a list box to select words as described above. The procedure thereafter remains the same.
Recording Rubrics:
From repertory screen:
‘Double click’ on a rubric you wish to select orHighlight the rubric by clicking once on it and Click on the ‘Record’ button ORHighlight the rubric and Simply Press ‘Enter’ on the keyboard.
Note: On attempting to record a rubric that does not have remedies listed in the main rubric, you will get a message prompting you accordingly. Look in the corresponding sub rubrics for the right rubric or try looking up a cross reference , which might contain the actual rubric you are searching for.
[You can also record rubrics from screens of Repertory Search Results, Convert Rep. to MM Result, Group Symptoms Results, Customised Repertories, Quick Rep, Quick Search feature and Symptom Forwarding feature. See the Common features under this section, for more details]
Each rubric can be recorded only once. If you try to record an already recorded rubric, appropriate message box will appear.
The screen shows Recording rubrics from the repertory screen. The number of recorded rubrics can be viewed at the bottom of the repertory screen.
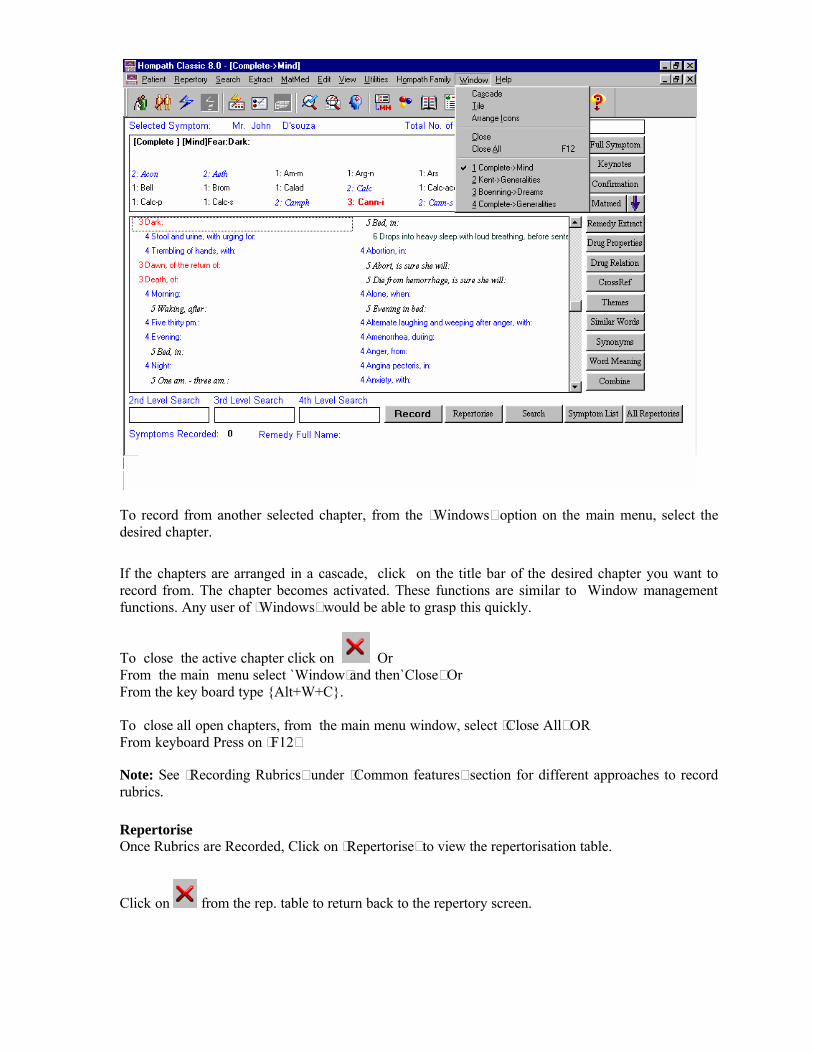
To record from another selected chapter, from the ‘Windows’ option on the main menu, select the desired chapter.
If the chapters are arranged in a cascade, click on the title bar of the desired chapter you want to record from. The chapter becomes activated. These functions are similar to Window management functions. Any user of ‘Windows’ would be able to grasp this quickly.
To close the active chapter click on Or From the main menu select `Window’and then`Close’ OrFrom the key board type {Alt+W+C}.
To close all open chapters, from the main menu window, select ‘Close All’ OR From keyboard Press on ‘F12’
Note: See ‘Recording Rubrics’ under ‘Common features’ section for different approaches to record rubrics.
RepertoriseOnce Rubrics are Recorded, Click on ‘Repertorise’ to view the repertorisation table.
Click on from the rep. table to return back to the repertory screen.

Quick Repertorisation: From main menu click on ‘Repertory’ and then choose ‘Quick Repertory’ From the keyboard Press the ‘F4’ key From the keyboard type {Alt + R} {Q}
This feature is essentially a time-saving repertorisation module where the user can do a quick recording of symptoms, view simultaneous repertorisation table, apply various repertorisationstrategies from this one screen itself.
Key features: Instant Symptom Recording from any of the installed repertories without having to
actually open any repertories or chapters Restrict symptom recording to a specific repertory or any of its specific chapter Option to View / Replace / Record Alternate rubrics for the main recorded rubric Simultaneously view the Repertorisation table Apply Symptom options like ‘Cross-references’, ‘Themes’, etc. to arrive a right rubric Apply Repertorisation strategies to filter down remedies View Remedy options like ‘materia medica’ , ‘keynotes’, etc.for the selected remedy

Search Words This option enables the user to select the desired query word (rubric) from word list provided in the ‘Search Words’ box.
Click on the drop down box next to ‘Search Words’ Either scroll down to the desired word ORType the initial few letters of the desired word in the ‘Search Words’ box to jump to the word.
Click on the to enter the word in the ‘Query’ box.
OR
Query:You can directly type the desired query words in the ‘Query’ box itself.

Simply type the words followed by a space after each word in the ‘Query’ box.
(Enter only main keywords, and avoid common words like ‘a’, ‘the’, ‘in’ ‘on’ etc. as most of the authors have avoided using these words while framing their rubrics.)
Click on ‘Record’ or simply press ‘Enter’ on the keyboard to record the rubric.
The program searches through all the installed repertories for the ‘ keywords’ (query) and records the rubric from that repertory which includes maximum remedies for it.
For instance the query ‘ailments from anger’ contains maximum (110) remedies in the ‘Complete’ ‘Mind’ repertory, so the rubric get automatically recorded from this repertory.
To reset the query, and start with a fresh query click on .
Alternate rubrics:This feature gives you the option to view / replace / record ‘Alternate Rubrics’ for the main recorded rubric.
When you click on ‘Record’ after entering the query the rubric gets recorded within seconds (from therepertory which includes maximum remedies for it) and can be viewed in the repertorisation table.
Simultaneously the program searches for the ‘next important rubrics’ (upto 10 rubrics) containing the ‘same query’ from all the installed repertories and displays them in the ‘Alternate rubrics list box. The rubrics are displayed according to the decreasing number of remedies each contains.
For instance: Consider the rubric ‘Ailments from anger’The rubric gets recorded from ‘Complete Mind’ chapter which includes maximum remedies (110) for this rubric as described above.

Simultaneously the program searches for the same rubric in all the installed repertories and displays up to 10 next important rubrics in the decreasing number of remedies each rubric contains. In this case, the ‘Alternate rubrics’ list box displays the 1st rubric from ‘Complete mind’ which includes ‘20’ remedies, the next from ‘Knerr mind’ which includes 17 remedies and so on. All these rubrics contain the same query ‘Ailments from anger’
Note: The number of alternate rubrics displayed will be ‘upto a maximum of 10 rubrics’. Sometimes the query word (rubric) will have more than 10 occurrences in all the repertories, in that case only the first ‘10’ important alternate rubrics will be displayed. . At times the query word (rubric) will have less than 10 occurrences from all repertories, in that case only that number of alternate rubrics will be displayed and at few times the query word will be the sole occurrence from all the repertories , in that case the ‘alternate rubrics’ list box will be empty
Record / Replace Alternate Rubrics:
This option allows you to ‘Replace’ the already recorded rubric with the Alternate rubrics listed ORRecord a Alternate rubric without replacing the already recorded one.
The ‘Record’ option is required when you want to record the same rubric from multiple repertories without deleting the already recorded ones.
Replace:The ‘Replace’ button is the default option. The ‘Replace’ option is especially required when you are not satisfied with the automatic recorded rubric Or when you want to replace that rubric from your desired repertorisation.Double click on the desired rubric from the list of ‘Alternate rubrics’ to replace the existing recorded rubric from the repertorisation table.The rubric gets automatically replaced in the rep. table.
For instance, To replace the rubric recorded from the ‘Complete mind’ , with any other relevant rubric simply ‘Double click’ on any desired rubric from the ‘Alternate rubric list’ to automatically replace the rubric.

Record:This option allows you to record a fresh rubric from the ‘Alternate rubrics’ without replacing the already recorded one.
For instance say you want to Record the rubric from ‘Knerr’, without replacing the already recorded rubric from complete mind
Select the ‘Record’ option.Now choose the desired rubric and double click on it.
The Repertorisation table will now include both the rubrics.
Select Repertory - Rep/ChaptersThis option allows you to restrict the search of words (rubric) to a specific repertory or to a specific chapter of a repertory.
Restrict the search to Specific Repertory:From the drop down list of ‘Select Repertory’ option select the repertory you want to restrict the search to by a click on it.
Select ‘Rep/Chapters’Then Choose ‘Kent’ and chapter ‘Generalities’

Click on Add to add it to the list.
Enter the words in the query box as explained above.Click on ‘Record’ or press ‘Enter’ from the keyboard to search and record the rubric only from Selected Repertory
Restrict the search to a Specific Chapter of a RepertoryEnter the words in the query box.From the ‘Rep/Chapters’ option select the Repertory and a specific Chapter you want to restrict the search to.
For instance say you want to search / record ‘Cold Air agg ’ from Kent generalities Type in ‘Cold air agg ‘ in ‘Query’ box.Select ‘Rep/Chapters’Then choose ‘Kent’ and chapter ‘Generalities’Click on ‘Add’ to add it to the list.
Click on O.k. You will return back to the main screen of Quik Rep. You can now proceed to record the symptom from the Kent Generalities chapter.For more details of selecting specific repertory and chapter see ‘Books’ option under ‘Search Repertory’
Include ChapterBy default this option is ticked, which means that when you search for query words, the chapter names will be included in search.
For instance when you enter the query words ‘head pain morning’ the rubric gets recorded from [complete] [head] Pain. Which is the right rubric to record.
Hompath suggests that when you have a query with a name of chapter like head, urine, stool, sleep etc. you should leave this option enabled.

Untick this option incase, you do not wish to include chapter name in the query.
Record:Enter the word(s) in the ‘Query’ box as explained previously
Click on the ‘Record’ Or Press the ‘Enter’ key from the keyboard to record the query (rubric).
Unless specified (Repertory and Chapter name/Repertories), this feature by default picks up the desired word (s) by searching it through all the repertories and records the rubric where it includes the maximum remedies.
Note: In case when query words are not found in any repertory a message ‘Words not found’ will appear.
Simultaneously the ‘Alternate rubrics’ for the same query are displayed in list box. Either Replace or Record rubrics as required from this list.
Repeat the procedure to record all your desired rubrics.
Repertorisation tableThe recorded rubrics automatically gets listed in the repertorisation table.
Normal Repertorisation This is the default Repertorisation method. The ‘Remedies’ in the table are placed in the order of ‘Totality’ i.e. the sum of the weightage of each rubric. The totality is more important than the number of rubrics covered.
Symptom Options: ‘Right click’ on any symptom to apply various options for recorded Symptoms.

For complete details of all these features see the ‘Common features’ section under Repertory
Remedy Options:
‘Right Click’ on any desired remedy to access various options for Remedy
For complete details of all these features see the ‘Common features’ section under Repertory
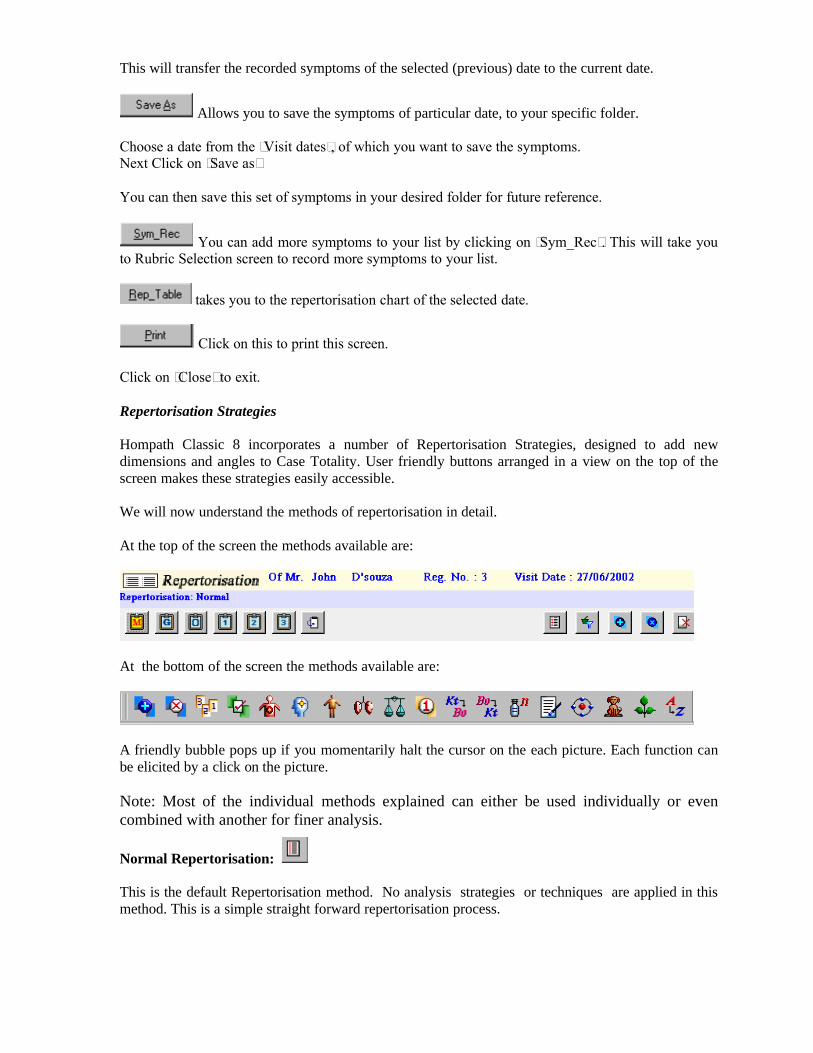
Repertorisation Strategies:
Clipboards:Different clipboards are provided for you to break up the symptoms into different groups and then analyze them separately.
On three clip boards, analysis is automatic while on the other three, it is defined by your choice of symptoms.
See ‘Clipboard Analysis’ under Repertorisation strategies for details of this feature.

Norm. Methods:Basic Repertorisation strategies included here are ‘Drug Filter’ , ‘Combine Method’ , ‘Cross Method’, ‘Elimination’.
Adv Methods:More Repertorisation methods included here are ‘Mineral’, ‘Animal’, ‘Plant’, ‘Drugmark filter’‘Weightage’, ‘DrgMark to 1’, ‘Author’, ‘Kent’, ‘Boenn’, and ‘Boger’.
For details on how to use both the ‘Norm. methods’ and ‘Adv. Methods’ See ‘Repertorisation Strategies’ under ‘Repertory’ for complete information on these methods.
Alphabetical display: Click on button to view remedies in alphabetical order.
Full screen view:To view repertorisation table on full screen From main menu click on ‘View’ and the on ‘Full screen’ OrFrom key board press the ‘F11’ to view more number of rubrics and in a larger sized font
Print: This option enables you to take a print out of the recorded symptoms along with the list of remedies.

Click on from the main menu to print the rep table.
Note: The repertorisation table displayed here is similar to the main repertorisation table availablefrom the main menu. Most of the functions and features remain similar to both. See ‘Repertorisation’ section for more details of all functions.
Some practice examples for quick rep:Dreams anxious - Symptom Recorded - [BN] [Dreams] anxious fruitful etc.Irritability during menses - ” - [KT] [Mind] irritability menses duringAnger at trifles - ” - [C] [Mind] Anger irascibility trifles atConcentration difficult - ” - [C] [Mind] Concentration difficultMental aversion to work - ” - [C] [Mind] Work aversion to mentalDelusions ghosts - ” - [C] [Mind] Delusions imaginations,
pecters, ghosts, spirits seesDesires to be magnetized - ” - [C] [Mind] Magnetized desires to beEmotions agg - ” - [BN] [Aggravation] Emotions agg.Hair fall - ” - [TH] [Skin] Hair of head falls out.Acne before menses - ” - [C] [Face] eruptions acne before mensesCatarrh from posterior nares - ” - [KR] [Throat] Throat nares posterior
mucus from in chronic catarrhCoryza cold air agg. - ” - [C] [Nose] coryza cold air aggDelirium during fever - ” - [LP] [Fever] during fever deliriumHeartburn eating after - ” - [C] [Stomach] Heart burn eating afterThirst large quantities - ” - [C] [Stomach] Thirst large quantities forAsthmatic night - ” - [C] [Respiration] Asthmatic nightWalking delay in - ” - [CL] [Clinical] walking delay inDevelopment arrested - ” - [C] [Generalities] Development arrestedConvulsions delivery after- ” - [C] [Generalities] convulsions delivery
parturition after puerperalDesires fish - ” - [C] [Generalities] Food and drinks Desires fishPerspiration staining the linen- ” - [C] [Perspiration] staining linenThroat pain swallowing on- ” - [C] [Throat] Pain general extending to ear
swallowing onThroat sensation lump of - ” - [C] [Throat] Throat plug sensation ofTeeth Discoloration black - ” - [C] [Teeth] Discoloration blackTeeth Pain Cold from - ” - [K] [Teeth] Pain toothache in general cold
drinks fromEar Discharges purulent - ” - [C] [Ear] Discharges purulentUrine Profuse with headache- ” - [C] [Urine] profuse increased with headacheCough Night agg - ” - [C] [Cough] Night agg.Cough Loose with expectoration- ” - [C] [Cough] loose expectoration withBack Pain warmth amel - ” - [C] [Back] pain general warmth external amel.
Rubrics will be instantly recorded from any of the ‘29’ repertories where it includes the maximum remedies, with the option of ‘alternate rubrics’ to either replace or record more rubrics.
Repertorisation
Repertorisation screen {F5} View Recorded Rubrics and the remedies of the repertorisation table Intelligent repertorisation system which can not only find the right remedy but also unknown
or less unknown remedies that can be missed in a superficial case analysis Magnify the repertorisation table to cover the full screen
Repertorisation strategies Incorporates a number of Repertorisation strategies arranged as user friendly buttons Common strategies like ‘Drug filter’, ‘Weightage method’ etc. used in our day to day practice
are available Classical strategies devised and used by original Masters of Homoeopathy like ‘Kentian’
‘Boenninghausen’ and ‘Boger’ analysis are exclusively available with Hompath Advanced strategies like ‘Mineral / Animal / Plant’ filters, ‘Drug mark set to one’, etc. are
especially designed to add new dimensions and angles to case totality
Hidden Utilities Various ‘Symptom’ as well as ‘Remedy’ options available at a right click on recorded
symptom.
Print Repertorisation Table Select various presentations, combinations, options etc. and take a print-out of symptoms and
remedies in a tabular format.
Repertorisation Graphs View Repertorisation in form of graphs
Retrieve Previously recorded symptoms {Ctrl+V} Keeps track of all symptoms recorded during previous visits View all repertorisation table associated with them
Repertorisation ScreenCentral to any Homoeopathic software is an intelligent repertorisation system which can find not only the right remedy but also unknown or less unknown remedies that are never apparent in a given case and can get missed easily in a superficial case analysis.
The multiple permutations and combination, all of which can be done in a matter of seconds can change the core analysis very clearly and conveniently, leading to more confidence in the ability to cope with fresh challenges arising with different cases.
The ‘Repertorisation’ table can be accessed by a click on From main menu select ‘Repertory’ then choose ‘Repertorisation’From keyboard press ‘F5’ keyFrom keyboard type {Alt+R} {R}
OR
Click on ‘Repertorise’ fromRepertory ScreenSymptom forwardingRepertory Search ResultsConvt. Rep to MM result screenGroup Symptoms result screenFavorite Convt. Rep to MM result screenFavorite Group Symptoms result screenAll User defined repertories under ‘My Repertories’ section
ORView simultaneous repertorisation from the ‘Quick Rep’ feature
Click on ‘Rep_table’ from the ‘Previously Recorded Symptoms’
Click on from Intelligent word search
Click on from the ‘Quick Search’ feature
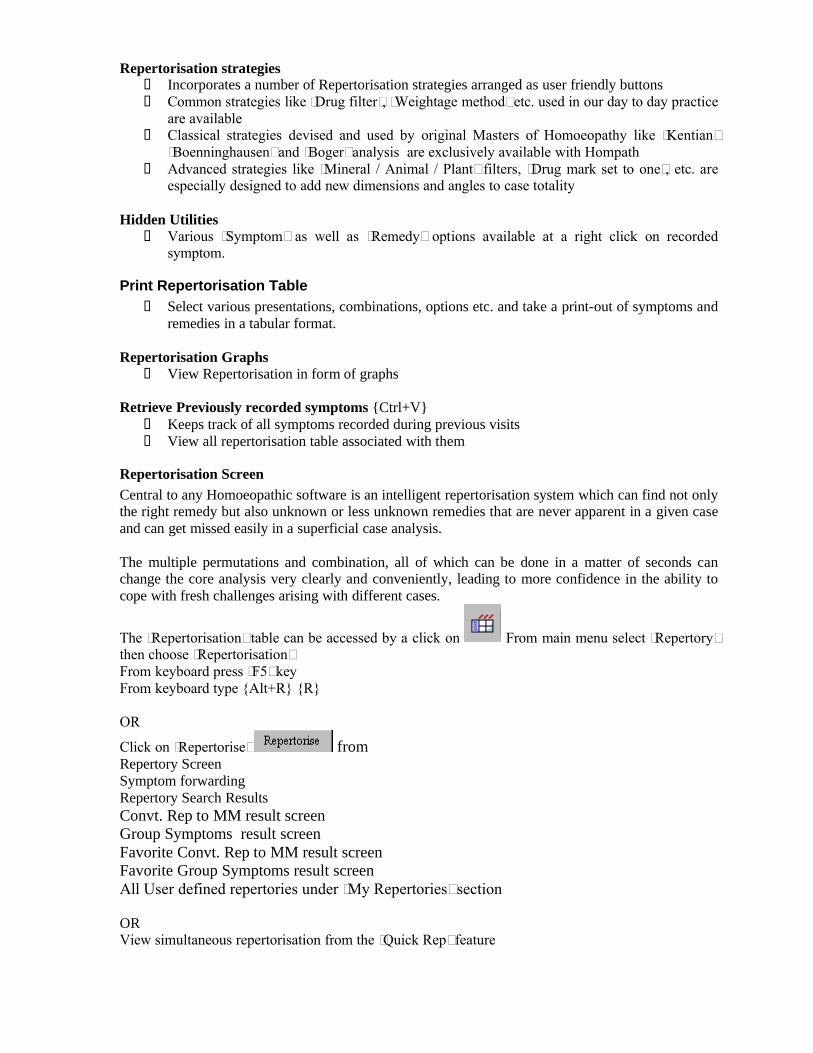
Note: This feature is not available unless at least one rubric is recordedThe patient name and registration number {except in a speed case} along with the date of recording of rubrics appear at the top. The method of repertorisation chosen is displayed in bold letters on the extreme left of the screen. The default repertorisation is `Normal Repertorisation’.
The repertorisation table is divided into two columns.
The left column includes the recorded rubrics along with the repertory and chapter name.The repertory names are abbreviated in the repertorisation table as follows:
Complete : C Kent: KT Allen: AL Boenninghausen: BNBoericke: BR Boger: BG Clarke: CL Fever: FR Gentry: GN Knerr: KR Lippe : LP Phatak: PH Roberts: RB Special: SP Therapeutic Pocket Book: TH Wards: WD My Repertories (Customised Repertories)[UR] User Repertory[MM] Matmed Repertory[CO] Combined Repertory
CLIPBOA
FILTERS
FILTERS

The right column consists of remedies and their levels (drug-intensity) for each selected rubric. Also observe the first two rows of this column. The first row (Totality) shows the sum total of the drug-marks of each remedy. The second row (Symptoms covered) consists of the number of rubrics covered by that remedy. By default the remedies are arranged in the order of the sum of their drug-marks.
The first eleven rubrics are displayed with the first fourteen remedies. To view the entire list of remedies, from main menu go to Repertory and then ‘Drug List’
Use vertical scroll bar to view more rubrics and the use the horizontal scroll bar to view more remedies.
View Drug List:
From the main menu select ‘Repertory’ and then choose ‘Drug list’From keyboard type {Alt + R}{D}
‘Drug List’ helps to view around 110 remedies of the rep. table (Main Repertorisation table or the ‘Quick Rep’ table) with their totality and symptom covered. Move the vertical scroll bar to view more remedies.
Search for any remedy by typing the first few characters in the ‘Search’ box. Observe the ‘Repertorisation’ table in the main screen rolls to the specific remedy.
Sort By:Totality: This is the default option where remedies are arranged according to totality.Remedy: Click on this option to view remedies in an alphabetical order.

Symptoms Cov. / Not Covd : Select a remedy and then click on this option to view the symptoms covered and not covered by the remedy.
Click on OK to return back to the repertorisation table.View Full Screen:From the main menu select ‘View’ and then choose ‘Full screen’From keyboard press ‘F11’ key From the keyboad type {Alt +V} {F}
You can view the repertorisation table without the toolbar, status bar, etc. with a screen covering the entire screen.
More number of rubrics become visible and in a larger type font.
Click on the to revert to the original screen size.
Tip: You can alter the screen size by clicking on the small “Splitter bar” placed between the two horizontal scroll bars below the table. Drag the bar to the left to increase the number of remedies visible in the table and drag it to the right to see the entire length of rubrics.
Hidden Utilities:Practical and easy flow solution and connections have been provided using the right click option.

There are some hidden utilities provided at different places within the program (as explained previously in the rubric selection section.) and there are some more from the ‘Repertorisation’ table. They are:
Quick Delete:To delete a unwanted symptom quickly either from the ‘Quik Rep’ or ‘Main Repertorisation Table’
Simply Right click on the symptom Then Click on ‘Delete Symptom’The symptom will be deleted from the repertorisation table.
See also ‘Delete / Undelete’ option under ‘Symptom List’
Open materia medica:
After repertorisation and before making a prescription, you can check the materia medica of any remedy in the ‘Repertorisation’ table to confirm some symptoms.
Right click on the ‘Totality’ box just below any remedy. From the list of options select ‘Open Materia Medica’ by left clicking on it. You can select the book that you would prefer to read from the four basic books provided here.

Tip: If you are looking for information from the other Materia Medicae, click on from the tool bar and select the desired book.
For more details of all the hidden utilities see the ‘Common features’ under ‘Repertory’section.
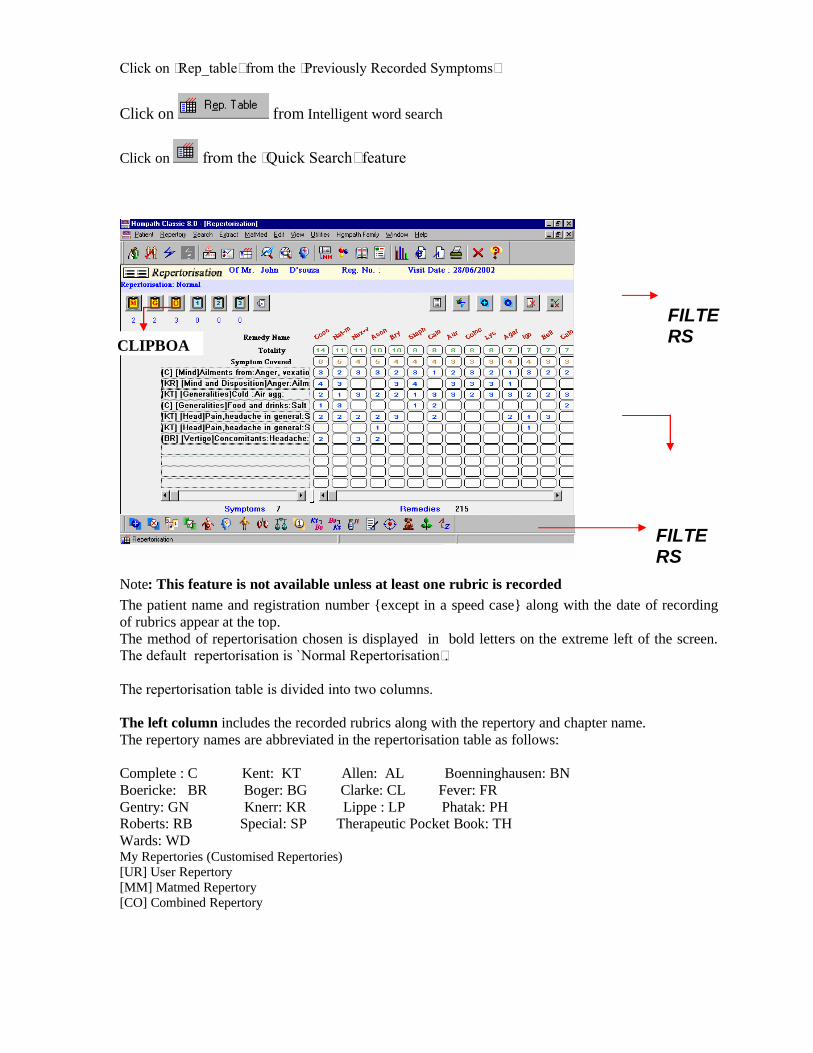
Print Repertorisation Table
From the ‘Patient’ menu click on ‘Print’ .
You can select various presentsations, combinations, options etc. and take a print-out of symptoms and the remedies in a tabular format.
On clicking on the button, a small screen appears, where you can type the number of remedies to be included in the print-out. By default, only the first 15 remedies have been specified for printing. You can increase or decrease this figure as per you need.
Select the number of remedies you desire to print.
Click on to close the ‘repertorisation’ table. If you had invoked the ‘repertorisation’ table from the repertory screen, you will be moved back there, otherwise , you will be returned to the main menu.
Be sure to save a speed case (if need be) before closing this screen. Answer ‘Yes’ to the prompt and enter the patient details in the screen that follows. Answer ‘No’ of you do not want to save
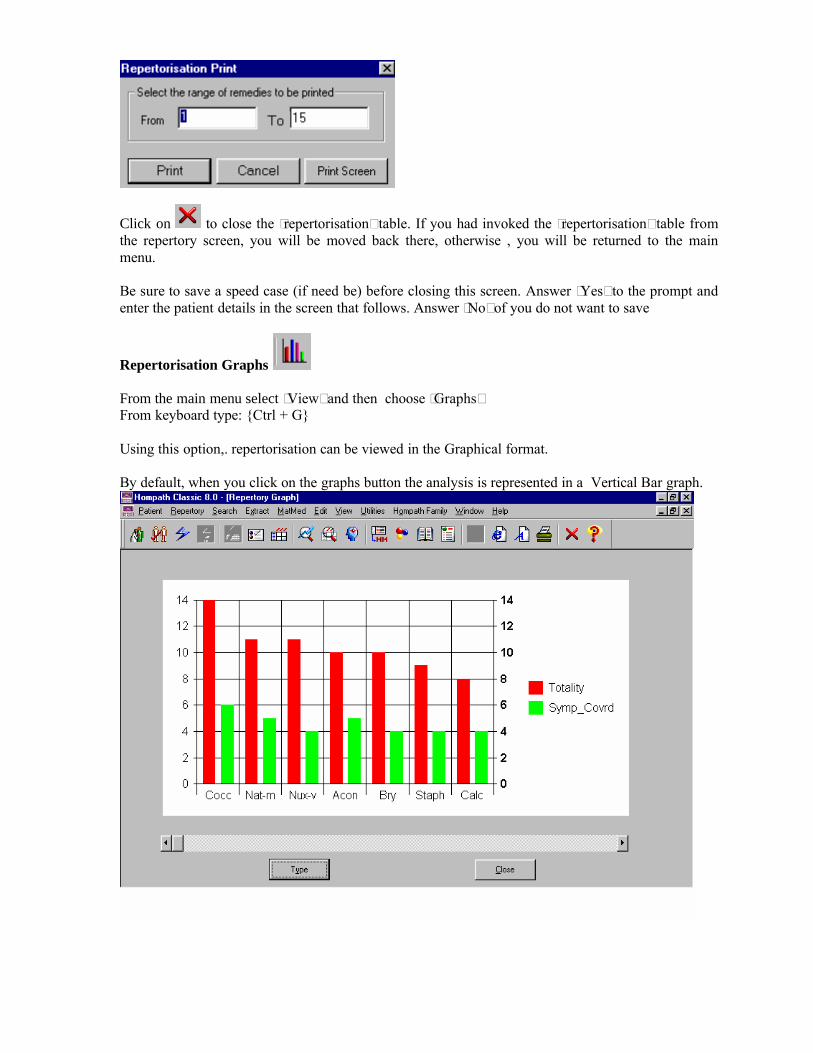
Repertorisation Graphs
From the main menu select ‘View’ and then choose ‘Graphs’From keyboard type: {Ctrl + G}
Using this option,. repertorisation can be viewed in the Graphical format.
By default, when you click on the graphs button the analysis is represented in a Vertical Bar graph.
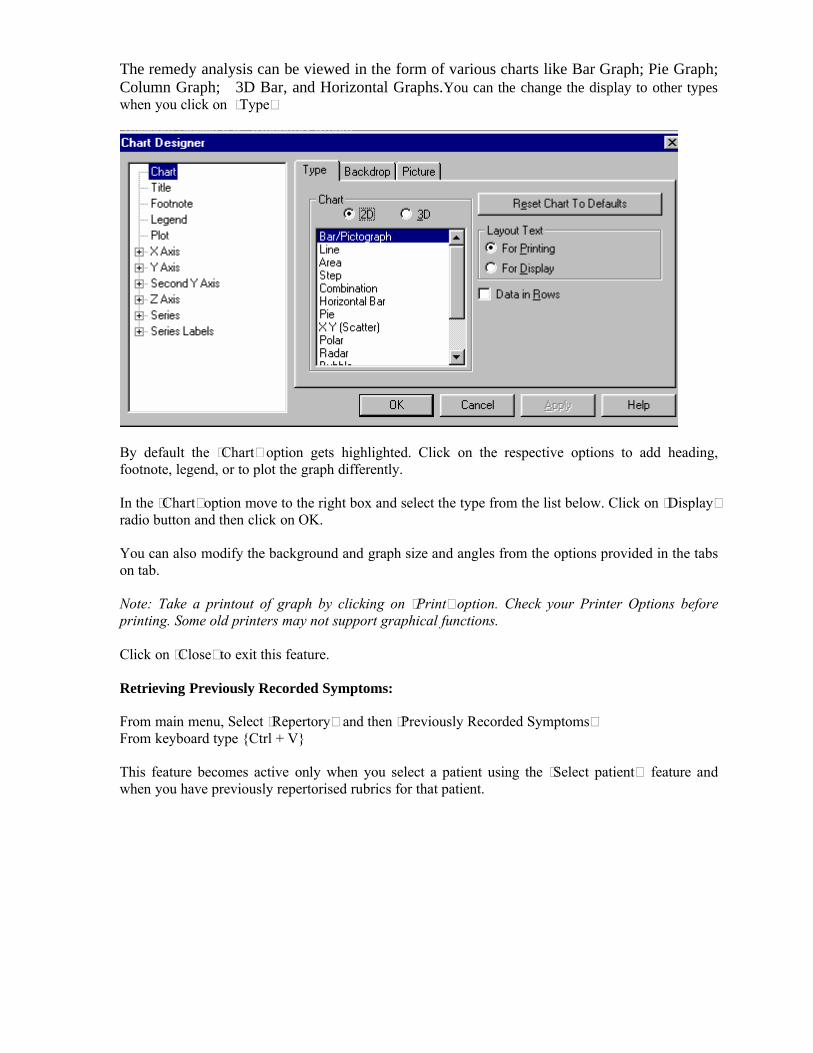
The remedy analysis can be viewed in the form of various charts like Bar Graph; Pie Graph; Column Graph; 3D Bar, and Horizontal Graphs.You can the change the display to other types when you click on ‘Type’
By default the ‘Chart’ option gets highlighted. Click on the respective options to add heading, footnote, legend, or to plot the graph differently.
In the ‘Chart’ option move to the right box and select the type from the list below. Click on ‘Display’ radio button and then click on OK.
You can also modify the background and graph size and angles from the options provided in the tabs on tab.
Note: Take a printout of graph by clicking on ‘Print’ option. Check your Printer Options before printing. Some old printers may not support graphical functions.
Click on ‘Close’ to exit this feature.
Retrieving Previously Recorded Symptoms:
From main menu, Select ‘Repertory’ and then ‘Previously Recorded Symptoms’From keyboard type {Ctrl + V}
This feature becomes active only when you select a patient using the ‘Select patient’ feature and when you have previously repertorised rubrics for that patient.

This feature keeps a track of all the symptoms recorded during previous visits and all the repertorisation table associated with them.
The ‘Recorded Symptoms’ dialog box appears in which there are two columns – the ‘Recorded’ column and the ‘Drug List’ column. The former shows a list of recorded symptoms and the latter shows a list of remedies when a symptom is clicked on.
The dialog box also contains the ‘Visit dates’ drop down list box which lists all the dates on which the symptoms were recorded. When a date is clicked on the symptoms recorded on that day are listed in the ‘Recorded’ column.
There are some buttons provided at the bottom.
You can create a fresh list of symptoms using the recorded symptoms of any previous date. For instance, you had recorded a few symptoms a month ago and now the same patient presents some more symptoms in addition to the previous ones. Click on ‘Forward >>”
This will transfer the recorded symptoms of the selected (previous) date to the current date.
Allows you to save the symptoms of particular date, to your specific folder.
Choose a date from the ‘Visit dates’, of which you want to save the symptoms.Next Click on ‘Save as’
You can then save this set of symptoms in your desired folder for future reference.
You can add more symptoms to your list by clicking on ‘Sym_Rec’. This will take you to Rubric Selection screen to record more symptoms to your list.
takes you to the repertorisation chart of the selected date.
Click on this to print this screen.
Click on ‘Close’ to exit.
Repertorisation Strategies
Hompath Classic 8 incorporates a number of Repertorisation Strategies, designed to add new dimensions and angles to Case Totality. User friendly buttons arranged in a view on the top of the screen makes these strategies easily accessible.
We will now understand the methods of repertorisation in detail.
At the top of the screen the methods available are:
At the bottom of the screen the methods available are:
A friendly bubble pops up if you momentarily halt the cursor on the each picture. Each function can be elicited by a click on the picture.
Note: Most of the individual methods explained can either be used individually or even combined with another for finer analysis.
Normal Repertorisation:
This is the default Repertorisation method. No analysis strategies or techniques are applied in this method. This is a simple straight forward repertorisation process.
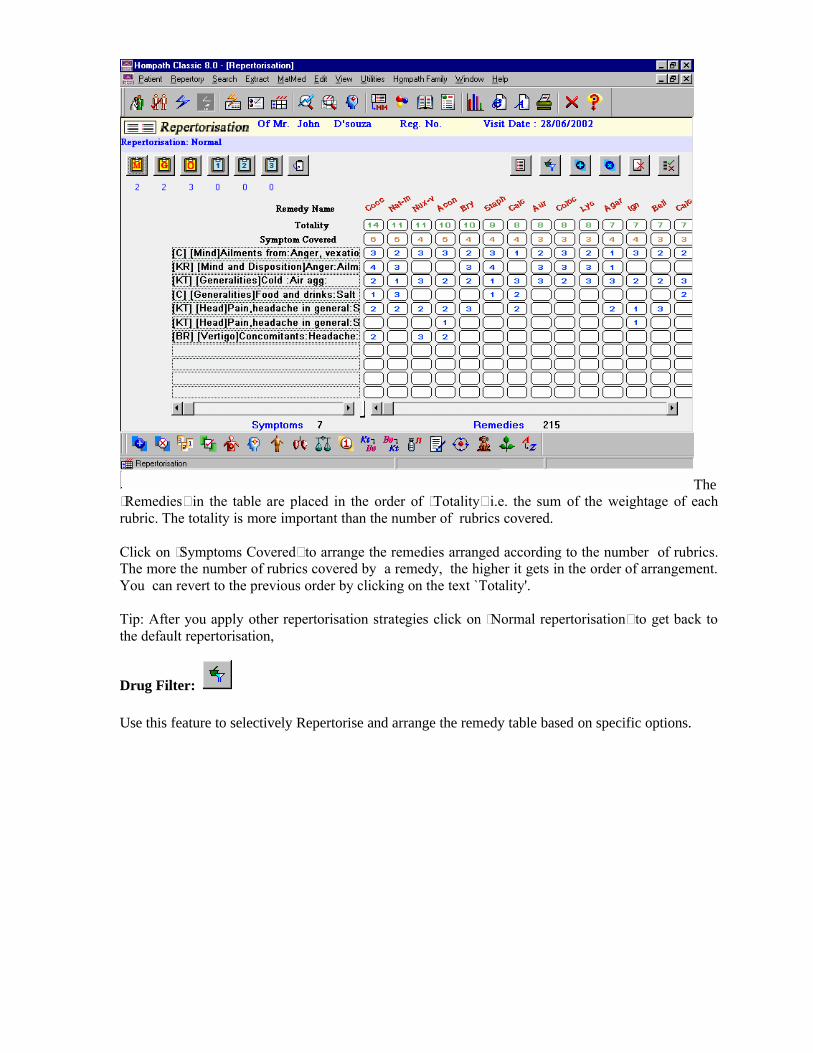
The ‘Remedies’ in the table are placed in the order of ‘Totality’ i.e. the sum of the weightage of each rubric. The totality is more important than the number of rubrics covered.
Click on ‘Symptoms Covered’ to arrange the remedies arranged according to the number of rubrics. The more the number of rubrics covered by a remedy, the higher it gets in the order of arrangement. You can revert to the previous order by clicking on the text `Totality'.
Tip: After you apply other repertorisation strategies click on ‘Normal repertorisation’ to get back to the default repertorisation,
Drug Filter:
Use this feature to selectively Repertorise and arrange the remedy table based on specific options.
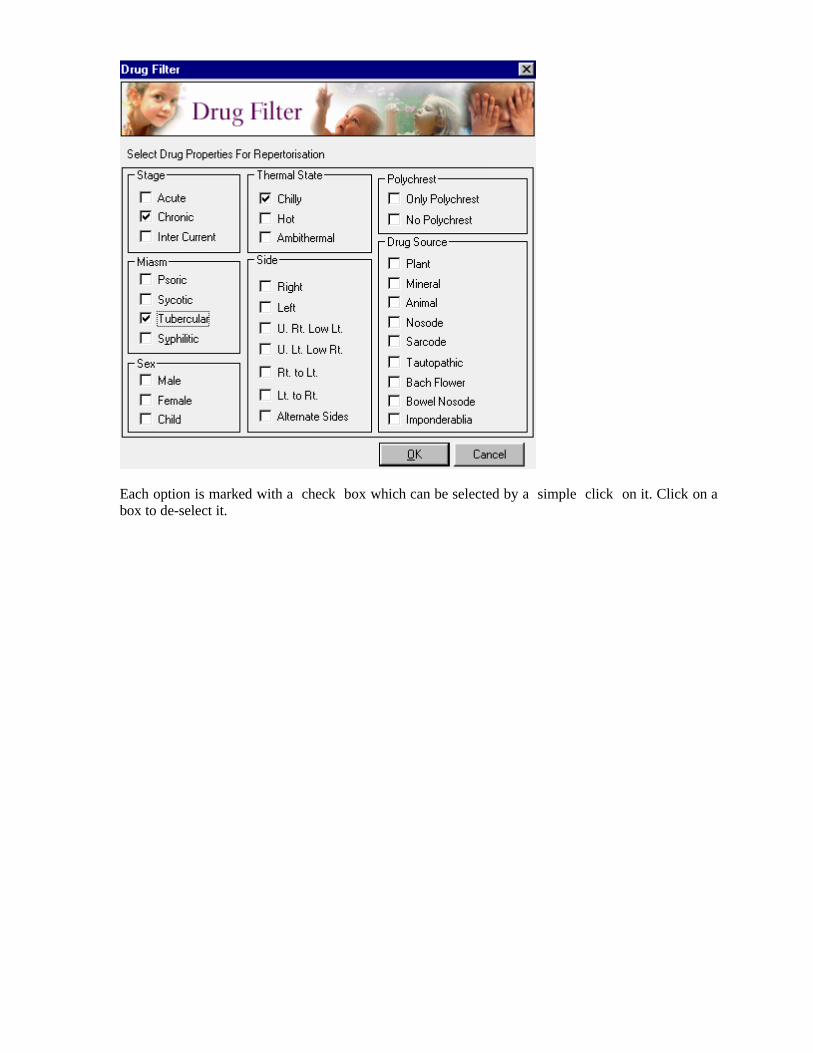
Each option is marked with a check box which can be selected by a simple click on it. Click on a box to de-select it.

Different options available under this topic are as follows:
Tip: Do not select too many options at one time. Start with minimal options to view more remedies for the repertorisation table
Stage: Select all drugs that correspond to a specific stage of the disease in the patient - acute, chronic or intercurrent. You can select either one or more by clicking in the check box. Click on `O.K.' after selection to change the remedy table.
Miasm: Select the option according to the specific miasmatic dominance in your case. Remedies having that specific miasmatic influence will be automatically reflected higher in table.
Sex: Select this option for remedies having gender affinity or age preponderence.
Thermal State: Use this feature as one of the elimination methods. Select hot, cold, or ambithermal remedies in the table by a simple click on the desired check box.
Side: Select this to select drugs with marked side preponderance in the symptom manifestations. You may also select a diagonal side like upper left, lower right and vice versa.

Polychrest: This option lets you specify whether you want Polychrest remedies in the table or only Non-Polychrest, rare, small remedies.
Drug Source:Helps in advanced remedy analysis. Select all remedies either from `Plant Source', `Animal Source', or `Mineral Source' and also from `Nosodes', `Sarcodes', `Tautopathic', `Bachflower', etc.
Note: You can select more than one combination of the above features. For instance you can check mark `Chronic', `Chilly', `Male', `Right Sided', `Tubercular', `Polychrest', `Plant Source', together as per your requirement. Reapply filters as per your requirements after resetting the previous one.
Combine Repertorisation:
This method works by the principle of ‘inclusion'.
The remedies present in all the selected rubrics get pooled together and are reflected in the remedy table. A remedy even though absent in one selected rubric, remains present in the repertorisation table, because it is covered by another rubric.
Use this method when many rubrics are represented by only a small group of remedies and more than 2 or 3 such rubrics are important in the given case. As a result you will not miss out important remedies.
Select the Rubrics by clicking on the button `Unselected' (which changes to selected) to select it.
Press ‘O.K.' to proceed with analysis.

Click on ‘Cancel’ when you do not want to apply this filter and return back to the repertorisation table.
Repertorisation table will now show ‘Combined Symptom Method’. Observe that a ‘C’ is placed next to the rubrics selected in the ‘Repertorisation’ table for this method of analysis.To revert back to the normal method, click on the `Normal Repertorisation’ button.
Advanced Combine Repertorisation:
This method is principally the same as the ‘Combine Repertorisation’ method.
The difference is in the display of rubrics. Unlike in the earlier case, where you would find only selected rubrics in the repertorisation table, in this method all rubrics whether selected or not, are displayed in the table. The analysis and ranking of remedies however, takes place according to the selected rubrics.
The procedure for selection of rubrics remains the same as in ‘Combine Repertorisation’

Select the Rubrics by clicking on the button `Unselected' (which changes to selected) to select it. Press ‘O.K.' to proceed with analysis.
Repertorisation table will now show ‘Advanced Combined Symptom Method’. Observe that a ‘C’ is placed next to the rubrics selected in the ‘Repertorisation’ table for this method of analysis.To revert back to the normal method, click on the ‘Normal Repertorisation’ button.

Cross Repertorisation:
This method works by the principle of ‘exclusion’ and filters the remedies, specially when many polychrest remedies occupy the top of the table, and become difficult to distinguish.
It will filter out common remedies that are present in the rubrics selected for Cross Repertorisation.
You will be presented with all recorded rubrics, as soon as you select this option.
Click in the `Unselected' check box to include for cross repertorisation. The check box turns to `Selected'.
After selecting the required rubrics, click on `O.K.' to start processing.
You will return back to the main repertorisation table.

The repertorisation includes only those rubrics which you have selected for cross method and a `X' mark is placed in front of the rubric.
To revert back to the normal method, click on the ‘Normal Method’ button.
Note: Select only two or three of the most important rubrics for cross repertorisation. Selection of too many will cause improper case analysis with a message `Selected combination does not have any remedies'.
Advance Cross Repertorisation:
This method is principally the same as the ‘Cross’ method.
The difference is in the display of rubrics. Unlike in the earlier case, where you would find only selected rubrics in the repertorisation table, in this method all rubrics whether selected or not, are displayed in the table. The analysis and ranking of remedies however, takes place according to the selected rubrics.
The procedure for selection of rubrics remains same as in ‘Cross Repertorisation’

Click on ‘O.K’ to proceed with analysis.
To revert back to the normal method, click on the ‘Normal Method’ button.
Elimination Repertorisation
This method seems to be the most preferred and is used specifically in the finer analysis of the case. In this method, you can combine some rubrics and at the same time cross some others. In some words, by selecting some moderately important rubrics you pool up the remedies first. And then, cross this with most important rubric(s). As a result the elimination will pick up only important remedies from the pooled lot.
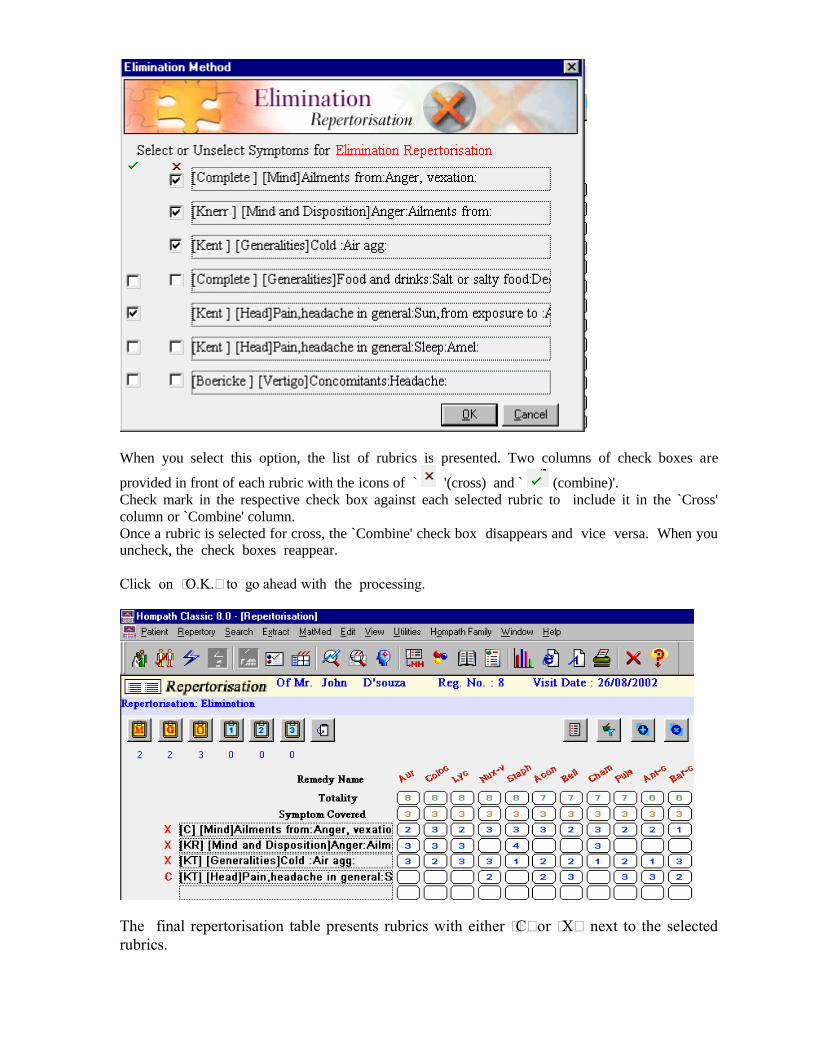
When you select this option, the list of rubrics is presented. Two columns of check boxes are
provided in front of each rubric with the icons of ` '(cross) and ` (combine)'.Check mark in the respective check box against each selected rubric to include it in the `Cross' column or `Combine' column. Once a rubric is selected for cross, the `Combine' check box disappears and vice versa. When you uncheck, the check boxes reappear.
Click on ‘O.K.’ to go ahead with the processing.
The final repertorisation table presents rubrics with either ‘C’ or ‘X’ next to the selected rubrics.

To revert back to the normal method, click on the ‘Normal Method’ button.
Advanced Drug Filter:
The doctrine that mineral remedies are more organized and resilient, while animal remedies are more aggressive and jealous and plant remedies are more sensitive and mild becomes very important in reaching a group of remedies.
Remedies from a particular kingdom display remarkable similarity in properties and characteristic and this similarity gets more specific and important as we go deeper into respective classes or types.
Mineral
Advanced analysis of mineral remedies based on periodic table is provided under this option.You can analyze on basis of basic groups and by columns and rows also.
Note: The ‘basic’ groupwise analysis is accessible from the ‘Drug filter’ option.
Click on this button from the ‘Methods’ screen.
A screen displaying the periodic table opens up.
Click on OK if you want ‘class-wise’ i.e complete mineral analysis only
The ‘Basic’ group like acids, metals etc are listed in a drop down box in the upper corner of the table. Click on the downward arrow to display the list. Select the group of your choice and click on OK.
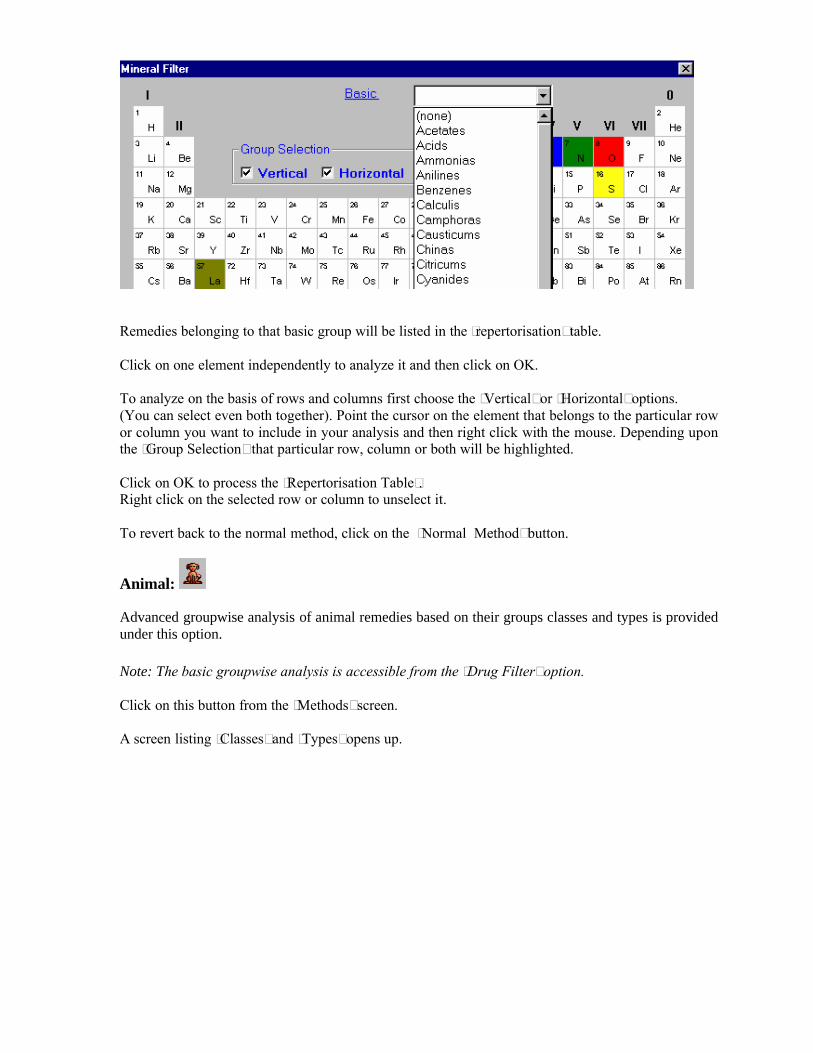
Remedies belonging to that basic group will be listed in the ‘repertorisation’ table.
Click on one element independently to analyze it and then click on OK.
To analyze on the basis of rows and columns first choose the ‘Vertical’ or ‘Horizontal’ options. (You can select even both together). Point the cursor on the element that belongs to the particular row or column you want to include in your analysis and then right click with the mouse. Depending upon the ‘Group Selection” that particular row, column or both will be highlighted.
Click on OK to process the ‘Repertorisation Table’. Right click on the selected row or column to unselect it.
To revert back to the normal method, click on the ‘Normal Method’ button.
Animal:
Advanced groupwise analysis of animal remedies based on their groups classes and types is provided under this option.
Note: The basic groupwise analysis is accessible from the ‘Drug Filter’ option.
Click on this button from the ‘Methods’ screen.
A screen listing ‘Classes’ and ‘Types’ opens up.

The ‘Classes’ box lists the basic classification of animals as per the zoological pharmacopoiea. Use the Search box to reach the desired class.
Click on OK (without checking anything) if you want ‘class-wise’ analysis only.You will be presented with the repertorisation table, depending on the analysis done.To revert back to the normal method, click on the ‘Normal Method’ button from the repertorisation table.
Plant:
Advanced groupwise analysis of plant remedies based on their groups classes and types is provided under this option.
Note: The basic groupwise analysis is accessible from ‘Drug filter’ option.
Click on this button from the ‘Methods’ screen.
A screen listing ‘Classes’ and ‘Types’ opens up.

The ‘Classes’ box lists the basic classification of plants as per the botanical pharmacopoeia. Use the search box to reach the desired class.
Click on OK (without unchecking anything) if you want ‘class-wise’ analysis only.
For more specific analysis choose the ‘Type’ after selecting the ‘Class’ and the click on OK.
You will be presented with the repertorisation table, depending on the analysis done.To revert back to the normal method, click on the ‘Normal Method’ button from the repertorisation table.
Masters Strategies, True Expert System (T.E.S):
Classical Homoeopathic repertorisation has always been based on the analysis and strategies devised and used by the original Masters of Homoeopathy. These strategies have been tried, tested and successfully applied by Homoeopaths all over the world for more that a hundred years.
These practical strategies have been incorporated exclusively in Hompath.
Before applying the Masters' strategies, you need to define the type of symptoms you have selected for the analysis. This is a very useful for teaching students analysis, evaluation and miasmatic classification.
Click on Symptom Type and the list of recorded rubrics appears.
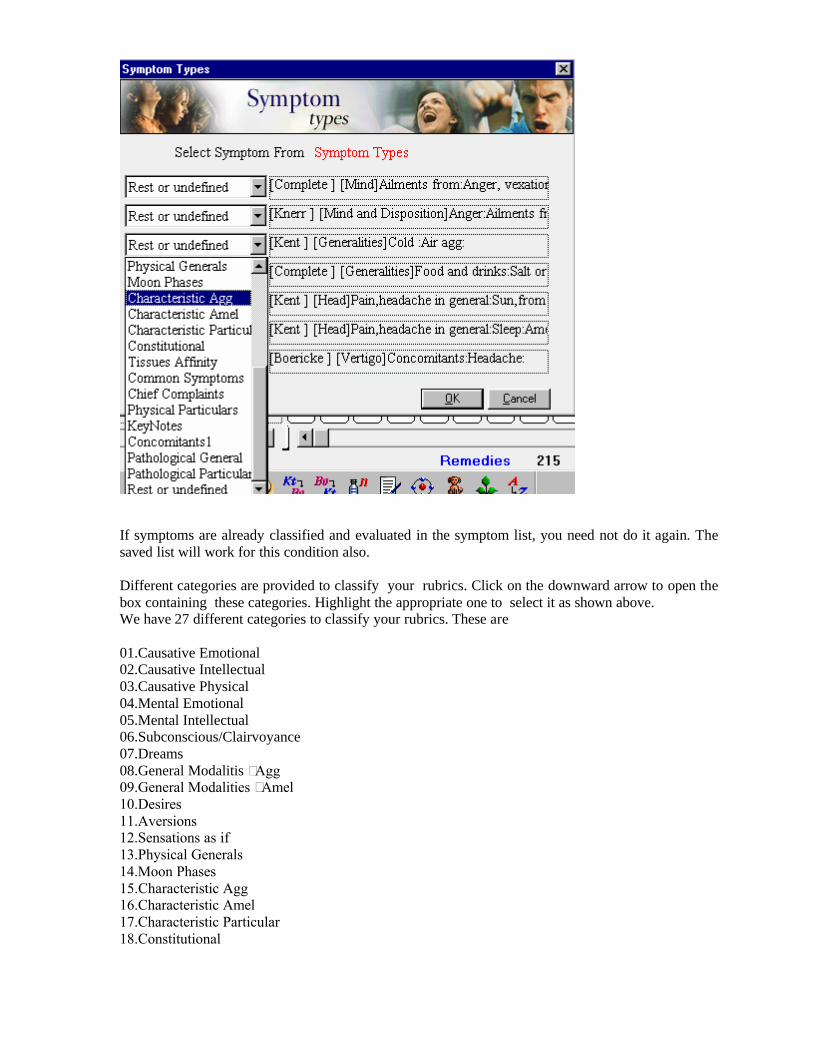
If symptoms are already classified and evaluated in the symptom list, you need not do it again. The saved list will work for this condition also.
Different categories are provided to classify your rubrics. Click on the downward arrow to open the box containing these categories. Highlight the appropriate one to select it as shown above.We have 27 different categories to classify your rubrics. These are
01.Causative Emotional 02.Causative Intellectual 03.Causative Physical04.Mental Emotional 05.Mental Intellectual 06.Subconscious/Clairvoyance07.Dreams 08.General Modalitis –Agg 09.General Modalities –Amel10.Desires 11.Aversions 12.Sensations as if13.Physical Generals 14.Moon Phases 15.Characteristic Agg16.Characteristic Amel 17.Characteristic Particular 18.Constitutional

19.Tissue Affinity 20.Common Symptoms 21.Chief Complaints22.Physical Particulars 23. Keynotes 24. Concomitants25.Pathological General 26.Pathological Particular 27. Rest or defined (by default)
The expert Masters' strategies can be applied once the symptom types are defined by you.
Note: Symptom types are also available from the ‘Symptom List’. When the ‘Symptom types’ are identified here, they will be automatically reflected in the Symptom List and vice versa. (See Symptom List)
Master Strategies available are:Kentian type, Boenninghausen type, Boger type
Kentian Analysis:
Kent's method of analysis of symptoms is from generals to particulars. The causative factors are evaluated at the highest order, followed by mental generals, physical generals, particulars, and so on. Even among the mental generals, those belonging to `will' and `emotions' are evaluated first followed by those belonging to the intellect.
Dr. Kent also gave high value to peculiar, rare, strange symptoms and in fact recommends “get the strong, strange, peculiar, rare, strange symptoms and then to see to it that there are no general in the case that oppose or contradict. First of all discover three, four or five or as many symptoms as exist that are strange, rare and peculiar….these are the highest generals…”
The rubrics are automatically ranked in order of importance, irrespective of the order in which you have selected them. The final analysis is reflected in the remedy table. It is recommended to use this method, when your case has marked `Mental Generals'.
The expert Kent strategy can be applied once the symptoms types are classified by you.
Boenninghausen Analysis:
Boenninghausen applies the principles of generalization and concomitance.
Boenninghausen gives importance to a single grand complete symptom which has location, sensation, modality and a concomitant. The concomitant symptom is vital as it represents the differentiating factor. These concomitants have been described by him as “the unreasonable symptoms with no scientific explanation for their persistent presence, concurrently with chief complaint’
In Boenninghausen’s analysis, these symptoms are evaluated as the highest priority. After defining symptom types as described in last section, click on above button for this analysis.
Note: You don’t have to classify symptoms again if you have done so before the Kentian analysis. Just click on Boenninghausen button directly.

It is recommended to use this method when in the case, concomitants or characteristic particulars are marked.
Presence of too many generals may not show any significant difference between Kent / Boenninghausen / Boger methods.
Tip: It is not necessary that you must record rubrics from the Boenninghausen repertory. The analysis strategy of Boennighausen can be applied irrespective of repertory used.
Boger Analysis:
The Boger method of repertorisation emphasizes on seat of local disease or the pathology for analysis. For instance, in some cases general descriptions like headache or toothache may not help in anyway, but the site and side of pain will greatly help in pointing to the right remedy. Boger also gives importance to the concomitants or all those accessory symptoms which belong to another sphere of disease, but are present as an accompaniment.
Also vital in Boger's method of analysis is anamnesis or the identification of the cause of the disease. Next in importance are the modalities and the time of onset or periodicity of disease.
After defining the symptom types, click on the picture button to get Bogers analysis.It is recommended to use this method when the pathological or pathological generals are more marked in a case.
Selective Analysis:
Normally, a ‘good’ Homoeopathic case-record does not result in large number of rubrics that can be used for repertorisation and usually shows the most common and well-proved polychrests at the top the table.
The art of Homoeopathy lies in our ability to choose the right group of rubrics for repertorisation.During finer analysis, you may want to try the what if … analysis, i.e what if this rubric is not recorded or what if only a specific group of rubrics are considered? To facilitate this kind of analysis this software has provided multiple strategies discussed below.
Select Symptom:
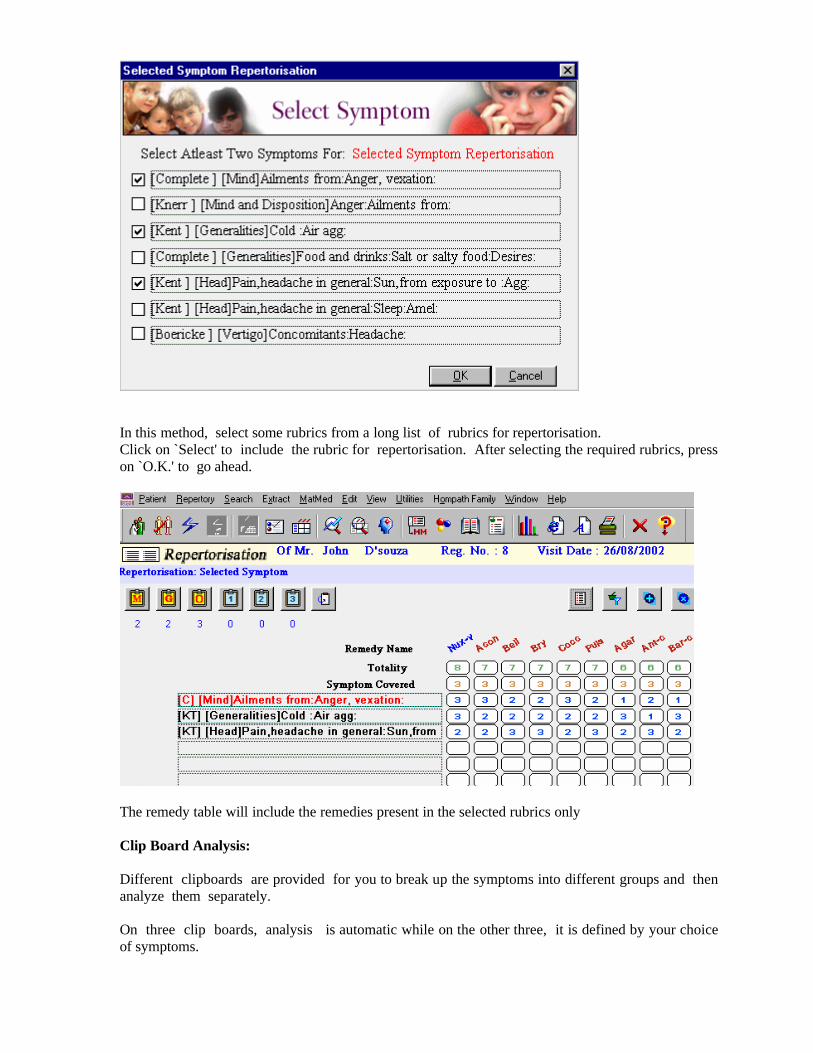
In this method, select some rubrics from a long list of rubrics for repertorisation. Click on `Select' to include the rubric for repertorisation. After selecting the required rubrics, press on `O.K.' to go ahead.
The remedy table will include the remedies present in the selected rubrics only
Clip Board Analysis:
Different clipboards are provided for you to break up the symptoms into different groups and then analyze them separately.
On three clip boards, analysis is automatic while on the other three, it is defined by your choice of symptoms.

Click on this picture to view analysis of all rubrics recorded from the `Mind' chapter of any repertory. In short, it is the analysis of mental symptoms recorded by you.
Click on this picture to view analysis of all rubrics recorded from the `Generalities' chapters of different repertories.
Click on this picture to view analysis of all rubrics recorded from the chapters others thanMind and Generalities i.e ‘Particulars’
Three separate clip boards named as ‘1’, ‘2’, ‘3’, are provided to differentiate rubrics and analyze them as groups.
To store rubrics on the clip boards ‘Right Click’ on any rubric and select any of the three clipboards ‘1’ ‘2’ or ‘3’ to drop the symptoms in the clipboard.
A message appears that the particular symptom is dropped into the particular clip board. Repeat this procedure for other symptoms.
For instance, you might want to have all fever related rubrics on one clip board so that you can obtain a fever totality, all the pathological symptoms in second clipboard and combine some fever, some physical and some mental symptoms in third clipboard.
After doing, this click on any of the clipboards to get the analysis of the rubrics present on that specific clipboard. The message on top also shows which clipboard is being analyzed. If the clipboard is empty when you click on it, the appropriate message is displayed.
For instance below is the “Clipboard analysis 1” where three symptoms have been dropped for separate repertorisation.

Similarly one can drop symptoms to any of the clipboards ‘1’, ‘2’, or ‘3’.
After completing the analysis, Clear the contents of the clipboards by first selecting any of the clipboards ‘1’ ‘2’ or ‘3’ and then clicking on the `Reset Clipboard' button. The clipboards will be ready for fresh selection of symptoms.
Miscellaneous Methods of Repertorisation:
The software development team has evolved new strategies of repertorisation table to suit the needs of the profession. These form the miscellaneous methods of repertorisation.
Drug Mark Repertorisation
All the remedies covering a specific grade like first grade, second grade or third grade can be selected in the table using this option.
Click in the check box corresponding to one mark, two marks, three marks, all, etc. to reflect the specific grade of remedies in the table.
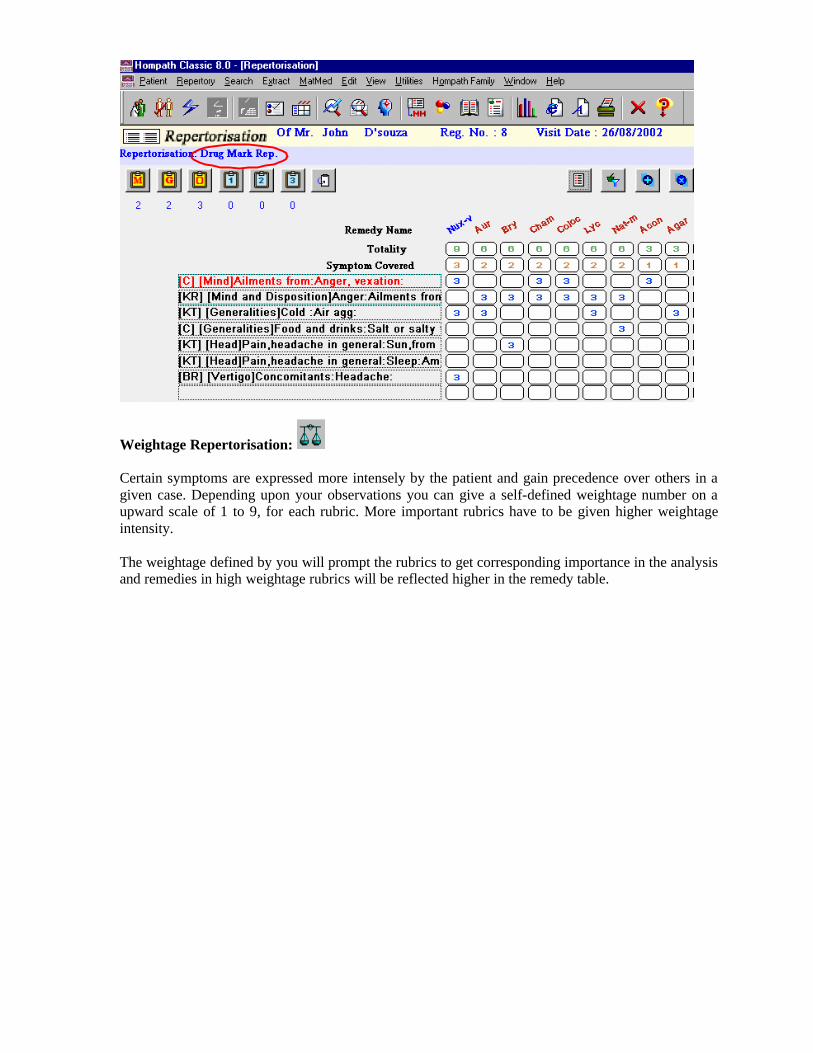
Weightage Repertorisation:
Certain symptoms are expressed more intensely by the patient and gain precedence over others in a given case. Depending upon your observations you can give a self-defined weightage number on a upward scale of 1 to 9, for each rubric. More important rubrics have to be given higher weightage intensity.
The weightage defined by you will prompt the rubrics to get corresponding importance in the analysis and remedies in high weightage rubrics will be reflected higher in the remedy table.

By default the weightage rubrics is ‘1’
Click on the downward arrow next to the number ‘1’, and then choose the weightage by clicking in the drop down list from 1 to 9 [where 9 has the highest priority] for desired rubrics .
Accordingly, the rubrics get importance in analysis and this is reflected in the remedy table.
To revert back to the normal method, click on the `Normal Repertorisation’ button.
Drug Mark Set To One
Using this option, all remedies are assumed to have covered the rubrics with minimum weightage, i.e. 1 mark.
Remedies, though they appear bold or italic in the rubrics, are taken as if they have covered the rubrics like their normal counterparts.

This method is also another way of looking at smaller remedies, which otherwise may not get prominence in the repertorisation table.
Neutralise Kent:
There is relative difference in the remedy grades of Kent and Boenninghausen repertories. The maximum strength in Kent is 3 marks while in Boenninghausen it is 5 marks.
Using this method the remedy grades of Kent are changed to equal weightage according to Boenninghausen.
Thus when you have recorded rubrics from Kent and Boenninghausen repertories, remedies from the latter do not get undue prominence because of their relative higher weightage.
The drug mark (or strength) of 1 in Kent gets converted to 2, drug mark 2 gets converted to 3 and drug mark 3 gets converted to 5.
To use this method, the repertorisation table must include rubrics recorded from ‘Kent’s’ repertory.
Neutralise Boenninghausen
This is the reverse of the former. However, in this case, the remedies in Boenninghausen get converted to Kent’s gradation to remove their higher weightage.
Using this method the remedy grades of Boenninghausen are changed to equal weightage according to Kent.
In this case the remedies in Boenninghausen rubrics gets converted to Kent's gradation to remove their higher weightage.
To use this method, the repertorisation table must include rubrics recorded from ‘Boenninghausen’ repertory.

Drug Intensity:
Select this method to arrange the remedies by their strength after multiplying the Totality by the Number of rubrics covered.
Assume, Natrum Mur covered 4 rubrics and scored a weightage of 11. Sepia covered 5 rubrics and scored a weightage of 9. In the ordinary course, Natrum Mur is placed first and Sepia next. But, when you use the `Drug Intensity' method, the order is reversed, because the Sepia Totality x Weightage product is more than that of Natrum mur
This method exhibits a new order of remedies and performs an important role, wherein small remedies, though covering more rubrics takes a lower place in contrast to polychrest remedies which occupy the top portion of the table by virtue of higher weightage in rubrics, even though their rubric coverage is poor.
Author Filter:
A useful utility of this software is that it allows you to select rubrics from a cross section of repertories.
No single repertory is complete and each of them are unique. The option to select rubrics from a wide range will accentuate case analysis and add weightage.
However, after selecting remedies from different repertories, if you would like to see remedies from only one specific repertory, you don’t have to delete the rubrics of that book.

Simply select this feature and the authors you wish to reflect in the repertorisation method.
Only rubrics from the particular author repertory (ies) will be considered for analysis. Check mark the required author repertories.Click on ‘OK’ to proceed with analysis.
Sort Remedies
This process allows to sort the remedies out according to their alphabetical order, irrespective of their relative strengths and totality.

This feature is especially useful for students who want to automate the task of repertorisation. All methods mentioned above are main strategies, you can use multiple permutation and combination of strategies depending upon your need.
Symptoms covered / Not covered
This is a practical utility and not an actual repertorisation method. You can view the rubrics, represented by a chosen remedy and the rubrics not represented from your list.
The left column displays rubrics covered and the right column displays the rubrics not covered by the remedy.
Change the remedy from the drop down arrow of ‘Select Remedy’ Option to view symptoms covd/ not covd of any other remedy.
The display of rubrics covered and not covered is retained just like their display on the repertory screen to keep uniformity.
Click on ‘Close’ to exit this screen.
Symptom ForwardingFrom the main menu select ‘Repertory’ and then ‘Symptom Forwarding’From the keyboard type {Alt+R} {F}

This feature is used to forward ‘All symptoms’ or ‘Few selected symptoms’ of any patient(s) to the current repertorisation date either for the ‘Same patient’ Or ‘Another registered patient’ or a ‘New patient’.
Key Features:It is a time-saving repertorisation procedure especially when
1. When you have recorded symptoms previously for any patient and now the same or another patient presents with the same set of symptoms, in that case you can simply forward ‘All or Few’ of the symptoms from any previous patient to the current repertorisation date.
2. When you have a genus epidemicus and you have the same set of symptoms appearing in all your patients you can simply use this feature and minimize your work. Add and delete as per your requirement.
To Forward symptoms in the Same patient to the current repertorisation date: Select the desired patient from the ‘Select patient’ list (See ‘Select patient’ section under ‘Patient’). Next move on to ‘Symptom Forwarding’ to Select this same patient name and thereafter proceed with symptom forwarding for the current date.
Or To Forward symptoms of any patient to another registered patient: From ‘Select patient’ choose the desired patient to which you want to forward the symptoms. Next move on to ‘Symptom Forwarding’ and Select that Patient Name from where you want to forward the symptoms to this registered patient
OrTo forward symptoms for a New patient: Directly click on ‘Symptom forwarding’ and after thereafter proceed with forwarding of symptoms Save this patient using ‘Save Speed case’.
After choosing any of the above desired options, Click on ‘Symptom Forwarding’ from the main menu:
Observe the screen for the following:

The upper row includes all your patients with their ‘Names’ , ‘Reg. No’ and first ‘Visit dates’As you move the cursor and highlight each patient name by a click on it, the lower screen shows the rubrics repertorised for the highlighted patient.
The rubrics are displayed in the form of [Repertory name] [chapter name] symptom name (number of remedies the rubrics contains) (the date at which the symptom was recorded)
1. Forward all symptomsThis feature will allow you to forward ‘all the symptoms’ of any selected patient to the current repertorisation.
Select the patient from where you wish to forward symptoms by highlighting the patient’s name. The repertorised rubrics of the selected patient will automatically appear on the lower screenNow, Simply check the box next to ‘Forward all symptoms’ (as shown in the above screen)All symptoms are automatically selected and highlightedNext Click on ‘Select’ to forward the symptoms for the current repertorisation date.
2. Forward selected symptomsThis feature will allow you to forward ‘few selected symptoms’ one by one, of any patient to the current repertorisation.Select patient list’ from where you wish to forward symptoms from the ‘Patient list’ The repertorised rubrics of the selected patient will automatically appear on the lower screen

To forward few selected symptoms, click on each symptom to highlight it one by one as shown above. bserve the screen which shows, ‘Forwarded/recorded symptoms: 3’
Click on ‘Select’. The ‘Repertorise’ and ‘Open’ button become active.
Note: You can select multiple patient names one by one from the patient list to forward all or few symptoms of each of these patients to the current repertorisation. For instance you can forward all symptoms of one patient, few other symptoms of some other patient and so on..
RepertoriseClick on ‘Repertorise’ to view the repertorisation table.All the symptoms are forwarded to the current repertorisation date either for the Same Patient / Another Registered Patient / or a New patient depending on the option you have chosen at the beginning.
OpenWill take you to the Rubric Selection Screen, incase you need to record and add more rubrics to the current forwarded rubrics. (See Rubric Selection section)
Note: When you forward symptoms for a Speed case make sure to ‘Save speed case’ to register it as a new patient. (See ‘Save Speed Case’ section under ‘Patient’ for details)
Common FeaturesMany features and functionalities are provided from several different places within the program to enhance the user-friendliness of the software

These common features can be classified under two types
Symptom OptionsRemedy Option
Symptom options:
All Repertories Search for a selected Rubric from all the installed Repertories Allows you to view the rubric and its remedies in a different perspective Record the symptom from your desired repertory.
Open Repertory Jump to the selected rubric in their corresponding repertory. View all the main and sub-rubrics related to the selected rubric, to record a better
choice of rubric from the repertory screen itself.
Symptom List Lists all the recorded symptoms. Delete any unwanted or accidentally recorded rubrics. Undelete rubrics that you have deleted. Apply ‘Symptom Classification’ and ‘Miasmatic Classification’ to the recorded symptoms
for symptom evaluation.
Full Symptom View the entire symptom and all its remedies at one glance.
Cross References View Cross references for the ‘Main Rubric’, and record the most appropriate symptom for
the patient . Referencing can be within a chapter or even extends to multiple repertories and chapters.
Themes Lists a number of 'general' concepts regarding personality, evolution, emotions, intellect,
ailments from, fears, etc. Each theme is connected to correctly related rubrics in the repertory which allows you to
search and record rubrics which would be otherwise difficult to interpret.
Synonyms Lists ‘Synonymal’ or ‘Alike’ words for the Main words to help you to consider other related
words for the main selected word from the vast ocean of homoeopathic literature
Similar Words Similar to the ‘synonyms’ feature includes more number of Main words and more number of
similar words for each main word It can be considered as Advanced extension of ‘Synonyms’ feature.
Word Meanings Dictionary of medical and non-medical words making understanding of complex words easy
Remedy Options:
Symptom covd / not covd View the rubrics, represented by a chosen remedy and the rubrics not represented from your
recorded list of symptoms.
Keynotes View PQRS and confirmatory symptoms of the selected remedy
Open Materia Medica Read the materia medica of the selected remedy from the four basic Materia Medicae
viz. ‘Allen’s Keynotes’, ‘Boericke Materia Medica’, ‘Kent’s Materia Medica’ and ‘Phatak’s Materia Medica’
Convt Rep to MM Use this feature from the ‘Repertorisation’ table, to help you Differentiate remedies that are
very close to each other and decide the Similimum. You can also compare and contrast the rubrics recorded by you.
Drug Properties View the basic properties of the selected drug according to Full name, Properties, Kingdom
etc.
Drug Relation View Complementary / Follow well / Inimical remedies of the selected drug.
Drug List View more ‘Drugs’ of the repertorisation table at one glance, along with their totality and
symptom covered. Search for any remedy present within the repertorisation table.
All Repertories: Every repertory has its own structure and format making each different from another one . Very often same or similar rubrics have different remedies and different expressions in different repertories.
Key features This feature allows you to ‘Search’ for a Selected Rubric of one repertory from the ‘All
installed repertories’. It allows you to view the symptom and its remedies in a different perspective and there after
record the symptom from your desired repertory. It widens your selection of a rubric by allowing you to view the same or a similar symptom from all the 29 repertories wherever
available.
To use ‘All Repertories’ feature:
Click on any symptom and then on button from:
Repertory ScreenRepertory Search Results ScreenRecorded Symptom ListConvt. Rep to Materia Medica Search Result Screen

Group Symptoms Search Result ScreenMy repertories (All Customised repertories)
OR
Right Click on any Symptom and then choose the ‘All Repertories’ option from:
Repertorisation table Quik Rep screen
Let us understand the use of this feature from the repertory screen.Open the ‘Complete’ ‘Generalities’ chapter.
Select the rubric ‘Diabetes Mellitus’
To view this symptom and its related rubrics from all the installed repertories simply Click on ‘All Repertories’

All rubrics of ‘Diabetes Mellitus’ wherever available in the ‘29’ repertories will be displayed in the repertory search results screen. Scroll down to view all the related rubrics, and then Highlight any desired rubric and Click on ‘Record’ to repertorise that rubric from the desired repertory.
(See the ‘Repertory Search Results’ for details of all other options on this screen.)
Click on to close this screen.
Similarly one can access this feature from different sites in the program as mentioned above.

For instance, ‘Right click’ on any symptom from the repertorisation table and then click on ‘All Repertories’ to view the same and its related rubrics from all the repertories installed.
You will be taken to the ‘Repertory search results’ from where you can record more symptoms or apply other options. (For more details of this screen see ‘Repertory Search Results’ section under ‘Search’)
Open Repertory OR Open Chapter:
The utility of this feature is that it allows you to jump to the selected rubric in its corresponding Repertory chapter to view all its related rubrics and record a better choice rubric for repertorisation when required.
To use this feature:
Click on from:
Repertory Search ResultsIntelligent Word SearchQuick Search
OR‘Right Click’ on any Symptom and then choose the ‘Open Repertory’ option from:Repertorisation tableQuik Rep
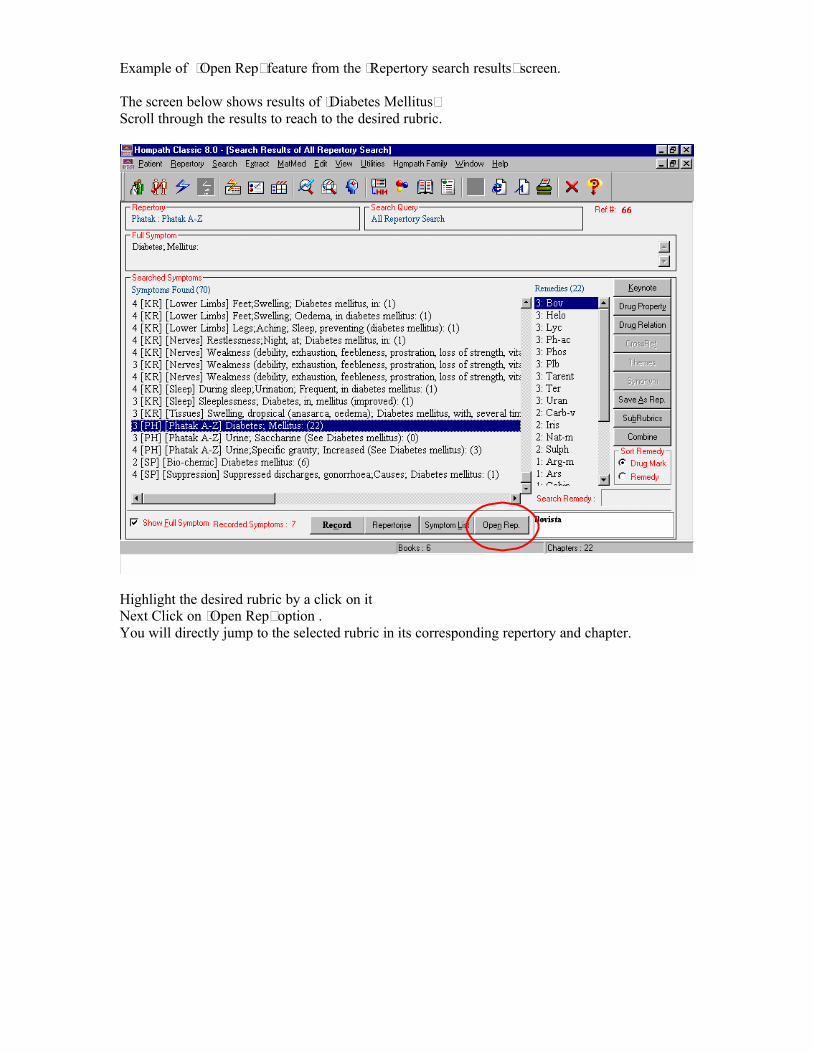
Example of ‘Open Rep’ feature from the ‘Repertory search results’ screen.
The screen below shows results of ‘Diabetes Mellitus’Scroll through the results to reach to the desired rubric.
Highlight the desired rubric by a click on it Next Click on ‘Open Rep’ option .You will directly jump to the selected rubric in its corresponding repertory and chapter.

Scroll through all the related rubrics or sub-rubrics from here for a better choice and record a desired rubric for repertorial analysis.
To revert back to previous screen click on from this screen.
Similarly one can access this feature from different sites in the program as mentioned above. Recording Rubrics:
Central to any Homoeopathic software is rubric recording, to help you arrive at the right remedy.
Hompath provides flexible and easy rubric-recording in different ways available from various features of the program.
To record rubrics from, Repertory screen
Repertory Search Results screenIntelligent Word Search Convt Rep To MM Results screenGroup Symptoms Results screen Customised Repertories under ‘My Repertories’
‘Double click’ on a rubric you wish to selectorHighlight the rubric by clicking once on it and Click on the ‘Record’or
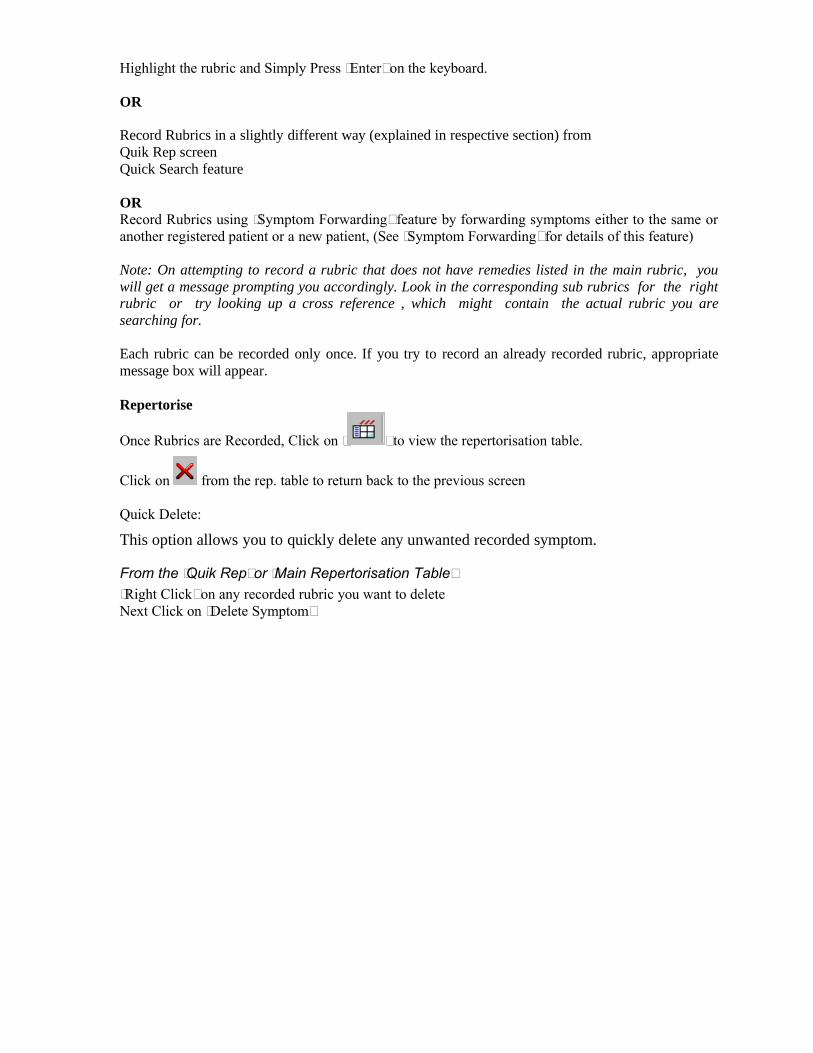
Highlight the rubric and Simply Press ‘Enter’ on the keyboard.
OR
Record Rubrics in a slightly different way (explained in respective section) fromQuik Rep screen Quick Search feature
ORRecord Rubrics using ‘Symptom Forwarding’ feature by forwarding symptoms either to the same or another registered patient or a new patient, (See ‘Symptom Forwarding’ for details of this feature)
Note: On attempting to record a rubric that does not have remedies listed in the main rubric, you will get a message prompting you accordingly. Look in the corresponding sub rubrics for the right rubric or try looking up a cross reference , which might contain the actual rubric you are searching for.
Each rubric can be recorded only once. If you try to record an already recorded rubric, appropriate message box will appear.
Repertorise
Once Rubrics are Recorded, Click on ‘ ’ to view the repertorisation table.
Click on from the rep. table to return back to the previous screen
Quick Delete:
This option allows you to quickly delete any unwanted recorded symptom.
From the ‘Quik Rep’ or ‘Main Repertorisation Table’‘Right Click’ on any recorded rubric you want to deleteNext Click on ‘Delete Symptom’

You will be prompted with a appropriate message whether you want to delete the rubric or no.
Click on ‘Yes’ to delete the rubric. The symptom will be instantly deleted from the repertorisation table.
Click on ‘No’ if you do not want to proceed with deletion.
Tip: If you have accidentally deleted any symptom go to the ‘Undelete’ option of the ‘Symptom List’ to revert back the symptom to the repertorisation table.
Symptom List:
From the main menu select ‘Repertory’ and then choose ‘Symptom List’From keyboard type {Ctrl+L}Click on ‘Symptom List’ from the ‘Repertory screen’ or ‘Repertory Search Results Screen’
Click on from the ‘Quick Search’ screen
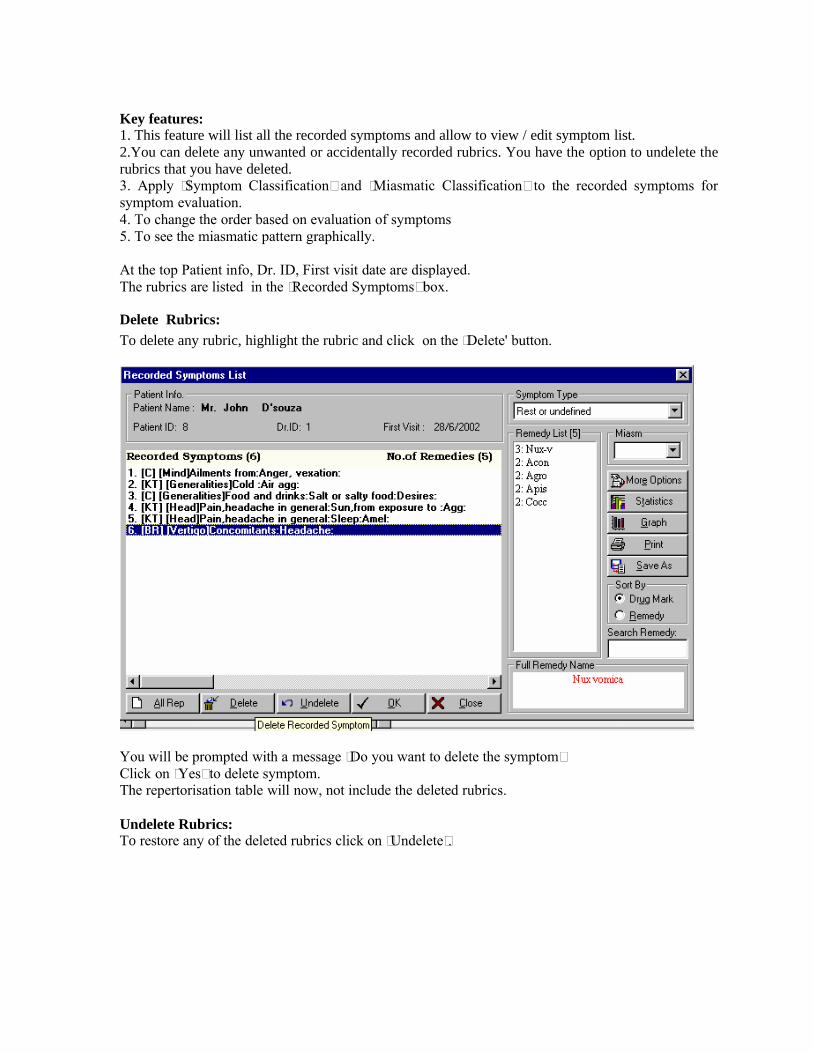
Key features:1. This feature will list all the recorded symptoms and allow to view / edit symptom list. 2.You can delete any unwanted or accidentally recorded rubrics. You have the option to undelete the rubrics that you have deleted. 3. Apply ‘Symptom Classification’ and ‘Miasmatic Classification’ to the recorded symptoms for symptom evaluation.4. To change the order based on evaluation of symptoms5. To see the miasmatic pattern graphically.
At the top Patient info, Dr. ID, First visit date are displayed.The rubrics are listed in the ‘Recorded Symptoms’ box.
Delete Rubrics:To delete any rubric, highlight the rubric and click on the ‘Delete' button.
You will be prompted with a message ‘Do you want to delete the symptom’Click on ‘Yes’ to delete symptom.The repertorisation table will now, not include the deleted rubrics.
Undelete Rubrics:To restore any of the deleted rubrics click on ‘Undelete’.
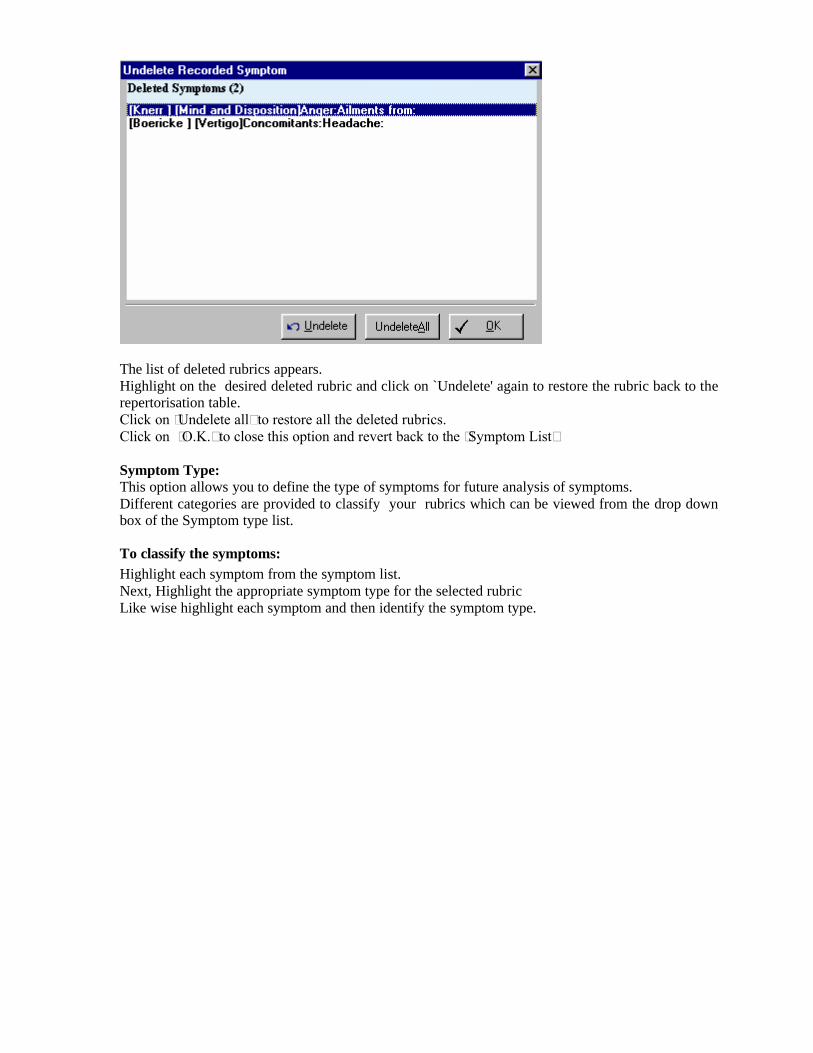
The list of deleted rubrics appears. Highlight on the desired deleted rubric and click on `Undelete' again to restore the rubric back to the repertorisation table. Click on ‘Undelete all’ to restore all the deleted rubrics.Click on ‘O.K.’ to close this option and revert back to the ‘Symptom List’
Symptom Type:This option allows you to define the type of symptoms for future analysis of symptoms.Different categories are provided to classify your rubrics which can be viewed from the drop down box of the Symptom type list.
To classify the symptoms:Highlight each symptom from the symptom list.Next, Highlight the appropriate symptom type for the selected rubric Like wise highlight each symptom and then identify the symptom type.

Note: Symptom types classification is also available from the ‘Symptom Type’ from the repertorisation table.When the ‘Symptom types’ are identified from the symptom list screen, they will be automatically reflected in the ‘Symptom type’ provided under repertorisation strategies and vice-versa.
Miasm: This option allows you to identify the Miasm for each symptom to assess the symptoms and repertorisation on miasmatic evaluation.

Select each symptom from the ‘Symptom List’ and then Click on the drop down arrow of ‘Miasm’ to select appropriate Miasm for each symptom.
More Options:Click on ‘More Options’ button for the following options:
Symptom Sorting:After identifying ‘Symptom type’ and / or ‘Miasm’ for the recorded symptoms one can sort the repertorisation table by any one of the following ways .Click on any of the radio button of ‘Evaluation’ or ‘Miasm’ to sort the symptoms according to the respective methods.
Normal:This is the default repertorisation and the rubrics will be displayed the way it is initially recorded and displayed.
Evaluation:Click on ‘Evaluation’ to Sort the symptoms according to the ‘Symptom types’ identified
The symptoms will be Sorted according to symptom evaluation i.e. All the ‘Mentals’ will be displayed first then the Physicals , then Particulars and lastly ‘Rest or undefined’ symptoms
Miasm:Click on ‘Miasm’ to Sort the symptoms according to Miasmatic evaluation, i.e the Psoric symptoms will be on the top, then the Sycotic, then Tubercular , Syphilitic and so on.
Once you evaluate, Click on ‘Save’ to save the Repertorisation table according to the desired sorting.
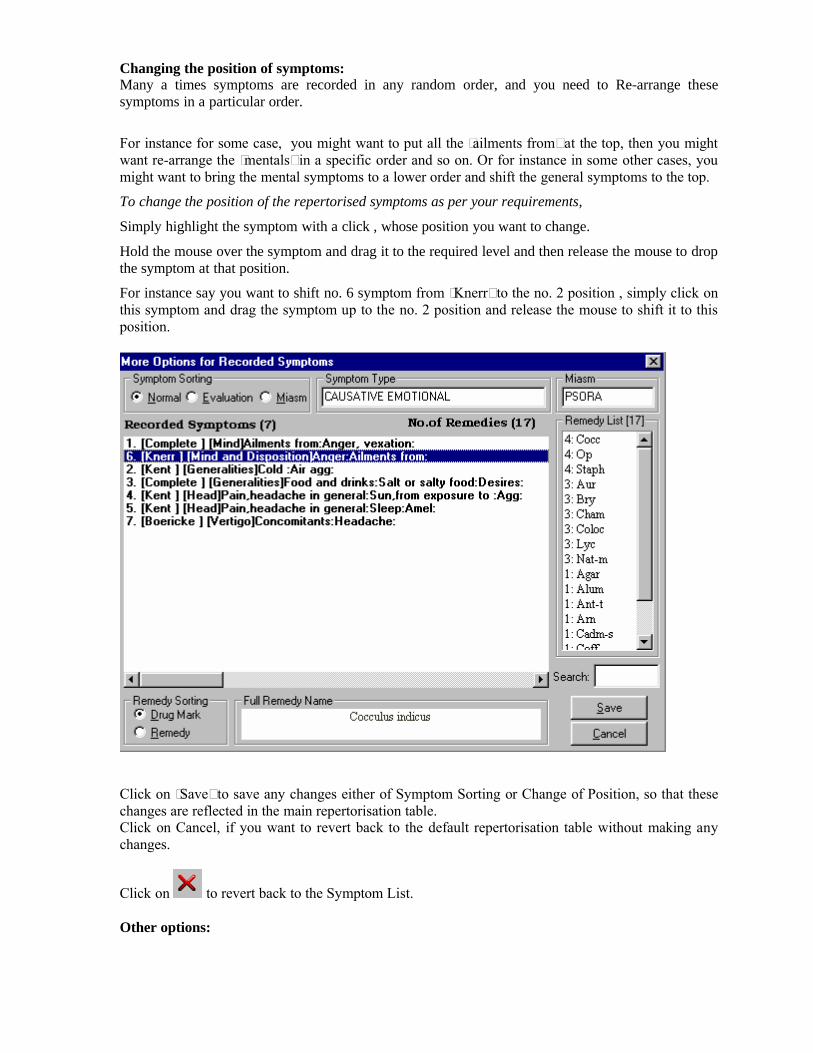
Changing the position of symptoms:Many a times symptoms are recorded in any random order, and you need to Re-arrange these symptoms in a particular order.
For instance for some case, you might want to put all the ‘ailments from’ at the top, then you might want re-arrange the ‘mentals’ in a specific order and so on. Or for instance in some other cases, you might want to bring the mental symptoms to a lower order and shift the general symptoms to the top.
To change the position of the repertorised symptoms as per your requirements,
Simply highlight the symptom with a click , whose position you want to change.
Hold the mouse over the symptom and drag it to the required level and then release the mouse to drop the symptom at that position.
For instance say you want to shift no. 6 symptom from ‘Knerr’ to the no. 2 position , simply click on this symptom and drag the symptom up to the no. 2 position and release the mouse to shift it to this position.
Click on ‘Save’ to save any changes either of Symptom Sorting or Change of Position, so that these changes are reflected in the main repertorisation table.Click on Cancel, if you want to revert back to the default repertorisation table without making any changes.
Click on to revert back to the Symptom List.
Other options:
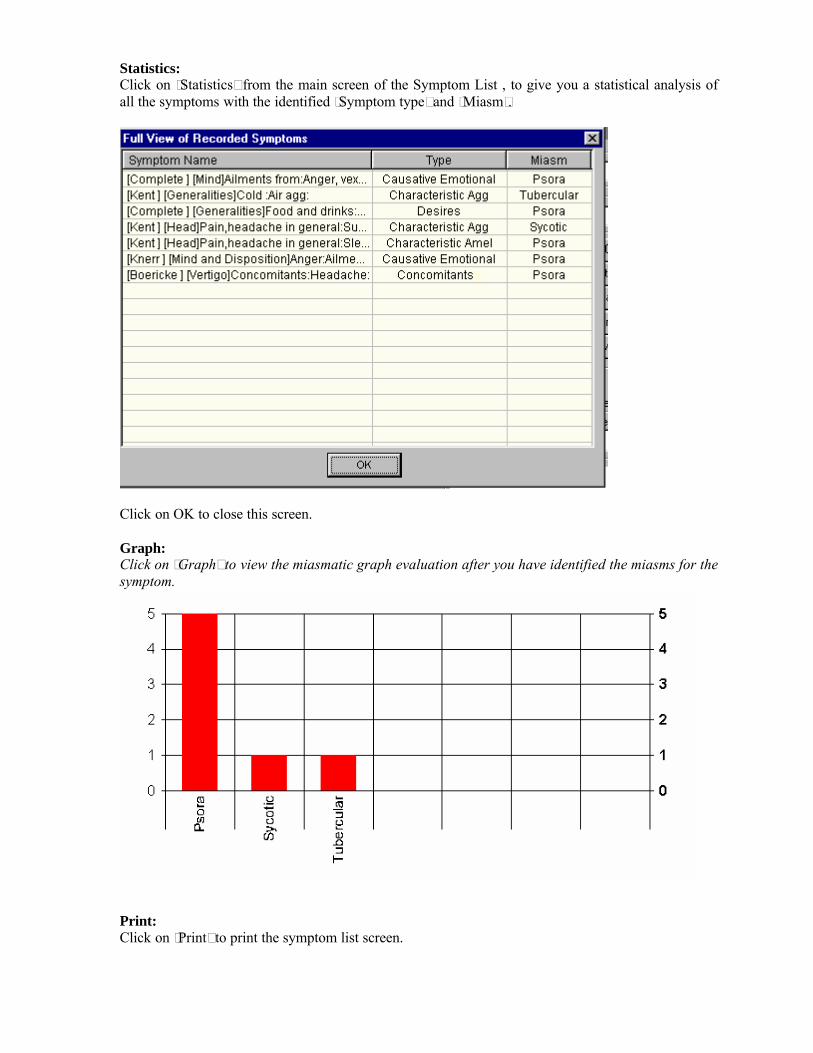
Statistics:Click on ‘Statistics’ from the main screen of the Symptom List , to give you a statistical analysis of all the symptoms with the identified ‘Symptom type’ and ‘Miasm’.
Click on OK to close this screen.
Graph:Click on ‘Graph’ to view the miasmatic graph evaluation after you have identified the miasms for the symptom.
Print:Click on ‘Print’ to print the symptom list screen.
Save As:Click on ‘Save As’ to save the Symptom list. You can save the list by giving your specific file name and to the desired folder which can be used for future reference.
Remedy List:Displays all the remedies of the highlighted rubric along with its intensity.Use the ‘Search’ option to search for any remedy available for that symptom. If the remedy is not available it will jump to the closest remedy abbreviation.As you move on each remedy the complete remedy name is displayed in the ‘Full Remedy Name’ box.
Sort ByDrug Mark: This is the default sort feature which will display remedies according to the intensity as displayed in the original books.Remedy: This will sort the remedies alphabetically.
All Repertories:Highlight any rubric from the ‘Recorded symptom list’ and click on ‘All Repertories’, to find the same symptom from the other installed repertories. (See ‘All Repertories’ under ‘Common features’ section for more details of this feature).
Click on ‘O.K’ to close the ‘Recorded Symptom List' and Save whatever changes you have made to the symptom list.
Click on ‘Cancel’ to close this window without making any changes.
Cross Reference:
Each and every repertory, whether big or small contains tons of valuable information , scattered in different chapters or at different places in the same chapter. All authors devised their own structure and format making each repertory different from another one.Very often similar rubrics have different remedies and different expressions in different books and are not considered in our analysis. It is humanly impossible to remember every minute detail of this information.
This special utility has been created with care to provide as many cross-references as possible. The referencing can be within a chapter and even extends to multiple books and chapters.
To access Cross-references
Click on from:
Repertory Search ResultsRepertory screenConvt. Rep to Materia Medica results screenGroup Symtoms results screenHomutil Module (as a reference data-base)

OR
‘Right Click’ on any symptom and then choose ‘Cross-ref’ from
Repertory ScreenMain Repertorisation tableQuik Rep Convt. Rep to MM results screenGroup Symptoms results screen
Example of Cross-reference from the ‘Repertory Search Results’.
Using the ‘Search Repertory’ feature search for the word ‘Censorious’ (See Search Repertory for details)
‘Repertory Search Results’ will show results of ‘Censorious’ from all repertories.
Highlight any rubric and then click on ‘Cross-reference’.
The Cross-references screen will appear on the top of the ‘Repertory search results’ screen.
The references are arranged in two rows- the ‘main rubric’ in the top left row and the ‘related reference rubrics’ in the row below labeled as ‘Cross References’. The right column gives you the ‘word meaning’ of the selected word.

To open the corresponding rubric in the repertory,Highlight any of the desired Cross-reference rubric, and thenClick on ‘Find Symptom’ORDouble click on the highlighted cross reference
The program will automatically jump to the desired cross-reference in the corresponding repertory.You can then record this rubric for repertorial analysis
Note: Where ever the cross-references are not available for a symptom the ‘cross-reference’ button will be disabled. Similarly one can access this option available from various features in the program mentioned above.
Themes:One of the most common problems faced by homoeopaths is understanding & reaching the right rubric that corresponds to the symptom of the patient.
Themes is a another feature incorporated in ‘Classic’ to facilitate your search to reach the right rubric.
This feature lists a number of 'general' concepts regarding personality, evolution, emotions, intellect, ailments from, fears, etc. Each theme is further connected to correctly related rubrics in the repertory.
To access Themes,
Click on from
Repertory Search ResultsRepertory ScreenConvt. Rep to Materia Medica results screenGroup Symptoms results screen
OR
Right Click on any symptom and then choose ‘Themes’ from
Repertory ScreenMain Repertorisation tableQuik RepConvt. Rep to MM results screenGroup Symptoms results screen
Example of themes from the ‘Repertory screen’
Jump to ‘Grief’ from the Complete Mind Chapter
Right click on the rubric and then click on ‘Themes’ OR Click on ‘Themes’ button available on the right side of the screen

The ‘Themes’ screen will appear on the top of the ‘Repertory screen’
The themes are arranged in two rows - the ‘main rubric’ in the top left column The ‘Related thematic rubrics’ in the row below.

The right column gives you the ‘word meaning’.
Highlight any of the desired thematic rubric from the ‘Symptom’ screen, and
Click on ‘Find Symptom’ORDouble click on the rubric to open the corresponding rubric in the repertory.
The program will automatically jump to the desired thematic rubric.
You can then record this rubric for repertorial analysis
Note: Where ever themes are not available for a symptom the ‘themes’ button will be disabled.
Similarly one can access this option available from various features in the program mentioned above.
SynonymsWords of repertory or materia medica very often carry a different expression and meaning in terms of selection of a rubric for the patient. This utility has been created to help to consider ‘alike’ words for the main word (rubric), the user is actually thinking for the patient.
These ‘synonymal’ words could be more suitable in terms of selecting a symptom for the patient, which the user would have otherwise missed in this wide ocean of homoeopathic literature. It helps the user to analyse and consider a rubric in view of these synonymal words.
To access Synonyms feature
Click on from
Repertory screenConvt. Rep to MM results screenGroup Symptoms results screenMy Repertories (all customised repertories)
‘Right Click’ on a symptom and then choose ‘Synonyms’ from:
Repertory screenRepertorisation tableQuick RepConvt. Rep to MM results screenGroup Symptoms results screen
Example of ‘Synonyms’ from the ‘Intelligent Word Search’ feature

All the main words are included under the ‘Words’ box.
As you highlight each Word , the corresponding synonyms are displayed on the right side of the screen under the ‘Synonyms’.
One can search for a particular word by typing the word in “Search Word” box OR Search for a synonym by typing the words in the ‘Search’ box under Synonyms
For instance the above screen shows Synonyms for the word ‘Weeping’ like ‘Crying’ ‘Lamenting’, ‘Sobbing’ etc. The user can view all the synonyms of the word to consider a right word or a rubric for each case.
You can either ‘Record’ the symptom or use the ‘Open rep’ feaures or apply any option as required.
Take another instance of Synonyms from the ‘Repertory Screen’Jump to ‘Fear’ from the Complete Mind ChapterTo view Synonyms from this screen,
‘Right click’ on the rubric and then click on ‘Synonyms’ OR Click on ‘Synonyms’ button available on the right side of the screen
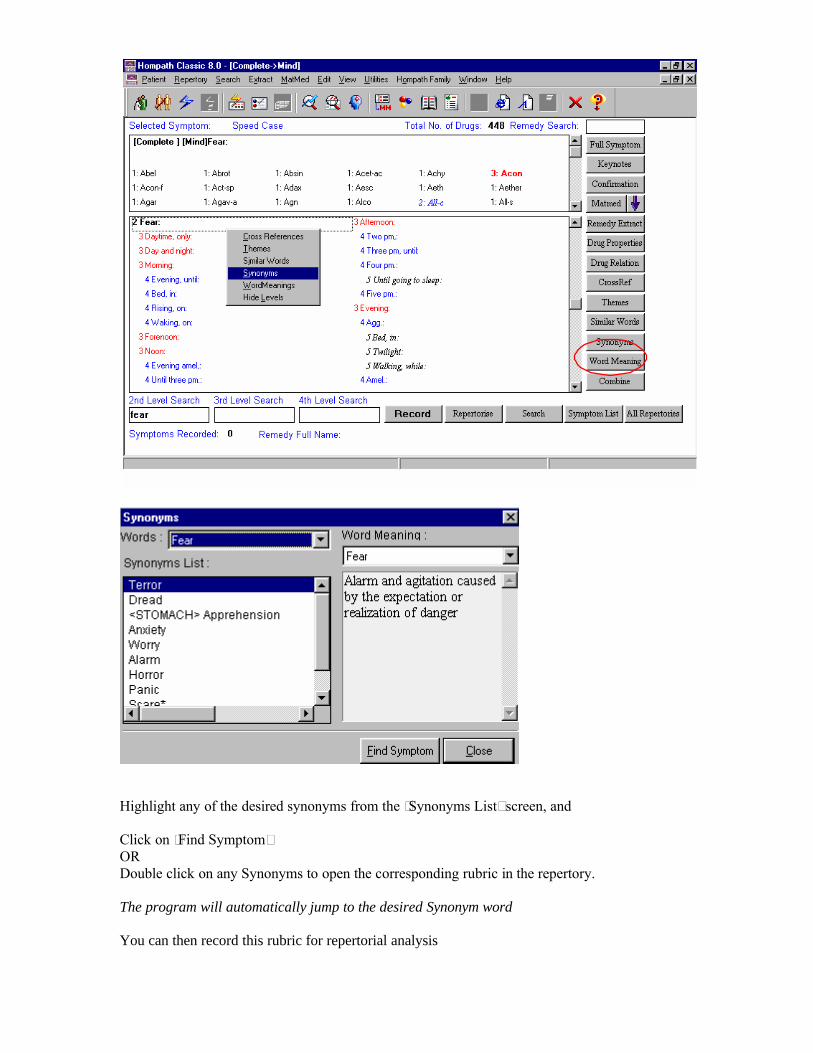
Highlight any of the desired synonyms from the ‘Synonyms List’ screen, and
Click on ‘Find Symptom’ORDouble click on any Synonyms to open the corresponding rubric in the repertory.
The program will automatically jump to the desired Synonym word
You can then record this rubric for repertorial analysis
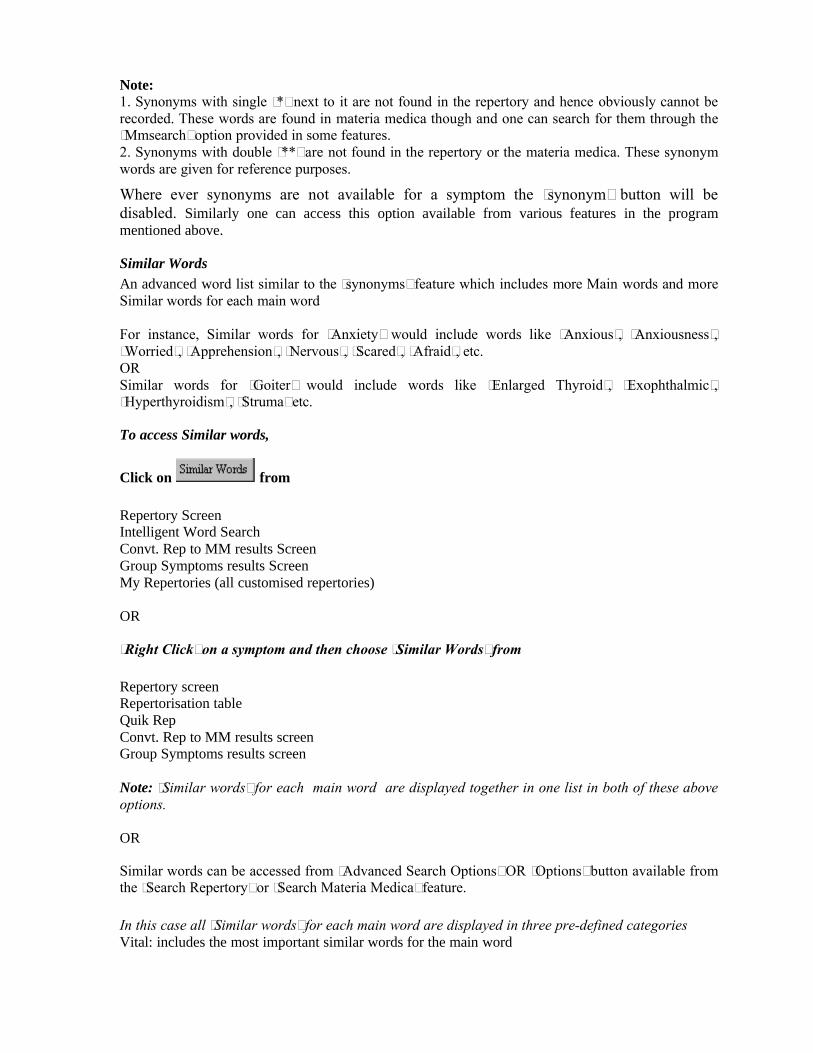
Note:1. Synonyms with single ‘*’ next to it are not found in the repertory and hence obviously cannot be recorded. These words are found in materia medica though and one can search for them through the ‘Mmsearch’ option provided in some features.2. Synonyms with double ’**’ are not found in the repertory or the materia medica. These synonym words are given for reference purposes.
Where ever synonyms are not available for a symptom the ‘synonym’ button will be disabled. Similarly one can access this option available from various features in the program mentioned above.
Similar WordsAn advanced word list similar to the ‘synonyms’ feature which includes more Main words and more Similar words for each main word
For instance, Similar words for ‘Anxiety’ would include words like ‘Anxious’, ‘Anxiousness’, ‘Worried’, ‘Apprehension’, ‘Nervous’, ‘Scared’, ‘Afraid’, etc. ORSimilar words for ‘Goiter’ would include words like ‘Enlarged Thyroid’, ‘Exophthalmic’, ‘Hyperthyroidism’, ‘Struma’ etc.
To access Similar words,
Click on from
Repertory ScreenIntelligent Word SearchConvt. Rep to MM results ScreenGroup Symptoms results ScreenMy Repertories (all customised repertories)
OR
‘Right Click’ on a symptom and then choose ‘Similar Words’ from
Repertory screenRepertorisation tableQuik RepConvt. Rep to MM results screenGroup Symptoms results screen
Note: ‘Similar words’ for each main word are displayed together in one list in both of these above options.
OR
Similar words can be accessed from ‘Advanced Search Options’ OR ‘Options’ button available from the ‘Search Repertory’ or ‘Search Materia Medica’ feature.
In this case all ‘Similar words’ for each main word are displayed in three pre-defined categoriesVital: includes the most important similar words for the main word
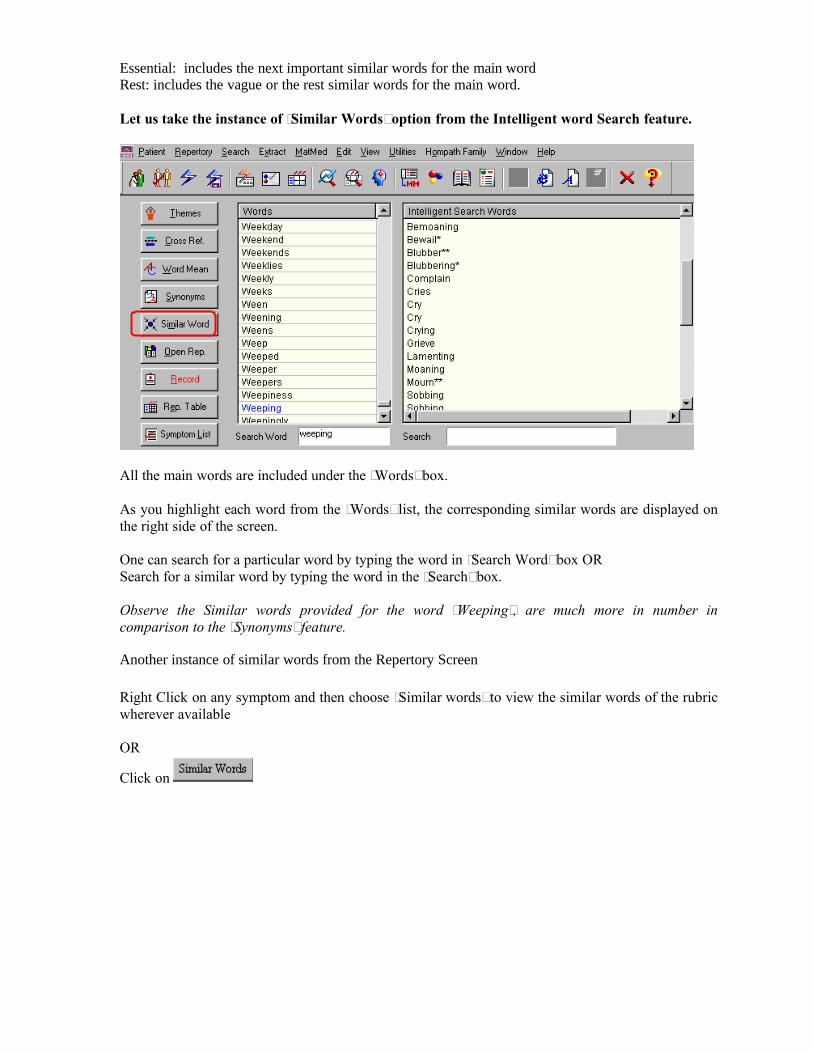
Essential: includes the next important similar words for the main wordRest: includes the vague or the rest similar words for the main word.
Let us take the instance of ‘Similar Words’ option from the Intelligent word Search feature.
All the main words are included under the ‘Words’ box.
As you highlight each word from the ‘Words’ list, the corresponding similar words are displayed on the right side of the screen.
One can search for a particular word by typing the word in ‘Search Word’ box OR Search for a similar word by typing the word in the ‘Search’ box.
Observe the Similar words provided for the word ‘Weeping’, are much more in number in comparison to the ‘Synonyms’ feature.
Another instance of similar words from the Repertory Screen
Right Click on any symptom and then choose ‘Similar words’ to view the similar words of the rubric wherever available
OR
Click on

The Similar words screen will appear on the top of the ‘Repertory’ screen
The left side of the screen includes all the ‘Similar words’ and the right side includes the ‘Word Meaning’ to the main word.
‘Double Click’ on any word from the ‘Similar Words List’
OR
Highlight any word from the Similar Word List and then on ‘Find Symptom’ to open rubric containing that similar word from the repertory.
For similar words from the ‘Search Repertory’ or ‘Search Materia Medica’:
Similar words here are given under pre-defined sections Vital / Essential / Rest Options
Advanced Search Options

OR
Click on ‘Options’ from this screen
See respective sections for complete details of this option.
Note:1. Similar words with single ‘*’ next to it are not found in the repertory but found in the materia medica and hence cannot be recorded as a symptom.2. Words with double ’**’ are not found in the repertory or the materia medica. Though they are not found in both, these similar words are given for reference purposes.
Word Meaning
Homoeopathic Materia Medica and repertories are a source of numerous words, the meaning of some may not be readily available because there are no longer used in medical communication today. These words, when used in past, carried a different meaning than from today’s context. When the same word is used in a rubric, it may carry a different meaning.
Then there are finer differences in the meanings of some words like anger, rage, irritability etc. Yet again, there are some common words that we never used and do not know the exact meaning of. The ‘Word Meanings’ screen will display the selected word (or rubric) in the ‘Selected Word’ Box.
To solve this problem, Hompath software comes equipped with a ready utility in form of ‘Word Meanings’ in which simplified meanings for the complex words are provided. More than 1000 words are explained in this utility.
To access ‘Word Meanings’
Click on fromIntelligent Word SearchRepertory ScreenConvt. Rep to Materia Medica result screenGroup Symptoms result screenHomutil Module (as a reference data-base)
OR
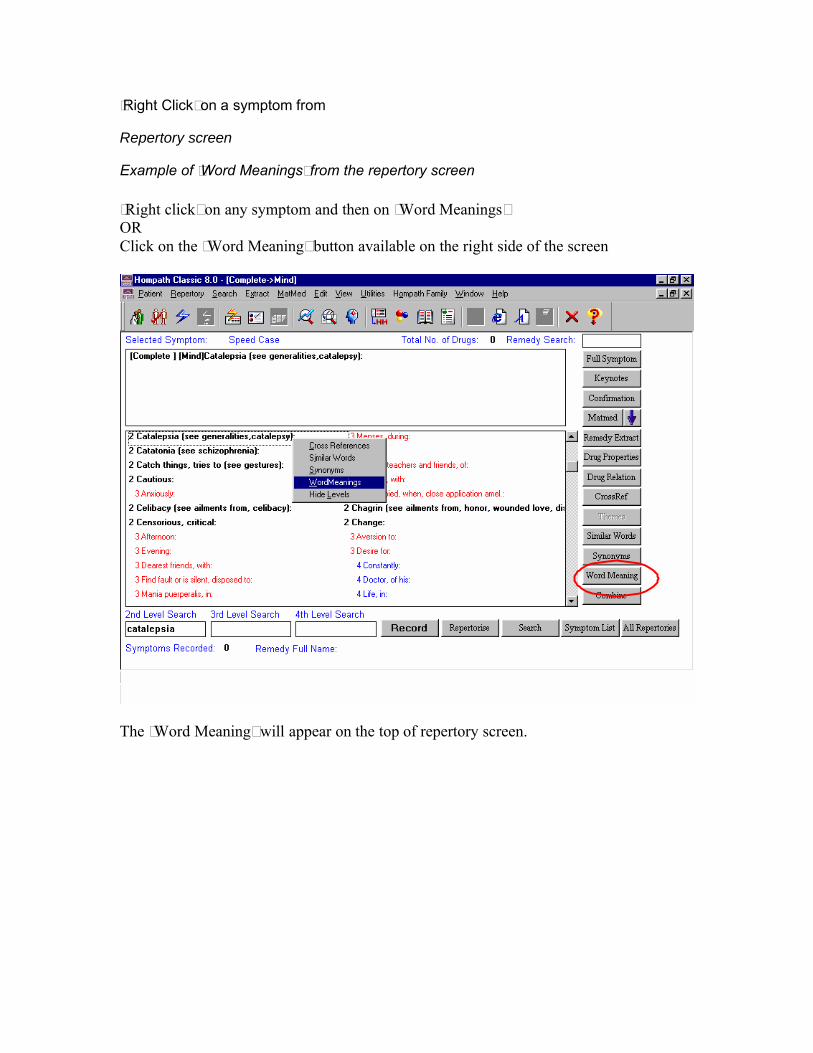
‘Right Click’ on a symptom from
Repertory screen
Example of ‘Word Meanings’ from the repertory screen
‘Right click’ on any symptom and then on ‘Word Meanings’ORClick on the ‘Word Meaning’ button available on the right side of the screen
The ‘Word Meaning’ will appear on the top of repertory screen.
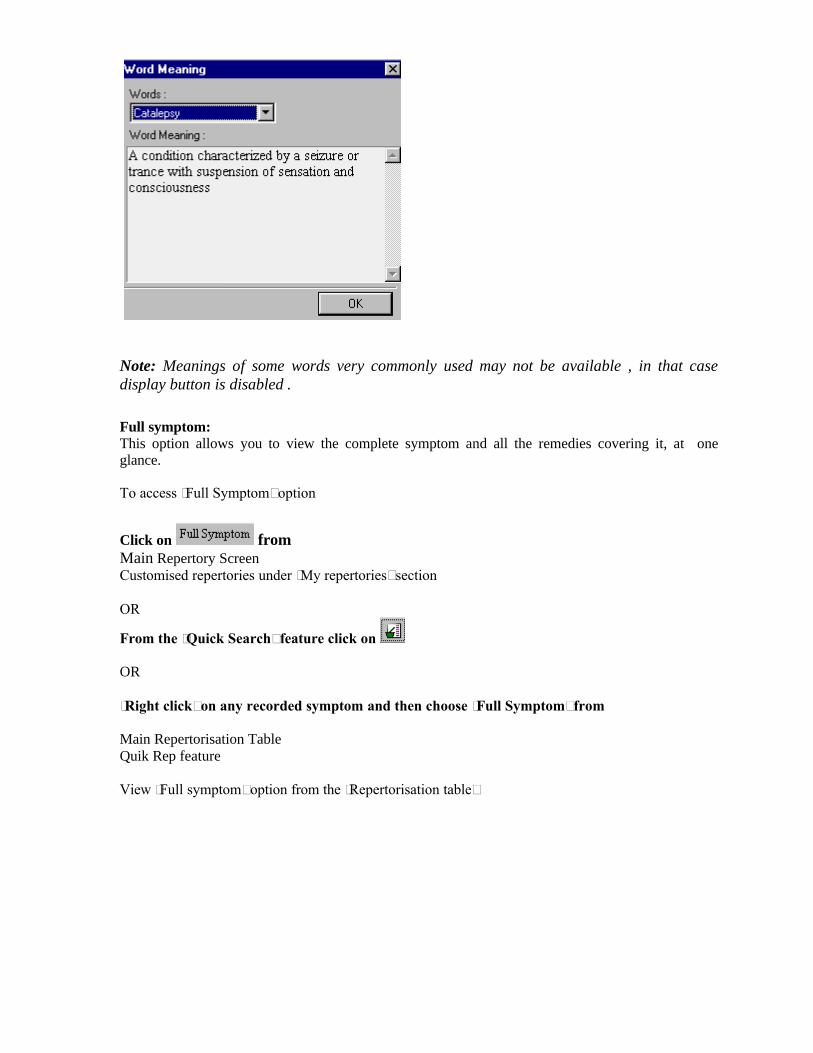
Note: Meanings of some words very commonly used may not be available , in that case display button is disabled .
Full symptom: This option allows you to view the complete symptom and all the remedies covering it, at one glance.
To access ‘Full Symptom’ option
Click on fromMain Repertory Screen Customised repertories under ‘My repertories’ section
OR
From the ‘Quick Search’ feature click on
OR
‘Right click’ on any recorded symptom and then choose ‘Full Symptom’ from
Main Repertorisation TableQuik Rep feature
View ‘Full symptom’ option from the ‘Repertorisation table’

Right Click on the desired symptom and then choose ‘Full Symptom’
The symptom and its entire remedy list will be displayed
The top row shows the selected Repertory, Chapter and the Symptom NameThe lower row gives you all the remedy abbreviations with their intensity
The number next to Remedies indicates the number of remedies the symptom includes
For instance the rubric ‘Cold air agg’ from Kent’s Repertory includes 121 remedies.
Click on any remedy abbreviation, to view the entire remedy name displayed at the bottom of the screen.‘Search Rem’: Type the desired remedy abbreviation to jump to a particular remedy if contained within that symptom.
Click on any remedy abbreviation to highlight it and then click on ‘Keynotes’, Drug Property’ Or ‘Drug Relation’ to access these options for the selected remedy.
Sort by:Drug Mark: This is the default sort feature which will display remedies according to the intensity as displayed in the original books.Remedy: This will sort the remedies alphabetically. It will be required if you want to save the remedies in an alphabetical order.
Print:Click on ‘Print’ to print the symptom with its remedies.
Save:To save the results for your future reference Click on ‘Save’ from the ‘Full symptom screen’Save it with the ‘desired name’ in the ‘desired folder’. You will get a message ‘File is successfully created’You can later access these results as per your requirements.
Click on ‘OK’ or to close this feature and return back to the previous screen.
Symptoms covered / Not covered
This is a practical utility and not an actual repertorisation method. You can view the rubrics, represented by a chosen remedy and the rubrics not represented from your list.
To access ‘Symptom covd / Not covd’ option
Click on a desired remedy and then choose from Main Repertorisation table
OR
‘Right click’ on the ‘Totality’ box under any remedy to select ‘Symp covd / Not covd’ fromMain Repertorisation table orQuik Rep
The left column displays rubrics covered and the right column displays the rubrics not covered by the remedy.
Change the remedy from the drop down arrow of ‘Select Remedy’ Option to view symptoms covd/ not covd of any other remedy.
The display of rubrics covered and not covered is retained just like their display on the repertory screen to keep uniformity.
Click on ‘Close’ or ‘ ’ to exit this screen.
Keynotes:
These are specially compiled keynotes (PQRS) and confirmatory symptoms that will help you cross check the right remedy quickly
To access Keynotes
Click on from :Repertory screenRepertory search resultsRemedy ListExtract Convt Rep to MMExtract Group SymptomsMy Repertories (all customised repertories)Open Materia Medica
OR
‘Right click’ on any remedy and then choose ‘Keynotes’ from:Repertory screenRepertorisation tableQuik rep
The PQRS symptoms of the selected remedy will be displayed in an eye-pleasing format.

The remedy can be read under sections like ‘Common Name’, ‘Mind’, ‘Particulars’, ‘Guiding Indications’ , ‘Confirmatory symptoms’, ‘Nucleus of remedy’ etc.
From this screen itself, one can also view the ‘Picture’, ‘Drug Property’ , ‘Drug Relation’ or ‘Help’ by a click on any of these buttons wherever available.
Click on ‘Close’ to exit this screen.
Note: Keynotes of some drugs may not be available and a message will appear accordingly.
Open Materia Medica:
This option allows you to read Materia Medica of a remedy from four basic books viz. Allen’s Key notesBoericke’s Materia MedicaKent’s Materia Medica and Phatak’s Materia Medica
As these are the commonly read books by most Homoeopaths the option of referring them quickly for the selected remedy is given at appropriate places.
For instance after repertorisation and before making a prescription, you can check the materia medica of any remedy in the ‘Repertorisation’ table to confirm some symptoms.
To read remedy from any of the four basic Materia Medicae: Right click on the ‘Totality’ box just below any remedy and choose ‘Open Materia Medica’fromRepertorisation table or Quik rep feature
OR

Right click on a remedy from Repertory screen and then Choose ‘Mat med’Repertory screenOR
Click on the ‘Mat med’ button fromRepertory screenRemedy list optionExtract convt rep to mmExtract group symptomsCustomised Repertories under ‘My Repertories’ section
Once you select ‘Materia medica’ option, then from the arrow provided next to it, choose any of the four basic books from where you want to read the materia medica.
Instance of ‘Open Mat med’ from ‘Repertorisation table’
Right click on any remedy and then choose ‘Open Materia Medica’.Click on any of the four materia medica options, you wish to read the remedy from
The selected remedy will be displayed from the selected book.
In case, a remedy is not available from the selected book, an appropriate message will appear.

Click on to return back to the previous screen.
Note: You can choose the default book of your choice, using the ‘Mat med Options’ available under ‘View’ ‘Options’ menu. (See the ‘View’ section for details)
Tip: If you are looking for information from the other Materia Medicae, click on from the tool bar and select the desired book.
Convert Rep to MM:After the results of the ‘Repertorisation’ table you can differentiate between a few remedies especially regarding what rubrics are covered by them and what are not.
This option helps you in deciding the Similimum and in differentiating remedies that are very close to each other. You can also compare and contrast in relation to the rubrics recorded by you.
Select the drug for which you want to use this featureNext ‘Right click’ on the ‘totality’ box below the remedy and select ‘Convert Rep to MM’ option either from‘Repertorisation’ table Or ‘Quik Rep’ feature.
From the box that appears, Select every drug you want to compare. (Ideally limit to three or four drugs)

Use different ‘Options’ provided on this screen, to compare , differentiate or use any other option.(Refer to ‘Extract Convt Rep to MM’ for details of this feature).
Drug Properties:
This option allows you to view the basic properties of the drug according to the name, full name, properties, kingdom etc.
Click on from:Repertory ScreenRepertory search results Full Remedy List under ‘Quick search’Extract Convt. Rep to Materia Medica Extract Group SymptomsCustomised Repertories under ‘My Repertories’Open Materia Medica
OR
Right click on any remedy and then choose ‘Drug properties’ from:
Repertory screenRepertorisation tableQuik RepCustomised Repertories under ‘My Repertories’
Highlight any remedy from the ‘Remedy List’ column and click on ‘Drug Properties’ to view full name, basic properties, kingdom, class type, etc of that remedy.

From this screen itself, one can also view the ‘Keynotes’, ‘Drug Relation’ etc. wherever available.Click on ‘Close’ to exit this screen.
Drug Relation:
This options allows you to read the complementary, follow-well, inimical and antidotes of the selected remedy. (The information as extracted from the works of Gibson Miller, Clarke and many other authors).
Click on from:
Repertory screenRepertory search results Full Remedy List’ under Quick SearchExtract Convt. Rep to Materia Medica Extract Group SymptomsMy RepertoriesOpen Materia Medica
OR
Right click on any remedy and then choose ‘Drug Relation’ from:
Repertory screenRepertorisation tableQuik RepMy Repertories

Highlight any remedy from the ‘Remedy List’ and click on ‘Drug Relation ’ to read the remedy relationships of the selected remedy.
From this screen itself, one can also view the ‘Keynotes’, ‘Drug Relation’ etc. wherever available.
Click on ‘Close’ to exit this screen.
Search
Repertory Search {F10}
Search for any specific word or combination of words in all or any of the installed repertories. Automatic inclusion of singular / plural and American / British alternatives of the query word
which makes your search most appropriate & complete. Use Advanced Search Options to improve your search query. Record Rubrics without opening the repertories and their corresponding chapters Save results as your own ‘User’ repertory. Extend your search to other modules of the software like ‘Materia Medica’ or ‘Tresorie’
Intelligent Word Search {F9}
View thousands of rubrics and Reach a right rubric from various ready-made options provided on this screen: Themes Cross – references Synonyms Similar Words

Record Rubrics without opening the repertories and their corresponding chapters Simplified meanings of complex words provided through ‘Word Meanings’ Confirm the authenticity of a repertory rubric from materia medica source books using
‘Mmsearch’ feature.
Quick Search {Ctrl + Q}
Quick view and search of rubrics / sub-rubrics / sub-sub rubrics etc. of any repertory and any chapter
Single screen allows you to select a repertory and any of its chapter to view all the rubrics. Simple identification of rubrics having sub-rubrics (marked with a ‘+’ sign) View All Sub-rubrics of a main rubric at one glance Speedy recording of rubric(s) View remedies of selected rubric and apply remedy option like ‘keynotes’ , drug properties to
it. View Repertorisation table / Symptom list Open Selected Symptom in the repertory when required Useful for those who are familiar with the repertory format.
Search
Have you ever wondered how the word ‘Loquacity’ is represented in the Homoeopathic literature?Or let’s say, on an occasion you wanted to prepare notes on paediatrics and you wanted extensive references.Yet, again, you wanted to know how many times the word ‘Fear’ occurred in the repertories and in what forms and relations of the word.One of your patients has expressed a peculiar symptom and you wanted to know its occurrence in the text books in the exact form.
No one has enough time and patience to manually explore through the huge Homoeopathic literature. Forget about reading, there are so many books and references that we haven’t even heard of. There are hundreds of chapters and thousands of pages all filled with gems of knowledge, some of which can be seen on the surface while some are cleverly hidden.
This is exactly where the global search feature comes into picture, making the world of Homoeopathy available at your finger tips.
Read on to understand the different paths created by us for you to explore this vast world…
The Search menu includesSearch RepertoryIntelligent Word SearchQuick Search
These features allow you to search for rubrics using various options, thus enabling easy rubric selection and rubric recording.

Global Repertory Search
From main menu select ‘Search' and then choose ‘Repertory’From Key board Press ‘F10’From Key board type: {Alt + S} {R}
Key features:1. Any specific word or phrase present in all or any of the installed repertories can be searched
for using this feature. 2. Automatic inclusion of singular / plural and American / British alternatives of the query word
which makes your search most appropriate & complete. Use Advanced Search Options to improve your search query.
3. The selection of the rubric can be made directly from the ‘Search Results’ screen without opening the repertories and their corresponding chapter.
4. Save results as your own ‘User’ repertory.5. Extend your search to other modules of the software like ‘Materia Medica’ or ‘Tresorie’
On activation of this option, a screen, as below, prompts you to enter the word you wish to search for.

Click in the empty box titled ‘Search Word’ box Type the word you are looking for. The words can also be selected from the list box containing words by a double click. Once selected, the word appears in the box titled ‘Query’. Click on the button ‘Search' to execute the search operation.You will be presented with all the rubrics containing the ‘Query’ you searched for
Select Repertory
For instance Type ‘Laughing’ in the ‘Search Word’ box. Then choose ‘Kent’ from the drop down list of this option. Click on ‘Search’ You will be presented will all the results of the word ‘Laughing’ only from the ‘Kent’ Repertory.
Note: By default the option ‘All’ is selected which means the query word will be searched in ‘All’ repertories unless you change the option.
Search in:
This option, allows you to limit the search of the word (s) to a single repertory. The drop down arrow next to this option list all the installed repertories.Choose the desired repertory from this list to restrict the search to the selected repertory.

Tresorie :This option allows you to search for the query word from ‘Tresorie’ – a separate module of Classic which is a compilation of over 4000 articles from the different homoeopathic journals.
Type the word in the ‘Search Word’ box. Next Click on the ‘Tresorie’ icon.The program will search for the query word and give you all the occurrences from the Tresorie.See Tresorie Help for ‘Understanding Search Results’.
MatMed :This option allows you to search for the query word from all the Materia Medicae installed in the program.
Simply type the word in the ‘Search Word’ box.Click on ‘Matmed’ icon.The program will search for the query word and give you results from all the materia medicae. See Understanding Materia Medica Search Results.
Click on to return back to the ‘Search Repertory’ screen.
Books :This option allows you to limit the search operation to specific repertories and chapters. Click on the ‘Books' button. A list of installed repertories are displayed. Click on a repertory name to display the list of chapters in the next box

Select the desired chapter(s) and then click on ‘Add’ or ‘double click’ with the mouse to add the chapters. The selected chapters are displayed in the last box.
If any unwanted chapter name appears in the list box, then click on the unwanted chapter and highlight it. Follow it with a click on the ‘Remove’ button.
Select all chapters of a repertory by ticking in ‘Select All Chapters’box.Click on another repertory and repeat the above procedure for selection of more chapters. Click on ‘O.K.' to finish the procedure. You will return to the main ‘Search’ screen.
Note: By default, the search operation is set on `All Books and All Chapters’. Click on `Cancelto reactivate this setting. You will be returned to the main `Search' screen.
Partial :
This feature enables you to include related words in the search operation. It eliminates the chance of missing a word or combination as all repertories are worded in their own characteristic manner and style.
For instance, to search for a word ‘Joy’ double click on it so that it appears in the ‘Query’ box. Then click on ‘Partial’ and all words related to ‘Joy’ and found in the repertories will be listed in the Partial word list box.

Click on and highlight all the desired words (joyful, joyous, joyously, etc.) to include them in the search. The Query box will display ‘Joy*' to signify the activation of this option.
Next, Click on ‘Search’ to execute the query. The results will include all the selected partial words.
Note: Some of the words may not have appropriate reference to the main word (like joyless). Ignore all such unrelated words and select the appropriate words for inclusion in search.
Tip: If you include a word like ‘Pain’ for the search, click on ‘Partial’ words like ‘Painful’ , ‘Painfulness’ , ‘Pains’ etc. will be searched for. This will increase the number of records available for reference giving you a wider choice and you can get closer to the correct symptom described by the patient.
Operators:You can use operators to create advanced queries in the form of phrases or combinations in the search operation. The following operators are available:
And: The ‘And’ operator combines two or more words. Every rubric in the results column will contain the words searched for, either in the main rubric, sub rubric or lower down in the hierarchy.
To use, select the first word, click on `And', then select the second word.
For instance 1. Desire {And} Sweets2. Painless {And} Swelling {And} glands, etc.

Or: The ‘Or' operator makes the search program look for all those rubrics which contain either of the words. Use this option to search for rubrics containing similar meaning words. To use, select the first word, click on `Or', then select the second word.
For instance:1. Sadness {Or} Despair 2. Damp {Or} Wet {Or} Moist {Or} Basement {Or} Cellars
Note, these two operators (And/Or) can be effectively combined in a single query like this one: Desires {and} Sweets {or} SugarCold {and} Asthmatic {or} Difficult
Not: The ‘Not' operator makes the program not to search for a particular word. This operator is generally used in combination of either `And' or `Or'.
For instance:Air {and} Amel. {not} Open --> searches all rubrics which has air amelioration but not open air.
Follow these simple rules while forming queries:
Do not include chapter name in the query. The common mistakes are to include words like ‘Respiration’ {and} ‘Asthmatic’ or ‘Fever’ {and} ‘Night’ in framing your query. In these instances the first words are chapter names and do not form a part of a rubric.
If you want to search for ‘Fever at night' in Kent's repertory, do not include two words ‘Fever' and ‘Night' in the query. You will be returned with inappropriate results. Instead, select Kent repertory and ‘Fever' chapter (using ‘Books’ option) and then select the word

‘Night' (or 'Night' with `Partial' option to include all the occurrences of ‘Night').
In the repertories, `Aggravation' and `Amelioration' are abbreviated to Agg. and Amel. respectively. Search for them instead of full names to avoid misrepresentation.
Limit the combination of words to three while using ‘And’, ‘Or’, and ‘Not’ operators. Toomany may cause confusion .
Use ‘Not’ operator for the last word of the query. Because ‘And’/‘Or’ will be evaluated first and then ‘Not’. Improper placing of `Not' may lead to invalid search results.
If you are sure you want to search only in limited books, always use the ‘Books' option. This will enhance the speed of the search.
Watch out for that little bubble that pops up with the message ‘Oh no match’. This happens when you type a word which does not exist in the repertories installed.
Advanced Search Options:
This feature provides various Advanced Word Search options which can be included in the search results to improve your search query.
For instance ‘Gloomy’ and ‘Grief’ are very closely related to the word ‘Sad’. How often have you wished that when you search for the word ‘Sad’ it should incorporate results of ‘Gloomy’ and ‘Grief as well!
Hompath has made this possible for you, making your search more appropriate and complete.
Exact:This option will only search for the ‘exact’ word you have given query for.
For instance Search for the word ‘Diarrhea’. Check the box next ‘Exact’ option from the ‘Search Options’ Click on ‘Search’ to execute the Query.The Search Results will give instances of the ‘Exact’ word ‘Diarrhea’ which has 328 occurrences available in all the Repertories installed.
Normal: This option will search for the ‘exact’ word query and its ‘plural’ form. It also includes the ‘American’ and ‘British’ English alternatives of the word.
For instance Search for the ‘Diarrhea’.Check the ‘Normal’ option from the ‘Search Option’. Click on ‘Search’ to execute the Query.The Search Results will now give instances of the word ‘Diarrhea’ and its plural form ‘Diarrheas’ + ‘Diarrhoea’ and its plural ‘Diarrhoeas’
The results, are now astounding ‘5370’ occurences as compared to the 328 previous results!
Similarly If the query word is ‘Diarrhoeas’, the search results will pick its singular form ‘Diarrhoea’ + its American alternative word ‘Diarrheas’ and its singular form ‘Diarrhea’

and will display the same results i.e. ‘5370’
Note: By Default the ‘Normal’ option is checked, as this will be the most commonly used option.
More ‘advanced search options’ are provided which allow the user to broaden his ‘Search Query’ with the help of pre-defined ‘Related words’ (Similar words) when required.
Hompath has categorized these ‘related words’ into ‘3’ Categories, viz.
VitalEssential Rest
Vital: Includes words which either directly ‘mean’ or are ‘most closely related’ to the Search Query.
For instance type ‘Sad’ as the Search Query.Now Check ‘Vital’ as the Search Option.
Execute the query by clicking on ‘Search’The Search Results will now include words like ‘Sadness’, ‘Gloomy’, ‘Brooding’ ‘Sorrowful’ etc. those which directly denote the word ‘Sad’ or those which are ‘most closely related’ to ‘Sad’.
Significance of ‘Vital’ words is to allow the user to broaden his ‘Search’ criteria using the most important ‘Related words’ for the ‘Query word’.
Essential: Include words which are the next ‘closely related’ to the Search Query.
For instance type ‘Sad’ again as the Search Query.Now, Check ‘Essential’ as the Search Option.
Execute the query by clicking on ‘Search’The Search Results include words like ‘Cheerless’, ‘Depressed’ , ‘Doleful’, ‘Sombre’ etc.
These words have an indirect bearing to the main word and hence cannot be overlooked. Hence ‘Essential’ words become the next important ‘Related words’ to the Main query word.
Rest: Include words which are in some way or the other related to the Search Query.
For instance Give’ Sad’ as the Search Query. Now Check ‘Rest’ as the Search Option. Execute the Query by clicking on ‘Search’The Search Results will now include words like ‘Depress’ ,‘Grieved’ , ‘Mournful’ etc. which are in some way or other related to the word ‘Sad’.
‘Rest’ words can be considered as the least important ‘Related words’ to the main query word.
Note: You can not only check each of these above options separately, but also one can include a combination of two or more options to execute the Search.
For instance for the same word ‘Sad’ can check the option of ‘Vital’ and ‘Essential’ words simultaneously. Observe the increase in number of results. Inclusion of “Rest’ words will further increase the number of search results.
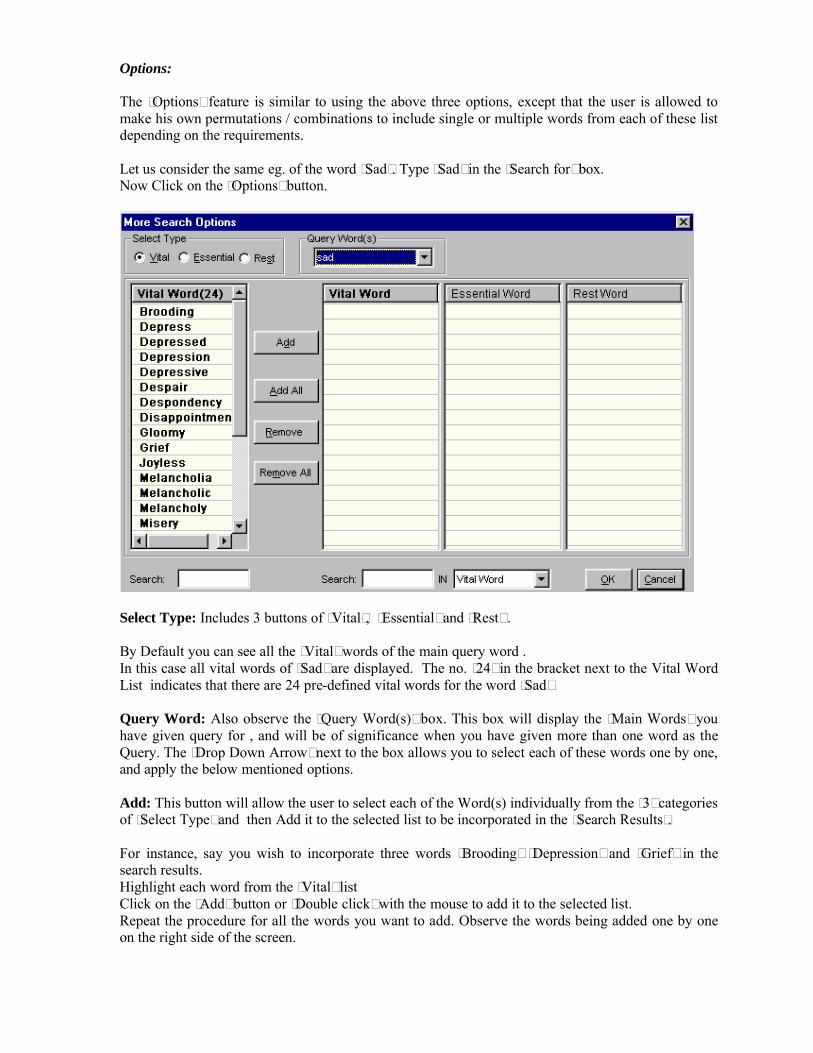
Options:
The ‘Options’ feature is similar to using the above three options, except that the user is allowed to make his own permutations / combinations to include single or multiple words from each of these list depending on the requirements.
Let us consider the same eg. of the word ‘Sad’. Type ‘Sad’ in the ‘Search for’ box.Now Click on the ‘Options’ button.
Select Type: Includes 3 buttons of ‘Vital’, ‘Essential’ and ‘Rest’ .
By Default you can see all the ‘Vital’ words of the main query word .In this case all vital words of ‘Sad’ are displayed. The no. ‘24’ in the bracket next to the Vital Word List indicates that there are 24 pre-defined vital words for the word ‘Sad’
Query Word: Also observe the ‘Query Word(s)’ box. This box will display the ‘Main Words’ you have given query for , and will be of significance when you have given more than one word as the Query. The ‘Drop Down Arrow’ next to the box allows you to select each of these words one by one, and apply the below mentioned options.
Add: This button will allow the user to select each of the Word(s) individually from the ‘3’ categories of ‘Select Type’ and then Add it to the selected list to be incorporated in the ‘Search Results’.
For instance, say you wish to incorporate three words ‘Brooding’ ‘Depression’ and ‘Grief’ in the search results.Highlight each word from the ‘Vital’ list Click on the ‘Add’ button or ‘Double click’ with the mouse to add it to the selected list.Repeat the procedure for all the words you want to add. Observe the words being added one by one on the right side of the screen.

Next, Change the option from ‘Vital’ to ‘Essential’ by checking the ‘Essential’ button from the ‘Select Type’ options.You will now see all the ‘Essential’ words related to ‘Sad’Select ‘Cheerless’ , ‘Discontended’ and ‘Sombre’ from this list following the same procedure. Apply the same method for the ‘Rest’ Words and Select ‘Grieve’ and ‘Mournful’ to the list.
The screen will now appear somewhat as below.
Click on ‘O.K’ to execute the Search Query.
The ‘Search Results’ will now incorporate the word ‘Sad’ + ‘All the above words’ taken into consideration.
Add All: This option allows you to add ‘All Words’ from any ‘Select Type’ optionSimply select any of the three types from the ‘Select Type’ option and click on ‘Add All’.
For eg. For the same word ‘Sad’, To incorporate all the ‘24’ Vital Words of ‘Sad’, Check the ‘Vital’ from Select type and then click on ‘Add All’ button.
Remove: Highlight each unwanted word from the ‘Selected List’ and then click on ‘Remove’ to delete any accidentally selected words.
Remove All: Place the cursor in any of the 3 columns and then click on ‘Remove All’ to delete all of the selected words.
Search: Type a word in the ‘Search’ box under the ‘Select type’ to search / jump to the word in any of the words in each category if available.
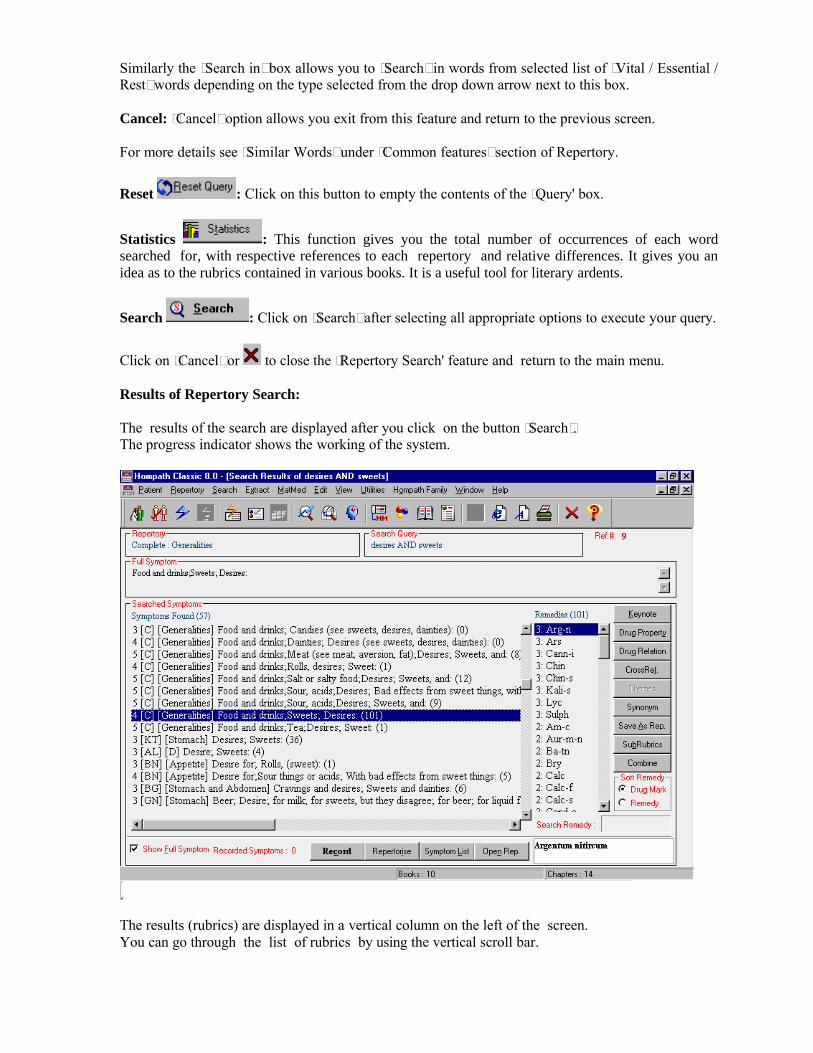
Similarly the ‘Search in’ box allows you to ‘Search’ in words from selected list of ‘Vital / Essential / Rest’ words depending on the type selected from the drop down arrow next to this box.
Cancel: ‘Cancel’ option allows you exit from this feature and return to the previous screen.
For more details see ‘Similar Words’ under ‘Common features’ section of Repertory.
Reset : Click on this button to empty the contents of the ‘Query' box.
Statistics : This function gives you the total number of occurrences of each word searched for, with respective references to each repertory and relative differences. It gives you an idea as to the rubrics contained in various books. It is a useful tool for literary ardents.
Search : Click on ‘Search’ after selecting all appropriate options to execute your query.
Click on ‘Cancel’ or to close the ‘Repertory Search' feature and return to the main menu.
Results of Repertory Search:
The results of the search are displayed after you click on the button ‘Search’. The progress indicator shows the working of the system.
The results (rubrics) are displayed in a vertical column on the left of the screen. You can go through the list of rubrics by using the vertical scroll bar.

The number next to `Symptoms Found' box contains the number of successfully searched rubrics from all selected repertories.
The number of drugs covered by each rubric are also displayed in the bracket next to the rubric. As you highlight each rubric, the right column consists of remedies for each rubric.
The reference no. of each highlighted rubric is shown under Ref.#.
RepertoryAs you highlight each rubric, the repertory and its chapter name is displayed in the ‘Repertory' box
The entire rubric is displayed in the ‘Full Symptom’ box.
The ‘Search Query’ includes the query word(s) you searched for.
The number of books and the number of chapters from which the rubrics are extracted are displayed in the status bar.
For instance in the above screen the ‘Search query’ is for ‘Desires’ and ‘Sweets’Total symptoms found are ‘57’.Ref. No # 9 is highlighted.Symptom highlighted is from Complete Generalities Chapter, “Food and Drinks Sweets desires’The right side includes remedies for this rubric which is ‘101’The status bar shows that the rubric(s) related to the query were found in the ‘10’ books (repertories) and in any 14 chapters of these repertories.
Options available on this screen:Record: Highlight any desired symptom and click on ‘Record’ to include it in the repertorisation.Repertorise: Click on ‘Repertorise’ to view the repertorisation table.Symptom List: Click on ‘Symptom List’ to view/ edit recorded symptom List.
Open Repertory: Highlight a rubric and click on ‘Open Repertory’ to jump to the rubric in its corresponding repertory.
Remedy options:Select a remedy and Click on ‘Keynote’, ‘Drug Property’ or ‘Drug Relation’ for the respective remedy options
Symptom Options:
Select a symptom and Click on ‘Cross-reference’ , ‘Themes’ , ‘Synonym’ for the respective Symptom options.
For more details of all these options see the respective sub-sections under the ‘Repertory’ section.
Sub-rubrics:This feature allows you to view all the sub-rubrics of a selected symptom.
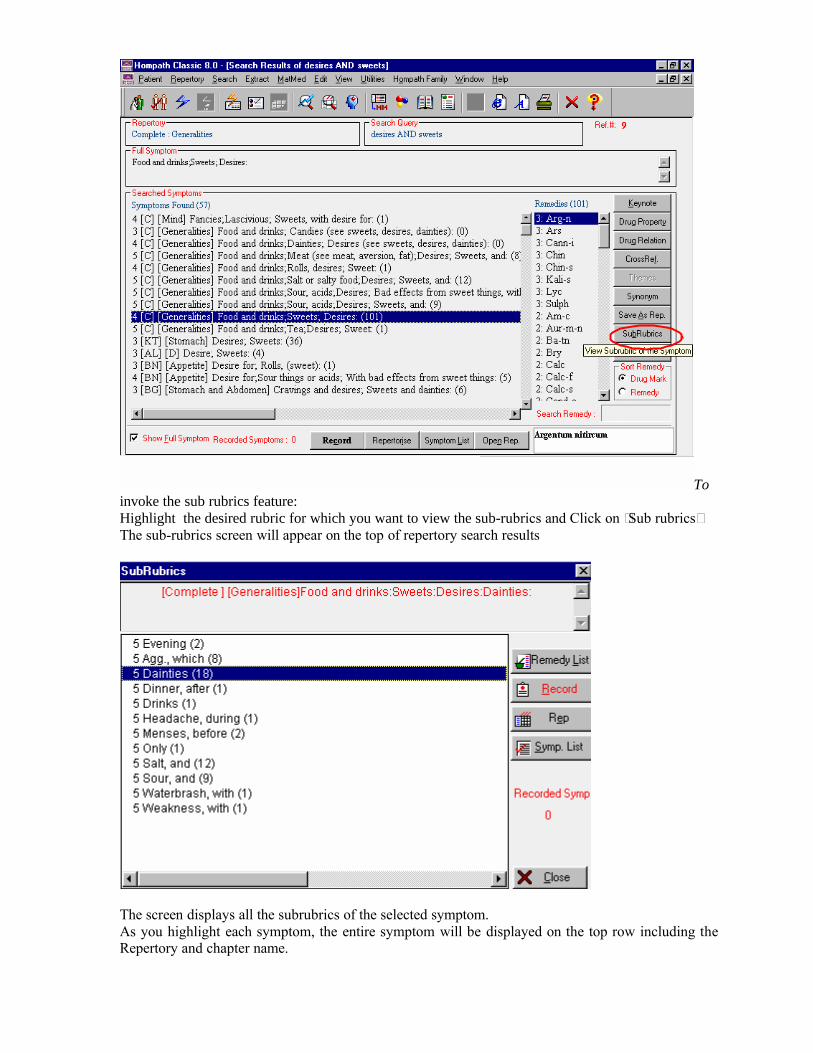
To invoke the sub rubrics feature:Highlight the desired rubric for which you want to view the sub-rubrics and Click on ‘Sub rubrics’The sub-rubrics screen will appear on the top of repertory search results
The screen displays all the subrubrics of the selected symptom.As you highlight each symptom, the entire symptom will be displayed on the top row including the Repertory and chapter name.

The number in the bracket next to each symptom indicates that the symptom includes that number of remedies.Click on ‘Remedy list’ to view all the remedies of the selected symptom.Highlight a Symptom and then click on ‘Record’ to repertorise the rubric Click on ‘Rep’ to view the repertorisation table.Click on ‘Symp. List’ to view/edit symptom list.
Note: In case when sub-rubrics of a selected rubric are not available, then a appropriate message ‘Sub-rubrics not found’ will appear.
Click on ‘Close’ to return back to the ‘Repertory Search Results’ screen.
Save As Repertory:Allows you to save all the Search results in form of a ‘User’ Repertory which can be accessed from the ‘My Repertories’ section. This repertory can be created by storing any number of search results from any number of repertories. Recall this repertory for faster and easier access to all symptoms commonly seen in your practice.
For details see ‘Create User Repertory’ under section of ‘Create customised repertories’
Combine:This is an another type of customised repertory which the user can create by combining two or more symptoms into one symptom, which can be recorded and/or saved as Combine symptom repertory.For details see ‘Create Combined Symptom Repertory’ under section of ‘Create customised repertories’
To quit the ‘Search results’ program and return to the main menu click ‘ ’ on the tool bar.
To go back to the ‘Query’ screen click on
Intelligent Word Search :
From main menu select ‘Search’ then choose ‘Intelligent Word Search’ From keyboard press ‘F9’.From keyboard type {Alt + S} {I}
‘Intelligent word Search’ allows you to view thousands of rubrics and Reach a Right Rubric from various ready-made options available like:
Themes Cross – references Synonyms Similar Words
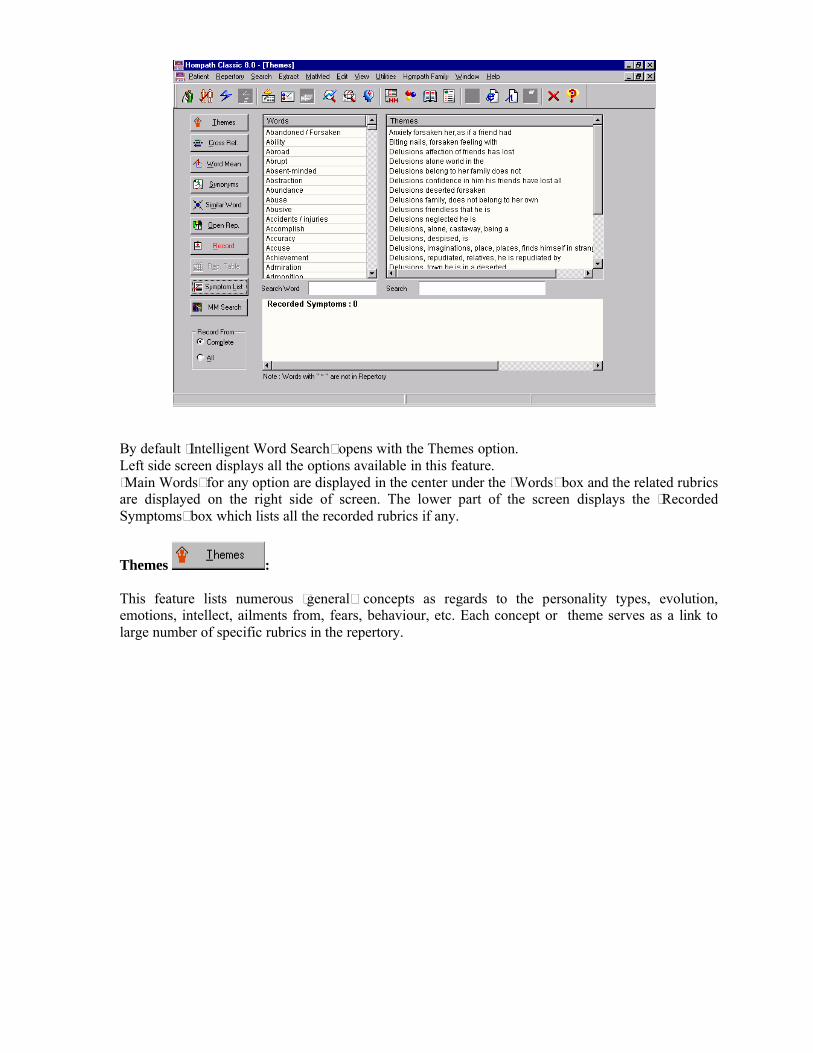
By default ‘Intelligent Word Search’ opens with the Themes option.Left side screen displays all the options available in this feature. ‘Main Words’ for any option are displayed in the center under the ‘Words’ box and the related rubrics are displayed on the right side of screen. The lower part of the screen displays the ‘Recorded Symptoms’ box which lists all the recorded rubrics if any.
Themes :
This feature lists numerous ‘general’ concepts as regards to the personality types, evolution, emotions, intellect, ailments from, fears, behaviour, etc. Each concept or theme serves as a link to large number of specific rubrics in the repertory.
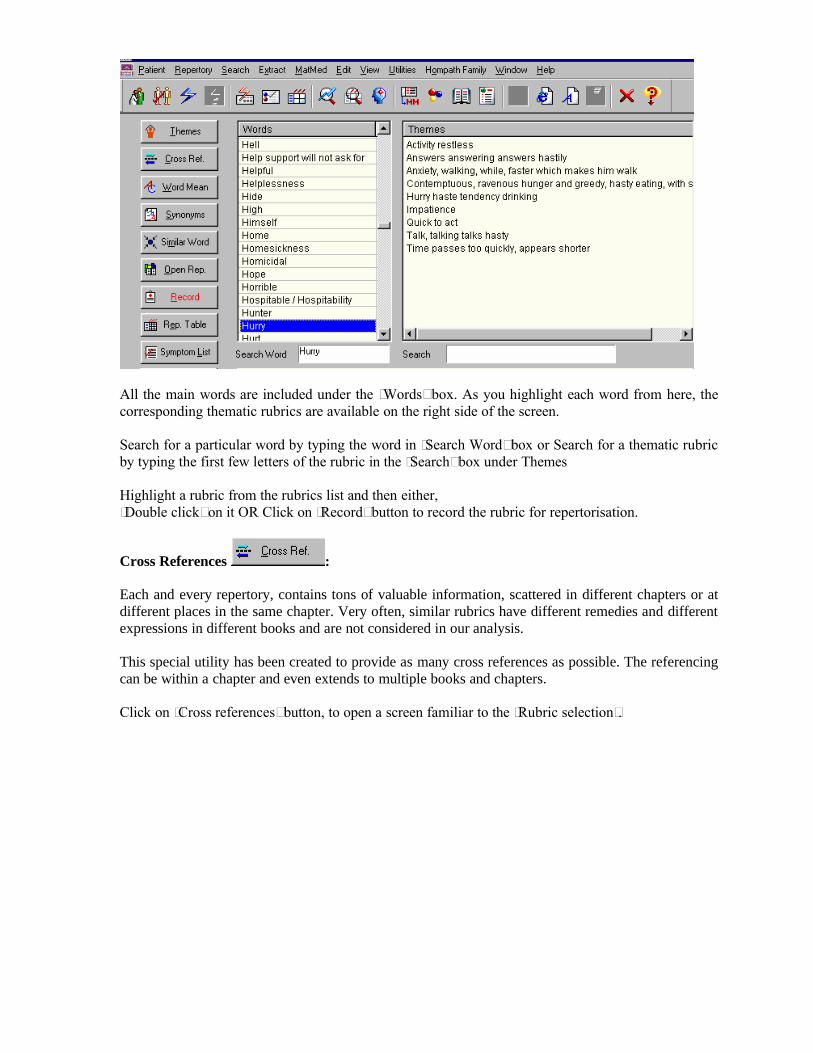
All the main words are included under the ‘Words’ box. As you highlight each word from here, the corresponding thematic rubrics are available on the right side of the screen.
Search for a particular word by typing the word in ‘Search Word’ box or Search for a thematic rubric by typing the first few letters of the rubric in the ‘Search’ box under Themes
Highlight a rubric from the rubrics list and then either, ‘Double click’ on it OR Click on ‘Record’ button to record the rubric for repertorisation.
Cross References :
Each and every repertory, contains tons of valuable information, scattered in different chapters or at different places in the same chapter. Very often, similar rubrics have different remedies and different expressions in different books and are not considered in our analysis.
This special utility has been created to provide as many cross references as possible. The referencing can be within a chapter and even extends to multiple books and chapters.
Click on ‘Cross references’ button, to open a screen familiar to the ‘Rubric selection’.
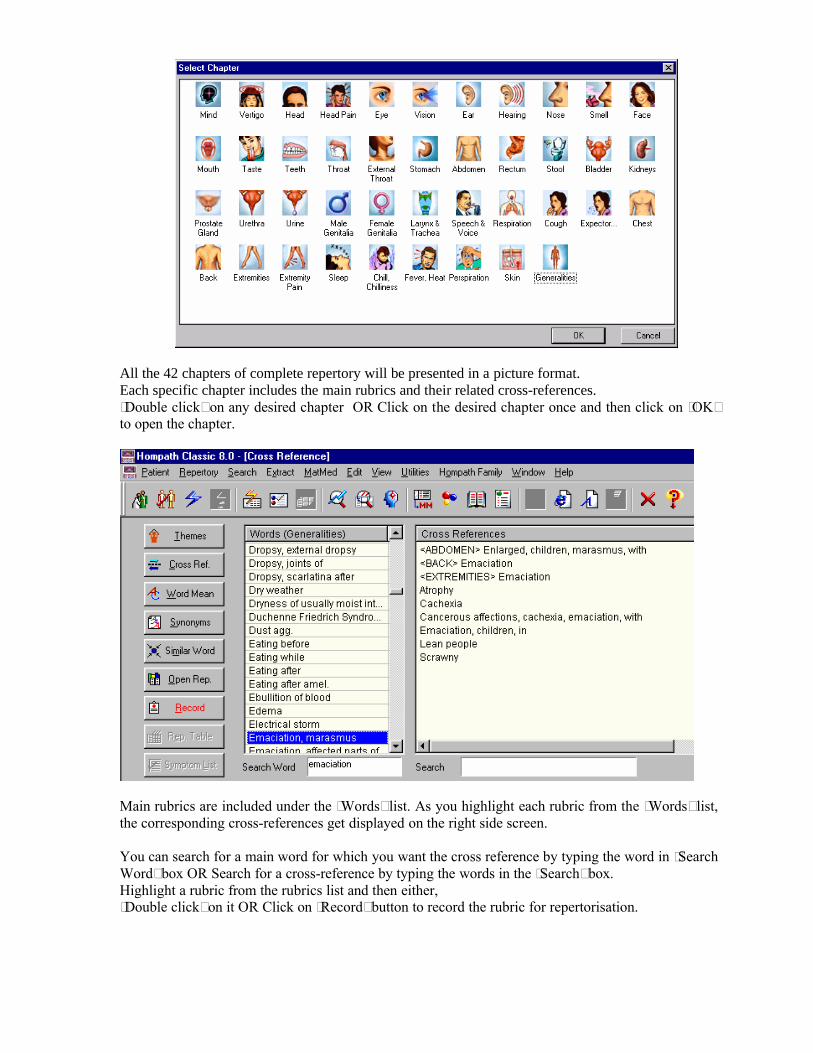
All the 42 chapters of complete repertory will be presented in a picture format.Each specific chapter includes the main rubrics and their related cross-references.‘Double click’ on any desired chapter OR Click on the desired chapter once and then click on ‘OK’ to open the chapter.
Main rubrics are included under the ‘Words’ list. As you highlight each rubric from the ‘Words’ list, the corresponding cross-references get displayed on the right side screen.
You can search for a main word for which you want the cross reference by typing the word in ‘Search Word’ box OR Search for a cross-reference by typing the words in the ‘Search’ box. Highlight a rubric from the rubrics list and then either, ‘Double click’ on it OR Click on ‘Record’ button to record the rubric for repertorisation.
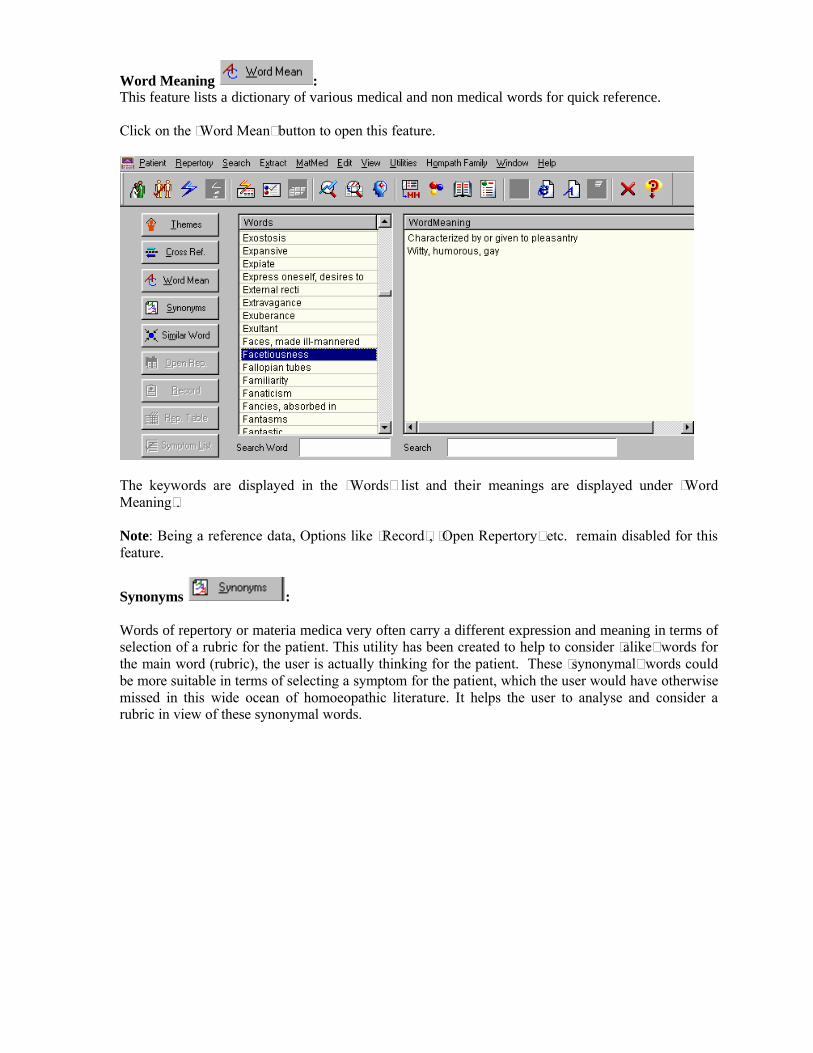
Word Meaning :This feature lists a dictionary of various medical and non medical words for quick reference.
Click on the ‘Word Mean’ button to open this feature.
The keywords are displayed in the ‘Words’ list and their meanings are displayed under ‘Word Meaning’.
Note: Being a reference data, Options like ‘Record’, ‘Open Repertory’ etc. remain disabled for this feature.
Synonyms :
Words of repertory or materia medica very often carry a different expression and meaning in terms of selection of a rubric for the patient. This utility has been created to help to consider ‘alike’ words for the main word (rubric), the user is actually thinking for the patient. These ‘synonymal’ words could be more suitable in terms of selecting a symptom for the patient, which the user would have otherwise missed in this wide ocean of homoeopathic literature. It helps the user to analyse and consider a rubric in view of these synonymal words.

All the main words are included under the ‘Words’ box. As you highlight each Word , the corresponding synonyms are displayed on the right under the ‘Synonyms’.
One can search for a particular word by typing the word in ‘Search Word’ box OR Search for a synonym by typing the words in the ‘Search’ box under Synonyms
Note: 1. Words with single ‘*’ next to it are not found in the repertory and hence obviously cannot be recorded. These words are found in materia medica though, and one can search for them through the ‘Mmsearch’ feature.2. Words with double ’**’ are not found in the repertory or the materia medica. Though not found in both, these words are given for reference purposes.
Similar Words :
This feature can be considered as an extension of the synonyms feature. These enlists ‘words’ and their ‘similar’ words in the similar way mentioned above and helps you to consider more ‘related similar’ words for the main word.
Note: This feature includes more number of main words, and also more number of similar words for each main word in comparison to the ‘synonyms’ feature.
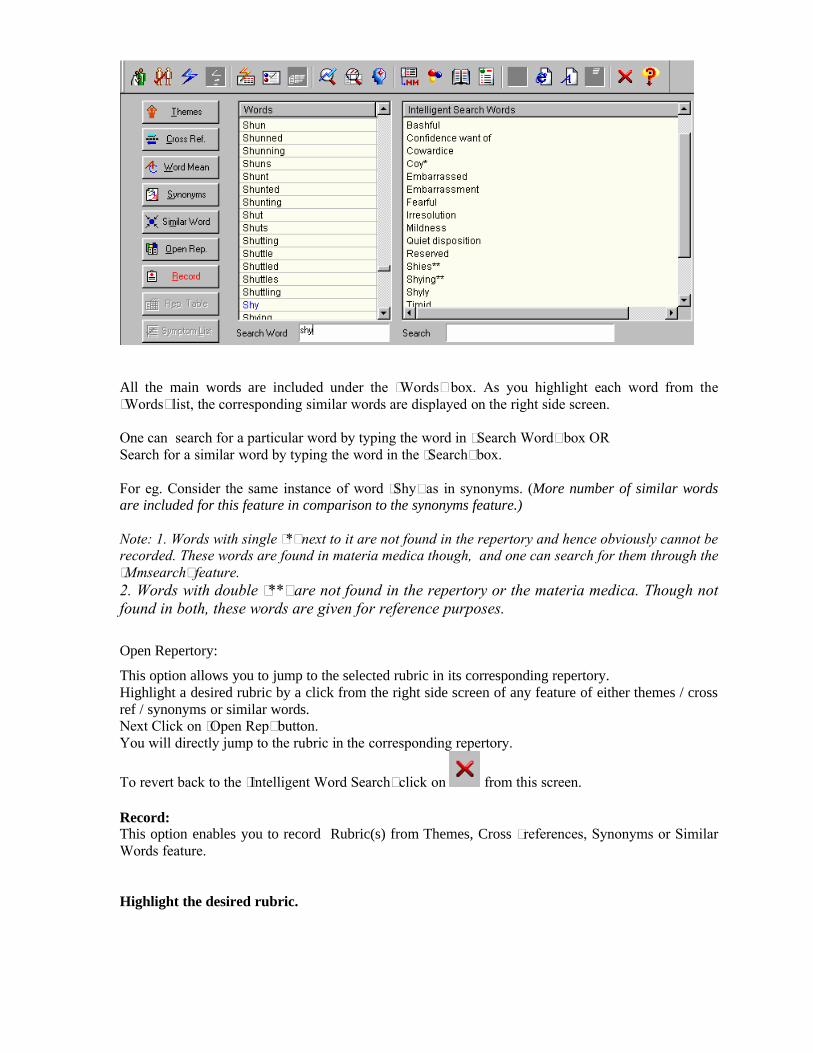
All the main words are included under the ‘Words’ box. As you highlight each word from the ‘Words’ list, the corresponding similar words are displayed on the right side screen.
One can search for a particular word by typing the word in “Search Word” box OR Search for a similar word by typing the word in the ‘Search’ box.
For eg. Consider the same instance of word ‘Shy’ as in synonyms. (More number of similar words are included for this feature in comparison to the synonyms feature.)
Note: 1. Words with single ‘*’ next to it are not found in the repertory and hence obviously cannot be recorded. These words are found in materia medica though, and one can search for them through the ‘Mmsearch’ feature.2. Words with double ’**’ are not found in the repertory or the materia medica. Though not found in both, these words are given for reference purposes.
Open Repertory:
This option allows you to jump to the selected rubric in its corresponding repertory. Highlight a desired rubric by a click from the right side screen of any feature of either themes / cross ref / synonyms or similar words.Next Click on ‘Open Rep’ button. You will directly jump to the rubric in the corresponding repertory.
To revert back to the ‘Intelligent Word Search’ click on from this screen.
Record: This option enables you to record Rubric(s) from Themes, Cross –references, Synonyms or Similar Words feature.
Highlight the desired rubric.
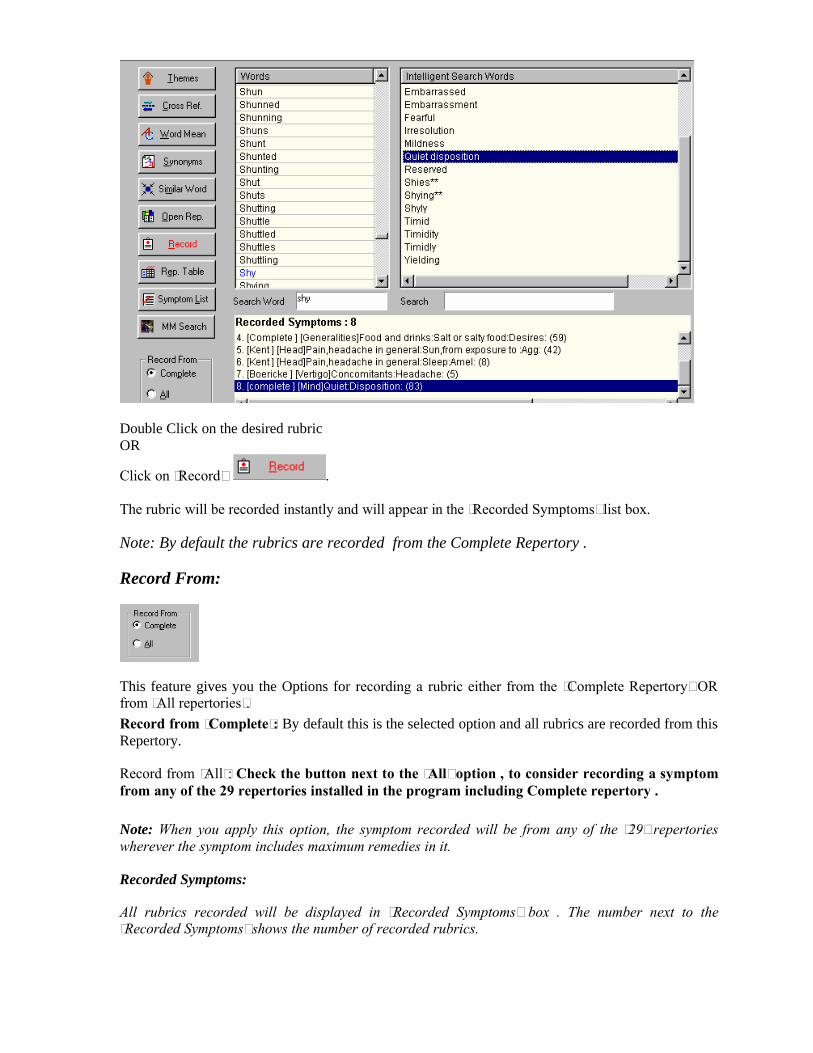
Double Click on the desired rubric OR
Click on ‘Record’ .
The rubric will be recorded instantly and will appear in the ‘Recorded Symptoms’ list box.
Note: By default the rubrics are recorded from the Complete Repertory .
Record From:
This feature gives you the Options for recording a rubric either from the ‘Complete Repertory’ OR from ‘All repertories’.Record from ‘Complete’: By default this is the selected option and all rubrics are recorded from this Repertory.
Record from ‘All’: Check the button next to the ‘All’ option , to consider recording a symptom from any of the 29 repertories installed in the program including Complete repertory .
Note: When you apply this option, the symptom recorded will be from any of the ‘29’ repertories wherever the symptom includes maximum remedies in it.
Recorded Symptoms:
All rubrics recorded will be displayed in ‘Recorded Symptoms’ box . The number next to the ‘Recorded Symptoms’ shows the number of recorded rubrics.

Rep. Table:
Click on to view the repertorisation table.
Click on from the rep table to return back to the main screen.
Symptom List :
This option enables the physician to view and modify the recorded symptoms list. Click on ‘Symptom List’ once rubrics are recorded.You will be presented with the ‘Symptom List’ screen where you can apply different symptom options.
For more details of most of the above mentioned options see the ‘Common features’ section under ‘Repertory’.
MM Search: This option enables the user to search a selected rubric from the Materia Medicae books installed in the program.Select any rubric by highlighting it. Next Click on the “MM Search”
A dialog box appears displaying the list of words to be searched in the materia medica.
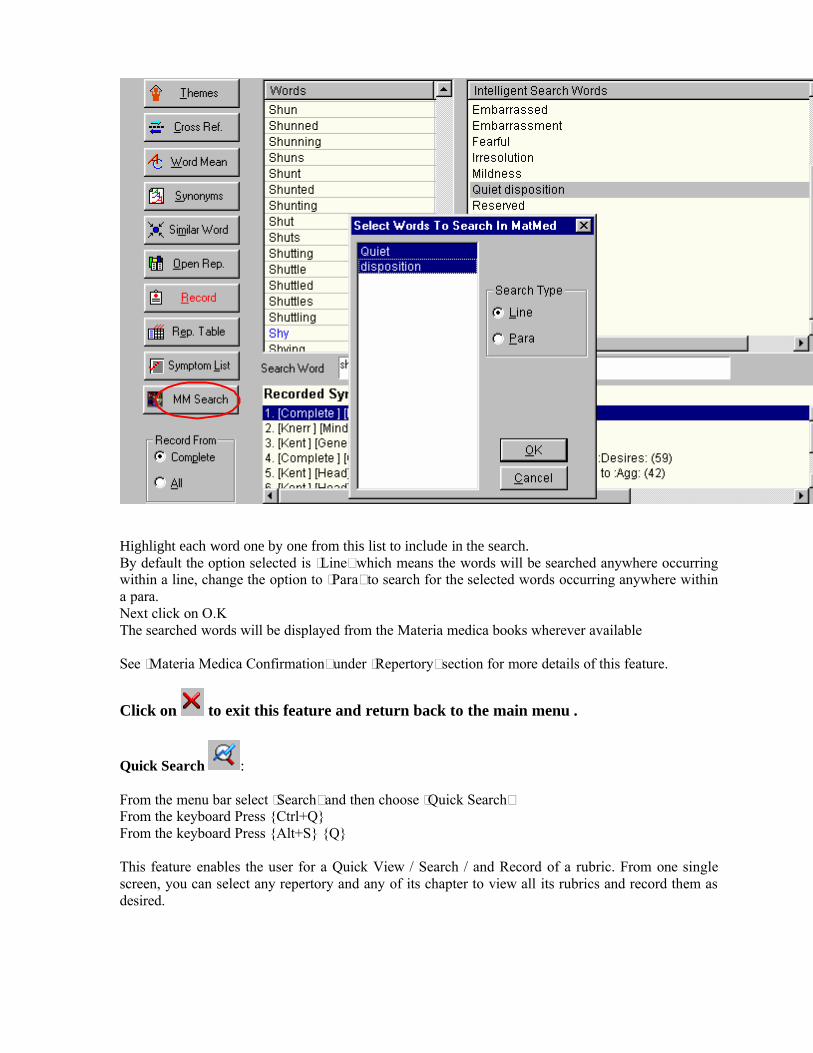
Highlight each word one by one from this list to include in the search.By default the option selected is ‘Line’ which means the words will be searched anywhere occurring within a line, change the option to ‘Para’ to search for the selected words occurring anywhere within a para.Next click on O.KThe searched words will be displayed from the Materia medica books wherever available
See ‘Materia Medica Confirmation’ under ‘Repertory’ section for more details of this feature.
Click on to exit this feature and return back to the main menu .
Quick Search :
From the menu bar select ‘Search’ and then choose ‘Quick Search’ From the keyboard Press {Ctrl+Q}From the keyboard Press {Alt+S} {Q}
This feature enables the user for a Quick View / Search / and Record of a rubric. From one single screen, you can select any repertory and any of its chapter to view all its rubrics and record them as desired.

By default the ‘Complete’ repertory and its ‘Mind’ chapter is displayed. The left column displays all the chapters of ‘Complete Repertory’ and any chapter can be selected by a click on that chapter. The central screen shows all the ‘main rubrics’ of the selected chapter. The number in the bracket next to each symptom, indicates the number of remedies that symptom includes.
The ‘+’ sign in front of rubric indicates that the rubric includes sub-rubrics.
Use the following keys for navigation in the ‘quick search’ screen:
Key moves cursor one rubric down. Key moves cursor one rubric up.
Key moves cursor to the right column. Key moves cursor to the left column.
PageUp key moves one screen up. PageDn key moves one screen downCtrl+Home keys move cursor to the first rubric of the chapter. Ctrl+End keys move cursor to the last rubric of the chapter.
The number at the extreme bottom Level 2 Symptoms ‘1150’ indicates that the Mind chapter of Complete Repertory includes 1150 main level rubrics.
Select Repertory:This option allows you to choose any other desired repertory and its chapter from all the repertories installed in the program.

Select Chapter:By default the first chapter of any chosen repertory is selected and all its rubrics are displayed. To change the chapter, from the ‘Select Chapter’ list, select the chapter by a single click.All the rubrics of the selected chapter will simultaneously appear on the main screen.
Consider symptom of ‘Abscesses’ from ‘Kent’ ‘Generalities’ which shows (44} next to the symptom indicating that there are ‘44’ remedies for this symptom in this repertory.
Select Rubric / Subrubric: This option enables the user to view all the Sub-rubrics to a particular rubric.Search for a rubric by typing the word in the empty box titled ‘Select the Rubric/Subrubric’. The rubric gets automatically highlighted. ORSearch for a rubric by scrolling through the entire chapter using the horizontal scroll bar and then highlight it.
Select the desired repertory by a click from the drop down list of the ‘Select Repertory’ option. As you choose the desired Repertory the chapter(s) of that repertory get listed under ‘Select Chapter’ list.
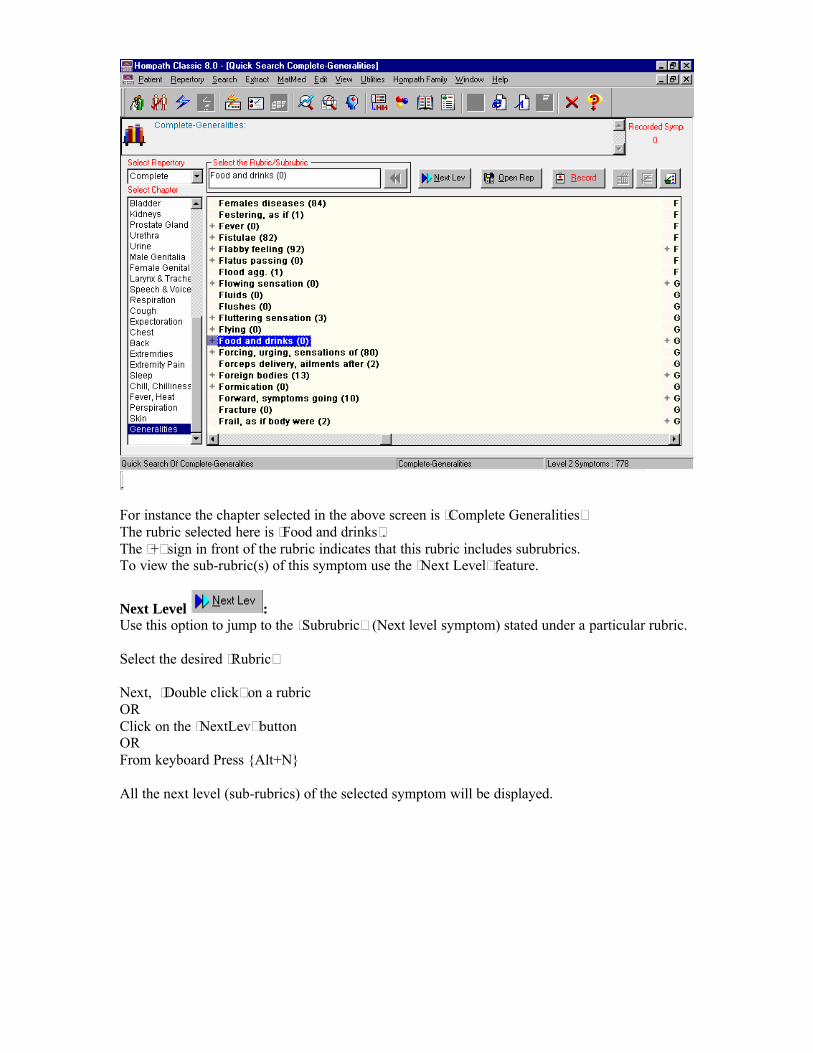
For instance the chapter selected in the above screen is ‘Complete Generalities’ The rubric selected here is ‘Food and drinks’.The ‘+’ sign in front of the rubric indicates that this rubric includes subrubrics. To view the sub-rubric(s) of this symptom use the ‘Next Level’ feature.
Next Level :Use this option to jump to the ‘Subrubric’ (Next level symptom) stated under a particular rubric.
Select the desired ‘Rubric’
Next, ‘Double click’ on a rubric ORClick on the ‘NextLev’ button ORFrom keyboard Press {Alt+N}
All the next level (sub-rubrics) of the selected symptom will be displayed.

Here the screen displays all sub-rubrics of the symptom ‘Food and drinks’. The text ‘Level 3 Symptoms 228’ at the bottom indicates that there are ‘228’ sub-rubrics (3rd level) to this main rubric. The ‘+’ sign in front of any rubric further signify that the rubric includes sub-sub-rubrics(4th level) and so on.
The symptom highlighted here is ‘Food and drinks, Artificial agg’. The number ‘(5)’ next to this rubric means that there are 5 remedies for this rubric. The ‘+’ sign in front of this symptom signify that are there are further sub-rubrics to this symptom. Highlight any symptom, to ‘Jump’ to its next level symptom Or click on ‘Record’ button to include it in the repertorisation.
Note: When you click on rubric which does not have a sub rubric, a message “Subrubrics for this symptom not available” will be displayed. Click on ‘Ok’, to close the box.
Tip: To view remedies of a rubric simply select the rubric by highlighting it and click on
Record :To Record a rubric for repertorisation.
Select the Rubric by highlighting it
Click on the ‘Record’ button OR From keyboard press {Alt+R}

You can select different Repertories and then its ‘different chapters’ to record any number of symptoms for one single case.
Note: When you try to record rubrics which does not have ‘Remedies’ listed, a message appears ‘This symptom does not have remedies listed’. Click on ‘Ok’, to close the box.
Previous level:This option enables you to ‘Jump’ back to the Previous Level screen, after you have used the Next-level option.
Click on the to go back to the previous level symptoms of the selected chapter.
The button will be disabled once you reach the Main Level Symptom screen.
Open Repertory :This option allows the user to jump and view the Selected symptom in the respective Repertory.Select the Rubric by highlighting it. Next Click on the ‘Open Rep’ button OR From keyboard Press {Alt+O} You will jump to that symptom in the respective Repertory.
Click on the to revert from the repertory screen back to the ‘Quick Search’ screen.
Repertorisation Table :This option gets enabled only when symptoms are recorded for repertorisation.
Click on this option to view the repertorisation table of recorded rubrics. Click on the to revert back to the ‘Quick Search’ screen
View / Edit Symptom List : This option gets enabled only when symptoms are recorded for repertorisation.
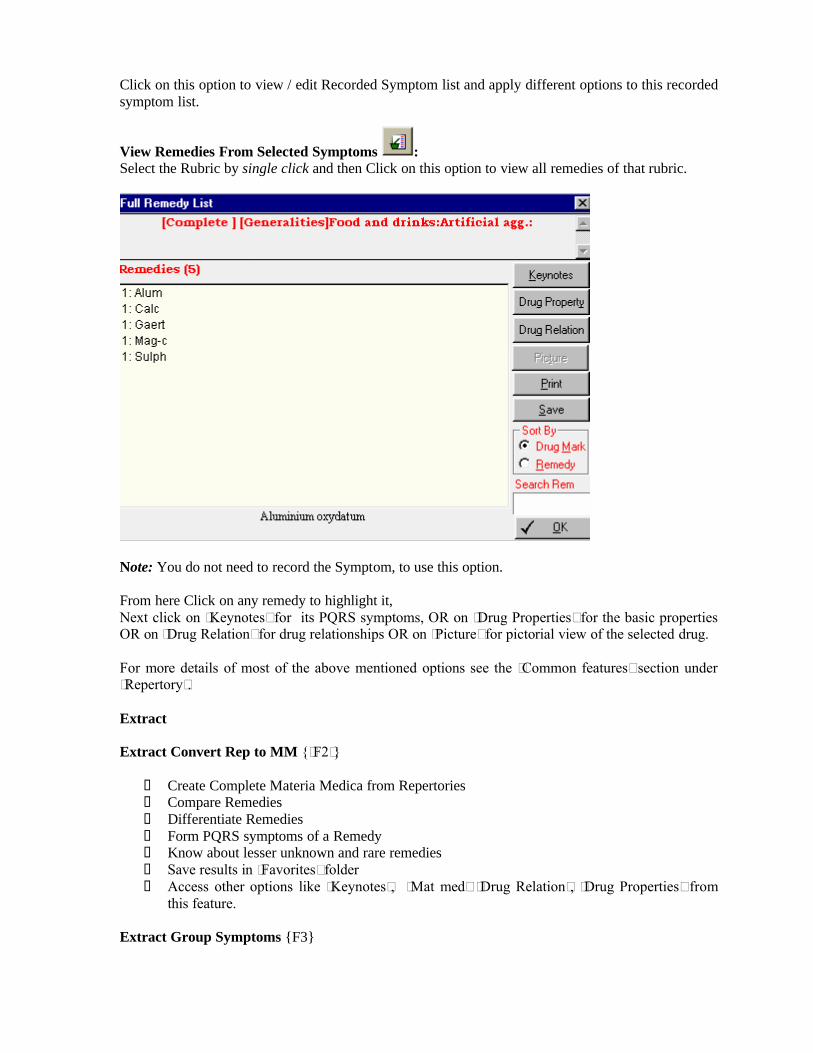
Click on this option to view / edit Recorded Symptom list and apply different options to this recorded symptom list.
View Remedies From Selected Symptoms : Select the Rubric by single click and then Click on this option to view all remedies of that rubric.
Note: You do not need to record the Symptom, to use this option.
From here Click on any remedy to highlight it, Next click on ‘Keynotes’ for its PQRS symptoms, OR on ‘Drug Properties’ for the basic properties OR on ‘Drug Relation’ for drug relationships OR on ‘Picture’ for pictorial view of the selected drug.
For more details of most of the above mentioned options see the ‘Common features’ section under ‘Repertory’.
Extract
Extract Convert Rep to MM {‘F2’}
Create Complete Materia Medica from Repertories Compare Remedies Differentiate Remedies Form PQRS symptoms of a Remedy Know about lesser unknown and rare remedies Save results in ‘Favorites’ folder Access other options like ‘Keynotes’, ‘Mat med’ ‘Drug Relation’, ‘Drug Properties’ from
this feature.
Extract Group Symptoms {F3}

Create Group symptoms of ‘Mineral’, ‘Plant’, ‘Animal’ kingdom and their sub-groups Create Group symptoms of sub-groups like ‘Acids’, ‘Natrum’, ‘Magnesiums’, ‘Solanaceae
family’, ‘Roots’, ‘Snakes kingdom’, ‘Nosodes’, ‘Sycotic Remedies’, and many more such permutations and combinations as required by you.
Save these group results in ‘Favorites’ folder Access other options like ‘Keynotes’, ‘Mat med’ ‘Drug Relation’, ‘Drug Properties’ from
this feature.Extract:
Homoeopathic literature is vast, and includes thousands of pages of information on remedies in form of repertories. To extract remedy or group remedy information manually would be an impossible task. Hompath gives you the option of achieving this difficult task in the simplest of ways and within seconds.
You can extract information of
1. Remedies with comparisons , differentiations, PQRS symptoms etc. OR 2. Group symptoms of general kingdoms like mineral, plant, animal kingdoms etc. or specific
groups like Natrum, Magnesiums, Nosodes, Snakes, Spiders, Solanaceae, Anacardiaceae etc.
This feature can be used to
Author research papers and booksPrepare lecture notesImprove knowledge of unknown aspects of common and uncommon remedies etc.
Extract feature includes:
Extract Convert Rep to MM Extract Group Symptoms Favorite Convert Rep to MMFavorite Group Symptom
Convert Repertory To Materia Medica:
From main menu select ‘Extract’ and then choose ‘Convt Rep to Materia Medica’From keyboard press ‘F2’From keyboard type {Alt + X} {M}
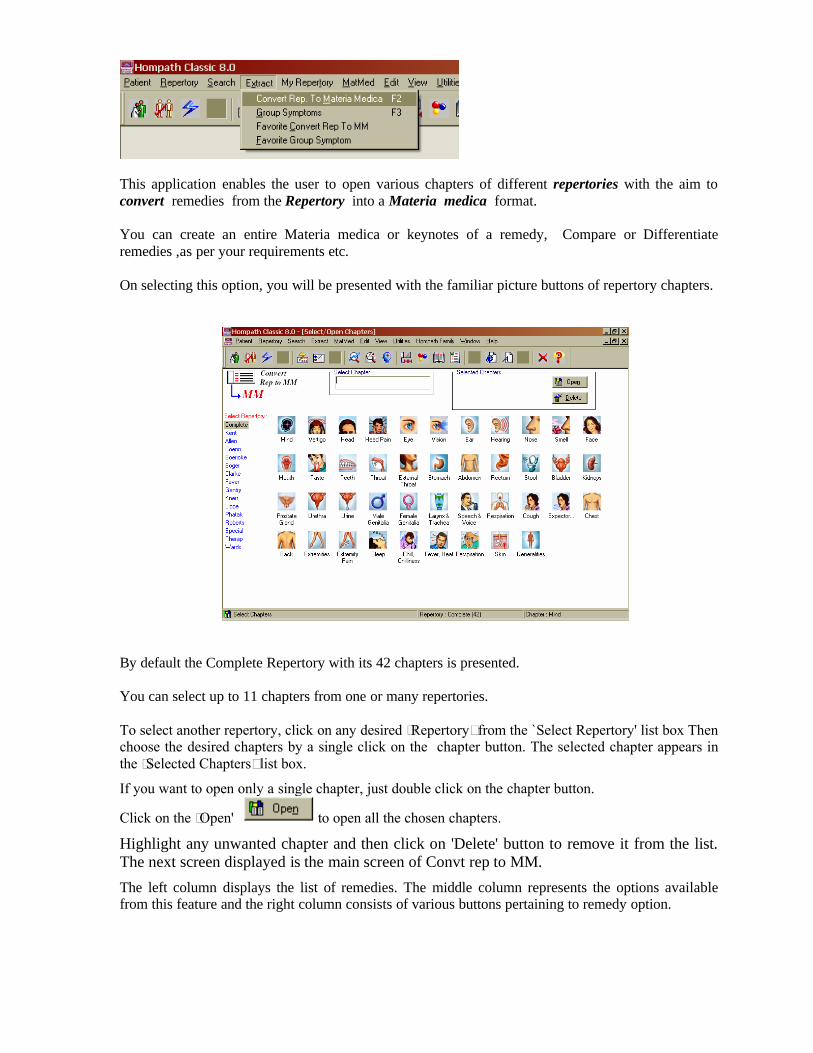
This application enables the user to open various chapters of different repertories with the aim to convert remedies from the Repertory into a Materia medica format.
You can create an entire Materia medica or keynotes of a remedy, Compare or Differentiate remedies ,as per your requirements etc.
On selecting this option, you will be presented with the familiar picture buttons of repertory chapters.
By default the Complete Repertory with its 42 chapters is presented.
You can select up to 11 chapters from one or many repertories.
To select another repertory, click on any desired ‘Repertory’ from the `Select Repertory' list box Then choose the desired chapters by a single click on the chapter button. The selected chapter appears in the ‘Selected Chapters’ list box.
If you want to open only a single chapter, just double click on the chapter button.
Click on the ‘Open' to open all the chosen chapters.
Highlight any unwanted chapter and then click on 'Delete' button to remove it from the list. The next screen displayed is the main screen of Convt rep to MM.The left column displays the list of remedies. The middle column represents the options available from this feature and the right column consists of various buttons pertaining to remedy option.

Remedy List: Includes all remedies (2184) in abbreviation form available in the program
Search Remedy: Search for a remedy in the drug list by typing the abbreviation in the `Search’ box. Full name gives you the full name of the searched remedy.
Alphabets A-Z: Click on any alphabet to View remedies beginning from that alphabet. For instance Click on ‘R’ to view all remedies beginning from ‘R’ in the remedy list.
To select remedy (ies):To apply options of “Convt Rep to MM” you must first select the remedy(ies) from the ‘Remedy List’ and add it to the ‘Selected Remedy’ list box.
Search for a remedy in the drug list by typing it in the ‘abbreviation’ box or use the vertical scroll bar provided to reach to the remedy. The desired remedy is now highlighted.
‘Double Click’ on it OR and use the ‘Add’ button to add it to the ‘Selected Remedy’ list box.
Click on ‘Add’ to add remedy one by one from the Remedy List.Click on ‘Add All’ to add all remedies at one time.Click on ‘Clear’ to remove any unwanted remedy from the ‘Selected Remedy’ box.Click on ‘Clear All’ to Clear All remedies from the ‘Selected Remedy’ list box.
Selected Remedy:

Initially this box will be empty and show no remedies.Later, this box will list all the ‘Remedies’ you have added to use the Convt Rep to MM options.
Tip: You can improvise and specify your remedy selection process by using the following Filters
Filter Options
&
These filter options are used to narrow down the remedies in the ‘Remedy list’ to particular group, and then apply ‘convt rep to mm options’ to it.
For instance when you Click on the ‘Minerals’ button, the program will take you to a familiar screen of ‘Mineral Kingdom’ . You can narrow the list of remedies to only Minerals or its sub groups or individual mineral. Click on the ‘Ok’ from the mineral screen .You will be taken you back to the previous screen where the ‘Remedy list’ will now display remedies pertaining to the selected mineral group.
Similarly you can filter remedies according to the ‘Plant’ ( choosing desired plant type and class/ family) or the ‘Animal’ (choosing animal type or its class/ family) so that the ‘Remedy List’ box contains these filtered remedies
One can also filter remedies according to the basic properties of the drug, using the ‘Drug Filters’options.
Click on to reset the filters applied.
Search Options:The middle row consists of main options of this feature as shown below:
Tick the ‘checkbox’ next to any of the options to apply thatoption to the selected remedy.
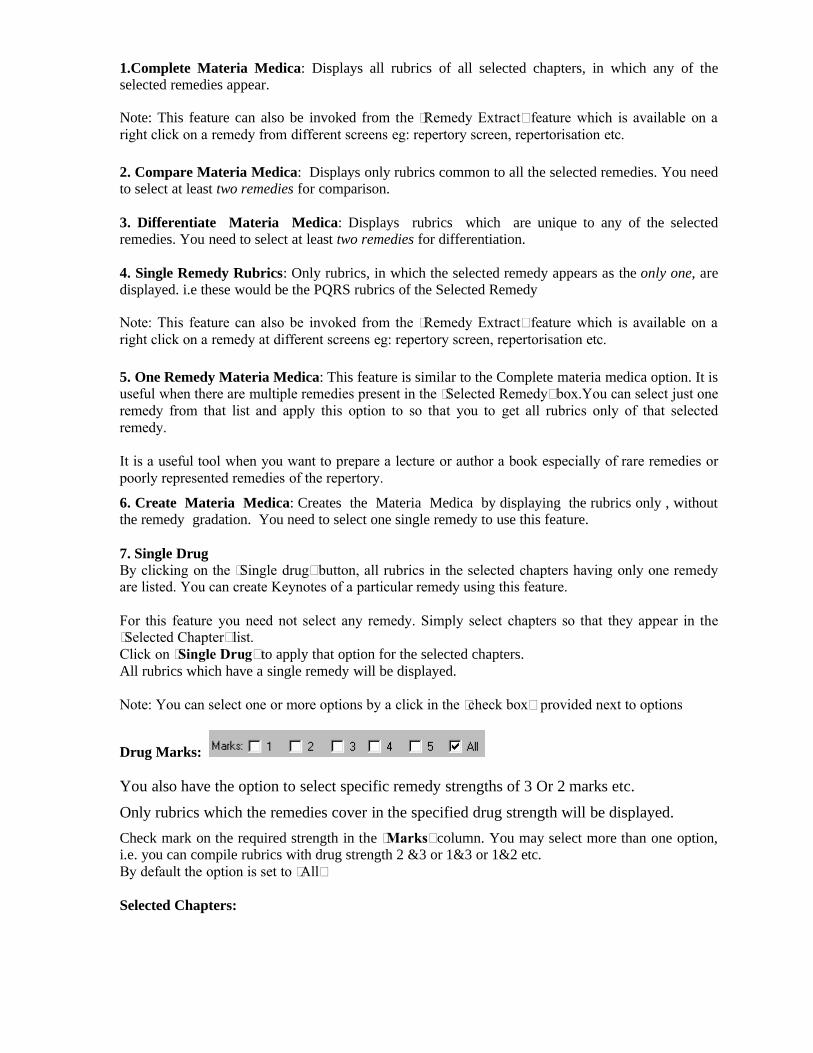
1.Complete Materia Medica: Displays all rubrics of all selected chapters, in which any of the selected remedies appear.
Note: This feature can also be invoked from the ‘Remedy Extract’ feature which is available on a right click on a remedy from different screens eg: repertory screen, repertorisation etc.
2. Compare Materia Medica: Displays only rubrics common to all the selected remedies. You need to select at least two remedies for comparison.
3. Differentiate Materia Medica: Displays rubrics which are unique to any of the selected remedies. You need to select at least two remedies for differentiation.
4. Single Remedy Rubrics: Only rubrics, in which the selected remedy appears as the only one, are displayed. i.e these would be the PQRS rubrics of the Selected Remedy
Note: This feature can also be invoked from the ‘Remedy Extract’ feature which is available on a right click on a remedy at different screens eg: repertory screen, repertorisation etc.
5. One Remedy Materia Medica: This feature is similar to the Complete materia medica option. It is useful when there are multiple remedies present in the ‘Selected Remedy’ box.You can select just one remedy from that list and apply this option to so that you to get all rubrics only of that selected remedy.
It is a useful tool when you want to prepare a lecture or author a book especially of rare remedies or poorly represented remedies of the repertory.
6. Create Materia Medica: Creates the Materia Medica by displaying the rubrics only , without the remedy gradation. You need to select one single remedy to use this feature.
7. Single DrugBy clicking on the ‘Single drug’ button, all rubrics in the selected chapters having only one remedy are listed. You can create Keynotes of a particular remedy using this feature.
For this feature you need not select any remedy. Simply select chapters so that they appear in the ‘Selected Chapter’ list. Click on ‘Single Drug’ to apply that option for the selected chapters.All rubrics which have a single remedy will be displayed.
Note: You can select one or more options by a click in the ‘check box’ provided next to options
Drug Marks:
You also have the option to select specific remedy strengths of 3 Or 2 marks etc. Only rubrics which the remedies cover in the specified drug strength will be displayed.Check mark on the required strength in the ‘Marks’ column. You may select more than one option, i.e. you can compile rubrics with drug strength 2 &3 or 1&3 or 1&2 etc. By default the option is set to ‘All’
Selected Chapters:

This box will list all the chapters that you have selected, when you opened this feature at the start. The program will extract information from these selected chapters.
You can highlight any unwanted chapter and delete by a click on the ‘Delete Chapter’ In case you wish to select more chapters click on ‘Select Chapter’ button. [This reopens the previous screen of ‘Select Chapter’ from where you can select more chapters.]
Note: A maximum of 11 windows (chapters) can be opened at a time. Convert: Once you have added remedies in the ‘Selected Remedy’ box and ticked various ‘Search Options’ you require
Click on the ‘Convert’ button to begin processing.
Search results of Convt Rep to MM will be displayed.
Let us understand the entire feature with an Example:Extract information on ‘Natrum’ remedies.
From main menu, Click on ‘Extract’ and then ‘Convt Rep to MM’.
Select ‘Complete Mind’ and ‘Complete Generalities’ from the first screen of this feature.You will be presented with the main screen of ‘Convt Rep to MM’Next, Click on ‘Minerals’ and then choose ‘Na’ (natrum) from there by a click.
Click on ‘OK’ on that screen, You will return back to the main screen which will now show only Natrum Remedies in the ‘Remedy List’

Select all desired remedies you want to extract information of from the ‘Remedy list’ using ‘Add’ .Check desired option(s) from ‘Search Option’, In this case ‘Complete’ and ‘Compare’ options are ticked.
Finally Click on ‘Convert’The program will extract ‘Complete’ materia medica and ‘Compare’ results of the 5 selected Natrum remedies from the Selected chapters.
Other Options:
Single DrugBy clicking on the ‘Single drug’ button, all rubrics in the selected chapters having only one remedy are listed. You can create Keynotes of a particular remedy using this feature.
For this feature you need not select any remedy. Simply select chapters so that they appear in the ‘Selected Chapter’ list. Click on ‘Single Drug’ to apply that option for the selected chapters.All rubrics which have a single remedy will be displayed.
Remedy Information:This feature gives you various remedy options for a particular selected remedy.
Highlight any desired remedy from the ‘Remedy list’.Click on any of the below mentioned options to view the respective details.

Note: These options will be disabled when not available for a particular remedy.
Understanding Convt Rep To MM Results:
As soon as you click on ‘Convert’ the program starts processing and explores through all the selectedRepertories and Chapters.
The extracted information is displayed in different windows one for each option selected, All results of ‘Complete Materia Medica’ appear in one window, All Results of ‘Compare Materia Medica’ appear in the second window, and so on.
The Rubrics extracted are displayed as they appear in the repertory, with main Rubric, sub-rubric,etc. Against the rubric, the Remedies are located with a gradation similar to their place in the repertory.
Keynotes – gives PQRS symptoms of the selected remedyMatmed – gives the detailed materia medica of the selected remedy. Choose the option from the drop down arrow provided thereDrug Property- gives basic details of the selected remedy
Drug Relation- gives the list of remedies related to the selected remedy Picture- gives the pictorial view of the remedy
Drug Filter- helps in selective selection of the remedy list.
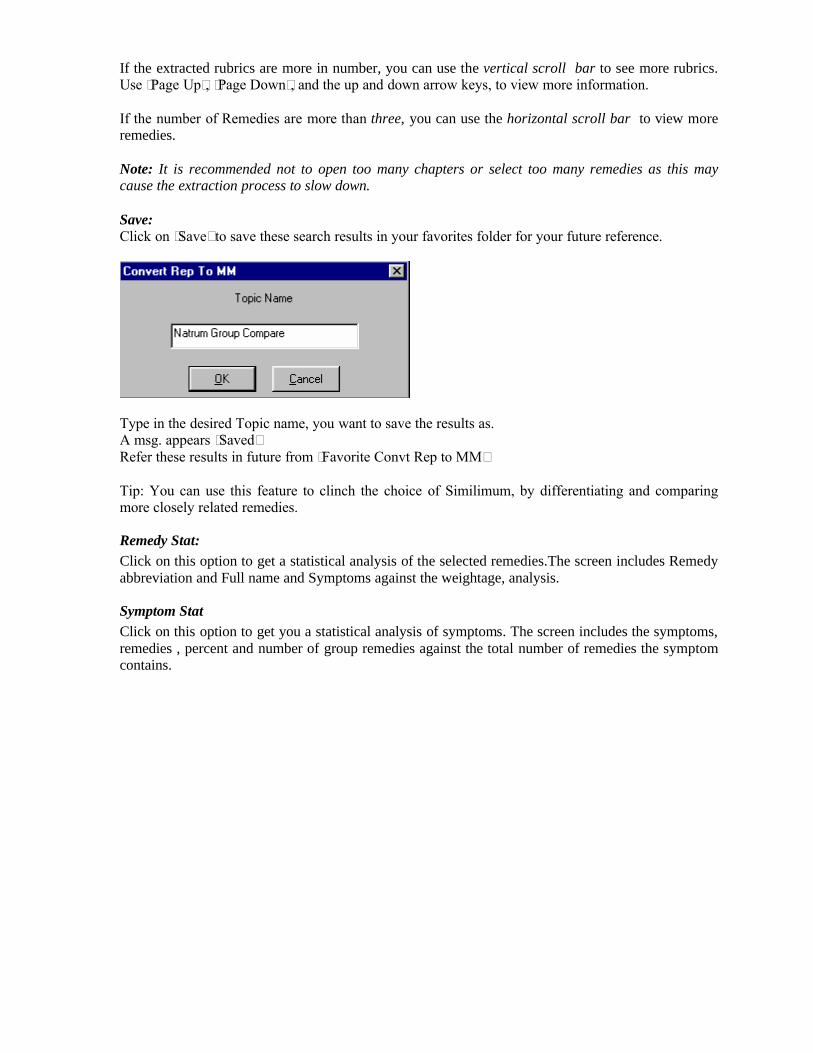
If the extracted rubrics are more in number, you can use the vertical scroll bar to see more rubrics. Use ‘Page Up’, ‘Page Down’, and the up and down arrow keys, to view more information.
If the number of Remedies are more than three, you can use the horizontal scroll bar to view more remedies.
Note: It is recommended not to open too many chapters or select too many remedies as this may cause the extraction process to slow down.
Save:Click on ‘Save’ to save these search results in your favorites folder for your future reference.
Type in the desired Topic name, you want to save the results as. A msg. appears ‘Saved’Refer these results in future from ‘Favorite Convt Rep to MM’
Tip: You can use this feature to clinch the choice of Similimum, by differentiating and comparing more closely related remedies.
Remedy Stat:Click on this option to get a statistical analysis of the selected remedies.The screen includes Remedy abbreviation and Full name and Symptoms against the weightage, analysis.
Symptom StatClick on this option to get you a statistical analysis of symptoms. The screen includes the symptoms, remedies , percent and number of group remedies against the total number of remedies the symptom contains.
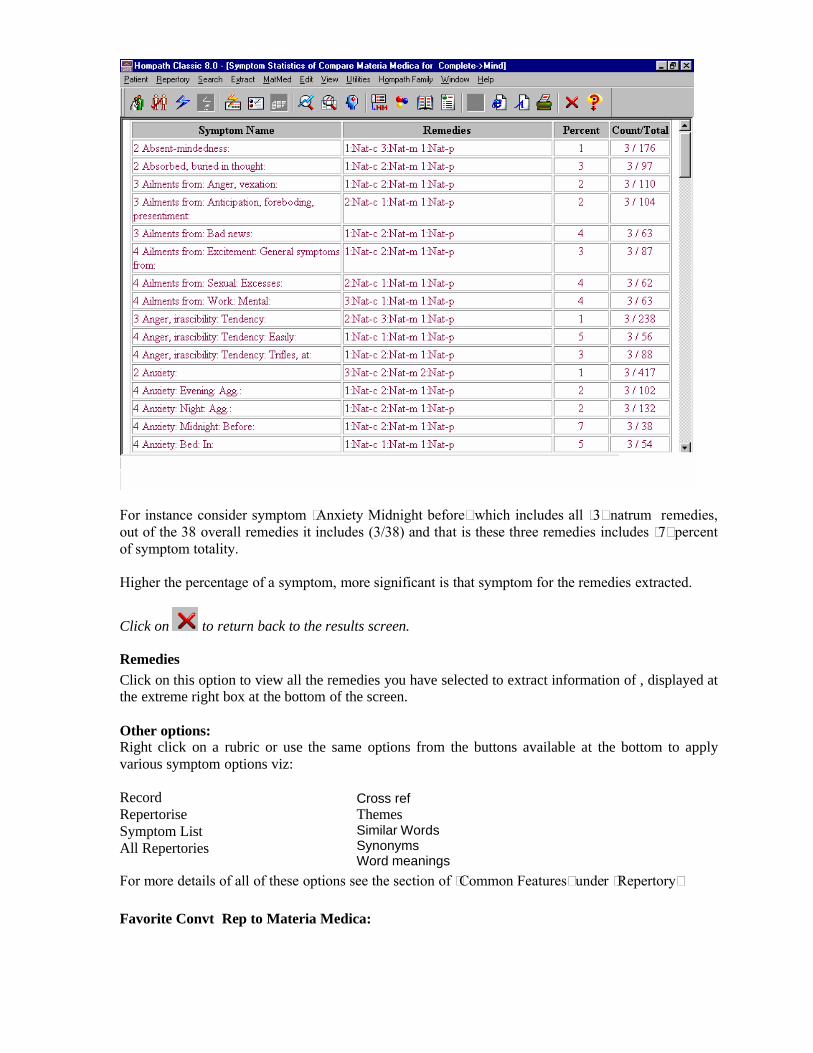
For instance consider symptom ‘Anxiety Midnight before’ which includes all ‘3’ natrum remedies, out of the 38 overall remedies it includes (3/38) and that is these three remedies includes ‘7’ percent of symptom totality.
Higher the percentage of a symptom, more significant is that symptom for the remedies extracted.
Click on to return back to the results screen.
RemediesClick on this option to view all the remedies you have selected to extract information of , displayed at the extreme right box at the bottom of the screen.
Other options: Right click on a rubric or use the same options from the buttons available at the bottom to apply various symptom options viz:
RecordRepertoriseSymptom List All Repertories
For more details of all of these options see the section of ‘Common Features’ under ‘Repertory’
Favorite Convt Rep to Materia Medica:
Cross refThemesSimilar WordsSynonymsWord meanings
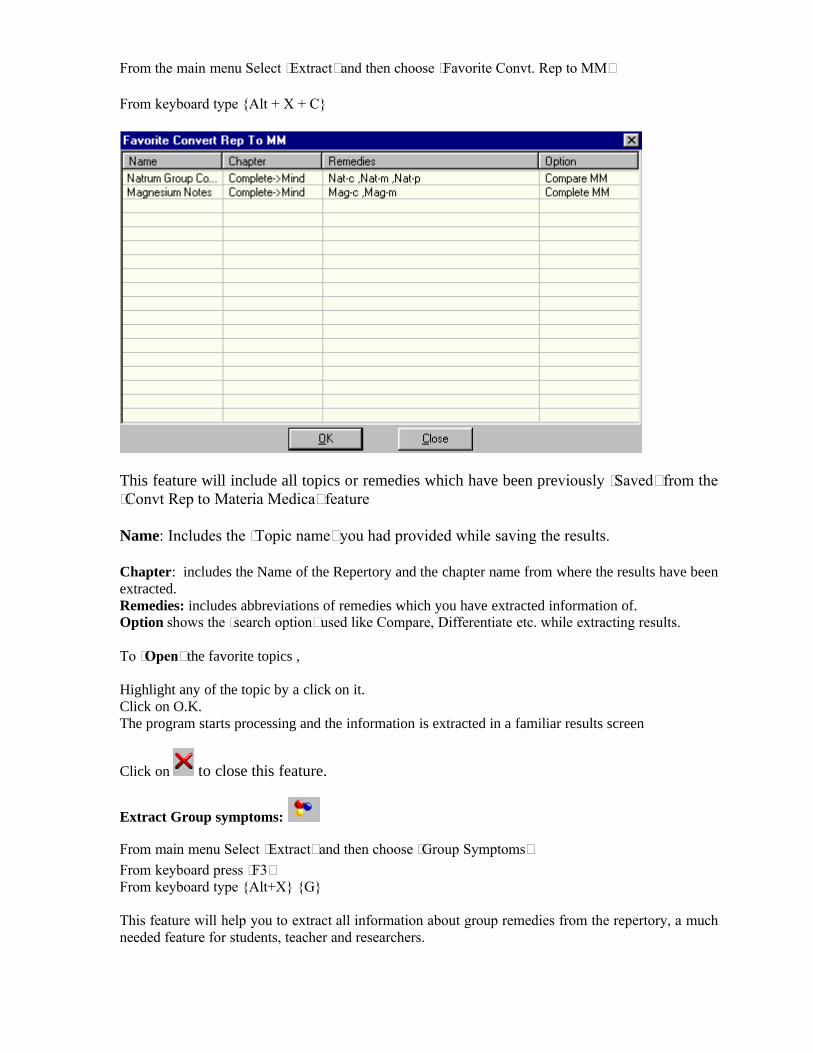
From the main menu Select ‘Extract’ and then choose ‘Favorite Convt. Rep to MM’
From keyboard type {Alt + X + C}
This feature will include all topics or remedies which have been previously ‘Saved’ from the ‘Convt Rep to Materia Medica’ feature
Name: Includes the ‘Topic name’ you had provided while saving the results.
Chapter: includes the Name of the Repertory and the chapter name from where the results have been extracted.Remedies: includes abbreviations of remedies which you have extracted information of. Option shows the ‘search option’ used like Compare, Differentiate etc. while extracting results.
To ‘Open’ the favorite topics ,
Highlight any of the topic by a click on it.Click on O.K.The program starts processing and the information is extracted in a familiar results screen
Click on to close this feature.
Extract Group symptoms:
From main menu Select ‘Extract’ and then choose ‘Group Symptoms’From keyboard press ‘F3’From keyboard type {Alt+X} {G}
This feature will help you to extract all information about group remedies from the repertory, a much needed feature for students, teacher and researchers.

Create Group symptoms of -General kingdoms like mineral, plant, animal kingdoms etc. -Specific groups like Natrums, Magnesiums, Nosodes, Snakes, Solanaceae, Anacardiaceae etc.-Groups based on drug properties like hot sycotic remedies, chilly right sided remedies, tubercular chronic remedies etc.
On Selecting this option you will be presented with familiar picture buttons of repertory chapters.
By default the Complete Repertory is presented. To open another repertory, click on any Other Repertory from the repertory list.Choose the desired repertory and then the desired chapters by a single click on the chapter button. The selected chapter appears in the ‘Selected Chapter’ list.
You can select upto 11 chapters from one or many repertories.Delete any unwanted chapter by highlighting it and pressing the 'Delete' button.
To open a single chapter, double click on the chapter button.Click on the ‘Open' button to open the chosen chapters.

Remedy List: Includes all remedies available in the program (2184)
Search Remedy: Search for a remedy in the drug list by typing the Abbreviation in the `Search’ box. Full name gives you the complete name of the remedy searched.
Alphabets A-Z: Click on any alphabet to View remedies beginning from that alphabet
To select remedy (ies):To use ‘Group Symptoms’ feature you must first select the group of remedies you want to extract information of from the ‘Remedy List’ and add it to the ‘Selected Remedy’ list box.
Search for a remedy in the drug list by typing it in the ‘abbreviation’ box or use the vertical scroll bar provided to reach to the remedy. The desired remedy is now highlighted.
‘Double Click’ on it OR and use the ‘Add’ button to add it to the ‘Selected Remedy’ list box.
Click on ‘Add’ to add remedy one by one from the Remedy List.
Click on ‘Add All’ to add all remedies at one time.
Click on ‘Clear’ to remove any unwanted remedy from the ‘Selected Remedy’ box.
Click on ‘Clear All’ to Clear All remedies from the ‘Selected Remedy’ list box.
Selected Remedy:Initially this box will be empty and show no remedies. Later, this box will list all the ‘Remedies’ you have added to use Group Symptoms options.

Tip: You can improvise and specify your remedy selection process by using the Remedy Filters
Remedy FiltersThese remedy options are used to narrow down the remedies to a particular group to create the group symptoms of the chosen group.
Filters available are ‘Minerals’, ‘Plants’, ‘Animals’, & ‘Drug Filters’For instance Click on the ‘Minerals’ button, the program will take you to a familiar screen of ‘Mineral Kingdom’ . You can narrow the list of remedies to Mineral groups or its sub groups like ‘Natrum’, ‘Acids’ etc. Click on the ‘Ok’ from the mineral screen .You will return back to the previous screen where the ‘Remedy list’ will now display remedies to the selected mineral group.
Similarly you can filter remedies according to the ‘Plant’ ‘or the ‘Animal’ group or its sub-groups
One can also filter remedies according to the basic properties of the drug, using the ‘Drug Filters’ options. For instance you might want to extract group symptoms of all ‘Chronic’ ‘Hot’ and ‘Sycotic’ Remedies.
Once you select any group, the ‘Remedy List’ will include Remedies only of that filter applied.Next from ‘Remedy List’ you can add desired remedies to the ‘Selected Remedy’ box.
Note: One can select combination of filter options to create group symptoms. You may want to extract information on ‘Chilly’ ‘Acid’ drugs. In this case the user should first select the ‘Acids’ group from the ‘Mineral’ filter and then ‘Chilly’ option from the ‘Drug filter’.
‘Reset’ allows you to reset the filters applied.
Selected Chapters:
This box will list all the chapters that you have selected, from the start screen of this feature.
You can highlight any unwanted chapter and delete by a click on the ‘Delete Chapter’ In case you wish to select more chapters click on ‘Select Chapter’ button. [This reopens the previous screen of ‘Select Chapter’ from where you can select more chapters.]
Note: A maximum of 11 windows (chapters) can be opened at a time.
Example of ‘Extract Group Symptoms’:
For instance you want to create group symptoms of ‘Solanaceae’ family .Click on ‘Extract group symptoms’. Select the desired chapters from the first screen that appears. In this case, Chapters selected are ‘Complete mind’, and ‘Complete generalities’ Click on the ‘Plants’ filter. Select the option ‘Solanaceae’ from the ‘families’ list.Click on O.K
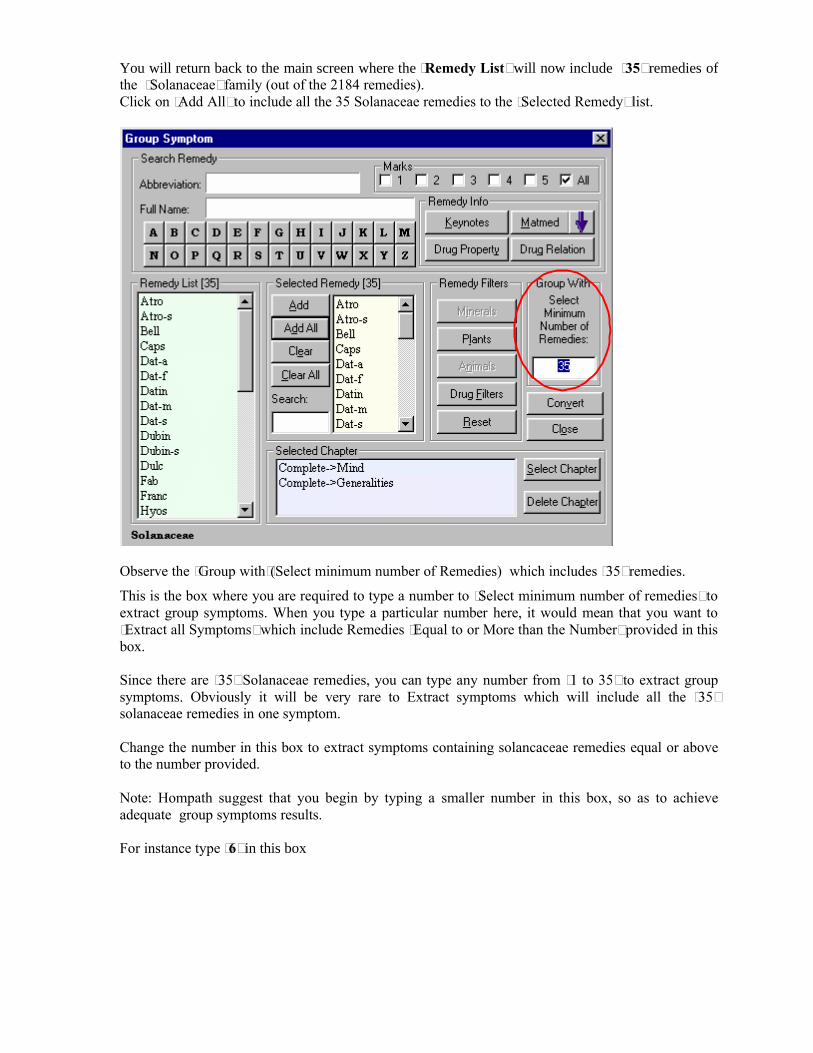
You will return back to the main screen where the ‘Remedy List’ will now include ‘35’ remedies of the ‘Solanaceae’ family (out of the 2184 remedies).Click on ‘Add All’ to include all the 35 Solanaceae remedies to the ‘Selected Remedy’ list.
Observe the ‘Group with’(Select minimum number of Remedies) which includes ‘35’ remedies.
This is the box where you are required to type a number to ‘Select minimum number of remedies’ to extract group symptoms. When you type a particular number here, it would mean that you want to ‘Extract all Symptoms’ which include Remedies ‘Equal to or More than the Number’ provided in this box.
Since there are ‘35’ Solanaceae remedies, you can type any number from ‘1 to 35’ to extract group symptoms. Obviously it will be very rare to Extract symptoms which will include all the ‘35’ solanaceae remedies in one symptom.
Change the number in this box to extract symptoms containing solancaceae remedies equal or above to the number provided.
Note: Hompath suggest that you begin by typing a smaller number in this box, so as to achieve adequate group symptoms results.
For instance type ‘6’ in this box

Click on ‘Convert’. The program will now start processing and Extract all Symptoms which include ‘6’ or ‘more than 6’ Solanaceae remedies within them.
The group symptoms of ‘Solanaceae’ family will be displayed in the results screen.

The results displays ‘98’ Group symptoms of this family, all of which include ‘6’ or more that ‘6’ solanaceae remedies within them.
As you scroll down each symptom, the lower extreme box will show the remedies abbrv. each symptom contains (in this case solanaceae remedies),.Close this Screen to return back to the previous screen.
Next, try to increase the number of remedies in the ‘Group with’ Select minimum number of Remedies.
Instead of ‘6’ now type ‘10’ in the ‘Group with’ box.The number of Symptoms that appear now, will be less, thus making your group symptoms information more authentic.
Click on ‘Convert’ . You will be presented with the similar ‘group symptom’ results screen.
The results now include only ‘18’ symptoms, in comparison to the ‘98’ symptoms extracted before. These ‘18’ symptoms, contain ‘10’ or more than ‘10’ Solanaceae remedies within them.
Tip: When you get a message ‘Results not found’ try typing a lower number in the ‘Group with’ box.

Remedy Info:
Highlight any remedy in the Remedy List box, and then Click on:
Keynotes: to read the PQRS symptoms of the remedyMateria Medica: to read the Materia Medica of the remedy. Use the drop down box next to this option to read the remedy either from ‘Kent’, ‘Allen’, ‘Phatak’ or ‘Boericke’Drug Property: to read the basic Properties of the drugDrug Relation: to view the Drug Relationships like complementary, follow-well etc.
Understanding Group Symptoms Results:
As soon as you click on ‘Convert’ the program starts processing and explores through all the selectedRepertories and Chapters.
In this screen, the ‘Solanaceae’ family group results are extracted.
Rubrics extracted are displayed as they appear in the repertory, with main Rubric, sub-rubric, etc. Against the rubric, the Remedies are located with a gradation similar to their place in the repertory.
If the extracted rubrics are more in number, you can use the vertical scroll bar to see more rubrics. Use ‘Page Up’, ‘Page Down’, and the up and down arrow keys, to view more information.If the number of Remedies are more than three, you can use the horizontal scroll bar to view more remedies.

At the bottom of the screen the totality of each remedy is represented as ‘Symptoms Count/ Total Weightage’.
Remedies covered / Total RemediesClick on any symptom to view the group remedies covered in that symptoms.
For instance in the above screen the highlighted symptom is ‘‘Excitement Excitable tendency’ – 9 / 373’ which means that this symptom includes ‘9’ solanaceae remedies (abbrv. displayed in the box) out of 373 overall remedies it includes.
Save:Click on ‘Save’ to save these search results in your favorites folder for your future reference.
Type in the name, you want to save the results to. A msg. appears ‘Saved’
Refer these group symptoms in the future from ‘Favorite Group Symptom’
Remedy Stat:Click on this option to get a statistical analysis of the group remedies.
Screen includes Remedy abbrv., Remedy Full name and Symptoms against weightage analysis.
For instance ‘Bell’ has ‘73/159’ weightage, which means Bell is present in ‘73’ out of the total 98 symptoms with a weightage of 159.
Symptom StatGives you a statistical analysis of symptoms.The screen includes the symptoms, remedies , percent and number of group remedies against the total number of remedies the symptoms contains.

For instance ‘Absent mindedness’ includes ‘7’ solanaceae remedies, out of 176 overall remedies it contains (7/176), that is solanacease remedies includes ‘3’ percent of symptom totality.
Higher the percentage of a symptom, more significant is that symptom for the group extracted.
‘Delirium Bed springs up suddenly from and escapes’ includes ‘6’ solanaceae remedies from 37 overall remedies which means ‘16’ percent of the symptom totality. Hence this symptom can be considered as one of important symptom for the ‘Solanceae family’
Click on to return back to the results screen.
RemediesClick on this option to view all the remedies you have selected to extract information of , displayed at the extreme right box at the bottom of the screen.
Other options:Right click on a rubric or use the same options from the buttons available at the bottom to apply various symptom options viz: RecordRepertoriseSymptom List All Repertories
For more details of all of these options see the section of ‘Common Features’ under ‘Repertory’
Cross refThemesSimilar WordsSynonymsWord meanings

Favorite Group Symptom:
From the menu bar select ‘Extract’ and then ‘Favorite Group Symptom’
From keyboard type {Alt + X + F}
This feature will include all topics or remedies (group symptoms search results) which have been previously ‘Saved’ from the ‘Extract Group Symptoms’ feature :
Name: This is the ‘topic name’ given by you while saving the results.Chapter: includes the Name of the Repertory and the chapter name from where the results have been extracted.Remedies: includes abbreviations of remedies which you have extracted information of.
To ‘Open’ the favorite topics ,
Highlight any of the topic.Click on O.K.The program starts processing and the information is extracted in a familiar results screen
Create Customised Repertories
Create User Repertory: This repertory can be created by storing any number of ‘Search Results’ from any number of
repertories Provides a faster and easier access to all the symptoms commonly observed by the user in his
practice.
Create Materia Medica Repertory Pick up any reference from the ‘Search Materia Medica’, and then save the ‘Search Results’
in the form of a repertory known as ‘Matmed Repertory’.

Use this feature to create repertory of symptoms which are not well defined in the original repertories
Create Combined Symptom Repertory Combine two or more symptoms into one symptom from any repertories Rubrics having similar expressions can be combined and saved, thus eliminating chances of
missing out any remedy for these symptoms.
My Repertories
Access all the Customised repertories using this feature Record rubrics for repertorisation from the self- created repertorisation Use symptom and remedy options like any other repertory.
Homoeopathy is changing everyday. Research in symptoms and rubrics is adding more and more data and creating more and more references and remedies for new and fresh symptoms.
Hompath overcomes the stagnation of data by providing this user friendly option. You can create your own personal repertories and use all options for it like any other author repertory
Create User Repertory:
The user repertory serves as a flexible feature enabling the user to adapt to the different repertories and their data as per the personal need. This repertory can be created by storing any number of ‘Search Results’ from any number of repertories.
This repertory provides a faster and easier access to all the symptoms commonly observed by the user in his/her practice.
For instance, the user can create a chapter on ‘Fever’ where all the rubrics related to fever selected from various repertories can be stored.
Similarly create repertories on ‘Infants’ and ‘children’, ‘Cancer’ etc. using this feature, by which you will avoid searching through repertories repeatedly.
Creating User Repertory:
The user repertory can be created from the option ‘Search Results’ screen of ‘Repertory search’.The ‘Repertory Search Results’ of any given query will be displayed in the results screen.
For instance all the results of ‘Infants or children’ are displayed in the screen below.
If you are satisfied with the search results, you can save your work for future reference and use.

Click on the option ‘Save as repertory’ to save all the results as a repertory.
A dialogue box stating whether you wish to save the selected rubric as “User Repertory” will appear .
Click on the option “Yes” to save .
In the next screen box, Type any chapter name you wish to save the user repertory.
Click on the option ‘OK’ to save this chapter name in the user repertory.

The program start processing, and ultimately you will get a message
‘Search results successfully saved as User Repertory’Click on OK.
NOTE: A particular repertory (chapter) name given can be used only once.
Create Materia Medica Repertory:Or‘Saving Materia Medica Search Results as Matmed Repertory’:
How often on so many varied occasions have we desired to make a repertory of the references and its remedies from our Materia Medicae?
Though this seems quite impossible Hompath has provided a unique and exclusive solution in this zone as well.
The user can now pick up any reference from the ‘Search Materia Medica’,and then save the ‘Search Results’ in the form of a repertory known as ‘Matmed Repertory’.
The ‘Matmed Repertory’ can later be accessed from the ‘My repertories’ feature.
Let us understand this feature using an illustration.
Follow these simple steps to create your own ‘Matmed Repertory’:
Search for the word ‘Obesity’ in ‘Search Materia Medica’ feature

You will be presented with all the occurrences of word ‘Obesity’ from the all the ‘Materia Medica’ reference books.
To ‘Save Search Results as Matmed Repertory’
Click on to ‘Save Search Results as Matmed Repertory’ You will be presented with the following screen:

The screen shows you two main parts ‘Select Drug Level’ and ‘Add Symptoms’
Select Drug Level:The top of this screen shows you total number of results of the ‘Search query’
For instance the query word ‘Obesity’ has ‘Total Results’ of ‘173’ from the entire Materia medica references
The screen also gives you a view of ‘Drug.’ , ‘Remedy full name’, ‘Level’, ‘Coverage’, and ‘% Coverage’ in that order.
Drug:The ‘Drug’ and ‘Full Name’ are self-explanatory , and it gives you all the Drugs that are covered by the Word you have given query for.
In this case Drug [44] means that in all there are 44 drugs covered by the word ‘Obesity’
Coverage:This feature give you the number of instances the ‘Remedy’ has occurred for the given query word in the Materia Medica references
Like the remedy ‘Calc’ has appeared ‘11’ times , the remedy ‘Graph’ has appeared ‘39’ times etc. for the word ‘Obesity’ in Materia Medica reference books .

% Coverage:This feature give you the calculated percent coverage of the remedy against the total no. of occurrences.
Remedy ‘Calc’ has a coverage of 6.36 % from the overall 173 occurrences of the word ‘Obesity’ as it is present 11 times out of 173 occurrences of obesity
Similarly Remedy ‘Graph’ has a coverage of 22.54 % from the overall 153 occurrences of the word ‘Obesity’ as it is present 39 times out of 173 occurrences of obesity
One can also indirectly infer from this kind of evaluation that the remedy ‘Graph’ is more important that the Remedy ‘Calc’ for the word ‘Obesity’ and so on.
Level:The ‘Level’ gives you the drug mark i.e intensity level of that particular drug.
Hompath has designed certain pre-defined values for the intensity of the drugs depending on the Coverage and the % Coverage.
These are:
Drug Mark or Level 1 -If the % Coverage of the Drug is between Range ‘0’ to ‘0.5’ Drug Mark or Level 2 -If the % Coverage of the Drug is between Range ‘0.6’ to ‘15’ Drug Mark or Level 3 -If the % Coverage of the Drug is between Range ‘16’ to ‘30’ Drug Mark or Level 4 -If the % Coverage of the Drug is between Range ‘31’ to ‘70’ Drug Mark or Level 5 -If the % Coverage of the Drug is between Range ‘71’ to ‘100’
Note: You can also change these default values as per your requirements from the ‘MatMed Options’. Select ‘View’ from main menu and then ‘Options’ to access this option .
Options:The range of % coverage can be changed and saved from this window.Once these values are changed, the intensity of the drugs will depend on the new range given.‘Set default’ option on the same dialog box will change the options back to the default values set by Hompath. Click on ‘x’ to exit this feature.
Select Drug:This option allows you to highlight and jump to any particular drug by typing in the first few letters or directly scrolling the remedies using the drop down arrow in the ‘Select Drug’ box .
Add Drug:You can ‘Add’ a New drug and its ‘Level’ (intensity) to the already existing list of drugs .
For instance say you wish to add a new drug ‘Carc’ [Carcinosin] to the already existing list of ‘Obesity’ drugs.
Choose ‘Carc’ from the drop down list of the ‘Add Drug’ option.
Give the desired intensity (level ‘2’ in this case) for the drug from drop down list of the ‘Level’ option.Click on ‘Add’The Drug ‘Carc’ with level ‘2’ is successfully added to the existing list of drugs.
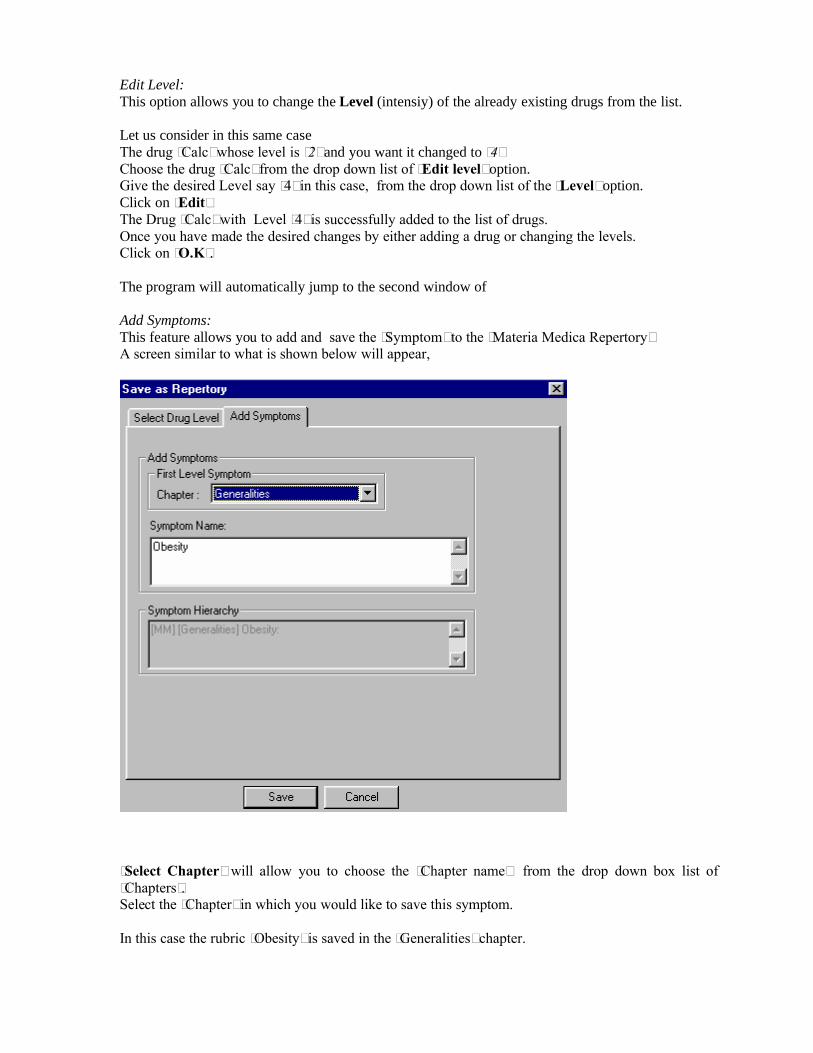
Edit Level:This option allows you to change the Level (intensiy) of the already existing drugs from the list.
Let us consider in this same case The drug ‘Calc’ whose level is ‘2’ and you want it changed to ‘4’Choose the drug ‘Calc’ from the drop down list of ‘Edit level’ option.Give the desired Level say ‘4’ in this case, from the drop down list of the ‘Level’ option.Click on ‘Edit’The Drug ‘Calc’ with Level ‘4’ is successfully added to the list of drugs.Once you have made the desired changes by either adding a drug or changing the levels.Click on ‘O.K’.
The program will automatically jump to the second window of
Add Symptoms: This feature allows you to add and save the ‘Symptom’ to the ‘Materia Medica Repertory’ A screen similar to what is shown below will appear,
‘Select Chapter’ will allow you to choose the ‘Chapter name’ from the drop down box list of ‘Chapters’. Select the ‘Chapter’ in which you would like to save this symptom.
In this case the rubric ‘Obesity’ is saved in the ‘Generalities’ chapter.

‘Symptom Name’ will allow the user to change the name of the symptom, [if desired] by re-naming it in that box.Click on ‘Save’ to finally ‘Save the Repertory’.
A msg appears
Click on OK to return to the search results screen.
Note: In case you have previously added a symptom with the same name, then on clicking ‘Save’ a msg will appear ‘Symptom with same name exist Change the symptom name’In this case you can modify the symptom name and then proceed with ‘Saving this symptom’
The symptom is now saved in the ‘Matmed Repertory’ which can be accessed from ‘My repertory’ in the Classic Module. See ‘Access MatMed Repertory’ under My Repertories for details.
Observe in this Repertory the symptom ‘Obesity’ is displayed along with the related remedies and the new additions.
Symptom Hierarchy
This feature displays the entire symptom in details
Like in the above case: [MM] [Generalities] ObesityThis indicates the rubric is from the ‘MatMed Repertory’, from the ‘Generalities Chapter’ and the Symptom is ‘Obesity’.
Click on ‘ ’ to close this screen and return back to the materia medica search results.
Click on to exit this feature.
Create Combine Repertory:It is a unique type of customised repertory where the user can combine two or more symptoms into one symptom, which can be saved as a combined symptom repertory and / or recorded for repertorisation.
The basic idea behind this feature is to combine, two or more similar symptoms ( from one or more repertorties) into one single symptom, thus including all the remedies for those similar symptoms for repertorisation .This feature eliminates chances of missing out any remedy for the combined symptoms.

For instance the user might want to combine rubrics, like ‘Weeping’ ‘Sobbing’ ‘Crying’ etc. into one symptom so that all the remedies present under these similar expressions can be included for repertorisation.
Symptoms can be combined from:
Repertory ScreenRepertory search results screenMy Repertories (all customised repertories)
Let us understand this feature with the help of an illustration For instance combine these following similar symptoms to save it in the repertory
Absent-mindedForgetfulAbsorbed buried in thoughts
Let us say the user wants to combine these symptoms from the ‘Complete Mind’ RepertorySelect ‘Complete’ Repertory and then ‘Mind’ Chapter. Jump to the first symptom of ‘Absent-minded’
Click on ‘Combine’You will be presented with the following screen

Currently the screen is showing ‘Absent-minded’ along with its remedies (176). One can sort the remedies according to the ‘Drug Mark’ i.e intensity OR ‘Remedy’ i.e alphabetically.
Click on ‘Add More’ button to combine the other symptoms.You will return back to the ‘Complete Mind’ Chapter.
Next Jump to the second symptom of ‘Forgetfulness’Again click on ‘Combine’
The second symptom of ‘Forgetfulness’ will be added to the ‘Combine Symptoms’ screen.Again click on ‘Combine’
Add the last symptom ‘Absorbed buried in thoughts’ in a similar fashion.
Incase you want to delete any of this list, highlight the symptom and click on ‘Delete’ to remove it from the list otherwise proceed further to combine these three symptoms into one.

Click on ‘Combine’ from this screen
A screen will be presented, where you can give a name to this combined symptom and add it under the appropriate chapter.
As in this instance the symptom name given is ‘Inclined to Forget’ and the symptom is added under the ‘Mind’ chapter.

Note: One can save the symptom either in ‘Mind’(all mind symptoms) Or‘General’ (all general symptoms) Or‘Other’ (all symptoms other than mind or general symptoms)
This categorization will help when you record these symptoms & want to view the specific repertorisation based on only Mind symptoms or Generalities symptoms etc. (clipboard analysis)
Finally Click on ‘Select’ to combine the Symptom.

Save:Click on ‘Save’ if you want to first save this symptom under the ‘Combine Symptoms Repertory for future reference’
On doing so, you will be presented with a message
‘Would you like to record this symptom too?’Click on ‘Yes’ to record the symptom for repertorisation.Click on ‘No’ if you only want to only save the symptom and not record it.
Record: Click on ‘Record’ if you want to first record this symptom for repertorisation.On doing so, you will be presented with a message ‘Would you like to save this symptom in Combined Symptom Repertory for future reference’Click on ‘Yes’ to save the symptom for future reference.Click on ‘No’ if you only want to record the symptom and not save it.
Click on to close this screen.
Tip: One can combine multiple symptoms from different repertories and different chapters.
For instance you can combine ‘ailments from weather in cloudy’ from ‘Complete mind’, ‘Cloudy weather agg.’ from ‘Kent Generalities’ , ‘Weather cloudy agg’ from ‘Boenninghausen Agg and Amel’ and so on by switching on to different chapters of different repertories {See ‘Rubric Selection’ on how to select multiple chapters}
All the saved combined symptoms can now be accessed from the ‘Combine Symptoms Repertory’ under My Repertories section.
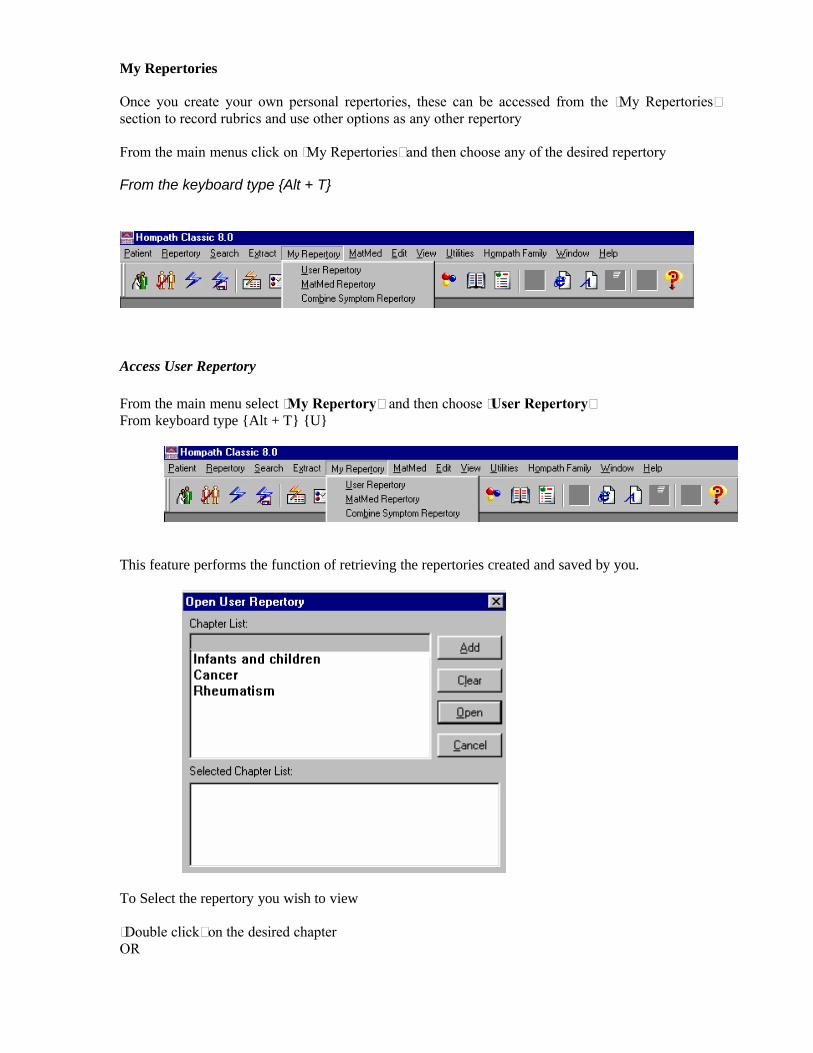
My Repertories
Once you create your own personal repertories, these can be accessed from the ‘My Repertories’ section to record rubrics and use other options as any other repertory
From the main menus click on ‘My Repertories’ and then choose any of the desired repertory
From the keyboard type {Alt + T}
Access User Repertory
From the main menu select ‘My Repertory’ and then choose ‘User Repertory’From keyboard type {Alt + T} {U}
This feature performs the function of retrieving the repertories created and saved by you.
To Select the repertory you wish to view
‘Double click’ on the desired chapter OR
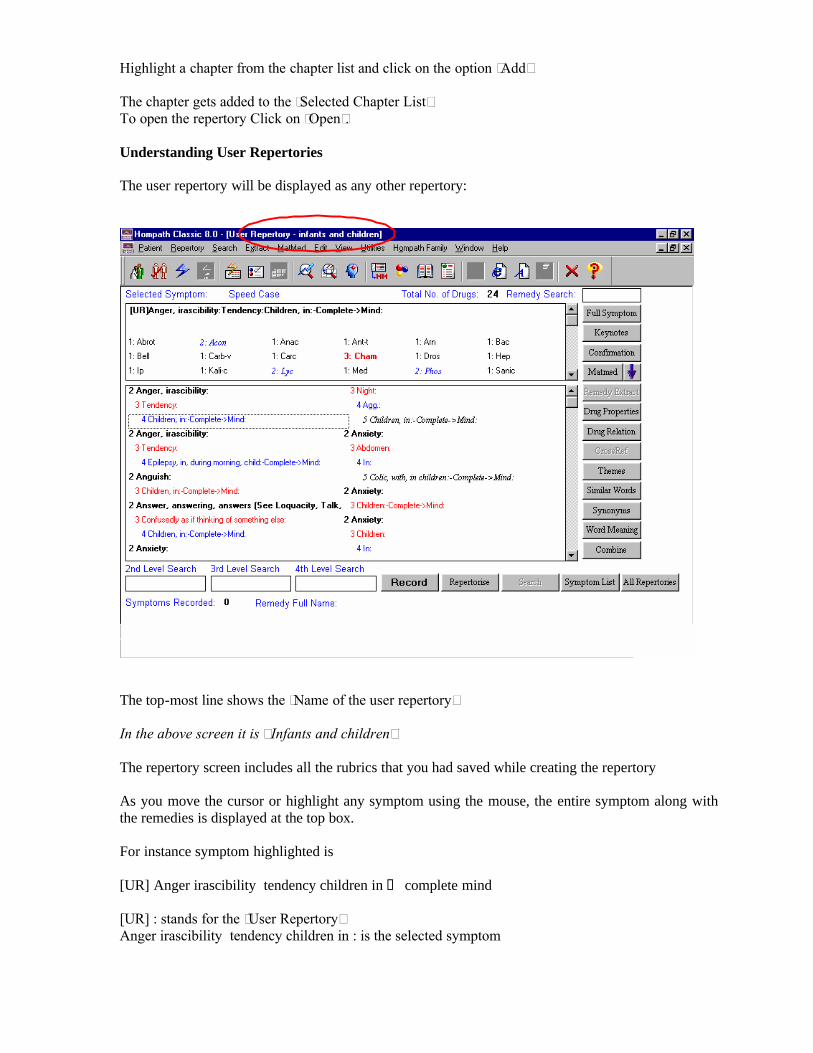
Highlight a chapter from the chapter list and click on the option ‘Add’
The chapter gets added to the ‘Selected Chapter List’To open the repertory Click on ‘Open’.
Understanding User Repertories
The user repertory will be displayed as any other repertory:
The top-most line shows the ‘Name of the user repertory’
In the above screen it is “Infants and children”
The repertory screen includes all the rubrics that you had saved while creating the repertory
As you move the cursor or highlight any symptom using the mouse, the entire symptom along with the remedies is displayed at the top box.
For instance symptom highlighted is
[UR] Anger irascibility tendency children in complete mind
[UR] : stands for the ‘User Repertory’Anger irascibility tendency children in : is the selected symptom
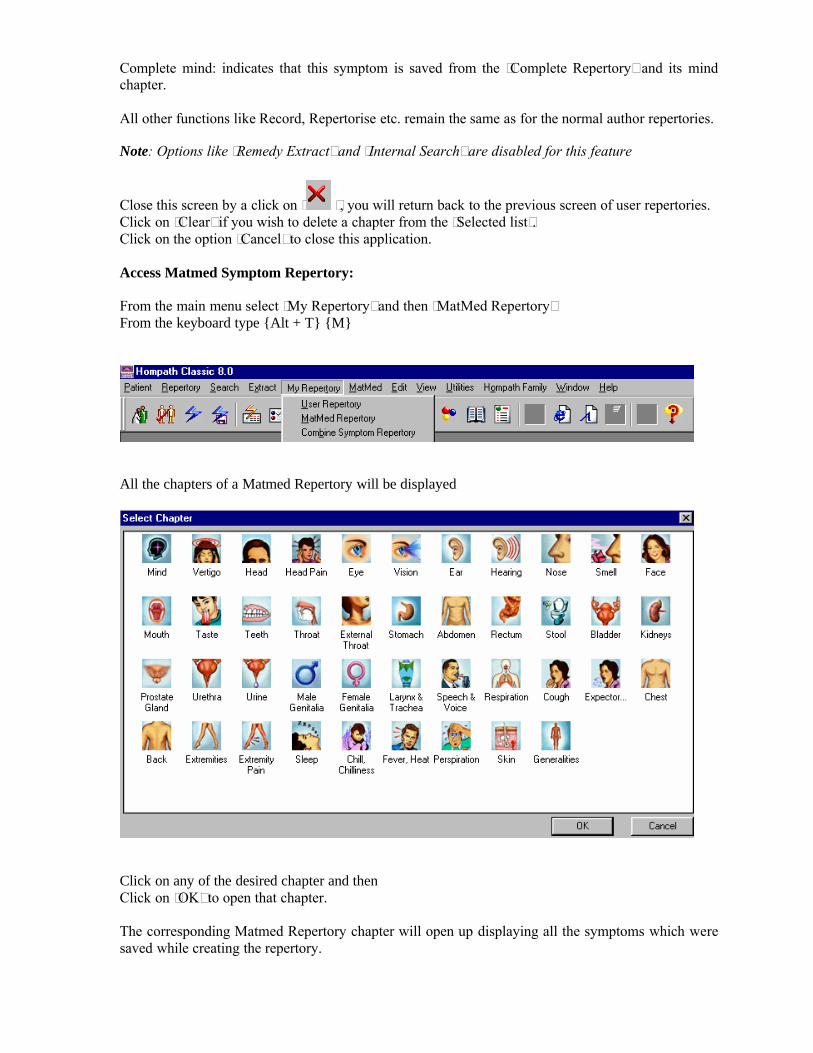
Complete mind: indicates that this symptom is saved from the ‘Complete Repertory’ and its mind chapter.
All other functions like Record, Repertorise etc. remain the same as for the normal author repertories.
Note: Options like ‘Remedy Extract’ and ‘Internal Search’ are disabled for this feature
Close this screen by a click on ‘ ’, you will return back to the previous screen of user repertories.Click on ‘Clear’ if you wish to delete a chapter from the ‘Selected list’.Click on the option ‘Cancel’ to close this application.
Access Matmed Symptom Repertory:
From the main menu select ‘My Repertory’ and then ‘MatMed Repertory’From the keyboard type {Alt + T} {M}
All the chapters of a Matmed Repertory will be displayed
Click on any of the desired chapter and thenClick on ‘OK’ to open that chapter.
The corresponding Matmed Repertory chapter will open up displaying all the symptoms which were saved while creating the repertory.

Understanding Matmed Repertory
The repertory screen includes all the rubrics that you had saved from the materia medica references as repertory rubric.
Note: The first two rubrics ‘ Sample 1’ and ‘Sample 2’ are illustrative rubrics , and hence cannot be used for recording purposes.
As you move the cursor or highlight any symptom using the mouse, the entire symptom along with the remedies is displayed at the top box.
For instance the symptom highlighted is
[MM] [Generalities] Obesity [MM] stands for the ‘Matmed Repertory’[Generalities] indicates that while saving the symptom, it was saved in the ‘Generalities’ chapter‘Obesity’ is the symptom name which was given while creating the symptom.
All other functions like ‘Remedy list’ , ‘Record’ , ‘Repertorise’ etc . remain the same as for the normal author repertories.
Note: Options like ‘Remedy Extract’ and ‘Internal Search’ are disabled for this feature

Click on ‘ ’, to close this repertory.
Access Combine Symptom Repertory
From main menu select ‘My Repertory’ and then ‘Combined Symptom Repertory’. From the keyboard type {Alt + T} {B}
All symptoms combined and saved through the ‘Combine’ feature will be displayed in this screen.
Understanding Combined Symptom Repertory
The repertory screen includes all the rubrics that you had saved while creating the repertory
All symptoms irrespective of whether they were saved in “Mind’, ‘Generalities’ or ‘Other’ sections will be displayed in this combined symptom repertory.
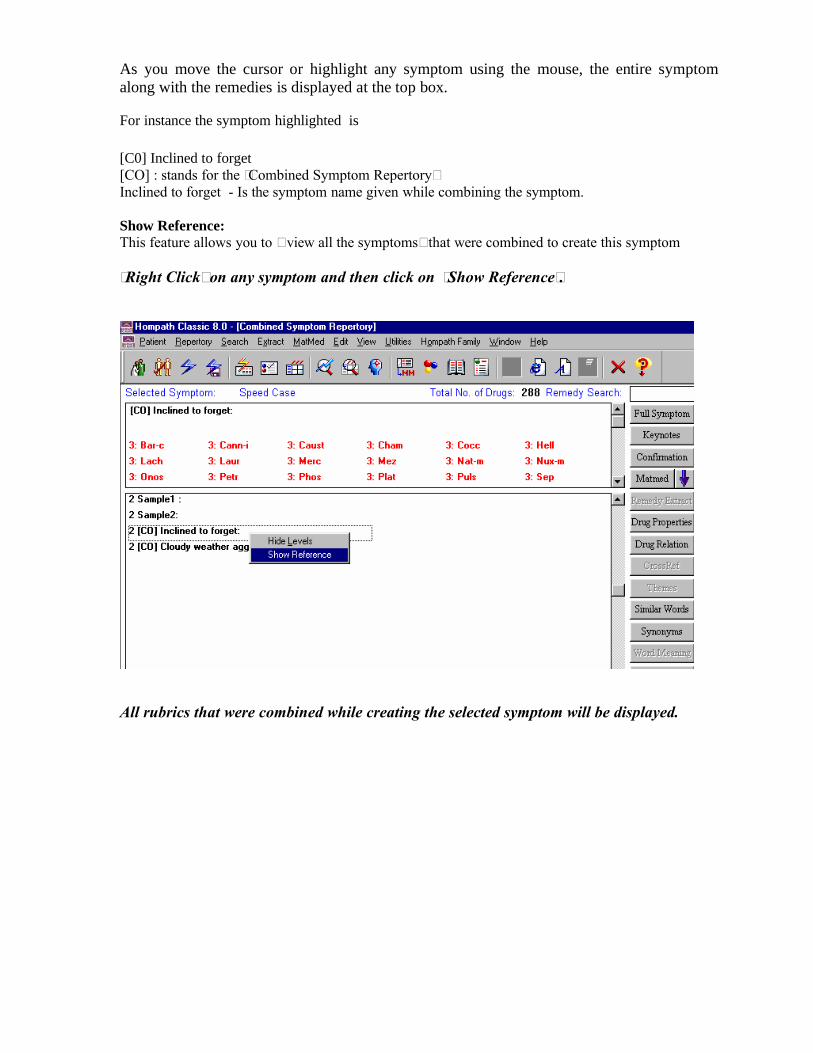
As you move the cursor or highlight any symptom using the mouse, the entire symptom along with the remedies is displayed at the top box.
For instance the symptom highlighted is
[C0] Inclined to forget [CO] : stands for the ‘Combined Symptom Repertory’Inclined to forget - Is the symptom name given while combining the symptom.
Show Reference:This feature allows you to “ view all the symptoms” that were combined to create this symptom
‘Right Click’ on any symptom and then click on ‘Show Reference’.
All rubrics that were combined while creating the selected symptom will be displayed.

Click on OK to close the window and return back to the repertory.
All other functions like ‘Record’, ‘Repertorise’ etc. remain the same as for the normal author repertories.
Note: Options like ‘Remedy Extract’ and ‘Internal Search’ are disabled for this feature
Click on ‘ ’, to close this repertory.
Materia Medica
Open Materia Medica {F8}
Read remedies from any of the Materia Medicae installed in the program. Select any Materia book and then read any of its remedy Select any Remedy and then read it from all the books it is available from Choose the author of your choice to read his authored materia medicae Read Keynotes / Drug Relationships / Drug Properties of the selected drug. Compare Specific sections of remedies in an eye pleasing format Add remedies significant to you in your ‘Favorites’ folder.
Search Materia Medica {F6} Search for any specific word or combination of words in all or any of the installed Materia
medicae
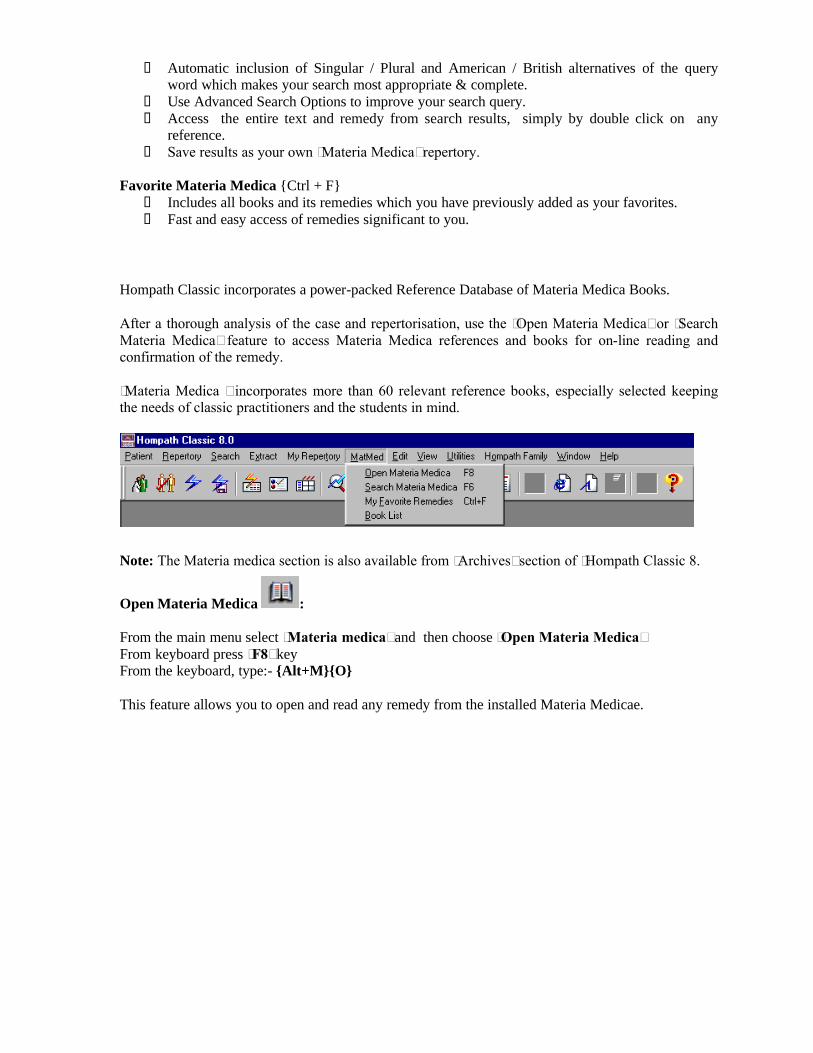
Automatic inclusion of Singular / Plural and American / British alternatives of the query word which makes your search most appropriate & complete.
Use Advanced Search Options to improve your search query. Access the entire text and remedy from search results, simply by double click on any
reference. Save results as your own ‘Materia Medica’ repertory.
Favorite Materia Medica {Ctrl + F} Includes all books and its remedies which you have previously added as your favorites. Fast and easy access of remedies significant to you.
Hompath Classic incorporates a power-packed Reference Database of Materia Medica Books.
After a thorough analysis of the case and repertorisation, use the ‘Open Materia Medica’ or ‘Search Materia Medica’ feature to access Materia Medica references and books for on-line reading and confirmation of the remedy.
‘Materia Medica ’ incorporates more than 60 relevant reference books, especially selected keeping the needs of classic practitioners and the students in mind.
Note: The Materia medica section is also available from ‘Archives’ section of ‘Hompath Classic 8.
Open Materia Medica :
From the main menu select ‘Materia medica’ and then choose ‘Open Materia Medica’From keyboard press ‘F8’ keyFrom the keyboard, type:- {Alt+M}{O}
This feature allows you to open and read any remedy from the installed Materia Medicae.
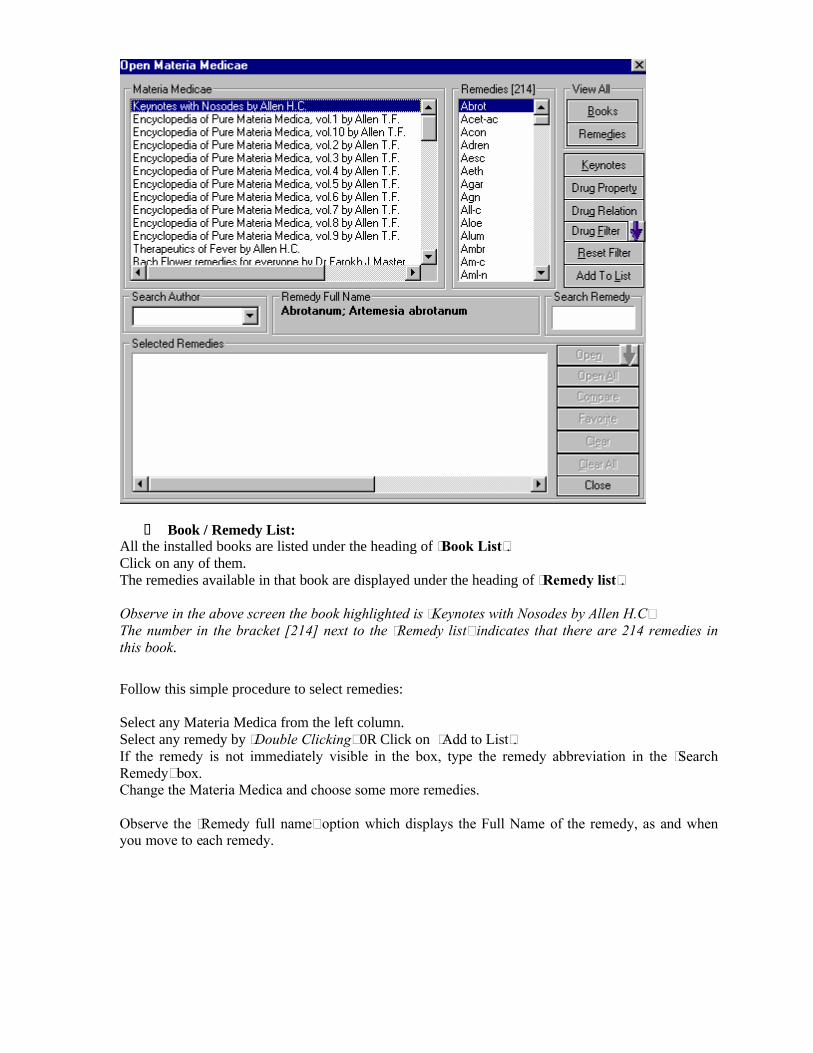
Book / Remedy List:All the installed books are listed under the heading of ‘Book List’. Click on any of them.The remedies available in that book are displayed under the heading of ‘Remedy list’.
Observe in the above screen the book highlighted is ‘Keynotes with Nosodes by Allen H.C” The number in the bracket [214] next to the ‘Remedy list’ indicates that there are 214 remedies in this book.
Follow this simple procedure to select remedies:
Select any Materia Medica from the left column.Select any remedy by ‘Double Clicking’ 0R Click on ‘Add to List’. If the remedy is not immediately visible in the box, type the remedy abbreviation in the ‘Search Remedy’ box.Change the Materia Medica and choose some more remedies.
Observe the ‘Remedy full name’ option which displays the Full Name of the remedy, as and when you move to each remedy.
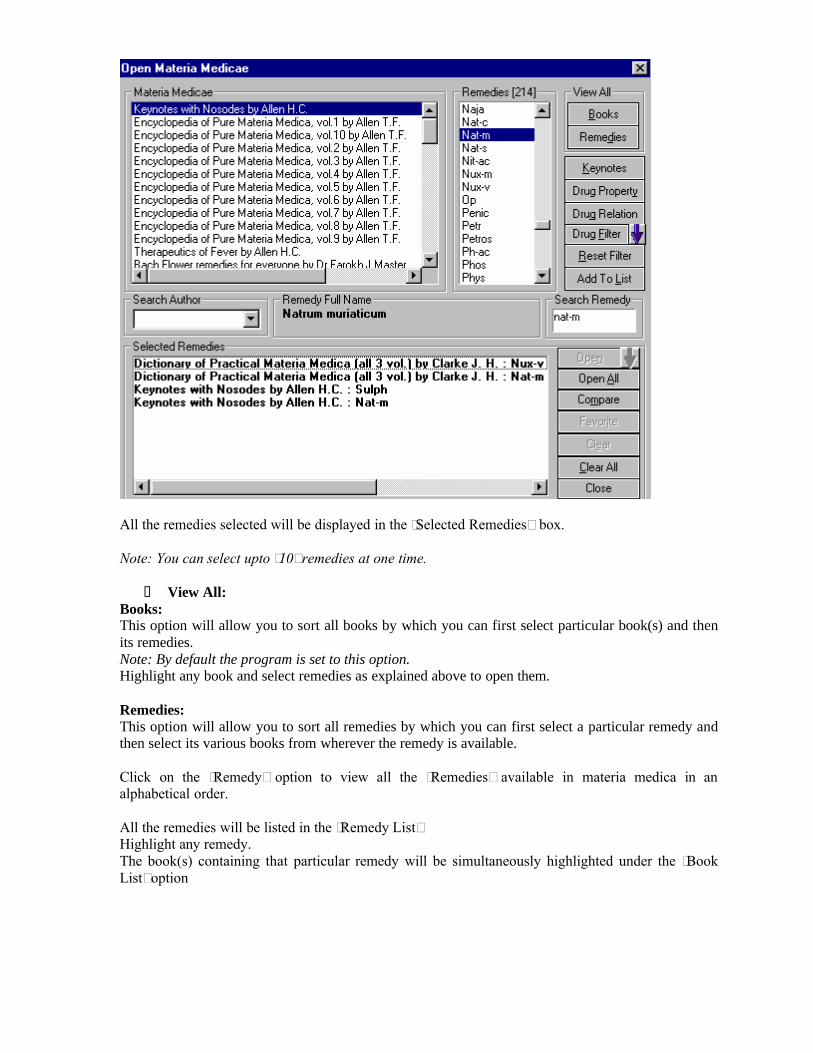
All the remedies selected will be displayed in the ‘Selected Remedies’ box.
Note: You can select upto ‘10’ remedies at one time.
View All:Books:This option will allow you to sort all books by which you can first select particular book(s) and then its remedies.Note: By default the program is set to this option.Highlight any book and select remedies as explained above to open them.
Remedies: This option will allow you to sort all remedies by which you can first select a particular remedy and then select its various books from wherever the remedy is available.
Click on the ‘Remedy’ option to view all the ‘Remedies’ available in materia medica in an alphabetical order.
All the remedies will be listed in the ‘Remedy List’Highlight any remedy.The book(s) containing that particular remedy will be simultaneously highlighted under the ‘Book List’ option

Select the book from where you wish to read the remedy either by ‘Double click’ OR ‘Add to list’option.
The remedy appears in the ‘Selected Topics’ box.
Keynotes: Highlight any remedy from the ‘Remedy List’ and click on ‘Keynotes’ to read the red line symptoms of that remedy.
Drug Property:Highlight any remedy from the ‘Remedy List’ and click on ‘Drug Properties’ to view full name, basic properties, kingdom, class type, etc. of that remedy.
Drug Relation:Highlight any remedy from the ‘Remedy List’ and click on ‘Drug Relation’ to view the complementary, inimical and antidotal relations of the selected remedy.
Note: Keynotes / Drug Properties / Drug Relation of certain drugs may not be available, in that case you will be presented with a appropriate message
Drug Filter:‘Drug filter’ allows you to filter remedies using either drug properties, mineral, plant or animal filters and then read remedies from there.
For instance Select book ‘Dictionary of Practical Materia medica (all 3 vol) by Clarke J.

Click on the drop down list box of ‘Drug Filter’ and select ‘Animal Filter’.
Select ‘Snakes’ from the Animal types.In the remedy list, nine (9) snake remedies are displayed meaning that Clarke’s Materia Medica includes these nine snake remedies.Now, double click on each of these remedies to add them to ‘Selected Topics’ list.

Click on ‘Open’ or ‘Open all’ to read them.
Similarly one can apply other filters of drug properties, plant and animal filters etc. to filter remedies and read them.
Reset Filter:Click on ‘Reset Filter’ to reset all applied filters and revert back to all remedies.
Add to list:Click on ‘Add to list’ to add remedies to the ‘Selected Remedies’ list, for you to open and read them.
Search Author:Search Author’ has a drop down list of all the authors listed alphabetically to help usread remedies written by any one particular author & his different books.
For instance, you want to read Materia medica remedies as written by Dr. Hering. Choose Hering C. from the ‘Search Author’ list.
All books authored by Dr. Hering from the installed materia medicae are displayed in the ‘Book List’: Select the book and the remedy (ies) you wish to read and add it to the ‘Selected Topics’ box.
Selected Topics The ‘Selected Topics’ box displays all the remedies you have selected to read.
Open:
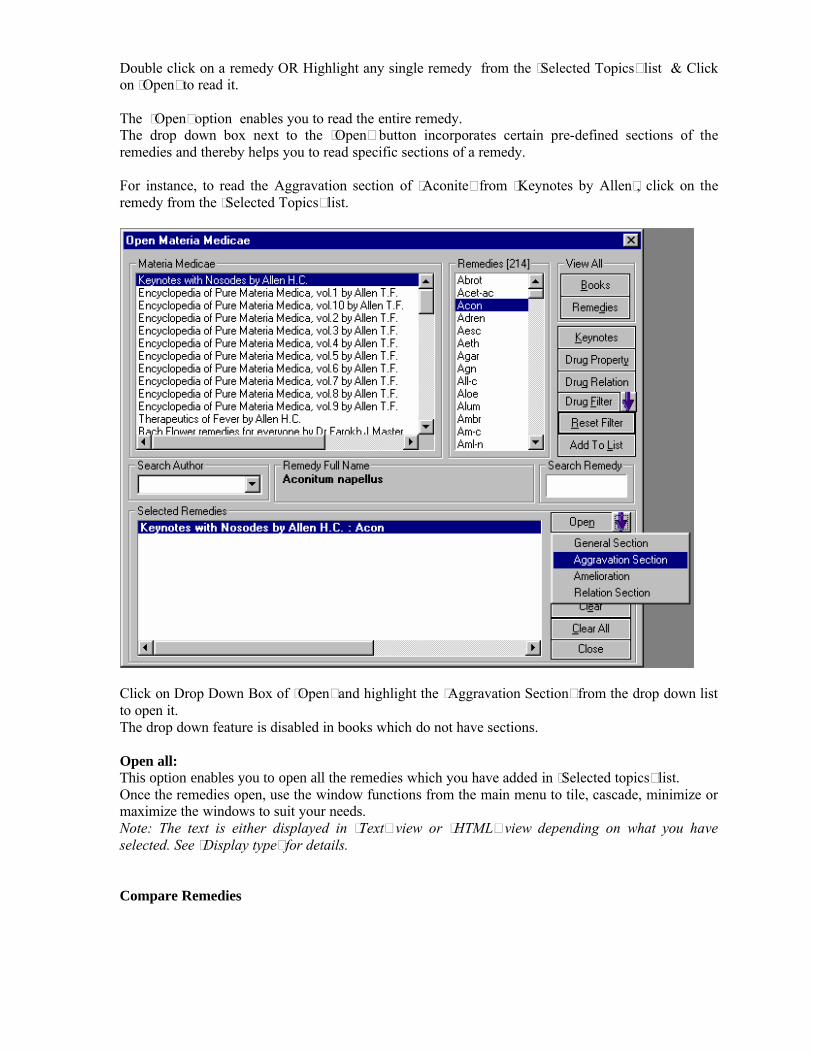
Double click on a remedy OR Highlight any single remedy from the ‘Selected Topics’ list & Click on ‘Open’ to read it.
The ‘Open’ option enables you to read the entire remedy.The drop down box next to the ‘Open’ button incorporates certain pre-defined sections of the remedies and thereby helps you to read specific sections of a remedy.
For instance, to read the Aggravation section of ‘Aconite’ from ‘Keynotes by Allen’, click on the remedy from the ‘Selected Topics’ list.
Click on Drop Down Box of ‘Open’ and highlight the ‘Aggravation Section’ from the drop down list to open it.The drop down feature is disabled in books which do not have sections.
Open all:This option enables you to open all the remedies which you have added in ‘Selected topics’ list.Once the remedies open, use the window functions from the main menu to tile, cascade, minimize or maximize the windows to suit your needs. Note: The text is either displayed in ‘Text’ view or ‘HTML’ view depending on what you have selected. See ‘Display type’ for details.
Compare Remedies

This feature allows you to compare specific sections of remedies in an eye pleasing format.
For instance Select ‘Keynotes by allen’ book.Select two remedies ‘Nat-m’ and ‘Sulph’ from this book and add it to the ‘Selected Remedies’ list.Click on ‘Compare’.The following screen will be displayed:
Observe the screen for following:The ‘Select Topic’ list all the remedies you have taken up for comparison from where one has to select a maximum of 4 remedies to compare.
The ‘Select the Section to compare’ allows you to change to different sections of the selected remedies and then compare .
‘Open Section’: Click on this button after you change the section using the above feature to execute the compare.
& These buttons allow you to jump to & fro from one remedy to other if more than two remedies are selected for comparison. Highlight all remedies from the ‘selected topics’ list before using this option.
& These buttons allow automatic scrolling of the text page up and down.
Observe the tool bar for following

allows you to increase the font size allows you to decrease the font size.
‘Search’ box allows you to search for a word within the opened text. ‘Go’ allows you to execute the search.
The Left and Right radio buttons allows you change the focus either to the left or the right side remedy, and thereafter apply all above options to it.
For eg. If you want to find a word or change the font of the left displayed remedy, simply tick the left radio button, and then apply these options to the remedy.
Add remedies to your favoritesThis option allows you to add all your favorite remedies in the ‘favorites’ section for future reference.
Highlight each book and remedy one by one from the ‘Selected Remedies’ list and then click on the ‘Favorite’ button.
An appropriate message that the book is added to your Favorites appears.
Click on ‘OK’.Similarly add all the desired remedies one by one to the favorites section.
Clear: Highlight any single remedy and click on ‘Clear’ to delete any single remedy from the ‘Selected topics’ list.
Clear all:‘Clear all’ allows you to reset all remedies from the ‘Selected Topics’ list.
Close:Allows you to exit the Open Materia Medica feature

Search Materia Medica
From the main menu select ‘Materia Medica’ and then choose ‘Search Materia Medica’From keyboard press ‘F6’ keyFrom keyboard type: {Alt+M}{S}
The ‘Materia Medica Search’ greatly enhances your prescription quality since it permits more combinations and sheds light on remedies that you could have never thought about.
Use this feature to get more information on a remedy or disease condition, or when you require references or to create custom-made Materia Medica or notes/presentations.
On activation of this feature, the following screen appears:
Search for / Query‘Search For’- Initially the blinking cursor is placed in the box below this message. You can type in the word you are searching for in this box.
A word list containing all the words [except common words like the ‘the’, ‘an’, ‘for’] found in the books are provided.
As you type, observe the word list, moving up to the nearest word you have typed. Simultaneously, the typed word also appears in the ‘Query’ box. You can double click on a word from the list box, which will then appear in the ‘Query box’.

Options:Once the Search query is given, one can now ‘Search’ for this word using two different Options
Quick SearchAdv. Search.
Quick Search ‘Quick Search’ option does a ‘simple search’ of the word and gives you the search results from all the installed materia medica. It also gives you the option to save these results as a Mat med Repertory.
For instance Type ‘Melancholy’ in the ‘Search For’ box
Select ‘Quick’ as the ‘Option’.Click on ‘Search’ to execute the query.

The software searches through the entire database of Materia Medicae books and compiles all occurrences that are found.
Advanced Search: Like ‘Quick’ Search, the ‘Advanced Search’ searches for the query word and displays results from all the installed materia medica and also gives you the option to save the results as a Mat Med Repertory. This search also allows you to ‘Search for a remedy within the search results’
For instance, Type the same word ‘Melancholy’ in the ‘Search For’ boxNow Select ‘Adv Search’ as the ‘Option’.Click on ‘Search’ to execute the query.The software displays all the results of the ‘query’ word.
In addition to this, observe the two buttons available on the top right corner [marked with a arrow in this screen]
a. Search: [Search for a remedy within the search results]:
The ‘Search’ box allows you to search for any one remedy from all the search results.
For instance: If you wish to find out how many times & in which reference books the word ‘Melancholy’ has appeared in the remedy ‘Ign (Ignatia)’ Simply type the remedy abbrv. ‘Ign’ in the Search box.
Click on ‘Find a Remedy’ .

The ‘Search Results’ will now show all occurrences of ‘Melancholy’ wherever listed in the remedy ‘Ignatia’ and from whichever book available.Note: Only short universal abbreviations of the remedies should be used for this feature for eg. ‘Ign’ for ‘Ignatia’, ‘Lyc’ for Lycopodium, ‘Phos’ for ‘Phosphorus’ etc..Revert back to All
Remedies by clicking on ‘Reset’ button.
Saving the Search Results as a Repertory :
The user can now pick up any reference from the ‘Search Materia Medica’,and then save the ‘Search Results’ in the form of a repertory known as ‘Matmed Repertory’.
Use this feature to create repertory of symptoms which are not well defined in the original repertories
For details of this feature See ‘Create Matmed Repertory’ section of ‘Create Customised Repertories’
Drug Filters / Remedy ListThis feature allows you to filter remedies using these options to restrict the ‘search query’ to only these ‘selected remedies’
Drug Filters
Choose ‘Drug Filter’ and from there Select either ‘Mineral, ‘Plant’, ‘Animal’, ‘More Filters’ to filter remedies you want to restrict the search to.
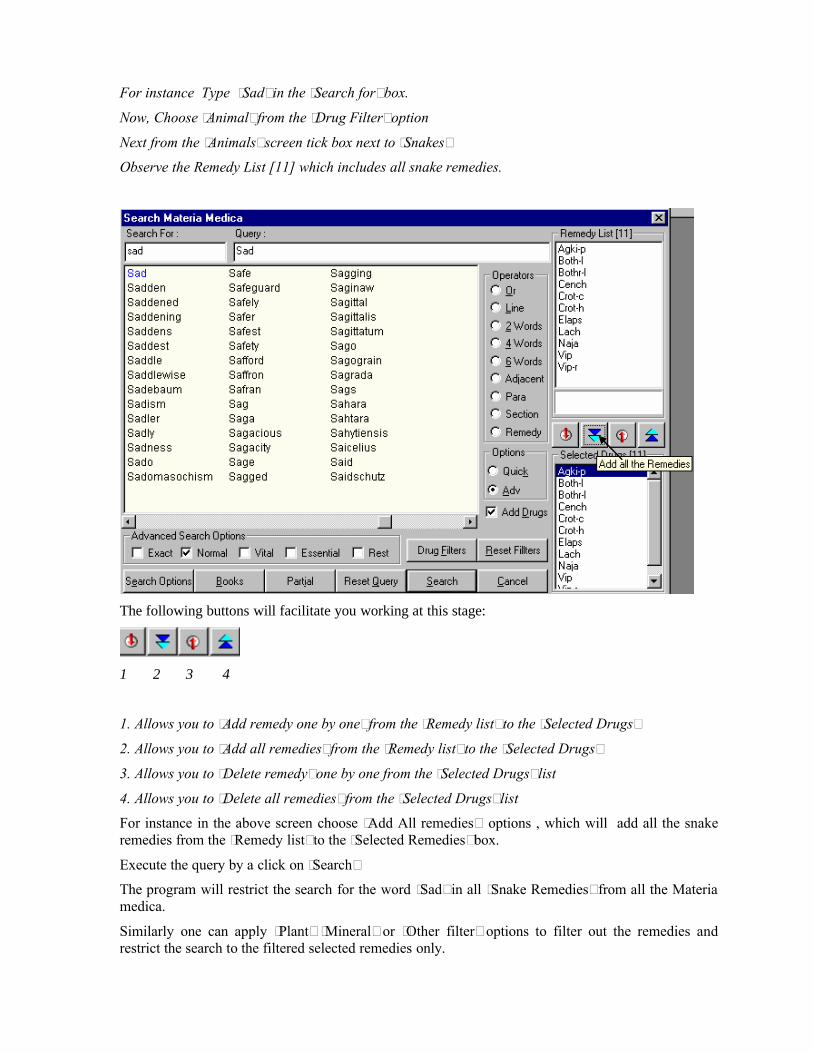
For instance Type ‘Sad’ in the ‘Search for’ box.
Now, Choose ‘Animal’ from the ‘Drug Filter’ option
Next from the ‘Animals’ screen tick box next to ‘Snakes’
Observe the Remedy List [11] which includes all snake remedies.
The following buttons will facilitate you working at this stage:
1 2 3 4
1. Allows you to ‘Add remedy one by one’ from the ‘Remedy list’ to the ‘Selected Drugs’
2. Allows you to ‘Add all remedies’ from the ‘Remedy list’ to the ‘Selected Drugs’
3. Allows you to ‘Delete remedy’ one by one from the ‘Selected Drugs’ list
4. Allows you to ‘Delete all remedies’ from the ‘Selected Drugs’ list
For instance in the above screen choose ‘Add All remedies’ options , which will add all the snake remedies from the ‘Remedy list’ to the ‘Selected Remedies’ box.
Execute the query by a click on ‘Search’
The program will restrict the search for the word ‘Sad’ in all ‘Snake Remedies’ from all the Materia medica.
Similarly one can apply ‘Plant’ ‘Mineral’ or ‘Other filter’ options to filter out the remedies and restrict the search to the filtered selected remedies only.

You can also choose remedies randomly one by one to restrict the search of the query word only for the chosen remedies. For this, simply ‘Double Click’ the desired remedies from the ‘Remedy list’ to add it to the ‘Selected Drugs’ list
Use the option of ‘Reset Filters’ to reset the entire list of remedies
Add Drugs: This check box is automatically ticked once you add remedies to the ‘Selected Remedies’ box.
This ensures that your ‘search query’ will be restricted to only the ‘Selected Remedies’ you have given.
Note: To restrict your search query to the remedies you have added to the ‘Selected Remedies’ list, the ‘Add drugs’ check box option should be ticked.
Advanced Search Options:This feature gives you different search options to include more ‘Related Words’ to the word(s) you have given query for.
For instance, ‘Gloomy’ and ‘Grief’ are very closely related to the word ‘Sad’.
How often have you wished that when you search for the word ‘Sad’ it should incorporate results of ‘Gloomy’ and ‘Grief’ as well!
Hompath has made this possible for you, thus making your search more easy and complete.
Various ‘Advanced Search Options’ available are:
1.Exact:This option will include search results for the ‘exact’ word you have given query for.
For instance, Type in ‘Diarrhoea’ in the ‘Search For’ query box. Check the ‘Exact’ option from the ‘Search Options’Click on ‘Search’ to execute the Query.
The Search Results will give instances of the ‘Exact’ word ‘Diarrhoea’ which has 13869 occurrences available in the entire Materia Medica references.
2.Normal: This option will include search results for the ‘exact’ word and its ‘plural’ form plus the ‘American’ and the ‘British’ English alternatives of the query word.
For instance, Search for the ‘Diarrhoea’Check the ‘Normal’ option from the ‘Search OptionClick on ‘Search’
The Search Results will include ‘Diarrhoea’ & its plural ‘Diarrhoeas’ + ‘Diarrhea [American English] and its plural ‘Diarrheas’ The results, are now 14723 occurrences as compared to the 13869 previous results!
Note:. By Default Hompath has kept the ‘Normal’ option as checked, as this will be the most commonly used option.
3. Vital / Essential / Rest Options:These are more advanced options which allow the user to improve or broaden the search results with the help of certain pre-defined ‘Related words’.

Each main word includes a list of related words (Similar Words) divided into three categories. The most important related words are included in ‘Vital’ list, the next important are included in the ‘Essential’ list and the last important are included in the ‘Rest’ list.
a. Vital: These include words which either directly ‘mean’ or are the ‘most closely related’ words to the main word.For instance, Type ‘Sad’ in the Search Query.Now Check ‘Vital’ as the Search Option.Execute the query by clicking on ‘Search’The Search Results will now include words like ‘Sadness’, ‘Gloomy’, ‘Brooding’ ‘Sorrowful’etc.
Thus the significance of ‘Vital’ words is to allow the user to broaden his ‘Search’ criteria with inclusion of the most important related words.
b. Essential: These include words which have an indirect bearing to the main word and hence cannot be overlooked.
With the same example of ‘Sad’ as the Search Query.Now Check ‘Essential’ as the Search Option.Click on ‘Search’The Search Results will now include words like ‘Cheerless’, ‘Depressed’ , ‘Doleful’, ‘Sombre’ etc, words which are next closely related to the word ‘Sad’
c. Rest: These will include words which are in some way or the other related to the main word.
Again with the same example of ‘Sad’ as the Search Query.Check ‘Rest’ as the Search Option.Click on ‘Search’The Search Results will now include words like ‘Depress’ ,‘Grieved’ , ‘Mournful’ etc. The ‘Rest’ words can be considered as the least important ‘Related words’ to the main word.
For more information on this feature see ‘Similar Words’ section, of ‘Common Features’ under Repertory.
Note: Hompath gives you option not only to check each of these above options separately, but also one can check two or more options at one given time to include it in the Search.
For instance: Check option of only ‘Vital’ words for the word ‘Sad’ . The results are ‘10837’. Similarly now check the option of ‘Vital’ and ‘Essential’ words simultaneously. The results are ‘13924’ in number.
Inclusion of “Rest’ words will similarly further increase the number of search results.
Search Options:The ‘Search Options’ is similar to using advanced search options, except that the user is allowed toinclude single or multiple words from the pre-defined list depending on his requirements, and thereby make his own permutations and combinations.
For instance type the same query ‘Sad’ in the ‘Search for’ box of Search Materia Medica.Click on ‘Search Options’
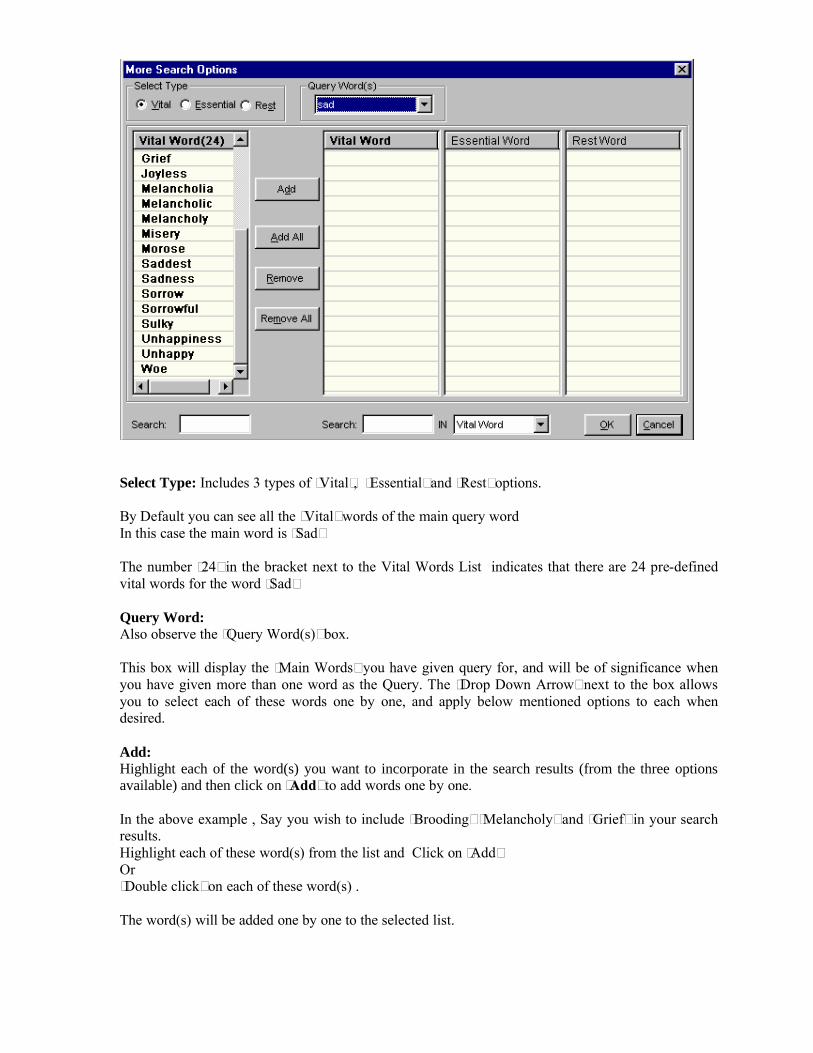
Select Type: Includes 3 types of ‘Vital’, ‘Essential’ and ‘Rest’ options.
By Default you can see all the ‘Vital’ words of the main query word In this case the main word is ‘Sad’
The number ‘24’ in the bracket next to the Vital Words List indicates that there are 24 pre-defined vital words for the word ‘Sad’
Query Word:Also observe the ‘Query Word(s)’ box.
This box will display the ‘Main Words’ you have given query for, and will be of significance when you have given more than one word as the Query. The ‘Drop Down Arrow’ next to the box allows you to select each of these words one by one, and apply below mentioned options to each when desired.
Add:Highlight each of the word(s) you want to incorporate in the search results (from the three options available) and then click on ‘Add’ to add words one by one.
In the above example , Say you wish to include ‘Brooding’ ‘Melancholy’ and ‘Grief’ in your search results.Highlight each of these word(s) from the list and Click on ‘Add’ Or‘Double click’ on each of these word(s) .
The word(s) will be added one by one to the selected list.
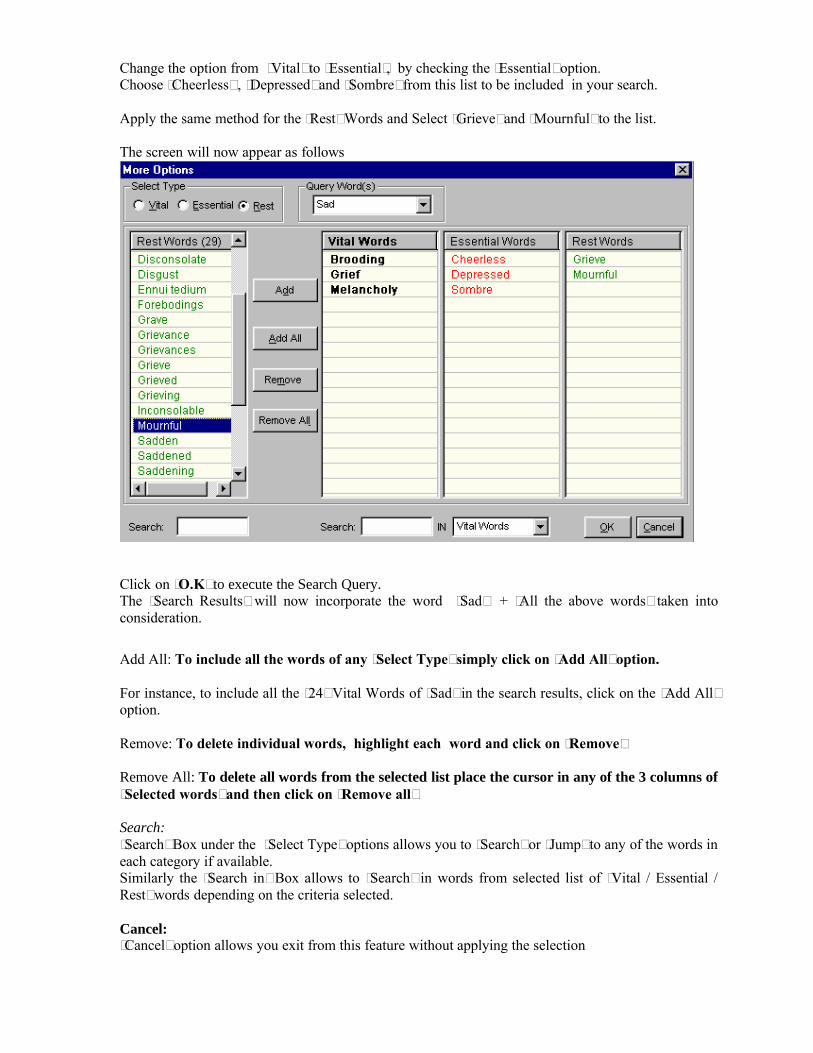
Change the option from ‘Vital’ to ‘Essential’, by checking the ‘Essential’ option.Choose ‘Cheerless’ , ‘Depressed’ and ‘Sombre’ from this list to be included in your search.
Apply the same method for the ‘Rest’ Words and Select ‘Grieve’ and ‘Mournful’ to the list.
The screen will now appear as follows
Click on ‘O.K’ to execute the Search Query.The ‘Search Results’ will now incorporate the word ‘Sad’ + ‘All the above words’ taken into consideration.
Add All: To include all the words of any ‘Select Type’ simply click on ‘Add All’ option.
For instance, to include all the ‘24’ Vital Words of ‘Sad’ in the search results, click on the ‘Add All’ option.
Remove: To delete individual words, highlight each word and click on ‘Remove’
Remove All: To delete all words from the selected list place the cursor in any of the 3 columns of ‘Selected words’ and then click on ‘Remove all’
Search: ‘Search’ Box under the ‘Select Type’ options allows you to ‘Search’ or ‘Jump’ to any of the words in each category if available.Similarly the ‘Search in’ Box allows to ‘Search’ in words from selected list of ‘Vital / Essential / Rest’ words depending on the criteria selected.
Cancel:‘Cancel’ option allows you exit from this feature without applying the selection

Books:You may want to limit the search operation to specific books or Materia Medicae. In that case Click on the ‘Books’ to select the desired books and remedies.
As you click on a book name, from the ‘Book List’ the list of remedies available in the selected book are displayed in the ‘ Remedy / Section’ list box as their abbreviations.
Select the desired remedies by double clicking on each remedy abbreviation or highlight any
remedy and click on the ‘ ’ button . The selected remedies get displayed in the ‘Selected Remedies’ list box.
To facilitate easy search of remedies, a ‘Search’ box is provided for you to type in the remedy name. You may also use the vertical scroll bar to reach any specific remedy.
To remove any Unwanted Book or Remedy click on after highlighting it from the ‘Selected Remedies / Sections’ List.
You can also select all remedies of a book by clicking on ‘Select All Remedies’ in the ‘Check’ box option.Click on ‘O.K’ once you have selected the specific books and remedies.You will return back to the ‘Search Materia Medica’ Screen.Click on ‘Search’ to execute the Search from the ‘Specific Books and Remedies’ you have given options for.
Note : By default the program is set on ‘All Books and All Remedies’ for the search operation. This is automatically selected once you invoke the ‘Materia Medica Search’ option or if you click on ‘Cancel’ from the ‘Books’ screen.

PartialThis feature enables you to include multiple and related words in the search operation.
For instance you may want to include all words related to ‘Hate’ in the search. What you would do is simply type ‘Hate’ in the ‘Search For’ box.
Then click on ‘Partial’ and you will be given all related words of the word ‘Hate’ like Hated, Hateful, Hates in the ‘Search For’ list box. Highlight each word that you want to include in the search.
The ‘Query’ box will display: ‘Hate*’ The asterisk next to the word signifies that all the words highlighted by you will also be searched for.
Note: All words with matching first four characters to those of the main word will be displayed in the ‘Search what?’ list box. Some of the words therefore may not have appropriate reference to the main word . For instance, if you select ‘Mania’ and click on ‘Partial’, you would be given a number of words including the words ‘Manifestations’, ‘Manifold’ etc. Please ignore all such unrelated words and select only the appropriate words for inclusion in the search.
Operators:To maximize the scope of the search operation and narrow it down to the right text that you are searching for, several operators have been provided here as well.
Or:When used between two words, the search program locates either of the words given in the query.
For instance, type ‘Rage’ in the ‘Search For’ box. Click on the‘Or’ operator. Type ‘Mania’ in the ‘Search for’ box. The query box displays: ‘Rage’ or ‘Mania’. Click on ‘Search’. All references any where in the data containing either ‘rage’ or ‘mania’ are displayed in the results screen.
Try out another combination. Use the ‘Or’ operator for the words ‘Babies’ or ‘Children’ or ‘Infants’. Within a fraction of a minute you will have all the references for Paediatrics and Homoeopathy.
Line:This operator extends the search for the words occurring anywhere in a given sentence.
For instance, type ‘Fever’ in the ‘Search For’ box. Click on the‘Ln’ operator. Type ‘Perspiration’ in the ‘Search for’ box. The query box displays: ‘Fever’ Ln ‘Perspiration’. Click on ‘Search’. All references any where in the data containing Fever and Perspiration in a line are displayed in the results screen.
2 words:

This operator helps if you want to search for a combination of words occurring within a space of 2 words in the same sentence. By using this you are increasing the scope of the search operation.
For example, you want to look for remedies and information on ‘Abortion In Third Month’. You are not sure whether the words ‘Third’ and ‘Abortion’ occur next to each other. In such a case use this operator while framing your query . Select the word ‘third’, then select the operator ‘2 words’ and finally, select the second word ‘Abortion’ and click on ‘Search’. The query box will display: ‘Third wd2 Abortion’.
4 words:This operator is similar to ‘2 words’ except that the scope of search is further extended and includes all the words occurring within a space of 4 words.
Try the same example above with the ‘4 words’ operator in place of the ‘2 words’ operator. You can see the difference in the number of references.
Tip: For changing the operator from ‘2 words’ to ‘4 words’ you need not retype your query. Simply click in the ‘Query’ box. Click and drag the mouse over the text ‘wd2’ to highlight it. When this is done, click on the operator ‘4 words’.
6 words:This operator has the same function as ‘2 words’ and ‘4 words’ but enlarges the scope of the search even more. You can use this where words may occur with considerable distance between them.
Try the same example above with the ‘6 words’ operator in place of the ‘2 words’ operator. You can see the difference in the number of references.
Adjacent: When you use this operator between two words the program will display all the references where the given two words are next to each other.
Lets say you are searching for a specific symptom of ‘Diabetes Mellitus’. To look for all remedies having this symptom and all those instances in Homoeopathic literature where these words are used you could type in the ‘Search For’ box: ‘Diabetes’. Select the word by double clicking. Click on the ‘Adj’ operator. Select the second word ‘Mellitus’. The query box will contain the text ‘Diabetes’ Adj ‘Mellitus’. Click on ‘Search’ to extract all that you are looking for.
Para:This operator ensures the ‘Search’ of words placed anywhere in an entire paragraph.
Use the same egs. Of ‘Fever’ and ‘Perspiration’ using ‘Para’ operator instead of ‘Line’. There is a four-fold or more increase in the number of references. This ensures that you would hardly miss any reference.
Section:Some Materia Medicae books represent remedy information in sections like Mind, Head, Generalities, Modalities. etc. Each section may have more than one paragraph also. In case you would like to enlarge the scope of the ‘Search’ operation, you may include the ‘Section’

operator instead of ‘Para’. The search will be made for all occurrences of the given words anywhere within one entire section.
Remedy:Each operator enlarges the scope of the search operation and has an edge over the other. When you select the ‘Remedy’ operator, the program searches for the occurrences of words anywhere in the entire remedy from beginning to end.
After selecting the search words, required options and the suitable operators, click on ‘Search’ to start processing and extracting of all that is required in a matter of seconds.
Note: A query can be formed in several words, but the results may not be impressive always, until u give the query in the right combination.
Reset / Search / CancelReset Click on this button if you want to clear queries and wish to go ahead with another word search. It will empty the contents of the ‘Query’ box.
SearchThis button will start processing your query to proceed with the search operation. Click on ‘Search’ after you have selected all appropriate options for your query. In a matter of seconds, the results of the query will be displayed.
Cancel Click on this button to close the ‘Materia Medica Search’ feature. You will return to the main menu.
Note: Materia medica Search / Open / Favorite is also given in the ‘Archives’ module of the software, most of the functionalities and options remain the same.
Understanding Search Results:
As you click on ‘Search’, the program starts searching and compiling all occurrences being found.
The top left corner displays a reference number which means that presently your cursor is positioned at that particular reference.

It also shows the total number of references found upon search.
In case you have given ‘Advanced Search’ as option, more two buttons shown by the blue arrow are also seen
The instances of words found along with a brief description or part of a sentence; are displayed along with the remedy name [only present in materia medica], topic name if any, and book of origin.
You can use the vertical scroll bar on the right of the screen to reach more references.From here you can also access the entire text and remedy from where the reference occurred.‘Double click’ with the mouse on any reference. The entire text is displayed in full (either in HTML or Text view). See ‘Display type’ for details.
To return to the query box click on .
To return to the main menu click on .
My Favorite Remedies
From the menu bar select ‘Materia Medica’ and then ‘My Favorite Remedies’
From the keyboard type {Ctrl + F}
This feature will include all books and its topics or remedies which you have previously added as favorites.
Select: This option includes the ‘Materia Medica’ , ‘Remedy’ and the ‘Author’ of the book.
One can use these above options to filter down specific books, remedies, or the author.To select, choose the desired book, remedy or author from the drop down arrow next to each option and filter down the favorite topics.
The ‘Sort By’ Book, Topic or Type are used to sort the favorite list in ascending or descending order. On single click the list is sorted in ascending order and on the second click the list is sorted in descending order.
OpenHighlight any Remedy and then Click on ‘Open’ OR ‘Double click’ to read any remedy .
Show all:
Click on ‘Show All' to reset all the topics if you have applied any filters.
View Types
Click on the ‘Text’ or the ‘HTML’ view to read the text in the respective format
See ‘Display type’ for details.
Delete Favorites
Highlight the topic from the list box and click on 'Delete' to remove it from the favorites list .
Close Favorites
To exit from the "Open Favorites" feature, Click on "Close".
Display type:
The remedies opened can be viewed in two types of views HTML view or Text view
Select the desired type of display of the book either by clicking on:
HTML view or TEXT view
The text appears in the selected format.
HTML View:
The text opens in an eye-pleasing and beautiful format.
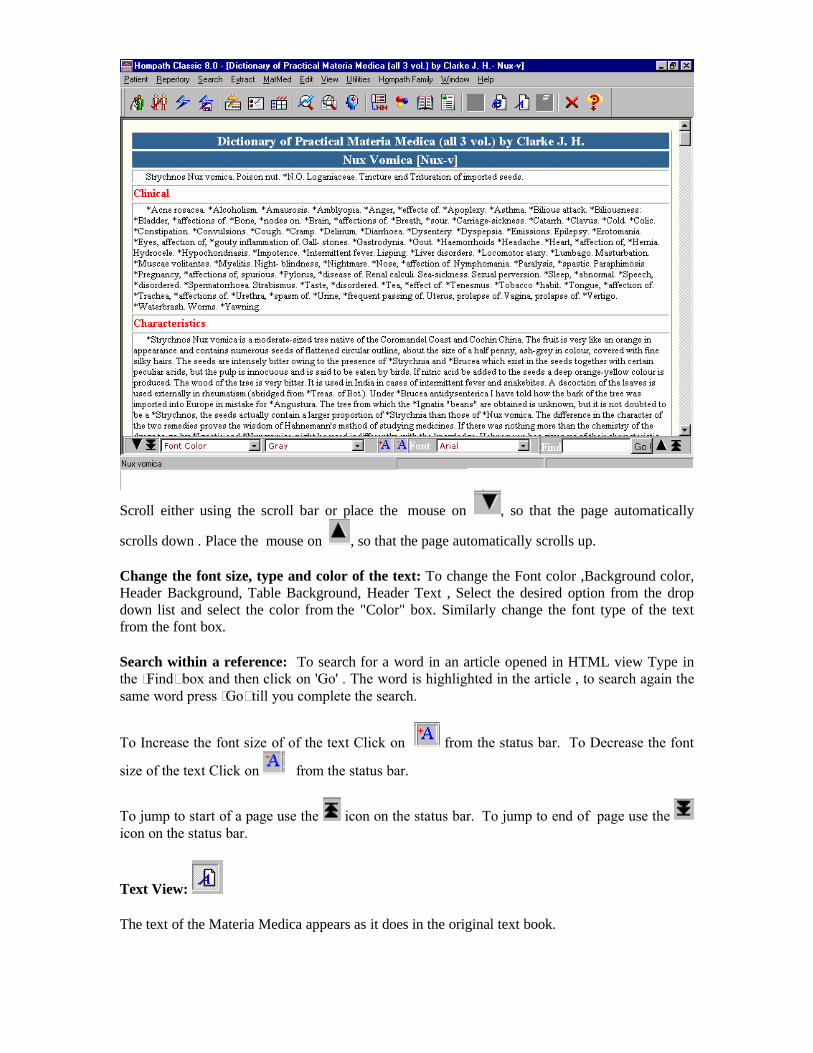
Scroll either using the scroll bar or place the mouse on , so that the page automatically
scrolls down . Place the mouse on , so that the page automatically scrolls up.
Change the font size, type and color of the text: To change the Font color ,Background color, Header Background, Table Background, Header Text , Select the desired option from the drop down list and select the color from the "Color" box. Similarly change the font type of the text from the font box.
Search within a reference: To search for a word in an article opened in HTML view Type in the ‘Find’ box and then click on 'Go' . The word is highlighted in the article , to search again the same word press ‘Go’ till you complete the search.
To Increase the font size of of the text Click on from the status bar. To Decrease the font
size of the text Click on from the status bar.
To jump to start of a page use the icon on the status bar. To jump to end of page use the icon on the status bar.
Text View:
The text of the Materia Medica appears as it does in the original text book.

Copy: Click on the ‘Edit’ menu and the choose ‘Copy’ OR
From the keyboard type {Alt + E} {C}
Allows you to copy the contents of the text page by page to the editor of your choice like notepad / wordpad etc. to create notes from archives.
Find: Click on the ‘Edit’ menu and the choose ‘Find’ OR
From keyboard type {Alt+E} {F}
Type the required word in the dialog box that appears, and click on ‘OK’ button. The required word is highlighted in the article.
If you want to search occurrence of the word again within the same article , Press the ‘Next ’ button from the ‘Edit’ menu OR From keyboard type {Alt + E} {N}
Click on ‘Cancel’ to close the search.
Change the font size, type and color of the text:
Choose ‘Edit’ from the main menu, and then choose ‘Fonts’ to change the font size and style.
Magnify
When you have selected the Text view the ‘View’ menu incorporates ‘Magnify’ option. This option helps to view the text in a magnified form.
To use it select the option from the menu, on selection the cursor changes to magnify glass shape, press the left mouse button and drag the cursor on the text.
In case you need to change the properties of the magnify options, right click on the main screen after clicking on the magnify option from the view menu.
One can change the shape of the magnifying glass, along with the zoom and the size properties.
Text to Speech:Exclusive and unique feature designed especially for the software.This feature reads the text into voice.Makes reading, learning a unique and live experience
Requirements:Sound cardSpeakers.
Various options available on the screen are:Read: Click on read to start, the voice function. The text is automatically converted to speech. As the voice talks through the topic each word in highlighted on the screen.Pause: Click on ‘Pause’ to pause the topic whenever required. To restart speech function from where it has stopped re-click on ‘Pause’

Stop: Click on ‘Stop’ to stop the voice. In this case, when you click on ‘Read’ again the text will start reading from the start all over again, no matter where you have actually stopped the text.Close: Click on ‘Close’ to exit the topic.
Voice: By default the voice is set to ‘Mary’
From the drop down arrow, choose any of the other two options, if you want to change the quality of the voice to a different option.
Rate: Increase or decrease the rate by moving the button to the right or left respectively to adjust the rate at which the speech talks.
Volume: Increase or decrease the volume of the speech by moving the button to the right or left respectively.
The text of the Materia Medica appears as it does in the original text book.
Find: Click on the ‘Edit’ menu and the choose ‘Find’ OR Type the required word in the dialog box that appears, and click on ‘OK’ button. The required word is highlighted in the article.
If you want to search occurrence of the word again within the same article , Press the ‘Next ’ button from the ‘Edit’ menu
Click on ‘Cancel’ to close the search.
Creating notes from Materia Medica:
This feature helps you create notes from the database of Materia medica books installed in your computer.
Note: These notes can only be created if you have opened the remedies / sections in the text view.
For Students:They can use this feature to prepare notes for exams and later reference.
For Teachers:They can utilize this feature for making notes for presentations, articles, lectures, etc. They can also author their own books using this feature.
Use this feature from ‘Open Materia Medica’ , after you have chosen and opened the text you want OR from ‘Search Materia Medica’, after you have searched for a particular word and then opened the corresponding search results.
Follow these simple steps to create your notes:
Click with the mouse and highlight the sentence, line, paragraph or text that you want to store.
Then click on ‘Edit’ from the main menu and choose the option ‘Copy’
The highlighted matter can now be opened in any word processor like ‘Word’ or in ‘Notepad’.
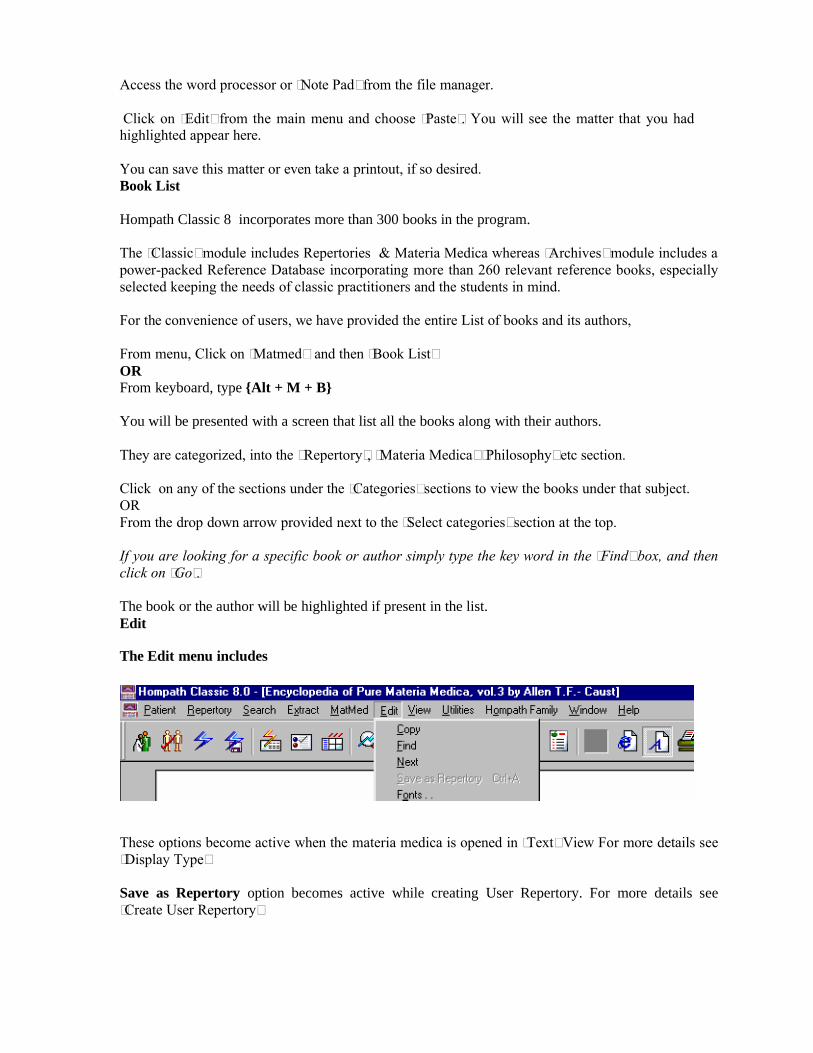
Access the word processor or ‘Note Pad’ from the file manager.
Click on ‘Edit’ from the main menu and choose ‘Paste’. You will see the matter that you had highlighted appear here.
You can save this matter or even take a printout, if so desired.Book List
Hompath Classic 8 incorporates more than 300 books in the program.
The ‘Classic’ module includes Repertories & Materia Medica whereas ‘Archives’ module includes a power-packed Reference Database incorporating more than 260 relevant reference books, especially selected keeping the needs of classic practitioners and the students in mind.
For the convenience of users, we have provided the entire List of books and its authors,
From menu, Click on ‘Matmed’ and then ‘Book List’OR From keyboard, type {Alt + M + B}
You will be presented with a screen that list all the books along with their authors.
They are categorized, into the “Repertory’, ‘Materia Medica’ ‘Philosophy’ etc section.
Click on any of the sections under the ‘Categories’ sections to view the books under that subject. ORFrom the drop down arrow provided next to the ‘Select categories’ section at the top.
If you are looking for a specific book or author simply type the key word in the ‘Find’ box, and then click on ‘Go’.
The book or the author will be highlighted if present in the list.Edit
The Edit menu includes
These options become active when the materia medica is opened in ‘Text’ View For more details see ‘Display Type’
Save as Repertory option becomes active while creating User Repertory. For more details see ‘Create User Repertory’

View
View menu includes
Full screen: {F11}You can view the repertorisation table without the toolbar, status bar, etc. with a screen covering the entire screen.More number of rubrics become visible and in a larger type font.This option remains disabled unless rubrics are recorded.
See ‘Full screen’ under Repertorisation for details.
Graphs: {Crtl +G}
Using this option, repertorisation can be viewed and printed in the Graphical format.
This option remains disabled unless rubrics are recorded.See ‘Repertorisation Graphs’ under Repertorisation for details.

Magnify {Ctrl +M}
This option is provided to view many active screen in a magnified form. To use it select the ‘View‘ from the menu and then ‘Magnify’
On selection the cursor changes to magnify glass shape , press the left mouse button and drag the cursor on the text.
In case you need to change the properties of the magnify options, right click on the main screen after clicking on the magnify option from the view menu. One can change the shape of the magnifying glass, along with the zoom and the size properties.
Note: This option is disabled for screens where it is not applicable.
Options
From the main menu Select ‘View’ and then choose the ‘Options’ option.From Keyboard type {Alt+V}{O}

This feature provides different ‘options’ viz.Select Default ChaptersModify Symptom TypeMatmed OptionsAdd Search Words
By default you are presented with ‘Select Default Chapters screen’ .
Select Default Chapters: This feature enables the user to set up default chapter(s), so that these chapters open up automatically every time ‘Classic’ module is opened.
The physician can set up common repertory chapters he usually refers for repertorisationAs these default set chapter(s) open up every time Classic is started it saves a lot of time & energy of the physician who need to open few specific chapters on a regular basis

By default the Repertory is ‘Complete’ and the Chapter List shows the Chapters of Complete Repertory
To add the desired chapters to make them default:First select the ‘Repertory’ from the drop down list of Repertory

Once you Select the desired Repertory , all the chapters of that Repertory will be listed in the Chapter List.
For instance the below screen lists all chapters of ‘Kent’

To ‘Select Chapters’ in order to make them as default chapters,Highlight the desired chapter from the ‘Chapter List’ by a single click on itNext, Double click on the chapter OR Single click on the chapter and then click on ‘>>’ button to add them to the ‘Selected chapters’ list.
Thus Select all the desired chapter(s) one by one and add them in the ‘Selected Chapters’
Tip: One can select different repertories (from drop down box of repertory) and its different chapters (from the Chapter List) , to add to the ‘Selected Chapters’
Note: A maximum of 12 chapters can be selected to make them as default..

After selecting the chapters, Click on the check-box ‘Click to Make Selected Chapters default’, to make them as default chapters
Incase you need to unselect the chapter , click on any chapter from the ‘Selected chapters’ list and then click on ‘<<’ button.
Click on the ‘Save’, to save the settings.Finally Click ‘Ok’ button to close this screen.
Next time onwards whenever you start ‘Classic’ , the Selected Chapter(s), will open up as default. You can select the desired chapter from the ‘Window’ menu, to start recording rubrics.

Note: When you want to disable this default feature, go back to the ‘Option’ feature, and Uncheck the ‘Click to make selected chapters default’.ORWhen you want to add more chapter(s) to the default list, go back to the Option feature to add more chapter(s) to the pre-existing ‘Selected Chapters’ list by the Add feature
Modify Symptom Type
From the ‘Options’ screen Click on ‘Modify Symptom Type’Classic provides certain pre-defined Symptom types (symptom classification) which are used to identify symptoms for various repertorisation strategies. (See Symptom Type Repertorisation OR Symptom List)
This feature provides you to 1. Modify the pre-existing Symptom types OR 2. Add a new Symptom Type

Symptom Type:List all the pre-define symptom types the program includes.
Operations:To add a new symptom type to this existing list,Type the Symptom type in the ‘Add new Symptom’ box,

The new symptom type added in the above screen is ‘Ailments From’Click on ‘Add’ to add this symptom to the existing list. (If you want to reset the content of the dialog box click on ‘Erase’)When you ‘Add’ a symptom type the following message appears
Click on Yes to finally add the symptom.(Click on No if you don’t want to proceed further with addition.)The new added symptom type appears in the ‘Symptom Type’ box.
One can now apply this newly added ‘Symptom Type’ to the symptom wherever applicable.(For instance from ‘Symptom type repertorisation’).
To modify or erase existing symptom type
Highlight the symptom from the ‘Symptom Type’ Once you highlight the symptom will automatically appear in the ‘Modify Symptom type’ box
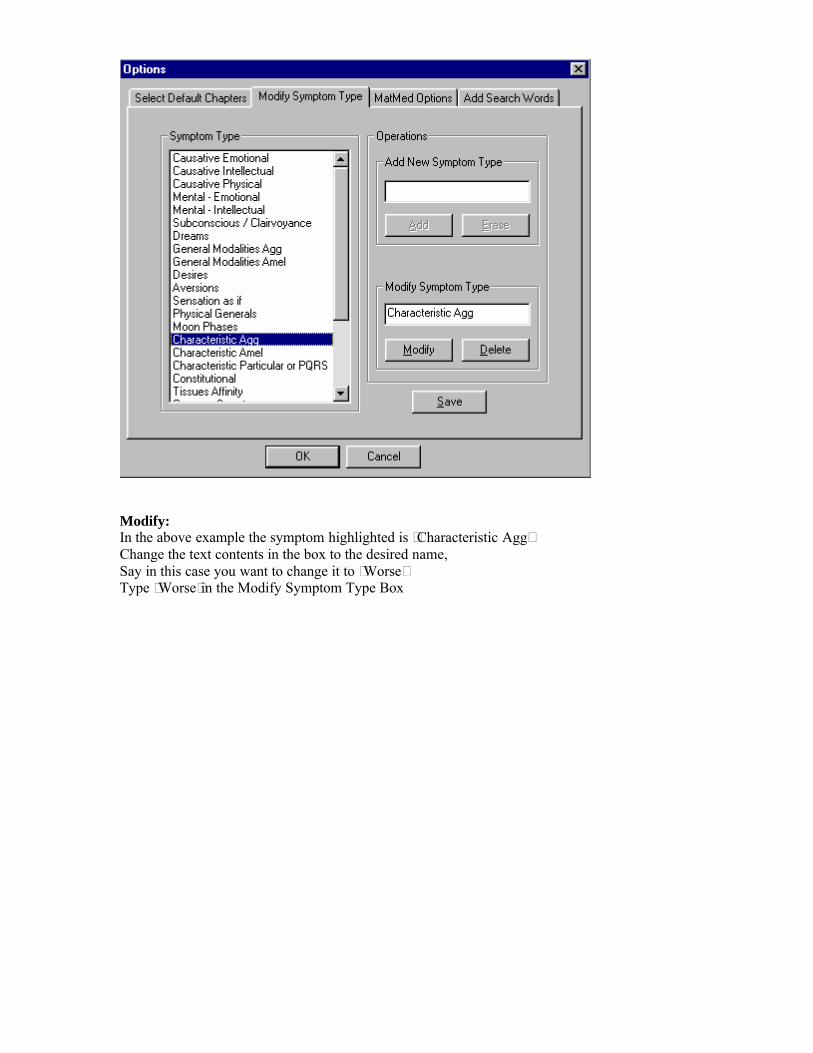
Modify:In the above example the symptom highlighted is ‘Characteristic Agg’Change the text contents in the box to the desired name,Say in this case you want to change it to ‘Worse’Type ‘Worse’in the Modify Symptom Type Box

Finally Click on ‘Modify’You will be presented with the following message
Click on Yes to finally modify it.The name will be modified in the ‘Symptom List’
DeleteTo delete any symptom type, highlight the symptom type.Next, from the modify symptom type box, click on Delete.You will be prompted with the appropriate message.Click on Yes to delete the symptom type from the existing list.
SaveAfter making desired changes, like ‘Add’ or ‘Modify’ or ‘Delete’, finally click on ‘Save’ to apply the changes overall in the program.
Matmed OptionsTo understand the utility of ‘Matmed Options’, you must know the feature of ‘Saving Search Results of Materia Medica as Repertory’

While saving the results of materia medica to a repertory , Hompath has defined certain pre-defined values for the intensity of the drugs depending on the Coverage and the % Coverage. (see Create Matmed Repertory under ‘Create Customised Repertory)
Hompath also gives you the option of changing these default values as per your requirements if desired.
Choose the ‘Matmed Options’ from the ‘Options’ screen.
The screen shows the default option which are :Drug Mark or Level 1 -If the % Coverage of the Drug is between Range ‘0’ to ‘0.5’ Drug Mark or Level 2 -If the % Coverage of the Drug is between Range ‘0.6’ to ‘15’ Drug Mark or Level 3 -If the % Coverage of the Drug is between Range ‘16’ to ‘30’ Drug Mark or Level 4 -If the % Coverage of the Drug is between Range ‘31’ to ‘70’ Drug Mark or Level 5 -If the % Coverage of the Drug is between Range ‘71’ to ‘100’
To change these pre-defined values, enter the first value you need to change as per you requirements in the box of ‘Max Range’ next to ‘Drug Mark 1’
Value applied there, will automatically adjust and change the other values
For instance the maximum range for ‘Drug Mark 1’ is changed to 10 instead of 0.5 and the other values are automatically changed.

Drug Mark or Level 1 -If the % Coverage of the Drug is between Range ‘0’ to ‘10’ Drug Mark or Level 2 -If the % Coverage of the Drug is between Range ‘11’ to ‘26’ Drug Mark or Level 3 -If the % Coverage of the Drug is between Range ‘27’ to ‘41’ and so on.
Click on ‘Save’ to apply these changes .
Once these values are changed, the intensity of the drugs will depend on the new range given.Click on ‘Set default’ option to change the options back to the default values set by Hompath.
Select Materia MedicaClick on any of the four options, to read the materia medica from the selected author.
This will be applicable when you right click on any remedy to read the materia medica from the basic books.
For instance if you select Kent from here and ‘Save’, the next time you right click on a remedy to read materia medica, the remedy will open from Kent. (see Open Mat Med under ‘Common features’)
Click on ‘ ’ to exit this feature.
Add Search Words:
The ‘Search’ feature of the program is designed in an intelligent format.
That is , any word(s) searched for either in Repertory Or Materia Medica feature of the program (See Search Repertory or Search Materia Medica) will include search results
1. for the ‘Exact’ word and its ‘Plural’ form you have given query for. +
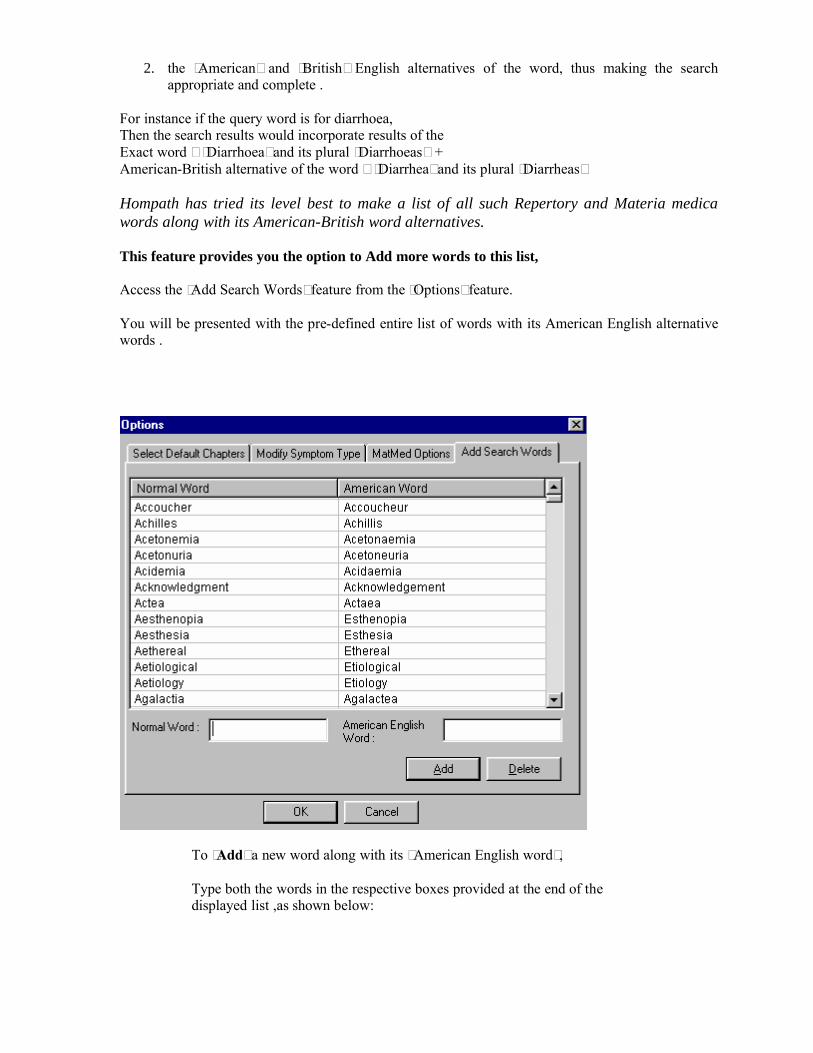
2. the ‘American’ and ‘British’ English alternatives of the word, thus making the search appropriate and complete .
For instance if the query word is for diarrhoea, Then the search results would incorporate results of the Exact word – ‘Diarrhoea’ and its plural ‘Diarrhoeas’ +American-British alternative of the word – ‘Diarrhea’ and its plural ‘Diarrheas’
Hompath has tried its level best to make a list of all such Repertory and Materia medica words along with its American-British word alternatives.
This feature provides you the option to Add more words to this list,
Access the ‘Add Search Words’ feature from the ‘Options’ feature.
You will be presented with the pre-defined entire list of words with its American English alternative words .
To ‘Add’ a new word along with its “American English word”,
Type both the words in the respective boxes provided at the end of the displayed list ,as shown below:
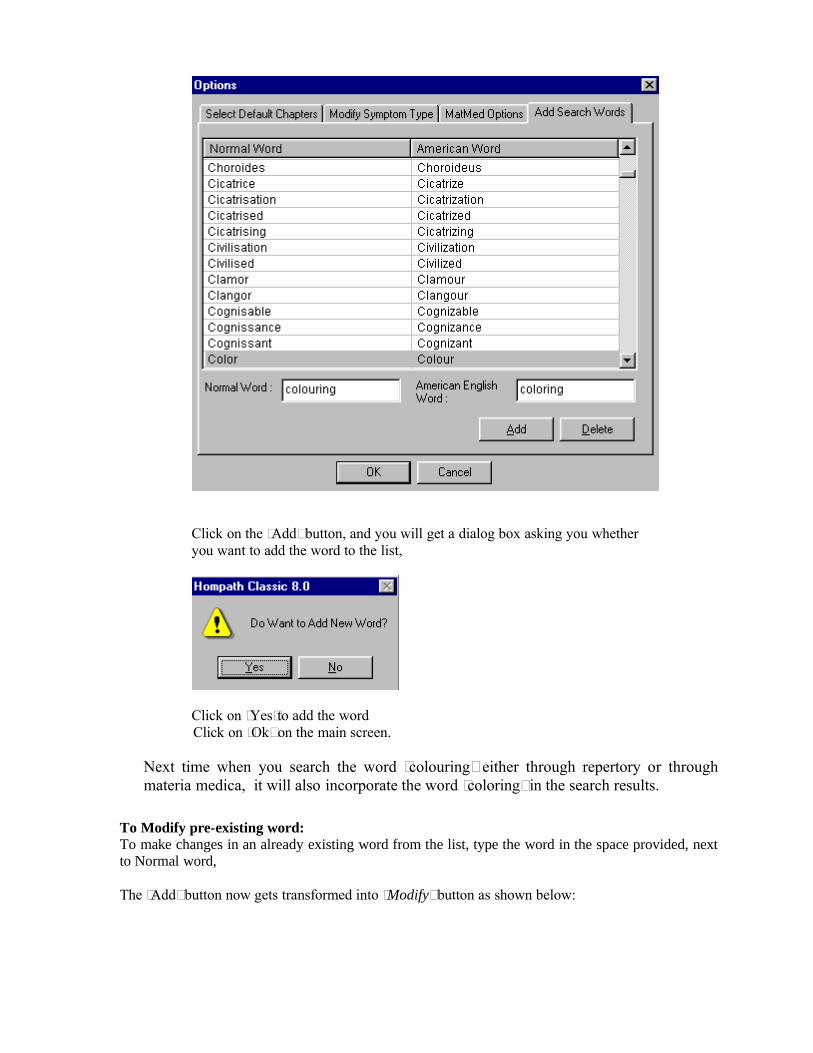
Click on the ‘Add’ button, and you will get a dialog box asking you whether you want to add the word to the list,
Click on ‘Yes’to add the wordClick on ‘Ok’ on the main screen.
Next time when you search the word ‘colouring’ either through repertory or through materia medica, it will also incorporate the word ‘coloring’ in the search results.
To Modify pre-existing word:To make changes in an already existing word from the list, type the word in the space provided, next to Normal word,
The ‘Add’ button now gets transformed into ‘Modify’ button as shown below:

Make the necessary changes either in the Normal word or in the Amerian English WordClick on the ‘Modify’ button,
Click on ‘Yes’ to modify the word.
The new change will get inserted in the word list.

Delete:To delete a particular word from the list, type the word and its corresponding American word in the space provided.
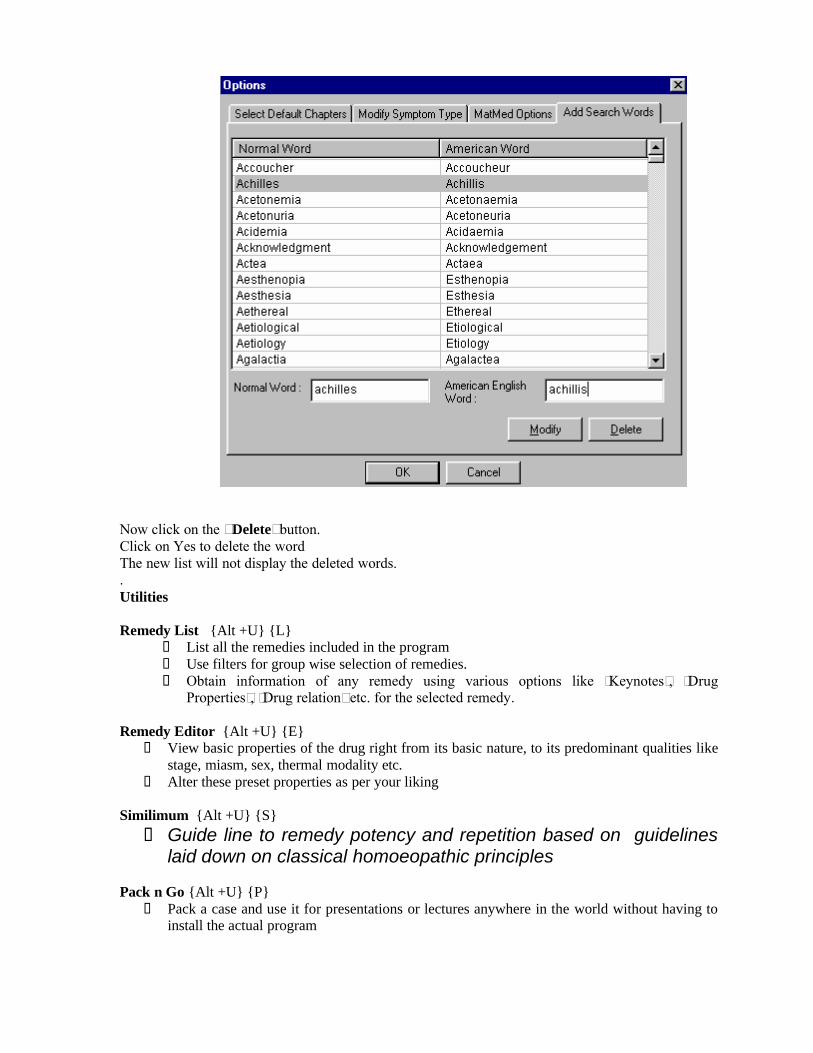
Now click on the ‘ Delete’ button.Click on Yes to delete the wordThe new list will not display the deleted words..Utilities
Remedy List {Alt +U} {L} List all the remedies included in the program Use filters for group wise selection of remedies. Obtain information of any remedy using various options like ‘Keynotes’, ‘Drug
Properties’, ‘Drug relation’ etc. for the selected remedy.
Remedy Editor {Alt +U} {E} View basic properties of the drug right from its basic nature, to its predominant qualities like
stage, miasm, sex, thermal modality etc. Alter these preset properties as per your liking
Similimum {Alt +U} {S} Guide line to remedy potency and repetition based on guidelines
laid down on classical homoeopathic principles
Pack n Go {Alt +U} {P} Pack a case and use it for presentations or lectures anywhere in the world without having to
install the actual program

Include essential elements of the case and other basic functionalities of the program to make your presentation complete.
Cases are packed in such small sizes that they can be carried even on a floppy.
Feed back {Alt +U} {F} Send us your feedback / suggestions / queries in a ready made feed back form.
Utilities:
Click on ‘Utilities’ from main menu and then choose any of the following options.
Remedy List:From the main menu select ‘Utilities’ and then ‘Remedy List’ From key board type {Alt+U} {L}
This feature lists all the remedies included in the program, and provides various useful remedy options for the same. You can study and obtain information on any remedy from this option.
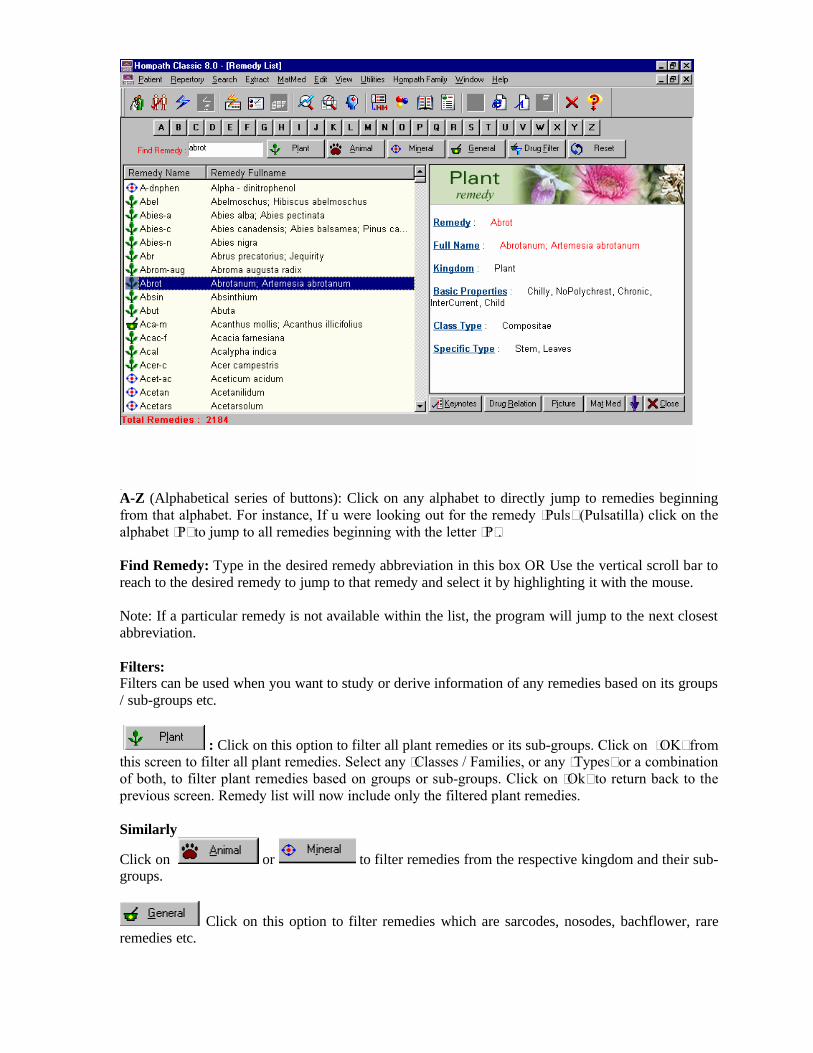
A-Z (Alphabetical series of buttons): Click on any alphabet to directly jump to remedies beginning from that alphabet. For instance, If u were looking out for the remedy ‘Puls’ (Pulsatilla) click on the alphabet ‘P’ to jump to all remedies beginning with the letter ‘P’.
Find Remedy: Type in the desired remedy abbreviation in this box OR Use the vertical scroll bar to reach to the desired remedy to jump to that remedy and select it by highlighting it with the mouse.
Note: If a particular remedy is not available within the list, the program will jump to the next closest abbreviation.
Filters:Filters can be used when you want to study or derive information of any remedies based on its groups / sub-groups etc.
: Click on this option to filter all plant remedies or its sub-groups. Click on ‘OK’ from this screen to filter all plant remedies. Select any ‘Classes / Families, or any ‘Types’ or a combination of both, to filter plant remedies based on groups or sub-groups. Click on ‘Ok’ to return back to the previous screen. Remedy list will now include only the filtered plant remedies.
Similarly
Click on or to filter remedies from the respective kingdom and their sub-groups.
Click on this option to filter remedies which are sarcodes, nosodes, bachflower, rare remedies etc.

Click on this option to filter remedies, according to the basic properties of the drug.
You can filter remedies using a combination of ‘Drug filter’ option + any of the above option to narrow down the remedy list. For instance you may want to filter ‘Natrum’ remedies (Mineral filter) which are ‘Hot’ thermally (Drug filter).
Click on ‘Reset’ to reset any filters applied and revert back to the original list of remedies.
As you highlight any remedy from the Remedy list, the right side screen automatically displays the ‘Basic properties’ of that drug including the abbreviation name, full name, properties etc.
‘Select’ any remedy by highlighting it to apply the following remedy options:
Keynotes: Click on ‘Keynotes’ to view the PQRS red line symptoms of a selected drug.
Drug Relation: Click on ‘Drug relation’ to view the complementary, follow well etc. of the selected drug.
Picture: Click on this option to see the pictorial view of the selected remedy wherever available.
MatMed:
Select the desired remedy from the remedy list. Next , Click on the ‘drop down’ box next to the ‘Matmed’ and then click on the desired materia medica, to read the remedy from the selected book.
Note: Materia Medica of some drugs may not be available in the basic four books provided here.In that case a message will appear ‘Materia Medica not available. Would you like to view other options’Click on ‘Yes’ to read the remedy from whichever source books the remedy is available.
You will be taken to the familiar screen of ‘Open Mat med’ where the selected remedy will be displayed from other available materia medica installed in the program. (see Open mat med under ‘Materia Medica’ for other details)
When the ‘Matmed’ of a selected remedy is not available (which may happen for rare, uncommon or newly proved drugs)A message appears ‘Selected remedy does not have materia medica, Do you want to extract the remedy from Complete Mind’?
Click on ‘Yes’ to extract the remedy information from the repertory. The ‘Complete Materia Medica’ and ‘PQRS symptoms’ of the selected remedy will be extracted from the ‘Complete’ ‘Mind’ Repertory (See also Extract Convt rep to Materia Medica).
Will allow you to read the materia medica of the drug from the four basic books provided from here. The books are ‘Kents Materia Medica’, ‘Boericke’s Materia Medica’, ‘Phatak’s Materia Medica’ and ‘Allen’s Key notes’.

Note: When a particular option is not available for any remedy, than either the option will be disabled or a message will appear accordingly.
Click on ‘Close’ to exit this application.
Remedy Editor:
From the main menu select ‘Utilities’ and then choose ‘Remedy Editor’ From keyboard type:- (Alt+U}{E}
Drug Editor is a feature that lists out all the properties of a drug, right from it's basic nature and kingdom to it's predominant qualities like stage, miasm, sex, side, thermal modality, etc. Most of the drugs in our Materia Medica, along with their properties, are represented here. You have the option to alter these preset properties as per your liking.
Note : Hompath advises you not to change the preset properties, which have been entered after indepth research, unless you are very sure about it.
Click in the ‘Search’ box and type the first few letters of the abbreviation of the remedy whose properties you want to alter, delete or add. You can also use the scroll bar to reach the desired remedy. As soon as the cursor highlights a remedy, it's corresponding properties are highlighted on the right side of the screen.
To alter any properties, Click in the square box to remove the present check-mark or add a new check-mark in an empty box. Click on ‘Save' to store the altered information.You will get a message ‘Do you want to save the changes?’ This will permanently change the drug properties?Click on ‘Yes’ to make the changes. Or Click on ‘No’ if you want to avoid the changes.

Note: Change made here will automatically be reflected at different places wherever this feature is in use.
Similimum:
From the main menu Select ‘Utilities’ and the choose ‘Similimum’From Keyboard :- {Alt+U}{S}
Selection of potency and deciding the repetition in a case is as important as selecting the right medicine. This feature has been specially designed based entirely on the guidelines laid down by classical homoeopathic principles. Multiple options based on these guidelines have been incorporated to give the most viable and intelligent solution to the problem of potency and repetition faced by the novice and professional alike In the ‘Similimum’ feature you have to select what is applicable in a given case. It will vary from case to case and from stage to stage of the disease of the patient who reports. The potency and repetition change according to the change in parameters.
There are 5 basic heading Patient Related factors, Drug/Remedy factors, Disease factorsType of Similarity, Response Desired
The headings are divided into 2 screens and consists of various parameters.Depending on your case, select the options by clicking on the required ‘Check' box or radio button to include them in the analysis.
The first screen:

Patient related factors:
a. Age - We know that age plays an important role in potency selection. In young children a high potency is preferred and in old people, a low potency.b. Occupation - A manual worker requires a low potency and frequent repetition while a professional or technical person requires high potency and infrequent repetition.c. If sleep is good, nutrition is ok and vitality is high, a high potency is required. But in the case of poor nutrition and poor vitality you need to prescribe a low potency and frequent repetition.d. Sensitivity - In the case of highly sensitive individuals, a high potency and infrequent repetition is required. With an average sensitivity, a medium potency and variable repetition is required. But if there is a lack of sensitivity - a low, medium or high potency is required depending upon the condition of the patient, the duration of the illness and various other factors.e. Mental state - An intelligent patient requires a high potency and one or two doses. A dull, unintelligent patient needs a low potency and frequent repetition.f. Physical status - A weak and feeble patient requires a low potency, while a strong robust constitution requires a high potency and infrequent repetition.
II. Drug/Remedy related factors:
Source:a. Nosodes or Sarcodes are normally given in high or medium potency and infrequent repetition.b. Plant, Animal and Mineral will have variable potency and repetition depending on many other factors.c. When you want physiological/chemical action, usually it is in low potency or Mother Tincture, and is frequently repeated.d. Tautopathic drugs are in low or medium potency, repeated till required.e. Imponderabilia - Normally is given in low or medium potency and both infrequent or frequent repetition depending on a case.
Type:Acute or short acting remedies need to begin in low potency, frequent repetition or medium or high potency with infrequent repetition. An intercurrent remedy will have to be given in medium or high potency with infrequent repetition. Specific remedies/organ remedies require low potency and frequent repetition, as they are intended to produce physiological or pathological results.
Nature:a. Inert nature –Usually medium or high potency is prescribedb. Active nature-Substances like acids can work in all potencies. Low potencies are used in case
of pathological presentation. But in cases of mental alteration, we will give importance to high potency and infrequent repetition.
c. Toxic substances- Can never be given in Mother Tincture form. It will produce predominantly physiological or pathological action in low potency, and the effect is for short term. A toxic substance has to be given in medium or high potency. Normally these remedies work beautifully in crisis or in case of complications of any acute nature.
Proving:Well proven remedies normally can be given in any potency and any repetition. While a not so well proved remedy can be given only in low or medium potency and frequent repetition till system responds.
Click on ‘Next’ to move to the second screen.

III. Disease related factors:
Stage:a. Acute
Mild - Requires medium potency and infrequent repetition Moderate - Requires medium or high potency and frequent repetition.Severe - Requires high potency, infrequent or frequent repetition.
b. ChronicMild - May require high potency or medium potency with infrequent repetition.Moderate - Requires high potency or medium potency with infrequent repetitionSevere - Requires low or medium potency with proper or guarded repetition.
Miasm: One of the greatest gifts of Hahnemann is the ‘Miasm’. The miasm forms the base which allows us to understand the diagnosis, prognosis, management and direction of cure. It also guides for potency and repetition. Most of the time all the miasms are present in almost all sick individuals, but their intensity or activity varies from individual to individual. There are two aspects to the miasms:a. Dominant: When the patient reports to the physician, the miasm which is active at the moment of reporting is known as a dominant miasm. The patient may have all miasms present, but at any given time only one miasm is most active or in certain cases there are two miasms which are very active.
Psora: If Psora is active, a high potency and infrequent repetition is required.Sycosis: If Sycosis is active, a low or medium potency and frequent repetition is required.
Tubercular: If the Tubercular miasm is active one has to be very careful in selecting potency and repetition. If you give too high a potency and repetition is frequent it may produce marked aggravation.Syphilitic Phase: If this phase is dominant you need to prescribe a low potency with minimum repetition. If it is the beginning of the Syphilitic phase you need to prescribe a medium or high potency, so as to prevent the patient from sliding into a deep Syphilitic phase and to arrest the progress of the disease, if possible.
b. Fundamental: It is a miasmatic stage decided on the basis of past history and family history of the patient. It gives a clear idea of what was the past and what can be the future course of the disease.
Psora: Fundamentally Psora is a relatively very healthy sign. It also suggests that the patient may recover very fast and may require only a few doses of medicine. Also we may think of a psoric antimiasmatic remedy if required. Medicine is required in high potency and with infrequent repetition.Sycotic: If Sycotic expressions are there as a base, we may require an antisycotic remedy. The patient requires proper constitutional medicine. It is certain that the disease is still in a curable phase. A medium potency and frequent repetition may be needed.Tubercular: This shows that the particular patient has a weak base and has to be managed carefully. Only a few doses of medicine need to be repeated carefully.Syphilitic: If there is a Syphilitic base one needs only low potency and frequent repetition. Constitutional medicine is not to be given frequently.Mixed: If there is a mixed fundamental miasm the case will be difficult to manage. A low potency and infrequent repetition is needed to control it. As soon as a response starts, stop the medicine. If you give too low a potency it may not register on the patient.
Predominance of Symptomsa)Mental
All the parameters under mental symptoms require high potency and in frequent repetition.
b) PhysicalGeneral : Require medium to high potency with infrequent repetition Particular: Require low to medium potency and frequent repetition.Pathological: Also require low to medium potency and frequent repetition.Common/Disease Symptoms: Require low potency and frequent repetition.Characteristic Symptoms: Require medium potency with infrequent repetition.Maze of Symptoms: May require an intercurrent remedy or nosode in medium to high potency with infrequent repetition.Acute Exacerbation: Require low to medium potency and infrequent repetition.
IV. Type of Similarity:a. If there is a clear cut case and there is more of similarity, the potency should be
higher and the repetition is to be minimum. If the similarity is partial then it has to be a lower potency and repetition is frequent (or) as desired.
b. If there are PQRS symptoms which are matching, then high potency and infrequent repetition is prescribed.
c. If the centre or essence of the case is matching, a high potency and infrequent repetition is required.
d. At Mental level: All parameters here require high potency and infrequent repetition.
e. At Physical level:General level similarity - Requires medium or high potency and infrequent repetition.If particular symptoms match - Medium or high potency and frequent repetition is required.

If match is at pathological level - Potency is low or medium and repetition is frequent.
V.Response Desired:a. Cure: A high potency and infrequent repetition is required.b. Palliation/relief: Low potency and frequent repetition.c. Prophylaxis or preventive: Medium/high potency with infrequent repetition.d. Relief: If the disease is grave and you desire to produce only partial relief or you wish to relieve acute suffering then a medium potency and frequent repetition is required.e. Finally if you are seeing some block in the treatment, the remedy given is not acting and you wish to remove this block - A high potency and infrequent repetition would be required.
Please note that as per standards:
Potencies:Below 30 are low potencies.30 to 200 (both inclusive) are considered medium potencies.Above 200 is a high potency.
LM potency is recommended in chronic conditions to produce better results without any medicinal aggravation.
Repetition:Infrequent - 1 or 2 doses onlyFrequent - 2 pills every 4 hours.
Frequent Till Response: Frequent doses till the patient responds. The remedy is to be repeated frequently as vitality is low, and the vitality has to be stimulated enough to get the response. Normally once the system reacts or starts reacting, the rest of the action will be taken care of by the system itself. You may not require any repetition of the medicine.
Click on the `Result' button.
When you click on ‘Previous’, you can move to the previous screen, in case you want to re-define the patient‘s condition.
The result in type of potency required and recommended frequency of repetition is flashed under the heading `Similimum Result’

Note: This option is only a guide-line about the potency selection of a medicine, the final judgment should be made by the physician.
Feedback:From main menu Click on ‘Utilities’ and then choose ‘Send Feed back’From keyboard type {Alt+U} {F}
Hompath gives you the option to send us your suggestions / queries etc. in the feed back form provided here.
Type in your e-mail id in the ‘From’ boxThe box next to ‘To’ includes our e-mail address.
By default the radio button next to ‘Suggestions’ is ticked. Enter your comments in the ‘Enter your message’ box.
Check the button of ‘Errors’ and then type in the details of any errors or problems you have come across while using the program.
Click on ‘Send’ to send the message (you need to be connected to the internet)Click on ‘Save’ if you wish to save the message and then send it later.Click on ‘Print preview’ to preview the contents and then click on ‘Print’ to remove the print-out Close allows you to exit from the program.
Pack n Go:
From the main menu select ‘Utilities’ and then choose ‘Pack n Go’From keyboard type {Alt+U} {P}

‘Pack n go’ is a unique feature designed for practitioners / users / teachers, especially for those who teach or deliver Lectures / Presentations for seminars or conferences, who conduct study courses at different places / group-teachings etc.
Unique features:‘Pack’ a case to use it for presentations any where in the world. You can run the presentation on any PC or laptop without actually installing the ‘Classic 8’ program.‘Packed’ cases include all the essential components like ‘Rep. table’, ‘Follow-ups’, ‘Case record’ etc. of the ‘patient’. Different repertorisation strategies, and other basic features of Classic are included to make your presentation apt, complete and interactive. Multiple cases can be packed , into very small file sizes, so that you can carry them easily on your floppy / laptop etc. without occupying more space.
Features of Unpacked Case
Once you have Selected the case
Select desired date from the drop down arrow of ‘Select Visit Dates’ Click on Rep table to view corresponding Repertorisation table.
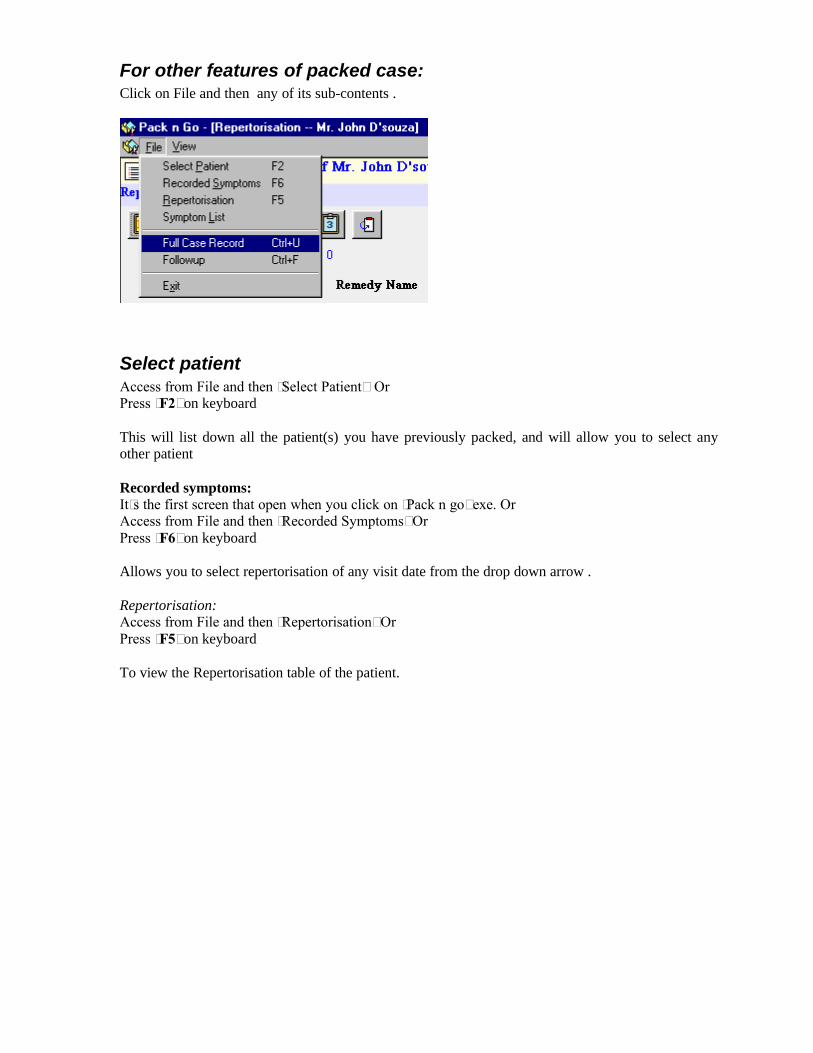
For other features of packed case:Click on File and then any of its sub-contents .
Select patientAccess from File and then ‘Select Patient’ OrPress ‘F2’ on keyboard
This will list down all the patient(s) you have previously packed, and will allow you to select any other patient
Recorded symptoms:It’s the first screen that open when you click on ‘Pack n go’ exe. OrAccess from File and then ‘Recorded Symptoms’ OrPress ‘F6’ on keyboard
Allows you to select repertorisation of any visit date from the drop down arrow .
Repertorisation:Access from File and then ‘Repertorisation’ OrPress ‘F5’ on keyboard
To view the Repertorisation table of the patient.

Different Repertorisation strategies given here are
Clipboard AnalysisNormal RepertorisationSorted RepertorisationDrug FilterPlant FilterAnimal FilterMineral FilterSymptoms covered not covered by remedy
Right Click on a symptom offersSymptom listFull SymptomClipboard Analysis
Right click on a remedy offersConvt rep to MMDrug List
Symptom List:Allows you to view / edit symptom list.
Full Case record: (Ctrl +U)Allows you to view the full case of the patientPlease refer ‘Full Case Record ’ section of ‘PMS Help’ to know more about this feature.
Follow-up : (Ctrl +F)Allows you to view the follow-ups for the patient.Please refer ‘Follow-up’ section of ‘PMS Help’ to know more about this feature.

Magnify:To use the magnify option for the Repertorisation, First open the rep table and then Click on View and then Magnify.
The Rep table will be magnified, and you will be able to show the details in a larger font .For detailed explanation of all these functions see each feature in their respective section.
To Pack cases:From the main menu select ‘Utilities’ and then Click on ‘Pack n Go’You will be presented with the list of all your patients.
From the list ‘Select the patient’ you want to pack.Highlight the patient name by a single click on it.
Next Click on ‘Pack’You will be presented with the following message.
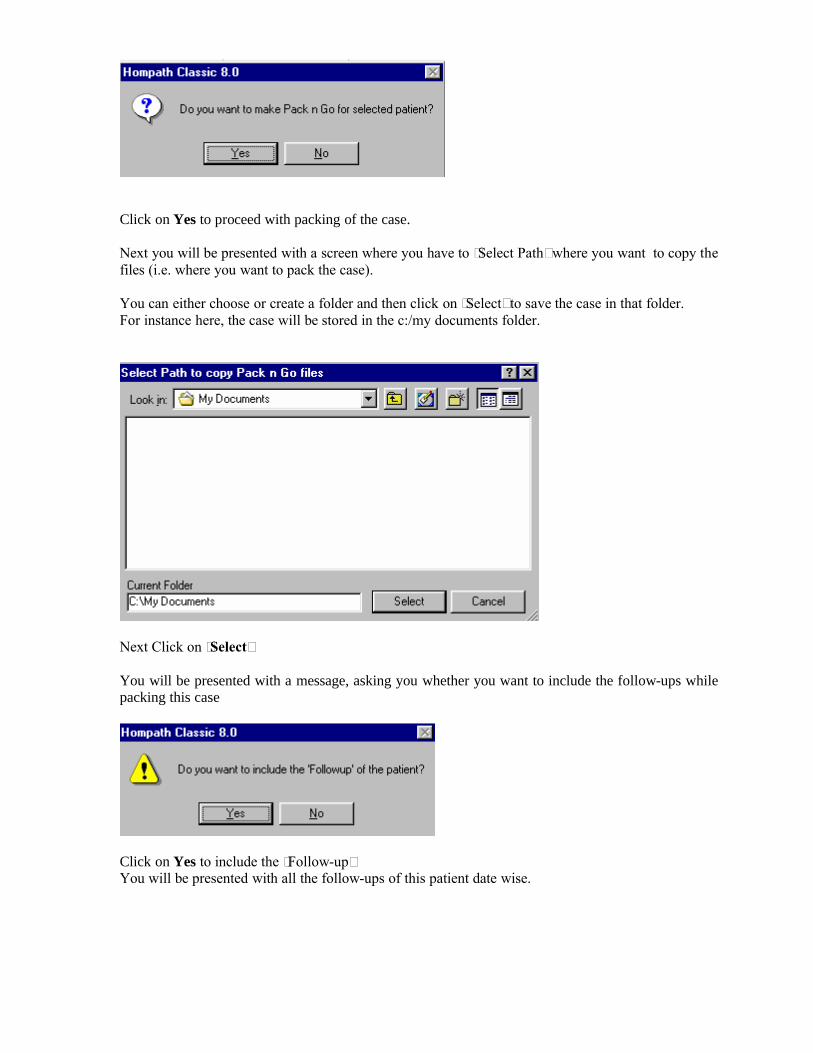
Click on Yes to proceed with packing of the case.
Next you will be presented with a screen where you have to ‘Select Path’ where you want to copy the files (i.e. where you want to pack the case).
You can either choose or create a folder and then click on ‘Select’ to save the case in that folder.For instance here, the case will be stored in the c:/my documents folder.
Next Click on ‘Select’
You will be presented with a message, asking you whether you want to include the follow-ups while packing this case
Click on Yes to include the ‘Follow-up’You will be presented with all the follow-ups of this patient date wise.

Hompath gives you the customize selection of follow-ups i.eYou can select each follow-up (date wise one by one) you wish to include in the case
This will be essential if you have multiple follow-ups of a patient and you only wish to choose only the most important ones
OR
Use the ‘Select all’ feature by clicking on the check box next to it, to include all the follow-ups of the case.
Next Click on ‘Continue’
You will be presented with the following screen
Click on Yes to include other details of the patient,This will automatically include, Case record , and other basic details for this patient
You have now finished with packing of one case.
In case you need to pack another case, then proceed with the same procedure as explained above.
The folder where you have packed the case, will now have the following contents:
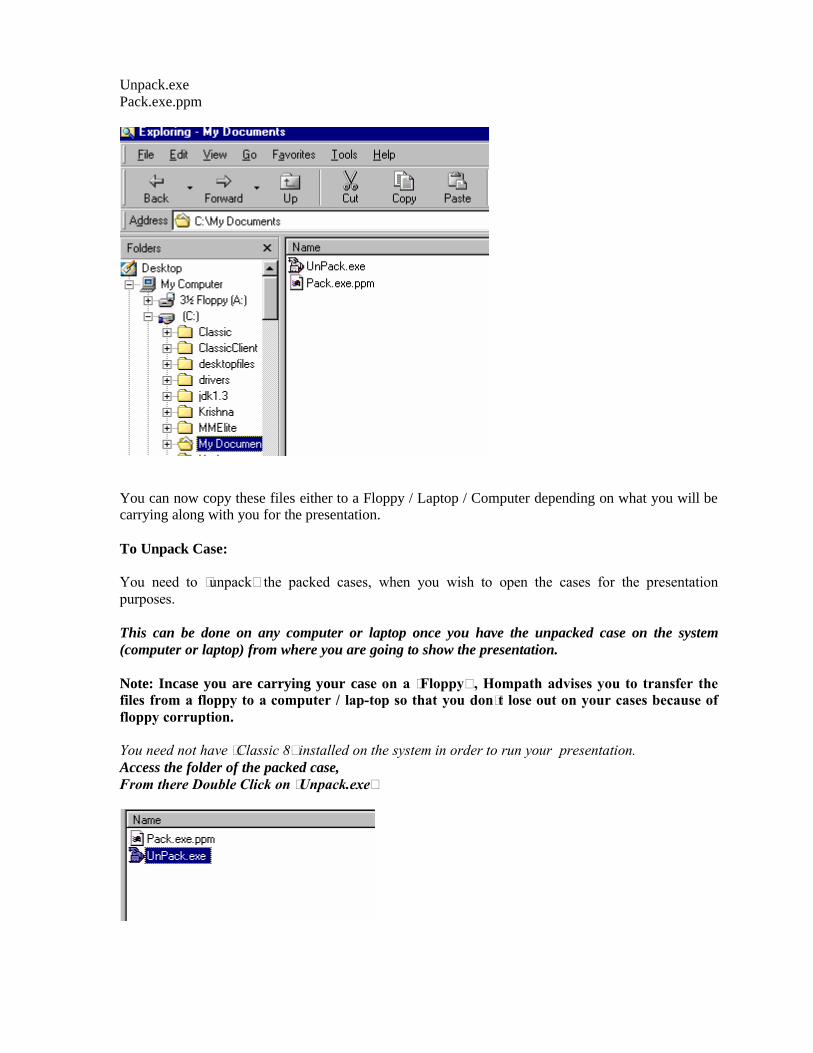
Unpack.exePack.exe.ppm
You can now copy these files either to a Floppy / Laptop / Computer depending on what you will be carrying along with you for the presentation.
To Unpack Case:
You need to ‘unpack’ the packed cases, when you wish to open the cases for the presentation purposes.
This can be done on any computer or laptop once you have the unpacked case on the system (computer or laptop) from where you are going to show the presentation.
Note: Incase you are carrying your case on a ‘Floppy’ , Hompath advises you to transfer the files from a floppy to a computer / lap-top so that you don’t lose out on your cases because of floppy corruption.
You need not have ‘Classic 8’ installed on the system in order to run your presentation.Access the folder of the packed case,From there Double Click on ‘Unpack.exe’

You will be presented with dialog box where you can provide a file name and then proceed to ‘Unpack’ORYou can also use the ‘Browse’ to select a desired folder to unpack the contents.For instance here, the contents would be unpacked in C:/ unpack /case
Click on ‘Unpack’You will be presented with an appropriate message.
Now to finally open the case (as mentioned in the above message)First go to the folder where you have Unpacked the case (In this case it is c:\unpack\case\pack n go.exe)Double Click on Pack n go.Exe

You will be presented with all the cases that you have packed
Highlight the patient and Click on ‘OK’ to view the case and all its details.
Hompath Family:
This menu provides the user an easy access to other modules of the program like ‘Archives’, ‘HomUtil’ Tresorie' ‘Links Tresorie’ ‘Case Analysis’, etc.
Click on any of the modules to directly jump to that module of the Classic 8.
Window
This option displays when "screens are open” or activated.
The menu contains options like 'Cascade', 'Tile' and 'Arrange Icons'.
The 'Cascade' option is used to cascade that is to reduce the window size . The 'Tile' option is used to divide the window in tiles.The 'New Window' option is used to open a new window.

‘Close’ will allow you close each screen one by one.‘Close all’ {F12} feature will be useful when there are multiple windows open and you need to close all the windows in one go.

Archives
Open Archives On-line library at your finger tips Read remedies / topics from any of the Homoeopathic books installed in the program. Choose the author of your choice to read his authored book Add remedies significant to you in your ‘Favorites’ folder.
Search Archives Search for any specific word or combination of words in all or any of the installed books Automatic inclusion of singular / plural and American / British alternatives of the query word
which makes your search most appropriate & complete. Use Advanced Search Options to improve your search query. Access the entire text and remedy from search results, simply by double click on any
reference.
Favorite Archives Includes all books and its remedies which you have previously added as your favorites. Fast and easy access of remedies/ topics/ articles significant to you.
ARCHIVES
Hompath Classic incorporates a power-packed Reference Database called Hompath Archives
‘Archives’ incorporates more than 260 relevant reference books, especially selected keeping the needs of classic practitioners and the students in mind.
All these books can be searched at an amazing speed using a very simple process and the results can be viewed & even printed.
Any given key word can be searched for and the information extracted in no time.
Archives can be read too, by opening specific books. You could also use the database of installed books to make your notes for your classes, lectures, presentations or projects.
Hompath Archives provides information and search facilities in:
Materia MedicaOrganon & PhilosophyTherapeuticsPharmacyRegional TherapeuticsClinicalRemedy Picture
To run this application double click on from ‘window program manager’

SEARCH BOOKS:
Homoeopathic literature is like a vast ocean of indeterminable depth and magnitude.Thousands of minor and major facts, information, experiences are strewn all over for picking. It is humanly impossible to store and recollect so many details and so much data from memory.
This option has been designed to search intelligently through all books, thousands of pages and millions of references and produce results within a few seconds.
You can search in any kind of reference book, right from Materia Medicae , Organon Therapeutics, Pharmacy etc.
On activation of this feature, a drop down list box containing the various subjects as shown below opens up. Select the appropriate subject to open the screen similar to ‘repertory search’ which will accept your query.
The different features of ‘Search’ program are explained further in each respective section.
Search Materia Medica
From the main menu select ‘Search’ and then choose ‘Materia Medica’ From keyboard type: {Alt+S}{M}
The ‘Materia Medica Search’ greatly enhances your prescription quality since it permits more combinations and sheds light on remedies that you could have never thought about.
Use this feature to get more information on a remedy or disease condition, or when you require references or to create custom-made Materia Medica or notes/presentations.
On activation of this feature, the following screen appears:

Search for / Query:
‘Search For’- Initially the blinking cursor is placed in the box below this message. You can type in the word you are searching for in this box.
A word list containing all the words [except common words like the ‘the’, ‘an’, ‘for’] found in the books are provided.
As you type, observe the word list, moving up to the nearest word you have typed.
Simultaneously, the typed word also appears in the ‘Query’ box.
You can double click on a word from the list box, which will then appear in the ‘Query box’.
Search Mode:
Once the Search query is given, one can now ‘Search’ for this word using two different ‘Search Mode’ available
a. Quick Searchb. Adv. Search.
Quick Search:
‘Quick Search’ option does a ‘simple search’ of the word and gives you the search results from all the installed materia medica. It also gives you the option to save these results as a Mat med Repertory.
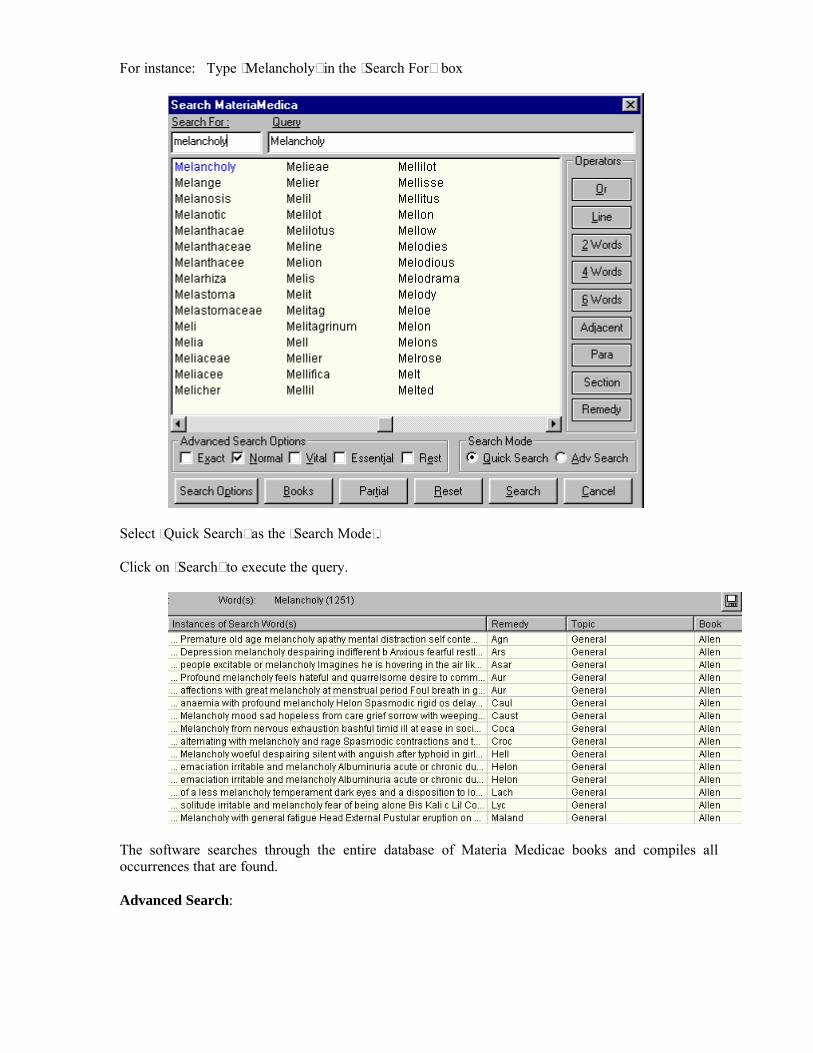
For instance: Type ‘Melancholy’ in the ‘Search For’ box
Select ‘Quick Search’ as the ‘Search Mode’.
Click on ‘Search’ to execute the query.
The software searches through the entire database of Materia Medicae books and compiles all occurrences that are found.
Advanced Search:

Like ‘Quick’ Search, the ‘Advanced Search’ searches for the query word and displays results from all the installed materia medica and also gives you the option to save the results as a Mat Med Repertory. This search also allows you to ‘Search for a remedy within the search results’
For instance, Type the same word ‘Melancholy’ in the ‘Search For’ boxNow Select ‘Adv Search’ now as the ‘Option’.Click on ‘Search’ to execute the query.The software displays all the results of the ‘query’ word.
In addition to this, observe the two buttons available on the top right corner [marked with a arrow in this screen]
a. Search: [Search for a remedy within the search results]:
The ‘Search’ box allows you to search for any one remedy from all the search results.
For instance: If you wish to find out how many times & in which reference books the word ‘Melancholy’ has appeared in the remedy ‘Ign (Ignatia)’ Simply type the remedy abbrv. ‘Ign’ in the Search box.
Click on ‘Find a Remedy’ .The ‘Search Results’ will now show all occurrences of ‘Melancholy’ wherever listed in the remedy ‘Ignatia’ and from whichever book available.Note: Only short universal abbreviations of the remedies should be used for this feature for eg. ‘Ign’ for ‘Ignatia’, ‘Lyc’ for Lycopodium, ‘Phos’ for ‘Phosphorus’ etc..
Revert back to All Remedies by clicking on ‘Reset’ button.
Saving the Search Results as a Repertory :
The user can now pick up any reference from the ‘Search Materia Medica’,and then save the ‘Search Results’ in the form of a repertory known as ‘Matmed Repertory’.
Use this feature to create repertory of symptoms which are not well defined in the original repertories
For details of this feature See ‘Create Matmed Repertory’ section of ‘Create Customised Repertories’
Advanced Search Options:

This feature gives you different search options to include more ‘Related Words’ to the word(s) you have given query for.
For instance, ‘Gloomy’ and ‘Grief’ are very closely related to the word ‘Sad’.
How often have you wished that when you search for the word ‘Sad’ it should incorporate results of ‘Gloomy’ and ‘Grief’ as well!
Hompath has made this possible for you, thus making your search more easy and complete.
Various ‘Advanced Search Options’ available are:
1.Exact:This option will include search results for the ‘exact’ word you have given query for.
For instance, Type in ‘Diarrhoea’ in the ‘Search For’ query box. Check the ‘Exact’ option from the ‘Search Options’Click on ‘Search’ to execute the Query.
The Search Results will give instances of the ‘Exact’ word ‘Diarrhoea’ which has 13869 occurrences available in the entire Materia Medica references.
2.Normal: This option will include search results for the ‘exact’ word and its ‘plural’ form plus the ‘American’ and the ‘British’ English alternatives of the query word.
For instance, Search for the ‘Diarrhoea’Check the ‘Normal’ option from the ‘Search OptionClick on ‘Search’
The Search Results will include ‘Diarrhoea’ & its plural ‘Diarrhoeas’ + ‘Diarrhea [American English] and its plural ‘Diarrheas’ The results, are now 14723 occurrences as compared to the 13869 previous results!
Note:. By Default Hompath has kept the ‘Normal’ option as checked, as this will be the most commonly used option.
3. Vital / Essential / Rest Options:These are more advanced options which allow the user to improve or broaden the search results with the help of certain pre-defined ‘Related words’.
Each main word includes a list of related words (Similar Words) divided into three categories. The most important related words are included in ‘Vital’ list, the next important are included in the ‘Essential’ list and the last important are included in the ‘Rest’ list.
a. Vital: These include words which either directly ‘mean’ or are the ‘most closely related’ words to the main word.For instance, Type ‘Sad’ in the Search Query.Now Check ‘Vital’ as the Search Option.Execute the query by clicking on ‘Search’The Search Results will now include words like ‘Sadness’, ‘Gloomy’, ‘Brooding’ ‘Sorrowful’etc.
Thus the significance of ‘Vital’ words is to allow the user to broaden his ‘Search’ criteria with inclusion of the most important related words.
b. Essential: These include words which have an indirect bearing to the main word and hence cannot be overlooked.
With the same example of ‘Sad’ as the Search Query.Now Check ‘Essential’ as the Search Option.Click on ‘Search’The Search Results will now include words like ‘Cheerless’, ‘Depressed’ , ‘Doleful’, ‘Sombre’ etc, words which are next closely related to the word ‘Sad’
c. Rest: These will include words which are in some way or the other way related to the main word.
Again with the same example of ‘Sad’ as the Search Query.Check ‘Rest’ as the Search Option.Click on ‘Search’The Search Results will now include words like ‘Depress’ ,‘Grieved’ , ‘Mournful’ etc. The ‘Rest’ words can be considered as the least important ‘Related words’ to the main word.
For more information on this feature see ‘Similar Words’ section, of ‘Common Features’ under Repertory.
Note: Hompath gives you option not only to check each of these above options separately, but also one can check two or more options at one given time to include it in the Search.
For instance: Check option of only ‘Vital’ words for the word ‘Sad’ . The results are ‘10837’. Similarly now check the option of ‘Vital’ and ‘Essential’ words simultaneously. The results are ‘13924’ in number.
Inclusion of “Rest’ words will similarly further increase the number of search results.
Search Options:
The ‘Search Options’ is similar to using advanced search options, except that the user is allowed toinclude single or multiple words from the pre-defined list depending on his requirements, and thereby make his own permutations and combinations.
For instance type the same query ‘Sad’ in the ‘Search for’ box of Search Materia Medica.Click on ‘Search Options’

Select Type: Includes 3 types of ‘Vital’, ‘Essential’ and ‘Rest’ options.
By Default you can see all the ‘Vital’ words of the main query word In this case the main word is ‘Sad’
The number ‘24’ in the bracket next to the Vital Words List indicates that there are 24 pre-defined vital words for the word ‘Sad’
Query Word:Also observe the ‘Query Word(s)’ box.
This box will display the ‘Main Words’ you have given query for, and will be of significance whenyou have given more than one word as the Query. The ‘Drop Down Arrow’ next to the box allows you to select each of these words one by one, and apply below mentioned options to each when desired.
Add:Highlight each of the word(s) you want to incorporate in the search results (from the three options available) and then click on ‘Add’ to add words one by one.
In the above example , Say you wish to include ‘Brooding’ ‘Melancholy’ and ‘Grief’ in your search results.Highlight each of these word(s) from the list and Click on ‘Add’ Or‘Double click’ on each of these word(s) .The word(s) will be added one by one to the selected list.Change the option from ‘Vital’ to ‘Essential’, by checking the ‘Essential’ option.Choose ‘Cheerless’ , ‘Depressed’ and ‘Sombre’ from this list to be included in your search.

Apply the same method for the ‘Rest’ Words and Select ‘Grieve’ and ‘Mournful’ to the list.The screen will now appear as follows
Click on ‘O.K’ to execute the Search Query.The ‘Search Results’ will now incorporate the word ‘Sad’ + ‘All the above words’ taken into consideration.
Add All: To include all the words of any ‘Select Type’ simply click on ‘Add All’ option.For instance, to include all the ‘24’ Vital Words of ‘Sad’ in the search results, click on the ‘Add All’ option.
Remove: To delete individual words, highlight each word and click on ‘Remove’
Remove All: To delete all words from the selected list place the cursor in any of the 3 columns of ‘Selected words’ and then click on ‘Remove all’
Search: ‘Search’ Box under the ‘Select Type’ options allows you to ‘Search’ or ‘Jump’ to any of the words in each category if available.Similarly the ‘Search in’ Box allows to ‘Search’ in words from selected list of ‘Vital / Essential / Rest’ words depending on the criteria selected.
Cancel:‘Cancel’ option allows you exit from this feature without applying the selection
Books:You may want to limit the search operation to specific books or Materia Medicae. In that case Click on the ‘Books’ to select the desired books and remedies.

As you click on a book name, from the ‘Book List’ the list of remedies available in the selected book are displayed in the ‘ Remedy / Section’ list box as their abbreviations.
Select the desired remedies by double clicking on each remedy abbreviation or highlight any
remedy and click on the ‘ ’ button .
The selected remedies get displayed in the ‘Selected Remedies’ list box.
To facilitate easy search of remedies, a ‘Search’ box is provided for you to type in the remedy name. You may also use the vertical scroll bar to reach any specific remedy.
To remove any Unwanted Book or Remedy click on after highlighting it from the ‘Selected Remedies / Sections’ List.
You can also select all remedies of a book by clicking on ‘Select All Remedies’ in the ‘Check’ box option.
Click on ‘O.K’ once you have selected the specific books and remedies.
You will return back to the ‘Search Materia Medica’ Screen.
Click on ‘Search’ to execute the Search from the ‘Specific Books and Remedies’ you have given options for.
Note : By default the program is set on ‘All Books and All Remedies’ for the search operation. This is automatically selected once you invoke the ‘Materia Medica Search’ option or if you click on ‘Cancel’ from the ‘Books’ screen.

PartialThis feature enables you to include multiple and related words in the search operation.
For instance you may want to include all words related to ‘Hate’ in the search. What you would do is simply type ‘Hate’ in the ‘Search For’ box.
Then click on ‘Partial’ and you will be given all related words of the word ‘Hate’ like Hated, Hateful, Hates in the ‘Search For’ list box. Highlight each word that you want to include in the search.
The ‘Query’ box will display: ‘Hate*’ The asterisk next to the word signifies that all the words highlighted by you will also be searched for.
Note: All words with matching first four characters to those of the main word will be displayed in the ‘Search what?’ list box. Some of the words therefore may not have appropriate reference to the main word . For instance, if you select ‘Mania’ and click on ‘Partial’, you would be given a number of words including the words ‘Manifestations’, ‘Manifold’ etc. Please ignore all such unrelated words and select only the appropriate words for inclusion in the search.
Operators:To maximize the scope of the search operation and narrow it down to the right text that you are searching for, several operators have been provided here as well.
Or:When used between two words, the search program locates either of the words given in the query. For instance, type ‘Rage’ in the ‘Search For’ box. Click on the‘Or’ operator. Type ‘Mania’ in the ‘Search for’ box. The query box displays: ‘Rage’ or ‘Mania’. Click on ‘Search’. All references any where in the data containing either ‘rage’ or ‘mania’ are displayed in the results screen.
Try out another combination. Use the ‘Or’ operator for the words ‘Babies’ or ‘Children’ or ‘Infants’. Within a fraction of a minute you will have all the references for Paediatrics and Homoeopathy.
Line:This operator extends the search for the words occurring anywhere in a given sentence.
For instance, type ‘Fever’ in the ‘Search For’ box. Click on the‘Ln’ operator. Type ‘Perspiration’ in the ‘Search for’ box. The query box displays: ‘Fever’ Ln ‘Perspiration’. Click on ‘Search’. All references any where in the data containing Fever and Perspiration in a line are displayed in the results screen.
2 words:

This operator helps if you want to search for a combination of words occurring within a space of 2 words in the same sentence. By using this you are increasing the scope of the search operation.
For example, you want to look for remedies and information on ‘Abortion In Third Month’. You are not sure whether the words ‘Third’ and ‘Abortion’ occur next to each other. In such a case use this operator while framing your query . Select the word ‘third’, then select the operator ‘2 words’ and finally, select the second word ‘Abortion’ and click on ‘Search’. The query box will display: ‘Third wd2 Abortion’.
4 words:This operator is similar to ‘2 words’ except that the scope of search is further extended and includes all the words occurring within a space of 4 words.
Try the same example above with the ‘4 words’ operator in place of the ‘2 words’ operator. You can see the difference in the number of references.
Tip: For changing the operator from ‘2 words’ to ‘4 words’ you need not retype your query. Simply click in the ‘Query’ box. Click and drag the mouse over the text ‘wd2’ to highlight it. When this is done, click on the operator ‘4 words’.
6 words:This operator has the same function as ‘2 words’ and ‘4 words’ but enlarges the scope of the search even more. You can use this where words may occur with considerable distance between them.
Try the same example above with the ‘6 words’ operator in place of the ‘2 words’ operator. You can see the difference in the number of references.
Adjacent: When you use this operator between two words the program will display all the references where the given two words are next to each other.
Lets say you are searching for a specific symptom of ‘Diabetes Mellitus’. To look for all remedies having this symptom and all those instances in Homoeopathic literature where these words are used you could type in the ‘Search For’ box: ‘Diabetes’. Select the word by double clicking. Click on the ‘Adj’ operator. Select the second word ‘Mellitus’. The query box will contain the text ‘Diabetes’ Adj ‘Mellitus’. Click on ‘Search’ to extract all that you are looking for.
Para:This operator ensures the ‘Search’ of words placed anywhere in an entire paragraph.
Use the same egs. Of ‘Fever’ and ‘Perspiration’ using ‘Para’ operator instead of ‘Line’. There is a four-fold or more increase in the number of references. This ensures that you would hardly miss any reference.
Section:Some Materia Medicae books represent remedy information in sections like Mind, Head, Generalities, Modalities. etc. Each section may have more than one paragraph also. In case you would like to enlarge the scope of the ‘Search’ operation, you may include the ‘Section’

operator instead of ‘Para’. The search will be made for all occurrences of the given words anywhere within one entire section.
Remedy:Each operator enlarges the scope of the search operation and has an edge over the other. When you select the ‘Remedy’ operator, the program searches for the occurrences of words anywhere in the entire remedy from beginning to end.
After selecting the search words, required options and the suitable operators, click on ‘Search’ to start processing and extracting of all that is required in a matter of seconds.
Note: A query can be formed in several words, but the results may not be impressive always, until u give the query in the right combination.
Reset / Search / Cancel
Reset Click on this button if you want to clear queries and wish to go ahead with another word search. It will empty the contents of the ‘Query’ box.
SearchThis button will start processing your query to proceed with the search operation. Click on ‘Search’ after you have selected all appropriate options for your query. In a matter of seconds, the results of the query will be displayed.
Cancel Click on this button to close the ‘Materia Medica Search’ feature. You will to the main menu.
Note: Since materia medica is the most widely used feature, Search / Open and Favorite materia medica are also given in the ‘Classic’ module of the software, most of the functionalities and options remain the same.
Understanding Search Results:
As you click on ‘Search’, the program starts searching and compiling all occurrences being found.
The top left corner displays a reference number which means that presently your cursor is positioned at that particular reference.

It also shows the total number of references found upon search.
In case you have given ‘Advanced Search’ as option, more two buttons shown by the blue arrow are also seen
The instances of words found along with a brief description or part of a sentence; are displayed along with the remedy name [only present in materia medica], topic name if any, and book of origin.
You can use the vertical scroll bar on the right of the screen to reach more references.From here you can also access the entire text and remedy from where the reference occurred.‘Double click’ with the mouse on any reference. The entire text is displayed in full (either in HTML or Text view). See ‘Display type’ for details.
To return to the query box click on .
To return to the main menu click on .
Search Philosophy
From the main menu select ‘Search’ and then choose ‘Philosophy’From keyboard type: {Alt+S}{P}
The functionality of this feature is similar to the ‘Materia Medica Search’.
The difference lies in the books and data available. The word list consists of all words from all the installed Philosophy and Organon books.
The method of formulating the query, using operators and limiting or enhancing the search options are as explained above in the previous section.
Note: All the options & functions remain the same as in ‘Search Materia Medica’, except ‘Adv search options’ which are not given in this feature as they are not applicable to this module.
Understanding Philosophy Search Results:
This is similar to the results screen of Materia Medica Search.
The instances of words found along with a brief description or part of a sentence are displayed along with the sub-chapter name if any and book of origin.
Double click on any occurrence that you want to read. That particular chapter opens up.
To return to the previous screen of search results, click on You can go into another reference by again selecting the reference and double clicking.
To return to the ‘Query’ box click on

Search Therapeutics
From the main menu select ‘Search’ and then choose ‘Therapeutics’From keyboard type: {Alt+S} {T}
The functionality of this feature is similar to the ‘Materia Medica Search’ and ‘Philosophy search’
The difference lies in the books and data available. The word list consists of all words from all the installed Homoeopathic Therapeutic books.
The method of formulating the query, using operators and limiting or enhancing the search options are as explained above in the previous section.
Note: All the options & functions remain the same as in ‘Search Materia Medica’, except ‘Adv search options’ which are not given in this feature as they are not applicable to this module.
Understanding Therapeutics Search Results:
This is similar to the results screen of Materia Medica Search.
The instances of words found along with a brief description or part of a sentence are displayed along with the sub-chapter name if any, and book of origin.
Double click on any occurrence that you want to read. That particular chapter opens up.
To return to the previous screen of search results, click on
You can go into another reference by again selecting the reference and double clicking.
To return to the ‘Query’ box click on
Search Pharmacy
From the main menu select ‘Search’ and then choose ‘Pharmacy’From keyboard type: {Alt+S} {H}
The functionality of this feature is similar to the ‘Materia Medica Search’ and ‘Philosophy search’ . The difference lies in the books and data available.
The method of formulating the query, using operators and limiting or enhancing the search options are as explained above in the previous section.
Note: All the options & functions remain the same as in ‘Search Materia Medica’, except ‘Adv search options’ which are not given in this feature as they are not applicable to this module.
Understanding Pharmacy Search Results:This is similar to the results screen of Materia Medica Search.

The instances of words found along with a brief description or part of a sentence are displayed along with the sub-chapter name if any and book of origin .
Double click on any occurrence that you want to read. That particular chapter opens up.
To return to the previous screen of search results, click on
You can go into another reference by again selecting the reference and double clicking.
To return to the ‘Query’ box click on
Search Clinical
Search Regional Therapeutics.
Search Remedy picture
The accessibility and functionality of these features is also similar to the previous features.
From the main menu select ‘Search’ and then choose respective options.
The method of formulating the query, using operators and limiting or enhancing the search options are as explained above in the previous options.
OPEN ARCHIVES
Open Materia MedicaOpen PhilosophyOpen TherapeuticsOpen PharmacyOpen Regional TherapeuticsOpen ClinicalOpen Remedy PictureCreating Notes from Archives
Open Books
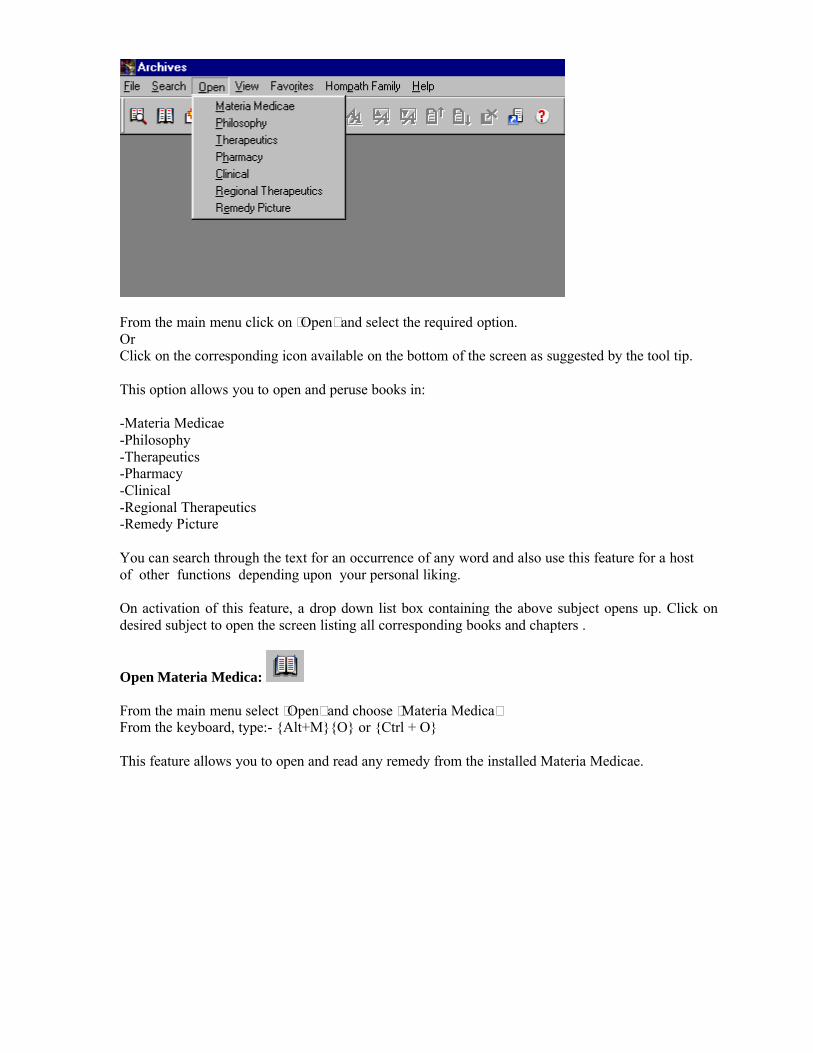
From the main menu click on ‘Open’ and select the required option.OrClick on the corresponding icon available on the bottom of the screen as suggested by the tool tip.
This option allows you to open and peruse books in:
-Materia Medicae -Philosophy -Therapeutics -Pharmacy -Clinical -Regional Therapeutics -Remedy Picture
You can search through the text for an occurrence of any word and also use this feature for a host of other functions depending upon your personal liking.
On activation of this feature, a drop down list box containing the above subject opens up. Click on desired subject to open the screen listing all corresponding books and chapters .
Open Materia Medica:
From the main menu select ‘Open’ and choose ‘Materia Medica’From the keyboard, type:- {Alt+M}{O} or {Ctrl + O}
This feature allows you to open and read any remedy from the installed Materia Medicae.

Book / Remedy List:All the installed books are listed under the heading of ‘Book List’. Click on any of them.The remedies available in that book are displayed under the heading of ‘Remedy list’.
Observe in the above screen the book highlighted is ‘Keynotes with Nosodes by Allen H.C” The number in the bracket [214] next to the ‘Remedy list’ indicates that there are 214 remedies in this book.
Follow this simple procedure to select remedies:
Select any Materia Medica from the left column.Select any remedy by ‘Double Clicking’ 0R Click on ‘Add to List’. If the remedy is not immediately visible in the box, type the remedy abbreviation in the ‘Search Remedy’ box.Observe the ‘Remedy full name’ option which displays the Full Name of the remedy, as and when you move to each remedy.All the remedies selected will be displayed in the ‘Selected Topics’ box.
Note: You can select upto ‘8’ remedies at one time.
View All:Books:
This option will allow you to sort all books by which you can first select particular book(s) and then its remedies.
Note: By default the program is set to this option.
Highlight any book and select remedies as explained above to open them.
Remedies: This option will allow you to sort all remedies by which you can first select a particular remedy and then select its various books from wherever the remedy is available.
Click on the ‘Remedy’ option to view all the ‘Remedies’ available in materia medica in an alphabetical order.
All the remedies will be listed in the ‘Remedy List’
Highlight any remedy.
The book(s) containing that particular remedy will be simultaneously highlighted under the ‘Book List’ option
Select the book from where you wish to read the remedy either by ‘Double click’ OR ‘Add to list’ option.
The remedy appears in the ‘Selected Topics’ box.
Keynotes: Highlight any remedy from the ‘Remedy List’ and click on ‘Keynotes’ to read the red line symptoms of that remedy.
Drug Property:Highlight any remedy from the ‘Remedy List’ and click on ‘Drug Properties’ to view full name, basic properties, kingdom, class type, etc. of that remedy.
Drug Relation:Highlight any remedy from the ‘Remedy List’ and click on ‘Drug Relation’ to view the complementary, inimical and antidotal relations of the selected remedy.
Note: Keynotes / Drug Properties / Drug Relation of certain drugs may not be available, in that case you will be presented with a appropriate message
Drug Filter:‘Drug filter’ allows you to filter remedies using either drug properties, mineral, plant or animal filters and then read remedies there from.
For instance Select book ‘Therapeutics of Fever by Allen. H.C.’ by highlighting it.
Click on the drop down list box of ‘Drug Filter’ and select ‘Animal Filter’.
Select ‘Snakes’ from the Animal types.
In the remedy list, the following six snake remedies are displayed:Both-l, Crot-c, Crot-h, Elaps, Lach, Naja.

This means that the above book includes these six snake remedies.
Now, double click on each of these remedies to add them to ‘Selected Topics’ list.
Similarly one can apply other filters of drug properties, plant and animal filters etc. to filter remedies and read them.
Reset Filter:Click on ‘Reset Filter’ to reset all applied filters and revert back to all remedies.
Add to list:Click on ‘Add to list’ to add remedies to the ‘Selected Remedies’ list, for you to open and read them.
Search Author:
‘Search Author’ has a drop down list of all the authors listed alphabetically to help usread remedies written by any one particular author & his different books.
For instance:You want to few remedies as written by Dr. Hering. Choose Hering C. from the ‘Search Author’ list.
The following 3 books authored by Dr. Hering are displayed in the ‘Book List’: 1. Condensed Materia Medica.2. The Guiding symptoms of our Materia Medica.

3. Model cures by Hering.Select the book and the remedy (ies) you wish to read and add it to the ‘Selected Topics’ box.
Selected Topics The ‘Selected Topics’ box displays all the remedies you have selected to read.
Open:Double click on a remedy OR Highlight any single remedy from the ‘Selected Topics’ list & Click on ‘Open’ to read it.
The ‘Open’ option enables you to read the entire remedy.
The drop down box next to the ‘Open’ button incorporates certain pre-defined sections of the remedies and thereby helps you to read specific sections of a remedy.
For instance: To read the Aggravation section of ‘Aconite’ from ‘Keynotes by Allen’, click on the remedy from the ‘Selected Topics’ list. Click on Drop Down Box of ‘Open’ and highlight the ‘Aggravation Section’ from the drop down list to open it.The drop down feature is disabled in books which do not have sections.
Open all:This option enables you to open all the remedies which you have added in ‘Selected topics’ list.Once the remedies open, use the window functions from the main menu to tile, cascade, minimize or maximize the windows to suit your needs.
Note: The text is either displayed in ‘Text’ view or ‘HTML’ view depending on what you have selected. See ‘Display type’ for details.
Clear: Highlight any single remedy and click on ‘Clear’ to delete any single remedy from the ‘Selected topics’ list.
Clear all:‘Clear all’ allows you to reset all remedies from the ‘Selected Topics’ list.
Close:Allows you to exit the Open Materia Medica feature
Compare Remedies
This feature allows you to compare specific sections of remedies in a eye pleasing format.
For instance Select ‘Keynotes by allen’ book.Select two remedies ‘Nat-m’ and ‘Sulph’ from this book and add it to the ‘Selected Remedies’ list.Click on ‘Compare’.The following screen will be displayed:

Observe the screen for following:The ‘Select Topic’ list all the remedies you have taken up for comparison from where one has to select a maximum of 4 remedies to compare.
The ‘Select the Section to compare’ allows you to change to different sections of the selected remedies and then compare .
‘Open Section’: Click on this button after you change the section using the above feature to execute the compare.
& These buttons allow you to jump to & fro from one remedy to other if more than two remedies are selected for comparison. Highlight all remedies from the ‘selected topics’ list before using this option.
& These buttons allow automatic scrolling of the text page up and down.
Observe the tool bar for following
allows you to increase the font size
allows you to decrease the font size.

‘Search’ box allows you to search for a word within the opened text. ‘Go’ allows you to execute the search.
The Left and Right radio buttons allows you change the focus either to the left or the right side remedy, and thereafter apply all above options to it.
For eg. If you want to find a word or change the font of the left displayed remedy, simply tick the left radio button, and then apply these options to the remedy.
Add remedies to your favoritesThis option allows you to add all your favorite remedies in the ‘favorites’ section for future reference.
Highlight each book and remedy one by one from the ‘Selected Remedies’ list and then click on the ‘Favorite’ button.
An appropriate message that the book is added to your Favorites appears. Click on ‘OK’.
Similarly add all the desired remedies one by one to the favorites section.
Favorites
From the menu bar select ‘Favorites’ and then choose ‘Open favorites’
This option allows you to read favorite remedies / topics which you have previously added from any of the ‘Open’ section.

The main screen displays the favorite book name / topic / author / and type of subject added.The bottom screen displays the 'Select' option which includes the ‘Book Name’ , ‘Topic’ ‘Author’ and the ‘Type’ of subject, to filter down specific books, remedies / topics, or the subjects by selecting from the drop down box.
The ‘Sort By’ ‘Book’, ‘Topic’ , etc. is used to sort the favorite list in ascending or descending order. On single click the list is sorted in ascending order and on the second click the list is sorted in descending order.
OpenHighlight any Remedy and then Click on ‘Open’ OR ‘Double click’ to read any remedy .
Show all:
Click on ‘Show All' to reset all the topics if you have applied any filters.
View Types
Click on the ‘Text’ or the ‘HTML’ view to read the text in the respective format
See ‘Display type’ for details.
Delete Favorites
Highlight the topic from the list box and click on 'Delete' to remove it from the favorites list .
Close Favorites
To exit from the "Open Favorites" feature, Click on "Close".
Open Philosophy
From the main menu select ‘Open ’ and choose‘ Philosophy’From keyboard type:- {Alt+O}{P}
This option allows you to open and read, any chapter(s) from the Philosophy book(s) installed.
The functionality of this feature is the same as that of ‘Open materia medica’ except for few options like ‘Compare’ ‘Full remedy name’ ‘View all’ options which are disabled here, as they are not applicable to this section.
As in previous section, the column on the left side lists all the installed books under the heading of ‘Book List’ and the chapters available in the book are displayed in the right column under ‘Section list’.
Highlight each chapter and click on ‘Add to list’ or ‘double click’ to add it to the ‘Selected Topics’ list.
‘Select author’ allows you to select a particular author and his books. ‘All Books’ option resets the entire list of books if any filters are applied.

The ‘Selected topics’ options remain the same as in previous section. Highlight a selected condition and click on ‘Open’ to read the selected topic, or use the ‘Favorites’ option to add it to your favorites. Similarly use the ‘Clear’ option to delete topics from the ‘Selected topics’ list.
Click on to close the currently active ‘Philosophy’ window.
Open Therapeutics
From the main menu select ‘Open ’ and choose‘ Therapeutics’From keyboard type:- {Alt+O}{T}
This option allows you to open and read, any condition from the Therapeutics books installed.
The functionality of this feature is the same as of ‘Open Philosophy’.
As in previous section, the column on the left side lists all the installed books under ‘Book List’ and the chapters available in the book are displayed in the right column under ‘Section list’.
Highlight each chapter and click on ‘Add to list’ or ‘double click’ to add it to the ‘Selected Topics’ list.
‘Select author’ allows you to select a particular author and his books. ‘All Books’ option resets the entire list of books if any filters are applied.
The ‘Selected topics’ options remain the same as in previous section. Highlight a selected condition and click on ‘Open’ to read the selected topic, or use the ‘Favorites’ option to add it to your favorites. Similarly use the ‘Clear’ option to delete topics from the ‘Selected topics’ list.
Click on to close the currently active ‘Therapeutics’ window
Open Pharmacy
From the main menu select ‘Open ’ and choose‘ Pharmacy’From keyboard type:- {Alt+O}{H}
Open Clinical
From the main menu select ‘Open ’ and choose‘ Clinical’From keyboard type:- {Alt+O}{C}
Open Regional Therapeutics
From the main menu select ‘Open ’ and choose‘ Regional Therapeutics’From keyboard type:- {Alt+O}{R}
Open Remedy Picture

From the main menu select ‘Open ’ and choose‘ Remedy Picture’From keyboard type:- {Alt+O}{E}
The features and functionality of these topics also remain the same as in the previous ‘Open topics’
Display type:
The remedies opened can be viewed in two types of views HTML view or Text view
Select the desired type of display of the book either by clicking on:
HTML view or TEXT view
The text appears in the selected format.
HTML View:
The text opens in an eye-pleasing and beautiful format.
Scroll either using the scroll bar or place the mouse on , so that the page automatically
scrolls down . Place the mouse on , so that the page automatically scrolls up.

Change the font size, type and color of the text: To change the Font color ,Background color, Header Background, Table Background, Header Text , Select the desired option from the drop down list and select the color from the "Color" box. Similarly change the font type of the text from the font box.
Search within a reference: To search for a word in an article opened in HTML view Type in the ‘Find’ box and then click on 'Go' . The word is highlighted in the article , to search again the same word press ‘Go’ till you complete the search.
To Increase the font size of of the text Click on from the status bar. To Decrease the font
size of the text Click on from the status bar.
To jump to start of a page use the icon on the status bar. To jump to end of page use the icon on the status bar.
Text View:
The text of the Materia Medica appears as it does in the original text book.
Click on the ‘Edit’ menu OR Use the tool bar options for the following options
allows you to copy the contents of the text page by page to the editor of your choice like notepad / wordpad etc. to create notes from archives.
Search within a reference: Click on ‘Edit’ from the main menu and then choose ‘Find’ OR
From keyboard type {Alt+E} {F}
Type the required word in the dialog box that appears, and click on ‘OK’ button. The required word is highlighted in the article.
If you want to search occurrence of the word again within the same article , Press the ‘Next ’ button from the ‘Edit’ menu OR From keyboard type {Alt + E} {N}
Click on ‘Cancel’ to close the search.
Change the font size, type and color of the text: The font type, size, and colour of font etc in
the opened article can be changed using toolbar icon.
allow you to move to the ‘next’ and ‘previous’ page of the text respectively.

Magnify
When you have selected the Text view the ‘View’ menu incorporates ‘Magnify’ option. This option helps to view the text in a magnified form.
To use it select the option from the menu, on selection the cursor changes to magnify glass shape , press the left mouse button and drag the cursor on the text.
In case you need to change the properties of the magnify options, right click on the main screen after clicking on the magnify option from the view menu.
One can change the shape of the magnifying glass, along with the zoom and the size properties.
Creating notes from Archives
This feature helps you create notes from the database of books installed in your computer.
Note: These notes can only be created if you have opened the remedies / topics in the text view.
Students can use this feature to prepare notes for exams and later reference. Teachers and practitioners can utilize this feature for making notes for presentations, articles, lectures, etc. They can also author their own books using this feature.
Use this feature from ‘Open Books’ , after you have chosen and opened the text you want OR from ‘Search Books’, after you have searched for a particular word and then opened the corresponding search results.
Follow these simple steps to create your notes:
Click with the mouse and highlight the sentence, line, paragraph or text that you want to store.
From main menu click on ‘Edit’ and then choose the option ‘Copy’ {Ctrl+C}OR
From the main bar click on
The highlighted matter can now be opened in any word processor like ‘Word’ or in ‘Notepad’.
Access the word processor or ‘Note Pad’ or any other text editor from the file manager. Click on ‘Edit’ from the main menu and choose ‘Paste’. You will see the matter that you had highlighted appear here.
You can save this matter or even take a printout, if so desired.
HOMUTIL
Hompath Vital offers numerous practical and clinical application hints in the form of ‘Homutil’.
This feature has been specially designed keeping the needs of the students/practitioners in mind thereby saving a a lot of time spent in referring various references and books.
HOMUTIL
Hompath Vital offers numerous practical and clinical application hints in the form of ‘Homutil’.
This feature has been specially designed keeping the needs of the students/practitioners in mind thereby saving a lot of time spent in referring various references and books.
The data has been compiled exclusively, by experienced teachers, using a large and varied reference base.
Mother tinctures: Provides internal and external tinctures useful for various clinical conditions
Prophylaxis: Provides you remedies useful in the area of preventive medicine
Therapeutics: Comes in handy for quick comparison & indications of frequently used remedies.
Word Meanings: Makes understanding complex words easy.
Cross References: Provides guide map for selection of rubrics, that are otherwise difficult to imagine.
Viva Questions: Provides practice set of questions & answers enabling the student to prepare for their Vivas.
Question Bank: Provides question set on subjects included in the curriculum .
Group Symptoms: Gives you generic information of various group remedies.
Getting Started with Homutil
Double click on the ‘Homutil’ icon on the desktop
OR
From the start menu select ‘Programs’ then choose ‘Classic 8’ and then ‘Homutil’
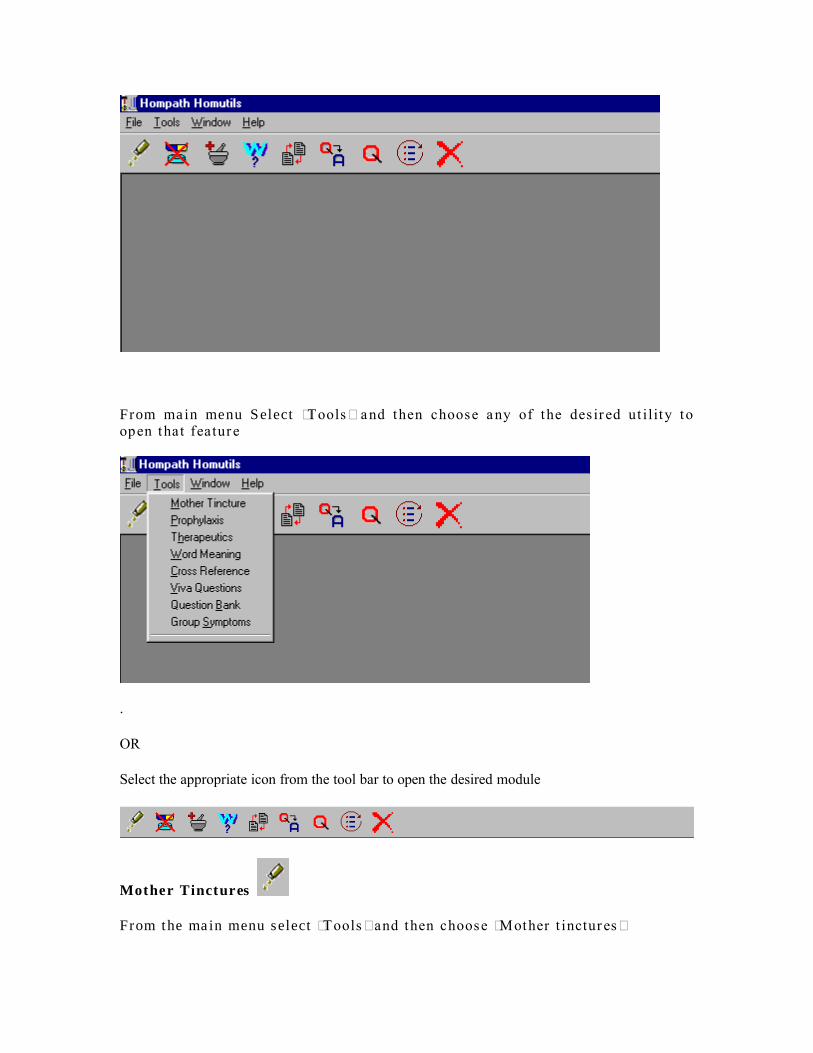
From ma in menu Select ‘Tools ’ and then choose any of the des ir ed ut i l ity to open that featur e
.
OR
Select the appropriate icon from the tool bar to open the desired module
Mother Tinctures
From the ma in menu select ‘Tools ’ and then choose ‘Mother t inctur es ’

From keyboard type {Alt+T} {M}
Some of the commonly used remedies in form of Mother Tinctures have been described in this Utility.
Normally mother tinctures can be given 4/5 drops every 4 hours or 4 times to produce desired action. But in case if intensity is severe you can give 4/5 drops every 15/20 minutes till some action is produced.
Mother tinctures can be applied locally. Local application has to be done after diluting in sterile water.
Mother t inctur es have been arranged in two forms:
1. Internal – to be taken as internal administr a t ion.
2. Externa l – to be applied as externa l application.
Click on either ‘Internal’ or ‘External’ button to view respective mother tinctures.
Clinical condition appears in the left column.
The corresponding remedy for the clinical condition appears in the right box with brief information about the Mother tincture.

Search for any condition by typing the first few characters in the ‘Search’ box.
ADD
This option enables you to add any new condition and its mother tincture to the existing data.
Click on the ‘Add New’ opt ion.
Choose the type of tincture ‘Internal’ or ‘External’ where you want to add the condition
Add the ‘Condition’ name
Next Add the ‘Description’ of the tincture and the ‘Remedy’ in the respective boxes.
Click on ‘Done’ to add the New mother tincture to the existing data.
Click on ‘Cancel’ if you do not want to include the new addition.
EDIT
This option enables you to ‘Edit’ or make changes in the existing data.
Select the type of tincture (internal or external) for which you require to make changes
Select the Condition from the list .
Next click on ‘Edit’
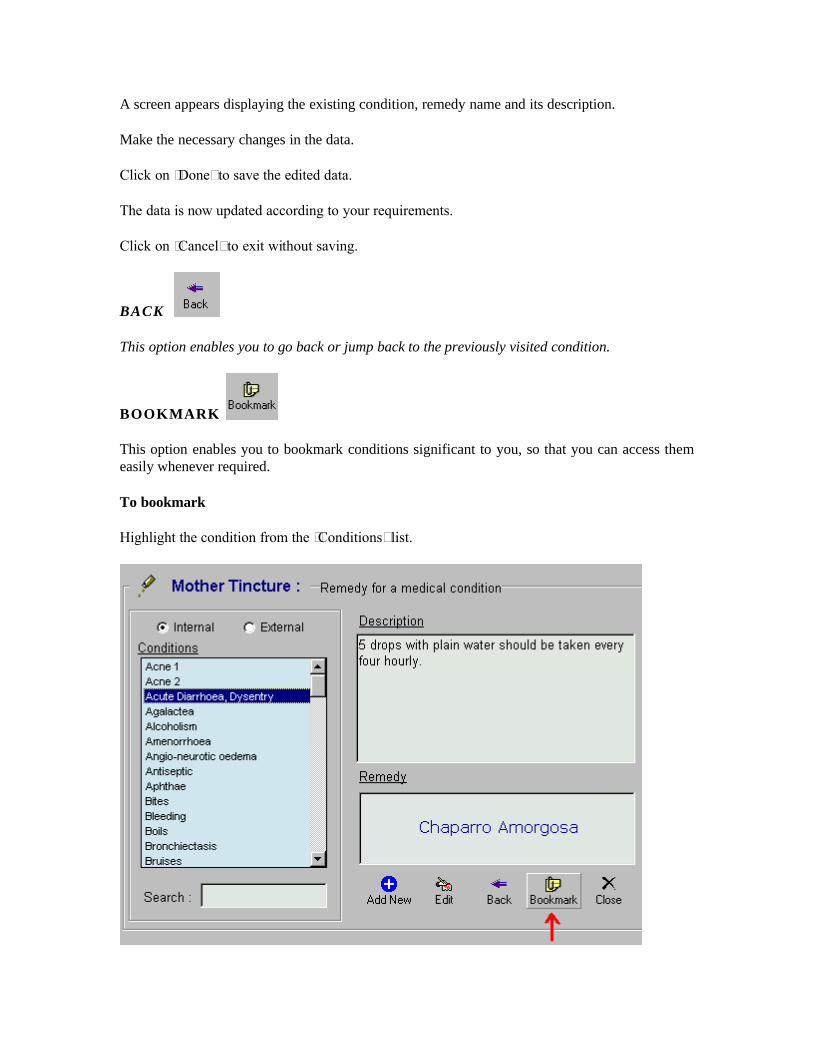
A screen appears displaying the existing condition, remedy name and its description.
Make the necessary changes in the data.
Click on ‘Done’ to save the edited data.
The data is now updated according to your requirements.
Click on ‘Cancel’ to exit without saving.
BACK
This option enables you to go back or jump back to the previously visited condition.
BOOKMARK
This option enables you to bookmark conditions significant to you, so that you can access them easily whenever required.
To bookmark
Highlight the condition from the ‘Conditions’ list.

Next, Click on ‘Bookmark’.
A screen appears which displays the condition you have selected.
Description
Type in description for the condition selected in the ‘Description’ box so that you can later search for the book marked topic(s) through this Description.
For eg. In the above screen case the description typed is ‘GIT complaints’ for the topic book marked.
AddFinally click on ‘Add’ to bookmark the topic.
Search in Description
One can search for all the book marked topics through the description provided in the ‘Description’ box while book marking.
Type ‘GIT complaints’ in the ‘Search in Description’ box
Click on ‘Search’.

All the topics where you have added ‘GIT complaints’ as the description (while book marking) will be displayed in the book marked list box.
In the above screen, ‘Acute Diarrhoea, Dysentry’ & ‘Flatulence 1’ are displayed (since ‘GIT complaints’ was the description given while book marking them).
To open a book marked topic
Select the condition from the bookmark list
Next click on the option ‘Go’.

You will directly jump to the condition on the main screen .
To delete a book marked topic
Select the condition from the book mark list.
Next click on ‘Delete’ to remove the topic from the list.
Click on ‘Cancel’ or ‘ ’ to close the book mark option and return to the main screen of mother tincture.
Click on to close the ‘Mother tincture’ utility .
Prophylaxis
From ma in menu Select ‘Tools’ and then choose ‘Prophylaxis ’
From keyboard type {Alt+T} {P}
The prophylactic conditions are listed in the left column. Search for any condition by typing the first few characters in the ‘Search’ box.

The remedies recommended are described in the right column. You can cl ick on each condit ion, and the related prophylacti c remedies change accordingly.
ADD
This option enables you to add any condition and its prophylactic remedies to the existing data.
Click on the ‘Add New’ opt ion
A new screen appears where you can enter the prophylaxis condition and its corresponding remedies.
Click on ‘Done’ to enter new prophylactic condition to the existing data.
Click on ‘Cancel’ if you do not want to save the new addition.
Note: ‘Edit’ , ‘Back’ and the ‘Book mark’ f eatures remain the same for every uti l i ty and have been described in detail in the ‘Mother t inctures’ section.
Click on to close this application.
Therapeutics
From the ma in menu Select ‘Tools’ and then choose ‘T herapeutics’
From keyboard type {Alt+T} {H}

Therapeutics is the study of clinical conditions along with their remedies. This feature provides ready made reference notes, saving a lot of your time and effort. Specific clinical conditions, the most important remedies and their main indications have been thoughtfully compiled from true clinical experience.
The feature is arranged in two columns, the left one displaying the clinical condition, and one on the right displaying remedies, useful in that particular condition.
The left column consists of list of therapeutic conditions. Use the vertical scroll bar to scroll down the column.
Use the search box at the bottom of the column to type and find the clinical condition.
As you click on each condition, the right column gives you the descriptive information of remedies for that information. Click in this column and use arrow keys to move up and down in this screen. You can also use the vertical scroll bar to do this.
ADD
This option enables you to add a new condition along with its remedy & description to the existing data.

Click on the ‘Add New’ opt ion.
A new window appears giving you an option of adding a new therapeutic condition.
Add the condition name in the ‘Clinical Condition’ text box.
Add Remedy full and short name in the respective boxes.
In the ‘Description’ box add the description of the remedy.
To add next remedy, Click on ‘Next Remedy’ option and enter the details.
Repeat the procedure till you have entered all the remedies you require, for that clinical condition.
Click on ‘Apply’ to add the new therapeutic condition to the existing data.
Click on ‘Cancel’ if you do not want to save the new addition.
Note: ‘Back’ and the ‘Book mark’ features remain the same for every ut i l i ty and have been described in detail in the ‘Mother t inctures’ section.
Creating Notes:
You can also use this information on therapeutics for preparation of notes.

First select the text you want, and highlight it using the mouse or Shift+arrow keys to select the text. Once the required portion is highlighted, right click with the mouse and select eh option ‘Copy’ {Ctrl+C}
Next open your favourite word processor like ‘Word’ or ‘Word star’ or any other text editor and paste the information by selecting ‘Paste’ from the ‘Edit’ menu {Ctrl +V}
You can later take print-outs of this matter.
Click on to close this application.
Word Meanings
From the ma in menu Select ‘Tools’ and then choose ‘Word Meanings’
From keyboard {Alt+T} + {W}
Homoeopathic Materia Medicae & Repertories are a source of numerous words, the meaning of some may not be readily available because they are no longer used in medical communication today. The words, when used in past, carried a different meaning than from today’s context. When the same word is used in rubric, it may carry a different meaning.
Then there are finer differences in the meanings of some words like anger, rage, fury, irritability etc.
Yet again, there are some common words that we never used and do not know the exact meaning of.
To solve this problem, Hompath software comes equipped with a ready utility in form of ‘Word meanings’ in which simplified meanings for the complex words are provided. More than 1000 words are explained in this utility.
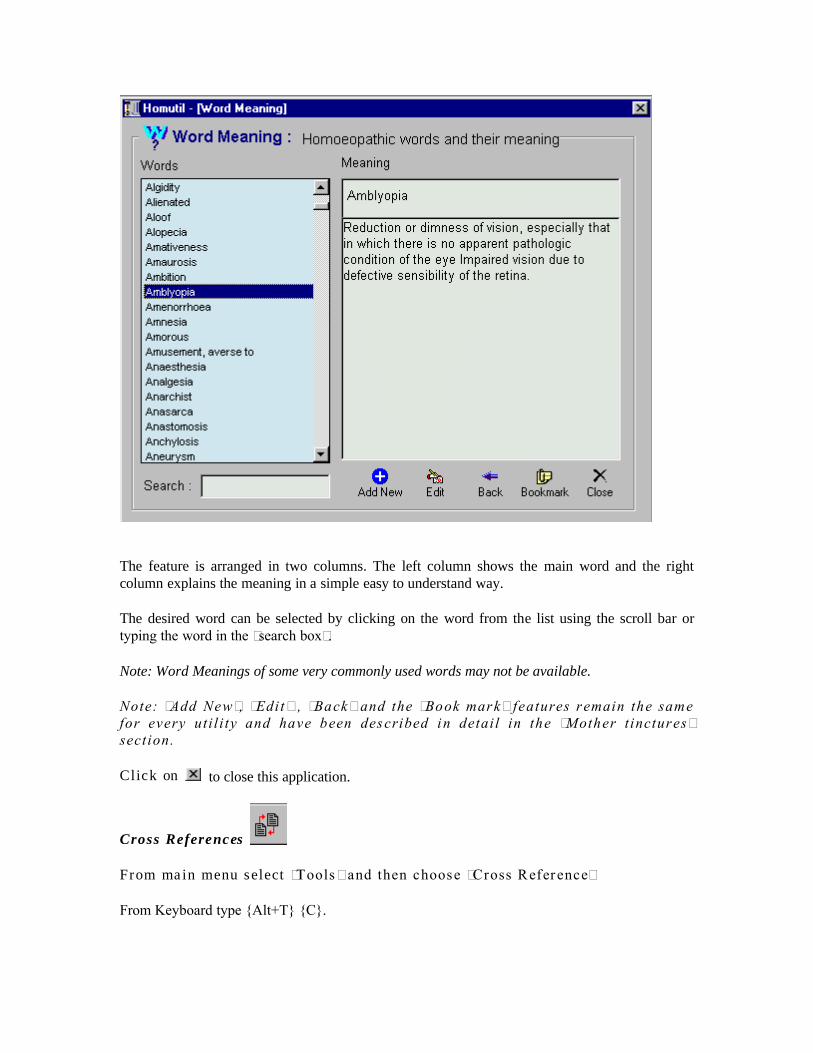
The feature is arranged in two columns. The left column shows the main word and the right column explains the meaning in a simple easy to understand way.
The desired word can be selected by clicking on the word from the list using the scroll bar or typing the word in the “search box”.
Note: Word Meanings of some very commonly used words may not be available.
Note: ‘Add New’, ‘Edit ’ , ‘Back’ and the ‘Book mark’ features remain the same for every uti l i ty and have been described in detail in the ‘Mother t inctures’ section.
Click on to close this application.
Cross References
From ma in menu select ‘Tools ’ and then choose ‘Cross Refer ence’
From Keyboard type {Alt+T} {C}.

Each and every repertory whether big or small, contains tons of valuable information, scattered in different chapters or at different places in the same chapter. Very often similar rubrics have different remedies and different expressions in different books and are not considered in our analysis.
This special utility has been created with care to provide as many cross-references as possible. The referencing can be within a chapter and even extends to multiple books and chapters.
On invoking the feature, you will be presented with the following screen
The screen displays 38 chapters in picture format. Each picture signifies a chapter. As you move the mouse over each icon, a bubble indicating the ‘chapters name’ will appear.
Click on any picture to open the cross-references of that chapter.
The references are arranged in two rows, the main rubric is displayed in the upper row, and the related cross references in the lower.
As you click on each main reference, the related cross-reference immediately appears in the lower column.
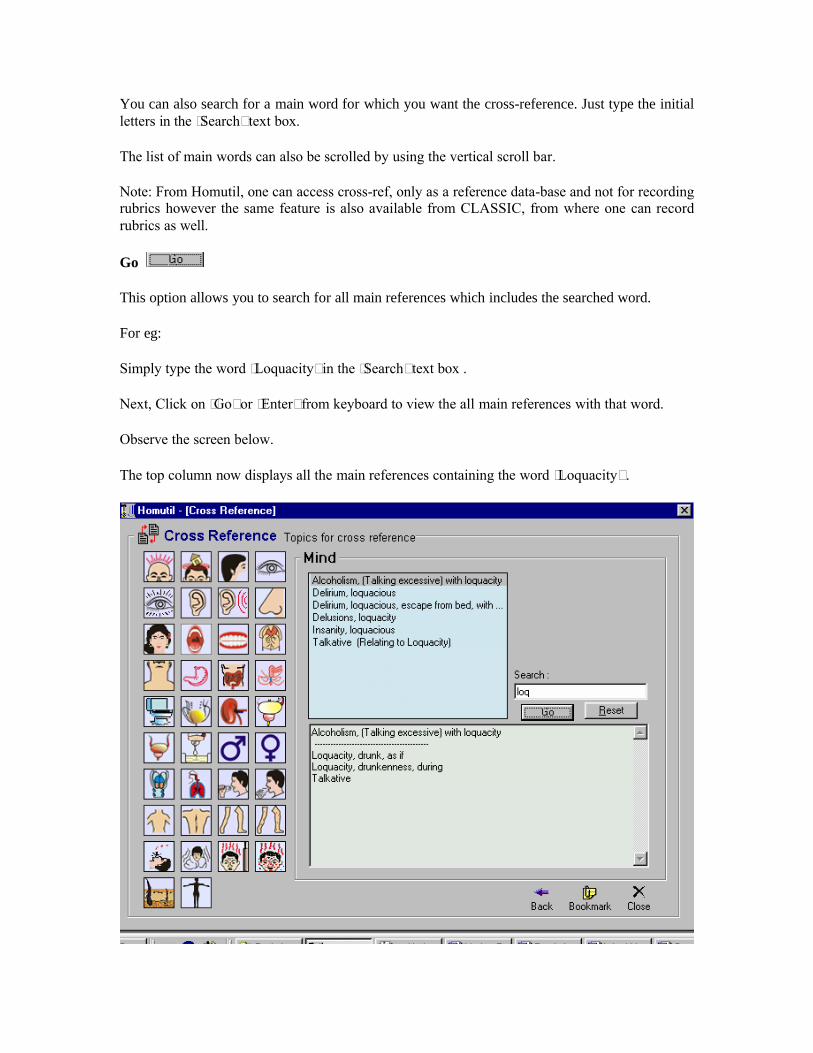
You can also search for a main word for which you want the cross-reference. Just type the initial letters in the ‘Search’ text box.
The list of main words can also be scrolled by using the vertical scroll bar.
Note: From Homutil, one can access cross-ref, only as a reference data-base and not for recording rubrics however the same feature is also available from CLASSIC, from where one can record rubrics as well.
Go
This option allows you to search for all main references which includes the searched word.
For eg:
Simply type the word ‘Loquacity’ in the ‘Search’ text box .
Next, Click on ‘Go’ or ‘Enter’ from keyboard to view the all main references with that word.
Observe the screen below.
The top column now displays all the main references containing the word ‘Loquacity’ .

Highlight each rubr ic from the top column to view its cross-r efer ences in the column below.
Reset
Allows you to reset the entire list of cross references.
Note: ‘Back’ and the ‘Book mark’ features remain the same for every utility and have been described in detail in the ‘Mother tinctures’ section.
Click on to close this application.
Viva Quest ions
From the ma in menu select ‘Tools ’ and then choose ‘Viva Questions’
From the keyboard type {Alt+T}{V}
The option is designed as a practice session to test your knowledge, before appearing for and Viva voce examination in Homoeopathic Materia medica, Philosophy, Pharmacy, and Repertory.

Click on the downward arrow and choose the subject requir ed.
Questions related to the chosen subject appear in the ‘Question’ box. Click on anyone.
To select a particular word from a particular topic, type the word you wish to search in the “Search For” provided.
By default the answers to each of the question can be viewed in the right column.
To hide the answers to the questions, untick the checkmark next to ‘View Answers’ & this will hide the answers to all the questions.
Answer the question in your box or in Windows ‘Notepad’
To check your answer re-tick the box next to ‘View answer’.
The numbers in brackets signify the page number and column.
To break the continuity, jump to any question by typing in the question number in the ‘Jump To Q. No.’ box.
Go
This feature will search for all questions which contains the searched word.
For eg:
Type in ‘Define’ in the ‘Search’ text box of pharmacy question.
Click on ‘Go’
All question(s) which contain the word ‘Define’ will be displayed.

Click on ‘Reset’ to reset the entire list of all the questions.
Note: ‘Add New’, ‘Edit’, ‘Back’ and the ‘Book mark’ features remain the same for every uti l i ty and have been described in detail in the ‘Mother t inctures’ section.
Click on to close this application.
Quest ion Bank
From the main menu select ‘Tools’ and then choose ‘Question Bank’From keyboard type {Alt+T} {B}
Question bank serves as an important source assisting the students to prepare for their theory exams. It is a practice session to brush your knowledge with full questions and short notes of Homoeopathic and medical subjects in any course curriculum. You can use this option to practice writing the answers for your exams.

Click on desired subject from the ‘Subjects’ box.
Questions related to chosen subject appear in the ‘Question’ box. Click on any one.
Answer the quest ion in your notebook or Window’s ‘Notepad’
Jump to any other question number by typing in the number in the ‘Jump To Q. No.’ box.
Note: ‘Add New’ , ‘Edit’ , ‘Back’ and the ‘Book mark’ features remain the same for every uti l i ty and have been described in detail in the ‘Mother t inctures’ section.
Click on to close this application.
Group Symptoms
From the main menu select ‘Tools’ and then choose ‘Group Symptoms’
From keyboard type {Alt+T} {S}

Group symptoms are important to understand general symptoms, and the characteristic behaviour of each group of remedies.
The left column disp lays the groups and the r ight column disp lays the descr ipt ion of the group clicked on.
Note: ‘Back’ and the ‘Book mark’ featur es rema in the same for every ut i l ity and have been descr ibed in detai l in the ‘Mother t inctur es’ sect ion.
Click on to close this application.

PATIENT MANAGEMENT SYSTEM
Patient Information
Patient Do’s and Don’t Instructions
Physician Information
Backup
Restore
Auto Backup
New Reports
Printing
Hompath Family
The ‘Patient Management System’ or PMS, as you may call it, is a modern day application that allows an easy way to store and update all the information about the Patient. It includes Patient Registration, Electronic Medical Record and many more features.
Features:To give a glimpse of what this unique software can do for you, here is an exhaustive listing of all its features:
Physician Information: Password protected storage and retrieval of physician’s information to provide security for
individual physician’s data. Personal Information Set / Modify Password Resume Details General Report Information (allows personalized reports) Backup / Restore Location
Patient Information: PMS allows efficient storage and retrieval of patient’s information. Personal Information Patient’s Voice Recordings, Video Clips and Scanned Pictures Case Record Full Case Record (lists all ‘Case Record’ information on a single page) Diagnosis Follow-up
Patient ‘Do’s and Don’t’ Instructions: Select from 200 pre-compiled clinical conditions that you can print and handout to the
patient. Saves times by avoiding repeated instructions to the patient.
Reports:Ready made and customized reports on General Report Information (allows personalized reports) Prescription Billing & Receipt Fitness Certificate Sickness Certificate Abroad Certificate Report to Physician Reference to Physician
Printing: Physician Details Physician Resume Patient Details List of Patients Patient More Information Full Case Record Diagnosis First Prescription & Follow-up Diagnosis History Follow List

Patient Instructions
Backup: All Patients Current Patient Selected Patients Physician Data
Restore: All Patients Current Patient Selected Patients Physician Data From Version 7.0 Restore Classic Data
Auto Backup: Unique feature, called Auto Backup, takes a backup of all your data periodically, at the start
of the PMS application. The period between Auto Backup’s is 24 hours.
Hompath Family: This provides an easy access to the other modules like ‘Classic’, ‘Case Analysis’,
‘HomUtils’, etc.
PMS – The First Run:
If you have been using Classic 7.0 then this is a must read topic for you. When you run PMS for the first time you will be shown the following “Restore Classic 7.0 Database” dialog:
Note: Before proceeding please ensure that you have kept at least two copies of Classic 7.0 data in separate folders using the ‘Back-up’ facility of Classic-7.0.

This is the point where you can restore your previous version i.e. Classic 7.0 data.
Click on the ‘Browse’ button to select the path of your old data and then click ‘Yes’ button to proceed with the restore.
If you do not wish to restore now you can restore the data later from ‘Backup/Restore’ feature.
Note: The Physician ID that you enter should match the one in your previous data. If the Physician ID’s does not match the previous data, then the data cannot be restored later. (See Backup & Restore)
If you are a new user or you do not wish to restore now click ‘No’ to proceed to enter the data for the Default or Owner physician. A sample screen is displayed below:
Note: Fields preceded with an asterisk ‘*’ symbol are compulsory, they cannot be left blank.
Click the ‘Save’ button to save the record.
Upon saving you will get a confirmation message stating:
“Physician with ID: ‘—‘ added successfully.

It is recommended that you secure your data by setting a password. Would you like to Set a Password now?” (see also Set-Modify Password)
If multiple physicians are using PMS then you should password protect your data.
Select ‘Yes’ to set a password.
Type the password in the ‘Password’ box and retype it in the ‘Retype Password’ box to confirm. Click on ‘OK’ to save the password.
The password can be a maximum of 10 characters. It can include alphabets & numbers. If you want to enter a blank password leave the ‘Password’ & ‘Retype Password’ boxes empty and click on ‘OK’.
PMS Menu:
The PMS menu includes 5 main sections
Patient InformationPhysician InformationToolsHompath FamilyHelp
Patient Information :
From the main menu Click on ‘Patient Info’From the keyboard type {Alt + P}

New Patient:
From the main menu select ‘Patient Info’ and then choose ‘New Patient’.From the keyboard type {Ctrl+N} or {Alt+P}{N}From the ‘navigation tree’ on the left select ‘Patient Details’ .
This option allows you to record a New Patient in PMS.
After a patient is saved, you can then use all the other features such as ‘More Info’, ‘Media Info’, ‘Case Record’, ‘First Prescription’, ‘Diagnosis’, ‘Follow up’, etc.
Whenever a patient consults you for the first time, you will want to record the patient’s preliminary information. When you select ‘New Patient’ a registration form is presented for you to record the preliminary details.
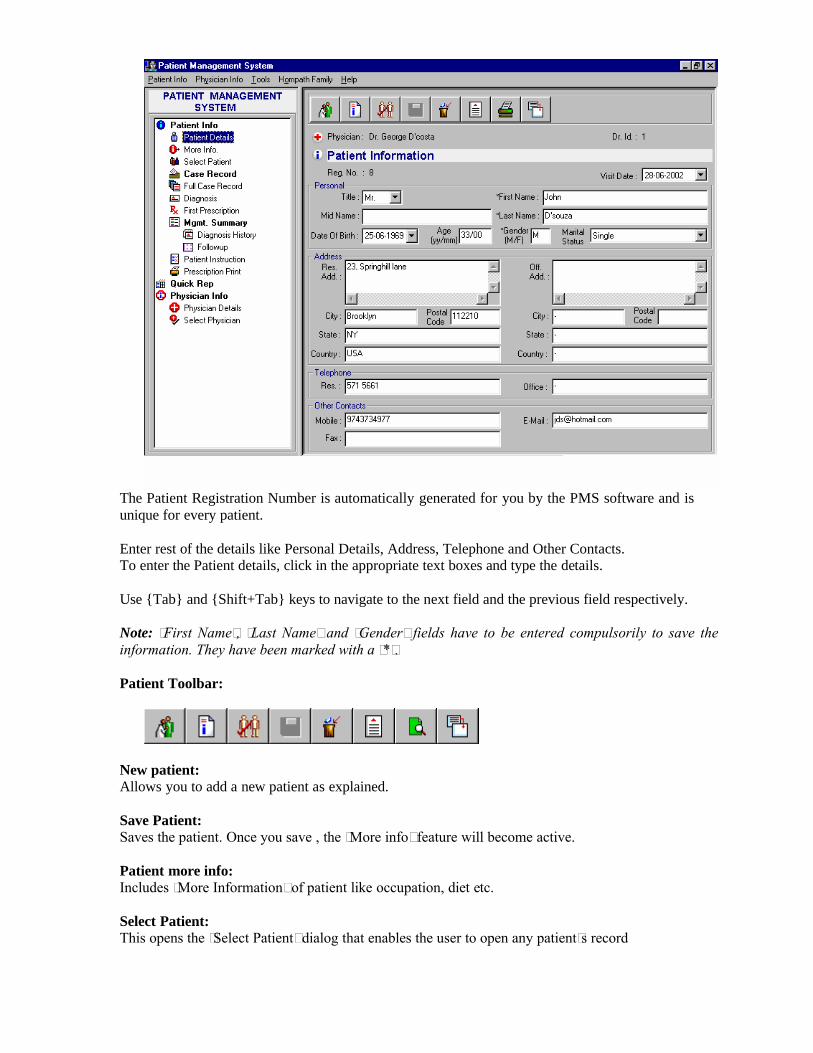
The Patient Registration Number is automatically generated for you by the PMS software and is unique for every patient.
Enter rest of the details like Personal Details, Address, Telephone and Other Contacts.To enter the Patient details, click in the appropriate text boxes and type the details.
Use {Tab} and {Shift+Tab} keys to navigate to the next field and the previous field respectively.
Note: ‘First Name’, ‘Last Name’ and ‘Gender’ fields have to be entered compulsorily to save the information. They have been marked with a ‘*’.
Patient Toolbar:
New patient: Allows you to add a new patient as explained.
Save Patient: Saves the patient. Once you save , the ‘More info’ feature will become active.
Patient more info: Includes ‘More Information’ of patient like occupation, diet etc.
Select Patient:This opens the ‘Select Patient’ dialog that enables the user to open any patient’s record

Delete:You can delete the active patient’s records by clicking the ‘Delete’ button on the toolbar.
Diagnosis:Allow you to enter the diagnosis of the patient.
Print Preview / Print:For the active patient, you can print the ‘Patient Info’ by first previewing it by clicking the ‘Print Preview’ button on the toolbar and then clicking the ‘Print’ button in the ‘Preview’ window.
Clear fields:For any patient, you can empty the existing data and retype new data. Simply click on the ‘Clear fields’ button from the toolbar.
More Info:
From the main menu select ‘Patient Info’ and then choose ‘More Info’.Press {Ctrl+ M} or {Alt+P}{M} on the keyboard.Click on the ‘More Info’ on the toolbar.
This feature enables the physician to save some additional information about the patient. This includes Occupation, Religion, Diet, OPD Date, OPD No., IPD Date, IPD No., some comments and finally the Media files.
Note: This feature is only enabled if, you have ‘Saved’ a new patient.
Some of the particulars such as ‘Diet’ are readily available in the drop down list, which can be selected by clicking on the arrow and then clicking on the desired particulars.
You can list down your own observations about the patient in the ‘Comments’ box provided.

Enter the required details in the screen.Click on this to ‘Save’ the more information of patientClick on ‘Clear’ to empty the contents of this page‘Print Preview’: View the print preview of the screen. Click on ‘Print’ from this screen to print this page.
Patient Media Info:
The ‘Media Information’ can be accessed by clicking on the ‘Media’
button OR Pressing {Alt+M} from keyboard when in the ‘Patient More Information’ dialog box.
This feature facilitates the physician to store Sound Files (Patient’s Voice Recordings), Video Files (Video Clips) and Image Files (Scanned Pictures).
Sound Files: You can record the ‘Cough’ of a patient suffering from bronchitis or record the ‘Laughter’ of a little child, etc.
Video Files: You can store the entire video of the case or the various expressions of a patient, or how the patient behaves during an attack of epilepsy or mania, etc. and assess it in the future.
Image Files: You can store the patient’s X-rays, sonographies, etc. e.g. The patient may have the typical cotton-ball appearance in the chest X-ray indicative of cancer and you may want to keep a record of it in your files.
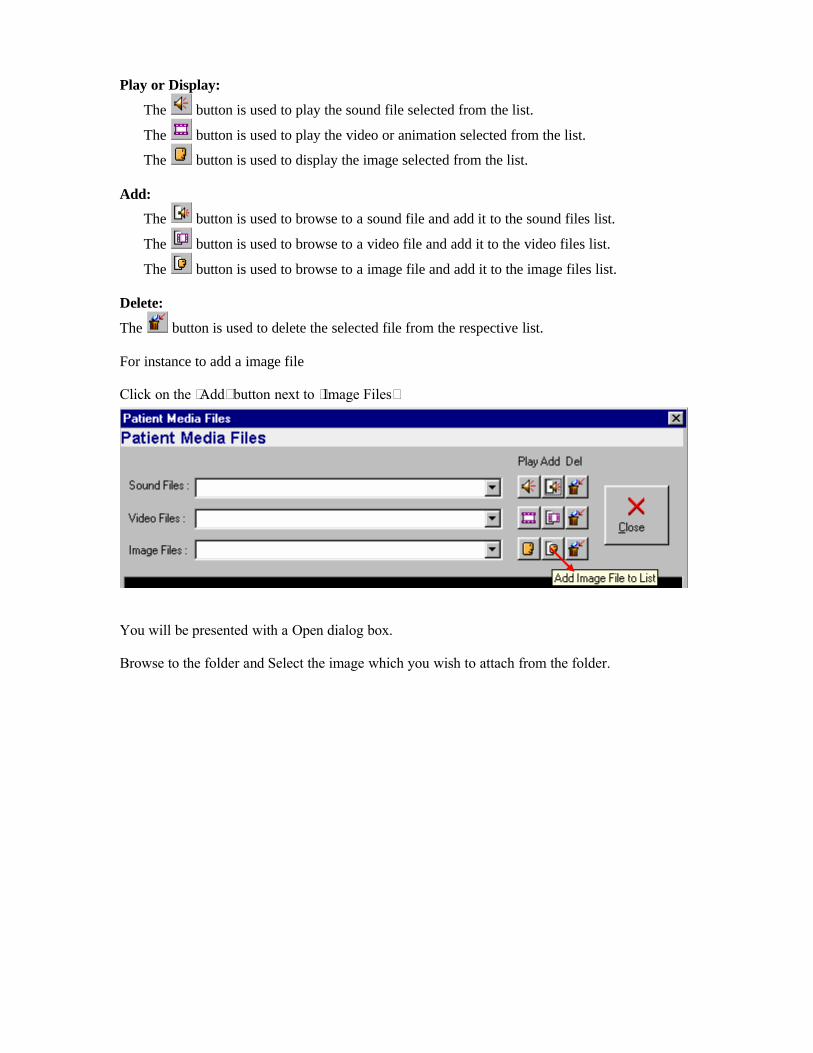
Play or Display:
The button is used to play the sound file selected from the list.
The button is used to play the video or animation selected from the list.
The button is used to display the image selected from the list.
Add:
The button is used to browse to a sound file and add it to the sound files list.
The button is used to browse to a video file and add it to the video files list.
The button is used to browse to a image file and add it to the image files list.
Delete:
The button is used to delete the selected file from the respective list.
For instance to add a image file
Click on the ‘Add’ button next to ‘Image Files’
You will be presented with a Open dialog box.
Browse to the folder and Select the image which you wish to attach from the folder.

Highlight the image, and click on ‘Open’The image is now attached to the media file in ‘PMS’

Select the image from the drop down list and click on the ‘Display’ button to view the image.
Similarly you can add the sound files in ‘wav. Format’ or the video files in ‘.avi format’.
Select Patient:
From the main menu select ‘Patient Info’ and then choose the ‘Select Patient’. Press {Ctrl+ O} or {Alt+P}{L} on the keyboard.Click on the ‘Select Patient’ on the toolbar.Select the ‘Select Patient’ item in the ‘navigation tree’ on the left.
This feature is used to open a patient’s record for modification or addition of information. Only the active physician’s patients are listed.
Patient.jpg

Searching Patient (Filtering) in the List:You can search for a patient by ‘Reg. No.’, ‘First Name’, ‘Middle Name’, ‘Last Name’ and ‘Visit Date’ by typing in the respective text boxes in front of the label ‘Search’.
As you type, the search will filter out those patients that satisfy the search condition. Once filtered, you can see all the patients again by clicking the ‘Show All’ button.
Sorting Patient List:You can sort the patient list by ‘Reg. No.’, ‘First Name’, ‘Middle Name’, ‘Last Name’ and ‘Visit Date’ by clicking the sort buttons in front of the label ‘Sort By’ or by clicking the respective column header. One click results in Ascending Sort Order. Clicking second time results in Descending Sort Order.
‘Highlight’ the desired patient To ‘Open’ Patient details:Click on ‘Open’ OrFrom the Keyboard type {Alt+O} Or Simply press ‘Enter’ on the keyboard.
Click on ‘Delete’ to see remove the patient’s information or pressing {Alt+D}.
‘Preview & Print’ Patient List by clicking on the ‘Print Preview’ button or pressing {Alt+P}. When u click on this you will be prompted with a screen, asking you to type the ‘Range’ of reg. no of patients you want to take out printout of.
Open ‘Follow-up’ of the patient by clicking on the ‘Follow-up’ button or pressing {Alt+W}.
Open ‘Diagnosis’ of the patient by clicking on the ‘Diagnosis’ button or pressing {Alt+G}.

Save:
To ‘Save’ the ‘New’ patient or ‘Modified’ information
From the menu select ‘Patient Info’ and then choose ‘Save Patient’.Press {Ctrl+ S} or {Alt+Y}{S} on the keyboard.
Click on the ‘Save’ button on the toolbar.
Note: In case of a new patient, the patient’s data must be ‘Saved’, in order that the physician can use all the other features such as ‘More Info’, ‘Media Info’, ‘Case Record’, ‘First Prescription’, ‘Diagnosis’, ‘Follow up’, etc.
Case Record:
From the menu select ‘Patient Info’ and then select ‘Case Record’. From the Case Record popup menu choose the section you wish to go to. OR
Using keyboard press {Alt+P}{C}, use Up & Down arrow keys to highlight the section you wish to go to and then press enter. OR
Choose ‘Case Record’ and then Use the following shortcut keys:SECTION SHORTCUTComplaints Ctrl+Shift+AAppearance Ctrl+Shift+BMind Ctrl+Shift+CMental State Ctrl+Shift+DGeneral Ctrl+Shift+ESystemic Ctrl+Shift+FThermal Ctrl+Shift+GFever Ctrl+Shift+HFemale Ctrl+Shift+ILife Space Ctrl+Shift+JHistory Ctrl+Shift+K Examination Ctrl+Shift+LInvestigation Ctrl+Shift+MNotes/Observations Ctrl+Shift+N
ORFrom the ‘navigation tree’ click on the ‘Case Record’ . All the sections will drop down into view. Click on the section you wish to go to.
A homoeopathic Case Record is a vital chart of the past and present details of the patient, which needs to be referred to whenever the case details are to be reviewed.
A standard case record pro-forma is incorporated into the software, which can be used to record the detailed history of each individual patient.
The arrangement is designed to facilitate on-line case taking. You can record the details while interviewing the patient. The case record is divided into small sections as seen in the ‘navigation tree’ below:
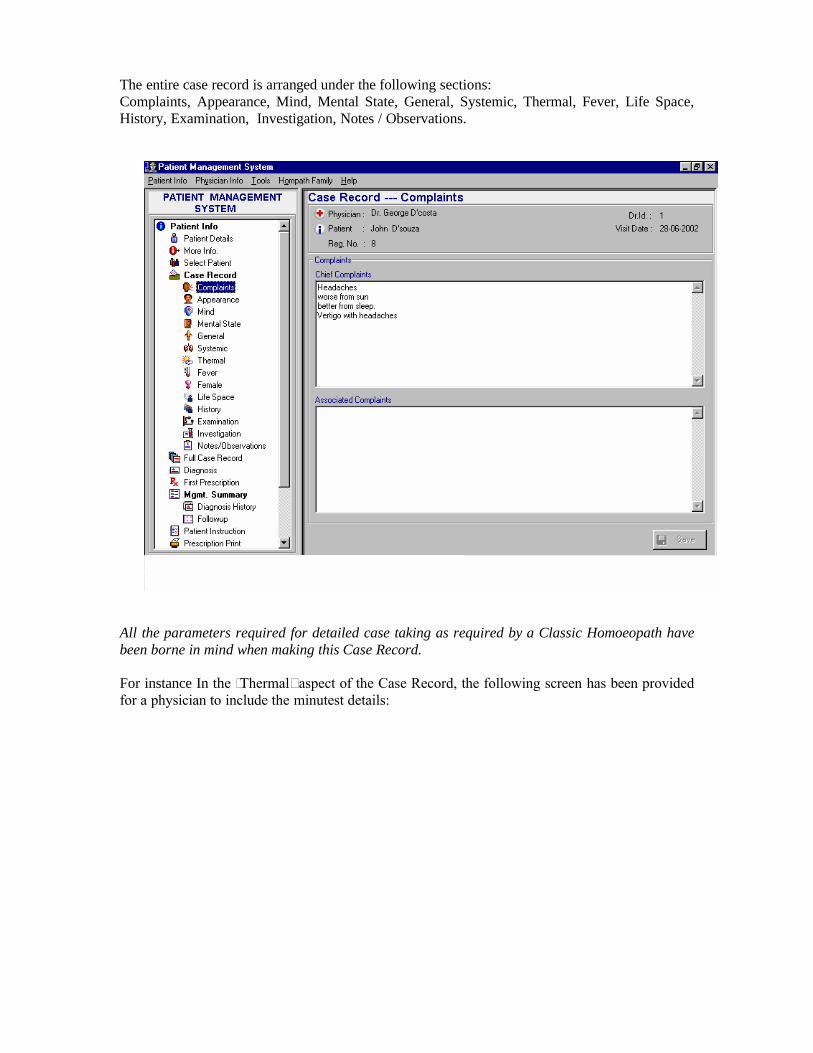
The entire case record is arranged under the following sections:Complaints, Appearance, Mind, Mental State, General, Systemic, Thermal, Fever, Life Space, History, Examination, Investigation, Notes / Observations.
All the parameters required for detailed case taking as required by a Classic Homoeopath have been borne in mind when making this Case Record.
For instance In the ‘Thermal’ aspect of the Case Record, the following screen has been provided for a physician to include the minutest details:

As seen above, the C5H0, C4H1, etc. are ‘Thermal States’ where C = Chilly and H = Hot. Thus, following are a few state meanings: C5H0 = Extremely Chilly CH = Ambithermal C0H5 = Extremely Hot
More information can be typed in the text boxes than actually seen on the screen. The text boxes may be provided with a vertical scrollbar for multi-line data entry.
In some text boxes, no scrollbar is visible you can still type beyond the length of the text box. The text will automatically scroll to the left as you type at the end. Later, to move between the text you can use ‘Right’ and ‘Left’ arrow keys.
Use ‘Home’ & ‘End’ keys to go to the beginning or end of the line.
When you finish case taking, click the ‘Save’ button at the bottom, to store the details.
Note: You need not click ‘Save’ every time you enter data in one section and move on to the next. Once you finish entering information in all the sections, only then you need to click ‘Save’. The save operation will save data in all the sections.
Tip: Your personal observations about the patient can be stored in the ‘Notes/Observations’ folder. Type all characteristic features and observations so that a later review becomes easy.
Full Case Record:

From the menu select ‘Patient Info’ and then choose ‘Full Case Record’.Press {Ctrl+U} or {Alt+P}{U} on the keyboard.
Note: You cannot modify any data in the ‘Full Case Record’. It is solely meant for display purpose.
You can take a print-out of the ‘Full Case record’ by clicking on ‘Print’ button.
Diagnosis:
From the menu select ‘Patient Info’ and then choose ‘Diagnosis’ Press {Ctrl+D} or {Alt+P}{G} on the keyboard On the ‘navigation tree’ click on the item labeled ‘Diagnosis’
Click on the ‘Diagnosis’ icon on the toolbar in the ‘Patient Details’ form.The ‘Diagnosis’ option helps you in maintaining date-wise diagnosis record of a patient.
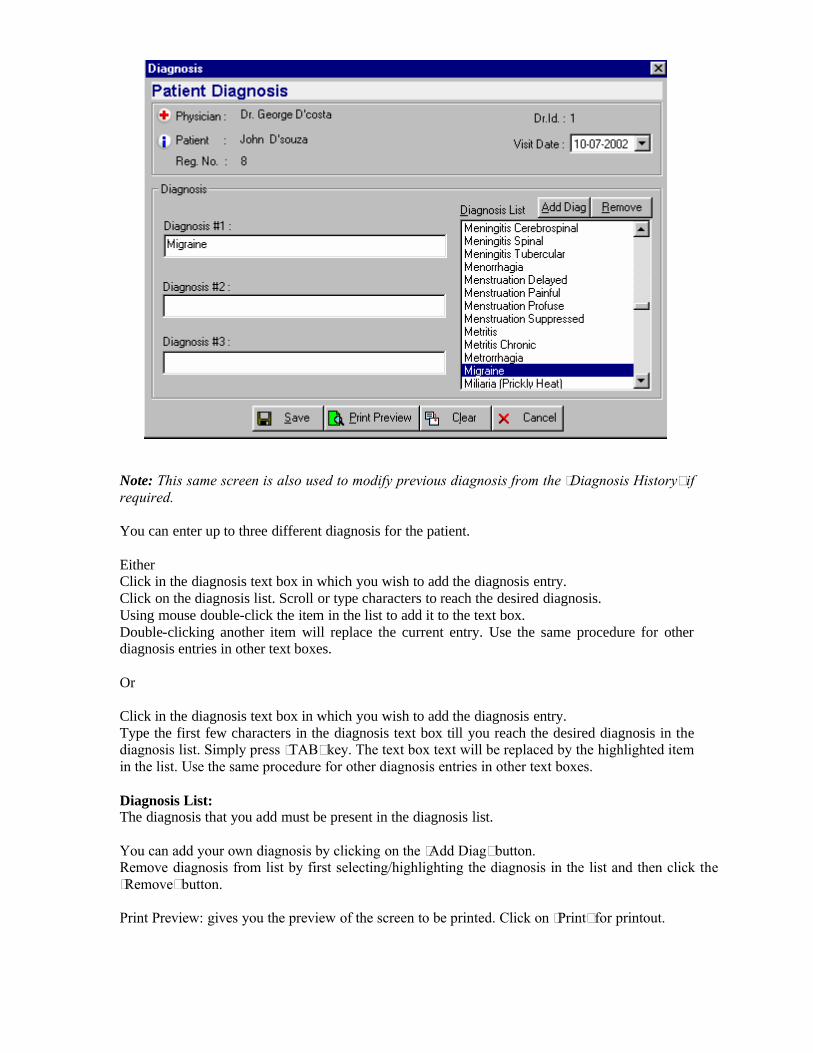
Note: This same screen is also used to modify previous diagnosis from the ‘Diagnosis History’ if required.
You can enter up to three different diagnosis for the patient.
EitherClick in the diagnosis text box in which you wish to add the diagnosis entry. Click on the diagnosis list. Scroll or type characters to reach the desired diagnosis. Using mouse double-click the item in the list to add it to the text box. Double-clicking another item will replace the current entry. Use the same procedure for other diagnosis entries in other text boxes.
Or
Click in the diagnosis text box in which you wish to add the diagnosis entry. Type the first few characters in the diagnosis text box till you reach the desired diagnosis in the diagnosis list. Simply press ‘TAB’ key. The text box text will be replaced by the highlighted item in the list. Use the same procedure for other diagnosis entries in other text boxes.
Diagnosis List:The diagnosis that you add must be present in the diagnosis list.
You can add your own diagnosis by clicking on the ‘Add Diag’ button. Remove diagnosis from list by first selecting/highlighting the diagnosis in the list and then click the ‘Remove’ button.
Print Preview: gives you the preview of the screen to be printed. Click on ‘Print’ for printout.
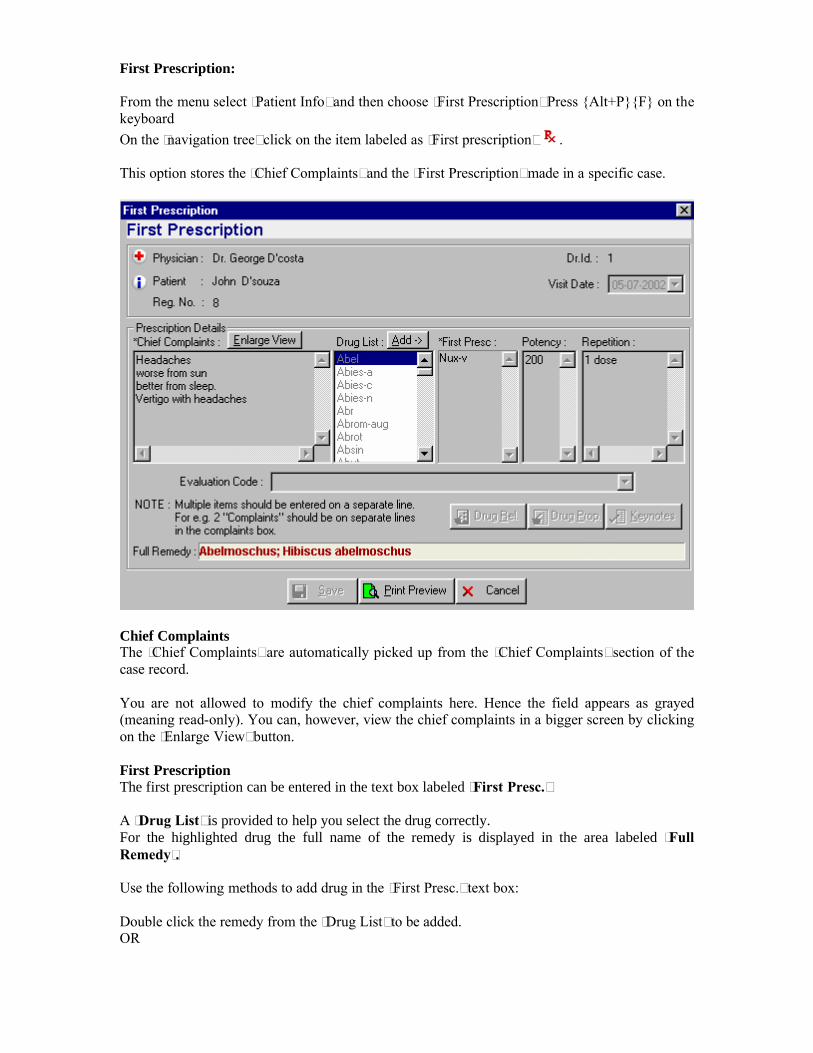
First Prescription:
From the menu select ‘Patient Info’ and then choose ‘First Prescription’ Press {Alt+P}{F} on the keyboard On the ‘navigation tree’ click on the item labeled as ‘First prescription’ .
This option stores the ‘Chief Complaints’ and the ‘First Prescription’ made in a specific case.
Chief ComplaintsThe ‘Chief Complaints’ are automatically picked up from the ‘Chief Complaints’ section of the case record.
You are not allowed to modify the chief complaints here. Hence the field appears as grayed (meaning read-only). You can, however, view the chief complaints in a bigger screen by clicking on the ‘Enlarge View’ button.
First PrescriptionThe first prescription can be entered in the text box labeled ‘First Presc.’
A ‘Drug List’ is provided to help you select the drug correctly. For the highlighted drug the full name of the remedy is displayed in the area labeled ‘Full Remedy’.
Use the following methods to add drug in the ‘First Presc.’ text box:
Double click the remedy from the ‘Drug List’ to be added. OR

Select the remedy by highlighting it and click on the ‘Add’ button provided on top of the list ORUse ‘Tab’ key to navigate to the ‘Drug List’. Type first few characters of the drug so that the highlight moves closer to the drug use wish to add. Use ‘Up and ‘Down’ arrow keys to highlight your drug and press {Alt+A}.
Tip: Make maximum use of the keyboard. Using keyboard might be difficult at first but once you get used to it you will work much faster than using mouse.
Type the ‘Potency’ and ‘Repetition’ and click on the ‘Save’ button to store the particulars.
Potency and Repetition for different drugs must be entered on separate lines and the first prescription can be saved only once. After saving the first prescription the ‘Save’ button always remains disabled meaning you will not be allowed to modify or save. For subsequent prescriptions use the ‘Follow-up’ feature.
Print Preview: Gives you a Preview of the print-out to be taken
Edit drug list :
This feature gives you the option to add a new drug to drug list, incase you need to incorporate a new remedy within the software. Once a remedy is added from here, it gets automatically reflected in the first prescription and follow up list.
Choose from the menu ‘Tools’ and then ‘Edit drug list’

Type in the drug name and full drug name and then click on Add to add the new remedy.

You will get a msg. whether you want to add the remedy or no?
Click on ‘Yes’ to add the remedy.
The remedy gets added to the list. Once the remedy is added, it will automatically be taken up in the first prescription and follow-up drug list.
Modify and Delete buttons will allow you to either modify or delete Remedies.
Note : Hompath advises you not to modify or delete any remedy unless, essentially required.Click on Yes to add the remedy.
Drug Relation, Drug Properties & Keynotes:Highlight the remedy and click on the respective buttons to view its relationship & properties or Keynotes.
Another way to do this is right click on the remedy and select Drug Relation, Drug Properties or Keynotes.
Note: Once you ‘Save’ the first prescription, the above options of relations, properties andkeynotes become disabled from here.
Management Summary :
Includes the Complete list of ‘Diagnosis History’ and ‘Follow-ups’ of a patient.
From the main menu select ‘Patient Info’ and then choose ‘Management Summary’ ORDouble click on Management Summary from the navigation tree on the left to view Diagnosis HistoryFollowup
Diagnosis History
From the menu, select ‘Patient Info’ and then from the ‘Management Summary’ choose ‘Diagnosis History’ OrPress {Alt+P}{A}{D} on the keyboard OrForm the ‘navigation tree’ click on the item labeled ‘Diagnosis History’ which comes under the item ‘Mgmt. Summary’.
This feature lists all the diagnosis of the selected patient and also allows you to modify by opening the highlighted record in the ‘Diagnosis’ dialog box.

Diagnosis can be searched by ‘Visit Date’ by selecting a date from the drop down box next to the visit date or by typing the ‘Diagnosis’ in the empty box provided above ‘Diagnosis’.
For any given patient, his Visit Dates along with the Diagnosis on those days are displayed in a tabular format.
ModifyClick on ‘Modify’ to change the diagnosis.You will be presented with the ‘Diagnosis’ window where in you can make the required changes, and Click on ‘Save’ to change the diagnosis.
DeleteHighlight a ‘Diagnosis’ to delete it from the records. You will be prompted with a appropriate message, Click on ‘Yes’ if you want to delete & ‘No’ if you do not want to delete the record.
PrintThe physician can also take a printout of all the diagnosis in an orderly fashion.
A preview of patient’s diagnosis, i.e. Diagnosis History, sorted by ‘Visit Date’ can be obtained by clicking the ‘Print Preview’ button. A printout can also be taken by clicking on the ‘Print’ button in the ‘Print Preview’ window.

Follow-up:
From the menu select ‘Patient Info’, then select ‘Management Summary’ and then choose ‘Follow-up’.Press {Ctrl+F} or {Alt+P}{A}{L} on the keyboard.
From the ‘navigation tree’ click the item labeled ‘Follow-up’ which comes under the item ‘Mgmt. Summary’.
The ‘Follow-up’ screen is used for recording subsequent prescriptions along with the status details for the previous prescription (i.e. how much he/she has improved since the last prescription).
The periodical visits and prescriptions made during the follow-ups constitute a very important aspect of patient analysis and response to therapy.
The ‘Follow-up’ feature has been designed in such a way that apart from storing details, it also provides practical and easy guidelines and connections to patient analysis and the second prescription.
The lower section of the screen shows the previous visits of the patient arranged in 6 columns. These are ‘Visit-Date’, ‘Complaints’, ‘Prescription’, ‘Potency’, ‘Repetition’ and ‘Evaluation Code’.
A brief description of the complaints reported by the patient and the prescriptions given so far are displayed. As you click on the relevant date, the complaints get displayed fully in the top left hand box and the prescription details in the right hand box under ‘Prescription’.

In case you wish to see the complaints in a larger screen, simply click on the ‘Enlarge View’ button just above the complaints box.
The current visit-date is displayed last in the respective column and also in the top right corner.
Entering Data:First ensure that the last row in the list below is selected. Only then will you be able to enter text.
If the selection is on any other row the text boxes are read-only.
To enter details, type-in the complaints and remedies in the ‘Complaints’ and ‘Prescription’ box respectively. Observe the words appearing simultaneously in the ‘Complaints’ column below.
After analysis of progress, and repertorization, the remedy(ies) can be prescribed in the ‘Prescription’ box.
Either select a remedy from the ‘Remedy List’ by double clicking on it or highlight the remedy and click on the ‘Add’ button provided above the list. It gets reflected in the ‘Prescription box’ along side and at the bottom.The full name of the highlighted remedy is displayed at the bottom, in the ‘Full Remedy’ box.
Type in the Potency and Repetition in the respective boxes provided. Here also different potencies and repetitions are to be entered on separate lines.
Drug Relation: Click on this option to view the remedies that complement, follow well, are inimical or antidote to the prescribed remedies.
Drug Properties: This option shows the full name, kingdom, class and properties of the remedy.
Keynotes: These are specially compiled confirmatory symptoms & keynotes that will help you confirm the remedy.
After filling all necessary details click the ‘Save’ button to store the particulars. All these details will have appeared in the bottom section of the screen with the current date.
Note: You cannot save the particulars, if any of the ‘Complaints’ or ‘Prescription’ boxes are empty.
Copy Prescription:Another interesting option available is ‘Copy Presc’. In a subsequent follow-up, in case you decide to repeat the prescription given in the last follow-up, just click on the ‘Copy Presc’ button and the same remedies appear in the current date column.
Evaluation Code: An evaluation code, i.e. the response of the patient to the last prescription, can be selected from the options available in the ‘Evaluation Code’ dropdown list box.
All the 12 observations of Kent and the clinical possibilities (like 10-20% better, 50-75% better, etc.) have been incorporated as a guideline for the correct second prescription.
Click on any one of the appropriate evaluation codes and it appears in the ‘Evaluation’ column below.

Later you will be able to judge the improvement or other changes in the condition of the patient easily by just viewing the evaluation code column.
2nd Prescription:
After choosing the correct evaluation, click on the ‘2nd Presc’ button for guidelines regarding the second prescription. A screen explaining the causes and their corresponding solutions, pops up.
The evaluation code selected is displayed boldly on the top. The ‘Can be’ section lists out the possible reasons and scenarios, while the ‘Can do’ section explains how you can deal with such situations.
Use the scroll bar to move across the matter.Click on ‘OK’ to close this screen.Change the font color, size or type according to your choice.Take a printout of these guidelines by clicking on the ‘Print’ button.
Followup List:A preview of patient’s follow-up’s, i.e. Follow List, sorted by ‘Visit Date’ can be obtained by clicking the ‘Print Preview’ button. A printout can also be taken by clicking on the ‘Print’ button in the ‘Print Preview’ window.
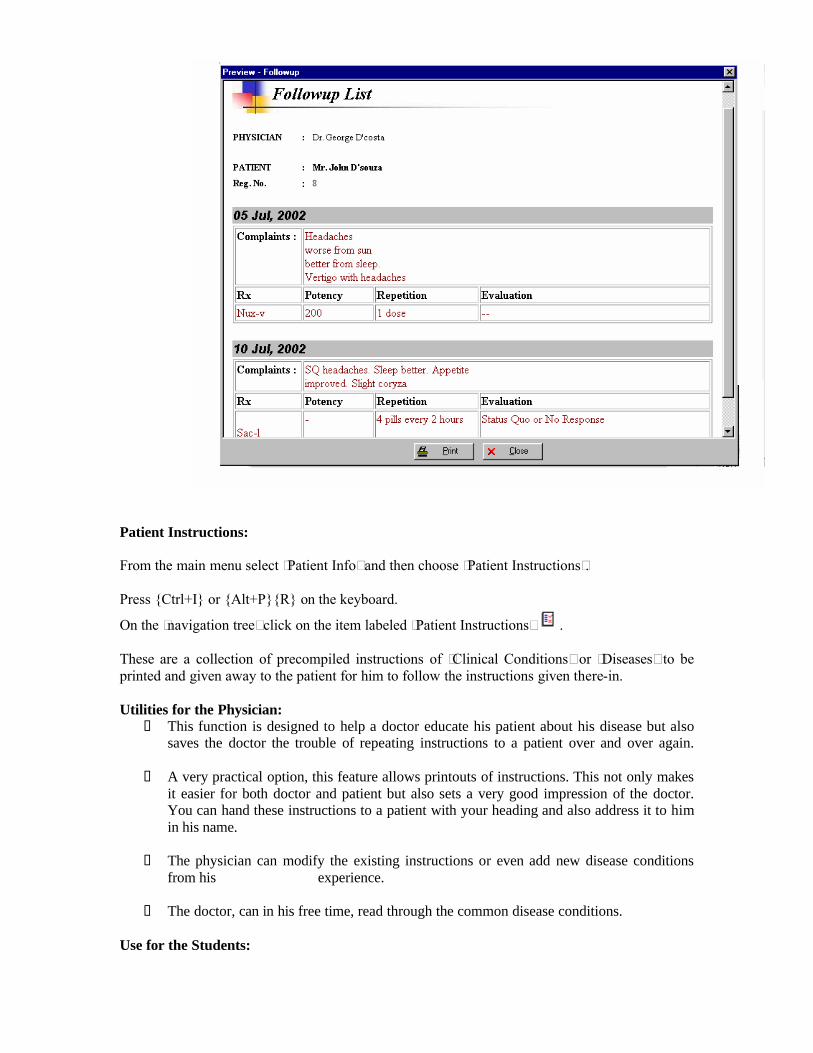
Patient Instructions:
From the main menu select ‘Patient Info’ and then choose ‘Patient Instructions’.
Press {Ctrl+I} or {Alt+P}{R} on the keyboard.
On the ‘navigation tree’ click on the item labeled ‘Patient Instructions’ .
These are a collection of precompiled instructions of ‘Clinical Conditions’ or ‘Diseases’ to be printed and given away to the patient for him to follow the instructions given there-in.
Utilities for the Physician: This function is designed to help a doctor educate his patient about his disease but also
saves the doctor the trouble of repeating instructions to a patient over and over again.
A very practical option, this feature allows printouts of instructions. This not only makes it easier for both doctor and patient but also sets a very good impression of the doctor. You can hand these instructions to a patient with your heading and also address it to him in his name.
The physician can modify the existing instructions or even add new disease conditions from his experience.
The doctor, can in his free time, read through the common disease conditions.
Use for the Students:

This feature provides simple and informative material about the common disease conditions that students face in day-to-day practice.
He can learn the do’s and don’ts to be remembered for various disease conditions.
Simple guidelines on diet and vaccination and some growth charts have been provided for easy reference.
As seen above the left column lists the ‘clinical conditions’ or ‘diseases’ and the right side displays the description of the disease. Simply highlight any condition or type the initial letters of the disease required to quickly reach it and the details of the same will be displayed in the right column. These details include a ‘brief description’ of the disease, the ‘symptoms associated’ with it, the ‘prevention’ and the ‘do’s and don’ts’.
Add Patient Instruction: This option allows you to Add ‘New Patient Instructions’ you come across in your practice.Click on ‘Add’ from the main screen.
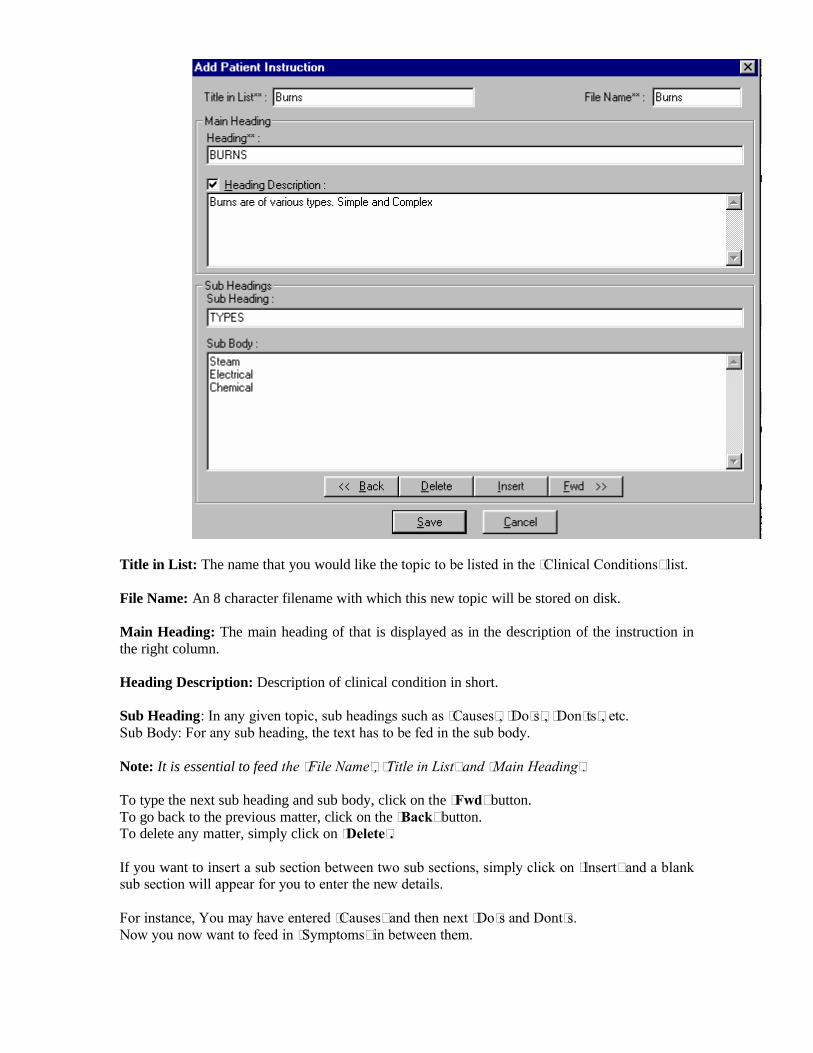
Title in List: The name that you would like the topic to be listed in the ‘Clinical Conditions’ list.
File Name: An 8 character filename with which this new topic will be stored on disk.
Main Heading: The main heading of that is displayed as in the description of the instruction in the right column.
Heading Description: Description of clinical condition in short.
Sub Heading: In any given topic, sub headings such as ‘Causes’, ‘Do’s’, ‘Don’ts’, etc.Sub Body: For any sub heading, the text has to be fed in the sub body.
Note: It is essential to feed the ‘File Name’, ’Title in List’ and ‘Main Heading’.
To type the next sub heading and sub body, click on the ‘Fwd’ button. To go back to the previous matter, click on the ‘Back’ button.To delete any matter, simply click on ‘Delete’.
If you want to insert a sub section between two sub sections, simply click on ‘Insert’ and a blank sub section will appear for you to enter the new details.
For instance, You may have entered ‘Causes’ and then next ‘Do’s and Dont’s. Now you now want to feed in ‘Symptoms’ in between them.

Keeping ‘Do’s and Don’ts section visible simply click on ‘Insert’ and you can do the needful.Click on ‘Save’ to store this data.If you do not want to save the matter that you have typed, simply click on ‘Cancel’.
Delete Patient Instruction:You can delete any condition that you do not want to keep in the list.
Highlight a topic and Click on ‘Delete’.A message pops up asking your confirmation. If you click on ‘Yes’, this condition is permanently removed from your list of Patient Instructions as well as from the disk.
Modify Patient Instruction:You can modify the existing clinical conditions according to your requirement. The procedure remains the same as described above for the ‘Add’ feature.Provision has been made to change the font type, size and color to customize these ‘Instructions’.
Print Patient Instruction: You can take a printout of these instructions to give to your patients. Set the printer on-line and click on the ‘Print’ icon.
Print Preview / Print:
For any active screen, you can print the ‘Info’ by first previewing it.
Click the ‘Print Preview’ button on the toolbar.
If the Print preview is O.K, Click on the ‘Print’ button in the ‘Preview’ window.
A sample ‘Print Preview’ screen is as below:

Print Prescription:
From the main menu select ‘Patient Info’ and then choose ‘Print Prescription’
From the key board type {Ctrl + P}
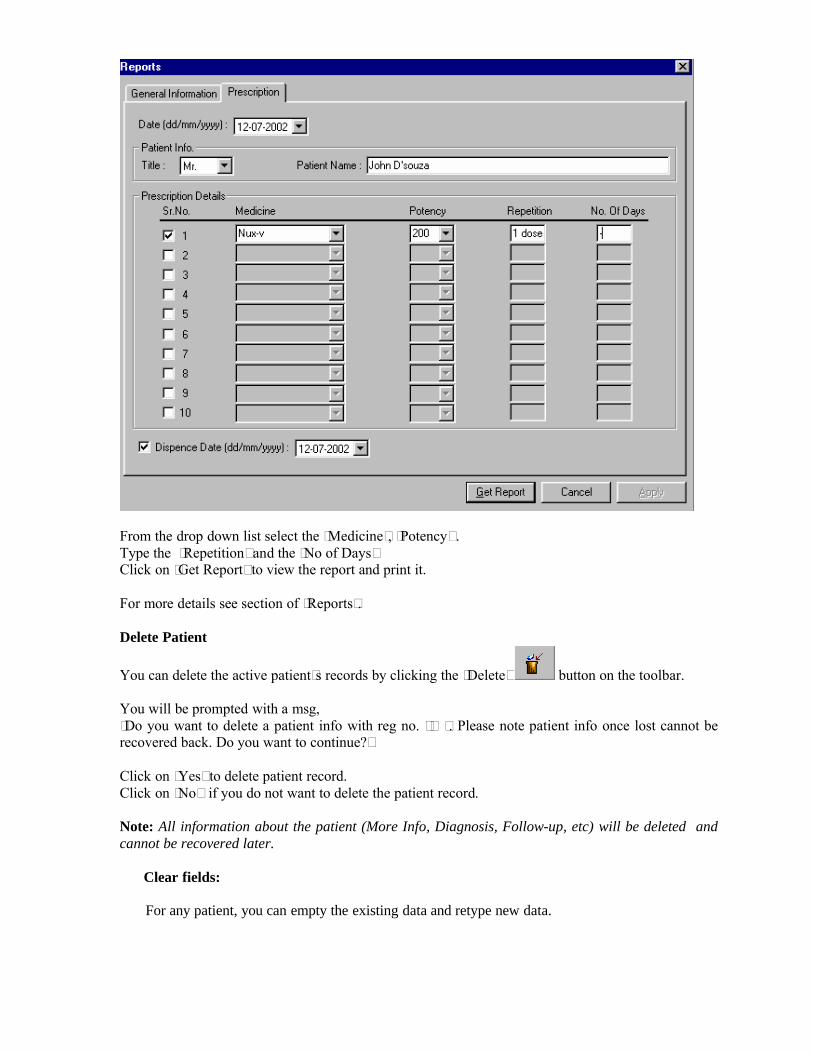
From the drop down list select the ‘Medicine’, ‘Potency’ .Type the ‘Repetition’ and the ‘No of Days’ Click on ‘Get Report’ to view the report and print it.
For more details see section of ‘Reports’.
Delete Patient
You can delete the active patient’s records by clicking the ‘Delete’ button on the toolbar.
You will be prompted with a msg, ‘Do you want to delete a patient info with reg no. ‘…’. Please note patient info once lost cannot be recovered back. Do you want to continue?’
Click on ‘Yes’ to delete patient record.Click on ‘No’ if you do not want to delete the patient record.
Note: All information about the patient (More Info, Diagnosis, Follow-up, etc) will be deleted and cannot be recovered later.
Clear fields:
For any patient, you can empty the existing data and retype new data.

Simply click on the button from the toolbar to empty the contents.
Exit
Click on ‘Patient Info’ and then on ‘Exit’ to exit this application.Quik Rep :
From the menu select ‘Patient Info’ and then choose ‘Quick Rep’
Press {Ctrl+Q} or {Alt+P}{Q} on the keyboard.
On the ‘navigation tree’ click on the item labeled ‘Quick Rep’
Note : The physician must select any one of his/ her patients to proceed with the ‘Quik Rep’ feature from PMS.
This feature is designed to be a time saving option.
This feature allows you to perform an instant repertorisation, by directly recording symptoms and arriving at a set of remedies.
Selecting this option causes ‘Classic’ to open, and you are directly presented with the ‘Quick Rep’ screen as shown : (See ‘Quik Rep section’ of Classic Help)
Physician Information
From the main menu Click on ‘Physician Info’ Or
From keyboard type {Alt +Y}
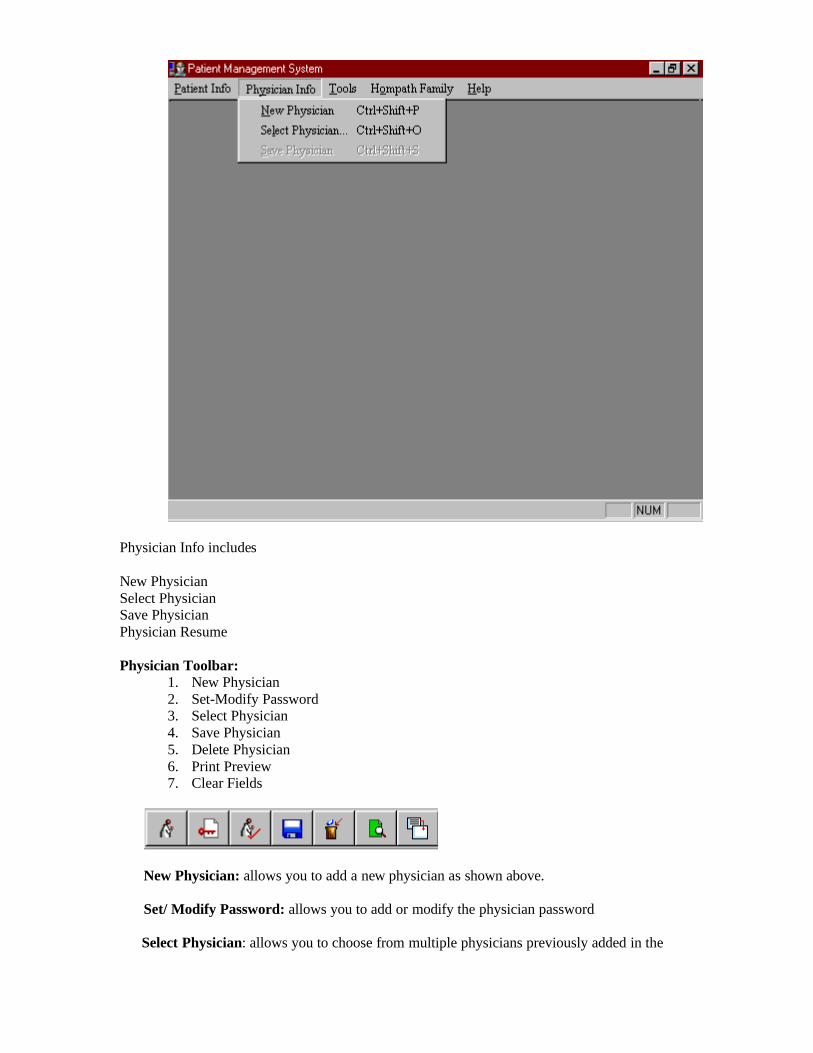
Physician Info includes
New PhysicianSelect PhysicianSave PhysicianPhysician Resume
Physician Toolbar:1. New Physician2. Set-Modify Password3. Select Physician4. Save Physician5. Delete Physician6. Print Preview7. Clear Fields
New Physician: allows you to add a new physician as shown above.
Set/ Modify Password: allows you to add or modify the physician password
Select Physician: allows you to choose from multiple physicians previously added in the

program.
Save Physician: allows you to save new or the modified physician data. This button will only be active when you either have entered a ‘New physician’ or modified any previous ‘Physician’ data.
Delete Physician: allows you to delete any physician (except the default physician)
Print preview: For the active physician, you can print the ‘Physician Info’ by first previewing it
by clicking the ‘Print Preview’ button on the toolbar and then clicking the ‘Print’ button in the ‘Preview’ window.
Clear fields: For any physician, you can empty the existing data and retype new data. Simply
click on the button from the toolbar. The ‘Title’ and ‘Dr.Id.’ fields do not get cleared.
New Physician:
From the menu select ‘Physician Info’ and then choose ‘New Physician’. OR
Press {Ctrl+Shift+P} or {Alt+Y+N} on the keyboard. (The ‘+’ sign indicates that the keys are to be pressed together.
From the ‘navigation tree’ on the left select ‘Physician Details’ and then click the ‘New
Physician’ button on the toolbar.
This option enables you to add a ‘New Physician’ in PMS. This feature is useful for use in hospitals, clinics or partnership practices, wherein multiple homoeopaths can use the same computer for storing information of their respective patients.

Enter the Name, Personal Details, Address, Telephone and Other Contacts and an exclusive Physician ID for each doctor in the ‘*Dr.Id.’ field.
You have the option of password protection wherein only you can open your patient records by typing the correct password.
To enter the Physician details, click in the appropriate text boxes and type with the keyboard.
Note: ‘Dr.Id.’, ‘Title’, ‘First Name’ and ‘Last Name’ have to be entered compulsorily to save the information. They have been marked with a ‘*’.
You have the option to define your own Physician ID. The ‘*Dr. Id.’ field accepts only numbers.
Save Physician:
From the menu select ‘Physician Info’ and then choose ‘Save Physician’ OR
Click on the ‘Save’ button on the toolbar OR
Press {Ctrl+Shift+S} or {Alt+Y}{S} on the keyboard.
This button will only be active when you either have entered a ‘New physician’ or modified any previous ‘Physician’ data.
Note: Once saved you cannot modify the ID of the physician.
Set/Modify Password:
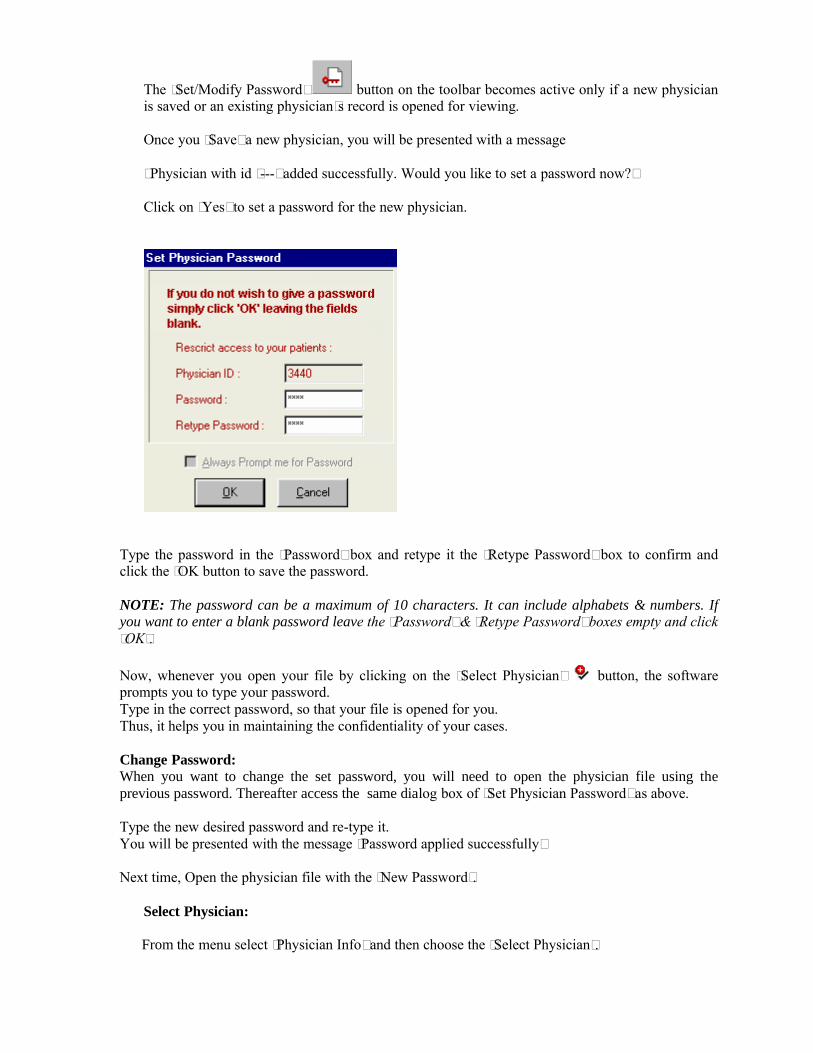
The ‘Set/Modify Password’ button on the toolbar becomes active only if a new physician is saved or an existing physician’s record is opened for viewing.
Once you ‘Save’ a new physician, you will be presented with a message
“Physician with id ‘---‘ added successfully. Would you like to set a password now?”
Click on ‘Yes’ to set a password for the new physician.
Type the password in the ‘Password’ box and retype it the ‘Retype Password’ box to confirm and click the ‘OK button to save the password.
NOTE: The password can be a maximum of 10 characters. It can include alphabets & numbers. If you want to enter a blank password leave the ‘Password’ & ‘Retype Password’ boxes empty and click ‘OK’.
Now, whenever you open your file by clicking on the ‘Select Physician’ button, the software prompts you to type your password. Type in the correct password, so that your file is opened for you. Thus, it helps you in maintaining the confidentiality of your cases.
Change Password:When you want to change the set password, you will need to open the physician file using the previous password. Thereafter access the same dialog box of ‘Set Physician Password’ as above.
Type the new desired password and re-type it.You will be presented with the message ‘Password applied successfully’
Next time, Open the physician file with the ‘New Password’.
Select Physician:
From the menu select ‘Physician Info’ and then choose the ‘Select Physician’.

Press {Ctrl+Shift+O} or {Alt+Y}{L} on the keyboard.
Click on the ‘Select Physician’ button on the toolbar.
Select the ‘Select Physician’ item in the ‘navigation tree’ on the left.
This is used to access a Physician’s records and all his/her patient’s information.
Searching Physician (Filtering) in the List:You can search for a physician by ‘Dr.Id.’, ‘First Name’, ‘Middle Name’ and ‘Last Name’ by typing in the respective text boxes in front of the label ‘Search’.
As you type, the search will filter out those physicians that do not match the criteria and show only those that satisfy the search condition. Once filtered, you can see all the physicians again by clicking the ‘Show All’ button.
Sorting Physician List:You can sort the physician list by ‘Dr. Id.’, ‘First Name’, ‘Middle Name’ and ‘Last Name’ by clicking the sort buttons in front of the label ‘Sort By’ or by clicking the respective column header. One click results in Ascending Sort Order. Clicking second time results in Descending Sort Order.
Upon highlighting the desired physician you can choose to:
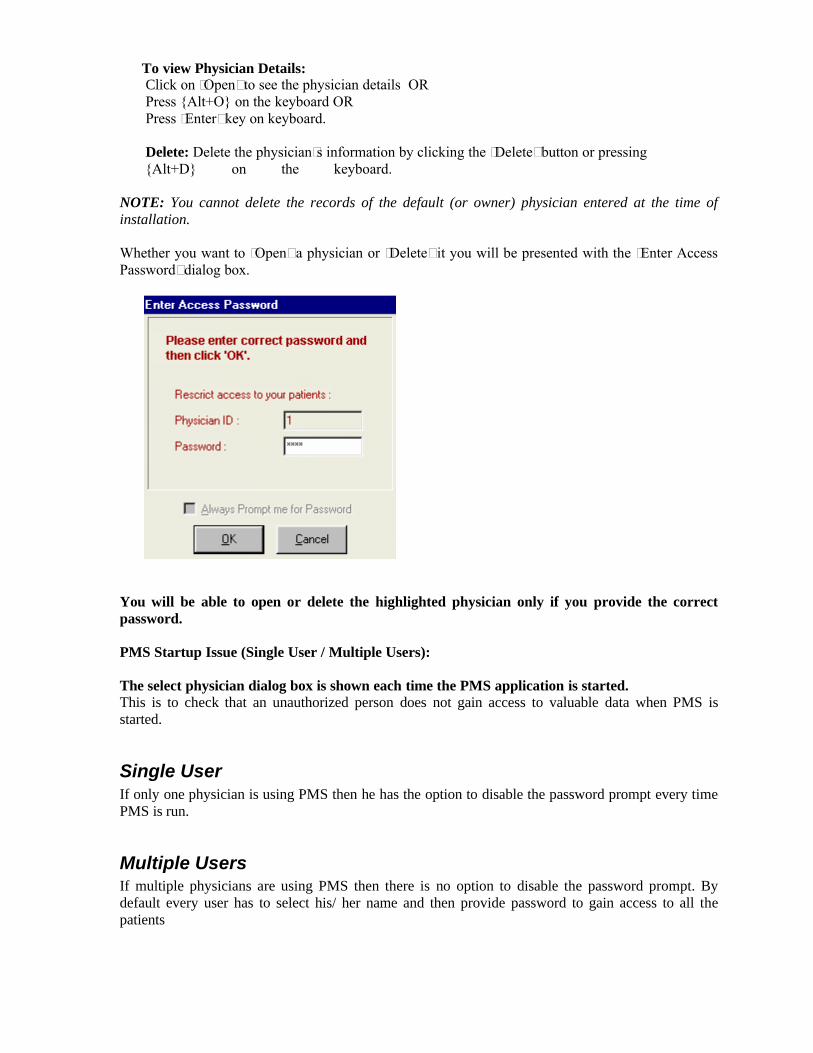
To view Physician Details:Click on ‘Open’ to see the physician details ORPress {Alt+O} on the keyboard ORPress ‘Enter’ key on keyboard.
Delete: Delete the physician’s information by clicking the ‘Delete’ button or pressing {Alt+D} on the keyboard.
NOTE: You cannot delete the records of the default (or owner) physician entered at the time of installation.
Whether you want to ‘Open’ a physician or ‘Delete’ it you will be presented with the ‘Enter Access Password’ dialog box.
You will be able to open or delete the highlighted physician only if you provide the correct password.
PMS Startup Issue (Single User / Multiple Users):
The select physician dialog box is shown each time the PMS application is started.This is to check that an unauthorized person does not gain access to valuable data when PMS is started.
Single User If only one physician is using PMS then he has the option to disable the password prompt every time PMS is run.
Multiple Users If multiple physicians are using PMS then there is no option to disable the password prompt. By default every user has to select his/ her name and then provide password to gain access to all the patients

Delete Physician:
You can delete the active physician’s records by clicking the ‘Delete’ button on the toolbar.
You will be presented with a appropriate message whether you want to delete the physician.
Click on ‘Yes’ to proceed with deletion.
Once deleted, all the data of that physician will be removed from the program and cannot be recovered.
Note: Default Physician cannot be deleted.
Print Preview / Print:
For any active screen, you can print the ‘Info’ by first previewing it.
Click the ‘Print Preview’ button on the toolbar.
If the Print preview is O.K, Click on the ‘Print’ button in the ‘Preview’ window.
A sample ‘Print Preview’ screen is as below:

ToolsThis menu holds the access to features such as ‘Auto Backup’, ‘Backup/Restore’, ‘Reports’ and ‘Physician Resume’
Backup & Restore:
The ‘Backup & Restore’ feature can be accessed only from the ‘Tools’ menu by choosing the ‘Backup & Restore’ menu item.
The ‘Backup’ feature ensures that the physician’s data remains safe and if something goes wrong the ‘Restore’ feature can be used to restore all the data from previous backup.

As seen above selecting Backup enables the backup related options disabling that of Restore and viceversa.
Backup:Each physician can take backup of:
All Patients: Selecting this option will enable a physician to take the backup of ‘All patients’.
Current Patient: This option allows backup of only the currently active patient data. If no patient record is open, this option remains disabled.
Selected Patient(s): As soon as this option is selected, the patient list on the right becomes enabled for patient selection. Only the selected patients will be considered for backup. (Multiple Patients can be selected by keeping the ‘Ctrl’ key pressed while clicking the patients to be selected).
The patient data that is backed up includes Patient Details, More Info, Media Files, Case Record, Recorded Symptoms, Diagnosis, First Prescription, Follow-up, Reports.
Physician Data: This option enables the physician to backup only data related to the physician excluding the data related to the patients.
The physician data that is backed up includes Physician Details (i.e. personal info. and password info.), Report Settings (i.e. the General Information page that sets various options
common to all reports), Backup/Restore info (i.e. the last Backup Folder & last Restore Folder), and finally the Physician Resume data
Location:This section specifies the place where the backup should be taken.

To Default Location:Selecting this will enable the backup to be taken to the default location i.e. the folder where the ‘Auto Backup’ is taken. Usually this is “c:\patdata”.
To Selected Location:As soon as this option is selected the ‘Browse’ button gets enabled, thus, allowing the physician to select a folder where the backup will be taken.
Upon selecting the necessary Backup & Location options click on the ‘OK’ button to activate the backup process.
Note: In certain cases the Backup process might take a considerable amount of time. For this purpose a progress bar is provided to indicate that the process is in progress and the physician should wait for its completion.
Restore:Each physician can restore from previous backup the following
All Patients:Selecting this option will enable a physician to restore the data of all of his patients.
Current Patient:This option allows data restoration of only the currently active patient. If no patient record is open, this option remains disabled.
Selected Patient(s):As soon as this option is selected the patient list on the right becomes enabled for patient selection. Only the selected patients will be considered for restoration. (Multiple Patients can be selected by keeping the ‘Ctrl’ key pressed while clicking the patients to be selected).
Note: By default the patients from the default backup location, i.e. the Auto Backup folder, are listed. Hence, if you wish to restore from a specified location then the location should be selected first to list the patients from that folder.
Physician Data:This option enables the physician to restore only data related to the physician excluding the data related to the patients.
From Version 7.0:If you have data from Classic 7.0, this option will allow you to restore that data. As explained earlier under the section ‘PMS - The First Run’ your ‘Dr. Id.’ should match theone in your previous data else you would not be able to restore. ( See PMS first run)
Restore Classic Data: Selecting this option allows the restoration of classic related data. This includes, Combined Symptoms, Cured Symptoms, Materia Medica Symptoms and lastly User information. For this option the ‘From Selected Location’ option is not available and hence is disabled.
Note: You might wonder that there is a restore option for the ‘Classic Data’ but is not seen in the Backup section, then when is the backup of Classic Data taken. Well, the backup is done automatically during the Auto Backup. So you are spared the complexities of the Classic Data backup

Location: This section specifies the place from where the data should be restored i.e. the previous backup folder.
From Default Location: Selecting this will enable the backup to be taken to the default location i.e. the folder where the ‘Auto Backup’ is taken. Usually this is “c:\patdata”.
From Selected Location: As soon as this option is selected the ‘Browse’ button gets enabled, thus, allowing the physician to select a folder where the backup will be taken.
Upon selecting the necessary Restore & Location options click on the ‘OK’ button to activate the restore process. In certain cases the Restore process might take a considerable amount of time. For this purpose a progress bar is provided to indicate that the process is in progress and the physician should wait for its completion.
Auto Backup:
This is a unique feature in PMS that takes the backup of all the data to the default folder “C:\Patdata\” or to the folder that the Physician specifies.
The ‘Auto Backup’ jumps into action whenever you start PMS if a period of 24 hours has passed from the last Auto Back.
The ‘Auto Backup’ feature can be accessed only from the ‘Tools’ menu by choosing the ‘Auto Backup’ menu item.
The ‘Auto Backup’ dialog allows the Physician to change the path where the backup can be taken. The ‘Auto Backup’ dialog is as shown:

As seen the path is displayed in the ‘Backup Destination Folder’. Click on the ‘Browse’ button to select a new path for the backup and be sure to click on the ‘OK’ button to save your selection. The next Auto Backup will be taken to the new path.
New Reports:
From the ‘Tools’ menu you can select ‘New Report’ after ‘selecting a patient’
OR
From the keyboard Press {Alt+T}{N}.
Patient Management System now features exhaustive reporting through which you can make all types of Medical certificates and reports that you require in your practice. And what’s more! You can customize these reports in the way you want them to be choosing your own fonts, colors, etc. Thus, you not only get the reports in the manner that you like but you also save a lot on printing costs.
General Information:

This page hosts information common to all reports. Following is a list of information stored:
Report Titles: You can type your own report titles here. Header Info: This includes the Physician’s Name, Qualification, Type of Profession,
Registration Number that allows him to practice as a physician and Consultation Timings.
Footer Info: This includes addresses and contact details.
The Header and Footer sections include check boxes. You can check to include a particular sub-section in reports or uncheck to exclude it from reports. Checking/ Un-checking the ‘Header Info’ or ‘Footer Info’ sections includes/excludes entiresection from reports. Thus, the ‘General Information’ allows full customization of report contents in terms of what should be included or excluded.
Apply: This button will become ‘active’ only when you have made changes in the ‘General Information, and want to apply these changes & modifications overall in all the reports mentioned below.
Click on ‘Apply’ once you make changes in the above screen, so that these changes are reflected in all reports.
Types of Reports:The other tabs seen at the top of the dialog box are the possible reports that can be generated and are as listed below:
PrescriptionReceiptSickness CertificatePatient BillingFitness CertificateAbroad CertificateReport to Physician - Report back to another physician about a patient he/she had referred to you.Refer to Physician - A reference note to a physician about a patient.
Click on any report that is required.Each report covers up all the essential requirements for that category.Fill in the necessary details for the report.
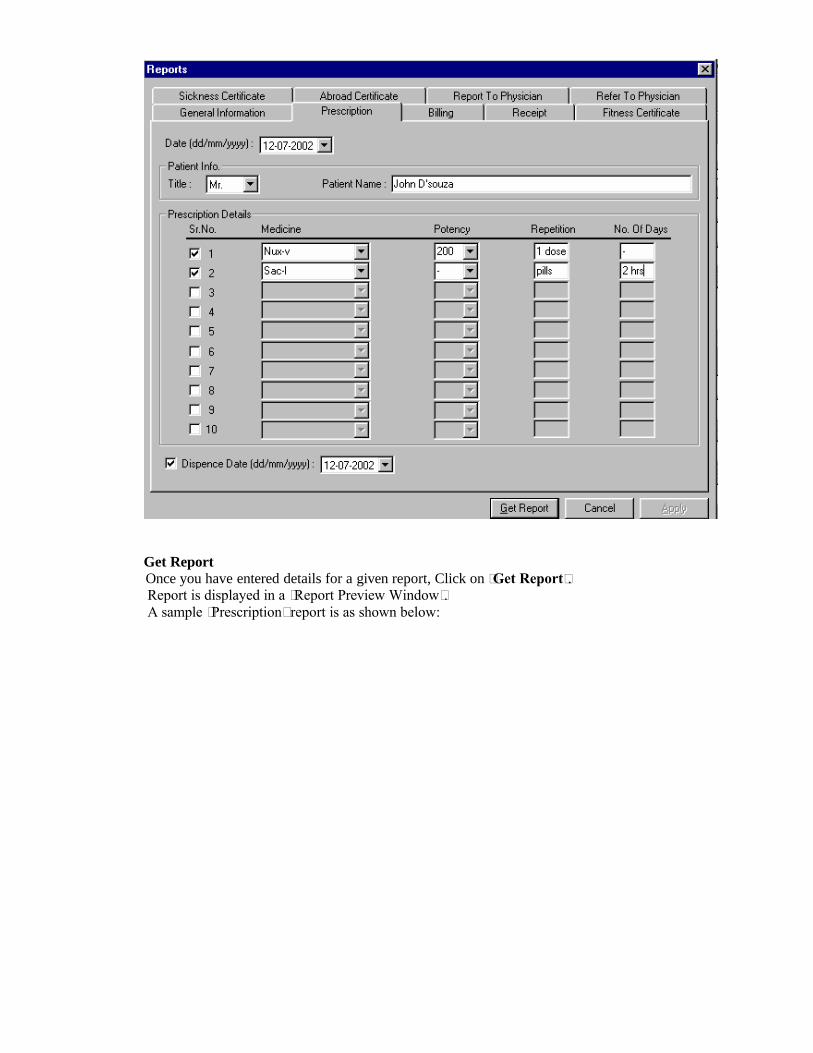
Get ReportOnce you have entered details for a given report, Click on ‘Get Report’.Report is displayed in a ‘Report Preview Window’. A sample ‘Prescription’ report is as shown below:
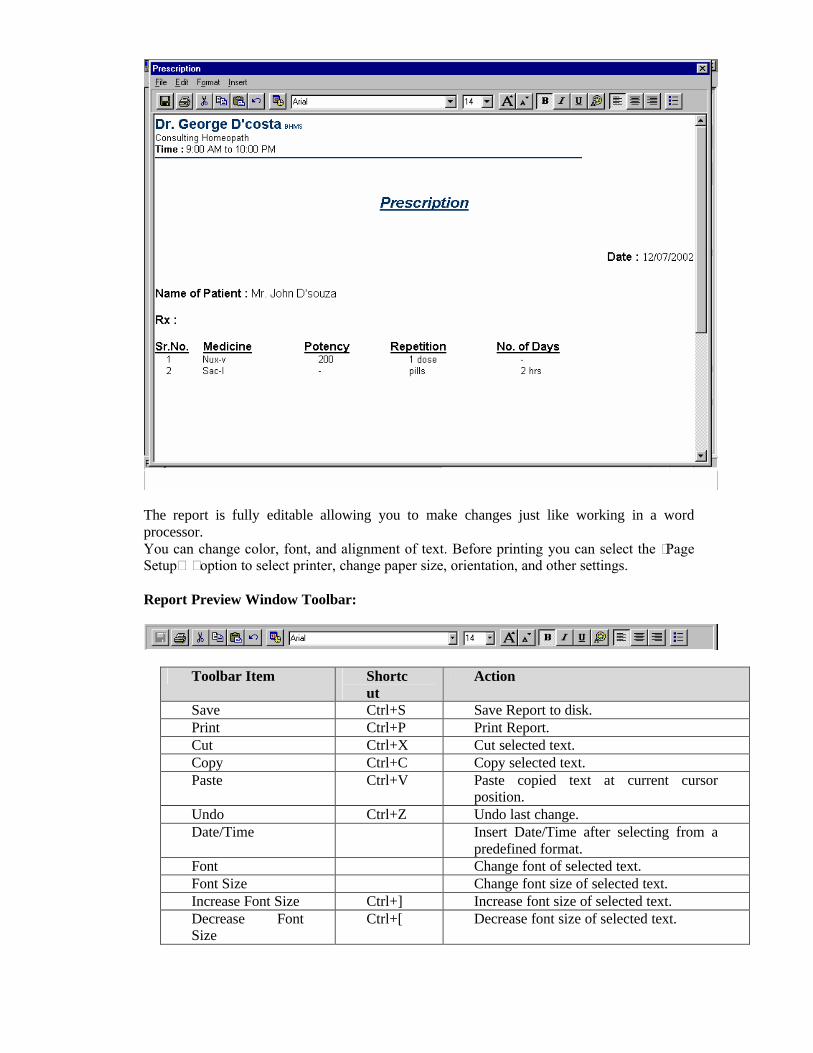
The report is fully editable allowing you to make changes just like working in a word processor. You can change color, font, and alignment of text. Before printing you can select the ‘Page Setup…’ option to select printer, change paper size, orientation, and other settings.
Report Preview Window Toolbar:
Toolbar Item Shortcut
Action
Save Ctrl+S Save Report to disk.Print Ctrl+P Print Report.Cut Ctrl+X Cut selected text.Copy Ctrl+C Copy selected text.Paste Ctrl+V Paste copied text at current cursor
position.Undo Ctrl+Z Undo last change.Date/Time Insert Date/Time after selecting from a
predefined format.Font Change font of selected text.Font Size Change font size of selected text.Increase Font Size Ctrl+] Increase font size of selected text.Decrease Font Size
Ctrl+[ Decrease font size of selected text.

Bold Ctrl+B Make selection bold.Italic Ctrl+I Make selection italic.Underline Ctrl+U Make selection underline.Text Color Change color of selected text.Align Left Ctrl+L Left align selected paragraph.Align Center Ctrl+E Center align selected paragraph.Align Right Ctrl+R Right align selected paragraph.Bullets Insert or Remove bullets for the current
line.
All the above mentioned actions can also be accessed via menu.
Note :If you close the ‘report preview window’ without saving it you will be prompted with a message
‘Do you want to save the new report? ‘Click on ‘Yes’ to save the reports.Click on ‘No’ if you don’t want to save the report.
Report Description:You can give a short report description by choosing the ‘Description’ menu item from the main menu ‘File’. Type the description in the text box in the dialog, as shown, that appears when you use this option.
Open Reports:Previously saved reports can be opened by selecting ‘Open Reports’ menu item from the ‘Tools’ menu. OR
Using keyboard press {Alt+T}{O} to do the same.
Through this feature, you can select any patient and see the list of his reports and open any reports that you want to view or print.

Select any patient through his Registration number, first, middle or last name from the top half of the screen.
As soon as you select any patient, all the reports given to him in the past get listed in the lower half of the screen.
You can select any report that you require by highlighting it and click on ‘Open Report’ button to view the entire report or ‘Delete Report’ to delete the report.
Physician Resume:From the menu select ‘Tools’ and then choose ‘Physician Resume’ ORPress {Alt+T}.
This is a unique feature that saves all academic and professional information of a physician and generates a resume at will. You can then readily take a printout of your bio-data. All the data needs to be entered only once and is editable.
The following categories of information can be filled: Physician Name

Addresses and Contacts: Address and Phone numbers related to physician’s residence, clinic and hospital. Mobile, Pager, Fax and Email can also be entered.
Qualifications
Professional Experience: This section includes the Duration, Company/Hospital name, Place of work, Designation and Achievements at the job
Additional Professional Experience: Similar to ‘Professional Experience’.
Education: Here also you fill the Duration of course, University/Institute name, Place of study, Course Title and Achievements like merits or scholarships that you may have received during your course study.
Seminar and Conferences: You can list down all the seminars and conferences that you have attended. The details you fill-up are Title/Topic of seminar, Date and Place of seminar.
Accreditations: Any official recognitions or certifications received at various stages of your career can be fed in here.
Articles: Details of articles written in any journal, the details of it would be included under this heading.
Presentations: If you have made any presentations or spoken in any seminar, it should be mentioned under ‘Presentations’.
Patents and Publications: You may have prepared certain combinations or discovered a new remedy. You also may have authored a book which is a credential aspect of your resume.
Community Activities: If you are engaged in any awareness programs or any social service camps in your area, the details would be included here.
Professional Membership: If you are a member of any medical association or attached to any society or have fellowship of any prestigious institute, they would add more substance to your resume.
Awards Received: The merits and credentials that you have received for your outstanding work deserves to be mentioned in details under this heading.
Interests: Your personal hobbies and interest reflect and enhance your personality type and deserve to be mentioned here.
Reference: To add to your credentials, you may add references of doctors whom you have assisted.
At every stage, the following buttons are provided to ease your work:

At certain stages such as ‘Education’, you may have done several courses and you may want to add all of them.
In that case, feed the details of the first course and click on ‘Fwd’, the software takes you to the next field where you can enter the details of your next course and so on.
To go back to the previous course, simply click on the ‘Back’ button.
To delete any matter, click on the ‘Delete’ icon.
Suppose you want to insert any matter between two entries that you have made, click on ‘Insert’ and the fields go blank to accommodate the new entry.
Multiple Achievements or Job Profiles can be entered using the four button ‘B’, ‘D’, ‘I’, ‘F’ (i.e. Back, Delete, Insert, Forward) buttons.
Once you enter all the details, Click on ‘Apply’ to save the changes.
Click on ‘Get Resume’ to view the print-preview of the resume.From the screen, Click on ‘File’ and then on ‘Print’ to remove the print-out of the resumeClick on ‘File’ and the ‘Save Resume’ to save the resume to your desired folder.
Click on to close the file.
Printing
Printing of various options is possible by a click on the ‘print preview’ option available on each screen and then a click on the ‘print’ option. (the printer must be installed on your computer)
Various Print-outs that can be extracted are:
Physician Details, Physician ResumePatient DetailsList of PatientsPatient More InformationFull Case RecordDiagnosisFirst Prescription & Follow-upDiagnosis HistoryFollow ListPatient Instructions
Hompath Family :
This menu provides the user an easy access to other modules like ‘Classic’, ‘Case Analysis’, ‘HomUtil’, etc. thus providing great interlinking between most of the features of the software.

Click on any of the modules from the ‘PMS’ to directly open that module to work on it.

Utilities
Remedy List {Alt +U} {L} List all the remedies included in the program Use filters for group wise selection of remedies. Obtain information of any remedy using various options like ‘Keynotes’, ‘Drug
Properties’, ‘Drug relation’ etc. for the selected remedy.
Remedy Editor {Alt +U} {E} View basic properties of the drug right from its basic nature, to its predominant qualities like
stage, miasm, sex, thermal modality etc. Alter these preset properties as per your liking
Similimum {Alt +U} {S} Guide line to remedy potency and repetition based on guidelines
laid down on classical homoeopathic principles
Pack n Go {Alt +U} {P} Pack a case and use it for presentations or lectures anywhere in the world without having to
install the actual program Include essential elements of the case and other basic functionalities of the program to make
your presentation complete. Cases are packed in such small sizes that they can be carried even on a floppy.
Feed back {Alt +U} {F} Send us your feedback / suggestions / queries in a ready made feed back form.
Utilities:
Click on ‘Utilities’ from main menu and then choose any of the following options.
Remedy List:From the main menu select ‘Utilities’ and then ‘Remedy List’ From key board type {Alt+U} {L}

This feature lists all the remedies included in the program, and provides various useful remedy options for the same. You can study and obtain information on any remedy from this option.
A-Z (Alphabetical series of buttons): Click on any alphabet to directly jump to remedies beginning from that alphabet. For instance, If u were looking out for the remedy ‘Puls’ (Pulsatilla) click on the alphabet ‘P’ to jump to all remedies beginning with the letter ‘P’.
Find Remedy: Type in the desired remedy abbreviation in this box OR Use the vertical scroll bar to reach to the desired remedy to jump to that remedy and select it by highlighting it with the mouse.
Note: If a particular remedy is not available within the list, the program will jump to the next closestabbreviation.
Filters:Filters can be used when you want to study or derive information of any remedies based on its groups / sub-groups etc.
: Click on this option to filter all plant remedies or its sub-groups. Click on ‘OK’ fromthis screen to filter all plant remedies. Select any ‘Classes / Families, or any ‘Types’ or a combination of both, to filter plant remedies based on groups or sub-groups. Click on ‘Ok’ to return back to the previous screen. Remedy list will now include only the filtered plant remedies.
Similarly
Click on or to filter remedies from the respective kingdom and their sub-groups.
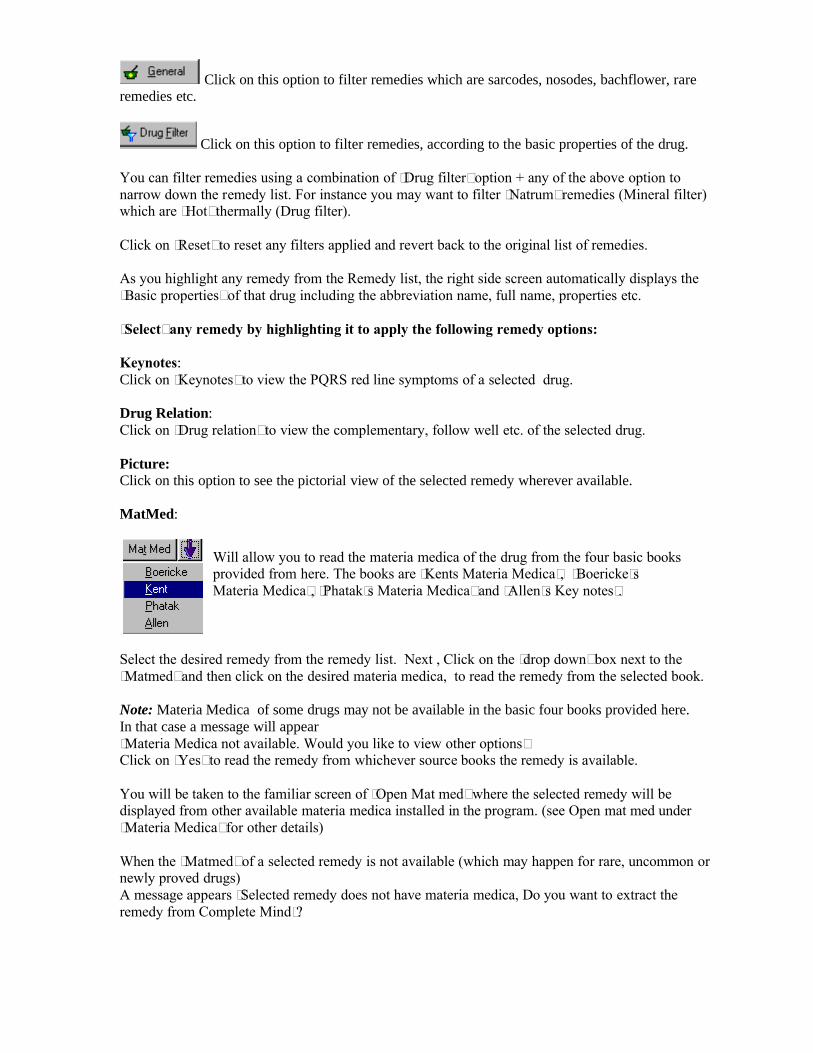
Click on this option to filter remedies which are sarcodes, nosodes, bachflower, rare remedies etc.
Click on this option to filter remedies, according to the basic properties of the drug.
You can filter remedies using a combination of ‘Drug filter’ option + any of the above option to narrow down the remedy list. For instance you may want to filter ‘Natrum’ remedies (Mineral filter) which are ‘Hot’ thermally (Drug filter).
Click on ‘Reset’ to reset any filters applied and revert back to the original list of remedies.
As you highlight any remedy from the Remedy list, the right side screen automatically displays the ‘Basic properties’ of that drug including the abbreviation name, full name, properties etc.
‘Select’ any remedy by highlighting it to apply the following remedy options:
Keynotes: Click on ‘Keynotes’ to view the PQRS red line symptoms of a selected drug.
Drug Relation: Click on ‘Drug relation’ to view the complementary, follow well etc. of the selected drug.
Picture: Click on this option to see the pictorial view of the selected remedy wherever available.
MatMed:
Select the desired remedy from the remedy list. Next , Click on the ‘drop down’ box next to the ‘Matmed’ and then click on the desired materia medica, to read the remedy from the selected book.
Note: Materia Medica of some drugs may not be available in the basic four books provided here.In that case a message will appear ‘Materia Medica not available. Would you like to view other options’Click on ‘Yes’ to read the remedy from whichever source books the remedy is available.
You will be taken to the familiar screen of ‘Open Mat med’ where the selected remedy will be displayed from other available materia medica installed in the program. (see Open mat med under ‘Materia Medica’ for other details)
When the ‘Matmed’ of a selected remedy is not available (which may happen for rare, uncommon or newly proved drugs)A message appears ‘Selected remedy does not have materia medica, Do you want to extract the remedy from Complete Mind’?
Will allow you to read the materia medica of the drug from the four basic books provided from here. The books are ‘Kents Materia Medica’, ‘Boericke’s Materia Medica’, ‘Phatak’s Materia Medica’ and ‘Allen’s Key notes’.

Click on ‘Yes’ to extract the remedy information from the repertory. The ‘Complete Materia Medica’ and ‘PQRS symptoms’ of the selected remedy will be extracted from the ‘Complete’ ‘Mind’ Repertory (See also Extract Convt rep to Materia Medica).
Note: When a particular option is not available for any remedy, than either the option will be disabled or a message will appear accordingly.
Click on ‘Close’ to exit this application.
Remedy Editor:
From the main menu select ‘Utilities’ and then choose ‘Remedy Editor’ From keyboard type:- (Alt+U}{E}
Drug Editor is a feature that lists out all the properties of a drug, right from it's basic nature and kingdom to it's predominant qualities like stage, miasm, sex, side, thermal modality, etc. Most of the drugs in our Materia Medica, along with their properties, are represented here. You have the option to alter these preset properties as per your liking.
Note : Hompath advises you not to change the preset properties, which have been entered after indepth research, unless you are very sure about it.
Click in the ‘Search’ box and type the first few letters of the abbreviation of the remedy whose properties you want to alter, delete or add. You can also use the scroll bar to reach the desired remedy. As soon as the cursor highlights a remedy, it's corresponding properties are highlighted on the right side of the screen.
To alter any properties, Click in the square box to remove the present check-mark or add a new check-mark in an empty box. Click on ‘Save' to store the altered information.You will get a message

‘Do you want to save the changes?’ This will permanently change the drug properties?Click on ‘Yes’ to make the changes. Or Click on ‘No’ if you want to avoid the changes.
Note: Change made here will automatically be reflected at different places wherever this feature is in use.
Similimum:
From the main menu Select ‘Utilities’ and the choose ‘Similimum’From Keyboard :- {Alt+U}{S}
Selection of potency and deciding the repetition in a case is as important as selecting the right medicine. This feature has been specially designed based entirely on the guidelines laid down by classical homoeopathic principles. Multiple options based on these guidelines have been incorporated to give the most viable and intelligent solution to the problem of potency and repetition faced by the novice and professional alike In the ‘Similimum’ feature you have to select what is applicable in a given case. It will vary from case to case and from stage to stage of the disease of the patient who reports. The potency and repetition change according to the change in parameters.
There are 5 basic heading Patient Related factors, Drug/Remedy factors, Disease factorsType of Similarity, Response Desired
The headings are divided into 2 screens and consists of various parameters.Depending on your case, select the options by clicking on the required ‘Check' box or radio button to include them in the analysis.
The first screen:

Patient related factors:
a. Age - We know that age plays an important role in potency selection. In young children a high potency is preferred and in old people, a low potency.b. Occupation - A manual worker requires a low potency and frequent repetition while a professional or technical person requires high potency and infrequent repetition.c. If sleep is good, nutrition is ok and vitality is high, a high potency is required. But in the case of poor nutrition and poor vitality you need to prescribe a low potency and frequent repetition.d. Sensitivity - In the case of highly sensitive individuals, a high potency and infrequent repetition is required. With an average sensitivity, a medium potency and variable repetition is required. But if there is a lack of sensitivity - a low, medium or high potency is required depending upon the condition of the patient, the duration of the illness and various other factors.e. Mental state - An intelligent patient requires a high potency and one or two doses. A dull, unintelligent patient needs a low potency and frequent repetition.f. Physical status - A weak and feeble patient requires a low potency, while a strong robust constitution requires a high potency and infrequent repetition.
II. Drug/Remedy related factors:
Source:a. Nosodes or Sarcodes are normally given in high or medium potency and infrequent repetition.b. Plant, Animal and Mineral will have variable potency and repetition depending on many other factors.c. When you want physiological/chemical action, usually it is in low potency or Mother Tincture, and is frequently repeated.
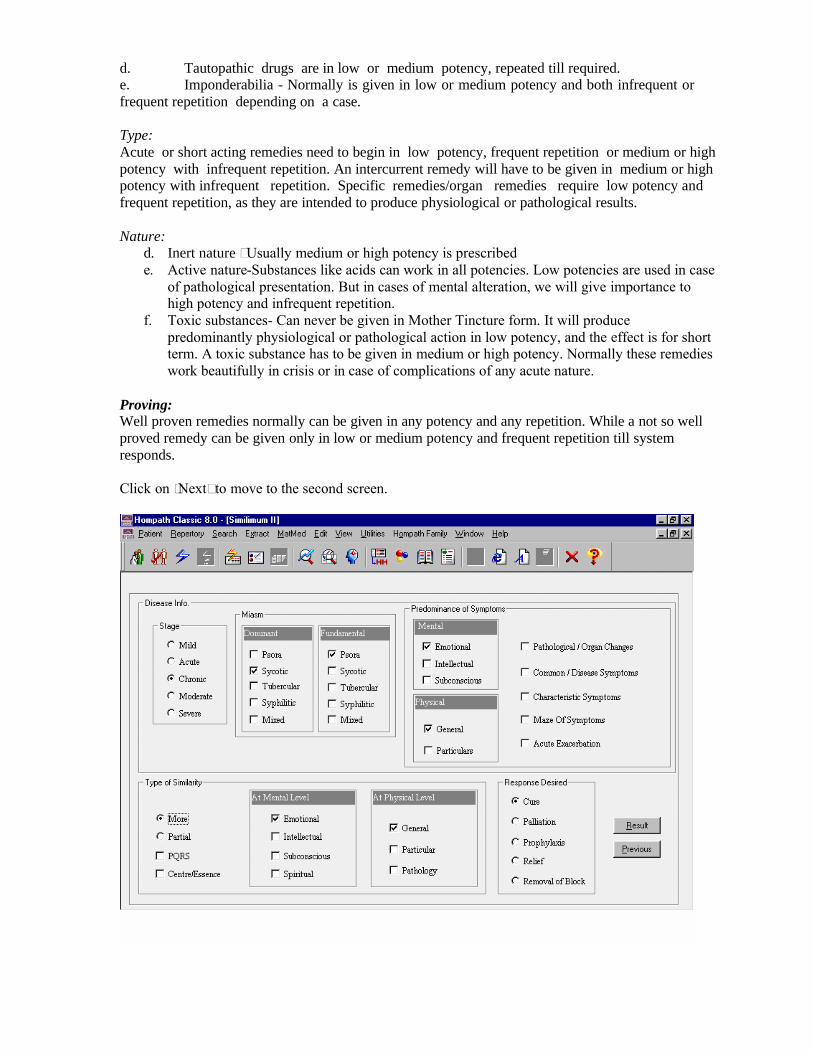
d. Tautopathic drugs are in low or medium potency, repeated till required.e. Imponderabilia - Normally is given in low or medium potency and both infrequent or frequent repetition depending on a case.
Type:Acute or short acting remedies need to begin in low potency, frequent repetition or medium or high potency with infrequent repetition. An intercurrent remedy will have to be given in medium or high potency with infrequent repetition. Specific remedies/organ remedies require low potency and frequent repetition, as they are intended to produce physiological or pathological results.
Nature:d. Inert nature –Usually medium or high potency is prescribede. Active nature-Substances like acids can work in all potencies. Low potencies are used in case
of pathological presentation. But in cases of mental alteration, we will give importance to high potency and infrequent repetition.
f. Toxic substances- Can never be given in Mother Tincture form. It will produce predominantly physiological or pathological action in low potency, and the effect is for short term. A toxic substance has to be given in medium or high potency. Normally these remedies work beautifully in crisis or in case of complications of any acute nature.
Proving:Well proven remedies normally can be given in any potency and any repetition. While a not so well proved remedy can be given only in low or medium potency and frequent repetition till system responds.
Click on ‘Next’ to move to the second screen.
III. Disease related factors:
Stage:a. Acute
Mild - Requires medium potency and infrequent repetition Moderate - Requires medium or high potency and frequent repetition.Severe - Requires high potency, infrequent or frequent repetition.
b. ChronicMild - May require high potency or medium potency with infrequent repetition.Moderate - Requires high potency or medium potency with infrequent repetitionSevere - Requires low or medium potency with proper or guarded repetition.
Miasm: One of the greatest gifts of Hahnemann is the ‘Miasm’. The miasm forms the base which allows us to understand the diagnosis, prognosis, management and direction of cure. It also guides for potency and repetition. Most of the time all the miasms are present in almost all sick individuals, but their intensity or activity varies from individual to individual. There are two aspects to the miasms:a. Dominant: When the patient reports to the physician, the miasm which is active at the moment of reporting is known as a dominant miasm. The patient may have all miasms present, but at any given time only one miasm is most active or in certain cases there are two miasms which are very active.
Psora: If Psora is active, a high potency and infrequent repetition is required.Sycosis: If Sycosis is active, a low or medium potency and frequent repetition is required.Tubercular: If the Tubercular miasm is active one has to be very careful in selecting potency and repetition. If you give too high a potency and repetition is frequent it may produce marked aggravation.Syphilitic Phase: If this phase is dominant you need to prescribe a low potency with minimum repetition. If it is the beginning of the Syphilitic phase you need to prescribe a medium or high potency, so as to prevent the patient from sliding into a deep Syphilitic phase and to arrest the progress of the disease, if possible.
b. Fundamental: It is a miasmatic stage decided on the basis of past history and family history of the patient. It gives a clear idea of what was the past and what can be the future course of the disease.
Psora: Fundamentally Psora is a relatively very healthy sign. It also suggests that the patient may recover very fast and may require only a few doses of medicine. Also we may thinkof a psoric antimiasmatic remedy if required. Medicine is required in high potency and with infrequent repetition.Sycotic: If Sycotic expressions are there as a base, we may require an antisycotic remedy. The patient requires proper constitutional medicine. It is certain that the disease is still in a curable phase. A medium potency and frequent repetition may be needed.Tubercular: This shows that the particular patient has a weak base and has to be managed carefully. Only a few doses of medicine need to be repeated carefully.Syphilitic: If there is a Syphilitic base one needs only low potency and frequent repetition. Constitutional medicine is not to be given frequently.Mixed: If there is a mixed fundamental miasm the case will be difficult to manage. A low potency and infrequent repetition is needed to control it. As soon as a response starts, stop the medicine. If you give too low a potency it may not register on the patient.
Predominance of Symptomsa)Mental

All the parameters under mental symptoms require high potency and in frequent repetition.
b) PhysicalGeneral : Require medium to high potency with infrequent repetition Particular: Require low to medium potency and frequent repetition.Pathological: Also require low to medium potency and frequent repetition.Common/Disease Symptoms: Require low potency and frequent repetition.Characteristic Symptoms: Require medium potency with infrequent repetition.Maze of Symptoms: May require an intercurrent remedy or nosode in medium to high potency with infrequent repetition.Acute Exacerbation: Require low to medium potency and infrequent repetition.
IV. Type of Similarity:a. If there is a clear cut case and there is more of similarity, the potency should be
higher and the repetition is to be minimum. If the similarity is partial then it has to be a lower potency and repetition is frequent (or) as desired.
b. If there are PQRS symptoms which are matching, then high potency and infrequent repetition is prescribed.
c. If the centre or essence of the case is matching, a high potency and infrequent repetition is required.
d. At Mental level: All parameters here require high potency and infrequent repetition.
e. At Physical level:General level similarity - Requires medium or high potency and infrequent repetition.If particular symptoms match - Medium or high potency and frequent repetition is required.If match is at pathological level - Potency is low or medium and repetition is frequent.
V.Response Desired:a. Cure: A high potency and infrequent repetition is required.b. Palliation/relief: Low potency and frequent repetition.c. Prophylaxis or preventive: Medium/high potency with infrequent repetition.d. Relief: If the disease is grave and you desire to produce only partial relief or you wish to relieve acute suffering then a medium potency and frequent repetition is required.e. Finally if you are seeing some block in the treatment, the remedy given is not acting and you wish to remove this block - A high potency and infrequent repetition would be required.
Please note that as per standards:
Potencies:Below 30 are low potencies.30 to 200 (both inclusive) are considered medium potencies.Above 200 is a high potency.
LM potency is recommended in chronic conditions to produce better results without any medicinal aggravation.
Repetition:Infrequent - 1 or 2 doses onlyFrequent - 2 pills every 4 hours.
Frequent Till Response: Frequent doses till the patient responds. The remedy is to be repeated frequently as vitality is low, and the vitality has to be stimulated enough to get the

response. Normally once the system reacts or starts reacting, the rest of the action will be taken care of by the system itself. You may not require any repetition of the medicine.
Click on the `Result' button.
When you click on ‘Previous’, you can move to the previous screen, in case you want to re-define the patient‘s condition.
The result in type of potency required and recommended frequency of repetition is flashed under the heading `Similimum Result’
Note: This option is only a guide-line about the potency selection of a medicine, the final judgment should be made by the physician.
Feedback:From main menu Click on ‘Utilities’ and then choose ‘Send Feed back’From keyboard type {Alt+U} {F}
Hompath gives you the option to send us your suggestions / queries etc. in the feed back form provided here.

Type in your e-mail id in the ‘From’ boxThe box next to ‘To’ includes our e-mail address.
By default the radio button next to ‘Suggestions’ is ticked. Enter your comments in the ‘Enter your message’ box.
Check the button of ‘Errors’ and then type in the details of any errors or problems you have come across while using the program.
Click on ‘Send’ to send the message (you need to be connected to the internet)Click on ‘Save’ if you wish to save the message and then send it later.Click on ‘Print preview’ to preview the contents and then click on ‘Print’ to remove the print-out Close allows you to exit from the program.
Pack n Go:
From the main menu select ‘Utilities’ and then choose ‘Pack n Go’From keyboard type {Alt+U} {P}
‘Pack n go’ is a unique feature designed for practitioners / users / teachers, especially for those who teach or deliver Lectures / Presentations for seminars or conferences, who conduct study courses at different places / group-teachings etc.
Unique features:

‘Pack’ a case to use it for presentations any where in the world. You can run the presentation on any PC or laptop without actually installing the ‘Classic 8’ program.‘Packed’ cases include all the essential components like ‘Rep. table’, ‘Follow-ups’, ‘Case record’ etc. of the ‘patient’. Different repertorisation strategies, and other basic features of Classic are included to make your presentation apt, complete and interactive. Multiple cases can be packed , into very small file sizes, so that you can carry them easily on your
floppy / laptop etc. without occupying more space.
Features of Unpacked Case
Once you have Selected the case
Select desired date from the drop down arrow of ‘Select Visit Dates’ Click on Rep table to view corresponding Repertorisation table.
For other features of packed case:Click on File and then any of its sub-contents .
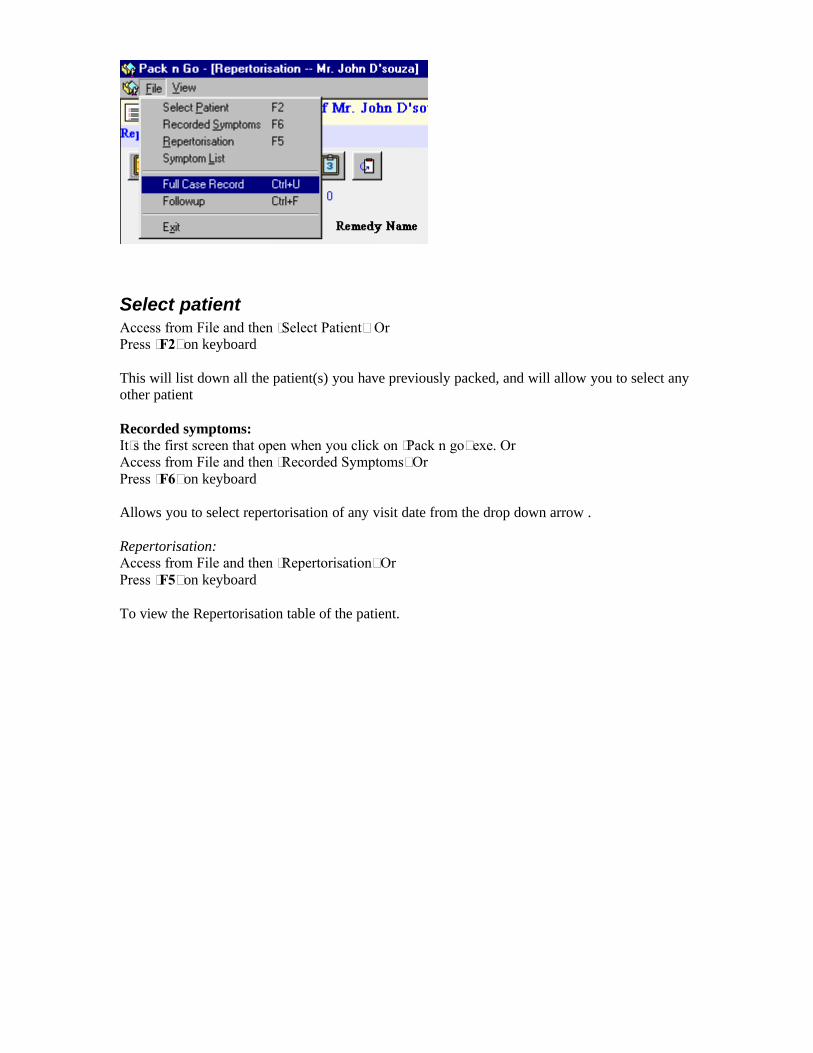
Select patientAccess from File and then ‘Select Patient’ OrPress ‘F2’ on keyboard
This will list down all the patient(s) you have previously packed, and will allow you to select any other patient
Recorded symptoms:It’s the first screen that open when you click on ‘Pack n go’ exe. OrAccess from File and then ‘Recorded Symptoms’ OrPress ‘F6’ on keyboard
Allows you to select repertorisation of any visit date from the drop down arrow .
Repertorisation:Access from File and then ‘Repertorisation’ OrPress ‘F5’ on keyboard
To view the Repertorisation table of the patient.
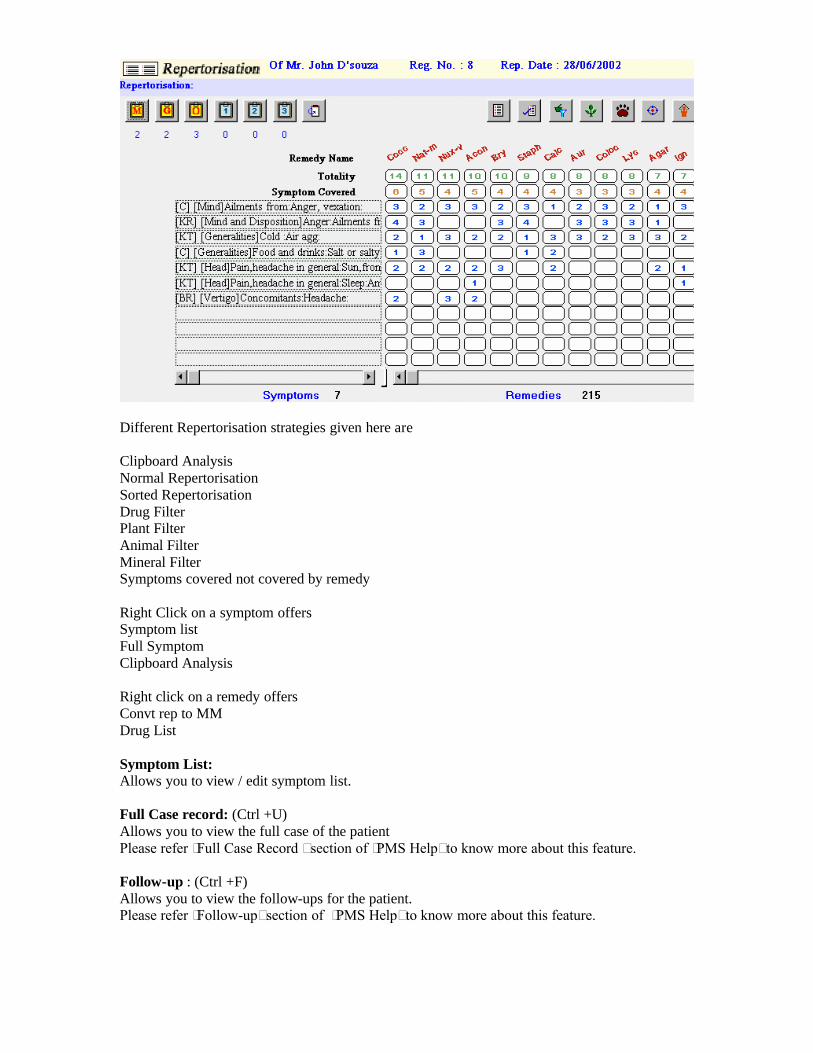
Different Repertorisation strategies given here are
Clipboard AnalysisNormal RepertorisationSorted RepertorisationDrug FilterPlant FilterAnimal FilterMineral FilterSymptoms covered not covered by remedy
Right Click on a symptom offersSymptom listFull SymptomClipboard Analysis
Right click on a remedy offersConvt rep to MMDrug List
Symptom List:Allows you to view / edit symptom list.
Full Case record: (Ctrl +U)Allows you to view the full case of the patientPlease refer ‘Full Case Record ’ section of ‘PMS Help’ to know more about this feature.
Follow-up : (Ctrl +F)Allows you to view the follow-ups for the patient.Please refer ‘Follow-up’ section of ‘PMS Help’ to know more about this feature.

Magnify:To use the magnify option for the Repertorisation, First open the rep table and then Click on View and then Magnify.
The Rep table will be magnified, and you will be able to show the details in a larger font .For detailed explanation of all these functions see each feature in their respective section.
To Pack cases:From the main menu select ‘Utilities’ and then Click on ‘Pack n Go’You will be presented with the list of all your patients.
From the list ‘Select the patient’ you want to pack.Highlight the patient name by a single click on it.
Next Click on ‘Pack’You will be presented with the following message.

Click on Yes to proceed with packing of the case.
Next you will be presented with a screen where you have to ‘Select Path’ where you want to copy the files (i.e. where you want to pack the case).
You can either choose or create a folder and then click on ‘Select’ to save the case in that folder.For instance here, the case will be stored in the c:/my documents folder.
Next Click on ‘Select’
You will be presented with a message, asking you whether you want to include the follow-ups while packing this case
Click on Yes to include the ‘Follow-up’You will be presented with all the follow-ups of this patient date wise.

Hompath gives you the customize selection of follow-ups i.eYou can select each follow-up (date wise one by one) you wish to include in the case
This will be essential if you have multiple follow-ups of a patient and you only wish to choose only the most important ones
OR
Use the ‘Select all’ feature by clicking on the check box next to it, to include all the follow-ups of the case.
Next Click on ‘Continue’
You will be presented with the following screen
Click on Yes to include other details of the patient,This will automatically include, Case record , and other basic details for this patient
You have now finished with packing of one case.
In case you need to pack another case, then proceed with the same procedure as explained above.
The folder where you have packed the case, will now have the following contents:
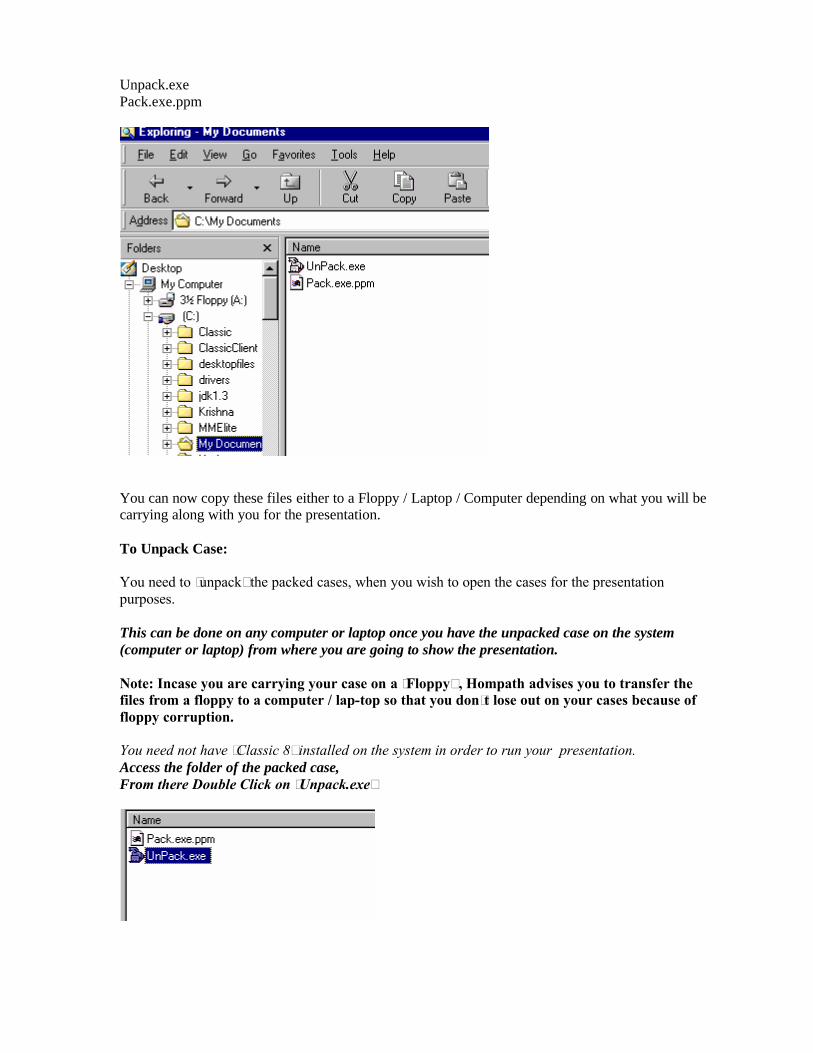
Unpack.exePack.exe.ppm
You can now copy these files either to a Floppy / Laptop / Computer depending on what you will be carrying along with you for the presentation.
To Unpack Case:
You need to ‘unpack’ the packed cases, when you wish to open the cases for the presentation purposes.
This can be done on any computer or laptop once you have the unpacked case on the system (computer or laptop) from where you are going to show the presentation.
Note: Incase you are carrying your case on a ‘Floppy’ , Hompath advises you to transfer the files from a floppy to a computer / lap-top so that you don’t lose out on your cases because of floppy corruption.
You need not have ‘Classic 8’ installed on the system in order to run your presentation.Access the folder of the packed case,From there Double Click on ‘Unpack.exe’

You will be presented with dialog box where you can provide a file name and then proceed to ‘Unpack’ORYou can also use the ‘Browse’ to select a desired folder to unpack the contents.For instance here, the contents would be unpacked in C:/ unpack /case
Click on ‘Unpack’You will be presented with an appropriate message.
Now to finally open the case (as mentioned in the above message)First go to the folder where you have Unpacked the case (In this case it is c:\unpack\case\pack n go.exe)Double Click on Pack n go.Exe

You will be presented with all the cases that you have packed
Highlight the patient and Click on ‘OK’ to view the case and all its details.
Hompath Family:
This menu provides the user an easy access to other modules of the program like ‘Archives’, ‘HomUtil’ Tresorie' ‘Links Tresorie’ ‘Case Analysis’, etc.
Click on any of the modules to directly jump to that module of the Classic 8.
Window
This option displays when "screens are open” or activated.
The menu contains options like 'Cascade', 'Tile' and 'Arrange Icons'.
The 'Cascade' option is used to cascade that is to reduce the window size . The 'Tile' option is used to divide the window in tiles.The 'New Window' option is used to open a new window.
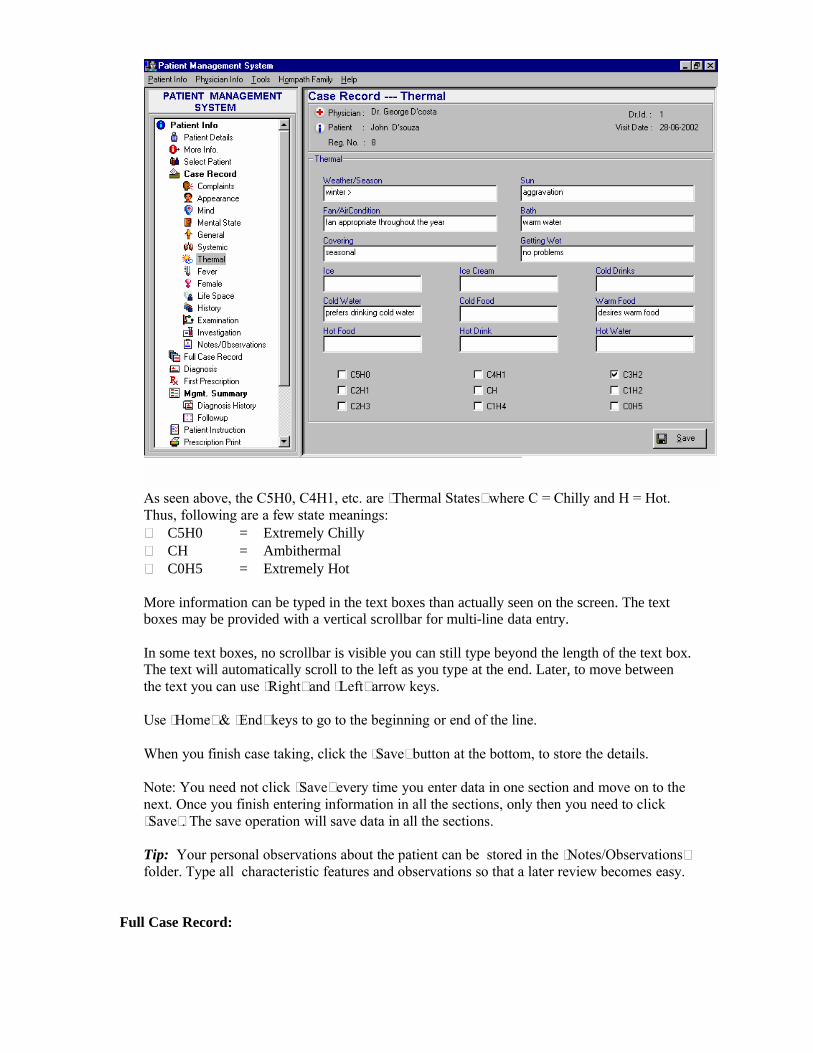
As seen above, the C5H0, C4H1, etc. are ‘Thermal States’ where C = Chilly and H = Hot. Thus, following are a few state meanings: C5H0 = Extremely Chilly CH = Ambithermal C0H5 = Extremely Hot
More information can be typed in the text boxes than actually seen on the screen. The text boxes may be provided with a vertical scrollbar for multi-line data entry.
In some text boxes, no scrollbar is visible you can still type beyond the length of the text box. The text will automatically scroll to the left as you type at the end. Later, to move between the text you can use ‘Right’ and ‘Left’ arrow keys.
Use ‘Home’ & ‘End’ keys to go to the beginning or end of the line.
When you finish case taking, click the ‘Save’ button at the bottom, to store the details.
Note: You need not click ‘Save’ every time you enter data in one section and move on to the next. Once you finish entering information in all the sections, only then you need to click ‘Save’. The save operation will save data in all the sections.
Tip: Your personal observations about the patient can be stored in the ‘Notes/Observations’ folder. Type all characteristic features and observations so that a later review becomes easy.
Full Case Record:

Click on any of the modules from the ‘PMS’ to directly open that module to work on it.


![SAP HowTo Guide - Unlocking User SAPStar [User Guide]](https://static.fdocuments.net/doc/165x107/544ac849b1af9f7c4f8b4bd1/sap-howto-guide-unlocking-user-sapstar-user-guide.jpg)