Analog Signal Capture Using FPGA and USB Interface Robert C DeMott II Jeremy A Cooper.
USB Capture Plus User Manual
Revised on 17/08/2017

Content 1 Function of the Interfaces ............................................................................................... 1
1.1 USB Capture HDMI Plus ........................................................................................... 1
1.2 USB Capture SDI Plus ............................................................................................... 1
1.3 USB Capture DVI Plus ............................................................................................... 2
2 Status of the Indicator Light ........................................................................................... 3
3 System Device Display .................................................................................................... 3
3.1 How to Find the System Device ............................................................................... 3
Windows ...................................................................................................................... 3
Linux ............................................................................................................................. 3
Mac .............................................................................................................................. 4
3.2 Description of Adding Device (Windows OS) ......................................................... 4
4 Typical Solutions for USB Capture Devices ................................................................... 5
4.1 Typical solutions for USB Capture HDMI Plus ........................................................ 5
Capture signal from camera / game console / video player / another computer . 5
Capture the signal of PC itself ................................................................................... 7
Solution A .................................................................................................................... 7
Solution B .................................................................................................................... 9
Solution C ................................................................................................................. 10
Solution D ................................................................................................................. 11
4.2 Typical solution for USB Capture SDI Plus .......................................................... 13
Capture signal from camera / professional video equipment .............................. 13
4.3 Typical solutions for USB Capture DVI Plus ........................................................ 14
Capture signal from camera / professional equipment / another computer via DVI cable ................................................................................................................... 14
Capture signal from camera / other professional equipment via HDMI cable ... 14
5 FAQ ................................................................................................................................ 14

1 / 18
1 Function of the Interfaces
1.1 USB Capture HDMI Plus INPUT: The input interface of HDMI signal. Support up to “4096x2160 4:4:4/4:2:2 30fps” or “4096x2160 4:2:0 60fps”
LOOP THRU: The loop through interface. The received HDMI signal will be sent to the other device without being processed.
Headphones: The headphone interface, through which source audio or audio from the computer can be monitored.
Mic: The microphone interface, through which voice can be recorded.
USB: The USB interface, through which the capture device can be connected to the USB 3.0 interface on the computer.
1.2 USB Capture SDI Plus INPUT: The input interface of SDI signal.
LOOP THRU: The loop through interface. The received SDI signal will be sent to the other device without being processed.
Line Out : Output the SDI embedded audio to other devices.
Line In : Connect to external audio device to add an audio input.
USB: The USB interface, by which the capture device can be connected to the USB 3.0 interface on the computer.

2 / 18
1.3 USB Capture DVI Plus 1. INPUT: The input interface of HDMI, VGA, component (YPbPr), composite (CVBS)
and YC(S-video) signal.
Line Out : Output the HDMI audio to other devices.
Line In : Connect to external audio device to add an audio input. USB: The
USB interface, by which the capture device can be connected to the USB 3.0 interface on the computer.

3 / 18
2 Status of the Indicator Light
On: The indicator light will be on steadily when a signal source is connected.
Breathing: The indicator light is pulsing slowly when there is no signal, the signal cannot be locked or supported.
Flashing: The indicator light flashes when there is a problem with the device.
3 System Device Display
3.1 How to Find the System Device
Windows Select System Tools - Device Manager under the Computer Manager.
Select Imaging Devices to view the video device name.
Select Sound, Video and Game controllers to view the audio device name.
Linux Enter the lshw command in the terminal interface.
Find USB in the displayed information, then you can see a USB device with the vendor attribute being “Magewell” as below.
4 / 18
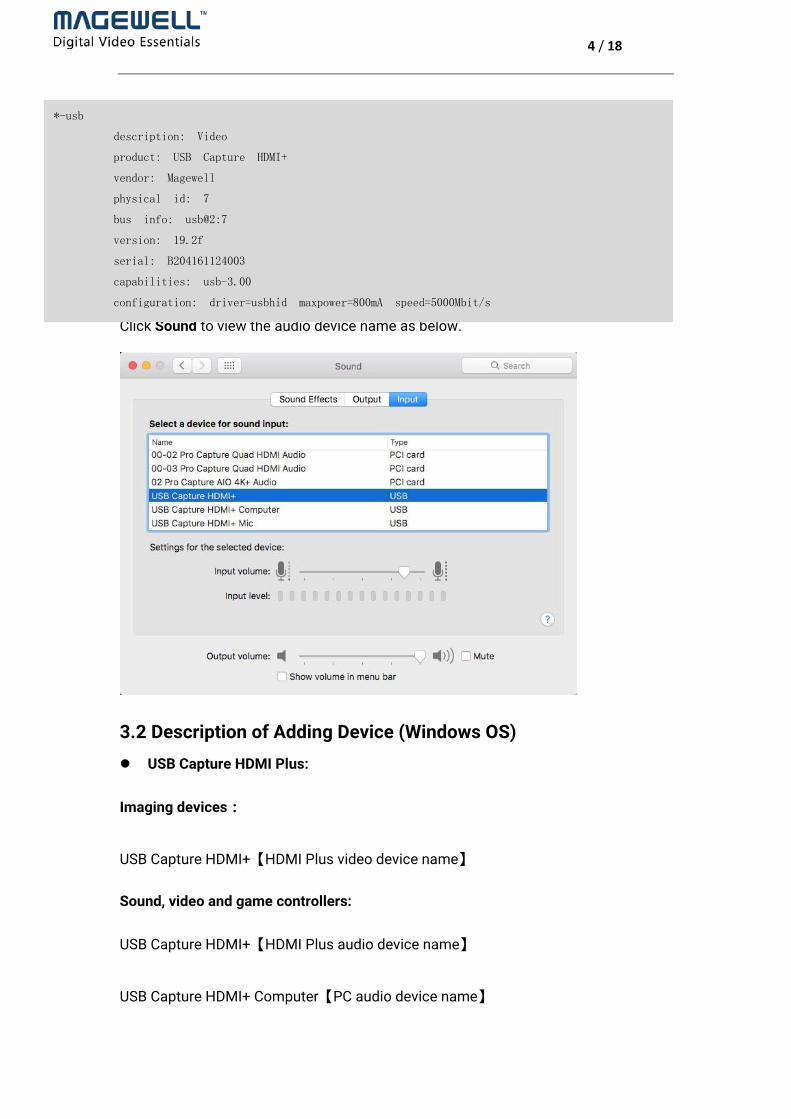
Mac Click System to open the System Preferences interface.
Click Sound to view the audio device name as below.
3.2 Description of Adding Device (Windows OS) USB Capture HDMI Plus:
Imaging devices:
USB Capture HDMI+【HDMI Plus video device name】
Sound, video and game controllers:
USB Capture HDMI+【HDMI Plus audio device name】
USB Capture HDMI+ Computer【PC audio device name】
*-usb
description: Video
product: USB Capture HDMI+
vendor: Magewell
physical id: 7
bus info: usb@2:7
version: 19.2f
serial: B204161124003
capabilities: usb-3.00
configuration: driver=usbhid maxpower=800mA speed=5000Mbit/s
5 / 18
USB Capture HDMI+ Mic【Microphone audio device name】
USB Capture SDI Plus:
Imaging devices:
USB Capture SDI+【SDI Plus video device name】
Sound, video and game controllers:
USB Capture SDI+【SDI Plus audio device name】
USB Capture DVI Plus:
Imaging devices:
USB Capture DVI+【DVI Plus video device name】
Sound, video and game controllers:
USB Capture DVI+【DVI Plus audio device name】
4 Typical Solutions for USB Capture Devices
4.1 Typical solutions for USB Capture HDMI Plus
Capture signal from camera / game console / video player / another computer 1. Capturing: Connect the HDMI connector of the game console / video player to
the “INPUT” interface of the USB Capture HDMI Plus via a HDMI cable.
2. Loop Through: Connect the LOOP THRU output interface to the display device (e.g. monitor, TV) via a HDMI cable. Please refer to the diagram below.

6 / 18
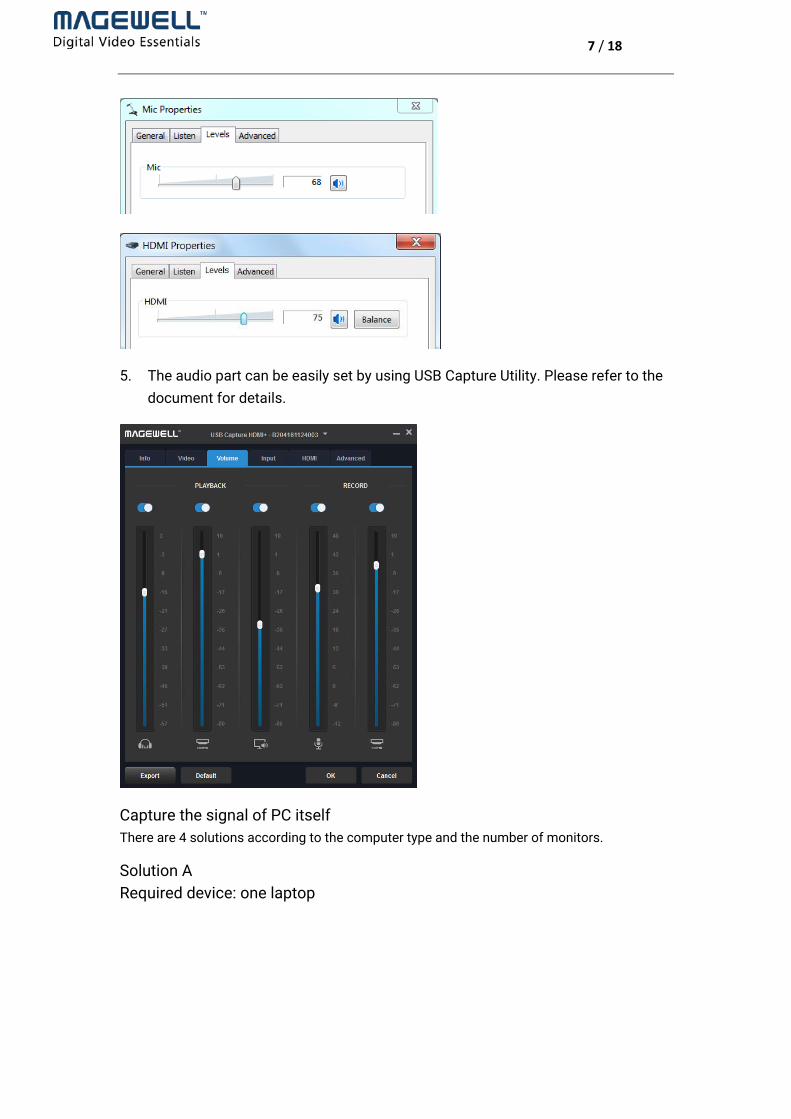
3. Volume adjustment for playback device: Enter the system sound playback device interface (Start Menu>>Control Panel>>Hardware and Sound>>Sound>>Change system sounds>>Playback). Select “Headphones” and click the “Properties” button to enter the property interface. Enter the “Levels” tab to adjust volumes. “Headphones” controls the overall volume, “HDMI” controls the audio volume of HDMI signal source and “Computer” controls the computer volume. You can drag the scroll bar to adjust the volume level or click the speaker icon to mute/enable the volume.
4. Volume adjustment for recording device: Enter the system sound recording device interface (Start Menu>>Control Panel>>Hardware and Sound>>Sound>>Change system sounds>>Recording). Select “Mic” or “HDMI” and click the “Properties” button to enter the property interface. Enter the “Levels” tab to adjust volumes. You can drag the scroll bar to adjust the volume or click the speaker icon to mute /enable the volume. There is no need to use the recording device in the solution.
7 / 18
5. The audio part can be easily set by using USB Capture Utility. Please refer to the document for details.
Capture the signal of PC itself There are 4 solutions according to the computer type and the number of monitors.
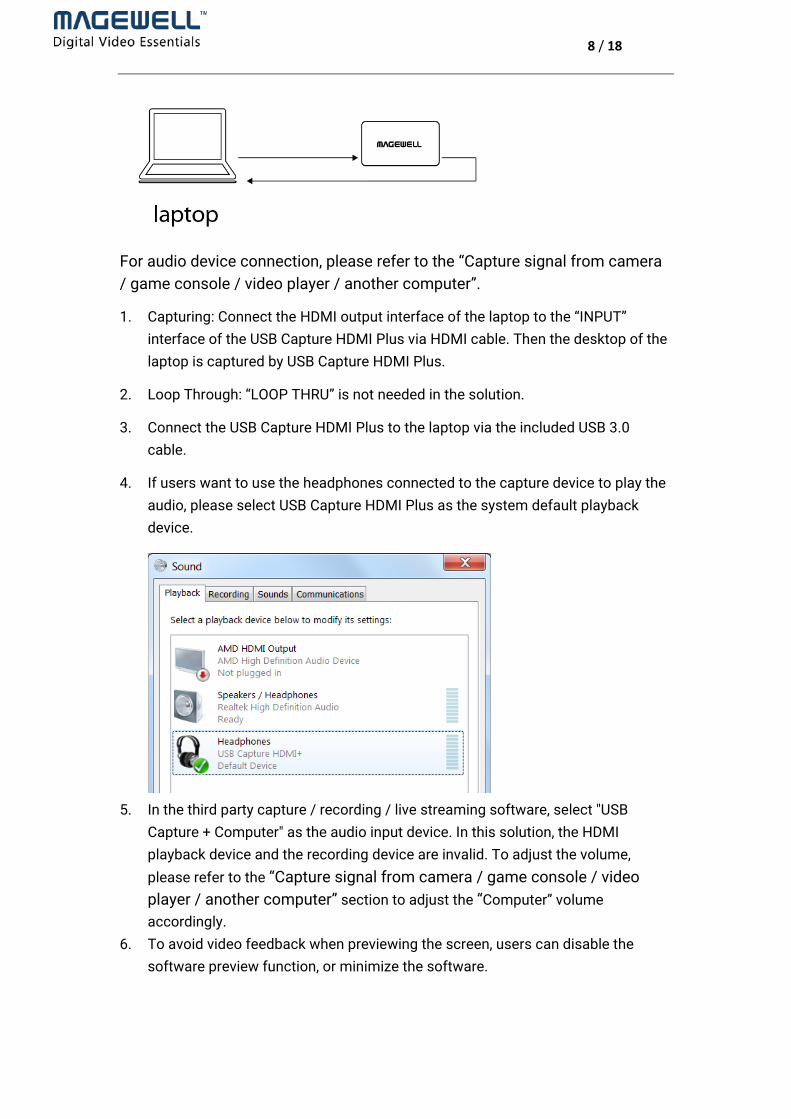
Solution A Required device: one laptop
8 / 18
For audio device connection, please refer to the “Capture signal from camera / game console / video player / another computer”.
1. Capturing: Connect the HDMI output interface of the laptop to the “INPUT” interface of the USB Capture HDMI Plus via HDMI cable. Then the desktop of the laptop is captured by USB Capture HDMI Plus.
2. Loop Through: “LOOP THRU” is not needed in the solution.
3. Connect the USB Capture HDMI Plus to the laptop via the included USB 3.0 cable.
4. If users want to use the headphones connected to the capture device to play the audio, please select USB Capture HDMI Plus as the system default playback device.
5. In the third party capture / recording / live streaming software, select "USB
Capture + Computer" as the audio input device. In this solution, the HDMI playback device and the recording device are invalid. To adjust the volume, please refer to the “Capture signal from camera / game console / video player / another computer” section to adjust the “Computer” volume accordingly.
6. To avoid video feedback when previewing the screen, users can disable the software preview function, or minimize the software.

9 / 18
Solution B Required device: one laptop, one monitor
1. Capturing: Connect the graphics output interface of the laptop to the “INPUT” interface of the USB Capture HDMI Plus via HDMI cable. Then the desktop of the laptop is captured by USB Capture HDMI Plus.
2. Loop Through: Connect the monitor to the “LOOP THRU” interface of the capture device to control the third party software or display any content that does not need to be captured.
3. Connect the USB Capture HDMI Plus to the laptop via the included USB 3.0 cable.
4. If users want to use the headphones connected to the capture device to play the audio, please select USB Capture HDMI Plus as the system default playback device.

10 / 18
5. In the third party capture / recording / live streaming software, select "USB Capture + Computer" as the audio input device. In this solution, the HDMI playback device and the recording device are invalid. To adjust the volume, please refer to the“Capture video and audio information of the camera / game console / video player / another computer” section to adjust the corresponding “Computer” and “Mic” volume.
6. To avoid video feedback when previewing the screen, users can disable the software preview function, or minimize the software.
Solution C Required device: one desktop computer, one monitor
1. Capturing: Connect the graphics output interface of the desktop computer to the “INPUT” interface of the USB Capture HDMI Plus via a HDMI cable.
11 / 18
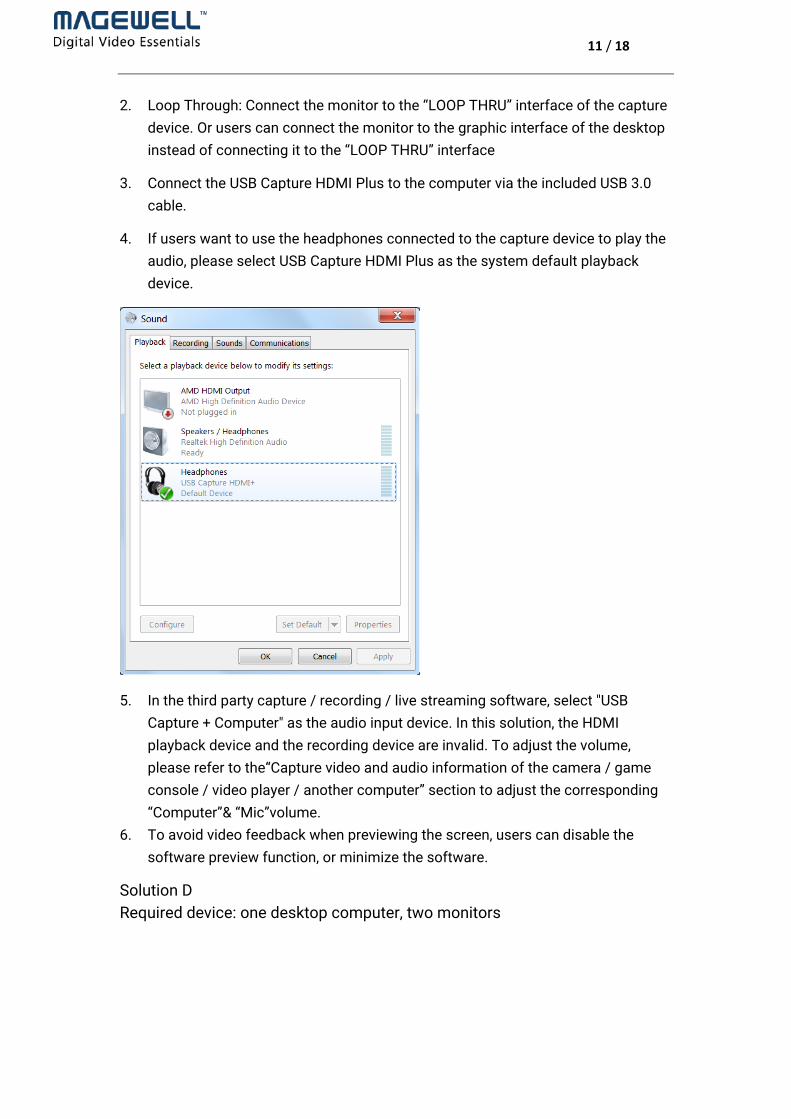
2. Loop Through: Connect the monitor to the “LOOP THRU” interface of the capture device. Or users can connect the monitor to the graphic interface of the desktop instead of connecting it to the “LOOP THRU” interface
3. Connect the USB Capture HDMI Plus to the computer via the included USB 3.0 cable.
4. If users want to use the headphones connected to the capture device to play the audio, please select USB Capture HDMI Plus as the system default playback device.
5. In the third party capture / recording / live streaming software, select "USB Capture + Computer" as the audio input device. In this solution, the HDMI playback device and the recording device are invalid. To adjust the volume, please refer to the“Capture video and audio information of the camera / game console / video player / another computer” section to adjust the corresponding “Computer”& “Mic”volume.
6. To avoid video feedback when previewing the screen, users can disable the software preview function, or minimize the software.
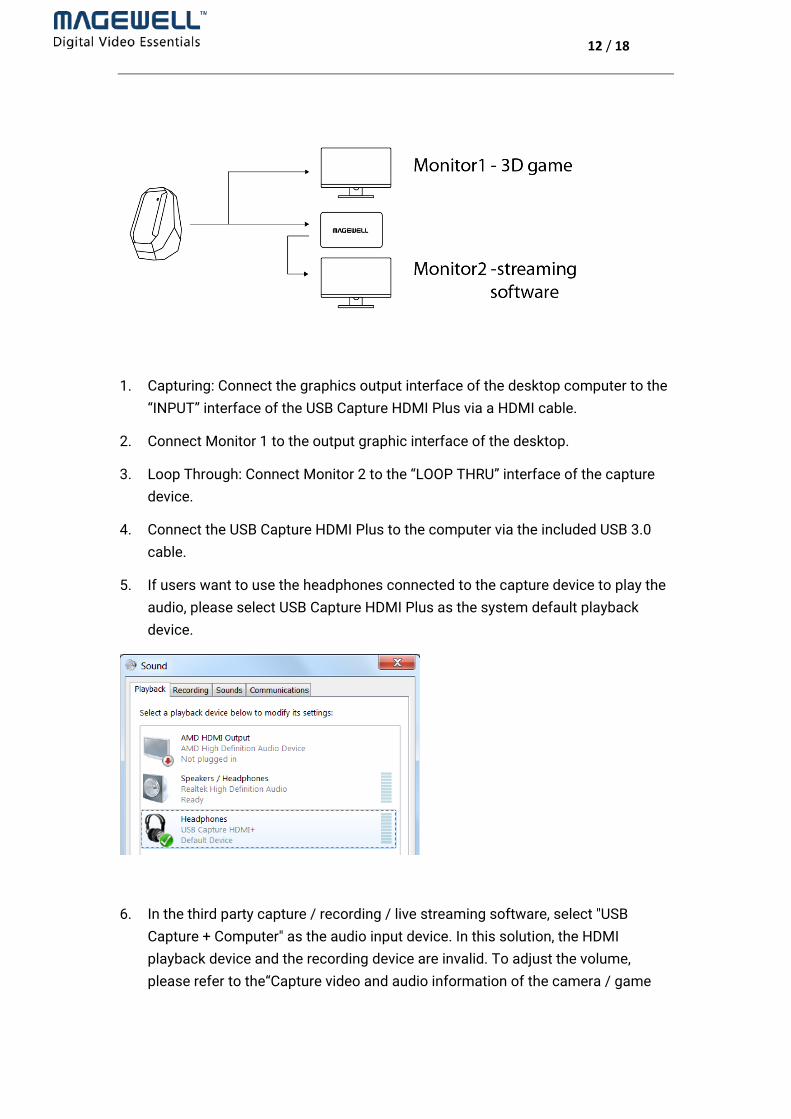
Solution D Required device: one desktop computer, two monitors
12 / 18
1. Capturing: Connect the graphics output interface of the desktop computer to the “INPUT” interface of the USB Capture HDMI Plus via a HDMI cable.
2. Connect Monitor 1 to the output graphic interface of the desktop.
3. Loop Through: Connect Monitor 2 to the “LOOP THRU” interface of the capture device.
4. Connect the USB Capture HDMI Plus to the computer via the included USB 3.0 cable.
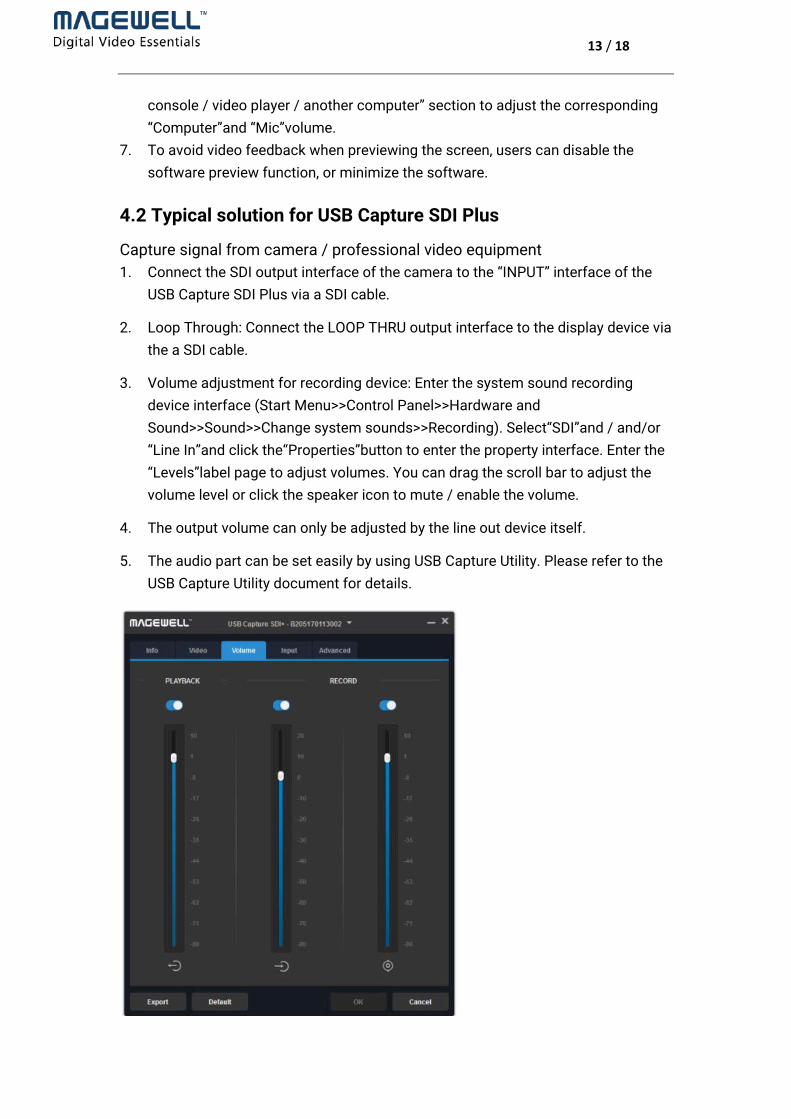
5. If users want to use the headphones connected to the capture device to play the audio, please select USB Capture HDMI Plus as the system default playback device.
6. In the third party capture / recording / live streaming software, select "USB Capture + Computer" as the audio input device. In this solution, the HDMI playback device and the recording device are invalid. To adjust the volume, please refer to the“Capture video and audio information of the camera / game
13 / 18
console / video player / another computer” section to adjust the corresponding “Computer”and “Mic”volume.
7. To avoid video feedback when previewing the screen, users can disable the software preview function, or minimize the software.
4.2 Typical solution for USB Capture SDI Plus
Capture signal from camera / professional video equipment 1. Connect the SDI output interface of the camera to the “INPUT” interface of the
USB Capture SDI Plus via a SDI cable.
2. Loop Through: Connect the LOOP THRU output interface to the display device via the a SDI cable.
3. Volume adjustment for recording device: Enter the system sound recording device interface (Start Menu>>Control Panel>>Hardware and Sound>>Sound>>Change system sounds>>Recording). Select“SDI”and / and/or “Line In”and click the“Properties”button to enter the property interface. Enter the “Levels”label page to adjust volumes. You can drag the scroll bar to adjust the volume level or click the speaker icon to mute / enable the volume.
4. The output volume can only be adjusted by the line out device itself.
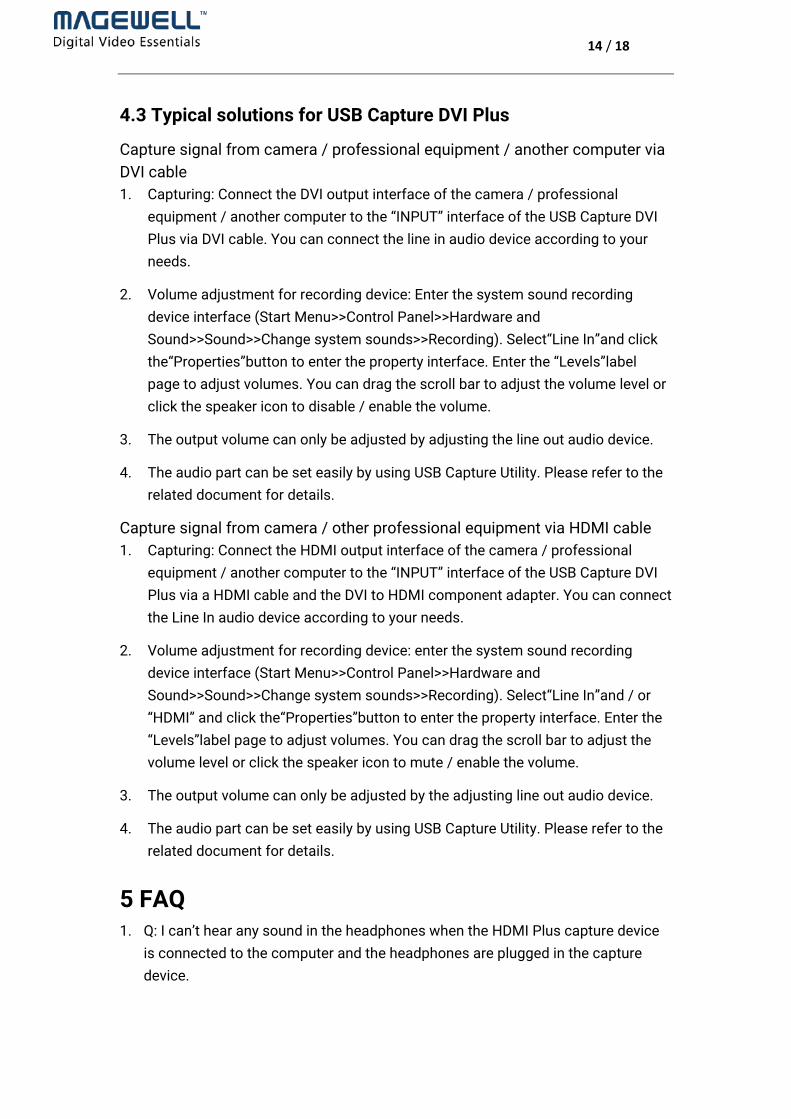
5. The audio part can be set easily by using USB Capture Utility. Please refer to the USB Capture Utility document for details.
14 / 18
4.3 Typical solutions for USB Capture DVI Plus
Capture signal from camera / professional equipment / another computer via DVI cable 1. Capturing: Connect the DVI output interface of the camera / professional
equipment / another computer to the “INPUT” interface of the USB Capture DVI Plus via DVI cable. You can connect the line in audio device according to your needs.
2. Volume adjustment for recording device: Enter the system sound recording device interface (Start Menu>>Control Panel>>Hardware and Sound>>Sound>>Change system sounds>>Recording). Select“Line In”and click the“Properties”button to enter the property interface. Enter the “Levels”label page to adjust volumes. You can drag the scroll bar to adjust the volume level or click the speaker icon to disable / enable the volume.
3. The output volume can only be adjusted by adjusting the line out audio device.
4. The audio part can be set easily by using USB Capture Utility. Please refer to the related document for details.
Capture signal from camera / other professional equipment via HDMI cable 1. Capturing: Connect the HDMI output interface of the camera / professional
equipment / another computer to the “INPUT” interface of the USB Capture DVI Plus via a HDMI cable and the DVI to HDMI component adapter. You can connect the Line In audio device according to your needs.
2. Volume adjustment for recording device: enter the system sound recording device interface (Start Menu>>Control Panel>>Hardware and Sound>>Sound>>Change system sounds>>Recording). Select“Line In”and / or “HDMI” and click the“Properties”button to enter the property interface. Enter the “Levels”label page to adjust volumes. You can drag the scroll bar to adjust the volume level or click the speaker icon to mute / enable the volume.
3. The output volume can only be adjusted by the adjusting line out audio device.
4. The audio part can be set easily by using USB Capture Utility. Please refer to the related document for details.
5 FAQ 1. Q: I can’t hear any sound in the headphones when the HDMI Plus capture device
is connected to the computer and the headphones are plugged in the capture device.

15 / 18
A: Enter the system sound playback device interface (Start Menu>>Control Panel>>Hardware and Sound>>Sound>>Change system sounds>>Playback). Check if the Headphones is ticked. If not, right click the device and select “Set Default” and “Set as the default communication device”.
2. Q: How to use the computer speakers to play the captured sound after capture device is connected? A: Set the audio card as the default device in the "Playback device".
3. Q: How to solve the problem that the captured image is black when the video is captured from PS4 and PS4 Pro? A: Please disable the HDCP function of the game console, otherwise the capture device cannot work.
4. Q: The screen shows “Unsupported signal” or flashes when I move or touch the capture device. A: Please use a new and high-quality HDMI cable, or the included cable of the TV / game console.
5. Q: When using a cable which is not the included Magewell USB 3.0 cable, signals cannot be captured. A: The USB 3.0 cable of USB Capture Plus is customized by Magewell, and cannot be replaced with any other similar cables in the market. For purchase of extra cables, please contact [email protected].
6. Q: Will it affect the capture quality and the service life of the capture device if the shell temperature is high when the device is working? A: The capture device uses a metal case and a special heat dissipation design, which can effectively dissipate the heat generated by the chip, so the housing temperature may be high. As long as the user's operating environment temperature is between 0 to 50 ℃, the capture quality and service life of the device will not be affected regardless of the shell temperature.
7. Q: How to resolve the problem of dropping frames or the actual capturing frame rate cannot reach the set format of 1080p60? A: First, make sure that the capture device is connected to the USB 3.0 interface on the computer. If it is connected to USB 2.0 interface, the USB bandwidth will be insufficient, limiting the frame rate to be lower than 60 fps. Second, please try to reduce the amount of USB devices simultaneously connected to the computer, because other devices will share the bandwidth leaving insufficient bandwidth for the capture device.
8. Q: I use USB Capture DVI Plus to capture the image and audio of my device via a DVI data cable, but can only capture the video without audio. A: DVI signal doesn’t have embedded audio. If you want to capture the video and audio, you can convert the DVI signal to HDMI signal.

16 / 18