Updated 5/9/2018 3:44:00 PM Quick Start Guide: Creating a ...
14
Service Area Map Quick Start Guide 1 Updated 5/9/2018 3:44:00 PM Quick Start Guide: Creating a Service Area Map and Data Table Using the UDS Mapper Introduction There are several different opportunities offered by the Bureau of Primary Health Care (BPHC) that require the inclusion of a service area map and data table that can be made using the UDS Mapper. This document will walk you through the creation of a service area map and data table for these opportunities. Rather than provide detailed instructions on how to use each tool in the UDS Mapper, links to user support tools that provide these details are included. Throughout this document, examples shown are for the creation of a map for Change in Scope. For detailed instructions, see: How to Create a Service Area Map and Data Table Using the UDS Mapper Your final output should be a map and data table. The map should include: Service area: The affected area (service area) must be highlighted on the map New/proposed location: The location(s) for which you are seeking funding, designation or change must be included Other providers in the area: The locations of other providers in the affected AND adjacent areas must be included; which other providers need to be included varies by opportunity, so please read all guidance from BPHC carefully when creating your service area map This document lives on the UDS Mapper site: https://www.udsmapper.org in the Tutorials section. Please visit that page to see if this document has been recently updated. If you need assistance, please contact the UDS Mapper support team by going to the UDS Mapper site to live chat with us, or send us an email.
Transcript of Updated 5/9/2018 3:44:00 PM Quick Start Guide: Creating a ...
Service Area Map Quick Start Guide 1
Updated 5/9/2018 3:44:00 PM
Quick Start Guide: Creating a Service Area Map and Data Table Using the UDS Mapper
Introduction
There are several different opportunities offered by the Bureau of Primary Health Care (BPHC) that require the inclusion of a service area map and data table that can be made using the UDS Mapper.
This document will walk you through the creation of a service area map and data table for these opportunities. Rather than provide detailed instructions on how to use each tool in the UDS Mapper, links to user support tools that provide these details are included. Throughout this document, examples shown are for the creation of a map for Change in Scope.
For detailed instructions, see:
How to Create a Service Area Map and Data Table Using the UDS Mapper
Your final output should be a map and data table. The map should include:
Service area: The affected area (service area) must be highlighted on the map New/proposed location: The location(s) for which you are seeking funding,
designation or change must be included Other providers in the area: The locations of other providers in the affected AND
adjacent areas must be included; which other providers need to be included varies by opportunity, so please read all guidance from BPHC carefully when creating your service area map
This document lives on the UDS Mapper site: https://www.udsmapper.org in the Tutorials section. Please visit that page to see if this document has been recently updated. If you need assistance, please contact the UDS Mapper support team by going to the UDS Mapper site to live chat with us, or send us an email.

Service Area Map Quick Start Guide 2
Basic UDS Mapper Functionalities
Accessing and Registering for the UDS Mapper Anyone can use the UDS Mapper. The UDS Mapper is free and open to the public. You simply need to register. Go to www.udsmapper.org to register and begin your service area map.
See these user support slide decks for help with this step:
How to Access the UDS Mapper
How to Reset Your Password
Welcome Screen When you first log in, you will be greeted by a Welcome screen. Towards the bottom of the Welcome screen you will see a Wizard that will help users create a service area map for various opportunities from BPHC. It is important to note that the Wizard is optional. If you would like to create your map manually, close the Welcome screen.
See these user support slide decks for help with this step:
How to Use the Wizard in the UDS Mapper
Saving Maps/ Progress There is no formal saving capability in the UDS Mapper but you can still stop what you are doing in the UDS Mapper and come back to it later. In general, if caching is allowed in your browser and you do not reset your map, the map will be in the same state as it was when you last used it the next time you access the UDS Mapper on the same machine in the same browser. Otherwise you can save your map using the Share or Print tools.
See these user support slide decks for help with this step:
How to Save or Print in the UDS Mapper

Service Area Map Quick Start Guide 3
Adjusting the Map View, including Zooming When looking at the map, you may need to zoom in or out or otherwise move the map around. These functionalities are particularly important when you are creating and finalizing your service area map. You can adjust the map view using the search box or manually zooming and panning the map.
See these user support slide decks for help with this step:
How to Navigate to a Location on the Map in the UDS Mapper
At this point, your map should look like this:

Service Area Map Quick Start Guide 4
Highlighting Your Service Area
For service area maps, you must select the ZIP Code Tabulation Areas (ZCTAs) that make up or approximate your service area. If you define your service area with a different geography, such as a County, you should select the ZCTAs that best approximate that geography.
We do not recommend adding additional boundaries that do not help you tell your story. If your service area is not based on ZCTAs, you may want to turn on those other boundaries just to help you select the proper ZCTAs and then turn them off afterwards.
See these user support slide decks for help with this step:
How to Use the Explore Service Area tool by Geography
How to Change the Background of Your Map or Add Other Boundaries
How to Use the ZIP Code to ZCTA Crosswalk
At this point, your map should look like this:
Service Area Map Quick Start Guide 5
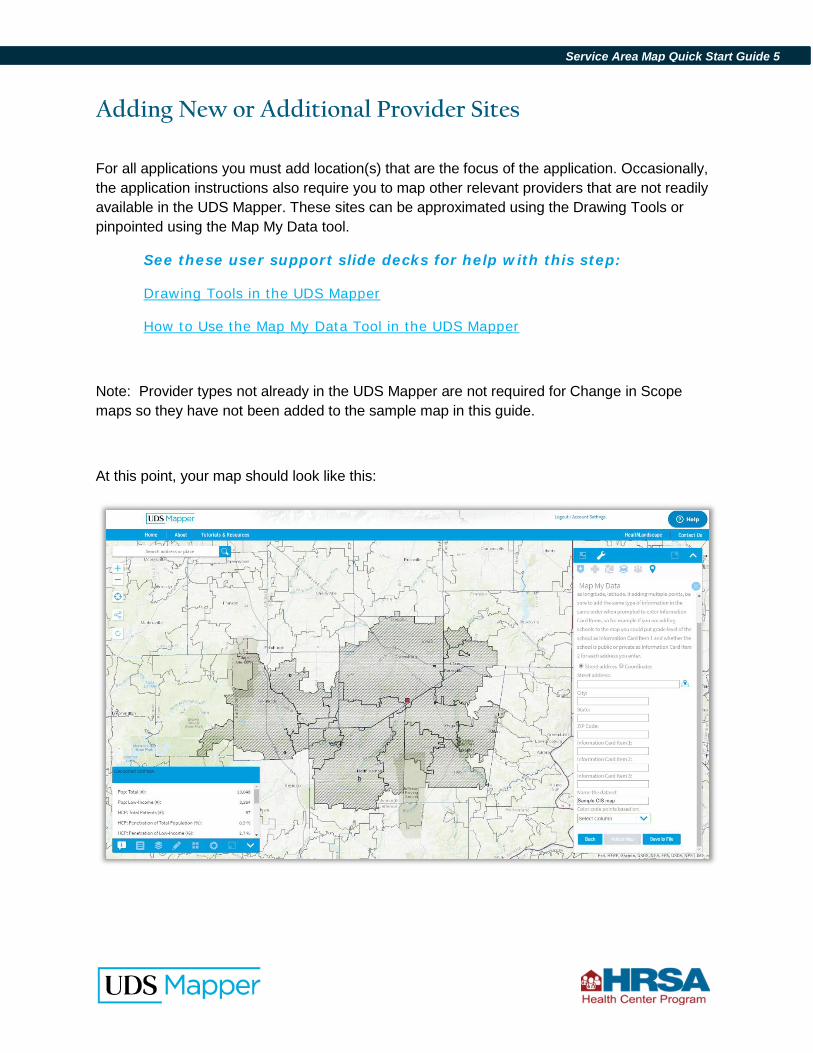
Adding New or Additional Provider Sites
For all applications you must add location(s) that are the focus of the application. Occasionally, the application instructions also require you to map other relevant providers that are not readily available in the UDS Mapper. These sites can be approximated using the Drawing Tools or pinpointed using the Map My Data tool.
See these user support slide decks for help with this step:
Drawing Tools in the UDS Mapper
How to Use the Map My Data Tool in the UDS Mapper
Note: Provider types not already in the UDS Mapper are not required for Change in Scope maps so they have not been added to the sample map in this guide.
At this point, your map should look like this:

Service Area Map Quick Start Guide 6
Adding Health Care Facilities Available in the UDS Mapper
Every service area map must include nearby health care facilities. Many of the required types of providers are available in the UDS Mapper. These layers should be turned on to make these providers visible. Even if there are none of these provider types in your area, be sure to leave these layers on so that they are listed in the Legend. That will positively indicate that there are none of these types of providers in the area.
See these user support slide decks for help with this step:
How to Add Health Related Facilities on the Map
At this point, your map should look like this:

Service Area Map Quick Start Guide 7
Using the Wizard
While there are individual tools that you can use to create your service area map, in 2018, a new tool launched in the UDS Mapper that consolidates the steps to starting a service area map. Even though this Wizard is one of the first things you will encounter in the UDS Mapper (it can be found at the bottom of the Welcome screen) we recommend that you close it when first learning to make your service area map so that you understand how a service area map is crafted. That way, you can better understand what each step does and know how to make changes to the map, if necessary.
Service area map requirements differ between the types of opportunities made available by BPHC. The Wizard has functionality to guide you through adding the required elements of your service area map for most of these opportunities.
See these user support slide decks for help with this step:
How to Use the Wizard in the UDS Mapper
How to Use the ZIP Code to ZCTA Crosswalk
This is the map created with the Wizard. Please compare it to the map on the previous page:

Service Area Map Quick Start Guide 8
Other Map Elements
The following map items are either not required on every map or are things we think you should consider when making your map.
Adding Medically Underserved Areas/Populations (MUA/P) Typically, service area maps for New Access Points, Service Area Competitions and Look-Alike designations require that you add MUA/Ps to your map. Read the instructions carefully to determine if this layer should be visible on your map.
See these user support slide decks for help with this step:
How to Change the Background of Your Map or Add Other Boundaries
Note: Medically Underserved Areas/Populations are not required for Change in Scope maps so they have not been added to the sample map in this guide.
Adding Labels Check the application instructions to determine which sites and areas must be labeled on the map (e.g., Health Center Program grantees/look-alikes, other providers, new access points, ZCTAs, MUA/Ps, etc.) Some of these may already be labeled well enough in the legend, including any points you added using the Map My Data tool, and if you color coded the points. For others that must be labeled, use the Drawing Tools.
HINT: When adding labels, switch to the Explore Health Related Facilities tool to ensure that you don’t accidentally select ZCTAs when adding your labels.
See these user support slide decks for help with this step:
Drawing Tools in the UDS Mapper
Selecting a Main Map Background The service area map instructions typically do not ask you to include a Main Map. Adding one may clutter your map, so we recommend you turn it off, if you have one turned on.
See these user support slide decks for help with this step:
How to Use the Main Maps Tool in the UDS Mapper

Service Area Map Quick Start Guide 9
At this point, your map should look like this:

Service Area Map Quick Start Guide 10
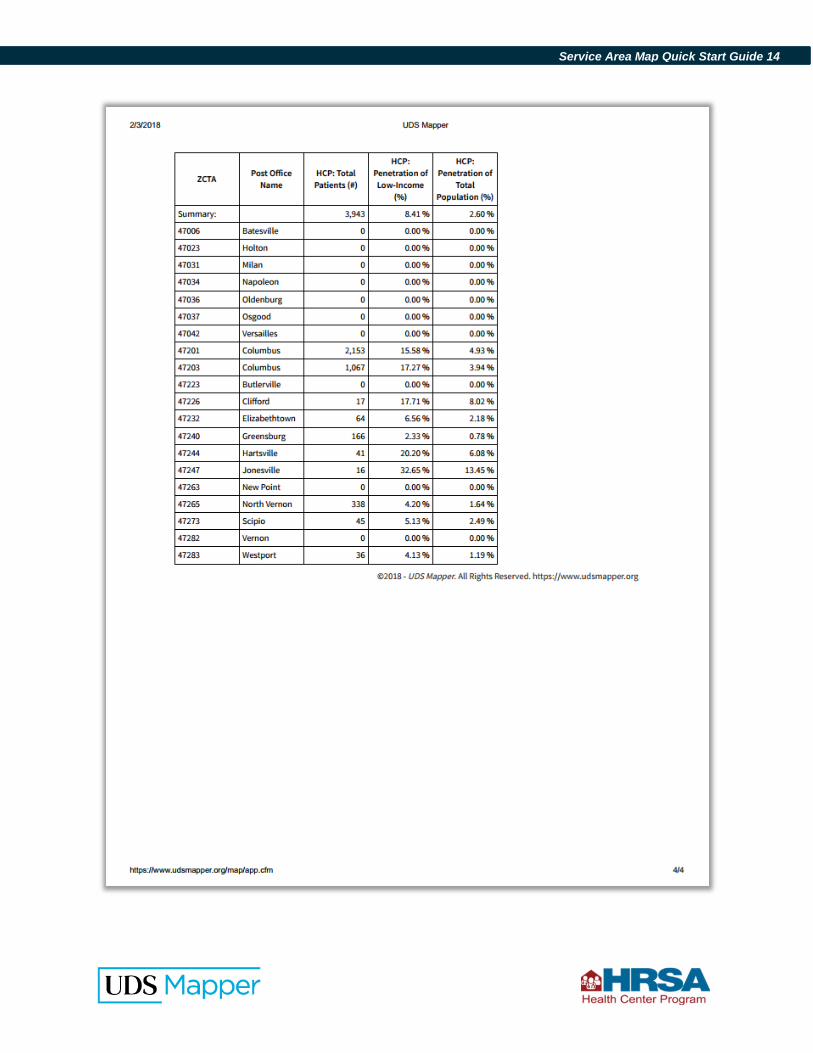
Creating a Data Table
By default, the UDS Mapper Data Table contains the information that is requested in the service area map instructions. These are the options included in the Standard UDS Mapper Report tab located at the bottom of the data table. Be sure that you have not accidentally turned off any of these options by checking that all the checkboxes are still checked. Also, be sure you have not accidentally turned on any additional data fields as these data are unnecessary and may muddle your submission; they may also push your report to multiple pages, which will count against page limits, if any for your application.
See these user support slide decks for help with this step:
How to Use the Data Table
Saving Your Completed Map and Data Table as a Document
To complete the map to include with your submission, print the map and data table.
See these user support slide decks for help with this step:
How to Save or Print in the UDS Mapper
Your final report should look something like this:

Service Area Map Quick Start Guide 11

Service Area Map Quick Start Guide 12

Service Area Map Quick Start Guide 13
Service Area Map Quick Start Guide 14