University of Hawaii EE 361L Project 2.1 and MPLab...
18
1 University of Hawaii EE 361L Project 2.1 and MPLab Quick Tutorial Last updated August 28, 2016 This is Lab 2.1 and an MPLab X Quick Tutorial. We first begin with the tutorial. This is a quick tutorial of programming the PIC 16F684A processor using the MPLab X Integrated Development Environment (IDE) v. 3.35. Programming the processor has the following steps: • Create a Project in MPLab X using the Project Wizard. Alternatively, you can create a new project using the New option or open an existing project. • Create, add, delete, and edit source code, and in this case the language will be C. • Compile the code using Build. • Simulate and debug the program. • Recompile the code using Rebuild. • Set up the processor chip on a protoboard. • Program the processor using Pickit 3. • Run the processor. You can get a copy of MPLab X for FREE. Go to the following web site and you will find a zipped version http://www.microchip.com/stellent/idcplg?IdcService=SS_GET_PAGE&nodeId=1406&dDocName=en019469& part=SW007002 The current version at the time of this writing is 3.35. This may be a newer version that the one we’ll use in the Holmes 451 lab room, but the operation should be about the same. Let the TA know if this is not the case. Contents 1 MPLab Tutorial .................................................................................................................................................................... 2 1.1 Create a Project ............................................................................................................................................................ 2 1.2 Create Source Code ...................................................................................................................................................... 5 1.3 Build, Simulate, and Rebuild ........................................................................................................................................ 6 4 Hardware Setup ................................................................................................................................................................ 12 5 Programming the PIC ........................................................................................................................................................ 16 6 Manuals and Tutorials in MPLAB X ................................................................................................................................... 17 7 Lab 2.1 Project .................................................................................................................................................................. 17 8. Circuit Diagram................................................................................................................................................................. 18
Transcript of University of Hawaii EE 361L Project 2.1 and MPLab...

1
University of Hawaii EE 361L Project 2.1 and MPLab Quick Tutorial Last updated August 28, 2016 This is Lab 2.1 and an MPLab X Quick Tutorial. We first begin with the tutorial. This is a quick tutorial of programming the PIC 16F684A processor using the MPLab X Integrated Development Environment (IDE) v. 3.35. Programming the processor has the following steps:
• Create a Project in MPLab X using the Project Wizard. Alternatively, you can create a new project using the New option or open an existing project.
• Create, add, delete, and edit source code, and in this case the language will be C. • Compile the code using Build. • Simulate and debug the program. • Recompile the code using Rebuild. • Set up the processor chip on a protoboard. • Program the processor using Pickit 3. • Run the processor.
You can get a copy of MPLab X for FREE. Go to the following web site and you will find a zipped version http://www.microchip.com/stellent/idcplg?IdcService=SS_GET_PAGE&nodeId=1406&dDocName=en019469&part=SW007002 The current version at the time of this writing is 3.35. This may be a newer version that the one we’ll use in the Holmes 451 lab room, but the operation should be about the same. Let the TA know if this is not the case.
Contents 1 MPLab Tutorial .................................................................................................................................................................... 2
1.1 Create a Project ............................................................................................................................................................ 2
1.2 Create Source Code ...................................................................................................................................................... 5
1.3 Build, Simulate, and Rebuild ........................................................................................................................................ 6
4 Hardware Setup ................................................................................................................................................................ 12
5 Programming the PIC ........................................................................................................................................................ 16
6 Manuals and Tutorials in MPLAB X ................................................................................................................................... 17
7 Lab 2.1 Project .................................................................................................................................................................. 17
8. Circuit Diagram ................................................................................................................................................................. 18

2
1 MPLab X Tutorial
1.1 Create a Project Open MPLAB X IDE v3.35
Go to File->New Project
Step 1: Select “Microchip Embedded” and “Standalone Project”. Click “Next”. Step 2: For the Family option, select “Mid-Range 8-bit MCUs”, then select PIC16F648A for the device, which is our processor. Click “Next”. For the “Select Header”, just skip this step and click “Next”. For the “Select Tool”, we will use PICkit3, click the “PICkit3”, and click “Next”. For the “Select Complier”, select XC8 Compiler. Step 3: For Create New Project File, browse and select a folder to store you files. For this tutorial, go to the Desktop (by going up folders). Then create a new folder, and give it a name such as EE361LMPLabTutorial. Go into the folder, then give the project file a name such as EE361LFirstProject and save. Note that the project folder will be given a suffix of “.X”. Step 4: Add any existing files to your project but currently you don’t have any so you can skip this step. Then you are Finished.

3

4

5
1.2 Create Source Code In one of the windows, you should see the project files: (Here a file testlab2.c is added to the project)
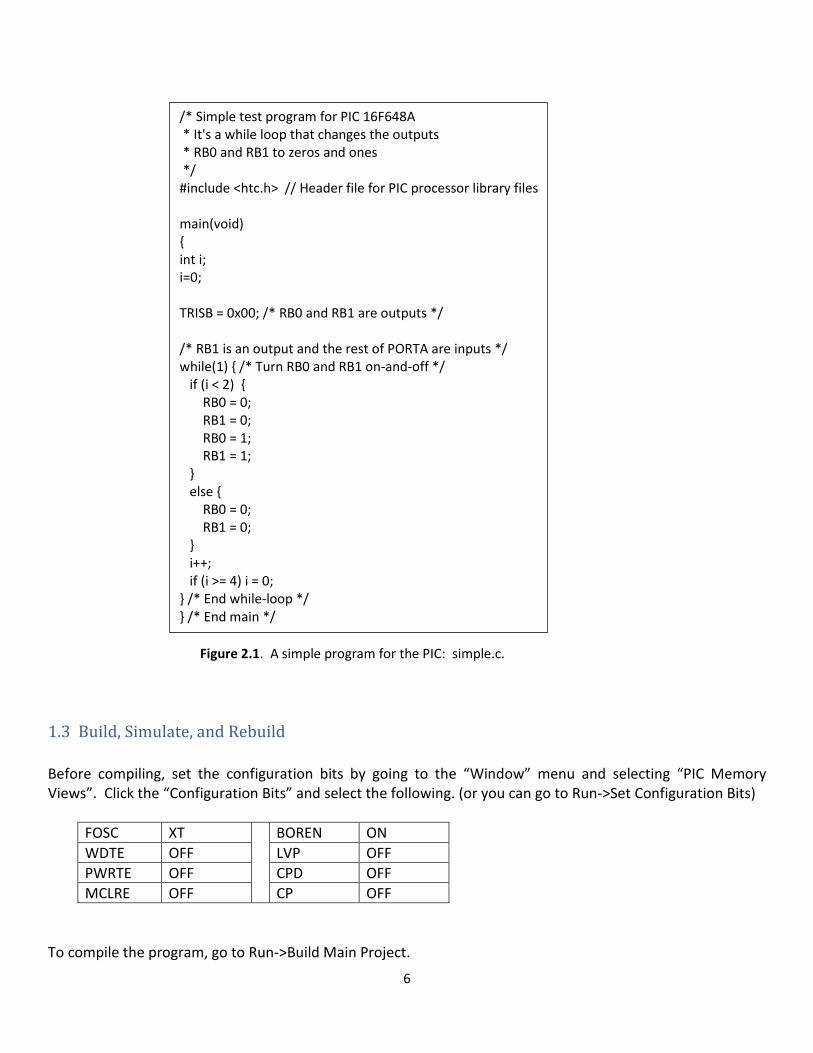
It is recommended you put your source files under the “Source Files”. To do so, just click the “Source Files” before you create a new file. After you create your file, it will be under the “Source Files”. If the file appears in other folders, just drag it to the target folder. You can add source files, which can be done in a number of ways. One way is to go to File->New File which will open a window. You can the language you will use for the new source file, such as C or C++. Type the simple program in Figure 2.1. To save the program, go to File->Save As. Then save it in your project folder as “simple.c”.
6
1.3 Build, Simulate, and Rebuild Before compiling, set the configuration bits by going to the “Window” menu and selecting “PIC Memory Views”. Click the “Configuration Bits” and select the following. (or you can go to Run->Set Configuration Bits)
FOSC XT BOREN ON WDTE OFF LVP OFF PWRTE OFF CPD OFF MCLRE OFF CP OFF
To compile the program, go to Run->Build Main Project.
/* Simple test program for PIC 16F648A * It's a while loop that changes the outputs * RB0 and RB1 to zeros and ones */ #include <htc.h> // Header file for PIC processor library files main(void) { int i; i=0; TRISB = 0x00; /* RB0 and RB1 are outputs */ /* RB1 is an output and the rest of PORTA are inputs */ while(1) { /* Turn RB0 and RB1 on-and-off */ if (i < 2) { RB0 = 0; RB1 = 0; RB0 = 1; RB1 = 1; } else { RB0 = 0; RB1 = 0; } i++; if (i >= 4) i = 0; } /* End while-loop */ } /* End main */
Figure 2.1. A simple program for the PIC: simple.c.

7
Note: please do not have more than 1 source file containing the main() function, otherwise you will get an error when compiling your code.
You can click the “Generate Source Code to Output” as in the figure. This will generate a set of macro definitions. You can copy the generated output and paste to the top of your source file (right after the line of “#include XXX”). To simulate the program, first, right click your project, or click the “File->Project Properties”. When we create the project, we select the “PICkit3”, now we select the “Simulator” option, then click “OK”. The MPLAB X Simulator is a software simulator even though it's listed under the “Hardware Tools”. Before we start the simulation, set up the following options: From the “Tools” pull down menu select “Options” Select the “Embedded icon” Select the “Generic Settings” tab Ensure the “Debug startup” is set to ‘Halt at Main’ You can reset the simulation with Debug-> Reset. There are a couple of options to run the simulation. Here’s the simplest. Go to Debug->Debug Main Project. This will start the simulator. If you have set up the options above, you will now halt at the location just beneath the “main” function. The current instruction is shown either as a green-arrow or some other highlight. To continue simulating one instruction at a time, keep pressing the F7. On the other hand, if you select Run, then the simulator will just run the program with the “Continue” icon (F5). To stop it, you can Halt. The simulation will often run too quickly for you to observe what’s going on. So single stepping is more useful in many cases. But try it to see what happens, you won’t break the machine. If you make changes to the source code, you can Rebuild rather than Build. There are different ways to watch the variable values of the simulation change over time. They can be found under the menu “Window->Debugging” and “Window->Simulator”. You can watch the PICs hardware (such as PORTB, RB0, and RB1) using the “Window->Simulator->Analyzer” and Special Function Registers. The Logic Analyzer will display the values as a graph over time (if you want to use this function, it is recommended to open the analyzer window before the simulation). Another way is “Window->Debugging ->Watches”. This opens a window where you can select the PIC hardware you would like to view (e.g., PORTB, TRISB) as well as variables from your program (e.g., the variable “i” in Figure 2.1). You can select two types of values: SFR

8
which are the registers in the PIC, and Add Symbol which are variables in your program such as “i”. See Figure 3.1 for an example snapshot of Watch. Note that in MPLAB X, variables near the executed line will be displayed in the “Variables” tab. To display all variables, you can press the icon next to the “Name” column. This will display all variables in the program.
Another window to trace your simulation is “Window->Debugging->Trace”. This will show the machine instructions executed and when they were executed (in CPU clock cycles). You can right click your project, then select “Properties”, select “Simulator” under the “Categories”, then select “Trace” under the “option categories” to enable the trace. Reset your program and single step. Observe how the values change. Now let’s change the simple.c program so that it accepts an input from port RB2, as shown in Figure 3.2 which also shows the modifications. Note that TRISB has to be changed so that the bit 2 is set to 1, indicating that RB2 is an input port. Recall that 0x04 in binary is 0000 0100. Also, the if-statement is changed so that it is conditioned on RB2. Thus, the program flow will depend on the value of RB2. To cause input changes to occur in the simulation, we use the “Window->Simulator->Stimulus” option that’s part of the Debugger. Selecting Stimulus will open a window, where you can control the input values to the PIC. Let’s have the input RB2 be initially zero. Select the tab Pin/Register Actions. There are two columns: the left corresponds to time and these values are in decimal (dec), and the right corresponds to the different pins and their values, which are in binary (bin). In the first row, under Time, enter 0, which indicates our values at the initial time 0. We can fill the row with different pins but in our case we’re only interested in RB2. Click the where it states “Click here to Add Signals”, and add RB2. Then enter the value 0 for the pin. Also, make sure that “Repeat” is disabled.
Figure 3.1. An example snapshot of the Watch window.

9
Select the Asynch tab. This allows you to change signals during simulation by the user input. For now, we’re interested in the Fire, PIN/FSR, and Action columns. In the first row, select RB2 under PIN/FSR. Then for action select Set High. Now, this row is set up so that when we click “Fire”, the RB2 pin will go high. Click the Apply button so that the Stimulate information is attached to your simulation.
Run the modified simple1.c program by single stepping. Run it through the while-loop a few times. Notice that RB2 is zero so that it executes the else-statement rather than the if-statement. You can also check the Watch window. Then click the Fire button in the Stimulate window. This will cause RB2 to change value the next time you single step. Now the if-statement is executed rather than the else-statement. You can also view the Logic Analyzer to see the signals varying over time. Figures 3.3 show snapshots of the two tabs of the Stimulus window.
/* Simple test program for PIC 16F648A * It's a while loop that changes the outputs * RB0 and RB1 to zeros and ones */ #include <htc.h> // Header file for PIC processor library files main(void) { int i; i=0; TRISB = 0x04; /* RB0 and RB1 are outputs */ /* RB1 is an output and the rest of PORTA are inputs */ while(1) { /* Turn RB0 and RB1 on-and-off */ if (RB2==1) { RB0 = 0; RB1 = 0; RB0 = 1; RB1 = 1; } else { RB0 = 0; RB1 = 0; } i++; if (i >= 4) i = 0; } /* End while-loop */ } /* End main */
Figure 3.2. Modified simple2.c that accepts input from RB2. The changes are highlighted in yellow.

10
You can also generate periodic signals from the Stimulus window by clicking the Repeat option. Then add signals so they change over time, each row being a different time. These input signals will repeat when the simulation is run. For more information about MPLAB X, select Help and under Tool Help Contents select the Simulator. This is a tutorial. You can go over the various chapters of the tutorial including the chapter on Using Stimulus.
Enclosed with this manual is a program testlab1.c that will have the PIC 16F648A control an LED at output port RB0. The LED will blink every half-second. You can simulate this program. However, single stepping isn’t as helpful because this program will run millions of instructions before any changes in the output RB0 occurs –
Figure 3.3. The Stimulus window: top is the Pin/Register and the bottom is Asynch.

11
very long delay loops. In this case, you should “Run” the program. Let it run for a while and then Halt. You can verify that the output is blinking by checking the Logic Analyzer. In the Analyzer, you must select the Channels to view – there’s a Channels button where you can choose RB0 to view. Actually, the blinking transitions take so long that you can see a square wave in the window of the Analyzer. Though you can see it transition from low to high or from high to low. Note: if you are going to download the compiled file to the PIC chip, please switch the setting from “Simulator” to “Pickit3”.

12
4 Hardware Setup Here are the parts that you should have:
• Pickit3 and USB connector (as shown in Fig. 4.1), which should be in a small plastic bag (snack size bag). Your group should pick up a bag. The bag should also contain some wires that are used to connect the Pickit3 with a protoboard.
• Protoboard • Parts kit, which should contain
o PIC 16F648A chip o LEDs o four MHz crystal oscillator (XTAL) o two 15-30 pf capacitors
Step 1. First go over Figures 4.1, 4.2, 4.3, and 4.4. Figure 4.1 shows the six connections of the Pickit3:
• VPP/MCLR • VDD • VSS • ICSPDAT/PGD • ICSPCLK/PGC • Auxiliary.
Figure 4.1. Pickit3 and its pin out.

13
Figure 4.2 has a typical set up to connect the PIC to Pickit 3, but the pinouts shown are not of the PIC 16F648A. The pinouts for the PIC 16F648A are shown in Figure 4.3. Note that ICSPDAT and ICSPCLK in Figure 4.2 correspond to PGD and PGC, respectively in Figure 4.3.
Figure 4.2. Typical set up for the Pickit 3 and the PIC processor, but not the correct pin numbers for 16F648A.
Figure 4.3. Pin out for the PIC 16F648A.

14
The following table explains how the Pickit3 should be connected to the PIC 16F648A.
Pickit3 Pins PIC 16F648A pins Pin 1 (VPP/MCLR) Pin 4 (RA5/MCLR/VPP) Pin 2 (VDD) Pin 14 (VDD) Pin 3 (VSS) Pin 5 (VSS) Pin 4 (ICSPDAT/PGD) Pin 13 (RB7/T1OSI/PGD) Pin 5 (ICSPCLK/PGC) Pin 12 (RS6/T1OSO/T1CKI/PGC) Pin 6 (AUX)
Here is a description of these pins:
• VPP/MCLR: Pin used to reset the PIC. “Reset” is 0v, while “run” is 5v. By connecting this to the PIC’s MCLR pin, the MPLAB software can control this pin, which means you can reset the PIC by the MPLAB software. Note that MCLR has an overbar in the documentation. This means that the pin is enabled with a low voltage. So a low voltage will reset the PIC, and a high voltage will allow the PIC to run.
• VDD: Voltage source. You can use this as the voltage source for the PIC. This can be controlled by the MPLAB software.
• VSS: Ground • PGD: Used to program the PIC. It is the data connection. • PGC: Used to program the PIC. It is the clock signal.
The Pickit3 and MPLab X allow in-circuit, serial programming (ICSP). This means that the Pickit3 can be attached to the PIC while the PIC is running. You can reprogram the PIC without removing it from the protoboard. Step 2 (Connecting Pickit3).
• Place a PIC 16F648A into the protoboard • Be sure that the Pickit3 is not powered, i.e., it’s USB connector is not connected to anything • Connect the Pickit3 to the PIC 16F648A according to the table above. Use the wires in the plastic bag.
These wires are slightly thicker than ordinary wires we use for protoboards because the Pickit3 connectors need slightly thicker wires.
Step 3 (Connecting crystal oscillator). Connect the PIC16F648A to the 4 MHz crystal oscillator (XTAL) as shown in Figure 4.4. In the figure, OSC1 and OSC2, are pins 16 and 15 of the PIC 16F648A (see Figure 4.3), respectively. Since we use 4MHz crystals, the mode should be “XT” (see Figure 4.4). The capacitors in the figure should be 15-30 pF but for this lab, we’ll forget about them. So instead of capacitors, we’ll leave it “open”. Also, we will not use the series resistor.

15
Step 4 (connect LED to port RB0) Connect an LED to port RB0 as shown in Figure 4.5. The LED has two leads
• Anode (long lead), which is connected to the higher voltage, and in our case RB0 • Cathode (short lead), which is connected to the lower voltage, and in our case Ground (GND) or 0 volts
Step 5 (Pickit3 to computer and power) Connect the Pickit 3 to your computer using the USB 2.0 port. Notes: For this project, you should be able to use the 5v and ground from the Pickit 3 to supply power and ground for your PIC and LED. If you do so, you may need to specify using Pickit 3 as power source in the IDE setting. Other projects may need a separate power supply but this project has few current draining components. As we have the DC power source available, you can use the source because it is more stable.
Figure 4.4. PIC’s configuration with the crystal oscillator.
RB0 (pin 6)
Ground (GND)
anode (long lead)
cathode (short lead)
Figure 4.5. PIC’s configuration with an LED.

16
5 Programming the PIC Programming can be done using the Programmer function in MPLAB X. Be sure that you select Pickit 3 as the programmer. Then Connect. This should check if the Pickit 3 and the PIC are connected properly.
Find the icon in the MPLAB X as shown in the figure . You can click it, then the source code will be built, and download to the microcontroller through Pickit3. Alternatively you can also click the little arrow, and then choose “Programmer To Go Pickit3 Main Project”, this will first build your source code, and then download to the Pickit3. If you are successful, you will see the figure as below:
Note the middle parts of the figure, it should demonstrate that “Target device PIC16F648A found”. If there is any error, double check your connection of the Pickit3 pins and the microcontroller pins. You may also see a message box as:
You can click “No”. In this way, the data in Pickit3 will be erased, and new data will be entered. When the code is downloaded to Pickit3, you will see the STATUS LED to be orange. When it returns to green, you can press the button on Pickit3, this will write the program to the microcontroller.

17
The LED should be blinking. Read the program testlab1.c if you haven’t already.
6 Manuals and Tutorials in MPLAB X MPLAB has manuals and tutorials that you may want to explore
• XC Manual: This is the manual for the C compiler and it can be found in the Debugger menu. Chapter 7 is useful because it gives library of available function calls and methods to set fuses and registers.
• MPLAB SIM Manual: This can be found in the Help menu. There is a tutorial to explain how to run a simulation. Most of you can follow much of this tutorial. It’s somewhat straight forward to follow if you’re familiar with microcontrollers.
• Other Manuals can be found in the Help menu too.
7 Lab 2.1 Project
Write a program for the PIC 16F648A so that RB0 and RB1 are two outputs that drive two LEDs, and RB2 is an input, which is connected to either 0v or 5v, for logic 0 or 1, respectively. When input RB2 is 0 then the LEDs blink on-and-off simultaneously every half-second. When input RB2 is 1 then the LEDs blink on-and-off every half-second but not together, i.e., when one LED is on the other is off. You can modify the program testlab1.c. Show your TA that it works. Include your code in your lab report. Comments: The MPLAB XC compiler does not appear to give good error messages. Error messages give the type of errors, which can be looked up in the XC compiler manual. It also appears to give the line number where the error occurred but doesn’t have a good way to jump to the error. One approach to finding the location of an error is commenting chunks of code out and compiling. Perhaps even to the point where your program is simply “main( ) { }”. When it finally compiles then you uncomment code until it doesn’t compile again. That will lead you to the location of the error. If you find a better way to find and correct compile errors, share them with your fellow students.

18
8. Circuit Diagram Extra page to draw your circuit diagram.