Unit IV- Advanced Features of ASP€¦ · Unit IV- Advanced Features of ASP.NET ... you can specify...
22
1 Unit IV- Advanced Features of ASP.NET Security in ASP.NET The most useful feature available in ASP.NET 3.5 is a suite of seven controls designed to simplify the applications that authenticate users. In Visual Studio 2008, these controls are located in the toolbox under the Login tab. These seven controls are as follows: 1. “Login ”: Allows the user to log in by entering a user name and password. 2. “CreateUserWizard ”: Allows the user to create a new user account. 3. “PasswordRecovery ”: Allows the user to retrieve a forgotten password. 4. “ChangePassword ”: Allows the user to change his or her password. 5. “LoginView ”: This displays the contents of a template based on the user’s login status. 6. “LoginStatus ”: If the user is logged in, displays a “Logout” link for the user to log out. If the user isn’t logged in, displays a “Login” link that leads to the application’s login page. 7. “LoginName ”: This displays the user’s login name if the user is logged in. Two aspects of user registration and login security in ASP.NET, and they are: 1. Authentication – The process of determining who a user is, and whether the user really is who he or she claims to be. 2. Authorization – The process of determining whether a particular user, once authenticated, can access a particular Web site page.
Transcript of Unit IV- Advanced Features of ASP€¦ · Unit IV- Advanced Features of ASP.NET ... you can specify...

1
Unit IV- Advanced Features of ASP.NET
Security in ASP.NET
The most useful feature available in ASP.NET 3.5 is a suite of seven controls designed to simplify
the applications that authenticate users. In Visual Studio 2008, these controls are located in the
toolbox under the Login tab.
These seven controls are as follows:
1. “Login”: Allows the user to log in by entering a user name and password.
2. “CreateUserWizard”: Allows the user to create a new user account.
3. “PasswordRecovery”: Allows the user to retrieve a forgotten password.
4. “ChangePassword”: Allows the user to change his or her password.
5. “LoginView”: This displays the contents of a template based on the user’s login status.
6. “LoginStatus”: If the user is logged in, displays a “Logout” link for the user to log out. If the
user isn’t logged in, displays a “Login” link that leads to the application’s login page.
7. “LoginName”: This displays the user’s login name if the user is logged in.
Two aspects of user registration and login security in ASP.NET, and they are:
1. Authentication – The process of determining who a user is, and whether the user really
is who he or she claims to be.
2. Authorization – The process of determining whether a particular user, once
authenticated, can access a particular Web site page.

2
Three types of authentication
1. Forms-based authentication:
This method of authentication uses a membership database to store the names and
passwords of valid users. In this method, whenever a user attempts to access a restricted
or limited access page, ASP.NET automatically redirects the user to a login page, which
is normally named “Login.aspx”, which prompts the user to login with a user name and
password in order to authenticate that user. The originally requested page is then
displayed if the user is valid. This is the most common type of authentication for Web
sites that allow public access but require that users create login accounts to access the
application.
2. Windows-based authentication:
This method of authentication uses the existing Windows accounts to authenticate users.
This type of authentication is used mostly for intranet applications, where the users
already have valid Windows accounts.
3. Passport authentication:
This method of authentication uses Microsoft’s Passport service to authenticate users.
When you use Passport authentication, a user must have a valid Passport account to
access the application. From these three authentication modes, this one is the least
used.
Login control
ASP.NET 2.0’s new “Login” control provides you with a more convenient way to let the users of
your application log in to you application. The “Login” control should be placed in a page called
“Login.aspx” unless you changed the default “<authentication>” in the “web.config” file for the
login page.

3
The “Login” control in its simplest form will look like the following:
<asp:Login id="Login1" runat="server" />
If you insert wrong username and password then message will show like this:
Note:
The “Login” control displays text boxes that let the user enter a user name and password.
If the fields are filled in, the “Login” control uses the membership provider to look up the
user name and password in the membership database.
If the user name and password are valid, the user is logged in and the page requested is
displayed else if it is not valid, an error message is displayed and the user will not be
logged in to show the requested page.
In ASP.NET, you have the ability to customize your “Login” control by using any of the optional
attributes listed below.
Attribute Description
id The “ID” for the Login control.
runat runat="Server” is needed for all ASP.NET server controls.
CreateUserText The text displayed as a link to the register new user page.
CreateUserUrl The URL to the register new user page.
DestinationPageUrl
The URL of the page for successful log in. If you don’t specify this
attribute, the page which the user was on before getting to this page
is displayed.
4
DisplayRememberMe
A checkbox, which is a Boolean, to choose whether the Login
Control should automatically let the user save his info by saving a
cookie and avoid re-logging in.
FailureText
Is the text that will be displayed if the Log in information is not valid.
If you do not change this message, a default message“Your login
attempt has failed. Please try again” is displayed.
InstructionText
A text displayed underneath the title text providing the user with login
information. If you do not change this attribute, the default is an
empty string.
LoginButtonText The Login button text.
Orientation This specifiex the “Horizontal” or “Vertical” layout of the login control.
If you do not change this attribute, the default is “Vertical”.
PasswordLabelText The text for the “Password” field.
PasswordRecoveryIconUrl The URL for the image used as a link to the recover a lost password
page.
PasswordRecoveryText The text for the recover a lost password page.
PasswordRecoveryUrl The URL for the recover a lost password page.
RememberMeText Remember Me check box’s text.
TitleText The text for the top of the Login control.
UserNameLabelText The text for the Username label.
CreateUserWizard control
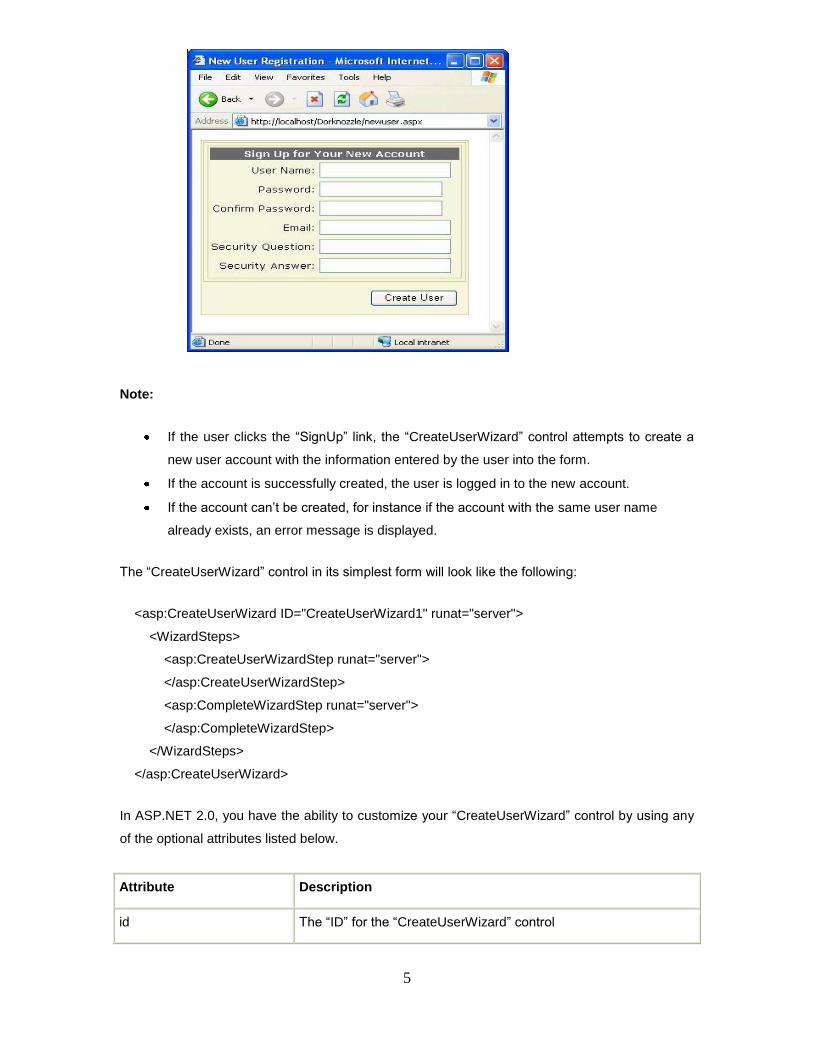
ASP.NET “CreateUserWizard” control automates the task of entering the information for a new
user and creating a record for the user in the membership database. The “CreateUserWizard”
control displays text boxes that let the user enter a user name, a password, an e-mail address, a
security question, and the answer to the security question.
5
Note:
If the user clicks the “SignUp” link, the “CreateUserWizard” control attempts to create a
new user account with the information entered by the user into the form.
If the account is successfully created, the user is logged in to the new account.
If the account can’t be created, for instance if the account with the same user name
already exists, an error message is displayed.
The “CreateUserWizard” control in its simplest form will look like the following:
<asp:CreateUserWizard ID="CreateUserWizard1" runat="server">
<WizardSteps>
<asp:CreateUserWizardStep runat="server">
</asp:CreateUserWizardStep>
<asp:CompleteWizardStep runat="server">
</asp:CompleteWizardStep>
</WizardSteps>
</asp:CreateUserWizard>
In ASP.NET 2.0, you have the ability to customize your “CreateUserWizard” control by using any
of the optional attributes listed below.
Attribute Description
id The “ID” for the “CreateUserWizard” control

6
runat “runat=“Server” is needed for all ASP.NET server controls.
CancelButtonImageUrl The URL for the image used for the Cancel button.
CancelButtonText The text for the Cancel button.
CancelDestinationPageUrl The URL of the page after the Cancel button is clicked.
CompleteStepText
The Complete step text, displayed after a user successfully
creates an account. This is only shown after the
“LoginCreatedUser” is set to “False”.
ContinueButtonImageUrl The URL for the Continue button image on the Success page.
ContinueButtonText The Continue button text on the Success page.
ContinueDestinationPageUrl The URLof page the user is taken to after clicking the Continue
button.
ConfirmPasswordLabelText The text for the “Password Confirmation” label field.
CreateUserButtonText The text for the Create User button.
DisableCreatedUser
This is a Boolean check box used to show if the user should be
allowed to log in or not. The default, if not specified, is “False”. This
can be set to “True” if you want the moderator or administrator to
approve their account.
DisplayCancelButton This is a Boolean, whether to display the Cancel button or not, the
default, if not specified, is “False”.
HeaderText The text for the header of the “CreateUserWizard” control.
InstructionText The text for the instructions to use the “CreateUserWizard” control.
LoginCreatedUser
This is a Boolean to choose if the new user should be
automatically logged into the application, the default, if not
specified, is “True”.
PasswordLabelText The text for the “Password” label field.
QuestionLabelText The text for the “Security Question” label field.
UserNameLabelText The text for the “Username” label field.

7
Note:
In ASP.NET 2.0, you can apply AutoFormat or the style attributes to customize the
appearance of the “CreateUserWizard” control.
The user is always logging to the application after the register is complete, so if you
would prefer not to, you can specify it using the LoginCreatedUser="False" attribute.
If you want the user account to be automatically deavticated till the administrator or
moderator approve it, you can specify it using DisableCreatedUser="True".
By default, the “CreateUserWizard” control has two steps, the “CreateUserWizardStep”
and “CompleteWizardStep” as shown in the code above. You can add steps or even a
sidebar with links to each of the steps.
The “CreateUserWizard” control can send a confirmation e-mail to the new user using
two methods;
o In the “<MailDefinition>” child element
<MailDefinition
From="[email protected]"
Subject="Subject Line"
BodyFileName="BodyFile.txt">
</MailDefinition>
In the “MailDefinition” attributes
<asp:CreateUserWizard runat="server" ID="CreateUserWizard1"
MailDefinition-From="[email protected]"
MailDefintion-Subject="Subject Line"
MailDefinition-BodyFileName="BodyFile.txt" >
</asp:CreateUserWizard>
Note:
The body of the e-mail message will be taken from the file "BodyFile.txt" in the
“BodyFileName attribute”.
This “.txt” file can include “<%UserName%>” and “<%Password%>” so you can put the
user’s account name and password into the email.
For the “<MailDefinition>” child element to work, “<MailSettings>" element in the
application’s “web.config” file should be changed into:

8
<system.net>
<mailSettings>
<smtp>
<network host="smtp.yourhostnamehere.com"
from="[email protected]" />
</smtp>
</mailSettings>
</system.net>
Note:
The “SMTP” settings for the “network host” and the address “from” should be changed to
the one you want to use.
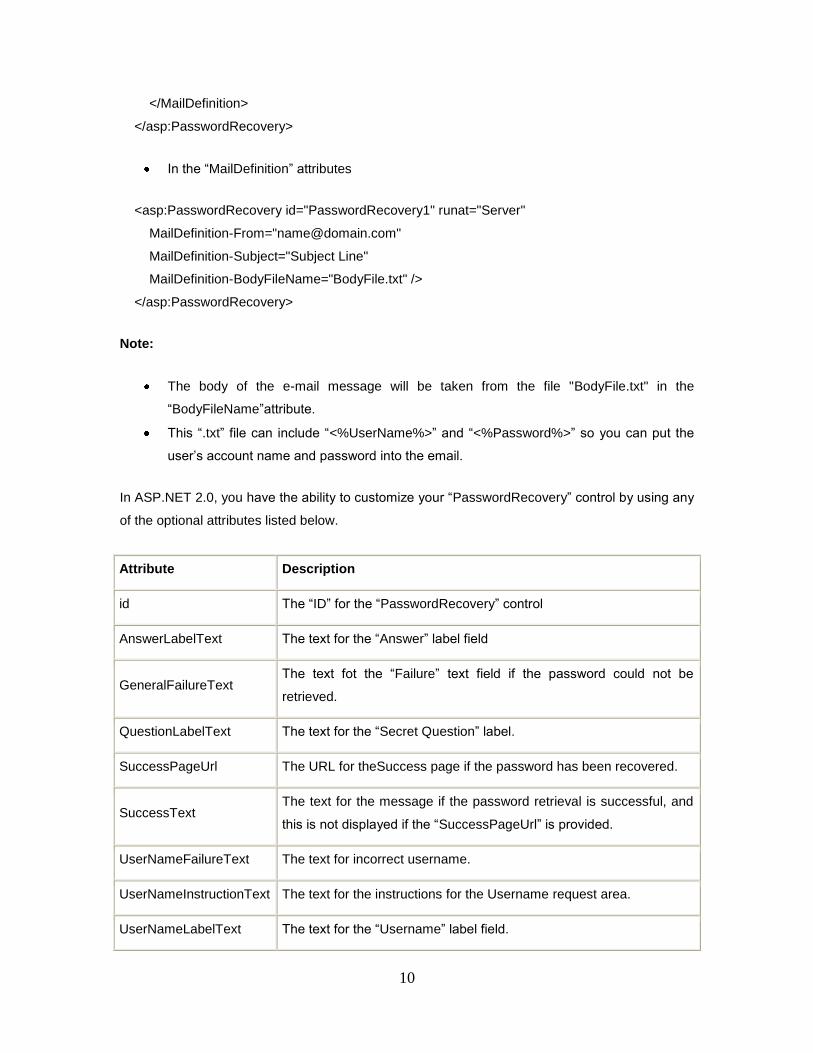
PasswordRecovery control
ASP.NET 2.0’s new “PasswordRecovery” control allows you to easily create a way to retrieve a
forgotten password. In this control, the user has to enter their security question and the answer to
it. If the values are valid, the password is reset to a random value and that password is emailed to
the email address the user provided when registering to the application.
The “PasswordRecovery” control in its simplest form will look like the following:
<asp:PasswordRecovery ID="PasswordRecovery1" runat="server">
</asp:PasswordRecovery>

9
Once users enter valid user names, they must answer their secret questions. In the browser, the
page looks like that shown below.
If everything is formatted correctly, the email will be sent and a message will appear to the user
similar to this:
The new password can be sent to the user’s email account. The “PasswordRecovery” control can
send a confirmation e-mail to the new user using two methods:
In the “<MailDefinition>” child element
<asp:PasswordRecovery ID="PasswordRecovery1" runat="server">
<MailDefinition
From="[email protected]"
Subject="Subject Line"
BodyFileName="BodyFile.txt">
10
</MailDefinition>
</asp:PasswordRecovery>
In the “MailDefinition” attributes
<asp:PasswordRecovery id="PasswordRecovery1" runat="Server"
MailDefinition-From="[email protected]"
MailDefinition-Subject="Subject Line"
MailDefinition-BodyFileName="BodyFile.txt" />
</asp:PasswordRecovery>
Note:
The body of the e-mail message will be taken from the file "BodyFile.txt" in the
“BodyFileName”attribute.
This “.txt” file can include “<%UserName%>” and “<%Password%>” so you can put the
user’s account name and password into the email.
In ASP.NET 2.0, you have the ability to customize your “PasswordRecovery” control by using any
of the optional attributes listed below.
Attribute Description
id The “ID” for the “PasswordRecovery” control
AnswerLabelText The text for the “Answer” label field
GeneralFailureText The text fot the “Failure” text field if the password could not be
retrieved.
QuestionLabelText The text for the “Secret Question” label.
SuccessPageUrl The URL for theSuccess page if the password has been recovered.
SuccessText The text for the message if the password retrieval is successful, and
this is not displayed if the “SuccessPageUrl” is provided.
UserNameFailureText The text for incorrect username.
UserNameInstructionText The text for the instructions for the Username request area.
UserNameLabelText The text for the “Username” label field.

11
ChangePassword control
ASP.NET 2.0’s new “ChangePassword” control gives you the ability to automate the process of a
user wanting to change their password. You can configure the new “ChangePassword” control to
accepts the username and the password the user wishes to change. You can also configure it
such that the user cannot enter his username, but should be logged into the application as a user
to change the password.The new “ChangePassword” control also can be configured such that
after changing the password, the new password can be e-mailed back to the user.
The “ChangePassword” control in its simplest form will look like the following:
<asp:ChangePassword ID="ChangePassword1" runat="server">
</asp:ChangePassword>
The “ChangePassword” control can send a new password e-mail to the user using the
“<MailDefinition>” child element. The following is a sample code of how this will look like:
<asp:ChangePassword id="ChangePassword1" runat="Server" >
<MailDefinition
From="[email protected]"
Subject="Subject Line"
BodyFileName=”BodyFile.txt">
</MailDefinition>
</asp:ChangePassword>
Note:
The body of the e-mail message will be taken from the file "BodyFile.txt" in the
“BodyFileName attribute”.
This “.txt” file can include “<%UserName%>” and “<%Password%>” so you can put the
user’s account name and password into the email.
In ASP.NET 2.0, you have the ability to customize your “ChangePassword” control by using any
of the optional attributes listed below.
Attribute Description
id The “ID” for the “ChangePassword” control

12
runat runat="Server" is needed for all ASP.NET server controls.
CancelButtonImageUrl The URL for the image used for the Cancel button.
CancelButtonText The text for the Cancel button.
CancelDestinationPageUrl The URL of the page after the Cancel button is clicked.
ChangePasswordButtonImageUrl The URL for the Change Password button image on the
Success page.
ChangePasswordButtonText The ChangePassword button text.
ChangePasswordTitleText The text for the “ChangePassword” title area.
ConfirmNewPasswordLabelText The text for the “ConfirmPassword” label field.
ContinueButtonImageUrl The URL for the Continue button image.
ContinueButtonText The Continue button text.
ContinueDestinationPageUrl The URLof page the user is taken to after clicking the
Continue button.
CreateUserText The text for the “CreateUser” link.
CreateUserUrl The URL for the CreateUser page.
DisplayUserName
This is a Boolean check box, to indicate if you want the user
to enter the username when changing the password or the
user to be loggied in to the system. If “True”, the
“ChangePassword” control can also be used to change the
password of an account other than the one to which the user
is currently logged in, if “False” they can only change the
password of the logged in account.
InstructionText The text for the instructions to use the “ChangePassword”
control.
NewPasswordLabelText The text for the “New Password” label field.
PasswordHintText
The text diplyed for the instruction for the new password and
its requiermetns, like how many character, minimum length,
etc…

13
PasswordLabelText The text displayed for the “Current Password” label field.
PasswordRecoveryText The text for the “Password Recovery” page link
PasswordRecoveryUrl The URL for the “Password Recovery” page.
SuccessPageUrl The URL for theSuccess page if the password has been
changed.
SuccessText
The text for the message if the password change is
successful, and this is not displayed if the “SuccessPageUrl”
is provided.
UserNameLabelText The text for the “Username” label field.
Attributes for the “ChangePassword” control
The following is the code for a customized “ChangePassword” control.
<asp:ChangePassword id="ChangePassword1" runat="Server"
ChangePasswordTitleText="Change Your Password<br />"
PasswordLabelText="Enter your current password:"
NewPasswordLabelText="Enter the new password:"
ConfirmNewPasswordLabelText="Confirm the new password:">
</asp:ChangePassword>
Note:
The “ChangePassword” control requires the user to be logged in to change the password
by default. You can change this by specifying the “DiplayeUsername=True” attribute. This
will display a “Useraname"textbox, where the user has to enter the valid user name and
password to change the password for any user.
The “ChangePassword” control has two views, and they are:
o The Initial view – this is the Change Password view including the text boxes for
the user to enter the new password.
o The Success view – displayed when the password change is successful with a
confirmation message. The success view is not displayed if the
“SuccessPageUrl” is provided, but instead the page in the URL specified will be
shown.

14
LoginView control
ASP.NET 2.0’s new “LoginView”control is a template control. This template control can display
the contents of its templates according to the login status of the user. This gives you the ability to
customize your content of your web application for the needs of different users.
For example:
The User authentication application should use a “LoginView” control to display a link to the
administrator’s page because this page should be only visible to the users with the login status of
an “Admin”.
The “LoginView” control does not have any special attributes to customize its appearance or
behavior but you can customize the “LoginView” control by using the three types of templates of
which each can be coded in as a child element. The three templates are:
1. “Anonymous” template: Displayed if the user isn’t logged in.
2. “LoggedIn” template: Displayed if the user is logged in.
3. “RoleGroup” template: Displayed if the user is logged in and is a member of a particular
role group.
The following is a sample code for all the three types of templates of a “LoginView” control.
<asp:LoginView runat="Server" id="LoginView1">
<AnonymousTemplate>
The Anonymous Template is displayed for anonymous users.
</AnonymousTemplate>
<LoggedInTemplate>
The Logged In Template is displayed for users logged in.
</LoggedInTemplate>
<RoleGroups>
<asp:RoleGroup Roles="Admin">
<ContentTemplate>
This Role Groups Template is displayed for admins.
</ContentTemplate>
</asp:RoleGroup>
</RoleGroups>
</asp:LoginView>

15
Note:
The “<RoleGroups>” elements can containg more than one “<RoleGroups>”, these
elements can be used alongside the “Anonymous” and the “LoggedIn” templates.
LoginName control
ASP.NET 2.0’s new “LoginName” control is used to display the user’s username which the user
logged in to the web application from. If a user is not currently logged into the web application, the
“LoginName” control does not display anything.
The “LoginName” control in its simplest form will look like the following:
<asp:LoginName ID="LoginName1" runat="server" />
If you want a custom message such as a welcome message to be displayed in front of the
Username, you can do the following:
<asp:LoginName ID="LoginName1" runat="server" FormatString="Welcome, {0}" />
Note:
The “Welcome” text will be added as a prefix to the Username if the user has logged in, and if no
user is logged in nothing is displayed.
LoginStatus control
ASP.NET 2.0’s new “LoginStatus” control will display a link for the user to log into or log out of the
web application depending on whether theuser is logged in or out.
For example:
If the user is logged in, a link is displayed to Logout
If the user is not logged in, a link is displayed to Login
The “LoginStatus” control in its simplest form will look like the following:
<asp:LoginStatus ID="LoginStatus1" runat="server" />

16
In ASP.NET 2.0, you have the ability to customize your “LoginStatus” control by using any of the
optional attributes listed below.
Attribute Description
id The “ID” for the “LoginStatus” control
runat runat=“Server” is needed for all ASP.NET server controls.
LoginImageUrl The URL for the “Login” link image.
LoginText The text for the “Login” link.
LogoutAction
The action to do after the user logs out. This can be specified to “Redirect”
to redirect the user to a page in the “LogoutPageUrl” attribute, or
“RedirectToLoginPage” to redirect the user to the login page, or “Refresh”
to refresh the current page.
LogoutImageUrl The URL for the “Logout” link.
LogoutPageUrl The URl for the rdirect page after a user logs out if the “LogoutAction”
attribute specifies “Redirect”.
LogoutText The text for the “Logout” link.
Attributes for the “LoginStatus” control
State Management in ASP.NET
Web pages rarely are stand alone. Web applications almost always need to track users who visits
multiple pages, whether to provide personalization, store information about a user or to track
usage for reporting purposes.
HTTP (Hyper Text Transfer Protocol) is a stateless protocol. When the client disconnects from
the server, the ASP.Net engine discards the page objects. This way each web application can
scale up to serve numerous requests simultaneously without running out of server memory.
However, there need to be some technique to store the information between requests and to
retrieve it when required. This information i.e., the current value of all the controls and variables
for the current user in the current session is called the State.

17
Types of State Management
1. Client – Side State Management
2.Server – Side State Management
Client – Side State Management
Client Side State Management involves storing information either on a Web page or on a Client
computer. There are four ways to manage states.
View State
Hidden Form Fields
Cookies
Query String
View State
In this method, the ViewState property that is inherited from the base Control class is used to
automatically save the values of the page and of each control prior to rendering of the page.
ViewState is implemented with a hidden form field called the _VIEWSTATE, which is
automatically created in every Web Form page. When ASP.Net executes a Web page on a Web
Server, the values stored in the ViewState property of the page and controls on it are collected
and formatted into a single encoded string. The encoded string is then assigned to the Value
attribute of the hidden form field _VIEWSTATE and is sent to the client as a part of the Web
page.
Hidden Form Fields
In ASP.Net we can use the HTML standard hidden fields in a Web Form to store page-specific
information. A hidden field does not render in a Web browser. However, we can set the properties
of the hidden field. When a page is submitted to the server, the content of the hidden field is sent
in the HTTP Form collection along with values of other controls.
Query String
The Query string is a part of the request that appears after the Question mark (?) character in the
URL. A query string provides a simple way to pass information from one page to another.

18
Cookies
A cookie, also known as an HTTP cookie, web cookie, or browser cookie, is usually a small piece
of data sent from a website and stored in a user's web browser while a user is browsing a
website. When the user browses the same website in the future, the data stored in the cookie can
be retrieved by the website to notify the website of the user's previous activity.[1]
Cookies were
designed to be a reliable mechanism for websites to remember the state of the website or activity
the user had taken in the past. This can include clicking particular buttons, logging in, or a record
of which pages were visited by the user even months or years ago.
Server Side State Management Options
Application State
An ASP.Net application is the collection of all web pages, code and other files within a single
virtual directory on a web server. When information is stored in application state, it is available to
all the users.
To provide for the use of application state, ASP.Net creates an application state object for each
application from the HTTPApplicationState class and stores this object in server memory. This
object is represented by class file global.asax.
Application State is mostly used to store hit counters and other statistical data, global application
data like tax rate, discount rate etc and to keep track of users visiting the site.
Application state data is generally maintained by writing handlers for the events:
Application_Start
Application_End
Application_Error
Session_Start
Session_End
Session State:
When a user connects to an ASP.Net website, a new session object is created. When session
state is turned on, a new session state object is created for each new request. This session state
object becomes part of the context and it is available through the page.

19
Session state is generally used for storing application data like inventory or supplier list, or a
customer record or shopping cart. It can also keep information about the user and his preference
and keep track of pending operations.
Sessions are identified and tracked with a 120-bit SessionID, which is passed from client to
server and back as cookie or a modified URL. The SessionID is globally unique and random.
The session state object is created from the HttpSessionState class, which defines a collection of
session state items.
Mobile Application Development in ASP.NET
Mobile application development in ASP.NET is similar to traditional ASP.NET web application
development. And it is very easy for ASP.NET developer to develop mobile application. All mobile
web pages are inherit from MobilePage class which exists in System.Web.UI.MobileControls
namespace.ASP.NET exposes a System.Web.Mobile namespace is for specifically to Web
development.
Creating Mobile Web Page in Application
A Default.aspx is added in your solution and it is traditional ASP.NET page which is inherited from
System.Web.UI.Page. But you need to create page which inherit from MobilePage class in
System.Web.UI.MobileControls namespace. In this demonstration, you will use controls from
the System.Web.Mobile namespace that are specifically designed for devices that cannot
display as much information as a desktop browser.
Creating Mobile Web Page in Application
1. Right-click the Default.aspx page in Solution Explorer and choose Delete.
2. Click OK in the dialog box.
3. Right-click the application in Solution Explorer and choose Add New Item
4. Choose Mobile Web Form under Visual Studio installed templates.

20
Test Application
Select Microsoft Mobile Explorer and press F5 to run the application. Microsoft Mobile
Explorer Emulator will appear. Click ASP.NET Development Server icon in the system tray to get
application URL name
and its port. It may be different in your system.
In the Microsoft Mobile Explorer Emulator type URL as http://localhost:1439/LRC/Loan_

21
RepaymentCalculator.aspx
Enter Amount, Term & Rate. Click on Repayment button in the screen. You will get result like
bellow,

22