
Ultrasound System Service Manual - Frank's Hospital...
112
Ultrasound System Service Manual
Transcript of Ultrasound System Service Manual - Frank's Hospital...

Ultrasound SystemService Manual

P03309-01 08/2003Copyright 2003 by SonoSite, Inc.All rights reserved. Printed in the USA.
ii
Manufactured bySonoSite, Inc.21919 30th Drive SEBothell, WA 98021-3904USATelephone: 1-888-482-9449 or 1-425-951-1200Fax: 1-425-951-1201
SonoSite LtdAlexander House40A Wilbury WayHitchin, HertsSG4 OAP UKT: +44-1462-444800F: +44-1462-444801
“TITAN” and “SonoSite TITAN” are trademarks of SonoSite, Inc.
Kensington is a registered trademark of Kensington Technology Group.
Non-SonoSite product names may be trademarks or registered trademarks of their respective owners.
SonoSite products may be covered by one or more of the following U.S. patents: 4454884, 4462408, 4469106, 4474184, 4475376, 4515017, 4534357, 4542653, 4543960, 4552607, 4561807, 4566035, 4567895, 4581636, 4591355, 4603702, (4607642), 4644795, 4670339, 4773140, 4817618, 4883059, 4887306, 5016641, 5050610, 5095910, 5099847, 5123415, 5158088, 5197477, 5207225, 5215094, 5226420, 5226422, 5233994, 5255682, (5275167), 5287753, 5305756, 5353354, 5365929, 5381795, 5386830, 5390674, 5402793, (5,423,220), 5438994, 5450851, 5456257, 5471989, 5471990, 5474073, 5476097, 5479930, 5482045, 5482047, 5485842, 5492134, 5517994, 5529070, 5546946, 5555887, 5603323, 5606972, 5617863, (5634465), 5634466, 5636631, 5645066, 5648942, 5669385, (5706819), 5715823, 5718229, 5720291, 5722412, 5752517, 5762067, 5782769, 5800356, 5817024, 5833613, 5846200, 5860924, 5893363, 5916168, 5951478, 6036643, 6102863, 6104126, 6113547, 6117085, 6142946, 6203498 B1, 6371918, 6135961, D0280762, D0285484, D0286325, D0300241, D0306343, D0328095, D0369307, D0379231. Other patents pending.
Caution: United States federal law restricts this device to sale by or on the order of a physician.
iii

iv

Contents
Chapter 1: Introduction
1.1 Audience .......................................................................................11.2 Conventions Used in This Service Manual ..............................11.3 Product Upgrades and Updates ................................................11.4 Customer Comments ...................................................................11.5 About the System .........................................................................21.6 About the System Software ........................................................41.7 Software Licensing .......................................................................4
Chapter 2: Safety
2.1 Electrical Safety ............................................................................52.2 Equipment Safety .........................................................................62.3 Battery Safety ................................................................................72.4 Biological Safety ...........................................................................82.5 Labeling Symbols .........................................................................8
Chapter 3: System Overview
3.1 System Overview .........................................................................93.2 Theory of Operation ....................................................................9
3.2.1 Transducer ........................................................................103.2.2 Front End Subsystem ......................................................103.2.3 Digital Signal Processing Subsystem ............................123.2.4 Backend Subsystem .........................................................123.2.5 Control Subsystem ...........................................................143.2.6 Power Supply and Control Subsystem .........................15
3.3 System Specifications ................................................................163.3.1 System Dimensions .........................................................163.3.2 Display Dimensions ........................................................163.3.3 Transducers ......................................................................163.3.4 Imaging Modes ................................................................163.3.5 Applications ......................................................................163.3.6 Image Storage ...................................................................173.3.7 Accessories ........................................................................173.3.8 Peripherals ........................................................................173.3.9 Temperature, Pressure, and Humidity Limits ............183.3.10 Electrical ..........................................................................183.3.11 Electromechanical Safety Standards ...........................183.3.12 EMC Standards Classification ......................................193.3.13 Airborne Equipment Standards ...................................193.3.14 ECG Standard .................................................................193.3.15 DICOM Standard ...........................................................19
Chapter 4: Setup and Operation
4.1 System Controls .........................................................................214.2 System Components ..................................................................224.3 Setup ............................................................................................234.4 Touchpad ....................................................................................244.5 Accessories ..................................................................................24
v

4.6 Preparing the System for Operation .......................................254.6.1 Installing and Removing the Battery ............................254.6.2 Using AC Power/Charging Battery .............................264.6.3 Connecting to AC Power ................................................274.6.4 Connecting and Removing Transducers ......................284.6.5 Turning the System On and Off ....................................28
4.7 Upgrading the System Software ..............................................294.7.1 Obtaining a License Key .................................................324.7.2 Installing a License Key ..................................................334.7.3 To Display the System Information Screen ..................344.7.4 To Display the License Update Screen .........................35
Chapter 5: Cleaning and Disinfecting
5.1 Universal Precautions ...............................................................375.2 Receipt of Suspected Contaminated Materials ......................375.3 Recommended Disinfectants ....................................................38
Chapter 6: Troubleshooting
6.1 Basic Troubleshooting ...............................................................396.2 Periodic Maintenance ................................................................406.3 System and Subsystem Diagnosis ...........................................416.4 System Repair .............................................................................416.5 Test Equipment ..........................................................................416.6 Failure Modes .............................................................................41
6.6.1 Display ...............................................................................416.6.2 Control Panel ....................................................................416.6.3 System/Main PCBA ........................................................426.6.4 Battery ................................................................................42
6.7 Troubleshooting Flow Diagrams .............................................436.7.1 Display ...............................................................................436.7.2 Control Panel ....................................................................446.7.3 System ................................................................................456.7.4 Battery ................................................................................466.7.5 Mini-Dock/Mobile Docking System .............................47
Chapter 7: Replacement Procedures
7.1 Display Replacement .................................................................497.1.1 Required Parts ..................................................................497.1.2 Required Tools .................................................................497.1.3 Display Removal ..............................................................497.1.4 Display Replacement .......................................................517.1.5 Test the Display ................................................................52
7.2 Control Panel Subassembly Replacement ..............................527.2.1 Required Parts ..................................................................527.2.2 Required Tools .................................................................527.2.3 Control Panel Removal ...................................................527.2.4 Control Panel Replacement ............................................52
7.3 Main System Disassembly for Repair and/or Replacement 537.3.1 Required Parts ..................................................................537.3.2 Required Tools .................................................................537.3.3 Main PCBA Removal ......................................................53
vi

Chapter 8: Performance Testing
8.1 Overview .....................................................................................598.2 Test Equipment ..........................................................................598.3 Setting Up Performance Tests ..................................................59
8.3.1 Scan Reference Orientation ............................................608.4 Testing 2D Performance ............................................................60
8.4.1 2D Image Quality .............................................................608.4.2 Axial Measurement Accuracy ........................................608.4.3 Lateral Measurement Accuracy .....................................618.4.4 Penetration ........................................................................61
8.5 Additional Performance Tests ..................................................628.5.1 CPD ....................................................................................628.5.2 Directional Color Power Doppler (DCPD) ..................628.5.3 M Mode Imaging .............................................................638.5.4 Tissue Harmonic Imaging ..............................................638.5.5 Pulsed Wave (PW) Doppler Imaging ...........................638.5.6 Image Quality Verification Test/Livescan ...................648.5.7 Image Review ...................................................................648.5.8 Printer ................................................................................648.5.9 Battery Charging ..............................................................648.5.10 Video Output ..................................................................64
8.6 Returning Products to SonoSite ...............................................658.6.1 Contacting SonoSite Technical Support .......................658.6.2 Shipping Instructions ......................................................65
Chapter 9: Accessory Service
9.1 Mobile Docking System ............................................................679.2 Mini-Dock ...................................................................................699.3 Connectivity ................................................................................699.4 Block Diagrams and Schematics ..............................................709.5 Theory of Operation ..................................................................78
9.5.1 Video ..................................................................................789.5.2 Power Distribution ..........................................................78
9.6 Replacement Procedures ...........................................................799.6.1 Required Tools .................................................................799.6.2 Cup Surround ...................................................................799.6.3 Casters ...............................................................................799.6.4 Power Supply ...................................................................809.6.5 Locking Handle ................................................................829.6.6 Deflector ............................................................................829.6.7 Mini-Dock .........................................................................83
Appendix A: Parts List
A.1 Replacement Parts List .............................................................85A.1.1 Display .............................................................................85A.1.2 Control Panel ...................................................................86A.1.3 Replacement Parts, System ...........................................87A.1.4 Transducer Nest Frame Assembly ...............................93A.1.5 AC Adapter .....................................................................94A.1.6 Mini-Dock ........................................................................95A.1.7 Mobile Docking System .................................................96
A.2 Ordering Replacement Parts ...................................................98
vii

Appendix B: Service Event Report
Index .................................................................................................101
viii

Chapter 1: Introduction
Before servicing the TITANTM high-resolution ultrasound system, please read the information in this manual. This text applies only to the SonoSite TITAN ultrasound system product manufactured after June 19, 2003. Please find service information about products manufactured before June 17, 2003 in C1.51 Ultrasound System Service Manual (P00715), C1.75 Ultrasound System Service Manual (P01118), C1.9 PLUS Ultrasound System Service Manual (P02287), and C1.99 PLUS and ELITE Ultrasound System Service Manual (P02913).
1.1 AudienceThe intended audience of this manual is properly trained field and in-house service personnel.
1.2 Conventions Used in This Service ManualThese conventions are used in this service manual:• A Warning describes precautions necessary to prevent injury or loss of life.• A Caution describes precautions necessary to protect the products.• When the steps in the operating instructions must be performed in a specific order, the steps are
numbered.• Bulleted lists present information in list format, but they do not imply a sequence.• The system handle is on the front of the system, and the battery compartment is on the back of the
system.
1.3 Product Upgrades and UpdatesSonoSite may offer software upgrades and new features that may improve system performance. Service manual updates, explaining the effects of upgrades and new features on system performance, will accompany the upgrades.
1.4 Customer CommentsQuestions and comments are encouraged. SonoSite is interested in your feedback regarding the service manual. Please call SonoSite at 1-877-657-8118. If you are outside the USA, call the nearest SonoSite representative. You can also send electronic mail (e-mail) to SonoSite at the following address:[email protected]
Chapter 1: Introduction 1

1.5 About the SystemThe ultrasound system has multiple configurations and feature sets. All are described in this service manual but not every option may apply to your system. System features are dependent on your system configuration, transducer, and exam type.
Figure 1.1 TITAN System Front View
4
3
1
2
5
Table 1.1: TITAN System Front Features
Number Feature
1 Control panel
2 Transducer connection
3 Handle
4 Display
5 CompactFlash™ slots (front for image storage, back for system updates)
2 Chapter 1: Introduction

Figure 1.2 TITAN System Rear View
The TITAN system is a portable, software-controlled, ultrasound system using all-digital architecture. The system is used to acquire and display high-resolution, real-time ultrasound images: 2D, color power Doppler (CPD), directional color power Doppler (DCPD), Tissue Harmonic Imaging (THI), M Mode, and pulsed wave (PW) Doppler. The system has cine buffer, image zoom, labeling, biopsy, measurements, calculations, a USB connection for image transfer, image storage, image review, printing, recording, and the ability to archive Doppler with audio output to a videotape.Currently, the system supports the following broadband transducers:• C11/8-5 MHz 11 mm microcurved array• C15/4-2 MHz 15 mm microcurved array• C60/5-2 MHz 60 mm curved array• HST/10-5 MHz 25 mm linear array• ICT/8-5 MHz 11 mm intracavitary array• L38/10-5 MHz 38 mm linear array System accessories include the TITAN mobile docking system, the TITAN mini-dock, a power supply, a battery, video and printer cables, and SiteLink Image Manager 2.0 software.System peripherals include medical grade (conforming to the requirements of EN60601-1) and non-medical (commercial) grade products. System medical grade peripherals include a printer and VCR. System non-medical grade peripherals include a CompactFlash card and a Kensington Security Cable. Use of peripherals is covered in the manufacturers’ instructions, which accompany each peripheral.
1
3 42
Table 1.2: TITAN System Rear Connectors
Number Feature
1 DC input connector
2 I/O connector
3 Battery
4 ECG connector (available on future releases)
Chapter 1: Introduction 3

1.6 About the System SoftwareThe ultrasound system contains software that controls its operation. A software upgrade may be required. SonoSite will provide you with a CompactFlash card containing the software. Typically new software provides new capabilities. A single CompactFlash card can be used to update one or more systems. Software upgrades use the back CompactFlash slot on the right hand side of the system. CompactFlash cards installed in the front CompactFlash slot do not upgrade the system.
1.7 Software LicensingUse of the software that you receive from SonoSite is controlled by a license key. A license key is a number sequence containing exactly 12 decimal digits.License keys are obtained from SonoSite or from its authorized representatives. You must obtain one key for each system that will use the new software. See “Obtaining a License Key” on page 32 for information on obtaining a license key.Software that you receive from SonoSite may be installed and will operate for a short period of time without requiring a valid license key. We refer to this period of time as the “grace period.” The grace period is variable.When you first install your software, your SonoSite system prompts you for a license key. If you have not yet obtained a valid license key, you can elect to use the software as long as the grace period time has not been fully consumed.When a system is running in the grace period, all system functions are available. As you use the system, the grace period is slowly consumed. When the grace period has expired, the system will not be usable until a valid license key has been entered. Grace period time is not consumed while the system is powered off or when it is in “sleep” mode. Whenever a system is running in the grace period, the grace period time remaining is available on the license update screen.
Caution: When the grace period expires, all system functions except for licensing are unavailable until a valid license key is entered into the system.
4 Chapter 1: Introduction

Chapter 2: Safety
Read this information before using the ultrasound system. The information in this manual applies to the ultrasound system, transducer, accessories, and peripherals. This chapter contains safety information.A Warning describes precautions necessary to prevent injury or loss of life.A Caution describes precautions necessary to protect the products.
2.1 Electrical SafetyThis system meets EN60601-1, Class I/internally-powered equipment requirements and Type BF isolated patient-applied parts safety requirements.This system complies with the applicable medical equipment requirements published in the Canadian Standards Association (CSA), European Norm Harmonized Standards, and Underwriters Laboratories (UL) safety standards.For maximum safety observe the following warnings and cautions:
Warning: To avoid the risk of electrical shock or injury, do not open the system enclosures. All internal adjustments and replacements, except battery replacement, must be made by a qualified technician.
To avoid the risk of injury, do not operate the system in the presence of flammable gasses or anesthetics. Explosion can result.
To avoid the risk of electrical shock, use only properly grounded equipment. Shock hazards exist if the power supply is not properly grounded. Grounding reliability can only be achieved when equipment is connected to a receptacle marked “Hospital Only” or “Hospital Grade” or the equivalent. The grounding wire must not be removed or defeated.
To avoid the risk of electrical shock, before using the transducer, inspect the transducer face, housing, and cable. Do not use the transducer if the transducer or cable is damaged.
To avoid the risk of electrical shock, always disconnect the power supply from the system before cleaning the system.
To avoid the risk of electrical shock, do not use any transducer that has been immersed beyond the specified cleaning or disinfection level. See Chapter 5, “Cleaning and Disinfecting.”
To avoid the risk of electrical shock and fire hazard, inspect the power supply, AC power cord and plug on a regular basis. Ensure they are not damaged.
To avoid the risk of electrical shock, use only accessories and peripherals recommended by SonoSite, including the power supply. Connection of accessories and peripherals not recommended by SonoSite could result in electrical shock. Contact SonoSite or your local representative for a list of accessories and peripherals available from or recommended by SonoSite.
Chapter 2: Safety 5

2.2 Equipment SafetyTo protect your ultrasound system, transducer, and accessories, follow these precautions.
Warning: To avoid the risk of electrical shock, use commercial grade peripherals recommended by SonoSite on battery power only. Do not connect these products to AC mains power when using the system to scan or diagnose a patient/subject. Contact SonoSite or your local representative for a list of the commercial grade peripherals available from or recommended by SonoSite.
To avoid the risk of electrical shock, inspect the interconnect cables on a regular basis for damage.
To avoid the risk of electrical shock to the patient/subject, do not touch the system battery contacts while simultaneously touching a patient/subject.
To prevent injury to the operator/bystander, the transducer must be removed from patient contact before the application of a high-voltage defibrillation pulse.
Caution: Although your system has been manufactured in compliance with existing EMC/EMI requirements (EN60601-1-2), use of the system in the presence of an electromagnetic field can cause degradation of the ultrasound image. If this occurs often, SonoSite suggests a review of the system environment. Identify and remove the possible sources of the emissions or move your system.
Electrostatic discharge (ESD), or static shock, is a naturally occurring phenomenon. ESD is common in conditions of low humidity, which can be caused by heating or air conditioning. Static shock is a discharge of the electrical energy from a charged body to a lesser or non-charged body. The degree of discharge can be significant enough to cause damage to a transducer or an ultrasound system. The following precautions can help reduce ESD: anti-static spray on carpets, anti-static spray on linoleum, and anti-static mats.
Do not use the system if an error message appears on the display: note the error code; call SonoSite or your local representative; turn off the system by pressing and holding the power key until the system powers down.
To avoid increasing the system and transducer connector temperature, do not block the airflow to the ventilation holes on the side of the system.
Caution: Excessive bending or twisting of cables can cause a failure or intermittent operation.
To avoid damaging the power supply, verify the power supply input is within the correct voltage range. See “Electrical” on page 18 in Chapter 3.
Improper cleaning or disinfecting of any part of the system can cause permanent damage. For cleaning and disinfecting instructions, see Chapter 5, “Cleaning and Disinfecting.”
Do not use solvents such as thinner or benzene, or abrasive cleaners on any part of the system.
Remove the battery from the system if the system is not likely to be used for some time.
Do not spill liquid on the system.
6 Chapter 2: Safety

2.3 Battery SafetyTo prevent the battery from bursting, igniting, or emitting fumes and causing equipment damage, observe the following precautions.
Warning: The battery has a safety device. Do not disassemble or alter the battery.
Charge the batteries only when the ambient temperature is between 0° and 45°C (32° and 113°F).
Do not short-circuit the battery by directly connecting the positive and negative terminals with metal objects.
Do not heat the battery or discard it in a fire.
Do not expose the battery to storage temperatures over 60°C (140°F). Keep it away from fire and other heat sources.
Do not charge the battery near a heat source, such as a fire or heater.
Do not leave the battery in direct sunlight.
Do not pierce the battery with a sharp object, hit it, or step on it.
Do not use a damaged battery.
Do not solder a battery.
The polarity of the battery terminals is fixed and cannot be switched or reversed. Do not force the battery into the system.
Do not connect the battery to an electrical power outlet.
Do not continue recharging the battery if it does not recharge after two successive six hour charging cycles.
Caution: To prevent the battery from bursting, igniting, or emitting fumes and causing equipment damage, observe the following precautions.
Do not immerse the battery in water or allow it to get wet.
Do not put the battery into a microwave oven or pressurized container.
If the battery leaks or emits an odor, remove it from all possible flammable sources.
If the battery emits an odor or heat, is deformed or discolored, or in any way appears abnormal during use, recharging or storage, immediately remove it and stop using it. If you have any questions about the battery, consult SonoSite or your local representative.
Store the battery between -20°C (-4°F) and 60°C (140°F).
Use only SonoSite batteries.
Do not use or charge the battery with non-SonoSite equipment. Only charge the battery with the TITAN system.
Chapter 2: Safety 7

2.4 Biological SafetyObserve the following precautions related to biological safety.
2.5 Labeling SymbolsLabeling symbols for SonoSite products can be found in the user guide for each product.
Warning: Non-medical (commercial) grade peripheral monitors have not been verified or validated by SonoSite as being suitable for diagnosis.
Do not use the system if it exhibits erratic or inconsistent behavior. Discontinuities in the scanning sequence are indicative of a hardware failure that must be corrected before use.
Do not use the system if it exhibits artifacts on the LCD screen, either within the clinical image or in the area outside of the clinical image. Artifacts are indicative of hardware and/or software errors that must be corrected before use.
Some transducer sheaths contain natural rubber latex and talc, which can cause allergic reactions in some individuals. Refer to 21 CFR 801.437, User labeling for devices that contain natural rubber.
Perform ultrasound procedures prudently. Use the ALARA (as low as reasonably achievable) principle.
SonoSite does not currently recommend a specific brand of acoustic standoff.
8 Chapter 2: Safety

Chapter 3: System Overview
3.1 System OverviewThe system houses the system electronics, display, control panel, and the system batteries. It provides basic connections for external power, and the transducer connector and a general purpose docking connector for all other interfaces. The system operates with external transducers and optional peripheral equipment. The types of external devices that may be used are:• Transducer(s)• AC Power Supply/Charger• Mobile Docking System/Mini-dock• External PeripheralsThe transducer connects to the main unit through the scanhead connector. The transducer contains data, which the system uses to drive the transducer in the scanhead, process the data received back and format and display the data for the user. The interface is backward compatible to previous systems and scanheads.The AC power supply not only provides power from the AC mains for operating the system, it also contains the charger for charging the internal system battery. This may be used if a mobile docking system or mini-dock is not desired or available.The mobile docking system provides power to run the system, contains the charger to charge the internal system battery and provides fixed external power, video, RS-232, and USB connections. The docking system may also provide additional control surfaces and monitors. The unit interfaces to the docking system through connections on the back of the unit. It provides a convenient place for the unit to be operated and stored under certain usage scenarios.The mini-dock provides the breakout for all the connectors from the docking connector for remote use where a docking system may not be available and the external connections are desired. The use of a mini-dock allows the main unit to be more portable when the connections are not required.External OEM peripherals are items such as monitor, printers, and VCRs. These can be connected to the mobile system or directly to the system with the use of the mini-dock using the video and/or printer control input/outputs.
3.2 Theory of OperationThe system has six major functional groups: the transducer, the frontend subsystem, the digital signal processing subsystem, the backend subsystem, the control subsystem, and the power supply and control subsystem. Figure 3.1 shows how these functions interact.
Chapter 3: System Overview 9

Figure 3.1 TITAN Block Diagram
3.2.1 TransducerThe transducer elements convert the pulser voltage to acoustic energy during the “transmit” portion of the ultrasound acquisition cycle. Also, the transducer elements convert the acoustic echo to voltage in the “receive” portion of the acquisition cycle. The system transducers have 64 to 128 elements. The front end subsystem senses the voltage developed on the transducer elements.
3.2.2 Front End SubsystemThe Front End is designed to support various imaging modalities such as 2D, spectral Doppler and color Doppler. From the Front End's perspective all modes can be grouped into a few basic types: single mode, simultaneous modes and triggered modes. All these modes are built from similar, basic transmit and receive sequences controlled within the Front End. A generic top level block diagram of a typical Front End is in the following figure.
10 Chapter 3: System Overview

Figure 3.2 Front End Subsystem
The transmit section consists of a waveform generator, delay block, and high power high voltage driver to excite the transducer element. Multiple elements are driven with delays determined by the time of flight in the medium from the elements to the point in space where the beam is to be focused. The longer the time of flight is to the focal point the smaller the delay is for a given transmit element to allow all to arrive at the focal point at the same time. The number of elements driven is determined by element sensitivity off axis and depth of field considerations. The waveform is selected to drive the transducer at a certain center frequency, bandwidth, and power and is optimized for the given mode.The receive section consists of a transmit/receive switch to protect the receiver from the transmit voltage, a variable gain receiver to amplify and condition the return echoes, an A/D to digitize the data, a delay block to focus the return signals and a weight block to scale the return echoes for each channel. All the signals are then summed together to generate the beamformed receive data. The analog gain varies with depth to compensate for signal attenuation through the medium. The delays and weights are independent for each channel. The delay and weight for the receive channel can typically be changed dynamically to keep the receive beam in continuous focus. The delay is simply set by the time of flight in the medium from the point of interest to the element, which starts at skinline and proceeds to the deepest depth of interest.The control section drives the data to the various data path elements on a line by line basis, controls the timing for the transmit and receive sections, and controls the tagged information and timing of the data to the rest of the system.Unique transmit and receive sequences, lines or PRIs, are arranged into repeated groups or frames. The simplest frame is for a single mode where the line does not change, for example M Mode or PW Doppler. Here the same line characteristics; aperture size, delay, weights, and waveform information, are continually repeated. A scanned single mode, such as 2D, keeps the same transmit aperture size but the delays and receive weights change due to the aperture translation or steering changes with each line acquired. Simultaneous modes may also change the transmit waveform and aperture size
Chapter 3: System Overview 11

and the delays and receive weights. Downstream processing also changes, due to the unique processing requirements for the different types of data. Triggered modes are the same as the previous modes except that the frames are started and stopped on user or external inputs.
3.2.3 Digital Signal Processing SubsystemThe DSP subsystem receives data from the front end chip sets, performs processing to enhance the signal-to-noise ratio of signal features of interest, and prepares data for raster scan conversion and display.
Figure 3.3 Digital Signal Processing Subsystem
3.2.4 Backend SubsystemThe Backend subsystem is responsible for the conversion of raw acquisition data into a raster image ready for display. This includes the acquisition data path with flash suppression and temporal filtering, and the display data path with scan conversion into raster space. The Backend subsystem also contains the video data path that supports generation of video comprising of the ultrasound image as well as graphics annotation. Video generation of both standard composite interlaced video and progressive scan video is supported. Most functionality is within the ASIC. However, the memory resources for acquisition memory, and display memory are found in external memory components. The conversion from PC type video to TV type video is also performed externally.Control is received initially from the CPU to setup each functional block and afterward the hardware is completely data driven. This control takes the form of programming setup registers inside the blocks and setting up scan conversion tables. Each block provides temporary storage as required to buffer data and keep their respective processing pipeline full and operating. Also note that the block diagrams show only the data path, but each block is responsible for generating any necessary memory addresses for their respective input data stream.
12 Chapter 3: System Overview

The BackEnd subsystem is shown in the figure below.
Figure 3.4 BackEnd Subsystem Block Diagram
The backend subsystem performs processing encompassing three main data domains, acquisition data, raster data, and video data.Support for acquisition data includes the input buffer, flash suppression, frame average, and external ACQ memory. Cine buffer management is performed by the acquisition controller.Conversion from acquisition data to raster data is performed by the graphics overlay, scan conversion engine, sweeping engine, and 3D engine. Raster data is stored in an external DISPLAY memory. Also supporting raster operations is the graphics support block that provides acceleration hardware for pixel operations from the CPU and graphics overlay engine.Video data is processed as progressive scan (60 Hz) and supplied externally on a digital bus. In addition, interlaced (30 Hz) video is supplied in both composite and S-video formats. The progressive video path includes buffers, priority logic, and LUTs. External video in signals are input and multiplexed onto the external video out path to allow for external sources to display information on connected displays, VCRs, or printers.
Chapter 3: System Overview 13

3.2.5 Control Subsystem
The control subsystem is shown in the figure below.
Figure 3.5 Control Subsystem
The core control subsystem contains the processor, the system bus, the system memory resources of FLASH and RAM, the interrupt logic, system timers, a DMA engine, and a floating point unit.Support for the ultrasound subsystem consists of a scanhead interface, scanhead mux control, a portion of the system FLASH for storage of saved images, and a control path to program the ultrasound datapath.Communication interfaces consist of an Ethernet interface, USB port, two general purpose serial bus interfaces, and the I2C bus.
14 Chapter 3: System Overview

3.2.6 Power Supply and Control SubsystemThe system Power Supply and Control System consists of an easily replaced rechargeable battery pack; an On/Off Key; a standby power regulator; digital, analog, display and transducer power supplies; a power monitor and a power control system. Operating current is drawn from the battery or an external AC/DC Adapter, which also contains circuitry for charging the battery.The Power Supply and Control Subsystem are in the figure below.
Figure 3.6 Power Supply and Control System Block Diagram
DigitalPower
Supplies
AnalogPower
Supplies
BatteryPack
PowerMonitor
andControl
On/OffLatch
VEXT VSTBY
VBAT
VEXTS
VCC1
CPU
PowerSelect
VCC(n)
VCC1_Good
DPS_Enables
PWR_Enable
BDATA
+HVB+HV
+6V-6V
APS_Enable
APS_Sense
DisplayPower
Supplies LCD_Enable
TransducerPower
Supplies SH_Enable
Fan
BL_PWR
SH_5VSH_3.3VSH_VPP
RSTN
VPWR
LCD(n)
Fan_Enable TempSense
PS_Bus
On/Off Key
Off
Standby PowerRegulator
VEXTSVBATS
PowerSwitch
HV_ADJ
LCD_Control
Chapter 3: System Overview 15

3.3 System SpecificationsThis section contains system and accessory specifications and agency approvals. The specifications for recommended peripherals can be found in the manufacturers’ instructions.
3.3.1 System DimensionsLength: 11.8 in. (29.97 cm)Width: 10.9 in. (27.69 cm)Depth: 3.0 in. (7.62 cm)Weight: 8.3 lbs. (3.76 kg) with the C60 transducer and battery installed
3.3.2 Display DimensionsLength: 5.1875 in. (13.18 cm)Width: 6.75 in. (17.15 cm)Diagonal: 8.5 in. (21.59 cm)
3.3.3 Transducers• C11/8-5 MHz 11 mm microcurved array (5 ft./1.5 m)• C15/4-2 MHz 15 mm microcurved array (5.5 ft./1.7 m)• C60/5-2 MHz 60 mm curved array (5 ft./1.5 m)• HST/10-5 MHz 25 mm linear array (8 ft./2.1 m)• ICT/8-5 MHz 11 mm intracavitary array (5 ft./1.5 m)• L38/10-5 MHz 38 mm linear array (5.5 ft./1.7 m)
3.3.4 Imaging Modes2D (256 gray shades)Color power Doppler (CPD) (256 colors)Directional color power Doppler (DCPD) (256 colors)M ModePulsed wave (PW) DopplerTissue Harmonic Imaging
3.3.5 ApplicationsAbdominal ImagingCardiac ImagingCephalic ImagingGynecology ImagingInterventional and Intraoperative Imaging ApplicationsObstetrical ImagingPediatric and Neonatal ImagingSuperficial ImagingVascular Imaging
16 Chapter 3: System Overview
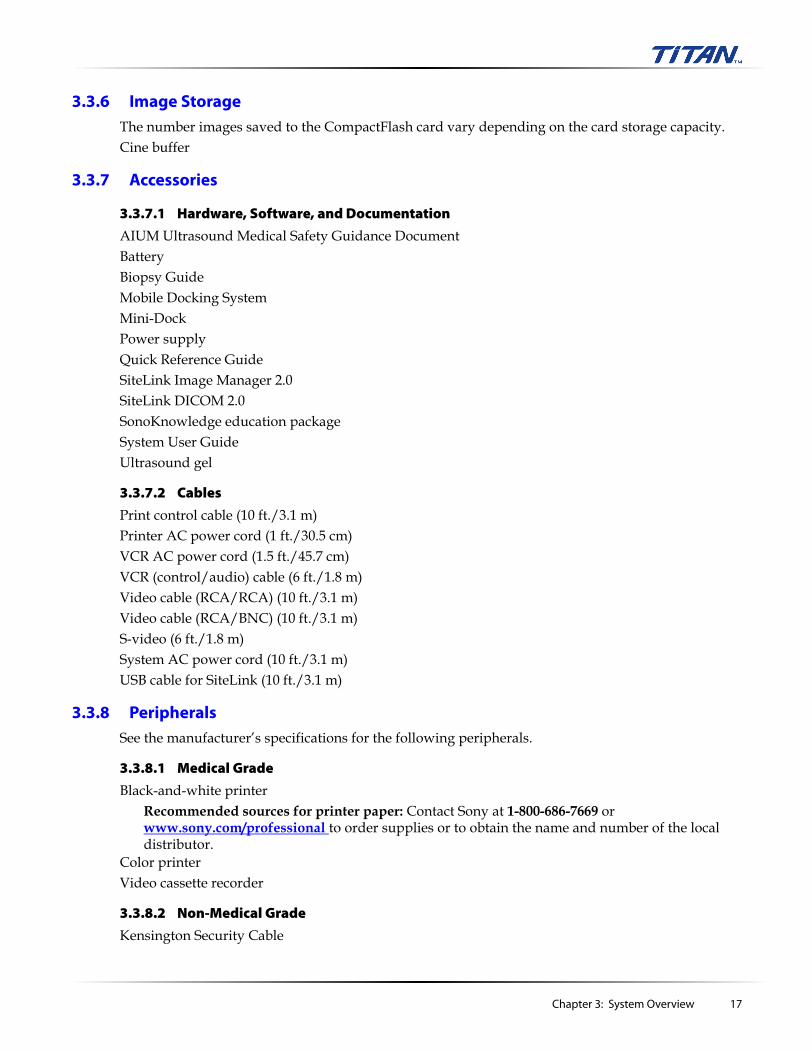
3.3.6 Image StorageThe number images saved to the CompactFlash card vary depending on the card storage capacity.Cine buffer
3.3.7 Accessories
3.3.7.1 Hardware, Software, and Documentation
AIUM Ultrasound Medical Safety Guidance DocumentBatteryBiopsy GuideMobile Docking SystemMini-DockPower supplyQuick Reference GuideSiteLink Image Manager 2.0SiteLink DICOM 2.0SonoKnowledge education packageSystem User GuideUltrasound gel
3.3.7.2 Cables
Print control cable (10 ft./3.1 m)Printer AC power cord (1 ft./30.5 cm)VCR AC power cord (1.5 ft./45.7 cm)VCR (control/audio) cable (6 ft./1.8 m)Video cable (RCA/RCA) (10 ft./3.1 m)Video cable (RCA/BNC) (10 ft./3.1 m)S-video (6 ft./1.8 m)System AC power cord (10 ft./3.1 m)USB cable for SiteLink (10 ft./3.1 m)
3.3.8 PeripheralsSee the manufacturer’s specifications for the following peripherals.
3.3.8.1 Medical Grade
Black-and-white printerRecommended sources for printer paper: Contact Sony at 1-800-686-7669 or www.sony.com/professional to order supplies or to obtain the name and number of the local distributor.
Color printerVideo cassette recorder
3.3.8.2 Non-Medical Grade
Kensington Security Cable
Chapter 3: System Overview 17

3.3.9 Temperature, Pressure, and Humidity LimitsThe temperature, pressure, and humidity limits apply only to the ultrasound system and transducers.Operating Limits: System• 10–40°C (50–104°F), 15–95% R.H.• 700 to 1060hPa (0.7 to 1.05 ATM)Shipping/Storage Limits: System without Battery• -35–65°C (-31–149°F), 15–95% R.H.• 500 to 1060hPa (0.5 to 1.05 ATM)Operating Limits: Battery• 10–40°C (50–104°F), 15–95% R.H.Shipping/Storage Limits: Battery• -20–60°C (-4–140°F), 0–95% R.H.*• 500 to 1060hPa (0.5 to 1.05 ATM)* For storage longer than 30 days, store at or below room temperature.Operating Limits: Transducer• 10–40°C (50–104°F), 15–95% R.H.Shipping/Storage Limits: Transducer• -35–65°C (-31–149°F), 15–95% R.H.
3.3.10 ElectricalPower Supply Input: 100-240 VAC, 50/60 Hz, 1.2 A Max @ 100 VAC.Power Supply Output (system on): (1) 15 VDC, 2.7A Max (system)
(2) 12.6 VDC, 0.8A Max (battery charging)Power Supply Output (system off): (1) 15 VDC, 2.0A Max (system)
(2) 12.6 VDC, 1.8A Max (battery charging)Combined output not exceeding 52W.
Battery• 6-cell, 11.25 VDC, 4.4 amp-hours, rechargeable lithium ion battery pack.• Run time is 2 hours or more, depending on imaging mode and display brightness.
3.3.11 Electromechanical Safety Standards
EN 60601-1:1997, European Norm, Medical Electrical Equipment–Part 1. General Requirements for Safety.
EN 60601-1-1:2001, European Norm, Medical Electrical Equipment–Part 1. General Requirements for Safety–Section 1-1. Collateral Standard. Safety Requirements for Medical Electrical Systems.C22.2, No. 601.1:1990, Canadian Standards Association, Medical Electrical Equipment–Part 1. General Requirements for Safety.CEI/IEC 61157:1992, International Electrotechnical Commission, Requirements for the Declaration of the Acoustic Output of Medical Diagnostic Ultrasonic Equipment.
UL 2601-1:1997, Second Edition, Underwriters Laboratories, Medical Electrical Equipment-Part 1: General Requirements for Safety.
18 Chapter 3: System Overview

3.3.12 EMC Standards Classification
EN 60601-1-2:2001, European Norm, Medical Electrical Equipment. General Requirements for Safety-Collateral Standard. Electromagnetic Compatibility. Requirements and Tests.CISPR11:97, International Electrotechnical Commission, International Special Committee on Radio Interference. Industrial, Scientific, and Medical (ISM) Radio-Frequency Equipment Electromagnetic Disturbance Characteristics-Limits and Methods of Measurement.
The Classification for the SonoSite system, SiteStand, accessories, and peripherals when configured together is: Group 1, Class A.
3.3.13 Airborne Equipment StandardsRTCA/DO160D:1997, Radio Technical Commission for Aeronautics, Environmental Conditions and Test Procedures for Airborne Equipment, Section 21.0 Emission of Radio Frequency Energy, Category B.
3.3.14 ECG StandardANSI/AAMI EC53-1995, Association for the Advancement of Medical Instrumentation, ECG Cables, and Lead Wires. The SonoSite ultrasound system meets the requirements of this standard except Section 4.4.1 (Exposure to ethylene oxide (EO) sterilization) and Section 4.5.9 (Connector retention force). The requirement in Section 4.5.9 does not apply, because the product weighs less than 8. 4 pounds.
3.3.15 DICOM StandardNEMA PS 3.15: 2000, Digital Imaging and Communications in Medicine (DICOM)-Part 15: Security Profiles.
Chapter 3: System Overview 19

20 Chapter 3: System Overview

Chapter 4: Setup and Operation
4.1 System Controls
Figure 4.1 System Controls
1
2
34
6
7
8 9 11 12 13
14
15
1716
1819
20
5
10
Table 4.1: System Controls
Number System Control Description
1 Power Turns system on and off.
2 Alphanumeric Use to enter text and numbers.
3 Annotation Text Turns the keyboard on and off for text entry.Picto Turns the pictographs/pictograph marker on and off.Arrow Displays an arrow that can be moved and rotated within the
image area.
4 THI Turns Tissue Harmonic Imaging on and off.
5 Depth Depth Adjusts the imaging depth for 2D.Depth Up Decreases imaging depth.Depth Down Increases imaging depth.
6 Zoom Magnifies image 2x.
7 Gain Near Adjusts the gain applied to the near field of the image.Far Adjusts the gain applied to the far field of the image.Gain Adjusts the overall gain applied to the entire image.
Chapter 4: Setup and Operation 21

4.2 System ComponentsThe SonoSite system components are identified in “About the System” on page 2.
8 AC power indicator
A steady green light indicates AC power is connected. A flashing green light indicates the system is in sleep mode.
9 Measurements/Calculations
Caliper activates a measurement caliper on the screen.Calcs turns the calculation menu on and off.
10 Touchpad Use to select, adjust, and move objects on the screen.
11 Select Use to switch among touchpad control for line position (2D), text position (text), calipers for measurement (calipers), pictograph marker position/angle (picto), arrow position/orientation (arrow).
12 Print Prints the active image to the printer.
13 Save Saves an image to the CompactFlash card.
14 Remappable controls
Controls features on the context menu which are adjusted based on the system state.
15 Forms Setup Access to the system settings.Report Access to the patient report.Review Access to the patient list and saved patient images.Patient Access to patient information.
16 (Delta key) Use as a shortcut to existing functionality in the system.
17 Video recording Record Turns VCR record on and off.Save Clip (Available on future releases.)
18 Freeze Freeze Stops the live imaging and displays a frozen image.Cine Review images stored in the cine buffer; (back/forward)back/forward through last-in, first-out sequence.
All mode images can be stored and reviewed in the cine buffer.
19 Update Toggles between image modes in M Mode and Doppler, e.g., between Doppler sample line and Doppler spectral trace.
20 Modes M Mode Turns M Mode on and off.Doppler Turns Doppler on and off.Color Turns CPD/DCPD on and off.2D Turns 2D on and off.
Table 4.1: System Controls (Continued)
Number System Control Description
22 Chapter 4: Setup and Operation

4.3 Setup
Key click 1 Press the Setup key.2 Select Audio, Battery from the on-screen menu.3 In the Key click list, select On or Off.
Beep alert 1 Press the Setup key.2 Select Audio, Battery from the on-screen menu.3 In the Beep alert list, select On or Off.
Sleep delay 1 Press the Setup key.2 Select Audio, Battery from the on-screen menu.3 In the Sleep delay list, select Off, 5, or 10 minutes.
Power delay 1 Press the Setup key.2 Select Audio, Battery, from the on-screen menu.3 In the Power delay list, select Off, 15, or 30 minutes.
OB Authors 1 Press the Setup key.2 Select Calculations from the on-screen menu.3 In OB Authors list, select the desired OB authors.
Date 1 Press the Setup key.2 Select Date and Time, Presets from the on-screen menu.3 In the Date field, enter the current date (year, month, and day).
Time 1 Press the Setup key.2 Select Date and Time, Presets from the on-screen menu.3 In the Time field, enter the current time in 24 hour format (hours and
minutes).
Thermal Index 1 Press the Setup key.2 Select Date and Time, Presets from the on-screen menu.3 In the Thermal Index list, select TIS, TIB, or TIC.
Doppler Scale 1 Press the Setup key.2 Select Date and Time, Presets from the on-screen menu.3 In the Doppler Scale list, select cm/s or kHz.
Printer 1 Press the Setup key.2 Select Date and Time, Presets from the on-screen menu.3 In the Printer list, select the desired printer from the list of
recommended printers.
Video mode 1 Press the Setup key.2 Select Date and Time, Presets from the on-screen menu.3 In the Video mode list, select NTSC or PAL.
Delta Key 1 Press the Setup key.2 Select Delta Key, F Keys from the on-screen menu.3 Select desired functionality for the Delta key.
The Delta key will now control this function.
Chapter 4: Setup and Operation 23

Press the Setup key to exit.
4.4 TouchpadThe touchpad is used to select, adjust, and move objects on the screen. For example, it controls the caliper position, CPD/DCPD box position, floating cursor, and more.Note: The arrow keys control much of the same functionality as the touchpad.
4.5 AccessoriesFor information about accessories and other SonoSite products, refer to the user guide for each product.
F Keys 1 Press the Setup key.2 Select Delta Key, F Keys from the on-screen menu.3 Type in desired text. Use the Backspace key or Delete key to correct
mistakes.
Patient Header 1 Press the Setup key.2 Select Display Information from the on-screen menu. 3 Select the desired check boxes to display desired information in the
patient header.
Mode Data 1 Press the Setup key.2 Select Display Information from the on-screen menu.3 Select the desired check boxes to display imaging information on the
screen.
System Status 1 Press the Setup key.2 Select Display Information from the on-screen menu.3 Select the desired check boxes to display the system status on the
screen.
System Information 1 Press the Setup key.2 Select System Information from the on-screen menu.Note: To install a license key see “Installing a License Key” on page 33.
Reset To return settings for this setup page to factory default, select Reset from the on-screen menu.
24 Chapter 4: Setup and Operation
4.6 Preparing the System for Operation
4.6.1 Installing and Removing the Battery
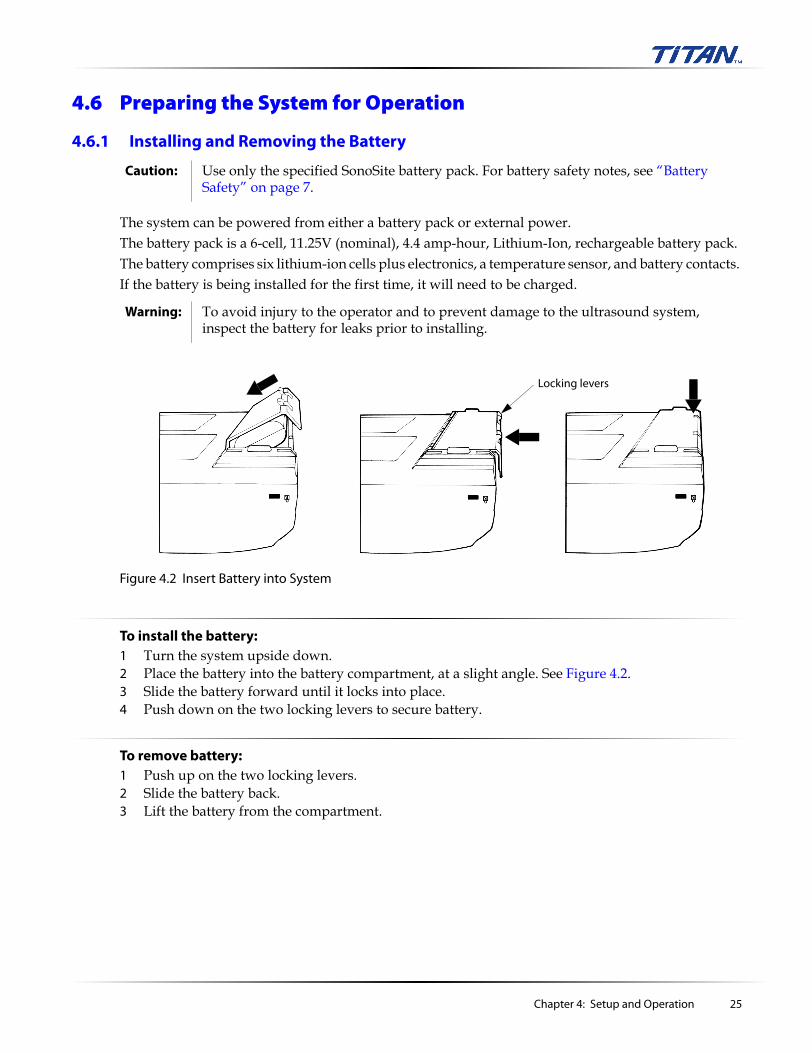
The system can be powered from either a battery pack or external power.The battery pack is a 6-cell, 11.25V (nominal), 4.4 amp-hour, Lithium-Ion, rechargeable battery pack. The battery comprises six lithium-ion cells plus electronics, a temperature sensor, and battery contacts. If the battery is being installed for the first time, it will need to be charged.
Figure 4.2 Insert Battery into System
To install the battery:1 Turn the system upside down.2 Place the battery into the battery compartment, at a slight angle. See Figure 4.2.3 Slide the battery forward until it locks into place.4 Push down on the two locking levers to secure battery.
To remove battery:1 Push up on the two locking levers.2 Slide the battery back.3 Lift the battery from the compartment.
Caution: Use only the specified SonoSite battery pack. For battery safety notes, see “Battery Safety” on page 7.
Warning: To avoid injury to the operator and to prevent damage to the ultrasound system, inspect the battery for leaks prior to installing.
Locking levers
Chapter 4: Setup and Operation 25
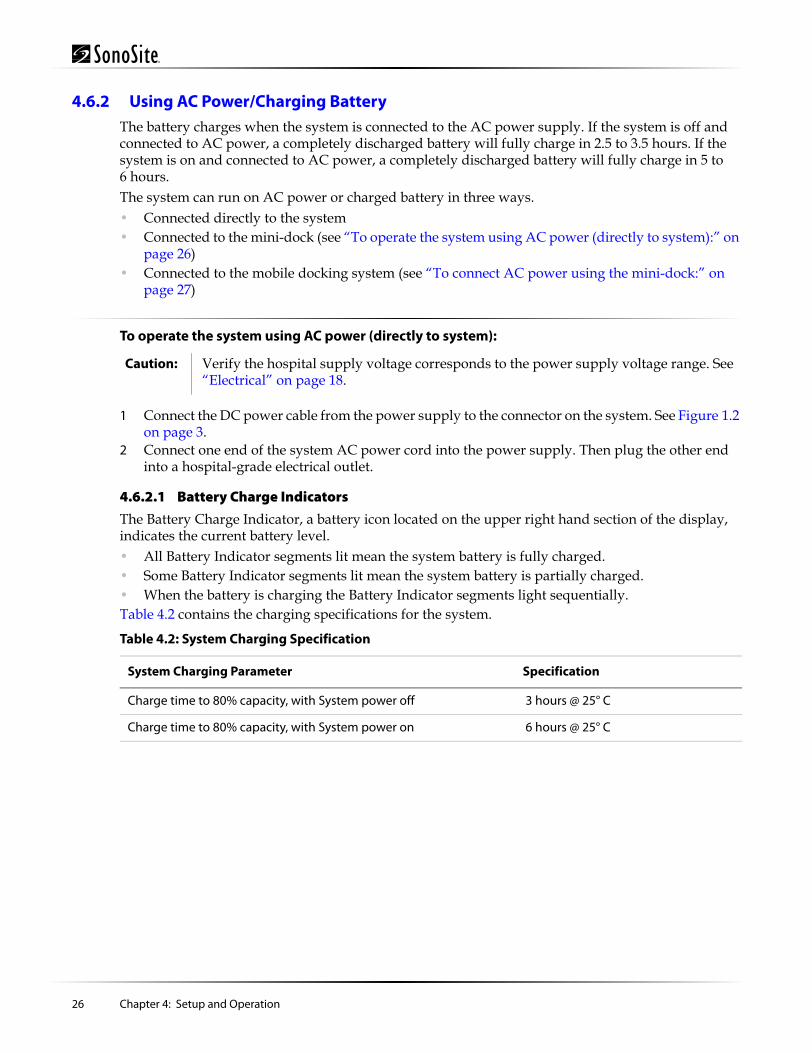
4.6.2 Using AC Power/Charging BatteryThe battery charges when the system is connected to the AC power supply. If the system is off and connected to AC power, a completely discharged battery will fully charge in 2.5 to 3.5 hours. If the system is on and connected to AC power, a completely discharged battery will fully charge in 5 to 6 hours.The system can run on AC power or charged battery in three ways.• Connected directly to the system• Connected to the mini-dock (see “To operate the system using AC power (directly to system):” on
page 26)• Connected to the mobile docking system (see “To connect AC power using the mini-dock:” on
page 27)
To operate the system using AC power (directly to system):
1 Connect the DC power cable from the power supply to the connector on the system. See Figure 1.2 on page 3.
2 Connect one end of the system AC power cord into the power supply. Then plug the other end into a hospital-grade electrical outlet.
4.6.2.1 Battery Charge Indicators
The Battery Charge Indicator, a battery icon located on the upper right hand section of the display, indicates the current battery level.• All Battery Indicator segments lit mean the system battery is fully charged.• Some Battery Indicator segments lit mean the system battery is partially charged.• When the battery is charging the Battery Indicator segments light sequentially.Table 4.2 contains the charging specifications for the system.
Caution: Verify the hospital supply voltage corresponds to the power supply voltage range. See “Electrical” on page 18.
Table 4.2: System Charging Specification
System Charging Parameter Specification
Charge time to 80% capacity, with System power off 3 hours @ 25° C
Charge time to 80% capacity, with System power on 6 hours @ 25° C
26 Chapter 4: Setup and Operation

4.6.3 Connecting to AC Power
Figure 4.3 Connectivity Diagram
To connect AC power to the docking system:Note: The AC power cord to the power supply and the DC power cord from the power supply are preinstalled.1 Remove back panel.2 Connect the system AC power cord to the power strip on the top shelf of the mobile docking
system.A country specific AC power cord is provided.
3 When ready to use, route the AC power cord out the back, and replace the back panel.4 Connect the system AC power cord to a hospital-grade electrical outlet.
To connect AC power using the mini-dock:1 Insert the ultrasound system into the mini-dock.2 Connect the DC power cable from the power supply to the connector on the mini-dock.3 Connect one end of the system AC power cord into the power supply. Then plug the other end
into a hospital-grade electrical outlet.
Mini-dock
PowerStrip
Power Supply
ACPower
PowerOut
Printer
AC In
Video- InRemote Out
VCR
AC In
S-Video Composite
AudioIn
AudioOut
VideoOut
RS 232
VideoIn
To AC Power(wall outlet)
ToPC
AB
C
D
E F
G
Dip switches1-4 Down5,6 Up
Chapter 4: Setup and Operation 27

4.6.4 Connecting and Removing Transducers
Figure 4.4 Connect the Transducer
To connect the transducer:1 Turn the system upside down (if not in docking system).2 Pull the transducer latch up and rotate it clockwise.3 Align the transducer connector with the connector on the bottom of the system.4 Insert the transducer connector into the system connector.5 Turn the latch counterclockwise.6 Press the latch down, securing the transducer connector to the system.
To remove the transducer:1 Pull the latch up and rotate it clockwise.2 Pull the transducer connector away from the system.
4.6.5 Turning the System On and Off
To turn the system on/off:
1 Locate the Power key on the top left side of the system. See Figure 4.1 on page 21.2 Press the Power key once to turn on and once to turn off.
Warning: The transducer connector can become hot during operation. This is normal. Operate the system in the docking system or on a flat, hard surface to allow air flow past the connector.
Caution: The electrical contacts inside the system transducer connector may be damaged by foreign material. Keep foreign material out of the connector.
Caution: Do not use the system if an error message appears on the display. Note the error code and turn off the system. Call SonoSite or your local representative.
28 Chapter 4: Setup and Operation
To wake up the system:To conserve battery life, the system is configured to go into sleep mode. The system goes into sleep mode when the lid is closed or if the system has not been touched for a preset amount of time. Press any key, touch the touchpad, open the lid to wake up the system. To adjust the time for sleep delay, see “Sleep delay” on page 23.
4.7 Upgrading the System SoftwareAs described in “About the System Software” on page 4, software upgrades are provided on CompactFlash cards, which are installed in the rear CompactFlash slot on the right hand side of the system. Upgrades provided may be required or optional.Whenever you install a CompactFlash card containing a newer version of software into the system, the system will determine the level of software, prepare the system for the upgrade, and then install the new software onto the system.
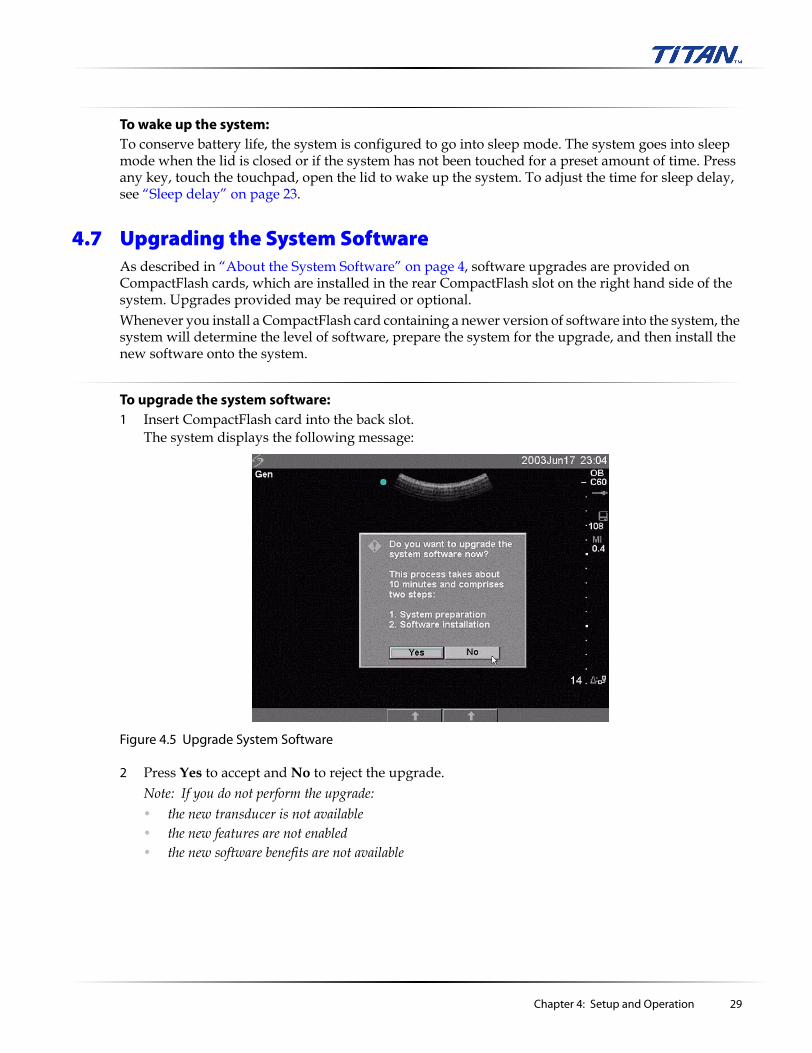
To upgrade the system software:1 Insert CompactFlash card into the back slot.
The system displays the following message:
Figure 4.5 Upgrade System Software
2 Press Yes to accept and No to reject the upgrade.Note: If you do not perform the upgrade:• the new transducer is not available• the new features are not enabled• the new software benefits are not available
Chapter 4: Setup and Operation 29

When you have accepted the upgrade, the system loads the new software and displays the following message:
Figure 4.6 System Software Loading
Note: The system upgrade can take up to 10 minutes; however, many software upgrades will be completed in less time.When the software upgrade has prepared the system for upgrade, the system displays the following message:
Figure 4.7 System Software Step 1 Restart
3 Press Restart.If the software upgrade is unsuccessful, the system displays an error code and you must contact SonoSite technical support at 1-877-657-8118.
30 Chapter 4: Setup and Operation

After restart, the system goes into the upgrade process. The system displays the following message:
Figure 4.8 System Software Installation
When the system preparation is completed, the system displays the following message:
Figure 4.9 System Software Step 2 Restart
4 Press Restart.During the restart, the initial system screen shows a progress indicator. The progress indicator is present while the system is replacing its operating software and disappears when the process is completed.When the operating software has been replaced, the system presents you with the license update screen so that you may license the software.
Chapter 4: Setup and Operation 31

Figure 4.10 System Software License Key
At this point, the software upgrade process is complete, but the system software is not yet licensed. The following section explains how to license your software.
4.7.1 Obtaining a License KeyA license key is required to update your system. It may be obtained by contacting SonoSite, Inc. Technical Support Department.USA/Canada Customers• Technical support: 1-877-657-8118• Technical support fax: 1-425-951-6700• Technical support e-mail: [email protected]• SonoSite website: www.sonosite.com and select Products & Solutions and then
Technical SupportInternational Customers• Contact your local representative
or call 425-951-1330• Technical support fax: 425-951-6700• Technical support e-mail: [email protected]• SonoSite website: www.sonosite.com and select Products & Solutions and then
Technical SupportTo receive your license key, you will need to provide the following information, which is displayed on the system information screen of your system:• Name of the person installing the upgrade• System serial number (located on the bottom of your system)• ARM version• PCBA serial number
32 Chapter 4: Setup and Operation
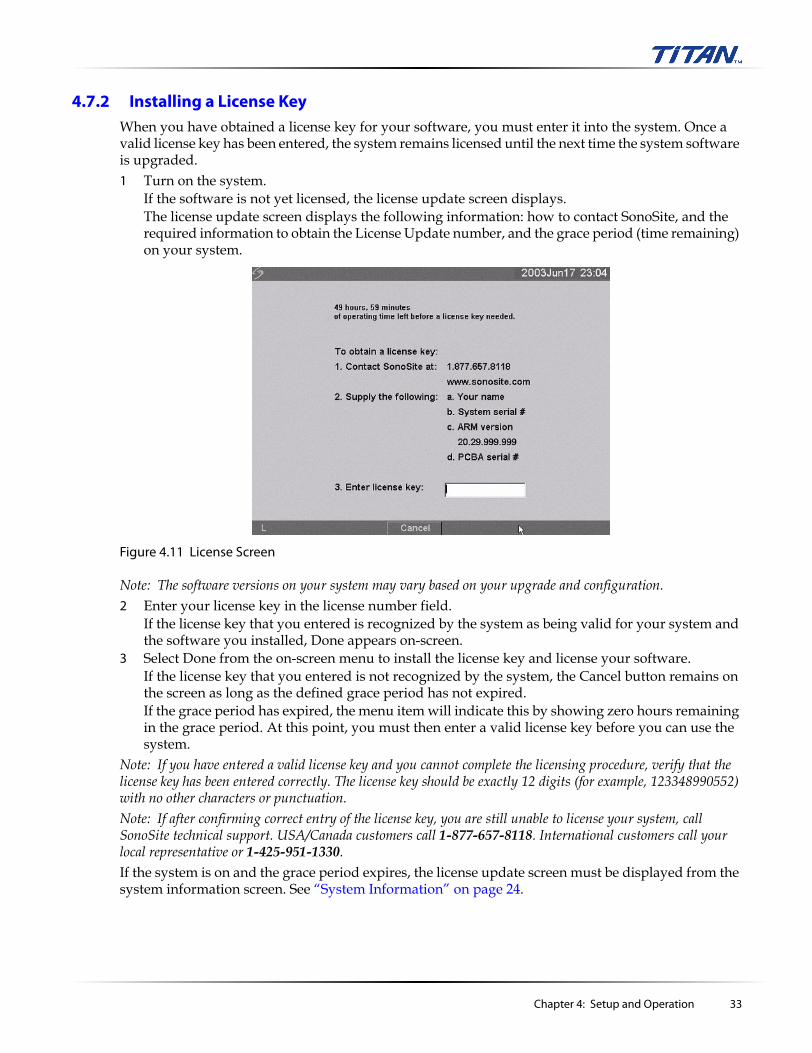
4.7.2 Installing a License KeyWhen you have obtained a license key for your software, you must enter it into the system. Once a valid license key has been entered, the system remains licensed until the next time the system software is upgraded. 1 Turn on the system.
If the software is not yet licensed, the license update screen displays.The license update screen displays the following information: how to contact SonoSite, and the required information to obtain the License Update number, and the grace period (time remaining) on your system.
Figure 4.11 License Screen
Note: The software versions on your system may vary based on your upgrade and configuration.2 Enter your license key in the license number field.
If the license key that you entered is recognized by the system as being valid for your system and the software you installed, Done appears on-screen.
3 Select Done from the on-screen menu to install the license key and license your software.If the license key that you entered is not recognized by the system, the Cancel button remains on the screen as long as the defined grace period has not expired.If the grace period has expired, the menu item will indicate this by showing zero hours remaining in the grace period. At this point, you must then enter a valid license key before you can use the system.
Note: If you have entered a valid license key and you cannot complete the licensing procedure, verify that the license key has been entered correctly. The license key should be exactly 12 digits (for example, 123348990552) with no other characters or punctuation.Note: If after confirming correct entry of the license key, you are still unable to license your system, call SonoSite technical support. USA/Canada customers call 1-877-657-8118. International customers call your local representative or 1-425-951-1330.If the system is on and the grace period expires, the license update screen must be displayed from the system information screen. See “System Information” on page 24.
Chapter 4: Setup and Operation 33

4.7.3 To Display the System Information Screen1 Press the Setup key. 2 Select System Information from the on-screen menu.The system information screen displays the following information: Product, Modes, Previous License Update, Boot Version, ARM Version, DSP Version, PCBA Serial Number, PLD, CPLD Version, SH Database Version, and SH Serial Number.Note: The software versions on your system may vary based on your upgrade and configuration.
Figure 4.12 System Information Screen
34 Chapter 4: Setup and Operation

4.7.4 To Display the License Update Screen1 Press the Setup key.2 Select System Information from the on-screen menu.3 On the lower section of system information screen, select the button under License.
The license update screen displays.4 Perform the steps in “Installing a License Key” on page 33.
Figure 4.13 Setup Screen: License Key
Chapter 4: Setup and Operation 35

36 Chapter 4: Setup and Operation

Chapter 5: Cleaning and Disinfecting
5.1 Universal PrecautionsSonoSite recommends that personnel who have regular exposure to medical devices returned for service practice “universal precautions.” Universal precautions are an approach to infection control. Those servicing this product should follow the prescribed standards for their area.
5.2 Receipt of Suspected Contaminated MaterialsSonoSite recommends that personnel who have regular exposure to medical devices returned for service practice “universal precautions.” Universal precautions are an approach to infection control. Those servicing this product should follow the prescribed standards for their area.If visual inspection suggests possible contamination when opening a product returned for service, take proper steps to contain the contamination. Wear necessary Personal Protective Equipment (PPE) (gloves, masks, and gowns) when opening or examining a suspect package.Before transfer to a service area, label the suspect package “contaminated” and seal it to prevent exposure.Discard any packing materials removed from a package suspected of contamination in a biohazard container.Discard any contaminated materials received with the product in an appropriate biohazard container. Contaminated materials may include biohazardous waste and sharps.Maintain a disinfecting agent in case any work surface is contaminated. The recommended agent is 0.5% sodium hypochlorite (bleach) solution. To prepare the agent, mix one part household bleach (5.25% - 6% sodium hypochlorite) to nine parts water. Spray or wipe the solution onto the work surface and allow to air dry.Please use these recommendations when cleaning or disinfecting your ultrasound system, transducers, and accessories. This chapter assists in effective cleaning and disinfection, but it is also intended to protect the system and transducers against damage during cleaning or disinfection. For more information about cleaning or disinfecting solutions or ultrasound gels for the transducer, call SonoSite technical support or your local representative. For information about a specific product, call the product manufacturer.
5.3 Recommended DisinfectantsFor a list of disinfectants recommended for use on the system and transducers, see the TITAN Ultrasound System User Guide.
Chapter 5: Cleaning and Disinfecting 37

38 Chapter 5: Cleaning and Disinfecting

Chapter 6: Troubleshooting
6.1 Basic TroubleshootingThis chapter contains information to help you correct problems with system operation and provides instructions on the proper care of the system, transducer, and accessories.If you encounter difficulty with the system, use the information in this chapter to help correct the problem. If the problem is not covered here, contact SonoSite technical support at the following numbers or addresses:USA/Canada Customers• Technical support: 1-877-657-8118 • Technical support fax: 1-425-951-6700• Technical support e-mail: [email protected]• SonoSite website: www.sonosite.com and select Products & Solutions and then
Technical SupportInternational Customers• Contact your local representative
or call 425-951-1330• Technical support fax: 425-951-6700• Technical support e-mail: [email protected]• SonoSite website: www.sonosite.com and select Products & Solutions and then
Technical Support
Table 6.1: Troubleshooting
Symptom Solution
System will not power on. Check all power connections.Perform the following sequence: remove DC input connector and battery; wait 10 seconds; connect DC input or install battery; press the power key.Ensure the battery is charged.
System image quality is poor. Adjust the LCD screen to improve viewing angle.Adjust the brightness, as necessary, to improve image quality.Adjust the gain.
Zoom does not work. Press Freeze key. Zoom does not work when the image is frozen.
No CPD image. Adjust the gain.
No DCPD image. Adjust the gain.
No OB measurement selections. Select the OB or Gyn exam type.
Print does not work. Set the correct printer in system setup.Check the printer connections.Check the printer to ensure that it is turned on and set up properly. See the printer manufacturer’s instructions, if necessary.
Chapter 6: Troubleshooting 39

6.2 Periodic MaintenanceThere is no recommended periodic or preventive maintenance required for the system, transducers, or accessories. There are no internal adjustments or alignments required. There are no functions that require periodic testing or calibration. All maintenance and/or performance tests are described in Chapter 8, “Performance Testing” of this manual. Performing maintenance activities not described in this manual may void the product warranty.Local regulations may require electrical safety testing.Contact SonoSite Technical Support for any maintenance questions.
VCR does not record. Check the VCR connections.Check the VCR to ensure that it is turned on and set up properly. See the VCR manufacturers’ instructions, if necessary.
External monitor does not work. Check the monitor connections.Check the monitor to ensure that it is turned on and set up properly. See the monitor manufacturers’ instructions, if necessary.
Unexpected labels using the function keys.
Ensure labels have been assigned to the function keys.
Inaccurate fetal age calculation. Ensure that the patient information, date, and time are set accurately.
System does not recognize the transducer.
Disconnect and reconnect the transducer.
Text cursor does not move when touchpad or arrows are selected.
Text cursor is constrained to one line.
A maintenance icon displays on the system screen.
This icon indicates that system maintenance may be required. Record the number in parentheses on the C: line and contact SonoSite or your SonoSite representative.
Table 6.1: Troubleshooting (Continued)
Symptom Solution
40 Chapter 6: Troubleshooting

6.3 System and Subsystem DiagnosisThis section covers basic diagnostic and troubleshooting procedures you may follow if the system does not operate properly. To diagnose system failures, consult the referenced diagnostic figures that follow or the SonoSite Technical Support department.
6.4 System RepairThe system is repairable through subassembly replacement or through replacement of parts as recommended by SonoSite in Chapter 7, “Replacement Procedures” of this manual. Component level repair of Printed Circuit Board Assemblies is performed only at the SonoSite repair facility. Replacement of board level components by unauthorized service facilities voids the SonoSite warranty.
6.5 Test EquipmentTest equipment is not required for this troubleshooting section. Troubleshooting test aids include an external monitor and a spare battery.
6.6 Failure Modes
6.6.1 DisplayAttach an external monitor to the external video connector to verify display failures. For example, if the system display is blank and the external monitor works properly, the system display requires servicing.Follow the Display Flow Diagram (Figure 6.2) to evaluate the cause of failure.
6.6.2 Control PanelGo to the patient information screen and press each individual key on the keyboard to identify and verify control panel failures. Press function keys and note their response.Follow the Control Panel Flow Diagram (Figure 6.3) to evaluate the cause of failure.
Table 6.2: Troubleshooting Subassemblies and Diagnostic Figures
Subassemblies Diagnostic Figures
Display Figure 6.2
Control Panel Figure 6.3
System Figure 6.4
Battery Figure 6.5
Mini-Dock/Mobile Docking System Figure 6.6
Chapter 6: Troubleshooting 41

6.6.3 System/Main PCBAThe main PCBA may present symptoms that are difficult to assess. Main PCBA failures typically result in “assert codes” that are output to the display. If an assert code should display, note the assert code and contact SonoSite technical support to clarify the failure. Figure 6.1 shows an assert code and a maintenance icon displayed on the system screen.Follow the System Flow Diagram (Figure 6.4) to evaluate the cause of failure.
Figure 6.1 Assert Screen
6.6.3.1 Clearing a System Assert Code
After the assert code has been recorded, power down the system.1 Press the Power key on the system and release it.2 Turn the power back on to check if the fault cleared or if the condition remains.
If the condition cleared, you may use the system. If the condition remains, corrective action must be taken before the system can be used. Contact SonoSite Technical Support for assistance or repair parts.
3 If the Power key is not functional, all sources of power must be removed to allow the system to power down.
6.6.4 BatteryIf the system does not operate or does not run for the expected duration for a given charge, battery failure may have occurred.Follow the Battery Flow Diagram (Figure 6.5) to evaluate the cause of failure.
Assert code
42 Chapter 6: Troubleshooting

6.7 Troubleshooting Flow Diagrams
6.7.1 Display
Figure 6.2 Display Flow Diagram
Chapter 6: Troubleshooting 43

6.7.2 Control Panel
Figure 6.3 Control Panel Flow Diagram
44 Chapter 6: Troubleshooting

6.7.3 System
Figure 6.4 System Flow Diagram
Chapter 6: Troubleshooting 45

6.7.4 Battery
Figure 6.5 Battery Flow Diagram
46 Chapter 6: Troubleshooting

6.7.5 Mini-Dock/Mobile Docking System
Figure 6.6 Mini-Dock and Mobile Docking System Flow Diagram, Part 1
Chapter 6: Troubleshooting 47

Figure 6.7 Mini-Dock and Mobile Docking System Flow Diagram, Part 2
48 Chapter 6: Troubleshooting

Chapter 7: Replacement Procedures
7.1 Display ReplacementNote: Consult Chapter 6, “Troubleshooting” before making any repairs.
7.1.1 Required PartsService Assembly, Display, TITAN (P03861)
7.1.2 Required Tools
• #1 Phillips screwdriver• Torque screwdriver, 2.0–10.0 in./lb. (0.23–1.1 newton meter)• 8 mm nut driver• An anti-static mat• A wrist grounding strap
7.1.3 Display Removal1 Remove the battery from the system. See Section 4.6.1, “Installing and Removing the Battery,” on
page 25 for battery removal.2 Remove the two screws from the back of the system per Figure 7.1.
Figure 7.1 System Rear
3 Lay the system on the top and remove the two screws from the bottom of the system per Figure 7.2.
Caution: Always use correct ESD procedures. ESD damage is cumulative and may not be noticeable at first. Initial ESD symptoms may be slightly degraded performance or image quality.
Screws (2)
Chapter 7: Replacement Procedures 49

Figure 7.2 System Bottom
4 Turn the system over, fully open the display, and lift off the Control Panel per Figure 7.3.
Figure 7.3 Control Panel Removal
Screws (2)
50 Chapter 7: Replacement Procedures

5 Disconnect the two connectors from the display to the Main PCBA per Figure 7.3.3.5.
Figure 7.4 Display Connectors
6 Remove the four screws from the Display Hinges per Figure 7.5.
Figure 7.5 Display Screws
7.1.4 Display Replacement1 Set the new display in place.2 Install the four screws that hold the Display in place. Torque the screws to 5.5 inch pounds.3 Connect the two connectors that connect the Display to the Main PCBA.4 Place the Control Panel in place.5 Reinstall the four screws that hold the Control Panel in place. Torque the screws to 5.5 inch
pounds.
Connectors (2)
Screws (4)
Chapter 7: Replacement Procedures 51

7.1.5 Test the Display1 Replace the battery, attach an external power supply, or attach a mini-dock.2 Press the Power key to apply power to the system.3 Verify the display operates correctly.
7.2 Control Panel Subassembly Replacement
7.2.1 Required Parts• P03862 Service Assembly, Control Panel TITAN, English or• P03863 Service Assembly, Control Panel TITAN, English, International, or• P03864 Service Assembly, Control Panel TITAN, French, or• P03865 Service Assembly, Control Panel TITAN, German, or• P03866 Service Assembly, Control Panel TITAN, Italian, or• P03867 Service Assembly, Control Panel TITAN, Spanish, or• P03868 Service Assembly, Control Panel TITAN, Portuguese
7.2.2 Required Tools• #1 Phillips screwdriver• Torque screwdriver, 2.0–10.0 in./lb. (0.23–1.1 newton meter)• 8 mm nut driver• An anti-static mat• A wrist grounding strap
7.2.3 Control Panel Removal1 Remove the two screws from the rear of the system per Figure 7.1.2 Remove the two screws from the bottom of the system per Figure 7.2.3 Turn the system over, fully open the display, and lift off the Control Panel per Figure 7.3.
7.2.4 Control Panel Replacement1 Place the new control panel in place.2 Install the four screws removed in Section 7.2.3. Torque the screws to 5.5 inch pounds.
Caution: Always use correct ESD procedures. ESD damage is cumulative and may not be noticeable at first. Initial ESD symptoms may be slightly degraded performance or image quality.
52 Chapter 7: Replacement Procedures
7.3 Main System Disassembly for Repair and/or Replacement
7.3.1 Required PartsParts for the Main System Repair could include any of the following• P03871 Service Assembly Main PCBA, TITAN• P03870 Service Assembly Power Supply, TITAN• P03869 Service Assembly TGC, TITAN• P03872 Service Assembly Speaker, TITAN• P03873 Service Assembly Upper Enclosure, TITAN• P03874 Service Assembly Lower Enclosure, TITAN
Note: Replacing the enclosure bottom requires printing a new label for the product. This must be printed prior to shipping the enclosure bottom. You will be required to provide the information to print this label.
• Nest Frame Assembly, TITAN (order these parts individually)• P00364 Connector, Interposer• P00524 Screw, Shoulder, Thrust Plate• P00353 Wear Plate• P00646 Spring, Thrust Plate• P02860 Nest Plate, Interposer• P00352 Shield, Perimeter, Long• P00527 Shield, Perimeter, Short• P02861 Post, Mounting
7.3.2 Required Tools
• #1 Phillips screwdriver• Torque screwdriver, 2.0–10.0 in./lb. (0.23–1.1 newton meter)• 8 mm nut driver• An anti-static mat• A wrist grounding strap
7.3.3 Main PCBA Removal1 Remove the display and the control panel from the system following the removal procedures in
Section 7.1.3 and Section 7.2.3.2 Remove the additional 4 screws from the bottom of the system per Figure 7.6.
Caution: Always use correct ESD procedures. ESD damage is cumulative and may not be noticeable at first. Initial ESD symptoms may be slightly degraded performance or image quality.
Chapter 7: Replacement Procedures 53

Figure 7.6 Bottom Screws
3 Turn the system over and remove the top enclosure from the main PCBA. This exposes all of the replaceable parts for the main system per Figure 7.7.
Screws (4)
54 Chapter 7: Replacement Procedures

Figure 7.7 System Components
7.3.3.1 Speaker Replacement
1 Press on the connector release and pull the connector out of the receptacle.2 Gently pry off the retaining clip with a flat bladed pry tool. See Figure 7.8.
Figure 7.8 Speaker Replacement
Nest frame assembly
TGC assembly
SpeakerSpeaker
Power supply
Main PCBA
Connector
Retaining clip
Chapter 7: Replacement Procedures 55
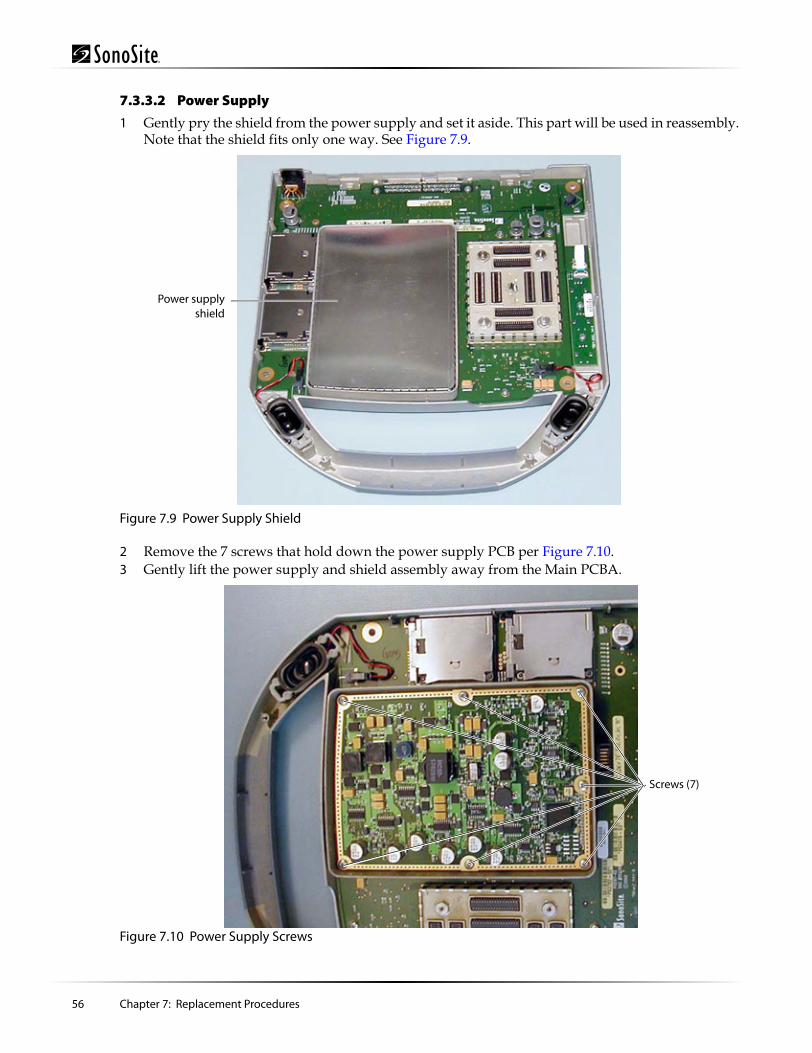
7.3.3.2 Power Supply
1 Gently pry the shield from the power supply and set it aside. This part will be used in reassembly. Note that the shield fits only one way. See Figure 7.9.
Figure 7.9 Power Supply Shield
2 Remove the 7 screws that hold down the power supply PCB per Figure 7.10.3 Gently lift the power supply and shield assembly away from the Main PCBA.
Figure 7.10 Power Supply Screws
Power supplyshield
Screws (7)
56 Chapter 7: Replacement Procedures

7.3.3.3 TGC PCBA
1 Remove the TGC knobs identified in Figure 7.11.
Figure 7.11 TGC Knobs
2 Remove the flex cable from the TGC PCB by lifting on the flex release tab. See Figure 7.12.3 Remove the flex cable from the Main PCBA by lifting gently on the flex release tab.4 Remove the two screws holding the TGC PCBA in place.
Figure 7.12 TGC Removal
TGC knobs (3)
Release tabs Screws (2)
Chapter 7: Replacement Procedures 57
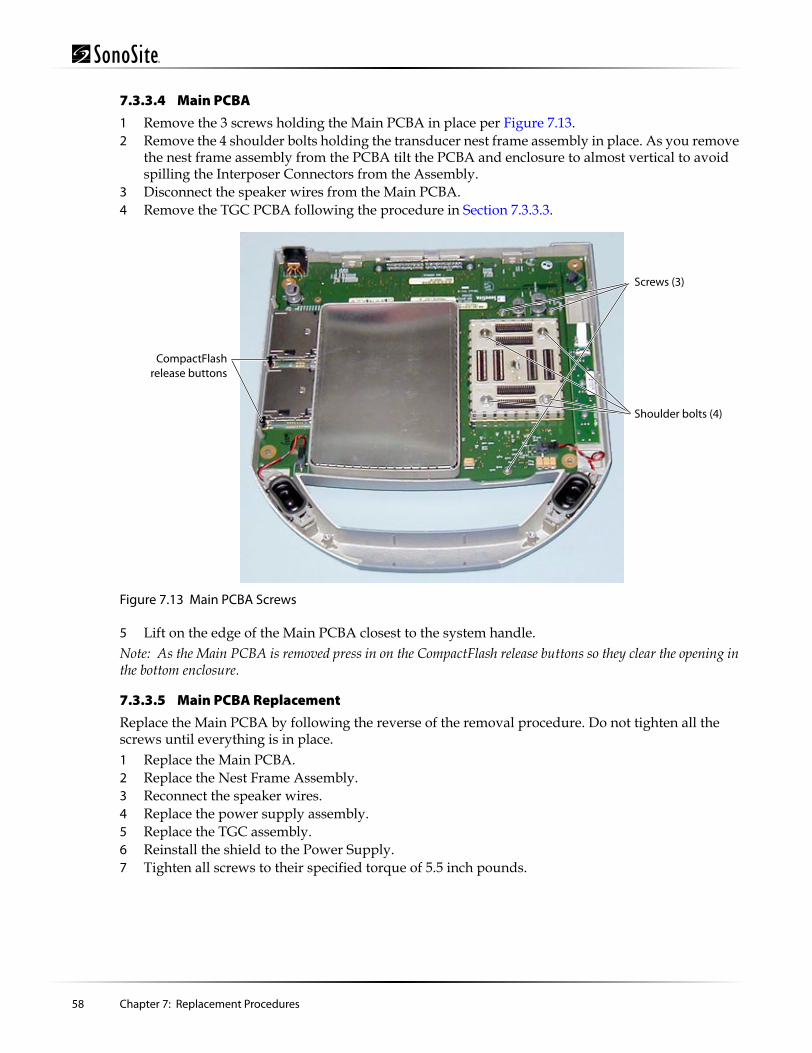
7.3.3.4 Main PCBA
1 Remove the 3 screws holding the Main PCBA in place per Figure 7.13.2 Remove the 4 shoulder bolts holding the transducer nest frame assembly in place. As you remove
the nest frame assembly from the PCBA tilt the PCBA and enclosure to almost vertical to avoid spilling the Interposer Connectors from the Assembly.
3 Disconnect the speaker wires from the Main PCBA.4 Remove the TGC PCBA following the procedure in Section 7.3.3.3.
Figure 7.13 Main PCBA Screws
5 Lift on the edge of the Main PCBA closest to the system handle.Note: As the Main PCBA is removed press in on the CompactFlash release buttons so they clear the opening in the bottom enclosure.
7.3.3.5 Main PCBA Replacement
Replace the Main PCBA by following the reverse of the removal procedure. Do not tighten all the screws until everything is in place.1 Replace the Main PCBA.2 Replace the Nest Frame Assembly.3 Reconnect the speaker wires.4 Replace the power supply assembly.5 Replace the TGC assembly.6 Reinstall the shield to the Power Supply.7 Tighten all screws to their specified torque of 5.5 inch pounds.
Screws (3)
Shoulder bolts (4)
CompactFlashrelease buttons
58 Chapter 7: Replacement Procedures

Chapter 8: Performance Testing
8.1 Overview
• Verify that all controls operate smoothly over their full range and that the system responds properly.
• To obtain 2D images, SonoSite recommends using the RMI 413A Soft Tissue Phantom or the RMI 403 GS Multipurpose Phantom. Any equivalent Phantom is acceptable.
• To obtain Power Doppler images, SonoSite recommends using the RMI 425 Doppler Phantom or the RMI 1425A Doppler Phantom. Any equivalent Phantom is acceptable.
• When making penetration measurements on a phantom, apply the phantom reference value and tolerance to the measurement.
8.2 Test Equipment• SonoSite ultrasound system under test• C60/5-2 MHz transducer• C15/4-2 MHz transducer• RMI 413A Soft Tissue Phantom, RMI 403 GS Multipurpose Phantom, or the equivalent• RMI 425 Doppler Phantom, RMI 1425A Doppler Phantom, or the equivalent• Video Printer• External Monitor• Acoustic gel
8.3 Setting Up Performance Tests
To set up the performance tests:1 Attach the C60/5-2 MHz transducer to the system.2 Select general for optimization and OB for exam type.3 Couple the transducer to the phantom, adjusting gain settings and transducer for a proper
phantom image (e.g., pins are high-level echoes positioned in straight lines; cysts are sonolucent, edges are sharp, and graphite particles of the phantom are mid-grays).
Warning: Critical Test Function — A failure of the system functions tested in this section could affect safety or effectiveness of the system adversely. While performing the steps in this section, verify that the images on the system display and on the external monitor are acceptable.
Chapter 8: Performance Testing 59

8.3.1 Scan Reference Orientation
To set up the scan reference orientation:1 Verify that the correct transducer name appears in the upper right corner of the system display.2 Verify that the scan plane orientation mark in the image located near the skinline corresponds to
element #1 on the transducer. To test, put your finger on the probe and run it across the transducer face. Your finger touching the transducer face should appear at the orientation mark on the display image format.
3 With the array pointing down and the orientation mark to the operator’s left, element #1 corresponds with the left side of the array.
8.4 Testing 2D Performance
To test 2D performance:1 Use a C60/5-2 MHz transducer in 2D mode.2 Adjust the position of the C60/5-2 MHz transducer on the phantom.3 Use the 2D system controls to obtain a clear image that shows both the horizontal and vertical rows
of pins.
8.4.1 2D Image Quality
To test 2D image quality:1 Verify that the ultrasound image appears uniform in both the axial and lateral direction, with no
dropouts or intensity variations.2 Verify that the cystic structure at the focal zone is clearly differentiated from the surrounding
tissue and is echo-free, while solid tissue, with numerous echo sources, appears solid.
8.4.2 Axial Measurement AccuracyNote: Measurements must be performed while the image is frozen.
To set up axial accuracy:1 Acquire the image.2 Press the Freeze key.3 Press the Caliper key. The caliper appears on the image display. The screen menu indicates Cal 1,
Cal 2, and Ellipse. (If the caliper line setup is on, then a dotted line connects the two calipers. See the TITAN Ultrasound System User Guide, if necessary.) The Cal 1 caliper is active by default.
4 Use the touchpad to position one of the calipers.5 Press the Select key to fix the caliper and enable the other caliper.6 Use the touchpad to move the other caliper. The results update as you move the caliper, and the
measurement is complete when you finish moving the calipers. (Press the Select key to alternate the active caliper, and adjust the measurement with the touchpad.)
7 To perform another distance measurement on the image, select the other distance icon and repeat the preceding steps.
60 Chapter 8: Performance Testing

To test axial accuracy:1 Measure the distance, center to center, of any two pins that are 5-12 cm apart vertically.2 Verify that the distance measured is within the tolerance listed in Table 8.1.
8.4.3 Lateral Measurement Accuracy
To set up the lateral measurement accuracy:Perform steps 1 through 7 in Section 8.4.2.
To test the lateral measurement accuracy:1 Measure the distance, center to center, of any two pins that are 4-10 cm apart horizontally.2 Verify that the distance measured is within the tolerance listed in Table 8.1.3 Press the Freeze key to return the system to live 2D mode.
8.4.4 Penetration
To test penetration:1 Adjust the system controls to obtain a clear image that shows the limits of echo penetration as
shown in Table 8.2.2 Measure from the center of the skinline to the deepest vertical position—where the scatter echoes
start to break up and tissue definition is lost.
Table 8.1: System Measurement Accuracy
Measurements Tolerance
Axial Distance +/- 2%
Lateral Distance +/- 2%
Table 8.2: Imaging Performance
Imaging Performance C60 ICT C15 L38 C11
2D Penetration 11.5 cm 5.0 cm 19.0 cm 6.0 cm 5.0 cm
Chapter 8: Performance Testing 61

8.5 Additional Performance Tests
8.5.1 CPD
To test CPD:Note: Use the RMI 425 Doppler Phantom or the RMI 1425A Doppler Phantom.1 Connect any transducer and set up the system for CPD mode.2 Acquire the image.3 Press and release the Color key for CPD/DCPD mode. Select CPD from the on-screen menu. A
Region of Interest (ROI) box is displayed on top of the grayscale image. (Press the 2D key to return to 2D imaging.)
To move the CPD image:• Use the touchpad to move the CPD ROI. While you are moving the CPD ROI, you will see an
outline of the new position moving on the display. When you stop moving, the new position will display the CPD ROI. (The size of the CPD ROI is fixed. There is no control to change it.)
To adjust CPD gain:Turn gain clockwise to increase the amount of CPD gain. (While in CPD imaging, near and far affect only the 2D image; they do not affect the CPD image.)Turn gain counterclockwise to decrease the amount of CPD gain.1 Image the vessel using a Doppler phantom. Verify that as the gain controls increase and decrease,
Doppler echo intensity increases and decreases to correspond. Verify that no flow exists outside the vessel.
2 Save a CPD image by pressing the Freeze key and then the Save key.
8.5.2 Directional Color Power Doppler (DCPD)
To test DCPD:Note: Use the RMI 425 Doppler Phantom or the RMI 1425A Doppler Phantom.1 Set up the system per Section 8.5.1 for CPD mode.2 Select DCPD. Press DCPD on the on-screen menu while in CPD mode. A Region of Interest (ROI)
box is displayed on top of the 2D grayscale. (Press the 2D key to return to 2D imaging.)
To move the DCPD image:• Use the touchpad to move the DCPD ROI. While you are moving the DCPD ROI, you will see an
outline of the new position moving on the display. When you stop moving, the new position will display the DCPD ROI. (The size of the DCPD image is fixed. There is no control to change it.)
62 Chapter 8: Performance Testing

To adjust DCPD gain:• Turn gain clockwise to increase the amount of DCPD gain. (While in DCPD imaging, near and far
affect only the 2D image; they do not affect the DCPD image.)• Turn gain counterclockwise to decrease the amount of DCPD gain.1 Image the vessel using a Doppler phantom. Verify that as the gain controls increase and decrease,
Doppler echo intensity increases and decreases to correspond. Verify that no flow exists outside the vessel.
2 Save a DCPD image by pressing the Freeze key and then the Save key.
8.5.3 M Mode Imaging
To test M Mode Imaging:1 Attach a C60 transducer and acquire an image.2 Press the M Mode key for the M Mode sample line.3 Position the M Mode sample line over the image using the touchpad.4 Press the M Mode key again to turn on M Mode.5 Select the desired sweep speed from the on-screen menu (slow, med, or fast). The on-screen menu
will show the selected sweep speed.6 Press the Freeze key to freeze the image. Press it again to return to live imaging.7 Press the 2D key to return to 2D imaging.
8.5.4 Tissue Harmonic Imaging
To test THI Imaging:1 Attach the C60 transducer and acquire an image.2 Set the depth to maximum and note the depth at which echo information is lost.3 Press the THI key on the control panel so it displays THI on the display. Tissue Harmonic Imaging
in now active.4 Observe a decrease in dot size and a significant loss in penetration due to the higher frequency.
Image resolution increases.5 Press the THI key again to turn off Tissue Harmonic Imaging.
8.5.5 Pulsed Wave (PW) Doppler Imaging
To test PW Doppler Imaging:1 Attach the C15 transducer.2 Press the Doppler key for the Doppler sample gate.3 Press the Doppler key again for the Doppler spectral trace.4 Place a large drop of ultrasound gel on the transducer lens.5 Gently tap the top of the gel and observe a reflection on the spectral trace and the sound from the
speakers.6 Press the 2D key to return to 2D imaging.
Chapter 8: Performance Testing 63

8.5.6 Image Quality Verification Test/Livescan• Products with replaced subassemblies, or products that have been otherwise disassembled, must
undergo an Image Quality Verification Test/Livescan.• The Image Quality Verification Test/Livescan should be performed after successfully completing
Section 8.3, “Setting Up Performance Tests,” on page 59 and Section 8.5.1, “CPD,” on page 62.• The test is completed before returning the system to service.• A certified sonographer must perform the test.• The Livescan test performed is at the discretion of the Sonographer and will represent their
acceptance of a successful service event.
8.5.7 Image ReviewReview all saved images and verify that the images are displayed properly.
8.5.8 Printer
To test printer operation:1 Print two images in rapid succession and verify proper operation.2 Verify that the print control on the system functions correctly.
8.5.9 Battery Charging
To test battery charging operation:1 Remove the system from the Docking System and insert a battery into the system.2 Press the Power key to turn the system on. Allow the battery to discharge. The battery indicator
icon on the display, below the Transducer Type indicator, will extinguish from left to right as the battery discharges.Note: The battery may take 1–2 hours to discharge.
3 Reattach the system to the Docking System and attach the AC power cord to the power connector.4 Note that the battery indicator indicates that the battery is charging. The sections of the battery
indicator will light sequentially from left to right as the battery charges.5 If charging is not evident, see Chapter 6, “Troubleshooting” for troubleshooting procedures.
8.5.10 Video Output
To test the video output:1 Attach an external video monitor to the video connector using the video cable.2 Turn on the system power and verify that the video on the external monitor matches the video on
the system display.If the video does not appear similar, or there is no display on the external monitor, see Chapter 6, “Troubleshooting” for troubleshooting procedures.
Caution: Use only the recommended video monitor, printer, or VCR when verifying the video output at the video receptacle.
64 Chapter 8: Performance Testing

8.6 Returning Products to SonoSite
8.6.1 Contacting SonoSite Technical SupportFor technical support of any SonoSite product, do one of the following: • USA/Canada customers: 1-877-657-8118• International customers: 425-951-1330• Technical support fax: 1-425-951-6700• Technical support e-mail: [email protected]• SonoSite website: www.sonosite.com and select Products & Solutions and then
Technical SupportYou will be asked to provide the following information by telephone or e-mail:• Contact name and phone number• Product name• Serial number• Description of the problem
8.6.2 Shipping InstructionsPlease contact SonoSite to get a return material authorization number (RMA). Contact SonoSite before returning any product.The shipping address for all returned products is:
SonoSite, Inc.Attn: Technical Support RMA ___________________21919 30th Drive SEBothell, Washington 98021USA
Chapter 8: Performance Testing 65

66 Chapter 8: Performance Testing
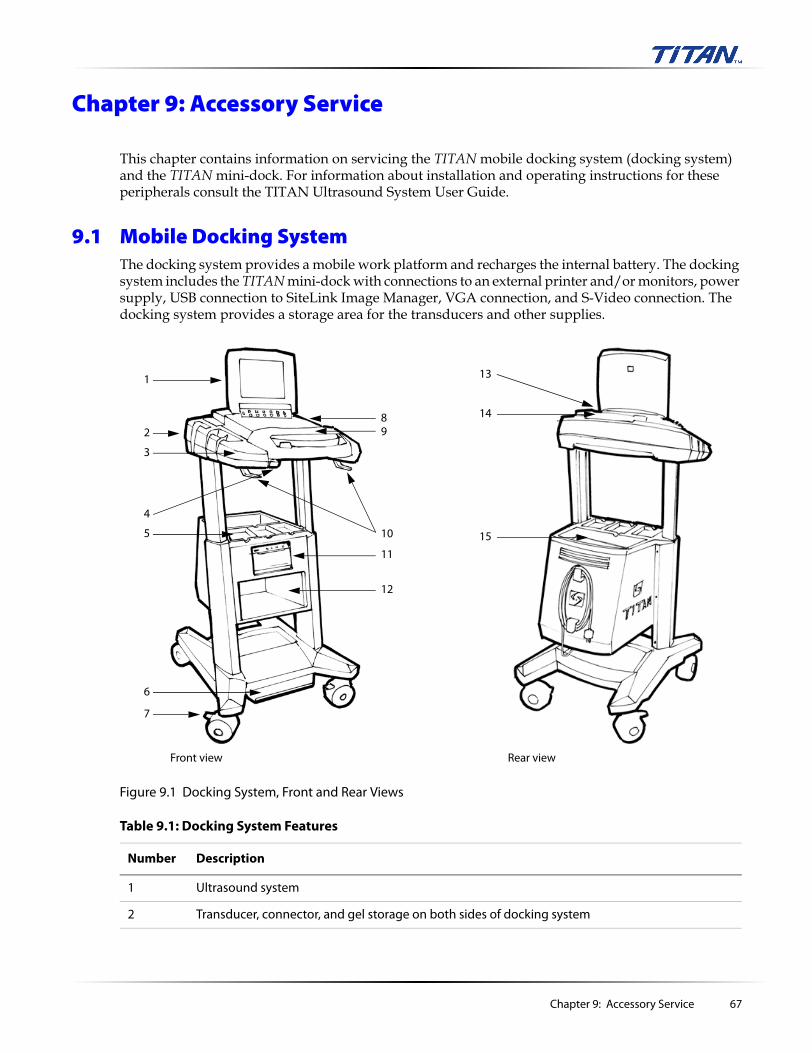
Chapter 9: Accessory Service
This chapter contains information on servicing the TITAN mobile docking system (docking system) and the TITAN mini-dock. For information about installation and operating instructions for these peripherals consult the TITAN Ultrasound System User Guide.
9.1 Mobile Docking SystemThe docking system provides a mobile work platform and recharges the internal battery. The docking system includes the TITAN mini-dock with connections to an external printer and/or monitors, power supply, USB connection to SiteLink Image Manager, VGA connection, and S-Video connection. The docking system provides a storage area for the transducers and other supplies.
Figure 9.1 Docking System, Front and Rear Views
Front view Rear view
1
2
4
5
6
7
89
10
11
12
15
14
13
3
Table 9.1: Docking System Features
Number Description
1 Ultrasound system
2 Transducer, connector, and gel storage on both sides of docking system
Chapter 9: Accessory Service 67

To insert system:1 Push in the handle release button and lift the handle to the upper most position.2 Close the lid on the ultrasound system and slide into the docking system. Connection will be made
when handle is pushed down.3 Press the handle down until an audible click is heard.
To remove system:1 Close the lid on the ultrasound system.2 Push in the handle release button and lift the handle to the upper most position.3 Remove the ultrasound system.
3 Side panels(Use to lift, raise, or transport the docking system)
4 Handle release button
5 Transducer storage
6 Height adjustment pedal(Press down on foot pedal, grab sides and raise/lower)
7 Locking wheels(Press down/pull up on locks to lock/unlock)
8 CompactFlash shield
9 Wrist rest/handle
10 Cable hooks
11 Printer bay (black/white only)
12 VCR bay
13 Mini-dock cable cover
14 Mini-dock
15 Storage
Table 9.1: Docking System Features (Continued)
Number Description
Warning: To prevent injury, do not use the handle to lift the docking system over an obstacle or threshold. Use the side panels to lift over an obstacle or threshold.
68 Chapter 9: Accessory Service

9.2 Mini-DockThe TITAN mini-dock (mini-dock) provides connectivity for the TITAN ultrasound system when the system is out of the docking system. The mini-dock provides connections to an external printer and/or monitors, a power supply, USB connection to SiteLink Image Manager, VGA connection, and S-video connection.
9.3 Connectivity
Figure 9.2 Mini-Dock Connections
Table 9.2: Mini-Dock Connections
Symbol Definition
DC input
Print control
USB
Ethernet (available on future releases)
RS-232 (VCR control/audio)
S-video out
S-video in (available on future releases)
RGB video out
Composite video out
Audio out
ECG (available on future releases)
Chapter 9: Accessory Service 69

Figure 9.3 Connectivity Diagram
9.4 Block Diagrams and Schematics
Figure 9.4 Mini-Dock PCB and I/O PCB Component Placement
Mini-dock
PowerStrip
Power Supply
ACPower
PowerOut
Printer
AC In
Video- InRemote Out
VCR
AC In
S-Video Composite
AudioIn
AudioOut
VideoOut
RS 232
VideoIn
To AC Power(wall outlet)
ToPC
AB
C
D
E F
G
Dip switches1-4 Down5,6 Up
70 Chapter 9: Accessory Service

Figure 9.5 TITAN Dock Interface Diagram
Chapter 9: Accessory Service 71

Figure 9.6 Mini-Dock Video Distribution
72 Chapter 9: Accessory Service

Figure 9.7 Mini-Dock Connectors Schematic, Page 1
RE
SE
Tn
SC
L_3
V
SD
A_3V
CLK
_E
NC
OD
ER
CLK
_14_318182
CLK
_17_734475
PAL Frequency is 17.734475
NTSC Frequency is 14.318182
Signals are connected properly, with net names reversed.
pag
e3
Vid
eoD
eco
der
RE
SE
Tn
SD
A_3V
SC
L_3V
CLK
_E
NC
OD
ER
CLK
_N
TS
C_E
NC
CLK
_P
AL_E
NC
pag
e2
DvE
nco
der
SC
L_3V
SD
A_3V
RE
SE
TnC
LK
_E
NC
OD
ER
CLK
_N
TS
C_E
NC
CLK
_P
AL_E
NC
Sys
tem
Io
pag
e4
SC
L_3V
SD
A_3V
RE
SE
Tn
Chapter 9: Accessory Service 73

Figure 9.8 Mini-Dock Connectors Schematic, Page 2
4 4
3 3
2 2
1 1
DD
CC
BB
AA
RO
UT
0
RO
UT
1
RO
UT
2
RO
UT
5
RO
UT
4
RO
UT
3
RO
UT
6
RO
UT
7
GO
UT1
GO
UT3
GO
UT2
GO
UT0
GO
UT6
BO
UT
1
BO
UT
0
GO
UT7
GO
UT5
GO
UT4
BO
UT
2
BO
UT
5
BO
UT
4
BO
UT
3
BO
UT
6
BO
UT
7
DV
_V
SY
NC
_O
UT
DV
_H
SY
NC
_O
UT
DV
_E
NA
BLE
LUM
AC
HR
OM
A
AC
MP
CVID
VR
EF
BO
UT
2
RO
UT
3
RO
UT
1
BO
UT
5
BO
UT
3
RO
UT
4
RO
UT
5
BO
UT
4
RO
UT
2
DV
_C
LK
_O
UT
RO
UT
0
GO
UT6
GO
UT1
RO
UT
6
GO
UT5
BO
UT
0
RO
UT
7
GO
UT4
GO
UT2
BO
UT
7
BO
UT
1
GO
UT3
VR
EF
GO
UT0
BO
UT
6
GO
UT7
IOB
IOG
IOR
AN
ALO
G_R
AN
ALO
G_G
AN
ALO
G_B
RS
ET
RE
SE
Tn
DV
_E
NA
BLE
MW
EN
L
MW
RS
T MR
CLK
SD
A_3V
SC
L_3
V
PLLC
LK
VC
OIN
1
SC
L_3
V
SD
A_3V
DV
_V
SY
NC
_O
UT
DV
_H
SY
NC
_O
UT
RE
SE
Tn
DV
_C
LK
_O
UT
RE
SE
Tn
OE
n
MD
9
MD
6
MD
3
MD
11
MD
10
MD
8
MD
7
MD
14
MD
13
MD
1
MD
2
MD
15
MD
7
MD
12
MD
4
MD
4
MD
12
MD
8
MD
0
MD
2
MD
5
MD
5
MD
11
MD
6
MD
15
MD
[15..0
]
MD
14
MD
0
MD
1
MD
13
MD
10
MD
9
MD
3
MW
EN
H
OE
n
MRE
N
MR
RS
T
RE
SE
Tn
MQ
8
MQ
3
MQ
7
MQ
5
MQ
0
MQ
14
MQ
9
MQ
3
MQ
5
MQ
1
MQ
11
MQ
6
MQ
7
MQ
2
MQ
10
MQ
4M
Q12
MQ
1
MQ
9
MQ
6
MQ
12
MQ
13
MQ
2
MQ
4
MQ
15
MQ
[15..0
]
MQ
15
MQ
0
MQ
14
MQ
8
MQ
11
MQ
10
MQ
13
MW
CLK
AC AY
SC
L_3
V
SD
A_3V
RE
SE
Tn
CLK
_E
NC
OD
ER
CLK
_N
TS
C_E
NC
CLK
_P
AL_E
NC
D
3.3V
3.3V
3.3V
DD
DD
DD
D
5V
D
D
D
DD
DD
D
D
D
D
D
D
D
D
D
D
DDD
D
D
D
D
D
D
3.3V
5V
RG
BD
AC
5V
RG
BD
AC
3VD
AV
DD
3VD
AV
DD
D
D
DD
3.3V
3.3V
3.3V
3.3V
3.3V
D
D
D
D
D
D
D
D
D
D
D
D
D
D
D
D
D
D
D
D
D
D
D
D
DD
D
D
DD
D
D
D
D
3.3V D
3.3V
3.3V
D
D
D
3.3V
3.3V
3.3V
D
D
3.3V
DD
3.3V
D
DD D
D
DD
DD
5V
D
RE
V
DA
TE
SH
.O
F
TH
IS D
OC
UM
EN
T C
ON
TA
INS
CO
NFID
EN
TIA
L I
NF
OR
MA
TIO
NW
HIC
H I
S P
RO
PR
IET
AR
Y T
OS
ON
OS
ITE
, IN
C.
NE
ITH
ER
TH
E D
OC
UM
EN
T N
OR
TH
E I
NF
OR
MA
TIO
N C
ON
TA
INE
DT
HE
RE
IN S
HA
LL
BE
DIS
CL
OS
ED
OR
RE
PR
OD
UC
ED
, IN
WH
OL
E O
RP
AR
T, W
ITH
OU
T T
HE
EX
PR
ES
SW
RIT
TE
N C
ON
SE
NT
OF
SO
NO
SIT
E,
INC
.S
CA
LE
SIZ
E
UN
LE
SS
OTH
ER
WIS
E S
PE
CIF
IED
,D
IMEN
SIO
NS
AR
E I
N I
NC
HE
S.
TO
LE
RA
NC
ES
AR
E:
<=
+/-
.XX
=+
/-
.XX
X=
+/-
NO
NE
SC
HE
MA
TIC
DIA
GR
AM
C2
DO
CK
BA
Fri
da
y,
De
ce
mb
er
20
, 2
00
2
D0
24
57
24
80p Diffline CONN
Video Encoder and RGB
RSET chosen to give 1V peak to peak analog
video outputs.
C60
330
PF
50V
P1-5
050
C66
0.1
UF
16V
U1B
AL300
VC
C151
VC
C141
VC
C121
VC
C116
VC
C111
VC
C96
VC
C91
VC
C66
VC
C61
VC
C51
VC
C37
VC
C19
GN
D5
GN
D10
GN
D28
GN
D45
GN
D56
GN
D71
GN
D76
GN
D87
GN
D101
GN
D106
GN
D131
GN
D136
GN
D146
GN
D156
PLLV
CC
128
PLLG
ND
130
P2-2
222
C41
18P
F50
V
C53
18P
F50
V
P1-3
232
C47
0.1
UF
16V
P1-4
747
C61
0.1
UF
16V
C75
0.0
1U
F50
V
P1-2
222
P1-4
242
C48
0.1
UF
16V
C51
0.1
UF
16V
C76
0.0
1U
F50
V
R25
47.5
K
P1-4
040
C83
0.0
1U
F50
V
R15
47.5
K
C40
330
PF
50V
R29
75
C38
18P
F50
V
C73
0.1
UF
16V
P2-1
818
C57
0.0
1U
F50
V
P2-2
121
P1-3
636
R41
10
0
P1-5
757
R22
150
R19
47.5
K
P1-2
424
P1-3
535
P2-3
131
U1A
AL300
TV
CLK
1
TV
HR
EF
2
TV
VS
3
TV
HS
4
GV
S6
GH
S7
GH
RE
F8
GC
LK
9
RIN
0/Y
IN0
18
RIN
1/Y
IN1
17
RIN
2/Y
IN2
16
RIN
3/Y
IN3
15
RIN
4/Y
IN4
14
RIN
5/Y
IN5
13
RIN
6/Y
IN6
12
RIN
7/Y
IN7
11
GIN
0/U
VIN
027
GIN
1/U
VIN
126
GIN
2/U
VIN
225
GIN
3/U
VIN
324
GIN
4/U
VIN
423
GIN
5/U
VIN
522
GIN
6/U
VIN
621
GIN
7/U
VIN
720
BIN
036
BIN
135
BIN
234
BIN
333
BIN
432
BIN
531
BIN
630
BIN
729
HOSTCLK38
XOUT39XIN40
IREQ41
SCL42
SDA43
GOUT181
GOUT282
GOUT383
PWRDN46
I2CADDR47
YUVIN48
TEST149
TEST250
RB
060
RB
159
RB
258
RB
357
RB
455
RB
554
RB
653
RB
752
GB
070
GB
169
GB
268
GB
367
GB
465
GB
564
GB
663
GB
762
BB
080
BB
179
BB
278
BB
377
BB
475
BB
574
BB
673
BB
772
PCLKA84
PCLKB85
SCLK86
PHS88
PVS89
PDSPEN90
RA
0100
RA
199
RA
298
RA
397
RA
495
RA
594
RA
693
RA
792
GA
0110
GA
1109
GA
2108
GA
3107
GA
4105
GA
5104
GA
6103
GA
7102
BA
0120
BA
1119
BA
2118
BA
3117
BA
4115
BA
6113
BA
7112
BA
5114
IHSREF 123
OHSREF 124
OHSFB 125
OC
LK
126
OPLLCLK 127
VC
OIN
129
RO
MD
AT
A0
140
RO
MD
AT
A1
139
RO
MD
AT
A2
138
RO
MD
AT
A3
137
RO
MD
AT
A4
135
RO
MD
AT
A5
134
RO
MD
AT
A6
133
RO
MD
AT
A7
132
ROMADDR0 142
ROMADDR1 143
ROMADDR2 144
ROMADDR3 145
ROMADDR4 147
ROMADDR5 148
ROMADDR6 149
ROMADDR7 150
ROMADDR8 152
ROMADDR9 153
ROMADDR10 154
ROMADDR11 155
ROMADDR12 157
ROMADDR13 158
ROMADDR14 159
ROMADDR15 160
RE
SE
TB
122
R14
47.5
K
L3 2.7U
H
P1-3
939
R24
47.5
K
P1-5
656
P2-1
919
L5 2.7U
H
C55
330
PF
50V
U9
AL440B
DI0
1
DI1
2
DI2
3
DI3
4
DI4
6
DI5
7
DI6
8
DI7
9
DO
044
DO
143
DO
242
DO
341
DO
439
DO
538
DO
637
DO
736
WC
K13
WE
10
WR
ST
14
RC
K32
RE
35
RR
ST
31
OE
34
TS
T17
AV
DD
18
AG
ND
22
NC1 19NC2 20NC3 21NC4 28S
DA
25
SC
L24
SD
AE
N23
IRD
Y15
OR
DY
30
IE11
RE
SE
T27
PLR
TY
16
GN
D33
VD
D29
VD
D5
GN
D12
VD
D40
GN
D26
P1-3
434
C49
0.1
UF
16V
P1-5
252
L6 2.7U
H
R42
37
.4
C84
0.0
1U
F50
V
P1-2
020
C77
0.0
1U
F50
V
R28
75
C64
0.1
UF
16V
P1-4
545
R16
100
P2-3
030
P1-6
060
C74
0.1
UF
16V
R27
47.5
K
C52
0.1
UF
16V
P1-3
838
C43
330
PF
50V
P2-3
333
L2 2.7U
H
P1-2
121
C90
0.1
UF
16V
C39
330
PF
50V
P1-3
333
C80
0.1
UF
16V
U2B AL128
VD
D150
VD
D139
VD
D123
VD
D113
VD
D99
VD
D89
VD
D79
VD
D70
VD
D61
VD
D46
VD
D24
VD
D8
GN
D14
GN
D19
GN
D29
GN
D51
GN
D56
GN
D67
GN
D74
GN
D84
GN
D94
GN
D108
GN
D118
GN
D142
GN
D155
GN
D160
AD
VD
D130
AD
VD
D131
AD
VD
D138
AD
GN
D128
AD
GN
D133
AD
GN
D136
DA
VD
D34
DA
VD
D44
DA
VD
D45
DA
GN
D36
DA
GN
D38
DA
GN
D40
VD
D144
C42
330
PF
50V
P1-4
848
P2-2
828
P2-2
020
P1-2
828
P1-4
343
C69
330
PF
50V
C46
330
PF
50V
P1-5
959
C63
0.1
UF
16V
R44
37
.4
P2-3
232
C44
18P
F50
V
P1-3
131
R26
75
R20
100
R34
10K
P1-3
030
L4 2.7U
H
R17
47.5
K
P1-5
454
P2-2
929 P2-2
525
C56
18P
F50
V
P1-2
323
C81
0.0
1U
F50
V
C59
330
PF
50V
C70
330
PF
50V
P1-4
444
R23
1.00K
U11
AD
V7120K
ST
30
G0
2
G1
3
G2
4
G3
5
G4
6
G5
7
G6
8
G7
9
R0
40
R1
41
R2
42
R3
43
R4
44
R5
45
R6
46
R7
47
B0
16
B1
17
B2
18
B3
19
B4
20
B5
21
B6
22
B7
23
BLA
NK
10
SY
NC
11
CLO
CK
26
VA
A12
VA
A30
VA
A31
GN
D1
GN
D14
GN
D15
GN
D27
GN
D28
GN
D38
GN
D39
GN
D48
IOR
33
IOG
32
IOB
29
CO
MP
34
FS
_A
DJU
ST
36
VR
EF
35
P1-6
262
C71
0.1
UF
16V
P1-6
161
C65
0.1
UF
16V
FB
5
080
5
FB
4
080
5
R39
10
0
P1-3
737
U2A
AL128
GH
SD
IV146
GH
SO
UT
145
GH
SO
UT
228
GV
SO
UT
147
GV
SY
NC
141
GH
SY
NC
140
GV
SO
UT
227
GC
LK
143
RE
D0
107
RE
D1
106
RE
D2
105
RE
D3
104
RE
D4
103
RE
D5
102
RE
D6
101
RE
D7
100
GR
EE
N0
117
GR
EE
N1
116
GR
EE
N2
115
GR
EE
N3
114
GR
EE
N4
112
GR
EE
N5
111
GR
EE
N6
110
GR
EE
N7
109
BL
UE
0127
BL
UE
1126
BL
UE
2125
BL
UE
3124
BL
UE
4122
BL
UE
5121
BL
UE
6120
BL
UE
7119
TV
CLK
151
XOUT1158XIN1/FIN1159
XIN2/FIN2154
SC
L13
SD
A10
MENU6
SELECT5
INC3
PW
RD
WN
148
I2C
AD
DR
11
RE
SE
T149
MQ
15
57
MQ
395
MQ
493
MQ
592
MQ
691
MQ
790
MQ
865
MQ
964
MQ
10
63
MQ
11
62
MQ
12
60
MQ
13
59
MQ
14
58
MW
EN
H77
MW
EN
L78
MW
RS
T71
MR
EN
66
MR
RS
T69
MW
CLK
73
MR
CLK
68
TV
CS
YN
C32
TV
HS
YN
C30
TV
VS
YN
C31
DEC4
RGBOUT1
PAL2
AC
/BO
UT
37
AY
/GO
UT
39
AC
MP
/RO
UT
41
CO
MP
43
VR
EF
35
MD
088
MD
187
MD
286
MD
385
MD
483
MD
582
MD
681
MD
780
MD
855
MD
954
MD
10
53
MD
11
52
MD
12
50
MD
13
49
MD
14
48
MD
15
47
MQ
197
MQ
296
MQ
098
TEST1 33
TEST2 26
TEST3 25
TEST4 23
TEST5 22
TEST6 21
TEST7 20
TEST8 18
TEST9 17
TEST10 16
TEST11 15
TEST12 9
XOUT2153
INT
YP
E0
157
INT
YP
E1
156
MEMCONFIG0 76
MEMCONFIG1 75
MEMTYP 72
AB129
AG132
AR137
ADEN7
CLKTYPE152
I2C
12
RS
ET
42
VRB135
VRT134
C78
0.0
1U
F50
V
P1-5
353
P2-2
626
P2-2
323
P1-2
525
R21
100
C85
0.1
UF
16V
P1-4
949
R32
49.9
U12
LT
1790B
CS
6-1
.25
Vin
4V
out
6
GND 1GND 2
C37
0.1
UF
16V
C58
0.1
UF
16V
C93
0.1
UF
16
V
P1-4
646
C62
0.1
UF
16V
FB
6
080
5
P1-5
858
L1 2.7U
H
C50
0.1
UF
16V
C86
0.1
UF
16V
R31
562
R18
47.5
K
C45
330
PF
50V
C82
0.0
1U
F50
V
P1-2
626
500
500
500
500
500
500
VCC
ENA
INA+
INA-
OUTA
ENB
INB+
INB-
OUTB
ENC
INC+
INC-
OUTC
VEE
U15
MA
X4019
7
11
65
1
4
3
10 9 2
12
13
14
8
P1-5
555
P2-2
727 P2-2
424
R33
47.5
K
P1-2
727
P1-5
151
R100
10
0
U10
AL440B
DI0
1
DI1
2
DI2
3
DI3
4
DI4
6
DI5
7
DI6
8
DI7
9
DO
044
DO
143
DO
242
DO
341
DO
439
DO
538
DO
637
DO
736
WC
K13
WE
10
WR
ST
14
RC
K32
RE
35
RR
ST
31
OE
34
TS
T17
AV
DD
18
AG
ND
22
NC1 19NC2 20NC3 21NC4 28S
DA
25
SC
L24
SD
AE
N23
IRD
Y15
OR
DY
30
IE11
RE
SE
T27
PLR
TY
16
GN
D33
VD
D29
VD
D5
GN
D12
VD
D40
GN
D26
C72
0.1
UF
16V
P1-4
141
R40
10
0
R43
37
.4
C67
0.1
UF
16V
C88
0.1
UF
16V
C87
4.7
UF
16V
C68
18P
F50
V
C54
330
PF
50V
C79
0.1
UF
16V
C89
18P
F50
V
P1-2
929
74 Chapter 9: Accessory Service

Figure 9.9 Mini-Dock Connectors Schematic, Page 3
4 4
3 3
2 2
1 1
DD
CC
BB
AA
Y0
Y1
Y2
Y3
Y4
Y5
Y6
Y7
UV
0
UV
1
UV
2
UV
3
UV
4
UV
5
UV
6
UV
7
RIN
0
RIN
1
RIN
3
RIN
2
RIN
6
RIN
4
RIN
7
RIN
5
GIN
4
GIN
2
GIN
6
GIN
1
GIN
7
GIN
3
GIN
5
GIN
0
BIN
5
BIN
0
BIN
1
BIN
3
BIN
2
BIN
7
BIN
4
BIN
6
VC
OIN
2
DV
_C
LK
_IN
DV_E
NA
BLE
_IN
DV
_HS
YN
C_IN
DV
_V
SY
NC
_IN
SC
L_3
V
SC
L_3
V
SD
A_3V
SD
A_3V
RE
SE
Tn
RE
SE
Tn
TV
_H
SY
NC
TV
_V
SY
NC
CH
RO
MA
_IN
LUM
A_IN
CLK
_26_8M
hz
PA
L_N
TS
Cn
TV
_V
SY
NC
TV
_H
SY
NC
TV
_C
LK
TV
_H
RE
F
SC
L_3
V
SD
A_3V
RE
SE
Tn
CLK
_E
NC
OD
ER
CLK
_N
TS
C_E
NC
CLK
_P
AL_E
NC
D
3.3V
DD
3.3V
D
D
D
3.3V
D
D
D
D
D
D
D
D
3.3V
DD
D
3.3V
D
D5V
D
DD D
5V
D
DD
D
D
D
D
D
3.3V
D
D
DD
D
3.3V
DD
RE
V
DA
TE
SH
.O
F
TH
IS D
OC
UM
EN
T C
ON
TA
INS
CO
NFID
EN
TIA
L I
NF
OR
MA
TIO
NW
HIC
H I
S P
RO
PR
IET
AR
Y T
OS
ON
OS
ITE
, IN
C.
NE
ITH
ER
TH
E D
OC
UM
EN
T N
OR
TH
E I
NF
OR
MA
TIO
N C
ON
TA
INE
DT
HE
RE
IN S
HA
LL
BE
DIS
CL
OS
ED
OR
RE
PR
OD
UC
ED
, IN
WH
OL
E O
RP
AR
T, W
ITH
OU
T T
HE
EX
PR
ES
SW
RIT
TE
N C
ON
SE
NT
OF
SO
NO
SIT
E,
INC
.S
CA
LE
SIZ
E
UN
LE
SS
OTH
ER
WIS
E S
PE
CIF
IED
,D
IMEN
SIO
NS
AR
E I
N I
NC
HE
S.
TO
LE
RA
NC
ES
AR
E:
<=
+/-
.XX
=+
/-
.XX
X=
+/-
NO
NE
SC
HE
MA
TIC
DIA
GR
AM
C2
DO
CK
BA
Fri
day, D
ecem
ber
20, 2002
D0
24
57
34
80 PIN CONN TO
CONNECTOR PCB
200 PIN
DOCK CONN
Video Decoder
P1-1
00
100
U4A
AL300
TV
CLK
1
TV
HR
EF
2
TV
VS
3
TV
HS
4
GV
S6
GH
S7
GH
RE
F8
GC
LK
9
RIN
0/Y
IN0
18
RIN
1/Y
IN1
17
RIN
2/Y
IN2
16
RIN
3/Y
IN3
15
RIN
4/Y
IN4
14
RIN
5/Y
IN5
13
RIN
6/Y
IN6
12
RIN
7/Y
IN7
11
GIN
0/U
VIN
027
GIN
1/U
VIN
126
GIN
2/U
VIN
225
GIN
3/U
VIN
324
GIN
4/U
VIN
423
GIN
5/U
VIN
522
GIN
6/U
VIN
621
GIN
7/U
VIN
720
BIN
036
BIN
135
BIN
234
BIN
333
BIN
432
BIN
531
BIN
630
BIN
729
HOSTCLK38
XOUT39XIN40
IREQ41
SCL42
SDA43
GOUT181
GOUT282
GOUT383
PWRDN46
I2CADDR47
YUVIN48
TEST149
TEST250
RB
060
RB
159
RB
258
RB
357
RB
455
RB
554
RB
653
RB
752
GB
070
GB
169
GB
268
GB
367
GB
465
GB
564
GB
663
GB
762
BB
080
BB
179
BB
278
BB
377
BB
475
BB
574
BB
673
BB
772
PCLKA84
PCLKB85
SCLK86
PHS88
PVS89
PDSPEN90
RA
0100
RA
199
RA
298
RA
397
RA
495
RA
594
RA
693
RA
792
GA
0110
GA
1109
GA
2108
GA
3107
GA
4105
GA
5104
GA
6103
GA
7102
BA
0120
BA
1119
BA
2118
BA
3117
BA
4115
BA
6113
BA
7112
BA
5114
IHSREF 123
OHSREF 124
OHSFB 125O
CLK
126
OPLLCLK 127V
CO
IN129
RO
MD
AT
A0
140
RO
MD
AT
A1
139
RO
MD
AT
A2
138
RO
MD
AT
A3
137
RO
MD
AT
A4
135
RO
MD
AT
A5
134
RO
MD
AT
A6
133
RO
MD
AT
A7
132
ROMADDR0 142
ROMADDR1 143
ROMADDR2 144
ROMADDR3 145
ROMADDR4 147
ROMADDR5 148
ROMADDR6 149
ROMADDR7 150
ROMADDR8 152
ROMADDR9 153
ROMADDR10 154
ROMADDR11 155
ROMADDR12 157
ROMADDR13 158
ROMADDR14 159
ROMADDR15 160
RE
SE
TB
122
U4B
AL300
VC
C151
VC
C141
VC
C121
VC
C116
VC
C111
VC
C96
VC
C91
VC
C66
VC
C61
VC
C51
VC
C37
VC
C19
GN
D5
GN
D10
GN
D28
GN
D45
GN
D56
GN
D71
GN
D76
GN
D87
GN
D101
GN
D106
GN
D131
GN
D136
GN
D146
GN
D156
PLLV
CC
128
PLLG
ND
130
P1-6
363
P1-1
05
105
FB
2
080
5
C19
0.1
UF
16V
P1-9
393
P1-7
777
P2-3
535
C34
0.0
1U
F50
V
U5A
KS
0127B
AY
084
AY
186
AY
288
AC
090
AC
192
AC
294
XT
ALI
8
XT
AL
O7
RS
T10
Y0
45
Y1
46
Y2
47
Y3
48
Y4
53
Y5
54
Y6
55
Y7
56
C0
33
C1
34
C2
35
C3
36
C4
37
C5
38
C6
39
C7
44
EX
V0
16
EX
V1
27
EX
V2
28
EX
V3
61
EX
V4
62
EX
V5
63
EX
V6
68
EX
V7
71
HS
126
HS
2(I
IC)
76
VS
23
HA
V25
EH
AV
5
VA
V(O
EN
C0)
3
EV
AV
(OE
NC
1)
4
OE
N15
CK
18
CK
221
OD
D22
PID
17
CC
DA
T73
CC
EN
74
PO
RT
A58
SC
H(P
OR
TB
)24
TE
ST
EN
57
TE
ST
96
VR
T77
VR
B78
CO
MP
297
SC
LK
75
AE
X0
69
SD
AT
72
AE
X1
70
P1-6
868
P1-9
898
P2-3
434
C29
0.1
UF
16V
C23
0.0
1U
F50
V
P1-9
797
C14
0.1
UF
16V
R9
75
P1-6
464
P1-7
878
P1-9
191
R7
47.5
K
C15
0.1
UF
16V
C13
0.1
UF
16V
P1-9
696
P1-8
383
P1-6
767
C22
0.0
1U
F50
V
FB
1
080
5C
25
0.1
UF
16V
C31
0.1
UF
16V
P1-9
494
C35
0.0
1U
F50
V
P1-6
969
P1-1
03
103
R8
47.5
K
P1-9
999
P1-8
585
C30
0.1
UF
16V
R13
47.5
K
P1-7
373
R10
75
C36
0.1
UF
16V
C91
0.0
1U
F50
V
P1-8
888
C16
0.1
UF
16V
P1-8
181
P1-8
282
P1-7
171
U5B
KS
0127B
VD
D20
VD
D59
VD
D3
11
VD
D3
12
VD
D3
42
VD
D3
43
VD
D3
66
VD
D3
67
VD
DA
85
VD
DA
89
VD
DA
93
VD
DA
98
VD
DA
19
VS
S6
VS
S13
VS
S14
VS
S19
VS
S40
VS
S41
VS
S60
VS
S64
VS
S65
VS
S83
VS
S87
VS
S91
VS
S95
NC
P1
NC
P2
NC
P29
NC
P30
NC
P31
NC
P32
NC
P49
NC
P50
NC
P51
NC
P52
NC
P79
NC
P80
NC
P81
NC
P82
NC
P99
NC
P100
C26
0.1
UF
16V
C20
0.0
1U
F50
V
P1-1
01
101
R12
10K
P1-6
666
C32
0.0
1U
F50
V
P1-7
676
C27
0.1
UF
16V
P1-7
070
R11
10K
P1-9
292
C17
0.1
UF
16V
P1-8
787
P1-7
272
P1-8
989
P1-1
04
104
C24
0.1
UF
16V
U14
CY
22381
FI
XT
ALIN
3
XT
ALO
UT
4
FS
8
VD
D7
GN
D2
CLK
A6
CLK
B5
CL
KC
1
P1-8
080
R5
47.5
K
FB
3
080
5
P1-7
474
P2-3
636
C18
0.1
UF
16V
R6
47.5
K
C33
0.0
1U
F50
V
P1-1
02
102
C21
0.0
1U
F50
V
P1-7
575
P1-9
595
C28
0.1
UF
16V
P1-8
484
P1-8
686
P1-9
090
P1-7
979
P1-6
565
Chapter 9: Accessory Service 75

Figure 9.10 Mini-Dock Connectors Schematic, Page 4
4 4
3 3
2 2
1 1
DD
CC
BB
AA
VP
WR
_IN
_R
TN
VC
HG
R
VB
AT_S
NS
RA
TE
VP
WR
_IN
EX
T_R
XC
EX
T_TX
C
EX
T_R
TS
C
EX
T_C
TS
C
SD
A_5V
SC
L_5
V
DO
CK
_S
EN
SE
2
SY
STE
M_S
EN
SE
0
SY
STE
M_S
EN
SE
1
SYS
TE
M_S
EN
SE
_E
NA
EC
G_A
NA
LO
G
EC
G_P
OW
ER
_C
LK
EC
G_F
ILT
ER
_C
LK
AU
D_R
_IN
EC
G_S
EN
SE
AU
D_L_IN
HE
AD
PH
ON
E_SN
S
AU
D_L_O
UT
AU
D_R
_OU
T
VP
WR
US
B_D
-
US
B_P
OW
ER
US
B_D
+
EN
ET_R
X+
EN
ET_TX
-
EN
ET_TX
+
EN
ET_R
X-
AC
TLE
D
LIL
ED
SP
EE
DLE
D
STAT_FR
AM
E
CTR
L_LIN
E
MO
NO
_O
UT
MO
NO
_IN
VC
R_TX
C
VC
R_C
TS
VC
R_TX
VC
R_R
X
VC
R_R
TS
PR
INTER
_S
EN
SE
EN
ET
_LE
D_P
WR
SC
L_3
V
SD
A_3V
DO
CK
_S
EN
SE
B
VC
R_R
TS
C
VC
R_C
TS
C
VC
R_R
XC
3_3V
IN
5VIN
VP
WR
VP
WR
SYS
TE
M_S
TA
TU
S0
RE
SE
Tn
3_3V
IN
3_3V
IN
RE
SE
Tn
5VIN
DO
CK
_S
EN
SE
1
DO
CK
_S
EN
SE
0
DO
CK
_S
EN
SE
A
SD
A_3V
SC
L_3
V
RE
SE
Tn
D
DD
D
3.3V D
D
3.3V
3.3V
D
D
D
D
D
D
D
3.3V
D
5V3.
3V D
D
D
3.3V
D
D
D
DD
D
D
D
D
D
D
D
RE
V
DA
TE
SH
.O
F
TH
IS D
OC
UM
EN
T C
ON
TA
INS
CO
NFID
EN
TIA
L I
NF
OR
MA
TIO
NW
HIC
H I
S P
RO
PR
IET
AR
Y T
OS
ON
OS
ITE
, IN
C.
NE
ITH
ER
TH
E D
OC
UM
EN
T N
OR
TH
E I
NF
OR
MA
TIO
N C
ON
TA
INE
DT
HE
RE
IN S
HA
LL
BE
DIS
CL
OS
ED
OR
RE
PR
OD
UC
ED
, IN
WH
OL
E O
RP
AR
T, W
ITH
OU
T T
HE
EX
PR
ES
SW
RIT
TE
N C
ON
SE
NT
OF
SO
NO
SIT
E,
INC
.S
CA
LE
SIZ
E
UN
LE
SS
OTH
ER
WIS
E S
PE
CIF
IED
,D
IMEN
SIO
NS
AR
E I
N I
NC
HE
S.
TO
LE
RA
NC
ES
AR
E:
<=
+/-
.XX
=+
/-
.XX
X=
+/-
NO
NE
SC
HE
MA
TIC
DIA
GR
AM
C2
DO
CK
BA
Fri
day, D
ecem
ber
20, 2002
D0
24
57
44
200 PIN DOCK CONN
80 PIN DIFF LINE CONN
DC Power /
Battery Charger
Interface
ECG / Honda
Connector
Interface
System
Sense /
Status
Audio I/O
VCR SERIAL
PORT CMOS
USB
SIGNALS
Ethernet
Printer
Control /
API Test
200 PIN DOCK CONN
MII Interface:
Allow Ethernet Physical Layer to exist in
Dock if necessary.
DOCK_TRSTN
DOCK_TMS
DOCK_TDI
DOCK_TCK
DOCK_TDO
SYSTEM JTAG INTERFACE:
Allow for System JTAG
chain to be accessed.
SYSTEM_STATUS1
SYSTEM_STATUS2
ON_OFF
80 PIN DIFF LINE CONN
System I/O
Dock Power Soft Start Switch
P1-1
30
130
D1
S
G
D2 Q
1AS
I4920D
Y
1
2
78
P2-7
878
P1-1
71
171
P1-1
34
134
P1-2
00
200
P2-4
343
P1-1
313
P2-6
767
P2-6
6
P1-1
82
182
P1-1
48
148
P2-8
2M
TG
2
P1-1
78
178
P2-5
959
P1-1
51
151
P1-7
7
P1-1
919
P2-1
616
R1
47.5
K
P1-1
27
127
P2-4
040
P2-4
747
P1-1
18
118
P1-2
02
MT
G2
P2-1
1
P1-1
45
145
P2-5
656
P1-1
31
131
P2-6
565
P2-7
373
P1-1
23
123
P1-1
72
172
P1-1
32
132
P1-1
97
197
P2-4
242
P2-3
838
P1-1
414
P2-6
868
P2-7
7
P1-1
88
188
P1-1
47
147
R3
10K
P1-1
53
153
P1-8
8
P1-1
07
107
P1-1
26
126
P2-5
252
P2-3
939
P1-1
13
113
U6
TP
S3820-3
3D
B
RE
SE
T1
MR
3
WD
I4
VD
D5
GN
D2
P1-1
44
144
P2-4
141
C11
0.1
UF
16V
C1
0.1
UF
16V
P2-7
575
P1-1
21
121
P1-1
74
174
P1-1
63
163
R2
47.5
K
D1
S
G
D2 Q
1B
SI4
920D
Y
3
4
56
P1-1
92
192
P2-4
444
P2-3
737
P1-1
60
160
U8
MA
X3371
VL
1
GN
D2
IOL
3IO
C4
SH
DN
5V
CC
6
P1-1
212
P2-6
969
P2-8
8
P1-1
87
187
P1-1
43
143
P1-1
50
150
P1-1
1
R37
10K
P2-6
161
P1-1
55
155
P1-6
6
P1-1
08
108
P2-4
4
P2-1
111
P2-5
858
P1-1
52
152
P1-1
717
C92
4.7
UF
16V
P2-5
454
P2-4
646
U3
MA
X3225
E
RD
Y1
C1+
2
C1-
4
C2+
5
C2-
6IN
VA
LID
11
GN
D
18
V+
3
V-
7
VC
C19
T1O
UT
17
T2O
UT
8R
1O
UT
15
R2O
UT
10
T1IN
13
T2IN
12
R1IN
16
R2IN
9
FO
RC
EO
N14
FO
RC
EO
FF
20
P2-7
474
P1-1
24
124
P1-1
75
175
P1-1
99
199
P1-1
61
161
P2-1
313
P1-1
010
P2-7
171
P1-1
83
183
P1-1
42
142
P1-1
49
149
P2-8
1M
TG
1
C12
0.1
UF
16V
P1-1
91
191
P2-6
262
P1-1
616
P1-1
06
106
P1-1
85
185
P1-1
64
164
P2-1
010
P1-1
80
180
P1-1
58
158
P1-2
2
P1-1
15
115
P2-5
555
P1-1
38
138
P2-5
151
P1-1
28
128
P2-8
080
P1-1
22
122
D1
MB
R0
54
0T
1
P1-1
98
198
P1-1
59
159
P2-7
070
Q2
2N
390
41
3 2
P1-1
89
189
P1-1
73
173
P1-1
41
141
P1-1
93
193
C5
330U
F10
V
P1-9
9
P1-1
11
111
P1-1
84
184
P2-9
9
C2
0.1
UF
16V
P1-1
79
179
P1-1
67
167
R38
100
K
P1-1
56
156
P1-3
3
P1-1
17
117
P2-6
060
P1-1
39
139
P2-5
050
P1-1
29
129
U13
M24C
04-W
DW
6T
SC
L6
WC
#7
SD
A5
VC
C8
VS
S4
NC
1
E1
2
E2
3
P1-1
10
110
P1-1
65
165
P2-1
414
P2-7
676
P2-2
2
R36
100
K
P1-1
96
196
C8
0.1
UF
16V
P2-7
272
P1-1
90
190
P1-1
69
169
P1-1
40
140
P1-1
35
135
P1-1
95
195
P1-1
19
119
P1-1
515
P1-1
818
P1-1
81
181
P2-1
212
R35
33.2
K
P1-1
76
176
P2-4
848
P1-1
57
157
P1-4
4
P1-1
16
116
C6
0.1
UF
16V
P1-1
37
137
P1-1
12
112
C3
0.1
UF
16V
P1-1
46
146
P2-7
777
P2-3
3
P2-6
363
P2-7
979
P2-6
464
P1-1
70
170
P1-1
33
133
C7
0.1
UF
16V
P1-1
94
194
P2-4
545
P1-1
66
166
P1-1
20
120
P1-1
111
P2-6
666
P2-5
5
P1-1
86
186
P2-1
515
U7
MA
X3371
VL
1
GN
D2
IOL
3IO
C4
SH
DN
5V
CC
6
P1-1
77
177
P2-5
353
P1-1
68
168
P2-1
717
P1-1
54
154
P1-5
5
P1-1
09
109
P1-1
25
125
P1-1
62
162
P1-1
36
136
P2-4
949
P1-1
14
114
P1-2
01
MT
G1
C4
330U
F10
V
R4
10K
C10
0.1
UF
16V
C9
0.1
UF
16V
P2-5
757
76 Chapter 9: Accessory Service

Figure 9.11 Dock Connectors Schematic
4 4
3 3
2 2
1 1
DD
CC
BB
AA
15 POS VGA
Connector
Ethernet
with
Transformer
Headphone Audio Output
Composite Video
Output
Honda Connector: ECG /
Serial Debug / Audio
OEM Serial
Port USB Connector
Power Input
Connector
Not Used
Key Pin
Not Used Mounting
Holes
Differential 100 ohm lines critical routing
SPEED LED
Printer Control / API
80 Pin Diff-Line Connector
80 Pin Diff-Line Connector
MONO_OUT
Differential 100 ohm lines critical routing
Place near P9
Place near P5
NO
NE
SC
HE
MA
TIC
DIA
GR
AM
C2
Do
ck
Co
nn
ec
tor
BC
Fri
da
y,
Ma
y 10, 2002
D0
19
11
11
RE
V
DA
TE
SH
.O
F
TH
IS D
OC
UM
EN
T C
ON
TA
INS
CO
NF
IDE
NT
IAL
IN
FO
RMA
TIO
NW
HIC
H I
S P
RO
PR
IET
AR
Y TO
SO
NO
SIT
E,
INC
.N
EIT
HE
R T
HE
DO
CU
ME
NT
NOR
TH
E I
NF
OR
MA
TIO
N C
ON
TAIN
ED
TH
ER
EIN
SH
AL
L B
E D
ISC
LO
SE
DO
R R
EP
RO
DU
CE
D,
IN W
HOL
E O
RP
AR
T,
WIT
HO
UT
TH
E E
XP
RE
SS
WR
ITT
EN
CO
NS
EN
T OF
SO
NO
SIT
E,
INC
.S
CA
LE
SIZ
E
UN
LE
SS
OT
HE
RW
ISE
SP
EC
IFIE
D,
DIM
EN
SIO
NS
AR
E I
N I
NC
HES
.T
OL
ER
AN
CE
S A
RE
:
<=
+/-
.XX
=+
/-
.XX
X=
+/-
EC
G_S
DA
EC
G_S
CL
EX
T_R
XC
EX
T_TX
C
VP
WR
EX
T_R
TS
C
EX
T_C
TS
C
EC
G_A
NA
LOG
EC
G_S
EN
SE
EG
C_F
ILT
ER
_C
LK
EC
G_P
WR
_C
LK
EC
G_A
UD
IO_R
IGH
T
H_A
UD
IO_L
H_A
UD
IO_S
NS
AU
D_R
_O
UT
EC
G_A
UD
IO_LE
FT
AU
D_L_O
UT
CV
ID_R
TN
CV
ID
R_O
UT
RG
B_R
TN
AN
ALO
G_R
G_O
UT
AN
ALO
G_G
B_O
UT
AN
ALO
G_B
VS
YN
C
HS
YN
C
C_IN
CIN
_R
TN
LU
MA
_IN
Y_I
N
YC
IN_R
TN
CH
RO
MA
_IN
YIN
_R
TN
VC
R_R
TS
AU
D_L_O
UT
AU
D_R
_O
UT
EN
ET
_R
X+
EN
ET
_R
X-
EN
ET_TX
-
EN
ET_TX
+
EN
ET
_LE
D_P
WR
AC
TLE
D
LIL
ED
US
B_V
BU
S
US
B_D
+
US
B_D
-
CV
ID_O
UT
VP
WR
_IN
VP
WR
_IN
_R
TN
VC
HG
R
VB
AT_S
NS
RA
TE
CT
RL_LIN
E
CH
RO
MA
_O
UT
LU
MA
_O
UT
Y_R
TN
Y_O
UT
C_O
UT
YC
OU
T_R
TN
H_A
UD
IO_R
HE
AD
PH
ON
E_S
NS
PR
INT
ER
_S
EN
SE
STA
T_FR
AM
E
MO
NO
_IN
AU
D_R
_IN
AU
D_L_I
N
VC
R_R
X
VC
R_TX
VC
R_C
TS
C_R
TN
RD
C
TD
C
D
D
3.3
V
D
D
D
D
D D D
D
D
DD
3.3
V
D
D
3.3
V
D
D
D
DD
D
P10-5
5
P10-5
252
P10-4
848
P7-1
1
P10-5
757
P10-6
767
P10-7
373
R9
1.0
0K
R25
0.0
0
P5-1
6M
TG
2
P10-2
424
P2
8 P
OS
RJ4
5
1 2 3 4 5 6 8
GND1
GND2
P8-6
GN
D2
R12
1.0
0K
FB
50805
C17
47P
F50
V
P10-8
2M
TG
2
C44
100P
F50
V
FB
10
0805
L8
600 O
HM
@100
MH
Z
14
3 2
P5-7
7
C7
0.0
01U
F50
V
L5
600 O
HM
@100
MH
Z
14
3 2
C12
0.0
01U
F50
VP
7-1
0G
ND
1
P7-6
6
R23
0.0
0
P1-6
6
P9-1
1
C33
100P
F50
V
P10-6
6
R3
1.0
0K
C15
0.0
01U
F50
V
P9-6
GN
D1
FB
9
0805
P10-8
8F
B2
0805
C25
100P
F50
V
FB
1
0805
C1
100P
F50
V
P10-5
858
P10-6
464
P10-7
575
C19
47P
F50
V
P5-1
313
P10-2
727
C10
0.0
01U
F50
V R16
1.0
0K
P10-3
838
P5-5
5
P7-1
1G
ND
2
P10-3
333
P1-5
5
R11
10K
P7-4
4
FB
30805
C43
100P
F50
V
C42
100P
F50
V
C46
0.1
UF
16V
C35
100P
F50
V
C36
100P
F50
V
P5-6
6
P10-1
515
L9
600 O
HM
@100
MH
Z
14
3 2
R6
1.0
0K
R28
0.0
0
P3
PH
ON
O
12
FB
40805
P10-2
929
P10-9
9
R13
0.0
0
C4
100P
F50
V
C28
100P
F50
V
P10-5
959
R17
10K
P10-3
737
P10-6
363
P10-7
979
R22
0.0
0
P10-2
525
FB
60805
P10-3
939
P5-1
212
P1-4
4
R8
1.0
0K
R2
1.0
0K
L1
600 O
HM
@100
MH
Z
14
3 2
C29
100P
F50
V
P7-2
2
C16
0.0
01U
F50
V
P10-4
444
R24
0.0
0
P5-8
8
P10-3
3
C31
100P
F50
V
P10-1
717
C22
100P
F50
V
P10-1
313
FB
7
0805
C39
100P
F50
V
C20
47P
F50
V
P5-1
8M
TG
4
P10-6
060
C9
0.0
01U
F50
V
P8-1
1
P9-2
2
P10-6
262
P10-7
777
FB
12
0805
P10-2
626
R4
1.0
0K
C21
100P
F50
V
S-V
ideo D
IN - F
ront
RT
NR
TN
LU
MA
CH
RO
MA
P11
3 124
5
6
7
C38
0.1
UF
16V
P10-4
040
P10-7
171
R20
49.9
P5-2
2
P10-2
121
R15
1.0
0K
P7-5
5
C40
100P
F50
V
C41
100P
F50
V
P1-1
6G
ND
1
P10-3
636
P7-3
3
P1-1
515
L2
600 O
HM
@100
MH
Z
14
3 2
C5
100P
F50
V
P10-4
545
D2 GR
EE
N
L6
600 O
HM
@100
MH
Z
14
3 2
R27
0.0
0
P10-2
2
P10-1
919
P10-3
030
C30
0.1
UF
16V
C24
100P
F50
V
P10-3
535
P8-2
2
P10-1
616
P10-5
555
P5-1
7M
TG
3
P9-3
3
P10-6
666
P10-7
272
FB
11
0805
R31
0.0
0
P10-2
828
P10-5
353
D1 GR
EE
N
P10-4
747
C3
100P
F50
V
P10-4
141
P10-7
070
P10-8
080
P5-4
4
P1-1
313
P1-1
1P
10-2
020
R10
0.0
0
P1-1
010
P1-1
7G
ND
2
P7-8
8
P5-9
9
P4
3 P
OS
PH
ON
E
12 3
11
R7
100K
L4
600 O
HM
@100
MH
Z
14
3 2
P10-8
1M
TG
1
P10-1
1
R5
1.0
0K
P10-1
818
R21
49.9
P8-3
3
C11
0.0
01U
F50
V
P12
3 P
OS
PH
ON
E
12 3
11
C8
0.0
01U
F50
V
P1-3
3
P10-1
010
P10-5
454
P10-3
131
P5-1
010
P9-4
4
P10-3
434
P10-6
161
P10-7
474
R18
47.5
K
R26
0.0
0
C6
100P
F50
V
P10-5
151
P10-5
050
P1-9
9
P10-4
4
P10-4
242
P10-6
565
P10-7
676
P5-1
414
P1-1
414
P10-2
323
C32
100P
F50
V
P7-7
7
P5-3
3
P8-4
4
C23
100P
F50
V
R30
0.0
0
P10-1
212
P1-2
2
C13
0.1
UF
16V
P10-7
7
P10-4
646
P9-5
5
L3
600 O
HM
@100
MH
Z
14
3 2
P10-6
868
P1-8
8
P10-1
111
C14
0.0
01U
F50
V
R1
0.0
0
R32
0.0
0
P10-4
949
C26
100P
F50
V
C2
100P
F50
V
P10-4
343
P10-6
969
P10-7
878
C34
100P
F50
V
P5-1
5M
TG
1
P1-1
212
P10-2
222
C18
47P
F50
V
P1-1
111
P8-5
GN
D1
FB
8
0805
C37
100P
F50
V
P5-1
1
R29
0.0
0
C45
18P
F50
VC
47
0.0
01U
F50
V
R19
0.0
0
P10-5
656
S-V
ideo D
IN - F
ront
RT
NR
TN
LU
MA
CH
RO
MA
P6
3 124
5
6
7R
14
499K
P7-9
9
P10-3
232
P10-1
414
C27
100P
F50
VP
1-7
7
P5-1
111
P9-7
GN
D2
L7
600 O
HM
@100
MH
Z
14
3 2
Chapter 9: Accessory Service 77

9.5 Theory of Operation
9.5.1 VideoThe video data originates on the main PCBA in 640 × 480, RGB-888 square pixel format at 60Hz refresh rate NTSC and 50Hz for PAL video.
9.5.1.1 VGA Video Output
The digital RGB data is converted to progressive scan analog RGB on the dock PCB. The analog RGB drives a VGA style connector and is also the input for the video encoder.
9.5.1.2 Analog Interlaced Video Outputs
The digital RGB data is converted to analog interlaced composite and S-Video outputs on the dock PCB. A video processor converts RGB and output in the selected video format. For NTSC video mode, the processor is converting from progressive scan to interlaced and is responsible for the color space conversion converting from RGB to composite and S-Video.For PAL video mode, the processor is doing the interlacing and color space conversion and outputs 768 × 576 lines at 50Hz.
9.5.1.3 Video Decoders
A video decoder digitizes the input S-Video data. A separate component performs the de-interlace and converts to digital RGB data.
9.5.2 Power DistributionThe battery charger and VPWR signals provided by the AC power supply are intended to be passed through the dock so that the system behaves the same whether the AC power supply is plugged into the dock or directly to the system (with no dock).The dock uses the 3.3V and 5V power supplies available on the Main PCB. When the dock is connected, the dock provides necessary surge limiting and reset circuitry necessary to ensure proper operation of all components.The dock provides the capability to turn OFF 3.3V and 5V power supplies to as much of the dock as possible to allow for a minimum power state.
78 Chapter 9: Accessory Service
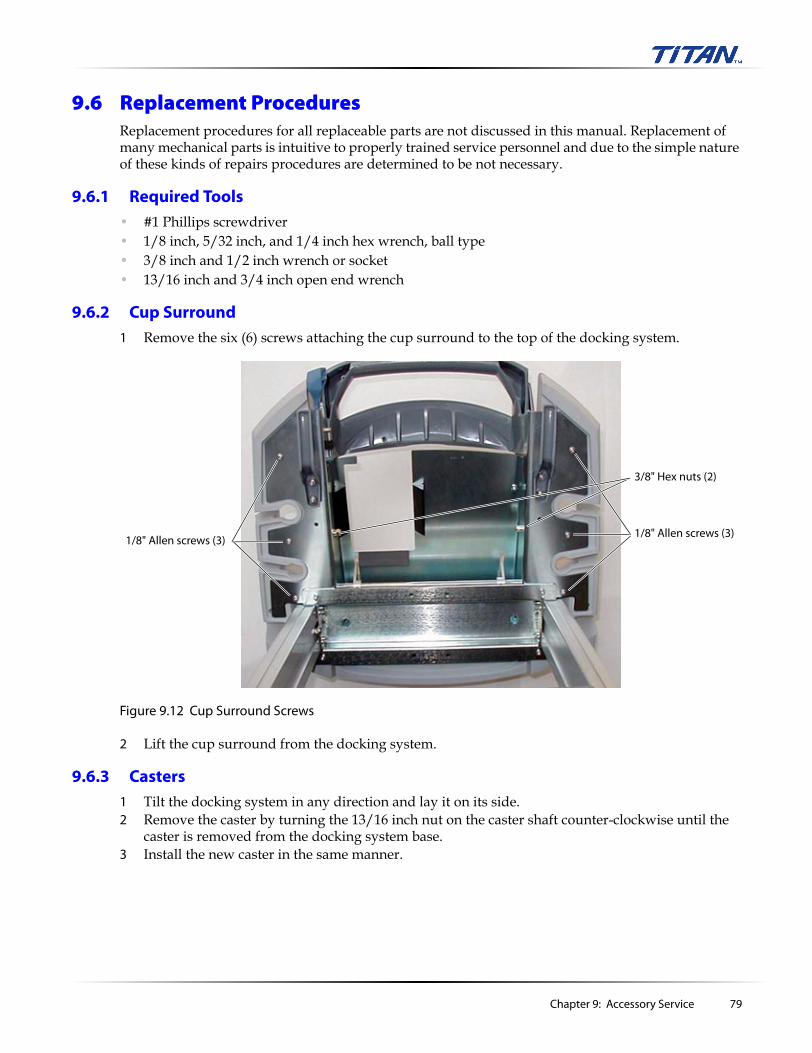
9.6 Replacement ProceduresReplacement procedures for all replaceable parts are not discussed in this manual. Replacement of many mechanical parts is intuitive to properly trained service personnel and due to the simple nature of these kinds of repairs procedures are determined to be not necessary.
9.6.1 Required Tools• #1 Phillips screwdriver• 1/8 inch, 5/32 inch, and 1/4 inch hex wrench, ball type• 3/8 inch and 1/2 inch wrench or socket• 13/16 inch and 3/4 inch open end wrench
9.6.2 Cup Surround1 Remove the six (6) screws attaching the cup surround to the top of the docking system.
Figure 9.12 Cup Surround Screws
2 Lift the cup surround from the docking system.
9.6.3 Casters1 Tilt the docking system in any direction and lay it on its side.2 Remove the caster by turning the 13/16 inch nut on the caster shaft counter-clockwise until the
caster is removed from the docking system base.3 Install the new caster in the same manner.
1/8" Allen screws (3)1/8" Allen screws (3)
3/8" Hex nuts (2)
Chapter 9: Accessory Service 79

9.6.4 Power Supply1 Remove the rear cover on the docking system by pressing on the black lever at the bottom of the
cover per Figure 9.13.
Figure 9.13 Mobile Docking System Rear Cover
2 Pull the cover down and away from the docking system.3 The power supply is located on the upper shelf on the left side.
Figure 9.14 Mobile Docking System Power Supply
Rear cover release lever
Power strip
Printer/video cables
Power supply
80 Chapter 9: Accessory Service

4 Unplug the power connector from the power strip and from the power supply per Figure 9.14.5 Remove cable cover from top rear of docking system to expose mini-dock wiring.6 Remove the power supply from the docking system by unplugging the cable from the mini-dock
per Figure 9.15 and removing the cable tie that attaches it to the docking system.
Figure 9.15 Mini-Dock Connectors
7 The power supply cable is threaded through the TITAN support leg from the power supply in the rear up to the mini-dock.
8 Lower the docking system to the lowest point.9 Tilt the docking system toward the rear and carefully lower it so it lays on the ground.10 In the right support leg, as you face it from the bottom, you will notice the cables attached to a cable
tie. Remove the cable tie and the tape from around the cables.11 Separate the cables and pull the cable from the power supply down to the bottom of the docking
system support leg. 12 Tilt the docking system back to the upright position and pull the power supply from the rear of
the docking system, pulling the cable up from the support leg.13 Install the new power supply into the rear of the docking system and thread the cable down the
support leg.14 Lay the docking system back down, pull the excess cable free then thread the cable up the support
leg to the top of the docking system. 15 Attach the power supply connector to the mini-dock and replace the cable tie.16 Retape the wires and reattach the wires to the support leg with a new cable tie.17 Install the power supply power cord.
Power supplycable
Cable tie
Chapter 9: Accessory Service 81

9.6.5 Locking Handle1 Remove the six (6) screws attaching the cup surround to the top of the docking system per
Figure 9.12.2 Lift the cup surround from the docking system.3 Remove the two 3/8 inch locking nuts from the handle screws per Figure 9.12.4 Remove the two 1/8 inch hex screws holding the handle in place per Figure 9.16.
Figure 9.16 Handle Screws
5 Lift the handle from the docking system. Remove the retaining clip from the latch link assembly and remove the handle.
6 Install the new handle and reassemble the docking system in the reverse order.
9.6.6 Deflector1 Remove the six (6) screws attaching the cup surround to the top of the docking system per
Figure 9.12.2 Lift the cup surround from the docking system.3 Peel the old deflector from the frame per Figure 9.16.4 Clean any adhesive residue from the frame.5 Install the new deflector in place of the old deflector noting the notches cut out for the attaching
hardware.6 Reinstall the cup surround.
Video/power cables
Deflector
1/8" hex screw
Retaining clip
82 Chapter 9: Accessory Service

9.6.7 Mini-Dock1 Remove the cover from the top of the docking system just behind the mini-dock per Figure 9.17 to
expose the cables attached to the mini-dock.2 Disconnect all of the cables.
Figure 9.17 Mobile Docking System Cable Cover
3 Raise the docking system to the highest point by pressing on the foot pedal and lifting on the outer edges of the cup surround.
4 Looking under the top of the docking system note two access holes per Figure 9.18. These access holes are to remove the two (2) screws holding the mini-dock in place.
Figure 9.18 Mini-Dock Access Holes
Cable cover
Access holes
Chapter 9: Accessory Service 83

5 Looking from the front of the docking system find the two screws holding the mini-dock in place and remove them using a Phillips screwdriver.
Figure 9.19 Mini-Dock Screws
6 Lift the mini-dock from the docking system.7 Reinstall the mini-dock by following these steps in reverse order.
Access hole
Phillips screw
84 Chapter 9: Accessory Service

Appendix A: Parts List
This section contains a list of field-replaceable parts.
A.1 Replacement Parts ListThe following tables contain all the replaceable parts for the TITAN Ultrasound System. All quantities are one unless otherwise noted.
A.1.1 Display
Table A.1: Display
Part Number Description
P03861 Service Assembly Display TITAN
Appendix A: Parts List 85

A.1.2 Control Panel
Table A.2: Control Panel
Part Number Description
P03862 Service Assembly Control Panel, TITAN, English
P03863 Service Assembly Control Panel, TITAN, English, International
P03864 Service Assembly Control Panel, TITAN, French
P03865 Service Assembly Control Panel, TITAN, German
P03866 Service Assembly Control Panel, TITAN, Italian
P03867 Service Assembly Control Panel, TITAN, Spanish
P03868 Service Assembly Control Panel, TITAN, Portuguese
86 Appendix A: Parts List

A.1.3 Replacement Parts, System
1
2 2
3
4
5
Table A.3: System
Find Number Part Number Description
1 P03870 Service Assembly Power Supply, TITAN
2 P03872 Service Assembly Speaker, TITAN
3 P03869 Service Assembly TGC, TITAN
4 P03873 Service Assembly Upper Enclosure, TITAN
not shown P03874 Service Assembly Lower Enclosure, TITANNote: This part requires printing a replacement label for the product. Contact SonoSite Technical Support when ordering this part to have the label printed and placed on the part.
5 P03871 Service Assembly Main PCBA, TITANNote: This part does not include the transducer nest frame assembly. Those parts must be ordered separately if needed to complete the replacement of the Main PCBA.
Appendix A: Parts List 87

Figure A.1 Power Supply, P03870
Figure A.2 Speaker Assembly, P03872
88 Appendix A: Parts List

Figure A.3 TGC Assembly, P03869
Figure A.4 Upper Enclosure, P03873
Appendix A: Parts List 89

Figure A.5 Lower Enclosure Assembly, P03874 (top view)
90 Appendix A: Parts List

Figure A.6 Lower Enclosure, P03874 (bottom view)
Appendix A: Parts List 91

Figure A.7 Main PCB Assembly, P03871
92 Appendix A: Parts List

A.1.4 Transducer Nest Frame Assembly
Figure A.8 Nest Frame Parts
1 (x8)
2 (x4)
4 (x4)
5 8 (x4)
3
6 (x2)7 (x2)
Table A.4: Nest Frame Assembly
Find Number Part Number Description
1 P00364 Connector, Interposer
2 P00524 Screw, Shoulder, Thrust Plate
3 P00353 Wear Plate
4 P00646 Spring, Thrust Plate, .047 wire
5 P02860 Nest Plate, Interposer, TITAN
6 P00352 Shield, Perimeter, Long
7 P00525 Shield, Perimeter, Short
8 P02861 Post, Mounting, TITAN
Appendix A: Parts List 93

A.1.5 AC Adapter
Figure A.9 Power Supply/Battery Charger, P01139
Part Number Description
P01139 Power Supply/Battery Charger
94 Appendix A: Parts List

A.1.6 Mini-Dock
Figure A.10 Mini-Dock Assembly, P03875
Figure A.11 Mini-Dock Rear Connector, P03875
Table A.5: Mini-Dock
Part Number Description
P03875 Service Assembly Mini-Dock, TITAN
Appendix A: Parts List 95

A.1.7 Mobile Docking System
Figure A.12 Mobile Docking System Front View
8
12
19
18
139
10
4
11
15
1
14
6
96 Appendix A: Parts List

Figure A.13 Mobile Docking System Rear View
Table 2: Replaceable Parts List
Find Number Part Number Part Description
P00536 Cable, RCA/BNC Video (not shown)
P00537 Cable, Printer Control (not shown)
P01139 Power Supply/Battery Charger (not shown)
1 P02491 Base, TITAN MDS
2 P02500 VCR/Printer Enclosure, TITAN MDS
3 P02505 Tray, TITAN MDS
2
7
3
5
16
17
Appendix A: Parts List 97

A.2 Ordering Replacement PartsTo order parts, contact SonoSite Technical Support as indicated in Section 8.6, “Returning Products to SonoSite,” on page 65.
4 P02506 Front Panel, TITAN MDS
5 P02507 Rear Door, TITAN MDS
6 P02952 Foot Pedal, TITAN MDS
7 P03132 Cable Cover, TITAN MDS
8 P03133 Cup Surround, TITAN MDS
P03300 Gas Spring, TITAN MDS (not shown)
9 P03301 Hook, Cable, TITAN MDS
P03302 Outlet Strip, IEC
10 P03303 Button, Release, TITAN MDS
11 P03304 Printer Strap, TITAN MDS
12 P03306 Handle, TITAN MDS
13 P03307 Head Support, TITAN MDS
14 P03310 Caster, Total Lock
15 P03418 Shelf, VCR
P03443 Assembly, Latch Link (not shown)
16 P03499 Release, Back Door
17 P03500 Caster, Swivel
18 P03595 Deflector, Ejector
P03610 Latch Spindle, Machined (not shown)
19 P03611 Latch Hook, Machined
P03613 Latch Lever, Machined (not shown)
P03653 Spring, Cover (not shown)
Table 2: Replaceable Parts List (Continued)
Find Number Part Number Part Description
98 Appendix A: Parts List

Appendix B: Service Event Report
The Service Event Report provides information about product failures to the manufacturer and to authorized service facilities, which provide approved warranty services for SonoSite products. For all repairs completed, complete the form and return a copy of it to the following address:
SonoSite, Inc.Technical Support 21919 30th Drive SEBothell, Washington 98021USA
• USA/Canada customers: 1-877-657-8118• International customers: 425-951-1330• Technical support fax: 1-425-951-6700• Technical support e-mail: [email protected]• SonoSite website: www.sonosite.com and select Products & Solutions and then
Technical Support
Appendix B: Service Event Report 99

Service Event Report
Service Provider Name: Date:
Company:
Address:
Phone Number: Fax Number:
E-mail address:
Device Description
Name: Serial Number:
Part Number: Lot Number: Revision:
Software Version: Other Identifiers:
Event Description
Diagnosis
Service Performed
Performed By: Date:
Actions:
Parts Removed
Part Name Part Number Serial Number Lot Number Rev Replaced By
Parts Installed
Part Name Part Number Serial Number Lot Number Rev Replaced By
Tests Performed (attach test data)
Test: Test:
Performed By: Performed By:
Result: Pass Fail Result: Pass Fail
Attach additional sheets as required Page ____ of ____ F00019 Rev B
100 Appendix B: Service Event Report

Index
Numerics2D performance tests
axial measurement accuracy 60image quality 60lateral measurement accuracy 61penetration 61
AAC power indicator 22accessories 16acquisition subsystem 10alphanumeric 21annotation 21assert code 42assistance, customer 1
Bbattery
installation 25safety 7specifications 18storage and shipping 18troubleshooting diagram 46
battery charging test 64
Ccable specifications 17cable, connect mobile docking system 69cautions 5connectivity 69control panel assembly
replacement procedure 52troubleshooting diagram 44
control subsystem 14conventions used 1
Ddepth 21display
failures 41subsystem 12
display assemblyreplacement procedure 49troubleshooting diagram 43
Eerror message 6external power 25
Fforms 22freeze 22
Ggain 21grace period 4
Iimage
problem 39quality verification test 64review 64
Llicense key
install 33obtain 32
license update screen, display 35
Mmain PCBA
failures 42replacement procedure 53
measurements/calculations 22mini-dock
connectivity 27, 69description 69service 69troubleshooting diagram 47
mobile docking systemconnectivity 69description 67service 67troubleshooting diagram 47
mobile docking system connectivity 27modes 22monitor 16moving image 62
Index 101

Pperformance tests
2D 60battery 64CPD 62DCPD 62M mode 63overview 59printer 64PW 63THI 63video output 64
peripherals 17phantoms
RMI 1425A Doppler 59RMI 403 GS Multipurpose 59RMI 413A Soft Tissue 59RMI 425 Doppler 59
powerbattery charge indicators 26battery pack 25subsystem 15
power supply replacement procedure 56print 22printer
problem 39test 64
processing subsystem 12product failures, reporting 99products, returning 65
Rrecording problem 40replacement parts
list 85ordering 98
return material authorization number (RMA) 65
Ssafety, ergonomic 5save image 22service event report 99shipping instructions 65software
license 4, 32upgrade 29
SonoSite technical support, contact 65speaker replacement 55subassembly replacement 41
systemcharging requirements 26dimensions 16information screen 34insert 68measurement accuracy 61overview 9remove 68software 4specifications 16, 18troubleshooting diagram 45upgrade software 29
system controlAC power indicator 22alphanumeric 21annotation 21depth 21forms 22freeze 22gain 21measurements/calculations 22modes 22power 21print 22remappable controls 22save 22select 22THI 21touchpad 22update 22video recording 22zoom 21
system setupbeep alert 23date 23delta key 23Doppler scale 23F keys 24key click 23mode data 24OB authors 23patient header 24power delay 23printer 23sleep delay 23system information 24system status 24thermal index 23time 23video mode 23
102 Index

Ttechnical support, contact 65THI 21touchpad 22transducer
acquisition subsystem 10problems 40specifications 16, 18storage and shipping 18
troubleshooting symptoms table 39
Uupdate 22
VVCR problem 40video output tests 64video recording 22
Wwarnings 5
Zzoom
description 21problem 39
Index 103

104 Index


![Untitled Document [frankshospitalworkshop.com]frankshospitalworkshop.com/equipment/documents/dental_units/service... · Title Untitled Document Created Date 1/16/2002 2:13:50 PM](https://static.fdocuments.net/doc/165x107/5fc44642d2a5db2f3019aaa7/untitled-document-fr-fr-title-untitled-document-created-date-1162002-21350.jpg)


