UCLA Photo Manual Digital
11
Dental Photography Student Handbook
-
Upload
nicu-ciobanu -
Category
Documents
-
view
16 -
download
2
description
dental photography manual
Transcript of UCLA Photo Manual Digital

Dental Photography Student Handbook
Below the images the magnification setting on the lens (i.e. 1:3, 1:1.5) and the aperture setting (i.e. f/8, f/32) will be identified.
Created by: Todd R. Schoenbaum, DDSRichard G. Stevenson, DDS
The settings and equipment recommendations pro-vided in this manual are guidelines. Adjustments may need to be made based on personal preference, equipment differences or varied situations.
Photographic Strategies- The field needs to be free of debris, plaque, saliva, and blood- Visualize the final image before aligning the camera- Position the retractors as desired, and have the patient hold them in position- Mirrors must be clean and scratch-free- Retractors should be pulled out and away from the face- Ensure that the flash batteries are fully charged
Full Face- Position the patient approximately 3 feet from the background drape- The patient’s head should be vertical left-to-right and front-to-back- Autofocus is useful for this image only- Set the aperture to f/8 (if the image is too dark set to f/5.6) Shade Images- Position the shade tabs parallel with, and in the same plane as, the teeth being matched- The teeth need to be dry, but fully hydrated - Ensure that the tongue is not touching the lingual of the teeth- Use a contraster for maxillary anterior teeth to emphasize translucency and characterization
Occlusal Images- Position the patient in a fully supine position, with the chair lowered as much as possible- The patient holds the retractors after they are placed by the clinician- The assistant holds the mirror and the air/water syringe to keep the teeth dry and de-fog the mirror- For the maxillary image, stand at the 12 o’clock position, tilt the patient’s head back- For the mandibular image, stand at the 9 o’clock position, lean against the chair over the patient “M” (incisal reveal with lips at rest) - Set the magnification to 1:3 on the lens - Instruct the patient to say “Emma”, allowing the lips to relax to a normal position - Watch the patient do this a few times before positioning the camera and taking the picture
“E” (maximum gingival display) - Instruct the patient to smile as big as possible- If the patient does not appear to be producing a complete smile, instruct them to say “eeee”
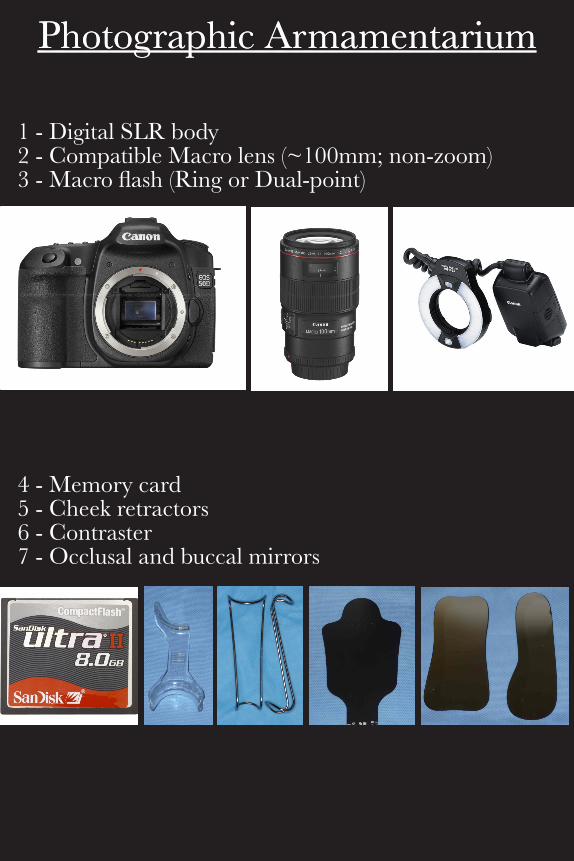
Photographic ArmamentariumPhotographic Armamentarium
1 - Digital SLR body2 - Compatible Macro lens (~100mm; non-zoom)3 - Macro flash (Ring or Dual-point)
4 - Memory card5 - Cheek retractors6 - Contraster7 - Occlusal and buccal mirrors
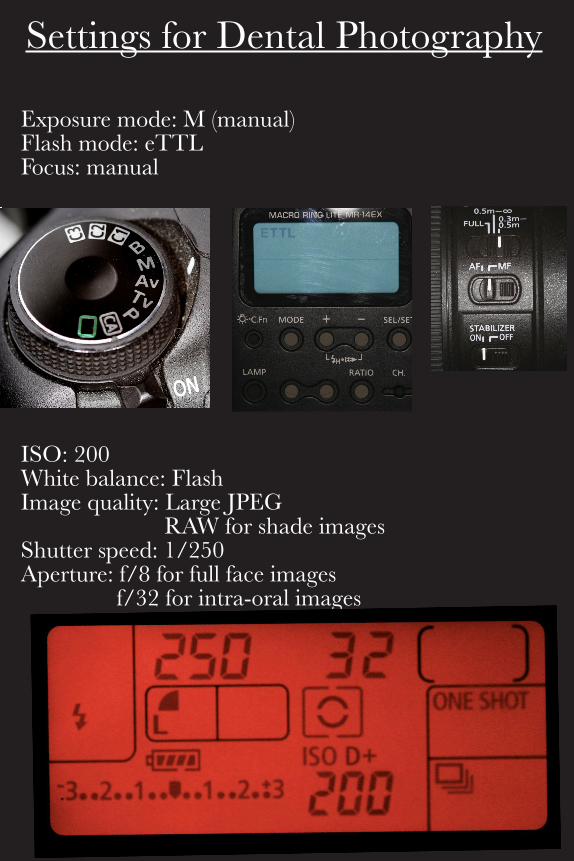
Exposure mode: M (manual)Flash mode: eTTLFocus: manual
ISO: 200White balance: FlashImage quality: Large JPEG RAW for shade imagesShutter speed: 1/250Aperture: f/8 for full face images f/32 for intra-oral images
Settings for Dental Photography

Basic Diagnostic Image Series6 images
2. Lips in Repose (“M” position)
- Turn off auto focus; set magnifi-cation to 1:3 and aperture to f/32- Instruct patient to say “Emma”- Used to determine incisal display with lips in repose
3. Maximum gingival display (“E” position)
- Instruct patient to say “eeee”- Used to determine the maximum lip height and gingival display
1. Full face smiling
- Use autofocus for this image- Patient’s head should be vertical- Aperture may need to be adjusted depending on the flash strength
magnification 1:3 aperture f/32
magnification 1:3 aperture f/32
magnification 1:15 aperture f/8

Basic Diagnostic Image Series6 images
5. Maxillary occlusal
- Place patient in fully supine position- Insert retractors (patient holds)- Dry teeth, then insert mirror- Shoot from 12 o’clock position- Focus at 1st premolar
4. Retracted
- Insert retractors- Thoroughly dry the teeth and gingiva- Teeth should be slightly separated- Retractors need to be pulled out and forward
6. Mandibular occlusal
- Place patient fully supine with head tilted back- Insert retractors and dry teeth- Place mirror under tongue- Focus at 1st premolar
magnification 1:3 aperture f/32
magnification 1:3 aperture f/32
magnification 1:3 aperture f/32

Posterior Restoration Image Series3 images
magnification 1:3 aperture f/32
magnification 1:1.5 aperture f/32
magnification 1:3 aperture f/32
magnification 1:3 aperture f/32
1. Shade Image (RAW)- Position shade tabs as close as possible to the teeth to be matched- Use the appropriate shade guide for the porcelain to be used- Keep tabs vertical
2. Pre-operative Occlusal- Use buccal mirror - If not using a rubber dam, use cheeck retractors- Teeth should be clean and dry
3. Post-operative Occlusal- Use buccal mirror - If not using a rubber dam, use cheeck retractors- Teeth should be clean and dry
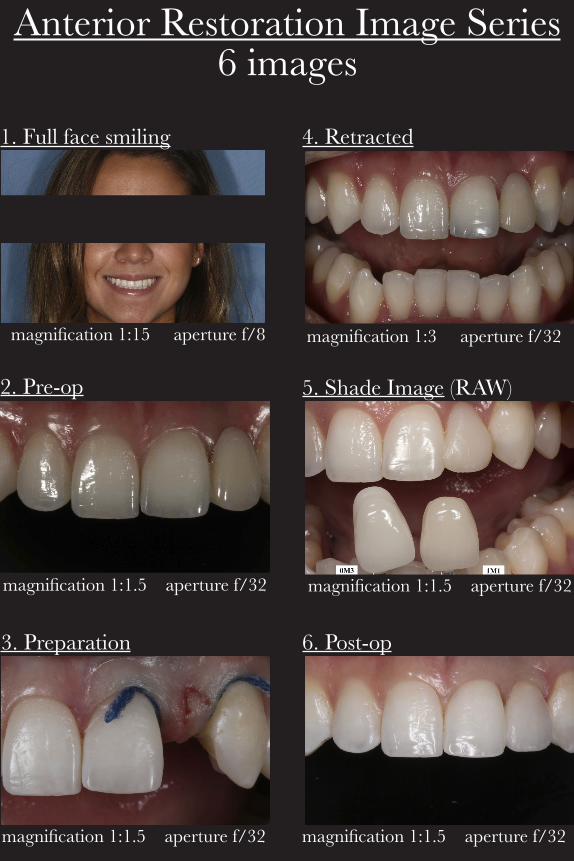
magnification 1:15 aperture f/8 magnification 1:3 aperture f/32
magnification 1:1.5 aperture f/32 magnification 1:1.5 aperture f/32
magnification 1:1.5 aperture f/32 magnification 1:1.5 aperture f/32
5. Shade Image (RAW)
4. Retracted1. Full face smiling
2. Pre-op
3. Preparation 6. Post-op
Anterior Restoration Image Series6 images

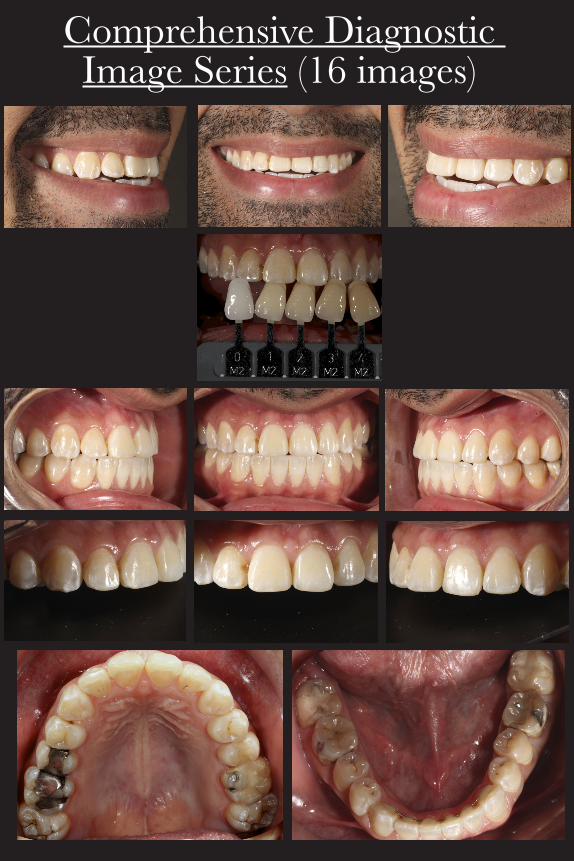
Comprehensive Diagnostic Image Series (16 images)
1. Full face smiling2. “M” (Lips in repose)3. “E” (max. gingival display)4. “F” (A-P relation)5. Right smile6. Center smile7. Left smile8. Pre-Operative shade image9. Right retracted10. Center retracted11. Left retracted12. Right close-up13. Center close-up 14. Left close-up15. Maxillary occlusal16. Mandibular occlusal
1. Full face smiling2. “M” (Lips in repose)3. “E” (max. gingival display)4. “F” (A-P relation)5. Right smile6. Center smile7. Left smile8. Pre-Operative shade image9. Right retracted10. Center retracted11. Left retracted12. Right close-up13. Center close-up 14. Left close-up15. Maxillary occlusal16. Mandibular occlusal
Comprehensive Diagnostic Image Series (16 images)