True Scale House Framing Kit · 2 True Scale House Framing Kit UG 59913 V0811 This kit is a 1:16...
12
True Scale House Framing Kit UG 59913 V0811 1 59913 V0811 User Guide True Scale House Framing Kit Hip Truss
-
Upload
nguyenliem -
Category
Documents
-
view
237 -
download
3
Transcript of True Scale House Framing Kit · 2 True Scale House Framing Kit UG 59913 V0811 This kit is a 1:16...

True Scale House Framing Kit UG 59913 V0811 159913 V0811
User Guide
True Scale House Framing Kit
Hip
Truss
2 True Scale House Framing Kit UG 59913 V0811
This kit is a 1:16 scale model of a two-bedroom house. It contains all the lumber needed to frame a two-bedroom house with a truss roof or a hip roof.
This kit teaches proper construction techniques according to the International Building Code (IBC). Local codes may vary, however, nearly all municipalities have adopted the IBC to ensure uniformity and safe construction.
The drawings in this kit are drawn to 1:16 scale and can be used for wall layout. The dimensional lumber is cut to scale to emulate lumber one would purchase at a lumberyard. The studs come cut to length and all other dimensional lumber is cut by the kit builder. The dimensions on the drawings are actual size dimensions. An architect scale will be used throughout the building of the kit to convert actual dimensions to 1:16 scale dimensions.
Materials Included:• Lumber
- 60 – 2" x 4" (1/8" x 1/4" x 24")- 5 – 2" x 12" (1/8" x 3/4" x 24")- 20 – 1"x 6" (1/16" x 3/8" x 18")- 80 – 2" x 6" (1/8" x 3/8" x 18")- 225 – Precut Studs (1/8" x 1/4" x 5" – 11/16")
• Architectscale• Nails(pins)• Houseplans• Foambase• Glue• Sandpaper• UserGuide
Materials Included (but not in Refill Kit):• LumberjackCutter
Items Required, not included:• Hammer• Needlenosepliers• #2Pencil• Waxedpaper• Maskingtape• Lil’TermiteSander(optional)
The lumber in this kit is balsa wood. Balsa wood is a lightweight wood grown mostly in Central America. Because it is a soft, open-cell wood, it is easy to cut, nail, and glue. The included glue is very tacky and quick drying – it driesclearandworkswellwithbalsawood.TheLumberjackCuttercutsalltheanglesneededtomakeeitherhouse.Thecutter’sdesignemulatesachopsawinthatthebladeishingedfromthebackandcomesdownthrough the wood as a chop saw would. Sanding is required for the side cuts on the hip roof house. Pitsco offers apowersandercalledtheLil’TermiteSanderthatcanbeusedinsteadofsandpaper.
True Scale House Framing Kit UG 59913 V0811 3
Before BuildingBefore you begin to build a house, there are some things you should be familiar with.
First,readthroughtheglossarylocatedonthelastpagesofthisuserguidetohelpyouunderstandtheinstructions and drawings.
Second, become familiar with the use of the architect scale, sometimes called an architect rule. Architects use these extensively to make scale drawings and to measure scale parts. An architect scale has 11 different scales on it. In this kit, you will use the 3/4 scale. This means that three-fourths inch on the house drawing is equal to one foot on a full-size house. If the drawing calls for a piece of lumber to be six-feet long, you would measure from 0 to 6 on the 3/4 scale. Start at the zero on the 3/4 scale. The foot divisions are to the right of 0 from 1 to 14. The inch divisions are to the left of 0.
Third, understand how to read the drawings. Sheet 1 shows the elevations of the house or how the house might look on the outside when finished. It also shows the floor plan of the house. Remember, the dimensions on the drawings are full-size house dimensions, not scale dimensions. The floor plan drawings on Sheet 1 are drawn in 1/4 scale and the drawing on Sheet 2 is drawn in half scale. If you try to measure on these sheets, use the appropriate scale on your architect scale. Note: On Sheet 2, each wall is numbered and has an arrow pointing to that wall. The wall drawings are drawn as though you were standing on the number and looking at the wall as the arrow indicates. Also note the legend on Sheet 2 that tells you how to identify studs, cripples, trimmers, and wall ties.
Fourth,decidebeforebeginningifyouaregoingtobuildatrussrooforahiproofhouse.Removetheunnecessary sheets from the drawing set to avoid confusion. Some walls are the same for both houses and some are different. Identify the walls you need for the chosen house before beginning (see wall index on page 4).
Fifth,becomefamiliarwiththeLumberjackCutter.Making90-degreecutsiseasy.Justmeasureandmarktheboardandcutonthemark.Whenmakinganglecuts,cuttheboardtolengthfirstandthencuttheangle.Keepyour fingers away from the blade. Do not cut anything other than balsa wood.
Building the HouseDecideifyouaregoingtousenails,glue,orboth.Ifusingnails,usenomorethantwonailsateachjoint.Ifusingglue,useonlyasmalldropateachjointandallowfordryingtime.Topreventthegluefromstickingtothedrawings, place a piece of waxed paper over the drawings.
Studsarecuttolengthanddonothavetobecutfromlongerlumber.Usestudsforstudsandtrimmers.Allother lumber will have to be cut to length. Always choose the shortest board available to avoid waste.
Thewallscanbebuiltinanyorder.BeginwithasimplewallsuchasWall10.PlacethedrawingforWall10onawork surface. The foam sheet, which will later be used as the base for the house, can be used as a work surface –butbecarefulnottodamagethefoam.Measureandcuttwoplatesthataretwofeet,sixincheslongfroma2" x 4" (not a stud). Lay three studs, the sole plate, and the cap plate on the drawing. Everything should line up perfectly.Nailand/orgluethestudstotheplates.Cutthetopcapplate3feet,1inchlongandnailorglueittothefirstcapplate(twonailswillbeenough).LabelthewallasWall10.
Wall13hasadoorandawalltieinit.TherearedrawingsofawalltieonSheets1and2.Walltiesareusedtojointwo perpendicular walls and are made of two studs with three short 2" x 4"s between them. The three short 2" x4"piecesshouldbeflushwiththesideofthewalltiethattouchestheadjoiningwall.Refertothefloorplan

4 True Scale House Framing Kit UG 59913 V0811
onSheet2toseewhichwaythewalltieshouldface.It’seasiertomakewalltiesbeforebuildingthewall.Aftermaking the wall tie, cut two trimmers from studs (6 feet, 8 inches). Cut two headers from a 2" x 12" (2 feet, 4 inches). Cut two plates (8 feet, 5 inches).
Placethelumberonthedrawingandmakesureeverythingfits.Makesurethewalltieisfacingthecorrectdirection.Inthiscasetheshort2"x4"piecesshouldbeflushwiththetopsideofthewall.Nailand/orgluethewall.Cutthetopcapplates(4feet,9inchesand3feet,11-1/2inches).Notethe3-1/2-inchspacebetweenthemdirectlyoverthewalltie.Nailand/orgluetheminplace.LabeltheWall13.Note:WhenyoucometoWall2,noticethatitistoolongtofitonthesheet,soitisdrawnintwopieceswithamatchlinewherethetwopiecesjoin.Youcanbuildthewallintwopiecesandassemblethemlater,oryoucancut the drawing and connect the match lines and make the wall in one piece.
Walls1,2A,2B,6A,6B,7,8,9,10,11,13,and14arethesameforboththetrussroofhouseandthehiproofhouse.Walls3,4,5,and12aredifferent.Markthewallsforthehouseyouarebuildingsoyouwon’tbuildthewrong ones. See the wall index.
Continuetobuildwalls,rememberingtolabeleachwallasyougo.Usethearchitectscaletomeasuresomeofthe boards on the drawings.
Wall Index Truss Roof House Hip Roof HouseSheet1 Elevation,FloorPlan Elevation,FloorPlanSheet2 WallLayoutGuide WallLayoutGuideSheet3 Walls1,3 Wall1Sheet4 Walls2a,2b Walls2a,2bSheet5 Walls4,5,6a,6b Walls6a,6bSheet6 Walls7,8,9 Walls7,8,9Sheet7 Walls10,11,12,13,14 Walls10,11,13,14Sheets8&9 TrussesSheet10 Walls3,12Sheet 11 Ceiling and RoofSheet12 Walls4,5
Assembling the WallsWhenbuildingahouse,acontractorbeginsbyplacingthefloorjoistsonthefoundationandthenputtingthefloorsheetingonthejoists.Thefloorthenbecomestheworksurfacetobuildthewalls.Theoutsidewallsareusually made first beginning with the longest wall. The contractor lays them out on the floor according to the drawingsandnailsalltheboardstogether.Next,thecontractorstandsitupandmovesitintoplaceonthefloor.Henailsbracesfromthefloortothewalltoholditplumb.Thisprocedurewouldberepeateduntilallthewallsare in place and plumb.
Withallthewallsinplace,thecontractorthenbuildstheroofandattachesittothetopsofthewalls.Next,hewouldputsheetingontheoutsideoftheexteriorwallsandtheroof.Withthesheetinginplace,thebraceswould be removed and the house would be considered roughed-in.
The foam in the kit will be the floor of the house. Centered on the foam, draw a rectangle 24 feet by 34 feet (scaledusingyourarchitectscale).Makesuretherectangleissquare.Ifyouhaveaccesstoacarpenter’ssquareor a drafting triangle, use them to help make it square. If not, measure diagonally from opposite corners on the rectangle. The measurements should be the same if the rectangle is square. This rectangle is the same size as the outside of the house.

True Scale House Framing Kit UG 59913 V0811 5
BeginstandingthewallswithWall1.Standitononeendoftherectangle.Makesureitisfacingtherightdirection. Remember, the top of the wall has two cap plates.
Next,standWall2BortheentireWall2ifyoumadeitinonepiece.UsetherectanglelinetokeepitsquarewithWall1.PlaceanailinthecaptoholdWall2toWall1temporarily.
StandWall3inthesamemanner.Placenailsinthecapswherethewallsjoin.
Continuestandingwallsintheordertheyarenumbered.Whenallthewallsarestandingandplumb,nailand/orglue them together permanently.
Ifbuildingahiproofhouse,youneedtoaddthecapovertheheaderbetweenWalls4and5.
Youarenowreadytostartontheroof.Refertothedirectionsforthetypeofroofyouhavechosentobuild.
6 True Scale House Framing Kit UG 59913 V0811
Truss Roof Directions
If you are making a house with a truss roof, follow these instructions.
Thetrussroofwillconsistof16Belgian“W”trussesandtwogableendtrusses(Sheets8and9).
BeginbymakingtheWtrusses(16required).
Cut 16 bottom cords.Cut 32 top cords.Cut32W2webs.Cut32W1webs.Cut all gussets.
Assemble the trusses as shown on Sheet 8. Lay out the cords and webs and glue them together using the gussets.Whenthegluehasdriedenoughtoturnthemover,gluethegussetsontheotherside.
Maketwogableendtrusses.
Cut two bottom cords.Cut four top cords.CutfoureachoftheF1throughF5fillboards.CuttwoeachoftheF6fillboards.
AssemblethetrussesasshownonSheet9.Glueand/ortoenailasneeded.
Assembling a Truss RoofThetrusslayoutonSheet9showshowthetrusseswillstandonthetopofthewalls.Thegableendtrussesareflushwiththeoutsideofthehousewalls.TheWtrussesareontwo-footcenters,meaningthatthecenterofeachtruss is two feet from either side of the truss.
Beginbylayingoutthetwo-footcentersonthetopofthefrontandbackwallsofthehouse.Usingthearchitectscale, measure two feet from the end of the house and place a mark on the cap plate. Continue to place marks every two feet along the cap plates of the front and back walls.
Since this mark represents the center of the truss, it will be hidden when the truss is in place. Therefore, you need to place another mark one inch on each side of the center mark. These marks can be seen when the trusses are in place.
Before standing the trusses, cut some short 2" x 6"s that will become the ridge of the roof. These boards will go between the trusses at the very top of the trusses. The ridge boards between the gable end trusses and the Wtrusseswillbe21-3/4incheslong.TheridgeboardsbetweentheWtrusseswillbe22-1/2incheslong.Youneed two of the 21-3/4 inch ridge boards and 15 of the 22-1/2 inch ridge boards. It is important that these are cut accurately to keep the spacing between the trusses correct.
BegintheroofbyplacingagableendtrussontheendofthehouseoverWall1.MakeitflushwiththeoutsideofWall1andcenteredsotheoverhangoneachendisequal.Temporarily,braceitontheoutsideofthehousesoitisvertical.Nailand/orglueittothecapplate.Thepicturesonthenextpageshowthetemporarybrace.
True Scale House Framing Kit UG 59913 V0811 7
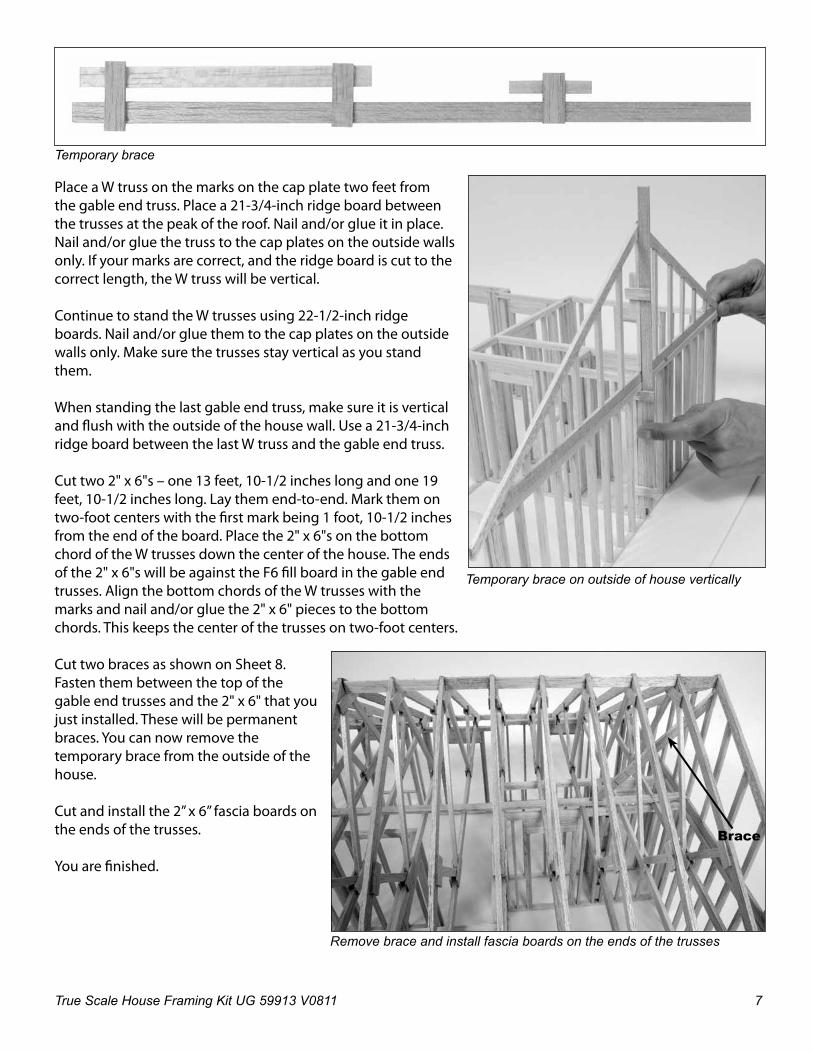
PlaceaWtrussonthemarksonthecapplatetwofeetfromthe gable end truss. Place a 21-3/4-inch ridge board between thetrussesatthepeakoftheroof.Nailand/orglueitinplace.Nailand/orgluethetrusstothecapplatesontheoutsidewallsonly. If your marks are correct, and the ridge board is cut to the correctlength,theWtrusswillbevertical.
ContinuetostandtheWtrussesusing22-1/2-inchridgeboards.Nailand/orgluethemtothecapplatesontheoutsidewallsonly.Makesurethetrussesstayverticalasyoustandthem.
Whenstandingthelastgableendtruss,makesureitisverticalandflushwiththeoutsideofthehousewall.Usea21-3/4-inchridgeboardbetweenthelastWtrussandthegableendtruss.
Cuttwo2"x6"s–one13feet,10-1/2incheslongandone19feet,10-1/2incheslong.Laythemend-to-end.Markthemontwo-foot centers with the first mark being 1 foot, 10-1/2 inches from the end of the board. Place the 2" x 6"s on the bottom chordoftheWtrussesdownthecenterofthehouse.Theendsofthe2"x6"swillbeagainsttheF6fillboardinthegableendtrusses.AlignthebottomchordsoftheWtrusseswiththemarks and nail and/or glue the 2" x 6" pieces to the bottom chords. This keeps the center of the trusses on two-foot centers.
Cut two braces as shown on Sheet 8. Fastenthembetweenthetopofthegable end trusses and the 2" x 6" that you justinstalled.Thesewillbepermanentbraces.Youcannowremovethetemporary brace from the outside of the house.
Cutandinstallthe2”x6”fasciaboardsonthe ends of the trusses.
Youarefinished.
Temporary brace
Temporary brace on outside of house vertically
Remove brace and install fascia boards on the ends of the trusses
Brace
8 True Scale House Framing Kit UG 59913 V0811
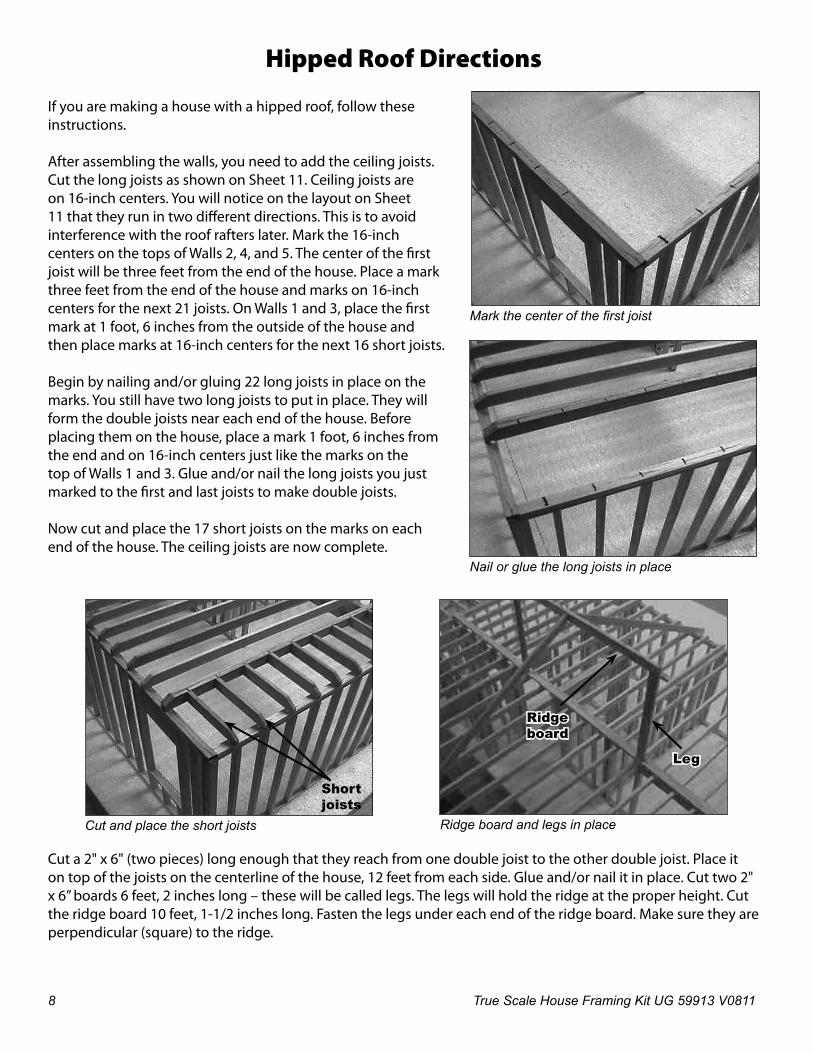
Hipped Roof Directions
If you are making a house with a hipped roof, follow these instructions.
Afterassemblingthewalls,youneedtoaddtheceilingjoists.CutthelongjoistsasshownonSheet11.Ceilingjoistsareon16-inchcenters.YouwillnoticeonthelayoutonSheet11 that they run in two different directions. This is to avoid interferencewiththeroofrafterslater.Markthe16-inchcentersonthetopsofWalls2,4,and5.Thecenterofthefirstjoistwillbethreefeetfromtheendofthehouse.Placeamarkthree feet from the end of the house and marks on 16-inch centersforthenext21joists.OnWalls1and3,placethefirstmark at 1 foot, 6 inches from the outside of the house and thenplacemarksat16-inchcentersforthenext16shortjoists.
Beginbynailingand/orgluing22longjoistsinplaceonthemarks.Youstillhavetwolongjoiststoputinplace.Theywillformthedoublejoistsneareachendofthehouse.Beforeplacing them on the house, place a mark 1 foot, 6 inches from theendandon16-inchcentersjustlikethemarksonthetopofWalls1and3.Glueand/ornailthelongjoistsyoujustmarkedtothefirstandlastjoiststomakedoublejoists.
Nowcutandplacethe17shortjoistsonthemarksoneachendofthehouse.Theceilingjoistsarenowcomplete.
Cuta2"x6"(twopieces)longenoughthattheyreachfromonedoublejoisttotheotherdoublejoist.Placeitontopofthejoistsonthecenterlineofthehouse,12feetfromeachside.Glueand/ornailitinplace.Cuttwo2"x6”boards6feet,2incheslong–thesewillbecalledlegs.Thelegswillholdtheridgeattheproperheight.Cuttheridgeboard10feet,1-1/2incheslong.Fastenthelegsundereachendoftheridgeboard.Makesuretheyareperpendicular (square) to the ridge.
Nail or glue the long joists in place
Mark the center of the first joist
Cut and place the short joists
Short joists
Ridge board and legs in place
Ridge board
Leg
True Scale House Framing Kit UG 59913 V0811 9
Measure11feet,11-1/4inchesfromeachendofthehouseandplaceamarkonthe2"x6"ontopoftheceilingjoists.Measure12feetfromthesideofthehouseandplaceamarkonthe2"x6".Themarksshouldcross.Ifthehouseisnotexactly24"x34",adjustthemarksaccordingly.Standthelegsandridgeuponthe2"x6"ontopoftheceilingjoists.Makesurethelegsarestraightverticallyandinthecenterofthehouseaccordingtoyourmarks.Youcancutandusecommonraftersasbracestoholdtheridgeinplace.Glueand/ornailthebottomofthe legs to the 2" x 6".
Allraftershaveabird’smouthcutwheretheyrestontopofthewalls.ThiscutcanbemadeusingtheendoftherazorbladeontheLumberjackCutter.
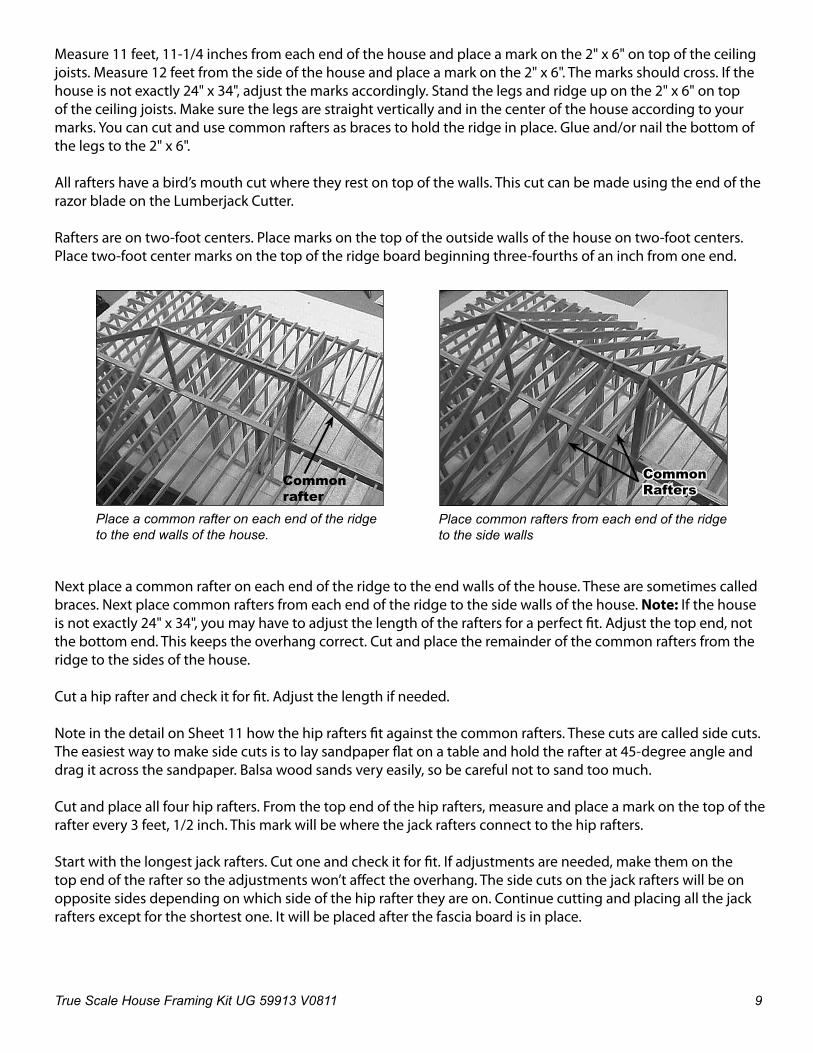
Rafters are on two-foot centers. Place marks on the top of the outside walls of the house on two-foot centers. Place two-foot center marks on the top of the ridge board beginning three-fourths of an inch from one end.
Nextplaceacommonrafteroneachendoftheridgetotheendwallsofthehouse.Thesearesometimescalledbraces.Nextplacecommonraftersfromeachendoftheridgetothesidewallsofthehouse.Note: If the house isnotexactly24"x34",youmayhavetoadjustthelengthoftheraftersforaperfectfit.Adjustthetopend,notthe bottom end. This keeps the overhang correct. Cut and place the remainder of the common rafters from the ridge to the sides of the house.
Cutahiprafterandcheckitforfit.Adjustthelengthifneeded.
NoteinthedetailonSheet11howthehipraftersfitagainstthecommonrafters.Thesecutsarecalledsidecuts.The easiest way to make side cuts is to lay sandpaper flat on a table and hold the rafter at 45-degree angle and drag it across the sandpaper. Balsa wood sands very easily, so be careful not to sand too much.
Cutandplaceallfourhiprafters.Fromthetopendofthehiprafters,measureandplaceamarkonthetopoftherafterevery3feet,1/2inch.Thismarkwillbewherethejackraftersconnecttothehiprafters.
Startwiththelongestjackrafters.Cutoneandcheckitforfit.Ifadjustmentsareneeded,makethemonthetopendoftheraftersotheadjustmentswon’taffecttheoverhang.Thesidecutsonthejackrafterswillbeonoppositesidesdependingonwhichsideofthehipraftertheyareon.Continuecuttingandplacingallthejackrafters except for the shortest one. It will be placed after the fascia board is in place.
Place a common rafter on each end of the ridge to the end walls of the house.
Common rafter
Place common rafters from each end of the ridge to the side walls
Common Rafters

10 True Scale House Framing Kit UG 59913 V0811
Thefasciaboardisnext.Holda2"x6"uptotheendsoftherafterstoseeifanyofthemneedtobetrimmed.Usingthefascia board as a guide, sand the side cuts on the ends of the hip rafters at 45 degrees to fit. Install the fascia board all thewayaroundthehouse.Installtheshortjackrafters.
Youarefinished.
Install the short jack rafters
Short jack rafters
Fascia board

True Scale House Framing Kit UG 59913 V0811 11
GlossaryBird’s mouthAbird’smouthisthenotchmadeintotheraftersoithasfullbearingontopofthewall.
BraceAbraceisatemporaryboardplacedonawallatanangletothestuds.Whenthewallisplumb,thebraceisnailed on the top and bottom to keep the wall plumb or, in other words, to keep it from racking.
Cap plateCapplatesaresometimescalledthetopplate.Itisthetopboardofawall.Wallshavetwocapplates.
Ceiling joist Aceilingjoististhehorizontalboardthatrestsonthetopofthewalls.Theceilingordrywallwouldbefastenedto it.
Cripples Cripples are short boards that run vertically below and/or above windows and doors.
Doubler Doublers are boards nailed together for added strength.
FasciaA fascia is the board that attaches to the ends of the trusses or roof rafters. It is the board that the gutter fastens to.
Gable A gable is the triangular shape formed on the end of a truss roof house.
Header A header is a beam running horizontally above windows, doors, or other openings to support the weight of the roof.
Hip rafter Ahiprafteristhemainsupportforthejackraftersinahiproof,normallyata45-degreeanglefromthecommonrafters.
Jack rafter Ajackrafterisarafterthatspansfromthetopplatetothehiprafterorfromthevalleyraftertotheridge.
Joist Joistsareboardsthatrunhorizontallyandsupporttheceilingorfloor.
King stud In carpentry terms, this is usually the stud running from the top to the bottom plate on either side of a window or door.
Layout Layout, or the laying out of a wall, is the marking of where studs and cripples are located on wall plates.
Miter cut A miter cut is an angled cut on the end of any board.
On center (O.C.) On center refers to a measurement from the center of one board to the center of another.
Plumb Toplumbawallmeanstomakeitstraightupanddown.Norackingandnoleaning.
12 True Scale House Framing Kit UG 59913 V0811
P.O.Box1708•Pittsburg,KS66762www.pitsco.com
Toll-FreeOrders800-835-0686
Prefabricated Roof TrussesPrefabricatedtrussesreplacetheraftersandceilingjoistsusedinconventionalframing.Theuseoftrussesenablesthebuildertoconstructhomeswithgreaterspeedandaccuracy(seeSheets8&9).Trussesarenormallybuilt off site and delivered as a complete truss set.
• Topchordisthetopmemberofthetrusstowhichtheroofwouldbeattached.• Bottomchordisthebottommemberofthetrusstowhichtheceilingwouldbeattached.• Websareusedtomakethetrussstrong.Theyformtriangles,whichareverystrongstructuralshapes.• Gussetsareusedwherethewebsmeetthetopandbottomchordsandwherethetopcordsandbottom
cordmeet.Gussetsareusedoneachsideofthejointforstrength.
RackingRacking is when a wall, or a rectangular shape, leans to one side and is no longer a rectangular shape. Braces are used to keep walls from racking.
Rafter Rafters are the sloping boards of the roof of a building.
Ridge The ridge is the highest point of a roof.
Rough in The framing of a house is called rough in. This includes floor framing, wall framing, roof framing, window installation, and exterior door installation.
Rough opening (R.O.)Rough opening means the opening left in a framed wall for a window or door.
Sole plate A sole plate is sometimes called the bottom plate. It is the bottom board of a wall.
StudStuds are the upright boards in the framing of the walls. The top and bottom plates are fastened to each end of thestuds.Studsforastandardeight-footwallareprecutto92-5/8inches.
SillA sill is a horizontal piece that forms the lowest part of the rough opening for a window.
Trimmer Atrimmeristheboardnailedtothekingstudthatsupportstheheader.Thisissometimescalledajackstud.
Wall tieWalltiesareusedtojointwoperpendicularwalls.Awalltieistwostudswiththreeshort2"x4"sbetweenthem.Thethreeshort2"x4"sshouldbeflushwiththesideofthewalltiethattouchestheadjoiningwall.