
Total Phosphorus Sampling Methods -...
12
1 Total Phosphorus Sampling Methods Water Action Volunteers Manual 2017 1 Table of Contents I. Project Contacts ............................................................................................................................................ 1 II. Project Background and Goal ................................................................................................................ 2 III. Volunteer Time Commitment ................................................................................................................ 2 IV. Volunteer Duties ......................................................................................................................................... 3 V. Safety ............................................................................................................................................................... 3 VI. Field Sampling and Preservation Methods....................................................................................... 4 VII. Delivery of Samples to the Wisconsin State Lab of Hygiene...................................................... 7 VIII. Field QC Duplicate Samples .................................................................................................................... 9 IX. Field QC Blank Samples......................................................................................................................... 10 X. Equipment Cleaning Procedures ....................................................................................................... 11 XI. Total Phosphorus Monitoring Videos.............................................................................................. 12 I. Project Contacts Ilana Haimes Wisconsin Department of Natural Resources 101 S. Webster St. Madison, WI 53707 [email protected] 608-266-3599 _____________________________ Peggy Compton University of Wisconsin - Extention 337 Gardner Hall 1 University Plaza Platteville, WI 53818. [email protected] 608-342-1633 1 Last updated March 1 st , 2017.
Transcript of Total Phosphorus Sampling Methods -...
1
Total Phosphorus Sampling Methods Water Action Volunteers Manual 20171
Table of Contents
I. Project Contacts ............................................................................................................................................ 1
II. Project Background and Goal ................................................................................................................ 2
III. Volunteer Time Commitment ................................................................................................................ 2
IV. Volunteer Duties ......................................................................................................................................... 3
V. Safety ............................................................................................................................................................... 3
VI. Field Sampling and Preservation Methods....................................................................................... 4
VII. Delivery of Samples to the Wisconsin State Lab of Hygiene ...................................................... 7
VIII. Field QC Duplicate Samples .................................................................................................................... 9
IX. Field QC Blank Samples......................................................................................................................... 10
X. Equipment Cleaning Procedures ....................................................................................................... 11
XI. Total Phosphorus Monitoring Videos .............................................................................................. 12
I. Project Contacts
Ilana Haimes
Wisconsin Department of Natural Resources
101 S. Webster St.
Madison, WI 53707
608-266-3599
_____________________________
Peggy Compton
University of Wisconsin - Extention
337 Gardner Hall
1 University Plaza
Platteville, WI 53818.
608-342-1633
1 Last updated March 1st, 2017.

2
II. Project Background and GoalPhosphorus is the most visible, widespread water pollutant in Wisconsin. In more than 80%
of our state’s lakes, high levels of phosphorus can trigger excess algae and plant growth in
lakes and streams. When these excess plants die and decompose, oxygen levels drop
dramatically and can lead to fish kills.
Streams act like conveyor belts, delivering phosphorus directly to lakes. Additionally,
phosphorus is associated with excess sediments covering stream bottoms, the most common
biological impairment in streams. Phosphorus in streams and lakes originates naturally from
rocks, but its major sources today are usually associated with human activities: soil erosion,
human and animal wastes, septic systems, detergents, and runoff from farmland or lawns.
An analysis of phosphorus often includes both total phosphorus and soluble reactive
phosphorus. Volunteers will only sample for total phosphorus, which is considered a better
indicator of nutrient status because its levels remain more stable than soluble reactive
phosphorus. Total phosphorus includes particulate phosphorus—which is attached to bottom
sediments and contained in plant and animal fragments suspended in water—and soluble
phosphorus. Soluble reactive phosphorus dissolves in water and readily aids plant growth, but its
concentration varies widely over short time periods as plants take it up and release it.
The goal of this monitoring is to characterize the total phosphorus concentrations most
commonly occurring in the streams during the primary algae and aquatic plant “growing season”
of May through October. Data will be reviewed during impaired waters listing assessments made
by Department of Natural Resources staff.
III. Volunteer Time CommitmentVolunteers must commit to attending a one to two hour training in its entirety prior to beginning
participation in this monitoring project. Once trained, most volunteers will monitor one site
monthly from May to October. Once at the monitoring site, it takes about five minutes to conduct
the sampling. Volunteers must commit to sending in up to six water samples to the Wisconsin
State Lab of Hygiene (WSLH) as soon as possible after sampling. All postage will be paid by the
project sponsors, but the volunteer will need to package the sample on ice in a cooler that will be

3
provided, contact a WAV staff person to obtain a printable FedEx shipping label via email, print
and affix that mailing label to the cooler, and arrange for the package to be picked up by FedEx
and/or delivered to a local drop off point for FedEx delivery. In all, we estimate the time
commitment per volunteer to be approximately 6 to 8 hours per year (including travel time
to/from their monitoring site) if one site is monitored.
IV. Volunteer DutiesVolunteers will take grab samples in streams to monitor total phosphorus as a potential cause of
biological impairment. Phosphorus water samples should be collected once per month, for
six months from May through October. Each sample should be collected approximately 30
days apart, with no samples collected within 15 days of one another. Some volunteers may
be asked to sample less frequently if some total phosphorus data are already available. Some
sites may require additional sampling.
All grab samples should be shipped via FedEx to the Wisconsin State Lab of Hygiene in
Madison for total phosphorus analysis.
Monitoring Schedule
2016
Nov Dec Jan Feb Mar April May June July Aug Sept Oct
Total Phosphorus
Grab Samples
No total phosphorus samples are collected during this time period
One sample per site collected per month (approximately 30 days apart, with no samples
collected within 15 days of one another)
V. Safety Safety precautions of a general nature should be recognized. Sampling should be done from
shore whenever possible using an extension pole sampler to aid in water collection. Collecting
samples in extremely hot and humid weather carries the risk of dehydration and heat stroke.
Preserving nutrient samples requires the use of small amounts of acid. Caution should be used
to avoid contact with skin or eyes when acidifying the sample. A first aid kit should always be
carried for general safety considerations.

4
VI. Field Sampling and Preservation Methods
A. Overview
The following water sampling requirements are taken from the Wisconsin State Lab of Hygiene
protocols. All water samples collected for analysis need to comply with the equipment and
procedures that follow.
B. Equipment
250 mL polyethylene bottle(s) (one per site)
Extension pole (PVC pipe or stick) with rubber band to use to fasten bottle
1.0 mL vial of sulfuric acid (H2SO4)
Nitrile or latex gloves
Safety glasses
Waterproof pen or marker
Lab slips (also called “Test Request – Inorganic Surface Water & Microbiology” form)
(one lab slip for each sampling site per visit; each lab slip is unique and should never be
photocopied)
Cooler(s) (one for every 2-3 samples)
2 gallon Ziploc bags filled with ice cubes (not ice packs)
Waders or shoes that can get wet (not needed if sampling is done from shore)
C. Considerations/ Precautions
To avoid bias, the monitoring should be conducted at a sampling location as follows:
Avoid disturbing the sample. If the sample is collected by wading in the stream, walk
upstream to the sample location and take the sample facing upstream. Also avoid surface
water and your hands from touching the rim of the bottle or inside of the cap.
Collect water sample 3 to 6 inches below surface, rinse sample bottle three times and
fill it to its neck the fourth time. Surface samples tend to have debris and other things
floating on the surface and should be avoided.
Do not collect sample immediately downstream of a wastewater or storm sewer
outfall pipe.
Ensure sample is representative of the upstream conditions. Stream reaches with
major springs or major sediment deposits, such as former millpond beds, may create
much localized conditions that aren’t reflective of the upstream conditions and should be
avoided. Also avoid reaches immediately downstream of where cattle are in the stream.

5
Ensure sample is collected in an area with thorough mixing of stream water. Stream
reaches immediately downstream from tributaries or major springs may not have
complete mixing and should be avoided.
Collect sample in portion of stream with greatest or strongest flow2. This may or may
not be in the middle of the stream. In general, relatively straight reaches of the stream are
preferred. However, if a meander section of the stream is selected for sampling, the
sample should be collected in the portion with greatest flow at the outside of the meander.
Slow flow areas along the banks, in eddies or immediately downstream of islands should
be avoided. Note: If sampling with an extension pole, reaching out from shore to an area
of flow with some movement (and not necessarily to an area of strongest flow) is
sufficient. Your safety is most important!
Don’t trespass on private lands to collect sample. Use a public access point, such as a
road right of way, or seek permission from the landowner or operator to cross their land
for the purpose of collecting the samples.
D. Collection method
1. On a 250 ml sample bottle circle the word “nutrients,” check the H2SO4 box, and write
the field number and sample location on the bottle (the latter two are listed on your lab
slip as the “Field Number” and the “Sample Address or Location Description”) (Figure 1).
2. Locate a sampling location that is at least 10 to 20 feet away from a bridge crossing, in the
middle of the stream channel, and is at least knee deep*.
Enter the stream and walk upstream towards the
sampling location. This ensures the sample is not
contaminated by sediment that has been dislodged from
the substrate.
3. Facing upstream, rinse the 250 mL polyethylene bottle
three times with water 3 to 6 inches below the water’s
surface. The fourth time, fill the bottle to its shoulder
and cap. Whenever possible, and especially when stream flow is swift or water levels are
2 In some instances, water depth may be very shallow. When sampling during low flow conditions, take extreme
care to ensure that the sample is not contaminated with sediment dislodged from the substrate. Also, at such times, it
is more important to collect the sample in the area of strongest flow than the deepest location. Contact WAV staff if
the water levels are low and you require a syringe to collect the water sample.
Figure 1. 250 mL polyethylene sample bottle.
6
high, fasten the bottle to an extension pole and use that to collect stream water that is well
mixed.
4. Avoid touching or allowing water at the surface / scum on the surface to touch the rim of the
bottle or inside of the cap. One way to prevent this is to uncap and recap the bottle
underwater. If you uncap the bottle above the water’s surface, always place the cap top side
down to avoid contamination (Figure 2).
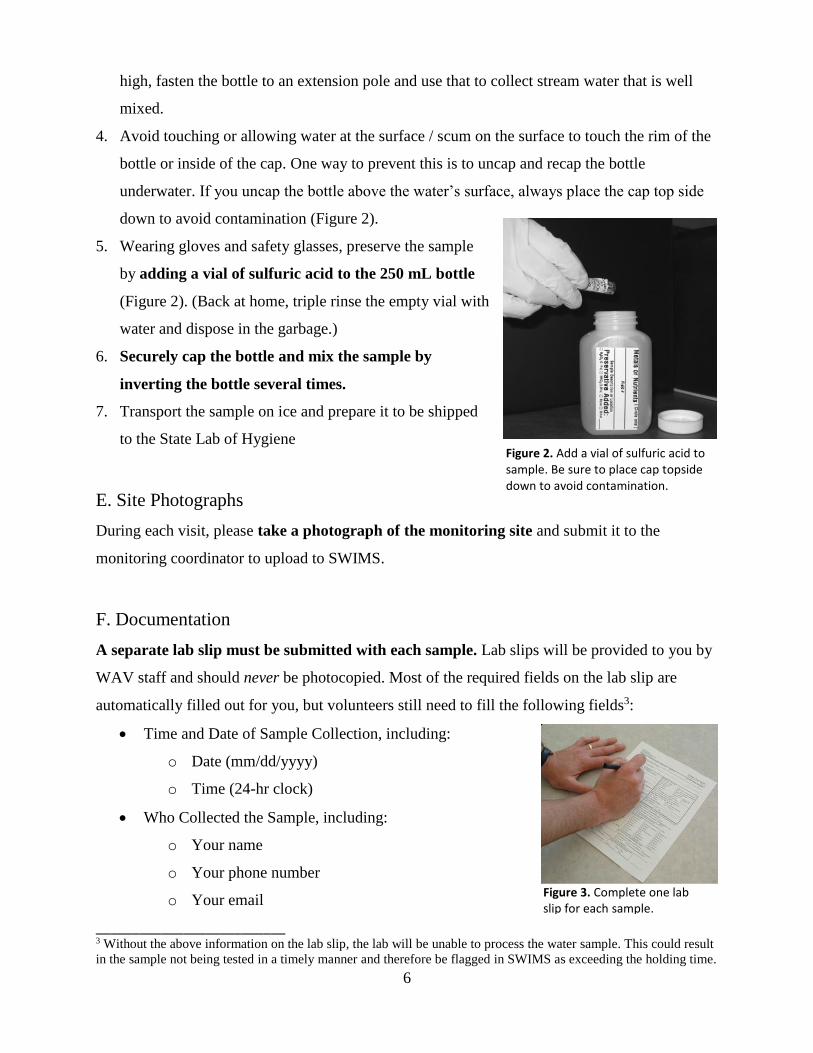
5. Wearing gloves and safety glasses, preserve the sample
by adding a vial of sulfuric acid to the 250 mL bottle
(Figure 2). (Back at home, triple rinse the empty vial with
water and dispose in the garbage.)
6. Securely cap the bottle and mix the sample by
inverting the bottle several times.
7. Transport the sample on ice and prepare it to be shipped
to the State Lab of Hygiene
E. Site Photographs
During each visit, please take a photograph of the monitoring site and submit it to the
monitoring coordinator to upload to SWIMS.
F. Documentation
A separate lab slip must be submitted with each sample. Lab slips will be provided to you by
WAV staff and should never be photocopied. Most of the required fields on the lab slip are
automatically filled out for you, but volunteers still need to fill the following fields3:
Time and Date of Sample Collection, including:
o Date (mm/dd/yyyy)
o Time (24-hr clock)
Who Collected the Sample, including:
o Your name
o Your phone number
o Your email
__________________________ 3 Without the above information on the lab slip, the lab will be unable to process the water sample. This could result
in the sample not being tested in a timely manner and therefore be flagged in SWIMS as exceeding the holding time.
Figure 2. Add a vial of sulfuric acid to sample. Be sure to place cap topside down to avoid contamination.
Figure 3. Complete one lab slip for each sample.
7
VII. Delivery of Samples to the Wisconsin State Lab of Hygiene
A. Overview
Madison area volunteers should deliver their samples directly to the Wisconsin State Lab of
Hygiene (2601 Agriculture Drive Madison, WI 53718) whenever possible. Volunteers outside of
the Madison area will be sent a prepaid FedEx shipping label to send samples to the State Lab of
Hygiene at the beginning of each month so that the sample can be sent out as soon as possible
after collection (see instructions below). Please contact Ilana Haimes if you have not received an
email with the label by the date you are sampling.
If you would like WAV staff to schedule a FedEx pick up for your sample(s), please contact
Ilana Haimes in advance to let her know the day and time your sample(s) will be ready and if
there are any specific instructions for pickup (back door, on porch, etc). Contact Ilana if you
have any questions about this process.
B. Equipment
250 mL polyethylene bottle(s) (one per site)
Lab slips (one per site)
Shipping cooler(s)
Quart Ziploc baggies (one per sample)
3 gallon Ziploc bags
1 large plastic liner bag
Ice cubes (not ice packs)
1 plastic zip tie
Shipping tape
C. Packing and Shipping Instructions
1. Place each sample in separate quart-size Ziploc bag and securely close. DO NOT place
multiple 250 mL bottles in the same bag.
2. Line cooler with the large plastic bag provided.
3. Fill two gallon size Ziploc bags with ice cubes (generally you want at least equal parts of ice
and water sample in the cooler, more if it’s very warm outside).
3. Insert one Ziploc bag of ice into the cooler inside the liner bag.
4. Add the quart Ziploc bag(s) containing the sample(s) on top of that.
5. Add the second Ziploc bag of ice on top of the samples.

8
Figure 4. Shipping container with FedEx label on the side.
Figure 5. Mailing label card with WSLOH address facing out.
6. Twist the liner bag closed.
7. Securely seal the bag with a plastic zip tie to prevent leakage during shipping.
8. Double check that the lab slip(s) is/are completed, and then place lab slip(s) in a gallon
Ziploc bag and place on top of the bag, or on top of the Styrofoam cooler but within the
shipping box, being cautious not to tape the Ziploc if the box isn’t fully closed when you add
the packaging tape.
9. Close the box lid and wrap with reinforced shipping tape completely around the box.
10. Remove the mailing label card from the plastic envelope, and flip over so the Wisconsin
State Laboratory of Hygiene address is exposed and reinsert into envelope.
11. Ship the samples to the Wisconsin State Laboratory of Hygiene using FedEx. Contact Ilana
Haimes to obtain the prepaid shipping label via email if you have not received one. Any time
WAV staff request a FedEx shipping label on your behalf, you will receive an email with a
link that when you click on it, will display a printable shipping label. Print it out and affix it
to your cooler. Then bring the package to the nearest FedEx shipping location or call (1-800-
463-3339) or contact WAV staff to have a FedEx pickup scheduled for you.
12. Report the date you sampled in the Google Drive document (the link for this will be
shared with you via email following your training). As it is imperative all six monthly
samples are collected, a WAV staff person will contact you if you have not entered a
sampling date to this document by about the 20th of each month.
9
D. Considerations/ Precautions
Samples should be shipped as soon as possible, ideally within 1-2 days after being collected.
Holding times are longer than one week, but the clock begins immediately after sampling and the
lab needs them quickly in order to process samples on time. However, do not mail samples on
Fridays or Saturdays because lab staff is usually not present on weekends. If the ice melts
completely, sample data will be flagged and unusable. If the weather is extremely warm, if
you collect a sample from more than one site, and/or if you collect QA/QC samples in addition to
your regular sample you should add extra ice or use multiple shipping coolers to submit your
samples to the lab. Refrigerate the samples or keep them on ice until they are shipped.
E. Questions?
Volunteers should feel free to contact Ilana Haimes (608-266-3599) or Peggy Compton (608-
342-1633) with questions or concerns about any aspect of the project.
VIII. Field QC Duplicate Samples
a. Overview
To document the accuracy and precision of the field data collected by volunteers, ten percent of
the samples that are monitored for total phosphorus (TP) are chosen each year to participate in
collection of additional quality assurance/quality control (QA/QC) samples. The samples are
randomly selected from the list of stations that are monitored. These QA/QC tests document the
accuracy and precision of the data collected and look at natural variability and sampling error.
Two types of QA/QC samples will be collected by volunteers: field blank and field replicate
(duplicate) samples for total phosphorus. If your site(s) have been selected at random for QA/QC
sampling, you will be notified. To carry out sampling, please read the following instructions.
The result of this additional sampling is that you will be mailing a total of three water samples to
the lab following one of your site visits: one regular sample, one duplicate, and one blank. Each
sample should be placed in a separate Ziploc baggie. Refrigerate or ice the samples until you are
ready to ship, ideally within 1-2 days, like with your regular sample.

10
B. Equipment
250 mL polyethylene bottle
Extension pole (PVC pipe or stick) with rubber band to use to fasten bottle
1.0 mL vial of sulfuric acid (H2SO4)
Nitrile or latex gloves and safety glasses
Waterproof pen or marker
Lab slip marked as “duplicate”
Cooler with ice (from regular sampling)
Waders or shoes that can get wet (not needed if sampling is done from shore)
C. Collection Method
Please prepare this sample at the same time as your regular samples, as follows:
Collect, preserve, and ship a second sample from the same location following the directions
on pages 4-8 of this manual, but write “DUPLICATE” on the bottle after the field number.
Find the lab slip that is pre-marked “DUPLICATE” near middle of the page, fill in the required
fields, and place it in the Ziploc bag containing lab slips.
Figure 6. Lab slip for the duplicate sample.
IX. Field QC Blank Samples
A. Equipment
Distilled water
250 mL polyethylene bottle
1 mL vial of sulfuric acid (H2SO4)
Waterproof pen or marker
Lab slip marked as “blank”
11
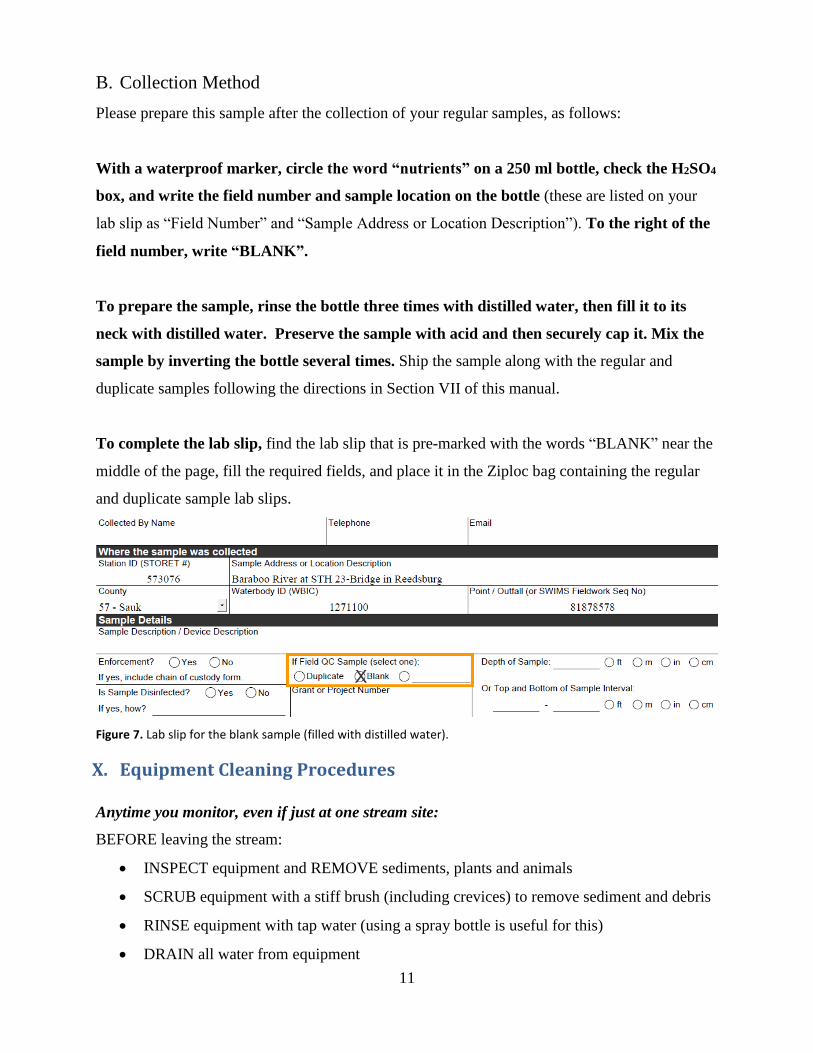
B. Collection Method
Please prepare this sample after the collection of your regular samples, as follows:
With a waterproof marker, circle the word “nutrients” on a 250 ml bottle, check the H2SO4
box, and write the field number and sample location on the bottle (these are listed on your
lab slip as “Field Number” and “Sample Address or Location Description”). To the right of the
field number, write “BLANK”.
To prepare the sample, rinse the bottle three times with distilled water, then fill it to its
neck with distilled water. Preserve the sample with acid and then securely cap it. Mix the
sample by inverting the bottle several times. Ship the sample along with the regular and
duplicate samples following the directions in Section VII of this manual.
To complete the lab slip, find the lab slip that is pre-marked with the words “BLANK” near the
middle of the page, fill the required fields, and place it in the Ziploc bag containing the regular
and duplicate sample lab slips.
Figure 7. Lab slip for the blank sample (filled with distilled water).
X. Equipment Cleaning Procedures
Anytime you monitor, even if just at one stream site:
BEFORE leaving the stream:
INSPECT equipment and REMOVE sediments, plants and animals
SCRUB equipment with a stiff brush (including crevices) to remove sediment and debris
RINSE equipment with tap water (using a spray bottle is useful for this)
DRAIN all water from equipment

12
If you are moving to another stream site:
AFTER leaving the stream and BEFORE entering another stream, if you have entered the
stream, switch to a completely new set of gear or do one of the following disinfection steps:
SOAK waders and other equipment in bleach solution (1 tbsp per gallon of water) FAR
AWAY FROM SURFACE WATER for 20 minutes in tote, then rinse. Wear gloves when
handling bleach; or
FREEZE for 8 hours.
ADDITIONAL RECOMMENDATIONS:
After mixing with water, the bleach solution is only viable for one day. A new batch will
need to be mixed before every sampling effort.
Do not use felt-soled boots. They are more likely to harbor small-bodied AIS and are
very difficult to disinfect completely.
If visiting multiple sites along the length of a stream or river, begin at the top of the
watershed and work downstream.
XI. Total Phosphorus Monitoring Videos
Training videos showing the total phosphorus monitoring processes described in this protocol
can be found on the Water Action Volunteers Video Training webpage:
http://watermonitoring.uwex.edu/wav/monitoring/video.html
Please contact WAV staff with any questions throughout the monitoring season!
Bleach solution will not be effective against certain invasive species, such as the New
Zealand mudsnail. Please take additional measures when sampling in a region affected
by resilient AIS to clean and disinfect equipment effectively.


